PMX8BUEU - PMX8BUUK
Professional 3-Channel DJ Mixer
Built-in Wireless BT Music Streaming,
USB/Phono/Microphone and Line (3.5 mm) Inputs,
CUE Select for Pre-Listening with Digital LED Display
/
UK
USA
IMPORTANT SAFETY INSTRUCTIONS
CAUTION: To reduce the risk of electric shock, do not remove the
top cover (or the rear section). No user serviceable parts inside;
refer servicing to qualified personnel.
RISK OF ELECTRIC SHOCK. DRY LOCATION USE ONLY!
This symbol, wherever it appears, alerts you to the presence of uninsulated
dangerous voltage inside the enclosure-voltage that may be sufficient to
constitute a risk of shock.
This symbol, wherever it appears, alerts you to important operation and
maintenance instructions in the accompanying literature. Please read the
manual.
WARNING: To reduce the risk of fire or electric shock, DO NOT expose this appliance
to rain and moisture. The apparatus shall not be exposed to dripping or splashing
and no objects filled with liquids, such as vases, shall be placed on the apparatus.
DETAILED SAFETY INSTRUCTIONS
1. Read these instructions.
2. Keep these instructions.
3. Heed all warnings.
4. Follow all instructions.
5. Do not use this apparatus near water.
6. Clean only with dry cloth.
7. Do not block any ventilation openings.
Install in accordance with the manufacturer's instructions.
8. Do not install near any heat sources such as radiators, heat registers, stoves, or
other apparatus (including amplifiers) that produce heat.
9. Do not defeat the safety purpose of the polarized or grounding-type plug.
A polarized plug has two blades with one wider than the other. A grounding type
plug has two blades and a third grounding prong. The wide blade or the third
prong are provided for your safety. If the provided plug does not fit into your
outlet, consult an electrician for replacement of the obsolete outlet.
10. Protect the power cord from being walked on or pinched particularly at plugs,
convenience receptacles, and the point where they exit from the apparatus.
11. Only use attachments/accessories specified by the manufacturer.
12. Use only with the cart, stand, tripod, bracket, or table specified by the manufac-
turer, or sold with the apparatus. When a cart is used, use caution when moving
the cart/apparatus combination to avoid injury from tip-over.
www.PyleUSA.com
2

www.PyleUSA.com
3
13. Unplug this apparatus during lightning storms or when unused for long periods
time.
14. Refer all servicing to qualified service personnel. Servicing is required when the
apparatus has been damaged in any way, such as power supply cord or plug in
damaged, liquid has been spilled or objects have fallen into the apparatus, the
apparatus has been exposed to rain or moisture, does not operate normally, or
has been dropped.
15. CAUTION: These service instructions are for use by qualified service personnel
only. To reduce the risks of electric shock do not perform any servicing other than
that contained in the operation instructions unless you are qualified to do so.
INTRODUCTION
With the PMXSBU, you have purchased an absolutely state-of-the-art DJ mixer. Its
extensive features open the door to new and creative ways of working, while
making it suitable for a variety of professional applications. At the same time, the
unit is extremely easy to operate, allowing you to completely unfold creativity.
The following instructions will give you a brief run-down on the terminology
and functions of the unit. After reading, please store this manual in a safe place
for future reference.
Your PRO MIXER was carefully packed in the factory and the packaging is designed
to protect the unit against rough handing. Nevertheless, we recommend that you
carefully examine packaging and contents for any signs of physical damage which
may have occurred during transit.
If the unit needs to be shipped, please always use the original packaging to avoid
damage.
Never let unsupervised children play with the unit or with its packaging.
Please dispose of all packaging materials in an environmentally-friendly fashion.
Please take care to always ensure adequate ventilation. Do not place the PRO
MIXER near heating units or heat-generating devices in order to avoid over-
heating.
CAUTION!
We would like to point out that high volumes can permanently damage your
sense of hearing and/or your headphone or speaker systems. Therefore, please
turn the MAIN control in the MIC/MAIN section all the way to the left before
turning on the mixer. And please exercise caution and common sense when
setting volume levels.

www.PyleUSA.com
4
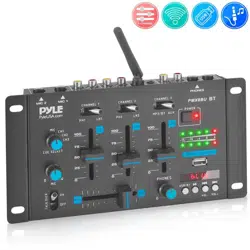
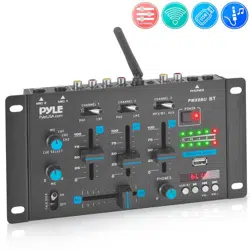
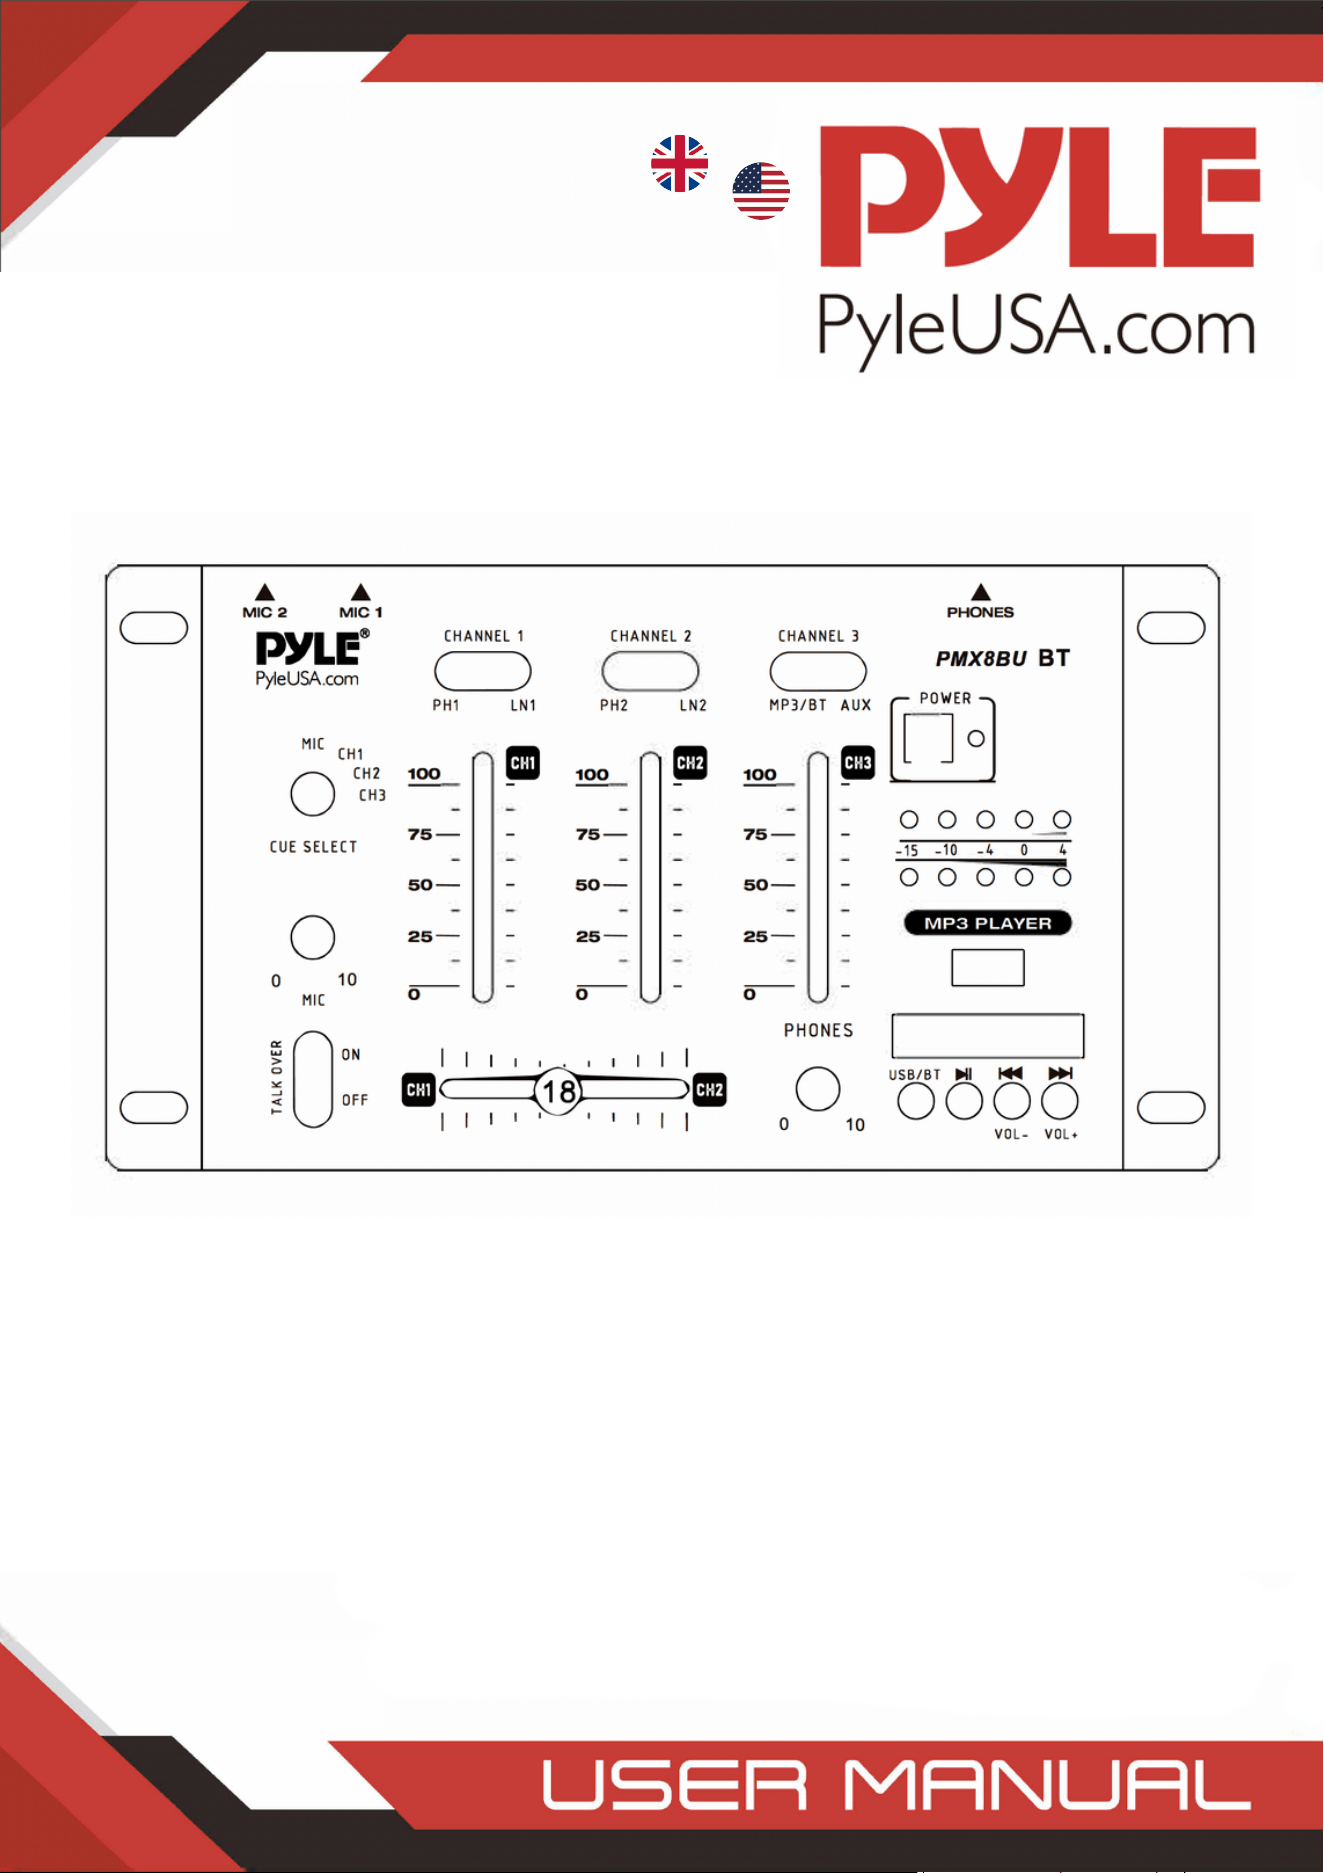
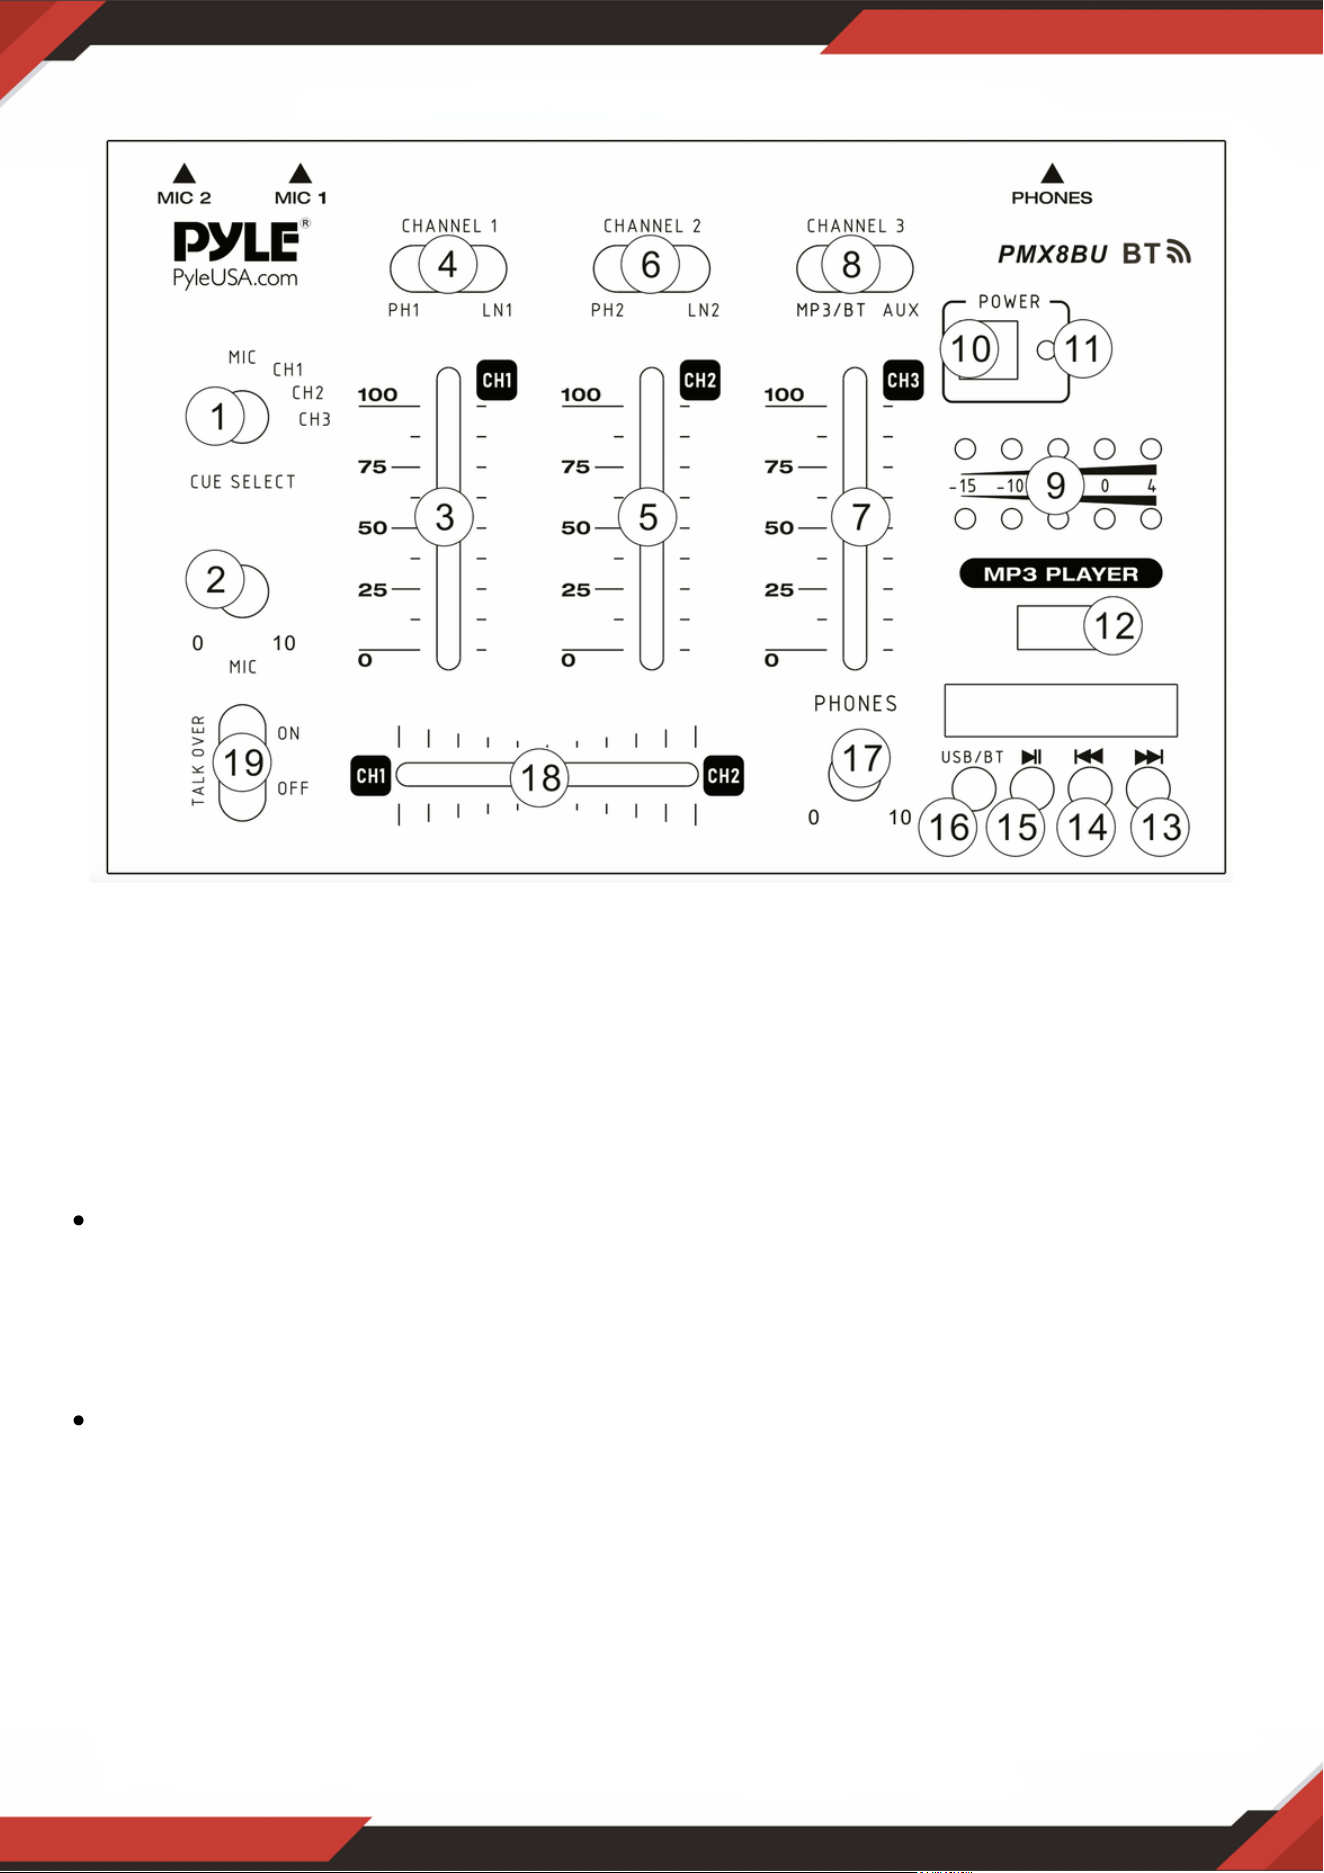
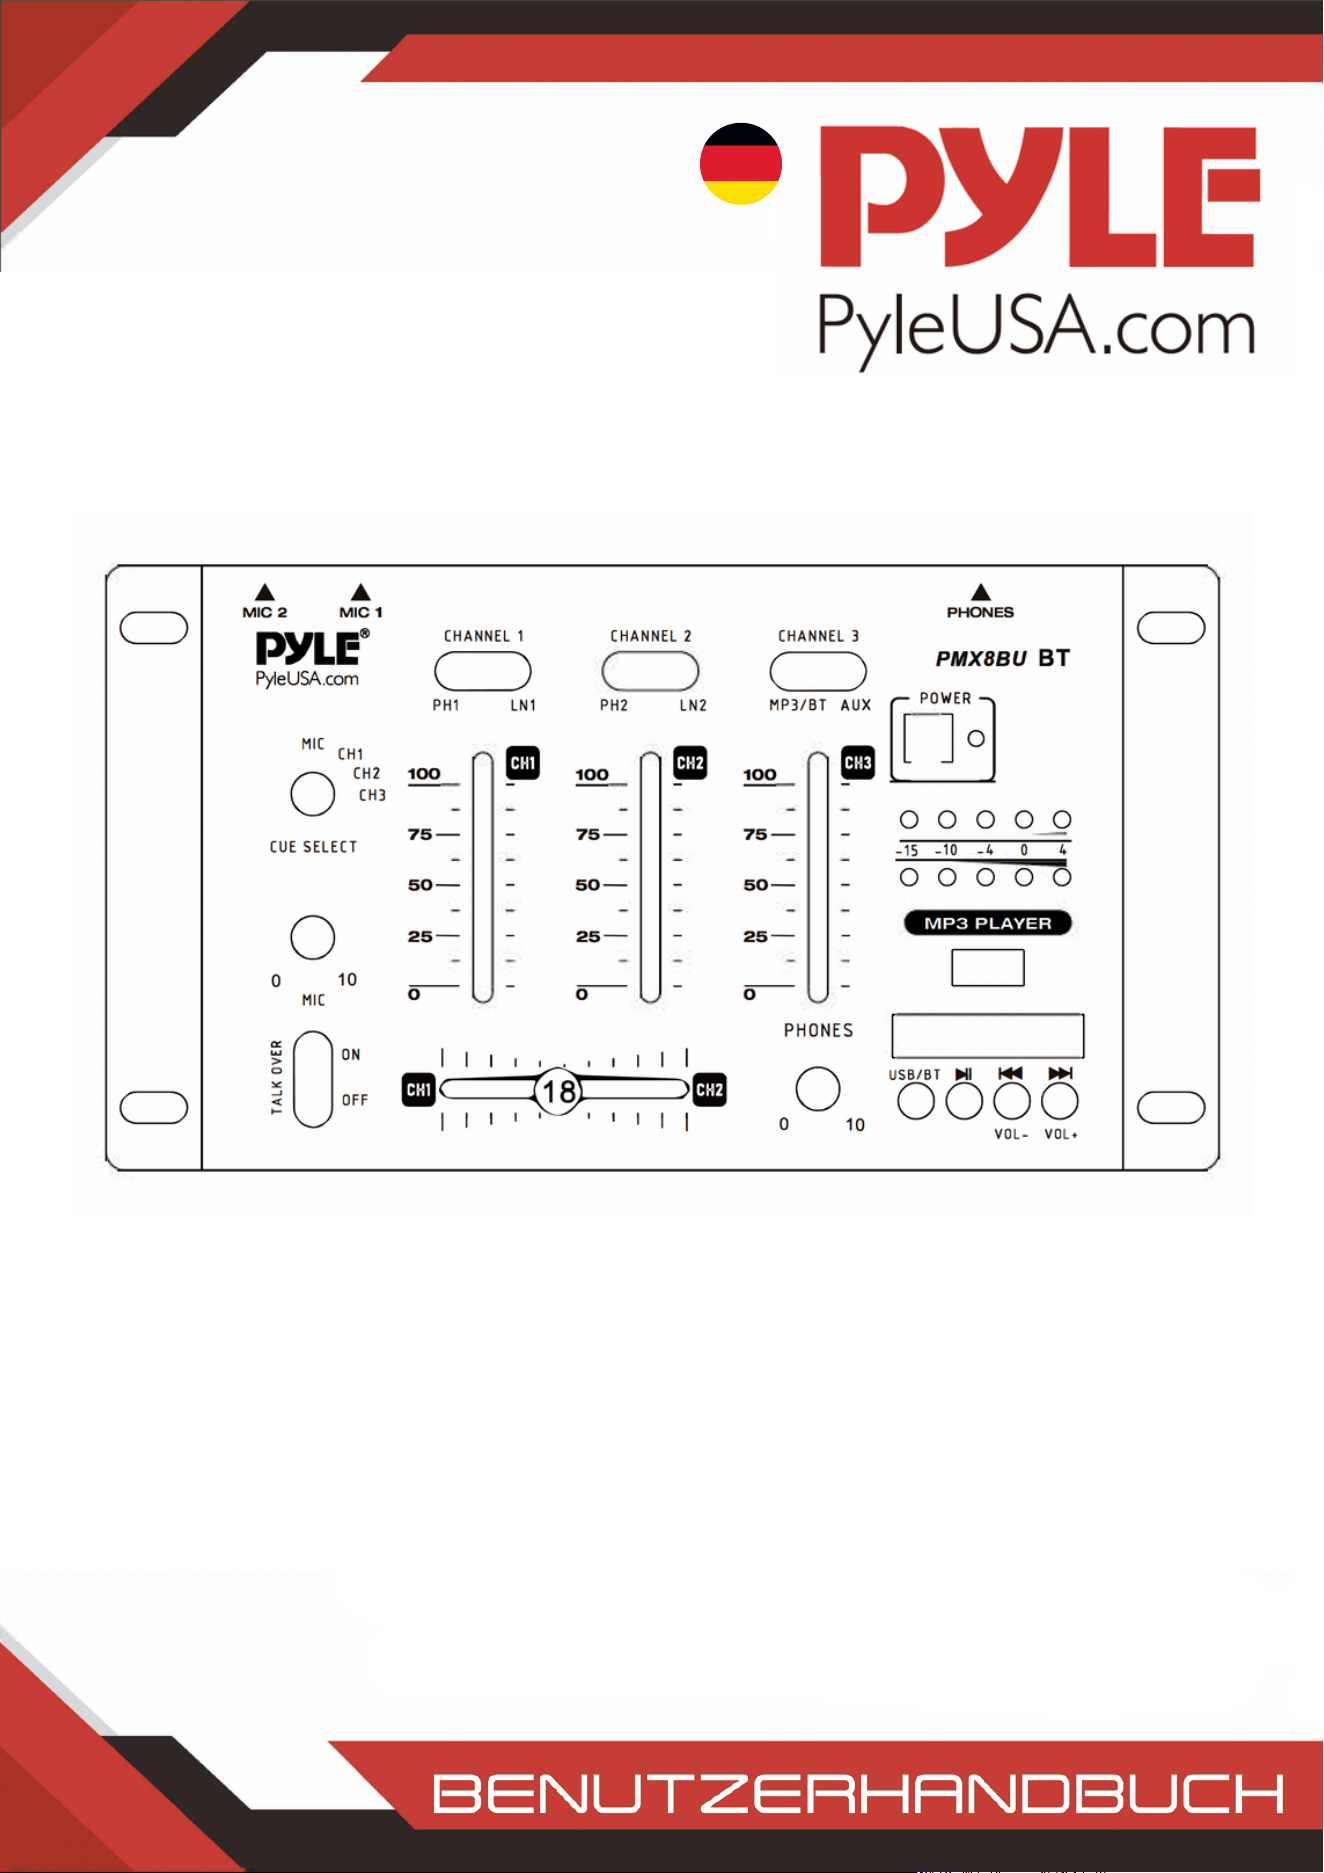
1. FRONT PANEL
1. The CUE SELECT monitoring each channel for MIC, Chanel 1, Channel 2 and
Channel 3.
2. The MIC LEVEL control adjusts the volume of the microphone signal
3. The CHANNEL 1 fader adjusts the final channel volume.
4. The PHONO/LINE switch selects one of the input pairs on the respective channel.
The "PH1" setting (and inputs) is intended for turntables; for all other signal sources,
i.e. a CD or MD player, use the "LN 1 "setting and inputs.
Never connect line-level equipment to the highly sensitive PHONO inputs!
The output levels of PHONO cartridge systems are in the millivolt range, whereas
CD and MD players, as well as tape decks, provide outputs levels in the volt range.
In other words, the level of line signals is up to 100 times higher than PHONO
output levels.
Do not turn up the volume when no turntable is connected to the PHONO input
terminals. Doing so will cause humming or noise.
When not connecting a turntable, keeps the "LINE" setting.
5. The CHANNEL 2 fader adjusts the final channel volume.
6. The PHONO/LINE switch.
7. The CHANNEL 3 fader adjusts the final channel volume.
8. The USB/BT and AUX switch.
9. Output Meter: Indicate the levels of Left and Right Master channels.
10. The POWER ON switch turns on the unit
www.PyleUSA.com
5
11. Power supply LED
12. USB port.
13. Next.
14. Previous
15. Play and Pause.
16. To choose play USB or BT source
17. The LEVEL control determines the volume of the headphones signal.
18. The CROSSFADERis used to fade between channels1 and 2.
19. MIC TALKOVER Allows you to lower the level of the input sources so you can talk
them using the DJ MIC
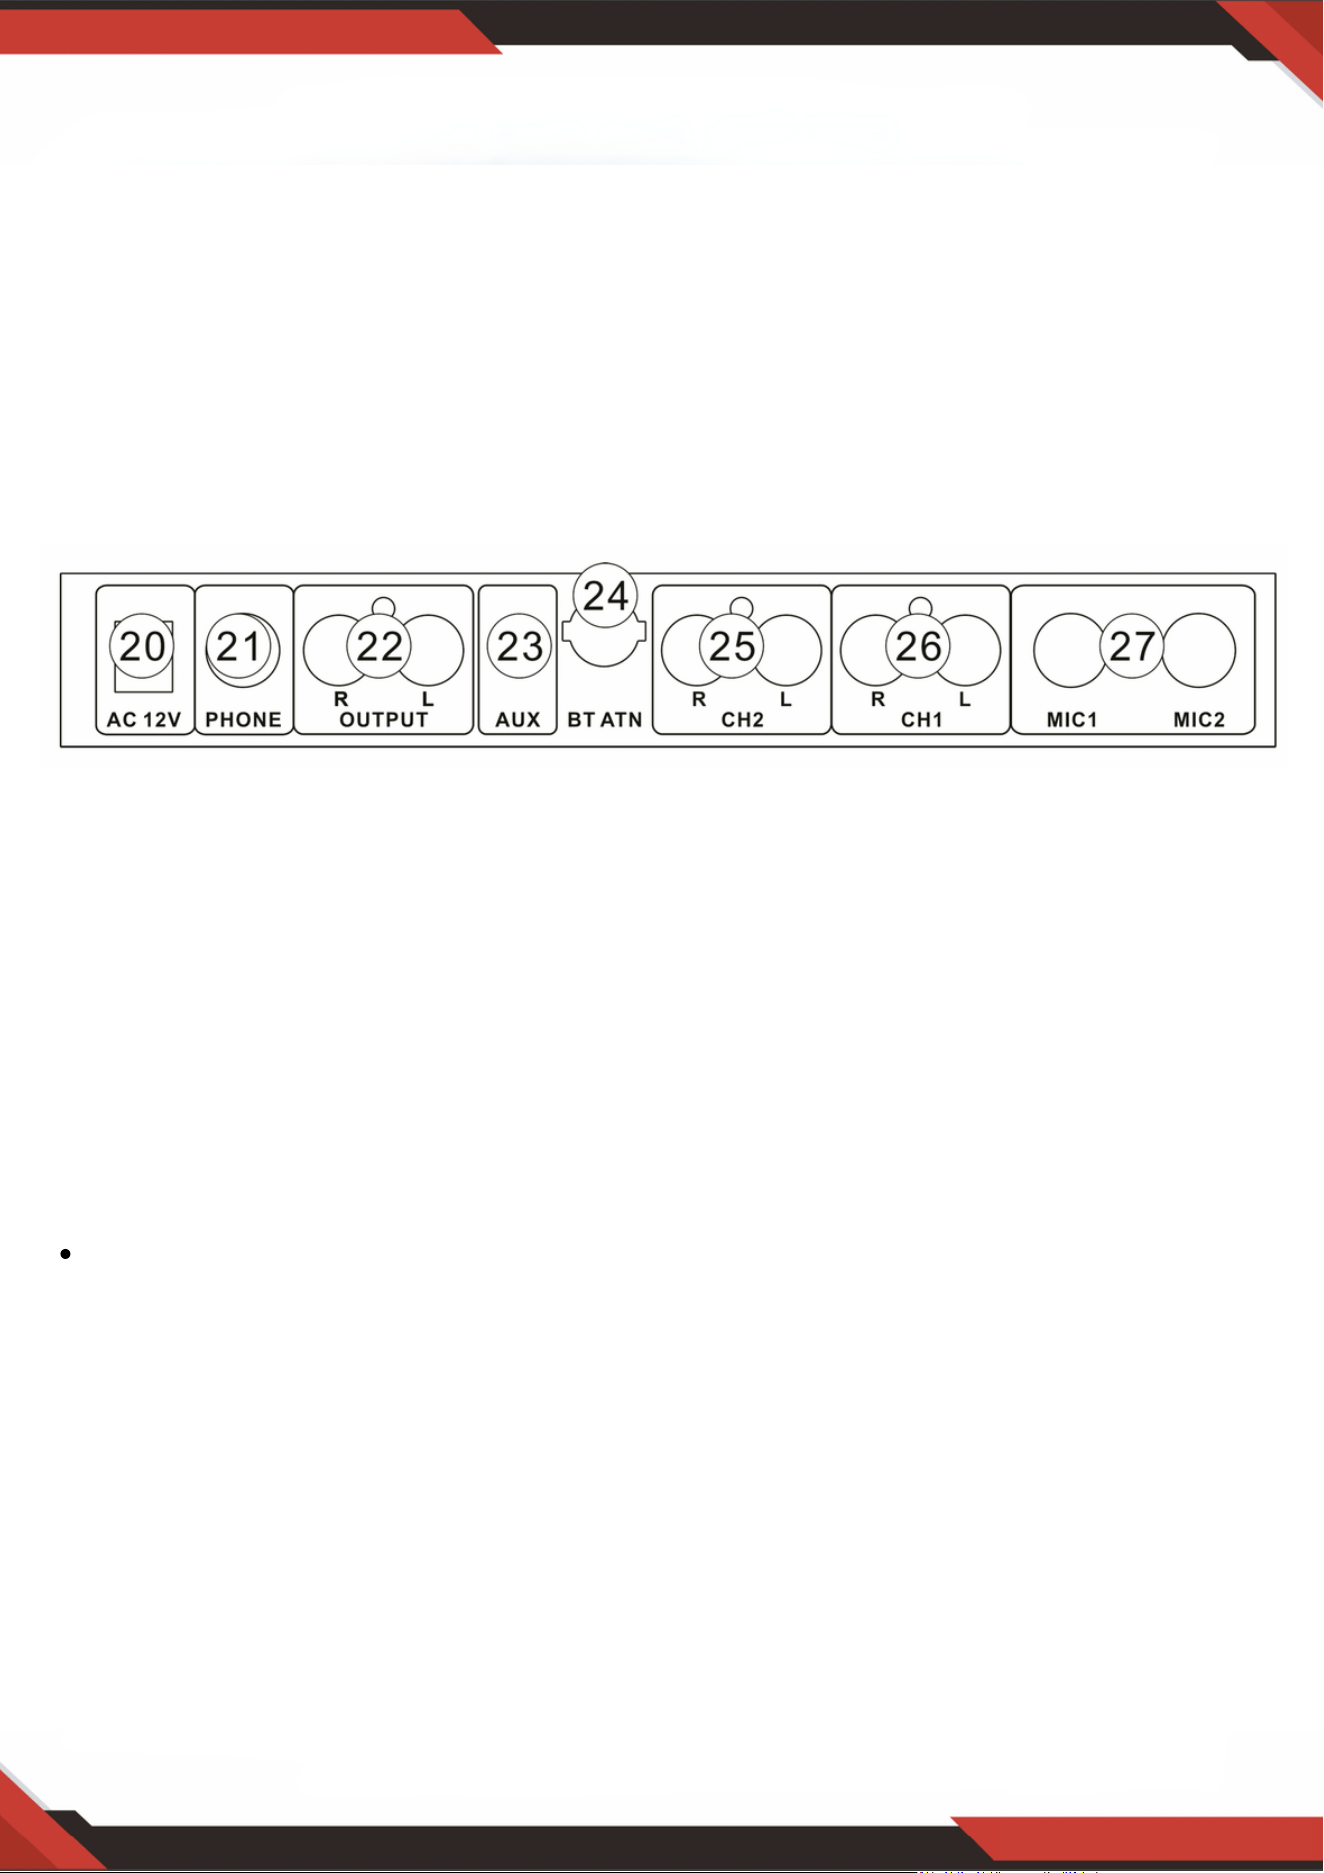
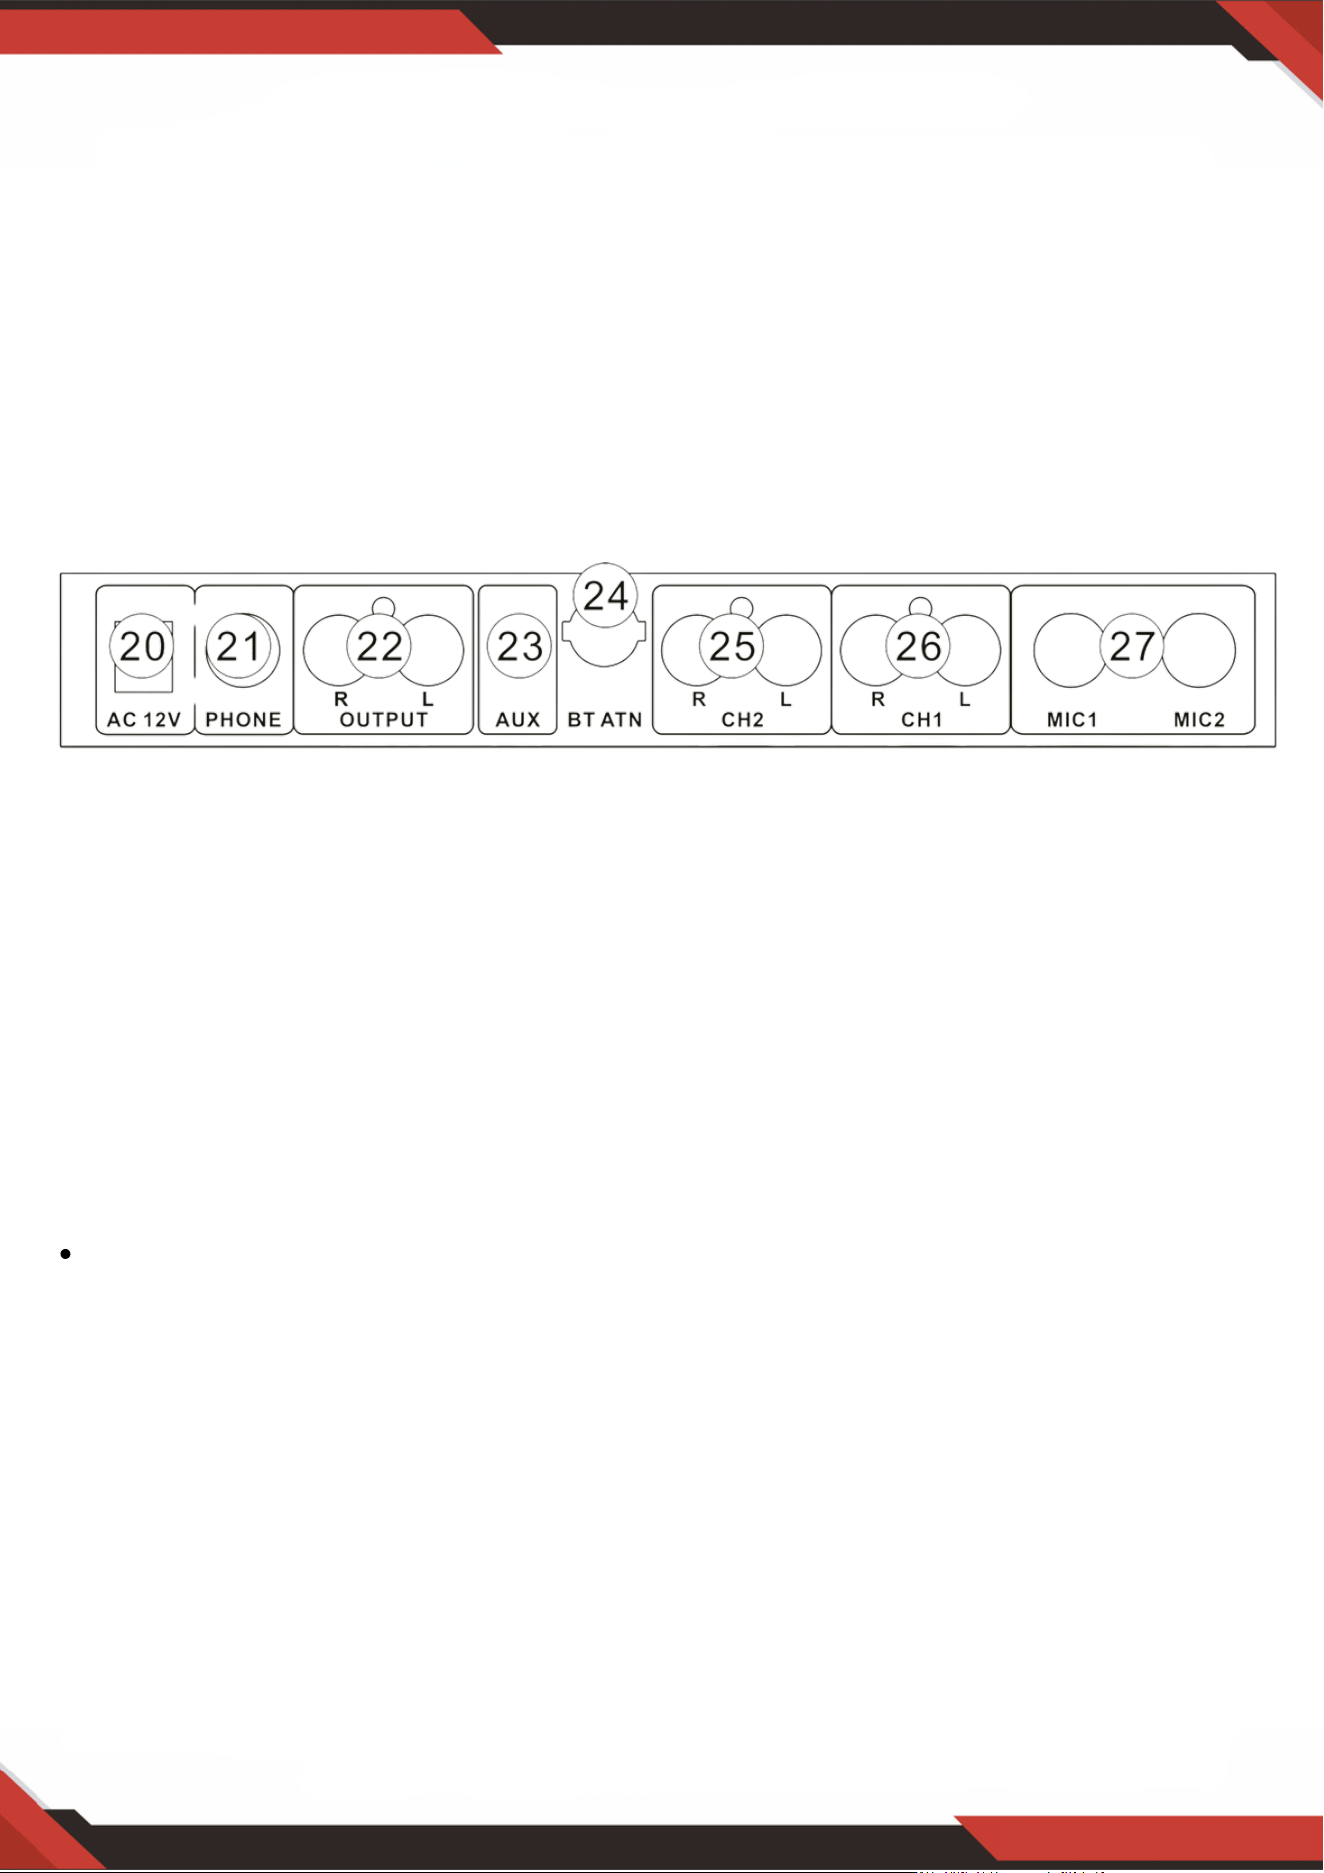
2. REAR PANEL
All of the unit's audio connections are located on the rear panel and supplied as
RCA connectors.
20. Power supply: Only use the power adapter provided with the unit to power the
unit. When connecting and disconnecting the power cord, be sure the power of
the unit is off. Connect the cord to the rear of the unit and then connect it to the
outlet.
21. The HEADPHONES socket allows you to connect your headphones for pre-
listening (PFL signal). For best results, use headphones with an impedance rating
of at least 32 Ohms
22. Use the AMP output to connect the unit to an amplifier.
In order to avoid power-up thumps, which can damage your loudspeakers, please
power up your amplifier last. There should be no signal present, e.g. no music
playing, when you turn on your amp. In addition, we suggest that you set all
volume-related controls to "zero" (down) before powering up your system.
Following these precautions will save you from unpleasant and potentially
dangerous surprises.
23. AUX inputs Jack for Line level signals.
24. WIRELESS BT ANTENNA: Please pull the antenna out when using Wireless BT
input.
25. The PHONO inputs for channel 2 and are only for turntable connection.
The LINE inputs may be used for connecting tape decks, CD or MD players etc.
26. The PHONO inputs for channel 1 and are only for turntable connection.
The LINE inputs may be used for connecting tape decks, CD or MD players etc.

www.PyleUSA.com
6
27. The MIC1 MIC2 INPUT connector is a balanced 1 /4"TRS socket for microphone
connection.
BUTTON CONTROLS AND FUNCTIONS
A. MODE BUTTON: This button lets you toggle a working mode, USB play mode,
Wireless BT mode. This lets you choose which music source device will play.
B. PLAY BUTTON: This button has two functions depending on these different
modes as below.
a. USB Play Mode: Play
Each press of the PLAY BUTTON causes the operation to change from play to
pause or from pause to play.
b. Wireless BT mode: Play
Each press of the PLAY BUTTON causes the operation to change from play to
pause or from pause to play.
C. PREV BUTTON: This button has four functions depending on these different
modes as below.
a. USB Play Mode: PREV and Volume DOWN
Use this button to select previous track.
The volume of USB will turn down if press and holding the button for more
than 3 seconds.
b. Wireless BT mode: PREV and Volume DOWN
Use this button to select previous track. The BT volume will turn down by
pressing and holding the button for more than 3 seconds.
c. NEXT BUTTON: This button has four functions depending on these different
modes as below.
a. USB Play Mode: NEXT and Volume UP
Use this button to select next track.
The volume of USB will increase if press and holding the button for more than 3
seconds
b. Wireless BT mode: PREV and Volume UP
Use this button to select previous track.
The volume of BT will increase if press and holding the button for more than
3 seconds.
Remark:
1. The unit will auto play that Insert into USB device (include mp3 files) in USB mode.
2. The unit will auto into Bluetooth mode when the unit turn on without USB.

www.PyleUSA.com
7
WARNING:
This product can expose you to a chemical or group of chemicals, which
may include "Nickel Carbonate" which is known in the state of California
to cause cancer, birth defects, or other reproductive harm. For more info,
go to https://www.p65warnings.ca.gov/.
PMX8BU
Professional 3-Channel DJ Mixer
Built-in Wireless BT Music Streaming, USB/Phono/Microphone and Line (3.5 mm)
Inputs, CUE Select for Pre-Listening with Digital LED Display (200 Watt)
Features:
Professional 3-channel DJ mixer
Built-in BT for Wireless Music Streaming
CUE select for PRE-listening
Digital LED display
Compatible with All of Your Favorite BT Devices
Combine & Mix (2) Aux Input Sources with BT Audio or MP3
AUX Inputs Switch between Line Level and Phono Input
(2) Phono RCA Audio Line Inputs for Connecting External Devices
(2) 1 /4" Balanced TRS Microphone Jacks
Microphone 1 and 2 Level Gain and Talk-over Control
Mic Talk-over Ability to Speak Over Audio, Karaoke Style
1/4" Head phone Jack with Volume Control
Amp Master Output (L/R)
USB Flash Drive Reader
Independent Channel Controls Cross Fader
Easily Mix & Control MP3 and BT Connected Devices
(L) and (R) RCA Master Output with Stereo
Technical Specifications:
LED Screen Size: 2.76"x 0.98" -inches (7 x 2.5 -cm)
Phono Inputs 1 and 2: 90mv 1 kHz, unbalanced inputs
Line Inputs 1 and 2: 0.6V, unbalanced inputs
Mic Input: 120mv, balanced inputs
Headphones: 300mW@ 1 % THD
Signal-to-Noise Ratio (S/N) : > 78dB (Line in)
Crosstalk: > 50dB (Line in)
Distortion (THD): < 1 %
Frequency Response: 20Hz - 20kHz
Power Consumption: Max 5 W
Dimensions (H x W x D): 5.31" x 9.25" x 1.97" -inches (13.4 x 23.5 x 5 -cm)
Weight: 1.98 lbs. (0.89 kg.)

Questions or Comments
We are here to help!
Phone: 1.718.535.1800
PyleUSA.com/ContactUs
PMX8BUEU - PMX8BUUK
Mezclador DJ profesional de 3 canales
Transmisor BT incorporado para transmisión de música
Entradas para USB/audio/micrófono y línea (3.5mm)
Selección de pistas para pre escucha con panel LED digital
SPANISH

INSTRUCCIONES DE SEGURIDAD IMPORTANTES
PRECAUCIÓN: Para reducir el riesgo de descarga eléctrica, no retire
la cubierta superior (ni la sección trasera). No hay piezas reparables
por el usuario en el interior; Refiera el servicio a personal calificado.
RIESGO DE DESCARGA ELÉCTRICA. ¡USO EXCLUSIVO EN LUGARES SECOS!
Este símbolo, dondequiera que aparezca, le avisa de la presencia de tensión
peligrosa no aislada dentro de la carcasa, tensión que puede ser suficiente
para constituir un riesgo de descarga eléctrica.
Este símbolo, dondequiera que aparezca, le avisa de las instrucciones
importantes de operación y mantenimiento en la documentación adjunta.
Por favor, lea el manual.
ADVERTENCIA: Para reducir el riesgo de incendio o descarga eléctrica, NO exponga este
aparato a la lluvia ni a la humedad. El aparato no debe exponerse a goteos o salpicaduras
y no se deben colocar objetos llenos de líquidos, como jarrones, sobre el aparato.
INSTRUCCIONES DE SEGURIDAD DETALLADAS
Lea estas instrucciones.1.
Guarde estas instrucciones.2.
Preste atención a todas las advertencias.3.
Siga todas las instrucciones.4.
No utilice este aparato cerca del agua.5.
Limpie solo con un paño seco.6.
No bloquee las aberturas de ventilación. Instale de acuerdo con las instrucciones del
fabricante.
7.
No lo instale cerca de fuentes de calor como radiadores, rejillas de calefacción, estufas
u otros aparatos (incluidos amplificadores) que produzcan calor.
8.
No anule el propósito de seguridad del enchufe polarizado o de conexión a tierra. Un
enchufe polarizado tiene dos clavijas, una más ancha que la otra. Un enchufe de
conexión a tierra tiene dos clavijas y una tercera clavija de conexión a tierra. La hoja
ancha o la tercera punta se proporcionan para su seguridad. Si el enchufe provisto no
encaja en su tomacorriente, consulte a un electricista para reemplazar el
tomacorriente obsoleto.
9.
Proteja el cable de alimentación para que no se pise ni se pellizque, especialmente en
los enchufes, los receptáculos de conveniencia y el punto donde salen del aparato.
1 0.
Utilice únicamente los aditamentos/accesorios especificados por el fabricante.1 1.
Úselo solo con el carro, soporte, trípode o mesa especificado por el fabricante o
vendido con el aparato. Cuando se utilice un carrito, tenga cuidado al mover la
combinación de carro / aparato para evitar lesiones por vuelco.
1 2.
www.PyleUSA.com
2

www.PyleUSA.com
3
13. Desenchufe este aparato durante tormentas eléctricas o cuando no se utilice durante
períodos prolongados.
14. Refiera todo el servicio a personal de servicio calificado. Se requiere servicio cuando
el aparato se ha dañado de alguna manera, como el cable de alimentación o el
enchufe dañados, se ha derramado líquido o han caído objetos dentro del aparato, el
aparato ha estado expuesto a la lluvia o la humedad, no funciona normalmente o se
ha caído.
15. PRECAUCIÓN: Estas instrucciones de servicio son para uso exclusivo de personal de
servicio calificado. Para reducir los riesgos de descarga eléctrica, no realice ningún
servicio que no sea el contenido en las instrucciones de operación, a menos que esté
calificado para hacerlo.
INTRODUCCIÓN
Con el PMXSBU, ha comprado un mezclador de DJ de última generación. Sus amplias
características abren la puerta a formas nuevas y creativas de trabajar, al tiempo que lo
hacen adecuado para una variedad de aplicaciones profesionales. Al mismo tiempo, la
unidad es extremadamente fácil de operar, lo que le permite desplegar completamente la
creatividad.
Las siguientes instrucciones le darán un breve resumen de la terminología y las funciones
de la unidad. Después de leerlo, guarde este manual en un lugar seguro para futuras
consultas.
Su PRO MIXER se embaló cuidadosamente en la fábrica y el empaque está diseñado para
proteger la unidad contra manipulaciones bruscas. No obstante, le recomendamos que
examine cuidadosamente el embalaje y el contenido en busca de cualquier signo de daño
físico que pueda haberse producido durante el transporte.
Si la unidad necesita ser enviada, utilice siempre el embalaje original para evitar
daños.
Nunca permita que niños sin supervisión jueguen con la unidad o con su empaque.
Deseche todos los materiales de embalaje de forma respetuosa con el medio
ambiente.
Por favor, tenga cuidado de asegurar siempre una ventilación adecuada. No
coloque el PRO MIXER cerca de unidades de calefacción o dispositivos
generadores de calor para evitar el sobrecalentamiento.
PRECAUCIÓN!
Nos gustaría señalar que los volúmenes altos pueden dañar permanentemente
su sentido del oído y/o sus sistemas de auriculares o altavoces. Por lo tanto,
gire el control MAIN en la sección MIC / MAIN completamente hacia la
izquierda antes de encender el mezclador. Y tenga cuidado y sentido común al
configurar los niveles de volumen.
www.PyleUSA.com
4
1. PANEL FRONTAL
1. El CUE SELECT monitorea cada canal para MIC, Chanel 1, Channel 2 y Channel 3.
2. El control MIC LEVEL ajusta el volumen de la señal del micrófono.
3. El fader CHANNEL 1 ajusta el volumen final del canal.
4. El interruptor PHONO/LINE selecciona uno de los pares de entrada en el canal
respectivo. El ajuste "PH1" (y las entradas) está diseñado para tocadiscos; para todas las
demás fuentes de señal, es decir, un reproductor de CD o MD, utilice la configuración y
las entradas "LN1".
¡Nunca conecte equipos de nivel de línea a las entradas PHONO de alta sensibilidad!
Los niveles de salida de los sistemas de cartuchos PHONO están en el rango de
milivoltios, mientras que los reproductores de CD y MD, así como las pletinas de cinta,
proporcionan niveles de salida en el rango de voltios. En otras palabras, el nivel de las
señales de línea es hasta 100 veces mayor que los niveles de salida de PHONO.
No suba el volumen cuando no haya ningún tocadiscos conectado a los terminales de
entrada PHONO. Si lo hace, provocará zumbidos o ruidos. Cuando no esté conectando
un tocadiscos, mantenga la configuración "LINE".
5. El fader CHANNEL 2 ajusta el volumen final del canal.
6. El interruptor PHONO/LINE.
7. El fader CHANNEL 3 ajusta el volumen final del canal.
8. El conmutador USB/BT y AUX.
9. Medidor de salida: Indica los niveles de los canales maestros izquierdo y derecho.
10. El interruptor POWER ON enciende la unidad
www.PyleUSA.com
5
11. LED de la fuente de alimentación
12. Puerto USB.
13. Próximo.
14. Anterior
15. Reproducir y pausar.
16. Para elegir reproducir una fuente USB o BT
17. El control LEVEL determina el volumen de la señal de los auriculares.
18. El CROSSFADER se utiliza para hacer un fundido entre los canales 1 y 2.
19. MIC TALKOVER Le permite bajar el nivel de las fuentes de entrada para que pueda
hablarlas usando el DJ MIC
2. PANEL TRASERO
Todas las conexiones de audio de la unidad se encuentran en el panel trasero y se
suministran como conectores RCA.
20. Fuente de alimentación: Utilice únicamente el adaptador de corriente suministrado
con la unidad para alimentar la unidad. Al conectar y desconectar el cable de
alimentación, asegúrese de que la unidad esté apagada. Conecte el cable a la parte
posterior de la unidad y luego conéctelo a la toma de corriente.
21. La toma AURICULARES le permite conectar sus auriculares para la escucha previa
(señal PFL). Para obtener los mejores resultados, utilice auriculares con una
clasificación de impedancia de al menos 32 ohmios
22. Utilice la salida AMP para conectar la unidad a un amplificador.
Para evitar golpes de encendido, que pueden dañar sus altavoces, encienda su
amplificador al final. No debe haber señal presente, por ejemplo, no se reproduzca
música, cuando encienda su amplificador. Además, le sugerimos que configure
todos los controles relacionados con el volumen en "cero" (abajo) antes de
encender su sistema. Seguir estas precauciones te salvará de sorpresas
desagradables y potencialmente peligrosas.
23. Entradas AUX Jack para señales de nivel de línea.
24. ANTENA BT INALÁMBRICA: Tire de la antena hacia afuera cuando utilice la entrada BT
inalámbrica.
25. Las entradas PHONO para el canal 2 y son solo para conexión de tocadiscos. Las entradas
LINE se pueden utilizar para conectar pletinas de cinta, reproductores de CD o MD, etc.
26. Las entradas PHONO para el canal 1 y son solo para conexión de tocadiscos. Las entradas
LINE se pueden utilizar para conectar pletinas de cinta, reproductores de CD o MD, etc.

www.PyleUSA.com
6
27. El conector MIC1 MIC2 INPUT es una toma TRS balanceada de 1/4" para la
conexión de micrófonos.
CONTROLES Y FUNCIONES DE LOS BOTONES
A. BOTÓN DE MODO: Este botón le permite alternar un modo de trabajo, un modo de
reproducción USB y un modo BT inalámbrico. Esto le permite elegir qué dispositivo
fuente de música se reproducirá.
B. BOTÓN DE REPRODUCCIÓN: Este botón tiene dos funciones dependiendo de
estos diferentes modos como se muestra a continuación.
a. Modo de reproducción USB: Reproducir
Cada vez que se presiona el BOTÓN DE REPRODUCCIÓN, la operación cambia
de reproducción a pausa o de pausa a reproducción.
b. Modo BT inalámbrico: Reproducir
Cada vez que se presiona el BOTÓN DE REPRODUCCIÓN, la operación cambia
de reproducción a pausa o de pausa a reproducción.
C. BOTÓN PREV: Este botón tiene cuatro funciones dependiendo de estos diferentes
modos como se muestra a continuación.
a. Modo de reproducción USB: PREV y bajar volumen
Utilice este botón para seleccionar la pista anterior.
El volumen del USB bajará si mantiene presionado el botón durante más de 3 seg.
b. Modo BT inalámbrico: PREV y Bajar volumen
Utilice este botón para seleccionar la pista anterior.
El volumen BT bajará manteniendo presionado el botón durante más de 3 seg.
c. BOTÓN SIGUIENTE: Este botón tiene cuatro funciones dependiendo de estos
diferentes modos como se muestra a continuación.
a. Modo de reproducción USB: NEXT y Subir volumen
Utilice este botón para seleccionar la siguiente pista.
El volumen del USB aumentará si mantiene presionado el botón durante más de
3 segundos
b. Modo BT inalámbrico: PREV y Subir volumen
Utilice este botón para seleccionar la pista anterior.
El volumen de BT aumentará si mantiene presionado el botón durante más de 3
segundos.
Comentario:
La unidad reproducirá automáticamente esa inserción en el dispositivo USB (incluidos los
archivos mp3) en modo USB.
1.
La unidad entrará automáticamente en modo Bluetooth cuando la unidad se encienda sin USB.2.

www.PyleUSA.com
7
ADVERTENCIA:
Este producto puede exponerlo a un químico o grupo de productos químicos, que
pueden incluir "Carbonato de Níquel", que se sabe en el estado de California
que causa cáncer, defectos de nacimiento u otros daños reproductivos. Para
obtener más información, visite https://www.p65warnings.ca.gov/.
PMX8BU
Mezclador profesional de DJ de 3 canales
Transmisión inalámbrica de música BT incorporada, entradas USB/Phono/Micrófono y
línea (3,5 mm), selección CUE para escucha previa con pantalla LED digital (200 vatios)
Características:
Especificaciones técnicas:
Mezclador profesional de DJ de 3 canales
BT incorporado para transmisión inalámbrica de música
Selección de CUE para PRE-escucha
Pantalla LED digital
Compatible con todos sus dispositivos BT favoritos
Combine y mezcle (2) fuentes de entrada auxiliar con audio BT o MP3
Las entradas AUX cambian entre el nivel de línea y la entrada de fono
(2) Entradas de línea de audio Phono RCA para conectar dispositivos externos
(2) Conectores de micrófono TRS balanceados de 1/4"
Micrófono 1 y 2 Ganancia de nivel y control de conversación
Posibilidad de hablar sobre el micrófono sobre audio, estilo karaoke
Conector para auriculares de 1/4" con control de volumen
Salida maestra de amplificador (L/R)
Lector de memoria USB
Controles de canal independientes Atenuador cruzado
Mezcle y controle fácilmente dispositivos conectados a MP3 y BT
Salida maestra RCA (L) y (R) con estéreo
Tamaño de la pantalla LED: 2.76" x 0.98"
Entradas de fono 1 y 2: 90mv 1 kHz, entradas no balanceadas
Entradas de línea 1 y 2: 0,6 V, entradas no balanceadas
Entrada de micrófono: 120 mv, entradas balanceadas
Auriculares: 300mW@ 1% THD
Relación señal-ruido (S/N): > 78 dB (entrada de línea)
Diafonía: > 50 dB (entrada de línea)
Distorsión (THD): < 1%
Respuesta de frecuencia: 20Hz - 20kHz
Consumo de energía: máx. 5 W
Dimensiones (alto x ancho x profundidad): 5.31" x 9.25" x 1.97" pulgadas
Peso: 1.98 libras.

Preguntas o Comentarios
¡Estamos para ayudarte!
Teléfono: 1.718.535.1800
PyleUSA.com/ContactUs
FRENCH
PMX8BUEU - PMX8BUUK
Table de mixage professionnelle 3 canaux
Streaming musical BT sans fil intégré, entrées
USB/phono/microphone et ligne (3,5 mm),
CUE Select pour la pré-écoute avec affichage numérique LED

INSTRUCTIONS IMPORTANTES EN MATIÈRE DE SÉCURITÉ
ATTENTION : Pour réduire le risque d'électrocution, ne pas retirer le couvercle
supérieur (ou la partie arrière). L'appareil ne contient aucune pièce réparable par
l'utilisateur, confiez l'entretien de l'appareil à un personnel qualifié.
RISQUE DE CHOC ÉLECTRIQUE. UTILISATION DANS UN ENDROIT SEC UNIQUEMENT!
Ce symbole, où qu'il apparaisse, vous avertit de la présence d'une tension
dangereuse non isolée à l'intérieur du boîtier, une tension qui peut être
suffisante pour constituer un risque d'électrocution.
Ce symbole, où qu'il apparaisse, vous avertit de la présence d'importantes
instructions d'utilisation et d'entretien dans la documentation qui
l'accompagne. Veuillez lire le manuel.
ATTENTION : Afin de réduire les risques d'incendie ou d'électrocution, N'EXPOSEZ PAS cet
appareil à la pluie et à l'humidité. L'appareil ne doit pas être exposé à des gouttes ou à des
éclaboussures et aucun objet rempli de liquide, tel qu'un vase, ne doit être placé sur l'appareil.
INSTRUCTIONS DE SÉCURITÉ DÉTAILLÉES
Lisez ces instructions.1.
Conservez ces instructions.2.
Tenez compte de tous les avertissements.3.
Suivre toutes les instructions.4.
Ne pas utiliser cet appareil à proximité de l'eau.5.
Nettoyer uniquement avec un chiffon sec.6.
Ne pas obstruer les ouvertures de ventilation. Installer conformément aux instructions du
fabricant.
7.
N'installez pas l'appareil à proximité d'une source de chaleur telle qu'un radiateur, une sortie
d'air chaud, une cuisinière ou tout autre appareil (y compris les amplificateurs) produisant de
la chaleur.
8.
Ne pas aller à l'encontre de l'objectif de sécurité de la prise polarisée ou de la prise de terre.
Une prise polarisée comporte deux broches, dont l'une est plus large que l'autre. Une prise
de terre comporte deux broches et une troisième broche de mise à la terre. Si la prise
fournie ne s'adapte pas à votre prise, consultez un électricien pour remplacer la prise
obsolète.
9.
10. Protéger le câble d'alimentation contre les piétinements et les pincements, en particulier
au niveau des prises, du courant et du point de sortie de l'appareil.
10.
N'utilisez que les accessoires spécifiés par le fabricant.11.
N'utilisez que le chariot, le support, le trépied, la console ou la table spécifiés par le
fabricant ou vendus avec l'appareil. Lorsqu'un chariot est utilisé, il convient d'être prudent
lors du déplacement de l'ensemble chariot/appareil afin d'éviter toute blessure due à un
basculement.
12.
www.PyleUSA.com
2

www.PyleUSA.com
3
13. Débranchez cet appareil en cas d'orage ou lorsqu'il n'est pas utilisé pendant de longues
périodes.
14. Confiez toute réparation à un personnel qualifié. Une réparation est nécessaire lorsque
l'appareil a été endommagé de quelque manière que ce soit, par exemple lorsque le
câble d'alimentation ou la prise sont endommagés, lorsqu'un liquide a été renversé ou
que des objets sont tombés dans l'appareil, lorsque l'appareil a été exposé à la pluie ou à
l'humidité, lorsqu'il ne fonctionne pas normalement ou lorsqu'il est tombé.
15. ATTENTION: Ces instructions d'entretien sont réservées à un personnel d'entretien
qualifié. Afin de réduire les risques d'électrocution, n'effectuez aucune opération
d'entretien autre que celle décrite dans les instructions d'utilisation, à moins d'être
qualifié pour le faire.
INTRODUCTION
Avec la PMXSBU, vous avez fait l'acquisition d'une table de mixage DJ ultramoderne. Ses
nombreuses caractéristiques ouvrent la voie à de nouvelles méthodes de travail créatives,
tout en la rendant adaptée à une grande variété d'applications professionnelles. En même
temps, l'appareil est extrêmement facile à utiliser, ce qui vous permet de laisser libre cours à
votre créativité.
Les instructions suivantes vous donneront un bref aperçu de la terminologie et des
fonctions de l'appareil. Après l'avoir lu, veuillez conserver ce manuel dans un endroit sûr
afin de pouvoir vous y référer ultérieurement.
Votre PRO MIXER a été soigneusement emballé en usine et l'emballage est conçu pour
protéger l'appareil contre les manipulations brutales. Néanmoins, nous vous recommandons
d'examiner attentivement l'emballage et le contenu de l'appareil afin de déceler tout signe
de dommage physique qui aurait pu survenir pendant le transport.
Si l'appareil doit être expédié, veuillez toujours utiliser l'emballage d'origine pour
éviter tout dommage.
Ne laissez jamais des enfants sans surveillance jouer avec l'appareil ou son
emballage.
Veuillez éliminer tous les matériaux d'emballage dans le respect de l'environnement.
Veillez à ce que la ventilation soit toujours suffisante. Ne placez pas le PRO
MIXER à proximité d'appareils de chauffage ou de dispositifs générant de la
chaleur afin d'éviter toute surchauffe.
ATTENTION!
Nous attirons votre attention sur le fait que les volumes élevés peuvent
endommager de façon permanente votre sens de l'ouïe et/ou votre casque ou
enceintes. C'est pourquoi, avant d'allumer la table de mixage, il convient de
basculer le bouton MAIN de la section MIC/MAIN à fond vers la gauche. Faites
preuve de prudence et de bon sens lorsque vous réglez les niveaux de volume.

www.PyleUSA.com
4
1. PANNEAU FRONTAL
1. Le CUE SELECT contrôle chaque canal pour MIC, Chanel 1, Channel 2 et Channel 3.
2. La commande MIC LEVEL permet de régler le volume du signal du microphone.
3. Le fader de CHANNEL 1 règle le volume du canal final.
4. L’interrupteur PHONO/LINE sélectionne l'une des paires d'entrées sur le canal
correspondant. Le réglage "PH1" (et les entrées) est destiné aux platines ; pour toutes les
autres sources de signaux, c'est-à-dire un lecteur CD ou MD, utilisez le réglage "LN1" et
les entrées.
¡Nunca conecte equipos de nivel de línea a las entradas PHONO de alta sensibilidad!
Los niveles de salida de los sistemas de cartuchos PHONO están en el rango de
milivoltios, mientras que los reproductores de CD y MD, así como las pletinas de cinta,
proporcionan niveles de salida en el rango de voltios. En otras palabras, el nivel de las
señales de línea es hasta 100 veces mayor que los niveles de salida de PHONO.
No suba el volumen cuando no haya ningún tocadiscos conectado a los terminales de
entrada PHONO. Si lo hace, provocará zumbidos o ruidos. Cuando no esté conectando
un tocadiscos, mantenga la configuración "LINE".
5. Le fader de CHANNEL 2 permet de régler le volume du canal final.
6. L’interrupteur PHONO/LINE.
7. Le fader de CHANNEL 3 permet de régler le volume du canal final.
8. L’interrupteur USB/BT et AUX.
9. Output Meter : indique le niveau des canaux Master gauche et droit. 10. L'interrupteur
10. POWER ON permet d'allumer l'appareil

www.PyleUSA.com
5
11. LED d'alimentation
12. Port USB.
13. Suivant.
14. Précédent
15. Lecture et pause.
16. Pour choisir la source de lecture USB ou BT
17. Le bouton LEVEL détermine le volume du signal du casque.
18. Le CROSSFADER permet d'effectuer un fondu entre les canaux 1 et 2.
19. MIC TALKOVER permet d'abaisser le niveau des sources d'entrée afin de pouvoir
les parler à l'aide du micro DJ.
2. PANNEAU ARRIÈRE
Toutes les connexions audio de l'appareil sont situées sur la face arrière et sont
fournies sous forme de connecteurs RCA.
20. Alimentation électrique : N'utilisez que l'adaptateur d'alimentation fourni avec
l'appareil pour alimenter ce dernier. Lors de la connexion et de la déconnexion du
câble d'alimentation, assurez-vous que l'appareil est hors tension. Branchez le
câble à l'arrière de l'appareil, puis à la prise de courant.
21. La prise HEADPHONES vous permet de connecter votre casque pour la pré-écoute
(signal PFL). Pour de meilleurs résultats, utilisez un casque d'une impédance d'au
moins 32 Ohms.
22. Utilisez la sortie AMP pour connecter l'appareil à un amplificateur.
Afin d'éviter les chocs à la mise sous tension, qui peuvent endommager vos enceintes,
veuillez mettre votre amplificateur sous tension en dernier. Il ne doit pas y avoir de signal
présent, par exemple pas de musique, lorsque vous allumez votre amplificateur. De plus,
nous vous suggérons de régler tous les boutons liés au volume sur "zéro" (vers le bas)
avant d'allumer votre système. Le respect de ces précautions vous évitera des surprises
désagréables et potentiellement dangereuses.
23. Entrées AUX, prise pour les signaux de niveau de ligne.
24. ANTENNE BT SANS FIL : Veuillez retirer l'antenne lorsque vous utilisez l'entrée BT sans fil.
25. Les entrées PHONO pour le canal 2 et sont uniquement destinées à la connexion d'une platine.
Les entrées LINE peuvent être utilisées pour connecter des magnétophones, des lecteurs CD ou
MD, etc.
26. Les entrées PHONO pour le canal 1 et sont uniquement destinées à la connexion d'une platine.
Les entrées LINE peuvent être utilisées pour connecter des magnétophones, des lecteurs CD ou
MD, etc.

www.PyleUSA.com
6
27. Le port MIC1 MIC2 INPUT est une prise jack 6,35 mm symétrique pour la
connexion d'un microphone.
COMMANDES ET FONCTIONS DES BOUTONS
A. BOUTON MODE: ce bouton vous permet de basculer entre un mode de travail, un
mode de lecture USB et un mode BT sans fil. Cela vous permet de choisir la source
de musique qui sera jouée.
B. BOUTON DE LECTURE: Ce bouton a deux fonctions selon les différents modes,
comme indiqué ci-dessous.
a. Mode de lecture USB: Lecture
Chaque pression sur la TOUCHE DE LECTURE fait passer l'opération de la lecture
à la pause ou de la pause à la lecture.
b. Mode BT sans fil: Lecture
Chaque pression sur la TOUCHE DE LECTURE fait passer l'opération de la lecture
à la pause ou de la pause à la lecture.
C. BOUTON PREV: Ce bouton a quatre fonctions selon les différents modes, comme
indiqué ci-dessous.
a. Mode de lecture USB: PREV et Volume DOWN
Cette touche permet de sélectionner la piste précédente.
Le volume de l'USB diminuera si vous appuyez sur le bouton pendant plus de 3
secondes.
b. Mode BT sans fil: PREV et Volume DOWN
Ce bouton permet de sélectionner la piste précédente. Le volume du BT baissera
si vous maintenez la touche enfoncée pendant plus de 3 secondes.
c. BOUTON SUIVANT: ce bouton a quatre fonctions selon les différents modes,
comme indiqué ci-dessous.
a. Mode de lecture USB: NEXT et Volume UP
Cette touche permet de sélectionner la piste suivante.
Le volume de l'USB augmentera si vous appuyez sur le bouton pendant plus de
3 secondes.
b. Mode BT sans fil: PREV et Volume UP
Cette touche permet de sélectionner la piste précédente.
Le volume de BT augmentera si vous appuyez sur la touche pendant plus de 3
secondes.
Remarque:
L'appareil lira automatiquement les fichiers insérés dans le périphérique USB (y compris les
fichiers mp3) en mode USB.
1.
L'appareil se met automatiquement en mode Bluetooth lorsqu'il est allumé sans USB.2.

AVERTISSEMENT:
Ce produit peut vous exposer à un produit chimique ou à un groupe de produits chimiques,
qui peut contenir du "Carbonate de Nickel" qui est connu dans l'État de Californie pour
provoquer des cancers, des malformations congénitales ou d'autres troubles de la
reproduction. Pour plus d'informations, voir https://www.p65warnings.ca.gov/.
www.PyleUSA.com
7
PMX8BU
Table de mixage DJ professionnelle à 3 canaux
Streaming musical BT sans fil intégré, entrées USB/Phono/Microphone et Une (3,5
mm), CUE Select pour la pré-écoute avec affichage numérique à LED (200 Watt)
Caractéristiques:
Caractéristiques techniques:
Table de mixage DJ professionnelle à 3 canaux
BT intégré pour l'écoute de musique en continu sans fil
Sélection CUE pour pré-écoute
Affichage numérique LED
Compatible avec tous vos appareils BT préférés
Combinez et mixez (2) sources d'entrée auxiliaire avec BT Audio ou MP3
Entrées AUX Commutation entre les entrées ligne et les entrées phono
(2) Entrées de ligne audio Phono RCA pour la connexion d'appareils externes.
externes
(2) prises microphoniques TRS équilibrées de 1/4 de pouce
Microphone 1 et 2 Levei Gain et Talk-over Control
Mie Talk-over Possibilité de parler sur l'audio, à la manière d'un karaoké
Prise casque 1/4" avec réglage du volume
Sortie principale de l'amplificateur (G/D)
Lecteur de clé USB
Commandes de canaux indépendantes Cross Fader
Mixez et contrôlez facilement les MP3 et les appareils connectés BT
Sortie principale RCA (L) et (R) avec stéréo
Taille de l'écran LED : 2.76" x 0.98"
Entrées phono 1 et 2 : 90mv 1 kHz, entrées asymétriques
Entrées de ligne 1 et 2 : 0,6V, entrées asymétriques
Entrée Mic : 120mv, entrées symétriques
Casque : 300mW@ 1% THD
Rapport signal/bruit (S/N) : > 78 dB (entrée ligne)
Diaphonie : > 50 dB (entrée ligne)
Distorsion (THD) : < 1%
Réponse en fréquence : 20 Hz – 20 kHz
Consommation électrique : Max 5 W
Dimensions (H x L x P) : 5.31" x 9.25" x 1.97" pouces
Poids : 1.98 lbs.

Questions ou Commentaires
Nous sommes là pour vous aider!
Téléphone: 1.718.535.1800
PyleUSA.com/ContactUs
ITALIAN
PMX8BUEU - PMX8BUUK
Mixer DJ professionale a 3 canali
Streaming musicale BT wireless integrato
Ingressi USB/Phono/Microfono e AUX (3,5 mm)
Selettore CUE per per anteprima di ascolto con display LED digitale

IMPORTANTI ISTRUZIONI DI SICUREZZA
ATTENZIONE: Per ridurre il rischio di shock elettrico, non rimuovere il coperchio
superiore (o la parte posteriore). L’apparecchio non contiene parti riparabili
dall’utente, affidare la manutenzione dell’apparecchio a personale qualificato.
PERICOLO DI SHOCK ELETTRICO. UTILIZZARE SOLO IN AMBIENTI ASCIUTTI!
Questo simbolo, ovunque appaia, avverte della presenza di tensione
pericolosa non isolata all’interno del vano, tensione che potrebbe essere
sufficiente a costituire un rischio di shock elettrico.
Questo simbolo, ovunque appaia, serve a segnalare la presenza nel
manuale di importanti istruzioni per l’uso e la manutenzione. Si prega di
leggere il manuale.
ATTENZIONE: Per ridurre i rischi di incendio o shock elettrico, NON ESPORRE questo
apparecchio alla pioggia e all'umidità. L'apparecchio non deve essere esposto a gocce o schizzi e
nessun oggetto contenente liquidi, come un vaso, deve essere posizionato sull'apparecchio.
ISTRUZIONI DI SICUREZZA DETTAGLIATE
Leggere queste istruzioni.1 .
Conservare queste istruzioni.2 .
Prestare attenzione a tutte le avvertenze.3 .
Seguire tutte le istruzioni.4 .
Non utilizzare questo apparecchio vicino all’acqua.5 .
Pulire esclusivamente con un panno asciutto.6 .
Non ostruire le fessure di ventilazione. Installare conformemente alle istruzioni del
produttore.
7 .
Non installare l’apparecchio vicino a fonti di calore come termosifoni, grate di
riscaldamento, fornelli o altri apparecchi (compresi amplificatori) che producono calore.
8 .
Non vanificare lo scopo di sicurezza della spina polarizzata o della spina con messa a
terra. Una spina polarizzata ha due spinotti, uno più largo dell’altro. Una spina con messa
a terra ha due connettori a lamella e un polo di messa a terra. Lo spinotto più largo e il
terzo polo di messa a terra sono previsti per la vostra sicurezza. Se la spina fornita non si
adatta alla vostra presa, consultare un elettricista per la sostituzione della presa
obsoleta.
9 .
Proteggere il cavo di alimentazione per evitare che venga calpestato o schiacciato,
specialmente vicino alle spine, al percorso del cavo e al punto di uscita dall’apparecchio.
1 0.
Utilizzare solo i componenti e gli accessori specificati dal produttore.1 1.
Utilizzare solo con carrelli, supporti, treppiedi, console o tavoli specificati dal produttore
o forniti con l’apparecchio. Quando si usa un carrello, fare attenzione quando carrello e
apparecchio vengono spostati per evitare lesioni causate da ribaltamento.
1 2.
www.PyleUSA.com
2

www.PyleUSA.com
3
13. Scollegare l’apparecchio durante i temporali o in caso di lunghi periodi d’inutilizzo.
14. Affidare qualsiasi riparazione a personale qualificato. La riparazione è necessaria quando
l’apparecchio viene danneggiato in qualsiasi modo, ad esempio se il cavo di
alimentazione o la spina sono danneggiate, se è stato versato liquido sull’apparecchio, se
sono caduti oggetti all’interno dell’apparecchio, se l'apparecchio è stato esposto a
pioggia o a umidità, se l’apparecchio non funziona normalmente o se è caduto a terra.
15. ATTENZIONE: Queste istruzioni per la manutenzione sono rivolte a personale
manutentore qualificato. Per ridurre i rischi di shock elettrico, non effettuare alcuna
operazione di manutenzione diversa da quella descritta nelle istruzioni per l’uso, a meno
che non si sia qualificati per farlo.
INTRODUZIONE
Acquistando un PMXSBU avete acquisito un mixer DJ all’avanguardia. Le sue numerose
caratteristiche permettono di usare nuovi metodi di lavoro creativi, rendendolo adatto a
una vasta gamma di applicazioni professionali. Allo stesso tempo, l’apparecchio è
estremamente facile da usare, consentendovi di dare libero sfogo alla vostra creatività.
Le seguenti istruzioni fanno una breve panoramica della terminologia e delle funzioni
collegate all’apparecchio. Dopo averle lette, conservate questo manuale in un luogo
sicuro in modo da poterlo consultare in futuro.
Il vostro PRO MIXER è stato accuratamente imballato in fabbrica, e l’imballaggio è
progettato per proteggere l’apparecchio da manomissioni. Tuttavia, vi consigliamo di
esaminare attentamente l’imballaggio e il contenuto della confezione per controllare che
non ci siano segni di danneggiamento avvenuto durante il trasporto.
Se si deve spedire l’apparecchio, utilizzare sempre l’imballaggio originale per evitare
danni.
Non permettere mai ai bambini di giocare con l’apparecchio o il suo imballaggio
senza la supervisione di un adulto.
Smaltire tutti i materiali di imballaggio nel rispetto dell’ambiente.
Assicurarsi che ci sia sempre sufficiente aerazione. Non posizionare il PRO
MIXER vicino a dispositivi di riscaldamento o a dispositivi che generano calore,
per evitare il surriscaldamento dell’apparecchio.
ATTENZIONE!
È importante ricordare che i volumi elevati possono danneggiare
permanentemente l’udito e/o le cuffie o gli altoparlanti. Pertanto, prima di
accendere il mixer, si consiglia di spostare completamente verso sinistra il
pulsante MAIN (PRINCIPALE) della sezione MIC/MAIN (PRINCIPALE). Fare
attenzione e usare buon senso quando si regolano i livelli del volume.

www.PyleUSA.com
4
1. PANNELLO ANTERIORE
1. Il SELETTORE CUE controlla ciascun canale per MIC, Channel 1, Channel 2 e Channel 3.
2. Il regolatore del LIVELLO MIC regola il volume del segnale del microfono.
3. La levetta fader (attenuatore) relativa a CHANNEL 1 regola il volume finale del canale.
4. L’interruttore PHONO/LINE seleziona una delle coppie di ingressi sul canale
corrispondente. L’impostazione "PH1" (e i relativi ingressi) è destinata ai giradischi; per
tutte le altre fonti di segnale, come lettori CD o MD, utilizzare l’impostazione "LN1" e i
relativi ingressi.
Non connettere mai apparecchiature con uscita LINE agli ingressi PHONO, perché
molto sensibili! I livelli di uscita dei sistemi di cartucce PHONO sono nell’ordine dei
millivolt, mentre i lettori CD e MD, nonché i registratori, forniscono livelli di uscita
nell’ordine dei volt. In altre parole, il loro livello dei segnali di linea è fino a 100 volte
superiore ai livelli di uscita PHONO.
Non aumentare il volume quando all’ingresso PHONO non è collegato un giradischi.
Ciò causerebbe ronzii e rumori. Se non si collega un giradischi, mantenere
l’impostazione "LINE".
5. La levetta fader (attenuatore) del CHANNEL 2 regola il volume finale del canale.
6. Interruttore di selezione tra PHONO e LINE.
7. La levetta fader (attenuatore) del CHANNEL 3 regola il volume finale del canale.
8. Interruttore di selezione tra USB/BT e AUX.
9. Misuratore di uscita: indica il livello dei canali Master sinistro e destro.
10. L’interruttore che accende/spegne l’apparecchio (POWER ON/OFF).

www.PyleUSA.com
5
11. LED dell’alimentazione
12. Porta USB.
13. Avanti.
14. Indietro.
15. Riproduci e pausa.
16. Per scegliere la fonte di riproduzione, USB o BT.
17. Il regolatore LEVEL determina il volume del segnale delle cuffie.
18. La levetta CROSSFADER consente di eseguire un crossfade (dissolvenza incrociata) tra i canali 1 e 2.
19. L’interruttore di selezione TALKOVER MIC abbassa il livello sorgente in ingresso in modo che ci si
possa parlare sopra usando il microfono DJ.
2. PANNELLO POSTERIORE
Tutte le prese per le connessioni audio dell’apparecchio si trovano sul retro e sono
sotto forma di connettori RCA.
20. Alimentazione elettrica: utilizzare solo l’adattatore di alimentazione fornito con
l’apparecchio per alimentarlo. Quando si collega o scollega il cavo di alimentazione,
assicurarsi che l’apparecchio sia spento. Collegare il cavo alla parte posteriore
dell’apparecchio, quindi alla presa di corrente.
21. La presa per le cuffie (HEADPHONES) consente di collegare le cuffie per
l’anteprima di ascolto (segnale PFL). Per migliori risultati, utilizzare cuffie con
un’impedenza di almeno 32 Ohm.
22. Utilizzare l’uscita AMP per collegare l’apparecchio a un amplificatore.
Per evitare tonfi e scoppiettii al momento dell’accensione, che potrebbero danneggiare gli
altoparlanti, accendere l’amplificatore per ultimo. Non dovrebbe esserci nessun segnale
audio attivo, ad esempio nessuna musica in riproduzione, quando si accende
l’amplificatore. Inoltre, si consiglia di impostare tutte le regolazioni di volume su "zero"
(verso il basso) prima di accendere il sistema. Seguire queste precauzioni per evitare
sorprese sgradevoli e potenzialmente pericolose.
23. Ingressi AUX, presa jack per segnali di ingresso LINE.
24. ANTENNA BT WIRELESS: rimuovere l’antenna quando si utilizza l’ingresso BT wireless.
25. Gli ingressi PHONO per il canale 2 sono destinati esclusivamente al collegamento di un
giradischi. Gli ingressi LINE possono essere utilizzati per collegare registratori, lettori CD o MD,
ecc.
26. Gli ingressi PHONO per il canale 1 sono destinati esclusivamente al collegamento di un
giradischi. Gli ingressi LINE possono essere utilizzati per collegare registratori, lettori CD o MD,
ecc.

www.PyleUSA.com
6
27. La presa MIC1 MIC2 (INPUT) è un connettore jack da 6,35 mm bilanciato per il
collegamento di un microfono.
REGOLAZIONE E FUNZIONI DEI PULSANTI
A. PULSANTE MODE: questo pulsante consente di passare da una modalità di lavoro
all’altra, cioè dalla modalità di riproduzione USB alla modalità BT wireless. Ciò
consente di scegliere da quale dispositivo audio riprodurre musica.
B. PULSANTE PLAY: Questo pulsante ha due funzioni che variano a seconda delle
diverse modalità indicate di seguito.
a. Modalità di riproduzione USB: Riproduzione
Ogni volta che si preme il PULSANTE PLAY si passa dalla riproduzione alla pausa o
dalla pausa alla riproduzione.
b. Modalità BT wireless: Riproduzione
Ogni volta che si preme il pulsante PLAY si passa dalla riproduzione alla pausa o
dalla pausa alla riproduzione.
C. PULSANTE PREV: Questo pulsante ha quattro funzioni che variano a seconda delle
diverse modalità indicate di seguito.
a. Modalità di riproduzione USB: PREV e Volume DOWN
Questo pulsante consente di selezionare la traccia precedente.
Il volume del dispositivo USB diminuirà se si tiene premuto il pulsante per più di 3
secondi.
b. Modalità BT wireless: PREV e Volume DOWN
Questo pulsante consente di selezionare la traccia precedente.
Il volume del dispositivo BT diminuirà se si tiene premuto il pulsante per più di 3
secondi.
c. PULSANTE NEXT: Questo pulsante ha quattro funzioni che variano a seconda delle
diverse modalità indicate di seguito.
a. Modalità di riproduzione USB: NEXT e Volume UP
Questo pulsante consente di selezionare la traccia successiva.
Il volume del dispositivo USB aumenterà se si tiene premuto il pulsante per più di
3 secondi.
b. Modalità BT wireless: PREV e Volume UP
Questo pulsante consente di selezionare la traccia precedente.
Il volume del dispositivo BT aumenterà se si tiene premuto il pulsante per più di
3 secondi.
Nota:
L’apparecchio leggerà automaticamente i file inseriti nel dispositivo USB (compresi i file mp3) in
modalità USB.
1.
L’apparecchio passerà automaticamente in modalità Bluetooth quando viene acceso senza USB.2.

ATTENZIONE:
Questo prodotto può causare l’esposizione a sostanze chimiche, incluso il "Carbonato di
Nichel", nello Stato della California quest’ultima sostanza è indicata come possibile causa
di cancro, difetti congeniti o altri danni all’apparato riproduttivo. Per ulteriori informazioni,
visitare il sito https://www.p65warnings.ca.gov/.
www.PyleUSA.com
7
PMX8BU
Mixer DJ professionale a 3 canali
Streaming musicale BT wireless integrato Ingressi USB/Phono/Microfono e
AUX (3,5 mm) Selettore CUE per anteprima di ascolto con display LED digitale (200 watt)
Caratteristiche:
Specifiche tecniche:
Mixer DJ professionale a 3 canali
BT integrato per lo riproduzione audio senza fili
Selettore CUE per l’anteprima di ascolto
Display LED digitale
Compatibile con tutti i tuoi dispositivi BT preferiti
Combina e mixa (2) sorgenti in ingresso AUX con audio BT o MP3
Interruttori AUX per passare da dispositivi con ingresso LINE a dispositivi con
ingresso PHONO.
(2) Ingressi audio LINE Phono RCA per il collegamento di dispositivi esterni.
(2) Prese microfoniche TRS jack da 6,35 mm bilanciate
Regolazione del level Gain per Microfono 1 e 2, e regolazione del talk-over
Funzione che permette di parlare sopra all’audio in riproduzione, in stile karaoke
Presa cuffie jack 6,35 mm con regolazione del volume
Uscita principale dell’amplificatore (L/R, destro/sinistro)
Lettore di chiavette USB
Regolazione indipendente del canale CrossFade
Mixa e regola facilmente l’audio dei dispositivi MP3 e BT collegati
Uscita principale sinistra e destra (L) e (R) RCA con funzione stereo
Dimensioni del display LED: 7 x 2,5 cm
Ingressi Phono 1 e 2: 90mv 1 kHz, ingressi non bilanciati
Ingressi Line 1 e 2: 0,6V, ingressi non bilanciati
Ingresso Mic: 120mv, ingressi bilanciati
Cuffie: 300mW @ 1% THD
Rapporto segnale/rumore (S/N): > 78 dB (ingresso Line)
Crosstalk/Diafonia: > 50 dB (ingresso Line)
Distorsione (THD): < 1%
Risposta in frequenza: 20 Hz – 20 kHz
Consumo energetico: Max 5 W
Dimensioni (A x L x P): 13,5 x 23,5 x 5 cm
Peso: 0,9 kg

Do man de o c om men ti
Siamo qui per aiutarvi!
Telefono: 1.718.535.1800
PyleUSA.com/ContactUs
GERMAN
PMX8BUEU - PMX8BUUK
Professioneller 3-Kanal-DJ-Mixer
Integrierter BT-Sender für Musik-Streaming
USB-/Audio-/Mikrofon-und Line-Eingänge (3,5 mm) Titelauswahl zum
Vorhören mit digitaler LED-Anzeige

WICHTIGE SICHERHEITSANWEISUNGEN
VORSICHT: Um das Risiko eines elektrischen Schlages zu verringern, darf die obere
Abdeckung (oder die hintere Abdeckung) nicht entfernt werden. Im Inneren befinden sich
keine vom Benutzer zu wartenden Teile; überlassen Sie die Wartung qualifiziertem Personal.
GEFAHR EINES ELEKTRISCHEN SCHLAGES. NUR IN TROCKENEN RÄUMEN
VERWENDEN!
Dieses Symbol, wo immer es erscheint, warnt vor einer nicht isolierten
gefährlichen Spannung im Inneren des Gehäuses, die ausreichen kann, um die
Gefahr eines elektrischen Schlages zu verursachen.
Dieses Symbol, wo auch immer es erscheint, warnt vor wichtigen
Betriebs- und Wartungsanweisungen, die in der Begleitdokumentation
enthalten sind. Lesen Sie unbedingt die Betriebsanleitung.
Um die Gefahr eines Brandes oder elektrischen Schlages zu verringern, darf das Gerät NICHT Regen oder
Feuchtigkeit ausgesetzt werden. Das Gerät darf keinen Tropfen oder Spritzern ausgesetzt werden, und es
dürfen keine mit Flüssigkeiten gefüllten Gegenstände, wie z. B. Vasen, auf das Gerät gestellt werden.
AUSFÜHRLICHE SICHERHEITSHINWEISE
Lesen Sie diese Anleitung. 1.
Bewahren Sie diese Anleitung auf. 2 .
Beachten Sie alle Warnhinweise. 3 .
Befolgen Sie alle Anweisungen. 4 .
Verwenden Sie das Gerät nicht in der Nähe von Wasser.5 .
Reinigen Sie es nur mit einem trockenen Tuch. 6 .
Blockieren Sie nicht die Lüftungsöffnungen. Montage nach den Anweisungen des
Herstellers.
7 .
nicht in der Nähe von Wärmequellen wie Heizkörpern, Heizregistern, Herden oder
anderen Geräten (einschließlich Verstärkern), die Wärme erzeugen, aufstellen.
8 .
Ein gepolter oder geerdeter Stecker darf die Sicherheit nicht beeinträchtigen. Ein gepolter
Stecker hat zwei Stifte, von denen einer breiter ist als der andere. Ein geerdeter Stecker
hat zwei Stifte und einen dritten Erdungsstift. Der breite Stecker oder der dritte Stift
dient der Sicherheit des Benutzers. Wenn der mitgelieferte Stecker nicht in die Steckdose
passt, wenden Sie sich an einen Elektriker, um die veraltete Steckdose zu ersetzen.
9 .
Schützen Sie das Netzkabel vor Quetschungen, insbesondere an Steckern, Steckdosen
und an der Stelle, an der es aus dem Gerät austritt.
10.
Verwenden Sie nur die vom Hersteller angegebenen Zubehörteile.11.
Verwenden Sie nur den Wagen, den Ständer, das Stativ, die Halterung oder den Tisch, die
vom Hersteller angegeben oder mit dem Gerät verkauft werden. Wenn Sie einen Wagen
verwenden, seien Sie vorsichtig, wenn Sie die Kombination Wagen/Gerät bewegen, um
Verletzungen durch Umkippen zu vermeiden.
12.
www.PyleUSA.com
2

www.PyleUSA.com
3
1 3. Ziehen Sie bei Gewitter oder bei längerer Nichtbenutzung des Geräts den Netzstecker.
1 4. Überlassen Sie alle Wartungsarbeiten qualifiziertem Personal. Eine Wartung ist
erforderlich, wenn das Gerät in irgendeiner Weise beschädigt wurde, z. B. wenn das
Netzkabel oder der Stecker beschädigt wurde, wenn Flüssigkeit oder Gegenstände in das
Gerät eingedrungen sind, wenn das Gerät Regen oder Feuchtigkeit ausgesetzt war, wenn
es nicht normal funktioniert oder wenn es heruntergefallen ist.
1 5. ACHTUNG: Diese Bedienungsanleitung ist nur für qualifiziertes Wartungspersonal
bestimmt. Um das Risiko eines elektrischen Schlages zu verringern, führen Sie keine
anderen als die in der Bedienungsanleitung beschriebenen Wartungsarbeiten durch,
wenn Sie nicht dafür qualifiziert sind.
EINFÜHRUNG
PMXSBU ist ein hochmoderner DJ-Mixer. Seine umfangreichen Funktionen eröffnen
neue und kreative Arbeitsweisen und machen ihn für eine Vielzahl von professionellen
Anwendungen geeignet. Gleichzeitig ist das Gerät extrem einfach zu bedienen, so dass
Sie Ihre Kreativität voll entfalten können.
Die folgende Anleitung gibt einen kurzen Überblick über die Terminologie und die
Funktionen des Geräts. Bewahren Sie diese Anleitung nach der Lektüre zum späteren
Nachschlagen an einem sicheren Ort auf.
PRO MIXER wurde im Werk sorgfältig verpackt, und die Verpackung wurde so
konzipiert, dass das Gerät vor unvorsichtiger Handhabung geschützt ist. Wir empfehlen
Ihnen jedoch, die Verpackung und ihren Inhalt sorgfältig auf Anzeichen von physischen
Schäden zu untersuchen, die während des Transports entstanden sein könnten.
Verwenden Sie für den Versand des Geräts immer die Originalverpackung, um
Schäden am Gerät zu vermeiden.
Lassen Sie Kinder niemals unbeaufsichtigt mit dem Gerät oder der Verpackung
spielen.
Entsorgen Sie alle Verpackungsmaterialien auf umweltfreundliche Weise.
Sorgen Sie stets für ausreichende Belüftung. Stellen Sie den PRO MIXER nicht
in der Nähe von Heizungen oder wärmeerzeugenden Geräten auf, um eine
Überhitzung zu vermeiden.
VORSICHT!
Bitte beachten Sie, dass hohe Lautstärken Ihr Gehör und/oder Ihre Kopfhörer
oder Lautsprecher dauerhaft schädigen können. Drehen Sie daher den MAIN-
Regler in der Sektion MIC / MAIN ganz nach links, bevor Sie das Mischpult
einschalten. Gehen Sie beim Einstellen der Lautstärke mit Vorsicht und
gesundem Menschenverstand vor.
www.PyleUSA.com
4
1. VORDERSEITE
1. CUE SELECT überwacht jeden Kanal auf MIC, Kanal 1, Kanal 2 und Kanal 3.
2. Regler MIC LEVEL regelt die Lautstärke des Mikrofonsignals.
3. Schieberegler CHANNEL 1 regelt die Lautstärke des letzten Kanals.
4. Schalter PHONO/LINE wählt eines der Eingangspaare eines bestimmten Kanals aus.
Einstellung "PH1" (und Eingänge) ist für Plattenspieler; für alle anderen Signalquellen, z.
B. CD- oder MD-Player, verwenden Sie die Einstellung 'LN1' und die Eingänge.
Schließen Sie niemals Geräte mit Line-Pegel an PHONO-Eingänge mit hoher
Empfindlichkeit an! Die Ausgangspegel von PHONO-Tonabnehmersystemen liegen im
Millivoltbereich, während CD- und MD-Player und Tonbandgeräte. Ausgangspegel im
Voltbereich liefern. Mit anderen Worten: Der Pegel von Line-Pegel-Signalen ist bis zu
100-mal höher als der PHONO-Ausgangspegel
Erhöhen Sie nicht die Lautstärke, wenn kein Plattenspieler an die PHONO-
Eingangsbuchsen angeschlossen ist. Dies führt zu Rauschen oder Störungen. Wenn
kein Plattenspieler angeschlossen ist, wählen Sie die Einstellung "LINE".
5. CHANNEL 2-Schalter zur Einstellung der Endlautstärke des Kanals.
6. PHONO/LINE-Schalter.
7. CHANNEL 3-Schieberegler zum Einstellen der Endlautstärke des Kanals.
8. USB/BT- und AUX-Schalter.
9. Ausgangsanzeige: Zeigt die Pegel des linken und rechten Hauptkanals an.
10. POWER ON-Schalter: Schaltet das Gerät ein.

www.PyleUSA.com
5
11.Betriebs-LED
12.USB-Anschluss.
13.Weiter.
14.Zurück.
15. Wiedergabe und Pause.
16.Auswahl der USB- oder BT-Quelle für die Wiedergabe
17.LEVEL-Regler bestimmt die Lautstärke des Kopfhörersignals.
18.CROSSFADER wird verwendet, um zwischen den Kanälen 1 und 2 zu wechseln.
19.MIC TALKOVER Ermöglicht es Ihnen, den Pegel der Eingangsquellen abzusenken, damit Sie mitihnen
über das DJ MIC-Mikrofon sprechen können.
2. RÜCKSEITE
Alle Audioanschlüsse des Geräts befinden sich auf der Rückseite und sind mit RCA-
Anschlüssen ausgestattet
20. Stromversorgung: Verwenden Sie zur Stromversorgung des Geräts nur das
mitgelieferte Netzteil. Achten Sie darauf, dass das Gerät ausgeschaltet ist, wenn
Sie das Netzkabel anschließen oder abziehen. Schließen Sie das Netzkabel auf der
Rückseite des Geräts an und stecken Sie es dann in die Steckdose.
21. An die HEADPHONES-Buchse können Sie einen Kopfhörer zum Vorhören (PFL-
Signal) anschließen. Die besten Ergebnisse erzielen Sie, wenn Sie einen Kopfhörer
mit einer Impedanz von mindestens 32 Ohm verwenden.
22. Der AMP-Ausgang ermöglicht den Anschluss des Geräts an einen Verstärker.
Um Einschaltstöße zu vermeiden, die die Lautsprecher beschädigen können, sollte der
Verstärker zuletzt eingeschaltet werden. Beim Einschalten des Verstärkers sollte kein
Signal anliegen, d.h. es sollte keine Musik abgespielt werden. Außerdem empfehlen wir,
vor dem Einschalten des Systems alle Lautstärkeregler auf "Null" (unten) zu stellen. Wenn
Sie diese Vorsichtsmaßnahmen beachten, vermeiden Sie unangenehme und
möglicherweise gefährliche Überraschungen.
23. AUX-Buchsen-Eingänge für Line-Pegel-Signale.
24. DRAHTLOSE BT-ANTENNE: Ziehen Sie die Antenne heraus, wenn Sie den drahtlosen BT-Eingang
verwenden.
25. PHONO-Eingänge für Kanal 2 und sind nur für den Anschluss von Plattenspielern vorgesehen.
Die LINE-Eingänge können für den Anschluss von Kassettenrekordern, CD- oder MD-Playern usw.
verwendet werden.
26. die PHONO-Eingänge für Kanal 1 und sind nur für den Anschluss eines Plattenspielers vorgesehen.
Die LINE-Eingänge können zum Anschluss von Tonbandgeräten, CD- oder MD-Playern usw. verwendet
werden.

www.PyleUSA.com
6
27. Złącze MIC1 MIC2 INPUT to zbalansowane gniazdo TRS 1/4" do podłączenia
mikrofonu.
BEDIENELEMENTE UND FUNKTIONEN
A. MODE-TASTE: Mit dieser Taste können Sie zwischen dem Betriebsmodus, dem
USB-Wiedergabemodus und dem BT-Wireless-Modus wechseln. Damit können
Sie das Quellgerät für die Musikwiedergabe auswählen.
B. PLAY-TASTE: Diese Taste hat je nach den verschiedenen Modi zwei Funktionen,
wie unten dargestellt.
a. USB-Wiedergabemodus: Wiedergabe
Bei jedem Drücken der PLAY-TASTE wechselt der Betrieb von Wiedergabe zu
Pause oder von Pause zu Wiedergabe.
b. Drahtloser BT-Modus: Spielen
Bei jedem Drücken der PLAY-TASTE wechselt der Betrieb von Wiedergabe zu
Pause oder von Pause zu Wiedergabe.
C. TASTE DRÜCKEN PREV: Diese Taste hat vier Funktionen entsprechend den
verschiedenen Modi, wie unten dargestellt.
a. Wiedergabemodus USB: PREV und die Lautstärke herunterdrehen
Verwenden Sie diese Taste, um den vorherigen Titel auszuwählen. Die USB-
Lautstärke wird verringert, wenn die Taste länger als 3 Sekunden gedrückt wird.
b. Drahtloser Modus BT: PREV und die Lautstärke herunterdrehen
Verwenden Sie diese Taste, um den vorherigen Titel auszuwählen. Die BT-
Lautstärke wird reduziert, wenn die Taste länger als 3 Sekunden gedrückt
gehalten wird.
c. TASTE DRÜCKEN NEXT: Diese Taste hat vier Funktionen entsprechend den
verschiedenen Modi, wie unten dargestellt.
a. USB-Wiedergabemodus: NEXT und Lautstärke erhöhen
Verwenden Sie diese Taste, um den nächsten Titel auszuwählen. Die USB-
Lautstärke wird erhöht, wenn Sie die Taste länger als 3 Sekunden gedrückt
halten.
b. Drahtloser BT-Modus: PREV und Lautstärke erhöhen
Verwenden Sie diese Taste, um den vorherigen Titel auszuwählen. Die BT-
Lautstärke wird erhöht, wenn Sie die Taste mehr als 3 Sekunden lang
gedrückt halten.
Anmerkungen:
Das Gerät gibt im USB-Modus automatisch Dateien wieder, die in das USB-Gerät eingesteckt
wurden (einschließlich mp3-Dateien).
1.
Das Gerät wechselt automatisch in den Bluetooth-Modus, wenn es ohne USB eingeschaltet wird.2.

WARNUNG:
Dieses Produkt kann Sie einer Chemikalie oder einer Gruppe von Chemikalien aussetzen,
zu denen auch "Nickelkarbonat" gehört, das im Bundesstaat Kalifornien dafür bekannt
ist, Krebs, Geburtsfehler oder andere Fortpflanzungsschäden zu verursachen. Für weitere
Informationen besuchen Sie bitte https://www.p65warnings.ca.gov/.
www.PyleUSA.com
7
PMX8BU
Professioneller 3-Kanal-DJ-Mixer
Integriertes drahtloses BT-Musikstreaming, USB-/Phono-/Mikrofon- und Line-Eingänge
(3,5 mm), CUE-Auswahl für Hörvorschau mit digitaler LED-Anzeige (200 W)
Eigenschaften:
Specifiche tecniche:
Professioneller 3-Kanal-DJ-Mixer
Eingebautes BT für kabelloses Musikstreaming
CUE-Auswahl für PRE-Hören
Digitale LED-Anzeige
Kompatibel mit all Ihren Lieblings-BT-Geräten
Mix and Match (2) AUX-Eingangsquellen mit BT- oder MP3-Audio
AUX-Eingänge schalten zwischen Line- und Phono-Eingang um
(2) RCA-Phono-Line-Audioeingänge für den Anschluss externer Geräte
(2) Symmetrische TRS 1/4"-Mikrofonanschlüsse
Mikrofon 1 und 2 Pegelverstärkung und Talk-over-Regelung
Möglichkeit zum Sprechen durch das Mikrofon im Karaoke-Modus
1/4"-Kopfhörerbuchse mit Lautstärkeregler
Hauptverstärkerausgang (L/R)
USB-Speicherstick-Leser
Unabhängige Kanalsteuerung Crossover-Dämpfungsregler
Einfaches Mischen und Steuern von an MP3 und BT angeschlossenen Geräten
Hauptausgang RCA (L) und (R) mit Stereoausgang
LED-Anzeigegröße: 2,76" x 0,98" LED-Anzeigegröße: 2,76" x 0,98"
Phonoeingänge 1 und 2: 90 mV 1 kHz, unsymmetrische Eingänge
Line-Eingänge 1 und 2: 0,6 V, unsymmetrische Eingänge
Mikrofoneingänge: 120 mV, symmetrische Eingänge
Kopfhörer: 300 mW bei 1% THD
Signal-Rausch-Verhältnis (S/N): > 78 dB (Leitungseingang)
Diaphonie: > 50 dB (Leitungseingang)
Verzerrung (THD): < 1% - Klirrfaktor (THD): < 1% - Frequenzgang: 20 Hz - 20 Hz - 20 Hz
Frequenzgang: 20 Hz - 20 kHz
Leistungsaufnahme: max. 5 W
Abmessungen (H x B x T): 5,31" x 9,25" x 1,97" in.
Gewicht: 1,98 lb.

Fragen oder Kommentare
Wir sind hier, um Ihnen zu helfen!
Telefon: 1.718.535.1800
PyleUSA.com/ContactUs
POLISH
PMX8BUEU - PMX8BUUK
Profesjonalny 3-kanałowy mikser DJ
Wbudowany nadajnik BT do strumieniowego przesyłania muzyki
Wejścia USB/audio/mikrofonowe i liniowe (3,5 mm)
Wybór utworu do wstępnego odsłuchu z cyfrowym panelem LED

WAŻNE INSTRUKCJE BEZPIECZEŃSTWA
PRZESTROGA: Aby zmniejszyć ryzyko porażenia prądem, nie należy zdejmować górnej pokrywy
(ani tylnej części). Wewnątrz nie znajdują się żadne części, które mogą być naprawiane przez
użytkownika; serwisowanie należy powierzyć wykwalifikowanemu personelowi.
RYZYKO PORAŻENIA PRĄDEM. UŻYWAĆ TYLKO W SUCHYCH
POMIESZCZENIACH!
Ten symbol, gdziekolwiek się pojawia, ostrzega o obecności nieizolowanego
niebezpiecznego napięcia wewnątrz obudowy, które może być
wystarczające, aby stanowić ryzyko porażenia prądem.
Ten symbol, gdziekolwiek się pojawi, ostrzega o ważnych instrukcjach
obsługi i konserwacji zawartych w dołączonej dokumentacji. Należy
zapoznać się z instrukcją obsługi.
Aby zmniejszyć ryzyko pożaru lub porażenia prądem elektrycznym, NIE należy wystawiać urządzenia na
działanie deszczu lub wilgoci. Urządzenie nie może być narażone na kapanie lub zachlapanie, a na urządzeniu
nie wolno umieszczać żadnych przedmiotów wypełnionych płynami, takich jak wazony.
SZCZEGÓŁOWE INSTRUKCJE BEZPIECZEŃSTWA
Przeczytaj niniejszą instrukcję.1 .
Zachowaj te instrukcje.2 .
Zwróć uwagę na wszystkie ostrzeżenia.3 .
Przestrzegaj wszystkich instrukcji.4 .
Nie używaj urządzenia w pobliżu wody.5 .
Czyścić wyłącznie suchą szmatką.6 .
Nie blokować otworów wentylacyjnych.Montaż zgodnie z instrukcjami producenta.7 .
Nie instalować w pobliżu źródeł ciepła, takich jak grzejniki, rejestratory ciepła, kuchenki
lub inne urządzenia (w tym wzmacniacze) wytwarzające ciepło.
8 .
Wtyczka spolaryzowana lub z uziemieniem nie może obniżać poziomu bezpieczeństwa.
Wtyczka spolaryzowana ma dwa bolce, z których jeden jest szerszy od drugiego. Wtyczka
z uziemieniem ma dwa bolce i trzeci bolec uziemiający. Szeroki wtyk lub trzeci bolec służą
bezpieczeństwu użytkownika. Jeśli dostarczona wtyczka nie pasuje do gniazdka, należy
skonsultować się z elektrykiem w celu wymiany przestarzałego gniazdka.
9 .
Należy chronić przewód zasilający przed nadepnięciem lub przytrzaśnięciem, w
szczególności przy wtyczkach, gniazdach i w miejscu, w którym wychodzi on z urządzenia.
10.
Należy używać wyłącznie przystawek/akcesoriów określonych przez producenta.11.
Używać wyłącznie z wózkiem, stojakiem, trójnogiem, wspornikiem lub stołem określonym
przez producenta lub sprzedawanym wraz z urządzeniem. W przypadku korzystania z
wózka należy zachować ostrożność podczas przemieszczania zestawu wózek/aparat, aby
uniknąć obrażeń spowodowanych przewróceniem się.
12.
www.PyleUSA.com
2

www.PyleUSA.com
3
13. Urządzenie należy odłączać od zasilania podczas wyładowań atmosferycznych lub gdy
nie jest używane przez dłuższy czas.
14. Wszelkie czynności serwisowe należy zlecać wykwalifikowanemu personelowi. Serwis
jest wymagany, gdy urządzenie zostało w jakikolwiek sposób uszkodzone, np.
uszkodzony jest przewód zasilający lub wtyczka, do urządzenia dostała się ciecz lub
przedmioty, urządzenie zostało wystawione na działanie deszczu lub wilgoci, nie działa
prawidłowo lub zostało upuszczone.
15. PRZESTROGA: Niniejsza instrukcja obsługi jest przeznaczona wyłącznie dla
wykwalifikowanego personelu serwisowego. Aby zmniejszyć ryzyko porażenia prądem
elektrycznym, nie należy wykonywać żadnych czynności serwisowych innych niż opisane
w instrukcji obsługi, chyba że użytkownik posiada odpowiednie kwalifikacje.
WPROWADZENIE
PMXSBU to najnowocześniejszy mikser DJ-ski. Jego rozbudowane funkcje otwierają
drzwi do nowych i kreatywnych sposobów pracy, a jednocześnie sprawiają, że nadaje się
on do różnych profesjonalnych zastosowań. Jednocześnie urządzenie jest niezwykle
łatwe w obsłudze, co pozwala w pełni uwolnić kreatywność.
Poniższe instrukcje zawierają krótki przegląd terminologii i funkcji urządzenia. Po
przeczytaniu należy zachować niniejszą instrukcję w bezpiecznym miejscu do
wykorzystania w przyszłości.
PRO MIXER został starannie zapakowany w fabryce, a opakowanie zostało
zaprojektowane tak, aby chronić urządzenie przed nieostrożnym obchodzeniem się z
nim. Zalecamy jednak dokładne sprawdzenie opakowania i jego zawartości pod kątem
oznak uszkodzeń fizycznych, które mogły powstać podczas transportu.
Jeśli urządzenie ma zostać wysłane, należy zawsze używać oryginalnego opakowania,
aby uniknąć jego uszkodzenia.
Nigdy nie pozwalaj dzieciom bez nadzoru bawić się urządzeniem lub jego
opakowaniem.
Wszystkie materiały opakowaniowe należy utylizować w sposób przyjazny dla
środowiska.
Należy zapewnić odpowiednią wentylację przez cały czas. Nie należy
umieszczać urządzenia PRO MIXER w pobliżu urządzeń grzewczych lub
generujących ciepło, aby uniknąć przegrzania.
PRZESTROGA
Zwracamy uwagę, że wysoki poziom głośności może trwale uszkodzić słuch
i/lub słuchawki lub głośniki. Dlatego przed włączeniem miksera należy
przekręcić pokrętło MAIN w sekcji MIC / MAIN do końca w lewo. Podczas
ustawiania poziomów głośności należy zachować ostrożność i zdrowy
rozsądek.

www.PyleUSA.com
4
1. PANEL PRZEDNI
1. CUE SELECT monitoruje każdy kanał dla MIC, Chanel 1, Channel 2 i Channel 3.
2. Regulator MIC LEVEL dostosowuje głośność sygnału mikrofonu.
3. Suwak CHANNEL 1 reguluje głośność kanału końcowego.
4. Przełącznik PHONO/LINE wybiera jedną z par wejść na danym kanale. Ustawienie
"PH1" (i wejścia) jest przeznaczone dla gramofonów; dla wszystkich innych źródeł sygnału,
tj. odtwarzacza CD lub MD, należy użyć ustawienia "LN1" i wejść.
Nigdy nie podłączaj urządzeń liniowych do wejść PHONO o wysokiej czułości!
Poziomy wyjściowe systemów wkładek PHONO mieszczą się w zakresie miliwoltów,
podczas gdy odtwarzacze CD i MD oraz magnetofony zapewniają poziomy wyjściowe
w zakresie woltów. Innymi słowy, poziom sygnałów liniowych jest do 100 razy wyższy
niż poziom wyjściowy PHONO.
Nie należy zwiększać głośności, gdy do gniazd wejściowych PHONO nie jest
podłączony gramofon. Spowoduje to powstanie szumów lub zakłóceń. Jeśli gramofon
nie jest podłączony, należy wybrać ustawienie "LINE".
5. Przełącznik CHANNEL 2 reguluje głośność końcową kanału.
6. Przełącznik PHONO/LINE.
7. Suwak CHANNEL 3 reguluje głośność końcową kanału.
8. Przełącznik USB/BT i AUX.
9. Miernik wyjścia: Wskazuje poziomy lewego i prawego kanału głównego.
10. Przełącznik POWER ON włącza urządzenie.

www.PyleUSA.com
5
11.Dioda LED zasilania
12.Port USB.
13.Następny.
14.Poprzedni
15.Odtwarzanie i pauza.
16.Wybór odtwarzania źródła USB lub BT
17.Regulator LEVEL określa głośność sygnału słuchawkowego.
18.CROSSFADER służy do przechodzenia między kanałami 1 i 2.
19.MIC TALKOVER Umożliwia obniżenie poziomu źródeł wejściowych, aby można było z nimi
rozmawiać za pomocą mikrofonu DJ MIC.
2. PANEL TYLNY
Wszystkie złącza audio urządzenia znajdują się na tylnym panelu i są wyposażone w
złącza RCA.
20. Zasilanie: Do zasilania urządzenia należy używać wyłącznie zasilacza
dostarczonego z urządzeniem. Podczas podłączania i odłączania przewodu
zasilającego należy upewnić się, że urządzenie jest wyłączone. Podłącz przewód
zasilający z tyłu urządzenia, a następnie podłącz go do gniazda zasilania.
21. Gniazdo HEADPHONES umożliwia podłączenie słuchawek w celu wstępnego
odsłuchu (sygnał PFL). Aby uzyskać najlepsze wyniki, należy używać słuchawek o
impedancji co najmniej 32 omów.
22. Wyjście AMP umożliwia podłączenie urządzenia do wzmacniacza.
Aby uniknąć wstrząsów przy włączaniu, które mogą uszkodzić głośniki, wzmacniacz
należy włączać jako ostatni. Po włączeniu wzmacniacza nie powinien być obecny żaden
sygnał, tj. nie powinna być odtwarzana muzyka. Ponadto zalecamy ustawienie wszystkich
elementów sterujących głośnością na "zero" (w dół) przed włączeniem systemu.
Przestrzeganie tych środków ostrożności pozwoli uniknąć nieprzyjemnych i potencjalnie
niebezpiecznych niespodzianek.
23. Wejścia AUX Jack dla sygnałów o poziomie liniowym.
24. BEZPRZEWODOWA ANTENA BT: Wyciągnij antenę podczas korzystania z bezprzewodowego
wejścia BT.
25. Wejścia PHONO dla kanału 2 i są przeznaczone wyłącznie do podłączenia gramofonu.
Wejścia LINE mogą być używane do podłączania magnetofonów, odtwarzaczy CD lub MD itp.
26. Wejścia PHONO dla kanału 1 i służą wyłącznie do podłączenia gramofonu.
Wejścia LINE mogą być używane do podłączania magnetofonów, odtwarzaczy CD lub MD itp.

www.PyleUSA.com
6
27. Złącze MIC1 MIC2 INPUT to zbalansowane gniazdo TRS 1/4" do podłączenia
mikrofonu.
PRZYCISKI STERUJĄCE I FUNKCJE
A. PRZYCISK TRYBU: Przycisk ten umożliwia przełączanie między trybem pracy,
trybem odtwarzania USB i trybem bezprzewodowym BT. Umożliwia to wybór
urządzenia źródłowego do odtwarzania muzyki.
B. PRZYCISK ODTWARZANIA: Przycisk ten ma dwie funkcje w zależności od
różnych trybów, jak pokazano poniżej.
a. Tryb odtwarzania USB: Odtwarzanie
Każde naciśnięcie PRZYCISKU ODTWARZANIA powoduje zmianę trybu z
odtwarzania na pauzę lub z pauzy na odtwarzanie.
b. Tryb bezprzewodowy BT: Odtwarzanie
Każde naciśnięcie PRZYCISKU ODTWARZANIA powoduje zmianę trybu z
odtwarzania na pauzę lub z pauzy na odtwarzanie.
C. PRZYCISK PREV: Ten przycisk ma cztery funkcje w zależności od różnych trybów,
jak pokazano poniżej.
a. Tryb odtwarzania USB: PREV i zmniejszanie głośności
Użyj tego przycisku, aby wybrać poprzedni utwór.
Głośność USB zmniejszy się po naciśnięciu i przytrzymaniu przycisku przez
ponad 3 sekundy.
b. Tryb bezprzewodowy BT: PREV i zmniejszanie głośności
Użyj tego przycisku, aby wybrać poprzedni utwór. Głośność BT zostanie
zmniejszona po naciśnięciu i przytrzymaniu przycisku przez ponad 3 sekundy.
c. PRZYCISK NEXT: Przycisk ten ma cztery funkcje w zależności od różnych
trybów, jak pokazano poniżej.
a. Tryb odtwarzania USB: NEXT i zwiększanie głośności
Użyj tego przycisku, aby wybrać następny utwór.
Głośność USB zwiększy się po naciśnięciu i przytrzymaniu przycisku przez
ponad 3 sekundy.
b. Tryb bezprzewodowy BT: PREV i zwiększanie głośności
Użyj tego przycisku, aby wybrać poprzedni utwór.
Głośność BT zwiększy się po naciśnięciu i przytrzymaniu przycisku przez
ponad 3 sekundy.
Uwagi:
Urządzenie będzie automatycznie odtwarzać pliki włożone do urządzenia USB (w tym pliki mp3)
w trybie USB.
1.
Urządzenie automatycznie przejdzie w tryb Bluetooth, gdy zostanie włączone bez USB.2.

OSTRZEŻENIE:
Ten produkt może narazić użytkownika na działanie substancji chemicznej lub grupy
substancji chemicznych, które mogą obejmować "węglan niklu", o których stan Kalifornia
wie, że powodują raka, wady wrodzone lub inne szkody reprodukcyjne. Więcej informacji
można znaleźć na stronie https://www.p65warnings.ca.gov/.
www.PyleUSA.com
7
PMX8BU
Profesjonalny 3-kanałowy mikser DJ
Wbudowane bezprzewodowe strumieniowanie muzyki BT, wejścia USB/Phono/Mikrofonowe
i liniowe (3,5 mm), wybór CUE do podglądu odsłuchu z cyfrowym wyświetlaczem LED (200 W)
Właściwości:
Dane techniczne:
Profesjonalny 3-kanałowy mikser DJ
Wbudowany BT do bezprzewodowego strumieniowania muzyki
Wybór CUE do odsłuchiwania PRE
Cyfrowy wyświetlacz LED
Kompatybilny ze wszystkimi ulubionymi urządzeniami BT
Mieszanie i dopasowywanie (2) źródeł wejściowych AUX z dźwiękiem BT lub MP3
Wejścia AUX przełączają się między wejściem liniowym i gramofonowym
(2) Wejścia liniowe audio RCA Phono do podłączania urządzeń zewnętrznych
(2) Zbalansowane złącza mikrofonowe TRS 1/4"
Mikrofon 1 i 2 Wzmocnienie poziomu i kontrola talk-over
Możliwość mówienia przez mikrofon w trybie karaoke
Gniazdo słuchawkowe 1/4" z regulacją głośności
Wyjście wzmacniacza głównego (L/R)
Czytnik pamięci USB
Niezależne sterowanie kanałami Tłumik zwrotnicy
Łatwe miksowanie i sterowanie MP3 i urządzeniami podłączonymi przez BT
Wyjście główne RCA (L) i (R) z wyjściem stereo
Rozmiar wyświetlacza LED: 2,76" x 0,98"
Wejścia phono 1 i 2: 90 mv 1 kHz, wejścia niezbalansowane
Wejścia liniowe 1 i 2: 0,6 V, wejścia niezbalansowane
Wejście mikrofonowe: 120 mv, wejścia zbalansowane
Słuchawki: 300 mW przy 1% THD
Stosunek sygnału do szumu (S/N): > 78 dB (wejście liniowe)
Diafonia: > 50 dB (wejście liniowe)
Zniekształcenia (THD): < 1% - Zniekształcenia (THD): < 1% - Pasmo przenoszenia: 20 Hz -
20 Hz - 20 Hz
Pasmo przenoszenia: 20 Hz - 20 kHz
Pobór mocy: maks. 5 W
Wymiary (wys. x szer. x gł.): 5,31" x 9,25" x 1,97" in.
Waga: 1,98 funta.

Pytania lub Komentarze
Jesteśmy tutaj, aby Ci pomóc!
Telefon: 1.718.535.1800
PyleUSA.com/ContactUs
TURKISH
PMX8BUEU - PMX8BUUK
Profesyonel 3 Kanallı DJ Mikseri
Dahili Kablosuz BT Müzik Akışı,
USB/Phono/Mikrofon ve Hat (3,5 mm)
Girişleri, Dijital LED Ekran ile Ön Dinleme için CUE Seçimi

ÖNEMLİ GÜVENLİK TALİMATLARI
DİKKAT: Elektrik çarpması riskini azaltmak için üst kapağı (veya arka bölümü)
çıkarmayın. İçinde kullanıcı tarafından bakımı yapılabilecek parça yoktur; servis için
kalifiye personele başvurun.
ELEKTRİK ÇARPMASI RİSKİ. SADECE KURU YERDE KULLANIN!
Bu sembol, nerede görünürse görünsün, muhafaza içinde şok riski
oluşturmaya yetebilecek yalıtılmamış tehlikeli voltajın varlığı konusunda sizi
uyarır.
Bu sembol, görüldüğü her yerde, birlikte verilen literatürdeki önemli
çalıştırma ve bakım talimatları konusunda sizi uyarır. Lütfen kılavuzu
okuyun.
UYARI: Yangın veya elektrik çarpması riskini azaltmak için, bu cihazı yağmur ve neme maruz
BIRAKMAYIN. Cihaz damlama veya sıçramaya maruz bırakılmamalı ve vazo gibi sıvı dolu nesneler
cihazın üzerine yerleştirilmemelidir.
DETAYLI GÜVENLİK TALİMATLARI
Bu talimatları okuyun.1.
Bu talimatları saklayın.2.
Tüm uyarıları dikkate alın.3.
Tüm talimatlara uyun.4.
Bu cihazı su yakınında kullanmayın.5.
Sadece kuru bezle temizleyin.6.
Havalandırma açıklıklarını kapatmayın. Üreticinin talimatlarına uygun olarak kurun.7.
Radyatör, kalorifer peteği, soba gibi ısı kaynaklarının veya ısı üreten diğer
cihazların (amplifikatörler dahil) yakınına kurmayın.
8.
Polarize veya topraklama tipi fişin güvenlik amacını bozmayın. Polarize fişin biri
diğerinden daha geniş olan iki kanadı vardır. Topraklama tipi fişin iki kanadı ve
üçüncü bir topraklama ucu vardır. Geniş bıçak veya üçüncü uç güvenliğiniz için
sağlanmıştır. Sağlanan fiş prizinize uymuyorsa, eski prizin değiştirilmesi için bir
elektrikçiye danışın.
9.
Güç kablosunun özellikle fişlerde, prizlerde ve cihazdan çıktığı noktada üzerine
basılmasını veya sıkışmasını önleyin.
10.
Sadece üretici tarafından belirtilen ekleri/aksesuarları kullanın.11.
Yalnızca üretici tarafından belirtilen veya cihazla birlikte satılan araba, stand,
tripod, braket veya masa ile kullanın. Bir araba kullanıldığında, devrilmeden
kaynaklanan yaralanmaları önlemek için araba/cihaz kombinasyonunu hareket
ettirirken dikkatli olun.
12.
www.PyleUSA.com
2

www.PyleUSA.com
3
13. Şimşekli fırtınalar sırasında veya uzun süre kullanılmadığında bu cihazın fişini çekin.
14. Tüm servis işlemleri için yetkili servis personeline başvurun. Cihaz herhangi bir
şekilde hasar gördüğünde, örneğin güç kaynağı kablosu veya fişi hasar gördüğünde,
sıvı döküldüğünde veya cihazın içine nesneler düştüğünde, cihaz yağmura veya
neme maruz kaldığında, normal çalışmadığında veya düşürüldüğünde servis
gereklidir.
15. DİKKAT: Bu servis talimatları yalnızca kalifiye servis personeli tarafından
kullanılmak üzere hazırlanmıştır. Elektrik çarpması riskini azaltmak için, bu konuda
kalifiye değilseniz, çalıştırma talimatlarında belirtilenler dışında herhangi bir servis
işlemi gerçekleştirmeyin.
GİRİŞ
PMX8BU ile kesinlikle son teknoloji ürünü bir DJ mikseri satın aldınız. Kapsamlı
özellikleri, çeşitli profesyonel uygulamalar için uygun hale getirirken, yeni ve yaratıcı
çalışma yöntemlerine kapı açar. Aynı zamanda, ünitenin kullanımı son derece kolaydır ve
yaratıcılığı tamamen ortaya çıkarmanıza olanak tanır.
Aşağıdaki talimatlar size ünitenin terminolojisi ve işlevleri hakkında kısa bir bilgi
verecektir. Okuduktan sonra, lütfen bu kılavuzu ileride başvurmak üzere güvenli bir
yerde saklayın.
PRO MIXER'ınız fabrikada özenle paketlenmiştir ve ambalajı üniteyi kaba kullanıma karşı
koruyacak şekilde tasarlanmıştır. Bununla birlikte, nakliye sırasında meydana gelmiş
olabilecek fiziksel hasar belirtileri için ambalajı ve içindekileri dikkatlice incelemenizi
öneririz.
Ünitenin gönderilmesi gerekiyorsa, hasarı önlemek için lütfen her zaman orijinal
ambalajı kullanın.
Gözetimsiz çocukların üniteyle veya ambalajıyla oynamasına asla izin vermeyin.
Lütfen tüm ambalaj malzemelerini çevre dostu bir şekilde imha edin.
Lütfen her zaman yeterli havalandırma sağlamaya özen gösterin. Aşırı ısınmayı
önlemek için PRO MIXER'ı ısıtma ünitelerinin veya ısı üreten cihazların
yakınına yerleştirmeyin.
DİKKAT!
Yüksek ses seviyelerinin işitme duyunuza ve/veya kulaklık ya da hoparlör
sistemlerinize kalıcı olarak zarar verebileceğini belirtmek isteriz. Bu nedenle,
mikseri açmadan önce lütfen MIC/MAIN bölümündeki MAIN kontrolünü
sonuna kadar sola çevirin. Ve lütfen ses seviyelerini ayarlarken dikkatli ve
sağduyulu olun.

www.PyleUSA.com
4
1. ÖN PANEL
1. CUE SELECT, MIC, Kanal 1, Kanal 2 ve Kanal 3 için her bir kanalı izler.
2. MIC LEVEL kontrolü mikrofon sinyalinin ses seviyesini ayarlar.
3. KANAL 1 fader'ı son kanal ses seviyesini ayarlar.
4. PHONO/LINE anahtarı ilgili kanaldaki giriş çiftlerinden birini seçer. "PH1" ayarı (ve
girişleri) pikaplar için tasarlanmıştır; CD veya MD çalar gibi diğer tüm sinyal kaynakları
için "LN1" ayarını ve girişlerini kullanın.
Son derece hassas PHONO girişlerine asla hat seviyesinde ekipman bağlamayın!
PHONO kartuş sistemlerinin çıkış seviyeleri milivolt aralığındayken, CD ve MD
çalarların yanı sıra kasetçalarlar volt aralığında çıkış seviyeleri sağlar. Başka bir deyişle,
hat sinyallerinin seviyesi PHONO çıkış seviyelerinden 100 kata kadar daha yüksektir.
PHONO giriş terminallerine herhangi bir pikap bağlı değilken sesi açmayın. Bunu
yapmak uğultu veya gürültüye neden olur. Bir pikap bağlamadığınızda, "LINE" ayarını
koruyun.
5. KANAL 2 fader'ı son kanal ses seviyesini ayarlar.
6. PHONO/LINE anahtarı.
7. KANAL 3 fader'ı son kanal ses seviyesini ayarlar.
8. USB/BT ve AUX anahtarı.
9. Çıkış Ölçer: Sol ve Sağ Ana kanalların seviyelerini gösterir.
10. POWER ON anahtarı üniteyi açar
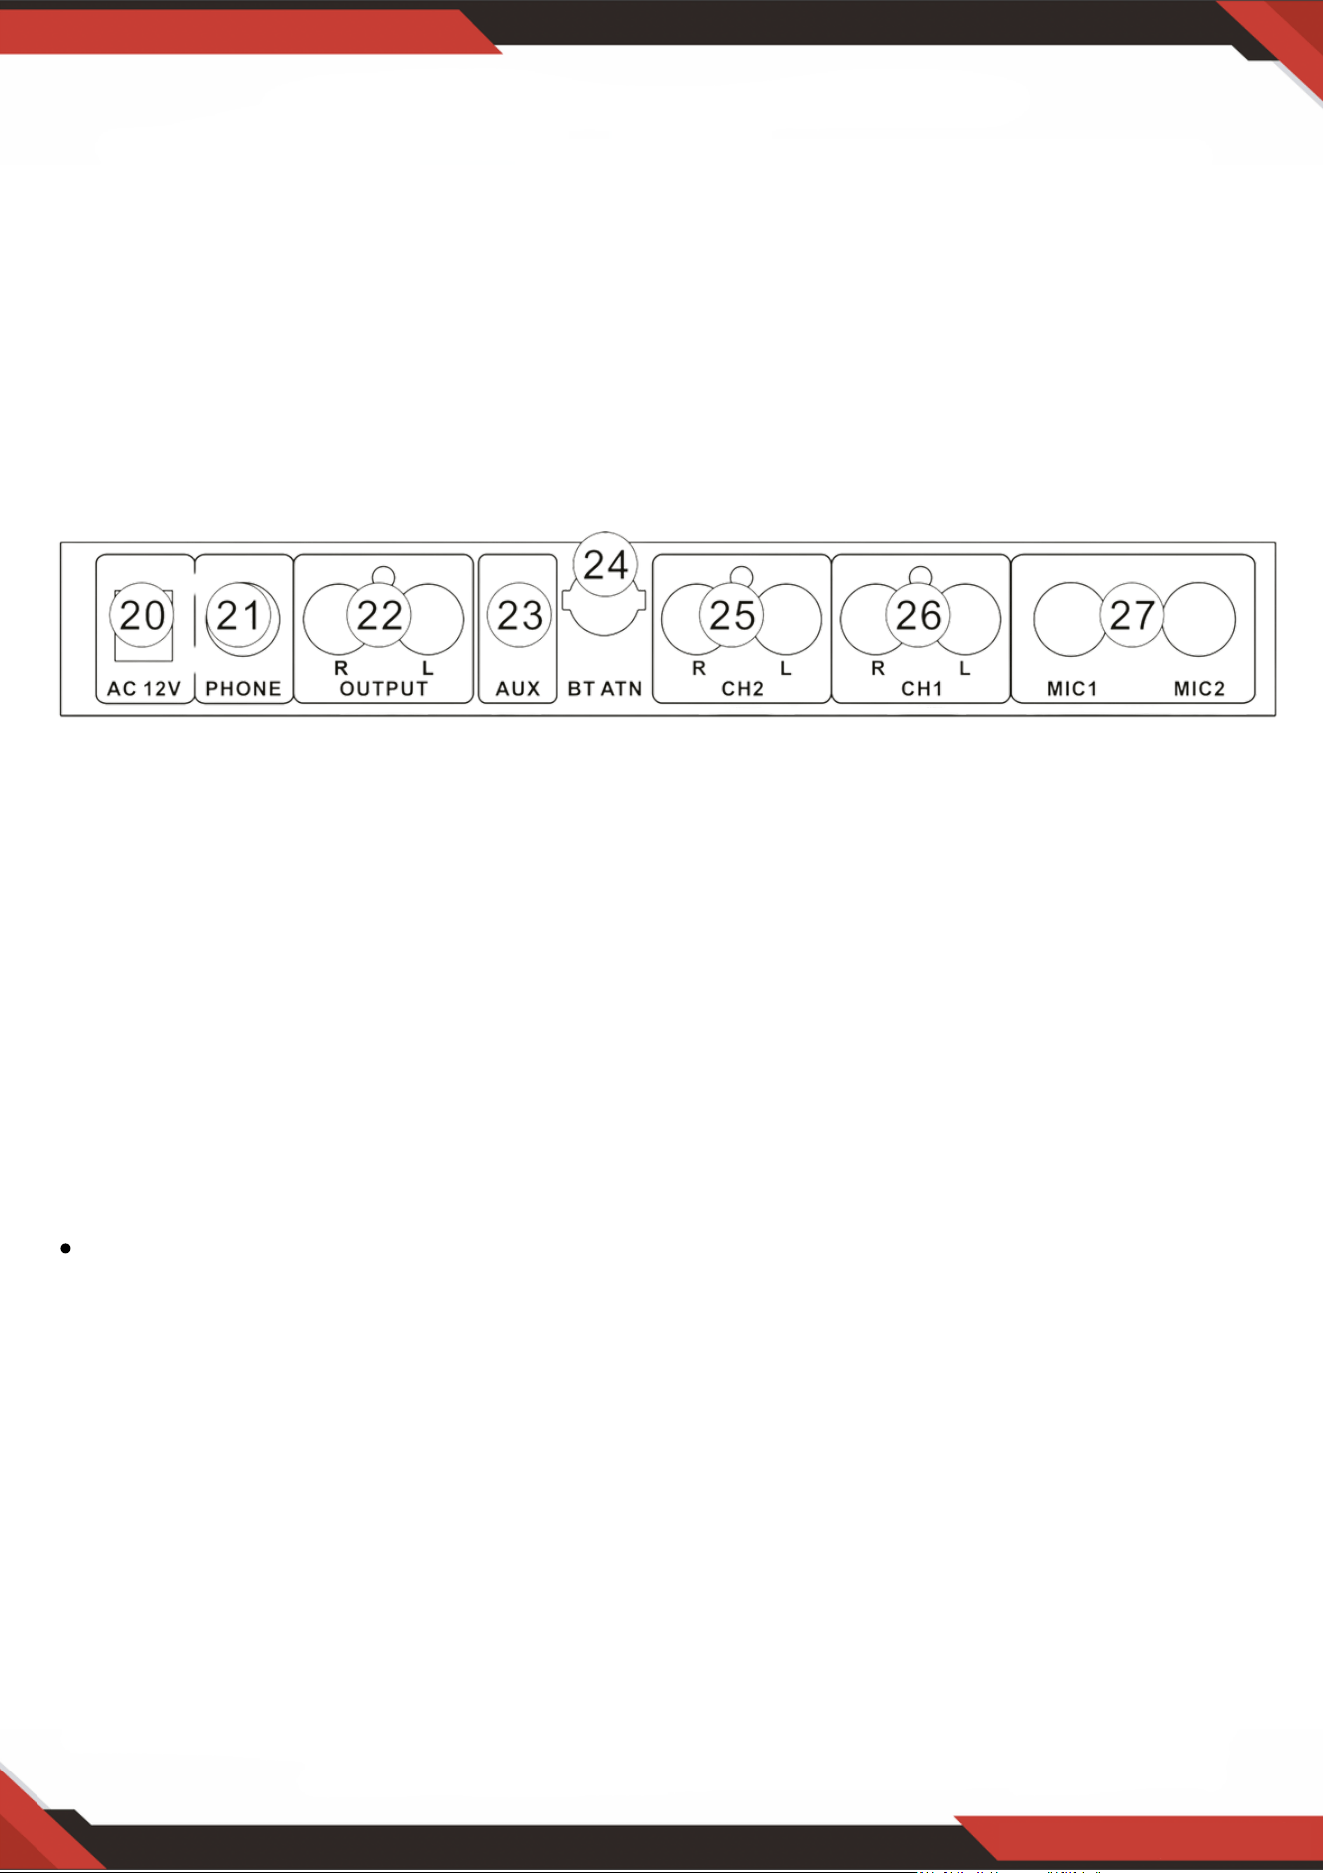
www.PyleUSA.com
5
11. Güç kaynağı LED'i
12. USB bağlantı noktası.
13. Sonraki.
14. Önceki
15. Oynat ve Duraklat.
16. USB veya BT kaynağını oynatmayı seçmek için
17. LEVEL (SEVİYE) kontrolü kulaklık sinyalinin ses seviyesini belirler.
18. CROSSFADER, kanal1 ve 2 arasında geçiş yapmak için kullanılır.
19. MIC TALKOVER DJ MIC kullanarak konuşabilmeniz için giriş kaynaklarının seviyesini düşürmenizi
sağlar.
2. ARKA PANEL
Ünitenin tüm ses bağlantıları arka panelde bulunur ve RCA konektörleri olarak
sağlanır.
20. Güç kaynağı: Üniteye güç sağlamak için yalnızca üniteyle birlikte verilen güç
adaptörünü kullanın. Güç kablosunu takarken ve çıkarırken, ünitenin gücünün
kapalı olduğundan emin olun. Kabloyu ünitenin arkasına bağlayın ve ardından
prize takın.
21. KULAKLIK soketi, ön dinleme (PFL sinyali) için kulaklığınızı bağlamanızı sağlar.
En iyi sonuçlar için, empedans değeri en az 32 Ohm olan kulaklıklar kullanın.
22. Üniteyi bir amplifikatöre bağlamak için AMP çıkışını kullanın.
Hoparlörlerinize zarar verebilecek güç açma darbelerini önlemek için, lütfen
amplifikatörünüzü en son çalıştırın. Amfinizi açtığınızda hiçbir sinyal olmamalıdır,
örneğin müzik çalmıyor olmalıdır. Ayrıca, sisteminizi çalıştırmadan önce ses
seviyesiyle ilgili tüm kontrolleri "sıfıra" (aşağı) ayarlamanızı öneririz. Bu önlemlere
uymanız sizi hoş olmayan ve potansiyel olarak tehlikeli sürprizlerden kurtaracaktır.
23. AUX girişleri Hat seviyesi sinyalleri için jak.
24. KABLOSUZ BT ANTENİ: Kablosuz BT girişini kullanırken lütfen anteni dışarı çekin.
25. PHONO girişleri kanal 2 içindir ve sadece pikap bağlantısı içindir. LINE girişleri teyp, CD
veya MD çalar vb. bağlamak için kullanılabilir.
26. Kanal 1 için PHONO girişleri ve sadece pikap bağlantısı içindir. LINE girişleri kasetçalar, CD
veya MD çalar vb. bağlamak için kullanılabilir.

www.PyleUSA.com
6
27. MIC1 MIC2 INPUT konektörü, mikrofon bağlantısı için dengeli bir 1/4 "TRS
soketidir.
DÜĞME KONTROLLERİ VE FONKSİYONLARI
A. MOD DÜĞMESİ: Bu düğme bir çalışma modu, USB çalma modu, Kablosuz BT
modu arasında geçiş yapmanızı sağlar. Bu, hangi müzik kaynağı cihazının
çalacağını seçmenizi sağlar.
B. OYNATMA DÜĞMESİ: Bu düğmenin bu farklı modlara bağlı olarak aşağıdaki
gibi iki işlevi vardır.
a. USB Oynatma Modu: Oynat
OYNATMA DÜĞMESİNE her basış işlemin oynatmadan duraklatmaya veya
duraklatmadan oynatmaya geçmesine neden olur.
b. Kablosuz BT modu: Oynat
OYNATMA DÜĞMESİNE her basış işlemin oynatmadan duraklatmaya veya
duraklatmadan oynatmaya geçmesine neden olur.
C. PREV DÜĞMESİ: Bu düğmenin aşağıdaki gibi farklı modlara bağlı olarak dört
işlevi vardır.
a. USB Çalma Modu: ÖNCEKİ ve SES AŞAĞI
Önceki parçayı seçmek için bu düğmeyi kullanın.
Düğmeye 3 saniyeden fazla basılı tutulursa USB'nin ses seviyesi düşecektir.
b. Kablosuz BT modu: ÖNCEKİ ve SES DÜZEYİ AŞAĞI
Önceki parçayı seçmek için bu düğmeyi kullanın. Düğmeye 3 saniyeden fazla
basılı tutulduğunda BT ses seviyesi düşecektir.
c. İLERİ DÜĞMESİ: Bu düğmenin aşağıdaki gibi farklı modlara bağlı olarak dört
işlevi vardır.
a. USB Çalma Modu: İLERİ ve SES YUKARI
Sonraki parçayı seçmek için bu düğmeyi kullanın.
Düğmeye 3 saniyeden fazla basılı tutulursa USB'nin ses seviyesi artacaktır
b. Kablosuz BT modu: PREV ve SES YUKARI
Önceki parçayı seçmek için bu düğmeyi kullanın.
Düğmeye 3 saniyeden fazla basılı tutulursa BT'nin ses seviyesi artacaktır.
Açıklama:
Ünite, USB modunda USB cihazına takılanları (mp3 dosyaları dahil) otomatik olarak
çalacaktır.
1.
Ünite USB olmadan açıldığında ünite otomatik olarak Bluetooth moduna geçecektir.2.

UYARI:
Bu ürün sizi, Kaliforniya eyaletinde kansere, doğum kusurlarına veya diğer üreme
zararlarına neden olduğu bilinen "Nikel Karbonat" içerebilecek bir kimyasal
maddeye veya kimyasal madde grubuna maruz bırakabilir. Daha fazla bilgi için
https://www.p65warnings.ca.gov/ adresine gidin.
www.PyleUSA.com
7
PMX8BU
Profesyonel 3 Kanallı DJ Mikseri
Dahili Kablosuz BT Müzik Akışı, USB/Phono/Mikrofon ve Hat (3,5 mm) Girişleri, Dijital LED
Ekran ile Ön Dinleme için CUE Seçimi (200 Watt)
Özellikler:
Teknik Özellikler:
Profesyonel 3 kanallı DJ mikseri
Kablosuz Müzik Akışı için Dahili BT
ÖN dinleme için CUE seçimi
Dijital LED ekran
Tüm Favori BT Cihazlarınızla Uyumlu
BT Ses veya MP3 ile (2) Aux Giriş Kaynağını Birleştirin ve Karıştırın
AUX Girişleri Hat Seviyesi ve Fono Girişi arasında geçiş
(2) Harici Cihazları Bağlamak için Phono RCA Ses Hattı Girişleri
(2) 1/4" Dengeli TRS Mikrofon Jakları
Mikrofon 1 ve 2 Seviye Kazancı ve Talk-over Kontrolü
Mic Talk-over Ses Üzerinden Konuşma Yeteneği, Karaoke Stili
1/4" Ses Kontrollü Kulaklık Jakı
Amfi Ana Çıkışı (L/R)
USB Flash Sürücü Okuyucu
Bağımsız Kanal Kontrolleri Çapraz Fader
MP3 ve BT Bağlantılı Cihazları Kolayca Karıştırın ve Kontrol Edin
(L) ve (R) Stereo ile RCA Ana Çıkış
LED Ekran Boyutu: 2,76" × 0,98"
Fono Girişleri 1 ve 2: 90m 1 kHz, balanssız girişler
Hat Girişleri 1 ve 2: 0,6V, dengesiz girişler
Mikrofon Girişi: 120m, dengeli girişler
Kulaklıklar: 300mW @ %1 THD
Sinyal-Gürültü Oranı (S/N) : > 78dB (Hat girişi)
Çapraz Karışma: > 50dB (Hat girişi)
Distorsiyon (THD): < 1%
Frekans Tepkisi: 20Hz - 20kHz
Güç Tüketimi: Maksimum 5 W
Boyutlar (Y x G × D): 5,31" × 9,25" x 1,97" inç
Ağırlık: 1,98 lbs

Sorular veya Yorumlar
Size yardım etmek için buradayız!
Telefon: 1.718.535.1800
PyleUSA.com/ContactUs