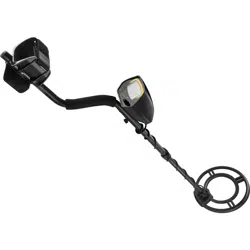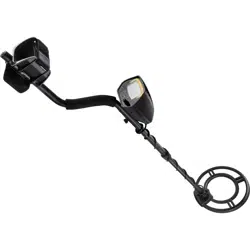
Metal Detector
WINBEST® by BARSKA®, as manufacturer, warrants this new product to be free of
original defects in materials and/or workmanship for the length of time specied by this
warranty. This warranty does not include damage caused by abuse, improper handling,
installation, maintenance, normal wear-and-tear, unauthorized repairs or modications
and tampering in anyway. Change or damage the inner components will cause the
detector fault, and such fault is not within our warranty.
This warranty is limited to the original purchaser and is not transferable. This warranty
applies only to products purchased in the United States of America and Canada.
In the event of a defect within 30 days, the consumer must return the defective unit to the
WINBEST® by BARSKA® dealer (the place of purchase) at his/her own expense.
Beyond 30 days, WINBEST® by BARSKA® products should be sent to the following
address for warranty repairs. Products must be packed carefully and sturdily to prevent
damage in transit, and returned freight prepaid to:
WINBEST® by BARSKA®
855 Towne Center Drive
Pomona, CA 91767
For additional and updated information
please visit www.barska.com
Please email service @barska.com or call 1.888.666.6769 for Return Merchandise
Number (RMA#) before any returns.
NOTE: All merchandise received without a valid RMA# will be returned to shipper at his/
her own expense.
Please include all of the following when returning WINBEST® by BARSKA® products for
service and/or replacement:
1. Please write your complete details (Name, Address, Telephone #, E-mail address,
RMA#, etc.)
2. Purchase receipt or Proof of Purchase. (Original/Copy)
3. A brief explanation of the defect
4. A Check/Money Order of amounts below to cover inspection, shipping and handling
$25.00 - Metal Detector
*Please allow 6-8 weeks for delivery
This product will either be replaced or repaired at the discretion of the warrantor. If it’s
a discontinued item, we will replace the product with an equivalent product. Should the
repair not be covered by this warranty, an estimate will be sent for your approval. Non-
warranty repairs or refurbishing are always provided at a reasonable cost.
WINBEST® by BARSKA® shall not be liable for any consequential, incidental and/or
contingent damages whatsoever. We will not pay shipping, insurance or transportation
charges from you to us, or any import fees, duties and or taxes. This warranty
supersedes all previous Winbest® by BARSKA warranties.
©2020 BARSKA®
1 YEAR LIMITED WARRANTY
Pursuit Edition Metal Detector
www.barska.com
BC651 10/20
LCD Display
Probable type of metal, depth of the
target, operating mode and low battery
indication
Three Tone Audio
Distinctive tones for different types of
metal
Super Slow Sweep Identication
With a very slow sweep discriminate
different metals
Notch Setting
Ignores junk metal
Headphone Jack
Connect headphones (not supplied)
Waterproof Search Coil
Use the detector in shallow water
Operates on two 9-volt alkaline
batteries (not supplied)

2
3
Notes Before Use
- This metal detector is a professional metal detector. As a sophisticated electronic
device, the most difcult aspects in metal detecting have been preset.
- If you are new to using metal detectors, it is recommended to set the sensitivity to a
low level in the event of false signals.
- Always begin at a low sensitivity level when using. After you have become familiar
with the detector, you may try it at full sensitivity.
- This detector is for outdoor use only. Do not use indoors. Many home appliances
can emit electromagnetic waves, and will interfere with the detector.
- For indoor testing, turn the sensitivity low and keep the search coil away from
electronics such as microwave ovens, computers and TVs. If your detector beeps
erratically, turn off the electronic appliances and lights, especially those with
dimmer switches.
- Read this manual before using.
Treasure Hunter’s Code of Ethics
A few basic rules you should follow while using your detector.
- Always get permission before searching any site.
- Respect the rights and property of others.
- Observe all national, state and local laws when treasure hunting.
- Never destroy historical or archaeological treasures. If you are not sure about an
object you have found, contact a museum or historical society in your area.
- Leave the land and vegetation as is, and ll in any holes you dig.
- Use the detector only in safe areas.
- Dispose of any junk you may nd, only in approved areas. Do not leave it for the
next treasure hunter nd.
Terminology
The following terms are used throughout the manual and are common terminology
among detectorists.
Elimination
Reference to a metal being “eliminated” means that the detector will not emit a tone,
nor light up an indicator, when a specied object passes through the coil’s detection
eld.
Discrimination
When the detector emits different tones for different types of metals, and when the
detector “eliminates” certain metals, we refer to this as the detector “discriminating”
among different types of metals. Discrimination is an important feature of
professional metal detectors. Discrimination allows the user to ignore trash and
otherwise undesirable objects.
CONTENTS
Metal Detector
Notes Before Use 3
Preparation 4
Assembling the Detector 5
Installing the Batteries 7
Using the Headphones 8
Listening Safely 8
Functions and Indications 9
Parts of the Control Box 10
Displays 10
Tones 10
Operation 11
Turning on the detector 11
Setting the operation mode 11
Search coil sweeping hints 13
Adjusting sensitivity 14
Quick-Start Demonstration 14
Troubleshooting Guide 16
Care and Maintenance 17
Warranty 18
4
5
Notch
Notching is the elimination of an item, or range of items, within the metallic spectrum.
We “notch-out” an object, or objects, selectively.
Relic
A relic is an object of interest by reason of its age or its association with the past.
Many relics are made of iron, but can also be made of bronze or precious metals.
Iron
Iron is a common, low-grade metal that is an undesirable target in certain metal
detecting applications. Examples of undesirable iron objects are old cans, pipes,
bolts, and nails. Sometimes, the desired target is made of iron. Property markers, for
instance, contain iron. Valuable relics can also be composed of iron; cannon balls,
old armaments, and parts of old structures and vehicles can also be composed of
iron.
Ferrous
Metals are made of, or contain, iron.
Preparation
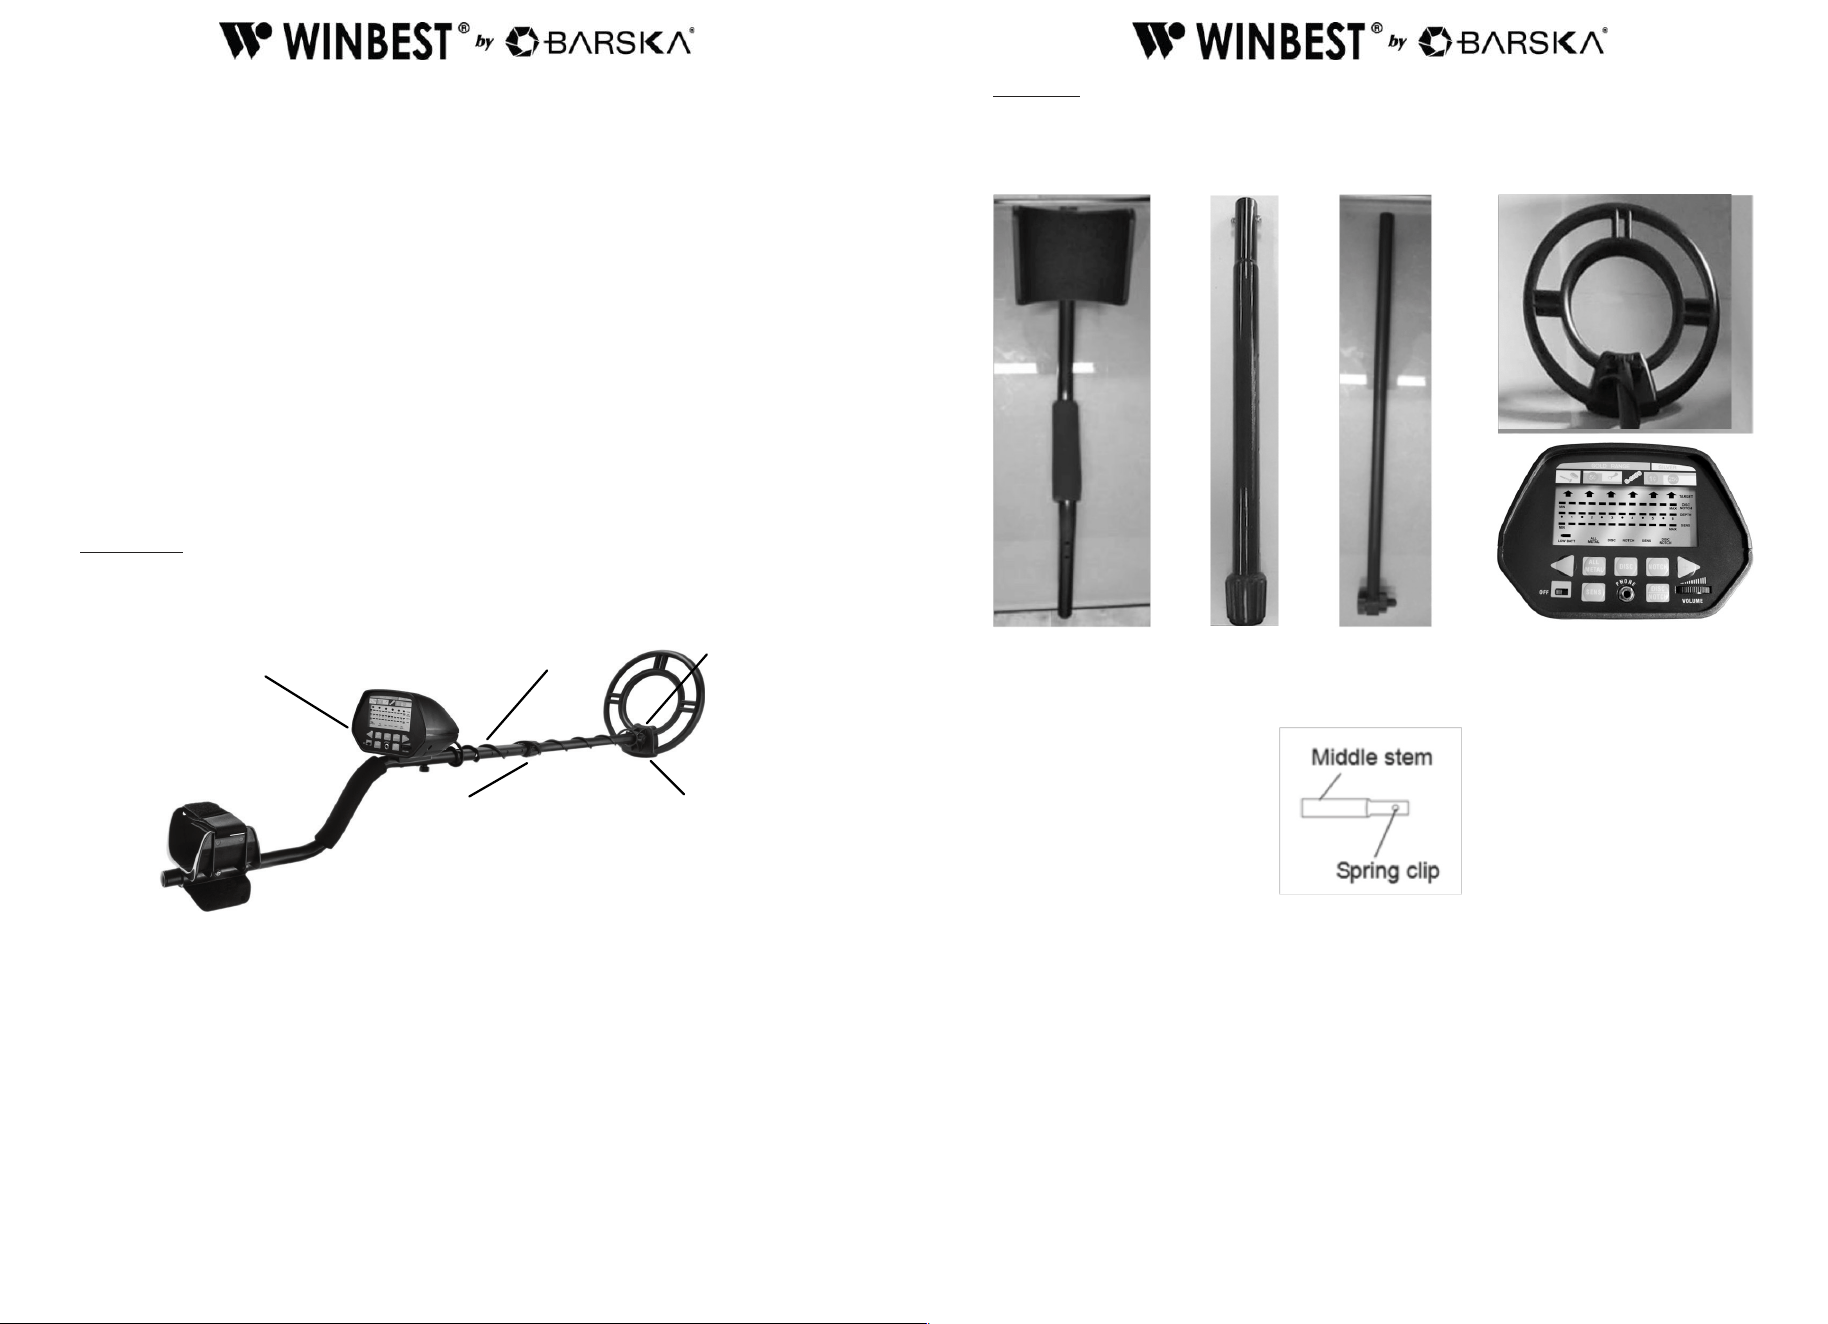
Parts of the Metal Detector
Assembly
Assembling the detector is easy and requires no special tools. Just follow these
steps.
1. Depress the spring clip in the middle stem and insert it into the top stem
aligning the clip with the hole.
2. Unscrew the knobs on the lower stem and remove the knob, washer and the
connector. Insert the lower stem and align the holes on the search coil bracket
and the stem. Push the connector through the holes and washer, then replace and
tighten the knob.
Lock Nut
Cable
Screw
Search Coil
1. Top Stem (Stem) 2. Middle Stem 3. Lower Stem 5. Control Box
4. Search Coil
Control Box
6
7
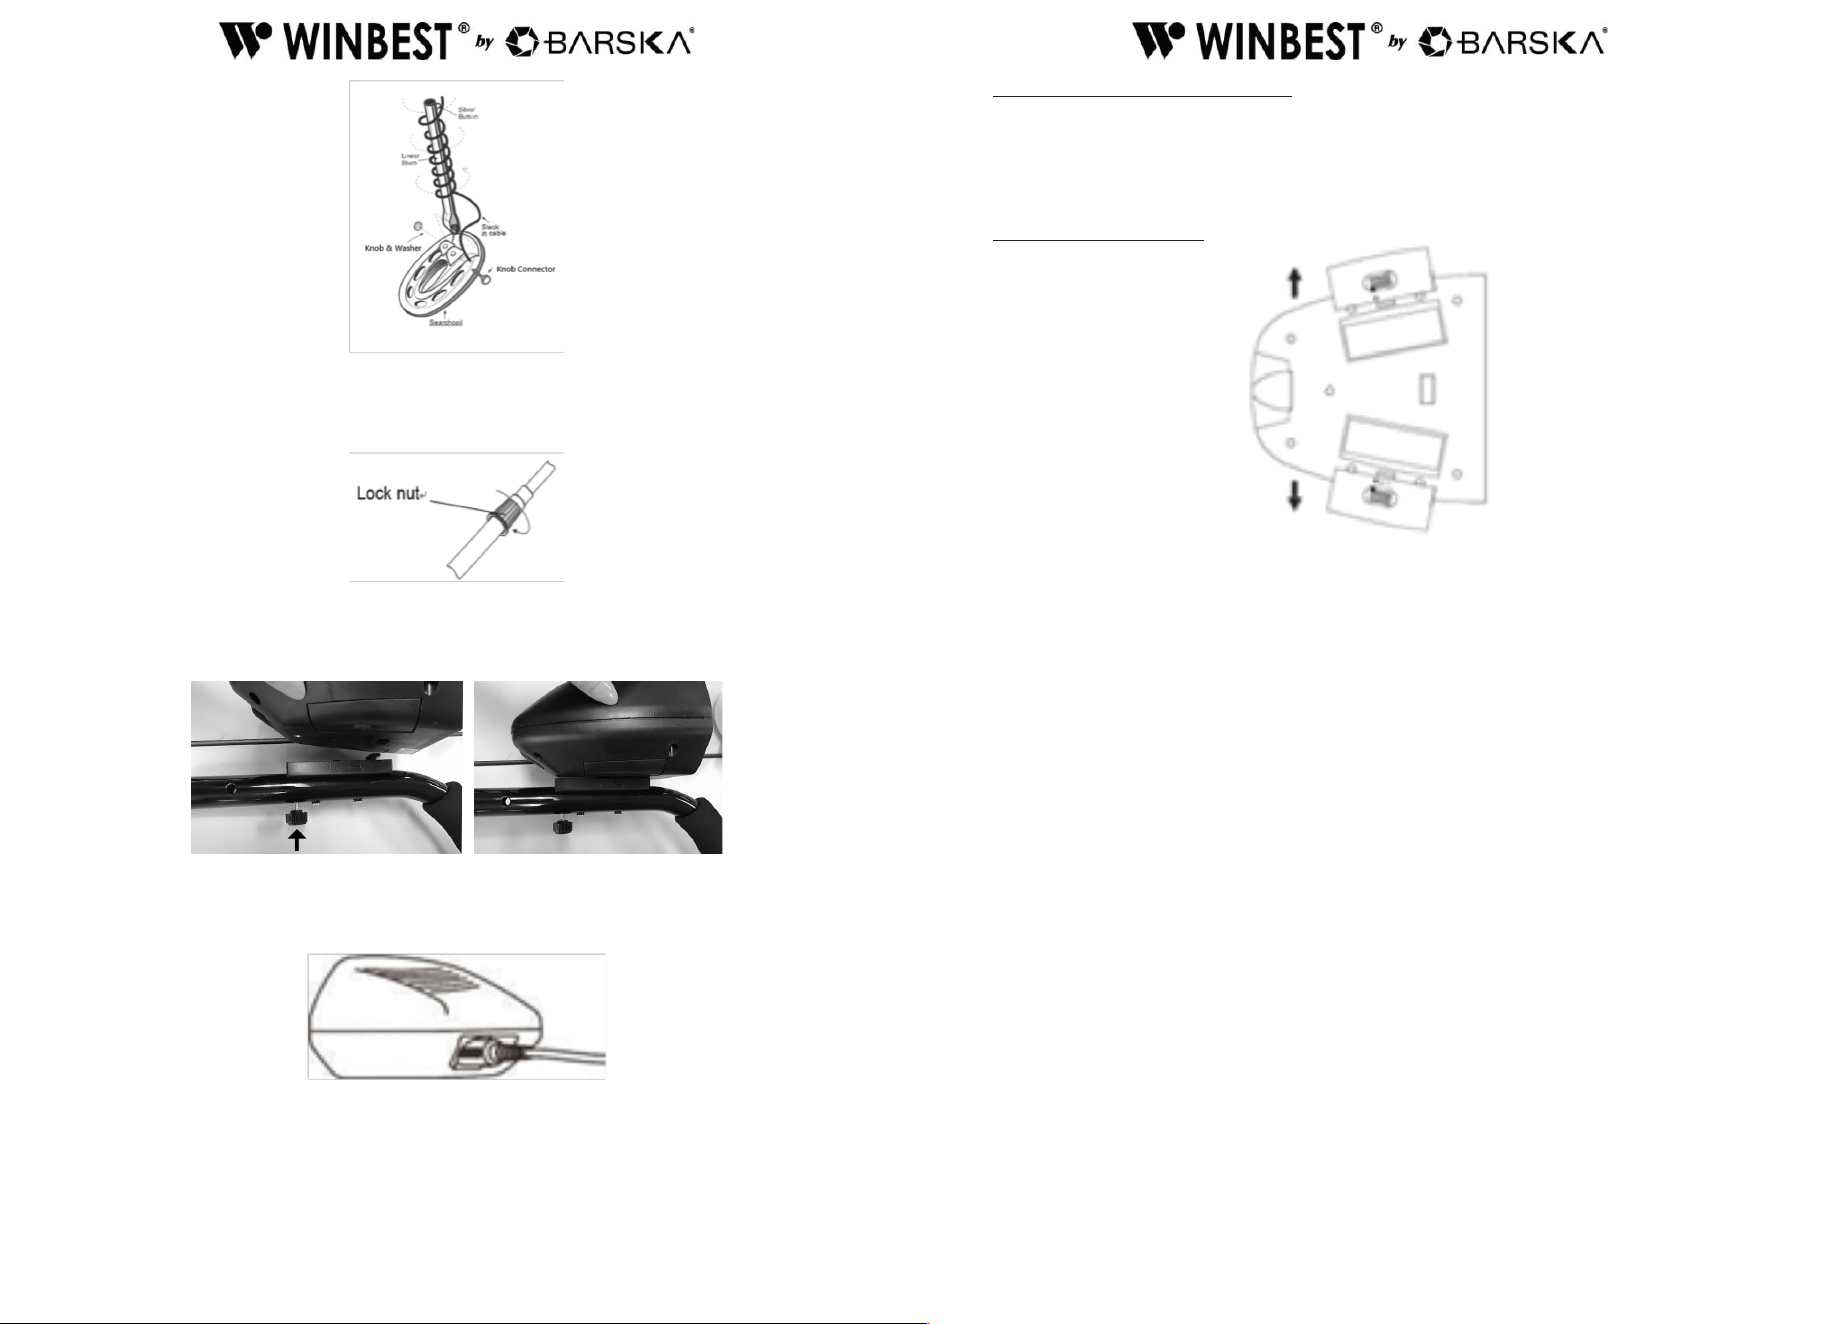
3. Loosen the middle stem’s lock nut in the direction of the arrow. Then, insert the
lower stem into the middle stem. Turn the stem’s lock nut in the reverse
direction of the arrow to lock it in place.
4. Unscrew the bolt of the control box and hitch the control box to the top stem.
Then, insert the bolt into the assembly hole on top stem and tighten it with the box.
5. Wind the cable around the stem. Insert the search coil cable plug into the ve pin
jack at the bottom of control box’s housing.
Caution:
• The search coil cable plug ts into the connector only one way.
• DO NOT force the plug or you could damage it.
• DO NOT disassemble the stem lock nut.
ADJUSTING THE SEARCH COIL
Loosen the knobs at the search coil’s end; adjust the search coil to the desired angle.
(The search coil should be parallel with the ground.) Tighten the knobs just enough
to keep the search coil from rotating or wobbling.
INSTALLING BATTERY
You need two 9V alkaline batteries to power your detector.
1. If the detector is on, turn the power switch (on the control panel) to POWER OFF.
2. Press on the battery compartment cover and slide the cover off in the direction of
the arrow.
3. Connect the battery with the battery connector taking care of the polarity. Then put
the battery into the compartment.
4. Replace the cover.
Cautions:
• Use only fresh batteries of the required size and recommended type.
• Always remove old or weak batteries; batteries can leak chemicals that can destroy
electronic parts.
• If you do not plan to use the detector for a long time, remove the batteries.
• Dispose of old batteries promptly and properly.
• You can extend battery life by using earphones, which require less power than the
built-in speakers.
8
9
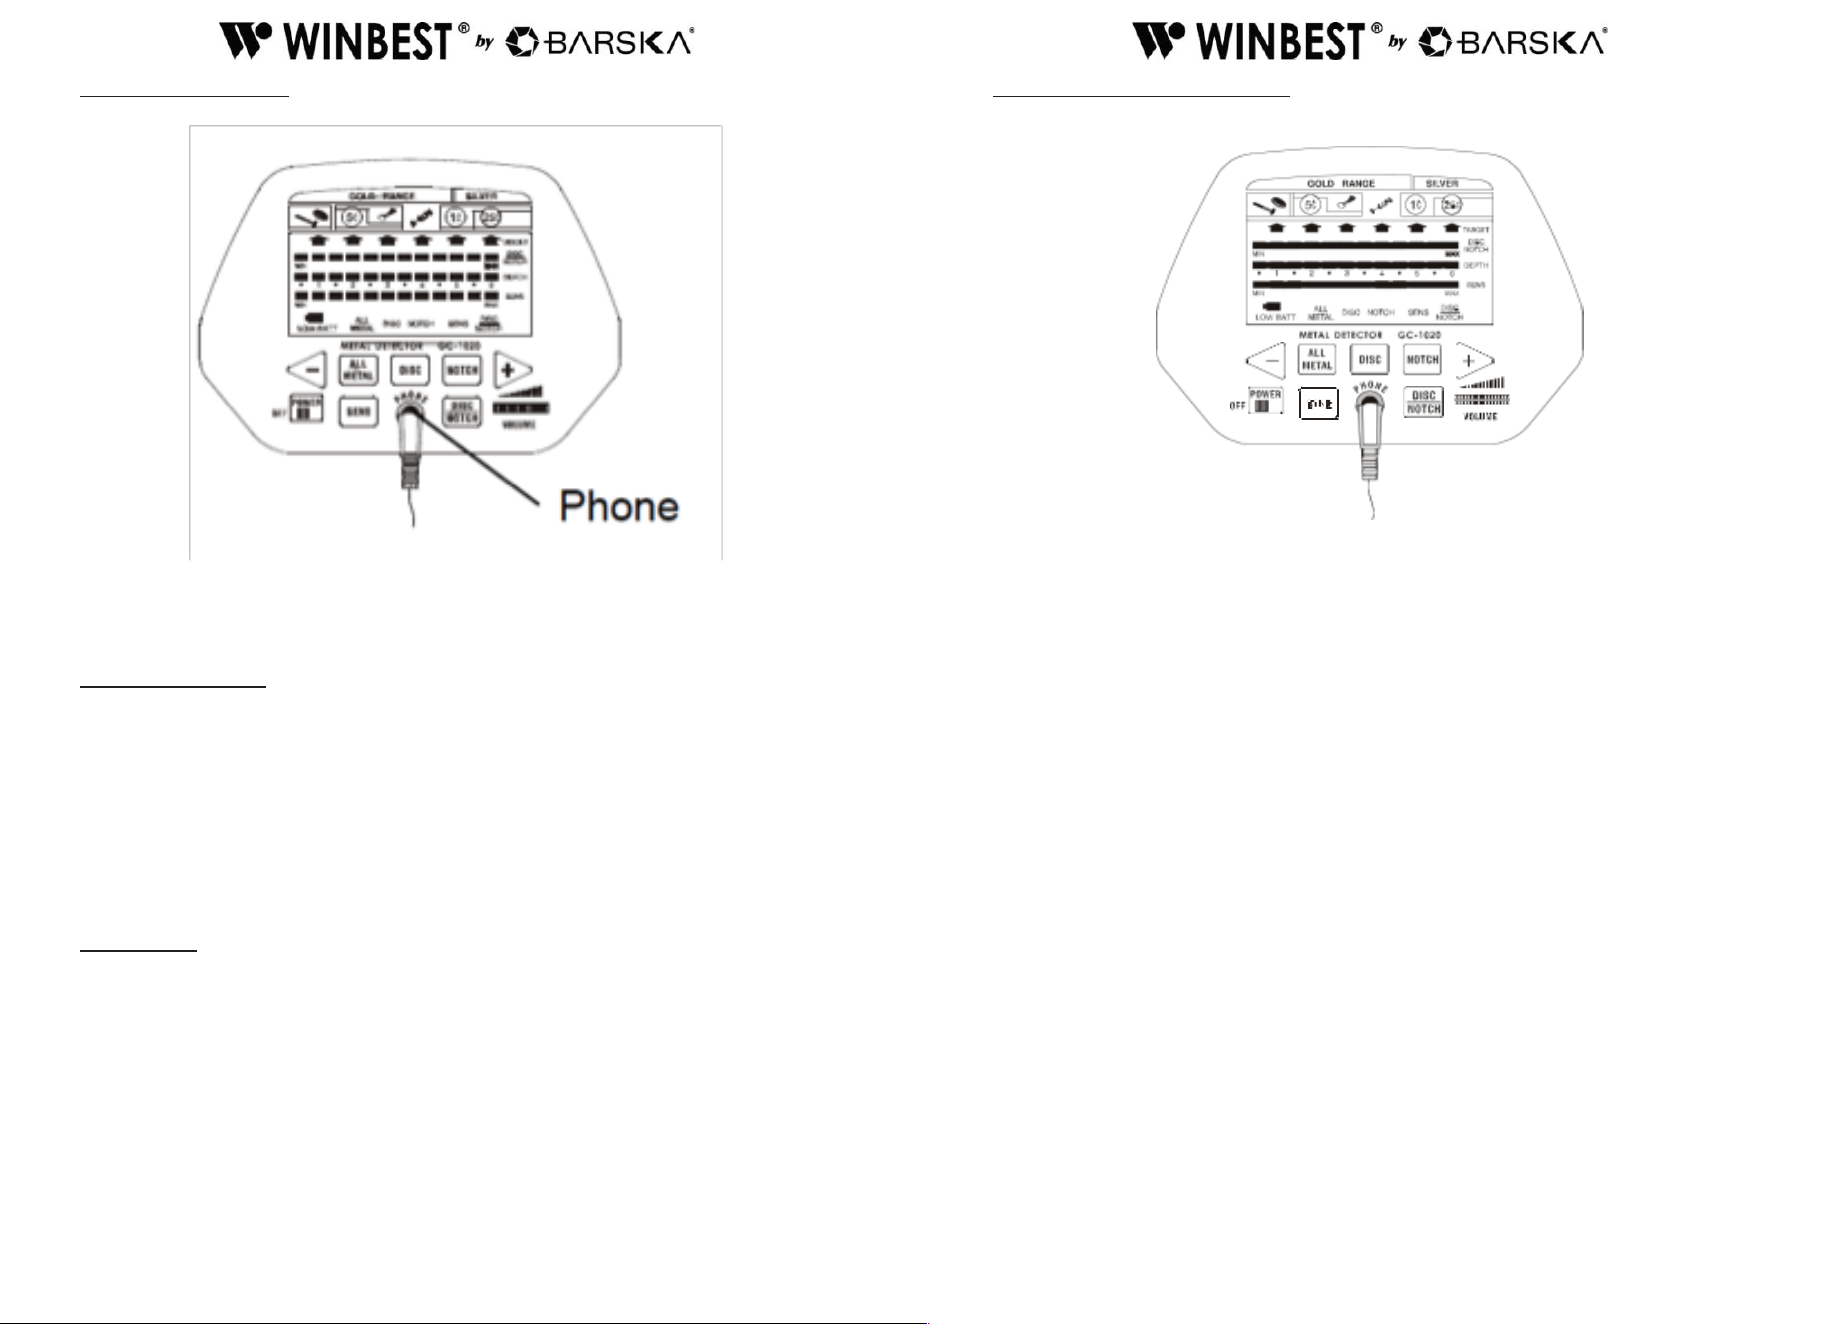
USING HEADPHONES
1. Insert the headphone’s 3.5mm plug into the PHONE jack. The detector’s internal
speaker disconnects when you connect the headphones.
2. Set the VOLUME to the desired setting.
LISTENING SAFELY
To protect your hearing, follow these guidelines when you use earphones.
• Set the volume to the lowest setting before you begin listening.
• After you begin listening, adjust the volume to a comfortable level.
• Do not listen at extremely high volume levels. Extended high volume listening can
lead to permanent hearing loss.
• Once you set the volume, do not increase it. Over time, your ears adapt to the
volume level, so a volume level that does not cause discomfort might still damage
your hearing.
Trafc Safety
DO NOT wear headphones while operating your detector near high-trafc areas.
Even though some earphones are designed to let you hear some outside sounds
when listening at normal volume levels, they still can present a trafc hazard.
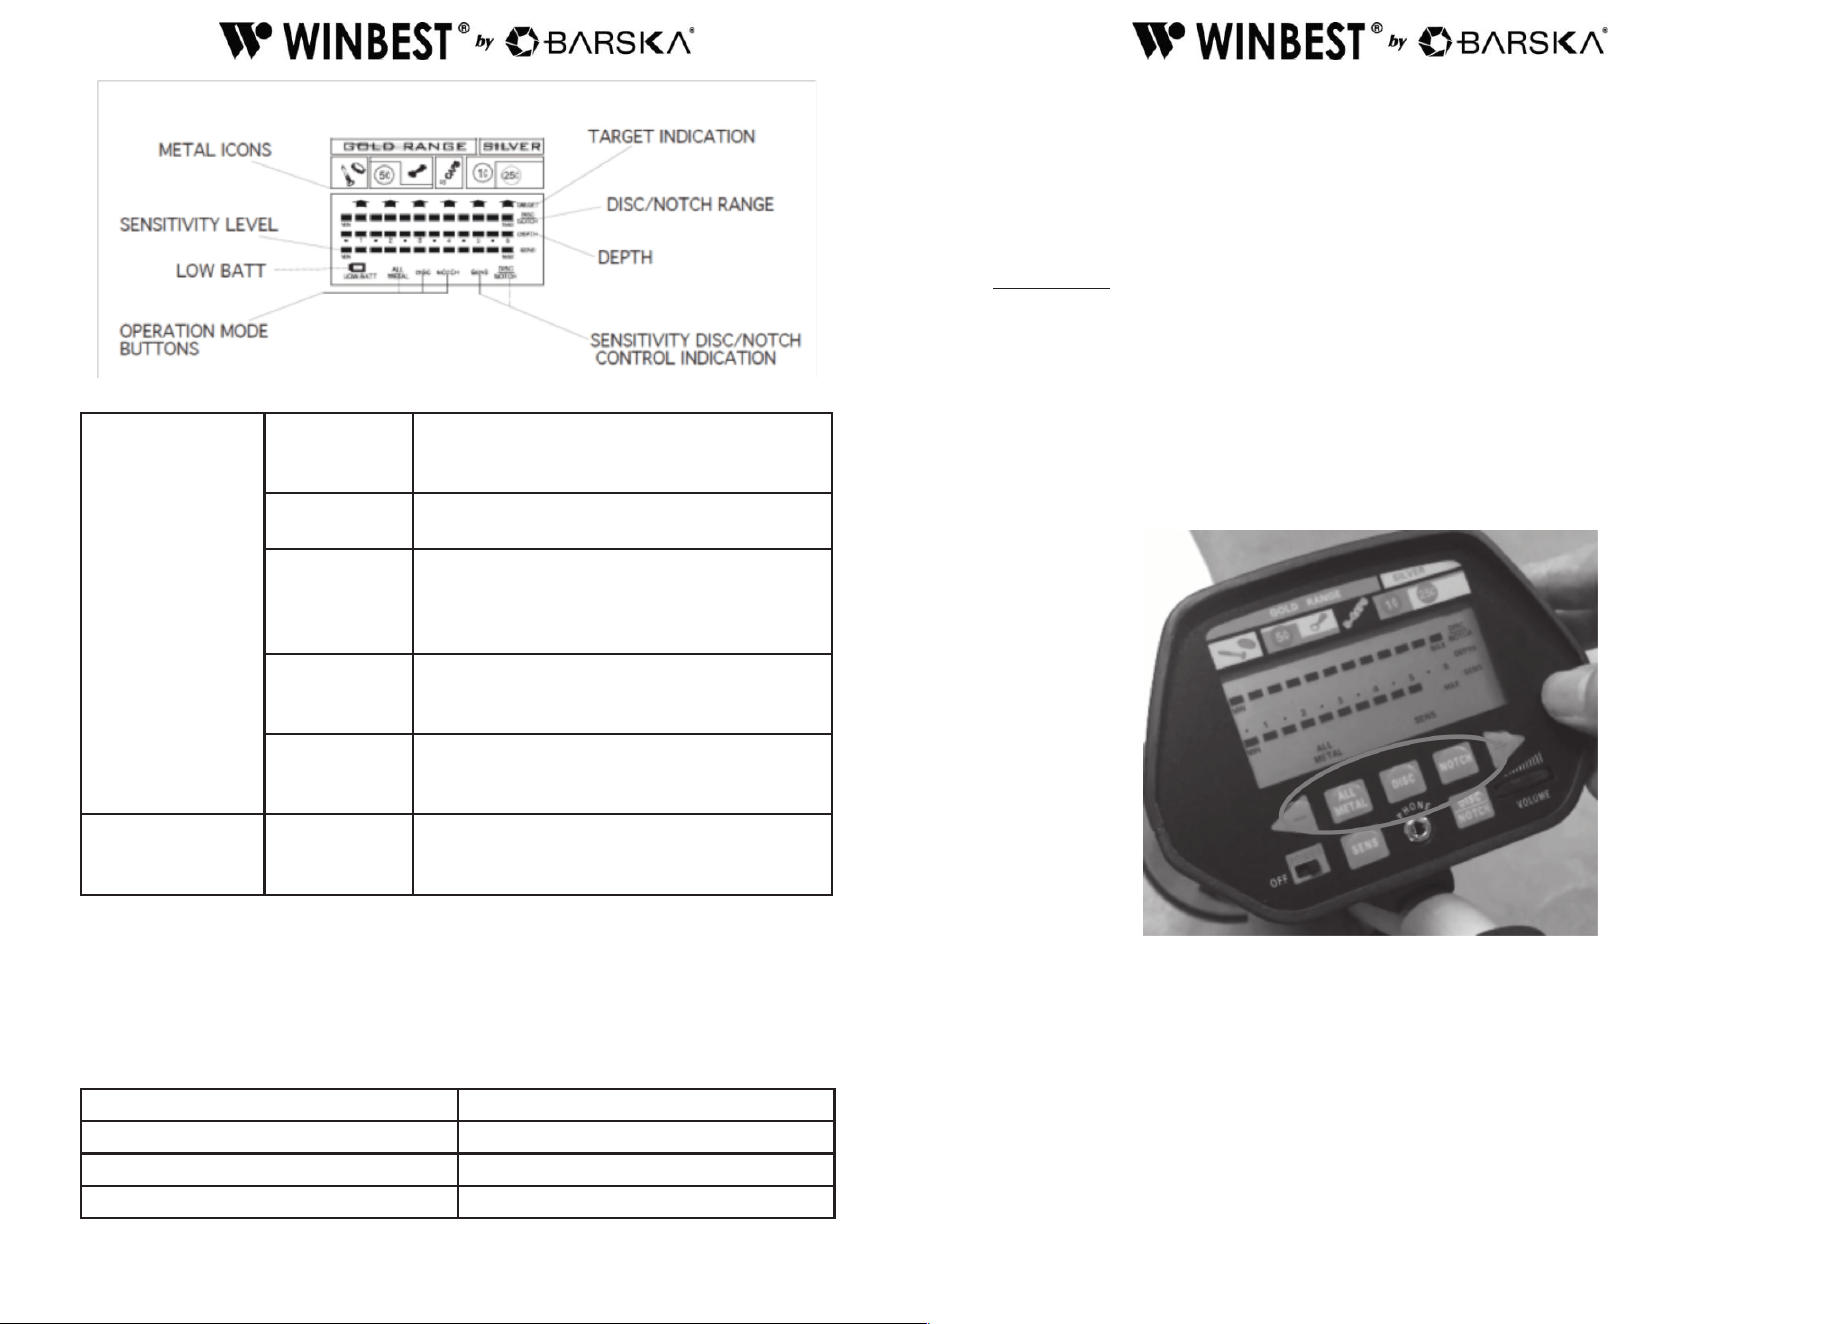
FUNCTIONS AND INDICATIONS
1. Control Panel
2. DISPLAYS
The indicator of target includes target icons and LCD displays and is located at the
top of the detector. It can indicate coins of different type, gold, silver etc. When the
detector detects an object, an arrow appears below the target icon of probable type
of metal being detected. If the detector receives a strong signal, the arrow appears
steadily. If the signal is weak, the arrow blinks or does not appear. Besides, it
displays the depth of the target. The larger the reading is; the farther the target away
from the coil.
Note:
• If the detecting pauses for about 5 seconds, the arrow will disappear.
• If an arrow points to a coin denomination, the detector might be detecting either a
coin or another type of metal (such as jewelry, tokens, medals, or even junk metal)
of similar size and type to the coin.
• Since the indications are approximations, the detector might not have actually
found the item it indicates. The indicator is only a visual reference to help you
decide if an item is worth perusing.
10
11
GOLD Range
Iron or Foil
Target is probably iron or foil. Some oxidized
iron might register somewhere within the
SILVER range.
5¢ or Nickel
Target is probably 5¢ or a nickel. Some small
gold rings might register within this range.
Pull Tab
Target is probably a pull-tab of aluminum
can. Some small gold rings might register
within this range and might register within
Pull Tab category.
S-Caps
Target is probably a type of metal like bottle
cap. Some medium sized gold rings might
register within this category.
1¢ or Penny
Target might be a zinc penny or a copper
coin. Some large rough gold items might
register within 1¢ category.
SILVER Range
1¢ Penny or
25¢ Quarter
Target is probably silver coin, 25¢ or 1¢.
Some large aluminum coin might register
within 1¢ 25¢ category.
3.TONES
If the detector is set to the ALL METAL target mode, it sounds a single tone when
it detects any type of metal. If you set the detector to the DISC or NOTCH modes,
the built in audio identication system sounds a unique audio tone for each of three
categories of metal. This makes it easier to identify the metal being detected.
Tone Detects
Low Tone Foil, nails, bottle caps and/or nickels
Medium Tone Pull tabs, zinc and/or copper items
High Tone Brass and/or silver items
Notes:
• When you set the detector to DISC or NOTCH mode, the detector sounds
a medium or high tone when it detects highly oxidized iron. An arrow appears in
medium or high tone area.
• Depending on the quality, about 15 percent of gold rings cause the detector to
sound a medium tone.
OPERATION
1. Turning on the detector
Slide the power switch to ON. The unit displays all symbols on the LCD screen.
The detector sounds low, medium, high tones respectively. After about 2 seconds
the detector enters stand-by state.
• At this time the LCD displays ALL METAL and SENS. The value of SENS on the
segment is 5. The range from MIN to MAX for DISC/NOTCH is available.
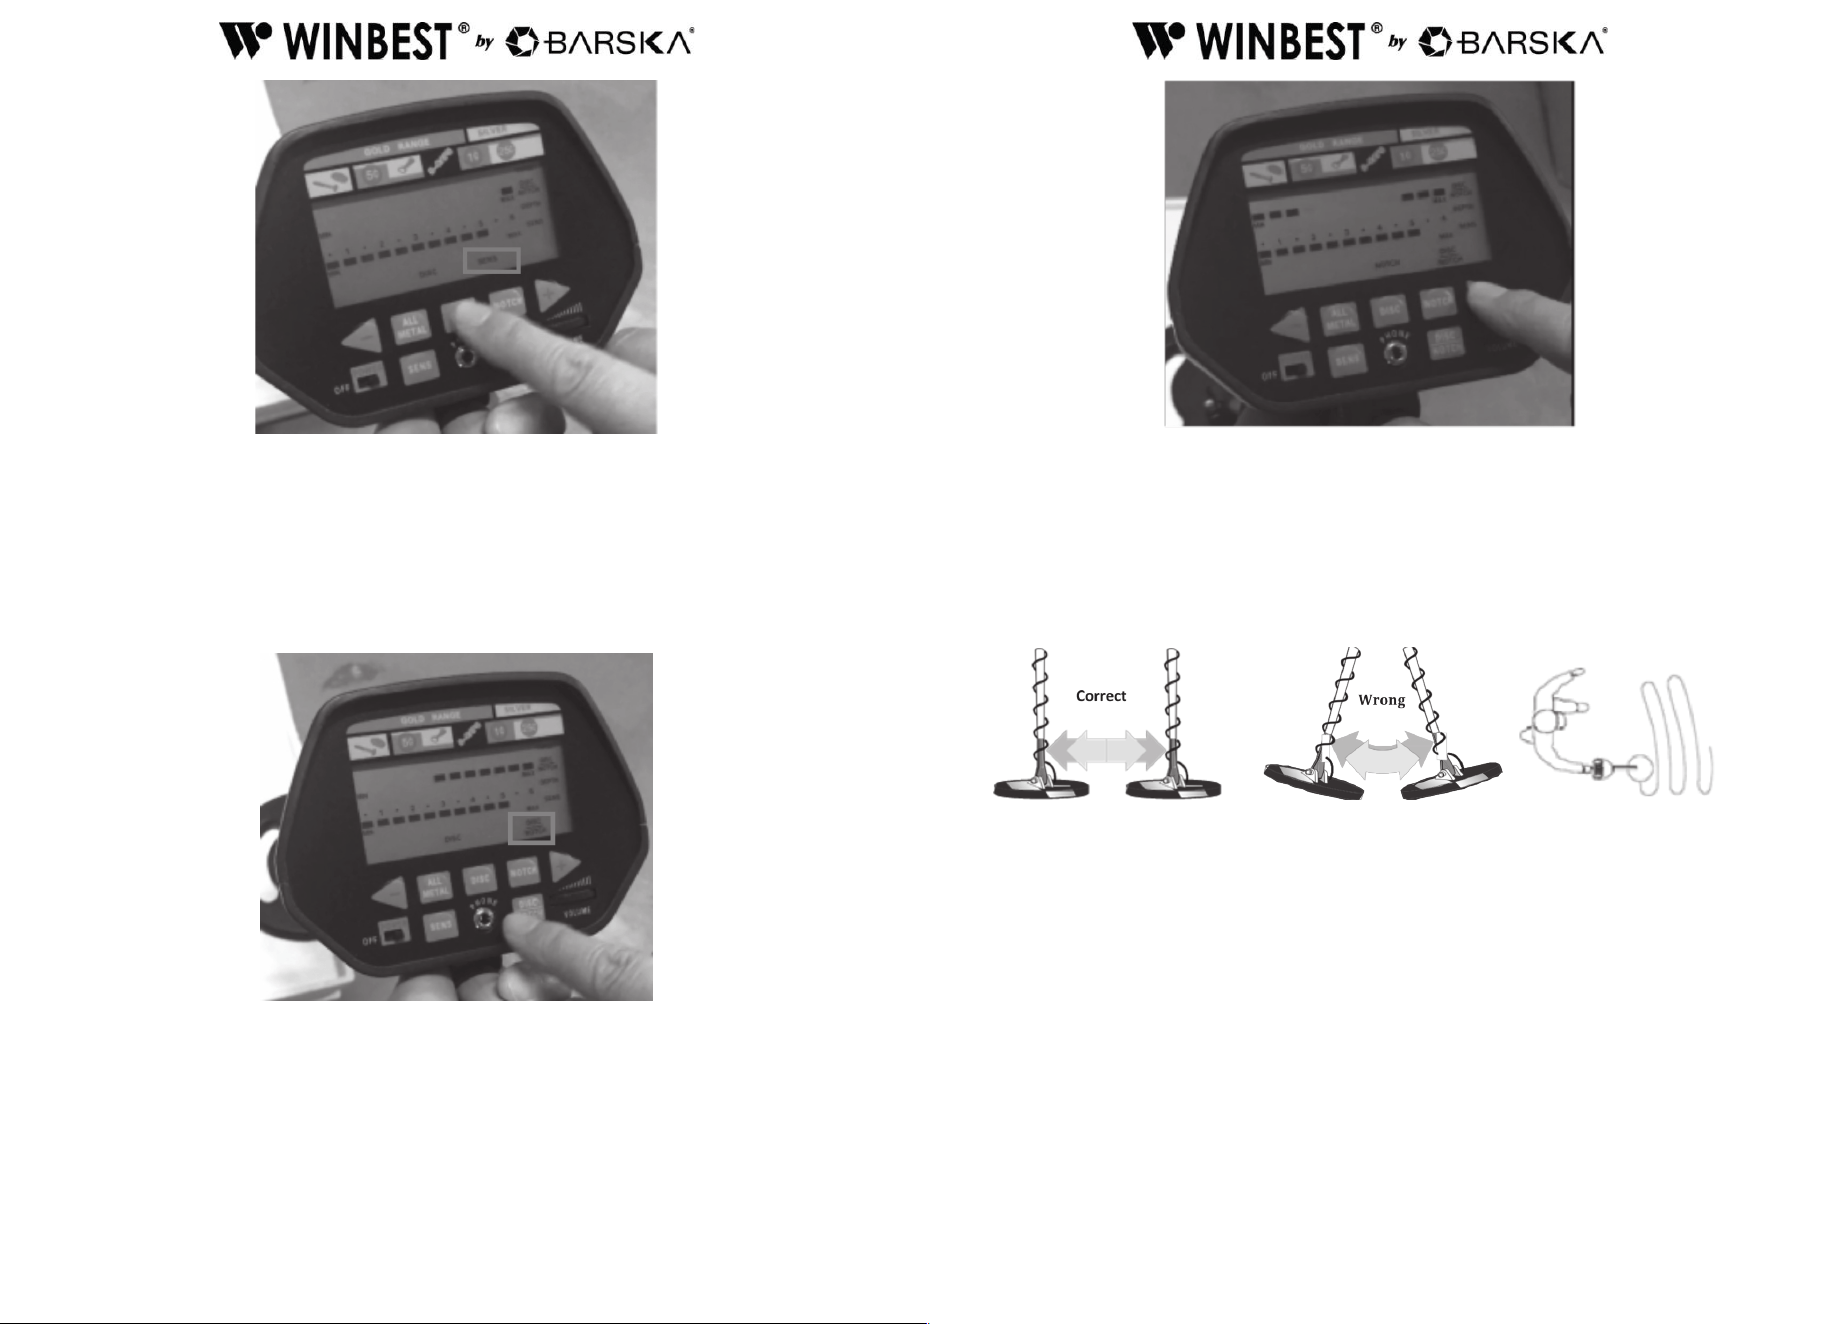
2. Setting the operation mode
The detector comes with three operating modes ALL METAL, DISC, or NOTCH. You
can select the desired mode by relative touch key.
a. ALL METAL — used for detecting any type of metal. When the detector detects
any type of metal, it sounds a tone and an arrow appears below the target icon of
probable type of metal being detected.
b. DISC — used for target discrimination. You can press DISC touch key to change
to DISC mode. When the bottom of right side shows SENS, you can adjust the
sensitivity by press + or -.
12
13
If you want to choose the target range from MAX to MIN, you need to press DISC/
NOTCH rst and press + or – keys to adjust the range. The cursor bars under target
range will show which metal objectives you may eliminate or select. The detector
can detect the metal type indicated on the display. At meanwhile, the detector rejects
other metal types without displaying on the screen. For example, press + key, 7
levels on cursor bars from Max to Min are increased. At this time, the detector can
detect Pull Tub, S- CAPS, 1¢ and also 25¢, other types of metal are rejected.
Note:
25¢ is unable to be eliminated since it contains silver and may be valuable object.
c. NOTCH—to ignore the metal type you do not want. You can select the metal type
desired by pressing the + and - keys. The LCD cursor bars will indicate the
selected types of metal. The detector can detect the selected metal type.
3. Search Coil Sweeping Hints
• Never sweep the search coil as if it were a pendulum. Raising the search coil while
sweeping or at the end of a sweep will cause false readings.
• Sweep slowly hurrying will cause you to miss targets.
• It is better you sweep the search coil from side to side in an arc line of 3 inches
motion and keep the search coil parallel with the ground.
If the detector detects the item, it sounds a tone, an arrow and the depth
appear on the display below the target icon.
If the detector does not detect the item, make sure that the target mode is set
correctly for the type of metal you’re searching for. Make sure that you’re
moving the search coil correctly.
Notes:
• The detector responds with a signal when it detects most valuable metal
objects. If a signal does not repeat after you sweep the search coil over the target a
few times, the target is probably junk metal.
• False signals can be caused by trashy ground, electrical interference, or large
irregular piece of junk metal.
• False signals are usually broken or non-repeatable.
14
15
4. Adjusting SENSITIVITY
After you become familiar with how your detector works, it’s important to ne tune
the sensitivity to get a good effect.
Press the touch button SENS on the panel. Then press + or - to increase or decrease
the sensitivity. The level on the segment will be displayed from MIN to MAX position.
Note:
In order to detect the target deeply buried, you can adjust the SENS to a high
position. However, do not set the level of SENS to Max position (the optimal level is
5). Otherwise, the detector will receive interference and false signal from a broadcast
antenna and other electronic lines. The detector will have unstable arrow and
irregular tone indications.
Quick Start Demonstration
Indoor Testing
Supplies Needed
• Nail
• Quarter
• 1¢ (post-1982)
1. Remove any metal items that you may be wearing.
2. Turn on the detector
3. Place the detector on a wooden or plastic table and adjust the search coil so the
at part points upwards toward the ceiling.
4. When in DISC or NOTCH mode, evenly sweep the nail 2-3 inches above the at
face of the search coil. The detector will emit a low tone and the arrow pointing to
nail in target indicator illuminates. The DEPTH indicator also displays
corresponding value.
Repeat the above test with a 1¢ (post-1982). Detector sounds medium tone this time,
and target indicator arrow points to 1¢. While in the test of25¢, detector emits high
tone and arrow points to 25¢.
When you use a coin as sample to run testing, lay the at side of the coin parallel
with the at face of the search coil and sweep evenly. By this way, the detector can
nd the target more easily. Sweeping with the side of the coin vertically with the
search coil will cause test error and target arrow might be ash and jump.
5. In All METAL Mode, the test is same as in DISC or NOTCH mode. However, the
detector emits only one tone when detects the target. Arrow points to the detected
target and DEPTH indicator shows relative value.
Outdoor Testing
Pinpointing
Accurate pinpointing takes practice and is best accomplished by crossing sweep the
target area.
1. Once a buried target is indicated by a clear tone response, continue sweeping the
coil over the target in a narrowing side-to-side motion.
2. Take visual note of the place on the ground where the “beep” sounds.
3. Stop the coil directly over this spot on the ground.
4. Now move the coil straight forward and straight back towards you a couple
of times.
5. Again make visual note of the spot on the ground at which the “beep” sounds.
6. If needed, cross sweep the target in “X” pattern at different angles to “zero in” on
the exact spot on the ground at which the “beep” sounds.

16
17
TROUBLESHOOTING GUIDE
Problem Reason Suggestion
The detector displays or
sounds without detecting
any target
The detector may receive
interference and false
signal from broadcast
antenna and other
electronic lines
Change searching place
The humidity of
environment may be
extremely high
Wait for some time to
check again
The detector sounds false
signals.
Sensitivity set too
high/ environmental
electromagnetic
interference
Reduce SENSITIVITY
Sweeping the detector’s
search coil too fast or at
wrong angle
Sweep the search coil
more slowly and hold the
detector correctly
Using 2 detectors in close
proximity
Keep two detectors at
least 6 meters(20’) apart
LCD display multiple
target categories or emits
several sounds at once
function.
There may be over one
kind of metal targets
Reduce the sensitivity to
eliminate the detection of
the deeper target
The detector can’t identify
the target. Sometimes,
oxidized metal also
causes the excursion of
target arrow and tone.
Sweep the search coil
with different angles
Five-pin cable not
connected well
Re-plug it properly
Dead battery Replace batteries
Care and Maintenance
Handle the detector gently and carefully. Dropping it can damage circuit boards and
can cause the detector to work improperly.
Use the detector only in normal temperature environments. Temperature extremes
can shorten the life of electronic devices, causing internal damage to the detector.
Keep the detector away from dust and dirt, which can cause premature wear and
tear of parts.
Wipe the detector with a damp cloth occasionally to keep it looking new. Do not use
harsh chemicals, cleaning solvents, or strong detergents to clean the detector.
CAUTION:
• The search coil is water proof, and it can be completely under the fresh water or
sea water. Please be careful to avoid the water enter into machine body. Sea water
may erode the search coil. Please always use fresh water to clean the search coil
after detection in sea water.
• Change or damage the inner components will cause the detector fault, and such
fault is not within our warranty.