
Technical Support and E-Warranty Certificate www.vevor.com/support
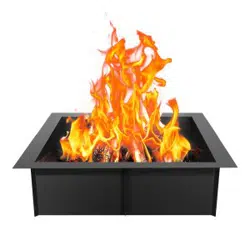
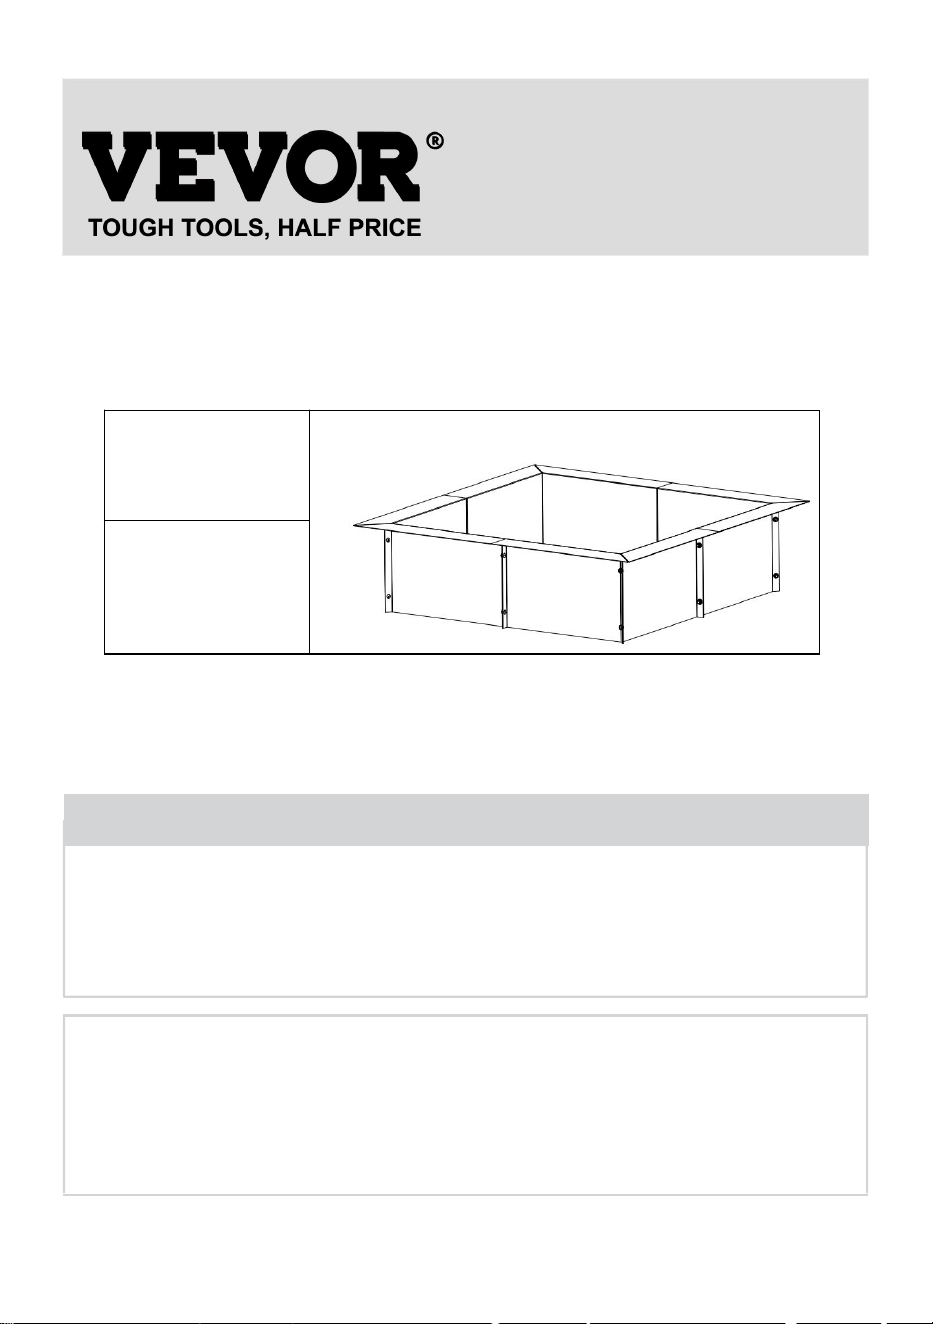
FIRE RING
MODEL: YCIS-30001-30 YCIS-30001-36
We continue to be committed to provide you tools with competitive price.
"Save Half", "Half Price" or any other similar expressions used by us only represents an
estimate of savings you might benefit from buying certain tools with us compared to the major
top brands and does not necessarily mean to cover all categories of tools offered by us. You
are kindly reminded to verify carefully when you are placing an order with us if you are
actually saving half in comparison with the top major brands.

1
YCIS-30001-30
YCIS-30001-36
Have product questions? Need technical support? Please feel free to
contact us:
Technical Support and E-Warranty Certificate
www.vevor.com/support
NEED HELP? CONTACT US!
This is the original instruction, please read all manual instructions
carefully before operating. VEVOR reserves a clear interpretation of our
user manual. The appearance of the product shall be subject to the
product you received. Please forgive us that we won't inform you again if
there are any technology or software updates on our product.
FIRE RING

2
INTRODUCTION
WARNING:
PLEASE READ AND UNDERSTAND ALL SAFETY RULES BEFORE
ASSEMBLY AND USE OF THE FIRE RING.
RULES FOR SAFE OPERATION:
• Caution: For Outdoor Use Only.
• Use the fire ring on stone, dirt or sand only.
• For adult use only – do not allow children to use the fire ring.
• Do not use on lawns, wooden decks, concrete or asphalt.
• Do not use fire ring indoors or under a patio roof.
• Do not use in windy conditions.
• Do not leave fire unattended at any time.
• Do not burn trash, leaves, paper, cardboard or plywood in fire ring.
• Do not use under low-hanging tree branches, trellis, and overhangs of
any kind, including covered porches.
• Do not use flammable liquids such as gasoline, alcohol, diesel fuel,
kerosene, or charcoal lighter to light or relight fires.
• Care should be taken to make sure all combustible material is far enough
away from the fire ring to not ignite.
• Always use in accordance with all applicable local and state fire codes.
• Failure to follow these instructions could result in a hazardous fire,
causing property damage or physical injury
WARNING!FOR YOUR SAFETY:
•Avoid using softwoods such as pine or cedar, because they are likely to
throw sparks. The use of seasoned hardwood is recommended.
• Do not allow children to use the fire ring. Keep children and pets away
from the fire ring while it is in use.
• Exercise the same precautions you would with any open fire.
• Do not wear flammable or loose clothing when tending an open fire.
• Avoid touching surfaces, as they will be extremely hot.
• Assure fire is completely extinguished before leaving fire ring.
• Any modifications to this appliance may be dangerous and are not
permitted.
Save the instructions.
3
PRODUCT PAREMETERS
Model
Colour
Outer
diameter
Inside
diameter
Height
YCIS-30001-30
Black
36”
30”
10”
YCIS-30001-36
Black
42”
36”
10”
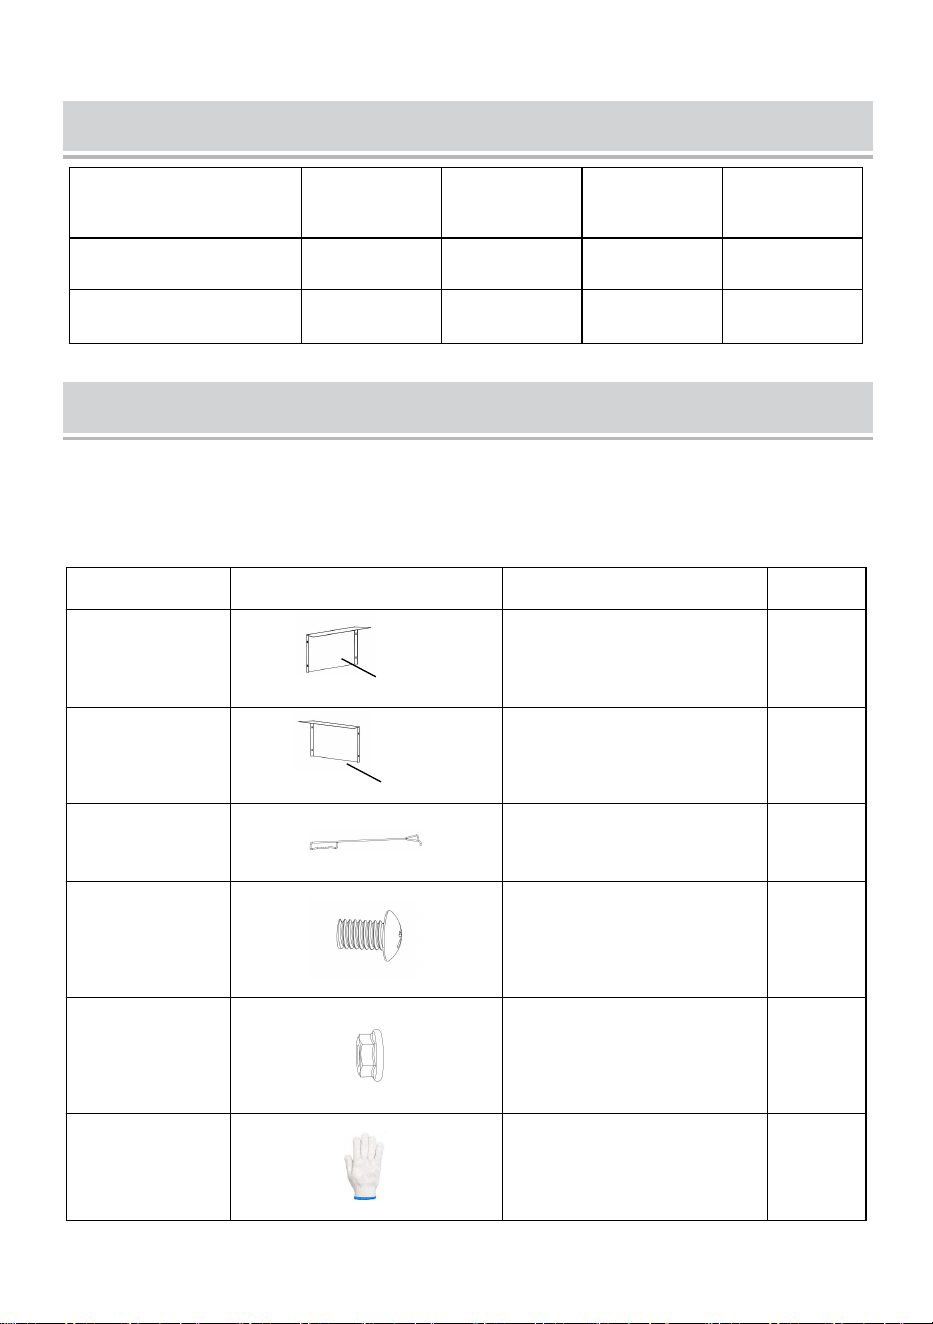
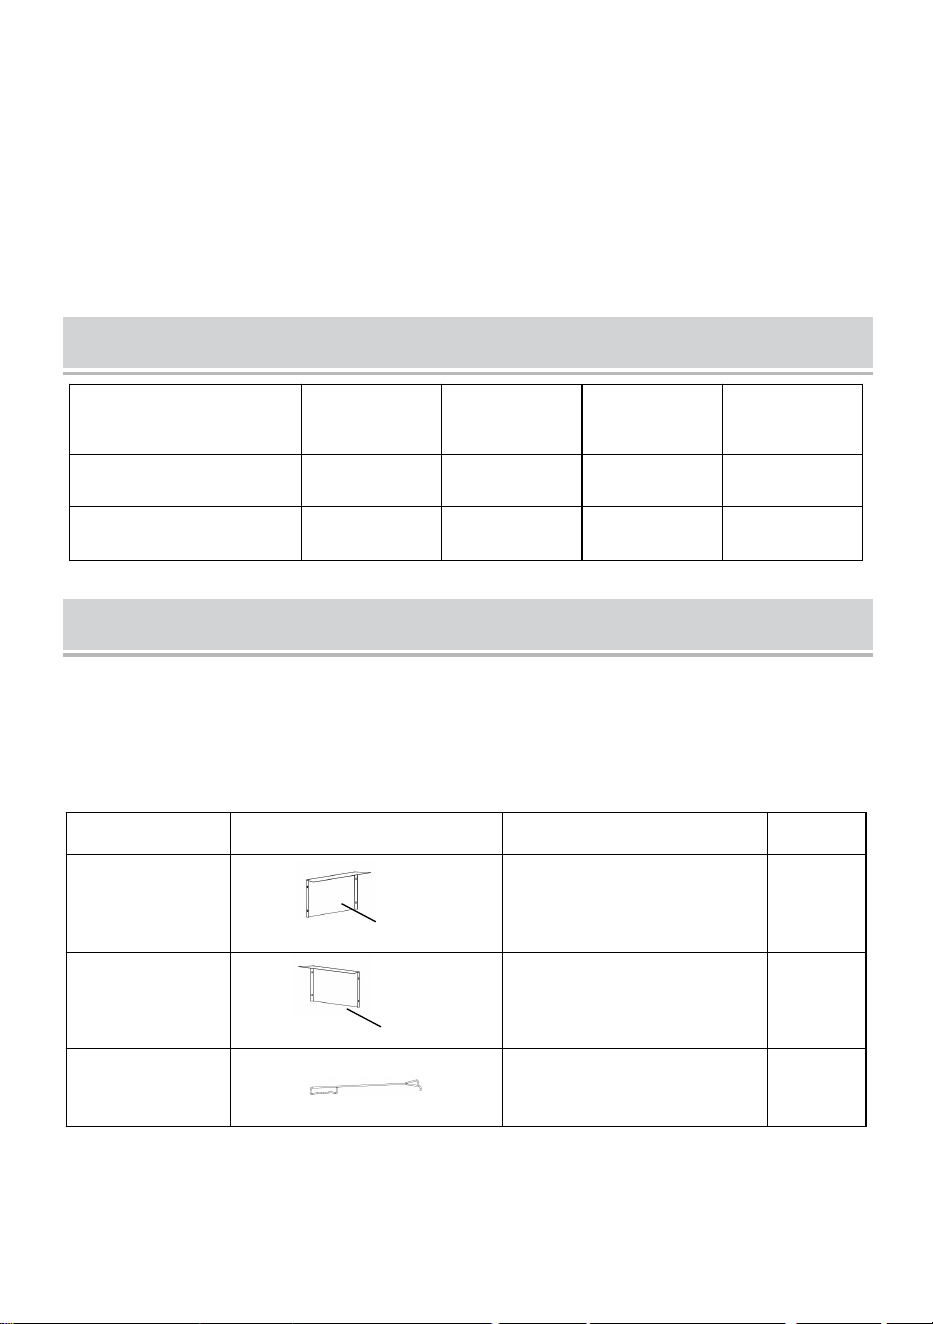
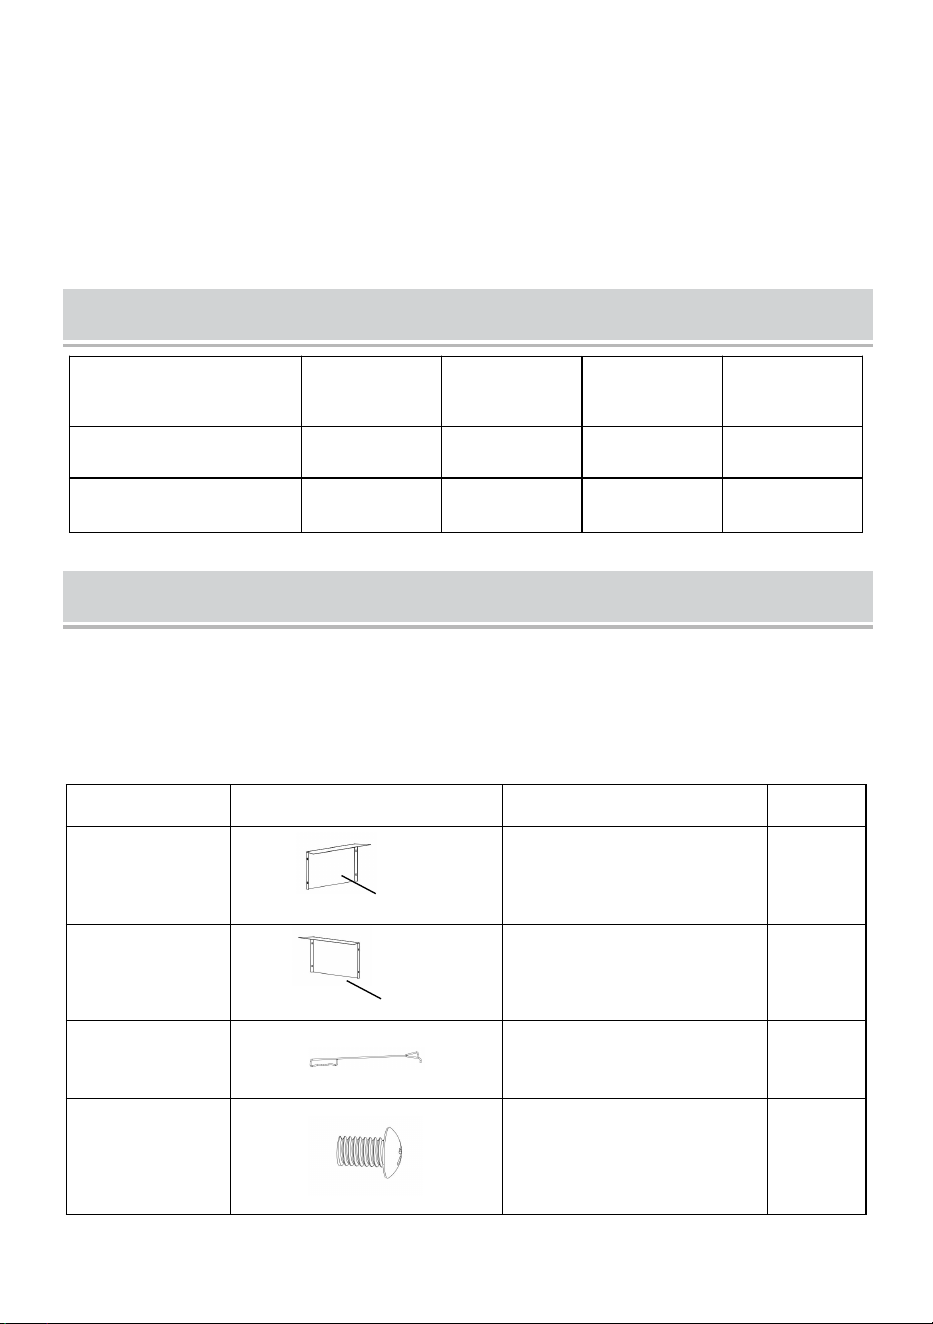
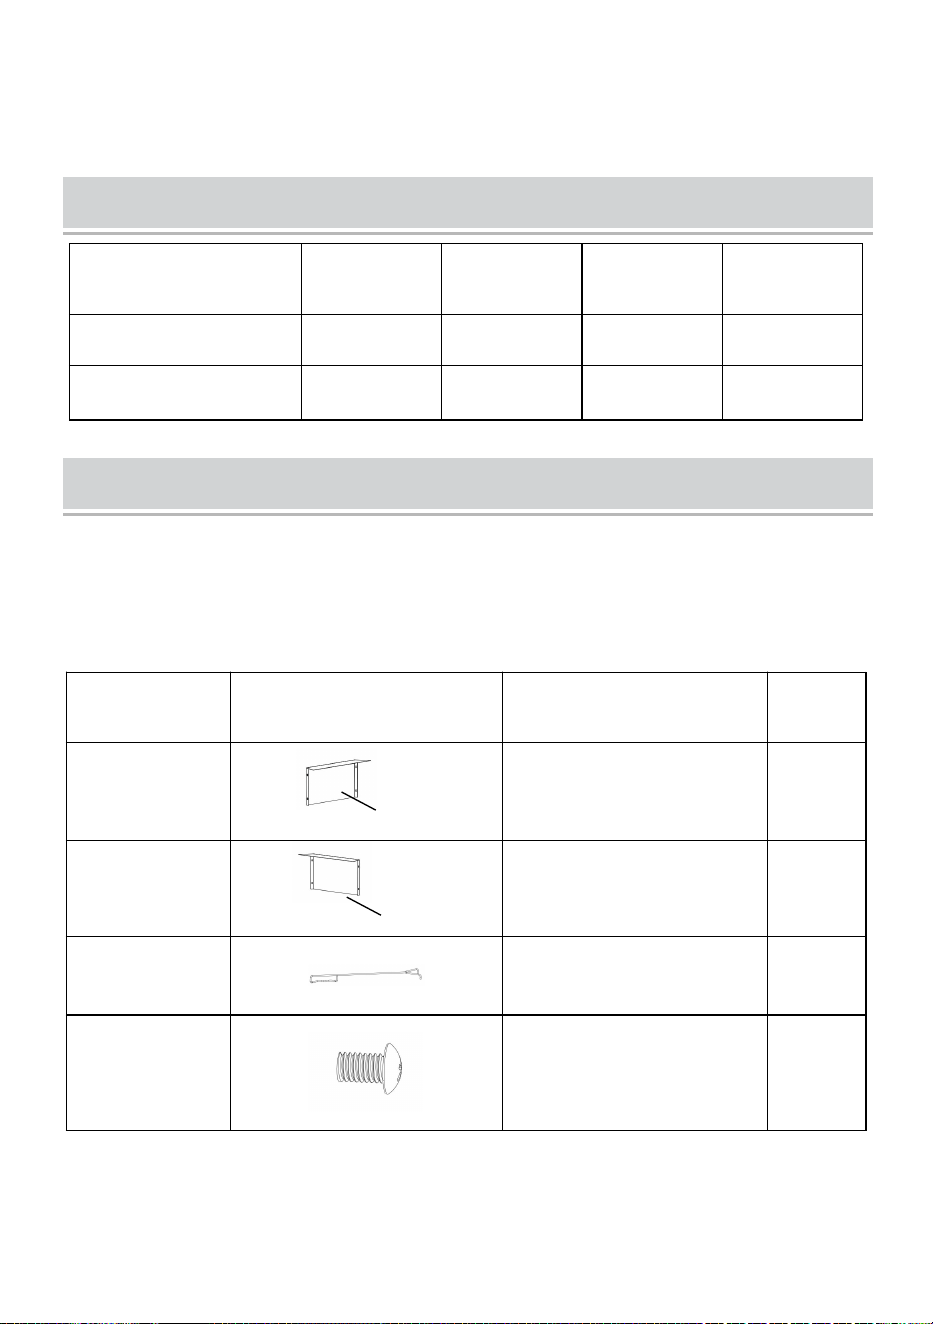
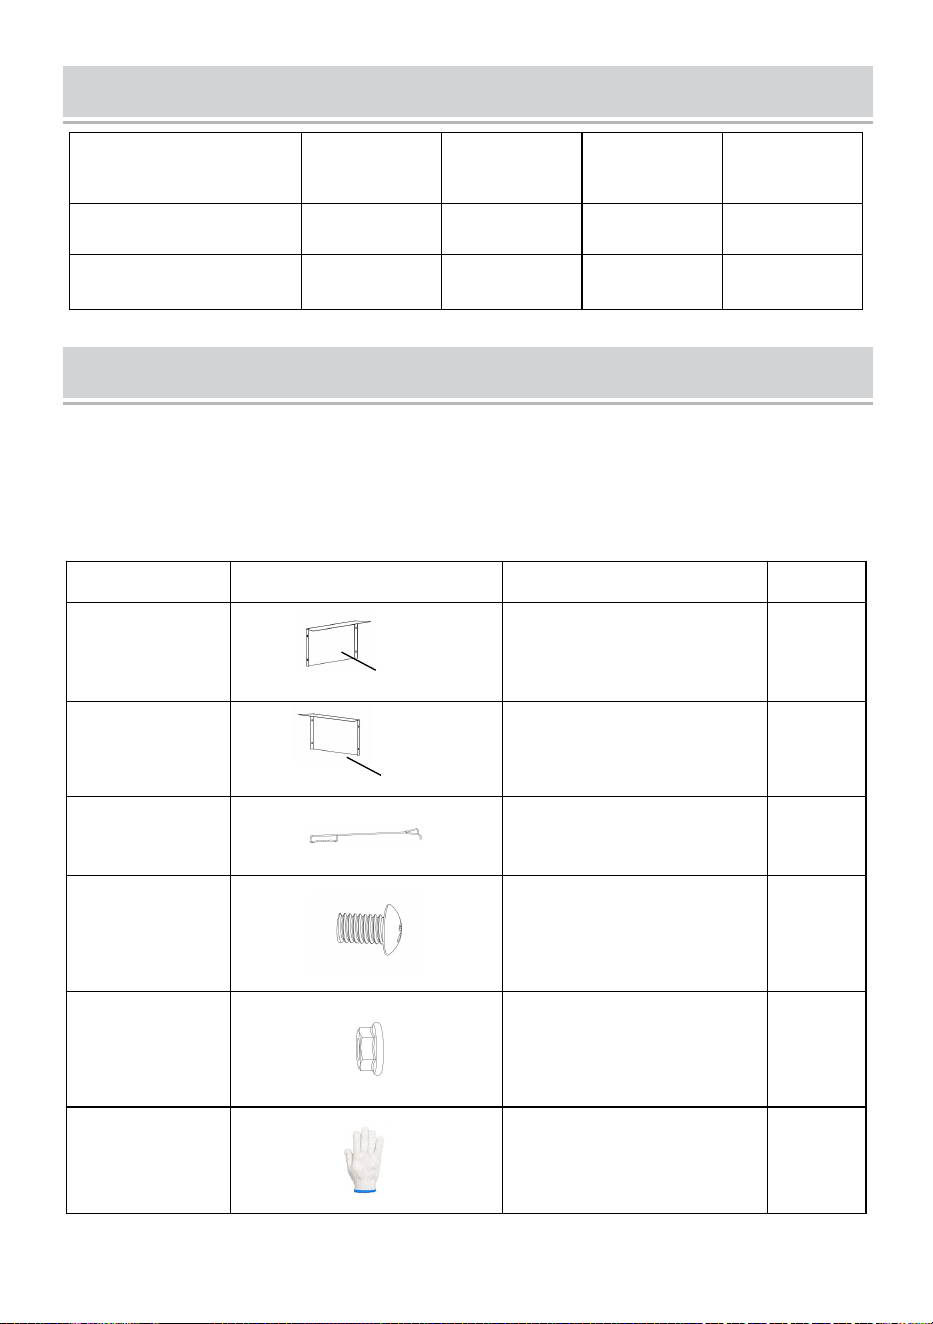
PART LIST
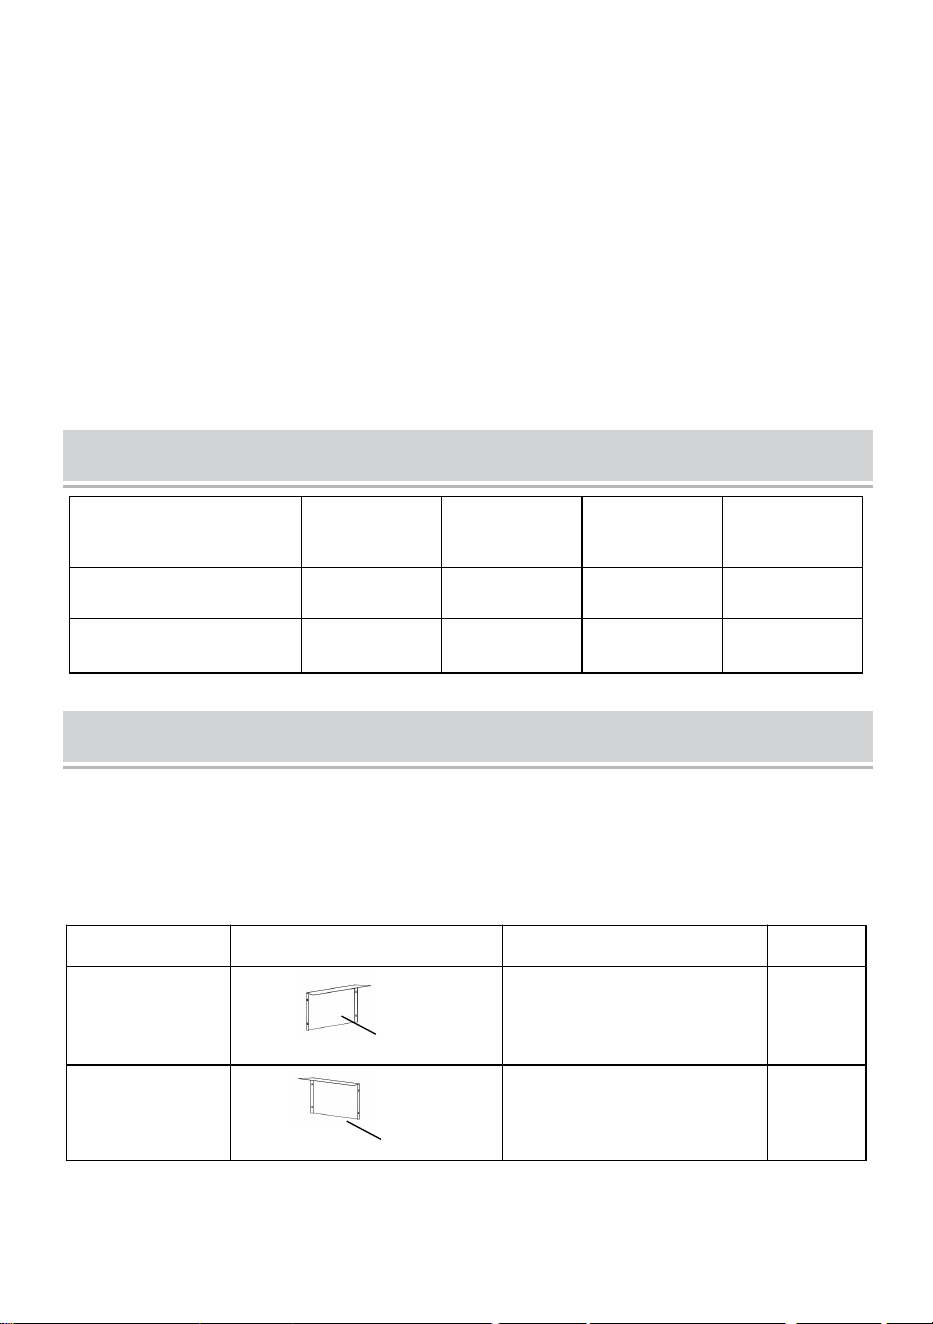
When unpacking this product, ensure the parts listed below are included and
carefully inspect for any damage that may have occurred during transit. Do not
attempt to assemble or use the product if any part is missing or damaged.
NO
PICTURE
PART NAME
QTY
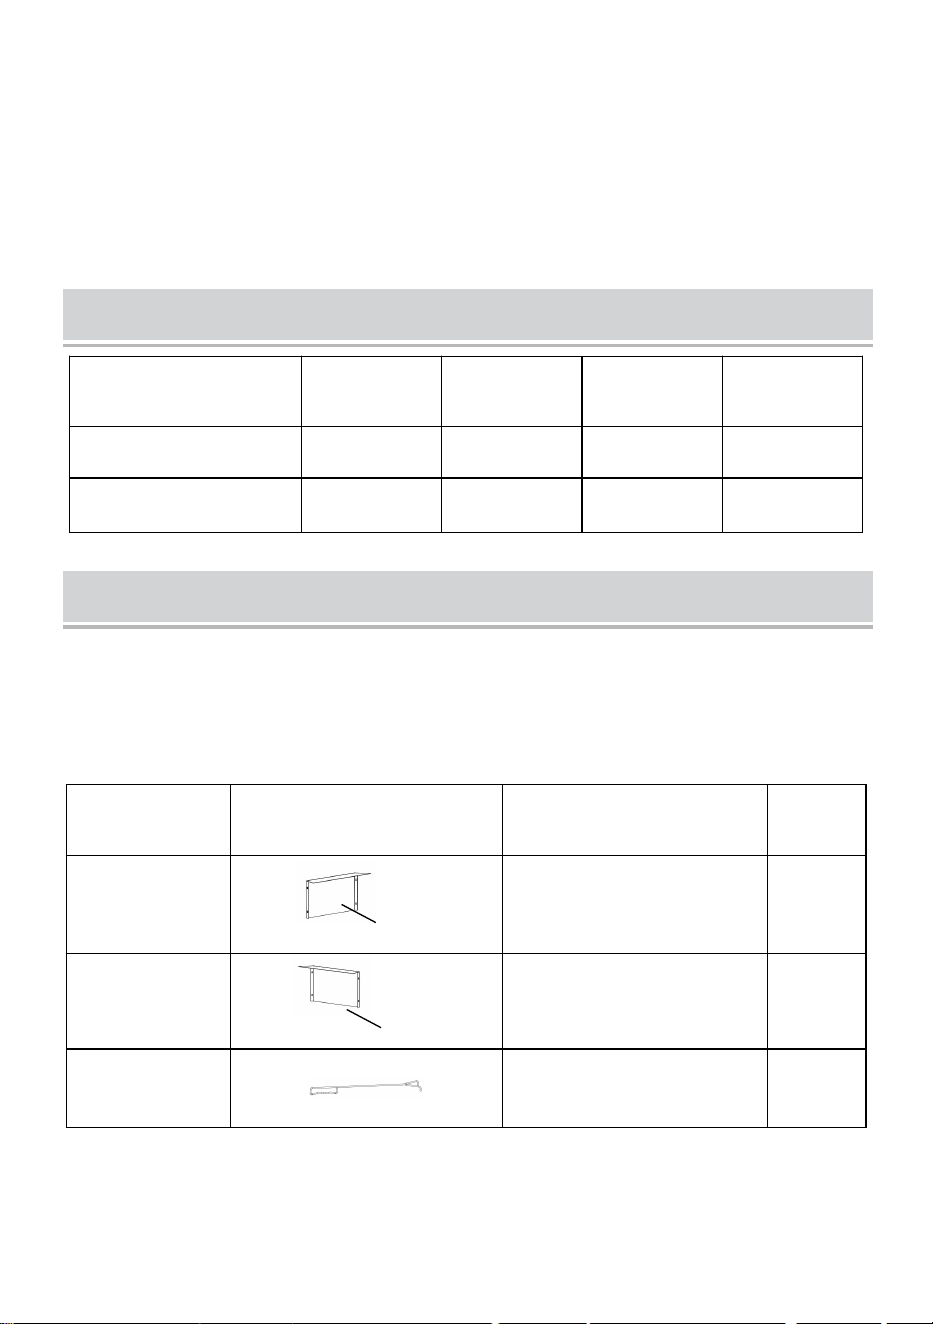
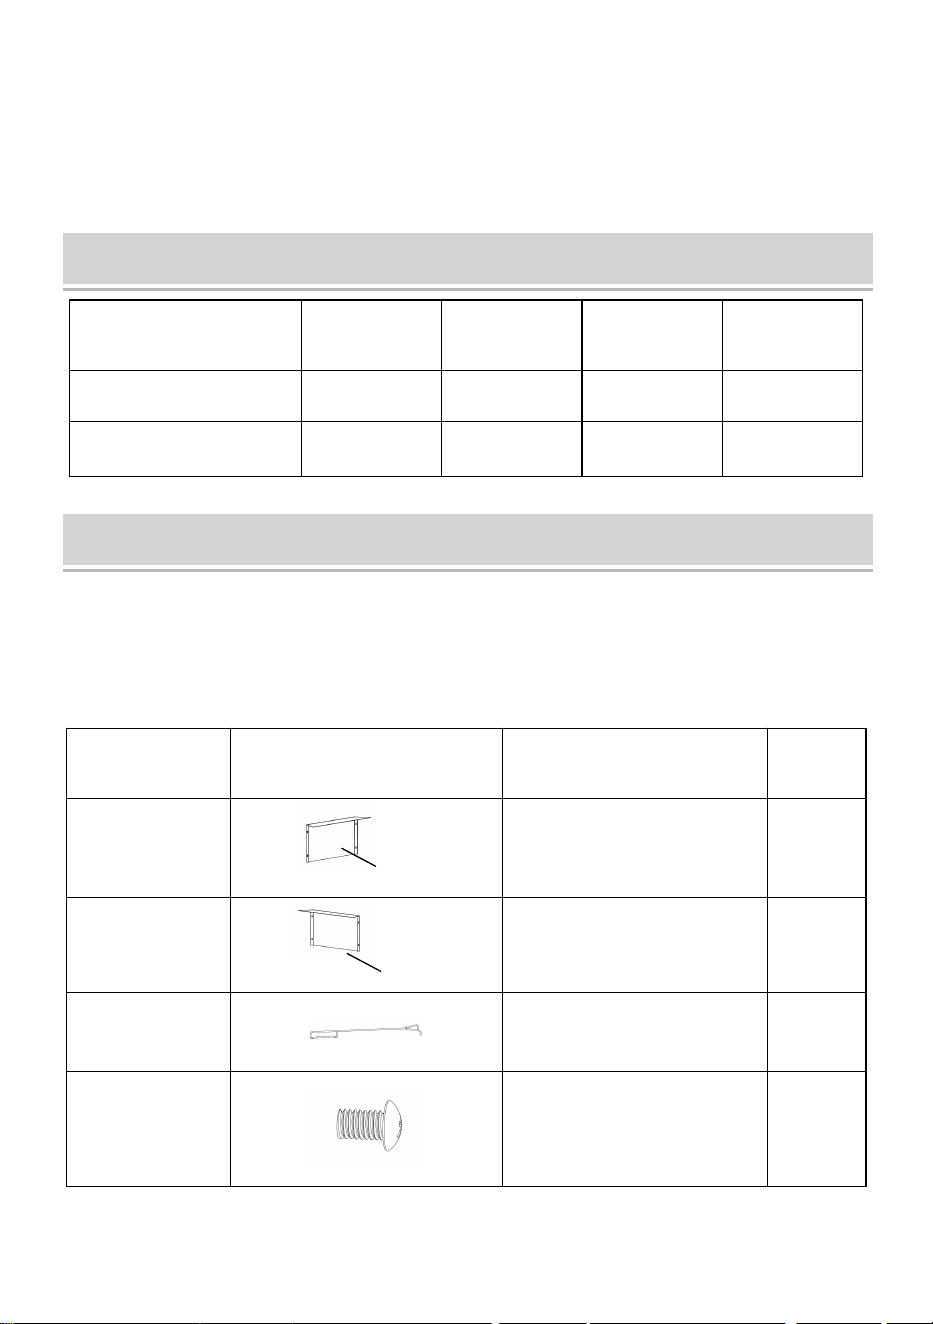
①
Left half
4
②
Right half
4
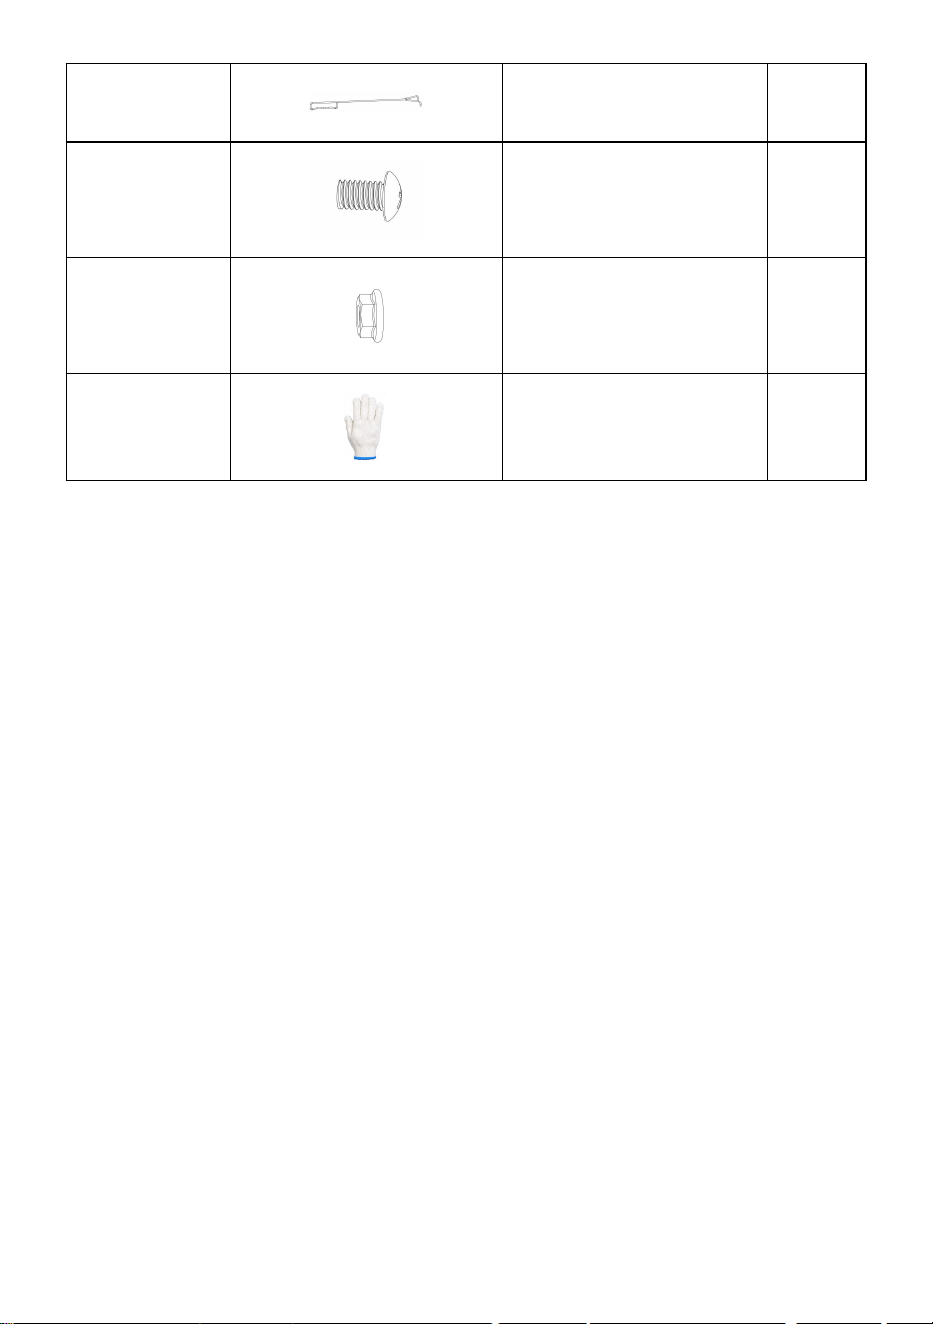
③
Poker
1
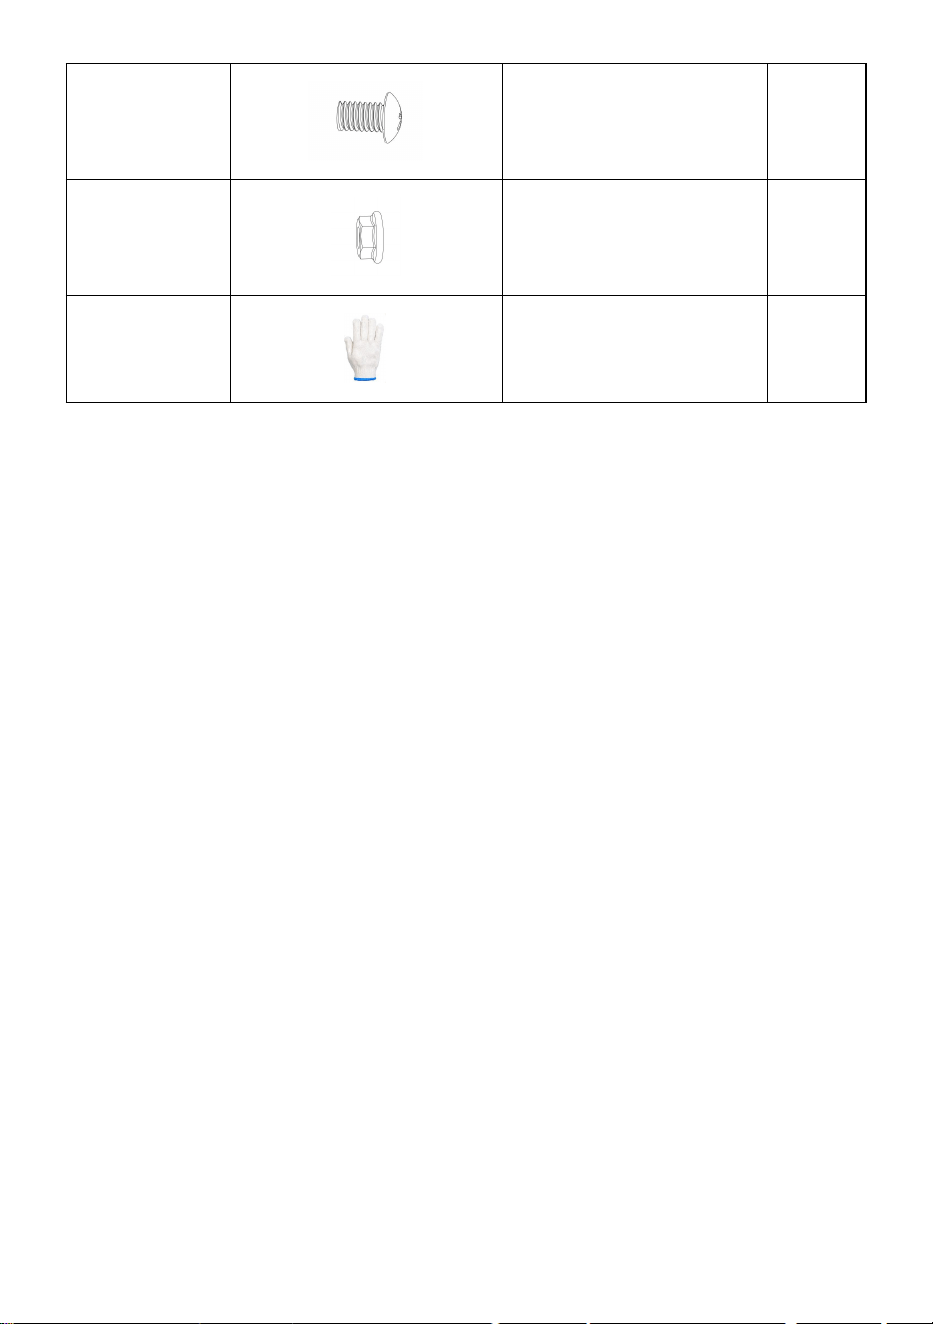
④
Screw
16
⑤
Nut
16
⑥
Glove
2
A
B

4
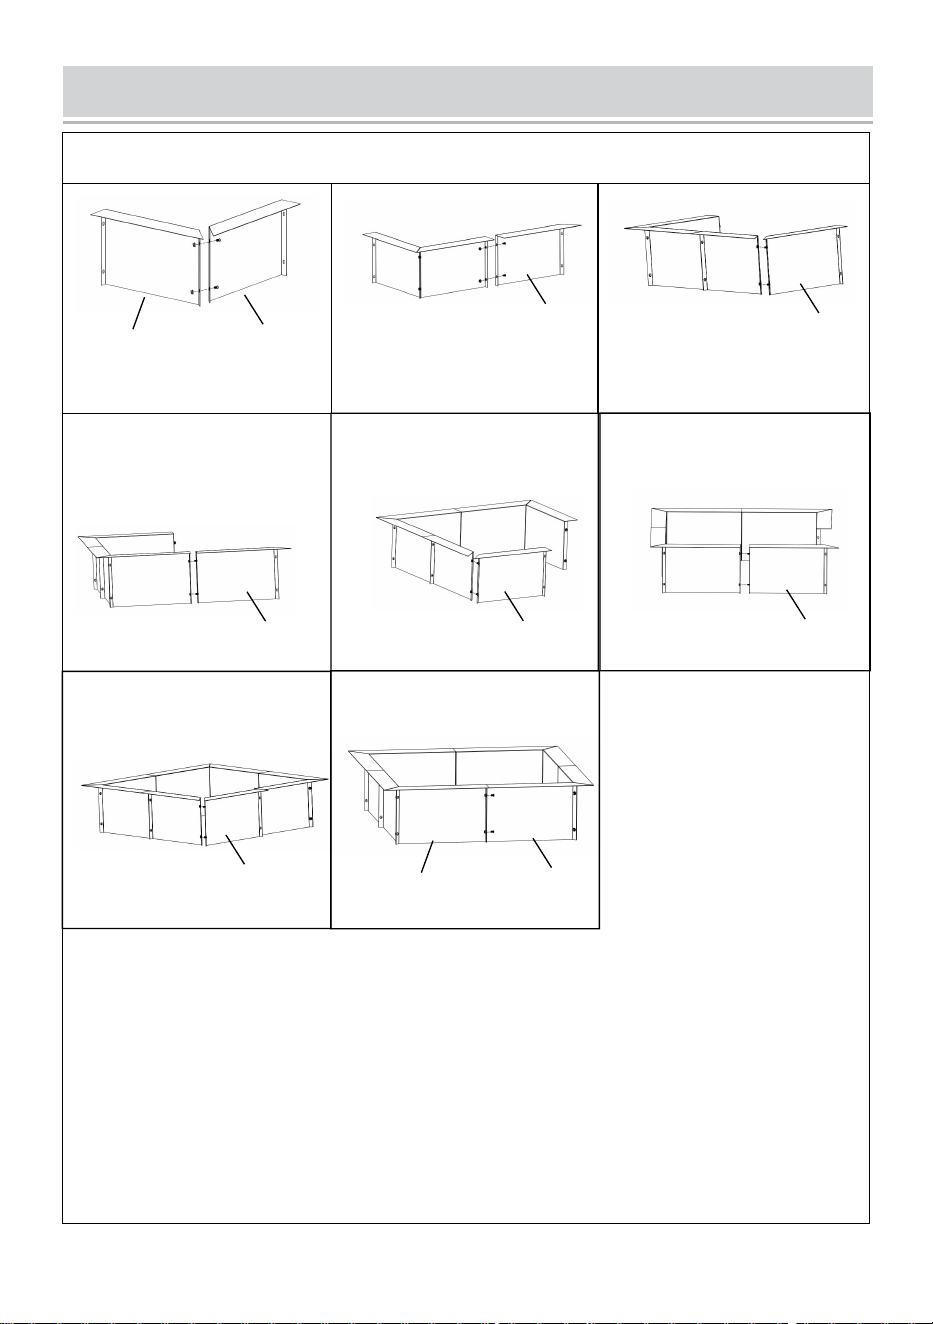
INSTALLATION METHODS
Model:YCIS-30001-30 / YCIS-30001-36
Step 1:
Decide on location for the fire ring. Make sure the fire ring is a safe distance
from all combustible materials. Using a rake, level the area if necessary and
remove any dry grass or overhanging tree branches.
Step 2:
Connect the left half(A) and the right half (B)at the bevel with two screws and
nuts
Step 3:
Connect the left half(A) of the flange to the right half (B) of the flange with two
A
B
B
A
A
A
B
B
A
B

5
screws and nuts.
Step 4:
Connect the left half(A) and the right half (B)at the bevel with two screws and
nuts
Step 5:
Connect the left half(A) of the flange to the right half (B) of the flange with two
screws and nuts.
Step 6:
Connect the left half(A) and the right half (B)at the bevel with two screws and
nuts
Step 7:
Connect the left half(A) of the flange to the right half (B) of the flange with two
screws and nuts.
Step 8:
Connect the left half(A) and the right half (B)at the bevel with two screws and
nuts
Step 9:
Stack firewood into fire ring and light the fire.
Helpful Hints:
• Do not attempt to move the fire ring once
the fire is started.
• Do not place the fire ring in an area where it could be easily tripped over.
• For best results, stack firewood in a pyramid shape for burning.

6
Address: Shuangchenglu 803nong11hao1602A-1609shi, baoshanqu,
shanghai 200000 CN.
Imported to AUS: SIHAO PTY LTD, 1 ROKEVA STREETEASTWOOD
NSW 2122 Australia
Imported to USA: Sanven Technology Ltd., Suite 250, 9166 Anaheim
Place, Rancho Cucamonga, CA 91730
REP
EC
E-CrossStu GmbH
Mainzer Landstr.69, 60329 Frankfurt am Main.
REP
UK
YH CONSULTING LIMITED.
C/O YH Consulting Limited Office 147, Centurion House,
London Road, Staines-upon-Thames, Surrey, TW18 4AX


2
Technique Assistance et certificat de garantie électronique
www.vevor.com/support
ANNEAU DE FEU
MODÈLE : YCIS-30001-30 YCIS-30001-36
We continue to be committed to provide you tools with competitive price.
"Save Half", "Half Price" or any other similar expressions used by us only represents an
estimate of savings you might benefit from buying certain tools with us compared to the major
top brands and does not necessarily mean to cover all categories of tools offered by us. You
are kindly reminded to verify carefully when you are placing an order with us if you are
actually saving half in comparison with the top major brands.

3

1
YCIS-30001-30
YCIS-30001-36
Have product questions? Need technical support? Please feel free to
contact us:
Technical Support and E-Warranty Certificate
www.vevor.com/support
NEED HELP? CONTACT US!
This is the original instruction, please read all manual instructions
carefully before operating. VEVOR reserves a clear interpretation of our
user manual. The appearance of the product shall be subject to the
product you received. Please forgive us that we won't inform you again if
there are any technology or software updates on our product.
FIRE RING

2
INTRODUCTION
AVERTISSEMENT:
VEUILLEZ LIRE ET COMPRENDRE TOUTES LES RÈGLES DE SÉCURITÉ
AVANT
ASSEMBLAGE ET UTILISATION DU FEU.
RÈGLES POUR UN FONCTIONNEMENT SÉCURISÉ :
• Attention : pour une utilisation en extérieur uniquement.
• Utilisez l'anneau de feu uniquement sur de la pierre, de la terre ou du sable.
• Réservé à un usage adulte – ne laissez pas les enfants utiliser le foyer.
• Ne pas utiliser sur les pelouses, les terrasses en bois, le béton ou l'asphalte.
• N'utilisez pas l'anneau de feu à l'intérieur ou sous un toit de terrasse.
• Ne pas utiliser dans des conditions venteuses.
• Ne laissez jamais le feu sans surveillance.
• Ne brûlez pas de déchets, de feuilles, de papier, de carton ou de contreplaqué
dans un foyer.
• Ne pas utiliser sous des branches d'arbres basses , des treillis et des surplombs
de
toute sorte , y compris les porches couverts.
• N'utilisez pas de liquides inflammables tels que l'essence, l'alcool, le carburant
diesel,
du kérosène ou un allume-charbon pour allumer ou rallumer des feux.
• Des précautions doivent être prises pour s'assurer que tous les matériaux
combustibles sont suffisamment loin
loin de l'anneau de feu pour ne pas s'enflammer.
• Utilisez toujours conformément à tous les codes de prévention des incendies
locaux et nationaux applicables.
• Le non-respect de ces instructions pourrait entraîner un incendie dangereux .
causant des dommages matériels ou des blessures physiques
AVERTISSEMENT ! POUR VOTRE SÉCURITÉ :
• Évitez d'utiliser des bois résineux comme le pin ou le cèdre, car ils risquent de
jeter des étincelles. L'utilisation de bois dur séché est recommandée.
• Ne laissez pas les enfants utiliser le foyer. Éloignez les enfants et les animaux
domestiques
du foyer pendant son utilisation.
• Prenez les mêmes précautions que pour n'importe quel feu ouvert.
• Ne portez pas de vêtements inflammables ou amples lorsque vous entretenez un
feu ouvert.
3
• Évitez de toucher les surfaces, car elles seront extrêmement chaudes.
• Assurez-vous que le feu est complètement éteint avant de quitter le cercle de
feu.
• Toute modification apportée à cet appareil peut être dangereuse et ne
permis.
Enregistrez les instructions.
PRODUCT PAREMETERS
Modèle
Couleur
Diamètre
extérieur
Diamètre
interieur
Hauteur
YCIS-30001-30
Noir
36 "
30 "
dix "
YCIS-30001-36
Noir
42 "
36 "
dix "
PART LIST
Lors du déballage de ce produit, assurez-vous que les pièces répertoriées
ci-dessous sont incluses et inspectez soigneusement tout dommage ayant pu
survenir pendant le transport. N'essayez pas d'assembler ou d'utiliser le produit si
une pièce est manquante ou endommagé.
NON
IMAGE
NOM DE LA PIÈCE
QTÉ
①
Moitié gauche
4
②
Moitié droite
4
③
Poker
1
A
B
4
④
Vis
16
⑤
Noix
16
⑥
Gant
2

5
INSTALLATION METHODS
Modèle : YCIS-30001-30 / YCIS-30001-36
Étape 1:
Décidez de l'emplacement du cercle de feu. Assurez-vous que l'anneau de feu
est à une distance sûre de tous les matériaux combustibles. À l'aide d'un râteau,
nivelez la zone si nécessaire et enlevez toute herbe sèche ou branches d'arbres
en surplomb.
Étape 2:
Connectez la moitié gauche (A) et la moitié droite (B) au biseau avec deux vis et
écrous
Étape 3:
A
B
B
A
A
A
B
B
A
B

6
Connectez la moitié gauche (A) de la bride à la moitié droite (B) de la bride avec
deux vis et écrous.
Étape 4 :
Connectez la moitié gauche (A) et la moitié droite (B) au biseau avec deux vis et
écrous
Étape 5 :
Connectez la moitié gauche (A) de la bride à la moitié droite (B) de la bride avec
deux vis et écrous.
Étape 6 :
Connectez la moitié gauche (A) et la moitié droite (B) au biseau avec deux vis et
écrous
Étape 7 :
Connectez la moitié gauche (A) de la bride à la moitié droite (B) de la bride avec
deux vis et écrous.
Étape 8 :
Connectez la moitié gauche (A) et la moitié droite (B) au biseau avec deux vis et
écrous
Étape 9 :
Empilez du bois de chauffage dans un anneau de feu et allumez le feu.
Astuces utiles:
• N'essayez pas de déplacer l'anneau de feu une fois
le feu est allumé.
• Ne placez pas l'anneau de feu dans un endroit où il pourrait facilement
trébucher.
• Pour de meilleurs résultats, empilez le bois de chauffage en forme de
pyramide pour le brûler.

7
Adresse : Shuangchenglu 803nong11hao1602A-1609shi, baoshanqu,
Shanghai 200000 CN.
Importé en Australie : SIHAO PTY LTD, 1 ROKEVA STREETASTWOOD
NSW 2122 Australie
Importé aux États-Unis : Sanven Technology Ltd., Suite 250, 9166
Anaheim Place, Rancho Cucamonga, CA 91730
REP
EC
E-CrossStu GmbH
Mainzer Landstr.69, 60329 Frankfurt am Main.
REP
UK
YH CONSULTING LIMITED.
C/O YH Consulting Limited Office 147, Centurion House,
London Road, Staines-upon-Thames, Surrey, TW18 4AX

8


2
Technisch Support- und E-Garantie-Zertifikat www.vevor.com/support
FEUERRING
MODELL : YCIS-30001-30 YCIS-30001-36
We continue to be committed to provide you tools with competitive price.
"Save Half", "Half Price" or any other similar expressions used by us only represents an
estimate of savings you might benefit from buying certain tools with us compared to the major
top brands and does not necessarily mean to cover all categories of tools offered by us. You
are kindly reminded to verify carefully when you are placing an order with us if you are
actually saving half in comparison with the top major brands.

1
YCIS-30001-30
YCIS-30001-36
Have product questions? Need technical support? Please feel free to
contact us:
Technical Support and E-Warranty Certificate
www.vevor.com/support
NEED HELP? CONTACT US!
This is the original instruction, please read all manual instructions
carefully before operating. VEVOR reserves a clear interpretation of our
user manual. The appearance of the product shall be subject to the
product you received. Please forgive us that we won't inform you again if
there are any technology or software updates on our product.
FIRE RING

2
INTRODUCTION
WARNUNG:
BITTE LESEN UND VERSTEHEN SIE VORHER ALLE
SICHERHEITSBESTIMMUNGEN
MONTAGE UND VERWENDUNG DES FEUERRINGS.
REGELN FÜR EINEN SICHEREN BETRIEB:
• Achtung: Nur zur Verwendung im Freien.
• Benutzen Sie den Feuerring nur auf Stein, Erde oder Sand.
• Nur für Erwachsene – erlauben Sie Kindern nicht, den Feuerring zu benutzen.
• Nicht auf Rasenflächen, Holzdecks, Beton oder Asphalt verwenden.
• Verwenden Sie den Feuerring nicht im Innenbereich oder unter einem
Terrassendach.
• Nicht bei Wind verwenden.
• Lassen Sie das Feuer niemals unbeaufsichtigt.
• Verbrennen Sie keinen Müll, Blätter, Papier, Pappe oder Sperrholz in der
Feuerstelle.
• Nicht unter tief hängenden Ästen, Spalieren und Überhängen von Bäumen
verwenden
jeglicher Art , einschließlich überdachter Veranden.
• Verwenden Sie keine brennbaren Flüssigkeiten wie Benzin, Alkohol,
Dieselkraftstoff usw.
Kerosin oder Kohleanzünder zum Anzünden oder Wiederanzünden von Feuern.
• Es sollte darauf geachtet werden, dass alle brennbaren Materialien weit genug
entfernt sind
vom Feuerring entfernt, damit es sich nicht entzündet.
• Benutzen Sie das Gerät stets in Übereinstimmung mit allen geltenden lokalen
und staatlichen Brandschutzbestimmungen.
• Die Nichtbeachtung dieser Anweisungen kann zu einem gefährlichen Brand
führen .
Sachschäden oder Körperverletzungen verursachen
WARNUNG ! ZU IHRER SICHERHEIT:
• Vermeiden Sie die Verwendung von Weichhölzern wie Kiefer oder Zeder, da dies
wahrscheinlich der Fall ist
Funken werfen. Die Verwendung von abgelagertem Hartholz wird empfohlen.
• Erlauben Sie Kindern nicht, den Feuerring zu benutzen. Halten Sie Kinder und
Haustiere fern
vom Feuerring fernhalten, während es in Betrieb ist.
3
• Treffen Sie die gleichen Vorsichtsmaßnahmen wie bei jedem offenen Feuer.
• Tragen Sie beim Bekämpfen eines offenen Feuers keine brennbare oder weite
Kleidung.
• Vermeiden Sie es, Oberflächen zu berühren, da diese extrem heiß sind.
• Stellen Sie sicher, dass das Feuer vollständig gelöscht ist, bevor Sie den
Feuerring verlassen.
• Jegliche Modifikationen an diesem Gerät können gefährlich sein, sind es aber
nicht
gestattet.
Bewahren Sie die Anweisungen auf.
PRODUCT PAREMETERS
Modell
Farbe
Außendurc
hmesser
Innendurch
messer
Höhe
YCIS-30001-30
Schwarz
36 ”
30 ”
10 ”
YCIS-30001-36
Schwarz
42 ”
36 ”
10 ”
PART LIST
Stellen Sie beim Auspacken dieses Produkts sicher, dass die unten aufgeführten
Teile enthalten sind, und überprüfen Sie es sorgfältig auf etwaige
Transportschäden. Versuchen Sie nicht, das Produkt zusammenzubauen oder zu
verwenden, wenn Teile fehlen oder beschädigt.
NEIN
BILD
TEILNAME
MENGE
①
Linke Hälfte
4
②
Rechte Hälfte
4
A
B
4
③
Poker
1
④
Schrauben
16
⑤
Nuss
16
⑥
Handschuh
2

5
INSTALLATION METHODS
Modell : YCIS-30001-30 / YCIS-30001-36
Schritt 1:
Legen Sie den Standort für den Feuerring fest. Stellen Sie sicher, dass der
Feuerring einen sicheren Abstand zu allen brennbaren Materialien hat. Glätten
Sie die Fläche bei Bedarf mit einem Rechen und entfernen Sie trockenes Gras
oder überhängende Äste.
Schritt 2:
Verbinden Sie die linke Hälfte (A) und die rechte Hälfte (B) an der Abschrägung
mit zwei Schrauben und Muttern
Schritt 3:
A
B
B
A
A
A
B
B
A
B

6
Verbinden Sie die linke Hälfte (A) des Flansches mit der rechten Hälfte (B) des
Flansches mit zwei Schrauben und Muttern.
Schritt 4 :
Verbinden Sie die linke Hälfte (A) und die rechte Hälfte (B) an der Abschrägung
mit zwei Schrauben und Muttern
Schritt 5 :
Verbinden Sie die linke Hälfte (A) des Flansches mit der rechten Hälfte (B) des
Flansches mit zwei Schrauben und Muttern.
Schritt 6 :
Verbinden Sie die linke Hälfte (A) und die rechte Hälfte (B) an der Abschrägung
mit zwei Schrauben und Muttern
Schritt 7 :
Verbinden Sie die linke Hälfte (A) des Flansches mit der rechten Hälfte (B) des
Flansches mit zwei Schrauben und Muttern.
Schritt 8 :
Verbinden Sie die linke Hälfte (A) und die rechte Hälfte (B) an der Abschrägung
mit zwei Schrauben und Muttern
Schritt 9 :
Stapeln Sie Brennholz in den Feuerring und zünden Sie das Feuer an.
Nützliche Hinweise:
• Versuchen Sie nicht, den Feuerring einmal zu bewegen
das Feuer wird gelegt.
• Stellen Sie den Feuerring nicht an einem Ort auf, an dem man leicht darüber
stolpern könnte.
• Um optimale Ergebnisse zu erzielen, stapeln Sie das Brennholz zum
Verbrennen in Pyramidenform.

7
Adresse : Shuangchenglu 803nong11hao1602A-1609shi, Baoshanqu,
Shanghai 200000 CN.
Importiert nach AUS: SIHAO PTY LTD, 1 ROKEVA STREETEASTWOOD
NSW 2122 Australien
In die USA importiert: Sanven Technology Ltd., Suite 250, 9166 Anaheim
Place, Rancho Cucamonga, CA 91730
REP
EC
E-CrossStu GmbH
Mainzer Landstr.69, 60329 Frankfurt am Main.
REP
UK
YH CONSULTING LIMITED.
C/O YH Consulting Limited Office 147, Centurion House,
London Road, Staines-upon-Thames, Surrey, TW18 4AX

8


2
Tecnico Supporto e certificato di garanzia elettronica www.vevor.com/support
ANELLO DI FUOCO
MODELLO : YCIS-30001-30 YCIS-30001-36
We continue to be committed to provide you tools with competitive price.
"Save Half", "Half Price" or any other similar expressions used by us only represents an
estimate of savings you might benefit from buying certain tools with us compared to the major
top brands and does not necessarily mean to cover all categories of tools offered by us. You
are kindly reminded to verify carefully when you are placing an order with us if you are
actually saving half in comparison with the top major brands.

1
YCIS-30001-30
YCIS-30001-36
Have product questions? Need technical support? Please feel free to
contact us:
Technical Support and E-Warranty Certificate
www.vevor.com/support
NEED HELP? CONTACT US!
This is the original instruction, please read all manual instructions
carefully before operating. VEVOR reserves a clear interpretation of our
user manual. The appearance of the product shall be subject to the
product you received. Please forgive us that we won't inform you again if
there are any technology or software updates on our product.
FIRE RING

2
INTRODUCTION
AVVERTIMENTO:
SI PREGA DI LEGGERE E COMPRENDERE TUTTE LE NORME DI
SICUREZZA PRIMA
MONTAGGIO E UTILIZZO DELL'ANELLO FUOCO.
REGOLE PER UN FUNZIONAMENTO SICURO:
• Attenzione: solo per uso esterno.
• Utilizzare l'anello di fuoco solo su pietra, terra o sabbia.
• Solo per uso adulto – non permettere ai bambini di utilizzare l'anello di fuoco.
• Non utilizzare su prati, ponti di legno, cemento o asfalto.
• Non utilizzare il braciere in ambienti chiusi o sotto il tetto di una terrazza.
• Non utilizzare in condizioni di vento.
• Non lasciare mai il fuoco incustodito.
• Non bruciare rifiuti, foglie, carta, cartone o compensato nel fuoco.
• Non utilizzare sotto rami di alberi bassi , tralicci e sporgenze
qualsiasi genere , compresi portici coperti.
• Non utilizzare liquidi infiammabili come benzina, alcool, gasolio,
kerosene o accendino per carbone per accendere o riaccendere il fuoco.
• È necessario prestare attenzione per assicurarsi che tutto il materiale
combustibile sia sufficientemente lontano
lontano dall'anello di fuoco per non accendersi.
• Utilizzare sempre in conformità con tutte le norme antincendio locali e statali
applicabili.
• La mancata osservanza di queste istruzioni potrebbe provocare un incendio
pericoloso ,
causare danni materiali o lesioni fisiche
ATTENZIONE ! PER LA VOSTRA SICUREZZA:
• Evitare l'uso di legni teneri come il pino o il cedro, perché è probabile che lo
facciano
lanciare scintille. Si consiglia l'utilizzo di legno duro stagionato.
• Non permettere ai bambini di utilizzare il fuoco. Tenere lontani i bambini e gli
animali domestici
dall'anello di fuoco mentre è in uso.
• Adottare le stesse precauzioni che si utilizzerebbero con qualsiasi fuoco aperto.
• Non indossare indumenti infiammabili o larghi quando si accende un fuoco
aperto.
• Evitare di toccare le superfici poiché saranno estremamente calde.
3
• Assicurarsi che il fuoco sia completamente spento prima di lasciare l'anello di
fuoco.
• Qualsiasi modifica a questo apparecchio può essere pericolosa e non lo è
permesso.
Salva le istruzioni.
PRODUCT PAREMETERS
Modello
Colore
Diametro
esterno
Diametro
interno
Altezza
YCIS-30001-30
Nero
36 ”
30 ”
10 ”
YCIS-30001-36
Nero
42 ”
36 ”
10 ”
PART LIST
Quando si disimballa il prodotto, assicurarsi che le parti elencate di seguito siano
incluse e ispezionare attentamente per eventuali danni che potrebbero essersi
verificati durante il trasporto. Non tentare di assemblare o utilizzare il prodotto se
manca qualche parte o danneggiato.
NO
IMMAGINE
NOME DELLA PARTE
QUANT
ITÀ
①
Metà sinistra
4
②
Metà destra
4
③
Poker
1
A
B

4
④
Vite
16
⑤
Noce
16
⑥
Guanto
2

5
INSTALLATION METHODS
Modello : YCIS-30001-30 / YCIS-30001-36
Passo 1:
Decidi il luogo in cui posizionare l'anello di fuoco. Assicurarsi che il braciere sia
a distanza di sicurezza da tutti i materiali combustibili. Utilizzando un rastrello,
livella l'area se necessario e rimuovi l'erba secca o i rami degli alberi sporgenti.
Passo 2:
Collegare la metà sinistra (A) e la metà destra (B) alla smussatura con due viti e
dadi
Passaggio 3:
Collegare la metà sinistra (A) della flangia alla metà destra (B) della flangia con
A
B
B
A
A
A
B
B
A
B

6
due viti e dadi.
Passaggio 4 :
Collegare la metà sinistra (A) e la metà destra (B) alla smussatura con due viti e
dadi
Passaggio 5 :
Collegare la metà sinistra (A) della flangia alla metà destra (B) della flangia con
due viti e dadi.
Passaggio 6 :
Collegare la metà sinistra (A) e la metà destra (B) alla smussatura con due viti e
dadi
Passaggio 7 :
Collegare la metà sinistra (A) della flangia alla metà destra (B) della flangia con
due viti e dadi.
Passaggio 8 :
Collegare la metà sinistra (A) e la metà destra (B) alla smussatura con due viti e
dadi
Passaggio 9 :
Impila la legna da ardere nell'anello di fuoco e accendi il fuoco.
Suggerimenti utili:
• Non tentare di spostare l'anello di fuoco una sola volta
è appiccato l'incendio.
• Non posizionare l'anello di fuoco in un'area in cui potrebbe essere facilmente
inciampato.
• Per ottenere i migliori risultati, impilare la legna da ardere a forma piramidale
per bruciarla.

7
Indirizzo : Shuangchenglu 803nong11hao1602A-1609shi, baoshanqu,
shanghai 200000 CN.
Importato in AUS: SIHAO PTY LTD, 1 ROKEVA STREETEASTWOOD
NSW 2122 Australia
Importato negli Stati Uniti: Sanven Technology Ltd., Suite 250, 9166
Anaheim Place, Rancho Cucamonga, CA 91730
REP
EC
E-CrossStu GmbH
Mainzer Landstr.69, 60329 Frankfurt am Main.
REP
UK
YH CONSULTING LIMITED.
C/O YH Consulting Limited Office 147, Centurion House,
London Road, Staines-upon-Thames, Surrey, TW18 4AX

8


2
Técnico Soporte y certificado de garantía electrónica www.vevor.com/support
ARO DE FUEGO
MODELO : YCIS-30001-30 YCIS-30001-36
We continue to be committed to provide you tools with competitive price.
"Save Half", "Half Price" or any other similar expressions used by us only represents an
estimate of savings you might benefit from buying certain tools with us compared to the major
top brands and does not necessarily mean to cover all categories of tools offered by us. You
are kindly reminded to verify carefully when you are placing an order with us if you are
actually saving half in comparison with the top major brands.

1
YCIS-30001-30
YCIS-30001-36
Have product questions? Need technical support? Please feel free to
contact us:
Technical Support and E-Warranty Certificate
www.vevor.com/support
NEED HELP? CONTACT US!
This is the original instruction, please read all manual instructions
carefully before operating. VEVOR reserves a clear interpretation of our
user manual. The appearance of the product shall be subject to the
product you received. Please forgive us that we won't inform you again if
there are any technology or software updates on our product.
FIRE RING

2
INTRODUCTION
ADVERTENCIA:
POR FAVOR LEA Y COMPRENDA TODAS LAS REGLAS DE SEGURIDAD
ANTES
MONTAJE Y USO DEL ANILLO DE FUEGO.
REGLAS PARA UNA OPERACIÓN SEGURA:
• Precaución: Sólo para uso en exteriores.
• Utilice el anillo de fuego únicamente sobre piedra, tierra o arena.
• Sólo para uso de adultos: no permita que los niños utilicen el aro de fuego.
• No lo use sobre césped, terrazas de madera, concreto o asfalto.
• No utilice el brasero en interiores o bajo el techo de un patio.
• No lo use en condiciones de viento.
• No deje el fuego desatendido en ningún momento.
• No queme basura, hojas, papel, cartón o madera contrachapada en el fogón.
• No lo use debajo de ramas bajas de árboles , enrejados y salientes de
de cualquier tipo , incluidos porches cubiertos.
• No utilice líquidos inflamables como gasolina, alcohol, combustible diesel,
encendedor de queroseno o carbón para encender o reencender el fuego.
• Se debe tener cuidado para asegurarse de que todo el material combustible esté
lo suficientemente lejos
lejos del anillo de fuego para no encenderse.
• Úselo siempre de acuerdo con todos los códigos de incendio locales y estatales
aplicables.
• No seguir estas instrucciones podría provocar un incendio peligroso .
causando daños a la propiedad o lesiones físicas
¡ADVERTENCIA ! PARA SU SEGURIDAD:
• Evite el uso de maderas blandas como el pino o el cedro, porque es probable
que
tirar chispas. Se recomienda el uso de madera dura curada.
• No permita que los niños utilicen el anillo de fuego. Mantenga alejados a los
niños y las mascotas
del anillo de fuego mientras está en uso.
• Tome las mismas precauciones que tomaría con cualquier fuego abierto.
• No use ropa inflamable o holgada cuando atienda un fuego abierto.
• Evite tocar superficies, ya que estarán extremadamente calientes.
• Asegúrese de que el fuego esté completamente extinguido antes de abandonar
el área de incendio.
3
• Cualquier modificación a este aparato puede ser peligrosa y no está
permitido.
Guarde las instrucciones.
PRODUCT PAREMETERS
Modelo
Color
Diámetro
externo
Diámetro
interno
Altura
YCIS-30001-30
Negro
36 ”
30 ”
10 ”
YCIS-30001-36
Negro
42 ”
36 ”
10 ”
PART LIST
Al desembalar este producto, asegúrese de que las piezas que se enumeran a
continuación estén incluidas e inspecciónelas cuidadosamente para detectar
cualquier daño que pueda haber ocurrido durante el transporte. No intente
ensamblar ni utilizar el producto si falta alguna pieza o dañado.
NO
IMAGEN
NOMBRE DE LA PARTE
CANTI
DAD
①
Mitad izquierda
4
②
Mitad derecha
4
③
Póquer
1
④
Tornillo
dieciséi
s
A
B

4
⑤
Tuerca
dieciséi
s
⑥
Guante
2
5
INSTALLATION METHODS
Modelo : YCIS-30001-30 / YCIS-30001-36
Paso 1:
Decide la ubicación del anillo de fuego. Asegúrese de que el anillo de fuego
esté a una distancia segura de todos los materiales combustibles. Con un
rastrillo, nivele el área si es necesario y retire el pasto seco o las ramas de
árboles que sobresalgan.
Paso 2:
Conecte la mitad izquierda (A) y la mitad derecha (B) en el bisel con dos
tornillos y tuercas.
Paso 3:
A
B
B
A
A
A
B
B
A
B

6
Conecte la mitad izquierda (A) de la brida a la mitad derecha (B) de la brida con
dos tornillos y tuercas.
Etapa 4 :
Conecte la mitad izquierda (A) y la mitad derecha (B) en el bisel con dos
tornillos y tuercas.
Paso 5 :
Conecte la mitad izquierda (A) de la brida a la mitad derecha (B) de la brida con
dos tornillos y tuercas.
Paso 6 :
Conecte la mitad izquierda (A) y la mitad derecha (B) en el bisel con dos
tornillos y tuercas.
Paso 7 :
Conecte la mitad izquierda (A) de la brida a la mitad derecha (B) de la brida con
dos tornillos y tuercas.
Paso 8 :
Conecte la mitad izquierda (A) y la mitad derecha (B) en el bisel con dos
tornillos y tuercas.
Paso 9 :
Apila leña en un aro de fuego y enciende el fuego.
Consejos útiles:
• No intente mover el anillo de fuego una vez
se inicia el fuego.
• No coloque el anillo de fuego en un área donde pueda tropezar fácilmente.
• Para obtener mejores resultados, apile la leña en forma de pirámide para
quemarla.

7
Dirección : Shuangchenglu 803nong11hao1602A-1609shi, baoshanqu,
shanghai 200000 CN.
Importado a AUS: SIHAO PTY LTD, 1 ROKEVA STREETEASTWOOD
NSW 2122 Australia
Importado a EE. UU.: Sanven Technology Ltd., Suite 250, 9166 Anaheim
Place, Rancho Cucamonga, CA 91730
REP
EC
E-CrossStu GmbH
Mainzer Landstr.69, 60329 Frankfurt am Main.
REP
UK
YH CONSULTING LIMITED.
C/O YH Consulting Limited Office 147, Centurion House,
London Road, Staines-upon-Thames, Surrey, TW18 4AX

8


2
Techniczny Certyfikat wsparcia i e-gwarancji www.vevor.com/support
PIERŚCIEŃ OGNIA
MODEL : YCIS-30001-30 YCIS-30001-36
We continue to be committed to provide you tools with competitive price.
"Save Half", "Half Price" or any other similar expressions used by us only represents an
estimate of savings you might benefit from buying certain tools with us compared to the major
top brands and does not necessarily mean to cover all categories of tools offered by us. You
are kindly reminded to verify carefully when you are placing an order with us if you are
actually saving half in comparison with the top major brands.
1
YCIS-30001-30
YCIS-30001-36
Have product questions? Need technical support? Please feel free to
contact us:
Technical Support and E-Warranty Certificate
www.vevor.com/support
NEED HELP? CONTACT US!
This is the original instruction, please read all manual instructions
carefully before operating. VEVOR reserves a clear interpretation of our
user manual. The appearance of the product shall be subject to the
product you received. Please forgive us that we won't inform you again if
there are any technology or software updates on our product.
FIRE RING

2
INTRODUCTION
OSTRZEŻENIE:
PROSZĘ PRZECZYTAĆ I ZROZUMIEĆ WSZYSTKIE ZASADY
BEZPIECZEŃSTWA PRZED
MONTAŻ I UŻYTKOWANIE PIERŚCIENIA OGNIOWEGO.
ZASADY BEZPIECZNEJ OBSŁUGI:
• Uwaga: wyłącznie do użytku na zewnątrz.
• Używaj pierścienia ognia wyłącznie na kamieniu, ziemi lub piasku.
• Tylko do użytku przez osoby dorosłe – nie pozwalaj dzieciom korzystać z
pierścienia ogniowego.
• Nie stosować na trawnikach, tarasach drewnianych, betonie lub asfalcie.
• Nie używaj pierścienia ogniowego w pomieszczeniach zamkniętych lub pod
dachem patio.
• Nie używać przy wietrznej pogodzie.
• Nigdy nie pozostawiaj ognia bez nadzoru.
• W palenisku nie wolno palić śmieci, liści, papieru, tektury ani sklejki.
• Nie stosować pod nisko wiszącymi gałęziami drzew, kratami i zwisami drzew
wszelkiego rodzaju , łącznie z zadaszonymi werandami.
• Nie używaj łatwopalnych cieczy, takich jak benzyna, alkohol, olej napędowy,
nafta lub zapalniczka węglowa do rozpalania lub ponownego rozpalania ogniska.
• Należy zachować ostrożność i upewnić się, że wszystkie materiały palne
znajdują się w wystarczającej odległości
z dala od pierścienia ognia, aby się nie zapalić.
• Zawsze używaj zgodnie ze wszystkimi obowiązującymi lokalnymi i stanowymi
przepisami przeciwpożarowymi.
• Niezastosowanie się do tych instrukcji może spowodować niebezpieczny pożar ,
powodując uszkodzenie mienia lub obrażenia ciała
UWAGA ! DLA TWOJEGO BEZPIECZEŃSTWA:
• Unikaj stosowania drewna iglastego, takiego jak sosna lub cedr, ponieważ jest to
prawdopodobne
rzucać iskry. Zaleca się stosowanie sezonowanego, twardego drewna.
• Nie pozwalaj dzieciom korzystać z pierścienia ogniowego. Trzymaj dzieci i
zwierzęta z daleka
z pierścienia ognia, gdy jest on używany.
• Zachowaj takie same środki ostrożności jak w przypadku otwartego ognia.
• Podczas obsługi otwartego ognia nie należy nosić łatwopalnej lub luźnej odzieży.
• Unikaj dotykania powierzchni, ponieważ będą one bardzo gorące.
3
• Przed opuszczeniem pierścienia należy upewnić się, że ogień został całkowicie
ugaszony.
• Wszelkie modyfikacje tego urządzenia mogą być niebezpieczne i takie nie są
dozwolony.
Zapisz instrukcje.
PRODUCT PAREMETERS
Model
Kolor
Średnica
zewnętrzna
Średnica
wewnętrzna
Wysokość
YCIS-30001-30
Czarny
36 ”
30 ”
10 ”
YCIS-30001-36
Czarny
42 ”
36 ”
10 ”
PART LIST
Rozpakowując ten produkt, upewnij się, że w zestawie znajdują się wymienione
poniżej części i dokładnie sprawdź, czy nie występują uszkodzenia, które mogły
powstać podczas transportu. Nie próbuj montować ani używać produktu, jeśli
brakuje jakiejkolwiek części lub uszkodzony.
NIE
ZDJĘCIE
CZĘŚCIOWE IMIĘ
ILOŚĆ
①
Lewa połowa
4
②
Prawa połowa
4
③
OK
1
④
Śruba
16
A
B

4
⑤
Orzech
16
⑥
Rękawica
2

5
INSTALLATION METHODS
Model : YCIS-30001-30 / YCIS-30001-36
Krok 1:
Zdecyduj o lokalizacji pierścienia ognia. Upewnij się, że pierścień ognia
znajduje się w bezpiecznej odległości od wszystkich materiałów palnych. W
razie potrzeby wyrównaj teren za pomocą grabi i usuń suchą trawę lub
zwisające gałęzie drzew.
Krok 2:
Połącz lewą połowę (A) i prawą połowę (B) przy skosie za pomocą dwóch śrub i
nakrętek
Krok 3:
A
B
B
A
A
A
B
B
A
B

6
Połącz lewą połowę (A) kołnierza z prawą połową (B) kołnierza za pomocą
dwóch śrub i nakrętek.
Krok 4 :
Połącz lewą połowę (A) i prawą połowę (B) przy skosie za pomocą dwóch śrub i
nakrętek
Krok 5 :
Połącz lewą połowę (A) kołnierza z prawą połową (B) kołnierza za pomocą
dwóch śrub i nakrętek.
Krok 6 :
Połącz lewą połowę (A) i prawą połowę (B) przy skosie za pomocą dwóch śrub i
nakrętek
Krok 7 :
Połącz lewą połowę (A) kołnierza z prawą połową (B) kołnierza za pomocą
dwóch śrub i nakrętek.
Krok 8 :
Połącz lewą połowę (A) i prawą połowę (B) przy skosie za pomocą dwóch śrub i
nakrętek
Krok 9 :
Ułóż drewno opałowe w pierścieniu ognia i rozpal ogień.
Pomocne wskazówki:
• Nie próbuj jednokrotnie poruszać pierścieniem ognia
rozpoczyna się ogień.
• Nie umieszczaj pierścienia ogniowego w miejscu, o który można się łatwo
potknąć.
• Aby uzyskać najlepsze rezultaty, drewno opałowe należy układać w kształcie
piramidy.

7
Adres : Shuangchenglu 803nong11hao1602A-1609shi, baoshanqu,
szanghaj 200000 CN.
Import do AUS: SIHAO PTY LTD, 1 ROKEVA STREETEASTWOOD NSW
2122 Australia
Import do USA: Sanven Technology Ltd., Suite 250, 9166 Anaheim Place,
Rancho Cucamonga, CA 91730
REP
EC
E-CrossStu GmbH
Mainzer Landstr.69, 60329 Frankfurt am Main.
REP
UK
YH CONSULTING LIMITED.
C/O YH Consulting Limited Office 147, Centurion House,
London Road, Staines-upon-Thames, Surrey, TW18 4AX

8


2
Technisch Ondersteuning en e-garantiecertificaat www.vevor.com/support
VUUR RING
MODEL : YCIS-30001-30 YCIS-30001-36
We continue to be committed to provide you tools with competitive price.
"Save Half", "Half Price" or any other similar expressions used by us only represents an
estimate of savings you might benefit from buying certain tools with us compared to the major
top brands and does not necessarily mean to cover all categories of tools offered by us. You
are kindly reminded to verify carefully when you are placing an order with us if you are
actually saving half in comparison with the top major brands.

1
YCIS-30001-30
YCIS-30001-36
Have product questions? Need technical support? Please feel free to
contact us:
Technical Support and E-Warranty Certificate
www.vevor.com/support
NEED HELP? CONTACT US!
This is the original instruction, please read all manual instructions
carefully before operating. VEVOR reserves a clear interpretation of our
user manual. The appearance of the product shall be subject to the
product you received. Please forgive us that we won't inform you again if
there are any technology or software updates on our product.
FIRE RING

2
INTRODUCTION
WAARSCHUWING:
LEES EN BEGRIJP ALLE VEILIGHEIDSREGELS VOORDAT
MONTAGE EN GEBRUIK VAN DE VUURRING.
REGELS VOOR VEILIGE BEDIENING:
• Let op: uitsluitend voor gebruik buitenshuis.
• Gebruik de vuurring alleen op steen, vuil of zand.
• Alleen voor gebruik door volwassenen – laat kinderen de vuurring niet gebruiken.
• Niet gebruiken op gazons, houten terrassen, beton of asfalt.
• Gebruik de vuurring niet binnenshuis of onder een terrasoverkapping.
• Niet gebruiken bij winderige omstandigheden.
• Laat het vuur nooit onbeheerd achter.
• Verbrand geen afval, bladeren, papier, karton of multiplex in de vuurring.
• Niet gebruiken onder laaghangende boomtakken , latwerk en overhangen
welke soort dan ook , inclusief overdekte veranda's.
• Gebruik geen ontvlambare vloeistoffen zoals benzine, alcohol, dieselbrandstof,
kerosine of houtskoolaansteker om vuur aan te steken of opnieuw aan te steken.
• Zorg ervoor dat al het brandbare materiaal ver genoeg verwijderd is
uit de buurt van de vuurring om niet te ontbranden.
• Altijd gebruiken in overeenstemming met alle toepasselijke lokale en nationale
brandvoorschriften.
• Het niet opvolgen van deze instructies kan leiden tot een gevaarlijke brand ,
materiële schade of lichamelijk letsel veroorzaken
W AARSCHUWING! VOOR UW VEILIGHEID:
• Vermijd het gebruik van zachthout zoals dennen- of cederhout, omdat dit
waarschijnlijk zal gebeuren
vonken gooien. Het gebruik van doorgewinterd hardhout wordt aanbevolen.
• Laat kinderen de vuurring niet gebruiken. Houd kinderen en huisdieren uit de
buurt
van de vuurring terwijl deze in gebruik is.
• Neem dezelfde voorzorgsmaatregelen als bij open vuur.
• Draag geen brandbare of losse kleding wanneer u een open vuur onderhoudt.
• Vermijd het aanraken van oppervlakken, aangezien deze extreem heet zullen
zijn.
• Zorg ervoor dat de brand volledig is gedoofd voordat u de vuurring verlaat.
• Eventuele wijzigingen aan dit apparaat kunnen gevaarlijk zijn en zijn dat niet
toegestaan.
3
Bewaar de instructies.
PRODUCT PAREMETERS
Model
Kleur
Buitenste
diameter
Binnen
diameter
Hoogte
YCIS-30001-30
Zwart
36 ”
30 ”
10 ”
YCIS-30001-36
Zwart
42 ”
36 ”
10 ”
PART LIST
Zorg er bij het uitpakken van dit product voor dat de onderstaande onderdelen
aanwezig zijn en controleer zorgvuldig op eventuele schade die tijdens het
transport is ontstaan. Probeer het product niet te monteren of te gebruiken als er
een onderdeel ontbreekt of beschadigd.
NEE
AFBEELDING
DEELNAAM
AANTA
L
①
Linker helft
4
②
Rechterhelft
4
③
P oker
1
④
Schroef
16
A
B

4
⑤
Noot
16
⑥
Handschoen
2

5
INSTALLATION METHODS
Model : YCIS-30001-30 / YCIS-30001-36
Stap 1:
Bepaal de locatie voor de vuurring. Zorg ervoor dat de vuurring zich op veilige
afstand van alle brandbare materialen bevindt. Gebruik een hark om het gebied
indien nodig waterpas te maken en eventueel droog gras of overhangende
boomtakken te verwijderen.
Stap 2:
Verbind de linkerhelft (A) en de rechterhelft (B) op de schuine kant met twee
schroeven en moeren
Stap 3:
A
B
B
A
A
A
B
B
A
B

6
Verbind de linkerhelft (A) van de flens met de rechterhelft (B) van de flens met
twee schroeven en moeren.
Stap 4 :
Verbind de linkerhelft (A) en de rechterhelft (B) op de schuine kant met twee
schroeven en moeren
Stap 5 :
Verbind de linkerhelft (A) van de flens met de rechterhelft (B) van de flens met
twee schroeven en moeren.
Stap 6 :
Verbind de linkerhelft (A) en de rechterhelft (B) op de schuine kant met twee
schroeven en moeren
Stap 7 :
Verbind de linkerhelft (A) van de flens met de rechterhelft (B) van de flens met
twee schroeven en moeren.
Stap 8 :
Verbind de linkerhelft (A) en de rechterhelft (B) op de schuine kant met twee
schroeven en moeren
Stap 9 :
Stapel brandhout in de vuurring en steek het vuur aan.
Handige tips:
• Probeer de vuurring niet één keer te verplaatsen
het vuur wordt aangestoken.
• Plaats de vuurring niet op een plaats waar men gemakkelijk kan struikelen.
• Voor het beste resultaat stapelt u het brandhout in piramidevorm om te
verbranden.

7
Adres : Shuangchenglu 803nong11hao1602A-1609shi, baoshanqu,
shanghai 200000 CN.
Geïmporteerd naar AUS: SIHAO PTY LTD, 1 ROKEVA
STREETEASTWOOD NSW 2122 Australië
Geïmporteerd naar de VS: Sanven Technology Ltd., Suite 250, 9166
Anaheim Place, Rancho Cucamonga, CA 91730
REP
EC
E-CrossStu GmbH
Mainzer Landstr.69, 60329 Frankfurt am Main.
REP
UK
YH CONSULTING LIMITED.
C/O YH Consulting Limited Office 147, Centurion House,
London Road, Staines-upon-Thames, Surrey, TW18 4AX

8


2
Teknisk Support och e-garanticertifikat www.vevor.com/support
BRANDRING
MODELL : YCIS-30001-30 YCIS-30001-36
We continue to be committed to provide you tools with competitive price.
"Save Half", "Half Price" or any other similar expressions used by us only represents an
estimate of savings you might benefit from buying certain tools with us compared to the major
top brands and does not necessarily mean to cover all categories of tools offered by us. You
are kindly reminded to verify carefully when you are placing an order with us if you are
actually saving half in comparison with the top major brands.

1
YCIS-30001-30
YCIS-30001-36
Have product questions? Need technical support? Please feel free to
contact us:
Technical Support and E-Warranty Certificate
www.vevor.com/support
NEED HELP? CONTACT US!
This is the original instruction, please read all manual instructions
carefully before operating. VEVOR reserves a clear interpretation of our
user manual. The appearance of the product shall be subject to the
product you received. Please forgive us that we won't inform you again if
there are any technology or software updates on our product.
FIRE RING

2
INTRODUCTION
VARNING:
LÄS OCH FÖRSTÅ ALLA SÄKERHETSREGLER INNAN
MONTERING OCH ANVÄNDNING AV BRANDRING.
REGLER FÖR SÄKER ANVÄNDNING:
• Varning: Endast för utomhusbruk.
• Använd endast eldningsringen på sten, smuts eller sand.
• Endast för vuxna – låt inte barn använda eldstaden.
• Använd inte på gräsmattor, trädäck, betong eller asfalt.
• Använd inte eldstaden inomhus eller under ett altantak.
• Använd inte i blåsiga förhållanden.
• Lämna aldrig elden obevakad när som helst.
• Bränn inte skräp, löv, papper, kartong eller plywood i eldstaden.
• Använd inte under lågt hängande trädgrenar, spaljéer och överhäng av
alla slag , inklusive täckta verandor.
• Använd inte brandfarliga vätskor som bensin, alkohol, dieselbränsle,
fotogen, eller träkolständare för att tända eller tända eld.
• Se till att allt brännbart material är tillräckligt långt borta
bort från brandringen för att inte antändas.
• Använd alltid i enlighet med alla tillämpliga lokala och statliga brandregler.
• Underlåtenhet att följa dessa instruktioner kan resultera i en farlig brand ,
orsakar egendomsskada eller fysisk skada
VARNING ! FÖR DIN SÄKERHET:
• Undvik att använda barrträd som tall eller cederträ, eftersom de sannolikt gör det
kasta gnistor. Användning av kryddat lövträ rekommenderas.
• Låt inte barn använda eldstaden. Håll barn och husdjur borta
från eldstaden medan den används.
• Iaktta samma försiktighetsåtgärder som vid all öppen eld.
• Bär inte lättantändliga eller löst sittande kläder när du sköter öppen eld.
• Undvik att vidröra ytor eftersom de blir extremt varma.
• Se till att elden är helt släckt innan den lämnar brandringen.
• Alla modifieringar av denna apparat kan vara farliga och är det inte
tillåtet.
Spara instruktionerna.
3
PRODUCT PAREMETERS
Modell
Färg
Yttre
diameter
Innerdiamet
er
Höjd
YCIS-30001-30
Svart
36 ”
30 ”
10 ”
YCIS-30001-36
Svart
42 ”
36 ”
10 ”
PART LIST
När du packar upp denna produkt, se till att delarna som listas nedan ingår och
inspektera noggrant för eventuella skador som kan ha uppstått under transporten.
Försök inte att montera eller använda produkten om någon del saknas eller
skadad.
NEJ
BILD
DELNAMN
ANTAL
①
Vänstra halvan
4
②
Höger halva
4
③
P oker
1
④
Skruva
16
⑤
Nöt
16
⑥
Handske
2
A
B

4
INSTALLATION METHODS
Modell : YCIS-30001-30 / YCIS-30001-36
Steg 1:
Bestäm plats för eldstaden. Se till att eldstaden är på ett säkert avstånd från alla
brännbara material. Använd en kratta, jämna till området vid behov och ta bort
torrt gräs eller överhängande trädgrenar.
Steg 2:
Anslut den vänstra halvan (A) och den högra halvan (B) vid fasningen med två
skruvar och muttrar
Steg 3:
Anslut den vänstra halvan (A) av flänsen till den högra halvan (B) av flänsen
A
B
B
A
A
A
B
B
A
B

5
med två skruvar och muttrar.
Steg 4 :
Anslut den vänstra halvan (A) och den högra halvan (B) vid fasningen med två
skruvar och muttrar
Steg 5 :
Anslut den vänstra halvan (A) av flänsen till den högra halvan (B) av flänsen
med två skruvar och muttrar.
Steg 6 :
Anslut den vänstra halvan (A) och den högra halvan (B) vid fasningen med två
skruvar och muttrar
Steg 7 :
Anslut den vänstra halvan (A) av flänsen till den högra halvan (B) av flänsen
med två skruvar och muttrar.
Steg 8 :
Anslut den vänstra halvan (A) och den högra halvan (B) vid fasningen med två
skruvar och muttrar
Steg 9 :
Stapla ved i eldstaden och tänd elden.
Hjälpsamma ledtrådar:
• Försök inte att flytta brandringen en gång
elden är anlagd.
• Placera inte eldstaden i ett område där den lätt kan snubbla över.
• För bästa resultat, stapla ved i pyramidform för förbränning.

6
Adress : Shuangchenglu 803nong11hao1602A-1609shi, baoshanqu,
shanghai 200000 CN.
Importerad till AUS: SIHAO PTY LTD, 1 ROKEVA STREETEASTWOOD
NSW 2122 Australien
Importerad till USA: Sanven Technology Ltd., Suite 250, 9166 Anaheim
Place, Rancho Cucamonga, CA 91730
REP
EC
E-CrossStu GmbH
Mainzer Landstr.69, 60329 Frankfurt am Main.
REP
UK
YH CONSULTING LIMITED.
C/O YH Consulting Limited Office 147, Centurion House,
London Road, Staines-upon-Thames, Surrey, TW18 4AX