
BIT HOLDER
PORTE-EMBOUTS
PORTAPUNTAS
IMPORTANT SAFETY
INSTRUCTIONS
WARNING
READ ALL SAFETY WARNINGS,
INSTRUCTIONS, ILLUSTRA-
TIONS AND SPECIFICATIONS PROVIDED
WITH THIS PRODUCT AND ANY POWER
TOOLS TO BE USED WITH THIS KIT. Failure
to follow all instructions listed below may result
in electric shock, re and/or serious injury.
SAVE THESE INSTRUCTIONS - THIS OPERA-
TOR’S MANUAL CONTAINS IMPORTANT
SAFETY AND OPERATING INSTRUCTIONS.
WARNING
Not for use with tethered tools.
Bits could disengage and cause
injury.
ASSEMBLY
WARNING
To reduce the risk of injury, al-
ways remove battery pack before
making any adjustments or changing acces-
sories. Only use accessories specically recom-
mended for this tool. Others may be hazardous.
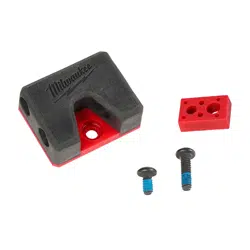
Installing Bit Holder
1. Kit includes Bit Holder, M12™ Adapter, M12™
Screw (Long), M18™ Screw (Short).
2. Remove battery pack.
3. Can be installed on either side of tool. Remove/
move belt clip if necessary.
4. Hand tighten screw securely (as shown in image
above). Do NOT use power tool.
Bit Holder will hold 1/4" hex shank bits. Insert bit(s)
fully into the holder.
INSTRUCTIONS IMPORTANTES
CONCERNANT LA SÉCURITÉ
AVERTISSEMENT
CONSULTER TOUS LES
AVERTISSEMENTS DE
SÉCURITÉ, TOUTES LES INSTRUCTIONS,
TOUTES LES ILLUSTRATIONS ET TOUTES LES
SPÉCIFICATIONS FOURNIES AVEC CE PRODUIT
ET TOUT AUTRE OUTIL ÉLECTRIQUE QUI SERA
UTILISÉ AVEC CET ENSEMBLE. Le non-respect
de toutes les instructions ci-dessous peut en-
traîner un choc électrique, un incendie et/ou des
blessures graves. GARDER CES INSTRUC-
TIONS. LE MANUEL D’UTILISATION CONTIENT
D’IMPORTANTES INSTRUCTIONS DE SÉCURITÉ
ET DE FONCTIONNEMENT.
AVERTISSEMENT
Ne pas utiliser jumelé à
des outils fixés. Les
pointes pourraient se désengager et causer des
blessures.
ASSEMBLAGE
AVERTISSEMENT
An de minimiser le ris-
que de blessures, tou-
jours retirer le bloc-piles avant d’entreprendre
tout ajustement ou de changer les accessoires.
Utiliser uniquement des accessoires spéciale-
ment recommandés pour cet outil. En utiliser
d’autres pourra poser un danger.
Installation du porte-embouts
1. L’ensemble comprend le porte-embouts,
l’adaptateur M12™, la vis M12™ (longue), la vis
M18™ (courte).
2. Retirer le bloc-piles.
3. Il est possible de l’installer dans n’importe quel
côté de l’outil. Retirer/bouger le clip de ceinture
si nécessaire.
4. Bien serrer la vis à la main (comme illustré
dans l’image ci-dessus). NE PAS utiliser un outil
électrique.
Le porte-embout soutiendra des tiges hexagonales
de 6 mm (1/4"). Insérer l’embout ou les embouts
dans le porte-embouts.
Cat. No. / No de cat.
49-16-3697
(For use with M18™ only)
(À utiliser avec M18™ uniquement)
(Para su uso exclusivo con M18™)
(For use with M12™ only)
(À utiliser avec M12™ uniquement)
(Para su uso exclusivo con M2™)
TM TM
TM TM

MILWAUKEE TOOL
13135 West Lisbon Road • Brookeld, WI 53005 USA
58223697d1 11/21 961014398-01(A)
Printed in
INSTRUCCIONES DE SEGURIDAD
IMPORTANTES
ADVERTENCIA
CONSULTE TODAS LAS
ADVERTENCIAS DE SEGU-
RIDAD, LAS INSTRUCCIONES, LAS ILUSTRA-
CIONES Y LAS ESPECIFICACIONES QUE
ACOMPAÑAN ESTE PRODUCTO, ASÍ COMO LAS
HERRAMIENTAS ELÉCTRICAS QUE SE UTILICEN
CON ESTE JUEGO. No seguir todas las instruc-
ciones que se enumeran a continuación podría
provocar una descarga eléctrica, incendio o
lesiones personales graves. GUARDE ESTAS
INSTRUCCIONES. EL MANUAL DEL OPERADOR
CONTIENE INSTRUCCIONES IMPORTANTES DE
SEGURIDAD Y OPERACIÓN.
ADVERTENCIA
No se utilice con herramien-
tas jadas. Las puntas po-
drían desengancharse y provocar lesiones.
ENSAMBLADO
ADVERTENCIA
Para reducir el riesgo de
lesión, siempre retire la
batería antes de realizar algún ajuste o cambiar
los accesorios. Utilice únicamente accesorios
especícamente recomendados para esta her-
ramienta. Utilizar otros accesorios podrá ser
peligroso.
Instalación del portapuntas
1. El juego incluye el portapuntas, el adaptador
M12™, el tornillo M12™ (largo), tornillo M18™
(corto).
2. Quite la batería.
3. Puede instalarse en cualquiera de los lados de
la herramienta. Quite/mueva el gancho para
cinturón de ser necesario.
4. Apriete rmemente el tornillo con la mano (tal
como se muestra en la imagen). NO utilice ningún
tipo de herramienta eléctrica.
El portapuntas sostendrá las espigas hexagonales
de 6 mm (1/4"). Inserte la o las puntas hasta el fondo
del portapuntas.