
Atlona Manuals
Software
Velocity Device Manager
AT-VDM-SW
Device Manager
Velocity Device Manager
2
Version Release Date Notes
1 Mar 2018 Initial release
2 Oct 2018 Updated to include Activation, API, and admin profile
3 Feb 2019 Updated to include new Scan Networks instructions
4 Mar 2019 Updated Roles and Permissions
5 June 2019 Updated Firmware updating instructions to include online and offline updating
Updated Devices section to include FW 2.3 updates
6 Aug 2019 Updated for Firmware 2.4.0 Registration requirements
Updated device Firmware instructions for updating by site/building/room,
hostname, or alias.
7 Oct 2019 Updated Device List for new 2.5.0 screenshots.
Added Device List Settings section.
8 Mar 2020 Updated with new screenshots for integration with Velocity FW 2.0.0+.
9 Apr 2020 Updated with new navigation for firmware V2.1.0.
10 May 2021 Updated for Velocity w/Integrated AMS firmware 2.3.3
Added:
• Home Page section
• 3rd Party Devices configuration section
11 Nov 2022 Updated for AT-AMS-SW sku change to AT-VDM-SW and new manual format.
Version Information

Velocity Device Manager
3
Thank you for purchasing this Atlona product. We hope you enjoy it and will take a extra few moments to register
your new purchase.
Registration only takes a few minutes and protects this product against theft or loss. In addition, you will receive
notications of product updates and rmware. Atlona product registration is voluntary and failure to register will not
aect the product warranty.
To register your product, go to https://www.atlona.com/registration
As of this writing, there are no rmware updates for this product. When new rmware is released, update instructions
will be included with the rmware and will be appended to this manual.
Sales, Marketing, and Customer Support
Welcome to Atlona!
Operating Notes
Main Oce
Atlona Incorporated
70 Daggett Drive
San Jose, CA 95134
United States
Oce: +1.877.536.3976 (US Toll-free)
Oce: +1.408.962.0515 (US/International)
Sales and Customer Service Hours
Monday - Friday: 6:00 a.m. - 4:30 p.m. (PST)
https://atlona.com/
International Headquarters
Atlona International AG
Tödistrasse 18
8002 Zürich
Switzerland
Oce: +41 43 508 4321
Sales and Customer Service Hours
Monday - Friday: 09:00 - 17:00 (UTC +1)

Velocity Device Manager
4
Table of Contents
Log In 6
System Settings 7
General 7
Gateway 7
Gateway Settings 7
Time Settings 8
Enable NTP Clock Synchronization 8
API Settings 8
Atlona Device Manager Settings 8
Linked Gateways 8
SNMP 8
Firmware 9
Database 10
Backup To Memory Location 10
Backups Available For Restore 10
Upload 10
Database Restore History 10
Redundancy Settings 10
Cloud 11
Licenses 11
Tools 12
Security 14
Allow Anonymous Room Control Access 14
Networks 16
Reset Password 18
Home Page 19
Explorer 19
Chrome 19
Firefox 19
Gateway Information 20
Usage Information 20
Customization 21
Devices 22
Device List 22
Scan Networks 22
Device List Settings 23
Login / Credentials Update 24
Firmware 24
Delete All Devices 26
Add Site 27
Add Building 27
Add Room 28
Device Options 29
IP 29
Reconnect 29
Re-sync 30
Firmware Update 30
View Logs 31
Move Device 31
Delete Device 31
Device Conguration 32
3rd Party Devices 33
Adding a Device 33
Basic Conguration 34
Advanced Conguration 34

Velocity Device Manager
5
System Settings
Sites 36
General 36
Add 36
Edit 38
Buildings 38
Add 38
Edit 39
Delete 39
Floors 40
Add 40
Edit 40
Copy 41
Export 41
Import 41
Delete 42
Rooms 42
Add / Edit 42
Add Multiple Rooms 43
Reorder 44
Adding Technology 45
User Settings 48
General 48
Adding Users 48
Editing Users 49
Prole 51
Roles and Permissions 52
Velocity Device Manager
6
Log In
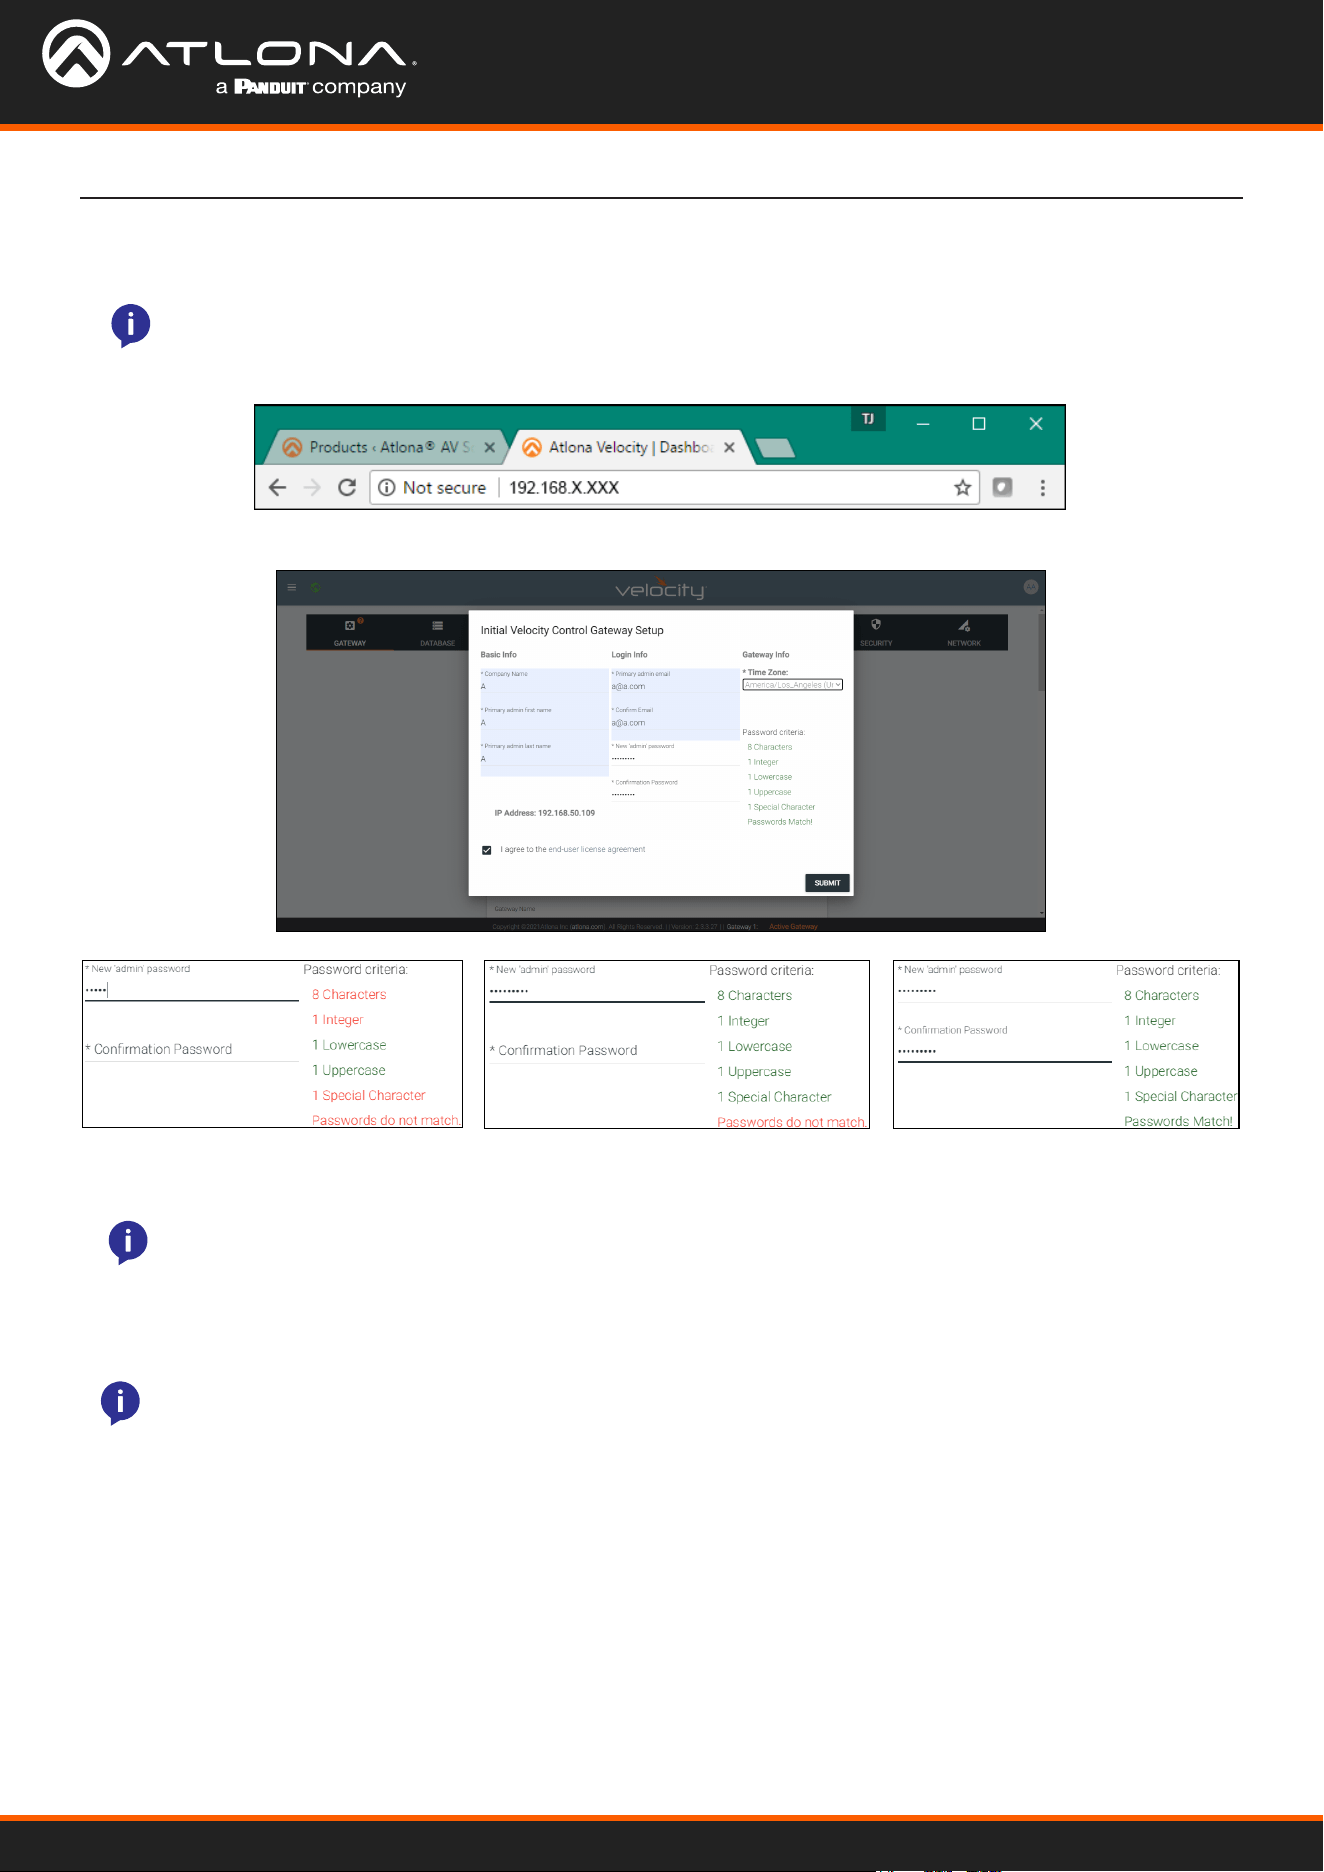
1. Open any browser on the network and type the IP address in, as shown below.
NOTE: Google Chrome is the recommended browser when using Velocity. Other browser may experience
technical diculties and may not support full functionality.
Once Velocity Device Manager has been set up on a network, locate the IP address of the unit. The IP address will be
located on the screen after software installation.
2. Fill in the initial set up information, including: Company Name, First & Last name, the email address for system
emails to be sent, time zone, and a new password.
3. Select the “I agree to the...” check box. The submit button will appear.
4. Select the SUBMIT button once all information is lled. A new pop up will appear.
NOTE: Passwords must be at least 8 characters and include: 1 number, 1 uppercase letter, 1 lowercase
letter, and 1 special character. The text will appear all green when the password meets all criteria.
NOTE: Once the initial log in and activation is complete, the new password should be kept somewhere
easy to nd. If the password is lost, please follow the directions in the Reset Password section.
Velocity will automatically log in once the IP is launched and a pop up will appear.
Velocity Device Manager
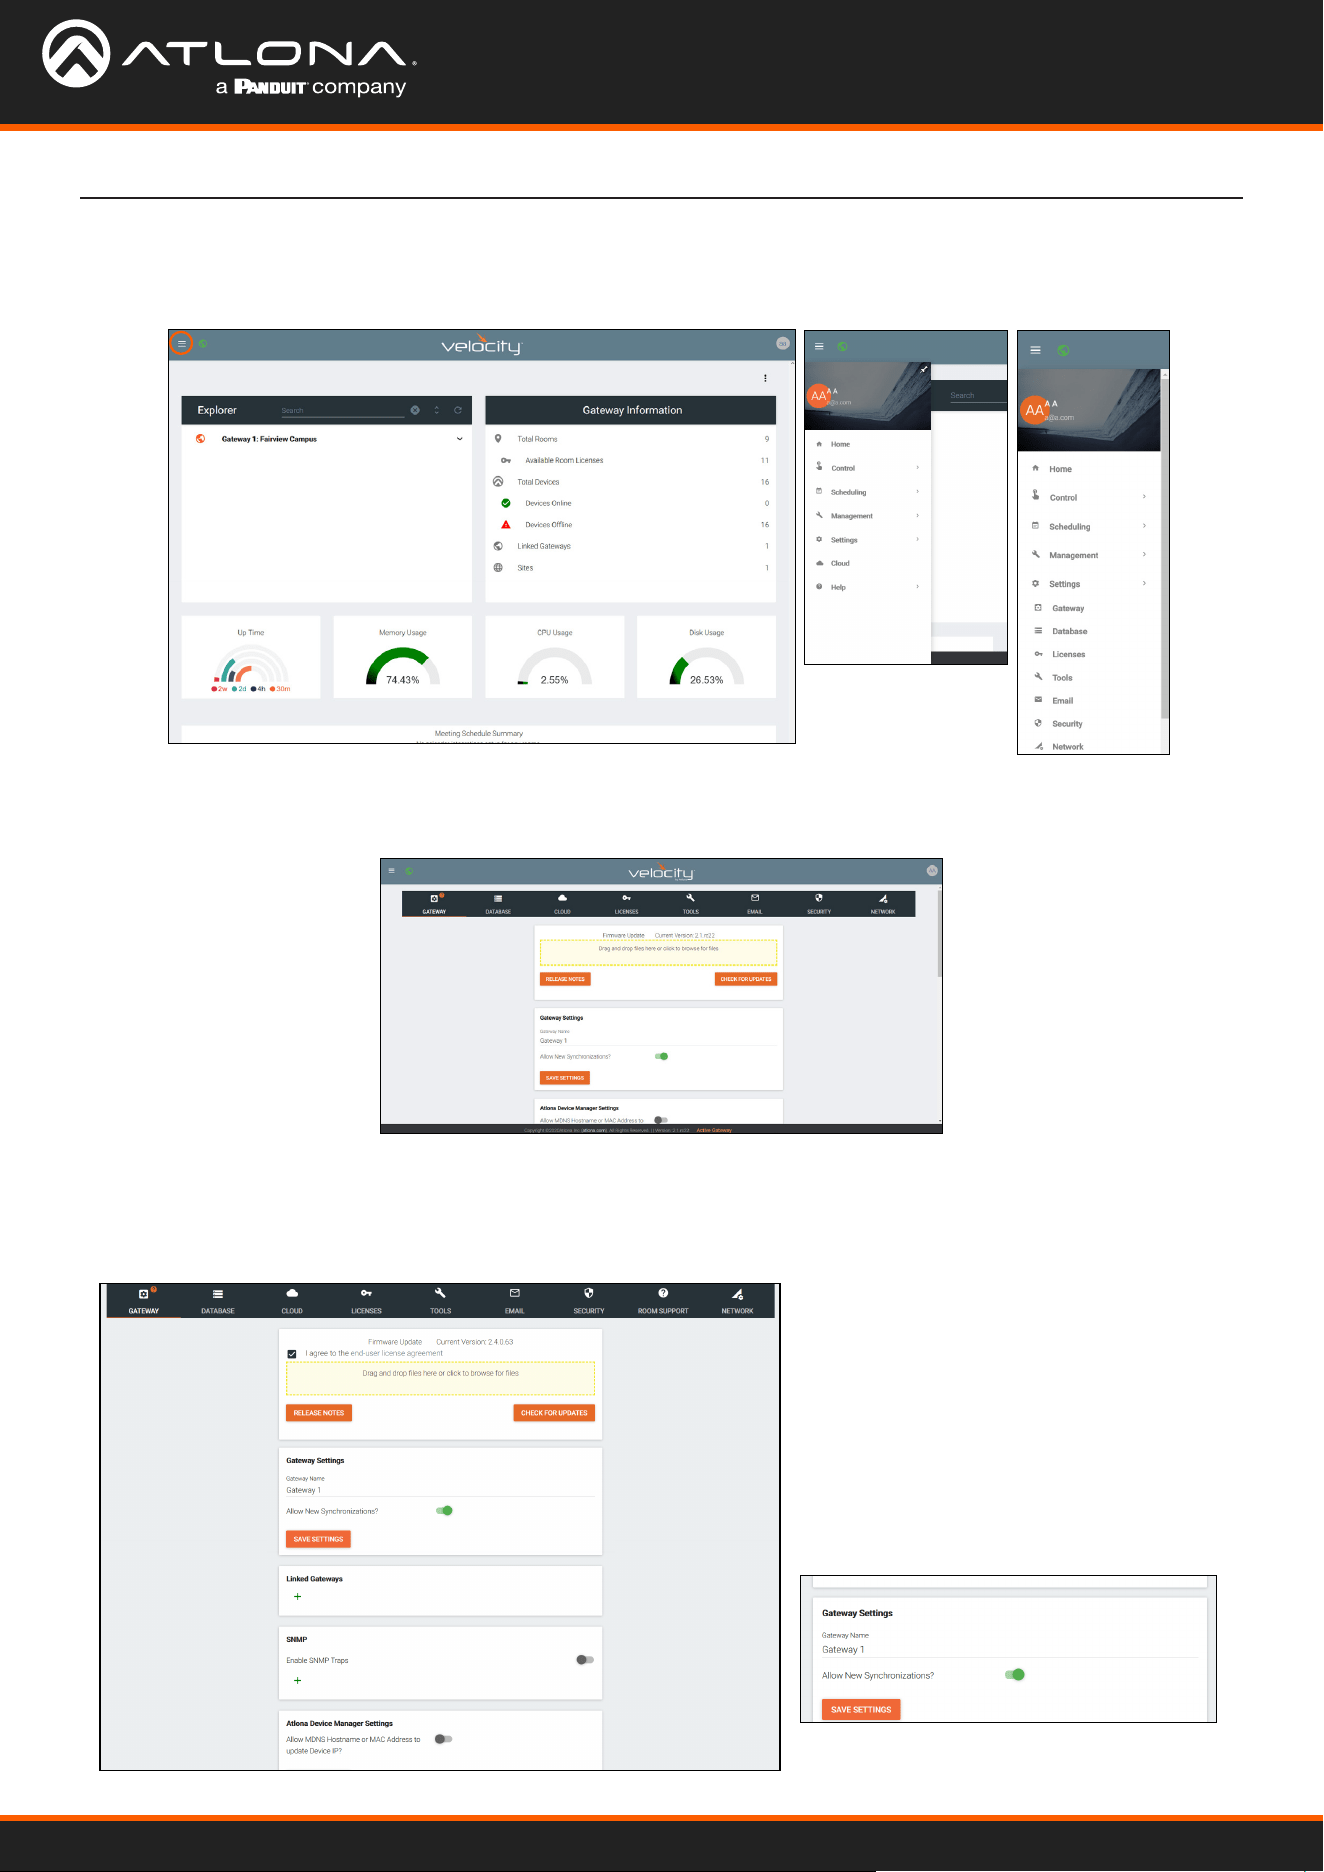
7
System Settings
Gateway
2. Select Settings from the menu. New options will appear.
3. Select Gateway.
General
1. Locate the ≡ in the top left corner of the home page and left click to open the menu.
Gatway is the default page opened when Settings is selected. It provides basic information for Velocity, such as:
Firmware, Gateway Settings, Synchronization, ID, Serial Number, and Time Settings.
The gateway name may be changed, to
provide an easy way to discern between
dierent gateways.
Select the slider bar next to Allow New
Synchronizations to enable the Atlona
Touch Pads and other BYOD control
devices to connect to the gateway. This is
enabled by default.
Gateway Settings
Velocity Device Manager
8
System Settings
Set the time, time zone, and date for Velocity.
Enter in the Local NTP Server information and select the
Sync VTP Panels to Local NTP Server slider to enable the
sync for the Velocity Touch Panels.
Time Settings
API Settings
Local NTP Server
NOTE: The gateway must be online in order for the
clock to synchronize with the server.
API is used for integrating Velocity with a pre existing
control system. Select the enabled slider and type in the
port to activate API integration.
NOTE: Once changes have been made, restart
Velocity using the Restart Velocity button in the
Tools tab.
• Select the + button to link to any other Velocity
Gateways on the network. A pop up will appear.
• Enter the IP address of the other gateway.
• Press the OK button.
• Press the Synchronize Gateways. A pop up will
appear when complete.
• Enable this feature to set up notications
when issues arise.
• Once enabled, press the + sign. A pop
up will appear that the name for the
notication device can be entered into.
• Press OK once the name is entered.
• Enter the IP Address in the IP Address
eld.
• The next eld is for the IP Port.
• The nal eld is for the community string,
which is dened by the watch device.
Enable this to have Velocity update a device IP address if it
changes to the new address and has the MDNS hostname
or MAC address associated to it within the software. e.g.
If a device is set to DHCP and the IP is renewed to a new
address, it will auto update in Velocity.
Linked Gateways
SNMP
Atlona Device Manager Settings
Velocity Device Manager
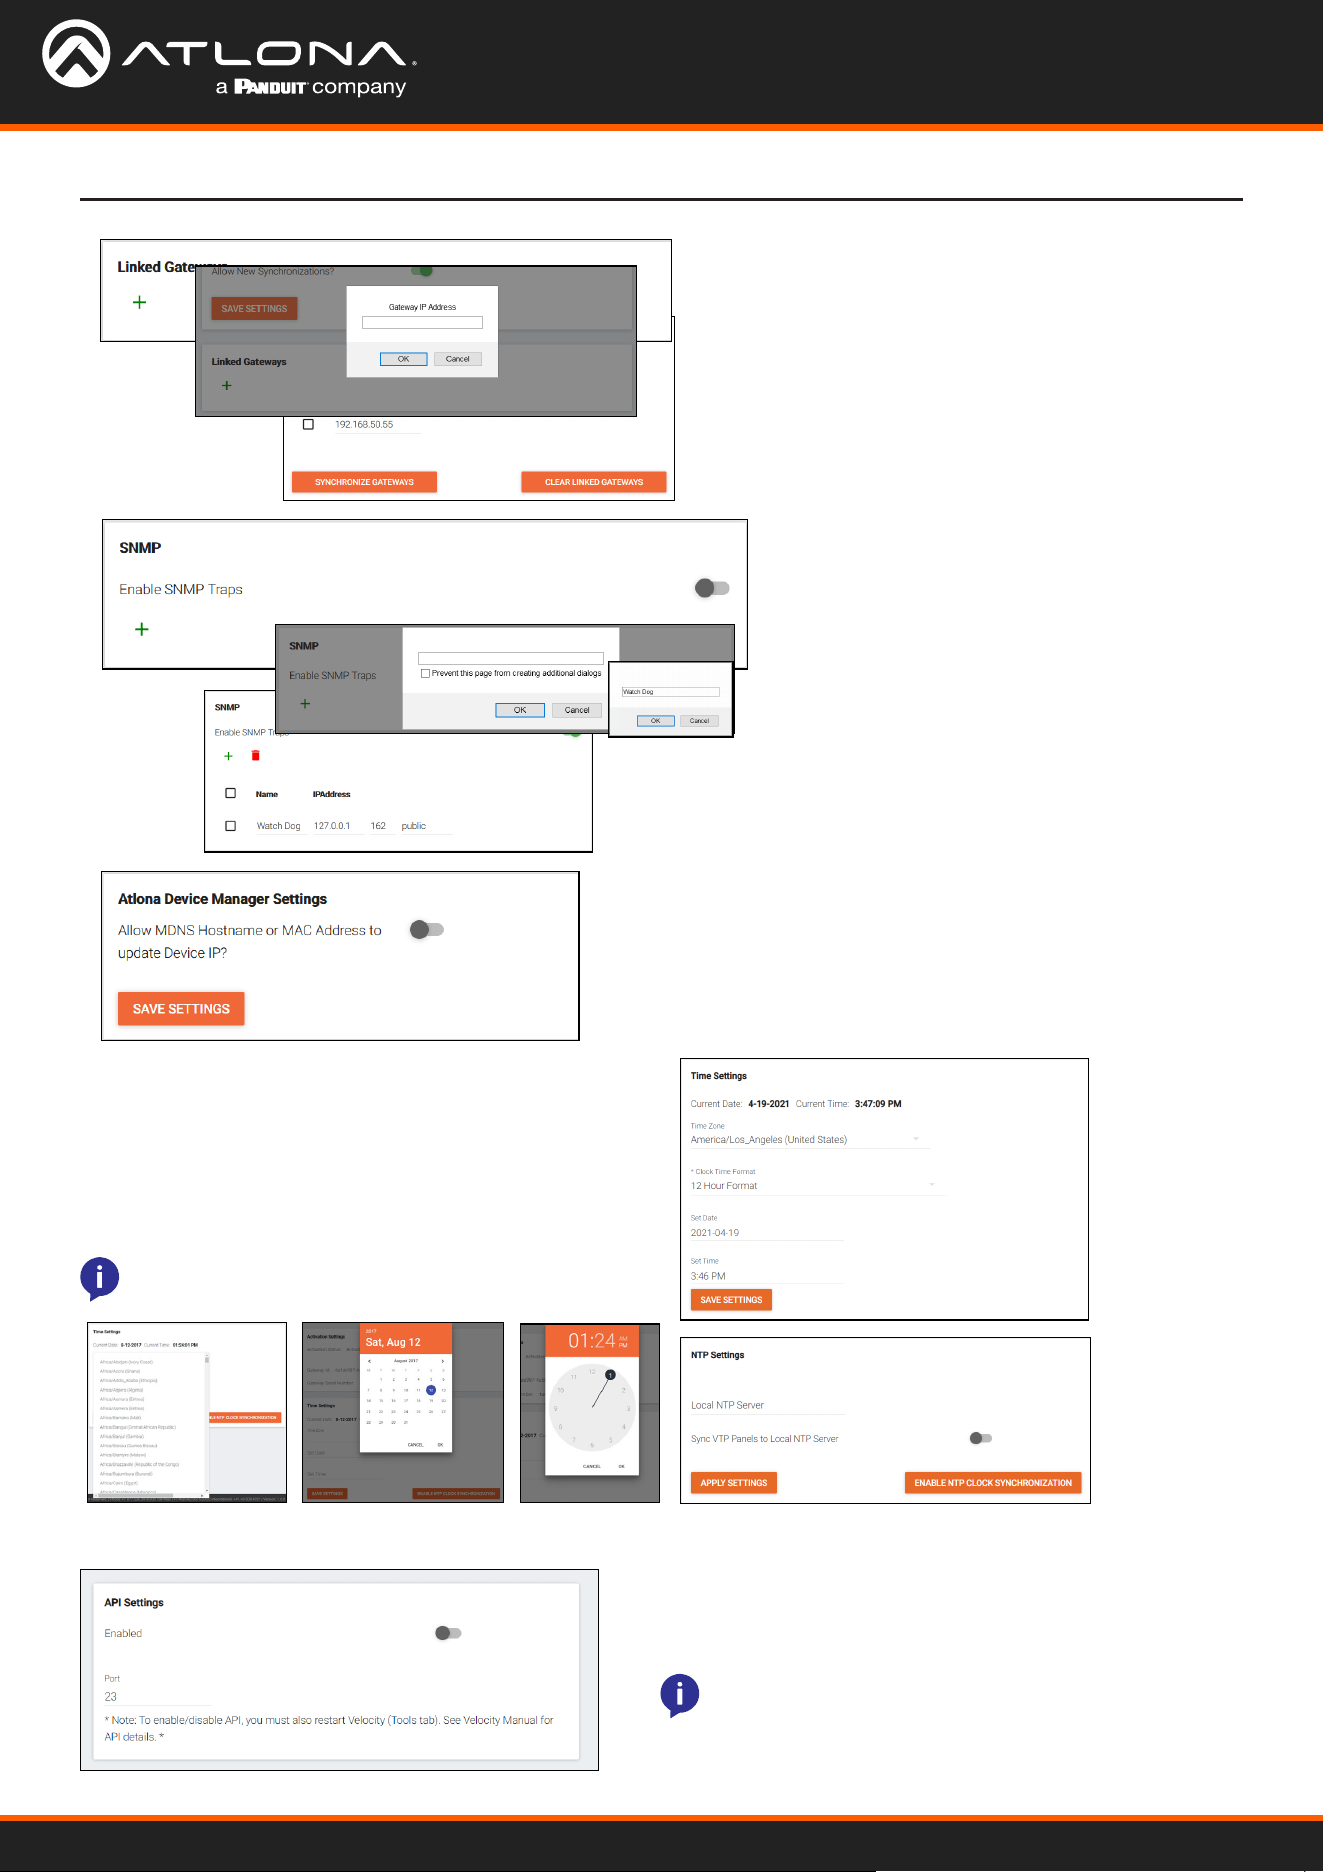
9
System Settings
Firmware
4. Click on the eld to browse the local computer for the rmware le, or drag and drop the rmware into the eld.
Firmware upgrading will start automatically.
When the rmware upgrade is successfully completed, a pop up window will appear. It will close a few seconds later.
NOTE: Velocity update les will be tar.gz le
extensions. These are compressed les and should
not be extracted before upload.
NOTE: When downloading the rmware le on a
MAC, ensure that the le is not being auto-extracted.
The option to turn o auto-extraction will be found
within the browser settings.
2. Select Settings from the menu. New options will appear.
3. Select Gateway.
1. Locate the ≡ in the top left corner of the home page and left click to open the menu.

Velocity Device Manager
10
System Settings
Database
Select one of the ve memory backup locations and press save.
This will back up the Velocity database to the currently selected
Backup Memory. Once a backup memory has been used, it can
be downloaded, restored from, or deleted.
1. Select Database from the top navigation inside of the Server Settings.
The Database page provides a way to back up, restore, set up redundancy, and delete databases & settings for
Velocity.
All backups available will appear in the list. The backups can be
renamed, deleted, downloaded to the local computer, or restored to.
Rename - Allows creation of a custom name for each backup.
Delete All - Delete all provides a quick way to clear all the previous
back ups at once.
Delete - Removes the selected backups, creating space for
additional backups if needed
Download - Save back ups to the local computer for future restores.
Restore - Restores the gateway to the selected back up, overwriting all current information/settings of the gateway.
Backups Available For Restore
Backup To Memory Location
NOTE: Atlona recommends creating a backup and saving
to a secure location after integration is complete.
Once a restore has occurred, a new eld will appear after the
restore. This will show all the database restores that have been
successfully processed.
Database Restore History
Drag and drop previously saved database backups from the local
computer.
Upload
This feature is for licensed Velocity units only. While using the free
Velocity Device Manager features, this will not function for control/
use.
Redundancy Settings
Velocity Device Manager
11
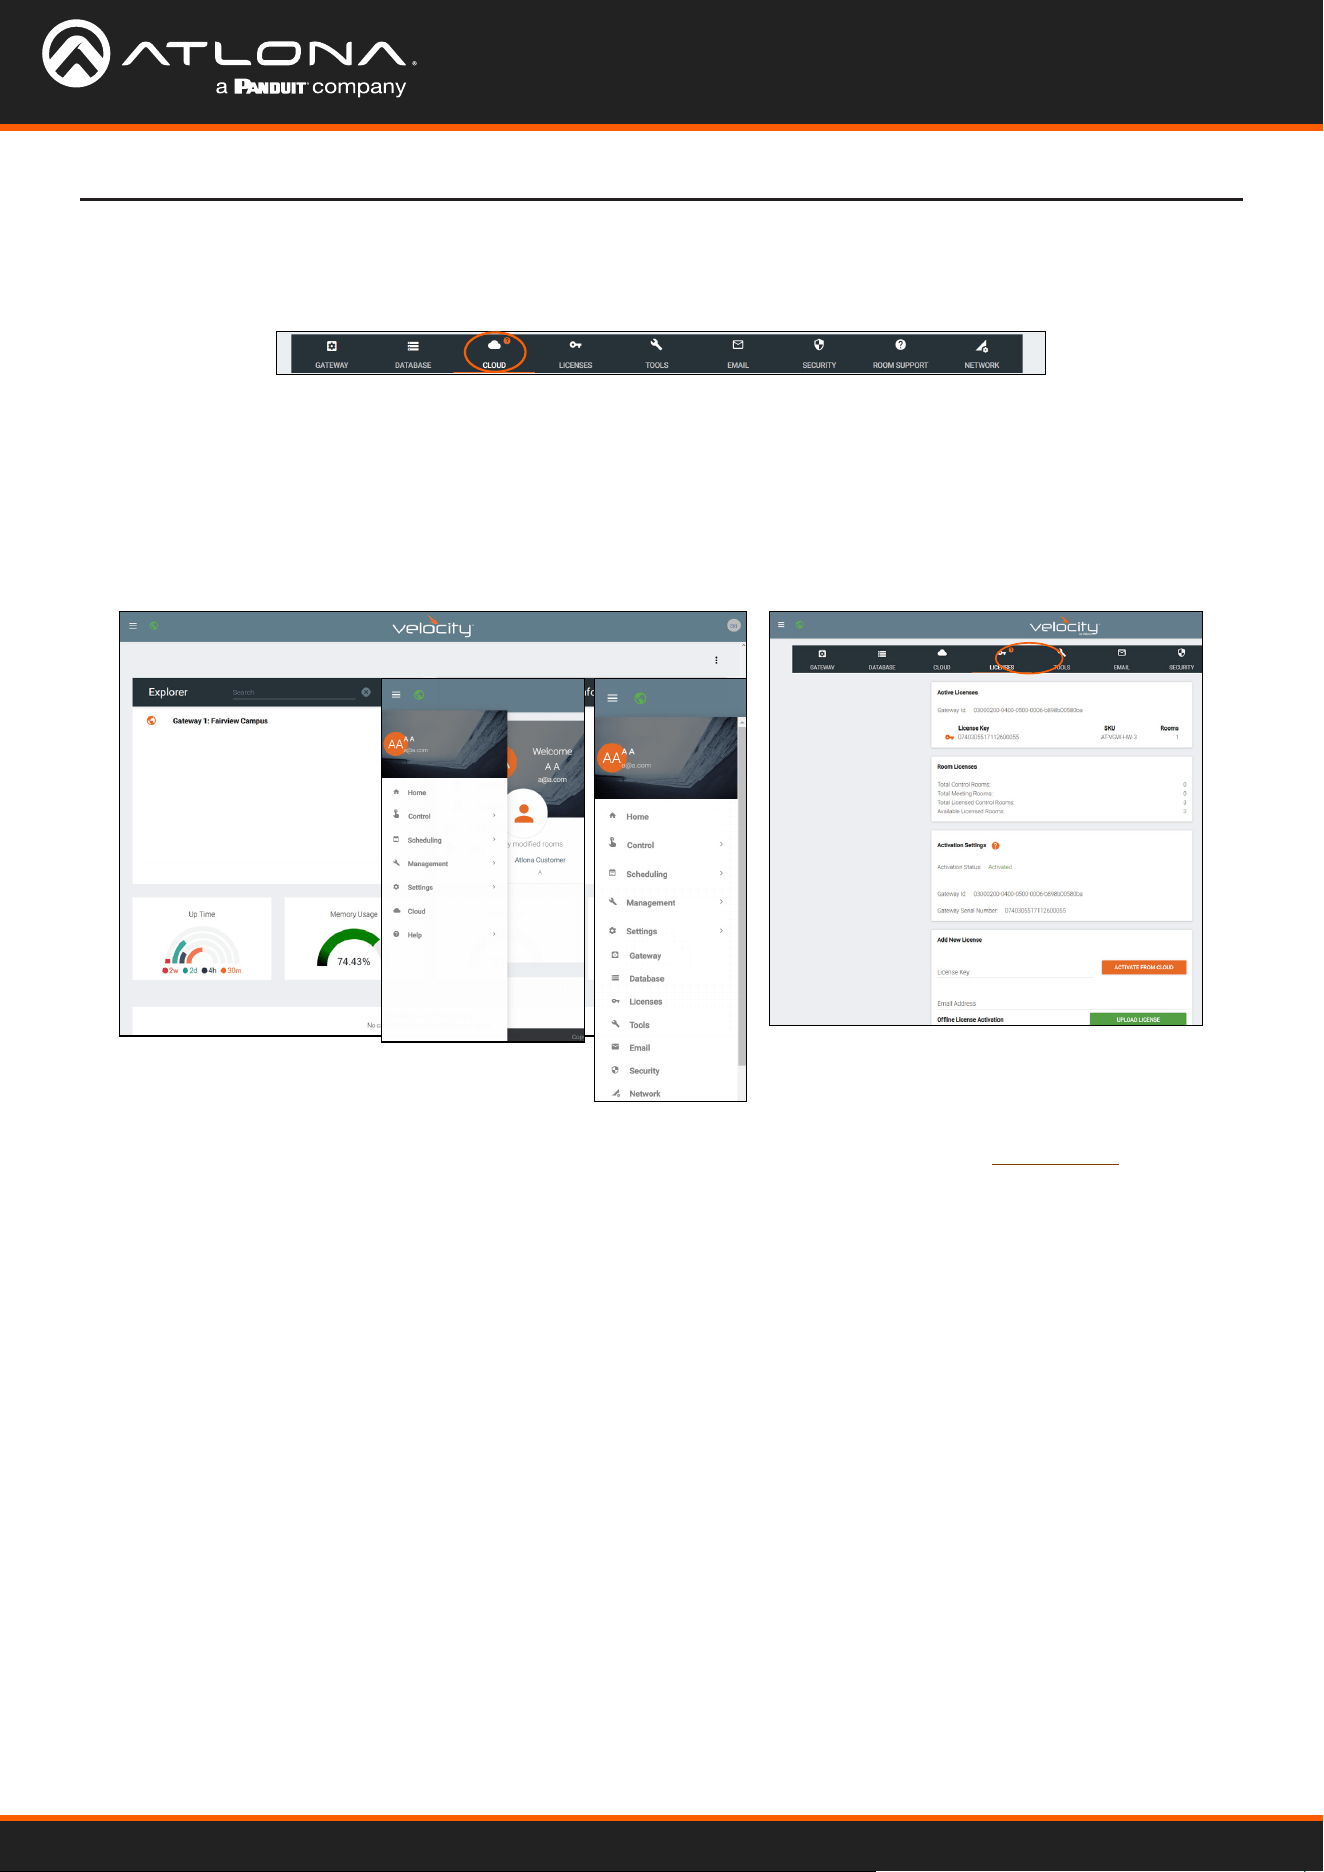
System Settings
This feature is for licensed Velocity units only. While using the free Velocity Device manager features, this will not
function for control/use. When using the AT- VDM-SW this will not be needed. Purchase the AT-VGW-SW to activate
licenses.
Licenses
Cloud
This feature is for licensed Velocity units only. While using the free Velocity Device Manager features, this will not
function for control/use.
2. Select Settings from the menu. New options will appear. If already in the Settings page, select Licenses from
the top navigation.
3. Select Licenses.
1. Locate the ≡ in the top left corner of the home page and left click to open the menu.
Velocity Device Manager
12
System Settings
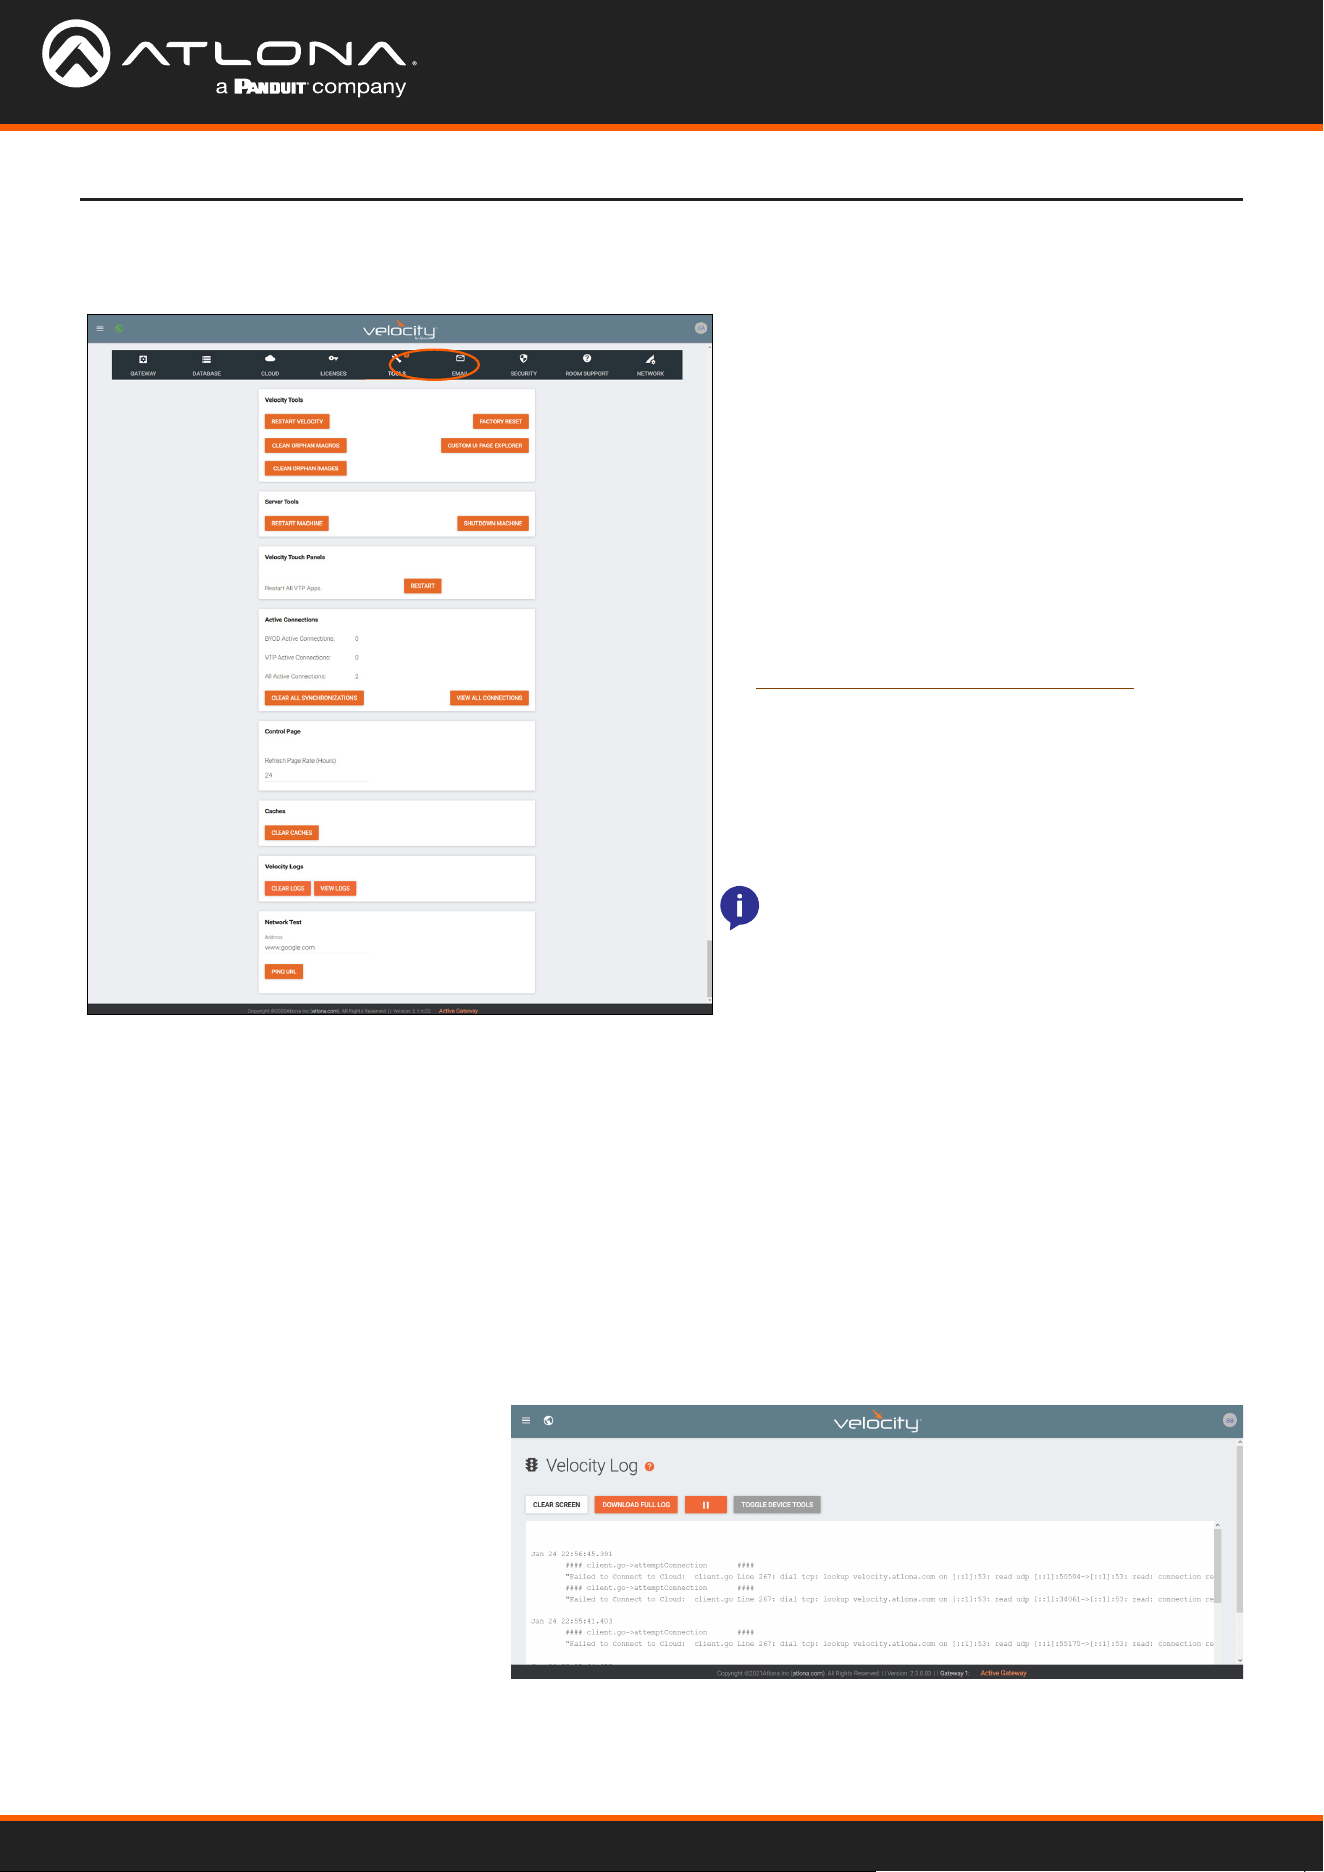
Tools
1. Select Tools from the top navigation inside of the Server Settings.
The tools page allows for the Velocity software,
Gateway, or web browser Velocity les to be reset.
Restart Velocity - Restarts the Velocity software
without restarting the hardware
Factory Reset - Resets Velocity back to factory
settings, removing all sites and settings. Network
settings will remain the same.
Clean Orphan Macros - Removes any unassigned
macros from within Velocity’s database.
Custom UI Page Explorer - See the Customized
Control UI Setup Guide found in the resources tab
at https://atlona.com/product/VGW-HW/.
Clean Orphan Images - Removes any unassigned
images from within Velocity’s database.
Restart Machine - Reboots the gateway.
Shutdown Machine - Shuts down the gateway
until it is power cycled.
Active Connections - Will display how many control touch pads and browser windows are connected to Velocity
at the time.
Clear All Synchronizations - This will disconnect all logged in touch pads & browser windows and refresh their
connections after 3 seconds.
View All Connections - This will display all the current control devices/screens connected to Velocity in a pop up
window with ID, connected page, IP address, time of last use, and connection type.
Control Page - Set how long in hours between Velocity refreshing the control page caches.
Clear Cache - This will clear all internal cached les for all equipment. Use this if equipment remotes are not
populating correctly after changes have been made.
Clear Logs - This will clear all internal log les for Velocity.
View Logs - This open a new tab that
will display all logs and provide the
ability to clear, download, and pause
all logs.
Network Test - Test the gateway’s connection to the internet by pressing PING URL. By default the URL is
www.google.com, but can be changed if needed. A green OK message will appear below the ping button if the
connection is ok.
Velocity Touch Panel : Restart - Forces any
connected VTPs to restart.
NOTE: Turning o the gateway will shut down
Velocity and control will not be possible until
the unit is restarted.
Velocity Device Manager
13
System Settings
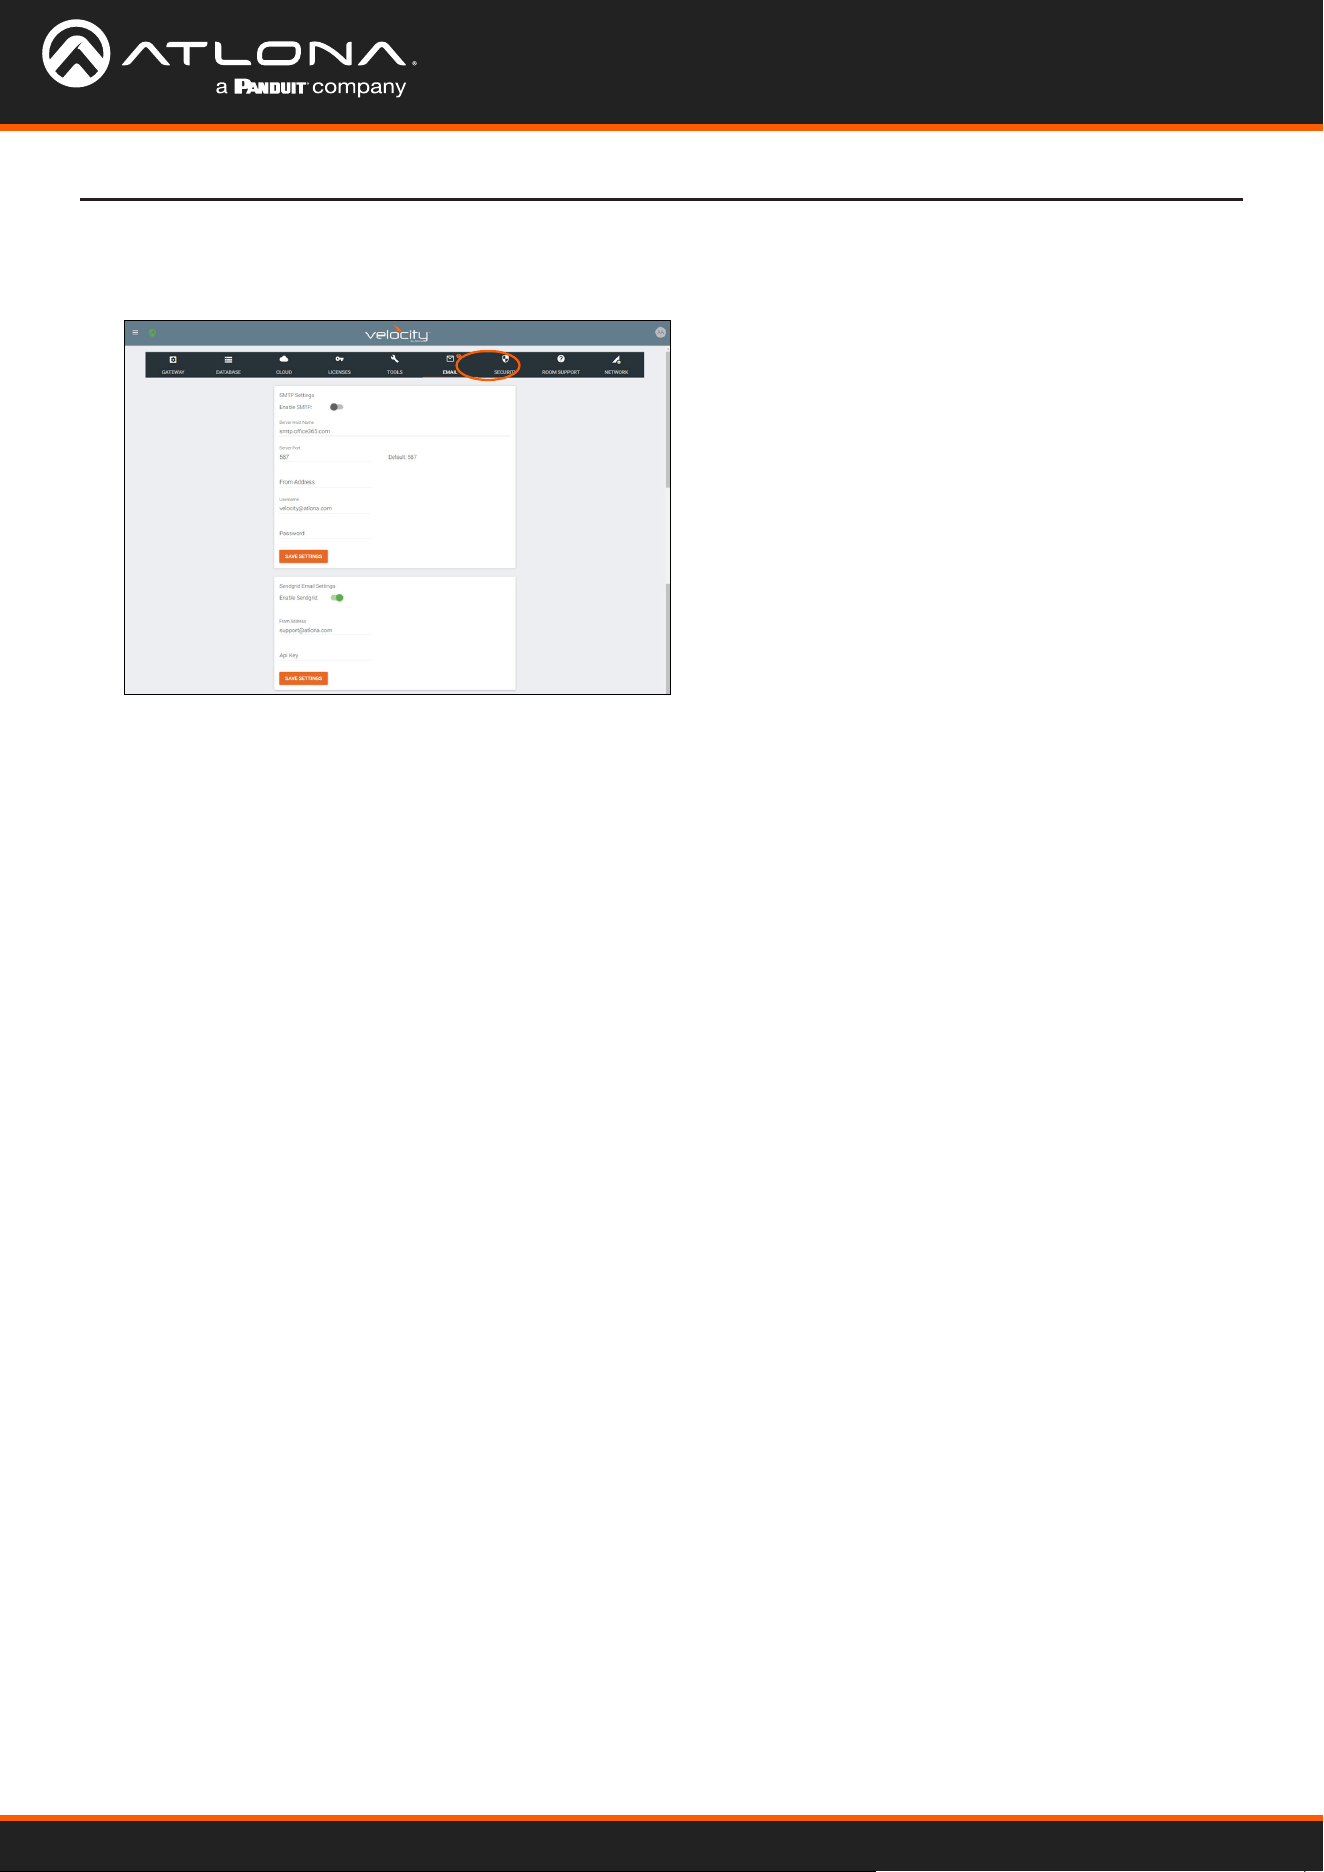
Email
1. Select Email from the top navigation inside of
the Server Settings.
2. Fill in the company’s email and/or Sendgrid
settings.
This information will be provided by the company’s
email host. If the IT admin is not setting up Velocity
Device Manager, check with them for the correct
settings.
Velocity Device Manager by default will send error notications from Atlona’s default email address.
Velocity Device Manager
14
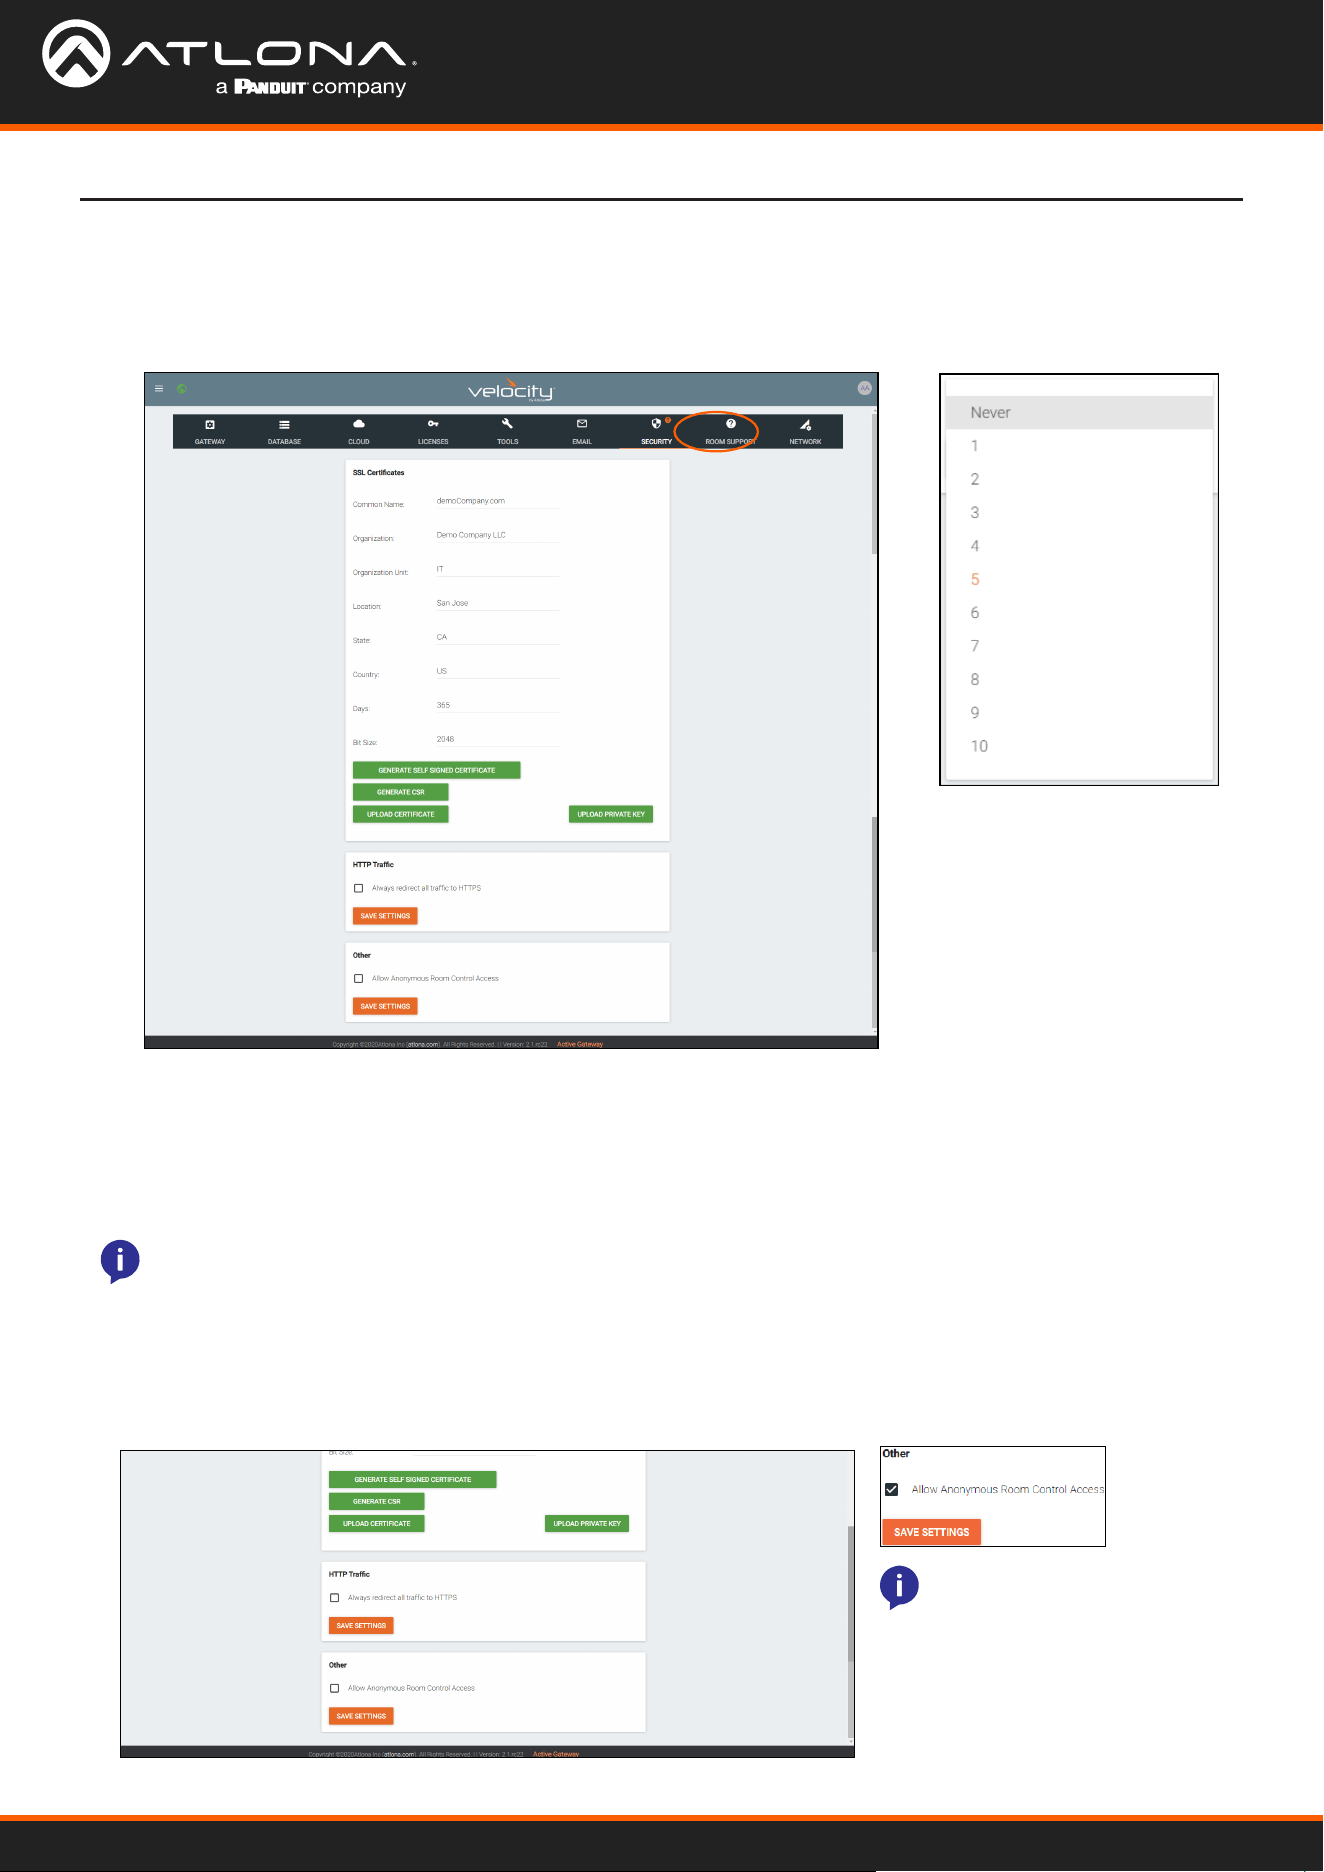
System Settings
Security
1. Select Security from the top navigation inside of the Server Settings.
2. Set the limit for how many login attempts a user has before the system is locked to those credentials.
• SSL - Contact Velocity Product Management for further information.
• HTTP Trac - Select the check box if a secured connection is required on the network.
• Other - Allow Anonymous Room Control Access - Check this box to allow for anyone with the link to control
a specic room on any touch device.
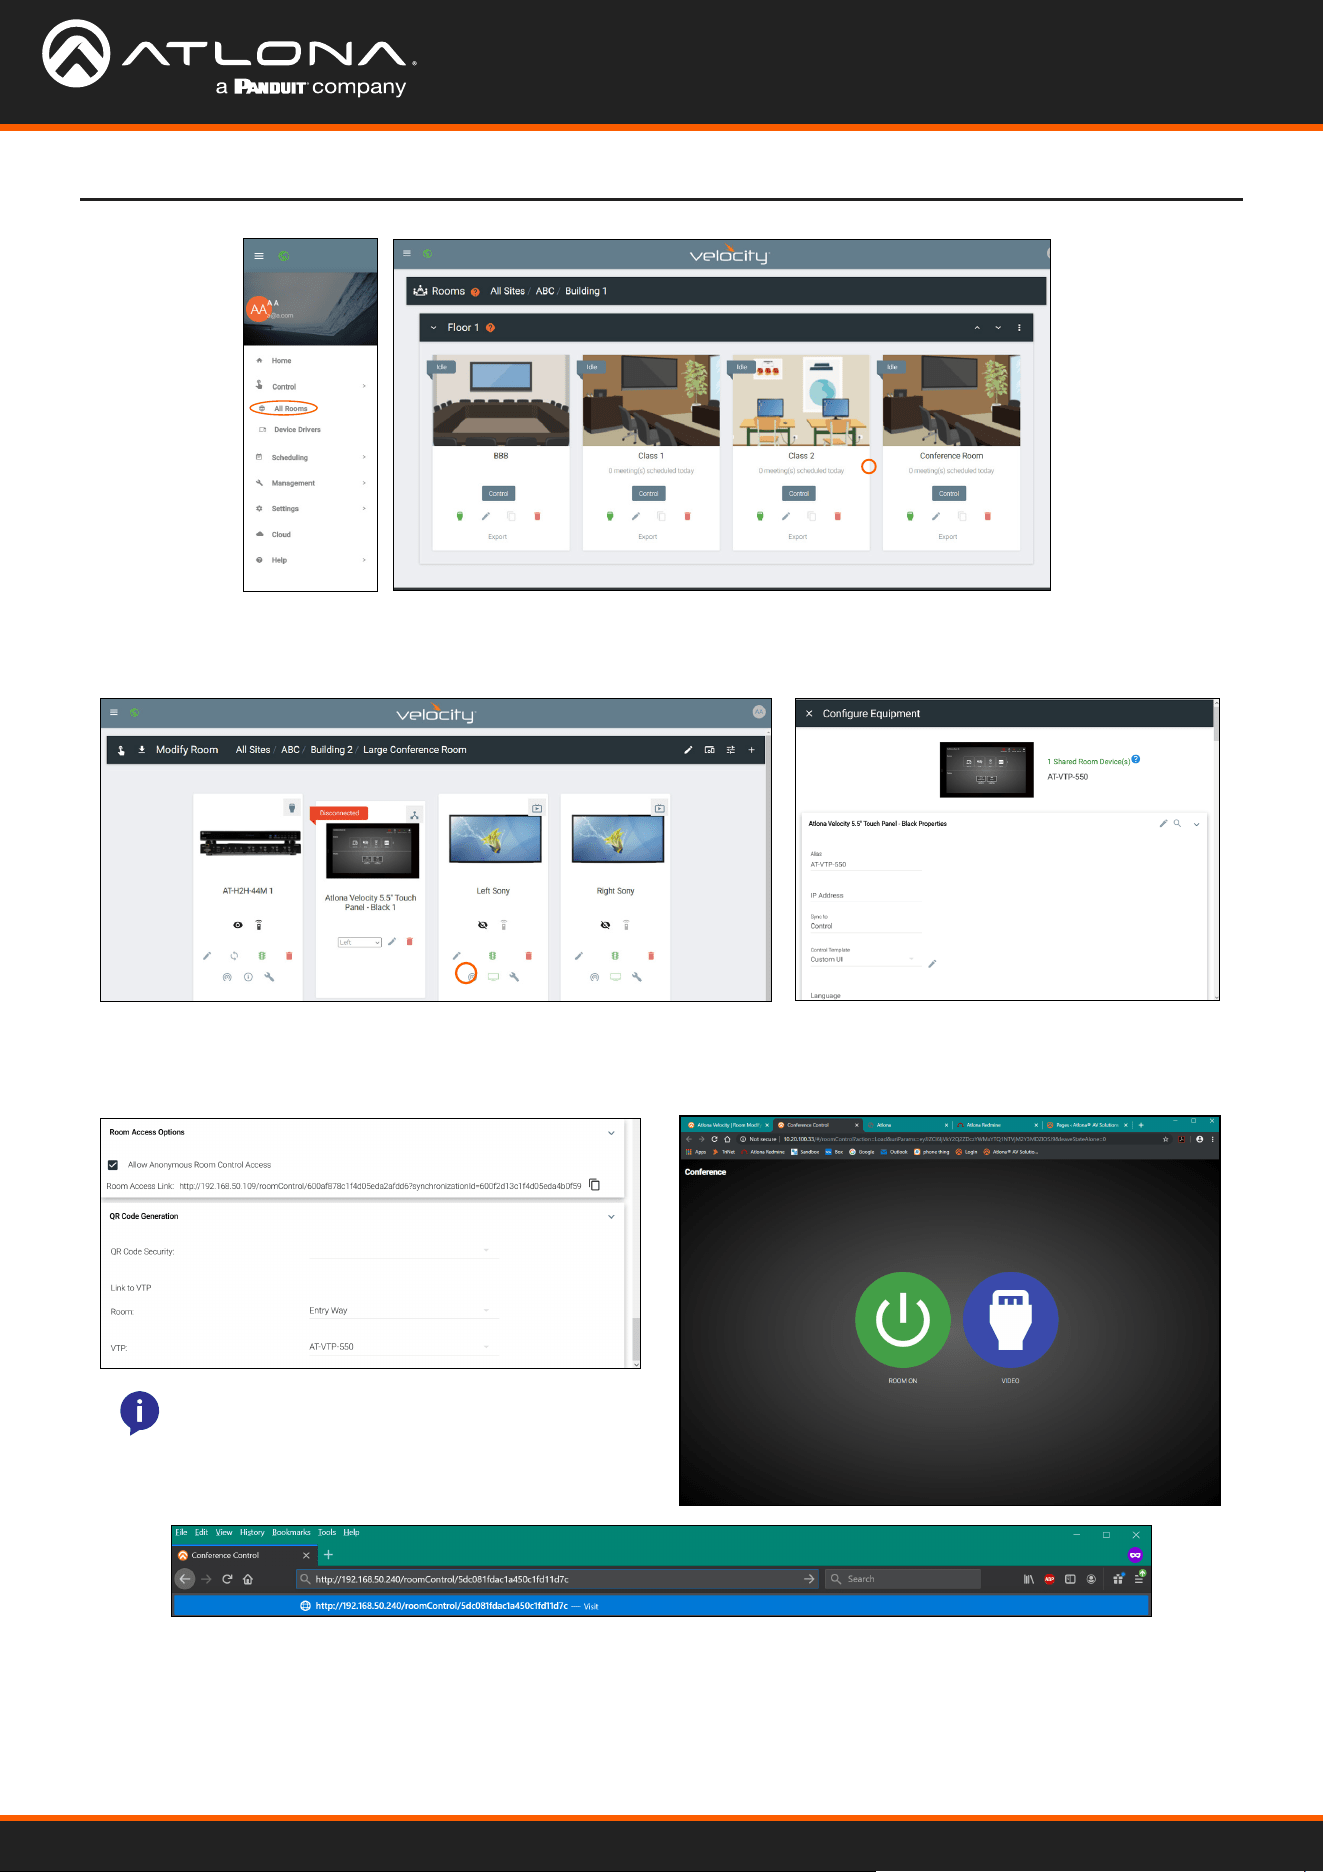
Allow Anonymous Room Control Access
To allow outside presenters access to specic room controls without logging into Velocity. Allow Anonymous Room
Control must be enabled. This is for set up only, room control is only available for licensed software only.
• Scroll down to the Other section within the Security tab of the Server Settings page.
• Select the checkbox next to Allow Anonymous Room Control Access.
• Press the Save Settings button.
NOTE: When Enabled, the
URL is not secure. Any user
with this URL can access and
control the room at any time.
NOTE: This feature may be set up but will not be accessible unless used with a licensed Velocity unit. Velocity
Device Manager free software does not have room control availability.
Velocity Device Manager
15
System Settings
• Open the left navigation menu using the ≡ button in the top left corner of the screen.
• Select the All Rooms button under the Control option.
• Select the Edit Room Technology button on the room tile.
• Select the Edit button on the room control device (AT-VTP-550 in the image above).
• Scroll down to the bottom of the screen and copy the URL listed next to Room Access Link.
• Give that URL to the guest user, or create a scannable QR code for easy navigation.
NOTE: The user device must be on the same
network as Velocity or the URL will not work.
NOTE: Do not navigate to the URL on the same
PC that the Velocity software is being used.
Velocity Device Manager
16
System Settings
• 802.1x Security - Enable or disable this by selecting
the slider. Enabling will allow the Velocity Gateway to
be authenticated and authorized when connected to a
network using 802.1x access control.
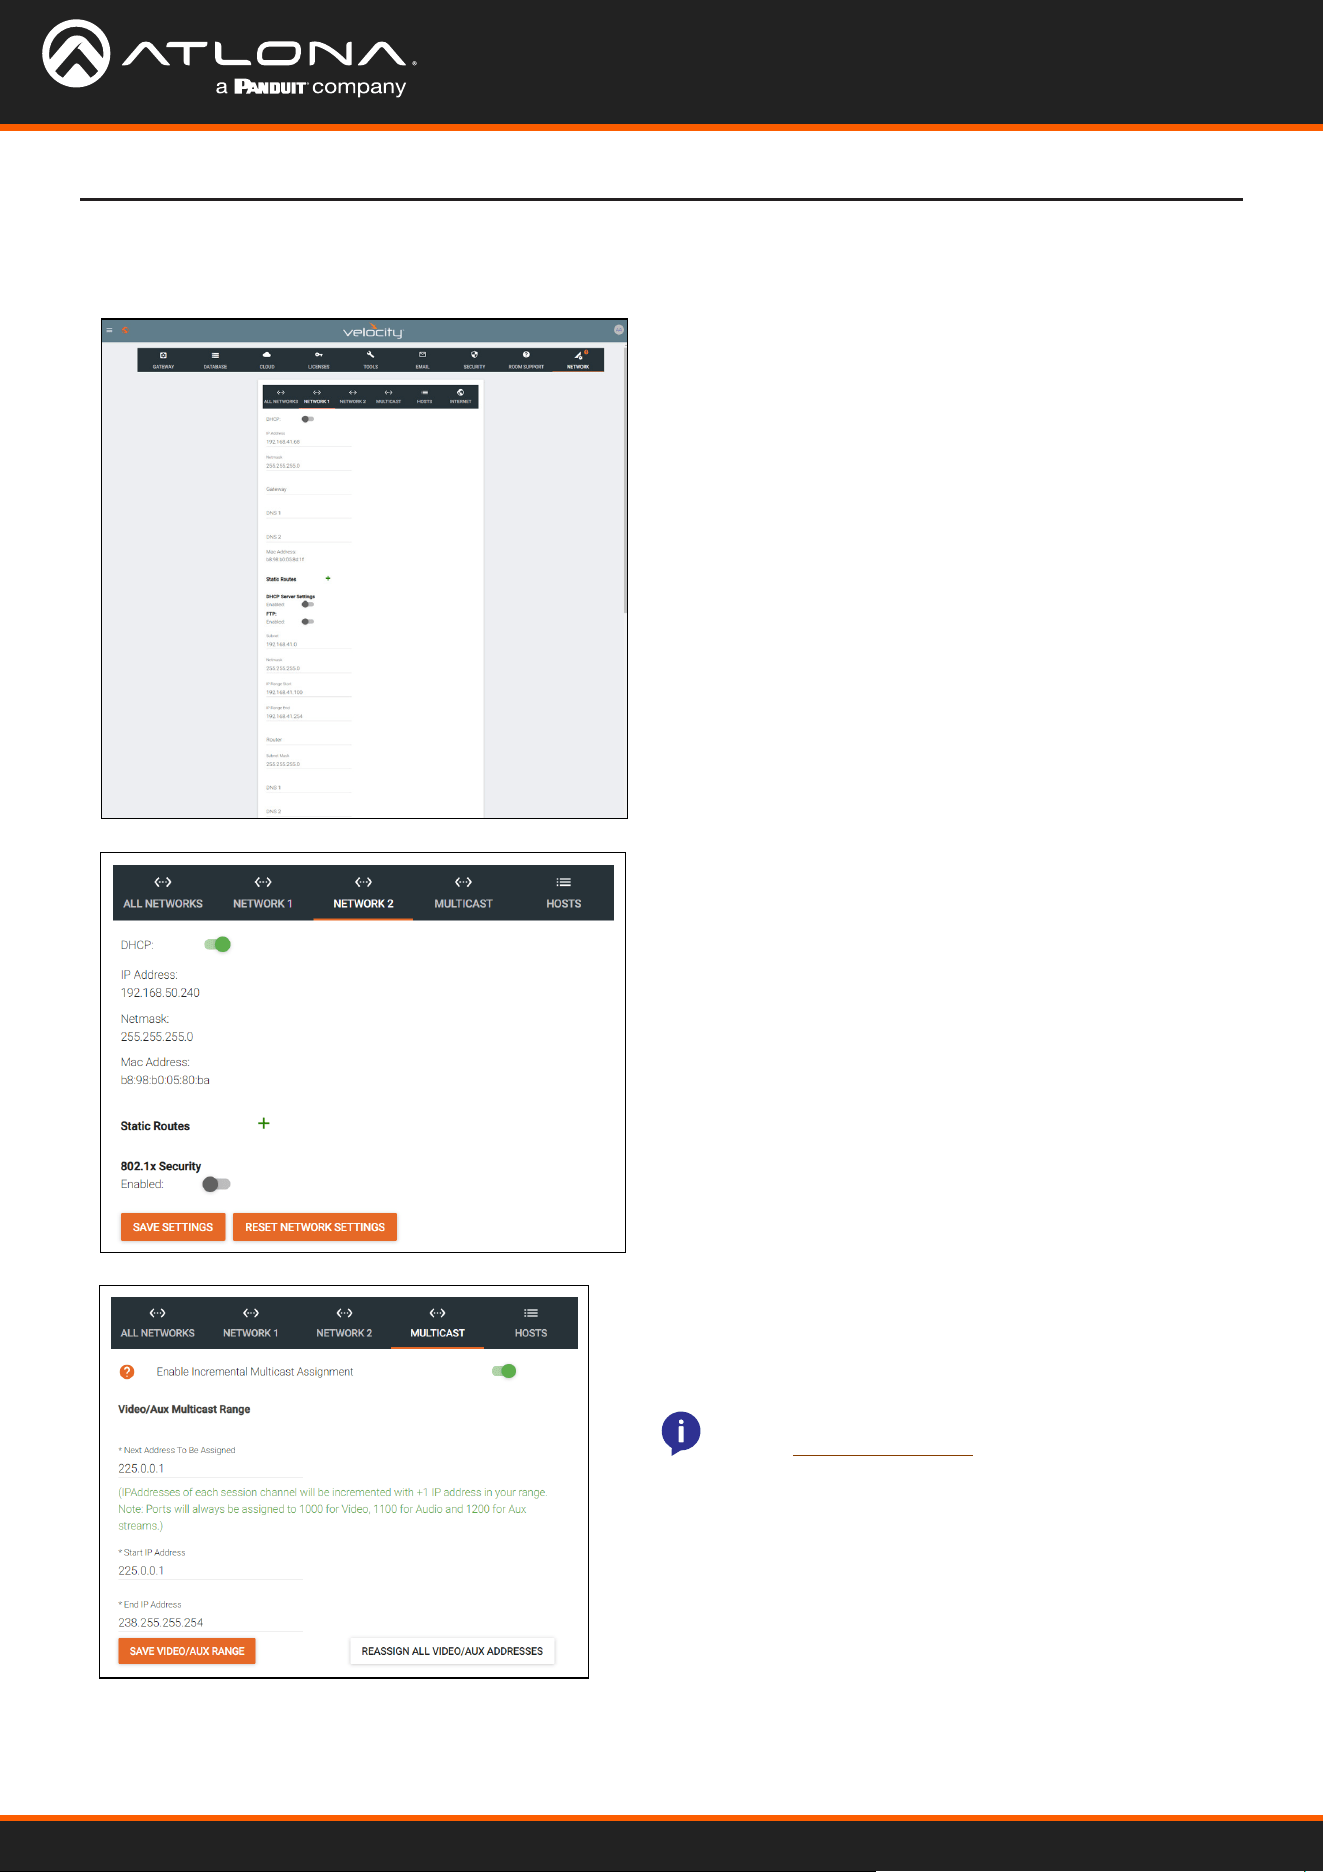
Networks
1. Select Networks from the top navigation inside of the Settings page.
• 802.1x Security - Enable or disable this by selecting
the slider. Enabling will allow the Velocity Gateway to
be authenticated and authorized when connected to a
network using 802.1x access control.
Network 1 - Corresponds with Ethernet Port 1 of the
software device and can be set between static IP, DHCP,
and DHCP server. If set as a DHCP server, a range of IP
addresses must be set so it can assign IP addresses for
anything else connected to the network.
Network 2 - Corresponds with Ethernet Port 2 of the
software device (where applicable) and can be set
between static IP and DHCP.
Multicast - Used for OmniStream set up and discovery.
View the OmniStream manual for more information on
Multicast, this information will be the same as the Velocity
Device Manager network multicast set up.
NOTE: To learn more about the OmniStream products,
visit the OmniStream page.
Velocity Device Manager
17
System Settings
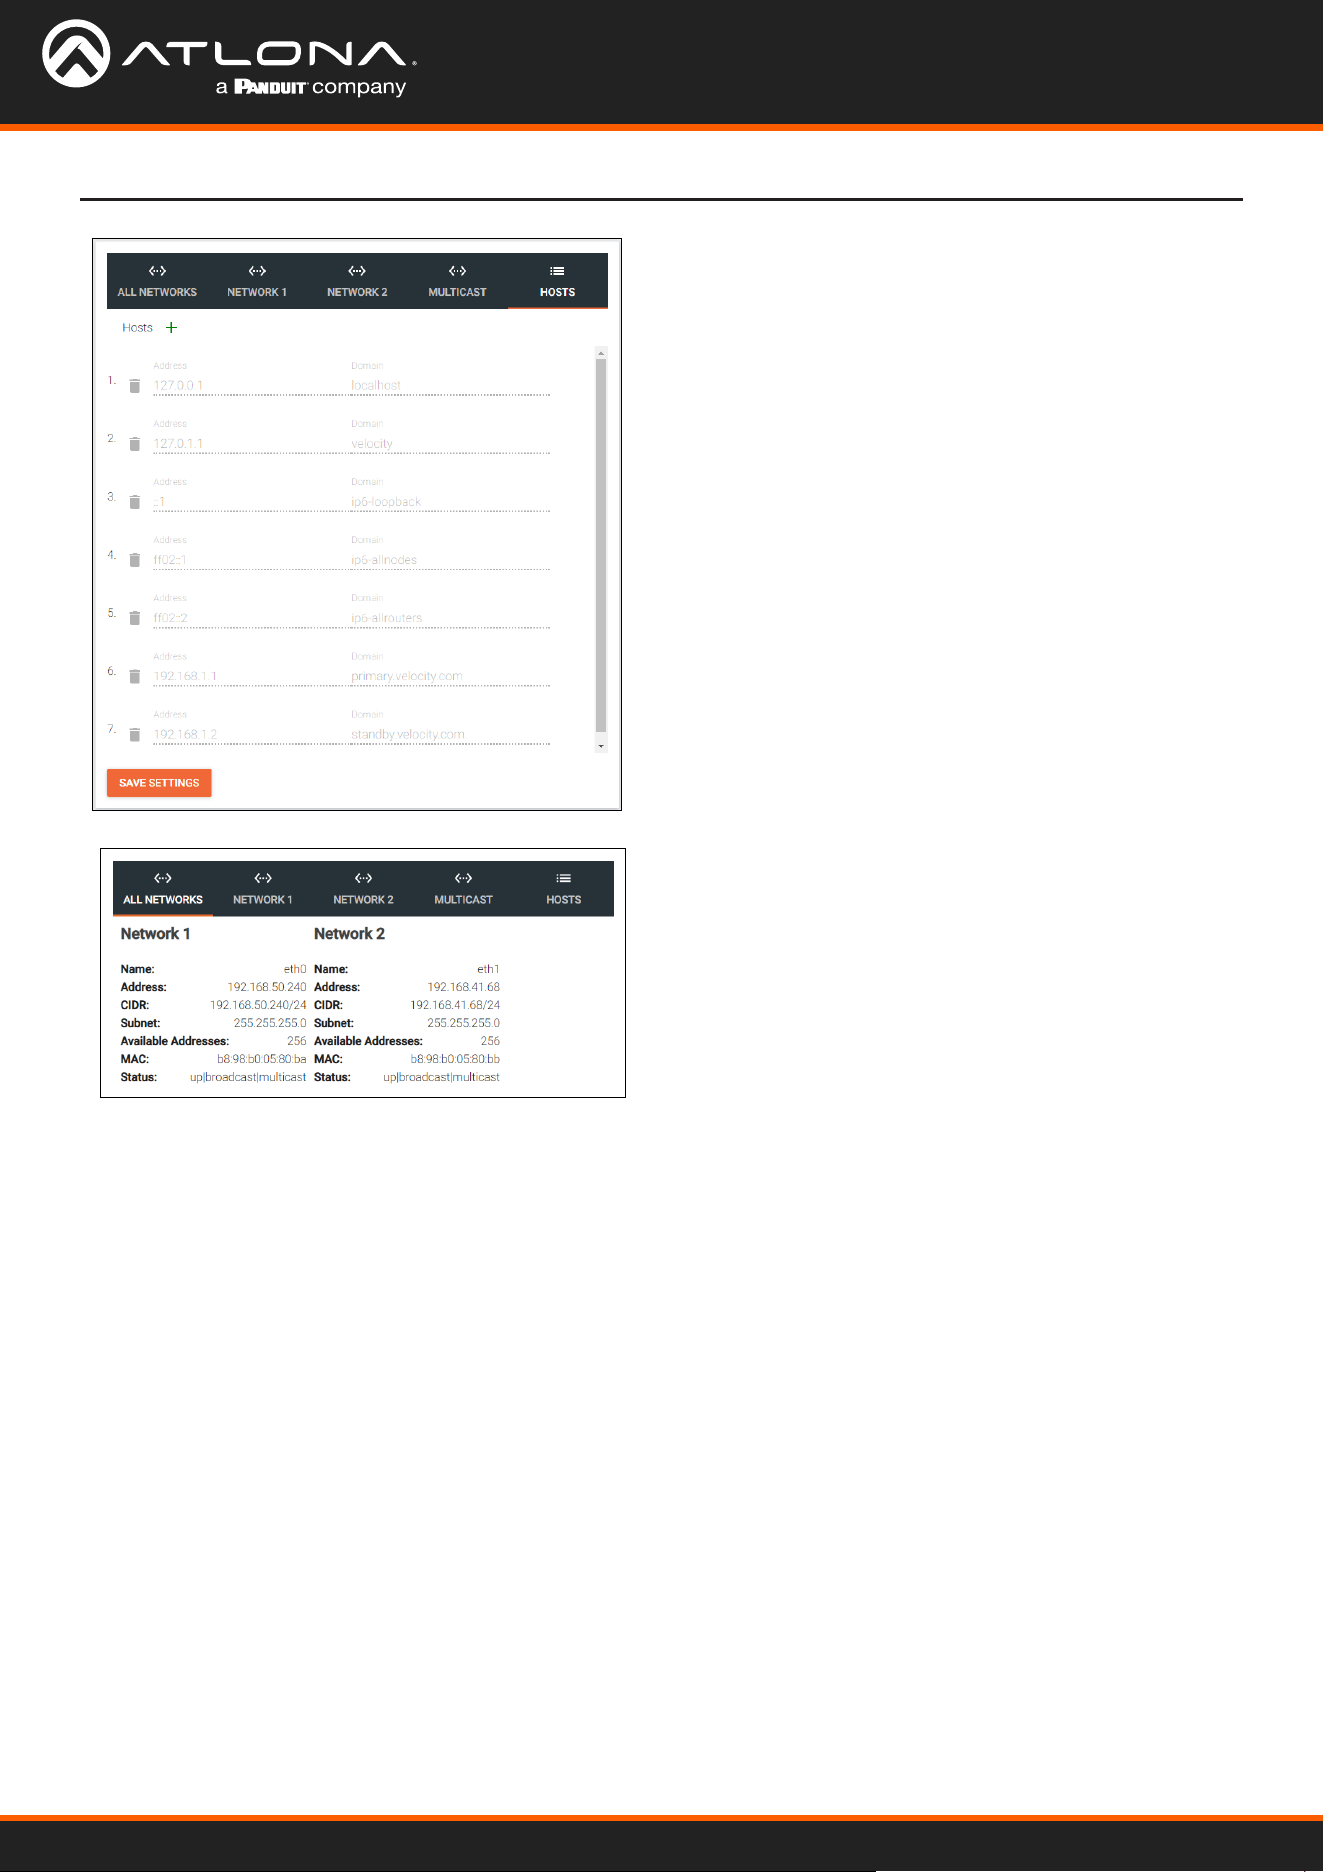
Host - Provide a simple way to assign a name to any
Velocity controlled device on the network. Simply enter
the controlled device IP address and write a host name to
assign to it.
All Networks - Provides a quick overview of the network
port settings.
Velocity Device Manager
18
System Settings
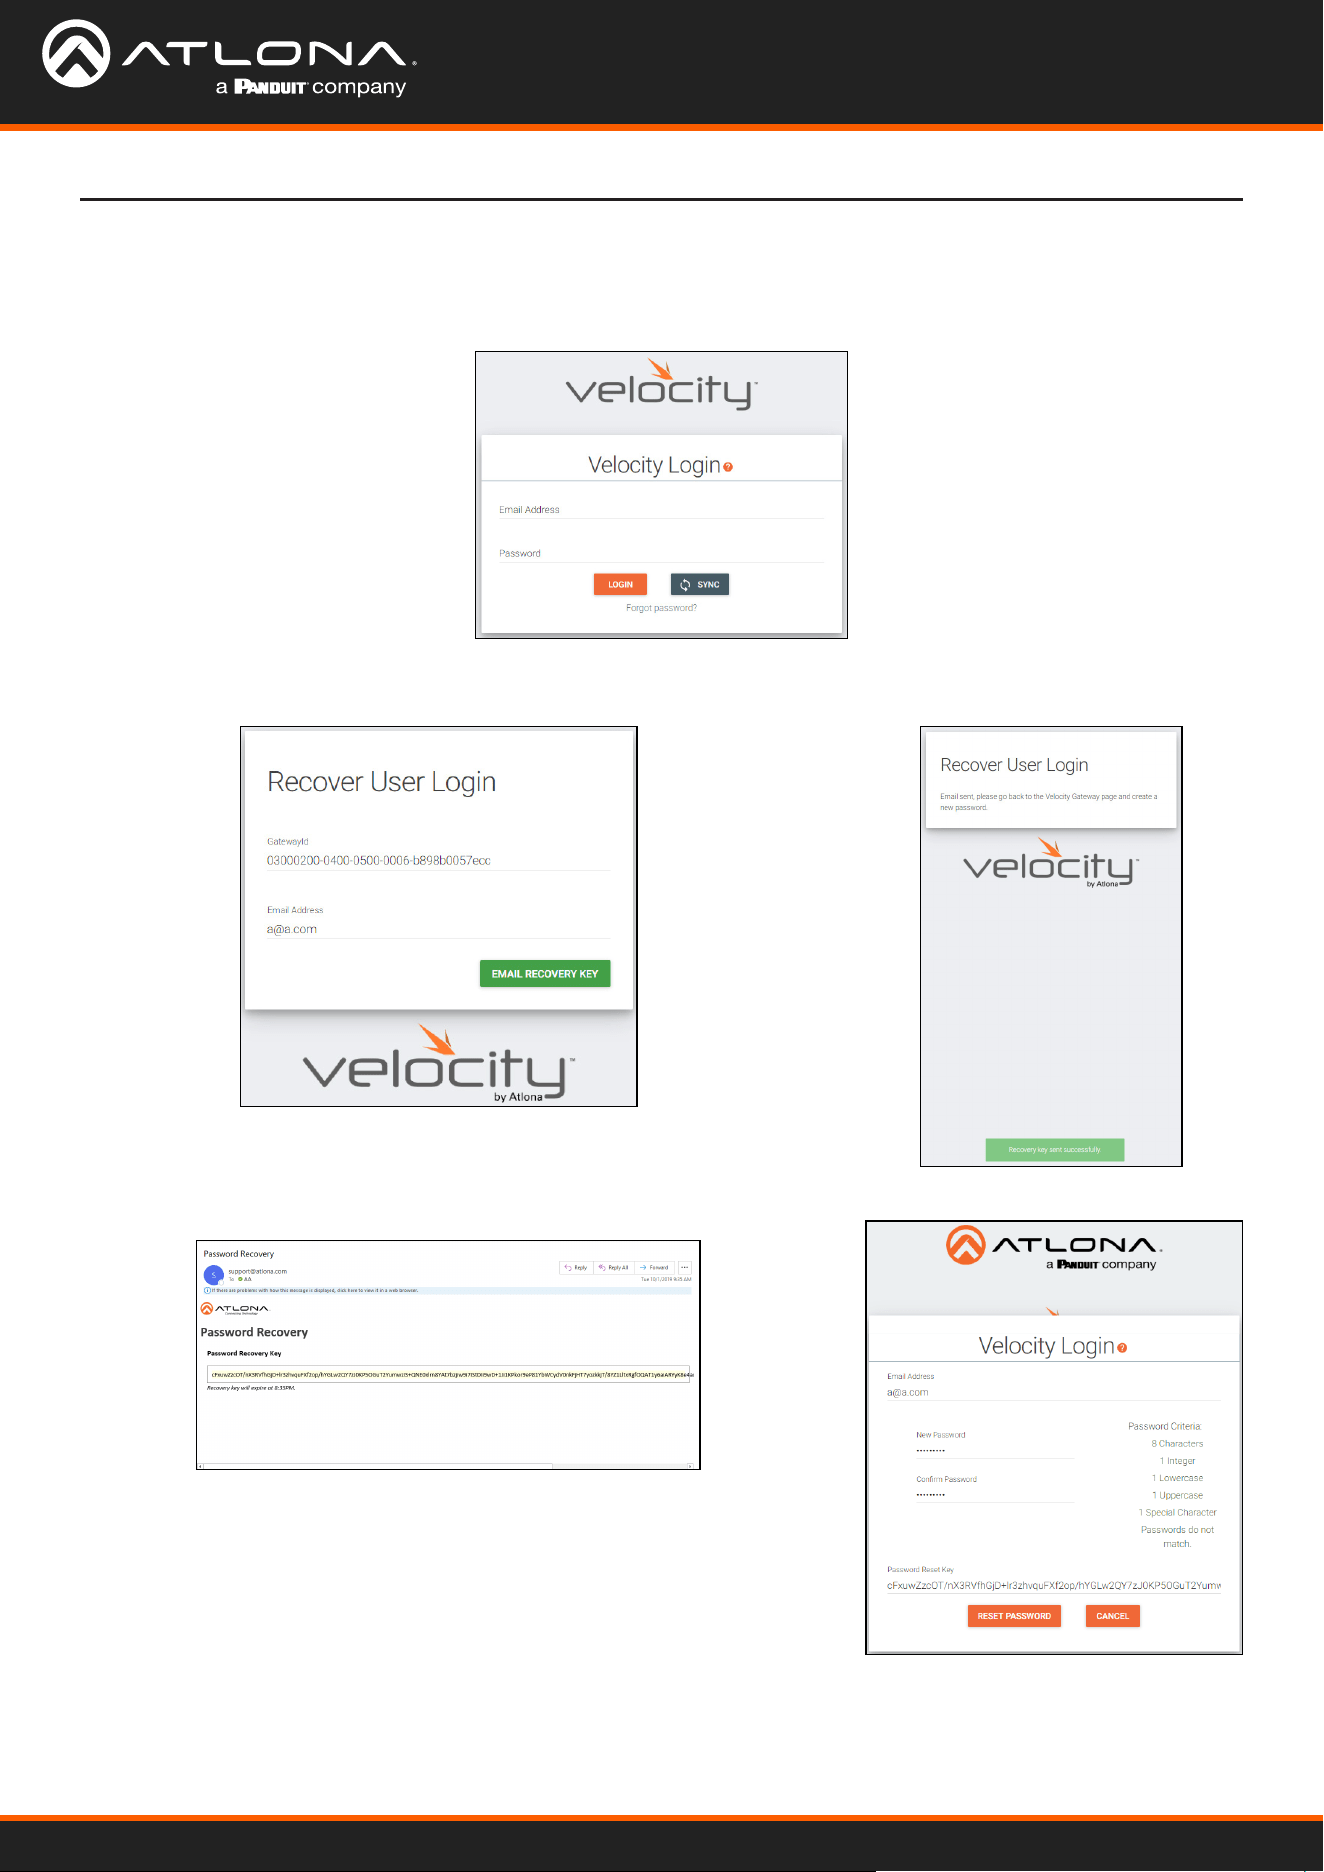
Reset Password
1. Select the Forgot Password link found under the LOGIN button. A new tab will open with the GatewayID number
and the Email associated with the account.
3. Once the email is received (be sure to check junk email), copy the
Password Recovery Key from the box.
4. The login page will have automatically changed to a password update
screen. Enter the new password and the Password Reset Key from the
email.
5. Select the RESET PASSWORD button. Velocity will open and a green
password reset successfully message will appear at the bottom.
2. The Email address should auto populate with the account Email. This can
be changed, but if the Email entered is not associated with the gateway, the
password key will not work. Press the EMAIL RECOVERY KEY button. A
success message should appear.
If the login password is ever forgotten, it can be reset on the login page. The password reset may only be done once
Email has been set up in System Settings.
Velocity Device Manager
19
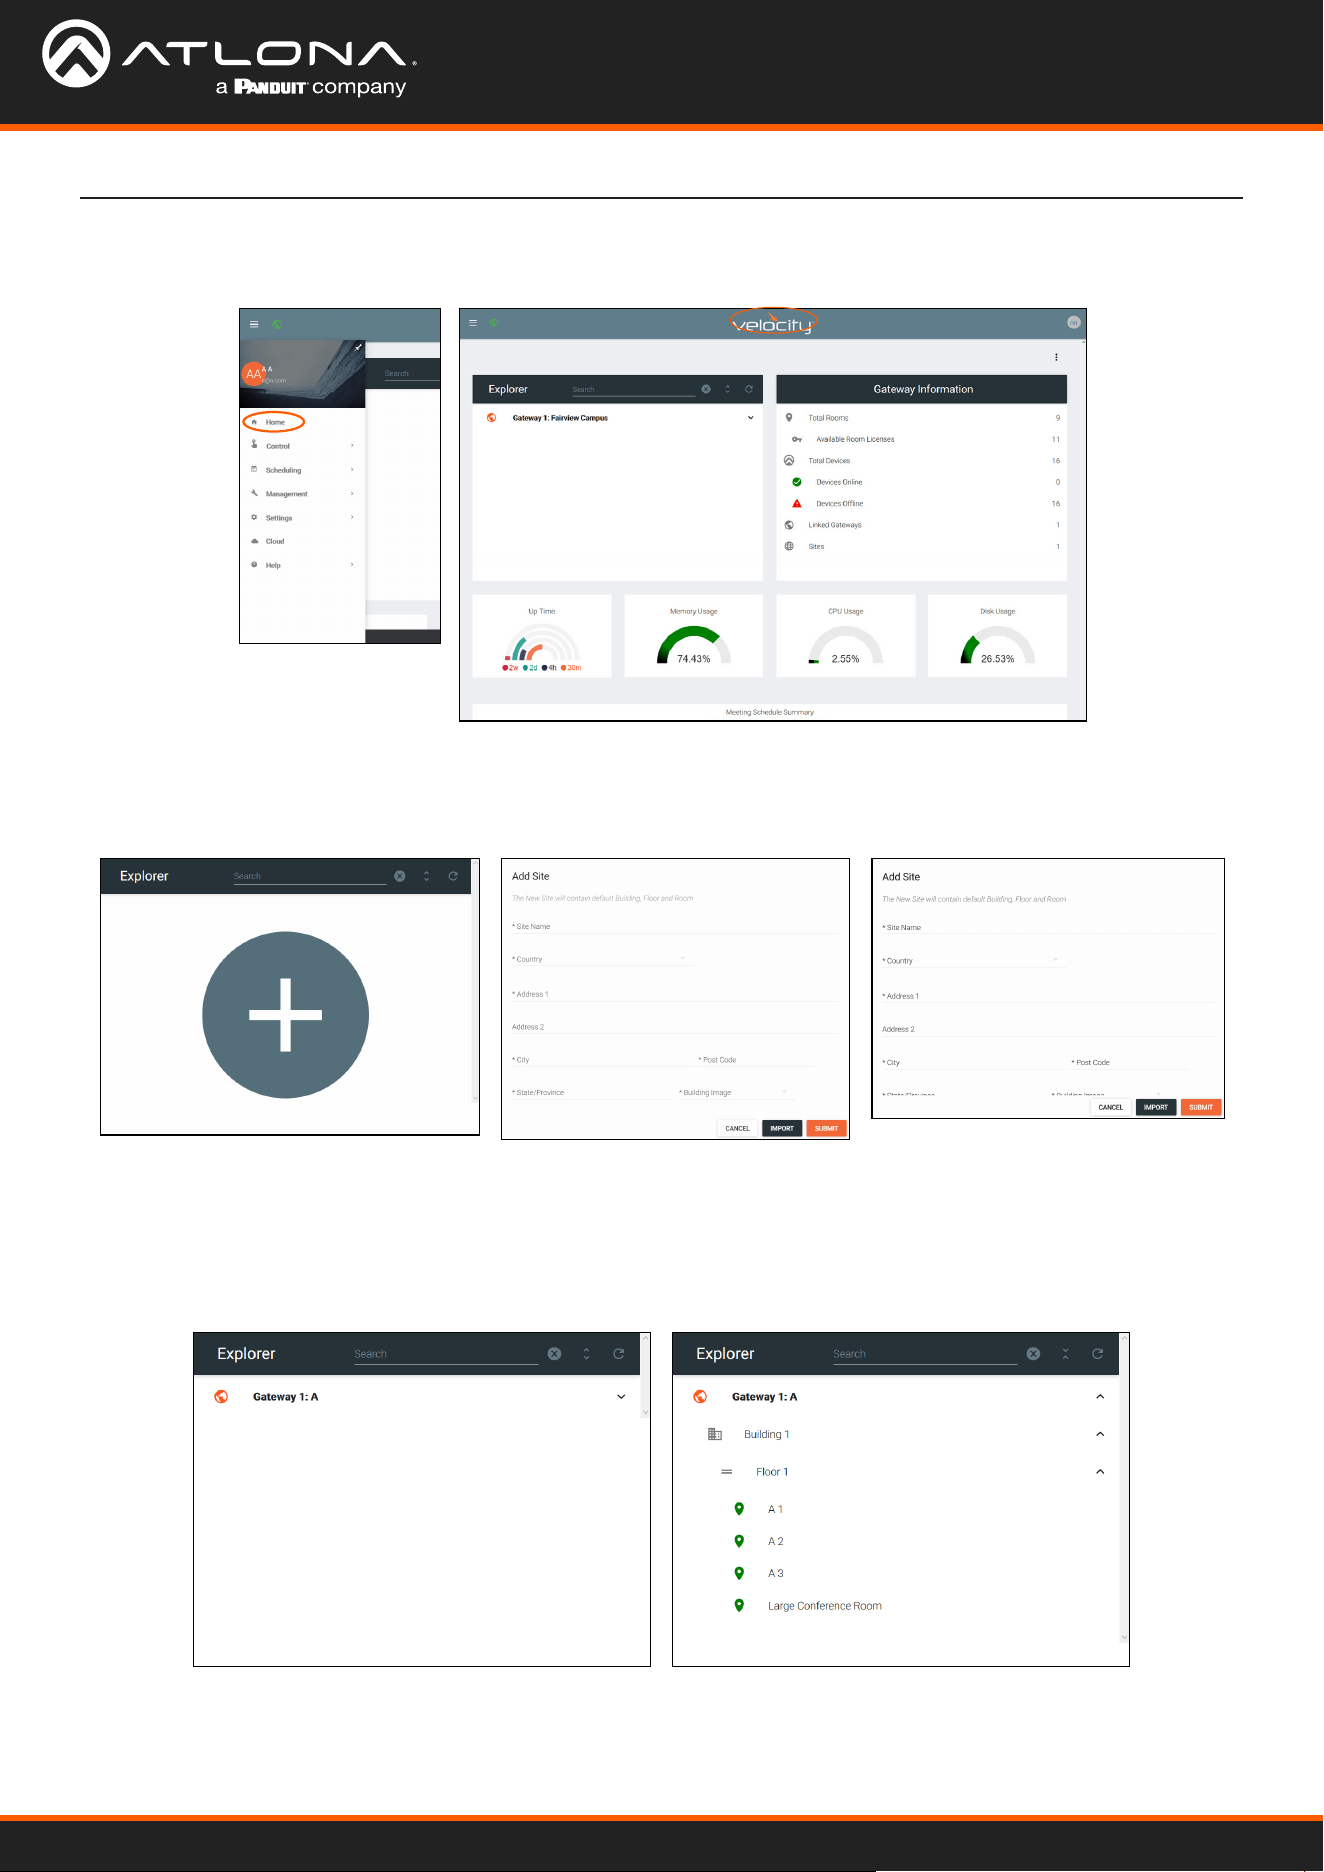
Home Page
The home page will display when logged in, when the Velocity logo in the center of the software is selected, or when
home is selected from the left navigation.
The explorer provides a quick place to add a site, or view all linked gateway sites.
Select the site name or the expand all button to view the site. All sites on connected gateways will display in the
explorer.
Explorer
1. Select the + button to add a site. A pop up will appear.
2. Fill in the Site Name, Country, Address, City, Zip Code, State, and select an image for the building or select the
import button and select a previously saved site from the local computer.
3. Press the Submit button. The site should appear in the explorer window, if not press the refresh button in the top
right corner.
Chrome
Firefox
Velocity Device Manager
20
Home Page
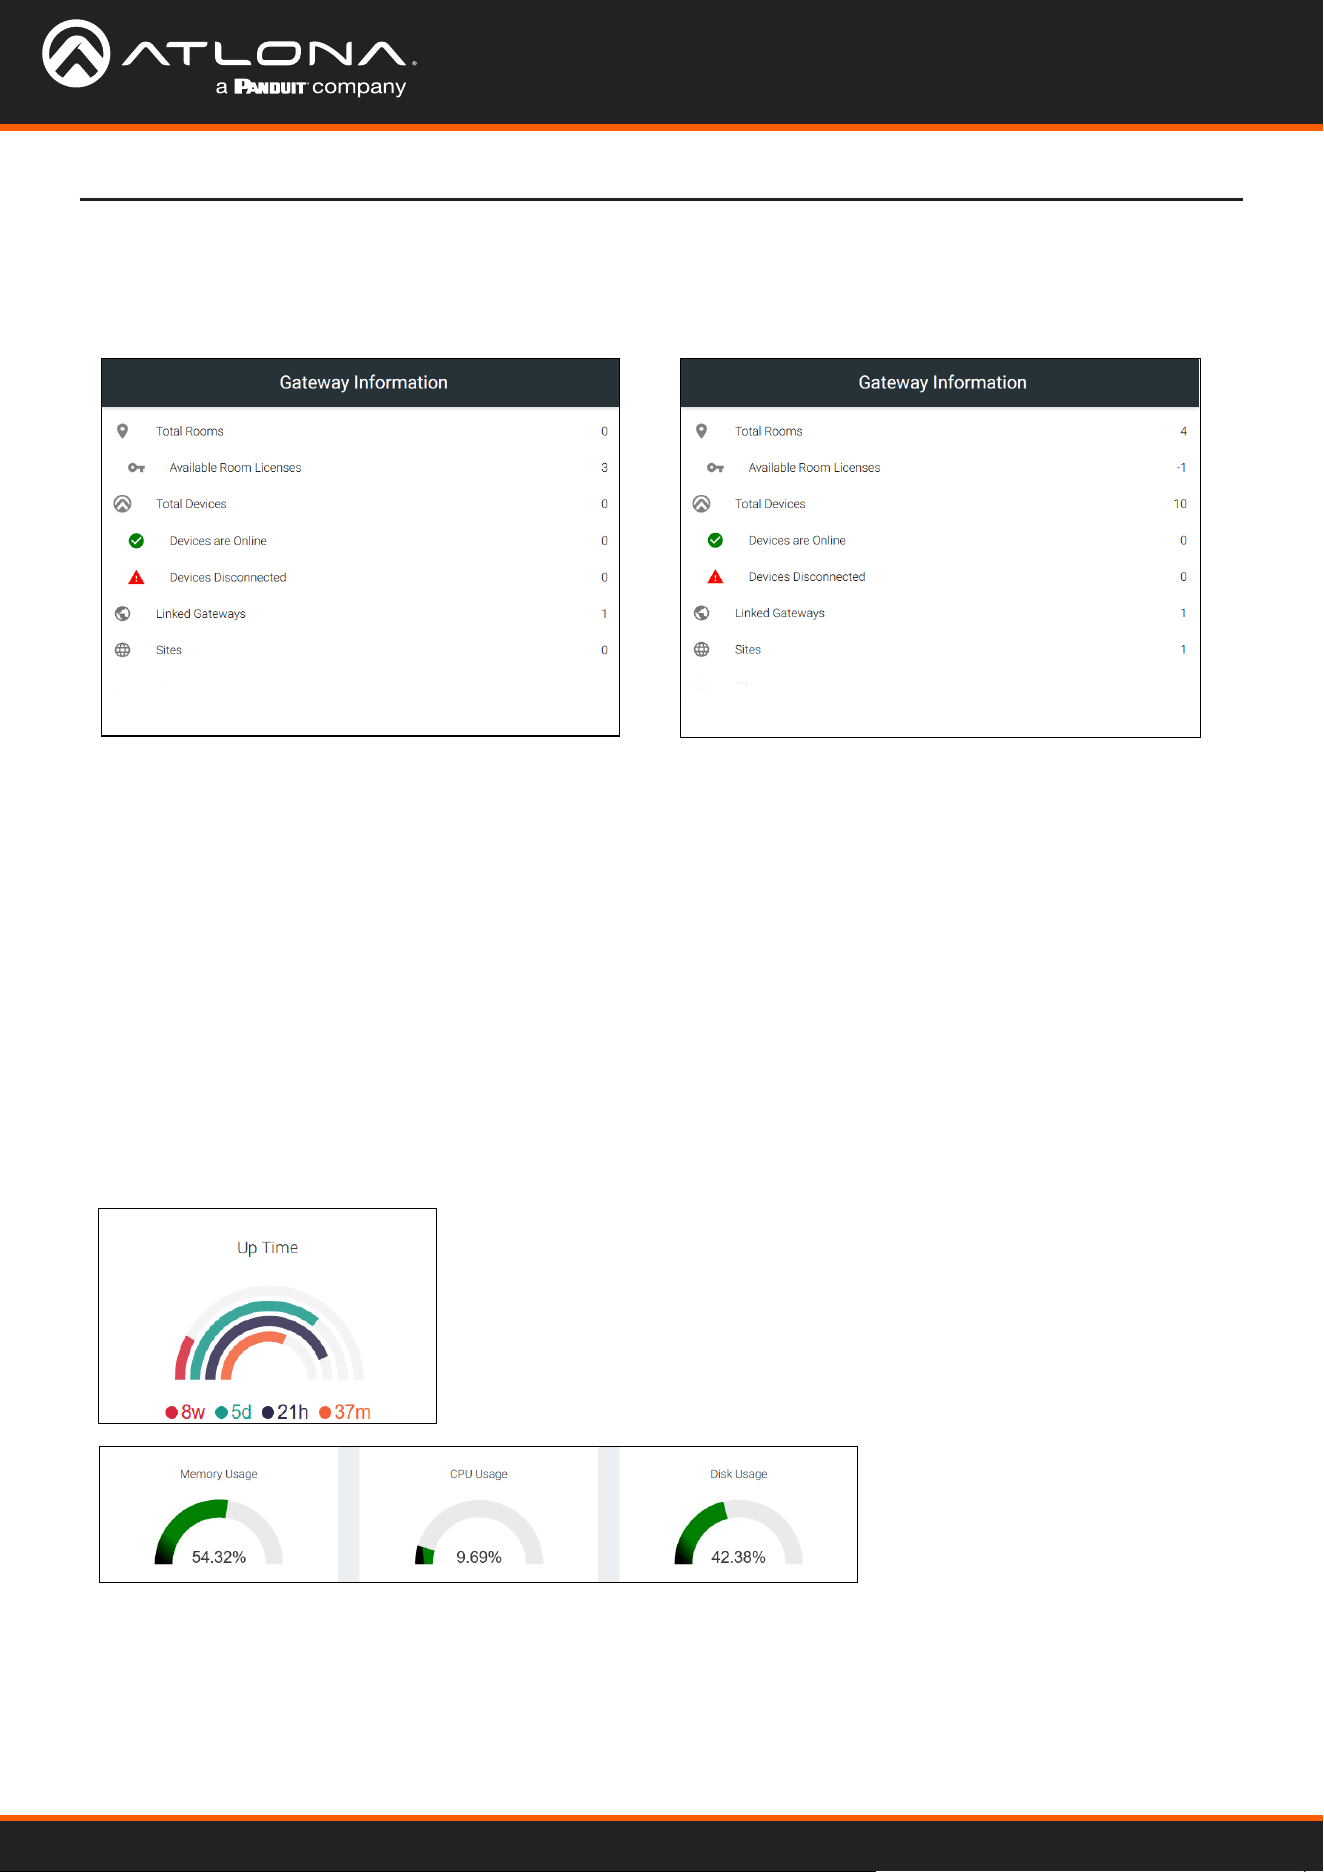
Gateway Information
Usage Information
The Gateway Information eld will display rooms, devices, gateways, and sites. This will update whenever a new site
or device is added. If the numbers do not update, refresh the browser screen.
Usage tiles will appear at the bottom of the home page. This will display status of the Velocity gateway.
Up time will display how long the software has been online at the current site.
It will display in weeks, days, hours, and minutes.
Memory, CPU, and Disk Usage tiles will display the status of the server. This will display the percentage of use on the
VGW-HW or the percentage of allocated resources in use on the server for VGW-SW.
Select any of the options (except for Total Devices) to go to the relevant section within the software. e.g. If Linked
Gateways is selected, it will open the Gateway tab within the Settings page.
Total Rooms - Displays the total amount of rooms on the gateway and linked gateways.
Available Room Licenses - Displays the total amount of licenses left. This can be negative if more rooms are
created than there are licenses.
Total Devices - Displays the total of all devices on the gateways (Atlona devices, displays, sources, etc)
Devices are Online - Displays the number of Atlona devices that are connected and communicating with Velocity.
Devices Disconnected - Displays the number of Atlona devices that are have been added but are not
communicating with Velocity.
Linked Gateways - Shows the number of gateways on the network that have been linked together.
Sites - Displays the number of sites on all connected gateways.
Velocity Device Manager
21
Home Page
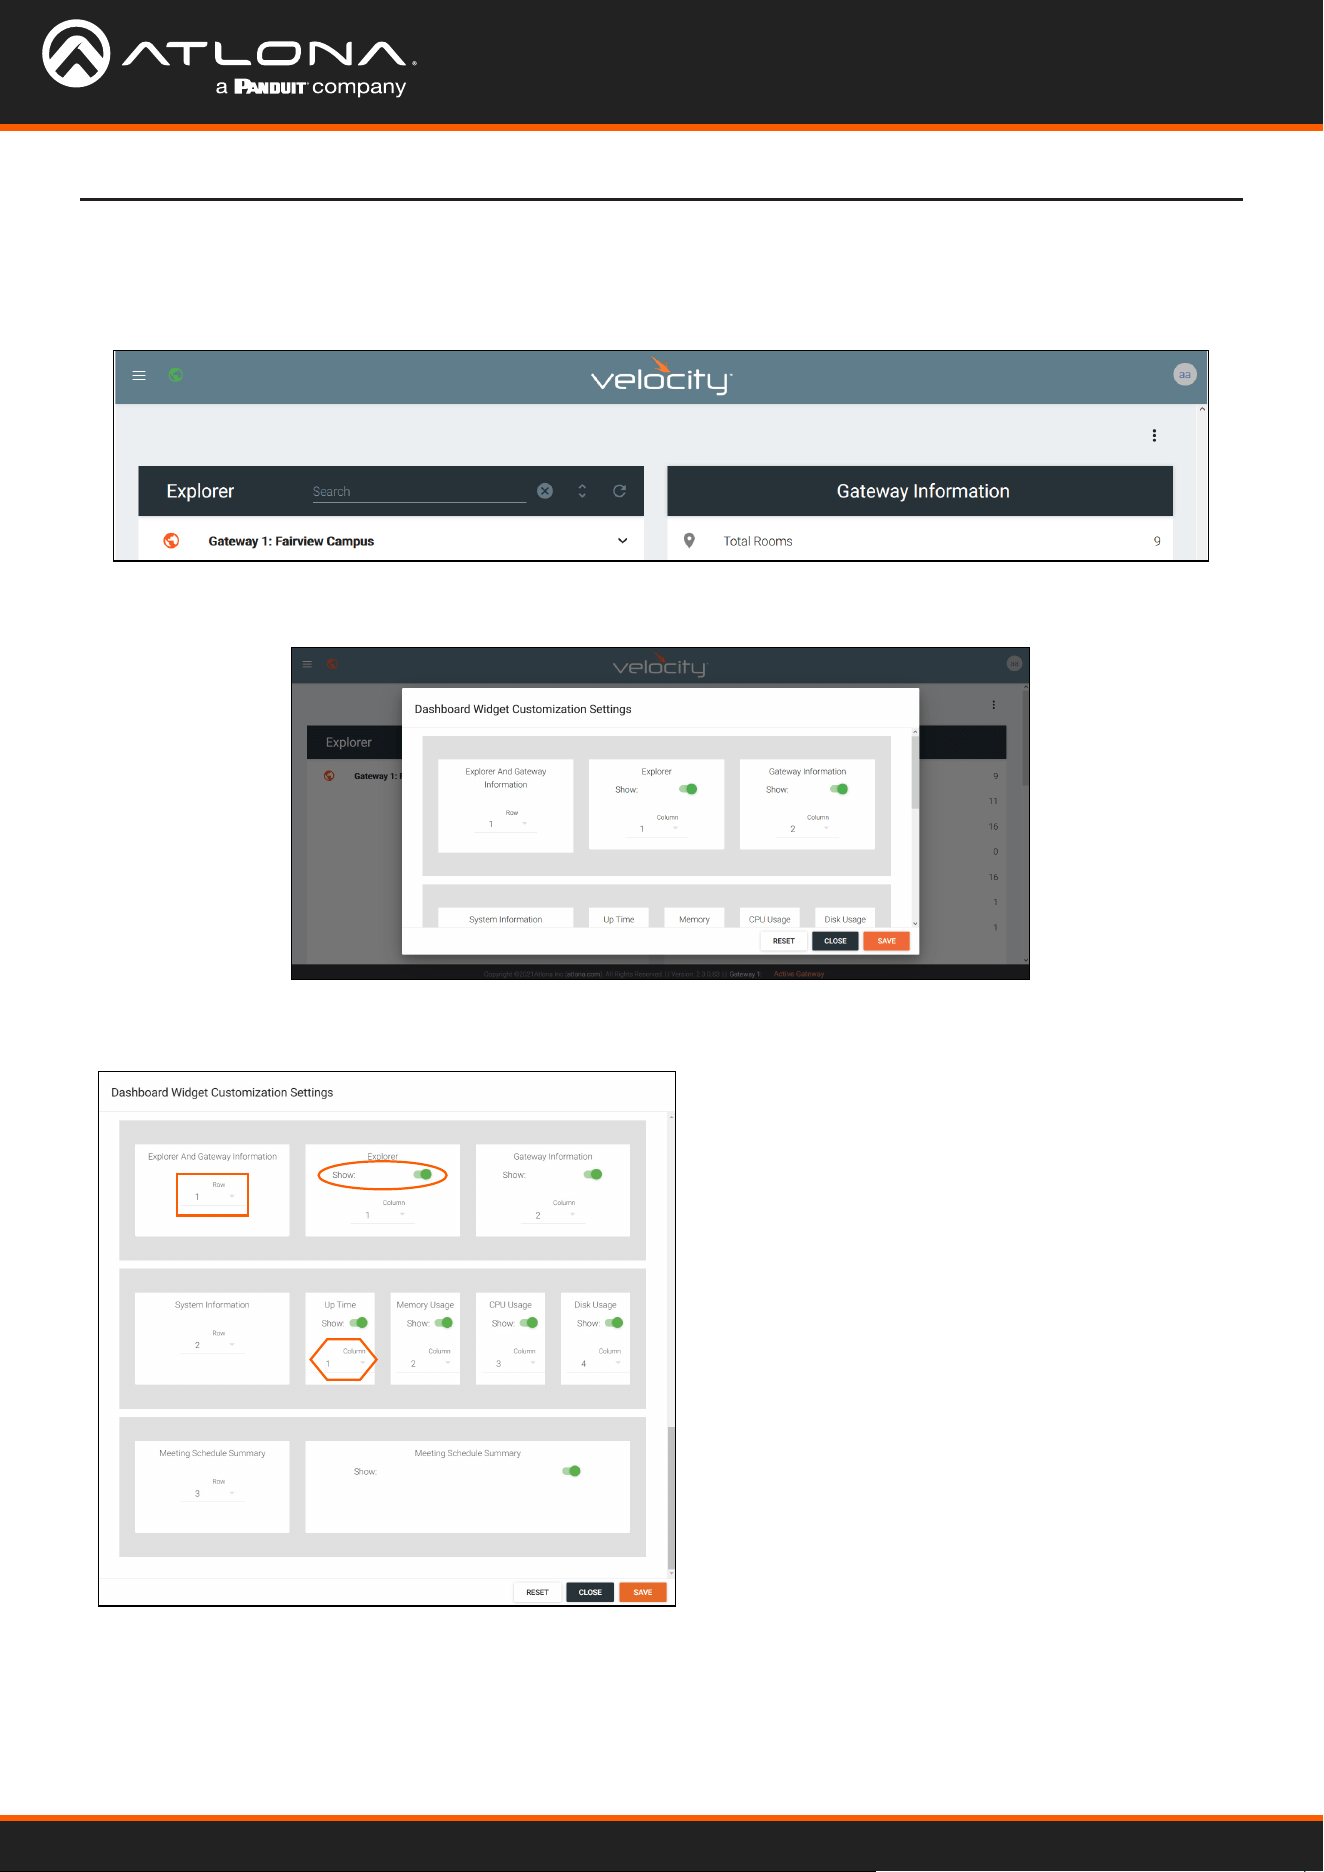
Customization
Memory, CPU, Disk Usage, and Calendar tiles will display the status of the server. The items shown on the home
page can be customized to display in any order and tiles can be hidden.
Select the : button in the top right corner of the home page. A new pop up will appear. This pop up will allow you to
adjust order and visualization.
Each option will display rst the name of what’s in the row, then the tile of what’s in the group. The rst tile will give
the option to change the order those groups show vertically, select the row number from the drop down.
Each tile will have a show slider. The tile will be active
when the slider is green and hidden when grey.
The order in which the tiles appear on the row can be
adjusted using the Column option. Select the number
to correspond with the wanted order.
RESET - Press this button to set the tiles back to the
factory default order.
CLOSE - This will shut the pop up window.
SAVE - Use this button to push the changes to the
home page.
Velocity Device Manager
22
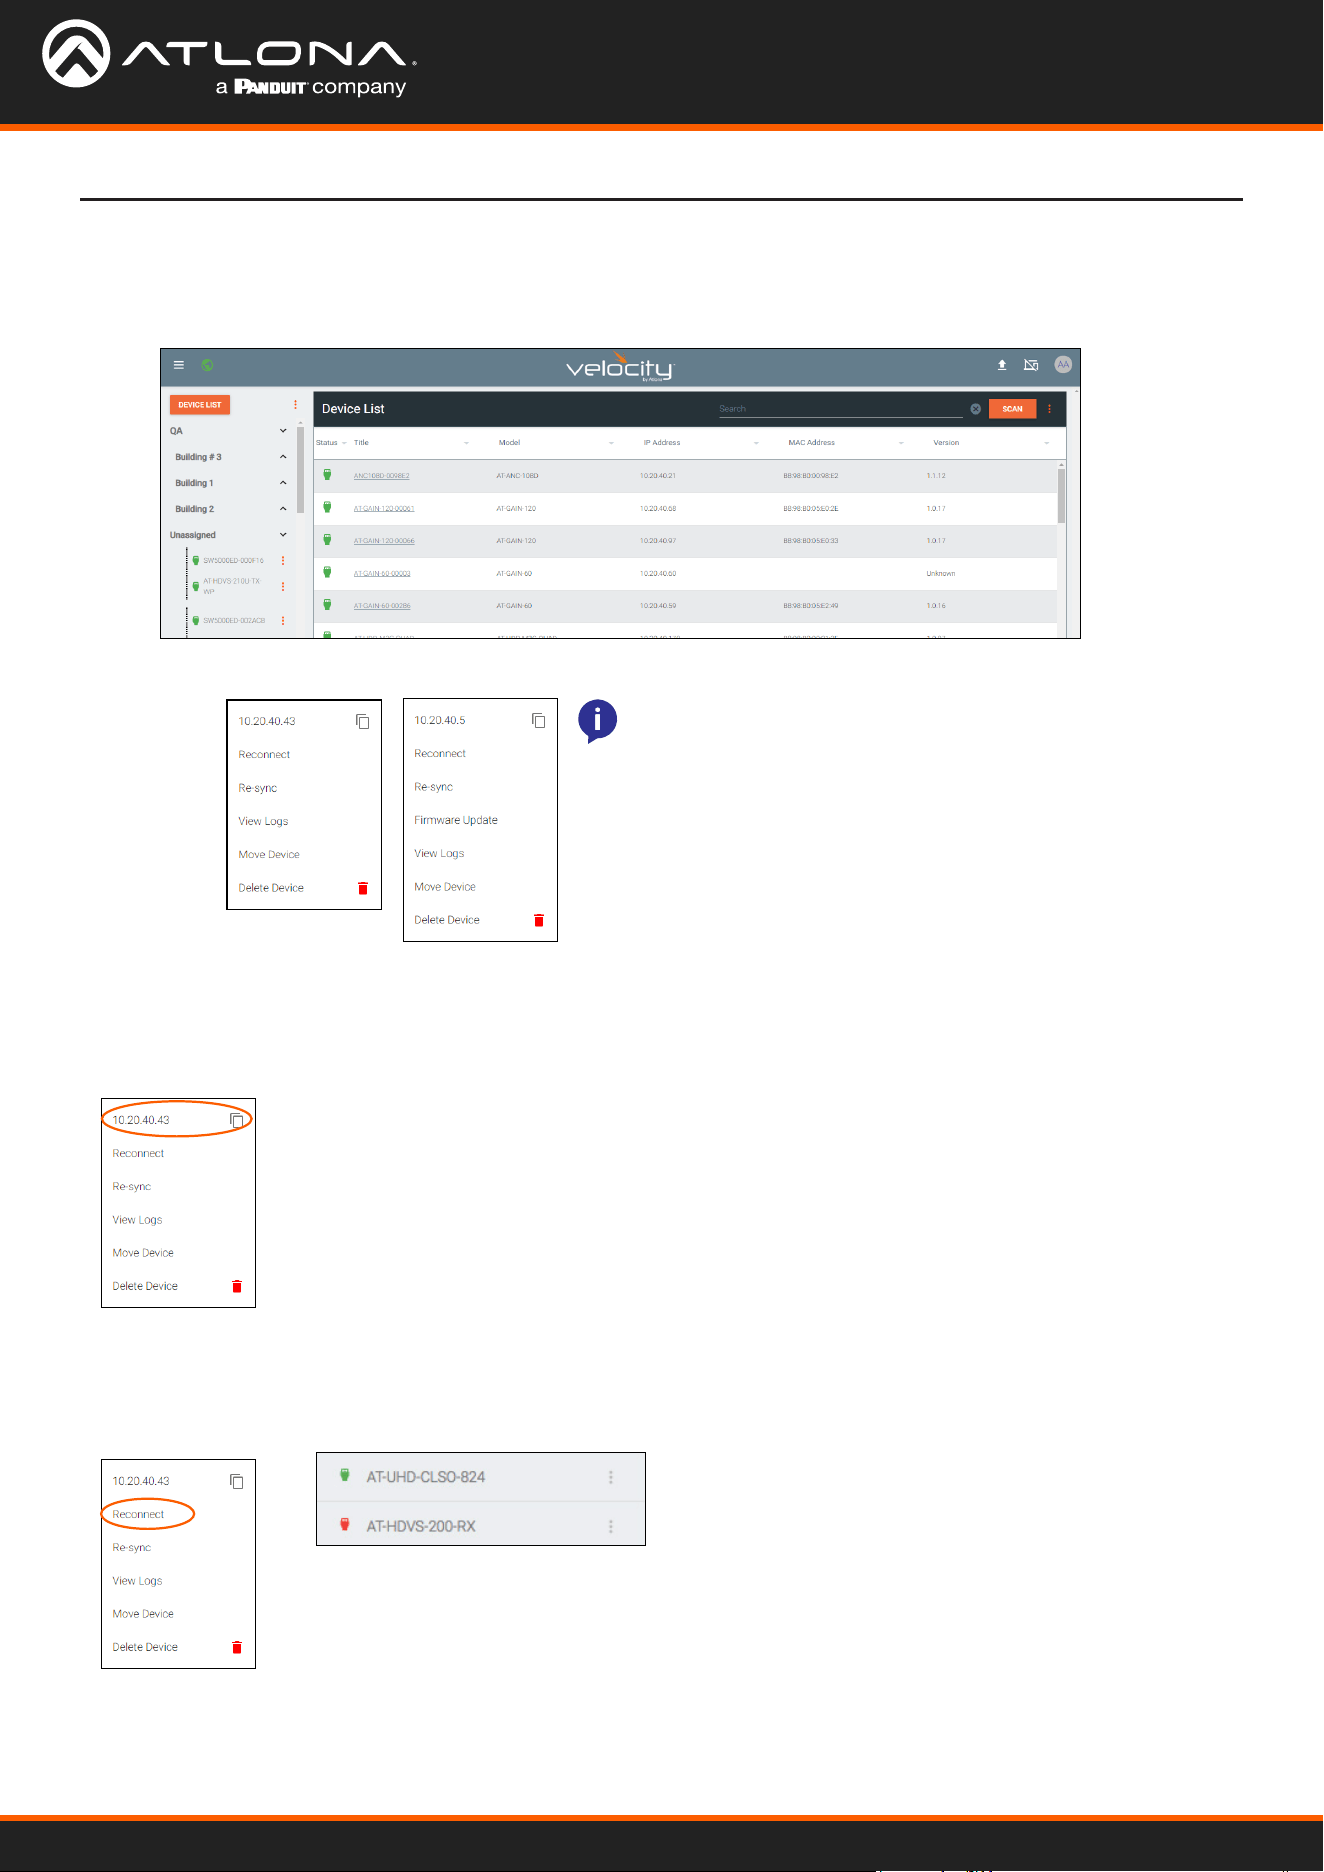
Devices
Device List
The device list provides a quick look at the current sites and already discovered devices, it also provides a quick and
simple way to discover, sort, congure, and update products.
Devices discovered through the mDNS autoscan will display under the unallocated list until added to a room. For
devices without mDNS, Velocity Device Manager will need to do a network scan to nd them.
Atlona devices can be discovered and congured using Velocity Device Manager. All supported devices can be
found through the device list or rooms page.
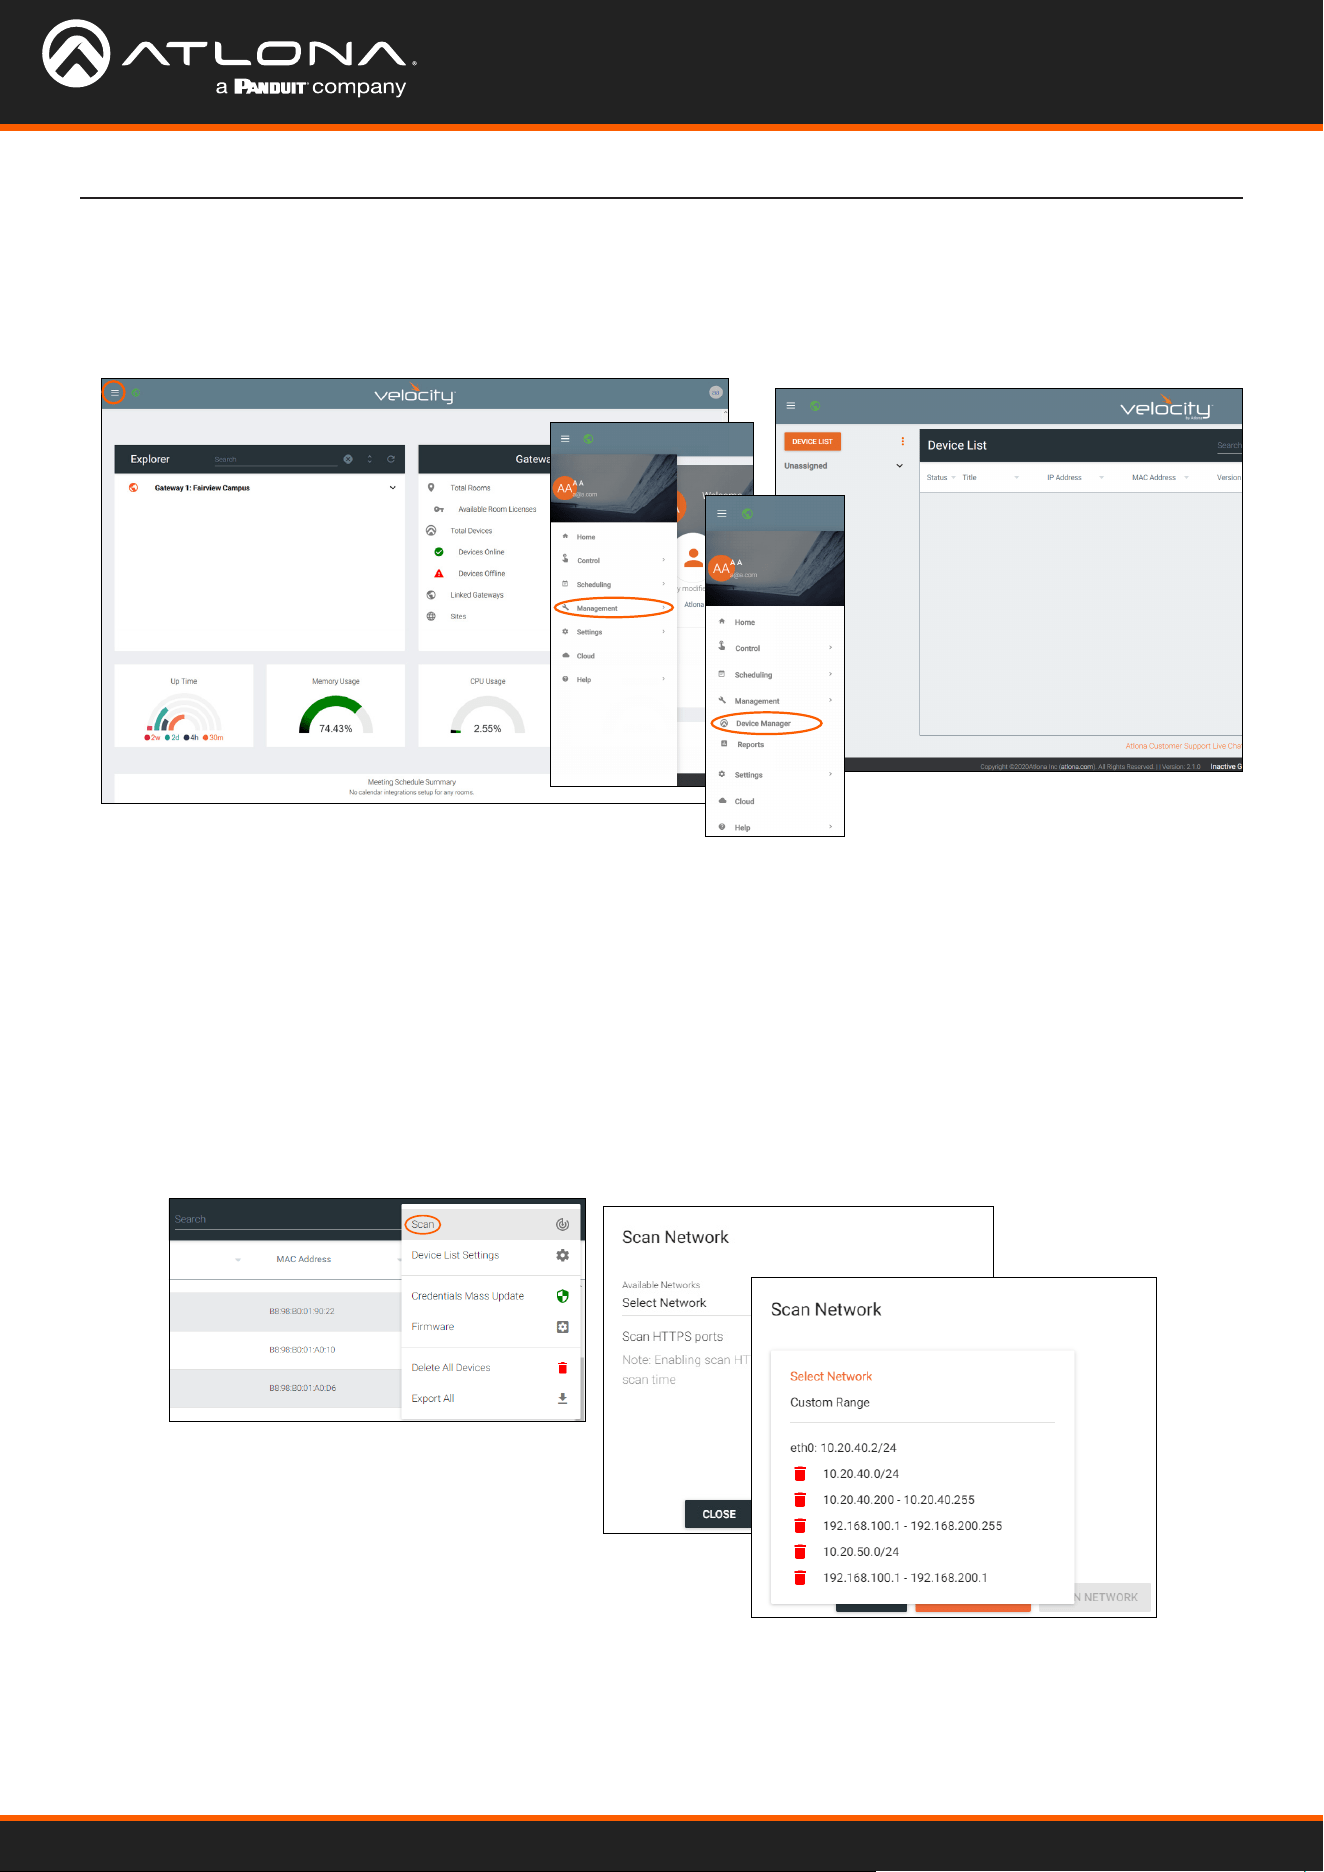
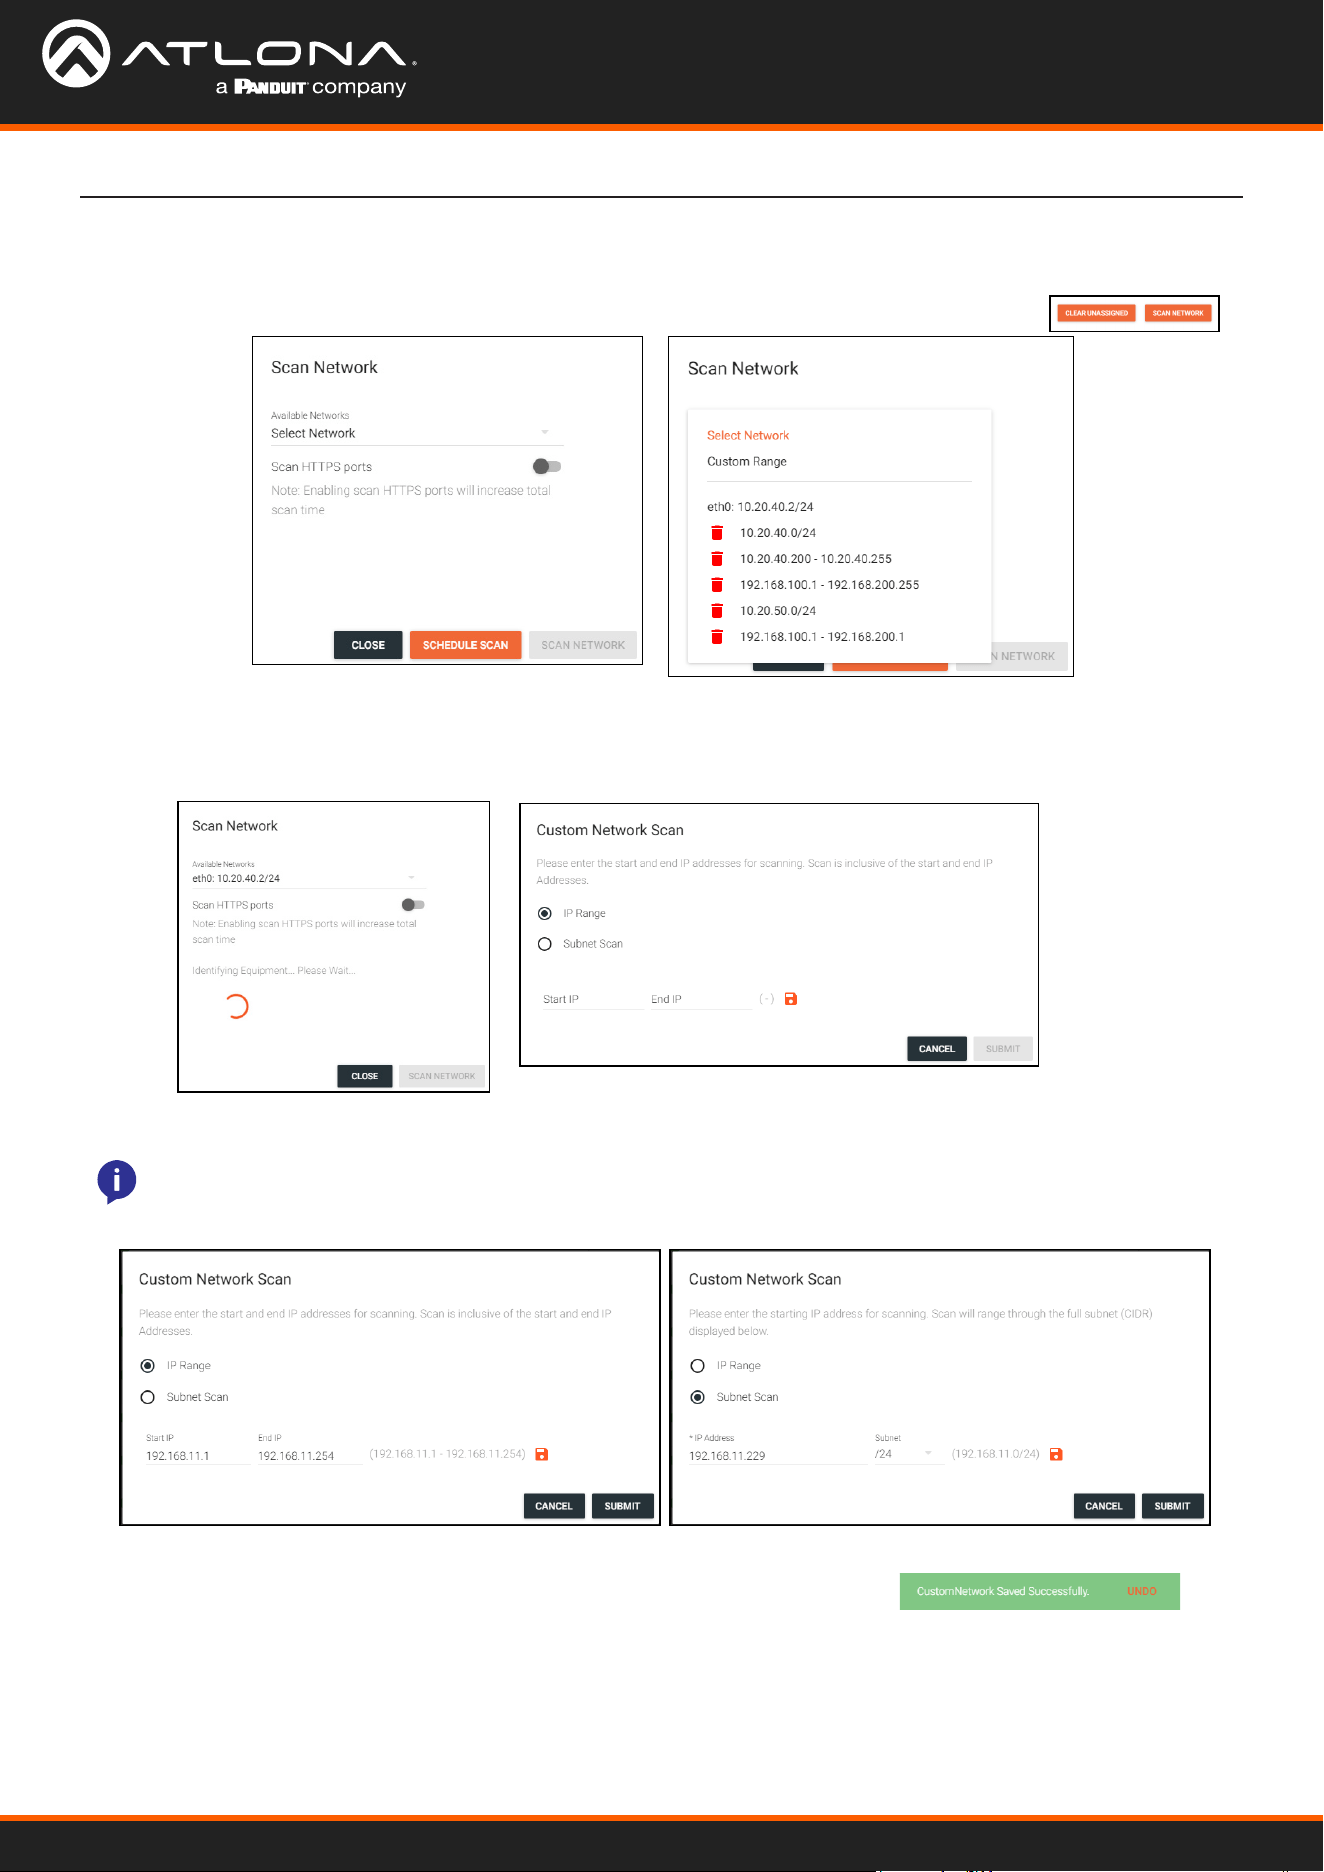
Scan Networks
1. Select the Scan button or press the : icon next to the Scan button. A new pop up will appear.
a. If : is selected, choose Scan from the drop down menu.
2. Select Custom Range (a new screen will take over) or the auto detected network eth0.
1. Select the ≡ button from the top left corner and select Management.
2. Select Device Manager from the available options. A new window will appear.
Velocity Device Manager
23
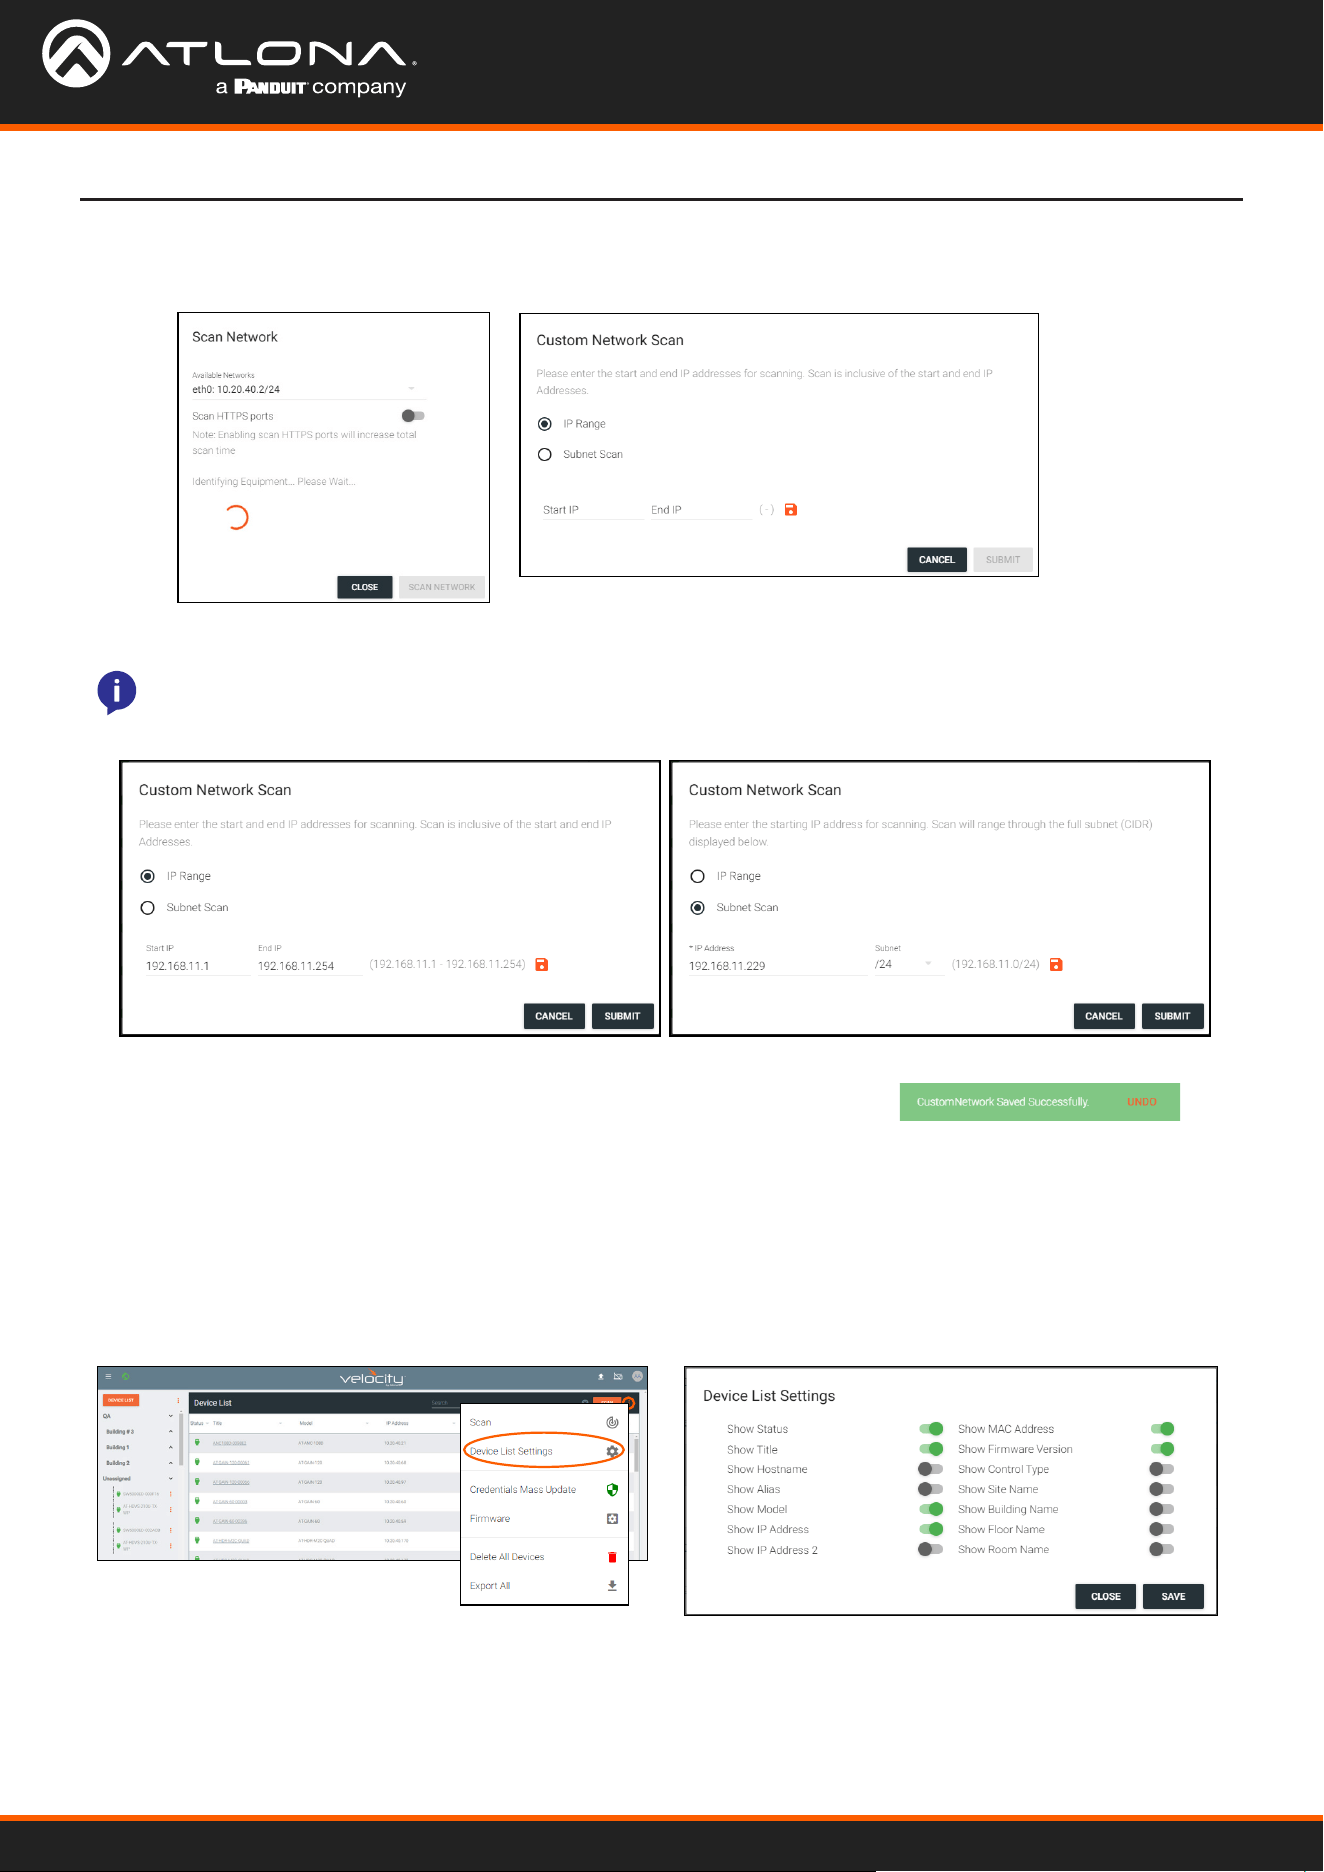
2. Press the save icon next to IP eld. A green CustomNetwork Saved Successfully message will appear
at the bottom of the page when the custom scan settings are saved.
3. Press the Submit button to start the scan. The pop up will close when the scan is completed.
Devices
a. If the auto detected network eth0 is selected, press Scan Network to start the scan.
b. If Custom Range is selected, select between IP Range and Subnet Scan
1. Type in the network range or subnet information.
NOTE: It is recommended to keep the network range scan to under a 512 IP range. The larger the network
range, the longer the scan will take. On subnet scan, Velocity Device Manager will automatically limit the
scan to 512 on subnet 23 or 256 on subnet 24.
Device list settings provide a way to customize what is seen on the device list, from connection status to room name.
Each option will have a slider to enable (green) or disable (grey) each option.
Device List Settings
1. Select the : icon next to SCAN button. A drop down menu will open.
2. Select Device List Settings. A new pop up will appear.
3. Select the slider for every detail to appear within the Device List page.
4. Press the SAVE button. The Device List will update to show the devices listed with the new settings.
Velocity Device Manager
24
Devices
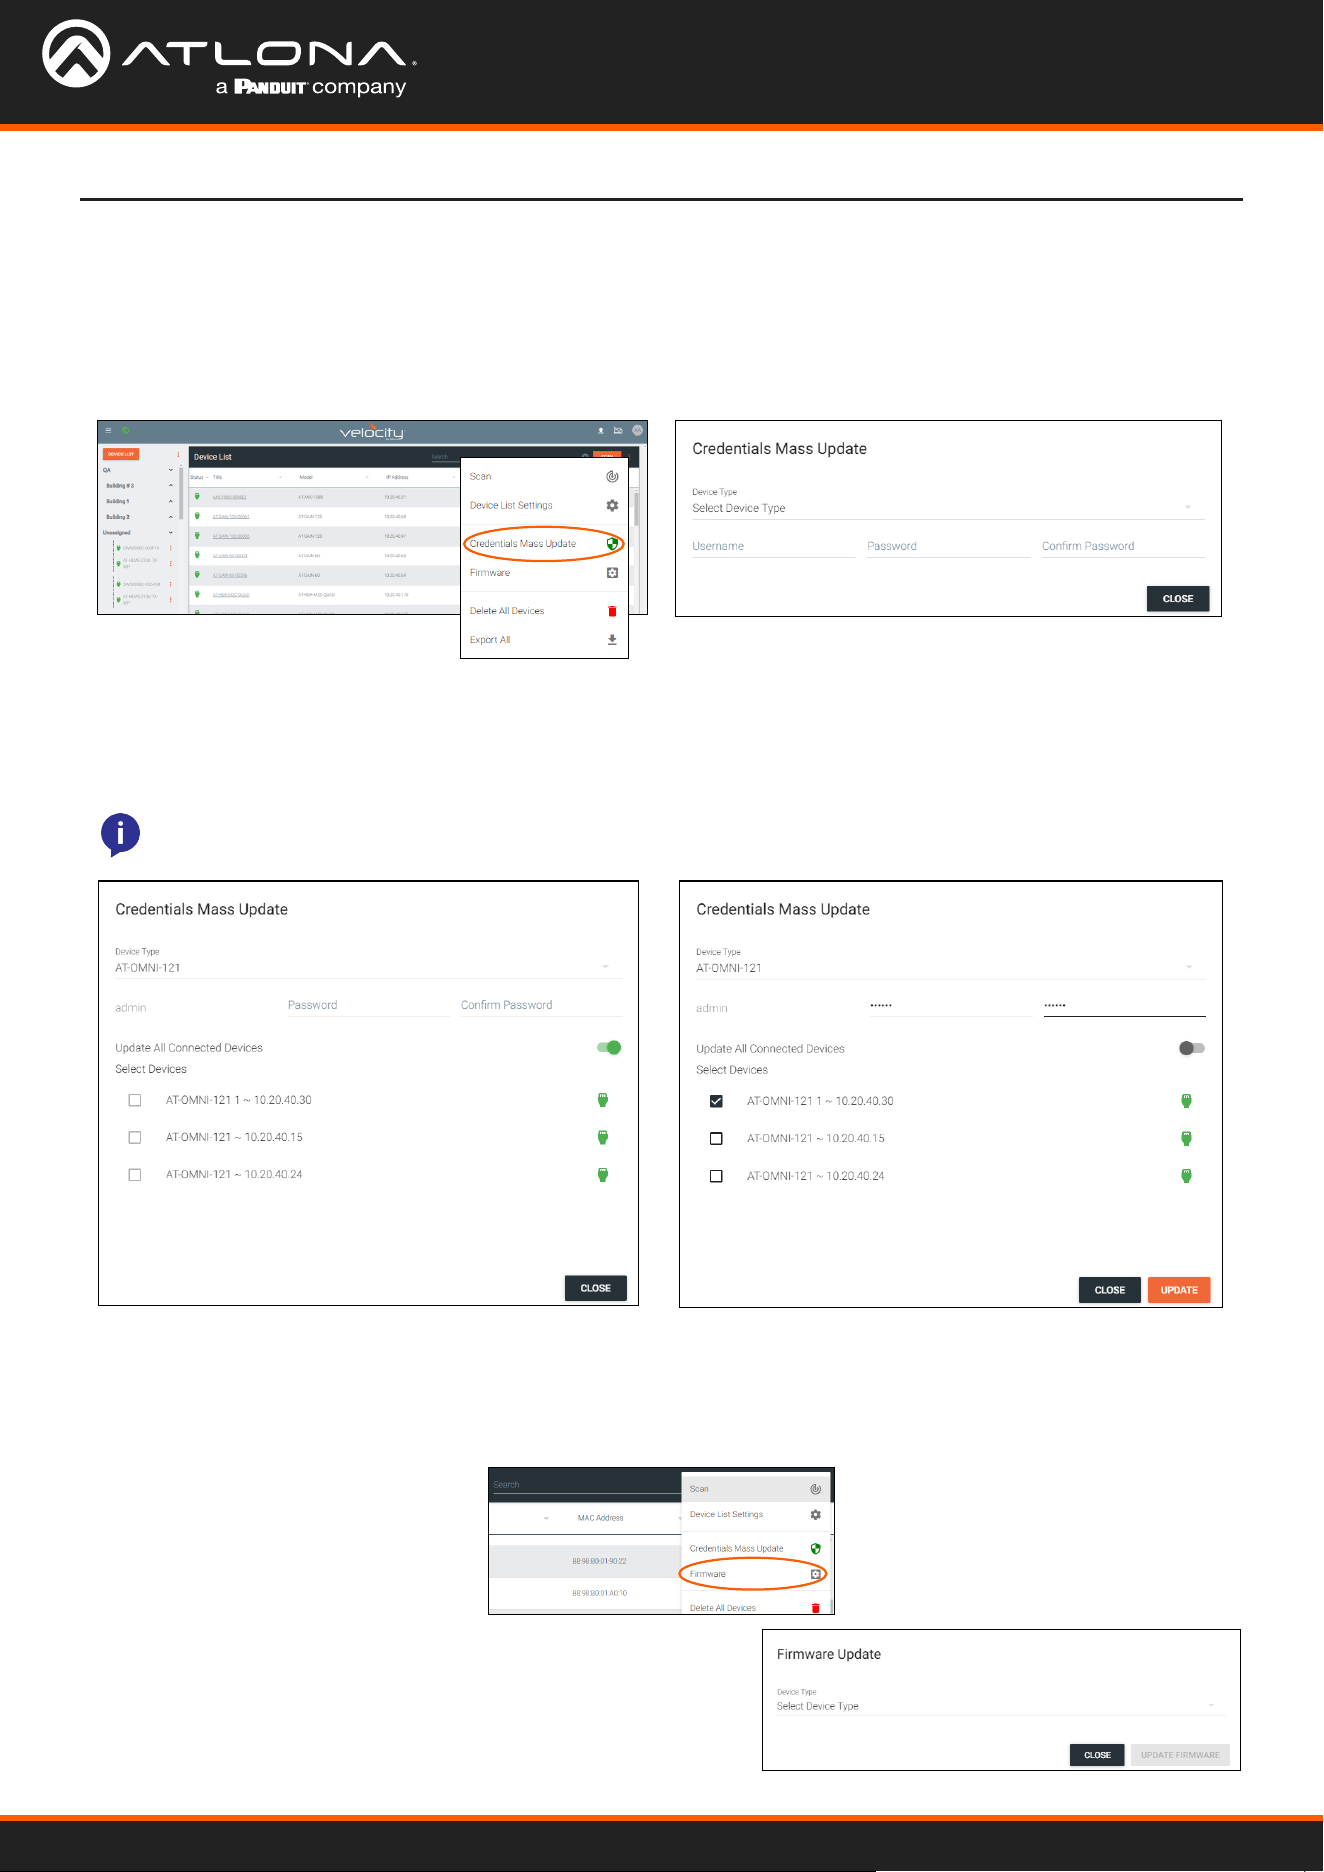
Device login information can be updated for all of a device type by selecting Credentials Mass Update from the
device drop down menu.
Login / Credentials Update
1. Select the : icon next to SCAN button. A drop down menu will open.
2. Select Credentials Mass Update. A new pop up will appear.
All device rmware can be updated through the Device List screen. This provides a simple way to update multiples of
the same product at the same time.
Firmware
1. Select the Firmware option. A conrmation pop up will
appear.
2. Select the SKU from the Device Type drop down menu. All
devices on the network with that SKU will appear and the
latest rmwares will display.
3. Select a device SKU from the Device Type drop down menu.
4. *Optional* Select the Update All Connected Devices slider to select the individual device IPs to update
credentials or leave the slider green to update all connected devices with the new login information.
5. Enter in the new login information.
6. Select the Update or CLOSE button.
NOTE: Many Atlona devices will only allow the password to be updated, those devices will grey out the
username eld.
Velocity Device Manager
25
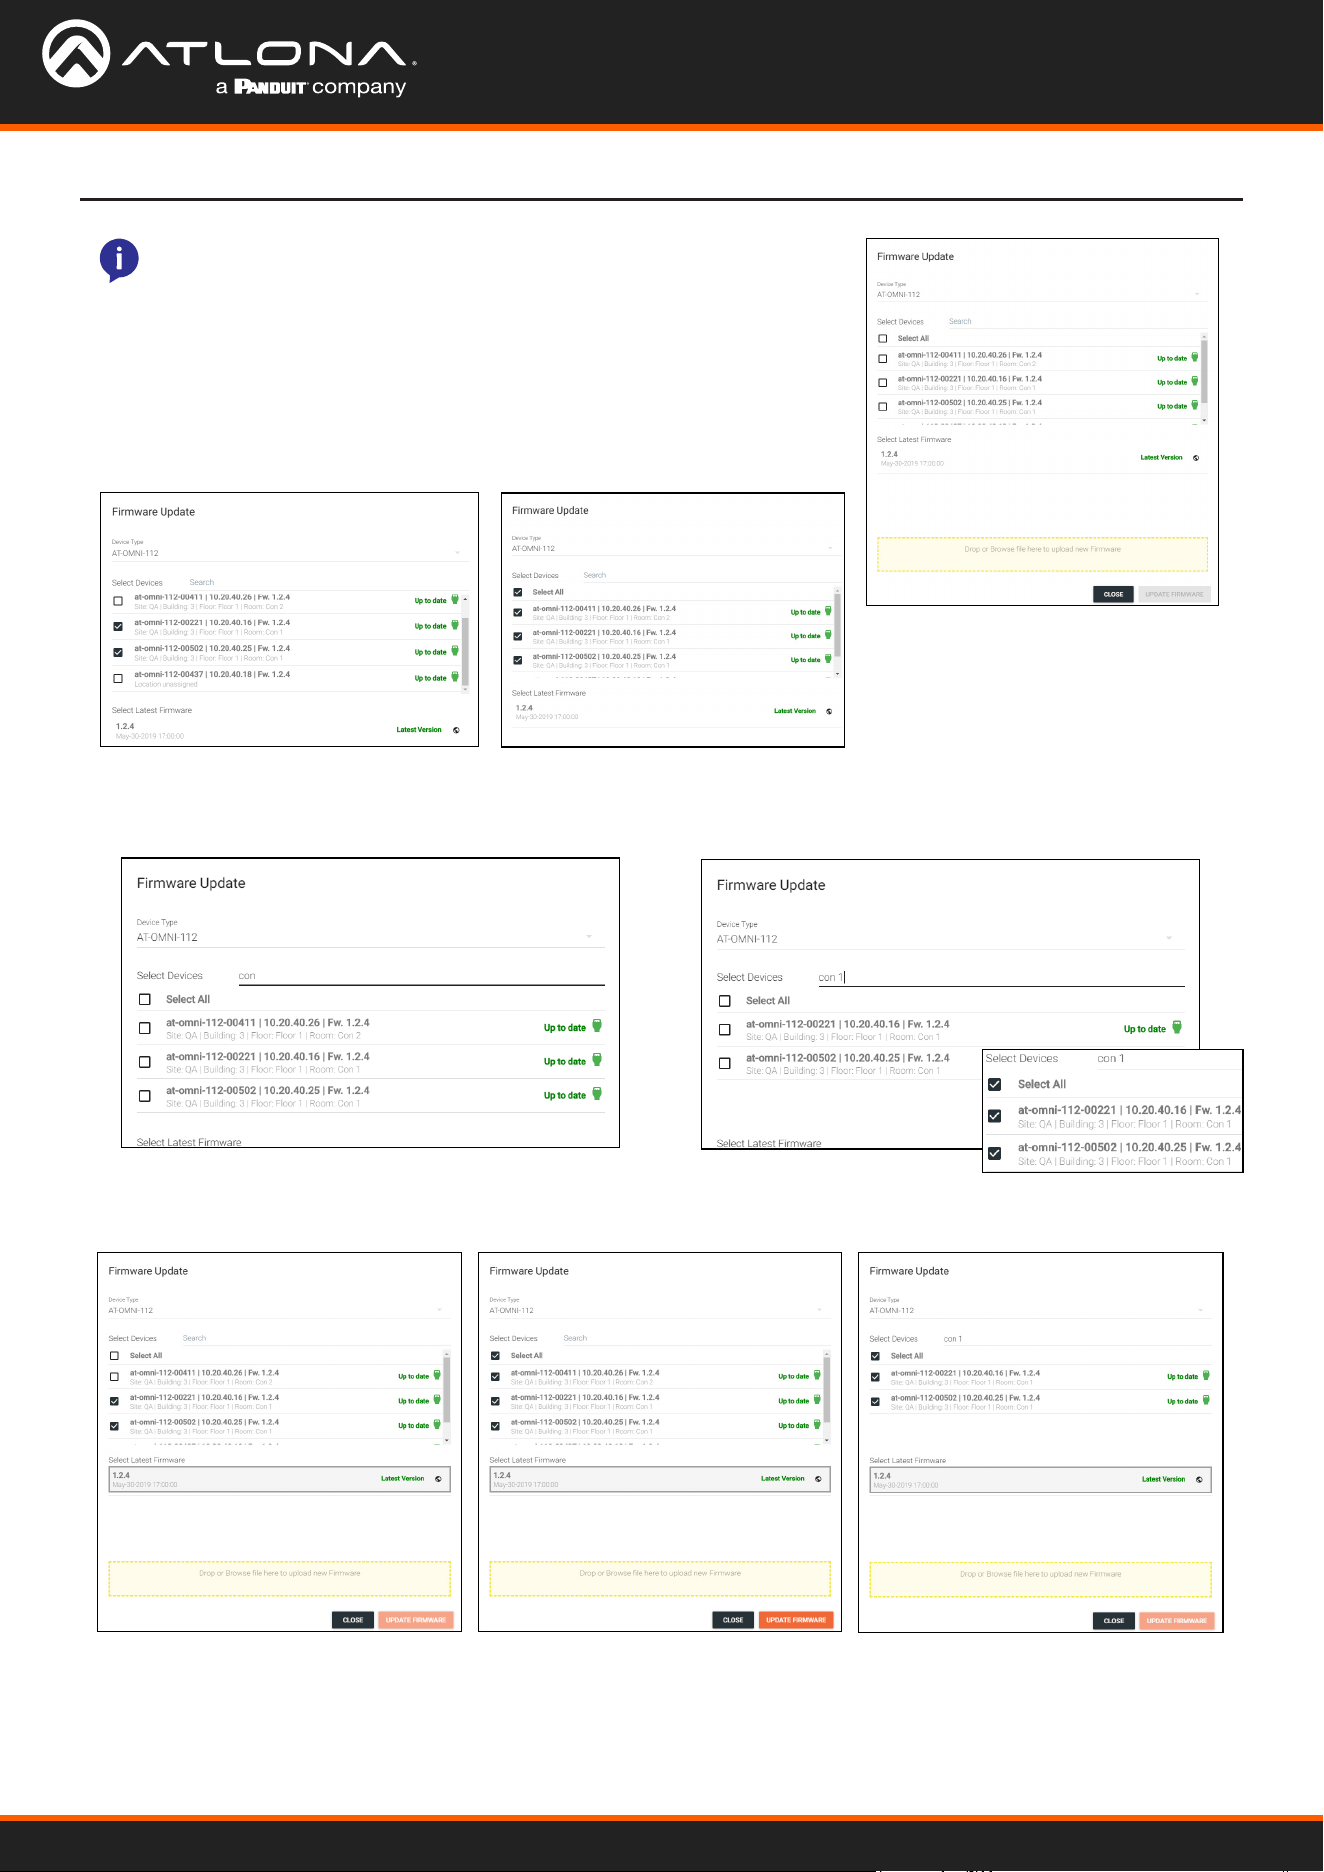
Devices
3. Select the devices to be updated.
a. Select each individual device check box (to the left of the device) to
be updated.
b. Choose the Select All check box to update all the devices in the
list together.
c. Type the building/site/room name, hostname, or Alias into the search eld to ensure only the devices
selected are being updated. Use this to update devices in specic areas or buildings while keeping the rest of
the devices live.
NOTE: If the rmware version is not displaying next to the product,
click into the unit interface from the side menu, then return to the FW
update screen.
4. Select the rmware (even if already highlighted) from the Select Latest Firmware list. The rmware with the world
icon will be the latest one listed on the website.
Velocity Device Manager
26
Devices
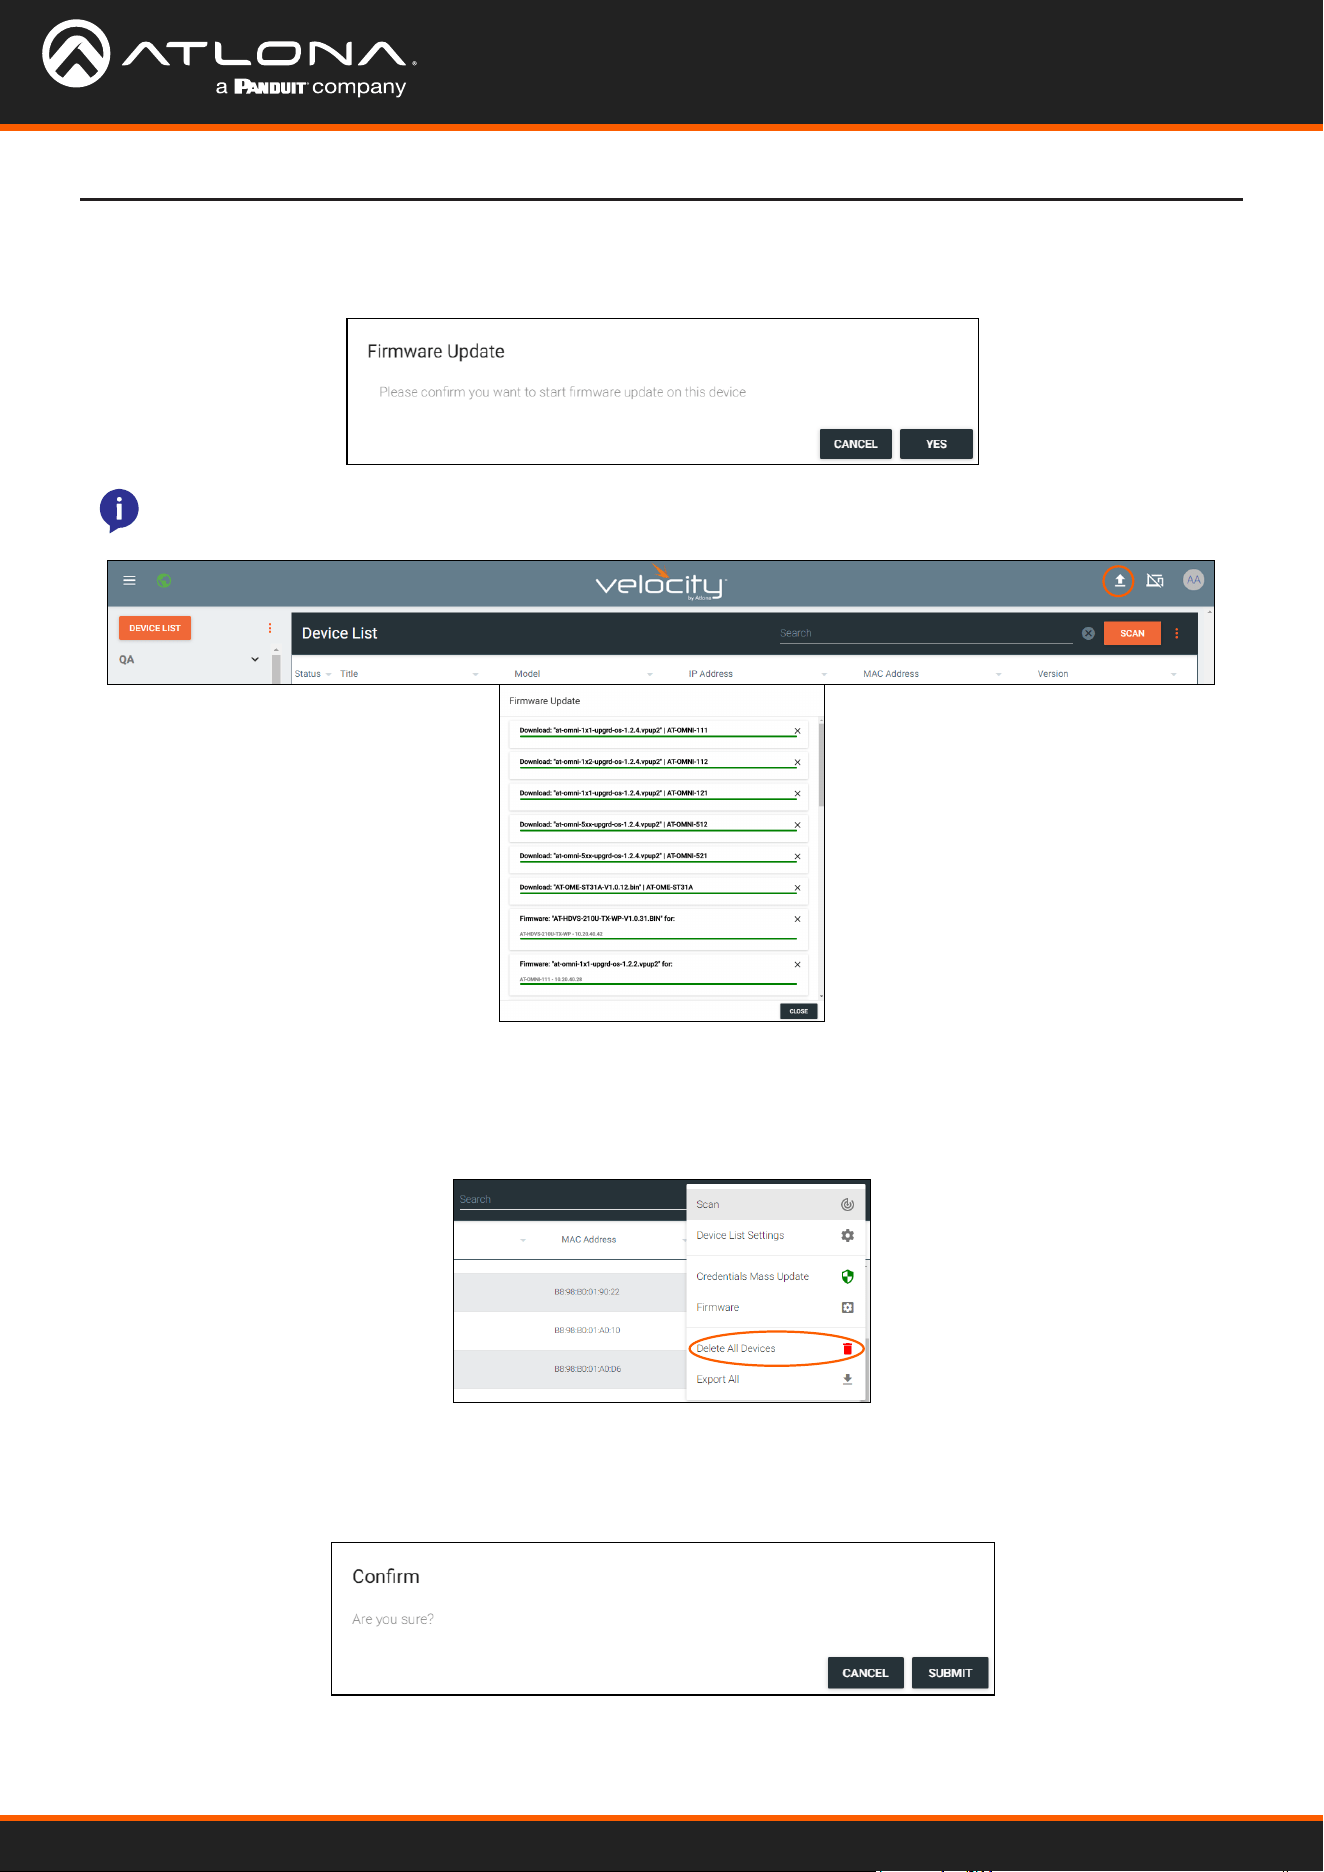
5. Press the UPDATE FIRMWARE button. The rmware window will close and a conrmation window will open.
6. Select YES to start the update.
NOTE: While the units are updating, the connection icon next to them may turn red. To view the status of
the rmware update, click the upload icon at the top right of the screen. A new pop up will appear.
To start over with devices within Velocity Device Manager, the Delete All button can be used. This will remove all
devices (including ones within rooms) from the database. The devices on the network will be found again through
mDNS or a manual scan after the deletion.
Delete All Devices
1. Select the : button. A drop down menu will open.
2. Select the Delete All Devices option. A conrmation pop up will appear.
3. Press the SUBMIT button to proceed. The pop up will close and the device list will reset.
Velocity Device Manager
27
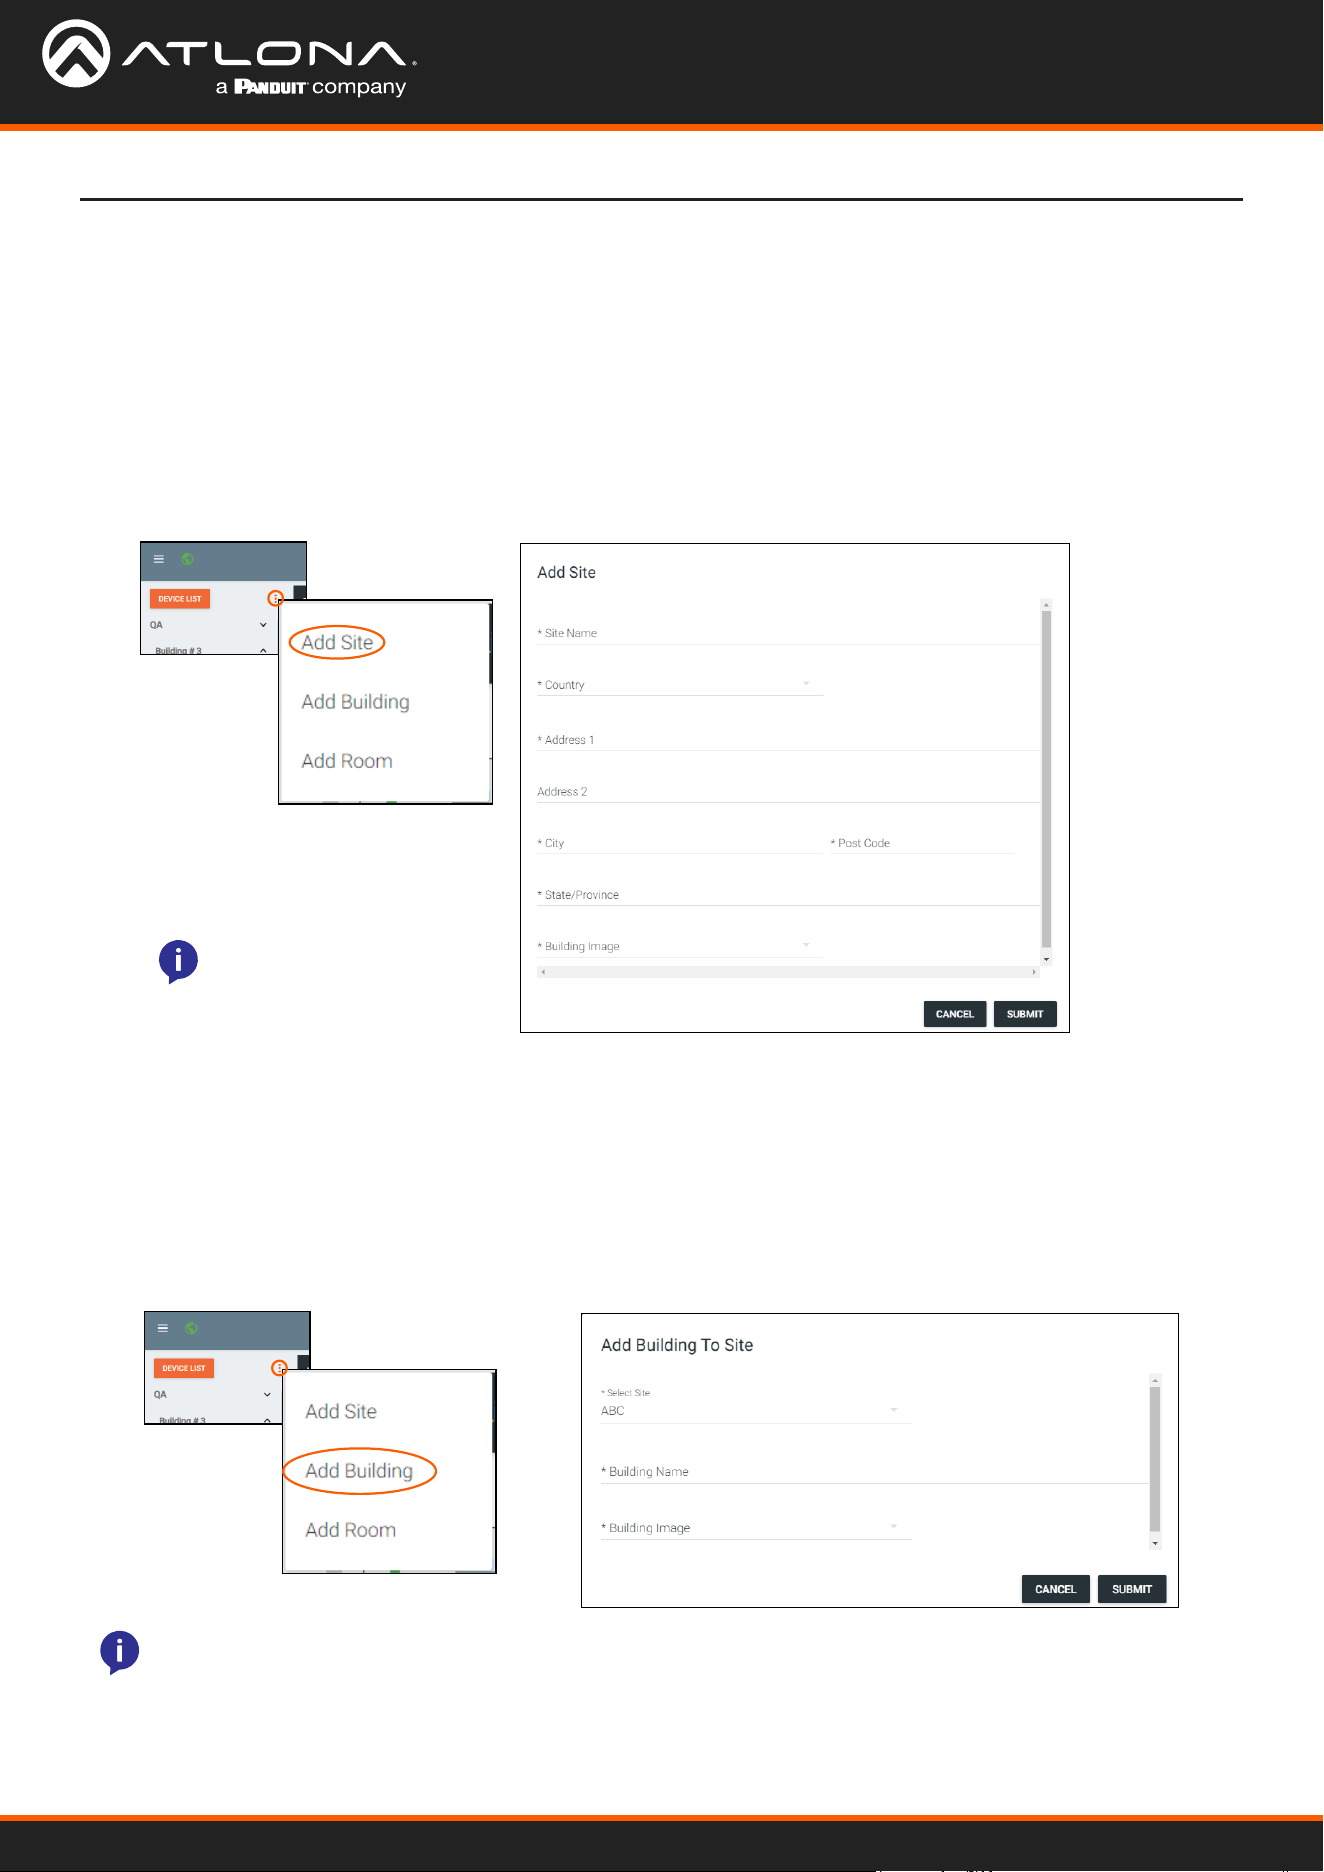
Sites can be added through the Device List drop down menu.
Sites can be added through the Device List drop down menu.
Add Site
Add Building
1. Select the : icon next to device list. A drop down menu will open.
2. Select Add Site. A new pop up will appear.
3. Fill in the site information.
1. Select the : icon next to device list. A drop down menu will open.
2. Select Add Building. A new pop up will appear.
3. Fill in the Building information.
4. Select the SUBMIT or CANCEL button.
4. Select the SUBMIT or CANCEL button.
Devices
• Name - Usually the building name or suite number, use to identify dierent buildings.
• Address 1 & 2 - Used to help determine the exact location of the building, to help when troubleshooting.
• Building image drop down menu - Select a building image.
NOTE: Uploading a custom
image must be done from
sites within the ≡ menu.
NOTE: Uploading a custom image must be done from sites within the ≡ menu.

Velocity Device Manager
28
Rooms can be added through the Device List drop down menu.
Add Room
1. Select the : icon next to device list. A drop down menu will open.
2. Select Add Room. A new pop up will appear.
3. Fill in the Room information.
4. Select the SUBMIT or CANCEL button.
NOTE: Uploading
a custom image or
renaming an already
created oor must be
done from sites within the
≡ menu.
Devices
a. One oor is automatically added when a building is created. To create a new oor, press the + button.
b. Fill in the oor name and press SUBMIT. The screen will refresh and the new oor will be selected from the
drop down list.
Velocity Device Manager
29
Devices
NOTE: Some devices may not be compatible
with the Firmware Update process of Velocity
Device manager and will need to be updated
through their interface. The option Firmware
Update will not be within the drop down unless
compatible.
1. Select the : icon next to device. A drop down menu will open.
Device Options
Within the device list all discovered Atlona devices will have the ability to be congured. Each device will have
dierent options within their menus.
Reconnect
IP
Reconnect will provide a way to reconnect a device or get the most up to date settings. If a device has a red icon
next to it, and is known to be active on the network, try reconnecting to reestablish connection.
For ease of use, the IP has been added to the drop down menu. By clicking the icon next to the IP address, the
device IP can be copied to be pasted into other windows or applications.

Velocity Device Manager
30
Devices
Firmware Update
Firmware Update will allow for the selected device to be rmware updated. To update all similar products at the same
time, view the Firmware section within Device List.
1. Select Firmware Update from the drop down menu. A new pop up will appear.
2. Select the rmware (even if already highlighted) from the Select Latest Firmware list. The rmware with the world
icon will be the latest one listed on the website.
Re-sync
Re-sync will provide a way to reconnect a device or get the most up to date settings without disconnecting and
reconnecting to the device.
3. Press the UPDATE FIRMWARE button. The rmware window will close and a conrmation window will open.
4. Select YES to start the update.
NOTE: While the unit is updating, the connection icon next to it may turn red. To view the status of the
rmware update, click the upload icon at the top right of the screen. A new pop up will appear.
Velocity Device Manager
31
Devices
View Logs
Selecting View Logs will open a new
screen which will display any events that
have occurred over IP with the device.
• Network Device Tools - provides the
ability to send/test commands to the
device over IP.
Delete Device
Velocity Device Manager keeps memory of devices that are connected even after they have been removed from the
network. To removed the device, select Delete Device.
Move Device
Once sites, buildings, and rooms are created, the device can be moved to them.
1. Select the : icon next to device.
2. Select Move Device from the drop down menu. A new
window will open.
3. Select the correct room. The page will refresh and the
device will be moved to the selected room.
Velocity Device Manager
32
Devices
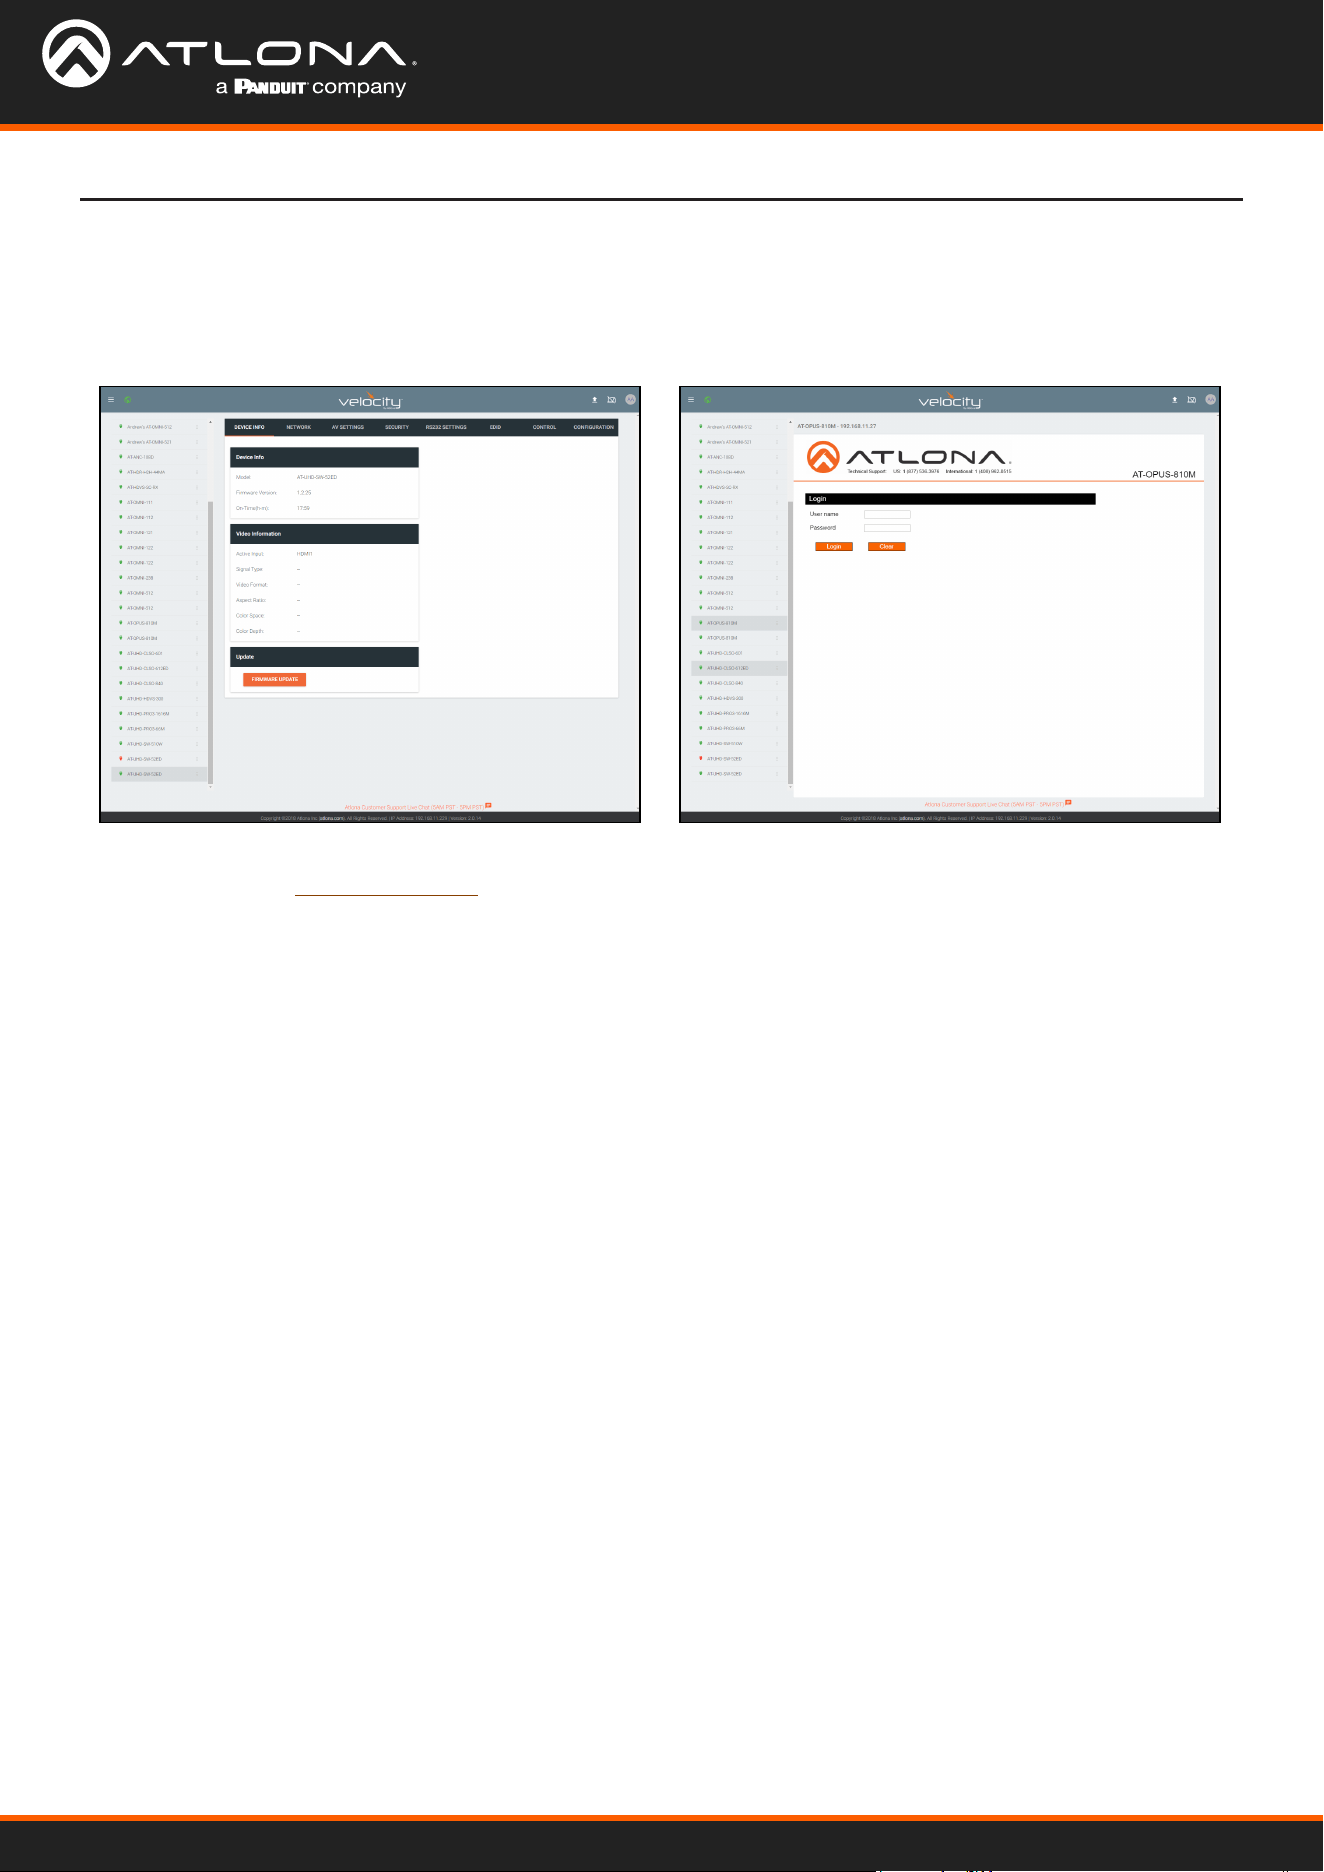
Device Conguration
Depending on the device, there will be two dierent styles of the devices when they are selected within the device
list. Fully integrated devices will have the look on the left and devices that are compatible but not fully integrated will
pull up the device webGUI (on the right) within the Velocity Device Manager window to congure.
View the device manual for each product to go over the conguration options. User Manuals can be found on their
product pages within https://atlona.com.
Velocity Device Manager
33
Devices
3rd Party Devices
Velocity Device Manager has the ability to adjust settings on 3rd party devices, such as IP, Alias, serial number, etc.
The 3rd party device must rst be added to the room and then it is able to be adjusted.
Devices are now ready for conguration.
Adding a Device
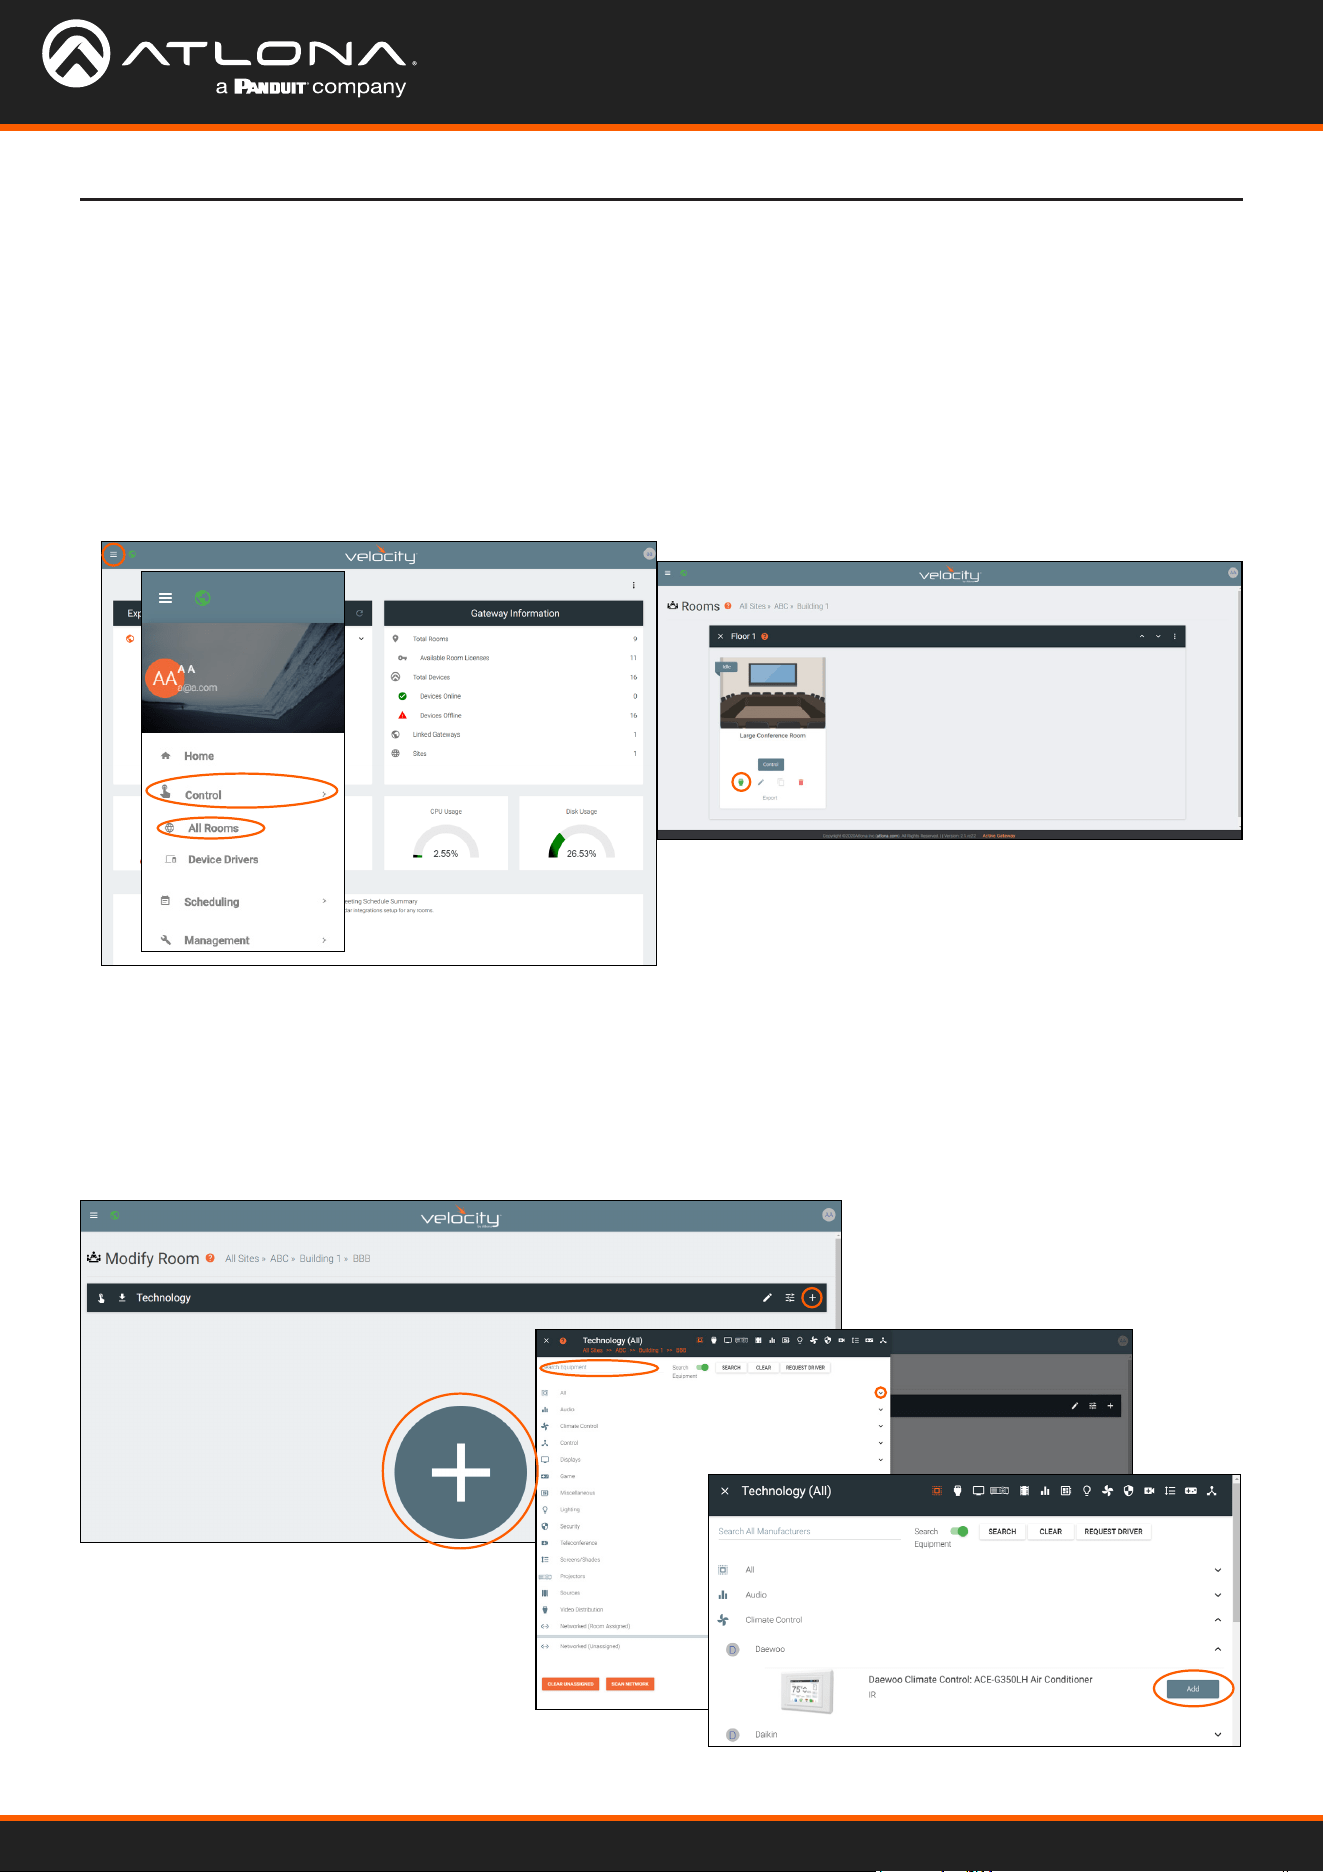
1. Select the ≡ button from the top left corner and select Management.
2. Select Control from the available options. New options will appear.
3. Select All Rooms from the options. A new screen will open.
4. Select the Edit Technology button on the room the device will be added to. A new screen will open.
5. Select the + button in the center of the room or the top right of the Technology bar. A new menu will slide open
from the left side of the screen.
6. Either use the search to nd a specic device and manufacturer, or use the categories to search by type to nd
the device.
7. Once the device is found, use the Add button on the right to assign the device to the room.
8. Repeat steps 6 and 7 until all needed devices are added.
Velocity Device Manager
34
Devices
Basic Conguration
Advanced Conguration
1. Select the ≡ button from the top left corner and select Management.
2. Select Device Manager from the available options. A new window will appear.
3. Select the device from either the device tree on the left of the screen or within the Device List on the right side.
1. Select the ≡ button from the top left corner and select Management.
2. Select Control from the available options. New options will appear.
3. Select All Rooms from the options. A new screen will open.
4. Select the : button on the top right corner of the oor banner. A drop down menu will appear.
5. Select All Devices from the list. A new screen will open.
Conguring the device alias and serial number can be done through the Device Manager.
These steps will allow devices to be named, the IP and port set, and User Name/Password set if required.
5. Once selected, type in the new device alias and/or
serial number.

Velocity Device Manager
35
Devices
6. Scroll through the list or use the search eld to nd the right device to edit.
7. Once found, select Edit on the right side of the screen to adjust device settings. Name (alias), IP Address, Port,
Authentication setting, User Name, Password, Mac Address, and IP Linking can be updated here.
8. Press the SAVE button to push the new settings to the device.

Velocity Device Manager
36
Sites
1. Select the ≡ button from the top left corner and select Control. New options will appear below.
2. Select Sites from the new options. A new screen will appear.
1. Press the orange + button in the bottom right hand corner to add a site. A popup window will appear.
2. Select the purple Add via Form button for new sites and the blue Import and Upload button if loading a site
based o a previously saved site. A new window will appear or a browse folder will open.
Add
General
NOTE: Only one site can be added per gateway.
Velocity Device Manager
37
Sites
• Name - Usually the company name, use to identify the site Velocity will be located.
• Multiple Building slider - Select this to start the site with two buildings instead of one.
• Address 1 & 2, Post Code, Region, Country, City - Used to help determine the exact location of the site,
to help when troubleshooting or if there is more than one site with the same name.
• Upload custom image slider - Select this option to add a custom image for the site.
• Site/Building image drop down menu - Select a Velocity site image.
4. Press the Create Site button.
3. Select the site o the local computer and press open, or ll in the Site Add form.
NOTE: Custom images must be .PNG, .JPG, .JPEG, or .BMP le types to display.
A new page will open.
To return to the sites page, press All Sites within the top navigation.
Velocity Device Manager
38
Sites
Buildings
Once a site is created, it will go straight to the buildings page. If multiple buildings was selected, then two buildings
will display.
Using the + button or the navigation below the View All Rooms button, buildings can be added, edited, and deleted
from this screen.
The options on the Site Modify window
will be the same as the Add Site window.
The requirements will be the same. Once
changed, press the SAVE CHANGES
button.
Edit
1. Press the Edit Site (pencil) button to update a site’s information. A new window will open.
Each site will start with at least one building. If more are needed, they can be added using the + button at the bottom
of the page.
Add
1. Select the purple Add via Form button for new buildings and the blue Import and Upload button if loading a
building based o a previously saved building. A new window will appear or a browse folder will open.
Velocity Device Manager
39
Sites
2. Select the building o the local computer and press open, or ll in the Building Add form.
• Name - Usually the building name or suite number, use to identify dierent buildings.
• Address 1 & 2 - Used to help determine the exact location of the building, to help when troubleshooting.
• Upload custom image slider - Select this option to add a custom image for the building.
• Building image drop down menu - Select a Velocity site image.
3. Press the Create Building button.
Edit
Delete
The options on the Building Modify window will be the same as the Add Building window. Once changed, press the
SAVE CHANGES button.
1. Press the Edit site (pencil) button to update a site’s information. A new window will open.
1. Press the Delete building (trash can) button to delete a building. A popup conrmation window will appear.
2. Press the SUBMIT to delete the building.
Velocity Device Manager
40
Sites
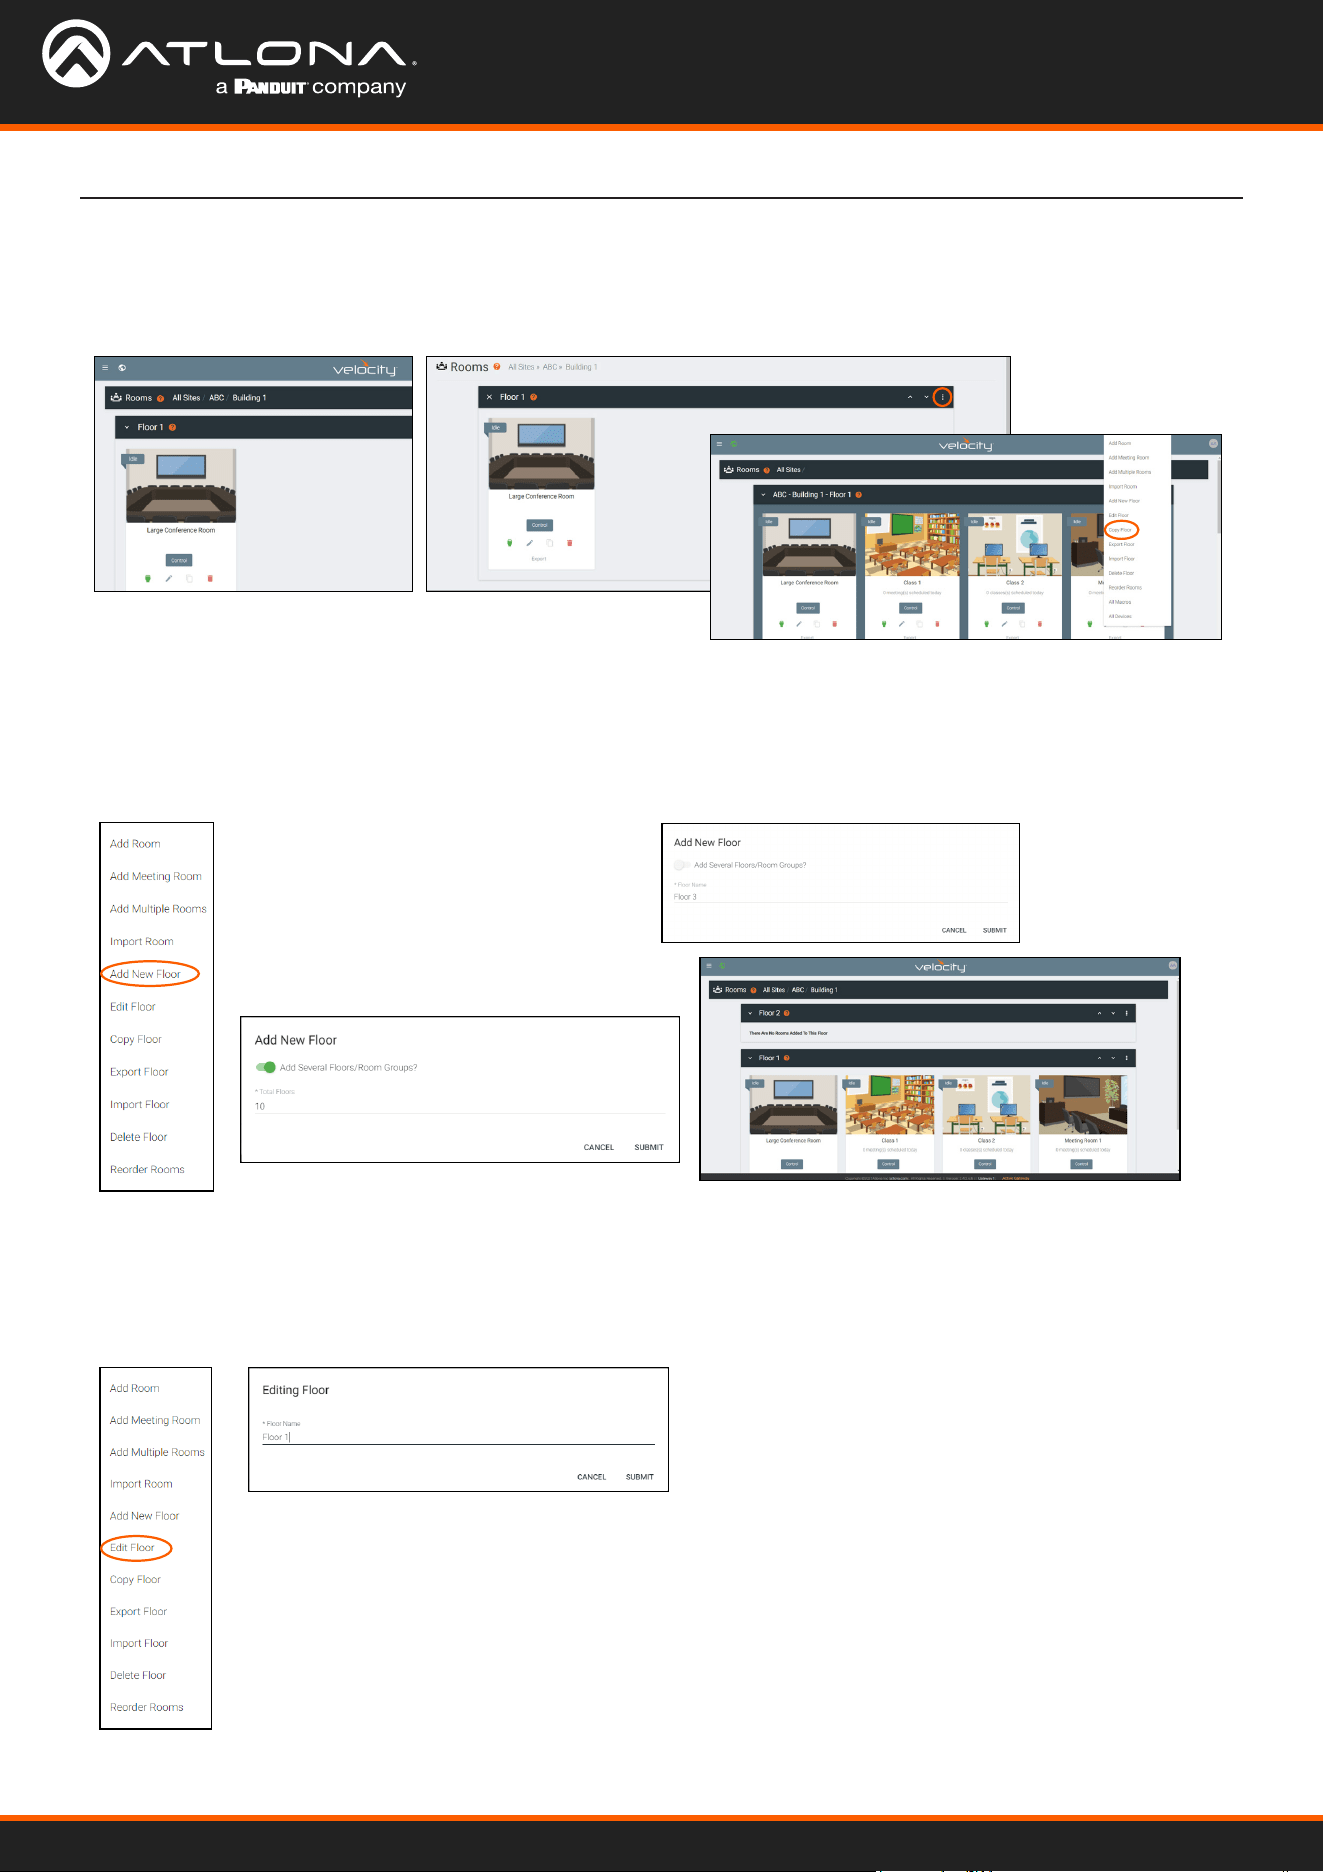
Floors
Once a building is created, the View All Rooms button can be pressed to go directly to the room and oors areas.
One oor and one room will automatically be generated based on the type of building selected during creation.
Each building will start with at least one oor. If more are needed, they can be added using the : button at the top
right of the oor header.
Each building will start with at least one oor. Once a room is added, the name can be changed through the edit
function.
Add
Edit
1. Select Add New Floor from the drop down list.
1. Select Edit Floor from the drop down list.
2. Type in a new name for the oor.
• Add Several Floors - When
enabled, the number of oors
added at once is unlimited, but
will slow the server if too many
are added.
• Floor Name - When adding a
singular oor, it can be named.
Velocity Device Manager
41
Sites
Copy
1. Select Copy Floor from the drop down list. The oor will duplicate.
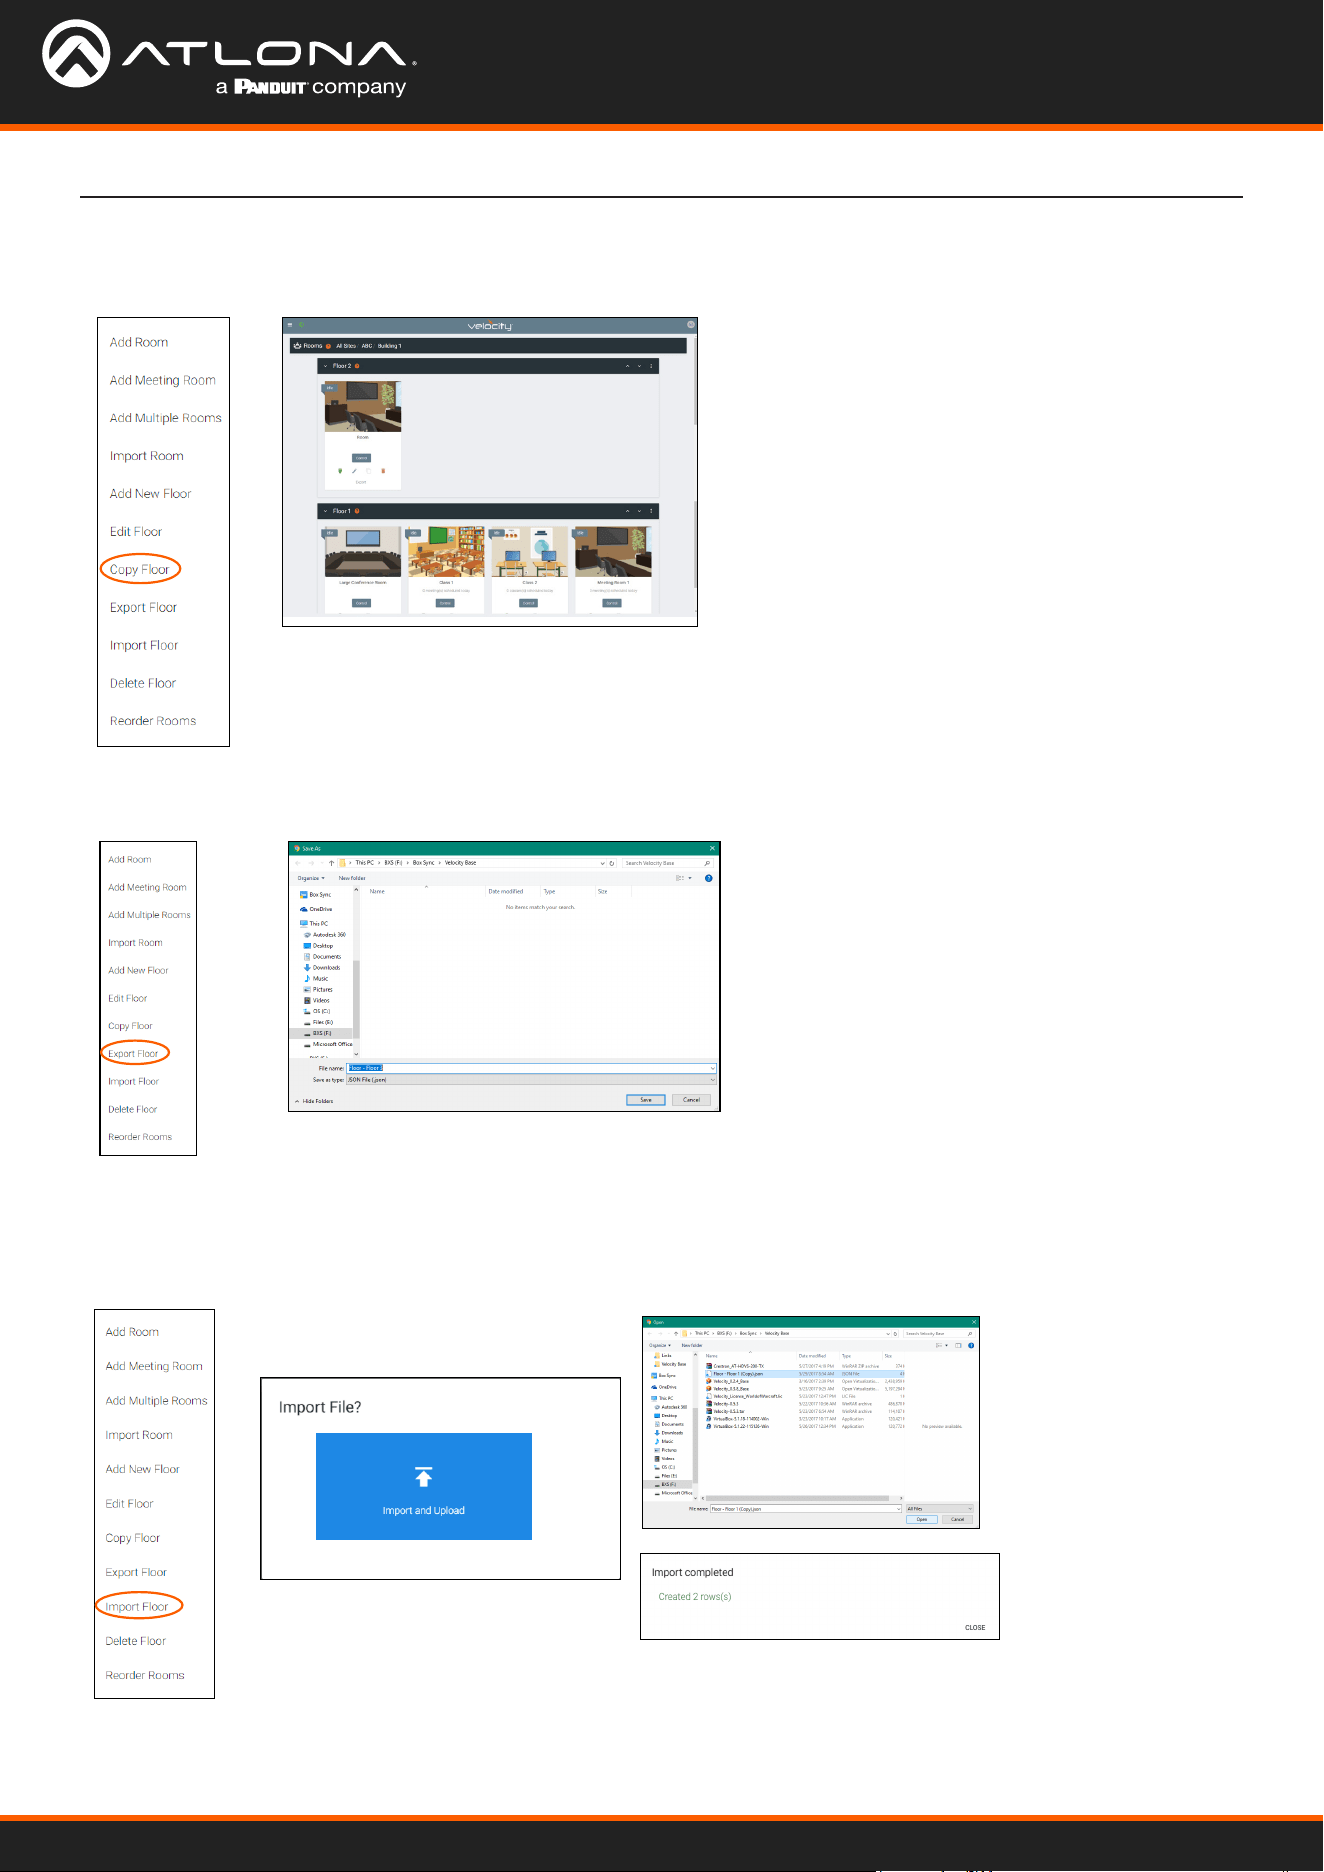
1. Select Export Floor from the drop down list. A new window will open.
1. Select Import Floor from the drop down list. A pop-up window will appear.
2. Select Import and Upload. A new window will open.
3. Select the le and press Open.
Import
Export
2. Save the le to an easy to remember area (e.g. desktop).
Velocity Device Manager
42
Sites
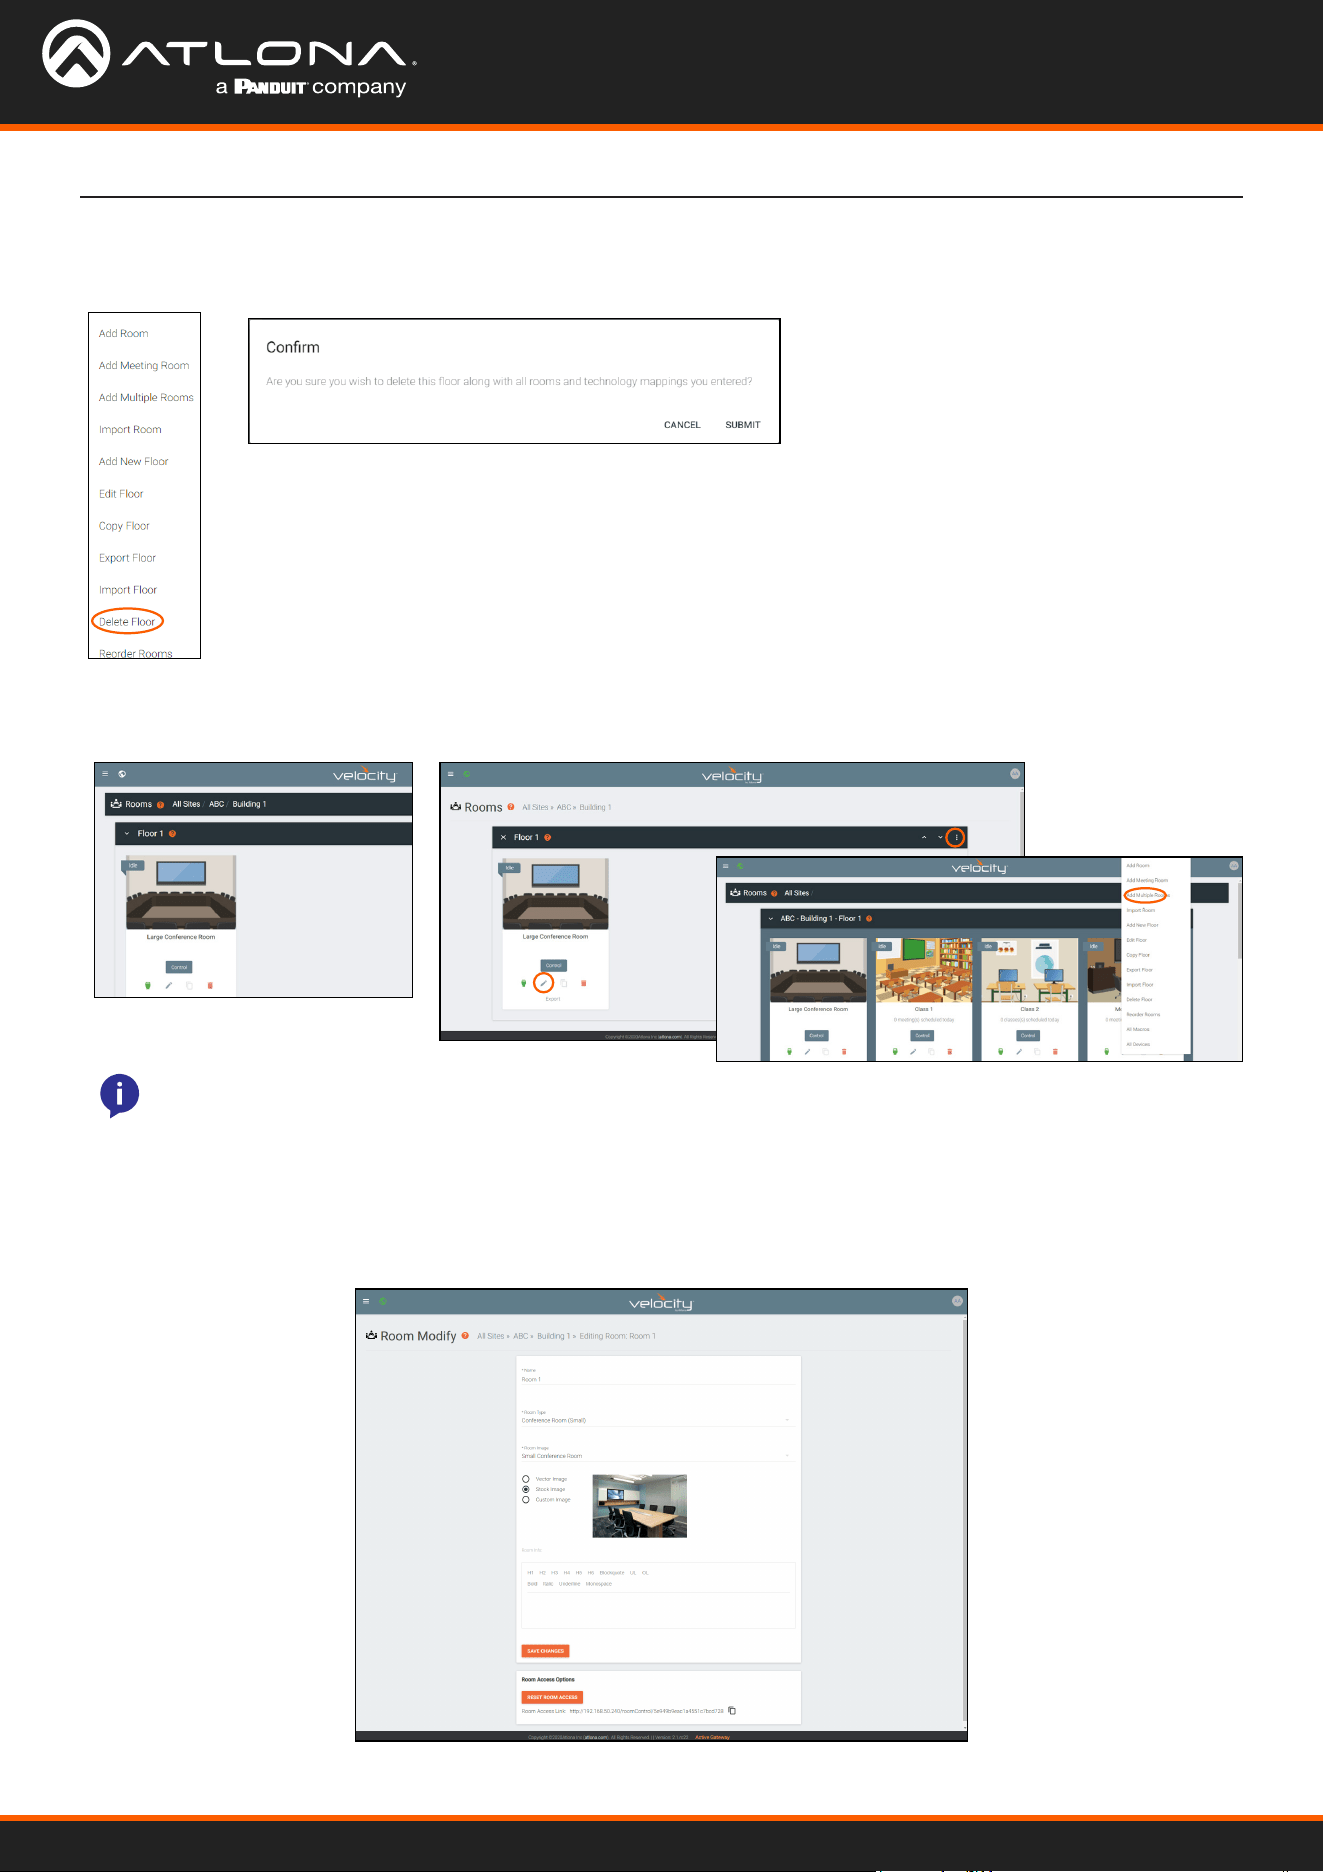
Delete
1. Select Delete Floor from the drop down list. A pop-up window will appear to conrm deletion.
Rooms
Once a building is created, the View All Rooms button can be pressed to go directly to the room and oors areas.
One room will automatically be generated based on the type of building selected during creation.
The rooms can be used, edited, imported, exported, reordered, or deleted based on preference.
Edit or Add Room will open the same Room Modify screen.
1. Press Edit (pencil) or Add Room from the drop down in the right corner. A new window will open.
Add / Edit
NOTE: Any amount of rooms can be added to Velocity Device Manager, but can only be controlled by a
licensed software.

Velocity Device Manager
43
Sites
2. Fill in all the base information
2. Fill in all the base information such as amount of rooms, a prex to the name that will appear before the room
number as they are created, the function of the room (Control, Meeting, or Control and Meeting), room type, and (if meeting
or control and meeting is selected) Calendar.
3. Press the Submit button. Velocity will take anywhere from 30 second to ve minutes to make rooms, depending
on the amount being created. Once done the page will refresh.
• Name - Usually the room number or name.
• Room Type drop down menu- Select a room type within the list that best represents the room.
• Room image drop down menu - Select between images to represent the room. There are three image types:
vector, stock, and custom image.
• Room Info - Provide extra information about the room.
• Reset Room Access - Removes all synced control panels from the
room. The removed panels will have to be resynchronized to be able
to control the room.
Add Multiple Rooms
Multiple rooms can be added at one time.
1. Select Add Multiple Rooms from the drop down list on the top right. A new pop up will appear.
Velocity Device Manager
44
Sites
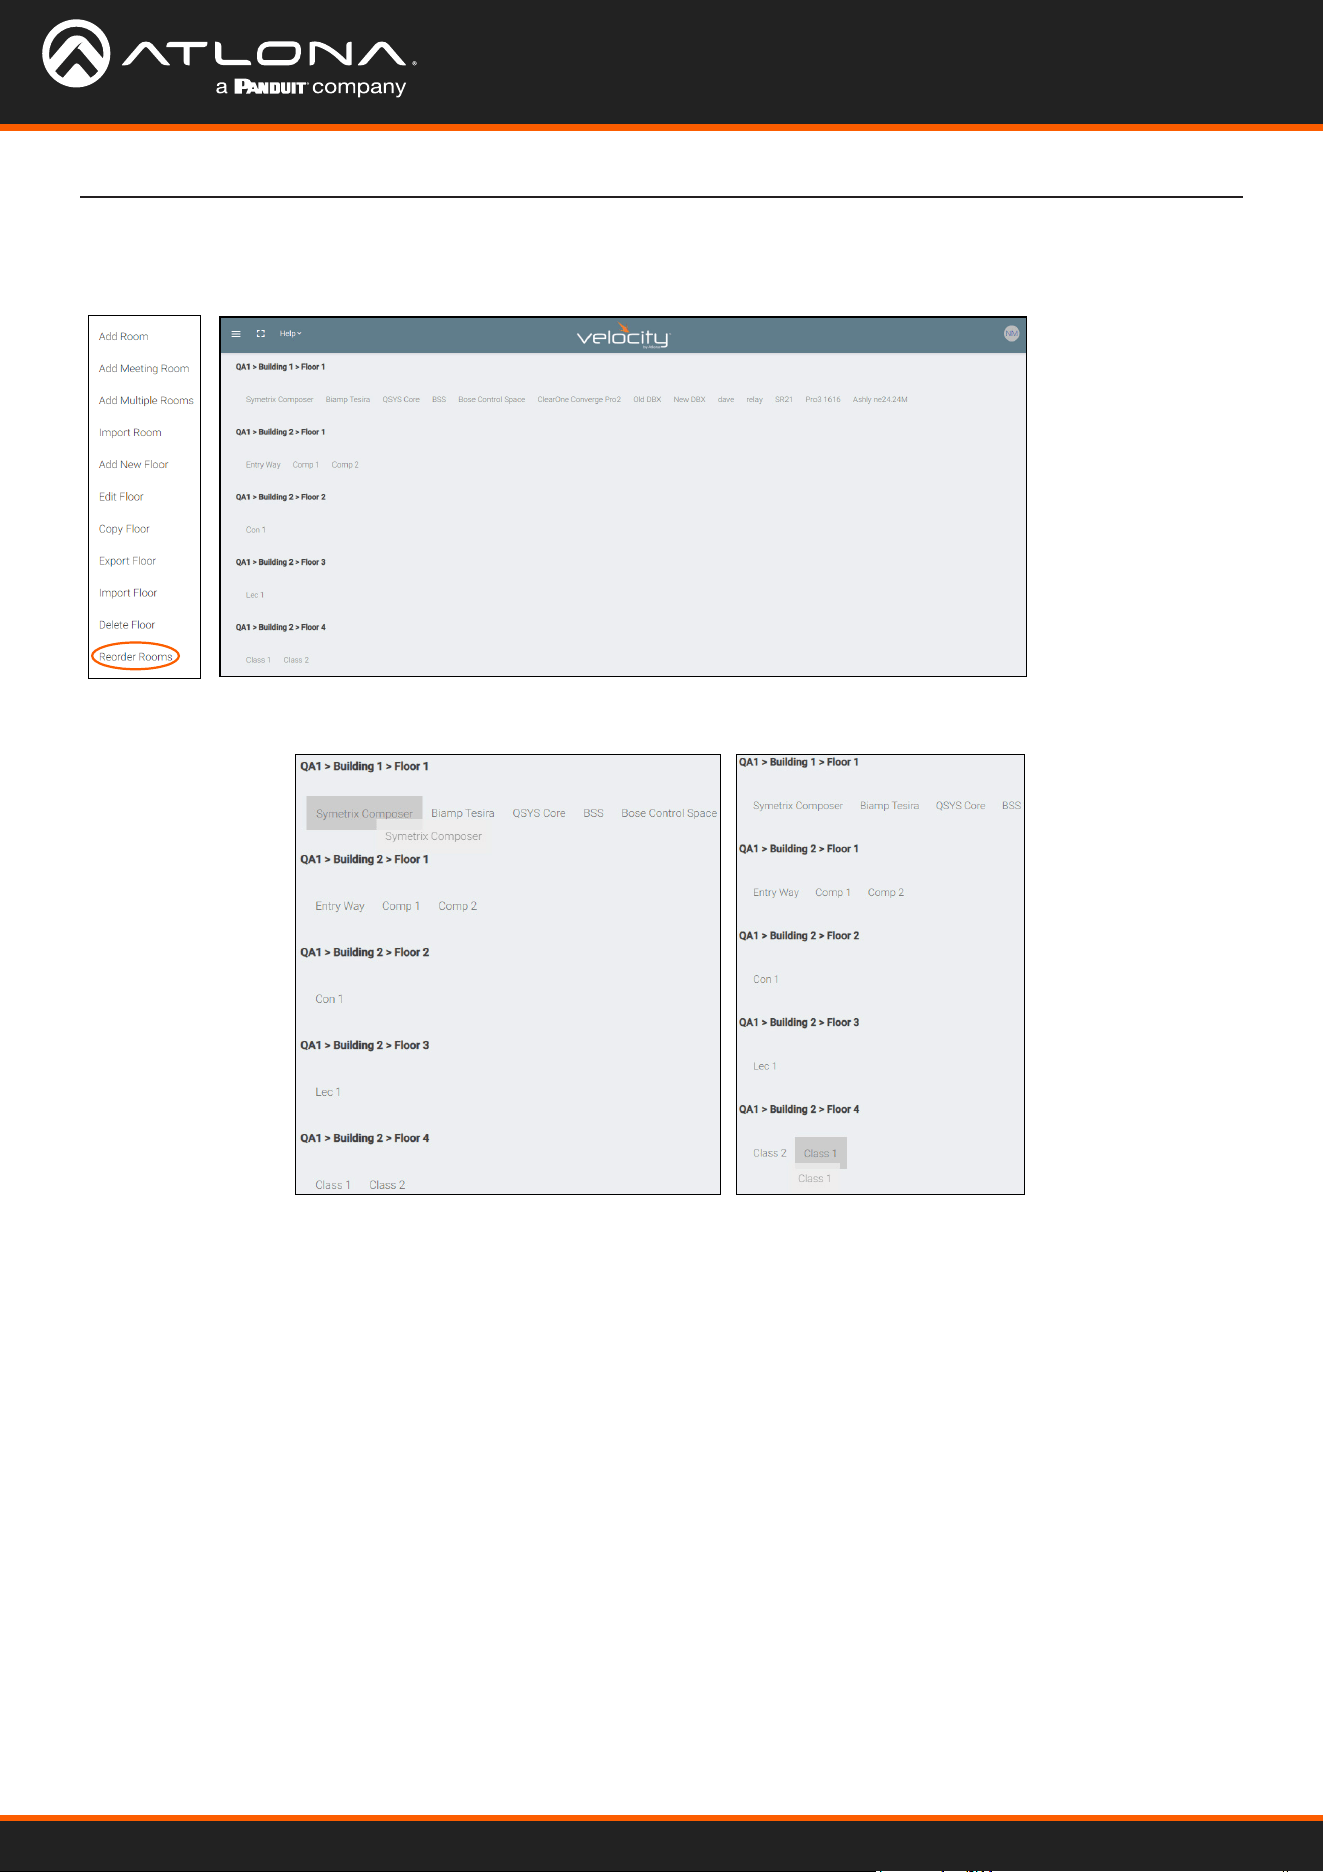
Reorder
1. Press Reorder Room from the drop down in the right corner. A new window will open.
2. Select rooms and drag them to the wanted order. Rooms may only be reordered within the same oor.
Velocity Device Manager
45
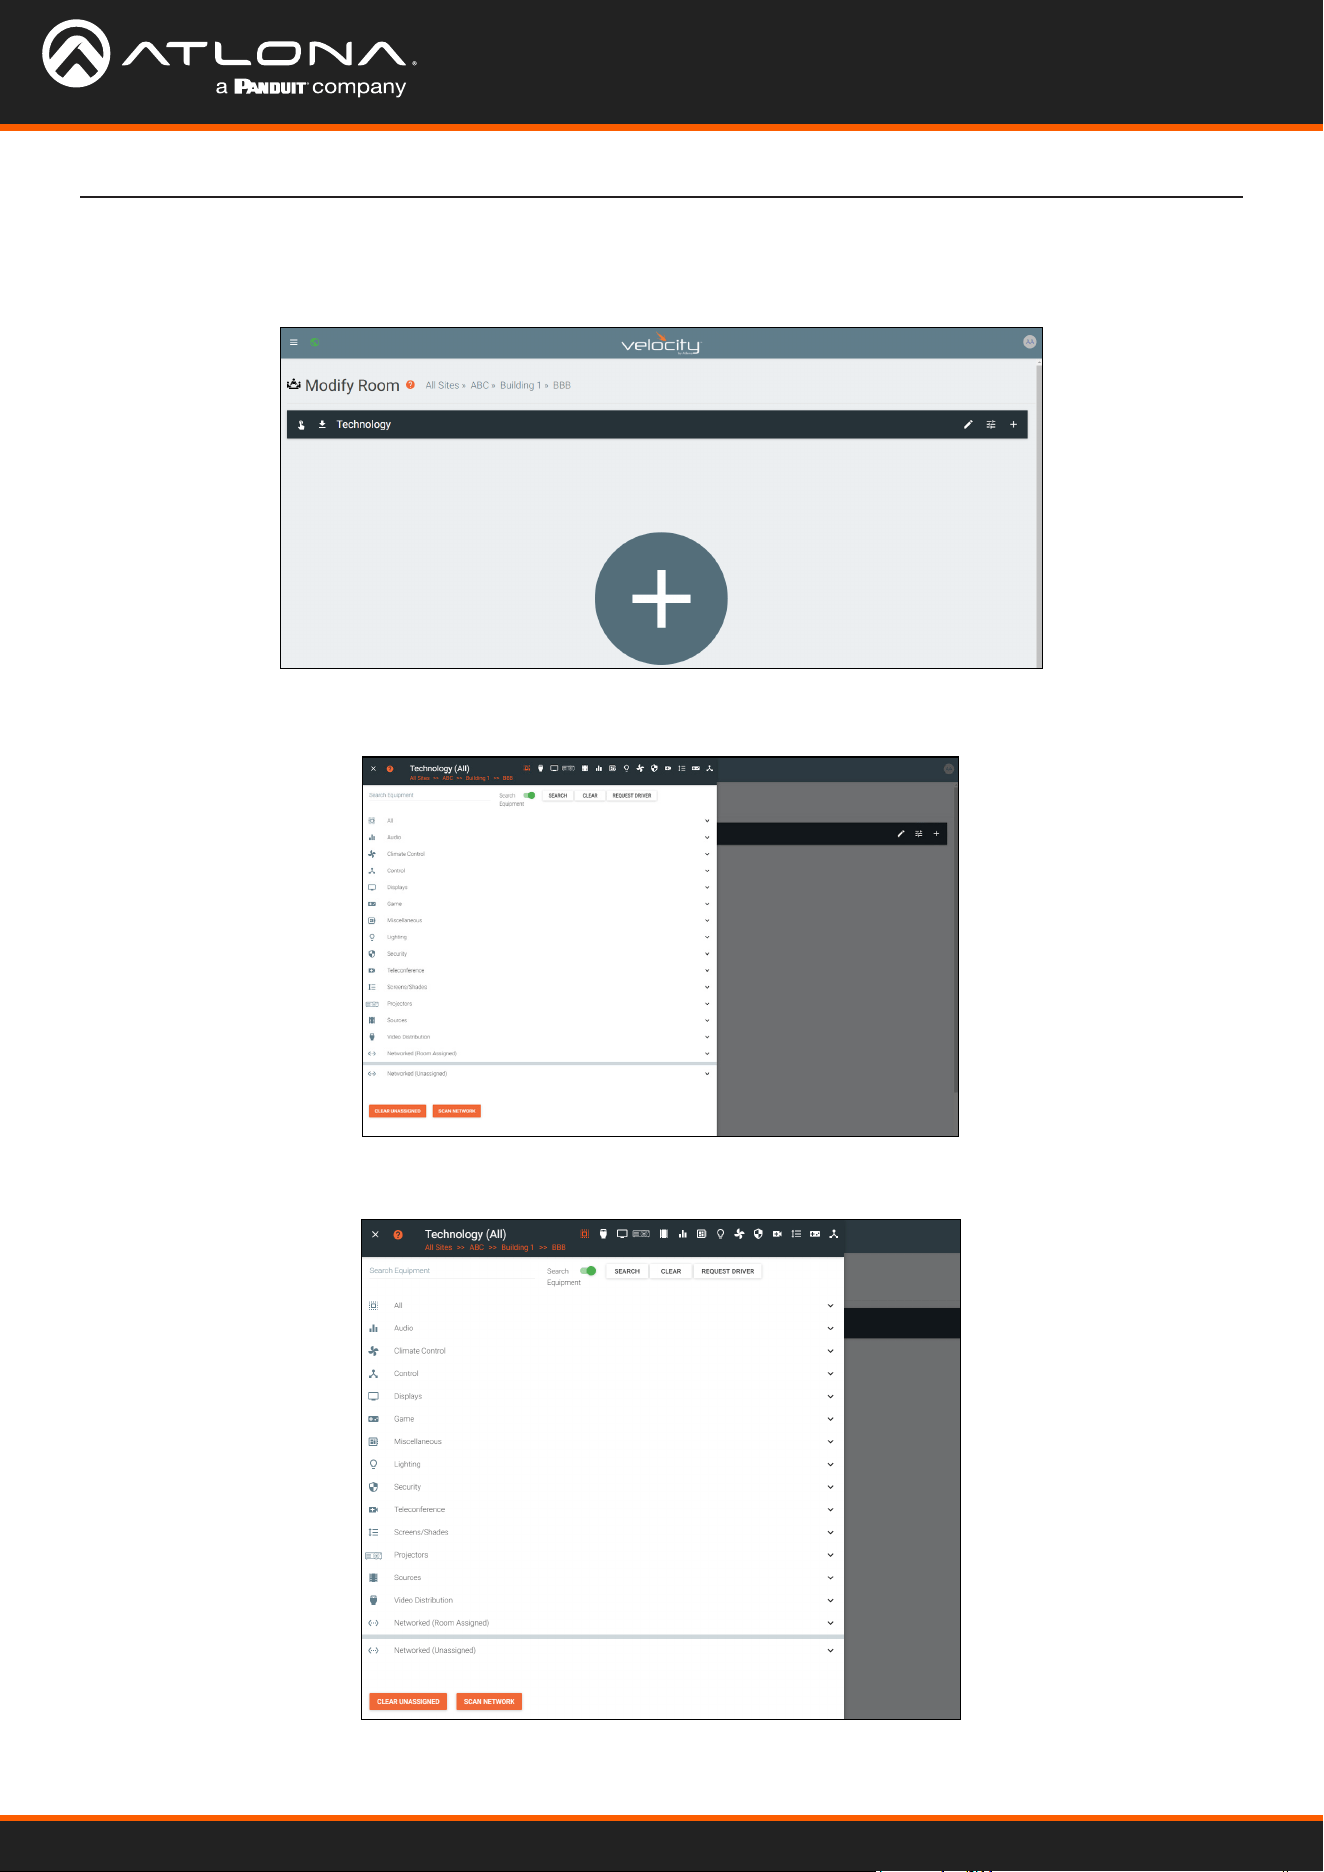
Sites
The easiest way to set up a room is to add all devices rst and then link them, as links will not appear as options for
drop down menus until they have been added to a room.
The room created will not be considered set up until at least 1 source and 1 display have been added and linked.
New technology can be added using either the large + in the center of the window or the + on the top right. Once
pressed, a new menu will appear on the page.
Adding Technology
Velocity Device Manager
46
Sites
1. Press the Scan Network button.
2. Select Custom Range (a new screen will take over) or the auto detected network eth0.
Devices discovered through the mDNS autoscan will display under the unallocated list until added to a room. For
devices without mDNS, Velocity will need to do a network scan to nd them.
2. Press the save icon next to IP eld. A green CustomNetwork Saved Successfully message will appear
at the bottom of the page when the custom scan settings are saved.
3. Press the Submit button to start the scan. The pop up will close when the scan is completed.
a. If the auto detected network eth0 is selected, press Scan Network to start the scan.
b. If Custom Range is selected, select between IP Range and Subnet Scan
1. Type in the network range or subnet information.
NOTE: It is recommended to keep the network range scan to under a 512 IP range. The larger the network
range, the longer the scan will take. On subnet scan, Velocity Device Manager will automatically limit the
scan to 512 on subnet 23 or 256 on subnet 24.
Velocity Device Manager
47
Sites
Each button along the top menu corresponds with the sections of the All menu.
1. Find the device you are looking for in the menu or by using the search eld.
2. Select Add on the device (recommended) to add
the device to the room. A Room Device Saved
Successfully message will appear in green at the
bottom of the screen. If more devices are needed,
complete adding those.
3. When nished adding all devices, press the X in the
top left corner next to Equipment Catalog to go to the
main screen.
NOTE: If a device is not found in the directory, use
the REQUEST DRIVER button in the top right to
go to atlona.com’s control driver request form. This
is only available if the PC connected to Velocity is
online and will take over the current window.
All Atlona devices on the network will be placed into the Networked
(Unassigned) menu selection.
4. Press the Add button on all devices that belong to the current
room. A device added message will appear on the bottom of the
screen.
Once all Atlona devices are added to the room, the sources and
displays will need to be added.
5. Select between the top navigation or sections in the default
menu (menu will always start on All) to search for sources, displays,
and other types of equipment that will be in the room.
Once all devices have been added to the room, they
can be linked to each other.
4. Press Edit on any of the devices in the room. A
menu will appear on the left side of the window.
NOTE: It is recommended to edit switchers rst,
as adding inputs and outputs to a switcher will
link them automatically for those devices.
NOTE: Non-Atlona devices can be added to the room and set
up for control to be exported to a licensed Velocity, but cannot
be controlled with the non-licensed Velocity Device Manager.

Velocity Device Manager
48
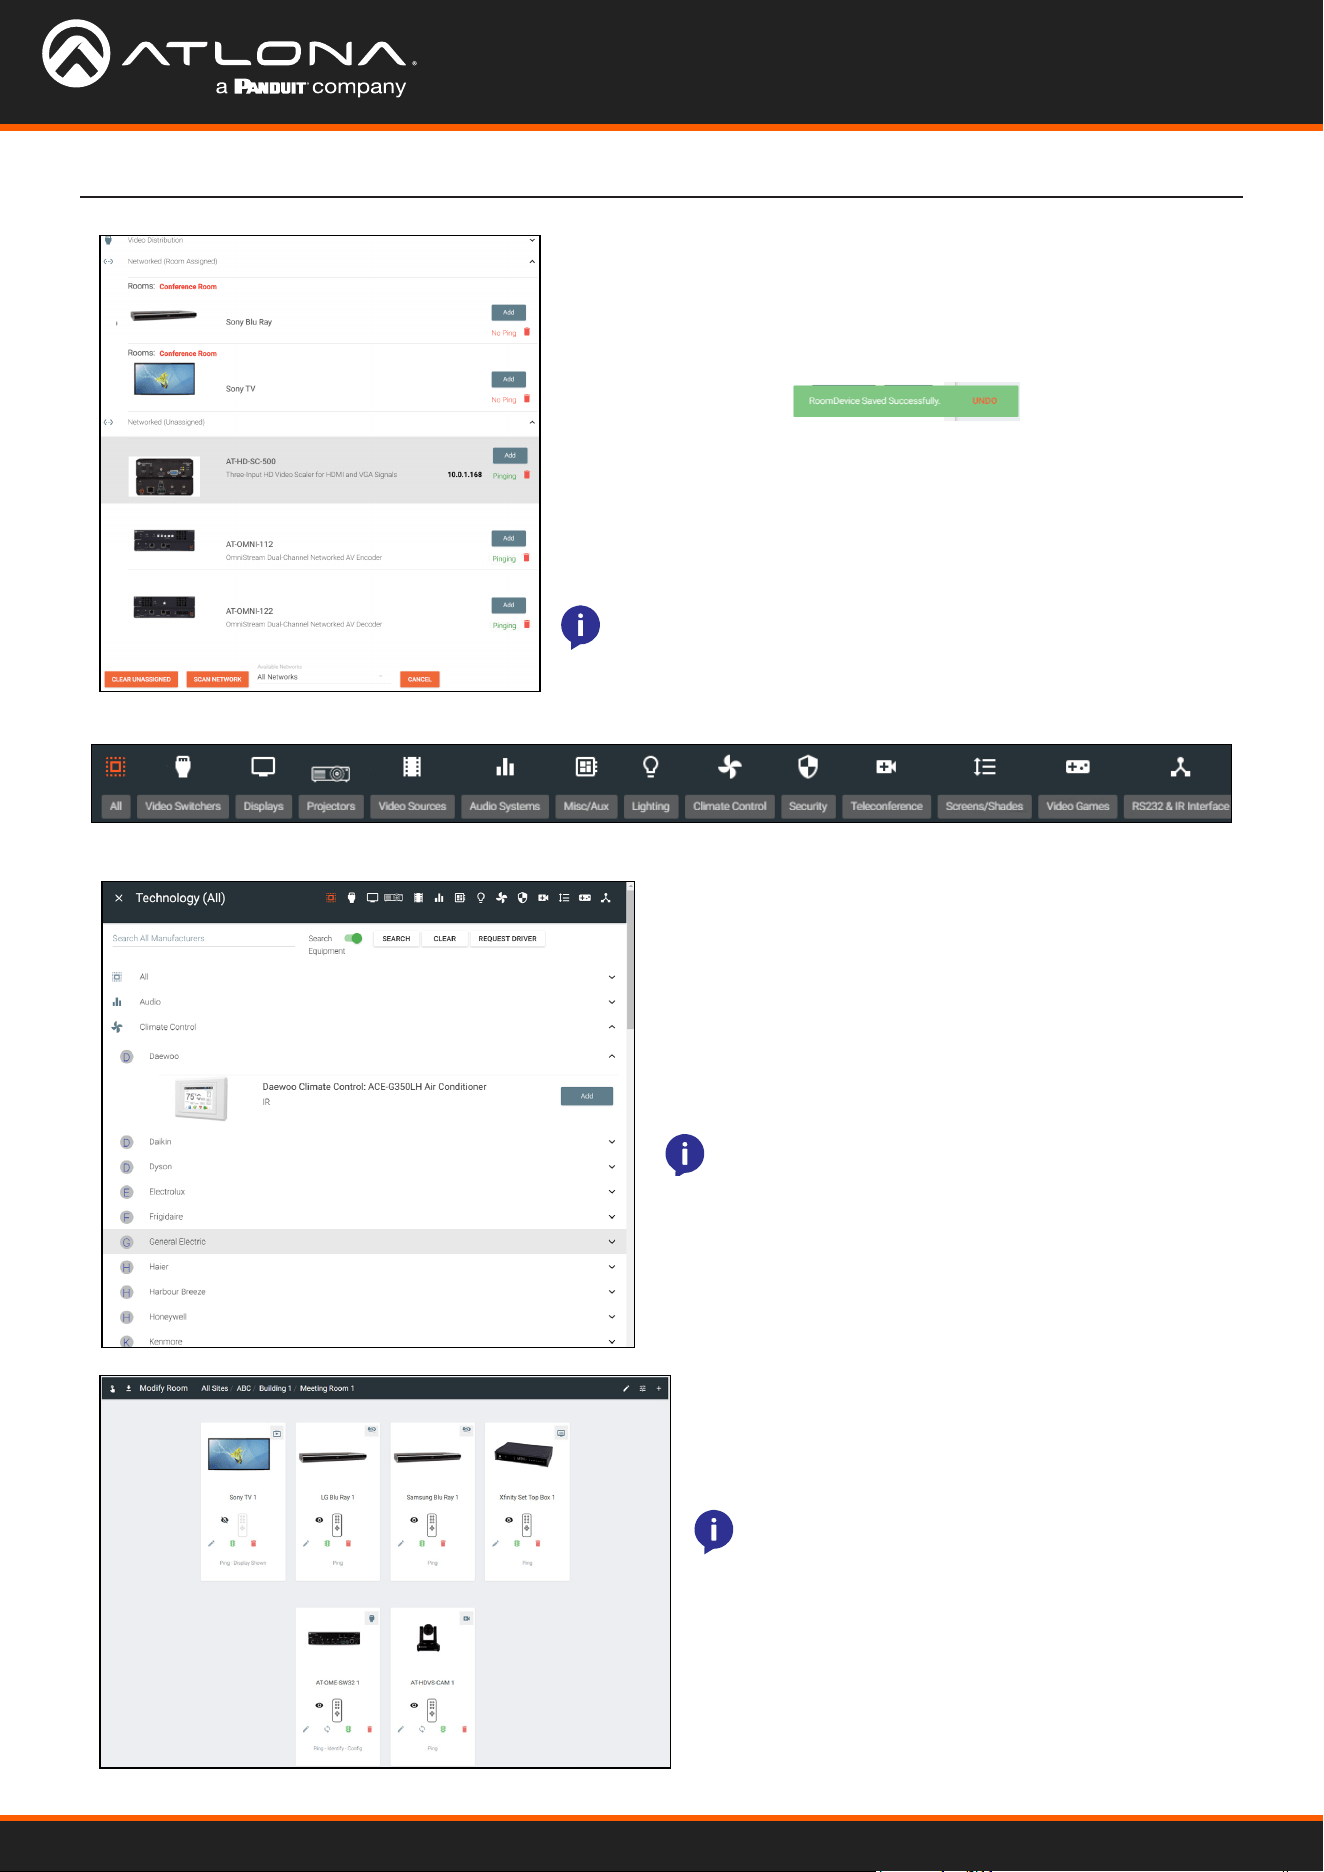
User Settings
Adding Users
General
1. Select the circle in the top right corner and select Users.
1. Select the + button to add a new user.
2. Fill in all the user information elds.
A new page will open.
A new page will open.
Velocity Device Manager
49
User Settings
• Email - Used for log in purposes and email password resets.
• First & Last Name - Velocity will provide a customized home page for a user using their credentials.
• Temporary Password - Use either the auto generated password or create a new one for the user to change
upon rst log in.
• Role Type - There are 7 roles to select from: Account Administrator, Site Administrator, Designer, Support
Technician, End User, Stream Moderator, and Control Tablet. To view the permissions of each role, select
Roles within the top navigation or view them starting on page 153.
• Language - Select the user’s language preference. Default will be English.
• Time Zone - Select the time zone the user will be logging in from.
3. Press the Create User button.
Upon login, all new users will be prompted to update their password.
Once users have been created, they can be edited. New options will appear in the user edit screen.
If successful, Velocity will redirect
to the Users page and a green
successful message will appear at
the bottom of the page.
Editing Users
1. Select the edit (pencil) button to add a new user.
A new page will open.
Velocity Device Manager
50
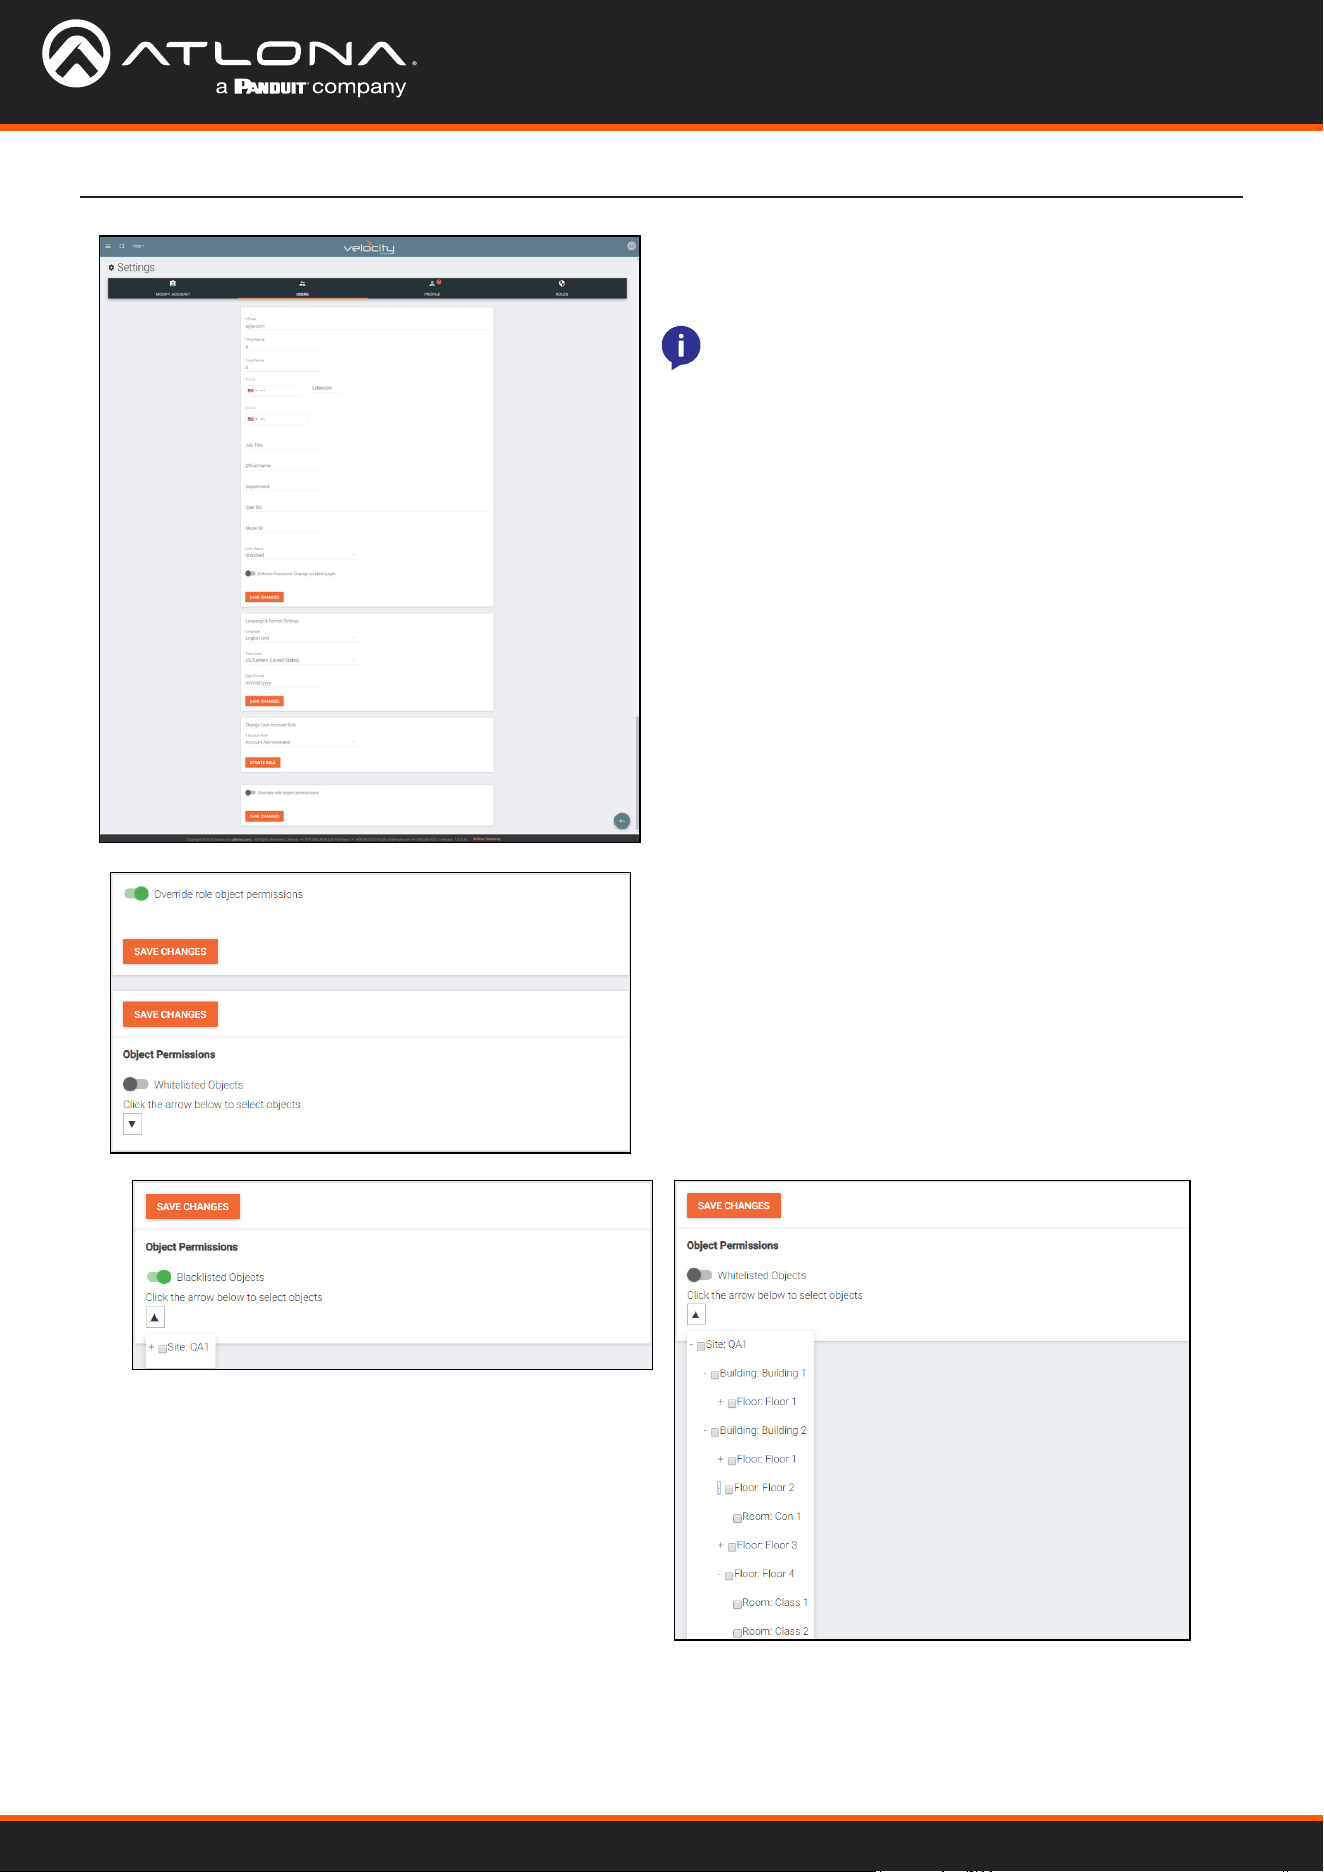
User Settings
• Language & Format Settings - Language, Time
Zone, and Date Format will have been set when
the prole was created, but can be updated here if
something has changed.
• Change User Account Role - Use this drop down
to update the user’s role to newly created roles or for
dierent permissions.
• Override role object permissions - Select this slider
to choose which buildings, oors, and rooms the user
can see. New options will appear when enabled.
• Whitelisted Objects - When this slider is grey, the
selections made will be what the user can see.
• Blacklisted Objects - When the whitelisted objects
slider is selected, it will turn green and the label will
switch to blacklisted objects once the arrow below it
is selected.
• Selector - Use the + to expand the sites, buildings,
and oors to decide which rooms the user has
access to. If on whitelist, the rooms will be available
to the user. If on blacklist, the rooms selected will be
unavailable to the user.
• Lock Status - Lock and unlock an account from here.
If the account is locked, the user will be unable to log
in.
• Enforce Password Change on Next Login - Select
this slider to force the user to update the password on
the account when logging in.
• Fill in the user information that was not created in
the user add screen, such as: Job Title, Oce Name,
Department, User Bio, and Skype ID.
NOTE: The information can be lled in the user
under prole options and is optional at this time.

Velocity Device Manager
51
User Settings
Prole
• Language & Format Settings - Language, Time Zone,
and Date Format will have been set when the prole
was created, but can be updated here if something has
changed.
• Change User Account Role / Override role object
permissions - These options should only be done within
the user edit screen.
• Change Password - Update the current password on the
account here.
1. Select Prole from the top navigation.
2. Fill in the user information that was not created when
the account was set up, such as: Job Title, Oce Name,
Department, User Bio, and Skype ID.
NOTE: The prole information that can be changed will
vary based on user permission level.
NOTE: To avoid problems, the administrators of Velocity
should not choose any role that is not administrator.
Velocity Device Manager
52
User Settings
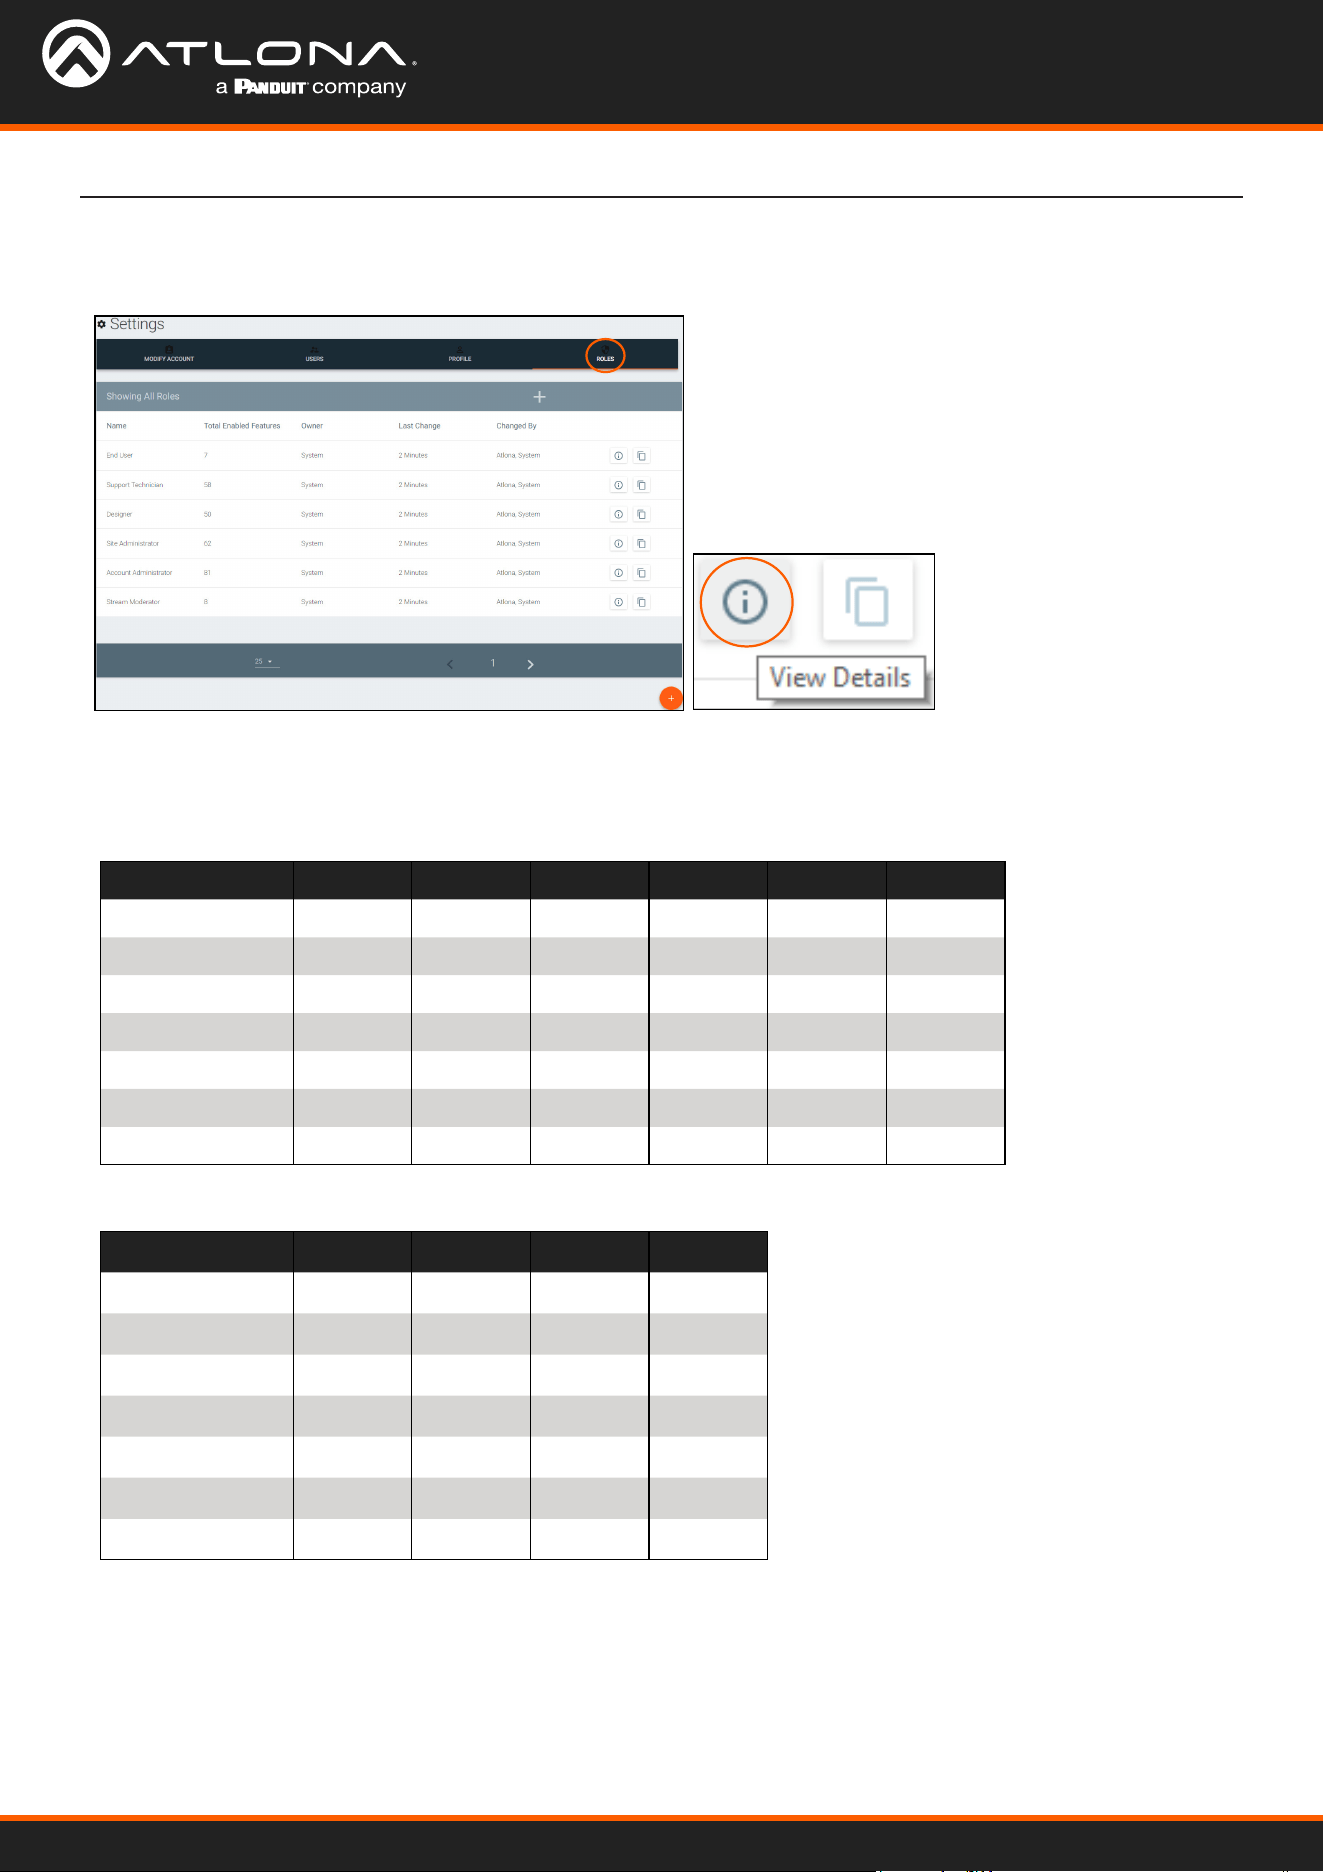
Roles and Permissions
1. Select Roles from the top navigation.
There are seven default roles: Account Administrator, Site Administrator, Designer, Support Technician, End User,
Stream Moderator, and Control Tablet. The permissions can be seen by pressing the View Details button or using the
tables below.
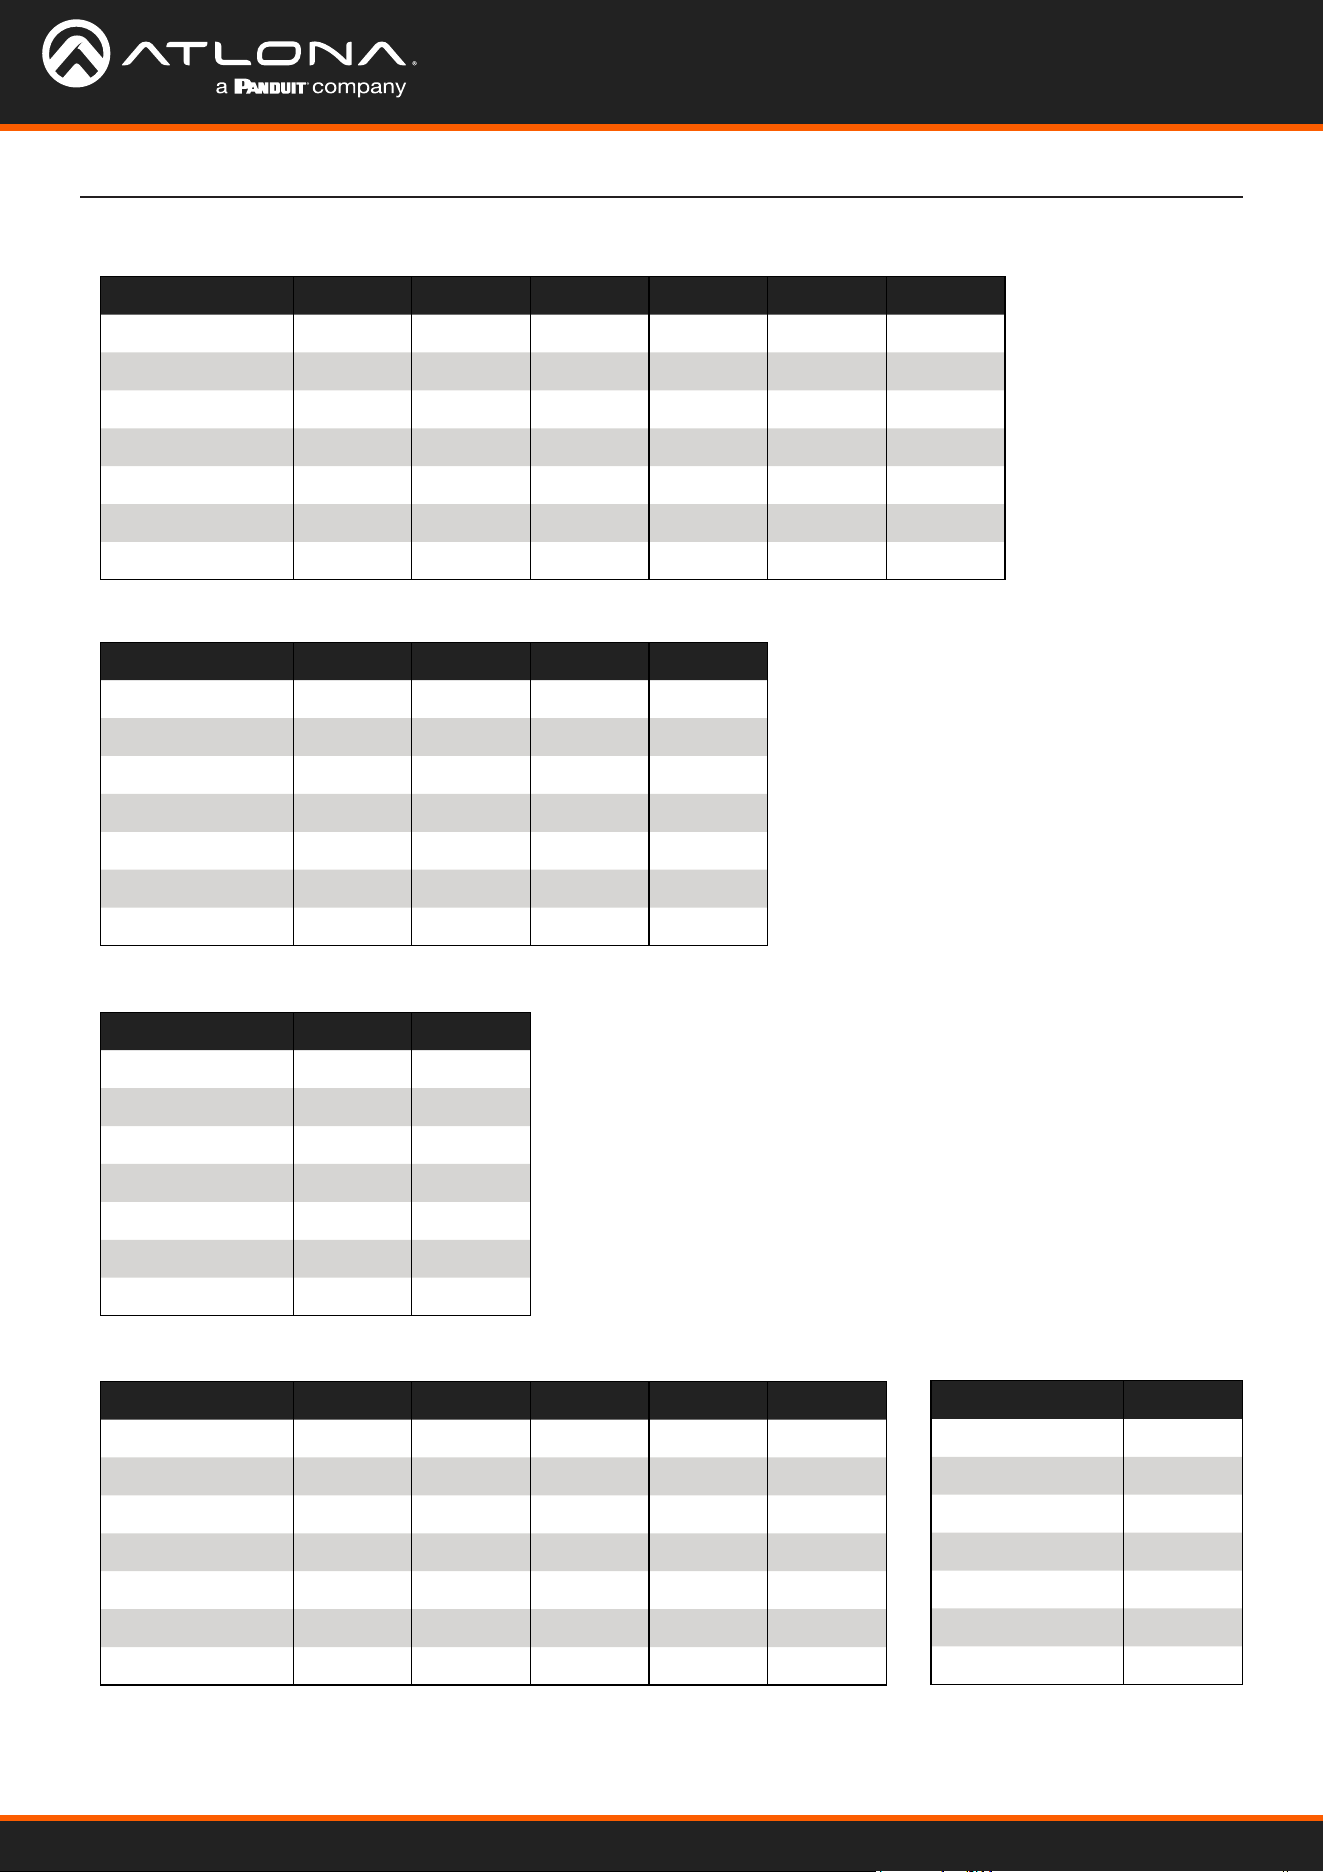
Site Related
User Level View Home Add Modify Delete Export
End User
Support Tech
Designer
Site Admin
Account Admin X X X X X
Stream Mod
Control Tablet
Building Related
User Level Add Modify Delete Copy
End User
Support Tech
Designer
Site Admin
Account Admin X X X X
Stream Mod
Control Tablet
Velocity Device Manager
53
User Settings
Floor Related
Room Related
User Level Add Modify Delete Copy Move
End User
Support Tech
Designer
Site Admin
Account Admin X X X X X
Stream Mod
Control Tablet
User Level Add Modify Delete Copy
End User
Support Tech
Designer
Site Admin
Account Admin X X X X
Stream Mod
Control Tablet
Technology Related
User Level Add View Modify Delete Control Ping Status
End User
Support Tech
Designer
Site Admin
Account Admin X X X X X X X
Stream Mod
Server Setting Related Maintenance Related
User Level Modify
End User
Support Tech
Designer
Site Admin
Account Admin X
Stream Mod
User Level Modify
End User
Support Tech
Designer
Site Admin
Account Admin X
Stream Mod
Velocity Device Manager
54
User Settings
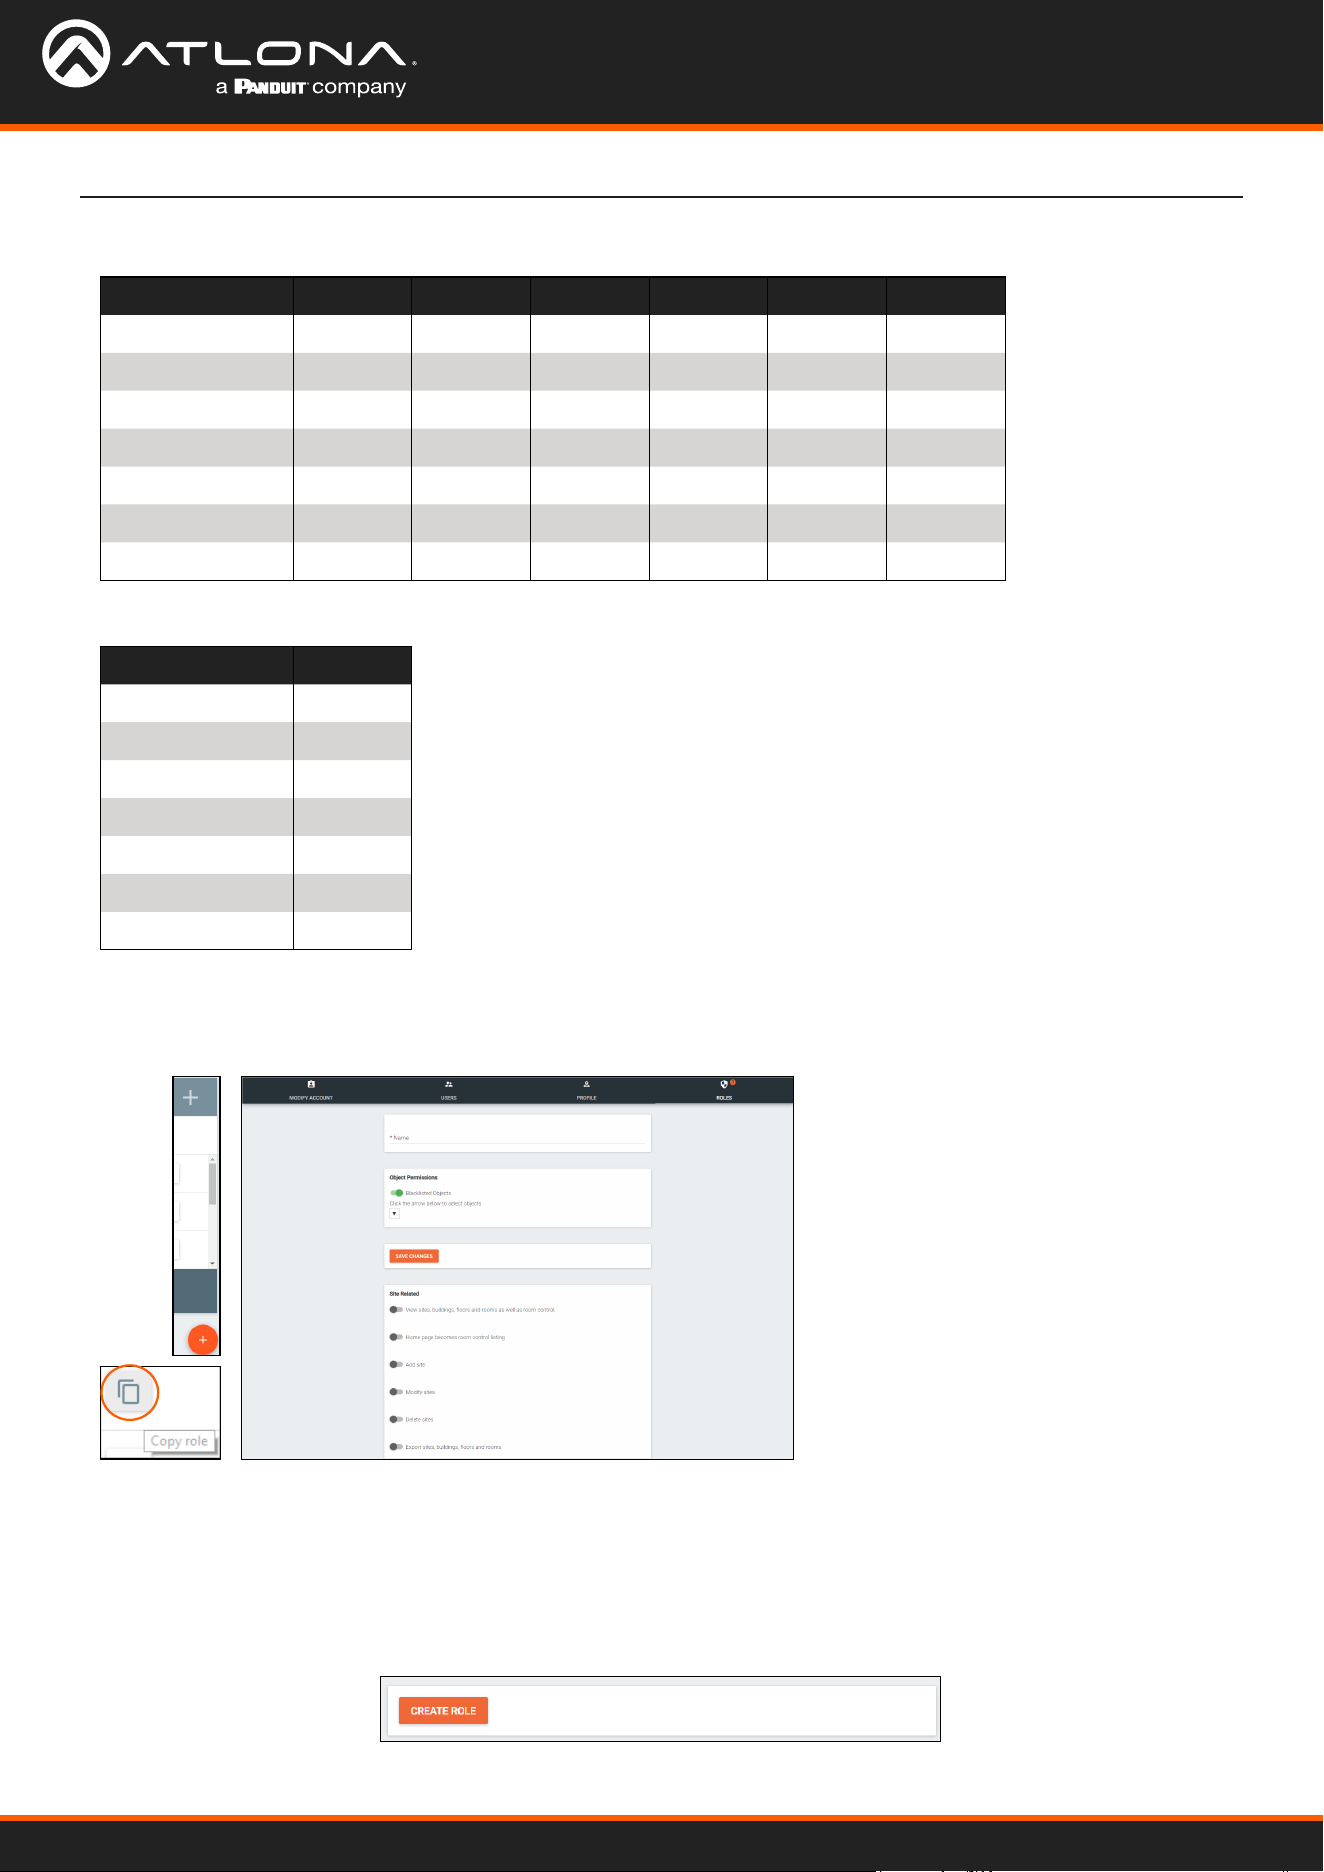
Role Related
Control Related
User Level View Add Modify Delete Copy
End User
Support Tech
Designer
Site Admin
Account Admin X X X X X
Stream Mod
Control Tablet
User Level Access View
End User
Support Tech
Designer
Site Admin
Account Admin X X
Stream Mod
Control Tablet
User Related
User Level Add View Modify Change Revoke
End User
Support Tech
Designer
Site Admin
Account Admin X X X X X
Stream Mod
Control Tablet
Equipment Related
User Level View Add Modify Delete Export Copy
End User
Support Tech
Designer
Site Admin
Account Admin X X X X X X
Stream Mod
Control Tablet
Velocity Device Manager
55
User Settings
Reference Image Related
User Level View Add Modify Delete Export Copy
End User
Support Tech
Designer
Site Admin
Account Admin X X X X X X
Stream Mod
Control Tablet
Device Related
User Level View Add Modify Delete
End User
Support Tech
Designer
Site Admin
Account Admin X X X X
Stream Mod
Control Tablet
Virtual Matrix Related
User Level View Modify
End User
Support Tech
Designer
Site Admin
Account Admin X X
Stream Mod
Control Tablet
DeviceGroup Related
User Level View Add Modify Delete Copy
End User
Support Tech
Designer
Site Admin
Account Admin X X X X X
Stream Mod
Control Tablet
Moderation Related
User Level View
End User
Support Tech
Designer
Site Admin
Account Admin X
Stream Mod
Control Tablet
Velocity Device Manager
56
User Settings
If the default roles do not provide the right permission levels, new roles can be added.
1. Select the + button to add a new role. The top + button may be used. The current role can also be copied using
the Copy role button, then edited.
4. Press the slider for each permission to grant the current
role.
5. Press the Create Role button to save all the settings.
2. Name the role, to make easy to
identify later.
3. Set the Object Permissions.
CustomNetwork Related
User Level View Add Modify Delete Export Copy
End User
Support Tech
Designer
Site Admin
Account Admin X X X X X X
Stream Mod
Control Tablet
Report Related
User Level View
End User
Support Tech
Designer
Site Admin
Account Admin X
Stream Mod
Control Tablet
• Whitelisted Objects - When this
slider is grey, the selections made
will be what the user can see.
• Blacklisted Objects - When
the whitelisted objects slider is
selected, it will turn green and
the label will switch to blacklisted
objects once the arrow below it is
selected.
• Selector - Use the + to expand the sites, buildings, and oors to decide which rooms the user has access to.
If on whitelist, the rooms will be available to the user. If on blacklist, the rooms selected will be unavailable to
the user.

Copyright, Trademark, and Registration
© 2023 Atlona Inc. All rights reserved. “Atlona” and the Atlona logo are registered trademarks of Atlona Inc. Pricing, specications and availability
subject to change without notice. Actual products, product images, and online product images may vary from images shown here.
All other trademark(s), copyright(s), and registered technologies mentioned in this document are the properties of their respective owner(s).
35142-R11
US International
atlona.com • 408.962.0515 • 41.43.508.4321