EN - IT
Remote control
User Manual

CONTENTS
ENGLISH 3-25
FRANÇAIS 26-51
ITALIANO 52-77
ESPAÑOL 78-101
PORTUGUÊS
102-128
V2211017
AG Inverter RC
Please read this user manual rst!
Dear Customer,
Thank you for preferring a Indesit product. We hope that you get the best results from
your product which has been manufactured with high quality and state-of-the-art
technology. Therefore, please read this entire user manual and all other accompanying
documents carefully before using the product and keep it as a reference for future use.
If you handover the product to someone else, give the user manual as well. Follow all
warnings and information in the user manual.
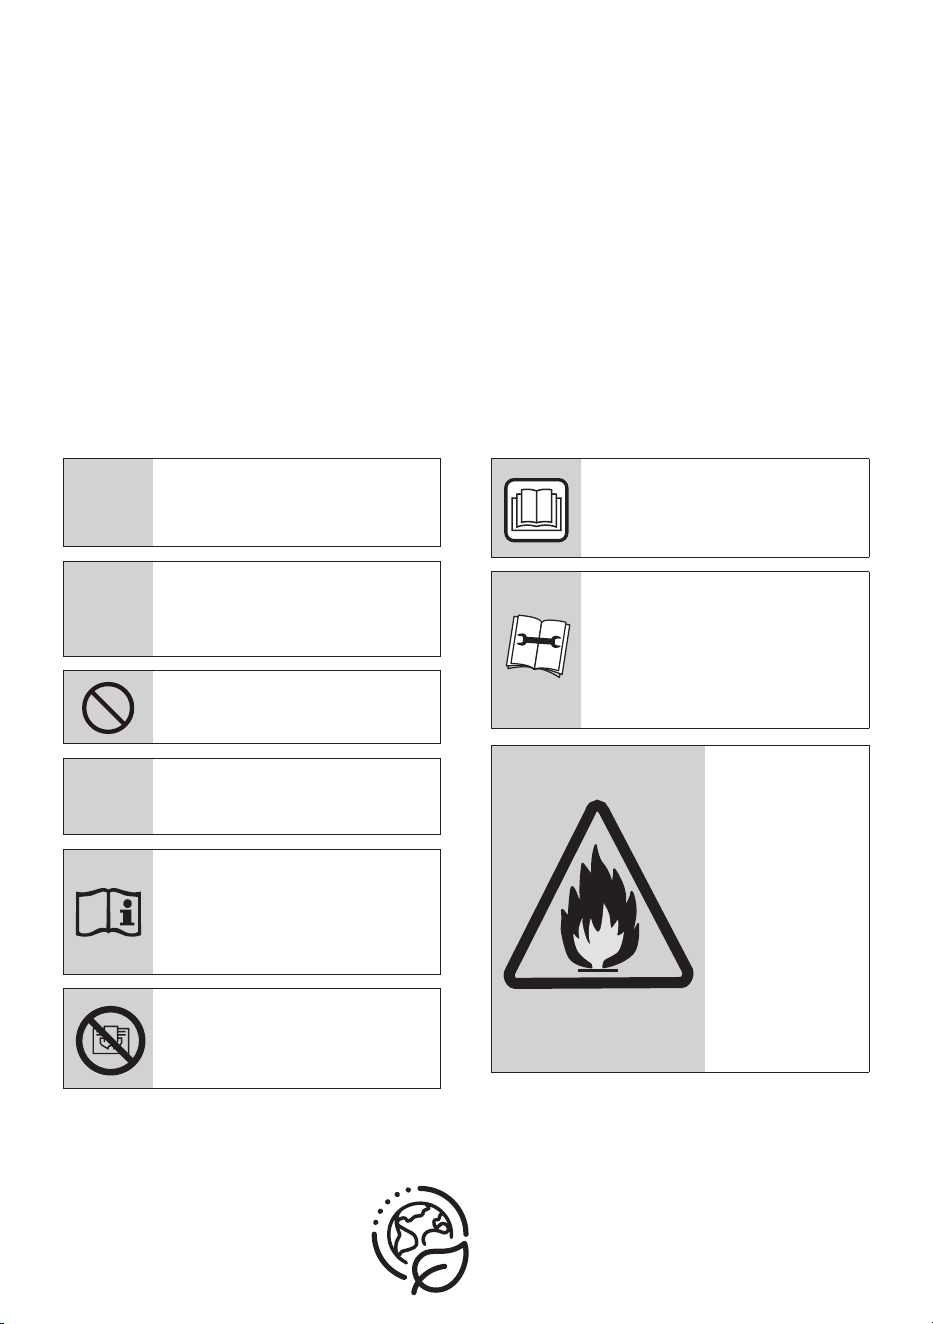
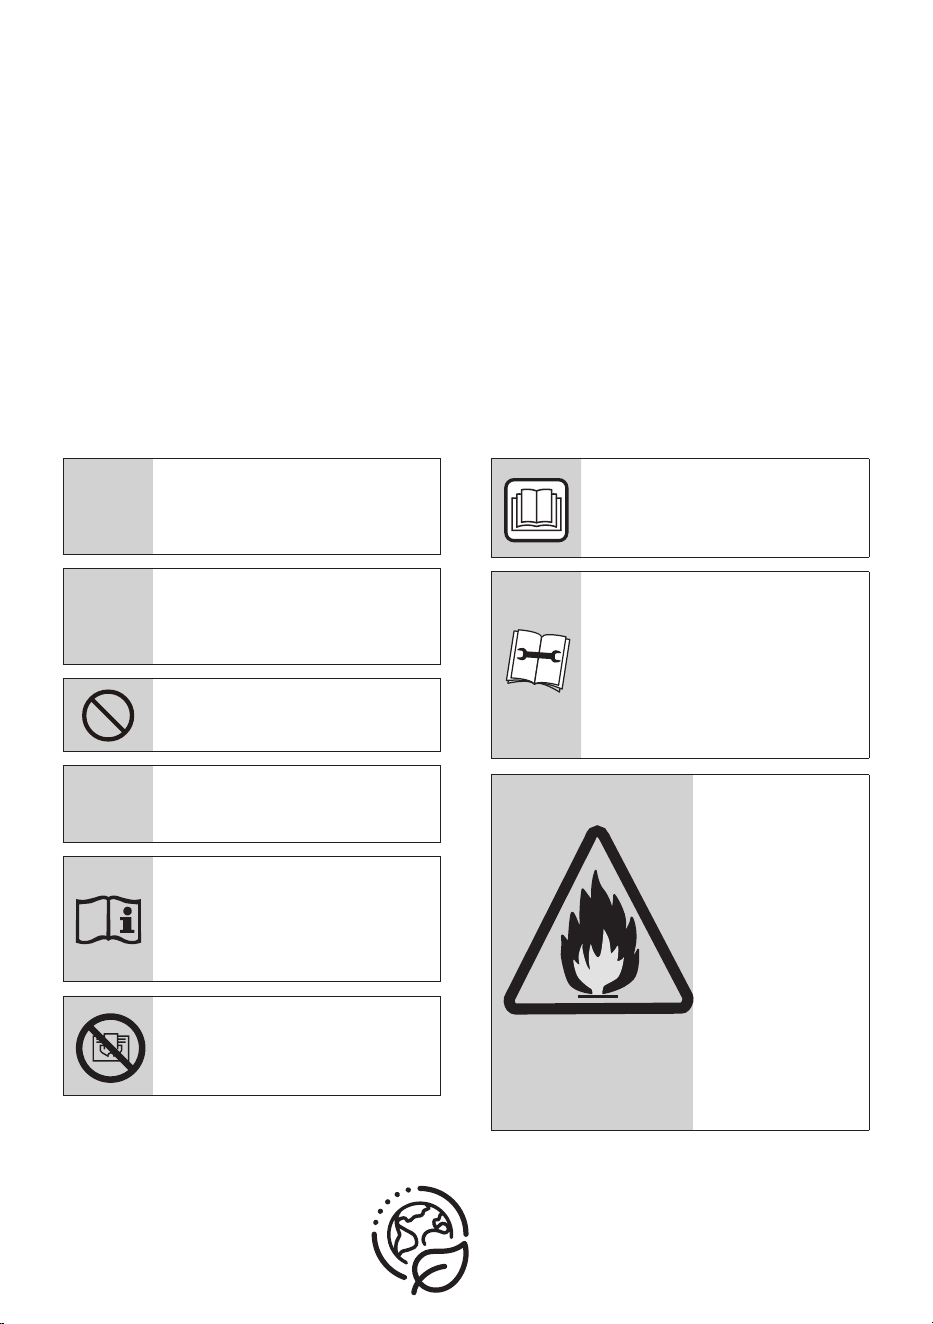
Meanings of the symbols
Following symbols are used in the various section of this manual:
C
Important information or
useful hints about usage.
A
Warning for hazardous
situations with regard to life
and property.
Warning to actions that must
never perform.
B
Warning for electric shock.
This symbol shows that
information is available such
as the operating manual or
installation manual.
Do not cover it.
This symbol shows that the
operation manual should be
read carefully.
This symbol shows that a
service personnel should be
handling this equipment with
reference to the installation
manual.
(For R32/R290 gas type)
This symbol
shows that this
appliance used
a flammable
refrigerant. If
the refrigerant
is leaked and
exposed to an
external ignition
source, there is a
risk of fire.
RECYCLED &
RECYCLABLE
PAPER
CONTENTS
1 Remote controller specifications 6
2 Quick start guide 7
3 Handling the remote controller 8
3.1 Inserting and replacing batteries. . . . . . . . . . . . . . . . . . . . . . . . . . . . . . . . . . . . . . . . . . . . . . . . . . . . . . . . . . 8
3.2 Notes for using remote control . . . . . . . . . . . . . . . . . . . . . . . . . . . . . . . . . . . . . . . . . . . . . . . . . . . . . . . . . . . 9
4 Buttons and functions 10
5 Remote screen indicators 14
6 How to use basic functions 16
6.1 Basic operation. . . . . . . . . . . . . . . . . . . . . . . . . . . . . . . . . . . . . . . . . . . . . . . . . . . . . . . . . . . . . . . . . . . . . . . . 16
6.2 AUTO Mode . . . . . . . . . . . . . . . . . . . . . . . . . . . . . . . . . . . . . . . . . . . . . . . . . . . . . . . . . . . . . . . . . . . . . . . . . . . 16
6.3 COOL mode . . . . . . . . . . . . . . . . . . . . . . . . . . . . . . . . . . . . . . . . . . . . . . . . . . . . . . . . . . . . . . . . . . . . . . . . . . . 17
6.4 DRY Mode (dehumidifying) . . . . . . . . . . . . . . . . . . . . . . . . . . . . . . . . . . . . . . . . . . . . . . . . . . . . . . . . . . . . . 17
6.5 FAN Mode . . . . . . . . . . . . . . . . . . . . . . . . . . . . . . . . . . . . . . . . . . . . . . . . . . . . . . . . . . . . . . . . . . . . . . . . . . . . 18
6.6 HEAT Mode . . . . . . . . . . . . . . . . . . . . . . . . . . . . . . . . . . . . . . . . . . . . . . . . . . . . . . . . . . . . . . . . . . . . . . . . . . . 18
7 Setting the TIMER 19
7.1 TIMER ON setting. . . . . . . . . . . . . . . . . . . . . . . . . . . . . . . . . . . . . . . . . . . . . . . . . . . . . . . . . . . . . . . . . . . . . . 19
7.2 TIMER OFF setting . . . . . . . . . . . . . . . . . . . . . . . . . . . . . . . . . . . . . . . . . . . . . . . . . . . . . . . . . . . . . . . . . . . . . 19
7.3 TIMER ON & OFF setting (example) . . . . . . . . . . . . . . . . . . . . . . . . . . . . . . . . . . . . . . . . . . . . . . . . . . . . . . 20
8 How to use advanced functions 21
8.1 Swing function . . . . . . . . . . . . . . . . . . . . . . . . . . . . . . . . . . . . . . . . . . . . . . . . . . . . . . . . . . . . . . . . . . . . . . . . 21
8.2 Airflow direction . . . . . . . . . . . . . . . . . . . . . . . . . . . . . . . . . . . . . . . . . . . . . . . . . . . . . . . . . . . . . . . . . . . . . . . 21
8.3 LED DISPLAY. . . . . . . . . . . . . . . . . . . . . . . . . . . . . . . . . . . . . . . . . . . . . . . . . . . . . . . . . . . . . . . . . . . . . . . . . . 22
8.4 ECO/GEAR function . . . . . . . . . . . . . . . . . . . . . . . . . . . . . . . . . . . . . . . . . . . . . . . . . . . . . . . . . . . . . . . . . . . . 22
4 / 128 EN
Remote control / User Manual

CONTENTS
8.5 Click & Clean function . . . . . . . . . . . . . . . . . . . . . . . . . . . . . . . . . . . . . . . . . . . . . . . . . . . . . . . . . . . . . . . . . 23
8.6 Silence function . . . . . . . . . . . . . . . . . . . . . . . . . . . . . . . . . . . . . . . . . . . . . . . . . . . . . . . . . . . . . . . . . . . . . . . 23
8.7 FP function (Freezing protection) . . . . . . . . . . . . . . . . . . . . . . . . . . . . . . . . . . . . . . . . . . . . . . . . . . . . . . . . 24
8.8 LOCK function. . . . . . . . . . . . . . . . . . . . . . . . . . . . . . . . . . . . . . . . . . . . . . . . . . . . . . . . . . . . . . . . . . . . . . . . . 24
8.9 SET function . . . . . . . . . . . . . . . . . . . . . . . . . . . . . . . . . . . . . . . . . . . . . . . . . . . . . . . . . . . . . . . . . . . . . . . . . . 24
8.10 HygieneMax function (some units). . . . . . . . . . . . . . . . . . . . . . . . . . . . . . . . . . . . . . . . . . . . . . . . . . . . . . . 25
Remote control / User Manual
5 / 128 EN

6 / 128 EN
Remote control / User Manual
Model
Rated voltage 3.0V (Dry batteries R03/LR03×2)
Signal receiving range 8m
Environment -5°C~60°C (23°F~140°F)
1 Remote controller specifications
RG10A (G2S)/BGEF
Remote control / User Manual
7 / 128 EN
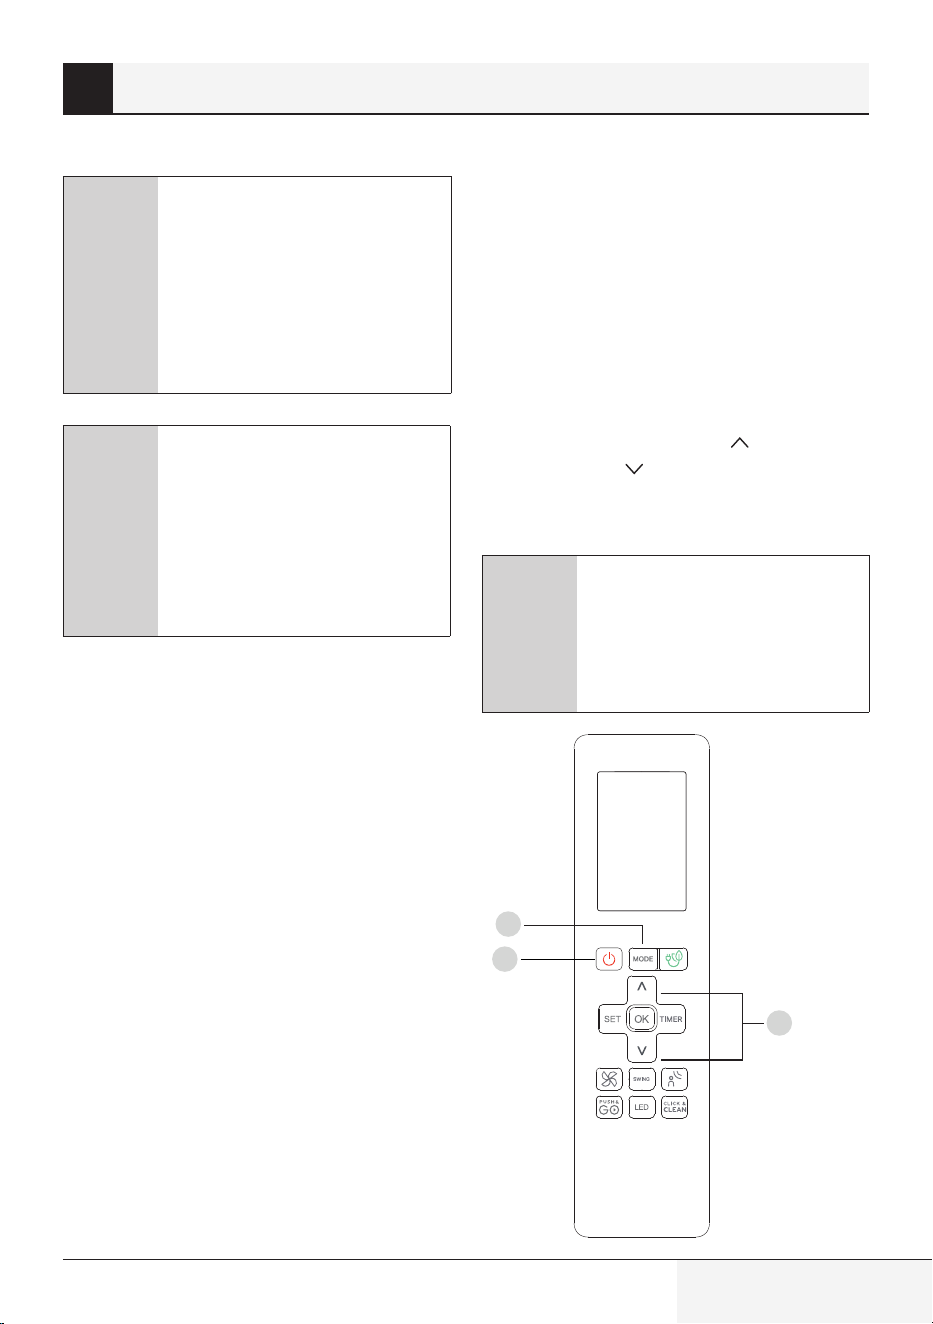
1
6
2
5 4
M
y Mode
F
ollow Me
L
E
D T
u
r
bo
Ioni
s
er
S
w
i
ng
Ti
m
e
r
S
elf Clean
Mode
On/
Of
f
Fan
Sleep
AUTO
COOL
DRY
HEAT
FAN
HIGH
MED
LOW
SET TEMPERATURE
3
AUTO
COOL
DRY
HEAT
FAN
AU-100%
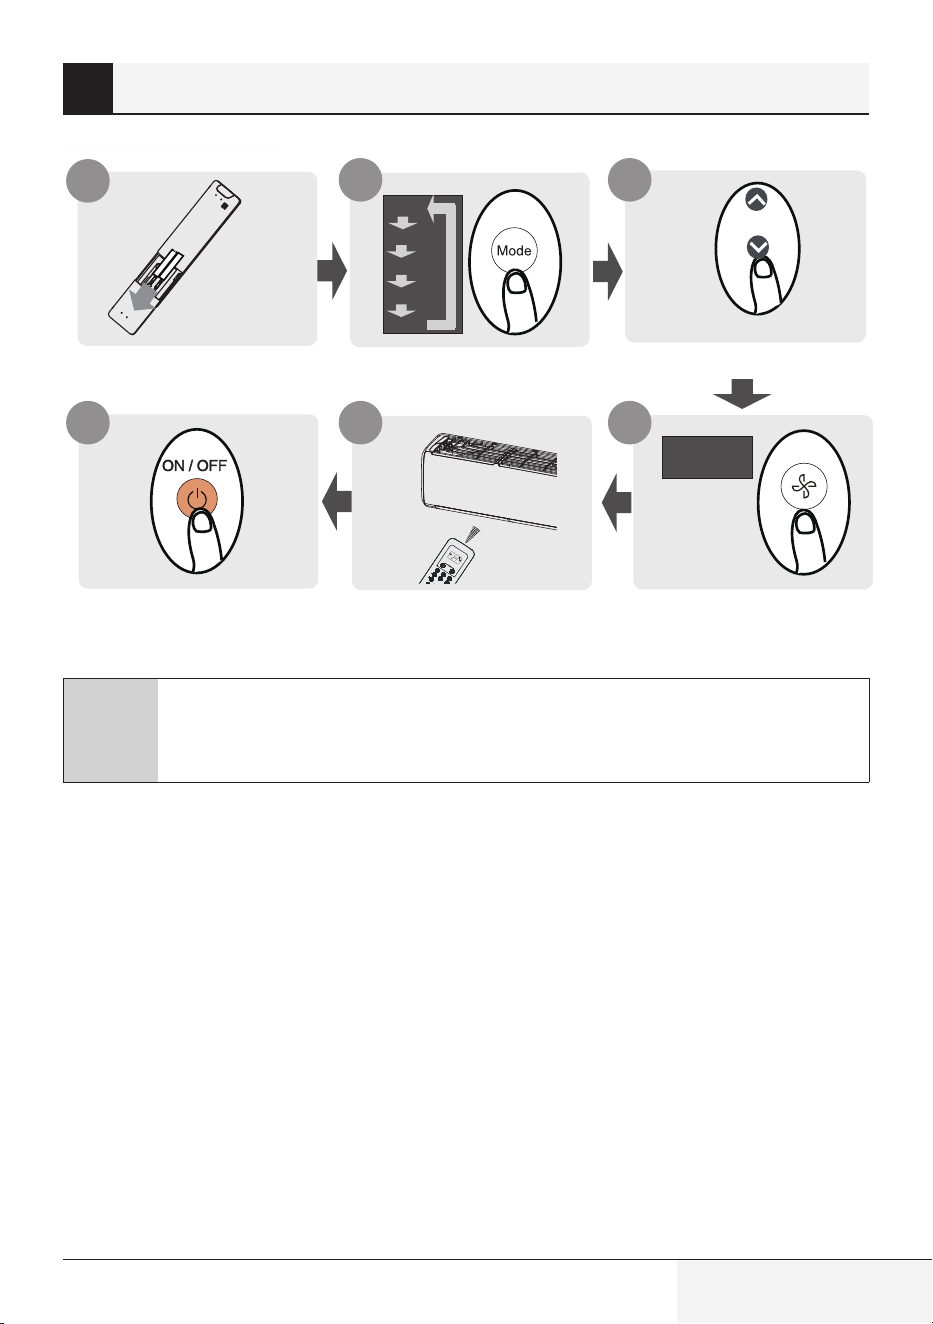
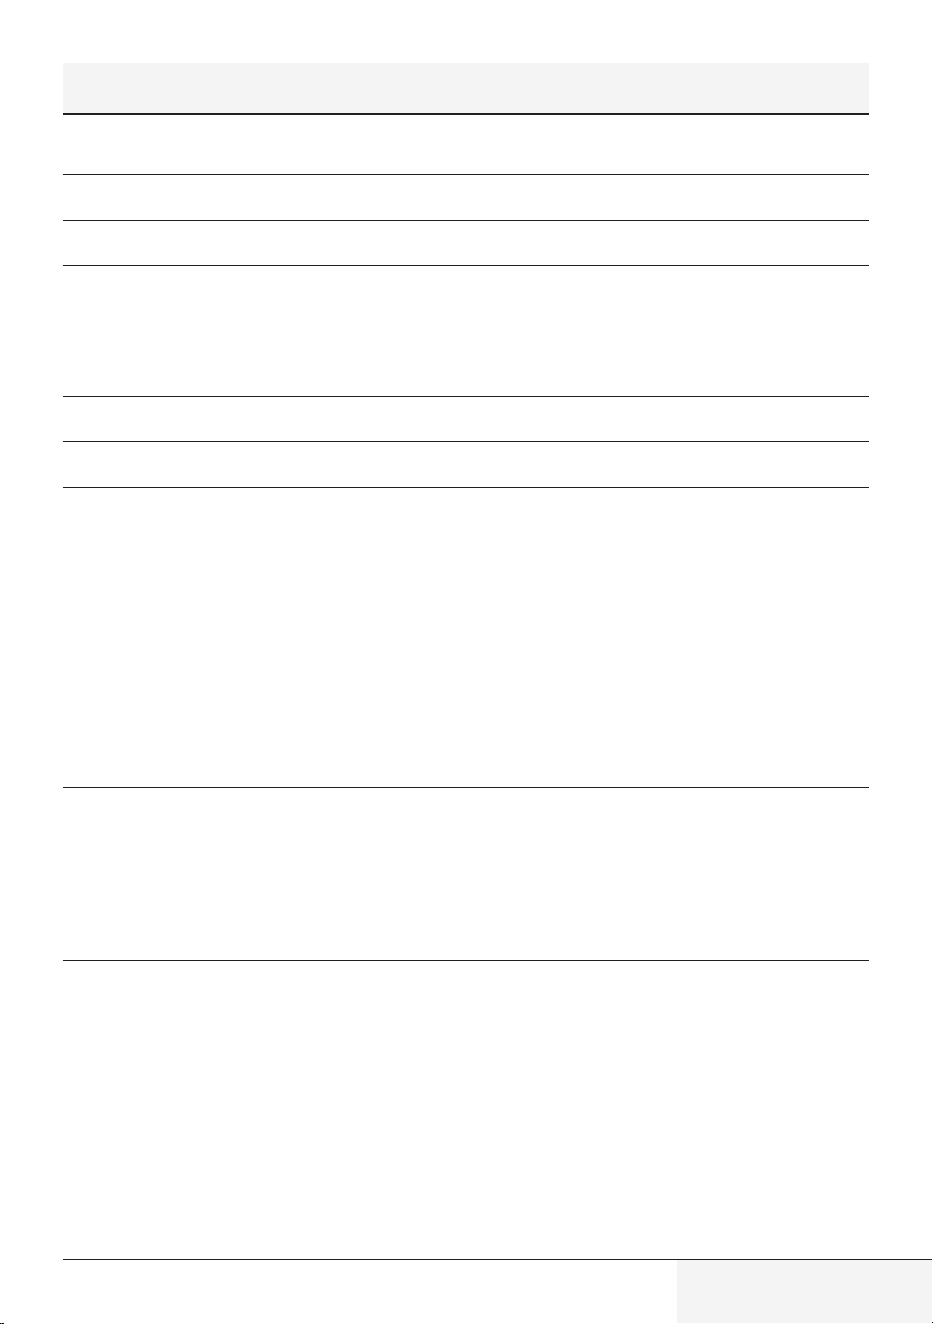
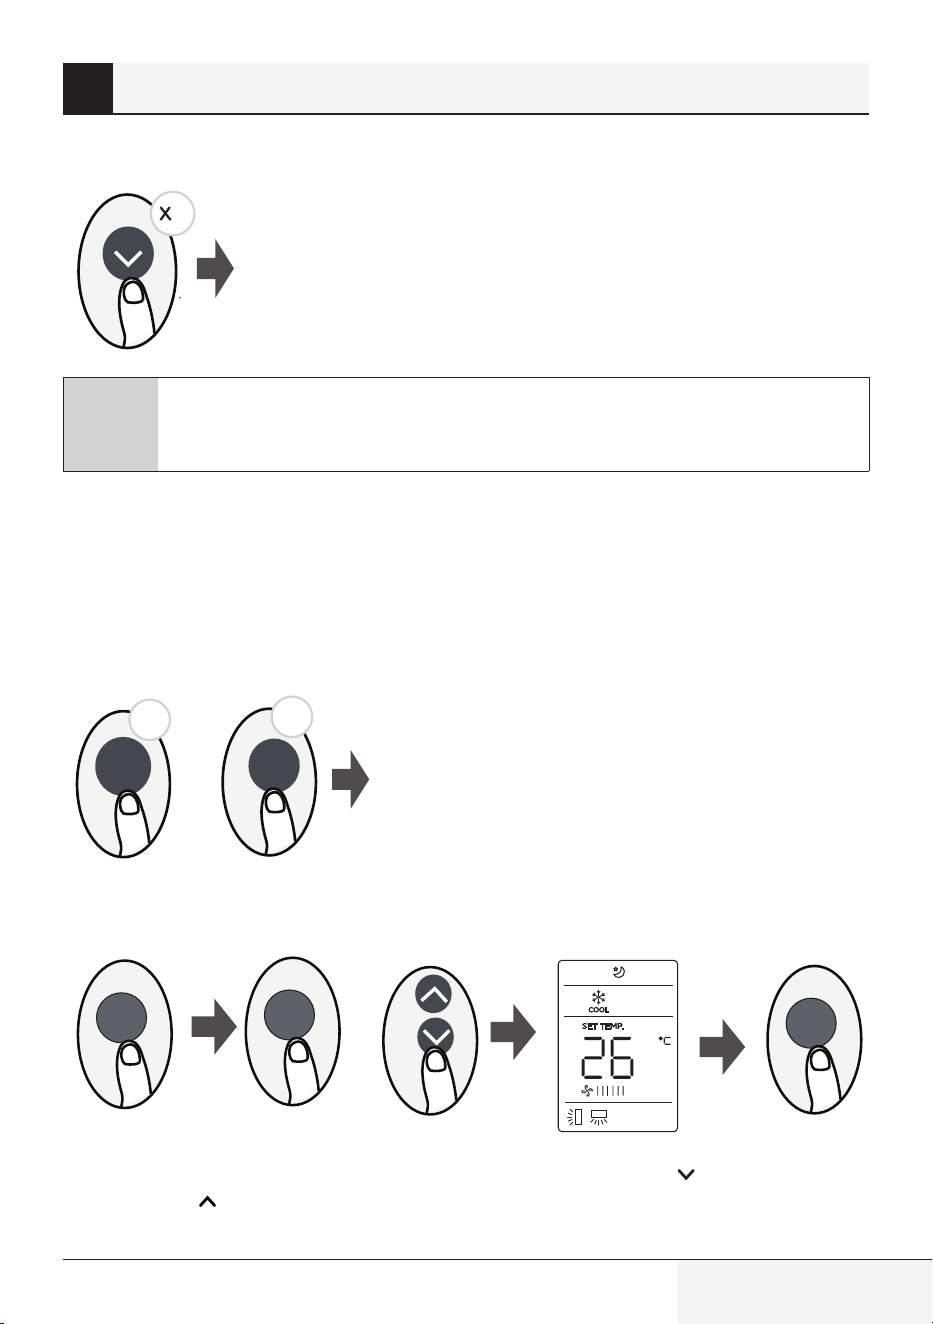
Fit batteries
Press power button
Select mode
Point remote toward unit
Select temperature
Select fan speed
C
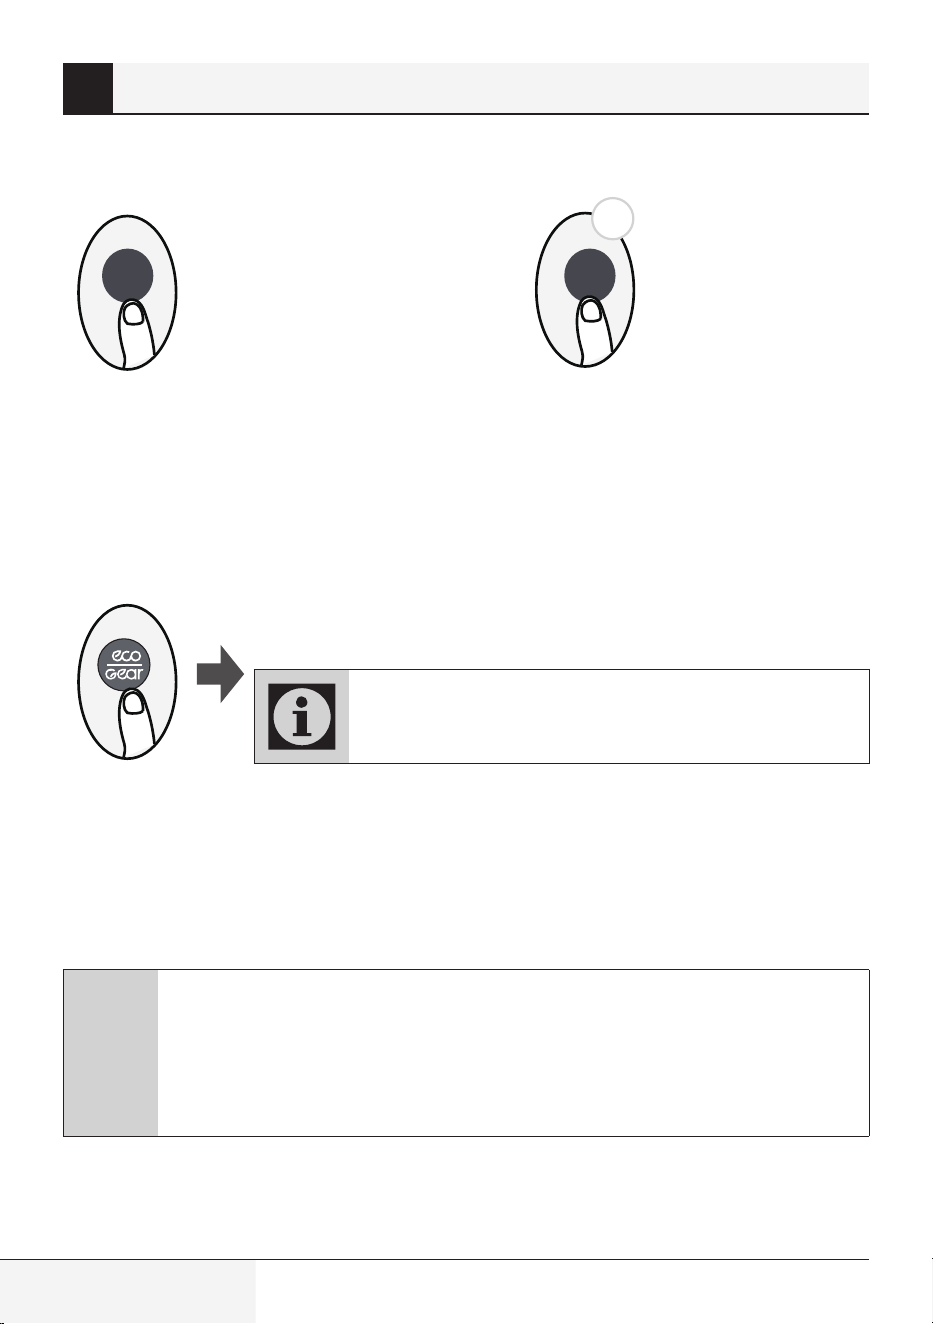
Not sure what a function does?
Refer to the How to use basic functions and How to use advanced functions sections
of this manual for a detailed description of how to use your air conditioner.
2 Quick start guide
8 / 128 EN
Remote control / User Manual
3 Handling the remote controller
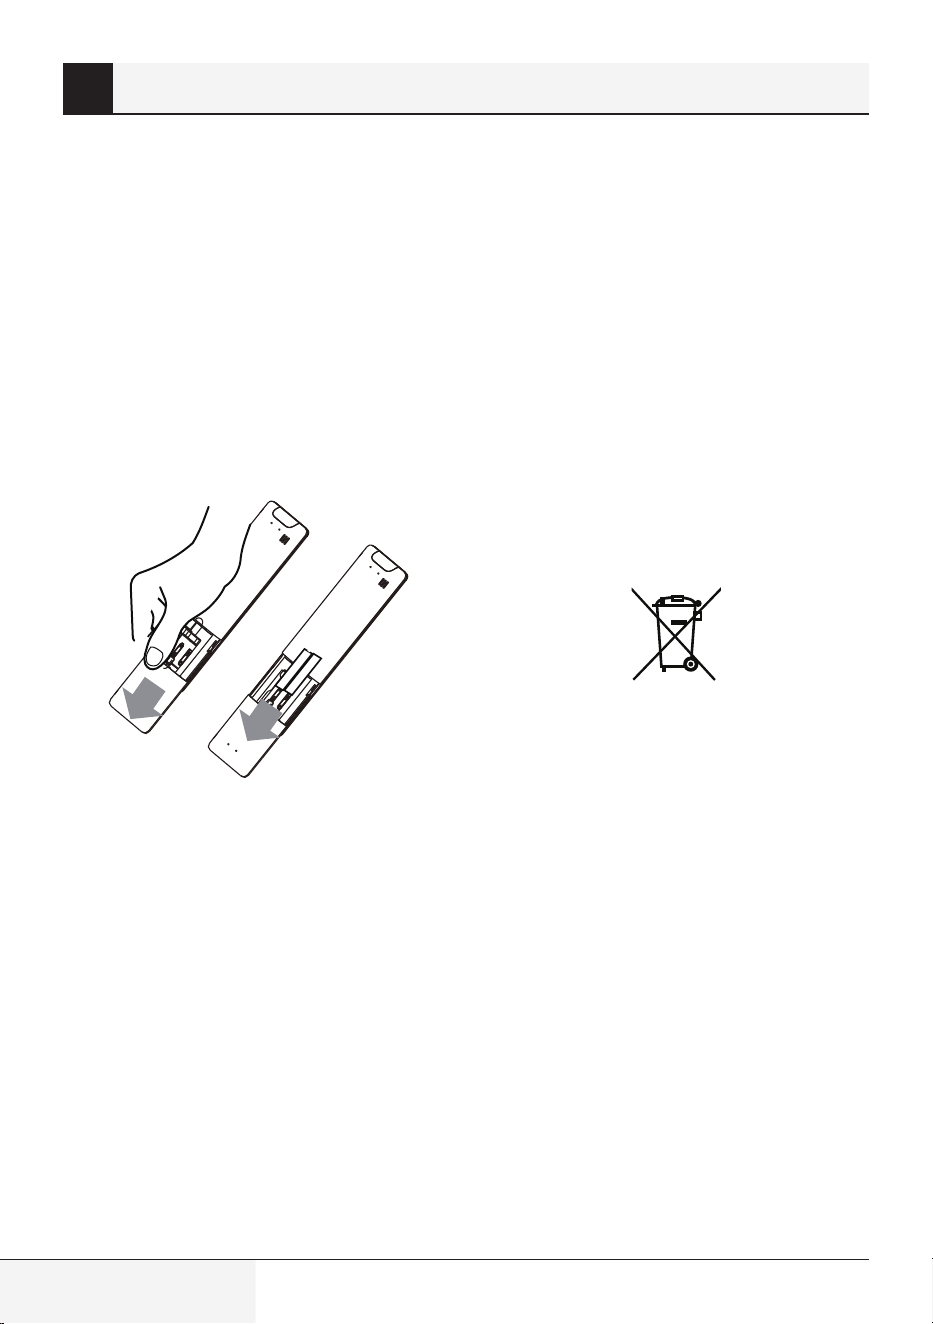
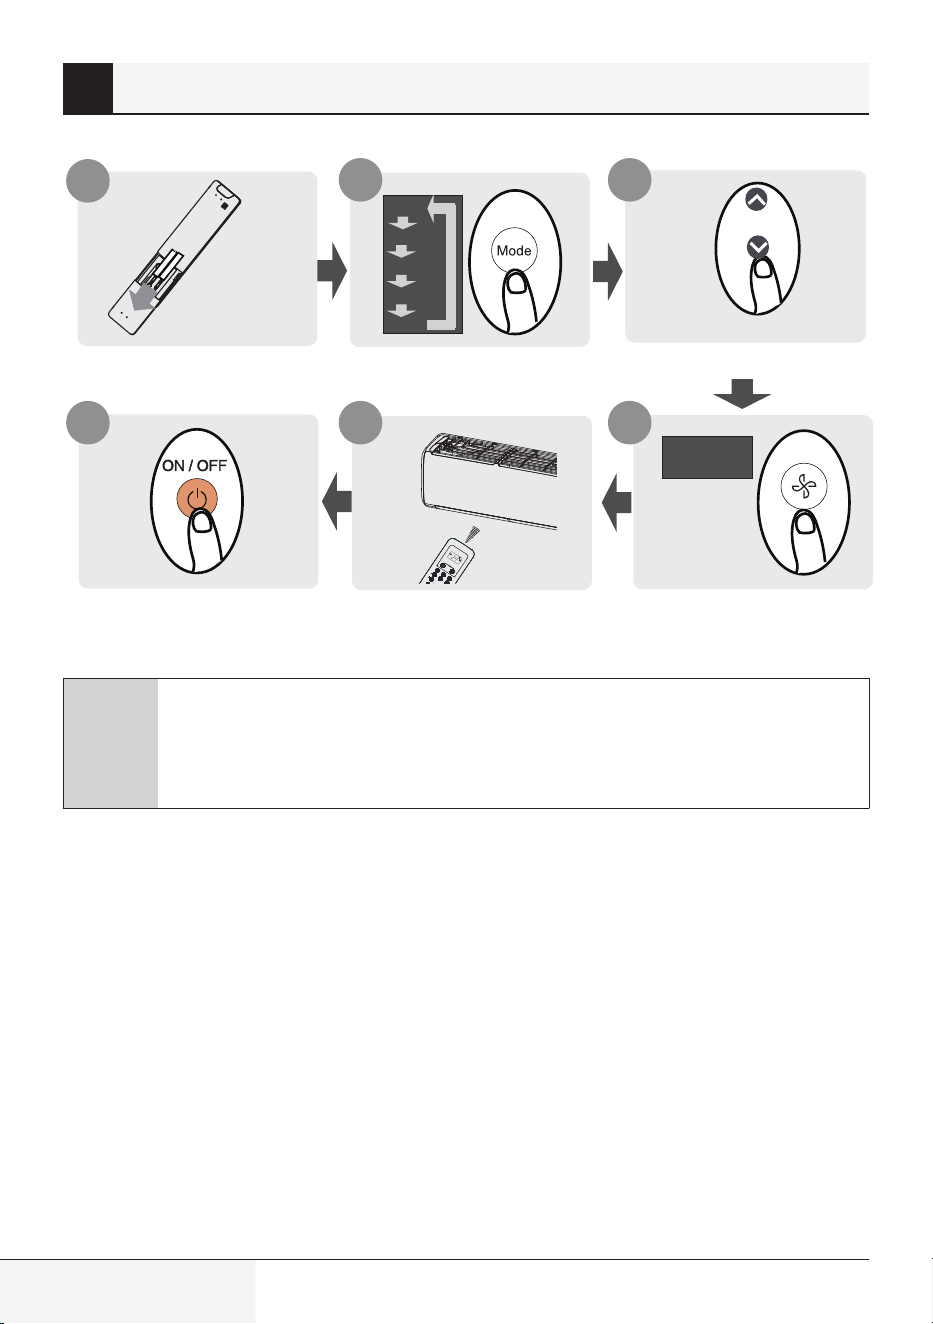
3.1 Inserting and replacing
batteries
Your air conditioning unit may come with two
batteries(some units). Put the batteries in the
remote control before use.
1.
Slide the back cover from the remote control
downward, exposing the battery compartment.
2.
Insert the batteries, paying attention to match
up the (+) and (-) ends of the batteries with
the symbols inside the battery compartment.
3.
Slide the battery cover back into place.
Remote Control
•
Direct sunlight can interfere with the infrared
signal receiver.
Battery Disposal
•
Do not dispose of batteries as unsorted
municipal waste. Refer to local laws for proper
disposal of batteries.
Battery Performance
•
Do not mix old and new batteries, or batteries of
different brands.
•
Do not leave batteries in the remote control if
you don’t plan on using the device for more than
2 months.
For optimal product performance:
•
Batteries may have a chemical symbol at the
bottom of the disposal icon. This chemical
symbol means that the battery contains a heavy
metal that exceeds a certain concentration.
An example is Pb: Lead (>0.004%).
•
Appliances and used batteries must be treated
in a specialized facility for reuse, recycling and
recovery. By ensuring correct disposal, you will
help avoid possible negative consequences for
the environment and human health.
•
There must be a clear line of sight between
the remote and the appliance.
•
If the signals from the remote control happen
to control another appliance, move the
appliance to another location or contact
customer service.
Pb

Remote control / User Manual
9 / 128 EN
3 Handling the remote controller
•
In Canada, it should comply with
CAN ICES-3(B)/NMB-3(B).
•
In USA, this device complies with part 15 of
the FCC Rules. Operation is subject to the
following two conditions:
•
Reorient or relocate the receiving antenna.
3.2 Notes For Using Remote
Control
The device could comply with the local national
regulations.
This equipment has been tested and found to
comply with the limits for a Class B digital
device, pursuant to part 15 of the FCC Rules.
These limits are designed to provide
reasonable protection against harmful
interference in a residential installation. This
equipment generates, uses and can radiate
radio frequency energy and, if not installed
and used in accordance with the instructions,
may cause harmful interference to radio
communications. However, there is no
guarantee that interference will not occur in a
particular installation. If this equipment does
cause harmful interference to radio or
television reception, which can be determined
by turning the equipment off and on, the user
is encouraged to try to correct the interference
by one or more of the following measures:
(1) This device may not cause harmful
interference, and
(2) this device must accept any interference
received, including interference that may
cause undesired operation.
•
Increase the separation between the
equipment and receiver.
•
Connect the equipment into an outlet on a circuit
different from that to which the receiver is
connected.
•
Consult the dealer or an experienced radio/TV
technician for help.
•
Changes or modifications not approved by the
party responsible for compliance could void
user’s authority to operate the equipment.
10 / 128 EN
Remote control / User Manual
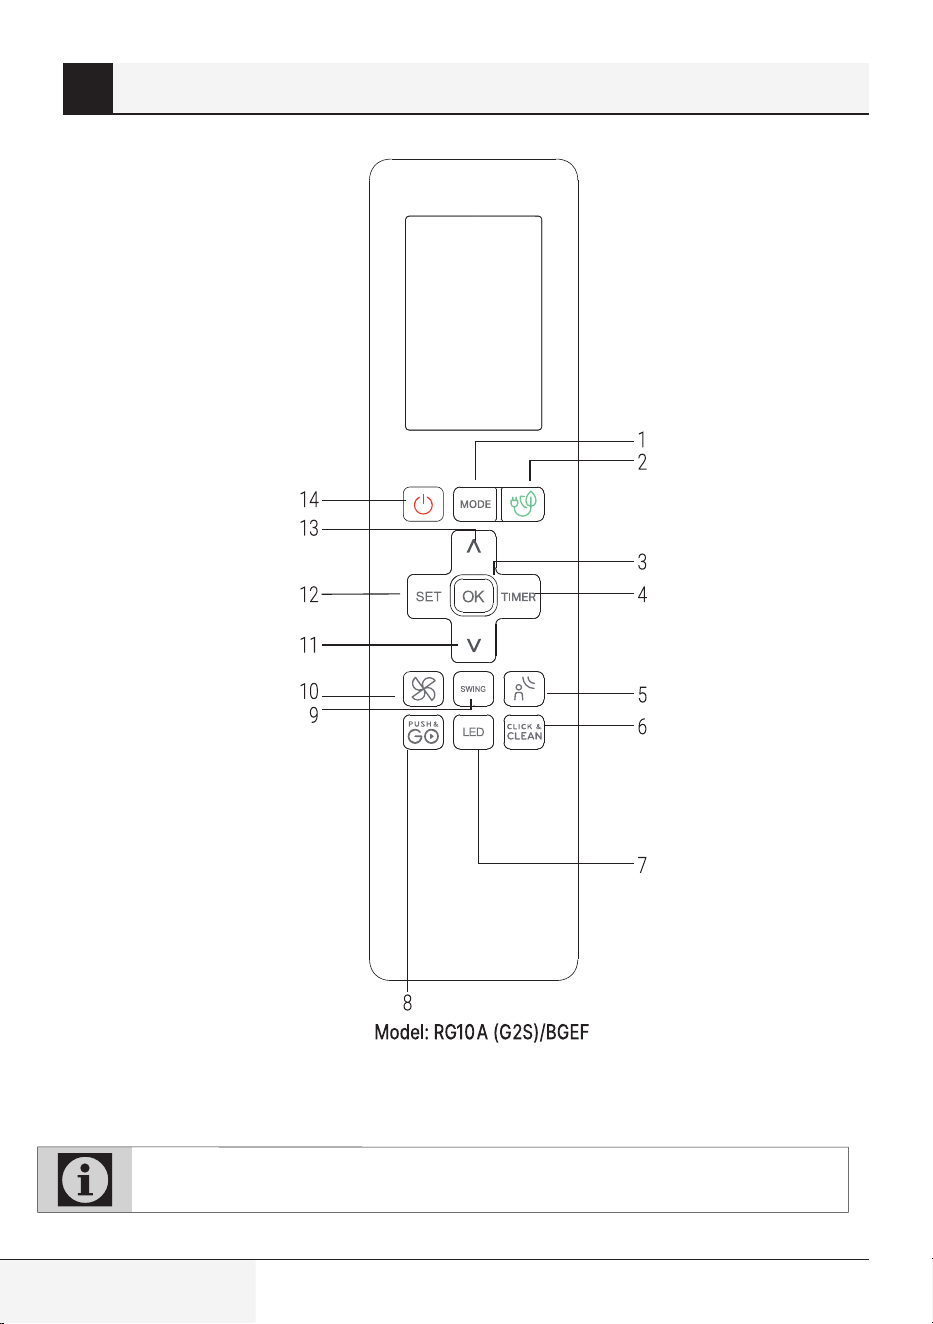
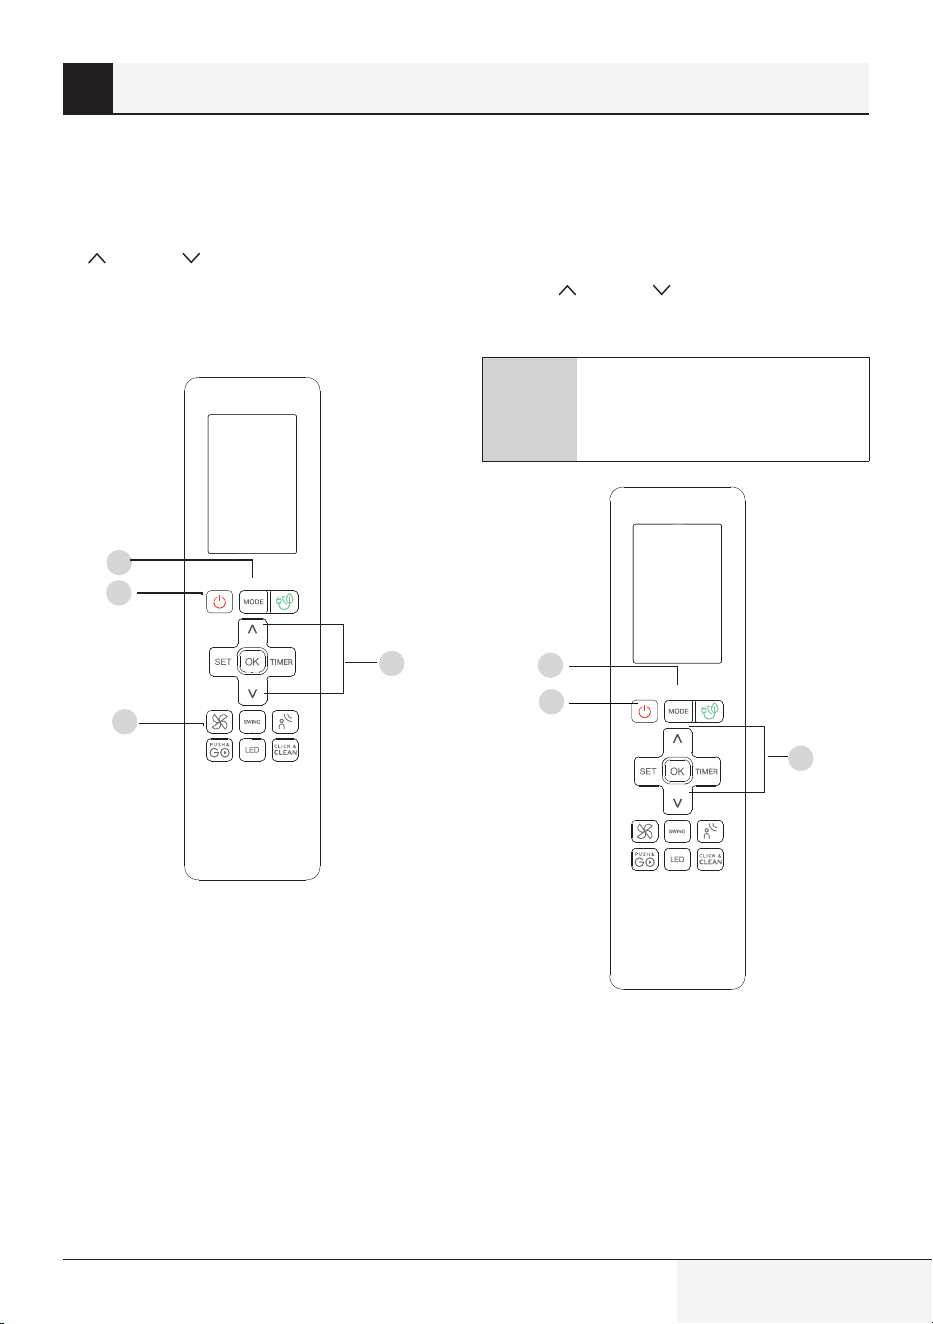
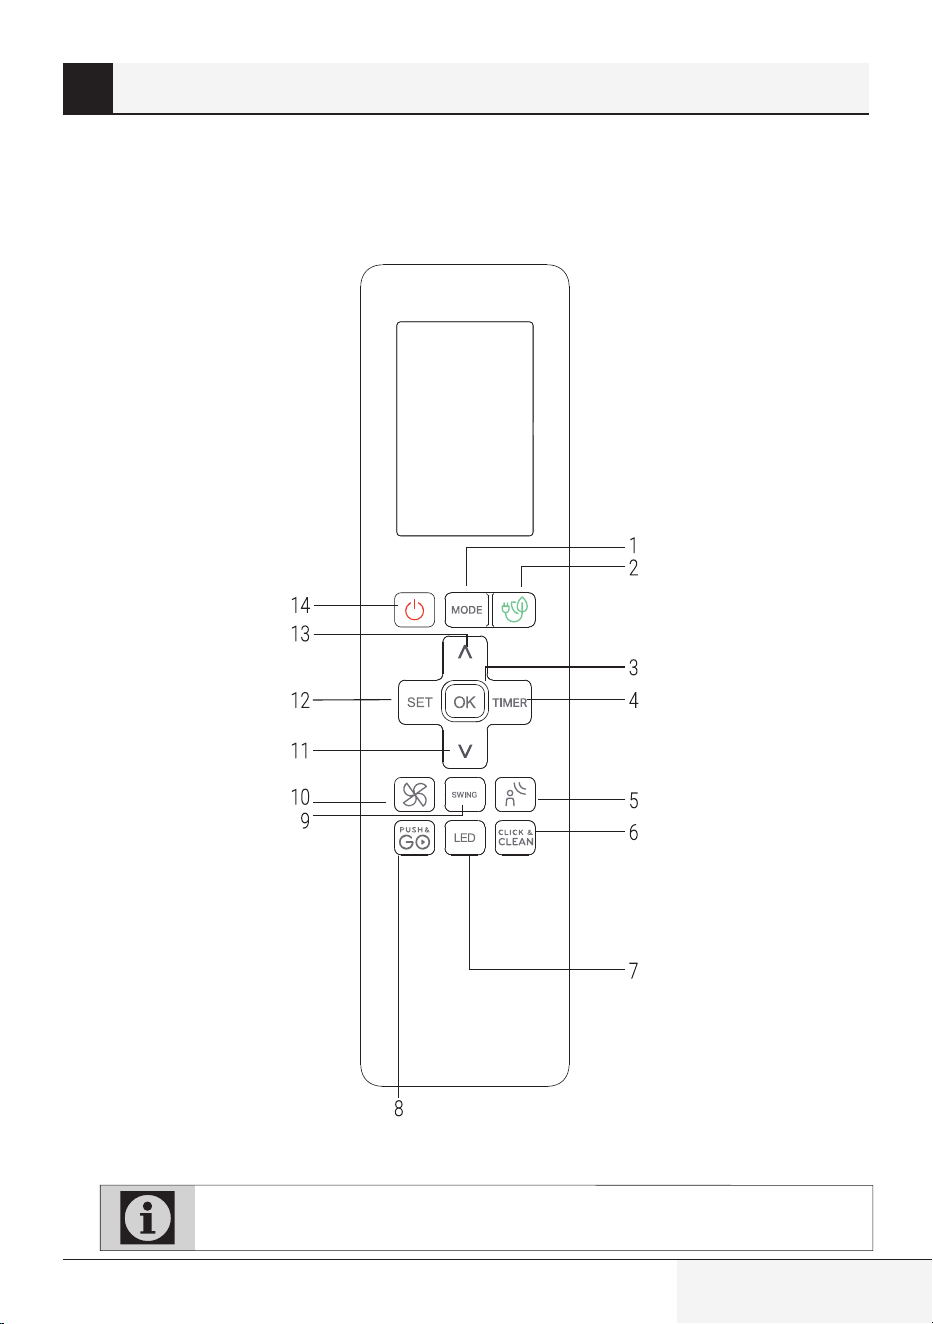
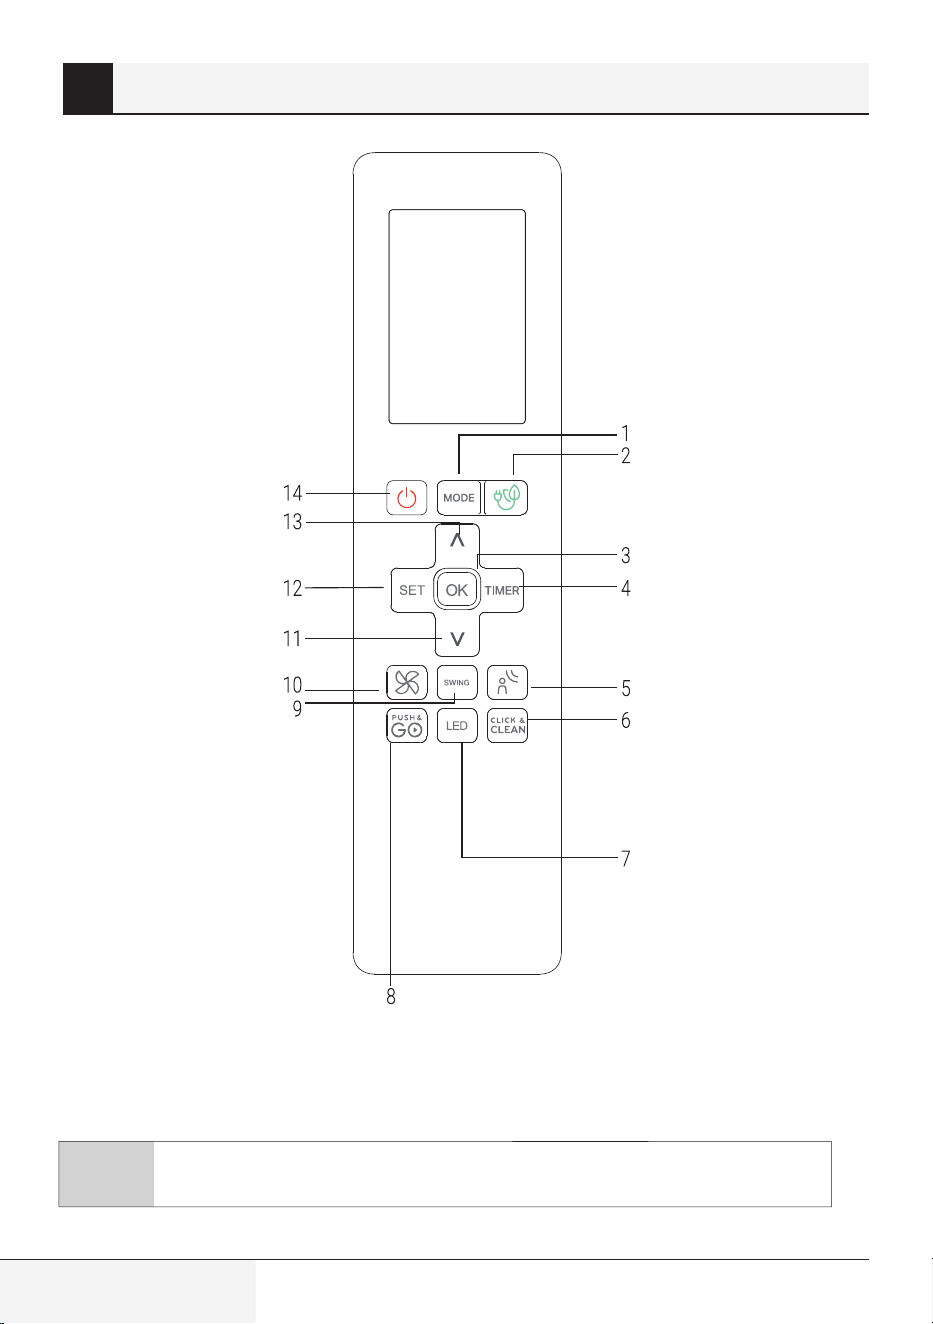
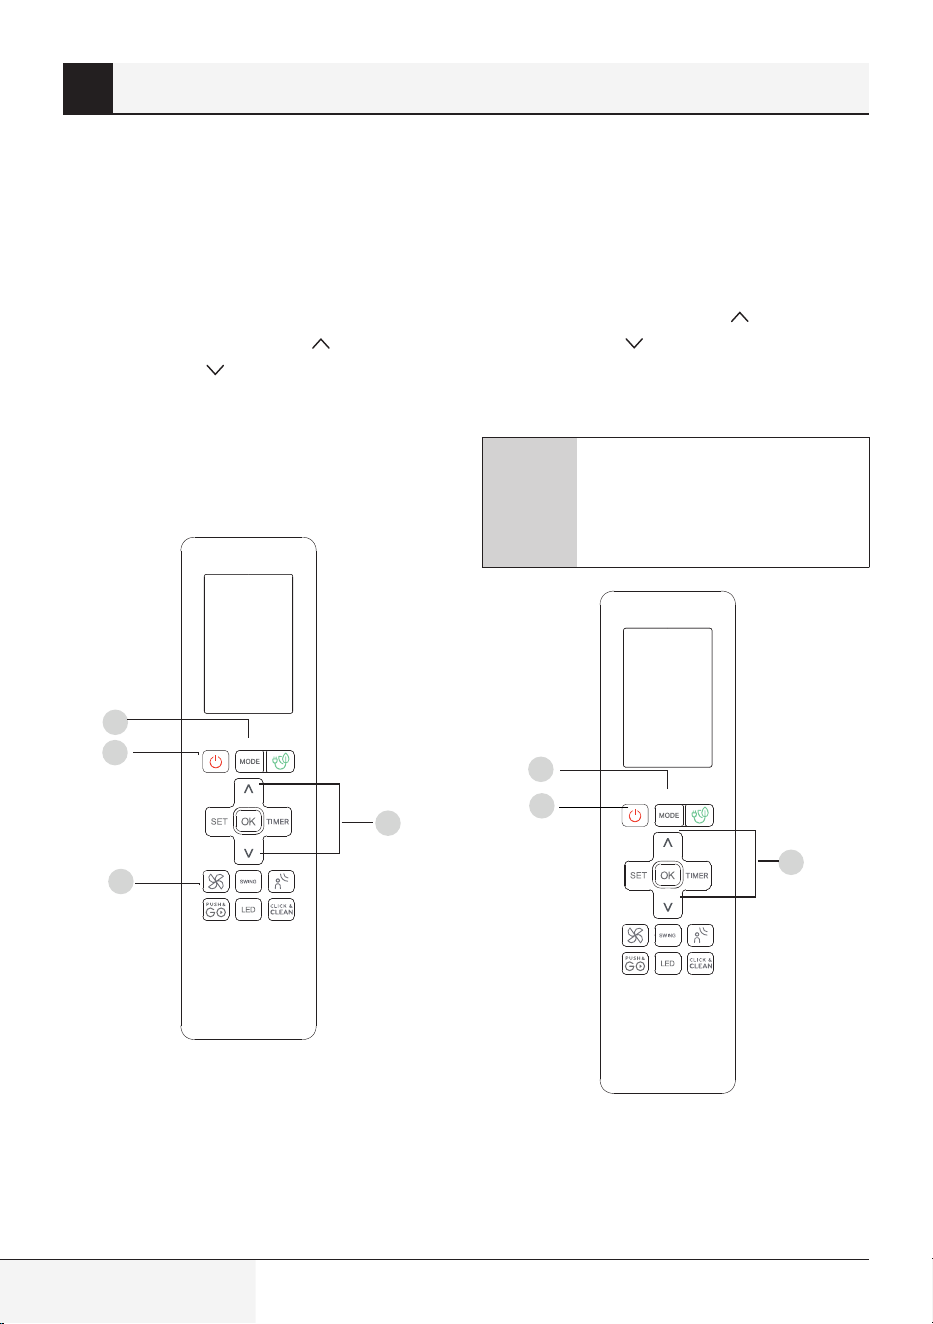
4 Buttons and functions
Before you begin using your new air conditioner,
make sure to familiarize yourself with its remote
control. The following is a brief introduction to the
remote control itself. For instructions on how to
operate your air conditioner, refer to the How to
use basic functions section of this manual.
Note: ECO/GEAR, Click & Clean, Breeze Away, Silence are not available on multi-split AC.
Remote control / User Manual
11 / 128 EN
1. Mode
Scrolls through operation modes as follows:
AUTO COOL DRY HEAT FAN
C
Note: HEAT mode is not
supported by the cooling only
appliance.
2. ECO/GEAR
Press this button to enter the energy efficient
mode in a sequence of following:
ECO GEAR (75%) GEAR (50%)
Previous setting mode ECO ....
3. OK
Used to confirm the selected functions
4. Timer
Set timer to turn unit on or off.
5. BREEZE AWAY
This feature avoids direct air flow blowing on
the body and makes you feel indulging in silky
coolness.
C
Note: This feature is available
under cool, Fan and Dry mode
only.
6. Click & Clean
Used to start/stop the Click & Clean function.
(Some units, please refer to the User’s
operation & Installation manual).
7. LED
Turns indoor unit’s LED display and air
conditioner buzzer on and off, which create
a comfortable and quiet environment.
8. Push&GO
Enables unit to reach preset temperature in
shortest possible time
9. Swing
Starts and stops the horizontal louver
movement. Hold down for 2 seconds to
initiate vertical louver auto swing feature.
10. FAN SPEED
Selects fan speeds in the following order:
AU 20% 40% 60% 80% 100%.
Press the TEMP
or button to increase/
decrease the fan speed in 1% increments.
11. TEMP
Decreases temperature in 1°C (1°F)
increments. Min. temperature is 16°C (60°F).
12. SET
Scrolls through operation functions as
follows:
Sleep (
)
)
AP mode (
) (Some units) Sleep...
The selected symbol will flash on the display
area, press the OK button to confirm.
13. TEMP
Increases temperate in 1°C (1°F) increments.
Max. temperature is 30°C (86°F).
C
Note: Press together &
buttons at the same time for
3 seconds will alternate the
temperature display between
the °C & °F.
14. On/Off
Turns the unit on or off.
4 Buttons and functions
C
Note: ECO/GEAR, Click & Clean,
Breeze Away, Silence are not
available on multi-split AC.
ZoneDetect
12 / 128 EN
Remote control / User Manual
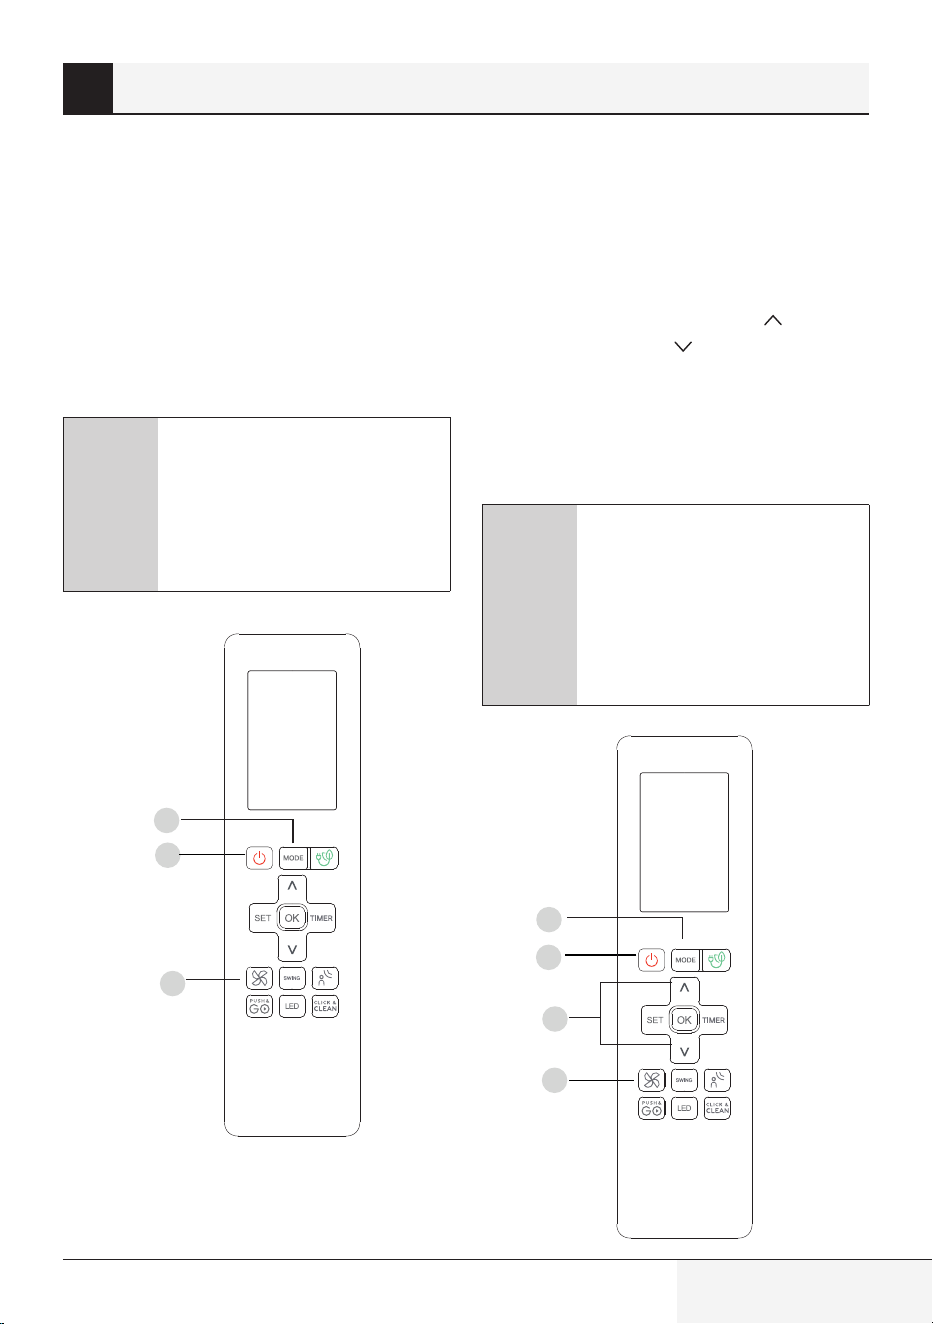
4 Buttons and functions
(HygieneMax feature is available)
Note: ECO/GEAR, Click & Clean, Breeze Away, Silence are not available on multi-split AC.
Remote control / User Manual
13 / 128 EN
1. Mode
Scrolls through operation modes as follows:
AUTO COOL DRY HEAT FAN
C
Note: HEAT mode is not
supported by the cooling only
appliance.
2. ECO/GEAR
Press this button to enter the energy efficient
mode in a sequence of following:
ECO GEAR (75%) GEAR (50%)
Previous setting mode ECO ....
3. OK
Used to confirm the selected functions
4. Timer
Set timer to turn unit on or off.
5. HygieneMax
Used to starts and stops the HygieneMax
feature.
6. Click & Clean
Used to start/stop the Click & Clean function.
(Some units, please refer to the User’s
operation & Installation manual).
7. LED
Turns indoor unit’s LED display and air
conditioner buzzer on and off, which create
a comfortable and quiet environment.
8. Push&GO
Enables unit to reach preset temperature in
shortest possible time
9. Swing
Starts and stops the horizontal louver
movement. Hold down for 2 seconds to
initiate vertical louver auto swing feature.
10. FAN SPEED
Selects fan speeds in the following order:
AU 20% 40% 60% 80% 100%.
Press the TEMP
or button to increase/
decrease the fan speed in 1% increments.
11. TEMP
Decreases temperature in 1°C (1°F)
increments. Min. temperature is 16°C (60°F).
12. SET
Scrolls through operation functions as
follows:
Breeze Away (
) Sleep ( )
) AP mode ( ) (Some units)
Breeze Away ...
The selected symbol will flash on the display
area, press the OK button to confirm.
13. TEMP
Increases temperate in 1°C (1°F) increments.
Max. temperature is 30°C (86°F).
C
Note: Press together &
buttons at the same time for
3 seconds will alternate the
temperature display between
the °C & °F.
14. On/Off
Turns the unit on or off.
4 Buttons and functions
C
Note: ECO/GEAR, Click & Clean,
Breeze Away, Silence are not
available on multi-split AC.
ZoneDetect
14 / 128 EN
Remote control / User Manual
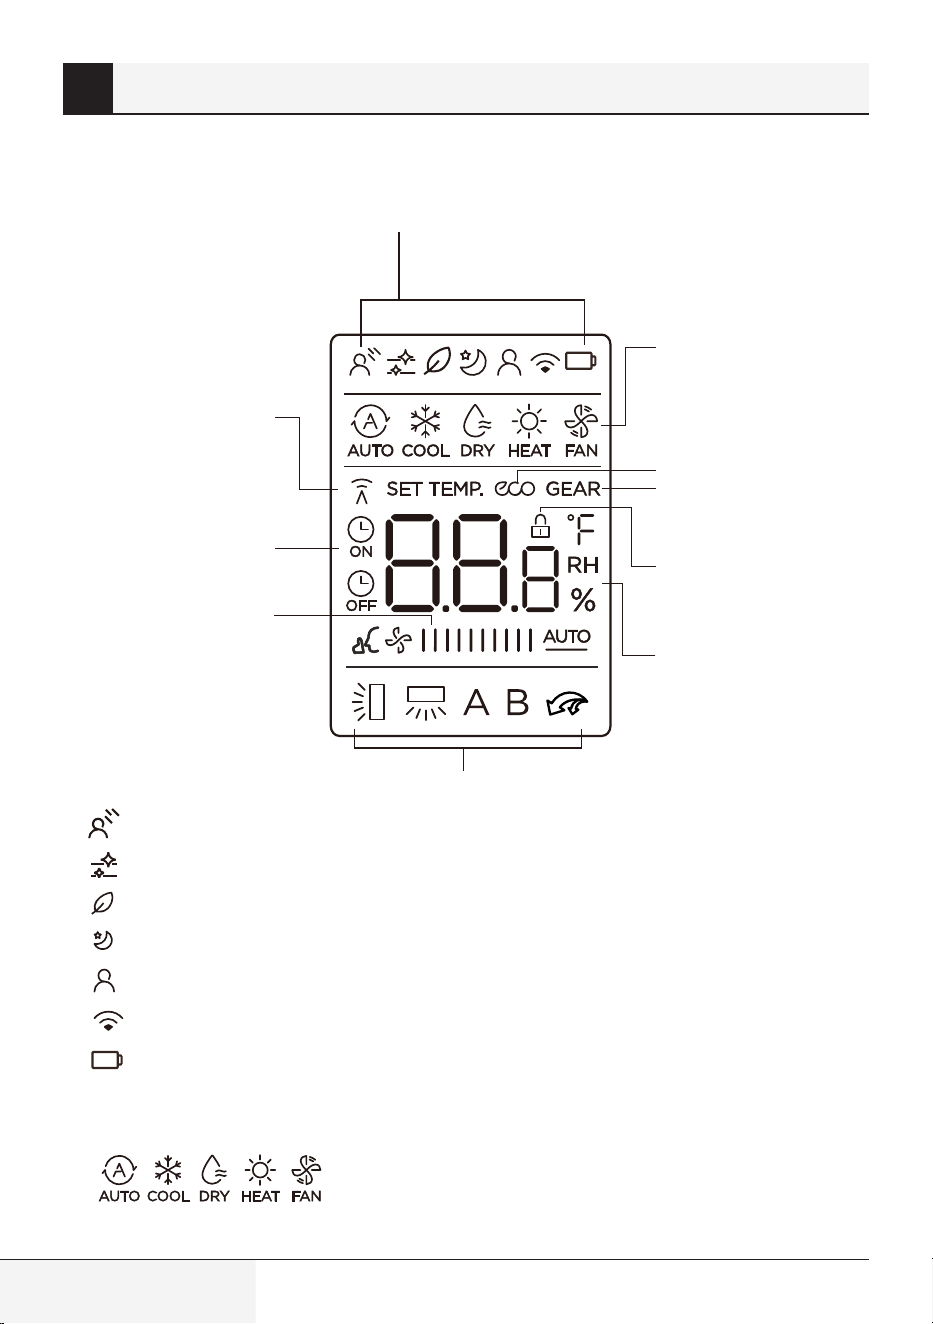
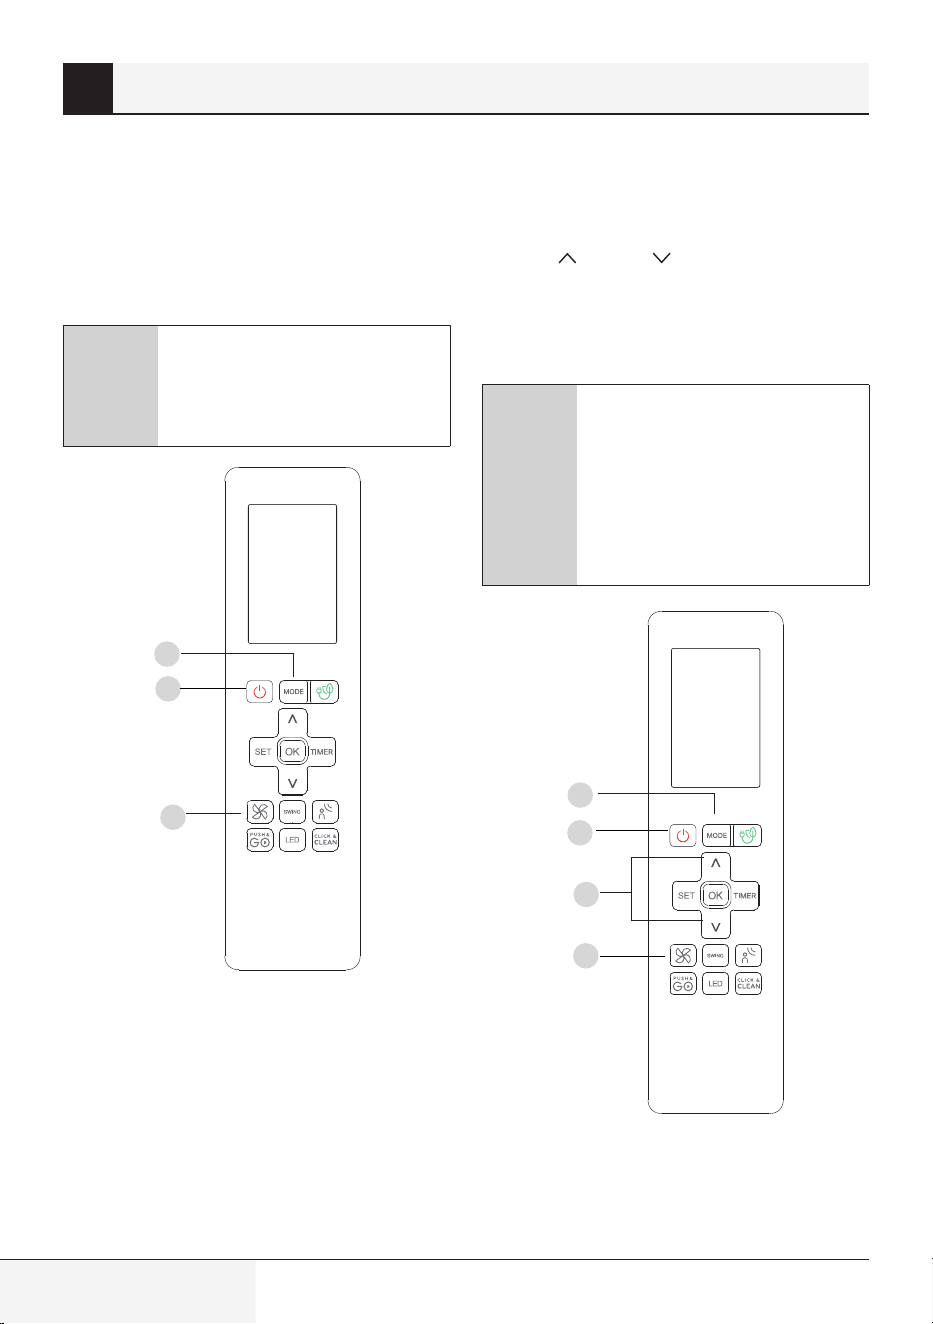
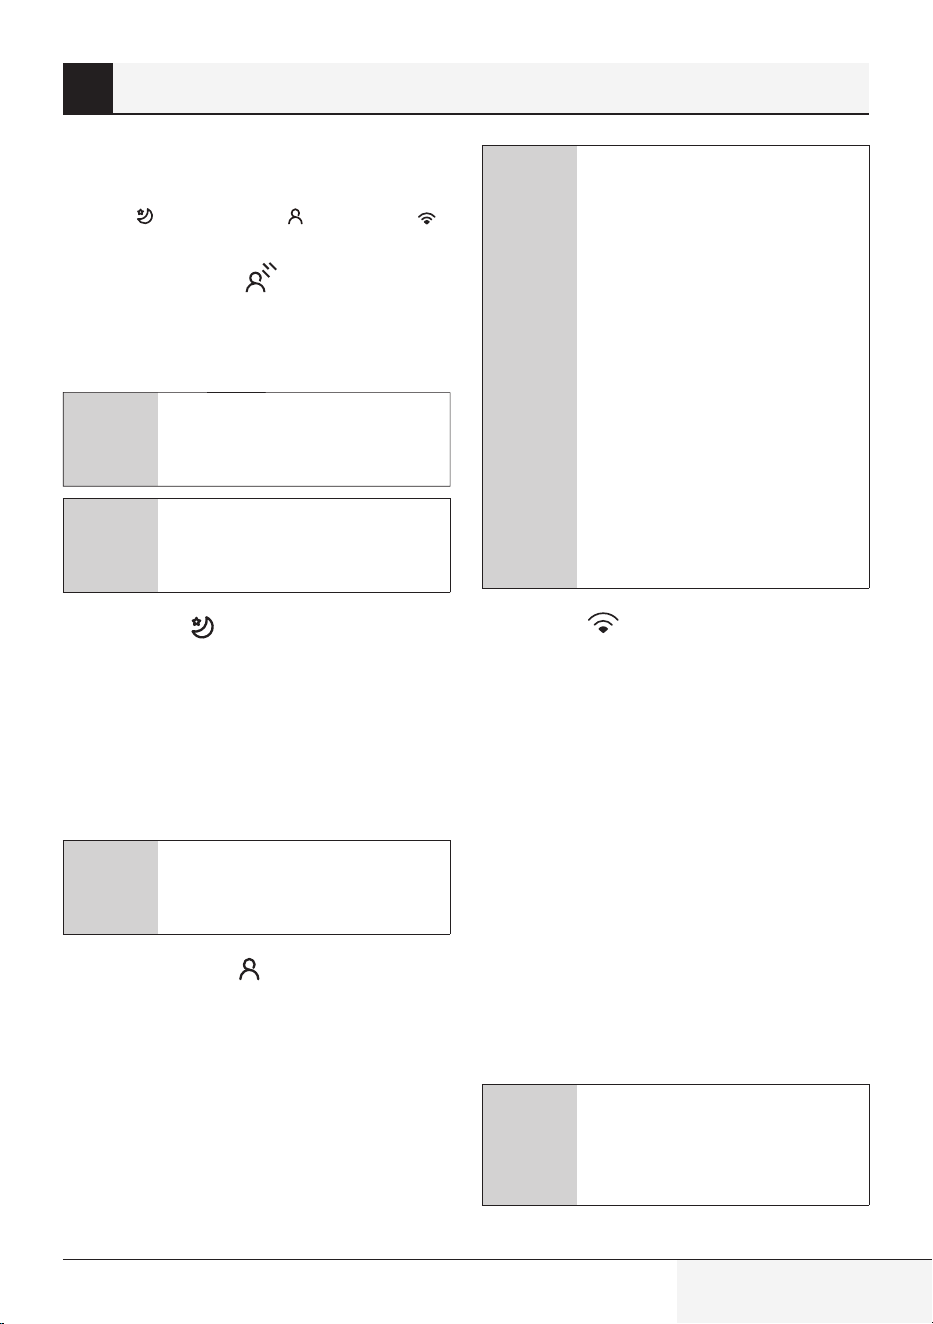
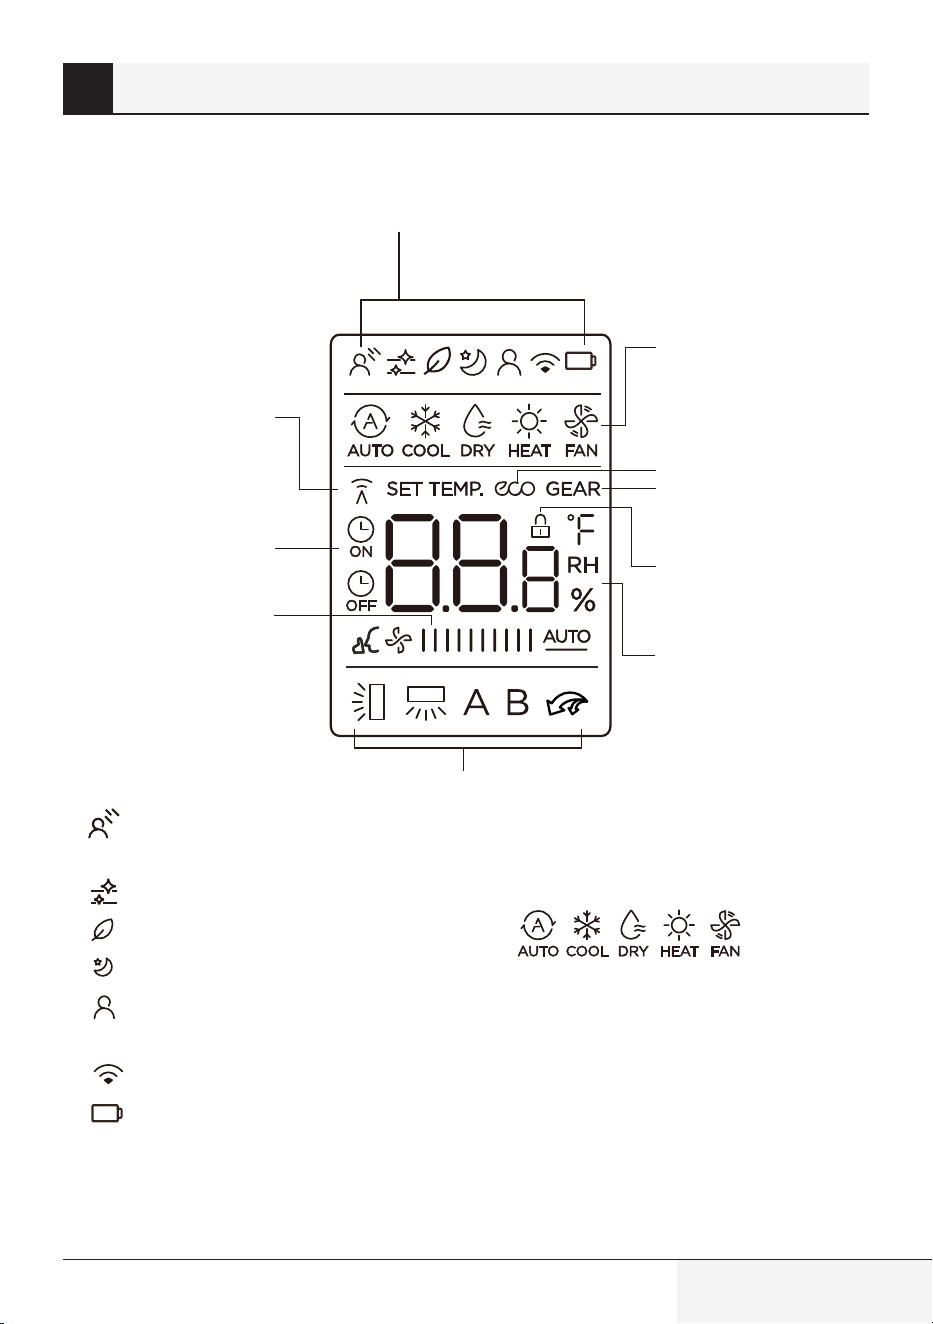
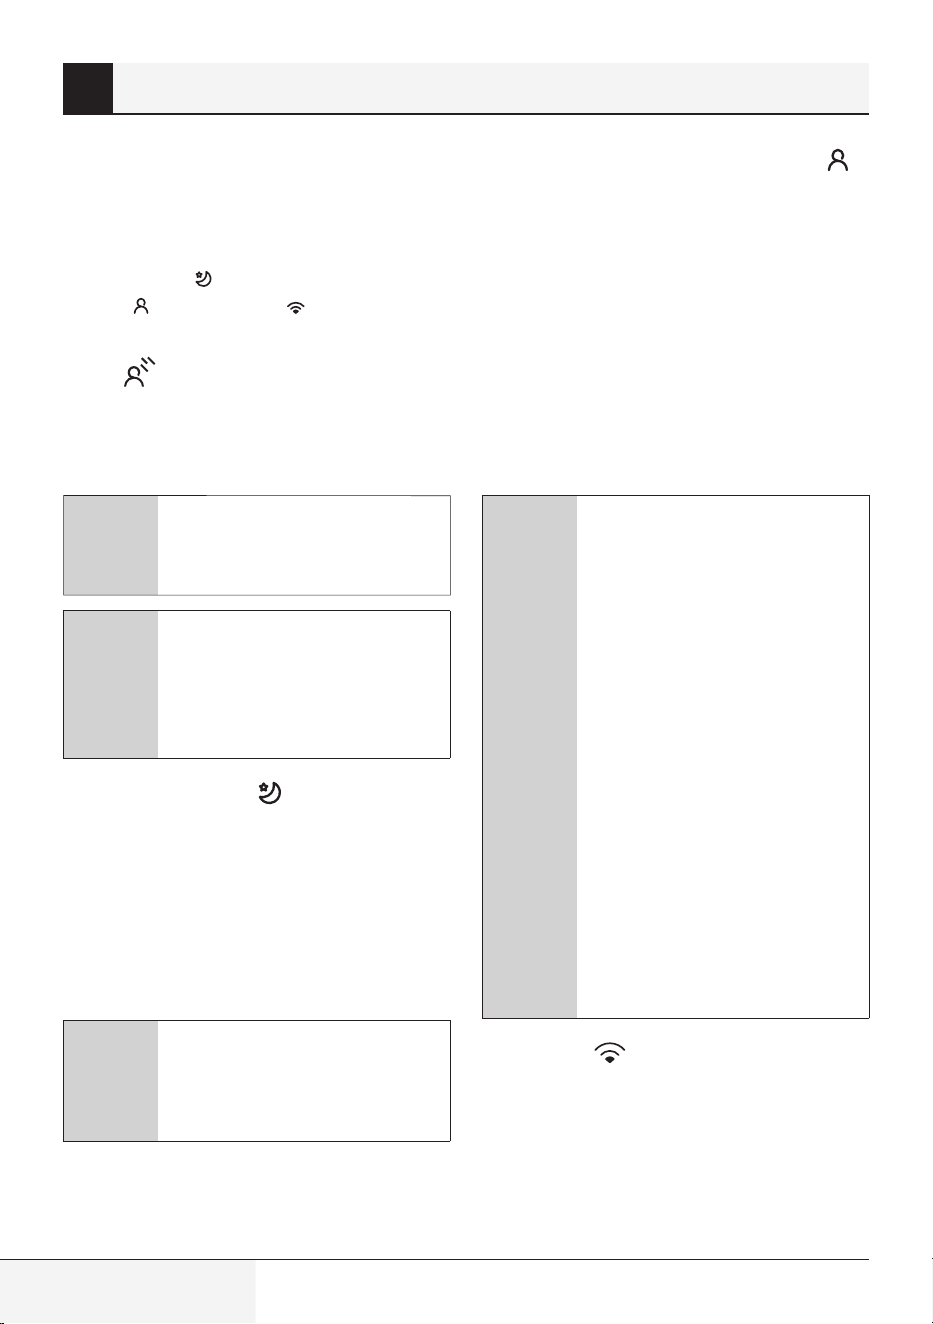
Information are displayed when the remote
controller is power up.
1
3
2
4
5
6
7
8
9
10
1.
Breeze Away display
Click & Clean feature display
Fresh feature display (Not available)
Sleep mode display
feature display
Wireless control feature display
Low battery detection display (If flashes)
2.
MODE display
Displays the current mode, including:
3.
ECO display
Displays when ECO feature is activated
4.
GEAR display
Displays when GEAR feature is activated
5.
LOCK display
Displays when LOCK feature is activated.
6.
Temperature/Timer/Fan speed display
Displays the set temperature by default, or fan
speed or timer setting when using TIMER
ON/OFF functions.
•
Temperature range: 16-30°C/60-86°F
(20-28°C/68-82°F) (Some units)
5 Remote screen indicators
ZoneDetect

Remote control / User Manual
15 / 128 EN
•
Timer setting range: 0-24 hours
•
Fan speed setting range: AU -100%
This display is blank when operating in FAN
mode.
7.
Horizontal louver
swing display
Vertical louver auto swing display
Push&GO mode display
Not available for this unit
8.
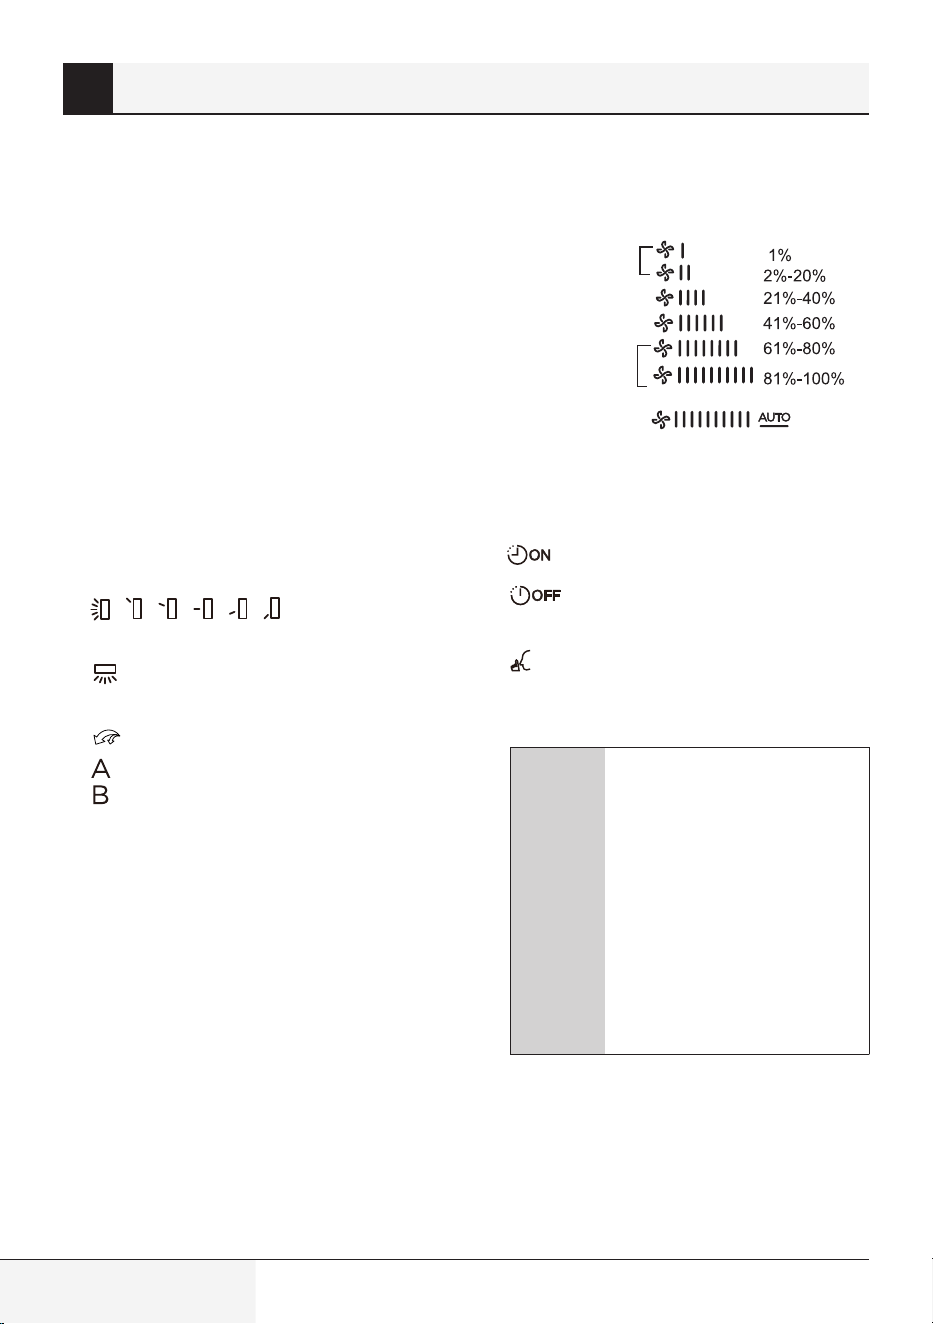
FAN SPEED display
Displays selected fan speed:
Silence
LOW
MED
HIGH
AUTO
This fan speed can not be adjusted in AUTO
or DRY mode.
9.
TIMER ON display
TIMER OFF display
Silence feature display
10.
Transmission Indicator Lights up when
remote sends signal to indoor unit
C
Note: All indicators shown in
the figure are for the purpose
of clear presentation. But
during the actual operation,
only the relative function signs
are shown on the display
window.
5 Remote screen indicators

16 / 128 EN
Remote control / User Manual
6.1 Basic operation
A
Warning:
Before operation, please
ensure the unit is plugged in
and power is available.
C
Setting temperature:
The operating temperature range
for units is 16-30°C (60-86°F)/
20-28°C (68-82°F). You can
increase or decrease the
set temperature in 1°C (1°F)
increments.
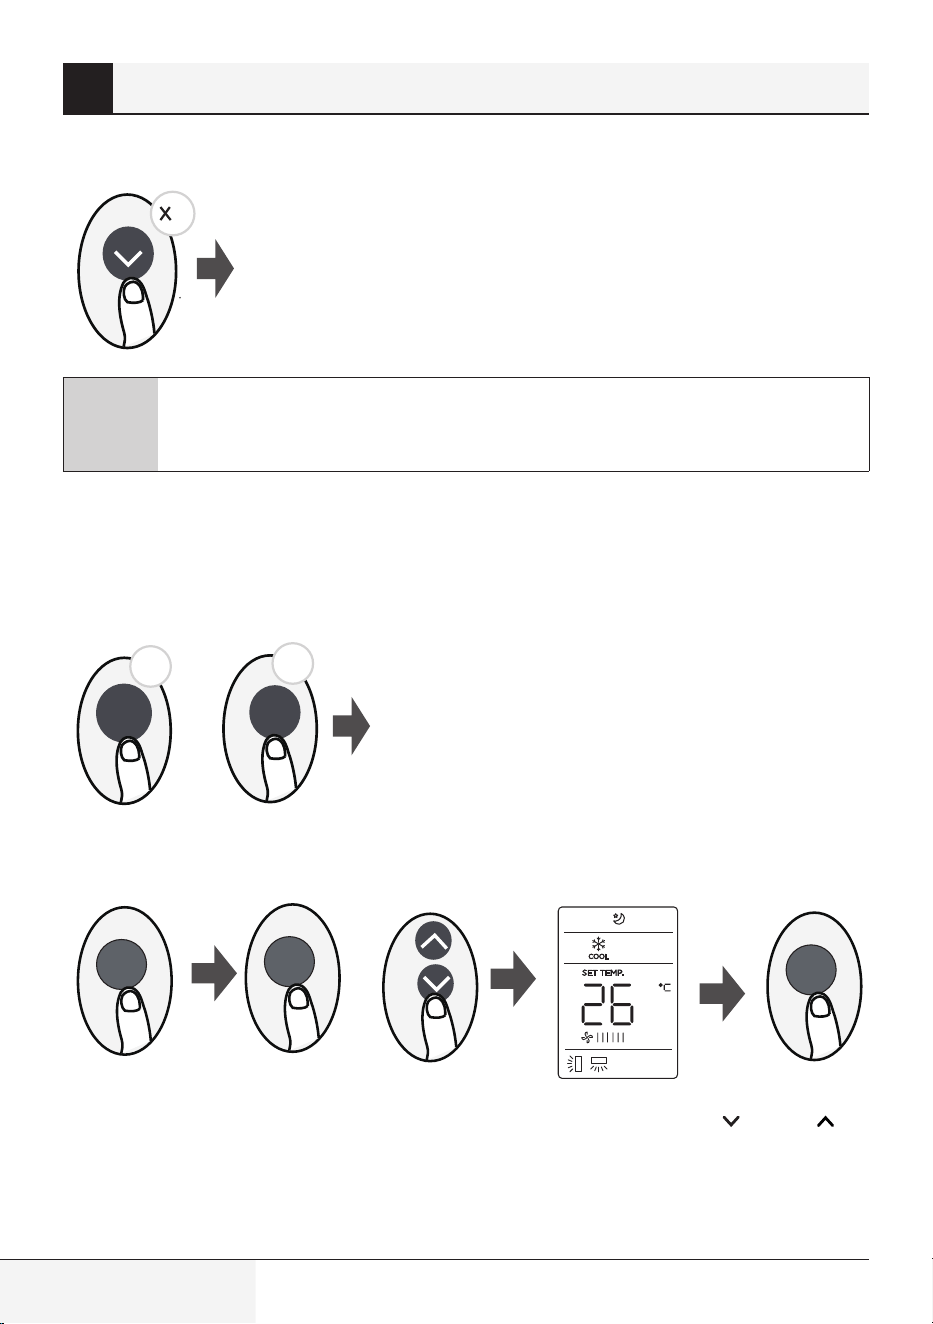
6.2 AUTO Mode
In AUTO mode, the unit will automatically select
the COOL, FAN, or HEAT operation based on the
set temperature.
1.
Press the MODE button to select AUTO.
2.
Set your desired temperature using the TEMP
or TEMP button.
3.
Press the ON/OFF button to start the unit.
C
Note:
FAN SPEED can’t be set in AUTO
mode.
6 How to use basic functions
1
3
2
Remote control / User Manual
17 / 128 EN
6.3 COOL mode
1.
Press the MODE button to select COOL mode.
2.
Set your desired temperature using the TEMP
or TEMP button.
3.
Press FAN button to select the fan speed in a
range of AU-100%.
4.
Press the ON/OFF button to start the unit.
6.4 DRY Mode
(dehumidifying)
1.
Press the MODE button to select DRY.
2.
Set your desired temperature using the
TEMP or TEMP button.
3.
Press the ON/OFF button to start the unit.
C
Note:
FAN SPEED cannot be changed in
DRY mode.
6 How to use basic functions
1
3
2
4
1
3
2
18 / 128 EN
Remote control / User Manual
6.5 FAN Mode
1.
Press the MODE button to select FAN mode.
2.
Press FAN button to select the fan speed in a
range of AU-100%.
3.
Press the ON/OFF button to start the unit.
C
Note: You can’t set temperature
in FAN mode. As a result, your
remote control’s LCD screen will
not display temperature.
6.6 HEAT Mode
1.
Press the MODE button to select HEAT mode.
2.
Set your desired temperature using the
TEMP or TEMP button.
3.
Press FAN button to select the fan speed in a
range of AU-100%.
4.
Press the ON/OFF button to start the unit.
C
Note: As outdoor temperature
drops, the performance of your
unit’s HEAT function may be
affected. In such instances,
we recommend using this air
conditioner in conjunction with
other heating appliances.
6 How to use basic functions
1
3
2
1
3
2
4
Remote control / User Manual
19 / 128 EN
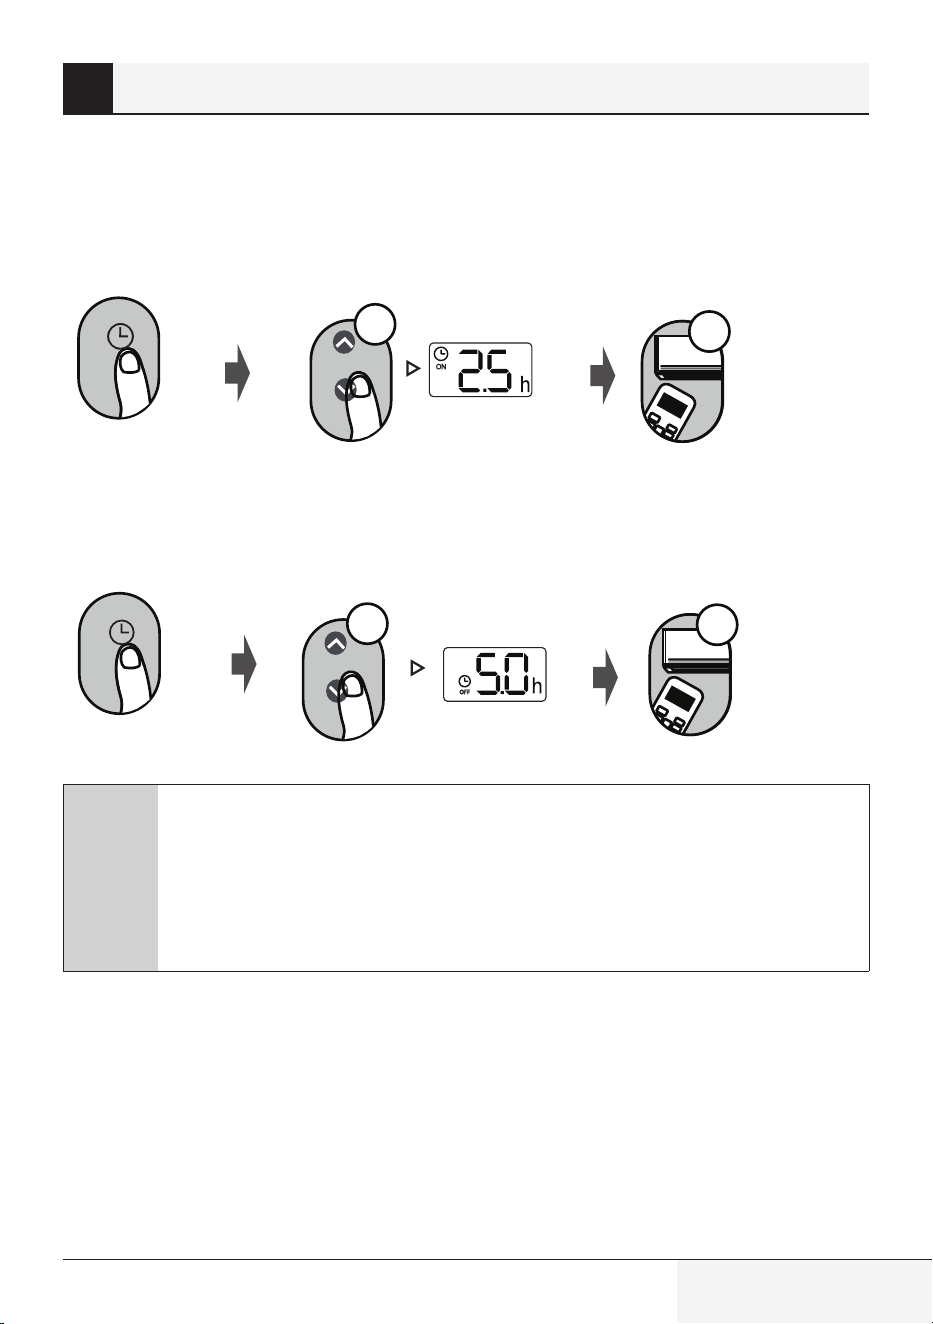
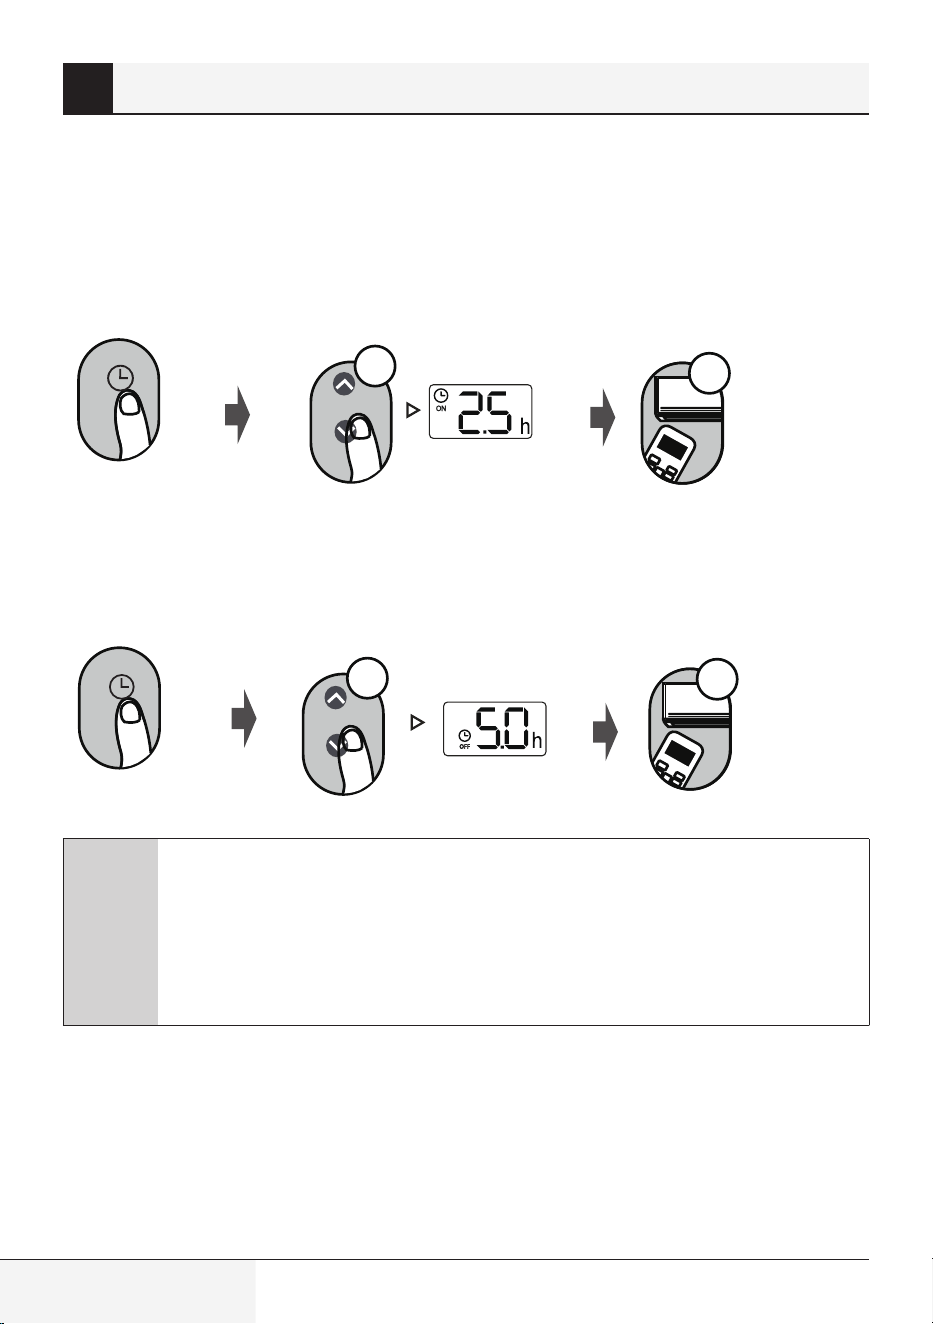
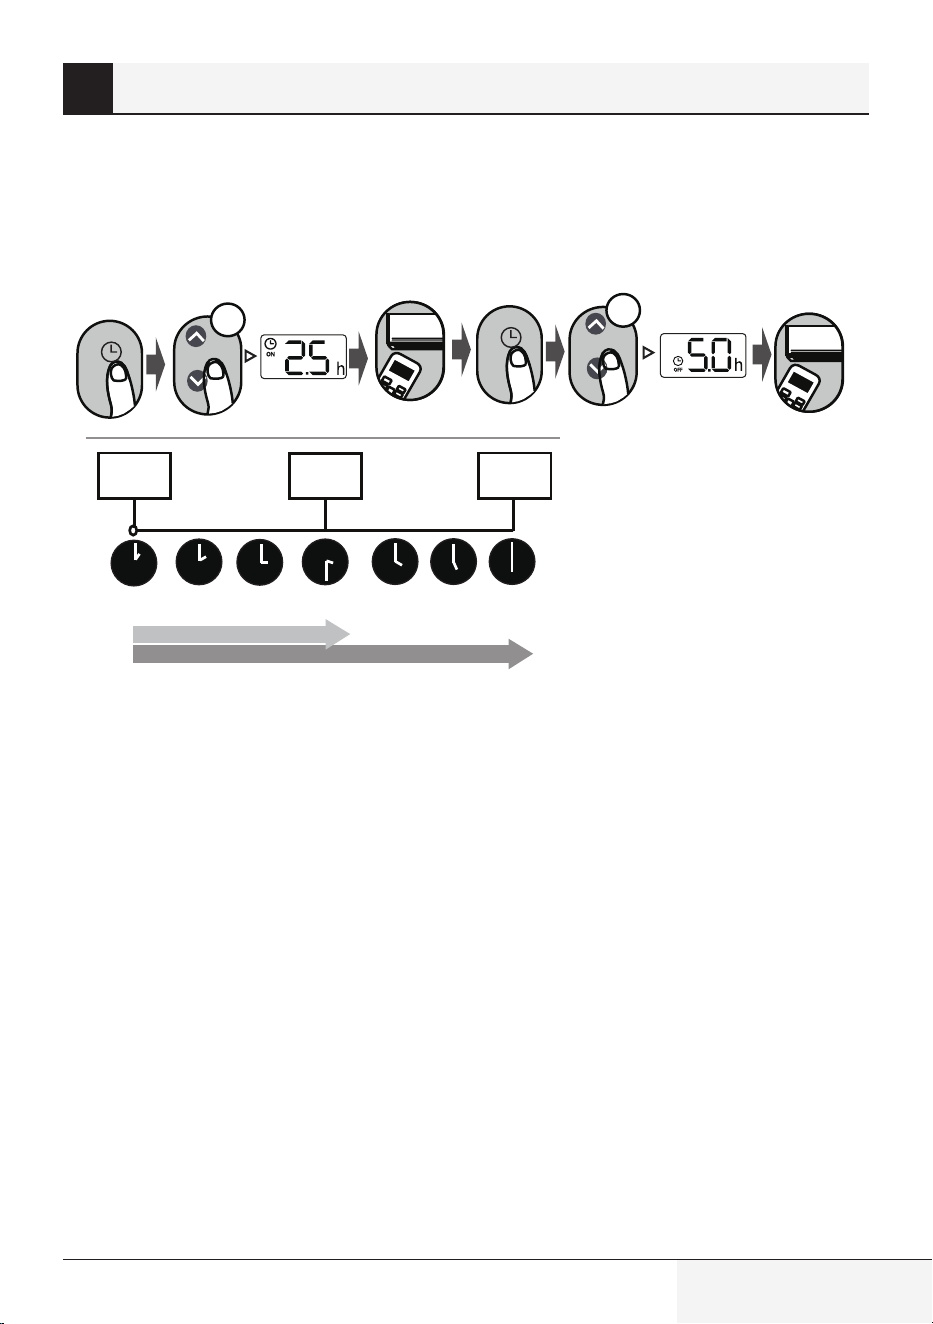
TIMER ON/OFF - Set the amount of time after which the unit will automatically turn on/off.
7.1 TIMER ON setting
O
N/O
FF
MODE
F
AN
SHORT
CU
T
T
IM
ER
ON
TIM
ER OF
F
TEMP
S
L
E
EP
1sec
x5
Press TIMER button to initiate the
ON time sequence.
Press Temp. up or down button for
multiple times to set the desired
time to turn on the unit.
Point remote to unit and wait
1 sec, the TIMER ON will be
activated.
7.2 TIMER OFF setting
O
N/O
FF
M
ODE
F
AN
SHORT
CU
T
T
IM
E
R ON
T
I
M
ER OF
F
TEMP
S
L
E
EP
1sec
x10
Press TIMER button to initiate the
OFF time sequence.
Press Temp. up or down button for
multiple times to set the desired
time to turn off the unit.
Point remote to unit and wait 1sec,
the TIMER OFF will be activated.
C
Note:
1.
When setting the TIMER ON or TIMER OFF, the time will increase by 30 minutes
increments with each press, up to 10 hours. After 10 hours and up to 24, it will
increase in 1 hour increments. (For example, press 5 times to get 2.5h, and press
10 times to get 5h,) The timer will revert to 0.0 after 24.
2.
Cancel either function by setting its timer to 0.0h.
7 Setting the TIMER
20 / 128 EN
Remote control / User Manual
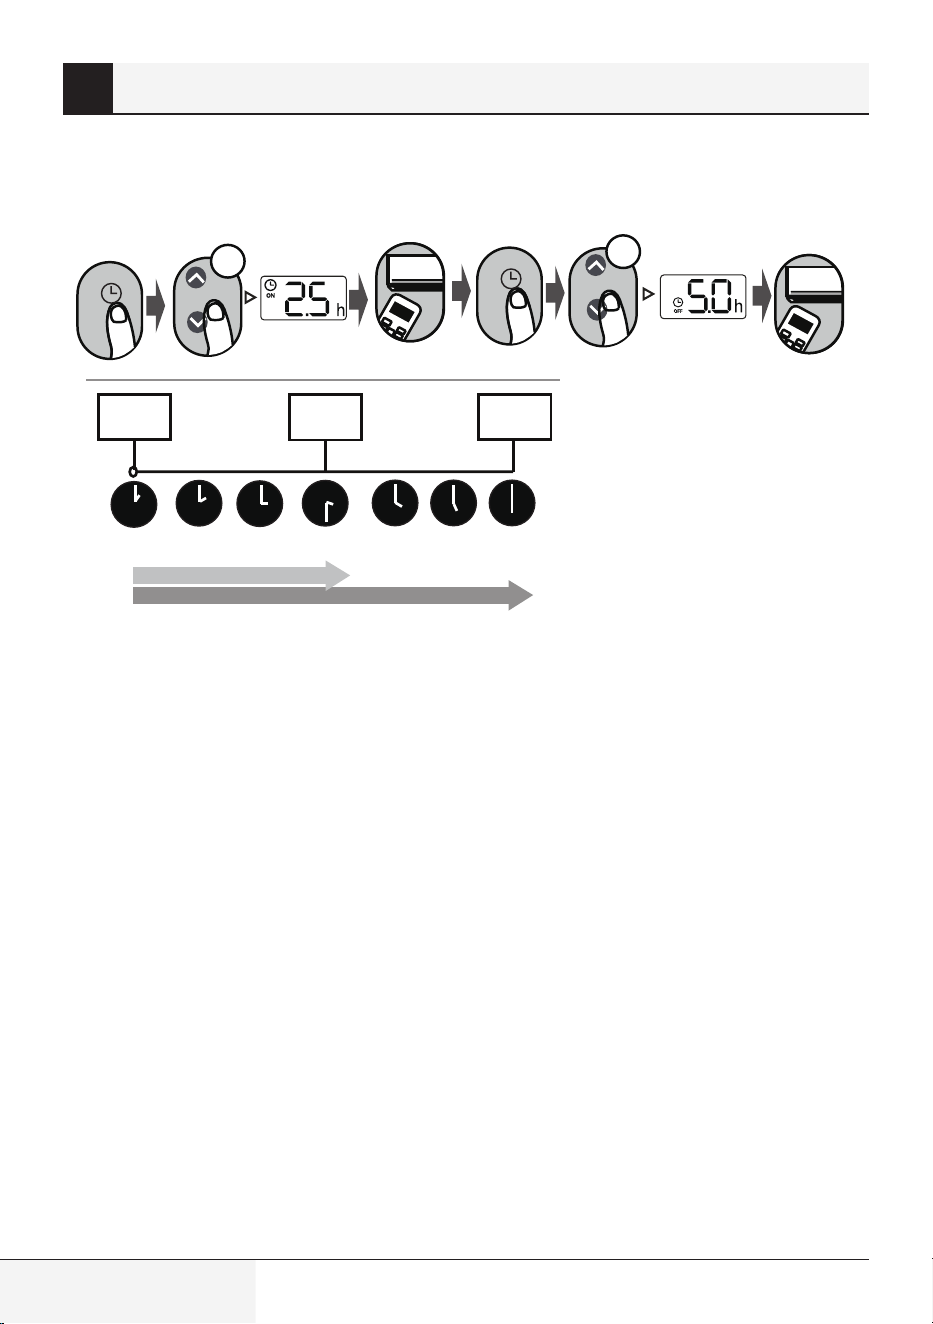
7.3 TIMER ON & OFF setting (example)
Keep in mind that the time periods you set for both functions refer to hours after the current time.
O
N
/OFF
M
ODE
FA
N
SHORT
CU
T
T
IMER
ON
TIME
R
O
FF
TEMP
S
LEE
P
O
N
/OFF
MOD
E
F
A
N
SHORT
CUT
TI
ME
R
O
N
TIME
R
O
F
F
TEM
P
S
L
E
E
P
xn
xnxn
Timer
starts
Unit turns
On
Unit turns
Off
Example: If current timer is 1:00PM, to
set the timer as above steps, the unit
will turn on 2.5h later (3:30PM) and turn
off at 6:00PM.
2.5 hours later
5 hours later
Current
time 1PM
2:00PM 3:00PM 3:30PM 4PM 5PM 6PM
7 Setting the TIMER

Remote control / User Manual
21 / 128 EN
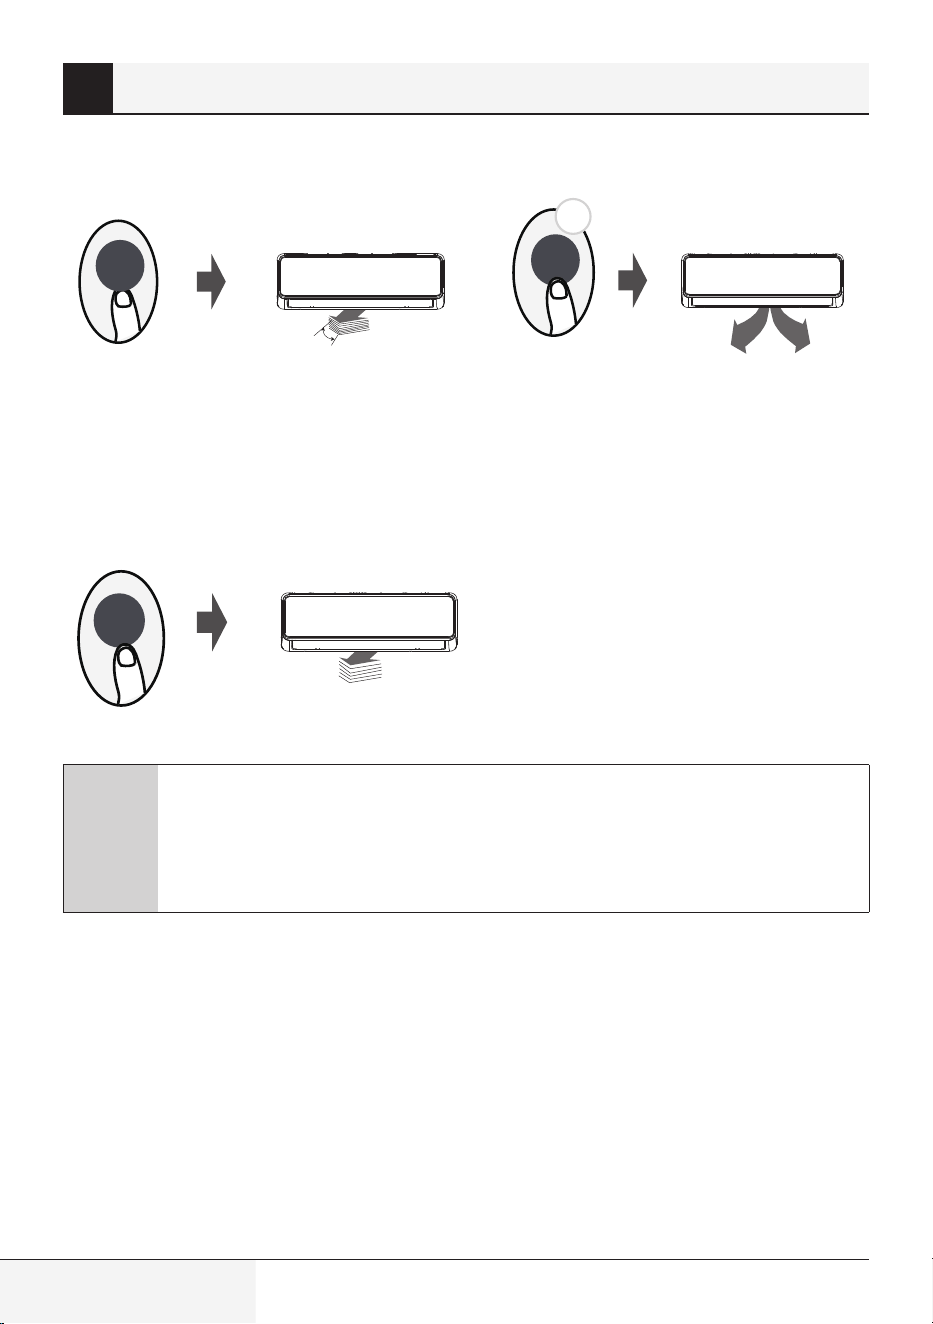
8.1 Swing function
2s
Swing
Swing
The horizontal louver will swing up and down
automatically when pressing Swing button.
Press again to make it stop.
Keep pressing this button more than
2 seconds, the vertical louver swing function is
activated. (Some units)
Press Swing button
8.2 Airflow direction
If continue to press the SWING button, five
different airflow directions can be set. The
louver can be move at a certain range each
time you press the button. Press the button
until the direction you prefer is reached.
Swing
C
Note: When the unit is off, press and hold MODE and SWING buttons together for one
second, the louver will open for a certain angle, which makes it very convenient for
cleaning. Press and hold MODE and SWING buttons together for one second to reset the
louver (Some units).
8 How to use advanced functions
22 / 128 EN
Remote control / User Manual
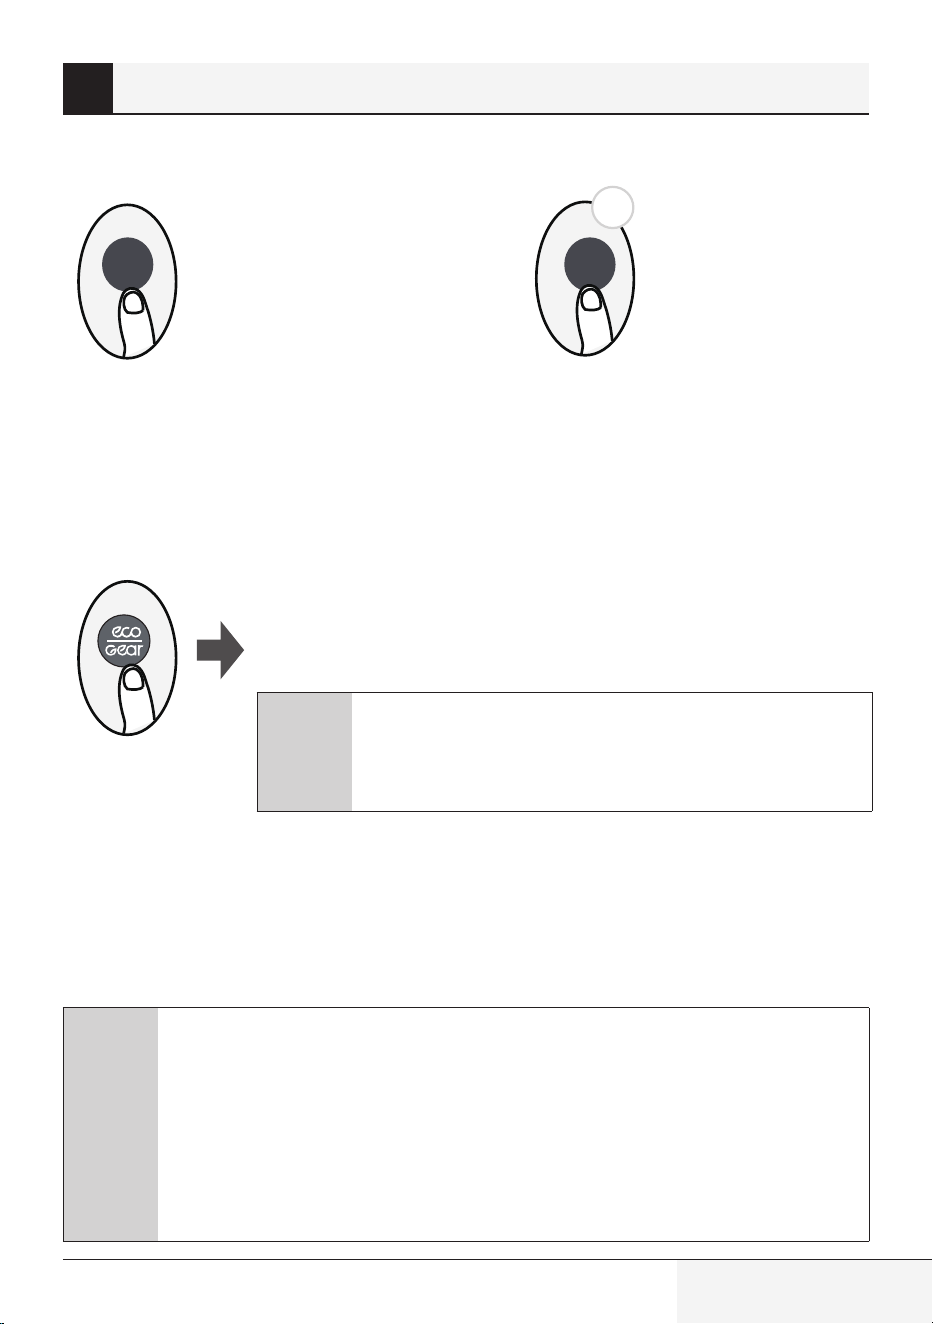
8.3 LED DISPLAY
5s
LED LED
Press LED button
Press this button to turn on and turn off the
display and air conditioner buzzer on the indoor
unit.
Keep pressing this button more than 5 seconds,
the indoor unit will display the actual room
temperature. Press more than 5 seconds again
will revert back to display the setting temperature.
Press this button more
than 5 seconds (some
units)
8.4 ECO/GEAR function
Press this button to enter the energy efficient mode in a sequence of following:
ECO GEAR (75%) GEAR (50%) Previous setting mode ECO......
ECO operation:
Under cooling mode, press this button, the remote controller will adjust the temperature automatically
to 24°C/75°F, fan speed of Auto to save energy (only when the set temperature is less than 24°C/75°F).
If the set temperature is above 24°C/75°F, press the ECO button, the fan speed will change to Auto, the
set temperature will remain unchanged.
C
Note:
Pressing the ECO/GEAR button, or modifying the mode or adjusting the set temperature
to less than 24 °C/75°F will stop ECO operation.
Under ECO operation, the set temperature should be 24°C/75°F or above, it may result in
insufficient cooling. If you feel uncomfortable, just press the ECO button again to stop it.
8 How to use advanced functions
Note:
ECO/GEAR, Click & Clean, Breeze Away, Silence arenot
available on multi-split AC.
This function is only available under COOL mode.
Remote control / User Manual
23 / 128 EN
GEAR operation:
Press the ECO/GEAR button to enter the GEAR operation as following:
75% (up to 75% electrial energy consumption)
50% (up to 50% electrial energy consumption)
Previous setting mode.
Under GEAR operation, the display on the remote controller will alternate between electical energy
consumption and set temperature.
8.5 Click & Cleann function
Airborne bacteria can grow in the moisture that condenses around heat
exchanger in the unit. With regular use, most of this moisture is evaporated
from the unit.
By pressing the Click & Clean button, your unit will clean itself automatically.
After cleaning, the unit will turn off automatically. Pressing the Click & Clean
button mid-cycle will cancel the operation and turn off the unit. You can use
Click & Clean as often as you like.
C
Note: You can only activate this function in COOL or DRY mode.
Press Click & Clean button
Go
Clean
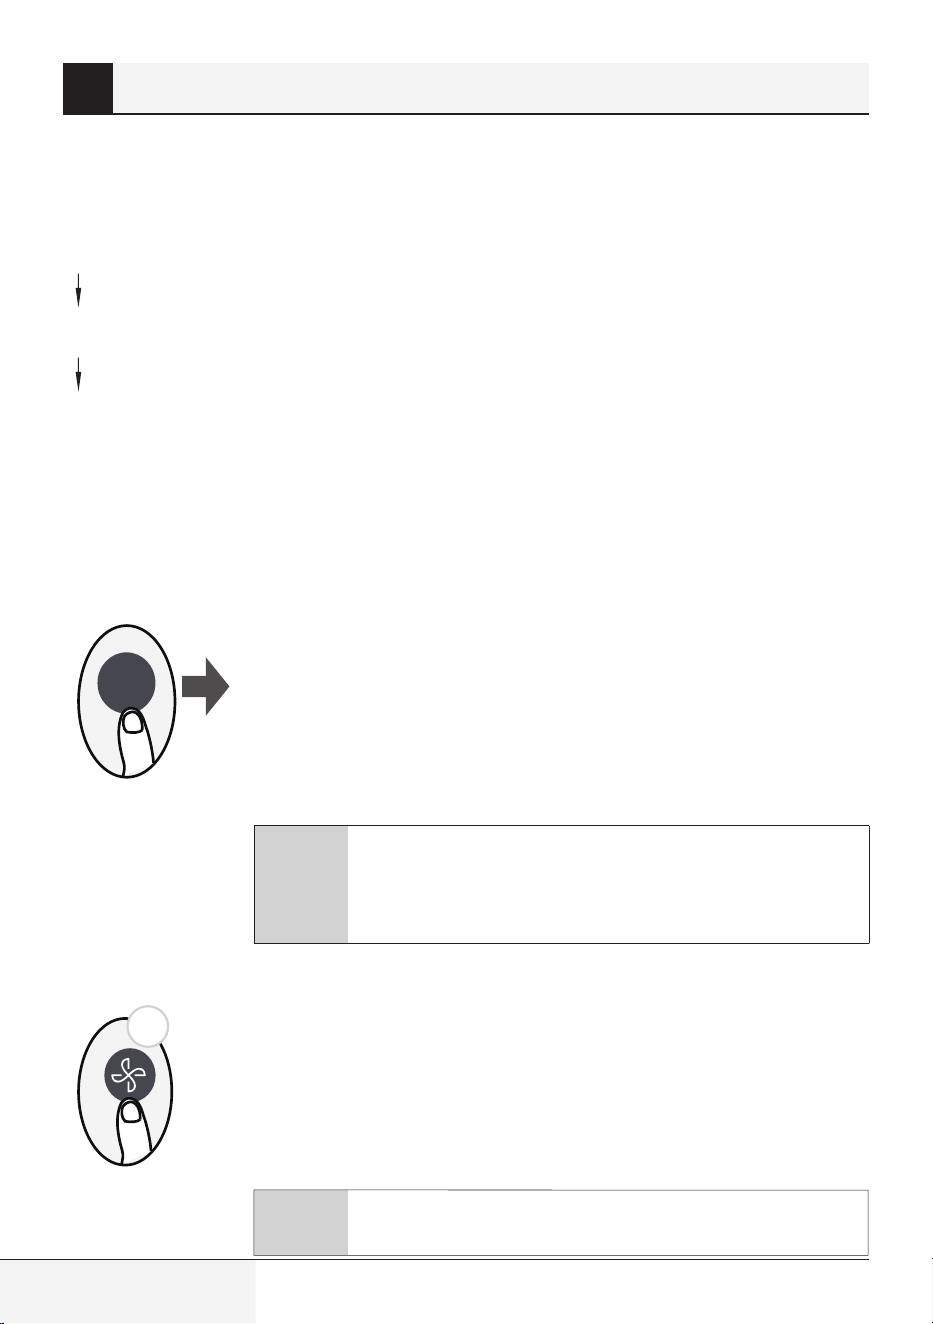
8.6 Silence function
2s
Keep pressing Fan button for more than 2 seconds to activate/disable Silence
function(some units).
Due to low frequency operation of compressor, it may result in insufficient
cooling and heating capacity. Press ON/OFF, Mode, Sleep, Push&GO or
Click & Clean button while operating will cancel silence function.
8 How to use advanced functions
ECO/GEAR, Click & Clean, Breeze Away, Silencearenot
available on multi-split AC.
C
Note: ECO/GEAR, Click & Clean, Breeze Away, Silence are not
available on multi-split AC.
24 / 128 EN
Remote control / User Manual
8.7 FP function (Freezing protection)
The unit will operate at high fan speed (while compressor on) with
temperature automatically set to 8 °C/46 °F.
2
C
Note: This function is for heat pump air conditioner only.
Press this button 2 times during one second under HEAT Mode and setting temperature of 16 °C/60 °F
to activate FP function.
Press On/Off, Sleep, Mode, Fan and Temp. button while operating will cancel this function.
8.8 LOCK function
8.9 SET function
or
SET
SET
OK
•
Press the SET button to enter the function setting, then press SET button or TEMP or TEMP
button to select the desired function. The selected symbol will flash on the display area, press the OK
button to confirm.
•
To cancel the selected function, just perform the same procedures as above.
8 How to use advanced functions
Click
& Clean
5s
5s
Push&GO
+
Press together Click & Clean button and Push&GO button
at the same time more than 5 seconds to activate Lock
function. All buttons will not response except pressing
these two buttons for two seconds again to disable locking.
Remote control / User Manual
25 / 128 EN
•
Press the SET button to scroll through
operation functions as follows:
Sleep (
) ) AP mode ( )
Breeze Away function ( ) (some units):
This feature avoids direct air flow blowing on
the body and makes you feel indulging in silky
coolness.
C
Note: This feature is available
under cool, Fan and Dry mode
only.
Sleep function (
) :
The SLEEP function make you feel comfortable
while you sleep (and don’t need the same
temperature settings to stay comfortable). This
function can only be activated via remote control.
For the detail, see ”sleep operation” in “User’s
Manual”.
C
Note: The SLEEP function is not
available in FAN or DRY mode.
ZoneDetect
function (
):
The ZoneDetect function enables the remote
control to measure the temperature at its current
location and send this signal to the air conditioner
every 3 minutes interval. When using AUTO, COOL
or HEAT modes, measuring ambient temperature
from the remote control(instead of from the
indoor unit itself) will enable the air conditioner to
optimize the temperature around you and ensure
maximum comfort.
C
Note: Press and hold Push&GO
button for seven seconds to
start/stop memory feature of
ZoneDetect function.
•
If the memory feature is
activated, ”On” displays for
3 seconds on the screen.
•
If the memory feature is
stopped, “OF” displays for
3 seconds on the screen.
•
While the memory feature is
activated, press the
ON/OFF button, shift the mode
or power failure will not cancel
the ZoneDetect function.
AP function (
) (some units) :
Choose AP mode to do wireless network
configuration. For some units, it doesn’t work by
pressing the SET button. To enter the AP mode,
continuously press the LED button seven times in
10 seconds.
8.10 HygieneMax function
(some units)
Press HygieneMax button on remote control
while AC is working, the UVC led starts working.
When irradiating single-cell microorganisms, it
can directly destroy the structure of DNA and
RNA in its life, and make them instantly lose their
replication ability and activity, to achieve the
effect of efficient killing on evaporator.
C
Note: The function will turn
on / off via HygieneMax button,
the function will turn off when AC
is turned off.
8 How to use advanced functions
C
Note: ECO/GEAR, Click & Clean,
Breeze Away, Silence are not
available on multi-split AC.
ZoneDetect (
Prima dell’utilizzo, leggere il presente manuale.
Gentile Cliente,
grazie per aver scelto un prodotto Indesit. Ci auguriamo che possa essere soddisfatto
del prodotto che è stato realizzato secondo elevati standard di qualità e con una
tecnologia all'avanguardia. Pertanto, prima di utilizzare il prodotto, legga attentamente
tutto il manuale e i documenti che lo accompagnano avendo cura di conservarli per un
riferimento futuro. Se cede il prodotto a terzi, fornisca anche il manuale utente. Segua
tutte le avvertenze e le informazioni riportate nel presente manuale.
Signicato dei simboli
I seguenti simboli sono utilizzati in diverse sezioni del presente manuale:
C
Informazioni importanti
o suggerimenti pratici
sull'utilizzo.
A
Avvertenza: situazioni che
mettono a rischio l'incolumità
di persone o cose.
Avvertenza: operazioni da non
eseguire mai.
B
Attenzione: rischio di scosse
elettriche.
Questo simbolo indica che
sono disponibili informazioni
quali il manuale operativo o il
manuale di installazione.
Non coprirlo.
Questo simbolo indica che
il manuale operativo deve
essere letto con attenzione.
Questo simbolo indica
che il personale addetto
all'assistenza deve maneggiare
questo dispositivo con
riferimento al manuale di
installazione.
(Per il tipo con gas
R32/R290)
Questo simbolo
indica che questo
dispositivo usa
un refrigerante
infiammabile.
Se il refrigerante
perde ed è
esposto a una
fonte di ignizione
esterna, c'è
un rischio di
incendio.
CARTA
RICICLATA E
RICICLABILE
SOMMARIO
1 Specifiche tecniche del telecomando 55
2 Guida introduttiva 56
3 Gestione del telecomando 57
3.1 Inserimento e sostituzione delle batterie. . . . . . . . . . . . . . . . . . . . . . . . . . . . . . . . . . . . . . . . . . . . . . . . . . 57
3.2 Note per l'uso del telecomando
. . . . . . . . . . . . . . . . . . . . . . . . . . . . . . . . . . . . . . . . . . . . . . . . . . . . . . . . . . 58
4 Pulsanti e funzioni 59
5 Indicatori sul display del telecomando 65
6 Come utilizzare le funzioni di base 67
6.1 Funzionamento di base. . . . . . . . . . . . . . . . . . . . . . . . . . . . . . . . . . . . . . . . . . . . . . . . . . . . . . . . . . . . . . . . . 67
6.2 Modalità AUTO (Automatico). . . . . . . . . . . . . . . . . . . . . . . . . . . . . . . . . . . . . . . . . . . . . . . . . . . . . . . . . . . . 67
6.3 Modalità COOL (RAFFREDDAMENTO) . . . . . . . . . . . . . . . . . . . . . . . . . . . . . . . . . . . . . . . . . . . . . . . . . . . . 68
6.4 Modalità DRY (SECCO) (Deumidificazione). . . . . . . . . . . . . . . . . . . . . . . . . . . . . . . . . . . . . . . . . . . . . . . . 68
6.5 Modalità FAN (VENTILAZIONE). . . . . . . . . . . . . . . . . . . . . . . . . . . . . . . . . . . . . . . . . . . . . . . . . . . . . . . . . . 69
6.6 Modalità HEAT (RISCALDAMENTO) . . . . . . . . . . . . . . . . . . . . . . . . . . . . . . . . . . . . . . . . . . . . . . . . . . . . . . 69
7 Impostazione del TIMER 70
7.1 Impostazioni TIMER ON (TIMER DI ACCENSIONE). . . . . . . . . . . . . . . . . . . . . . . . . . . . . . . . . . . . . . . . . 70
7.2 IMPOSTAZIONI TIMER OFF (TIMER DI SPEGNIMENTO) . . . . . . . . . . . . . . . . . . . . . . . . . . . . . . . . . . . . 70
7.3 Impostazione del TIMER DI ACCENSIONE/DI SPEGNIMENTO (esempio) . . . . . . . . . . . . . . . . . . . . . 71
8 Come utilizzare le funzioni avanzate 72
8.1 Funzione Swing (Oscillazione). . . . . . . . . . . . . . . . . . . . . . . . . . . . . . . . . . . . . . . . . . . . . . . . . . . . . . . . . . . 72
8.2 Direzione del flusso d’aria . . . . . . . . . . . . . . . . . . . . . . . . . . . . . . . . . . . . . . . . . . . . . . . . . . . . . . . . . . . . . . . 72
8.3 DISPLAY A LED . . . . . . . . . . . . . . . . . . . . . . . . . . . . . . . . . . . . . . . . . . . . . . . . . . . . . . . . . . . . . . . . . . . . . . . . 73
8.4 Funzione ECO/GEAR (RISPARMIO ENERGETICO/VELOCITÀ) . . . . . . . . . . . . . . . . . . . . . . . . . . . . . . . . 73
Telecomando / Manuale utente
53 / 128 IT

SOMMARIO
8.5 Funzione di pulizia Click & Clean (Pulizia) . . . . . . . . . . . . . . . . . . . . . . . . . . . . . . . . . . . . . . . . . . . . . . . . 74
8.6 Funzione Silence (Silenzioso) . . . . . . . . . . . . . . . . . . . . . . . . . . . . . . . . . . . . . . . . . . . . . . . . . . . . . . . . . . . 74
8.7 Funzione FP (Freezing protection) (Protezione anti gelo). . . . . . . . . . . . . . . . . . . . . . . . . . . . . . . . . . . . 75
8.8 Funzione LOCK (BLOCCO) . . . . . . . . . . . . . . . . . . . . . . . . . . . . . . . . . . . . . . . . . . . . . . . . . . . . . . . . . . . . . . 75
8.9 Funzione SET (IMPOSTAZIONE) . . . . . . . . . . . . . . . . . . . . . . . . . . . . . . . . . . . . . . . . . . . . . . . . . . . . . . . . . 75
8.10 Funzione HygieneMax (Igiene max) (alcuni modelli). . . . . . . . . . . . . . . . . . . . . . . . . . . . . . . . . . . . . . . . 77
54 / 128 IT
Telecomando / Manuale utente

Telecomando / Manuale utente
55 / 128 IT
Modello
Tensione nominale 3,0 V (2 pile a secco R03/LR03)
Intervallo di ricezione del segnale 8 m
Ambiente
da -5 °C a 60 °C
1 Specifiche tecniche del telecomando
RG10A (G2S)/BGEF
56 / 128 IT
Telecomando / Manuale utente
1
6
2
5 4
M
y Mode
F
ollow Me
L
E
D T
u
r
bo
Ioni
s
er
S
w
i
ng
Ti
m
e
r
S
elf Clean
Mode
On/
Of
f
Fan
Sleep
AUTO
COOL
DRY
HEAT
FAN
HIGH
MED
LOW
SET TEMPERATURE
3
AUTO
COOL
DRY
HEAT
FAN
AU-100%
Inserire le batterie
Premere il pulsante power
Selezionare la modalità
Puntare il telecomando verso
l’unità
Selezionare la temperatura
Selezionare la velocità
della ventola
C
Non si conoscono i dettagli delle funzioni?
Consultare le sezioni Come utilizzare le funzioni di base e Come utilizzare le funzioni
avanzate di questo manuale per una descrizione dettagliata di come utilizzare il
condizionatore d’aria.
2 Guida introduttiva
Telecomando / Manuale utente
57 / 128 IT
3.1 Inserimento e sostituzione
delle batterie
Il condizionatore può essere dotato di due batterie
(in alcuni modelli). Inserire le batterie nel
telecomando prima dell’uso.
1.
Fare scorrere il coperchio posteriore del
telecomando verso il basso, in modo da
accedere al vano batterie.
2.
Inserire le batterie, facendo attenzione a fare
combaciare i terminali (+) e (-) delle batterie
con i simboli raffigurati all'interno del vano
batterie.
3.
Richiudere il coperchio del vano batterie
facendolo scorrere in posizione.
3 Gestione del telecomando
Telecomando
•
La luce diretta del sole può interferire con il
funzionamento del ricevitore del segnale a
infrarossi.
Smaltimento delle batterie
•
Non smaltire le batterie come normali rifiuti
indifferenziati. Per il corretto smaltimento delle
batterie, fare riferimento alle normative locali.
Prestazioni della batteria
•
Non utilizzare insieme batterie vecchie e nuove
o batterie di marchi diversi.
•
Non lasciare le batterie nel telecomando se si
prevede di non utilizzare il dispositivo per più
di 2 mesi.
Per prestazioni ottimali del prodotto:
•
Nella parte inferiore dell’icona dello
smaltimento delle batterie può essere
riportato il simbolo di una sostanza chimica.
Questo simbolo indica che la batteria contiene
un metallo pesante che supera una determinata
concentrazione. Ad esempio Pb: Piombo
(>0,004%).
•
Gli apparecchi e le batterie usate devono
essere trattati negli appositi stabilimenti per il
riutilizzo, il riciclo e il recupero.
Garantendo il corretto smaltimento delle
batterie, contribuirete a prevenire eventuali
conseguenze negative per l'ambiente e per la
salute umana.
•
La traiettoria tra il telecomando e l’apparecchio
deve essere libera.
•
Se il segnale proveniente dal telecomando
sembra interferire con un altro apparecchio,
spostare questo apparecchio in un’altra
posizione o contattare il servizio clienti.
Pb

58 / 128 IT
Telecomando / Manuale utente
3.2 Note per l'uso del
telecomando
Il dispositivo deve essere conforme alle
normative nazionali locali.
Questo apparecchio è stato testato e dichiarato
conforme ai limiti dei dispositivi digitali di Classe
B, ai sensi della parte 15 delle Norme FCC.
Questi limiti sono definiti per fornire una
ragionevole protezione contro le interferenze
dannose in installazioni residenziali. Questo
apparecchio genera, usa e può irradiare energia
a frequenze radio e, se non installata e usata in
conformità con le istruzioni, può provocare
interferenze dannose alle comunicazioni radio.
Tuttavia, non vi è alcuna garanzia che si
verifichino interferenze in un impianto in
particolare. Se l'apparecchio provoca interferenze
dannose alla ricezione radiotelevisiva, riscontrabili
spegnendo e accendendo l'apparecchio, si
consiglia di provare a correggerle adottando uno
o più dei seguenti accorgimenti:
•
In Canada, deve essere conforme alla norma
CAN ICES-3(B)/NMB-3(B).
•
Riorientare o riposizionare l'antenna di
ricezione.
•
Aumentare la distanza tra l'apparecchio e il
ricevitore.
•
Collegare l'apparecchio a una presa
appartenente a un circuito diverso da quello
a cui è collegato il ricevitore.
•
Consultare il rivenditore o un tecnico radio/TV
esperto per richiedere assistenza.
•
Eventuali cambiamenti o modifiche non
approvate dalla parte responsabile della
conformità possono invalidare l’autorizzazione
all’uso dell’apparecchio.
•
Negli Stati Uniti, il dispositivo è conforme alla
parte 15 delle norme FCC. Il funzionamento
è soggetto alle due condizioni seguenti:
(1) Il dispositivo non deve causare
interferenze dannose, e
(2) il dispositivo deve accettare qualsiasi
interferenza in ricezione, comprese quelle
che potrebbero causare un funzionamento
indesiderato.
3 Gestione del telecomando
Telecomando / Manuale utente
59 / 128 IT
4 Pulsanti e funzioni
Prima di iniziare ad utilizzare il condizionatore
d’aria, assicurarsi di acquisire familiarità con
il telecomando. Quella che segue è una breve
introduzione allo stesso. Per istruzione sull’uso
del condizionatore d’aria, consultare la sezione
Come utilizzare le funzioni di base di questo
manuale.
Modello: RG10A (G2S)/BGEF
(Le funzioni Fresh (Fresco) e HygieneMax (igiene max) non sono disponibili)
Nota: ECO/GEAR, Click & Clean, Breeze Away, Silence non sono disponibili su AC
multi-split.
60 / 128 IT
Telecomando / Manuale utente
1. Mode (Modalità)
Consente di scorrere tra le modalità
di funzionamento come segue: AUTO
(Automatico) COOL (Raffreddamento)
DRY (Deumidificatore) HEAT
(Riscaldamento) FAN (Ventilatore)
C
Nota: La modalità HEAT
(Riscaldamento) non è
supportata da apparecchi di
solo raffreddamento.
2. ECO/GEAR (RISPARMIO ENERGETICO/
VELOCITÀ)
Premere questo pulsante per accedere
alla modalità di risparmio energetico nella
seguente sequenza:
ECO (RISPARMIO ENERGETICO) GEAR
(VELOCITÀ) (75%) GEAR (VELOCITÀ) (50%)
Modalità di impostazione precedente ECO
(RISPARMIO ENERGETICO)....
3. OK
Utilizzato per confermare le funzioni
selezionate
4. Timer
Consente di impostare il timer per
l'accensione e lo spegnimento dell’unità.
5. BREEZE AWAY (DEVIAZIONE DEL FLUSSO
D’ARIA)
Questa funzione evita che il flusso d’aria
soffi direttamente sul corpo e lascia una
sensazione di piacevole freschezza.
C
Nota: Questa funzione è
disponibile solo nelle modalità
Cool (Raffreddamento),
Fan (Ventilatore) e Dry
(Deumidificatore).
6. Click & Clean (Pulizia)
Utilizzato per avviare/arrestare la funzione
Click & Clean (Pulizia).
(Some in alcuni modelli; fare riferimento al
manuale d’uso e installazione dell’utente).
7. LED
Accende e spegne il display a LED e le
segnalazioni acustiche del condizionatore
d’aria, creando così un ambiente confortevole
e silenzioso.
8. Push&GO
Consente all'unità di raggiungere la
temperatura predefinita nel minor tempo
possibile
9. Swing (Oscillazione)
Avvia e interrompe il movimento orizzontale
del deflettore. Tenere premuto per due
secondi per avviare la funzione di movimento
automatico verticale del deflettore.
10. FAN SPEED (Velocità ventilazione)
Consente di selezionare la velocità della
ventilazione nel seguente ordine: AU 20%
40% 60% 80% 100%.
Premere il pulsante TEMP o per
aumentare/diminuire la velocità della ventola
in passi dell’1%.
11. TEMP (TEMPERATURA)
Riduce la temperatura con incrementi di 1°C.
La temperatura minima è 16° C.
4 Pulsanti e funzioni
Telecomando / Manuale utente
61 / 128 IT
12. SET (IMPOSTA)
Consente di scorrere tra le modalità di
funzionamento come segue:
Sleep (Notte) (
)
ZoneDetect (Temperatura zona) (
)
Modalità AP (
) (alcuni modelli) Sleep
(Notte)...
Quando l’icona selezionata lampeggerà
sul display, premere il pulsante OK per
confermare.
13. TEMP (TEMPERATURA)
Aumenta la temperatura con incrementi di
1°C. La temperatura massima è 30°C.
C
Nota: Premere
contemporaneamente i
pulsanti e per tre
secondi per alternare tra
le visualizzazioni della
temperatura in °C e °F.
14. On/Off (Accensione/Spegnimento)
Consente l'accensione o lo spegnimento
dell'unità.
4 Pulsanti e funzioni
C
Nota: ECO/GEAR,Click & Clean,
Breeze Away, Silence non
sono disponibili su AC
multi-split.
62 / 128 IT
Telecomando / Manuale utente
4 Pulsanti e funzioni
C
Nota: ECO/GEAR, Click & Clean, Breeze Away, Silence non sono disponibili su AC
multi-split.
(La funzione HygieneMax (Igiene max.) è disponibile)
Modello: RG10A (G2S)/BGEF
Telecomando / Manuale utente
63 / 128 IT
1. Mode (Modalità)
Consente di scorrere tra le modalità
di funzionamento come segue: AUTO
(Automatico) COOL (Raffreddamento)
DRY (Deumidificatore) HEAT
(Riscaldamento) FAN (Ventilatore)
C
Nota: La modalità HEAT
(Riscaldamento) non è
supportata da apparecchi di
solo raffreddamento.
2. ECO/GEAR (RISPARMIO ENERGETICO/
VELOCITÀ)
Premere questo pulsante per accedere
alla modalità di risparmio energetico nella
seguente sequenza:
ECO (RISPARMIO ENERGETICO) GEAR
(VELOCITÀ) (75%) GEAR (VELOCITÀ) (50%)
Modalità di impostazione precedente ECO
(RISPARMIO ENERGETICO)....
3. OK
Utilizzato per confermare le funzioni
selezionate
4. Timer
Consente di impostare il timer per
l'accensione e lo spegnimento dell’unità.
5. HygieneMax (Igiene max.)
Utilizzato per avviare e arrestare la funzione
HygieneMax (Igiene max.).
6. Click & Clean (P ulizia)
Utilizzato per avviare/arrestare la funzione
Click & Clean (Pulizia).
(Some in alcuni modelli; fare riferimento al
manuale d’uso e installazione dell’utente).
7. LED
Accende e spegne il display a LED e le
segnalazioni acustiche del condizionatore
d’aria, creando così un ambiente confortevole
e silenzioso.
8. Push&GO
Consente all'unità di raggiungere la
temperatura predefinita nel minor tempo
possibile
9. Swing (Oscillazione)
Avvia e interrompe il movimento orizzontale
del deflettore. Tenere premuto per due
secondi per avviare la funzione di movimento
automatico verticale del deflettore.
10. FAN SPEED (Velocità ventilazione)
Consente di selezionare la velocità della
ventilazione nel seguente ordine: AU 20%
40% 60% 80% 100%.
Premere il pulsante TEMP o per
aumentare/diminuire la velocità della ventola
in passi dell’1%.
11. TEMP (TEMPERATURA)
Riduce la temperatura con incrementi di 1°C.
La temperatura minima è 16° C.
12. SET (IMPOSTA)
Consente di scorrere tra le modalità di
funzionamento come segue:
Breeze Away (Deviazione del flusso d’aria)
( ) Sleep (Notte) ( )
(Monitoraggio area) ( ) Modalità AP ( )
(Alcuni modelli) Breeze Away (Deviazione
del flusso d’aria) ...
Quando l’icona selezionata lampeggerà
sul display, premere il pulsante OK per
confermare.
4 Pulsanti e funzioni
ZoneDetect
64 / 128 IT
Telecomando / Manuale utente
13. TEMP (TEMPERATURA)
Aumenta la temperatura con incrementi di
1°C. La temperatura massima è 30°C.
C
Nota: Premere
contemporaneamente i
pulsanti e per tre
secondi per alternare tra
le visualizzazioni della
temperatura in °C e °F.
14. On/Off (Accensione/Spegnimento)
Consente l'accensione o lo spegnimento
dell'unità.
4 Pulsanti e funzioni
C
Nota: ECO/GEAR,Click & Clean,
Breeze Away, Silence non
sono disponibili su AC
multi-split.
Telecomando / Manuale utente
65 / 128 IT
Le informazioni vengono visualizzate quando il
telecomando è acceso.
1
3
2
4
5
6
7
8
9
10
1.
Funzione Breeze Away (Deviazione del
flusso d’aria)
Funzione Click & Clean (Pulizia)
Funzione Fresh (Fresco) (non disponibile)
Modalità Sleep (Notte)
Indicatore della funzione ZoneDetect
(Temperatura zona)
Funzione di controllo wireless
Spia di batteria scarica (se lampeggia)
2.
Visualizzazione della MODE (MODALITÀ)
Consente di visualizzare la modalità corrente,
come:
3.
Icona ECO (Risparmio energetico)
Appare quando la funzione ECO
(Risparmio energetico) è attiva
4.
Icona GEAR (VELOCITÀ)
Si illumina quando la funzione GEAR
(VELOCITÀ) è attiva
5.
Icona LOCK (BLOCCO)
Si illumina quando la funzione LOCK
(BLOCCO) è attiva.
5 Indicatori sul display del telecomando
66 / 128 IT
Telecomando / Manuale utente
6.
Indicazione di Temperatura/Timer/Velocità
ventola
Consente di visualizzare la temperatura
impostata predefinita, la velocità della
ventola o l’impostazione del timer quando si
utilizzano le funzioni Timer ON/OFF (Timer di
accensione/spegnimento).
•
Intervallo di temperatura: da 16 °C a 30 °C
(da 20 °C a 28 °C) (Alcuni modelli)
•
Intervallo impostazione del timer: 0-24 ore
•
Intervallo di impostazione della velocità
della ventola: AU -100%
Questa parte del display è vuota
quando l'unità funziona in modalità FAN
(Ventilazione).
7.
Indicazione
dell’oscillazione del deflettore orizzontale
Indicazione dell’oscillazione automatica
del deflettore verticale
Icona della modalità Push&GO
Non disponibile per questa unità
8.
Visualizzazione FAN SPEED
(Velocità ventilazione)
Consente di visualizzare velocità della ventola:
Silenzioso
LOW (BASSA)
MED (MEDIA)
HIGH (ALTA)
AUTO
(AUTOMATICA)
La velocità della ventola non può essere
regolata in modalità AUTO (AUTOMATICA) o
DRY (DEUMIDIFICAZIONE).
9.
Icona TIMER ON (Timer di accensione)
Icona TIMER OFF (Timer di
spegnimento)
Icona della funzione Silence (Silenzioso)
10.
La spia di Trasmissione si illumina quando il
telecomando invia un segnale all’unità interna
C
Nota: gli indicatori
mostrati nella figura
hanno lo scopo di fornire
una chiara presentazione
delle funzioni. Tuttavia,
durante il funzionamento
dell’apparecchio, solo gli
indicatori e le spie delle
funzioni effettivamente in
uso saranno visualizzati sul
display.
5 Indicatori sul display del telecomando
Telecomando / Manuale utente
67 / 128 IT
6.1 Funzionamento di base
A
Avvertenza:
Prima della messa in
funzione, assicurarsi che
l’unità sia collegata e
che l'alimentazione sia
disponibile.
C
Impostazione della temperatura:
La temperatura operativa
dell'unità è compresa tra 16 °C
e 30 °C/20 °C-28 °C. È possibile
aumentare o diminuire la
temperatura impostata con
incrementi di 1 °C.
6.2 Modalità AUTO
(Automatico)
In modalità AUTO (Automatico), l’unità
seleziona automaticamente la modalità COOL
(Raffreddamento), FAN (Ventilazione) o HEAT
(Riscaldamento) in base alla temperatura
impostata.
1.
Premere il tasto MODE (MODALITÀ) per
selezionare AUTO (AUTOMATICO).
2.
Impostare la temperatura desiderata con
il tasto Temp (Temperatura) o Temp
(Temperatura) .
3.
Premere il tasto ON/OFF (Accensione/
Spegnimento) per avviare l'unità.
C
Nota:
in modalità AUTO (AUTOMATICO)
non è possibile impostare la
velocità di ventilazione FAN SPEED
(VELOCITÀ VENTILAZIONE).
6 Come utilizzare le funzioni di base
1
3
2
68 / 128 IT
Telecomando / Manuale utente
6.3 Modalità COOL
(RAFFREDDAMENTO)
1.
Premere il tasto MODE (MODALITÀ)
per selezionare la modalità COOL
(RAFFREDDAMENTO).
2.
Impostare la temperatura desiderata con
il tasto Temp (Temperatura) o Temp
(Temperatura) .
3.
Premere il tasto FAN (VENTILAZIONE) per
selezionare la velocità di ventilazione tra AU
e 100%.
4.
Premere il tasto ON/OFF (Accensione/
Spegnimento) per avviare l'unità.
6.4 Modalità DRY (SECCO)
(Deumidificazione)
1.
Premere il tasto MODE (MODALITÀ) per
selezionare DRY (DEUMIDIFICAZIONE).
2.
Impostare la temperatura desiderata con
il tasto Temp (Temperatura) o Temp
(Temperatura) .
3.
Premere il tasto ON/OFF (Accensione/
Spegnimento) per avviare l'unità.
C
Nota:
La VELOCITÀ DI VENTILAZIONE
non può essere modificata nella
MODALITÀ DRY (SECCO).
6 Come utilizzare le funzioni di base
1
3
2
4
1
3
2
Telecomando / Manuale utente
69 / 128 IT
6.5 Modalità FAN
(VENTILAZIONE)
1.
Premere il tasto MODE (MODALITÀ) per
selezionare la modalità FAN (VENTILAZIONE).
2.
Premere il tasto FAN (VENTILAZIONE) per
selezionare la velocità di ventilazione tra AU
e 100%.
3.
Premere il tasto ON/OFF (Accensione/
Spegnimento) per avviare l'unità.
C
Nota: in modalità FAN
(VENTILAZIONE) non è possibile
impostare la temperatura. Di
conseguenza, sullo schermo LCD
del telecomando in uso non verrà
visualizzata la temperatura.
6.6 Modalità HEAT
(RISCALDAMENTO)
1.
Premere il tasto MODE (Modalità)
per selezionare la modalità HEAT
(RISCALDAMENTO).
2.
Impostare la temperatura desiderata
con il tasto Temp (Temperatura) o
Temp (Temperatura) .
3.
Premere il tasto FAN (VENTILAZIONE) per
selezionare la velocità di ventilazione tra AU
e 100%.
4.
Premere il tasto ON/OFF (Accensione/
Spegnimento) per avviare l'unità.
C
Nota: quando la temperatura
esterna scende, le prestazioni della
funzione di Riscaldamento dell'unità
in uso potrebbero risentirne. In
tal caso, si consiglia di utilizzare il
condizionatore d’aria insieme a un
altro apparecchio di riscaldamento.
6 Come utilizzare le funzioni di base
1
3
2
1
3
2
4
70 / 128 IT
Telecomando / Manuale utente
TIMER ON/OFF (Timer di accensione/spegnimento): consente di impostare il lasso di tempo dopo il
quale l’unità si accende o si spegne automaticamente.
7.1 Impostazioni TIMER ON (TIMER DI ACCENSIONE)
O
N/O
FF
MODE
F
AN
SHORT
CU
T
T
IM
ER
ON
TIM
ER OF
F
TEMP
S
L
E
EP
1sec
x5
Premere il pulsante TIMER per
avviare la sequenza del tempo di
accensione.
Premere più volte il pulsante
Temp (Temperatura) su o giù e
impostare il tempo desiderato per
l'accensione dell’unità.
Puntare il telecomando verso
l'unità e attendere un secondo fino
a quando il TIMER ON (TIMER DI
ACCENSIONE) non si attiva.
7.2 IMPOSTAZIONI TIMER OFF (TIMER DI SPEGNIMENTO)
O
N/O
FF
M
ODE
F
AN
SHORT
CU
T
T
IM
E
R ON
T
I
M
ER OF
F
TEMP
S
L
E
EP
1sec
x10
Premere il pulsante TIMER per
avviare la sequenza del tempo di
spegnimento.
Premere più volte il pulsante
Temp (Temperatura) su o giù e
impostare il tempo desiderato per
lo spegnimento dell’unità.
Puntare il telecomando verso l'unità e
attendere un secondo fino a quando il
TIMER OFF (TIMER DI SPEGNIMENTO)
non si attiva.
C
Nota:
1.
Durante l’impostazione del timer di accensione o di spegnimento, il tempo aumenta
di 30 minuti ad ogni pressione, fino a un massimo di 10 ore. Dopo le 10 ore e fino alle
24 ore, gli incrementi sono di 1 ora. Ad esempio, premere 5 volte per ottenere 2,5 ore
e premere 10 volte per ottenere 5 ore. Dopo 24, il timer tornerà a 0.0.
2.
È possibile disattivare entrambe le funzioni impostandone il timer su "0.0 h".
7 Impostazione del TIMER
Telecomando / Manuale utente
71 / 128 IT
7.3 Impostazione del TIMER DI ACCENSIONE/DI SPEGNIMENTO
(esempio)
Tenere bene a mente che i periodi di tempo che si impostano per entrambe le funzioni si riferiscono alle
ore successive all'ora corrente.
O
N
/OFF
M
ODE
FA
N
SHORT
CU
T
T
IMER
ON
TIME
R
O
FF
TEMP
S
LEE
P
O
N
/OFF
MOD
E
F
A
N
SHORT
CUT
TI
ME
R
O
N
TIME
R
O
F
F
TEM
P
S
L
E
E
P
xn
xnxn
Avvio del
Timer
L'unita si
accende
L'unita si
spegne
Esempio: se il timer corrente è alle
1:00PM (13:00), impostare il timer come
descritto sopra: l’unità si accende dopo
2,5 ore (3:30PM) (15:30) e si spegne alle
6:00PM (18:00).
2,5 ore più tardi
5 ore più tardi
Ora corrente
1PM (13:00)
2:00PM
(14:00)
3:00PM
(15:00)
3:30PM
(15:30)
4PM
(16:00)
5PM
(17:00)
6PM
(18:00)
7 Impostazione del TIMER
72 / 128 IT
Telecomando / Manuale utente
8.1 Funzione Swing (Oscillazione)
2s
Swing
Swing
Il deflettore orizzontale si muoverà
automaticamente verso l’alto e verso il basso
premendo il pulsante Swing (Oscillazione).
Premerlo di nuovo per interrompe la funzione.
Tenere premuto questo pulsante per più
di 2 secondi per attivare la funzione di
oscillazione del deflettore verticale. (alcuni
modelli)
Premere il pulsante Swing (Oscillazione)
8.2 Direzione del flusso d’aria
Continuando a premere il pulsante SWING
(OSCILLAZIONE) è possibile impostare cinque
diverse direzioni del flusso d’aria. Il deflettore
può spostarsi in un determinato intervallo
ogni volta che si preme il pulsante. Premere il
pulsante finché non si raggiunge la direzione
desiderata.
Swing
C
Nota: quando l’unità è spenta, tenere premuti contemporaneamente i pulsanti MODE
(MODALITÀ) e SWING (OSCILLAZIONE) per un secondo: il deflettore di aprirà in una
determinata angolazione facilitando la pulizia. Tenere premuti contemporaneamente I
pulsanti MODE (MODALITÀ) e SWING (OSCILLAZIONE) per un secondo per ripristinare il
deflettore (alcuni modelli).
8 Come utilizzare le funzioni avanzate
Telecomando / Manuale utente
73 / 128 IT
8.3 DISPLAY A LED
5s
LED LED
Premere il pulsante LED
Premere questo pulsante per accendere e
spegnere il display e per attivare e disattivare le
segnalazioni acustiche dell’unità interna.
Tenendo premuto questo pulsante per più
di cinque secondi, l’unità interna mostrerà la
temperatura ambiente corrente. Premere di
nuovo per più di cinque secondi per tornare alla
visualizzazione della temperatura impostata.
Premere questo pulsante
per più di 5 secondi
(alcuni modelli)
8.4 Funzione ECO/GEAR (RISPARMIO ENERGETICO/VELOCITÀ)
Premere questo pulsante per accedere alla modalità di risparmio energetico
nella seguente sequenza:
ECO (RISPARMIO ENERGETICO) GEAR (VELOCITÀ) (75%) GEAR
(VELOCITÀ) (50%) Modalità di impostazione precedente ECO (RISPARMIO
ENERGETICO)......
C
Nota:
ECO/GEAR, Click & Clean, Breeze Away, Silence non sono
disponibili su AC multi-split.
Questa funzione non è disponibile in modalità COOL
(FRESCO).
Funzionamento ECO (RISPARMIO ENERGETICO):
In modalità di raffreddamento, premere questo pulsante in modo che il telecomando regoli
automaticamente la temperatura su 24 °C e imposti la velocità della ventola su Auto (Automatica)
per risparmiare energia (solo quando la temperatura impostata è inferiore a 24 °C). Se la temperatura
impostata è superiore a 24 °C, premere il pulsante ECO (Risparmio energetico): la velocità della ventola
passa a Auto (Automatica) e la temperatura impostata rimarrà invariata.
C
Nota:
Premendo il pulsante ECO/GEAR (RISPARMIO ENERGETICO/VELOCITÀ), modificando
la modalità o regolando la temperatura a meno di 24 °C, il sistema uscirà dalla modalità
ECO (RISPARMIO ENERGETICO).
In modalità ECO (RISPARMIO ENERGETICO), la temperatura impostata deve essere
uguale o superiore a 24 °C e ciò può causare un raffreddamento insufficiente. Se
questo crea disagio, premere di nuovo il pulsante ECO (RISPARMIO ENERGETICO) per
disattivare la funzione.
8 Come utilizzare le funzioni avanzate
74 / 128 IT
Telecomando / Manuale utente
Funzione GEAR (VELOCITÀ):
Premere il pulsante ECO/GEAR (RISPARMIO ENERGETICO/VELOCITÀ) per accedere alla modalità GEAR
(VELOCITÀ) come indicato di seguito:
75% (fino al 75% di consumo di energia elettrica)
50% (fino al 50% di consumo di energia elettrica)
Modalità di impostazione precedente.
Durante il funzionamento in modalità GEAR (VELOCITÀ), il display del telecomando alternerà tra il
consumo di energia e la temperatura impostata.
8.5 Funzione di pulizia Click & Clean (Pulizia)
I batteri presenti nell'aria possono riprodursi nell'umidità che si condensa
attorno agli scambiatori di calore dell'unità. Con l'uso costante, la maggior
parte di questa umidità evapora dall'unità.
Premendo il pulsante Click & Clean (Pulizia), l’unità entra in modalità di pulizia
automatica. Al termine della pulizia, l’unità si spegne automaticamente.
Premendo il tasto Tasto Click & Clean (Pulizia) a metà ciclo, si annulla l’operazione
e l’unità si spegne. È possibile utilizzare la funzione Click & Clean (Pulizia) ogni volta
che si desidera.
C
Nota: questa funzione è attivabile solo in Modalità COOL
(Raffreddamento) o DRY (Deumidificazione).
Premere il pulsante Click & Clean (Pulizia)
Go
Clean
8.6 Funzione Silence (Silenzioso)
2s
Tenere premuto il pulsante Fan (Ventilazione) per più di 2 secondi per attivare/
disattivare la funzione Silence (Silenzioso) (alcuni modelli).
A causa del funzionamento a bassa frequenza del compressore, ciò potrebbe
causare una capacità di raffreddamento e di riscaldamento insufficienti.
Premere il pulsante ON/OFF (ACCENSIONE/SPEGNIMENTO), Mode (Modalità),
Sleep (Notte), Push&GO o Click & Clean (Pulizia) durante il funzionamento per
annullare la funzione di funzionamento silenzioso.
8 Come utilizzare le funzioni avanzate
C
Nota: ECO/GEAR, Click & Clean, Breeze Away, Silence non sono
disponibili su AC multi-split.
ECO/GEAR, Click & Clean, Breeze Away, Silence non sono
disponibili su AC multi-split.
Telecomando / Manuale utente
75 / 128 IT
8.7 Funzione FP (Freezing protection) (Protezione anti gelo)
La ventola dell’unità funzionerà a velocità elevata (con il compressore acceso)
e la temperatura sarà impostata automaticamente su 8 °C.
2
C
Nota: Questa funzione è disponibile solo per il condizionatore d’aria con pompa di
calore.
In modalità HEAT (RISCALDAMENTO), premere questo pulsante due volte in un secondo e impostare la
temperatura su 16 °C per attivare la funzione FP (Protezione anti gelo).
Premendo uno dei pulsanti On/Off (Accensione/Spegnimento), Sleep (Notte), Mode (Modalità), Fan
(Ventilazione) e Temp. (Temperatura) durante il funzionamento, l’apparecchio uscirà da questa
funzione.
8.8 Funzione LOCK (BLOCCO)
8.9 Funzione SET (IMPOSTAZIONE)
or
SET
SET
OK
•
Premere il pulsante SET (IMPOSTAZIONE) o il pulsante TEMP (Temperatura) o TEMP
(Temperatura) e selezionare la funzione desiderata. Quando l’icona selezionata lampeggerà sul
display, premere il pulsante OK per confermare.
8 Come utilizzare le funzioni avanzate
Premere contemporaneamente il pulsante Click & Clean
(Pulizia) e il pulsante Push&GO per più di cinque secondi
per attivare la funzione di blocco. Tranne questi due pulsanti,
tutti gli altri pulsanti saranno disattivati; premerli di nuovo
per due secondi per disattivare il blocco.
Click
& Clean
5s
5s
Push&GO
+
76 / 128 IT
Telecomando / Manuale utente
•
Per annullare la funzione selezionata, eseguire
gli stessi passaggi descritti sopra.
•
Premere il pulsante SET (IMPOSTAZIONE) per
scorrere le funzioni operative come segue:
Sleep (Notte) (
) ZoneDetect (Monitoraggio
area) ( ) Modalità AP ( )
Funzione Breeze Away (Deviazione del flusso
d’aria) (
) (alcuni modelli):
Questa funzione evita che il flusso d’aria soffi
direttamente sul corpo e lascia una sensazione di
piacevole freschezza.
C
Nota: Questa funzione è
disponibile solo nelle modalità
Cool (Raffreddamento),
Fan (Ventilatore) e Dry
(Deumidificatore).
Funzione Sleep (Notte) (
):
La funzione SLEEP (NOTTE) fa sentire a proprio
agio mentre si dorme (e non è necessario
mantenere la stessa temperatura per creare
un ambiente confortevole). È possibile attivare
questa funzione solo tramite telecomando.
Per i dettagli, fare riferimento alla sezione
“Funzione Notte” nel Manuale per l’utente”.
C
Nota: La funzione SLEEP (NOTTE)
non è disponibile durante la
modalità FAN (VENTILAZIONE) o
DRY (DEUMIDIFICAZIONE).
Funzione ZoneDetect (Monitoraggio area) (
):
La funzione ZoneDetect (Monitoraggio Area)
consente al telecomando di misurare la
temperatura nella sua posizione corrente e inviare
questa informazione al condizionatore d’aria
ogni tre minuti. Se si utilizzano le modalità AUTO
(Automatico), COOL (Raffreddamento), o HEAT
(Riscaldamento), la misurazione della temperatura
ambiente dal telecomando (invece che dall'unità
interna) consente al condizionatore d’aria di
ottimizzare la temperatura cir
costante e assicurare
il massimo comfort.
C
Nota: Tenere premuto il pulsante
Push&GO per sette secondi per
avviare/interrompere la funzione
di memorizzazione ZoneDetect
(Monitoraggio area).
•
Se la funzione di memoria è
attiva, sul display appare “On”
(Attivo) per tre secondi.
•
Se la funzione di memoria è
disattivata, su display appare
“OF” (Disattivo) per tre secondi.
•
Quando la funzione di memoria
è attiva e si preme il pulsante
ON/OFF (ATTIVA/DISATTIVA),
se si cambia moda lità o la
corrente manca, la funzione
ZoneDetect (Monitoraggio area)
non sarà annullata.
Funzione AP (
) (alcuni modelli):
Selezionare la modalità AP per eseguire la
configurazione della rete wireless. In alcuni
modelli, ciò non è possibile premendo il pulsante
SET (IMPOSTAZIONE). Per accedere alla modalità
AP, premere il pulsante LED sette volte in 10
secondi.
8 Come utilizzare le funzioni avanzate
C
Nota
: ECO/GEAR, Click & Clean,
Breeze Away, Silence
non sono
disponibili su AC multi-split.
Telecomando / Manuale utente
77 / 128 IT
8.10 Funzione HygieneMax
(Igiene max) (alcuni modelli)
Premere il pulsante HygieneMax (Igiene max)
sul telecomando mentre il condizionatore d’aria
è in funzione; il LED UVC si illuminerà. Quando
la funzione è attiva, è in grado di distruggere
direttamente la struttura del DNA e dell’RNA
dei microrganismi monocellulari e di fargli
perdere all'istante la capacità di replicazione e di
attività, ottenendo così l’effetto di un'efficiente
eliminazione di batteri e virus sull’evaporatore.
C
Nota: La funzione si attiva/
disattiva tramite il pulsante
HygieneMax (Igiene max)
e si disattiva spegnendo il
condizionatore d’aria.
8 Come utilizzare le funzioni avanzate

16117000A50211
Beko Europe Management Srl
Via Varesina 204, 20156 Milano, Italy
https://www.bekoeurope.com/safety