The MXNet Ecosystem is an AV-over-IP platform of products that use a traditional networking infrastructure to route
video and audio signals throughout large scale systems with unlimited numbers of sources and displays, all switching
independently and seamlessly. MXNet also has its own line of Network Switches, pre-configured and optimized for 4K
video signals with HDR color, to save you precious onsite installation time.
Installing the devices for MXNet is a very simple and straightforward process. AVPro Edge doesn’t expect AV integrators
to get a master’s degree in networking overnight, and they shouldn’t need to! With the MXNet setup process, the IP
elements have been removed, allowing AV integrators to configure their setup just as they would with any traditional
HDMI matrix switch.
If using a 3rd party network switch with MXNet, please review our Knowledge Base article here.
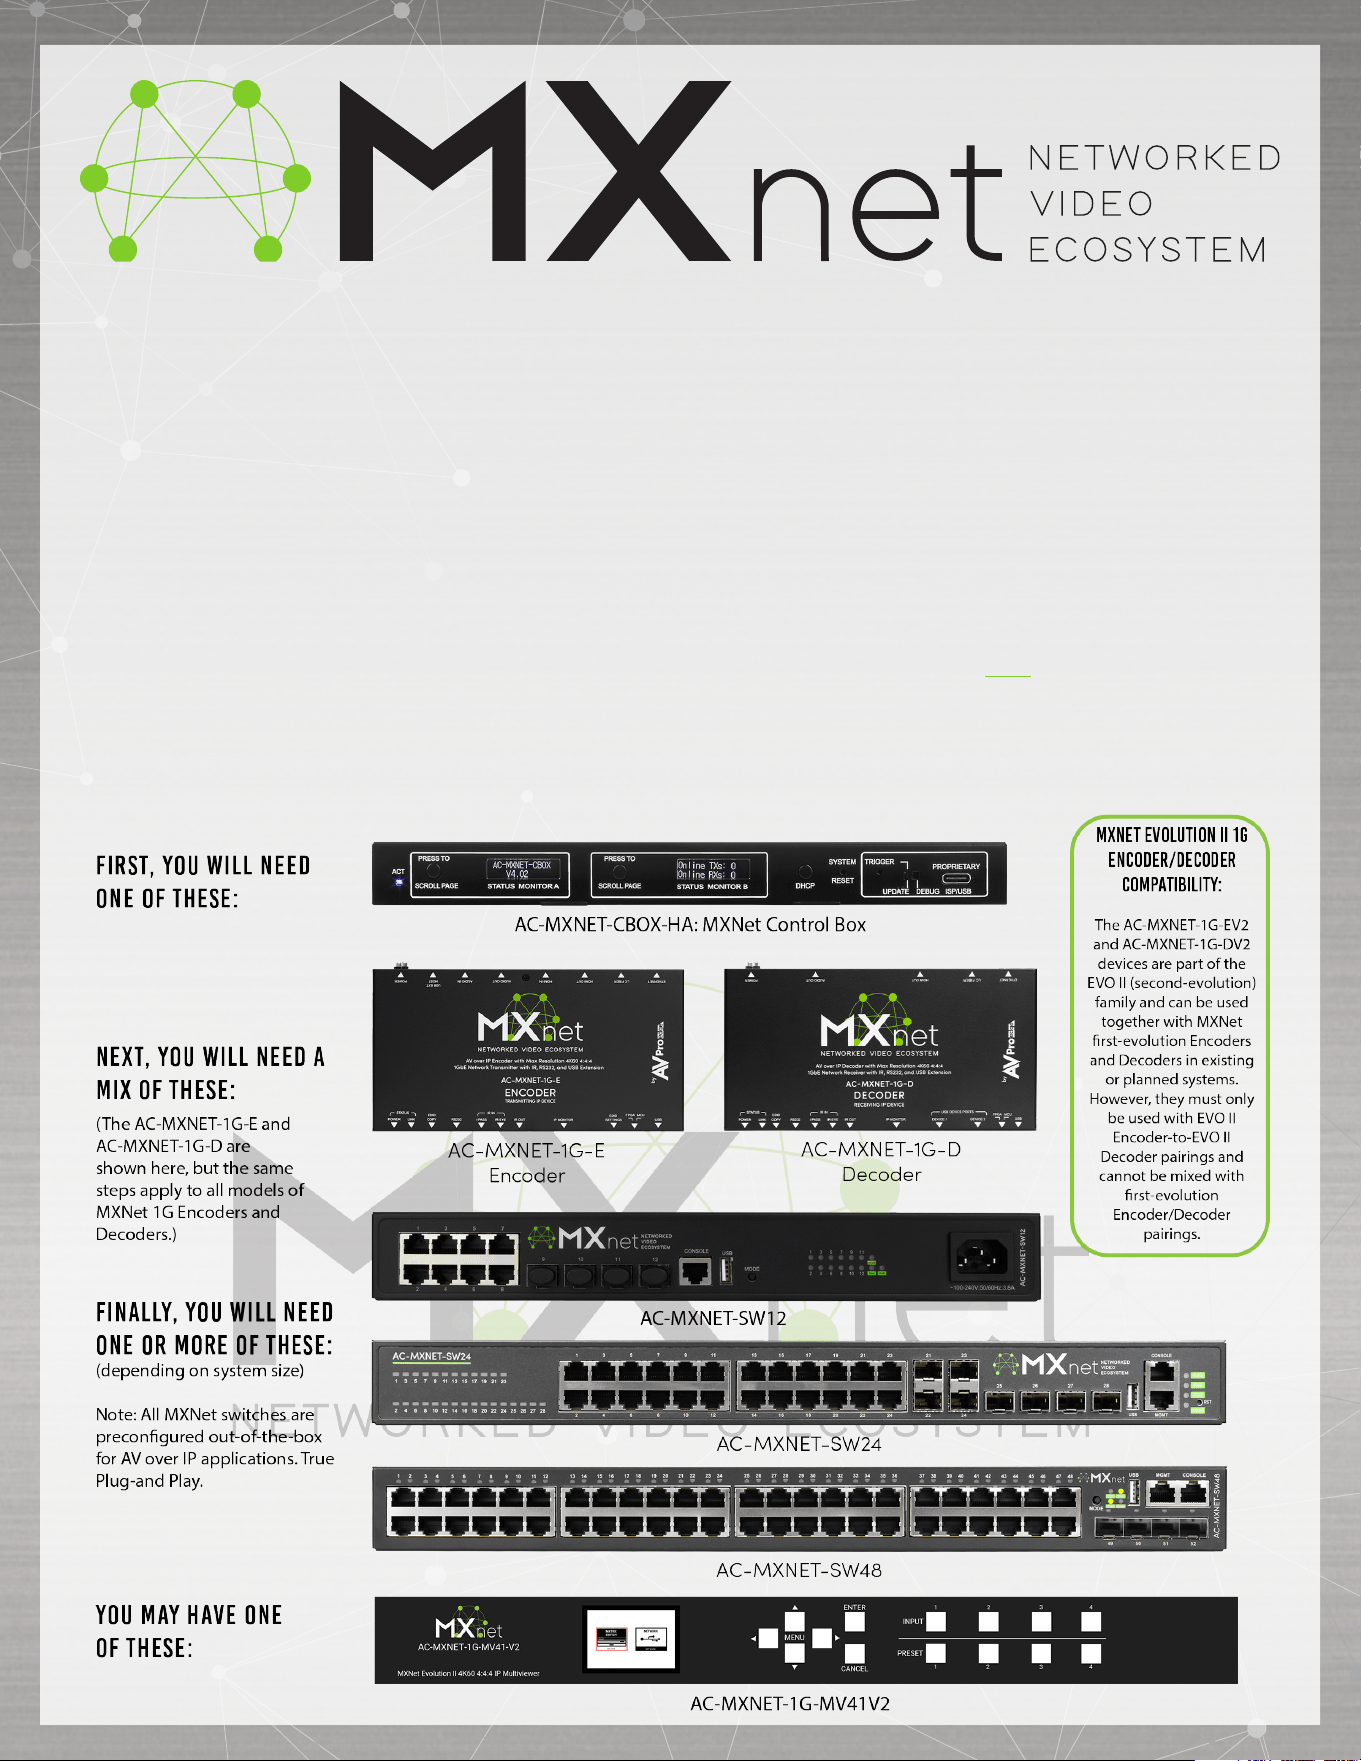
QUICK CONNECT
THE MXNET 1G ECOSYSTEM
QUICK CONNECT GUIDE
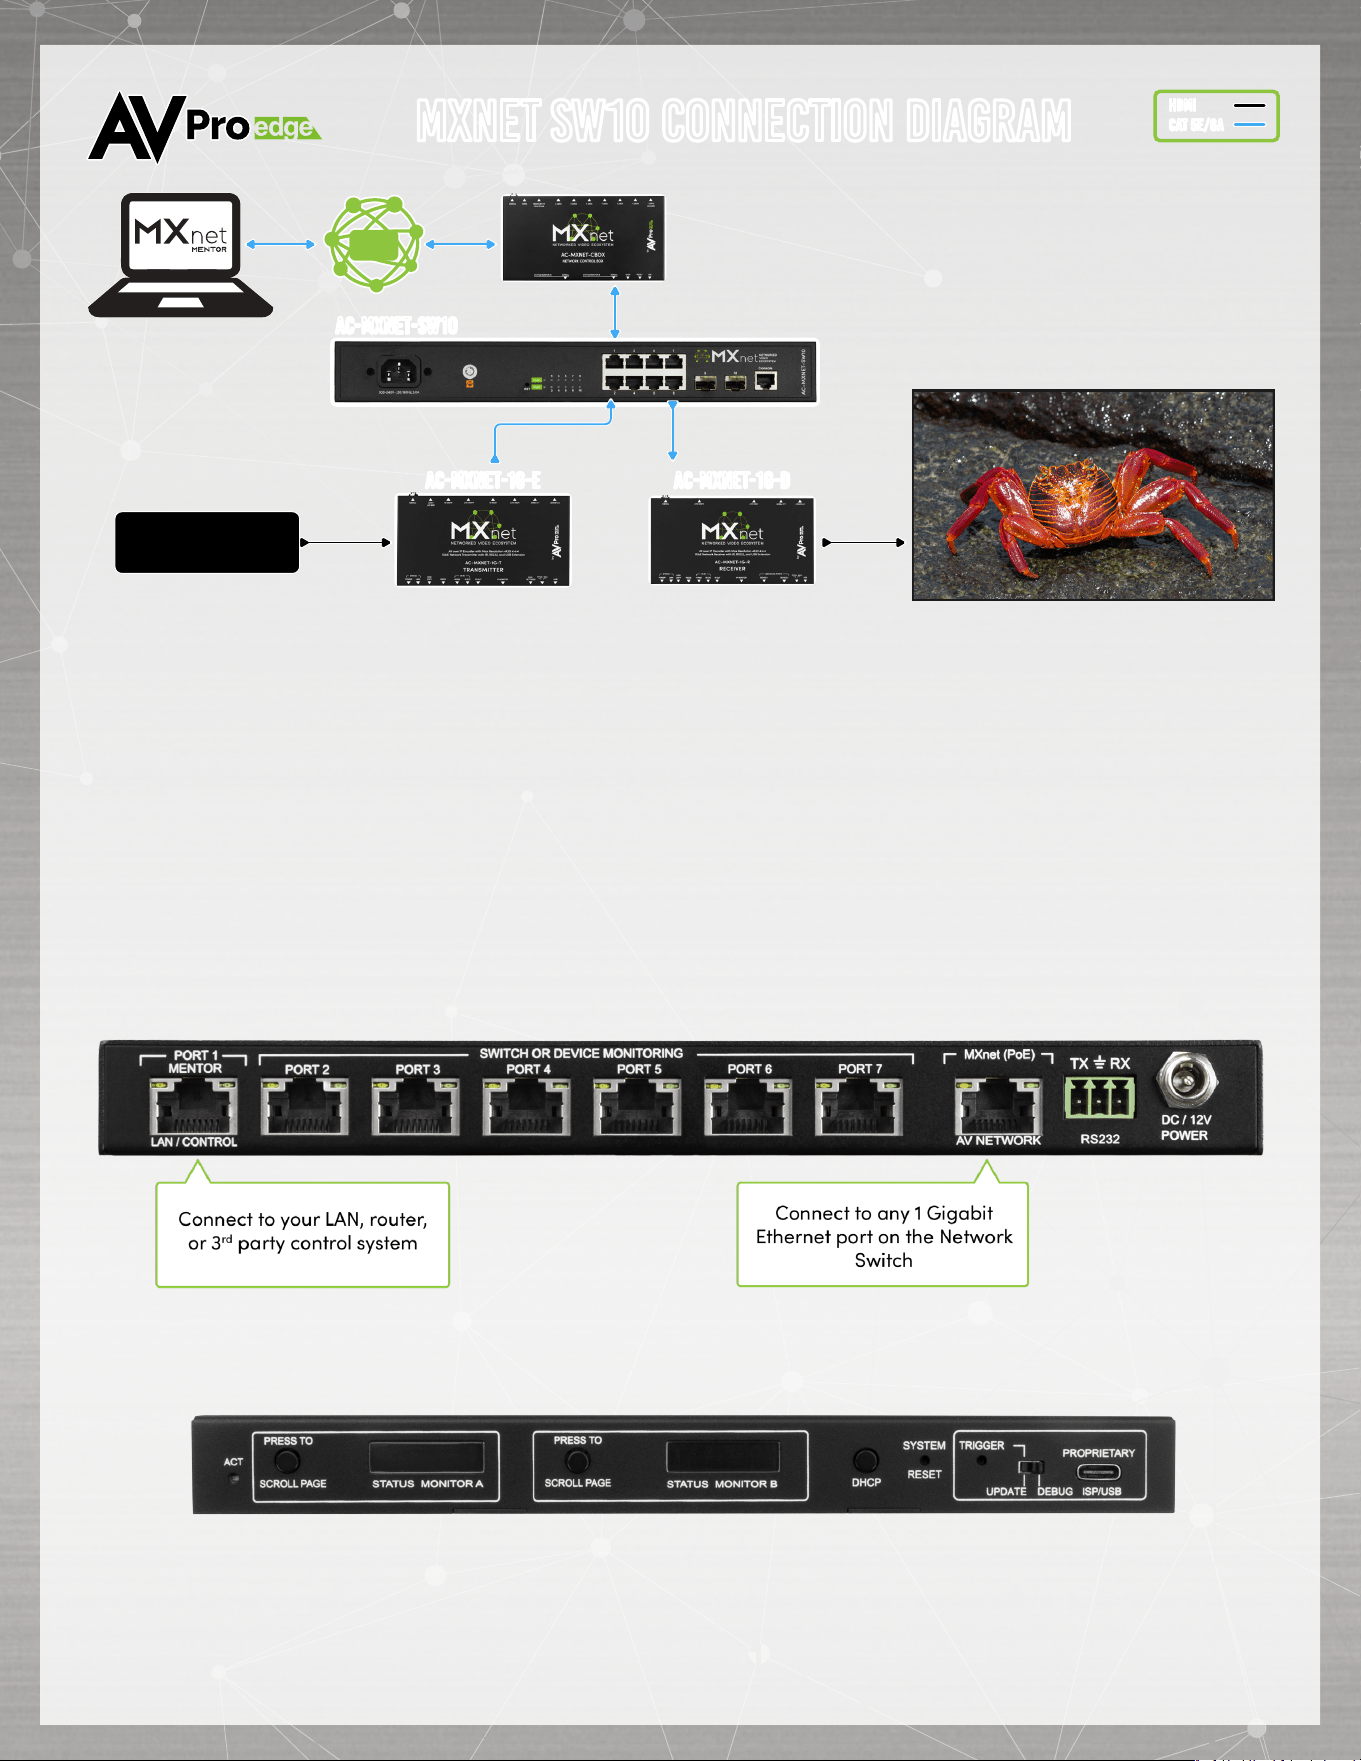
Application Diagram applies to all MXNet 1G Network Switches.
INSTALLATION
1. Connect the HDMI source devices to the Encoders.
2. Connect the HDMI output devices to the Decoders.
3. Connect the power supply to the Network Switch.
4. Connect the Encoders and Decoders to the Network Switch (CBOX, Encoders, and Decoders
will be powered via PoE)
5. Connect the CBOX’s MXnet (PoE) AV NETWORK port to the Network Switch.
6. Connect the CBOX’s PORT 1 MENTOR LAN/CONTROL port to your LAN, router, or third-party
control system.
7. Press the STATUS MONITOR A button on the CBOX until you see the IP address (CBOX is
preconfigured out-of-the-box for DHCP).
8. Open up a new tab in your web browser and type in the CBOX’s IP address.
9. Type in the default username “admin” and password “admin” (all lowercase) to log in.
10. Setup and control using the MXNet Mentor web app.
MXNET sw10 CONNECTION DIAGRAM
hdmi
cat 5e/6a
AC-MXNET-sw10
4k HDMI sources
LAN
AC-MXNET-1g-E AC-MXNET-1g-d
AC-MXNET-CBOxAC-MXNET-CBOx
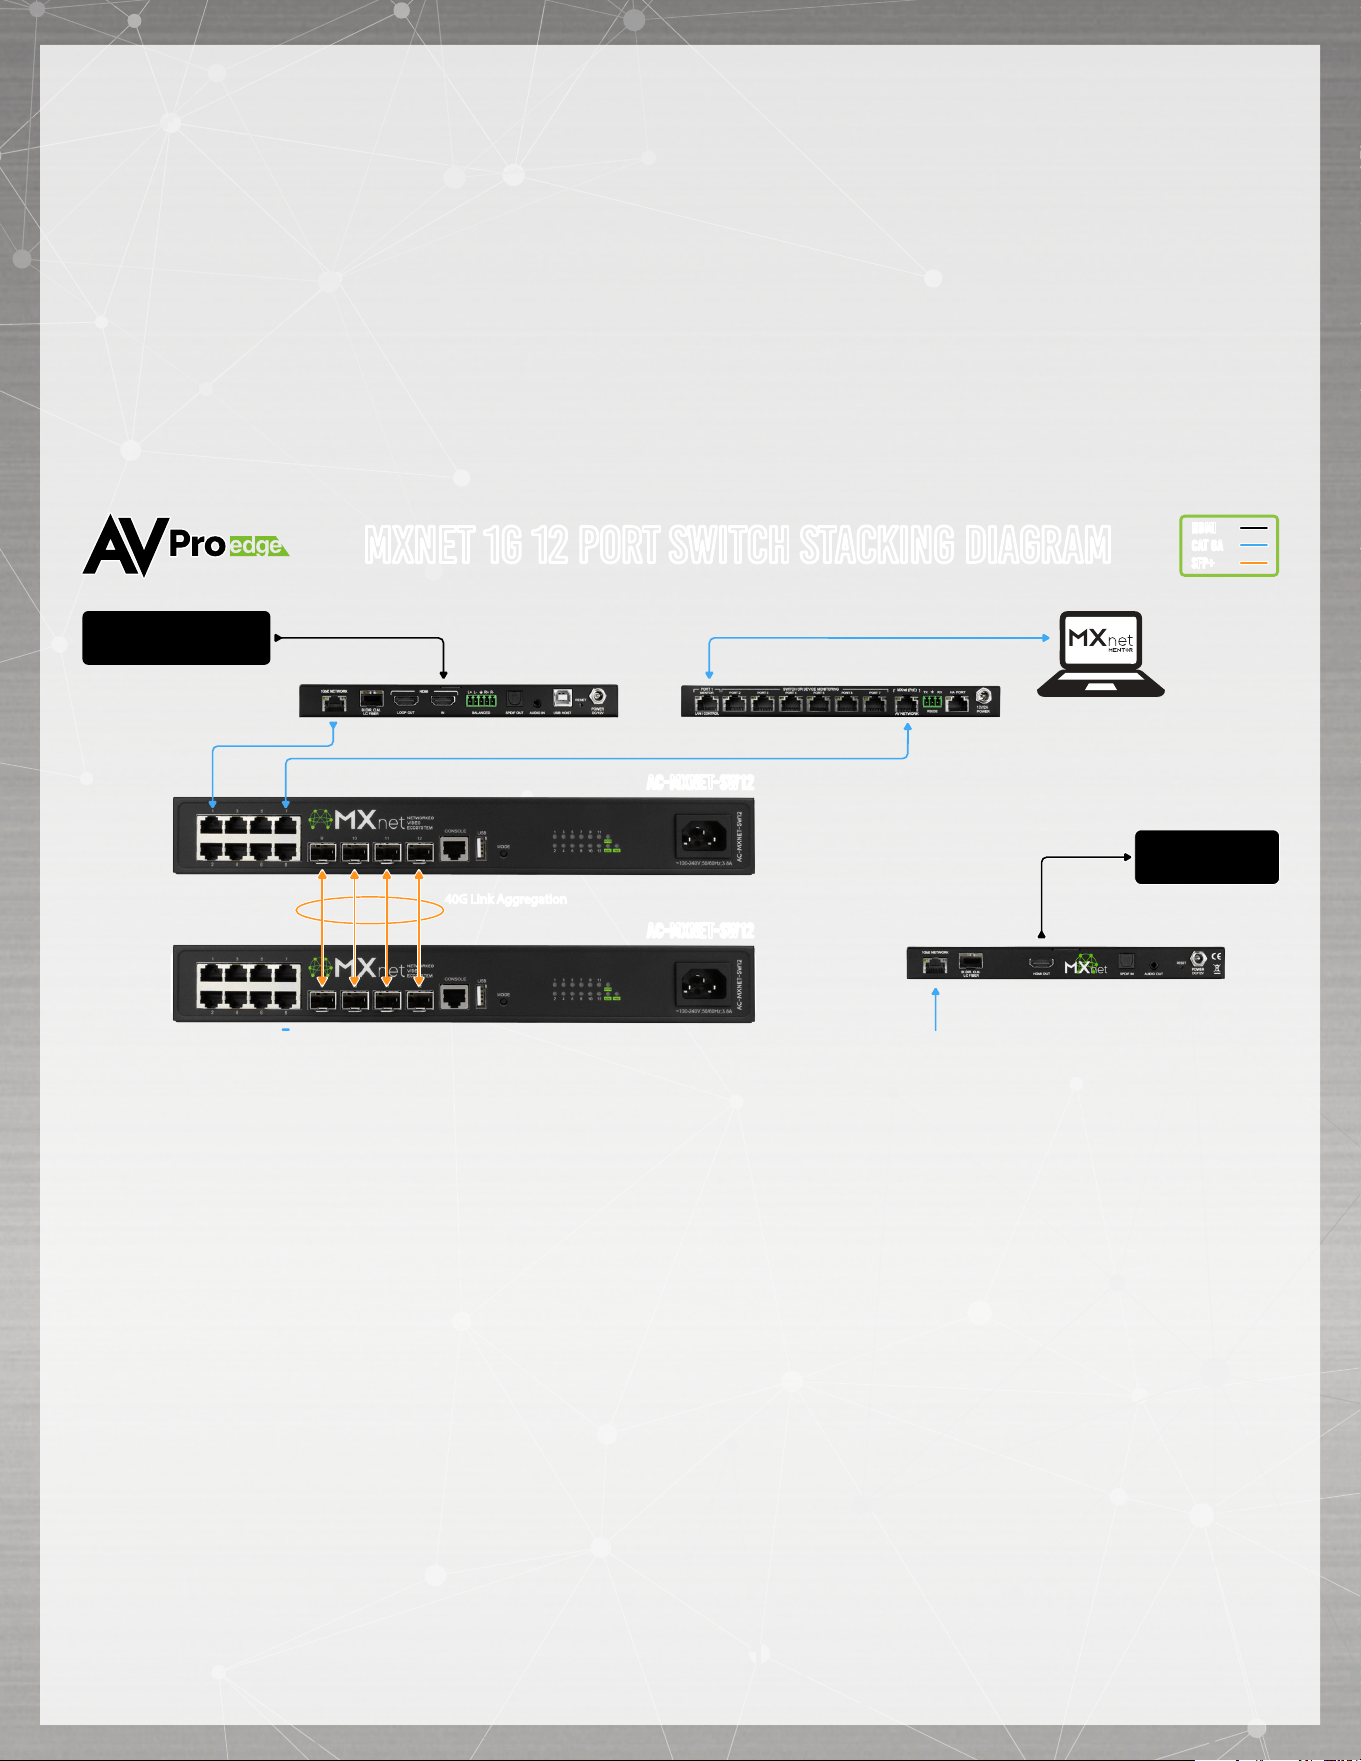
STACKING SWITCHES (only available on the MXNet SW12, SW24 and SW48)
The MXNet SW12, SW24 and SW48 Network Switches can be stacked together by connecting up to
four SFP+ ports between the two switches. Each SFP+ port provides 10G uplink between each switch.
An SFP+ link is required per every 10 Encoders; it is recommended to add an additional SFP+ link for
system redundancy.
If stacking 3 or more switches together, please contact AVPro Technical Support for further assistance
as this requires additional configuration.
MXNET 1g 12 port Switch Stacking DIAGRAM
hdmi
cat 6a
SFP+
4k Display
AC-MXNET-sw12
AC-MXNET-sw12
40G Link Aggregation40G Link Aggregation
4k HDMI sources
AC-MXNET-CBOxAC-MXNET-CBOx
AC-MXNET-1g-eV2AC-MXNET-1g-eV2
AC-MXNET-1g-DV2AC-MXNET-1g-DV2
The SW12 is NOT configured for stacking by default.

STACKING SWITCHES (only available on the MXNet SW12, SW24 and SW48)
MXNET Two Switch SFP+ CONNECTION DIAGRAM
hdmi
cat 6a
SFP+
4k HDMI sources
4k Displays
40 X AC-MXNET-1g-e
55 X AC-MXNET-1g-d
AC-MXNET-sw48
AC-MXNET-sw48
40G Link Aggregation40G Link Aggregation
LAN
AC-MXNET-CBOx-BAC-MXNET-CBOx-B
OR AC-MXNET-sw48
AC-MXNET-sw24
10G SFP+ Ports for Switch Stacking to
AC-MXNET-SW24 or AC-MXNET-SW48
MXNET Two Switch SFP+ CONNECTION DIAGRAM
hdmi
cat 6a
SFP+
4k HDMI sources
4k Displays
23 X AC-MXNET-1g-e
24 X AC-MXNET-1g-d
AC-MXNET-sw24
AC-MXNET-sw24
40G Link Aggregation40G Link Aggregation
LAN
AC-MXNET-CBOx-HAAC-MXNET-CBOx-HA
OR AC-MXNET-sw48
AC-MXNET-sw24
10G SFP+ Ports for Switch Stacking to
AC-MXNET-SW24 or AC-MXNET-SW48
MENTOR
The MXNet Mentor web app comes pre-installed on every CBOX and is a great tool to help you set
up, configure, and test with MXNet.
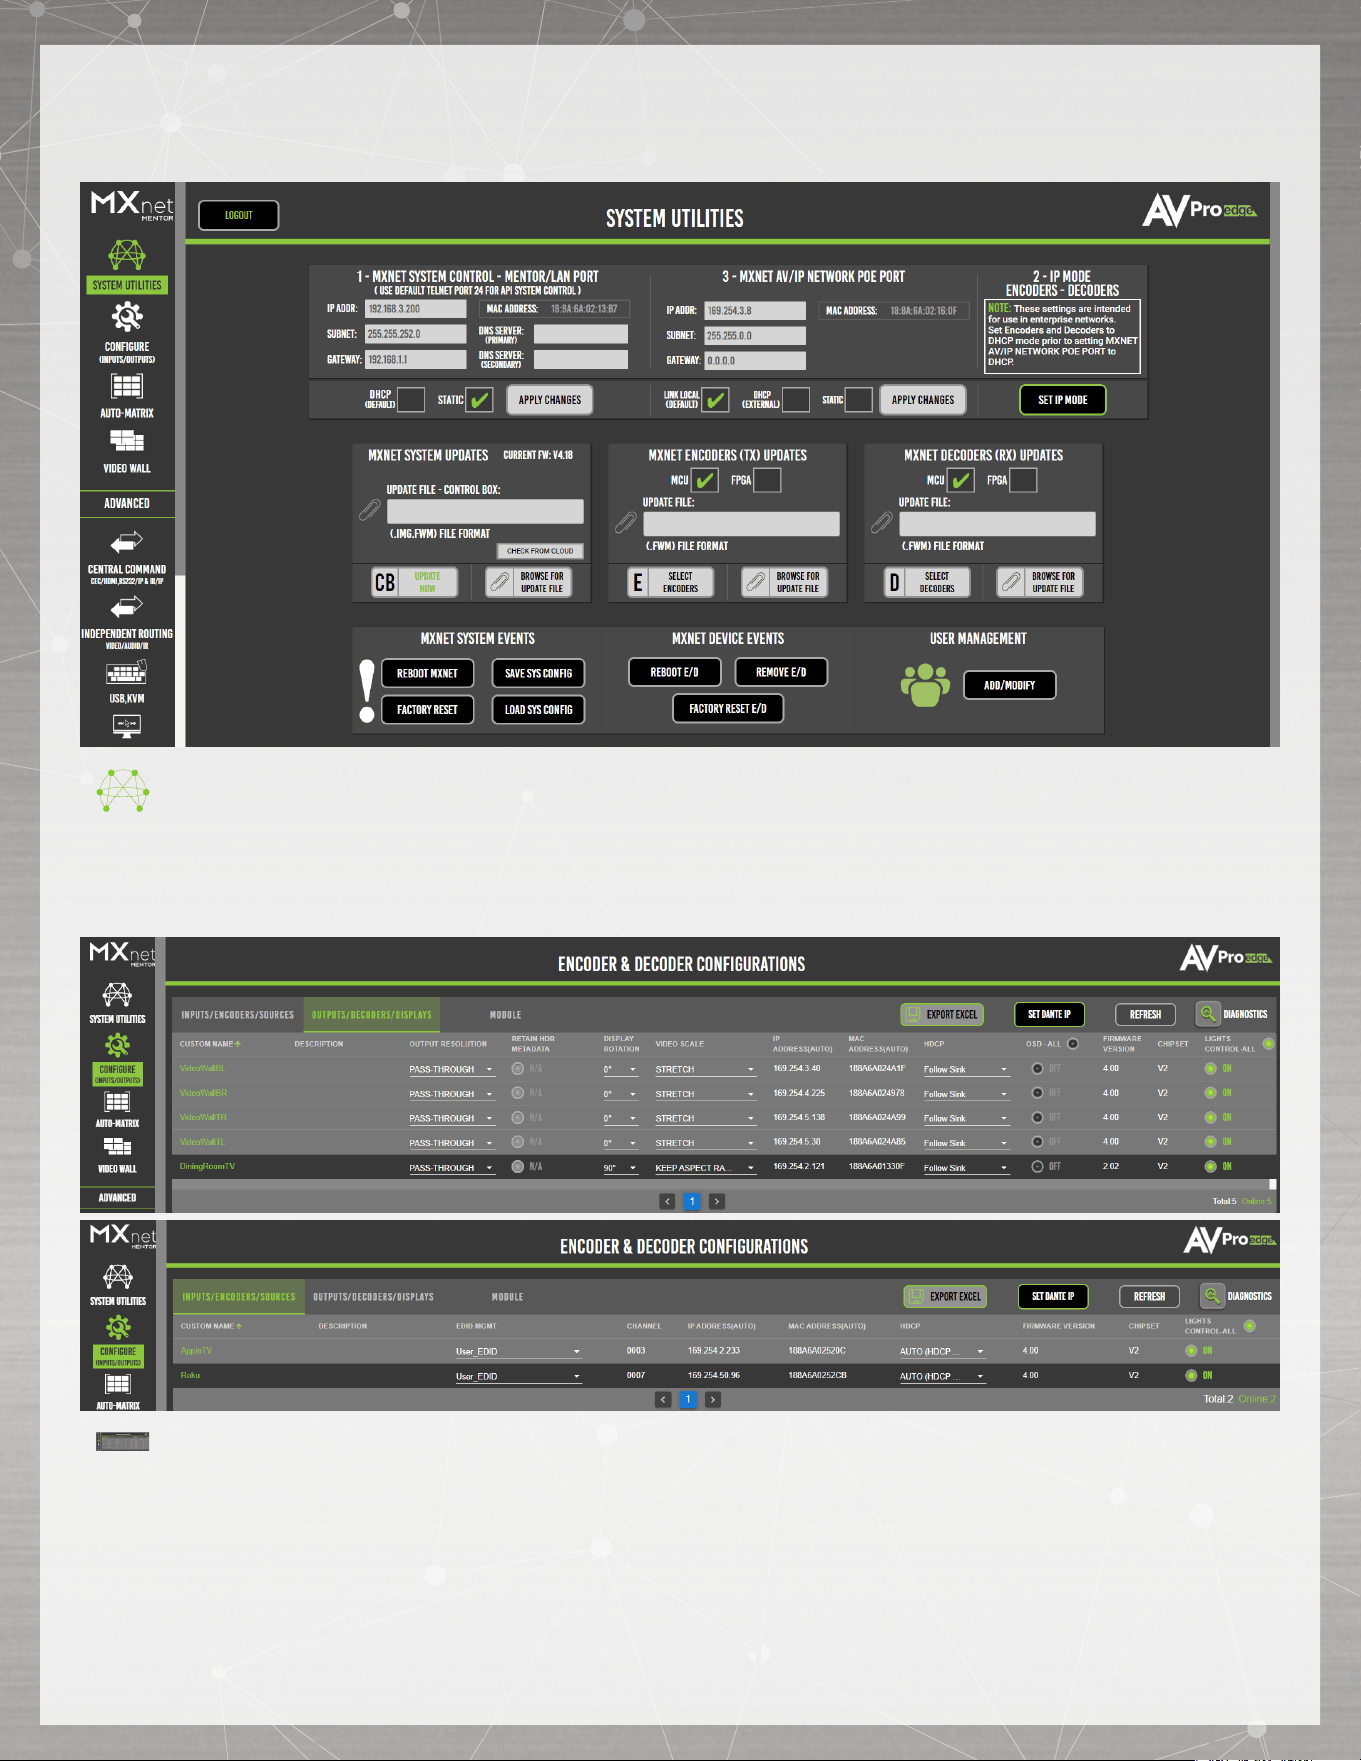
HOME - SYSTEM UTILITIES
Once you have successfully logged in, you will be taken to the Mentor home page with SYSTEM
UTILITIES. This page shows the IP address for MXNet and the current firmware version on the
CBOX. From here, you can update all the MXNet devices to their latest versions of firmware,
reboot the CBOX, reboot/remove the Encoders and Decoders, and also factory reset them.
CONFIGURE - INPUTS & OUTPUTS
This page is where you can configure the Encoders and Decoders, including assign custom
names and descriptions (limit of 12 characters), set the input EDID’s and output resolution
scaling, adjust the front panel lights, and check the current version of firmware on the encoders
and decoders. The System Diagnostics page provides useful information on the speed and
quality of the link and signal strength, the video and audio signal coming through, detect and
reset HDMI hot-plug events, view HDCP versions, and more.
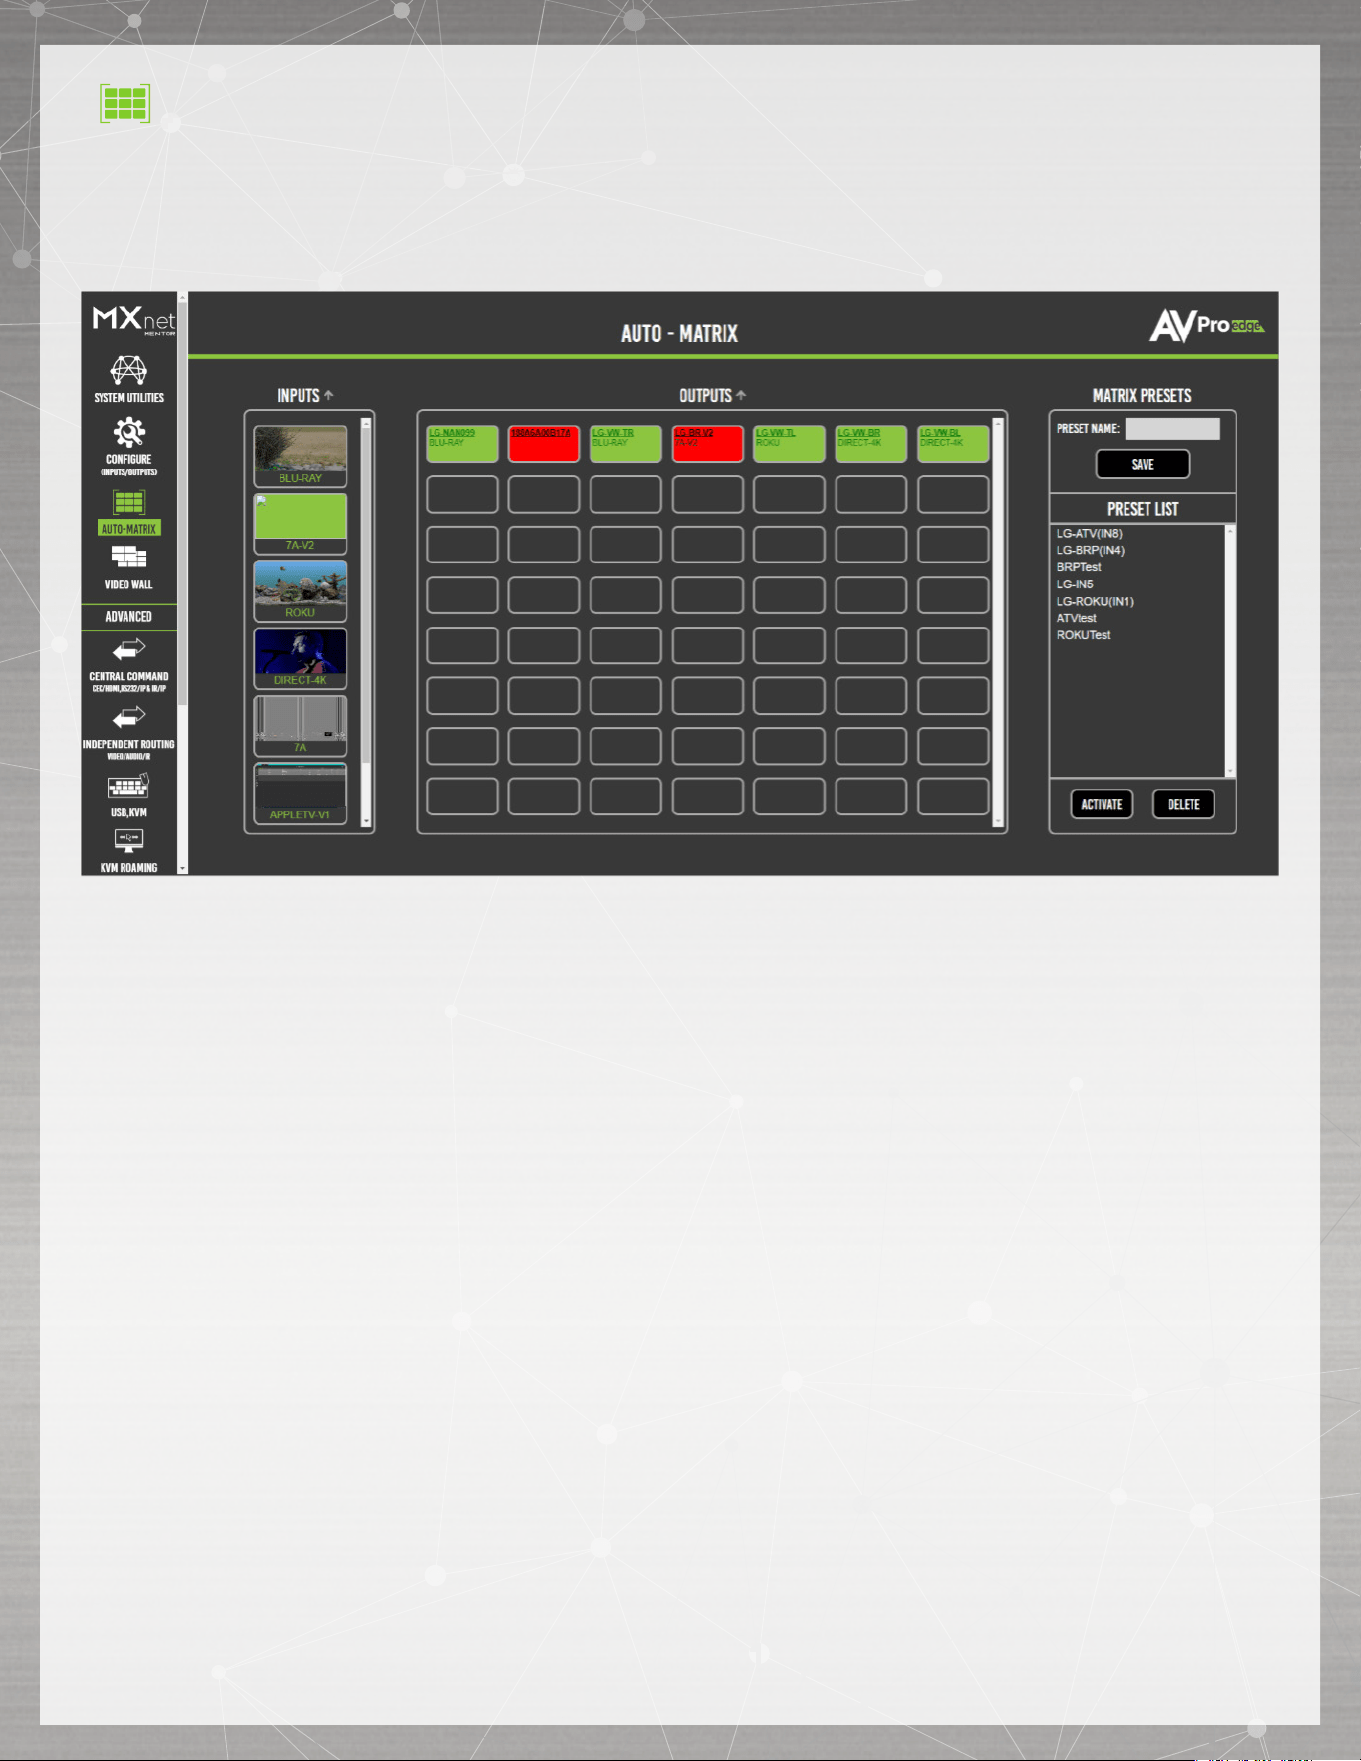
AUTO-MATRIX - SWITCHING
From here, you can switch your sources and displays just like you would with an HDMI matrix
switcher. The sources are located on the left, and the displays are on the right. Simply click
on the source first, then click on the display you wish to view it on. You can also save and
recall presets on this page for faster switching and preview the sources’ video content as a
thumbnail for easy visual reference.
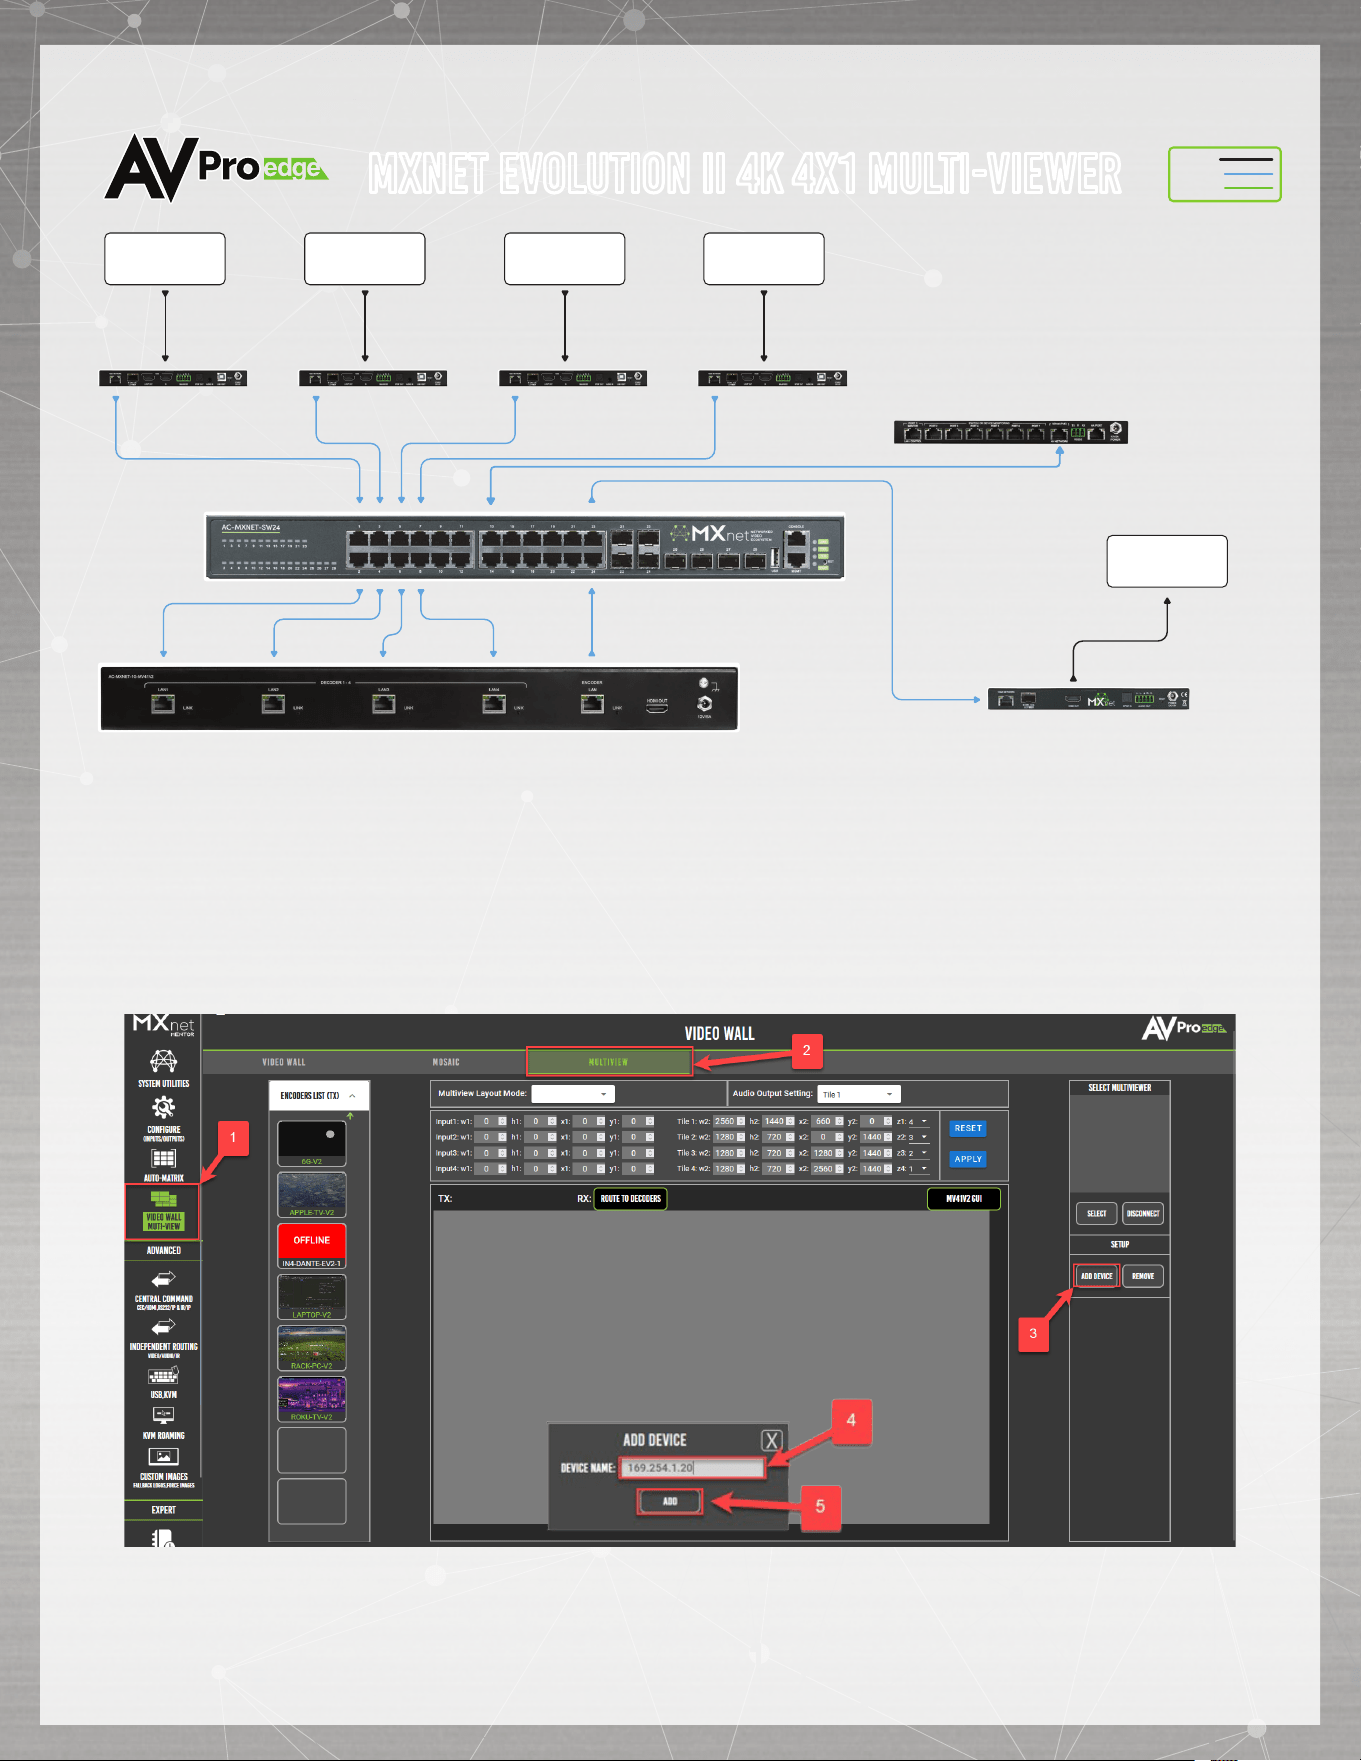
INSTALLATION
1. Connect the Evolution II Multi-viewer’s built in decoders and encoders to the MXnet 1G switch
2. Connect the 12V/5A PSU to the Evolution II Multiviewer
3. Press the ENTER button on the front panel of the Evolution II Multiviewer
4. Navigate to the NETWORK page
5. Configure the Evolution II Multiviewr to be in the same subnet as the MXnet system
6. Note the HIP of the Evolution II Multiviewer
HDMI
Output
1GbE
Network
HDMI
CAT 6A
AUDIO
AC-MXNET-1G-DV2
AC-MXNET-1G-MV41V2
AC-MXNET-SW24
Multi-View
LAN Output
LAN
Input 1 - 4
AC-MXNET-1G-MV41V2
HDMI
Input
1GbE
Network
4K HDMI
SOURCE 3
AC-MXNET-1G-EV2
HDMI
Input
1GbE
Network
4K HDMI
SOURCE 1
AC-MXNET-1G-EV2
HDMI
Input
1GbE
Network
4K HDMI
SOURCE 2
AC-MXNET-1G-EV2
HDMI
Input
1GbE
Network
4K HDMI
SOURCE 4
AC-MXNET-1G-EV2
4K HDMI
DISPLAY
AC-MXNET-CBOX-HA
MXnet Evolution II 4K 4x1 Multi-viewer
7. Open up a new tab in your web browser and type in the CBOX’s IP Address
8. Navigate to MULTIVEW page in Mentor & add MXnet Multviewer
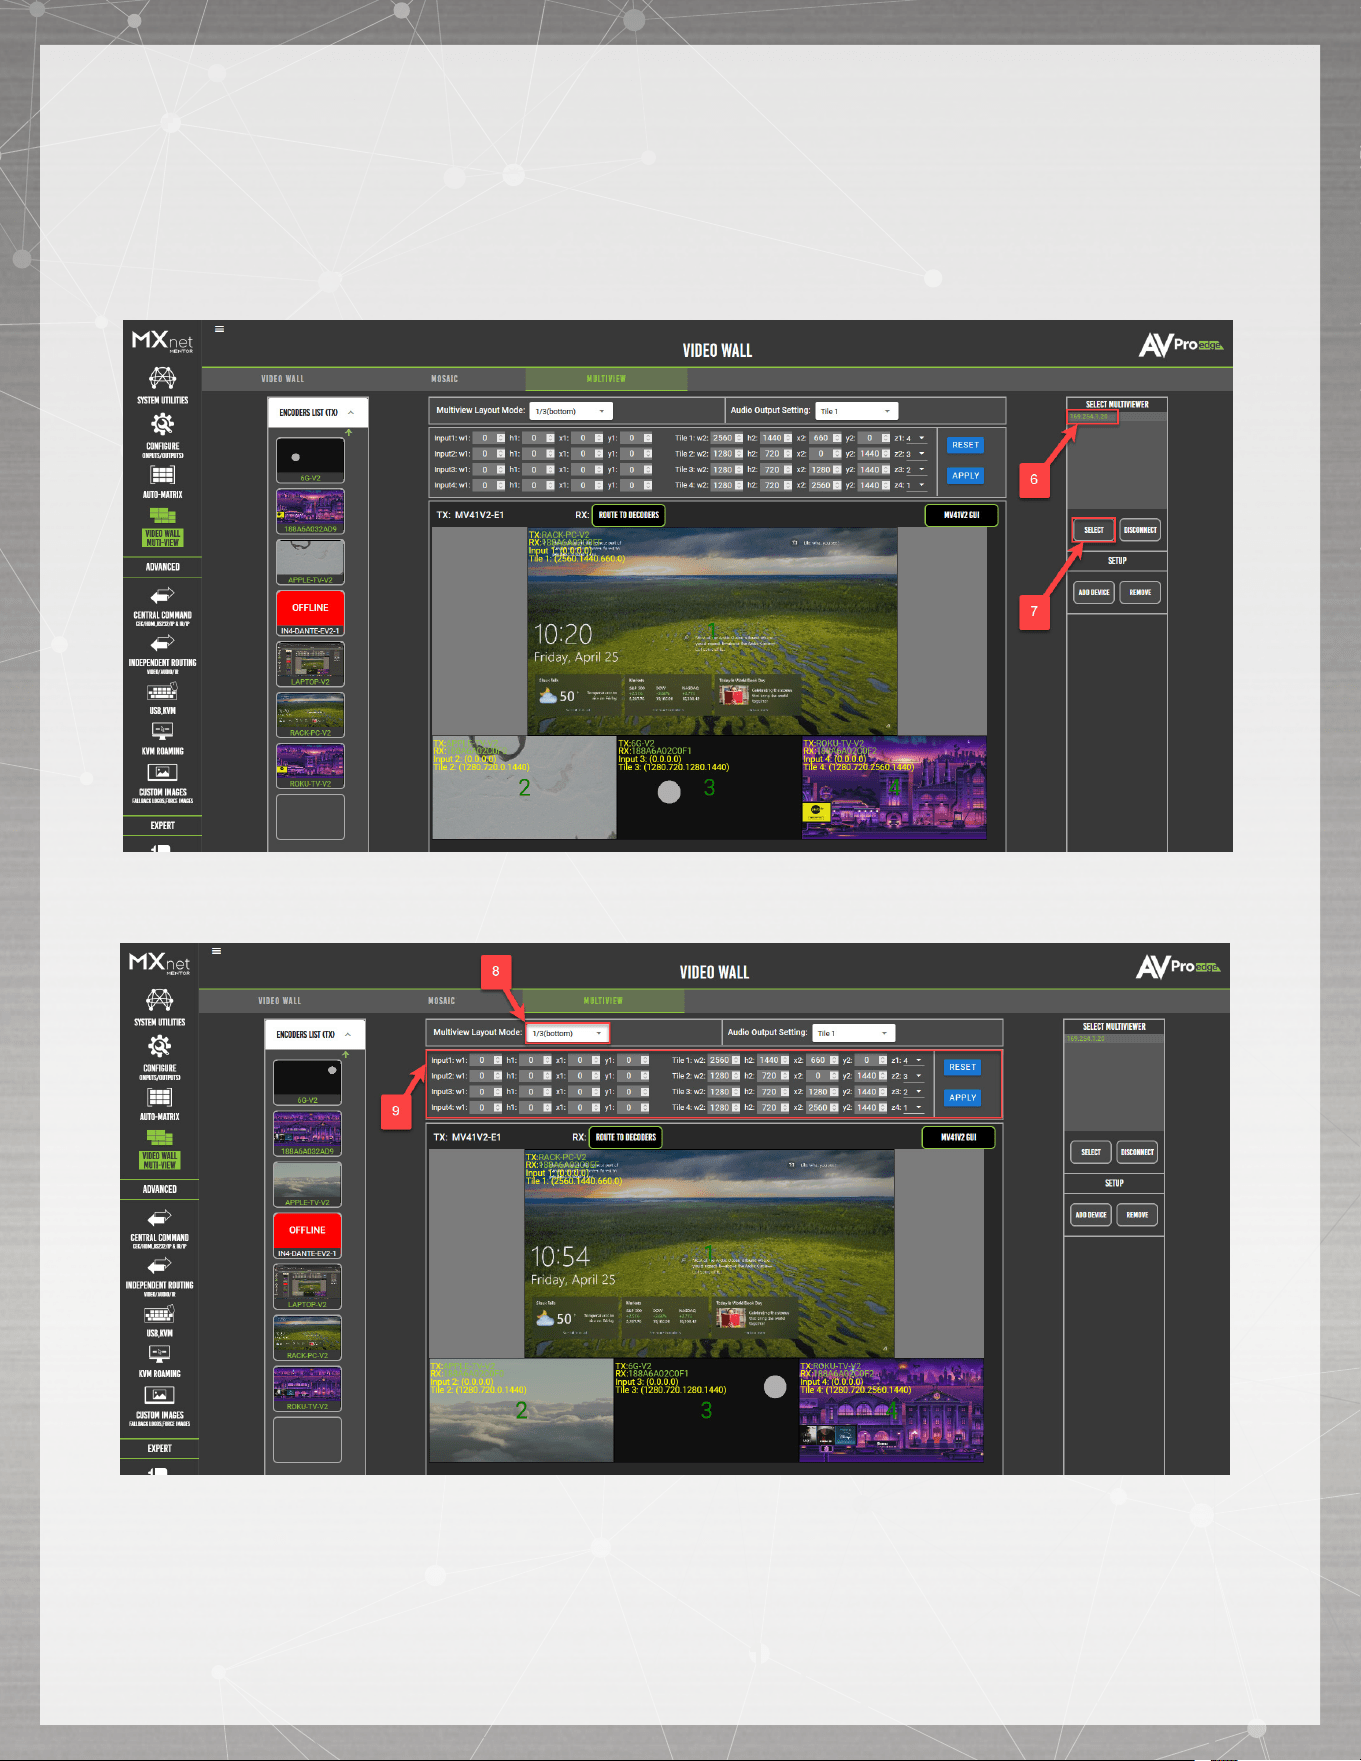
9. Select MV41V2 from the list of MULTIVIEWERs
10. Select preset layouts or customize
MULTIVIEW
From here, you can switch your sources and displays just like you would with an HDMI matrix
switcher. The sources are located on the left, and the 4x Multiview tiles in the main section. Simply
drag the source to the display tile you wish to view it on. You can also crop and position tiles using
The Input and Display 1-4 parameter boxes and pressing the APPLY button. You can also change
the Layout Mode of the Multivew via the dropdown. Various tiles placements can be achieved as
well by dragging resizing the tiles themselves on the screen.
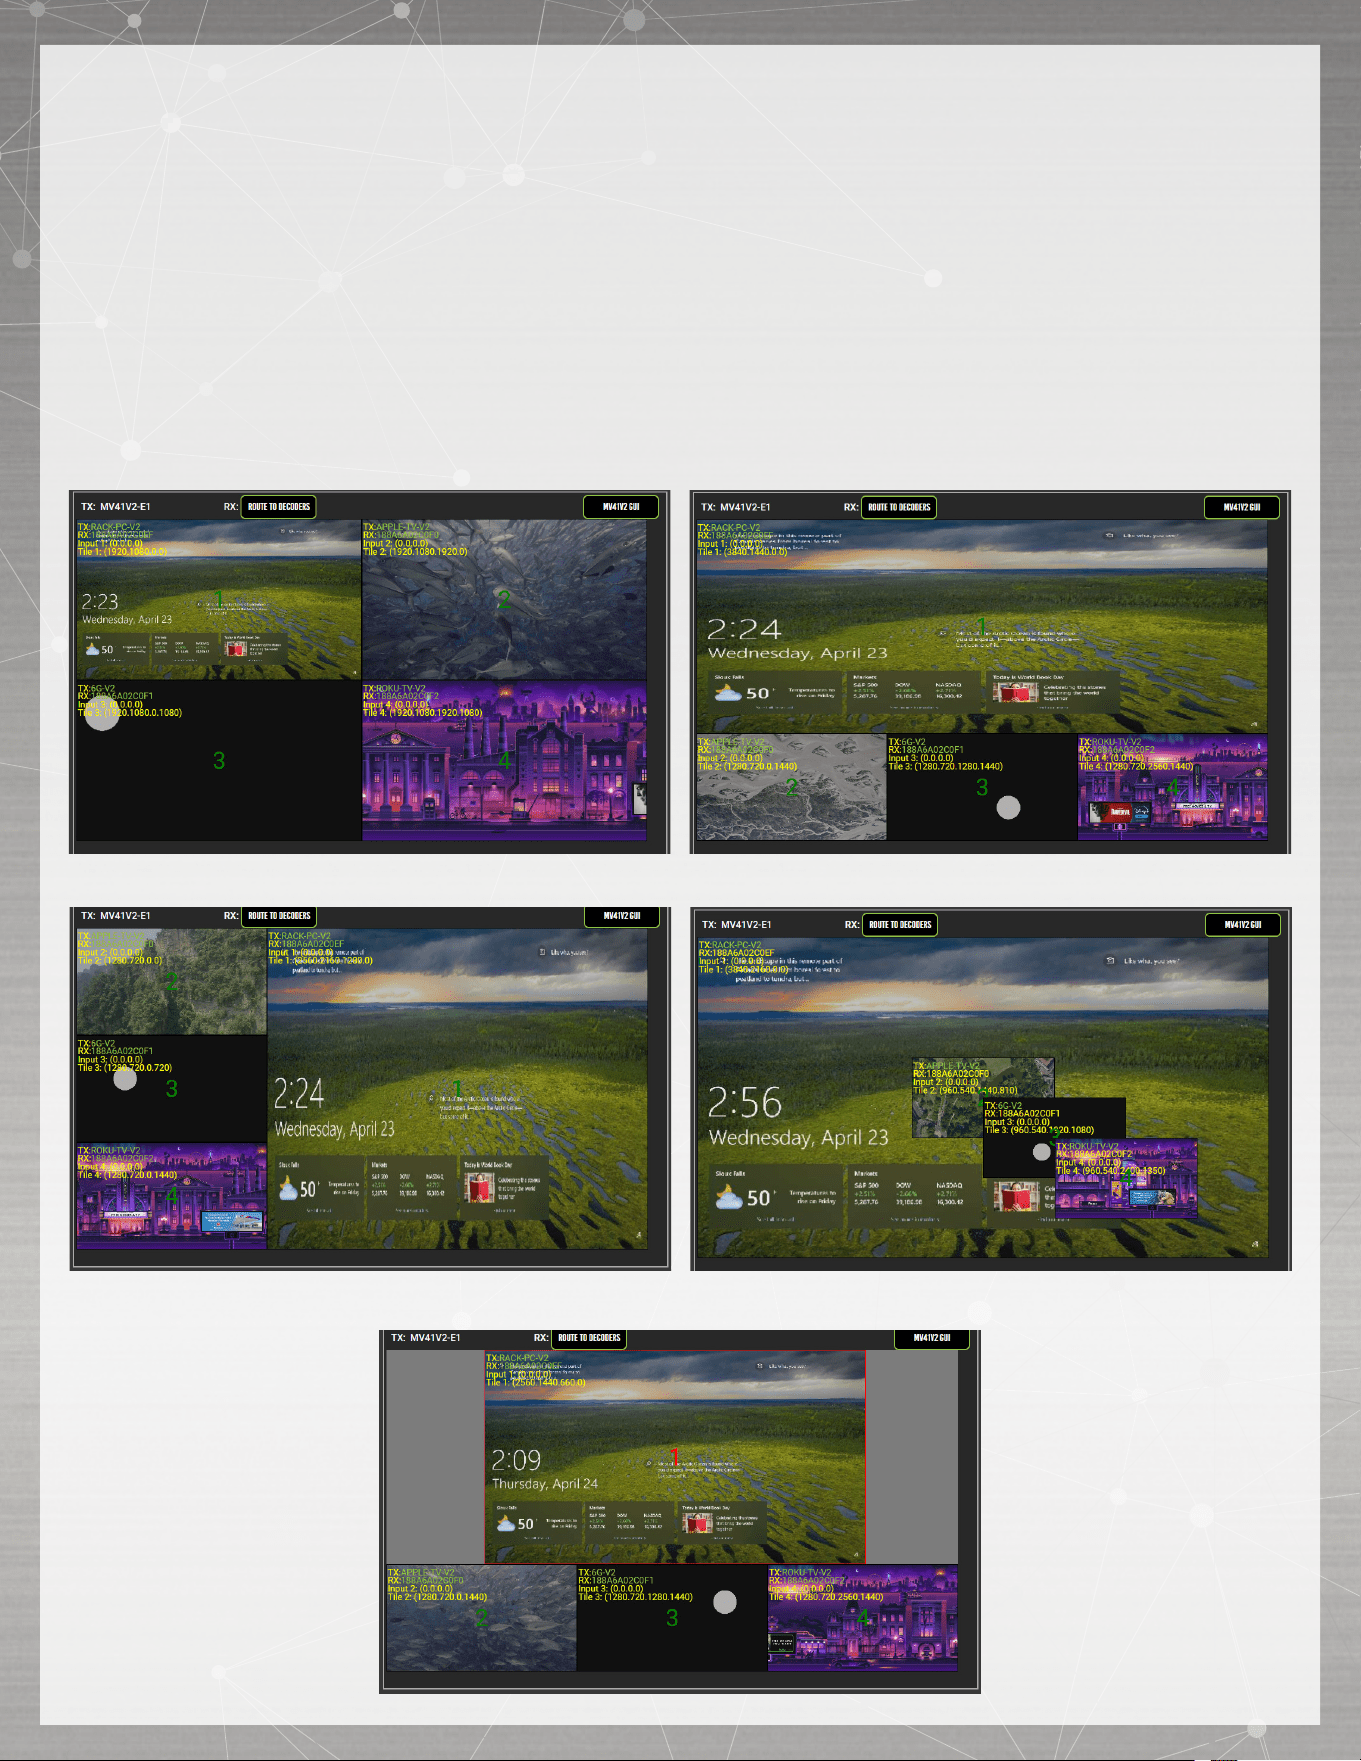
FACTORY PRESET
2X2 1/3 Bottom
3+1 Left Cascade
Custom Layout

TROUBLESHOOTING
Encoder/Decoder/CBOX not powering up – If all devices are not getting power, verify the power
connection on the Network Switch and check the LED indicator lights for each device connection. If
only one device isn’t getting power, verify your connection to the Network Switch is appropriate (see
examples below).
Verify Connections (device not getting power, video signal dropouts, Mentor shows device with poor
network connection, etc.) – Check that all cables are properly connected and not tightly bundled
together or exceeding their bend radius.
• Re-terminate using standard RJ-45 connectors. Avoid using push-through or “EZ” type ends,
as these have exposed copper wiring at the tips that can damage or bend the pins inside the
ports.
• Generally speaking, the higher the video resolution and the longer the run, the better the
cabling should be. For most applications, Cat 5e (or better) is recommended with MXNet.
• Swap ports, cables, devices, etc., to help narrow down if the issue stays with the port, cable,
or device. Try replicating the issue with a shorter, factory-terminated patch cable closer to the
Network Switch.
• If using a third-party network switch, verify its IGMP settings, MTU size, PoE Budget, and EEE
functionality are configured correctly. Third-party switch requirements and settings for MXNet
can be found here.
Encoder/Decoder not showing up in Mentor – Check the mini-OLED screen on the front panel of the
Encoder/Decoder and verify if it shows the MAC address and its current IP address. The IP address
(if running default configurations on an MXNet switch) should be a link-local address of 169.254.x.x.
If the address is a non-link-local address, and the MXNet switch/CBOX is running default factory
configurations (no IP settings changed), please reach out to AVPro Technical Support for further
assistance.
Verify EDID’s and Scaling – If you’re having issues with 4K signals, but 1080p is working, verify all the
connected devices are capable of the signal you are sending.
• Adjust the output resolution scaling down to a lower resolution, such as 1080p, on a Decoder
plugged into a display you’re having issues with. Adjusting the output resolution scaling allows
you to simultaneously send 4K signals to the more capable zones, and a lower resolution
signal to the non-4K displays, eliminating the need to downgrade the entire system when
using a mix of 4k and non-4K displays.

Have a question or need assistance?
Don’t hesitate to contact us!
SUPPORT: +1 605-274-6055
USA TOLL FREE: 877-886-5112
EMAIL: support@avproedge.com
Have a question or need assistance?
Don’t hesitate to contact us!
SUPPORT: +1 605-274-6055
USA TOLL FREE: 877-886-5112
EMAIL: support@avproedge.com