Technical Support and E-Warranty Certificate
www.vevor.com/support
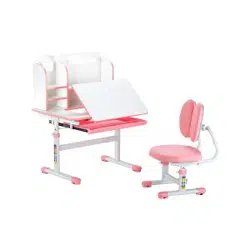
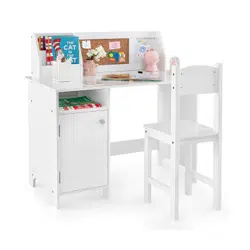
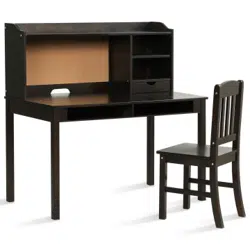
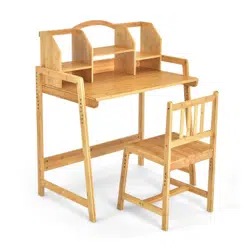
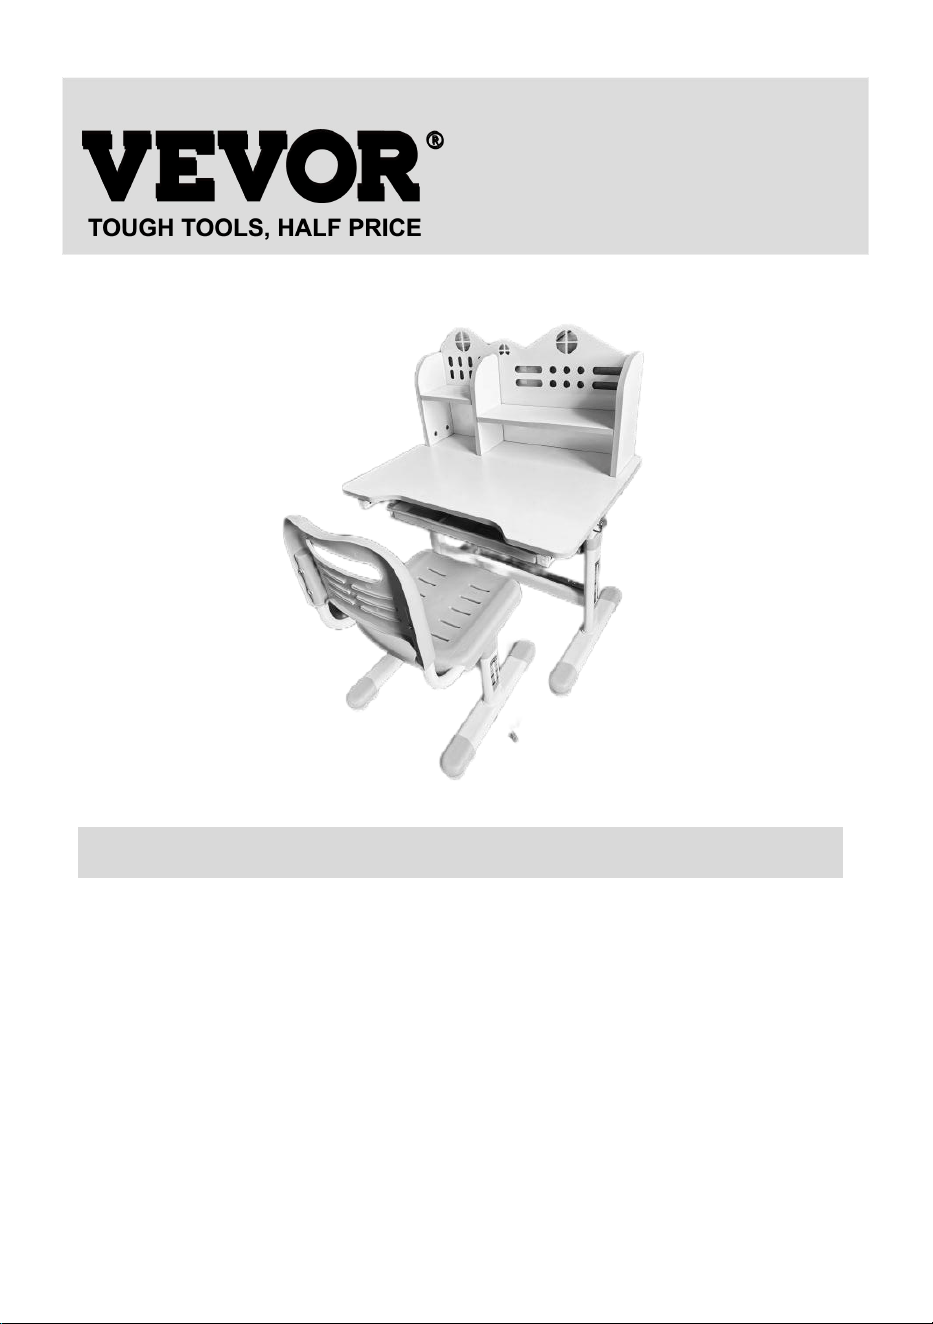
KID'S STUDY DESKS AND CHAIRS
USER MANUAL
MODEL:707
We continue to be committed to provide you tools with competitive price.
"Save Half", "Half Price" or any other similar expressions used by us only
represents an estimate of savings you might benefit from buying certain tools
with us compared to the major top brands and does not necessarily mean to cover
all categories of tools offered by us. You are kindly reminded to verify carefully
when you are placing an order with us if you are actually Saving
Half in comparison with the top major brands.
WARNING
Adult assembly
- 1 -
MODEL:707
NEED HELP? CONTACT US!
Have product questions? Need technical support? Please feel free to
contact us:
Technical Support and E-Warranty Certificate
www.vevor.com/support
This is the original instruction, please read all manual instructions
carefully before operating. VEVOR reserves a clear interpretation of our
user manual. The appearance of the product shall be subject to the
product you received. Please forgive us that we won't inform you again if
there are any technology or software updates on our product.
KID'S STUDY
DESKS AND CHAIRS
- 2 -
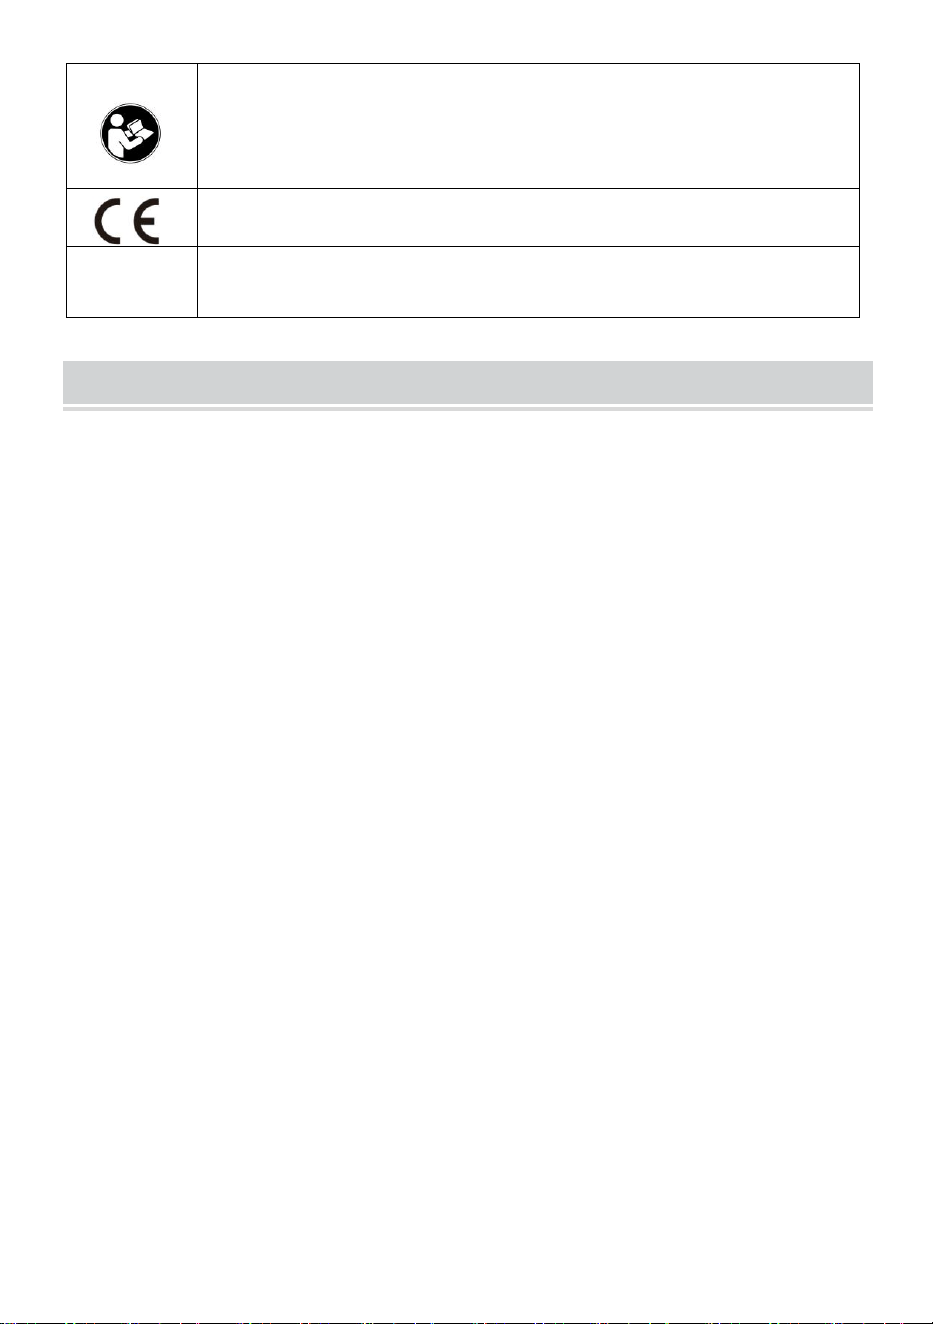
Warning-To reduce the risk of injury, user must read instructions
manual carefully.
Note: Adult assembly required !
Compliance is a CE security certification.
Ages
3 Years +
SAFETY INSTRUCTIONS
WARNING:
Read this material before using this product. Failure to do so may
result in serious injury.
Cautions
1. Do not place your hands on the desk frame when turning over the desk
to avoid pinching.
2. Do not put your head under the desk and chair when adjusting the
height of the desk and chair.
3. Young children should be guided by adults in use.
4. The load on the desk and chair set should be within its load capacity.
5. Air circulation should be maintained during use (temperature between
18-28 degrees Celsius, relative humidity between 40%-60%).
6. Do not use this desk and chair set in direct sunlight, next to air
conditioning vents or next to heaters, to reduce the possibility of
discoloration or aging.
7. Pay attention to the height of the desk and chair on both sides to avoid
loosening of the connecting parts or deformation caused by slanting or
tilting.
8. Do not place hot or icy objects directly on the desktop to avoid
discoloration and permanent marks caused by extreme temperatures.
9. Do not use sharp objects on the desktop to prevent scratching the panel
and damaging its appearance.
10. Dry the water stains on the surface in a timely manner when cleaning

- 3 -
the desk and chair set.
Maintenance
1. Wipe off marks left by water-based pens and watercolor pens with
water.
2. Wipe off the marks left by oil-based pens using alcohol or essential
balm.
3. Do not use knives to scratch the desktop, even though the desktop is
moisture-proof, scratch-resistant, and wear-resistant.
SAVE THIS
INSTRUCTIONS
- 4 -
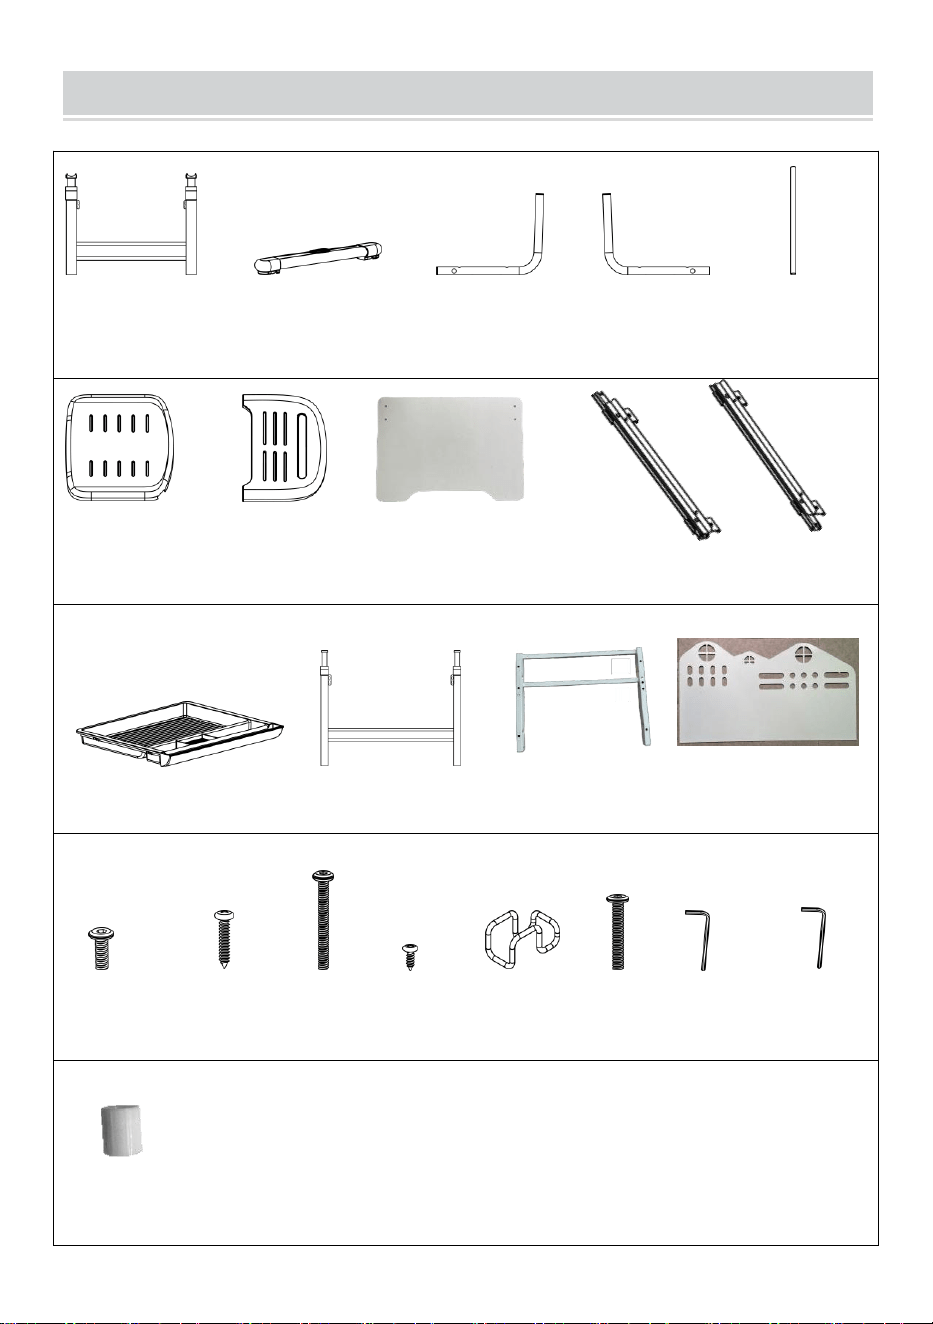
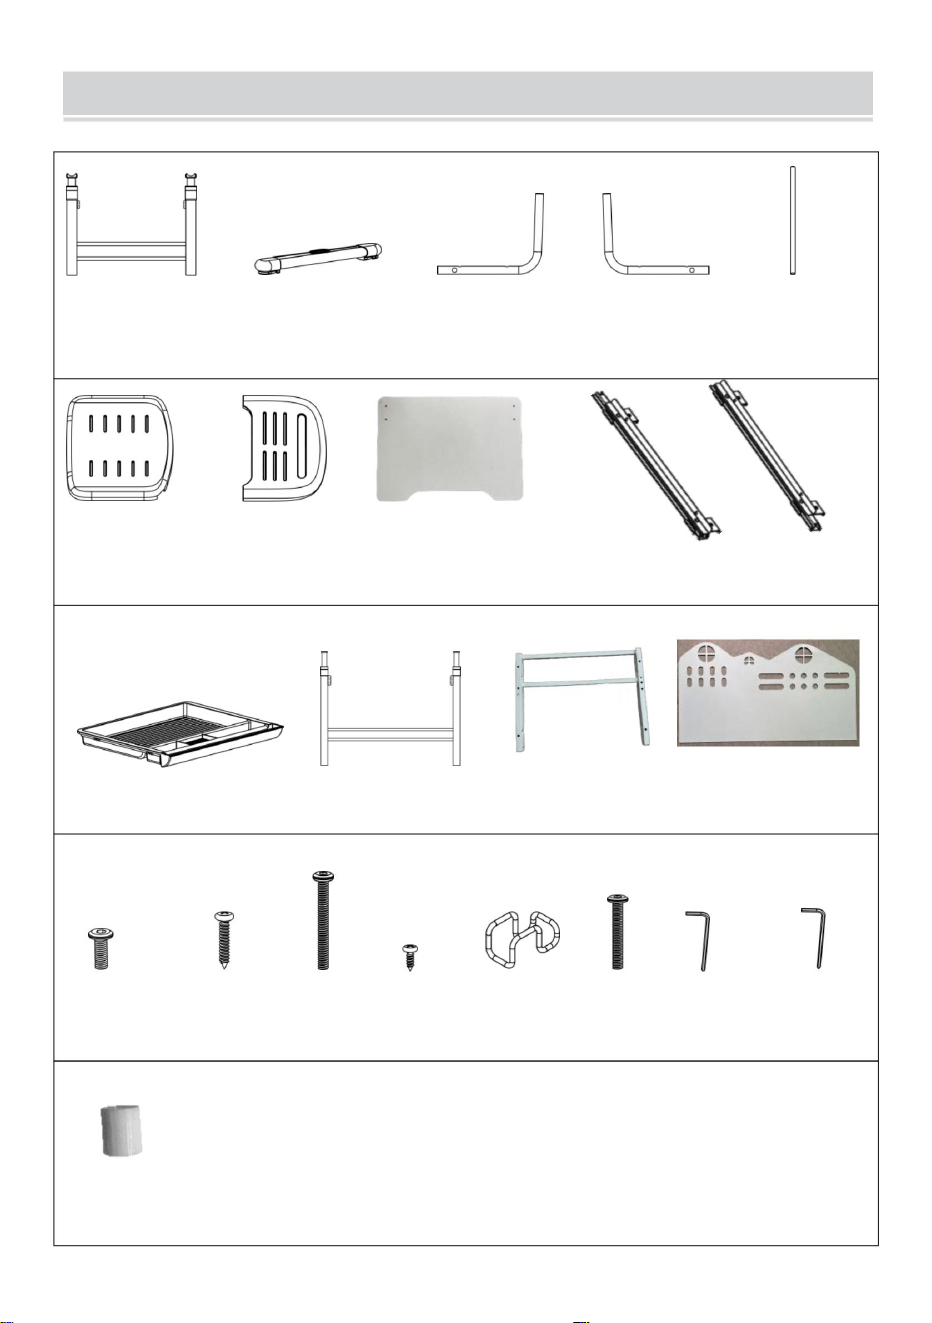
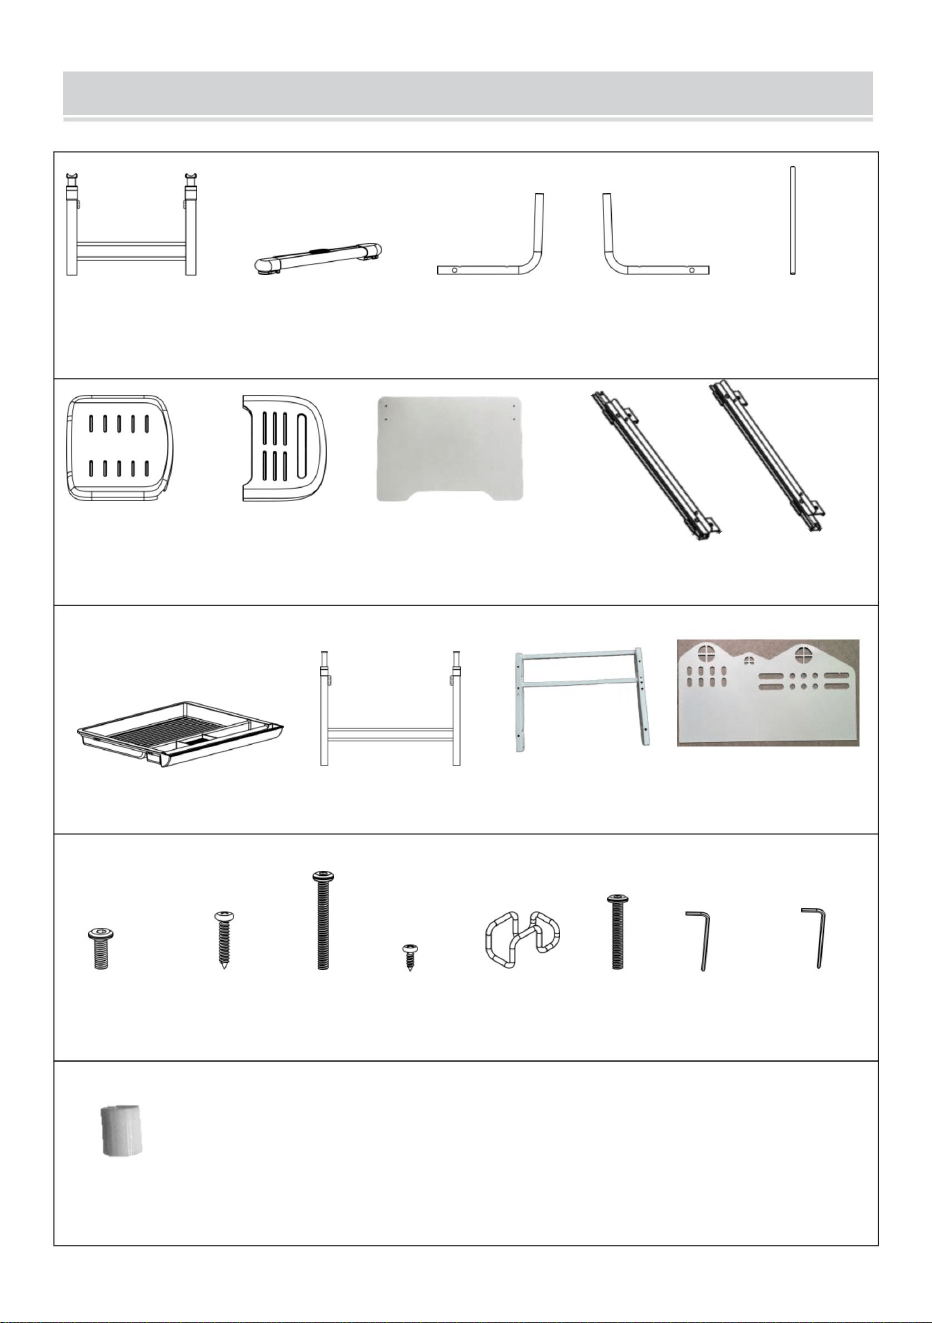
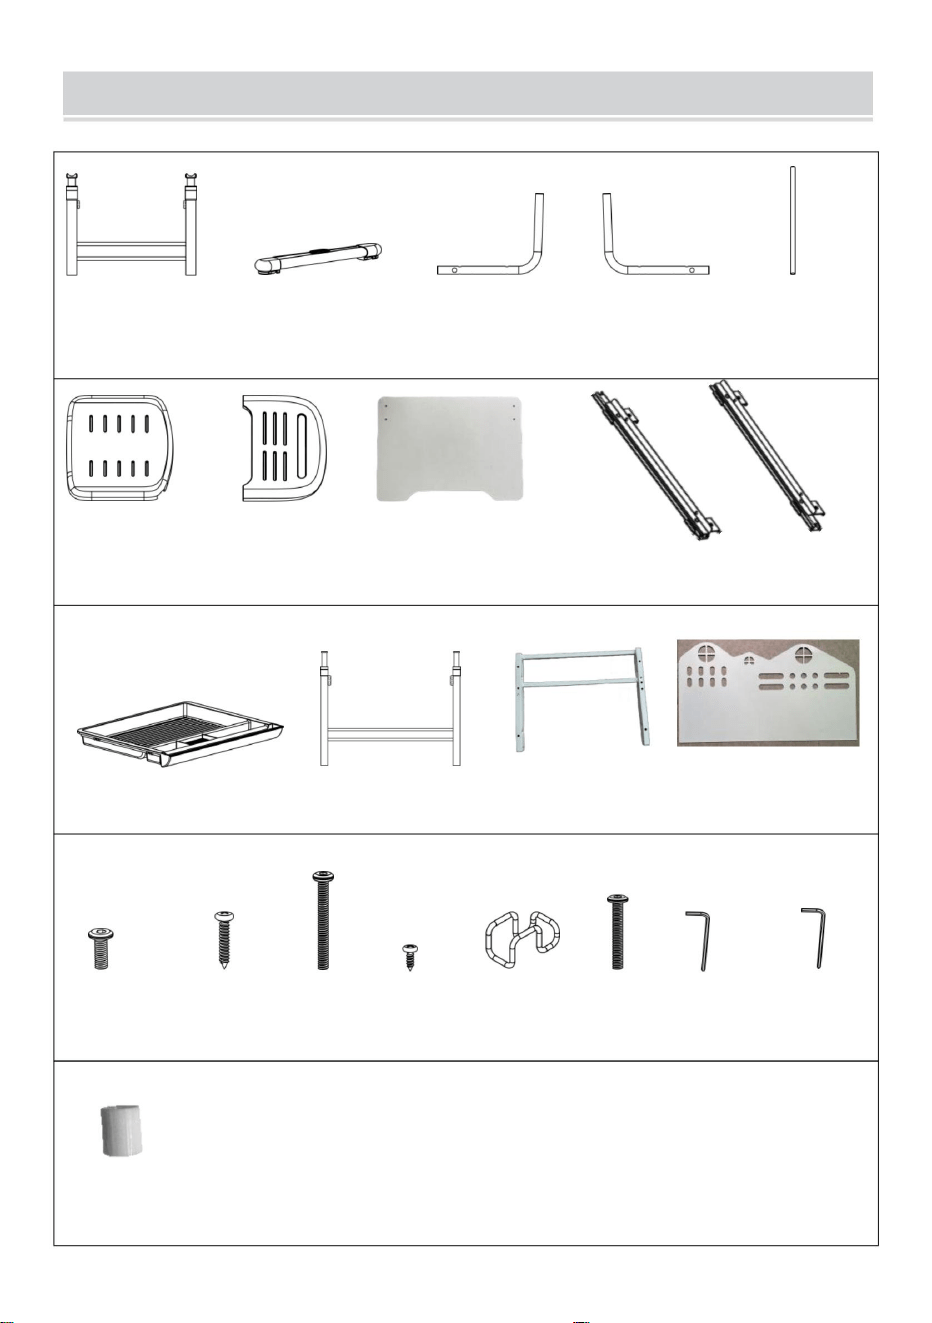
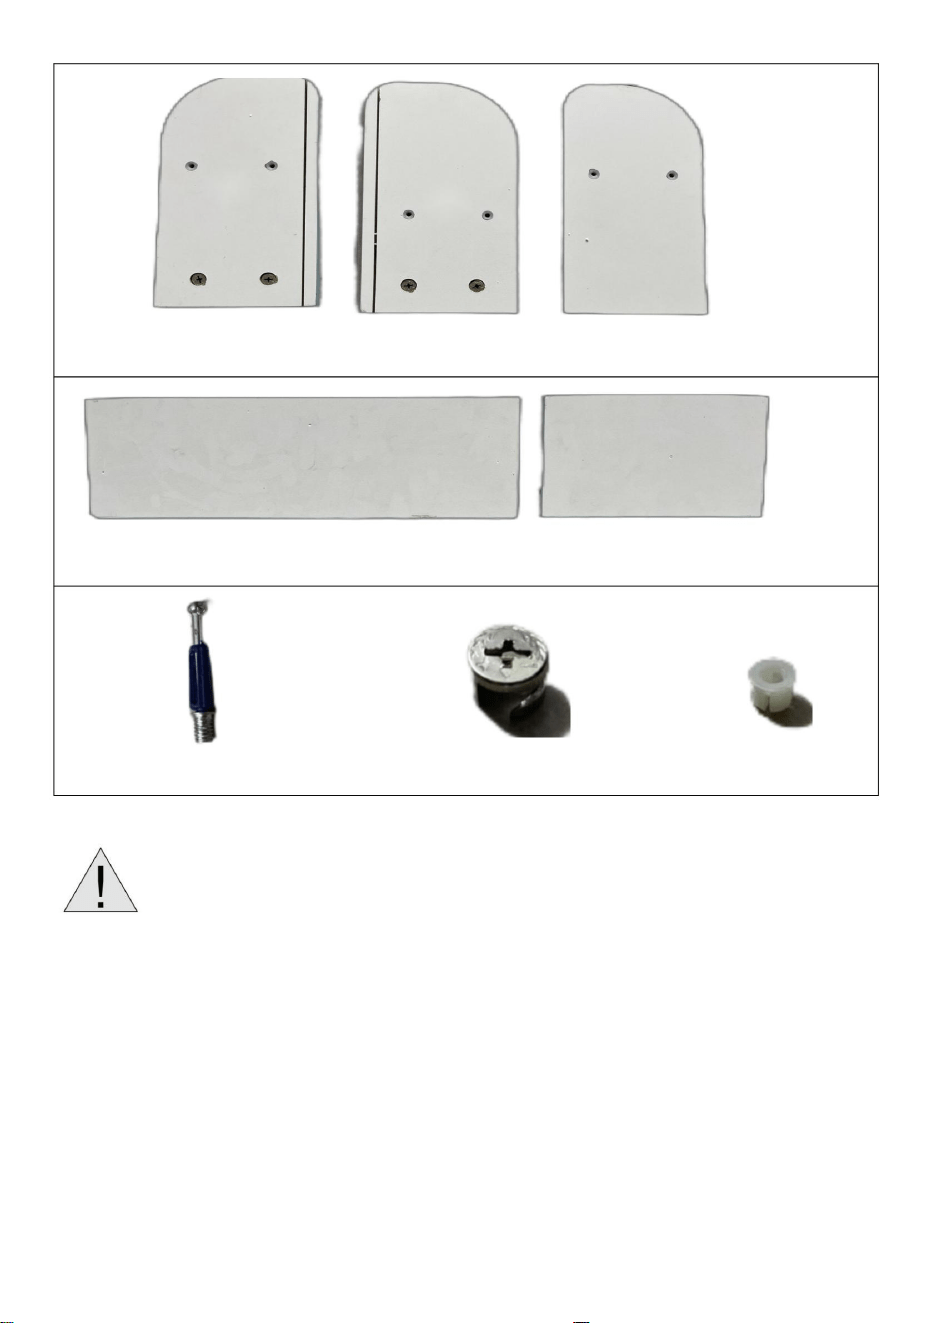
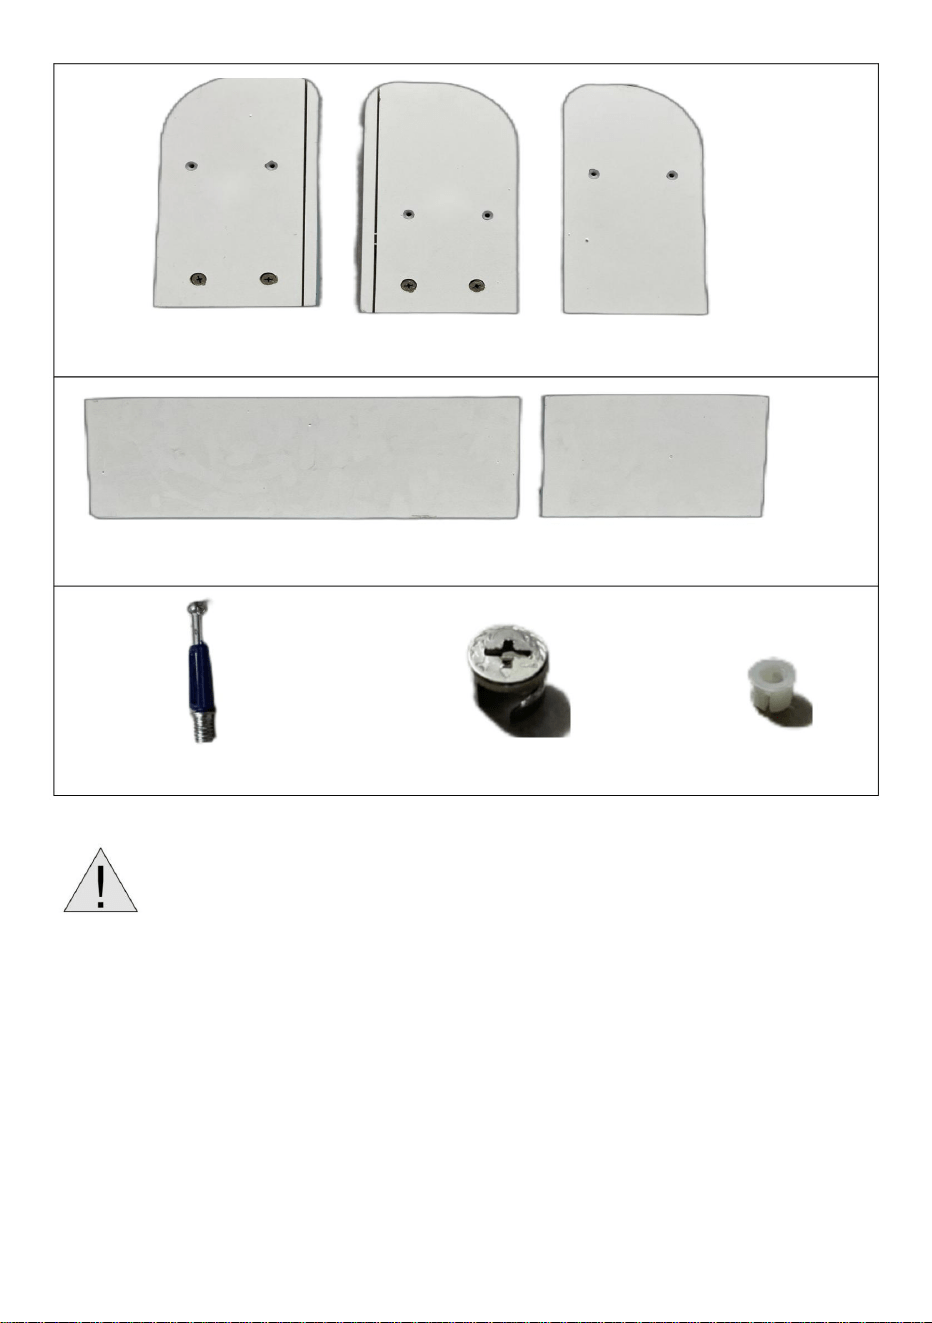
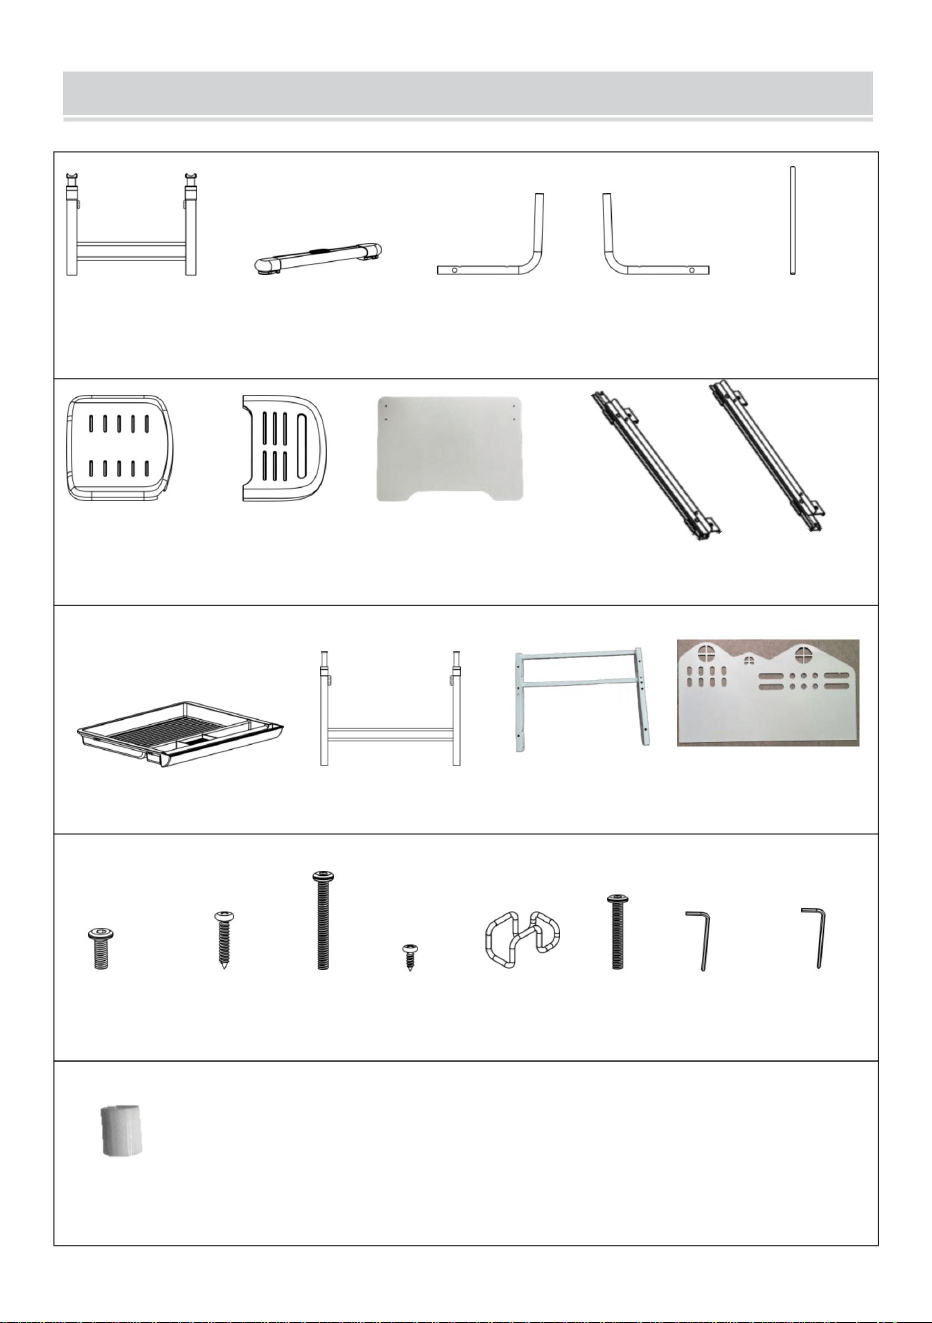
PARTS LIST
B1 B2x4 B3 B4 B5
B6 B7 B8 B9 B10
B11 B12 B13 B14
(6x20) (4x25) (6x55) (4x12) (6x42)
A2x18 A3x4 A7x4 A5x4 A6x1 A12x4 A8x1 A9x1
Upright x4

- 5 -
Attention:
① Once all screws are installed, tighten them one by one. Do not tighten
any screws before all are in place to avoid issues with adjustment or lifting.
② Do not get under or stay under the chair to avoid pinching.
③ Adult installation is required, and keep children away during the
installation.
④ Only suitable for children aged 3-18 years.
⑤ Do not use this desk and chair set under direct sunlight, next to air
conditioning vents, or next to heaters.
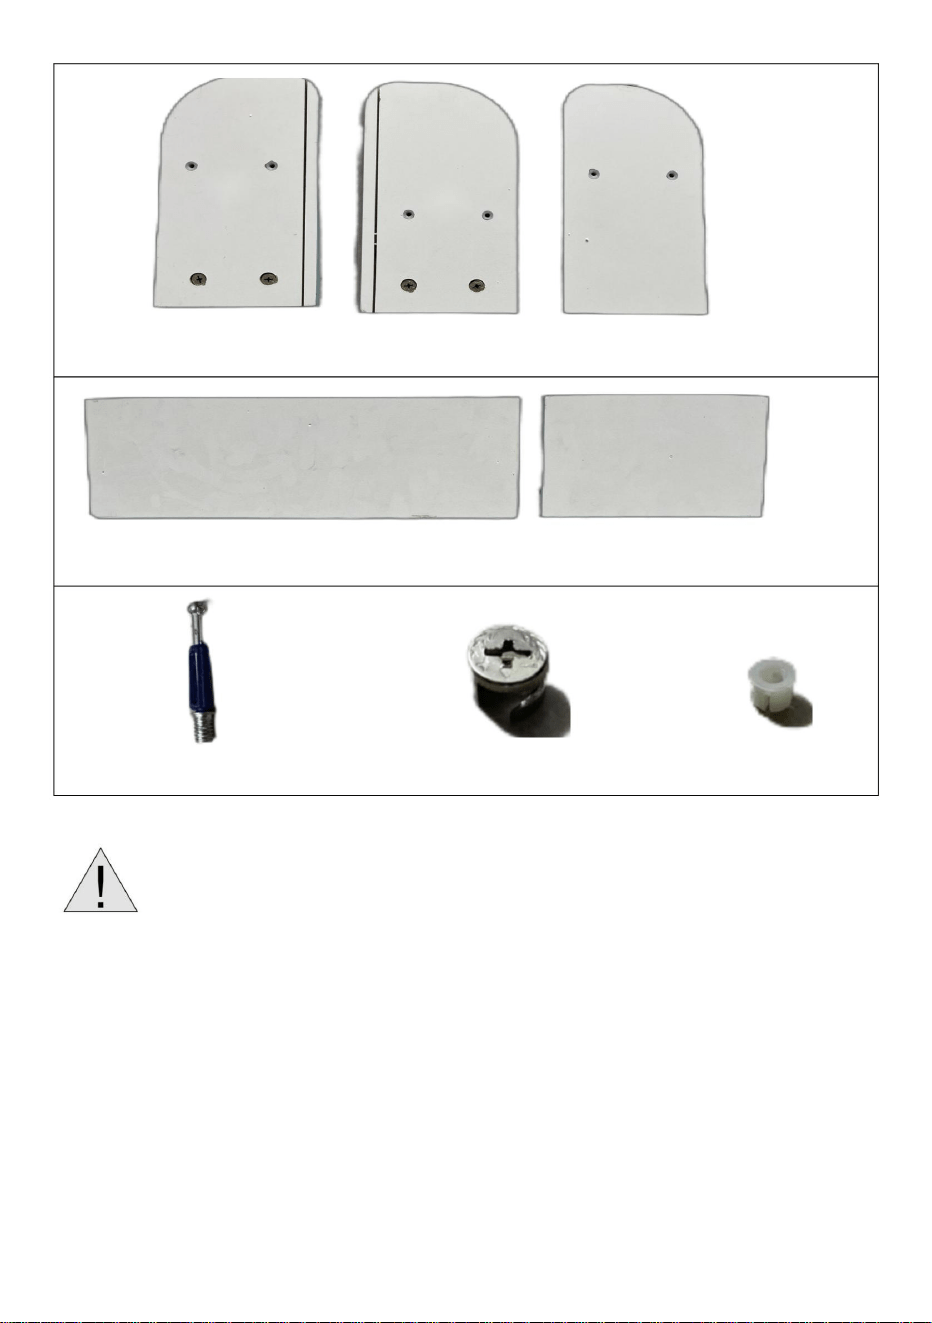
Board 1 Board 3 Board 2
Board 4 Board 5
Three-In-One Screw x12 Nut (Metal) x12 Nut (Plastic) x12
- 6 -
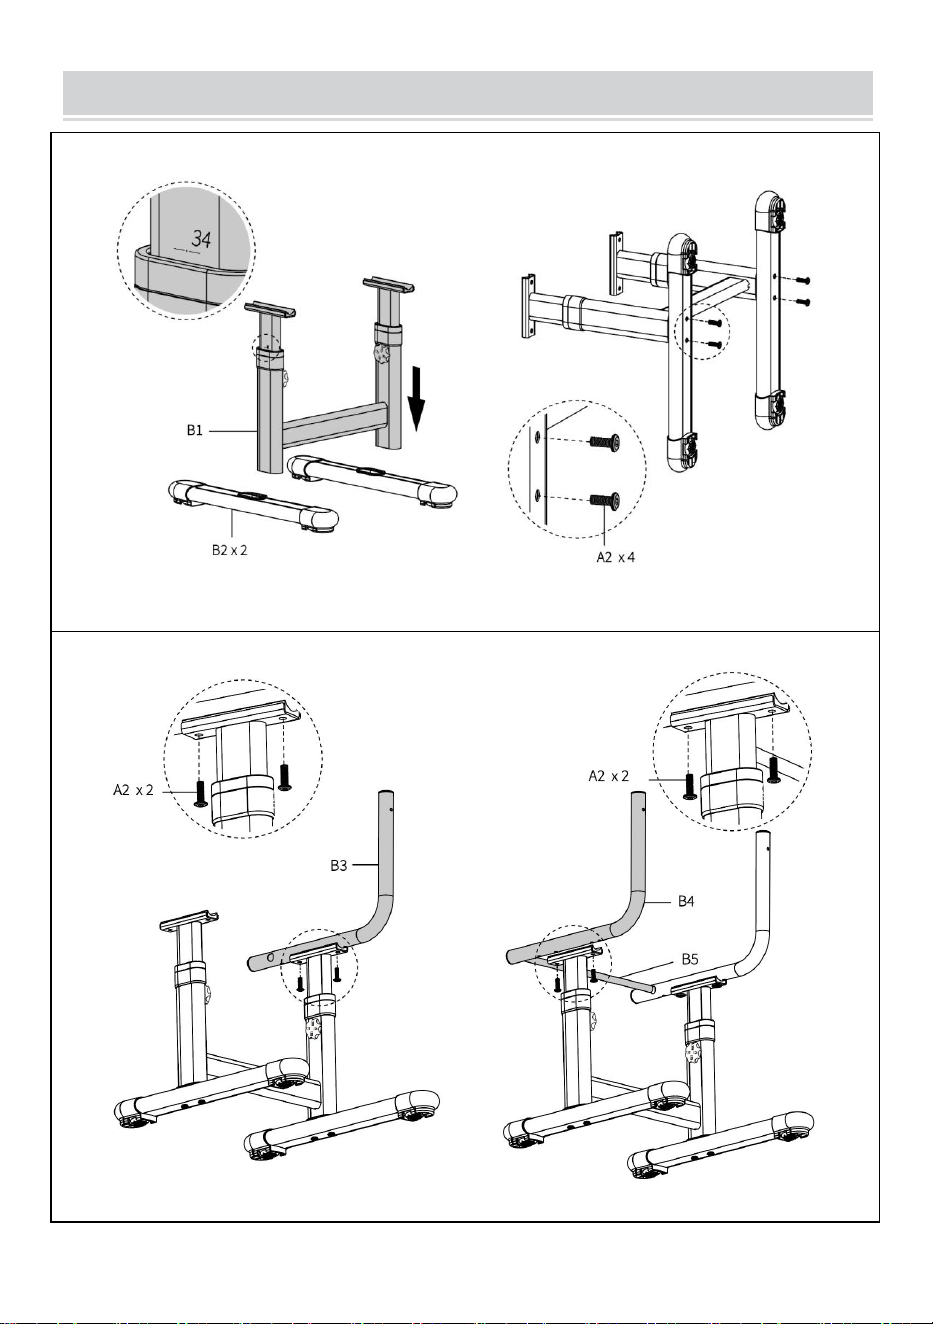
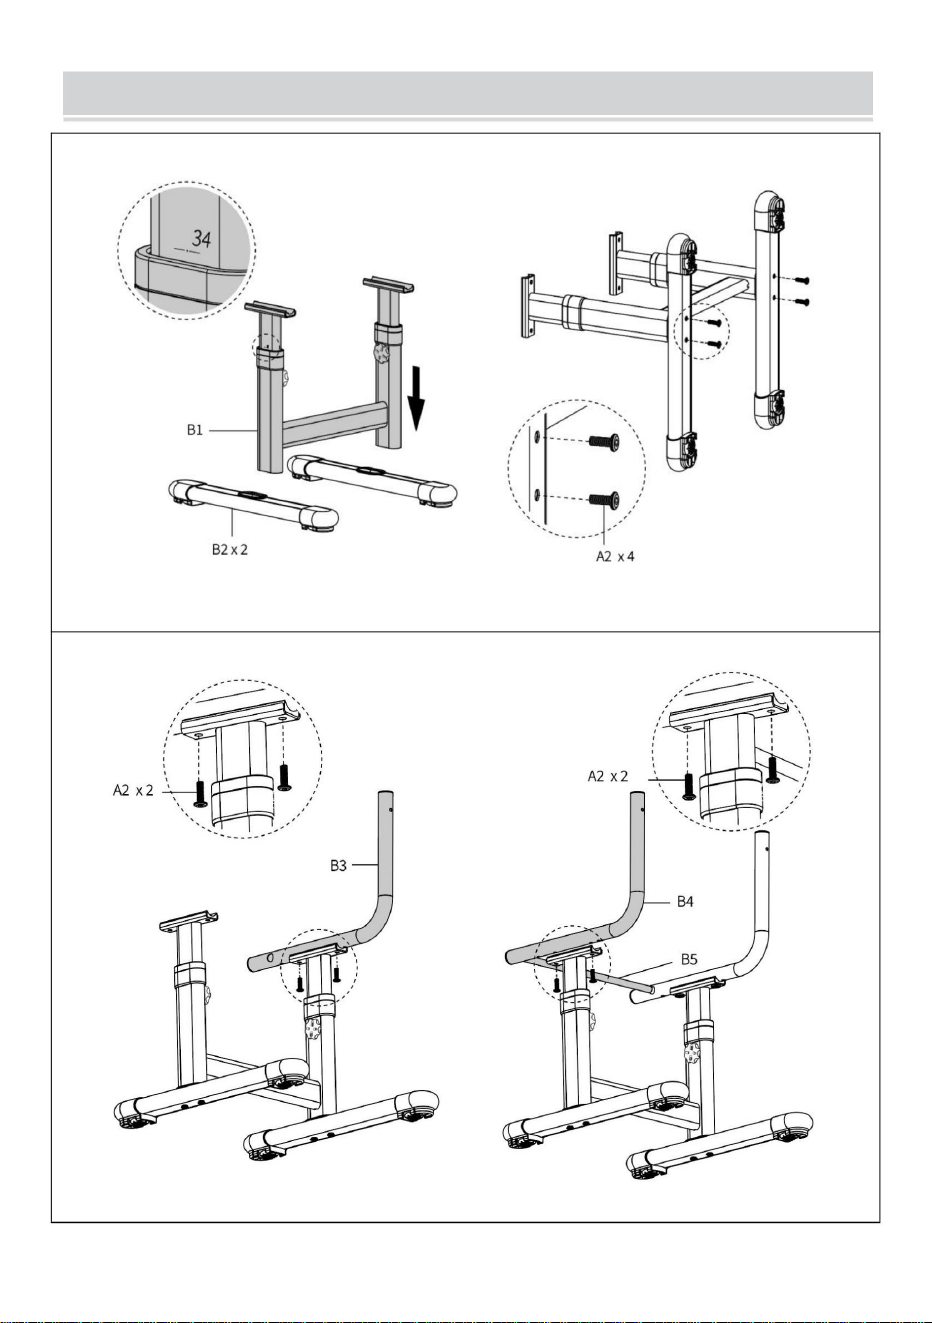
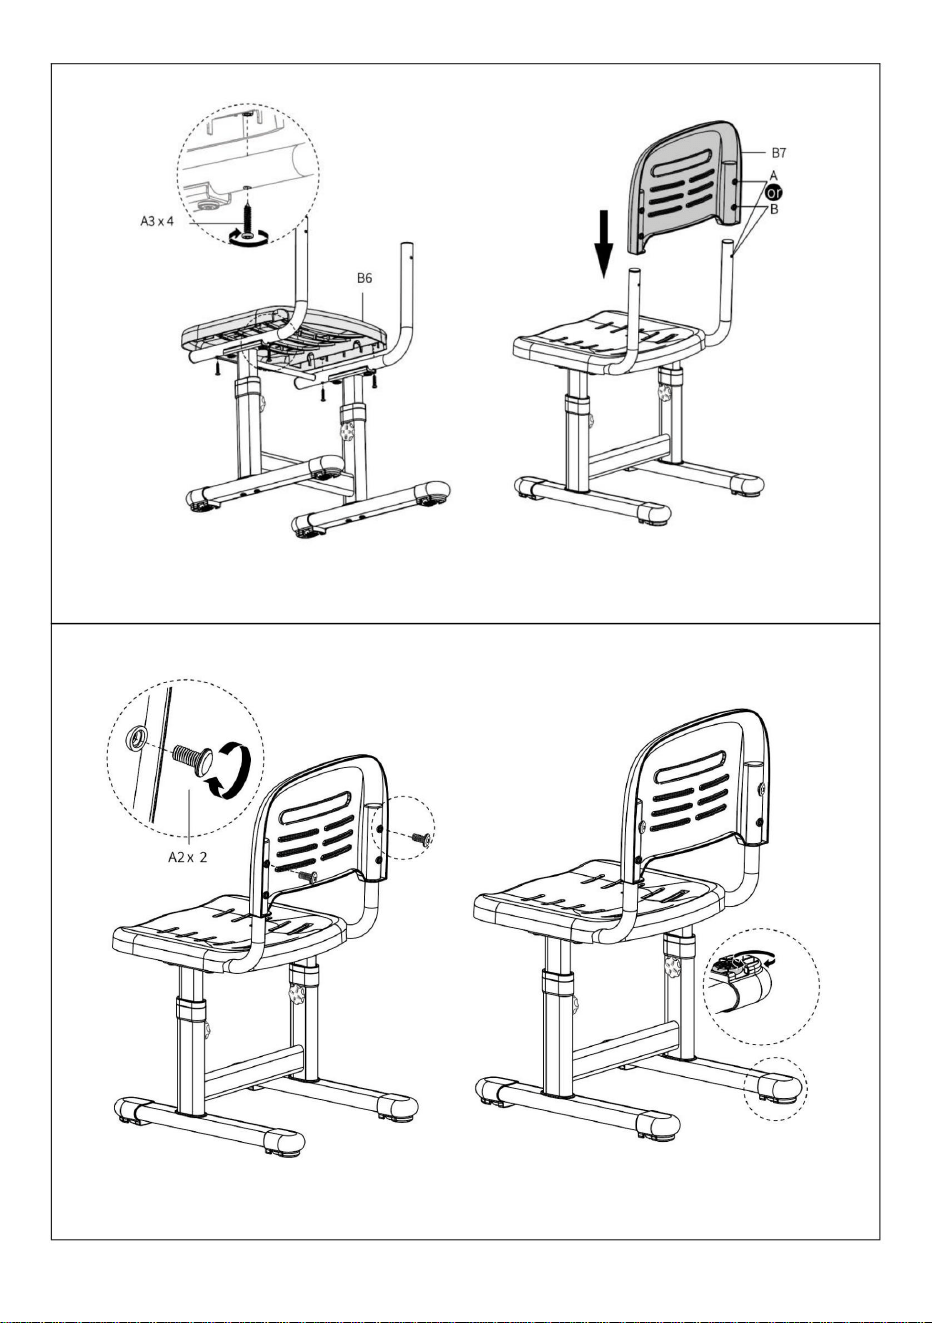
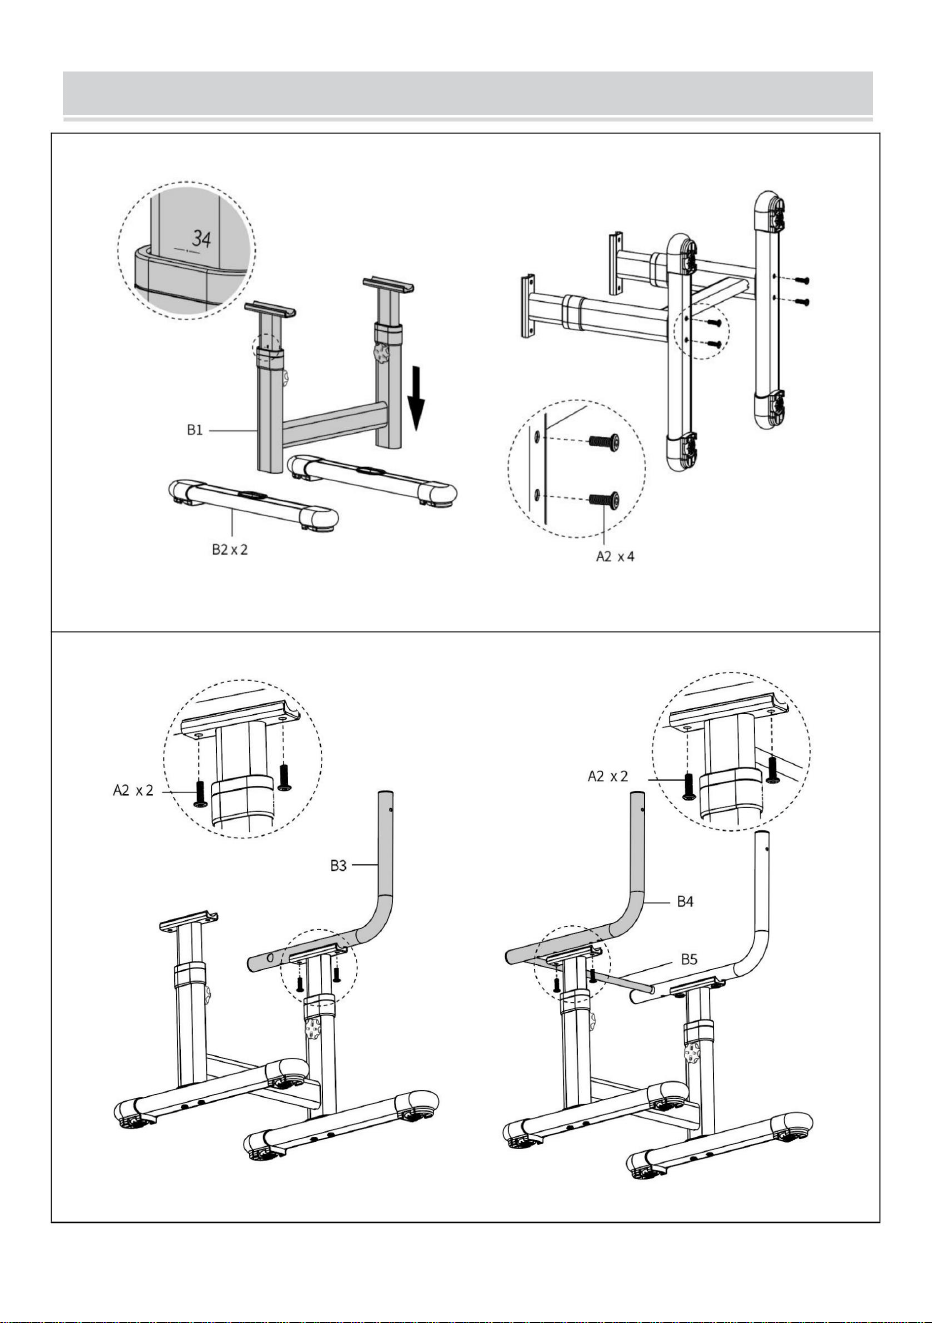
INSTRUCTIONS(CHAIR)
STEP 1
Assemble and secure the chair legs (B1, B2) with screws A2×4.
STEP 2
Assemble and secure the support bars (B3, B4, B5) with screws A2×4.
- 7 -
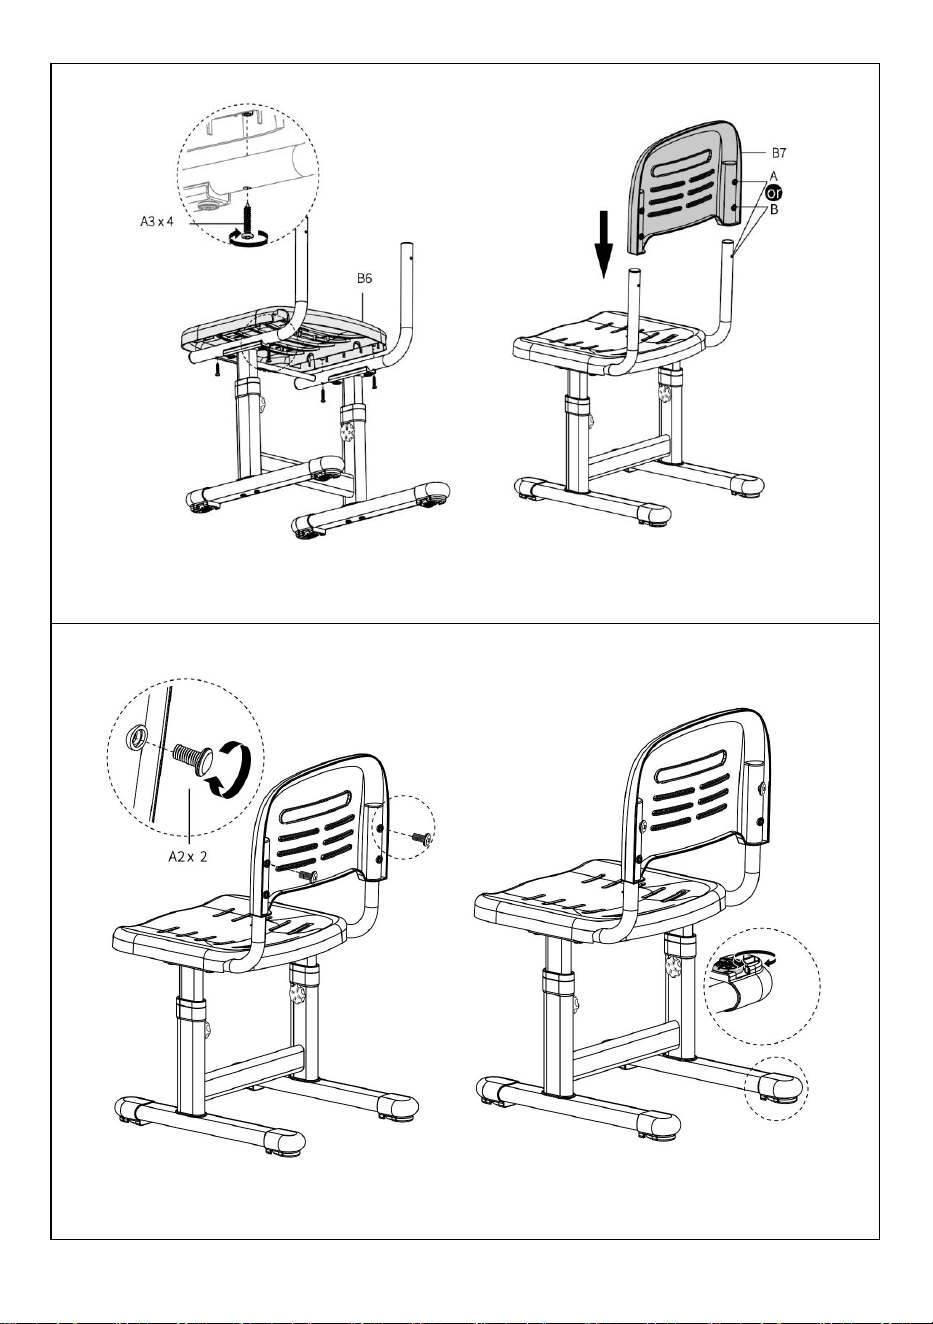
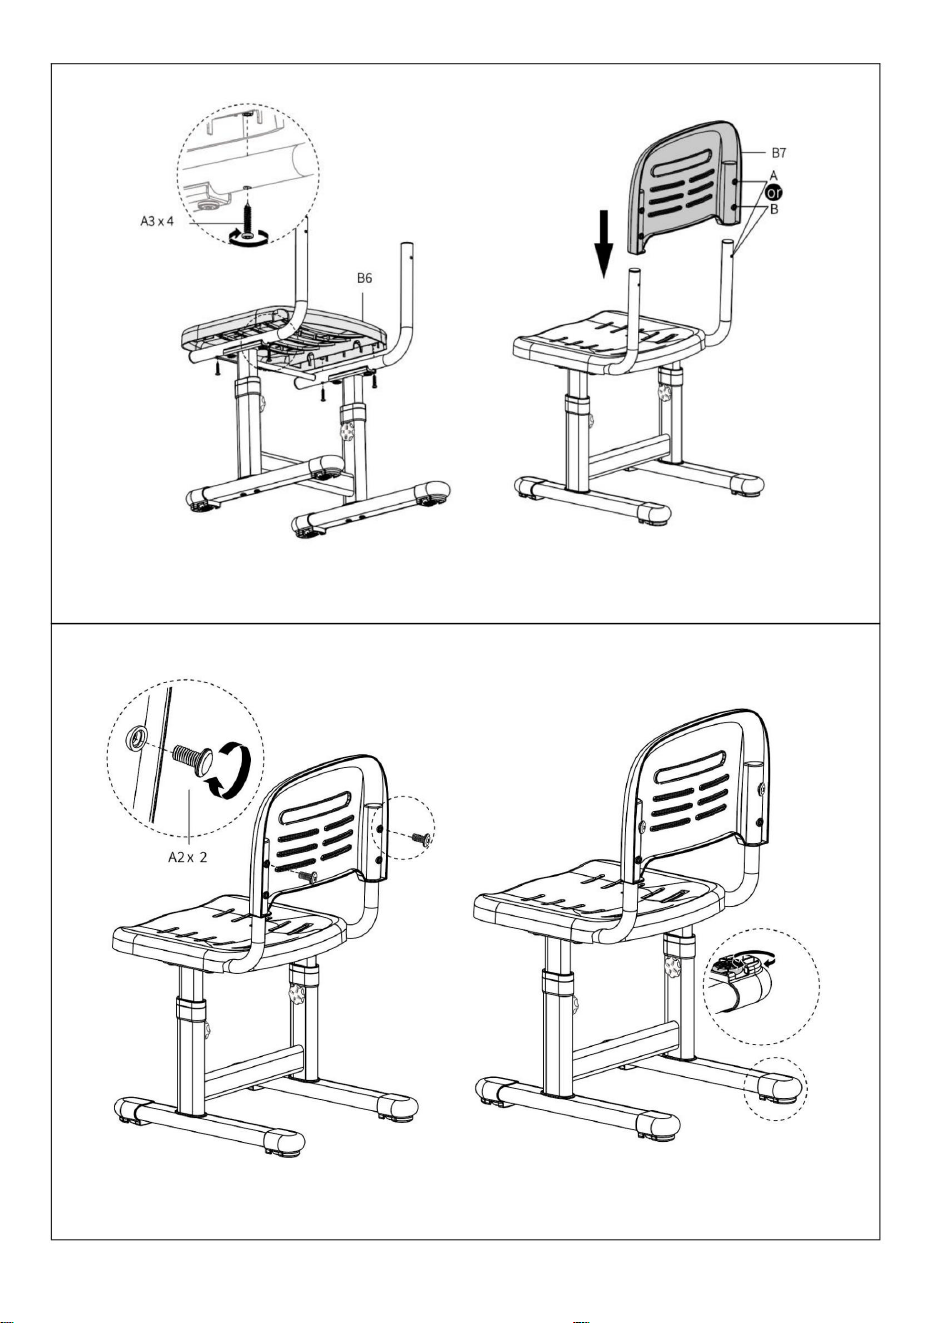
STEP 3
Assemble the seat board (B6) with screws A3×4, and insert the chair back (B7)
into the support bars.
STEP 4
Secure the chair back with the screws A2×2.
- 8 -
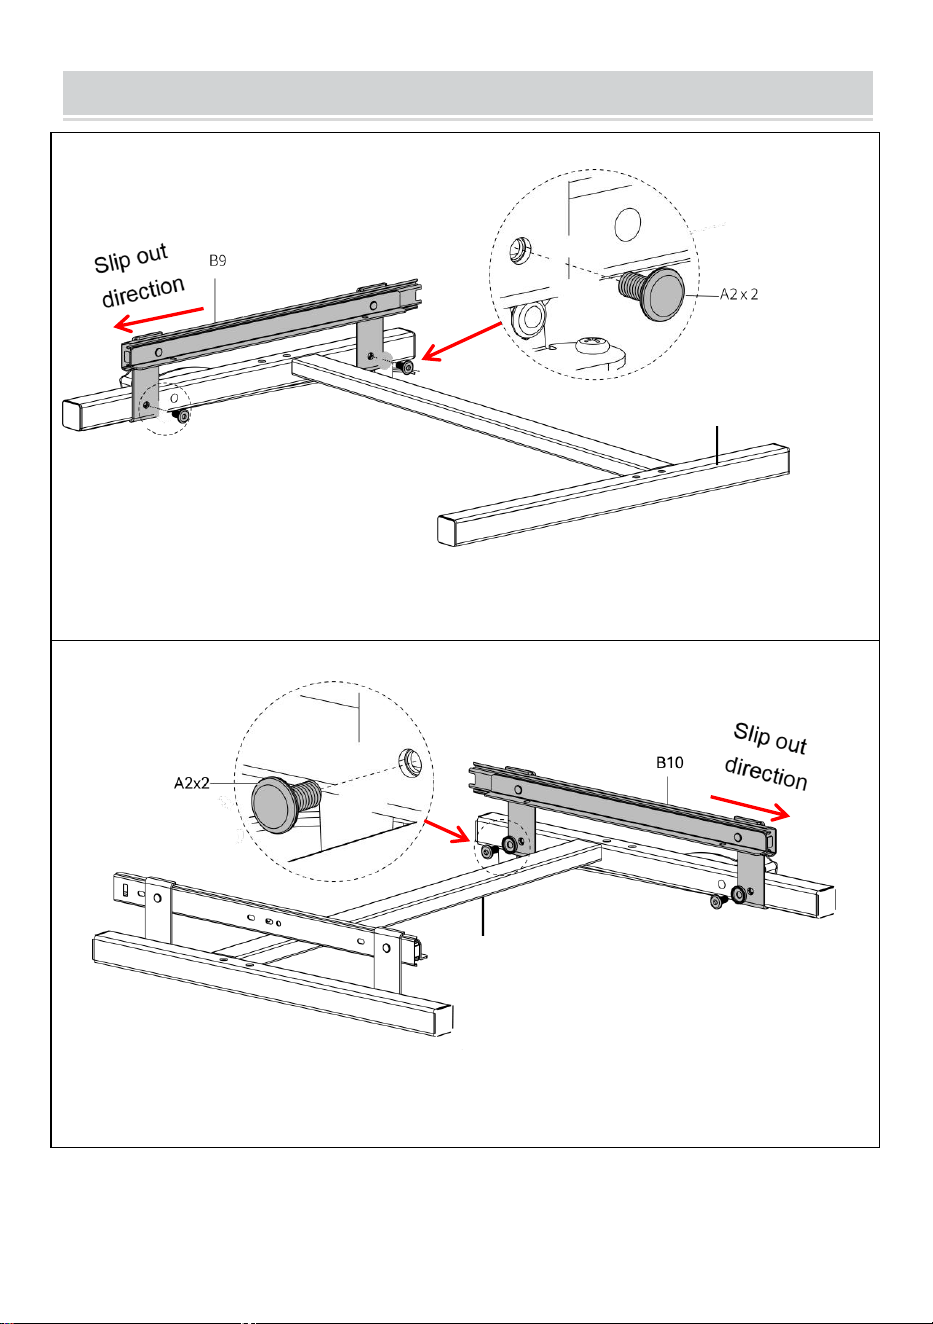
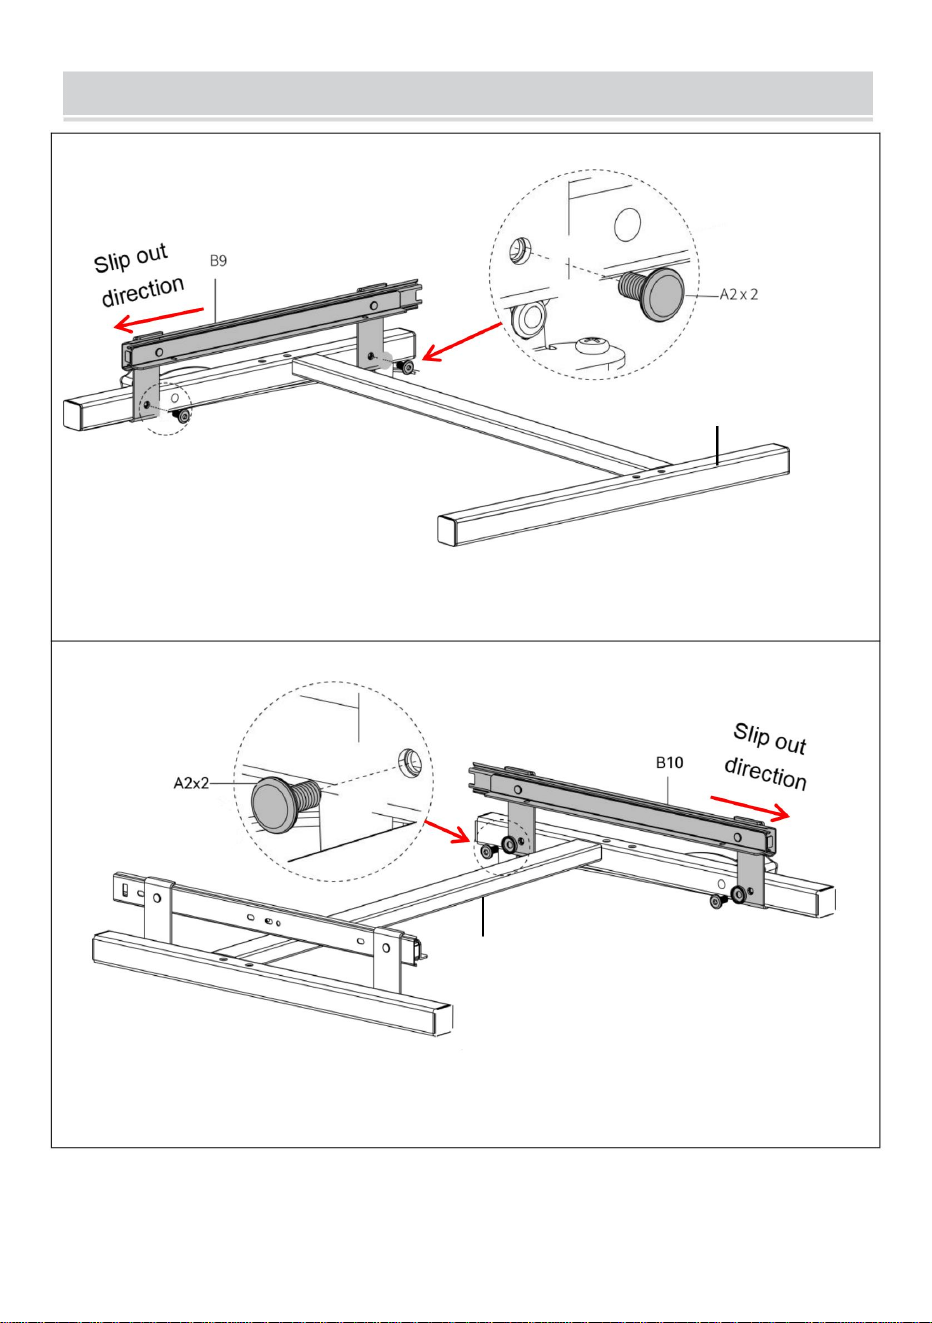
INSTRUCTIONS(DESK)
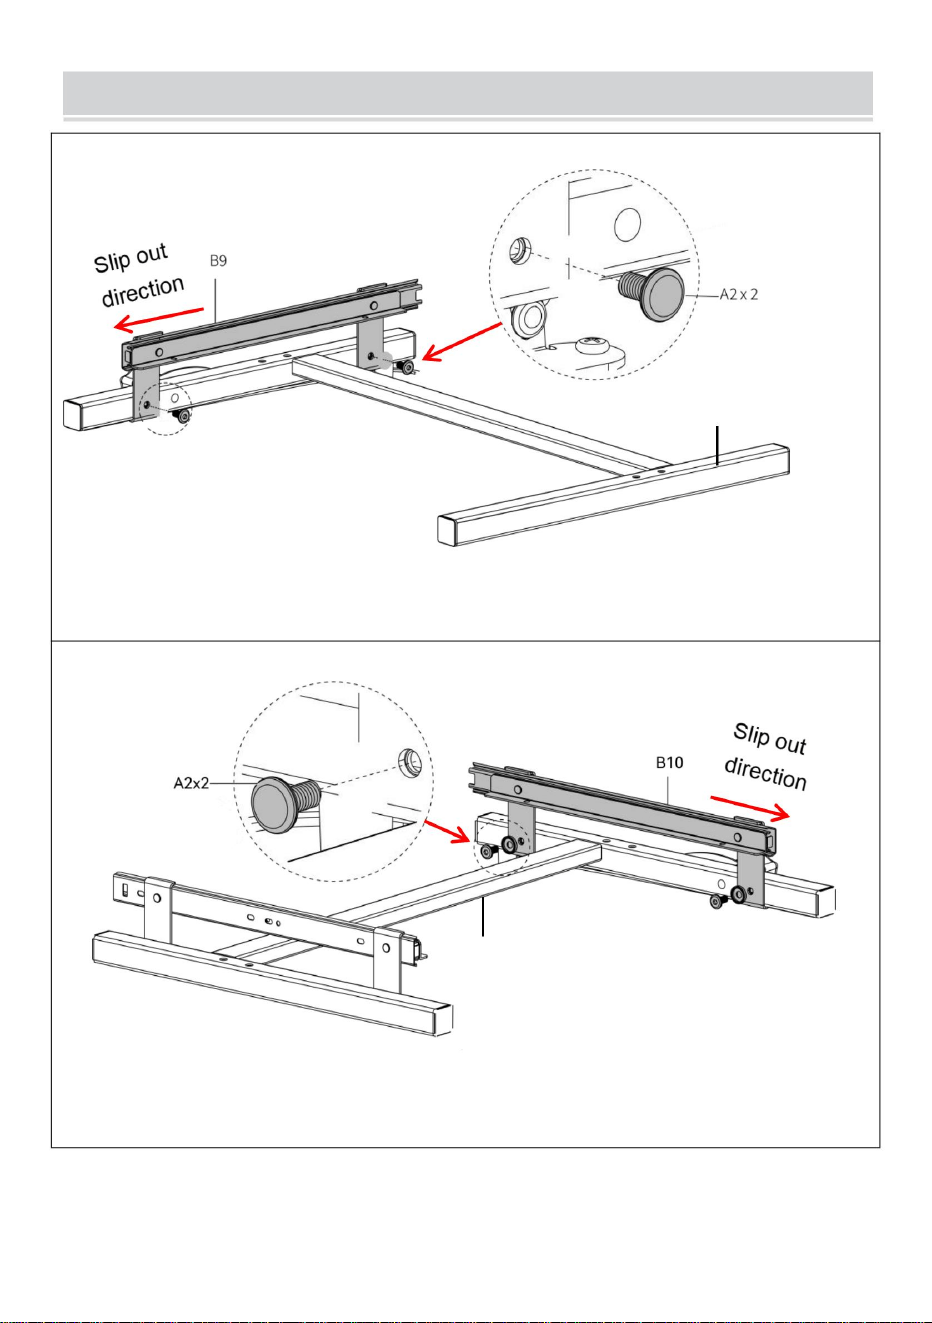
STEP 5
Assemble and secure one slide rail (B9) to the iron stand (B13)
with screws A2×2.
STEP 6
Assemble and secure the other slide rail (B10) to the iron stand (B13)
with screws A2×2.
B13
B13
- 9 -
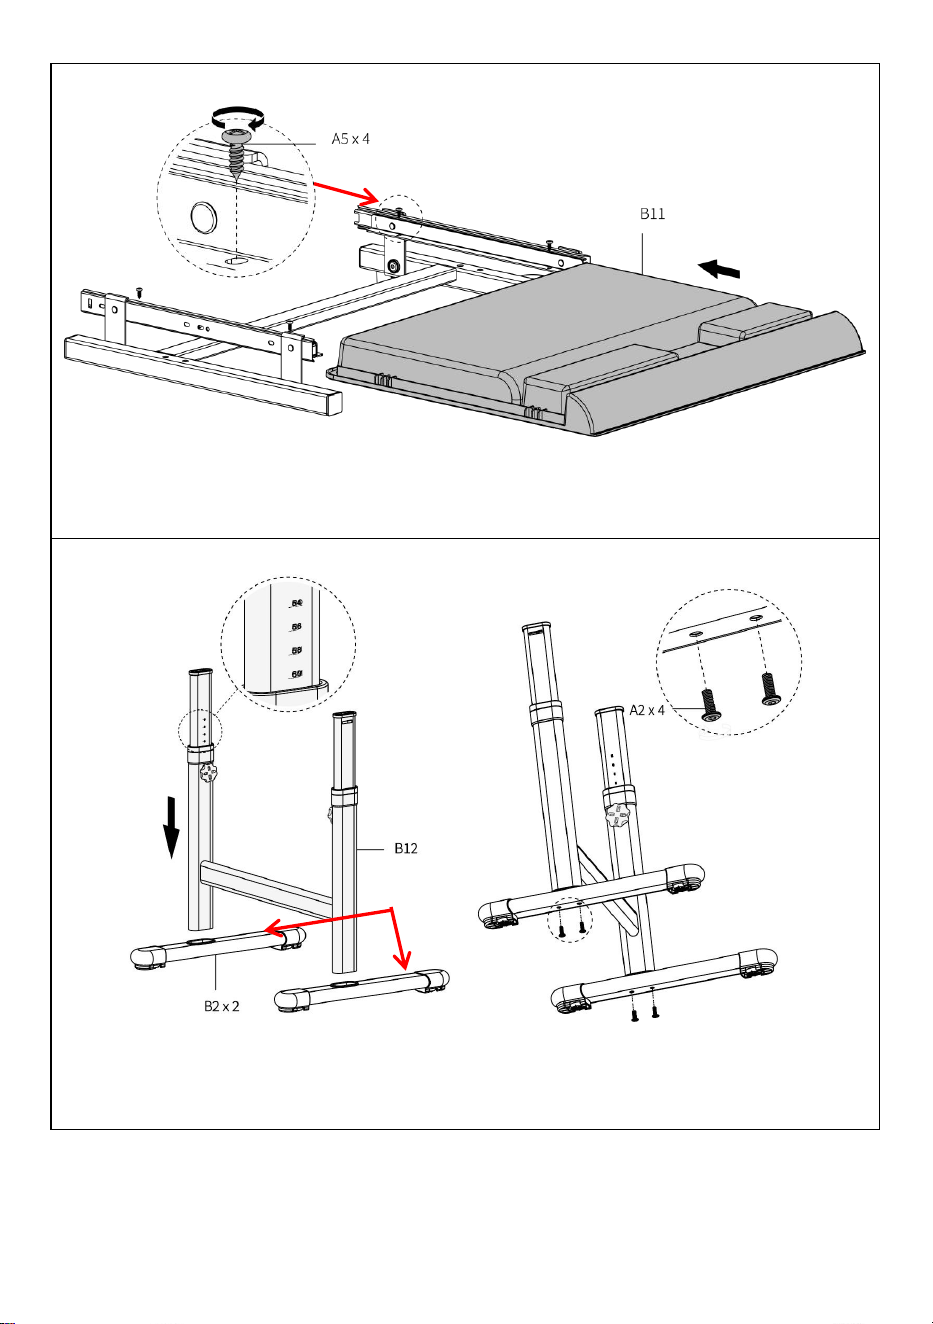
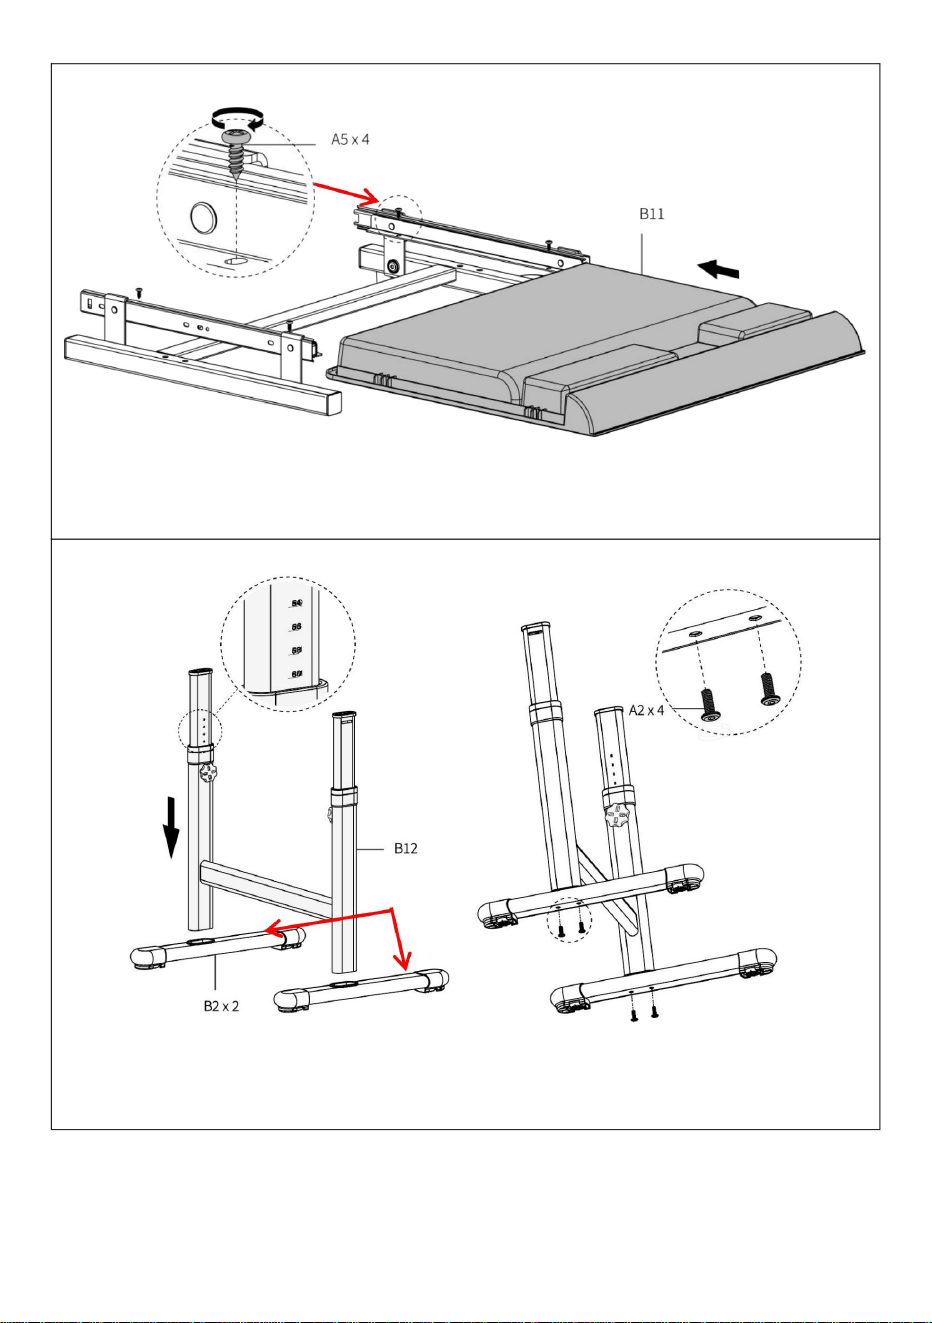
STEP 7
Slide the storage drawer (B11) under the slide rail and secure it
with screws A5×4.
STEP 8
Assemble and secure the desk legs (B2, B12) with screws A2×4.
Longer Side

- 10 -
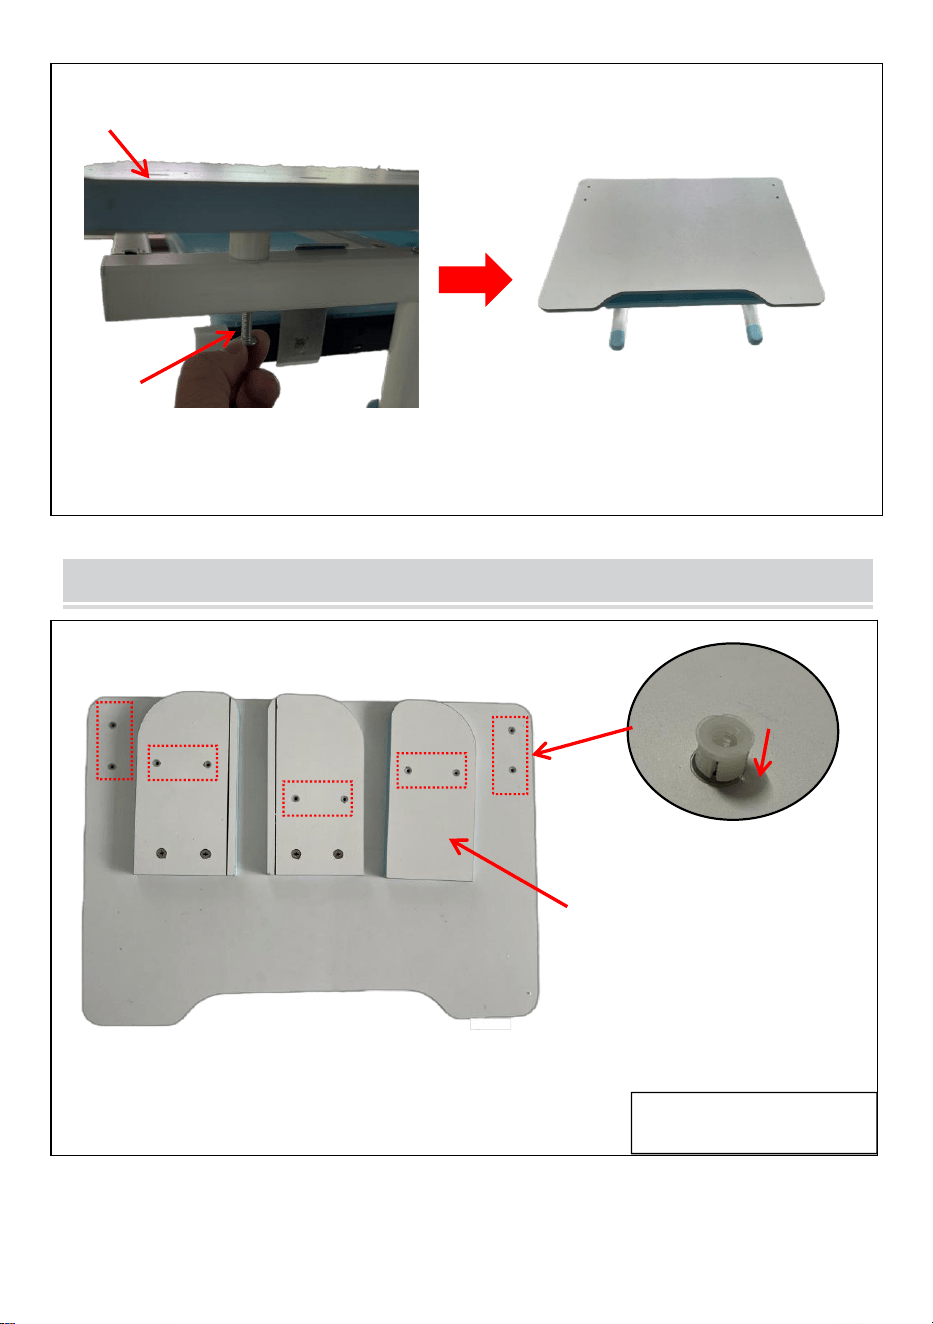
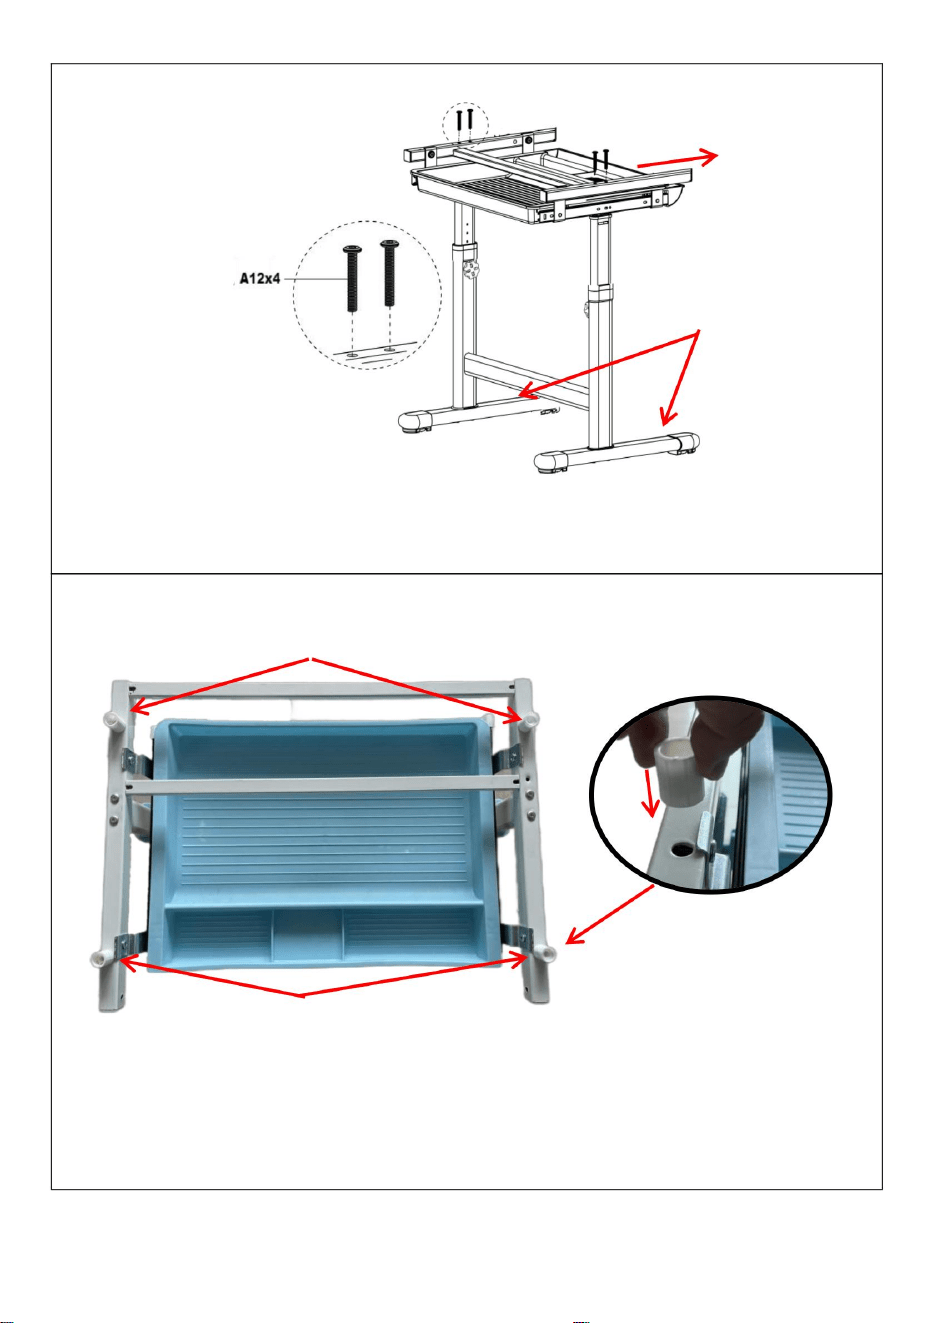
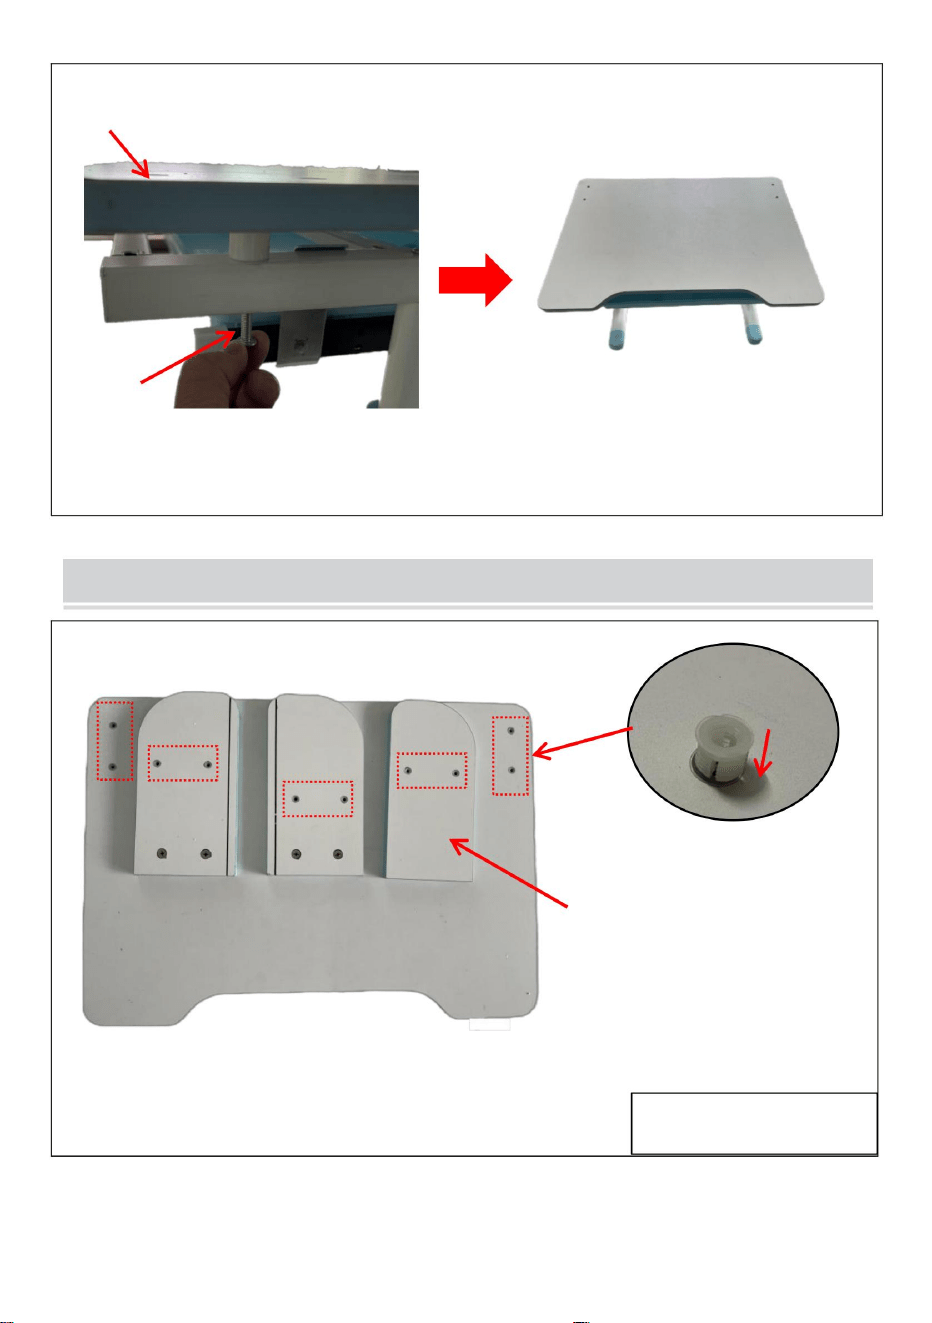
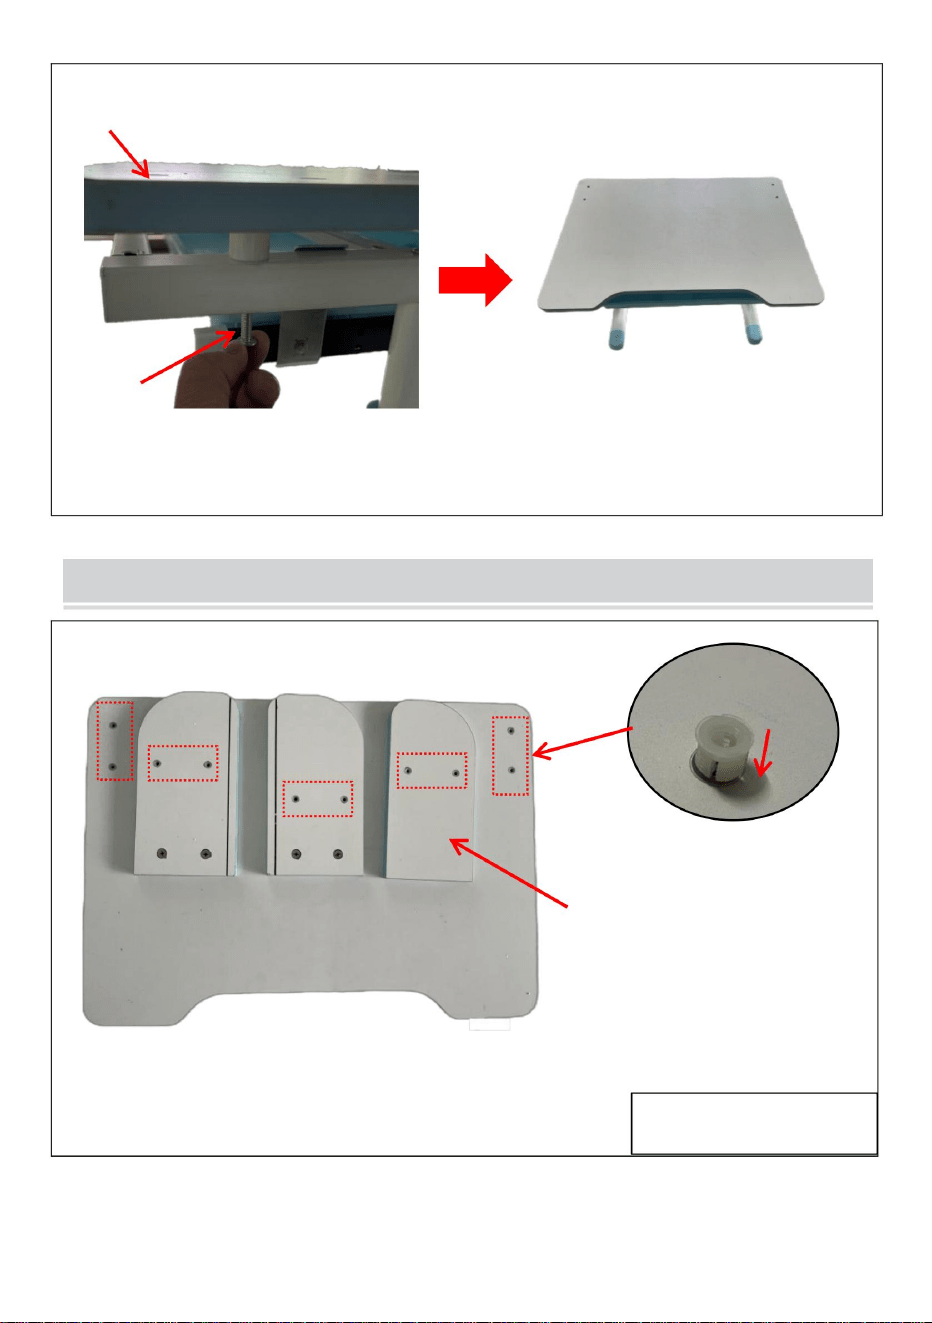
STEP 9
Then assemble and secure the assembled desktop board on the desk legs
with screws A12×4.
STEP 10
Place the upright in the 4 holes of the bracket.
Longer Side
Slip out
direction
Upright
Upright
- 11 -
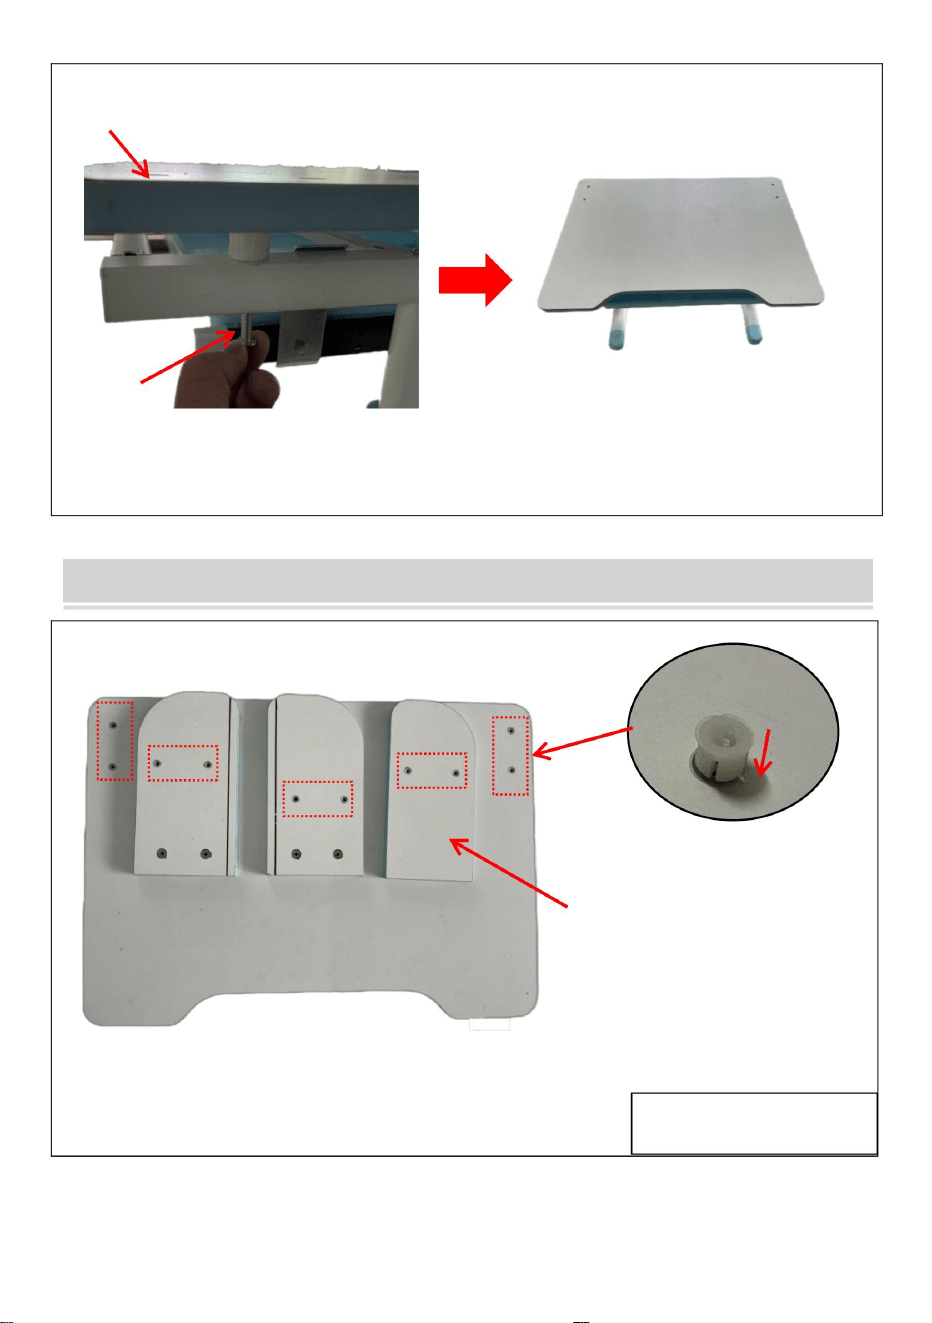
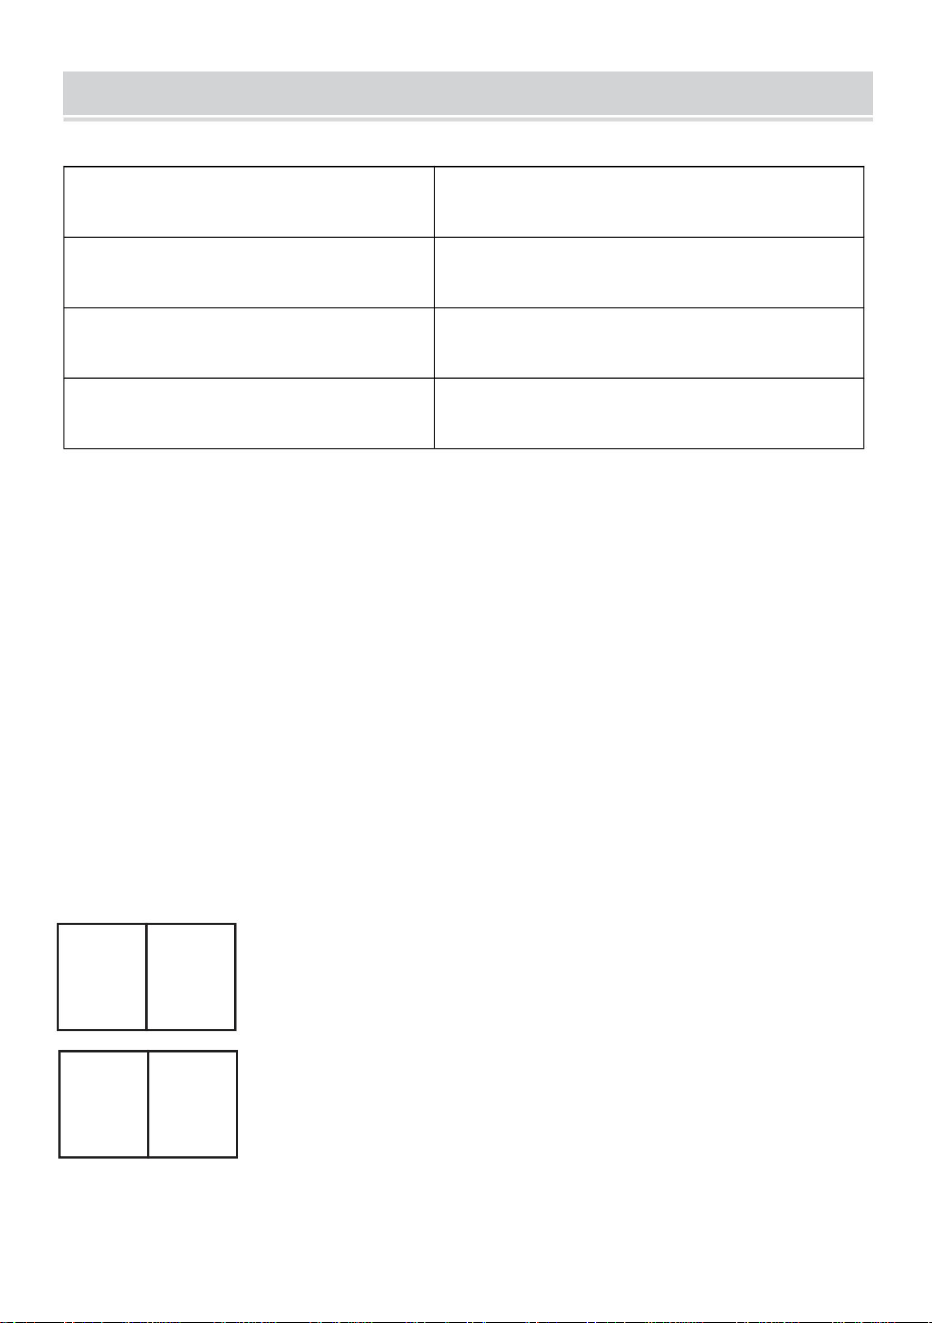
STEP 11
Then assemble and secure the panel board on the upright and desk legs
with screws A7×4.
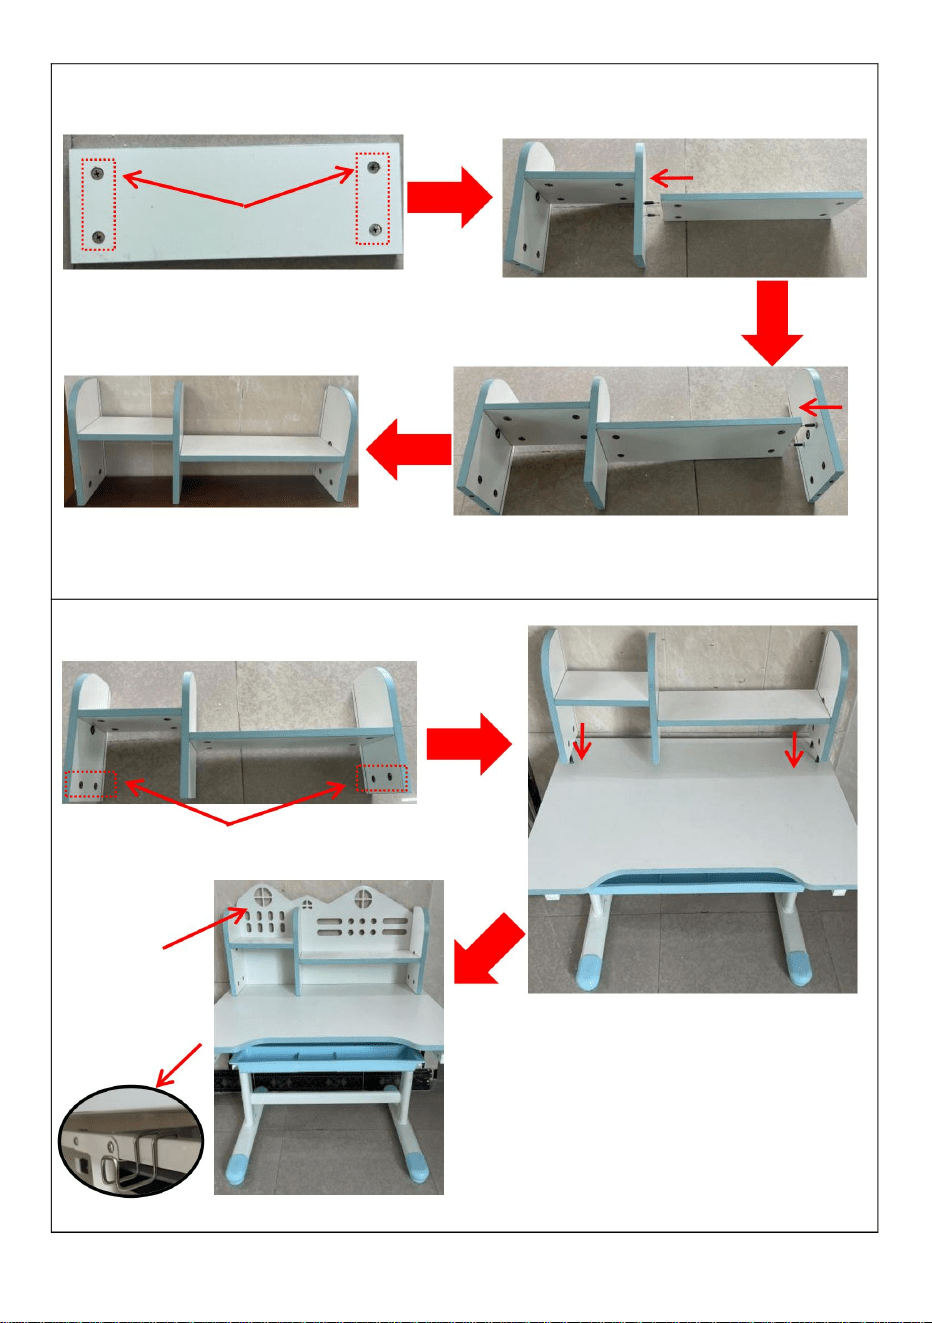
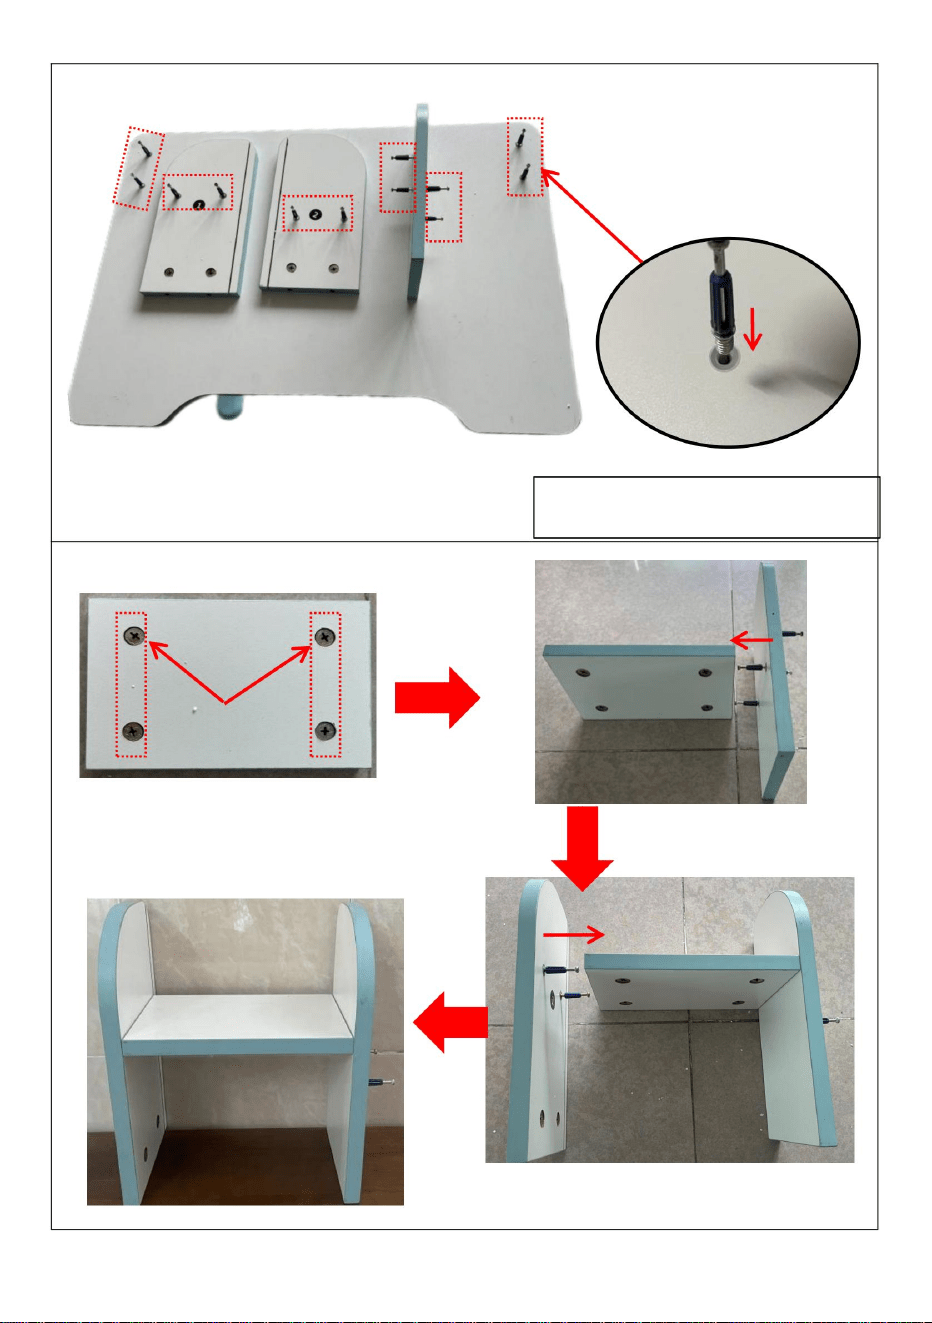
INSTRUCTIONS(WOODEN CABINET)
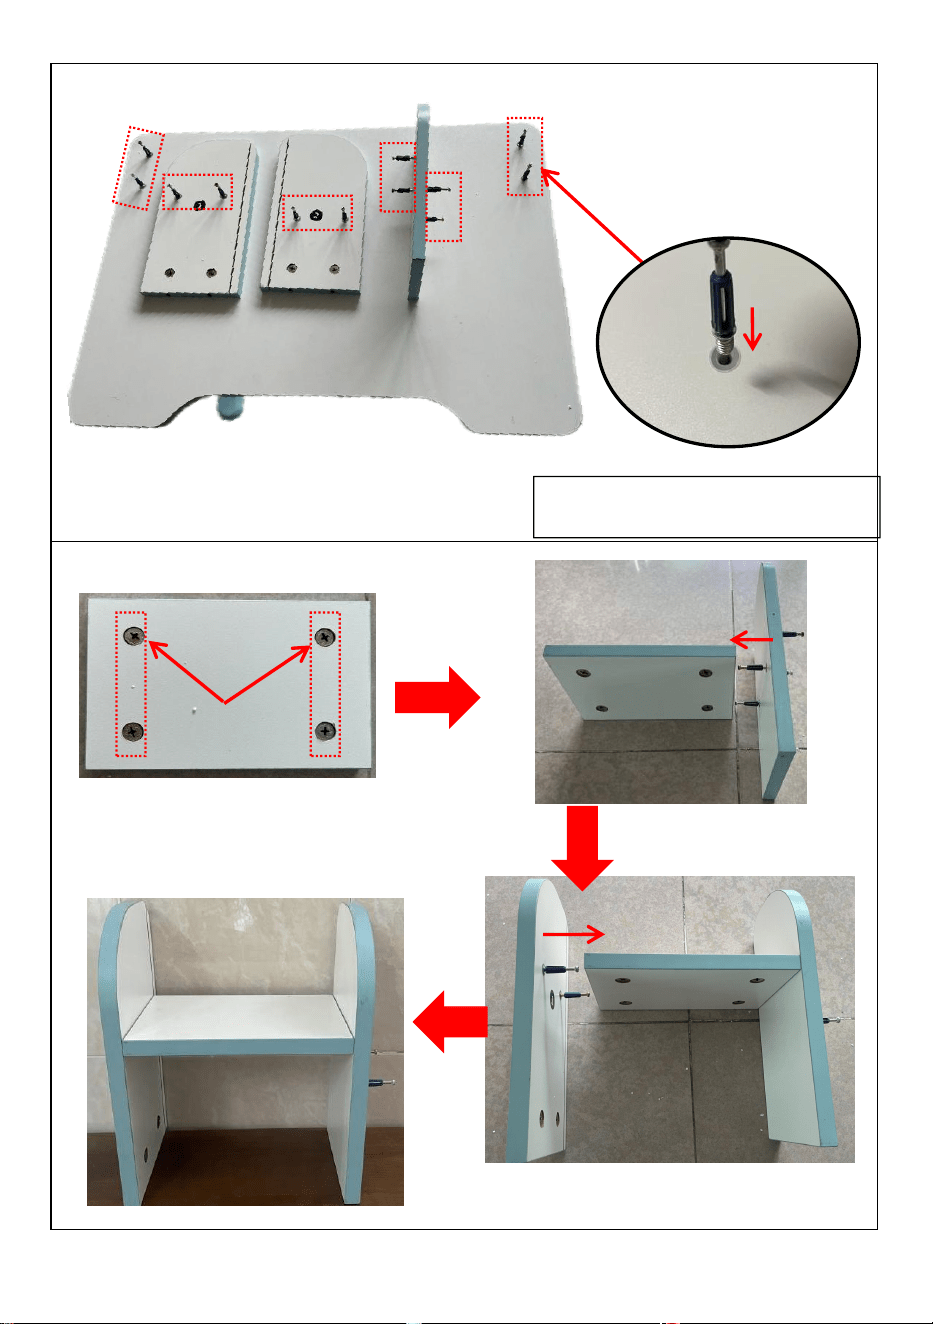
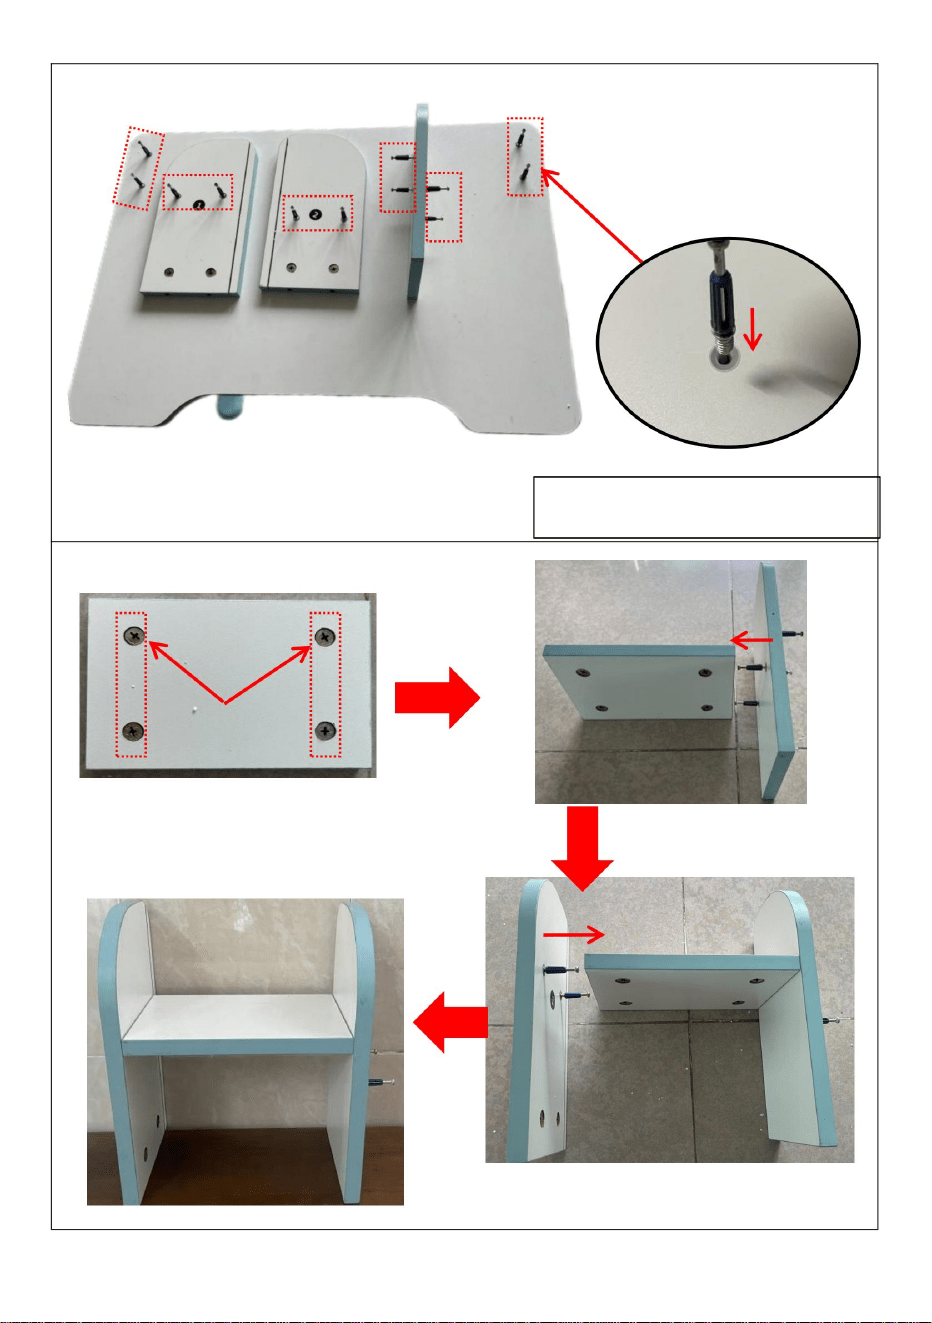
STEP 12
Install nut (plastic) on all the small holes.
B8
A7 x 4
Nut (Plastic)
Two Sides
Nut (Plastic) x 12
- 12 -
STEP 13
Tighten the three-in-one screw onto the nut (plastic).
STEP 14
Three-In-One Screw x12
Three-In-One Screw x12
B8
Board 1
Board 3
Board 2
Board 2
Board 5
Nut (Metal)
Install 4 nuts (metal)
Board 5
Board 5
Board 1
Board 2
Assemble and screw
the nut tightly
Assemble and screw the nut tightly
- 13 -
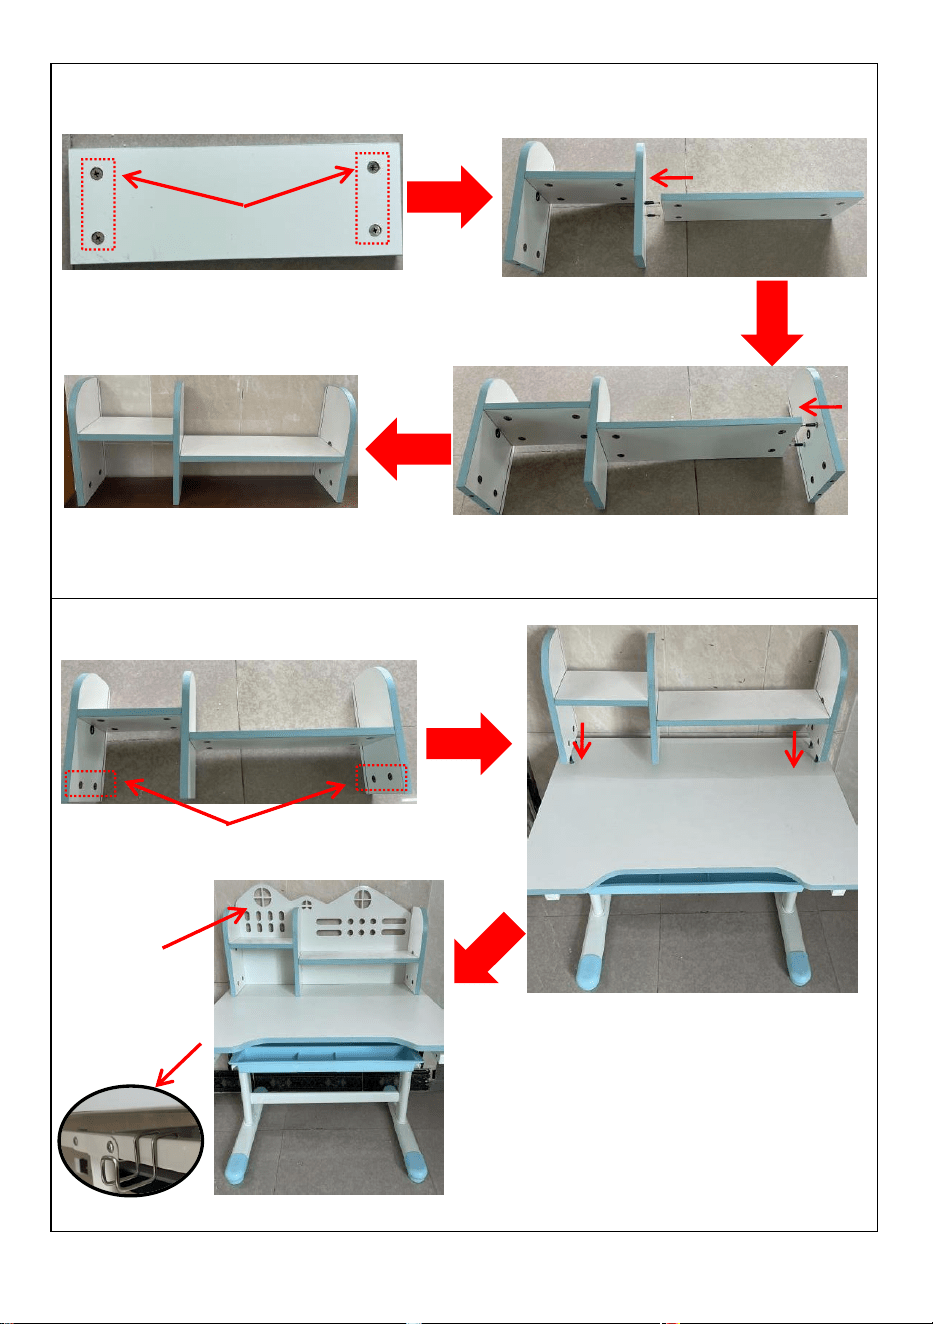
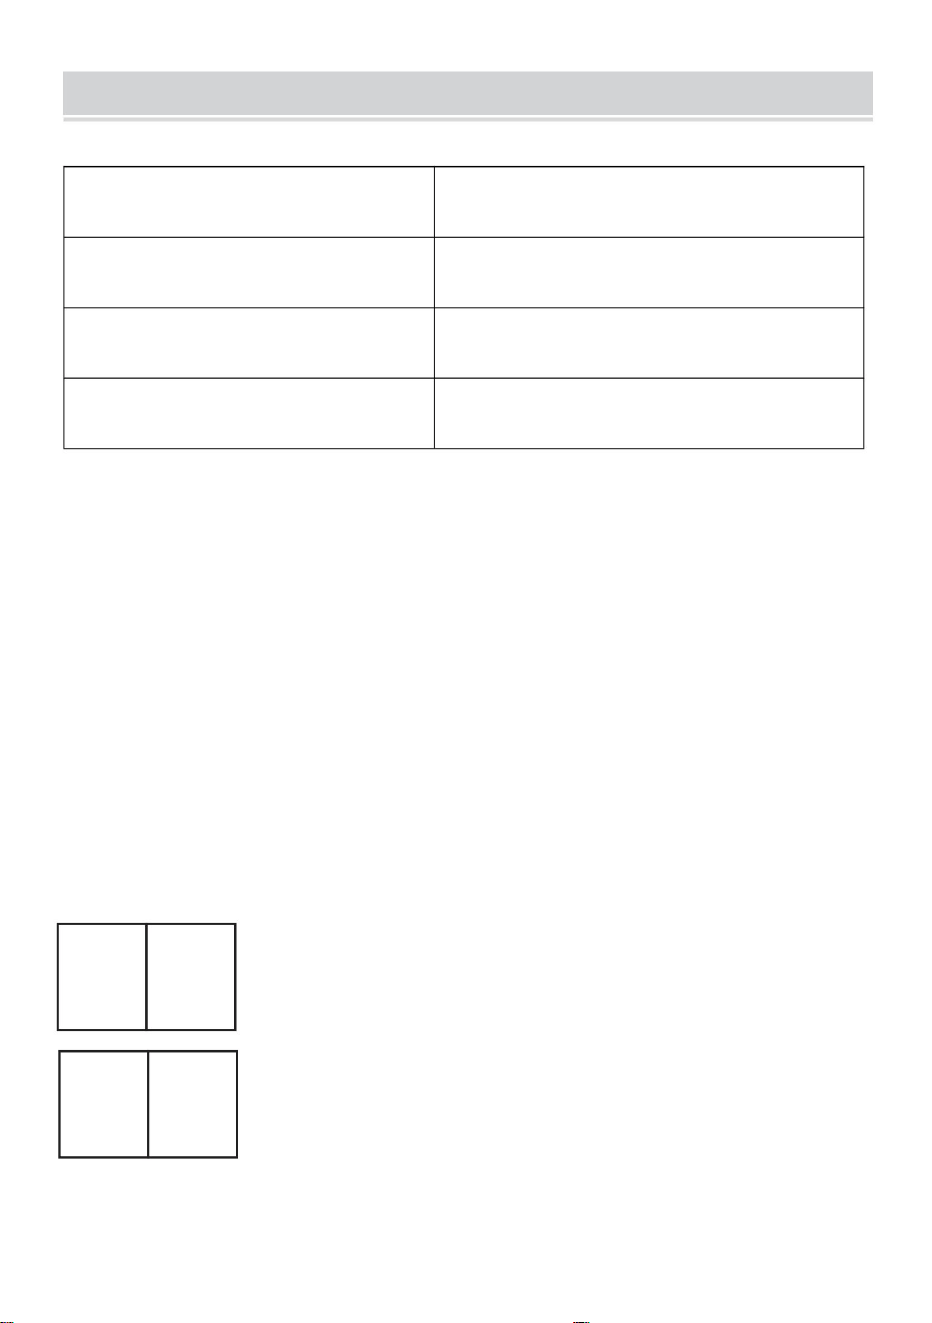
STEP 15
STEP 16
Nut (Metal)
Install 4 Nuts (Metal)
Board 4
Board 2
Board 4
Board 2
Board 3
Install 4 Nuts (Metal)
Assemble and screw
the nut tightly
Assemble and screw the nut tightly
Assemble and screw the
nut tightly
B14
Insert the iron backboard(B14) into the
installed bookshelf.
A6
- 14 -
PRODUCT PARAMETER
Manufacturer: Shanghaimuxinmuyeyouxiangongsi
Address: Shuangchenglu 803nong11hao1602A-1609shi, baoshanqu,
shanghai 200000 CN.
Imported to AUS: SIHAO PTY LTD. 1 ROKEVA STREETEASTWOOD
NSW 2122 Australia
Imported to USA: Sanven Technology Ltd. Suite 250, 9166 Anaheim
Place, Rancho Cucamonga, CA 91730
Model
707
Colour
PINK
Safe Loading Capacity
Table: 220lbs
Chair: 220lbs
Product Size
Table: 700*500*(530-710)mm
Chair: 420*390*(660-780)mm
REP
EC
E-CrossStu GmbH
Mainzer Landstr.69, 60329 Frankfurt am Main.
REP
UK
YH CONSULTING LIMITED.
C/O YH Consulting Limited Office 147, Centurion
House, London Road, Staines-upon-Thames, Surrey,
TW18 4AX


Assembléed'adultes
BUREAUXETCHAISESD'ÉTUDEPOURENFANTS
AVERTISSEMENT
MANUELD'UTILISATION
Assistancetechniqueetcertificatdegarantie
électroniquewww.vevor.com/support
MODÈLE:707
«Économisezlamoitié»,«Moitiéprix»outouteautreexpressionsimilaireutiliséepar
nousnereprésentequ'uneestimationdeséconomiesquevouspourriezréaliserenachetant
certainsoutilscheznousparrapportauxgrandesmarquesetnecouvrepasnécessairementtoutes
lescatégoriesd'outilsquenousproposons.Nousvousrappelonsdebienvouloirvérifier
soigneusementlorsquevouspassezunecommandecheznoussivous
économisezréellementlamoitiéparrapportauxgrandesmarques.
Nouscontinuonsànousengageràvousfournirdesoutilsàdesprixcompétitifs.
Machine Translated by Google

Assistancetechniqueetcertificatdegarantie
électroniquewww.vevor.com/support
Vousavezdesquestionssurnosproduits?Vousavezbesoind'assistancetechnique?N'hésitezpasà
nouscontacter:
MODÈLE:707
Ils'agitdelanoticed'utilisationd'origine.Veuillezlireattentivementtouteslesinstructionsdu
manuelavantdel'utiliser.VEVORseréserveledroitd'interpréterclairementnotremanueld'utilisation.
L'apparenceduproduitdépendduproduitquevousavezreçu.Veuilleznousexcuser,nousne
vousinformeronsplusencasdemiseàjourtechnologiqueoulogicielledenotreproduit.
BUREAUXETCHAISES
ÉTUDEPOURENFANTS
BESOIND'AIDE?CONTACTEZNOUS!
1
Machine Translated by Google

CONSIGNESDESÉCURITÉ
2
Précautions
entraînerdesblessuresgraves.
1828degrésCelsius,humiditérelativeentre40%60%).
9.N'utilisezpasd'objetstranchantssurlebureaupouréviterderayerlepanneau
1.Neplacezpasvosmainssurlecadredubureaulorsquevousretournezlebureau
bouchesdeclimatisationouàcôtédesradiateurs,pourréduirelapossibilité
6.N'utilisezpascetensemblebureauetchaiseenpleinsoleil,àcôtédel'air
etendommagersonapparence.
4.Lachargesurl'ensemblebureauetchaisedoitêtreconformeàsacapacitédecharge.
AVERTISSEMENT:
8.Neplacezpasd'objetschaudsouglacésdirectementsurlebureaupouréviter
Lisezcedocumentavantd'utiliserceproduit.Lenonrespectdecetteconsignepeutentraîner
5.Lacirculationdel'airdoitêtremaintenuependantl'utilisation(températureentre
hauteurdubureauetdelachaise.
desserragedespiècesdeliaisonoudéformationcauséeparuneinclinaisonou
décolorationetmarquespermanentescauséespardestempératuresextrêmes.
inclinable.
3.Lesjeunesenfantsdoiventêtreguidéspardesadulteslorsdel'utilisation.
pouréviterlespincements.
décolorationouvieillissement.
10.Séchezrapidementlestachesd'eausurlasurfacelorsdunettoyage
2.Nemettezpasvotretêtesouslebureauetlachaiselorsquevousajustezle
7.Faitesattentionàlahauteurdubureauetdelachaisedesdeuxcôtéspouréviter
Remarque:assemblageparunadulterequis!
LaconformitéestunecertificationdesécuritéCE.
Lisezattentivementlemanuel.
AvertissementPourréduirelerisquedeblessure,l'utilisateurdoitlirelesinstructions
Âges3anset+
Machine Translated by Google

2.Essuyezlestraceslaisséesparlesstylosàbased'huileàl'aided'alcooloud'essence.
baume.
3.N'utilisezpasdecouteauxpourrayerlebureau,mêmesilebureauest
CONSERVEZCESINSTRUCTIONS
1.Essuyezlestraceslaisséesparlesstylosàbased'eauetlesstylosaquarelleavec
eau.
Entretien
l'ensemblebureauetchaise.
résistantàl'humidité,auxrayuresetàl'usure.
3
Machine Translated by Google
B13
B14B12B11
B9B8
B1
B10
(4x25)(6x55)(4x12)
A3x4
A7x4A5x4
B6
(6x20)
A2x18
B7
Montantx4
B4
B5
(6x42)
B2x4
A6x1A12x4A8x1A9x1
B3
LISTEDESPIÈCES
4
Machine Translated by Google

5
Planche5
Vistroisenunx12
Écrou(métal)x12 Écrou(plastique)x12
Planche3
Planche4
Planche2Planche1
installation.
Convientuniquementauxenfantsâgésde3à18ans.
N'utilisezpascetensemblebureauetchaisesouslalumièredirectedusoleil,àproximitédel'air
Unefoistouteslesvisinstallées,serrezlesuneparune.Neserrezpas
desbouchesdeclimatisationouàcôtédesradiateurs.
touteslesvisavantquetoutsoitenplacepouréviterlesproblèmesderéglageoudelevage.Nevous
mettezpassouslachaiseounerestezpassouslachaisepourévitertoutpincement.
L'installationparunadulteestrequiseetéloignezlesenfantspendantl'installation.
Attention:
Machine Translated by Google
ÉTAPE2
Assemblezetfixezlespiedsdelachaise(B1,B2)avecdesvisA2×4.
ÉTAPE1
Assemblezetfixezlesbarresdesupport(B3,B4,B5)avecdesvisA2×4.
INSTRUCTIONS(CHAIR)
6
Machine Translated by Google
7
ÉTAPE4
FixezledossierdelachaiseaveclesvisA2×2.
Assemblezlepanneaud’assise(B6)avecdesvisA3×4etinsérezledossierdelachaise(B7)
danslesbarresdesupport.
ÉTAPE3
Machine Translated by Google

Assemblezetfixezunrailcoulissant(B9)ausupportenfer(B13)avecdesvis
A2×2.
B13
B13
ÉTAPE5
ÉTAPE6
Assemblezetfixezl'autrerailcoulissant(B10)ausupportenfer(B13)
avecvisA2×2.
INSTRUCTIONS(BUREAU)
8
Machine Translated by Google

9
ÉTAPE8
Côtélepluslong
Faitesglisserletiroirderangement(B11)souslerailcoulissantetfixezleavecdesvis
A5×4.
ÉTAPE7
Assemblezetfixezlespiedsdubureau(B2,B12)avecdesvisA2×4.
Machine Translated by Google
10
Assemblezensuiteetfixezleplateaudebureauassemblésurlespiedsdubureau
avecvisA12×4.
ÉTAPE10
Droit
Sortir
Côtélepluslong
direction
ÉTAPE9
Placerlemontantdansles4trousdusupport.
Droit
Machine Translated by Google
Écrou(plastique)x12
INSTRUCTIONS(ARMOIREENBOIS)
ÉTAPE12
Écrou(plastique)
Deuxcôtés
A7x4
Assemblezensuiteetfixezlepanneausurlemontantetlespiedsdubureauavecdesvis
A7×4.
B8
ÉTAPE11
Installezl'écrou(enplastique)surtouslespetitstrous.
11
Machine Translated by Google

Vistroisenunx12
B8
Planche5
Planche5
Planche2
12
Planche2
Planche5
Planche3
Planche1
Planche1
Planche2
Serrezlavistroisenunsurl'écrou(plastique).
ÉTAPE13
ÉTAPE14
Assembleretvisser
Installer4écrous(enmétal)
Écrou(métal)
l'écroufermement
Assembleretvisserfermementl'écrou
Vistroisenunx12
Machine Translated by Google

Planche4
13
Planche2
Planche4
Planche3
Planche2
ÉTAPE16
ÉTAPE15
l'écroufermement
Assembleretvisserfermementl'écrou
Assembleretvisserle
Installer4écrous(métal)
Installer4écrous(métal)
serrerfermementl'écrou
Assembleretvisser
Écrou(métal)
A6
B14
Insérezlepanneauarrièreenfer(B14)dansla
bibliothèqueinstallée.
Machine Translated by Google

ImportéauxÉtatsUnis:SanvenTechnologyLtd.Suite250,9166Anaheim
Lieu,RanchoCucamonga,CA91730
ECrossStuGmbH
A/SYHConsultingLimitedBureau147,Centurion
ImportéenAustralie:SIHAOPTYLTD.1ROKEVASTREETEASTWOOD
NSW2122Australie
Adresse:Shuangchenglu803nong11hao1602A1609shi,baoshanqu,shanghai200000
CN.
Fabricant:Shanghaimuxinmuyeyouxiangongsi
MainzerLandstr.69,60329FrancfortsurleMain.
YHCONSULTINGLIMITÉE.
Maison,LondonRoad,StainesuponThames,Surrey,TW184AX
ROSE
Chaise:220lb
Capacitédechargementsécuritaire
Chaise:420*390*(660780)mm
Couleur
Table:220lb
707Modèle
Tailleduproduit
Tableau:700*500*(530710)mm
PARAMÈTREDUPRODUIT
14
REPRÉSENTANTDUROYAUMEUNI
REPRÉSENTANTDELACE
Machine Translated by Google


Versammlung für Erwachsene
Schreibtische und Stühle für Kinder
WARNUNG
BENUTZERHANDBUCH
Technischer Support und E-Garantie-Zertifikat
www.vevor.com/support
MODELL:707
Wir sind weiterhin bestrebt, Ihnen Werkzeuge zu wettbewerbsfähigen Preisen anzubieten.
„Sparen Sie die Hälfte“, „Halber Preis“ oder andere ähnliche Ausdrücke, die wir verwenden,
stellen nur eine Schätzung der Ersparnis dar, die Sie beim Kauf bestimmter Werkzeuge bei uns
im Vergleich zu den großen Topmarken erzielen können, und decken nicht unbedingt alle von uns
angebotenen Werkzeugkategorien ab. Wir möchten Sie freundlich daran erinnern, bei der
Bestellung bei uns sorgfältig zu prüfen, ob Sie im Vergleich zu den großen
Topmarken tatsächlich die Hälfte sparen.
Machine Translated by Google

Technischer Support und E-Garantie-Zertifikat
www.vevor.com/support
Sie haben Fragen zu unseren Produkten? Sie benötigen technischen Support? Dann kontaktieren
Sie uns gerne:
MODELL:707
Dies ist die Originalanleitung. Bitte lesen Sie alle Anweisungen sorgfältig durch, bevor Sie
das Gerät in Betrieb nehmen. VEVOR behält sich eine klare Auslegung unserer Bedienungsanleitung
vor. Das Erscheinungsbild des Produkts richtet sich nach dem Produkt, das Sie erhalten
haben. Bitte verzeihen Sie uns, dass wir Sie nicht erneut informieren, wenn es Technologie- oder
Software-Updates für unser Produkt gibt.
SCHREIBTISCHE UND STÜHLE
KINDERSTUDIE
Brauchen Sie Hilfe? Kontaktieren Sie uns!
- 1 -
Machine Translated by Google

3. Kleine Kinder sollten bei der Verwendung von Erwachsenen angeleitet werden.
WARNUNG:
4. Die Belastung des Schreibtisch- und Stuhlsets sollte innerhalb seiner Tragfähigkeit liegen.
8. Stellen Sie keine heißen oder eisigen Gegenstände direkt auf den Schreibtisch, um
Lesen Sie dieses Material, bevor Sie dieses Produkt verwenden.
5. Die Luftzirkulation sollte während des Gebrauchs aufrechterhalten werden (Temperatur zwischen
Verfärbungen und dauerhafte Flecken durch extreme Temperaturen.
Vorsichtsmaßnahmen
kann zu schweren Verletzungen führen.
18–28 Grad Celsius, relative Luftfeuchtigkeit zwischen 40 % und 60 %).
9. Verwenden Sie keine scharfen Gegenstände auf dem Schreibtisch, um Kratzer auf dem Panel zu vermeiden
1. Legen Sie Ihre Hände nicht auf den Tischrahmen, wenn Sie den Tisch umdrehen
6. Verwenden Sie diesen Schreibtisch und Stuhl nicht in direktem Sonnenlicht, neben Luft
Klimaanlagen oder neben Heizkörpern, um die Möglichkeit von
und sein Aussehen zu beschädigen.
um ein Einklemmen zu vermeiden.
Verfärbung oder Alterung.
10. Trocknen Sie die Wasserflecken auf der Oberfläche rechtzeitig beim Reinigen
2. Stecken Sie Ihren Kopf nicht unter den Schreibtisch und Stuhl, wenn Sie den
7. Achten Sie auf die Höhe des Schreibtischs und des Stuhls auf beiden Seiten, um zu vermeiden
Höhe des Schreibtischs und des Stuhls.
Lösen der Verbindungsteile oder Verformung durch Schrägstellung oder
Kippen.
- 2 -
SICHERHEITSHINWEISE
Hinweis: Die Montage muss durch einen Erwachsenen erfolgen!
Die Konformität erfolgt durch eine CE-Sicherheitszertifizierung.
Lesen Sie das Handbuch sorgfältig durch.
Warnung - Um das Verletzungsrisiko zu verringern, muss der Benutzer die Anweisungen lesen
Ab 3 Jahren
Machine Translated by Google

Balsam.
2. Wischen Sie die Spuren von Ölstiften mit Alkohol oder ätherischen Ölen ab.
3. Verwenden Sie keine Messer, um den Desktop zu kratzen, auch wenn der Desktop ist
feuchtigkeitsbeständig, kratzfest und verschleißfest.
1. Wischen Sie die Spuren von wasserbasierten Stiften und Aquarellstiften mit
Wasser.
Wartung
das Schreibtisch- und Stuhlset.
BEWAHREN SIE DIESE ANLEITUNG AUF
- 3 -
Machine Translated by Google
B13
B14Vitamin B12B11
B5
B6
(6 x 20)
B7
A2x18
B9B8
(4x25) (6x55) (4x12)
B1
A3x4
B10
B2x4
A7x4 A5x4
(6 x 42)
B3
A6x1 A12x4 A8x1 A9x1
Aufrecht x4
B4
TEILELISTE
- 4 -
Machine Translated by Google

Aufmerksamkeit:
Drei-in-eins-Schraube x12
Tafel 5
Mutter (Metall) x12 Mutter (Kunststoff) x12
Tafel 2
Tafel 4
Tafel 3
Tafel 1
alle Schrauben, bevor alle an Ort und Stelle sind, um Probleme beim Einstellen oder Anheben zu vermeiden. ÿ
Gehen Sie nicht unter den Stuhl und bleiben Sie nicht darunter, um Einklemmen zu vermeiden.
ÿ Die Installation muss durch einen Erwachsenen erfolgen. Halten Sie Kinder während der Installation fern.
Installation.
ÿ Nur für Kinder im Alter von 3-18 Jahren geeignet. ÿ
Verwenden Sie dieses Schreibtisch- und Stuhlset nicht in direktem Sonnenlicht, in der Nähe von Luft
ÿ Sobald alle Schrauben installiert sind, ziehen Sie sie nacheinander fest. Nicht festziehen
Klimaanlagenöffnungen oder neben Heizgeräten.
- 5 -
Machine Translated by Google

SCHRITT 2
Montieren und befestigen Sie die Stuhlbeine (B1, B2) mit Schrauben A2×4.
SCHRITT 1
Die Stützstangen (B3, B4, B5) montieren und mit den Schrauben A2×4 befestigen.
ANWEISUNGEN (STUHL)
- 6 -
Machine Translated by Google

Montieren Sie die Sitzplatte (B6) mit den Schrauben A3×4 und stecken Sie die Stuhllehne (B7) in die Stützstangen.
Befestigen Sie die Stuhllehne mit den Schrauben A2×2.
SCHRITT 4
SCHRITT 3
- 7 -
Machine Translated by Google
- 8 -
ANWEISUNGEN (SCHREIBTISCH)
Montieren und befestigen Sie eine Gleitschiene (B9) mit Schrauben A2×2 am Eisenständer
(B13).
B13
B13
SCHRITT 5
mit Schrauben A2×2.
SCHRITT 6
Montieren und befestigen Sie die andere Gleitschiene (B10) am Bügeleisenständer (B13).
Machine Translated by Google

Schieben Sie die Aufbewahrungsschublade (B11) unter die Gleitschiene und befestigen Sie sie
mit Schrauben A5×4.
Längere Seite
SCHRITT 8
SCHRITT 7
Montieren und befestigen Sie die Tischbeine (B2, B12) mit den Schrauben A2×4.
- 9 -
Machine Translated by Google

- 10 -
mit Schrauben A12×4.
Anschließend montieren und befestigen Sie die fertig montierte Tischplatte an den Tischbeinen
SCHRITT 10
Aufrecht
Richtung
Längere Seite
Ausrutschen
SCHRITT 9
Platzieren Sie den Pfosten in den 4 Löchern der Halterung.
Aufrecht
Machine Translated by Google
Mutter (Kunststoff) x 12
ANLEITUNG (HOLZSCHRANK)
SCHRITT 12
Mutter (Kunststoff)
Zwei Seiten
A7 x 4
Anschließend montieren und befestigen Sie die Paneelplatte mit den Schrauben A7×4 an den
Pfosten- und Tischbeinen.
B8
SCHRITT 11
Bringen Sie an allen kleinen Löchern Muttern (Kunststoff) an.
- 11 -
Machine Translated by Google
Drei-in-eins-Schraube x12
B8
Tafel 5
Tafel 5
Tafel 5
Tafel 3
Tafel 2
Tafel 2
Tafel 1
Tafel 2
- 12 -
Tafel 1
Die 3-in-1-Schraube auf der Mutter (Kunststoff) festschrauben.
SCHRITT 13
SCHRITT 14
Drei-in-eins-Schraube x12
Zusammenbauen und verschrauben
4 Muttern (Metall) montieren
Mutter (Metall)
die Mutter fest
Mutter montieren und festschrauben
Machine Translated by Google

Tafel 2
Tafel 2
Tafel 4
Tafel 4
Tafel 3
- 13 -
SCHRITT 16
SCHRITT 15
die Mutter fest
Mutter montieren und festschrauben
Zusammenbauen und verschrauben
Stecken Sie die Eisenrückwand (B14) in das
montierte Bücherregal.
Zusammenbauen und verschrauben
Mutter fest
Installieren Sie 4 Muttern (Metall)
Mutter (Metall)
Installieren Sie 4 Muttern (Metall)
B14
A6
Machine Translated by Google
Ort, Rancho Cucamonga, CA 91730
Importiert in die USA: Sanven Technology Ltd. Suite 250, 9166 Anaheim
E-CrossStu GmbH
Mainzer Landstr.69, 60329 Frankfurt am Main.
Nach AUS importiert: SIHAO PTY LTD. 1 ROKEVA STREETEASTWOOD
NSW 2122 Australien
Adresse: Shuangchenglu 803nong11hao1602A-1609shi, baoshanqu, Shanghai 200000
CN.
Hersteller: Shanghaimuxinmuyeyouxiangongsi
YH CONSULTING LIMITED.
Haus, London Road, Staines-upon-Thames, Surrey, TW18 4AX
C/O YH Consulting Limited Office 147, Centurion
Sichere Ladekapazität
ROSA
Stuhl: 220 Pfund
Tisch: 700*500*(530-710)mm
Farbe
Tisch: 220 Pfund
707Modell
Stuhl: 420*390*(660-780)mm
Produktgröße
PRODUKTPARAMETER
UK REP
Vertreter der EG
- 14 -
Machine Translated by Google


Assemblea degli adulti
MODELLO:707
BANCONI E SEDIE PER LO STUDIO DEI BAMBINI
AVVERTIMENTO
MANUALE D'USO
Supporto tecnico e certificato di garanzia
elettronica www.vevor.com/support
Continuiamo a impegnarci per fornirvi strumenti a prezzi competitivi.
"Risparmia la metà", "Metà prezzo" o qualsiasi altra espressione simile da noi
utilizzata rappresenta solo una stima del risparmio che potresti ottenere acquistando
determinati utensili con noi rispetto ai principali marchi principali e non significa
necessariamente coprire tutte le categorie di utensili da noi offerti. Ti ricordiamo
gentilmente di verificare attentamente quando effettui un ordine con noi
se stai effettivamente risparmiando la metà rispetto ai principali marchi principali.
Machine Translated by Google

Supporto tecnico e certificato di garanzia
elettronica www.vevor.com/support
- 1 -
Hai domande sui prodotti? Hai bisogno di supporto tecnico? Non esitare a contattarci:
MODELLO:707
Questa è l'istruzione originale, si prega di leggere attentamente tutte le istruzioni del
manuale prima di utilizzare. VEVOR si riserva una chiara interpretazione del nostro manuale
utente. L'aspetto del prodotto sarà soggetto al prodotto ricevuto. Vi preghiamo di
perdonarci se non vi informeremo di nuovo se ci sono aggiornamenti tecnologici o software sul
nostro prodotto.
SCRIVANIE E SEDIE
STUDIO PER BAMBINI
HAI BISOGNO DI AIUTO? CONTATTACI!
Machine Translated by Google

Leggere questo materiale prima di utilizzare questo prodotto. La mancata osservanza di quanto sopra potrebbe
5. Durante l'uso deve essere mantenuta la circolazione dell'aria (temperatura compresa tra
scolorimento e segni permanenti causati da temperature estreme.
8. Non posizionare oggetti caldi o ghiacciati direttamente sulla scrivania per evitare
AVVERTIMENTO:
prese d'aria di condizionamento o accanto ai riscaldatori, per ridurre la possibilità di
1. Non appoggiare le mani sul telaio della scrivania quando si gira la scrivania
4. Il carico sulla scrivania e sulla sedia deve rientrare nella loro capacità di carico.
6. Non utilizzare questo set di scrivania e sedia alla luce diretta del sole, vicino all'aria
e danneggiandone l'aspetto.
Attenzione
provocare lesioni gravi.
18-28 gradi Celsius, umidità relativa tra il 40% e il 60%).
2. Non mettere la testa sotto la scrivania e la sedia quando si regola il
7. Prestare attenzione all'altezza della scrivania e della sedia su entrambi i lati per evitare
9. Non utilizzare oggetti appuntiti sul desktop per evitare di graffiare il pannello
scolorimento o invecchiamento.
per evitare pizzicamenti.
10. Asciugare tempestivamente le macchie d'acqua sulla superficie durante la pulizia
inclinazione.
3. I bambini piccoli devono essere guidati dagli adulti durante l'uso.
altezza della scrivania e della sedia.
allentamento delle parti di collegamento o deformazione causata da inclinazione o
- 2 -
ISTRUZIONI DI SICUREZZA
manuale con attenzione.
Età 3 anni +
Nota: è richiesto il montaggio da parte di un adulto!
Attenzione: per ridurre il rischio di lesioni, l'utente deve leggere le istruzioni
La conformità è una certificazione di sicurezza CE.
Machine Translated by Google

3. Non usare coltelli per graffiare il desktop, anche se il desktop è
balsamo.
acqua.
SALVA QUESTE ISTRUZIONI
1. Pulisci i segni lasciati dalle penne a base d'acqua e dalle penne acquerellabili con
2. Pulisci i segni lasciati dalle penne a base di olio usando alcol o prodotti essenziali
Manutenzione
il set di scrivania e sedia.
resistente all'umidità, ai graffi e all'usura.
- 3 -
Machine Translated by Google
B13
B12B11 B14
- 4 -
B4
B7
A2x18
B6
(6x20)
B1
B10
A3x4
A7x4 A5x4
B9B8
(4x25) (6x55) (4x12)
B3
A6x1 A12x4 A8x1 A9x1
B2x4
Italiano:
Si5
Verticale x4
ELENCO DELLE PARTI
Machine Translated by Google
- 5 -
Dado (metallo) x12
Vite tre in uno x12
Consiglio 4
tutte le viti prima che tutto sia a posto per evitare problemi di regolazione o sollevamento. ÿ Non infilarsi o
restare sotto la sedia per evitare pizzicamenti. ÿ È richiesta l'installazione da parte di un
adulto e tenere i bambini lontani durante l'installazione.
Consiglio 2
Consiglio 5
Consiglio 3
Consiglio 1
Dado (plastica) x12
ÿ Una volta installate tutte le viti, serrarle una alla volta. Non serrarle
installazione.
ÿ Adatto solo a bambini di età compresa tra 3 e 18 anni. ÿ Non
utilizzare questo set di scrivania e sedia sotto la luce diretta del sole, vicino all'aria
bocchette di condizionamento o accanto ai termosifoni.
Attenzione:
Machine Translated by Google

- 6 -
ISTRUZIONI (SEDIA)
PASSO 2
Montare e fissare le barre di supporto (B3, B4, B5) con le viti A2×4.
Montare e fissare le gambe della sedia (B1, B2) con le viti A2×4.
PASSO 1
Machine Translated by Google
PASSO 4
Fissare lo schienale della sedia con le viti A2×2.
Assemblare il pannello del sedile (B6) con le viti A3×4 e inserire lo schienale della sedia (B7) nelle
barre di supporto.
PASSO 3
- 7 -
Machine Translated by Google

- 8 -
ISTRUZIONI (SCRIVANIA)
Montare e fissare una guida scorrevole (B9) al supporto in ferro (B13) con le viti
A2×2.
PASSO 6
B13
PASSO 5
B13
Montare e fissare l'altra guida scorrevole (B10) al supporto in ferro (B13)
con viti A2×2.
Machine Translated by Google

PASSO 8
Lato più lungo
Far scorrere il cassetto portaoggetti (B11) sotto la guida scorrevole e fissarlo con
le viti A5×4.
PASSO 7
Montare e fissare le gambe della scrivania (B2, B12) con le viti A2×4.
- 9 -
Machine Translated by Google

- 10 -
Quindi assemblare e fissare la tavola del desktop assemblata sulle gambe della scrivania
con viti A12×4.
PASSO 10
direzione
Lato più lungo
Scivolare fuori
PASSO 9
Verticale
Verticale
Posizionare il montante nei 4 fori della staffa.
Machine Translated by Google

Dado (plastica) x 12
- 11 -
ISTRUZIONI (MOBILE IN LEGNO)
PASSO 12
Dado (plastica)
Due lati
Installare il dado (di plastica) su tutti i piccoli fori.
B8
Quindi assemblare e fissare il pannello sul montante e sulle gambe del tavolo con viti A7×4.
A7×4
PASSO 11
Machine Translated by Google

B8
Vite tre in uno x12
Vite tre in uno x12
Consiglio 5
Consiglio 5
Consiglio 5
Consiglio 1
Consiglio 2
Consiglio 2
Consiglio 3
Consiglio 1
Consiglio 2
- 12 -
Serrare la vite tre in uno sul dado (plastica).
PASSO 13
PASSO 14
Montare e avvitare
il dado stretto
Installare 4 dadi (metallo)
Dado (Metallo)
Montare e avvitare saldamente il dado
Machine Translated by Google

Consiglio 4
Consiglio 3
Consiglio 2
Consiglio 4
Consiglio 2
- 13 -
PASSO 16
PASSO 15
Montare e avvitare il
dado stretto
Montare e avvitare saldamente il dado
Installare 4 dadi (metallo)
Montare e avvitare
il dado stretto
Installare 4 dadi (metallo)
Dado (Metallo)
Inserire il pannello posteriore in ferro (B14) nella
libreria installata.
A6
B14
Machine Translated by Google

Luogo, Rancho Cucamonga, CA 91730
Nuovo Galles del Sud 2122 Australia
E-CrossStu GmbH
Mainzer Landstr.69, 60329 Francoforte sul Meno.
Importato in AUS: SIHAO PTY LTD. 1 ROKEVA STREETEASTWOOD
Importato negli USA: Sanven Technology Ltd. Suite 250, 9166 Anaheim
Indirizzo: Shuangchenglu 803nong11hao1602A-1609shi, baoshanqu, shanghai 200000
CN.
Produttore: Shanghaimuxinmuyeyouxiangongsi
Casa, London Road, Staines-upon-Thames, Surrey, TW18 4AX
C/O YH Consulting Limited Ufficio 147, Centurion
CONSULENZA YH LIMITATA.
Rappresentante della CE
RAPPRESENTANZA DEL REGNO UNITO
Sedia: 220 libbre
Tavolo: 220 libbre
Capacità di carico sicura
Tavolo: 700*500*(530-710)mm
Colore
ROSA
707Modello
Sedia: 420*390*(660-780)mm
Dimensioni del prodotto
PARAMETRO PRODOTTO
- 14 -
Machine Translated by Google

Asambleadeadultos
ESCRITORIOSYSILLASDEESTUDIOPARANIÑOS
ADVERTENCIA
MANUALDELUSUARIO
Soportetécnicoycertificadodegarantía
electrónicawww.vevor.com/support
"Ahorrelamitad","mitaddeprecio"ocualquierotraexpresiónsimilarqueutilicemos
solorepresentaunaestimacióndelahorroquepodríaobteneralcomprarciertas
herramientasconnosotrosencomparaciónconlasprincipalesmarcasynonecesariamente
significaquecubratodaslascategoríasdeherramientasqueofrecemos.Lerecordamos
que,alrealizarunpedidoconnosotros,verifiquecuidadosamentesi
realmenteestáahorrandolamitadencomparaciónconlasprincipalesmarcas.
Seguimoscomprometidosabrindarleherramientasaprecioscompetitivos.
MODELO:707
Machine Translated by Google

Soportetécnicoycertificadodegarantía
electrónicawww.vevor.com/support
¿Tienepreguntassobreelproducto?¿Necesitaasistenciatécnica?Nodudeenponerseencontacto
connosotros:
MODELO:707
Estassonlasinstruccionesoriginales,leaatentamentetodaslasinstruccionesdelmanual
antesdeutilizarelproducto.VEVORsereservaunainterpretaciónclaradenuestromanualde
usuario.Laaparienciadelproductoestarásujetaalproductoquerecibió.Perdónenosporno
informarlenuevamentesihayactualizacionesdetecnologíaosoftwareennuestroproducto.
ESCRITORIOSYSILLAS
ESTUDIOPARANIÑOS
¿NECESITAAYUDA?¡CONTÁCTENOS!
1
Machine Translated by Google

paraevitarpellizcos.
6.Noutiliceesteconjuntodeescritorioysillabajolaluzsolardirecta,cercadelaire
decoloraciónoenvejecimiento.
ydañandosuapariencia.
7.Presteatenciónalaalturadelescritorioylasillaenambosladosparaevitar
2.Nocoloquelacabezadebajodelescritorioylasillaalajustarel
10.Sequelasmanchasdeaguaenlasuperficiedemaneraoportunaallimpiar.
alturadelescritorioylasilla.
aflojamientodelaspiezasdeconexiónodeformacióncausadaporinclinacióno
inclinación.
3.Losniñospequeñosdebenserguiadosporadultosdurantesuuso.
ADVERTENCIA:
4.Lacargasobreelconjuntodeescritorioysilladebeestardentrodesucapacidaddecarga.
8.Nocoloqueobjetoscalientesoheladosdirectamentesobreelescritorioparaevitar
5.Sedebemantenerlacirculacióndelaireduranteeluso(temperaturaentre
Leaestematerialantesdeutilizaresteproducto.Delocontrario,podría
Precauciones
decoloraciónymarcaspermanentescausadasportemperaturasextremas.
9.Noutiliceobjetosafiladossobreelescritorioparaevitarrayarelpanel.
provocarlesionesgraves.
1.Nocoloquelasmanossobreelmarcodelescritorioalgirarlo.
1828gradoscentígrados,humedadrelativaentre40%60%).
rejillasdeventilacióndelaireacondicionadoojuntoacalentadores,parareducirlaposibilidadde
2
INSTRUCCIONESDESEGURIDAD
Nota:¡Requiereensamblajeporpartedeunadulto!
ComplianceesunacertificacióndeseguridadCE.
Leaelmanualconcuidado.
Advertencia:Parareducirelriesgodelesiones,elusuariodebeleerlasinstrucciones.
Apartirde3años
Machine Translated by Google

2.Limpielasmarcasdejadasporlosbolígrafosabasedeaceiteconalcoholoaceiteesencial.
bálsamo.
3.Noutilicecuchillospararayarelescritorio,inclusosiésteestá
Apruebadehumedad,resistenteaarañazosyresistentealdesgaste.
1.Limpielasmarcasdejadasporlosbolígrafosabasedeaguaylosbolígrafosdeacuarelacon
agua.
Mantenimiento
Elconjuntodeescritorioysilla.
GUARDEESTASINSTRUCCIONES
3
Machine Translated by Google

B13
B14B12B11
A3x4
B2x4
A7x4A5x4
(6x42)
A6x1A12x4A8x1A9x1
B3
Verticalx4
B4
B5
B6
(6x20)
A2x18
B7
B9B8
B1
B10
(4x25)(6x55)(4x12)
LISTADEPIEZAS
4
Machine Translated by Google
Atención:
Tornillotresenunox12
Tablero5
Tuerca(Metal)x12 Tuerca(plástico)x12
Tablero2
Tablero4
Tablero3
Tablero1
Unavezinstaladostodoslostornillos,apriételosunoporuno.Noaprietedemasiado.
instalación.
Soloaptoparaniñosde3a18años.Noutiliceeste
juegodeescritorioysillabajolaluzsolardirecta,cercadelaire
Nosecoloquedebajodelasillanisequededebajodeellaparaevitarquequedeatrapado.
Lainstalacióndebeserrealizadaporunadultoymantengaalosniños
alejadosdurantelainstalación.
rejillasdeventilacióndelaireacondicionadoojuntoacalentadores.
5
Machine Translated by Google

PASO2
Ensambleyasegurelaspatasdelasilla(B1,B2)contornillosA2×4.
PASO1
Ensambleyasegurelasbarrasdesoporte(B3,B4,B5)contornillosA2×4.
INSTRUCCIONES(SILLA)
6
Machine Translated by Google

Ensambleeltablerodelasiento(B6)contornillosA3×4einserteelrespaldodelasilla(B7)enlas
barrasdesoporte.
AsegureelrespaldodelasillaconlostornillosA2×2.
PASO4
PASO3
7
Machine Translated by Google
8
INSTRUCCIONES(ESCRITORIO)
Ensambleyasegureunrieldeslizante(B9)alsoportedehierro(B13)con
tornillosA2×2.
B13
B13
PASO5
PASO6
Ensambleyasegureelotrorieldeslizante(B10)alsoportedelaplancha(B13)
contornillosA2×2.
Machine Translated by Google

Desliceelcajóndealmacenamiento(B11)debajodelrieldeslizanteyfíjelocon
tornillosA5×4.
Ladomáslargo
PASO8
PASO7
Ensambleyasegurelaspatasdelescritorio(B2,B12)contornillosA2×4.
9
Machine Translated by Google

Acontinuación,ensambleyasegureeltablerodeescritorioensambladoenlaspatasdelescritorio.
contornillosA12×4.
PASO10
Vertical
dirección
Ladomáslargo
Escurrirse
PASO9
Vertical
Coloqueelmontanteenlos4orificiosdelsoporte.
10
Machine Translated by Google

INSTRUCCIONES(GABINETEDEMADERA)
Tuerca(plástica)x12
PASO12
Tuerca(plástica)
Doslados
Instalelatuerca(plástica)entodoslosorificiospequeños.
A7x4
Acontinuación,ensambleyfijeeltableroalmontanteylaspatasdelescritoriocontornillos
A7×4.
B8
PASO11
11
Machine Translated by Google

Tablero5
Tablero5
Tablero2
Tablero1
Tablero2
Tablero5
Tablero3
Tablero1
Tablero2
12
B8
Tornillotresenunox12
Aprieteeltornillotresenunoenlatuerca(plástico).
PASO13
PASO14
Montaryatornillar
Instalar4tuercas(metálicas)
Tuerca(Metal)
latuercabienapretada
Ensambleyatornillelatuercafirmemente
Tornillotresenunox12
Machine Translated by Google

latuercabienapretada
Ensambleyatornillelatuercafirmemente
Montaryatornillarel
Inserteeltablerodehierro(B14)enelestante
instalado.
Montaryatornillar
Tuercabienapretada
Instalar4tuercas(metal)
Tuerca(Metal)
B14
Instalar4tuercas(metal)
A6
PASO15
PASO16
Tablero4
13
Tablero2
Tablero4
Tablero3
Tablero2
Machine Translated by Google

ROSA
Silla:220libras
Capacidaddecargasegura
Color
Mesa:220libras
707Modelo
Tamañodelproducto
Mesa:700*500*(530710)mm
Silla:420*390*(660780)mm
ImportadoaEE.UU.:SanvenTechnologyLtd.Suite250,9166Anaheim
Lugar,RanchoCucamonga,CA91730
ECrossStuGmbH
C/OYHConsultingLimitedOficina147,Centurion
Dirección:Shuangchenglu803nong11hao1602A1609shi,baoshanqu,
shanghai200000CN.
NuevaGalesdelSur2122Australia
ImportadoaAustralia:SIHAOPTYLTD.1ROKEVASTREETEASTWOOD
Fabricante:Shanghaimuxinmuyeyouxiangongsi
YHCONSULTINGLIMITADA.
MainzerLandstr.69,60329FráncfortdelMeno.
Casa,LondonRoad,StainesuponThames,Surrey,TW184AX
PARÁMETRODELPRODUCTO
14
REPRESENTANTEDELREINOUNIDO
REPRESENTANTECE
Machine Translated by Google


Zgromadzenie dorosłych
BIURKA I KRZESŁA DO GABINETU DLA DZIECI
OSTRZEŻENIE
INSTRUKCJA OBSŁUGI
Wsparcie techniczne i certyfikat gwarancji
elektronicznej www.vevor.com/support
MODEL:707
„Oszczędzaj połowę”, „Połowa ceny” lub inne podobne wyrażenia używane przez
nas stanowią jedynie szacunkowe oszczędności, jakie możesz uzyskać, kupując u nas
określone narzędzia w porównaniu z głównymi markami i niekoniecznie oznaczają one
objęcie wszystkich kategorii oferowanych przez nas narzędzi. Uprzejmie przypominamy,
aby przy składaniu zamówienia dokładnie sprawdzić, czy faktycznie
oszczędzasz połowę w porównaniu z głównymi markami.
Nadal staramy się oferować Państwu narzędzia w konkurencyjnych cenach.
Machine Translated by Google

Wsparcie techniczne i certyfikat gwarancji
elektronicznej www.vevor.com/support
Masz pytania dotyczące produktu? Potrzebujesz wsparcia technicznego? Skontaktuj się z nami:
MODEL:707
To jest oryginalna instrukcja, przed użyciem należy uważnie przeczytać wszystkie
instrukcje. VEVOR zastrzega sobie jasną interpretację naszej instrukcji obsługi. Wygląd
produktu będzie zależał od produktu, który otrzymałeś. Prosimy o wybaczenie, że nie
poinformujemy Cię ponownie, jeśli w naszym produkcie pojawią się jakiekolwiek aktualizacje
technologiczne lub oprogramowania.
BIURKA I KRZESŁA
BADANIA DLA DZIECI
POTRZEBUJESZ POMOCY? SKONTAKTUJ SIĘ Z NAMI!
- 1 -
Machine Translated by Google

otworów wentylacyjnych klimatyzacji lub obok grzejników, aby zmniejszyć ryzyko
aby uniknąć przyszczypania.
przebarwienia lub starzenie.
i niszcząc jego wygląd.
2. Podczas regulacji nie wkładaj głowy pod biurko i krzesło.
7. Zwróć uwagę na wysokość biurka i krzesła po obu stronach, aby uniknąć
10. Podczas czyszczenia należy w odpowiednim czasie wysuszyć plamy wody na powierzchni.
wysokość biurka i krzesła.
poluzowanie się części łączących lub odkształcenie spowodowane przechyleniem lub
przechylanie.
3. Małe dzieci powinny korzystać z urządzenia pod nadzorem osób dorosłych.
OSTRZEŻENIE:
4. Obciążenie zestawu biurko + krzesło powinno mieścić się w granicach jego nośności.
8. Nie umieszczaj gorących lub lodowatych przedmiotów bezpośrednio na blacie, aby uniknąć
Przeczytaj ten materiał przed użyciem tego produktu. Nieprzestrzeganie tego może
5. Podczas użytkowania należy zachować cyrkulację powietrza (temperatura pomiędzy
przebarwienia i trwałe ślady spowodowane ekstremalnymi temperaturami.
Ostrzeżenia
spowodować poważne obrażenia.
18-28 stopni Celsjusza, wilgotność względna pomiędzy 40%-60%).
9. Nie używaj ostrych przedmiotów na pulpicie, aby uniknąć zarysowania panelu.
1. Podczas odwracania biurka nie należy opierać rąk na ramie biurka.
6. Nie należy używać zestawu biurka i krzesła w bezpośrednim świetle słonecznym, w pobliżu nawiewu powietrza.
- 2 -
INSTRUKCJE BEZPIECZEŃSTWA
Uwaga: Wymagany montaż przez osobę dorosłą!
Zgodność oznacza certyfikat bezpieczeństwa CE.
instrukcję uważnie.
Ostrzeżenie – aby zmniejszyć ryzyko obrażeń, użytkownik musi przeczytać instrukcję
Wiek 3 lata +
Machine Translated by Google

2. Ślady pozostawione przez pisaki na bazie oleju wytrzyj alkoholem lub olejkiem eterycznym.
balsam.
3. Nie używaj noży do rysowania blatu, nawet jeśli blat jest
ZAPISZ TĘ INSTRUKCJĘ
1. Wytrzyj ślady pozostawione przez pisaki wodne i akwarelowe za pomocą
woda.
Konserwacja
Zestaw biurko i krzesło.
odporne na wilgoć, zarysowania i zużycie.
- 3 -
Machine Translated by Google

B12 B14
B13
B11
B2x4
A3x4
A7x4 A5x4
(6x42)
B3
A6x1 A12x4 A8x1 A9x1
Pionowo x4
B4
B5
B6
(6x20)
B7
A2x18
B9B8
(4x25) (6x55) (4x12)
B1
B10
LISTA CZĘŚCI
- 4 -
Machine Translated by Google

- 5 -
Śruba trzy w jednym x12
Tablica 5
Nakrętka (metalowa) x12
Po zainstalowaniu wszystkich śrub dokręć je po kolei. Nie dokręcaj
Tablica 2
Tablica 4
Tablica 3
Tablica 1
przed zamontowaniem wszystkich śrub, aby uniknąć problemów z regulacją lub podnoszeniem.
Nie wchodź pod krzesło ani nie przebywaj pod nim, aby uniknąć przytrzaśnięcia.
Wymagana jest instalacja przez osobę dorosłą, a dzieci powinny być z dala od krzesła.
otworów wentylacyjnych klimatyzacji lub obok grzejników.
instalacja.
Nakrętka (plastikowa) x12
Nadaje się wyłącznie dla dzieci w wieku od 3 do 18 lat. Nie
należy używać zestawu biurka i krzesła w bezpośrednim świetle słonecznym, w pobliżu nawiewów i wywiewów.
Uwaga:
Machine Translated by Google

- 6 -
INSTRUKCJE(PRZEWODNIK)
Złóż i zabezpiecz nogi krzesła (B1, B2) za pomocą śrub A2×4.
KROK 2
KROK 1
Złóż i zabezpiecz wsporniki (B3, B4, B5) za pomocą śrub A2×4.
Machine Translated by Google

KROK 4
Przymocuj oparcie krzesła za pomocą śrub A2×2.
Zamontuj deskę siedziska (B6) za pomocą śrub A3×4 i włóż oparcie krzesła (B7) w pręty podporowe.
KROK 3
- 7 -
Machine Translated by Google

- 8 -
INSTRUKCJE(BIURKO)
Zamontuj i przymocuj jedną szynę ślizgową (B9) do stojaka żelaznego (B13) za
pomocą śrub A2×2.
B13
B13
KROK 5
KROK 6
Złóż i przymocuj drugą szynę ślizgową (B10) do stojaka żelaznego (B13).
ze śrubami A2×2.
Machine Translated by Google

KROK 8
Dłuższy bok
Wsuń szufladę do przechowywania (B11) pod szynę ślizgową i zabezpiecz ją
śrubami A5×4.
KROK 7
Złóż i zabezpiecz nogi biurka (B2, B12) za pomocą śrub A2×4.
- 9 -
Machine Translated by Google

- 10 -
Następnie zmontuj i zabezpiecz zmontowaną płytę biurka na nogach biurka
ze śrubami A12×4.
KROK 10
Wywijać się
Dłuższy bok
kierunek
KROK 9
Pionowo
Pionowo
Umieść pion w 4 otworach wspornika.
Machine Translated by Google

Nakrętka (plastikowa) x 12
INSTRUKCJA (SZAFKA DREWNIANA)
KROK 12
Nakrętka (plastikowa)
Dwie strony
Zamontuj nakrętki (plastikowe) na wszystkich małych otworach.
B8
Następnie zamontuj i przymocuj płytę panelu do słupka i nóg biurka za pomocą śrub A7×4.
A7x4
KROK 11
- 11 -
Machine Translated by Google

Śruba trzy w jednym x12
B8
Tablica 5
Tablica 5
Tablica 2
Tablica 1
Tablica 2
Tablica 5
Tablica 3
Tablica 1
Tablica 2
- 12 -
Dokręć śrubę trzy w jednym do nakrętki (plastikowej).
KROK 13
KROK 14
Złóż i przykręć
Zamontuj 4 nakrętki (metalowe)
Nakrętka (metalowa)
nakrętka mocno
Złóż i mocno dokręć nakrętkę
Śruba trzy w jednym x12
Machine Translated by Google
Tablica 4
- 13 -
Tablica 2
Tablica 4
Tablica 3
Tablica 2
KROK 16
KROK 15
nakrętka mocno
Złóż i mocno dokręć nakrętkę
Złóż i przykręć
Zainstaluj 4 nakrętki (metalowe)
Złóż i przykręć
nakrętka mocno
Zainstaluj 4 nakrętki (metalowe)
Nakrętka (metalowa)
Włóż żelazną płytę tylną (B14) do zamontowanej
półki na książki.
A6
B14
Machine Translated by Google

Importowane do USA: Sanven Technology Ltd. Suite 250, 9166 Anaheim
Miejsce, Rancho Cucamonga, CA 91730
E-CrossStu GmbH
C/O YH Consulting Limited Biuro 147, Centurion
Importowane do AUS: SIHAO PTY LTD. 1 ROKEVA STREETEASTWOOD
NSW 2122 Australia
Adres: Shuangchenglu 803nong11hao1602A-1609shi, baoshanqu, szanghaj
200000 CN.
Producent: Shanghaimuxinmuyeyouxiangongsi
Mainzer Landstr.69, 60329 Frankfurt nad Menem.
YH CONSULTING LIMITED.
Dom, London Road, Staines-upon-Thames, Surrey, TW18 4AX
RÓŻOWY
Krzesło: 220 funtów
Bezpieczna ładowność
Stół: 700*500*(530-710)mm
707
Stół: 220 funtów
Kolor
Model
Krzesło: 420*390*(660-780)mm
Rozmiar produktu
PARAMETR PRODUKTU
- 14 -
Przedstawiciel UE
REP WIELKIEJ BRYTANII
Machine Translated by Google


Volwassen vergadering
MODEL:707
KINDERSTUDIE BUREAUS EN STOELEN
WAARSCHUWING
GEBRUIKERSHANDLEIDING
Technische ondersteuning en e-garantiecertificaat
www.vevor.com/support
"Save Half", "Half Price" of andere soortgelijke uitdrukkingen die wij gebruiken, geven alleen
een schatting weer van de besparingen die u kunt behalen door bepaalde gereedschappen bij ons
te kopen in vergelijking met de grote topmerken en betekent niet noodzakelijkerwijs dat alle categorieën
gereedschappen die wij aanbieden, worden gedekt. Wij herinneren u eraan om zorgvuldig te
controleren of u daadwerkelijk de helft bespaart in vergelijking met de grote
topmerken wanneer u een bestelling bij ons plaatst.
Wij streven er voortdurend naar om u gereedschappen tegen concurrerende prijzen te leveren.
Machine Translated by Google

Technische ondersteuning en e-
garantiecertificaat www.vevor.com/support
- 1 -
Heeft u vragen over het product? Heeft u technische ondersteuning nodig? Neem dan gerust
contact met ons op:
MODEL:707
Dit is de originele instructie, lees alle handleidingen zorgvuldig door voordat u het product
gebruikt. VEVOR behoudt zich een duidelijke interpretatie van onze gebruikershandleiding voor.
Het uiterlijk van het product is afhankelijk van het product dat u hebt ontvangen. Vergeef ons
dat we u niet opnieuw zullen informeren als er technologie- of software-updates voor ons product
zijn.
HULP NODIG? NEEM CONTACT MET ONS OP!
KINDERSTUDIE
BUREAUS EN STOELEN
Machine Translated by Google

1. Plaats uw handen niet op het bureauframe wanneer u het bureau omdraait
ventilatieopeningen of naast verwarmingstoestellen, om de kans op
10. Droog de watervlekken op het oppervlak tijdig bij het schoonmaken
6. Gebruik deze bureau- en stoelset niet in direct zonlicht, naast de lucht
Voorzorgsmaatregelen
en het uiterlijk ervan aantasten.
9. Gebruik geen scherpe voorwerpen op het bureaublad om krassen op het paneel te voorkomen
ernstig letsel tot gevolg hebben.
18-28 graden Celsius, relatieve luchtvochtigheid tussen 40%-60%).
5. Tijdens het gebruik moet de luchtcirculatie behouden blijven (temperatuur tussen
Lees dit materiaal voordat u dit product gebruikt. Als u dit niet doet, kan dit leiden tot:
verkleuring en permanente vlekken veroorzaakt door extreme temperaturen.
4. De belasting van de bureau- en stoelset moet binnen het draagvermogen vallen.
WAARSCHUWING:
8. Plaats geen hete of ijskoude voorwerpen direct op het bureaublad om
kantelen.
3. Jonge kinderen dienen bij gebruik begeleid te worden door volwassenen.
hoogte van het bureau en de stoel.
losraken van de verbindingsdelen of vervorming door scheefstand of
7. Let op de hoogte van het bureau en de stoel aan beide kanten om te voorkomen dat
2. Steek uw hoofd niet onder het bureau en de stoel bij het verstellen van de
om beknelling te voorkomen.
verkleuring of veroudering.
VEILIGHEIDSINSTRUCTIES
Let op: Montage door een volwassene vereist!
Compliance is een CE-beveiligingscertificering.
handleiding zorgvuldig door.
Waarschuwing - Om het risico op letsel te verminderen, moet de gebruiker de instructies lezen
Leeftijd 3 jaar +
- 2 -
Machine Translated by Google

- 3 -
2. Veeg de vlekken die door pennen op oliebasis zijn achtergelaten weg met alcohol of etherische olie.
balsem.
3. Gebruik geen messen om het bureaublad te krassen, ook al is het bureaublad
vochtbestendig, krasbestendig en slijtvast.
1. Veeg vlekken van pennen op waterbasis en aquarelpennen weg met
water.
Onderhoud
het bureau en de stoel.
BEWAAR DEZE INSTRUCTIES
Machine Translated by Google

B1
B10
A3x4
A7x4 A5x4
B9B8
(4x25) (6x55) (4x12)
B7
A2x18
B6
(6x20)
B5
Rechtopstaand x4
B4
B3
A6x1 A12x4 A8x1 A9x1
B2x4
(6x42)
- 4 -
B13
B12B11 B14
ONDERDELENLIJST
Machine Translated by Google
- 5 -
Bord 5
Drie-in-één schroef x12
Moer (metaal) x12
ÿ Zodra alle schroeven zijn geïnstalleerd, draait u ze één voor één vast. Draai ze niet vast.
Bord 2
Bord 4
Bord 3
Bord 1
alle schroeven voordat ze allemaal op hun plaats zitten om problemen met het verstellen of optillen
te voorkomen. ÿ Ga niet onder de stoel zitten of blijf er niet onder om beknelling te
voorkomen. ÿ Installatie door volwassenen is vereist en houd kinderen uit de buurt tijdens de
ventilatieopeningen of naast verwarmingstoestellen.
installatie.
Moer (kunststof) x12
ÿ Alleen geschikt voor kinderen van 3 tot 18 jaar. ÿ
Gebruik deze bureau- en stoelset niet in direct zonlicht, naast de lucht
Aandacht:
Machine Translated by Google
- 6 -
INSTRUCTIES(STOEL)
Monteer en bevestig de stoelpoten (B1, B2) met schroeven A2×4.
Monteer en bevestig de steunbalken (B3, B4, B5) met schroeven A2×4.
STAP 2
STAP 1
Machine Translated by Google

- 7 -
STAP 4
Bevestig de rugleuning van de stoel met de schroeven A2×2.
Monteer het zitgedeelte (B6) met schroeven A3×4 en plaats de rugleuning (B7) in de
steunbalken.
STAP 3
Machine Translated by Google

Monteer en bevestig één glijrail (B9) aan de strijkijzerstandaard (B13) met
schroeven A2×2.
STAP 6
B13
STAP 5
B13
Monteer en bevestig de andere glijrail (B10) aan de strijkijzerstandaard (B13)
met schroeven A2×2.
INSTRUCTIES(BUREAU)
- 8 -
Machine Translated by Google
- 9 -
STAP 8
Langere zijde
Schuif de opberglade (B11) onder de glijrail en zet deze vast met schroeven A5×4.
STAP 7
Monteer en bevestig de poten van het bureau (B2, B12) met schroeven A2×4.
Machine Translated by Google

Monteer en bevestig vervolgens het gemonteerde bureaublad aan de poten van het bureau
met schroeven A12×4.
STAP 10
Rechtop
richting
Langere zijde
Glip eruit
STAP 9
Plaats de staander in de 4 gaten van de beugel.
Rechtop
- 10 -
Machine Translated by Google
INSTRUCTIES (HOUTEN KAST)
- 11 -
Moer (kunststof) x 12
STAP 12
Moer (Kunststof)
Twee kanten
A7 x 4
Monteer vervolgens het paneelbord aan de staander en de poten van het bureau en bevestig
het met schroeven A7×4.
B8
STAP 11
Plaats een moer (kunststof) op alle kleine gaten.
Machine Translated by Google

Drie-in-één schroef x12
B8
Drie-in-één schroef x12
Bord 5
Bord 5
Bord 5
Bord 2
Bord 2
Bord 3
Bord 1
- 12 -
Bord 2
Bord 1
Draai de 3-in-1-schroef op de moer (kunststof) vast.
STAP 13
STAP 14
Monteren en schroeven
de moer stevig vastdraaien
4 moeren (metaal) monteren
Moer (Metaal)
Monteer en draai de moer stevig vast
Machine Translated by Google

Bord 4
Bord 3
Bord 2
Bord 4
Bord 2
- 13 -
STAP 16
STAP 15
Monteer en schroef de
moer stevig vast
Monteer en draai de moer stevig vast
4 moeren (metaal) monteren
Monteren en schroeven
de moer stevig vastdraaien
4 moeren (metaal) monteren
Moer (Metaal)
B14
A6
Plaats het ijzeren achterbord (B14) in de
geïnstalleerde boekenplank.
Machine Translated by Google
NSW 2122 Australië
Plaats, Rancho Cucamonga, CA 91730
E-CrossStu GmbH
C/O YH Consulting Limited Kantoor 147, Centurion
Geïmporteerd naar AUS: SIHAO PTY LTD. 1 ROKEVA STREETEASTWOOD
Geïmporteerd naar de VS: Sanven Technology Ltd. Suite 250, 9166 Anaheim
Adres: Shuangchenglu 803nong11hao1602A-1609shi, baoshanqu, shanghai 200000 CN.
Fabrikant: Shanghaimuxinmuyeyouxiangongsi
YH CONSULTING LIMITED.
Mainzer Landstr.69, 60329 Frankfurt am Main.
Huis, London Road, Staines-upon-Thames, Surrey, TW18 4AX
VK REP
EC-REP
Tafel: 220lbs
Stoel: 220lbs
Veilige laadcapaciteit
Kleur
ROZE
707Model
Productgrootte
Stoel: 420*390*(660-780)mm
Tafel: 700*500*(530-710)mm
PRODUCTPARAMETER
- 14 -
Machine Translated by Google


Vuxensamling
BORD OCH STOLAR FÖR BARN
VARNING
ANVÄNDARMANUAL
Teknisk support och e-garanticertifikat
www.vevor.com/support
"Spara hälften", "halva priset" eller andra liknande uttryck som används av oss
representerar bara en uppskattning av besparingar du kan dra nytta av att köpa vissa
verktyg hos oss jämfört med de stora toppmärkena och betyder inte nödvändigtvis att täcka
alla kategorier av verktyg som erbjuds av oss. Du påminns om att noggrant kontrollera
när du gör en beställning hos oss om du verkligen sparar hälften i
jämförelse med de främsta varumärkena.
Vi fortsätter att vara engagerade i att ge dig verktyg till konkurrenskraftiga priser.
MODELL:707
Machine Translated by Google

Har du produktfrågor? Behöver du teknisk support? Kontakta oss gärna:
MODELL:707
Detta är den ursprungliga instruktionen, läs alla instruktioner noggrant innan du
använder den. VEVOR reserverar sig för en tydlig tolkning av vår användarmanual. Utseendet
på produkten är beroende av den produkt du fått. Ursäkta oss att vi inte kommer att
informera dig igen om det finns någon teknik eller mjukvaruuppdateringar på vår produkt.
Teknisk support och e-garanticertifikat
www.vevor.com/support
BEHÖVER HJÄLP? KONTAKTA OSS!
BARNSTUDIE
SKRIVBORD OCH STOLAR
- 1 -
Machine Translated by Google
Varningar
9. Använd inte vassa föremål på skrivbordet för att förhindra repor på panelen
resultera i allvarlig skada.
1. Placera inte händerna på skrivbordsramen när du vänder på skrivbordet
18-28 grader Celsius, relativ luftfuktighet mellan 40%-60%).
luftkonditioneringsventiler eller bredvid värmare, för att minska möjligheten till
6. Använd inte detta skrivbord och stolset i direkt solljus, bredvid luft
och skadar dess utseende.
VARNING:
4. Belastningen på skrivbords- och stolsetet ska vara inom dess lastkapacitet.
8. Placera inte varma eller isiga föremål direkt på skrivbordet för att undvika
5. Luftcirkulationen bör upprätthållas under användning (temperatur mellan
Läs detta material innan du använder denna produkt. Underlåtenhet att göra det kan
missfärgning och permanenta märken orsakade av extrema temperaturer.
höjden på skrivbordet och stolen.
lossning av de anslutande delarna eller deformation orsakad av lutande eller
lutning.
3. Små barn bör vägledas av vuxna i bruk.
för att undvika klämning.
missfärgning eller åldrande.
10. Torka vattenfläckarna på ytan i tid vid rengöring
7. Var uppmärksam på höjden på skrivbordet och stolen på båda sidor för att undvika
2. Lägg inte huvudet under skrivbordet och stolen när du justerar
- 2 -
SÄKERHETSINSTRUKTIONER
handbok noggrant.
Compliance är en CE-säkerhetscertifiering.
Obs: Vuxen montering krävs!
Varning - För att minska risken för skada måste användaren läsa instruktionerna
Ålder 3 år +
Machine Translated by Google

- 3 -
balsam.
2. Torka bort märken som lämnats av oljebaserade pennor med alkohol eller livsnödvändigt
3. Använd inte knivar för att repa skrivbordet, även om skrivbordet är det
SPARA DENNA INSTRUKTIONER
Underhåll
vatten.
1. Torka bort märken efter vattenbaserade pennor och akvarellpennor med
skrivbords- och stolsetet.
fuktsäker, reptålig och slitstark.
Machine Translated by Google
B12 B14
B13
B11
B9
(4x25) (6x55) (4x12)
B1
B10B8
A3x4
A7x4 A5x4
B6
(6x20)
A2x18
B7
Upprätt x4
B4
B5
(6x42)
B2x4
A6x1 A12x4 A8x1 A9x1
B3
DELLISTA
- 4 -
Machine Translated by Google

Uppmärksamhet:
Styrelse 5
Tre-i-ett-skruv x12
Mutter (metall) x12
ÿ När alla skruvar är installerade, dra åt dem en efter en. Dra inte åt
Styrelse 2
Styrelse 4
Styrelse 3
Styrelse 1
alla skruvar innan alla är på plats för att undvika problem med justering eller lyft. ÿ Gå inte under
eller stanna under stolen för att undvika klämning. ÿ Vuxeninstallation krävs,
och håll barn borta under tiden
installation.
luftkonditioneringsventiler, eller bredvid värmare.
ÿ Endast lämplig för barn i åldrarna 3-18 år. ÿ Använd inte
detta skrivbord och stolset i direkt solljus, bredvid luft
Mutter (plast) x12
- 5 -
Machine Translated by Google

Montera och fäst stolsbenen (B1, B2) med skruvar A2×4.
STEG 2
STEG 1
Montera och fäst stödstängerna (B3, B4, B5) med skruvar A2×4.
INSTRUKTIONER (STOL)
- 6 -
Machine Translated by Google

STEG 4
Fäst stolsryggen med skruvarna A2×2.
Montera sittbrädan (B6) med skruvarna A3×4, och sätt in stolsryggen (B7) i stödstängerna.
STEG 3
- 7 -
Machine Translated by Google

- 8 -
INSTRUKTIONER (DESK)
B13
B13
Montera och fäst en glidskena (B9) på järnstativet (B13) med skruvarna A2×2.
STEG 5
STEG 6
Montera och fäst den andra glidskenan (B10) på järnstativet (B13)
med skruvar A2×2.
Machine Translated by Google

STEG 8
Längre sida
Skjut in förvaringslådan (B11) under glidskenan och fäst den med skruvarna A5×4.
STEG 7
Montera och fäst skrivbordsbenen (B2, B12) med skruvar A2×4.
- 9 -
Machine Translated by Google

Montera sedan och säkra den monterade bordsskivan på skrivbordsbenen
med skruvar A12×4.
STEG 10
Upprätt
riktning
Längre sida
Slipa ut
STEG 9
Upprätt
Placera stolpen i fästets 4 hål.
- 10 -
Machine Translated by Google

Mutter (plast) x 12
INSTRUKTIONER (TRÄSKÅP)
STEG 12
Mutter (plast)
Två sidor
A7 x 4
Montera sedan och fäst panelskivan på stolpen och skrivbordsbenen med skruvar A7×4.
B8
STEG 11
Montera mutter (plast) på alla små hål.
- 11 -
Machine Translated by Google
B8
Tre-i-ett-skruv x12
Styrelse 5
Styrelse 5
Styrelse 2
Styrelse 3
Styrelse 5
Styrelse 2
Styrelse 1
Styrelse 2
- 12 -
Styrelse 1
Dra åt tre-i-ett-skruven på muttern (plast).
STEG 13
STEG 14
Montera och skruva
Montera 4 muttrar (metall)
Mutter (metall)
Montera och skruva fast muttern
muttern tätt
Tre-i-ett-skruv x12
Machine Translated by Google

Styrelse 4
- 13 -
Styrelse 2
Styrelse 4
Styrelse 3
Styrelse 2
STEG 16
STEG 15
muttern tätt
Montera och skruva fast muttern
Montera och skruva fast
Installera 4 muttrar (metall)
Montera och skruva
muttern hårt
Installera 4 muttrar (metall)
Mutter (metall)
Sätt in järnbackboarden (B14) i den installerade
bokhyllan.
A6
B14
Machine Translated by Google

Importerad till USA: Sanven Technology Ltd. Suite 250, 9166 Anaheim
Place, Rancho Cucamonga, CA 91730
E-CrossStu GmbH
Mainzer Landstr.69, 60329 Frankfurt am Main.
Importerad till AUS: SIHAO PTY LTD. 1 ROKEVA STREETEASTWOOD
NSW 2122 Australien
Adress: Shuangchenglu 803nong11hao1602A-1609shi, baoshanqu, shanghai 200000
CN.
Tillverkare: Shanghaimuxinmuyeyouxiangongsi
C/O YH Consulting Limited Office 147, Centurion
House, London Road, Staines-upon-Thames, Surrey, TW18 4AX
YH CONSULTING LIMITED.
ROSA
Stol: 220lbs
Säker lastkapacitet
Bord: 700*500*(530-710)mm
Färg
Bord: 220lbs
707Modell
Stol: 420*390*(660-780)mm
Produktstorlek
PRODUKTPARAMETER
- 14 -
UK REP
EC REP
Machine Translated by Google