
INSTALLATION INSTRUCTIONS
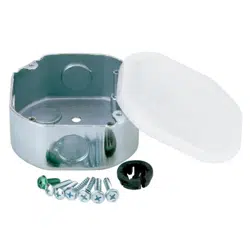
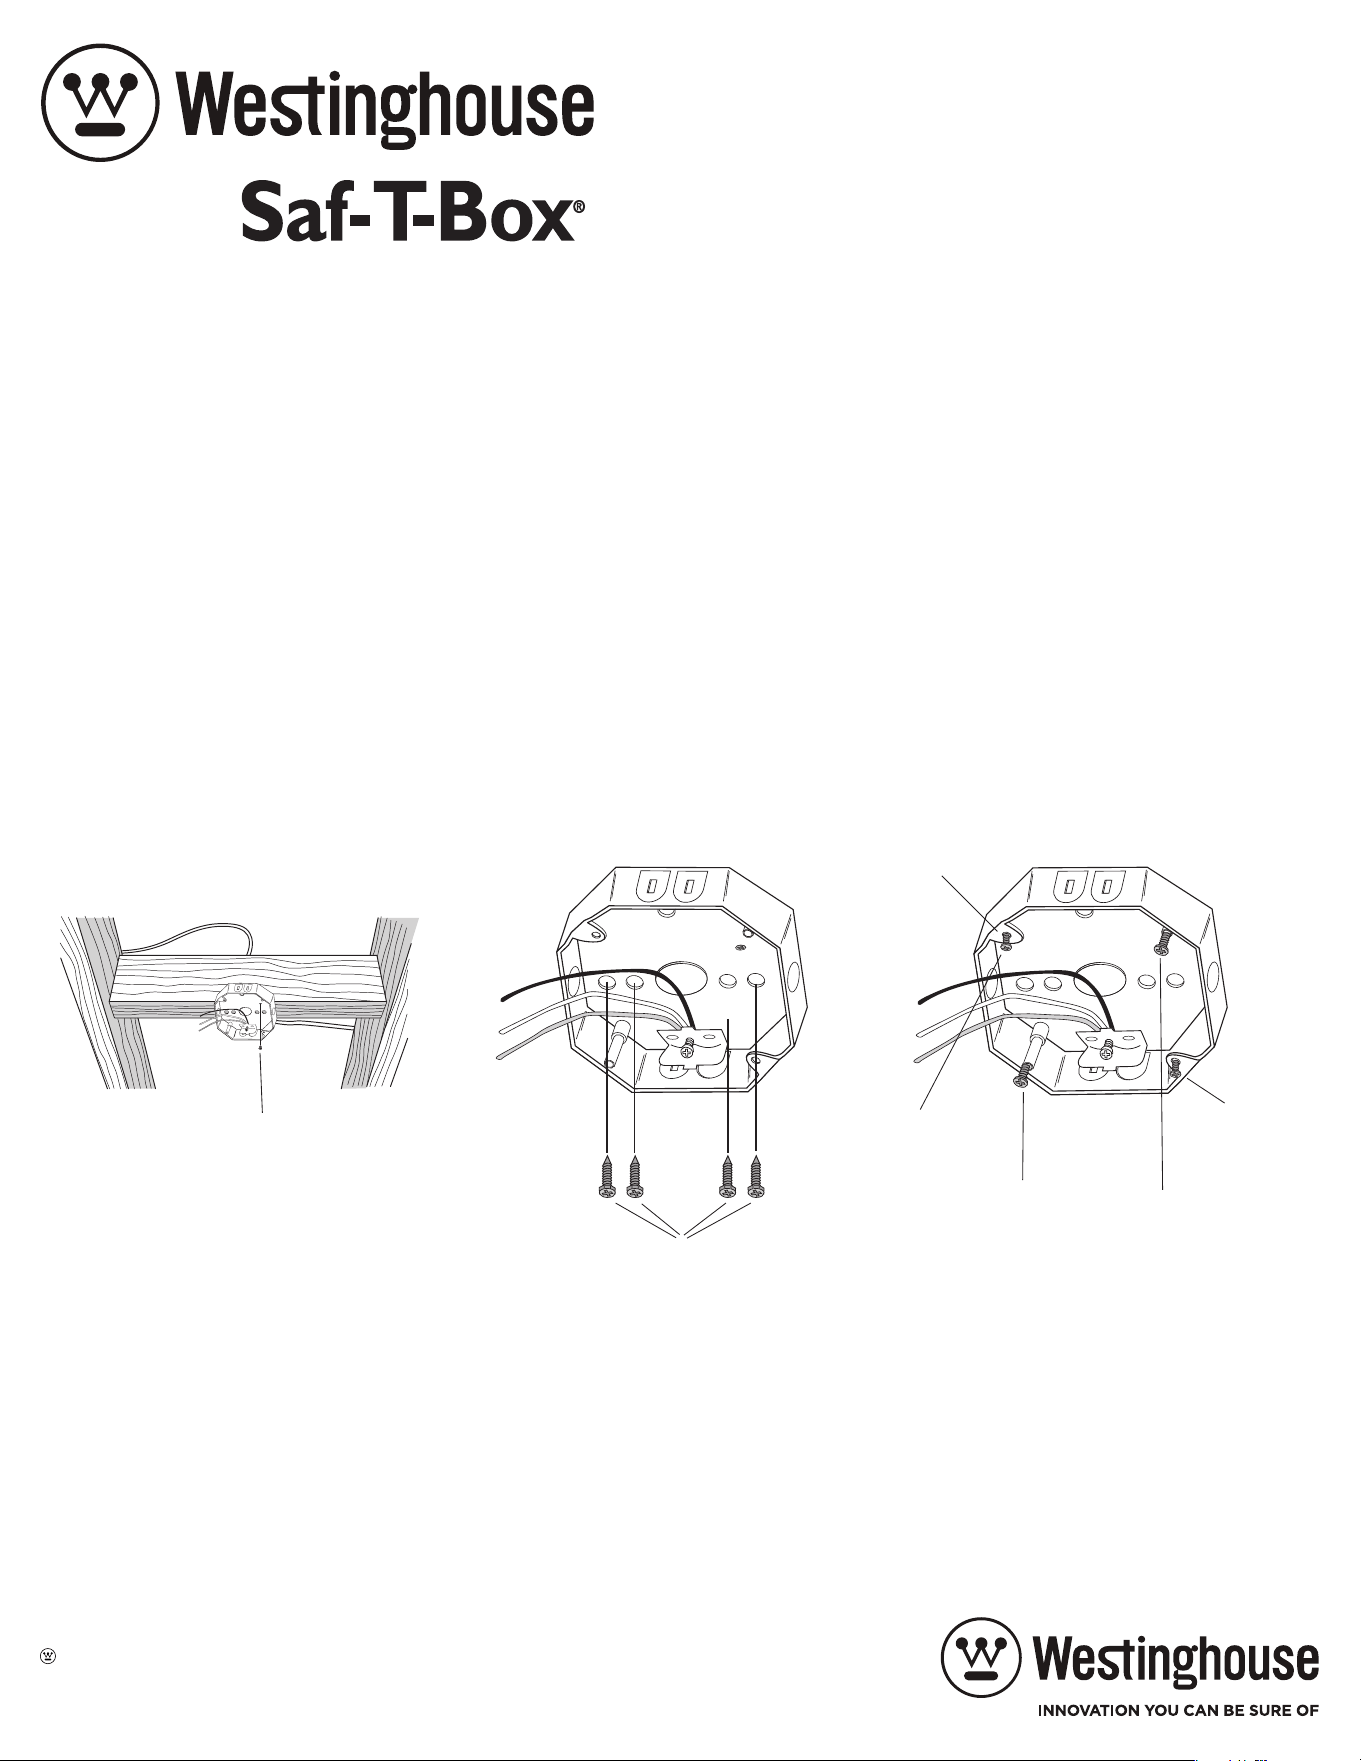
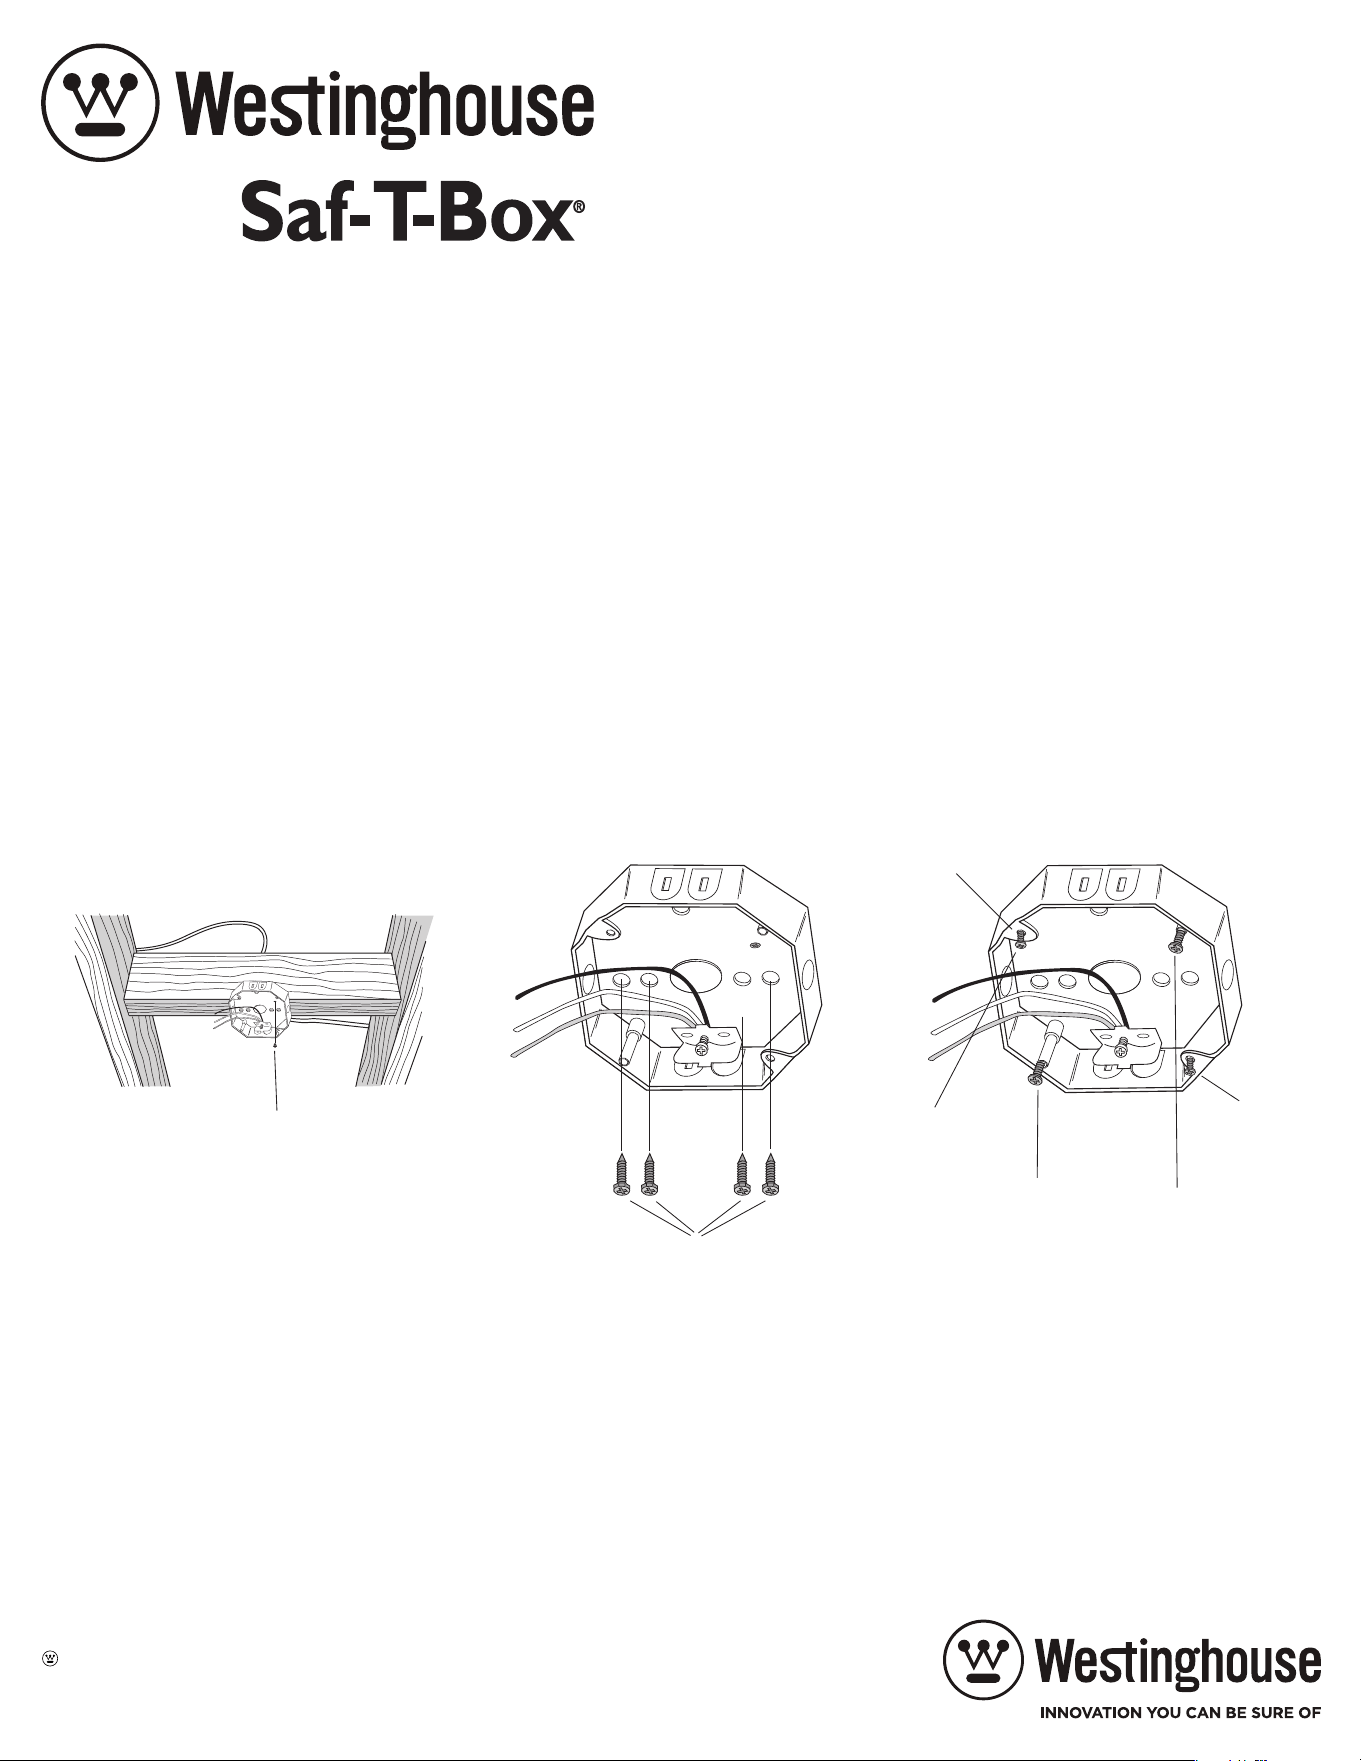
1. Pull wire into electrical box through one of the knockouts and secure using the single clamp provided, or other strain relief
supplied by the installer. Install the green grounding screw (provided) (Figure 1).
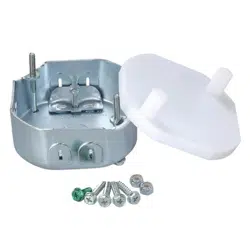
2. Mount electrical box to joist using the 4 wood screws provided (Figure 2).
NOTE: If you are not installing the fan at this time, install mounting hardware (to prevent it from being misplaced), tuck wire
into box and replace Saf-T-Cap. Saf-T-Cap protects bolts and wiring during painting and sheet-rocking.
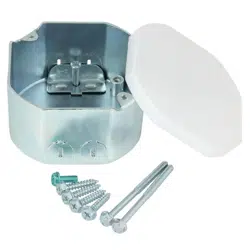
3. When you are ready to hang the fan or fixture, remove Saf-T-Cap. Mount fan bracket or fixture mounting bar (heavier fixtures
or chandeliers) to the threaded post using the #10-24 x 1” bolts provided, or mount cover plates or lightweight fixtures to
the box ears using #8-32 screws (not provided) (Figure 3). Complete installation according to fan or fixture manufacturer’s
instructions.
Ceiling Fan and Fixture Support
MODELS 01050-00, 01050-11
The Saf-T-Box is UL listed for fan support and exceeds the requirements of the National Electric Code for fans
weighing up to 70 lbs. and lighting fixtures weighing up to 150 lbs.
Figure 1 Figure 2 Figure 3
Westinghouse Lighting, Philadelphia, PA 19154-1029, U.S.A.
www.westinghouselighting.com
, WESTINGHOUSE, and INNOVATION YOU CAN BE SURE OF
are trademarks of Westinghouse Electric Corporation.
Used under license by Westinghouse Lighting.
All rights reserved.
Made in China
4 Wood screws
Green
grounding screw
10-24 Bolt
10-24 Bolt
Box Ears
8-32 Screw
(not included)
8-32 Screw
(not included)
INSTRUCCIONES DE INSTALACIÓN
1. Introduzca el cable en la caja eléctrica a través de uno de los agujeros ciegos y asegúrelo con la abrazadera incluida u otro
alivio de tensión suministrado por el instalador. Instale el tornillo verde de conexión de puesto a tierra (incluido) (Figura 1).
2. Monte la caja eléctrica en la vigueta usando los 4 tornillos para madera incluidos (Figura 2).
NOTA: Si no está instalando el ventilador en este momento, instale los accesorios de montaje (para evitar que se pierden),
meta el cable en la caja y reemplace el Saf-T-Cap. El Saf-T-Cap protege los pernos y el cableado durante la pintura e
instalacion de paneles de yeso.
3. Cuando esté listo para colgar el ventilador o el accesorio, quítale el Saf-T-Cap. Monte el soporte del ventilador o la barra de
montaje del artefacto (accesorios o lámparas más pesadas) en el poste con los pernos de #10-24 x 1" incluidos o monte
placas de cubierta o artefactos livianos en las orejas de la caja eléctrica utilizando #8-32 tornillos (no incluidos) (Figura 3).
Complete la instalación de acuerdo con las instrucciones del fabricante del ventilador o del accesorio.
El Saf-T-Box está listado por UL para soporte de ventiladores y excede los requisitos del Código Eléctrico
Nacional (NEC) para ventiladores que pesen hasta 70 lbs. y artefactos luminosos que pesan hasta 150 lbs.
Tornillo de
10-24
Tornillo de
10-24
Orejas de
Caja
Soporte para Abanicos de Techo y
Accessorios de Iluminación
MODELOS 01050-00, 01050-11
Figura 1 Figura 2 Figura 3
4 tornillos de
madera
Tornillo verde de
puesto a tierra
Tornillos de
8-32 (no
incluido)
Tornillos de 8-32
(no incluido)
Westinghouse Lighting, Philadelphia, PA 19154-1029, U.S.A.
www.westinghouselighting.com
, WESTINGHOUSE, and INNOVATION YOU CAN BE SURE OF
are trademarks of Westinghouse Electric Corporation.
Used under license by Westinghouse Lighting.
All rights reserved.
Made in China
INSTRUCTIONS D'INSTALLATION
1. Tirez le fil dans le boîtier électrique à travers l'une des découpes et arrimez-le avec le collier unique prévu ou un autre
réducteur de tension fourni par l'installateur. Installez la vis de terre verte (fournie) (Figure 1).
2. Montez le boîtier électrique sur la solive avec les 4 vis à bois fournies (figure 2).
REMARQUE: Si vous n'installez pas encore le ventilateur, mettez la visserie en place (pour éviter de la perdre), rangez le fil
dans le boîtier et replacez le Saf-T-Cap. Le Saf-T-Cap protège les boulons et le câblage durant les travaux de peinture et
d'isolation.
3. Dès que vous êtes prêt à suspendre le ventilateur ou le luminaire, retirez le Saf-T-Cap. Montez le support de ventilateur ou
la barre de montage de luminaire (chandeliers ou luminaires plus lourds) sur le montant fileté avec les boulons #10 -24 x 1”
fournis ou montez les plaques de cache ou les luminaires plus légers sur les oreillettes du boîtier avec des vis #8 -32 (non
fournies) (Figure 3). Terminez l'installation selon les instructions du fabricant du ventilateur ou du luminaire.
Le Saf-T-Box est homologué UL comme support de ventilateur et surpasse les exigences du Code national
d'électricité pour les ventilateurs pesant jusqu'à 70 lb (31 kg) et les luminaires pesant jusqu'à 150 lb (68 kg).
Westinghouse Lighting, Philadelphia, PA 19154-1029, U.S.A.
www.westinghouselighting.com
, WESTINGHOUSE, and INNOVATION YOU CAN BE SURE OF
are trademarks of Westinghouse Electric Corporation.
Used under license by Westinghouse Lighting.
All rights reserved.
Made in China
Soutien du Ventilateur de Plafond et
de l’Appareil d’Éclairage
MODELES 01050-00, 01050-11
10-24
boulon
10-24
boulon
BoÎte à
bordure
Figure 1 Figure 2 Figure 3
4 vis à bois
Vis de mise
a la terre
8-32 Vis
(non inclus)
8-32 Vis
(non inclus)