
Technical Support and E-Warranty Certificate www.vevor.com/support
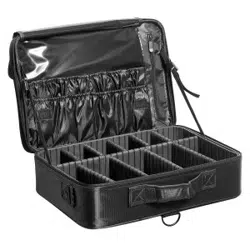
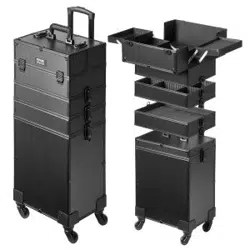
MAKEUP-TRAIN-CASE
USER MANUAL
We continue to be committed to provide you tools with competitive price.
"Save Half", "Half Price" or any other similar expressions used by us only represents an
estimate of savings you might benefit from buying certain tools with us compared to the major
top brands and does not necessarily mean to cover all categories of tools offered by us. You
are kindly reminded to verify carefully when you are placing an order with us if you are
actually saving half in comparison with the top major brands.

- 1 -
Have product questions? Need technical support? Please feel free to
contact us:
Technical Support and E-Warranty Certificate
www.vevor.com/support
NEED HELP? CONTACT US!
This is the original instruction, please read all manual instructions
carefully before operating. VEVOR reserves a clear interpretation of our
user manual. The appearance of the product shall be subject to the
product you received. Please forgive us that we won't inform you again if
there are any technology or software updates on our product.
MAKEUP-TRAIN-CASE

- 2 -
Important Safety Instructions:
These instructions are provided for your safety . It ' s very important that
they are read carefully and completely before assembly and installation of
this makeup train case.
Only use with supplied transformer hardware.
Unplug the transformer from the power outlet when the product is not in
use.
If any abnormal condition occurs , unplug the lighted mirror , allow it to
cool , and return it to manufacturer for examination and repair.
Keep these instructions for future use.
A DANGER / WARNINGS:
1 . The product can be used in countries with voltage rated at 10-250V ,
maximum wattage is 500w.
2 . Bulb is hot when it is use and risk of scalding , please do not touch .
Cool off before bulb replacement . Please switch off supply and let the
bulbs cool off before the case cover can be closed.
3 . Please unplug hair dryer or other high-power electrical appliance
immediately after use so that possible accident as a result of overheat and
long time working caused by forgotten carelessness can be avoided
4 . In case of smoke or fire , please don't pull the plug with hand if the
cause of smoke or fire is unidentified Power supply must be cut off by using
insulator to unplug the product and ther ask professional technician for
help .
5 . Do not shake the support stand or case body as the makeup case may
fall down or get damaged or it may pose a risk to personal safety.
The plug needs to be inserted tightly ( to avoid plugging the plug with
water ) , otherwise it will easily cause the transformer in the box to burn
out .
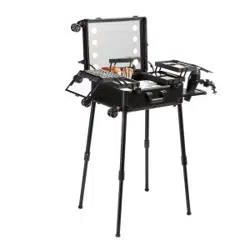
Product Introduction
- 3 -
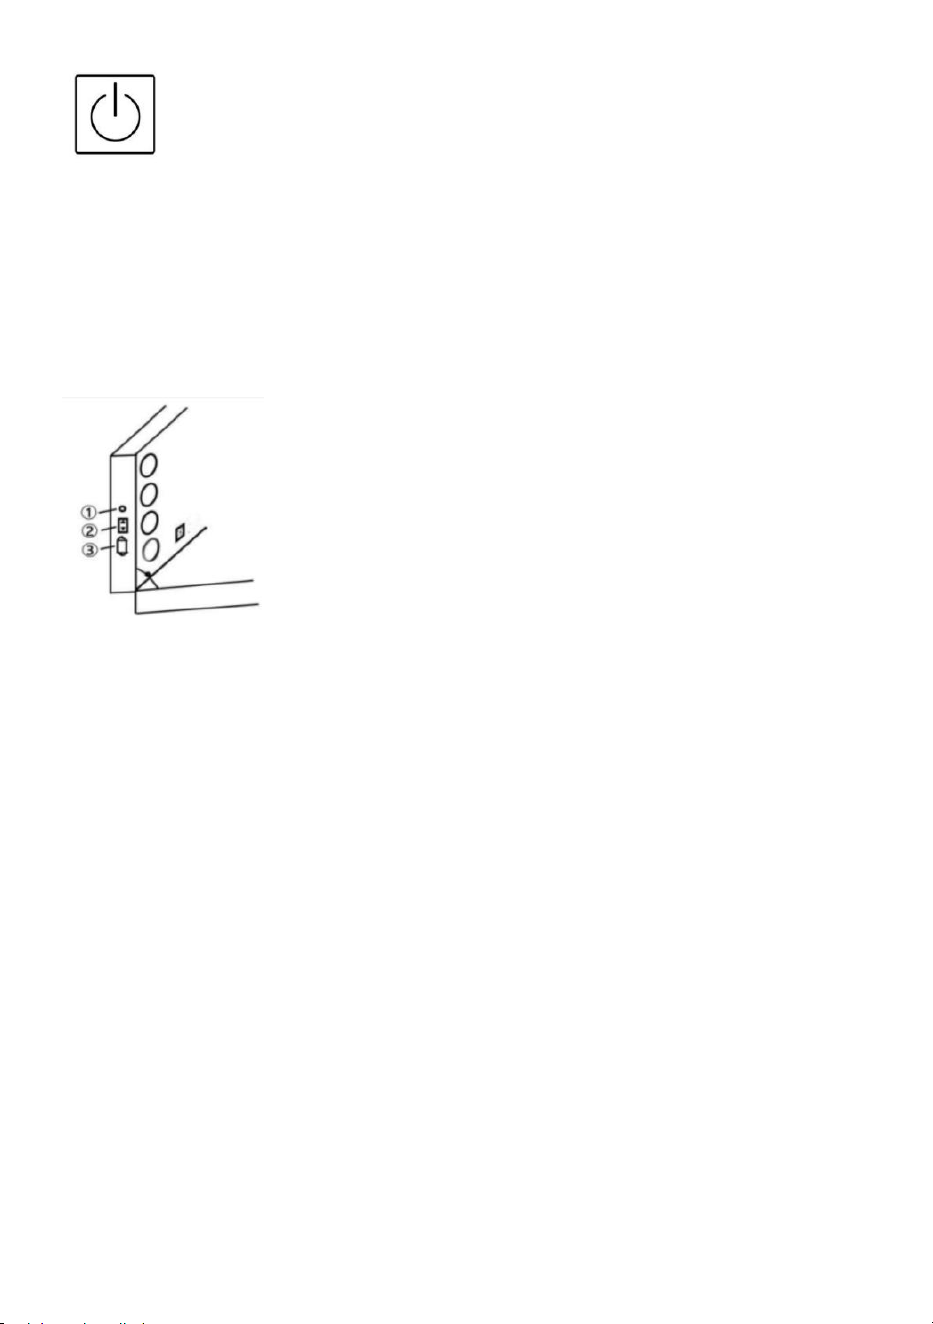
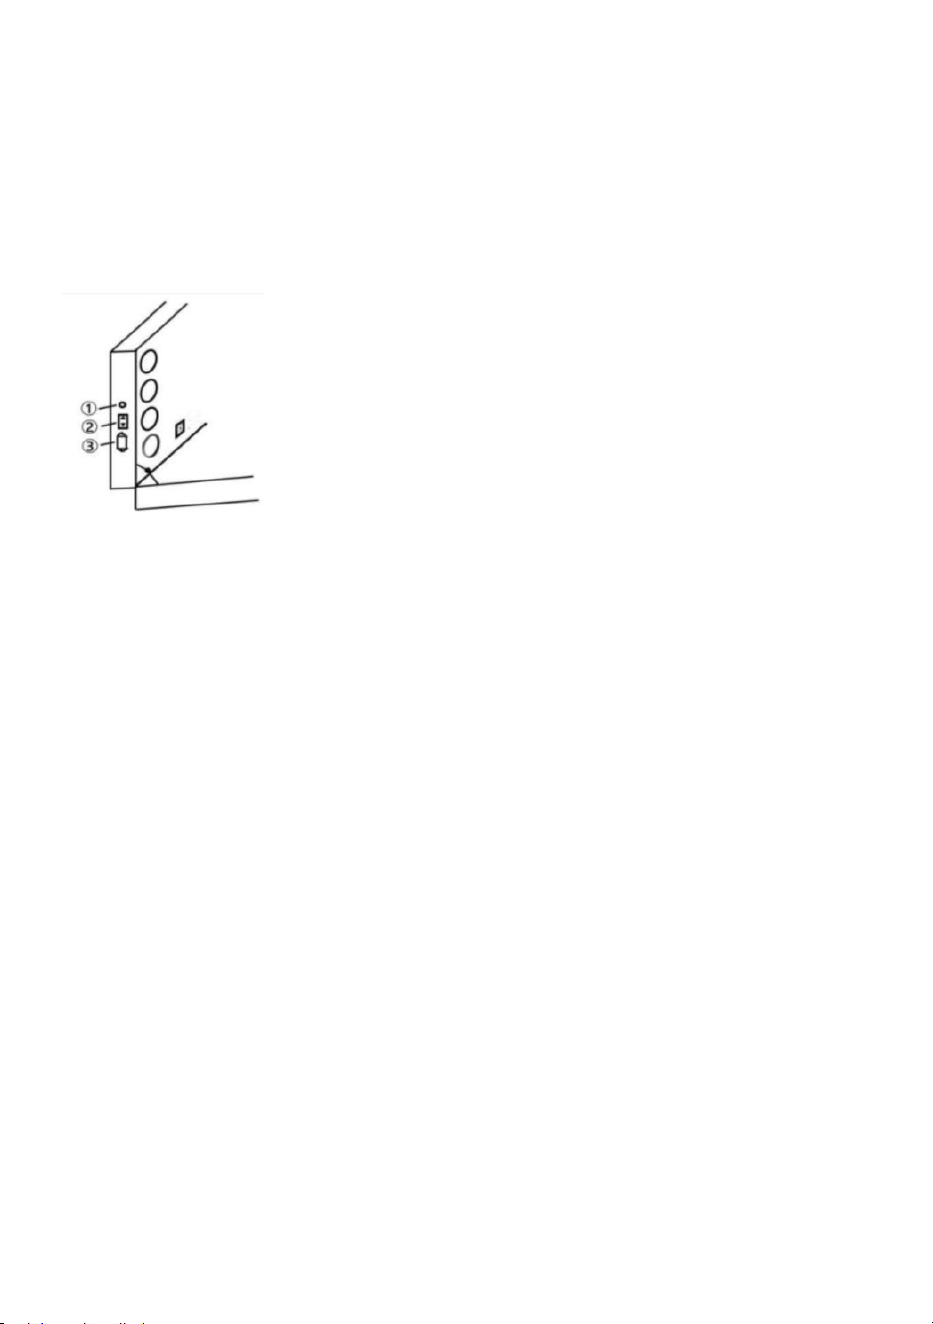
How to operate the Touch Switch:
Tip : Needs to be plugged into mains power.
Turn on / off , Convert light color , Adjust brightness
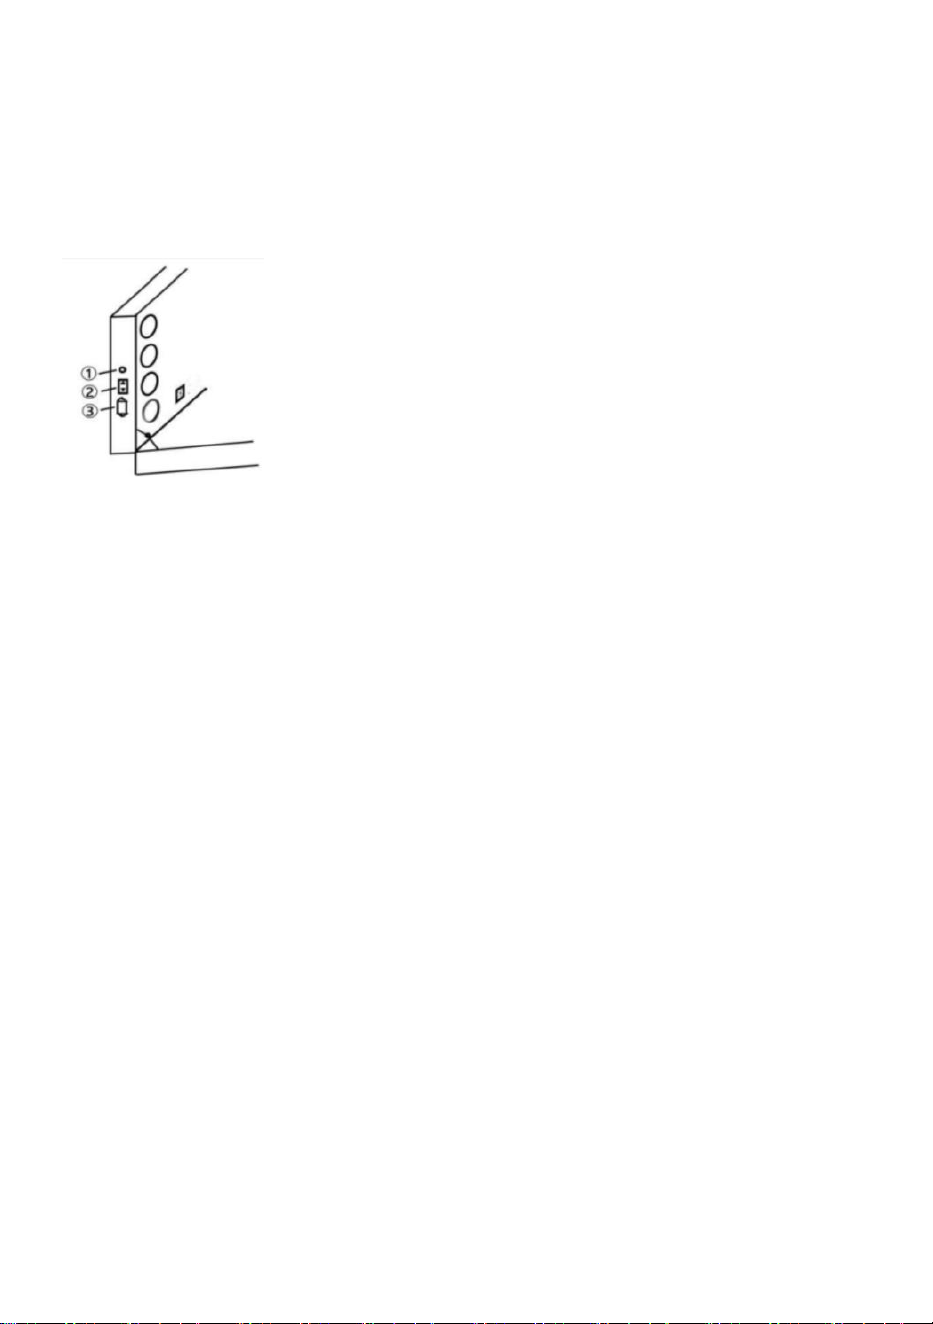
- 4 -
1 . Tap once to switch cool white , warm white and warm light
2 . Long press to adjust the brightness stepless.
Power Introduction :
1.Power cord plug, just open the slide cover( Only use with supplied Power
cord plug ).
2.Charge other devices ( plug and cable required
)
.
3.Headphone cable connector.
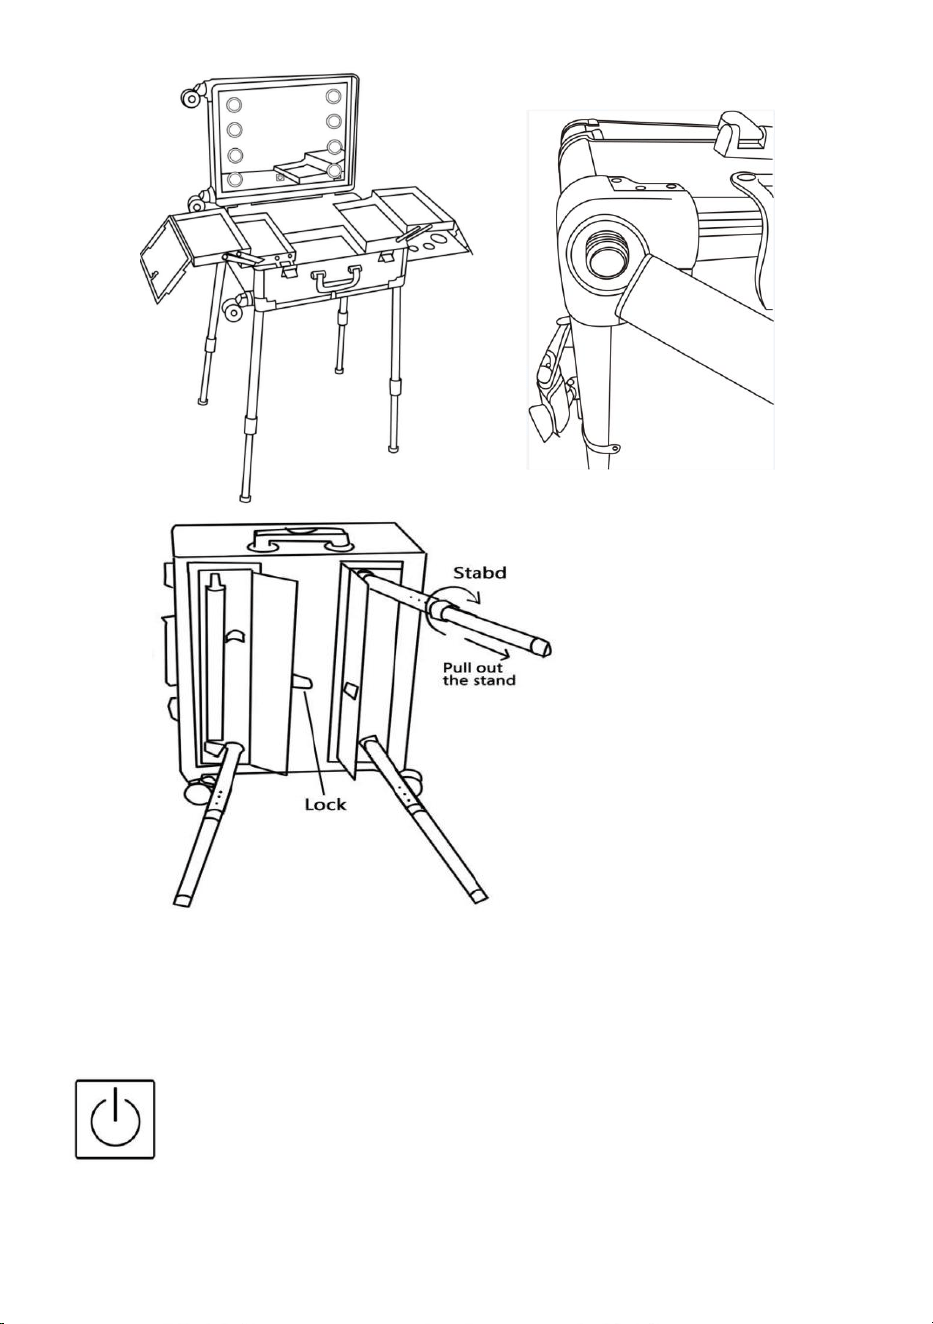
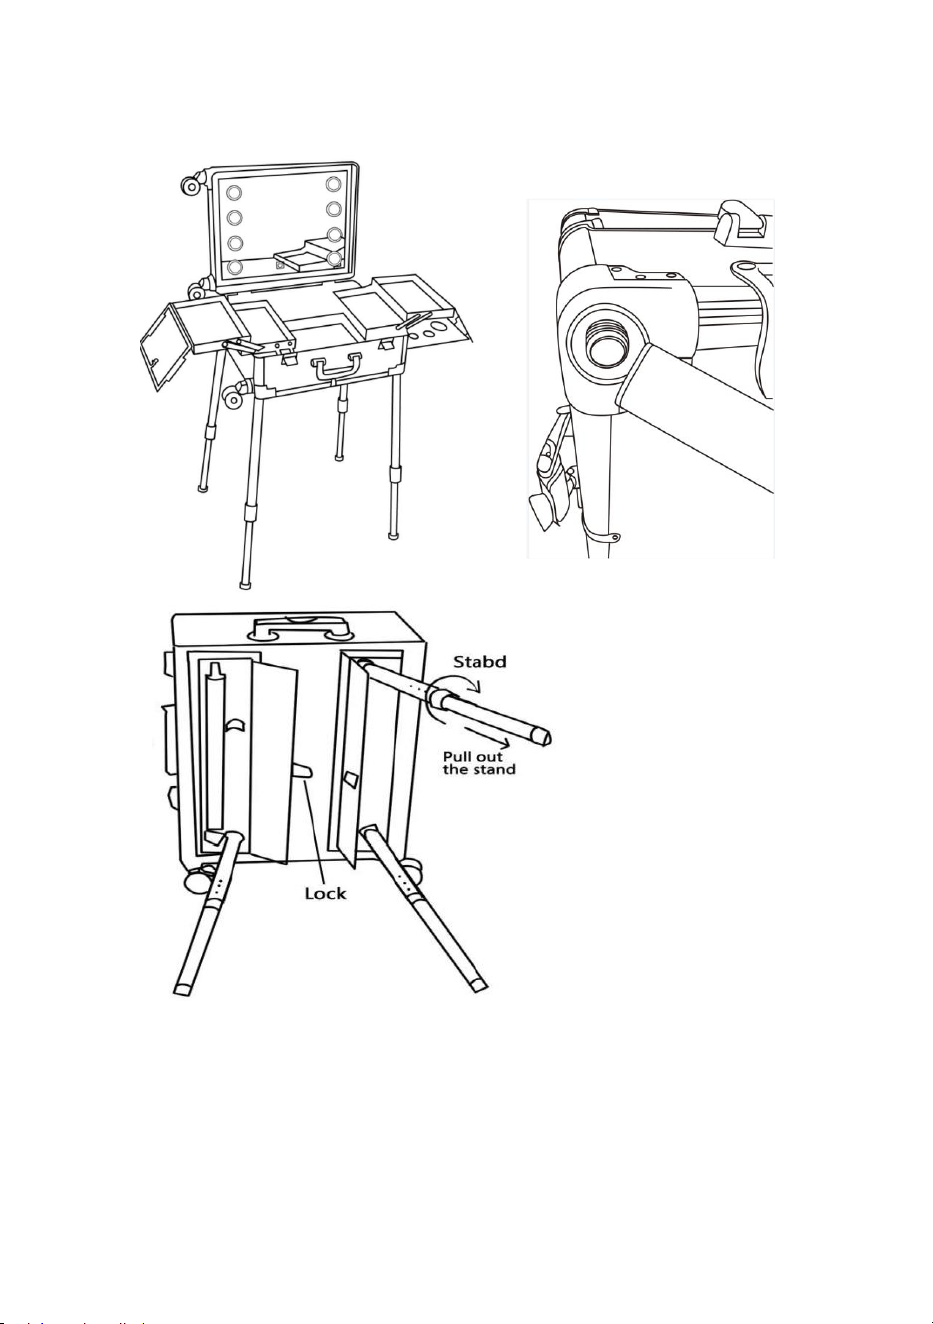
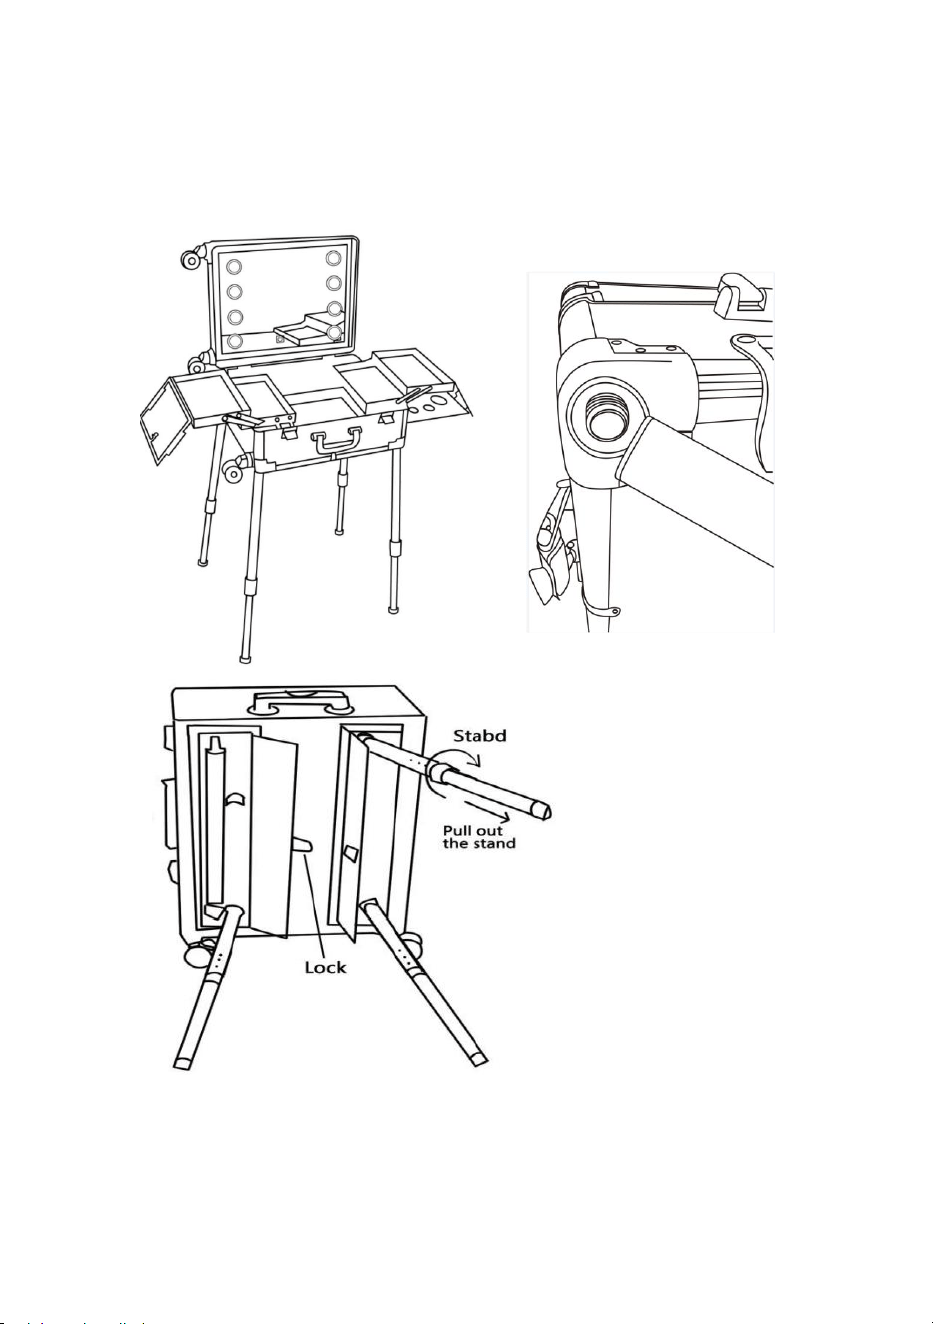
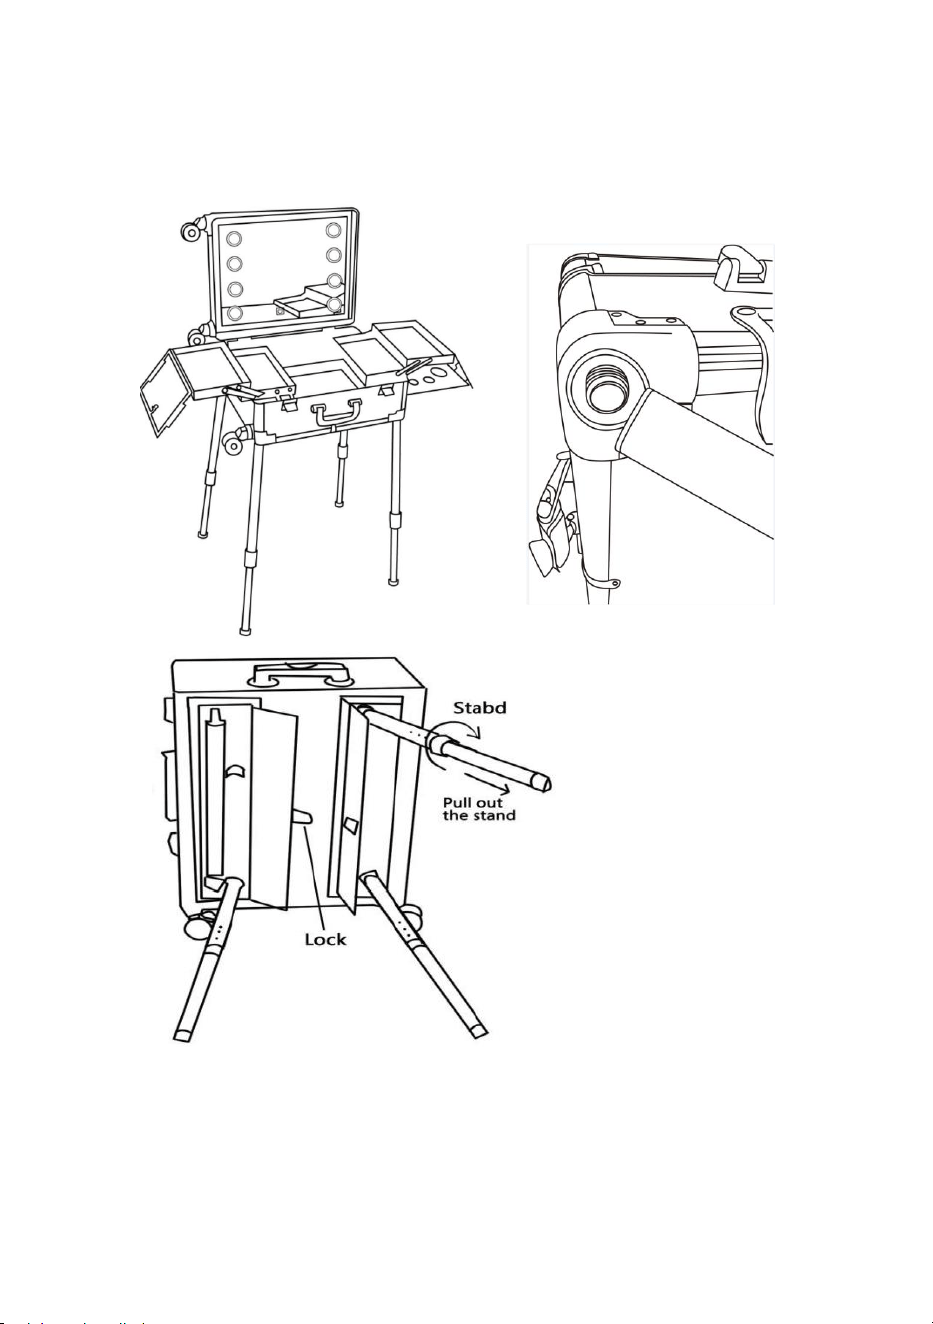
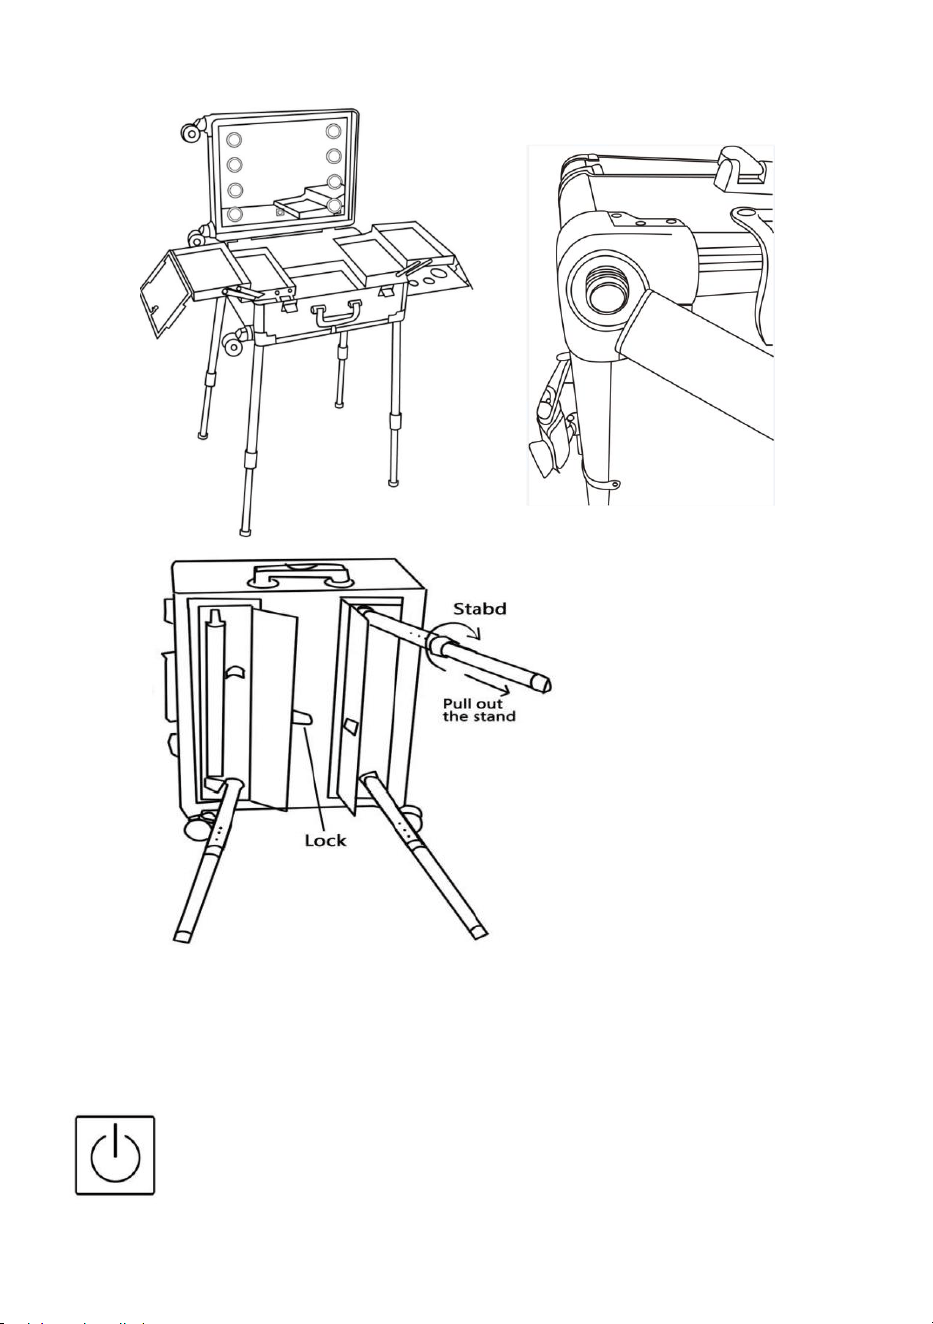
How to Adjustable Stand :
1 . Unlatch two doors located at the bottom of the case.
2 . Pull out four adjustable stands with one end semi-fixed at the bottom of
the case one by one.
3 . Rotate the stand clockwise to place and make sure it is tightly attached
to the bottom of the case without any shaking . Loosen the screw rings at
one end of the stand by unscrewing it counter-clockwise.
4 . Press the two height adjusted buttons located at upper part of the stand
and stretch out the lower part of it simultaneously so as to adjust the stand
to the right height,tighten the screw rings at the middle of the stand by
screw down them clockwise.
5 . Repeat steps No. 3-5 so as to make sure four support stands are of
exactly the same height .
6 . Lift up the case and make sure four support stands on the door evenly
and steadily .

- 5 -
Cleaning & L Maintenance:
During use , fingerprints ( not stains ) may be left on the outer box of the
luggage , which can be wiped off with a clean cloth.
Always unplug the mirror before cleaning . Do not use harsh or abrasive
cleaners or furniture polish on mirror surface or any portion of the case.
Clean the mirror with any dry soft cloth . Slightly moisten cloth with water .
A damp cloth holds dust , wipe sudden blot spills and prevents scratching.
Hardware may loosen over time . Periodically check to make sure all
connections are tight Re-tighten if necessary.
Storage Guides:
If mirror is not in use , disconnect from electrical outlet.
SURE DIRECT SUNLGHT WILL NOT STRKE MIRROR WHEN LEFT
UNATTENDED
( reflected sunlight may cause fire ) . Allow to cool to room temperature
before storing
Place in cool , dry area out of reach of children , and where it will not be
damaged
Frequently Asked Questions:
Why doesn’t the light bulb or Bluetooth work ? ( Please do the following
troubleshooting work )
1 . Check whether the main power has been plugged in . ( They need to be
used with power ).
2 . The light is still off even when the power is turned on . After trying to
connect the Bluetooth.
to see if it can be used normally.
- 6 -
Address:Baoshanqu Shuangchenglu 803long 11hao 1602A-1609shi
Shanghai
Imported to AUS: SIHAO PTY LTD, 1 ROKEVA STREETEASTWOOD
NSW 2122 Australia
Imported to USA: Sanven Technology Ltd., Suite 250, 9166 Anaheim
Place, Rancho Cucamonga, CA 91730
REP
UK
Pooledas Group Ltd
Unit 5 Albert Edward House, The Pavilions
Preston, United Kingdom
REP
EC
SHUNSHUN GmbH
Römeräcker 9 Z2021, 76351
Linkenheim-Hochstetten, Germany
Made In China


- 8 -
Assistance technique et certificat de garantie électronique www.vevor.com/support
TROUSSE DE MAQUILLAGE
MANUEL DE L'UTILISATEUR
We continue to be committed to provide you tools with competitive price.
"Save Half", "Half Price" or any other similar expressions used by us only represents an
estimate of savings you might benefit from buying certain tools with us compared to the major
top brands and does not necessarily mean to cover all categories of tools offered by us. You
are kindly reminded to verify carefully when you are placing an order with us if you are
actually saving half in comparison with the top major brands.

- 1 -
Have product questions? Need technical support? Please feel free to
contact us:
Technical Support and E-Warranty Certificate
www.vevor.com/support
NEED HELP? CONTACT US!
This is the original instruction, please read all manual instructions
carefully before operating. VEVOR reserves a clear interpretation of our
user manual. The appearance of the product shall be subject to the
product you received. Please forgive us that we won't inform you again if
there are any technology or software updates on our product.
MAKEUP-TRAIN-CASE

- 2 -
Consignes de sécurité importantes:
Ces instructions sont fournies pour votre sécurité. Il est très important que
ils sont lus attentivement et complètement avant le montage et l'installation
de cette valise de train de maquillage .
À utiliser uniquement avec le matériel de transformateur fourni .
Débranchez le transformateur de la prise de courant lorsque le produit
n'est pas utilisé .
Si une condition anormale se produit, débranchez le miroir éclairé,
laissez-le refroidir et remettez-le à fabricant pour examen et réparation .
Conservez ces instructions pour une utilisation future.
UN DANGER / AVERTISSEMENTS :
1 . Le produit peut être utilisé dans les pays avec une tension nominale de
10 à 250 V, la puissance maximale est de 500 W.
2 . L'ampoule est chaude lorsqu'elle est utilisée et risque de brûlure,
veuillez le faire pas toucher . Rafraîchissez-vous avant ampoule
remplacement. Veuillez couper l'alimentation et laisser les ampoules
refroidir avant de pouvoir retirer le couvercle du boîtier. fermé .
3 . Veuillez débrancher le sèche-cheveux ou tout autre appareil électrique
haute puissance immédiatement après utiliser pour que accident possible
dû à une surchauffe et à un travail prolongé causé par une négligence
oubliée peut être évité
4 . En cas de fumée ou d'incendie, veuillez ne pas débrancher la fiche
avec la main si la cause de la fumée ou de l'incendie est L'alimentation
électrique non identifiée doit être coupée en utilisant un isolant pour
débrancher le produit et demander technicien professionnel pour obtenir
de l'aide.
5 . Ne secouez pas le support ou le corps de la trousse car la trousse de
maquillage pourrait tomber. tomber ou être endommagé ou cela peut
présenter un risque pour la sécurité personnelle .
Le bouchon doit être inséré fermement (pour éviter de boucher le bouchon
avec de l'eau), sinon il faire facilement griller le transformateur dans la
boîte.
- 3 -
Présentation du produit
Comment utiliser l'interrupteur tactile :
Astuce : Doit être branché sur le secteur .

- 4 -
Allumer/éteindre, convertir la couleur de la lumière, régler la luminosité
1 . Appuyez une fois pour changer de lumière blanche froide, blanche
chaude et chaude.
2 . Appuyez longuement pour régler la luminosité en continu .
Présentation de la puissance :
1 . Prise du cordon d'alimentation, ouvrez simplement le couvercle
coulissant (à utiliser uniquement avec la prise du cordon d'alimentation
fournie) .
2 . Chargez d'autres appareils (prise et câble requis) .
3 . Connecteur du câble du casque .
Comment régler le support :
1 . Déverrouillez les deux portes situées au bas du boîtier.
2 . Sortez un à un quatre supports réglables dont une extrémité est
semi-fixée au bas du boîtier.
3 . Faites pivoter le support dans le sens des aiguilles d'une montre pour le
placer et assurez-vous qu'il est bien fixé au bas du boîtier sans aucune
secousse. Desserrez les bagues à vis à une extrémité du support en le
dévissant dans le sens inverse des aiguilles d'une montre.
4 . Appuyez sur les deux boutons de réglage en hauteur situés en partie

- 5 -
supérieure du support et étirez simultanément la partie inférieure de
celui-ci afin d'ajuster le support à la bonne hauteur, serrez les anneaux à
vis au milieu du support en les vissant dans le sens des aiguilles d'une
montre.
5 . Répétez les étapes n° 3 à 5 pour vous assurer que les quatre supports
sont exactement de la même hauteur.
6 . Soulevez le boîtier et assurez-vous que les quatre supports reposent
sur la porte de manière uniforme et stable.
Nettoyage et entretien :
Pendant l'utilisation, des empreintes digitales (et non des taches) peuvent
rester sur la boîte extérieure du bagage, qui peuvent être essuyées avec
un chiffon propre.
Débranchez toujours le miroir avant de le nettoyer. N'utilisez pas de
nettoyants agressifs ou abrasifs ou de cirage pour meubles sur la surface
du miroir ou sur toute partie du boîtier.
Nettoyez le miroir avec n'importe quel chiffon doux et sec. Chiffon
légèrement humidifié avec de l'eau. Un chiffon humide retient la poussière,
essuie les déversements soudains et évite les rayures.
Le matériel peut se desserrer avec le temps. Vérifiez périodiquement que
toutes les connexions sont bien serrées. Resserrez si nécessaire.
Guides de stockage :
Si le miroir n'est pas utilisé, débranchez-le de la prise électrique.
Sûr que la lumière directe du soleil ne frappera pas le miroir
lorsqu'elle est laissée sans surveillance.
(la lumière du soleil réfléchie peut provoquer un incendie). Laisser refroidir
à température ambiante avant de conserver
Placer dans un endroit frais et sec, hors de portée des enfants et où il ne
sera pas endommagé
Questions fréquemment posées:

- 6 -
Pourquoi l'ampoule ou le Bluetooth ne fonctionnent-ils pas ? (Veuillez
effectuer le travail de dépannage suivant)
1 . Vérifiez si l'alimentation principale est branchée. (Ils doivent être utilisés
avec puissance) .
2 . La lumière est toujours éteinte même lorsque l'appareil est allumé.
Après avoir essayé de connecter le Bluetooth .
pour voir s'il peut être utilisé normalement.
Adresse : Baoshanqu Shuangchenglu 803long 11hao 1602A-1609shi
Shanghai
Importé en Australie : SIHAO PTY LTD, 1 ROKEVA STREETASTWOOD
NSW 2122 Australie
Importé aux États-Unis : Sanven Technology Ltd., Suite 250, 9166
Anaheim Place, Rancho Cucamonga, CA 91730
REP
UK
Pooledas Group Ltd
Unit 5 Albert Edward House, The Pavilions
Preston, United Kingdom
REP
EC
SHUNSHUN GmbH
Römeräcker 9 Z2021, 76351
Linkenheim-Hochstetten, Germany
Fabriqué en Chine


- 8 -
Technischer Support und E-Garantiezertifikat www.vevor.com/support
MAKE-UP-TRAIN-ETUI
BENUTZERHANDBUCH
We continue to be committed to provide you tools with competitive price.
"Save Half", "Half Price" or any other similar expressions used by us only represents an
estimate of savings you might benefit from buying certain tools with us compared to the major
top brands and does not necessarily mean to cover all categories of tools offered by us. You
are kindly reminded to verify carefully when you are placing an order with us if you are
actually saving half in comparison with the top major brands.
- 1 -
Have product questions? Need technical support? Please feel free to
contact us:
Technical Support and E-Warranty Certificate
www.vevor.com/support
NEED HELP? CONTACT US!
This is the original instruction, please read all manual instructions
carefully before operating. VEVOR reserves a clear interpretation of our
user manual. The appearance of the product shall be subject to the
product you received. Please forgive us that we won't inform you again if
there are any technology or software updates on our product.
MAKEUP-TRAIN-CASE

- 2 -
Wichtige Sicherheitsanweisungen:
Diese Anweisungen dienen Ihrer Sicherheit. Das ist sehr wichtig Sie
müssen vor der Montage und Installation dieses Kosmetikkoffers sorgfältig
und vollständig gelesen werden .
Nur mit der mitgelieferten Transformator-Hardware verwenden .
Trennen Sie den Transformator von der Steckdose, wenn das Produkt
nicht verwendet wird .
Wenn ein ungewöhnlicher Zustand auftritt, ziehen Sie den beleuchteten
Spiegel aus der Steckdose, lassen Sie ihn abkühlen und stellen Sie ihn
wieder ein Hersteller zur Prüfung und Reparatur .
Bewahren Sie diese Anleitung für den späteren Gebrauch auf.
GEFAHR/WARNHINWEISE:
1 . Das Produkt kann in Ländern mit einer Nennspannung von 10–250 V
verwendet werden, die maximale Wattleistung beträgt 500 W.
2 . Die Glühbirne ist beim Gebrauch heiß und es besteht
Verbrühungsgefahr Nicht anfassen . Kühlen Sie sich vorher ab Birne
Ersatz . Bitte schalten Sie die Stromversorgung aus und lassen Sie die
Lampen abkühlen, bevor Sie den Gehäusedeckel öffnen geschlossen .
3 . Bitte trennen Sie den Haartrockner oder andere leistungsstarke
Elektrogeräte sofort danach vom Stromnetz so verwenden, dass Möglicher
Unfall durch Überhitzung und lange Arbeitszeiten aufgrund vergessener
Unachtsamkeit kann vermieden werden
4 . Im Falle von Rauch oder Feuer ziehen Sie bitte nicht mit der Hand den
Stecker, wenn die Ursache für Rauch oder Feuer liegt nicht identifiziert Die
Stromversorgung muss unterbrochen werden, indem ein Isolator
verwendet wird, um das Produkt und die Gefahr auszustecken
Professioneller Techniker für Hilfe.
5 . Schütteln Sie nicht den Ständer oder den Kofferkörper, da der
Make-up-Koffer sonst herunterfallen könnte herunterfallen oder beschädigt
werden Andernfalls kann es zu einer Gefahr für die persönliche Sicherheit
kommen .
Der Stecker muss fest eingesteckt sein (um ein Verstopfen des Steckers
- 3 -
mit Wasser zu vermeiden), sonst wird er beschädigt Dies kann leicht dazu
führen, dass der Transformator im Kasten durchbrennt.
Produkteinführung
So bedienen Sie den Touch-Schalter:
Tipp: Muss an das Stromnetz angeschlossen werden .

- 4 -
Ein-/Ausschalten, Lichtfarbe umwandeln, Helligkeit anpassen
1 . Tippen Sie einmal, um zwischen kaltweißem, warmweißem und
warmem Licht zu wechseln
2 . Durch langes Drücken wird die Helligkeit stufenlos eingestellt .
Leistungseinführung:
1 . Netzkabelstecker, öffnen Sie einfach die Schiebeabdeckung (Nur mit
dem mitgelieferten Netzkabelstecker verwenden) .
2 . Laden Sie andere Geräte auf (Stecker und Kabel erforderlich) .
3 . Kopfhörerkabelanschluss .
So stellen Sie den Ständer ein:
1 . Entriegeln Sie die beiden Türen an der Unterseite des Gehäuses.
2 . Ziehen Sie nacheinander vier verstellbare Ständer heraus, deren eines
Ende halb am Boden des Gehäuses befestigt ist.
3 . Drehen Sie den Ständer im Uhrzeigersinn, um ihn zu platzieren, und
stellen Sie sicher, dass er fest und ohne Erschütterungen am Boden des
Gehäuses befestigt ist. Lösen Sie die Schraubringe an einem Ende des
Ständers, indem Sie ihn gegen den Uhrzeigersinn abschrauben.
4 . Drücken Sie die beiden höhenverstellbaren Knöpfe am oberen Teil des
Ständers und strecken Sie gleichzeitig den unteren Teil des Ständers aus,

- 5 -
um den Ständer auf die richtige Höhe einzustellen. Ziehen Sie die
Schraubringe in der Mitte des Ständers fest, indem Sie sie im
Uhrzeigersinn festschrauben.
5 . Wiederholen Sie die Schritte Nr. 3-5, um sicherzustellen, dass die vier
Stützfüße genau die gleiche Höhe haben.
6 . Heben Sie das Gehäuse an und stellen Sie sicher, dass die vier Stützen
gleichmäßig und stabil auf der Tür stehen.
Reinigung und Wartung:
Während des Gebrauchs können Fingerabdrücke (keine Flecken) auf der
Außenverpackung des Gepäcks zurückbleiben, die mit einem sauberen
Tuch abgewischt werden können.
Trennen Sie den Spiegel immer vom Netz, bevor Sie ihn reinigen.
Verwenden Sie keine scharfen oder scheuernden Reinigungsmittel oder
Möbelpolitur auf der Spiegeloberfläche oder Teilen des Gehäuses.
Reinigen Sie den Spiegel mit einem trockenen, weichen Tuch. Tuch leicht
mit Wasser anfeuchten. Ein feuchtes Tuch hält Staub zurück, wischt
plötzlich verschüttete Flecken ab und verhindert Kratzer.
Die Hardware kann sich mit der Zeit lockern. Überprüfen Sie regelmäßig,
ob alle Verbindungen fest sitzen. Ziehen Sie sie bei Bedarf nach.
Aufbewahrungsanleitungen:
Wenn der Spiegel nicht verwendet wird, trennen Sie ihn von der
Steckdose.
STELLEN SIE SICHER, DASS DIREKTES SONNENLICHT NICHT AUF
DEN SPIEGEL STRINGT, WENN SIE UNBEAUFSICHTIGT WERDEN
(Reflektiertes Sonnenlicht kann einen Brand verursachen). Vor dem
Lagern auf Raumtemperatur abkühlen lassen
An einem kühlen, trockenen Ort außerhalb der Reichweite von Kindern
aufbewahren und an einem Ort aufbewahren, an dem es nicht beschädigt
wird
- 6 -
Häufig gestellte Fragen:
Warum funktionieren die Glühbirne oder Bluetooth nicht ? (Bitte führen Sie
die folgenden Fehlerbehebungsarbeiten durch)
1 . Überprüfen Sie, ob die Hauptstromversorgung angeschlossen ist. (Sie
müssen mit Strom betrieben werden) .
2 . Das Licht ist immer noch aus, auch wenn der Strom eingeschaltet ist.
Nach dem Versuch, eine Bluetooth-Verbindung herzustellen .
um zu sehen, ob es normal verwendet werden kann.
Adresse: Baoshanqu Shuangchenglu 803long 11hao 1602A-1609shi
Shanghai
Importiert nach AUS: SIHAO PTY LTD, 1 ROKEVA STREETEASTWOOD
NSW 2122 Australien
In die USA importiert: Sanven Technology Ltd., Suite 250, 9166 Anaheim
Place, Rancho Cucamonga, CA 91730
REP
UK
Pooledas Group Ltd
Unit 5 Albert Edward House, The Pavilions
Preston, United Kingdom
REP
EC
SHUNSHUN GmbH
Römeräcker 9 Z2021, 76351
Linkenheim-Hochstetten, Germany
In China hergestellt

- 7 -


- 9 -
Supporto tecnico e certificato di garanzia elettronica www.vevor.com/support
VALIGETTA PER IL TRUCCO
MANUALE D'USO
We continue to be committed to provide you tools with competitive price.
"Save Half", "Half Price" or any other similar expressions used by us only represents an
estimate of savings you might benefit from buying certain tools with us compared to the major
top brands and does not necessarily mean to cover all categories of tools offered by us. You
are kindly reminded to verify carefully when you are placing an order with us if you are
actually saving half in comparison with the top major brands.

- 1 -
Have product questions? Need technical support? Please feel free to
contact us:
Technical Support and E-Warranty Certificate
www.vevor.com/support
NEED HELP? CONTACT US!
This is the original instruction, please read all manual instructions
carefully before operating. VEVOR reserves a clear interpretation of our
user manual. The appearance of the product shall be subject to the
product you received. Please forgive us that we won't inform you again if
there are any technology or software updates on our product.
MAKEUP-TRAIN-CASE

- 2 -
Importanti istruzioni di sicurezza:
Queste istruzioni sono fornite per la vostra sicurezza. E' molto importante
vengono letti attentamente e completamente prima del montaggio e
dell'installazione di questa valigetta per il trucco .
Utilizzare solo con l'hardware del trasformatore in dotazione .
Scollegare il trasformatore dalla presa di corrente quando il prodotto non è
in uso .
Se si verifica una condizione anomala, scollegare lo specchio illuminato,
lasciarlo raffreddare e riaccenderlo produttore per l'esame e la
riparazione .
Conservare queste istruzioni per un uso futuro.
A PERICOLO/AVVERTENZE:
1 . Il prodotto può essere utilizzato in paesi con tensione nominale di
10-250 V, la potenza massima è 500 W.
2 . La lampadina è calda quando è in uso e c'è il rischio di scottature, si
prega di farlo non toccare . Rinfrescati prima lampadina sostituzione. Si
prega di interrompere l'alimentazione e lasciare raffreddare le lampadine
prima di poter rimuovere la copertura della custodia chiuso .
3 . Si prega di scollegare immediatamente l'asciugacapelli o altri
apparecchi elettrici ad alta potenza utilizzare in modo che possibili incidenti
dovuti al surriscaldamento e al lavoro prolungato causati da disattenzione
dimenticata può essere evitato
4 . In caso di fumo o incendio, non staccare la spina con le mani se la
causa è il fumo o l'incendio non identificato L'alimentazione deve essere
interrotta utilizzando un isolante per scollegare il prodotto e la richiesta
tecnico professionista per aiuto.
5 . Non scuotere il supporto o il corpo della custodia poiché la custodia per
il trucco potrebbe cadere giù o danneggiarsi oppure potrebbe
rappresentare un rischio per la sicurezza personale .
La spina deve essere inserita saldamente (per evitare di intasare la spina
con l'acqua), altrimenti lo farà causare facilmente la bruciatura del
trasformatore nella scatola.

- 3 -
introduzione al prodotto
Come utilizzare l'interruttore tattile:
Suggerimento: deve essere collegato alla rete elettrica .

- 4 -
Accendi/spegni, converti il colore della luce, regola la luminosità
1 . Tocca una volta per alternare la luce bianca fredda, bianca calda e
calda
2 . Premere a lungo per regolare la luminosità in modo continuo .
Introduzione al potere:
1 . Spina del cavo di alimentazione, basta aprire il coperchio scorrevole
(utilizzare solo con la spina del cavo di alimentazione in dotazione) .
2 . Carica altri dispositivi (spina e cavo richiesti) .
3 . Connettore del cavo delle cuffie .
Come supporto regolabile:
1 . Sblocca le due porte situate nella parte inferiore del case.
2 . Estrarre uno alla volta i quattro supporti regolabili con un'estremità
semifissa nella parte inferiore della custodia.
3 . Ruotare il supporto in senso orario per posizionarlo e assicurarsi che
sia saldamente fissato al fondo della custodia senza scuoterlo. Allentare gli
anelli a vite su un'estremità del supporto svitandolo in senso antiorario.
4 . Premere i due pulsanti di regolazione dell'altezza situati nella parte
superiore del supporto e allungare contemporaneamente la parte inferiore
in modo da regolare il supporto alla giusta altezza, stringere gli anelli a vite

- 5 -
al centro del supporto avvitandoli in senso orario.
5 . Ripetere i passaggi n. 3-5 in modo da assicurarsi che i quattro supporti
di supporto siano esattamente della stessa altezza.
6 . Sollevare la custodia e assicurarsi che i quattro supporti siano
posizionati sulla porta in modo uniforme e stabile.
Pulizia e manutenzione:
Durante l'uso, sulla scatola esterna del bagaglio possono rimanere
impronte (non macchie), che possono essere rimosse con un panno pulito.
Scollegare sempre lo specchio prima di pulirlo. Non utilizzare detergenti
aggressivi o abrasivi o lucidanti per mobili sulla superficie dello specchio o
su qualsiasi parte della custodia.
Pulire lo specchio con un panno morbido e asciutto. Inumidire leggermente
il panno con acqua. Un panno umido trattiene la polvere, asciuga le
macchie improvvise e previene i graffi.
L'hardware potrebbe allentarsi nel tempo. Controllare periodicamente per
assicurarsi che tutte le connessioni siano serrate. Stringere nuovamente
se necessario.
Guide per lo stoccaggio:
Se lo specchio non è in uso, scollegarlo dalla presa elettrica.
SICURO CHE LA LUCE SOLARE DIRETTA NON COLPISCE LO
SPECCHIO QUANDO LASCIATO INCUSTODITO
(La luce solare riflessa può provocare un incendio). Lasciare raffreddare a
temperatura ambiente prima di riporlo
Collocare in un'area fresca e asciutta, fuori dalla portata dei bambini e
dove non verrà danneggiato
Domande frequenti:
Perché la lampadina o il Bluetooth non funzionano ? (Si prega di eseguire
le seguenti operazioni di risoluzione dei problemi)
- 6 -
1 . Controllare se l'alimentazione principale è stata collegata. (Devono
essere usati con potenza) .
2 . La luce è ancora spenta anche quando l'alimentazione è accesa. Dopo
aver provato a connettere il Bluetooth .
per vedere se può essere utilizzato normalmente.
Indirizzo: Baoshanqu Shuangchenglu 803long 11hao 1602A-1609shi
Shanghai
Importato in AUS: SIHAO PTY LTD, 1 ROKEVA STREETEASTWOOD
NSW 2122 Australia
Importato negli Stati Uniti: Sanven Technology Ltd., Suite 250, 9166
Anaheim Place, Rancho Cucamonga, CA 91730
REP
UK
Pooledas Group Ltd
Unit 5 Albert Edward House, The Pavilions
Preston, United Kingdom
REP
EC
SHUNSHUN GmbH
Römeräcker 9 Z2021, 76351
Linkenheim-Hochstetten, Germany
Made in China


- 8 -
Soporte técnico y certificado de garantía electrónica www.vevor.com/support
ESTUCHE-DE-MAQUILLAJE
MANUAL DE USUARIO
We continue to be committed to provide you tools with competitive price.
"Save Half", "Half Price" or any other similar expressions used by us only represents an
estimate of savings you might benefit from buying certain tools with us compared to the major
top brands and does not necessarily mean to cover all categories of tools offered by us. You
are kindly reminded to verify carefully when you are placing an order with us if you are
actually saving half in comparison with the top major brands.

- 1 -
Have product questions? Need technical support? Please feel free to
contact us:
Technical Support and E-Warranty Certificate
www.vevor.com/support
NEED HELP? CONTACT US!
This is the original instruction, please read all manual instructions
carefully before operating. VEVOR reserves a clear interpretation of our
user manual. The appearance of the product shall be subject to the
product you received. Please forgive us that we won't inform you again if
there are any technology or software updates on our product.
MAKEUP-TRAIN-CASE

- 2 -
Instrucciones de seguridad importantes:
Estas instrucciones se proporcionan para su seguridad. Es muy
importante que se leen atenta y completamente antes del montaje e
instalación de este estuche de maquillaje .
Úselo únicamente con el hardware del transformador suministrado .
Desenchufe el transformador de la toma de corriente cuando el producto
no esté en uso .
Si ocurre alguna condición anormal, desenchufe el espejo iluminado,
déjelo enfriar y regréselo a fabricante para su examen y reparación .
Guarde estas instrucciones para uso futuro.
UN PELIGRO / ADVERTENCIAS:
1 . El producto se puede utilizar en países con voltaje nominal de 10-250 V,
la potencia máxima es de 500 w .
2 . La bombilla está caliente cuando está en uso y hay riesgo de
quemaduras, por favor no No tocar . refrescarse antes bulbo reemplazo.
Apague el suministro y deje que las bombillas se enfríen antes de poder
quitar la tapa de la caja. cerrado .
3 . Desenchufe el secador de pelo u otro aparato eléctrico de alta potencia
inmediatamente después utilizar para que Posible accidente como
resultado del sobrecalentamiento y el trabajo prolongado causado por un
descuido olvidado. se puede evitar
4 . En caso de humo o fuego, no desconecte el enchufe con la mano si la
causa del humo o el fuego es El suministro de energía no identificado
debe cortarse usando un aislante para desenchufar el producto y el
riesgo . Técnico profesional para obtener ayuda.
5 . No agite el soporte ni el cuerpo del estuche, ya que el estuche de
maquillaje podría caerse. caerse o dañarse o puede suponer un riesgo
para la seguridad personal .
El enchufe debe insertarse firmemente (para evitar que se tape con agua),
de lo contrario se dañará. Causa fácilmente que el transformador en la
caja se queme.

- 3 -
Introducción del producto
Cómo operar el interruptor táctil:
Consejo: Necesita estar enchufado a la red eléctrica .

- 4 -
Encender/apagar, convertir el color de la luz, ajustar el brillo
1 . Toque una vez para cambiar la luz blanca fría, blanca cálida y cálida
2 . Mantenga presionado para ajustar el brillo de forma continua .
Introducción de energía:
1 . Enchufe del cable de alimentación, simplemente abra la cubierta
deslizante (utilícela únicamente con el enchufe del cable de alimentación
suministrado) .
2 . Cargue otros dispositivos (se requiere enchufe y cable) .
3 . Conector del cable de auriculares .
Cómo ajustar el soporte:
1 . Destrabe dos puertas ubicadas en la parte inferior de la caja.
2 . Saque uno por uno cuatro soportes ajustables con un extremo semifijo
en la parte inferior del estuche.
3 . Gire el soporte en el sentido de las agujas del reloj para colocarlo y
asegúrese de que esté bien sujeto a la parte inferior de la carcasa sin que
se mueva. Afloje los anillos roscados en un extremo del soporte
desenroscándolo en el sentido contrario a las agujas del reloj.
4 . Presione los dos botones de ajuste de altura ubicados en la parte
superior del soporte y estire la parte inferior simultáneamente para ajustar

- 5 -
el soporte a la altura correcta, apriete los anillos de tornillo en el centro del
soporte atornillándolos en el sentido de las agujas del reloj.
5 . Repita los pasos 3 a 5 para asegurarse de que cuatro soportes tengan
exactamente la misma altura.
6 . Levante la caja y asegúrese de que cuatro soportes se apoyen en la
puerta de manera uniforme y constante.
Limpieza y mantenimiento L:
Durante el uso, es posible que queden huellas dactilares (no manchas) en
la caja exterior del equipaje, que se pueden limpiar con un paño limpio.
Desenchufe siempre el espejo antes de limpiarlo. No utilice limpiadores
fuertes o abrasivos ni cera para muebles en la superficie del espejo ni en
ninguna parte de la carcasa.
Limpia el espejo con cualquier paño suave y seco. Humedezca
ligeramente el paño con agua. Un paño húmedo retiene el polvo, limpia
derrames repentinos y evita rayones.
Los herrajes pueden aflojarse con el tiempo. Verifique periódicamente
para asegurarse de que todas las conexiones estén apretadas. Vuelva a
apretar si es necesario.
Guías de almacenamiento:
Si el espejo no está en uso, desconéctelo del tomacorriente.
ASEGÚRESE DE QUE LA LUZ SOLAR DIRECTA NO GOLPEA EL
ESPEJO CUANDO SE DEJA DESATENDIDO
(La luz solar reflejada puede provocar un incendio). Dejar enfriar a
temperatura ambiente antes de guardar.
Colóquelo en un lugar fresco y seco fuera del alcance de los niños y donde
no se dañe.
Preguntas frecuentes:
Por qué no funciona la bombilla o el Bluetooth? (Realice el siguiente

- 6 -
trabajo de solución de problemas)
1 . Compruebe si la alimentación principal ha sido enchufada. (Necesitan
usarse con energía) .
2 . La luz sigue apagada incluso cuando se enciende la alimentación.
Después de intentar conectar el Bluetooth .
para ver si se puede utilizar normalmente.
Dirección: Baoshanqu Shuangchenglu 803long 11hao 1602A-1609shi
Shanghai
Importado a AUS: SIHAO PTY LTD, 1 ROKEVA STREETEASTWOOD
NSW 2122 Australia
Importado a EE. UU.: Sanven Technology Ltd., Suite 250, 9166 Anaheim
Place, Rancho Cucamonga, CA 91730
REP
UK
Pooledas Group Ltd
Unit 5 Albert Edward House, The Pavilions
Preston, United Kingdom
REP
EC
SHUNSHUN GmbH
Römeräcker 9 Z2021, 76351
Linkenheim-Hochstetten, Germany
Hecho en china


- 8 -
Wsparcie techniczne i certyfikat e-gwarancji www.vevor.com/support
KOSMETYCZKA-POCIĄG
INSTRUKCJA OBSŁUGI
We continue to be committed to provide you tools with competitive price.
"Save Half", "Half Price" or any other similar expressions used by us only represents an
estimate of savings you might benefit from buying certain tools with us compared to the major
top brands and does not necessarily mean to cover all categories of tools offered by us. You
are kindly reminded to verify carefully when you are placing an order with us if you are
actually saving half in comparison with the top major brands.

- 1 -
Have product questions? Need technical support? Please feel free to
contact us:
Technical Support and E-Warranty Certificate
www.vevor.com/support
NEED HELP? CONTACT US!
This is the original instruction, please read all manual instructions
carefully before operating. VEVOR reserves a clear interpretation of our
user manual. The appearance of the product shall be subject to the
product you received. Please forgive us that we won't inform you again if
there are any technology or software updates on our product.
MAKEUP-TRAIN-CASE

- 2 -
Ważne instrukcje dotyczące bezpieczeństwa:
Instrukcje te podano dla Twojego bezpieczeństwa. To bardzo ważne
należy je dokładnie i całkowicie przeczytać przed montażem i instalacją tej
walizki do makijażu .
Używać wyłącznie z dostarczonym sprzętem transformatorowym .
Odłącz transformator od gniazdka elektrycznego, gdy produkt nie jest
używany .
Jeśli wystąpią jakiekolwiek nietypowe warunki, odłącz podświetlane
lusterko, poczekaj, aż ostygnie i włóż je z powrotem producenta w celu
sprawdzenia i naprawy .
Zachowaj tę instrukcję do wykorzystania w przyszłości.
NIEBEZPIECZEŃSTWO / OSTRZEŻENIA:
1. Produkt może być używany w krajach o napięciu znamionowym 10-250
V, maksymalna moc wynosi 500 W.
2. Żarówka jest gorąca podczas użytkowania i istnieje ryzyko poparzenia.
Należy to zrobić nie dotykać . Ochłodź się wcześniej żarówka wymiana .
Proszę wyłączyć zasilanie i poczekać, aż żarówki ostygną, zanim będzie
można założyć pokrywę obudowy zamknięte .
3. Natychmiast po wyłączeniu suszarki do włosów lub innego urządzenia
elektrycznego dużej mocy użyj tak, aby możliwy wypadek na skutek
przegrzania i długotrwałej pracy spowodowanej zapomnianą
nieostrożnością można uniknąć
4. W przypadku dymu lub pożaru nie należy wyciągać wtyczki ręką, jeśli
przyczyną jest dym lub pożar niezidentyfikowany Należy odciąć zasilanie
za pomocą izolatora, aby odłączyć produkt i zapytać profesjonalnego
technika o pomoc.
5. Nie potrząsaj podstawką ani korpusem etui, ponieważ kosmetyczka
może spaść upaść lub ulec uszkodzeniu lub może stanowić zagrożenie dla
bezpieczeństwa osobistego .
Wtyczkę należy włożyć ciasno (aby uniknąć zalania wtyczki wodą), w
przeciwnym razie tak się stanie łatwo spowodować spalenie
transformatora w skrzynce.

- 3 -
Wprowadzenie produktów
Jak obsługiwać przełącznik dotykowy:
Wskazówka: Należy podłączyć do źródła zasilania .

- 4 -
Włączanie/wyłączanie, konwersja koloru światła, regulacja jasności
1. Stuknij raz, aby przełączyć chłodną biel, ciepłą biel i ciepłe światło
2. Długie naciśnięcie umożliwia bezstopniową regulację jasności .
Wprowadzenie do zasilania:
1 . Wtyczka przewodu zasilającego, wystarczy otworzyć przesuwaną
pokrywę (używać wyłącznie z dołączoną wtyczką przewodu zasilającego) .
2 . Ładuj inne urządzenia (wymagana wtyczka i kabel) .
3 . Złącze kabla słuchawek .
Jak regulować stojak:
1. Odblokuj dwoje drzwiczek znajdujących się na dole obudowy.
2. Wyciągnij jeden po drugim cztery regulowane stojaki z jednym końcem
częściowo przymocowanym do dolnej części obudowy.
3. Obróć stojak w kierunku zgodnym z ruchem wskazówek zegara, aby go
umieścić i upewnij się, że jest mocno przymocowany do spodu obudowy,
bez żadnych wstrząsów. Poluzuj pierścienie śrubowe na jednym końcu
stojaka, odkręcając je w kierunku przeciwnym do ruchu wskazówek
zegara.
4. Naciśnij dwa przyciski regulacji wysokości znajdujące się w górnej
części stojaka i jednocześnie rozciągnij jego dolną część, aby ustawić

- 5 -
stojak na odpowiedniej wysokości, dokręć pierścienie śrubowe na środku
stojaka, dokręcając je w kierunku zgodnym z ruchem wskazówek zegara.
5. Powtórz kroki nr 3-5, aby upewnić się, że cztery podpory mają dokładnie
tę samą wysokość.
6. Podnieś obudowę i upewnij się, że cztery podpory stoją na drzwiach
równomiernie i stabilnie.
Czyszczenie i konserwacja L:
Podczas użytkowania na zewnętrznym pudełku bagażu mogą pozostać
odciski palców (nie plamy), które można przetrzeć czystą szmatką.
Zawsze odłączaj lustro przed czyszczeniem. Nie używaj ostrych lub
ściernych środków czyszczących lub pasty do czyszczenia mebli na
powierzchni lustra lub jakiejkolwiek części obudowy.
Wyczyść lustro dowolną suchą, miękką szmatką. Lekko zwilż szmatkę
wodą. Wilgotna szmatka zatrzymuje kurz, wyciera nagłe plamy i zapobiega
zarysowaniom.
Z biegiem czasu sprzęt może się poluzować. Okresowo sprawdzaj, czy
wszystkie połączenia są dobrze dokręcone. W razie potrzeby dokręć
ponownie.
Przewodniki dotyczące przechowywania:
Jeśli lustro nie jest używane, odłącz je od gniazdka elektrycznego.
PEWNE, ŻE BEZPOŚREDNIE ŚWIATŁO SŁONECZNE NIE UDERZE W
LUSTRO, JEŚLI POZOSTAWIONE BEZ NADZORU
(odbite światło słoneczne może spowodować pożar). Przed
przechowywaniem pozostawić do ostygnięcia do temperatury pokojowej
Umieścić w chłodnym, suchym miejscu niedostępnym dla dzieci i tam,
gdzie nie ulegnie uszkodzeniu
Często Zadawane Pytania:
Dlaczego nie działa żarówka ani Bluetooth? (Proszę wykonać następujące
- 6 -
czynności związane z rozwiązywaniem problemów)
1. Sprawdź, czy główne zasilanie zostało podłączone. (Muszą być
używane z zasilaniem) .
2. Światło jest nadal wyłączone, nawet po włączeniu zasilania. Po próbie
połączenia Bluetooth .
aby sprawdzić, czy można go normalnie używać.
Adres: Baoshanqu Shuangchenglu 803long 11hao 1602A-1609shi
Szanghaj
Import do AUS: SIHAO PTY LTD, 1 ROKEVA STREETEASTWOOD NSW
2122 Australia
Import do USA: Sanven Technology Ltd., Suite 250, 9166 Anaheim Place,
Rancho Cucamonga, CA 91730
REP
UK
Pooledas Group Ltd
Unit 5 Albert Edward House, The Pavilions
Preston, United Kingdom
REP
EC
SHUNSHUN GmbH
Römeräcker 9 Z2021, 76351
Linkenheim-Hochstetten, Germany
Wyprodukowano w Chinach


- 8 -
Technische ondersteuning en e-garantiecertificaat www.vevor.com/support
MAKE-UP-TREIN-KOFFER
HANDLEIDING
We continue to be committed to provide you tools with competitive price.
"Save Half", "Half Price" or any other similar expressions used by us only represents an
estimate of savings you might benefit from buying certain tools with us compared to the major
top brands and does not necessarily mean to cover all categories of tools offered by us. You
are kindly reminded to verify carefully when you are placing an order with us if you are
actually saving half in comparison with the top major brands.

- 1 -
Have product questions? Need technical support? Please feel free to
contact us:
Technical Support and E-Warranty Certificate
www.vevor.com/support
NEED HELP? CONTACT US!
This is the original instruction, please read all manual instructions
carefully before operating. VEVOR reserves a clear interpretation of our
user manual. The appearance of the product shall be subject to the
product you received. Please forgive us that we won't inform you again if
there are any technology or software updates on our product.
MAKEUP-TRAIN-CASE

- 2 -
Belangrijke veiligheidsinstructies:
Deze instructies zijn bedoeld voor uw veiligheid. Het is heel belangrijk dat
ze worden zorgvuldig en volledig gelezen voordat deze make-uptreinkoffer
wordt gemonteerd en geïnstalleerd .
Alleen gebruiken met meegeleverde transformatorhardware .
Haal de transformator uit het stopcontact als het product niet in gebruik is .
Als zich een abnormale situatie voordoet, koppelt u de verlichte spiegel los,
laat u deze afkoelen en plaatst u deze terug fabrikant voor onderzoek en
reparatie .
Bewaar deze instructies voor toekomstig gebruik.
A GEVAAR / WAARSCHUWINGEN:
1. Het product kan worden gebruikt in landen met een spanning van
10-250 V, het maximale wattage is 500 W.
2. De lamp is heet tijdens gebruik en er bestaat gevaar voor brandwonden.
Doe dit alstublieft niet aanraken . Vooraf afkoelen lamp vervanging.
Schakel de voeding uit en laat de lampen afkoelen voordat u de behuizing
kunt afdekken gesloten .
3. Haal onmiddellijk daarna de stekker uit het stopcontact van de föhn of
een ander krachtig elektrisch apparaat gebruiken zodat mogelijk ongeval
als gevolg van oververhitting en langdurig werken veroorzaakt door
vergeten onzorgvuldigheid Kan vermeden worden
4. In geval van rook of brand, trek de stekker niet met de hand uit het
stopcontact als dit de oorzaak van rook of brand is ongeïdentificeerd De
stroomvoorziening moet worden afgesloten door een isolator te gebruiken
om het product los te koppelen en de r vraag professionele technicus voor
hulp.
5. Schud de steunstandaard of de behuizing niet, omdat het
make-updoosje dan kan vallen vallen of beschadigd raken of het kan een
risico vormen voor de persoonlijke veiligheid .
De stekker moet stevig in het stopcontact worden gestoken (om te
voorkomen dat de stekker met water wordt aangesloten), anders zal dit wel
het geval zijn gemakkelijk ervoor zorgen dat de transformator in de doos
- 3 -
doorbrandt.
product Introductie
Hoe de Touch-schakelaar te bedienen:
Tip: Moet op het elektriciteitsnet worden aangesloten .
- 4 -
In-/uitschakelen, lichtkleur omzetten, helderheid aanpassen
1. Tik één keer om tussen koel wit, warm wit en warm licht te schakelen
2. Lang indrukken om de helderheid traploos aan te passen .
Machtsintroductie:
1 . Netsnoerstekker, open gewoon het schuifdeksel (alleen gebruiken met
de meegeleverde netsnoerstekker) .
2 . Laad andere apparaten op (stekker en kabel vereist) .
3 . Kabelaansluiting voor hoofdtelefoon .
Hoe verstelbare standaard:
1. Ontgrendel twee deuren aan de onderkant van de behuizing.
2. Trek de vier verstelbare standaarden één voor één naar buiten, waarvan
het ene uiteinde half vastzit aan de onderkant van de behuizing.
3. Draai de standaard met de klok mee om hem te plaatsen en zorg ervoor
dat deze stevig aan de onderkant van de behuizing is bevestigd, zonder te
trillen. Maak de schroefringen aan het ene uiteinde van de standaard los
door deze tegen de klok in los te draaien.
4. Druk op de twee in hoogte verstelbare knoppen aan de bovenkant van
de standaard en strek tegelijkertijd het onderste gedeelte uit om de
standaard op de juiste hoogte af te stellen. Draai de schroefringen in het

- 5 -
midden van de standaard vast door ze met de klok mee vast te draaien.
5. Herhaal stap nr. 3 t/m 5 om er zeker van te zijn dat vier steunpoten
precies dezelfde hoogte hebben.
6. Til de behuizing op en zorg ervoor dat vier steunen gelijkmatig en stabiel
op de deur staan.
Reiniging en onderhoud:
Tijdens gebruik kunnen er vingerafdrukken (geen vlekken) op de
buitendoos van de bagage achterblijven, die met een schone doek kunnen
worden afgeveegd.
Haal altijd de stekker uit het stopcontact voordat u de spiegel schoonmaakt.
Gebruik geen agressieve of schurende schoonmaakmiddelen of
meubelpoetsmiddel op het spiegeloppervlak of op enig ander deel van de
behuizing.
Maak de spiegel schoon met een droge, zachte doek. Bevochtig de doek
lichtjes met water. Een vochtige doek houdt stof vast, veegt plotseling
gemorste vlekken weg en voorkomt krassen.
Hardware kan na verloop van tijd losraken. Controleer regelmatig of alle
verbindingen goed vastzitten. Draai indien nodig opnieuw vast.
Opslaghandleidingen:
Als de spiegel niet in gebruik is, haal dan de stekker uit het stopcontact.
ER ZIJN ZEKER VAN DIRECTE ZONNEBRAND ZAL DE SPIEGEL NIET
AANVRAGEN WANNEER ONBEHEERD WORDT VERLATEN
(gereflecteerd zonlicht kan brand veroorzaken). Laat afkoelen tot
kamertemperatuur voordat u het opbergt
Plaats het op een koele, droge plaats, buiten het bereik van kinderen en
waar het niet beschadigd raakt
Veel Gestelde Vragen:
Waarom werkt de gloeilamp of Bluetooth niet ? (Voer alstublieft de

- 6 -
volgende probleemoplossingswerkzaamheden uit)
1. Controleer of de netvoeding is aangesloten. (Ze moeten met stroom
worden gebruikt) .
2. Het licht is nog steeds uit, zelfs als de stroom is ingeschakeld. Na
geprobeerd te hebben verbinding te maken met Bluetooth .
om te zien of het normaal kan worden gebruikt.
Adres: Baoshanqu Shuangchenglu 803long 11hao 1602A-1609shi
Shanghai
Geïmporteerd naar AUS: SIHAO PTY LTD, 1 ROKEVA
STREETEASTWOOD NSW 2122 Australië
Geïmporteerd naar de VS: Sanven Technology Ltd., Suite 250, 9166
Anaheim Place, Rancho Cucamonga, CA 91730
REP
UK
Pooledas Group Ltd
Unit 5 Albert Edward House, The Pavilions
Preston, United Kingdom
REP
EC
SHUNSHUN GmbH
Römeräcker 9 Z2021, 76351
Linkenheim-Hochstetten, Germany
Gemaakt in China


- 8 -
Teknisk support och e-garanticertifikat www.vevor.com/support
SMINK-TÅG-FODRAL
ANVÄNDARMANUAL
We continue to be committed to provide you tools with competitive price.
"Save Half", "Half Price" or any other similar expressions used by us only represents an
estimate of savings you might benefit from buying certain tools with us compared to the major
top brands and does not necessarily mean to cover all categories of tools offered by us. You
are kindly reminded to verify carefully when you are placing an order with us if you are
actually saving half in comparison with the top major brands.

- 1 -
Have product questions? Need technical support? Please feel free to
contact us:
Technical Support and E-Warranty Certificate
www.vevor.com/support
NEED HELP? CONTACT US!
This is the original instruction, please read all manual instructions
carefully before operating. VEVOR reserves a clear interpretation of our
user manual. The appearance of the product shall be subject to the
product you received. Please forgive us that we won't inform you again if
there are any technology or software updates on our product.
MAKEUP-TRAIN-CASE

- 2 -
Viktiga säkerhets instruktioner:
Dessa instruktioner tillhandahålls för din säkerhet. Det är väldigt viktigt det
de läses noggrant och fullständigt innan montering och installation av detta
sminktågfodral .
Använd endast med medföljande transformatorhårdvara .
Koppla bort transformatorn från eluttaget när produkten inte används .
Om något onormalt tillstånd inträffar, koppla ur den upplysta spegeln, låt
den svalna och sätt tillbaka den till tillverkare för undersökning och
reparation .
Spara dessa instruktioner för framtida bruk.
EN FARA / VARNINGAR:
1 . Produkten kan användas i länder med en spänning på 10-250V,
maximal effekt är 500w .
2 . Glödlampan är varm när den används och risk för skållning, vänligen
gör det inte röra . Svalna innan Glödlampa ersättning . Stäng av
strömförsörjningen och låt glödlamporna svalna innan höljet kan tas bort
stängd .
3 . Koppla ur strömmen till hårtorken eller andra kraftfulla elektriska
apparater omedelbart efter använda så att möjlig olycka till följd av
överhettning och långvarig arbete orsakad av glömd slarv kan undvikas
4 . Vid rök eller brand, dra inte i kontakten med handen om orsaken till rök
eller brand är oidentifierad Strömförsörjning måste brytas genom att
använda isolator för att koppla ur produkten och r fråga professionell
tekniker för hjälp.
5 . Skaka inte stödstället eller fodralkroppen eftersom sminkfodralet kan
falla ner eller skadas eller det kan utgöra en risk för personlig säkerhet .
Pluggen måste sättas in ordentligt ( för att undvika att pluggen täpps till
med vatten ) , annars kommer den att lätt att transformatorn i lådan brinner
ut.
- 3 -
produkt introduktion
Så här använder du Touch Switch:
Tips: Behöver anslutas till elnätet .
- 4 -
Slå på/av, Konvertera ljusfärg, Justera ljusstyrkan
1 . Tryck en gång för att byta kallvitt, varmvitt och varmt ljus
2 . Långt tryck för att justera ljusstyrkan steglöst .
Power Introduktion:
1 . Nätsladdskontakt, öppna bara skjutluckan (använd endast med den
medföljande nätsladdens kontakt) .
2 . Ladda andra enheter (kontakt och kabel krävs) .
3 . Hörlurskabelkontakt .
Hur man justerar ett stativ:
1 . Lås upp två dörrar som finns längst ner på väskan.
2 . Dra ut fyra justerbara stativ med ena änden halvfixerad i botten av
fodralet en efter en.
3 . Vrid stativet medurs för att placera det och se till att det sitter ordentligt
fast i botten av fodralet utan att skaka. Lossa skruvringarna i ena änden av
stativet genom att skruva loss det moturs.
4 . Tryck på de två höjdjusterade knapparna på den övre delen av stativet
och sträck ut den nedre delen av den samtidigt för att justera stativet till rätt
höjd, dra åt skruvringarna i mitten av stativet genom att skruva ner dem
medurs.
5 . Upprepa steg nr 3-5 för att säkerställa att fyra stödstativ har exakt
samma höjd.
6 . Lyft upp höljet och se till att fyra stöd står jämnt och stadigt på dörren.

- 5 -
Rengöring & L underhåll:
Under användning kan fingeravtryck (inte fläckar) lämnas kvar på
bagagets yttre låda, som kan torkas av med en ren trasa.
Koppla alltid ur spegeln före rengöring. Använd inte hårda eller slipande
rengöringsmedel eller möbelpolish på spegelytan eller någon del av höljet.
Rengör spegeln med en torr mjuk trasa. Fukta trasan lätt med vatten. En
fuktig trasa håller damm, torkar plötsliga fläckspill och förhindrar repor.
Hårdvara kan lossna med tiden. Kontrollera regelbundet att alla
anslutningar är åtdragna. Dra åt igen vid behov.
Förvaringsguider:
Om spegeln inte används, koppla bort den från eluttaget.
SÄKERT KOMMER DIREKT SOL ATT INTE STRÄCKA SPEGEL NÄR
LÄMNAS OBJEKT
(reflekterat solljus kan orsaka brand). Låt svalna till rumstemperatur innan
förvaring
Placera på en sval, torr plats utom räckhåll för barn och där den inte
kommer att skadas
Vanliga frågor:
Varför fungerar inte glödlampan eller Bluetooth? (Snälla gör följande
felsökningsarbete)
1 . Kontrollera om huvudströmmen är inkopplad. (De måste användas med
kraft) .
2 . Lampan är fortfarande släckt även när strömmen är påslagen. Efter att
ha försökt ansluta Bluetooth .
för att se om den kan användas normalt.

- 6 -
Adress: Baoshanqu Shuangchenglu 803long 11hao 1602A-1609shi
Shanghai
Importerad till AUS: SIHAO PTY LTD, 1 ROKEVA STREETEASTWOOD
NSW 2122 Australien
Importerad till USA: Sanven Technology Ltd., Suite 250, 9166 Anaheim
Place, Rancho Cucamonga, CA 91730
REP
UK
Pooledas Group Ltd
Unit 5 Albert Edward House, The Pavilions
Preston, United Kingdom
REP
EC
SHUNSHUN GmbH
Römeräcker 9 Z2021, 76351
Linkenheim-Hochstetten, Germany
Tillverkad i Kina