Ultrasonic
Humidifier
MFS-JSQ-2303P
User Manual
Thanks for your purchase.
We provide a one-year warranty.
If any quality issues,
replacement or refund is available.
Please feel free to contact us via E-mail:
service@keecoon.com

Precautions
Thank you for purchasing our humidifier MFS-JSQ-2303P.
Please read this manual carefully before using
and keep it for future reference.
All pictures shown are for illustration purposes only.
Actual products may vary due to product enhancement.
For more installation information,
please visit the official website link or scan the QR code:
https://keecoon.com/pages/customer-instruction-manual

Safety Guide
1-2
After Using the Humidifier
3
Placement
6
Components
4-5
Application in Tents
8-10
Installation
7
Using the Aroma Box
12
Water Filling
11
Control Panel & Remote
13-16
Care & Maintenance
17-19
Troubleshooting
20-21
Product Specifications
22
Warranty
23
Contents
0101010101010101
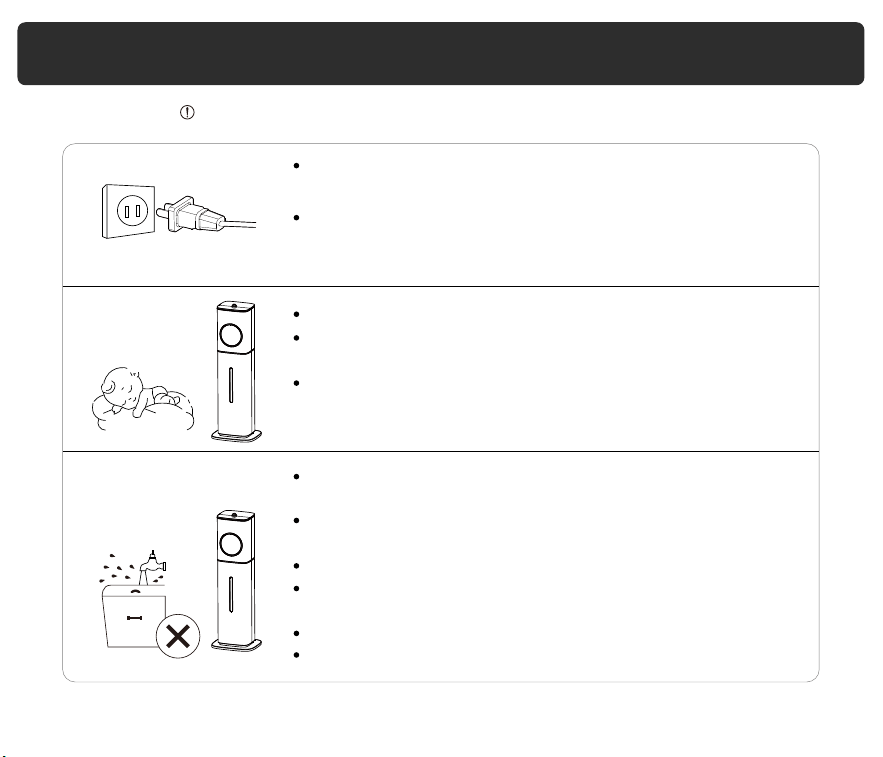
Safety Guide
When not in use, turn the humidifier off and disconnect
from power by removing the plug from the outlet.
Keep the humidifier out of reach from children.
Always make sure to place the humidifier on a flat, level
surface before operation.
When discarding the product, keep it out of the reach of
children.
Also, take similar precautionsfor any parts that may pose
adanger, especially those thatcould be hazardous to
children.
Always unplug your humidifier from the power outlet
before cleaning your humidifier or detaching the water
tank.
Only use the humidifier as described in this manual.
Do not place the humidifier near sources of heat, such as
stovetops, ovens, or radiators.
Do not use the humidifier in wet environments.
Do not immerse the humidifier sink, power cord, or plug in
water.
Do not handle the power cord or plug with wet hands.
Keep the plug and power cord away from liquids.
020202
Only fill the water tank with clean water. Never fill the
water tank with any other liquids.
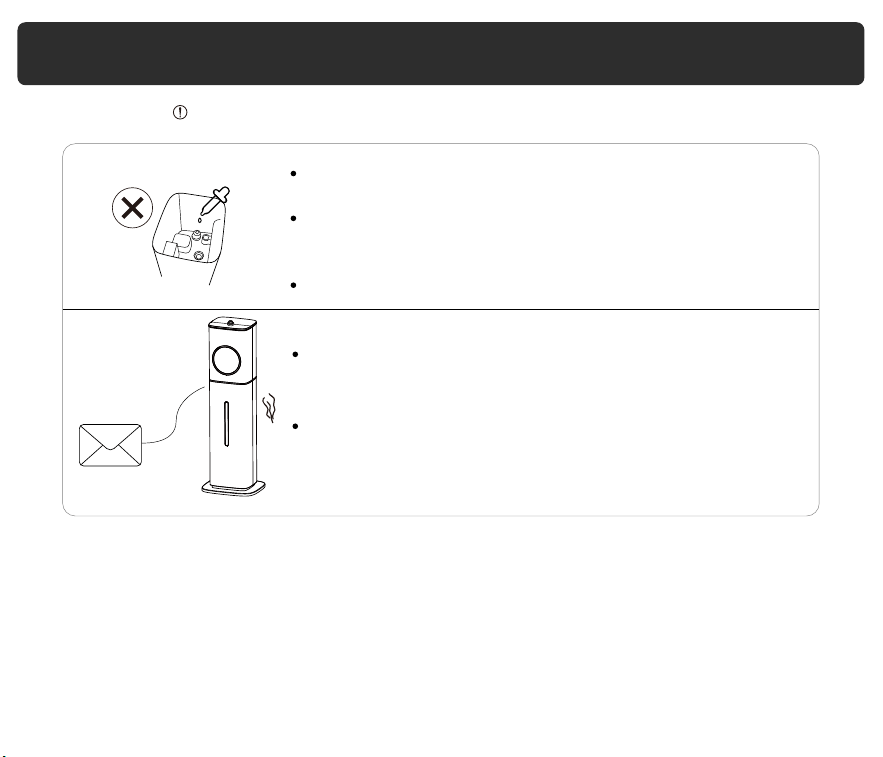
Safety Guide
Only use the humidifier as described in this manual.
Do not add essential oils, supplemental water treatment
liquids, or water filters into the water tank or sink. This
will damage the humidifier and cause leaks.
Only add essential oils to the aroma pad.
Do not modify the product, and non-professional repair
personnel are prohibited from disassembling or repairing
it, as it may result in fire, electric shock, or injury accidents.
If the product malfunctions, please stop using it
immediately and disconnect the power. Contact the
after-sales team by email.
03
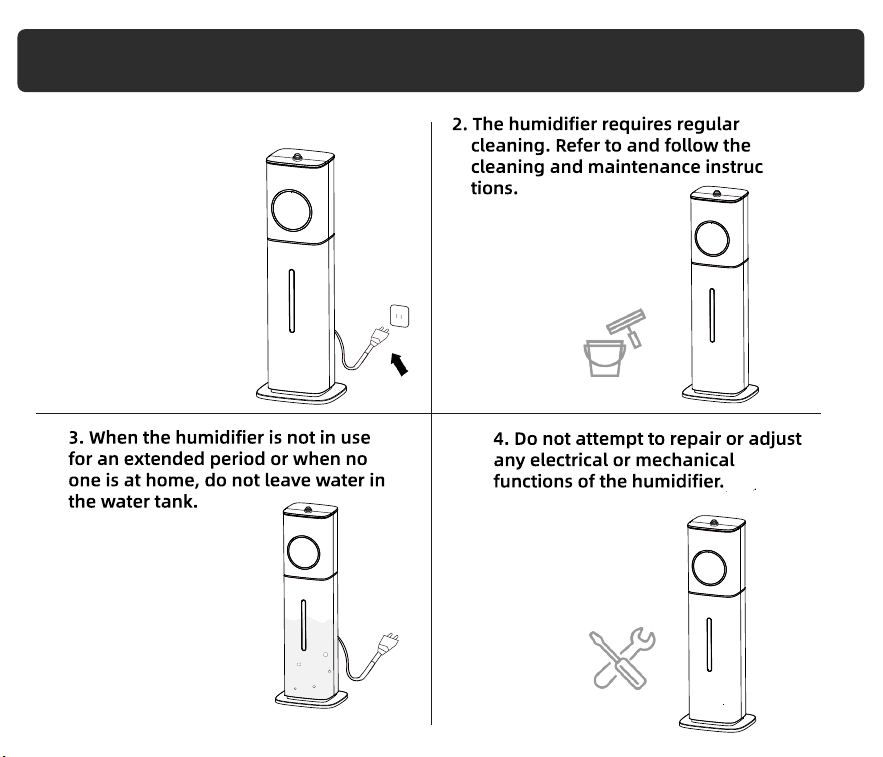
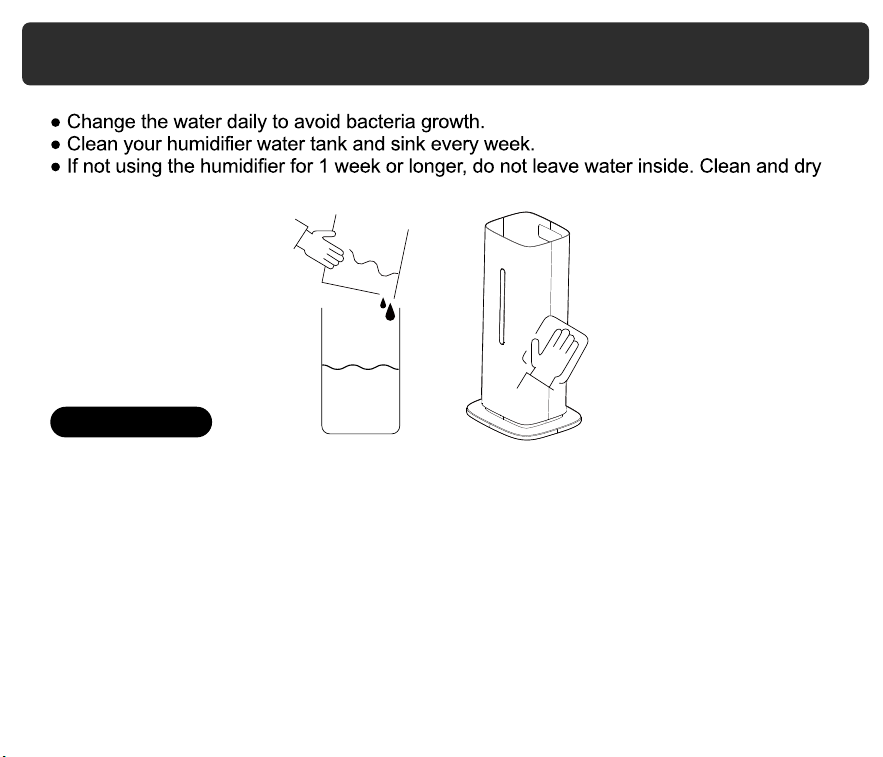
1. Always unplug the device when
not in use
After Using the Humidifier
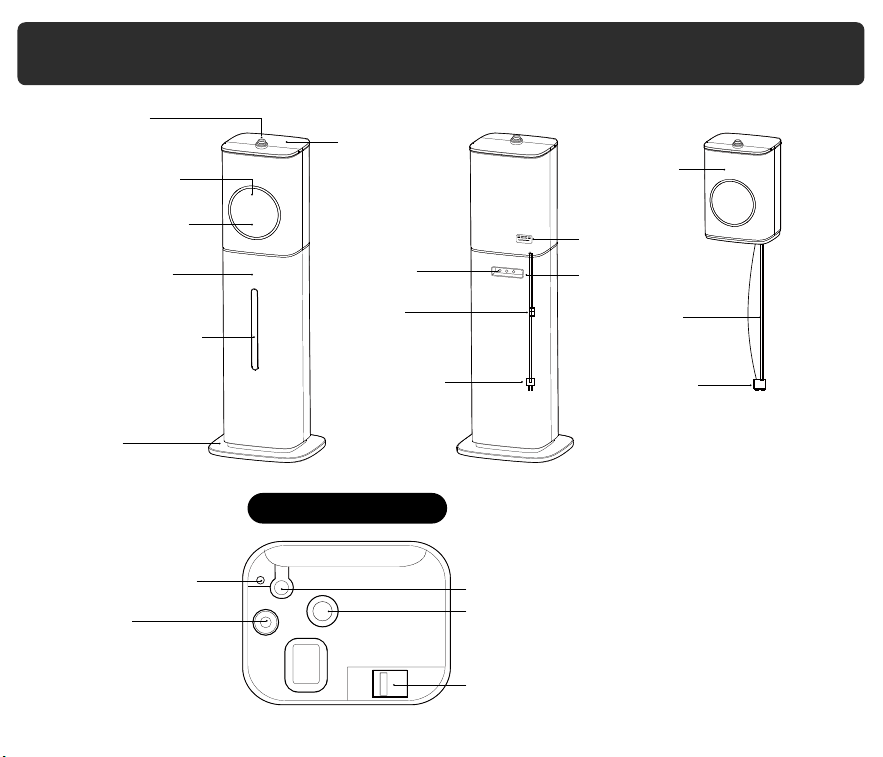
Components
Nozzles
Top Cover
LED Display
Control Panel
Aroma Box
Main Body
Water Pipe
Water Pump
Tank Handle
Power Cord
Sensor
Safety
Drain Hole
Water Viewport
Water Tank
Base
Main Body Inside
Float
Water Outlet
Water Overflow Port
Fan Outlet
Atomizer
04
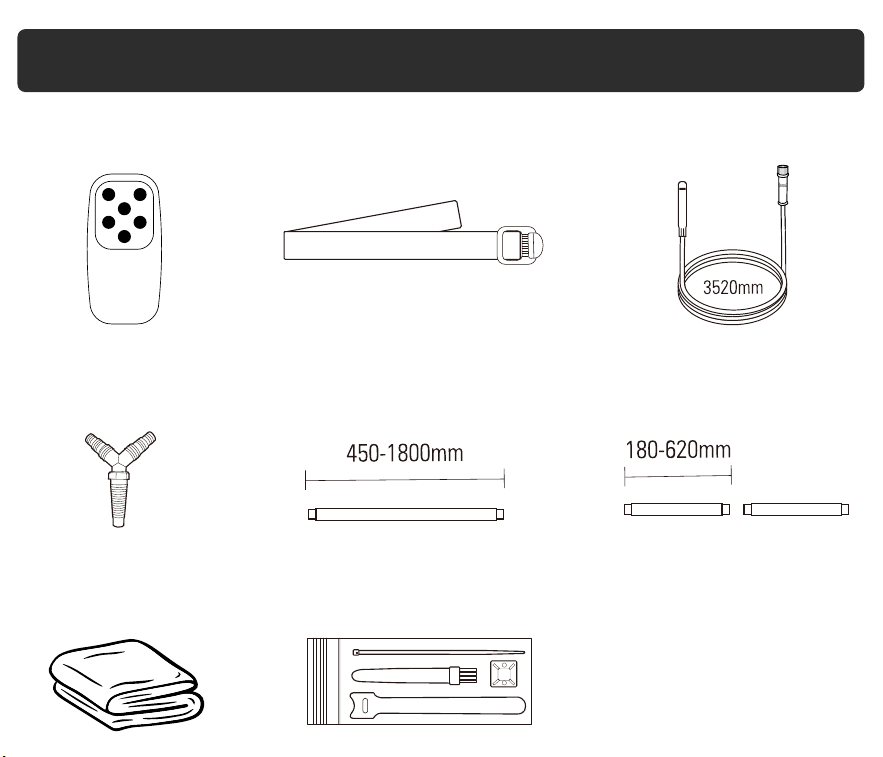
Components
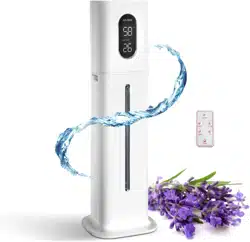
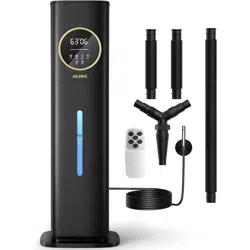
Remote Control (x1)
05
Strap (x3)
2-Way Nozzle (x1)
Flexible Long Hose (x1) Flexible Short Hose (x2)
Corded Sensor Probe (x1)
Cleaning Cloth (x1) Tool Bag(x1)
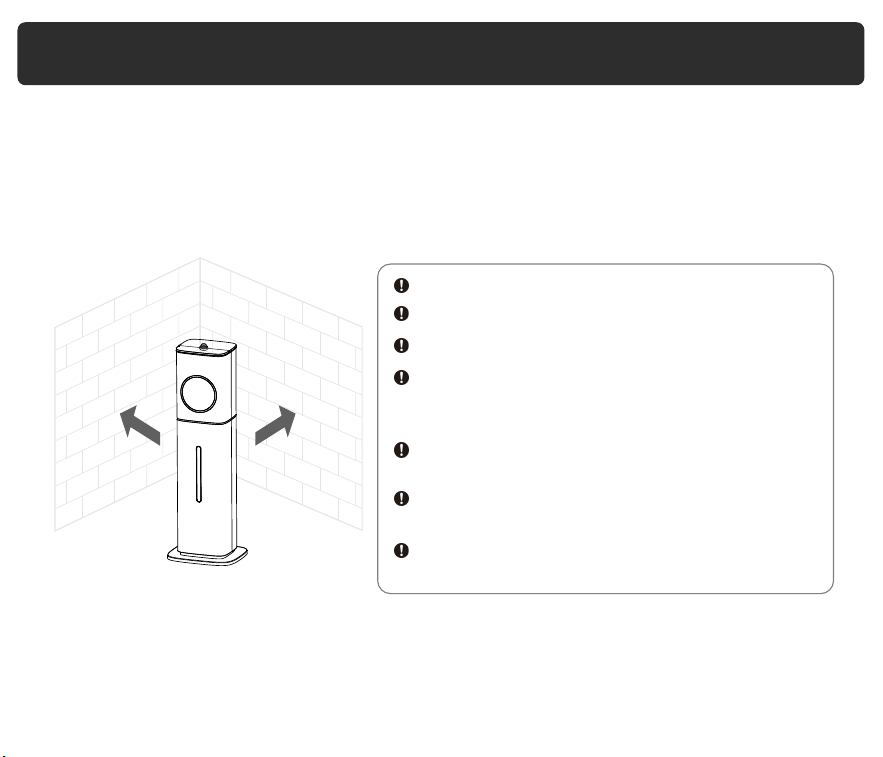
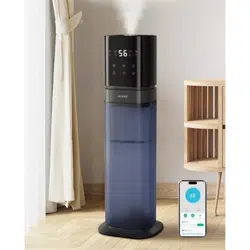
Placement
Place the humidifier on a level, dry surface that is free from any inclinations. Ensure
that it is horizontally positioned at a distance of more than 50 cm from any furniture,
walls, appliances, or other items.
Avoid using the humidifier in the following situations to prevent water leakage,
signal jamming, damage, or injury:
Please follow these guidelines carefully to ensure the safe and proper operation of
your humidifier. If you have any questions or concerns, please refer to the user
manual or contact customer support.
In direct sunlight.
50cm 50cm
On an unstable platform.
In high temperatures, humidity, or dust.
Near heat sources like air conditioners,
heaters, stoves, or any other objects that emit
heat.
Under tables, curtains, carpets, bedding, or
any other similar objects to avoid dampness.
Near objects that emit radio waves such as
radios.
Near precision instruments like mobile phones,
computers, and other electronic devices.
06
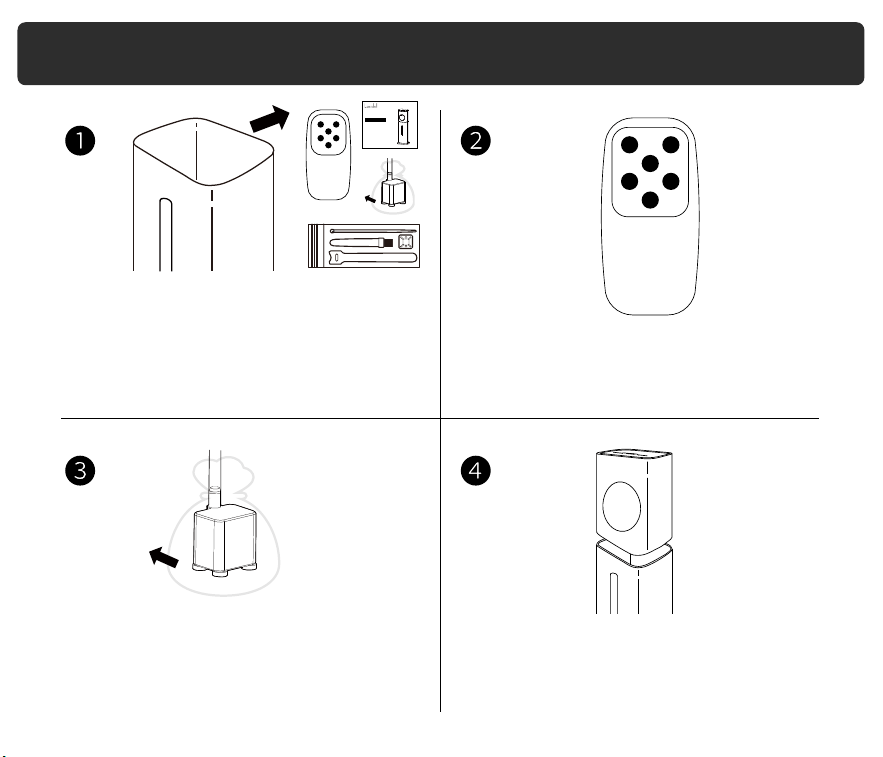
Installation
1. All accessories, including the remote
control, tool kit, and ducts, are inside the
water tank. Please locate and remove
them, and take off the protective bag
from the water pump.
2. Insert 2 AAA batteries (please purchase
separately) before using the remote control.
3. Remove the packaging bag of the water
pump and check if the water pipe is
connected to both ends of the water
pump and the main body's interface.
4. Place the main body on the water tank
properly.
07
Cool and Warm
Mist Humidifier
LCD-MH-2303
User Manual
Thanks for your purchase.
We provide a one-year warranty.
If any quality issues,
replacement or refund is available.
Please feel free to contact us via E-mail:
......
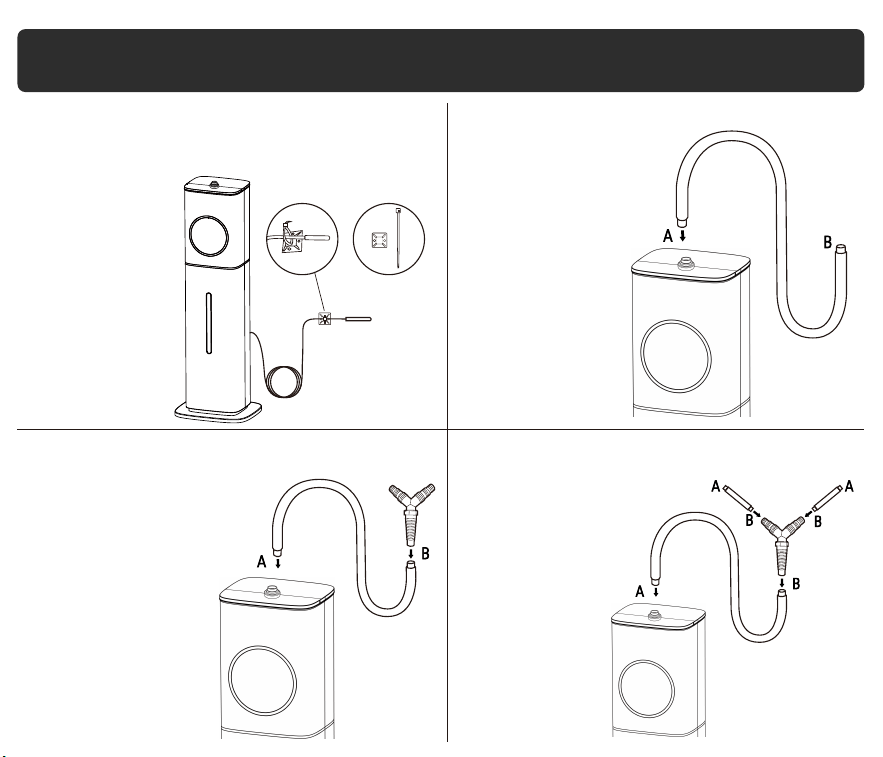
1. Use the tie to secure the sensor probe to the
suction cup, which can be placed on a flat
wall surface.
3. Connect the Flexible Long Hose to
the 2-Way Nozzle.
4. Connect the 2-Way Nozzle to the
Flexible Short Hose.
2. Attach the Flexible Long Hose to the mist
outlet of the humidifier.
08
Application in Tents
5. Secure these ducts with the straps.
Caution: * Please secure the ducts properly, or they may leak during the misting process.
09
Note
Application in Tents
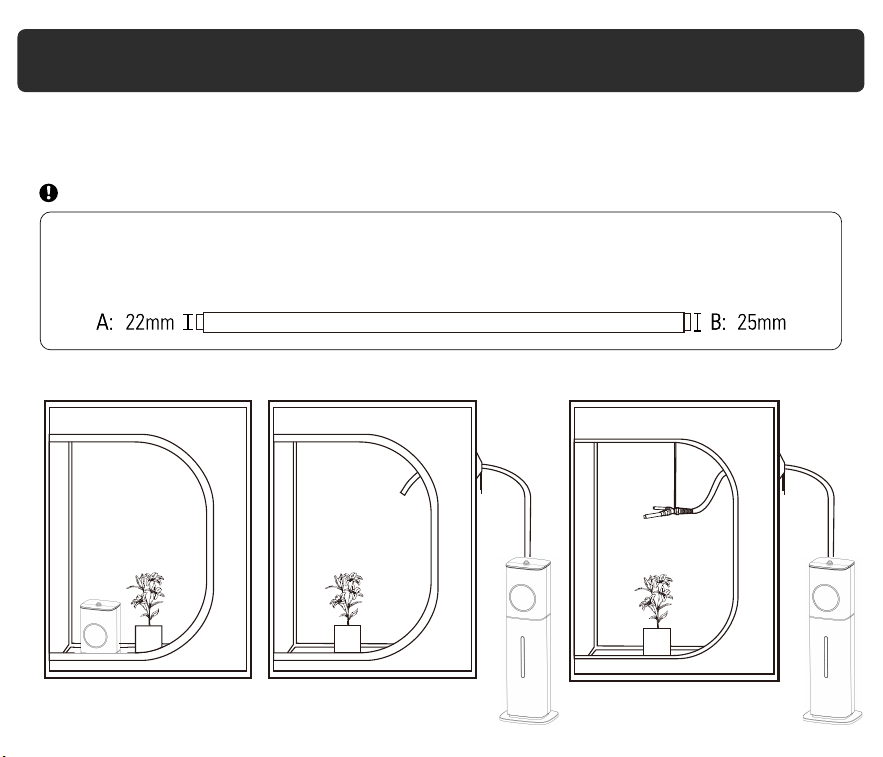
This step is for demonstration purposes only. Do not bend the spray pipes during use.
The opening sizes at both ends of the long and short pipelines are different. The diameter
of port A is 22mm, while the diameter of port B is 25mm.
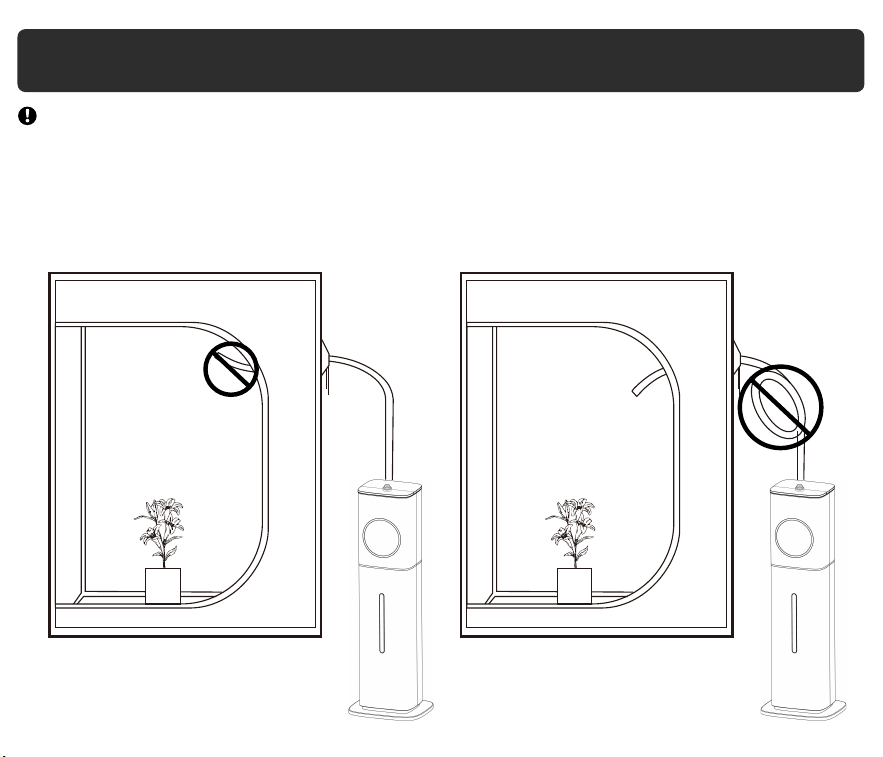
1. When using spray pipes, please use straps to hang the pipeline horizontally above the plants.
2. Do not excessively bend the pipeline to avoid water accumulation.
3. Do not direct the duct downward, as this may cause water to accumulate on the floor.
10
Note
Application in Tents
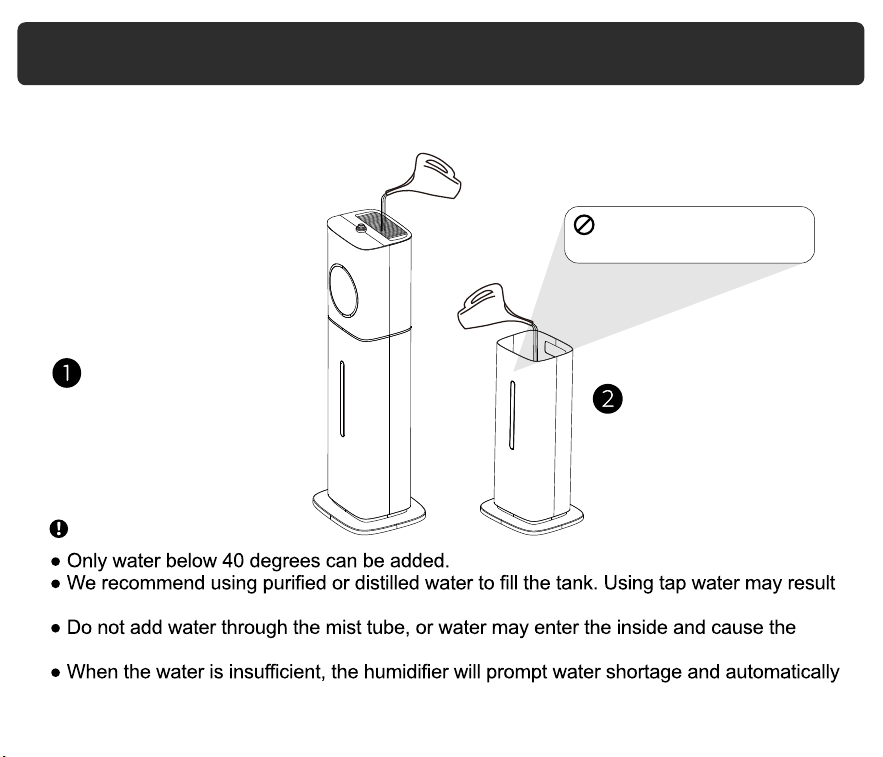
There are two ways to add water.
Fill the water tank up to the "MAX" mark indicated.
You can directly add water to
the machine at the top grid.
in a white dust (dried minerals) on surfaces.
machine to malfunction.
shut down. Please refill with water and turn it on.
Lift the humidifier mainbody
and add water to the water
tank.
Note
Water Filling
MAX
MAX
Do not exceed the full
water line(MAX).
11
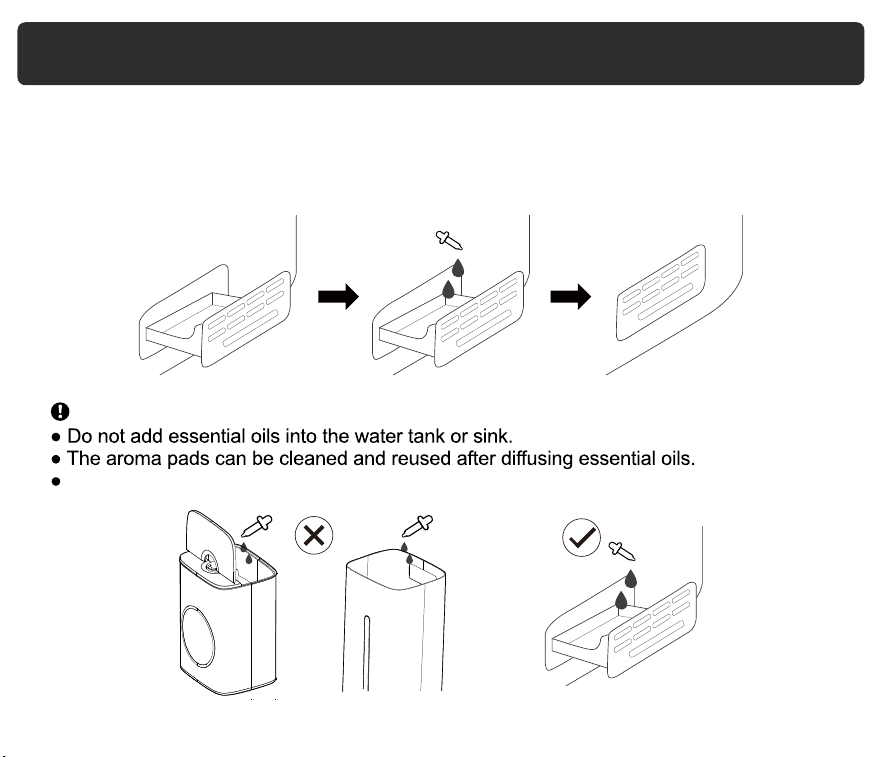
1. Push the aroma box at the back of the tank and pull it out.
2. Put 2-5 drops of essential oils on the aroma pad.
3. Insert the aroma box back into the humidifier.
4. Turn on the humidifier. The humidifier will automatically diffuse aroma when used.
This humidifier uses a small heat-based aroma diffuser. The aroma is intended to be light.
Note
Using the Aroma Box
MAX
12
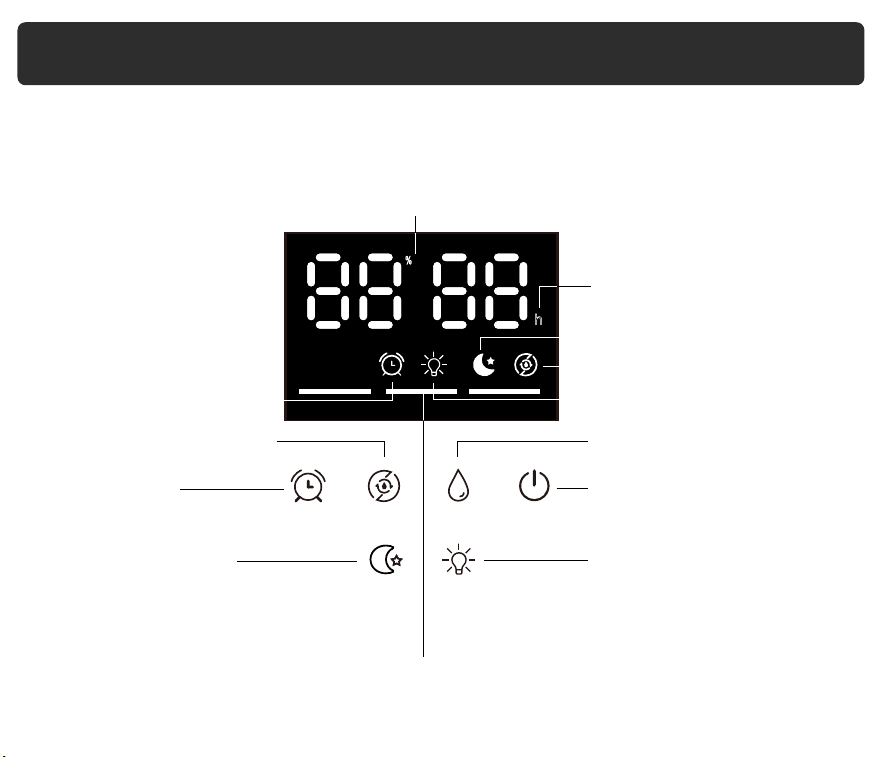
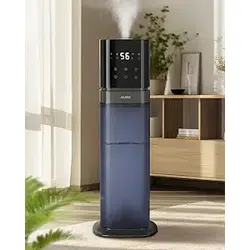
The control panel and remote control allow you to operate the humidifier with ease.
13
Control Panel & Remote
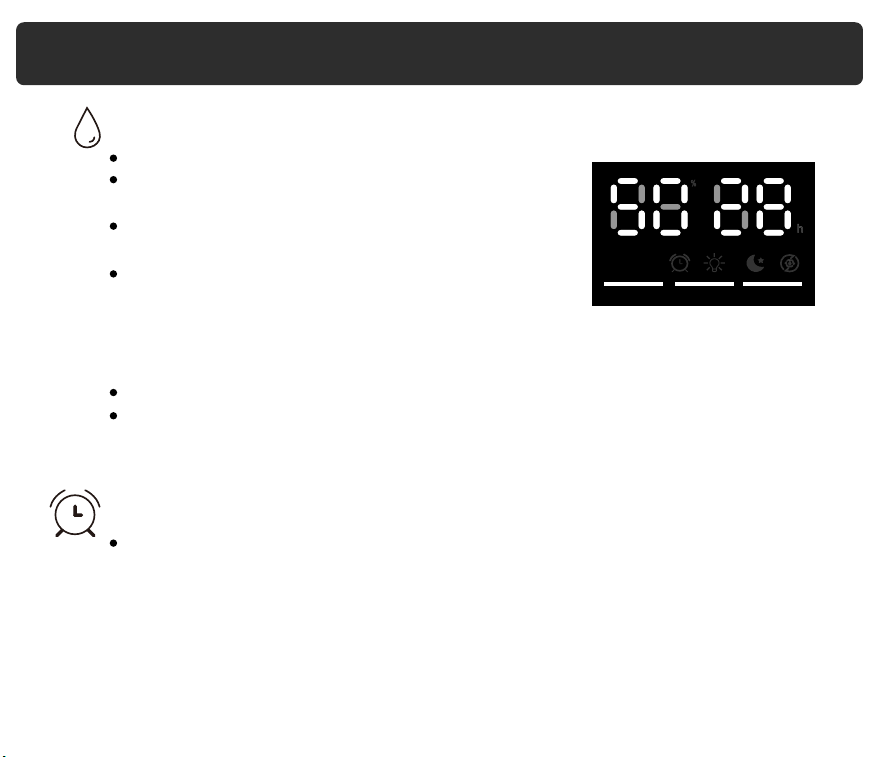
Relative Humidity(RH) Percentage Indicator
Hour
Timer Indicator
Humidity Setting Button
Timer Button
Sleep Mode Button
Mist Level Button
Power Button
Night Light Button
Night Light Indicator
Sleep Mode Indicator
Humidity Setting Indicator
Mist Level / No Water Indicatior
h
RH
%
Timer Humidity
Max-Min Power
Sleep
Light
14
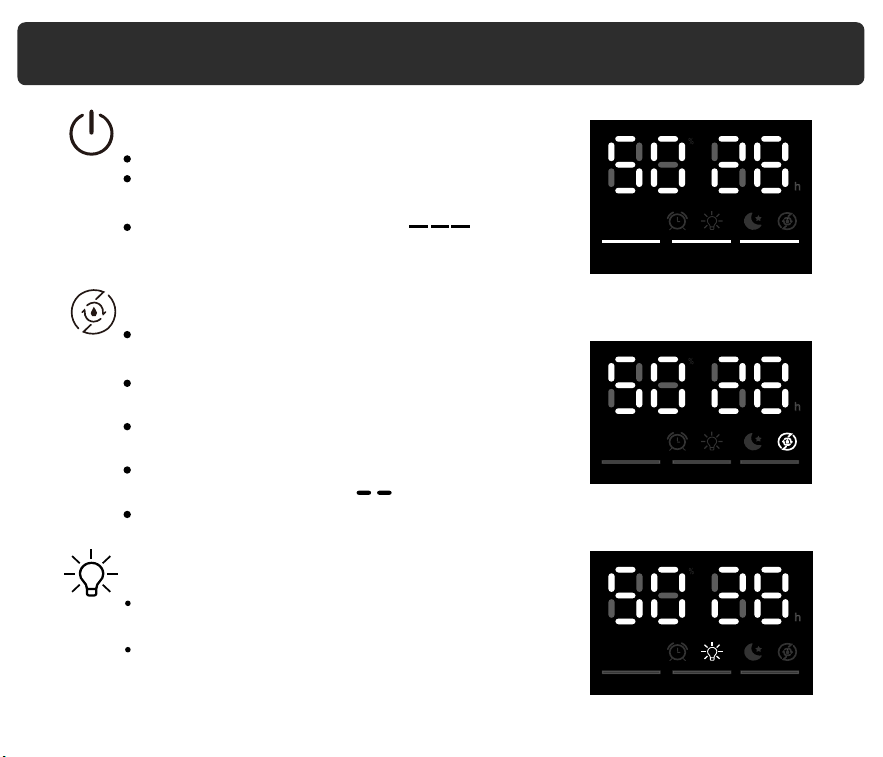
Control Panel & Remote (cont.)
Press to turn the humidifier on/off.
The humidifier will start misting at the maximum
level.
If there is no water in the tank, will flash
5 times, and the humidifier will turn off
automatically.
Humidity
Press repeatedly to cycle through mist settings:
35%-95%.
After setting, the panel only displays the current
ambient humidity instead of the target humidity.
When the room reaches your preferred humidity,
the humidifier will automatically stop misting.
To stop or reset this function, press repeatedly
until the screen displays .
The function is set to be off by default when
turning on the humidifier.
Power (ON/OFF)
h
RH
%
%
F
°
h
RH
%
%
F
°
Night Light
Press this button to activate the night light
function.
h
RH
%
%
C
°
The function is set to be off by default when
turning on the machine.
15
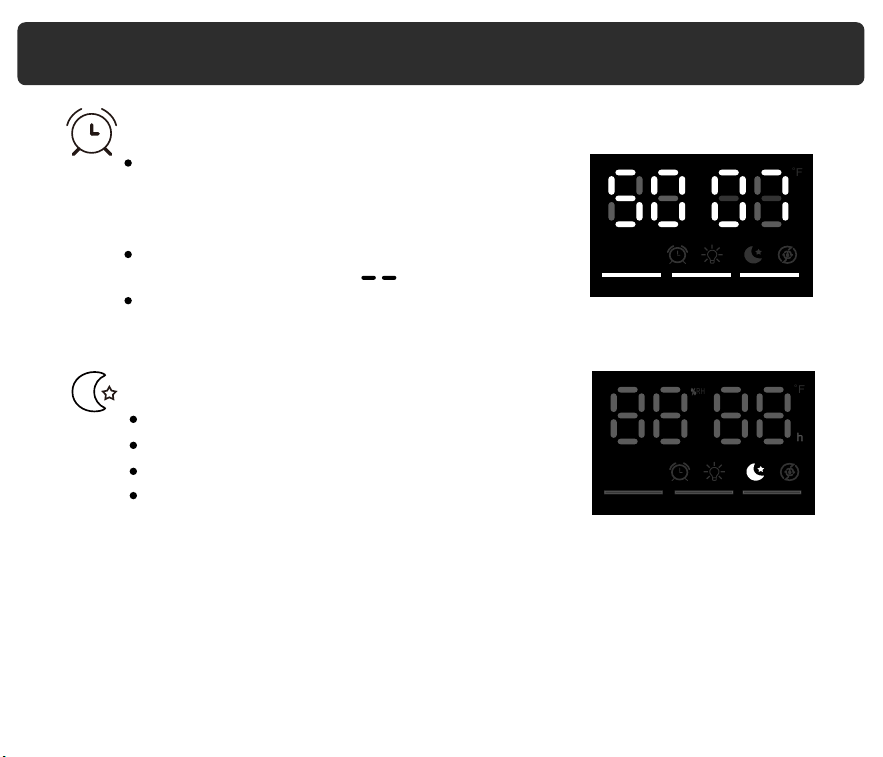
Control Panel & Remote (cont.)
During the operation of the machine, lightly touch
this button to set the misting time range from 1 to
12 hours. The display will show the corresponding
values after 3 seconds.
Timer
Sleep
Press this button to activate the sleep function.
The sleep mode icon will be dimly lit on the screen.
Press any button to wake up the display.
The function is set to be off by default when turning
on the machine.
To stop or reset this function, press repeatedly
until the screen displays .
The function is set to be off by default when turning
on the humidifier.
h
R
H
%
F
°
hh
RH
%%
F
°
16
Control Panel & Remote (cont.)
Max-Min
The remote control has the same control function.
The humidifier will start misting at the maximum level.
Before using the remote control, please remove the insulation plastic sheet.
Point the infrared emitter of the remote control towards the humidifier's
control panel.
Press repeatedly to cycle through mist settings: Low,
Medium, and High.
The mist indicator on the display will light up
accordingly.
If there is water around the humidifier during use,
it means that the humidity in the room is too high,
please adjust the mist setting appropriately.
h
RH
%%
Memory Function
This humidifier will automatically resume operation based on the previous settings
when turned on again.
h
RH
%
Care & Maintenance
17
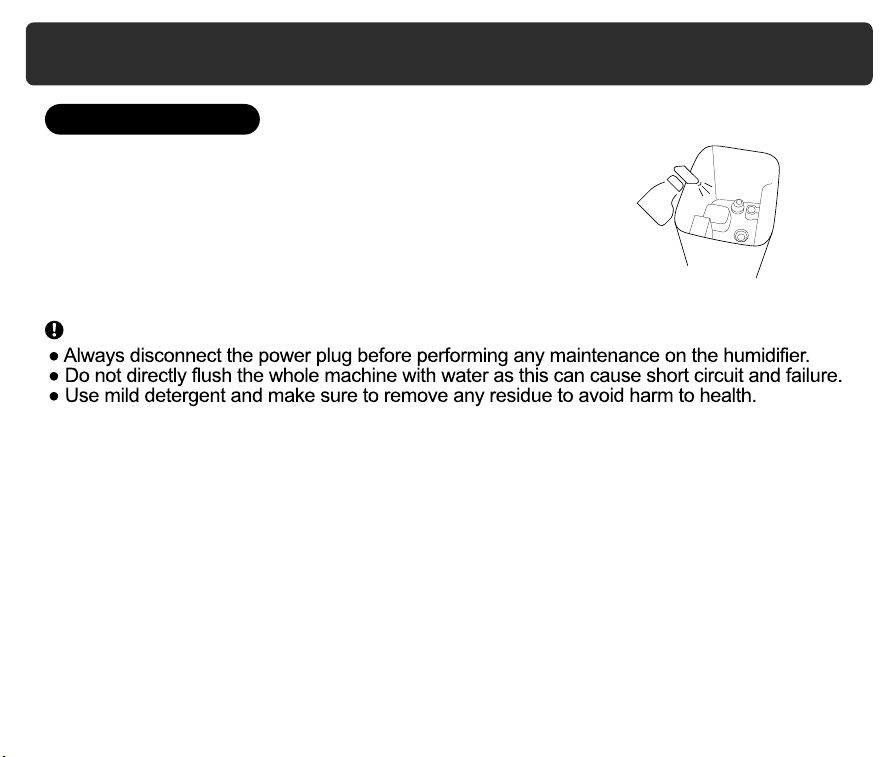
1. Unplug the humidifier.
2. Remove and rinse the water tank cover / aroma box /aroma pad.
3. Remove the mainbody. Pour out any water from the tank and sink.
4. Wipe the outside of the humidifier with a damp soft cloth or sponge below 40 °C.
5. clean the inside surfaces of sinks and tanks with a soft cloth or brush. Never immerse
the mainbody in water or liquid.
6. Dry all parts with a cloth. Make sure all parts are completely dry before reassembling or
storing.
the humidifier instead.
Daily Cleaning
Care & Maintenance (cont.)
18
To descale the humidifier (remove mineral buildup):
1. Fill the tank or sink with distilled white vinegar or citric acid
solution and soak for 15-20 minutes. Vinegar will loosen scale
(mineral buildup).
2. Use a soft cloth and the included cleaning brush to remove
scale from all parts.
3. Rinse all parts until any vinegar smell is completely gone.
Note
Humidifier Descaling
Care & Maintenance (cont.)
19
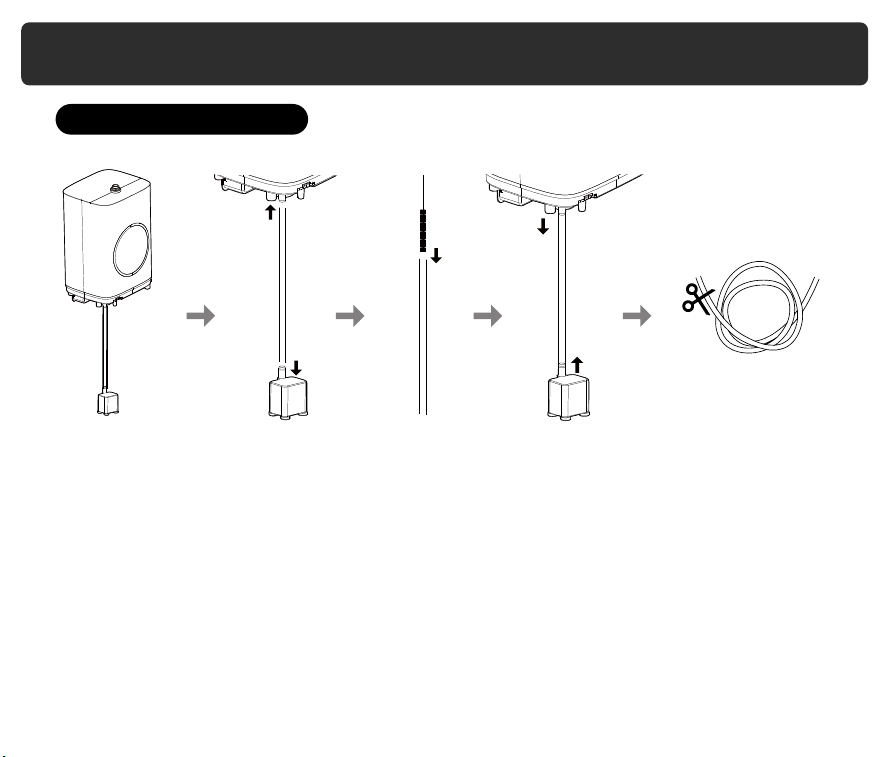
If you notice mineral buildup (scale) in the water pipe, please clean it with a slim brush
or contact our customer service to request a replacement.
1. Unplug the water pipe from the humidifier.
2. Clean the water pipe using a slim brush, or replace it if necessary.
3. Reinstall the water pipe by plugging it back into the humidifier.
4. If the water pipe is too long, you can cut it to a suitable length before reinstalling it.
Cleaning the Water Pipe

Q: Why is there white powder around the humidifier?
A: Tap water contains minerals that can adhere to objects.
We recommend using purified or distilled water to fill the humidifier. Avoid using
water with high mineral content, such as tap water. Clean the water tank regularly
and keep precision instruments away from the humidifier to avoid damage.
Q: Why is there scale in the water sink or tank?
A: Tap water contains minerals that can adhere to objects. Clean the water sink and
tank regularly.
Q: Little or no mist comes out.
A: There could be several reasons, such as unclean water, a dirty atomizer plate,
or a clogged air intake. Clean the atomizer plate, replace the water with clean
water, and then check if the air inlet is blocked.
Q: Why is there unusual noise?
A: There could be too little water or the humidifier may be placed on an unstable
surface. Place the humidifier on a solid and sturdy surface and fill the water tank
with water.
Q: Why is the red light flashing?
A: Open the sink and check whether the water can be pumped up.
If not, disassemble the water pump and water pipe and install them again (see
page 14). If neither of these is the issue, please contact customer service to get
replacement pump via email.
Troubleshooting
20

21
Q: Why does display show an incorrect humidity percentage?
A: Moisture may have built up the humidity sensor. Please dry the sensor with a cloth
or air dry it first.
The humidity sensor will give an improper reading if it is exposed to dust. Avoid
using the humidifier in dusty rooms. Avoid using tap water in the humidifier as this
can increase dust in the air.
Please note that the humidity sensor and hygrometer in the room may have an
error range of 5-10% depending on the sensing method and structure.
If neither of these is the issue, please contact cusstomer service to get
replacement pump via email.
Q: Why is the floor wet or there is water around the humidifier?
A: The humidity may be too high or the humidifier may be placed in a non-ventilated
area, causing the mist to not fully evaporate.
Q: Why is there interference with the TV remote control signal?
A: Keep the humidifier at least 1 meter away from the TV or other objects that emit
radio waves.
Q: Why is the fire on the stove turning red?
*If your problem is not listed, please contact Customer Support.
A: The composition of tap water can react with the flame, so keep the humidifier
away from the stove.
Troubleshooting (cont.)

22
Product Name
Ultrasonic Humidifier
Model Number
MFS-JSQ-2303P
Operation Mode
Low Medium High
25WRated Power
Product Specifications
Noise <35dB
Tank Capacity
2.1Gal/8L
Rated Voltage 120V~
Rated Frequency
60Hz

23
Warranty Period
Our company provides a one-year warranty starting from the date of purchase.
Warranty Requirements
In order to receive warranty service, please follow these steps:
Non-Warranty Policy
The following conditions are not covered by the warranty
Please note that we cannot provide warranty service if you are unable to provide the
above information.
Thank you for choosing our product, and we hope you enjoy using it. If you have any
questions or concerns, please don't hesitate to contact us.
:
Damage that occurs after the warranty period has expired.
Damage caused by natural disasters or other force majeure events.
Any damage caused by use that does not follow the requirements outlined in the
User Manual.
Failure or damage caused by the forced use of the product.
The user disassembles or repairs the product without authorization.
Warranty
If you need to return the product, please make sure that it is intact and the
packaging boxes and accessories are complete.
Provide the warranty card and the order number.
Describe the problems you are experiencing in detail and provide pictures or videos
if possible.
Send an email to

Waranty Card
Model Number
Warranty Period
Purchase date
Customer
Store
MFS-JSQ-2303P
Year Month Date
Name
Address
Phone Number
Within 1 year from the date of purchase