
SAFETY WARNING
PRECAUTIONS
FCC INFORMATION
0908
REMOTE CONTROL
REMOTE CONTROL
0504
SKATEBOARD INTRODUCTION
03
01
Briefly understands the composition of the various
components on this electric skateboard
Brushless motor
Switch
ECS and battery
charging port
Front truck
PU wheel
8 ply maple
Rear truck
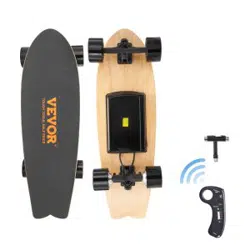
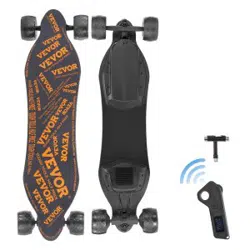
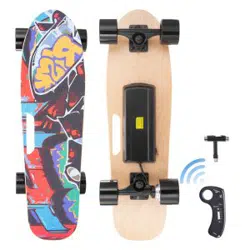
SKATEBOARDS AND ACCESSORIES
① 1X Electric Skateboard
② 1X Charger
③ 1x Wireless remote controller
④ 1x USB cable
⑤ 1x T-shape tool
⑥ 1x user's manual
②
①
③ ⑤
⑥
Power on/off the remote control
Short press the power button "Power", ① the indicator light is on and it
is turned on.
Long press the power button "Power" for 3 seconds, ①After the
indicator light is off, it is turned off.
The remote control is not connected to the scooter, and it will automati-
cally shut down within 30 seconds. The remote control and the scooter
will not be automatically shut down if there is a connection between the
remote control and the scooter. You must wait for the scooter to shut
down and shut down after 30 seconds without connection.
Switch direction of skateboard
When the scooter is in a stationary state, short press the "Reverse"
button to switch the front and rear direction of the scooter, and the
skateboard will drive forward ①The light will show green, and then
short press the "Reverse" button, the scooter will drive backwards ①
The light will show red, and cycle in turn Front and back direction.
Speed shift of skateboard
Short press the Power button to switch the four gears of the scooter,
the low-speed mode ⑤ light will be on, the medium speed mode ④ the
light will be on, the high-speed mode ③ the light will be on, the sport
mode ② the light will be on, the switch will exit after 3 seconds.
Switching of the brake force of the skateboard
Pull the "roller" back on the remote control and don't turn it on. At
the same time, short press the "Power" button to switch the four gears
of the scooter braking force, one gear ⑤ flashing, second gear ④
flashing, third gear ③ flashing, fourth gear ②The file flashes.
Charge the remote control
The remote control is charged with Micro USB. After the remote
control is connected and charged, the indicator light of the remote
control ②③④⑤ flashes and moves quickly. All four lights are on to
indicate that the remote control is fully charged. When charging, the
light is always on and the light is the charging indicator.
Acceleration / brake
Remote control off
①Signal indication
②
③
④
⑤
⑥Charging tips
Direction switch
USB charging
②("100%-75%") Electricity
③("75%-50%") Electricity
④("50%-25%")Electricity
⑤("25%-5%") Electricity
CHARGING INSTRUCTIONS
0706
INSTRUCTIONS FOR USE
PRODUCT PARAMETER
02
BOARD
MATERIAL 8 LAYERS MAPLE
MAX LOAD 160Lbs
MOTOR
Single drive
Dual drive
72MM HUB MOTOR*1
72MM HUB MOTOR*2
MAXIMUM SPEED
15KM/H
22KM/H
Single drive
Dual drive
BATTERY
Single drive
Dual drive
CAPACITY
2000mAH (Endurance:8KM )
4000mAH (Endurance:15KM )
4000mAH (Endurance:12KM )
WAT T
BATTERY
WHEEL
REMOTE
CHARGER
PACKAGE
58.8W (
2000mAH
)
117.6W (
4000mAH)
CHARGING TIME 2-3 HOURS
VOL TAGE 29.4V
MATERIAL PU
SIZE 72MM
CAPACITY 200MAH
FREQUENCY 2.4GHZ
CONTROL DISTANCE 8-10M
CHARGING TIME 0.5HOURS
VOLTAGE 29.4V
29.4V
INPUT 100-130V
OUTPUT
N.W. 4.05KG
G.W. 5.15KG
Product size 700*230*130mm
PACKAGE SIZE 770*250*160mm
Technical Support and E-Warranty Certificate www.vevor.com/support
Instruction Manual
ELECTRIC SKATEBOARD
We continue to be committed to provide you tools with competitive price.
"Save Half", "Half Price" or any other similar expressions used by us only represents an
estimate of savings you might benefit from buying certain tools with us compared to the major
top brands and doses not necessarily mean to cover all categories of tools offered by us. You
are kindly reminded to verify carefully when you are placing an order with us if you are
actually saving half in comparison with the top major brands.
MODEL: SYL-03A
ELECTRIC SKATEBOARD
Have product questions? Need technical support? Please feel free to
contact us:
CustomerService@vevor.com
NEED HELP? CONTACT US!
This is the original instruction, please read all manual instructions
carefully before operating. VEVOR reserves a clear interpretation of our
user manual. The appearance of the product shall be subject to the
product you received. Please forgive us that we won't inform you again if
there are any technology or software updates on our product.
10 11
Technical Support and E-Warranty Certificate
www.vevor.com/support
Technical Support and E-Warranty Certificate www.vevor.com/support
Instruction Manual
ELECTRIC SKATEBOARD
Wecontinue t o be committed to provid e you tools with competit ive price.
"SaveHalf" ," Half Price" or any other similar express ions used by us only repres ents an
es
timateof sav ingsy ou might benefit from buying certain tools with us co mpared tot he major
to
pbrands and d osesno t necessarily mean to cov er all categories of tools off eredb y us. Yo
u
arekindly remind ed to verify carefully whe n you are placing an o rder with us if you are
actuallysaving half in comp arison with the top major b rands.
For more information on skateboarding styles, see the web page
For more information on skateboarding styles, see the web pa.
CAUTION:
Changes or modifications not expressly approved by the party responsible for
compliance could void the user's authority to operate the equipment!
This device complies with Part 15 of the FCC Rules. Operation is subject to the following
two conditions:
1) This product may cause harmful interference.
2)This product must accept any interference received, including interference that may
cause undesired operation.
WARNING:
Changes or modifications to this product not expressly approved by the party.
responsible for compliance could void the user's authority to operate the product.
Note: This product has been tested and found to comply with the limits for a Class B digi
tal device pursuant to Part 15 of the FCC Rules, These limits are designed to provide reas
onable protection against harmful interference in a residential installation.
This product generates, uses and can radiate radio frequency energy, and if not installed
and used in accordance with the instructions, may cause harmful interference to radio
communications. However, there is no guarantee that interference will not occur in a par
ticular installation. If this product does cause harmful interference to radio or television
reception,which can be determined by turning the product off and on, the user is encour
aged to try to correct the interference by one or more of the following measures.
· Reorient or relocate the receiving antenna.
· Increase the distance between the product and receiver.
· Connect the product to an outlet on a circuit different from that to which the receiver
is connected.
· Consult the dealer or an experienced radio/TV technician for assistance.