To reduce the risk of injury, the user must read and understand the Operator’s
Manual before using this product. Save these instructions for future reference.
Operations Manual
W
A
R
R
A
N
T
Y
ELECTRIC MOBILE
LIFT TABLE
MODEL NUMBER: TLIFT600

2
Table of Contents
1. SAFETY INFORMATION
1.1 Fire Safety
1.2 General Safety
1.3 Service Safety
1.4 Operation Safety
2. PRODUCT DATA
2.1 Specifications
2.2 Features
3. ASSEMBLY
4. OPERATION
4.1 Pre-Operation Requirements
4.2 Turning On Machine
4.3 Using The Machine On A Slope
4.4 Charger Instructions
4.5 Led Indicator & Voltage Display
5. CLEANING
6. STORAGE
6.1 Disposal
7. TROUBLESHOOTING
8.REPLACEMENT PARTS
9. MAINTENANCE RECORD
10. WARRANTY
10.1 Warranty Claims
11. SERVICE CENTERS
5
5
6
6
6
7
7
7
8
8
8
9
9
9
9
9
10
10
10
11
11
12
13
13
13
3
Register Your Equipment
Thank you for purchasing TOMAHAWK® equipment! Your product is covered by the
TOMAHAWK® Warranty policy, but in order to activate your warranty, we need you to register
your product. In addition to activating your equipment warranty, product registration will
grant you access to important product updates, streamlined customer service and more.
INCLUDED WITH YOUR REGISTRATION
☑ Equipment Warranty Activation
☑ Product Updates
☑ Streamlined Customer Service
☑ Exclusive Discounts and Sales
STEPS TO REGISTER YOUR EQUIPMENT
1. Visit www.tomahawk-power.com
2. Choose “Product Registration” at the bottom of the page
3. Enter your equipment’s serial number to get started
4. Provide all required information
5. Submit Registration
Equipment Resources
TOMAHAWK® Customer Service doesn’t stop at checkout. We understand to keep a job-site
running smoothly - the proper equipment, spare parts, instruction manuals, and more are
needed at the drop of a hat. Visit www.tomahawk-power.com to gain access to the incredible
resources below.
How To Video Library
More of a visual person? Visit our Video Library for equipment
assembly instructions, troubleshooting tips, and more!
Found at the TOMAHAWK® Resource Center
Manual and Assembly Guide Library
Visit our Manual Library if you are looking for a lost
operations manual or a particular spare part?
Found on the TOMAHAWK® Manuals Page
Service Requests
In need of a quick fix or a service center referral? Submit a
Service Request and a TOMAHAWK® Technician will respond
shortly to get you the help you need.
Choose “Service Request” at the bottom of www.tomahawk-power.com

This manual provides information and procedures to safely operate and maintain this
model. For your own safety and protection from injury, carefully read, understand and
observe the safety instructions described in this manual.
Keep this manual or a copy of it with the machine. If you lose this manual or need an
additional copy, please contact TOMAHAWK® or visit www.tomahawk-power.com This
machine is built with user safety in mind; however, it can present hazards if improperly
operated and serviced. Follow operating instructions carefully. If you have questions about
operating or servicing this equipment, please contact TOMAHAWK®.
The information contained in this manual is based on machines in production at the time of
publication. TOMAHAWK® reserves the right to change any portion of this information
without notice.
No part of this publication may be reproduced in any form or by any means, electronic or
mechanical, including photocopying, without express written permission from
TOMAHAWK®.
Any type of reproduction or distribution not authorized by TOMAHAWK® represents an
infringement of valid copyrights and will be prosecuted. We expressly reserve the right to
make technical modifications, even without due notice, which aim at improving our
machines or their safety standards.
1. SAFETY INFORMATION
This manual contains DANGER, WARNING, CAUTION, and NOTE callouts which must be
followed to reduce the possibility of personal injury, damage to the equipment, or improper
service.
This is the safety alert symbol. It is used to alert you to potential personal injury
hazards. Obey all safety messages that follow this symbol to avoid possible injury
or death.
DANGER indicates an imminently hazardous situation which, if not avoided, will
result in death or serious injury.
WARNING indicates a potentially hazardous situation which, if not avoided, could
result in death or serious injury.
CAUTION indicates a potentially hazardous situation which, if not avoided, may
result in minor or moderate injury.
DANGER
WARNING
CAUTION
4

5
1.1 Fire Safety
If your machine catches fire, turn o the electric supply. Using a dry powder or C02 fire
extinguisher, put out the fire. If the fire cannot be put out, keep away and call the fire
department. If you are in any doubt about the safety condition of your machine, please
consult TOMAHAWK®.
1.2 General Safety
Familiarity and proper training are required for the safe operation of equipment!
Equipment operated improperly or by untrained personnel can be dangerous! Read
the operating instructions contained in both this manual and the engine manual and
familiarize yourself with the location and proper use of all controls. Inexperienced operators
should receive instruction from someone familiar with the equipment before being allowed
to operate the machine.
1.2.1 Operating the machine beyond the technical specifications in this manual.
1.2.2 Using the machine without all safety and protective components in place.
1.2.3 Employing the machine for purposes other than those specifically described
in this manual.
1.2.4 Tampering with the machine or any of its parts.
1.2.5 Operate the machine only in well-lit conditions to ensure visibility and safe use.
1.2.6 DO NOT use the machine when fatigued, distracted, or under the influence of alcohol,
drugs, or medication.
1.2.7 Use caution in slippery areas. Wear non-slip footwear to reduce the risk of injury.
1.2.8 Only trained personnel should operate the machine.
1.2.9 Always use both hands while operating the machine.
1.2.10 This manual must remain with the machine and be provided to any new user upon
transfer.
1.2.11 Conduct a safety inspection before each use.
1.2.12 Exercise caution near pools, ponds, or other bodies of water.
1.2.13 DO NOT operate the machine in rain or wet conditions.
1.2.14 ALWAYS disconnect the battery before making adjustments or performing
maintenance.
WARNING

6
1.3 Charger Safety
1.3.1 The charger is intended solely for charging this machine’s battery. Do not use it for
other batteries.
1.3.2 DO NOT use the charger in wet or damp environments.
1.3.3 ALWAYS disconnect the charger by pulling the plug, not the cable, to avoid damage.
1.3.4 DO NOT use the charger if the cord, plug, or unit is damaged. Keep it away
from heat sources.
1.3.5 DO NOT use extension cords to power the charger.
1.3.6 Keep metal objects away from the charging contacts.
1.3.7 DO NOT attempt to open the charger. Contact a qualified technician if repair is needed.
1.4. Battery Safety
Only charge the battery using the original charger. Using third-party chargers may damage
the battery or cause fire.
Improper use or damaged batteries may emit harmful vapors. Leave the area
immediately and seek medical attention if necessary.
FIRE HAZARD: Do not charge batteries near flammable materials or acids.
1.4.1 Charge batteries only in temperatures between 0°C and 40°C. Allow the battery to cool
aer charging.
EXPLOSION RISK: Keep the battery away from heat and open flames.
1.4.2 Use the battery only within the temperature range of 0°C to 40°C.
SHORT CIRCUIT RISK: When storing, transporting, or disposing of the battery,
ensure contacts are taped and the battery is properly packaged.
1.4.3 Never open or disassemble the battery.
Improper use or damaged batteries may emit harmful vapors. Leave the area immediately and
seek medical attention if necessary.
WARNING
WARNING
DANGER
DANGER

7
2. PRODUCT DATA
2.1 Specifications
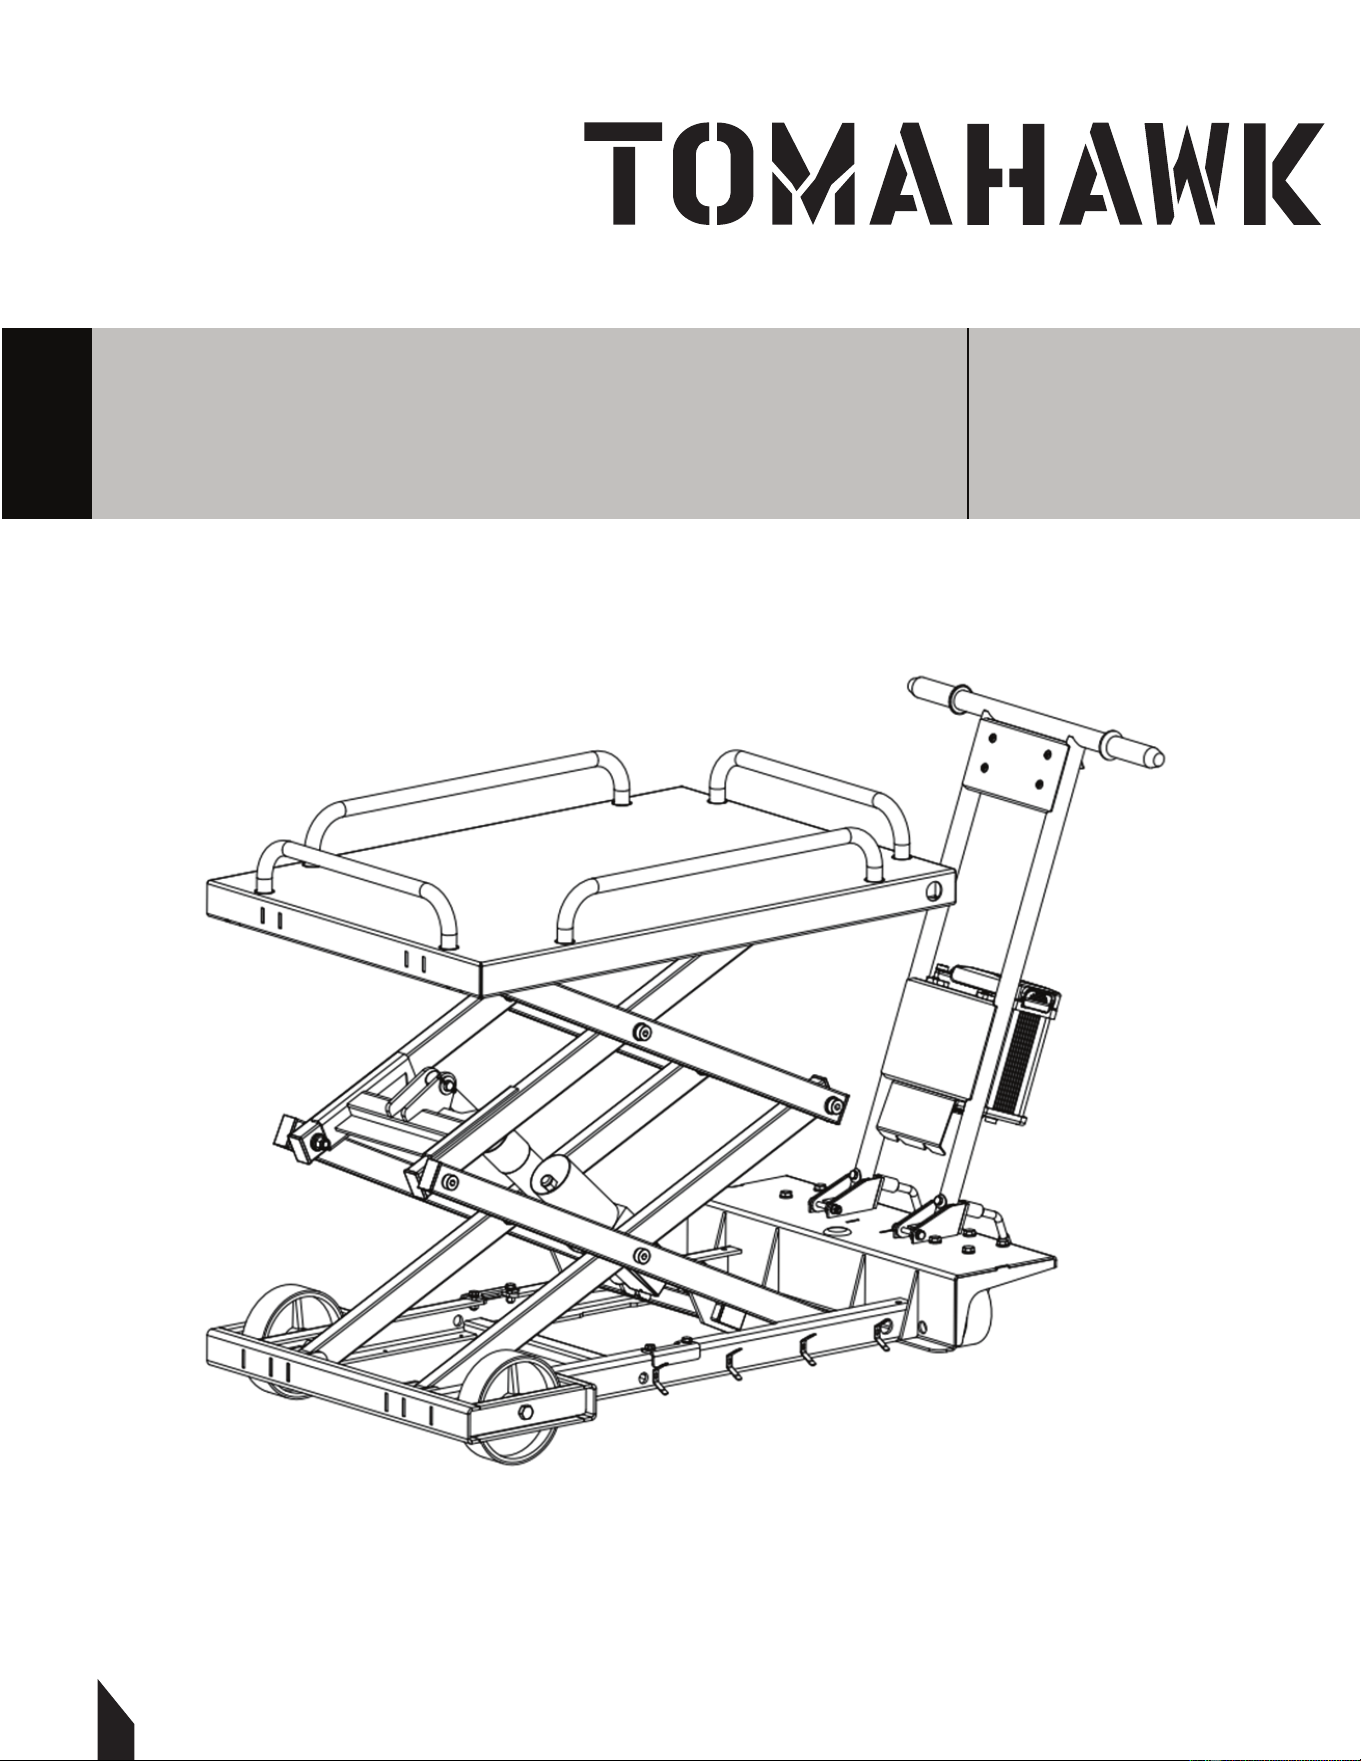
2.2 Features
1. Side Frame
2. Handles
3. Battery Box
4. Table Protector
5. Wheels
6. Main Base
7. Scissor Arm
8. Table Base
CHARGER
Power
Input voltage
97 W/ 42 V
110~240 V / 50~60 Hz / AC
Charge me 3 h
BATTERY
Baery capacity
Rated voltage
6 Ah
40 V
Baery power 240 Wh
MODEL
TLIFT600
Baery capacity
Rated voltage
6 Ah
40V DC
Max Baery workme 6 h
max. load capacity
660 lbs(300kg)
weight 198 lbs (90 kgs)
Dimension
60”x28”39.3”

8
3. ASSEMBLY
3.1 Fold Down the Guard Rails(FIGURE 1)
• Begin with the platform in its upright position with all four guard rails extended.
• Carefully fold down all four guard rails inward so they lay flat over the platform.
• Ensure rails are fully secured in the folded position.
3.2 Attach the Handle Assembly(FIGURE 2)
• Position the handle assembly above the back of the platform (where the hydraulic unit
is located).
• Align the mounting holes on the lower end of the handle frame with the holes on the
platform bracket.
• Insert 1 M8x65 bolt through each side of the handle bracket, using 2 M8 washers per
bolt (one on each side of the bracket).
• Fasten using 1 M8 nut per bolt on the opposite side.
• Tighten both bolts securely using a wrench.
4. OPERATION
4.1 Pre-Operation Requirements
• As soon as you receive your machine, open the box and check for any damage or
missing parts.
• If anything is broken or missing, let us know right away—before you start using the
machine.
FIGURE 1
FIGURE 2

9
• Always Check the Machine Before Use
• Only use the machine when it’s in perfect working condition.
• Before each use, do a quick visual check—especially the safety
features, control buttons, power cables, and any screws or
fasteners.
• If you see any damage or loose parts, do not use the machine
until those parts are fixed or replaced.
4.2. Turning On Machine
4.2.1 Switch the battery box power to "1 = ON". FIGURE 3
4.2.2 Once the power is on(FIGURE 4):
• Press Hydraulic Button 1# to li the platform. It will rise to
about 1.5 meters.
• Press Hydraulic Button 2# to lower the platform.
• If you hear a straining or struggling noise from the hydraulic
pump, it means the platform has reached the top or bottom
limit.
NOTE: Immediately release Button 1# or 2# to avoid damaging the system.
4.3 Using the Machine on a Slope
F
or your safety, never overload the machine—especially on slopes.
Always operate within the weight limits. Exceeding these limits can lead to accidents
or equipment damage.
4.4 Charger Instructions
4.4.1 The charger is built into the battery system.
4.4.4.2 To charge the battery:
• Plug the charger into a standard 230V / 50Hz AC outlet.
• Connect the charger plug to the battery.
4.
4.3 Always follow all safety instructions when charging. Only use the original
charger provided.
4.4.4 Charging the Battery
Plug the charger into a 230V / 50Hz outlet and connect it to the battery.
Charge the battery fully.
4.
4.5 When the battery is fully charged (as shown by the indicator on the charger), you
can safely disconnect the charger.
4.5 LED Indicator & Voltage Display
4.5.1 The LED lights on the control panel show the charging status.
4.5.2 The voltage display on the battery box shows the battery’s current charge level.
4.5.3 Always monitor charging progress using the indicators, and never leave the battery
charging unattended for long periods.
FIGURE 3
FIGURE 4

10
5. CLEANING
R
egularly inspect the condition of the machine.
Aer each use, store the machine in a dry, enclosed location to prevent damage.
NOTE: Do not use harsh chemicals or abrasive cleaners—these can damage the metal
surfaces. Never use a high-pressure washer to clean the machine.
5.1 Wipe the machine’s surface with a wet cloth after each use.
5.2 Use a damp sponge to clean the outer parts.
5.3 Do not clean any electronic parts with water.
5.4 Use a soft brush to remove any dirt or buildup from the machine after use.
6. STORAGE
6.1 Thoroughly clean all parts of the machine before storing.
6.2 Store components separately in a dry area, at temperatures no lower than -10°C (14°F).
6.3 Fully charge the battery before storing.
6.4 For long-term storage, recharge the battery at least once a month to maintain battery
health.
Voltage display shows 42 V Battery capacity 100%
Voltage display shows 36V Battery capacity ~50%
Voltage display shows <30 V
Please charge the battery (too less capacity left)
#1 Voltage display switch
#2 Voltage display
#3 Recharge port
FIGURE 3

6.1 Disposal
Important: Do not throw the machine or battery in regular household waste.
Contact your local waste authority for proper disposal or recycling options.
If you're replacing the unit through a local dealer, they are required to accept your old
machine for disposal.
7. TROUBLESHOOTING
8. REPLACEMENT PARTS
8.1
8.2
7.3
7.4
11
Problem Possible cause Solution
No electrical support
Battery is not charged Recharge battery
Motor stuck Check motor
Power switch is damaged Check switch
Broken or loose cables Check cables
No charging of battery Loosen cable Check cable connection
12
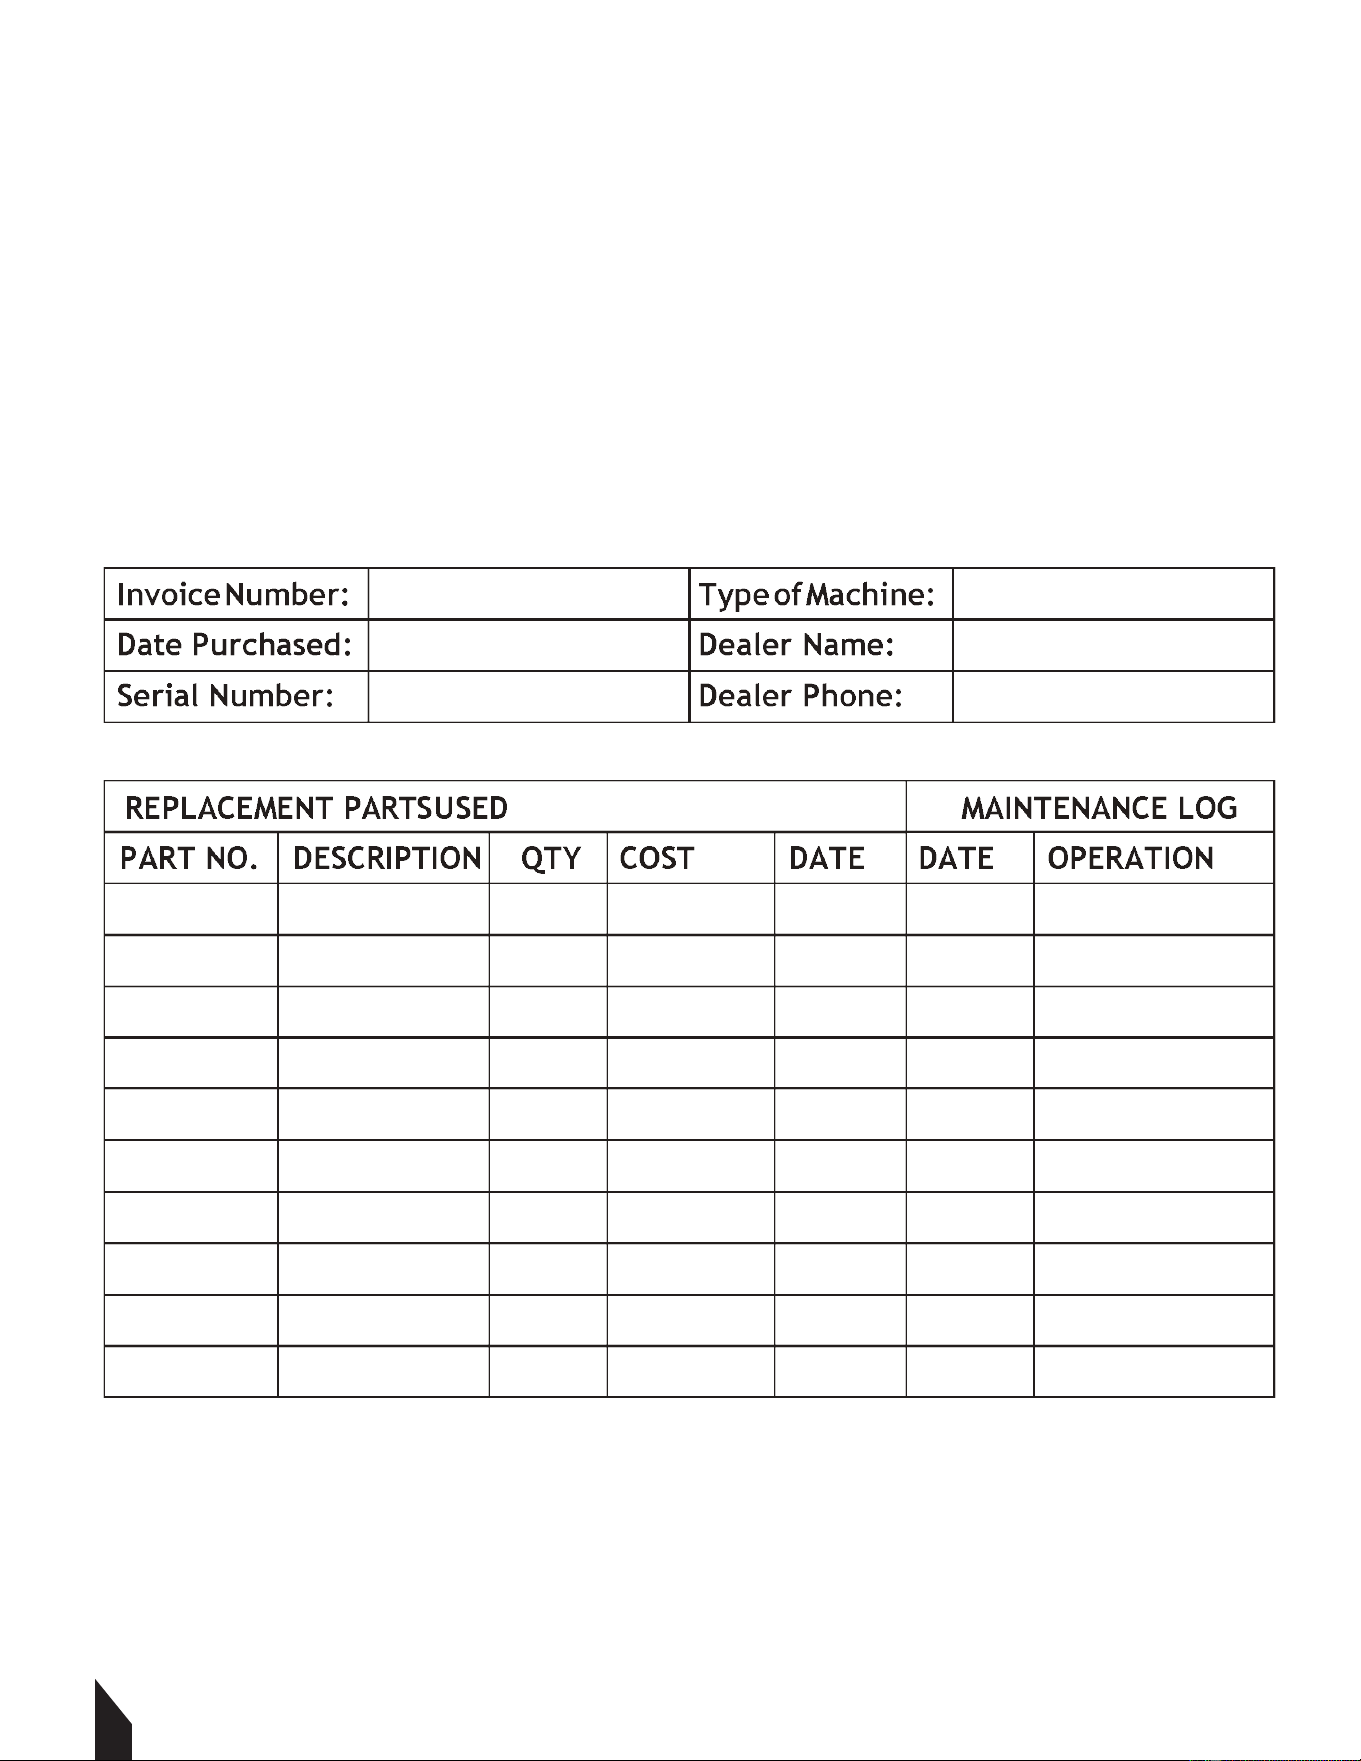
9. MAINTENANCE RECORD
TOMAHAWK® tools are assembled with care and will provide years of service when properly
maintained. Preventative maintenance and routine service are essential to the long life of
your equipment. Adhere to reading through this manual thoroughly. You will find that you
can do some of the regular maintenance yourself. However, when in need of parts or major
service, be sure to contact a TOMAHAWK® Technician. For your convenience we have
provided this space to record relevant data about your TOMAHAWK® equipment.

13
10. EQUIPMENT WARRANTY
Your new TOMAHAWK® equipment is warranted to the original purchaser for a period of
one-year (12 months) from the original date of purchase. The TOMAHAWK® warranty is
against defects in design, materials and workmanship.
The following are not covered under the warranty:
10.1 Damage caused by abuse, misuse, dropping or other similar damage caused by or as a
result of failure to follow assembly, operation or user maintenance instructions.
10.2 Alterations, additions or repairs carried out by persons other than TOMAHAWK® or their
recognized agents.
10.3 Transportation or shipment costs to and from TOMAHAWK® or their recognized agents,
for repair or assessment against a warranty claim, on any machine.
10.4 Materials and/or labor costs to renew, repair or replace components due to fair
wear and tear.
10.5 TOMAHAWK® and/or their recognized agents, directors, employees or insurers will not
be held liable for consequential or other damages, losses or expenses in connection with or
by reason of or the inability to use the machine for any purpose.
10.1 Warranty Claims
Before submitting any warranty claim, you will need to register your
new TOMAHAWK® equipment through www.tomahawk-power.com
or email support@tomahawk-power.com.
Follow the steps on page 3 or scan this QR codes to complete
the equipment registration. Aer registration is complete,
all warranty claims should firstly be directed to TOMAHAWK®
through the online Service Request form found at
www.tomahawk-power.com/pages/service-request.
11. SERVICES CENTERS
Our service centers are equipped to handle your equipment maintenance and repair needs
efficiently. With a network of authorized local service locations , you can find expert
support and genuine parts needed to keep your equipment running smoothly. All locations
are listed on the webpage https://tomahawk-power.com/pages/find-a-service-center.
For Service Call (866) 577- 4476
For big areas and busy schedules, Tomahawk 38” push sweepers cover a
wider path to reach more surface area so you can finish sweeping faster
around indoor and outdoor spaces and on wet or dry surfaces!
14
14
ELECTRIC MOBILE
LIFT TABLE
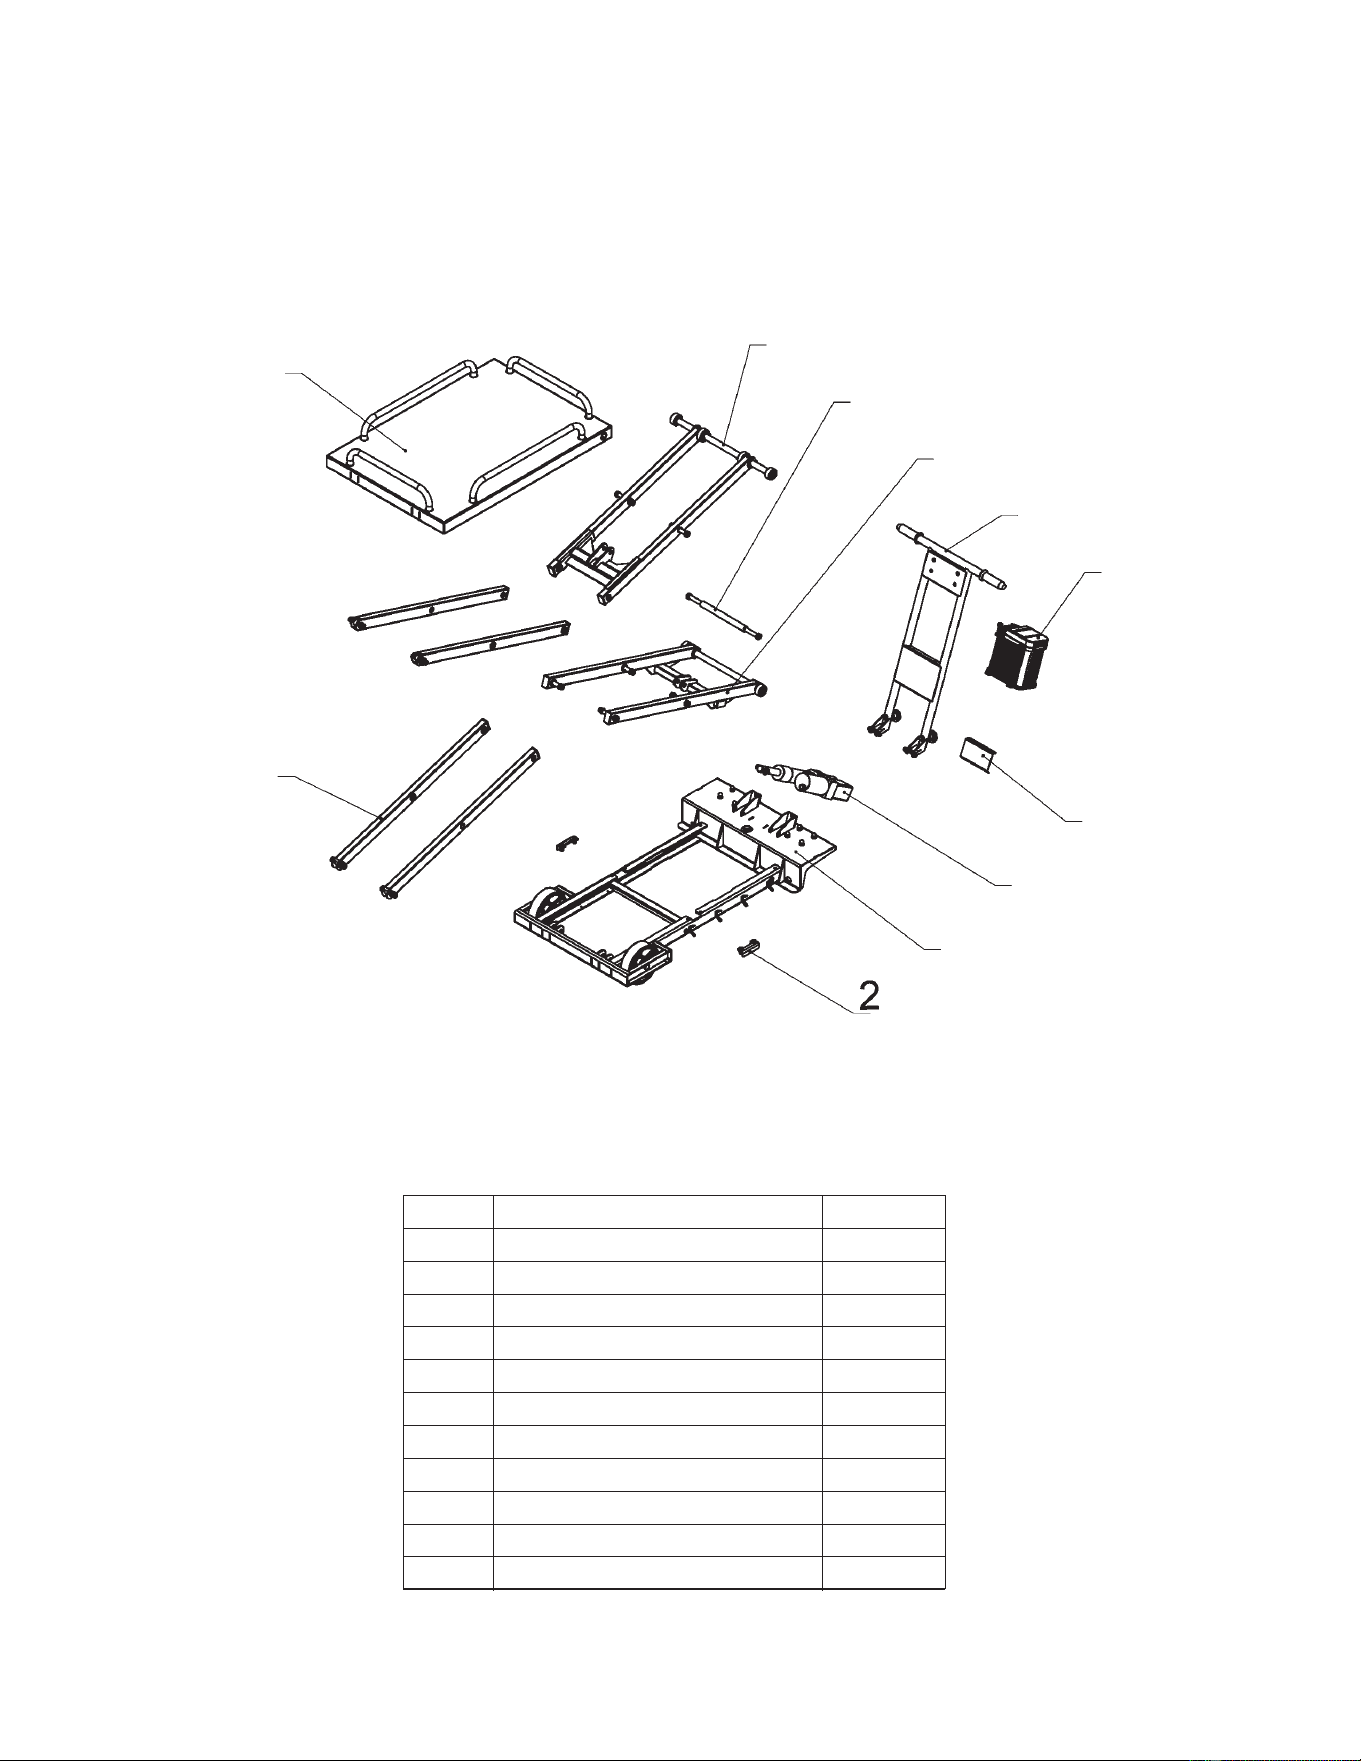
Parts Manual
MODEL NUMBER: TLIFT600
4
6
5
7
8
9
3
10
11
1
No. Qty
1 1
2 2
3
4
Parts Name
Main
Base
Side Track Cover
4 1
5
1
6
1
7 1
8
1
9
1
10 1
11 1
Side Scissor Arm
Platform & Side Frame
Upper Scissor Arm
Scissor Arm Sha
Below Scissor
Arm
Handle Assy
Battery Box Assy
Cable
Protector
Plate
Hydraulic Pump

TOMAHAWK®, LLC
San Diego, CA
Sales Support
(866) 577-4476
Equipment Support
(866) 577-4476
www.tomahawk-power.com
Tomahawk understands to keep a job-site running smoothly the proper equipment and
spare parts are needed at the drop of a hat. With same day shipping and faster
delivery times, count on Tomahawk to keep you powered throughout the day! With
long lasting parts and engines, Tomahawk equipment will be the star of your fleet for
years to come. Visit www.tomahawk-power.com to get started today!
Power Your World
FACEBOOK
facebook.com/TomahawkPowerUSA
YOUTUBE
youtube.com/TomahawkPower
INSTAGRAM
@tomahawkpower