
ENDURO
®
PRO
Operating Instructions
Instrucciones de funcionamiento
Instructions d’utilisation
Bedienungsanleitung
Caution: LED Radiation (RG-2) -
Do not stare into beam.
May be harmful to eyes.
Precaución: Radiación de LED (RG-2) -
No mire directamente al haz.
Podría dañar su vista.
Attention : Rayonnement DEL (RG-2) -
Ne pas regarder dans le faisceau.
Susceptible d’endommager les yeux.
Achtung: LED-Strahlung (RG-2) -
Nicht direkt in den Lichtstrahl schauen.
Augenschädigung möglich.
FRANÇAIS
Merci d’avoir sélectionné la lampe frontale Enduro
®
Pro
de Streamlight.
Fonctions :
- 8 Modes d’éclairage/Niveaux d’éclairage réglables
- Serre-tête en nylon réglable pour tenue confortable.
S’enlève facilement pur nettoyer la lampe.
- Plaque frontale encliquetable
- Faisceau étroit – pour repérage à distance.
- Faisceau large - possède un faisceau uniforme doux
pour du travail de près.
- DEL rouges - préservent la vision de nuit.
- Bouton d’alimentation en retrait évite l’activation
accidentelle.
Enduro Pro - Mode d’emploi
1. Remplacement des piles
a. Tout en maintenant le couvercle arrière, détachez le clip à
pression du pouce. Ouvrez le couvercle comme un livre
pour accéder au compartiment des piles.
b. Placez trois piles AAA en respectant les schémas de
polarité sur le fond de chaque logement de pile.
c. Faites tourner le couvercle arrière pour le fermer.
Appuyez sur le couvercle à l’emplacement des clips pour
enclencher le clip sur le système de verrouillage. Vous
entendrez un déclic lorsque le verrouillage est enclenché.
2. Fonction éclairage
a. Modes de sortie faisceau étroit - bas, moyen, haut et arrêt
b. Modes de sortie faisceau large - bas, moyen, haut et arrêt
c. Modes de sortie rouge - bas, haut et arrêt
Changement de modes de sortie :
Appuyez sur le bouton dans les 1,5 secondes de la dernière
pression du bouton changera le mode d’éclairage. (Bas,
Moyen, Haut) Vous pouvez cycler dans tous les niveaux
d’éclairage et les mettre sur arrêt ensuite.
REMARQUE : Si vous attendez plus de 2 secondes entre
deux pressions, l’éclairage s’éteint à la pression suivante.
Changement de fonction d’éclairage :
Appuyez sur le bouton on/off pour activer la lumière étant
donné que la lumière doit être allumée avant la prochaine
étape.
Pour changer la lumière de faisceau étroit à faisceau large,
appuyez sur le bouton on/off et maintenez-le enfoncé
pendant que la lumière change au mode de faisceau large.
Relâchez le bouton.
Pour passer du mode faisceau large au mode DEL rouges,
appuyez sur le bouton à nouveau et maintenez-le pendent
deux autres secondes jusqu’à ce que l’éclairage change au
mode rouge. Relâchez le bouton.
Suivez la même procédure que ci-dessous pour que
l’éclairage passe au mode faisceau étroit.
Garantie limitée à vie de Streamlight
Streamlight garantit ce produit à vie contre les défauts, à
l’exception des batteries et des ampoules, des emplois abu-
sifs et de l’usure normale. Nous nous engageons à réparer,
à remplacer ou à rembourser le prix d’achat de ce produit
si nous déterminons qu’il est défectueux. Cette garantie
limitée à vie exclut également les batteries rechargeables,
les chargeurs, les commutateurs et l’électronique, qui
sont couverts par une garantie de 2 ans sur présentation
d’un justificatif d’achat. LES PRÉSENTES SONT LA SEULE
GARANTIE, EXPRESSE OU IMPLICITE, Y COMPRIS TOUTE
GARANTIE DE QUALITÉ COMMERCIALE OU D’ADAPTA-
TION À UN USAGE PARTICULIER. TOUS DOMMAGES
INDIRECTS, IMMATÉRIELS OU SPÉCIAUX FONT L’OBJET
D’UNE EXONÉRATION DE RESPONSABILITÉ EXPRESSE,
SAUF EN CAS DE LIMITATION INTERDITE PAR LA LOI.
D’autres droits spécifiques peuvent s’avérer applicables en
fonction de la juridiction.
Consultez le site www.streamlight.com/support pour obtenir
un exemplaire complet de la garantie, ainsi que des informa-
tions sur l’enregistrement du produit et les adresses des
centres de services techniques agréés. Pensez à vous munir
de votre justificatif d’achat.
DEUTSCH
Vielen Dank, dass Sie sich für Streamlights Stirnlampe
Enduro
®
Pro entschieden haben.
Merkmale:
- 8 Beleuchtungsmodi/Einstellbare Beleuchtungsstärken
- Einstellbares Stirnband aus Polyamid für Tragekomfort.
Leicht zu Reinigungszwecken von der Stirnlampe
abnehmbar.
- Frontplatte zum Aufstecken
- Spot-Lichtkegel – zum Beleuchten weit entfernter Gegenstände.
- Flutlicht - gleichmäßige Ausleuchtung für Arbeiten im
Nahbereich.
- Rote LEDs - Erhalt des Nachtsehvermögens.
- Versenkter Einschalter verhindert versehentliches Betätigen.
Bedienungsanleitung Enduro Pro
1. Austausch der Batterien
a. Hintere Gehäuseabdeckung festhalten und den Ver-
schlussclip mit dem Daumen überwerfen. Die Abdeckung
wie ein Buch aufschlagen, um das Batteriefach zu öffnen.
b. Drei Batterien der Größe AAA wie im Batteriefach gezeigt
einlegen.
c. Zum Verschließen die hintere Abdeckung drehen. Die
Abdeckung bei den Clips nach unten drücken, um den Clip
über den Verschluss zu heben. Sie hören ein Klickgeräus-
ch, wenn der Verschluss einrastet.
2. Lichtfunktionen
a. Spot-Leuchtmodi = abgeblendet, mittelhell, hell und aus
b. Flutlicht-Leuchtmodi = abgeblendet, mittelhell, hell und aus
c. Rotlicht-Leuchtmodi = abgeblendet, hell und aus
Leuchtstärke wechseln:
Wird der Schalter innerhalb von 1,5 Sekunden nach dem
letzten Knopfdruck erneut gedrückt, schaltet der Leuchtmod-
us weiter. (Abgeblendet, hell und aus) Sie können durch alle
Leuchtmodi und dann auf Aus schalten.
HINWEIS: Wenn Sie zwischen dem Drücken länger als
zwei Sekunden warten, schaltet das nächste Drücken das
Licht aus.
Lichtfunktion wechseln:
Drücken Sie den Ein-/Ausschalter, denn das Licht muss vor
dem nächsten Schritt eingeschaltet sein.
Zum Wechseln von Spot zu Flutlicht den Ein-/Ausschalter
zwei Sekunden lang drücken und gedrückt halten, bis auf
Flutlichtmodus umgeschaltet wird. Schalter loslassen.
Zum Wechseln vom Flutlichtmodus in den Rote-LED-Modus
den Ein-/Ausschalter erneut zwei Sekunden lang drücken und
gedrückt halten, bis auf Rotlichtmodus umgeschaltet wird.
Schalter loslassen.
Wird das oben beschriebene Verfahren noch einmal durchge-
führt, schaltet das Licht in den Spotmodus.
Streamlights eingeschränkte lebenslange Garantie
Streamlight garantiert, dass dieses Produkt während
eines gesamten Verwendungslebens frei von Mängeln ist.
Ausgenommen sind Batterien und Glühbirnen, Missbrauch
und normaler Verschleiß. Wir werden dieses Produkt
reparieren, ersetzen oder den Kaufpreis zurückerstatten, wenn
wir feststellen sollten, dass es mangelhaft ist. Ebenfalls von
dieser eingeschränkten lebenslangen Garantie ausgenommen
sind wiederaufladbare Batterien, Ladegeräte, Schalter
und die Elektronik, für die eine zweijährige Garantie mit
Kaufnachweis gilt. DIES IST DIE EINZIGE AUSDRÜCKLICHE
ODER IMPLIZITE GARANTIE EINSCHLIESSLICH EINER
ETWAIGEN GARANTIE DER MARKTÜBLICHKEIT ODER
EIGNUNG FÜR EINEN BESTIMMTEN ZWECK. ERSATZ
FÜR BEILÄUFIGE SCHÄDEN ODER FOLGESCHÄDEN UND
BESONDERER SCHADENSERSATZ WERDEN AUSDRÜCKLICH
AUSGESCHLOSSEN, AUSSER IN LÄNDERN, IN DENEN EINE
DERARTIGE EINSCHRÄNKUNG GESETZLICH VERBOTEN
IST. Je nach Land könnten Sie andere bestimmte gesetzliche
Rechte haben.
Alle Garantieunterlagen sowie Informationen zur
Produktregistrierung und Vertragswerkstätten finden Sie auf
www.streamlight.com/support. Bewahren Sie Ihren
Einkaufsbeleg als Kaufnachweis auf.
997754 Rev. A 8/17
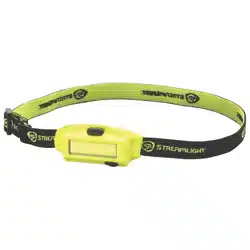
ENGLISH
Thank you for selecting Streamlight’s Enduro
®
Pro Headlamp.
Features:
- 8 Lighting modes/Adjustable lighting levels
- Adjustable nylon head band for comfort fit. Easily removes
from the light for cleaning.
- Snap-on face plate
- Spot beam – for distance spotting.
- Flood beam - has a smooth even beam for up close work.
- Red LEDs - preserve night vision.
- Recessed Power Button prevents accidental actuation.
Enduro Pro Operating Instructions
1. Battery replacement
a. While holding onto the rear cover on the main body,
unclip the snap over clip with your thumb. Open the
cover as you would a book to access the battery
compartment.
b. Insert three AAA cell batteries following the battery
diagrams on the bottom of each battery cavity.
c. Rotate the rear cover to close it. Push down on the
cover at the clips location, to snap the clip over the
catch. You will hear a click when the lock engages.
2. Light Function
a. Spot Output Modes = Low, Medium, High and Off
b. Flood Output Modes = Low, Medium, High and Off
c. Red Output modes = Low, High and Off
Switching Output Modes:
Pushing the button within 1.5 seconds of the last button
push will change the light mode. (Low, Med, High)
You may sequence through all light levels and then to off.
NOTE: If you wait more than two seconds between button
pushes, the next press of the button will turn the light off.
Switching Light Function:
Press the on/off button to actuate the light as the light must
be on prior to the next step.
To change the light from Spot to Flood, press and hold the
on/off button for two seconds until the light changes to the
flood beam mode. Release the button.
To switch from Flood mode to the Red LED mode, Press
and hold the button again for two seconds until the light
changes to the Red mode. Release the button.
Follow the same procedure as above and the light will go
to Spot mode.
Streamlight’s Limited Lifetime Warranty
Streamlight warrants this product to be free of defects for
a lifetime of use except for batteries and bulbs, abuse and
normal wear. We will repair, replace or refund the purchase
price of this product should we determine it to be defective.
This limited lifetime warranty also excludes rechargeable
batteries, chargers, switches and electronics which have a
2 year warranty with proof of purchase. THIS IS THE ONLY
WARRANTY, EXPRESSED OR IMPLIED, INCLUDING ANY
WARRANTY OF MERCHANTABILITY OR FITNESS FOR A
PARTICULAR PURPOSE. INCIDENTAL, CONSEQUENTIAL
OR SPECIAL DAMAGES ARE EXPRESSLY DISCLAIMED
EXCEPT WHERE SUCH LIMITATION IS PROHIBITED BY
LAW. You may have other specific legal rights which vary
by jurisdiction.
Go to www.streamlight.com/support for a complete copy
of the warranty, and information on product registration
and the location of authorized service centers. Retain your
receipt for proof of purchase.
Customer Service
STREAMLIGHT, INC.
30 Eagleville Road, Suite 100
Eagleville, PA U.S.A. 19403-3996
Phone: (800) 523-7488 Toll-Free
Fax: (800) 220-7007
www.streamlight.com
ESPAÑOL
Le agradecemos que haya seleccionado el faro Enduro
®
Pro
de Streamlight.
Características:
- 8 Modos de iluminación/Niveles de iluminación ajustables
- Cinta de nailon ajustable para la cabeza que proporciona
un ajuste cómodo. Se extrae fácilmente de la linterna
para su limpieza.
- Placa a presión
- Haz focal: para iluminación puntual a distancia.
- Haz ambiente: cuenta con un haz uniforme y suave para
trabajos de cerca.
- LED rojos: para conservar la visión nocturna.
- El botón de alimentación embutido evita que se accione
accidentalmente.
Instrucciones de funcionamiento de Enduro Pro
1. Sustitución de las pilas
a. Mientras agarra la tapa trasera del cuerpo principal,
suelte el enganche que hay sobre el broche con el pulgar.
Abra la tapa tal y como abriría un libro para acceder al
compartimento de las pilas.
b. Inserte tres pilas de célula AAA siguiendo los diagramas
de la pila en la parte inferior de cada una de las cavidades
de las pilas.
c. Gire la tapa trasera para cerrarla. Empuje la tapa en el
lugar donde se encuentran los enganches, para encajar
el enganche en el cierre. Oirá un chasquido al encajar
el bloqueo.
2. Funcionamiento de la linterna
a. Modos de salida de haz focal = Bajo, medio,
alto y apagado
b. Modos de salida de haz ambiente = Bajo, medio,
alto y apagado
c. Modos de salida de color rojo = Bajo, alto y apagado
Cambio demodos de salida:
Si se presiona el botón dentro de los 1,5 segundos siguientes
a la pulsación del último botón, se cambiará el modo de
iluminación. (Bajo, medio, alto) Puede pasar por todos los
niveles de iluminación y después apagarse.
NOTA: Si espera más de dos segundos entre las pulsaciones
del botón, al pulsar de nuevo el botón se apagará la linterna.
Cambio de la función de la linterna:
Oprima el botón de encendido/apagado para accionar la
linterna ya que la linterna tiene que estar encendida antes
de pasar al siguiente paso.
Para cambiar la luz del modo focal a ambiente, pulse y
mantenga pulsado el botón de encendido/apagado durante
dos segundos hasta que la luz cambie al modo de haz
ambiente. Suelte el botón.
Para cambiar del modo de haz ambiente al modo LED
de color rojo, pulse y mantenga pulsado el botón una vez
más durante dos segundos hasta que la luz cambie al
modo rojo. Suelte el botón.
Siga el mismo procedimiento indicado más arriba y la
luz pasará al modo de luz focal.
Garantía limitada de por vida de Streamlight
Streamlight garantiza que este producto estará libre de
defecto durante una vida útil de uso a excepción de las pilas
y bombillas, o por abuso y desgaste normal. Repararemos,
sustituiremos o reembolsaremos el precio de compra de
este producto si determináramos que está defectuoso. Esta
garantía limitada de por vida también excluye las pilas recar-
gables, los cargadores, interruptores y sistemas electrónicos
que tienen una garantía de 2 años con prueba de compra.
ESTA ES LA ÚNICA GARANTÍA, EXPRESA O IMPLÍCITA,
INCLUIDA CUALQUIER GARANTÍA DE COMERCIABILIDAD
E IDONEIDAD PARA UN FIN EN PARTICULAR. SE
RECHAZAN EXPRESAMENTE LOS DAÑOS FORTUITOS,
CONSECUENTES O ESPECIALES SALVO EN AQUELLOS
LUGARES DONDE DICHA LIMITACIÓN ESTÉ PROHIBIDA
POR LA LEY. Podría tener otros derechos legales específicos
que varían según la jurisdicción.
Vaya a www.streamlight.com/support para obtener una copia
completa de la garantía e información sobre el registro del
producto y la ubicación de centros de servicio autorizados.
Conserve su recibo como prueba de compra.
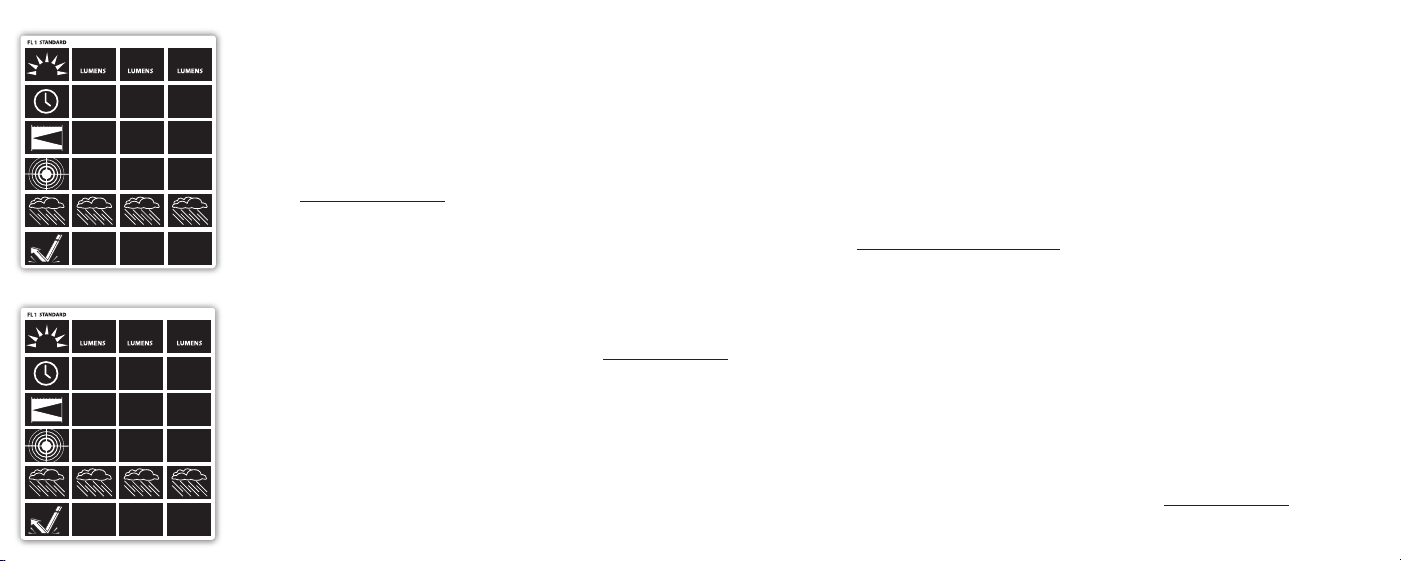
6h
2m
135 45
29m
210cd
14h
2m
18m
80cd
15
38h
2m
9m
20cd
MEDIUM LOWHIGH
6h
2m
200 75
95m
2,250cd
14h
2m
57m
825cd
25
38h
2m
35m
300cd
MEDIUM LOWHIGH
Spot // Haz // Spot // Spot
Flood // Luz // Projecteur // Flutlicht