
FR
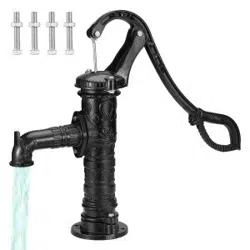
POMPE BRAS
Manuel d’instructions et d’utilisation
EN
HAND WATER PUMP
User and maintenance manual
IT
POMPA PER ACQUA MANUALE
Manuale di istruzioni e di manutenzione

AVERTISSEMENTS DE SÉCURITÉ
Avertissement! Lire tous les avertissements de sécurité et toutes les instructions contenus dans ce
manuel.
Conserver tous les avertissements et toutes les instructions pour pouvoir s’y reporter ultérieurement.
- Il est recommandé de maintenir éloignées toutes les personnes non concernées par l’utilisation du
produit (et tout spécialement les enfants).
- Le produit ne doit pas être laissé à la portée des enfants ou dans l’environnement des enfants. Ne laissez
jamais des enfants l’utiliser. Il convient de surveiller les enfants pour s’assurer qu’ils ne jouent pas avec le
produit.
- Remarques
Les consignes de sécurité et les instructions indiquées dans la présente notice ne sont pas en mesure
d'illustrer d'une manière exhaustive toutes les conditions et les situations qui peuvent se produire.
L’utilisateur et/ou l’opérateur doivent utiliser le produit avec bon sens et prudence notamment en ce qui
concerne ce qui n’est pas indiqué dans ce manuel.
- Le produit est destiné pour un usage domestique en extérieur dans les jardins privés.
- Utilisez cette pompe uniquement pour le pompage d’eau.
- Ce produit n’est pas destiné à un usage artisanal, commercial, professionnel et/ou industriel.
- N'utilisez pas ce produit à des fins, pour des travaux et pour des liquides pour lesquels il n'a pas été
conçu.
- La responsabilité du constructeur ou du vendeur ne saurait être engagée du fait d’une utilisation
incorrecte ou non conforme de la machine.
- Ne laissez pas la pompe geler, cela entraînerait l’annulation de la garantie
- Contrôlez régulièrement la pompe
- En fin de vie, ne pas jeter le produit avec les ordures ménagères ou dans l’environnement.
Effectuer la mise au rebut du produit, des accessoires et de l'emballage conformément aux
réglementations locales relatives à la protection de l'environnement.
SAFETY INSTRUCTIONS
WARNING! Read all safety warnings and all instructions laid down in this manual.
Save all warnings and instructions for future reference.
- All bystanders (esp. children) should be kept away from tool and work area.
- Keep the product away from children or from their environment. Never allow children to operate the tool.
Children should be supervised to ensure that they do not play with the tool.
- Remarks:
The safety precautions and instructions given in this manual are unable to cover in detail all the conditions
and situations that may arise.
The operator and/or user must use common sense and caution when operating the product especially for
any matters that are not referred in the above.
- The product is intended for outdoor domestic use in private gardens.
- Only pump water with this hand pump.
- The product is not intended for artisanal, commercial, professional and/or industrial use
- Do not use this product for purposes, for works and for liquids for which it is not designed nor intended.
- The manufacturer or seller cannot be held responsible for incorrect or non-compliant use of machine.
- Do not allow the pump to freeze. Doing so will void the warranty.
- Periodically inspect the pump
- Do not throw with household rubbish or in the environment.
Proceed with disposal of the product, accessories and packaging according to local regulations regarding
the protection of the environment.

ISTRUZIONI DI SICUREZZA
Avvertenza! Leggere tutte le avvertenze di pericolo e le istruzioni operative.
Conservare tutte le avvertenze di pericolo e le istruzioni operative per ogni esigenza futura.
- Tenere tutte le persone (es bambini) lontani del prodotto e dall’area di lavoro.
- Tenere il prodotto fuori dalla portata dei bambini e in ogni caso lontano da ambienti frequentati da essi.
Non lasciare che i bambini utilizzino l'attrezzo. I bambini devono essere controllati per garantire che non
giochino con l'apparecchio.
- Osservazioni
Le consegne di sicurezza e le istruzioni indicate nella presente istruzioni non sono in grado di illustrare in
modo esauriente tutte le condizioni e le situazioni che possono prodursi.
L'utente e/o l'operatore deve utilizzare l'attrezzo con buono senso e prudenza in particolare in ciò che
riguarda quanto indicato in questo manuale.
- Il prodotto è destinato per un uso domestico all’ esterno, in giardini priviati.
- Usate questa pompa solo per pompare l’acqua.
- Questa pompa non è destinato all'uso artigianale, comerciale, professionale e / o industriale
- Non utilizzare questa pompa per lavori e perliquidi per i quali non è stato concepito.
- La responsabilità del costruttore o del venditore non saprebbe essere impegnata a causa di
un'utilizzazione scorretta o non conforme della pompa.
- Evitare il congelamento de la pompa. Questo potrebbe danneggiare la pompa e invalidare la garanzia.
- Ispezionare periodicamente la pompa
- In fine di vita, non gettare la pompa usata con i rifiuti domestici o nell'ambiente.
Effettuare lo smaltimento del prodotto, degli accessori e dell'imballaggio conformemente alle
regolamentazioni locali relative alla protezione dell'ambiente naturale.
- Déballage: Retirez le produit de son emballage.
Vérifiez que le produit et les accessoires ne présentent pas de dégâts.
- Unpacking: Remove product from its packaging.
Check that product and accessories are not damage.
- Disimballagio: Rimuovere il prodotto dal suo imballaggio.
Controllare che il prodotto e gli accessori non siano danneggiati.
L’utilisation de ce produit est interdite aux enfants et adolescents.
The use of this product by children is forbidden.
L'utilizzo di questo prodotto è vietato ai bambini ed adolescenti.
Contenu / Content / Contenuto
Pc
Desc.
Pc
1
Corps de pompe /
Pump body /
Corpo della pompa
x1
2
Bec
Spout
Becco
x1
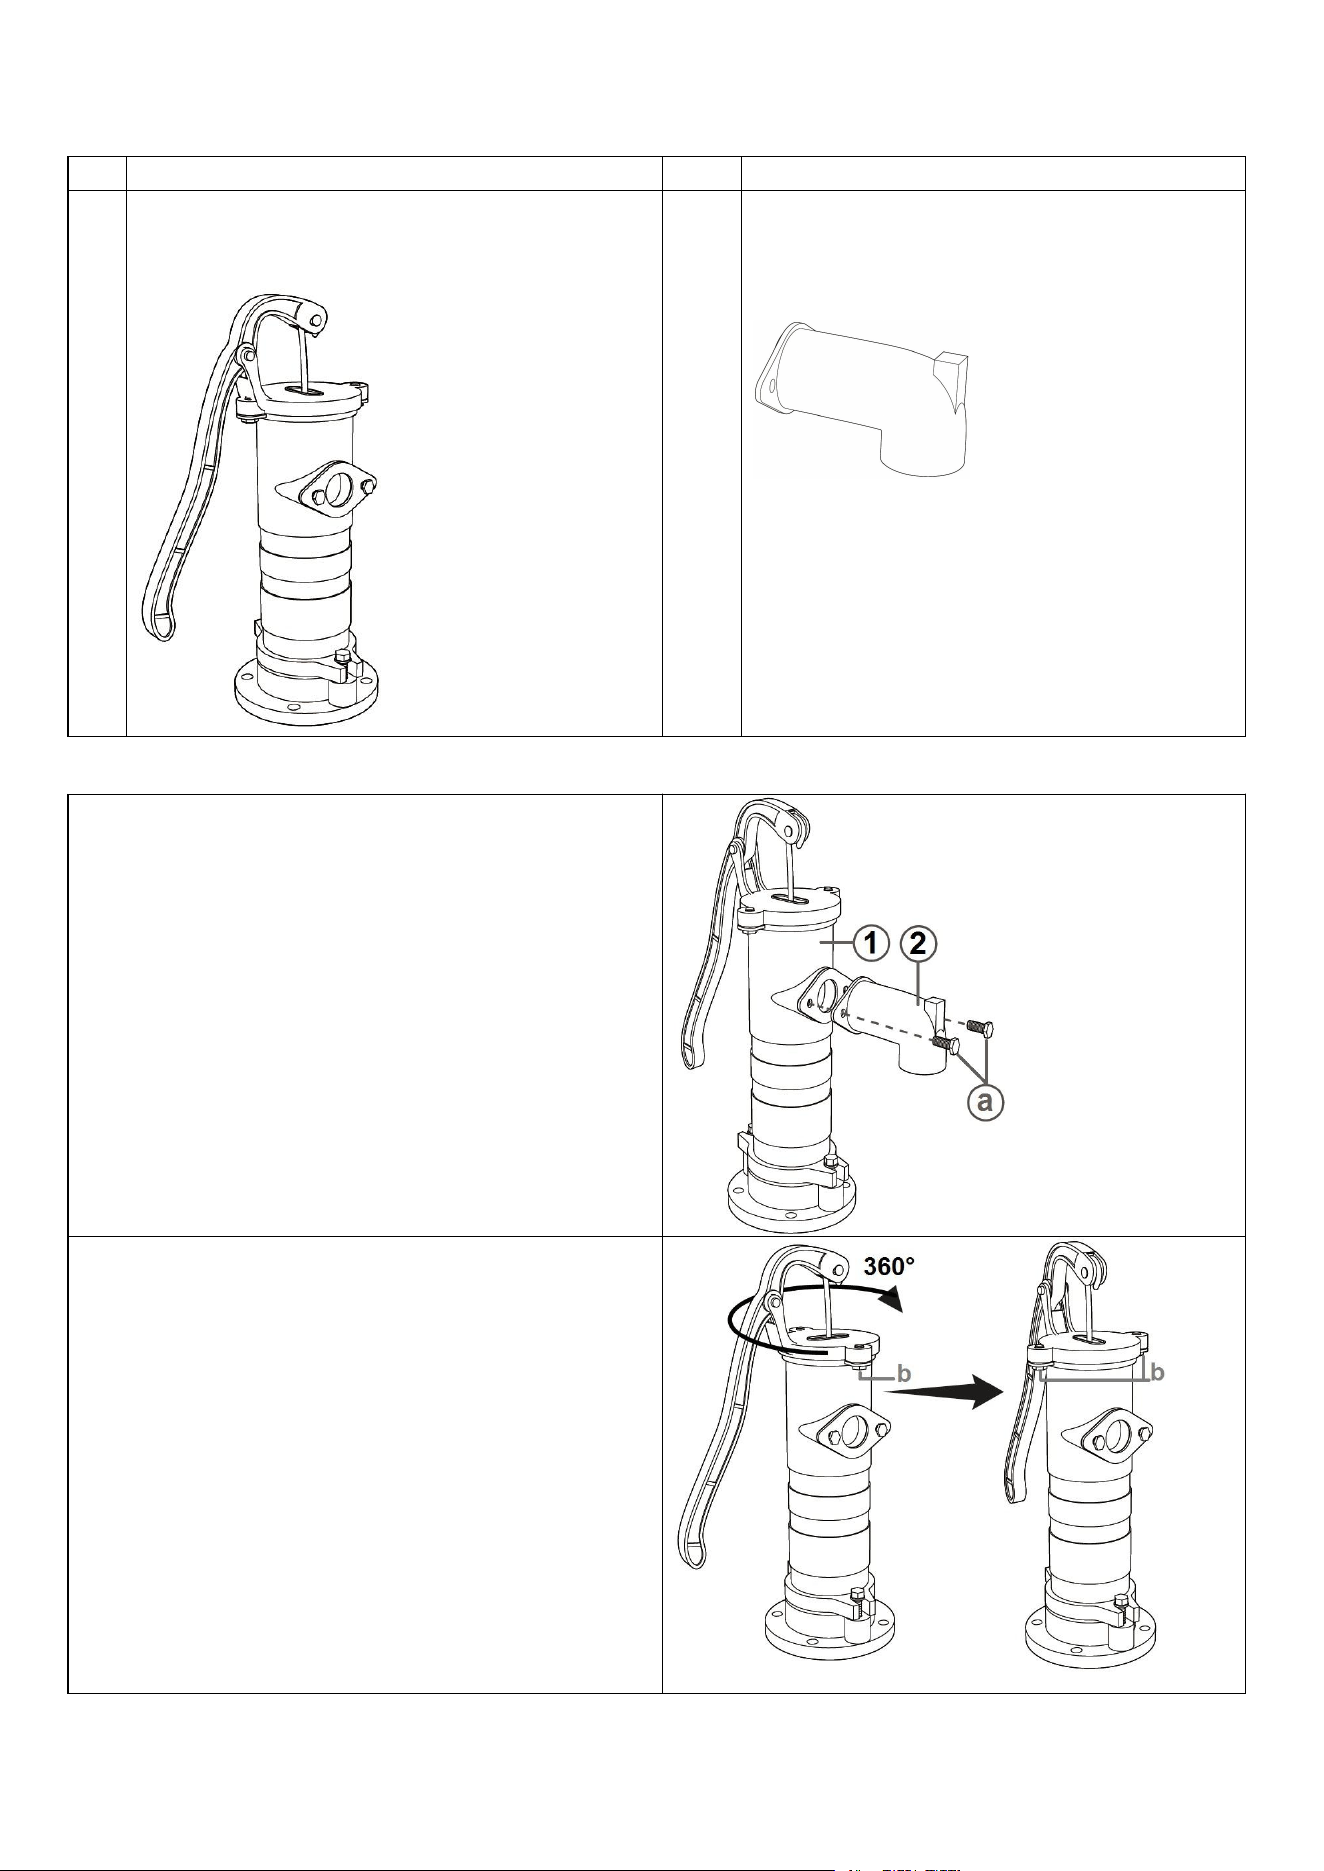
Assemblage / Assembly / Montaggio
Assembler le bec (2) au corps de pompe (1) a l’aide
des vis (a).
Mount the spout (2) to the pump body (1) with the
screws (a).
Montare il becco (2) sul corpo de la pompa (1) con
le vite (a).
La poignée peut pivoter à 360°.
Devisser les vis (b), ajuster à la position de travail
desirée, revisser les vis (b).
The handle can rotate at 360°.
Loosen screws (b), adjust to desired working
position, and tighten the screws (b).
La manovella può ruotare di 360° per raggiungere la
posizione di lavoro desiderata.
Allentare le viti (b), girare a la posizione di lavoro
desiderata, serrare le viti (b).
Installation / Installation / Installazione
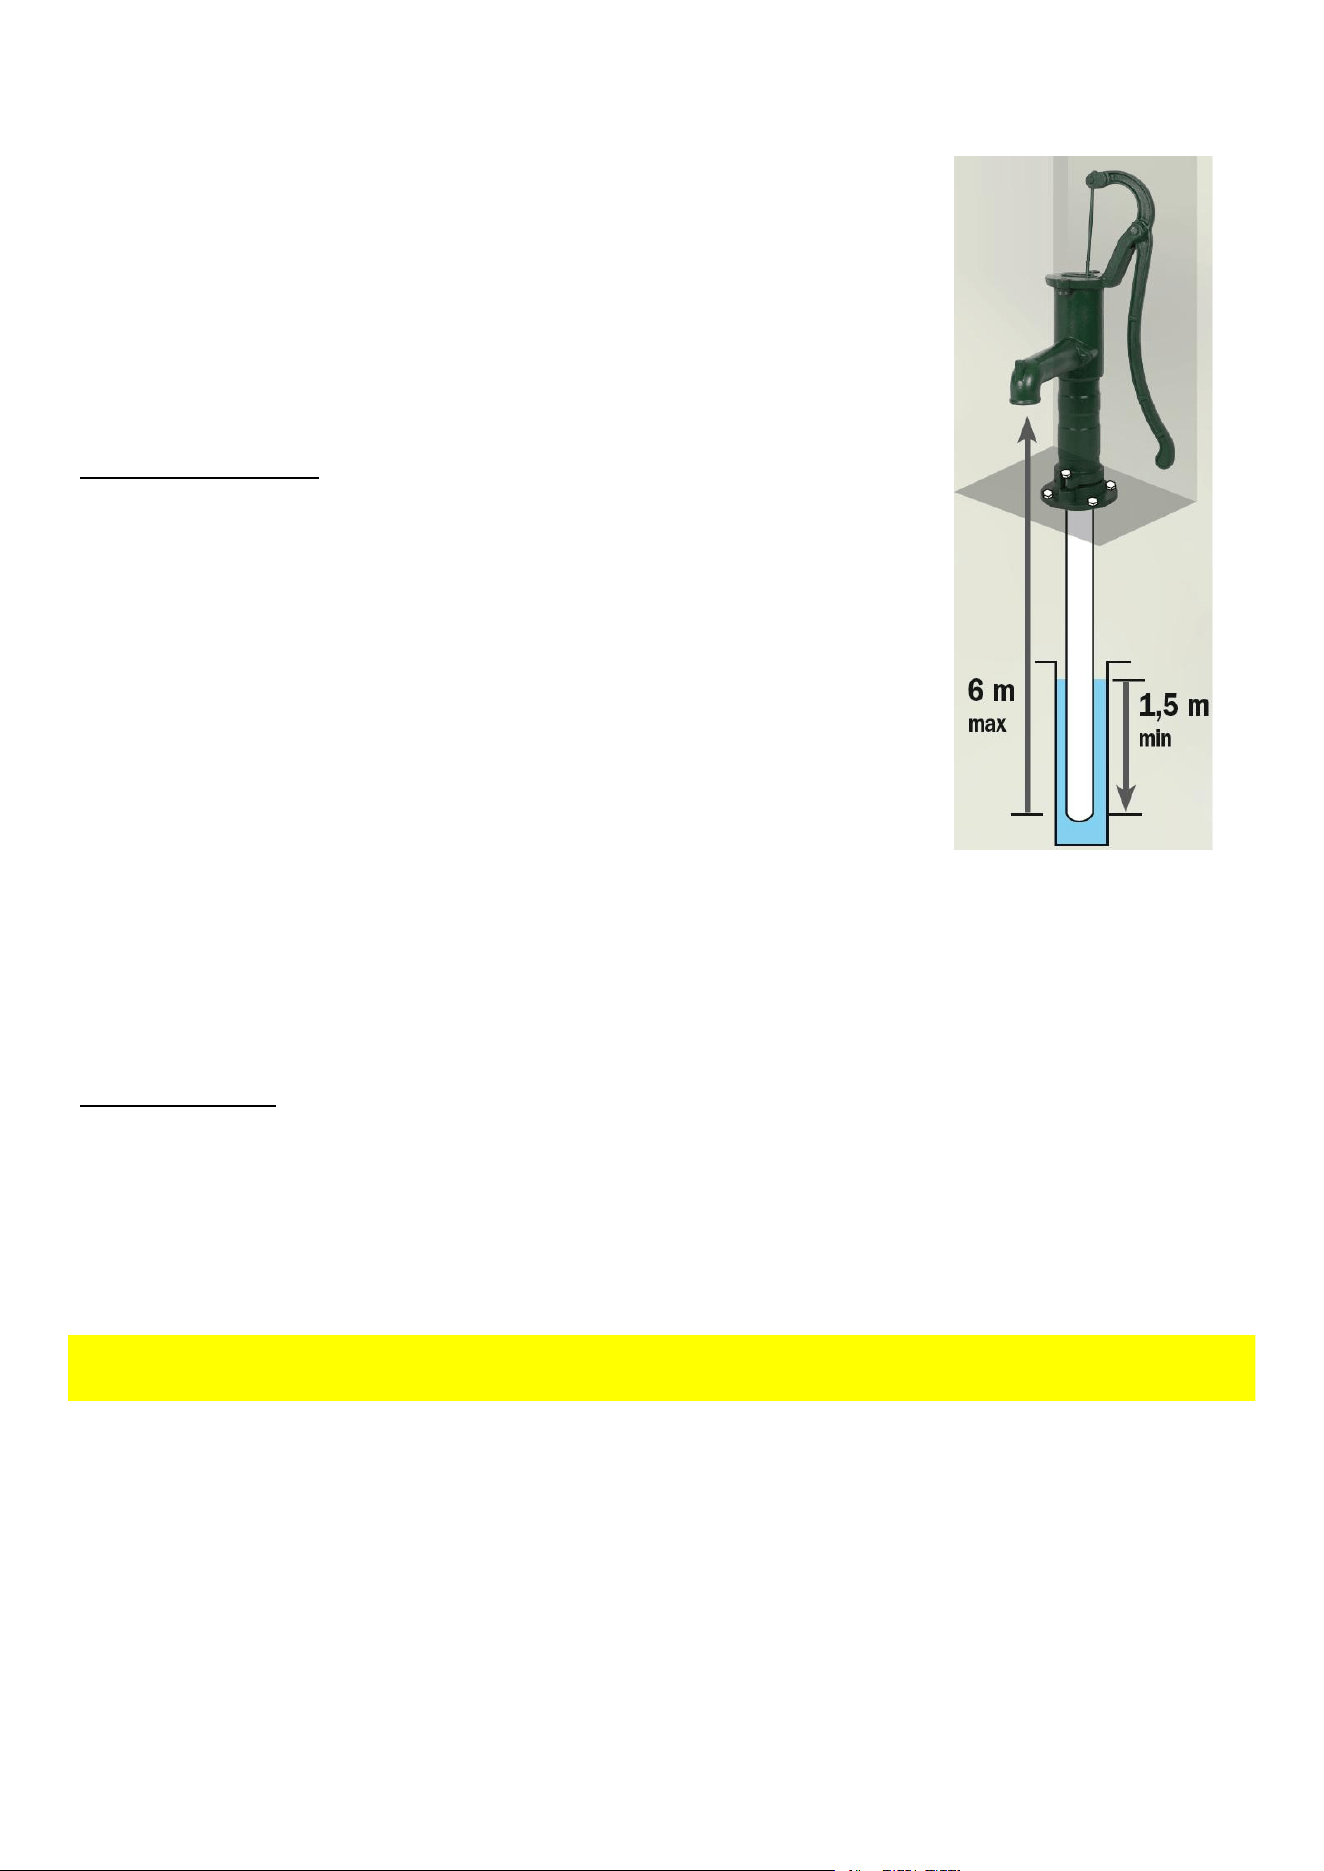
INSTALLATION DU TUBE D’ASPIRATION
Vous avez besoin d’un tuyau en acier fileté 1¼“ ou d’un tuyau PVC avec un
adaptateur extérieur fileté 1¼“.
• Vissez un tube d’aspiration sur la partie inférieure de la pompe (le tube
d’aspiration doit être exactement de la même taille que le branchement de la
pompe). Le tube d’aspiration doit être plongé dans l’eau à une profondeur de
1,5m minimum.
• Vissez fermement le tube d’aspiration afin d’éviter une fuite.
ATTENTION: même une toute petite fuite peut entraver un pompage normal.
Étanchéité des tuyaux:
• Utilisez une bande pour l’étanchéité du filetage ou un produit d’étanchéité
pour filetage de bonne qualité sur tous les filetages des tuyaux.
ATTENTION: n’utilisez aucune bande d’étanchéité pour filetage sur les tuyaux
PVC.
• Pour lier le tuyau en acier au branchement métallique de la pompe, utilisez
uniquement une bande d’étanchéité pour filetage ou un produit d’étanchéité
au téflon pour filetage.
• Assurez-vous que toutes les liaisons du tube d’aspiration soient étanches à
l’air et à l’eau.
• La pompe ne peut pas pomper l’eau du puits dans le cas où le tube
d’aspiration n’est pas étanche à l’air.
SUCTION PIPE INSTALLATION
You will need 1¼“ steel pipe with threads or 1¼“ PVC pipe with a 1¼“ male adapter.
• Screw a drop-pipe to the bottom of the pump (the drop-pipe should be the same size as the connection
on the pump). The drop-pipe should be submerged at least 1.5m.
• Tighten the drop-pipe enough to prevent leaks.
NOTE: Any small leaks will prevent the pump from priming.
Sealing pipe joints:
• Thread tape or a good quality thread sealant should be used on all pipe threads.
NOTE: Do not use thread tape with PVC pipe.
• Use only thread tape or Teflon-based joint compounds for making metal to metal connections on the
pump itself.
• Make sure that all pipe joints in the suction pipe are air tight as well as water tight.
• If the suction pipe can suck air, the pump will not be able to pull water from the well.
IT
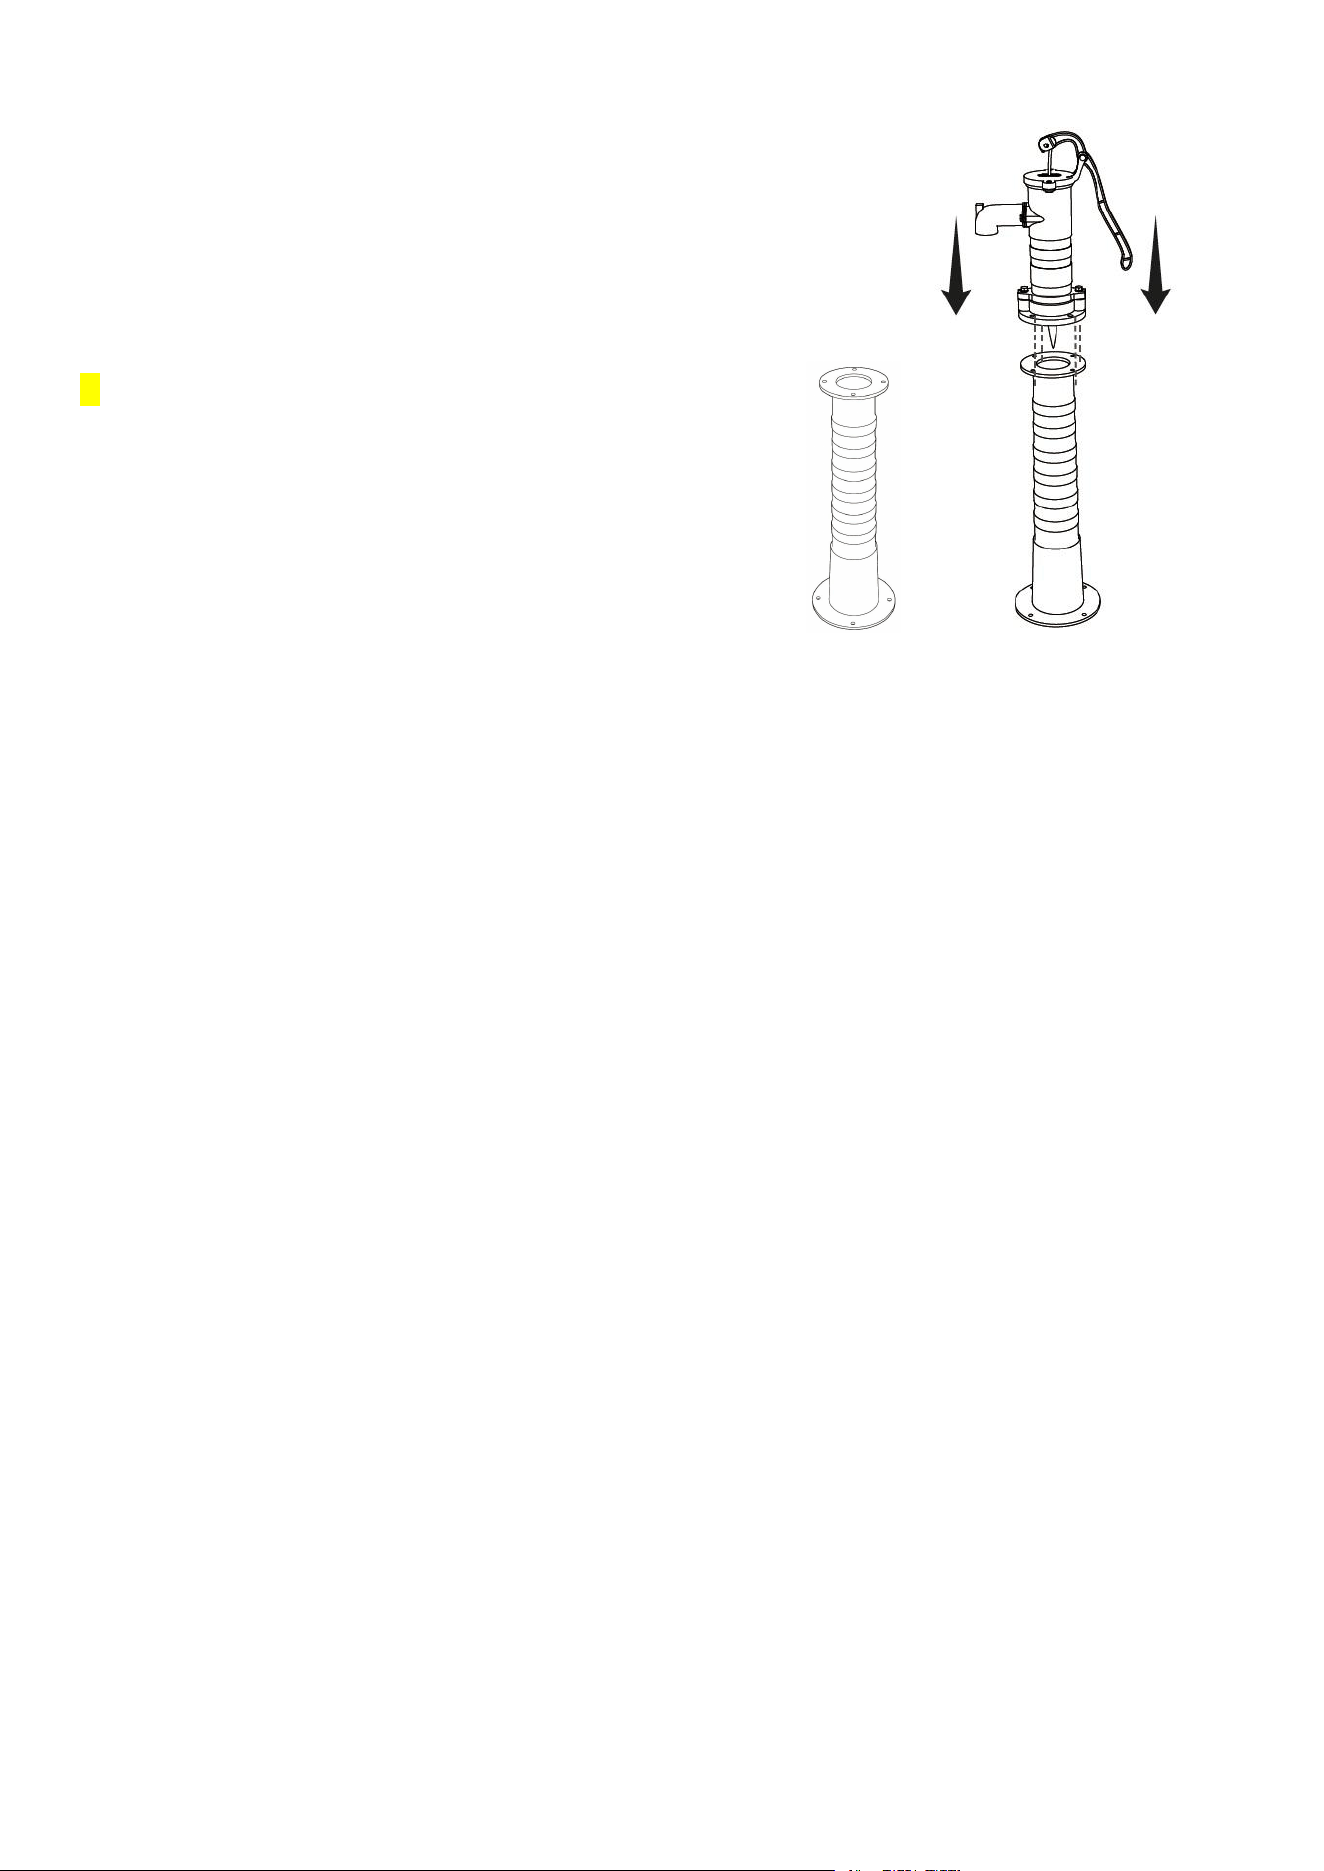
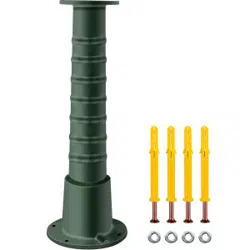
INSTALLATION SUR COLONNE SUPPORT
(colonne et visserie non-fournies)
Fixez la pompe sur la colonne support avec des vis M8 ou M10
PUMP ASSEMBLY ON STAND
(Stand and screws not provided)
Attach the pump to the pump stand with the M8 or M10 screws.
IT
Colonne Installation
Stand Assembly
Colonna Montaggio
Utilisation / Operation / Utilizzo
AVANT L’UTILISATION
N’utilisez pas la pompe à sec. Utilisez la pompe sans eau peut endommager
le joint en cuir.
Avant l’utilisation remplissez toujours la pompe avec de l’eau.
• Pour utiliser la pompe, verser de l’eau par le haut dans la pompe, jusqu’à
ce que de l’eau coule par le bec de sortie.
• Attendez 5 minutes jusqu’à ce que le joint en cuir gonfle suffisamment, de
manière à ce qu’il puisse entrer en contact avec la paroi intérieure de la
pompe.
• Lever et baisser le bras par petit coup, jusqu’à ce que le tube d’aspiration
soit rempli d’eau. (ATTENTION: même une toute petite fuite sur le tube
d’aspiration entravera le fonctionnement normal de la pompe).
UTILISATION
• Assurez-vous que le joint en cuir (9) ainsi que tous les joints ne sont pas endommagés.
• Assemblez de nouveau le corps de la pompe et assurez-vous que tous les boulons soient fermement
vissés, afin d‘éviter l‘entrée d‘air dans la base.
• Testez l’étanchéité des branchements. Vissez les attaches fermement et utilisez au besoin de la bande
d’étanchéité pour filetage. Remplacez le matériel de fixation défectueux.
• Assurez-vous que l’extrémité du tube d’aspiration est plongé dans l’eau.
• Utilisez, lors de la préparation, de l’eau claire en abondance pour faire l’amorçage. Le joint en cuir (9) va
gonfler une fois qu’il aura aspiré l’eau. Laissez le joint en cuir absorber l’eau pendant quelques heures puis
essayez de nouveau.
• Assurez-vous de ne pas pomper de l’eau se trouvant à plus 6m de profondeur (le niveau mesurée est de
la surface de l’eau jusqu’à la sortie).
• La profondeur d’eau à pomper sera réduite sur les plateaux. Au niveau de la mer et dans des conditions
idéales on pourra pomper une eau ayant une profondeur maximale d’à peu près 6m.
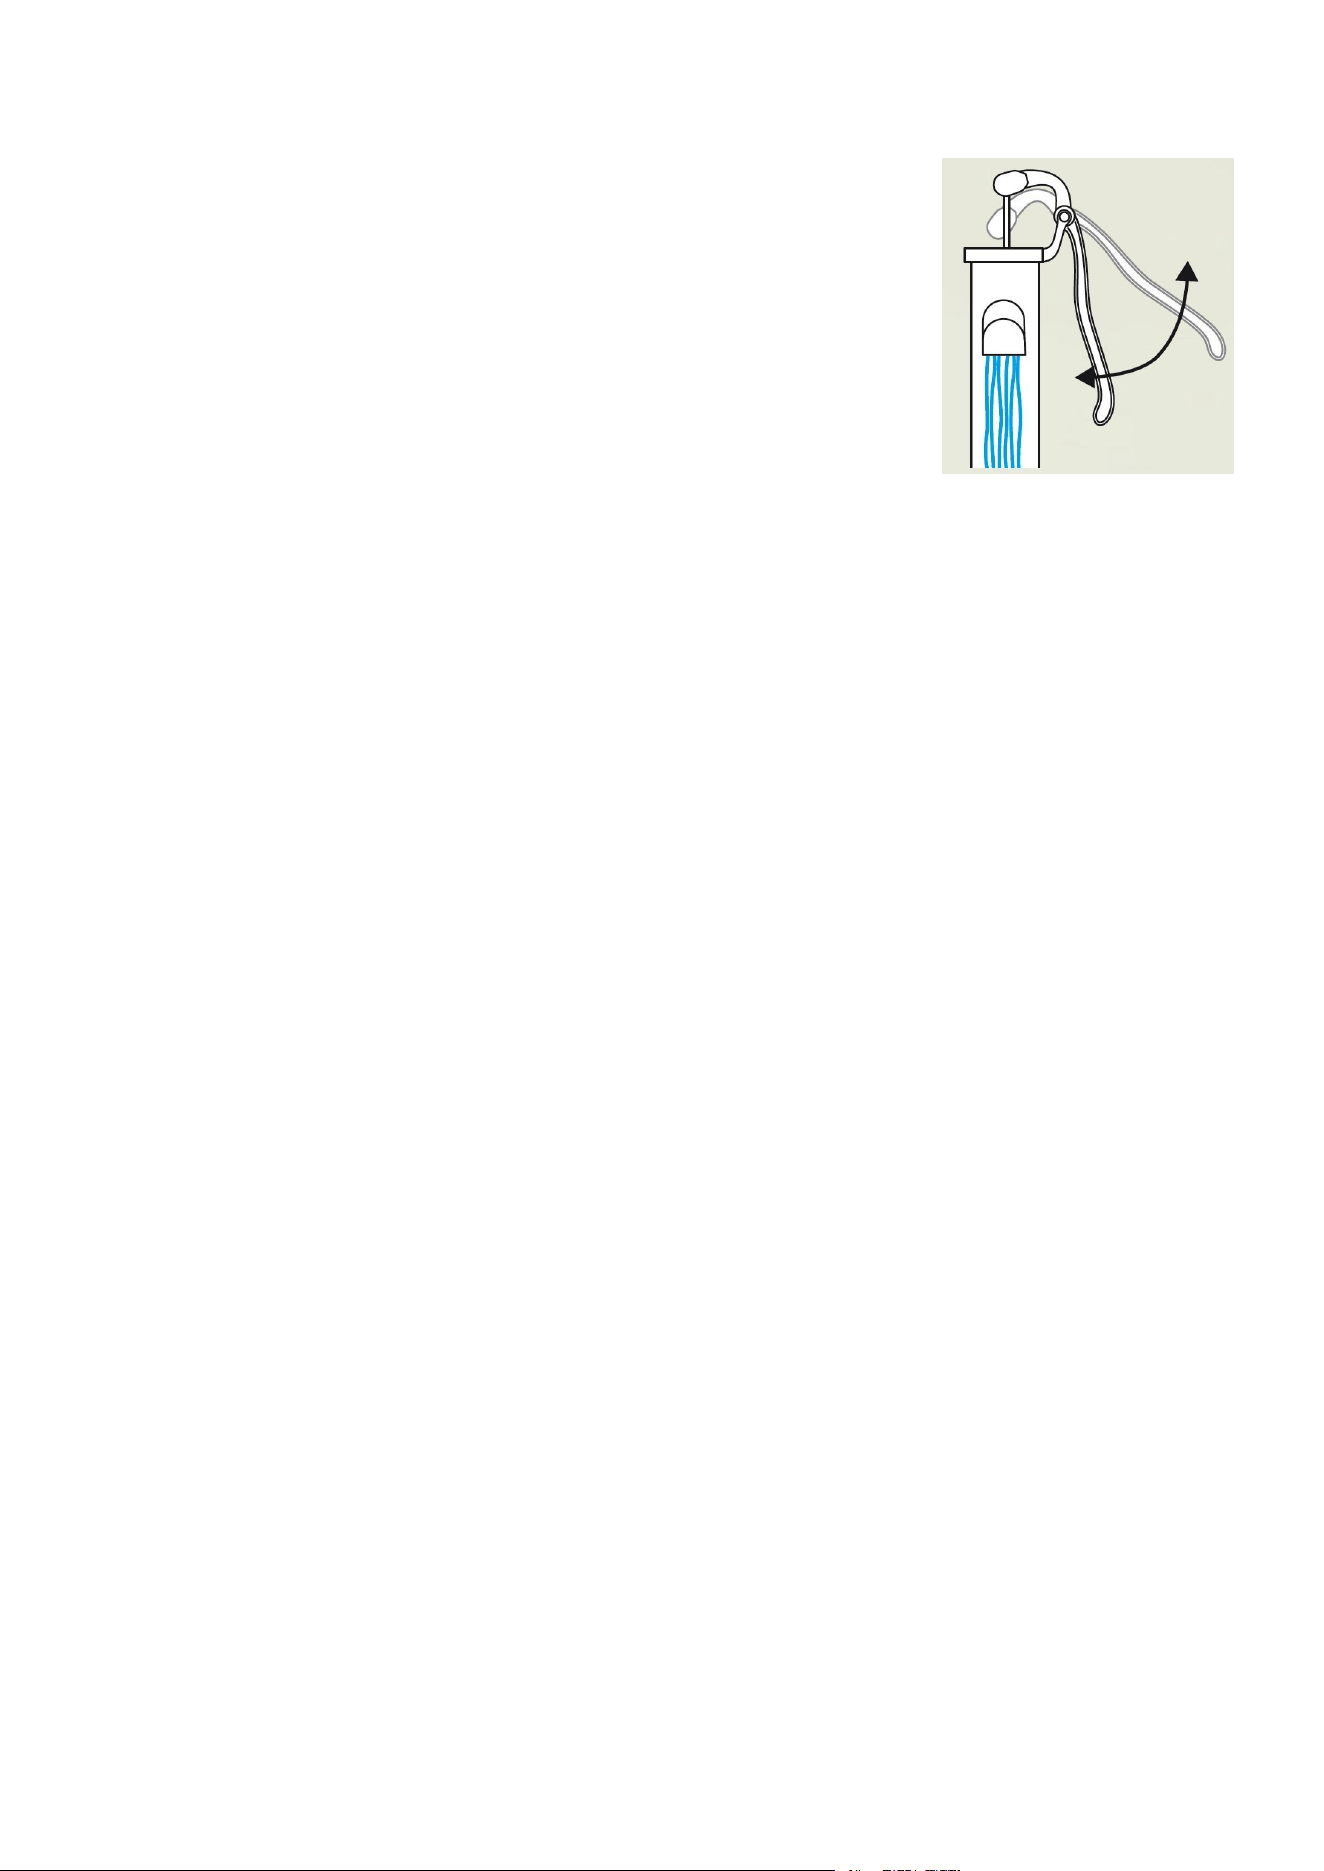
PROTECTION ANTI-GEL
Le joint du clapet aiguille (19) et le joint en cuir (9) situés sur le corps de la pompe peuvent geler lorsque la
température descend en-dessous de zéro. Ces deux pièces peuvent, dans de telles conditions, se fissurer et
ne plus fonctionner lorsque vous amorcez le pompage.
• Vous pouvez protéger la pompe contre le gel en tirant le bras vers le haut et en le maintenant dans une
position verticale, en effet la pompe laisse ainsi l’eau s’écouler.
PRIMING THE PUMP
Never operate the pump while it is dry. Operating the pump without water may cause damage to the
leather cup. Always fill the pump with water before starting the pump.
• To prime the pump, pour water in the top of the pitcher pump until it runs out of the spout.
• Wait 5 minutes until the cup leather swells enough to make contact with the pump wall.
• Raise and lower the handle in short strokes until the suction pipe fills with water. (NOTE: Any leak on the
suction side will prevent the pump from priming.)
USAGE
• Check for leaks around the joints. Tighten clamps or add thread tape as needed. Replace defective
fasteners.
• Make sure the pipe end is submersed in the water.
• Use plenty of clean water when priming. The cup leather (9) will expand as it absorbs water.
Let the cup leather absorb water for a few hours and try again.
• Make sure you are not trying to lift water more than 6m (measured from the water surface to the spout).
• At higher elevations, the depth of the water to be pumped is being reduced. At sea level and under ideal

conditions, this pump will lift to a maximum of about 6m.
FREEZING PROTECTION
In freezing weather, the plug valve gasket (19) and the cup leather (9) may freeze to the pump body. If you
start pumping, these two pieces may tear, making the pump inoperable.
• You can protect the pump against freezing by keeping the handle in the ’up’ position, since in this case,
the pitcher pump will self-drain
IT
ENTRETIEN
REMPLACEMENT DU JOINT EN CUIR
1. Dévissez le boulon de fixation situé sur le couvercle de la pompe (16) et soulevez toute la construction
du piston de la pompe.
2. Dévissez l’écrou du piston (7).
3. Retirez le joint en cuir (9) usagé et placez le nouveau joint en cuir.
4. Vissez de nouveau l’écrou du piston (7) dans sa position d’origine.
5. Assemblez de nouveau la construction du piston ainsi que le couvercle de la pompe (13).
6. Placez les boulons de fixation pour le couvercle de la pompe (16) et vissez-les fermement.
REMPLACEMENT DES JOINTS
1. Desserrez les boulons de fixation (10) et retirez le corps de la pompe (4) de la vasque (1).
2. Prenez le clapet aiguille inférieur (3). Puis retirez les joints usagés pour clapet aiguille inférieur (19) et
placez le nouveau joint.
3. Retirez les joints usagés (2) de la vasque (1) et placez les nouveaux joints sur la vasque.
ATTENTION: avant de positionner les nouveaux joints sur la vasque (1), retirez tout d’abord les saletés
restantes.
4. Positionnez de nouveau le clapet aiguille inférieur (3) dans son emplacement d’origine.
5. Placez le corps de la pompe (4) de nouveau dans la vasque (1) tout en vissant fermement les boulons de
fixation (10).
MAINTENANCE
REPLACING THE CUP LEATHER
1. Loosen the fastening bolt for top cap (16) and lift the plunger assembly out of the pump.
2. Unscrew the cup leather holder (7).
3. Remove the old cup leather (9) and put on a new cup leather.
4. Screw the cup leather holder (7) back into the original position.
5. Reinstall the plunger assembly and top cap (13).
6. Insert the fastening bolt (16) and tighten.
REPLACING THE PLUG VALVE GASKET AND THE SEALING GASKET
1. Unscrew the fastening bolt (10) and remove the pump body (4) from the flange (1).
2. Take out of the plug valve (3), remove the old plug valve gasket (19) from the plug valve and then put
on new plug valve gasket.
3. Remove the old sealing gasket (2) from the flange (1) and put a new sealing gasket on the flange. NOTE:
Before placing the new sealing gasket on the flange (1), clean the flange by removing dirt/debris that
could be left over.
4. Place the plug valve (3) back into the original position.
5. Reattach the pump body (4) to the flange (1) by tightening the fastening bolt (10).
IT
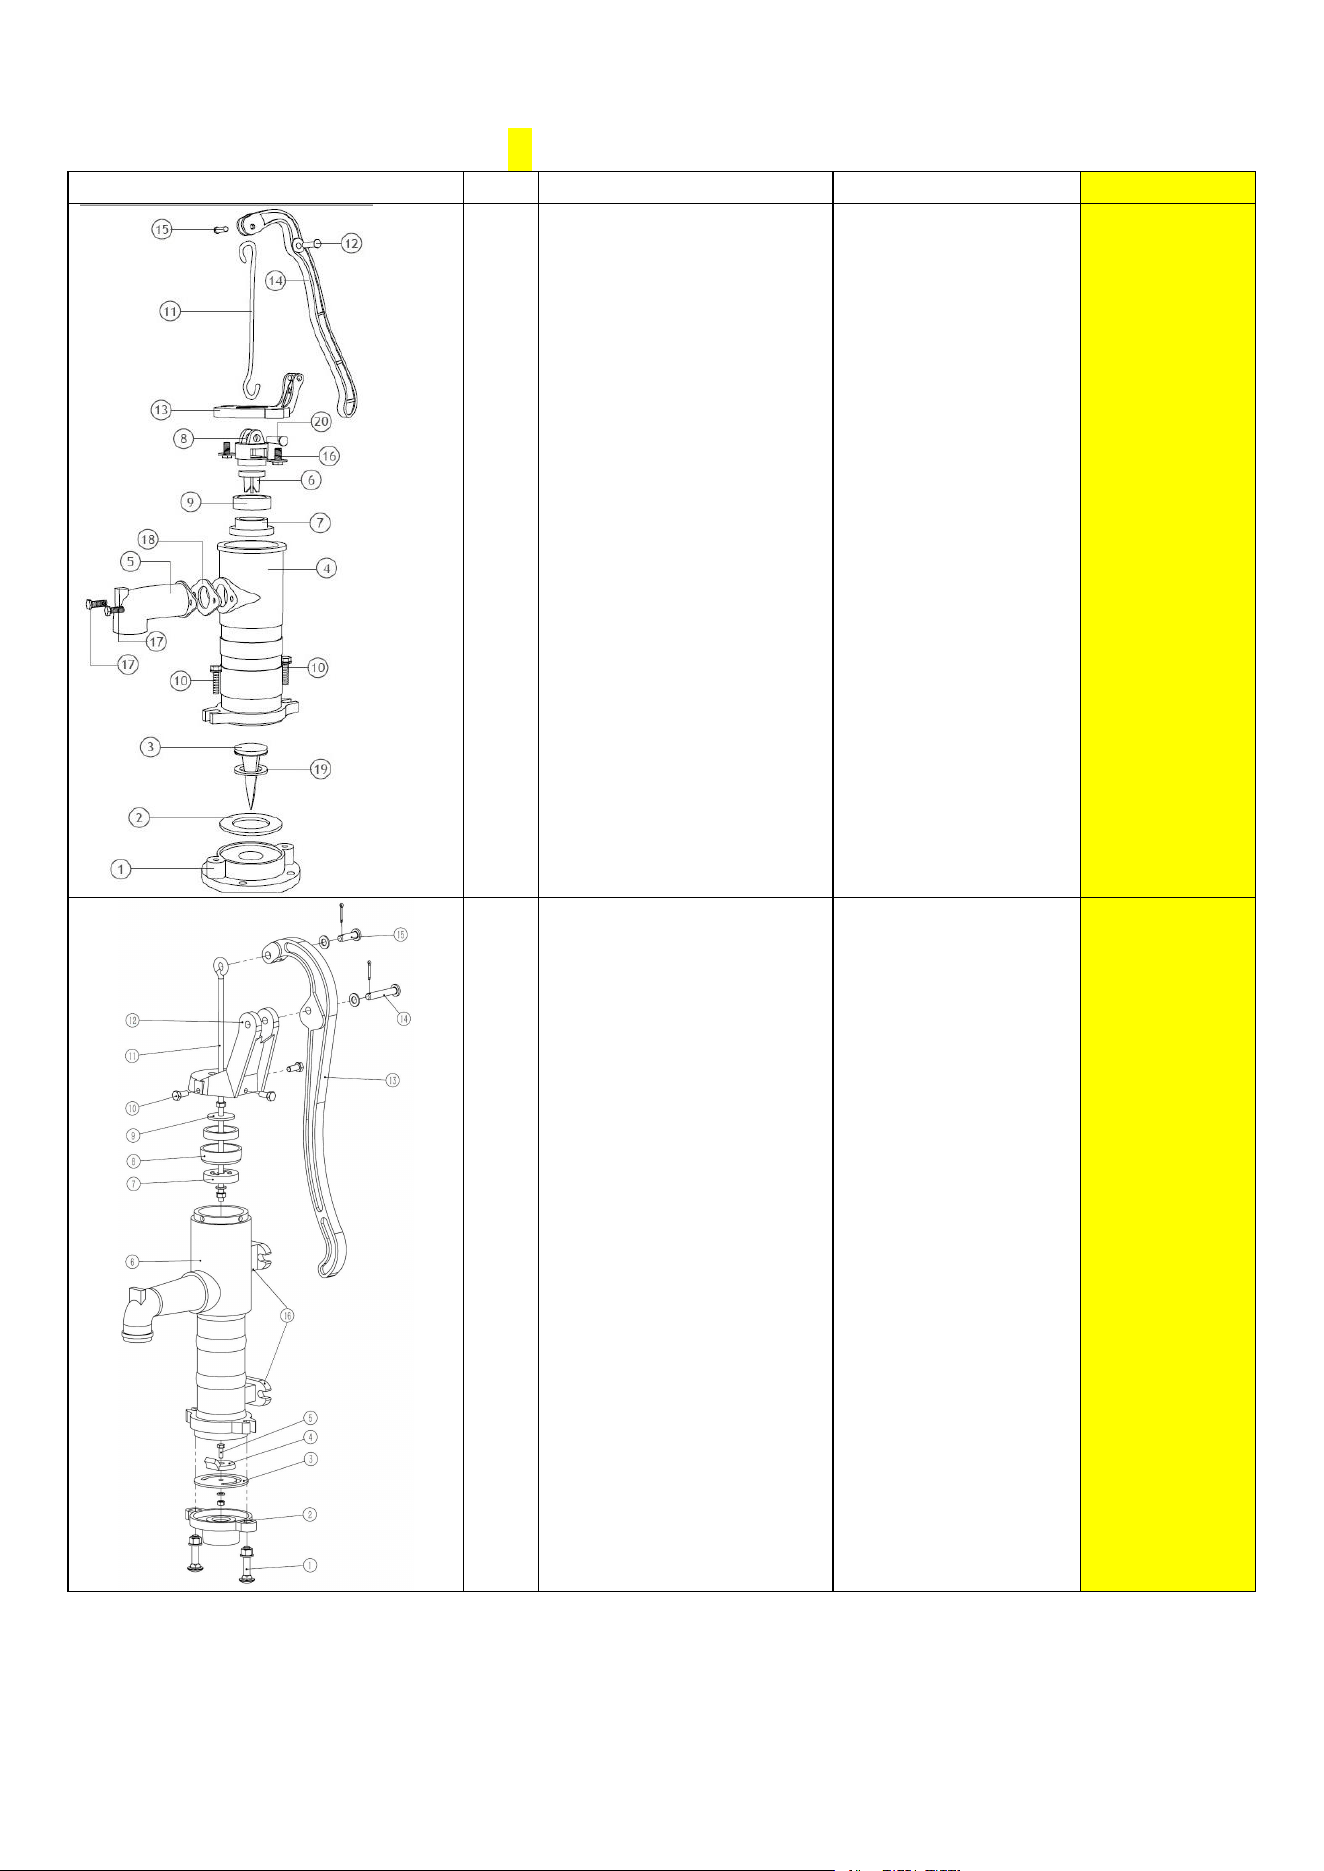
Vue éclatée / Exploded diagram / IT
Pos.
FR
EN
IT
1
2
3
4
5
6
7
8
9
10
11
12
13
14
15
16
17
18
19
20
Flasque
Joint
Clapet aiguille inferieure
Corps de pompe
Bec
Clapet aiguille superieure
Support joint cuir
Cage piston plongeur
Joint en cuir
Boulon de fixation
Bielle
Boulon long
Couvercle de pompe
Bras
Boulon court
Boulon de fixation
(couvercle)
Boulon de fixation (bec)
Joint (bec)
Joint (clapet aiguille
inferieure)
Boulon court (Cage piston
plongeur)
Flange
Sealing gasket
Plug valve
Pump body
Spout
Plunger valve
Cup leather holder
Plunger valve cage
Cup leather
Fastening bolt
Lift rod
Long pin
Top cap
Handle
Short pin
Fastening bolt (top
cap)
Fastening bolt (spout)
Spout gasket
Plug valve gasket
Short pin (plunger
valve cage)
1
2
3
4
5
6
7
8
9
10
11
12
13
14
15
16
Boulon de fixation
Flasque
Joint
Clapet
Boulon de fixation
Corps de pompe
Support joint cuir
Joint en cuir
Caoutchouc
Boulon de fixation
Bielle
Couvercle de pompe
Bras
Boulon long
Boulon couort
Patte assemblage sur mur
Fastening bolt
Flange
Sealing gasket
Plug valve
Fastening bolt
Pump body
Cup leather holder
Cup leather
Rubber
Fastening bolt
Lift rod
Top cap
Handle
Long pin
Short pin
Wall mount brackets