
Technical Support and E-Warranty Certificate
www.vevor.com/support
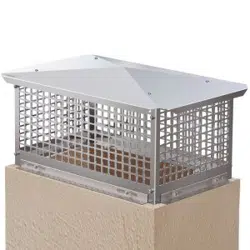
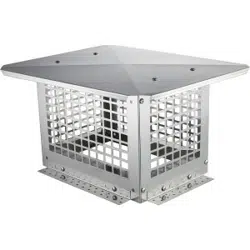
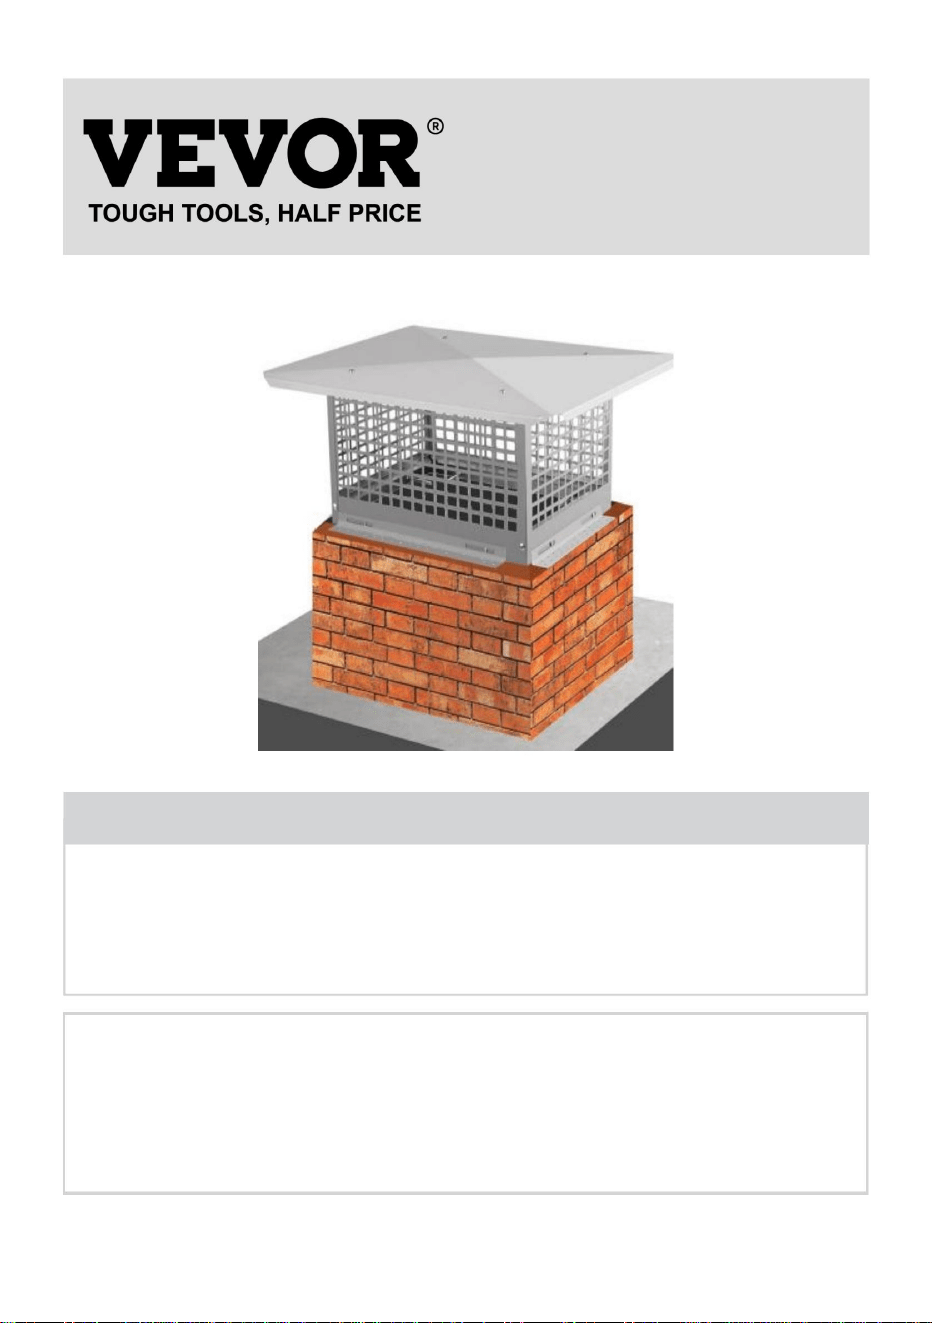
CHIMNEY CAP
USER MANUAL
We continue to be committed to provide you tools with competitive price.
"Save Half", "Half Price" or any other similar expressions used by us only represents an
estimate of savings you might benefit from buying certain tools with us compared to the major
top brands and does not necessarily mean to cover all categories of tools offered by us. You
are kindly reminded to verify carefully when you are placing an order with us if you are
actually saving half in comparison with the top major brands.

- 1 -
Have product questions? Need technical support? Please feel free to
contact us:
Technical Support and E-Warranty Certificate
www.vevor.com/support
NEED HELP? CONTACT US!
This is the original instruction, please read all manual instructions
carefully before operating. VEVOR reserves a clear interpretation of our
user manual. The appearance of the product shall be subject to the
product you received. Please forgive us that we won't inform you again if
there are any technology or software updates on our product.
CHIMNEY CAP
User Manual
Model: SSRC-9*13
- 2 -
Safety & Warning
Read and understand this entire manual before assembling, installing,
operating, or servicing this product. Failure to follow these warnings and
instructions can cause death, personal injury or damage valuable
property.
Wear ANSI-approved safety goggles, heavy-duty work gloves and safety
shoes during assembly and installation of this product. Keep bystanders
out of the area during assembly.
Do not assemble when tired or under the influence of alcohol, drugs or
medication.
Use as intended only. TO PREVENT SERIOUS INJURY AND DEATH
FROM TIPPING: DO NOT SIT, STAND OR CLIMB ON THIS ITEM.
This product is not a toy. Do not allow children to play with or near
this item.
Before use, inspect the general condition of the product. Check for:
broken, cracked, or bent parts, loose or missing parts, and any condition
that may affect the proper function of the product.
Ensure only genuine parts are used for replacement and repair.
SAVE THESE INSTRUCTIONS
Specifications
Model Series
SSRC-9*13
Chimney Size
for Horizontal
Installation
Length of the Long External Side: 12.80-13.19
inch/325-335 mm
Length of the Short External Side: 8.66-9.06
inch/220-230 mm
Chimney Size
for Vertical
Installation
Length of the Long Inner Side: ≤13.19 inch/≤335 mm
Length of the Short Inner Side: ≤9.06 inch/≤230 mm
Length of the Long External Side: ≥15.94 inch/≥405 mm
Length of the Short External Side: ≥11.73 inch/≥298 mm
Net Weight
(kg)
2.3

- 3 -
Gross Weight
(kg)
3.0
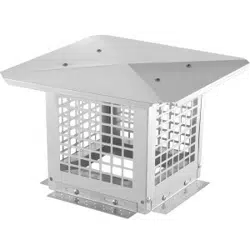
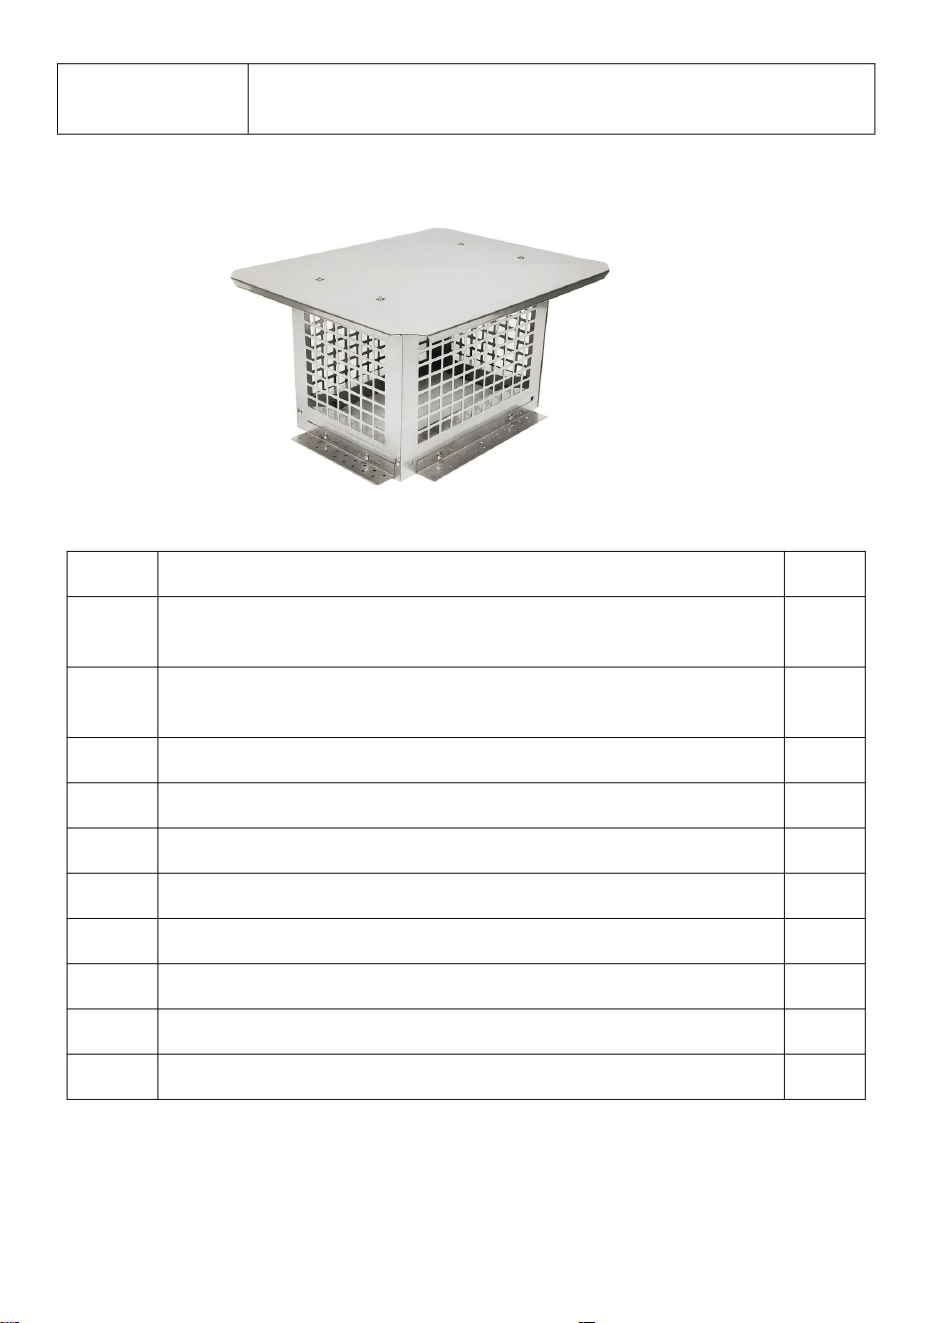
Figure of the Product
Figure 1
Part
Description
Qty
1
Screw M5*10 (12 PCS Needed for Horizontal
Installation or 20 PCS Needed for Vertical Installation.)
24
2
Nut M5 (12 PCS Needed for Horizontal Installation or 20
PCS Needed for Vertical Installation.)
24
3
Expansion Sleeve (8 PCS Needed for Installation)
10
4
Expansion Screw (8 PCS Needed for Installation)
10
5
Bottom Bracket A
2
6
Bottom Bracket B
2
7
Upper Cover
1
8
Grid Piece A
2
9
Grid Piece B
2
10
User Manual
1
Instructions
A.Check whether the product parts and accessories are complete.

- 4 -
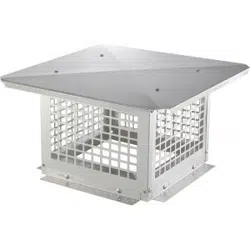
Figure 2
B.Fix the 4 grid pieces with screw M5*10 and nut M5.
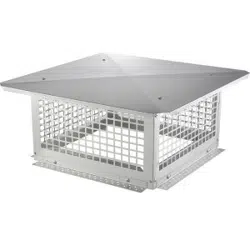
Figure 3
C.Assemble the upper cover to the 4 grid pieces with screw M5*10 and nut
M5.
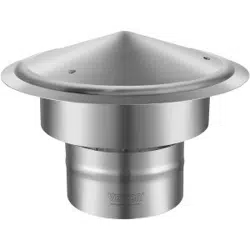
Figure 4
Two optional installation methods D (Horizontal installation) or E (Vertical
installation).
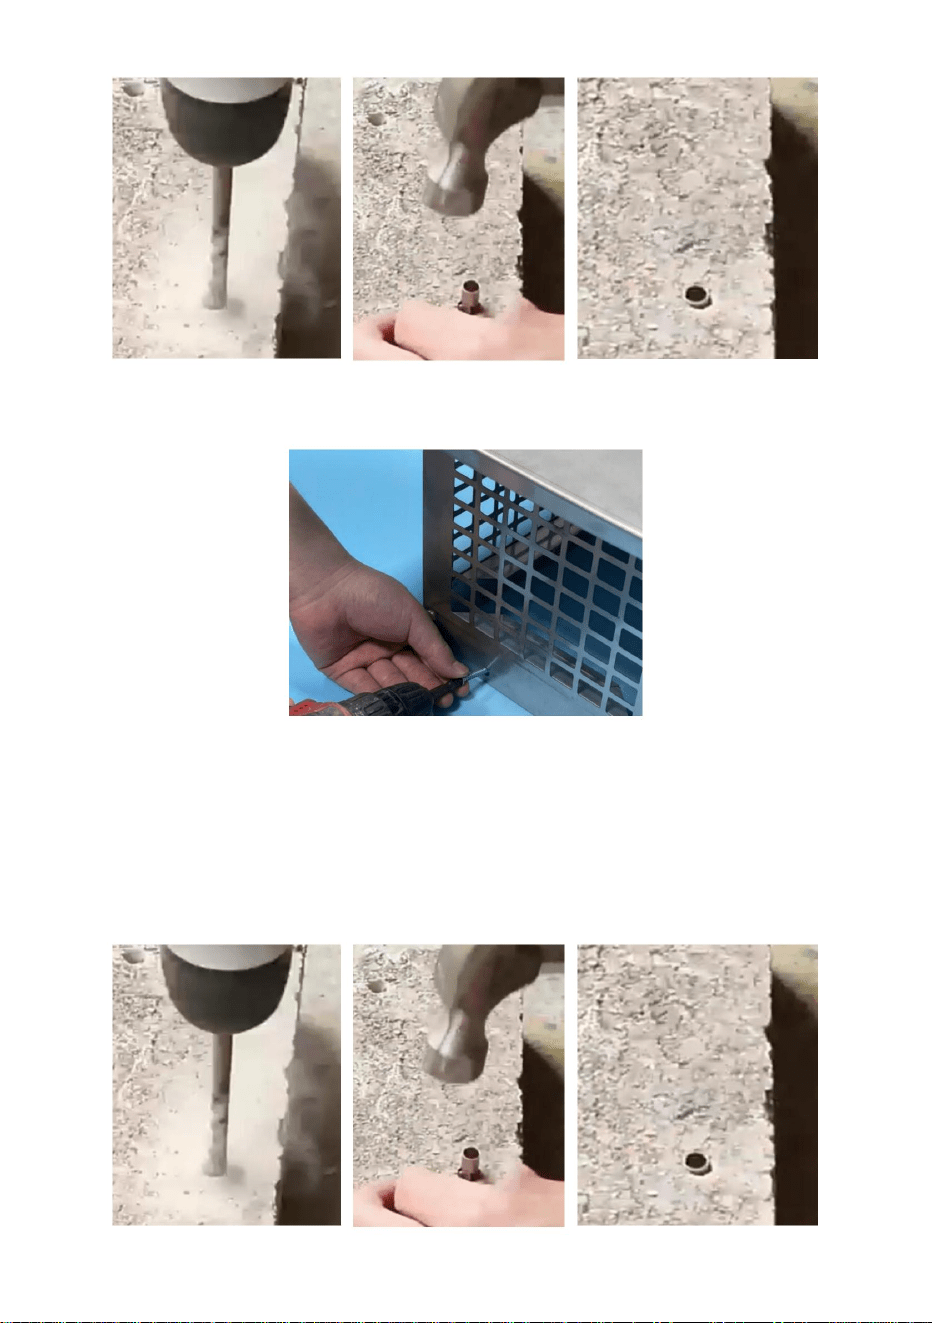
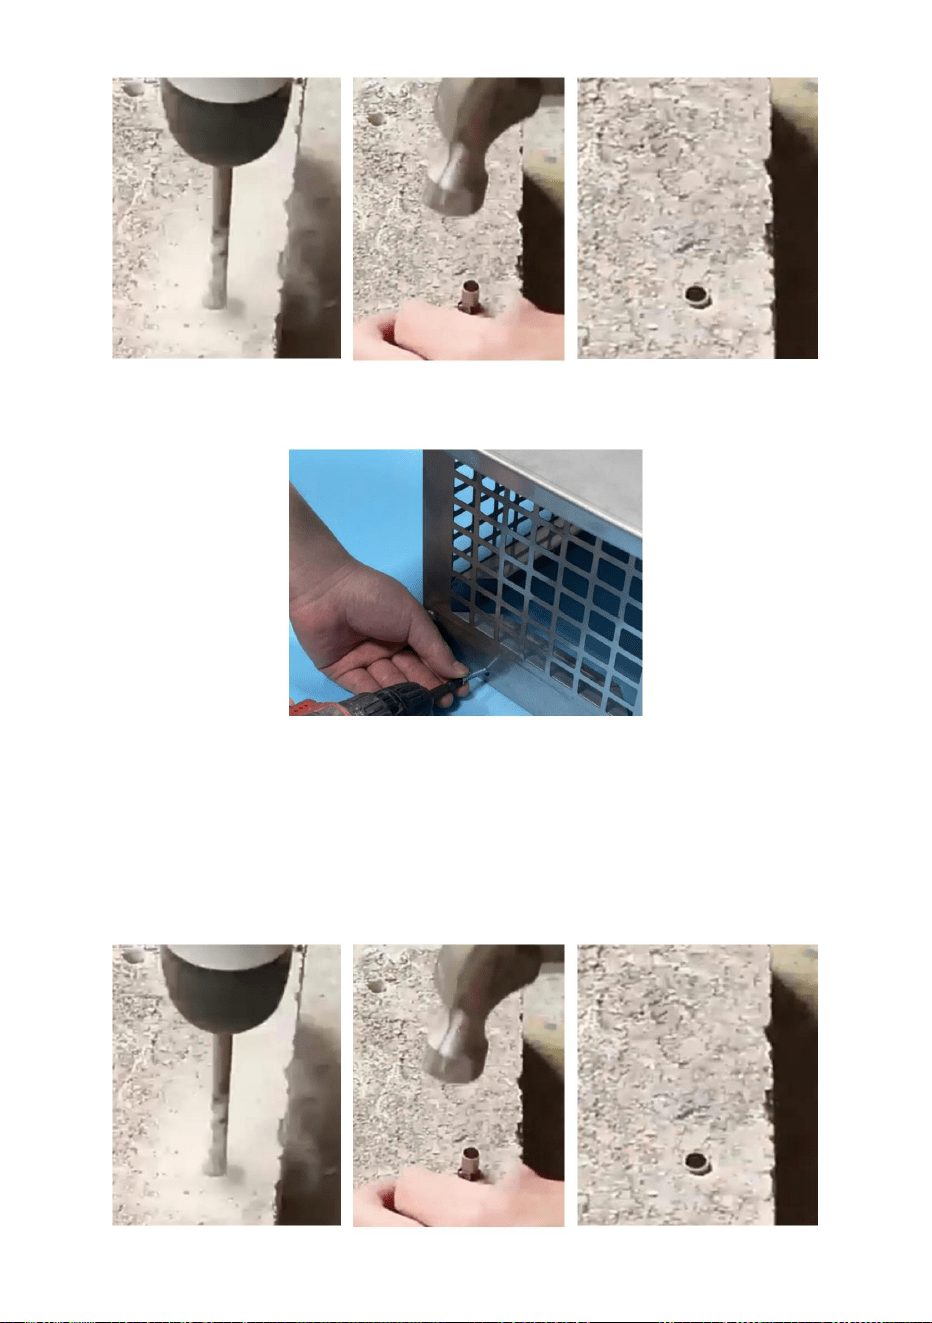
D.For horizontal installation, drill 8 Φ8*40 holes on the chimney in
horizontal direction, use a hammer to press 8 expansion sleeves into these
8 holes, and then firmly install the chimney cap to the chimney with 8
expansion screws.

- 5 -
Figure 5
Figure 6
E.For vertical installation, mount the 4 bottom brackets to the 4 grid pieces
with screw M5*10 and nut M5, drill 8 Φ8*40 holes on the chimney in
vertical direction, use a hammer to press 8 expansion sleeves into these 8
holes, and then firmly install the chimney cap to the chimney with 8
expansion screws.

- 6 -
Figure 7
Figure 8
Manufacturer: Shanghaimuxinmuyeyouxiangongsi
Address: Shuangchenglu 803nong11hao1602A-1609shi, baoshanqu,
shanghai 200000 CN.
Imported to AUS: SIHAO PTY LTD. 1 ROKEVA STREETEASTWOOD
NSW 2122 Australia
Imported to USA: Sanven Technology Ltd. Suite 250, 9166 Anaheim
Place, Rancho Cucamonga, CA 91730
REP
UK
YH CONSULTING LIMITED. C/O YH Consulting
Limited Office 147, Centurion House, London
Road, Staines-upon-Thames, Surrey, TW18 4AX
REP
EC
E-CrossStu GmbH
Mainzer Landstr.69,
60329 Frankfurt am Main.


MANUELD'UTILISATION
CHAPEAUDECHEMINÉE
Assistancetechniqueetcertificatdegarantie
électroniquewww.vevor.com/support
«Économisezlamoitié»,«Moitiéprix»outouteautreexpressionsimilaireutiliséeparnousnereprésente
qu'uneestimationdeséconomiesquevouspourriezréaliserenachetantcertainsoutilscheznousparrapport
auxgrandesmarquesetnecouvrepasnécessairementtouteslescatégoriesd'outilsquenousproposons.
Nousvousrappelonsdebienvouloirvérifiersoigneusementlorsquevouspassezunecommandechez
noussivouséconomisezréellementlamoitiéparrapportauxgrandesmarques.
Nouscontinuonsànousengageràvousfournirdesoutilsàdesprixcompétitifs.
Machine Translated by Google
BESOIND'AIDE?CONTACTEZNOUS!
Assistancetechniqueetcertificatdegarantie
électroniquewww.vevor.com/support
Vousavezdesquestionssurnosproduits?Vousavezbesoind'assistancetechnique?N'hésitezpasà
nouscontacter:
Modèle:SSRC9*13
Ils'agitdelanoticed'utilisationd'origine.Veuillezlireattentivementtouteslesinstructionsdu
manuelavantdel'utiliser.VEVORseréserveledroitd'interpréterclairementnotremanueld'utilisation.
L'apparenceduproduitdépendduproduitquevousavezreçu.Veuilleznousexcuser,nousne
vousinformeronsplusencasdemiseàjourtechnologiqueoulogicielledenotreproduit.
Manueld'utilisation
CHAPEAUDECHEMINÉE
1
Machine Translated by Google

cetarticle.
d'utiliseroud'entretenirceproduit.Lenonrespectdecesavertissementset
pouces/325335mm
Longueurducôtéextérieurcourt:≥11,73pouces/≥298mm
propriété.
pourvertical
piècescassées,fissuréesoupliées,piècesdesserréesoumanquantesettoutecondition
pouce/220230mm
chaussurespendantlemontageetl'installationdeceproduit.Tenezlesspectateursàl'écart
CONSERVEZCESINSTRUCTIONS
pourHorizontal
Poidsnet
Lisezetcomprenezl'intégralitédecemanuelavantd'assembler,d'installer,
CONTRELEBASCULEMENT:NEVOUSASSISEZPAS,NEVOUSTENEZPASDEBOUTETNE
MONTEZPASSURCETARTICLE.Ceproduitn'estpasunjouet.Nelaissezpaslesenfantsjoueravecouàproximité
Longueurducôtélongexterne:12,8013,19
médicament.
Sériedemodèles
Longueurducôtéintérieurlong:≤13,19pouces/≤335mm
2.3
Longueurducôtécourtexterne:8,669,06
instructionspeuvententraînerlamort,desblessurescorporellesoudesdommagesprécieux
Avantutilisation,inspectezl'étatgénéralduproduit.Vérifiez:
Longueurducôtéextérieurlong:≥15,94pouces/≥405mm
Tailledelacheminée
PortezdeslunettesdesécuritéhomologuéesANSI,desgantsdetravailrobustesetdesvêtementsdesécurité.
celapeutaffecterlebonfonctionnementduproduit.Assurez
vousqueseulesdespiècesd'originesontutiliséespourleremplacementetlaréparation.
Tailledelacheminée
Installation
Installation
horsdelazonependantlemontage.Ne
pasmontersivousêtesfatiguéousousl'influencedel'alcool,dedroguesou
(kg)
SSRC9*13
Longueurducôtéintérieurcourt:≤9,06pouces/≤230mm
Utiliseruniquementcommeprévu.POURÉVITERLESBLESSURESGRAVESETLAMORT
Caractéristiques
Sécuritéetavertissement
2
Machine Translated by Google
Instructions
Figureduproduit
PCSnécessairespouruneinstallationverticale.)
Manueld'utilisation
Quantité
3.0
7
2
Figure1
1
1
9
A.Vérifiezsilespiècesetaccessoiresduproduitsontcomplets.
Description
VisM5*10(12piècesnécessairespourl'horizontale)
24
10
BoîtierdepédalierA
(kg)
Manchond'extension(8piècesnécessairespourl'installation)
6
ÉcrouM5(12piècesnécessairespouruneinstallationhorizontaleou20
4
2
Couverturesupérieure
8
24
2
1
PièceBdelagrille
Partie
2
10
Visd'expansion(8piècesnécessairespourl'installation)
3
(Installationou20piècesnécessairespouruneinstallationverticale.)
10
BoîtierdepédalierB
PiècedegrilleA
5
2
Poidsbrut
3
Machine Translated by Google

4
Figure3
D.Pouruneinstallationhorizontale,percez8trousΦ8*40surlacheminéedansle
senshorizontal,utilisezunmarteaupourenfoncer8manchonsd'expansiondansces8trous,
puisinstallezfermementlechapeaudecheminéesurlacheminéeavec8visd'expansion.
B.Fixezles4piècesdelagrilleaveclavisM5*10etl'écrouM5.
Figure2
Figure4
C.Assemblezlecouverclesupérieuraux4piècesdelagrilleaveclavisM5*10etl'écrouM5.
Deuxméthodesd'installationoptionnellesD(installationhorizontale)ouE(installation
verticale).
Machine Translated by Google
5
Figure5
Figure6
E.Pouruneinstallationverticale,montezles4supportsinférieurssurles4piècesde
grilleaveclavisM5*10etl'écrouM5,percez8trousΦ8*40surlacheminée
danslesensvertical,utilisezunmarteaupourenfoncer8manchonsd'expansiondans
ces8trous,puisinstallezfermementlechapeaudecheminéesurlacheminée
avec8visd'expansion.
Machine Translated by Google

REPRÉSENTANTDELACE
REPRÉSENTANTDUROYAUMEUNI
6
MainzerLandstr.69,
ECrossStuGmbH
YHCONSULTINGLIMITED.C/OYHConsulting
LimitedBureau147,CenturionHouse,London
Road,StainesuponThames,Surrey,TW184AX
60329FrancfortsurleMain.
Fabricant:ShanghaimuxinmuyeyouxiangongsiAdresse:
Shuangchenglu803nong11hao1602A1609shi,baoshanqu,shanghai200000CN.
Figure8
Figure7
ImportéauxÉtatsUnis:SanvenTechnologyLtd.Suite250,9166AnaheimPlace,
RanchoCucamonga,CA91730
ImportéenAustralie:SIHAOPTYLTD.1ROKEVASTREETEASTWOODNSW2122
Australie
Machine Translated by Google


BENUTZERHANDBUCH
Schornsteinabdeckung
Technischer Support und E-Garantie-Zertifikat
www.vevor.com/support
Wir sind weiterhin bestrebt, Ihnen Werkzeuge zu wettbewerbsfähigen Preisen anzubieten.
„Sparen Sie die Hälfte“, „Halber Preis“ oder andere ähnliche Ausdrücke, die wir verwenden, stellen nur eine
Schätzung der Ersparnis dar, die Sie beim Kauf bestimmter Werkzeuge bei uns im Vergleich zu den großen
Topmarken erzielen können, und decken nicht unbedingt alle von uns angebotenen Werkzeugkategorien ab. Wir
möchten Sie freundlich daran erinnern, bei Ihrer Bestellung bei uns sorgfältig zu prüfen, ob Sie im Vergleich
zu den großen Topmarken tatsächlich die Hälfte sparen.
Machine Translated by Google

Brauchen Sie Hilfe? Kontaktieren Sie uns!
Technischer Support und E-Garantie-Zertifikat
www.vevor.com/support
Dies ist die Originalanleitung. Bitte lesen Sie alle Anweisungen sorgfältig durch, bevor Sie
das Gerät in Betrieb nehmen. VEVOR behält sich eine klare Auslegung unserer Bedienungsanleitung
vor. Das Erscheinungsbild des Produkts richtet sich nach dem Produkt, das Sie erhalten
haben. Bitte verzeihen Sie uns, dass wir Sie nicht erneut informieren, wenn es Technologie- oder
Software-Updates für unser Produkt gibt.
Modell: SSRC-9*13
Sie haben Fragen zu unseren Produkten? Sie benötigen technischen Support? Dann kontaktieren
Sie uns gerne:
Bedienungsanleitung
Schornsteinabdeckung
- 1 -
Machine Translated by Google

dieser Artikel.
Betrieb oder Wartung dieses Produkts. Die Nichtbeachtung dieser Warnungen und
Zoll/325-335 mm
Länge der kurzen Außenseite: ÿ11,73 Zoll/ÿ298 mm
Eigentum.
für Vertikal
gebrochene, gerissene oder verbogene Teile, lose oder fehlende Teile und jeglicher Zustand
Zoll/220-230 mm
Schuhe während der Montage und Installation dieses Produkts. Halten Sie umstehende Personen
BEWAHREN SIE DIESE ANWEISUNGEN AUF
für Horizontal
Nettogewicht
ÿLesen Sie das gesamte Handbuch vor der Montage, Installation,
VOR DEM UNKIPPEN: SITZEN, STEHEN ODER STEIGEN SIE NICHT AUF DIESEM ARTIKEL.
ÿ Dieses Produkt ist kein Spielzeug. Erlauben Sie Kindern nicht, mit oder in der Nähe des Artikels zu spielen.
Länge der langen Außenseite: 12,80-13,19
Medikamente.
Modellreihe
Länge der langen Innenseite: ÿ13,19 Zoll/ÿ335 mm
2.3
Länge der kurzen Außenseite: 8,66-9,06
Anweisungen können zum Tod, zu Verletzungen oder zur Beschädigung wertvoller
ÿÜberprüfen Sie vor der Verwendung den allgemeinen Zustand des Produkts. Überprüfen Sie:
Länge der langen Außenseite: ÿ15,94 Zoll/ÿ405 mm
Schornsteingröße
ÿTragen Sie ANSI-zugelassene Schutzbrillen, strapazierfähige Arbeitshandschuhe und
die die ordnungsgemäße Funktion des Produkts beeinträchtigen
können. ÿStellen Sie sicher, dass für Austausch und Reparatur nur Originalteile verwendet werden.
Schornsteingröße
Installation
Installation
außerhalb des Bereichs während der
Montage. ÿMontieren Sie nicht, wenn Sie müde sind oder unter dem Einfluss von Alkohol, Drogen oder
(kg)
SSRC-9*13
Länge der kurzen Innenseite: ÿ9,06 Zoll/ÿ230 mm
ÿNur bestimmungsgemäß verwenden. UM SCHWERE VERLETZUNGEN UND TOD ZU VERMEIDEN
Technische Daten
Sicherheit und Warnung
- 2 -
Machine Translated by Google

Anweisungen
Abbildung des Produkts
Menge
3.0
7
2
Bedienungsanleitung
Abbildung 1
1
1
9
A. Überprüfen Sie, ob die Produktteile und das Zubehör vollständig sind.
Beschreibung
Schraube M5*10 (12 Stück erforderlich für Horizontal
24
10
Tretlager A
2
Mutter M5 (12 Stück erforderlich für horizontale Installation oder 20
4
Obere Abdeckung
(kg)
Dehnungshülse (8 Stück für die Installation erforderlich)
6
1
Gitterstück B
8
24
2
Teil
2
10
Dehnschraube (8 Stück für die Montage erforderlich)
3
Installation oder 20 Stück für vertikale Installation erforderlich.)
10
Tretlager B
Bruttogewicht
PCS für vertikale Installation erforderlich.)
Gitterstück A
5
2
- 3 -
Machine Translated by Google

- 4 -
Abbildung 3
D. Für eine horizontale Installation bohren Sie 8 Löcher mit den Abmessungen ÿ8*40 in
horizontaler Richtung in den Schornstein, drücken Sie mit einem Hammer 8 Spreizhülsen in diese 8 Löcher
und befestigen Sie die Schornsteinkappe anschließend mit 8 Spreizschrauben fest am Schornstein.
B. Befestigen Sie die 4 Gitterstücke mit Schraube M5*10 und Mutter M5.
Abbildung 2
Abbildung 4
C. Montieren Sie die obere Abdeckung mit Schraube M5*10 und Mutter M5 an den 4 Gitterteilen.
Zwei optionale Installationsmethoden D (horizontale Installation) oder E (vertikale Installation).
Machine Translated by Google

Abbildung
6 E. Für eine vertikale Installation montieren Sie die 4 unteren Halterungen mit Schrauben M5*10 und Muttern
M5 an den 4 Gitterstücken, bohren Sie 8 Löcher ÿ8*40 in vertikaler Richtung in den Schornstein,
drücken Sie mit einem Hammer 8 Spreizhülsen in diese 8 Löcher und montieren Sie dann die Schornsteinkappe
mit 8 Spreizschrauben fest am Schornstein.
Abbildung 5
- 5 -
Machine Translated by Google

Mainzer Landstr.69,
E-CrossStu GmbH
YH CONSULTING LIMITED. C/O YH Consulting
Limited Office 147, Centurion House, London
Road, Staines-upon-Thames, Surrey, TW18 4AX
60329 Frankfurt am Main.
- 6 -
Vertreter der EG
UK REP
Hersteller: Shanghaimuxinmuyeyouxiangongsi Adresse:
Shuangchenglu 803nong11hao1602A-1609shi, baoshanqu, Shanghai 200000 CN.
Abbildung 8
Abbildung 7
Importiert in die USA: Sanven Technology Ltd. Suite 250, 9166 Anaheim Place,
Rancho Cucamonga, CA 91730
Nach AUS importiert: SIHAO PTY LTD. 1 ROKEVA STREETEASTWOOD NSW 2122
Australien
Machine Translated by Google


"Risparmia la metà", "Metà prezzo" o qualsiasi altra espressione simile da noi utilizzata rappresenta
solo una stima del risparmio che potresti ottenere acquistando determinati utensili con noi rispetto ai
principali marchi principali e non significa necessariamente coprire tutte le categorie di utensili da noi
offerti. Ti ricordiamo gentilmente di verificare attentamente quando effettui un ordine con noi se
stai effettivamente risparmiando la metà rispetto ai principali marchi principali.
Continuiamo a impegnarci per fornirvi strumenti a prezzi competitivi.
Supporto tecnico e certificato di garanzia
elettronica www.vevor.com/support
MANUALE D'USO
CAPPELLO DEL COMIGNOLO
Machine Translated by Google

Hai domande sui prodotti? Hai bisogno di supporto tecnico? Non esitare a contattarci:
Modello: SSRC-9*13
Questa è l'istruzione originale, si prega di leggere attentamente tutte le istruzioni del
manuale prima di utilizzare. VEVOR si riserva una chiara interpretazione del nostro manuale
utente. L'aspetto del prodotto sarà soggetto al prodotto ricevuto. Vi preghiamo di
perdonarci se non vi informeremo di nuovo se ci sono aggiornamenti tecnologici o software sul
nostro prodotto.
HAI BISOGNO DI AIUTO? CONTATTACI!
Manuale d'uso
CAPPELLO DEL COMIGNOLO
- 1 -
Supporto tecnico e certificato di garanzia
elettronica www.vevor.com/support
Machine Translated by Google

fuori dall'area durante il montaggio. ÿNon
montare quando si è stanchi o sotto l'effetto di alcol, droghe o
parti rotte, incrinate o piegate, parti allentate o mancanti e qualsiasi condizione
proprietà.
pollici/220-230 mm
per verticale
(kg)
Lunghezza del lato esterno corto: ÿ11,73 pollici/ÿ298 mm
questo articolo.
funzionamento o la manutenzione di questo prodotto. La mancata osservanza di queste avvertenze e
pollici/325-335 mm
Lunghezza del lato interno lungo: ÿ13,19 pollici/ÿ335 mm
farmaco.
ÿLeggere e comprendere l'intero manuale prima di assemblare, installare,
DA RIBALTAMENTO: NON SEDERSI, STARE IN PIEDI O ARRAMPICARSI SU QUESTO
ARTICOLO. ÿQuesto prodotto non è un giocattolo. Non permettere ai bambini di giocare con o vicino
Serie di modelli
Lunghezza del lato esterno lungo: 12,80-13,19
2.3
Peso netto
scarpe durante il montaggio e l'installazione di questo prodotto. Tenere gli astanti
SALVA QUESTE ISTRUZIONI
per orizzontale
Dimensioni del camino
ÿIndossare occhiali di sicurezza approvati ANSI, guanti da lavoro resistenti e dispositivi di sicurezza
che potrebbero compromettere il corretto funzionamento del prodotto.
ÿAssicurarsi che per la sostituzione e la riparazione vengano utilizzati solo ricambi originali.
Installazione
Lunghezza del lato esterno lungo: ÿ15,94 pollici/ÿ405 mm
Lunghezza del lato esterno corto: 8,66-9,06
le istruzioni possono causare morte, lesioni personali o danni preziosi
ÿPrima dell'uso, ispezionare le condizioni generali del prodotto. Controllare:
Dimensioni del camino
ÿUtilizzare solo come previsto. PER PREVENIRE LESIONI GRAVI E MORTE
Codice articolo: SSRC-9*13
Lunghezza del lato interno corto: ÿ9,06 pollici/ÿ230 mm
Installazione
Sicurezza e avvertenza
Specifiche
- 2 -
Machine Translated by Google

Istruzioni
Figura del prodotto
Installazione (o 20 pezzi necessari per l'installazione verticale.)
10
1
Figura 1
9
1
Movimento centrale B
A. Controllare che i componenti e gli accessori del prodotto siano completi.
Quantità
3.0
7
2
Manuale d'uso
2
Dado M5 (12 pezzi necessari per installazione orizzontale o 20
(kg)
Manicotto di espansione (8 pezzi necessari per l'installazione)
4
6
Copertura superiore
Movimento centrale A
Descrizione
Vite M5*10 (12 pezzi necessari per orizzontale)
24
10
10
Parte
2
Vite di espansione (8 pezzi necessari per l'installazione)
1
8
24
2
Pezzo di griglia B
Peso lordo
PCS necessari per l'installazione verticale.)
Pezzo di griglia A
5
2
3
- 3 -
Machine Translated by Google

- 4 -
B.Fissare i 4 pezzi della griglia con la vite M5*10 e il dado M5.
C. Assemblare il coperchio superiore sui 4 pezzi della griglia con la vite M5*10 e il dado M5.
Figura 3
Figura 2
Figura 4
Due metodi di installazione opzionali: D (installazione orizzontale) o E (installazione
verticale).
D. Per l'installazione orizzontale, praticare 8 fori ÿ8*40 sul camino in
direzione orizzontale, utilizzare un martello per premere 8 manicotti di espansione in
questi 8 fori, quindi installare saldamente il cappello del camino sul camino con
8 viti di espansione.
Machine Translated by Google

- 5 -
Figura 6
E. Per l'installazione verticale, montare le 4 staffe inferiori sui 4 pezzi della griglia
con vite M5*10 e dado M5, praticare 8 fori ÿ8*40 sul camino in direzione
verticale, utilizzare un martello per premere 8 manicotti di espansione in questi
8 fori, quindi installare saldamente il cappello del camino sul camino con
8 viti di espansione.
Figura 5
Machine Translated by Google

Rappresentante della CE
RAPPRESENTANZA DEL REGNO UNITO
Magonza Landstr.69,
60329 Francoforte sul Meno.
E-CrossStu GmbH
YH CONSULTING LIMITED. C/O YH Consulting
Limited Ufficio 147, Centurion House, London
Road, Staines-upon-Thames, Surrey, TW18 4AX
Figura 8
Importato in AUS: SIHAO PTY LTD. 1 ROKEVA STREETEASTWOOD NSW 2122
Australia
Produttore: Shanghaimuxinmuyeyouxiangongsi Indirizzo:
Shuangchenglu 803nong11hao1602A-1609shi, baoshanqu, shanghai 200000 CN.
Figura 7
Importato negli USA: Sanven Technology Ltd. Suite 250, 9166 Anaheim Place,
Rancho Cucamonga, CA 91730
- 6 -
Machine Translated by Google


Seguimoscomprometidosabrindarleherramientasaprecioscompetitivos.
"Ahorrelamitad","mitaddeprecio"ocualquierotraexpresiónsimilarqueutilicemossolorepresenta
unaestimacióndelahorroquepodríaobteneralcomprarciertasherramientasconnosotrosencomparación
conlasprincipalesmarcasynonecesariamentesignificaquecubratodaslascategoríasdeherramientas
queofrecemos.Lerecordamosque,alrealizarunpedidoconnosotros,verifiquecuidadosamentesi
realmenteestáahorrandolamitadencomparaciónconlasprincipalesmarcas.
Soportetécnicoycertificadodegarantía
electrónicawww.vevor.com/support
MANUALDELUSUARIO
Tapadechimenea
Machine Translated by Google

Estassonlasinstruccionesoriginales,leaatentamentetodaslasinstruccionesdelmanual
antesdeutilizarelproducto.VEVORsereservaunainterpretaciónclaradenuestromanualde
usuario.Laaparienciadelproductoestarásujetaalproductoquerecibió.Perdónenosporno
informarlenuevamentesihayactualizacionesdetecnologíaosoftwareennuestroproducto.
Modelo:SSRC9*13
¿Tienepreguntassobreelproducto?¿Necesitaasistenciatécnica?Nodudeenponerseencontacto
connosotros:
¿NECESITAAYUDA?¡CONTÁCTENOS!
Manualdeusuario
Tapadechimenea
1
Soportetécnicoycertificadodegarantía
electrónicawww.vevor.com/support
Machine Translated by Google

propiedad.
Paravertical
piezasrotas,agrietadasodobladas,piezassueltasofaltantesycualquiercondición
pulgada/220230mm
Esteartículo.
operarorepararesteproducto.Elincumplimientodeestasadvertenciasy
pulgada/325335mm
Longituddelladoexternocorto:≥11,73pulgadas/≥298mm
Longituddelladoexteriorlargo:12,8013,19
Leaycomprendatodoestemanualantesdeensamblar,instalar,
Longituddelladointeriorlargo:≤13,19pulgadas/≤335mm
medicamento.
ANTESDEVUELCO:NOSESIENTE,SEPARENISESUBAAESTEARTÍCULO.
Esteproductonoesunjuguete.Nopermitaquelosniñosjueguenconélocercadeél.
Seriedemodelos
2.3
zapatosduranteelmontajeylainstalacióndeesteproducto.Mantengaalostranseúntes
GUARDEESTASINSTRUCCIONES
Parahorizontal
Pesoneto
UsegafasdeseguridadaprobadasporANSI,guantesdetrabajoresistentesyequipodeseguridad.
quepuedanafectarelcorrectofuncionamientodelproducto.
Asegúresedeutilizarúnicamentepiezasoriginalesparaelreemplazoylareparación.
Tamañodelachimenea
Instalación
Longituddelladoexternocorto:8,669,06
Lasinstruccionespuedencausarlamuerte,lesionespersonalesodañosvaliosos.
Antesdeutilizarelproducto,inspeccionesuestadogeneral.Compruebelosiguiente:
Longituddelladoexteriorlargo:≥15,94pulgadas/≥405mm
Tamañodelachimenea
NormaSSRC9*13
Longituddelladointeriorcorto:≤9,06pulgadas/≤230mm
Utiliceúnicamentesegúnloprevisto.PARAEVITARLESIONESGRAVESYLAMUERTE
Instalación
fueradeláreaduranteelmontaje.No
realiceelmontajecuandoestécansadoobajolainfluenciadelalcohol,drogaso
(kilogramo)
Seguridadyadvertencias
Presupuesto
2
Machine Translated by Google

3
Figura1
1
1
9
Manualdeusuario
A.Verifiquequelaspiezasyaccesoriosdelproductoesténcompletos.
Cantidad
3.0
7
2
6
(kilogramo)
2
TuercaM5(senecesitan12piezasparainstalaciónhorizontalo20
Manguitodeexpansión(senecesitan8piezasparalainstalación)
4
Cubiertasuperior
Descripción
TornilloM5*10(12piezasnecesariasparamontajehorizontal)
24
10
EjedepedalierA
Parte
2
10
Tornillodeexpansión(senecesitan8piezasparalainstalación)
8
24
2
1
PiezaderejillaB
PiezadecuadrículaA
5
2
Pesobruto
PCSnecesariosparainstalaciónvertical.)
3
(Senecesitan20piezasparainstalaciónvertical).
10
EjedepedalierB
Instrucciones
Figuradelproducto
Machine Translated by Google
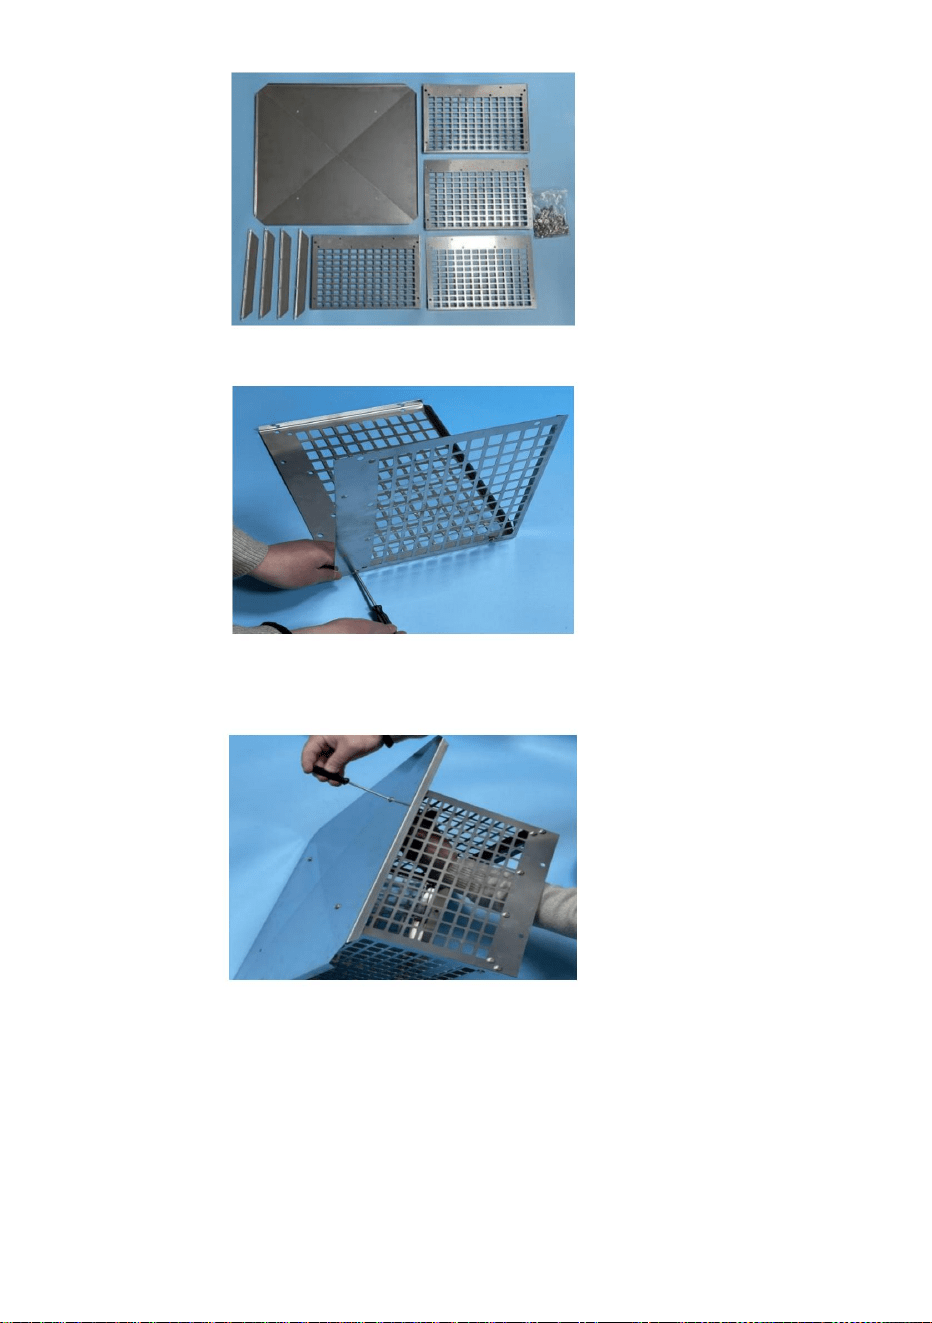
Figura3
C.Ensamblelacubiertasuperioralas4piezasdelarejillaconeltornilloM5*10ylatuercaM5.
B.Fijelas4piezasdelarejillaconeltornilloM5*10ylatuercaM5.
Figura2
Figura4
Dosmétodosdeinstalaciónopcionales:D(instalaciónhorizontal)oE(instalaciónvertical).
D.Paralainstalaciónhorizontal,taladre8orificiosdeΦ8*40enlachimeneaen
direcciónhorizontal,useunmartilloparapresionar8manguitosdeexpansiónenestos8
orificiosyluegoinstalefirmementelatapadelachimeneacon8tornillosdeexpansión.
4
Machine Translated by Google

5
Figura5
Figura6
E.Paralainstalaciónvertical,montelos4soportesinferioresenlas4piezasdelarejilla
conuntornilloM5*10yunatuercaM5,taladre8orificiosdeΦ8*40enlachimenea
endirecciónvertical,useunmartilloparapresionar8manguitosdeexpansiónenestos8
orificiosyluegoinstalefirmementelatapadelachimeneaenlachimeneacon8
tornillosdeexpansión.
Machine Translated by Google

REPRESENTANTECE
REPRESENTANTEDELREINOUNIDO
MainzerLandstraße69,
60329FráncfortdelMeno.
ECrossStuGmbH
YHCONSULTINGLIMITED.ALADIRECCIÓNDEYH
ConsultingLimitedOficina147,CenturionHouse,London
Road,StainesuponThames,Surrey,TW184AX
Figura8
ImportadoaAUS:SIHAOPTYLTD.1ROKEVASTREETEASTWOODNSW2122
Australia
Fabricante:ShanghaimuxinmuyeyouxiangongsiDirección:
Shuangchenglu803nong11hao1602A1609shi,baoshanqu,shanghai200000CN.
Figura7
ImportadoaEE.UU.:SanvenTechnologyLtd.Suite250,9166AnaheimPlace,
RanchoCucamonga,CA91730
6
Machine Translated by Google


„Oszczędź połowę”, „Połowa ceny” lub inne podobne wyrażenia używane przez nas stanowią
jedynie szacunkowe oszczędności, jakie możesz uzyskać, kupując u nas określone narzędzia w
porównaniu z głównymi markami i niekoniecznie oznaczają one objęcie wszystkich kategorii narzędzi
oferowanych przez nas. Uprzejmie przypominamy, aby dokładnie sprawdzić, czy składając u nas
zamówienie faktycznie oszczędzasz połowę w porównaniu z głównymi markami.
Nadal staramy się oferować Państwu narzędzia w konkurencyjnych cenach.
Wsparcie techniczne i certyfikat gwarancji
elektronicznej www.vevor.com/support
INSTRUKCJA OBSŁUGI
CZAPKA KOMINOWA
Machine Translated by Google

To jest oryginalna instrukcja, przed użyciem należy uważnie przeczytać wszystkie
instrukcje. VEVOR zastrzega sobie jasną interpretację naszej instrukcji obsługi. Wygląd
produktu będzie zależał od produktu, który otrzymałeś. Prosimy o wybaczenie, że nie
poinformujemy Cię ponownie, jeśli w naszym produkcie pojawią się jakiekolwiek aktualizacje
technologiczne lub oprogramowania.
Model: SSRC-9*13
Masz pytania dotyczące produktu? Potrzebujesz wsparcia technicznego? Skontaktuj się z
nami:
POTRZEBUJESZ POMOCY? SKONTAKTUJ SIĘ Z NAMI!
Instrukcja obsługi
CZAPKA KOMINOWA
- 1 -
Wsparcie techniczne i certyfikat gwarancji
elektronicznej www.vevor.com/support
Machine Translated by Google
nieruchomość.
dla pionowego
uszkodzone, pęknięte lub wygięte części, luźne lub brakujące części oraz każdy stan
cal/220-230 mm
ten przedmiot.
obsługi lub serwisowania tego produktu. Nieprzestrzeganie tych ostrzeżeń i
cal/325-335 mm
Długość krótszej zewnętrznej strony: 11,73 cala/298 mm
Długość długiego zewnętrznego boku: 12,80-13,19
Przed montażem, instalacją,
Długość długiego wewnętrznego boku: 13,19 cala/335 mm
lek.
PRZECIWKO PRZEWRÓCENIU: NIE SIEDZIĆ, NIE STOJEĆ ANI NIE WSPINAĆ SIĘ NA TYM
PRZEDMIOCIE. Ten produkt nie jest zabawką. Nie pozwalaj dzieciom bawić się nim lub przebywać w jego pobliżu.
Seria modeli
2.3
buty podczas montażu i instalacji tego produktu. Osoby postronne
ZAPISZ TE INSTRUKCJE
dla poziomego
Masa netto
Noś okulary ochronne, wytrzymałe rękawice robocze i odzież ochronną z certyfikatem ANSI.
które mogą mieć wpływ na prawidłowe działanie produktu.
Należy upewnić się, że do wymiany lub naprawy używane są wyłącznie oryginalne części.
Rozmiar komina
Instalacja
Długość krótszego boku zewnętrznego: 8,66-9,06
instrukcje mogą spowodować śmierć, obrażenia ciała lub uszkodzenie cennych przedmiotów
Przed użyciem sprawdź ogólny stan produktu. Sprawdź:
Długość długiego zewnętrznego boku: 15,94 cala/405 mm
Rozmiar komina
SSRC-9*13
Długość krótszej wewnętrznej strony: 9,06 cala/230 mm
Używać wyłącznie zgodnie z przeznaczeniem. W CELU ZAPOBIEGANIA POWAŻNYM OBRAŻENIOM I ŚMIERCI
Instalacja
podczas montażu należy opuścić teren.
Nie należy się zbierać, będąc zmęczonym lub pod wpływem alkoholu, narkotyków lub
(kg)
Specyfikacje
Bezpieczeństwo i ostrzeżenia
- 2 -
Machine Translated by Google

Instrukcje
Rysunek produktu
Rysunek 1
1
1
9
Instrukcja obsługi
A. Sprawdź, czy części i akcesoria produktu są kompletne.
Ilość
3.0
7
2
6
(kg)
2
Nakrętka M5 (12 szt. potrzebnych do montażu poziomego lub 20 szt.)
Tuleja rozprężna (do montażu potrzebnych jest 8 szt.)
4
Górna okładka
Opis Śruba
M5*10 (potrzebne 12 szt. do montażu poziomego)
24
10
Suport A
Część
2
10
Śruba rozporowa (8 szt. potrzebnych do montażu)
8
24
2
1
Element siatki B
Część siatki A
5
2
Masa brutto
(Szczególne wymagania dotyczące montażu pionowego.)
3
Montaż lub 20 szt. potrzebnych do montażu pionowego.)
10
Suport B
- 3 -
Machine Translated by Google

- 4 -
Rysunek 3
C. Zamontuj górną pokrywę do 4 elementów kratki za pomocą śruby M5*10 i nakrętki M5.
B. Przymocuj 4 elementy kratki za pomocą śruby M5*10 i nakrętki M5.
Rysunek 2
Rysunek 4
Dwie opcjonalne metody instalacji: D (instalacja pozioma) lub E (instalacja pionowa).
D. W przypadku montażu poziomego wywierć 8 otworów Φ8*40 w kominie w kierunku
poziomym, wciśnij młotkiem 8 tulei rozporowych w te 8 otworów, a następnie mocno zamontuj
czapkę kominową do komina za pomocą 8 śrub rozporowych.
Machine Translated by Google

- 5 -
Rysunek
6 E. W przypadku montażu pionowego zamontuj 4 dolne wsporniki do 4 elementów kratki
za pomocą śruby M5*10 i nakrętki M5, wywierć 8 otworów Φ8*40 w kominie w
kierunku pionowym, za pomocą młotka wciśnij 8 tulei rozporowych w te 8 otworów, a
następnie mocno zamontuj czapkę kominową do komina za pomocą 8 śrub
rozporowych.
Rysunek 5
Machine Translated by Google

Przedstawiciel UE
REP WIELKIEJ BRYTANII
Mainzer Landstr.69,
60329 Frankfurt nad Menem.
E-CrossStu GmbH
YH CONSULTING LIMITED. C/O YH Consulting Limited
Biuro 147, Centurion House, London Road, Staines-
upon-Thames, Surrey, TW18 4AX
Producent: Shanghaimuxinmuyeyouxiangongsi Adres:
Shuangchenglu 803nong11hao1602A-1609shi, baoshanqu, szanghaj 200000 CN.
Importowane do AUS: SIHAO PTY LTD. 1 ROKEVA STREETEASTWOOD NSW 2122 Australia
Rysunek 8
Rysunek 7
Importowane do USA: Sanven Technology Ltd. Suite 250, 9166 Anaheim Place, Rancho
Cucamonga, CA 91730
- 6 -
Machine Translated by Google


"Save Half", "Half Price" of andere soortgelijke uitdrukkingen die wij gebruiken, geven alleen een schatting van de
besparingen die u kunt behalen door bepaalde gereedschappen bij ons te kopen in vergelijking met de grote topmerken
en betekent niet noodzakelijkerwijs dat alle categorieën gereedschappen die wij aanbieden, worden gedekt. Wij
herinneren u eraan om zorgvuldig te controleren of u daadwerkelijk de helft bespaart in vergelijking met de grote
topmerken wanneer u een bestelling bij ons plaatst.
Wij streven er voortdurend naar om u gereedschappen tegen concurrerende prijzen te leveren.
Technische ondersteuning en e-garantiecertificaat
www.vevor.com/support
GEBRUIKERSHANDLEIDING
SCHOORSTEENKAP
Machine Translated by Google

HULP NODIG? NEEM CONTACT MET ONS OP!
Dit is de originele instructie, lees alle handleidingen zorgvuldig door voordat u het product
gebruikt. VEVOR behoudt zich een duidelijke interpretatie van onze gebruikershandleiding voor.
Het uiterlijk van het product is afhankelijk van het product dat u hebt ontvangen. Vergeef ons
dat we u niet opnieuw zullen informeren als er technologie- of software-updates voor ons product zijn.
Model: SSRC-9*13
Heeft u vragen over het product? Heeft u technische ondersteuning nodig? Neem dan gerust
contact met ons op:
Gebruiksaanwijzing
SCHOORSTEENKAP
- 1 -
Technische ondersteuning en e-
garantiecertificaat www.vevor.com/support
Machine Translated by Google

- 2 -
Specificaties
Veiligheid en waarschuwing
eigendom.
voor verticaal
gebroken, gebarsten of verbogen onderdelen, losse of ontbrekende onderdelen en elke toestand
inch/220-230 mm
dit item.
het bedienen of onderhouden van dit product. Het niet opvolgen van deze waarschuwingen en
inch/325-335 mm
Lengte van de korte buitenzijde: ÿ11,73 inch/ÿ298 mm
Lengte van de lange buitenzijde: 12,80-13,19
ÿLees en begrijp deze volledige handleiding voordat u het apparaat monteert, installeert,
Lengte van de lange binnenkant: ÿ13,19 inch/ÿ335 mm
medicatie.
TEGEN KANTELEN: NIET OP DIT ITEM ZITTEN, STAAN OF KLIMMEN. ÿDit product
is geen speelgoed. Laat kinderen niet met of in de buurt van dit product spelen.
Modelserie
2.3
schoenen tijdens de montage en installatie van dit product. Houd omstanders
BEWAAR DEZE INSTRUCTIES
voor Horizontaal
Netto gewicht
ÿDraag een door ANSI goedgekeurde veiligheidsbril, stevige werkhandschoenen en veiligheidsschoenen.
die de juiste werking van het product kunnen beïnvloeden. ÿZorg
ervoor dat alleen originele onderdelen worden gebruikt voor vervanging en reparatie.
Schoorsteengrootte
Installatie
Lengte van de korte buitenzijde: 8,66-9,06
instructies kunnen de dood, persoonlijk letsel of schade aan waardevolle goederen veroorzaken
ÿControleer voor gebruik de algemene staat van het product. Controleer op:
Lengte van de lange buitenzijde: ÿ15,94 inch/ÿ405 mm
Schoorsteengrootte
SSRC-9*13
Lengte van de korte binnenkant: ÿ9,06 inch/ÿ230 mm
ÿGebruik alleen zoals bedoeld. OM ERNSTIG LETSEL EN DE DOOD TE VOORKOMEN
Installatie
buiten het gebied tijdens de montage.
ÿMonteer niet als u moe bent of onder invloed van alcohol, drugs of
(kg)
Machine Translated by Google

Instructies
Afbeelding van het product
Trapas A
Beschrijving
Schroef M5*10 (12 stuks nodig voor horizontale
24
6
10
(kg)
Expansiehuls (8 stuks nodig voor installatie)
2
Moer M5 (12 stuks nodig voor horizontale installatie of 20 stuks
4
Bovenste deksel
Gebruiksaanwijzing
Hoeveelheid
3.0
7
2
1
1
Figuur 1
9
A. Controleer of de productonderdelen en accessoires compleet zijn.
3
Installatie of 20 stuks nodig voor verticale installatie.)
10
Trapas B
Rasterstuk A
5
2
Brutogewicht
(PCS nodig voor verticale installatie.)
8
24
2
1
Rasterstuk B
10
Deel
2
Expansieschroef (8 stuks nodig voor installatie)
- 3 -
Machine Translated by Google

- 4 -
Figuur 3
C. Monteer de bovenste afdekking aan de 4 roosterdelen met schroef M5*10 en moer M5.
B. Bevestig de 4 roosterstukken met schroef M5*10 en moer M5.
Figuur 2
Figuur 4
Twee optionele installatiemethoden D (horizontale installatie) of E (verticale installatie).
D. Voor horizontale installatie boort u 8 gaten van ÿ8*40 in horizontale richting
in de schoorsteen, drukt u met een hamer 8 expansiehulzen in deze 8 gaten en bevestigt
u vervolgens de schoorsteenkap stevig aan de schoorsteen met 8 expansieschroeven.
Machine Translated by Google

- 5 -
Afbeelding
6 E. Voor verticale installatie monteert u de 4 onderste beugels aan de 4 rasterstukken
met schroef M5*10 en moer M5, boort u 8 gaten van ÿ8*40 in de schoorsteen
in verticale richting, drukt u met een hamer 8 expansiehulzen in deze 8 gaten en
monteert u vervolgens de schoorsteenkap stevig aan de schoorsteen met 8
expansieschroeven.
Figuur 5
Machine Translated by Google

EC-REP
VK REP
Mainzer Landstr.69,
60329 Frankfort aan de Main.
E-CrossStu GmbH
YH CONSULTING LIMITED. C/O YH Consulting
Limited Kantoor 147, Centurion House, London
Road, Staines-upon-Thames, Surrey, TW18 4AX
Fabrikant: Shanghaimuxinmuyeyouxiangongsi Adres:
Shuangchenglu 803nong11hao1602A-1609shi, baoshanqu, shanghai 200000 CN.
Geïmporteerd naar AUS: SIHAO PTY LTD. 1 ROKEVA STREETEASTWOOD NSW
2122 Australië
Figuur 8
Figuur 7
Geïmporteerd naar de VS: Sanven Technology Ltd. Suite 250, 9166 Anaheim Place,
Rancho Cucamonga, CA 91730
- 6 -
Machine Translated by Google


Vi fortsätter att vara engagerade i att ge dig verktyg till konkurrenskraftiga priser.
"Spara hälften", "halva priset" eller andra liknande uttryck som används av oss representerar
bara en uppskattning av besparingar du kan dra nytta av att köpa vissa verktyg hos oss jämfört med
de stora toppmärkena och betyder inte nödvändigtvis att täcka alla kategorier av verktyg som erbjuds
av oss. Du påminns vänligen om att noggrant kontrollera när du gör en beställning hos oss om
du faktiskt sparar hälften i jämförelse med de främsta stora varumärkena.
Teknisk support och e-garanticertifikat
www.vevor.com/support
ANVÄNDARMANUAL
SKORSTENSKAPP
Machine Translated by Google

Har du produktfrågor? Behöver du teknisk support? Kontakta oss gärna:
Modell: SSRC-9*13
Detta är den ursprungliga instruktionen, läs alla instruktioner noggrant innan du
använder den. VEVOR reserverar sig för en tydlig tolkning av vår användarmanual. Utseendet
på produkten är beroende av den produkt du fått. Ursäkta oss att vi inte kommer att
informera dig igen om det finns någon teknik eller mjukvaruuppdateringar på vår produkt.
BEHÖVER HJÄLP? KONTAKTA OSS!
Användarmanual
SKORSTENSKAPP
- 1 -
Teknisk support och e-garanticertifikat
www.vevor.com/support
Machine Translated by Google

- 2 -
Säkerhet och varning
Specifikationer
ut ur området under monteringen. ÿ
Sätt inte ihop när du är trött eller påverkad av alkohol, droger eller
trasiga, spruckna eller böjda delar, lösa eller saknade delar och alla tillstånd
egendom.
tum/220-230 mm
för Vertikal
(kg)
Längd på den korta yttre sidan: ÿ11,73 tum/ÿ298 mm
denna artikel.
använda eller serva denna produkt. Underlåtenhet att följa dessa varningar och
tum/325-335 mm
Längd på den långa innersidan: ÿ13,19 tum/ÿ335 mm
medicin.
ÿLäs och förstå hela denna manual innan du monterar, installerar,
FRÅN TIPPNING: SIT, STÅ ELLER KLÄTTRA INTE PÅ DETTA FÖREMÅL. ÿDenna
produkt är ingen leksak. Låt inte barn leka med eller nära
Modellserie
Längd på den långa yttre sidan: 12.80-13.19
2.3
Nettovikt
skor under montering och installation av denna produkt. Behåll åskådare
SPARA DESSA INSTRUKTIONER
för horisontell
Skorstensstorlek
ÿBär ANSI-godkända skyddsglasögon, kraftiga arbetshandskar och skydd
som kan påverka produktens korrekta funktion. ÿSe till att
endast äkta delar används för utbyte och reparation.
Installation
Längd på den långa yttre sidan: ÿ15,94 tum/ÿ405 mm
Längd på den korta yttre sidan: 8,66-9,06
ÿInspektera produktens allmänna skick före användning. Kontrollera efter:
instruktioner kan orsaka dödsfall, personskada eller värdefull skada
Skorstensstorlek
ÿ Använd endast på avsett sätt. FÖR ATT FÖREBYGGA ALLVARLIGA SKADA OCH DÖDSFALL
SSRC-9*13
Längd på den korta innersidan: ÿ9,06 tum/ÿ230 mm
Installation
Machine Translated by Google

Instruktioner
Bild på produkten
Installation eller 20 PCS behövs för vertikal installation.)
10
1
Figur 1
9
1
Nedre fäste B
A. Kontrollera om produktens delar och tillbehör är kompletta.
Antal
3.0
7
2
Användarmanual
2
Mutter M5 (12 st behövs för horisontell installation eller 20
(kg)
Expansionshylsa (8 st behövs för installation)
4
6
Övre omslag
Nedre fäste A
Beskrivning
Skruv M5*10 (12 STK behövs för horisontell
24
10
10
Del
2
Expansionsskruv (8 st behövs för installation)
1
8
24
2
Rutnätsdel B
PCS behövs för vertikal installation.)
Bruttovikt
Rutnätsdel A
5
2
3
- 3 -
Machine Translated by Google

- 4 -
Figur 3
C.Sätt ihop det övre locket till de 4 gallerbitarna med skruv M5*10 och mutter M5.
B. Fäst de 4 gallerbitarna med skruv M5*10 och mutter M5.
Figur 2
Figur 4
Två valfria installationsmetoder D (horisontell installation) eller E (vertikal installation).
D. För horisontell installation, borra 8 ÿ8*40 hål på skorstenen i horisontell riktning,
använd en hammare för att trycka in 8 expansionshylsor i dessa 8 hål, och installera sedan
skorstenslocket ordentligt på skorstenen med 8 expansionsskruvar.
Machine Translated by Google
- 5 -
Figur 5
Figur 6
E. För vertikal installation, montera de 4 bottenfästena på de 4 gallerbitarna
med skruv M5*10 och mutter M5, borra 8 ÿ8*40 hål på skorstenen i
vertikal riktning, använd en hammare för att trycka in 8 expansionshylsor i
dessa 8 hål och installera sedan skorstenslocket ordentligt på
skorstenen med 8 expansionsskruvar.
Machine Translated by Google

Mainzer Landstr.69,
60329 Frankfurt am Main.
E-CrossStu GmbH
YH CONSULTING LIMITED. C/O YH Consulting
Limited Office 147, Centurion House, London
Road, Staines-upon-Thames, Surrey, TW18 4AX
EC REP
UK REP
Tillverkare: Shanghaimuxinmuyeyouxiangongsi
Adress: Shuangchenglu 803nong11hao1602A-1609shi, baoshanqu,
shanghai 200000 CN.
Importerad till AUS: SIHAO PTY LTD. 1 ROKEVA STREETEASTWOOD NSW 2122
Australien
Bild 8
Bild 7
Importerad till USA: Sanven Technology Ltd. Suite 250, 9166
Anaheim Place, Rancho Cucamonga, CA 91730
- 6 -
Machine Translated by Google