INSTRUCTION MANUAL
Please read this manual carefully before using, and keep it for future reference.
143L
CHEST
FREEZER / FRIDGE
SC-150AU8CH


General Safety 4
Product Overview 8
Installation 9
Operation 12
Maintenance And Cleaning 15
Troubleshooting 17
Specifications 18
Customer Helpline Last Page
CONTENTS
4
Read this manual thoroughly before you start using the Top Mount Refrigerator.
The safety precautions instructions reduces the risk of fire, electric shock and injury when cor-
rectly complied to.
Please follow all instructions and take notice of all warnings.
The refrigerant isobutane (R600a) is contained within the refrigerant circuit of the
appliance, a gas with a high level of environmental compatibility, which is flammable.
During transportation and installation of the appliance, make sure that none of the
components of the refrigerant circuit become damaged.
WARNING: Never use an appliance with a damaged refrigerant circuit. If the refrigerant
circuit becomes damaged, avoid proximity to open fires and all types of heat and
ignition sources. Thoroughly ventilate the room in which the appliance is located.
It is dangerous for anyone other than an authorised service person to work on this
appliance. In Queensland, the authorised service person MUST hold a Gas Work
Authorisation for hydrocarbon refrigerants to carry out servicing or repairs which
involve the removal of covers.
The room for installing the appliance must be at least 1m³ per 8g of refrigerant.
The amount and type of refrigerant in the appliance can be found in the Technical
Specifications at the back of the manual and on the appliance rating label.
Pay close attention to messages that follow this safety alert symbol
or the words DANGER, WARNING or CAUTION. These words will be
used to alert you of potential hazards that and injure you and others.
Following these instruction will tell you how to reduce the chance of
injury and the possible dangers if instructions aren’t followed.
This symbol alerts you to take care as the appliance contains flammable
materials: isobutane as refrigerant and cyclopentane as insulation
blowing gas. Do not expose it to high heat, sparks and open flames.
IMPORTANT INFORMATION
GENERAL SAFETY

5
GENERAL SAFETY INSTRUCTIONS (Cont.)
This appliance is intended to be used in household and similar applications such as: -
sta areas in shops, oces and other working environments;
- farm houses and by clients in hotels, motels and other residential type environments;
- bed and breakfast type environments;
- catering and similar non-retail applications
R600A WARNINGS
NOTE: This model uses 0.046Kg of R600a flammable refrigerant in its sealed system.
The following must be observed for your safety:
R600A Refrigerant Warning
• This appliance contains a small quantity of R600A refrigerant which is
environmentally friendly, but flammable. It does not damage the ozone layer, nor
does it increase the greenhouse eect.
• During transportation and installation, ensure that the tubing of the refrigerant
circuit is not damaged.
• Leaking refrigerant can ignite and may damage the eyes.
• In the event any damage does occur, avoid exposure to open fires and any device
which creates a spark. Disconnect the appliance from the mains power.
• Thoroughly ventilate the room in which the appliance is located for several minutes.
• Notify Customer Service for necessary action and advice.
• The room for installing the appliance must be at least 1 cubic metre per 8 grams
of refrigerant. The refrigerant quantity contained in this appliance is listed above in
grams; it is also noted on the Rating Plate of the appliance.
It is hazardous for anyone other than an Authorised Service Person to carry out
servicing or repairs to this appliance. In Queensland the authorized person must hold
a Gas Work Authorisation for hydrocarbon refrigerants, before carrying out servicing
or repairs which involve the removal of covers.
WARNNING
1. Keep ventilation openings, in the appliance enclosure or in the built-in structure, clear
of obstruction.
2.Do not use mechanical devices or other means to accelerate the defrosting process,
other than those recommended by the manufacturer.
3.Do not damage the refrigerant circuit.
4.Do not use electrical appliances inside the food storage compartments of the
appliance, unless they are of the type recommended by the manufacturer.
5.Do not store explosive substances such as aerosol cans with a flammable propellant
in the appliance.
The environment and personal safety must be considered when disposing of this
appliance. Please ensure the appliance is taken to a recycle center for safe recycling.
DO NOT dispose of the appliance in land fill as the insulation and refrigerant gas
contained in these appliances are flammable.

6
To reduce risk of fire, electric shock or injury, always follow these basic precautions and
accident prevention measures when using this appliance, including the below:
INSTALLATION
• Heavy: The product is heavy, be careful when moving it. To avoid back or other
injury, have 2 people lift or mechanical aid when installing.
• Damage: When unnoxing, thoroughly inspect the appliance carefully for any
damage. If there is any damage, do not install the appliance. Contact our
support centre on info@ayonz.com for advice.
• Protection from moisture: Make sure the appliance is installed in an indoor area
away from wind, rain, water spray or drips.
• Protect from heat: Do not place the appliance next to an oven, grill or other
source of high heat, or where it will be exposed to direct sunlight for long
periods of time.
• WARNING: Ventilation: Make sure to have enough ventilation, keep any
ventilation openings, in the appliance enclosure or in the built-in structure,
clear all obstructions. Make sure plenty of air circulation around the appliance
to prevent overheating.
• Level: Install appliance level in order for proper operation.
ELECTRICAL SAFETY
• Voltage: Plug the appliance to a 220-240V, 50Hz, properly earthed power
outlet, it must be in good working order.
• Power connection: Do not use an adaptor or an extension cord.
Plug the power plug directly into a separate power point that cannot be
accidentally turned o, and that is easily accessible so you can switch it o
if needed.
• Power cord: Do not kink or damage the power supply cord. Make sure it is
behind the appliance so no one can step on or place anything on the power
supply cord or against it. A damaged power plug may overheat and cause a fire.
• Damaged cord: Do not use a cord that shows cracks or abrasion damage. Any
damage to the cord may cause a short circuit, fire and/or electric shock. Contact
our support centre on info@ayonz.com for advice
• WARNING! The light supplied with this appliance cannot be replaced by the user.
Contact the authorised service agent for replacement or service.
• Disconnection: Never pull the powercord to unplug appliance. Grip the plug and
pull straight out from the power point.
• Electrical work: If the installation of this appliance requires any electrical work,
make sure it is carried out by an electrician.
GENERAL SAFETY INSTRUCTIONS (Cont.)

7
GENERAL SAFETY INSTRUCTIONS (Cont.)
USAGE CONDITIONS AND RESTRICTIONS
• Children: Supervision over children is to ensure that they do not play with the
appliance. Never allow them to use, play with or crawl inside the appliance.
Cleaning and maintenance must not be done by children.
• Usage restrictions: The appliance is not to be used by persons
(including children) with reduced physical, sensory or mental capabilities, or
lack of experience and knowledge, unless they have been given supervision
or instruction.
• Indoor domestic use only: Only for indoor domestic use only, such as in
households, kitchen areas in shops, oces and in other working environments,
use by clients in hotels, motels, bed and breakfast establishments and in catering
and similar non-retail applications. It is not to be used for industrial or
commercial use.
• Intended purpose: Do not use this product for anything other than its intended
purpose, and only use it as described in this manual. Do not attempt to alter or
modify this appliance.
• WARNING! Do not use any electrical or electronic appliances inside the
food storage compartments of the appliance, unless they are of the type
recommended by the manufacturer.
REPONSIBLE DISPOSAL
• Do not throw this appliance out with your household rubbish. Observe any local
regulations regarding the disposal of electrical consumer goods and dispose
of it appropriately.
8
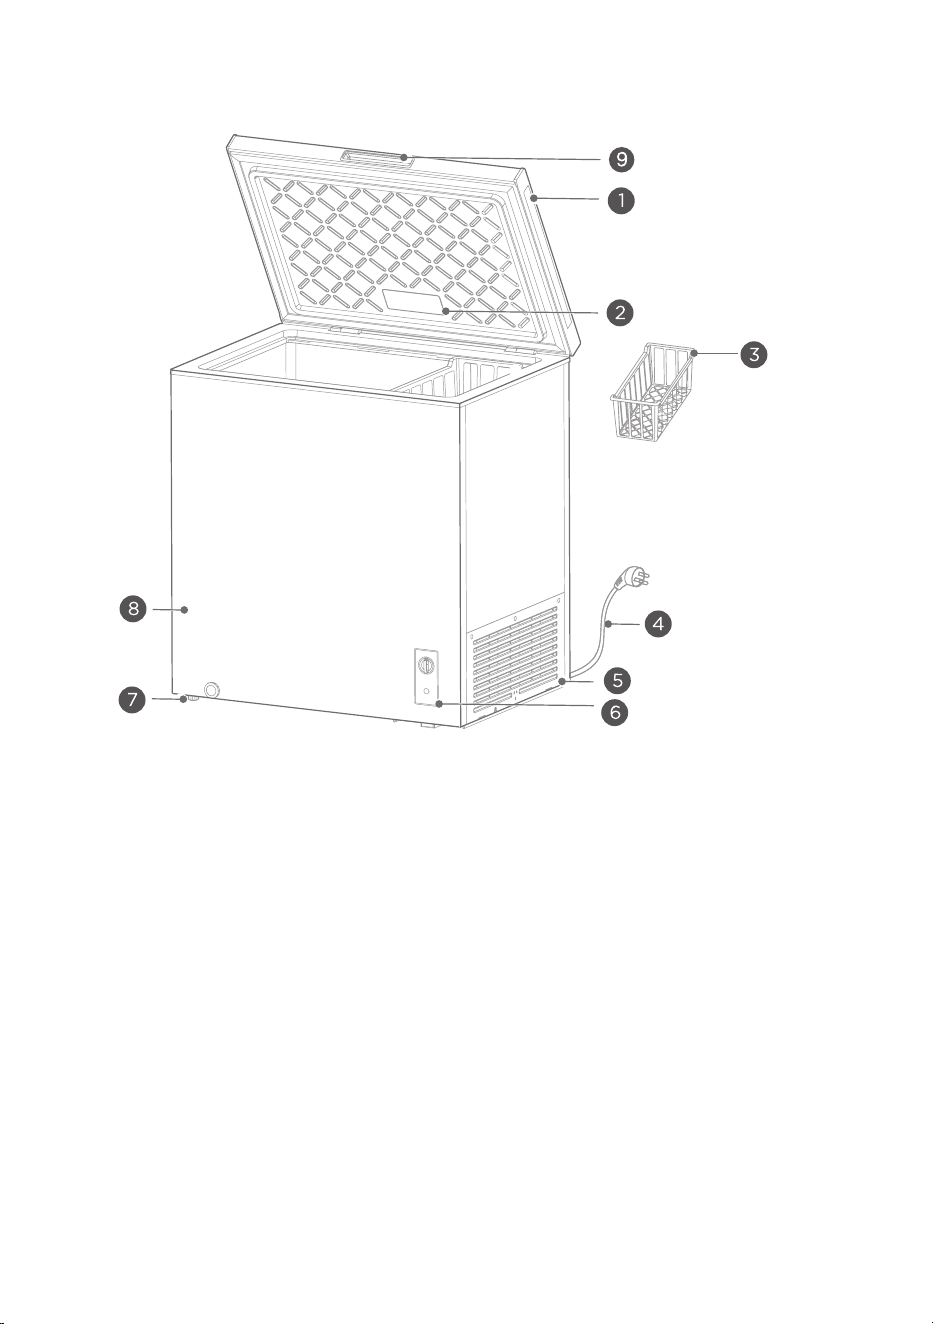
PRODUCT OVERVIEW
NOTE:Do not store fluids in bottled or closed containers Items such as bottled beer,
beverages,etc.
• This refrigerating appliance needs to be installed independently and cannot be
used as a built-in. Otherwise, it will cause problems such the performance and
life of the appliance are reduced. And the manufacturer does not provide basic
appliance warrant.
• The freezing speed of the product is related to the amount of food stored and
the ambient temperature. If too much normal temperature food is put in at the
same time, the thermostat shall be adjusted to the maximum gear 24 hours
in advance or prepare ice ahead for cold storage, and the large food shall be
divided into small pieces and put in several times, otherwise the large size or
amount food cannot be frozen locally, and the food may deteriorate.
1. Door handle
2. Lamp (optional)
3. Shelving basket
4. Power cord
5. Shutter
6. Temperature control panel
7. Leveling foot
8. Cabinete
9. Front concealed handle (optional)
9
INSTALLATION
BEFORE FIRST USE:
• Remove the exterior and interior packing,wipe the outside thoroughly with a soft
dry cloth and the inside with a wet, lukewarm cloth.
• Avoid placing the cabinet in a narrow recess or near any heat source, direct
sunlight, or moisture.
• Adequate air circulation is required for efficient operation. Maintain the
recommended clearance to ensure adequate air circulation.
• Before connecting your freezer to the power supply, check that the voltage stated
on the rating label of your appliance corresponds to the voltage in your home. A
different voltage could damage the appliance.
• The appliance must be grounded. The manufacturer is not responsible for
damages that may occur as a result of usage without grounding.
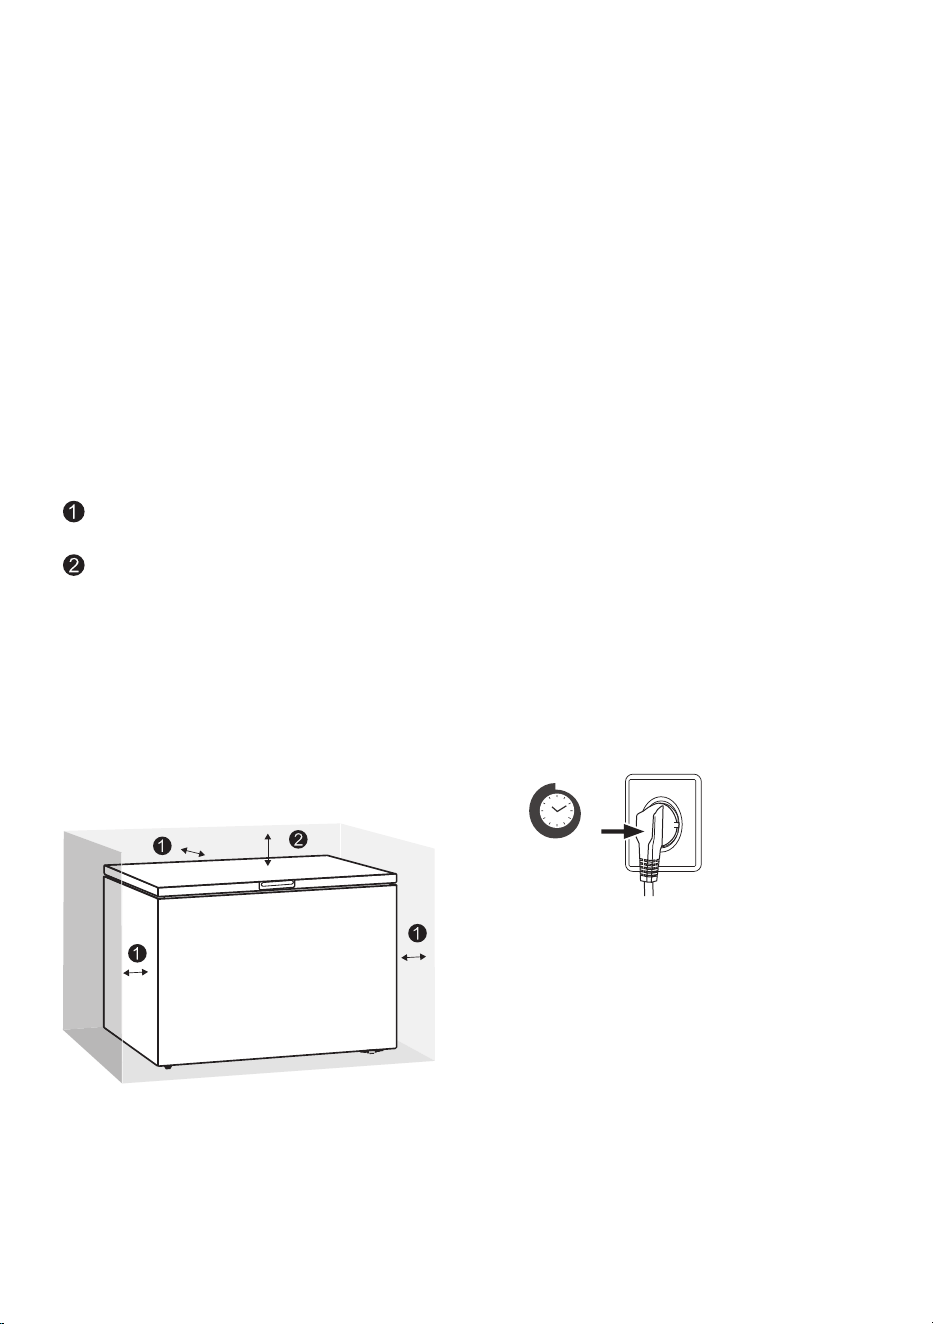
RECOMMENDED CLEARANCE:
20 cm Between sides and back
of cabinet and walls.
270 cm Above the freezer.
WARNING:Placement on soft, uneven,
or unstable surfaces may reduce the
freezer’s efficiency, increase the risk of
malfunction, and potentially result in
damage to the unit or surrounding
property.
CONNECTING THE APPLIANCE:
• After installing the product,
please let it stay for more than
2 hours before turning on the
power, otherwise it will lead to a
decrease in cooling capacity or a
damage to the product.
• Allow the appliance to run empty
for 24 hours so the compartment
can cool to the appropriate
temperature.
CAUTION: The freezer should always
be plugged into its own individual
electrical outlet which has a voltage
rating that matches the rating plate.
When positioning the appliance,
ensure the supply cord is not trapped
ordamaged.
2 h
10
INSTALLATION (Cont.)
AMBIENT TEMPERATURE:
• Depending on the climate class, this freezer is intended to be used at an ambient-
temperature range as specified in the following table.
• The product may not operate properly at temperatures outside of the specific
range.
• You can find the climate class on the product label.
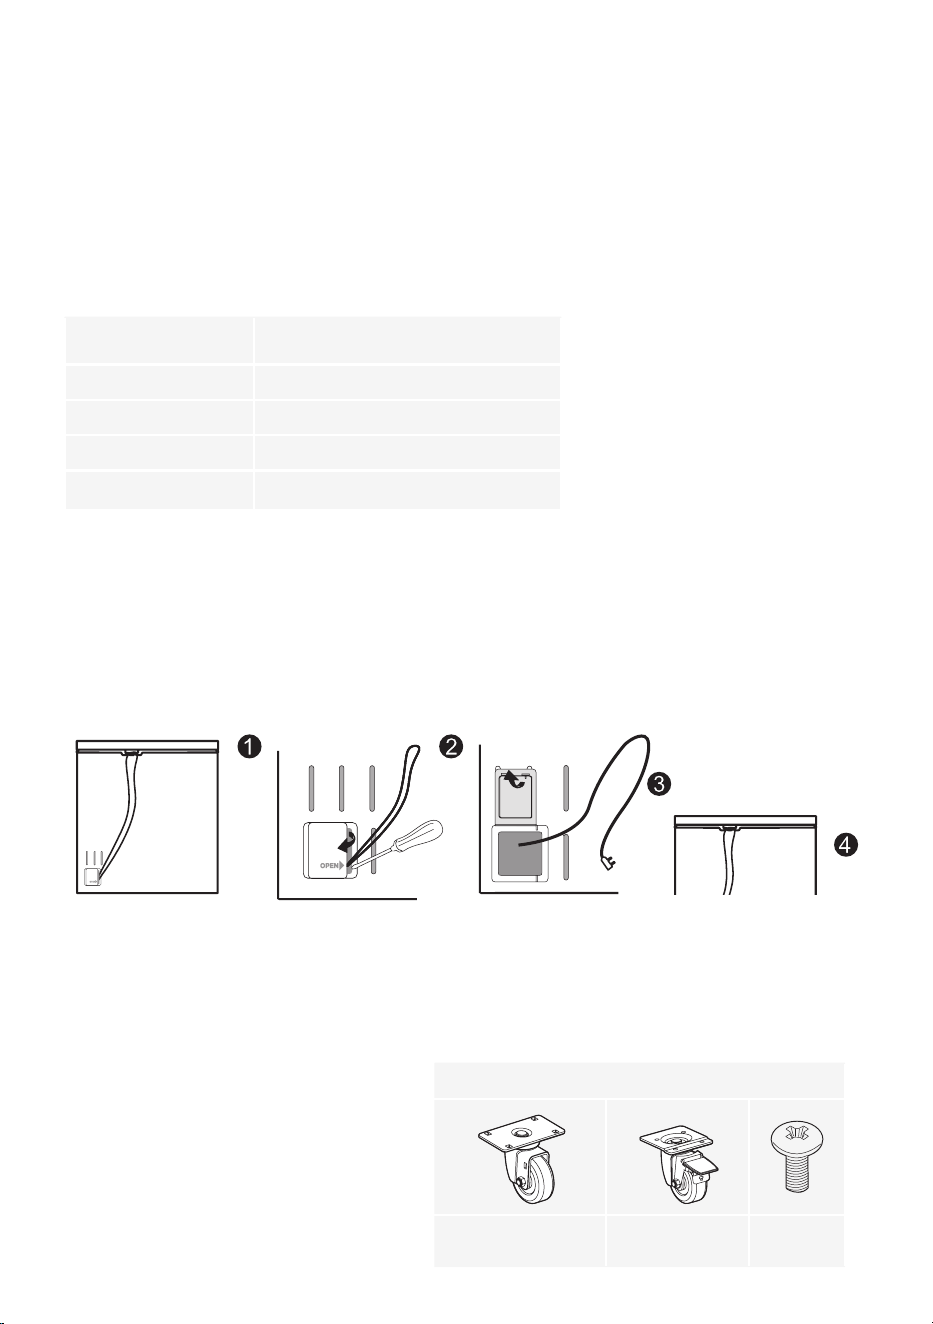
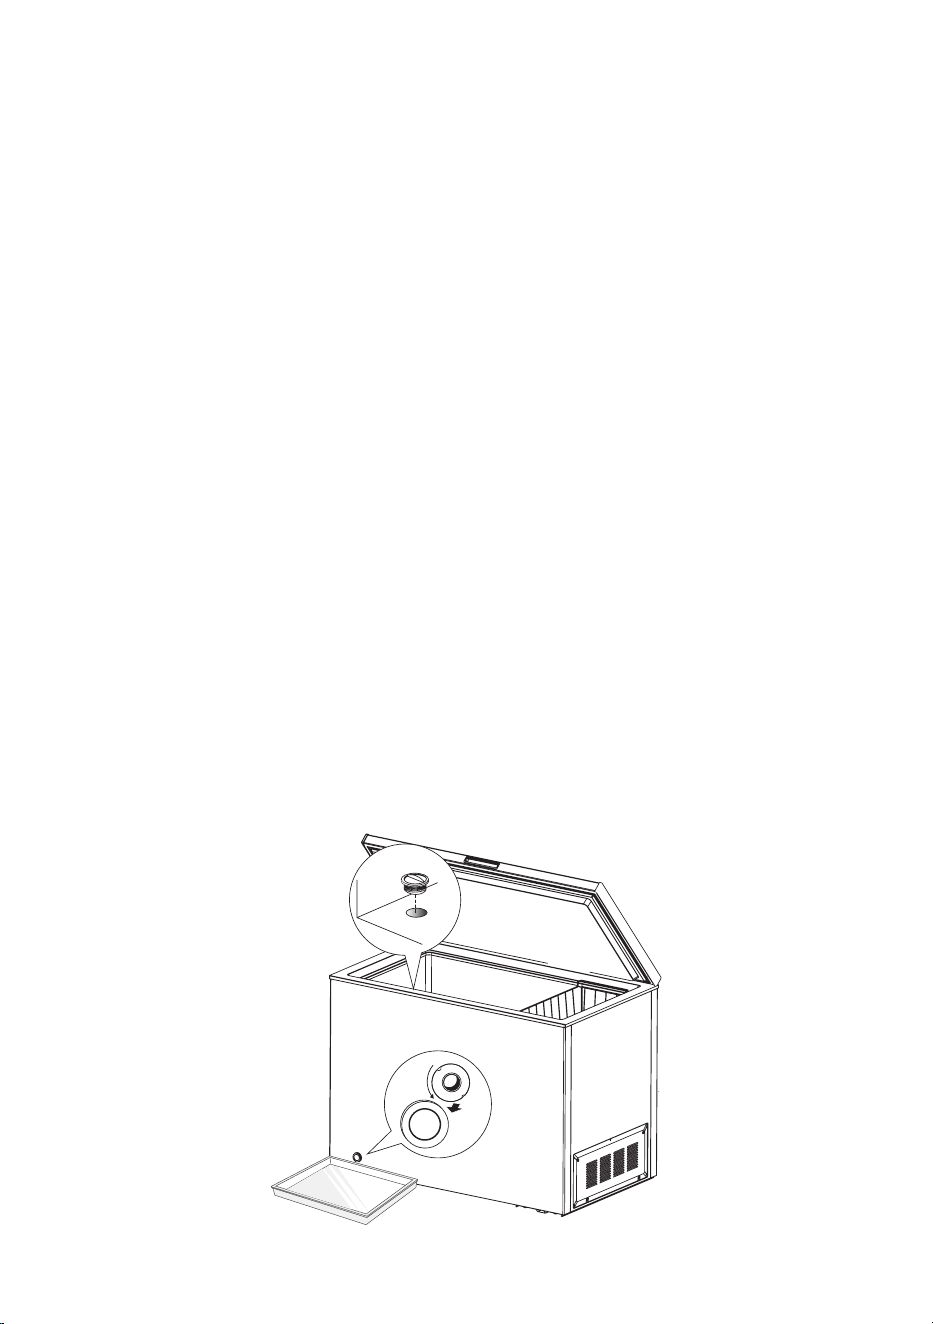
REMOVE THE CABLE FROM INSIDE THE COMPARTMENT:
1. Checking whether power cords is in good condition.
2. Using a tool (slotted screwdriver or coneshape tool), insert it into the gap where
the OPEN-arrow points to and gently pry it outward to open the cover.
3. After opening the cover, take out the power cord plug from the hole, and then
close the cover.
4. Gently take out the power cord from the top hook.
CASTER INSTALLATION (OPTIONAL):
1. Unplug the unit from power source and empty contents before caster installation.
2. Lock and secure lid to prevent opening during caster installation.
3. The appliance comes with a caster installation kit shipped in basket of chest
freezer. The casters allow ease of moving the unit to its final location. The casters
can be then be locked into place.
Climate Class Ambient Temperature
SN +10 ˚C to +32 ˚C
N+ 16 ˚C to +32 ˚C
ST +16 ˚C to +38 ˚C
T+ 16 ˚C to +43 ˚C
Caster Kit contents:
Part A
Part B
2 Casters without
brakes
2 Casters with
brakes
screws
ATTENTION: The freezer should Two
or more people are required to rotate
and tilt the freezer on its back,
allowing accessibility to all sides.
11
INSTALLATION (Cont.)
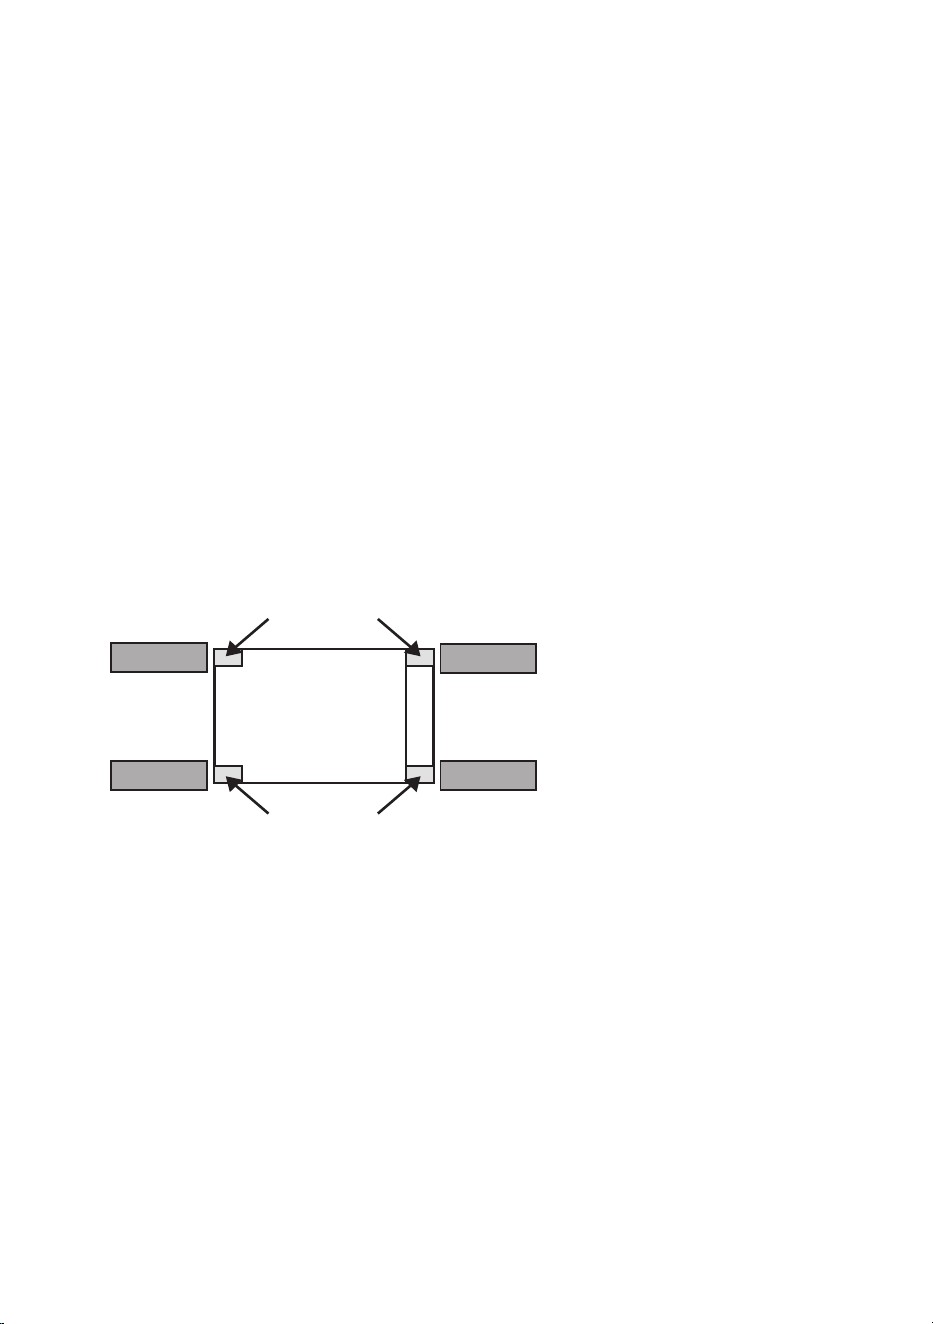
TO INSTALL THE CASTERS:
1. Move freezer to a work area that provides sufficient clearance on all sides to allow
easy handling and access to the freezer.
2. Cover the floor area behind the freezer with a protective material to prevent
damage while it is resting on its back during the caster installation.
3. Remove the adjustable leveling legs already installed on the freezer by
unscrewing counterclockwise, as they are not required when using casters.
4. Remove casters and screws from the caster kit. The Part A casters are installed on
the right front and rear compressor side of the unit. The Part B casters are
installed on the left front and rear of the unit (with brake lever facing ouside).
Align the caster holes with the corresponding screw holes in the mounting
locations.
CHANGING THE LIGHT (OPTIONAL):
Any replacement or maintenance of the LED lamps is intended to be made by the
manufacturer, its service agent or similar qualified person.
• After casters are installed, with the help of an assistant, carefully lift and rotate the
freezer to its upright position. Move the freezer to the desired location, and en-
gage brakes on the 2 left casters.
• Wait a minimum of 2 hours before connecting the freezer to an AC power source.
• Load the freezer after the desired operating temperature is reached.
ATTENTION: Casters with brakes are to stop chest freezer movement on level ground
only.They are not intended to prevent movement on an uneven or sloping floor.
Part A
Part A
Part B
Part B
Left Side Right Side
Front
Rear
Compressor Side
Bottom view
Of freezer
12
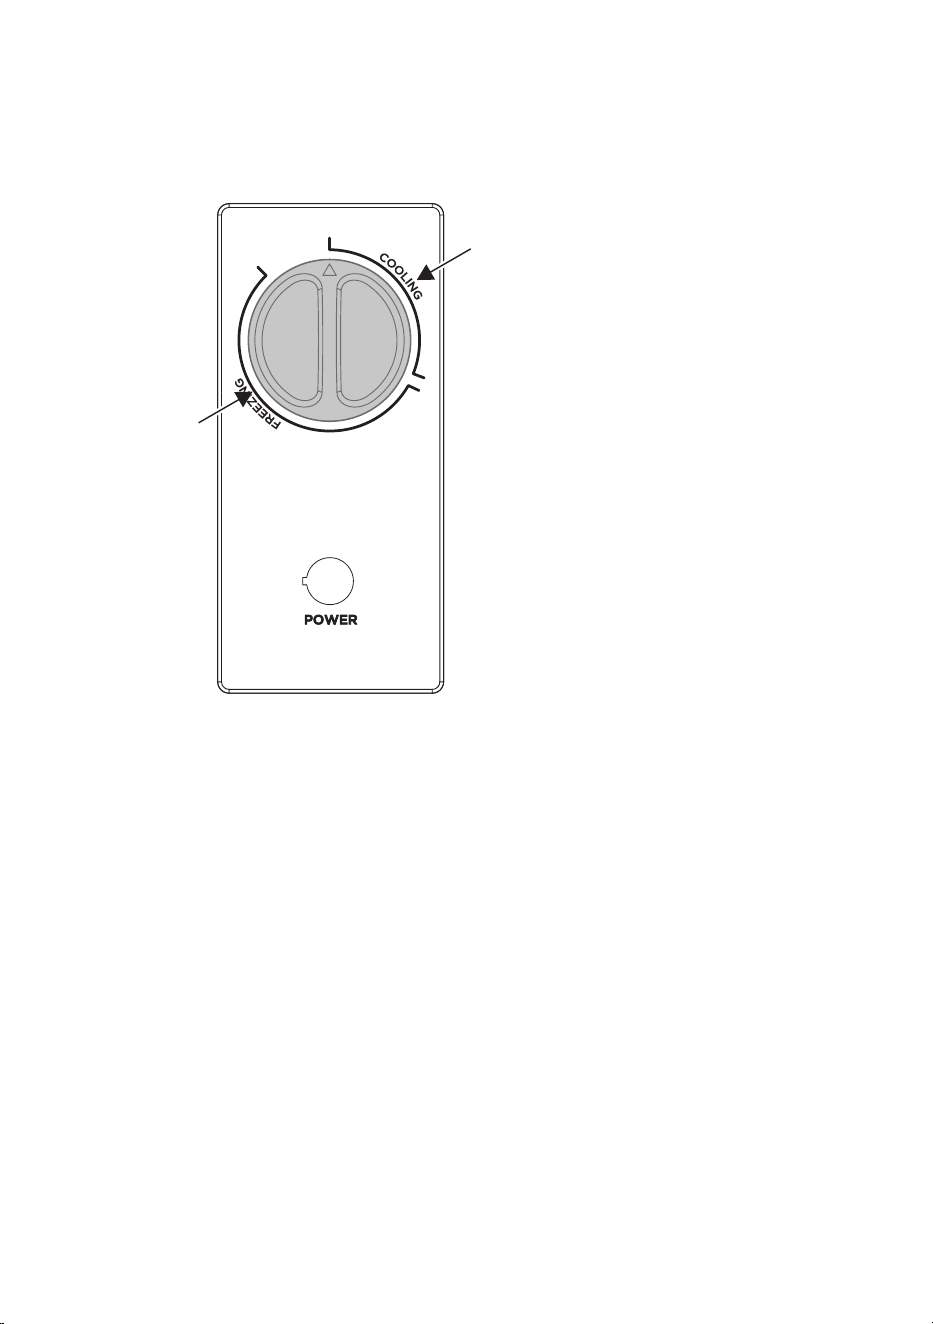
After power on the “POWER” indicator light will be light( green ).
> The area where the temperature controller knob points to “COOLING” is the
refrigeration area, and “FREEZING” is the frozen area;
> When the temperature controller knob is turned clockwise, the temperature inside
the freezer decreases;
> When the temperature controller knob is turned counterclockwise, the temperature
inside the freezer increases;
> Please refer to the schematic diagram to identify the “Recommended gear”.
NOTE: Do not store fluids in bottled or closed containers Items such as bottled beer,
beverages, etc.
USE AND FUNCTIONS
Temperature control:
OPERATION
Recommended
gear
Recommended
gear

13
OPERATION (Cont.)
STORING FOOD
Freezer compartment:
• The freezer compartment is designated for the low-temperature freezing of
food,long-term storage of frozen food, and for the production of ice cubes.
• When freezing large amounts of fresh food (such as meat, fish or chopped meat),
please divide them into several small pieces before putting in, so that they can be
quickly frozen and pick up easily.
• Abide by the storage times recommended by food manufacturers on the
packages, there is no information on the packaging, food should not be stored
frozen for longer than three months from the date of purchase.
• When purchasing frozen food, make sure that it was frozen at a suitable
temperature and that the packaging is not damaged.
• Frozen food should be kept in suitable individual packages to ensure that adjacent
food cannot be contaminated.Consume thawed and defrosted foods immediately,
do not refreeze them.
• In case of prolonged power failure or malfunction of the appliance, remove the
stored frozen food and check whether they are still edible, then store them in a
sufficiently cool place or in another appliance.
• To defrost food, remove it from the freezer and let it defrost at room temperature
or in the freezer. To defrost food quickly, you can use the defrost function on your
microwave,for example.
• If you only want to defrost part of a pack, remove the portion you need and
immediately close the rest of the pack. In this way, you will avoid “freezer burn”
and will reduce ice formation on the remaining foods.
ATTENTION: Storage of too much food during operation after the initial connection
to power may adversely affect the freezing effect of the freezer.
Storage times and temperature:
NOTE: Overlong storage or storage at inappropriate freezing temperature may cause a
quality loss or spoiled foods, which causes food waste, is inedible and may cause food
poisoning. The minimum temperature in most cases should be -18°C or colder. Follow
the maximum recommended storage times below:
> Stew, ice cream, sausages, bread: 2-6 months.
> Fish, shrimp, lamb, meat: 4-8 months.
> poultry, beef: 6-12 months.

14
OPERATION (Cont.)
TIPS FOR ENERGY SAVING
• Do not place the appliance near cookers,radiators or other heat sources. If the
• ambient temperature is high, the compressor will run more frequently and for
longer, resulting in increased energy consumption.
• Ensure that there is sufficient ventilation at the base of the appliance, on the sides
of the appliance and at the back of the appliance.
• To obtain a larger storage space (e.g. for large refrigerated/frozen goods), the
middle drawers and shelves can be removed. The top and bottom drawers and
shelves should be removed last if necessary.
• An evenly filled refrigerator/freezer compartment contributes to optimal energy
use.
• Allow warm food to cool before placing it in the refrigerator/freezer compartment.
Food that has already cooled down increases energy efficiency.
• Open the door only as briefly as necessary to minimise cold loss. Opening the
door briefly and closing it properly reduces energy consumption.
• The door gaskets of your appliance must be perfectly intact so that the doors
close properly and energy consumption is not increased unnecessarily.

15
MAINTENANCE AND CLEANING
CAUTION:
• Disconnect the appliance from the electrical supply before ndertaking any routine
maintenance. Allow at least 5 minutes before restarting the appliance, as frequent
starting may damage the compressor.
• Do not use mechanical devices or other means to accelerate the defrosting
process,other than those recommended by the manufacturer.
• Do not try to repair, disassemble or modify the appliance by yourself. In case of
repair please contact our customer service.
• Eliminate the dust on the back of the unit at least once in the year to avoid hazard
by fire, as well as increased energy consumption.
• Check the door gasket regularly to make sure there are no debris. Clean the door
gasket with a soft cloth dampened with soapy water or diluted detergent.
• The interior of the product should be cleaned regularly to avoid odor.
• Use a soft cloth or sponge to clean the inside of the product, with two
tablespoons of baking soda and a quart of warm water. Then rinse with water and
wipe clean.After cleaning, open the door and let it dry naturally before turning on
the power.
• For areas that are difficult to clean in the product (such as narrow sandwiches,
gaps or corners), it is recommended to wipe them regularly with a soft rag, soft
brush, etc., and when necessary, combined with some auxiliary tools (such as thin
sticks) to ensure no contaminants or bacterials accumulation in these areas.
• Wipe the outer surface of the product with a soft cloth dampened with soapy
water, detergent, etc., and then wipe dry.
• Do not use hard brushes, clean steel balls, wire brushes, abrasives (such
as toothpastes), organic solvents (such as alcohol, acetone, Isoamyl acetate,
etc.), boiling water, acid or alkaline items, which may damage the fridge surface
and interior. Boiling water and organic solvents such as benzene may deform or
damage plastic parts.
• Do not rinse directly with water or other liquids during cleaning to avoid short
circuits or affect electrical insulation after immersion.
16
MAINTENANCE AND CLEANING (Cont.)
DEFROSTING
Your freezer is designed for year-round use with only minimal cleaning and
maintenance. We recommend that you do the following every time you clean it to
keep your freezer running odor-free and efficiently:
1. Power off the freezer.
2. Remove the food from the freezer and place it properly to prevent food from
melting.
3. Clear the drain pipe (to use soft materials to prevent damage to the liner), Prepare
the water containers for defrosting. (pay attention to clean the compressor
compartment water draining tray,Avoding overflow to the ground).
4. You can use the natural temperature for the natural defrost, you can also use the
ice shovel to eliminate the frost (to use plastic or wooden ice shovel, for avoding
damage to the liner or pipe)
5. Pull out the drain plug inside the appliance,and pull off the outside defrost drain
plug. Defrost water will drain out. Check pan occasionally so water does not
overflow. Replace the drain plugs when defrosting is completed.
6. You can also use the appropriate amount of hot water to speed up the defrost,
with a dry towel to dry the water after defrosting.
7. After defrosting, put back the foods in cabinet , and power on the freezer.
ATTENTION: The appliance shall run continuously once it is started. Generally, the
operation of the appliance shall not be interrupted;otherwise the service life may be
impaired.
17
TROUBLSHOOTING
Certain sounds can be heard during normal use of the freezer, which do not affect its
correct operation.
Sounds, which can be easily prevented:
> Noise caused by the appliance which is not level - adjust the position with the
adjustable turn-in front feet. Alternatively, place pads made of soft material under the
rear rollers, especially when the appliance is placed on tiles.
> Touching the adjacent piece of furniture - move the freezer away.
Sounds heard during normal use are mainly due to operation of the compressor
(switching on) and cooling, system (thermal expansion and contraction of the radiator
caused by flow of the cooling agent).
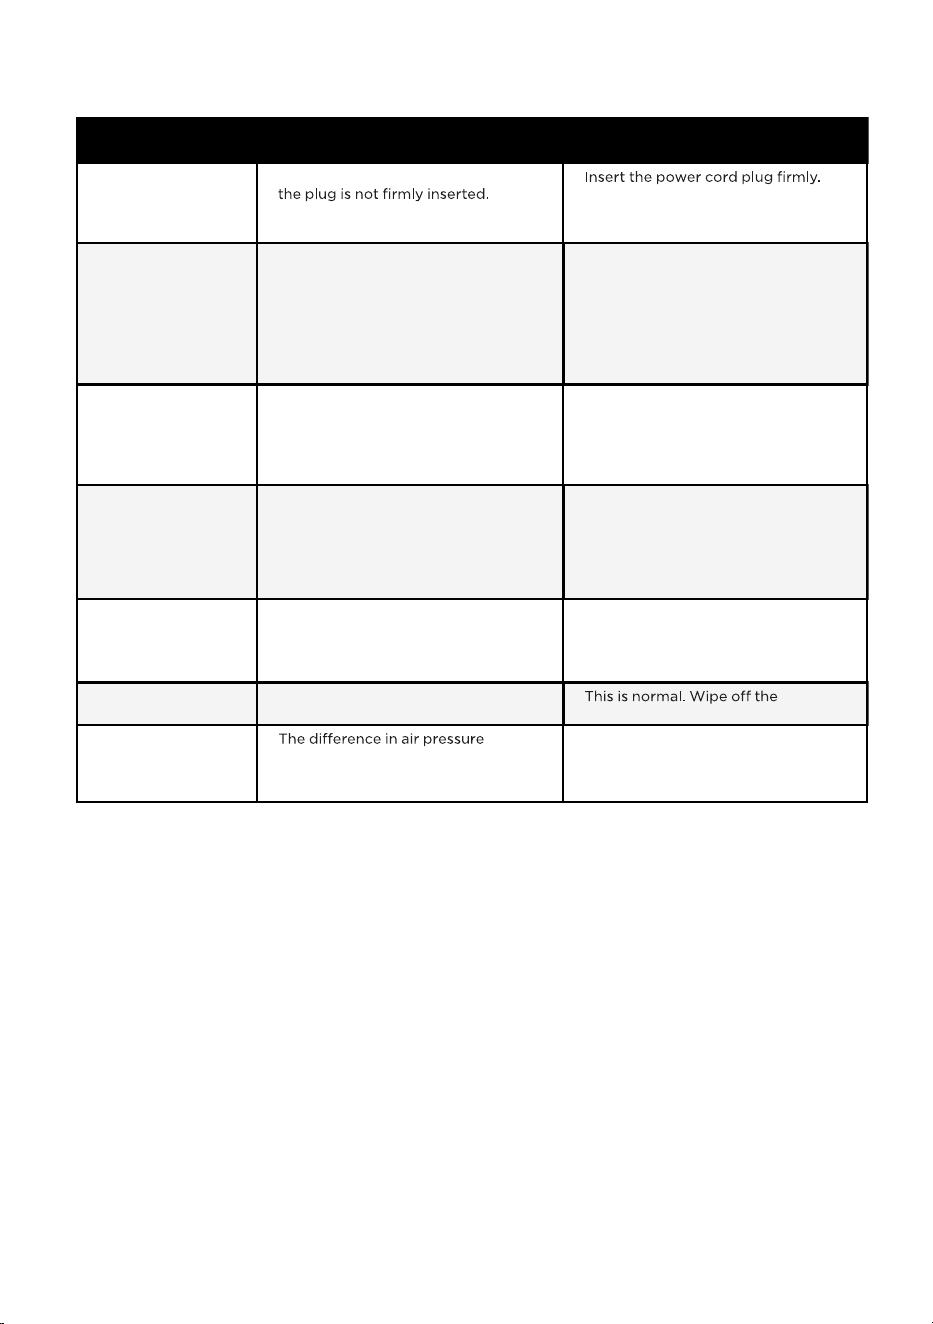
ProblemPossible Causes Solution
Not operate
• The power supply is not turned on and
• Low voltage, power failure or part of
the circuit tripped.
•
• Check the power supply at home.
Compressor working
for a long time
• High ambient temperature causing
long working time.
• Putting too much food in at one time.
• Food is put in before it has cooled
down.
• Opening the door too often.
• The frost layer inside is too thick.
• This is normal.
• Do not put too much food in at one
time.
• Wait until the food has cooled down
before putting it in.
• Do not open the door too often.
• Need to defrost.
Door does not close
properly
• Door is stuck with objects.
• Too much food in.
• Door gasket deformed.
• Do not put in too much food.
• Place the appliance stably.
• Heat the door gasket, then cool it for
restoration (with an electrical drier or
hot water for heating).
Outer wall is hot
• When the appliance is operating, heat
is dissipated to the outside through the
metal tubes inside the cabinet.
• Higher ambient temperatures in the
summer cause the temperature of the
outer wall to rise.
• Higher temperature on the outer wall
is normal.
• Increase the heat dissipation space,
or
put the appliance in a ventilated and
cool place.
Odors
• Spoiled food
• Food with strong odors
• The interior compartment is dirty.
• Clean and remove any spoiled food.
• Make sure strong smelling food is
wrapped airtight.
• Clean the interior compartment.
Condensation forms
on the outside
• Condensation may form when the
humidity in the room is high.
•
condensation using a dry cloth.
Hard to open the door
•
between the inside and outside of the
compartment may sometimes make it
hard to open the freezer door.
• Wait a few moments, and then try to
open the door slowly.
18
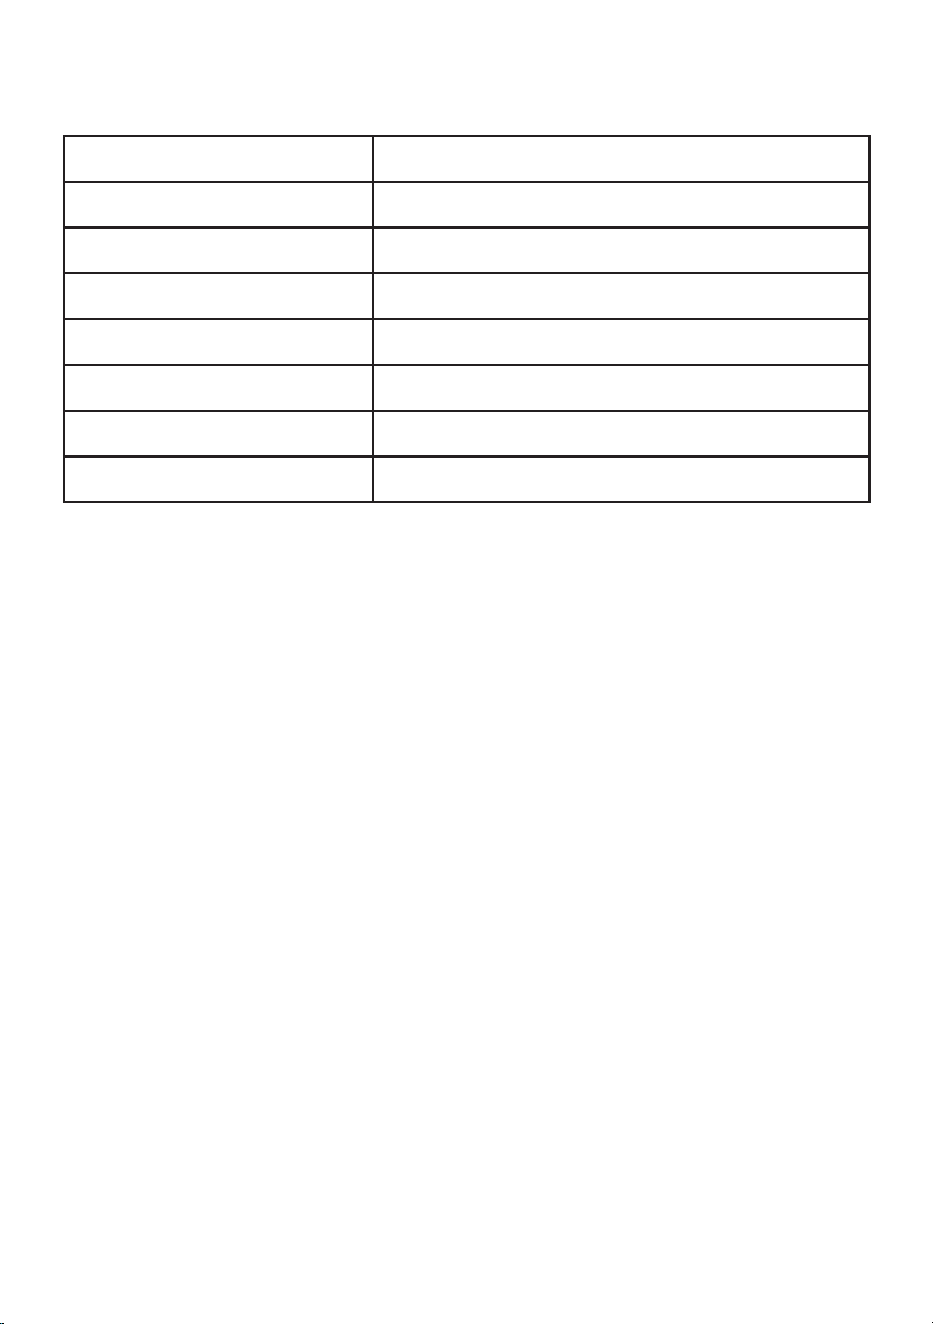
SPECIFICATIONS
Storage capacity 143 Litres
Climate Class SN/N/ST/T
Rated Current 0.6 A
Power Supply 220-240V ~ 50Hz
Refrigerant R600a(46g)
Insulation Blowing Gas Cyclopentane
Weights Net: 24.7kg / Gross: 27.2kg
Dimensions 600 (w) x 560 (d) x 850 (h) mm

19
THIS PAGE IS LEFT
BLANK ON PURPOSE

CUSTOMER HELPLINE:
info@ayonz.com
02 8279 8606
DISTRIBUTED BY:
Ayonz Pty Ltd