SERVICE/INSTALL MANUAL
IMPORTANT INFORMATION,
KEEP FOR OPERATOR
PART NUMBER HB_738371_9F73837100, REV. A (07/23)
This manual provides information for:
CHEST FREEZER
THIS MANUAL MUST BE RETAINED FOR FUTURE REFERENCE. READ,
UNDERSTAND AND FOLLOW THE INSTRUCTIONS AND WARNINGS
CONTAINED IN THIS MANUAL.
FOR YOUR SAFETY Do not store or use gasoline or other ammable vapors
and liquids in the vicinity of this or any other appliance.
NOTIFY CARRIER OF DAMAGE AT ONCE It is the responsibility of the consignee
to inspect the container upon receipt of same and to determine the possibility
of any damage, including concealed damage. Electrolux Professional, Inc.
suggests that if you are suspicious of damage to make a notation on the
delivery receipt. It will be the responsibility of the consignee to le a claim with
the carrier. We recommend that you do so at once.
Manufacture Service/Questions 866-339-8515.
RETAIN THIS MANUAL FOR FUTURE REFERENCE
NOTICE: Due to a continuous program of product improvement, Electrolux
Professional, Inc. reserves the right to make changes in design and specications
without prior notice.
NOTICE: Please read the entire manual carefully before
installation. If certain recommended procedures are not followed, warranty claims
will be denied.
The serial number of all self-contained refrigerators and freezers is located inside
the unit on the left hand side near the top on the wall. Always have the serial
number of your unit available when calling for parts or service. This manual
covers standard units only. If you have a custom unit, consult the customer service
department at the number listed in this manual.
USA & Canada, 866-339-8515
4003 Collins Lane, Louisville, KY 40245
www.kelvinatorcommercial.com
Kelvinator Commercial is a pending or registered trademark of Electrolux Consumer Products, Inc., and is used under a license from Electrolux Consumer Products, Inc. Information contained in
this document is known to be current and accurate at the time of printing/creation. Reference our product line website for the most updated product information and specications.
© 2024 Electrolux Professional, Inc. All Rights Reserved.
REV. D (09/24)
EQUIPMENT DESCRIPTION
MODEL NO.
REFRIGERANT
TYPE
REFRIGERANT
WEIGHT, G
V/HZ/PH AMPS
CAPACITY
STORAGE (CU FT)
HP BTU CHARGE OZ SHIP WEIGHT LBS NEMA PLUG
KCCF073WS R600a 45 115/60/1 1.2 7 1/8 140 1.9 99 5-15P
KCCF140WH R600a 85 115/60/1 1.9 14.2 1/5 1500 3 187 5-15P
KCCF170WH R290 119 115/60/1 1.9 17.3 1/5 1740 4.2 205 5-15P
KCCF210WH R290 128 115/60/1 1.9 20.9 1/5 2100 4.52 240 5-15P

2 CHEST FREEZER
RECEIVING & INSPECTING THE EQUIPMENT
Even though most equipment is shipped crated, care should be taken during
unloading so the equipment is not damaged while being moved into the building.
1. Visually inspect the exterior of the package and skid or container. Any
damage should be noted and reported to the delivering carrier immediately.
2. If damaged, open and inspect the contents with the carrier.
3. In the event that the exterior is not damaged, yet upon opening, there is
concealed damage to the equipment, notify the carrier. Notication should
be made verbally as well as in written form.
4. Request an inspection by the shipping company of the damaged equipment.
This should be done within 10 days from receipt of the equipment.
5. Be certain to check the compressor compartment housing and visually
inspect the refrigeration package. Be sure lines are secure and base is still
intact.
6. Freight carriers can supply the necessary damage forms upon request.
7. Retain all crating material until an inspection has been made or waived.
IMPORTANT - READ FIRST - IMPORTANT
YOUR SAFETY AND THE SAFETY OF OTHERS ARE VERY IMPORTANT.
WE HAVE PROVIDED MANY IMPORTANT SAFETY MESSAGES IN THIS MANUAL AND ON YOUR
APPLIANCE. ALWAYS READ AND OBEY ALL SAFETY MESSAGES.
OUR PRODUCT INSTRUCTIONS WILL BE UPLOADED ON OUR COMPANY OFFICIAL WEBSITE.
THIS IS THE SAFETY ALERT SYMBOL. THIS SYMBOL ALERTS YOU TO POTENTIAL
HAZARDS THAT CAN KILL OR INJURE YOU AND OTHERS. ALL SAFETY MESSAGES
WILL FOLLOW THE SAFETY ALERT SYMBOL AND EITHER THE WORDS” DANGER”,
“WARNING” OR “CAUTION”.
DANGER MEANS THAT FAILURE TO HEED THIS SAFETY STATEMENT MAY RESULT
IN SEVERE PERSONAL INJURY OR DEATH.
WARNING MEANS THAT FAILURE TO HEED THIS SAFETY STATEMENT MAY
RESULT IN EXTENSIVE PRODUCT DAMAGE, SERIOUS PERSONAL INJURY, OR
DEATH.
CAUTION MEANS THAT FAILURE TO HEED THIS SAFETY STATEMENT MAY RESULT
IN MINOR OR MODERATE PERSONAL INJURY, OR PROPERTY OR EQUIPMENT
DAMAGE.
ALL SAFETY MESSAGES WILL ALERT YOU TO WHAT THE POTENTIAL HAZARD IS, TELL YOU
HOW TO REDUCE THE CHANCE OF INJURY, AND LET YOU KNOW WHAT CAN HAPPEN IF THE
INSTRUCTIONS ARE NOT FOLLOWED.
FOLLOW BASIC PRECAUTIONS, INCLUDING THE FOLLOWING:
NOTE: IF THE SUPPLY CORD IS DAMAGED, IT MUST BE REPLACED BY THE
MANUFACTURER, ITS SERVICE AGENT OR SIMILARLY QUALIFIED PERSONS IN
ORDER TO AVOID A HAZARD.
NOTE: THIS APPLIANCE IS NOT INTENDED FOR USE BY PERSONS (INCLUDING
CHILDREN) WITH REDUCED PHYSICAL, SENSORY OR MENTAL CAPABILITIES,
OR LACK OF EXPERIENCE AND KNOWLEDGE, UNLESS THEY HAVE BEEN GIVEN
SUPERVISION OR INSTRUCTION CONCERNING USE OF THE APPLIANCE BY A
PERSON RESPONSIBLE FOR THEIR SAFETY.
NOTE: CHILDREN SHOULD BE SUPERVISED TO ENSURE THAT THEY DO NOT PLAY WITH
THE APPLIANCE.
NOTE: THIS APPLIANCE CAN BE USED BY CHILDREN AGED FROM 8 YEARS AND ABOVE
AND PERSONS WITH REDUCED PHYSICAL SENSORY OR MENTAL CAPABILITIES
OR LACK OF EXPERIENCE AND KNOWLEDGE IF THEY HAVE BEEN GIVEN
SUPERVISION OR INSTRUCTION CONCERNING USE OF THE APPLIANCE IN A SAFE
WAY AND UNDERSTAND THE HAZARDS INVOLVED. CHILDREN SHALL NOT PLAY
WITH THE APPLIANCE. CLEANING AND USER MAINTENANCE SHALL NOT BE
MADE BY CHILDREN WITHOUT SUPERVISION.
NOTE: KEEP THE APPLIANCE AND ITS CORD OUT OF REACH OF CHILDREN LESS THAN 8
YEARS.
NOTE: DO NOT STORE EXPLOSIVE SUBSTANCES SUCH AS AEROSOL CANS WITH A
FLAMMABLE PROPELLANT IN THIS APPLIANCE.
NOTE: THE APPLIANCE USE FLAMMABLE INSULATION BLOWING GAS C5H10, DISPOSAL
OF THE APPLIANCE SHALL IN ACCORDANCE WITH THE REGULATIONS OF LOCAL
AUTHORITIES.
NOTE: THE KEY FOR APPLIANCE ELECTRIC BOX SHOULD BE SAFE KEPT BY QUALIFIED
PERSONS IN ORDER TO AVOID A HAZARD
WARNING: KEEP VENTILATION OPENINGS, IN THE APPLIANCE ENCLOSURE OR IN THE BUILT-IN
STRUCTURE, CLEAR OF OBSTRUCTION.
WARNING: DO NOT USE MECHANICAL DEVICES OR OTHER MEANS TO ACCELERATE
THE DEFROSTING PROCESS, OTHER THAN THOSE RECOMMENDED BY THE
MANUFACTURER.
WARNING: DO NOT DAMAGE THE REFRIGERANT CIRCUIT.
WARNING: DO NOT USE ELECTRICAL APPLIANCES INSIDE THE FOOD STORAGE COMPARTMENTS
OF THE APPLIANCE, UNLESS THEY ARE OF THE TYPE RECOMMENDED BY THE
MANUFACTURER. HANDLING, MOVING, AND USE OF THE REFRIGERATOR OR
FREEZER TO AVOID EITHER DAMAGING THE REFRIGERANT TUBING, OR INCREASING
THE RISK OF A LEAK.
CAUTION: RISK OF FIRE OR EXPLOSION DUE TO FLAMMABLE REFRIGERANT USED. FOLLOW
HANDLING INSTRUCTIONS CAREFULLY IN COMPLIANCE WITH U.S. GOVERNMENT
REGULATIONS. COMPONENT PARTS SHALL BE REPLACED WITH LIKE COMPONENTS
AND THAT SERVICING SHALL BE DONE BY FACTORY AUTHORIZED SERVICE
PERSONNEL, SO AS TO MINIMIZE THE RISK OF POSSIBLE IGNITION DUE TO
INCORRECT PARTS OR IMPROPER SERVICE. SPARE PARTS MUST BE REPLACED
BY THE RELATIVE COMPONENTS AND OPERATIONS MUST BE CARRIED OUT BY
PROFESSIONALS IN ORDER TO MINIMIZE THE RISK OF IGNITION DUE TO INCORRECT
PARTS OR IMPROPER OPERATIONS.
CAUTION: RISK OF FIRE OR EXPLOSION DUE TO PUNCTURE OF REFRIGERANT TUBING; FOLLOW
HANDLING INSTRUCTIONS CAREFULLY. FLAMMABLE REFRIGERANT USED
DANGER: RISK OF CHILD ENTRAPMENT. BEFORE YOU THROW AWAY YOUR OLD REFRIGERATOR
OR FREEZER: TAKE OFF THE DOORS, LEAVE THE SHELVES IN PLACE SO THAT
CHILDREN MAY NOT EASILY CLIMB INSIDE.
INSTALLATION
WARNING:
STANDARD WARRANTIES WILL BE VOIDED DUE TO IMPROPER INSTALLATION
PROCEDURES.
DANGER:
THE ON/OFF SWITCH MUST BE TURNED TO OFF AND THE UNIT
DISCONNECTED FROM THE POWER SOURCE WHENEVER PERFORMING
SERVICE, MAINTENANCE FUNCTIONS OR CLEANING THE REFRIGERATED
AREA.
DANGER
• Plug into a grounded 3-prong outlet, do not remove grounding prong, do not
use an adapter, and do not use an extension cord.
• It is recommended that a separate circuit, serving only your refrigerator be
provided. Use receptacles that cannot be turned off by a switch or pull chain.
• Never clean refrigerator parts with ammable uids. These fumes can
create a re hazard or explosion. And do not store or use gasoline or other
ammable vapors and liquids in the vicinity of this or any other appliance.
The fumes can create a re hazard or explosion.
• Before proceeding with cleaning and maintenance operations, make sure
the power line of the unit is disconnected.
• Do not connect or disconnect the electric plug when your hands are wet.
• Unplug the refrigerator or disconnect power before cleaning or servicing.
Failure to do so can result in electrical shock or death.
• Do not attempt to repair or replace any part of your refrigerator unless it
is specically recommended in this manual. All other servicing should be
referred to a qualied technician.

3 CHEST FREEZER
WARNING
• Use two or more people to move and install refrigerator. Failure to do so can
result in back or other injury.
• To ensure proper ventilation for your refrigerator, the front of the unit must be
completely unobstructed. Choose a well-ventilated area with temperatures
above 60°F (16°C) and below 90°F (32°C). This unit must be installed in an
area protected from the element, such as wind, rain, water spray or drips.
• The refrigerator should not be located next to ovens, grills or other sources
of high heat.
• The refrigerator must be installed with all electrical connections in
accordance with state and local codes. A standard electrical supply (115 V
AC only, 60 Hz), properly grounded in accordance with the National Electrical
Code and local codes and ordinances is required.
• Do not kink or pinch the power supply cord of refrigerator.
• The fuse (or circuit breaker) size should be 15 amperes.
• It is important for the refrigerator to be leveled in order to work properly. You
may need to make several adjustments to level it.
• Never allow children to operate, play with or crawl inside the refrigerator.
• Although the unit has been tested at the factory, due to long-term transit and
storage, the rst batch of cubes must be discarded.
• Do not use solvent-based cleaning agents of abrasives on the interior. These
cleaners may damage or discolor the interior.
• Do not use this apparatus for other than its intended purpose.
BEFORE USING YOUR APPLIANCE
• Remove the exterior and interior packing.
• Check to be sure you have all of the following parts:
- 1 Storage Basket
- 1 Drain Plug
- 1 Instruction Manual
- 1 Plastic Scraper
• Before connecting the unit to the power source, let it stand upright for
approximately 2 hours. This will reduce the possibility of a malfunction in
the cooling system from handling during transportation.
• Clean the interior surface with lukewarm water using a soft cloth.
INSTALLATION OF YOUR APPLIANCE
• Place your refrigerator-freezer on a oor that is strong enough to support the
refrigerator- freezer when it is fully loaded. To level your refrigerator-freezer,
adjust the leveling legs at the bottom of unit.
• Allow 5 inches of space between the back and sides of the unit, which
allows the proper air circulation to cool the compressor and condenser.
• Locate the unit away from direct sunlight and sources of heat (stove, heater,
radiator, etc.). Direct sunlight may affect the acrylic coating and heat sources
may increase electrical consumption. Extreme cold ambient temperatures
may also cause the refrigerator- freezer not to perform properly.
• Avoid locating the unit in moist areas.
• Plug the unit into an exclusive properly installed-grounded wall outlet. Do
not under any circumstances cut or remove the third (ground) prong from
the power cord. Any questions concerning power and/or grounding should
be directed toward a certied electrician or an authorized service center.
ELECTRICAL CONNECTION
WARNING: IMPROPER USE OF THE GROUNDED PLUG CAN RESULT IN THE RISK OF
ELECTRICAL SHOCK. IF THE POWER CORD IS DAMAGED, HAVE IT REPLACED
BY AN AUTHORIZED PRODUCTS SERVICE CENTER.
This appliance should be properly grounded for your safety. The power cord of this
appliance is equipped with a three-prong plug which mates with standard three
prong wall outlets to minimize the possibility of electrical shock.
Do not under any circumstances cut or remove the third ground prong from
the power cord supplied. For personal safety, this appliance must be properly
grounded.
This appliance requires a standard 115/120 Volt AC ~/60Hz electrical ground
outlet with three-prong. Have the wall outlet and circuit checked by a qualied
electrician to make sure the outlet is properly grounded. When a standard 2-prong
wall outlet is encountered, it is your responsibility and obligation to have it replaced
with a properly grounded 3-prong wall outlet.
The cord should be secured behind the appliance and not left exposed or dangling
to prevent accidental injury.
The appliance should always be plugged into its own individual electrical outlet
which has a voltage rating that matches the rating label on the appliance. This
provides the best performance and also prevent overloading house wiring circuits
that could cause a re hazard from overheated. Never unplug the appliance by
pulling the power cord. Always grip the plug rmly and pull straight out from the
receptacle. Repair or replace immediately all power cords that have become
frayed or otherwise damaged. Do not use a cord that shows cracks or abrasion
damage along its length or at either end. When moving the appliance, be careful
not to damage the power cord.
EXTENSION CORD
Because of potential safety hazards under certain conditions, it is strongly
recommended that you do not use an extension cord with this appliance. However,
if you must use an extension cord it is absolutely necessary that it be a UL/CUL-
Listed, 3-wire grounding type appliance extension cord having a grounding type
plug and outlet and that the electrical rating of the cord be 115 volts and at least
10 amperes.
SURGE PROTECTOR
Most electrical appliances use a series of electric control boards to operate. These
boards are very susceptible to power surges and could be damaged or destroyed.
If the appliance is going to be used in an area or if your city / country is prone to
power surges / outages; it is suggested that you use a power surge protector for
all electrical devices / appliances you use. The surge protector that you select must
have a surge block high enough to protect the appliance it is connected to. If you
have any questions regarding the type and size of surge protector needed contact
a licensed electrician in your area.
Damages due to power surges are not considered a manufacturer covered defect
and will void your product warranty.
OPERATION
CUATION: DO NOT USE BOILING WATER BECAUSE IT MAY DAMAGE THE PLASTIC
PARTS. IN ADDITION, NEVER USE A SHARP OR METALLIC INSTRUMENT
TO REMOVE FROST AS IT MAY DAMAGE THE COOLING COILS AND WILL
VOID THE WARRANTY. WE RECOMMEND USING THE PLASTIC SCRAPER
PROVIDED WITH YOUR UNIT.
NOTE: IF THE UNIT IS UNPLUGGED, HAS LOST POWER, OR IS TURNED OFF, YOU
MUST WAIT 3 TO 5 MINUTES BEFORE RESTARTING THE UNIT. IF YOU
ATTEMPT TO RESTART BEFORE THIS TIME DELAY, THE REFRIGERATOR-
FREEZER WILL NOT START.
4 CHEST FREEZER
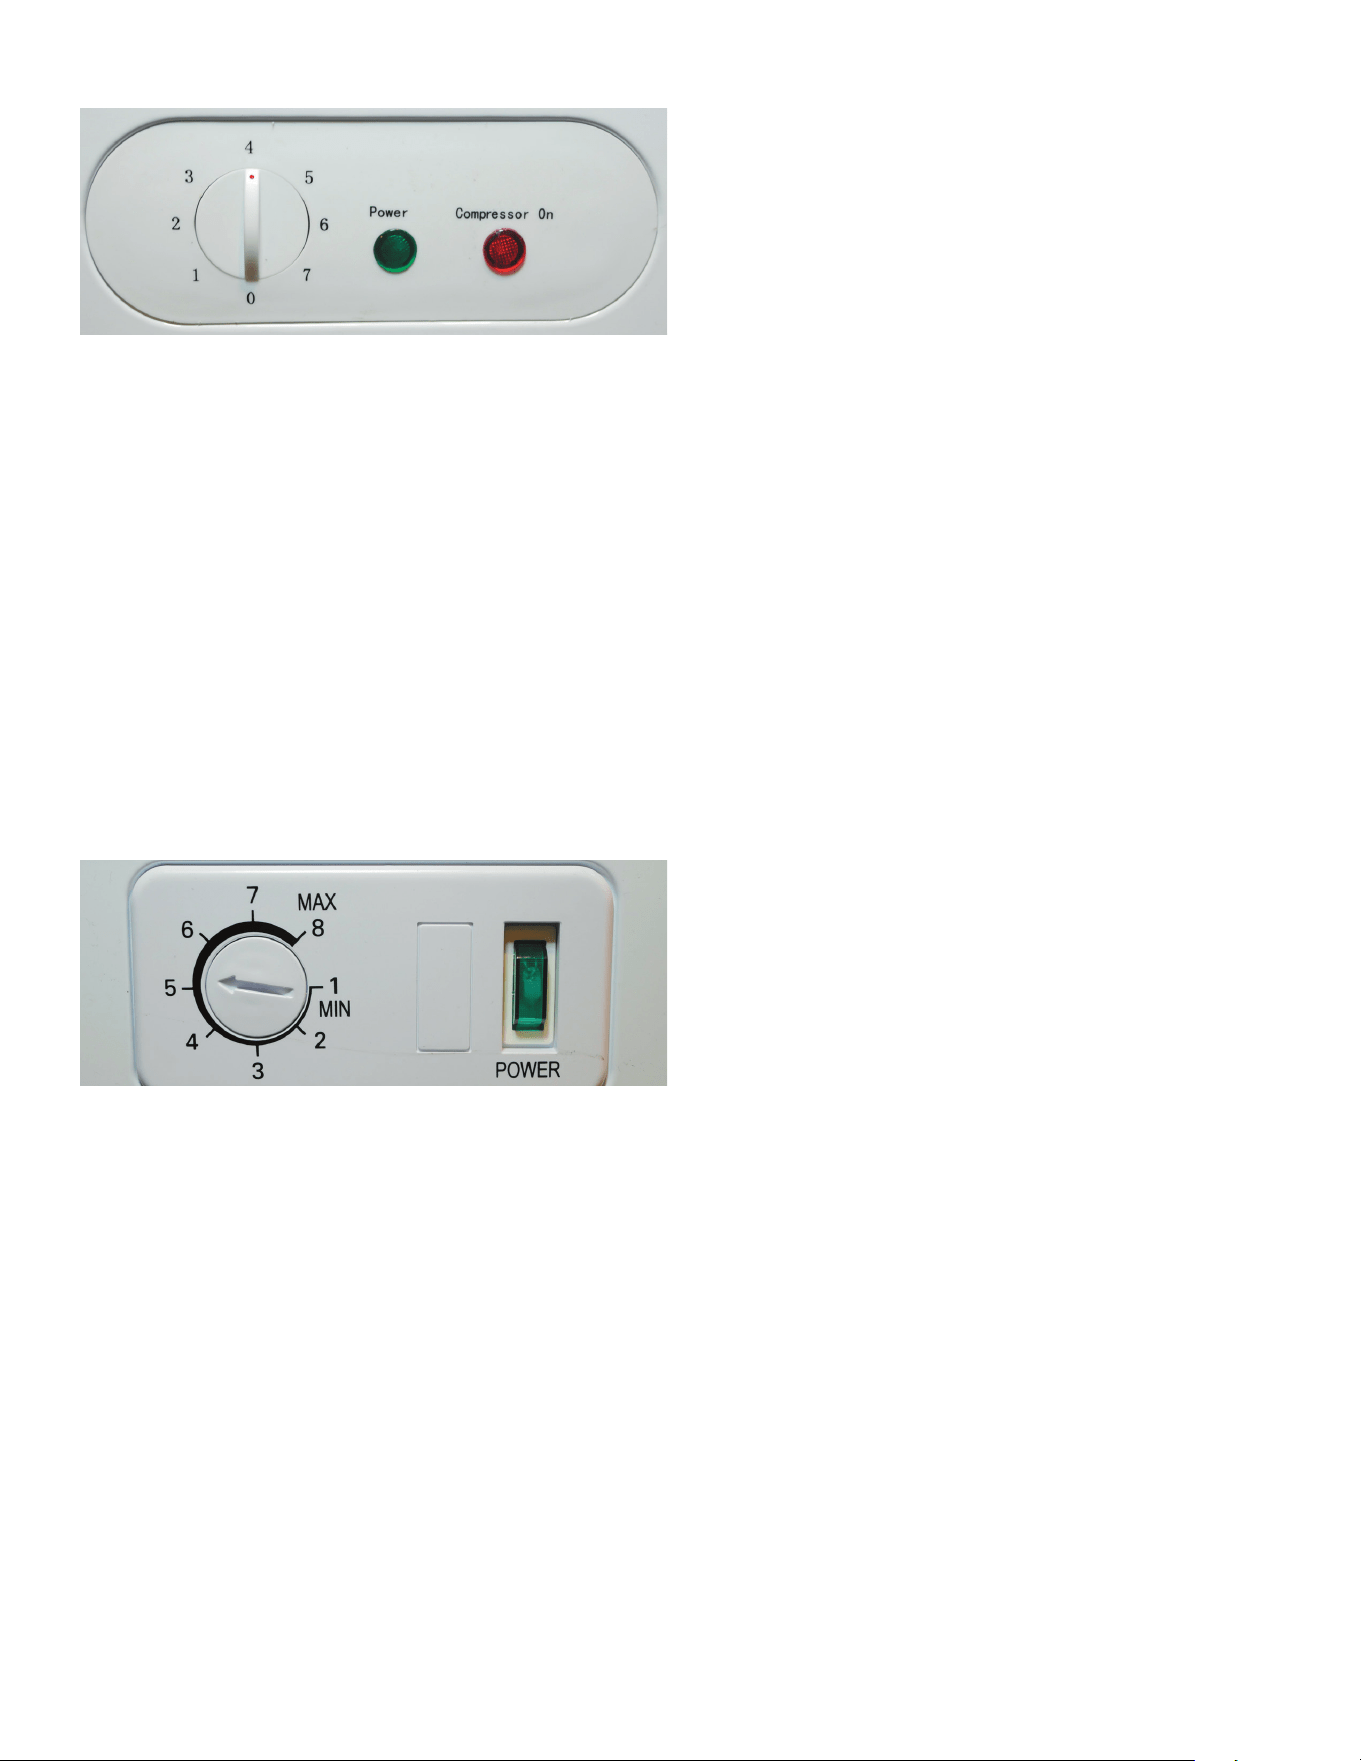
SETTING THE TEMPERATURE CONTROL: KCCF073WS
• To control the internal temperature, adjust the control dials according to the
ambient temperature or purpose of use.
• The rst time you turn the unit on, set the temperature control to “7”.
• The range of the temperature control is from position “1” the warmest
to “7” the coldest in the freezer section. After 24 to 48 hours, adjust the
temperature control to the setting that best suits your needs. The setting of
“4” should be correct for home or ofce refrigerator use.
• Turning the temperature control to “0” stops the cooling cycle but does not
shut off the power to the freezer.
• If the unit is unplugged, lost power, or turned off; you must wait 3 to 5
minutes before restarting the unit. If you attempt to restart before this time
delay, the freezer will not start.
• Large amounts of food will lower the cooling efciency of the appliance.
• If you choose to change the thermostat setting, adjust thermostat control by
one numerical increment at a time. Allow several hours for temperature to
stabilize between adjustments.
SETTING THE TEMPERATURE CONTROL:
KCCF140WH, KCCF170WH, KCCF210WH
• To control the internal temperature, adjust the control dials according to the
ambient temperature or purpose of use.
• The rst time you turn the unit on, set the temperature control to “8”.
• The range of the temperature control is from position “1” the warmest to
“8” the coldest in the freezer section. After 24 to 48 ho0urs, adjust the
temperature control to the setting that best suits your needs. The setting of
“4” should be correct for home or ofce refrigerator use.
• Turning the temperature control to “1” stops the cooling cycle but does not
shut off the power to the freezer.
• If the unit is unplugged, lost power, or turned off; you must wait 3 to 5
minutes before restarting the unit. If you attempt to restart before this time
delay, the freezer will not start.
• Large amounts of food will lower the cooling efciency of the appliance.
• If you choose to change the thermostat setting, adjust thermostat control by
one numerical increment at a time. Allow several hours for temperature to
stabilize between adjustments.
DEFROSTING YOUR FREEZER
• When? For the most efcient operation and minimum energy consumption,
defrost the freezer when the frost on the freezer walls is excessive or ¼ to
½ inch thick.
• Choose a time when the stock of frozen food is low.
• Remove the frozen food from the freezer and place it in a cooler to protect
the food.
• Turn the thermostat knob to “0” or lowest setting.
• Unplug the freezer. The “POWER ON INDICATOR” light should be OFF.
• During defrosting, the ice melts into the cabinet.
• Remove the drain plug on the inside oor of the freezer by pulling straight
out.
• Place a shallow pan outside drain outlet. The defrost water will drain out.
• Check the pan occasionally so the water does not overow.
• Clean the interior of the freezer.
• Replace the plug on the inside oor.
• Reconnect electrical connection. The “POWER ON INDICATOR” light should
be ON
• Reset the thermostat to desired setting.
• Allow the cabinet to cool for one hour.
• Return food to the freezer.
Defrosting usually takes a few hours. Leaving the door open will help speed the
process. Also, pouring warm water (not boiling) on the ice/frost will help speed
melting. If you must use a scraper- please use caution - it is very easy to damage
the freezer compartment and void your warranty.
THE FREEZER COMPARTMENT
• This compartment is designed for the long-term storage of frozen food.
Storage time is up to three months.
• The storage life of frozen foods varies and the recommended storage time
should not be exceeded. The instructions regarding the care of frozen foods
should be followed when defrosting the freezer.
• Pre-packed commercially frozen food should be stored in accordance with
the frozen foods manufacturer’s instructions for a three star frozen food
storage compartment or home freezer.
• Place frozen food into the freezer as quickly as possible after purchase.
If there are instructions on the packet, carefully follow these instructions
regarding storage times.
• The freezer door is susceptible to breaking due to excessive ice build up. Be
sure to defrost when the ice reaches ¼ to ½ inch thick.
A storage basket is provided for the organization of odd-shaped items. To reach
other packages in the freezer, just slide the basket to one side, or lift it out.
FREEZING FRESH FOODS
• Proper use of the appliance, adequately packed food, correct temperature
and taking into account hygienic precautions will substantially inuence the
quality of freezing the food or storing of the frozen foods.
• This compartment is designed for the long-term storage of frozen food.
• The storage life of frozen foods varies and the recommended storage time
should not be exceeded.
• Pre-packed commercially frozen food should be stored in accordance with
the frozen foods manufacturer’s instructions for a three star frozen food
storage compartment or home freezer.
• Place frozen food into the freezer as quickly as possible after purchase.
If there are instructions on the packet, carefully follow these instructions
regarding storage times.

5 CHEST FREEZER
• Carefully select food you intend to freeze, it should be of adequate quality
and suitable for freezing.
• Use correct packaging and wrap it tight.
• The packaging should be airtight and shouldn’t leak since this could cause
substantial vitamin loss and dehydration of foods.
• Foils and bags should be soft enough to tightly wrap around the foods.
• When preparing foods to be frozen, consider sanitary precautions.
• Mark packages with following data: kind and amount of foods and the date
of loading.
• It is most Important that the food is frozen as quickly as possible.
• If the loading amount is too large, the quality of freezing is reduced which
affects the quality of frozen foods.
MAINTENANCE
DANGER:
THE POWER MUST BE TURNED OFF AND THE UNIT DISCONNECTED FROM
THE POWER SOURCE WHENEVER PERFORMING SERVICE, MAINTENANCE
FUNCTIONS OR CLEANING THE REFRIGERATED AREA.
DANGER:
NEVER USE A HIGH PRESSURE WATER WASH FOR THIS CLEANING
PROCEDURE AS WATER CAN DAMAGE THE ELECTRICAL COMPONENTS
LOCATED NEAR OR AT THE CONDENSER COIL.
DANGER: NEVER USE STEEL PADS, WIRE BRUSHES OR SCRAPERS!
CAUTION: NEVER USE AN ACID BASED CLEANING SOLUTION!MANY FOOD PRODUCTS
HAVE AN ACIDIC CONTENT WHICH CAN DETERIORATE THE FINISH. BE SURE
TO CLEAN THE STAINLESS STEEL SURFACES OF ALL FOOD PRODUCTS.
CLEANING YOUR FREEZER
• Upon installation of your new appliance, it is recommended that it be cleaned
thoroughly.
• Turn the temperature control to “OFF”, unplug the freezer, remove the food
and storage basket.
• Wash the inside with a damp warm cloth containing a water and baking
soda solution. The solution should be about 2 tablespoons of baking soda to
a quart of water.
• Wash the storage basket with a mild detergent solution.
• Be sure to keep the door gasket (seal) clean to keep the unit running
efciently.
• The outside of the freezer should be cleaned with mild detergent and warm
water.
• Dry the interior and exterior with a soft cloth.
• It is recommended that the unit be cleaned each time it is defrosted to help
keep the unit odor free and running efciently.
VACATION TIME
• Remove all the food.
• Unplug the freezer.
• Clean the freezer.
• Leave the door open slightly to avoid possible formation of condensation,
mold, or odors.
• Use extreme caution in the case of children. The unit should not be accessible
to child’s’ play.
• Short vacations: Leave the freezer operating during vacations of less than
three weeks.
• Long vacations: If the appliance will not be used for several months, remove
all food and unplug the power cord. Clean and dry the interior thoroughly. To
prevent odor and mold growth, leave the door open slightly: blocking it open
if necessary or have the door removed.
MOVING YOUR FREEZER
• Remove all the food.
• Securely tape down all loose items inside your freezer.
• Remove the rollers to prevent damage.
• Tape the doors shut.
• Be sure the freezer stays in the upright position during transportation.
ENERGY SAVING TIPS
• The freezer should be located in the coolest area of the room, away from
heat producing appliances or heating ducts, and out of the direct sunlight.
• Let hot foods cool to room temperature before placing in the freezer.
Overloading the freezer forces the compressor to run longer. Foods that
freeze too slowly may lose quality, or spoil.
• Be sure to wrap foods properly, and wipe containers dry before placing them
in the freezer. This cuts down on frost build-up inside the freezer.
• Freezer storage bin should not be lined with aluminum foil, wax paper, or
paper toweling. Liners interfere with cold air circulation, making the freezer
less efcient.
• Organize and label food to reduce door openings and extended searches.
Remove as many items as needed at one time, and close the door as soon
as possible.
6 CHEST FREEZER
TROUBLE SHOOTING
You can solve many common freezer problems easily, saving you the cost of a
possible service call. Try the suggestions below to see if you can solve the problem
before calling the servicer.
PROBLEM CAUSES
Freezer does not
operate
Not plugged in.
The circuit breaker tripped or a blown fuse.
The freezer temperature control is set at “0/OFF”.
Compressor turns on
and off frequently
The room temperature is hotter than normal.
A large amount of food has been added to the freezer.
The door is open too often.
The door is not closed completely.
The temperature control is not set correctly.
The door gasket does not seal properly.
The freezer does not have the correct clearances.
The freezer has recently been disconnected for a period of
time. Four hours are required for the freezer to cool down
completely.
Temperature inside the
freezer is too warm
Temperature control is set too warm. Turn the control to a
cooler setting and allow several hours for the temperature
to stabilize.
Door is kept open too long or is opened too frequently.
Warm air enters the freezer every time the door is opened.
Open the door less often.
The door is not closed completely.
The door gasket does not seal properly.
A large amount of warm or hot food might have been stored
recently. Wait until the freezer has had a chance to reach its
selected temperature.
The freezer has recently been disconnected for a period of
time. Four hours are required for the freezer to cool down
completely.
Temperature inside the
freezer is too cold
Temperature control is set too cold. Turn the control to a
warmer setting and allow several hours for the temperature
to stabilize.
Fast Freeze switch is turned on. This causes continuous
running of the compressor and bypasses the temperature
control.
Temperature of external
freezer surface is warm
The exterior freezer walls can be as much as 30ºF
warmer than room temperature. This is normal while the
compressor works to transfer heat from inside the freezer
cabinet.
Popping or cracking
sound when
compressor comes on
Metal parts undergo expansion and contraction, as in
hot water pipes. This is normal. Sound will level off or
disappear as freezer continues to run.
Bubbling or gurgling
sound, like water
boiling
Refrigerant (used to cool freezer) is circulating throughout
the system. This is normal.
PROBLEM CAUSES
Vibrations Check to assure that the freezer is on a level surface.
Floor is uneven or weak. Freezer rocks on the oor when
it is moved slightly. Be sure oor can adequately support
freezer. Level the freezer by putting wood or metal shims
under part of the freezer.
The freezer is touching the wall. Re-level the freezer and
move it from the wall.
See “Installation Instructions”.
Moisture forms on
inside freezer walls
Weather is hot and humid, which increases internal rate of
frost build-up. This is normal.
Door is slightly open.
Door is kept open too long, or is opened too frequently.
Open the door less often.
The door is not sealed properly.
Moisture forms on
outside of freezer
Door is slightly open, causing cold air from inside the
freezer to meet warm moist air from outside.
The door will not close
properly
The freezer is not on a level surface.
The gasket is dirty.
The storage basket is out of position.

7 CHEST FREEZER
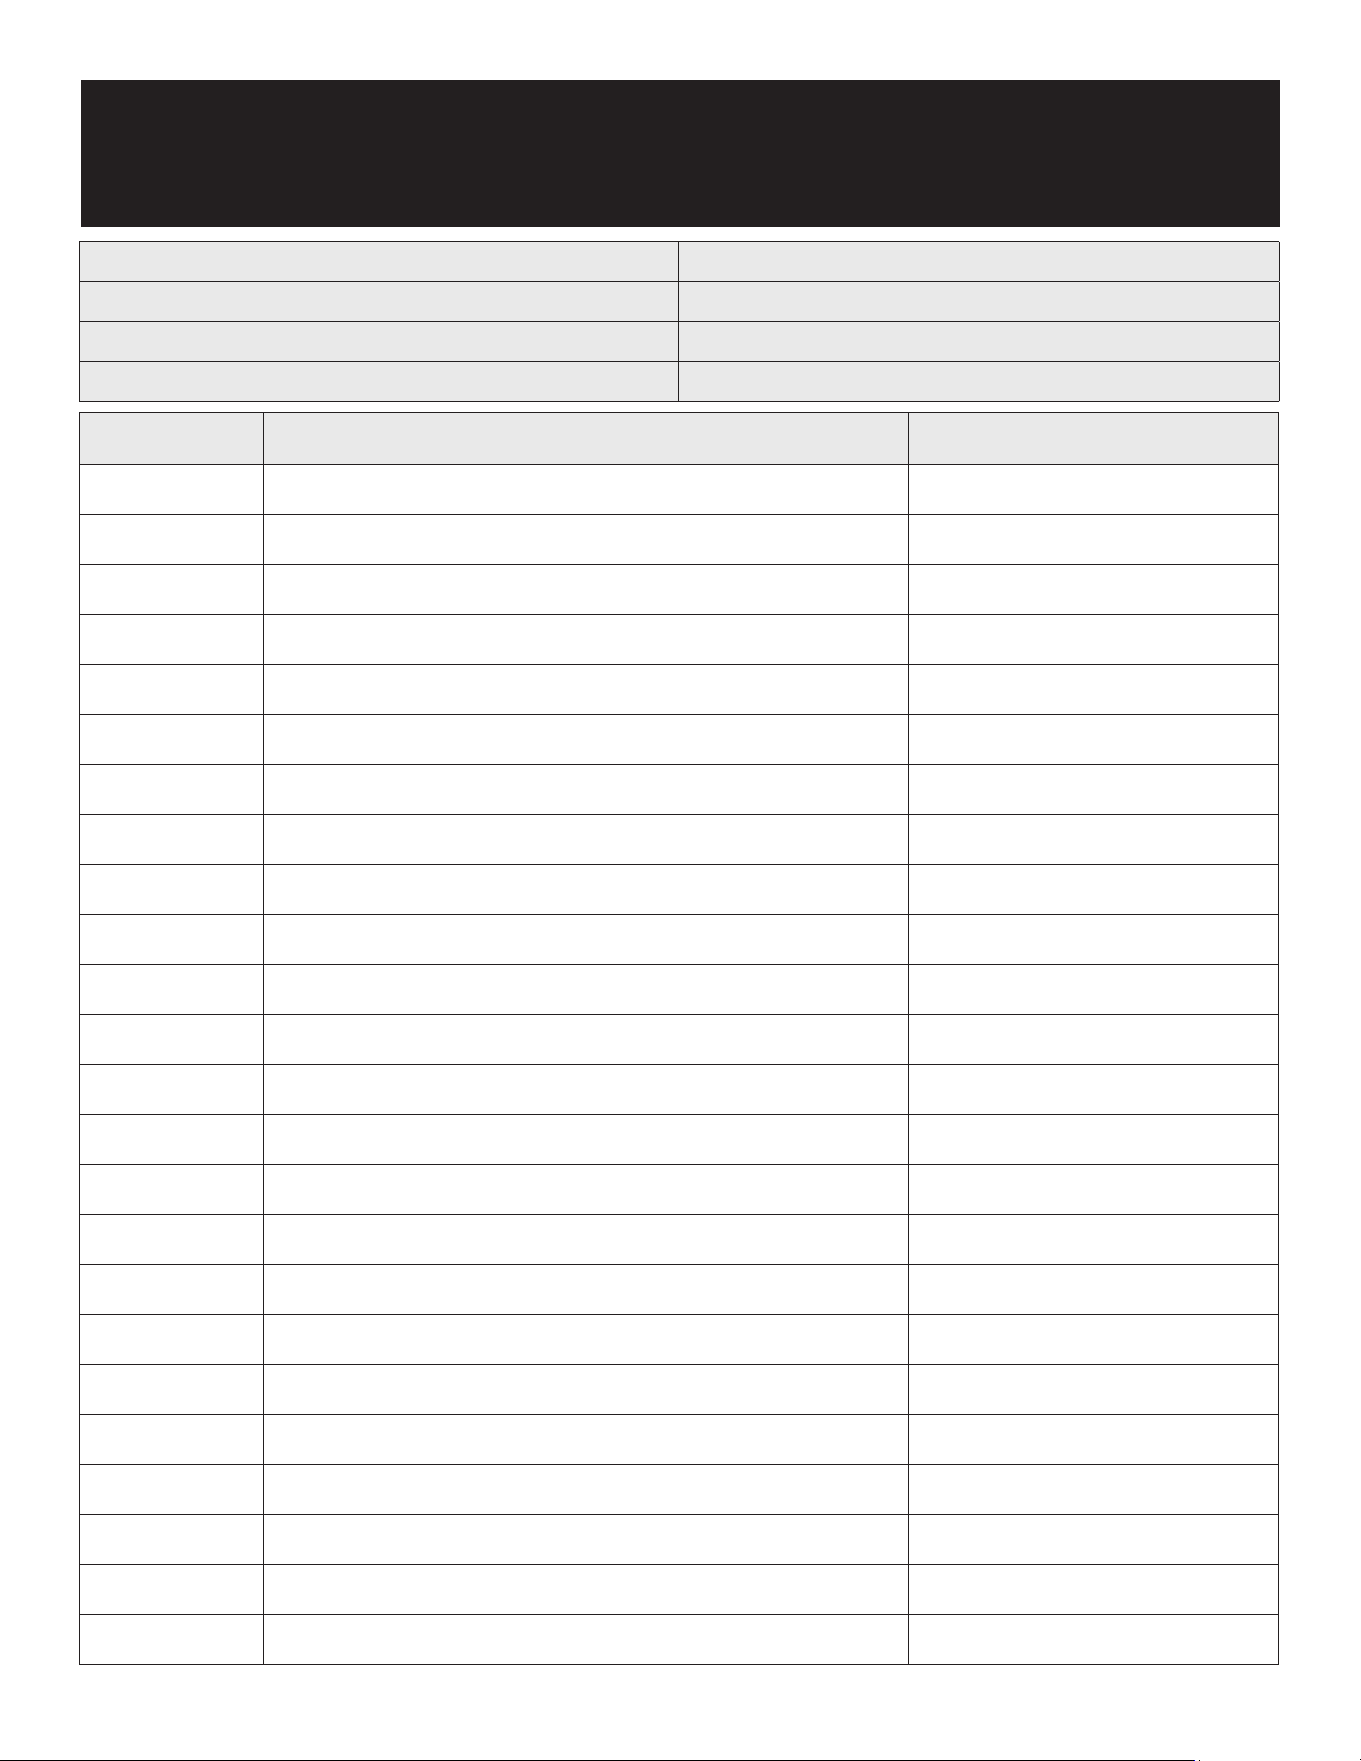
Wiring Diagram
KCCF073WS
CALL FACTORY FOR REPLACEMENT PARTS:
866-339-8515
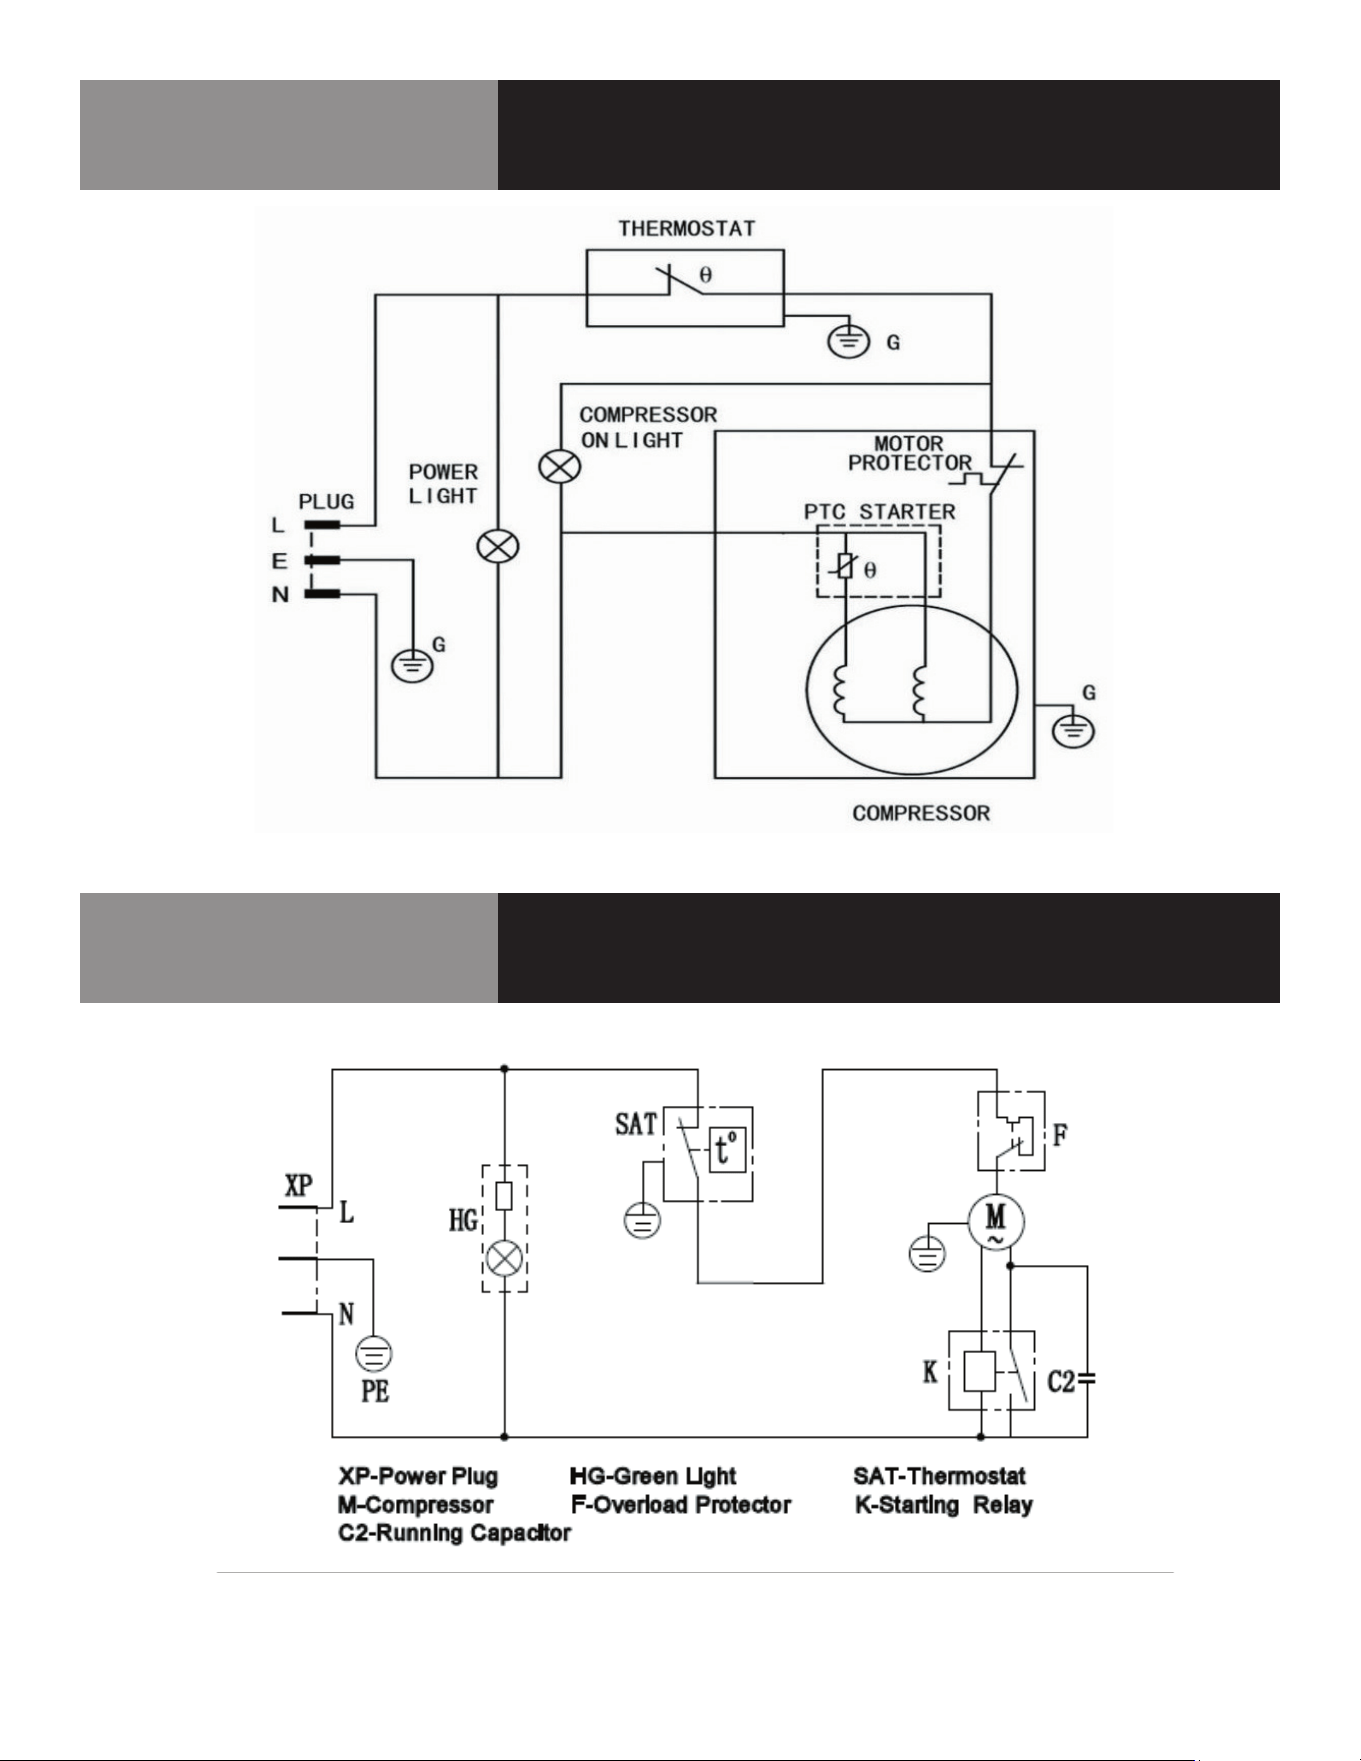
Wiring Diagram
KCCF140WH
CALL FACTORY FOR REPLACEMENT PARTS:
866-339-8515

8 CHEST FREEZER
Wiring Diagram
KCCF170WH
CALL FACTORY FOR REPLACEMENT PARTS:
866-339-8515
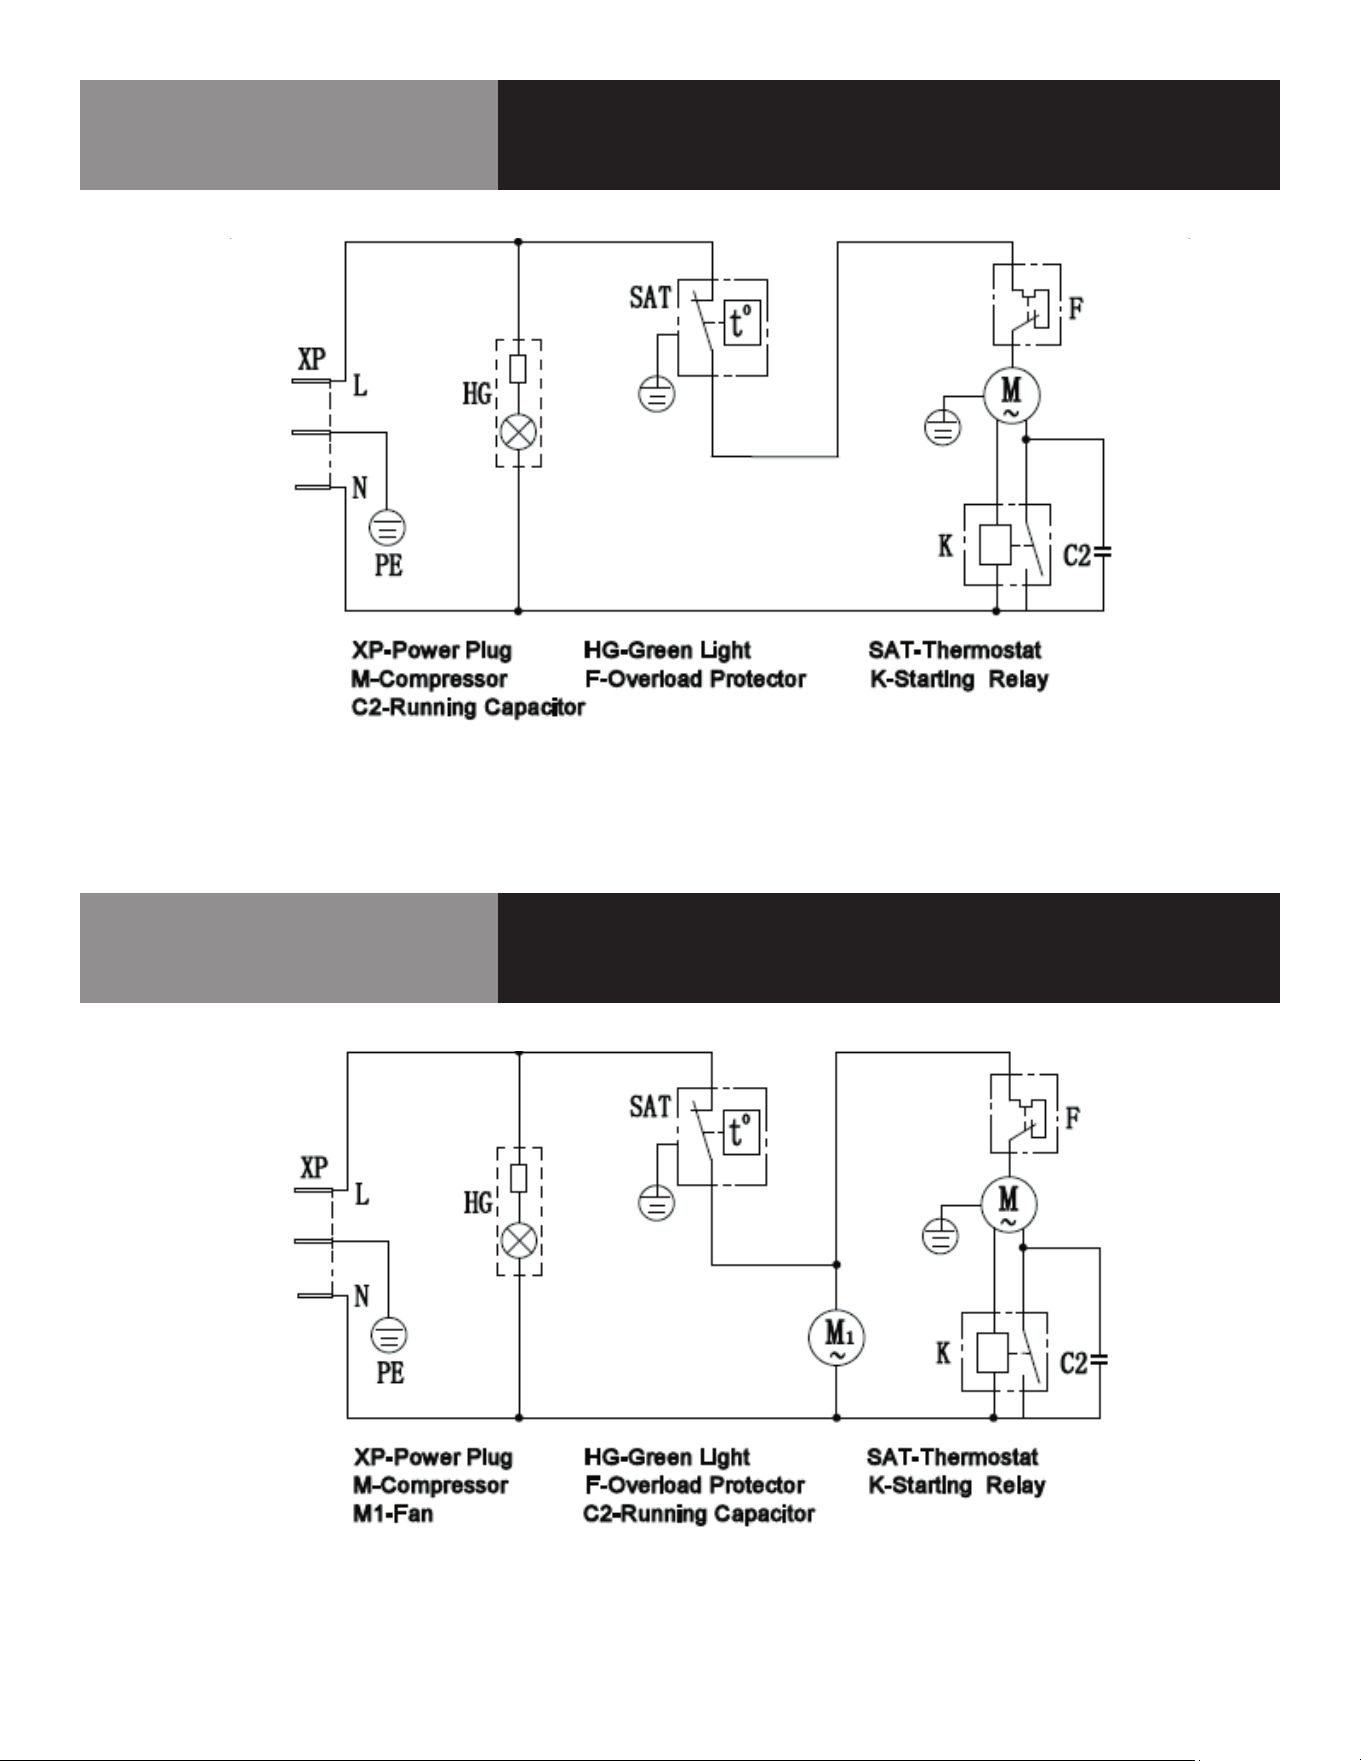
Wiring Diagram
KCCF210WH
CALL FACTORY FOR REPLACEMENT PARTS:
866-339-8515

9 CHEST FREEZER
WARRANTY
Your appliance is covered by a one (1) year limited warranty. For one (1) year from
your original date of purchase, Electrolux Professional, Inc. will pay all costs, except
as set forth below, for repairing or replacing any parts of this appliance that prove
to be defective in materials or workmanship when such appliance is installed, used,
and maintained in accordance with the provided instructions. For appliances that are
manufactured with a compressor, an additional four (4) year part warranty is provided
for the compressor only.
EXCLUSIONS
THIS WARRANTY DOES NOT COVER THE FOLLOWING:
1. Products where the original serial number has been removed, altered or cannot be
readily determined.
2. Normal wear and tear and gradual deterioration.
3. Product that has been transferred from its original owner to another party or
moved outside the USA or Canada.
4. Rust on the interior or exterior of the unit.
5. Products purchased “as-is”.
6. Food loss due to any refrigerator or freezer failures.
7. Damage caused at any time during shipment.
8. Service calls which do not involve malfunction or defects in materials or
workmanship, or for appliances used other than in accordance with the provided
instructions.
9. Service calls to correct the installation of your appliance or to instruct you how to
use your appliance.
10. Expenses for making the appliance accessible for servicing, such as removal of
trim, cupboards, shelves, etc., which are not a part of the appliance when it is
shipped from the factory.
11. Service calls to replace appliance light bulbs, air lters, water lters, and other
consumables, or knobs, handles, and other cosmetic parts.
12. Surcharges including, but not limited to, any after hours, weekend, or holiday
service calls, tolls, ferry trip charges, or mileage expense for service calls to
remote areas, including the state of Alaska.
13. Damages to the nish of the appliance and/or the appliance location that are
incurred during installation, including but not limited to oors, cabinets, walls, etc.
14. Damages caused by: services performed by unauthorized service companies; use
of parts other than genuine Electrolux Professional, Inc. parts or parts obtained
from persons other than authorized service companies; or external causes such
as abuse, misuse, inadequate power supply, accidents, res, or acts of God.
15. For appliances operated by a concessionaire or vendor in a trailer or other
motorized vehicle, or at varying locations, your appliance is covered by a one
(1) year, limited parts and labor warranty. For appliances that are manufactured
with a compressor, an additional four (4) year part warranty is provided for the
compressor only.
DISCLAIMER OF IMPLIED WARRANTIES; LIMITATION OF REMEDIES
CUSTOMER’S SOLE AND EXCLUSIVE REMEDY UNDER THIS LIMITED WARRANTY
SHALL BE PRODUCT REPAIR OR REPLACEMENT AS PROVIDED HEREIN. CLAIMS
BASED ON IMPLIED WARRANTIES, INCLUDING WARRANTIES OF MERCHANTABILITY
OR FITNESS FOR A PARTICULAR PURPOSE, ARE LIMITED TO ONE (1) YEAR OR
THE SHORTEST PERIOD ALLOWED BY LAW, BUT NOT LESS THAN ONE (1) YEAR.
ELECTROLUX PROFESSIONAL, INC. SHALL NOT BE LIABLE FOR CONSEQUENTIAL OR
INCIDENTAL DAMAGES SUCH AS PROPERTY DAMAGE AND INCIDENTAL EXPENSES
RESULTING FROM ANY BREACH OF THIS WRITTEN LIMITED WARRANTY OR ANY
IMPLIED WARRANTY. SOME STATES AND PROVINCES DO NOT ALLOW THE EXCLUSION
OR LIMITATION OF INCIDENTAL OR CONSEQUENTIAL DAMAGES, OR LIMITATIONS ON
THE DURATION OF IMPLIED WARRANTIES, SO THESE LIMITATIONS OR EXCLUSIONS
MAY NOT APPLY TO YOU. THIS WRITTEN WARRANTY GIVES YOU SPECIFIC LEGAL
RIGHTS. YOU MAY ALSO HAVE OTHER RIGHTS THAT VARY FROM STATE TO STATE.
If You Need Service
In order to obtain service the unit must rst be registered at KelvinatorCommercial.
com. Once registered please call 866-339-8515 for assistance.
This warranty only applies in the USA and Canada and is warranted by Electrolux
Professional, Inc. For installations outside the US and Canada, please contact your
local equipment provider for warranty specics.
Electrolux Professional, Inc. authorizes no person to change or add to any obligations
under this warranty. Obligations for service and parts under this warranty must be
performed by Electrolux Professional, Inc. or an authorized service company. Product
features or specications as described or illustrated are subject to change without
notice.
(November 2023)
866-339-8515
Electrolux Professional, Inc.
10 CHEST FREEZER
Service Log
Model No: Purchased From:
Serial No: Location:
Date Purchased: Date Installed:
Purchase Order No: For Service Call:
Date Maintenance Performed Performed By

MANUAL DE SERVICIO/INSTALACIÓN
INFORMACIÓN IMPORTANTE,
CONSÉRVESE PARA EL USUARIO
REFERENCIA DE PIEZA HB_738371_9F73837100, REV. A (07/23)
Este manual contiene información sobre:
CONGELADOR HORIZONTAL
ESTE MANUAL DEBE CONSERVARSE PARA CONSULTAS FUTURAS. ASEGÚRESE
DE LEER, COMPRENDER Y CUMPLIR LAS INSTRUCCIONES Y ADVERTENCIAS
QUE CONTIENE ESTE MANUAL.
POR SU SEGURIDAD No guarde ni utilice gasolina ni otros líquidos o vapores
inflamables cerca de este equipo ni de ningún otro.
NOTIFIQUE LOS DAÑOS AL TRANSPORTISTA DE MANERA INMEDIATA
Es responsabilidad del destinatario inspeccionar el contenedor al recibirlo
y determinar la posibilidad de cualquier daño, incluidos los daños ocultos.
Electrolux Professional Inc. recomienda que, si sospecha que se han producido
daños, anote un comentario en el recibo del material. Será responsabilidad del
destinatario presentar una reclamación al transportista. Es conveniente que lo
haga de inmediato.
Servicio de fabricación/consultas 866-339-8515.
Estados Unidos y Canadá, 866-339-8515
4003 Collins Lane, Louisville, KY 40245
www.kelvinatorcommercial.com
Kelvinator Commercial es una marca comercial pendiente o registrada de Electrolux Consumer Products, Inc., y se utiliza bajo una licencia de Electrolux Consumer Products, Inc. La
información que contiene este documento se considera actual y exacta en el momento de su impresión/creación. Consulte el sitio web de nuestra línea de productos para obtener la
información y las especificaciones más actualizadas. © 2024 Electrolux Professional, Inc. Todos los derechos reservados.
REV. D (09/24)
CONSERVE ESTE MANUAL PARA CONSULTAS FUTURAS
AVISO: Debido a un programa continuo de mejora del producto, Electrolux Professional
Inc. se reserva el derecho de realizar cambios en el diseño y las especificaciones sin
previo aviso.
AVISO: Lea detenidamente todo el manual antes de la instalación. Si no
se siguen ciertos procedimientos recomendados, se rechazarán las reclamaciones
de garantía.
El número de serie de todas las neveras y congeladores autónomos se encuentra
fuera de la unidad, en el lado izquierdo, cerca de la parte superior. Tenga siempre a
mano el número de serie de la unidad cuando llame para solicitar piezas o servicio
técnico. Este manual trata solamente sobre unidades estándar. Si tiene una unidad
personalizada, consulte al servicio de atención al cliente en el número que aparece
en este manual.
DESCRIPCIÓN DEL EQUIPO
N.º DE MODELO
TIPO DE
REFRIGERANTE
PESO DEL
REFRIGERANTE,
G
V/HZ/PH AMPERIOS
CAPACIDAD DE
ALMACENAMIENTO
(PIES
3
/M
3
)
HP BTU ONZAS DE CARGA PESO DE ENVÍO LB/KG
ENCHUFE
NEMA
KCCF073WS R600a 45 115/60/1 1,2 0,20 1/8 140 1,9 99/45 5-15P
KCCF140WH R600a 85 115/60/1 1,9 0,40 1/5 1500 3 187/85 5-15P
KCCF170WH R290 119 115/60/1 1,9 0,49 1/5 1740 4,2 205/93 5-15P
KCCF210WH R290 128 115/60/1 1,9 0,59 1/5 2100 4,52 240/109 5-15P

2 CONGELADOR HORIZONTAL
RECEPCIÓN E INSPECCIÓN DEL EQUIPO
Si bien la mayoría de los equipos se envían embalados, se debe tener cuidado durante
la descarga para no dañar el equipo al desplazarlo hasta el lugar de instalación.
1. Inspeccione visualmente el exterior del paquete y la plataforma o contenedor. Si
se observan daños se deben registrar y comunicar de inmediato al transportista.
2. En caso de daños, abra e inspeccione el contenido con el transportista.
3. Si el exterior no está dañado, pero tras la apertura se observan daños ocultos en
el equipo, notifique al transportista. La notificación se debe realizar de manera
verbal y por escrito.
4. Solicite que la empresa de transporte inspeccione el equipo dañado. Esto debe
hacerse en el plazo de 10 días desde la recepción del equipo.
5. Cerciórese de revisar el alojamiento del compresor y de inspeccionar visualmente
el conjunto refrigerante. Compruebe si los conductos están seguros y si la base
sigue intacta.
6. Los transportistas pueden suministrar los formularios de notificación de daños si
se solicitan.
7. Conserve todo el material de embalaje hasta que se haya realizado o descartado
la inspección.
IMPORTANTE - LÉASE PRIMERO - IMPORTANTE
SU SEGURIDAD Y LA DE LOS DEMÁS SON MUY IMPORTANTES.
EN ESTE MANUAL Y EN EL EQUIPO ENCONTRARÁ NUMEROSOS MENSAJES DE SEGURIDAD
IMPORTANTES. LEA Y CUMPLA SIEMPRE TODOS LOS MENSAJES DE SEGURIDAD.
LAS INSTRUCCIONES SOBRE NUESTROS PRODUCTOS SE CARGARÁN EN EL SITIO WEB OFICIAL
DE NUESTRA EMPRESA.
ESTE ES EL SÍMBOLO DE ALERTA SOBRE SEGURIDAD. ESTE SÍMBOLO ALERTA
DE RIESGOS POTENCIALES QUE PUEDEN PROVOCAR HERIDAS O MUERTE AL
USUARIO O A OTRAS PERSONAS. TODOS LOS MENSAJES DE SEGURIDAD IRÁN
SEGUIDOS DE LOS SÍMBOLOS DE ALERTA DE SEGURIDAD Y DE LAS PALABRAS
"PELIGRO", "ADVERTENCIA" O "PRECAUCIÓN".
PELIGRO SIGNIFICA QUE EL INCUMPLIMIENTO DE ESTA INDICACIÓN DE
SEGURIDAD PUEDE PROVOCAR LESIONES GRAVES O MUERTE.
ADVERTENCIA SIGNIFICA QUE SI NO SE TIENE EN CUENTA ESTE AVISO DE
SEGURIDAD SE PUEDEN PRODUCIR DAÑOS IMPORTANTES EN EL PRODUCTO,
LESIONES PERSONALES GRAVES O MUERTE.
PRECAUCIÓN SIGNIFICA QUE EL INCUMPLIMIENTO DE ESTA INDICACIÓN DE
SEGURIDAD PUEDE PROVOCAR LESIONES PERSONALES LEVES O MODERADAS,
O DAÑOS MATERIALES O EN EL EQUIPO.
TODOS LOS MENSAJES DE SEGURIDAD ALERTAN SOBRE CUÁL ES EL PELIGRO POTENCIAL,
INDICAN CÓMO REDUCIR EL RIESGO DE LESIONES E INFORMAN DE LO QUE PUEDE OCURRIR SI
NO SE SIGUEN LAS INSTRUCCIONES.
ADOPTE MEDIDAS DE PRECAUCIÓN BÁSICAS, INCLUIDAS LAS SIGUIENTES:
NOTA: SI EL CABLE ELÉCTRICO SUFRE ALGÚN DAÑO, EL FABRICANTE, SU SERVICIO
TÉCNICO O UN PROFESIONAL TENDRÁN QUE CAMBIARLO PARA EVITAR
RIESGOS.
NOTA: ESTE EQUIPO NO ESTÁ DISEÑADO PARA QUE LO USEN PERSONAS (INCLUIDOS
NIÑOS) CON DISCAPACIDAD FÍSICA, SENSORIAL O MENTAL, O CON EXPERIENCIA
Y CONOCIMIENTO INSUFICIENTES, A MENOS QUE UNA PERSONA RESPONSABLE
DE SU SEGURIDAD LAS SUPERVISE O INSTRUYA EN EL USO DEL EQUIPO.
NOTA: SE DEBE VIGILAR A LOS NIÑOS PARA IMPEDIR QUE JUEGUEN CON EL EQUIPO.
NOTA: ESTE EQUIPO PUEDEN UTILIZARLO NIÑOS DE MÁS DE 8 AÑOS Y PERSONAS
CON CAPACIDADES FÍSICAS, SENSORIALES O MENTALES REDUCIDAS O QUE
CAREZCAN DE EXPERIENCIA Y CONOCIMIENTOS SI SE LES SUPERVISA O SE LES
INSTRUYE EN EL USO SEGURO DEL EQUIPO Y SI COMPRENDEN LOS RIESGOS
QUE COMPORTA. LOS NIÑOS NO DEBEN JUGAR CON EL EQUIPO. LOS NIÑOS SIN
SUPERVISIÓN NO DEBEN REALIZAR TAREAS DE LIMPIEZA Y MANTENIMIENTO.
NOTA: MANTENGA EL EQUIPO Y EL CABLE FUERA DEL ALCANCE DE NIÑOS MENORES DE 8
AÑOS.
NOTA: NO GUARDE EN EL EQUIPO SUSTANCIAS EXPLOSIVAS COMO AEROSOLES CON
PROPELENTE INFLAMABLE.
NOTA: EL EQUIPO UTILIZA GAS INFLAMABLE DE AISLAMIENTO C5H10; LA ELIMINACIÓN
DEL EQUIPO DEBE HACERSE DE ACUERDO CON LAS NORMAS DE LAS AUTORIDADES
LOCALES.
NOTA: LA LLAVE DE LA CAJA ELÉCTRICA DEL EQUIPO DEBE GUARDARLA PERSONAL
PROFESIONAL PARA EVITAR RIESGOS.
ADVERTENCIA: MANTENGA LIBRES DE OBSTRUCCIONES LAS ABERTURAS DE VENTILACIÓN DEL
ALOJAMIENTO DEL EQUIPO O DE LA ESTRUCTURA EMPOTRADA.
ADVERTENCIA: NO UTILICE DISPOSITIVOS MECÁNICOS NI OTROS MEDIOS PARA ACELERAR EL
PROCESO DE DESCONGELACIÓN, EXCEPTO LOS RECOMENDADOS POR EL FABRI
-
CANTE.
ADVERTENCIA: NO DAÑE EL CIRCUITO REFRIGERANTE.
ADVERTENCIA: NO UTILICE DISPOSITIVOS ELÉCTRICOS DENTRO DE LOS COMPARTIMIENTOS
PARA ALIMENTOS DEL EQUIPO, SALVO SI SON DEL TIPO RECOMENDADO POR EL
FABRICANTE. MANIPULACIÓN, TRASLADO Y USO DE LA NEVERA O CONGELADOR
PARA EVITAR DAÑAR LOS TUBOS DE REFRIGERANTE O AUMENTAR EL RIESGO DE
FUGAS.
PRECAUCIÓN: RIESGO DE INCENDIO O EXPLOSIÓN DEBIDO AL REFRIGERANTE INFLAMABLE
UTILIZADO. SIGA ATENTAMENTE LAS INSTRUCCIONES DE MANIPULACIÓN DE
CONFORMIDAD CON LA NORMATIVA DEL GOBIERNO DE EE.UU. LOS COMPONENTES
DEBERÁN SUSTITUIRSE POR OTROS SIMILARES Y EL MANTENIMIENTO DEBERÁ
REALIZARLO PERSONAL DE SERVICIO AUTORIZADO POR LA FÁBRICA, CON
EL FIN DE MINIMIZAR EL RIESGO DE UNA POSIBLE IGNICIÓN DEBIDA A PIEZAS
INCORRECTAS O A UN SERVICIO INADECUADO. LAS PIEZAS DEBEN SUSTITUIRSE
POR LOS COMPONENTES CORRESPONDIENTES Y LAS OPERACIONES DEBEN ESTAR
A CARGO DE PROFESIONALES PARA MINIMIZAR EL RIESGO DE IGNICIÓN DEBIDO A
PIEZAS INCORRECTAS U OPERACIONES INADECUADAS.
PRECAUCIÓN: RIESGO DE INCENDIO O EXPLOSIÓN DEBIDO A LA PERFORACIÓN DEL TUBO DE
REFRIGERANTE; SIGA ATENTAMENTE LAS INSTRUCCIONES DE MANIPULACIÓN. SE
UTILIZA REFRIGERANTE INFLAMABLE.
PELIGRO: RIESGO DE QUE NIÑOS QUEDEN ATRAPADOS. ANTES DE DESECHAR LA NEVERA O
EL CONGELADOR ANTIGUO: EXTRAIGA LAS PUERTAS Y DEJE LOS ESTANTES EN SU
SITIO PARA QUE LOS NIÑOS NO PUEDAN INTRODUCIRSE CON FACILIDAD.
INSTALACIÓN
ADVERTENCIA:
LAS GARANTÍAS ESTÁNDAR SE ANULAN SI SE REALIZAN PROCEDIMIENTOS
DE INSTALACIÓN INCORRECTOS.
PELIGRO:
EL INTERRUPTOR DE ENCENDIDO/APAGADO DEBE ESTAR EN POSICIÓN
DE APAGADO Y LA UNIDAD DESCONECTADA DE LA FUENTE DE
ALIMENTACIÓN CUANDO SE LLEVEN A CABO TAREAS DE SERVICIO,
MANTENIMIENTO O LIMPIEZA DE LA ZONA REFRIGERADA.
PELIGRO
• Enchúfelo a una toma de 3 clavijas con conexión a tierra, no quite la clavija de
tierra, no utilice adaptador ni cable prolongador.
• Se recomienda disponer de un circuito aparte que sirva únicamente a la nevera.
Utilice tomas de corriente que no puedan desconectarse mediante un interruptor
o una cadena.
• No limpie nunca las piezas de la nevera con líquidos inflamables. Las
emanaciones pueden originar riesgo de fuego o explosión. Además, no guarde ni
utilice gasolina ni otros líquidos o vapores inflamables cerca de este aparato ni
de ningún otro. Las emanaciones pueden originar riesgo de fuego o explosión.
• Antes de proceder a operaciones de limpieza y mantenimiento, asegúrese de
que la línea de alimentación eléctrica de la unidad esté desconectada.
• No conecte ni desconecte el enchufe eléctrico con las manos mojadas.
• Desenchufe la nevera o desconéctela de la corriente antes de limpiarla o
repararla. De lo contrario, existe el riesgo de sufrir descargas eléctricas o muerte.
• No intente reparar o sustituir ninguna pieza de la nevera a menos que se
recomiende específicamente en el manual. Para cualquier otro tipo de
mantenimiento, diríjase a un técnico profesional.

3 CONGELADOR HORIZONTAL
ADVERTENCIA
• Dos o más personas deben encargarse de trasladar e instalar la nevera. Esto
debe hacerse para evitar lesiones de espalda, entre otras.
• Para garantizar la correcta ventilación de la nevera, la parte frontal debe estar
completamente despejada. Elija una zona bien ventilada con temperaturas
superiores a 16 °C (60 °F) e inferiores a 32 °C (90 °F). Esta unidad debe
instalarse en una zona protegida de los elementos, como el viento, la lluvia, las
salpicaduras o gotas de agua.
• La nevera no debe colocarse cerca de hornos, parrillas u otras fuentes de calor
intenso.
• La nevera debe instalarse con todas las conexiones eléctricas de acuerdo con
los códigos estatales y locales. Se requiere un suministro eléctrico estándar
(sólo 115 VCA, 60 Hz), debidamente conectado a tierra de acuerdo con el Código
Eléctrico Nacional y las normas y ordenanzas locales.
• No retuerza ni apriete el cable de alimentación de la nevera.
• La capacidad del fusible (o disyuntor) debe ser de 15 amperios.
• Es importante que la nevera esté nivelada para que funcione correctamente. Es
posible que tenga que hacer varios ajustes para nivelarla.
• No permita que los niños utilicen la nevera, jueguen con ella o penetren en el
interior.
• Aunque la unidad ha sido probada en fábrica, debido al transporte y
almacenamiento a largo plazo, el primer lote de cubos debe desecharse.
• No utilice productos de limpieza a base de disolventes o abrasivos en el interior.
Esos limpiadores pueden dañar o decolorar el interior.
• No utilice este equipo para fines distintos de los previstos.
ANTES DE UTILIZAR EL EQUIPO
• Retire el embalaje exterior e interior.
• Compruebe que dispone de todas las piezas siguientes:
- 1 cesto de almacenamiento
- 1 tapón de desagüe
- 1 manual de instrucciones
- 1 rascador plástico
• Antes de conectar la unidad a la fuente de alimentación, debe estar en posición
vertical durante al menos unas 2 horas. Se reduce así la posibilidad de
desperfectos en el sistema de refrigeración debidos a la manipulación durante el
transporte.
• Limpie la superficie interior con agua templada y un paño suave.
INSTALACIÓN DEL EQUIPO
• Coloque la nevera-congelador sobre un piso capaz de soportarla cuando esté
completamente cargada. Para nivelar la nevera-congelador, ajuste las patas de
nivelación situadas en la parte inferior del equipo.
• Deje 12-13 cm (5 pulg.) de espacio libre entre la parte trasera y los lados de la
unidad, para facilitar la circulación de aire y el enfriamiento del compresor y del
condensador.
• Sitúe la unidad alejada de la luz solar directa y de fuentes de calor (cocina, estufa,
radiador, etc.). La luz solar directa puede afectar al recubrimiento de acrílico y
las fuentes de calor pueden aumentar el consumo eléctrico. Las temperaturas
sumamente frías también pueden afectar al funcionamiento normal de la nevera/
congelador.
• No coloque la unidad en zonas húmedas.
• Enchufe la unidad a una toma de pared exclusiva y con conexión a tierra. En
ningún caso debe cortar ni extraer la tercera clavija (de conexión a tierra) del
cable de alimentación. Para cualquier duda referente a la alimentación eléctrica
o la conexión a tierra se debe consultar a un electricista profesional o a un centro
de servicio técnico autorizado.
CONEXIÓN ELÉCTRICA
ADVERTENCIA: EL USO INADECUADO DEL ENCHUFE CON TOMA A TIERRA PUEDE
PROVOCAR EL RIESGO DE DESCARGA ELÉCTRICA. SI EL CABLE DE
ALIMENTACIÓN SE DETERIORA, SOLICITE SU SUSTITUCIÓN A UN
CENTRO DE SERVICIO TÉCNICO AUTORIZADO.
Para su seguridad, este equipo debe estar correctamente conectado a tierra. El cable
de alimentación de esta unidad está equipado con un enchufe de tres clavijas que se
acopla a las tomas de pared estándar de tres clavijas para minimizar la posibilidad
de descarga eléctrica.
En ningún caso debe cortar ni extraer la tercera clavija de conexión a tierra del
cable de alimentación. Para su seguridad, este aparato debe estar correctamente
conectado a tierra.
Este equipo requiere una toma de corriente estándar de 115/120 voltios CA ~/60 Hz
con toma de tierra de tres clavijas. Solicite a un electricista profesional que revise la
toma de corriente y el circuito para asegurarse de que la toma esté correctamente
conectada a tierra. Si solo se dispone de una toma para 2 clavijas, la responsabilidad
y obligación del usuario es hacer que se sustituya por una toma de pared de 3
clavijas con conexión a tierra adecuada.
El cable debe fijarse detrás del equipo y no dejarse a la vista ni colgando para evitar
lesiones accidentales.
El equipo debe enchufarse siempre a su propia toma de corriente, cuyo voltaje coincida
con el indicado en la etiqueta del aparato. Esto proporciona el mejor rendimiento y
también evitar la sobrecarga de los circuitos del cableado doméstico, que podría
causar un peligro de incendio por sobrecalentamiento. Nunca desenchufe el aparato
tirando del cable de alimentación. Debe asir siempre el enchufe con firmeza y tirar
rectamente de él para retirarlo de la toma. Repare o sustituya inmediatamente los
cables de alimentación que se hayan deshilachado o dañado de algún modo. No
utilice cables que presenten grietas o daños por abrasión en toda su longitud o en
alguno de sus extremos. Al mover el equipo, tenga cuidado de no dañar el cable de
alimentación.
CABLE PROLONGADOR
Debido a los riesgos potenciales de seguridad bajo ciertas condiciones, se
recomienda especialmente que no utilice cable prolongador con este aparato. No
obstante, si tiene que utilizar un prolongador, es absolutamente necesario que sea de
3 hilos con conexión a tierra, homologado por UL/CUL, que tenga un enchufe y que
su capacidad eléctrica sea de 115 voltios y al menos 10 amperios.
ESTABILIZADOR DE CORRIENTE
La mayoría de los aparatos eléctricos utilizan una serie de placas eléctricas de
control para funcionar. Esas placas son muy susceptibles a las subidas de voltaje y
podrían resultar dañadas o destruidas.
Si el equipo se va a utilizar en una zona, ciudad o país propenso a subidas de voltaje
o apagones, se sugiere que emplee un estabilizador de corriente con todos los
aparatos eléctricos y electrodomésticos que utilice. El estabilizador que elija debe
tener bloqueo de sobrevoltaje suficientemente alto como para proteger el aparato al
que está conectado. Si tiene alguna duda sobre el tipo y la capacidad del estabilizador
de corriente que necesita, póngase en contacto con un electricista autorizado de su
zona.
Los daños debidos a subidas de voltaje no se consideran defectos cubiertos por el
fabricante y anularán la garantía del producto.
FUNCIONAMIENTO
PRECAUCIÓN: NO UTILICE AGUA HIRVIENDO PORQUE PUEDE DAÑAR LAS PIEZAS DE
PLÁSTICO. ADEMÁS, NO UTILICE NUNCA UN INSTRUMENTO AFILADO
O METÁLICO PARA ELIMINAR LA ESCARCHA, YA QUE PODRÍA DAÑAR
LOS SERPENTINES DE REFRIGERACIÓN Y ANULARÍA LA GARANTÍA. SE
RECOMIENDA UTILIZAR EL RASCADOR DE PLÁSTICO SUMINISTRADO CON
LA UNIDAD.
NOTA: SI LA UNIDAD SE DESENCHUFA, DEJA DE RECIBIR ALIMENTACIÓN O SE
APAGA, DEBE ESPERAR DE 3 A 5 MINUTOS ANTES DE VOLVER A PONERLA
EN MARCHA. SI INTENTA VOLVER A PONERLA EN MARCHA ANTES DE ESE
TIEMPO, EL CONGELADOR NO ARRANCARÁ.

4 CONGELADOR HORIZONTAL
AJUSTE DEL CONTROL DE TEMPERATURA: KCCF073WS
• Para controlar la temperatura interior, ajuste los mandos de control en función de
la temperatura ambiente o del uso previsto.
• La primera vez que encienda el equipo, ajuste el control de temperatura en "7".
• La escala de control de temperatura va de la posición "1", la más caliente, a la
"7", la más fría, en la sección del congelador. Después de 24 a 48 horas, ajuste
el mando de temperatura en la posición más adecuada para sus necesidades. El
ajuste “4” es normalmente el adecuado para el uso de la nevera en el hogar o la
oficina.
• Al girar el mando de temperatura a “0” se detiene el ciclo de enfriamiento pero
no se corta el suministro de electricidad al congelador.
• Si la unidad se desenchufa, deja de recibir alimentación o se apaga, se debe
esperar de 3 a 5 minutos antes de volver a ponerla en marcha. Si intenta volver
a ponerla en marcha antes de ese tiempo, el congelador no arrancará.
• Una gran cantidad de alimentos reduce la eficacia de refrigeración del equipo.
• Si decide cambiar el ajuste del termostato, regule el control en incrementos
numéricos de uno en uno. Deje pasar varias horas para que la temperatura se
estabilice entre un ajuste y otro.
AJUSTE DEL CONTROL DE TEMPERATURA
:
KCCF140WH, KCCF170WH, KCCF210WH
• Para controlar la temperatura interior, ajuste los mandos de control en función de
la temperatura ambiente o del uso previsto.
• La primera vez que encienda el equipo, ajuste el control de temperatura en “7”.
• La escala de control de temperatura va de la posición “1”, la más caliente, a la
“7”, la más fría, en la sección del congelador. Después de 24 a 48 horas, ajuste
el mando de temperatura en la posición más adecuada para sus necesidades. El
ajuste “4” es normalmente el adecuado para el uso de la nevera en el hogar o la
oficina.
• Al girar el mando de temperatura a “1” se detiene el ciclo de enfriamiento pero
no se corta el suministro de electricidad al congelador.
• Si la unidad se desenchufa, deja de recibir alimentación o se apaga, se debe
esperar de 3 a 5 minutos antes de volver a ponerla en marcha. Si intenta volver
a ponerla en marcha antes de ese tiempo, el congelador no arrancará.
• Una gran cantidad de alimentos reduce la eficacia de refrigeración del equipo.
• Si decide cambiar el ajuste del termostato, regule el control en incrementos
numéricos de uno en uno. Deje pasar varias horas para que la temperatura se
estabilice entre un ajuste y otro.
DESCONGELACIÓN DEL CONGELADOR
• ¿Cuándo? Para un funcionamiento más eficiente y un consumo mínimo de
energía, descongele el congelador cuando la escarcha de sus paredes sea
excesiva o tenga un grosor de 0,6 a 1,3 cm (¼ a ½ pulg.).
• Elija un momento en el que las existencias de alimentos congelados sean
escasas.
• Saque los alimentos congelados del congelador y colóquelos en una nevera para
protegerlos.
• Gire la perilla del termostato a la posición “0” o la configuración más baja.
• Desenchufe el congelador. La luz indicadora de encendido debe estar apagada.
• Durante la descongelación, el hielo se funde en el armario.
• Retire el tapón de vaciado situado en la base del congelador tirando hacia fuera.
• Coloque una bandeja poco profunda en la salida del desagüe. El agua de
descongelación saldrá por el desagüe.
• Compruebe ocasionalmente la bandeja para evitar que rebose.
• Limpie el Interior del congelador.
• Vuelva a colocar el tapón en la base.
• Vuelva a conectar la conexión eléctrica. La luz indicadora de encendido debe
encenderse
• Restablezca el termostato al ajuste que desee.
• Deje enfriar el armario durante una hora.
• Devuelva los alimentos al congelador.
La descongelación suele tardar unas horas. Dejar la puerta abierta acelera el
proceso. También, verter agua caliente (no hirviendo) sobre el hielo o la escarcha.
Si tiene que utilizar un rascador, tenga cuidado: es muy fácil dañar el congelador y
anular la garantía.
COMPARTIMIENTO CONGELADOR
• Este compartimiento está diseñado para el almacenamiento a largo plazo de
alimentos congelados. El tiempo de almacenamiento es de hasta tres meses.
• La duración de conservación de los alimentos congelados varía y no debe
superarse el tiempo de conservación recomendado. Al descongelar el congelador
deben seguirse las instrucciones relativas al cuidado de los alimentos
congelados.
• Los congelados preenvasados comercialmente deben almacenarse de acuerdo
con las instrucciones del fabricante para un compartimiento de tres estrellas o
un congelador doméstico.
• Introduzca los alimentos congelados en el congelador lo antes posible después
de comprarlos. Si hay instrucciones en el paquete relativas a los tiempos de
almacenamiento, sígalas atentamente.
• La puerta del congelador puede romperse debido a una acumulación excesiva de
hielo. Debe descongelar cuando el hielo alcance de 0,6 a 1,3 cm (¼ a ½ pulg.)
de grosor.
Se proporciona un cesto de almacenamiento para la organización de artículos con
formas irregulares. Para alcanzar otros envases en el congelador, deslice el cesto a
un lado o elévelo.
CONGELACIÓN DE ALIMENTOS FRESCOS
• El uso correcto del aparato, el envasado adecuado de los alimentos, la temperatura
correcta y la adopción de precauciones higiénicas influirán sustancialmente en
la calidad de la congelación o el almacenamiento de los alimentos congelados.
• Este compartimiento está diseñado para el almacenamiento a largo plazo de
alimentos congelados.
• La duración de conservación de los alimentos congelados varía y no debe
superarse el tiempo de conservación recomendado.
• Los congelados preenvasados comercialmente deben almacenarse de acuerdo
con las instrucciones del fabricante para un compartimiento de tres estrellas o
un congelador doméstico.
• Introduzca los alimentos congelados en el congelador lo antes posible después
de comprarlos. Si hay instrucciones en el paquete relativas a los tiempos de
almacenamiento, sígalas atentamente.
• Seleccione cuidadosamente los alimentos que vaya a congelar, deben ser de
calidad adecuada y aptos para la congelación.
• Utilice un envase adecuado y bien envuelto.

5 CONGELADOR HORIZONTAL
• El envase debe ser hermético y sin fugas, ya que podrían causar una pérdida
importante de vitaminas y la deshidratación de los alimentos.
• El papel de aluminio y las bolsas deben ser suficientemente blandas para
envolver bien los alimentos.
• Cuando prepare alimentos para congelar, tenga en cuenta las precauciones
sanitarias.
• Marque los envases con los datos siguientes: tipo y cantidad de alimentos y
fecha de carga.
• Lo más importante es que los alimentos se congelen lo antes posible.
• Si la carga es demasiado grande, se reduce la calidad de la congelación, lo que
afecta a la calidad de los alimentos congelados.
MANTENIMIENTO
PELIGRO:
EL INTERRUPTOR DEBE ESTAR EN POSICIÓN DE APAGADO Y LA UNIDAD
DESCONECTADA DE LA FUENTE DE ALIMENTACIÓN CUANDO SE LLEVEN
A CABO TAREAS DE SERVICIO, MANTENIMIENTO O LIMPIEZA DE LA ZONA
REFRIGERADA.
PELIGRO:
NO UTILICE AGUA A ALTA PRESIÓN PARA ESTE PROCEDIMIENTO DE
LIMPIEZA, YA QUE EL AGUA PUEDE DAÑAR LOS COMPONENTES ELÉCTRICOS
UBICADOS EN EL SERPENTÍN DEL CONDENSADOR O CERCA DE ÉL.
PELIGRO: NO UTILICE ESTROPAJOS DE ACERO, CEPILLOS DE ALAMBRE NI
RASCADORES.
PRECAUCIÓN: ¡NO UTILICE NUNCA SOLUCIONES DE LIMPIEZA CON BASE DE ÁCIDO!
MUCHOS PRODUCTOS ALIMENTICIOS TIENEN UN CONTENIDO ÁCIDO QUE
PUEDE DETERIORAR EL ACABADO. ASEGÚRESE DE ELIMINAR TODOS LOS
PRODUCTOS ALIMENTICIOS DE LAS SUPERFICIES DE ACERO INOXIDABLE.
LIMPIEZA DEL CONGELADOR
• Tras la instalación del equipo nuevo, se recomienda limpiarlo a fondo.
• Gire el control de temperatura a "OFF", desenchufe el congelador, retire los
alimentos y el cesto de almacenamiento.
• Lave el interior con un paño húmedo y templado, empapado en una solución
de agua y bicarbonato de sodio. La solución debe ser de unas 2 cucharadas de
bicarbonato de sodio por cada litro de agua.
• Lave el cesto de almacenamiento con una solución de detergente suave.
• Asegúrese de mantener limpia la junta de la puerta para que la unidad funcione
correctamente.
• El exterior del congelador se debe limpiar con un detergente suave y agua
templada.
• Seque el interior y el exterior con un paño suave.
• Se recomienda limpiar la unidad cada vez que se descongele para ayudar a
mantenerla libre de olores y funcionando de manera eficiente.
PERIODO DE VACACIONES
• Extraiga todos los alimentos.
• Desenchufe el congelador.
• Limpie el congelador.
• Deje la puerta ligeramente abierta para evitar la posible formación de
condensación, moho u olores.
• Extreme las precauciones con los niños. La unidad no debe ser accesible para
los juegos de los niños.
• Vacaciones cortas: Deje el congelador en marcha durante las vacaciones o por
periodos inferiores a tres semanas.
• Vacaciones largas: Si no va a utilizar el equipo durante varios meses, retire todos
los alimentos y desenchufe el cable de alimentación. Limpie y seque a fondo
el interior. Para evitar olores y la aparición de moho, deje la puerta ligeramente
abierta: bloquéela si es necesario o pida que la retiren.
DESPLAZAMIENTO DEL CONGELADOR
• Extraiga todos los alimentos.
• Fije con cinta adhesiva todos los objetos sueltos en el interior del congelador.
• Retire los rodillos para evitar daños.
• Fije las puertas cerradas con cinta adhesiva.
• Cerciórese de mantener el congelador en posición vertical durante el transporte.
CONSEJOS PARA AHORRAR ENERGÍA
• El congelador debe estar situado en la zona más fresca del recinto, lejos de
aparatos que produzcan calor o conductos de calefacción, y alejado de la luz
solar directa.
• Espere a que los alimentos calientes se enfríen a temperatura ambiente antes de
introducirlos en el congelador. La sobrecarga del congelador obliga al compresor
a funcionar más tiempo. Los alimentos que se congelan con demasiada lentitud
pueden perder calidad o estropearse.
• Envuelva bien los alimentos y seque los recipientes antes de introducirlos en el
congelador. Esto reduce la formación de escarcha en el interior del congelador.
• El recipiente de almacenamiento del congelador no debe forrarse con papel de
aluminio, papel encerado ni papel de cocina. Los revestimientos interfieren en la
circulación del aire frío, restando eficiencia al congelador.
• Organice y etiquete los alimentos para reducir las aperturas de la puerta y las
búsquedas prolongadas. Retire todos los elementos necesarios de una vez y
cierre la puerta lo antes posible.

6 CONGELADOR HORIZONTAL
SOLUCIÓN DE PROBLEMAS
El usuario puede resolver fácilmente muchos de los problemas sencillos del
congelador sin necesidad de realizar gastos en llamadas al servicio técnico. Pruebe
las recomendaciones siguientes para ver si puede resolver el problema antes de
llamar al servicio técnico.
PROBLEMA CAUSAS
El congelador no
funciona
No está enchufado.
Se activó el disyuntor o se ha quemado el fusible.
El control de temperatura del congelador está en "0/OFF".
El compresor se activa y
desactiva con frecuencia
La temperatura ambiente es superior a la normal.
Se ha introducido una gran cantidad de alimentos en el
congelador.
La puerta se abre a menudo.
La puerta no está cerrada por completo.
El control de temperatura no se ha ajustado correctamente.
La junta de la puerta no sella adecuadamente.
El congelador no tiene los espacios libres adecuados.
El congelador se ha desconectado recientemente durante un
tiempo. Son necesarias cuatro horas para que el congelador se
enfríe por completo.
La temperatura dentro
del congelador es muy
elevada
El mando de temperatura se ha ajustado en un valor demasiado
alto. Gire el mando a un ajuste más frío y deje pasar varias
horas para que la temperatura se estabilice.
La puerta se mantiene abierta durante demasiado tiempo o se
abre con excesiva frecuencia. Entra aire cálido en el congelador
cada vez que se abre la puerta. Abra la puerta con menor
frecuencia.
La puerta no está cerrada por completo.
La junta de la puerta no sella adecuadamente.
Se ha almacenado recientemente una gran cantidad de
alimentos templados o calientes. Espere a que el congelador
alcance la temperatura seleccionada.
El congelador se ha desconectado recientemente durante un
tiempo. Son necesarias cuatro horas para que el congelador se
enfríe por completo.
La temperatura dentro
del congelador es
demasiado baja
El mando de temperatura se ha ajustado en un valor demasiado
frío. Gire el mando a un ajuste más cálido y deje pasar varias
horas para que la temperatura se estabilice.
El interruptor Fast Freeze (congelación rápida) está activado.
Esto provoca el funcionamiento continuo del compresor y no se
tiene en cuenta el mando de la temperatura.
La temperatura de la
superficie exterior del
congelador es cálida
Es posible que las paredes externas del equipo estén hasta
-1 °C (30 ºF) por encima de la temperatura ambiente. Esto es
normal mientras el compresor transfiere calor desde el interior
del armario congelador.
Sonido de chasquido o
crujido al encenderse el
compresor
Las piezas metálicas están sometidas a dilatación y
contracción, al igual que las tuberías de agua caliente. Es
normal. El ruido se estabiliza o desaparece mientras el
congelador sigue funcionando.
Sonido de borboteo o
gorgoteo, como el de
agua en ebullición
El refrigerante (que enfría el congelador) está circulando a
través del sistema. Es normal.
PROBLEMA CAUSAS
Vibraciones Compruebe que el congelador se encuentre sobre una
superficie plana.
El piso es desigual o poco firme. El congelador se balancea
en el piso cuando se mueve ligeramente. Cerciórese de que
el suelo pueda soportar debidamente el peso del congelador.
Nivele el congelador colocando debajo suplementos de madera
o metálicos.
El congelador toca la pared. Vuelva a nivelar el congelador y
sepárelo de la pared.
Consulte “Instrucciones de instalación”.
Se forma humedad en
las paredes internas del
congelador
El clima es húmedo y cálido, lo que aumenta la acumulación de
escarcha en el interior. Es normal.
La puerta está ligeramente abierta.
La puerta se mantiene abierta durante demasiado tiempo o
se abre con excesiva frecuencia. Abra la puerta con menor
frecuencia.
La puerta no está bien sellada.
Se forma humedad en el
exterior del congelador
La puerta está ligeramente abierta, lo que hace que el aire frío
del interior del congelador coincida con el aire húmedo y tibio
del exterior.
La puerta no cierra bien El congelador no está sobre una superficie nivelada.
La junta está sucia.
El cesto de almacenamiento está fuera de su posición.
7 CONGELADOR HORIZONTAL
Diagrama de cableado
KCCF073WS
LLAME A LA FÁBRICA SI NECESITA REPUESTOS:
866-339-8515
Diagrama de cableado
KCCF140WH
LLAME A LA FÁBRICA SI NECESITA REPUESTOS:
866-339-8515
8 CONGELADOR HORIZONTAL
Diagrama de cableado
KCCF170WH
LLAME A LA FÁBRICA SI NECESITA REPUESTOS:
866-339-8515
Diagrama de cableado
KCCF210WH
LLAME A LA FÁBRICA SI NECESITA REPUESTOS:
866-339-8515

9 CONGELADOR HORIZONTAL
GARANTÍA
El equipo cuenta con
garantía limitada de un (1) años. Desde la fecha original de
compra y durante un periodo de tres (3) años, Electrolux Professional, Inc. correrá con
todos los gastos, excepto los indicados más abajo, de reparación o sustitución de las
piezas de este equipo que muestren desperfectos de materiales o mano de obra en
el momento de la instalación, uso o mantenimiento, de acuerdo con las instrucciones
suministradas. Los equipos fabricados con compresor tienen una garantía adicional
de
cuatro
(4) años que solo se aplica al compresor.
EXCLUSIONES
ESTA GARANTÍA NO CUBRE LO SIGUIENTE:
1. Productos en los que el número de serie original se ha eliminado, alterado o no
pueda observarse con facilidad.
2. Desgaste normal y deterioro gradual.
3. Producto que ha sido transferido de su propietario original a otra parte o
trasladado fuera de EE.UU. o Canadá.
4. Óxido en el interior o el exterior de la unidad.
5. Productos adquiridos “tal cual”.
6. Pérdidas de alimentos debidas a desperfectos de nevera o congelador.
7. Daños sufridos en cualquier momento del transporte.
8. Llamadas al servicio técnico que no se refieran a desperfectos o defectos de
material o elaboración, o respecto a equipos utilizados de un modo distinto al
indicado en las instrucciones suministradas.
9. Llamadas al servicio técnico para corregir la instalación del equipo o para
solicitar instrucciones de uso.
10. Gastos para hacer accesible el equipo para su mantenimiento, como la retirada
de molduras, armarios, estantes, etc., que no formen parte del equipo cuando
se envía de fábrica.
11. Llamadas al servicio técnico para sustituir lámparas, filtros de aire, filtros de
agua y otros consumibles, o perillas, asas u otras piezas ornamentales.
12. Recargos derivados, entre otras cosas, de trabajo en horas extra, fin de semana
o festivos, peajes, trasbordos o kilometraje por llamadas al servicio técnico
desde zonas alejadas, incluido el Estado de Alaska.
13. Daños ocasionados al acabado del equipo o a su ubicación producidos durante
la instalación, entre otros, a pisos, armarios, paredes, etc.
14. Daños provocados por: servicios realizados por empresas de servicios no
autorizadas; uso de repuestos que no sean originales de Electrolux Professional,
Inc. o repuestos obtenidos de personas que no sean empresas de servicios
autorizadas; o causas externas como uso incorrecto o indebido, alimentación
eléctrica inadecuada, accidentes, incendios o desastres naturales.
15. Los equipos utilizados por concesionarios o distribuidores en un remolque u otro
vehículo motorizado, o en distintas ubicaciones, tienen garantía de un (1) año
con limitación de piezas y mano de obra. Los equipos fabricados con compresor
tienen una garantía adicional de cuatro (4) años que solo se aplica al compresor.
EXCLUSIÓN DE GARANTÍAS IMPLÍCITAS; LIMITACIÓN DE RECURSOS
EL ÚNICO Y EXCLUSIVO RECURSO DEL CLIENTE SEGÚN LOS TÉRMINOS DE ESTA
GARANTÍA LIMITADA SERÁ LA REPARACIÓN O SUSTITUCIÓN DEL PRODUCTO SEGÚN
SE ESTIPULA EN EL PRESENTE DOCUMENTO. LAS RECLAMACIONES BASADAS
EN GARANTÍAS IMPLÍCITAS, INCLUIDAS LAS GARANTÍAS DE COMERCIABILIDAD
O DE IDONEIDAD PARA UN FIN DETERMINADO, ESTÁN LIMITADAS A UN (1) AÑO
O AL PERÍODO MÁS CORTO PERMITIDO POR LEY, AUNQUE NO INFERIOR A UN
(1) AÑO. ELECTROLUX PROFESSIONAL, INC. NO SERÁ RESPONSABLE DE DAÑOS
CONSECUENTES O FORTUITOS COMO DAÑOS A LA PROPIEDAD Y GASTOS
OCASIONALES DERIVADOS DE CUALQUIER INCUMPLIMIENTO DE ESTA GARANTÍA
LIMITADA ESCRITA O DE CUALQUIER GARANTÍA IMPLÍCITA. ALGUNOS ESTADOS Y
PROVINCIAS NO PERMITEN LA EXCLUSIÓN O LIMITACIÓN DE DAÑOS ACCIDENTALES
O DERIVADOS NI LIMITACIONES ACERCA DE LA DURACIÓN DE LA GARANTÍA
IMPLÍCITA, DE MODO QUE ES POSIBLE QUE LAS LIMITACIONES O EXCLUSIONES
ARRIBA MENCIONADAS NO SE APLIQUEN A SU CASO. ESTA GARANTÍA ESCRITA LE
OTORGA DERECHOS LEGALES ESPECÍFICOS. ES POSIBLE QUE TAMBIÉN DISFRUTE
DE OTROS DERECHOS QUE VARÍEN DE UNA JURISDICCIÓN A OTRA.
Si necesita servicio
Para obtener servicio, la unidad debe registrarse primero en KelvinatorCommercial.
com. Una vez registrada, llame al 866-339-8515 para solicitar asistencia.
Esta garantía sólo se aplica en EE.UU. y Canadá y está garantizada por Electrolux
Professional, Inc. Para instalaciones fuera de EE. UU. y Canadá, comuníquese con
su proveedor de equipos local para conocer los detalles de la garantía.
Electrolux Professional, Inc. no autoriza a persona alguna a cambiar o añadir
obligaciones a esta garantía. Las obligaciones de servicio y repuestos impuestas
por esta garantía debe satisfacerlas Electrolux Professional, Inc. o una empresa
de servicios autorizada. Las características o especificaciones que se describen o
ilustran están sujetas a cambios sin previo aviso.
(Noviembre de 2023)
866-339-8515
Electrolux Professional, Inc.

10 CONGELADOR HORIZONTAL
Registro de servicio
N.º de modelo: Adquirido a:
Nº de serie: Ubicación:
Fecha de compra: Fecha de instalación:
N.º de orden de compra: Para llamadas al servicio técnico:
Fecha Mantenimiento realizado Realizado por