Loading ...
Loading ...
Loading ...
PART 2: FAN MOTOR INSTALLTION GUIDE
External Solution - Wall Mounted
Models included: EL-800, EP-1140 and EPP-2010
18
Positioning your KLEENAIR Unit:
It is recommended that when the KLEENAIR EXTERNAL UNIT is
WALL mounted, it is positioned a minimum 1800mm above
the ground surface with a downward clearance of 1200mm
and with a radial clearance of 600mm. Please ensure that the
KLEENAIR unit is positioned in an environment that is free of
other gases to enable an efcient expulsion of the cooking
bi-products and to ensure that back-draft of external gases
doesn’t take place.
Please ensure the fan motor is positioned away from other
exhausts such as chimneys, gas fuses, etc. The unit can be
mounted so that it ducts directly through the wall.
STEP 1:
Cut a 200mm diameter hole in the wall to enable the rigid duct
on the back of the KLEENAIR unit to protrude. Please ensure
that the hole is cut in a practical position to enable sufcient
clearance around the fan motor unit.
STEP 2:
Remove the mounting bracket from your KLEENAIR unit by
twisting the cover in an anti-clockwise direction. Mark at least
four mounting points on the wall and pre-drill the holes
required.
STEP 3:
The rigid duct may require cutting to suit your particular wall
thickness. Attach the exi-duct to the rigid duct on the back of
the mounting bracket using the pipe clamps supplied.
STEP 4:
Fix the mounting bracket to the wall using the screws and wall
plugs provided. Making sure to secure it at 90 degree’s to the
horizontal. A secondary mounting bracket (HBXP24) is
available is additional clearance between the wall and outlet is
required.
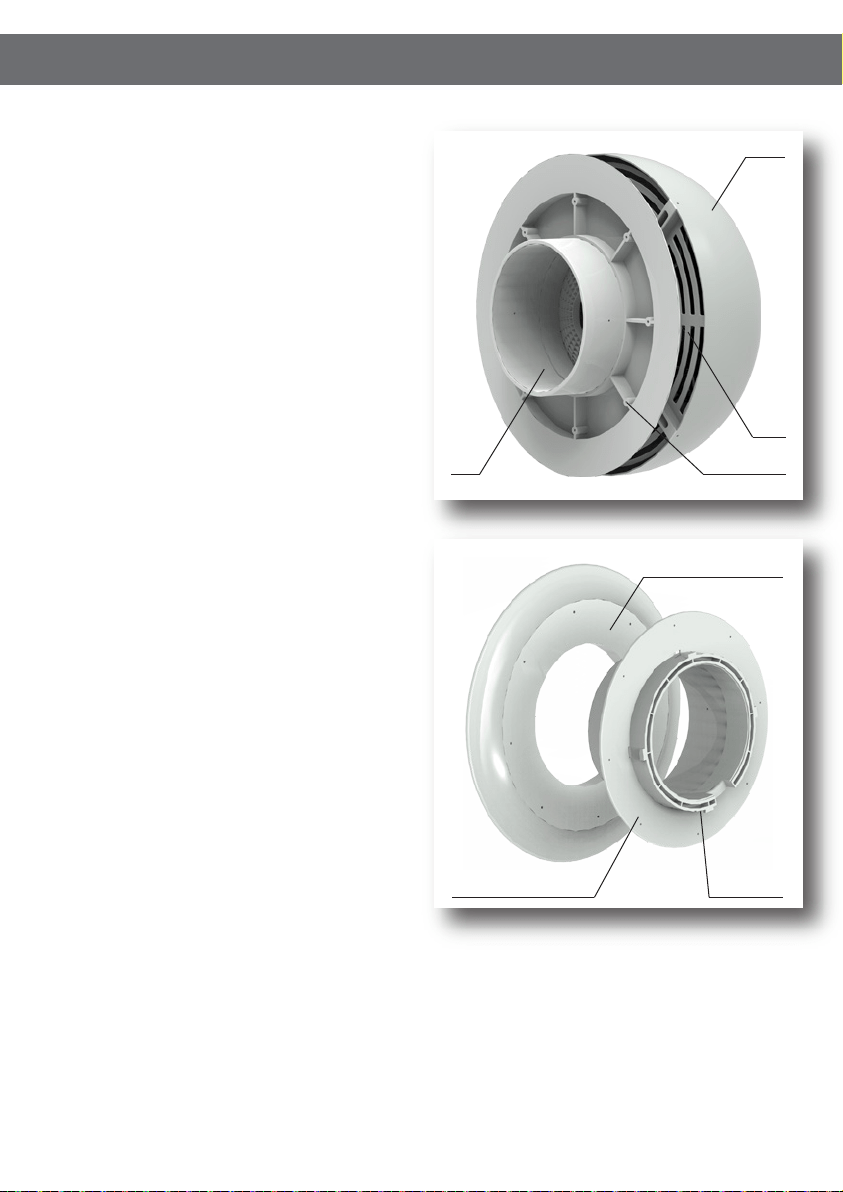
Cover
Inlet
Outlet
Mounting Holes
Primary Wall
Mounting Bracket (Supplied)
Secondary Wall
Mounting Bracket (Optional)
Locking Screw
STEP 5:
Feed the power cable through the centre of the mounting bracket and return the KLEENAIR unit onto the mounting bracket and
x it by rotating the cover in a clockwise direction noting the locating points. Lock the cover into position by tightening the locking
screw.
STEP 6:
Attach the male plug of the KLEENAIR unit to the female plug of the rangehood to enable power supply to the fan motor unit. An
extension lead (not supplied) of up to ve meters may be added if required.
Loading ...
Loading ...
Loading ...