TACX
®
NEO BIKE PLUS
Owner’s Manual

© 2022 Garmin Ltd. or its subsidiaries
All rights reserved. Under the copyright laws, this manual may not be copied, in whole or in part, without the written consent of Garmin. Garmin reserves the right to change
or improve its products and to make changes in the content of this manual without obligation to notify any person or organization of such changes or improvements. Go to
www.garmin.com for current updates and supplemental information concerning the use of this product.
Garmin
®
, the Garmin Logo, ANT+
®
, and Tacx
®
are trademarks of Garmin Ltd. or its subsidiaries, registered in the USA and other countries. Garmin Connect
™
is a trademark of Garmin
Ltd. or its subsidiaries. These trademarks may not be used without the express permission of Garmin.
The BLUETOOTH
®
word mark and logos are owned by the Bluetooth SIG, Inc. and any use of such marks by Garmin is under license. Campagnolo
®
is a registered trademark of
Campagnolo S.r.l. Shimano
®
is a registered trademark of Shimano, Inc. SRAM
®
is a registered trademark of SRAM LLC.
This product is ANT+
®
certified. Visit www.thisisant.com/directory for a list of compatible products and apps.

Table of Contents
Before Assembly.............................. 1
Dimensions and Clearance..................... 1
Cycling Posture....................................... 3
Adjusting the Trainer Geometry............. 4
Tacx NEO Bike Plus Assembly
Instructions...................................... 5
Order of Assembly.................................. 5
Installing the Legs on the Trainer...........6
Installing Your Pedals............................. 8
Attaching the Bottle Cage....................... 9
Installing the Saddle................................9
Installing the Handlebar........................11
Installing the Fans with Tablet
Mount..................................................... 12
Attaching Your Tablet to the Trainer....14
Connecting the Power Cable................ 15
Training..........................................15
Display Data...........................................16
Going for a Ride.....................................17
Tacx Training App................................. 19
Device Information......................... 20
Specifications........................................20
Device Care and Storage...................... 20
Installing the Tablet Mount...................21
Installing the Sweat Cover.................... 22
Wrapping the Handlebar....................... 22
Replacing the Saddle............................ 23
Troubleshooting............................. 23
Updating the Trainer Software............. 23
The Tacx NEO Bike Plus trainer is not
responding............................................. 23
Tips for Proper Bike Fit......................... 24
Tightening the Handles and Screws.... 25
Can I pair ANT+ or Bluetooth sensors
using an open connection?.................. 25
Pairing Optional Sensors...................... 25
Table of Contents i


Before Assembly
WARNING
See the Important Safety and Product Information guide in the product box for product warnings and other
important information.
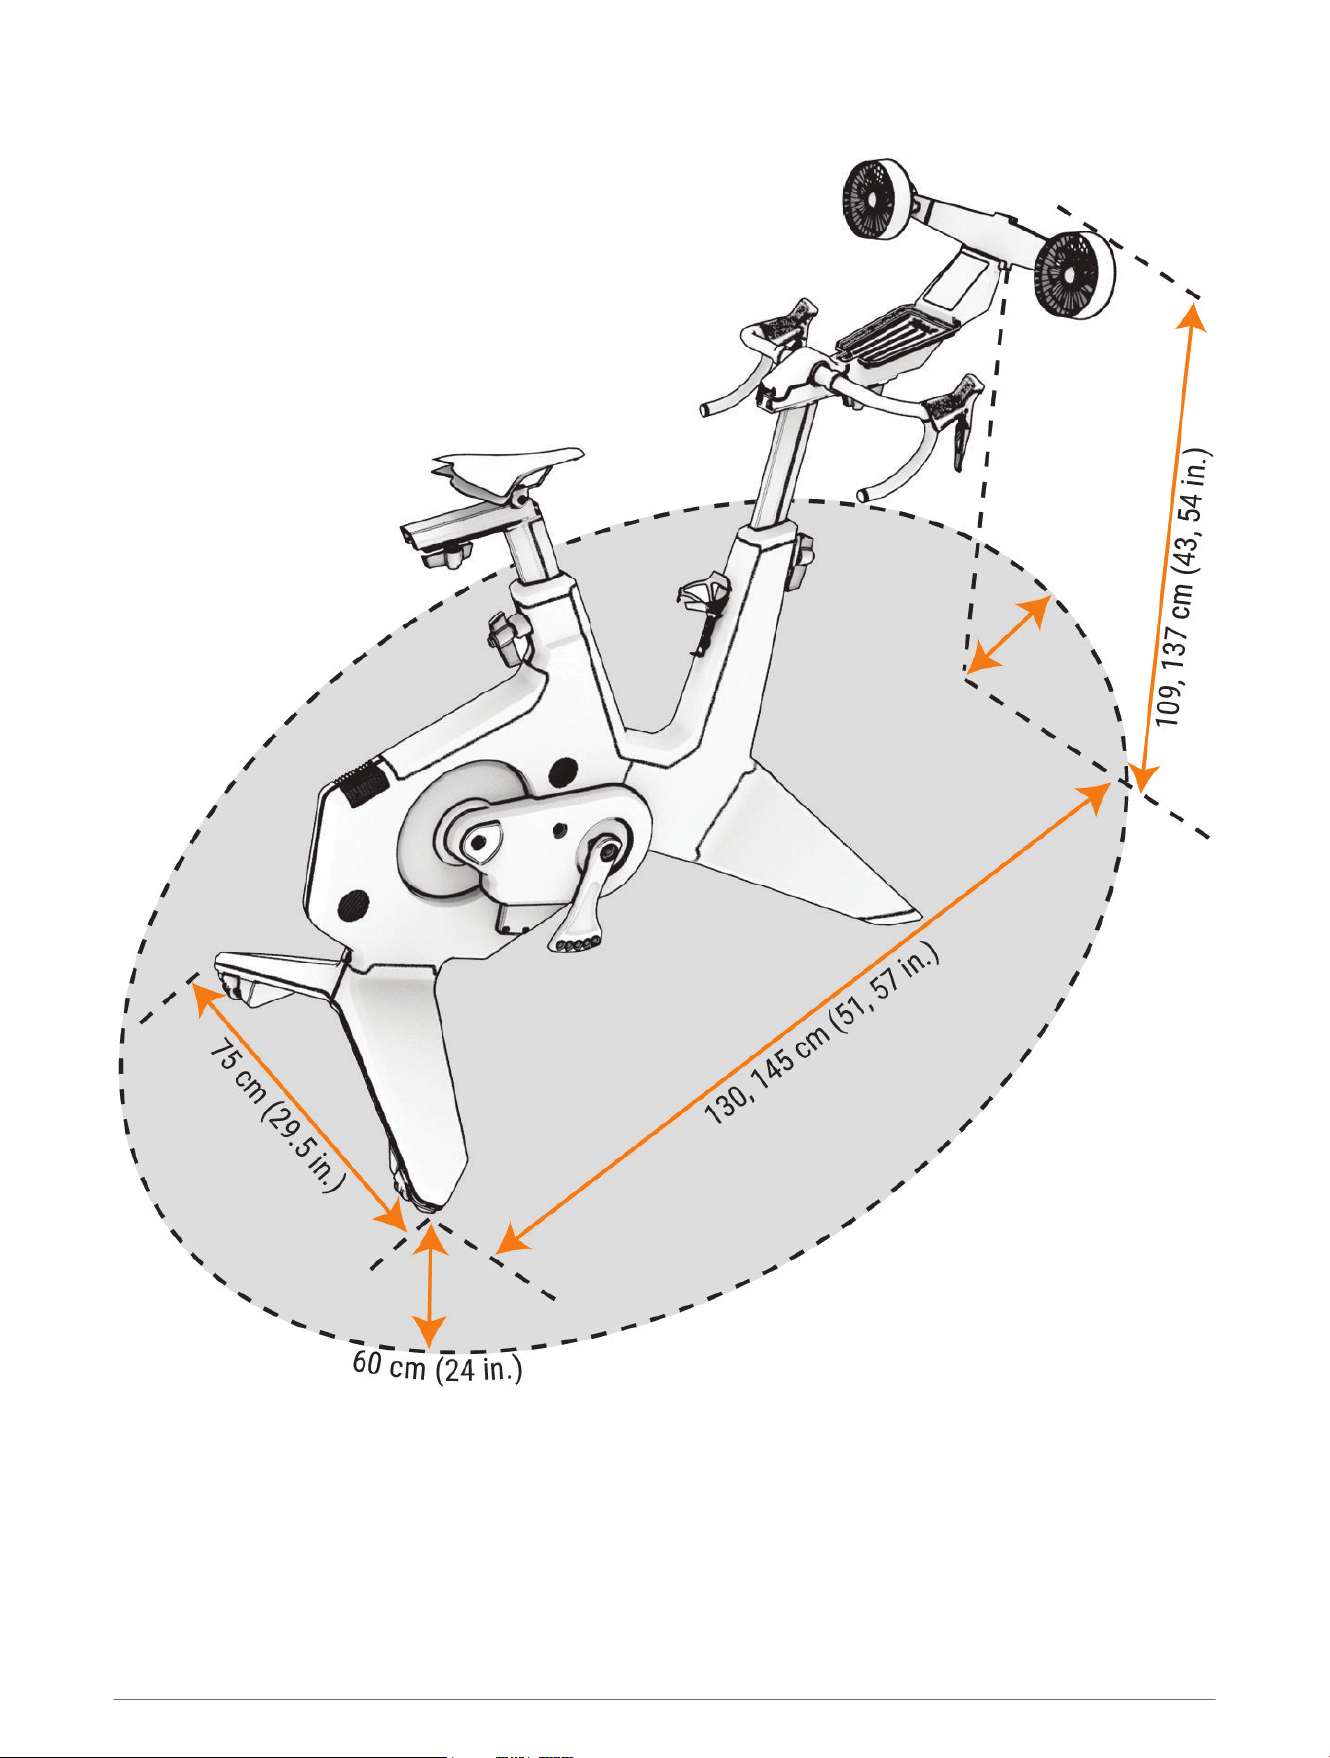
Dimensions and Clearance
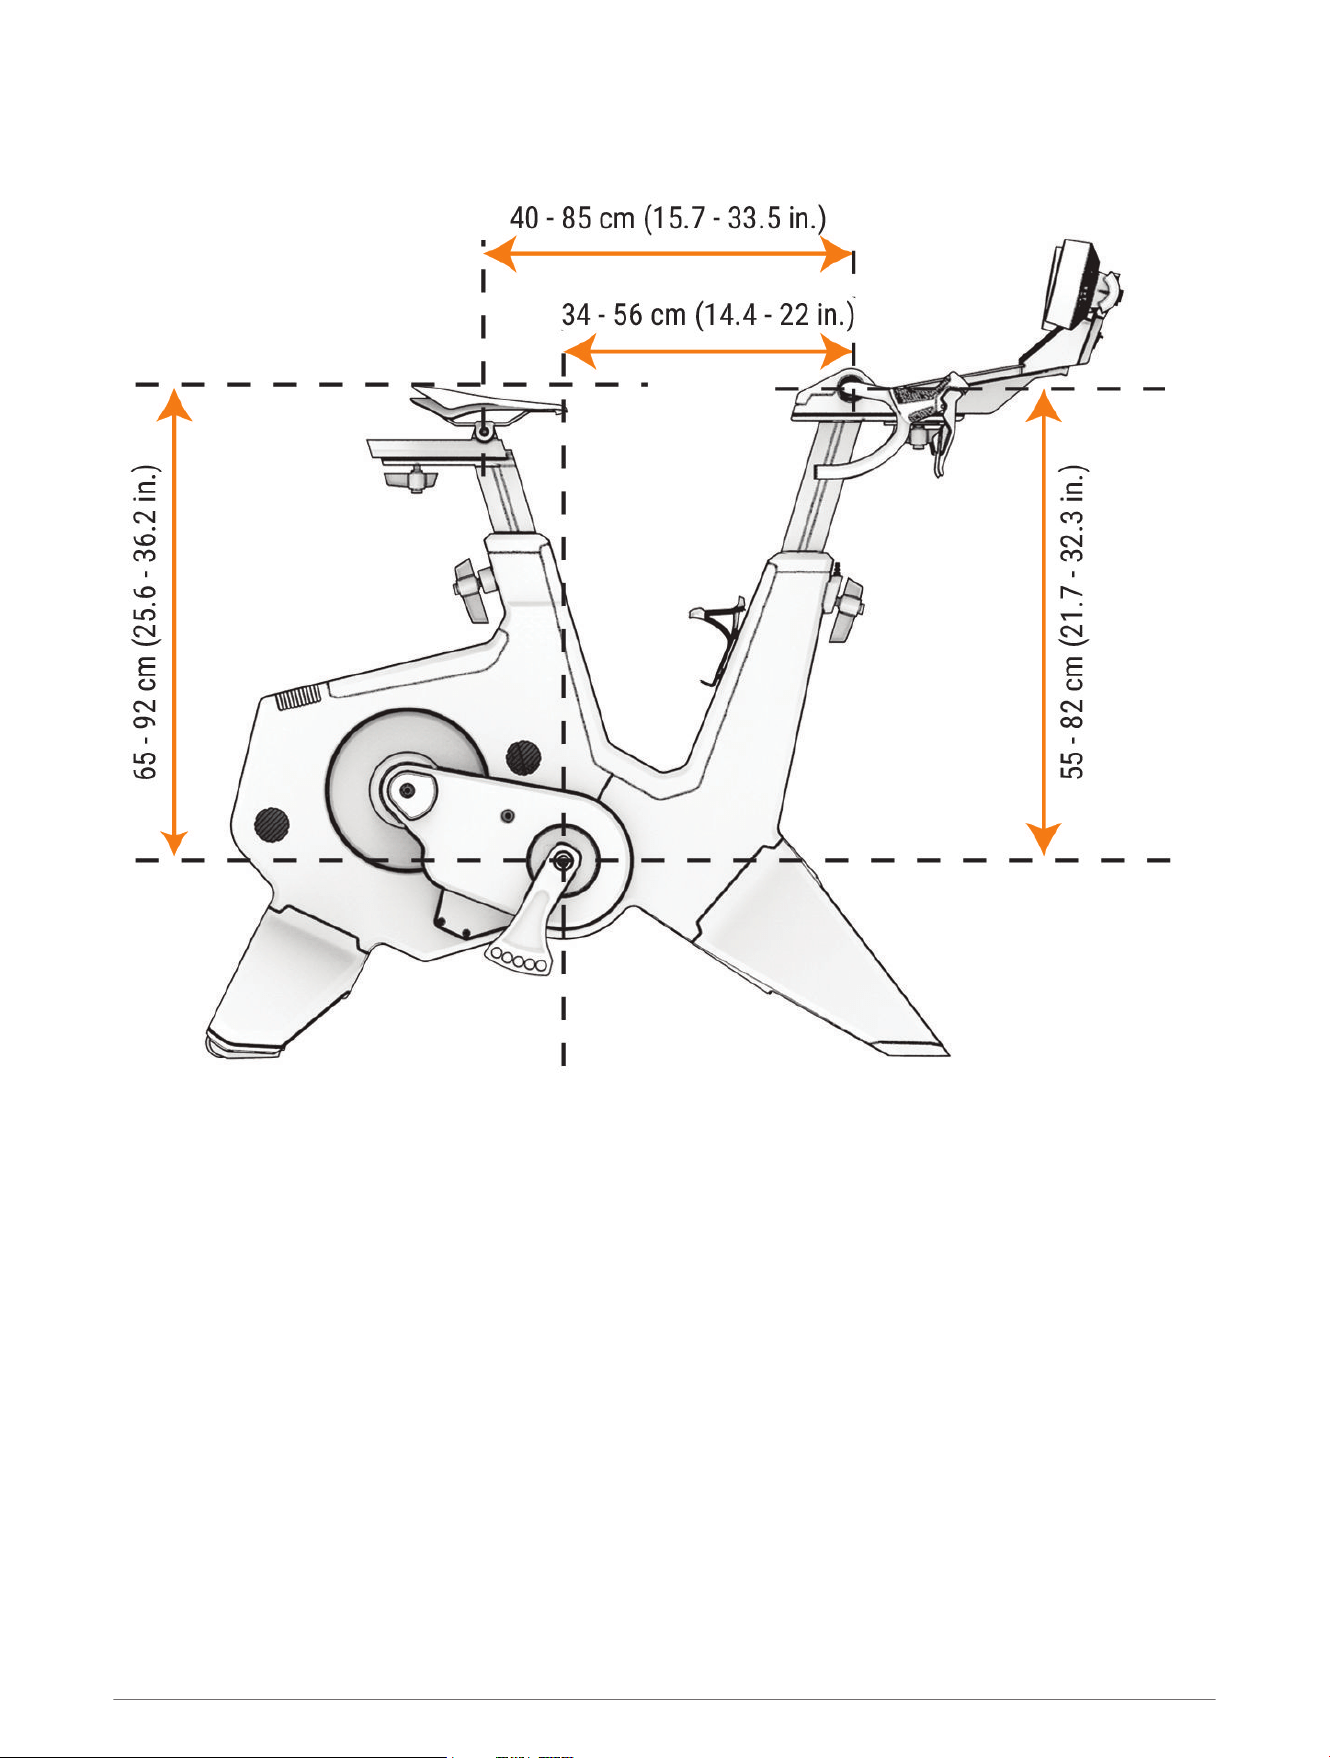
When finding a suitable location for the Tacx NEO Bike Plus trainer, consider the maximum dimensions. The
dimensions of the Tacx NEO Bike Plus trainer are shown with and without the fans.
Tacx recommends a minimum clearance of 60 cm (24 in.) on all sides of the trainer.
Before Assembly 1
2 Before Assembly
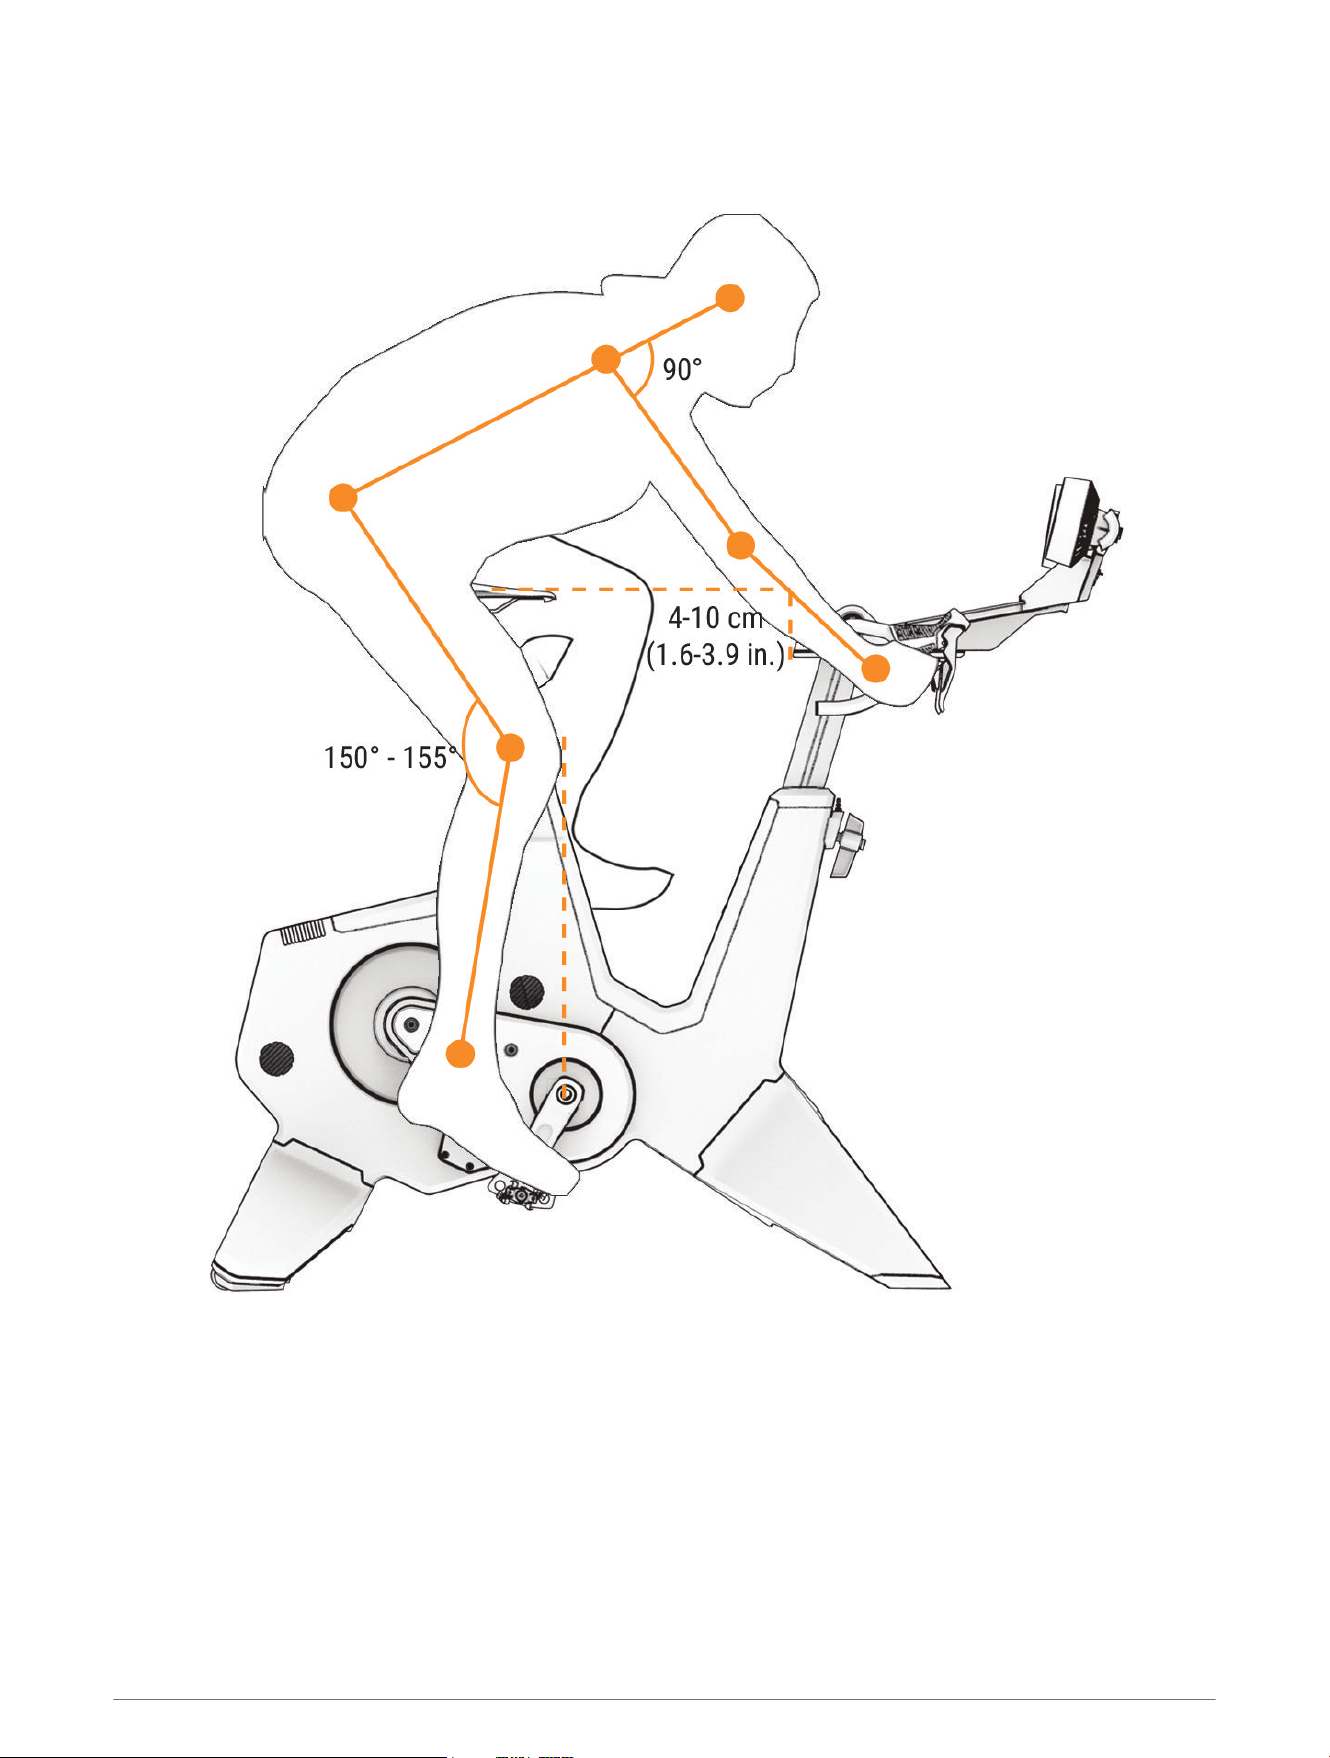
Cycling Posture
NOTE: Cycling posture is unique to each cyclist and may require several adjustments. Pedals and tablets are not
included with the Tacx NEO Bike Plus trainer and can impact your cycling posture.
The image contains guidelines for the correct cycling posture while using the Tacx NEO Bike Plus trainer.
Your elbows should be slightly bent, and you should be able to reach the shifters and brakes comfortably. At the
bottom of the pedal stroke, your knee should be slightly bent.
Before Assembly 3
Adjusting the Trainer Geometry
Before you assemble the Tacx NEO Bike Plus trainer, consider that the saddle and handlebar have set screws
installed from the factory that can be adjusted and tightened using a hex key. To install the 4 handles, you must
remove the 4 set screws using a hex key.
NOTE: If multiple riders will use the trainer, Tacx recommends installing the handles for easy adjustments. The
handles are packaged in the assembly kit with the screws and washers. If you are the only rider that will use the
trainer and you do not make geometry or posture adjustments, you can use the set screws and a hex key.
• Get off the trainer before adjusting the saddle or handlebar.
• Remove your tablet before adjusting the handlebar height, reach, or angle.
• Match the geometry of the trainer to your road bike (Tips for Proper Bike Fit, page24).
• If you adjust your saddle more than 1 cm, check the saddle height and the handlebar reach again.
• Do not exceed the maximum range of the saddle or handlebar.
• If you change your pedals or saddle, check the geometry of the trainer again.
After you tighten each handle bolt, you should align the handle to be parallel to the frame or rail. You can pull out
and twist the handle.
4 Before Assembly

Tacx NEO Bike Plus Assembly Instructions
Order of Assembly
A
Trainer legs: Installing the Legs on the Trainer, page6
B
Pedals: Installing Your Pedals, page8
C
Bottle cage: Attaching the Bottle Cage, page9
D
Saddle: Installing the Saddle, page9
E
Handlebar with display: Installing the Handlebar, page11
F
Fans with tablet mount: Installing the Fans with Tablet Mount, page12
Alternative tablet mount: Installing the Tablet Mount, page21
G
Tablet: Attaching Your Tablet to the Trainer, page14
H
Power cable: Connecting the Power Cable, page15
TIP: For additional customization, see Device Information, page20.
Assembly Kit
NOTE: The assembly kit contains manuals, bolts, washers, tools, and other parts that are
required for each assembly task.
Tacx NEO Bike Plus Assembly Instructions 5
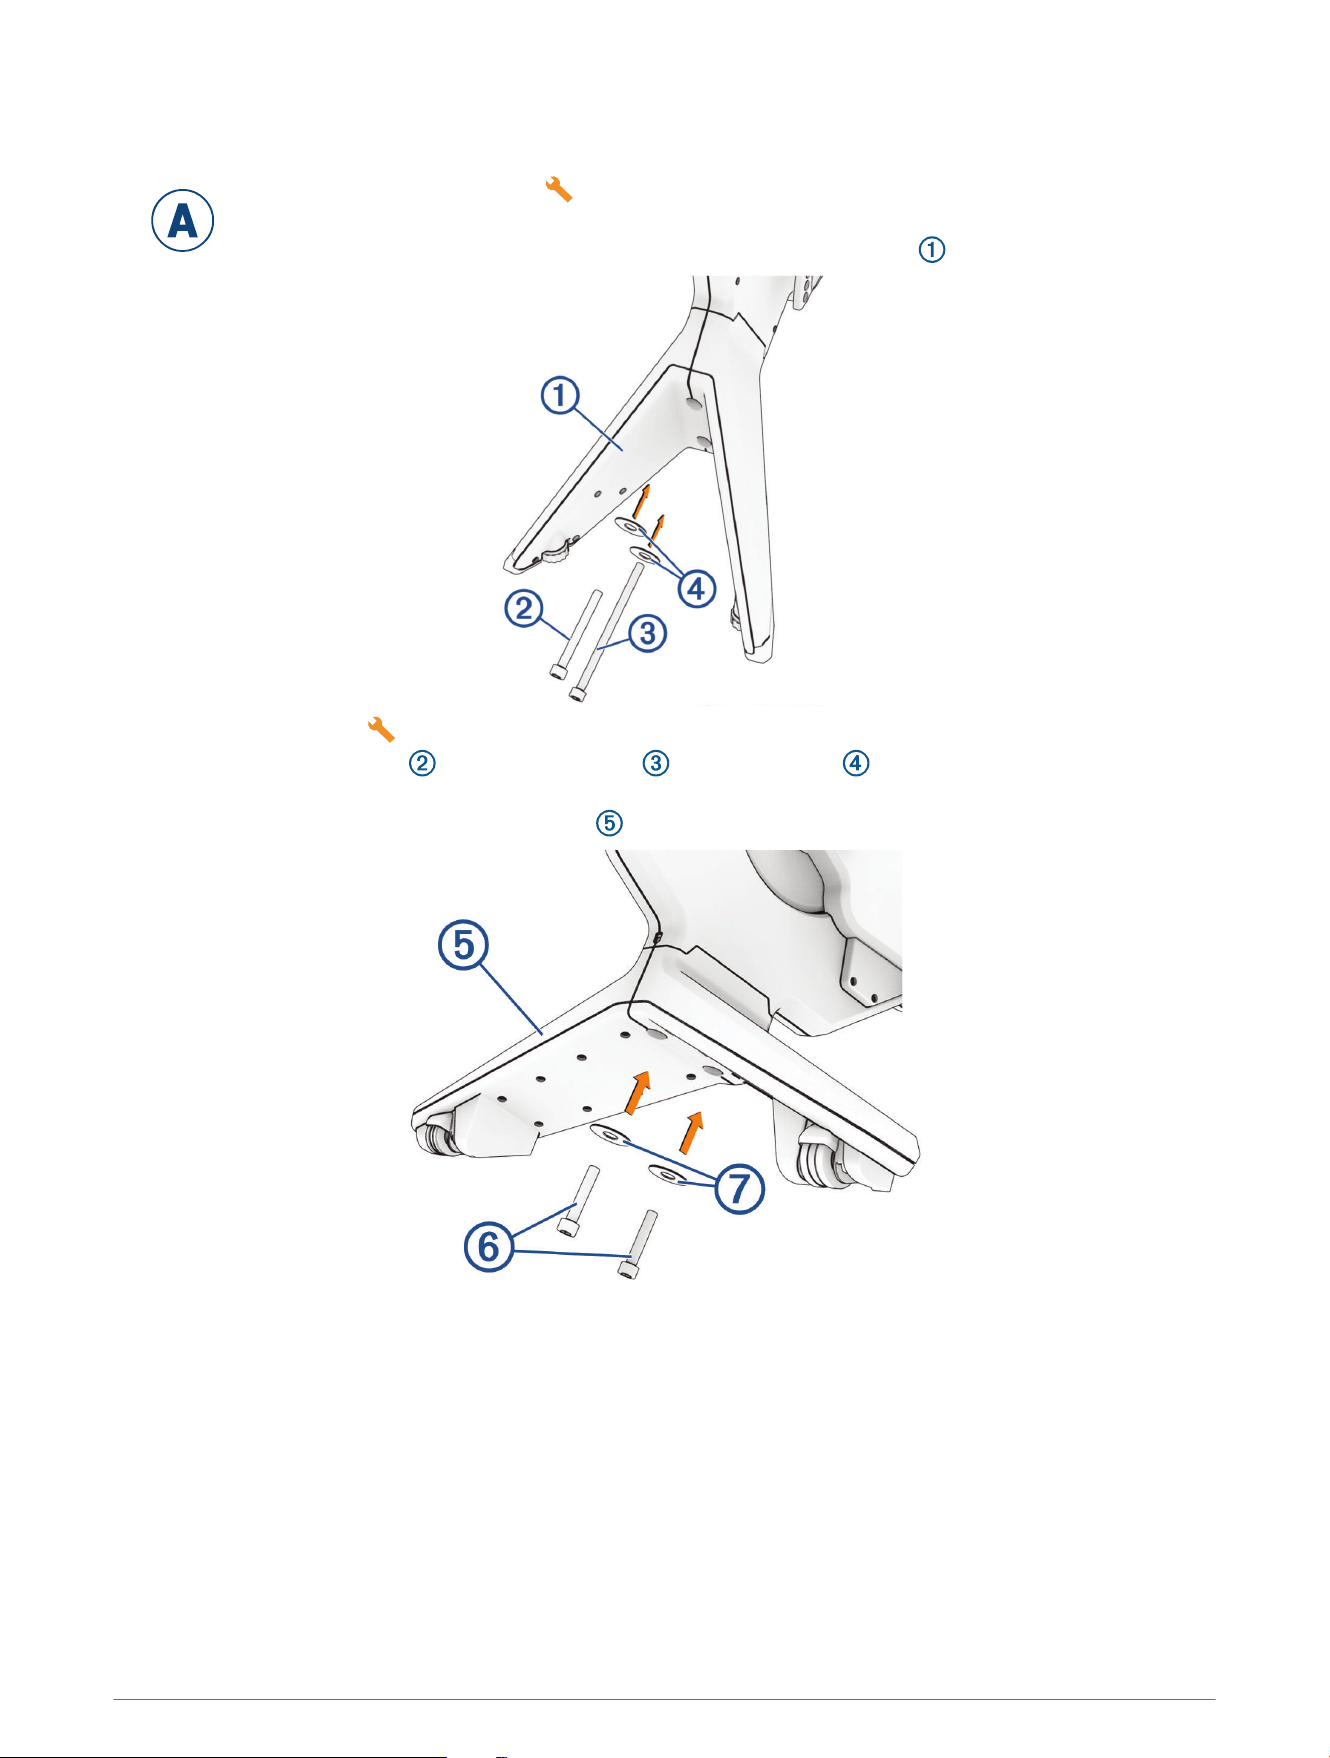
Installing the Legs on the Trainer
You must have the assembly kit for this task. You must have at least two people to assemble the
Tacx NEO Bike Plus trainer. Use care when lifting the trainer.
1 Place the trainer on the floor, and tilt it back to install the front legs .
2 Open the assembly kit .
3 Use the M10 x 90 mm bolt , M10 x 130 mm bolt , 10 mm washers , and the 8 mm hex key to install
the front legs.
4 Tilt the trainer forward to install the back legs .
A
6 Tacx NEO Bike Plus Assembly Instructions
5 Use the M10 x 65 mm bolts , 10 mm washers , and the 8 mm hex key to install the back legs.
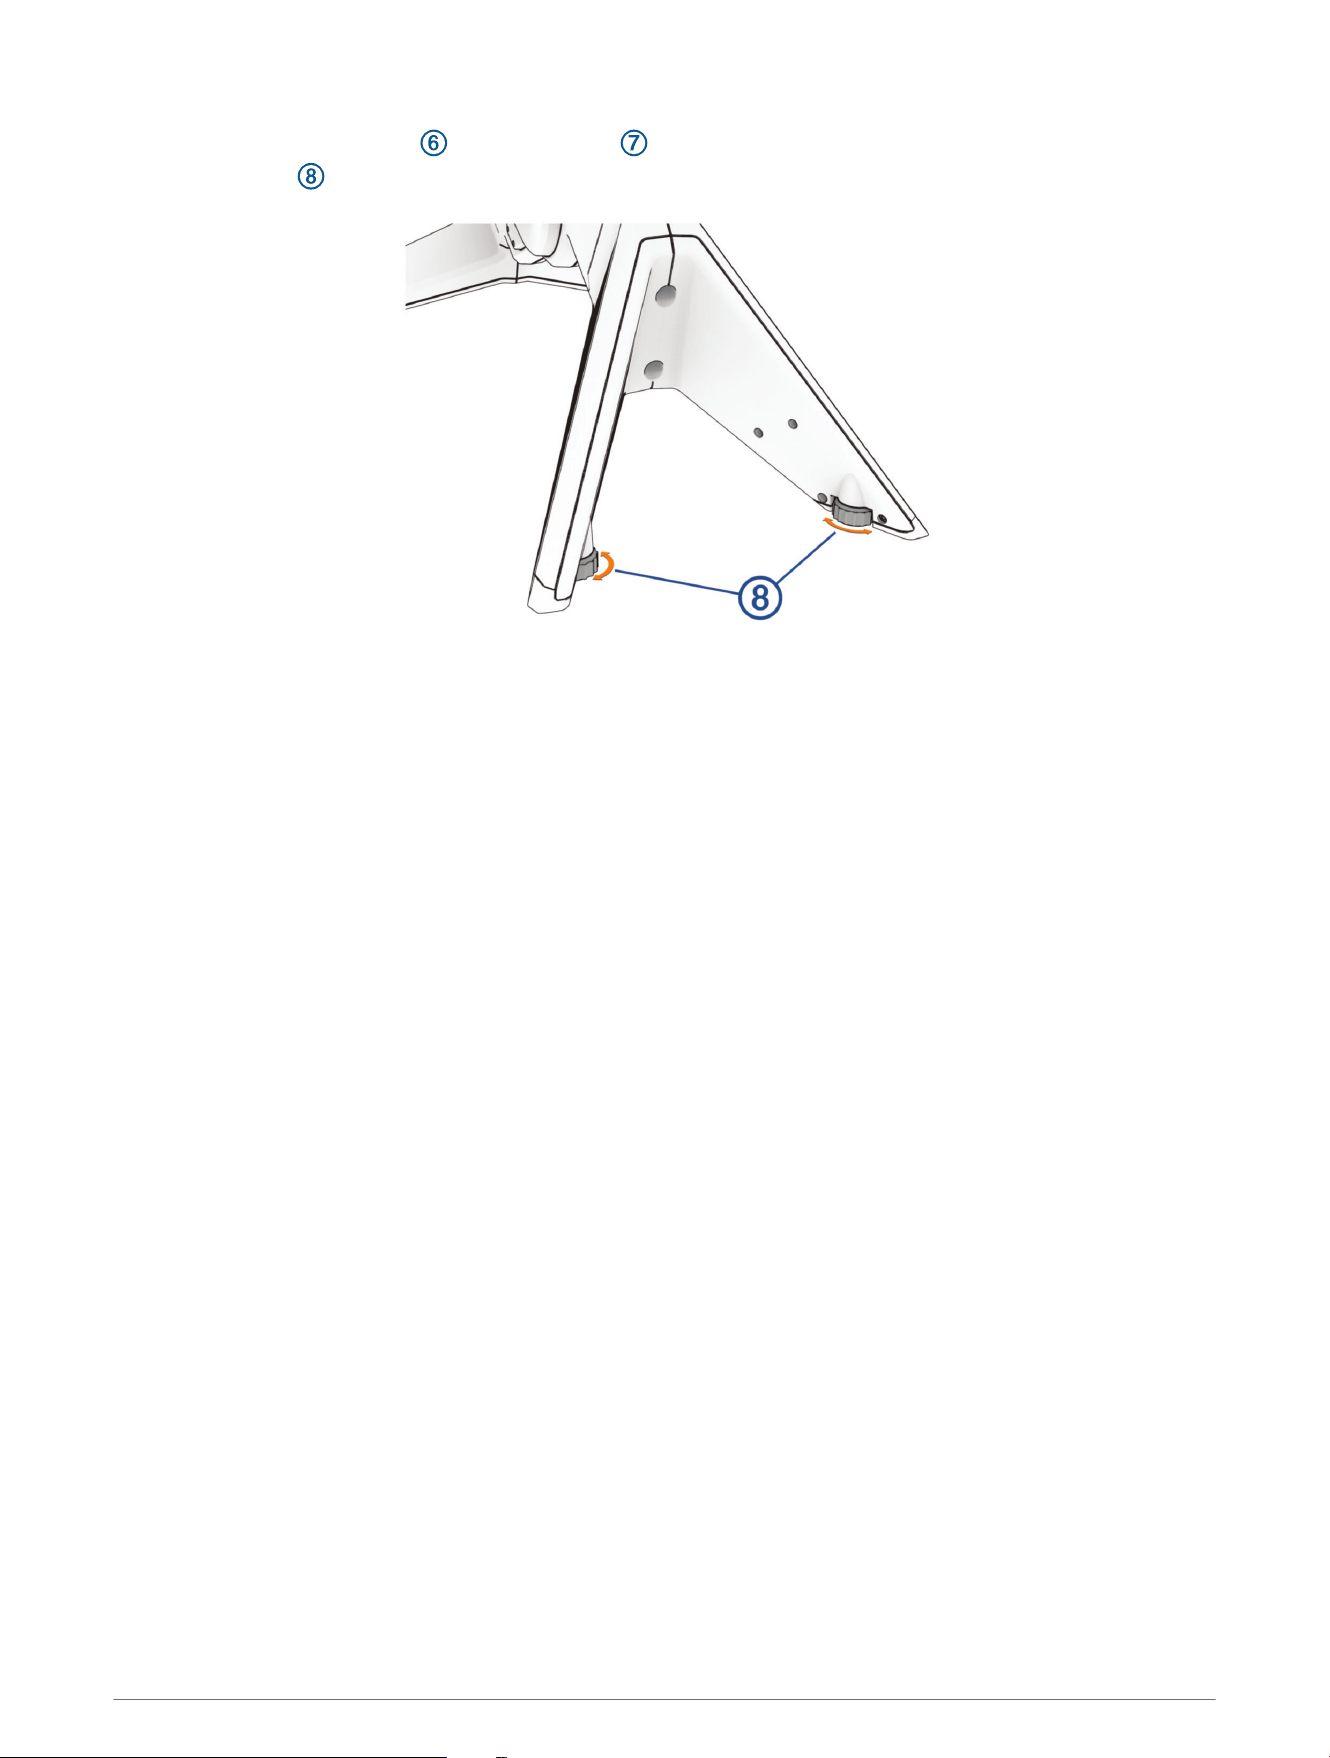
6 Turn the knobs on the front legs to stabilize and level the trainer (optional).
Tacx NEO Bike Plus Assembly Instructions 7
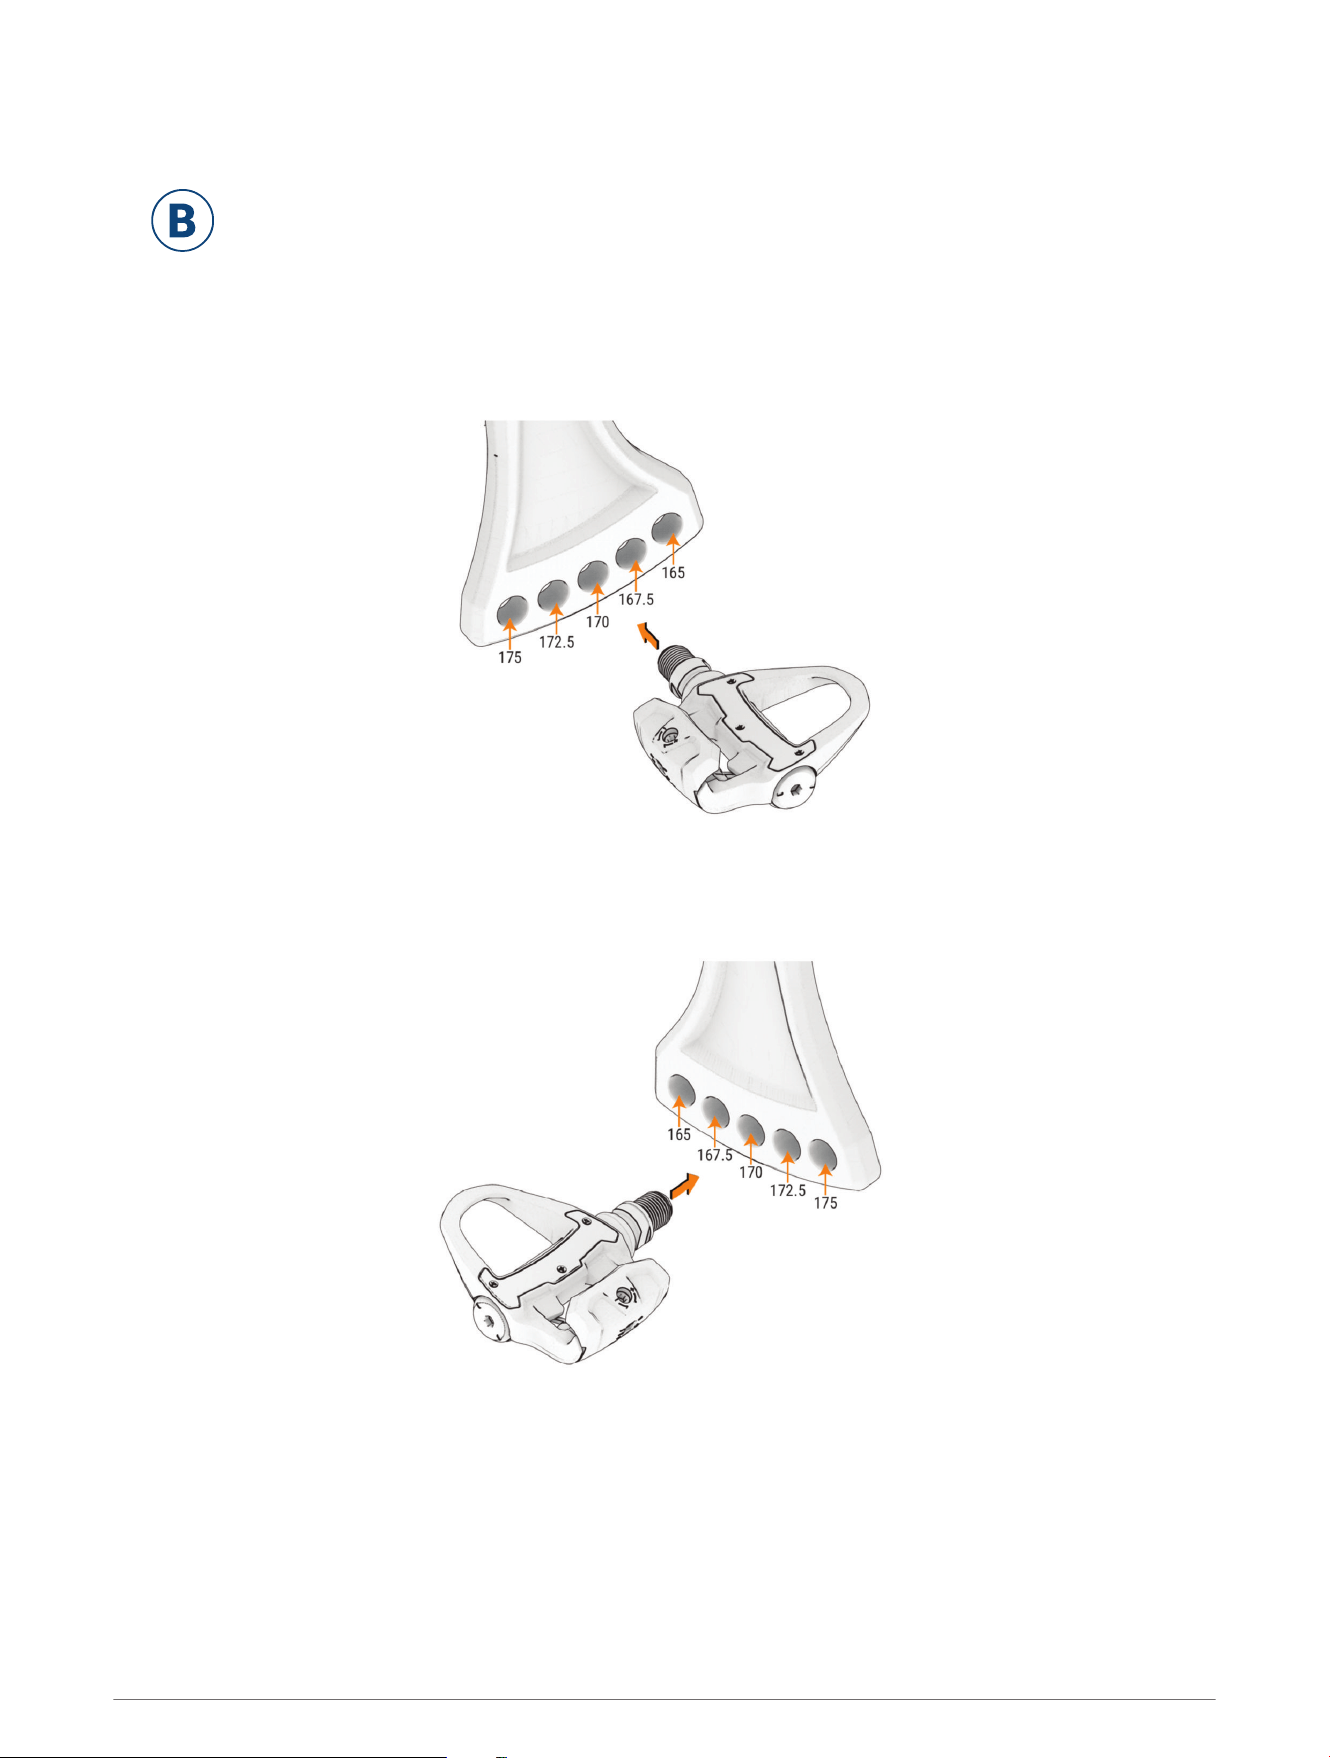
Installing Your Pedals
Pedals are not included with the Tacx NEO Bike Plus trainer. For installation instructions specific to
your pedals, see the manufacturer's instructions.
1 Install the right pedal first.
2 Apply a thin layer of grease on the pedal spindle threads.
3 Insert the spindle into the crank arm.
There are five crank length (mm) options (Crank Length Options, page24). Use the same crank length for
both pedals.
4 Tighten the spindle according to the instructions provided with your pedal.
5 Repeat steps 2 through 4 to install the left pedal.
NOTE: The left pedal spindle has a left-handed (reverse) thread.
B
8 Tacx NEO Bike Plus Assembly Instructions
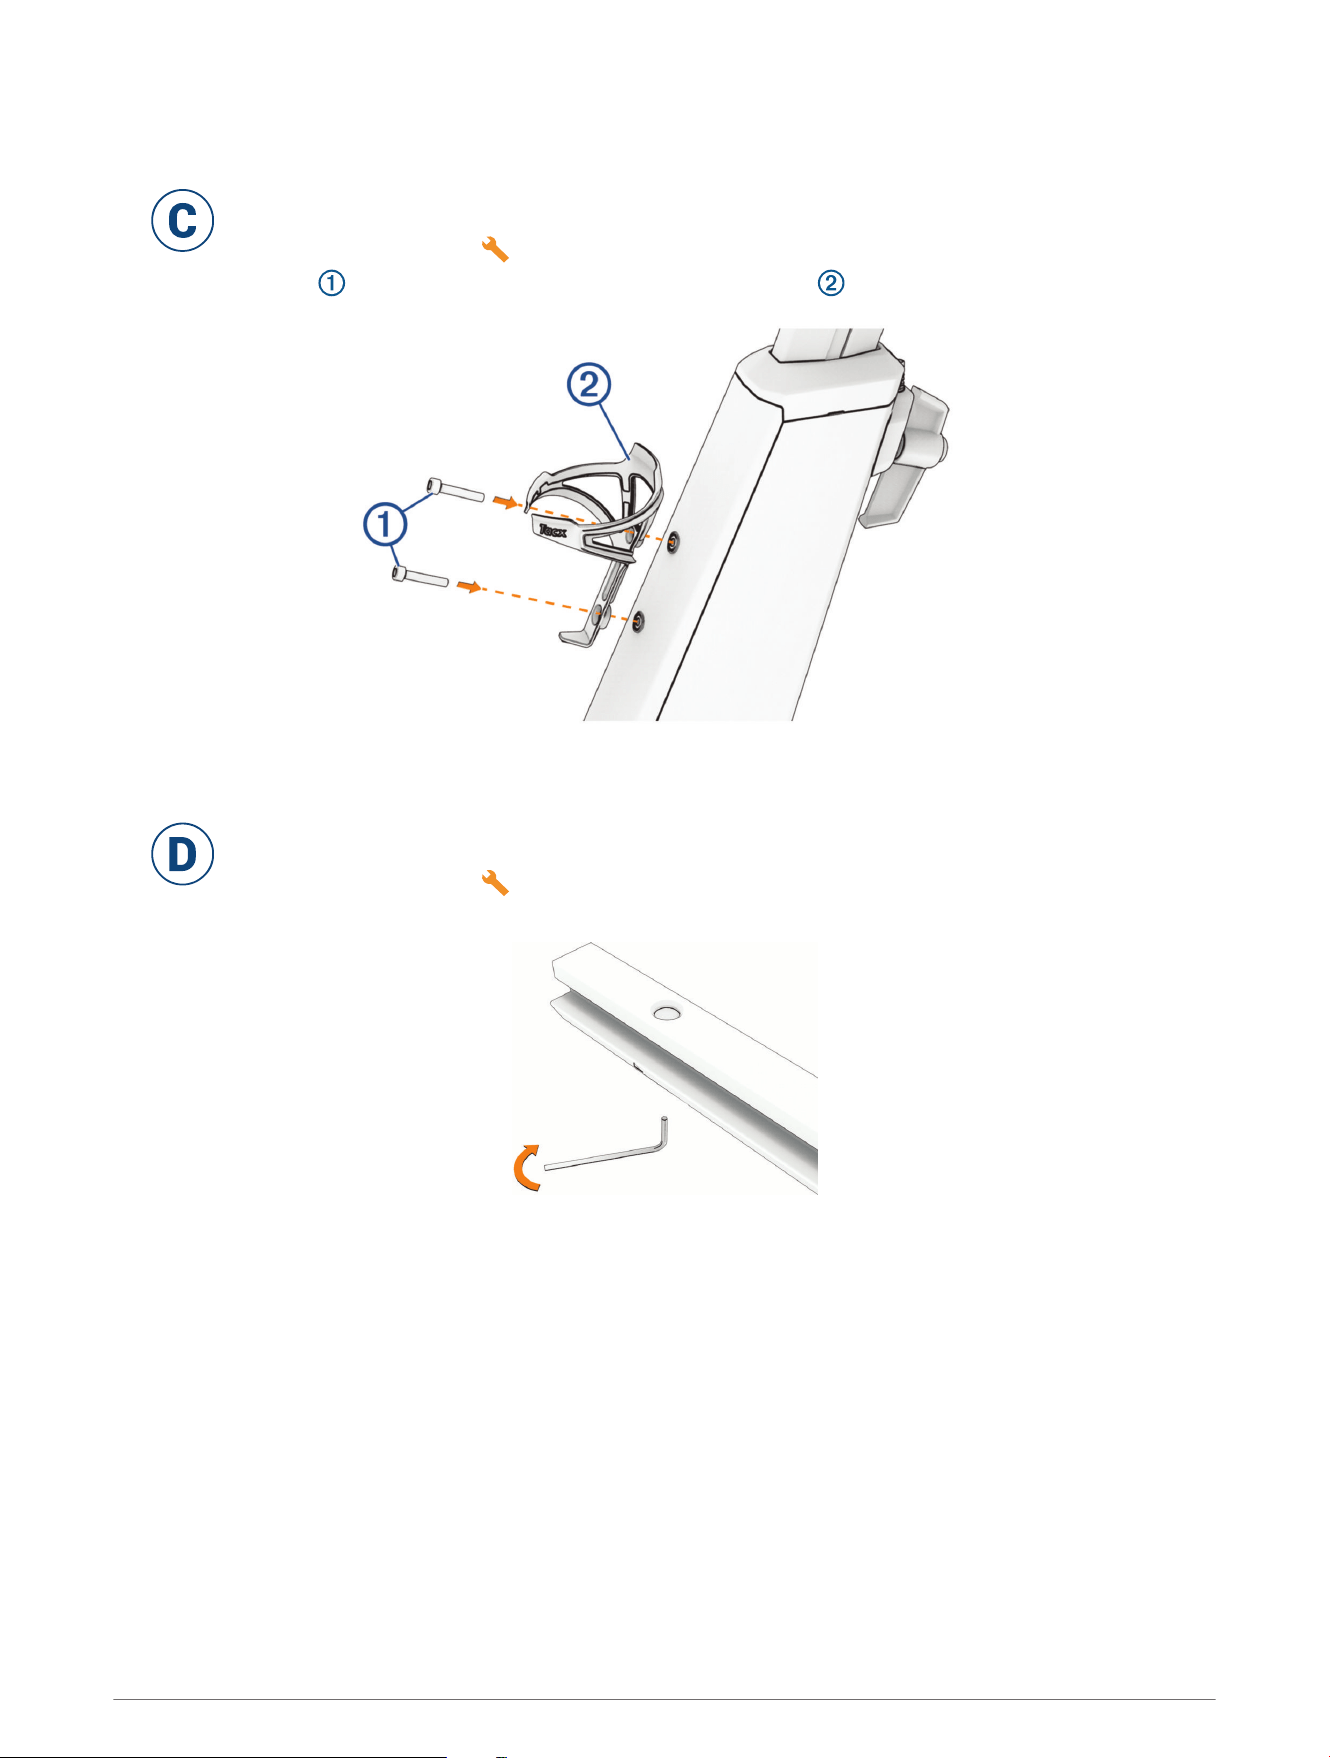
Attaching the Bottle Cage
You can attach the optional, standard-sized bottle cage to the trainer. The bottle cage is packaged in
the gift box. The screws and washers are preinstalled on the frame.
1 Open the assembly kit and the gift box.
2 Use the 2 screws and the 4 mm hex key to attach the bottle cage .
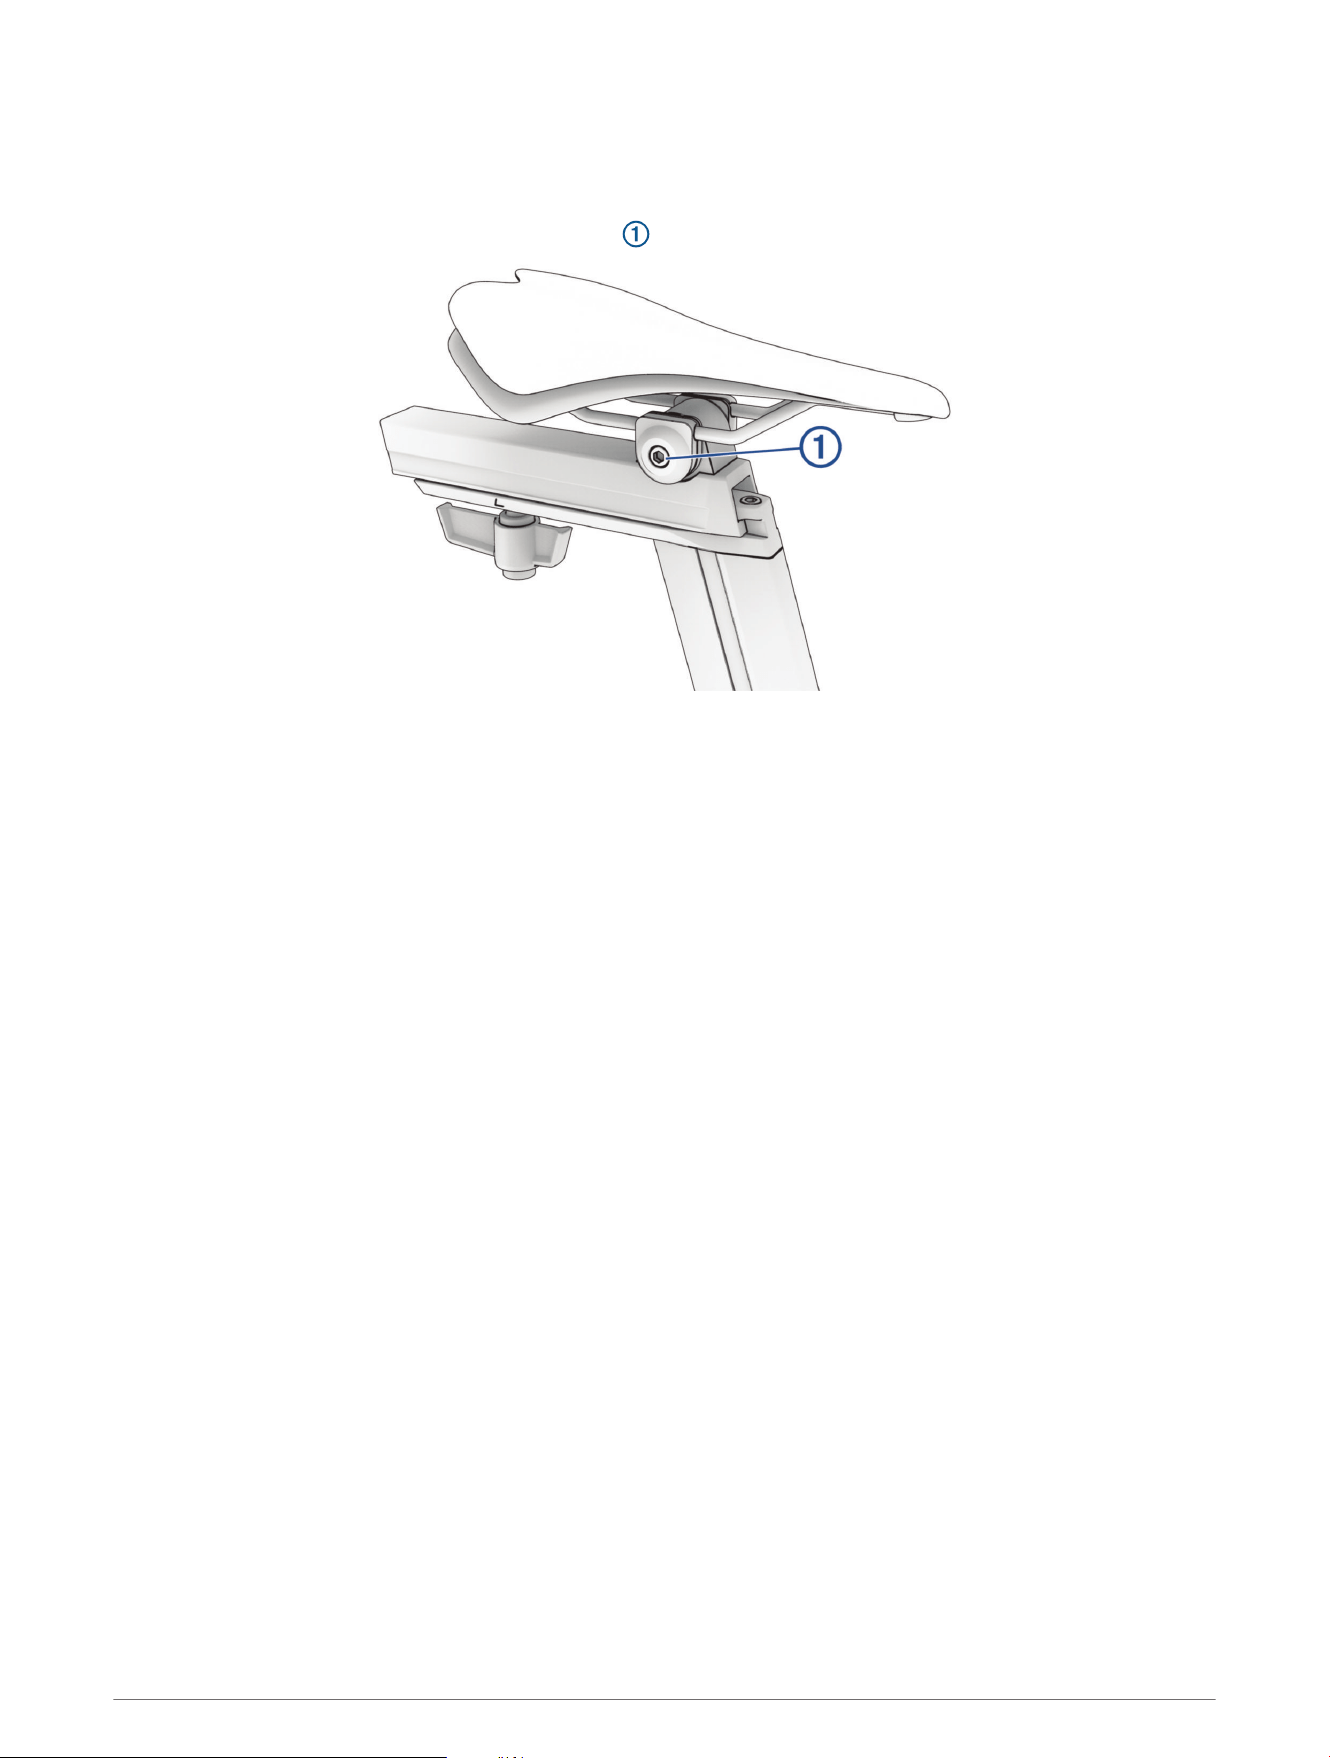
Installing the Saddle
Before you install the saddle, see the topics on posture (Cycling Posture, page3) and geometry
(Adjusting the Trainer Geometry, page4).
1 Open the assembly kit .
2 Use the 6 mm hex key to remove the set screw.
C
D
Tacx NEO Bike Plus Assembly Instructions 9
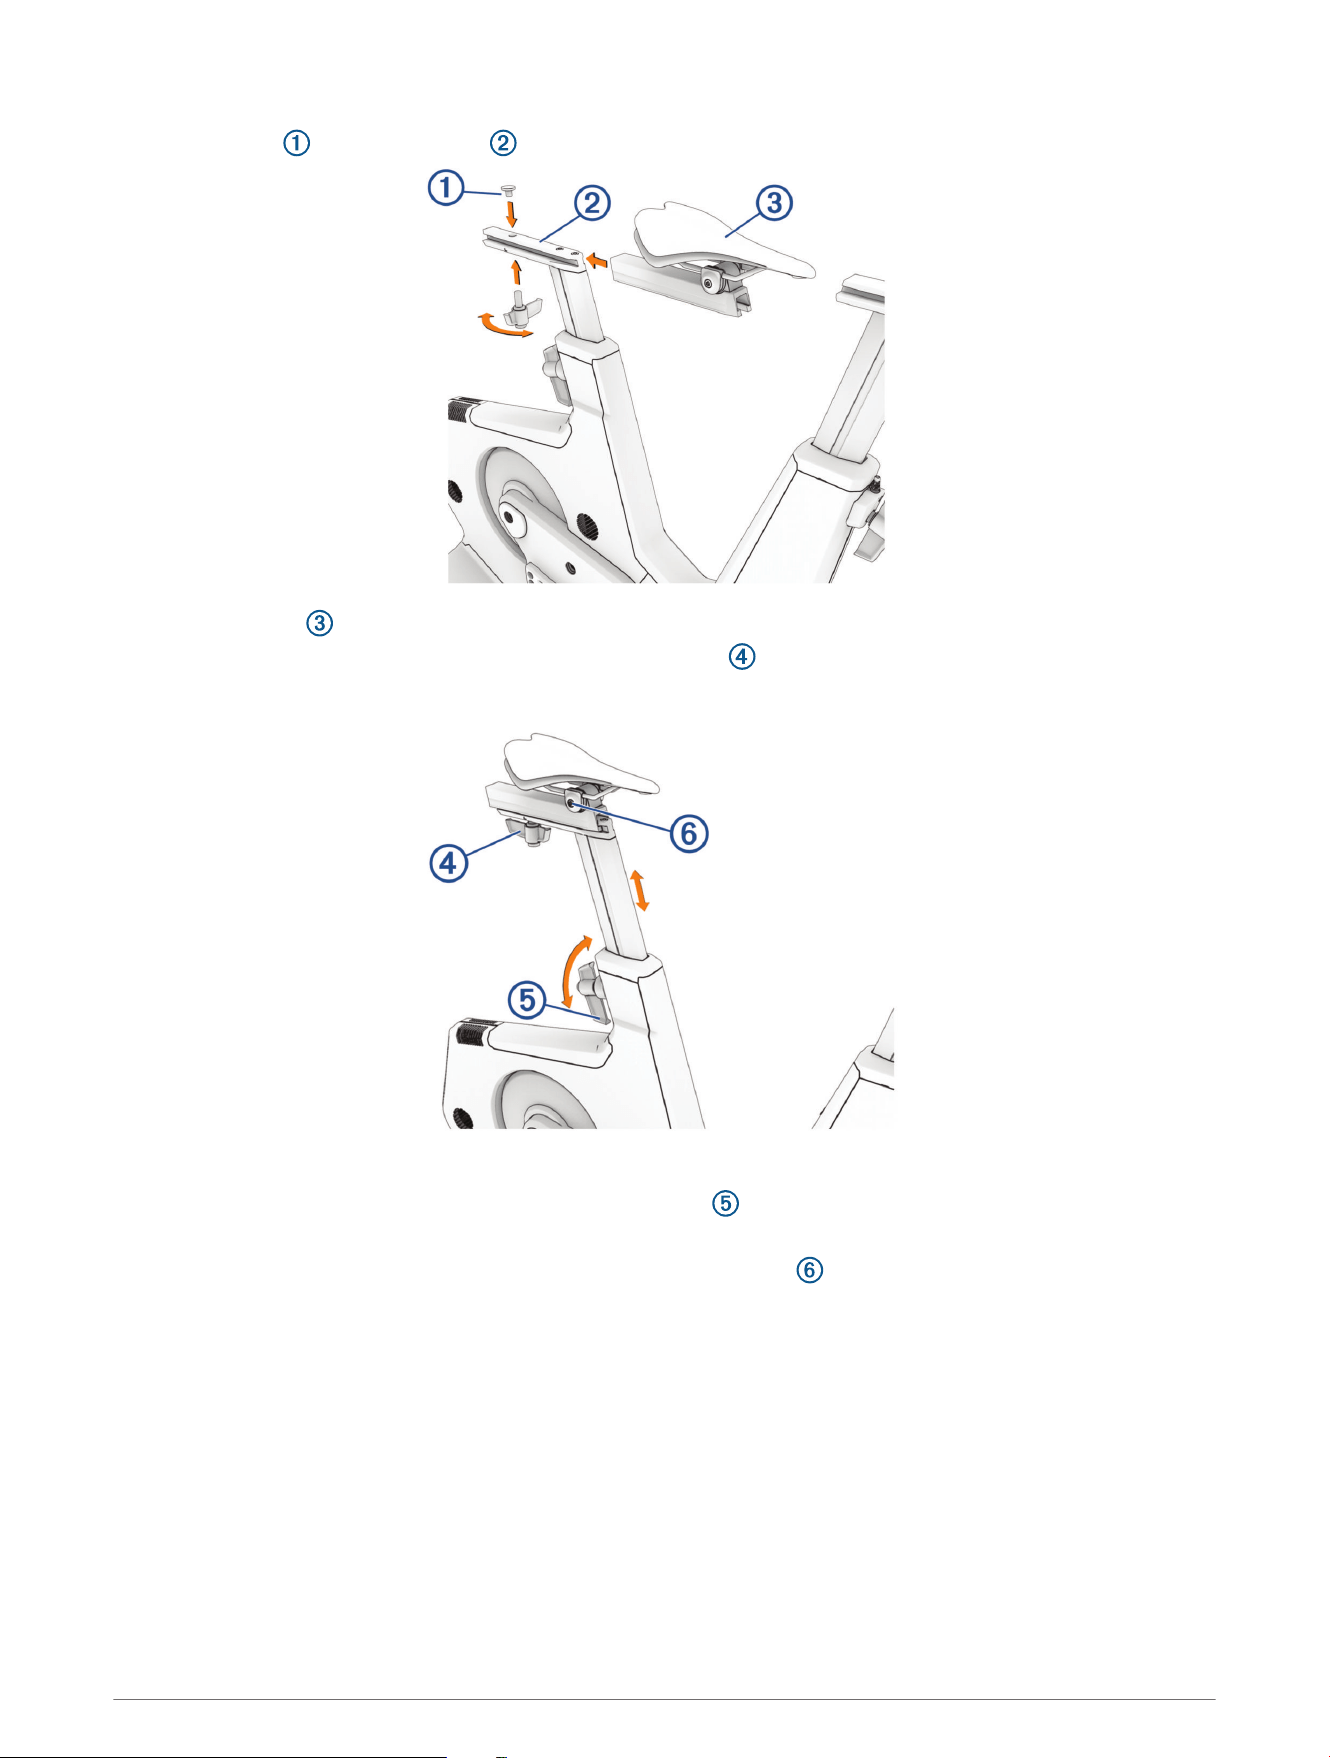
3 Place the cap on the saddle rail .
4 Slide the saddle onto the saddle rail.
5 Adjust the saddle setback, and secure the M12 x 25 handle .
The maximum setback distance is 15 cm.
6 Use the 8 mm hex key to remove the set screw from the saddle post.
7 Adjust the saddle height, and secure the M16 x 22 handle .
The maximum saddle height is 26 cm.
8 If necessary, use the 5 mm hex key to adjust the saddle angle bolt .
10 Tacx NEO Bike Plus Assembly Instructions
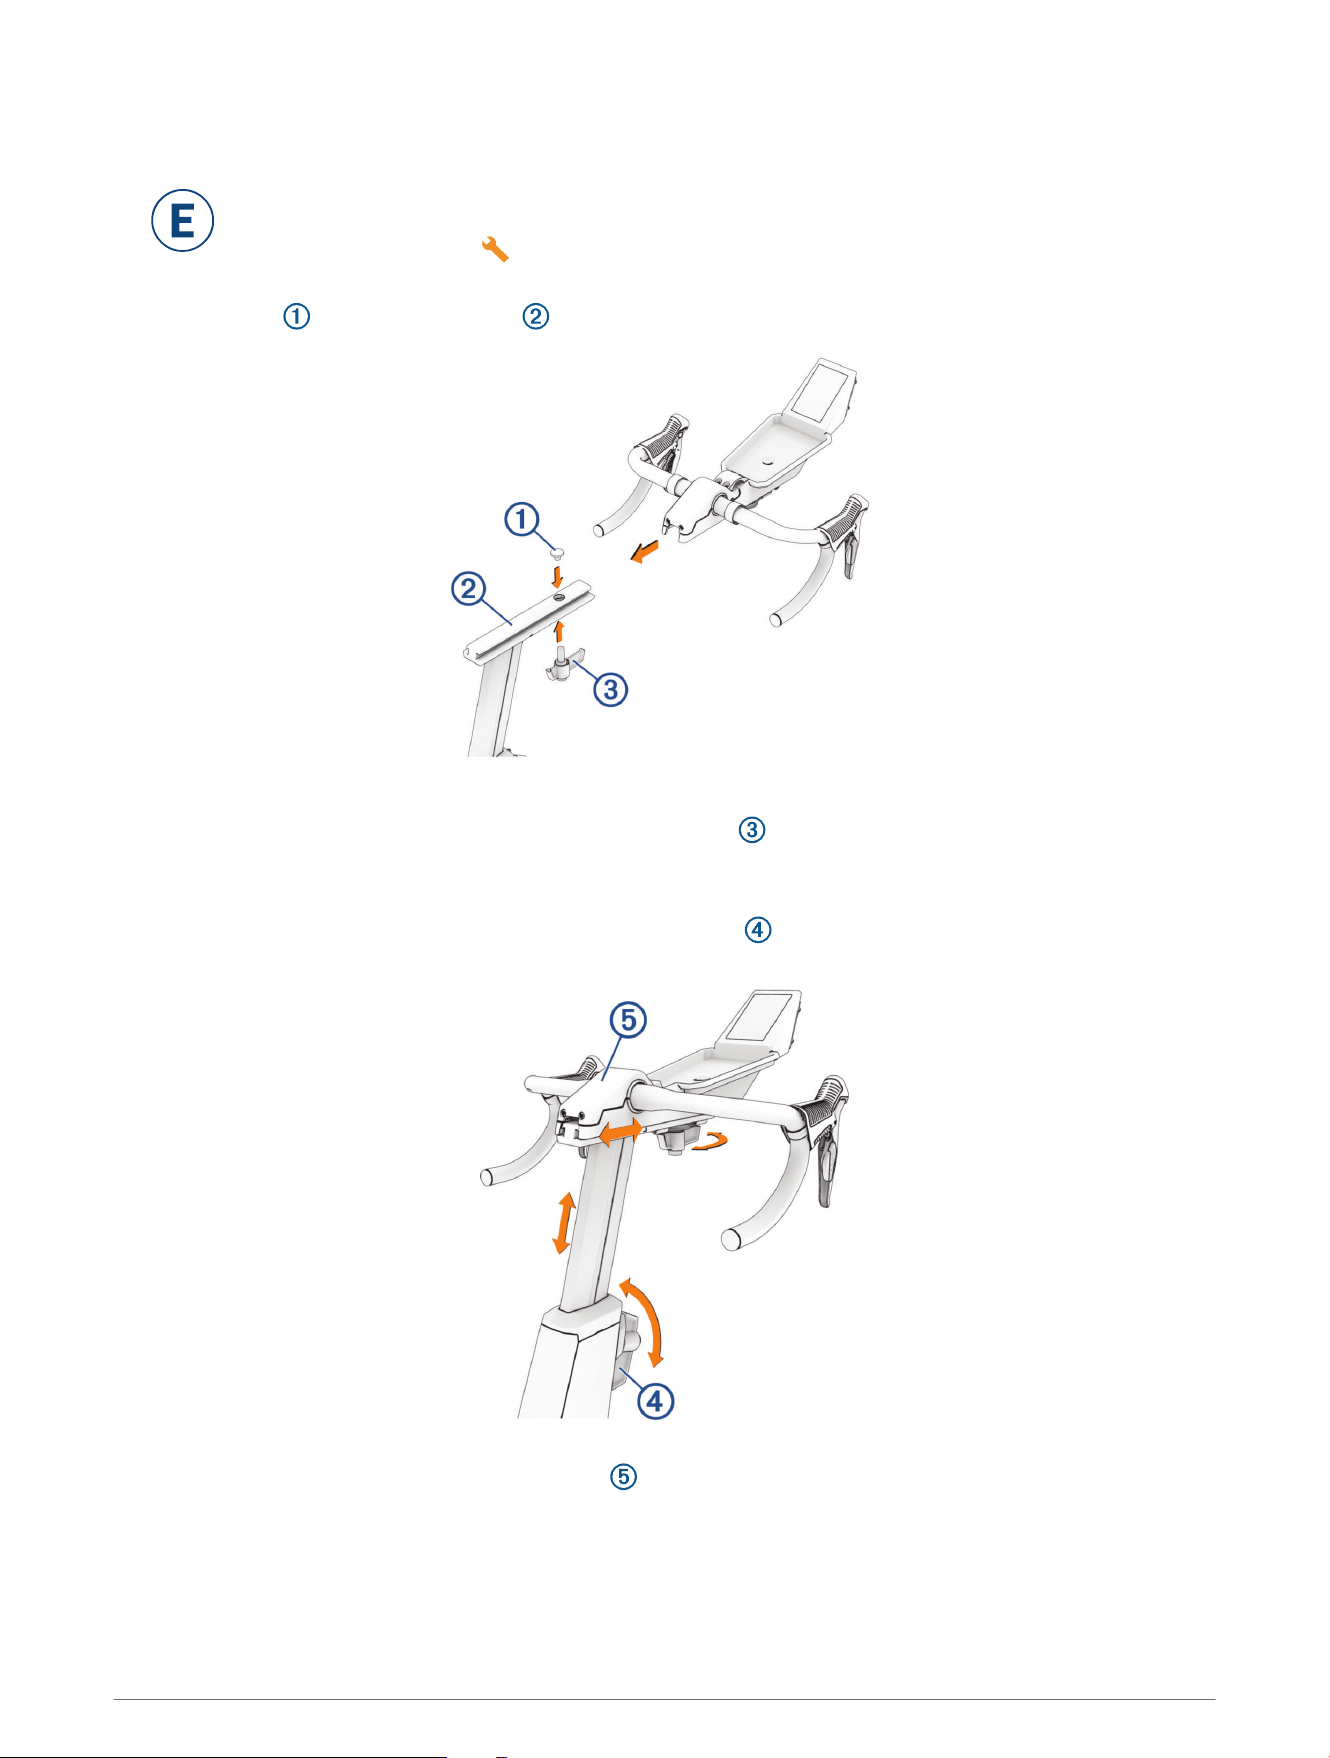
Installing the Handlebar
Before you install the handlebar, see the topics on posture (Cycling Posture, page3) and geometry
(Adjusting the Trainer Geometry, page4).
1 Open the assembly kit .
2 Use the 6 mm hex key to remove the set screw.
3 Place the cap on the handlebar rail .
4 Slide the handlebar onto the handlebar rail.
5 Adjust the handlebar reach, and secure the M12 x 25 handle .
The maximum handlebar distance is 15 cm.
6 Use the 8 mm hex key to remove the set screw from the handlebar post.
7 Adjust the handlebar height, and secure the M16 x 22 handle .
The maximum handlebar height is 26 cm.
8 If necessary, follow these steps to adjust the handlebar angle.
9 Use the Torx 20 to remove the handlebar cover .
10 Use the 5 mm hex key to loosen the 4 screws.
11 Adjust the angle of the handlebar.
E
Tacx NEO Bike Plus Assembly Instructions 11

12 Tighten the 4 screws.
13 Replace and secure the handlebar cover.
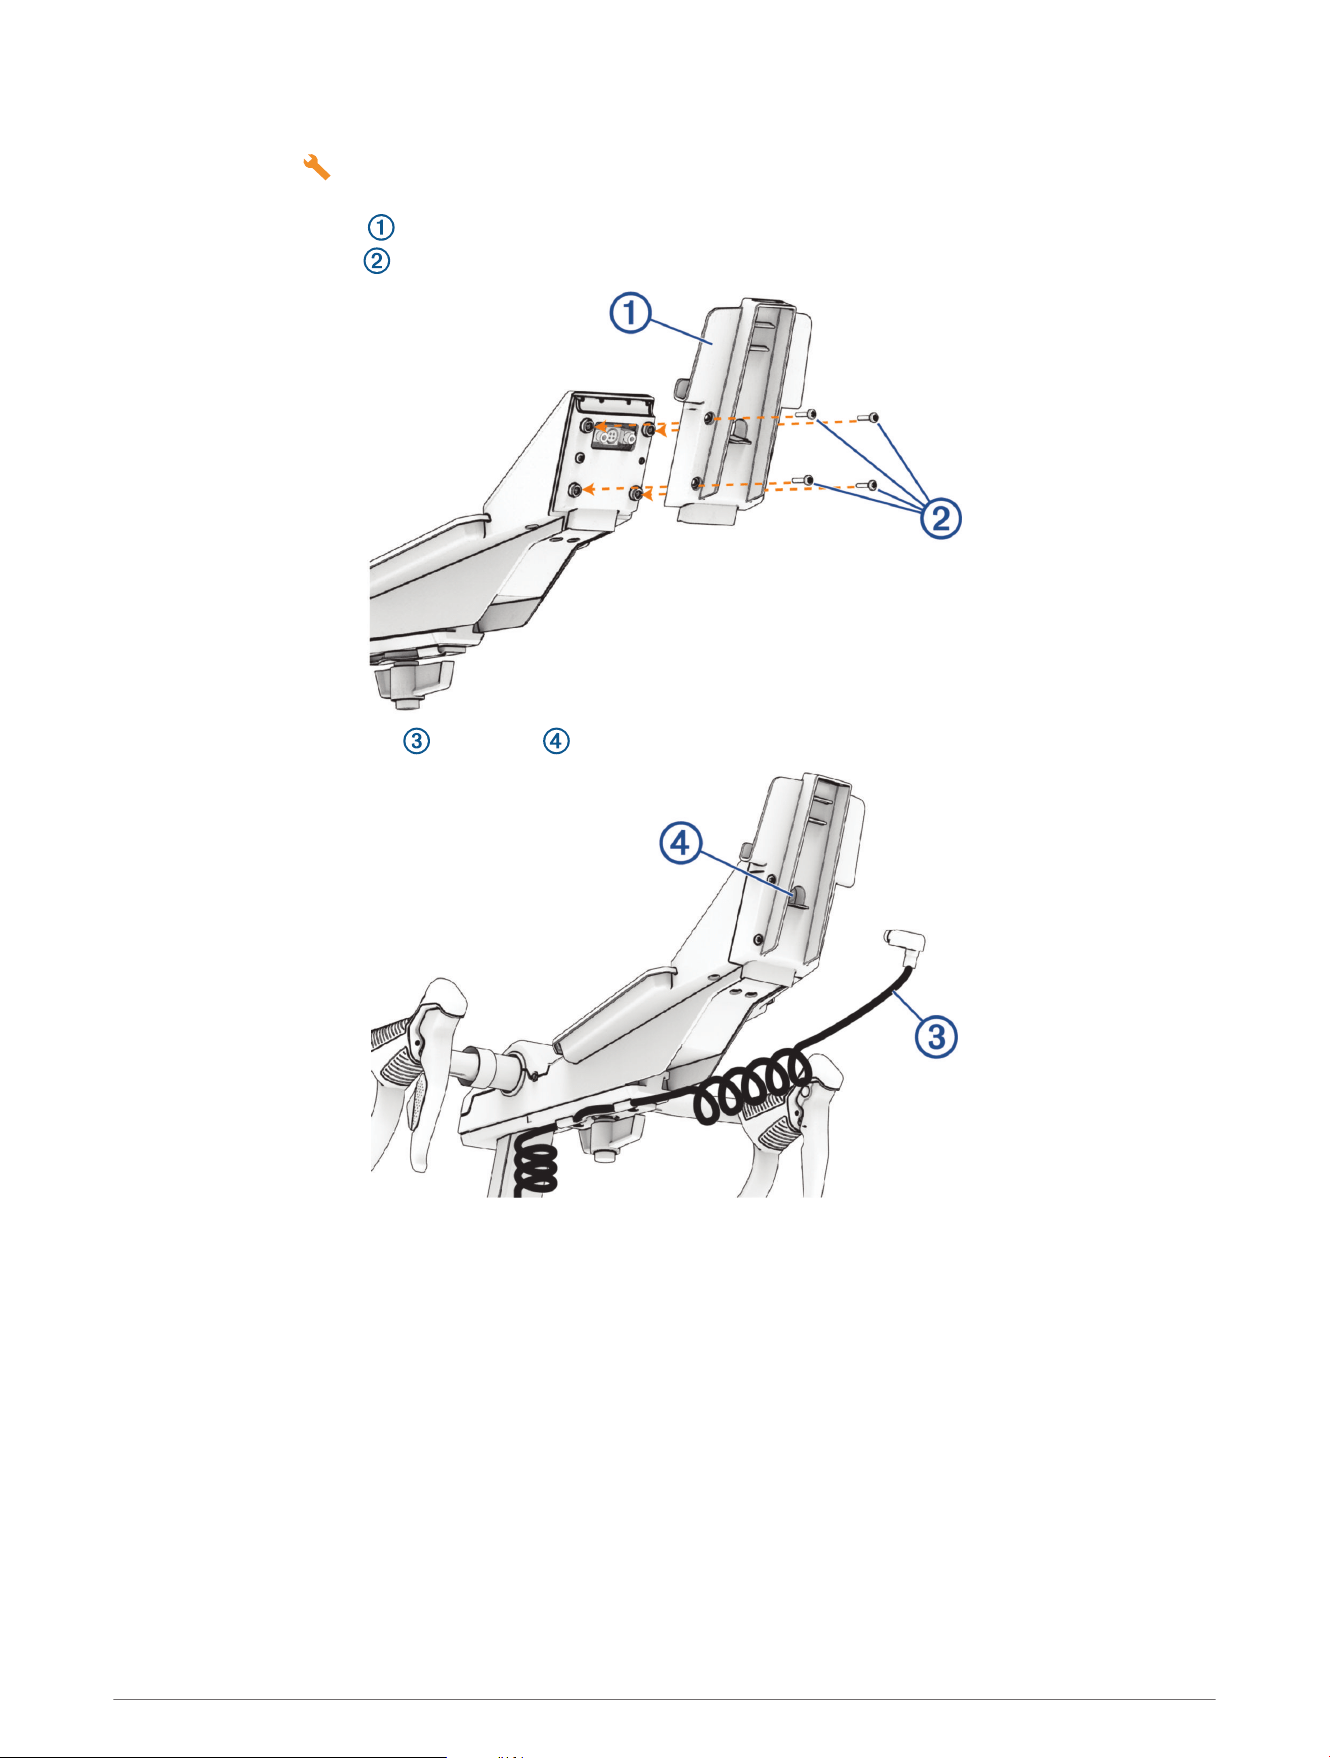
Installing the Fans with Tablet Mount
CAUTION
Do not contact the fan blades or insert any objects into the fan housing during use. Contact with the fans or fan
housing could damage the fans and cause personal injury.
The tablet mount is between the fans (Attaching Your Tablet to the Trainer, page14).
NOTE: If you choose not to install the fans, you can install the tablet mount only (Installing the Tablet
Mount, page21).
1 Align the fans with the back of the display.
TIP: You may need to move the fan cables out of the way.
2 Use the M4 x 10 bolts and the Torx 20 wrench to install the fans.
3 Connect the display cable and the fan cables to the ports .
F
12 Tacx NEO Bike Plus Assembly Instructions
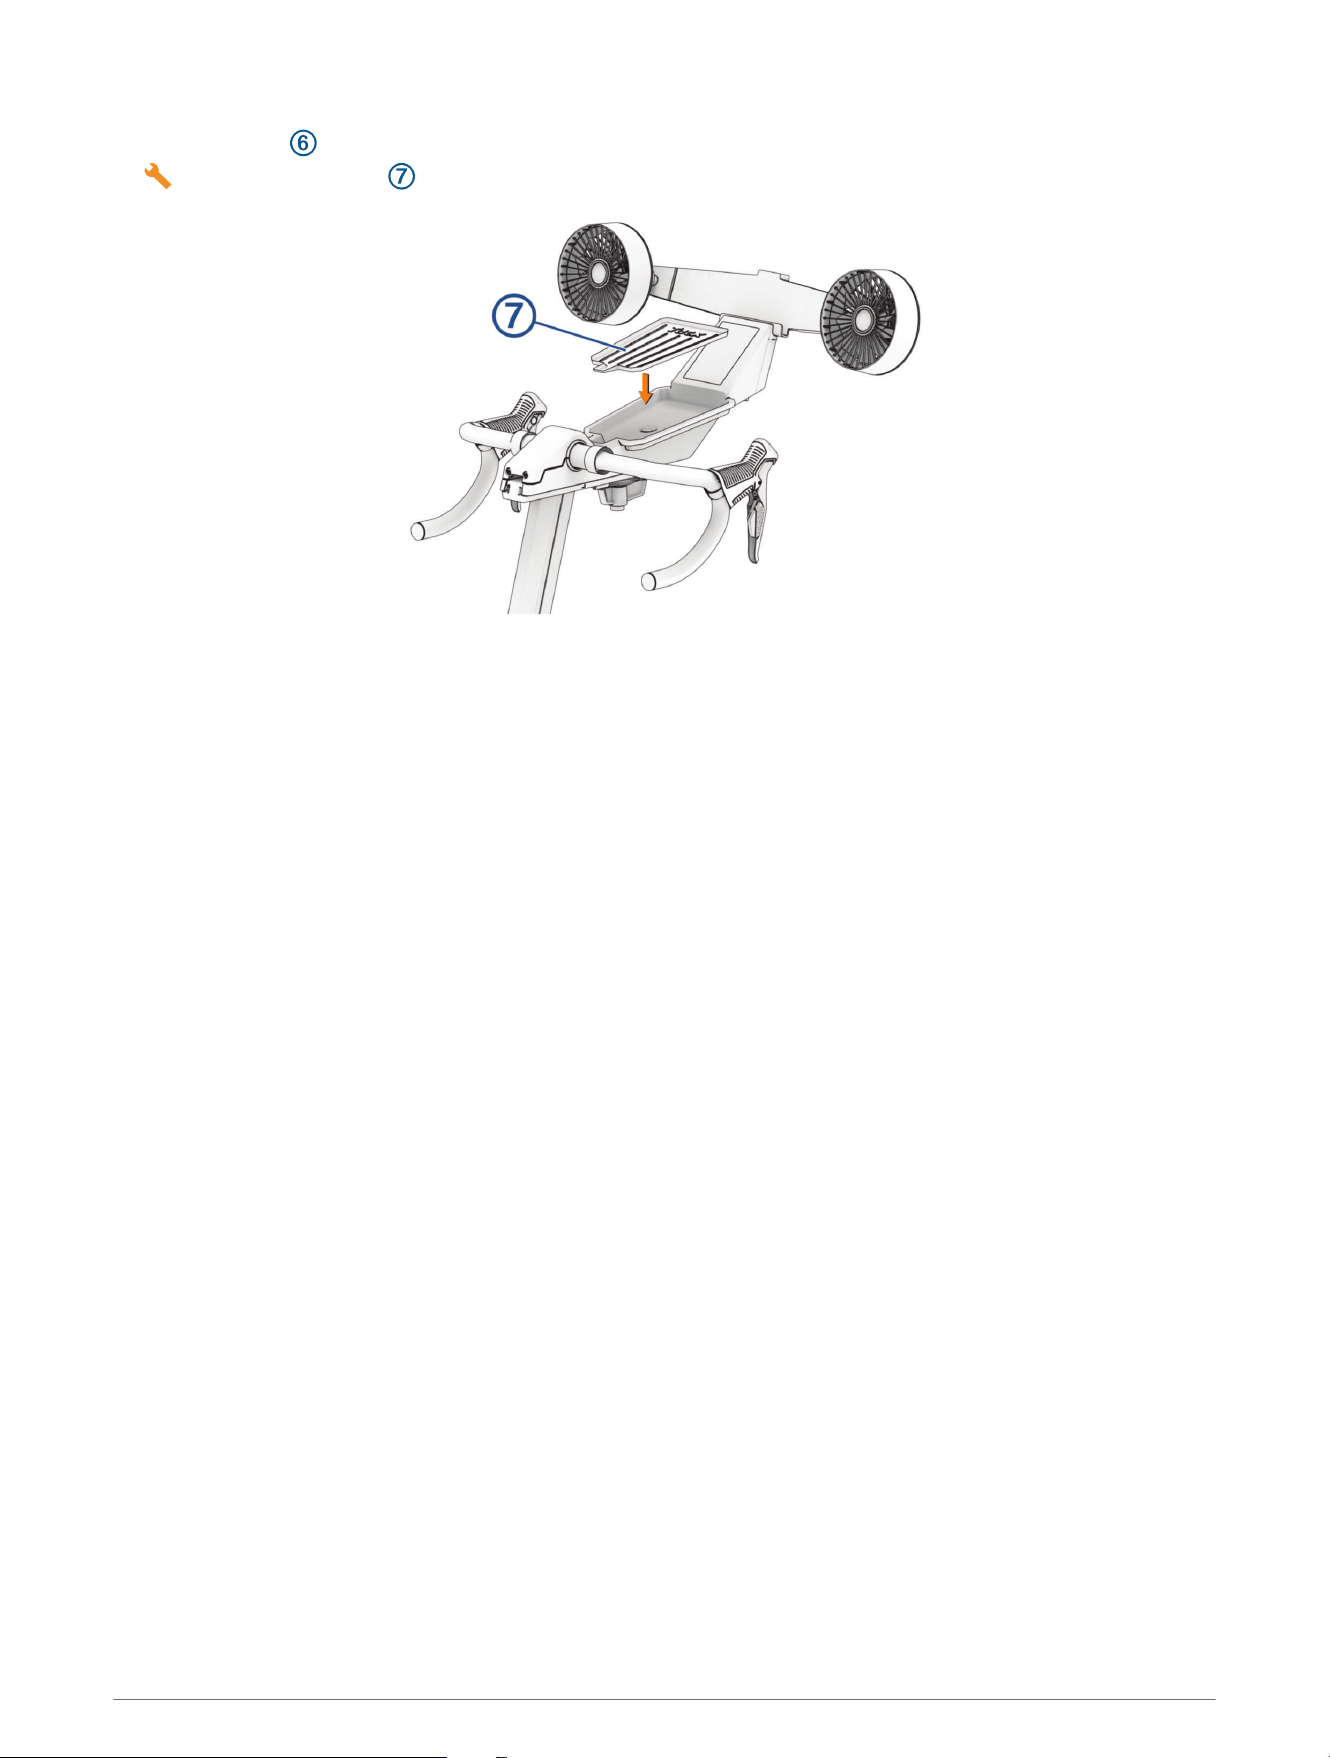
4 Use the knobs to adjust the angle of the fans.
5 Place the rubber mat into the tray.
Tacx NEO Bike Plus Assembly Instructions 13
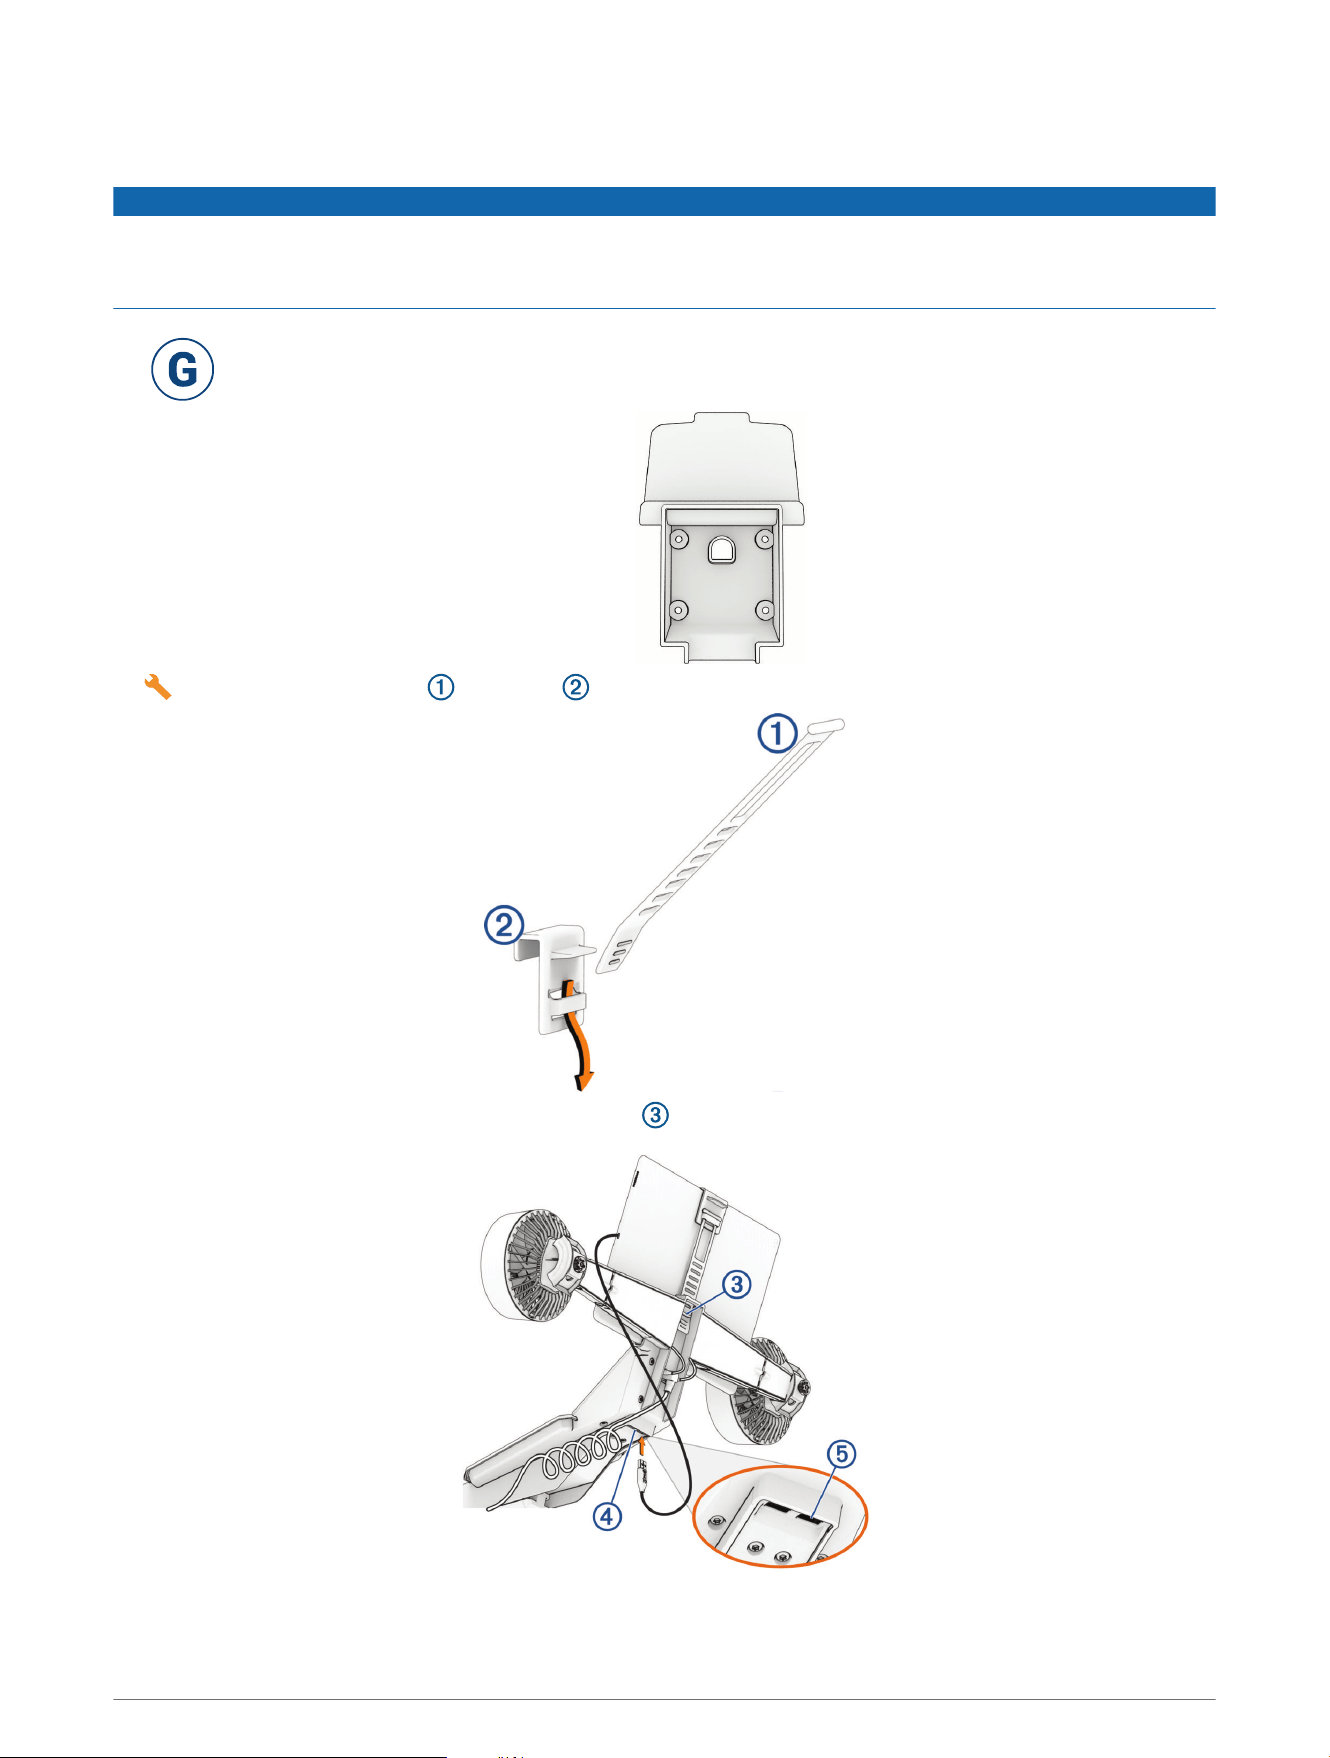
Attaching Your Tablet to the Trainer
NOTICE
Before your first ride, read all of the instructions and secure your tablet to the trainer. Garmin
®
is not responsible
for damage caused to your tablet due to incorrect mounting of the tablet holder.
Do not adjust the handlebar height or reach while your tablet is attached to the trainer.
The clip fits most standard-sized tablets. If your tablet has a thick case or folio, you can remove the
case or folio before attaching the tablet to the trainer. The assembly kit includes a separate tablet
mount if you choose not to install the fans (Installing the Tablet Mount, page21).
1 Connect the rubber strap to the clip .
2 Connect the rubber strap to the back of the mount .
G
14 Tacx NEO Bike Plus Assembly Instructions
3 Position your tablet on the trainer, and secure it with the clip.
4 If necessary, connect your tablet cable to a USB port .
TIP: The USB port labeled 12.5 W is for high-output charging. The USB port labeled 2.5 W is for low-output
charging and may not work for all devices.
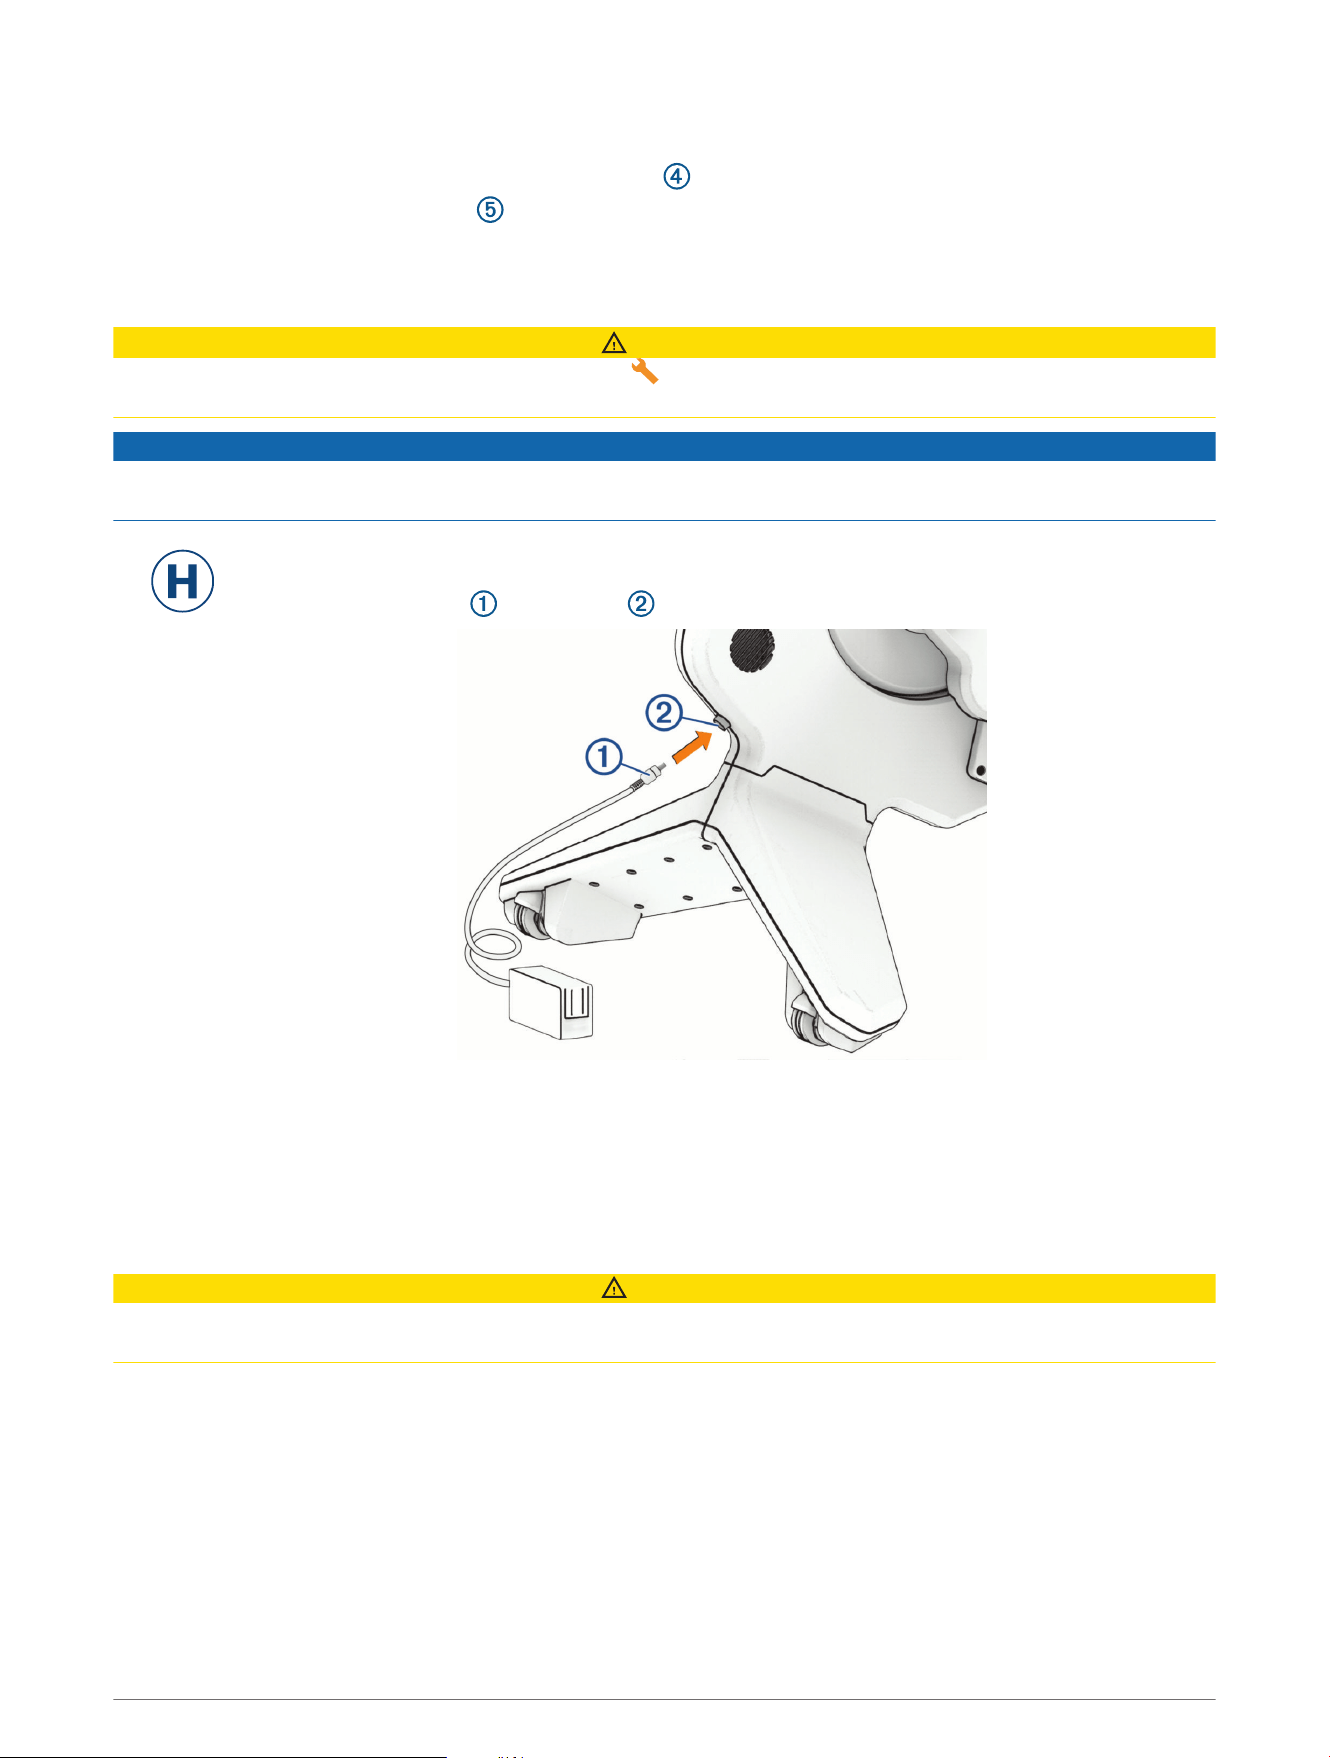
Connecting the Power Cable
CAUTION
The power cable and adapter are in the assembly kit . Do not attempt to use a third-party power cable or
adapter with the Tacx NEO Bike Plus trainer because this could lead to personal injury or damage to the trainer.
NOTICE
Do not expose the power cable or adapter to sweat or moisture because this could damage your trainer. For
more about device care, see Device Care and Storage, page20.
You can use the Tacx NEO Bike Plus trainer with or without power. Some of the trainer features
require power, including downhill assistance and USB charging.
1 Plug the power cable into the port .
NOTE: Some models may have a 2-part power cable with an adapter, but the functionality of
either power cable is the same.
2 Plug the power cable into a standard wall outlet.
3 Rotate the crank.
The display and fans turn on. The floor LED is blue.
After each use, disconnect the power cable and store it in a dry location.
CAUTION
Make sure to power off the device and unplug it after every use. This will minimize the risk of damage to the
device.
H
Training
Training 15
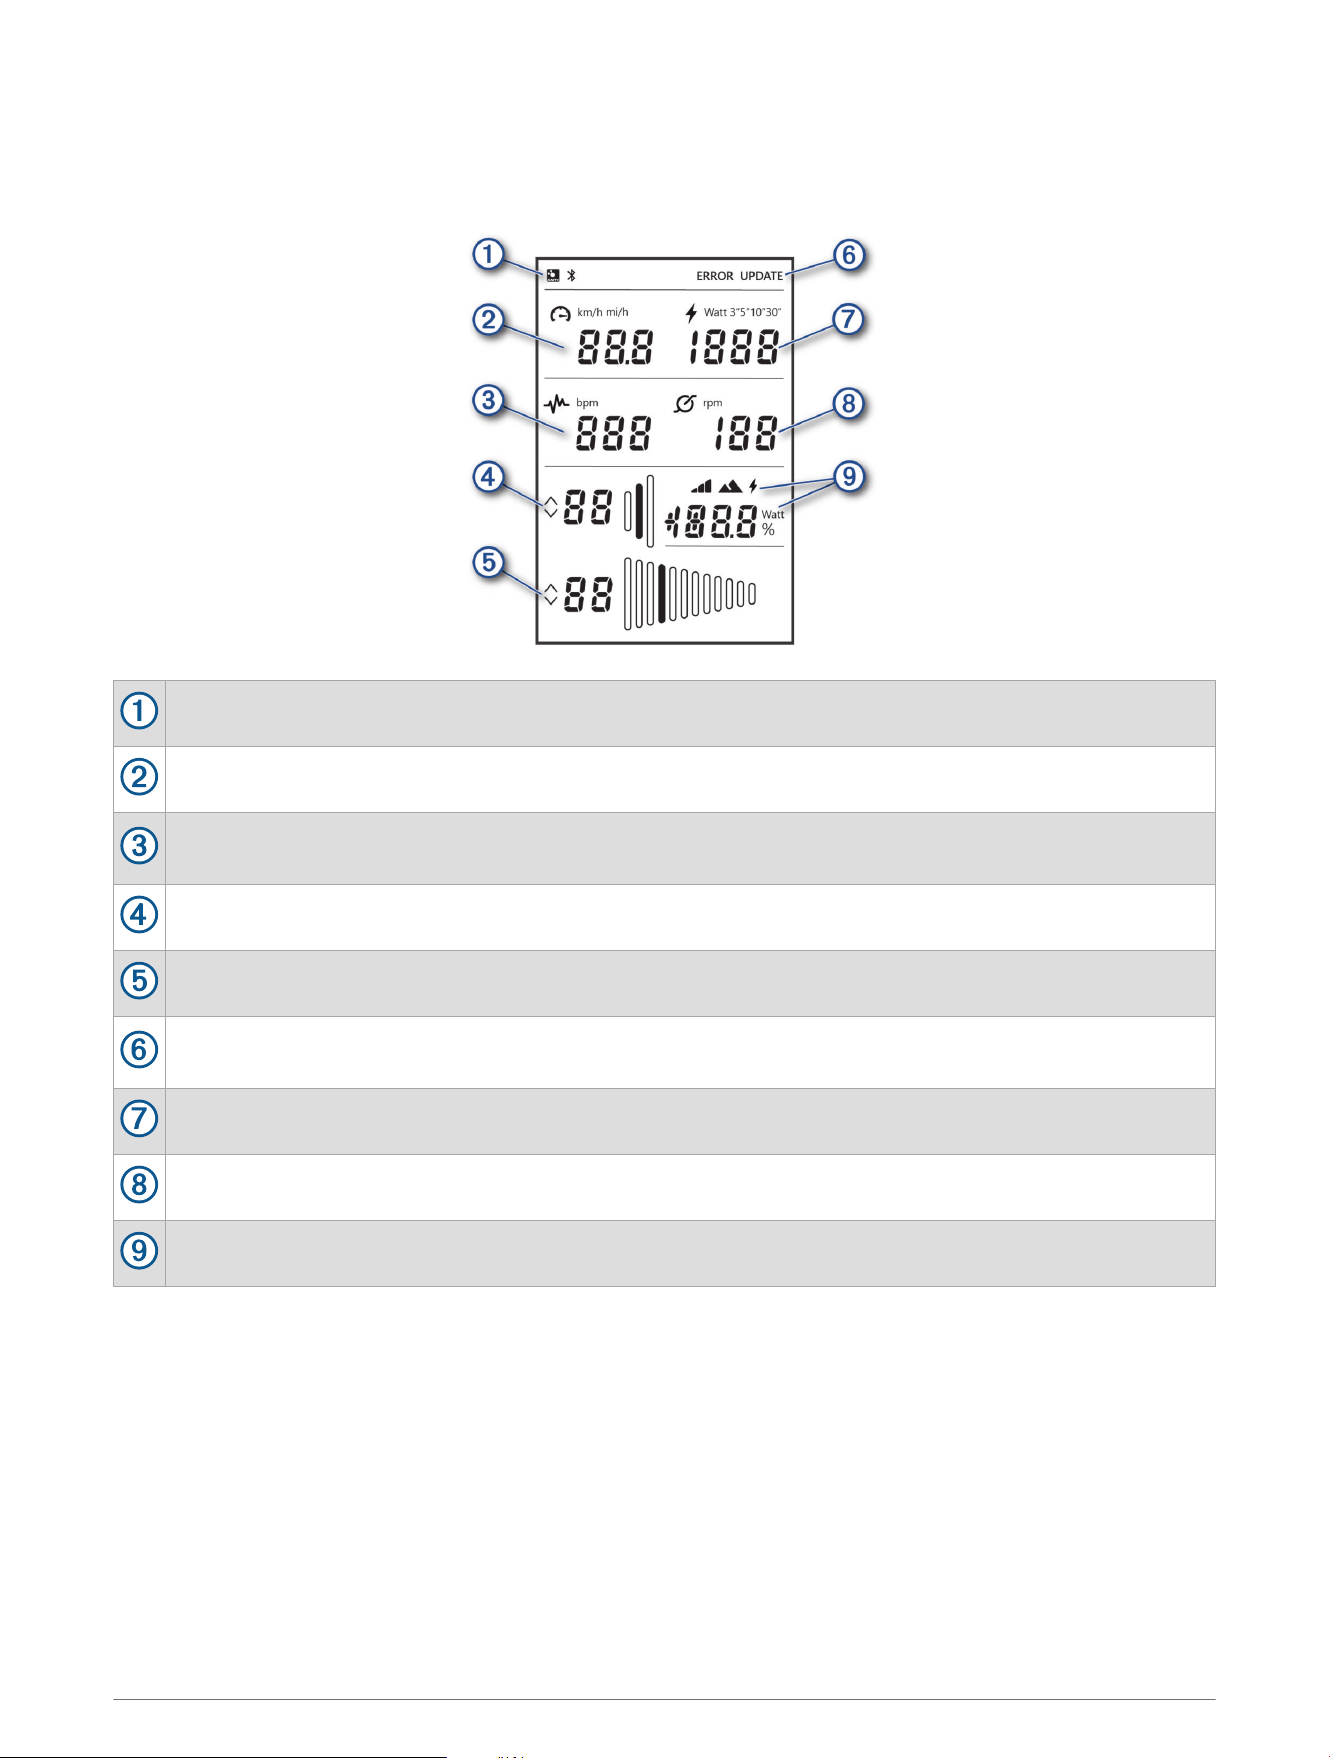
Display Data
The display turns on as soon as you start pedaling. The display data varies if you are connected to the Tacx
Training app, a third-party app, or optional wireless sensors.
Displays the ANT+
®
or Bluetooth
®
connection status (Pairing Optional Sensors, page25).
Displays your current speed in kilometers per hour (km/h) or miles per hour (mi/h).
Displays your current heart rate in beats per minute (bpm). You must have a connected heart rate
monitor.
Displays the current front gear (by default, the left shifter).
Displays the current rear gear (by default, the right shifter).
Displays an error message or an available trainer software update. For more information, connect to the
Tacx Training app.
Displays your current power output in watts (W).
Displays your current cadence in revolutions per minute (rpm).
Displays the manual training mode (Training Modes, page18) and additional data.
16 Training

Going for a Ride
Your first ride on the Tacx NEO Bike Plus trainer should be a short, manual training ride. You should learn how to
use the basic features and get comfortable with the controls and settings.
1 Start pedaling.
The display and fans turn on. The floor LED is blue (Floor LED, page18).
2 Use the shifters to change the front and rear gears:
• Press to shift the front gear up.
• Press to shift the front gear down.
• Press to shift the rear gear down.
• Press to shift the rear gear up.
The list includes the default shifter functions. You can customize the shifters to behave like Campagnolo
®
,
Shimano
®
, or SRAM
®
shifters (Customizing the Trainer Settings from the App, page19).
3 Hold both control buttons to select a manual training mode (Training Modes, page18).
4 Press either button to select a mode.
The active mode icon blinks for 1 second to confirm your choice.
Training 17
5 During your ride, select an option:
• Press to increase the incline, value, or resistance.
• Press to decrease the incline, value, or resistance.
6 If necessary, squeeze the brakes to slowly come to a stop.
TIP: If you rest or pause your training, you can also use the brakes to slow down the flywheel.
Adjusting the Fan Speed
After you pair your trainer to the Tacx Training app and start an activity, the fan behavior is determined by the
settings in the app (Customizing the Trainer Settings from the App, page19). You can also manually adjust the
fan speed.
1 Press both control buttons twice (Going for a Ride, page17).
The fan controls appear on the trainer display.
2 Use the right control button to increase the fan speed or the left control button to decrease the fan speed.
There are four fan speeds: high, medium, low, and off.
Training Modes
You can choose a training mode when you are doing a manual (stand alone) workout on your Tacx NEO
Bike Plus trainer. Training modes are not available if you are connected to the Tacx Training app or another
third-party app.
NOTE: Training modes function with or without external power connected. Training will feel more realistic with
external power connected.
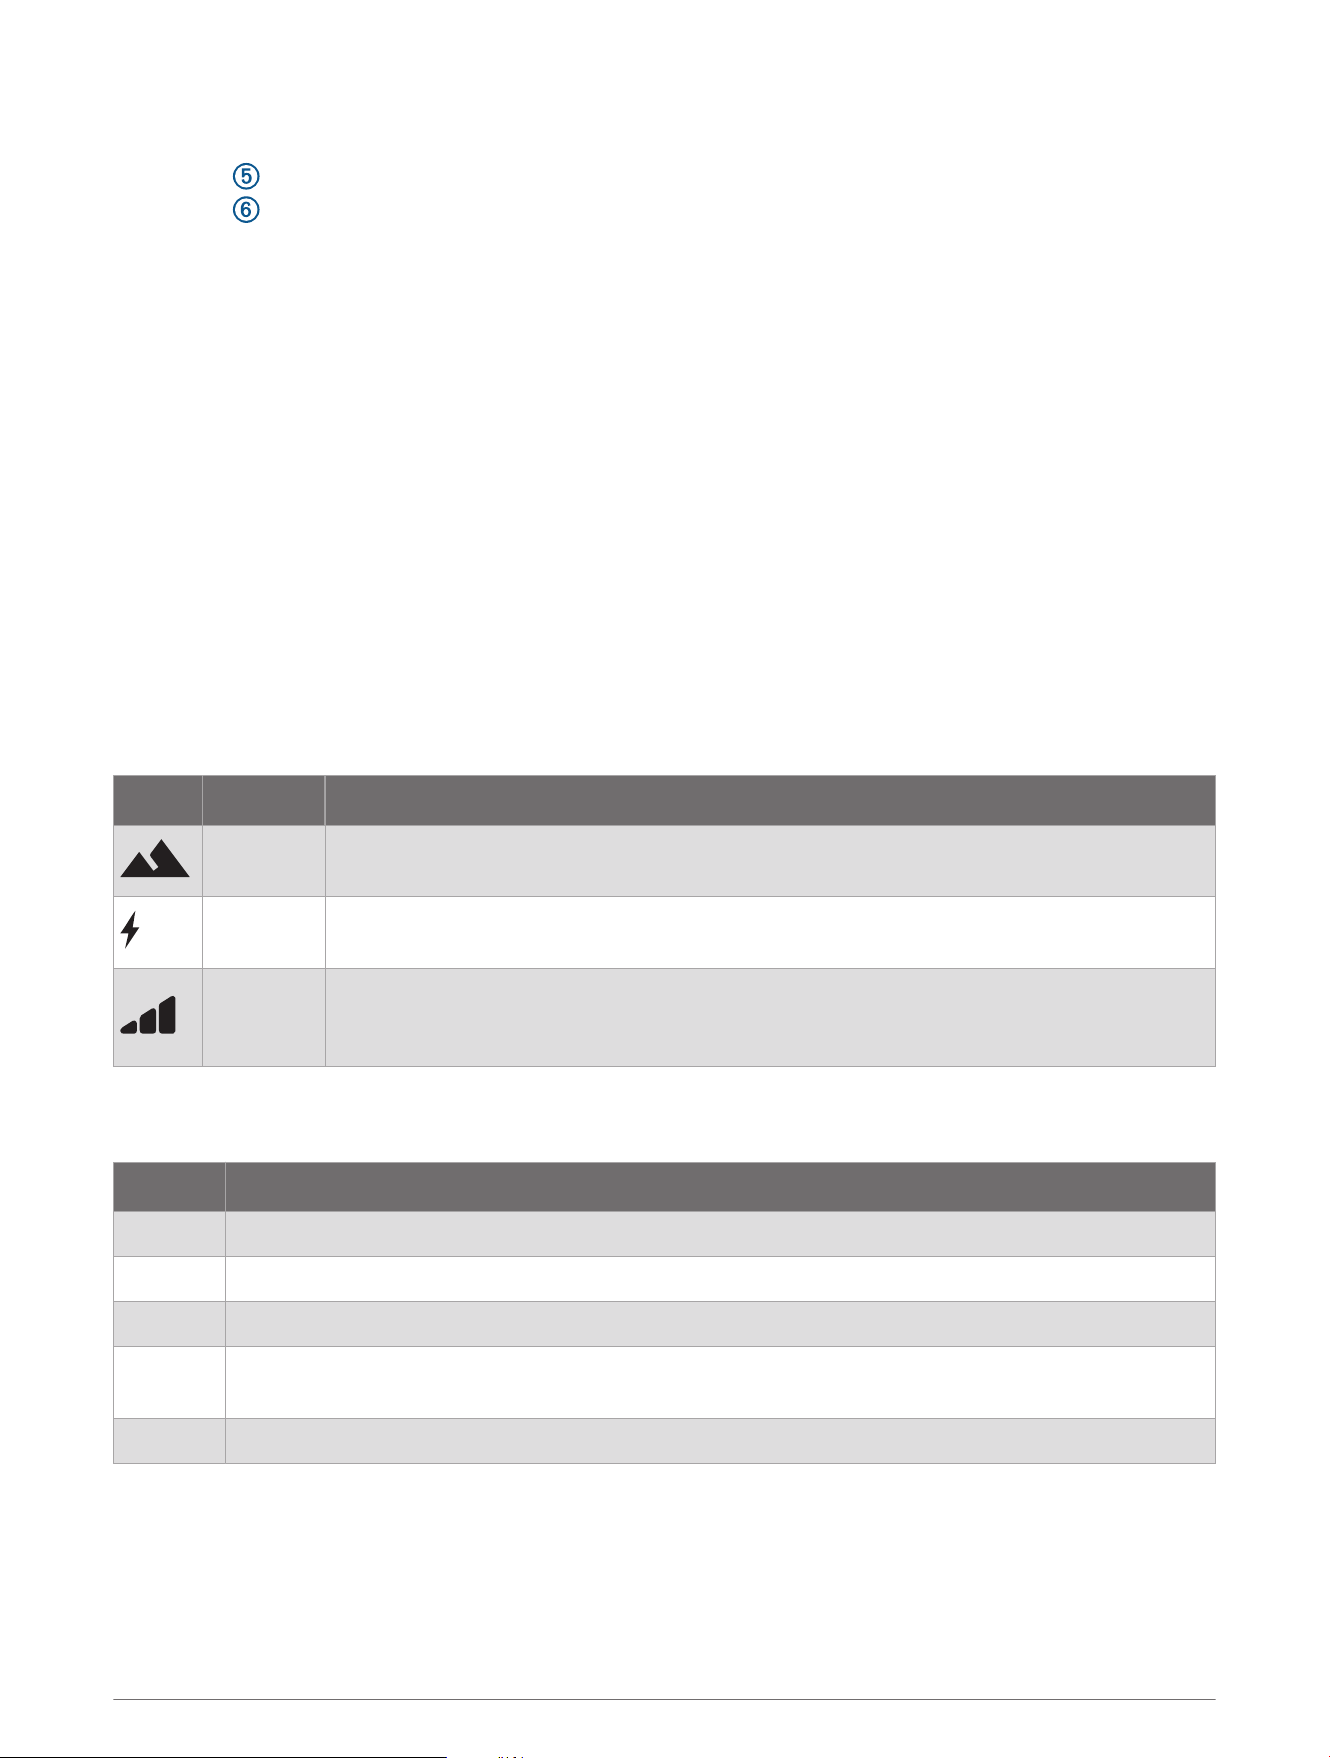
Symbol Mode Description
Slope
Training is based on a fixed incline so you can simulate gradients and hills. You can use
the control buttons to set the incline and use the shifters to change gears.
Power
Training is based on a fixed power output value so you can ride at a controlled and
constant effort level. You can use the control buttons to set the value.
Resistance
Training is based on 20 possible resistance levels so you can ride without a specific
target, such as a spin class. You can use the control buttons to change the resistance
level.
Floor LED
The floor LED changes colors during training.
LEDColor Status
Blue The trainer is active and working properly.
Purple Indicates medium power output.
Red Indicates high power output.
Green
When you stop pedaling for 5 minutes, the LED flashes green one time before going into standby
mode (Standby Mode, page18).
Off The trainer is off or in standby mode.
Standby Mode
When not in use, the Tacx NEO Bike Plus trainer goes into standby mode. You can wake up the trainer by
rotating the crank.
External Power Connected: After 5 minutes of no activity, the trainer goes into standby mode.
No External Power: After 10 seconds of no activity, the trainer goes into standby mode.
18 Training

Tacx Training App
You can download the Tacx Training app to your compatible phone, tablet, or computer.
• Ride exciting courses without leaving your home.
• Create your own rides, workouts, and more.
• Manage your training, customize the default settings, and diagnose issues.
• Sync your indoor training data with your Garmin Connect
™
account.
• Update your device software (Updating the Trainer Software, page23).
Riding with the Tacx Training App
To use the full features of your trainer, you must put the trainer into pairing mode to connect to the Tacx
Training app.
1 Plug the trainer into a standard wall outlet to use all the features such as downhill assistance and USB
charging.
2 From the app store on your phone or tablet, install and open the Tacx Training app.
3 On the Tacx NEO Bike Plus trainer, hold both control buttons for 5 seconds (Going for a Ride, page17).
4 When the display appears empty except for the flashing , release the buttons.
The trainer will enter secure pairing mode for five minutes or until pairing is successful. You can press any
button to cancel.
5 From the Tacx Training app, select Connect Trainer.
6 Follow the on-screen instructions to complete the pairing and setup process.
TIP: You should customize the trainer settings in the app before you start a workout or course (Customizing
the Trainer Settings from the App, page19).
7 Select a workout or course.
8 Start pedaling.
The display and fans turn on. The floor LED is blue (Floor LED, page18).
9 Follow the on-screen instructions.
Customizing the Trainer Settings from the App
TIP: You should customize the trainer settings in the app before you start a workout or course. Some options
require a connected ANT+ accessory.
1 Open the Tacx Training app.
2 Select your trainer.
3 Select Trainer Settings.
4 Select an option:
• Select Virtual Gears to customize the gear settings.
• Select Fan to set the fan levels and training conditions.
• Select Display to customize the power display and speed units of measure.
• Select Connection Settings to use secure or open connections.
• Select Shifting Mechanism to set the type of shifting system.
TIP: It's a good idea to use the same shifting system as your road bike.
• Select Road Feel to adjust the intensity of the road feel.
• Select Device Defaults to set the default body weight or bike weight.
• Select Crank to set your crank length to match the physical crank length of your trainer (Installing Your
Pedals, page8).
Training 19
Device Information
Specifications
Power supply
Use the included 48 Vdc power cable.
From 100 to 240 V
Operating temperature
range
From 0º to 40ºC (from 32º to 104ºF)
Storage temperature
range
From -20º to 60ºC (from -4º to 140ºF)
NOTICE
If the trainer is stored or shipped below this temperature range, allow the trainer to
normalize to the operating temperature range, and wait 12 hr. before use. Extreme
temperature changes can cause condensation inside the trainer that may result in
property damage.
Wireless frequency 2.4 GHz @ 5.7 dBm maximum
Maximum rider weight 120 kg (265 lb.)
Device Care and Storage
WARNING
See the Important Safety and Product Information guide in the product box for product warnings and other
important information.
NOTICE
Garmin recommends the following care and storage tips to help avoid sweat and moisture exposer to certain
trainer components, which can damage your trainer.
Follow these steps to help avoid sweat or moisture exposure to certain trainer components, which could
damage your trainer.
• Install the sweat cover (Installing the Sweat Cover, page22).
To help prevent sweat or moisture getting into trainer components, always use the sweat cover.
• Do not expose the power cable or adapter to sweat or moisture during or after riding.
• After every use, disconnect the power cable and store it in a dry location.
• After every use, clean the aluminum disc on the right side of the trainer with a moist cloth, and dry it
thoroughly.
• Clean the saddle, handlebar, and pedals with a cloth and a mild cleaning solution.
• Clean and throroughly dry the trainer before storing it.
• Use the small wheels on the back of the Tacx NEO Bike Plus trainer to move the trainer.
NOTE: You should stabilize and level the trainer after moving it.
• Check and firmly tighten the bolts, handles, and screws before use.
• Check the power cable and adapter for damage before each use.
• Go to buy.garmin.com, or contact your Garmin dealer for information about optional accessories and
replacement parts.
• When you do not plan to use the trainer for several months, you should store the trainer in a cool, dry place
with temperatures around the typical household level (Specifications, page20).
20 Device Information
Installing the Tablet Mount
In the assembly kit , there are M4 X 10 bolts (4) to install either the fans (Installing the Fans with Tablet
Mount, page12) or the tablet mount.
1 Align the tablet mount with the back of the display.
2 Use the M4 x 10 bolts and the Torx 20 wrench to install the tablet mount.
3 Connect the display cable to the port .
4 Attach the clip and tablet (Attaching Your Tablet to the Trainer, page14).
Device Information 21
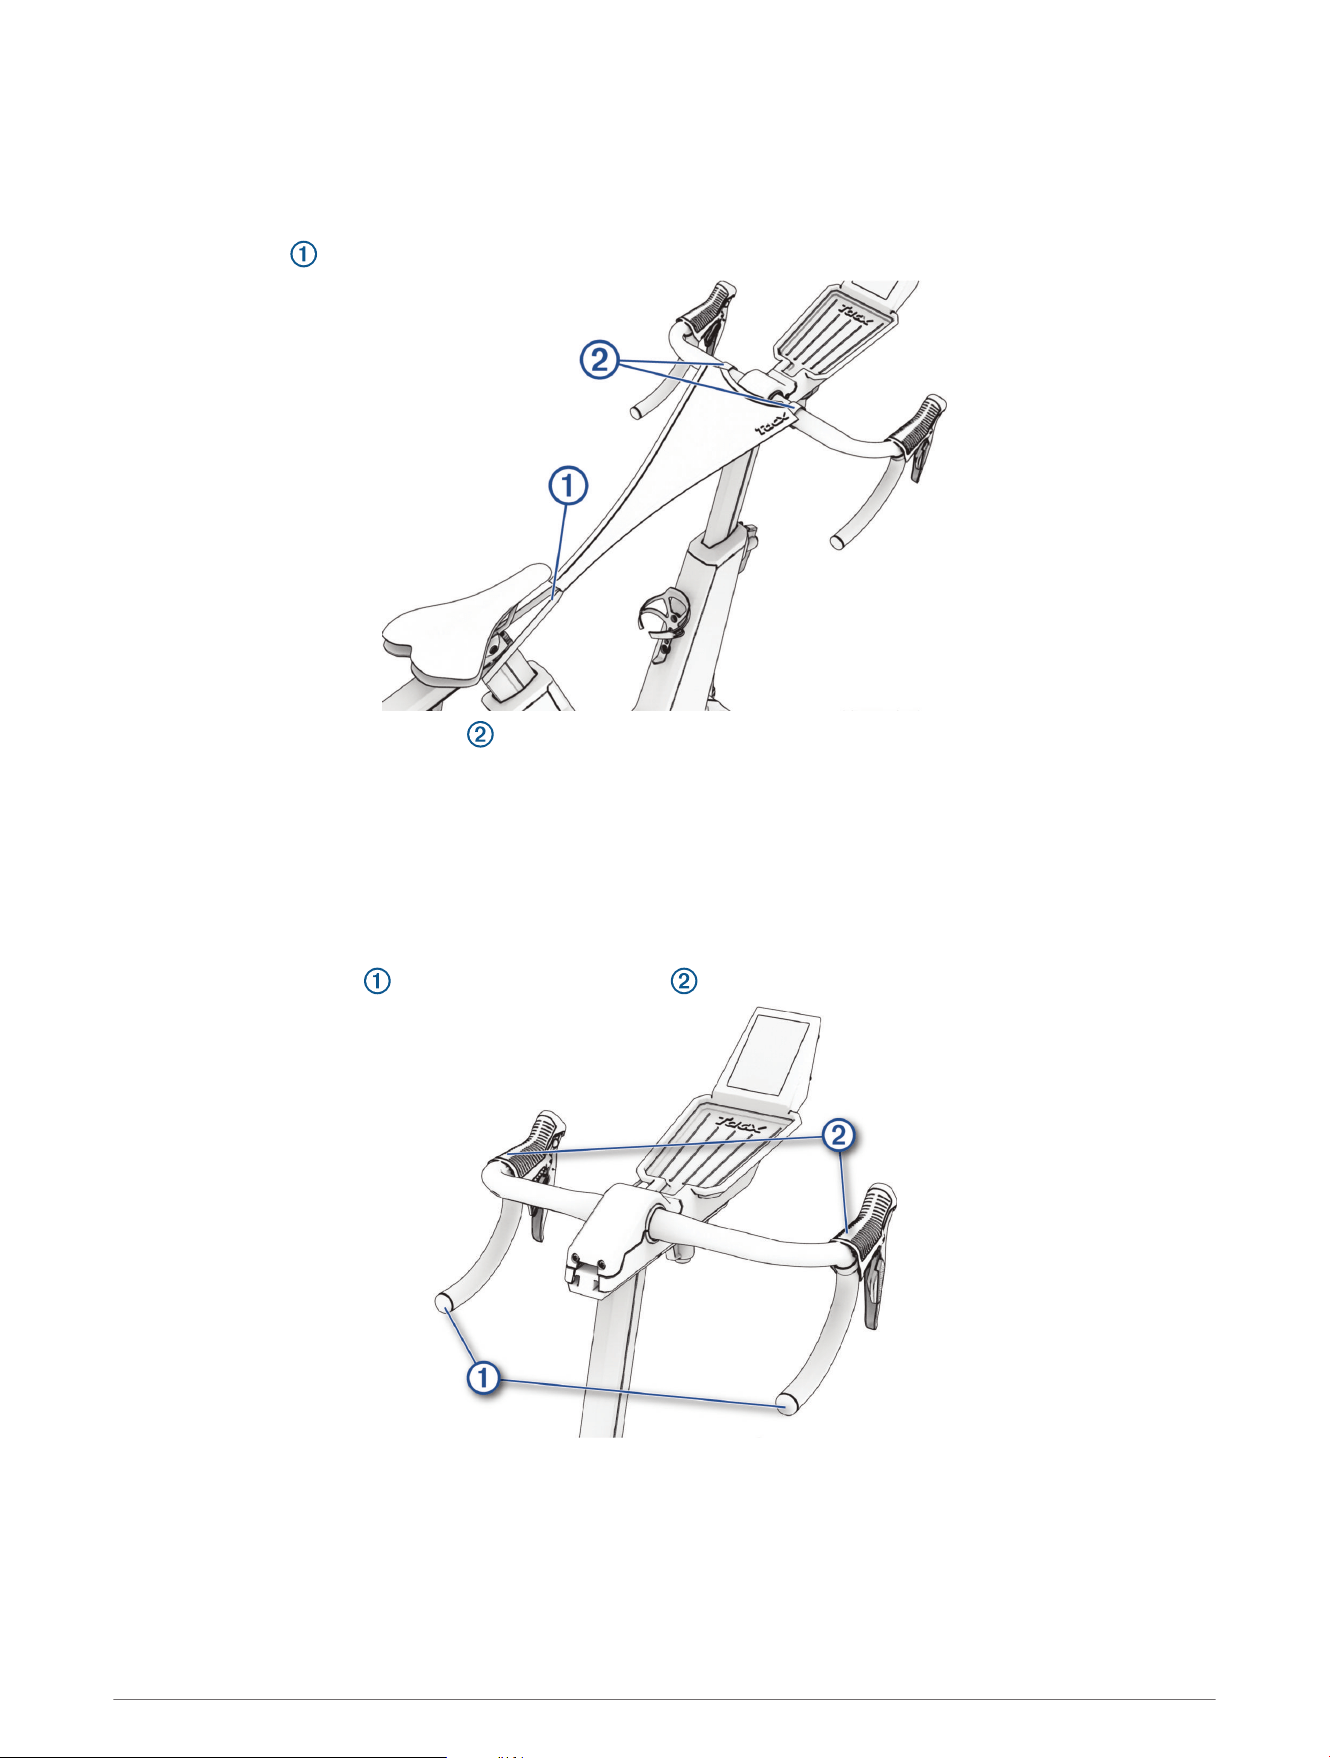
Installing the Sweat Cover
Heavy sweat can get into the components of your device while riding and cause corrosion. For best results,
Garmin recommends using the included sweat cover to protect your device while riding. The sweat cover is
absorbent.
1 Place the loop around the saddle post.
2 Fasten the hook and loop straps around the handlebar.
TIP: You should hand wash the sweat cover after a few rides. For care instructions, see the back of the sweat
cover.
Wrapping the Handlebar
You should replace the handlebar tape if it is worn or uncomfortable. Sweat from your hands can cause the tape
to degrade. Garmin recommends wearing cycling gloves.
TIP: It's a good idea to replace the tape on one side first, so you can compare it to the other side.
1 Remove the bar plugs , and pull up the lever hoods .
2 Remove all existing handlebar tape and damaged electrical tape.
3 If necessary, use electrical tape to secure the shifter cables.
4 Wrap the handlebar with new tape.
5 Pull down the lever hoods, and replace the bar plugs.
22 Device Information
Replacing the Saddle
You can use a third-party, compatible saddle with your trainer.
NOTE: To purchase a replacement saddle assembly, go to garmin.com/intosports.
1 Use the 5 mm hex key to remove the saddle bolt .
2 Remove the saddle.
3 Align the new saddle on the rail, and replace the saddle bolt.
4 If necessary, adjust the saddle height, setback distance, and seat angle.
Troubleshooting
Updating the Trainer Software
Before you can update the trainer software, you must pair your trainer with the latest version of the Tacx
Training app (Riding with the Tacx Training App, page19).
1 Connect the power cable to a wall outletConnecting the Power Cable, page15.
2 Confirm that the display cable is connected (Installing the Tablet Mount, page21).
3 Open the Tacx Training app.
4 Select your trainer.
5 Select Firmware Update > Update.
6 Wait while the firmware update finishes.
This might take a couple of minutes.
The Tacx NEO Bike Plus trainer is not responding
If the Tacx NEO Bike Plus stops responding, you can reset the device to the factory settings.
1 Hold both control buttons for 10 seconds.
The icons flash.
2 Press both control buttons to confirm.
You can press any other button to cancel the factory reset.
3 Wait for the device to reset.
After the factory reset is complete, you must pair the Tacx NEO Bike Plus with the Tacx Training app.
Troubleshooting 23

Tips for Proper Bike Fit
Bike fit is unique to each person and requires some trial and error and several rides. After a few rides, if you
need help customizing the fit and geometry of your Tacx NEO Bike Plus trainer, you can try these tips.
REMEMBER: Remove your tablet before adjusting the handlebar height, reach, or angle.
• Adjust your saddle height:
◦ Measure your road bike, and match it to your trainer.
◦ If you don't have a road bike, stand next to the bike, and set the saddle height at your hip bone.
• Select the appropriate crank length of your trainer:
◦ Match the crank length of your road bike.
Most manufacturers print the length (mm) on the inside of the crank.
◦ Use your height or inseam to determine the crank length (Crank Length Options, page24).
◦ Check the crank settings in the Tacx Training app (Customizing the Trainer Settings from the App,
page19).
• Adjust the handlebar height, reach, or angle.
• Get on the bike, and see how it feels.
TIP: If multiple riders will use the trainer, you should record the height and reach values for each rider.
• If you still have questions about your bike fit, consult a professional bike fitter.
Crank Length Options
There are many published reports and crank length calculators available on the internet. If you still have
questions about your bike fit, you can consult a professional bike fitter.
Crank Length Height (approximate) Inseam (approximate)
165 mm 170 cm (5 ft. 7 in.) or shorter less than 79 cm (31 in.)
167.5 mm 172.5 cm (5 ft. 8 in.) 79 to 81 cm (31 to 32 in.)
170 mm 175 cm (5 ft. 9 in.) 81 to 83 cm (32 to 33 in.)
172.5 mm 177.5 cm (5 ft. 10 in.) 83 to 86 cm (33 to 34 in.)
175 mm 180 cm (5 ft. 11 in.) or taller more than 86 cm (34 in.)
24 Troubleshooting
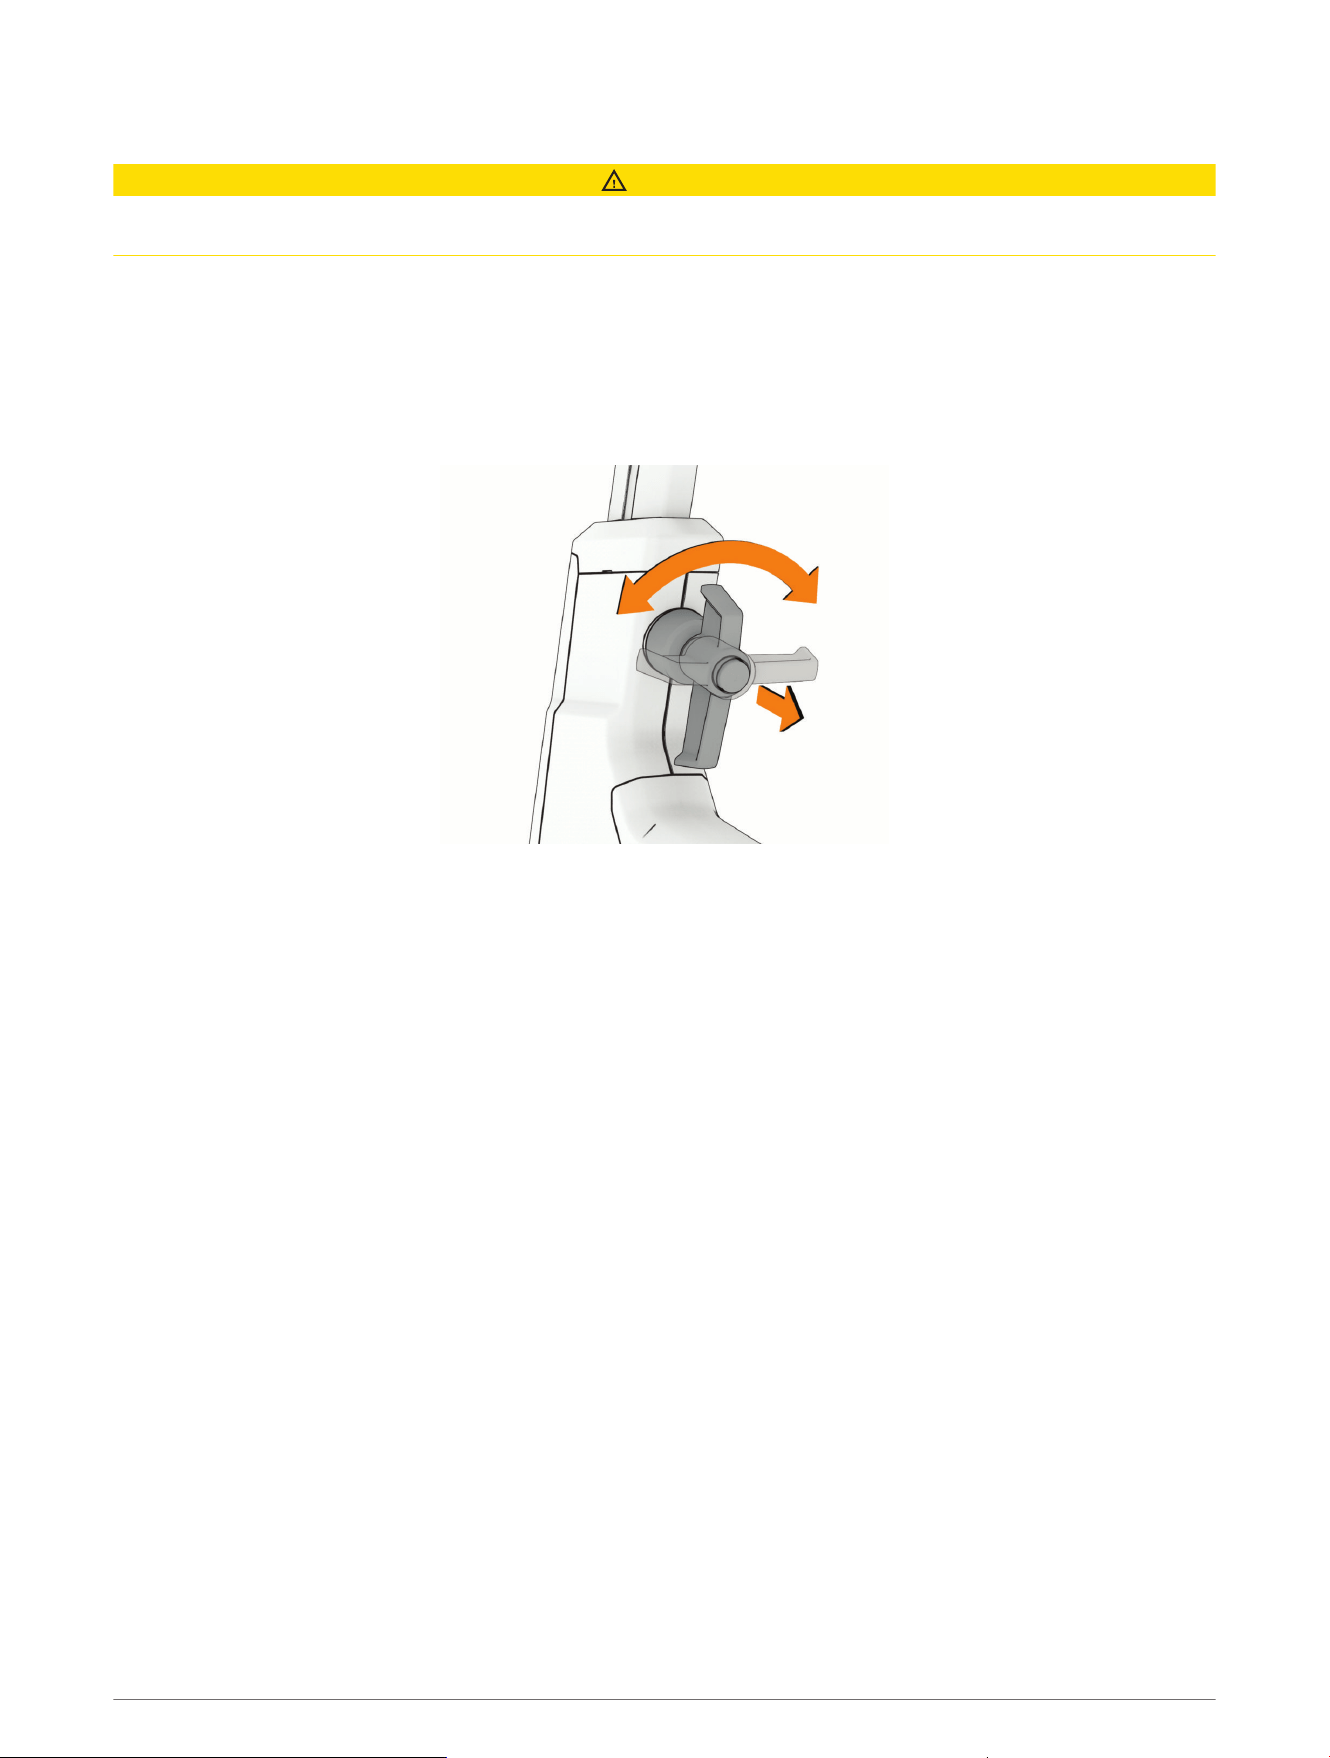
Tightening the Handles and Screws
CAUTION
To avoid personal injury and damaging the trainer, firmly tighten all of the handle bolts or set screws before
each use.
1 Confirm the bike geometry, and select an option:
• For the handle bolts, firmly tighten each handle by hand.
• For the set screws, firmly tighten each screw using the 6 mm or 8 mm hex keys.
2 For the handles, pull and turn the handle only (the bolt doesn't move), and align it to the frame or rail.
The handle itself has a spring mechanism that can be snapped into alignment with the bike so it doesn't
stick out or get in the way.
3 Make sure the handle snaps back into place.
Can I pair ANT+ or Bluetooth sensors using an open connection?
Your trainer can use an open connection with compatible ANT+ or Bluetooth sensors.
1 From the Tacx Training app, select Connection Settings.
2 For Bluetooth sensors, turn off Secure Bluetooth Connections.
A confirmation message appears.
3 For ANT+ sensors, turn on ANT+ FE-C or ANT+ Power Sensor.
A confirmation message appears.
4 Bring the sensor within 3 m (10 ft.) of your trainer.
NOTE: Stay 10 m (33 ft.) away from other sensors while pairing.
5 Follow the pairing instructions for your compatible sensor and trainer.
When you wake up the trainer, the ANT+ or Bluetooth connection icon will flash three times repeatedly
(Display Data, page16). The connection type is open until you change it in the Tacx Training app settings.
Pairing Optional Sensors
Your trainer can be used with wireless sensors such as a heart rate monitor. Bluetooth sensors should be
paired directly to the Tacx Training app, using a secure connection. To use ANT+ sensors, you must change the
device settings in the Tacx Training app. For more information about connection types, go to garmin.com/hrm
_connection_types.
1 Bring the sensor within 3 m (10 ft.) of your trainer.
NOTE: Stay 10 m (33 ft.) away from other sensors while pairing.
2 Open the Tacx Training app.
The sensor appears in the connections list, and the sensor data appears on the trainer and app data fields.
Troubleshooting 25

support.garmin.com
GUID-8AA4B804-1987-45AC-8B9D-71AE54BD62B0 v2July 2025