
D I G I TA L
VO I C E
R E CORDER .
U SER
M A NUA L

Thank you for choosing our recorder!
To ensure smooth operation, we kindly request that you
thoroughly review this manual before using the device.
If you encounter any issues during use, please don't hesitate
to contact our customer service at:
info@tctecinnovation.com.
We appreciate your support and cooperation!
Please note that the information in this manual may be
subject to change without prior notice.
The content of this manual is protected by copyright law.
Any unauthorized photocopying or
reproduction is strictly
prohibited without the company's prior written consent.
The company retains the exclusive right to interpret the
manual, the warranty certificate, and any related materials.
Note: Product specifications may change without prior notice.
DEAR USER
USER GUIDELINES
Reproduction, translation, or conversion of this manual or
instruction guide into any format is strictly prohibited without
the company's prior written permission.
Please note that the design and specifications of the device
and accessories may change without prior notice.
T
he recorder may not function correctly in the presence of
magnetic/electromagnetic fields, radio waves, or high voltage.
Do not submerge the product in water or other liquids,
and refrain from using organic solvents to clean any of its
components.
Avoid disassembling the product, as it may lead to electric
shock or equipment damage. If needed, consult a service
center or professional for assistance.
The company shall not be held liable for any incidental,
consequential, or additional damages arising from the
use
of this manual, the software, or other contained information,
whether under tort, contract, or any other legal theory.
.02

.03
If you plan to leave the recorder unused for an extended
period, ensure the product is charged and discharged every
two months to maintain optimal battery life.
HELPFUL TIPS
Constructed using zinc alloy technology and featuring an
acrylic mirror.
TF-Memory card compatibility: expandable up to 128GB.
One-touch quick recording (supports MP3 and WAV formats).
High-sensitivity microphone for stereo sound reproduction.
1536Kbps HD lossless linear recording support.
Loop functionality and A - B segment repeat playback
features.
USB 2.0 comput
er connectivity for seamless voice or music
file uploading and downloading.
Built-in lithium battery, chargeable directly via USB port.
Multi-functional digital product combining a recorder,
MP3 player, and USB.
Password-protected startup function to prevent unautho-
rized access and data leakage.
Long recording time enabled by a built-in high-capacity
battery; automatic low-voltage detection and protection.
Built-in hi-fi speaker for direct external music playback
and sharing.
Playback: eight levels of speed adjus
tment available.
Compatible with common audio formats for playback:
MP3, WMA, AAC - LC, M4A, and OGG.
Supports three lossless audio formats: WAV, APE, and FLAC.
Timer recording support for more efficient recording
time management.
Monitoring and segmented recording capabilities.
Line-in recording and voice-activated recording support.
Equipped with a professional noise reduction chip for
high-quality recording.
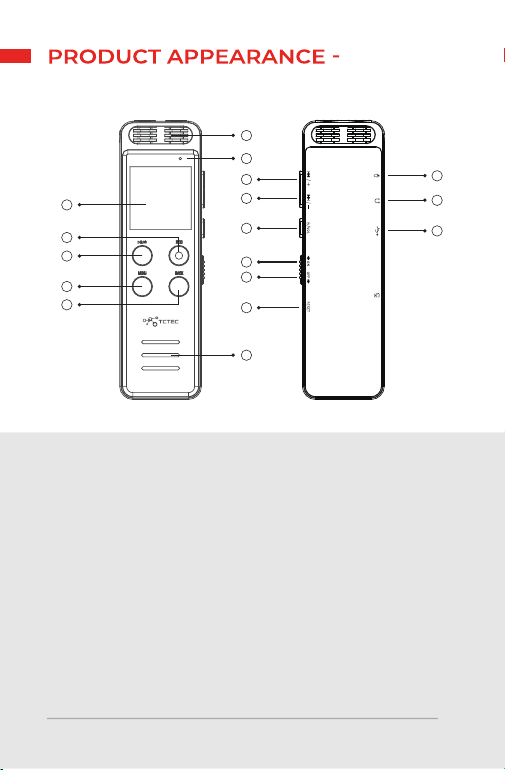
PRODUCT DESCRIPTION
.04
1.
2.
3.
4.
5.
6.
7.
8.
9.
Built-in microphone
Recording indicator
Display (screen)
Recording shortcut
Confirm/play/
pause button
M/Menu button
Back
Outgoing speaker
USB interface
10.
11.
12.
13.
14.
15.
16.
17.
Previous song key/
Plus key
Next song button/
minus button
Volume button
Reset
Power ON
Power OFF
External microphone
Headphone jack
INDIVIDUAL DEFINITION LABELS
10
16
11
12
13
14
15
3
4
7
5
6
17
9
8
1
2

.05
Power switch
NAME METHODS ROLE
Recording
Play/pause
button
Menu button
Push up
Push down
Boot up.
Shutdown.
Short press
Short press
Short press
Long press
Long press
Short press REC then star
recording.
When recording, short
press REC, stop, and save
recordings in a file.
The power is in the
“ON”, long press this
button to turn on/off.
Shortly press the menu
key when the file is
playing to enter the
secondary sub – menu
selection interface.
Shortly press the Play
key to confirm the entry
Enter/play/pause.
1.
2.
PRODUCT FUNCTION
KEYS INTRODUCTION
In the playback or recording
state, short press this
button to pause the current
playback or recording;
short press the play/pause
button again to continue
the current playback or
recording.

.06
Previous key
Next key
Back button
Volume keys
Short press
Short press
Short press
Long press
Long press
Short press
Long press
Long press
Turn up function; short
press the volume button
to display the volume, and
then press the previous
button to increase the
volume.
Long press this button
during playback to rewind.
Turn down function; short
press the volume key to
display the volume, and
then press the next key to
decrease the volume.
Long press this button
during playback to fast
forward.
Short press under the
submenu to return to the
previous level.
Lon
g press during
playback to return to the
main interface directly.
Volume adjustment.
Access the lock screen
and unlock.

Key: A short press is to press and release; a long press is to
hold for 2-3 seconds before releasing.
In the process of recording - if the device encounters low
power and shuts down automatically, it will save the
current recording file before shutting down due to
insufficient power (please be aware).
The device has an automatic power-saving function. If left
on without operation and in standby mode, the product
will automatically shut off after 5 minutes by default to
conserve powe
r.
Avoid turning off the power switch directly while configuring
various tasks, as this may result in the current settings not
being saved (Note: briefly press the confirmation key to
ensure the settings are correct, and then power off normally).
During recording, you can directly operate the power-off
switch, and the device will save the recording file before
shutting down (i.e., the product features a power-off save
recording function).
.07
DESCRIPTION
1.
2.
3.
4.
5.
1.
Playing mode: Choose from single track repeat, all repeat,
random play, or single track play.
Under the "Music" menu, you will find "All Songs/Artists/Al-
bums/Update Playlist" (use the up and down track buttons
to browse through the selections).
For music and recording files, briefly press the menu button
during playback, pause, or stop to access the "secondary
sub-menu options" allowing you to adjust playback settings
and delete files.
While in play, pause, or stop mode, briefly press the menu
button, and the "Play Mode/Sound Settings/Speed Settings/
Bookmarks/Delete" functions will be displayed.
MAIN MENU
Music
Menu option

.08
2.
3.
4.
5.
Delete All: Deletes all files within the currently selected
storage media. Do not forcibly turn off the power switch
during the file deletion process. Note: The more files there
are, the longer the deletion process will take, so please be
patient.
Single Repeat: Repeats the current track.
Repeat All: Loops through all files.
Random Play: Plays all files randomly.
Single Play: Plays the selected file once.
Sound Effects Settings: Selectable equalizer options
include Off, Rock, Funk, Hip-hop, Jazz, Classical, and
Electroni
c.
Variable Speed Playback: Offers 8 levels of speed control.
Note: Variable speed playback supports only MP3, WMA,
and WAV formats.
Add Bookmark: Adds the current playback time to the
bookmark.
Go to Bookmark: Starts playback from the added bookmark.
Delete Bookmarks: Deletes selected bookmarks.
Bookmarks
File deletion
During play or pause, briefly press the menu button and
select "Delete" in the sub-menu options. The interface
will display "Delete Files" and "Delete All" options. Use
the up and down buttons to move and select "Y
es" for
the operation (the device will delete or delete all), or
select "No" (the device will not delete). Note: Files cannot
be recovered after deletion, so please back up your files
beforehand.
Briefly press the volume key, and the LCD screen will display
the volume level. Press the previous key to increase the
volume, and press the next key to decrease the volume. The
volume value displayed on the screen will change accordingly.
Once the adjustment is complete, press the volume key
again to exit the volume adjustment, or it will automatically
exit after 4 seconds of inactivity.
Volume adjustment

Recording Library
View the recording files on the current device.
.09
1.
2.
3.
4.
Recording format
Choose between MP3 and WAV formats.
Recording bit rate
After selecting the recording format, the corresponding
bit rate options will be displayed. MP3 format: 32kbps,
64kbps, 128kbps, 192kbps; WAV format: 512kbps, 768kbps,
1024kbps, 1536kbps.
Sound-activated recording.
When the sound control switch is turned on, briefly press
the record button to activate the sound control recording.
The device will automatically sense the surrounding
sound. If the surrounding sound reaches a cer
tain threshold,
the device will automatically start recording.
When the
surrounding sound drops below the threshold, the device
will pause the recording.
If the sound level reaches the
threshold again, the device will resume recording (Note: It
is recommended not to use this function in important
situations.). Sound control recording sensitivity can be
adjusted between 1 to 7 levels, where a higher level
indicates lower sensitivity when detecting sound sources.
Example: 20230418001.WAV (the previous group 20211001)
indicates the date the file was recorded, i.e., April 18th, 2023
(the first recording of the day in this latter group 001). The WAV
at the end indicates the corresponding file format.
Timestamp: Recording files are named by year, date, and
serial number, making it easy for you to search and find them.
When you enter the "Recording" application, you will find
options such as Recording Library, Recording Format,
Recording Bit Rate, Sound Control Recording, Monitor
Setting
s, Recording Split, Recording Light Switch, Noise
Reduction Switch, and Timer Recording. Use the up and
down arrow keys to select the recording settings and briefly
press the confirm button to enter.
Recording
Menu options

Recording light switch
Set to on or off; the factory default is on.
Recording split
Select from four different split times: 30, 60, 90, or 120 minutes.
Listening settings
Choose between "Monitoring On" or "Monitoring Off”.
When monitoring is turned on and headphones are
plugged in, you can monitor the recording process.
Note: Turn off the noise reduction switch before using this
function.
.10
5.
6.
7.
8.
9.
10.
11.
Choose between the music folder and the recording
folder to view the corresponding files.
Please choose the appropriate sensitivity level for sound
control recording according to the current environment.
Note that the factory default setting for sound control on
this device is "Off". To use this feature, you'll need to enable
it in the settings first.
Noise reduction switch
Factory default is set to "Open."
Timed recording
You can customize the start and end times for recording
s
as needed. After turning "on" the timer switch, you can
set the desired start and end times. Additionally, you can
choose the preferred recording frequency: single, daily, or
weekday recordings, based on your requirements.
Power on
Timer recording cannot be activated when the switch is off.
Source of the recording
When an external microphone or line-in is connected to
the device, briefly press the record button, and you will be
prompted to select the external microphone/line-in.
Folders

.11
1.
2.
3.
4.
5.
6.
7.
8.
9.
Storage location
Choose between internal memory or external memory
for storing your files.
Language
Select from 25 available languages, including Simplified
Chinese, English, and German, to set the display language
for your device.
Brightness
Adjust the overall brightness of the display to suit your
preference.
Backlight Timer
Set the screen backlight to automatically turn off after
10, 20, or 30 seconds, or keep it always on.
Screensaver
When the backlight timer is activated, the device
displays a digital clock as a
screensaver.
Sleep off
Set the device to automatically power off after a duration
of 1 to 99 minutes.
Power saving shutdown
Set the device to automatically shut down after 1 to 30
minutes of inactivity. Selecting 0 means the device will
not shut down due to inactivity.
Date and time
To set the date and time, use the up and down curved
keys to select the numbers, and the volume keys to
switch between the moving clock, minutes, and
year-month-day. Once set, press the confirmation key
to save the changes.
Tool
Select "ON" to enable password protection.
Short press the confirmation key to enter the password
setting mode.
You can enable or disable password protection for your
device. To set a password, follow these steps:
Password setting
Settings

.12
The display will show two groups of "00 00" for the
password combination.
Use the up and down curved keys to select numbers
for each group, and press the MENU key to switch
between the groups.
Once you've set your desired password, press the
confirmation key to save it. The device will prompt that
the password has been changed.
Enter "18 18" as the password.
Press the BACK key to quickly crack the password.
The device will automatically lift the password set
before the quick c
rack action.
Access basic information about the device and its
memory capacity by navigating to the "Information"
section in the settings menu.
To connect the device to your computer, follow these steps:
If you forget your password:
Note: If the password is not entered correctly, you will not
be able to use or view the files on the machine, nor will
you be able to view them from your computer. Please be
cautious when using the password feature.
10.
1.
2.
3.
Factory settings
To restore the d
evice to its factory settings, select "Yes" in
the factory settings option. Once confirmed, the device
settings will automatically revert to their original factory
settings. This may be useful if you encounter issues with
the device or wish to reset all settings to their defaults.
Locate the USB cable provided with your device.
Insert the USB Type-C connector into the correspond-
ing port on the device.
Connect the other end of the cable to an available USB
port on your computer.
Information
CONNECTING TO A COMPUTER

.13
When charging, connect the appropriate end of
the USB cable to the charger's USB port;
During charging, the battery icon will display the
charging progress. It takes approximately 3 hours
to fully charge the battery. Once fully charged, the
battery icon will show full capacity;
When the battery power icon has only one cell left
make sure to charge the device as soon as possible;
If the battery icon shows an empty cell, the device
may automatically power off due to insufficient
battery life;
Upon connecting, the device will power on automatically.
If this is the first time connecting, your computer may
prompt you to install necessary drivers and recognize
new hardware. Once a new disk appears in My Computer,
the connection is successful.
You can easily transfer files between the device and your
computer.
Note: This device features OTG functionality, allowing for
compatibility with mobile phones that support OTG.
1.
2.
Connect the device to a computer using the supplied
USB Type-C cable.
Use a 5V/500mA power adapter.
Once file transfers are complete, make sure to safely remove
the hardware and eject the media before disconnecting.
The device comes equipped with a built-in lithium battery.
To charge the device, follow these options:
Transferring Files
Batteries & Charging
Safely Disconnecting from the Computer

.14
Notes:
Always use the provided USB Type-C cable for connections.
Using other cables may result in improper connections or
damage to the interface;
Optional charger specifications: 5V/500mA
(approximate charging time: 2 hours);
[The Company reserves the right of final interpretation of
this manual].
When charging the device via a computer, ensure
that the computer is powered on beforehand;
Main accessories included with this product: device,
USB Type-C cable, user manual, etc. (refer to the actual
product; contents subject to change without notice);
When the battery icon displays only one cell, switch
to using headphones for listening. Continuing to
use the built-in speakers may lead to premature
shutdown due to high power consumption.

.15
Product size
106.8*32.5*11.7mm
(subject to availability)
Battery gauge (420mAh) 3.7V Li-Ion battery 35
Resolution 240*240 TFT:1.4inch
SNR ≥ 80db
Recording format MP3, WAV
Recording ratio
Special rate
MP3:32kbps, 64kbps, 128kbps,
192kbps WAV:512kbps, 768kbps,
1024kbps, 1536kbp
Speakers 8Ω 1W
Transfer
connection
Type-C (USB2.0)
Headphone
connection
Standard 3.5mm header
Dual channel output
WEIGHT 90g
Working
temperature
0 to 45 degrees Celsius
Audio format
MP3, WMA, WAV, APE, FLAC,
OGG, AAC
LINE-In
Standard 3.5mm header
Dual channel input
Languages
Chinese, English, Germany etc.
25 languages
SPECIFICATION PARAMETERS

.16
RECORDING
METHOD
WAV
Format
MP3
Format
MIC
RECORDING
Recording
quality
Storage 96Gb
(32Gb internal +
64Gb TF Card)
512kbps 418H
768kbps 277H
1024kbps 208H
1536kbps 139H
32kbps 6720H
64kbps 3360H
128kbps 1680H
192kbps 1333H
Note: The mentioned recording times represent the
maximum duration possible based on storage capacity
and do not take battery life into account. Please keep
this in mind.

.17
Why doesn't the displayed storage capacity on the
operating system match the stated value?
Computers use binary calculations for storage capacity,
which leads to a difference between the nominal
value and the displayed capacity in the operating
system. Additionally, internal fonts and system files
occupy a small portion of the memory. As a result,
the storage capacity displayed in the operating
system may be less than the nominal value.
A:
Why do some songs not play correctly on this device?
This issue may arise if the audio format is not
supported by the device. Please ensure that you use
an audio format compatible with the device.
A:
Why does the device exhibit slow response times?
Prolonged use or frequent file deletion may cause
fragmentation within the internal chip, similar to hard
disk fragmentation, leading to slower performance.
To resolve this issue, format the disk using professional
software. Additionally, damaged MP3 files within the
device may also contribute to slow response times.
A:
What should I do if the device's software becomes
corrupted?
Software corruption is typically caused by abnormal
operations. In such cases, please contact your local
dealer for assistance.
A:
TROUBLESHOOTING

CUSTOMER SUPPORT
Email: info@tctecinnovation.com
Website: tctecinnovation.com/contact-us
For video instructions, please scan the QR code below.