Technical Support and E-Warranty Certificate
www.vevor.com/support
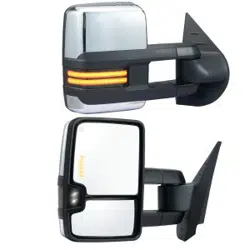
TOWING MIRRORS
MODEL:YH3344/43PSA-E-B-H
We continue to be committed to provide you tools with competitive price.
"Save Half", "Half Price" or any other similar expressions used by us only represents an
estimate of savings you might benefit from buying certain tools with us compared to the major
top brands and does not necessarily mean to cover all categories of tools offered by us. You
are kindly reminded to verify carefully when you are placing an order with us if you are
actually saving half in comparison with the top major brands.

- 1 -
MODEL: YH3344/43PSA-E-B-H
Have product questions? Need technical support? Please feel free to
contact us:
Technical Support and E-Warranty Certificate
www.vevor.com/support
NEED HELP? CONTACT US!
This is the original instruction, please read all manual instructions
carefully before operating. VEVOR reserves a clear interpretation of our
user manual. The appearance of the product shall be subject to the
product you received. Please forgive us that we won't inform you again if
there are any technology or software updates on our product.
TOWING MIRRORS

- 2 -
C
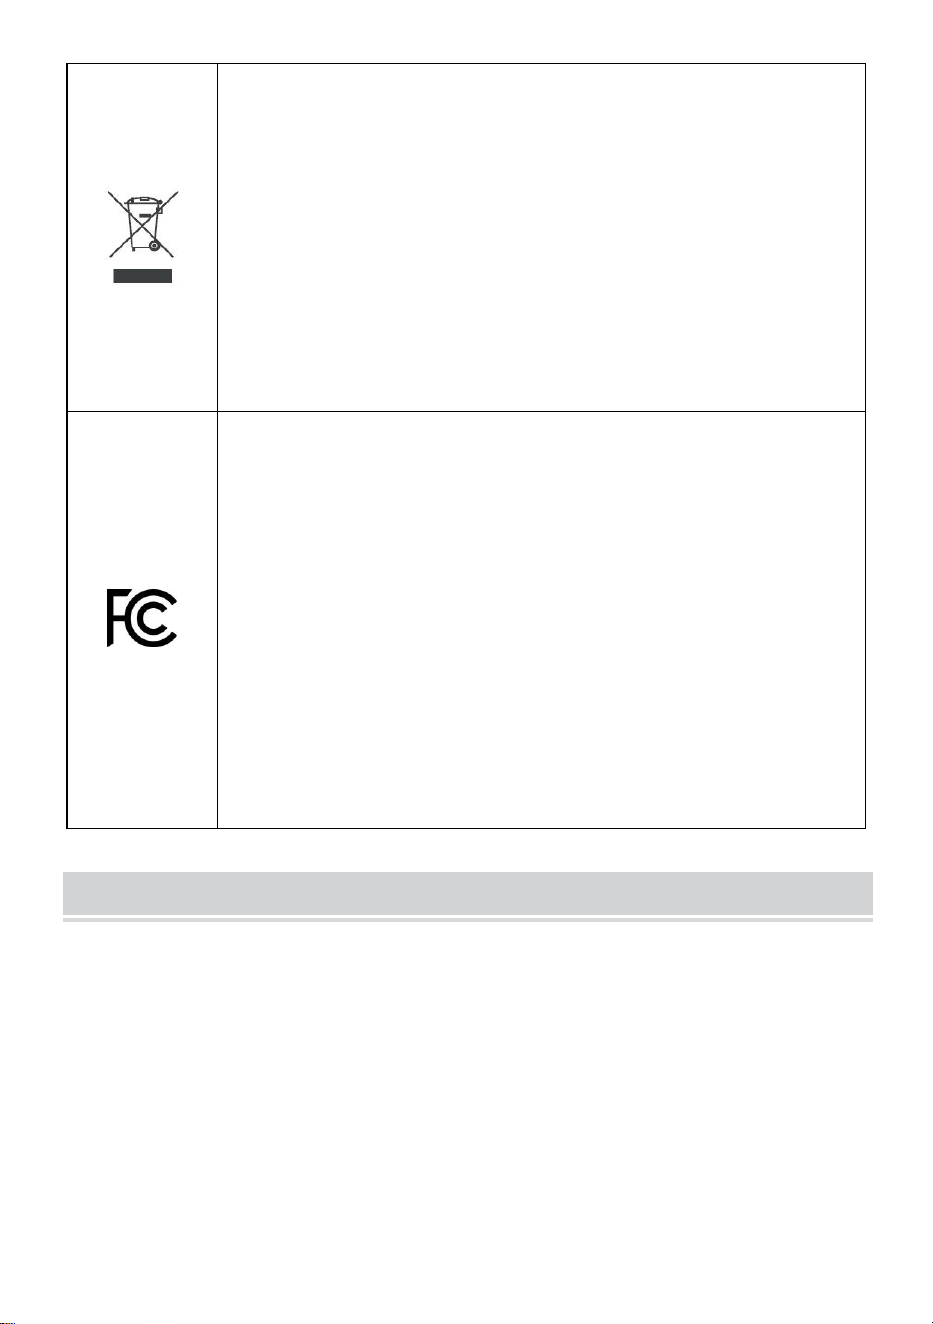
ORRECT DISPOSAL
This product is subject to the provisions of European Directive
2012/19/EU. The symbol showing a wheelie bin crossed
through indicates that the product requires separate refuse
collection in the European Union. This applies to the product
and all accessories marked with this symbol. Products marked
as such may not be discarded with normal domestic waste, but
must be taken to a collection point for recycling electrical and
electronic devices.
FCC Information:
CAUTION:
Changes or modifications not expressly approved by the party
responsible for compliance could void the user's authority to
operate the equipment!
This device complies with Part 15 of the FCC Rules. Operation
is subject to the following two conditions:
1) This product may cause harmful interference.
2)This product must accept any interference received, including
interference that may cause undesired operation.
NOTES
1. Please read this instruction carefully before starting installation.
2. Proper tools will improve the quality of installation and reduce the time
required.
3. All mirrors are symmetrical and designed for better view range.
4. If you find missing parts or damaged, please take a photo and contact
us.
5. Please reference the vehicle owner's manual to adjust the new mirrors.
6. If you can't install it yourself, contact an auto repair professional to
replace it for you.
- 3 -
MODEL AND PARAMETERS
Model
YH3344/43PSA-E-B-H
Auto Part Position
Front Outside
Input
DC 12V
Fold
Manual Folding
Functions
Heated+Turn Signal Light+Arrow
Signal Light+Puddle Light
Applicable Vehicle Type
2002-2009 Dodge Ram
1500/2500/3500
Color
Black
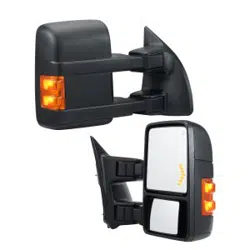
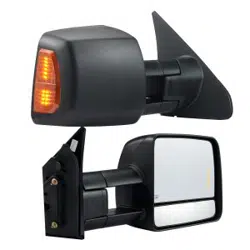
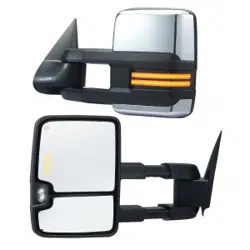
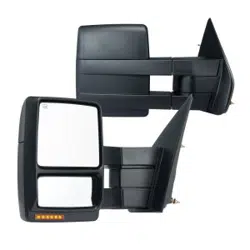
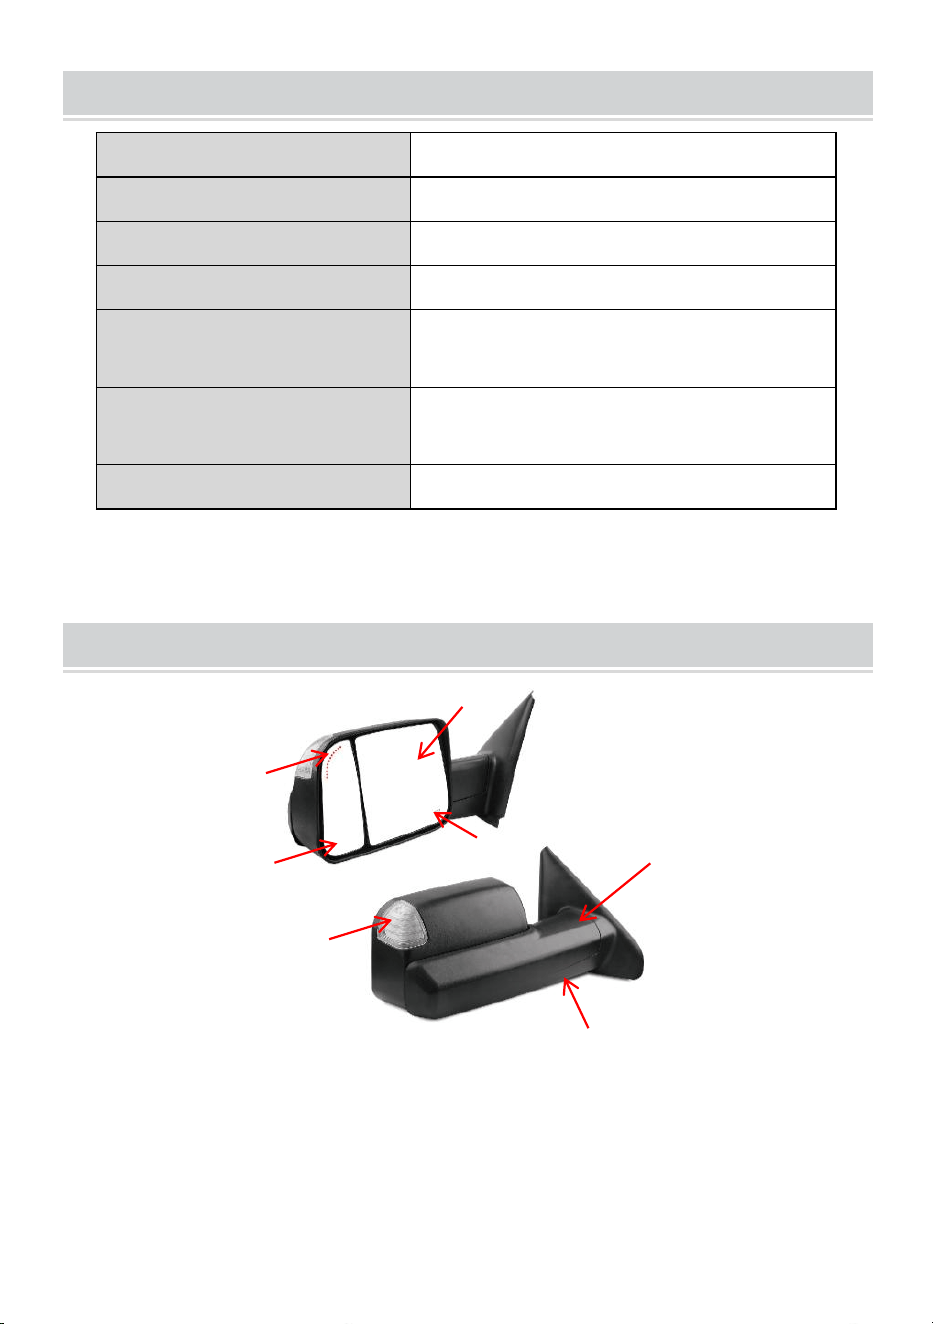
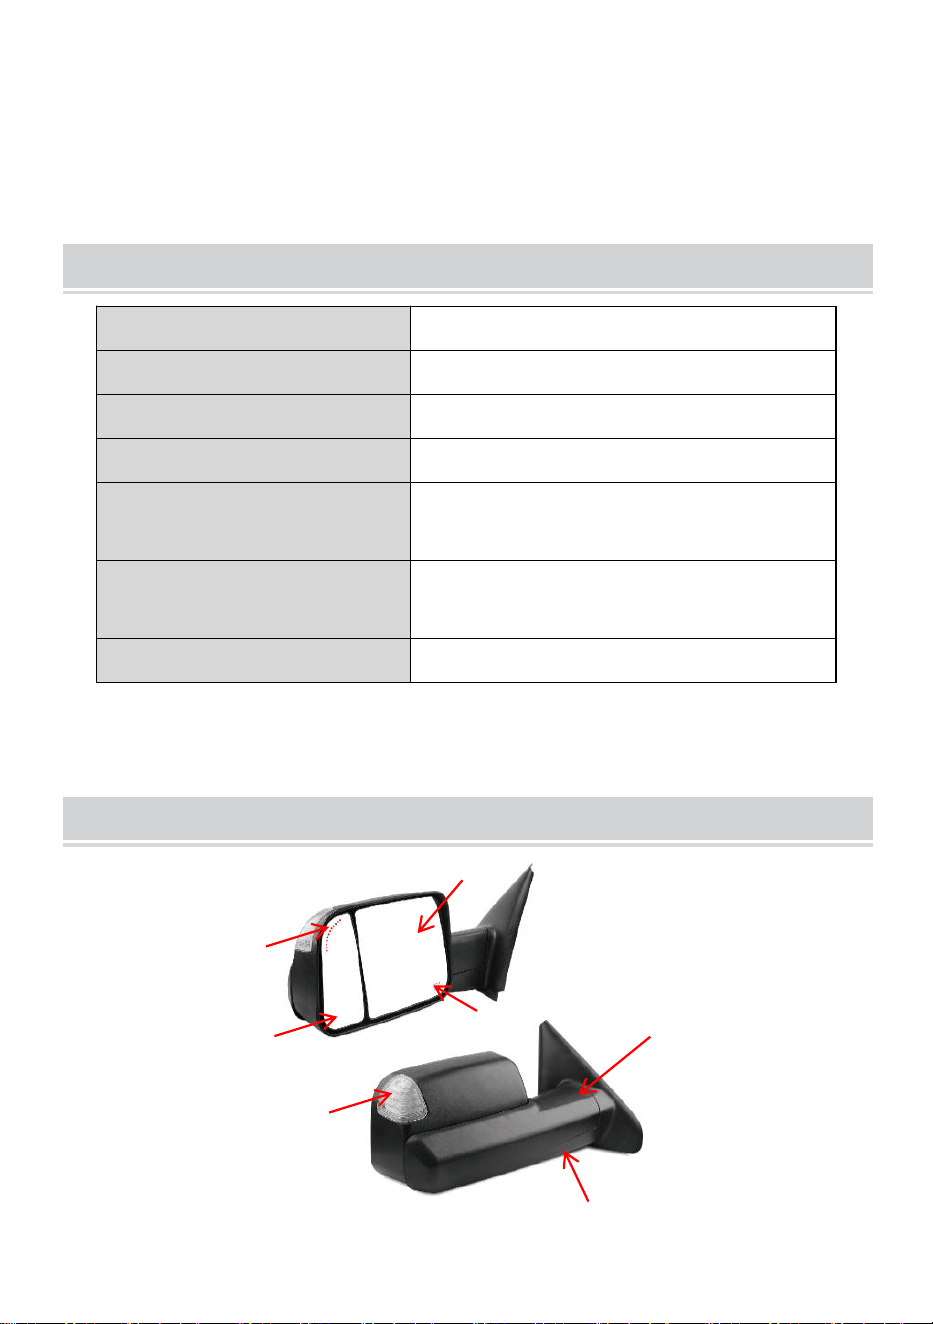
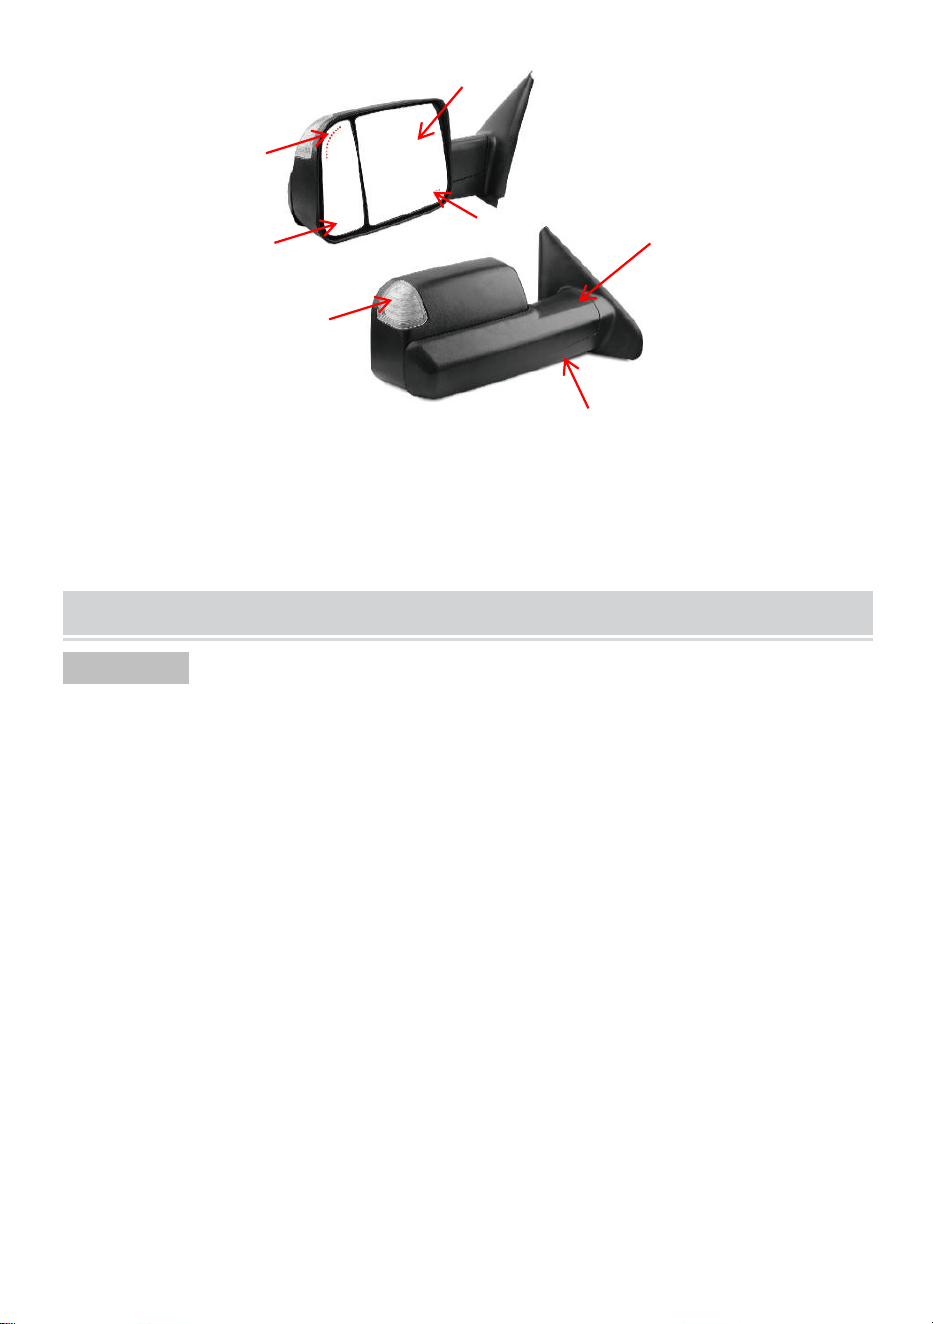
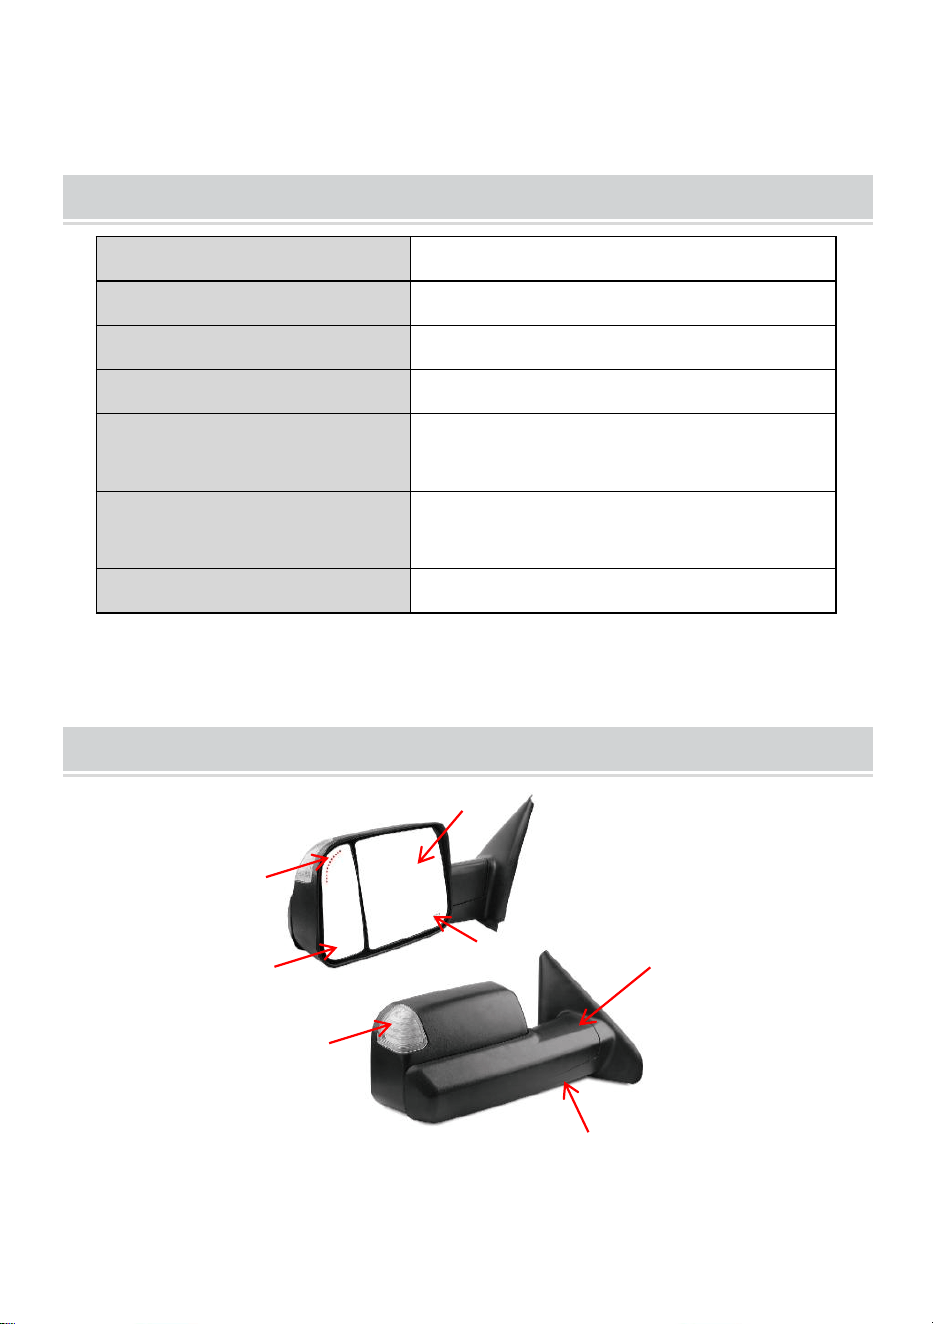
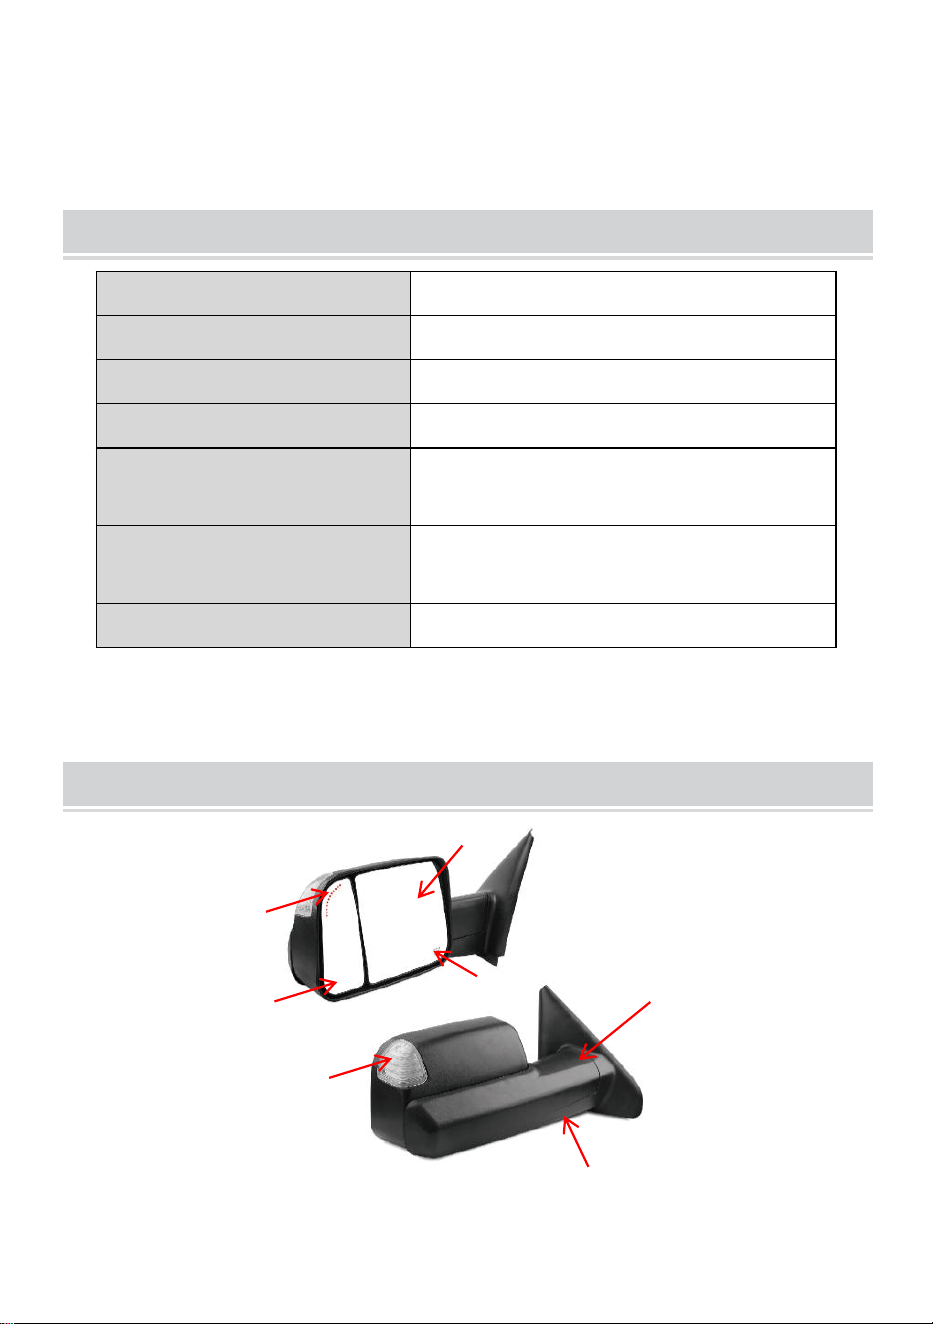
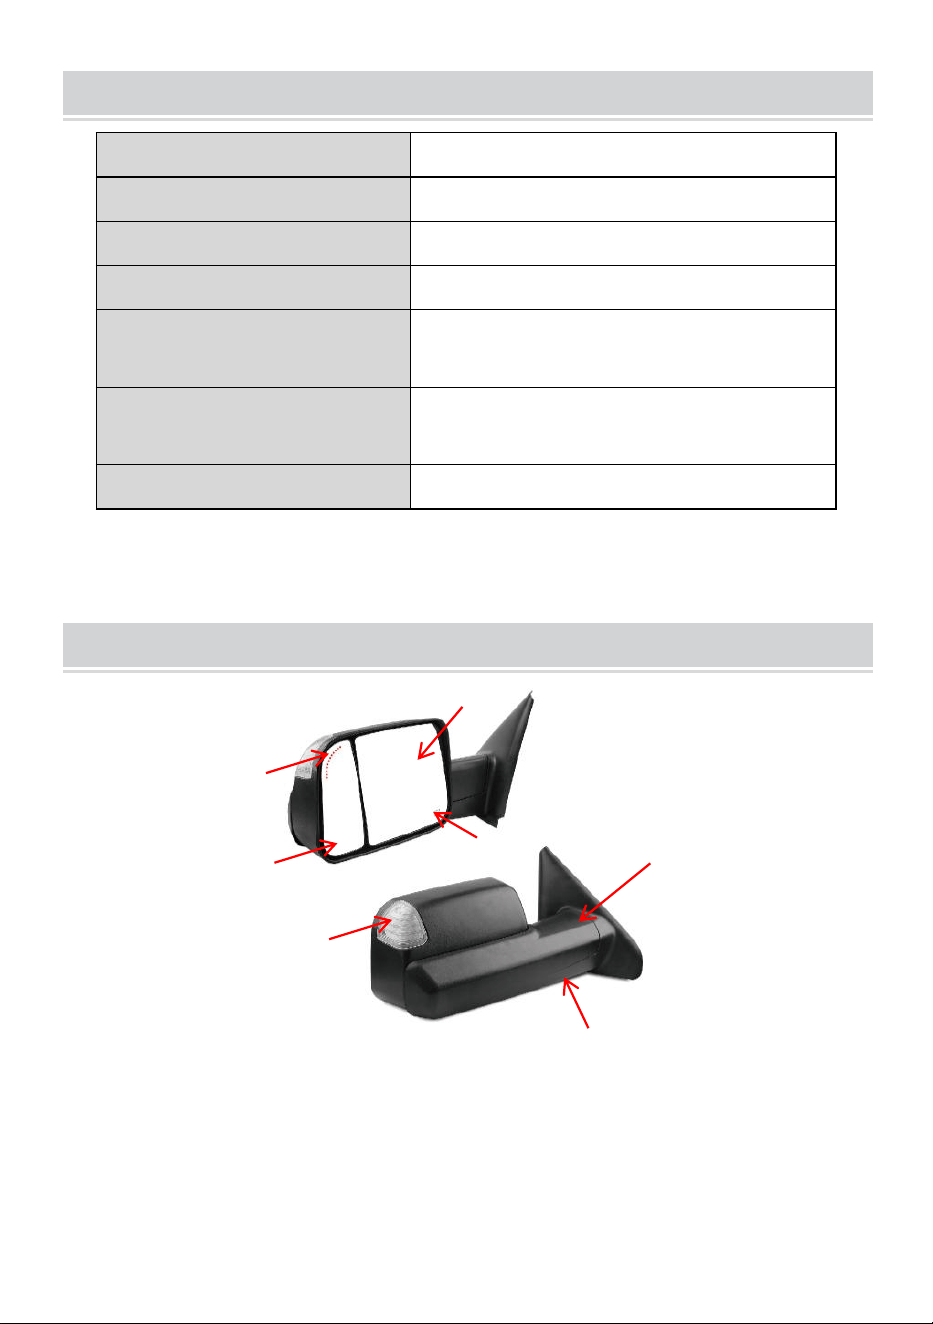
STRUCTURE DIAGRAM
1.Heated 2.Turn Signal Light 3.Arrow Signal Light 4.Puddle Light
5.Manual Folding 6.Convex Glass (Manual Adjustment)
7.Flat Glass (Power Adjustment)
2
1
3
4
5
6
7
- 4 -
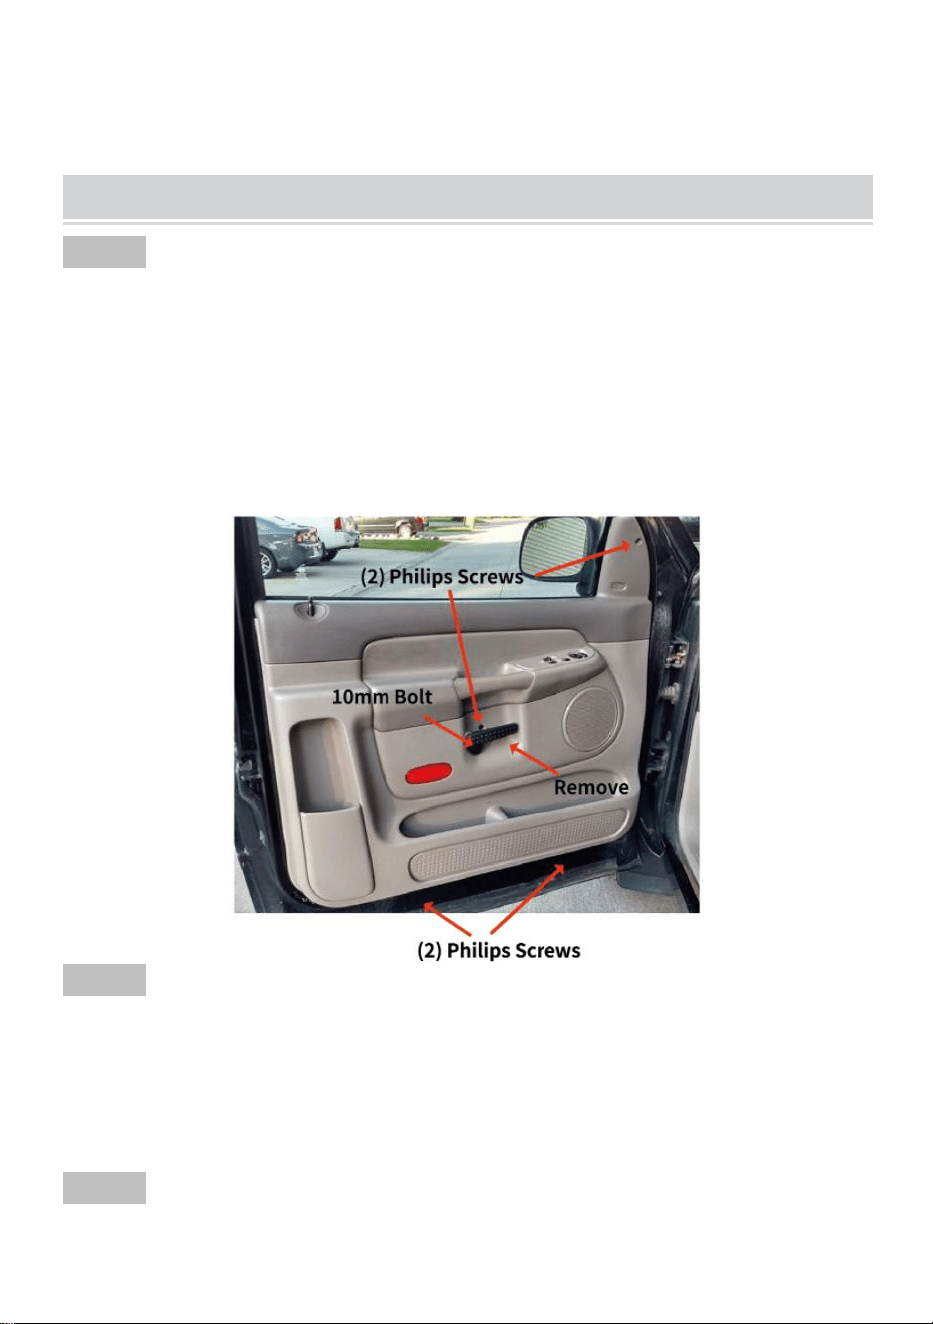
INSTALLATION INSTRUCTIONS
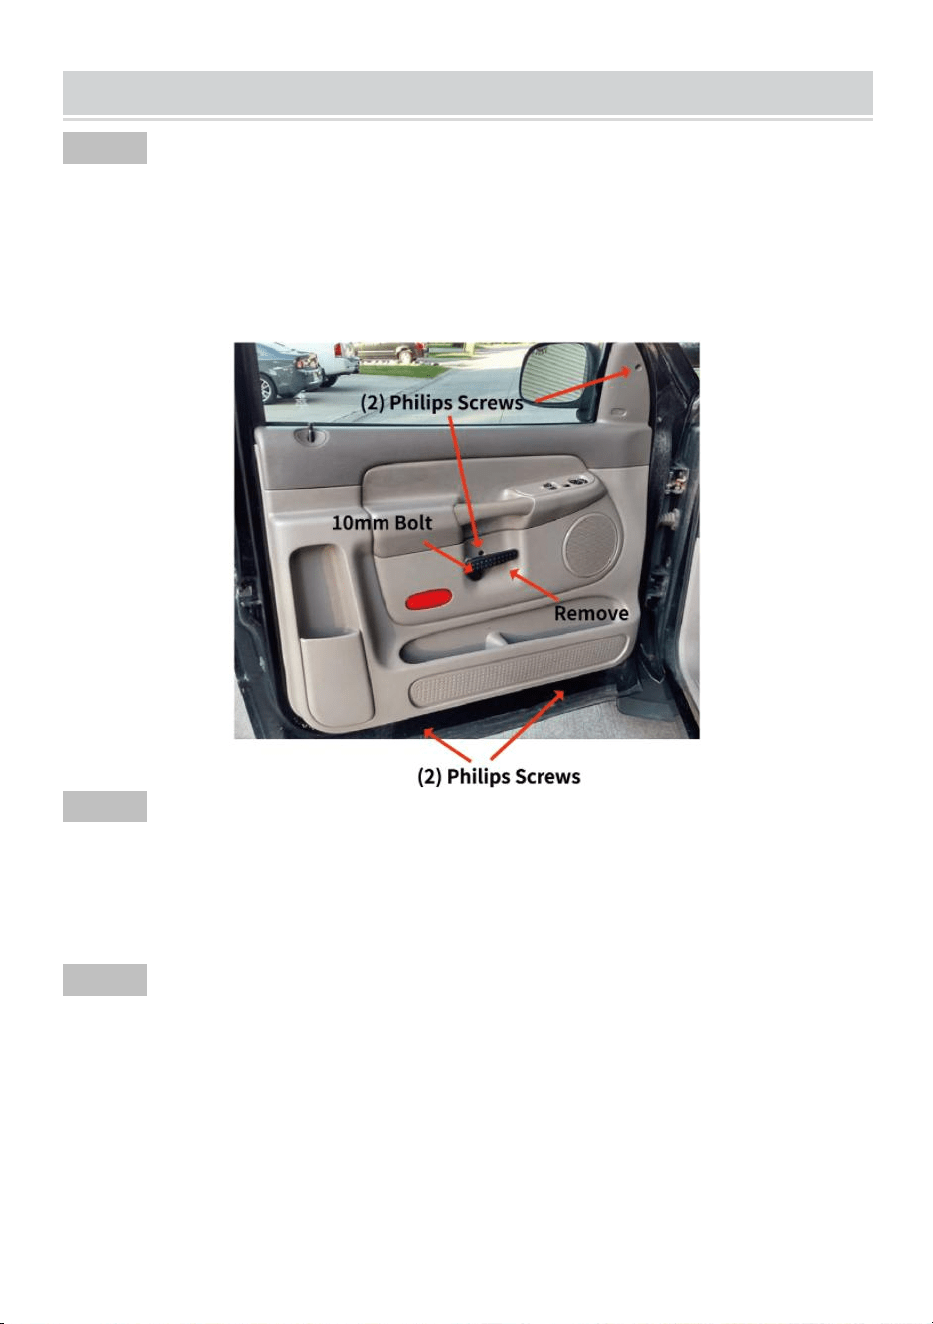
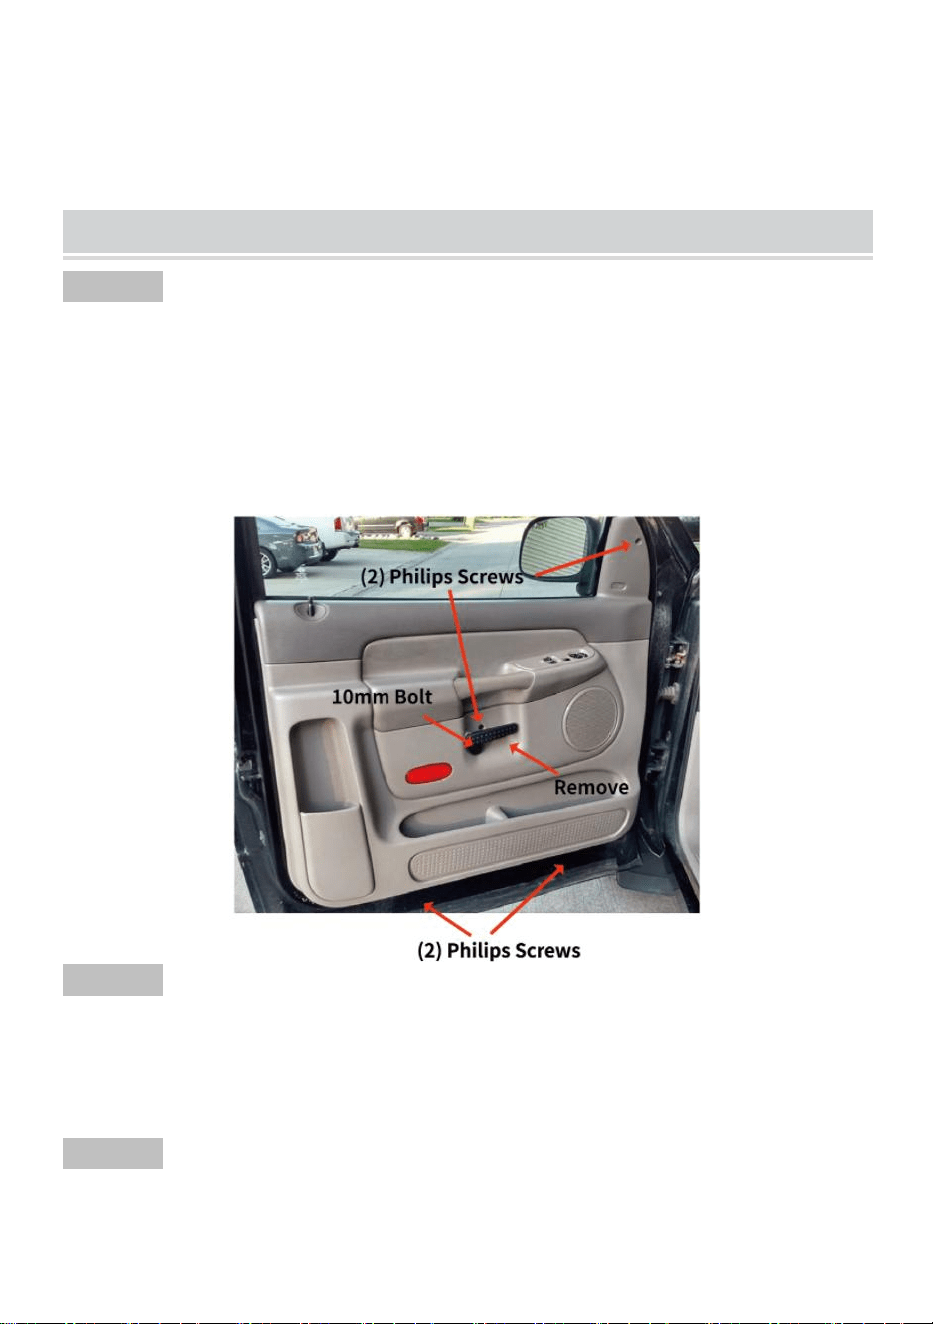
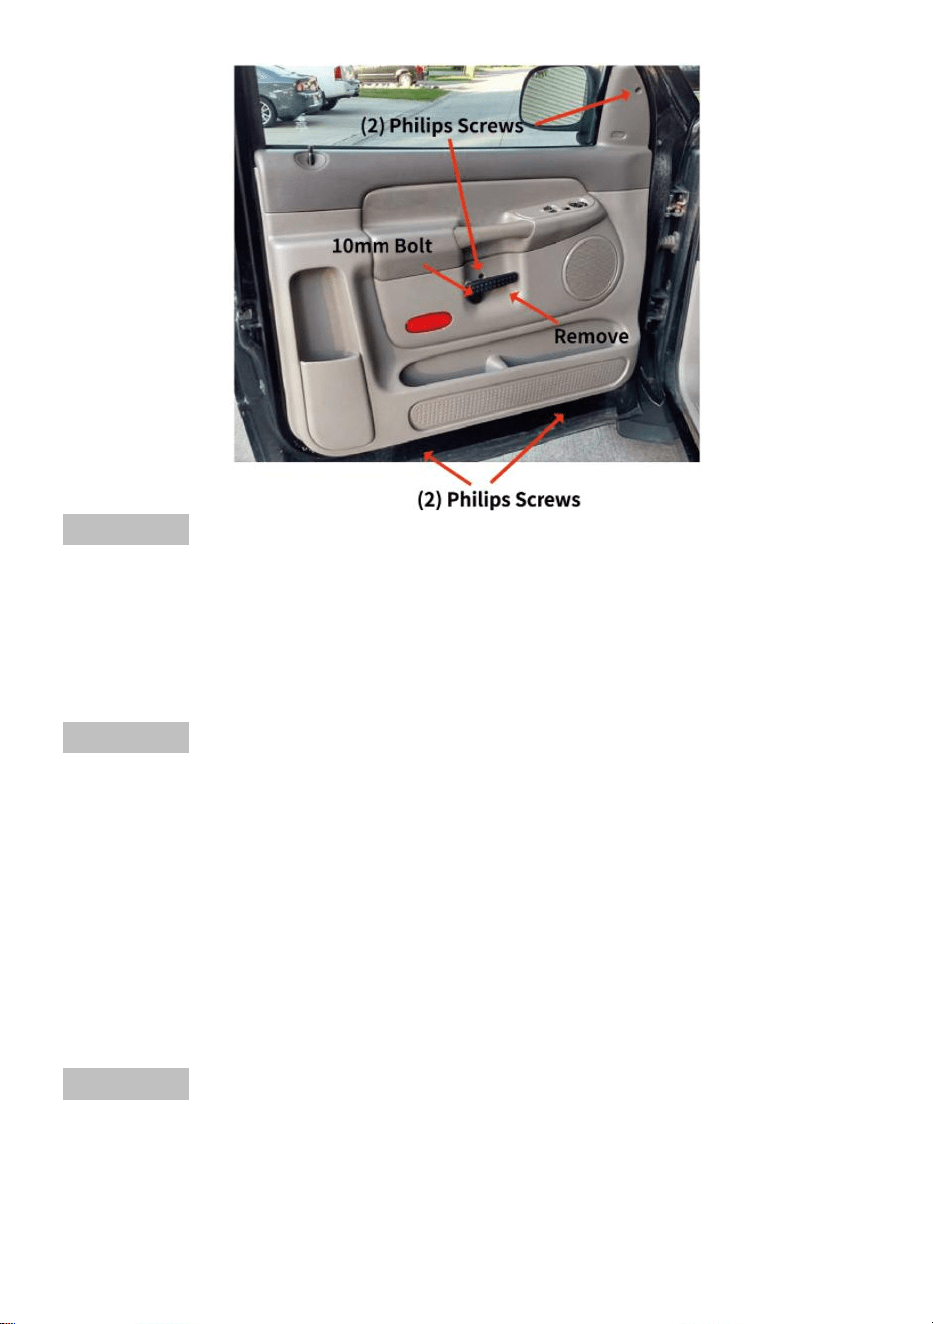
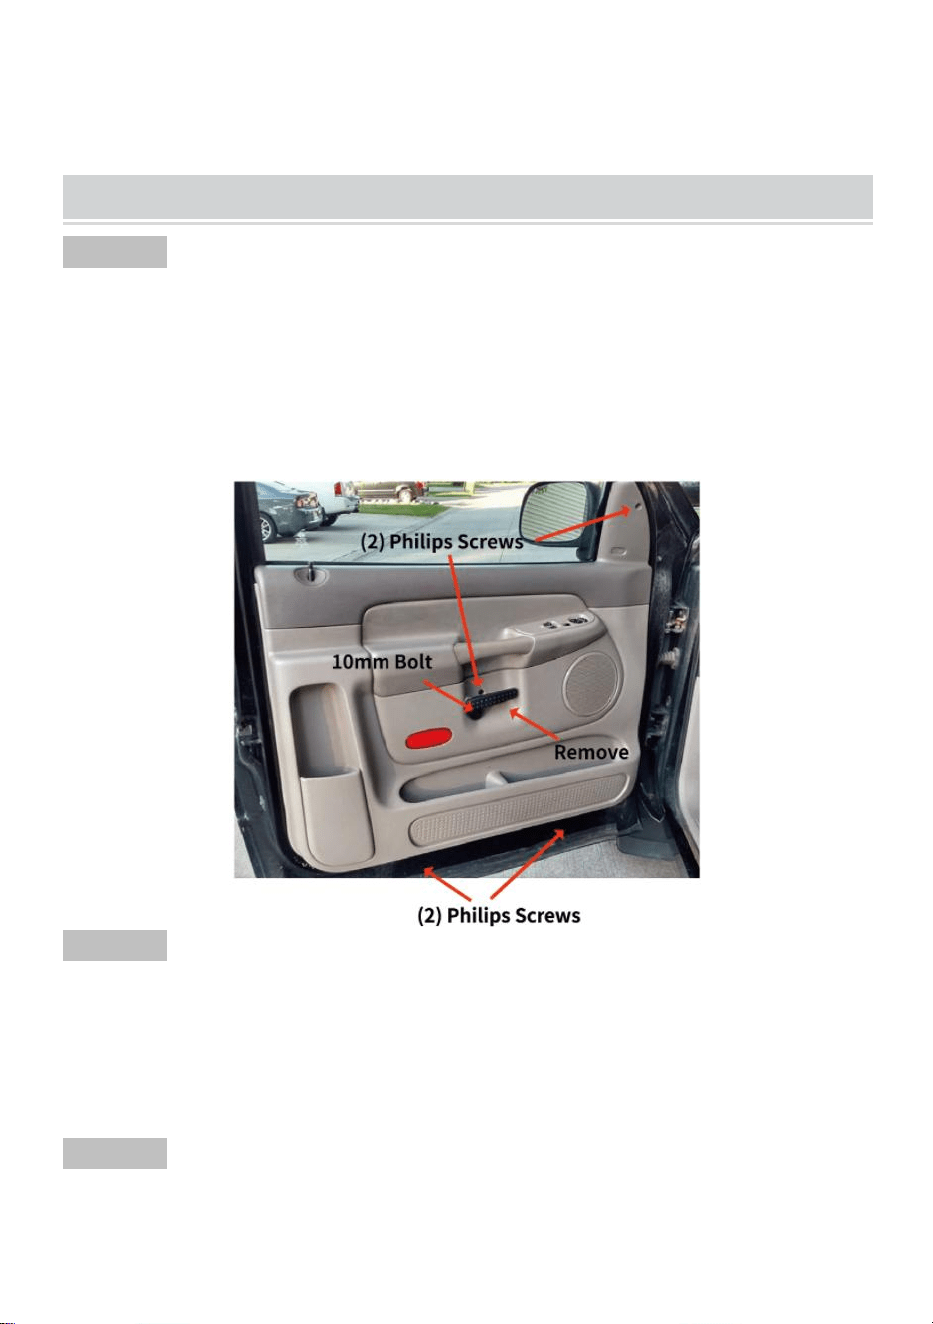
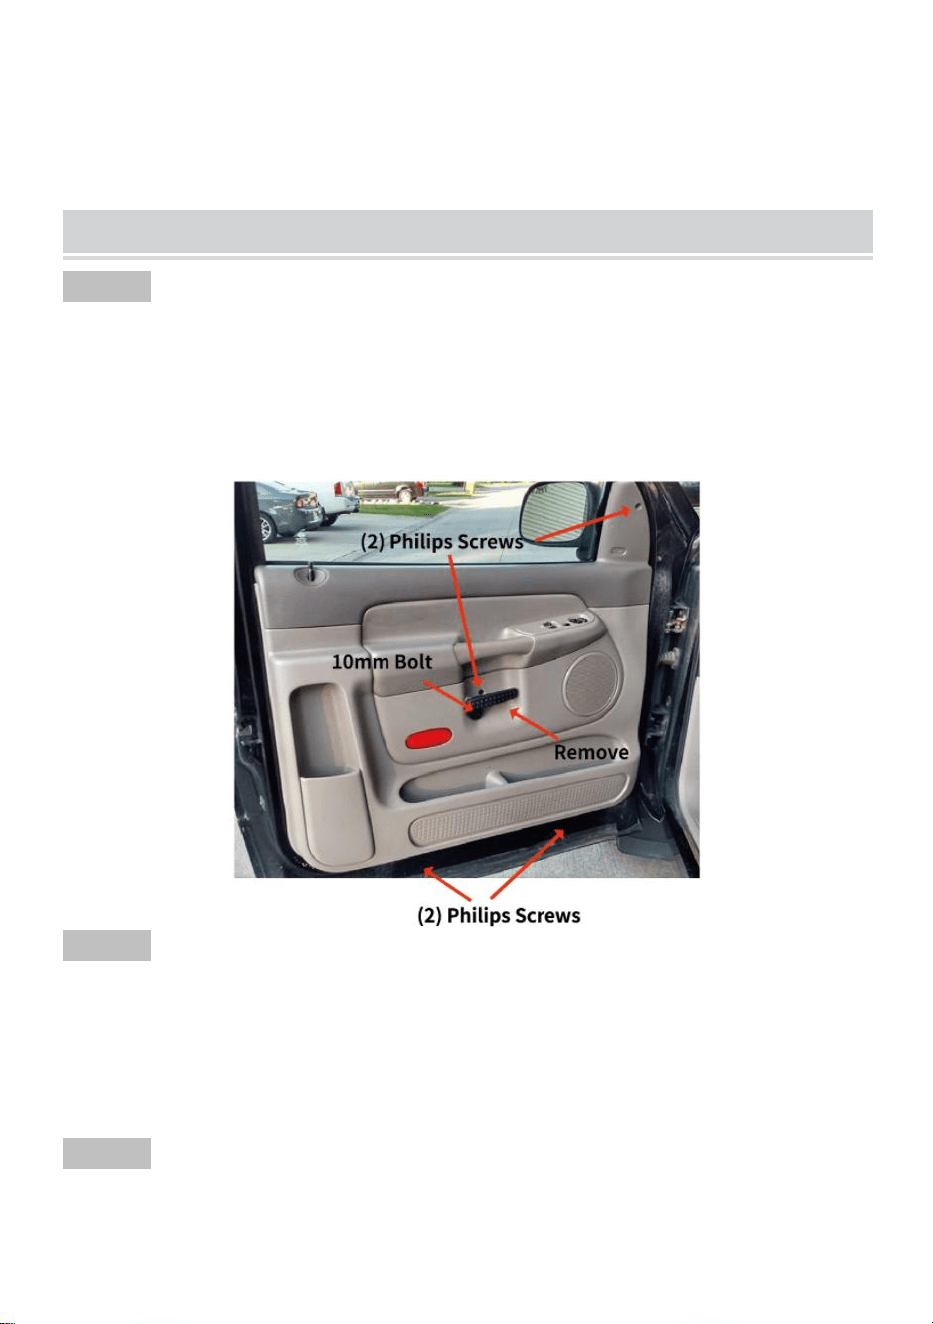
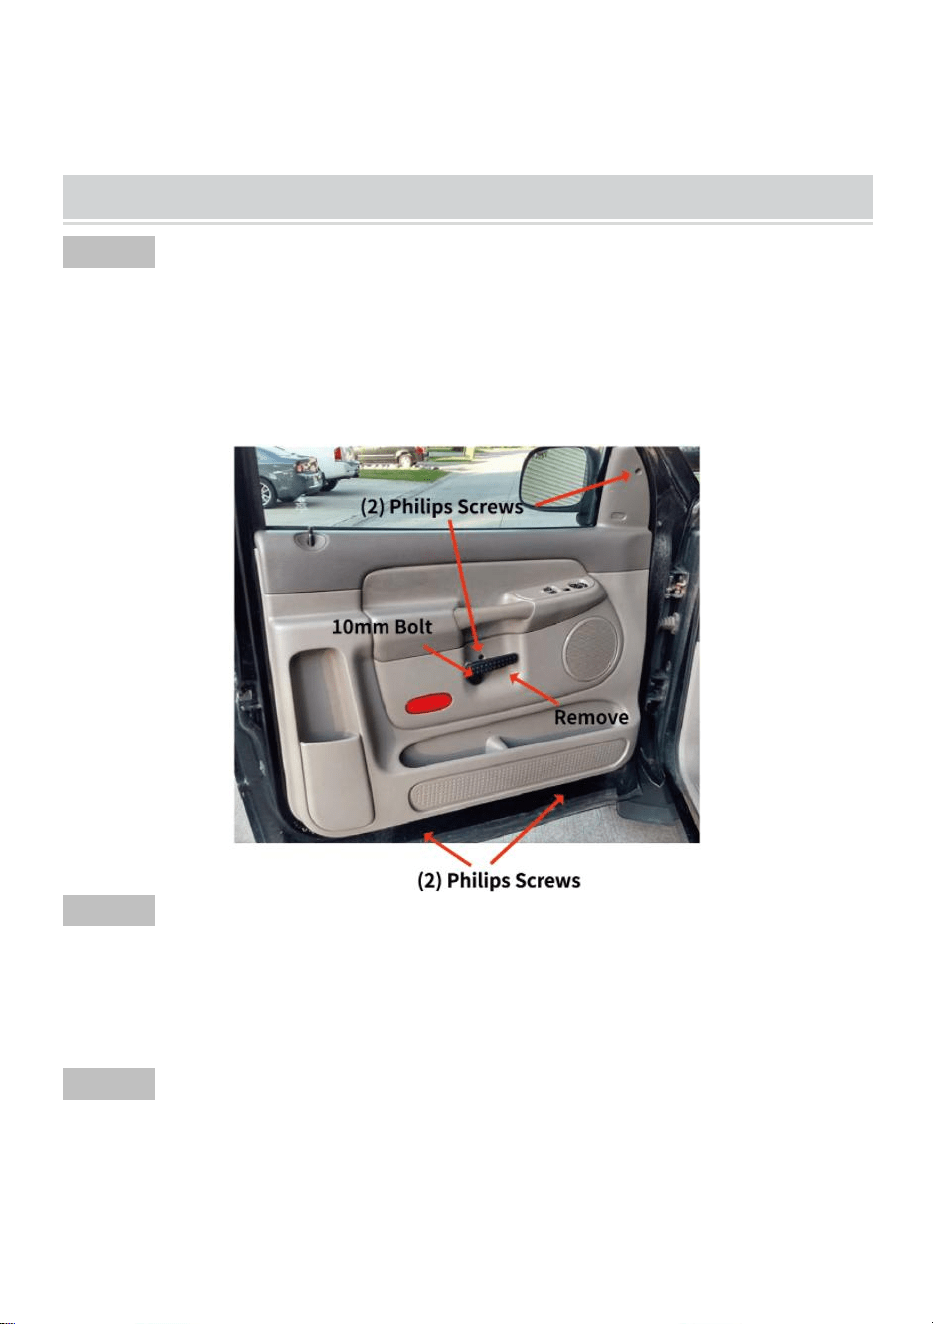
STEP 1
1. Remove (1) 10mm bolt securing the door handle.
2. Remove (4) Philips screws securing the door trim panel.
3. Pull the door trim panel up to release from door panel.
4. Disconnect the door harness.
5. Remove the door trim panel.
STEP 2
1. Disconnect mirror harness connector.
2. Remove the foam pad from door panel.
3. Remove (3) 10mm hex nuts securing the factory mirror.
4. Carefully remove factory mirror.
STEP 3
1. Attach the foam pad to the new mirror mounting base.
2. Take the new mirror, feed studs and harness through the existed holes
on door panel.
3. Install (3) provided hex nuts to secure the new mirror. Torque to 80 lb in.
4. Connect mirror harness.
5. Connect the red/black harness and feed through door harness tunnel to
the engine room.
- 5 -
STEP 4
1. Connect the door harness.
2. Reinstall the door trim panel back to position.
3. Reinstall (4) Philips screws.
4. Reinstall the door handle and secure with (1) 10mm bolt.
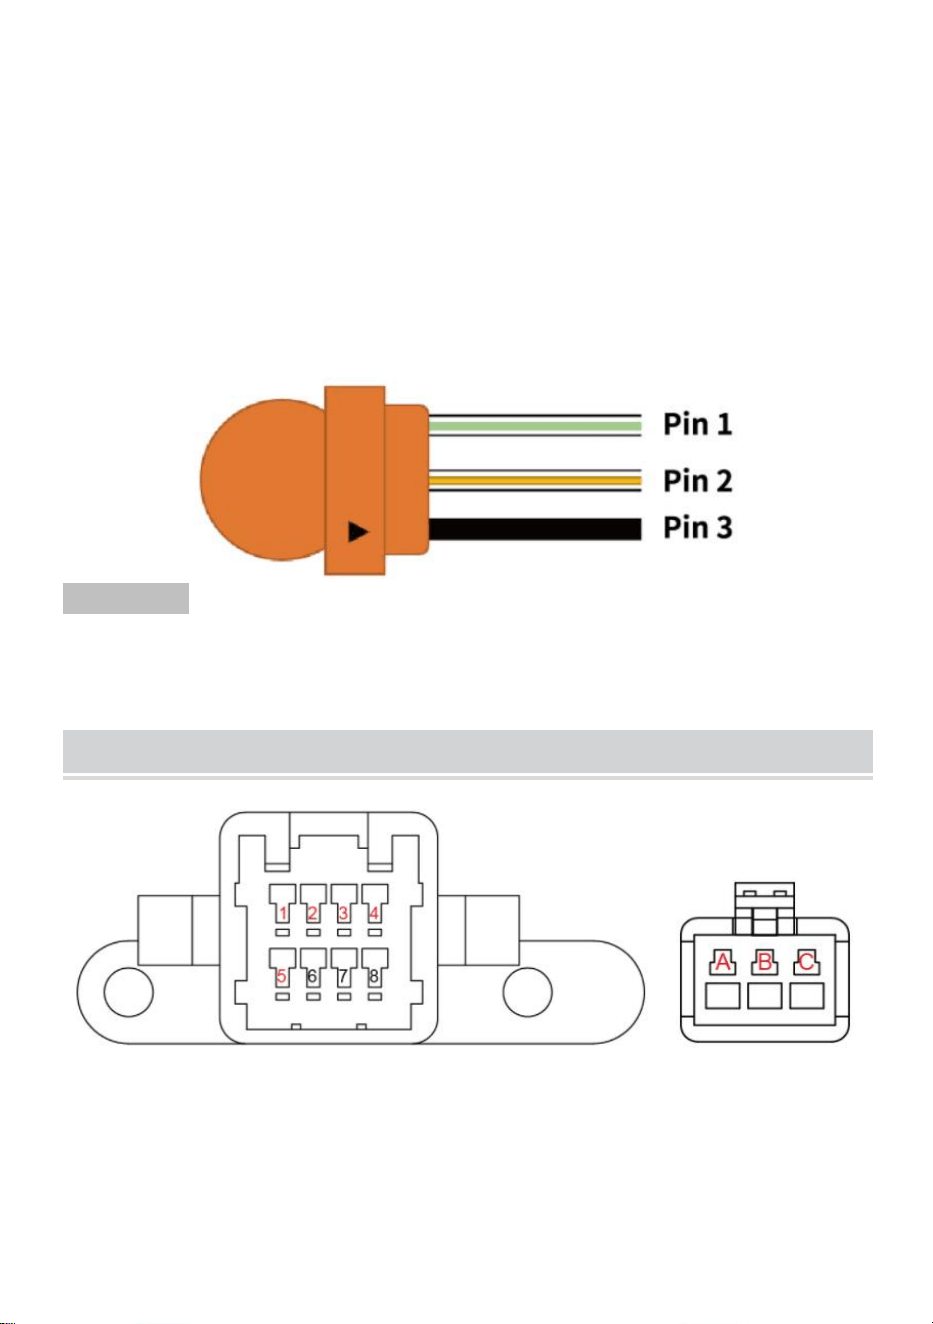
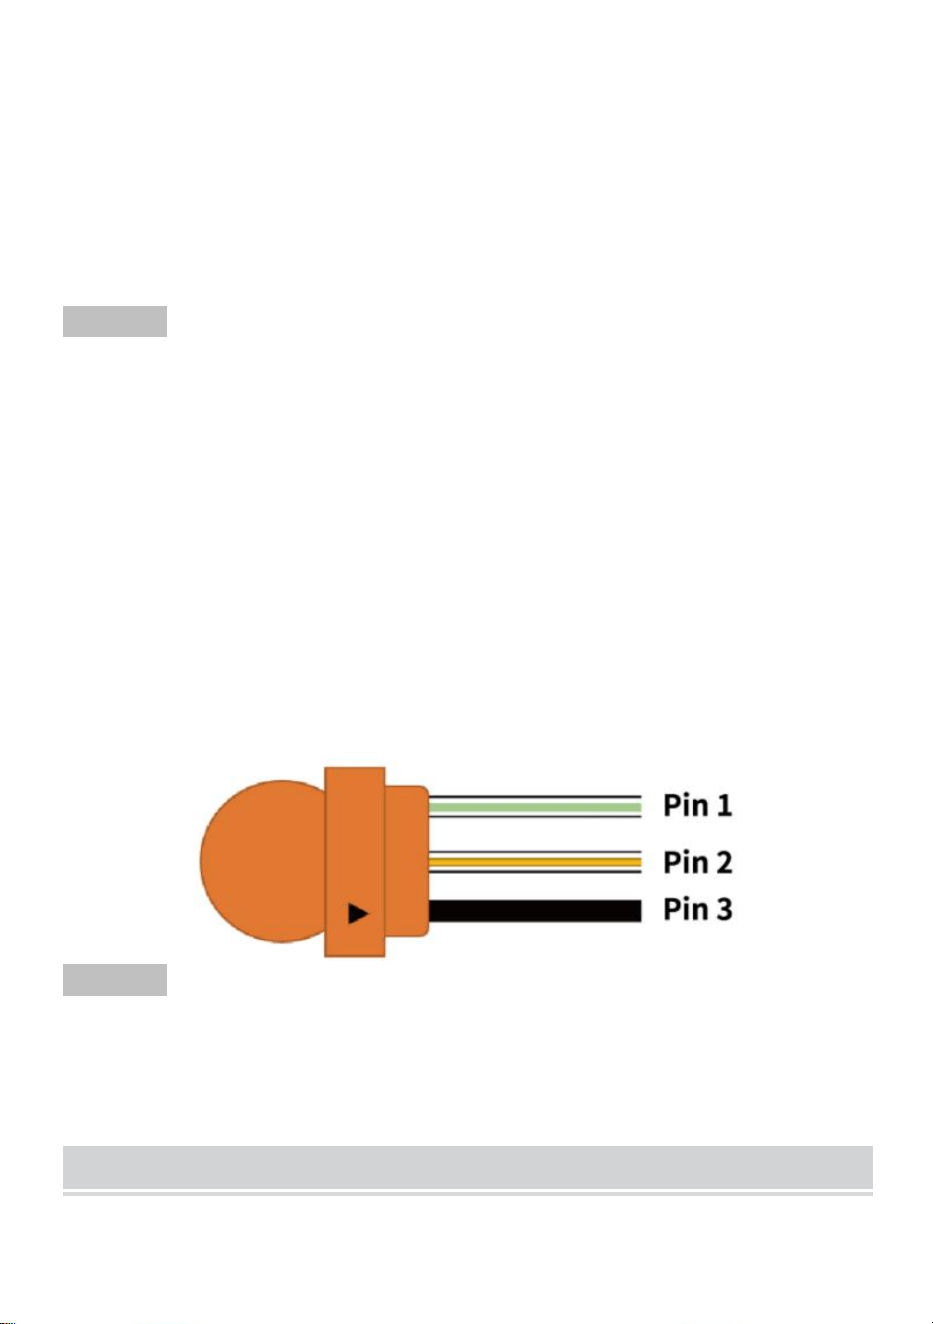
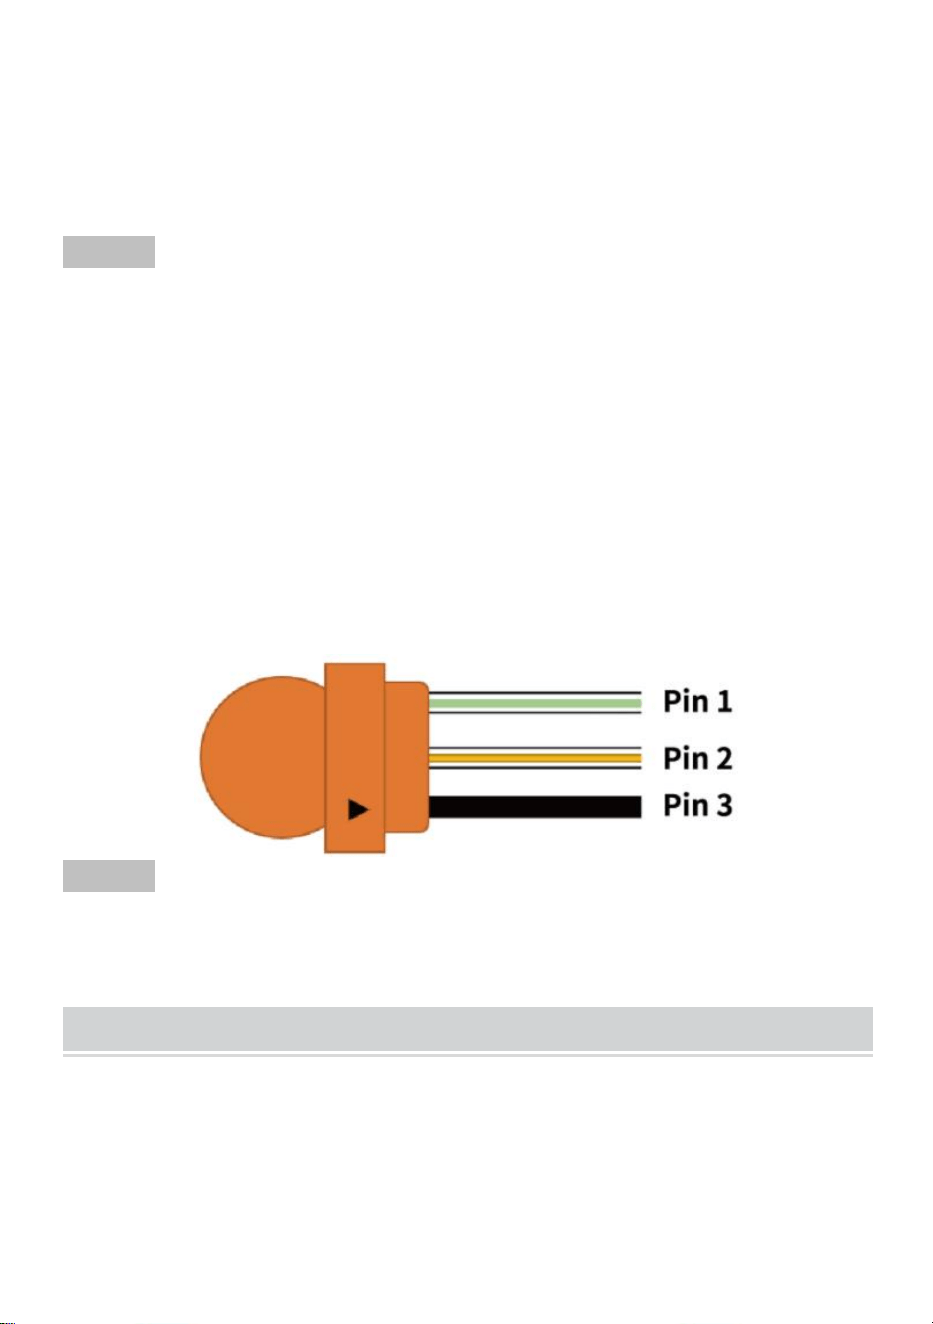
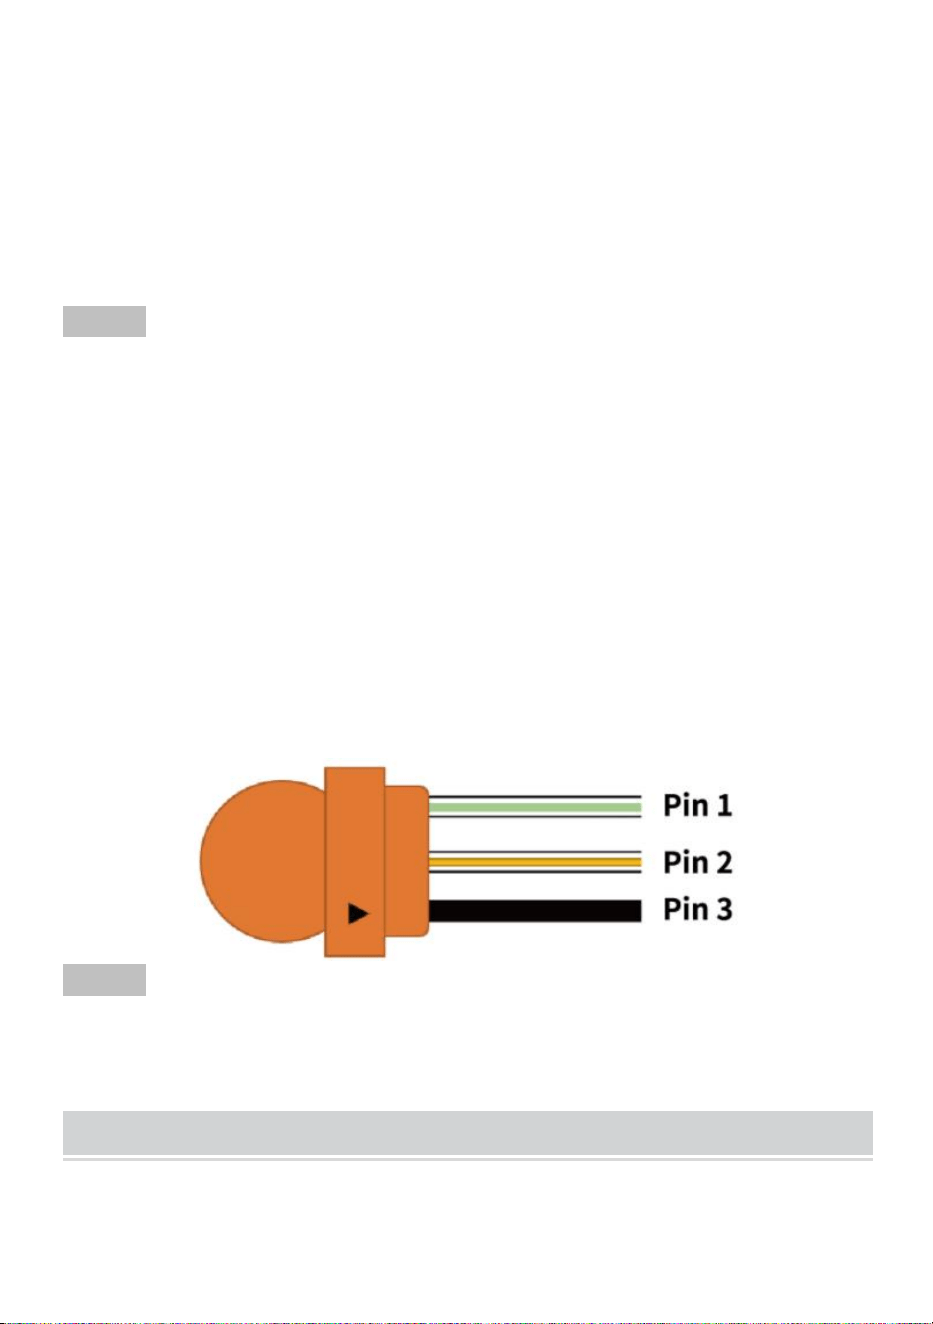
5. Locate the front signal/parking light socket. Wire the black wire to
ground pole on body panel.
For turn signal function, wire the red wire to the pin 1 of the conenctor.
For running light function, wire the red wire to the pin 2 of the connector.
2007 RAM 2500 models is shown, colors may vary. Pin 3 always be black
wire with a arrow on the bulb socket.
STEP 5
1. Repeat above steps on the passenger side.
2. Carefully check all mirror functions before the first drive.
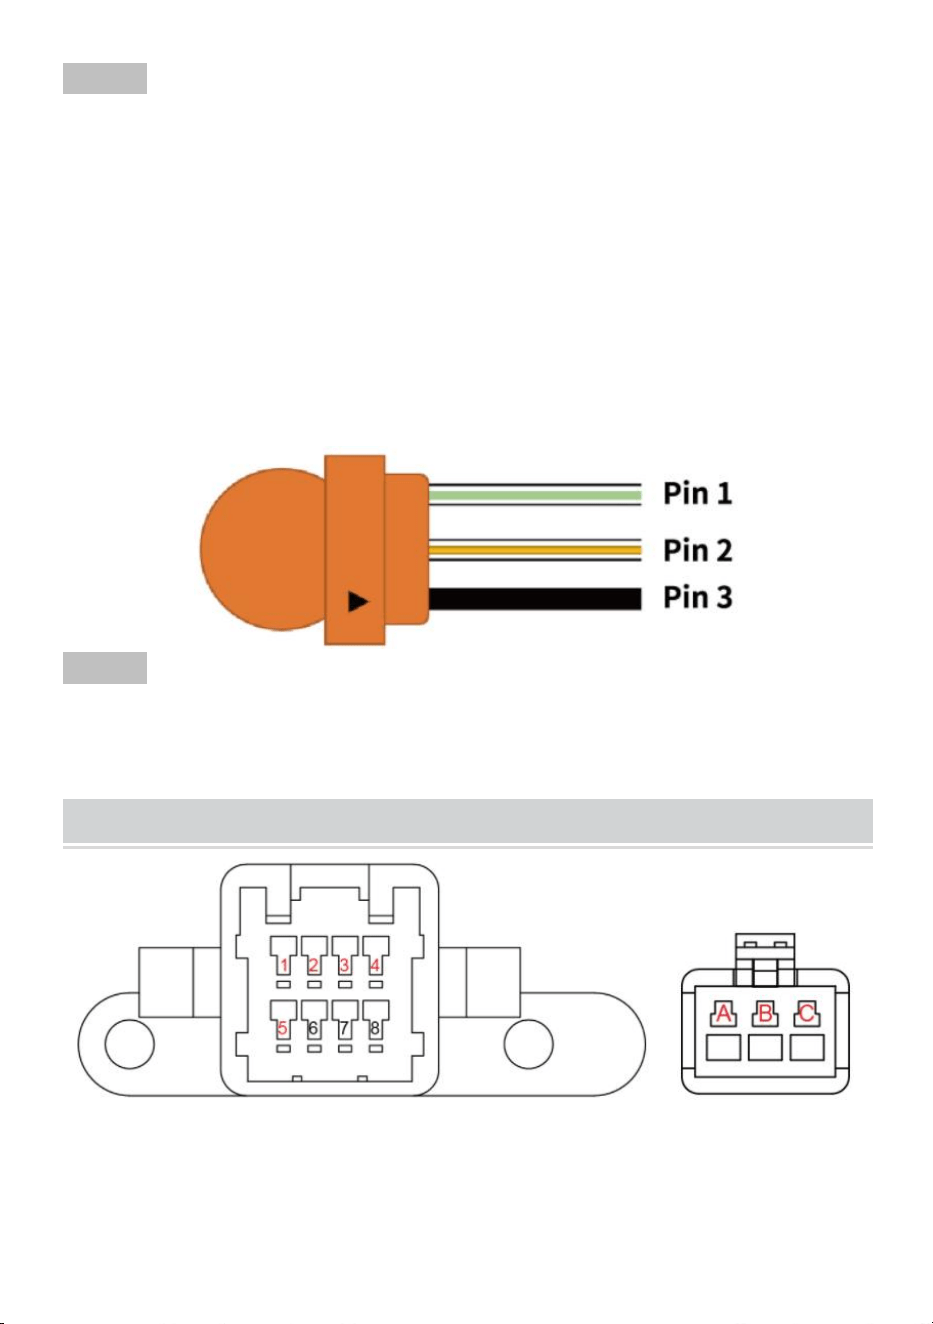
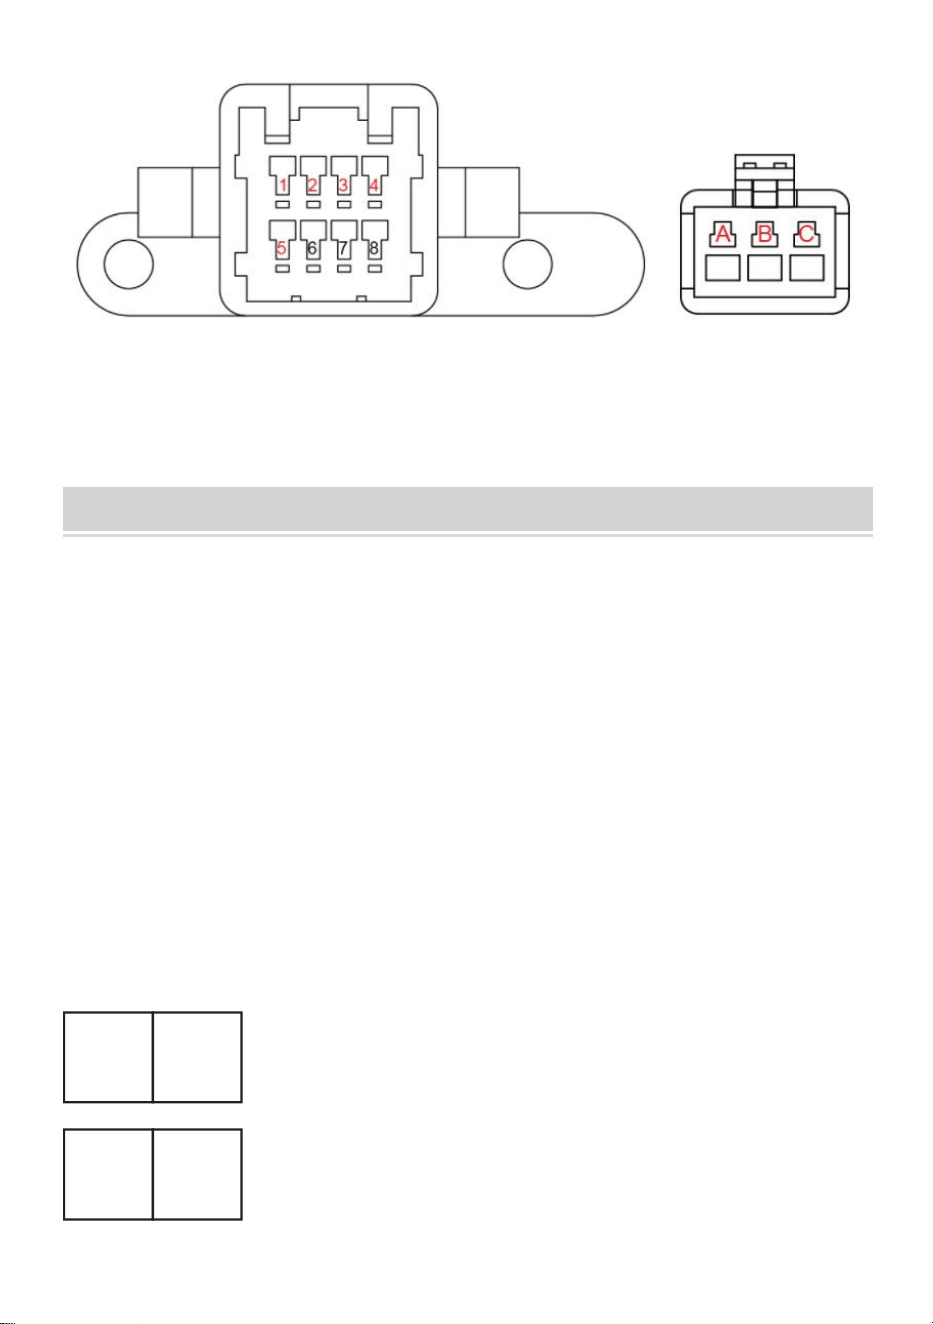
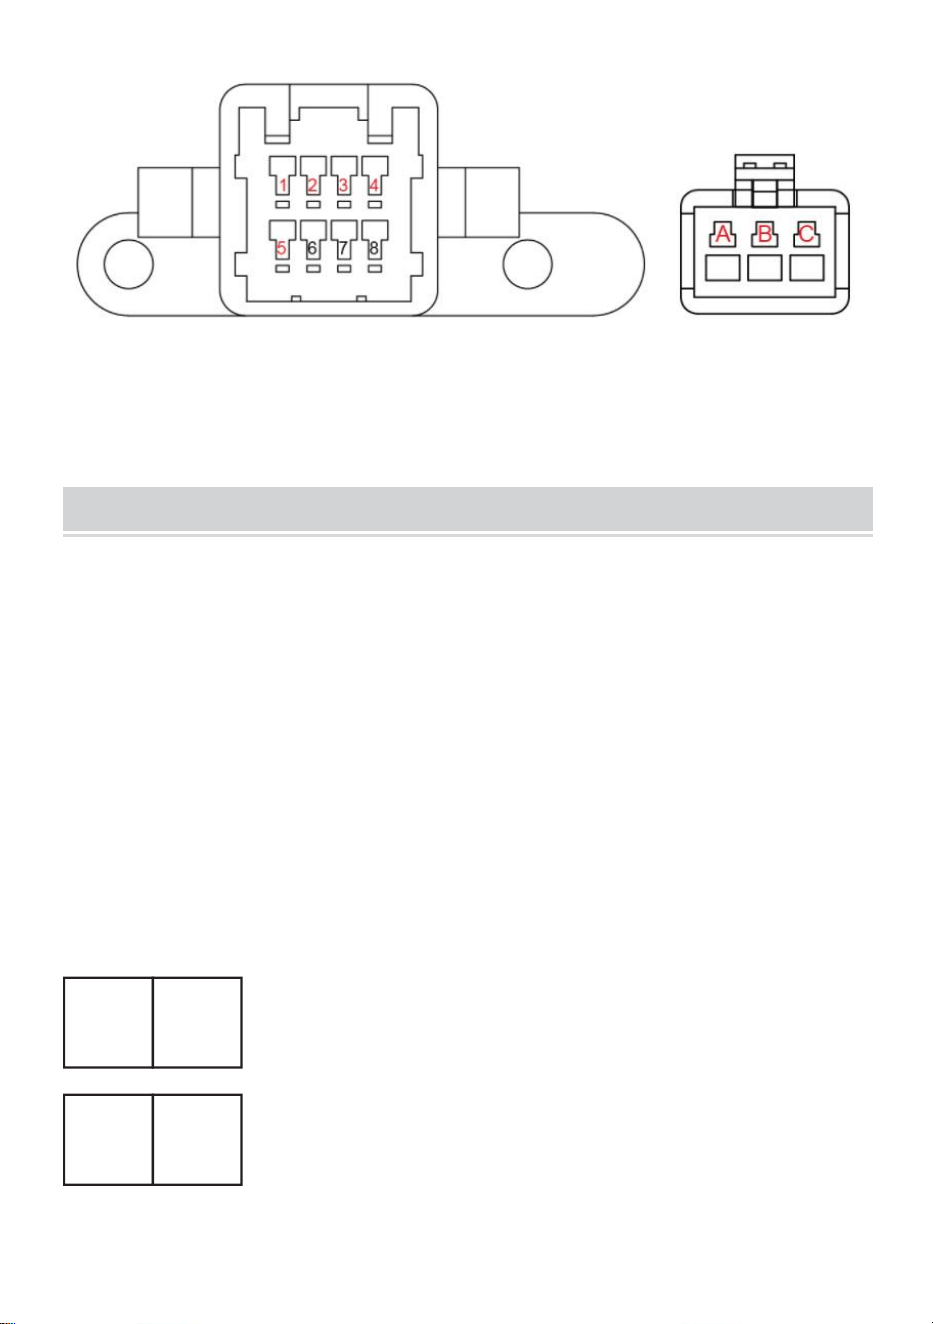
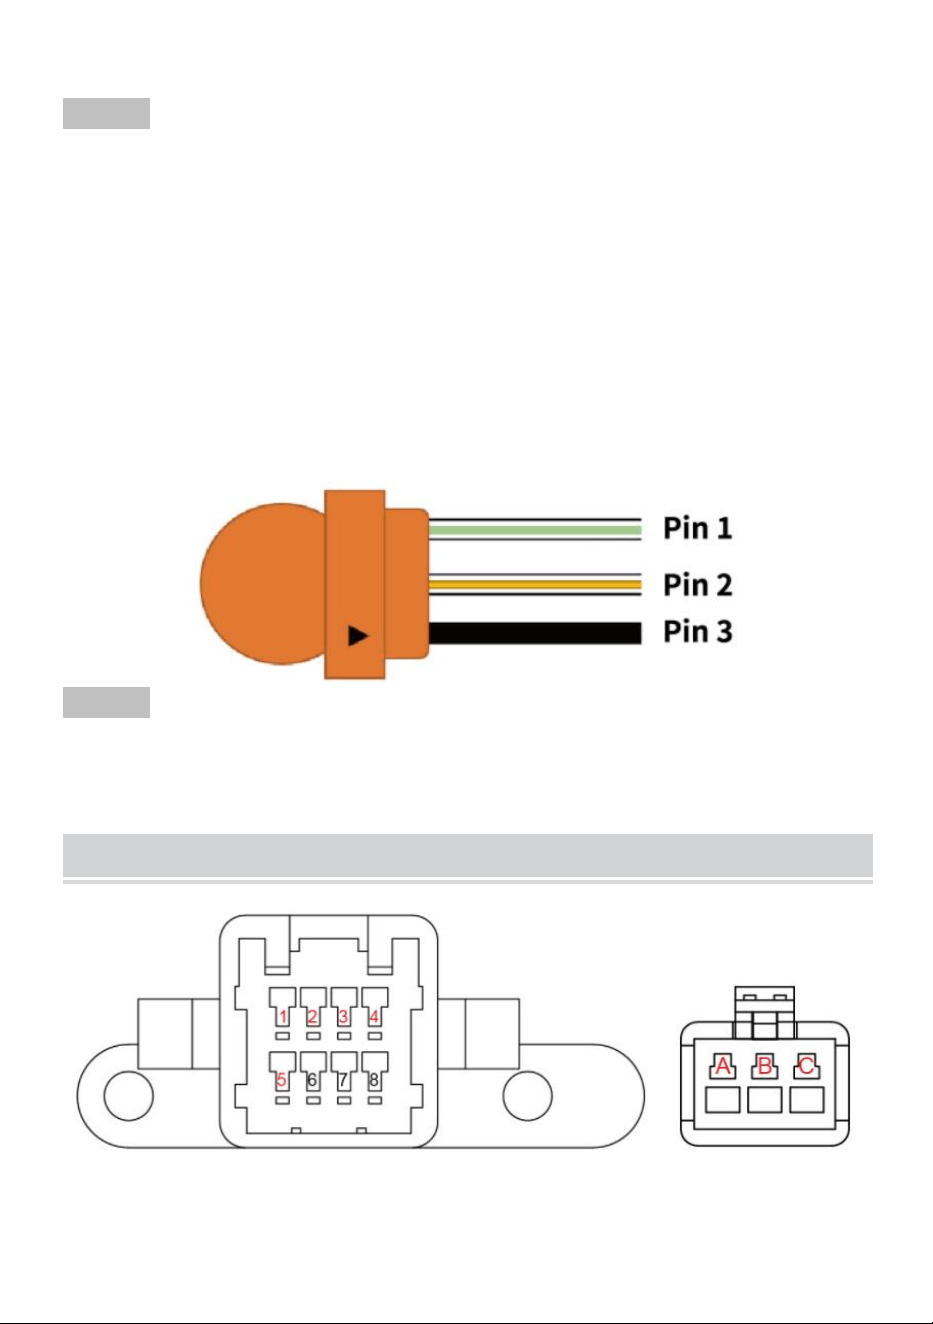
REFERENCE WIRE DIAGRAM
1.Mirror Heater 2/3/4:Mirror Motor 5.Mirror Heater 6/7/8:Not Used
A:Puddle Light B:Ground C:Turn Signal Light
- 6 -
MAINTENANCE
1. Scrub the towing mirror when it is dirty.
2. Get into the habit of folding the towing mirrors when parking.
Address:Baoshanqu Shuangchenglu 803long 11hao 1602A-1609shi
Shanghai
Imported to AUS: SIHAO PTY LTD, 1 ROKEVA STREETEASTWOOD
NSW 2122 Australia
Imported to USA: Sanven Technology Ltd., Suite 250, 9166 Anaheim
Place, Rancho Cucamonga, CA 91730
REP
EC
SHUNSHUN GmbH
Römeräcker 9 Z2021, 76351
Linkenheim-Hochstetten, Germany
REP
UK
Pooledas Group Ltd
Unit 5 Albert Edward House, The
Pavilions Preston, United Kingdom
Made In China


- 8 -
Assistance technique et certificat de garantie électronique
www.vevor.com/support
RÉTROVISEURS DE REMORQUAGE
MODÈLE : YH3344/43PSA-EBH
We continue to be committed to provide you tools with competitive price.
"Save Half", "Half Price" or any other similar expressions used by us only represents an
estimate of savings you might benefit from buying certain tools with us compared to the major
top brands and does not necessarily mean to cover all categories of tools offered by us. You
are kindly reminded to verify carefully when you are placing an order with us if you are
actually saving half in comparison with the top major brands.

- 1 -
MODÈLE : YH3344/43PSA-EBH
Have product questions? Need technical support? Please feel free to
contact us:
Technical Support and E-Warranty Certificate
www.vevor.com/support
NEED HELP? CONTACT US!
This is the original instruction, please read all manual instructions
carefully before operating. VEVOR reserves a clear interpretation of our
user manual. The appearance of the product shall be subject to the
product you received. Please forgive us that we won't inform you again if
there are any technology or software updates on our product.
TOWING MIRRORS
- 2 -
ÉLIMINATION
CORRECTE
Ce produit est soumis aux dispositions de la directive
européenne 2012/19/UE. Le symbole représentant une
poubelle barrée indique que le produit nécessite une collecte
sélective des déchets dans l'Union européenne. Ceci s'applique
au produit et à tous les accessoires marqués de ce symbole.
Les produits marqués comme tels ne doivent pas être jetés
avec les ordures ménagères normales, mais doivent être
apportés à un centre de collecte. point de collecte pour le
recyclage des appareils électriques et électroniques.
Informations FCC :
PRUDENCE:
Les changements ou modifications non expressément
approuvés par la partie responsable de la conformité pourraient
annuler le droit de l'utilisateur à utiliser l'équipement !
Cet appareil est conforme à la partie 15 des règles FCC.
L’exploitation est soumise aux deux conditions suivantes :
1) Ce produit peut provoquer des interférences nuisibles.
2) Ce produit doit accepter toute interférence reçue, y compris
les interférences susceptibles de provoquer un fonctionnement
indésirable.
NOTES
7. Veuillez lire attentivement ces instructions avant de commencer
l'installation.
8. Des outils appropriés amélioreront la qualité de l’installation et réduiront
le temps requis.
9. Tous les miroirs sont symétriques et conçus pour une meilleure portée
de vue.
10.Si vous constatez des pièces manquantes ou endommagées, veuillez
prendre une photo et nous contacter.
11.Veuillez vous référer au manuel du propriétaire du véhicule pour régler
les nouveaux rétroviseurs.
- 3 -
12.Si vous ne pouvez pas l'installer vous-même, contactez un
professionnel de la réparation automobile pour le remplacer à votre place.
MODEL AND PARAMETERS
Modèle
YH3344/43PSA-EBH
Position des pièces
automobiles
Façade Extérieure
Saisir
C.C 12 V
Pli
Pliage manuel
Les fonctions
Chauffant + clignotant + flèche
lumineuse + lumière de flaque d'eau
Type de véhicule
applicable
2002-2009 Dodge Ram
1500/2500/3500.
Couleur
Noir
STRUCTURE DIAGRAM
2
1
3
4
5
6
7
- 4 -
1. Chauffé 2. Clignotant 3. Flèche lumineuse 4. Lumière de flaque d'eau
5. Pliage manuel 6. Verre convexe (réglage manuel)
7. Verre plat (réglage de la puissance)
INSTALLATION INSTRUCTIONS
ÉTAPE 1
5. Retirez (1) boulon de 10 mm fixant la poignée de porte.
6. Retirez les (4) vis Philips fixant le panneau de garniture de porte.
7. Tirez le panneau de garniture de porte vers le haut pour le dégager du panneau
de porte.
8. Débranchez le faisceau de porte.
5 . Retirez le panneau de garniture de porte.
ÉTAPE 2
4. Débranchez le connecteur du faisceau de rétroviseur.
5. Retirez le coussin en mousse du panneau de porte.
6. Retirez les (3) écrous hexagonaux de 10 mm fixant le miroir d'usine.
4. Retirez soigneusement le miroir d'usine.
ÉTAPE 3
6. Fixez le coussinet en mousse à la nouvelle base de montage du miroir.
7. Prenez le nouveau miroir, faites passer les goujons et le harnais à

- 5 -
travers les trous existants sur le panneau de porte.
8. Installez les (3) écrous hexagonaux fournis pour fixer le nouveau miroir.
Serrez à 80 lb po .
9. Connectez le faisceau du miroir.
10. Connectez le faisceau rouge/noir et faites passer le tunnel du faisceau
de porte jusqu'à la salle des machines.
ÉTAPE 4
6. Connectez le faisceau de porte.
7. Réinstallez le panneau de garniture de porte en position.
8. Réinstallez les (4) vis Philips.
9. Réinstallez la poignée de porte et fixez-la avec (1) boulon de 10 mm.
10. Localisez la prise du signal avant/feu de stationnement. Câblez le fil
noir au poteau de terre sur le panneau de carrosserie.
Pour la fonction clignotant, câblez le fil rouge à la broche 1 du connecteur.
Pour la fonction feux de circulation, câblez le fil rouge à la broche 2 du
connecteur. Les modèles RAM 2500 2007 sont illustrés, les couleurs
peuvent varier. La broche 3 est toujours un fil noir avec une flèche sur la
douille de l'ampoule.
ÉTAPE 5
3. Répétez les étapes ci-dessus du côté passager.
4. Vérifiez soigneusement toutes les fonctions des rétroviseurs avant le
premier trajet.
REFERENCE WIRE DIAGRAM

- 6 -
1. Chauffage miroir 2/3/4 : moteur miroir 5. Chauffage miroir 6/7/8 : non
utilisé.
A : Lumière de flaque d'eau B : Terre C : Clignotant.
MAINTENANCE
3. Frottez le rétroviseur de remorquage lorsqu'il est sale.
4. Prenez l'habitude de rabattre les rétroviseurs de remorquage lorsque
vous vous garez.
Adresse : Baoshanqu Shuangchenglu 803long 11hao 1602A-1609shi
Shanghai
Importé en Australie : SIHAO PTY LTD, 1 ROKEVA STREETASTWOOD
NSW 2122 Australie
Importé aux États-Unis : Sanven Technology Ltd., Suite 250, 9166
Anaheim Place, Rancho Cucamonga, CA 91730
REP
EC
SHUNSHUN GmbH
Römeräcker 9 Z2021, 76351
Linkenheim-Hochstetten, Germany
REP
UK
Pooledas Group Ltd
Unit 5 Albert Edward House, The
Pavilions Preston, United Kingdom

- 7 -
Fabriqué en Chine


- 9 -
Zertifikat für technischen Support und E-Garantie
www.vevor.com/support
ANHÄNGERSPIEGEL
MODELL: YH3344/43PSA-EBH
We continue to be committed to provide you tools with competitive price.
"Save Half", "Half Price" or any other similar expressions used by us only represents an
estimate of savings you might benefit from buying certain tools with us compared to the major
top brands and does not necessarily mean to cover all categories of tools offered by us. You
are kindly reminded to verify carefully when you are placing an order with us if you are
actually saving half in comparison with the top major brands.

- 1 -
MODELL: YH3344/43PSA-EBH
Have product questions? Need technical support? Please feel free to
contact us:
Technical Support and E-Warranty Certificate
www.vevor.com/support
NEED HELP? CONTACT US!
This is the original instruction, please read all manual instructions
carefully before operating. VEVOR reserves a clear interpretation of our
user manual. The appearance of the product shall be subject to the
product you received. Please forgive us that we won't inform you again if
there are any technology or software updates on our product.
TOWING MIRRORS
- 2 -
KORREKTE
ENTSORGUNG
Dieses Produkt unterliegt den Bestimmungen der europäischen
Richtlinie 2012/19/EU. Das Symbol einer durchgestrichenen
Mülltonne weist darauf hin, dass das Produkt in der
Europäischen Union einer getrennten Müllsammlung bedarf.
Dies gilt für das Produkt und alle Zubehörteile, die mit diesem
Symbol gekennzeichnet sind. Als solche gekennzeichnete
Produkte dürfen nicht über den normalen Hausmüll entsorgt
werden, sondern müssen zu einem Recyclinghof gebracht
werden Sammelstelle für das Recycling von Elektro- und
Elektronikgeräten.
FCC-Informationen:
VORSICHT:
Änderungen oder Modifikationen, die nicht ausdrücklich von der
für die Einhaltung verantwortlichen Partei genehmigt wurden,
können zum Erlöschen der Berechtigung des Benutzers zum
Betrieb des Geräts führen!
Dieses Gerät entspricht Teil 15 der FCC-Bestimmungen. Der
Betrieb unterliegt den folgenden zwei Bedingungen:
1) Dieses Produkt kann schädliche Störungen verursachen.
2) Dieses Produkt muss alle empfangenen Störungen
akzeptieren, einschließlich Störungen, die zu unerwünschtem
Betrieb führen können.
NOTES
13.Bitte lesen Sie diese Anleitung sorgfältig durch, bevor Sie mit der
Installation beginnen.
14.Die richtigen Werkzeuge verbessern die Qualität der Installation und
verkürzen den Zeitaufwand.
15.Alle Spiegel sind symmetrisch und für eine bessere Sichtweite
ausgelegt .
16.Wenn Sie fehlende oder beschädigte Teile finden, machen Sie bitte ein
Foto und kontaktieren Sie uns.
- 3 -
17.Bitte beachten Sie die Bedienungsanleitung des Fahrzeugs, um die
neuen Spiegel einzustellen.
18.Wenn Sie es nicht selbst einbauen können, wenden Sie sich an einen
Autoreparaturfachmann, um es für Sie auszutauschen.
MODEL AND PARAMETERS
Modell
YH3344/43PSA-EBH
Autoteilposition
Vorne draußen
Eingang
Gleichstrom 12 V
Falten
Manuelles Falten
Funktionen
Beheizt + Blinkerlicht +
Pfeilsignallicht + Pfützenlicht
Anwendbarer
Fahrzeugtyp
2002–2009 Dodge Ram
1500/2500/3500
Farbe
Schwarz
STRUCTURE DIAGRAM
7
- 4 -
1. Beheizt 2. Blinkerlicht 3. Pfeilsignallicht 4. Pfützenlicht
5. Manuelles Falten 6. Konvexes Glas (manuelle Einstellung)
7.Flachglas (Leistungsanpassung)
INSTALLATION INSTRUCTIONS
SCHRITT 1
9. Entfernen Sie (1) 10-mm-Schraube, mit der der Türgriff befestigt ist.
10. Entfernen Sie (4) Kreuzschlitzschrauben, mit denen die Türverkleidung
befestigt ist.
11. Ziehen Sie die Türverkleidung nach oben, um sie von der Türverkleidung zu
lösen.
12. Trennen Sie den Türkabelbaum.
5 . Entfernen Sie die Türverkleidung.
2
1
3
4
5
6
- 5 -
SCHRITT 2
7. Den Stecker des Spiegelkabelbaums abziehen.
8. Entfernen Sie das Schaumstoffpolster von der Türverkleidung.
9. Entfernen Sie (3) 10-mm-Sechskantmuttern, mit denen der
Werksspiegel befestigt ist.
4. Entfernen Sie vorsichtig den Werksspiegel.
SCHRITT 3
11. Befestigen Sie das Schaumstoffpolster an der neuen
Spiegelmontagebasis.
12. Nehmen Sie den neuen Spiegel, führen Sie die Bolzen und den
Kabelbaum durch die vorhandenen Löcher in der Türverkleidung.
13. Installieren Sie (3) der mitgelieferten Sechskantmuttern, um den
neuen Spiegel zu befestigen. Mit 80 lb in anziehen .
14. Spiegelkabelbaum anschließen.
15. Schließen Sie den rot/schwarzen Kabelbaum an und führen Sie ihn
durch den Türkabelbaumtunnel zum Motorraum.
SCHRITT 4
11. Schließen Sie den Türkabelbaum an.
12. Bringen Sie die Türverkleidung wieder an ihrer Position an.
13. Bringen Sie die (4) Kreuzschlitzschrauben wieder an.
14. Bringen Sie den Türgriff wieder an und befestigen Sie ihn mit (1)
- 6 -
10-mm-Schraube.
15. Suchen Sie die vordere Signal-/Standlichtsteckdose. Verdrahten Sie
das schwarze Kabel mit dem Erdungspol am Karosserieblech.
Für die Blinkerfunktion schließen Sie das rote Kabel an Pin 1 des Steckers
an.
Für die Lauflichtfunktion schließen Sie das rote Kabel an Pin 2 des
Steckers an. Abgebildet sind RAM 2500-Modelle von 2007, die Farben
können variieren. Pin 3 ist immer ein schwarzes Kabel mit einem Pfeil auf
der Lampenfassung.
SCHRITT 5
5. Wiederholen Sie die obigen Schritte auf der Beifahrerseite .
6. der ersten Fahrt sorgfältig alle Spiegelfunktionen .
REFERENCE WIRE DIAGRAM
1.Spiegelheizung 2/3/4: Spiegelmotor 5. Spiegelheizung 6/7/8: Nicht
verwendet
A: Pfützenlicht B: Boden C: Blinkerlicht
- 7 -
MAINTENANCE
5. Schrubben Sie den Abschleppspiegel, wenn er verschmutzt ist.
6. Gewöhnen Sie sich an, beim Parken die Abschleppspiegel
einzuklappen.
Adresse: Baoshanqu Shuangchenglu 803long 11hao 1602A-1609shi
Shanghai
Importiert nach AUS: SIHAO PTY LTD, 1 ROKEVA STREETEASTWOOD
NSW 2122 Australien
In die USA importiert: Sanven Technology Ltd., Suite 250, 9166 Anaheim
Place, Rancho Cucamonga, CA 91730
REP
EC
SHUNSHUN GmbH
Römeräcker 9 Z2021, 76351
Linkenheim-Hochstetten, Germany
REP
UK
Pooledas Group Ltd
Unit 5 Albert Edward House, The
Pavilions Preston, United Kingdom
In China hergestellt


- 9 -
Supporto tecnico e certificato di garanzia elettronica
www.vevor.com/support
SPECCHIETTI DA TRAINO
MODELLO:YH3344/43PSA-EBH
We continue to be committed to provide you tools with competitive price.
"Save Half", "Half Price" or any other similar expressions used by us only represents an
estimate of savings you might benefit from buying certain tools with us compared to the major
top brands and does not necessarily mean to cover all categories of tools offered by us. You
are kindly reminded to verify carefully when you are placing an order with us if you are
actually saving half in comparison with the top major brands.

- 1 -
MODELLO: YH3344/43PSA-EBH
Have product questions? Need technical support? Please feel free to
contact us:
Technical Support and E-Warranty Certificate
www.vevor.com/support
NEED HELP? CONTACT US!
This is the original instruction, please read all manual instructions
carefully before operating. VEVOR reserves a clear interpretation of our
user manual. The appearance of the product shall be subject to the
product you received. Please forgive us that we won't inform you again if
there are any technology or software updates on our product.
TOWING MIRRORS
- 2 -
CORRETTO
SMALTIMENTO
Questo prodotto è soggetto alle disposizioni della Direttiva
Europea 2012/19/UE. Il simbolo del bidone della spazzatura
barrato indica che nell'Unione Europea il prodotto richiede la
raccolta differenziata dei rifiuti. Ciò vale per il prodotto e tutti gli
accessori contrassegnati da questo simbolo. I prodotti
contrassegnati come tali non possono essere smaltiti con i
normali rifiuti domestici, ma devono essere portati a punto di
raccolta per il riciclaggio di dispositivi elettrici ed elettronici.
Informazioni FCC:
ATTENZIONE:
Cambiamenti o modifiche non espressamente approvati dalla
parte responsabile della conformità potrebbero invalidare il
diritto dell'utente a utilizzare l'apparecchiatura!
Questo dispositivo è conforme alla Parte 15 delle norme FCC. Il
funzionamento è soggetto alle seguenti due condizioni:
1) Questo prodotto può causare interferenze dannose.
2)Questo prodotto deve accettare qualsiasi interferenza
ricevuta, comprese le interferenze che potrebbero causare un
funzionamento indesiderato.
NOTES
19.Si prega di leggere attentamente queste istruzioni prima di iniziare
l'installazione.
20.Strumenti adeguati miglioreranno la qualità dell'installazione e
ridurranno il tempo richiesto.
21.gli specchietti sono simmetrici e progettati per una migliore portata
visiva.
22.Se trovi parti mancanti o danneggiate, scatta una foto e contattaci.
23.Fare riferimento al manuale del proprietario del veicolo per regolare i
nuovi specchietti.
24.Se non riesci a installarlo da solo, contatta un professionista della
riparazione auto per sostituirlo.

- 3 -
MODEL AND PARAMETERS
Modello
YH3344/43PSA-EBH
Posizione della parte
automatica
Parte anteriore esterna
Ingresso
CC 12 V
Piega
Piegatura manuale
Funzioni
Riscaldato + indicatore di direzione +
indicatore di freccia + luce di
pozzanghera
Tipo di veicolo
applicabile
2002-2009 Dodge Ram
1500/2500/3500
Colore
Nero
STRUCTURE DIAGRAM
1. Riscaldato 2. Indicatore di direzione 3. Indicatore di direzione della
freccia 4. Luce di pozzanghera
2
1
3
4
5
6
7
- 4 -
5. Piegatura manuale 6. Vetro convesso (regolazione manuale)
7.Vetro piano (regolazione della potenza)
INSTALLATION INSTRUCTIONS
PASSO 1
13. Rimuovere (1) bullone da 10 mm che fissa la maniglia della porta.
14. Rimuovere (4) viti a croce che fissano il pannello di rivestimento della portiera.
15. Tirare il pannello di rivestimento della portiera verso l'alto per sganciarlo dal
pannello della portiera.
16. Scollegare il cablaggio della porta.
5 . Rimuovere il pannello di rivestimento della porta.
PASSO 2
10. Scollegare il connettore del cablaggio dello specchietto.
11. Rimuovere il cuscinetto in schiuma dal pannello della porta.
12. Rimuovere (3) dadi esagonali da 10 mm che fissano lo specchietto di
fabbrica.
4. Rimuovere con attenzione lo specchietto di fabbrica.
PASSO 3
16. Attacca il cuscinetto in schiuma alla nuova base di montaggio dello
specchio.
- 5 -
17. Prendere il nuovo specchietto, inserire i perni e il cablaggio attraverso i
fori esistenti sul pannello della portiera.
18. Installare i (3) dadi esagonali forniti per fissare il nuovo specchietto.
Coppia a 80 libbre in .
19. Collegare il cablaggio dello specchietto.
20. Collegare il cablaggio rosso/nero e farlo passare attraverso il tunnel
del cablaggio della porta fino alla sala motore.
PASSO 4
16. Collegare il cablaggio della porta.
17. Reinstallare il pannello di rivestimento della porta in posizione.
18. Reinstallare (4) viti Philips.
19. Reinstallare la maniglia della porta e fissarla con (1) bullone da 10
mm.
20. Individuare la presa delle luci di posizione/luce di posizione anteriori.
Collegare il filo nero al polo di terra sul pannello della carrozzeria.
Per la funzione degli indicatori di direzione, collegare il filo rosso al pin 1
del connettore.
Per la funzione luce di marcia, collegare il filo rosso al pin 2 del connettore.
Sono mostrati i modelli RAM 2500 del 2007, i colori possono variare. Il pin
3 deve essere sempre un filo nero con una freccia sul portalampada.
PASSO 5
7. Ripetere i passaggi precedenti sul lato passeggero.
8. Controllare attentamente tutte le funzioni dello specchietto prima della
prima guida.
REFERENCE WIRE DIAGRAM
- 6 -
1.Riscaldatore specchio 2/3/4:Motore specchio 5.Riscaldatore specchio
6/7/8:Non utilizzato
A: Luce pozzanghera B: Terra C: Indicatore di direzione
MAINTENANCE
7. Strofina lo specchietto retrovisore quando è sporco.
8. Prendi l'abitudine di ripiegare gli specchietti del rimorchio quando
parcheggi.
Indirizzo: Baoshanqu Shuangchenglu 803long 11hao 1602A-1609shi
Shanghai
Importato in AUS: SIHAO PTY LTD, 1 ROKEVA STREETEASTWOOD
NSW 2122 Australia
Importato negli Stati Uniti: Sanven Technology Ltd., Suite 250, 9166
Anaheim Place, Rancho Cucamonga, CA 91730
REP
EC
SHUNSHUN GmbH
Römeräcker 9 Z2021, 76351
Linkenheim-Hochstetten, Germany
REP
UK
Pooledas Group Ltd
Unit 5 Albert Edward House, The
Pavilions Preston, United Kingdom

- 7 -
Made in China


- 9 -
Soporte técnico y certificado de garantía electrónica
www.vevor.com/support
ESPEJOS DE REMOLQUE
MODELO:YH3344/43PSA-EBH
We continue to be committed to provide you tools with competitive price.
"Save Half", "Half Price" or any other similar expressions used by us only represents an
estimate of savings you might benefit from buying certain tools with us compared to the major
top brands and does not necessarily mean to cover all categories of tools offered by us. You
are kindly reminded to verify carefully when you are placing an order with us if you are
actually saving half in comparison with the top major brands.

- 1 -
MODELO: YH3344/43PSA-EBH
Have product questions? Need technical support? Please feel free to
contact us:
Technical Support and E-Warranty Certificate
www.vevor.com/support
NEED HELP? CONTACT US!
This is the original instruction, please read all manual instructions
carefully before operating. VEVOR reserves a clear interpretation of our
user manual. The appearance of the product shall be subject to the
product you received. Please forgive us that we won't inform you again if
there are any technology or software updates on our product.
TOWING MIRRORS
- 2 -
ELIMINACIÓN
CORRECTA
Este producto está sujeto a las disposiciones de la Directiva
Europea 2012/19/UE. El símbolo que muestra un contenedor
con ruedas tachado indica que el producto requiere recogida
selectiva de basura en la Unión Europea. Esto se aplica al
producto y a todos los accesorios marcados con este símbolo.
Los productos marcados como tales no podrán desecharse con
la basura doméstica normal, sino que deberán llevarse a un
Punto de recogida para el reciclaje de aparatos eléctricos y
electrónicos.
Información de la FCC:
PRECAUCIÓN:
¡Los cambios o modificaciones no aprobados expresamente
por la parte responsable del cumplimiento podrían anular la
autoridad del usuario para operar el equipo!
Este dispositivo cumple con la Parte 15 de las normas de la
FCC. La operación está sujeta a las dos condiciones
siguientes:
1) Este producto puede causar interferencias perjudiciales.
2) Este producto debe aceptar cualquier interferencia recibida,
incluidas las interferencias que puedan causar un
funcionamiento no deseado.
NOTES
25.Lea atentamente estas instrucciones antes de comenzar la instalación.
26.Las herramientas adecuadas mejorarán la calidad de la instalación y
reducirán el tiempo necesario.
27.Todos los espejos son simétricos y están diseñados para ofrecer un
mejor rango de visión.
28.Si encuentra piezas faltantes o dañadas, tome una foto y contáctenos.
29.Consulte el manual del propietario del vehículo para ajustar los nuevos
espejos.
30.Si no puede instalarlo usted mismo, comuníquese con un profesional

- 3 -
de reparación de automóviles para que lo reemplace por usted.
MODEL AND PARAMETERS
Modelo
YH3344/43PSA-EBH
Posición de pieza de
automóvil
Frente exterior
Aporte
CC 12 V
Doblar
Plegado manual
Funciones
Calefacción+ luz de señal de giro
+luz de señal de flecha+luz de
charco
Tipo de vehículo
aplicable
2002-2009Dodge Ram
1500/2500/3500
Color
Negro
STRUCTURE DIAGRAM
1. Calefacción 2. Luz de señal de giro 3. Luz de señal de flecha 4. Luz de
2
1
3
4
5
6
7
- 4 -
charco
5. Plegado manual 6.Vidrio convexo (ajuste manual)
7.Vidrio plano (ajuste de potencia)
INSTALLATION INSTRUCTIONS
PASO 1
17. Retire (1) perno de 10 mm que sujeta la manija de la puerta.
18. Retire los (4) tornillos Philips que sujetan el panel de la puerta.
19. Tire del panel de la puerta hacia arriba para soltarlo del panel de la puerta.
20. Desconecte el arnés de la puerta.
5 . Retire el panel de la puerta.
PASO 2
13. Desconecte el conector del mazo del espejo.
14. Retire la almohadilla de espuma del panel de la puerta.
15. Retire las (3) tuercas hexagonales de 10 mm que sujetan el espejo de
fábrica.
4. Retire con cuidado el espejo de fábrica.
PASO 3
21. Coloque la almohadilla de espuma en la nueva base de montaje del
espejo.

- 5 -
22. Tome el nuevo espejo, pase los pernos y el arnés a través de los
orificios existentes en el panel de la puerta.
23. Instale (3) tuercas hexagonales proporcionadas para asegurar el
nuevo espejo. Apriete a 80 lb pulg .
24. Conecte el arnés del espejo.
25. Conecte el arnés rojo/negro y páselo a través del túnel del arnés de la
puerta hasta la sala del motor.
ETAPA 4
21. Conecte el arnés de la puerta.
22. Vuelva a instalar el panel de la puerta en su posición.
23. Vuelva a instalar los (4) tornillos Philips.
24. Vuelva a instalar la manija de la puerta y asegúrela con (1) perno de
10 mm.
25. Localice el enchufe de la luz de estacionamiento/señal delantera.
Conecte el cable negro al polo de tierra en el panel de la carrocería.
Para la función de señal de giro, conecte el cable rojo al pin 1 del conector.
Para la función de luz de marcha, conecte el cable rojo al pin 2 del
conector. Se muestran los modelos RAM 2500 2007, los colores pueden
variar. El pin 3 siempre será un cable negro con una flecha en el
portalámparas.
PASO 5
9. Repita los pasos anteriores en el lado del pasajero.
10. Verifique cuidadosamente todas las funciones de los espejos antes
del primer viaje.
REFERENCE WIRE DIAGRAM
- 6 -
1. Calentador de espejo 2/3/4: Motor de espejo 5. Calentador de espejo
6/7/8: No utilizado
A: Luz de charco B: Tierra C: Luz de señal de giro
MAINTENANCE
9. Frote el espejo retrovisor cuando esté sucio.
10. Adquiera el hábito de plegar los espejos retrovisores al estacionar.
Dirección: Baoshanqu Shuangchenglu 803long 11hao 1602A-1609shi
Shanghai
Importado a AUS: SIHAO PTY LTD, 1 ROKEVA STREETEASTWOOD
NSW 2122 Australia
Importado a EE. UU.: Sanven Technology Ltd., Suite 250, 9166 Anaheim
Place, Rancho Cucamonga, CA 91730
REP
EC
SHUNSHUN GmbH
Römeräcker 9 Z2021, 76351
Linkenheim-Hochstetten, Germany
REP
UK
Pooledas Group Ltd
Unit 5 Albert Edward House, The
Pavilions Preston, United Kingdom
Hecho en china

- 7 -


- 9 -
Wsparcie techniczne i certyfikat e-gwarancji
www.vevor.com/support
HOLOWANIE LUSTEREK
MODEL: YH3344/43PSA-EBH
We continue to be committed to provide you tools with competitive price.
"Save Half", "Half Price" or any other similar expressions used by us only represents an
estimate of savings you might benefit from buying certain tools with us compared to the major
top brands and does not necessarily mean to cover all categories of tools offered by us. You
are kindly reminded to verify carefully when you are placing an order with us if you are
actually saving half in comparison with the top major brands.

- 1 -
MODEL: YH3344/43PSA-EBH
Have product questions? Need technical support? Please feel free to
contact us:
Technical Support and E-Warranty Certificate
www.vevor.com/support
NEED HELP? CONTACT US!
This is the original instruction, please read all manual instructions
carefully before operating. VEVOR reserves a clear interpretation of our
user manual. The appearance of the product shall be subject to the
product you received. Please forgive us that we won't inform you again if
there are any technology or software updates on our product.
TOWING MIRRORS

- 2 -
PRAWIDŁOWA
UTYLIZACJA
Ten produkt podlega przepisom europejskiej dyrektywy 2012
/19/UE. Symbol przekreślonego kosza na śmieci oznacza, że
produkt wymaga selektywnej zbiórki śmieci na terenie Unii
Europejskiej. Dotyczy to produktu i wszystkich akcesoriów
oznaczonych tym symbolem. Produktów oznaczonych jako
takie nie można wyrzucać razem ze zwykłymi odpadami
domowymi, lecz należy je oddać do: punkt zbiórki sprzętu
elektrycznego i elektronicznego przeznaczonego do recyklingu.
Informacje FCC:
OSTROŻNOŚĆ:
Zmiany lub modyfikacje, które nie zostały wyraźnie
zatwierdzone przez stronę odpowiedzialną za zgodność, mogą
unieważnić uprawnienia użytkownika do obsługi urządzenia!
To urządzenie jest zgodne z częścią 15 przepisów FCC.
Działanie podlega następującym dwóm warunkom:
1) Ten produkt może powodować szkodliwe zakłócenia.
2) Ten produkt musi akceptować wszelkie odbierane
zakłócenia, w tym zakłócenia, które mogą powodować
niepożądane działanie.
NOTES
31.Przed rozpoczęciem instalacji prosimy o dokładne zapoznanie się z
niniejszą instrukcją.
32.Odpowiednie narzędzia poprawią jakość montażu i skrócą czas jego
montażu.
33.Wszystkie lustra są symetryczne i zaprojektowane z myślą o lepszym
zasięgu widzenia.
34.Jeśli znajdziesz brakujące lub uszkodzone części, zrób zdjęcie i
skontaktuj się z nami.
35., zapoznaj się z instrukcją obsługi pojazdu.
36.Jeśli nie możesz zainstalować go samodzielnie, skontaktuj się z
warsztatem samochodowym, aby go wymienił.
- 3 -
MODEL AND PARAMETERS
Model
YH3344/43PSA-EBH
Automatyczne położenie
części
Przód na zewnątrz
Wejście
Napięcie stałe 12 V
Zginać
Składanie ręczne
Funkcje
Ogrzewany + kierunkowskaz +
kierunkowskaz strzałki + światło
kałuży
Odpowiedni typ pojazdu
2002-2009 Dodge Ram
1500/2500/3500
Kolor
Czarny
STRUCTURE DIAGRAM
1. Ogrzewanie 2. Kierunkowskaz 3. Światło kierunkowskazu ze strzałką 4.
Światło w kałuży
2
1
3
4
5
6
7
- 4 -
5. Składanie ręczne 6. Szkło wypukłe (regulacja ręczna)
7. Szkło płaskie (regulacja mocy)
INSTALLATION INSTRUCTIONS
KROK 1
21. Wykręcić (1) śrubę 10 mm mocującą klamkę drzwi.
22. Wykręć (4) wkręty Philips mocujące panel poszycia drzwi.
23. Pociągnij panel poszycia drzwi do góry, aby go zdjąć z panelu drzwi.
24. Odłącz wiązkę drzwi.
5 . Zdemontuj panel poszycia drzwi.
KROK 2
16. Odłącz złącze wiązki przewodów lusterka.
17. Zdjąć podkładkę piankową z panelu drzwi.
18. Odkręć (3) nakrętki sześciokątne 10 mm mocujące lusterko fabryczne.
4. Ostrożnie zdejmij lusterko fabryczne.
KROK 3
26. Przymocuj podkładkę piankową do nowej podstawy montażowej
lusterka.
27. Weź nowe lusterko, przełóż kołki i uprząż przez istniejące otwory w
panelu drzwi.
- 5 -
28. Zamontuj (3) dostarczone nakrętki sześciokątne, aby zabezpieczyć
nowe lusterko. Moment obrotowy do 80 funtów na cal .
29. Podłącz wiązkę lusterek.
30. Podłącz czerwono-czarną wiązkę przewodów i poprowadź przez tunel
wiązki drzwi do maszynowni.
KROK 4
26. Podłącz wiązkę drzwi.
27. Zamontuj ponownie panel poszycia drzwi na swoje miejsce.
28. Zainstaluj ponownie (4) śruby Philips.
29. Zamontuj ponownie klamkę drzwi i zabezpiecz ją (1) śrubą 10 mm.
30. Znajdź gniazdo przedniego kierunkowskazu/światła postojowego.
Podłącz czarny przewód do bieguna uziemiającego na panelu nadwozia.
Aby uzyskać funkcję kierunkowskazów, podłącz czerwony przewód do
styku 1 złącza.
Aby włączyć funkcję świateł drogowych, podłącz czerwony przewód do
styku 2 złącza. Pokazano modele RAM 2500 z roku 2007, kolory mogą się
różnić. Pin 3 to zawsze czarny przewód ze strzałką na gnieździe żarówki.
KROK 5
11. Powtórz powyższe kroki po stronie pasażera .
12. pierwszą jazdą dokładnie sprawdź działanie wszystkich lusterek .
REFERENCE WIRE DIAGRAM

- 6 -
1. Podgrzewacz lusterka 2/3/4: Silnik lusterka 5. Podgrzewacz lusterka
6/7/8: Nieużywany
Odp.: światło w kałuży B: masa C: włączony kierunkowskaz
MAINTENANCE
11. Wyszoruj lusterko holownicze, jeśli jest brudne.
12. Wyrób sobie nawyk składania lusterek holowniczych podczas
parkowania.
Adres: Baoshanqu Shuangchenglu 803long 11hao 1602A-1609shi
Szanghaj
Import do AUS: SIHAO PTY LTD, 1 ROKEVA STREETEASTWOOD NSW
2122 Australia
Import do USA: Sanven Technology Ltd., Suite 250, 9166 Anaheim Place,
Rancho Cucamonga, CA 91730
REP
EC
SHUNSHUN GmbH
Römeräcker 9 Z2021, 76351
Linkenheim-Hochstetten, Germany
REP
UK
Pooledas Group Ltd
Unit 5 Albert Edward House, The
Pavilions Preston, United Kingdom

- 7 -
Wyprodukowano w Chinach


- 9 -
Technische ondersteuning en e-garantiecertificaat
www.vevor.com/support
SLEEPSPIEGELS
MODEL: YH3344/43PSA-EBH
We continue to be committed to provide you tools with competitive price.
"Save Half", "Half Price" or any other similar expressions used by us only represents an
estimate of savings you might benefit from buying certain tools with us compared to the major
top brands and does not necessarily mean to cover all categories of tools offered by us. You
are kindly reminded to verify carefully when you are placing an order with us if you are
actually saving half in comparison with the top major brands.
- 1 -
MODEL: YH3344/43PSA-EBH
Have product questions? Need technical support? Please feel free to
contact us:
Technical Support and E-Warranty Certificate
www.vevor.com/support
NEED HELP? CONTACT US!
This is the original instruction, please read all manual instructions
carefully before operating. VEVOR reserves a clear interpretation of our
user manual. The appearance of the product shall be subject to the
product you received. Please forgive us that we won't inform you again if
there are any technology or software updates on our product.
TOWING MIRRORS
- 2 -
JUISTE
VERWIJDERING
Dit product valt onder de bepalingen van de Europese richtlijn
2012/19/EU. Het symbool met een doorgestreepte
afvalcontainer geeft aan dat het product in de Europese Unie
een aparte afvalinzameling vereist. Dit geldt voor het product en
alle accessoires die met dit symbool zijn gemarkeerd.
Producten die als zodanig zijn gemarkeerd mogen niet bij het
normale huisvuil worden gegooid, maar moeten worden
afgevoerd naar een inzamelpunt voor recycling van elektrische
en elektronische apparaten.
FCC-informatie:
VOORZICHTIGHEID:
Wijzigingen of aanpassingen die niet uitdrukkelijk zijn
goedgekeurd door de partij die verantwoordelijk is voor
naleving kunnen de bevoegdheid van de gebruiker om de
apparatuur te bedienen ongeldig maken!
Dit apparaat voldoet aan Deel 15 van de FCC-regels. De
werking is onderworpen aan de volgende twee voorwaarden:
1) Dit product kan schadelijke interferentie veroorzaken.
2)Dit product moet alle ontvangen interferentie accepteren,
inclusief interferentie die een ongewenste werking kan
veroorzaken.
NOTES
37.Lees deze instructie zorgvuldig door voordat u met de installatie begint.
38.Het juiste gereedschap verbetert de kwaliteit van de installatie en
verkort de benodigde tijd.
39.Alle spiegels zijn symmetrisch en ontworpen voor een beter zichtbereik.
40.Als u ontbrekende onderdelen of beschadigingen aantreft, maak dan
een foto en neem contact met ons op.
41.Raadpleeg de gebruikershandleiding van het voertuig om de nieuwe
spiegels af te stellen.
42.Als u het niet zelf kunt installeren, neem dan contact op met een
- 3 -
autoreparateur om het voor u te vervangen.
MODEL AND PARAMETERS
Model
YH3344/43PSA-EBH
Automatische
onderdeelpositie
Voorkant Buiten
Invoer
Gelijkstroom 12V
Vouw
Handmatig vouwen
Functies
Verwarmd + richtingaanwijzer +
pijlsignaallicht + plaslicht
Toepasselijk
voertuigtype
2002-2009 Dodge Ram
1500/2500/3500
Kleur
Zwart
STRUCTURE DIAGRAM
1. Verwarmd 2. Richtingaanwijzer 3. Pijlsignaallamp 4. Plaslicht
2
1
3
4
5
6
7
- 4 -
5. Handmatig vouwen 6. Convex glas (handmatige aanpassing)
7. Plat glas (vermogensaanpassing)
INSTALLATION INSTRUCTIONS
STAP 1
25. Verwijder (1) 10 mm bout waarmee de deurgreep is bevestigd.
26. Verwijder (4) kruiskopschroeven waarmee het deurbekledingspaneel is
bevestigd.
27. Trek het deurbekledingspaneel omhoog om het los te maken van het
deurpaneel.
28. Maak de deurdraadboom los.
5 . Verwijder het deurbekledingspaneel.
STAP 2
19. Maak de connector van de spiegelkabelboom los.
20. Verwijder het schuimrubberen kussentje van het deurpaneel.
21. Verwijder (3) 10 mm zeskantmoeren waarmee de fabrieksspiegel is
bevestigd.
4. Verwijder de fabrieksspiegel voorzichtig.
STAP 3
31. Bevestig het schuimkussentje op de nieuwe spiegelmontagebasis.
- 5 -
32. Neem de nieuwe spiegel, voer de noppen en kabelboom door de
bestaande gaten in het deurpaneel.
33. Installeer (3) de meegeleverde zeskantmoeren om de nieuwe spiegel
vast te zetten. Aandraaien tot 80 lb in .
34. Sluit de spiegelkabelboom aan.
35. Sluit de rood/zwarte kabelboom aan en voer deze door de
kabelboomtunnel van de deur naar de machinekamer.
STAP 4
31. Sluit de deurdraadboom aan.
32. Plaats het deurbekledingspaneel terug op zijn plaats.
33. Plaats (4) Philips-schroeven opnieuw.
34. Plaats de deurgreep terug en zet deze vast met (1) 10 mm bout.
35. Zoek de aansluiting voor het signaal/parkeerlicht aan de voorkant.
Sluit de zwarte draad aan op de massapool op het carrosseriepaneel.
Voor de richtingaanwijzerfunctie sluit u de rode draad aan op pin 1 van de
connector.
Voor de werking van het looplicht sluit u de rode draad aan op pin 2 van de
connector. Er worden RAM 2500-modellen uit 2007 getoond, kleuren
kunnen variëren. Pin 3 is altijd een zwarte draad met een pijl op de
lampfitting.
STAP 5
13. Herhaal bovenstaande stappen aan de passagierszijde .
14. de eerste rit zorgvuldig alle spiegelfuncties .
REFERENCE WIRE DIAGRAM

- 6 -
1. Spiegelverwarming 2/3/4: Spiegelmotor 5. Spiegelverwarming 6/7/8:
Niet gebruikt
A: Plaslicht B: Grond C: Richtingaanwijzer
MAINTENANCE
13. Boen de trekspiegel als deze vuil is.
14. Maak er een gewoonte van om tijdens het parkeren de trekspiegels in
te klappen.
Adres: Baoshanqu Shuangchenglu 803long 11hao 1602A-1609shi
Shanghai
Geïmporteerd naar AUS: SIHAO PTY LTD, 1 ROKEVA
STREETEASTWOOD NSW 2122 Australië
Geïmporteerd naar de VS: Sanven Technology Ltd., Suite 250, 9166
Anaheim Place, Rancho Cucamonga, CA 91730
REP
EC
SHUNSHUN GmbH
Römeräcker 9 Z2021, 76351
Linkenheim-Hochstetten, Germany
REP
UK
Pooledas Group Ltd
Unit 5 Albert Edward House, The
Pavilions Preston, United Kingdom

- 7 -
Gemaakt in China


- 9 -
Teknisk support och e-garanticertifikat
www.vevor.com/support
DRAGANDE SPEGLAR
MODELL: YH3344/43PSA-EBH
We continue to be committed to provide you tools with competitive price.
"Save Half", "Half Price" or any other similar expressions used by us only represents an
estimate of savings you might benefit from buying certain tools with us compared to the major
top brands and does not necessarily mean to cover all categories of tools offered by us. You
are kindly reminded to verify carefully when you are placing an order with us if you are
actually saving half in comparison with the top major brands.

- 1 -
MODELL: YH3344/43PSA-EBH
Have product questions? Need technical support? Please feel free to
contact us:
Technical Support and E-Warranty Certificate
www.vevor.com/support
NEED HELP? CONTACT US!
This is the original instruction, please read all manual instructions
carefully before operating. VEVOR reserves a clear interpretation of our
user manual. The appearance of the product shall be subject to the
product you received. Please forgive us that we won't inform you again if
there are any technology or software updates on our product.
TOWING MIRRORS
- 2 -
KORREKT
AVFALLSHANTERING
Denna produkt omfattas av bestämmelserna i det europeiska
direktivet 2012/19/EU. Symbolen som visar en soptunna korsad
anger att produkten kräver separat sophämtning i EU. Detta
gäller för produkten och alla tillbehör märkta med denna
symbol. Produkter märkta som sådana får inte slängas
tillsammans med vanligt hushållsavfall utan ska lämnas till en
insamlingsställe för återvinning av elektriska och elektroniska
apparater.
FCC-information:
VARNING:
Ändringar eller modifieringar som inte uttryckligen godkänts av
den part som ansvarar för överensstämmelse kan ogiltigförklara
användarens behörighet att använda utrustningen!
Denna enhet uppfyller del 15 av FCC-reglerna. Driften är
föremål för följande två villkor:
1) Denna produkt kan orsaka skadliga störningar.
2) Denna produkt måste acceptera alla mottagna störningar,
inklusive störningar som kan orsaka oönskad funktion.
NOTES
43.Läs denna instruktion noggrant innan du påbörjar installationen.
44.Rätt verktyg kommer att förbättra kvaliteten på installationen och
minska den tid som krävs.
45.Alla speglar är symmetriska och designade för bättre siktområde .
46.Om du hittar delar som saknas eller är skadade, ta ett foto och kontakta
oss.
47.Se fordonets instruktionsbok för att justera de nya speglarna.
48.Om du inte kan installera den själv, kontakta en bilreparatör för att byta
ut den åt dig.
- 3 -
MODEL AND PARAMETERS
Modell
YH3344/43PSA-EBH
Auto Part Position
Framsida Utanför
Inmatning
DC 12V
Vika ihop
Manuell vikning
Funktioner
Uppvärmd+ Blinkersljus
+Pilsignalljus+Pölljus
Tillämplig fordonstyp
2002-2009 Dodge Ram
1500/2500/3500
Färg
Svart
STRUCTURE DIAGRAM
1. Uppvärmd 2. Blinkersljus 3. Pilsignalljus 4. Pölljus
5. Manuell vikning 6. Konvext glas (manuell justering)
7. Platt glas (strömjustering)
2
1
3
4
5
6
7

- 4 -
INSTALLATION INSTRUCTIONS
STEG 1
29. Ta bort (1) 10 mm bult som håller fast dörrhandtaget.
30. Ta bort (4) Philips-skruvar som håller fast dörrbeklädnaden.
31. Dra dörrbeklädnaden uppåt för att lossa från dörrpanelen.
32. Koppla loss dörrkabeln.
5 . Ta bort dörrbeklädnaden.
STEG 2
22. Koppla loss kontakten för spegelkabelstammen.
23. Ta bort skumkudden från dörrpanelen.
24. Ta bort (3) 10 mm sexkantsmuttrar som håller fast fabriksspegeln.
4. Ta försiktigt bort fabriksspegeln.
STEG 3
36. Fäst skumkudden på den nya spegelmonteringsbasen.
37. Ta den nya spegeln, matningsbultarna och selen genom de befintliga
hålen på dörrpanelen.
38. Montera (3) medföljande sexkantsmuttrar för att fästa den nya spegeln.
Vridmoment till 80 lb in .
39. Anslut spegelsele.
40. Anslut den röda/svarta selen och mata genom dörrkabelns tunnel till
- 5 -
maskinrummet.
STEG 4
36. Anslut dörrselen.
37. Sätt tillbaka dörrbeklädnaden i läge.
38. Sätt tillbaka (4) Philips skruvar.
39. Sätt tillbaka dörrhandtaget och fäst med (1) 10 mm bult.
40. Leta upp det främre signal-/parkeringsljusuttaget. Anslut den svarta
ledningen till jordstolpen på karosspanelen.
För blinkersfunktion, koppla den röda kabeln till stift 1 på kontakten.
För löpljusfunktion, koppla den röda kabeln till stift 2 på kontakten. 2007
RAM 2500-modeller visas, färgerna kan variera. Stift 3 alltid vara svart tråd
med en pil på glödlampssockeln.
STEG 5
15. Upprepa ovanstående steg på passagerarsidan .
16. Kontrollera noggrant alla spegelfunktioner innan den första körningen.
REFERENCE WIRE DIAGRAM
1. Spegelvärmare 2/3/4: Spegelmotor 5. Spegelvärmare 6/7/8: Används ej
A: Pölljus B: Mark C: Blinkersljus
- 6 -
MAINTENANCE
15. Skrubba dragspegeln när den är smutsig.
16. Ta för vana att fälla dragspeglarna när du parkerar.
Adress: Baoshanqu Shuangchenglu 803long 11hao 1602A-1609shi
Shanghai
Importerad till AUS: SIHAO PTY LTD, 1 ROKEVA STREETEASTWOOD
NSW 2122 Australien
Importerad till USA: Sanven Technology Ltd., Suite 250, 9166 Anaheim
Place, Rancho Cucamonga, CA 91730
REP
EC
SHUNSHUN GmbH
Römeräcker 9 Z2021, 76351
Linkenheim-Hochstetten, Germany
REP
UK
Pooledas Group Ltd
Unit 5 Albert Edward House, The
Pavilions Preston, United Kingdom
Tillverkad i Kina