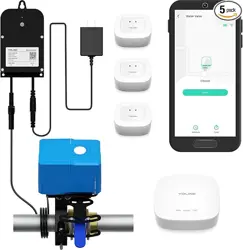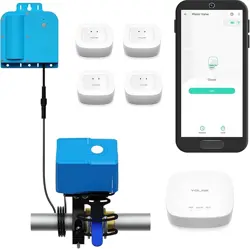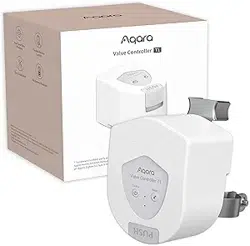
Valve Controller T1 User Manual
Product Introduction
Aqara Valve Controller T1 is a valve controller based on Zigbee wireless
communication protocol, which is suitable for wireless control and manual control of
valves in pipelines. It can be linked with water leak/gas sensors and other devices to
realize risk identification, notification and treatment to protect home property and
personal safety.
* This device needs to be used with Aqara Home app and an Aqara Zigbee Hub,
hereinafter referred to as App and the Hub, Aqara Valve Controller T1, hereinafter
referred to as the device.
* For more Aqara product details, please visit www.aqara.com
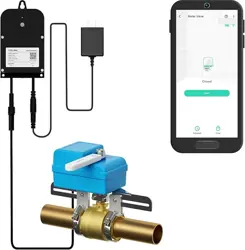
Product Installation
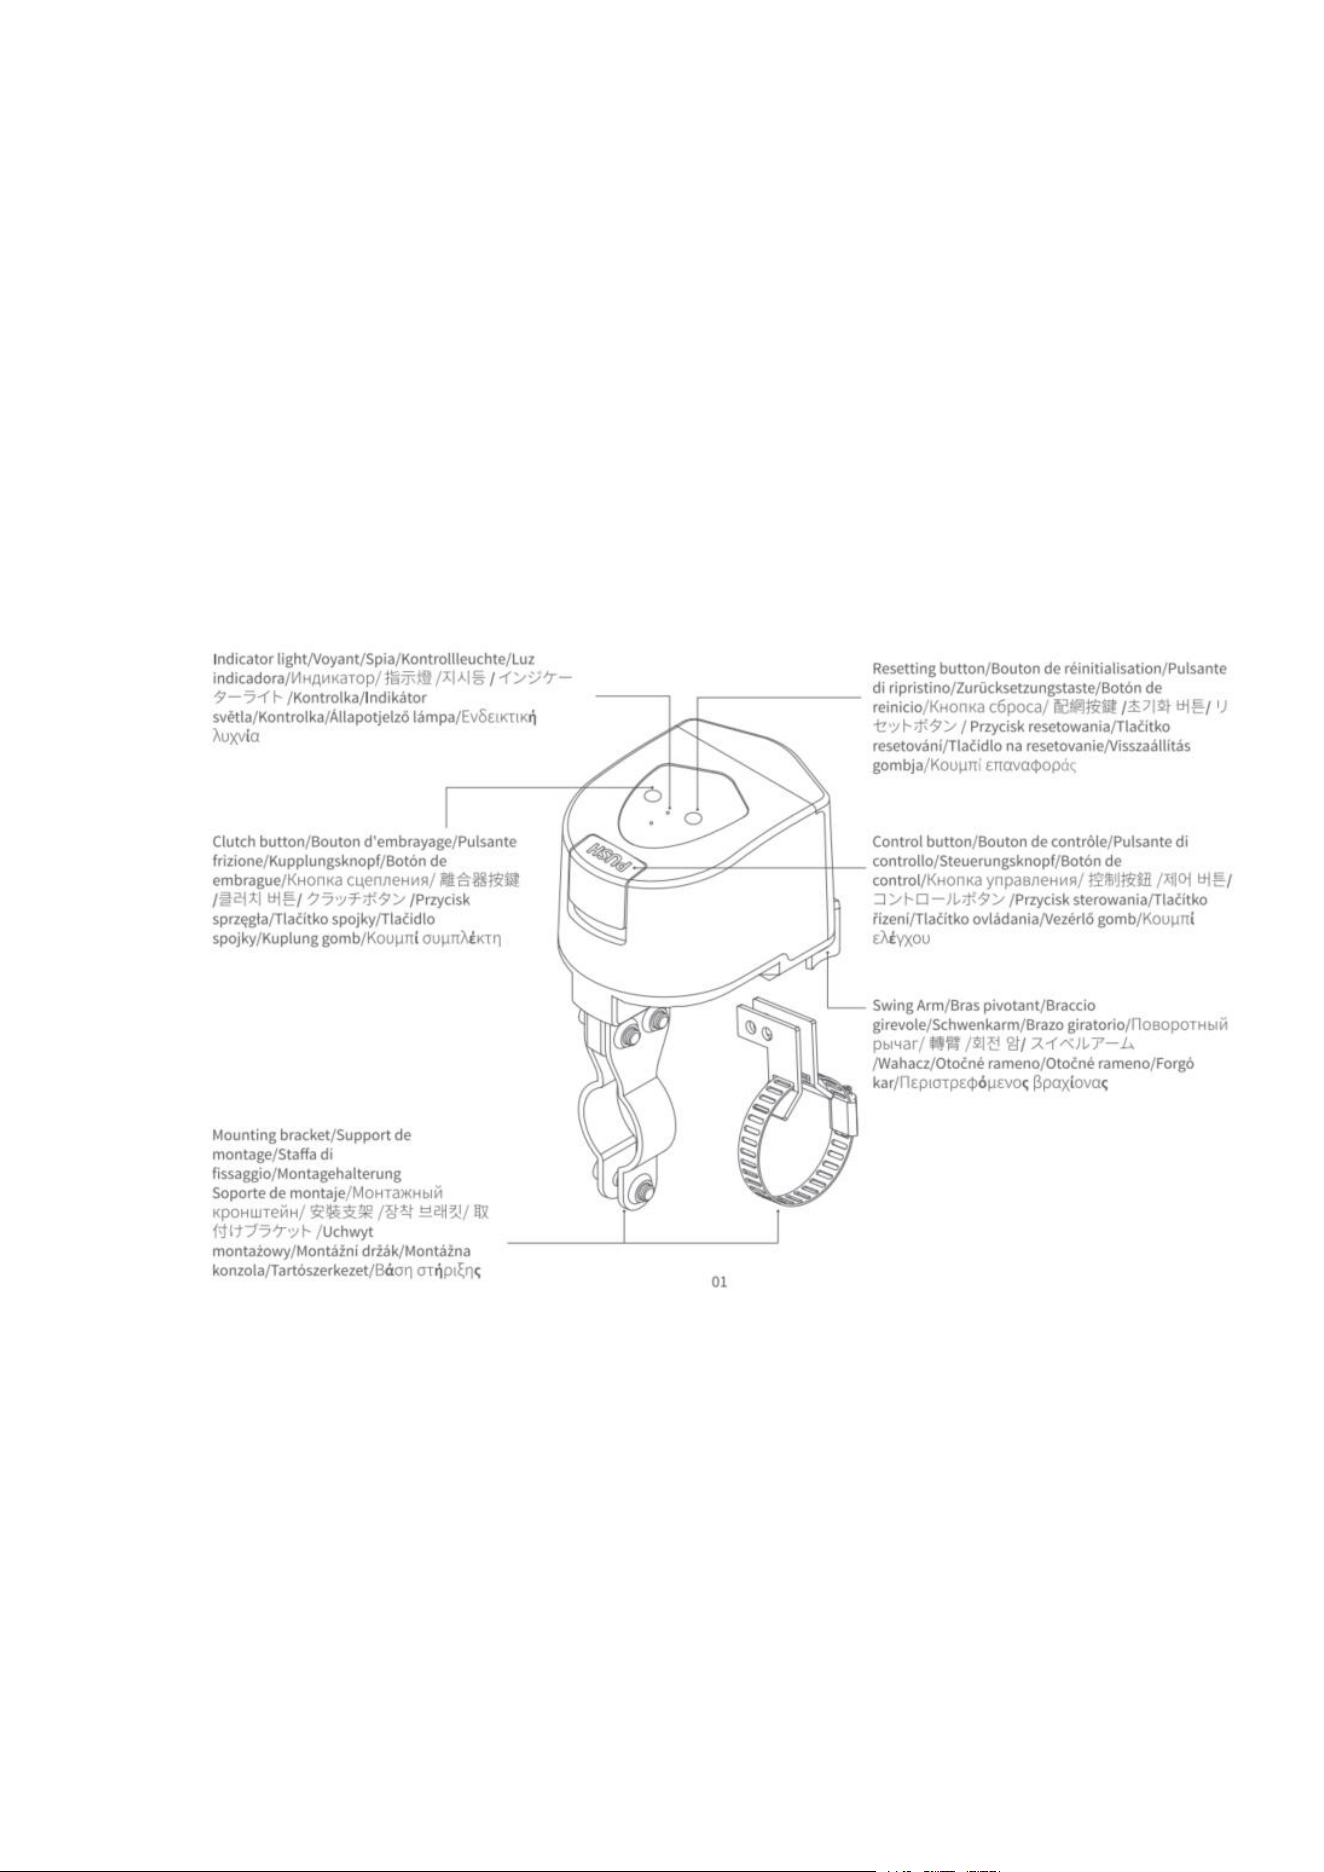
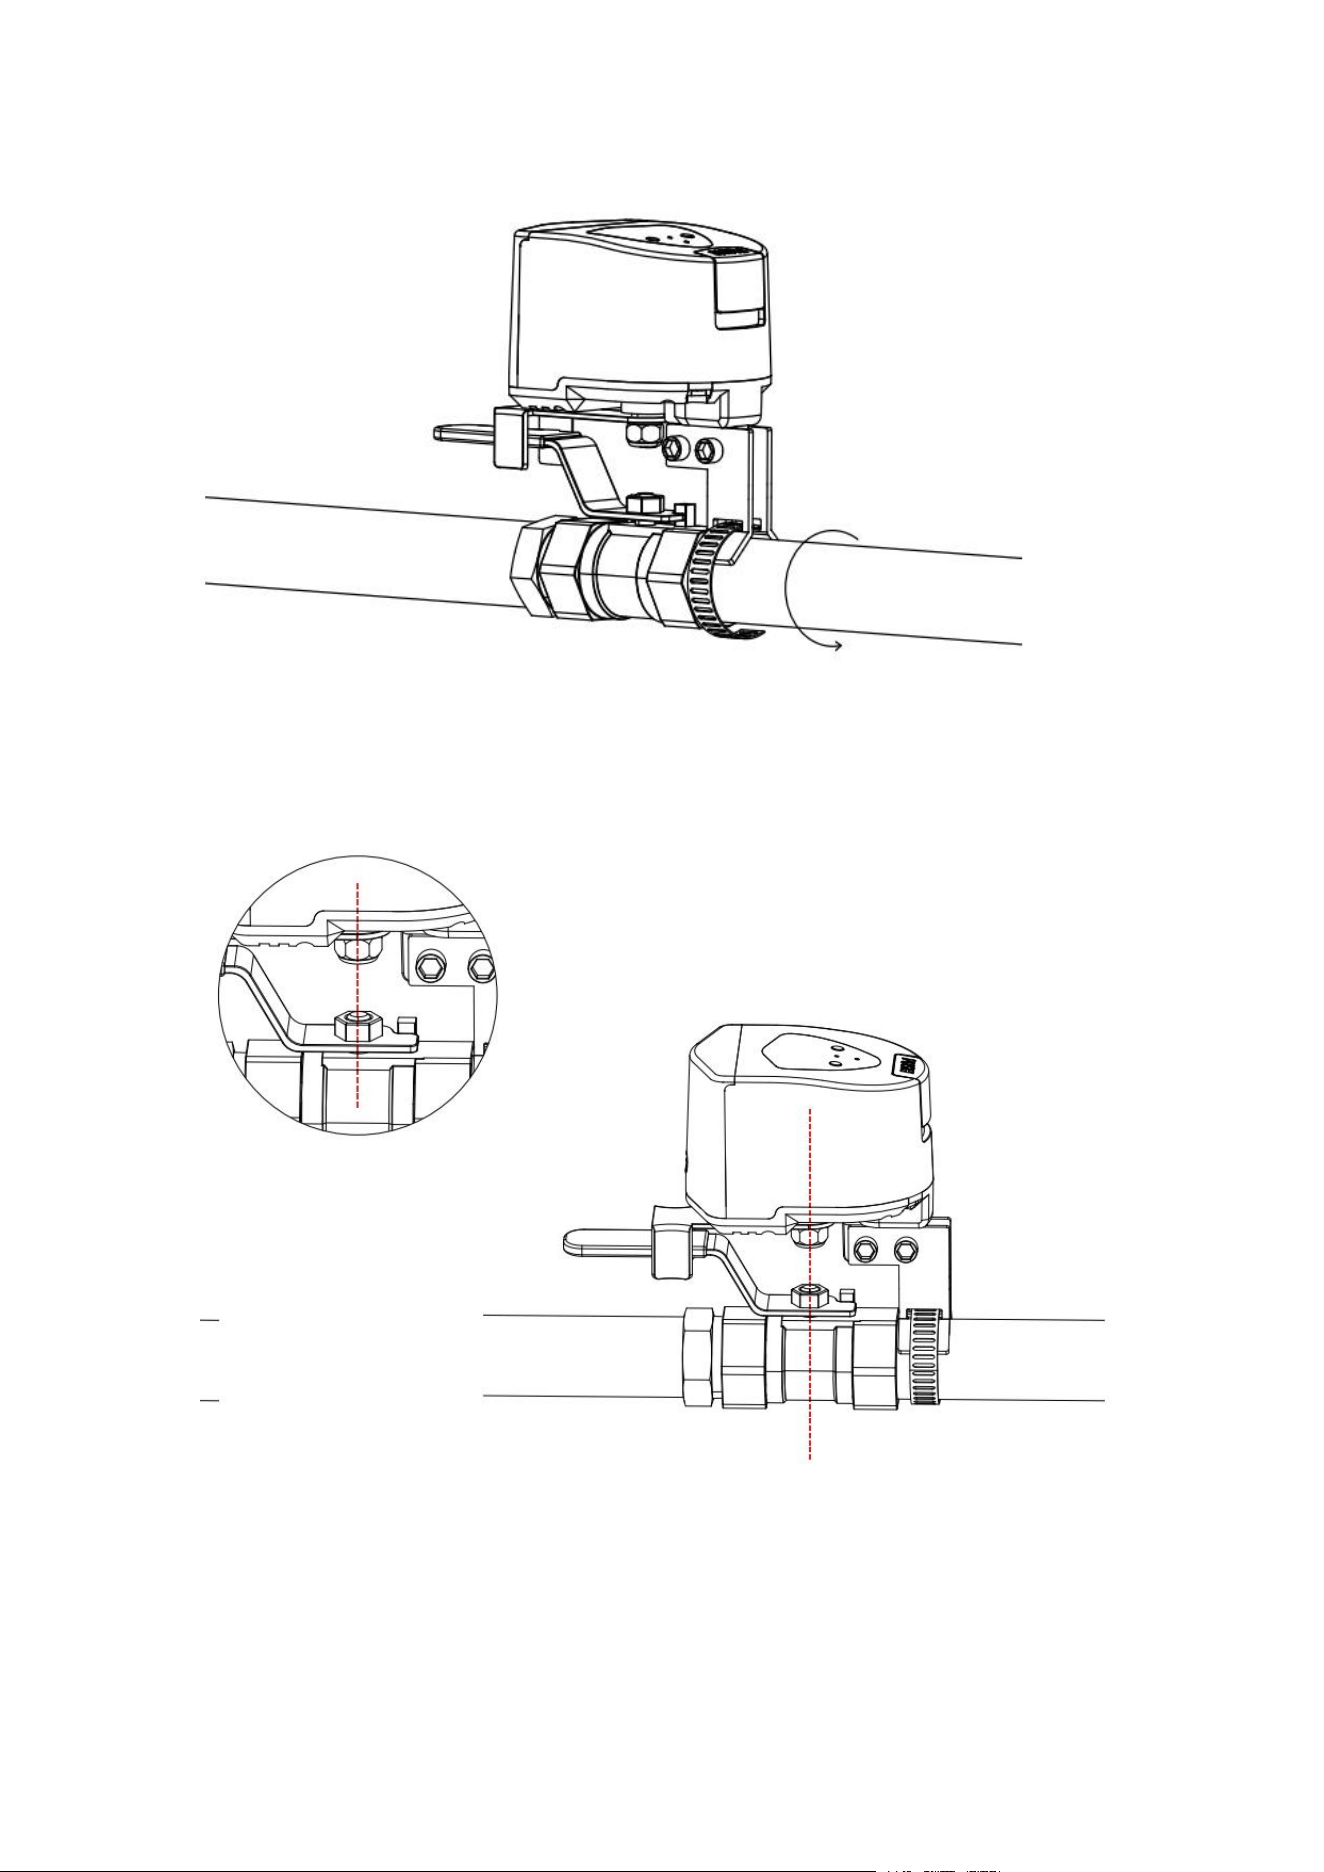
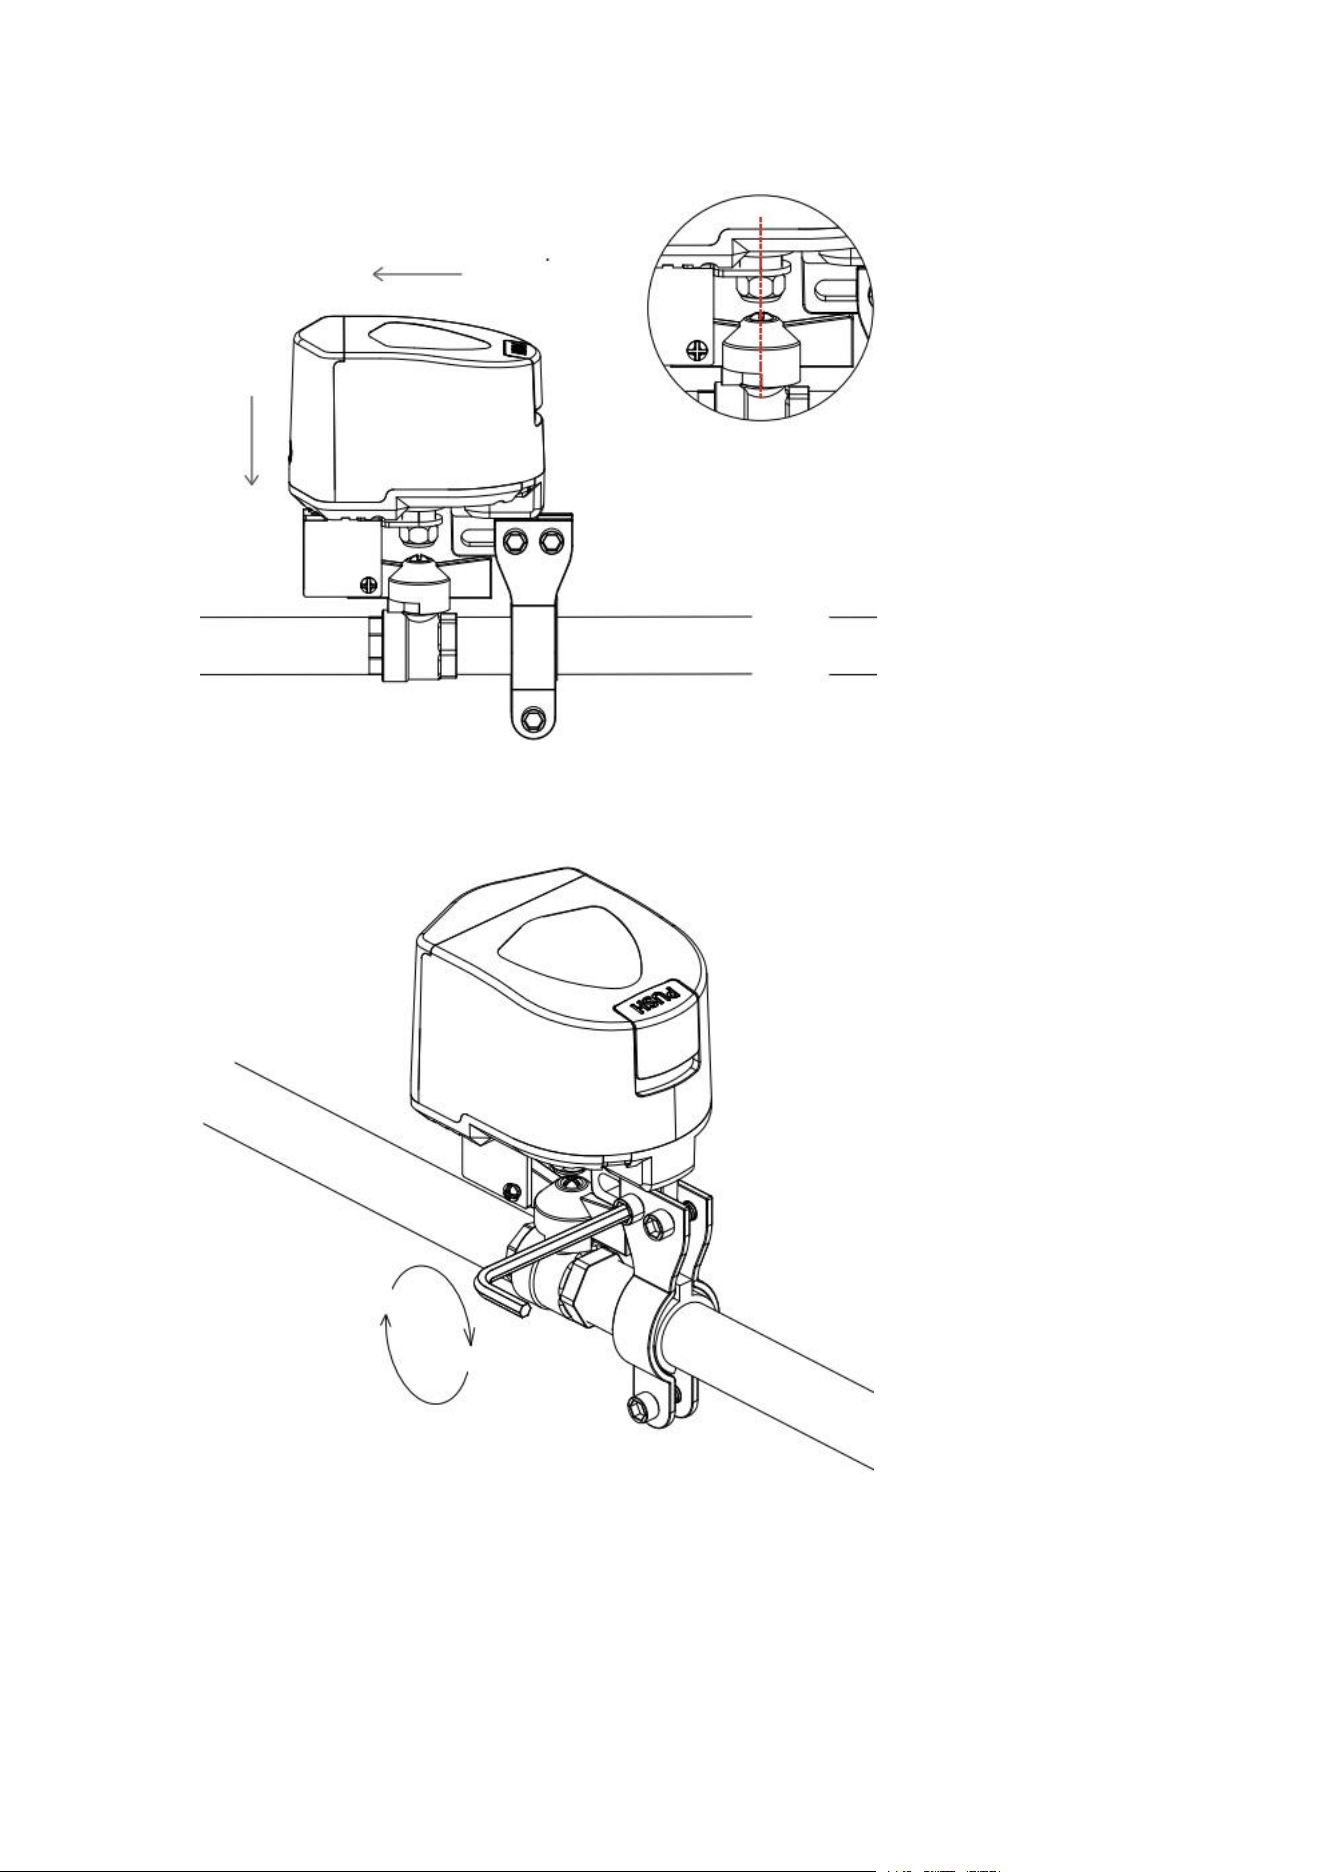
4, 6 points pipe diameter
1. Find the valve piping where you plan to install the equipment, manually switch the
valve once to make sure that the valve is in a state where it can be normally switched
on and off, and please adjust the valve to open.
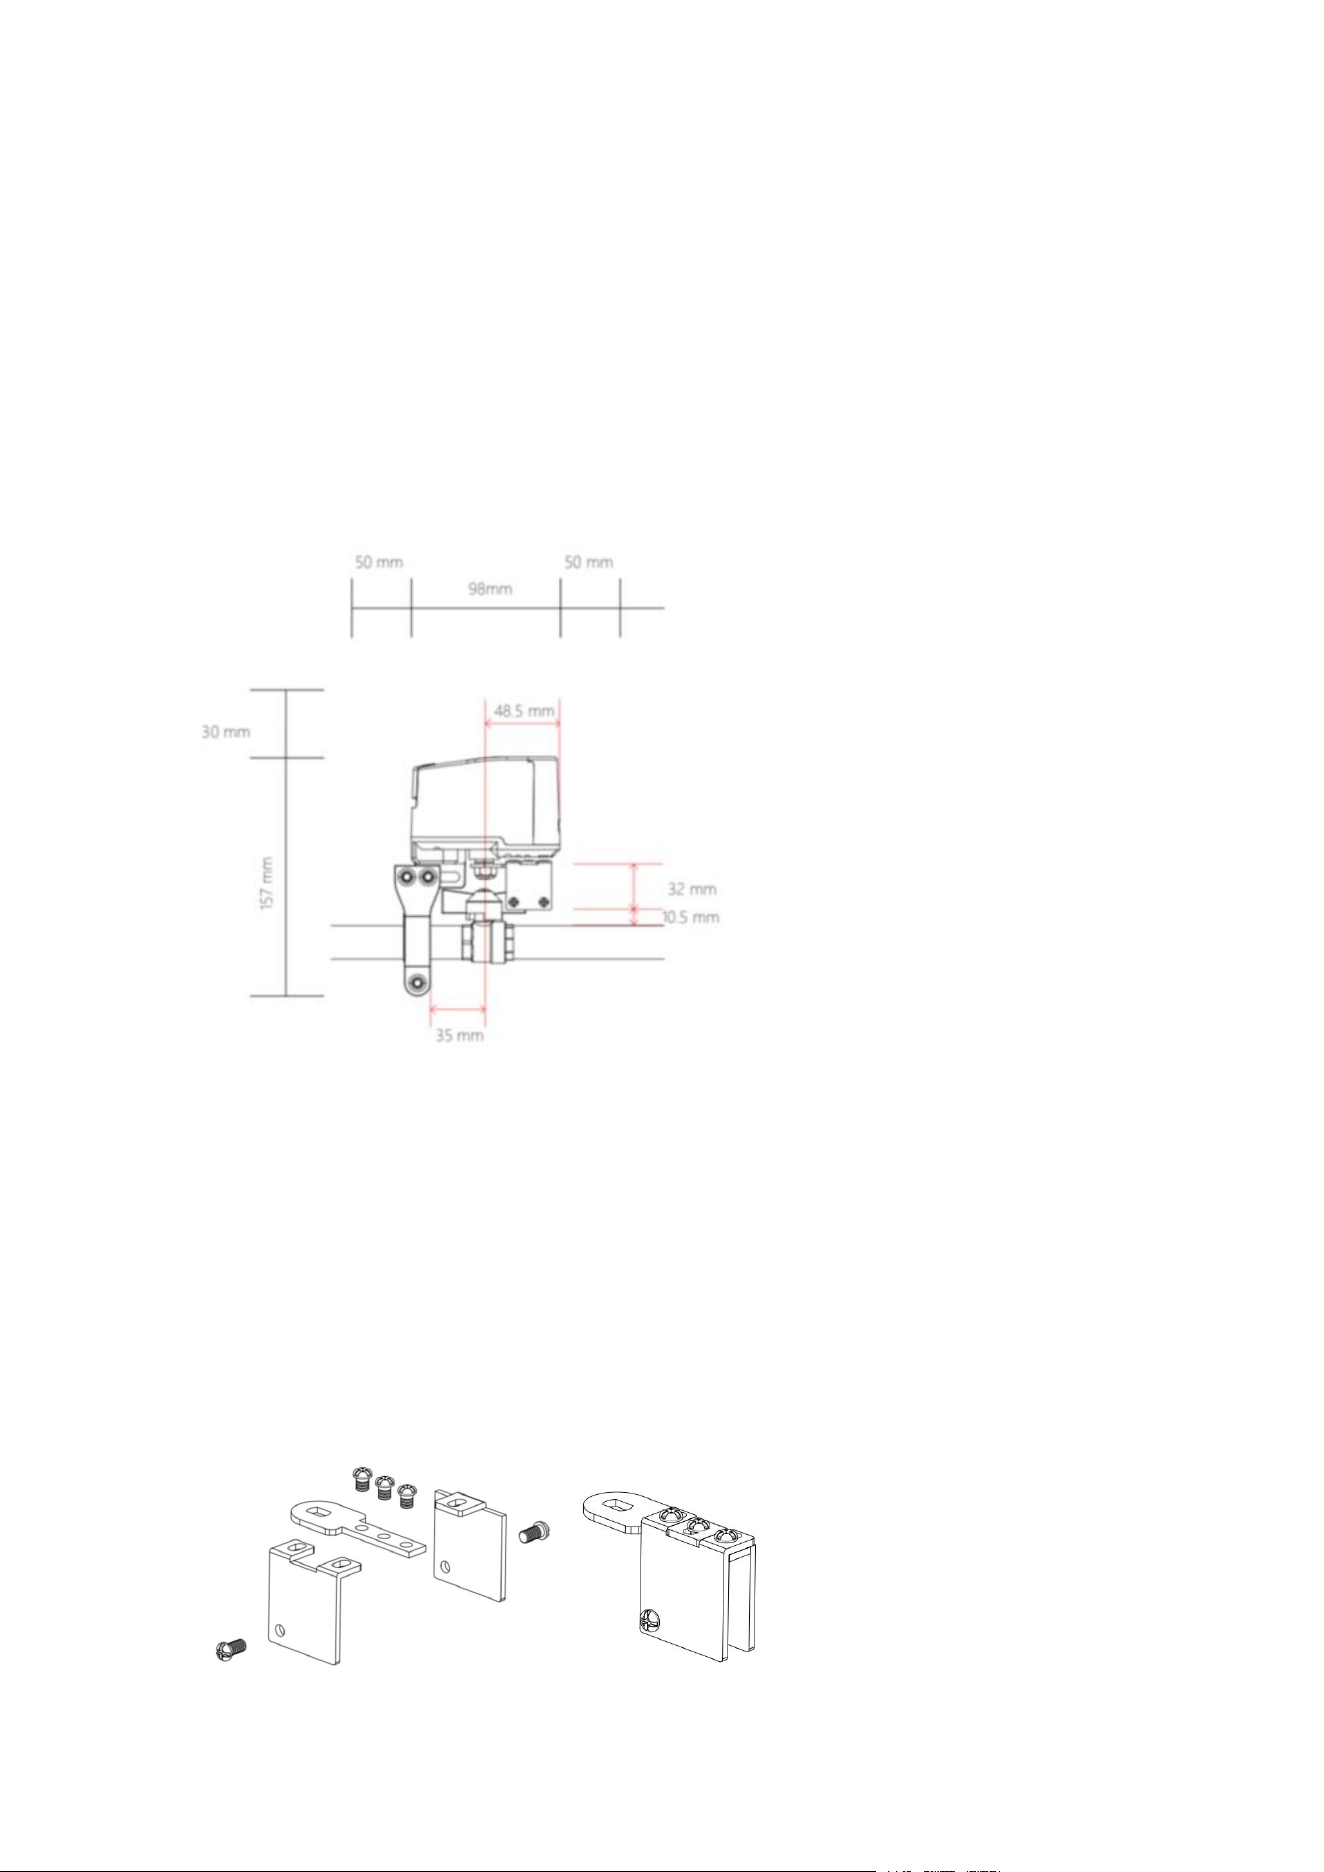
Note: At least 187 * 248 mm size should be reserved above the pipeline to ensure that
there is enough space to install the equipment.
2. Pre-mount the 2 pieces of mounting bracket on the pipe using screws (do not
tighten the screws yet).
Note: The mounting bracket is suitable for pipes up to a maximum DN20 size. If there
is a large gap between the mounting bracket and the pipe during installation, please
insert the rubber gasket on the outer side of the pipe before securing it with the
mounting bracket.
3. Move the device to the valve, secure the swivel arm to the valve handle, and take
note of the mounting position of the controller, ensuring that the output shaft of the
unit aligns with the center axis of the valve swivel.
4. Tighten the mounting bracket screws to ensure the stability of the device.

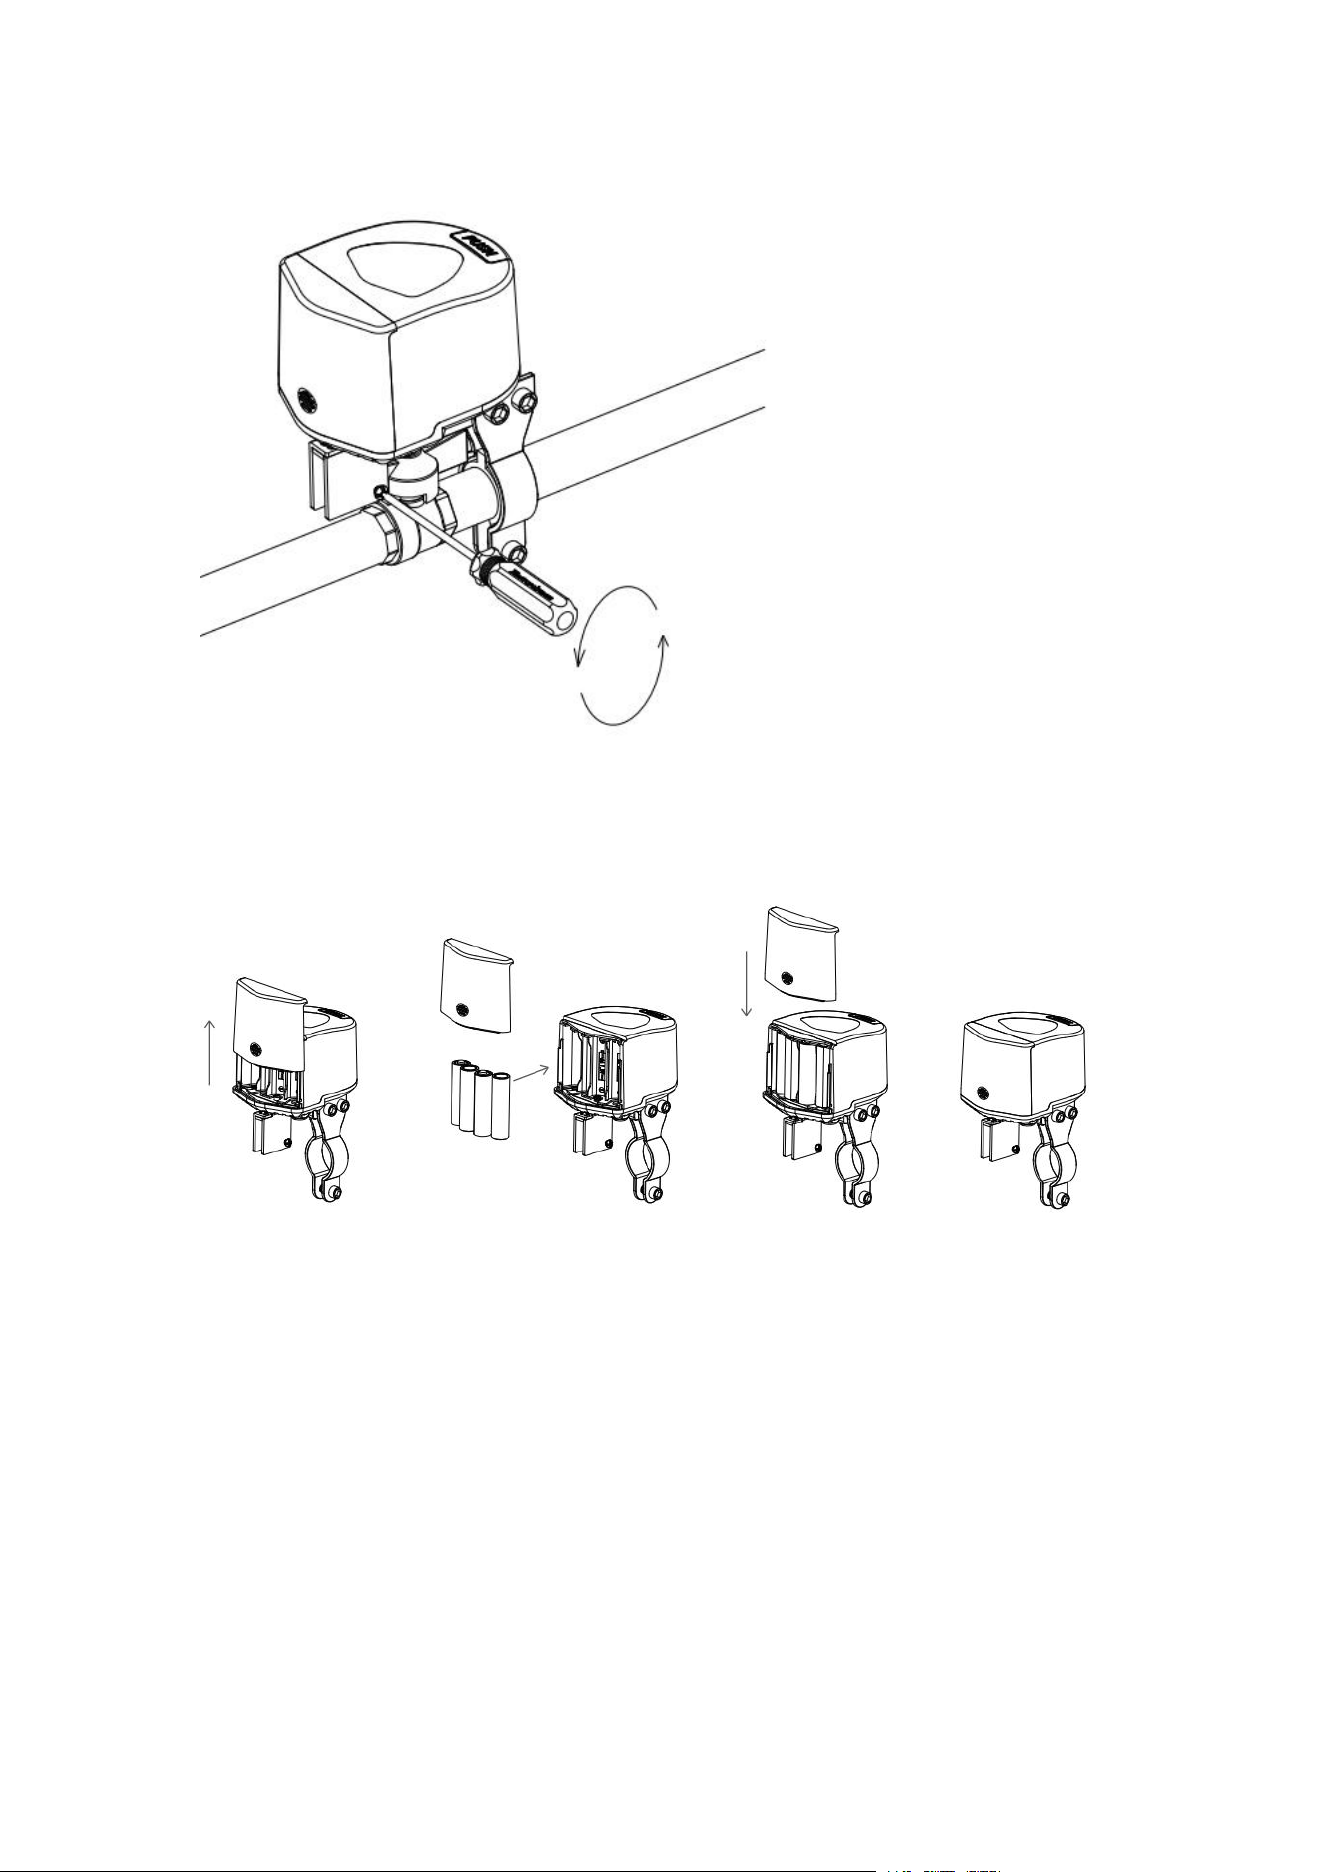
5. Open the battery compartment, install the batteries, and then re-close the battery
compartment.
6. Click the work button, the device will perform a closing action. If the equipment
wobbles or breaks away from the valve handle during the working process, please
re-fix it. The installation is complete when you make sure that the device remains
stable in the working condition.
Note: When adjusting the stability of the device, please remove the battery to prevent
accidentally touching the device during the adjustment process, resulting in the
operation of the device and causing inconvenience.
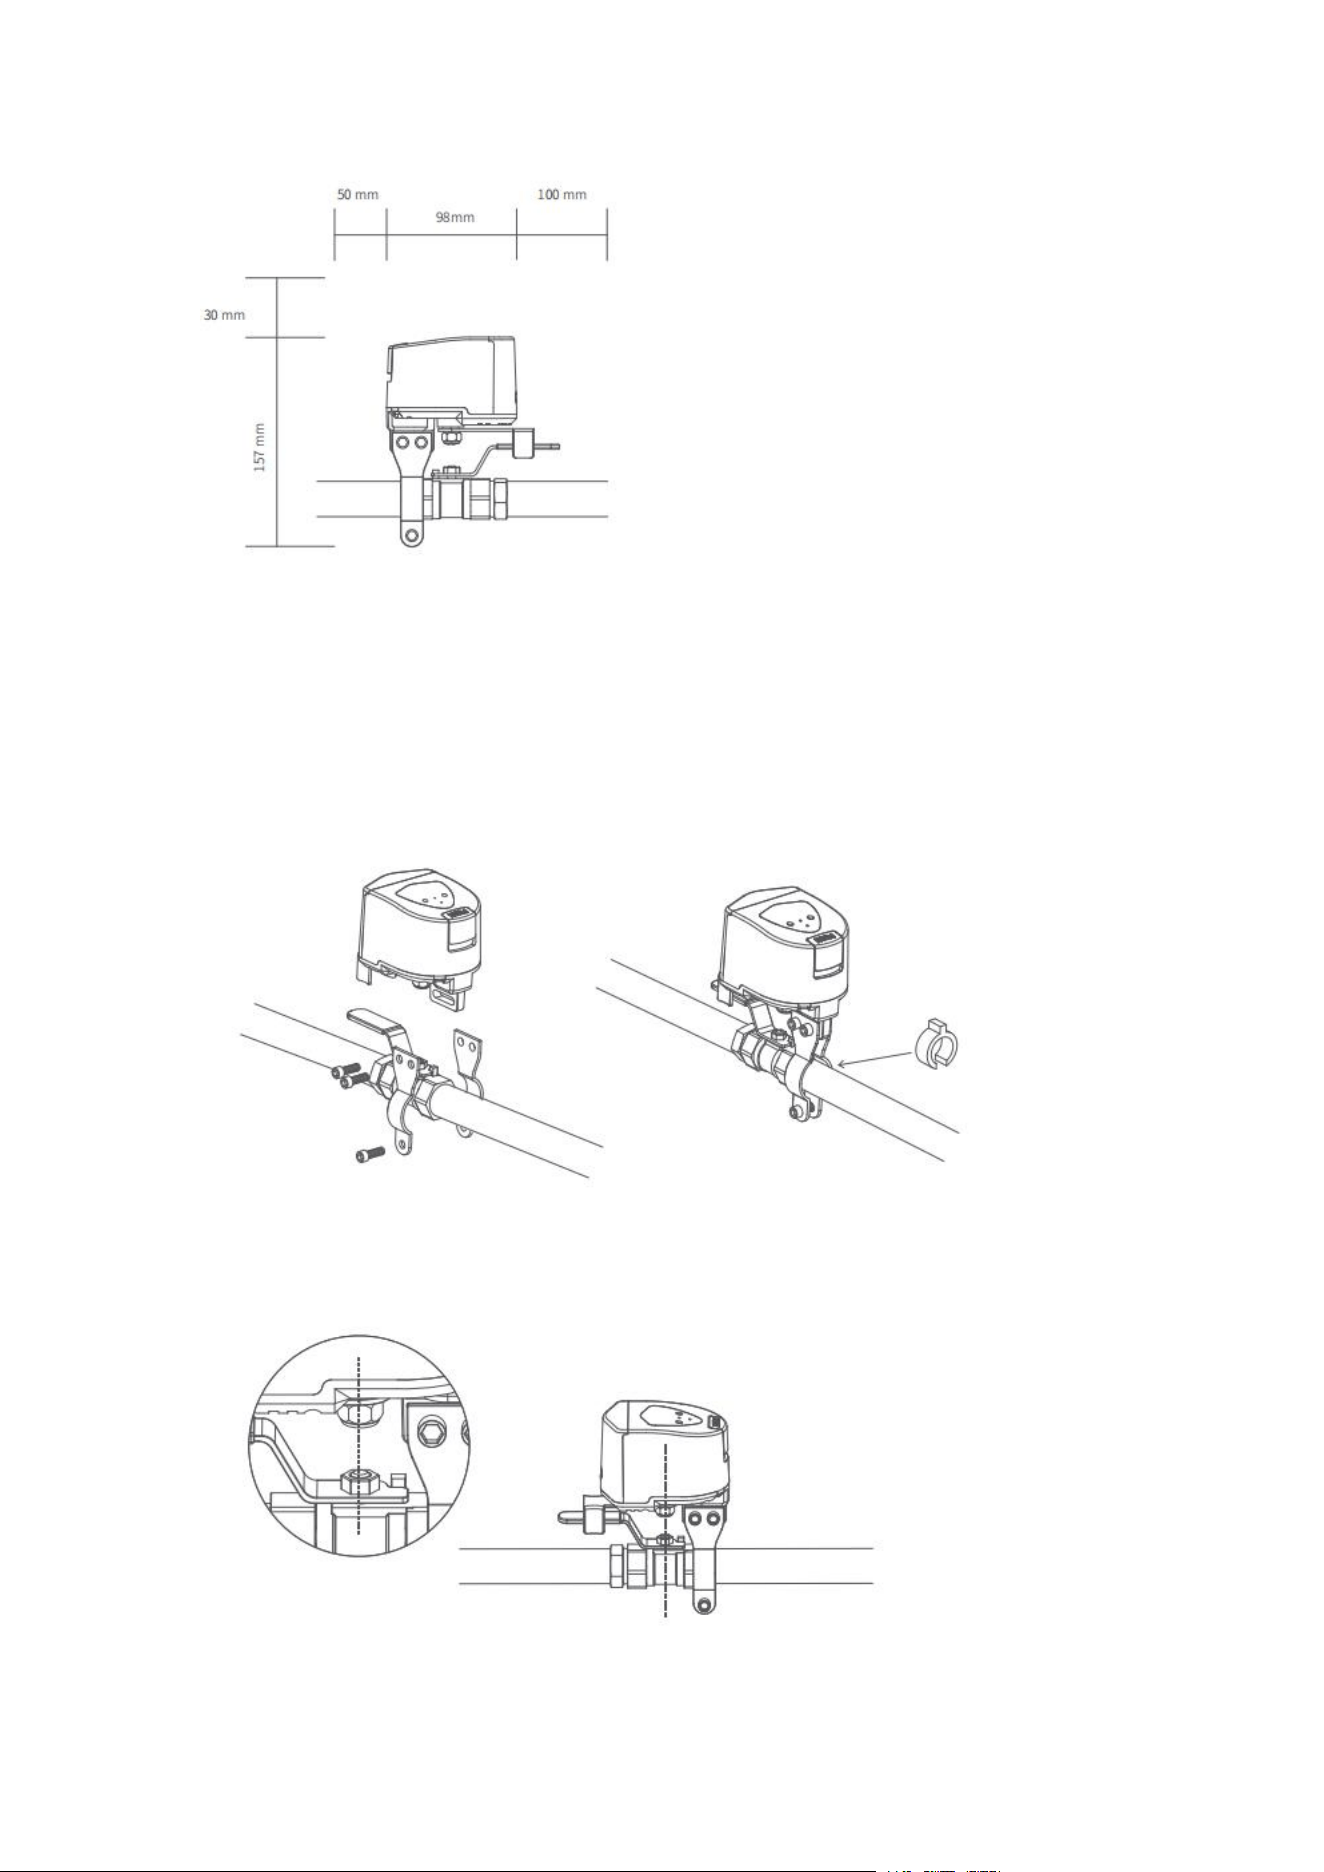
For DN25 pipes
1. Locate the valve piping where you intend to install the equipment, manually open
and close the valve once to verify that it operates correctly, and then adjust the valve
to the open position.
Note: A minimum of 180 * 268 mm dimensions should be kept above the piping to
ensure enough space for equipment installation.
2. Attach the 2-piece mounting bracket to the device by screws.
3. Adjust the pipe fixture, turn the screw to loosen the fixture, and thread the fixture
through the hole under the bracket to finish installing the bracket and fixture.
4. Move the device to the valve, attach the swivel arm to the valve handle, and
carefully observe the installation position of the device, ensuring that the output axis
of the device aligns with the center axis of the valve swivel.
5. Tighten the mounting screws to secure the pipe clamps around the pipe and ensure
the equipment's stability.
Note: If there is a significant gap between the bracket and the pipe during installation,
insert the rubber washer on the outer side of the pipe before securing the pipe with the
pipe clamp.
6. Open the battery compartment, install the batteries, and then close the battery
compartment again.
7. Click the work button, the device will perform a closing action. If the device
wobbles or breaks away from the valve handle during the working process, please
re-fix it. The installation is complete when you make sure that the device remains
stable in the working condition.
Note: When adjusting the stability of the device, please remove the battery to prevent
accidentally touching the device during the adjustment process, resulting in the
operation of the device and causing inconvenience.
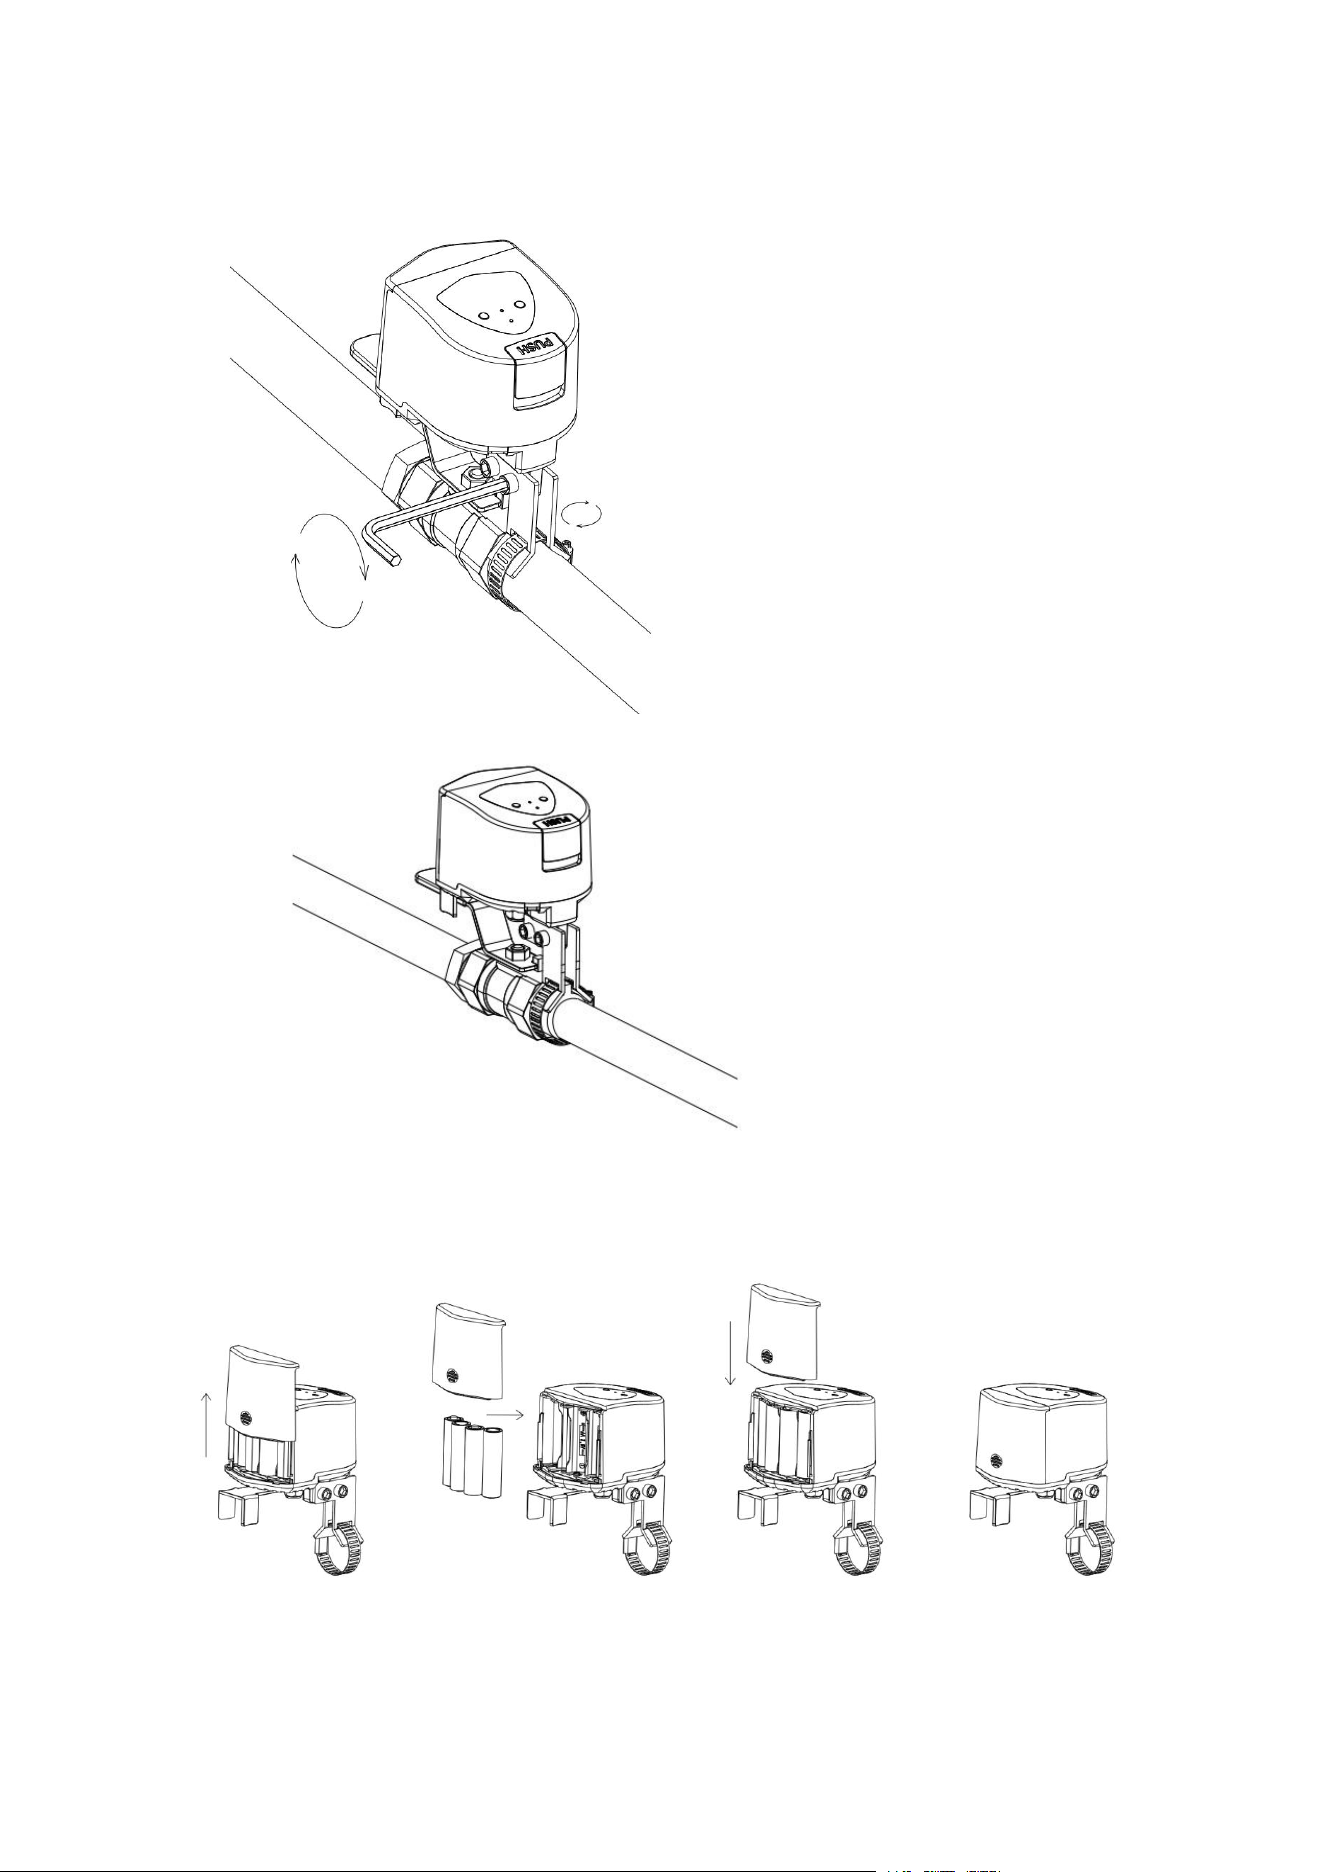
Butterfly Valve Type Installation
1. Find the valve piping where you plan to install the equipment, manually switch the
valve once to ensure it can be normally turned on and off, and then adjust the valve to
the open position.
Note: A space of at least 187 * 248 mm should be reserved around the pipeline to
ensure there is enough room for equipment installation.
2. Open the butterfly handle valve accessory package and assemble the fixture.
Secure the swing arm and the clamp with three screws, while pre-installing the other
two screws in the holes below the clamp.
* Ensure the smooth side of the arm faces upwards; position the holes on the
underside of the clamp towards the inside of the arm.
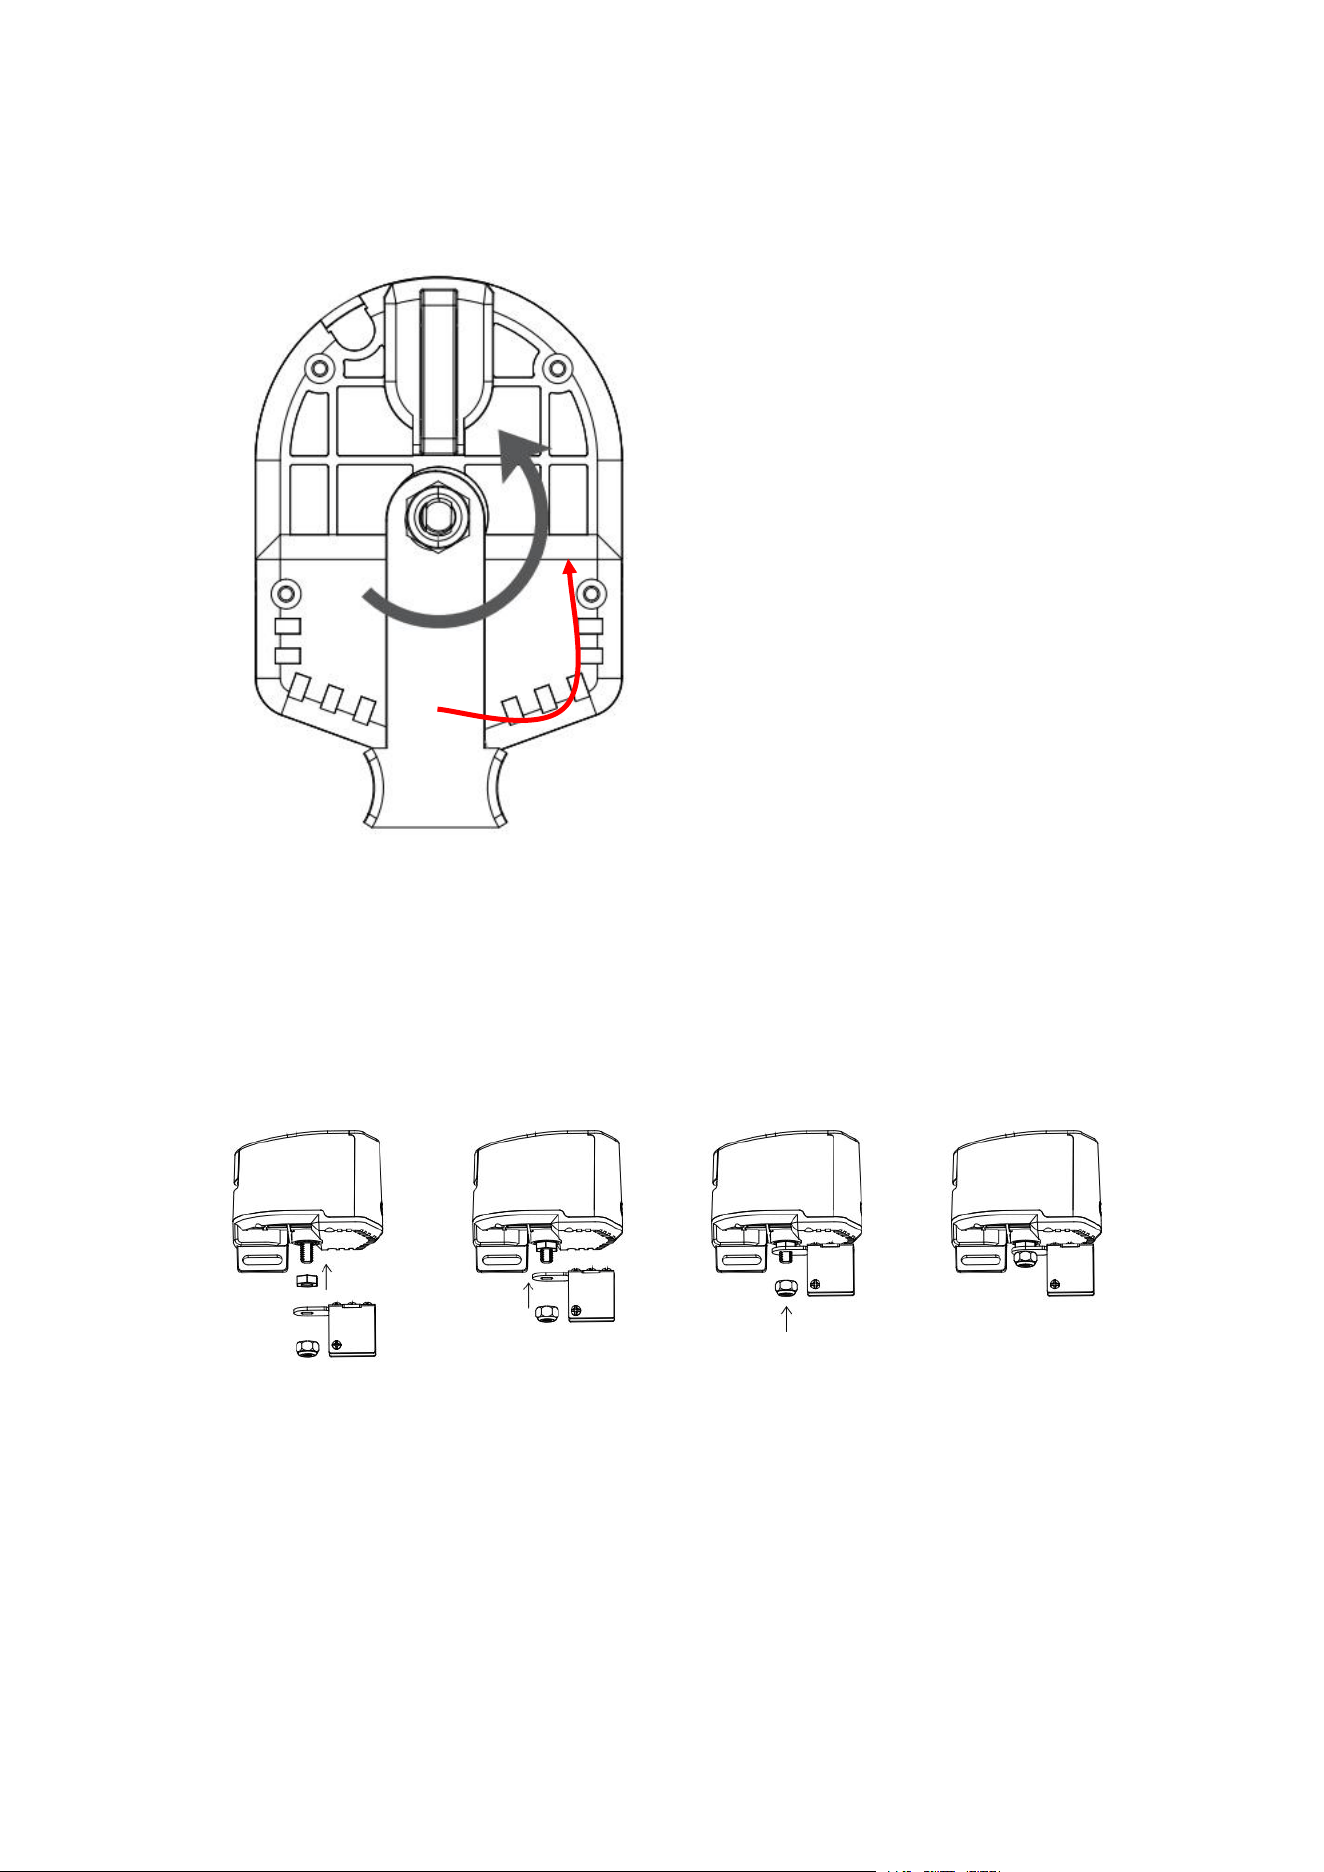
3. Use an Allen key or pliers to rotate counterclockwise, loosen the hex nut located
below the device, and disassemble the nut, washer, and the swing arm for lever
handles.
4. Install the butterfly handle swing arm onto the device in the following order: nut
from the accessory package, swing arm, and then the securing nut.
Note: when installing, do not tighten the nut to the point of locking it. Once
installation is complete, operate the device once to check if the device is functioning
properly.
5. Move the device onto the valve, secure the arm with the valve handle, and pay
attention to the installation position of the device. Ensure that the axis of the swing
arm aligns with the valve handle’s.
* The picture showcases installation onto DN15/20 pipes.
6. Tighten the mounting bracket screws to ensure the stability of the equipment.
7. According to the style of the butterfly handle, adjust the screws of the clamp to
ensure that the fixture can secure the butterfly handle without any interference during
operation.
8. Open the battery compartment, install the batteries, and then close the battery
compartment again.
9. Click the Controller button once, and the equipment will perform a closing action.
If the equipment shakes or detaches from the valve handle during operation, please
re-secure it. Once you ensure that the equipment remains stable during operation, the
installation is complete.
Note: When adjusting the stability of the equipment, remove the batteries to prevent
accidental operation during the adjustment process, causing inconvenience.
Quick Setup
1. Please download the latest version of Aqara Home App via the app store or scan
the QR code below.

Aqara Home APP
2. Please make sure the hub is bound in the Aqara Home account you are using. If you
have not bound the hub, please refer to the manual of the hub to add the hub to the
app.
3. Open the app, click "+" in the upper right corner of the home page, enter the page
of adding equipment (accessories), select "Valve Controller T1", and follow the
prompts to operate; you can also scan the device body by clicking Scan Logo in the
upper right corner of the home page on the upper right corner of the home page, scan
the QR code of the device body to add equipment.
* If adding fails, please move the product closer to the hub, re-power on and try again.
3. Control the device through App, if the device status changes, it means the device is
connected normally.
* Valid distance verification: Click the distribution button 3 times consecutively, and
the hub emits a beep, it means that the device and the hub can communicate with each
other effectively (only Aqara Home app supports this function).
* To ensure the user experience, please update the device firmware to the latest
version after the device has finished binding and then use it.
Operating Guidelines
Key Control
When the device is powered on, press the "Control" button on the device to initiate
the open/close action. The status indicator will flash green while the device is in
operation.
Manual Control
Press the clutch "PUSH" button and manually rotate the arm, then release the clutch
"PUSH" button after the arm has finished rotating.
Note: The clutch "PUSH" button may not be able to spring back to reset after it is
released, please shake the arm gently, and when you hear the "click" sound, the clutch
"PUSH" button will finish springing back. Please shake the arm gently.

Buttons & Indicators & Device Status
Device status
Indicator status
Buzzer
Status
Ready to bound
to hub
Green device status light blinks fast
/
Connecting to
hub
Green device status light blinks slowly 1 time
/
Device during
operation of
on/off
Green device status light blinks slowly until the
end of the operation
/
Communication
function
verification
Green device status light blinks 3 times slowly
/
Abnormal in
alarm state
Green device status light blinks 1 time
Synchronized
buzzer sound
Device is
offline or not
on the network
Red indicator blinks fast for 10S
/
Device failure
The red indicator blinks every 10S (1S on) for 30S.
Synchronized
buzzer sound
Low battery
The red indicator flashes every 30S (1S on). Lasts
2 minutes
Action on Button(s)
Indicator Status
Device Status
Click on Reset
Green indicator light flashing fast
Alarm status
release
Click on Reset 3 times
quickly
Green indicator light flashing fast
Communication
distance
verification
Click on Reset 5 times
quickly
Green indicator light flashing fast
Device reset
Device Alarm
Reasons
1. Equipment timeout: equipment switching valve maximum working time 20S, if

more than 20S is not completed, the equipment alarm
2. Equipment is not completely open/close: equipment work is completed, the valve
does not reach 0/90 °, that is, not completely open/close, the equipment alarm
Processing Procedure
1. Click the distribution network button to clear the alarm.
2. Press the "PUSH" button on the clutch, manually rotate the arm to reset the device,
and release the "PUSH" button after resetting.
3. Check the valve status to ensure that rust or any issues do not prevent the
equipment from fully controlling the valve. If there is an issue, please repair the valve
promptly.
Product Specifications
Product size: 93 × 72 × 84 mm (3.66 × 2.83 × 3.31 in.)
Wireless connection: Zigbee
Power supply: AA Battery × 4
Valve pressure: 1.6MPa
Torque: ≤ 3.6 N·m
Operating temperature: -10℃ - 50℃
Working humidity: 0-95%, non-condensing
Valve opening/closing time: 5-20s
Compatible Pipe Sizes: DN15, DN20, DN25
Compatible Handle Types: lever handle, butterfly handle
Warnings
1. This product is for indoor use only, please do not use it outdoors;
2. Pay attention to moisture, please do not spill water or other liquids on this product;
3. Do not place the product near a heat source;
4. Do not allow children to play with the controller, place the device away from
children;
5. This product is only intended to enhance the entertainment and convenience of your
family life and for device status reminders, and the manufacturer is not responsible for
any risk or property damage caused by any violation of the product's instructions for
use and these precautions by the user.
6. Please do not attempt to repair this product yourself, this work should be carried
out by an authorized professional.
7. This product is intended for safe use only at altitudes up to 2000 meters above sea
level.

* Please read these instructions carefully and keep them in a safe place
—————————————————————————————
Manufacturer: Lumi United Technology Co., Ltd.
Address: Room 801-804, Building 1, Chongwen Park, Nanshan iPark, No. 3370,
Liuxian Avenue, Fuguang Community, Taoyuan Residential District, Nanshan District,
Shenzhen, China.
Online Customer Service: www.aqara.com/support
Email: s[email protected]