

OPERATOR’S MANUAL
STRAIGHT SHAFT
POLE SAW WITH
EXTENSION SHAFT
MODEL: WB26EXTPS
SAVE THESE INSTRUCTIONS
DO NOT RETURN THIS UNIT TO THE RETAILER. PROOF OF
PURCHASE WILL BE REQUIRED FOR WARRANTY SERVICE.
For assistance regarding the assembly, operatio 4 -7335 687-48-1 llac esaelp ,tinu eht fo ecnanetniam ro n
(in the United States and Canada) or contact email box
Warranty service is available through an authorized service center. To locate a service center in your
area, please email us or call the number listed above. Service on this unit, both within and after the
warranty period, should only be performed by an authorized and approved service center. When
servicing, use only identical replacement parts. For additional information visit wildbadgerpower.com.
All information, illustrations, and specifications in this manual are based on the latest product
information available at the time of printing. We reserve the right to ma
ke changes at any time
without notice. The product may vary slightly from the illustrations contained in this manual.
IMPORTANT: Read this manual thoroughly before using this product. Follow all instructions.
CUSTOMERSUPPORT@WILDBADGERPOWER.COM
1
STARTING INSTRUCTIONS
Do not start the unit until it has been completely assembled.
.remmirt eht gnitrats dloc nehw serudecorp eseht wollof syawlA
QUICK START GUIDE
BASIC ASSEMBLY
For detailed assembly instruction consult the assembly section of
this operators manual.
1. FILL WITH 50:1 MIX
1. CONNECT SHAFTS
By removing plug & cap,
attaching the two shafts
and tightening the knob.
4. PULL 3-5X
Until the engine
begins to try to start.
2. MOVE CHOKE
TO START
By moving the priming lever
up to the START position.
2. ATTACH HANDLE
Using the bolts and
hex wrench provided.
5. MOVE CHOKE TO RUN
By moving the priming lever
down to the RUN position.
3. PRIME ENGINE 7X
By pressing the priming
bulb beside the gas cap.
6. PULL UNTIL THE
ENGINE STARTS
3. ATTACH BAR AND CHAIN
Using socket wrench.
2

SAFETY
The purpose of safety symbols is to attract your attention to possible dangers. The safety symbols,
and their explanations deserve your careful attention and understanding. The safety warnings do not
by themselves eliminate any danger. The instructions or warnings they give are not substitutes for
proper accident prevention measures.
SYMBOL MEANING
DANGER: Signals an EXTREME hazard. Failure to obey a safety DANGER symbol WILL
result in serious injury or death to yourself or to others.
WARNING: Signals a SERIOUS hazard. Failure to obey a safety WARNING symbol CAN
result in serious injury to yourself or to others.
CAUTION: Signals a MODERATE hazard. Failure to obey a safety CAUTION symbol MAY
result in property damage or injury to yourself or to others.
NOTE: Advises you of information or instructions vital to the operation or maintenance of the
equipment.
SPARK ARRESTOR NOTE
NOTE: For users on U.S. Forest Land and in the states of California, Maine, Oregon and Washington.
All U.S. Forest Land and the state of California (Public Resources Codes 4442 and 4443), Oregon and
Washington require, by law that certain internal combustion engines operated on forest brush and/
or grass-covered areas be equipped with a spark arrestor, maintained in effective working order, or
the engine be constructed, equipped and maintained for the prevention of fire. Check with your
state or local authorities for regulations pertaining to these requirements. Failure to follow these
requirements could subject you to liability or a fine. This unit is factory equipped with a spark ar-
restor. If it requires replacement, contact your local service dealer to install the appropriate muffler
assembly.
CALIFORNIA PROPOSITION 65
WARNING: This product contains a chemical known to the state of California to cause
cancer, birth defects or other reproductive harm.
Read the operator’s manual and follow all warnings and safety instructions. Failure to do so can
result in serious injury to the operator and/or bystanders.
IMPORTANT SAFETY INSTRUCTIONS
READ ALL INSTRUCTIONS BEFORE OPERATING
WARNING: When using the unit, all safety instructions must be followed. Please read
these instructions before operating the unit in order to ensure the safety of the operator
and any bystanders. Please keep these instructions for later use.
• Read the instructions carefully. Be familiar with the controls and proper use of the unit.
• Do not operate this unit when tired, ill or under the influence of alcohol, drugs or medication.
• Never allow children to operate the unit. Teens must be trained, accompanied and supervised by
an adult. Never allow adults to operate the unit without proper instruction.
• All guards and safety attachments must be installed properly before operating the unit. Inspect the
unit before use. Replace damaged parts. Check for fuel leaks. Make sure all fasteners are in place
and secure. Replace parts that are cracked, chipped, or damaged in any way. Do not operate the
unit with loose or damaged parts.
3

• Only use the pole saw described in the Specifications section of this manual.
• Only use the supplied pole saw or an appropriate replacement.
• Be aware of risk of injury to the head, hands and feet.
• Carefully inspect the area before starting the unit. Remove rocks, broken glass, nails, wire, string
and other objects that may be thrown or become entangled with the unit.
• Clear the area of children, bystanders and pets; keep them outside a 50-foot (15 m) radius, at a
minimum. Even then, they are still at risk from thrown objects. Encourage bystanders to wear eye
protection. If you are approached, stop the unit immediately.
• Squeeze the throttle control and check that it returns automatically to the idle position. Make all
adjustments or repairs before using the unit.
• Do not change the engine governor settings or over-speed the engine.
• This unit is intended for occasional, household use only.
SAFETY WARNINGS FOR GAS UNITS
WARNING: Gasoline is highly flammable and its vapors can explode if ignited. Take the
following precautions:
• Store fuel only in containers specifically designed and approved for the storage of such materials.
• Always stop the engine and allow it to cool before filling the tank. Never remove the fuel tank cap
or add fuel when the engine is hot. Always loosen the fuel tank cap slowly to relieve any pressure in
the tank before fueling.
• Always mix and add fuel in a clean, well-ventilated outdoor area where there are no sparks or
flames. DO NOT smoke.
• Never operate the unit without the fuel cap securely in place.
• Avoid creating a source of ignition for spilled fuel. Wipe up any spilled fuel from the unit immedi-
ately, before starting the unit. Move the unit at least 30 ft. (9.1 m) from the fueling source and site
before starting the engine. DO NOT smoke.
• Never start or run the unit inside a closed room or building. Breathing exhaust fumes can kill. Oper-
ate this unit only in a well ventilated outdoor area.
• Before setting the unit down, always make sure the engine is off and all moving parts have stopped.
• If you strike or become entangled with a foreign object, stop the unit immediately and check for
damage. Do not operate the unit before repairing damage. Do not operate the unit with loose or
damaged parts.
• Turn the engine off and disconnect the spark plug for maintenance or repair.
• Use only original equipment manufacturer (OEM) replacement parts and accessories for this unit.
These are available from your authorized service dealer. Use of any other parts or accessories could
lead to serious injury to the user, or damage to the unit, and void the warranty.
• Keep the unit clean. Carefully remove vegetation and other debris that could block moving parts.
• To reduce fire hazard, replace a faulty muffler and spark arrestor. Keep the engine and muffler free
from grass, leaves, excessive grease or carbon build up.
• If the unit starts to vibrate abnormally, stop the unit immediately. Inspect the unit for the cause of
the vibration. Vibration is generally an indicator of trouble.
WHILE OPERATING
• Wear safety glasses or goggles that meet current ANSI / ISEA Z87.1 standards and are marked as
such. Wear ear/hearing protection when operating this unit. Wear a face mask or dust mask if the
operation is dusty.
• Wear heavy long pants, boots, gloves and a long sleeve shirt. Do not wear loose clothing, jewelry,
short pants, sandals or go barefoot. Secure hair above shoulder level.
• The cutting head shield must always be in place while operating the unit. Do not operate the unit
without pole saw installed.
• The cutting head should remain stationary when the engine idles. If it does not, refer to Adjusting
4

the Idle Speed.
• Adjust the handle to provide the best grip, if applicable.
• Make sure the cutting head is not in contact with anything before starting the unit.
• Use the unit only in daylight or good artificial light.
• Avoid accidental starting. Be in the starting position whenever pulling the starter rope. The opera-
tor and unit must be in a stable position while starting. Refer to Starting and Stopping.
• Use the right tool. Only use this tool for its intended purpose.
• Always hold the unit with both hands when operating. Keep a firm grip on both handles or grips.
• Do not overreach. Always keep proper footing and balance. Take extra care when working on stairs,
steep slopes or inclines. To avoid serious injury, do not operate the unit while on a ladder or a roof.
• Keep hands, face, and feet away from all moving parts. Do not touch or try to stop moving parts.
• Do not touch the engine, gear housing or muffler. These parts get extremely hot from operation,
even after the unit is turned off.
• Do not operate the unit faster than the speed needed to do the job. Do not run the unit at high
speed when not in use.
• Do not force the unit. It will do a better, safer job when used at the intended rate.
• Always stop the unit when operation is delayed or when walking from one location to another.
• Before setting the unit down, always make sure the engine is off and all moving parts have stopped.
• If you strike or become entangled with a foreign object, stop the unit immediately and check for
damage. Do not operate the unit before repairing damage. Do not operate the unit with loose or
damaged parts.
• Turn the engine off and disconnect the spark plug for maintenance or repair.
• Use only original equipment manufacturer (OEM) replacement parts and accessories for this unit.
These are available from your authorized service dealer. Use of any other parts or accessories could
lead to serious injury to the user, or damage to the unit, and void the warranty.
• Keep the unit clean. Carefully remove vegetation and other debris that could block moving parts.
• To reduce fire hazard, replace a faulty muffler and spark arrestor. Keep the engine and muffler free
from grass, leaves, excessive grease or carbon build up.
• If the unit starts to vibrate abnormally, stop the unit immediately. Inspect the unit for the cause of
the vibration. Vibration is generally an indicator of trouble.
OTHER SAFETY WARNINGS
• Maintain the unit with care.
• All service, other than the maintenance procedures described in this manual, should be performed
by an authorized service dealer.
• Never remove, modify or make inoperative any safety device furnished with the unit.
• Before inspecting, servicing, cleaning, storing, transporting or replacing any parts on the unit:
1. Stop the unit.
2. Make sure all moving parts have stopped.
3. Allow the unit to cool.
4. Disconnect the spark plug wire.
• Secure the unit while transporting.
• Never store the unit with fuel in the tank, inside a building where fumes may reach an open flame
(pilot lights, etc.) or sparks (switches, electrical motors, etc.).
• Store the unit in a dry place, secured or at a height to prevent unauthorized use or damage. Keep
the unit out of the reach of children.
• Never douse or squirt the unit with water or any other liquid.
• Keep handles dry and clean (free from debris, oil and grease).
• Clean the unit after each use. Refer to Cleaning and Storage. Do not use solvents or strong deter-
gents.
• Keep these instructions. Refer to them often and use them to instruct other users. If you loan this
unit to others, also loan them these instructions.
SAVE THESE INSTRUCTIONS
5

SAFETY & INTERNATIONAL SYMBOLS
This operator’s manual describes safety and international symbols and pictographs that may appear
on this product. Read the operator’s manual for complete safety, assembly, operating and mainte-
nance and repair information.
SAFETY ALERT SYMBOL: Indicates danger, warning or caution. May be used in conjunc-
tion with other symbols or pictographs.
READ OPERATOR’S MANUAL
WARNING: Read the operator’s manual(s) and follow all warnings and safety instructions.
Failure to do so can result in serious injury to the operator and/or bystanders.
WEAR EYE AND HEARING PROTECTION
WARNING: Thrown objects and loud noise can cause severe eye injury and hearing loss.
Wear eye protection meeting current ANSI / ISEA Z87.1 standards and ear protection
when operating this unit. Use a full face shield when needed.
WEAR FOOT PROTECTION: Always wear heavy-duty, non-slip footwear when
operating this unit.
WEAR HAND PROTECTION: Always wear heavy-duty, non-slip gloves when
handling this unit.
HANDLE POSITION: Make sure the handle is positioned beyond the end of the
safety label.
UNLEADED FUEL: Always use clean, fresh unleaded fuel.
OIL: Refer to operator’s manual for the proper type of oil.
DO NOT USE E85 FUEL IN THIS UNIT
WARNING: It has been proven that fuel containing greater than 10% ethanol will likely
damage this engine and void the warranty.
ON/OFF STOP CONTROL: ON / START / RUN
ON/OFF STOP CONTROL: OFF or STOP
PRIMER BULB: Push primer bulb, fully and slowly, 7 times.
THROWN OBJECTS CAN CAUSE SEVERE INJURY
WARNING: Small objects can be propelled at high speed, causing injury.
KEEP BYSTANDERS AWAY
WARNING: Keep all bystanders especially children and pets, at least 50 feet (15 m) from
the operating area.
10m (35ft)
Min. 50
ft
15 m
Min. 50
ft
15 m
Min. 50
ft
15 m
Min. 50
ft
15 m
Min. 50
ft
15 m
Min. 50
ft
15 m
Min. 50
ft
15 m
Min. 50
ft
15 m
Min. 50
ft
15 m
Min. 50
ft
15 m
Min. 50
ft
15 m
Min. 50
ft
15 m
6
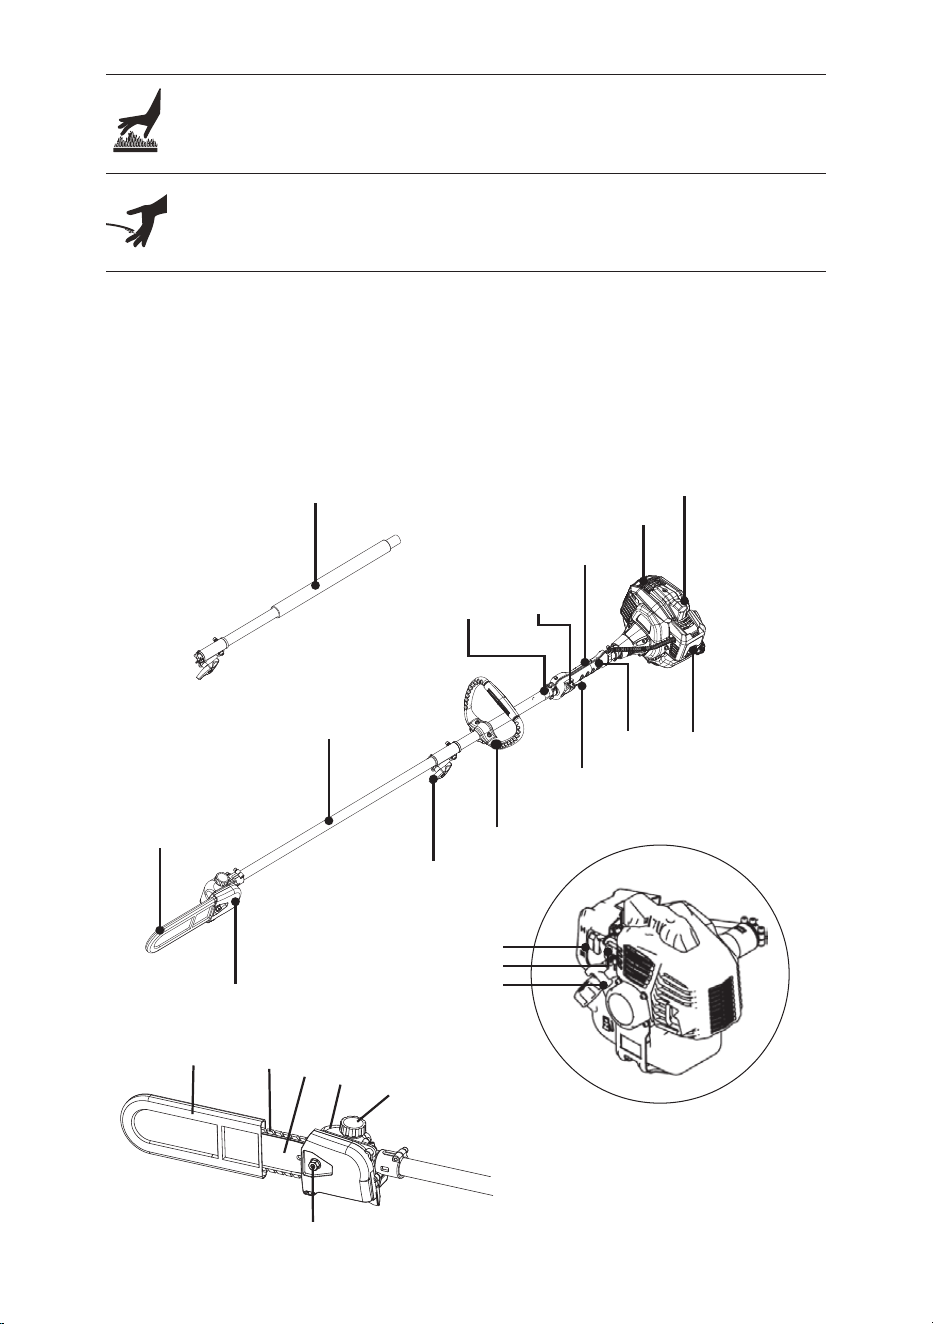
KNOW YOUR UNIT
APPLICATIONS
As a Pole Saw:
• Cutting tree branch.
Other optional attachments may be used with this unit.
Starting Cord
Primer Bulb
Choke Lever
Air Filter
Spark Plug
Muffler
Throttle
Lockout
On/Off
Switch
Harness
Hanger
Shaft Housing
Extension Shaft
Rear
Handle
Throttle
Control
Handle
Coupler
Chain and Bar
Bar Cover
Bar Cover
Chain
bar
oil tank
oil tank cap
Nut
HOT SURFACE WARNING: Do not touch a hot muffler or cylinder. You may get burned.
These parts get extremely hot from operation. When turned off, they remain hot for a
short time.
SHARP NIAHC
WARNING: There are sharp teeth on the cutting head shield. To prevent serious injury,
do not touch the chain.
Min. 50
ft
15 m
Min. 50
ft
15 m
7
SPECIFICATIONS
All specifi .gnitnirp fo emit eht ta elbaliava noitamrofni tcudorp tsetal eht no desab era snoitac
We reserve the right to make changes at any time without notice.
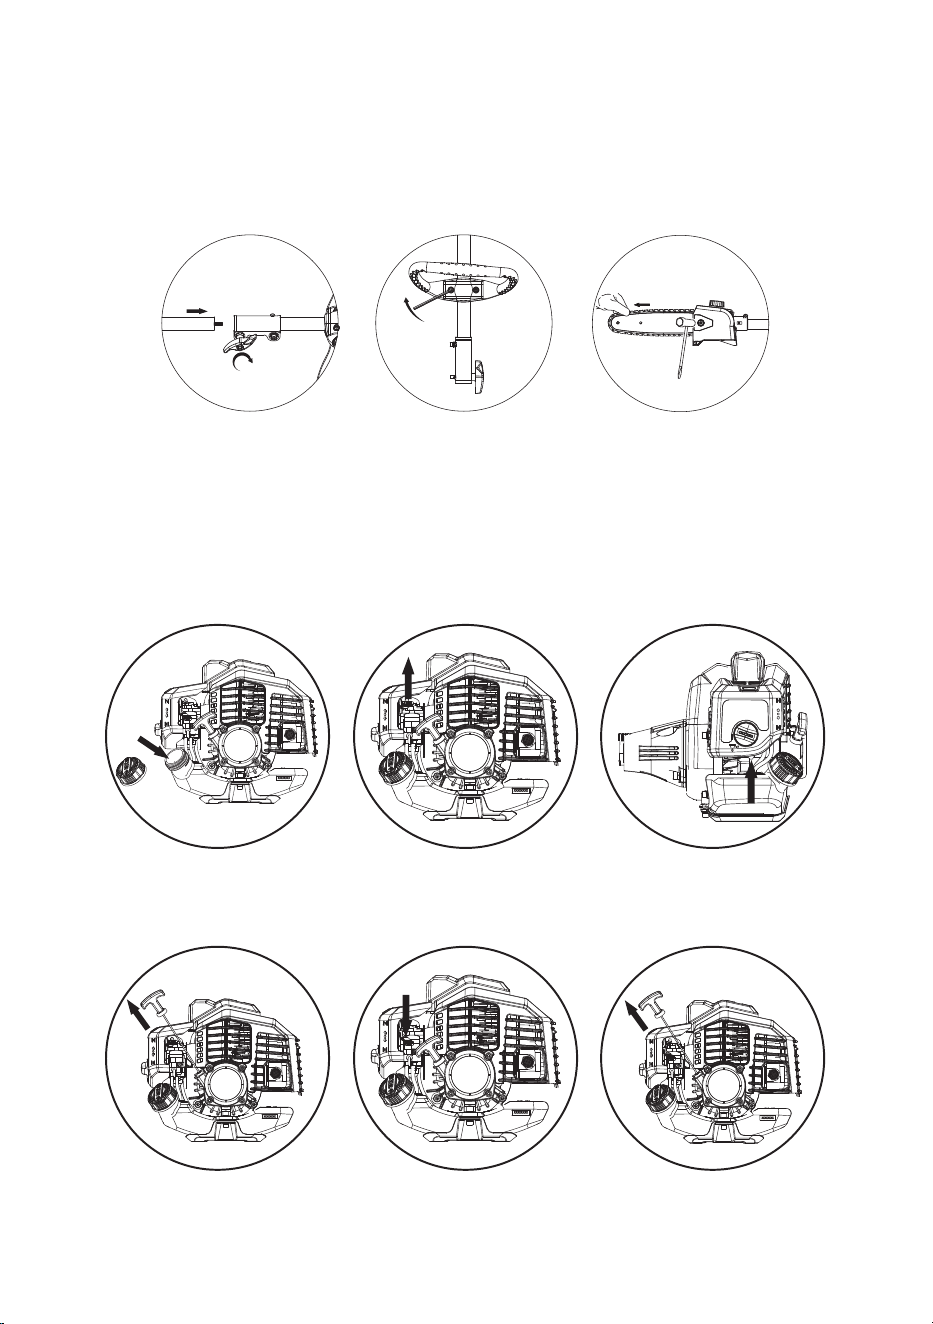
ASSEMBLY
When assembling this machine, please follow the instructions for assembly steps.
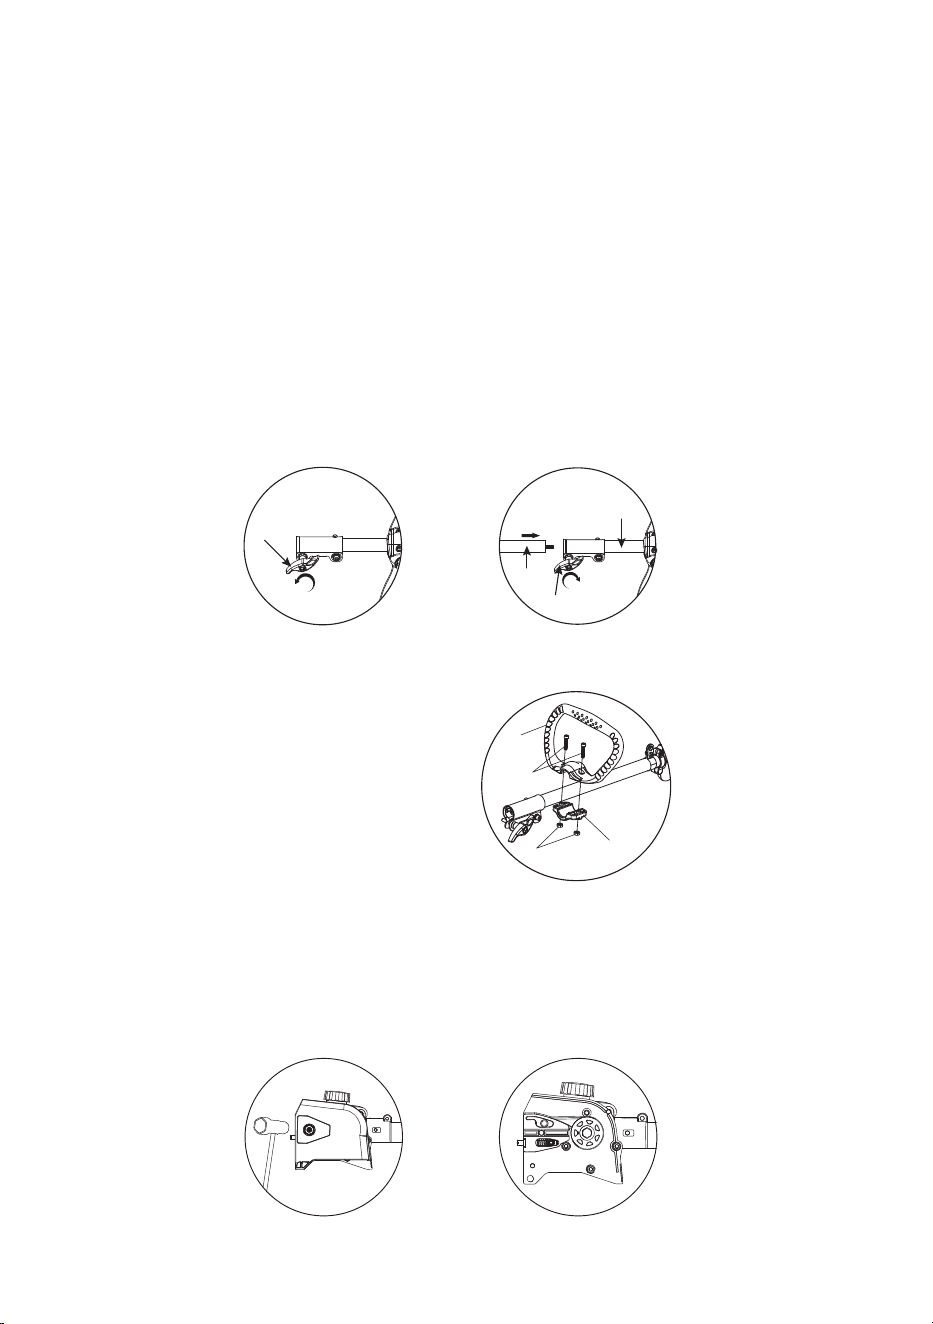
1. Connecting the upper and lower shafts:
Release the knob (D) , and put in the trimmer shaft (A) , after the trimmer shaft get in, tight the knob (D)
3. Attaching the bar and chain:
- Unscrew nut and take off the sporcket cover.
- Turn tensioning screw (1) anticlockwise until the
tensioning nut (2) butts against the left.
Model name . . . . . . . . . . . . . .WB26EXTPS
Engine type. . . . . . . . . . Air-Cooled, 2-Cycle
Engine displacement . . . . . 25.4cc (1.52 cu. in.)
Rated motor power . . . . . . . . . . 0.7kw
Lubrication . . . . . . . . . . . . Fuel/Oil Mixture
Fuel/Oil ratio. . . . . . . . . . . . . . . . . . . 50:1
Volumes of fuel tank . . . . . . . . 20 oz. (600ml)
Bar and chian . . . . . . . . . . . . . . . . . . . . . . 10" (9.4 in.)
Max. engine speed (with cutting
attachment, no-load) . . . . . . . . . . 10500/min
2. Attaching the handle:
- Put (A) and (B) on the tube
- Then tight the screw (C) to nut (D)
- Fully tighten the screw (C) .
D
D
A
B
A
C
D
B
1
2
8
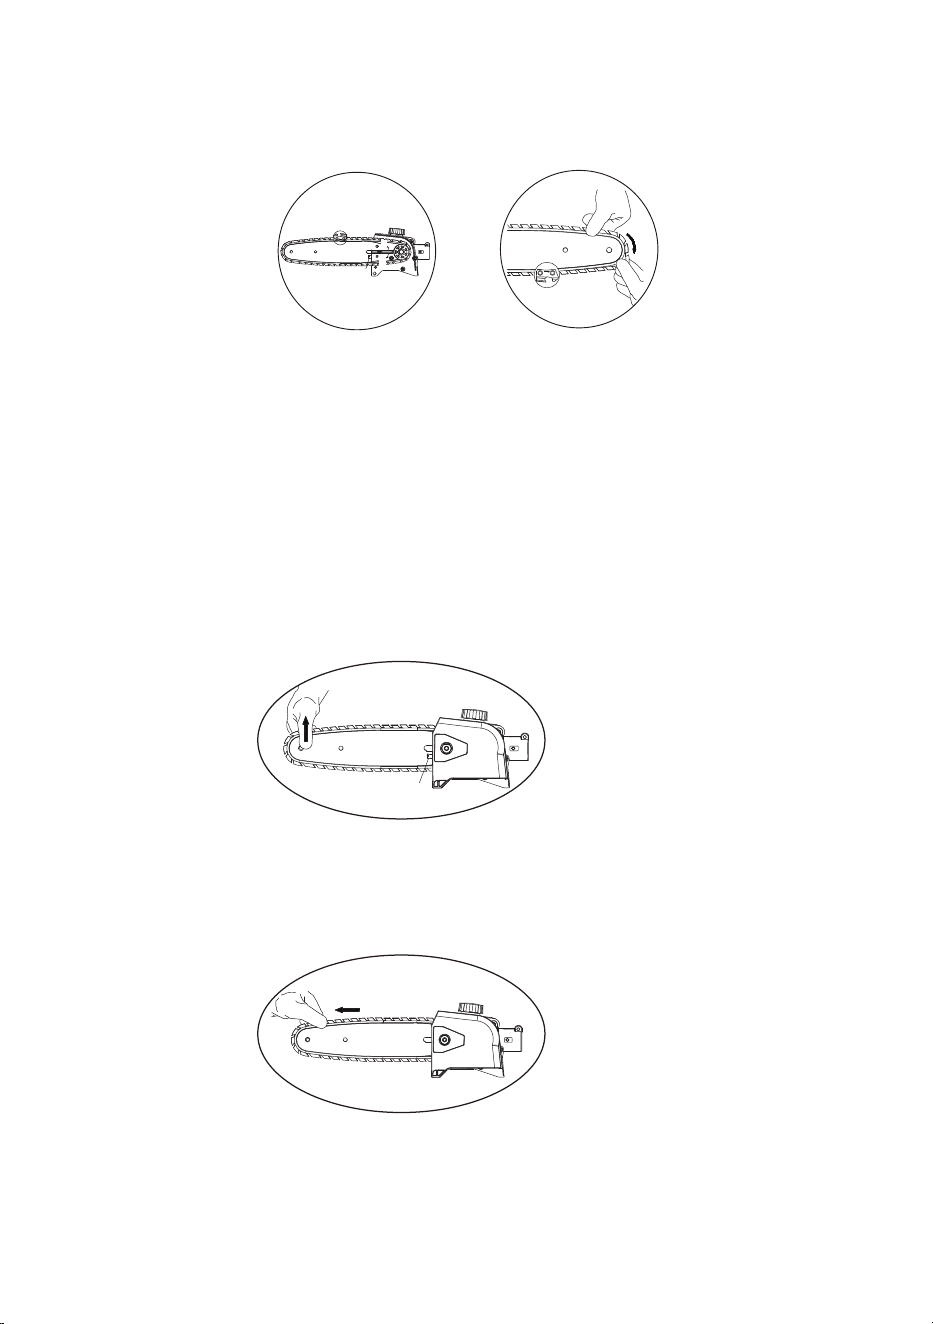
4. The chain is very sharp – wear work gloves to protect hands from cuts
Tensioning the Saw Chain
Checking Chain Tension
- Fit the chain – start at the bar nose.
- Fit guide bar over the stud (3). Engage peg of ten-sioner slide in locating hole (4) – place the chain
over sprocket (5) at the same time.
- Refit the sprocket cover and screw on the nut tightly enough.
- Retensioning during cutting work:
Shut off the engine and then slacken the nut.
Hold the bar nose up.
Use screwdriver to turn the tensioning screw (1) clock-wise until chain fits snugly against the
underside of the bar
- A new chain has to be re-tensioned more often than one that has been in use for some time
check chain tension frequently. see chapter “Operating Instructions/ During Operation”.
- Wear work gloves to protect hands.
- Chain must fit snugly against the underside of the bar bar by hand.
- If necessary, retension the chain.
1
- Now turn tensioning screw (1) clockwise until there is very little chain sag on the underside of the bar
and the drive link tangs are located in the bar groove.
3
5
4
1
Chain Lubricant
- For automatic and reliable lubrication of the chain and guide bar – use only an environmentally
compatible quality chain and bar lubricant with non-fling additive is recommended.
9
Filling Chain Oil Tank
Do not use waste oil!
Checking Chain Lubrication
The service life of the chain and guide bar depends on the quality of the lubricant. It is therefore
essential to use only a specially formulated chain lubricant. If special chain lubricant is not available,
you may – in an emergency – use an HD single grade or multi-grade engine oil with a viscosity that
suits the prevailing outside temperature.
Medical studies have shown that renewed contact with waste oil can cause skin cancer. Moreover,
waste is environmentally harmful!
Waste oil does not have the necessary lubricating properties and is unsuitable for chain lubrication.
A full chain oil tank is sufficient for only half a tankful of fuel. Check the oil level regularly during
cutting work. Never allow the oil tank to run dry!
Thoroughly clean the filler cap and area around it so that no dirt can fall into the tank.
Position the unit so that the filler cap faces up.
If the oil level in the tank does not go down, the reason may be a problem in the oil supply system:
Check chain lubrication, clean the oil ways, contact your servicing deal-er for assistance if necessary.
The saw chain must always throw off a small amount of oil.
Always check chain lubrication and the oil level in the tank before starting work.
Never operate your pruner without chain lubrication. If the chain is run dry, the whole cutting
attachment will be irretrievably damaged within a very short time.
Every new chain has to be broken in for about 2 to 3 minutes. After breaking in the chain, check
chain tension and adjust if necessary – see chapter „Checking Chain Tension“.
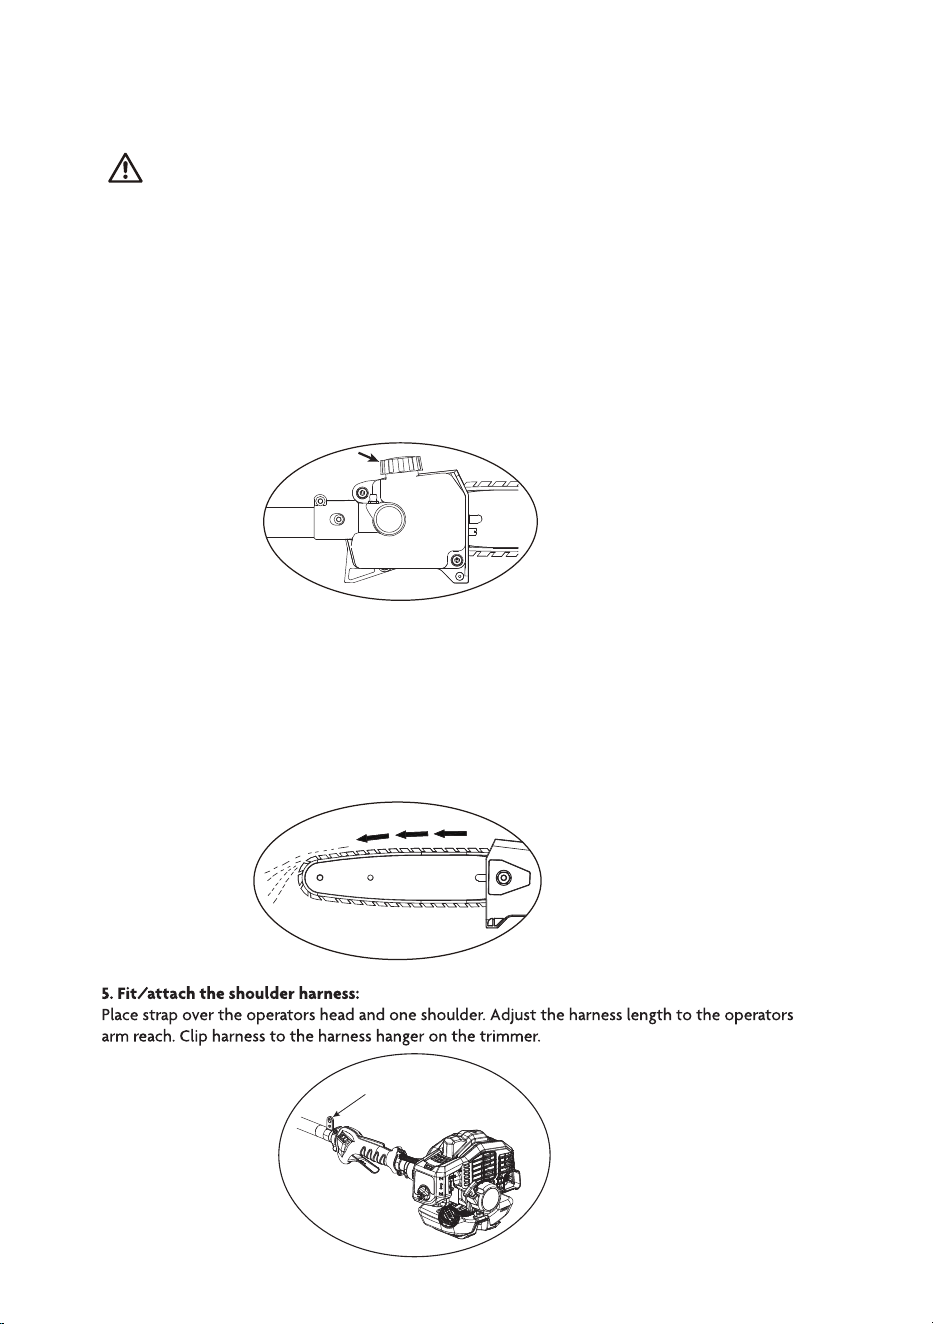
harness hanger on here
10

BEFORE OPERATION
When operating this machine, please follow the instructions for operations steps.
1. Filling with fuel
DANGER OF INJURY!
FUEL IS EXPLOSIVE! Indicates danger, warning or caution. May be used in conjunction
with other symbols or pictographs.
RISK OF DEVICE DAMAGE!
The device is supplied without motor or gearbox oil. Before operating you must fill it
with fuel.
Never use oil for 4-cycle engine use or water-cooled 2-cycle engines. It can cause spark plug foul-
ing, exhaust port blocking or piston ring sticking. Mixed fuels, which have been left unused for a
period of one month or more may clog the carburetor or result in the engine failing to operate
properly. Put unused fuel into an airtight container and keep it in the dark and cool room.
Mix a regular grade gasoline (leaded or unleaded, alcohol-free) and a quality-proven motor
oil for air-cooled 2 cycle engines.
RECOMMENDED MIXING RATIO
GASOLINE 50: OIL 1
WARNING! Always shut off engine before fueling. Never add fuel to a machine with a running or
hot engine.
WARNING! Never smoke while refueling and avoid inhaling petrol fumes.
WARNING! Be careful when opening the fuel tank as pressure may have formed inside.
Before refueling:
• Shake the fuel mixture container well.
• Place the unit on a flat stable surface, with the fuel tank cap facing upwards.
• Clean the fuel tank cap and the surrounding area to
avoid any dirt from entering the tank during refilling.
• Carefully open the fuel tank cap to allow
any pressure inside to decrease gradually.
• Unscrew the mixture container cap.
• Use a funnel to refill and avoid over-filling the tank.
• Pour the fuel carefully to avoid spilling.
• Screw the tank cap on firmly by hand.
Draining fuel
• Hold a collection container beneath the fuel drain bolt.
• Unscrew the tank cap and remove it.
• Allow the fuel to run out completely.
• Press the priming bulb and let its fuel runs out.
• Screw the tank cap on firmly by hand.
WARNING! Always close the fuel tank cap firmly.
WARNING! Immediately clean all traces of fuel which may have dripped
on the machine or the ground and do not start the engine until the petrol fumes have dissipated.
1. FILL WITH 50:1 MIX
11
STARTING PROCEDURES
Do not start the unit until it has been completely assembled.
Before starting the unit, always check the oil.
1. Inspect the device before use
!YRUJNI FO REGNAD
Do not operate the device if you find any faults. If a part has become damaged or
defective, make sure to replace it before you use the device again.
Check the safe condition of the device:
• Check the device for leaks.
• Check the device for visual defects.
• Check th .dettfi yleruces neeb evah ecived eht fo strap lla ta
• Check that all safety components are in proper working condition.
DANGER OF INJURY!
Before starting work, always check the ground and remove all objects which could be
thrown by the device.
Once the machine has been set up properly and inspected, cold start the engine as follows:
1. Press the priming bulb 7 times.
2. Move the choke lever to the START position.
3. Hold the machine firmly on the ground with one hand. Pull the starting cord 3-5 times until you hear
the engine start to turn over. Move choke lever to the RUN position.
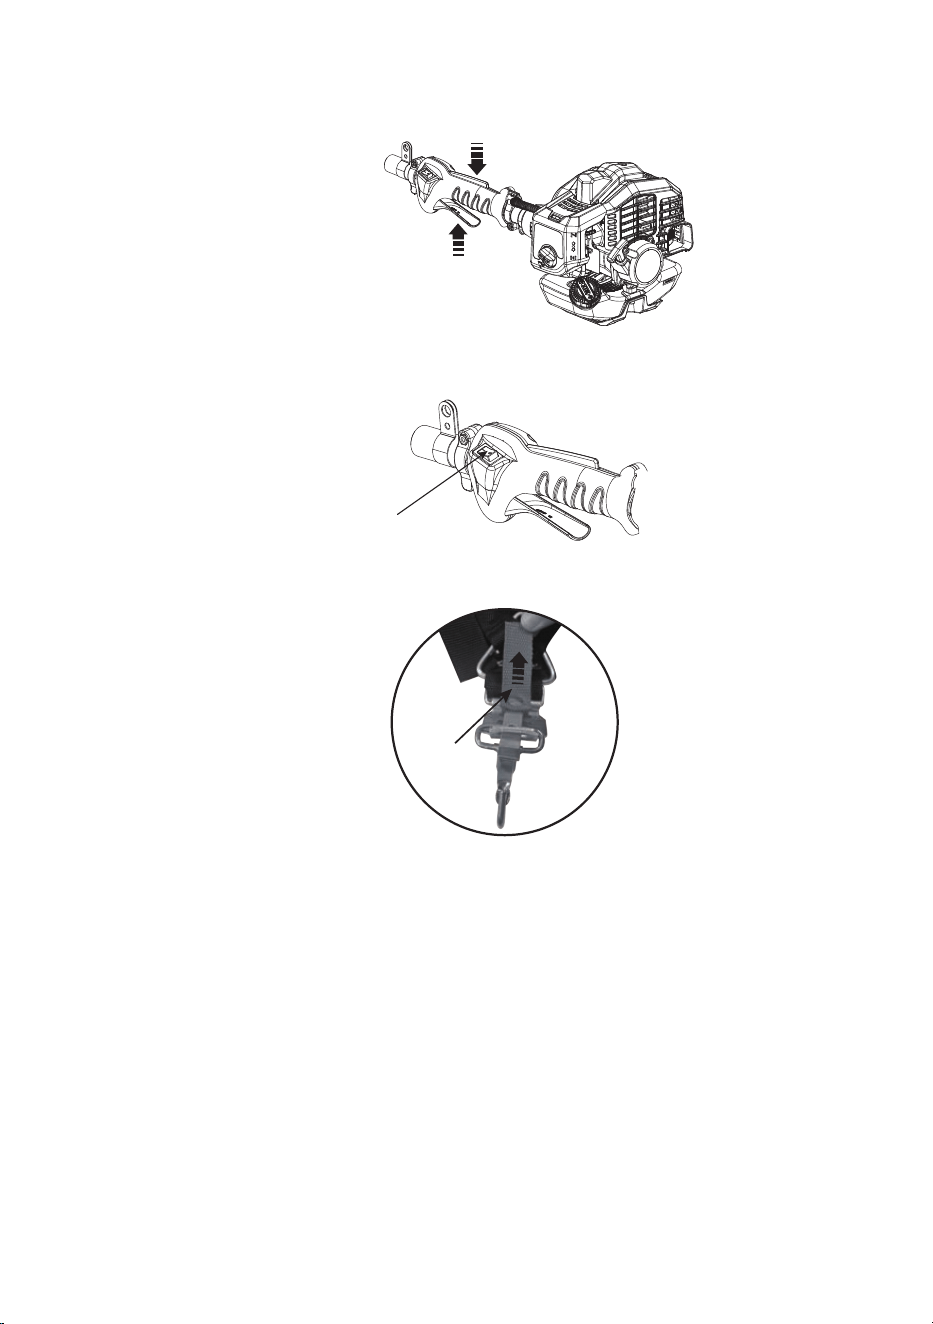
Attention: The switch will always remain in the ‘ON’ position. To stop the unit press it to ‘OFF’
and hold until it is no longer running, release and it will return to the ‘On’
12
4. Pull the starting cord again until the engine starts.
htiw revel elttorht eht llup dna bmuht ruoy htiw nwod revel kcol eht sserp ,gnimmirt nigeb oT .5
your fingers to increase power.
.hctiws pots eht sserp dna revel elttorht eht esaeler ,noitarepo gnirud rucco smelborp yna fI .6
The machine will stop running.
ot nip eht gnillup yb ssenrah redluohs eht esaeler ,noitarepo gnirud rucco smelborp yna fI .7
release the brush cutter immediately.
If the machine is still warm from running, warm start
Operating Instructions
During operation
Check chain tension frequently!
Cold chain:
the engine as follows:
1. Move the throttle lever to the RUN position
2. Pull the starting cord to start the engine.
Before starting work,allow the engine running one minutes at idiling to warm up.
stop switch
pull the pin to
release the machine
A new chain has to be tensioned more often than one that has been in use for some time.
Tension is correct when the chain fits snugly against the underside of the bar and can still be pulled
along the bar by hand. Re-tension if necessary – see chapter “Tensioning the Saw Chain”. Chain at
operating temperature: The chain stretches and begins to sag. The drive links on the underside of the
bar must not come out of the bar groove – the chain may otherwise jump off the bar.
Re-tension the chain – see chapter “Tensioning the Saw Chain”.
Always slacken off the chain again after finishing work. The chain contracts as it cools down.
If it is not slackened off, it may damage the gear shaft and bearings.
13

After finishing work
USING THE POLE PRUNER
Preparations:
Slacken off the chain if you have retensioned it at operating temperature during cutting work.
The chain contracts as it cools down. If it is not slackened off, it may damage the gear shaft and bearings.
Wear suitable protective clothing and equipment .
Start the engine.
Put on the shoulder strap.
Never throw cuttings into the household garbage can – they can be composted!
Never stand directly under the branch you are cutting – be ware of falling branches. Note that a
branch may spring back at you after it hits the ground!
Cutting sequencePreparations:
To allow branches a free fall, always cut the lower branches first. Prune heavy branches
(large diameter) in several controllable pieces.
Working position
Hold the control handle with your right hand, and the drive tube with your left hand. Your left arm
should be extended to the most comfortable position.
The shaft should always be held at an angle of 60° or less!
The most convenient working position is a tool angle of 60°, but any lesser angle may be used to
suit the situation concerned.
Flush-cutting thick branches
If branch diameter is more than 4“ (10 cm), first per-form undercut ( 3) and then cross-cut at a
distance (A) of about 8“ (20cm) from the final cut.
Then carry out the flush-cut (4), starting with a reliev-ing cut and finishing with a cross-cut.
Taking Care of Guide Bar
Turn the bar over – every time you sharpen the chain – and every time you replace the chain.
This avoids one-sided wear, especiallly at nose and underside of the bar.
Regularly clean position 1/2/3/4
3
4
1
2
14
CLEANING THE ENGINE
To reduce the risk of fire or overheating, periodically clean the cylinder fins and air vents with
compressed air and clear the silencer area to get rid of dust, branches, leaves or other debris.
GENERAL INSPECTION
Periodically check that all the nuts and screws are securely tightened and the hand grips are
securely fastened. If you notice signs of wear on the starting cable, contact your dealer for a
replacement. Frequently check for and replace any damaged parts.
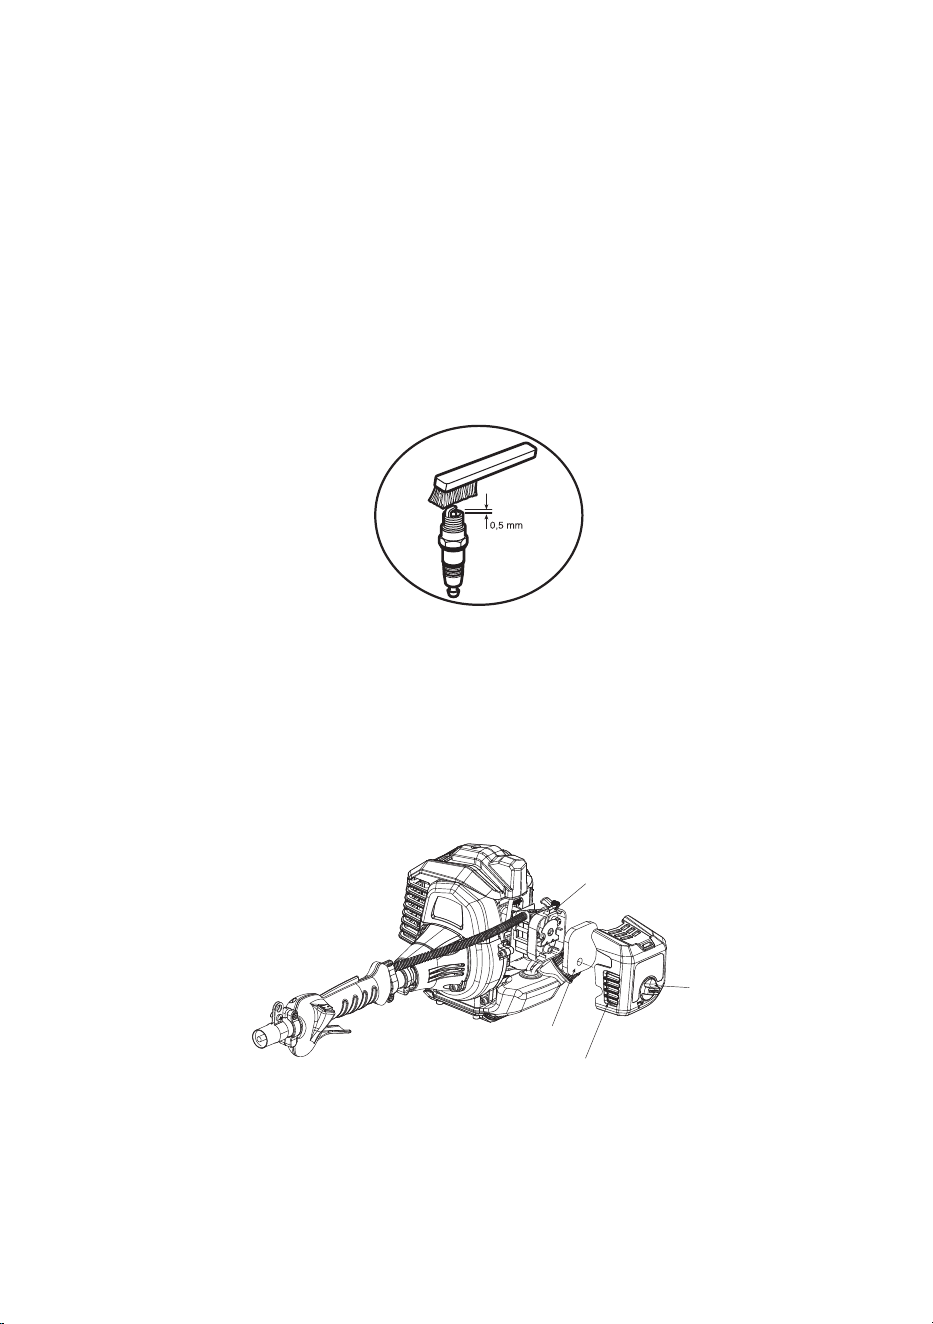
CLEANING & CHANGING THE SPARK PLUG
• Periodically remove and clean the spark plug using a metal brush to get rid of any deposits.
• Check and reset the correct distance between the electrodes.
• Replace the spark plug and fasten it firmly using the supplied wrench.
• The spark plug must be replaced by one with the same characteristics whenever the electrodes
have burned or the insulation has worn, or every 100 working hours.
CLEAN THE AIR FILTER
IMPORTANT Cleaning the air filter is essential to guarantee the efficiency and duration of
the machine. Do not work with a damaged filter or without a filter, as this could permanently
damage the engine. The air filter must be cleaned after every 12 working hours.
Clean the Filter as follows:
• Loosen the knob (A) , remove the cover (D) and the filter element (B)
• Wash the filter (B) with petrol .
• Leave the filter (B) to dry in the open air.
• Fit the filter (B) and the cover (D) back on, tightening the knob (A) again
WARNING! Never run the engine without the air filter installed.
A
B
C
D
15

CLEANING AND STORAGE
CLEANING
WARNING: To avoid serious personal injury, always stop the engine and allow it to cool
before cleaning or maintaining the unit.
At the end of each working session, use a small brush to clean the outside of the unit. Do not
use strong detergents. Household cleaners that contain aromatic oils such as pine and lemon, and
solvents such as kerosene, can damage plastic. Wipe off any moisture with a soft cloth. Carefully
make sure that there are no damaged parts, replacing any faulty parts.
STORAGE
• Never store a fueled unit where fumes may reach an open flame or spark.
• Allow the engine to cool before storing.
• Lock up the unit to prevent unauthorized use or damage.
• Store the unit in a dry, well-ventilated area.
• Store the unit out of the reach of children.
erus ekaM .tnemhcatta eht otno pac regnah eht llatsni ,kooh a morf tnemhcatta eht dnepsus oT •
the release button is securely locked into one of the holes on the hanger cap.
Short-term Storage (1-2 weeks)
p ton si siht fI .noitisop latnoziroh a ni tinu eht erotS • ossible, store the unit vertically with the
engine at the top.
ROUTINE MAINTENANCE
Correct maintenance is essential to maintain the original efficiency and safety of the machine
over time.
Before performing any maintenance or cleaning work, always turn off the engine.
mad yam retaw fo ssergnI .retaw htiw tinu eht yarps ton oD • age the engine and electrical connec-
tions.
• Clean the unit with a cloth or soft hand brush only.
WARNING! During maintenance operations:
• Remove the spark plug cap.
• Wait until the engine is sufficiently cold.
Note: Never dispose of oils, fuel or other polluting materials in unauthorized places.
Maintenance schedule
Hours of Use 12 Hrs 24 Hrs >50 Hrs
Air filter
Clean Clean Replace
Spark plug
Clean Clean Replace
16

Long-term Storage
• Remove the fuel cap, tip the unit and drain the fuel into an approved container. Reinstall the
fuel cap.
• Start the engine and allow it to run until it stalls. This ensures that all fuel has been drained from
the carburetor.
• Allow the engine to cool. Remove the spark plug and put 5 drops of any high-quality motor oil
or 2-cycle oil into the cylinder. Pull the starter rope slowly to distribute the oil. Reinstall the
spark plug.
• Thoroughly clean the unit and inspect it for any loose or damaged parts. Repair or replace dam-
aged parts and tighten loose screws, nuts or bolts.
Preparing the Unit for Use after Long-term Storage
• Remove the spark plug. Tip the unit and drain all of the oil from the cylinder into an approved
container. Reinstall the spark plug.
NOTE: Do not use fuel that has been stored for more than 30 days. Dispose of old fuel and oil
according to federal, state and local regulations.
17

TROUBLESHOOTING
POLE CHAIN SAW
PROBLEM SOLUTION
THE ENGINE WILL NOT START
The fuel tank is empty Fill the fuel tank with properly-mixed fuel
The priming bulb was not pressed enough Press the primer bulb 7 times or until fuel is visible
The engine is flooded Squeeze the throttle control and pull the starter
rope until the engine starts
The fuel is old (over 30 days) and/or improperly
mixed
Drain the fuel tank and add fresh, properly-mixed
fuel
The spark plug is fouled Clean or replace the spark plug
The choke lever was not flipped Refer to Starting Instructions in this guide
THE ENGINE WILL NOT IDLE
The air filter is dirty Clean or replace the air filter
The fuel is old (over 30 days) and/or improperly
mixed
Drain the fuel tank and add fresh, properly-mixed
fuel
The idle speed is incorrect Adjust the idle speed
THE ENGINE WILL NOT ACCELERATE
The fuel is old (over 30 days) and/or improperly
mixed
Drain the fuel tank and add fresh, properly-mixed
fuel
The cutting head is bound with grass Stop the engine and clean the cutting head
The air filter is dirty Clean or replace the air filter
THE ENGINE LACKS POWER OR STALLS
The fuel is old (over 30 days) and/or improperly
mixed
Drain the fuel tank and add fresh, properly-mixed
fuel
The air filter is dirty Clean or replace the air filter
The spark plug is fouled Clean or replace the spark plug
If further assistance is required, contact an authorized service dealer.
Please note that the following maintenance intervals
apply for normal operating conditions only. If your
daily working time is longer than normal or cutting
conditions are difficult (very dusty work area,
resin-rich wood,tropical wood etc.), shorten the
specified intervals accordingly.
before
starting
work
after
finishing
work or
daily
after each
refueling
stop
if
necessary
Chain lubrication
Saw chain
Guide bar
Safety labels
Check
Check, also check sharpness
Check chain tension
Sharpen
Check (wear, damage)
Clean and turn over
Deburr
Replace
Replace
X
X X
X
X
X
X
X
X
X
X
18

19

MANUFACTURER’S LIMITED WARRANTY
The limited warranty set forth below is given by Badger with respect to new merchandise purchased and used
in the United States, its possessions and territories .
Badger warrants this product against defects in material and workmanship for a period of one (1) years
commencing on the date of original purchase and will, at its option, repair or replace, free of charge, any part
found to be defective in material or workmanship. This limited warranty shall only apply if thi
s product has been
operated and maintained in accordance with the Operator’s Manual furnished with the product, and has not been
subject to misuse, abuse, commercial use, neglect, accident, improper maintenance, alteration, vandalism,
theft, fire, water or damage because of other peril or natural disaster. Damage resulting from the installation or
use of any accessory or attachment not approved by Badger for use with the product(s) covered by this
manual will void your warranty as to any resulting damage.
HOW TO OBTAIN SERVICE: Warranty service is available, WITH PROOF OF PURCHASE THROUGH YOUR
LOCAL AUTHORIZED SERVICE DEALER. To locate the dealer in your area, call 1-844-786-7335. No product
returned directly to the factory will be accepted unless prior written permission has been extended by the
Customer Service Department of Badger.
This limited warranty does not provide coverage in the following cases:
A. Tune-ups - Spark Plugs, Carburetor Adjustments, Filters
B. Wear items - Bump Knobs, Outer Spools, Cutting Line, Inner Reels, Starter Pulley, Starter Ropes, Drive Belts,
Saw Chains, Guide Bars, Cultivator Tines, Blades.
C. Badger does not extend any warranty for products sold or exported outside of the United States of America,
its possessions and territories, except those sold through Badger’s authorized channels of export distribution.
Badger reserves the right to change or improve the design of any Badger Product without assuming any
obligation to modify any product previously manufactured.
No implied warranty, including any implied warranty of merchantability or fitness for a particular purpose,
applies after the applicable period of express written warranty above as to the parts as identified. No
other express warranty or guaranty, whether written or oral, except as mentioned above, given by any
person or entity, including a dealer or retailer, with respect to any product shall bind Badger. During
the period of the Warranty, the exclusive remedy is repair or replacement of the product as set forth
above. (Some states do not allow limitations on how long an implied warranty lasts, so the above limitation may
not apply to you.)
The provisions as set forth in this Warranty provide the sole and exclusive remedy arising from the sales.
Badger shall not be liable for incidental or consequential loss or damages including, without
limitation, expenses incurred for substitute or replacement lawn care services, for transportation or for
related expenses, or for rental expenses to temporarily replace a warranted product. (Some states do not
allow limitations on how long an implied warranty lasts, so the above limitation may not apply to you.)
In no event shall recovery of any kind be greater than the amount of the purchase price of the product sold.
Alteration of the safety features of the product shall voi
d this Warranty. You assume the risk and liability for loss,
damage, or injury to you and your property and/or to others and their property arising out of the use or misuse or
inability to use the product.
This limited warranty shall not extend to anyone other than the original purchaser, original lessee or the person
for whom it was purchased as a gift.
How State Law Relates to this Warranty: This
warranty gives you specific legal rights, and you may also have
other rights which vary from state to state.
To locate your nea
rest service dealer, dial 1-844-786-7335 in the United States.
2 6CC
20