USER GUIDE
High-Performance Air Purifier
SLARP1076WT - SLARP1076BK
Start Here
Serenelifehome.com/
register

www.SereneLifeHome.com
2
California Prop 65 Warning
WARNING:
This product may expose you to chemicals, which is known to
the state of California to cause cancer, birth defects and other
reproductive harm. Do not ingest.
For more info go to: www.P65warnings.ca.gov
PLEASE KEEP THIS MANUAL CAREFULLY FOR FUTURE REFERENCE.
FOR HOUSEHOLD USE ONLY.
TABLE OF CONTENTS
Features and Technical Specs
General Safety
Product Map
Controls & Display
Getting Started
Using Your Smart Air Purier
About the Filter
Care & Maintenance
Smart Life App Setup
Troubleshooting
Smart Life App Troubleshooting
Register Product
3
4
6
7
8
10
12
13
14
17
18
19

www.SereneLifeHome.com
3
Features:
•
Engineered Design Allows for Optimum Air Circulation
• Ultra Quiet Operation
• Simple Button Controls and Adjustable Gears
• Eective Air Purifying for Rooms up to 1,076 Square Feet
• Features Sleep Mode and Automatic Mode
• Equipped with Child Lock and Filter Replacement Reminder
• User-Friendly Digital Display and Indicators
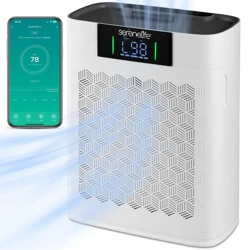
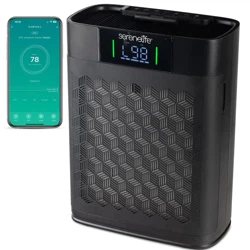
• High Sensitivity PM2.5 Sensor
• WiFi-Controlled Air Purier for Remote Access
• Boasts High Filtration Eciency and Thorough Air Purication
• Eectively Removes Airborne Particles
• Maintains Fresh and Comfortable Air Quality
• Ideal for Bedrooms, Living Rooms, Oces and Kitchens
What's in the Box:
•
Air Purier
• Adapter
• Stage Filter
Technical Specs:
•
Construction Materials: ABS + HEPA
• Severed Area: 1,076 Feet
• Control: Touch Panel
• Timer: 2 Hours, 5 Hours & 8 Hours
• Cleaning Stages: Red (Bad) Orange (Moderate) Green (Very Good)
• Pollutants Removed: Particulate Matter, Harmful Gas, Unpleasant Odor,
Bacteria Virus & Pet Hair
• Sound Level: First Gear Noise, Second Gear Noise, Third Gear Noise
• Adapter Power: USA
• Rated Voltage: 100-240V
• Rated Frequency: 50/60 Hz
• Rated Power: 24W
• Noise: White Noise
• CADR Value: 200 m³/h
• Item Weight: 7.1 lbs.
• Product Dimensions (L x W x H): 12.2” x6.3 x 15.75 -inches

www.SereneLifeHome.com
4
General Safety
• Take the necessary precautions to reduce the risk of re, electric shock, or injury.
• READ AND SAVE THESE INSTRUCTIONS.
• WARNING: To reduce the risk of re or electric shock, do not use this air purier
with any solid-state speed control device.
• Only use your air purier as described in this manual.
• Important: Do not use the purier without removing the plastic wrap from the
lter. The air purier will not lter air and may overheat, causing a re hazard.
• Keep your air purier away from water and wet or damp areas.
Never place it in water or other liquids.
• Do not use in excessively humid areas.
• Keep your air purier away from heat sources.
• Do not use in areas where combustible gases, vapors, metallic dust, aerosol
(spray) products, or fumes from industrial oil are present.
• Keep the air purier at least 5 feet (1.5 meters) away from areas where oxygen is
being administered.
• This appliance is not intended for use by persons (including children) with
reduced physical, sensory, or mental capabilities, or lack of experience and
knowledge, unless they have been given supervision or instruction concerning
the use of the appliance by a person responsible for their safety.
• Do not allow children to play with the plastic packaging.
Immediately discard the plastic after unwrapping the lter.
• Do not insert objects into any opening on the air purier.
• Do not sit on or place heavy objects on the air purier.
• Keep the inside of the air purier dry. To prevent moisture buildup, avoid placing
it in rooms with signicant temperature changes.
• Always unplug your air purier before servicing (such as changing the lter).
• Do not use your air purier if it is damaged or not working correctly, or if the
cord or plug is damaged. Do not attempt to repair it yourself.
• Children should not clean or perform maintenance on the air purier without
supervision.

www.SereneLifeHome.com
5
• Keep the appliance, including the power cable, at a safe distance from heated
surfaces and open ames.
• Never clean with gasoline, chemical solvents, or corrosive materials, as these
agents may damage the air purier.
• Never place the cord near any heat source.
• Do not cover the cord with a rug, carpet, or other covering.
Do not place the cord under furniture or appliances.
• Keep the cord out of areas where people walk frequently.
Place the cord where it will not be tripped over.
• This air purier is only to be used with the power supply adapter provided with
the unit.
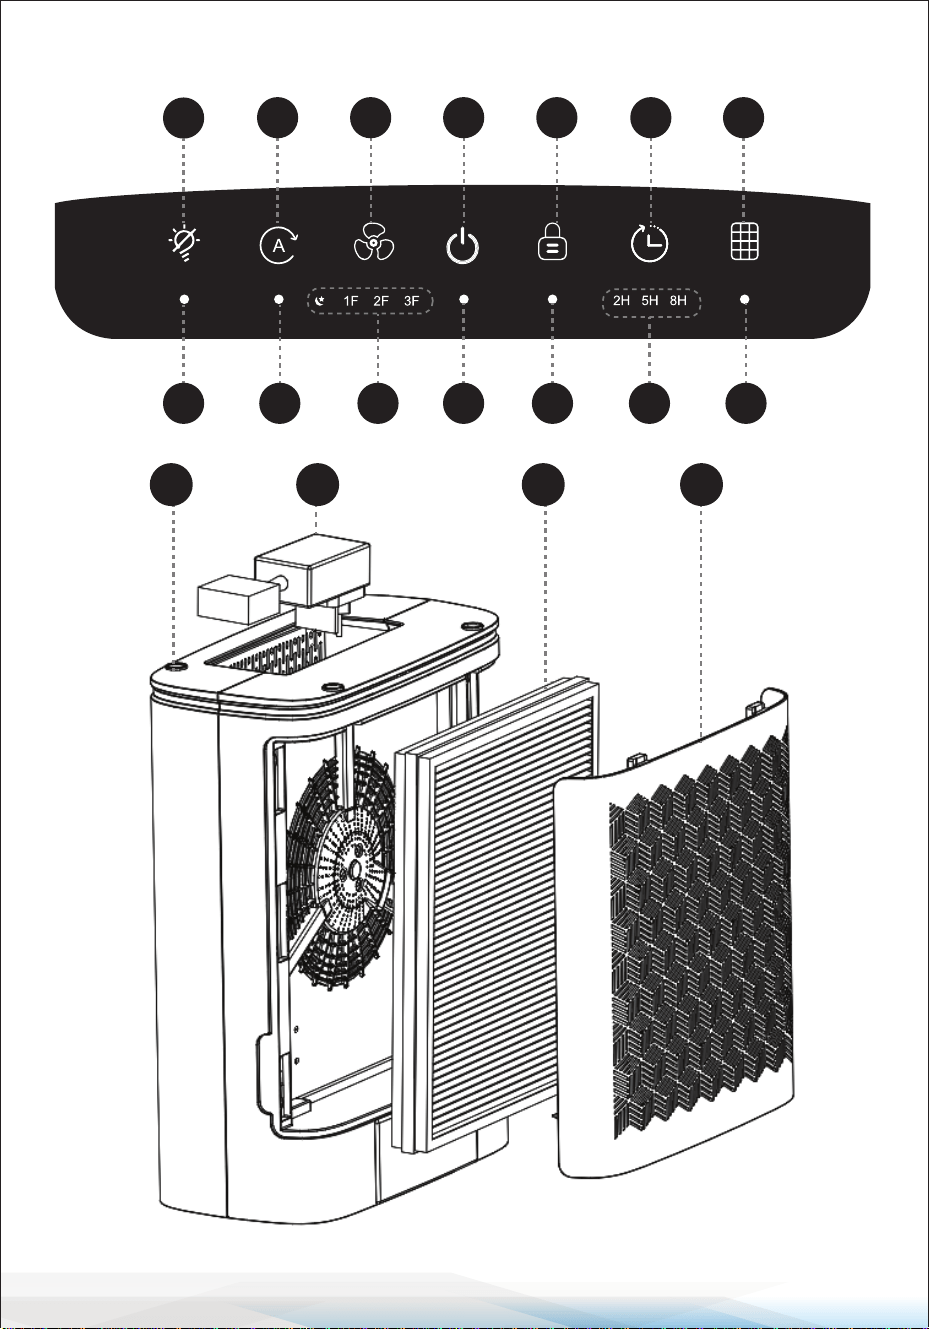
Product Map
A. Light On/O Button
B. Auto Mode Button
C. Fan Speed Button
D. Power On/O Button
E. Child Lock Button
F. Timer Button
G. Filter Reset Button
H. Light On/O Indicator
I. Auto Mode Indicator
J. Fan Speed Indicators
K. Power On/O Indicator
L. Child Lock Indicator
M. Timer Indicators
N. Change Filter Indicator
O. Power Adapter
P. Housing
Q. Air Intake Filter
R. Filter Cover
www.SereneLifeHome.com
6
OP
Q
R
Product Map
A B
C D E F G
H
I J
K L
M
N
www.SereneLifeHome.com
7
Controls & Display
Fan Speed Button & Indicators:
Cycles through fan speeds:
Low (1F), Medium (2F), High (3F), and Sleep ( ).
Auto Mode Button: Turns Auto Mode on or o.
Timer Button:
Sets the timer for 2 hours, 5 hours, or 8 hours.
Note: The timer indicators will light up corresponding to the selected
time. To cancel the timer, tap the button until all timer indicators
are o.
Change Filter Indicator & Reset Button
• Lights up when the lter needs to be replaced.
• To reset the lter life (after changing the lter), press and hold the
button for 5 seconds. The device will beep 3 times and then turn o.
Light On/O Button
• Turns the Air Quality Lights o.
• When the lights are o, tap to turn them back on.
Child Lock Button
• Prevents the current settings from being changed. Press and hold
for 3 seconds to lock and unlock the Control Panel.
• When the Control Panel is locked, the Child Lock indicator will light
up and beep twice if any other button is tapped, indicating that
the display is locked.
Air Quality Indicator
Displays the air quality using an automatic infrared dust sensor:
Green (Very Good), Orange (Moderate), Red (Bad).
Display
Shows the Fan Speed, PM 2.5 levels, Filter Life, and Wi-Fi connection
status.
On/O Button: Turns the air purier on or o.
Wi-Fi Reset Button: Tap the power button to turn on your purier.
Press and hold the power button for 5 seconds to reset the Wi-Fi
connection.
Note: The indicator blinks when connecting/disconnecting from
Smart Life App and lights up when connected.
www.SereneLifeHome.com
8
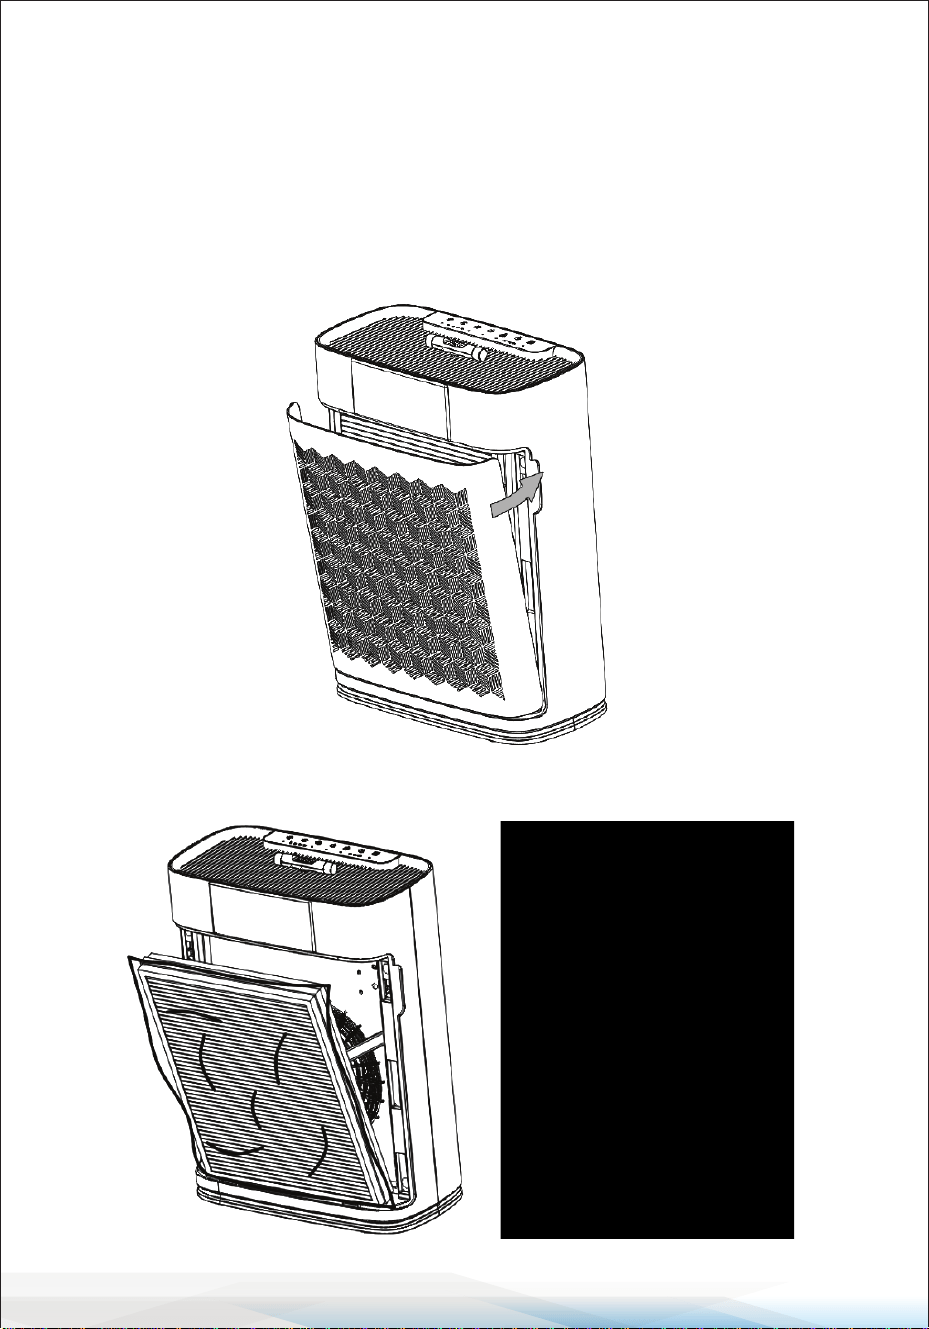
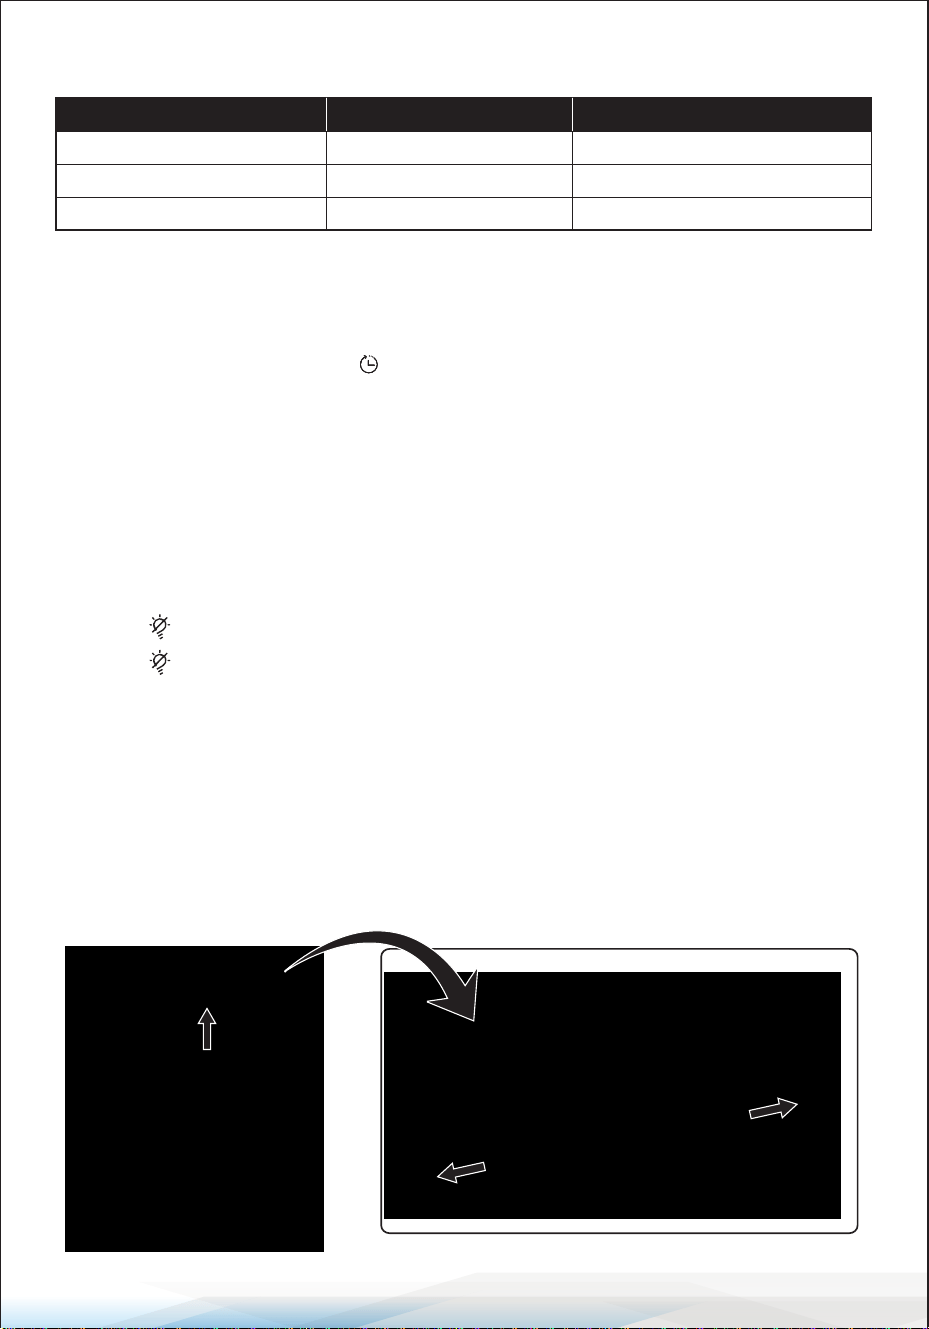
Getting Started
Important:
Do not use the purier without removing the plastic wrap from the lter.
The air purier will not lter air and may overheat, causing a re hazard.
1. Place the air purier on a at, stable surface such as the oor.
2. Pull both sides of the lter cover to remove it.
3. Remove the lter (protected by plastic packaging) from inside the air purier.

www.SereneLifeHome.com
9
4. Remove the plastic packaging from the lter and place the lter back into the
air purier.
Note: Be sure to remove all packaging from the lter before use. If not removed,
the air purier will not lter the air properly and may overheat, posing a re hazard.
When inserting the lter, make sure the side labeled "FRONT" faces outward.
5. Replace the lter cover, ensuring the tabs on the cover align with the slots at
the bottom of the air purier.
6. Insert the power adapter plug into the side of the air purier.
Note: The power adapter is located underneath the air purier.
www.SereneLifeHome.com
10
Using Your Smart Air Purier
1. Plug in the air purier and tap the button to turn it on.
The air purier will start at Low (1F) speed by default.
2. Tap button to change the fan speed between Low (1F), Medium (2F), High
(3F), and Sleep ( ).
Note:
• The High fan speed (3F) is the loudest setting but cleans the air the quickest.
• For best results, especially for air quality issues like smoke, run the air purier
on High fan speed for 15–20 minutes. After that, switch to a lower fan speed if
desired.
• Keep windows and doors closed while using the air purier to ensure it cleans
the air eectively.
Sleep Mode
Sleep Mode operates quietly by using a fan speed lower than Low (1F).
1. Tap button to switch to Sleep Mode (the indicator will light up).
2. Sleep Mode will turn o the display, except for the , which will remain
semi-bright. After 5 seconds, if no other buttons are tapped, the display will
remain o.
Note:
When the display is turned o, tap any button to turn it back on.
If no other button is tapped, the display will turn o again after 5 seconds.
Auto Mode
Auto Mode uses an infrared dust sensor inside the air purier to adjust the fan
speed automatically based on air quality. For example, if the air quality is poor,
the fan will automatically switch to high speed.
1. Tap the button to turn Auto Mode on.
2. The Auto Mode indicator will light up while Auto Mode is active.
3. To exit Auto Mode, tap the button to select a dierent fan speed.
Air Quality Indicator Chart
Timer
1. You can manually set the timer for 2 hours, 5 hours, or 8 hours.
2. Once the timer nishes, the air purier will turn o.
3. To cancel the timer, tap the button until all timer indicators are o.
Note:
If you change the fan speed while the timer is on, the timer will automatically
restart.
Light On/O
This feature turns the air quality indicator lights on or o.
• Tap the button to turn o the air quality indicator lights.
• Tap the button again to turn the air quality indicator lights back on.
Standby Mode:
The air purier will remain in Standby Mode when it is turned o but still plugged in.
Aromatherapy Function
1. Remove the covers at both ends and open the top cover of the essential oil box.
Add your chosen essential oil (4-5 drops each time), then reassemble the parts.
www.SereneLifeHome.com
11
Light Color Air Quality Auto Mode Fan Speed
Green Very Good 1F
Orange Moderate 2F
Red Bad 3F

www.SereneLifeHome.com
12
A
B
C
2. Place the essential oil box back into the slot (designed for machines with a grille).
Note:
• Turn o the machine before adding oils.
• Use the provided droppers; do not pour oils directly. Add 4-5 drops each time.
Important: Before using the purier, remove the plastic wrap from the lter.
If the plastic wrap is not removed, the air purier will not lter the air properly
and may overheat, which could result in a re hazard.
About The Filter
The air purier uses a 3-stage ltration system to purify the air.
A. Pre-Filter
• Captures large particles such as dust, lint, bers, hair, and pet fur.
• Maximizes the lter’s life by protecting it.
B. True HEPA Filter
Filters small particles such as ne dust, moke particles, and allergens like
pollen and pet dander.
C. Activated Carbon Filter
Helps capture and neutralize cooking smells,
smoke, odors, fumes, and VOCs (Volatile Organic Compounds).

Care & Maintenance
Cleaning the Air Purier
•
Unplug the air purier before cleaning.
• Wipe the exterior with a soft, dry cloth.
If necessary, use a damp cloth to clean the housing, then dry immediately.
• Use a vacuum to clean the inside of the air purier.
• Do not use abrasive chemicals or ammable cleaning agents.
Cleaning the Pre-Filter
The Pre-Filter should be cleaned every 2-4 weeks to maintain eciency and
extend the life of your lter. Use a soft brush or vacuum hose to remove hair,
dust, and large particles.
Note:
• Do not clean the lter with water or other liquids.
• Do not clean the True HEPA and Activated Carbon lters.
• Moisture may damage the lter. The air purier should be used in an area with
a humidity level below 85% RH. Using the purier in excessively humid areas
can cause the lter surface to become moldy.
• Do not add essential oils to the air purier or lter, as this will damage the lter
and cause unpleasant odors.
• Do not use oil diusers near the air purier.
Replacing the Filter
1. Unplug the air purier, then pull o the front cover (see "Getting Started"
section, step 2).
2. Remove the old lter from the air purier.
3. Use a vacuum hose to clean out any remaining dust or hair inside the air purier.
Note: Do not use water or liquids to clean the air purier.
4. Remove the plastic packaging from the new lter and insert it into the air
purier (see "Getting Started," step 4).
Note: Ensure the side of the lter marked "FRONT" is facing outward.
5. Replace the lter cover.
6. Plug in the air purier and turn it on. Reset the lter life by pressing and
holding the button for 5 seconds. The indicator will ash and beep twice,
then turn o.
www.SereneLifeHome.com
13

www.SereneLifeHome.com
14
Available on the
App Store
ANDROID APP ON
Google Play
Storage
If you are not using the air purier for an extended period, wrap both the air
purier and the lter in plastic packaging and store them in a dry place to
prevent moisture damage.
Smart Life App Setup
Note:
The Smart Life app is continually being improved and may change over time.
To ensure the best performance and troubleshooting, regularly update your app
and follow any in-app instructions if there are dierences.
Steps to Download the Smart Life App:
1. To download the Smart Life app, search for "Smart Life" in the Apple App Store®
or Google Play Store. You can also scan the QR code to access the download
directly.
2. During the setup process, ensure you are connected to a secure 2.4GHz Wi-Fi®
network (5GHz is not available). Conrm that the network is working correctly.
Note:
• Make sure your phone has Bluetooth® turned on and is not currently connected
to another Bluetooth device.
• Double-check that the Wi-Fi password you entered is correct.

Steps to Set Up Your Purier:
Note:
Ensure that Location is turned on when connecting your phone to the smart air
purier. This is required to establish the Bluetooth® connection. You can turn
Location o after the connection to the Smart Life app is complete.
1. Plug in the device and tap the power button ( ) to turn it on. Press and hold
the power button ( ) for 5 seconds until the Wi-Fi indicator ( ) blinks.
This means the device is ready to connect, and the purier’s Wi-Fi is turned on.
2. Open the Smart Life app, then log in or sign up to connect the purier via the
app.
Note:
You must create a Smart Life account or use a third-party account (such as
Google or Apple) to access third-party services and products.
3. The device will be automatically detected. Follow the in-app instructions to
complete the connection. If successful, the Wi-Fi indicator will remain on.
Otherwise, it will keep blinking.
Remove a Connected Mobile Device:
1. Plug in the purier and tap the power button ( ) to turn on your purier.
2. Press and hold the power button ( ) for 5 seconds until the Wi-Fi indicator
blinks fast, indicating that the connected mobile device has been removed
successfully.
3. To add a new mobile device, refer to the Smart Life App Setup.
www.SereneLifeHome.com
15
www.SereneLifeHome.com
16
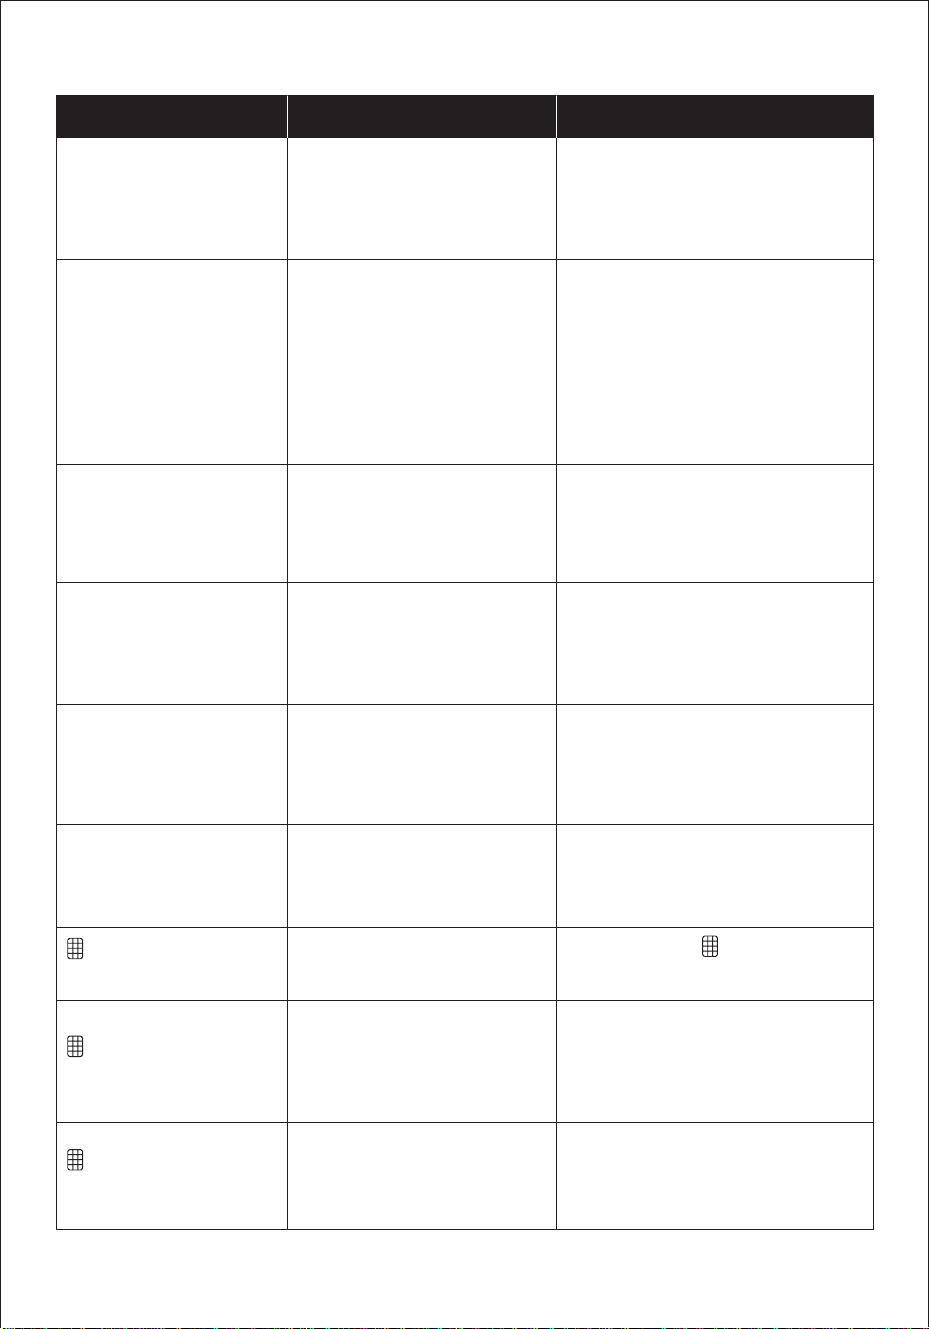
Problem Reasons Possible Solutions
Air purier cannot be
turned on or no
response to button
controls.
- No electricity.
- The air purier
malfunctioned.
- Power cord is damaged.
- Check that the unit is properly
plugged into an electrical
outlet.
- Try a dierent outlet.
Airow is signicantly
reduced.
- The airow is blocked by
plastic wrap or lter.
- Not enough clearance
around the air openings.
- Pre-Filter may be clogged.
- Ensure plastic wrap is removed
from the lter.
- Allow at least 12 inches (30 cm
clearance around all sides of
the purier.
- Clean the Pre-Filter (see Care &
Maintenance section).
Air purier makes an
unusual noise while
fan is on.
- Filter blocked by plastic
wrap or dirt.
- Appliance is on uneven
surface.
- Ensure plastic wrap is removed.
- Place the unit on a hard, at,
even surface.
Strange smell comes
from the purier.
- The air purier was used
in a high humidity area.
- A new lter was installed
recently.
- Move the unit to an area with
less than 85% relative humidity.
- Clean the lter or replace it.
Poor air purication
quality.
- Airow is blocked by
plastic wrap or dirt.
- Windows or doors are
open.
- Ensure plastic wrap is removed
and clean the lter.
- Close windows and doors to
improve eectiveness.
Air purier always
detects high levels of
particulates.
Unit operating in a very
dusty environment.
Consider turning the fan speed
to HIGH or switch to AUTO mode.
is still on after
replacing the lter.
Forgot to reset the air
purier.
Long press the Reset button
for 5 seconds.
has not turned on
after 9 months.
Appliance is run infre-
quently or the air is in good
condition, delaying lter
replacement.
The indicator will turn on based
on how much the air purier has
been used.
turned on before 6
months.
Appliance is frequently
used in high pollution
areas.
Replace the lter.
Troubleshooting
www.SereneLifeHome.com
17
Troubleshooting
Manual Connection:
Turn to manual connection if the auto connection fails after Wi-Fi has been on
for 2 minutes.
Method 1: When the Wi-Fi indicator blinks fast
1. Make sure Wi-Fi on your phone is turned ON.
2. Open the Smart Life app, click to add Device “Add manually” “Small home
appliances” “air purier (Wi-Fi)” follow the prompts in the app to complete
the setup.
Note:
This method is only available for 2.4G network.
Please switch to a 2.4G network if currently using 5G.
Method 2:
1. Tap the power button ( ) to turn on your purier. Press and hold the power
button ( ) for 5 seconds and don’t release it. After the device beeps once, the
Wi-Fi indicator will start blinking fast. Hold the button for another 10
seconds until the Wi-Fi indicator blinks slowly.
2. Make sure Wi-Fi and Bluetooth® on your phone are both ON. Open the Smart Life
app click to add Device “Add manually” “Small home appliances” “air
purier (Bluetooth + Wi-Fi)” follow the app prompts to complete the setup.
Wi-Fi Reset Button:
Tap the power button ( ) to turn on your purier.
Press and hold the power button ( ) for 5 seconds to reset the Wi-Fi connection.
Note:
The indicator blinks when connecting/disconnecting from Smart Life, and
lights up when connected.

www.SereneLifeHome.com
18
Smart Life App Troubleshooting
My smart air purier isn’t connecting to the Smart Life app.
• Ensure your phone’s Bluetooth is turned on and not connected to another
Bluetooth device.
• During setup, make sure you’re connected to a secure 2.4GHz Wi-Fi® network
(5GHz is not supported). Conrm that the network is functioning properly.
• Double-check that the Wi-Fi password entered is correct.
There should be no spaces at the beginning or end of the password.
• Test the password by connecting another electronic device to your router.
• Move your air purier closer to the router and ensure your phone is as close as
possible to the air purier during setup.
• Place the router in a higher, unobstructed location for a stronger signal.
• Keep the air purier and router away from appliances like microwaves,
refrigerators, or other electronic devices to prevent signal interference.
• If using a VPN, turn it o during setup.
• Disable portal authentication on your Wi-Fi network. Portal authentication
requires you to sign in through a web page, which can prevent the air purier
from accessing the Wi-Fi network and cause setup to fail.
My air purier is oine.
• Check that the air purier is plugged in and powered on, then refresh the
Smart Life app by swiping down on the screen.
• Ensure your router is connected to the internet and that your phone’s network
connection is working.
• Remove the oine air purier from the Smart Life app. Swipe left (iOS®) or
press and hold (Android™), then tap Delete. Recongure the air purier with
the Smart Life app.
Note: Power outages, internet issues, or changing Wi-Fi routers may cause the
air purier to go oine.

www.SereneLifeHome.com
19
FCC INFORMATION
WARNING: Changes or modications not expressly approved by the party
responsible for compliance could void the user’s authority to operate the
equipment.
NOTE: This equipment has been tested and found to comply with the limits for a
Class B digital device, pursuant to Part 15 of the FCC Rules. These limits are
designed to provide reasonable protection against harmful interference in a
residential installation. This unit generates, uses, and can radiate radio frequency
energy, and if not installed and used in accordance with the instructions, may
cause harmful interference to radio communications. However, there is no
guarantee that interference will not occur in a particular installation.
If this equipment does cause harmful interference to radio or television reception,
which can be determined by turning the equipment o and on, the user is
encouraged to try and correct the interference by one or more of the following
measures:
• Reorient or relocate the receiving antenna.
• Increase the separation between the equipment and receiver.
• Connect the equipment to an outlet on a circuit dierent from that to which
the receiver is connected.
• Consult the dealer or an experienced radio/TV technician for help.
This device complies with Part 15 of the FCC Rules. Operation is subject to the
following two conditions:
1. This device may not cause harmful interference.
2. This device must accept any interference received, including interference that
may cause undesired operation.
Register Product
Thank you for choosing SereneLife. By registering your product,
you ensure that you receive the full benets of our exclusive
warranty and personalized customer support.
Complete the form to access expert support and to keep your
SereneLife purchase in perfect condition.
Start Here
Model Number:
SLARP1076WT
Serenelifehome.com/pages/register

Questions or Comments?
We are here to help!
Phone: 1.718.535.1800
Serenelifehome.com/ContactUs