Visit Our Website
SCAN ME
serenelifehome.com
SLPAC240W - SLPAC406W - SLPAC242B - SLPAC408B
USER GUIDE
Portable Air Conditioner

www.SereneLifeHome.com
2
About SereneLife
SereneLife products are designed to create a more comfortable living space,
indoors and out. Our team presents innovative lifestyle solutions throughout
the year that promote simplicity and serenity.
We’re committed to delivering the most dependable products so you can live a
better, more serene life.
www.SereneLifeHome.com
3
CONTENTS
FEATURES AND TECHNICAL SPECS
BEFORE YOU BEGIN
FOR YOUR SAFETY
PRODUCT OVERVIEW
INSTALLATION
OPERATION
CLEANING AND CARE
TROUBLESHOOTING
DECOMMISSIONING
REGISTER PRODUCT
READ AND SAVE THESE INSTRUCTIONS
4
5
6
11
11
15
20
21
23
25
California Prop 65 Warning
WARNING:
This product may expose you to chemicals, which is known to
the state of California to cause cancer, birth defects and other
reproductive harm. Do not ingest.
For more info go to: www.P65warnings.ca.gov

www.SereneLifeHome.com
4
Features:
•
Ecient & Powerful Cooling
• Metal Control Box to Prevent from Fire and Exploding
• Rotary Compressor
• Universal Castors for Moving Freely
• Lightweight & Portable A/C Unit
• Compact Freestanding Room Air Conditioner
• (3) Operation Modes: AC Cooling / Dehumidier / Fan
• Hassle-Free, Quick Setup Cooling
• Simple Electric Plug-in Operation
• Convenient Wide-Area Climate Control Room AC Coverage
• Time, Temperature & Fan Speed Adjustment Settings
• Includes Universal Window Mount AC Exhaust Kit
• Removable & Washable Air Filter Screen
• Modern Style, Matt Body Housing
• Energy Ecient: Low Power Consumption
• Low Noise Level Motor
• Rolling Wheels for Easy Portability
• Ideal for Home, Oce, School & Business Rooms
Technical Specs:
•
Construction Material: ABS
• Power Supply: 115V/60Hz
• Refrigerant Type: R32
• Operating Modes: Cool / Fan / Dry (Dehumidier)
• Fan Speed Settings: Three Level, Low / Middle / High
• Temperature Range: °C / °F (Celsius / Fahrenheit)
• Adjustable Timer Settings: Up to 24 Hours
• Battery Operated Remote Control, Requires (2) x ‘AAA’ Batteries, (Not-Included)
• Power Cable Length: 5.5’ ft.
• Product Dimension (L x W x H): 18.5” x 13.9” x 30”-inches
www.SereneLifeHome.com
5
BEFORE YOU BEGIN
PRODUCT DESCRIPTION
Our powerful portable air conditioners serve as excellent cooling solutions for
single rooms, creating a comfortable atmosphere in your space. Additionally,
they feature ventilation and dehumidifying functions to circulate air and remove
moisture. These self-contained systems do not require any permanent installation,
allowing you to move them to the space where they are most needed.
They are commonly used in kitchens, temporary residences, computer rooms,
garages, and other places where installing an Outdoor Unit is impractical.
The environmentally friendly R32 is used as the refrigerant. R32 has no damaging
inuence on the ozone layer (Ozone Depleting Potential - ODP), a negligible
greenhouse eect (Global Warming Potential - GWP), and is available worldwide.
Due to its ecient energy properties, R32 is highly suitable as a coolant for this
application. Special precautions must be taken into consideration due to the
coolant's high ammability.
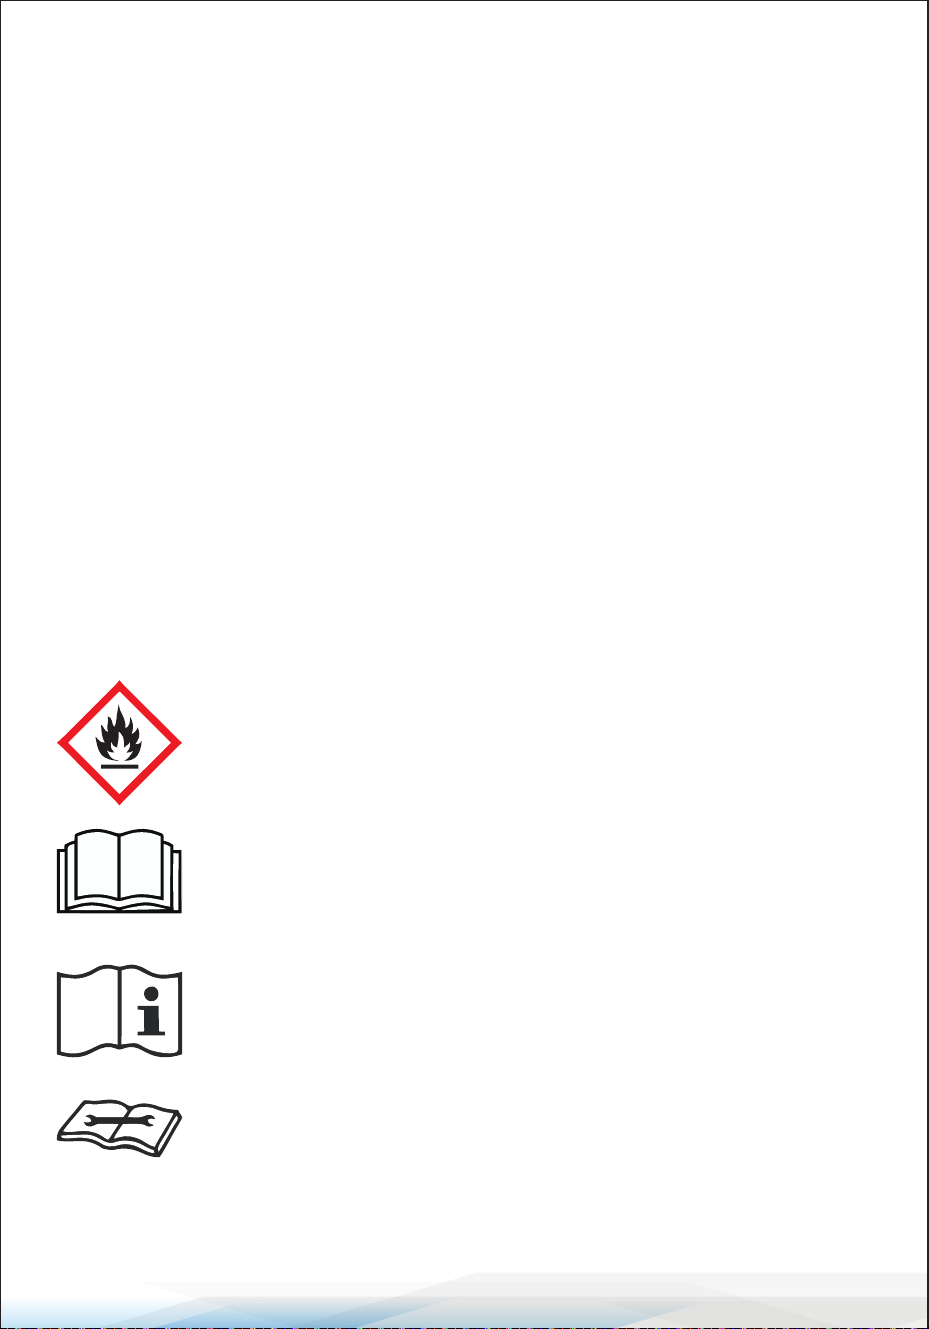
SYMBOLS FROM THE UNIT AND USER MANUAL
This unit utilizes a ammable refrigerant.
In the event of refrigerant leakage and contact with re or heating
elements, harmful gases may be produced, posing a risk of re.
It is imperative to read the USER MANUAL carefully before
operating the unit.
Additional information can be found in the USER MANUAL,
SERVICE MANUAL, and similar documents.
Service personnel are required to thoroughly read the
USER MANUAL and SERVICE MANUAL before conducting any
operations.
www.SereneLifeHome.com
6
THE FOLLOWING SHOULD ALWAYS BE OBSERVED FOR SAFETY
•
This appliance is intended for use by experts, trained users in shops, light
industry, farms, or for commercial use by laypersons.
• Children over the age of 8 and persons with reduced physical, sensory, or mental
capabilities can use this appliance if they have received proper supervision or
instruction on safe usage. Children should not play with the appliance, and
cleaning and user maintenance should not be performed by children without
supervision.
• The unit is designed exclusively for use with R32 gas as the designated
refrigerant.
• The refrigerant loop is sealed, and only a qualied technician should attempt
to service it.
• Avoid discharging refrigerant into the atmosphere.
• R32 is ammable and heavier than air; it can collect in low areas and be
circulated by fans.
• If R32 gas is present or suspected, untrained personnel should not attempt to
nd the cause.
• The R32 gas used in the unit is odorless. The absence of a smell does not indicate
a lack of escaped gas.
• If a leak is detected, immediately evacuate all persons, ventilate the room, and
contact the local re department to report an R32 gas leak.
• Do not allow re-entry into the room until a qualied service technician arrives
and deems it safe.
• No open ames, cigarettes, or other potential ignition sources should be used
inside or in the vicinity of the units.
• Component parts are designed for R32 gas and are non-incendiary and
non-sparking. Replacement of component parts should only be done with
identical repair parts.
FAILURE TO ABIDE BY THIS WARNING COULD RESULT IN AN EXPLOSION,
DEATH, INJURY, AND PROPERTY DAMAGE.
FOR YOUR SAFETY
Ensuring your safety is our utmost priority.
Please read this manual carefully and ensure a complete
understanding before operating your appliance.
WARNING

www.SereneLifeHome.com
7
OPERATIONAL PRECAUTIONS
WARNING
To reduce the risk of re, electric shock, or injury to persons or property:
• If the supply cord is damaged, it must be replaced by the manufacturer, its
service agent, or similarly qualied persons to avoid hazards.
• The appliance shall be disconnected from its power source during service.
• Always operate the unit from a power source with equal voltage, frequency,
and rating as indicated on the product identication plate.
• Always use a grounded power outlet.
• Unplug the power cord when cleaning or when not in use.
• Do not operate with wet hands. Prevent water from spilling onto the unit.
• Do not immerse or expose the unit to rain, moisture, or any other liquid.
• Do not leave the unit running unattended. Do not tilt or turn over the unit.
• Do not unplug while the unit is operating.
• Do not unplug by pulling on the power cord.
• Do not use an extension cord or an adapter plug.
• Do not place objects on the unit.
• Do not climb or sit on the unit.
• Do not insert ngers or other objects into the air outlet.
• Do not touch the air inlet or the aluminum ns of the unit.
• Do not operate the unit if it is dropped, damaged, or showing signs of product
malfunction.
• Do not clean the appliance with any chemicals.
• Ensure the unit is far away from re, inammable, or explosive objects.
• The unit shall be installed following national wiring regulations.
• Do not use means to accelerate the defrosting process or to clean, other than
those recommended by the manufacturer.
• The appliance shall be stored in a room without continuous operation sources
(e.g., open ames, an operating gas appliance, or an operating electric heater).
• Store the appliance to prevent mechanical damage.
• Do not pierce or burn, even after use.
• Be aware that refrigerants may not have an odor.
• Pipe-work shall be protected from physical damage and should not be installed
in an unventilated space smaller than 4 m².
• Compliance with national gas regulations shall be observed.
• Keep any required ventilation openings clear of obstruction.
• The appliance shall be stored in a well-ventilated area where the room size
corresponds to the room area specied for operation.
www.SereneLifeHome.com
8
If you don't understand something or need help, contact the dealer services.
SAFETY PRECAUTIONS ON SERVICING
Please follow these warnings when undertaking the following during the
servicing of an appliance with R32.
Checks to the area
Prior to beginning work on systems containing ammable refrigerants, safety
checks are necessary to minimize the risk of ignition. Before conducting work
on the refrigerating system, comply with the following precautions.
Work procedure
Work shall be undertaken under a controlled procedure to minimize the risk of
ammable gas or vapor being present during the work.
General work area
All maintenance sta and others working in the local area shall be instructed on
the nature of the work being carried out. Avoid working in conned spaces.
Section o the area around the workspace. Ensure that the conditions within
the area have been made safe by controlling ammable materials.
Checking for the presence of refrigerant
The area shall be checked with an appropriate refrigerant detector prior to and
during work to ensure the technician is aware of potentially ammable atmos-
pheres. Ensure that the leak detection equipment being used is suitable for
ammable refrigerants, i.e., no sparking, adequately sealed, or intrinsically safe.
WARNING
Any person involved in working on or breaking into a refrigerant
circuit should possess a currently valid certicate from an industry-
accredited assessment authority. This certicate authorizes their
competence to handle refrigerants safely in accordance with an
industry-recognized assessment specication.
WARNING
Servicing shall only be performed as recommended by the
equipment manufacturer. Maintenance and repairs requiring the
assistance of other skilled personnel shall be conducted under the
supervision of an individual competent in the use of ammable
refrigerants.

www.SereneLifeHome.com
9
Presence of re extinguisher
If any hot work is to be conducted on the refrigeration equipment or any
associated parts, appropriate re extinguishing equipment shall be available at
hand. Have a dry powder or CO2 re extinguisher adjacent to the charging area.
No ignition sources
No person carrying out work related to a refrigeration system that involves
exposing any pipework containing or having contained ammable refrigerant
shall use any sources of ignition in a manner that may lead to the risk of re or
explosion. Keep all possible ignition sources, including cigarette smoking,
suciently far away from the site of installation, repairing, removal, and disposal
during which ammable refrigerant can possibly be released into the surrounding
space. Before work takes place, survey the area around the equipment to ensure
there are no ammable hazards or ignition risks. Display "No Smoking" signs.
Ventilated Area
Ensure that the area is open or adequately ventilated before breaking into the
system or conducting any hot work. Maintain a degree of ventilation throughout
the work period. The ventilation should safely disperse any released refrigerant
and preferably expel it externally into the atmosphere.
Checks to the Refrigeration Equipment
When changing electrical components, ensure they are t for the purpose and
to the correct specications. Always follow the manufacturer’s maintenance and
service guidelines. If in doubt, consult the manufacturer’s technical department
for assistance.
The following checks shall be applied to installations using ammable refrigerants:
• The charge size is in accordance with the room size within which the refrigerant-
containing parts are installed.
• The ventilation machinery and outlets are operating adequately and are not
obstructed.
• If an indirect refrigerating circuit is being used, the secondary circuit shall be
checked for the presence of refrigerant.

www.SereneLifeHome.com
10
• Ensure markings on the equipment remain visible and legible.
Illegible markings and signs shall be corrected.
• Refrigeration pipes or components are installed in a position where they are
unlikely to be exposed to any substance that may corrode refrigerant-containing
components, unless the components are constructed of materials inherently
resistant to corrosion or suitably protected against corrosion.
Checks to Electrical Devices
Repair and maintenance of electrical components shall involve initial safety
checks and component inspection procedures. If a fault exists that could
compromise safety, no electrical supply shall be connected to the circuit until
the fault is satisfactorily addressed. If the fault cannot be corrected immediately
but it is necessary to continue operation, an adequate temporary solution shall
be implemented. This should be reported to the equipment owner to ensure all
parties are informed.
Initial safety checks shall include:
• Discharging capacitors: this should be done in a safe manner to avoid the
possibility of sparking.
• Ensuring there are no live electrical components and that wiring is not exposed
during charging, recovering, or purging the system.
• Verifying continuity of earth bonding.
WARNING!
Install the unit only in rooms exceeding 4 m².
Avoid installing the unit in areas where inammable gas may leak.
NOTE: The manufacturer may oer other relevant examples or additional
information regarding the refrigerant odor.
1
2 3
4
5
1
2
3
4
5
6
7
8
www.SereneLifeHome.com
11
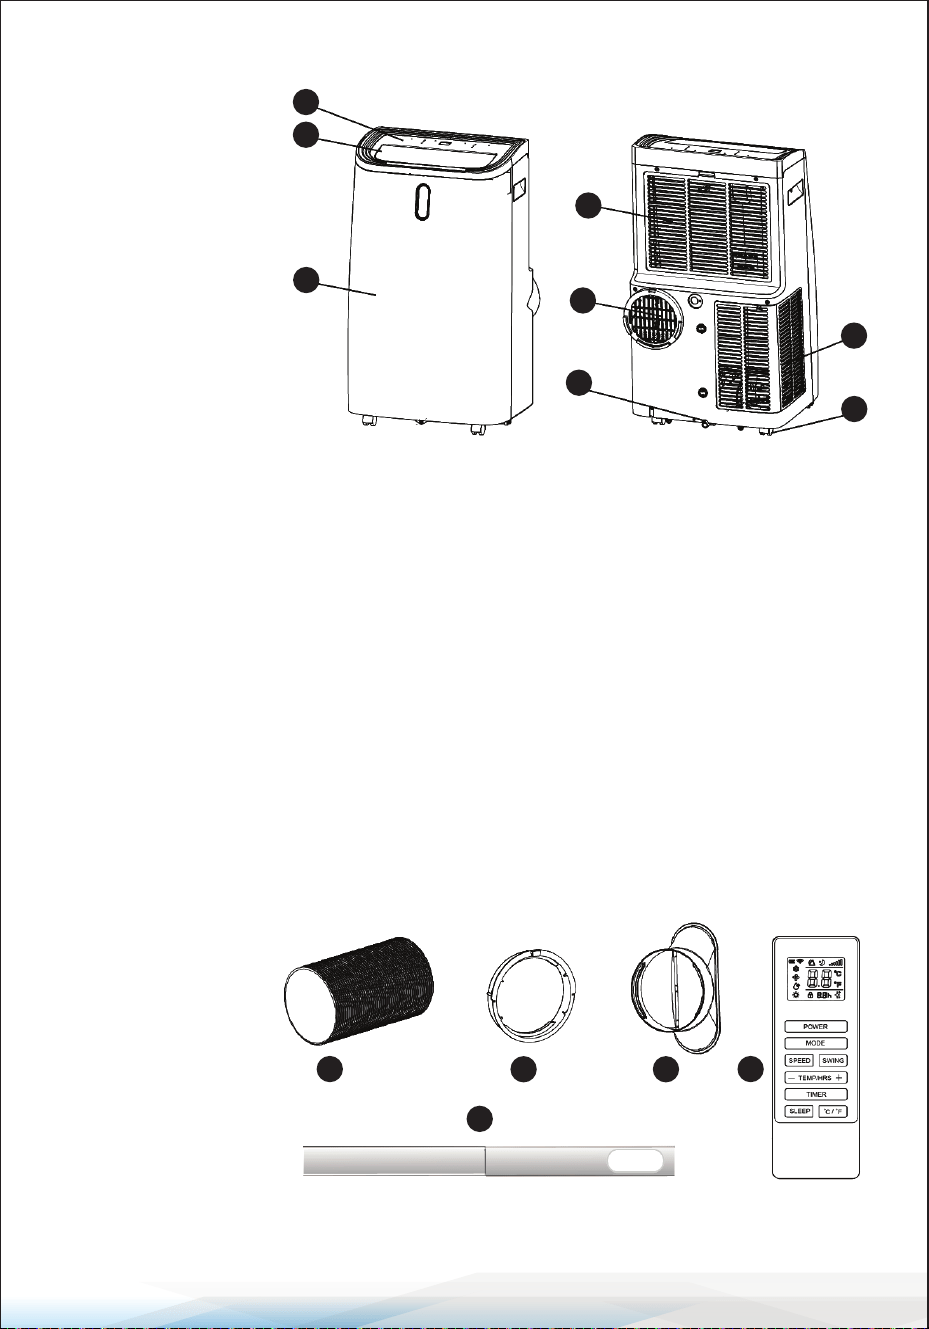
PRODUCT OVERVIEW
PRODUCT DIAGRAM
1. Control panel
2. Air outlet with
adjustable louver
3. Front Panel
4. Air inlet with air lter
5. Recessed handle
6. Air Exhaust
7. Drain opening with sealing plug
8. Castor
Note:
The appearance is provided for reference purposes only.
For detailed information, please refer to the actual product.
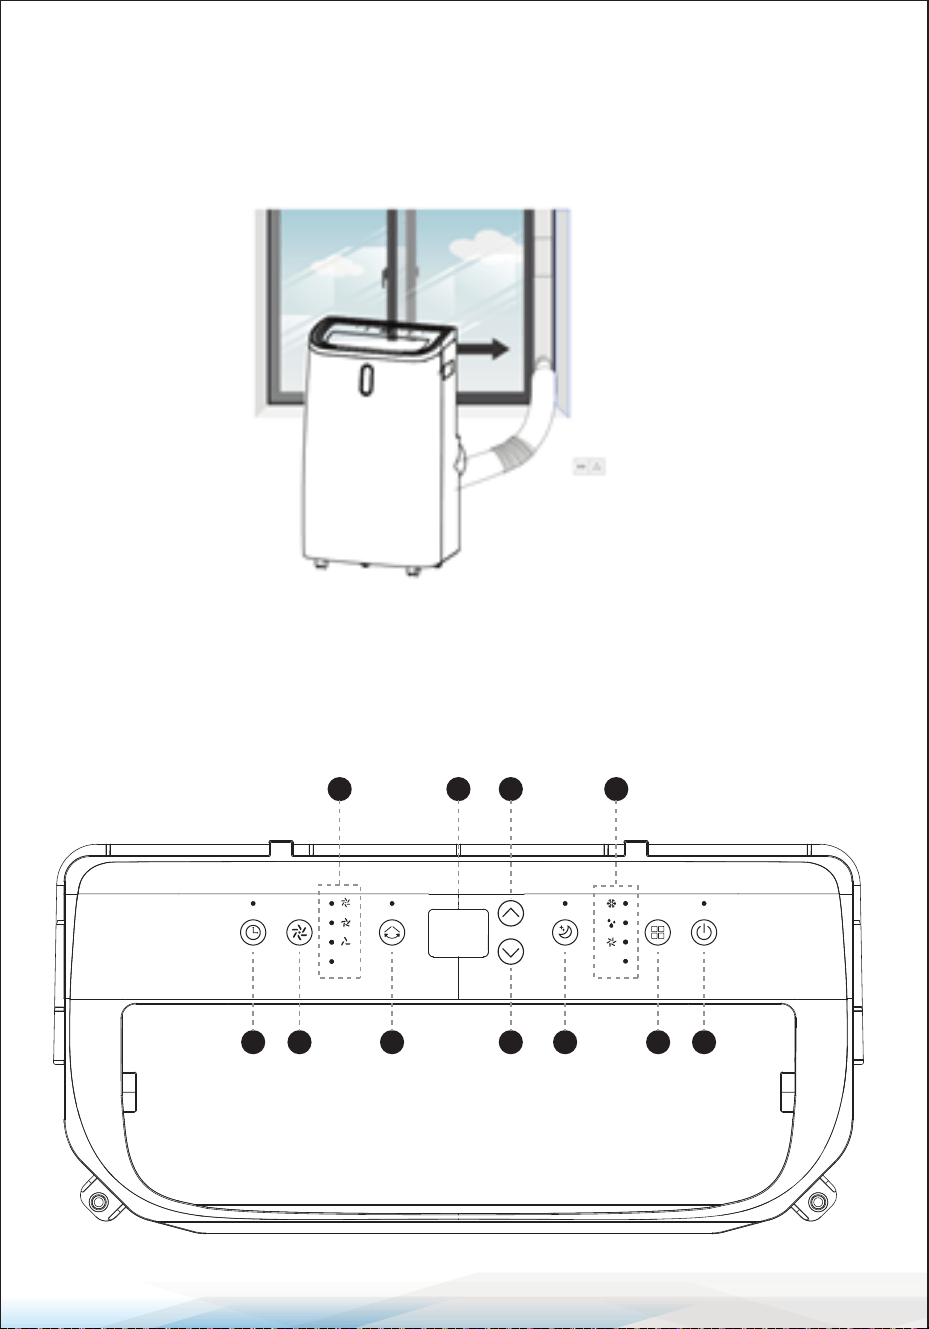
INSTALLATION
UNPACKING
Unpack the carton and remove the appliance and accessories.
Check the device for any damage or scratches after unpacking.
Accessories:
1. Exhaust hose
2. Hose connector
3. Window kit adapter
4. Remote control
5. Window kit
6. Drain pipe

www.SereneLifeHome.com
12
Choose Your Location
• If tipped more than 45°, allow the unit to remain
upright for at least 24 hours before starting up.
• Place the unit on a rm, level surface with at least
19.6 inches of free space around it for proper air
circulation.
• Do not operate in close proximity to walls, curtains, or
other objects that may block the air inlet and outlet.
Keep the air inlet and outlet free of obstacles.
• Never install the unit where it could be subject to:
• Heat sources such as radiators, heat registers, stoves, or other products that
produce heat.
• Direct sunlight.
• Mechanical vibration or shock.
• Excessive dust.
• Lack of ventilation, such as a cabinet or bookcase.
• Uneven surface.
WARNING!
Install the unit only in rooms exceeding 4 m².
Avoid installing the unit in areas where inammable gas may leak.
NOTE:
The manufacturer may provide other suitable examples or additional
information about the refrigerant odor.
www.SereneLifeHome.com
13
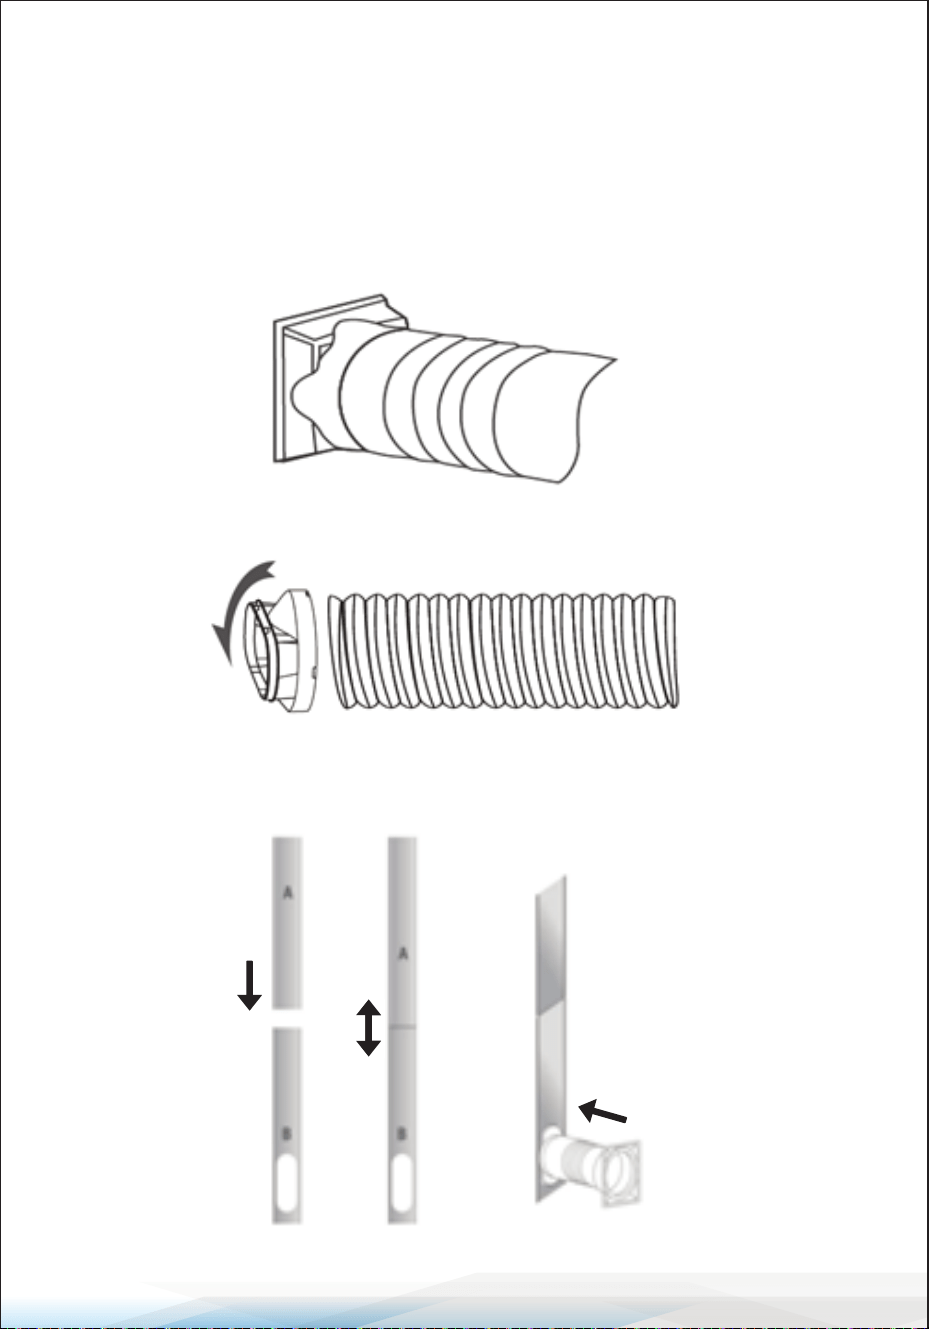
ATTACH THE EXHAUST HOSE
The air conditioner requires venting outside to allow the exhaust air, containing
waste heat and moisture, to escape the room. Do not replace or extend the
exhaust hose, as it may decrease eciency or, worse, result in the unit shutting
down due to low back pressure.
Step 1: Connect the hose connector to one end of the exhaust hose.
Step 2: Connect the window kit adapter to the other end of the exhaust hose.
Step 3: Extend the adjustable window kit to the length of your window.
Connect the exhaust hose to the window kit.
www.SereneLifeHome.com
14
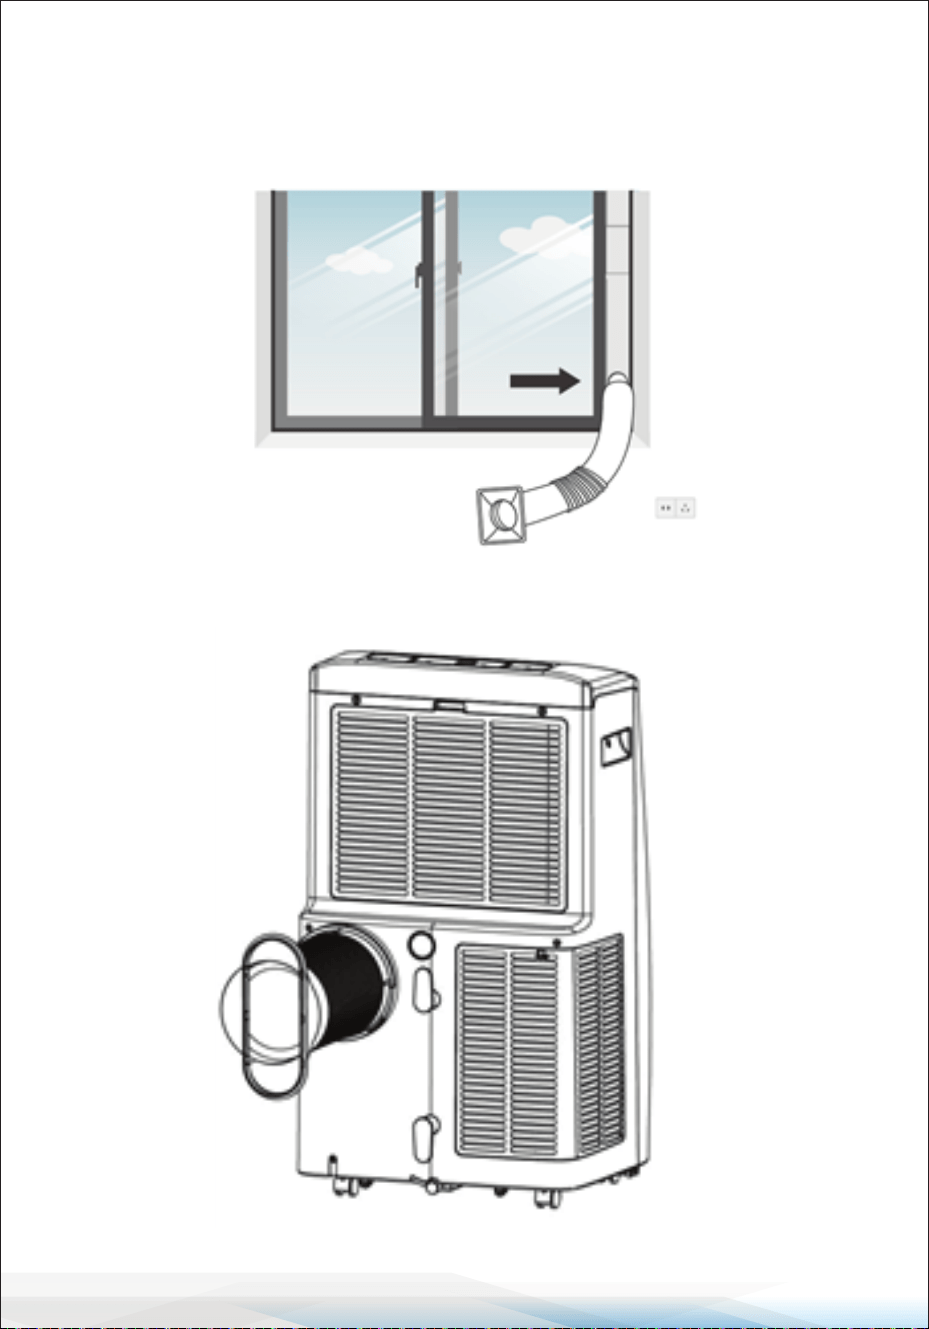
Step 4: Close your window to secure the kit in place. Ensure the window kit is
held rmly in place, and use duct tape if necessary. It is recommended to seal
o the gap between the adapter and the sides of the window for maximum
eciency.
Step 5: Attach the hose connector to the exhaust air outlet of the unit.
www.SereneLifeHome.com
15
Step 6: Adjust the length of the exible exhaust hose to ensure the distance
between the unit and the window is more than 27.5 inches, and the height from
the exhaust hose to the oor is more than 35.4 inches.
Avoid bends in the hose. Place the AC near an electrical outlet.
Step 7: Adjust the louver at the air outlet, and then switch on the unit.
OPERATION
CONTROL PANEL AND DISPLAY
24 1567
8
1011
3
9
www.SereneLifeHome.com
16
FUNCTION KEYS AND INDICATORS
1. POWER: Press to switch the machine on or o.
2. MODE: Press to switch the operation mode between cool, dry, and fan.
3. MODE Indicator: Displays the Mode Setting among cool, dry, and fan.
4. SLEEP: Press to turn sleep mode on or o.
5. DOWN: Decreasing the desired temperature or timer setting.
6. SWING: Adjust the air ow direction vertically.
7. SPEED: Press to switch the fan speed in HIGH, MIDDLE, and LOW.
8. Indicators: LED for high speed, middle, and low speed.
9. TIMER: Sets a time for the unit to automatically start or stop.
10. UP: Increasing the desired temperature (61°F-90°F) or timer setting.
11. Digital Display: Displays timer setting and temperature.
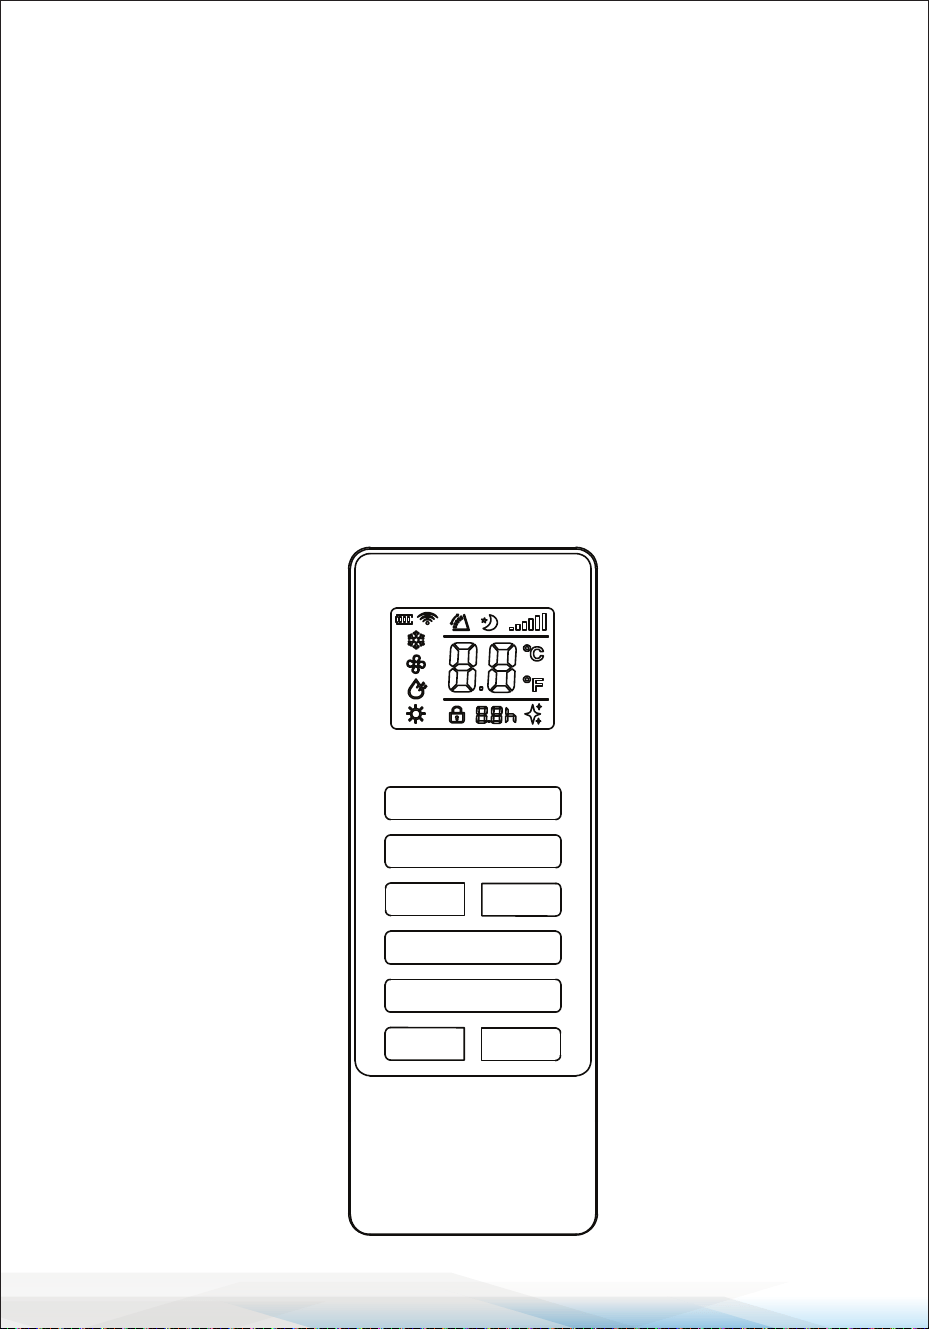
REMOTE CONTROL
POWER
MODE
SWING
TIMER
C
SLEEP
F
/
°
°
SPEED
TEMP/HRS
—
—
—

www.SereneLifeHome.com
17
SETTINGS
Start-up and Shutdown
• Press POWER to turn on the unit.
• Press MODE button to select the desired operation mode.
• Press POWER again to turn o the power.
Operation Modes
The unit has four operation modes: Cool, Dehumidier, Fan, Sleep.
The unit's working temperature under cooling mode is 61°F-95°F.
A. Cooling Your Room:
Select the cool mode to lower the temperature in your room.
• Press MODE button repeatedly until the COOL indicator lights up.
• Press Up/Down button to adjust the temperature displayed on the screen (set
between 61°F and 90°F).
• Press SPEED button repeatedly until the desired fan speed indicator lights up.
• To control the direction of the air ow horizontally, please press the SWING
button. This button is responsible for adjusting the horizontal oscillation of
the air ow, ensuring even distribution throughout the room.
Note: The air conditioner stops if the room temperature is lower than the
selected temperature.
B. Ventilating Your Room:
• Press MODE button repeatedly until the FAN indicator lights up.
• In ventilation mode, the room air is circulated but not cooled.
• Press SPEED button repeatedly to select the desired fan speed.
C. Drying Your Room:
Press the MODE button on the control panel or remote control, and the dry
indicator lights up. The fan speed is unable to be selected. The user should
connect the hose to the drain outlet at the bottom of the unit.
Note: In this mode, the fan speed switches over to low speed and cannot be
selected.
D. Sleep Mode:
The sleep mode can be activated when in cool mode and heat mode.
In cool mode: After 1 hour, the preset temperature is increased by 2°F.
After another hour, the preset temperature will again be increased by 2°F.

www.SereneLifeHome.com
18
TIMER SETTING (1 hour - 24 hours)
The timer has two ways of operation:
• To turn o (When power on): Press the Timer key to activate the timer function.
Press Up/Down repeatedly to set the delay OFF time.
• To turn on (When power o): Press the Timer key to activate the timer function.
Press Up/Down repeatedly to set the delay ON time.
• Cancel timer: Press Up/Down repeatedly until the LED shows '00'.
Note: Pressing POWER will also exit the timer setting.
Automatic Defrost
At low room temperatures, frost may build up at the evaporator during operation.
The unit will automatically start defrosting, and the POWER LED will blink.
The defrost control sequence is as follows:
A. When the unit operates in the cooling and drying operation, and the ambient
temperature sensor senses the evaporator coil temperature is below 30°F,
after the compressor stops operating for 10 minutes or the coil temperature
reaches 44°F, the unit restarts in cooling operating mode.
B. When the unit operates in the drying operation, once the coil temperature
sensor senses the temperature of the evaporator is below 104°F and the
dierential temperature between coil temperature and room temperature is
below 66°F after the compressor operates for 20 minutes, the unit starts
defrosting for 5 minutes, and the power indicator blinks.
Overload Protection
In the event of a power loss, there is a 3-minute delay to protect the compressor
before it restarts.
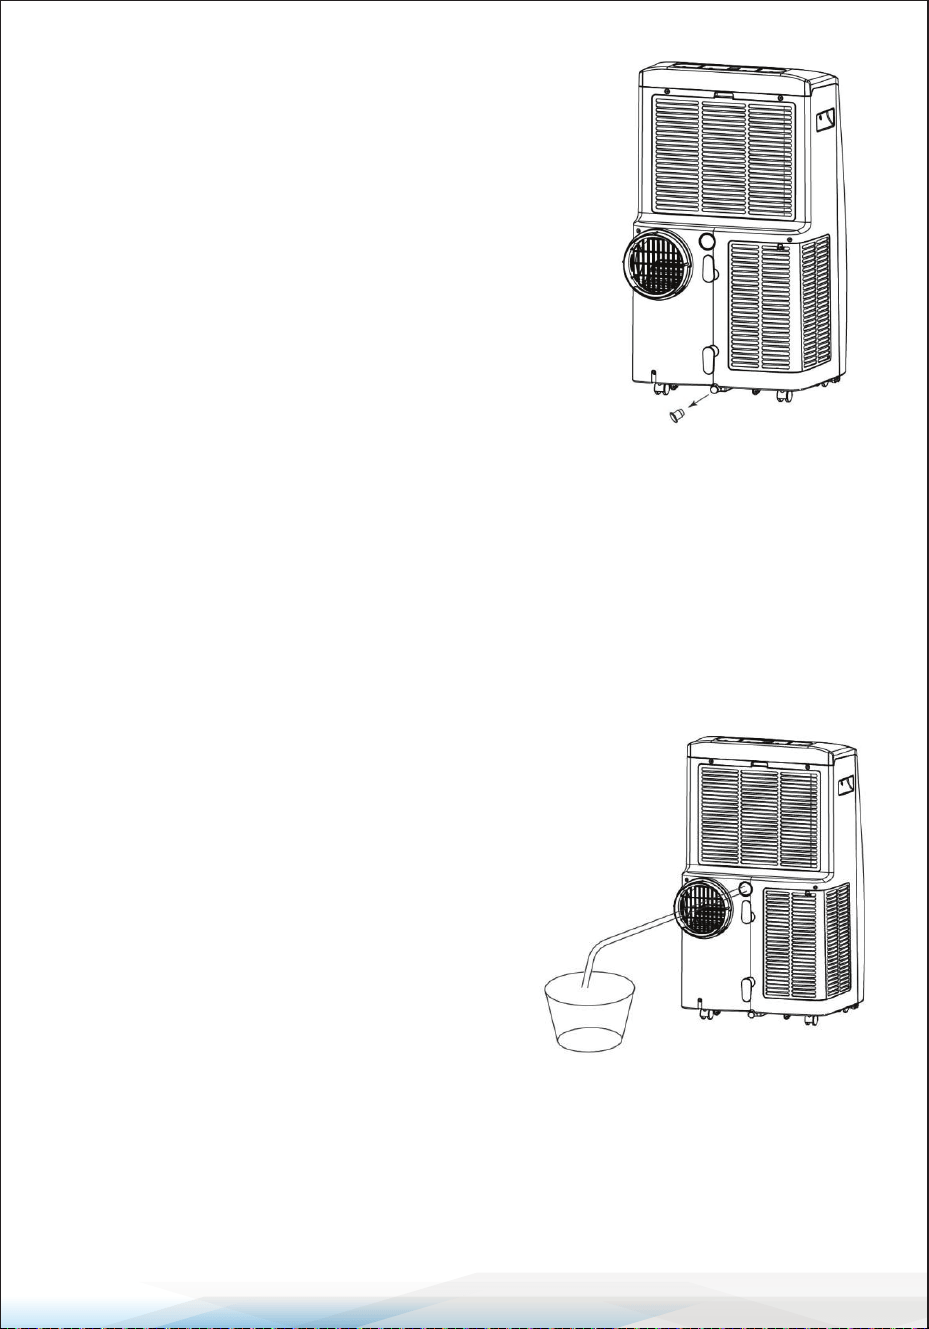
DRAINAGE
Manual Drainage
1. When the machine stops after the water is full, please unplug the power plug.
Note: Move the machine carefully to avoid spilling water from the water pan
at the bottom of the body.
2. Place the water container below the side water outlet behind the body.
3. Unplug the water plug, and the water will automatically ow into the water
container.
www.SereneLifeHome.com
19
Continuous Drainage
The self-evaporating system utilizes collected water to cool the condenser coils
for better eciency. There is no need to empty the drainage tank during cooling
operation, except in drying operation and high humidity conditions.
The condensate water evaporates at the condenser and is expelled through the
exhaust hose. For continuous or unattended operation in drying mode, please
connect the provided drain hose to the unit. Condensate water will automatically
ow into a bucket or drain by gravity.
To Avoid Water Spillage:
• Due to the signicant negative pressure of the condensate drain pan, tilt the
drain hose downward toward the oor. The appropriate degree of inclination
should exceed 20 degrees.
• Straighten the hose to prevent any traps from forming in the hose.
Notes:
1. Keep the water plug properly.
2. During drainage, the body can be tilted slightly
backward.
3. If the water container cannot hold all the water,
before the water container is full, insert the water
plug into the water outlet as soon as possible to
prevent water from owing onto the oor or carpet.
4. When water is discharged, insert the water plug.
Note: Restart the machine after the water plug
and drainage cover are installed; otherwise,
condensate water from the machine may ow onto
the oor or carpet.
• Switch o the unit before operating.
• Remove the plug from the water outlet
opening and keep it in a safe area.
• Securely and properly connect the drain hose,
ensuring it is not kinked and clear of obstruction.
• Place the hose outlet over a drain or bucket,
ensuring that water can freely ow out of the
unit.
• Do not submerge the end of the hose in water,
as it can cause an "Air Lock" in the hose.
www.SereneLifeHome.com
20
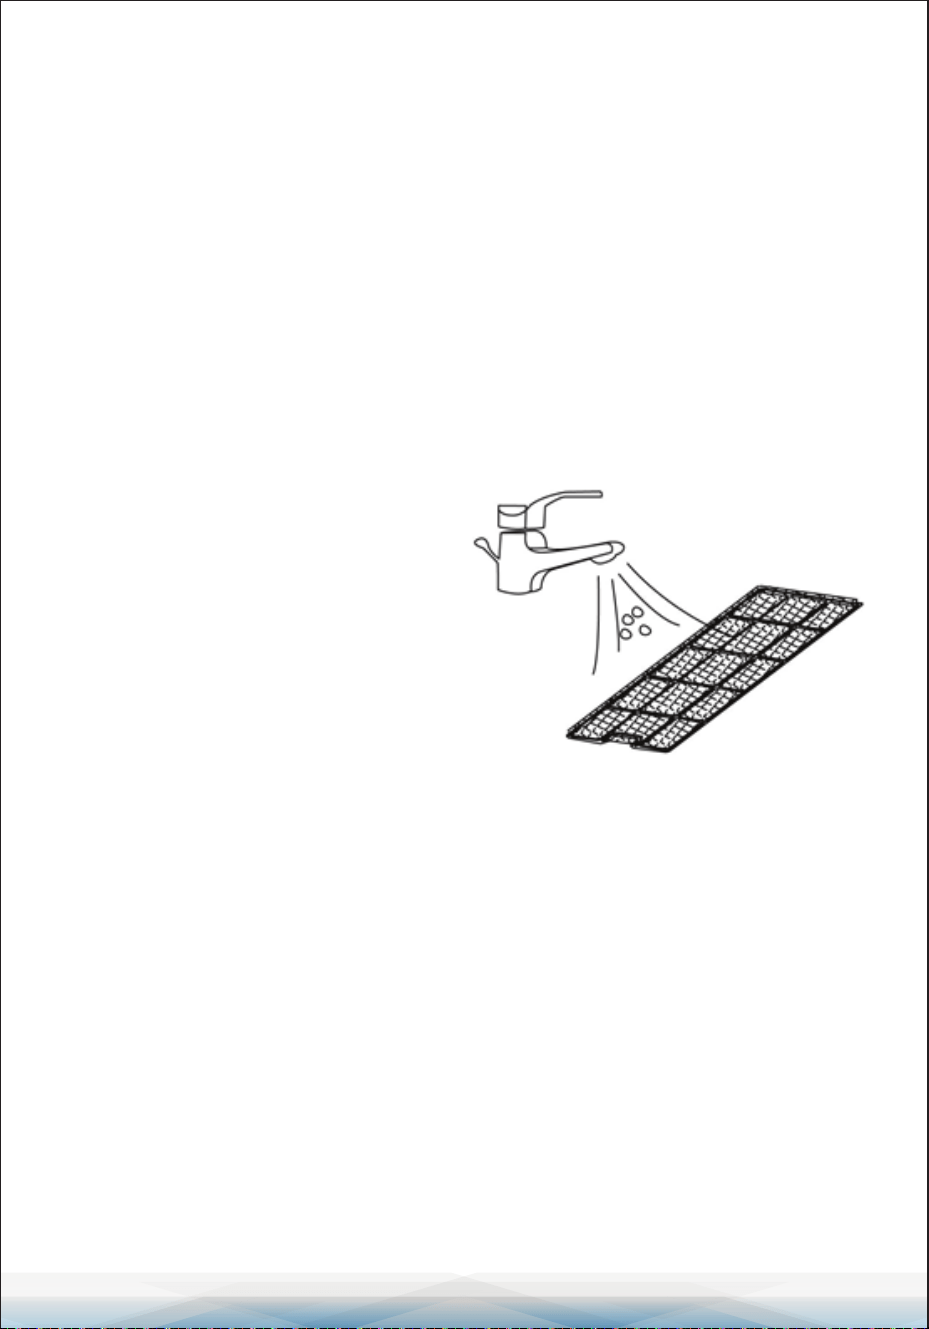
CLEANING AND CARE
CLEANING THE AIR FILTER (Every Two Weeks):
Dust collects on the lter and restricts airow. The restricted airow reduces the
eciency of the system, and if it becomes blocked, it can cause damage to the
unit. The air lter requires regular cleaning and is removable for easy mainte-
nance. Do not operate the unit without an air lter, or the evaporator may be
contaminated.
1. Press the POWER button to switch o the unit and unplug the power cord.
2. Remove the lter mesh from the unit.
3. Use a vacuum cleaner to remove dust from the lter.
4. Turn the lter over and rinse it under running water. Let the water run through
the lter in the opposite direction of airow. Set aside and allow the lter to
air dry completely before reinstalling.
Cleaning Procedure:
1. Switch o the unit and remove the
air lters.
2. Rinse the air lter under running water.
Warning:
Do not touch the evaporator surface with
bare hands, as it could cause injury to
your ngers.
CLEANING UP OF REFRIGERANT
General Measures
1. Gas/vapor is heavier than air and may accumulate in conned spaces,
particularly at or below ground level.
2. Eliminate every possible source of ignition.
3. Use appropriate personal protection equipment (PPE).
4. Evacuate unnecessary personnel, isolate, and ventilate the area.
5. Do not get in the eyes, on the skin, or clothing. Do not breathe vapors or gas.
6. Prevent entry to sewers and public waters.
7. Stop the source of the release, if safe to do so. Consider the use of water spray
to disperse vapors.
8. Isolate the area until the gas has dispersed. Ventilate and gas test the area
before entering. Contact competent authorities after a spill.

www.SereneLifeHome.com
21
TROUBLESHOOTING
Symptom: The unit is not operating.
Inspection:
• Check the power connection securely.
• Check if the water level indicator lights up.
• Check the room temperature.
Solutions:
• Insert the power cord securely into the wall outlet.
• Empty the drain pan by removing the rubber plug.
• Ensure the operating temperature is within the range.
Symptom: The unit works with reduced capacity.
Inspection:
• Check the air lter for dirt.
• Check if the air duct is blocked.
• Check if the room door or window is open.
• Check if the desired operating mode and temperature are set.
• The exhaust hose is detached.
Solutions:
• Clean the air lter.
• Clear any obstacles in the air duct.
• Keep doors and windows closed.
• Set the mode and temperature at the proper set-point.
• Ensure the exhaust hose is securely attached.

www.SereneLifeHome.com
22
Symptom: Water Leakage.
Inspection:
• Overow while moving the unit.
• Check if the drain hose is kinked or bends.
Solutions:
Empty the water tank before transport.
Straighten the hose to avoid a trap.
Symptom: Excessive Noise.
Inspection:
Check if the unit is securely positioned.
Check for any loose, vibrating parts.
The noise sounds like water owing.
Solutions:
Place the unit on horizontal and rm ground.
Secure and tighten loose parts.
Noise from owing refrigerant is normal.
Error Codes: E0, E1, E2, Ft
Symptom Inspection Solution
E0
Communication faults between
the main PCB and display PCB.
Check the wire harness of the display
PCB for damage.
E1
Ambient temperature sensor
failure
Check the connection or replace it.
To clean or replace the temperature
sensor.
E2
Coil temperature sensor failures.
Check the connection or replace it.
To clean or replace the temperature
sensor.
Ft
Condensate water high level
alarm.
Empty the drain pan by removing
the rubber plug.

www.SereneLifeHome.com
23
Decommissioning
STORAGE
For long-term storage of the air conditioner unit, follow these steps to
ensure proper decommissioning and preservation:
1. Unplug the Unit: Disconnect the power supply by unplugging the unit from
the electrical outlet.
2. Remove Exhaust Hose and Window Kit: Take out the exhaust hose and
window kit that were originally stored with the unit.
3. Drain Remaining Water: Ensure that any remaining water in the unit is
drained. Follow the recommended drainage procedure specied in the user
manual.
4. Clean and Dry the Filter: Remove the air lter and clean it.
Let the lter dry completely in a shaded area.
5. Re-install the Filter: After the lter is completely dry, re-install it in its
designated position within the unit.
6. Store Upright: Store the unit in an upright position. This helps prevent potential
damage and ensures proper functioning when brought back into use.
7. Preserve in a Suitable Environment: Store the air conditioner in a well-
ventilated, dry, non-corrosive gas environment. Avoid exposure to extreme
temperatures or humidity.
8. Evaporator Drying: To prevent component damage and mold growth, it is
recommended to dry out the evaporator inside the machine before storage.
This can be done by either placing the unplugged unit in a dry open area for
several days or by running the machine in low-wind ventilation mode until
the drainage pipe becomes dry.
9. Ensure Indoor Storage: Store the unit indoors in a safe and secure location.
Attention:
Ensure the unit is completely dry before storage to prevent mold and
component damage. Follow the recommended storage conditions to
maintain the unit's functionality. If uncertain, refer to the user manual or
contact the manufacturer for specic storage guidelines.
www.SereneLifeHome.com
24
Disposal Instructions
Releasing refrigerant into the atmosphere is strictly forbidden.
1. Do Not Dispose as Unsorted Municipal Waste: Electrical appliances, including
the air conditioner unit, should not be disposed of as unsorted municipal
waste.
2. Use Separate Collection Facilities: Utilize separate collection facilities for the
disposal of electrical appliances. Contact your local government or waste
management authorities to inquire about available collection systems.
3. Follow Local Regulations: Comply with local regulations and guidelines for
the disposal of electronic waste. Dierent regions may have specic protocols
for handling and recycling electrical appliances.
4. Prevent Environmental Damage: Avoid disposing of electrical appliances,
including air conditioners, in landlls or dumps. Such disposal methods may
lead to hazardous substances leaking into the groundwater, posing risks to
the environment and the food chain.
5. Contact Local Authorities for Information: Seek information from local
government or environmental agencies regarding proper disposal methods
and designated collection points for electronic waste.
6. Protect Health and Well-being: Responsible disposal of electrical appliances
is crucial to prevent hazardous substances from causing harm to health and
well-being.
WARNING
Note:
Always adhere to local regulations and guidelines related to
the disposal of electronic waste. Improper disposal can have
detrimental eects on the environment and human health.
www.SereneLifeHome.com
25
Register Product
Thank you for choosing SereneLife. By registering your
product, you ensure that you receive the full benets of our
exclusive warranty and personalized customer support.
Complete the form to access expert support and to keep
your SereneLife purchase in perfect condition.
Serenelifehome.com/
pages/register

Questions or Comments?
We are here to help!
Phone: 1.718.535.1800
Serenelifehome.com/ContactUs