
Liquitorre
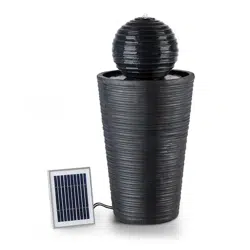
Solar-Springbrunnen
Solar Fountain
Fuente solar
Fontaine solaire
Fontana solare
10033273 10033274


3
DE
Sehr geehrter Kunde,
wir gratulieren Ihnen zum Erwerb Ihres Gerätes.
Lesen Sie die folgenden Hinweise sorgfältig durch und
befolgen Sie diese, um möglichen Schäden vorzubeugen.
Für Schäden, die durch Missachtung der Hinweise und
unsachgemäßen Gebrauch entstehen, übernehmen wir
keine Haftung. Scannen Sie den folgenden QR-Code,
um Zugriff auf die aktuellste Bedienungsanleitung und
weitere Informationen rund um das Produkt zu erhalten:
INHALTSVERZEICHNIS
Hinweise zum Produkt 4
Zusammenbau 4
Bedienung 5
Reinigung und Pege 7
Problemlösung 7
Nach dem Betrieb 8
Hinweise zur Entsorgung 8
Spezielle Entsorgungshinweise für Verbraucher in Deutschland 9
TECHNISCHE DATEN
Artikelnummer 10033273, 10033274
Stromversorgung (Akku) 6 V DC
Stromverbrauch 2 W
Max. Durchussrate 200 Liter/Stunde
HERSTELLER & IMPORTEUR (UK)
Hersteller:
Chal-Tec GmbH, Wallstraße 16, 10179 Berlin, Deutschland.
Importeur für Großbritannien:
Berlin Brands Group UK Limited
PO Box 42
272 Kensington High Street
London, W8 6ND
United Kingdom
English 13
Español 19
Français 23
Italiano 29

4
DE
HINWEISE ZUM PRODUKT
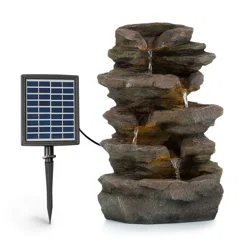
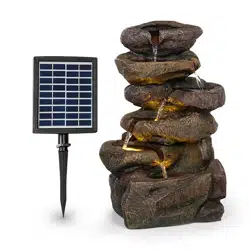
• Die Solarpumpe ist für den Einsatz im Brunnen, Teich oder im Freien
ausgelegt. Damit die Solarpumpe funktionieren kann, muss sich das
Solarmodul in direktem Sonnenlicht benden.
• Diese Solarpumpe ist mit einem Akkupack ausgestattet und kann über
einen Schalter am Steuergehäuse ein- und ausgeschaltet werden. Am
Abend spenden vier eingebaute weiße LEDs automatisch Licht, um den
Wasserstrahl in Szene zu setzen.
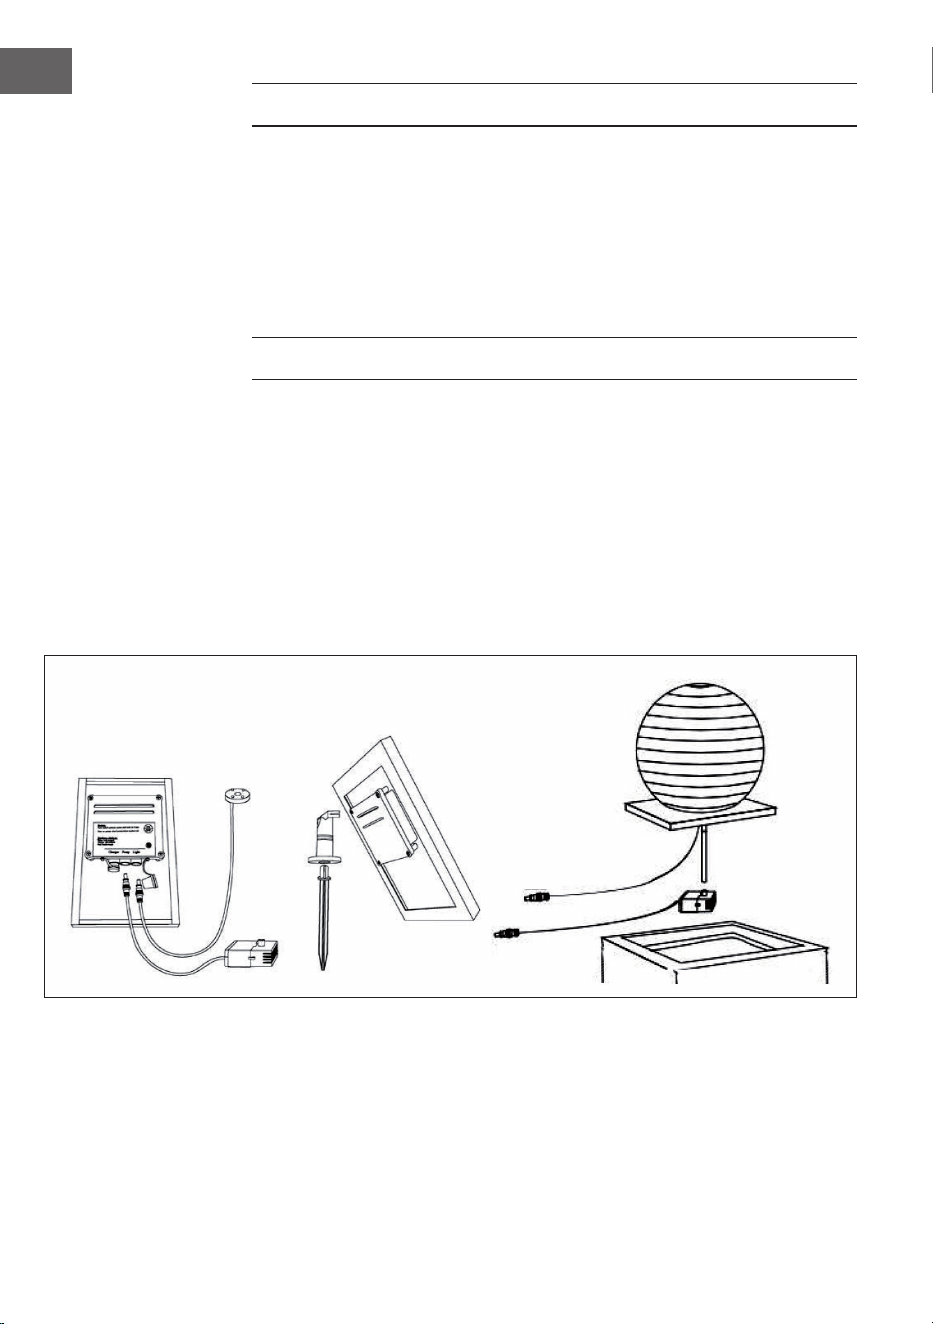
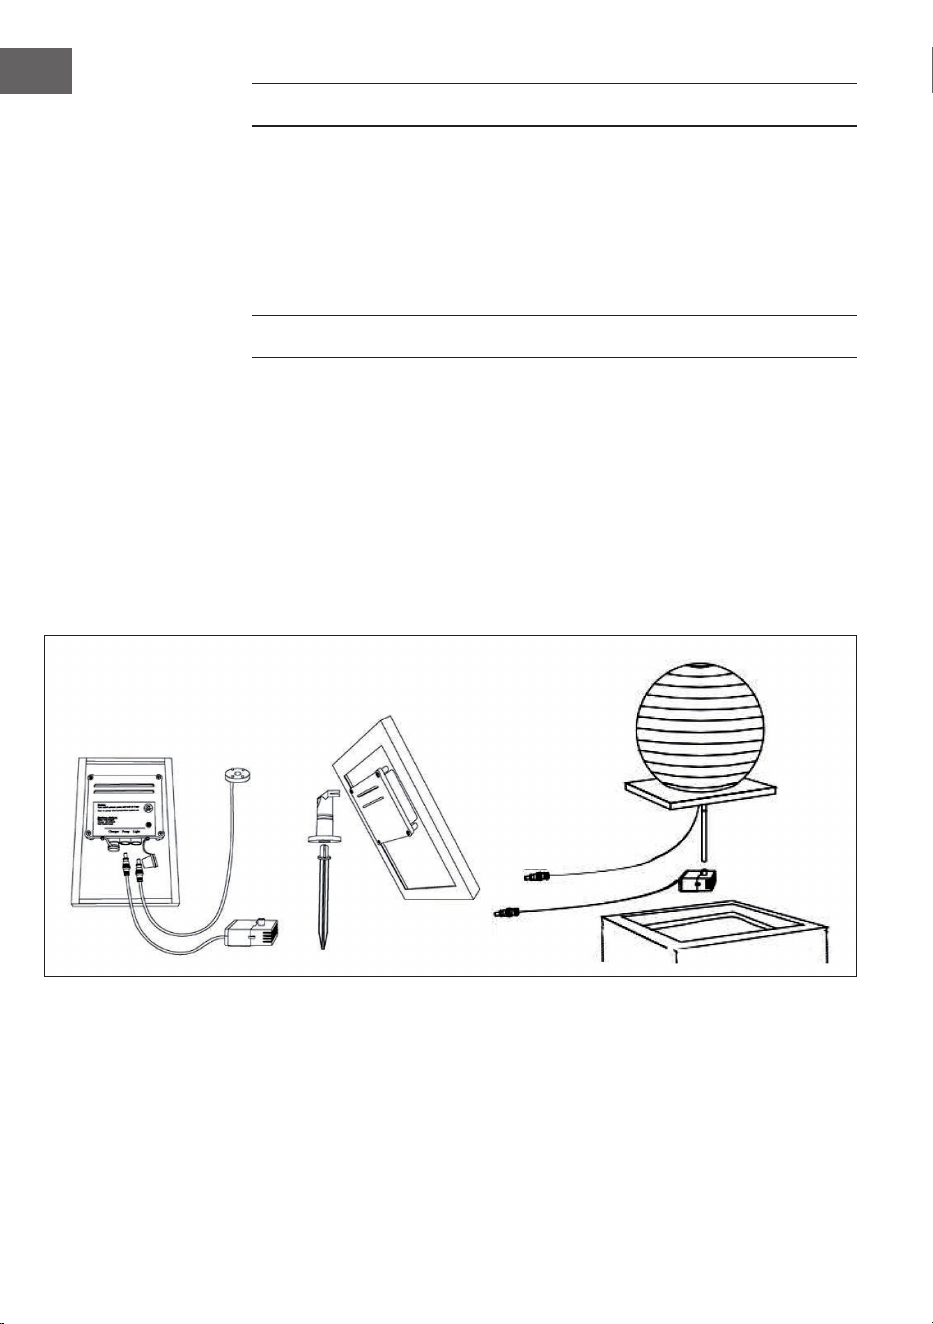
ZUSAMMENBAU
1 Packen Sie alle Teile vorsichtig aus.
2 Schließen Sie den Schlauch an die Entlüftung oben an der Pumpe an
und platzieren Sie die Pumpe unter Wasser. Stellen Sie sicher, dass sie
vollständig ins Wasser eingetaucht ist.
3 Schließen Sie das Pumpenkabel an den Anschluss am Steuergehäuse auf
der Rückseite des Solarmoduls an.
4 Schließen Sie das LED-Lichtkabel an den Anschluss am Steuergehäuses an.
5 Achten Sie bei der Auswahl des Platzes für das Solarmodul darauf, dass
direktes Sonnenlicht auf das Solarmodul fällt. Auf diese Weise wird der
eingebaute Akku aufgeladen.
6 Der Solarbrunnen ist nun betriebsbereit.
LED
Pumpe
Schlauch

5
DE
Wichtige Hinweise
• Setzen Sie das Solarmodul keinen Stößen oder Erschütterungen aus.
• Lassen Sie die Pumpe nicht trocken laufen.
• Heben Sie die Pumpe nicht am Kabel an.
• Benutzen Sie die Pumpe nur mit frischem, sauberen Wasser.
BEDIENUNG
Diese Solarpumpe ist in erster für den Betrieb bei Sonne ausgelegt und
speichert zusätzliche Energie im Akku, um einen späteren Einsatz bei
bewölktem Himmel oder bei Nacht zu ermöglichen. Die Pumpe schaltet am
nächsten Tag bei Sonneneinstrahlung automatisch in den Solarmodus. Die
Pumpe läuft niemals im Batteriebetrieb, bis Sie die entsprechende Taste
drücken.
Einschalten der Pumpe:
Drücken Sie kurz auf ie Taste, um die Pumpe einzuschalten. Die Pumpe läuft,
solange es der Akku hergibt und wechselt in den Solarmodus. Die Pumpe
arbeitet am nächsten Tag automatisch weiter, sobald die Sonne scheint.
Schnelles Auaden des Akkus:
Halten Sie die Taste 3 Sekunden lang gedrückt, um die Pumpe bei
Sonneneinstrahlung auszuschalten und die volle Sonnenenergie auf den Akku
zu laden, damit sie später auf Abruf genutzt werden kann.
Anzeige des Batteriestatus:
• Grün: Der Akku ist voll geladen. Die Pumpe läuft ca. 6-8 Stunden.
• Orange: Der Akku ist halb aufgeladen. Die Pumpe läuft ca. 2-6 Stunden.
• Rot: Der Akku muss aufgeladen werden. Die Pumpe läuft weniger als 1
Stunde.
Hinweis: Um die Batterie zu schützen, schalten Sie die Pumpe nicht häug
manuell ein. Die Kontrollleuchte leuchtet beim Laden des Akkus.
6
DE
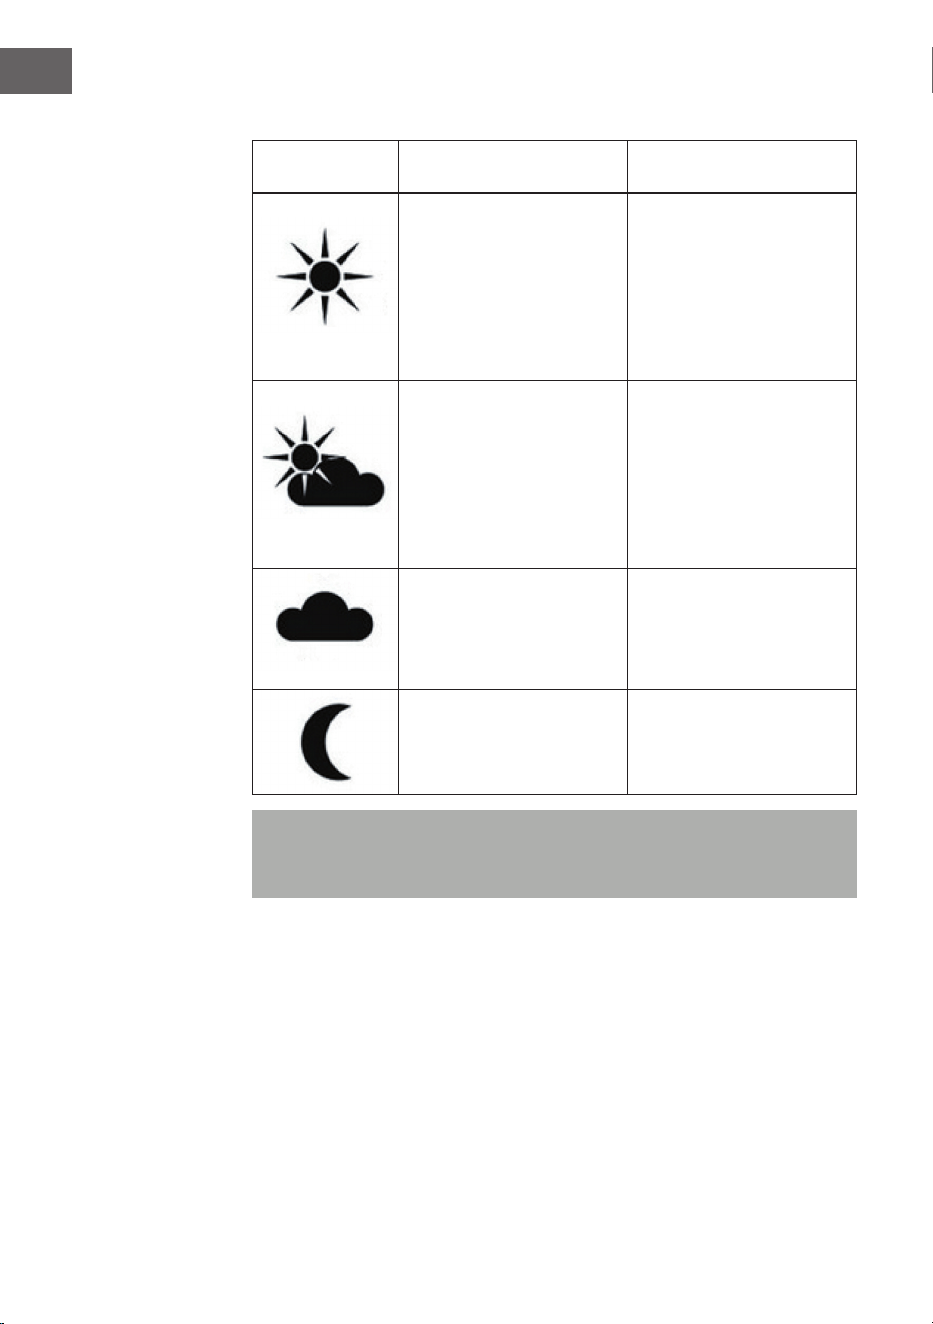
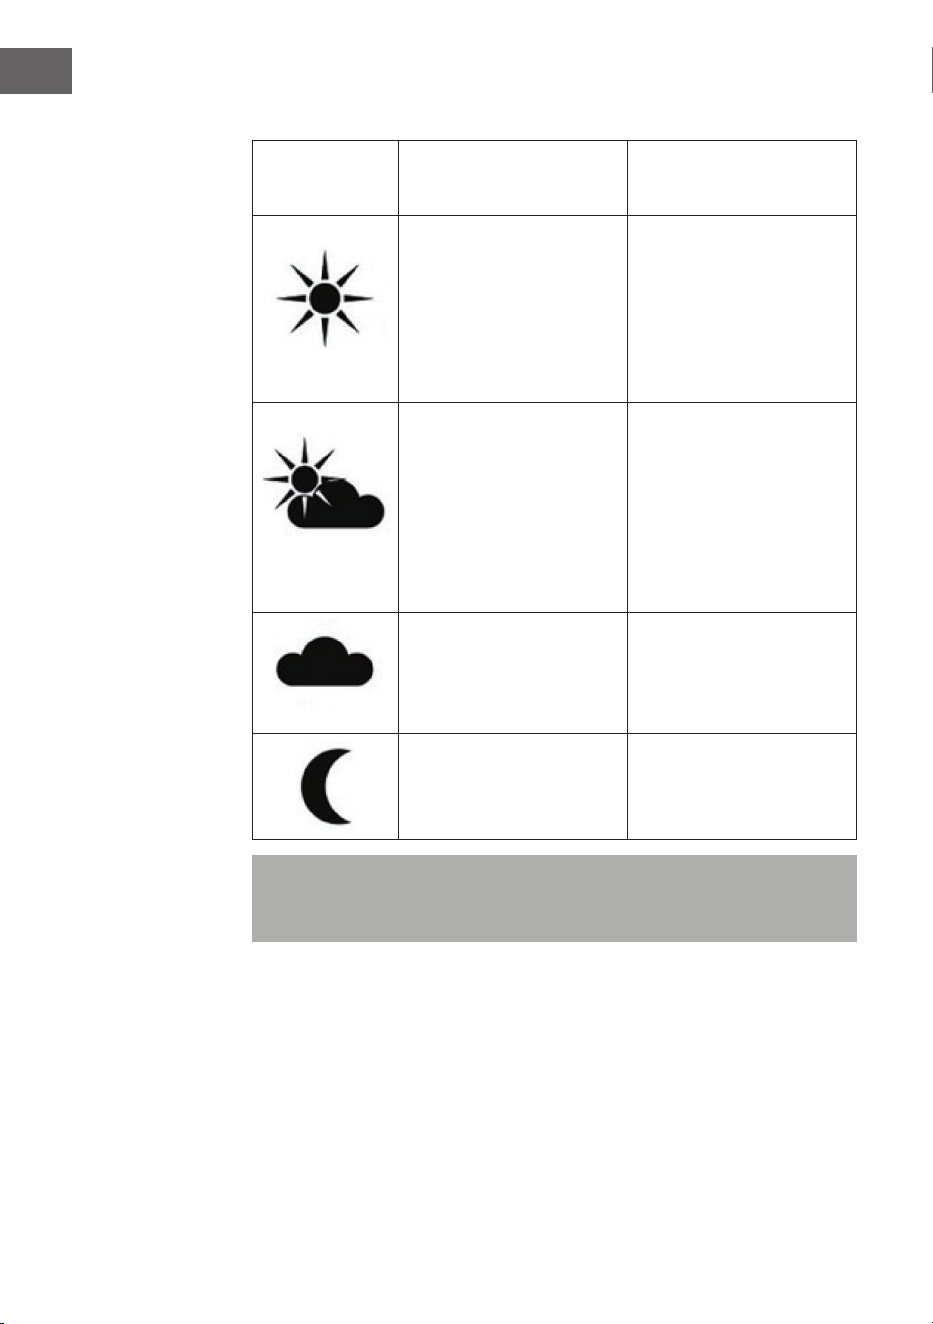
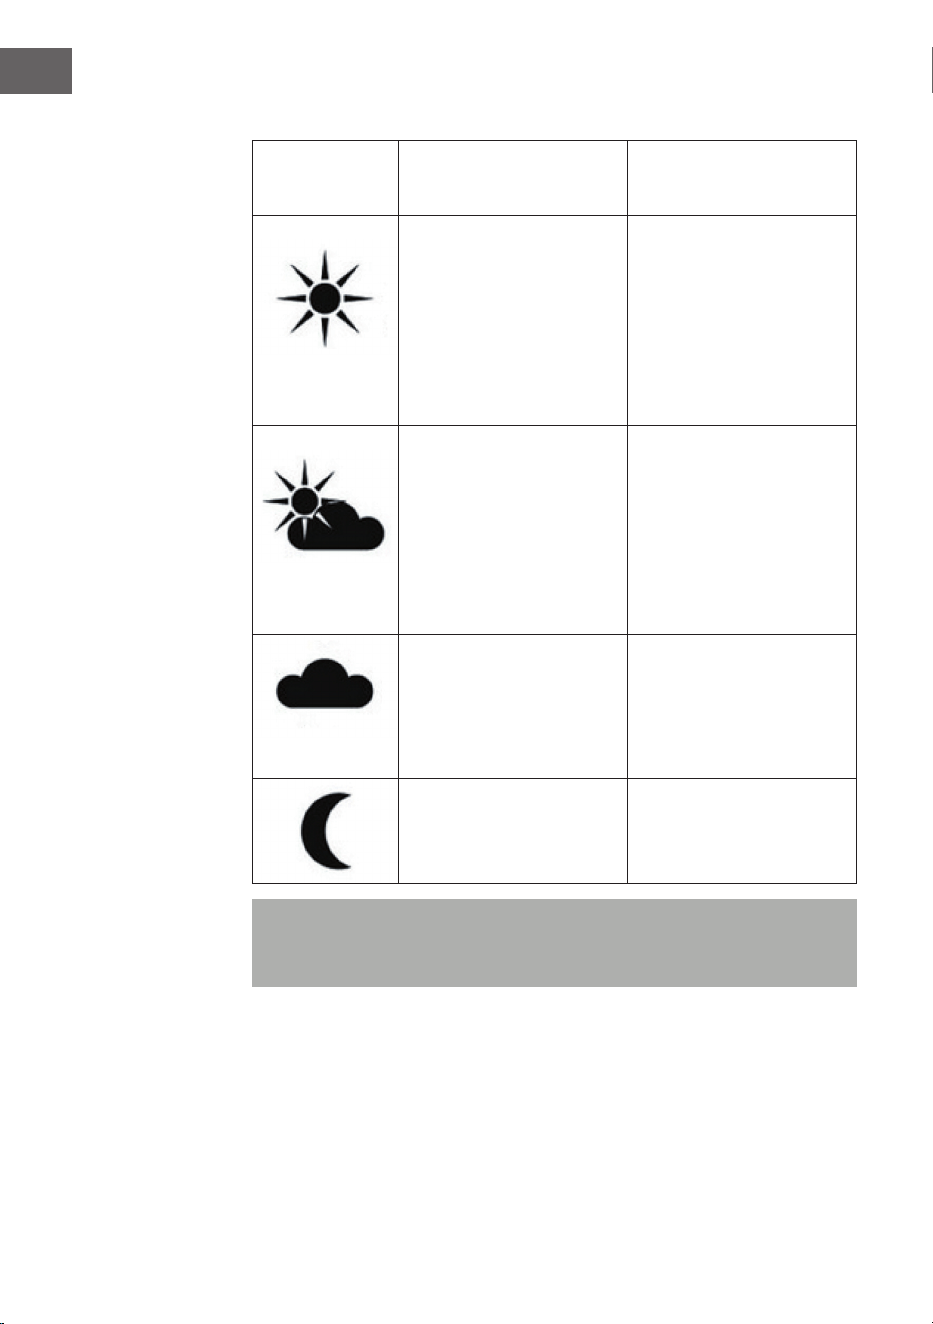
Pumpenleistung wei verschiedenen Wetterszenarien
Wetter
Pumpe ist an. Überschüssige
Energie ießt in den Akku.
Pumpe ist aus. Die komplette
Energie ießt in den Akku.
Die Sonnenenergie lässt
die Pumpe laufen und lädt
den Akku. Falls Wolken
kommen läuft die Pumpe
trotzdem weiter. Ohne
Sonne läuft die Pumpe
etwa noch eine halbe
Stunde weiter.
Nach etwa 1 Tag ist der
Akku voll aufgeladen.
Die Sonnenenergie
lässt die Pumpe laufen.
Überschüssige Energie lädt
den Akku. Falls Wolken
kommen läuft die Pumpe
trotzdem weiter. Ohne
Sonne läuft die Pumpe nur
noch kurz weiter.
Nach etwa 2-3 Tagen ist
der Akku voll aufgeladen.
Die Pumpe läuft nur,
solange der Akku noch
Energie liefert. Sobald der
Akku alle ist, stoppt die
Pumpe-
Der Akku braucht mehrere
Tage für eine volle
Auadung.
Die Pumpe läuft nicht
und der Akku wird nicht
aufgeladen.
Der Akku wird nicht
aufgeladen.
Hinweis: Wenn die Pumpe bei wolkigem Himmel oder bei Nacht stoppt,
drücken Sie auf die Taste, um die Pumpe laufen zu lassen, solange es die
Akkuleistung hergibt. Die LEDs leuchten nur bei Nacht.

7
DE
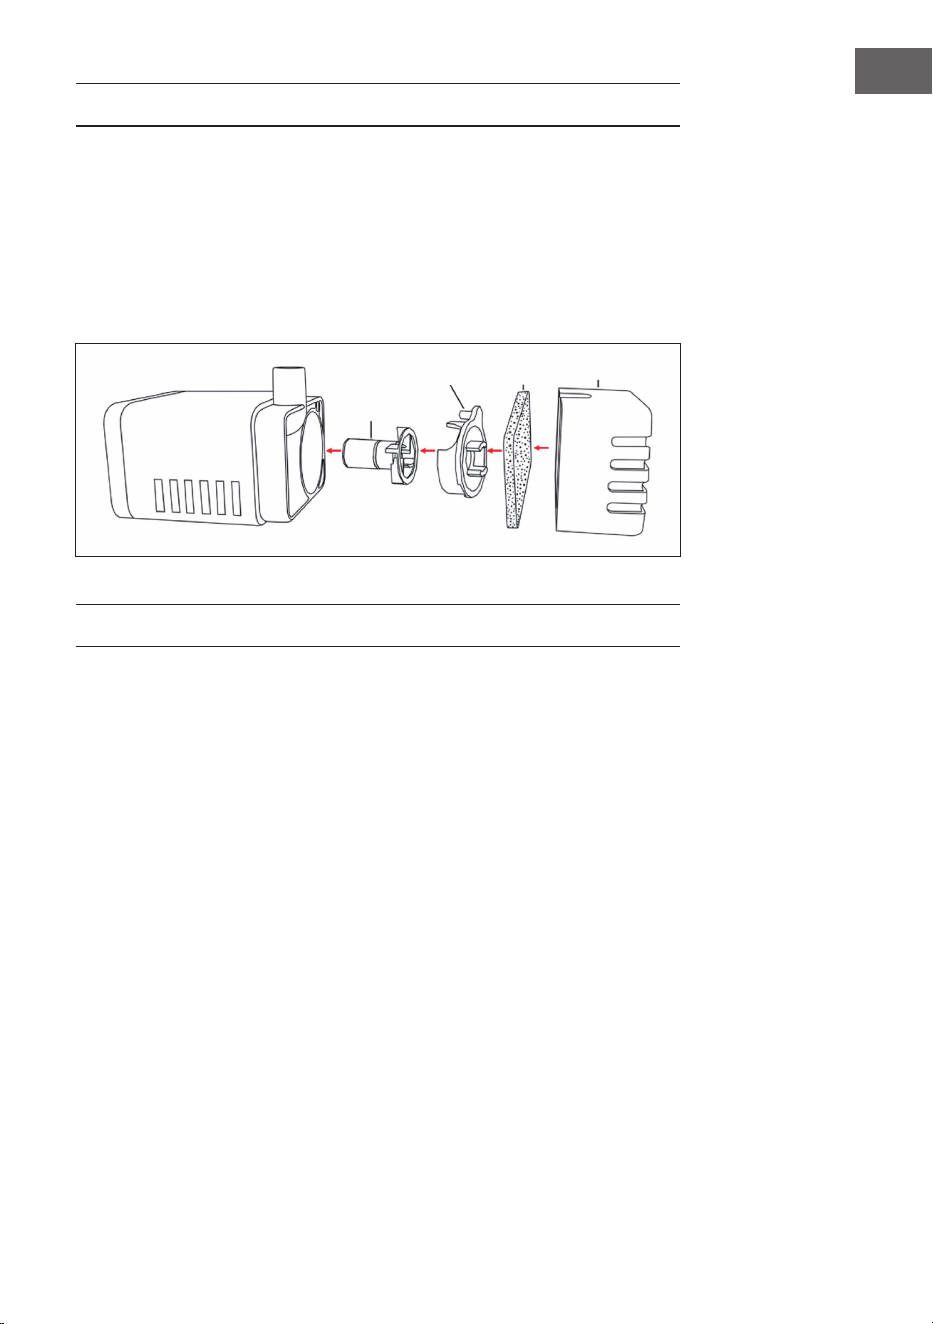
REINIGUNG UND PFLEGE
Pumpe: Wenn die Pumpe nach einiger Zeit an Leistung verliert oder ihre
Arbeit einstellt, überprüfen Sie die Ablagerung von Sedimenten, Kalk oder
Schmutz im Filter. Entfernen Sie die Frontplatte und die Abdeckung. Reinigen
Sie beide Teile und den Filter mit frischem Wasser.
Solarmodul: Die Platte sollte regelmäßig mit einem weichen Tuch gereinigt
werden. Reinigen Sie die Platte regelmäßig, um eine optimale Umwandlung
der Sonnenenergie zu gewährleisten.
PROBLEMLÖSUNG
Die Pumpe funktioniert nicht, auch wenn das Solarmodul in vollem
Sonnenlicht steht.
• Keine Verbindung zum Solarmodul. Überprüfen Sie die Verbindung zum
Solarmodul.
• Laufrad ist blockiert. Um die Pumpe zu reinigen, entfernen Sie die
Frontplatte und das Flügelrad. Verwenden Sie eine kleine Bürste oder
einen Wasserdampf, um Rückstände zu entfernen.
Die Pumpe funktioniert, aber es läuft kein Wasser durch den Brunnenkopf.
• Überprüfen Sie, ob sich Sedimente oder Ablagerungen in den Rohren oder
im Filter gebildet haben und reinigen Sie die Rohre und den Filter.
Flügelrad
Abdeckung Filter Frontplatte
8
DE
NACH DEM BETRIEB
• Bitte laden Sie den Akku mindestens einen Tag lang unter direkter
Sonneneinstrahlung auf, wenn Sie die Solarpumpe zum ersten Mal
benutzen oder wenn Sie die Solarpumpe für einen Winter einlagern.
• Um eine lange Lebensdauer des Akkus zu gewährleisten, laden Sie die
Pumpe voll und entfernen Sie sie Solarmodul, bevor Sie den Brunnen
einlagern.
HINWEISE ZUR ENTSORGUNG
Wenn es in Ihrem Land eine gesetzliche Regelung
zur Entsorgung von elektrischen und elektronischen
Geräten gibt, weist dieses Symbol auf dem Produkt
oder auf der Verpackung darauf hin, dass dieses
Produkt nicht im Hausmüll entsorgt werden darf.
Stattdessen muss es zu einer Sammelstelle für das
Recycling von elektrischen und elektronischen Geräten
gebracht werden. Durch regelkonforme Entsorgung
schützen Sie die Umwelt und die Gesundheit
Ihrer Mitmenschen vor negativen Konsequenzen.
Informationen zum Recycling und zur Entsorgung
dieses Produkts, erhalten Sie von Ihrer örtlichen
Verwaltung oder Ihrem Hausmüllentsorgungsdienst.
Dieses Produkt enthält Batterien. Wenn es in Ihrem
Land eine gesetzliche Regelung zur Entsorgung von
Batterien gibt, dürfen die Batterien nicht im Hausmüll
entsorgt werden. Informieren Sie sich über die
örtlichen Bestimmungen zur Entsorgung von Batterien.
Durch regelkonforme Entsorgung schützen Sie die
Umwelt und die Gesundheit Ihrer Mitmenschen vor
negativen Konsequenzen.

9
DE
SPEZIELLE ENTSORGUNGSHINWEISE FÜR
VERBRAUCHER IN DEUTSCHLAND
Entsorgen Sie Ihre Altgeräte fachgerecht. Dadurch wird gewährleistet, dass
die Altgeräte umweltgerecht verwertet und negative Auswirkungen auf die
Umwelt und menschliche Gesundheit vermieden werden. Bei der Entsorgung
sind folgende Regeln zu beachten:
• Jeder Verbraucher ist gesetzlich verpichtet, Elektro- und
Elektronikaltgeräte (Altgeräte) sowie Batterien und Akkus
getrennt vom Hausmüll zu entsorgen. Sie erkennen die
entsprechenden Altgeräte durch folgendes Symbol der
durchgestrichene Mülltonne (WEEE-Symbol).
• Sie haben Altbatterien und Altakkumulatoren, die nicht vom Altgerät
umschlossen sind, sowie Lampen, die zerstörungsfrei aus dem Altgerät
entnommen werden können, vor der Abgabe an einer Entsorgungsstelle
vom Altgerät zerstörungsfrei zu trennen.
• Bestimmte Lampen und Leuchtmittel fallen ebenso unter das Elektro- und
Elektronikgesetz und sind dementsprechend wie Altgeräte zu behandeln.
Ausgenommen sind Glühbirnen und Halogenlampen. Entsorgen Sie
Glühbirnen und Halogenlampen bitte über den Hausmüll, sofern sie nicht
das WEEE-Symbol tragen.
• Jeder Verbraucher ist für das Löschen von personenbezogenen Daten auf
dem Elektro- bzw. Elektronikgerät selbst verantwortlich.
Rücknahmepicht der Vertreiber
Vertreiber mit einer Verkaufsäche für Elektro- und Elektronikgeräte von
mindestens 400 Quadratmetern sowie Vertreiber von Lebensmitteln mit einer
Gesamtverkaufsäche von mindestens 800 Quadratmetern, die mehrmals im
Kalenderjahr oder dauerhaft Elektro- und Elektronikgeräte anbieten und auf
dem Markt bereitstellen, sind verpichtet,
1 bei der Abgabe eines neuen Elektro- oder Elektronikgerätes an einen
Endnutzer ein Altgerät des Endnutzers der gleichen Geräteart, das
im Wesentlichen die gleichen Funktionen wie das neue Gerät erfüllt,
am Ort der Abgabe oder in unmittelbarer Nähe hierzu unentgeltlich
zurückzunehmen und
2 auf Verlangen des Endnutzers Altgeräte, die in keiner äußeren
Abmessung größer als 25 Zentimeter sind, im Einzelhandelsgeschäft
oder in unmittelbarer Nähe hierzu unentgeltlich zurückzunehmen; die
Rücknahme darf nicht an den Kauf eines Elektro- oder Elektronikgerätes
geknüpft werden und ist auf drei Altgeräte pro Geräteart beschränkt.

10
DE
• Bei einem Vertrieb unter Verwendung von Fernkommunikationsmitteln
ist die unentgeltliche Abholung am Ort der Abgabe auf Elektro- und
Elektronikgeräte der Kategorien 1, 2 und 4 gemäß § 2 Abs. 1 ElektroG,
nämlich „Wärmeüberträger“, „Bildschirmgeräte“ (Oberäche von mehr
als 100 cm²) oder „Großgeräte“ (letztere mit mindestens einer äußeren
Abmessung über 50 Zentimeter) beschränkt. Für andere Elektro- und
Elektronikgeräte (Kategorien 3, 5, 6) ist eine Rückgabemöglichkeit in
zumutbarer Entfernung zum jeweiligen Endnutzer zu gewährleisten.
• Altgeräte dürfen kostenlos auf dem lokalen Wertstoffhof oder in
folgenden Sammelstellen in Ihrer Nähe abgegeben werden: www.take-e-
back.de
• Für Elektro- und Elektronikgeräte der Kategorien 1, 2 und 4 bieten
wir auch die Möglichkeit einer unentgeltlichen Abholung am Ort der
Abgabe. Beim Kauf eines Neugeräts haben Sie die Möglichkeit, eine
Altgerätabholung über die Webseite auszuwählen.
• Batterien können überall dort kostenfrei zurückgegeben werden, wo sie
verkauft werden (z. B. Super-, Bau-, Drogeriemarkt). Auch Wertstoff- und
Recyclinghöfe nehmen Batterien zurück. Sie können Batterien auch per
Post an uns zurücksenden. Altbatterien in haushaltsüblichen Mengen
können Sie direkt bei uns von Montag bis Freitag zwischen 08:00 und
16:00 Uhr unter der folgenden Adresse unentgeltlich zurückgeben:
Chal-Tec Fulllment GmbH
Norddeutschlandstr. 3
47475 Kamp-Lintfort
• Wichtig zu beachten ist, dass Lithiumbatterien aus Sicherheitsgründen
vor der Rückgabe gegen Kurzschluss gesichert werden müssen (z. B. durch
Abkleben der Pole).
• Finden sich unter der durchgestrichenen Mülltonne auf der Batterie
zusätzlich die Zeichen Cd, Hg oder Pb ist das ein Hinweis darauf, dass die
Batterie gefährliche Schadstoffe enthält. (»Cd« steht für Cadmium, »Pb«
für Blei und »Hg« für Quecksilber).
Hinweis zur Abfallvermeidung
Indem Sie die Lebensdauer Ihrer Altgeräte verlängern, tragen Sie dazu bei,
Ressourcen efzient zu nutzen und zusätzlichen Müll zu vermeiden. Die
Lebensdauer Ihrer Altgeräte können Sie verlängern, indem Sie defekte
Altgeräte reparieren lassen. Wenn sich Ihr Altgerät in gutem Zustand bendet,
könnten Sie es spenden, verschenken oder verkaufen.

11
EN
Dear Customer,
Congratulations on purchasing this equipment.
Please read this manual carefully and take care of the
following hints to avoid damages. Any failure caused
by ignoring the items and cautions mentioned in the
instruction manual is not covered by our warranty and
any liability. Scan the QR code to get access to the latest
user mannual and other information about the product
CONTENT
Notes about the Product 12
Assembly 12
Operation 13
Cleaning and Care 15
Troubleshooting 15
Storage 16
Hints on Disposal 16
TECHNICAL DATA
Item number 10033273, 10033274
Power supply (Battery) 6 V DC
Power consumtion 2 W
Max. Water ow 200 Liter/Hour
MANUFACTURER & IMPORTER (UK)
Manufacturer:
Chal-Tec GmbH, Wallstrasse 16, 10179 Berlin, Germany.
Importer for Great Britain:
Berlin Brands Group UK Limited
PO Box 42
272 Kensington High Street
London, W8 6ND
United Kingdom

12
EN
NOTES ABOUT THE PRODUCT
• The solar pump is designed for fountain, pond or outdoor use. In order for
the solar pump to operate, the solar panel needs to be in direct sunlight.
• This solar pump is equipped with battery pack and can be switched on
and off by a touch switch on the control housing. In evening, four built-in
white LEDs will give light automatically to enhance the beauty scene of the
water jet.
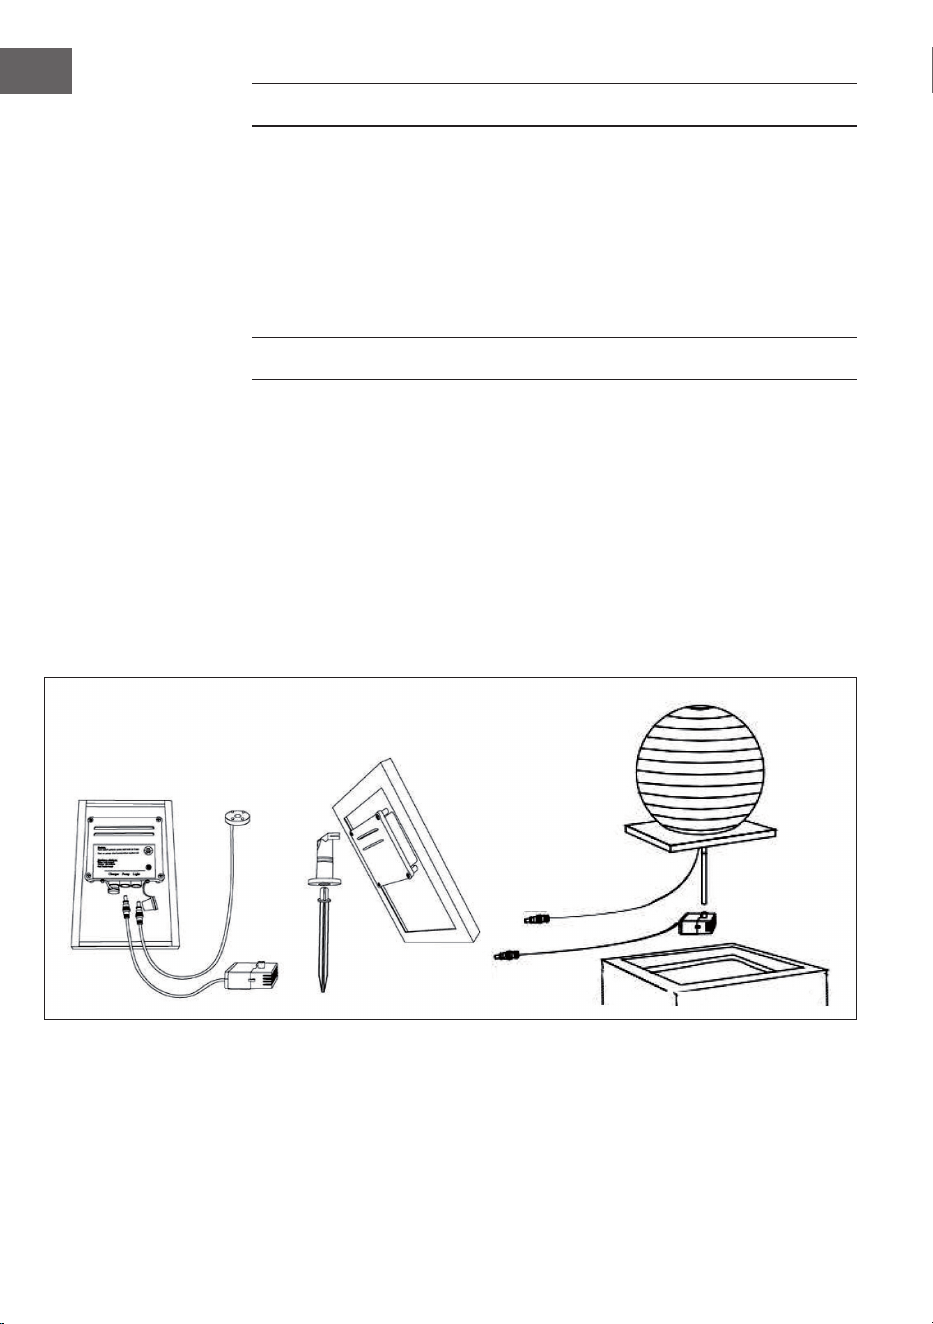
ASSEMBLY
1 Unpack all components carefully;
2 Connect the hose from the top jug to the vent of the pump and place the
pump underwater and make sure that, it is fully immersed in water;
3 Connect the pump cable to the socket of the control housing on the rear
side of the solar panel;
4 Connect the LED light cable to the socket of the control housing;
5 Make sure direct sunlight shines on the solar module when selecting the
right place for the solar module. By this way the built-in battery will be
charged.
6 The solar fountain is now ready to use.
LED
Pump
Hose

13
EN
Important Hints
• Do not strike the solar panel
• Do not let the pump run dry for long time
• Do not lift the pump by the power cord
• Operate in freshwater only
OPERATION
This solar pump is designed primarily to operate in sunlight hours and always
charge extra energy to battery to allow use later “on demand” in cloudy day
or night time. The pump will turn to solar mode automatically on next day in
sunlight hours. The pump will never run on battery mode until your press the
button.
Turn on the pump:
Short press to turn on the pump, the pump will run certain hours (ref to
battery status) and turn to solar mode. The pump will operate automatically
next day insunlight hours.
Quick charge full energy to the battery:
Press and hold on 3 seconds to Turn OFF the pump in sunlight hours and
charge the full solar energy to battery to allow use later of “on demand”.
Battery status:
• Green: battery is full charged. Pump will run around 6-8 hours.
• Orange: battery is half charged. Pump will run around 2-6 hours.
• Red: battery needs charges. Pump will run less than 1 hour.
Note: In order to protect battery, don’t manually turn on the pump
frequently. The indicator light is solid when charging battery.
14
EN
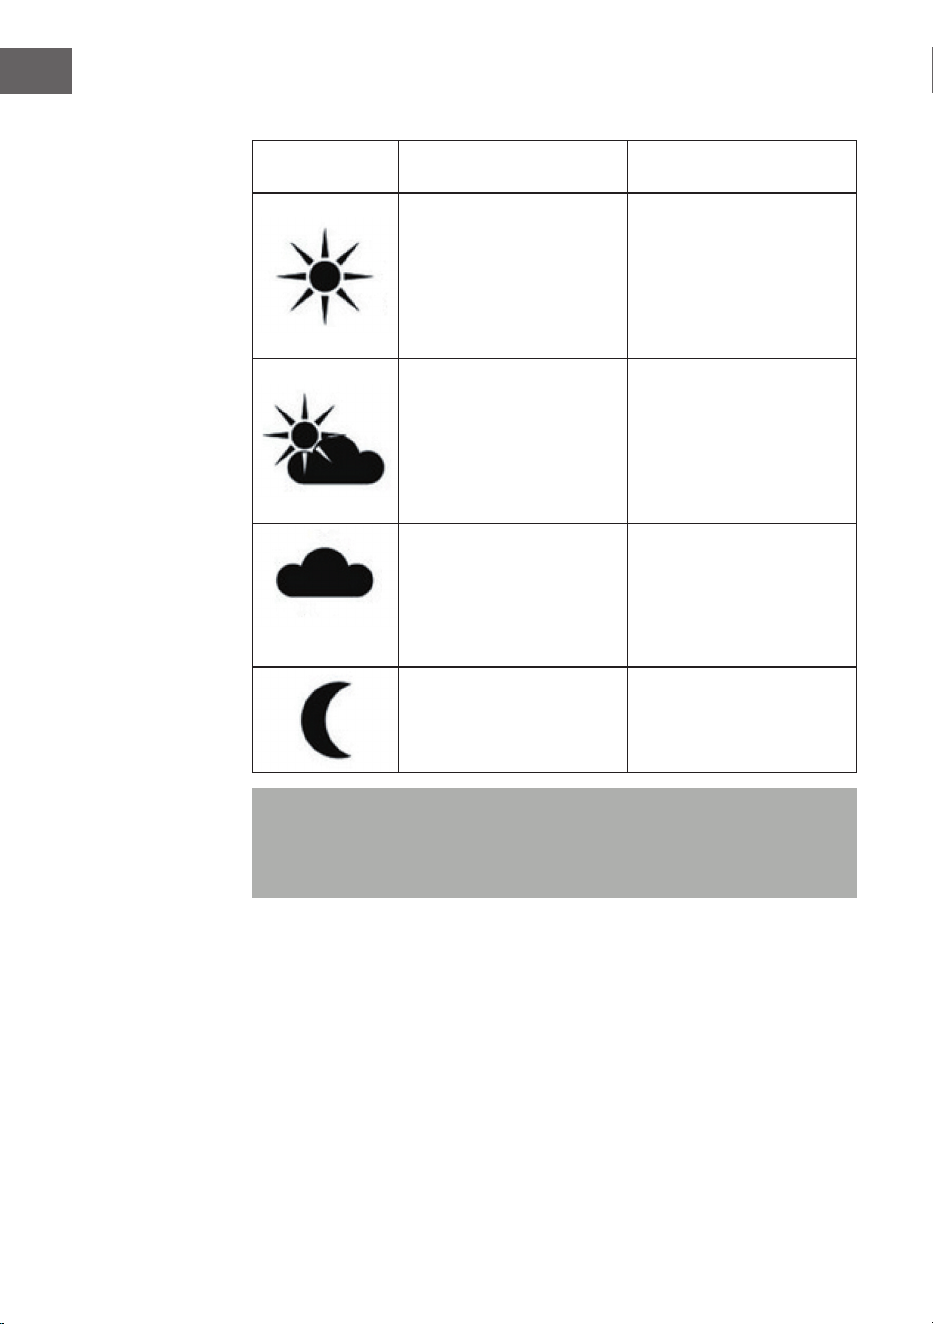
Pump performance in different weather condition:
Weather
Pump on. Charge extra solar
energy to battery.
Pump off. Charge full solar
energy to battery.
Solar runs the pump and
charges the battery. Pump
performance is maintained
when the clouds pass.
Pump runs on fully half
an hour longer into the
evening.
Battery should be fully
charged in 1day.
Solar runs the pump and
supplies extra energy to
the battery. Performance
is maintained when the
clouds pass. Pump will only
run a shorter period of
time into the evening.
Battery will take 2 to 3
days to fully charge.
Pump will only run when
there is sufcient power
from the battery. Little or
no battery charging occurs
so pump performance is
not maintained.
Battery will take several
days to fully charge.
No solar power is available,
pump will not run and
battery will not charge.
Battery will not charge.
Note: If the pump stop running when cloudy or night, and you want to force
the pump running for certain hours, short press to turn on the pump, the
pump will run certain hours until battery at. LED lights will only function at
night.

15
EN
CLEANING AND CARE
Pump: lf, after a period of time, the pump starts to lose power or stops working
check for the build up of sediment, scale or dirt in the lter. Remove the pump
cover and the impeller cover. Clean them and the lter by fresh water.
Solar panel: The panel should be cleaned periodically with a soft tissue.
Regular cleaning of the panel is advised to maintain optimum conversion of the
sun’s energy into direct current.
TROUBLESHOOTING
Pump does not operate even thought the solar module is in full sunlight.
• No connection to the solar module – check connection to the solar module.
• Impeller is blocked – To clean the pump, remove the front plate and the
impeller. Use a small brush or steam of water to remove any debris.
Pump does operate but there is no water running through the
fountainhead.
• Check for the build up of sediment or scale in the tubes or the lter- clean
the tubes and the lter.
Impeller
Cover Filter Front plate

16
EN
STORAGE
• Please charge the battery for at least a day in direct sunlight when the rst
time using the solar pump or when you store the solar pump for a winter.
• In order to keep the battery long life, please charge the solar pump to fully
charge status and plug-out the pump from the solar panel before you store
the solar pump into warehouse.
HINTS ON DISPOSAL
If there is a legal regulation for the disposal of electrical
and electronic devices in your country, this symbol
on the product or on the packaging indicates that this
product must not be disposed of with household waste.
Instead, it must be taken to a collection point for the
recycling of electrical and electronic equipment. By
disposing of it in accordance with the rules, you are
protecting the environment and the health of your
fellow human beings from negative consequences. For
information about the recycling and disposal of this
product, please contact your local authority or your
household waste disposal service.
This product contains batteries. If there is a legal
regulation for the disposal of batteries in your country,
the batteries must not be disposed of with household
waste. Find out about local regulations for disposing
of batteries. By disposing of them in accordance with
the rules, you are protecting the environment and
the health of your fellow human beings from negative
consequences.

17
ES
Estimado cliente:
Le felicitamos por la adquisición de este producto. Lea
atentamente el siguiente manual y siga cuidadosamente
las instrucciones de uso con el n de evitar posibles
daños. La empresa no se responsabiliza de los daños
ocasionados por un uso indebido del producto o por
haber desatendido las indicaciones de seguridad.
Escanee el código QR para obtener acceso al manual
de usuario más reciente y otra información sobre el
producto:
ÍNDICE DE CONTENIDOS
Notas sobre el producto 18
Montaje 18
Funcionamiento 19
Limpieza y cuidado 21
Solución de problemas 21
Después de la operación 22
Retirada del aparato 22
DATOS TÉCNICOS
Número de artículo
10033273, 10033274
Alimentación (batería recargable)
6 V DC
Consumo de energía
2 W
Max. velocidad de ujo
200 litros/ hora
FABRICANTE E IMPORTADOR (REINO UNIDO)
Fabricante:
Chal-Tec GmbH, Wallstraße 16, 10179 Berlín, Alemania.
Importador para Gran Bretaña:
Berlin Brands Group UK Limited
PO Box 42
272 Kensington High Street
London, W8 6ND
United Kingdom
18
ES
NOTAS SOBRE EL PRODUCTO
• La bomba solar está diseñada para su uso en fuentes, estanques o al
aire libre. Para que la bomba solar funcione, el módulo solar debe estar
expuesto a la luz solar directa.
• Esta bomba solar está equipada con un paquete de baterías y se puede
encender y apagar mediante un interruptor en la carcasa del control. Por
la noche, cuatro LEDs blancos incorporados iluminan automáticamente el
chorro de agua en la escena.
MONTAJE
1. Desembale cuidadosamente todas las piezas.
2. Conecte la manguera al respiradero en la parte superior de la bomba y
coloque la bomba bajo el agua. Asegúrese de que esté completamente
sumergido en agua.
3. Conecte el cable de la bomba al conector de la caja de control situada en la
parte posterior del módulo solar.
4. Conecte el cable de luz LED al conector de la caja de control.
5. Al seleccionar la ubicación del módulo solar, asegúrese de que la luz
directa del sol cae sobre el módulo solar. Esto carga la batería incorporada.
6. El fuente solar ya está listo para funcionar.
LED
Bomba
Manguera

19
ES
Notas importantes
• No exponga el módulo solar a golpes o vibraciones.
• No deje que la bomba funcione en seco.
• No levante la bomba por el cable.
• Utilice la bomba sólo con agua fresca y limpia.
FUNCIONAMIENTO
Esta bomba solar está diseñada inicialmente para funcionar bajo el sol y
almacena energía adicional en la batería para permitir su uso posterior en
cielos nublados o por la noche. La bomba cambia automáticamente al modo
solar al día siguiente cuando el sol está brillando. La bomba nunca funcionará
en modo batería hasta que usted presione el botón apropiado.
Encender la bomba:
Pulse brevemente el botón para encender la bomba. La bomba funciona
mientras dure la batería y cambia al modo solar. La bomba sigue funcionando
automáticamente al día siguiente tan pronto como brilla el sol.
Carga rápida de la batería:
Presione y mantenga presionado el botón durante 3 segundos para apagar la
bomba a la luz del sol y cargar la batería con energía solar completa para su uso
posterior a demanda.
Indicación del estado de la batería:
• Verde: La batería está completamente cargada. La bomba funciona
durante aprox. 6-8 horas.
• Naranja: La batería está medio cargada. La bomba funciona durante aprox.
2-6 horas.
• Rojo: La batería debe estar cargada. La bomba funciona durante menos de
1 hora.
Nota: Para proteger la batería, no encienda la bomba manualmente con
frecuencia. La lámpara de control se enciende cuando se está cargando la
batería.
20
ES
Rendimiento de la bomba en diversos escenarios climáticos
Tiempo
La bomba está encendida. El
exceso de energía uye hacia
la batería.
La bomba está apagada.
Toda la energía uye hacia la
batería.
La energía solar
mantiene la bomba en
funcionamiento y carga
la batería. Si vienen
nubes, la bomba seguirá
funcionando. Sin sol, la
bomba sigue funcionando
durante media hora.
Después de
aproximadamente
1 día, la batería está
completamente cargada.
La energía solar
mantiene la bomba en
funcionamiento. El exceso
de energía carga la batería.
Si vienen nubes, la bomba
seguirá funcionando. Sin
sol, la bomba sólo funciona
durante un corto periodo
de tiempo.
Después de 2-3
días la batería está
completamente cargada.
La bomba sólo funciona
mientras la batería siga
suministrando energía. En
cuanto se agota la batería,
la bomba se detiene.
La batería tarda varios
días en cargarse
completamente.
La bomba no funciona
y la batería no se está
cargando.
La batería no se está
cargando.
Nota: Si la bomba se detiene en tiempo nublado o por la noche, pulse el
botón para mantener la bomba en funcionamiento durante el tiempo que
dure la batería. Los LEDs sólo se encienden de noche.
21
ES
LIMPIEZA Y CUIDADO
Bomba: Si la bomba pierde potencia o deja de funcionar después de algún
tiempo, compruebe si hay sedimentos, cal o suciedad en el ltro. Retire el panel
frontal y la cubierta. Limpie ambas partes y el ltro con agua fresca.
Panel solar: La placa debe ser limpiada regularmente con un paño suave.
Limpie la placa regularmente para asegurar una conversión óptima de la
energía solar.
SOLUCIÓN DE PROBLEMAS
La bomba no funciona incluso cuando el panel solar está a plena luz del sol.
• No hay conexión con el módulo solar. Compruebe la conexión con el
módulo solar.
• El impulsor está bloqueado. Para limpiar la bomba, retire la placa frontal y
el impulsor. Utilice un cepillo pequeño o vapor para eliminar los residuos.
La bomba funciona, pero no hay agua corriendo por la boca del pozo.
• Compruebe si se han formado sedimentos o depósitos en las tuberías o en
el ltro y limpie las tuberías y el ltro.
Turbina
Revestir Filtro Placa frontal
22
ES
DESPUÉS DE LA OPERACIÓN
• Por favor, cargue la batería durante al menos un día bajo la luz directa
del sol cuando utilice la bomba solar por primera vez o cuando la guarde
durante el invierno.
• Para asegurar una larga duración de la batería, cargue completamente la
bomba y retire el panel solar antes de almacenar el fuente.
RETIRADA DEL APARATO
Si en su país existe una disposición legal relativa a la
eliminación de aparatos eléctricos y electrónicos, este
símbolo estampado en el producto o en el embalaje
advierte que no debe eliminarse como residuo
doméstico. En lugar de ello, debe depositarse en un
punto de recogida de reciclaje de aparatos eléctricos y
electrónicos. Una gestión adecuada de estos residuos
previene consecuencias potencialmente negativas
para el medio ambiente y la salud de las personas.
Puede consultar más información sobre el reciclaje y
la eliminación de este producto contactando con su
administración local o con su servicio de recogida de
residuos.
Este producto contiene baterías. Si en su país existe
una disposición legal relativa a la eliminación de
baterías, estas no deben eliminarse como residuo
doméstico. Infórmese sobre la normativa vigente
relacionada con la eliminación de baterías. Una gestión
adecuada de estos residuos previene consecuencias
potencialmente negativas para el medio ambiente y la
salud de las personas.

23
FR
Cher client,
Toutes nos félicitations pour l’acquisition de ce nouvel
appareil. Veuillez lire attentivement les instructions
suivantes de branchement et d’utilisation an d’éviter
d’éventuels dommages. Le fabricant ne saurait être tenu
pour responsable des dommages dus au non-respect
des consignes de sécurité et à la mauvaise utilisation de
l’appareil. Scannez le QR-Code pour accéder à la dernière
version du mode d‘emploi et à d‘autres informations
concernant le produit:
SOMMAIRE
Notes sur le produit 24
Assemblage 24
Utilisation 25
Nettoyage et entretien 27
Résolution des problèmes 27
Après utilisation 28
Conseils pour le recyclage 28
FICHE TECHNIQUE
Numéro d'article
10033273, 10033274
Alimentation (batterie)
6 V DC
Consommation
2 W
Débit max
200 litres/heure
FABRICANT ET IMPORTATEUR (UK)
Fabricant :
Chal-Tec GmbH, Wallstraße 16, 10179 Berlin, Allemagne.
Importateur pour la Grande Bretagne :
Berlin Brands Group UK Limited
PO Box 42
272 Kensington High Street
London, W8 6ND
United Kingdom
24
FR
NOTES SUR LE PRODUIT
• La pompe solaire est conçue pour une utilisation dans une fontaine, un
étang ou à l‘extérieur. Pour que la pompe solaire fonctionne, le panneau
solaire doit être éclairé directement par le soleil.
• Cette pompe solaire est équipée d‘un bloc batterie et peut être activée et
désactivée via un interrupteur situé sur le boîtier de commande. Le soir,
quatre LED blanches intégrées éclairent automatiquement le jet d‘eau.
ASSEMBLAGE
1 Déballez toutes les pièces avec soin.
2 Raccordez le tuyau à l’aération située en haut de la pompe et placez-la
sous l’eau. Assurez-vous qu‘elle est complètement immergée dans l‘eau.
3 Branchez le câble de la pompe sur la prise du boîtier de commande située à
l‘arrière du module solaire.
4 Branchez le câble du voyant LED à la prise du boîtier de commande.
5 Lors du choix de l‘emplacement du panneau solaire, assurez-vous que
le panneau solaire sera directement exposé au soleil. Cela chargera la
batterie intégrée.
6 La fontaine solaire est maintenant prête à fonctionner.
LED
Pompe
Tuyau

25
FR
Remarques importantes
• N‘exposez pas le panneau solaire à des chocs ou secousses.
• Ne laissez pas la pompe fonctionner à sec.
• Ne soulevez pas la pompe par le câble.
• Utilisez la pompe avec de l‘eau fraîche et propre uniquement.
UTILISATION
Cette pompe solaire est conçue pour fonctionner au soleil et stocke de
l‘énergie supplémentaire dans la batterie pour une utilisation ultérieure par
temps nuageux ou la nuit. La pompe passe automatiquement en mode solaire
le jour suivant en plein soleil. La pompe ne fonctionne jamais sur batterie sauf
si vous appuyez sur le bouton correspondant.
Allumage de la pompe :
Appuyez brièvement sur le bouton pour allumer la pompe. La pompe
fonctionne aussi longtemps que la batterie le permet et bascule en mode
solaire. La pompe continue à fonctionner le lendemain automatiquement dès
que le soleil brille.
Recharge rapide de la batterie :
Appuyez sur le bouton et maintenez-le pendant 3 secondes pour éteindre la
pompe en fonctionnement en plein soleil et charger toute l‘énergie solaire
dans la batterie an qu‘elle puisse être utilisée plus tard sur demande.
Afchage du niveau de la batterie :
• Vert : La batterie est complètement chargée. La pompe peut fonctionner
pendant environ 6-8 heures.
• Orange : La batterie est à moitié chargée. La pompe peut fonctionner
pendant environ 2-6 heures.
• Rouge : La batterie a besoin d‘être chargée. La pompe peut encore
fonctionner mais moins d‘1 heure.
Remarque : Pour protéger la batterie, ne l‘allumez pas fréquemment et
manuellement. Le voyant s‘allume lors du chargement de la batterie.
26
FR
Puissance de la pompe en fonction de divers scenarii météo
Météo
La pompe est allumée.
L'énergie excédentaire va
dans la batterie.
La pompe est à l'arrêt.
toute l'énergie coule dans la
batterie.
L'énergie solaire fait
fonctionner la pompe et
charge la batterie. S'il y
a des nuages, la pompe
fonctionnera quand même.
Sans le soleil, la pompe
continuera à fonctionner
pendant environ une demi-
heure.
Il faut une journée environ
pour que la batterie se
recharge complètement.
L'énergie solaire fait
fonctionner la pompe.
L'énergie excédentaire
charge la batterie. S'il y
a des nuages, la pompe
fonctionnera quand même.
Sans soleil, la pompe ne
fonctionnera que pendant
une courte période.
Il faut environ 2-3
jours pour recharger
complètement la batterie.
La pompe ne fonctionne
que tant que la batterie
fournit toujours de
l'énergie. Une fois que la
batterie est déchargée, la
pompe s'arrête.
Il faut plusieurs jours pour
recharger complètement la
batterie.
La pompe ne fonctionne
pas et la batterie ne se
recharge pas.
La batterie ne se recharge
pas.
Remarque : Si la pompe s‘arrête par temps nuageux ou la nuit, appuyez sur
le bouton pour faire fonctionner la pompe tant que la batterie a encore de la
charge. Les LED ne s‘allument que la nuit.

27
FR
NETTOYAGE ET ENTRETIEN
Pompe : Au bout d‘un certain temps, si la pompe perd de la puissance ou cesse
de fonctionner, vériez s‘il y a des dépôts de calcaire ou de poussière dans le
ltre. Retirez la plaque avant et le cache. Nettoyez les deux parties et le ltre
avec de l‘eau douce.
Module solaire : il est nécessaire de nettoyer régulièrement la plaque avec un
chiffon humide. Nettoyez régulièrement la plaque pour assurer une conversion
optimale de l‘énergie solaire.
RÉSOLUTION DES PROBLÈMES
La pompe ne fonctionne pas même quand le module solaire est en plein
ensoleillement.
• Pas de connexion au module solaire. Vériez la connexion au module
solaire.
• La turbine est bloquée. Pour nettoyer la pompe, retirez la plaque avant
et la turbine. Utilisez une petite brosse ou de la vapeur pour enlever les
débris.
La pompe fonctionne mais l‘eau ne coule pas par la tête de la fontaine.
• Vériez la présence de sédiments ou de débris dans les tuyaux ou le ltre
et nettoyez les tuyaux et le ltre.
Turbine
Cache Filtre
Plaque frontale

28
FR
APRÈS UTILISATION
• Veuillez charger la batterie au soleil pendant au moins une journée lors
de la première utilisation de la pompe solaire ou lors de son stockage
hivernal.
• Pour prolonger la durée de vie de la batterie, chargez complètement la
pompe et retirez le panneau solaire avant de ranger la fontaine.
CONSEILS POUR LE RECYCLAGE
S‘il existe une réglementation pour l‘élimination ou le
recyclage des appareils électriques et électroniques
dans votre pays, ce symbole sur le produit ou sur
l‘emballage indique que cet appareil ne doit pas
être jeté avec les ordures ménagères. Vous devez le
déposer dans un point de collecte pour le recyclage des
équipements électriques et électroniques. La mise au
rebut conforme aux règles protège l‘environnement
et la santé de vos semblables des conséquences
négatives. Pour plus d‘informations sur le recyclage
et l‘élimination de ce produit, veuillez contacter votre
autorité locale ou votre service de recyclage des
déchets ménagers.
Ce produit contient des piles. S‘il existe une
réglementation pour l‘élimination ou le recyclage
des piles dans votre pays, vous ne devez pas les jeter
avec les ordures ménagères. Renseignez-vous sur les
dispositions locales relatives à la collecte des piles
usagées. La mise au rebut conforme aux règles protège
l‘environnement et la santé de vos semblables des
conséquences négatives.
29
IT
Gentile cliente,
La ringraziamo per aver acquistato il dispositivo. La
preghiamo di leggere attentamente le seguenti istruzioni
per l’uso e di seguirle per evitare possibili danni tecnici.
Non ci assumiamo alcuna responsabilità per danni
scaturiti da una mancata osservazione delle avvertenze
di sicurezza e da un uso improprio del dispositivo.
Scansionare il codice QR seguente, per accedere al
manuale d’uso più attuale e per ricevere informazioni sul
prodotto.
INDICE
Informazioni sul prodotto 30
Montaggio 30
Funzionamento 31
Pulizia e manutenzione 33
Risoluzione dei problemi 33
Dopo l’uso 34
Smaltimento 34
DATI TECNICI
Codice articolo
10033273, 10033274
Alimentazione (batteria)
6 V DC
Consumo elettrico
2 W
Velocità di usso max.
200 l/ora
PRODUTTORE E IMPORTATORE (UK)
Produttore:
Chal-Tec GmbH, Wallstraße 16, 10179 Berlino, Germania.
Importatore per la Gran Bretagna:
Berlin Brands Group UK Limited
PO Box 42
272 Kensington High Street
London, W8 6ND
United Kingdom
30
IT
INFORMAZIONI SUL PRODOTTO
• La pompa solare è progettata per l’utilizzo nelle fontane, nei laghetti o
all’aperto. Afnché la pompa solare funzioni, il modulo solare deve essere
esposto alla luce diretta del sole.
• La pompa solare è dotata di una batteria ed è possibile accenderla e
spegnerla tramite un interruttore sull’alloggiamento di controllo. Di
sera quattro LED bianchi integrati emettono luce in automatico per
trasformare il getto d’acqua in uno spettacolo.
MONTAGGIO
1 Rimuovere con cautela l’imballaggio da tutti i componenti.
2 Collegare il tubo alla presa d’aria sulla parte superiore della pompa e
posizionare la pompa sott’acqua. Assicurarsi che sia completamente
immersa in acqua.
3 Collegare il cavo della pompa presente all’attacco dell’alloggiamento sul
retro del modulo solare.
4 Collegare il cavo della luce a LED all’attacco dell’alloggiamento.
5 Quando si seleziona la posizione del modulo solare, assicurarsi che la
luce diretta del sole cada sul modulo solare. In questo modo la batteria
integrata si ricarica.
6 La fontana solare è ora pronta all’uso.
LED
Pompa
Tubo

31
IT
Note importanti
• Non esporre il modulo solare a urti o vibrazioni.
• Non far funzionare a secco la pompa.
• Non sollevare la pompa per il cavo.
• Utilizzare la pompa solo con acqua fresca e pulita.
FUNZIONAMENTO
Questa pompa solare è progettata principalmente per il funzionamento
con il sole e immagazzina energia extra nella batteria al ne di consentirne
un utilizzo successivo in caso di cielo nuvoloso o durante la notte. Il giorno
seguente, con la luce diretta del sole, la pompa passa automaticamente in
modalità solare. La pompa non funzionerà mai a batteria no a quando non si
preme il rispettivo pulsante.
Accensione della pompa:
Premere brevemente il pulsante per accendere la pompa. La pompa funziona
ntantoché la batteria non si esaurisce e passa in modalità solare. Il giorno
seguente, la pompa continuerà a funzionare automatico no a quando il sole
splende.
Ricarica rapida della batteria:
Tenere premuto il pulsante per 3 secondi per spegnere la pompa con la luce del
sole e caricare l’intera energia solare nella batteria in modo che possa essere
utilizzata successivamente su richiesta.
Indicatori dello stato della batteria:
• Verde: la batteria è completamente carica. La pompa funziona per ca. 6-8
ore.
• Arancione: la batteria è carica a metà. La pompa funziona per ca. 2-6 ore.
• Rosso: la batteria deve essere caricata. La pompa funziona per meno di 1
ora.
Nota: Per proteggere la batteria, non accendere spesso la pompa
manualmente. Le spie luminose si illuminano durante la carica della batteria.

32
IT
Prestazioni della pompa in caso di diversi scenari meteorologici
Condizione
meteorologica
La pompa è accesa. Nella
batteria vi è sovraccarico di
energia.
La pompa è spenta. Nella
batteria circola energia
completa.
L’energia solare consente
alla pompa di funzionare
e carica la batteria. Se
è nuvoloso, la pompa
continua a funzionare.
Senza sole, la pompa
continua a funzionare
ancora per circa mezz’ora.
Dopo circa 1 giorno la
batteria è completamente
carica.
L’energia solare consente
alla pompa di funzionare.
L’energia in eccesso carica
la batteria. Se è nuvoloso,
la pompa continua a
funzionare. Senza sole,
la pompa continua a
funzionare ancora per un
po’.
Dopo circa 2 -3 giorni la
batteria è completamente
carica.
La pompa funziona solo
no a quando la batteria
fornisce energia. Non
appena la batteria è
scarica, la pompa si arresta.
La batteria necessita di
diversi giorni per una
ricarica completa.
La pompa non funziona e la
batteria non si carica.
La batteria non si carica.
Nota: se la pompa si arresta in caso di cielo nuvoloso o durante la notte,
premere il pulsante per far funzionare la pompa ntantoché la potenza della
batteria non si esaurisce. I LED si illuminano solo durante la notte.

33
IT
PULIZIA E MANUTENZIONE
Pompa: se la pompa perde potenza col tempo oppure se interrompe l’attività,
controllare eventuale depositi di sedimenti, calcare o sporcizia nel ltro.
Rimuovere la piastra frontale della copertura. Pulire entrambi i componenti e il
ltro con acqua fresca.
Modulo solare: la piastra dovrebbe essere pulita regolarmente con un panno
morbido. Pulire regolarmente la piastra per garantire una trasformazione
ottimale dell’energia solare.
RISOLUZIONE DEI PROBLEMI
La pompa non funziona anche se il modulo solare è esposto alla luce del
sole.
• Nessun collegamento al modulo solare. Vericare il collegamento al
modulo solare.
• Il girante è bloccato. Per pulire la pompa, rimuovere la piastra frontale e la
ventola. Utilizzare una piccola spazzola oppure del vapore per rimuovere i
residui.
La pompa funziona, ma non scorre acqua nella testa del pozzo.
• Vericare che non si siano formati sedimenti o depositi nei tubi o nel ltro
e pulire i tubi e il ltro.
Ventola
Copertura Filtro Piastra frontale
34
IT
DOPO L’USO
• Caricare la batteria alla luce diretta del sole per almeno un giorno, se si
utilizza la pompa solare per la prima volta o se si mette via quest’ultima per
una stagione invernale.
• Per garantire la lunga durata della batteria, caricare completamente la
pompa e rimuovere il modulo solare prima di mettere via la fontana.
SMALTIMENTO
Se nel proprio paese si applicano le regolamentazioni
inerenti lo smaltimento di dispositivi elettrici ed
elettronici, questo simbolo sul prodotto o sulla
confezione segnala che questi prodotti non possono
essere smaltiti con i riuti normali e devono essere
portati a un punto di raccolta di dispositivi elettrici ed
elettronici. Grazie al corretto smaltimento dei vecchi
dispositivi si tutela il pianeta e la salute delle persone
da possibili conseguenze negative. Informazioni
riguardanti il riciclo e lo smaltimento di questi prodotti
si ottengono presso l’amministrazione locale oppure il
servizio di gestione dei riuti domestici.
Il prodotto contiene batterie. Se nel proprio paese si
applicano le regolamentazioni inerenti lo smaltimento
di batterie, non possono essere smaltite con i normali
riuti domestici. Preghiamo di informarvi sulle
regolamentazioni vigenti sullo smaltimento delle
batterie. Grazie al corretto smaltimento dei vecchi
dispositivi si tutela l’ambiente e la salute delle persone
da conseguenze negative.