
B5K-1157_ref_K_En_00© 2024 JVCKENWOOD Corporation
DMX4710S
DMX40S
DMX400S
MONITOR WITH RECEIVER
INSTRUCTION MANUAL
• Updated information (the latest Instruction Manual, system updates,
new functions, etc.) is available from
<https://www.kenwood.com/cs/ce/>.
Take the time to read through this instruction manual.
Familiarity with installation and operation procedures will help you obtain the best performance from your new
receiver.
For your records
Record the serial number, found on the back of the unit, in the spaces designated on the warranty card, and in the space
provided below. Refer to the model and serial numbers whenever you call upon your KENWOOD dealer for information or
service on the product.
Model DMX4710S / DMX40S / DMX400S Serial number
US Residence Only
Register Online
Register your KENWOOD product at www.kenwood.com/usa/

2
Contents
Before Use 4
Precautions ................................................................... 4
How to read this manual .........................................5
Basic Operations 6
Functions of the Buttons on the Front Panel ... 6
Turning on the Unit ................................................... 6
Getting Started............................................................ 7
Adjusting the volume ............................................... 8
Touch screen operations ......................................... 8
HOME screen descriptions ...................................... 9
Source selection screen descriptions .................. 9
Source control screen descriptions ...................11
Popup menu ..............................................................12
List screen ...................................................................12
APPS 13
Apple CarPlay Operation .......................................13
Android Auto™ Operation .....................................14
USB Mirroring Operation for iPhone .................15
USB Mirroring Operation for Android
Smartphone ...............................................................16
USB 18
Connecting a USB device ......................................18
USB Basic Operation ................................................18
Search Operation ......................................................20
Radio 21
Radio Basic Operation ............................................21
Memory Operation ..................................................22
Selecting Operation ................................................22
Traffic Information ...................................................23
SiriusXM® 24
SiriusXM® Basic Operation ....................................24
Storing Channels in Preset Memory ..................25
Preset select ...............................................................25
Direct search ..............................................................26
Category/Channel search ...................................... 26
Replay ...........................................................................27
SiriusXM Setup ..........................................................27
Bluetooth Control 31
Information for using Bluetooth® devices .......31
Register the Bluetooth device .............................32
Connection Setup ....................................................32
Playing Bluetooth Audio Device .........................33
Using Hands-Free Unit ............................................34
Hands-Free Setup ..................................................... 38
Other External Components 39
View Camera ..............................................................39
Maestro Features Operation .................................40

3English
Setting Up 42
Monitor Screen Setup ............................................. 42
System Setup .............................................................42
User Interface Setup ................................................ 43
Special Setup .............................................................43
Display Setup .............................................................44
AV Setup ......................................................................45
Connection Setup ....................................................46
Controlling Audio 47
Speaker/ X’over setup .............................................47
Controlling General Audio ....................................48
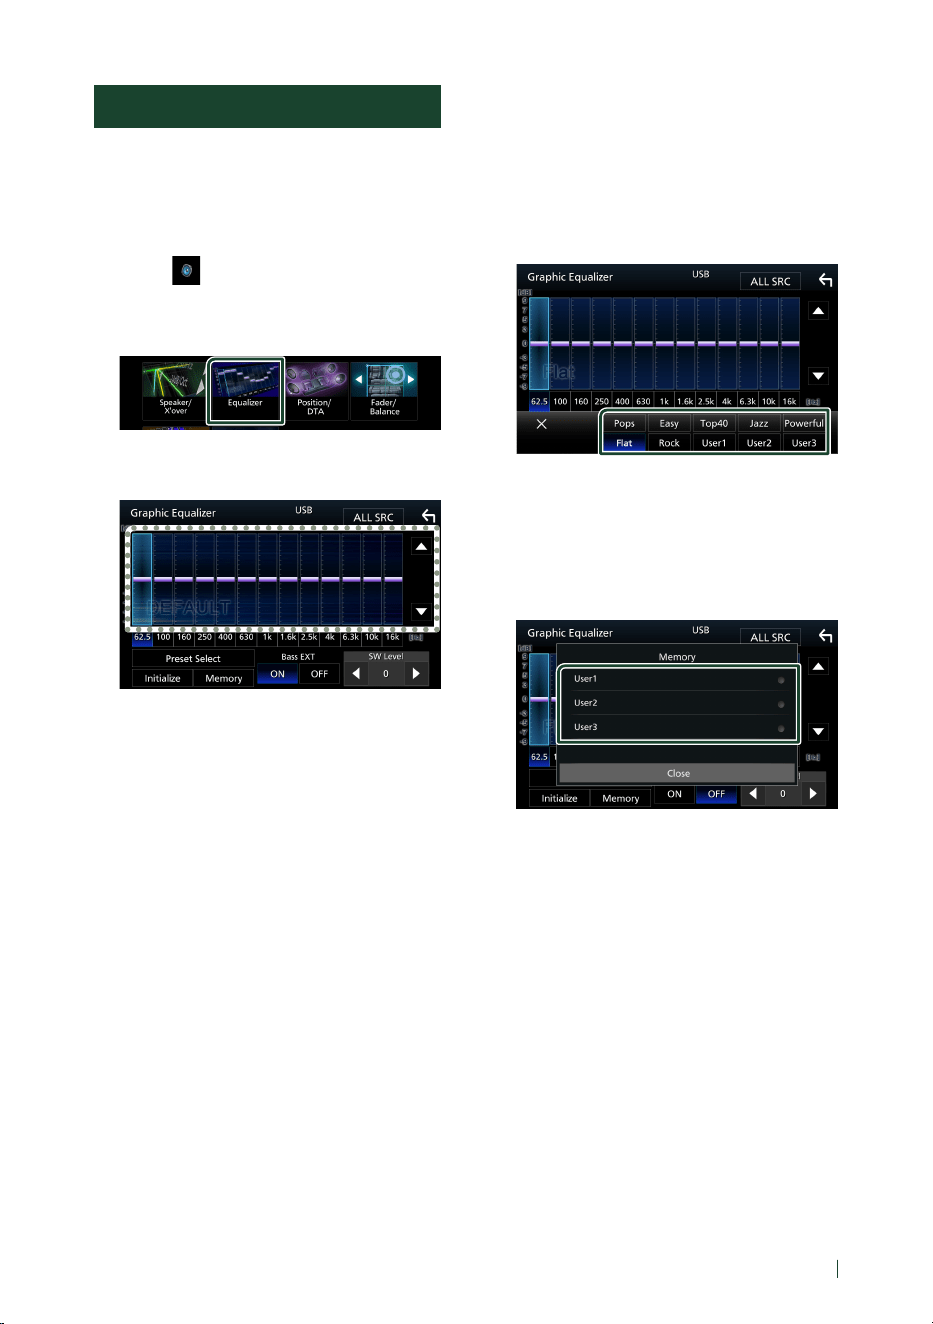
Equalizer Control ......................................................49
Volume Offset ............................................................50
Sound Effect ...............................................................50
Listening Position/ DTA ..........................................51
Remote control 52
Functions of the Remote control Buttons .......52
Connection/Installation 54
Before Installation ....................................................54
Installing the unit .....................................................55
Troubleshooting 60
Problems and Solutions .........................................60
Error Messages ..........................................................60
Appendix 62
Playable Media and Files........................................62
Specifications ............................................................. 63
About this Unit ..........................................................65
Before Use
4
Before Use
IMPORTANT
• Please read this manual carefully to ensure
proper use before using this product. It is
especially important that you read and observe
WARNINGS and CAUTIONS in this manual. Please
keep the manual in a safe and accessible place
for future reference.
Precautions
# WARNINGS
Ñ To prevent injury or re, take
the following precautions:
• To prevent a short circuit, never put or leave
any metallic objects (such as coins or metal
tools) inside the unit.
• Do not watch or x your eyes on the unit’s
display when you are driving for any extended
period.
• If you experience problems during installation,
consult your KENWOOD dealer.
Ñ Precautions on using this unit
• When you purchase optional accessories,
check with your KENWOOD dealer to make
sure that they work with your model and in
your area.
• You can select language to display menus,
audio le tags, etc. See User Interface Setup
(P.43).
• The Radio Data System or Radio Broadcast
Data System feature won’t work where the
service is not supported by any broadcasting
station.
Ñ Protecting the monitor
• To protect the monitor from damage, do not
operate the monitor using a ball point pen or
similar tool with the sharp tip.
Ñ Cleaning the unit
• If the faceplate of this unit is stained, wipe it
with a dry soft cloth such as a silicon cloth.
If the faceplate is stained badly, wipe the
stain o with a cloth moistened with neutral
cleaner, then wipe it again with a clean soft
dry cloth.
NOTE
• Applying spray cleaner directly to the unit may
aect its mechanical parts. Wiping the faceplate
with a hard cloth or using a volatile liquid such
as thinner or alcohol may scratch the surface or
erase screened print.
Ñ How To Reset Your Unit
• If the unit or the connected unit fails to
operate properly, reset the unit. Press the
<Reset> button.The unit returns to factory
settings.
Reset button
NOTE
• Disconnect the USB device before pressing the
<Reset> button. Pressing the <Reset> button
with the USB device connected can damage
the data stored in the USB device. For how to
disconnect the USB device, see Disconnect the
USB device (P.18).
• When the unit is turned on after resetting, the
Initial SETUP screen appears. See Initial setup
(P.7).
Ñ Acquiring GPS signal
The rst time you turn on this unit, you must
wait while the system acquires satellite signals
for the rst time. This process could take up
to several minutes. Make sure your vehicle
is outdoors in an open area away from tall
buildings and trees for fastest acquisition.
After the system acquires satellites for the rst
time, it will acquire satellites quickly each time
thereafter.
Before Use
5English
Ñ Caution for Smartphone Users
• Simultaneously running multiple applications
on your smartphone while screen sharing
places heavy demand on the microprocessor
of the phone, potentially aecting
communication and performance.
• For best results while pairing with your
KENWOOD receiver, please be sure to close
any unused applications.
How to read this manual
• The screens and panels shown in this manual are
examples used to provide clear explanations of the
operations.
For this reason, they may be dierent from the actual
screens or panels used, or some display patterns may
be dierent.
• Indication language: English indications are used
for the purpose of explanation. You can select the
indication language from the [SETUP] menu. See
User Interface Setup (P.43).
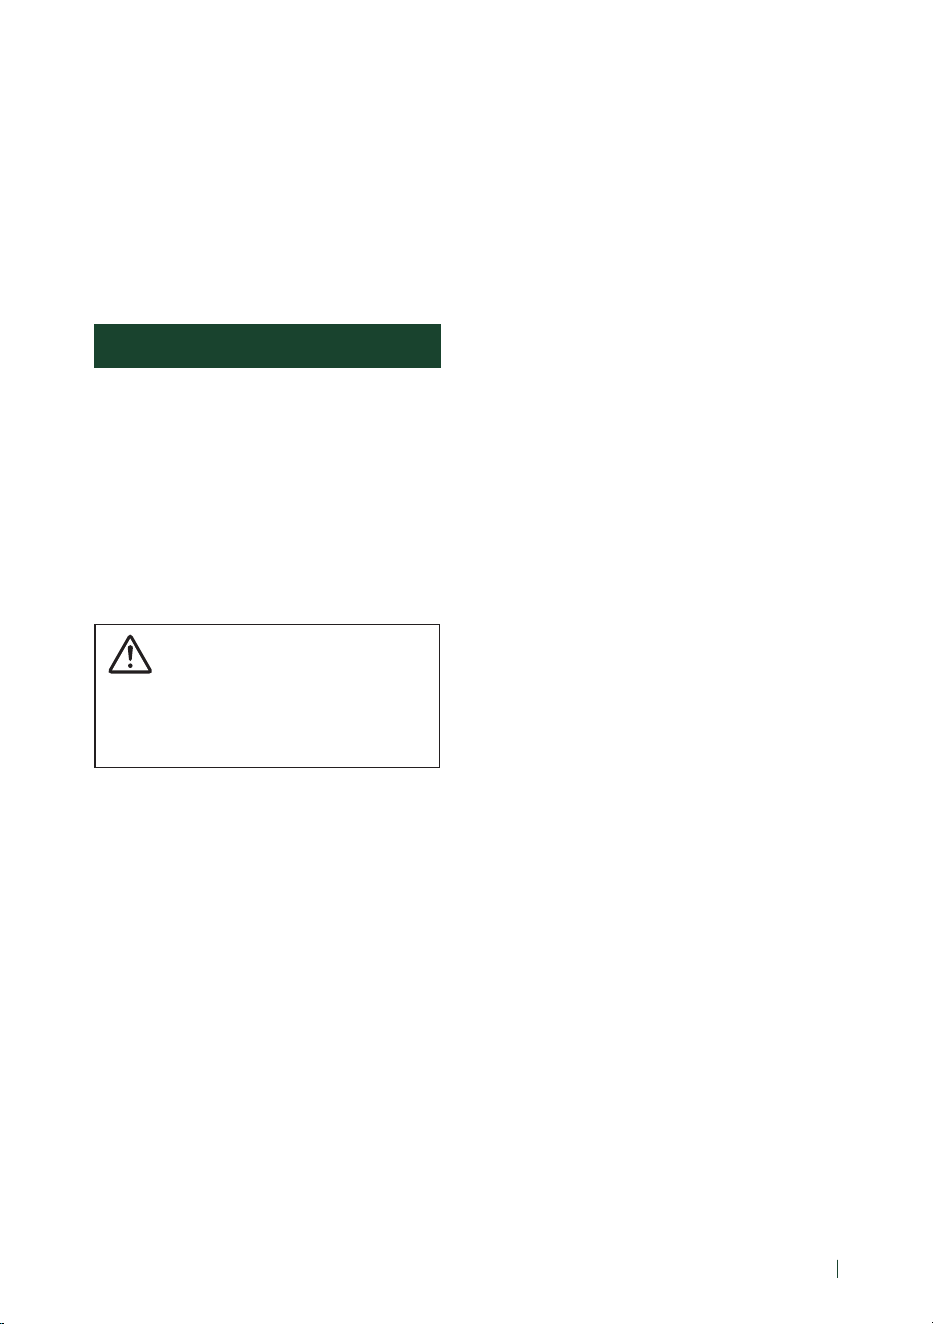
This symbol on the product means
there are important operating and
maintenance instructions in this
manual.
Be sure to carefully read
instructions in this manual.
Basic Operations
6
Basic Operations
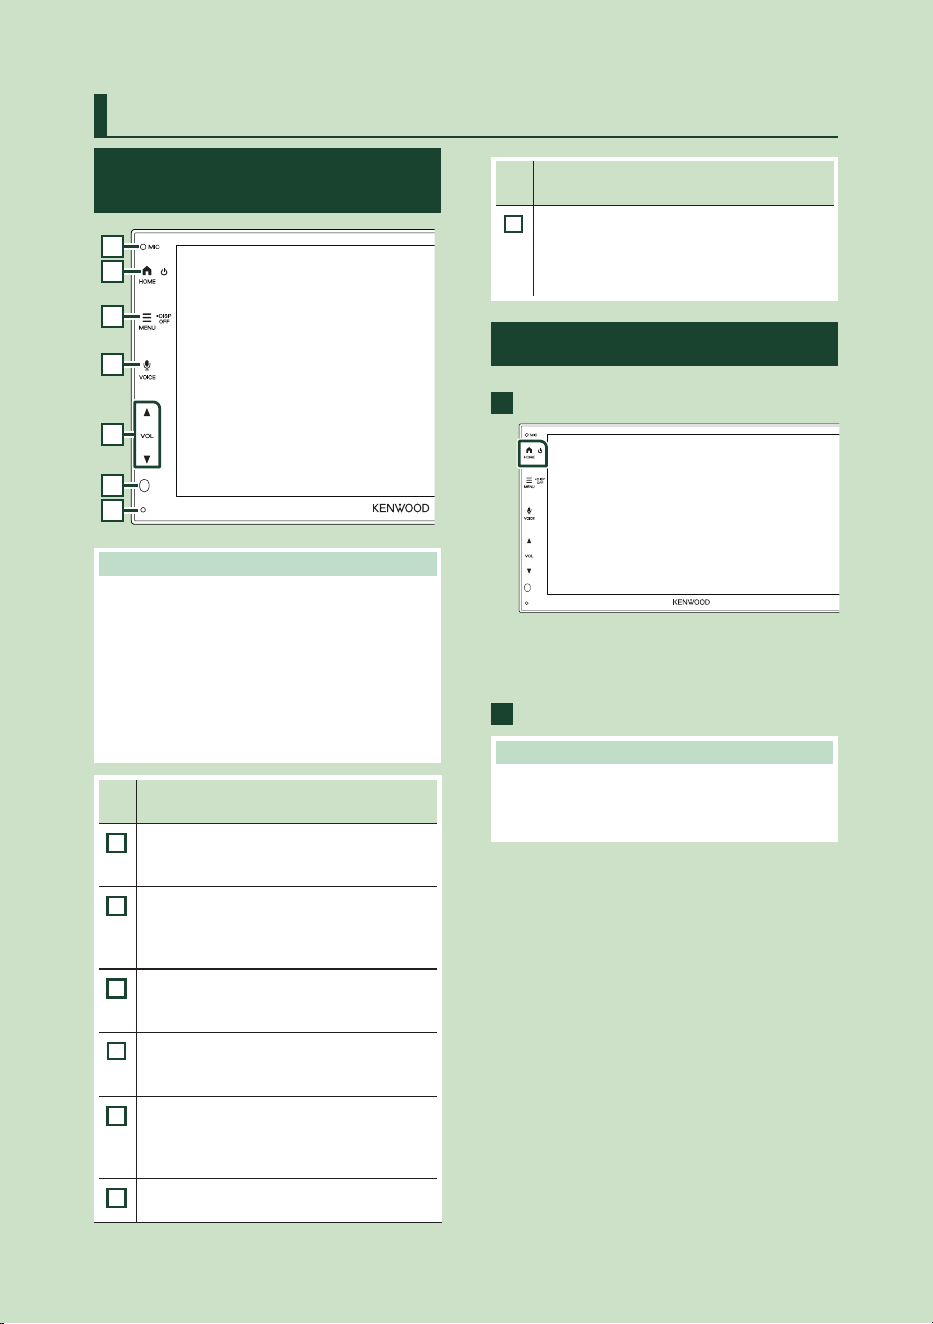
Functions of the Buttons on
the Front Panel
1
2
5
4
3
6
7
NOTE
• The panels shown in this guide are examples
used to provide clear explanations of the
operations. For this reason, they may be dierent
from the actual panels.
• Noise inside the vehicle during a call may aect
call quality. If call quality is poor, we recommend
setting the air conditioner's fan to the lowest
setting.
Name
• Motion
1
Built-in microphone
• Speak via Bluetooth hands-free mode when
a Bluetooth telephone is connected.
2
[HOME]
• Displays the HOME screen (P.9).
• Press and hold to turn off the power.
• When the power off, turns the power on.
3
[MENU]
• Displays the popup menu screen.
• Press and hold to turn off the screen.
4
[VOICE]
• Displays the Voice Recognition screen
(P.36).
5
[S], [R] ([VOL])
• Adjusts volume.
The volume will go up until 15 when you
keep pressing [R].
6
Remote Sensor
• Receives the remote control signal.
Name
• Motion
7
Reset
• If the unit or the connected unit fails to
operate properly, the unit returns to initial
settings when this button is pressed.
Turning on the Unit
1
Press the [HOME] button.
h The unit is turned on.
● To turn off the unit:
1
Press and hold the [HOME] button.
NOTE
• If it is your rst time turning the unit on after
installation, it will be necessary to perform Initial
setup (P.7).
Basic Operations
7English
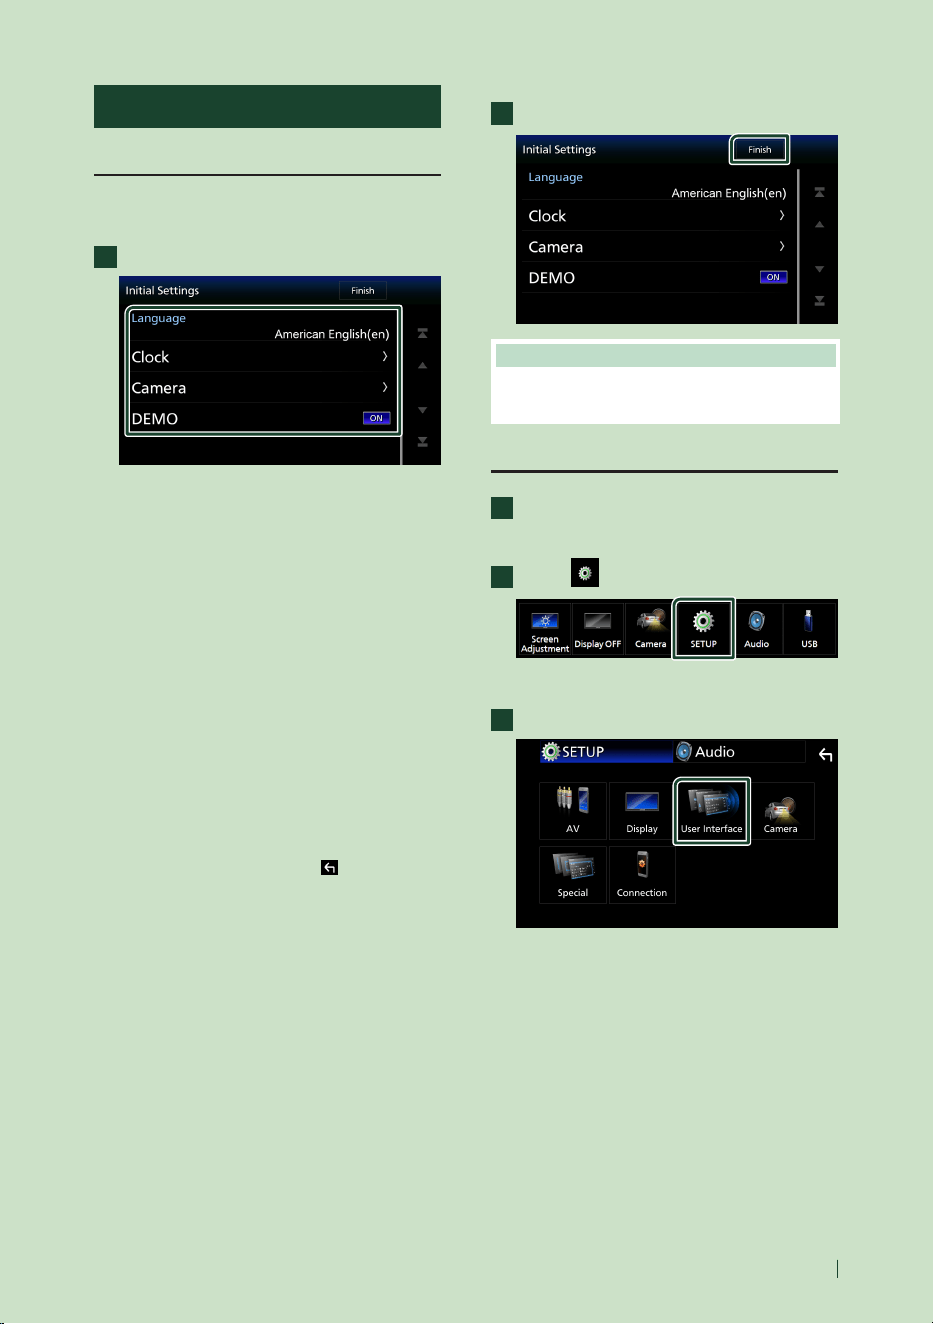
Getting Started
Initial setup
Perform this setup when you use this unit rst
time.
1
Set each item as follows.
■ [Language]
Select the language used for the control
screen and setting items. Default is
“[American English(en)]”.
1 Touch [Language].
2 Select the desired language.
3 Touch [Close].
■ [Clock]
Sets the synchronization of the clock and
adjusts it.
For detailed operation, see Calendar/clock
settings (P.7).
■ [Camera]
Set the parameters for the camera.
1 Touch [Camera].
2 Set each item and touch [
].
For detailed operation, see Camera Setup
(P.39).
■ [DEMO]
Set the demonstration mode. Default is “ON”.
1 Touch [DEMO] and set [ON] or [OFF].
2
Touch [Finish].
NOTE
• These settings can be set from the SETUP menu.
See Setting Up (P.42).
Calendar/clock settings
1
Press the [MENU] button.
h Popup menu appears.
2
Touch [ ].
h SETUP Menu screen appears.
3
Touch [User Interface].
h User Interface screen appears.
Basic Operations
8
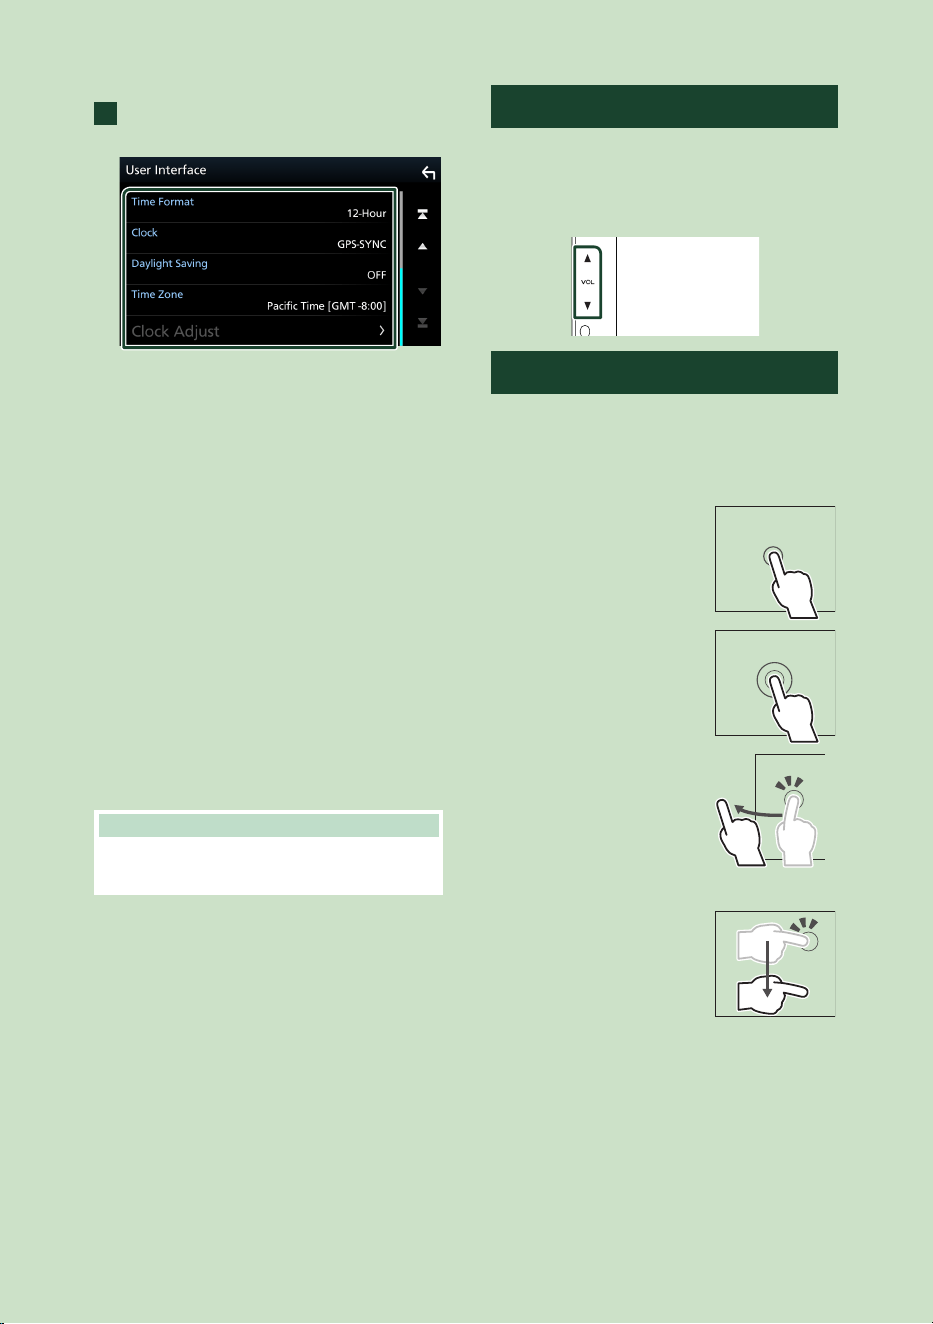
4
Set each item as follows.
Scroll the page to show hidden items.
■ [Time Format]
Select the time display format.
[12-Hour] (Default)/[24-Hour]
■ [Clock]
[GPS-SYNC] (Default): Synchronizes the clock
time with the GPS.
[Manual]: Set the clock manually.
■ [Daylight Saving]
(Not used when the clock is set manually)
Activate this by selecting the additional time
for daylight saving time (if available in your
residential area).
[OFF] (Default)/[+1 hr.]/[+30 min.]
■ [Time Zone]
Select the time zone.
■ [Clock Adjust]
If you select [Manual] for Clock, adjust the
date and time manually.
NOTE
• Please set the date and time. If they are not set,
some functions may not work.
Adjusting the volume
To adjust the volume (0 to 40),
Press [R] to increase, and press [S] to decrease.
Holding [R] increases the volume continuously
to level 15.
Touch screen operations
To perform operations on the screen, you need
to touch, touch and hold, ick or swipe to select
an item, display setting menu screen or to
change the page, etc.
● Touch
Touch the screen gently to
select an item on the screen.
● Touch and hold
Touch the screen and keep
your nger in place until the
display changes or a message
is displayed.
● Flick
Slide your nger quickly to
the left or right on the screen
to change the page.
You can scroll the list screen
by icking the screen up/
down.
● Swipe
Slide your nger up or down
on the screen to scroll the
screen.
Basic Operations
9English
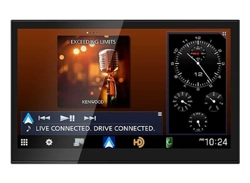
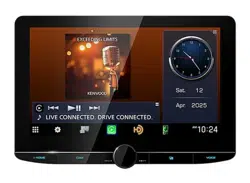
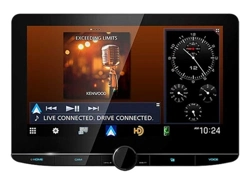
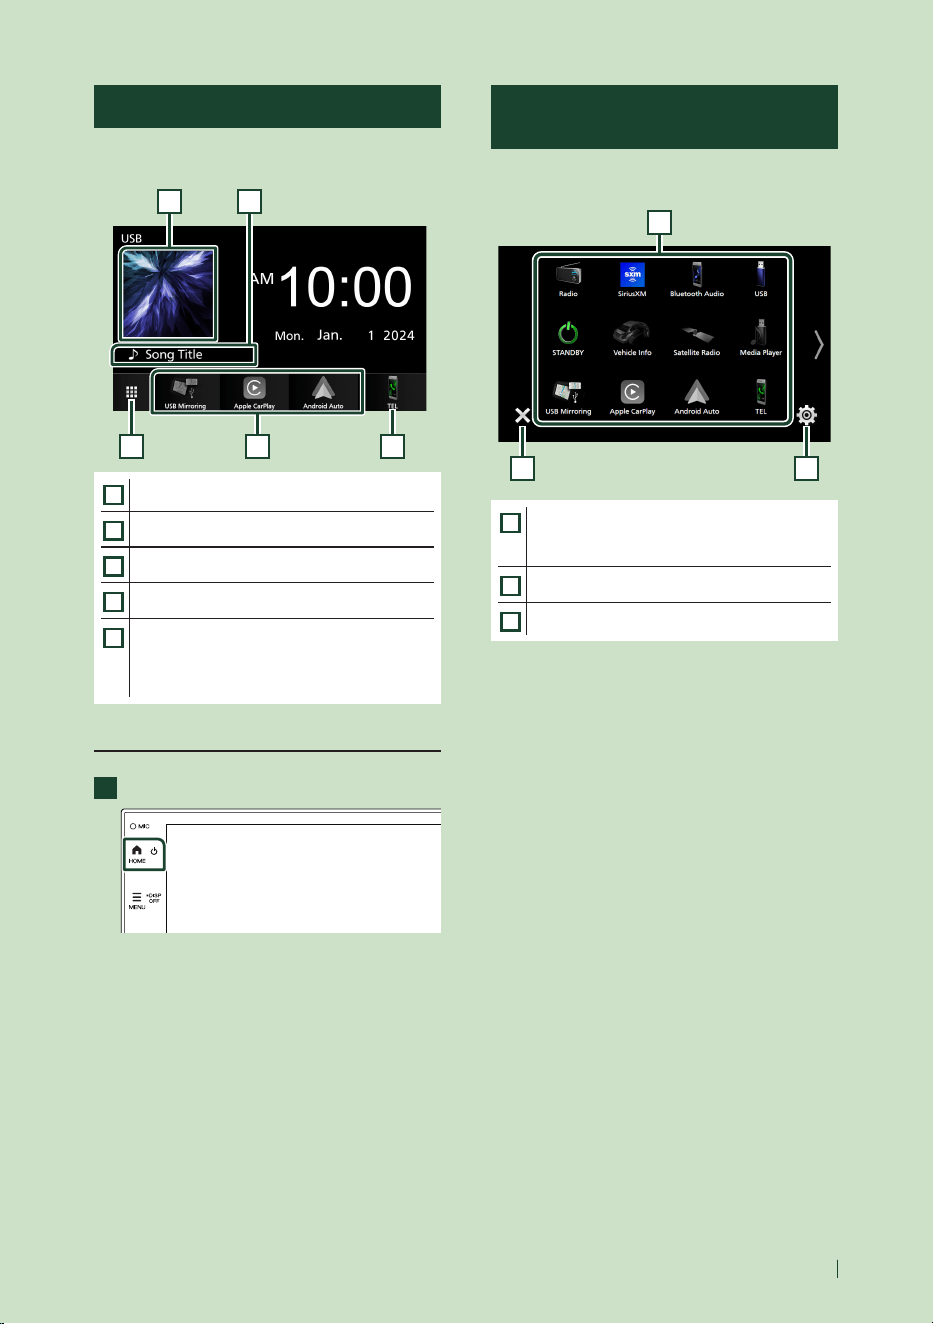
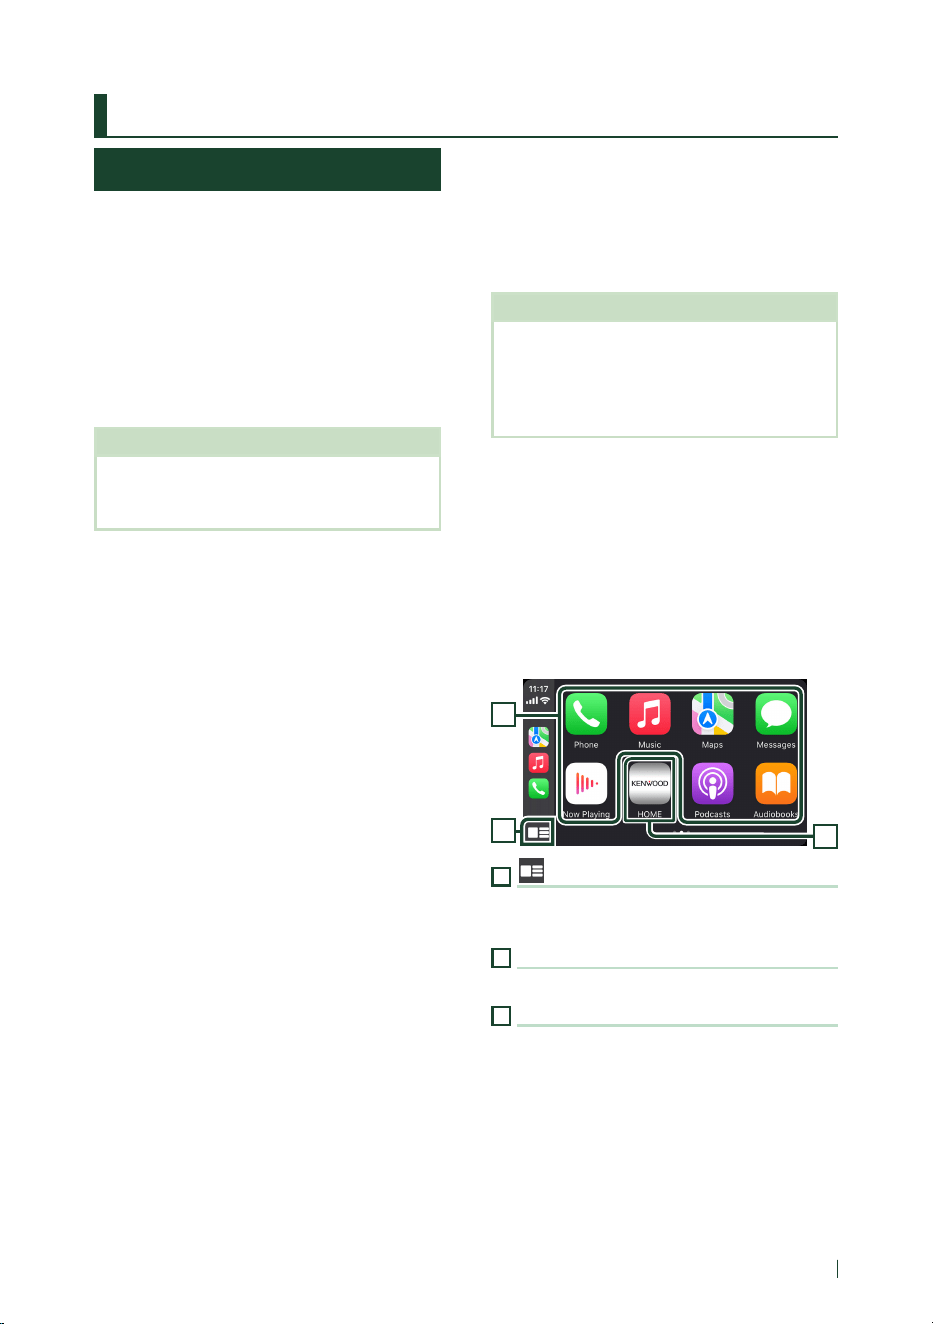
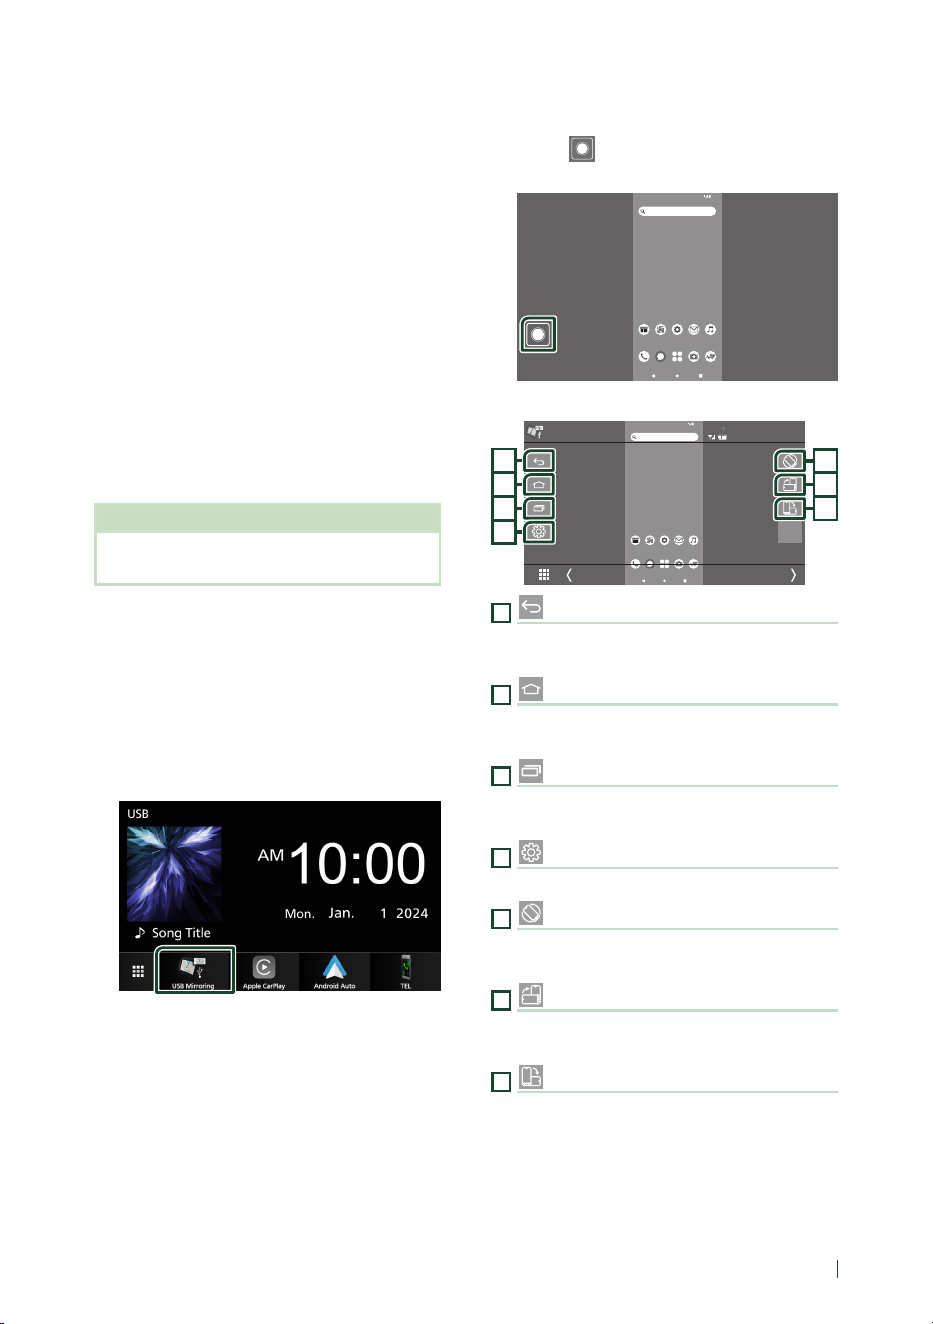
HOME screen descriptions
Most functions can be performed from the
HOME screen.
3
2
4 5
1
1
• Displays the control screen of current source.
2
• Current source information
3
• Displays the source selection screen. (P.10)
4
• Short-cut playback source icons (P.10)
5
• Displays the Hands Free screen. (P.34)
• When connecting as Apple CarPlay or
Android Auto™, it works as a phone provided
in Apple CarPlay or Android Auto.
Display the HOME screen
1
Press the [HOME] button.
h HOME screen appears.
Source selection screen
descriptions
You can display all playback sources and options
on the source selection screen.
2 3
1
1
• Changes the playback source.
For playback sources, see Select the
playback source (P.10).
2
• Returns to previous screen.
3
• Displays the SETUP Menu screen. (P.42)
Basic Operations
10
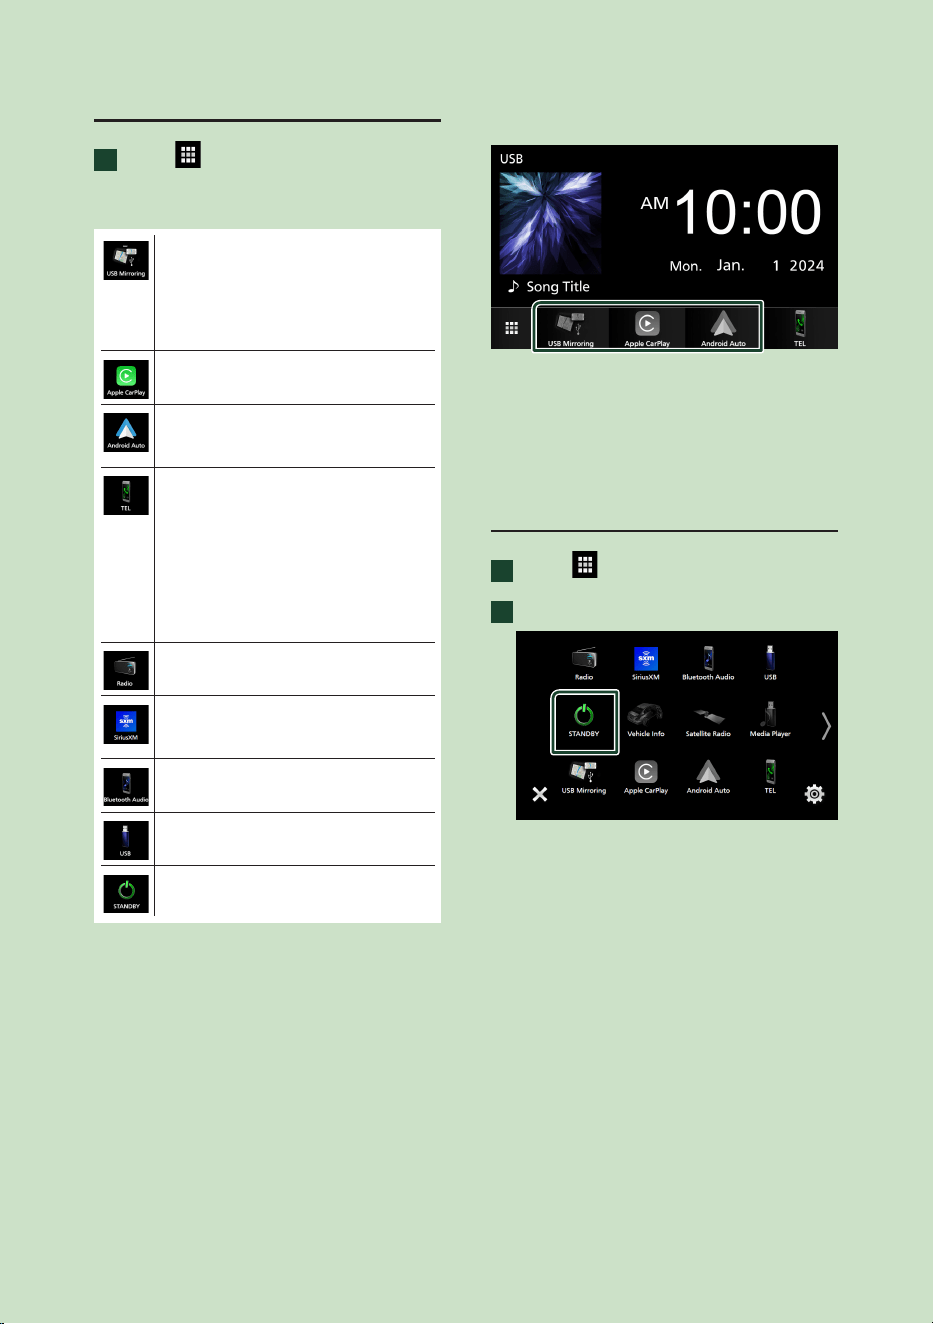
Select the playback source
1
Touch [ ] on the HOME screen.
From the screen, you can select the
following sources and functions.
• Switches to the USB Mirroring screen
from the connected iPhone or Android
smartphone. (P.15, P.16)
It is necessary to connect iPhone or
Android smartphone with “MirrorAPP+™”
application installed].
• Switches to the Apple CarPlay screen
from the connected iPhone. (P.13)
• Switches to the Android Auto
screen from the connected Android
smartphone. (P.14)
• Displays the Hands Free screen. (P.34)
When neither Apple CarPlay, Android
Auto, nor a Bluetooth Hands-Free phone
is connected, displays "[Disconnected]"
message in the TEL screen.
When connecting as Apple CarPlay
or Android Auto, it works as a phone
provided in Apple CarPlay or Android
Auto.
• Switches to the Radio broadcast.
(P.21)
• Switches to the SiriusXM® satellite radio
broadcast. (P.24)
(DMX4710S/ DMX40S only)
• Plays a Bluetooth audio player. (P.33)
• Plays files on a USB device. (P.18)
• Puts the unit in standby. (P.10)
• For sources and information displayed
when an iDatalink Maestro is connected, see
Maestro Features Operation (P.40).
(DMX4710S/ DMX40S only)
To select the playback source on the
HOME screen
The 3 items displayed on the source selection
screen as the large icons are shown on the
HOME screen.
You can change items displayed on this area
by customizing the source selection screen.
(P.11)
Put the unit in standby
1
Touch [ ] on the HOME screen.
2
Touch [STANDBY].
Basic Operations
11English
Customize Short-cut buttons on
HOME screen
You can arrange the position of the source icons
as you like.
1
Touch [ ] on the HOME screen.
2
Touch and hold the icon which you want
to move to go into the customizing
mode.
3
Drag it where you want to move.
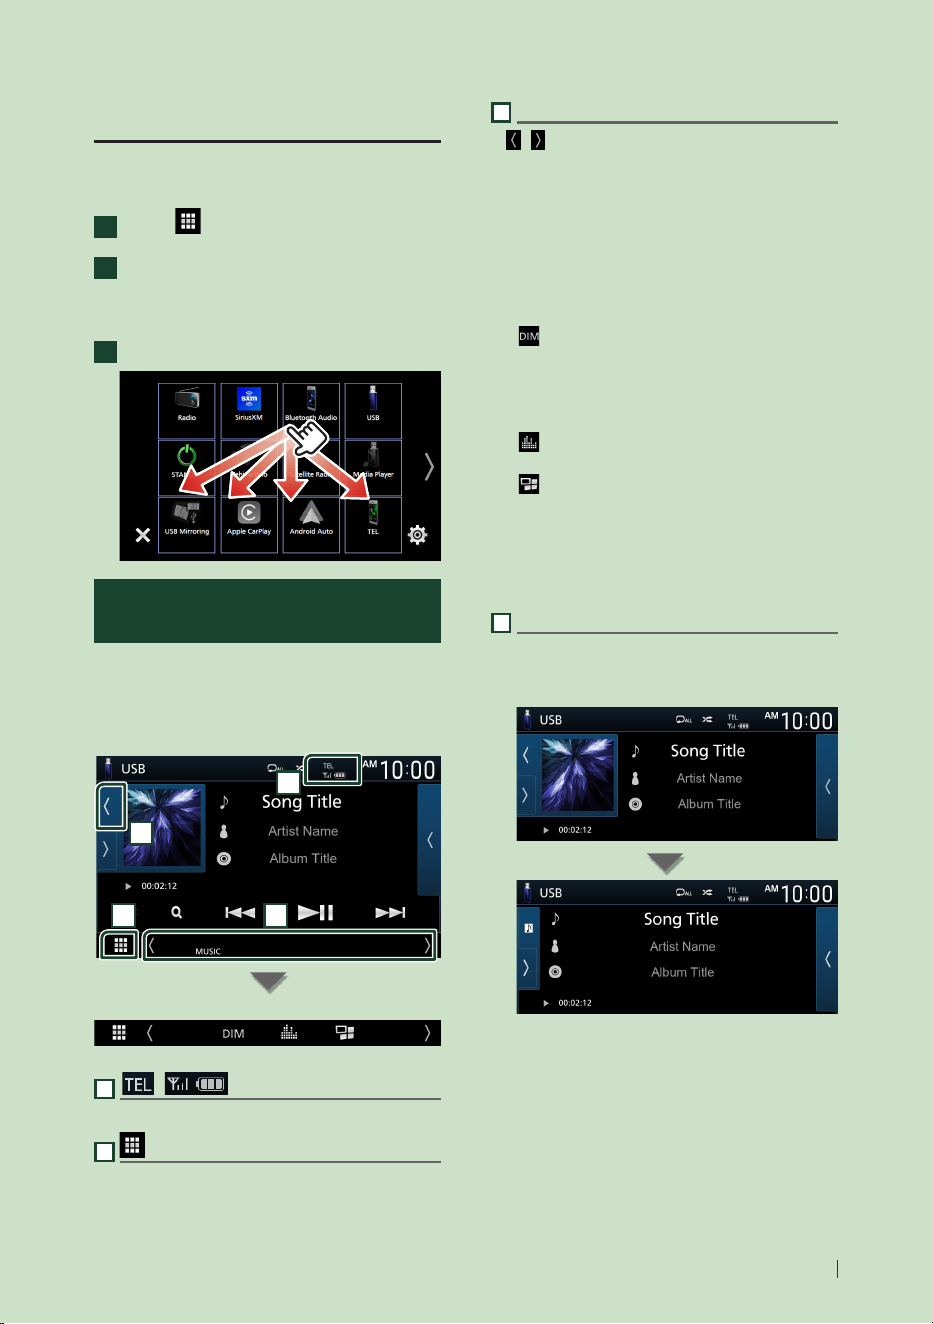
Source control screen
descriptions
There are some functions which can be
operated from most screens.
Indicators
1
2
4
3
Sub menu
1
[ ]/[ ]
Connected Bluetooth device information.
2
All sources icon
Displays all sources.
3
Secondary screen
• [
]/[ ] : The Secondary screen changes every
time you touch it. You can also change the
Secondary screen by icking left or right on
the screen.
• Short-cut source icons: The source changes to
the one you have set with a short-cut. For the
short-cut setting, refer to Customize Short-
cut buttons on HOME screen (P.11).
• Sub menu
– [ ]: Operation when the icon is touched:
The rst touch darkens the screen, the second,
third and forth touch darken the screen further,
and the fth touch restores the screen to its
original brightness.
– [
]: Displays the Graphic Equalizer screen.
(P.49)
– [
]: Displays the APP (Apple CarPlay/ Android
Auto) screen (P.13).
• Indicators: Displays the current source
condition and so on.
– [MUTE]: The mute function is active.
– [LOUD]: The loudness control function is on.
4
Artwork & information
You can select whether to display an artwork
and song information or only song information
in more detail.
Basic Operations
12
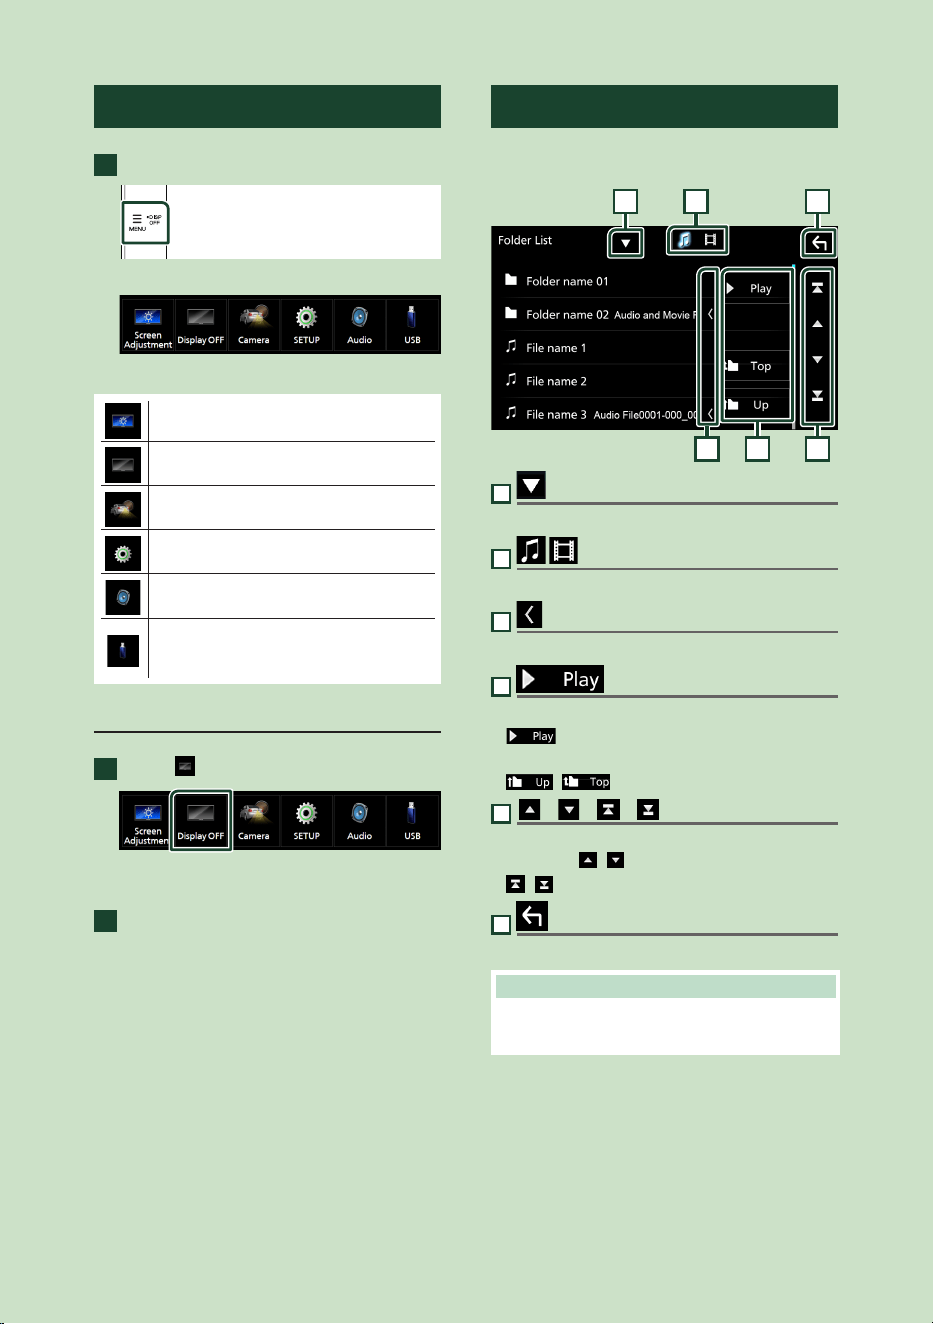
Popup menu
1
Press the [MENU] button.
h Popup menu appears.
The contents of the menu are as follows.
• Displays the Screen Adjustment screen.
(P.42)
• Turns the display off. (P.12)
• Displays the view camera. (P.39)
• Displays the SETUP Menu screen. (P.42)
• Displays the Audio Control Menu screen.
(P.47)
• Displays the control screen of current
source. Icon feature differs depending on
the source. This icon is for USB source.
Turn o the screen
1
Select [ ] on the popup menu.
● To turn on the screen
1
Touch the display.
List screen
There are some common function keys in the
list screens of most sources.
61 2
3 4 5
1
Displays list type selection window.
2
Displays music/movie le list.
3
Text scroll
Scrolls the displayed text.
4
etc.
Keys with various functions are displayed here.
• [
] : Plays all tracks in the folder
containing the current track.
• [
] [ ] : Moves to the upper hierarchy.
5
[ ] / [ ] / [ ] / [ ] Page scroll
You can change the page to display more items
by pressing [
]/[ ].
• [
]/[ ] : Displays the top or bottom page.
6
Return
Returns to previous screen.
NOTE
• Buttons which cannot be activated from the list
screen are not displayed.
APPS
13English
APPS
Apple CarPlay Operation
Apple CarPlay is a smarter, safer way to use your
iPhone in the car. Apple CarPlay takes the things
you want to do with iPhone while driving and
displays them on the screen of the product. You
can get directions, make calls, send and receive
messages, and listen to the music from iPhone
while driving. You can also use Siri voice control
to make it easier to operate iPhone.
For details about Apple CarPlay, visit
https://www.apple.com/ios/carplay/.
NOTE
• If your iPhone isn't working the way you want,
try restarting it by turning it o and then turning
it back on.
Compatible iPhone devices
You can use Apple CarPlay with the following
iPhone models.
• iPhone 15 Pro Max
• iPhone 15 Pro
• iPhone 15 Plus
• iPhone 15
• iPhone 14 Pro Max
• iPhone 14 Pro
• iPhone 14 Plus
• iPhone 14
• iPhone 13 Pro Max
• iPhone 13 Pro
• iPhone 13
• iPhone 13 mini
• iPhone 12 Pro Max
• iPhone 12 Pro
• iPhone 12
• iPhone 12 mini
• iPhone SE (2nd
generation)
• iPhone 11 Pro Max
• iPhone 11 Pro
• iPhone 11
• iPhone XR
• iPhone XS Max
• iPhone XS
• iPhone X
• iPhone 8 Plus
• iPhone 8
• iPhone 7 Plus
• iPhone 7
• iPhone SE
• iPhone 6s Plus
• iPhone 6s
Ñ Preparation
1 Connect your iPhone with the USB cable
that matches the connector. (P.59)
2 Unlock your iPhone.
NOTE
• Depending on the iPhone connector, use a
genuine Apple Lightning-USB cable or a USB-IF
certied USB-C® to USB-A USB cable.
If you use non-certied cable, it may not work
properly.
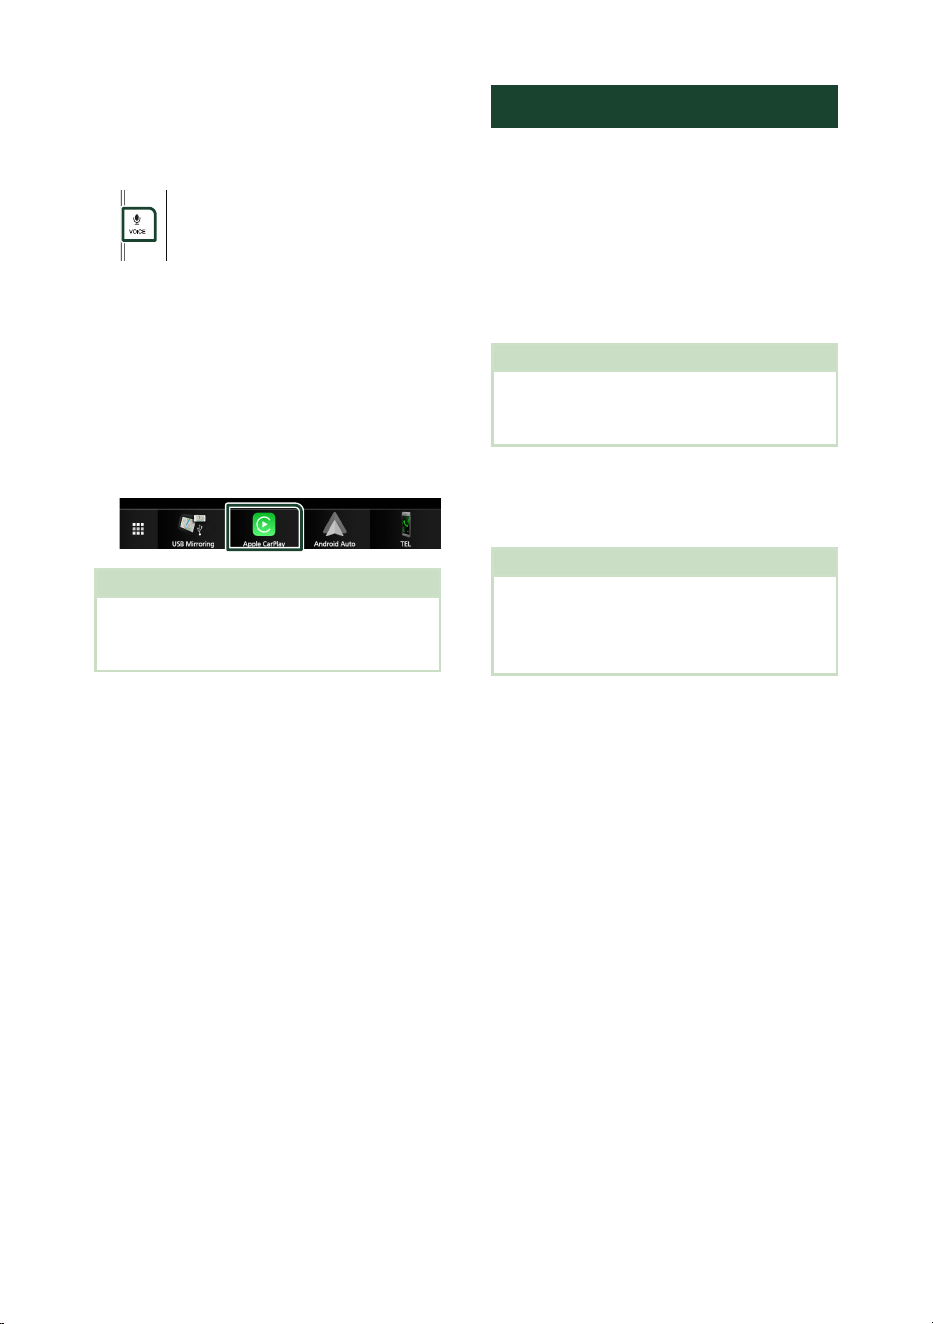
Ñ Operation buttons and
available Apps on the home
screen of Apple CarPlay
You can use the Apps of the connected iPhone.
The items displayed and the language used on
the screen dier among the connected devices.
To enter Apple CarPlay mode, touch
[Apple CarPlay] icon in the source selection
screen. (P.10)
1
2
3
1
[ ]
*
• Displays the home screen of Apple CarPlay.
• Touch and hold to activates Siri.
2
Application buttons
Starts the application.
3
[HOME]
Exits the Apple CarPlay screen and displays the
Home screen.
* The icon design may change depending on
the iOS version.
To exit the Apple CarPlay screen
1 Press the [HOME] button.
APPS
14
Ñ Use Siri
You can activate Siri.
1 Press the [VOICE] button.
2 Talk to Siri.
Ñ Switch to the Apple CarPlay
screen while listening to
another source
1 Press the [HOME] button.
h HOME screen appears.
2 Touch [Apple CarPlay].
NOTE
• If sound is output using Apple CarPlay when the
Apple CarPlay screen is displayed, the source is
switched to Apple CarPlay.
Android Auto™ Operation
Android Auto enables you to use functions
of your Android smartphone convenient
for driving. You can easily access route
guidance, make calls, listen to music, and
access convenient functions on the Android
smartphone while driving.
For details about Android Auto, visit
https://www.android.com/auto/ and
https://support.google.com/androidauto.
NOTE
• If your Android smartphone isn't working the
way you want, try restarting it by turning it o
and then turning it back on.
Compatible Android smartphone
You can use Android Auto with Android
smartphone of Android version 8.0 or later.
NOTE
• Android Auto may not be available on all devices
and is not available in all countries or regions.
• Compatible Android versions are subject to
change without notice.
Ñ Preparation
1 Connect an Android smartphone via USB
terminal. (P.59)
To use the hands-free function, connect the
Android smartphone via Bluetooth.
2 Unlock your Android smartphone.

APPS
15English
Ñ Operation buttons and
available Apps on the Android
Auto screen
You can perform the operations of the Apps of
the connected Android smartphone.
The items displayed on the screen dier among
the connected Android smartphone.
To enter Android Auto mode, touch
[Android Auto] icon in the source selection
screen. (P.10)
1
1
Application/information buttons
Starts the application or displays information.
To exit the Android Auto screen
1 Press the [HOME] button.
Ñ Using voice control
1 Press the [VOICE] button.
To cancel
1 Press the [VOICE] button.
Ñ Switch to the Android Auto
screen while listening to
another source
1 Press the [HOME] button.
h HOME screen appears.
2 Touch [Android Auto].
NOTE
• If sound is output using Android Auto when the
Android Auto screen is displayed, the source is
switched to Android Auto.
USB Mirroring Operation for
iPhone
You can display and control the App on the
unit while your iPhone is connected to the USB
terminal.
To use USB mirroring, follow the instructions on
your iPhone.
NOTE
• When using USB Mirroring, park in a safe place.
While driving, an iPhone screen will not appear
on this unit's display.
• Some content and applications may not display
or output sound due to copyright reasons.
• If your iPhone isn't working the way you want,
try restarting it by turning it o and then turning
it back on.
Ñ Preparation
1 Download Mirroring App from the App
store.
Install the latest version of the Mirroring
application “MirrorAPP+” on your iPhone.
NOTE
• Go to the MirrorAPP+ web page on the App
Store to conrm compatibility.
• This application is not provided by
JVCKENWOOD.
JVCKENWOOD is not liable for any damages
incurred by the customer in connection with
the use of the application, except in cases where
such damages are caused by JVCKENWOOD's
willful misconduct or gross negligence.

APPS
16
Ñ Connecting an iPhone
1 Pair your iPhone with the unit via
Bluetooth.
See Register the Bluetooth device (P.32)
and Connect the Bluetooth device
(P.33).
2 Connect an iPhone via the USB terminal.
3 Launch Mirroring App on your iPhone.
Touch [Screen Mirror] to start Mirroring
App.
Touch [Start Broadcast] to start capturing
your iPhone screen.
Wait 15 to 30 seconds until the screen
calibration is complete. (First time only)
Touch [Close] to close the message.
You can display the same screen of the
iPhone on the monitor of the unit.
4 Start to enjoy Mirroring.
NOTE
• When an advertisement appears, touch the
[Close] to close it.
• When you lock iPhone screen orientation, please
unlock it.
Ñ Mirroring Operation
1 Operate your iPhone to activate Mirroring
App, then connect to this unit.
2 Press the [HOME] button.
3 Touch USB Mirroring.
USB Mirroring Operation for
Android Smartphone
You can display and control the App on the unit
while your Android smartphone is connected to
the USB terminal.
To use USB mirroring, follow the instructions on
your Android smartphone.
NOTE
• When using USB Mirroring, park in a safe place.
While driving, an Android smartphone screen
will not appear on this unit's display.
• Some content and applications may not display
or output sound due to copyright reasons.
• If your Android smartphone isn't working the
way you want, try restarting it by turning it o
and then turning it back on.
Ñ Preparation
1 Download Mirroring App from the Google
Play.
Install the latest version of the Mirroring
application “MirrorAPP+” on your Android
smartphone.
NOTE
• Go to the MirrorAPP+ web page on the Google
Play to conrm compatibility.
• This application is not provided by
JVCKENWOOD.
JVCKENWOOD is not liable for any damages
incurred by the customer in connection with
the use of the application, except in cases where
such damages are caused by JVCKENWOOD's
willful misconduct or gross negligence.
APPS
17English
Ñ Connecting an Android
smartphone
1 Pair your Android smartphone with the
unit via Bluetooth.
See Register the Bluetooth device (P.32)
and Connect the Bluetooth device
(P.33).
2 Connect an Android smartphone via the
USB terminal.
3 Launch Mirroring App on your Android
Smartphone.
Touch [OK] to start Mirroring App.
Touch [Start now] to start capturing your
Android screen.
4 Start to enjoy Mirroring.
NOTE
• When an advertisement appears, touch the
[Close] to close it.
Ñ Mirroring Operation
1 Operate your Android smartphone to
activate Mirroring App, then connect to
this unit.
2 Press the [HOME] button.
3 Touch USB Mirroring.
• After the app's advertisement ends, you
can display the same screen of the Android
smartphone on the monitor of the unit.
Ñ Operation buttons
1 Touch [ ] on the bottom left of the
screen.
10:00 92%
4G
h Operation menu appears.
10:00 92%
4G
USB Mirroring
AM
TEL
10:00
1
2
3
4
5
6
7
1
[ ]
Works the same as the Back button on the
Android smartphone.
2
[ ]
Works the same as the Home button on the
Android smartphone.
3
[ ]
Works the same as the App Overview button on
the Android smartphone.
4
[ ]
Displays the SETUP Menu screen.
5
[ ]
Automatically rotates the screen to match the
orientation of your smartphone.
6
[ ]
Displays the screen in portrait orientation
regardless of the orientation of the smartphone.
7
[ ]
Displays the screen in landscape orientation
regardless of the orientation of the smartphone.
USB
18
USB
Connecting a USB device
1 Connect the USB device with the USB
cable. (P.57)
2 Press the [HOME] button.
3 Touch [ ].
4 Touch [USB]. (P.10)
Ñ Disconnect the USB device
1 Press the [HOME] button.
2 Touch [ ].
3 Touch a source other than [USB].
4 Detach the USB device.
Ñ Usable USB device
You can use a mass-storage-class USB device on
this unit.
The word “USB device” appearing in this manual
indicates a ash memory device.
● About file system
The le system should be the one of the
following.
• FAT16 • FAT32 • exFAT • NTFS
NOTE
• Install the USB device in the place where it will
not aect safe driving.
• You cannot connect a USB device via a USB hub
and Multi Card Reader.
• Take backups of the audio les used with this
unit. The les can be erased depending on the
operating conditions of the USB device.
We shall have no compensation for any damage
arising from any erased data.
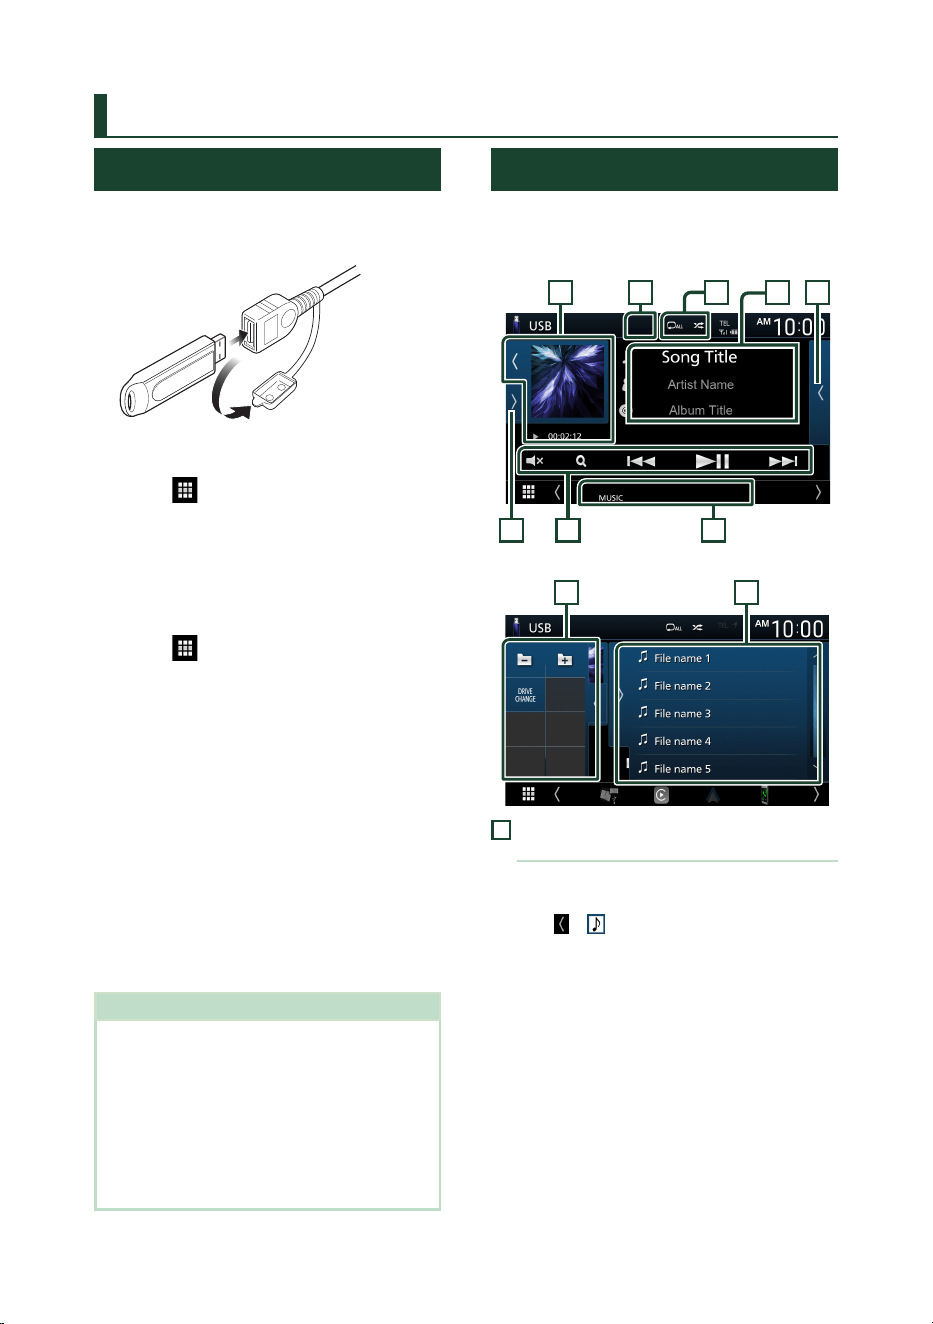
USB Basic Operation
Most functions can be controlled from the
source control screen and playback screen.
Control screen
5
43
7
1
6
8 2
Open the drawer
45
1
Artwork/ Play mode indicator/ Playing
time
The jacket of the currently playing le is
displayed.
• Touch [
] / [ ] allows you to hide/display the
artwork area.
• [D], [B], etc.: Current play mode indicator
The meanings of each icon are as follows;
[D] (play), [B] (fast forward), [A] (fast
backward), [H] (pause).
USB
19English
2
[ ] / [ ]
• [
] : Repeats the current track/folder. Each
time you touch the key, repeat mode switches
in the following sequence;
File repeat ([
]), Folder repeat ([ ]), Repeat
all ([
])
• [
] : Randomly plays all tracks in current
folder. Each time you touch the key, random
mode switches in the following sequence;
File random ([
]), Random o ([ ])
3
Track information
Displays the information of the current le.
Only a le name and a folder name are
displayed if there is no tag information.
4
Content list
Touch [
] on the right side of the screen to
display the Content list. Touch [
] to close the
list.
Displays the playing list. When you touch a
track/le name on the list, playback will start.
5
Function panel
Touch [
] on the left side of the screen to
display the function panel. Touch [
] to close
the panel.
• [
] [ ] : Searches previous/next folder.
• [DRIVE CHANGE] :Switches between
partitions in a USB memory that has been
fragmented into multiple partitions (up to 2
drives).
• [ASPECT](Only during video playback): Select
screen mode.
[Full] : Changes the aspect ratio of video and
displays fully on the screen.
[Normal] : Display with 4:3 ratio.
[Auto] : Displays video fully on vertical or
horizontal with no ratio change.
6
[Operation keys
• [1] : Searches track/le. For details on search
operation, see Search Operation (P.20).
• [E] [F] : Searches the previous/next track/
le.
Touch and hold to fast forward or fast
backward.
• [D]H] : Plays or pauses.
• [
] : Touch to mute or not to mute.
7
Indicator Items
• [VIDEO]: Identies the video le.
• [MUSIC]: Identies the music le.
8
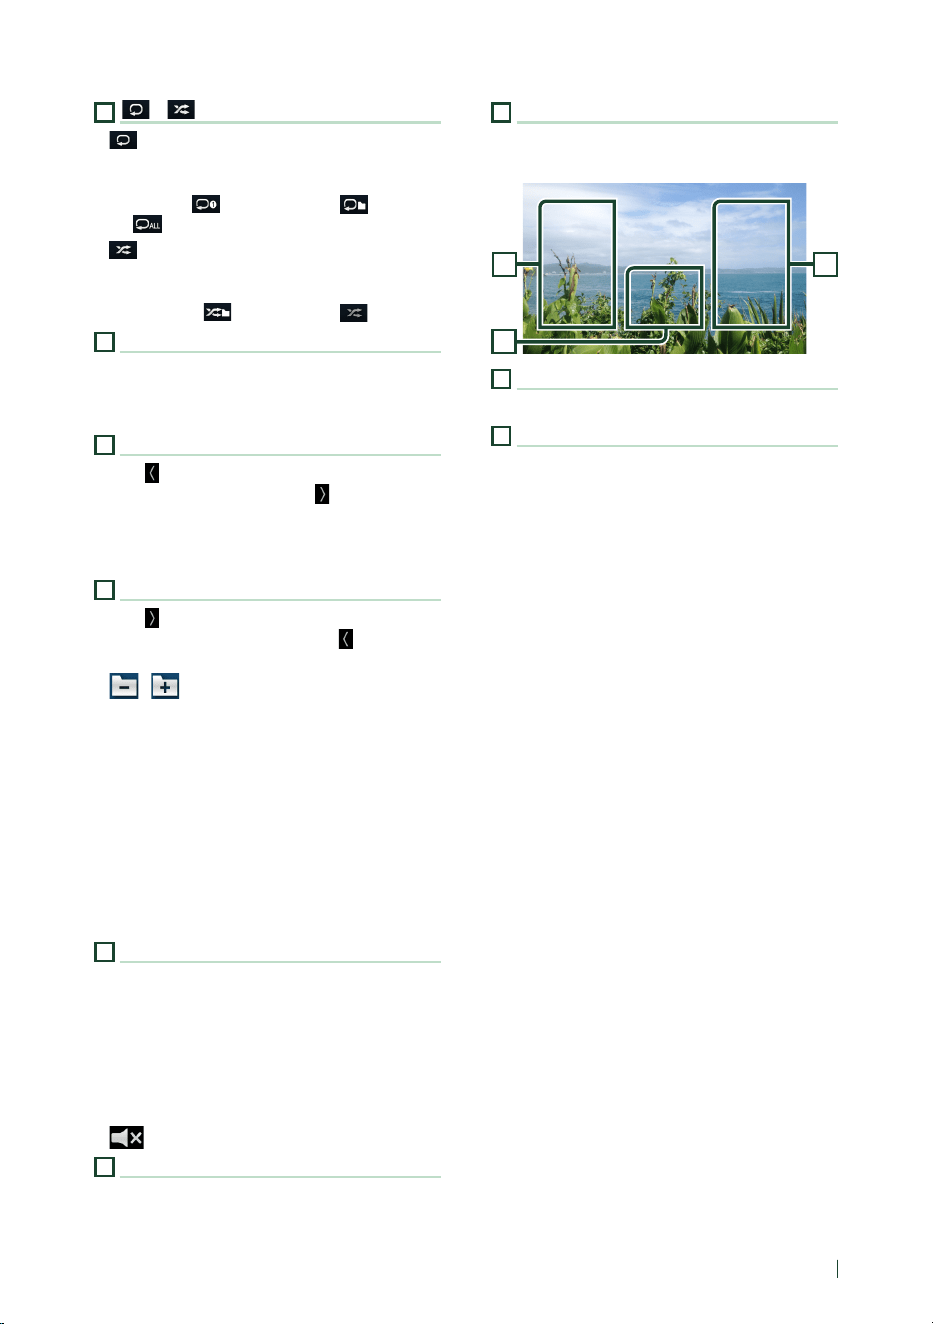
Hide (Video file only)
Touch to hide the operation keys.
Video screen
10
99
9
Searching file area (Video file only)
Touch to search the next/previous le.
10
Key display area (Video file only)
Touch to display the control screen.
USB
20
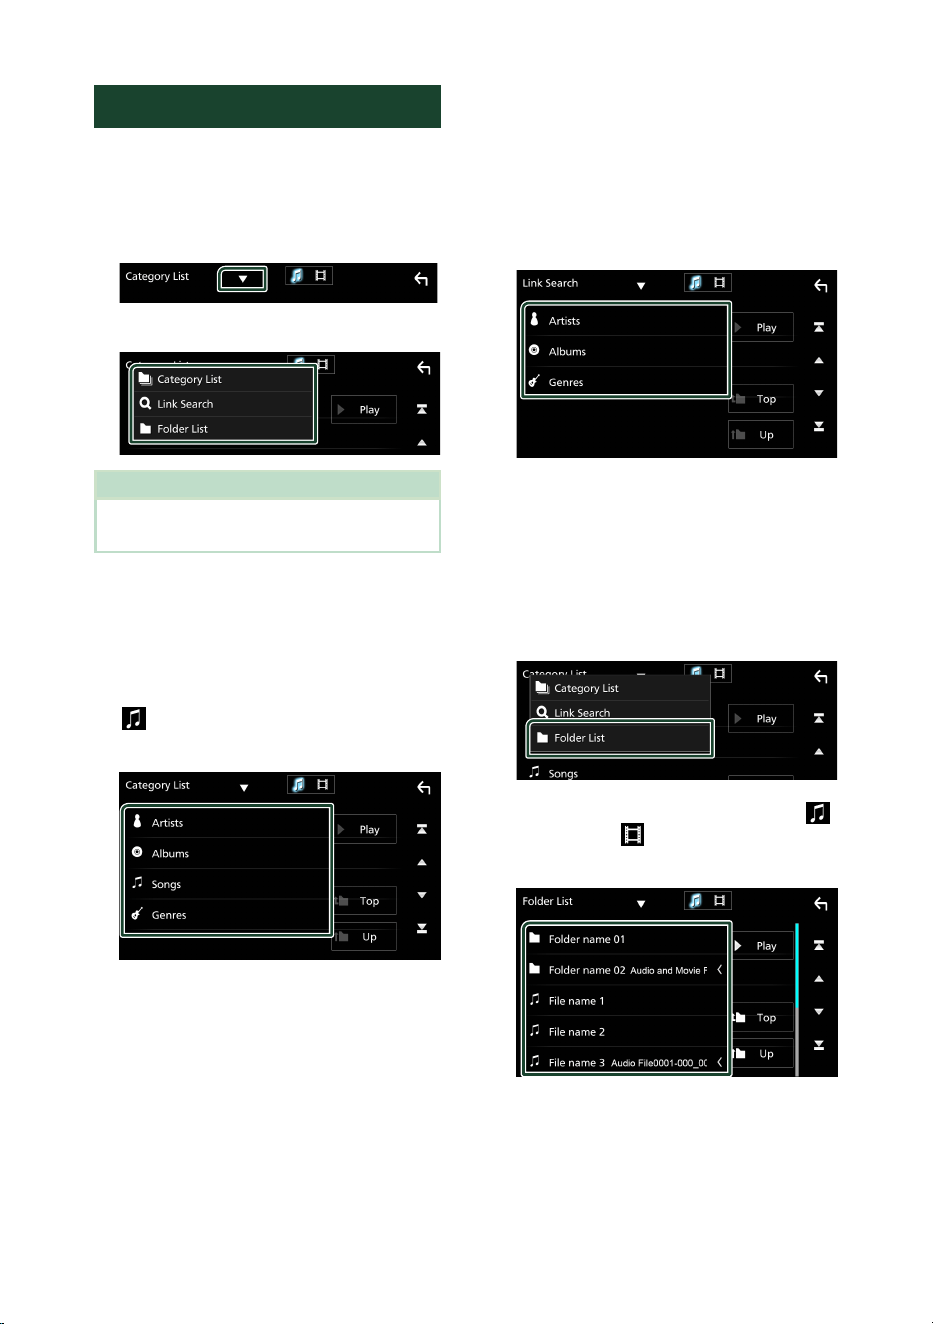
Search Operation
You can search music or video les by the
following operations.
1 Touch [1].
2 Touch [S].
3 Select the list type.
NOTE
• For operations in the list screen, see List screen
(P.12).
Ñ Category search
You can search a le by selecting category.
1 Touch [Category List].
2 Select whether you search by audio files
[
]
.
3 Touch the desired category.
h The list corresponding to your selection
appears.
4 Touch to select desired item in the list.
Repeat this step until you find the desired
file.
Ñ Link search (Audio le only)
You can search a le of same artist/album/genre
as the current track.
1 Touch [Link Search].
2 Touch the desired tag type. You can select
from artist, album and genre.
h The list corresponding to your selection
appears.
3 Touch desired item from the content list.
Ñ Folder search
You can search a le according to hierarchy.
1 Touch [Folder List].
2 Select whether you search audio files [
]
or video files [
]
.
3 Touch the desired folder.
When you touch a folder its contents are
displayed.
4 Touch to select desired item in the list.
Repeat this step until you find the desired
file.
Radio
21English
Radio
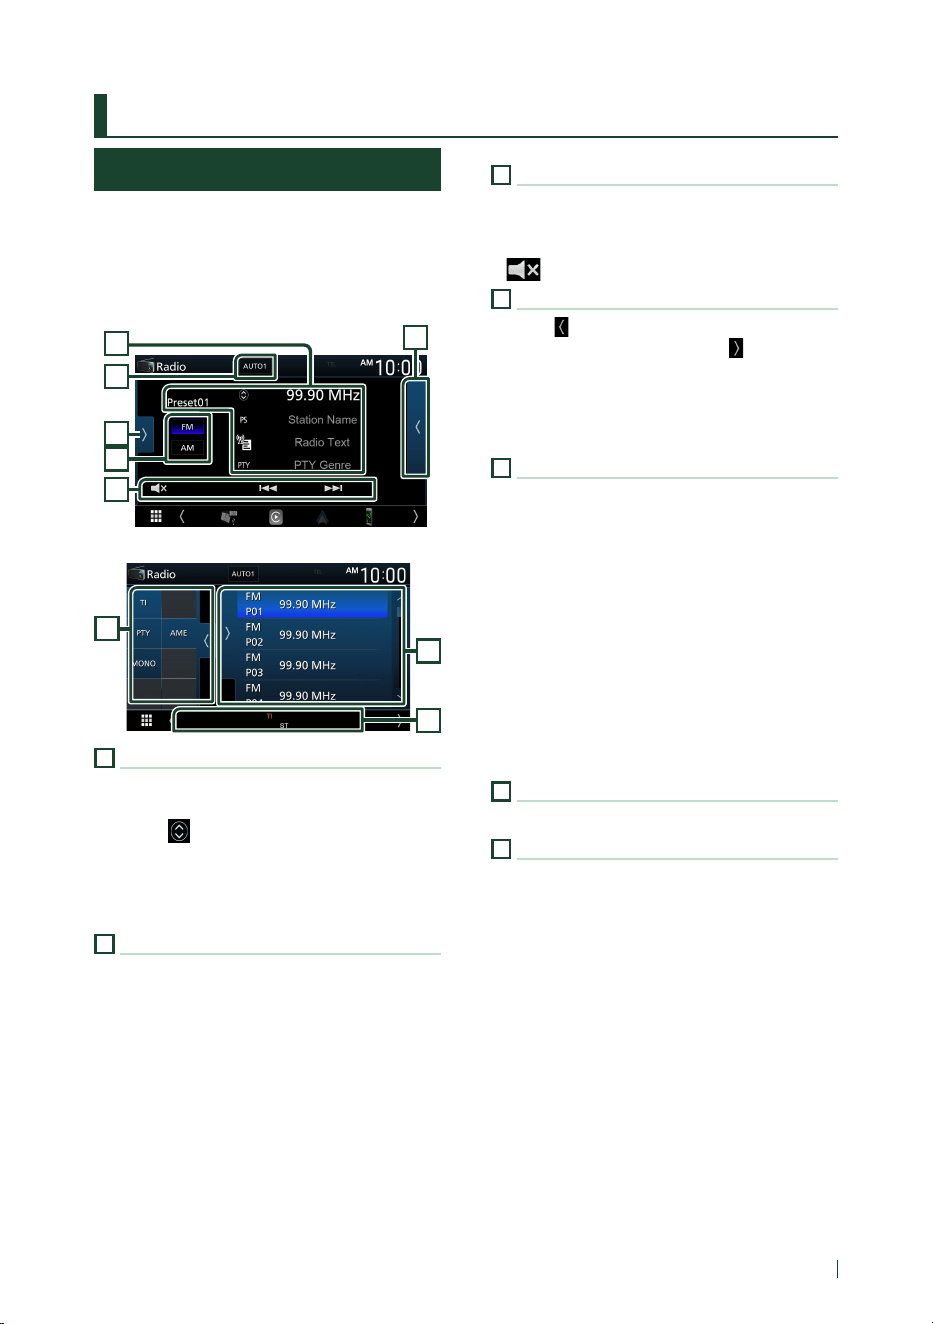
Radio Basic Operation
Most functions can be controlled from the
source control screen.
To enter Radio source, touch [Radio] icon in the
source selection screen. (P.10)
Control screen
4
6
5
3
2
1
Open the drawer
4
7
5
1
Information display
Displays the information of the current station:
Frequency
Touching [ ] allows you to switch between
Content A and Content B.
– Content A: PS name, Radio Text, PTY Genre
– Content B: Radio Text plus, Title Artist
[Preset#]: Preset number
2
Seek mode
Switches the seek mode in the following
sequence; [AUTO1], [AUTO2], [MANUAL].
• [AUTO1]: Tunes in a station with good
reception automatically.
• [AUTO2]: Tunes in stations in memory one
after another.
• [MANUAL]: Switches to the next frequency
manually.
3
Operation keys
• [E] [F] : Tunes in a station. The method of
frequency switching can be changed (see 2
in table).
• [
] : Touch to mute or not to mute.
4
Preset list
• Touch [
] twice on the right side of the screen
to display the Preset list. Touch [
] to close
the list.
• Recalls the memorized station.
• When touched for 2 seconds, stores the
current receiving station in memory.
5
Function panel
Touch on the left side of the screen to display
the function panel. Touch again to close the
panel.
• [TI] (FM only): Sets the trac information
mode on. For details, see Trac Information
(P.23).
• [PTY] (FM only): Searches a program by setting
program type. For details, see Search by
program type (P.22).
• [AME]: Presets stations automatically. For
details, see Auto memory (P.22).
• [MONO] (FM only): Select the Monaural
reception.
6
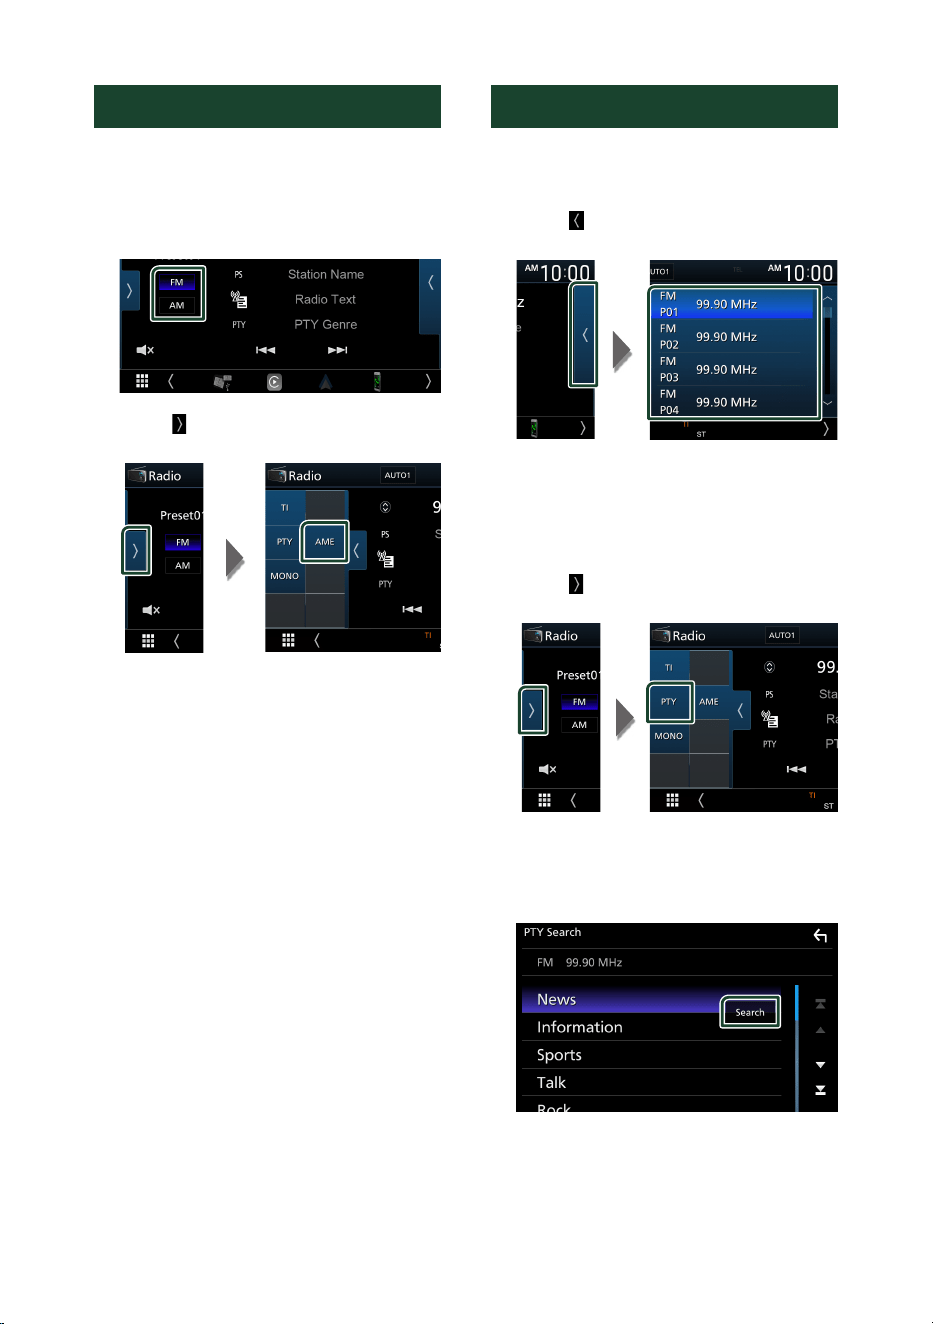
[FM] [AM]
Switches the band.
7
Indicator Items
• [ST]: A stereo broadcast is being received.
• [MONO]: The forced monaural function is on.
• [TI]: Indicates the reception state of trac
information.
White: TP is being received.
Orange: TP is not being received.
Radio
22
Memory Operation
Ñ Auto memory
You can store stations with good reception in
memory automatically.
1 Touch desired band key.
2 Touch [ ] on the left side of the screen.
Touch [AME].
h A confirmation screen appears.
3 Touch [Yes ].
h Auto memory starts.
Ñ Manual memory
You can store the current receiving station in
memory.
1 Select a station you wish to store in
memory.
2 Touch [FM#] (#: 1-24) or [AM#] (#: 1-12) on
the preset list in which you want to store
the station for 2 seconds.
Selecting Operation
Ñ Preset select
You can list and select memorized station.
1 Touch [ ] twice on the right side of the
screen. Select a station from the list.
Ñ Search by program type
(FM only)
You can tune to a station with a specic
program type when listening to FM.
1 Touch [ ] on the left side of the screen.
Touch [PTY].
h PTY Search screen appears.
2 Select a program type from the list.
3 Touch [Search].
You can search a station of the selected
program type.
Radio
23English
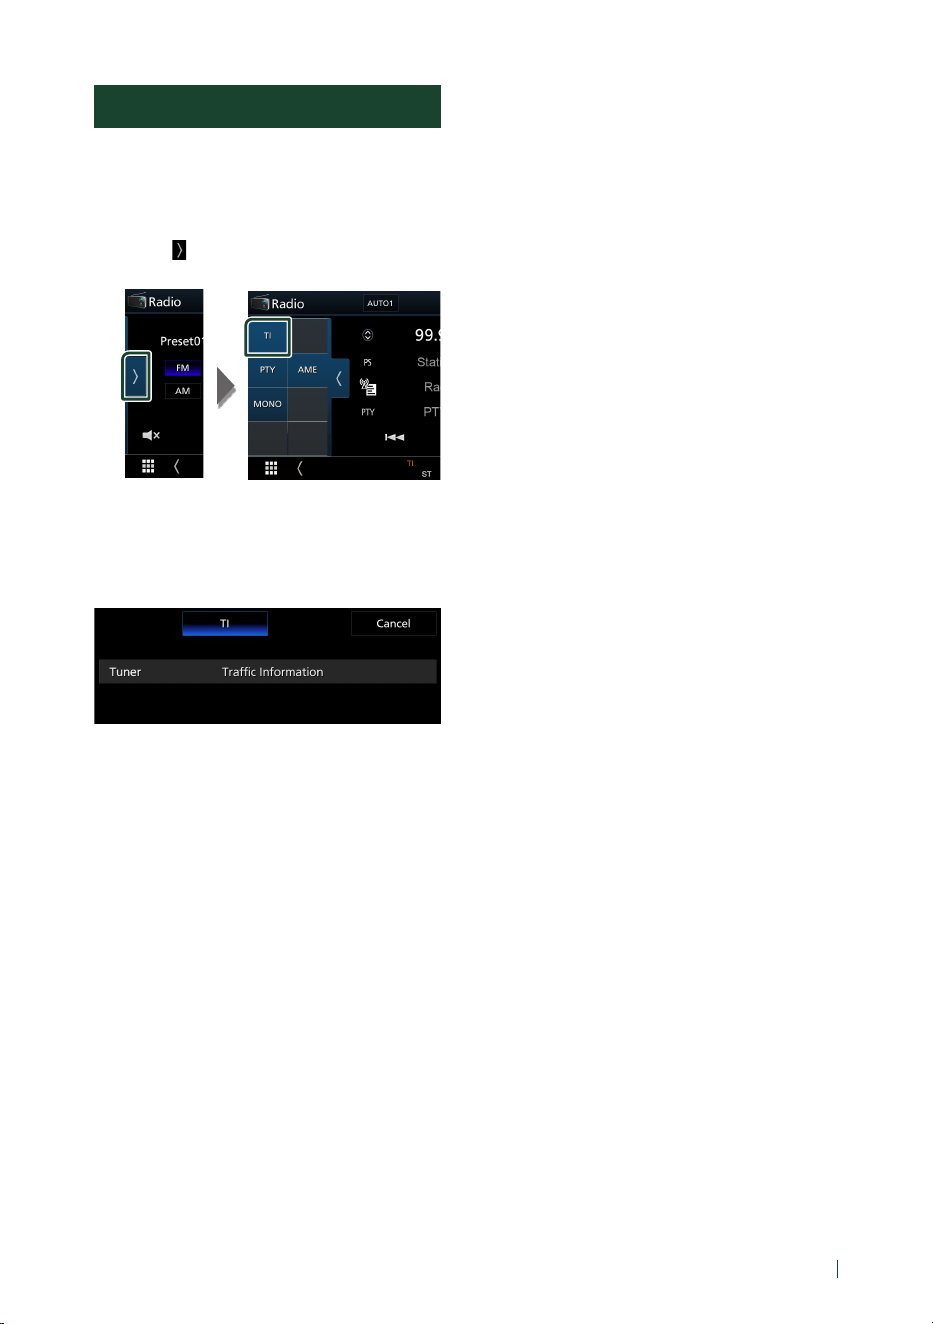
Trac Information (FM only)
You can listen and watch the trac information
automatically when a trac bulletin starts.
However, this feature requires a Radio Broadcast
Data System that includes the TI information.
1 Touch [ ] on the left side of the screen.
Touch [TI].
h Traffic information mode is set.
Ñ When the trac bulletin starts
The Trac Information screen appears
automatically.
SiriusXM®
24
SiriusXM®
(DMX4710S/ DMX40S)
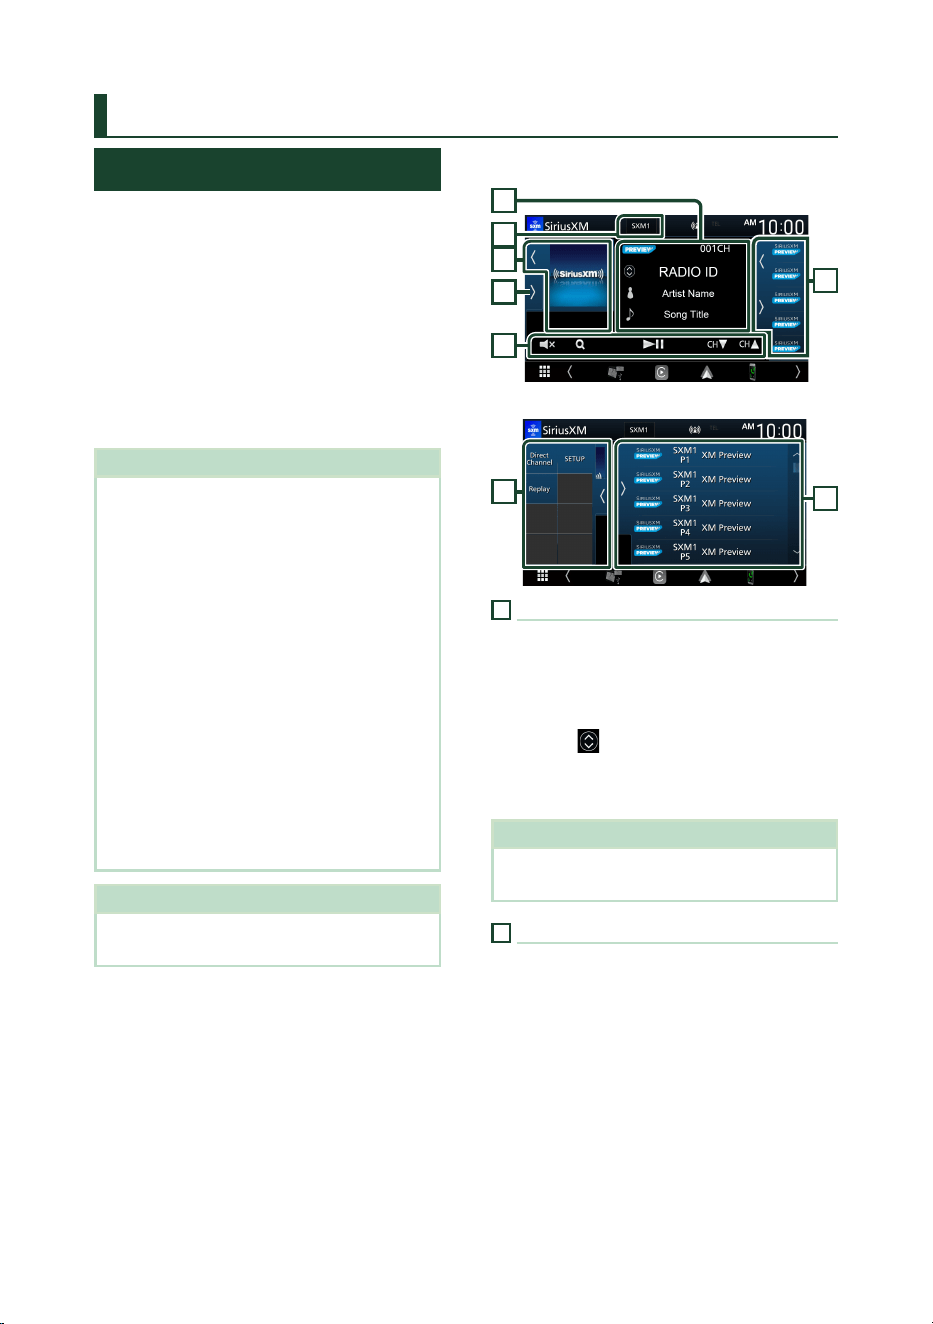
SiriusXM® Basic Operation
Only SiriusXM® brings you more of what you
love to listen to, all in one place. Get over 140
channels, including commercial-free music
plus the best sports, news, talk, comedy and
entertainment. Welcome to the world of satellite
radio. A SiriusXM Vehicle Tuner and Subscription
are required. For more information, visit
www.siriusxm.com.
To listen to the SiriusXM source, touch the
[SiriusXM] icon on the source selection screen.
(P.10)
Activating subscription
• Check your Radio ID.
The SiriusXM Satellite Radio ID is required
for activation and can be found by tuning in
Channel 0 as well as on the label found on the
SiriusXM Connect tuner and its package.
The Radio ID does not include the letters I, O,
S or F.
• Activate the SiriusXM Connect Vehicle Tuner
using either one of the two methods below:
– For users in U.S.A.
Online: Visit www.siriusxm.com/activatenow
Phone:
Call SiriusXM Listener Care at 1-866-635-2349
– For Canadian Subscriptions, please contact:
Online:
Visit www.siriusxm.ca/activate
Phone:
Call SiriusXM Customer Care at 1-888-539-7474
NOTE
• To use SiriusXM® Satellite Radio, the optional
accessory is necessary.
Control screen
2
4
1
6
5
3
Open the drawer
6
4
1
Information display
• Displays the information on the current
channel: Channel Name
[P#]: Preset number
]#CH]: Channel number
]Logo]: Channel logo
Touching [
] allows you to switch between
Content A and Content B.
– Content A: Artist Name, Song Title
– Content B: Content Info, Category Name
NOTE
• While getting contents, "Waiting" is showing on
the display.
2
Band button
Switches among bands. (SXM1/SXM2/SXM3/
SXM4)
SiriusXM®
25English
3
Artwork
• Touch [
] / [ ] allows you to hide/display the
artwork area.
4
Function panel
• Touch [
] of the screen to display the function
panel. Touch [
] to close the panel.
– [Direct Channel]: Touch and enter the desired
number. For details, see Direct search (P.26).
– [SETUP]: Touch to display the SiriusXM SETUP
screen. For details, see SiriusXM Setup (P.27).
– [Replay/Live]: Touch to turn on or off the replay
mode. See Replay (P.27).
5
Operation keys
• [1] : Display the Category search screen. For
details on search operation, see Category/
Channel search (P.26).
• [DH] : Plays or pauses. See Replay (P.27).
• [CHS] [CHR] : Selects a channel.
• [
] : Touch to mute or not to mute.
6
Preset list
• Touch [
] / [ ] allows you to change the
display size.
• Recalls the memorized channel.
• When touched for 2 seconds, stores the
currently being received channel in the
memory.
Storing Channels in Preset
Memory
You can store the current channel in memory.
1 Tune in the channel you wish to store in
the memory.
2 Touch [ ] on the right side of the screen.
3 Touch [SXM(1-4)] [P(1-6)] in which you
want to store the channel for 2 seconds.
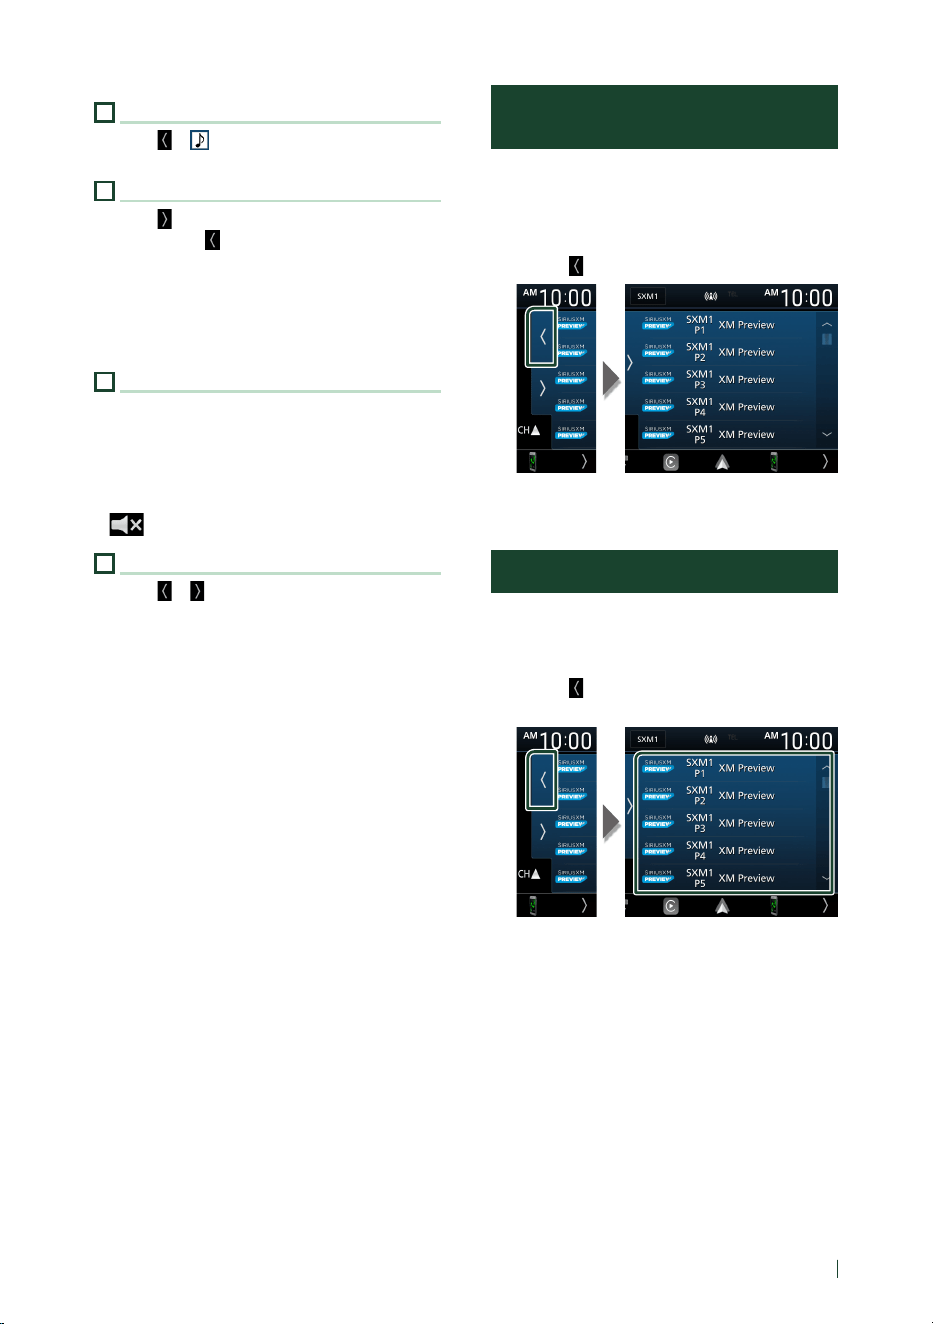
Preset select
You can list and select memorized channels.
To select from the preset list
1 Touch [ ] on the right side of the screen.
Select a channel from the list.
SiriusXM®
26
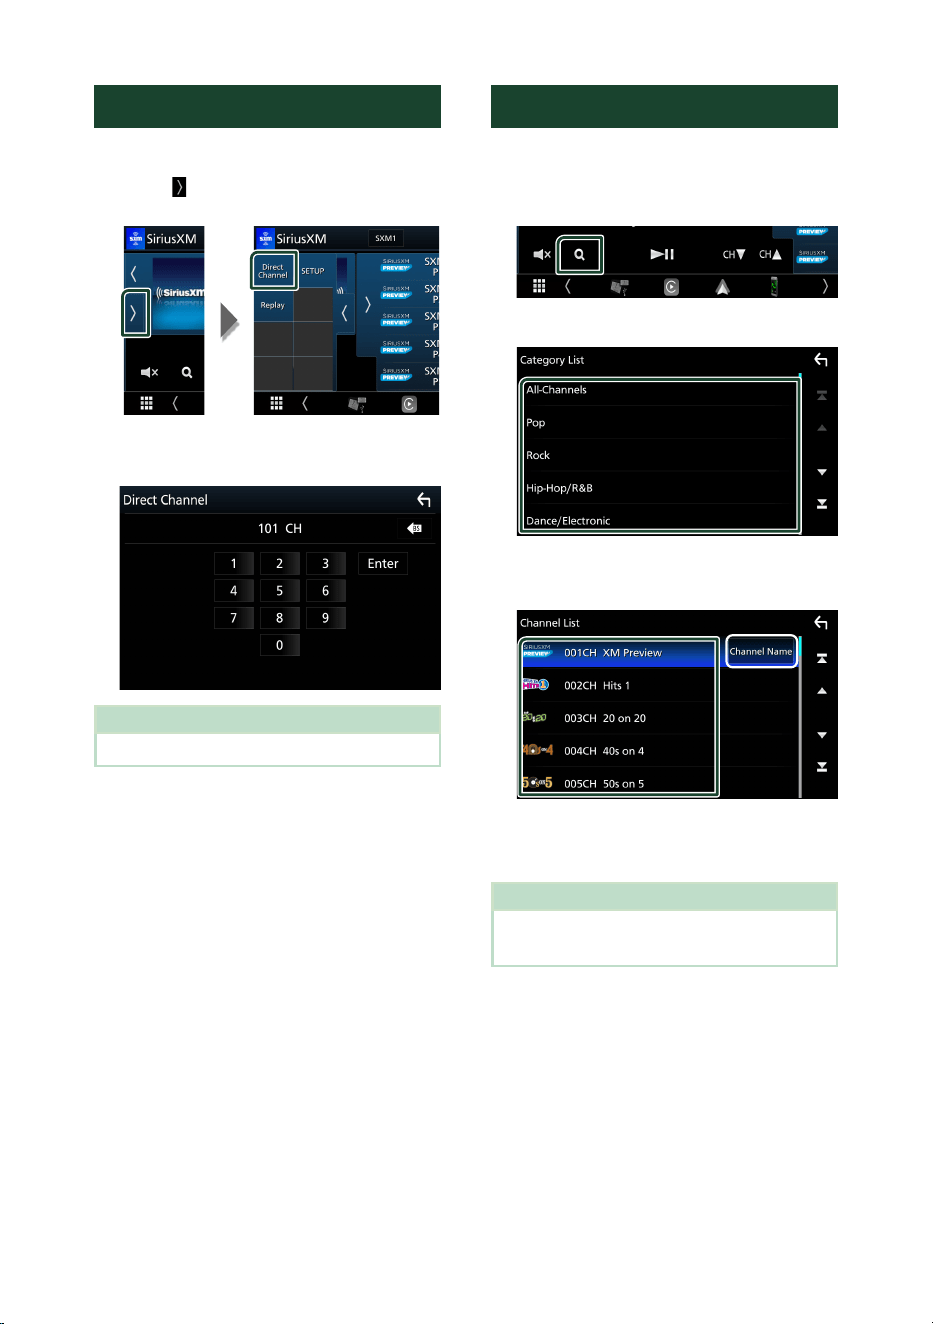
Direct search
You can tune in a channel directly.
1 Touch [ ] on the left side of the screen.
Touch [Direct Channel].
2 Enter the channel number and touch
[Enter].
NOTE
• To clear the number you entered, touch [BS].
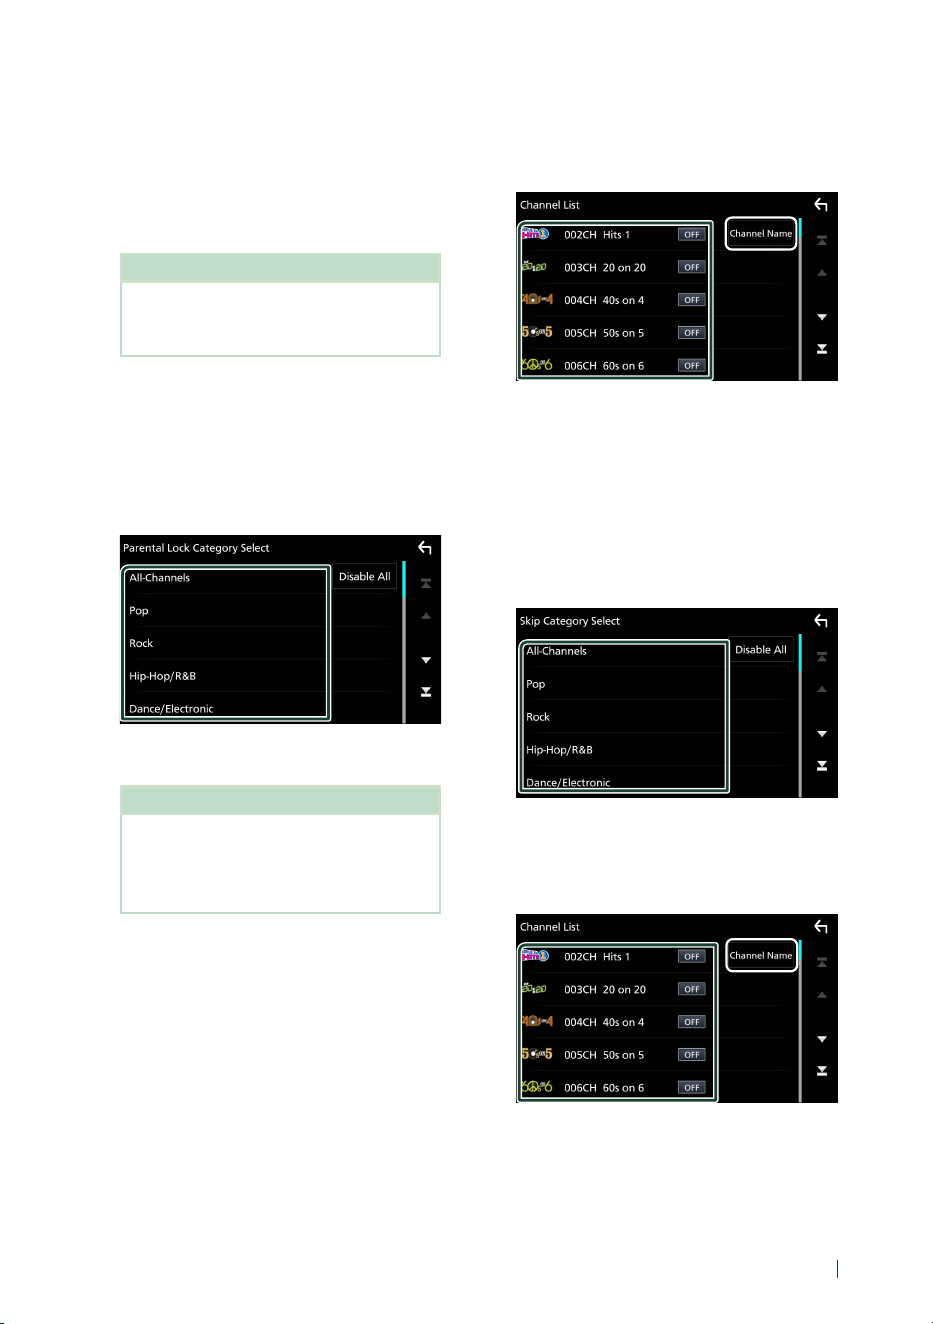
Category/Channel search
You can specify the desired category and select
a channel.
1 Touch [1].
2 Select a category.
h Channel list appears.
3 Select the desired content from the list.
*
1
*
1
Touch to select a desired item: channel
name, artist name, song title, content info,
category name.
NOTE
• All channels in the selected category appear.
• Touching [All-Channels] displays all channels.
SiriusXM®
27English
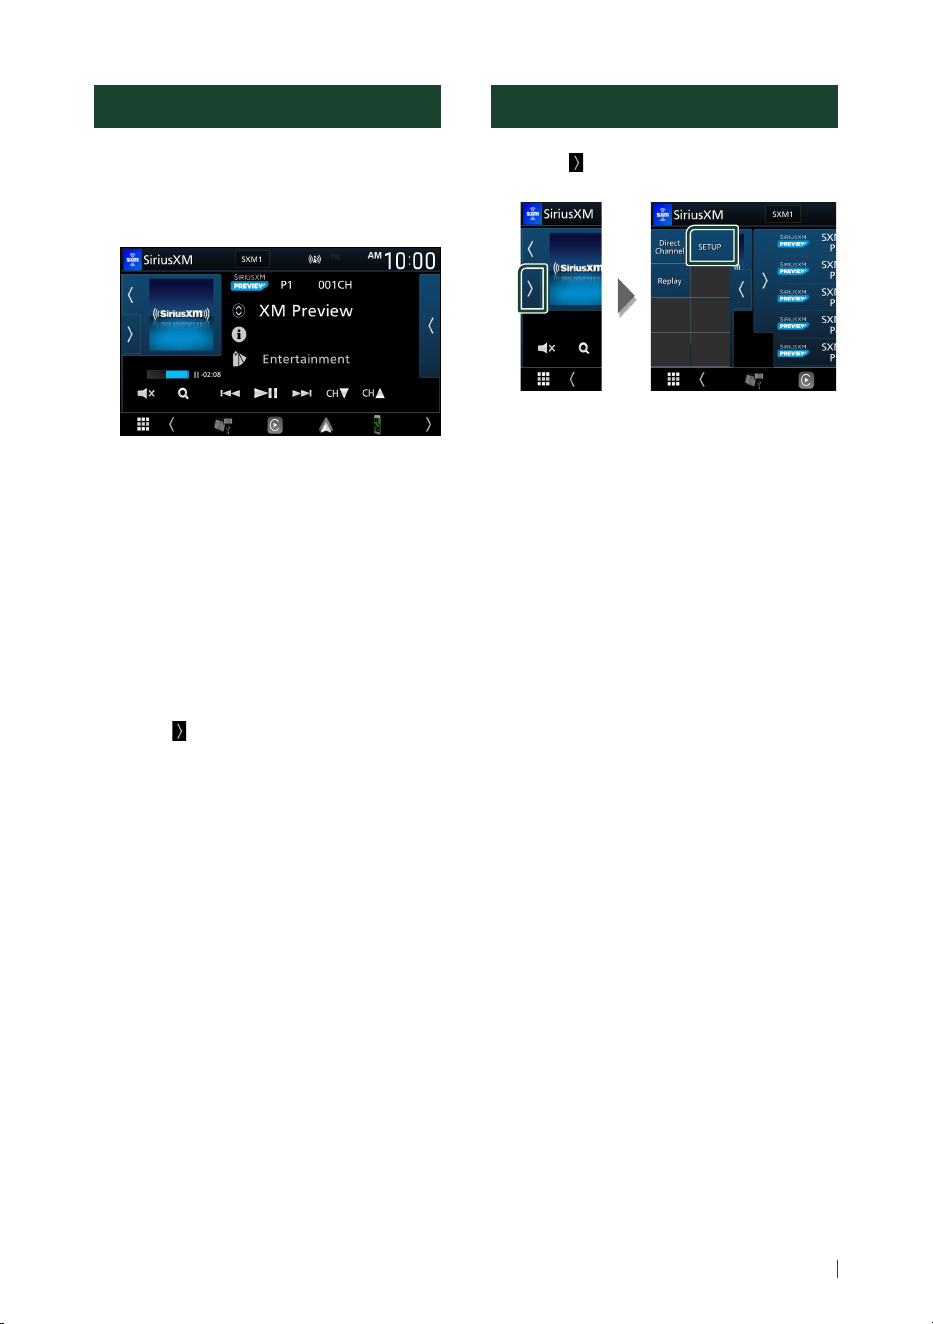
Replay
You can replay the last 60 minutes of the
program from the current channel.
1 Touch [L] or [Replay] on the function
panel.
■ [E] [F]
Press to skip to the previous/next track.
Press and hold to rewind or fast forward.
■ [DH]
Plays or pauses.
■ Replay time bar/Play mode indicator
Displays the recorded data capacity and
playback position.
[D], [B], etc.: Current play mode indicator
To return to live music/content
1 Touch [ ] on the left side of the screen.
2 Touch [Live].
SiriusXM Setup
1 Touch [ ] on the left side of the screen.
Touch [SETUP].
h SiriusXM SETUP screen appears.
See the following sections for each
setting.
• Set up the Parental Code (P.28)
• Set up the Parental Control (P.28)
• Set up the Parental Lock Channel
(P.29)
• Set up the skip channel select (P.29)
• Reset to the default settings (P.30)
SiriusXM®
28
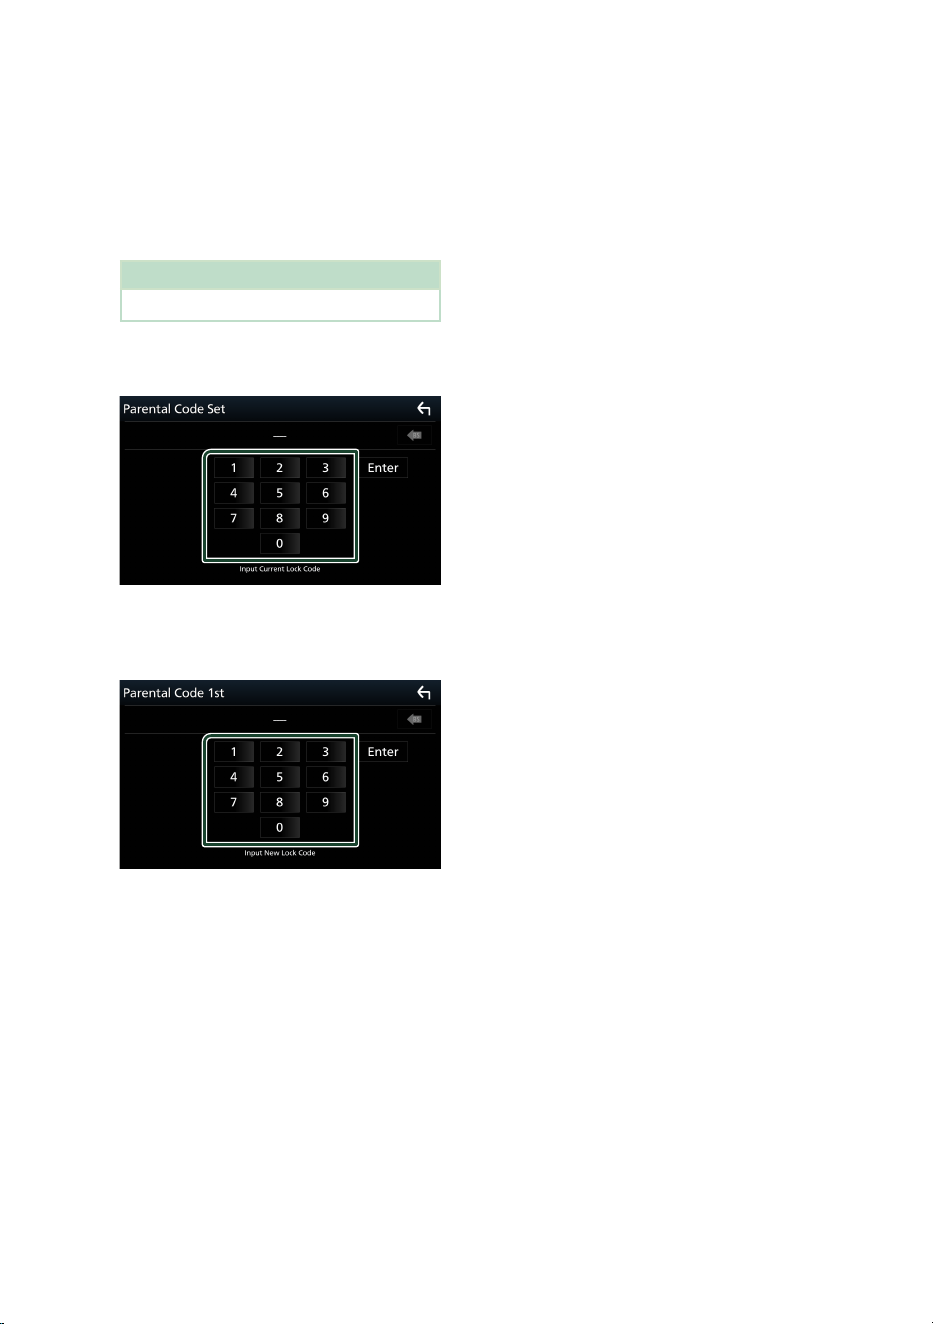
Ñ Parental code
You can set a SiriusXM parental code for Parental
Control.
1 Touch [Parental Code] on the SiriusXM
SETUP screen.
h Parental Code Set screen appears.
NOTE
• The code number is set to “0000” as default.
2 Enter the current code number and touch
[Enter].
h Parental Code 1st screen appears.
3 Enter the new code number and touch
[Enter].
h Parental Code 2nd screen appears.
4 Enter the same code number as that you
entered in step 3 and touch [Enter].
h The code number is confirmed and the
SiriusXM parental code is now set.
Ñ Parental Control
The Parental Control feature allows you to limit
access to any SiriusXM channels, including
those with mature content. When enabled, the
Parental Control feature requires you to enter a
Parental Code to tune to the locked channels.
1 Touch [Parental Control] on the SiriusXM
SETUP screen.
2 Touch [User], [Mature] or [OFF].
■ [User]
Locks only the selected channels.
■ [Mature]
Locks channels classified as “mature” only.
■ [OFF]
Deactivates the parental mature and user
locks.
3 Enter the parental code you originally
input in as stated in Parental code
(P.28) and touch [Enter].
SiriusXM®
29English
When selecting [User]
This allows you to limit access to any SiriusXM
channel (Parental Lock Channel).
1 Touch [Parental Lock Channel Selection]
on the SiriusXM SETUP screen.
h Parental Lock Code screen appears.
NOTE
• You need to set up a parental code
beforehand as stated in Parental code
(P.28).
2 Enter the parental code you originally
input as stated in Parental code (P.28)
and touch [Enter].
h Parental Lock Category Select screen
appears.
3 Touch the desired category in the list.
h Displays all channels in the selected
category.
NOTE
• Touch [All-Channels] to display all channels.
• To delete the parental lock channel setting,
touch [Disable All] and then touch [Yes] on
the conrmation screen.
4 Touch each channel on the list and set to
[ON] or [OFF].
[ON]: Locks the channel.
[OFF]: Unlocks the channel.
*
1
*
1
Select a desired item ([Info], [CH Name],
[Artist], [Title]).
Ñ Skip channel select
You can set the undesired channels to skip.
1 Touch [Skip Channel Select].
h Skip Category Select screen appears.
2 Touch the desired category from the list.
h Displays all channels in the selected
category.
3 Touch each channel in the list and set to
ON or OFF.
*
1
*
1
Touch to select a desired item: channel
name, artist name, song title, content info,
category name.

SiriusXM®
30
NOTE
• To delete the skip channel setting, touch
[Disable All] and then touch [YES] on the
conrmation screen.
• Direct Channel and Preset Memory functions
allow you to select channels.
Ñ Reset
1 Touch [SiriusXM Reset] on the SiriusXM
SETUP screen.
h Confirmation screen appears.
2 Touch [Yes ].
h All SiriusXM settings are reset to defaults.

Bluetooth Control
31English
Bluetooth Control
Using the Bluetooth function, various functions
can be used: listening to the audio le, making/
receiving a call.
Information for using
Bluetooth® devices
Bluetooth is a short-range wireless radio
communication technology for mobile devices
such as mobile phones, portable PCs, and other
devices.
Bluetooth devices can be connected without
cables and communicate with each other.
NOTE
• While driving, do not perform complicated
operations such as dialing numbers, using the
phone book, etc. When you perform these
operations, stop your car in a safe place.
• Some Bluetooth devices may not connect to
this unit depending on the Bluetooth version of
the device.
• This unit may not work for some Bluetooth
devices.
• Connecting conditions may vary depending on
your environment.
• For some Bluetooth devices, the device is
disconnected when the unit is turned o.
Ñ About the cell-phone and
Bluetooth audio player
This unit conforms to the following Bluetooth
specications:
Version
Bluetooth Ver. 5.0
Prole
Cell-phone:
HFP (Hands Free Prole)
PBAP (Phonebook Access Prole)
Audio player:
A2DP (Advanced Audio Distribution Prole)
AVRCP (Audio/Video Remote Control Prole)
Sound codec
SBC, AAC
NOTE
• The units supporting the Bluetooth function
have been certied for conformity with the
Bluetooth Standard following the procedure
prescribed by Bluetooth SIG.
• However, it may be impossible for such units to
communicate with your cell-phone depending
on its type.

Bluetooth Control
32
Register the Bluetooth device
It is necessary to register the Bluetooth audio
player or cell-phone to this unit before using the
Bluetooth function.
You can register up to 7 Bluetooth devices.
NOTE
• Up to 7 Bluetooth devices can be registered. If
an attempt is made to register the 8th Bluetooth
device, the Bluetooth device connected on the
earliest date will be deleted to register the 8th
one.
1 Turn on the Bluetooth function on your
smartphone/cell-phone.
2 Search the unit (“DMX*****”) from your
smartphone/cell-phone.
3 Operate your smartphone/cell-phone
according to the displayed messages.
■ Confirm the request on the
smartphone/cell-phone.
■ If a PIN code is required, enter the PIN
code (“0000”).
4 Touch [Yes ].
When data transmission and connection
have completed, the Bluetooth connection
icon appears on the screen.
Connection Setup
1 Press the [MENU] button.
h Popup menu appears.
2 Touch [ ].
h SETUP Menu screen appears.
3 Touch [Connection].
h Connection screen appears.
See the following section for each
setting.
• Connect the Bluetooth device (P.33)
Bluetooth Control
33English
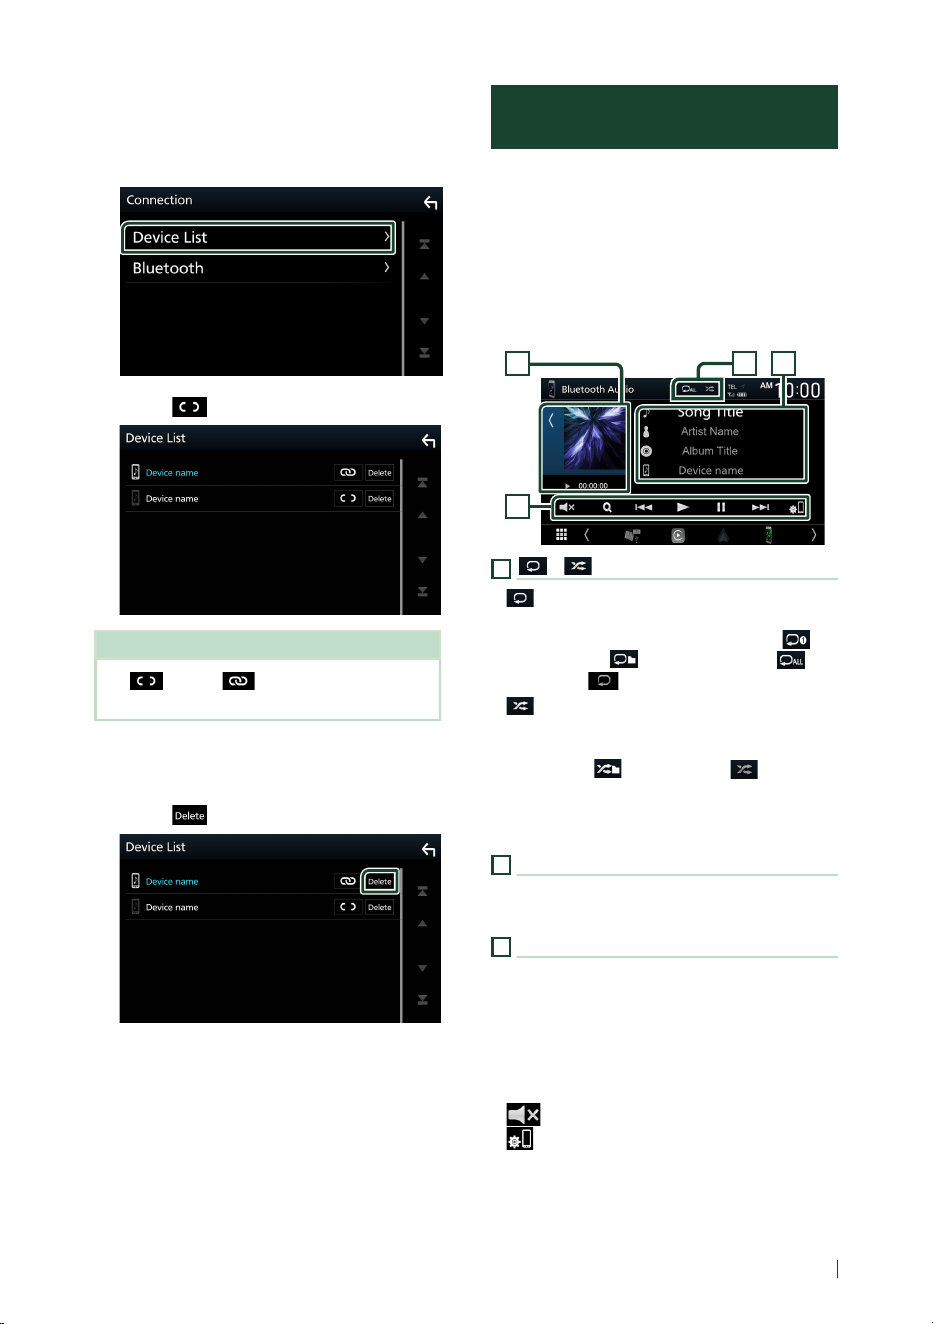
Ñ Connect the Bluetooth device
1 Touch [Device List] in the Connection
screen.
2 Touch [ ] you want to connect.
NOTE
• If [ ] turns to [ ], it means that the unit will
use that device.
To delete the registered Bluetooth
device
1 Touch [ ].
h Confirmation message appears.
2 Touch [Yes ].
Playing Bluetooth Audio
Device
Most function can be controlled from the
source control screen.
To enter Bluetooth source, touch
[Bluetooth Audio] icon in the source selection
screen. (P.10)
Ñ Bluetooth basic operation
Control screen
3
4 21
1
[ ] / [ ]
• [
] : Repeats the current track/folder. Each
time you touch the key, repeat mode switches
in the following sequence; File repeat ([
]),
Folder repeat ([
]), All songs repeat ([ ]),
Repeat o ([
])
• [
] : Randomly plays all tracks in current
folder. Each time you touch the key, random
mode switches in the following sequence;
All random ([
]), Random o ([ ])
• Operations and display indications may
dier according to their availability on the
connected device.
2
Information display *
• Displays the name of the track information.
• Connected device name.
3
Operation keys *
• [1]: Searches le. See File search (P.34).
• [E] [F]: Searches the previous/next
content. Touch and hold to fast forward or fast
backward.
• [D]: Plays.
• [H]: Pauses.
• [
] : Touch to mute or not to mute.
• [
] : Displays the Device List screen. (P.33)
Bluetooth Control
34
4
Play mode indicator/ Playing time
• Touch [
] / [ ] allows you to hide/display the
artwork area.
• [D], [H]: Current play mode indicator
The meanings of each icon are as follows;
[D] (play), [B] (fast forward), [A] (fast
backward), [H] (pause).
* These items appear only when the audio
player which supports AVRCP prole is
connected.
NOTE
• If the operation keys do not appear, operate
from the player.
• Depending on your cell-phone or audio player,
audio may be heard and controlled but text
information may not appear.
• If the volume is too low, raise it on your cell-
phone or audio player.
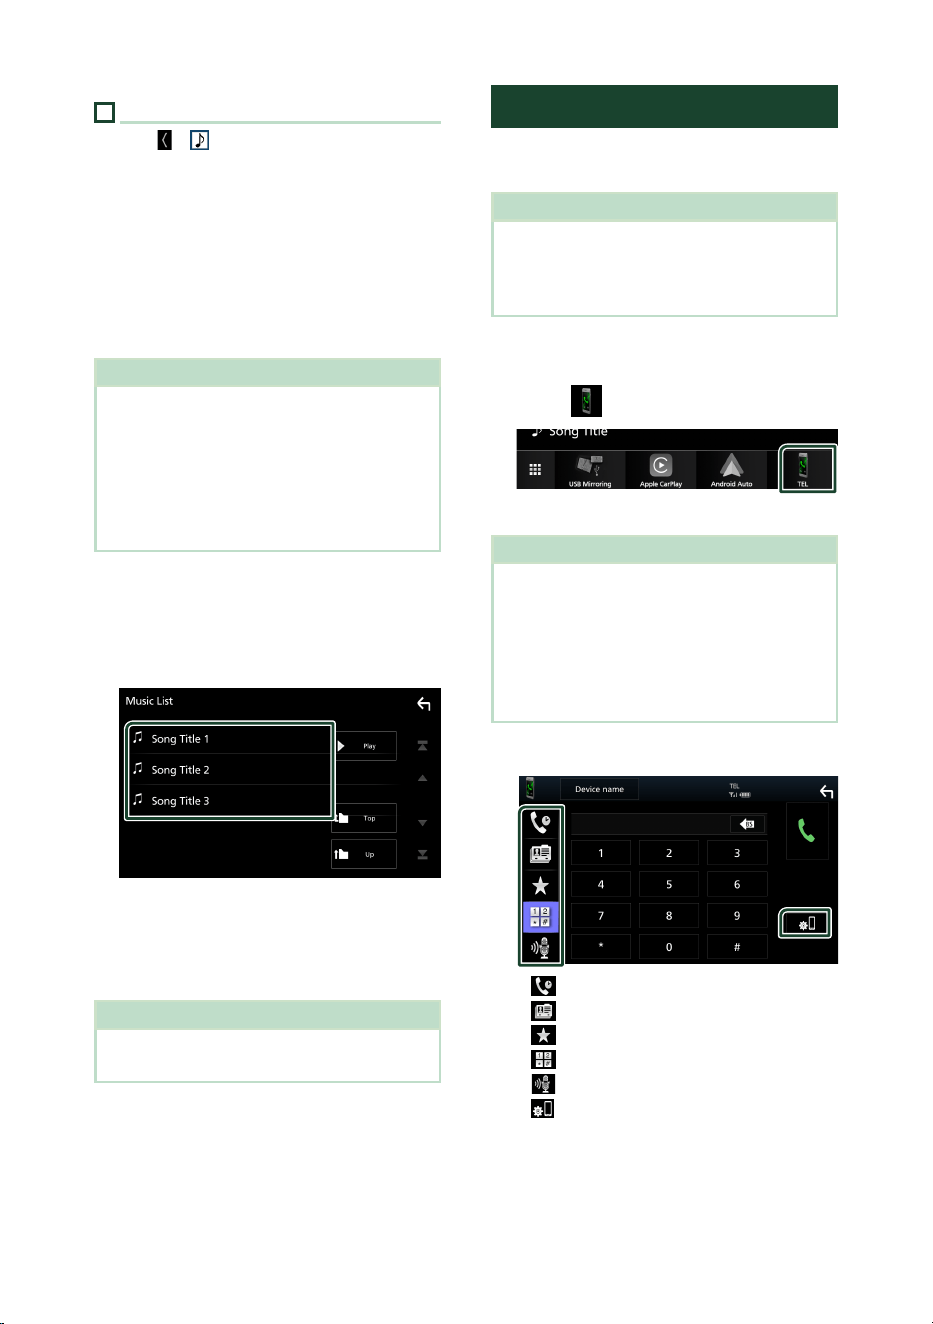
Ñ File search
1 Touch [1].
2 Touch the desired file or folder.
When you touch a folder its contents are
displayed.
3 Touch desired item from the content list.
h Playback starts.
NOTE
• For operations in the list screen, see List screen
(P.12).
Using Hands-Free Unit
You can use telephone function by connecting
the Bluetooth telephone to this unit.
NOTE
• While Apple CarPlay or Android Auto is being
connected, Bluetooth Hands-Free function
cannot be used. Only Apple CarPlay or Android
Auto Hands-Free function can be used.
Ñ Make a call
1 Touch [[ ].
h Hands Free screen appears.
NOTE
• If your mobile phone supports PBAP, you can
display the phone book and call lists on the
touch panel screen when the mobile phone is
connected.
– Phone book: up to 1000 entries
– Up to 20 entries including dialed calls,
received calls, and missed calls
2 Select a dialing method.
• [ ]: Call using call records
• [
]: Call using the phonebook
• [
]: Call using the preset number
• [
]: Call by entering a phone number
• [
]: Voice Recognition (P.36)
• [
]: Device List
Bluetooth Control
35English
● Device List
1) Touch [
].
Device List screen appears.
NOTE
• The status icons such as battery and antenna
displayed may dier from those displayed on the
cell-phone.
• Setting the cell-phone in the private mode can
disable the hands-free function.
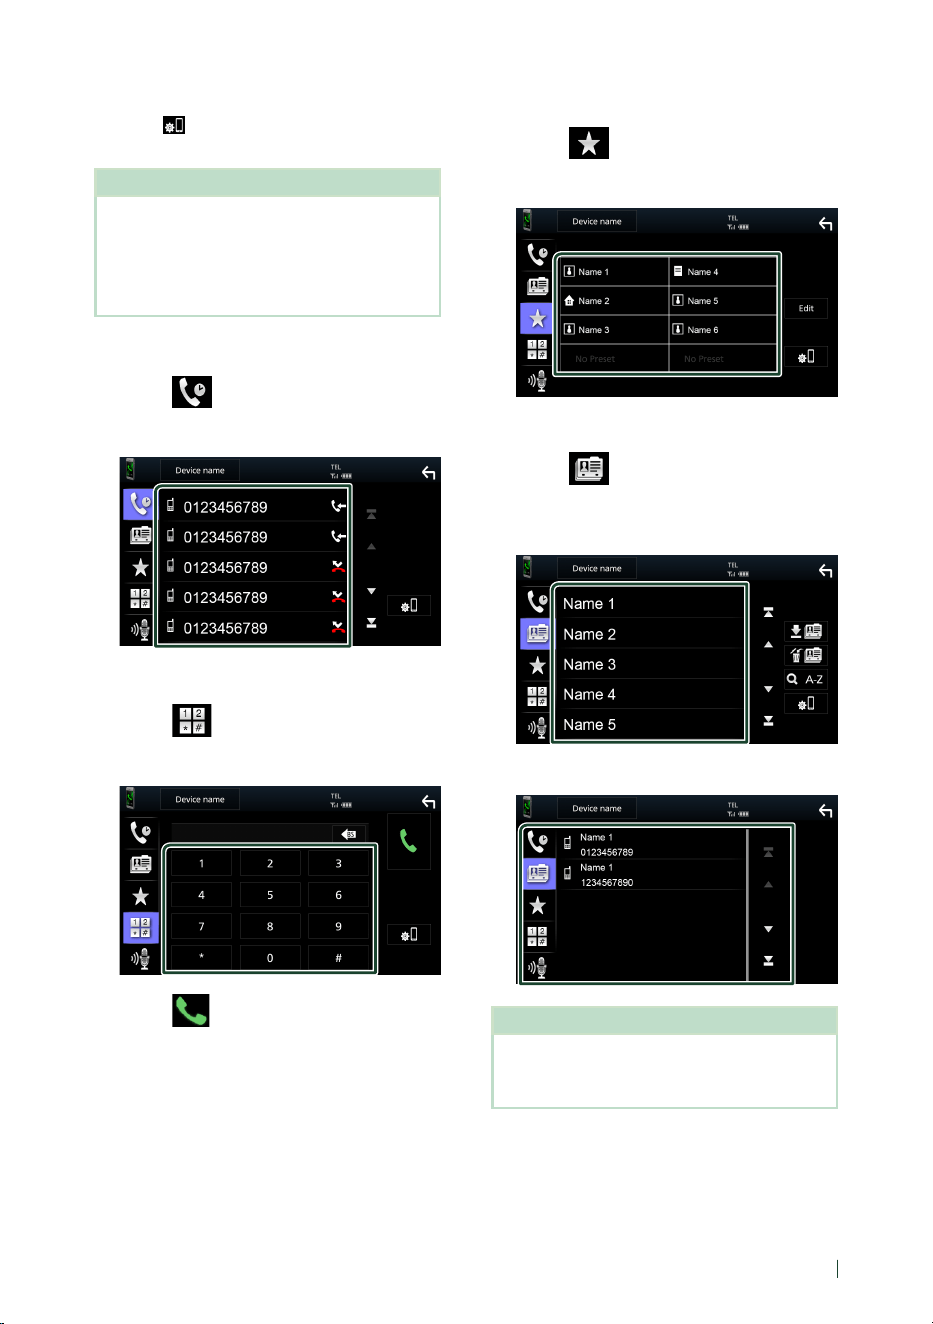
Call using call records
1 Touch [ ].
2 Select the phone number from the list.
Call by entering a phone number
1 Touch [ ].
2 Enter a phone number with number keys.
3 Touch [ ].
Call using the preset number
1 Touch [ ].
2 Touch the Name or phone number.
Call using the phonebook
1 Touch [ ].
2 Select the person you want to call from
the list.
3 Select the phone number from the list.
NOTE
• If no Phonebook has been downloaded,
touching [Download Phonebook Now] will
start downloading the Phonebook.
Bluetooth Control
36
Ñ Voice Recognition
You can access the voice recognition function of
the cell-phone connected to this unit. You can
search the cell-phone phonebook by voice. (The
functionality depends on the cell-phone.)
1 Press the [VOICE] button.
h Voice Recognition screen appears.
2 Start speaking.
NOTE
• You can use voice recognition function by
touching [
] on the Hands Free screen.
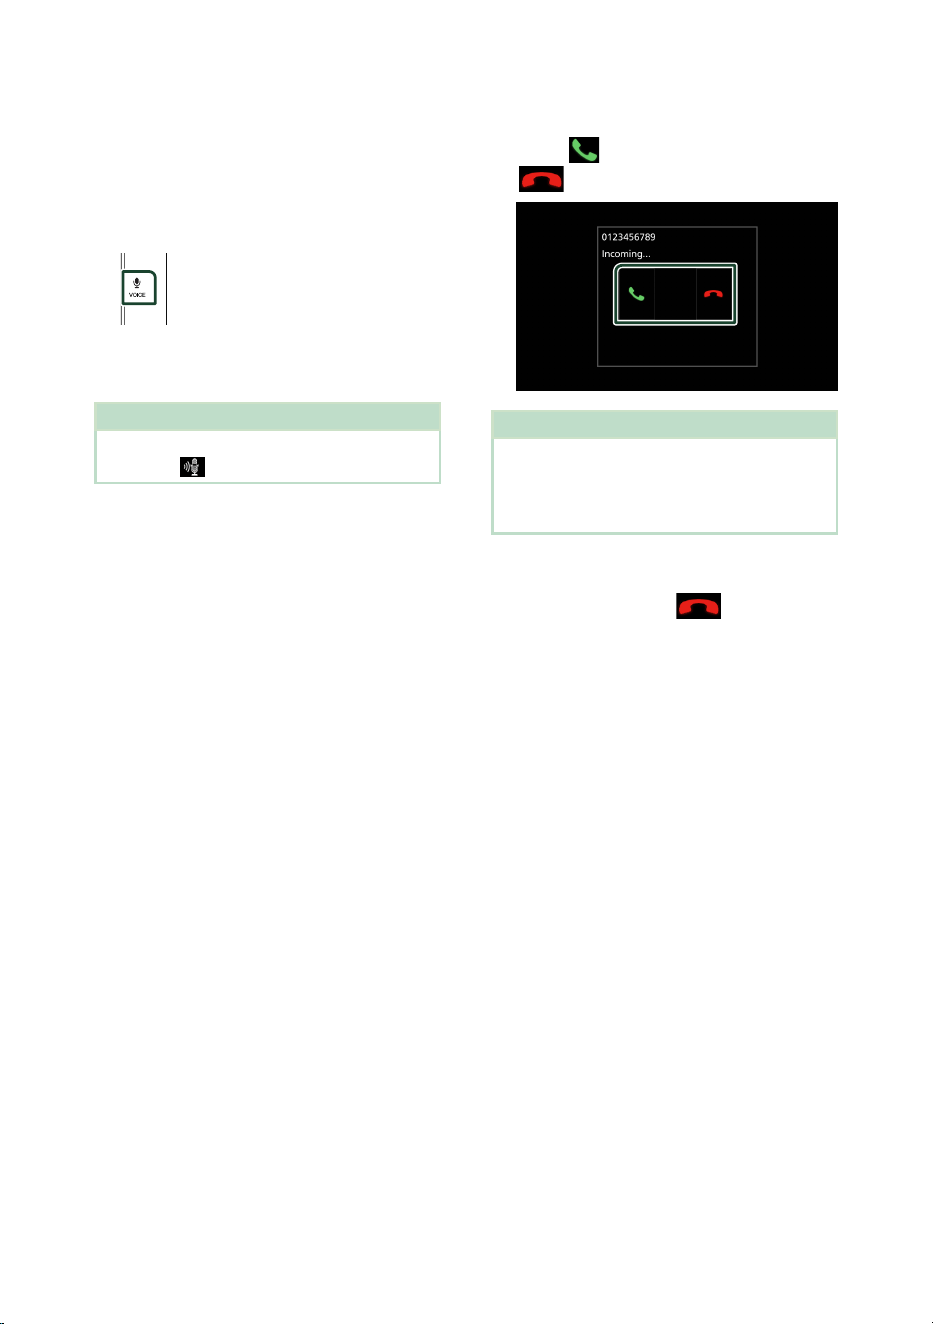
Ñ Receive a call
1 Touch
[ ]
to answer a phone call or
[
]
to reject an incoming call.
NOTE
• While monitoring the view camera, this screen
does not appear even if a call comes in. To
display this screen, return the shift knob of car to
the driver position.
To end call
1 While talking, touch [ ].
Bluetooth Control
37English
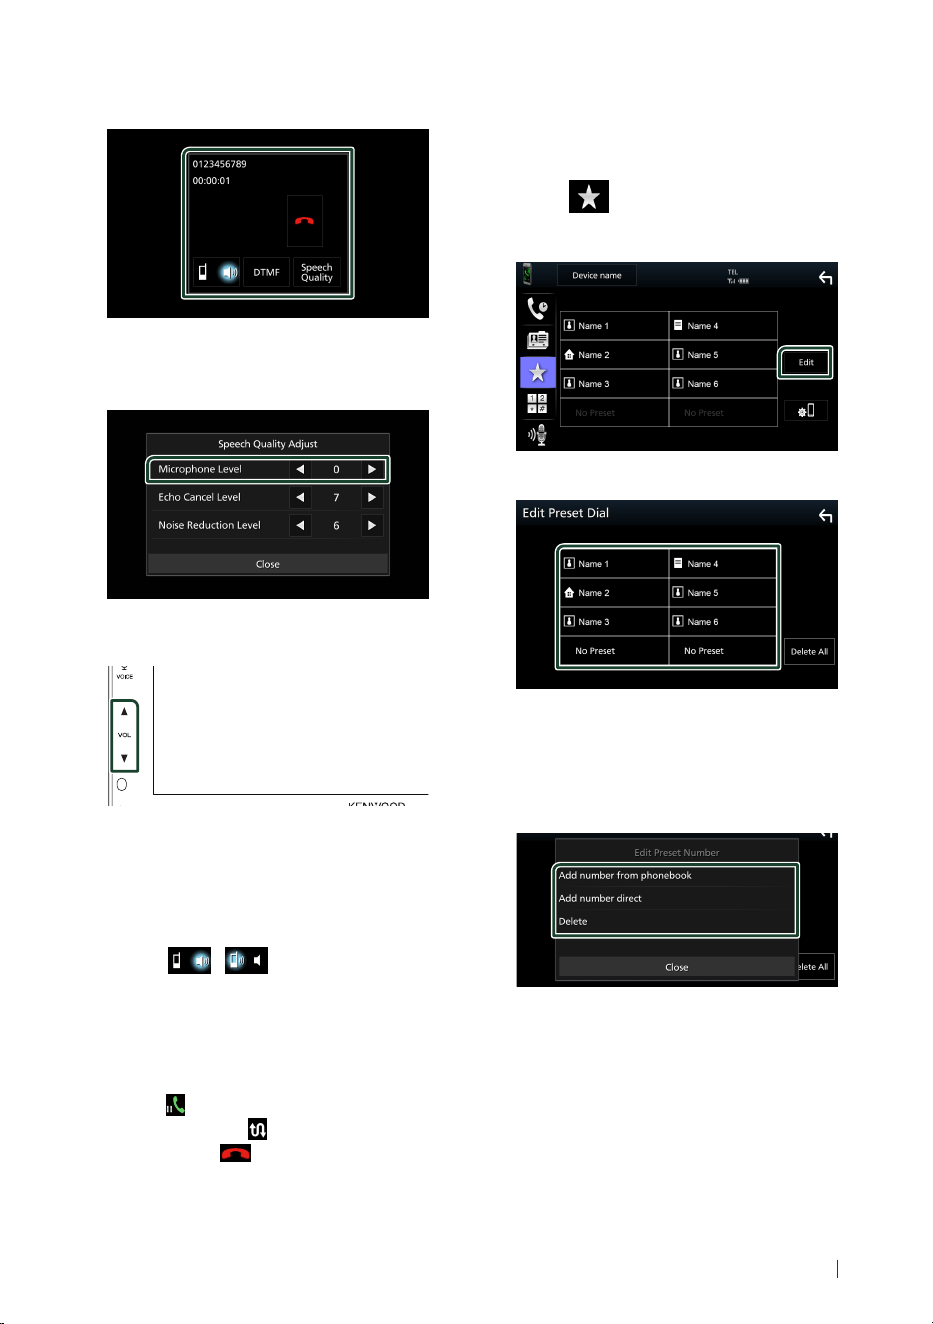
Ñ Operations during a call
● Adjust the volume of your voice
1) Touch [Speech Quality].
2) Touch [T] or [U] for [Microphone Level].
● Adjust the receiver volume
Press the [S] or [R] button.
● Output the dial tone
Touch [DTMF] to display the tone input screen.
You can send tones by touching desired keys on
the screen.
● Switching the speaking voice output
Touching [
]/ [ ] each time switches the
speaking voice output between cell-phone and
speaker.
● Call-waiting
When you receive a call while talking on another
call, you can answer the newly received call by
touching
[
]
. The current call is on hold.
Each time you touch
[
]
, the caller will change.
When you touch [
], the current call will end
and switch to the call in hold.
Ñ Phone number preset
You can register frequently used phone
numbers to this unit.
1 Touch [ ].
2 Touch [Edit].
3 Select where to preset.
■ [Delete all]
To delete all preset numbers, touch
[Delete all] and then touch [Yes ] on the
confirmation screen.
4 Select how to preset.
■ [Add number from phonebook]
Select the number to preset from the
phonebook. See Call using the phonebook
(P.35).
■ [Add number direct]
Enter the telephone number directly and
touch [SET]. See Call by entering a phone
number (P.35).
Bluetooth Control
38
■ [Delete]
To delete a preset number, touch [Delete]
and then touch [Ye s ] on the confirmation
screen.
Ñ Phonebook transfer
You can transfer the phonebook in your
Bluetooth smartphone via PBAP.
1 Touch [ ].
2 Touch [ ].
h The phonebook data transmission starts.
NOTE
• If the Phonebook contains more than 1000
entries, Phonebook data cannot be transferred.
Phonebook deletion
1 Touch [ ].
h Confirmation message appears.
2 Touch [Yes ].
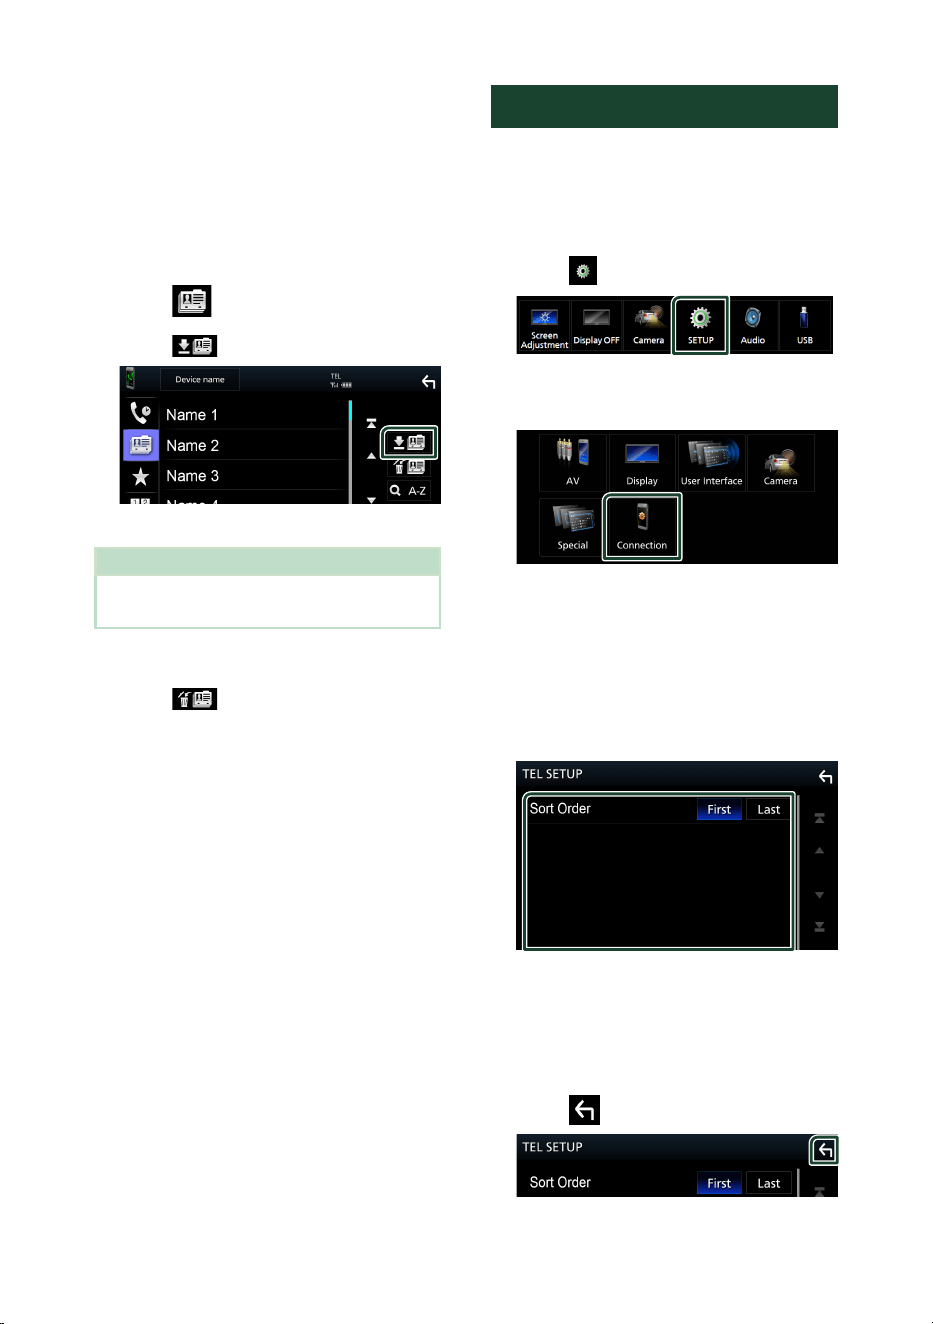
Hands-Free Setup
You can make various settings for the Hands-
Free function.
1 Press the [MENU] button.
h Popup menu appears.
2 Touch [ ].
h SETUP Menu screen appears.
3 Touch [Connection].
h Connection screen appears.
4 Touch [Bluetooth]
h Bluetooth screen appears.
5 Touch [TEL SETUP].
h TEL SETUP screen appears.
6 Set each function as follows.
■ [Sort Order]
Set how to sort the data in the smartphone/
cell-phone phonebook.
[First] (Default)]: Sorts data by the first name.
[Last]: Sorts data by the last name.
7 Touch [ ].
Other External Components
39English
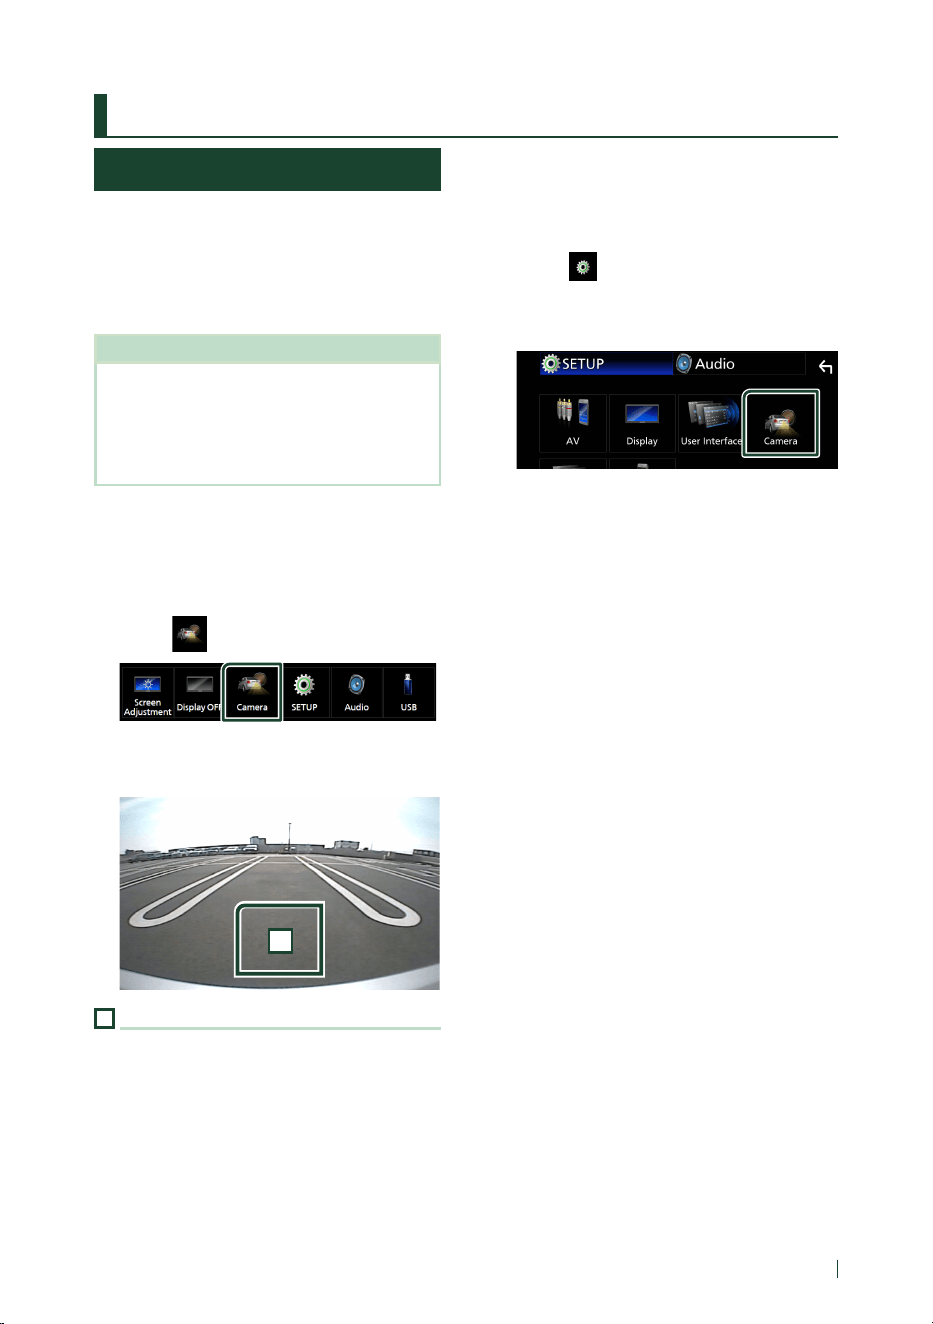
Other External Components
View Camera
# CAUTION
The position of parking guidelines displayed on
the monitor may dier from actual condition.
Please take the actual parking guidelines as
reference and check with eyes.
NOTE
• To connect a camera, see P.57.
• To use a rear view camera, a REVERSE lead
connection is required. (P.58)
• The rear view screen is displayed when you shift
the gear to the reverse (R) position.
Ñ Display the camera screen
1 Press the [MENU] button.
h Popup menu appears.
2 Touch [ ].
h View camera screen appears.
3 Adjust each item as follows.
1
1
Camera off
Touch to exit the camera screen.
Ñ Camera Setup
1 Press the [MENU] button.
h Popup menu appears.
2 Touch [ ].
h SETUP Menu screen appears.
3 Touch [Camera].
h Camera screen appears.
4 Set each item as follows.
■ [Rear Camera Message]
[Always display] (Default): Always displays
the caution message on the rear camera
interruption screen.
[Clear after 5 seconds]: Displays the
caution message for about 5 seconds on the
rear camera interruption screen.
■ [Parking Guidelines]
You can display parking guidelines to enable
easier parking when you shift the gear to the
reverse (R) position.
Default is “ON”.
■ [Guidelines SETUP]
If you select [ON] for [Parking Guidelines],
adjust the parking guidelines. See To adjust
the parking guidelines (P.40).
Other External Components
40
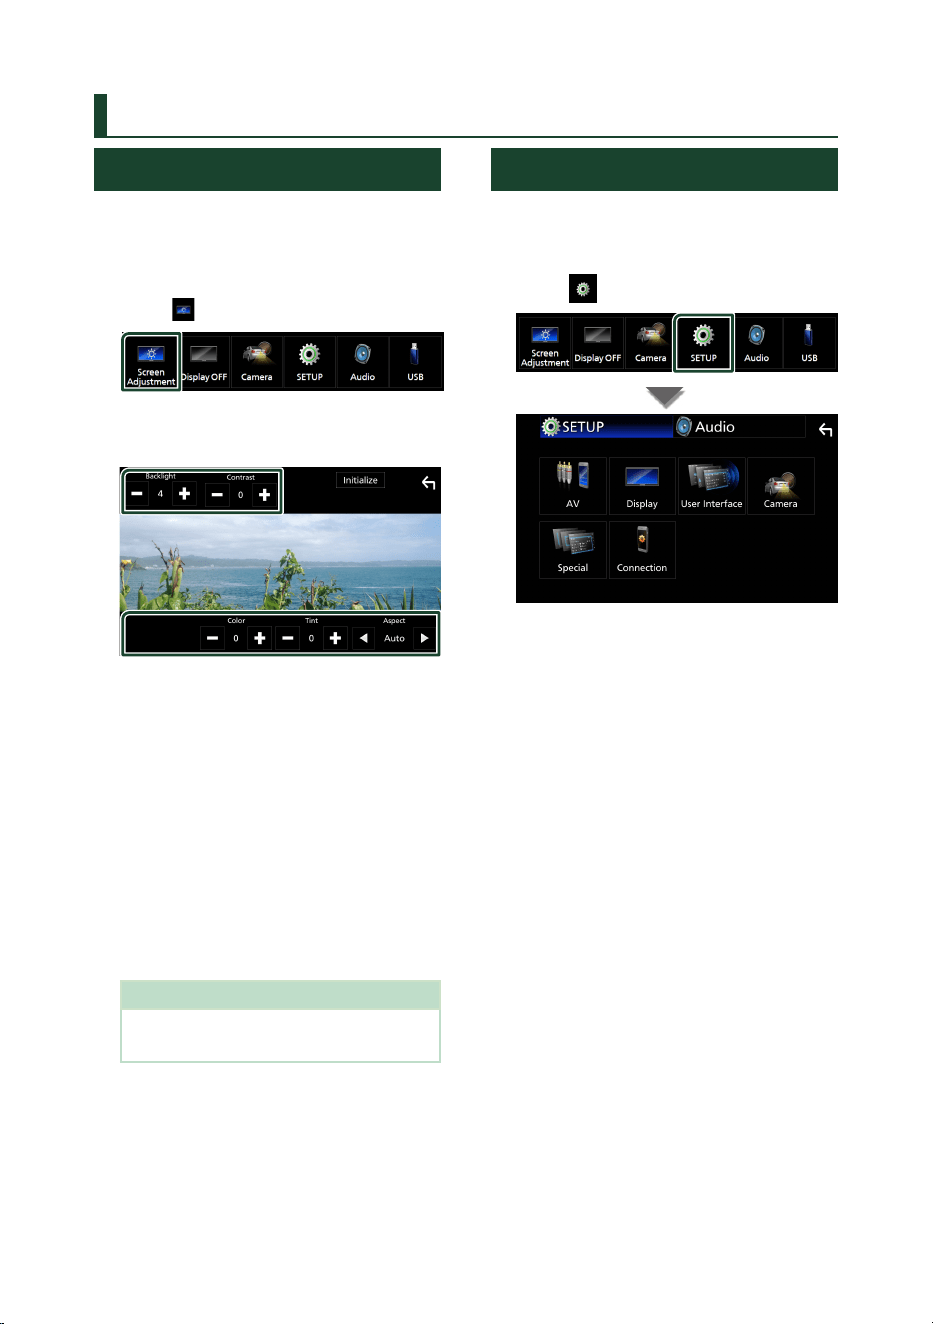
Maestro Features Operation
(DMX4710S/ DMX40S)
By connecting this unit to the bus system of the
vehicle using an iDatalink Maestro (commercially
available), this unit can access OEM audio
sources, vehicle settings, and show vehicle
information on this unit.
1 Press the [HOME] button.
h HOME screen appears.
2 Touch [ ] on the HOME screen.
3 Touch icon.
• Displays the control screen of the
Bluetooth Hands-Free function provided
for the vehicle.
• Displays vehicle information such as tire
pressure, battery voltage, check engine
codes.
• Display and control the OEM satellite
radio.
• Display and control the OEM media player.
• Displays the control screen of the
Bluetooth streaming source provided for
the vehicle.
• Display and controls the radar detector.
• Displays information from the vehicle
data lines, such as speedometer and fuel
economy.
• Displays information about the status of
the climate control system in the vehicle.
• Displays information from the vehicle’s
parking sensors.
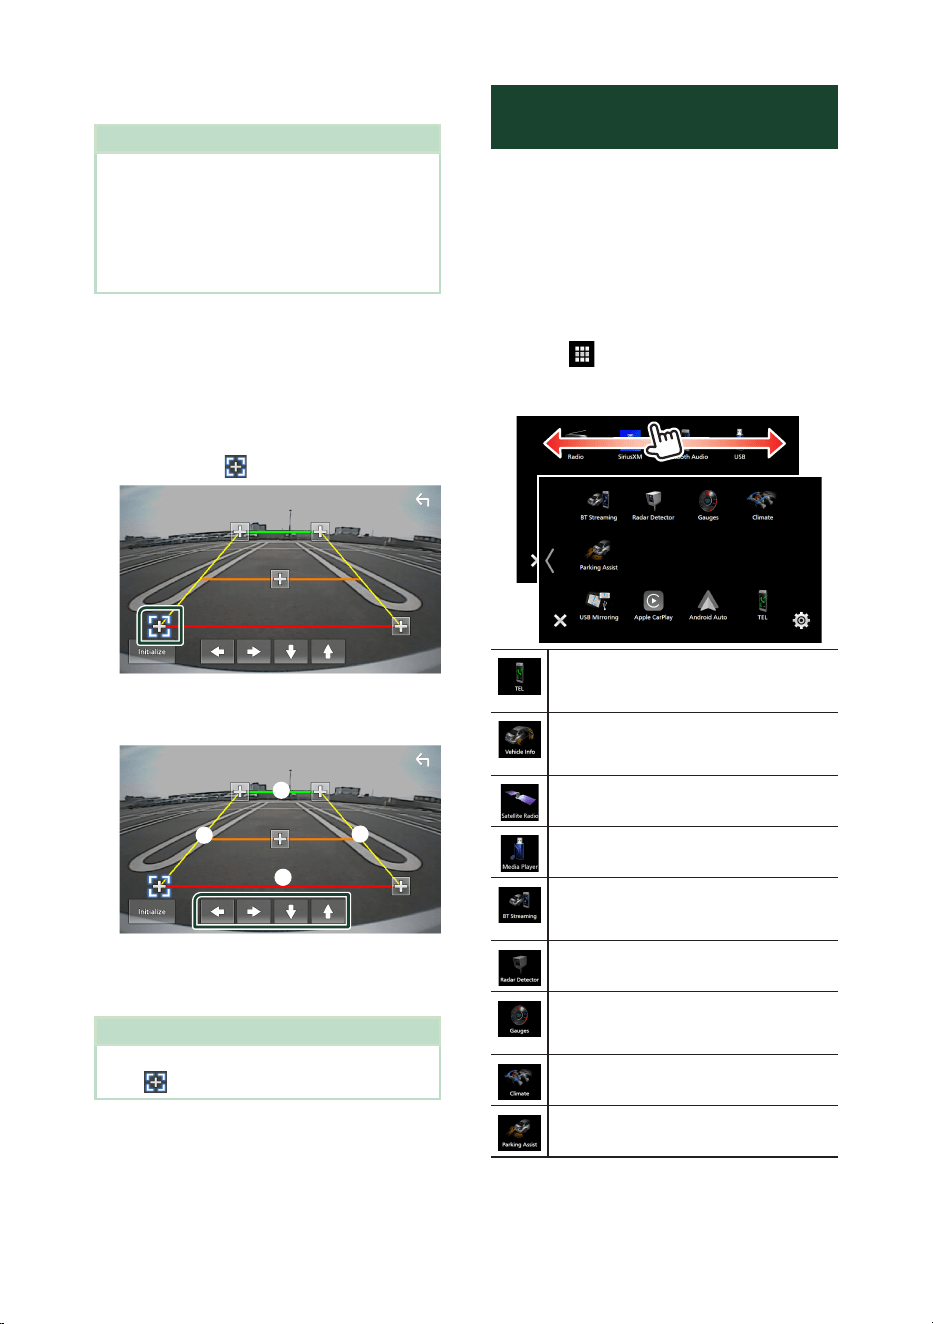
To adjust the parking guidelines
NOTE
• Install the rear view camera in the appropriate
position according to the instructions supplied
with the rear view camera.
• When adjusting the parking guidelines, make
sure to use the parking brake to prevent the car
from moving.
1 Touch [ON] of [Parking Guidelines] in the
Camera screen. (P.39)
2 Touch [Guidelines SETUP] in the Camera
screen.
3 Adjust the parking guidelines by
selecting the [ ] mark.
4 Adjusting the position of the selected
mark.
A
B
C
D
Make sure that A and B are horizontally
parallel, and that C and D are the same
length.
NOTE
• Touch [Initialize] and after touch [Yes] to set all
the [
] marks to the initial default position.

Setting Up
42
Setting Up
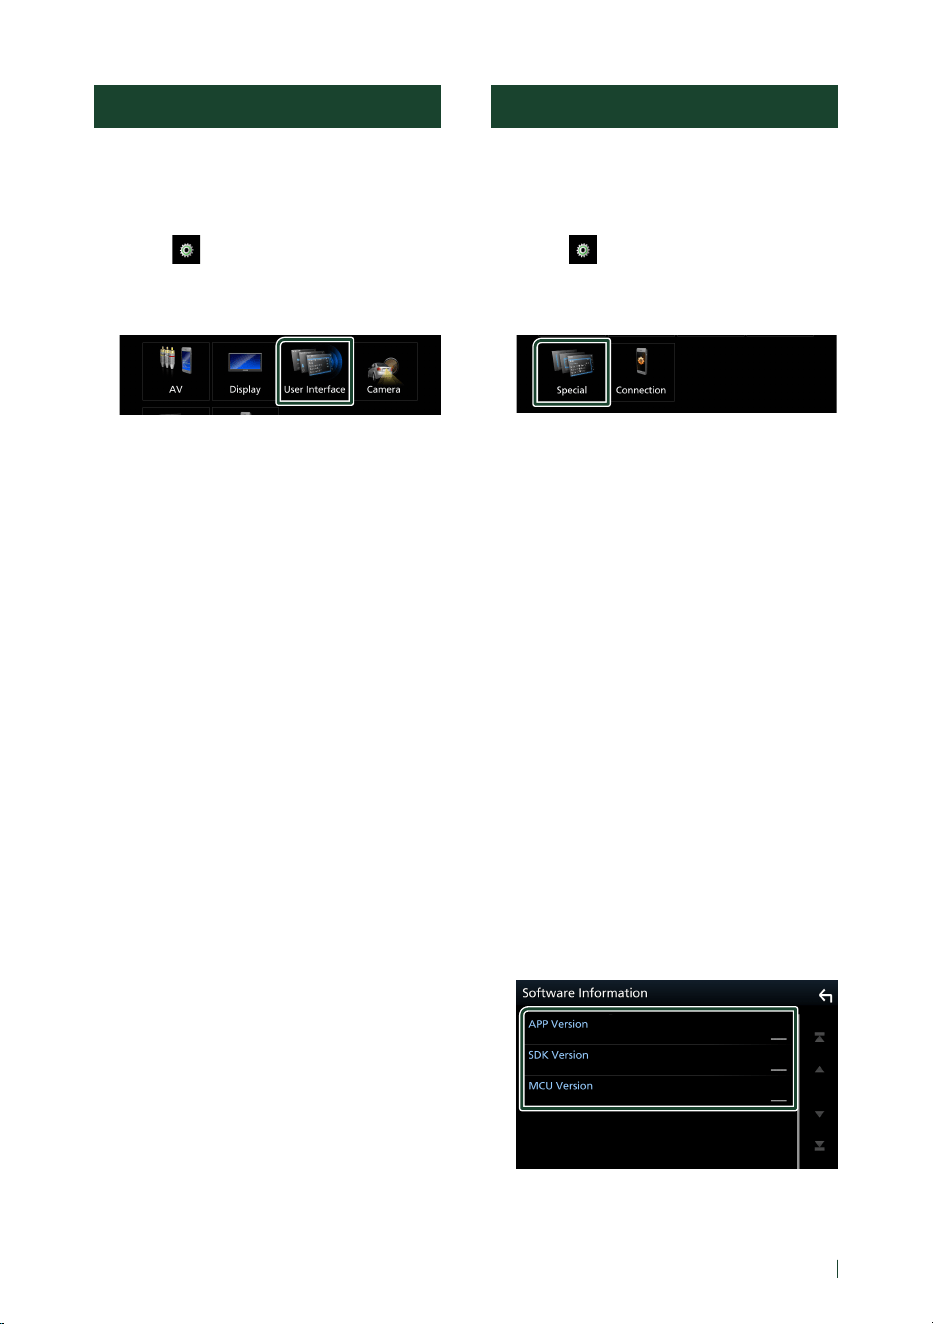
Monitor Screen Setup
You can adjust image quality in video screen.
1 Press the [MENU] button.
h Popup menu appears.
2 Touch [ ].
h Screen Control screen appears.
3 Adjust each item as follows.
■ [Backlight]
■ [Contrast]
■ [Brightness]
■ [Color]
■ [Tint]
■ [Aspect]
Select screen mode.
[Auto](Default): Displays video fully on
vertical or horizontal with no ratio change.
[Full]: Changes the aspect ratio of video and
displays fully on the screen.
[Normal]: Display with 4:3 ratio.
NOTE
• Adjusting items are dierent depending on
the current source.
System Setup
1 Press the [MENU] button.
h Popup menu appears.
2 Touch [ ].
h See the following section for each
setting.
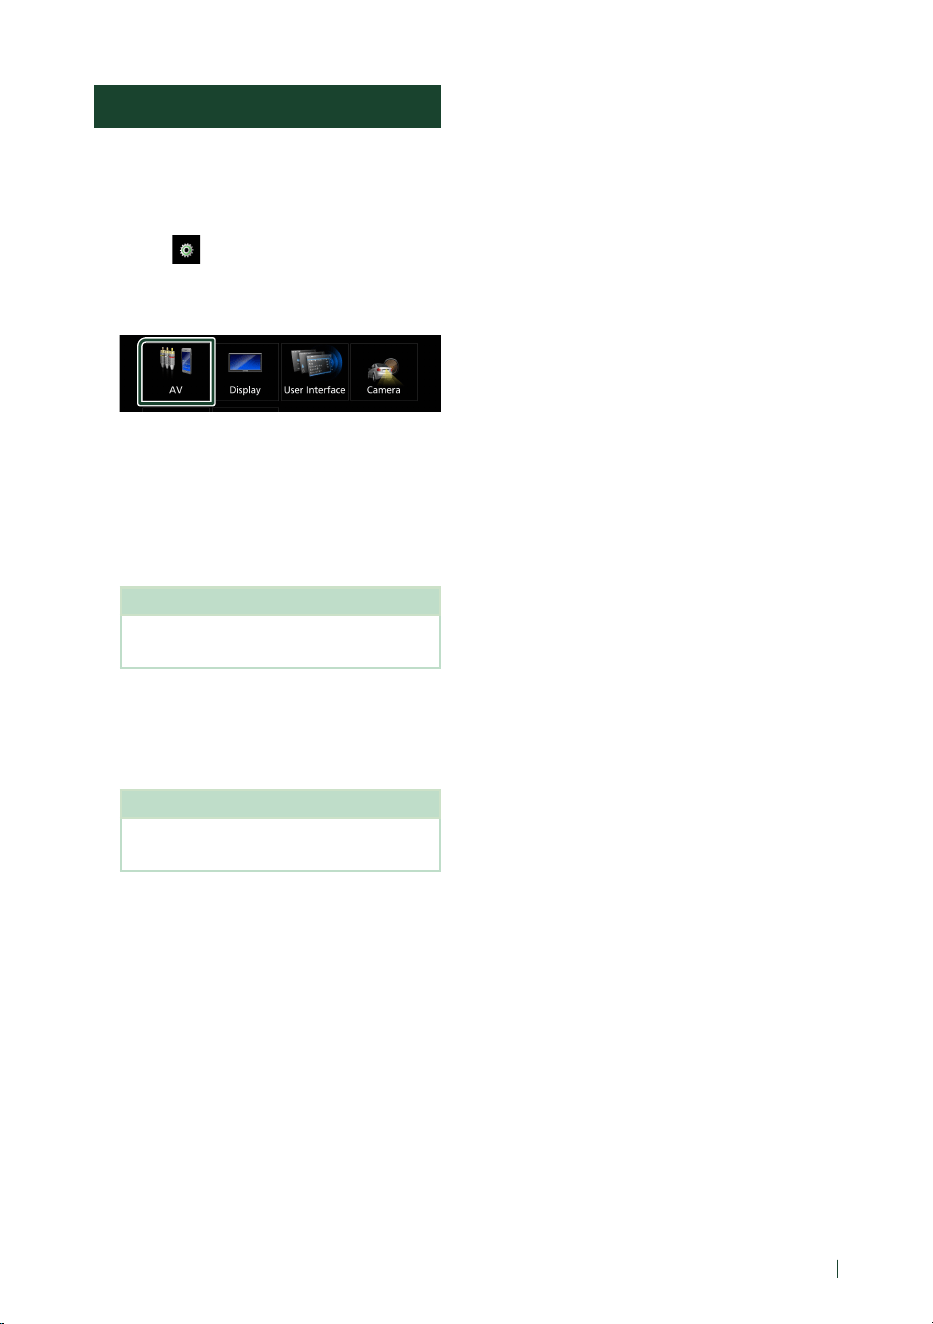
• Set up AV (P.45)
• Set up display (P.44)
• Set up the user interface (P.43)
• Set up camera (P.39)
• Set up special (P.43)
• Set up Connection (P.32)
Setting Up
43English
User Interface Setup
You can setup user interface parameters.
1 Press the [MENU] button.
h Popup menu appears.
2 Touch [ ].
h SETUP screen appears.
3 Touch [User Interface].
h User Interface screen appears.
4 Set each item as follows.
■ [Beep]
Turns the key touch tone on or off.
Default is “[OFF]”.
■ [Language]
Selects a language.
■ [Parking Assist Display (DMX4710S/
DMX40S only)]
When the iDatalink Maestro (commercially
available) is connected, you can display
information about obstacles around the car.
[ON]: Always displays information.
[Dyn.]: Displays information when the sensor
detects obstacles.
[OFF] (Default): Cancels this function.
This can be set when the iDatalink Maestro
(commercially available) is connected.
■ [Parking Assist Position (DMX4710S/
DMX40S only)]
If you select [ON] or [Dyn.] for Parking Assist
Display, select the position of car illustration.
"[Left]" / "[Right]" (Default)
This can be set when the iDatalink Maestro
(commercially available) is connected.
■ [Time Format]
Select the time display format.
"[12-Hour]" (Default)/ "[24-Hour]"
■ [Clock]
■ [Daylight Saving]
■ [Time Zone]
■ [Clock Adjust]
You can set the date and time.
Special Setup
You can setup Special parameters.
1 Press the [MENU] button.
h Popup menu appears.
2 Touch [ ].
h SETUP screen appears.
3 Touch [Special].
h Special screen appears.
4 Set each item as follows.
■ [DEMO]
Set the demonstration mode. Default is “[ON]”.
■ [Product Info]
Displays the product information.
Check the serial number of this unit.
■ [Software Information]
Check the software version of this unit.
(P.43)
■ [Open Source Licenses]
Displays the open source licenses.
■ [Initialize]
Touch [Initialize] and then touch [Ye s ] to set
all the settings to the initial default settings.
Ñ Software Information
Check the software version of this unit.
1 Touch [Software Information] in the
Special screen.
2 Confirm the software version.
Setting Up
44
Display Setup
1 Press the [MENU] button.
h Popup menu appears.
2 Touch [ ].
h SETUP screen appears.
3 Touch [Display].
h Display screen appears.
4 Set each item as follows.
■ [Dimmer]
Select dimmer mode.
[OFF]: The display and buttons do not dim.
[ON]: The display and buttons dim.
[SYNC] (Default): Turns the dimmer function
on or off when the vehicle light control
switch is turned on or off.
■ [OSD Clock]
Select if you want to display the clock while
watching video files on USB, etc.
"[ON]" (Default)/"[OFF]"
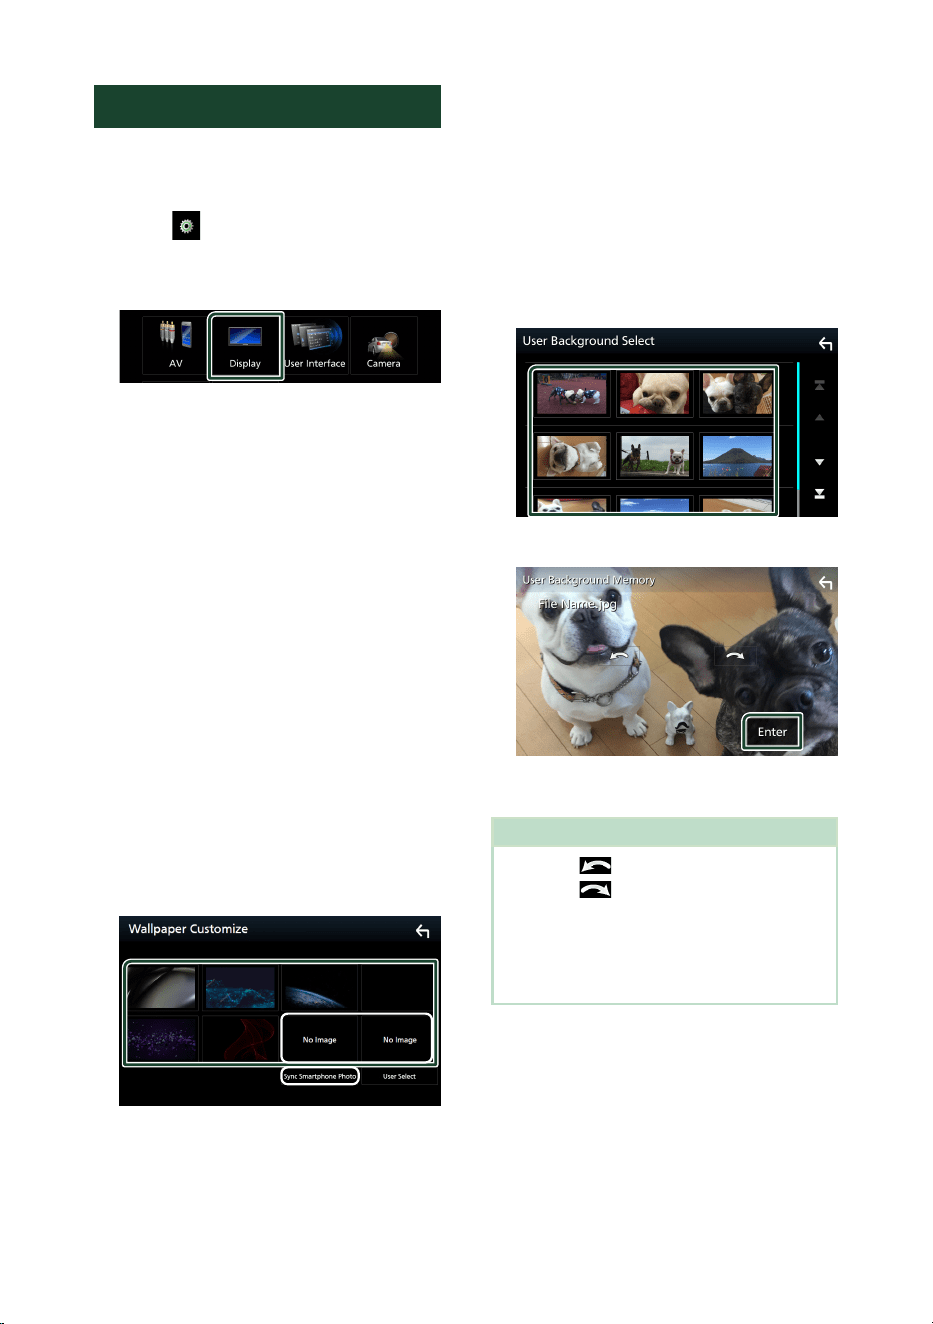
■ [Wallpaper Customize]
Changing wallpaper image. (P.44)
Ñ Change wallpaper image
1 Touch [Wallpaper Customize] in the
Display screen.
2 Select an image.
*
1
*
2
*
1
Select an original image in advance.
*
2
This function is available once MirrorAPP+
is installed on your iPhone or Android
smartphone. See the description of the
application for details.
To register original image
You can load an image from the connected USB
device and set it for the wallpaper image.
Before operating this procedure, it is necessary
to connect the device which has the image to
load.
1 Touch [User Select] in the wallpaper
screen.
2 Select the image to load.
3 Touch [Enter].
h The selected image is loaded and the
display returns to the wallpaper screen.
NOTE
• Touching [ ] rotates counter clockwise.
• Touching [
] rotates clockwise.
• Picture les: JPEG (.jpg, .jpeg), PNG (.png), BMP
(.bmp)
• Maximum number of pixels: 1200 x 1200
• Bit depth: 24 bit
Setting Up
45English
AV Setup
You can set AV parameters.
1 Press the [MENU] button.
h Popup menu appears.
2 Touch [ ].
h SETUP screen appears.
3 Touch [AV].
h AV screen appears.
4 Set each item as follows.
■ [AV-OUT]
Specify whether to output the current source
signal from the VIDEO OUT terminal.
“[ON]”/ “[OFF]” (Default)
NOTE
• Images can be output only from the USB
(video le) source.
■ [Driving Position]
Select the position of the control bar (left or
right) shown on the touch panel.
“[Left]” (Default)/ “[Right]”
NOTE
• The setting is available when an iPhone is
disconnected.
■ [Reverse with ATT]
When the gear is shifted to the reverse
(R) position, the volume of the device is
adjusted.
“[ON]”(Default) / “[OFF]”
■ [Guidance Volume]
Adjust the level of guidance volume. Default
is “15”
■ [Voice Recognition Volume]
Adjust the level of voice recognition volume.
Default is “15”
■ [Phone Incoming Volume]
Adjust the level of phone incoming volume.
Default is “15”
■ [Phone Calling/Talking Volume]
Adjust the level of phone calling/talking
volume. Default is “15”
■ [Speech Quality Adjust]
Adjust the speech quality.
[Microphone Level] : Adjust the level of
microphone gain.
[Echo Cancel Level] : Adjust the level of
echo cancellation.
[Noise Reduction Level] : Reduce the
noise generated in the surrounding
environment without changing the
microphone volume. Use this function
when the voice of caller is not clear.
■ [Maestro SETUP] (DMX4710S/ DMX40S
only)
Access settings for the iDatalink Maestro
(commercially available), including settings
menus for advanced camera controls, vehicle
diagnostics, OEM Settings menus, and more.
(Requires installation of an iDatalink Maestro
in a compatible vehicle).
■ [Vehicle Feature Settings]
This function requires a commercial adaptor.
Consult your KENWOOD dealer for details.
Setting Up
46
Connection Setup
1 Press the [MENU] button.
h Popup menu appears.
2 Touch [ ].
h SETUP Menu screen appears.
3 Touch [Connection].
h Connection screen appears.
4 Touch [Bluetooth].
h Bluetooth screen appears.
5 Set each parameter as follows.
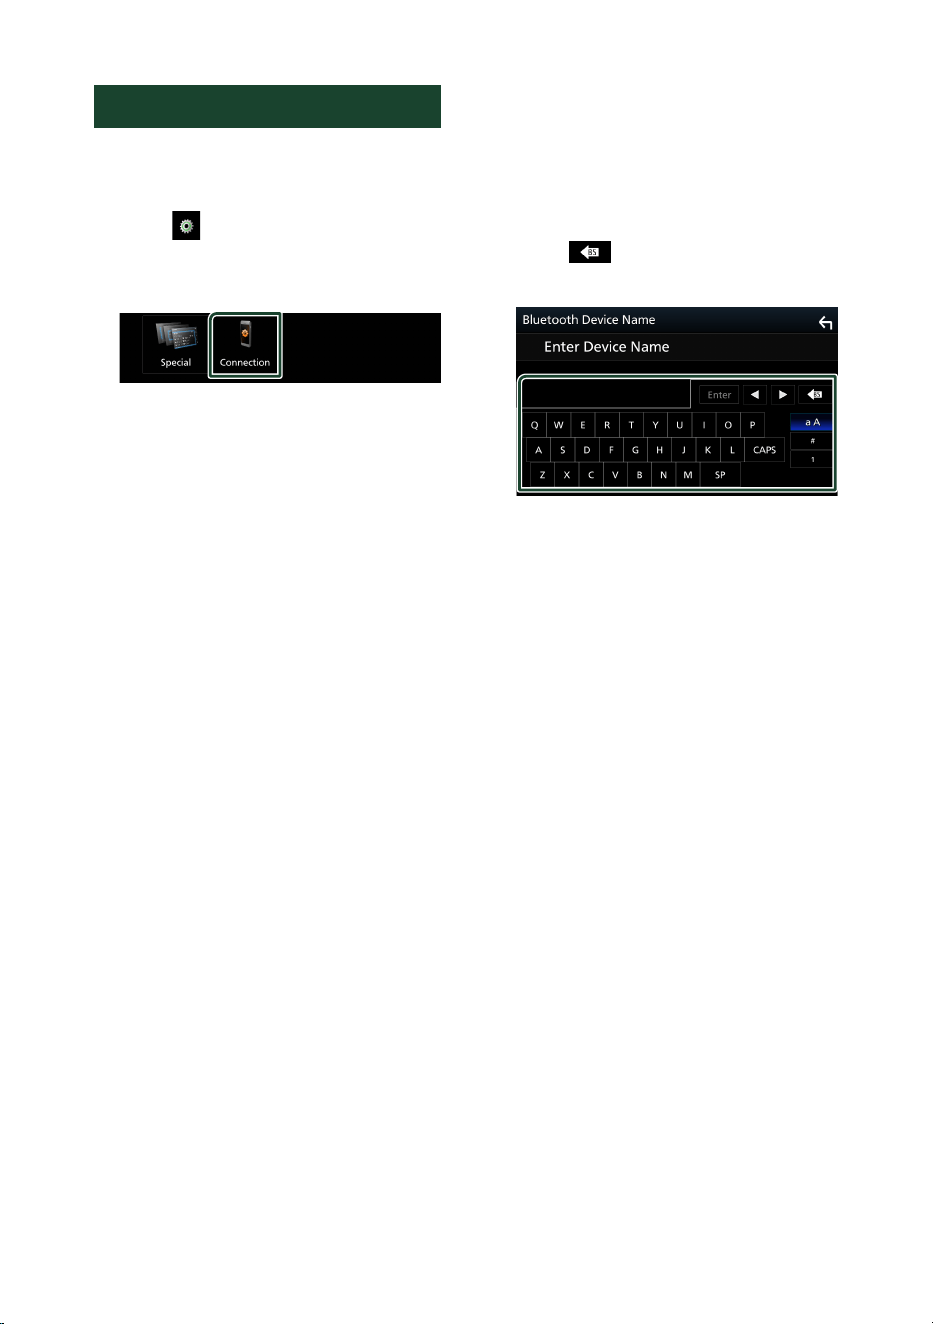
■ [Bluetooth Device Name]
You can change the Bluetooth device name.
See Change the device name for Bluetooth
(P.46).
■ [PIN Code]
Display the PIN code.
■ [Bluetooth MAC Address]
Display the MAC address.
■ [Auto Response]*
Set the automatic response time to pick-up
an incoming call.
[OFF] (Default): Turns off the Automatic
response function.
[20/25/30]: Sets the ringing time (second).
■ [TEL SETUP]
You can change the settings for Hands-Free
function. See Hands-Free Setup (P.38).
* Either the auto response time set on this
unit or the time set on the smartphone/
cell-phone, whichever is shorter takes
effect.
Ñ Change the device name for
Bluetooth
1 Touch [Device Name] on the Connection
screen.
h Change Device Name screen appears.
2 Touch [ ].
3 Input the device name.
4 Touch [Enter].
Controlling Audio
47English
Controlling Audio
You can adjust the various settings such as
audio balance or subwoofer level.
1 Press the [MENU] button.
h Popup menu appears.
2 Touch [ ].
h See the following section for each
setting.
• Set up speaker/ X’over (P.47)
• Controlling equalizer (P.49)
• Set listening position/ DTA (P.51)
• Controlling general audio (Fader /
Balance) (P.48)
• Set volume offset (P.50)
• Set sound effect (P.50)
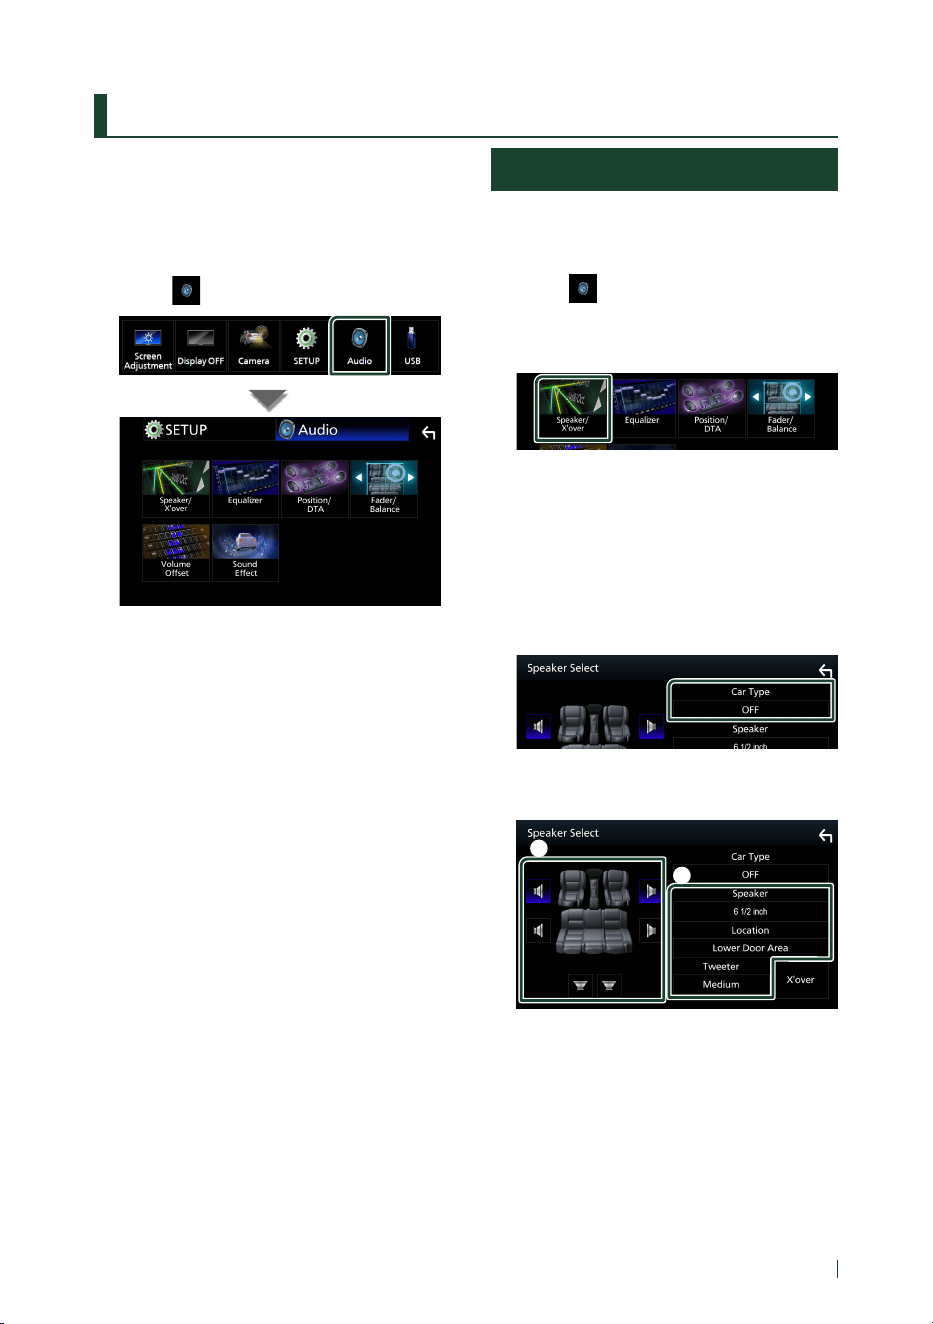
Speaker/ X’over setup
1 Press the [MENU] button.
h Popup menu appears.
2 Touch [ ].
h Audio screen appears.
3 Touch [Speaker/Xʼover].
4 Select a car type.
You can setup the car type and speaker
network, etc.
If your car type is selected, the Delay Time
Alignment is set automatically (for timing
adjustment of sound output for each
channel) to have the highest surround
effects.
5 Touch the speaker (1) you wish to adjust
and set each item (2) as follows.
1
2
■ [Speaker]
You can select a speaker type and its size to
get the best sound effects.
When the speaker type and size are set,
the speaker crossover network is set
automatically.
■ [Location] (Only for Front, Rear)
Select the speaker position you have fixed.
Controlling Audio
48
■ [Tweeter] (Only for Front)
You can set the tweeter when you are
selecting front speakers.
[None], [Small], [Medium], [Large]
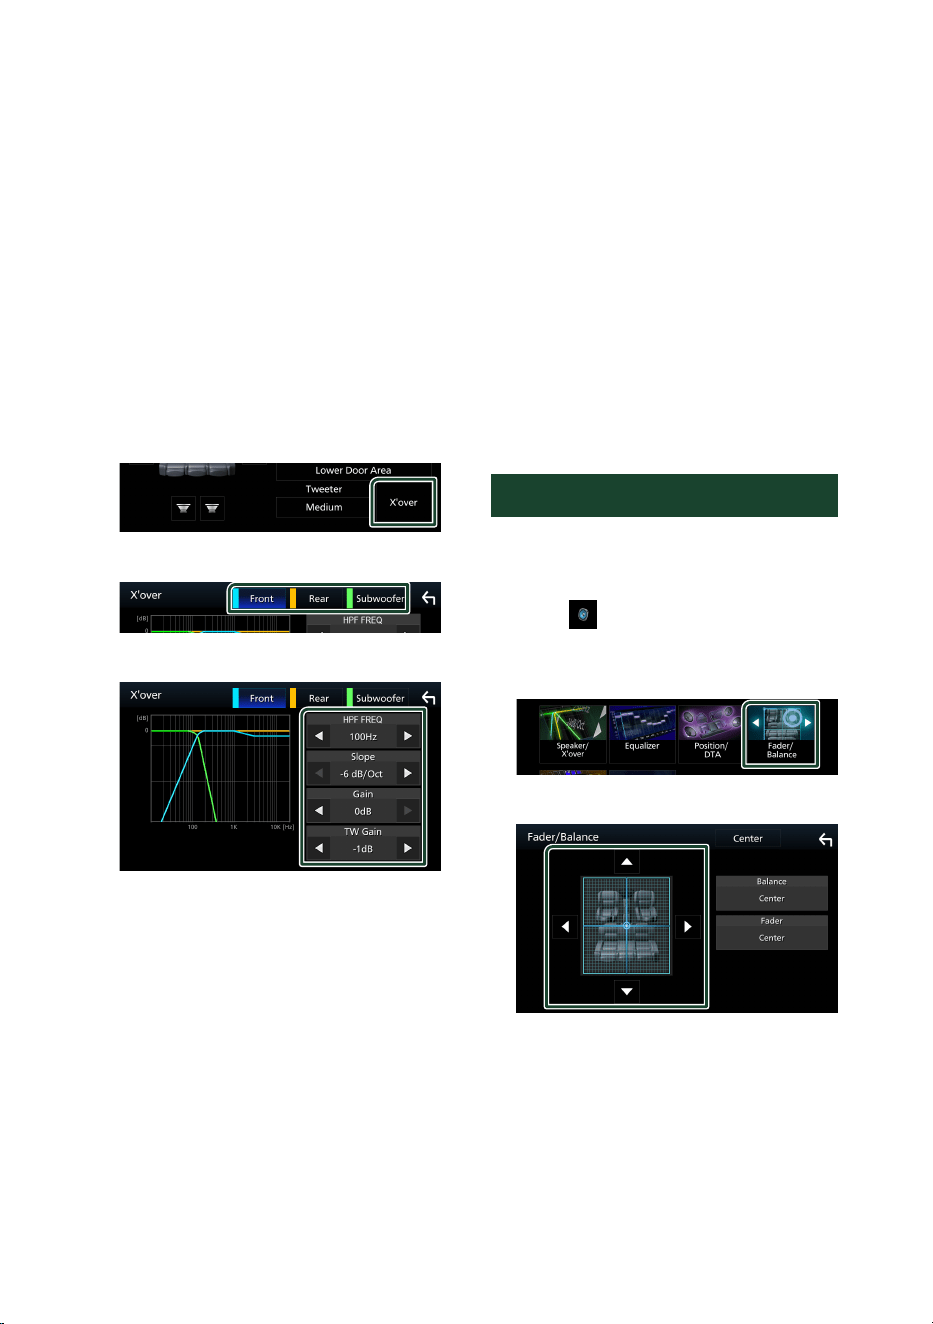
■ [Xʼover]
Displays the speaker crossover setup screen.
You can adjust the crossover setup that was
set automatically when you selected the
speaker type.
For details, see Crossover network setup
(P.48)
Ñ Crossover network setup
You can set a crossover frequency of speakers.
1 Touch [Xʼover].
2 Touch the speaker to set.
3 Set each item as follows.
■ [HPF FREQ]
High Pass Filter adjustment. (When front or
rear speaker is selected on Speaker Select
screen)
■ [LPF FREQ]
Low Pass Filter adjustment. (When subwoofer
is selected on Speaker Select screen)
■ [Slope]*
1
Sets a crossover slope.
■ [Gain]
Adjusts the front speaker, rear speaker, or
subwoofer level.
■ [TW] (Tweeter) [Gain]*
2
Adjusts the tweeter level. (When front is
selected on Speaker Select screen)
■ [Phase Inversion]*
3
Sets the phase of subwoofer output.
Check [Phase Inversion] to shift the phase
180 degrees. (When subwoofer is selected
on Speaker Select screen)
*
1
Only when “[LPF FREQ]”/“[HPF FREQ]” is
set to a mode other than “[Through]” in
[Xʼover].
*
2
Only when “[Tweeter]” is set to “[Small]”,
“[Medium]”, “ [Large]” in [Speaker Setup].
*
3
Only when “[Subwoofer]” is set to a mode
other than “[None]” in [Speaker Setup].
Controlling General Audio
1 Press the [MENU] button.
h Popup menu appears.
2 Touch [ ].
h Audio screen appears.
3 Touch [Fader / Balance].
4 Set each item as follows.
■ [Fader] / [Balance]
Adjust the volume balance around the
touched area.
[C] and [D] adjust the right and left volume
balance.
[R] and [S] adjust the front and rear volume
balance.
■ [Center]
Clear the adjustment.
Controlling Audio
49English
Equalizer Control
You can adjust equalizer by selecting the
optimized setting for each category.
1 Press the [MENU] button.
h Popup menu appears.
2 Touch [ ].
h Audio screen appears.
3 Touch [Equalizer].
4 Touch the screen and set the Graphic
Equalizer as desired.
■ [ALL SRC]
Apply the adjusted equalizer to all sources.
Touch [ALL SRC] and then touch [OK] on the
confirmation screen.
■ Gain level (dotted frame area)
Adjust the gain level by touching the each
frequency bar.
You can select frequency bar and adjust its
level by [R], [S].
■ [Preset Select]
Displays the screen to recall the preset
equalizer curve.
■ [Initialize]
The current EQ curve returns to flat.
■ [Memory]
Saves the adjusted equalizer curve from
“[User1]” to “[User3]”.
■ [Bass EXT] (Bass Extend Settings)
When turned on, the frequency lower than
62.5 Hz is set to the same gain level as 62.5
Hz.
■ [SW Level]
Adjusts the subwoofer volume.
Ñ Recall the EQ curve
1 Touch [Preset Select].
2 Select EQ curve.
Ñ Save the EQ curve
1 Adjust the EQ curve.
2 Touch [Memory].
3 Select where to save.
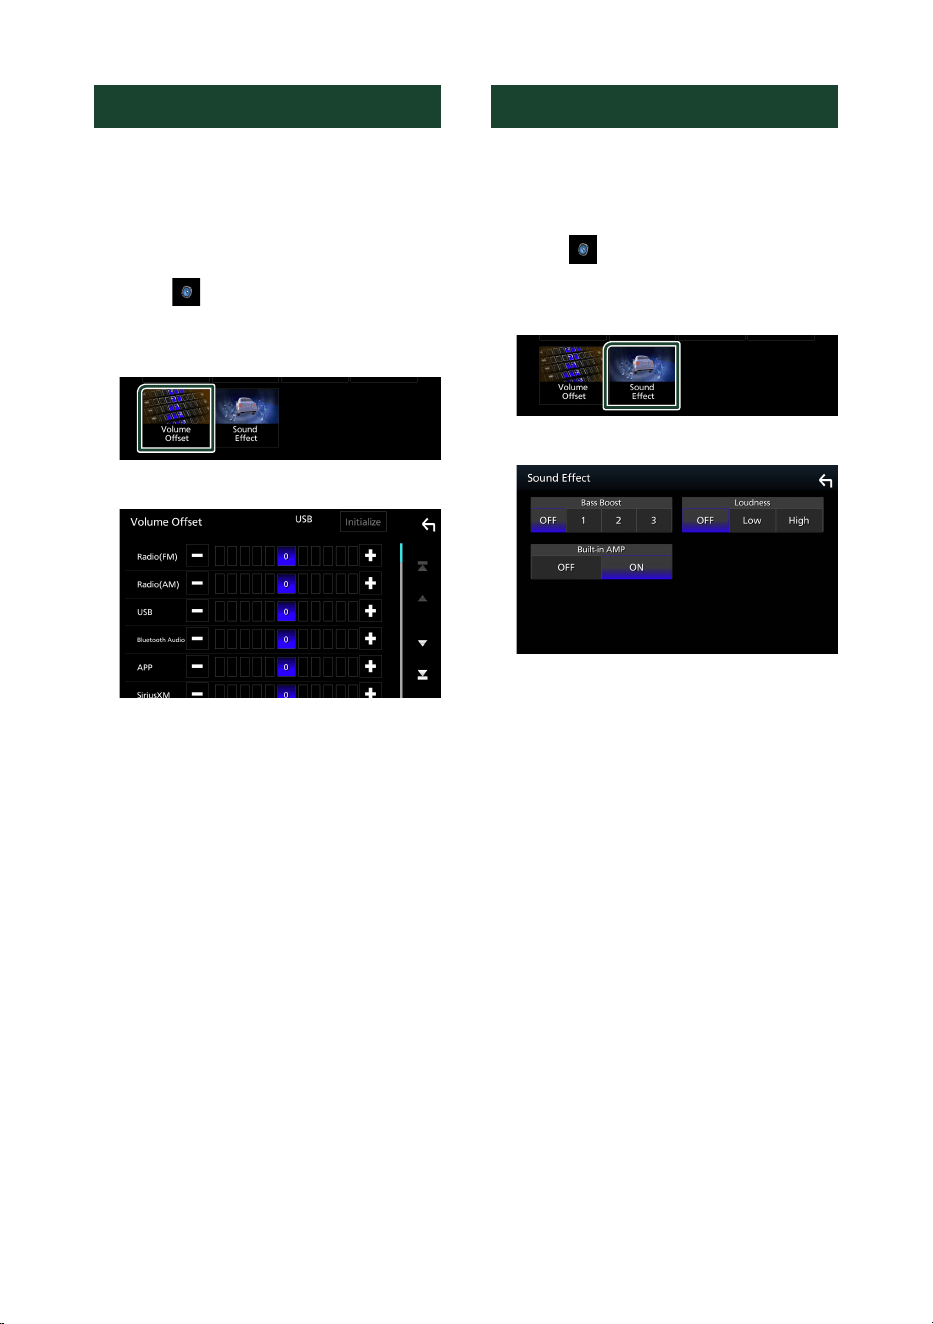
Controlling Audio
50
Volume Oset
Finely adjust the volume of the current source
to minimize the dierence in volume between
dierent sources.
1 Press the [MENU] button.
h Popup menu appears.
2 Touch [ ].
h Audio screen appears.
3 Touch [Volume Offset].
4 Touch [+] or [−] to adjust the level.
■ [Initialize]
Returns to the initial settings.
* If you have increased the volume rst, then
reduced the volume using the “Volume
Oset”, the sound generated if you suddenly
switch to another source may be extremely
loud.
Sound Eect
You can set sound eects.
1 Press the [MENU] button.
h Popup menu appears.
2 Touch [ ].
h Audio screen appears.
3 Touch [Sound Effect].
4 Set each item as follows.
■ [Bass Boost]
Sets the amount of bass boost among
“[OFF]”/ “[1]”/ “[2]”/ “[3]”.
■ [Loudness]
Sets the amounts of boost of low and high
tones.
“[OFF]”, “ [Low]”, “ [High]”
■ [Built-in AMP]
Turn ON/OFF the built-in amplifier.
When an external power amplifier is
connected, stopping the current flowing
to the built-in amplifier will reduce heat
generation and produce better sound.
“[OFF]”, “ [ON]”
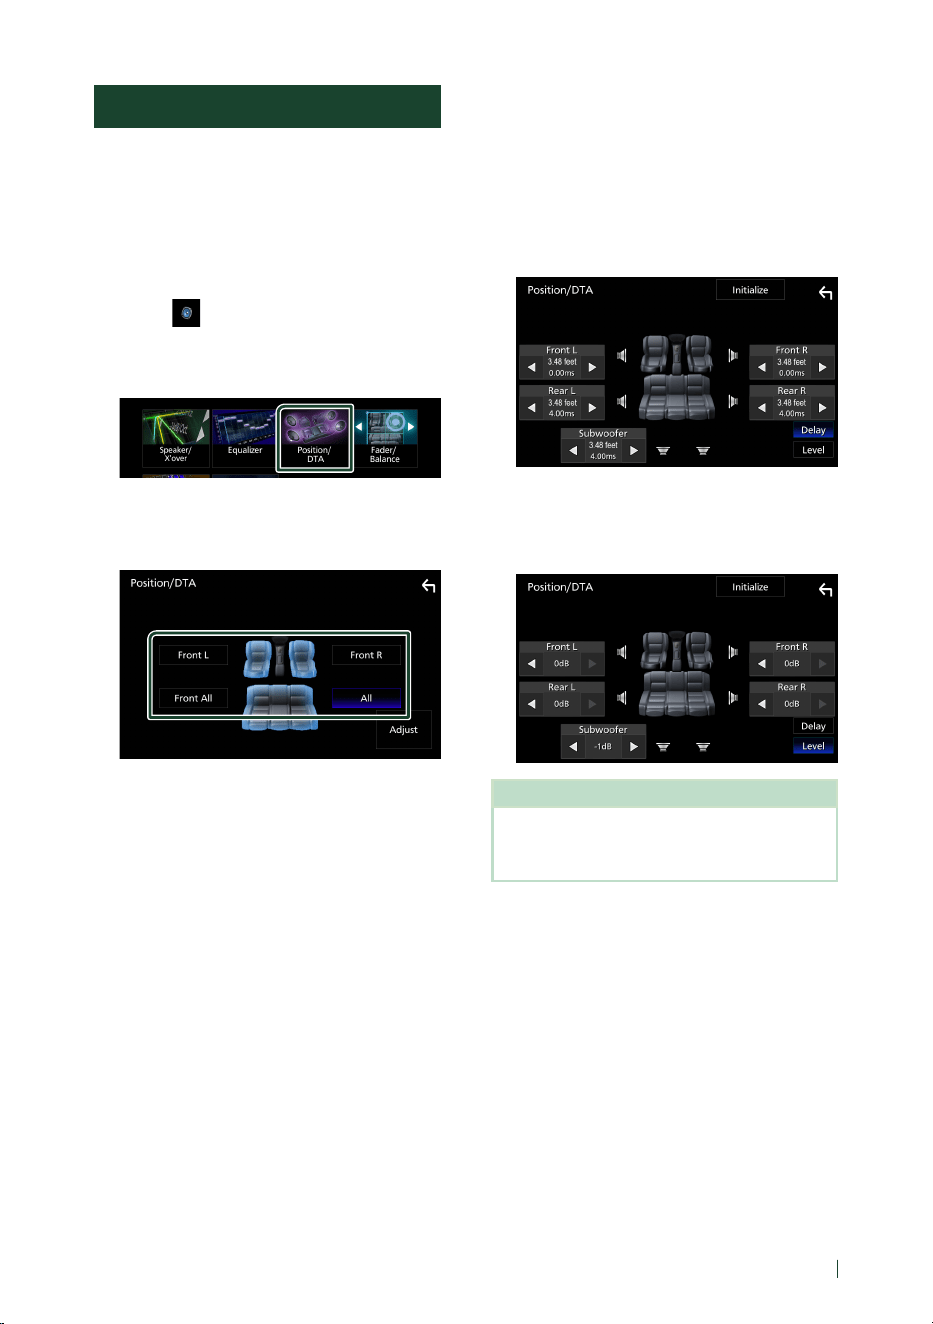
Controlling Audio
51English
Listening Position/ DTA
Adjust the sound delay time as nearer speakers
to the selected seat have more delay time,
so that the sound from each speaker arrive a
listener at the same time.
1 Press the [MENU] button.
h Popup menu appears.
2 Touch [ ].
h Audio screen appears.
3 Touch [Position/DTA].
4 Select listening position from [FrontR]
(Right front), [FrontL] (Left front),
[FrontAll] (All front), and [All].
Position DTA control
You can ne-adjust your listening position.
1 Touch [Adjust].
2 Touch [Delay].
3 Touch [T] or [U] to adjust the delay time of
the selected speaker.
4 Touch [Level].
5 Touch [T] or [U] to adjust the sound level
of the selected speaker.
NOTE
• To return to the initial setting of Delay and Level,
touch [Initialize] and [Yes] in the conrmation
screen.
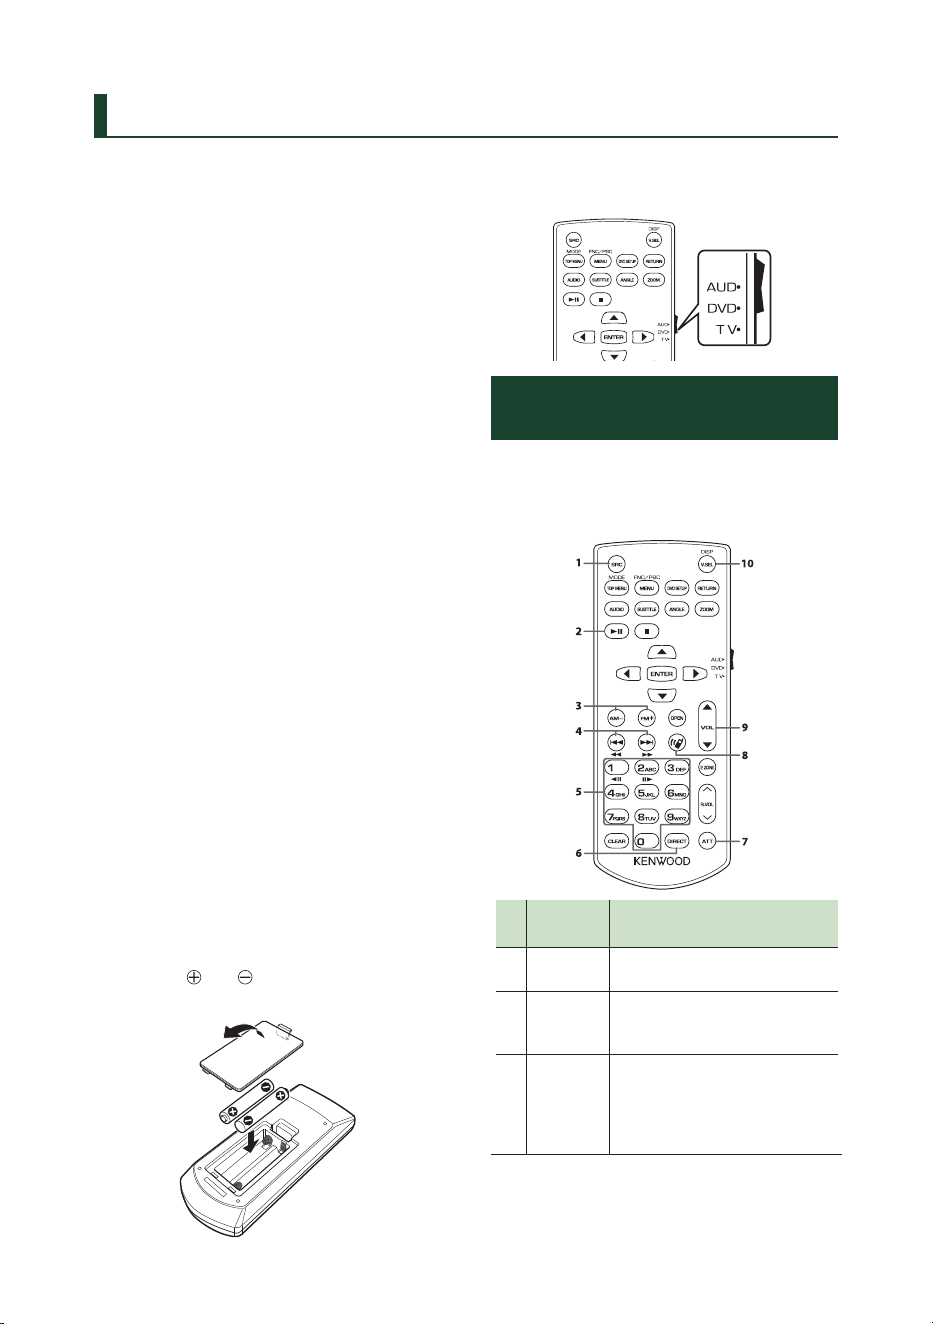
Remote control
52
Remote control
This unit can be operated using the remote
control KCA-RCDV340 (optional accessory).
# CAUTION
• Put the remote control in a place where it will
not move during braking or other operations.
A dangerous situation could result, if the
remote control falls down and gets wedged
under the pedals while driving.
• Risk of re or explosion if the battery is
replaced by an incorrect type. Ensure to
replace only with the same type.
• Risk of re, explosion or the leakage of
ammable liquid or gas if the battery is left in
an extremely high temperature surrounding
environment and/or subjected extremely
low air pressure. The battery pack or batteries
shall not be exposed to excessive heat such as
sunshine, re or the like.
• Risk of re, explosion or the leakage of
ammable liquid or gas if the battery is
disposed into re or a hot oven, recharged,
shorted, mechanically crushed or cut of the
battery.
• If spilled uid comes in contact with your eyes
or on clothing, immediately rinse with water
and consult a physician.
Ñ Battery Installation
If the remote control operates only over shorter
distances or does not operate at all, it is possible
that the batteries are depleted.
In such instances, replace the both batteries
with new ones.
1 Insert two “AAA”/“R03”-size batteries
with the and poles aligned properly,
following the illustration inside the case.
Ñ Switch the operation mode
Turn its operation mode switch to “AUD.”
Functions of the Remote
control Buttons
• Aim the remote control directly at the remote
sensor on the faceplate.
• DO NOT expose the remote sensor to bright
light (direct sunlight or articial lighting).
Key
Name
Function
1 SRC
Switches to the source to be
played.
2
L
Plays or pauses.
For the radio sources, switches the
seek mode.
3 FM+
AM–
During radio source, select FM/ AM
band to be received.
For the SiriusXM source, selects the
band to be received. (DMX4710S/
DMX40S only)

Remote control
53English
Key
Name
Function
4
E
F
Selects the track or file to be
played.
For the tuner radio and SiriusXM
(DMX4710S/DMX40S only) sources,
switches to broadcast stations
received by the unit.
5
Numeric
Keypad
Allows you to enter the number to
search in the direct search mode.
For details on the direct search
mode, see Direct search mode
(P.53).
6
[DIRECT]
Switches to the direct search
mode.
For details on the direct search
mode, see Direct search mode
(P.53).
7 ATT
Mutes/restores the sound
8
When a call comes in, answers
the call.
9 VOL R S
Adjusts the volume.
10
[DISP]
Switches the screen between the
current source and the App screen
from the connected iPhone/
Android.
–
Other Not used.
Ñ Direct search mode
Using the remote control, you can jump directly
to the desired frequency or channel by entering
the number corresponding to the content.
NOTE
• This operation cannot be performed for the USB
device.
1 Press the [DIRECT] button.
The available contents are different
depending on the source type.
■ Radio
Frequency value
■ SiriusXM (DMX4710S/DMX40S only)
Channel number
2 Enter the number of the content you want
to play using the numeric keypad.
3 Press the [E] or [F] button.
h The content corresponding to the
number you entered is played.

Connection/Installation
54
Connection/Installation
This section is for the professional installer.
For safety’s sake, leave wiring and mounting
to professionals. Consult the car audio dealer.
Before Installation
Before installation of this unit, please note the
following precautions.
# WARNINGS
• If you connect the ignition wire (red) and
the battery wire (yellow) to the car chassis
(ground), you may cause a short circuit, that
in turn may start a re. Always connect those
wires to the power source running through
the fuse box.
• Do not cut out the fuse from the ignition wire
(red) and the battery wire (yellow). The power
supply must be connected to the wires via
the fuse.
• When wiring wires, be sure to wrap insulating
tape, to protect the insulation, around wires
where they contact metal parts. Failure to do
so may result in re or electric shock.
# CAUTION
• Install this unit in the console of your vehicle.
Do not touch the metal part of this unit during
and shortly after the use of the unit. Metal part
such as the heat sink and enclosure become
hot.
• To prevent injury from sharp edges, etc., do
not expose the skin on your arms and hands
while installing this unit.
• Be careful not to pinch the harnesses during
the installation.
NOTE
• Mounting and wiring this product requires
skills and experience. For best safety, leave the
mounting and wiring work to professionals.
• Make sure to ground the unit to a negative 12V
DC power supply.
• Do not install the unit in a spot exposed to
direct sunlight or excessive heat or humidity.
Also avoid places with too much dust or the
possibility of water splashing.
• Do not use your own screws. Use only the
screws provided. If you use the wrong screws,
you could damage the unit.
• If the power is not turned ON (“There is an
error in the speaker wiring. Please check
the connections.” is displayed), the speaker
wire may have a short-circuit or touched
the chassis of the vehicle and the protection
function may have been activated. Therefore,
the speaker wire should be checked.
• If your car’s ignition does not have an ACC
position, connect the ignition wires to a power
source that can be turned on and o with the
ignition key. If you connect the ignition wire
to a power source with a constant voltage
supply, such as with battery wires, the battery
may be drained.
• If the console has a lid, make sure to install the
unit so that the front panel will not hit the lid
when closing and opening.
• If the fuse blows, rst make sure the wires
aren’t touching to cause a short circuit, then
replace the old fuse with one with the same
rating.
• Insulate unconnected wires with vinyl tape
or other similar material. To prevent a short
circuit, do not remove the caps on the ends of
the unconnected wires or the terminals.
• Connect the speaker wires correctly to the
terminals to which they correspond. The unit
may be damaged or fail to work if you share
the ¤ wires or ground them to any metal part
in the car.
• When only two speakers are being connected
to the system, connect the connectors either
to both the front output terminals or to both
the rear output terminals (do not mix front
and rear). For example, if you connect the ¢
connector of the left speaker to a front output
terminal, do not connect the ¤ connector to
a rear output terminal.
• After the unit is installed, check whether the
brake lamps, blinkers, wipers, etc. on the car
are working properly.
• Do not press hard on the panel surface when
installing the unit to the vehicle. Otherwise
scars, damage, or failure may result.

Connection/Installation
55English
• Reception may drop if there are metal objects
near the Bluetooth antenna.
Bluetooth antenna unit
Ñ Supplied accessories for
installation
1 2
x1
3
(2 m)
x1
4
x1
5
(M5 × 8 mm)
x4
6
(M5 × 8 mm)
x4
7
(3 m)
x1
8
x1
9
x1
Ñ Installation procedure
1) To prevent a short circuit, remove the key
from the ignition and disconnect the ¤
terminal of the battery.
2) Make the proper input and output wire
connections for each unit.
3) Connect the speaker wires of the wiring
harness.
4) Connect the wiring harness wires in the
following order; ground, battery, ignition.
5) Connect the wiring harness connector to the
unit.
6) Install the unit in your car.
7) Reconnect the ¤ terminal of the battery.
8) Press the reset button.
Installing the unit
Ñ Japanese cars
5 or 6
5 or 6
Car Bracket
Ñ Trim plate
1) Attach accessory 2 to the unit.
2
Ñ 1DIN install
You can install the unit in a 1DIN size space by
removing the right, left, and rear brackets.
Remove the four black screws from the rear
bracket, then remove two black screws from
each of the left and right brackets.
Rear bracket
Left bracket
Right bracket
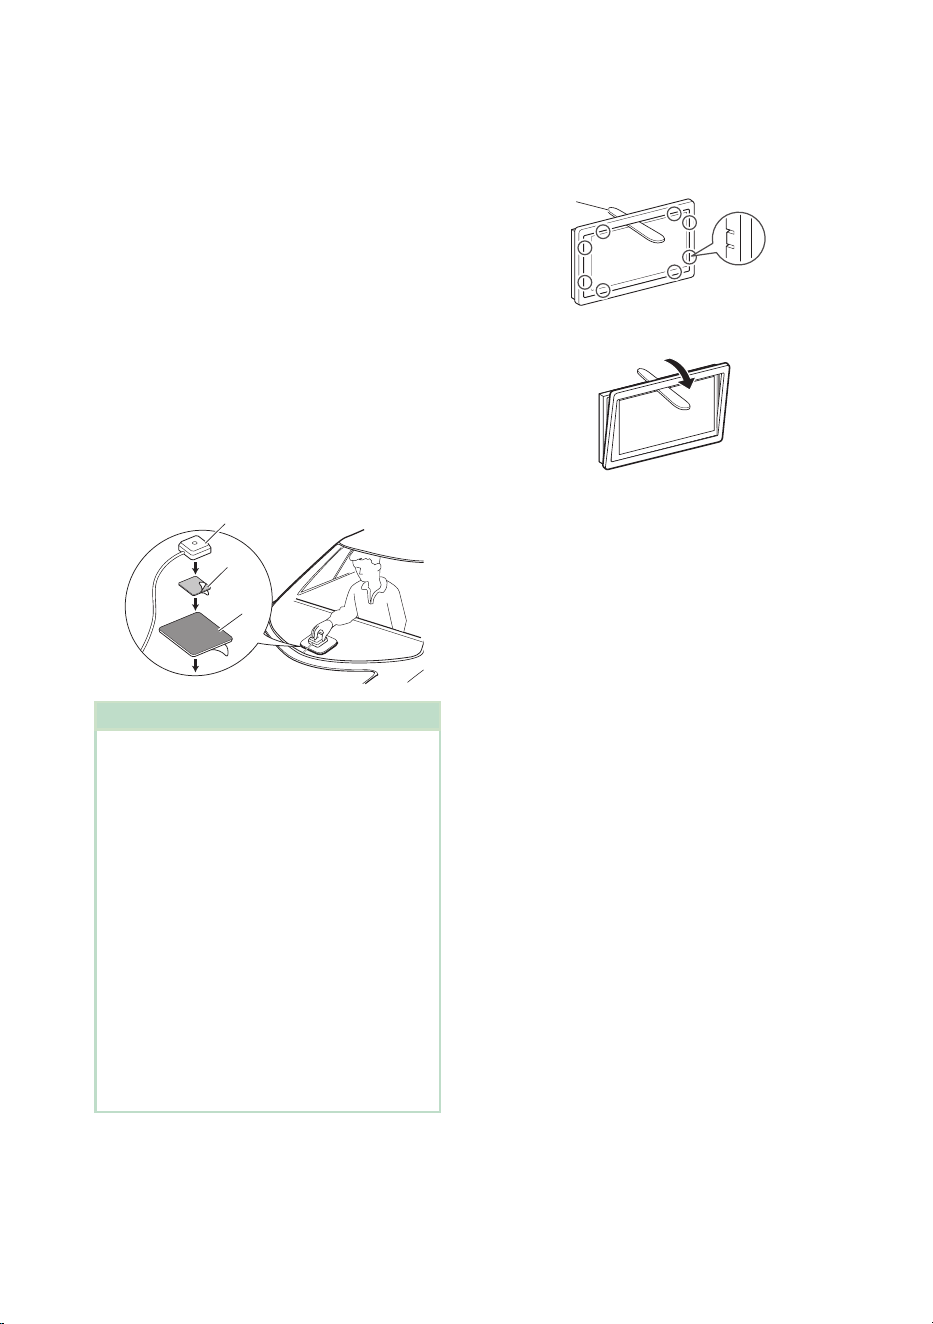
Connection/Installation
56
Ñ GPS antenna
GPS antenna is installed inside of the car. It
should be installed as horizontally as possible to
allow easy reception of the GPS satellite signals.
To mount the GPS antenna inside your vehicle:
1) Clean your dashboard or other mounting
surface.
2) Remove the separator of the metal plate
(accessory 9).
3) Press the metal plate (accessory 9) down
firmly on your dashboard or other mounting
surface. You can bend the metal plate
(accessory 9) to conform to a curved surface,
if necessary.
4) Peel off the backing paper of the double-
sided tape (accessory 8) and use it to attach
the GPS antenna (accessory 7) and metal
plate (accessory 9).
9
8
7
NOTE
• Use the supplied GPS antenna. Using the GPS
antenna other than the supplied one may cause
a drop in positioning accuracy.
• Depending on the type of car, reception of the
GPS satellite signals might not be possible with
an inside installation.
• Please install this GPS antenna in an area away
from any antennas that are used with CB radios
or satellite televisions.
• The GPS antenna should be installed at a
position that is spaced at least 12 inch (30
cm) from smartphone/cell-phone or other
transmitting antennas. Signals from the GPS
satellite may be interfered with by these types of
communication.
• Painting the GPS antenna with (metallic) paint
may cause a drop in performance.
Ñ Removing the trim plate
1) Insert the extraction key (accessory 4)
between the trim plate and the main unit
from between the claws.
4
2) Pull the plate out towards yourself.
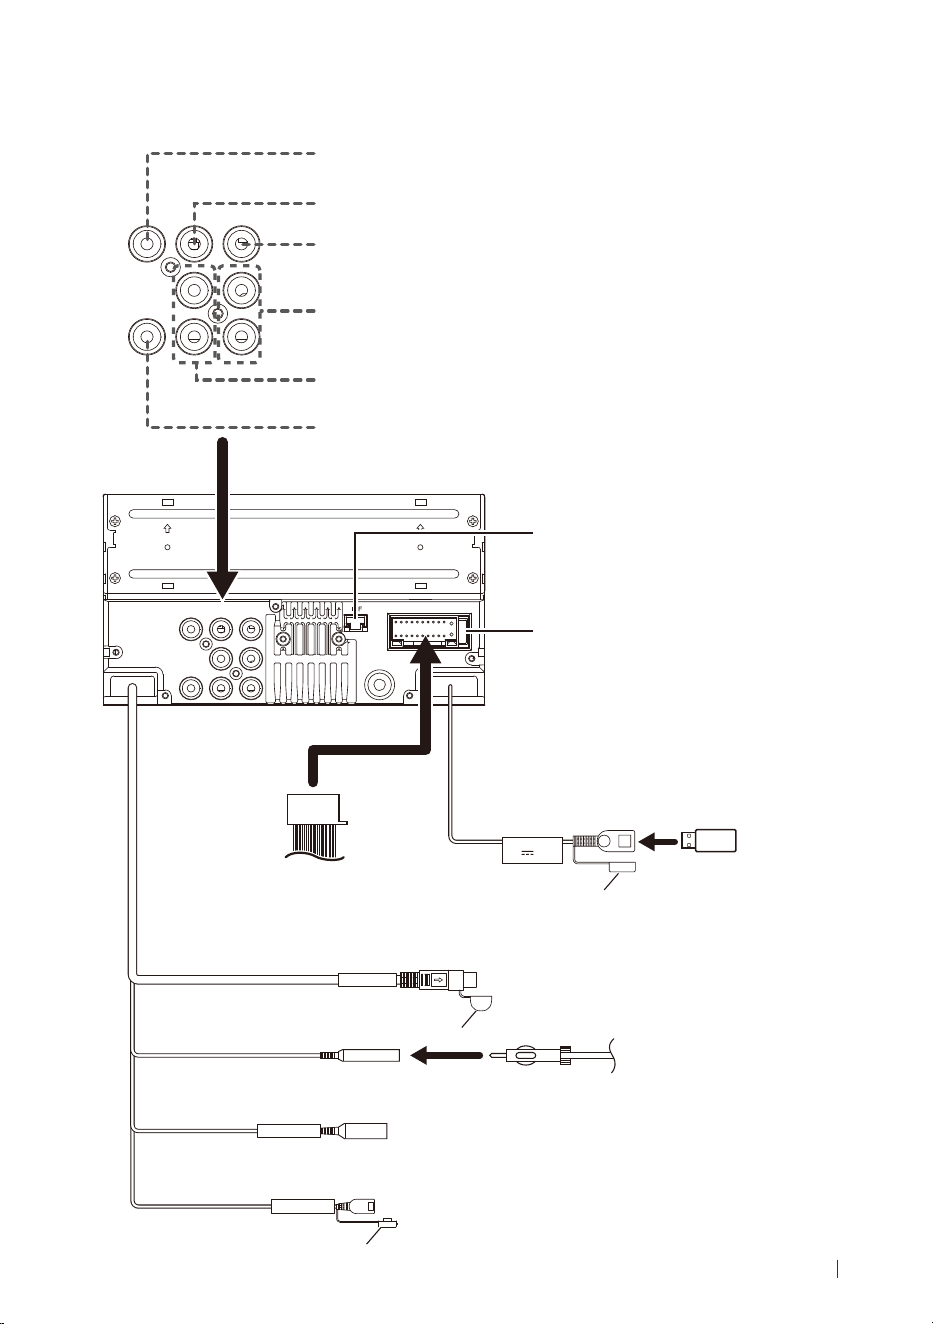
Connection/Installation
57English
Ñ Connecting wires to terminals
SUB-W
SUB-W
V-OUT
CAM IN
FR
RR
FL RL
SUB-W
SUB-W
V-OUT
CAM IN
FR
RR
FL RL
15
GPS Antenna
Sirius XM
5V 2.1A
iDatalink I/F
SiriusXM Connect Vehicle Tuner connector
(DMX4710S/DMX40S only)
For more information on how to install the SiriusXM
Connect Vehicle tuner, consult the installation guide
included with the tuner.
iDatalink Maestro connector
(DMX4710S/DMX40S only)
Accessory 1
Cap
Cap
Cap
USB device
[2]
FM/AM antenna
GPS Antenna
Subwoofer Preout (Blue)
Visual Output (Yellow)
Rear view camera input (Yellow)
Fuse (15A)
Rear Audio Preout
(Left; White, Right; Red)
Front Audio Preout
(Left; White, Right; Red)
Subwoofer Preout (Blue) (DMX4710S/DMX40S only)
USB terminal
[1]
(1.0 m)
iDatalink Maestro connector
(DMX4710S/DMX40S only)
[1]
USB maximum power supply current :
DC 5 V = 2.1 A
[2]
Sold separately
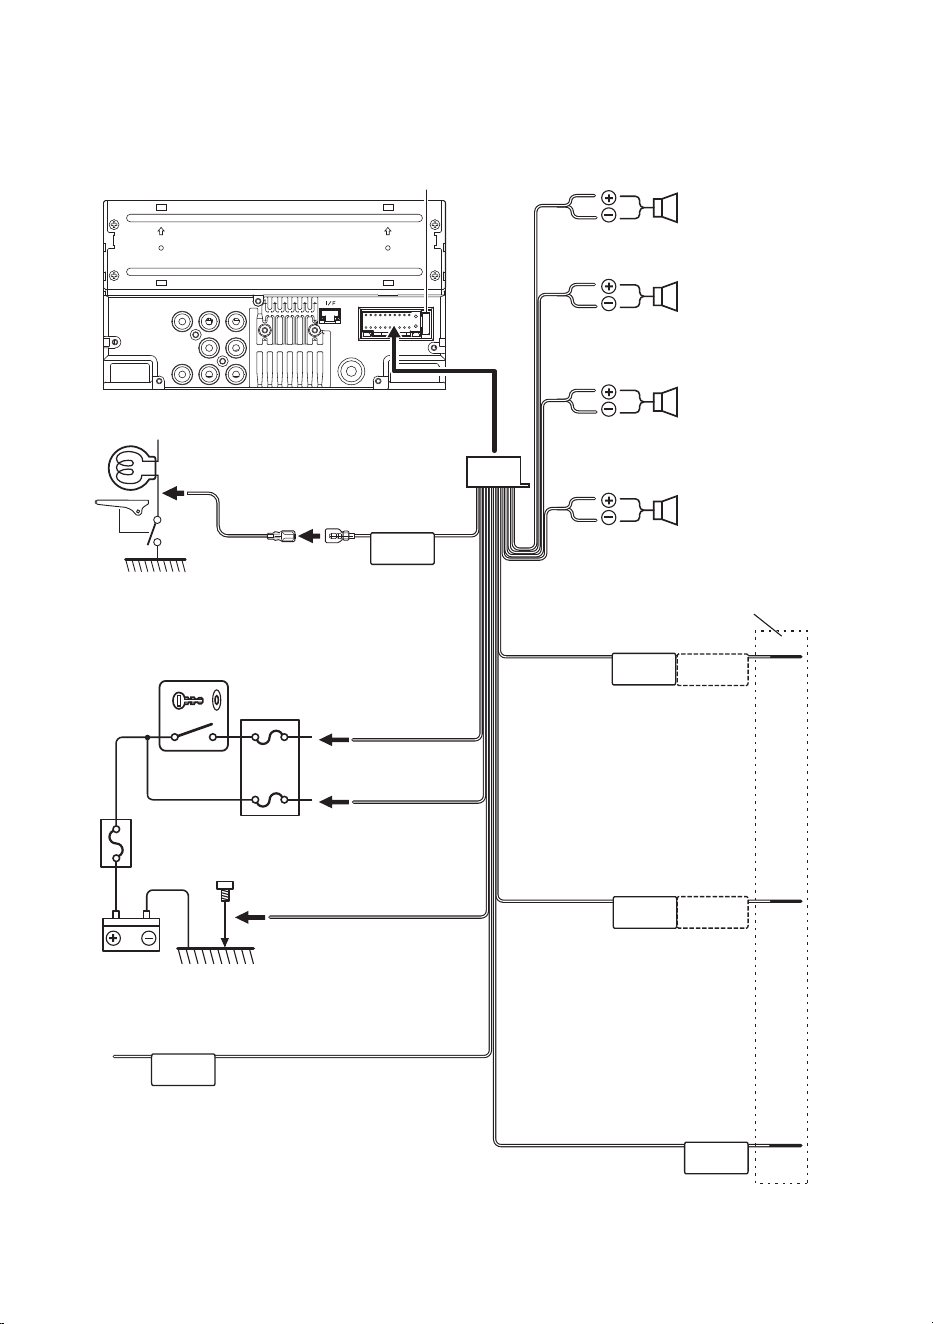
Connection/Installation
58
SUB-W
SUB-W
V-OUT
CAM IN
FR
RR
FL RL
15
ILLUMI
STEERING WHEEL
REMOTE INPUT
REMOTE CONT
REVERSE
P. CONT
ANT CONT
PRK SW
Fuse (15A)
Connect either to the power control
terminal when using the optional
power amplifier, or to the power
terminal for the booster amplifier
of the film-type or short pole type
antenna. (Max. 150mA, 12V)
Blue/White
(Power control/Antenna control wire)
To car light control switch
Orange/White
(Dimmer control wire)
Purple/White (Reverse sensor wire)
Light Blue/Yellow
(Steering remote control wire)
Connect to vehicle’s reverse lamp harness when
using the optional rear view camera.
To steering remote
To use the steering wheel remote
control feature, you need an
exclusive remote adapter (not
supplied) matched to your car.
Do not remove the cable from
the heat shrink tubing unless
you are making a connection.
Purple/Black
To rear right speaker
To rear left speaker
To front right speaker
To front left speaker
Speaker impedance: 4-8 Ω
Other cable : Not used.
Purple
Green/Black
Green
Gray/Black
Gray
White/Black
White
Accessory 1
Connect to the vehicle’s
parking brake detection
switch harness.
Light Green (Parking sensor wire)
Accessory 3: Parking Extention cable
For best safety, be sure to
connect the parking sensor.
Ignition key switch
Red
(Ignition wire)
Yellow
(Battery wire)
Car fuse box
Battery
Black
(Ground wire) ¤
(To car chassis)
Connecting wires to terminals_2
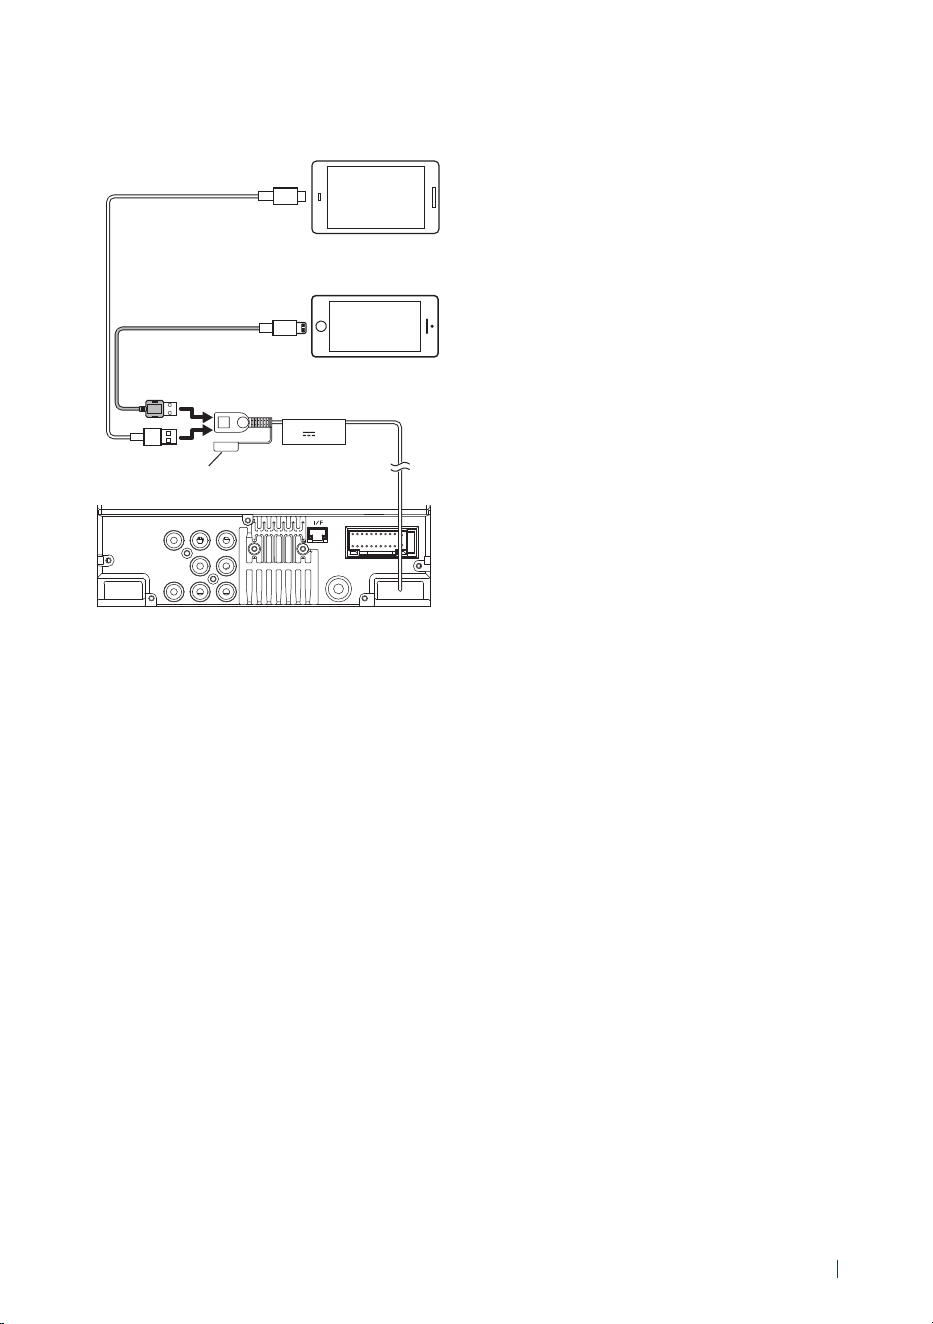
Connection/Installation
59English
Ñ Connecting an iPhone/Android
SUB-W
SUB-W
V-OUT
CAM IN
FR
RR
FL RL
15
5V
2.1A
USB cable for iPhone
[2]
USB cable for Android
smartphone
[2]
iPhone
[2]
Android smartphone
[2]
Cap
USB terminal
[1]
(1.0 m)
[1]
USB maximum power supply current :
DC 5 V = 2.1 A
[2]
Sold separately

Troubleshooting
60
Troubleshooting
Problems and Solutions
If any trouble occurs, rst check the following
table for possible problems.
NOTE
• Some functions of this unit may be disabled by
some settings made on this unit.
• What might seem to be a malfunction in your
unit may just be the result of slight misoperation
or miswiring.
Ñ About settings
• Cannot set up the subwoofer.
• Cannot set up subwoofer phase.
• No output from the subwoofer.
• Cannot set up the low pass lter.
• Cannot set up the high pass lter.
Subwoofer is not set to on.
h Set the subwoofer to on. See Speaker/ X’over
setup (P.47).
Ñ About audio operations
Radio reception is poor.
The car antenna is not extended.
h Pull out the antenna all the way.
The antenna control wire is not connected.
h Connect the wire correctly. See Connecting wires
to terminals (P.57).
Cannot select a folder.
The random play function is enabled.
h Turn o the random function.
The sound skips when an audio le is being
played.
The recording condition is bad.
h Record the le again or use another USB memory.
Ñ Other
The Touch Sensor Tone doesn’t sound.
The preout jack is being used.
h The Touch Sensor Tone cannot be output from the
preout jack.
Error Messages
When you fail to operate the unit correctly, the
cause of the failure appears as the message on
the screen.
[No Device] (USB device)
The USB device is selected as a source although no
USB device is connected.
h Change the source to any source other than USB.
Connect a USB device, and change the source to
USB again.
[Disconnected] (Bluetooth audio player)
The Bluetooth audio player is selected as a source
although no Bluetooth audio player is connected.
h Change the source to any source other than
Bluetooth. Connect an Bluetooth audio player, and
change the source to Bluetooth again.
[No Media le]
The connected USB device contains no playable audio
le. Media was played that doesn’t have data recorded
that the unit can play.
h See Playable Media and Files (P.62) and try
another USB device.

Troubleshooting
61English
Ñ SiriusXM (DMX4710S/DMX40S
only)
[Check Tuner]
A SiriusXM tuner is not connected to this unit.
h Verify that the SiriusXM Connect Vehicle Tuner
cable is securely connected to the radio.
[Subscription Updated - Press Return To Continue]
The SiriusXM subscription has been renewed.
h Touching [Return] on the popup screen will clear
the message.
[Channel *** Not Available]
The currently selected channel is unavailable.
h Visit www.siriusxm.com for more information
about the SiriusXM channel lineup.
[Channel *** Not Subscribed /
Call SiriusXM to Subscribe]
The currently selected channel is not subscribed to.
h In the U.S.A., visit www.siriusxm.com or call
1-866-635-2349 if you have questions about your
subscription package or would like to subscribe to
this channel.
h In Canada, visit www.siriusxm.ca or call 1-877-438-
9677.
[Check Antenna]
No antenna is connected to the SiriusXM tuner.
h Check that an antenna is connected to the SiriusXM
tuner. Check antenna for damages.
[No Signal]
No SiriusXM radio signal is received.
h Verify that your vehicle is outdoors with a clear
view of the sky.
[Channel *** Locked /
Please Enter the Lock Code _ _ _ _]
The selected channel has been locked by the parental
controls.
h Enter the unlock code when you are asked. See
Parental Control (P.28).
[Incorrect Pass Code entered]
The selected channel is a mature or parental lock
channel, and locked by the parental lock or user lock
code.
h Enter the correct lock code.
Appendix
62
Appendix
Playable Media and Files
You can play various kinds of media and les on this unit.
Ñ About les
The following audio and video les are supported.
■ Playable Audio files
Format Bit rate Sampling frequency Bit count
AAC-LC (.m4a) MPEG2/4 AAC LC
HE-AAC(V1,V2)
8 – 320kbps, VBR 16 – 48 kHz 16 bit
MP3 (.mp3) MPEG 1/2 Audio Layer 3 8 – 320kbps, VBR 16 – 48 kHz 16 bit
WMA (.wma) Windows Media Audio Standard
L3 profile (Version 7,8,9)
8 – 320kbps 16 – 48 kHz 16 bit
Linear PCM
(WAVE) (.wav)
RIFF waveform Audio Format –
16 – 192 kHz 16/ 24 bit
FLAC (.flac) flac – 16 – 192 kHz 16/ 24 bit
Vorbis (.ogg) vorbis VBR 16 – 48 kHz 16 bit
NOTE
• WMA and AAC of which is covered with DRM cannot be played.
• Although the audio les are complied with the standards listed above, the play may be impossible depending
on the types or conditions of media or device.
■ Acceptable Video files
Profile Max. Picture size Max. bit rate Audio format
MPEG-1 (.mpg, .mpeg) – 352 × 240, 352 × 288 1.5 Mbps MPEG Audio Layer 2
MPEG-2 (.mpg, .mpeg) MP@ML 720 × 480, 720 × 576 8 Mbps MPEG Audio Layer 2
H.264/MPEG-4 AVC
(.mp4, .m4v, .avi, .flv)
Baseline Profile, Main
Profile
1920 × 1080 (30 fps) 8 Mbps MP3, AAC
MPEG-4 (.mp4, .avi) Advanced Simple Profile 1920 × 1080 (30 fps) 8 Mbps MP3, AAC
WMV (.wmv) Main Profile 1920 × 1080 (30 fps) 8 Mbps WMA
MKV (.mkv) Video Format follows H.264/MPEG-4 AVC, MPEG-4 MP3, AAC
■ Limitation of structure for the file and the folder
USB device
Maximum number of folder layers 8
Maximum number of files (per folder) 999
Maximum number of folders (per folder) 9999
Maximum number of folders (per device) –
NOTE
• You can enter a folder name and le name with 255 or fewer single-byte characters.
• Files in the folder whose folder name begins with a dot (.) cannot be played.

Appendix
63English
Specications
■ Monitor section
Picture Size
: 6.8 inches (diagonal) wide
Display System
: Transparent TN LCD panel
Drive System
: TFT active matrix system
Number of Pixels
: 1,843,200 (1024H × 600V × RGB)
Eective Pixels
: 99.99%
Pixel Arrangement
: RGB striped arrangement
Back Lighting
: LED
■ USB interface section
USB Standard
: USB 2.0 High Speed
File System
: FAT 16/ 32, exFAT, NTFS
Maximum Power Supply Current
: DC 5 V
2.1 A
D/A Converter
: 24 bit
Audio Decoder
: MP3/ WMA/ AAC/ WAV/ FLAC
Video Decoder
: MPEG1/ MPEG2/ MPEG4/ WMV/ H.264/ MKV
Frequency Response
• 192 kHz : 20 – 20,000 Hz
• 96 kHz : 20 – 20,000 Hz
• 48 kHz : 20 – 20,000 Hz
• 44.1 kHz : 20 – 20,000 Hz
Total Harmonic Distortion
: 0.2% (1 kHz)
Signal to Noise Ratio
: 75 dB
Dynamic Range
: 75 dB
■ Bluetooth section
Technology
: Bluetooth Ver. 5.0
Frequency
: 2.402 – 2.480 GHz
Maximum Communication range
: Line of sight approx. 10 m (32.8 ft)
Audio Codec
: SBC/ AAC
Prole (Multi Prole support)
• HFP (Hands Free Prole) 1.8
• A2DP (Advanced Audio Distribution Prole) 1.3
• AVRCP (Audio/Video Remote Control Prole) 1.6
• PBAP (Phonebook Access Prole) 1.2
■ DSP section
Graphics equalizer
Band: 13 Band
Frequency (BAND1 – 13)
: 62.5/ 100/ 160/ 250/ 400/ 630/ 1k/ 1.6k/ 2.5k/ 4k/
6.3k/ 10k/ 16k Hz
Gain
: -9/ -8/ -7/ -6/ -5/ -4/ -3/ -2/ -1/ 0/
+1/ +2/ +3/ +4/ +5/ +6/ +7/ +8/ +9 dB
2Way X'Over
High pass lter
Frequency: Through, 30/ 40/ 50/ 60/ 70/ 80/ 90/
100/ 120/ 150/ 180/ 220/ 250 Hz
Slope: -6/ -12/ -18/ -24 dB/ Oct.
Gain: -8/ -7/ -6/ -5/ -4/ -3/ -2/ -1/ 0 dB
Low pass lter
Frequency: 30/ 40/ 50/ 60/ 70/ 80/ 90/ 100/ 120/
150/ 180/ 220/ 250 Hz, Through
Slope: -6/ -12/ -18/ -24 dB/ Oct.
Gain: -8/ -7/ -6/ -5/ -4/ -3/ -2/ -1/ 0 dB
Position
Front / Rear /Subwoofer Delay
: 0 – 20.01 ft (0.03 or 0.04 ft Step)
Gain
: -8 – 0 dB
Subwoofer level
: -40 – +6 dB

Appendix
64
■ FM tuner section
Frequency Range (step)
: 87.9 MHz – 107.9 MHz (200 kHz)
Usable Sensitivity (S/N: 30 dB)
: 16.2 dBf (1.8 μV/75 Ω)
Frequency Response (± 3.0 dB)
: 30 Hz – 14 kHz
S/N (dB)
: 50 dB (MONO)
Stereo Separation
: 35 dB (1 kHz)
■ AM tuner section
Frequency Range (step)
: 530 – 1700 kHz (10 kHz)
Usable Sensitivity
: 99 μV (40 dBμ)
■ Video section
Color System of External Video Input
: NTSC/ PAL
External Video Input Level (Mini jack)
: 1 Vp-p/ 75 Ω
Video Output Level (RCA jacks)
: 1 Vp-p/ 75 Ω
■ Audio section
Maximum Power Output (Front & Rear)
: 50 W × 4
Full Bandwidth Power (at less than 1% THD)
: 22 W × 4
Output Frequency Band
: 20 – 20,000 Hz
Preout Level (V)
: 2.5 V/ 10 kΩ
Preout Impedance
: 1.4 kΩ
Speaker Impedance
: 4 – 8 Ω
■ General
Operating Voltage
: 12V DC Car Battery
Main Unit Installation size (W × H × D)
: 178 × 100 × 86 mm
7-1/16 × 3-15/16 × 3-3/8 inch
Weight
: 1.07 kg (2.41 lbs)
(Including Trim plate)
NOTE
• Although the eective pixels for the liquid
crystal panel is given as 99.99% or more, 0.01% of
pixels may not light or may light incorrectly.
Specications subject to change without
notice.

Appendix
65English
About this Unit
■ Copyrights
• The Bluetooth® word mark and logos are registered
trademarks owned by Bluetooth SIG, Inc. and any use
of such marks by JVCKENWOOD Corporation is under
license. Other trademarks and trade names are those of
their respective owners.
• Windows Media is a registered trademark or trademark
of Microsoft Corporation in the United States and/or
other countries.
• This product is protected by certain intellectual
property rights of Microsoft. Use or distribution of
such technology outside of this product is prohibited
without a license from Microsoft.
• Use of the Made for Apple badge means that an
accessory has been designed to connect specifically
to the Apple product(s) identified in the badge and
has been certified by the developer to meet Apple
performance standards. Apple is not responsible for
the operation of this device or its compliance with
safety and regulatory standards. Please note that the
use of this accessory with an Apple product may affect
wireless performance.
• Apple, iPhone and Lightning are trademarks of Apple
Inc., registered in the U.S. and other countries.
• Apple, Siri, Apple CarPlay and Apple CarPlay logo are
trademarks of Apple Inc., registered in the U.S. and other
countries.
• App Store is a service mark of Apple Inc., registered in
the U.S. and other countries.
• Sirius, XM and all related marks and logos are
trademarks of Sirius XM Radio Inc. All rights reserved.
• IOS is a trademark or registered trademark of Cisco in
the U.S. and other countries and is used under license.
• Google, Android, Google Play, Android Auto and other
marks are trademarks of Google LLC.
• To use Android Auto on your car display, you’ll need an
Android Auto compatible vehicle or aftermarket stereo,
an Android phone running Android 5.0 or higher, and
the Android Auto app.
• USB Type-C® and USB-C® are registered trademarks of
USB Implementers Forum.
• MirrorAPP+ is a trademark of Gigaboyz.com Limited.
• THIS PRODUCT IS LICENSED UNDER THE AVC PATENT
PORTFOLIO LICENSE FOR THE PERSONAL USE OF A
CONSUMER OR OTHER USES IN WHICH IT DOES NOT
RECEIVE REMUNERATION TO (¡)ENCODE VIDEO IN
COMPLIANCE WITH THE AVC STANDARD (“AVC VIDEO”)
AND/OR (¡¡)DECODE AVC VIDEO THAT WAS ENCODED BY
A CONSUMER ENGAGED IN A PERSONAL ACTIVITY AND/
OR WAS OBTAINED FROM A VIDEO PROVIDER LICENSED
TO PROVIDE AVC VIDEO. NO LICENSE IS GRANTED OR
SHALL BE IMPLIED FOR ANY OTHER USE. ADDITIONAL
INFORMATION MAY BE OBTAINED FROM MPEG LA, L.L.C.
SEE HTTP://WWW.MPEGLA.COM
• THIS PRODUCT IS LICENSED UNDER THE VC-1 PATENT
PORTFOLIO LICENSE FOR THE PERSONAL AND NON-
COMMERCIAL USE OF A CONSUMER TO ( i ) ENCODE
VIDEO IN COMPLIANCE WITH THE VC-1 STANDARD
(“VC-1 VIDEO”) AND/OR ( ii ) DECODE VC-1 VIDEO
THAT WAS ENCODED BY A CONSUMER ENGAGED IN A
PERSONAL AND NON-COMMERCIAL ACTIVITY AND/
OR WAS OBTAINED FROM A VIDEO PROVIDER LICENSED
TO PROVIDE VC-1 VIDEO. NO LICENSE IS GRANTED OR
SHALL BE IMPLIED FOR ANY OTHER USE. ADDITIONAL
INFORMATION MAY BE OBTAINED FROM MPEG LA, L.L.C.
SEE HTTP://WWW.MPEGLA.COM
• libFLAC
Copyright (C) 2000,2001,2002,2003,2004,2005,2006,2007
,2008,2009 Josh Coalson
Redistribution and use in source and binary forms, with
or without modification, are permitted provided that
the following conditions are met:
– Redistributions of source code must retain the above
copyright notice, this list of conditions and the
following disclaimer.
– Redistributions in binary form must reproduce the
above copyright notice, this list of conditions and the
following disclaimer in the documentation and/or
other materials provided with the distribution.
– Neither the name of the Xiph.org Foundation nor the
names of its contributors may be used to endorse or
promote products derived from this software without
specific prior written permission.
THIS SOFTWARE IS PROVIDED BY THE COPYRIGHT
HOLDERS AND ONTRIBUTORS ``AS IS’’ AND ANY
EXPRESS OR IMPLIED WARRANTIES, INCLUDING,
BUT NOT LIMITED TO, THE IMPLIED WARRANTIES OF
MERCHANTABILITY AND FITNESS FOR A PARTICULAR
PURPOSE ARE DISCLAIMED. IN NO EVENT SHALL THE
FOUNDATION OR CONTRIBUTORS BE LIABLE FOR ANY
DIRECT, INDIRECT, INCIDENTAL, SPECIAL, EXEMPLARY,
OR CONSEQUENTIAL DAMAGES (INCLUDING, BUT NOT
LIMITED TO, PROCUREMENT OF SUBSTITUTE GOODS
OR SERVICES; LOSS OF USE, DATA, OR PROFITS; OR
BUSINESS INTERRUPTION) HOWEVER CAUSED AND ON
ANY THEORY OF LIABILITY, WHETHER IN CONTRACT,
STRICT LIABILITY, OR TORT (INCLUDING NEGLIGENCE OR
OTHERWISE) ARISING IN ANY WAY OUT OF THE USE OF
THIS SOFTWARE, EVEN IF ADVISED OF THE POSSIBILITY
OF SUCH DAMAGE.
• libvorbis
Copyright (c) 2002-2008 Xiph.org Foundation
Redistribution and use in source and binary forms, with
or without modification, are permitted provided that
the following conditions are met:
– Redistributions of source code must retain the above
copyright notice, this list of conditions and the
following disclaimer.
– Redistributions in binary form must reproduce the
above copyright notice, this list of conditions and the
following disclaimer in the documentation and/or
other materials provided with the distribution.
– Neither the name of the Xiph.org Foundation nor the
names of its contributors may be used to endorse or
promote products derived from this software without
specific prior written permission.
THIS SOFTWARE IS PROVIDED BY THE COPYRIGHT
HOLDERS AND CONTRIBUTORS ``AS IS’’ AND ANY
EXPRESS OR IMPLIED WARRANTIES, INCLUDING,
BUT NOT LIMITED TO, THE IMPLIED WARRANTIES OF
MERCHANTABILITY AND FITNESS FOR A PARTICULAR

Appendix
66
PURPOSE ARE DISCLAIMED. IN NO EVENT SHALL THE
FOUNDATION OR CONTRIBUTORS BE LIABLE FOR ANY
DIRECT, INDIRECT, INCIDENTAL, SPECIAL, EXEMPLARY,
OR CONSEQUENTIAL DAMAGES (INCLUDING, BUT NOT
LIMITED TO, PROCUREMENT OF SUBSTITUTE GOODS
OR SERVICES; LOSS OF USE, DATA, OR PROFITS; OR
BUSINESS INTERRUPTION) HOWEVER CAUSED AND ON
ANY THEORY OF LIABILITY, WHETHER IN CONTRACT,
STRICT LIABILITY, OR TORT (INCLUDING NEGLIGENCE OR
OTHERWISE) ARISING IN ANY WAY OUT OF THE USE OF
THIS SOFTWARE, EVEN IF ADVISED OF THE POSSIBILITY
OF SUCH DAMAGE.
• libogg
Copyright (c) 2002, Xiph.org Foundation Redistribution
and use in source and binary forms, with or without
modification, are permitted provided that the following
conditions are met:
– Redistributions of source code must retain the above
copyright notice, this list of conditions and the
following disclaimer.
– Redistributions in binary form must reproduce the
above copyright notice, this list of conditions and the
following disclaimer in the documentation and/or
other materials provided with the distribution.
– Neither the name of the Xiph.org Foundation nor the
names of its contributors may be used to endorse or
promote products derived from this software without
specific prior written permission.
THIS SOFTWARE IS PROVIDED BY THE COPYRIGHT
HOLDERS AND CONTRIBUTORS ``AS IS’’ AND ANY
EXPRESS OR IMPLIED WARRANTIES, INCLUDING,
BUT NOT LIMITED TO, THE IMPLIED WARRANTIES OF
MERCHANTABILITY AND FITNESS FOR A PARTICULAR
PURPOSE ARE DISCLAIMED. IN NO EVENT SHALL THE
FOUNDATION OR CONTRIBUTORS BE LIABLE FOR ANY
DIRECT, INDIRECT, INCIDENTAL, SPECIAL, EXEMPLARY,
OR CONSEQUENTIAL DAMAGES (INCLUDING, BUT NOT
LIMITED TO, PROCUREMENT OF SUBSTITUTE GOODS
OR SERVICES; LOSS OF USE, DATA, OR PROFITS; OR
BUSINESS INTERRUPTION) HOWEVER CAUSED AND ON
ANY THEORY OF LIABILITY, WHETHER IN CONTRACT,
STRICT LIABILITY, OR TORT (INCLUDING NEGLIGENCE OR
OTHERWISE) ARISING IN ANY WAY OUT OF THE USE OF
THIS SOFTWARE, EVEN IF ADVISED OF THE POSSIBILITY
OF SUCH DAMAGE.

Appendix
67English
■ FCC CAUTION
Changes or modifications not expressly approved by
the party responsible for compliance could void the
user’s authority to operate the equipment.
NOTE
• This equipment has been tested and found to
comply with the limits for a Class B digital device,
pursuant to part 15 of the FCC Rules. These limits
are designed to provide reasonable protection
against harmful interference in a residential
installation.
• This equipment generates, uses and can radiate
radio frequency energy and, if not installed
and used in accordance with the instructions,
may cause harmful interference to radio
communications. However, there is no guarantee
that interference will not occur in a particular
installation. If this equipment does cause harmful
interference to radio or television reception,
which can be determined by turning the
equipment o and on, the user is encouraged to
try to correct the interference by one or more of
the following measures:
– Reorient or relocate the receiving antenna.
– Increase the separation between the
equipment and receiver.
– Connect the equipment into an outlet on a
circuit dierent from that to which the receiver
is connected.
– Consult the dealer or an experienced radio/TV
technician for help.
This transmitter must not be co-located or operated in
conjunction with any other antenna or transmitter.
■ ISED CAUTION
This device contains licence-exempt transmitter(s)/
receiver(s) that comply with Innovation, Science and
Economic Development Canada’s licence-exempt
RSS(s).
Operation is subject to the following two conditions:
(1) This device may not cause interference.
(2) This device must accept any interference, including
interference that may cause undesired operation of
the device.
# CAUTION
This equipment complies with FCC/ISED radiation
exposure limits set forth for an uncontrolled
environment and meets the FCC radio frequency (RF)
Exposure Guidelines and RSS-102 of the ISED radio
frequency (RF) Exposure rules. This equipment should
be installed and operated keeping the radiator at least
20cm or more away from person’s body.
Supplier’s Declaration of Conformity
Trade Name: KENWOOD
Products: MONITOR WITH RECEIVER
Model Name: DMX4710S / DMX40S /
DMX400S
Responsible Party: JVCKENWOOD USA
CORPORATION
4001 Worsham Avenue, Long
Beach, CA 90808, U.S.A.
PHONE : 1-800-252-5722
THIS DEVICE COMPLIES WITH PART 15 OF THE FCC
RULES. OPERATION IS SUBJECT TO THE FOLLOWING
TWO CONDITIONS:
(1) THIS DEVICE MAY NOT CAUSE HARMFUL
INTERFERENCE, AND
(2) THIS DEVICE MUST ACCEPT ANY INTERFERENCE
RECEIVED, INCLUDING INTERFERENCE THAT MAY
CAUSE UNDESIRED OPERATION.

Appendix
68
■ Información acerca de la eliminación
de equipos eléctricos y electrónicos
al final de la vida útil (aplicable a los
países que hayan adoptado sistemas
independientes de recogida de
residuos)
Los productos con el símbolo de un contenedor con
ruedas tachado no podrán ser desechados como
residuos domésticos.
Los equipos eléctricos y electrónicos al final de la vida
útil, deberán ser reciclados en instalaciones que puedan
dar el tratamiento adecuado a estos productos y a sus
subproductos residuales correspondientes. Póngase
en contacto con su administración local para obtener
información sobre el punto de recogida más cercano.
Un tratamiento correcto del reciclaje y la eliminación
de residuos ayuda a conservar los recursos y evita al
mismo tiempo efectos perjudiciales en la salud y el
medio ambiente.
■ Informação sobre a eliminação de
pilhas
Este produto não deve ser eliminado como lixo
doméstico geral. Devolva a pilha usada ao revendedor
ou entidade autorizada para que a mesma seja
devolvida ao fabricante ou importador.
A reciclagem e a eliminação de lixo de maneira
apropriada ajudarão a conservar os recursos naturais ao
mesmo tempo que prevenirão os efeitos prejudicais à
nossa saúde e ao meio ambiente.
■ Para cumplimiento de la IFT:
“La operación de este equipo esta sujeta a las siguientes
dos condiciones:
(1) es posible que este equipo o dispositivo no cause
interferencia perjudicial y
(2) este equipo o dispositivo debe aceptar cualquier
interferencia, incluyendo la que pueda causar su
operación no deseada.”

69English
Important Notice on Software
Ñ Software License on This Product
The software embedded in this product comprises a
number of independent software components, each
of which is copyrighted by JVCKENWOOD Corporation
or by a third party.
This product uses software components that
are based on an End-User License Agreement
(hereinafter called “EULA”) stipulated by JVCKENWOOD
Corporation and by third parties.
The EULA dictates the availability of the source codes
of free-software components as a prerequisite to
distributing them in executable form under the
terms of the GNU General Public License or the Lesser
General Public License (hereinafter called “GPL/LGPL”).
To get information about the software components
that are subject to the terms of the GPL/LGPL, please
visit the following Website:
Website URL https://www2.jvckenwood.com/gpl/
Queries concerning the contents of the source code or
the like will not be accepted.
Please note that software components based on a
EULA that is not subject to the terms of the GPL/LGPL
or those that have been developed or created by
JVCKENWOOD Corporation will be excluded from the
scope of source code disclosure.
Because licenses to use software components
distributed under the GPL/LGPL are oered to the
customers for free of charge, no warranty is granted to
the customers, whether explicitly or implicitly, to the
extent of the applicable laws.
Unless otherwise stipulated by the applicable laws
or agreed upon in writing, the copyright holders or
those who are entitled to modify and redistribute the
software components are not held responsible for
any and all damages resulting from their use or from
inability to use them. For more information about the
terms of use of the software components, required
items of compliance and so on, please refer to the
GPL/LGPL.
Customers wishing themselves to use a software
component that is subject to the GPL/LGPL embedded
in this product are encouraged to read the terms of
the corresponding license before use. Because each
individual license is prescribed by a third party other
than JVCKENWOOD Corporation, the original (English)
of the license is presented.
EULA
Ñ Software License Agreement
JVCKENWOOD Corporation (hereinafter called
“Licensor”) holds either the copyright to the
embedded software or the right to sublicense it. This
agreement establishes the conditions under which the
customer uses this “Licensed Software.”
The customer shall agree to the terms of this license
agreement before proceeding to use Licensed
Software.
This agreement is deemed to have taken eect when
the customer (hereinafter called “User”) has used a
product implementation of Licensed Software.
The Licensed Software may contain software Licensor
has been licensed to use by third parties directly
or indirectly. Some third parties may have terms of
use prescribed for their customers, apart from this
Software License Agreement. This agreement does not
apply to such software. Be sure to consult “Important
Notice on Software” as presented separately.
Article 1 (General)
Licensor grants to User a non-exclusive, non-
assignable right of use Licensed Software within
the country where the User purchases the Product
(hereinafter the "Country") (except for the exception
provided for in Paragraph 1, Article 3).
Article 2 (Right of Use)
1. The rise of use granted under this agreement is the
right to use Licensed Software in this product.
2. User may not duplicate, copy, modify, add to,
translate or otherwise alter, or loan licensed Software
and the associated literature in whole or in part.
3. Use of Licensed Software is limited to a private
extent , and Licensed Software may not be
distributed, licensed or sublicensed for any purposes
whatsoever, including commercial use.
4. User shall use Licensed Software as per the
instruction manual or instructions given in the help
le and may not use or duplicate data in violations
of the regulations of the Copyright Law or other
governing laws by using Licensed Software in whole
or in part.

70
Article 3 (Terms of License)
1. In assigning this product, User may not retain
the original copy of the embedded Licensed
Software (including associated literature, updates
and upgrades) and any duplicates and associated
literature with regard to the license to use Licensed
Software. User may transfer Licensed Software only
to the condition of binding the assignee to abide by
the terms of this Software License Agreement.
2. User may not reverse-engineer, disassemble,
decompile or otherwise analyze the source code of
Licensed Software.
Article 4 (Rights to Licensed Software)
All rights to Licensed Software and the associated
literature, including copyrights, shall reside with
Licensor or the original right holder who has granted
the Right of Use and right to sublicense to Licensor
(hereinafter referred to as “Original Right Holder”), and
User does not have any rights other than Right of Use
granted hereunder with regard to Licensed Software
and the associated literature.
Article 5 (Exemption Granted to Licensor)
1. Licensor and Original Right Holder do not assume
any responsibility for damages caused to User or
third parties resulting from the exercise by User of
the license granted hereunder, unless otherwise
provided by any law to the contrary.
2. Licensor does not warrant Licensed Software to
be merchantable, compatible and t for specic
purposes.
Article 6 (Responsibility for Third Parties)
If disputes over the infringement of third parties’
intellectual property rights, such as copyrights and
patent rights, arise out of the use of Licensed Software
by User, User shall resolve these disputes at User’s
own expenses while keep Licensor and Original Right
Holder harmless.
Article 7 (Secrecy Obligation)
User shall keep condential Licensed Software
provided hereunder, information contained in the
associated literature or the like and those provisions of
this agreement not yet in public knowledge and may
not disclose or leak these to third parties without prior
written consent from Licensor.
Article 8 (Cancellation of the Agreement)
Licensor reserves the right to cancel this agreement
forthwith and claim compensation from User for the
damages caused by such cancellation when User:
(1) Breaches any of the provisions of this agreement, or
(2) Has received a petition for seizure, provisional
seizure, provisional disposition or any other kind of
compulsory execution.
Article 9 (Destruction of Licensed Software)
If this agreement is terminated under the provision of
the foregoing paragraph, User shall destroy Licensed
Software, along with all associated literature and its
duplicates, within two (2) weeks from the date of
termination.
Article 10 (Copyright Protection)
1. Copyrights and all other intellectual property
rights relating to Licensed Software shall reside
with Licensor and Original Right Holder and in no
circumstances with User.
2. User shall abide by the laws relating to copyrights
and intellectual property rights in using Licensed
Software.
Article 11 (Export Control)
1. Licensed Software and the associated literature or
the like may not be exported to places outside the
Country (including transmission outside the Country
over the Internet or the like).
2. User agrees that Licensed Software is subject to
export controls imposed by the Country and the
United States of America.
3. User agrees to comply with all the international
and domestic laws that apply to this software (U.S.
Export Administration Regulations and regulations
established by the U.S., the Country and their
governmental agencies regarding usage by end
users and export destinations).
Article 12 (Miscellaneous)
1. Even if this agreement is invalidated in part by law,
all other provisions shall remain in eect.
2. Licensor and User shall consult each other in
good faith to resolve any matters not provided for
in this agreement or questions arising from the
interpretation of this agreement.
3. Licensor and User agree that this agreement is
governed by the law of Japan and that all disputes
involving claims and obligations that may arise out
of this agreement will be settled by arbitration at the
Tokyo District Court as the court of rst instance.