vantrue.com
truly driven.
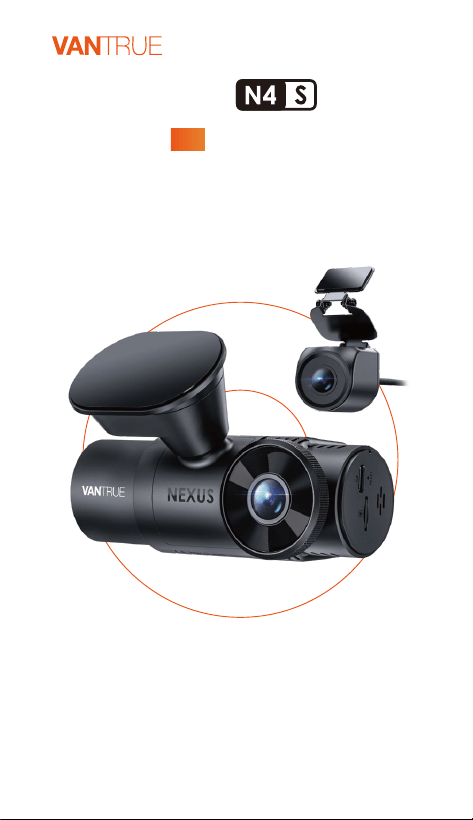
USER MANUAL V1
Nexus 4S

1
1
2
3
5
6
7
9
10
10
34
41
41
42
43
Contents
1. Quick Start Guide
1.1 What’s in the Box?
1.2 Assembling the Device
1.3 Installation and Setup
2. Basic Operation
2.1 Camera Overview
2.2 Button Description
2.3 LED Indicator Description
2.4 Screen Overview
2.5 Operation Guide
2.6 Menu Introduction
3. Product Specifications & FAQs
3.1 Specifications
3.2 Safety Warnings
3.3 FAQs
4. Warranty & Support 44

Warm Tips:
Please read the manual carefully before use.
The dash cam must remain connected to a power
source for operation.
For safe driving, please do not set up products or
use your phone to watch driving videos while
driving.
This product requires an SD card to be inserted in
order to record video.
Please do not disassemble the camera shell or
repair it by yourself. If the product malfunctions,
please contact VANTRUE official.
Please do not install the dash camera in a position
that may block your driving vision.
Avoid exposing the product to high temperatures or
humidity.
In order to continuously improve our customers'
experience with our products, we will update the
firmware from time to time. If you need, you can
update the firmware.
Do not install the camera directly in front of the
occupants to prevent accidental dislodgement
causing a safety hazard.
Please note that you may not be able to connect to
the Vantrue APP when using wireless CarPlay or
Android Auto.
Please use this product as permitted by law.
1.
2.
3.
4.
5.
6.
7.
8.
9.
10.
11.
- 1 -
1. Quick Start Guide
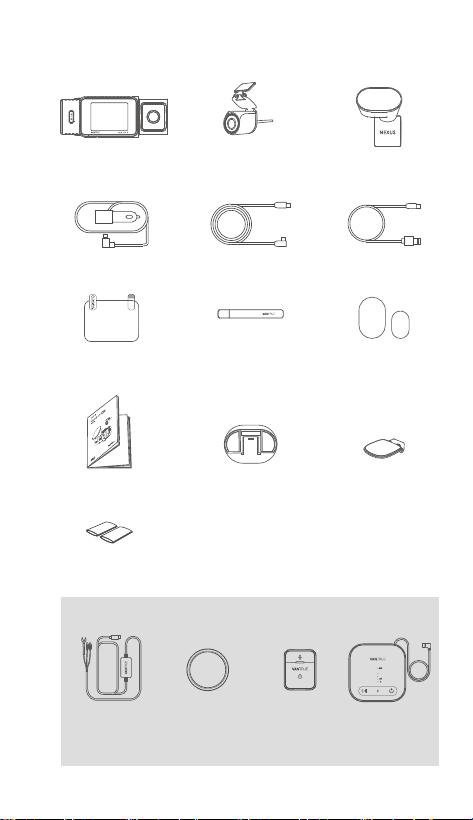
1.1 What’s in the Box?
O. CPL Filter P. Wireless
Remote
Controller
Q. LTE
Module
Optional Accessories (Buy Separately)
N. Vantrue
Hardwire Kit
D. Car Charger
K. Adhesive
Mount Base
B. Waterproof
Rear Camera
F. Data Cable
G. Electrostatic
Stickers
M. Heat Shrink Tubing * 2
(for waterproong rear camera connections)
A. N4S Dashcam C. Adhesive
Mount
H. Crowbar
E. Rear Camera
Cable
I. Spare Adhesive
Stickers
L. Rear Camera
Mount
J. Quick User
Guide
- 2 -
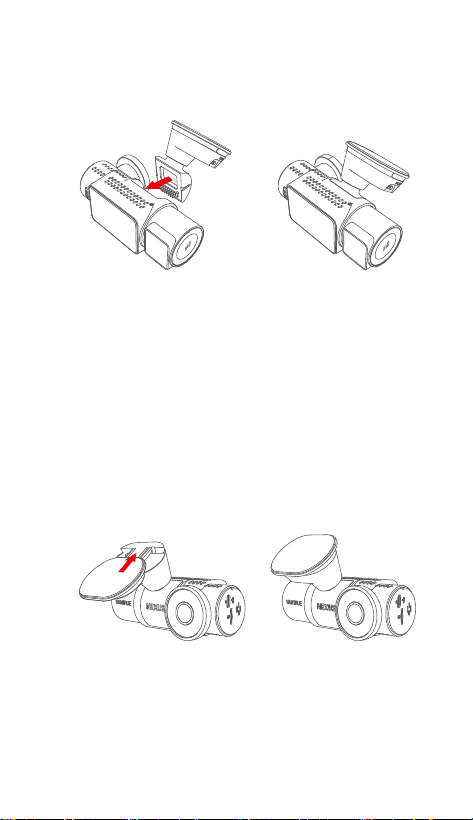
The N4S dashcam mount has a detachable structure,
so users don’t need to remove the entire mount. The
mount can be removed easily by detaching it from the
mount base.
Note: Please keep the interface horizontally aligned
when installing, a crisp 'click' sound indicates that the
installation is in place. The adhesive surface needs to
be removed from the protective film before installation
to ensure a perfect fit with the mounting surface.
1.2 Assembling the Device
Align the adhesive mount with the mount connector
of the N4S main unit and fit it into place.
(1)
(2)

- 3 -
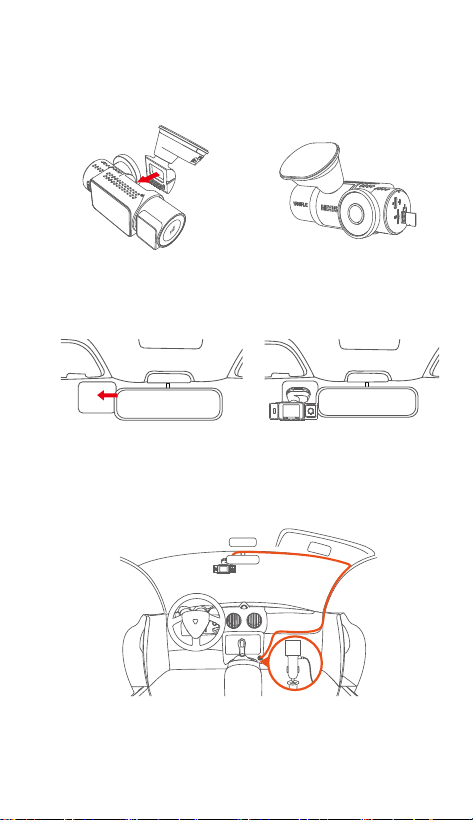
1.3 Installation and Setup
After assembly, power on the dashcam and configure
the desired settings before mounting it on the vehicle’s
windshield.
Power On: After connecting the main unit and the rear
camera, please use the car charger to power it on and
check if it works normally.
Confirm Settings: When using the dash cam for the
first time, you need to reset some basic settings such
as date and time, language and region. Follow the
on-screen prompts. After completing the settings,
please confirm that the dash cam is working properly,
then proceed with installation.
Insert the memory card, and format it first after turning
on the dash cam.
(3)
(1)
(2)
- 4 -
Proper Installation: Make sure that the dash cam has
been properly installed on the windshield of the vehicle
and the camera is oriented to the road.
③ Install the electrostatic
sticker
④ Install the dash
cam
① Assemble the bracket ② Install the memory
card
⑤ Installing the car charger adapter and wiring
(3)

- 5 -
Note: When installing the rear camera, you can slide a
heat shrink tube over the connection point between the
rear camera and the cable, then apply heat to shrink
the tube and secure it to the connection, which can
enhance waterproofing, improve the seal, and increase
the durability of the connector.
⑥ Install the rear camera and wiring
The instruction mainly introduces the screen icon,
button description, function introduction and operation
guide of N4S dashcam , which can help users
understand the usage of N4S dashcam quickly.
2. Basic Operation
Start Recording: After installation is completed, the
dash cam will automatically begin recording video
when the car starts. You can set the recording mode
such as loop recording or emergency recording as
needed.
Power Off: When not in use, you can disconnect the
power cable or long press the power button to turn off
the dash cam.
(4)
(5)
- 6 -
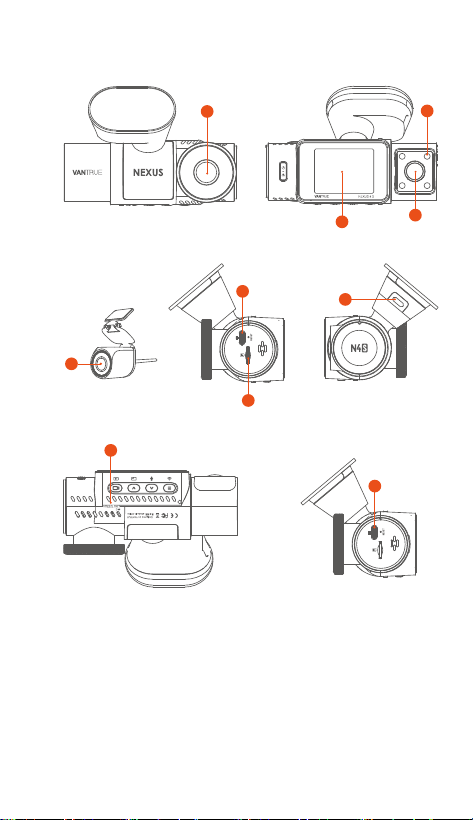
2.1 Camera Overview
3
4
2
8
1
5
6
9
10
7
- 7 -
Front Camera
Infrared Lights for Cabin Camera
2" IPS Screen
Cabin Camera
Rear Camera
TYPE-C Port for Transferring Data
TYPE-C Port for Charging
Serial Number
Memory Card Slot
Rear Camera Port
1
2
3
4
5
6
7
8
9
10
6
2
1
3 4 5
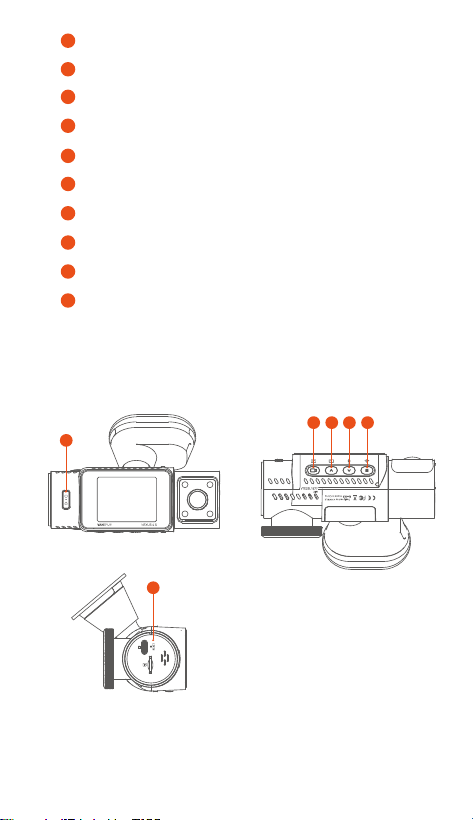
2.2 Button Description

1
Buttons Instruction
• In the power-on state, long press
to turn off the camera; in the
power-off state, short press to turn
on the camera.
• In the recording interface and
WiFi interface, short press to start
emergency recording and
snapshot.
• In file browsing, short press to
pop up the menu for deleting files.
• In the recording interface, short
press to start or pause recording,
and enter standby mode; long
press to turn off the screen.
• In the menu settings, short press
to confirm an option.
• In the playback video, short press
to play the video or pause the
video.
SOS /Power
Button
Record
Button
2
• During video recording, short
press to switch the video window.
• In the menu setting and file
browsing screen, short press to
select the previous option or file,
and long press to scroll through
the above options or files.
• When playing back a file, short
press to multiply the speed of the
video.
3
Up
Button
- 8 -
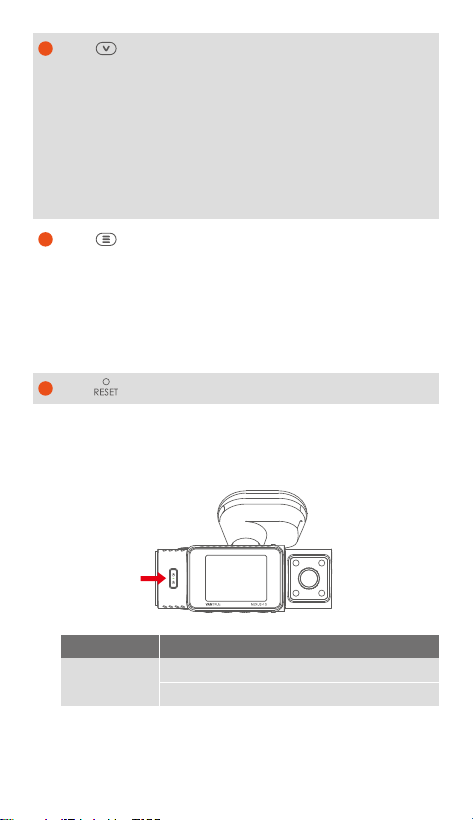
2.3 LED Indicator Description
• In the recording interface, long
press to quickly enter the parking
mode; short press to turn on/off
the microphone.
• In the menu settings and file
browsing interface, short press to
select the next option or file, and
long press to scroll down to display
the option or file.
4
• In standby mode, short press to
enter the menu.
• In power-on mode, long press to
switch WiFi on or off.
• In menu setting and file browsing
interface, short press to return to
the previous interface.
5
Menu
Button
Down
Button
- 9 -
Short press to restart the camera.
6
Power light
Description
Green light steady: Standby mode.
Green light flashing: Recording mode
LED Status
1440P+1440P+1440P 30FPS
00:00:37
05-05-2025 AM 10:09:07
MP/H
45
- 10 -
2.5 Operation Guide
The operation guide is mainly divided into two parts.
The upper part focuses on the APP operation guide,
while the lower part focuses on the dash cam
operation guide. These sections are interrelated,
please read thoroughly before operation.
APP Operation Guide
The N4S dashcam connects to the phone via WiFi to
realize the functions of real-time preview, changing the
dash cam settings, downloading files, playing back
videos on the phone, etc. Users need to install the
Vanture APP on phone and use these functions via the
APP.
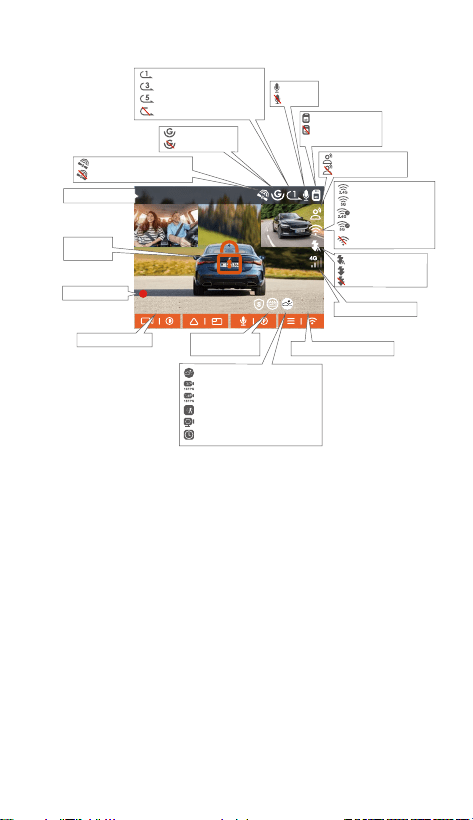
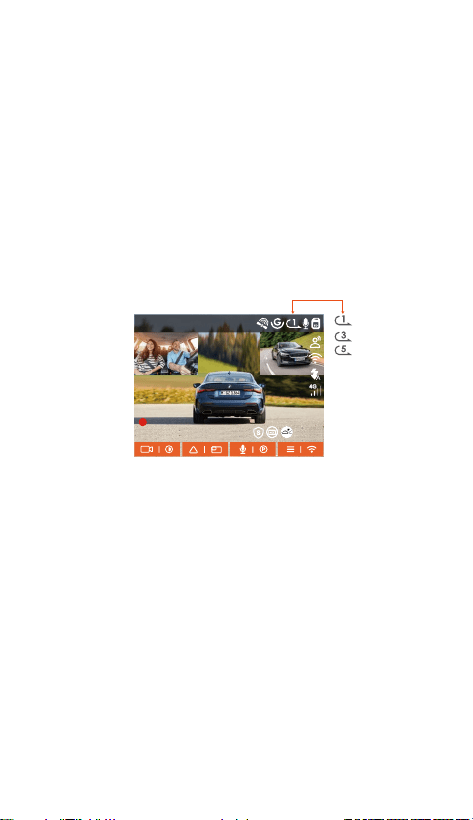
2.4 Screen Overview
Loop Recording for 1 min
Loop Recording for 3 mins
Loop Recording for 5 mins
Loop Recording OFF
G-Sensor ON
G-Sensor OFF
SD Card Inseed
No SD Card / SD
Card Error
MIC ON
MIC OFF
Voice Control ON
Voice Control OFF
Recorded Driving Speed
LTE Network Signal
IR Automatic Mode
IR Always On Mode
IR Mode OFF
Recording Time
Video Resolution
Emergency
Recording
2.4G WiFi ON
5G WiFi ON
2.4G WiFi Connected
5G WiFi Connected
WiFi OFF
GPS Located Successfully
GPS OFF
Collision Detection
1080P 15FPS Low Bitrate Mode
720P 15FPS Low Bitrate Mode
Motion Detection
Low Framerate Mode
Time Lapse ON
Date and Time
ACC Status
ACC Connected
(1)

- 11 -
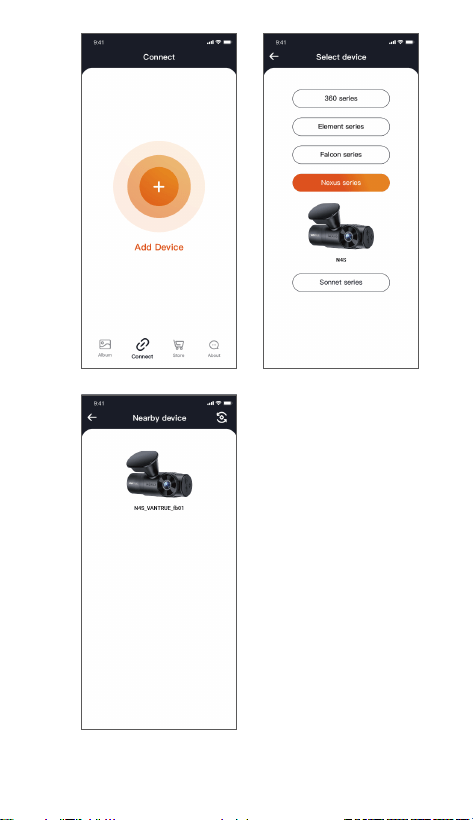
Connection Method: After WiFi function is turned on,
click "Add Device" on Vantrue APP, select "Nexus"
series, choose N4S model, confirm the corresponding
WiFi name, and then click “Join” to connect.
APP Download
Please scan the QR code below using your phone to
download and install the Vantrue APP, and follow the
prompts to complete the installation.
Add Device
WiFi function will be automatically turned on when you
turn on the N4S dash cam. When there is no
connection, WiFi function will be turned off after 10
minutes by default. After WiFi function is turned off,
you can turn it on again through shortcut keys, voice
control or menu.
(2)
(3)
- 12 -
- 13 -
Note:
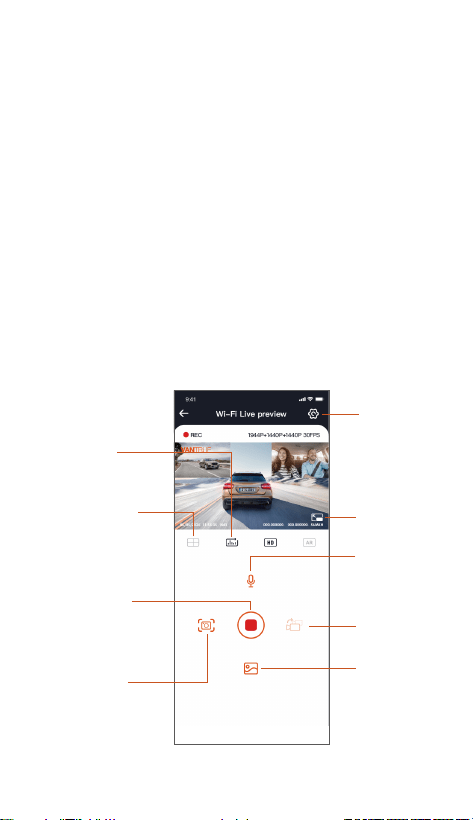
APP Connection
Camera
Correction
Line
Start/Pause
Recording
Mileage
Statistics
Full Screen
Microphone
ON/OFF
Camera
Displays
Switch
Setup
Snapshot
Album
(4)
Please check whether the WiFi function of your
phone is turned on first.
The initial password of this device is for initial login
only. In order to eliminate security risks, please
make sure to change the initial password in time
after the initial login to prevent others from
unauthorised access to the user's device or other
undesirable consequences. Users need to change
the WiFi password through the dash cam settings in
the Vanture APP.
If you forget your password, navigate to "System
Setup" and select "Restore Default Settings" . After
restoring the default settings, the WiFi password is
the initial password (12345678).
①
②
③

- 14 -
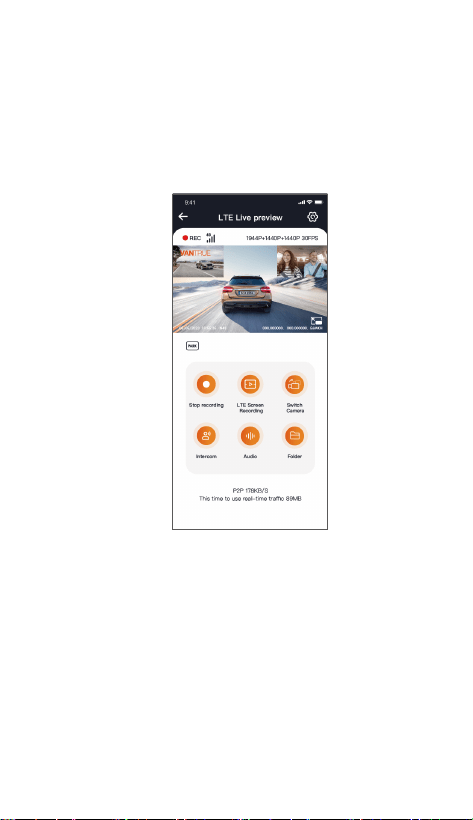
After entering the real-time preview interface of APP,
you can do the following operations.
Video Preview: After the APP is connected
successfully, it will enter the real-time preview
interface, click the full screen button or horizontal
playback, the real-time screen automatically
switches to full screen preview mode. Click the
window switch button to switch the front, and rear
video windows, this function is only for
multi-channel dash cam.
Playback Video: You can view the recorded video or
photo files in the SD card on APP, click "File" and
then select the video to play back.
①
②
Video Download: You can choose to download
videos or pictures in the SD card browse file
interface or in the video playback. After
downloading the video, you can playback it in the
APP local file and view the GPS track of the video.
Snapshot: In the live preview interface, you can
capture the current picture.
Mileage Statistics: Users can click to download the
mileage information as needed. The mileage
information will be saved in the APP as a picture or
PDF file.
Camera Correction Line: The lens balance is
corrected by the accurate cross line, so that the
recording image will not be skewed.
OTA Upgrade: Update the firmware verison for the
N4S dash cam via the APP.
The real-time preview resolution can be switched.
You can switch the real-time preview display
resolution by clicking
③
④
⑤
⑥
⑦
⑧

- 15 -
(5) APP Upgrade
Open "Vantrue" APP, connect the dash cam’s WiFi, go
to "Setup>About>Detect New Version", then the APP
will automatically detect whether the APP version is
the latest version.
If there is a new version of the APP, follow the
instructions of the APP to operate and upgrade the
version.
(6) Dash Cam Operation Guide
The important functions of N4S are introduced to
facilitate users to grasp the usage of N4S functions
more quickly.
- 16 -
A. Loop Recording
After inserting the memory card and connecting the
power, the N4S will automatically turn on and enter
loop recording. The duration of each recorded video
will be saved based on the loop recording time you set,
and the video file will be saved in the Normal Video
folder. When the capacity of the Normal Video folder
reaches 70% of the total capacity, the new loop
recording file will automatically overwrite the original
loop recording files. After this function is enabled, the
video file will automatically overwrite the loop to
ensure continuous recording.
Note:
The normal operation of the loop recording function
depends on the speed of the memory card, so
please format the memory card regularly to avoid
problems such as excessive memory card files and
card aging that affect the normal loop recording.
Please check the loop recording video regularly to
avoid the necessary videos being overwritten by
loop.
After loop recording is turned off, the lock video
function will no longer work.
When the loop recording setting is turned off, the
length of each recording is 20 minutes. When the
memory card is full, the camera will stop recording
and prompt “SD card is full!”.
①
②
③
④
1440P+1440P+1440P 30FPS
00:00:37
05-05-2025 AM 10:09:07
MP/H
45
- 17 -
Note:
The sensitivity of the automatic locking video
trigger is determined by the sensitivity of the
collision. The higher the sensitivity setting, the
greater the probability of being triggered.
①
1440P+1440P+1440P 30FPS
00:00:37
05-05-2025 AM 10:09:07
MP/H
45
After the recording is completed, the video will be
stored in the emergency video folder and the photos
will be stored in the photo folder to ensure that
important videos will not be overwritten by loop
recording.
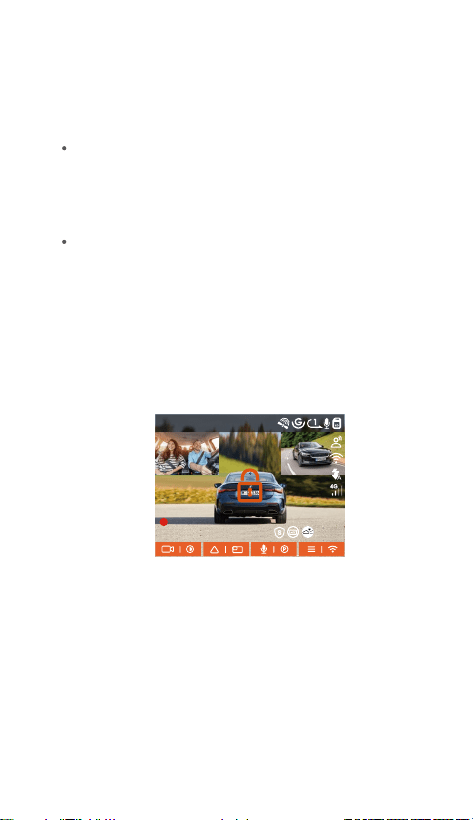
B. Emergency Recording
When driving, the video can be locked manually by the
user or automatically locked by the N4S dash cam if
special circumstances occur.
Manual Lock: Press the emergency recording button
to lock the current video and snapshot. During the
recording period, the user can press the button
several times to snapshot.
Automatic Lock: The dash cam will automatically
trigger emergency lock when it detects an
emergency.

- 18 -
(Road test comparisons demonstrate enhanced license
plate clarity when PlatePix™ Mode is activated.)
C. Picture Quality Function and PlatePix™ Timer
The default picture quality mode is standard, users can
turn on the PlatePix™ Mode as needed and set the
automatic on/off time with the PlatePix™ timer. This
function prioritizes the enhancement of license plate
clarity, avoiding the blurring of license plate due to
lighting problems, which may affect the evidence of
accidents.
Turn on PlatePix™ Mode Turn off PlatePix™ Mode
When the total capacity of the event video files is
30% of the total capacity of the current memory
card, the new event video files will automatically
overwrite the old event video files.
We recommend checking and saving event video
files regularly to avoid losing them.
Lock recording will not trigger in either of the
following situations: loop recording is off or time
lapse recording is on. When loop recording is turned
off/time-lapse recording is turned on, you can only
snapshot under these situations.
②
③
1440P+1440P+1440P 30FPS
00:00:37
05-05-2025 AM 10:09:07
MP/H
45
1440P+1440P+1440P 30FPS
00:00:37
05-05-2025 AM 10:09:07
MP/H
45
- 19 -
③
Parking Mode
OFF
Collision Detection
Motion Detection
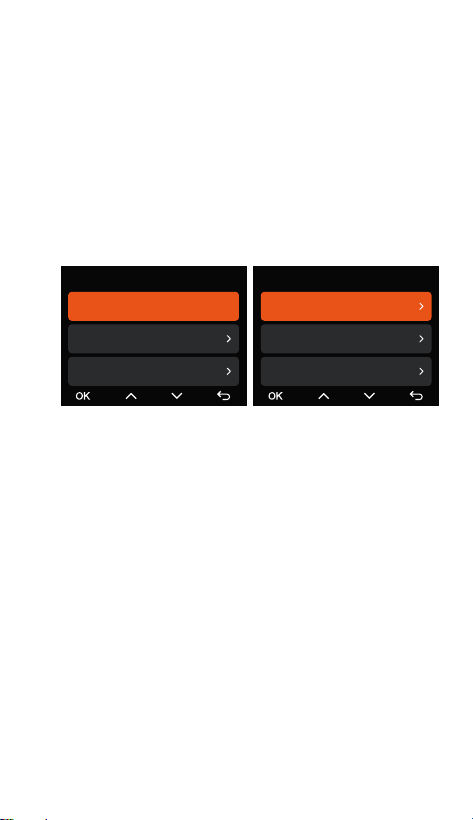
D. Parking Mode Settings
When parking, users can set up a variety of parking
monitoring settings according to the vehicle itself, the
parking environment, their own needs and other
factors.
When using the Parking Mode function, please note
the following:
Note:
PlatePix™ Mode will enhance the brightness in front of
the vehicle, but the overall picture may be dark. In
low-light environments, it is recommended turning off
this feature to avoid affecting the recording results.
To ensure that the parking mode of dash cam
works properly, please use the Vantrue hardwire kit
or other stable and continuous power supply to
power the dash cam.
We recommend using Vantrue ACC hardwire kit.
The ACC hardwire kit from other brands may not
work well due to the different location of the ACC
detection PINs.
Under the hot and sunny environment in summer,
we recommend users to use the collision detection
mode. When the ambient temperature in the car is
up to 60℃, we recommend users to turn off the
dash cam so that the high temperature will not
make the dash cam work abnormally.
①
②
Low Light Night Vision...
Parking Mode Camera Sele...
Collision Detection in Park..
Parking Monitor Settings

E. Parking Mode Introduction
In order to meet different user needs, we have enriched
the working modes of parking and improved the
working logic therein.
Due to the different power supply modes of users, the
way the dash cam enters the parking monitoring mode
is also different. At present, it supports two entry
modes.
Only one of time lapse recording and parking mode
(including collision detection, motion detection, low
bit rate mode, and low frame rate mode) can be
turned on. Enabling one will automatically disable
the other.
All the files recorded in parking mode will be saved
in the parking video folder. In order to avoid the
parking mode files from being overwritten by loop
recording, please check them regularly in case of
being lost.
The parking monitoring mode and the parking
monitoring setting function are related, according to
different parking monitoring modes, different
parking monitoring settings can be matched.
Parking mode function will be improved with the
dash cam function, please pay attention to the
Vanture official website firmware description of the
public announcement, or consult with customer
service.
- 20 -
After the ACC hardwire kit is disconnected, the dash
cam enters the parking monitoring mode
immediately.
When the vehicle is stationary for 5 minutes, the
dash cam will enter the parking monitoring mode
automatically.
①
②
④
⑥
⑦
⑤
1440P+1440P+1440P 30FPS
00:00:37
05-05-2025 AM 10:09:07
MP/H
45
Motion Detection
Collision Detection
Low Bitrate Mode
Parking Mode
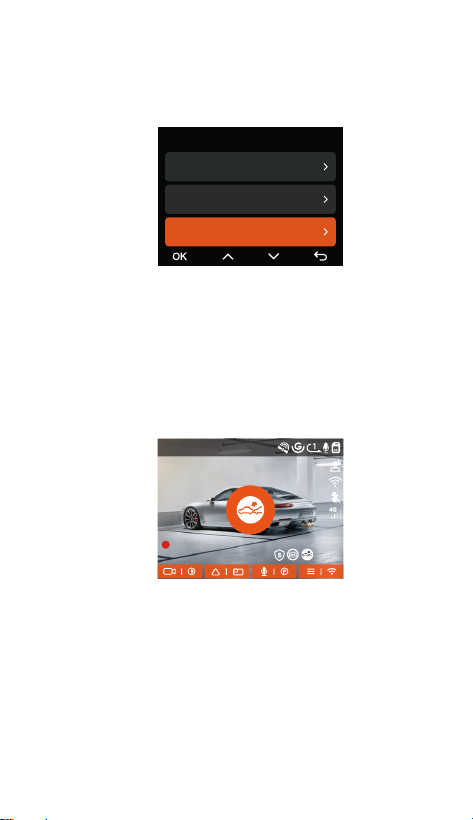
Mode 1: Collision Detection
When the collision detection function is on, the
recording interface will display the corresponding icon,
indicating that the device is in the collision detection
mode. Sensitivity can be adjusted between levels 1 to
5 based on user preferences and vehicle conditions,
the higher the number, the higher the sensitivity level.
Users can choose the appropriate entry mode
according to their own vehicle power supply to
ensure the normal operation of the parking
monitoring function.
When the G-sensor detects that the vehicle has been
stationary for 5 minutes (entering the collision
detection mode), the dash cam will display the
corresponding icon in the middle of the screen and
automatically shut down. After switching off, if the
vehicle vibrates or moves, the dash cam will
automatically switch on and record 1 minute of
video, and then switch off again to ensure that key
images are recorded.
- 21 -
③

Note:
If the dash cam continues to be hit by a collision during
the collision detection recording process, it will exit the
collision detection mode, enter the normal recording,
and continue to stand still for 5 minutes before
entering the collision detection again.
According to different user habits, the collision
detection mode provides two start-up modes: quick
start mode and power saving mode, which can be
selected by users in Recording Settings > Parking
Monitor Settings > Parking Collision Detection.
Quick Start Mode: The device enters the standby
mode with the screen off, and when a collision
occurs, the device will immediately light up the
screen to record video, and save the file and continue
to enter the standby mode when the recording is
finished.
Power Saving Mode: The device is completely
switched off and automatically switches on to record
video after detecting a collision, saves the file and
switches off after recording is completed, which is
more energy-saving.
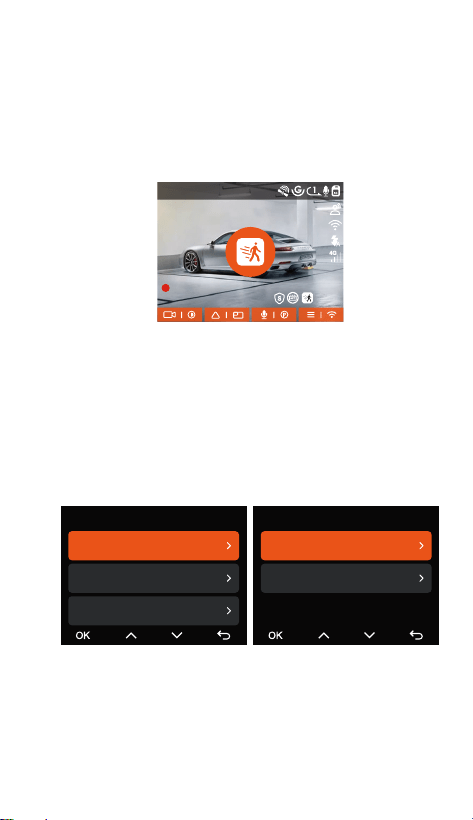
Mode 2: Motion Detection
When motion detection is turned on, the recording
interface will display the motion detection icon,
indicating that the device has entered the motion
detection mode. Users can select three levels of
sensitivity, low/medium/high, corresponding to a
detection range of 2 /4 /6 meters.
- 22 -
Motion Detection Area
Rear Area Detection
Front Area Detection
1440P+1440P+1440P 30FPS
00:00:37
05-05-2025 AM 10:09:07
MP/H
45
Note: Please make sure the device is in normal
working condition to ensure that the motion detection
function works effectively.
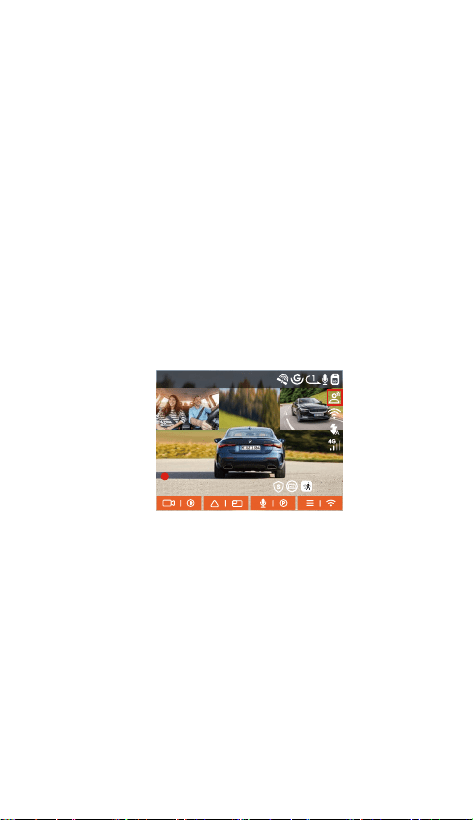
Trigger process: The dash cam supports
pre-recording function, which can better restore the
event process, you can add the recording screen 10
seconds before the triggering event in the motion
detection video, which will eventually form a
40-second motion detection recording (10 seconds
pre-recording + 30 seconds after the trigger)
In the Parking Mode setting, select the detection lens
and adjust the motion detection area to more
accurately monitor activity within a specific
range.This function works in conjunction with the
Motion Detection Parking Mode to ensure that the
device automatically triggers recording when it
detects abnormal movement, increasing surveillance
efficiency and reducing ineffective recordings.
- 23 -
Collision Detection in Park...
Low Light Night Visio...
Motion Detection Area
Parking Monitor Settings

1440P+1440P+1440P 30FPS
00:00:37
05-05-2025 AM 10:09:07
MP/H
45
1440P+1440P+1440P 30FPS
00:00:37
05-05-2025 AM 10:09:07
MP/H
45
Entry Method: After parking and turning off the engine,
the device automatically enters a low bitrate mode,
where the resolution of all lenses is adjusted to the
preset value, and recording is conducted according to
the set loop recording duration.
Note: This mode is only effective when the device is
powered on. If the device is turned off, it will not
function.
Mode 3: Low Bitrate Recording
When Low Bitrate Recording is on, the screen
displays the Low Bitrate icon and records according
to the set resolution (1080P 15FPS or 720P 15FPS).
Mode 4: Low Frame Rate Recording
Entry Method: Upon parking and turning off the
engine, the device automatically enters a low frame
rate mode, effectively preserving video integrity while
saving storage space.
Calculation Formula: Time-lapse recording file
duration (seconds) × Recording frame rate ÷ Frame
rate of resolution = Actual recording duration
(seconds).
- 24 -
Note:
Time calculations are based on seconds; for
conversions to other units, adjustments must be
made accordingly.
The device requires a stable power supply. If the
power is disconnected, the dash cam will
automatically shut down.
F. Voice Control
Users can give voice commands to the dash cam
through the language recognition function, such as
capturing pictures, starting recording, turning on/off
WiFi, video locking and so on.Currently supported
languages are English, Japanese, French, Russian
and Chinese. For more detailed voice commands,
please check System Setup>Voice Content.
Voice recognition has options of low
sensitivity/standard/high sensitivity/off. The default
is standard sensitivity.
- 25 -
1440P+1440P+1440P 30FPS
00:00:37
05-05-2025 AM 10:09:07
MP/H
45
①
②
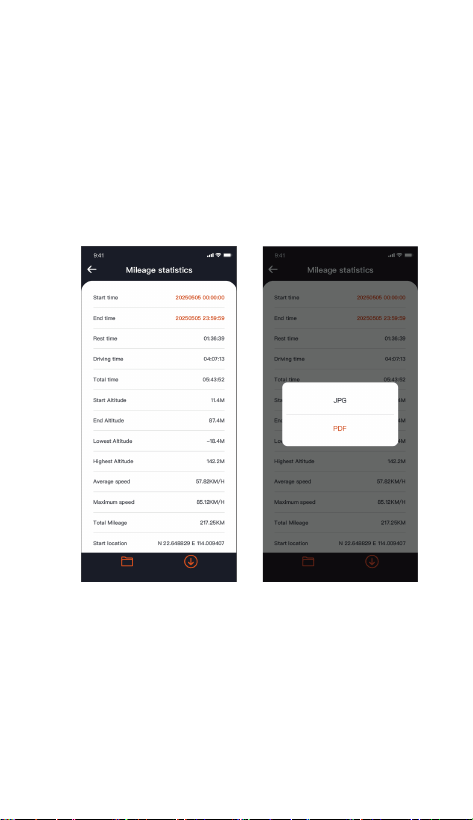
G. Mileage Statistics
The N4S dash cam analyzes and counts the user's
driving hours, driving mileage, altitude, driving speed
and other information by recording the GPS
information of the driving process and exporting the
mileage file through APP.
In the Vanture APP’s real-time preview interface,
select the start and end times, then download the file
as a PDF or JPG for local storage.
- 26 -
120
KM/H
12�20
S
EW
N
NW
NE
SE
SW
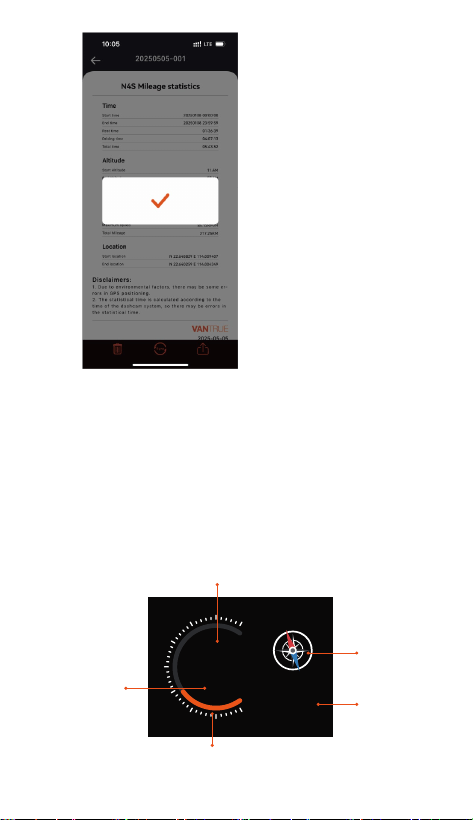
H. HUD Speed and Time
When this function is turned on, every time the GPS
fixes successfully and the screen of dash cam is off,
the screen will display the following information:
current driving speed, current driving direction and
current time, which can help the user to obtain the
key driving information intuitively and improve driving
safety and convenience.
- 27 -
Current speed
Compass
Time
Speed indicator
Unit of
speed

GPS Settings
40
46
39
43
48
Note:
The HUD function will not be displayed when the GPS
is not located or the GPS function is not turned on.
Note:
GPS connection time: GPS connection should be
completed within 1 minute after the device is
switched on.If it is not successful for more than 1
minute, please check:
If the GPS function is enabled;
If the device is correctly connected to the GPS
bracket;
Whether the environment affects the signal (e.g.
underground car parks, tunnels, densely built-up
areas, etc.).
GPS Information Viewing: GPS data is embedded in
recorded video and can be viewed through the
Vantrue APP or Vantrue GPS player.
I. GPS Function
GPS is enabled by default. The N4S receives GPS
signals via a GPS mount. It automatically corrects
the time and date in your area, records the location
where the video was taken and the speed of the
vehicle at the time.
- 28 -
①
②
The following LTE settings are customizable:
a. Message push settings
b. SIM card traffic consumption limit
c. Crash video upload quality
Users can customize the settings based on their SIM
card data plan, ensure efficient use of traffic and
remote monitoring features.
J. LTE Setup (Must be connected with LTE module.
Buy separately)
To make it easier for users to remotely check parking
conditions, Vantrue has developed the LTE module
(LT01). Users can insert the SIM card into the LTE
module and connect the dash cam for remote
monitoring.
- 29 -
Set Date/Time Manually
GPS Automatic Update
ST/WT Auto Switch
Time & Date
Note:
GPS auto-correct time needs to set the correct
time zone, you can refer to the representative city
after each time zone.
Automatic switching between winter and summer
time function, this function is limited to use in
North America.
K. GPS Auto-correction Time
The N4S dash cam is set to automatically adjust the
time via GPS by default. Users can select their time
zone, for example, if the user is in Los Angeles, they
can choose GMT-08:00. If the user is unsure of their
current time zone, they can connect to the Vantrue
APP via WiFi, ensure that the automatic time
adjustment feature in the APP is enabled, and once
connected successfully, the dash cam's time zone
will be forcibly corrected based on the user's phone's
time zone.
- 30 -
①
②
- 31 -
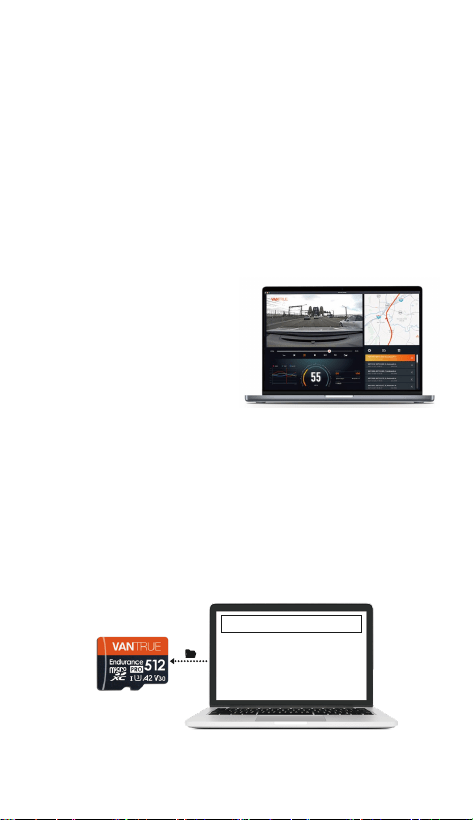
L. Playback File
Vantrue offers an exclusive PC player for viewing
video content in higher definition:
• Mac users can search for "Vantrue Player" in the
Apple App Store and download it.
• Windows users can go to Vantrue's official
website. (https://www.vantrue.net/app/app.html)to
download the latest version of the player. The player
supports video playback, GPS track view, speed
display and other functions to provide users with a
better video experience.
Vantrue Player Version 3.0.3 (for Windows)
Vantrue Player (for Mac)
Vantrue Player
M. Dashcam Upgrade
Upgrade Route 1: File upgrade
Go to VANTRUE website to download the latest N4S
dashcam firmware, copy the firmware file to the root
directory of the memory card, then insert the memory
card back into the dashcam and power it on to
initiate the upgrade process.
Upgraded Files
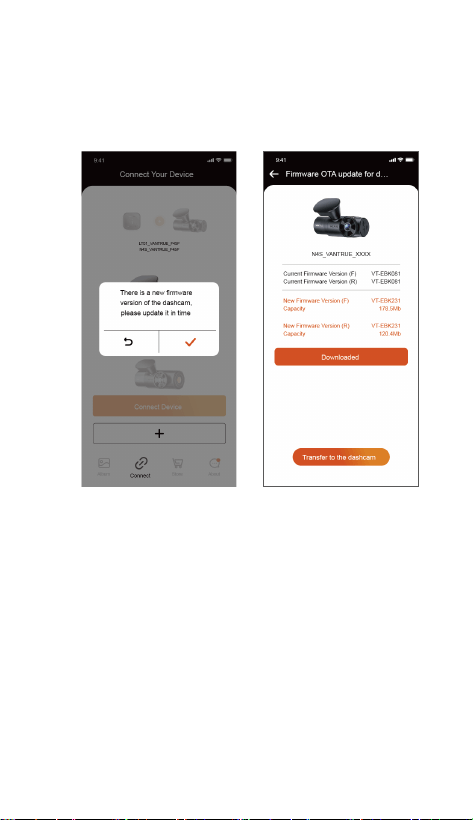
Upgrade Route 2: OTA (OvertheAir) Firmware Update
After launching the APP, a firmware update
notification will be displayed, after the user confirms
the upgrade, it will jump to the OTA upgrade
interface, you can follow the APP guide to upgrade.
- 32 -

- 33 -

2.6 Menu Introduction
The N4S dash cam main functions setup has three
sections, Record Setup, System Setup, and File
Browsing. You can set your dash cam according to
your requirements with these function setting.
- 34 -
Whether it is file upgrade or OTA upgrade, you need
to keep the N4S dashcam normally powered on
during the upgrade process.
Download upgrade file during OTA upgrade need to
use the data traffic.
When using the file upgrade, you need to format the
memory card on the host of N4S dashcam, and then
put the upgrade file into the memory card to carry
out the upgrade process.
Entry Modes:
(1) Record Setup
Resolution: The N4S dashcam includes 3 lens
combination modes:
Front + Inside + Rear
1944P+1440P+1440P 30FPS
1440P+1440P+1440P 30FPS
1440P+1080P+1440P 30FPS
1440P+1080P+1080P 30FPS
1080P+1080P+1080P 30FPS
1440P+720P+1080P 30FPS
1080P+720P+720P 30FPS
Front + Inside
1944P+1944P 30FPS
1440P+1440P 30FPS
1440P+1080P 30FPS
1440P+720P 30FPS
1080P+1080P 30FPS
1080P+720P 30FPS
a.
①
②
③

- 35 -
Front + Rear
1944P+1440P 30FPS
1440P+1440P 30FPS
1440P+1080P 30FPS
1440P+720P 30FPS
1080P+1080P 30FPS
1080P+720P 30FPS
Front
2592x1944P 30FPS
2560x1440P 30FPS
1920x1080P 30FPS
1280x720P 30FPS
b.
d.
e.
g.
f.
h.
Image Quality: Default is Standard mode, with the
option to turn on PlatePix™ Mode.
Loop Recording: Default setting is 1 min, this
feature contains 4 options: off, 1 minute, 3 minutes,
5 minutes. When you turn off loop recording, it
records 20 minutes per video by default until the
SD card is full.
IR LEDs: The interior camera of the N4S dashcam
is equipped with infrared lights, and it offers three
modes to choose from: automatic, on,andoff. The
default mode is automatic.
G-Sensor: Select the level of G-sensor you need,
then you can set 3 directions (Front + Rear/Left +
Right/Up + Down). The G-sensor value in each
direction can be selected as 1/2/3/4/5/Off. Default
setting is level 3.
Privacy Mode: Default setting is off, when it is on,
the video recording will be in three loop mode.
Audio Recording: Default setting is on, here you
can set audio recording on/off.
Audio Noise Reduction: Default setting is on,
adjust the recording audio effect by dynamic noise
reduction. You can choose to turn it off.
c.

- 36 -
i.
j.
k.
l.
m.
Exposure: You can set the exposure value of the
front, inside and rear camera separately, default
setting is +0.0, through this option, you can adjust
the exposure of the lens.
REC Status Light: Default setting is on, adjust the
recording indicator on or off.
HDR: Default setting is on, you can adjust the HDR
switch of the front, inside and rear lens separately
to achieve a better balance of the recording effect,
you can choose to turn it off.
HDR Timer: Default setting is off, when on, you can
choose the automatic on time and off time.
PlatePix™ Timer: Default setting is off, when on, it
will turn on and off the PlatePix™ Mode according
to the set time.
Rotating Display: Default setting is off, you can turn
on the rotating display of the front, inside and rear
camera separately.
Mirror: Default setting is on, when it is on, the
interior and rear lens screen is displayed in mirror
image mode.
Number Plate: 9-digit license plate number can be
set, which can be viewed in the watermark of the
recorded video.
Stamp: Display time and date, VANTRUE brand
name, license plate number, GPS location
information, vehicle speed in the recorded video,
default all on.
Time Lapse: Default setting is off, user can choose
to turn on 1FPS/5FPS/10FPS/15FPS.
Parking Mode: Here you can set the parking mode
that user needs, respectively collision
detection/motion detection/low bit rate
recording/low frame rate recording/off, default off.
o.
p.
q.
r.
s.
n.

- 37 -
t.
u.
v.
w.
x.
Parking Monitor Settings: This function includes
detection lens settings, low night vision in parking
mode, motion detection area, collision detection
mode adjustment.
LTE Settings: This function needs to be used after
connecting the LTE module, the default settings are
turning on real-time push message, use daily
300MB data traffic, collision video save traffic to
upload, users can change the settings according to
their needs.
Mileage Statistics: Default setting is on, open this
function will record the driving mileage information,
you can find the mileage statistics function in the
WiFi connection mode of the APP to analyze and
export the mileage statistics.
HUD Speed and Time:Default setting is off, can be
set to enter after 1/3/5 minutes, it will show current
speed, compass bearing and time after entering.
GPS Setting: GPS function is turned on by default,
GPS switch, speed unit setting, GPS information
can be checked here.

- 38 -
(2) System Setup
Languages: Available languages are
English/Français/Español/Deutsch/ Italiano/简体中
文/русский/日本語/Polski/한국어.
Wi-Fi: There are Wi-Fi auto on, Wi-Fi mode, and
Wi-Fi information options under the WiFi function
of the dash cam respectively.
Wi-Fi auto on: default setting is on, WiFi will turn off
after 10 minutes. When it is set to off, WiFi need to
be turned on manually.
Wi-Fi Mode: default setting is 5G, after opening it,
you can use your phone to connect to WiFi and
operate N4S dash cam through your phone.
Wi-Fi information: shows the WiFi name as well as
the WiFi password.
Voice Control: Default setting is standard
sensitivity. When enabled, the dash cam can
recognize voice commands. It can also be set to
low sensitivity/high sensitivity/off.
Voice Content: The voice commands for this dash
cam can be checked here. Users can use the
specific commands to remote control the dash
cam.
Format SD Card: Format all data on the memory
card.
Format Reminder Setup: Default setting is off, you
can choose to remind 15 days or 1 month later,
according to the day of setting from the calculation
of 15 days or 1 month, after reaching the time, you
can choose "OK" for formatting, or choose "Next
time". If the user selects "Next time", the time will
be recalculated.
a.
b.
c.
d.
e.
f.

- 39 -
Time & Date: There are 2 ways to set the date and
time:
GPS auto update, default turn on GPS auto update,
GPS auto update date and time is based on user's
time zone, so you need to select the correct time
zone;
Set date/time manually, you can choose to turn off
the GPS auto update, turn on set date/time
manually, and correct the date and time manually.
Daylight saving/winter time auto switching, off by
default, when it is on, it will switch automatically
according to the date of daylight saving time and
winter time.
*This feature is only available in North America,
other regions may cause time errors.
Also, the date format and time zone settings are
within this menu.
Auto LCD Off: Default setting is off, users can
choose 30 seconds, 1 minute, 3 minutes
screensaver time.
Device Sound: The default volume level is 2 steps,
the lowest is 0 and the highest is 5.
Warning Tone: According to different situations,
the dash cam sets 5 kinds of tones, which are
switch-on sound, key tone, locking tone, formatting
reminder tone, and abnormal recording tone. All
tones are turned on by default.
Frequency: Different countries have different light
source frequencies, in order to avoid affecting the
recording, choose 50Hz or 60Hz light source
frequency according to different regions.
System Information: You can check the machine
model, firmware version number, and VANTRUE
official website URL here.
Certification Information: You can view the
certification information of N4S here.
g.
h.
i.
j.
k.
l.
m.
①
②
- 40 -
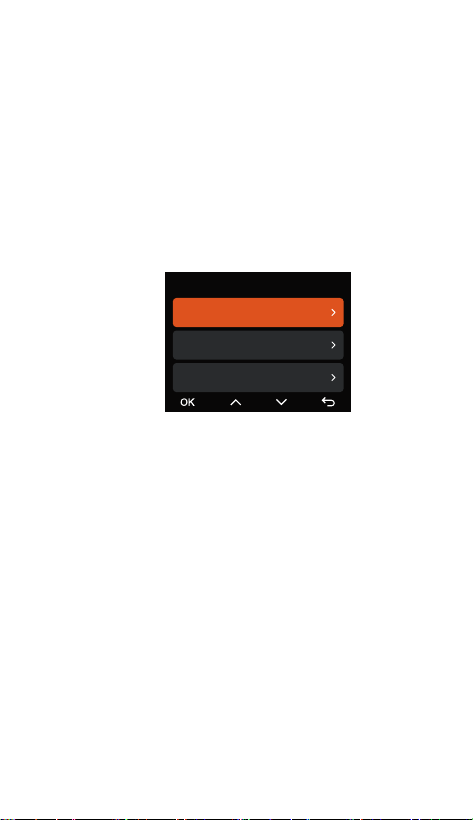
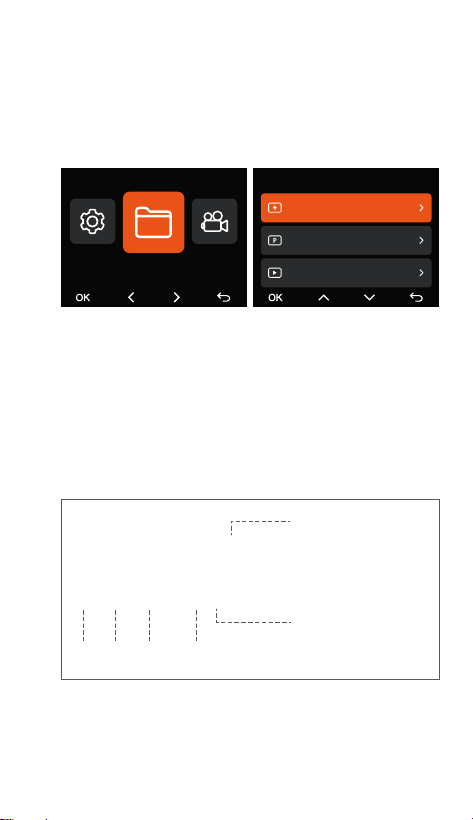
(3) Files Browsing
Default Settings: Restore the dash cam system
default settings.
Under this function, users can view the video files and
photo files recorded by the dash cam.
n.
Event Video: This folder holds emergency video
files.
Normal Video: This folder holds loop video and
time-lapse video.
Parking Video: This folder stores all the videos
under parking monitoring.
Photo: Photo files are stored in this folder.
All Files: All files can be viewed.
①
②
③
④
⑤
Files
Files
Event Video
Parking Video
Normal Video
1/5
A for the front camera
B for cabin camera
C for rear Camera
Year Date Time
N for loop recording
E for event recording
T for time lapse video
P for the video recorded
in the parking mode
S for privacy recording
Sequence
Number
20250505_140933_0008_N_A.MP4
20250505_140833_0007_P_B.MP4
20250505_140733_0006_T_C.MP4
20250505_140633_0005_S_A.MP4
File Format Definition

- 41 -
Video File Format MP4
Picture File
Format
JPEG
Camera Angle Front: 158°wide viewing angle;
Cabin: 165°wide viewing angle;
Rear: 160°wide viewing angle
Aperture Front: F/1.8 wide aperture
Cabin: F/1.8 wide aperture
Rear: F/1.8 wide aperture
Languages English / Français / Español /
Deutsch / Italiano / 简体中文 /
русский / 日本語/ Polski / 한국어
Video Resolution Front+Inside+Rear:
1944P+1440P+1440P 30FPS
Front+Inside:
1944P+1944P 30FPS
Front+Rear:
1944P+1440P 30FPS
Front:
2592x1944P 30FPS
In order for users to have a better product
experience, we will upgrade our products and product
specifications may change without notice.
3. Product Specifications & FAQs
3.1 Specifications
Model N4S
Chips Novatek High Performance
Processor
Image Sensor Sony Sensor
G-sensor Built-in 3-Axis G-sensor
WiFi Built-in 2.4G & 5GHz
Screen 2.0” IPS Screen

- 42 -
Audio Built-in microphone and speaker
USB Port Type C
Power Source Built-in super capacitor
Supply voltage
current
DC 5V 2.4A
Power 7W
Working
Temperature
-4°F to 140°F(-20°C to 60°C)
Storage
Temperature
-4°F to 158°F(-20°C to 70°C)
Memory Storage Micro SD card (supports
32GB-1TB, U3 or higher card
speed memory cards)
This product is an auxiliary device designed to
record images of the exterior of the vehicle, and
some functions may not be supported due to
differences in driving and vehicle environments.
In order to further improve the product, we will
upgrade the firmware from time to time, For specific
upgrades, please pay attention to Vantrue official
notice.
Although this product can record and save images
of vehicle accidents, there is no guarantee that all
accident images can be recorded. A minor collision
cannot cause the collision sensor to activate, so the
image may not be recorded in a specialized folder,
and the user needs to view all videos of the accident
period to avoid missing video evidence.
Ensure the power is turned off before inserting or
removing the memory card.
Format the memory card at least once every two
weeks for stable product use.
①
②
③
④
⑤
3.2 Safety Warnings

- 43 -
General memory cards have a service life, long-term
use may lead to data can not be saved, in this case
it is recommended to buy a new memory card to
use, due to long-term use of defective memory
cards, resulting in the destruction of data on the
memory card, the company will not be responsible.
To ensure safe driving, please do not install or
operate this product when driving.
Do not subject the product to strong shocks or
vibrations, which may damage the product, resulting
in malfunction or inability to use.
Do not use chemical solvents or cleaners to clean
this product.
The ambient temperature range for normal use of
the function of this equipment is from -20℃ to 60℃;
exceeding this temperature range may result in
product failure.
Do not place the product in an open flame or use it
in a high temperature or high humidity area, as this
may cause electric shock, short circuit or other
hazards and damage to the product.
Do not short-circuit, disassemble, or modify the car
charger, as this may cause electric shock, fire, or
personal injury.
Do not disassemble or modify this product without
authorization, as this may damage the dash cam,
generate heat and cause fire.
⑥
⑦
⑧
⑨
⑩
Cannot switch on: check whether the power
connection is normal, whether the power cord or car
charger is damaged.
The following are the FAQs during the use of the
dash cam:
①
3.3 FAQs
11
12
13

- 44 -
Memory card error: ensure that the use of
compatible SD card, format FAT32, and regular
formatting.
Video interruption or jamming: check the memory
card rate, it is recommended to use U3/A2 grade
memory card.
Poor night vision: Clean the lens as well as the car
windscreen and turn on HDR mode.
GPS can't locate: make sure to use it in outdoor
open area, avoid shielding interference.
WiFi connection failure: restart the device and make
sure the WiFi function of the dash cam is in the
state of pending connection.In addition, you can try
to switch the dash cam WiFi band, reconnect.
Button failure: check the device firmware version,
reset the dash cam to try to recover.
If the problem persists, we recommend contacting
the official customer service for further assistance.
②
③
④
⑤
⑥
⑦
Find answers to your questions at About > FAQs in
the Vantrue APP.
Contact purchase channel customer service for
support.
Send email to [email protected].
①
②
③
4. Warranty & Support
VANTRUE Warranty Service
VANTRUE ® offers a 12-month warranty. If you have
any problems related to the product, you can solve
them in the following ways, we will reply within 24
hours:
VANTRUE is committed to product improvement and
user experience enhancement, please feel free to send
us your comments at [email protected] you
for choosing VANTRUE!

www.vantrue.com Made in China
truly driven.