PROFESSIONAL CARE
ON BATTERIES & CHARGER
SINCE 1998
USER GUIDE
CONTENTS
Welcome Guide • English .......................................................... 01-08
Instructions de Bienvenue • Français ........................................ 09-16
Benutzerhandbuch • Deutschland ............................................. 17-24
Guía de Bienvenida • Español ................................................... 25-32
Guida di Benvenuto • Italiano .................................................... 33-40
取扱説明書 日本語 ..................................................................... 41-48
WELCOME GUIDE ● ENGLISH
IMPORTANT SAFEGUARDS
Read these instruction carefully and retain them for future use. If
this product is passed to a third party, then these instructions must be
included.
When using electrical devices, basic safety precautions should
always be followed to reduce the risk of fire, electric shock, and/or
injury to persons including the following:
SAVE THESE INSTRUCTIONS TO REDUCE THE RISK OF FIRE
OR ELECTRIC SHOCK, CAREFULLY FOLLOW THESE
INSTRUCTIONS.
●
01
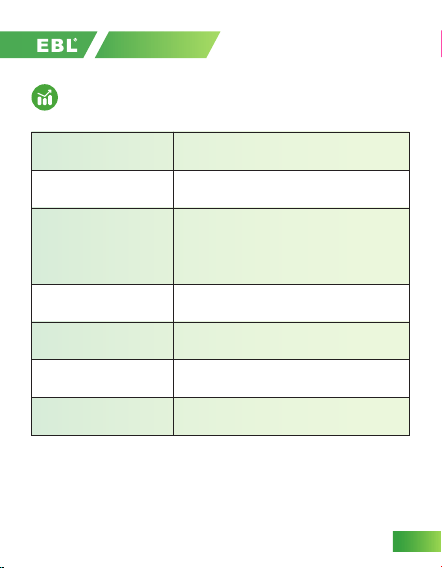
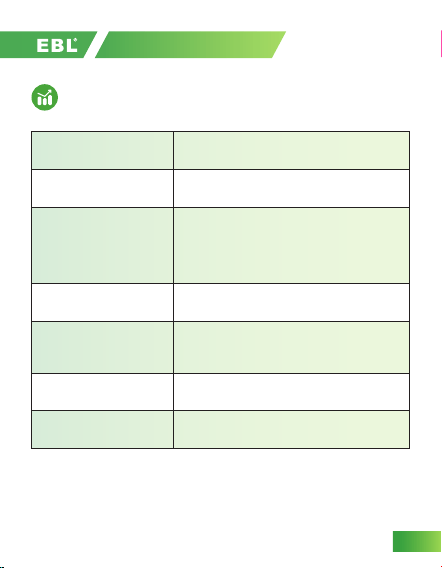
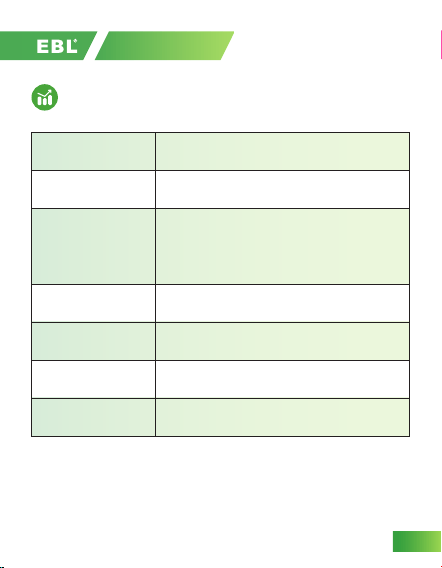
TEST DATA
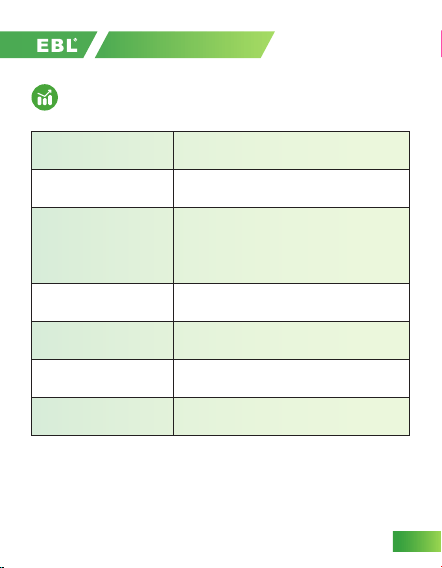
SPECIFICATIONS
02
AA/AAA*2 : 600mA ([email protected])
AA/AAA*4: 400mA([email protected])
9V*1/2 : 80mA (60-100mA@ 8.4V)
Model
Input
Average charging
current
No-load voltage
Battery Charging Rate
Size
Weight
EBL-C802
AC 100~240V 50/60HZ 4W Max
AAA/AA: DC 3.5-5.5V; 9V: 9-15V
Up to 80%
99.8mm×67mm×69.5mm
81±5g
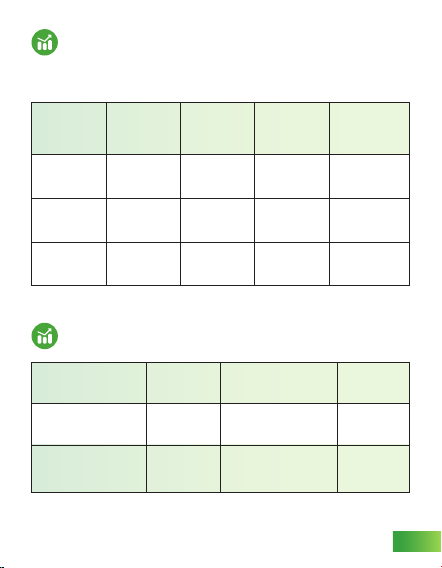
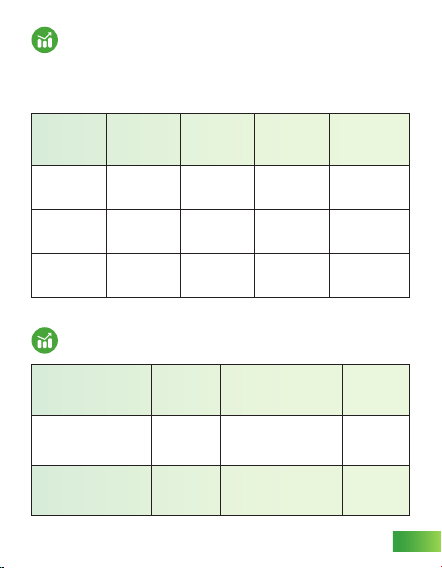
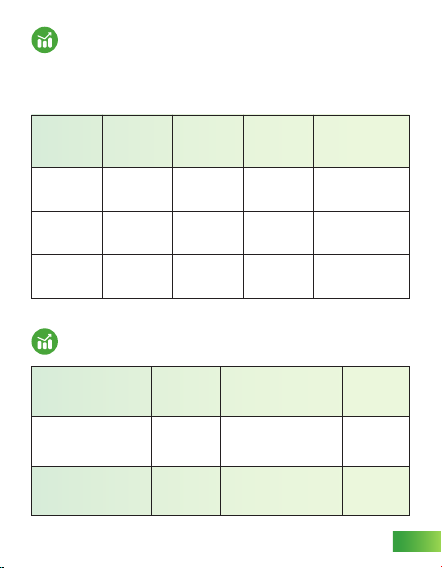
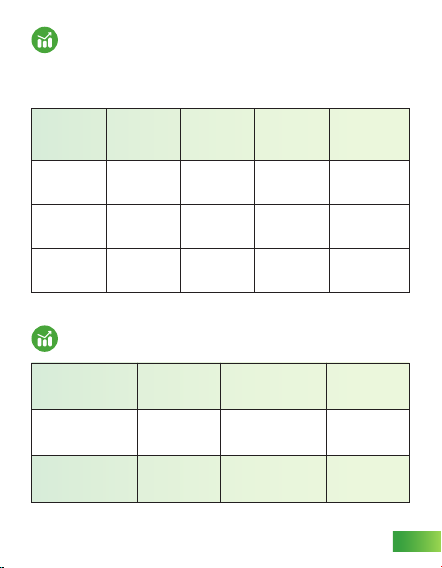
CHARGING TIMES
WORKING & STORAGE CONDITION
Charging times are a guide only. Real charging time will vary depending
upon the brand, capacity and condition of battery being charged.
Battery
Size
(Ni-MH)
Related
Capacity
(mAh)
Battery
Number
(pcs)
Charging
Current
(mA)
Approximate
Charging Time
(Hrs)
Storage Temperature
Working Temperature
Surface Temperature
of Charger
Storage Humidity
Working Humidity
Surface Temperature
of Battery
-10°C-50°C
0°C-40°C
≦45°C
45%-85%
35%-95%
≦60°C
03
AA
AAA
9V
2300-2800
800-1100
280
1-4
1-4
1-2
1000
1000
80
5-7.5
3-4.5
3.5
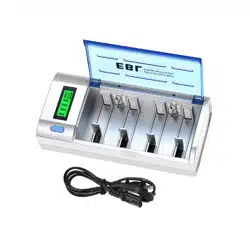
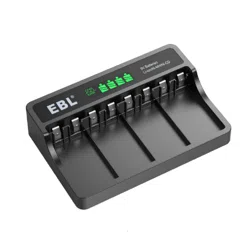
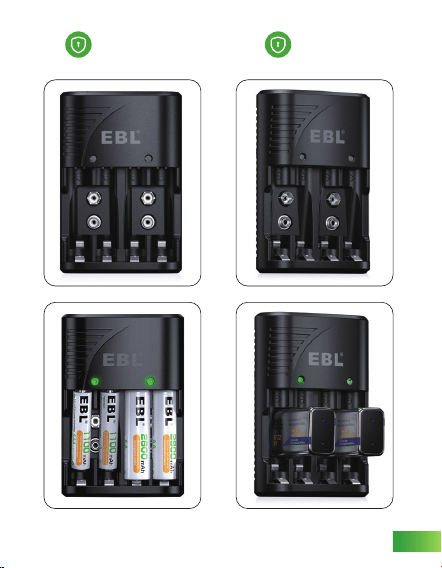
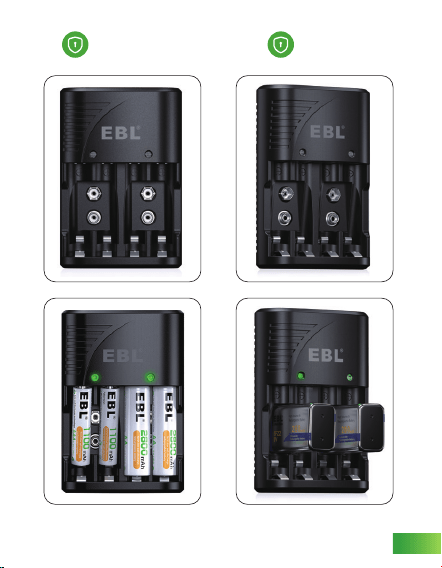
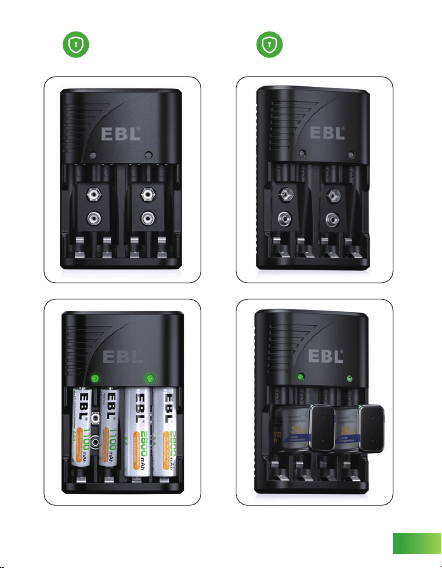
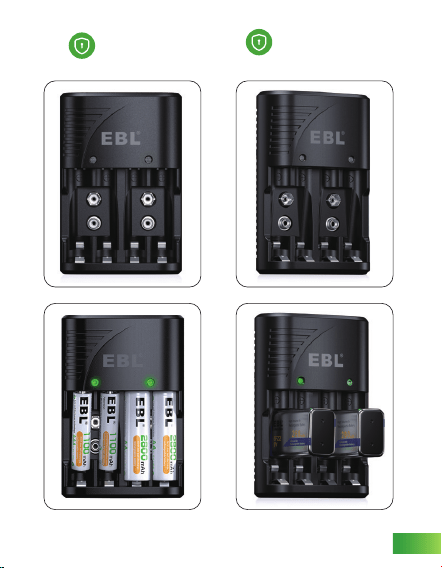
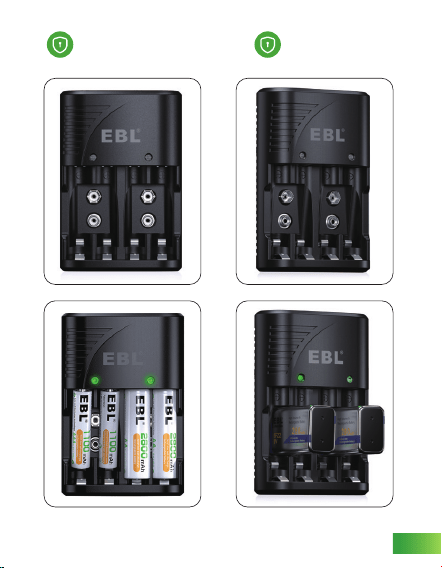
HOW TO USE
This battery charger is used for AA/AAA Ni-MH Ni-CD batteries
and 9V batteries.
AA/AAA batteries must be charged in pairs and installed into 1,2
slots or 3,4 slots.
When power on the charger, the LED indicate light will flash in red
and green one time and then off.
Charging AA/AAA/9V batteries, the LED indicate light will be red,
and then turns to green when fully charged.
The absolute 0V battery can not be charged.
Can not charge alkaline or carbon batteries.
1.
2.
3.
4.
5.
6.
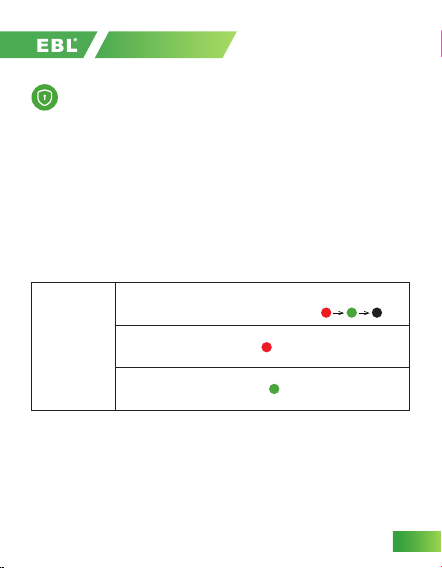
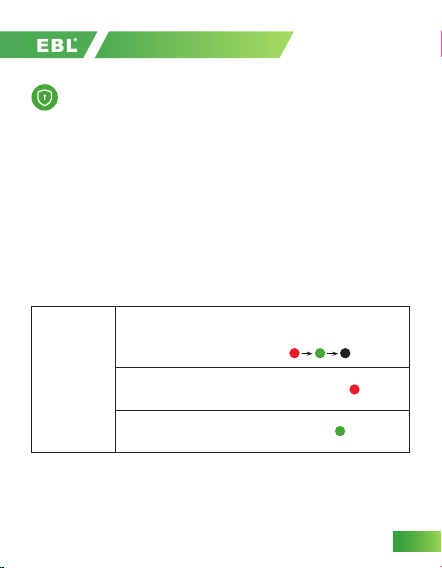
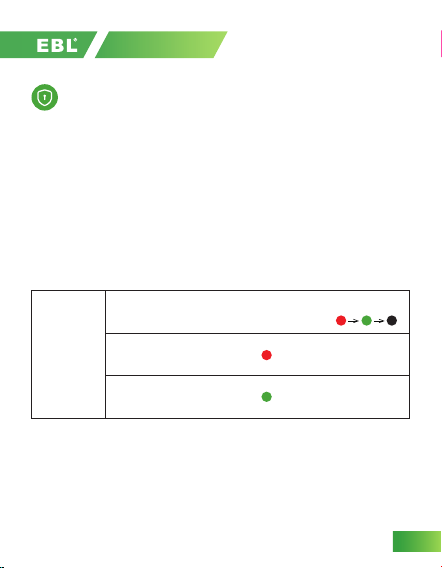
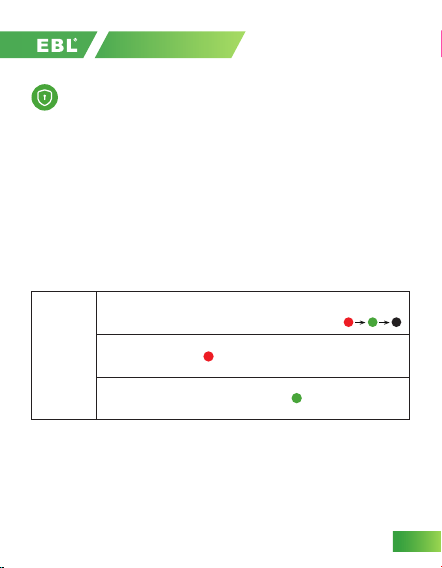
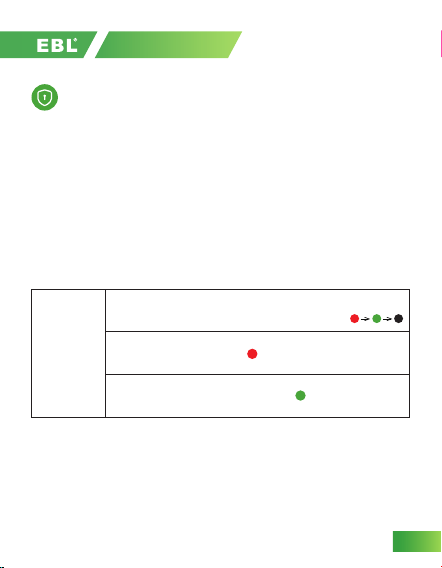
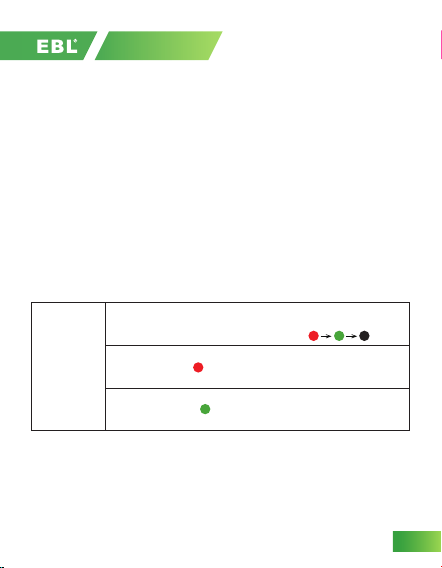
USE STEPS
04
Charging
indicating
mode
1. Power on and no battery inserted-First red light,
then green light, then off the lights
2. Charging-Red Light
3. Green-Fully Charged
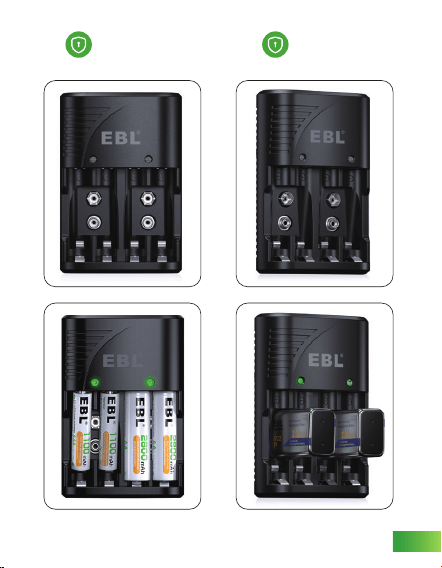
Charging AA or
AAA Batteries
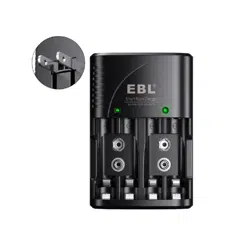
Charging 9V
Batteries
05

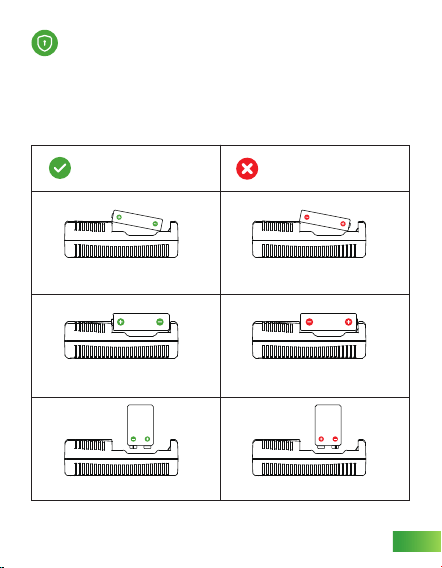
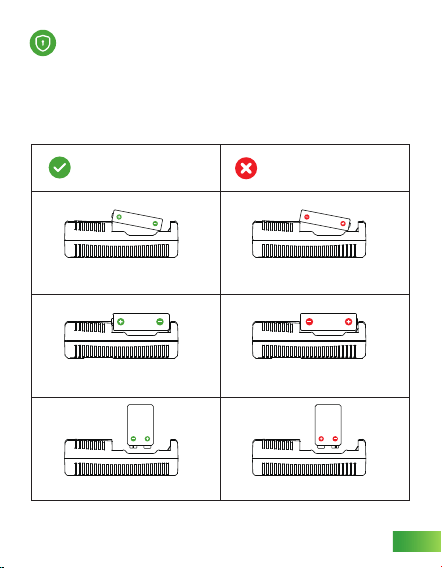
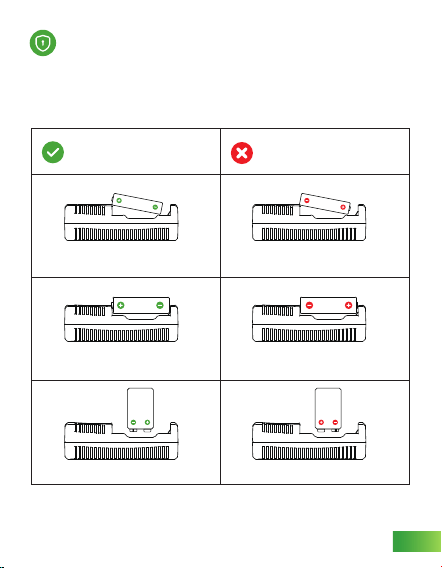
TO PROTECT YOUR CHARGER & BATTERIES
When installing battery for charging, make sure to insert the negative
(-)terminal of battery first, then press the top of battery to connect the
positive(+) contact the plate. Incorrect direction to install the battery will
cause damage to the negative terminal of the charger and the battery
sleeve.
06
Incorrect direction to
install the battery
Correct direction to
install the battery
AAA batteries AAA batteries
AA batteries
AA batteries
9V batteries 9V batteries
9V
9V
WARNINGS
TO AVOID PERSONAL INJURY AND PROPERTY
DAMAGE FROM, BUT NOT LIMITED TO, THE RISK
OF ELECTRIC SHOCK OR FIRE:
DO NOT disassemble and reassemble the charger, or it may cause
short-circuit.
DO NOT charge batteries whose cover are damaged, or it may
cause short circuit and fire hazard.
DO NOT charge non-rechargeable batteries. It might cause battery
leakage, battery explosion, personal injuries, etc.
DO NOT put anything on the charger while charging batteries, it
will accumulate heat to cause fire hazard.
Indoor use only, keep it away from direct sunlight and moist/high-
temperature environment.
Children should not use this charger without any adult’s supervision.
This battery charger is used for AA/AAA Ni-MH Ni-CD batteries
and 9V batteries.
If no LED light on when charging, please check if the battery is
absolute 0V, and make sure the+/- pole is connected correctly.
Can not charge alkaline or carbon batteries.
New battery will reach the best performance after using 2-3 times.
Battery power will lose because of long time storage. Please
charge the battery fully if it is not used for long time.
It's normal that the battery becomes hot while charging. The
temperature will cool down to normal later, please feel free to use it.
1.
2.
3.
4.
5.
6.
7.
8.
9.
10.
11.
12.
07
WARRANTY
08
WE PROVIDE 30 DAYS WORRY-FREE MONEY
BACK AND ONE YEAR LIMITED WARRANTY.
Our professional and friendly support team members will be here
offering hassle-free service for you 24hour*7days.
We will go on to provide sincere customer service and technical
support for you and hope you have a good experience with EBL.

INSTRUCTIONS DE BIENVENUE ● FRANÇAIS
PROTECTIONS SÉCURITAIRES IMPORTANTES
Lisez attentivement ces instructions et conservez-les pour une
utilisation future. Si ce produit est transmis à un tiers, ces instructions
doivent être incluses.
Lors de l’utilisation d’appareils électriques, des précautions de
sécurité de base doivent toujours être suivies pour réduire le risque
d’incendie, d’électrocution et/ou de blessures aux personnes, y compris
les éléments suivants:
CONSERVEZ CES INSTRUCTIONS POUR RÉDUIRE LE RISQUE
D’INCENDIE OU D’ÉLECTROCUTION, SUIVEZ ATTENTIVEMENT
CES INSTRUCTIONS.
●
09
DONNÉES D 'ESSAI
SPÉCIFICATIONS
10
AA/AAA*2 : 600mA ([email protected])
AA/AAA*4: 400mA([email protected])
9V*1/2 : 80mA (60-100mA@ 8.4V)
Modèle
Entrée
Courant de charge
moyen
Consommation
d’Alimentation Sans
Charge
Taux de Charge de La Pile
Dimension
Poids
EBL-C802
AC 100~240V 50/60HZ 4W Max
AAA/AA: DC 3.5-5.5V; 9V: 9-15V
Jusqu’à 80%
99.8mm×67mm×69.5mm
81±5g

TEMPS DE CHARGE
CONDITION DE FONCTIONNEMENT ET DE STOCKAGE
Les temps de charge sont pour référence uniquement. Le temps de
charge réel varie en fonction de la marque, de la capacité et de l’état
de la pile en cours de charge.
Taille de
Pile
(Ni-MH)
Capacité
Connexe
(mAh)
Nombre
de Piles
(pcs)
Courant
de Charge
(mA)
Temps de Charge
Approximatif
(Heures)
Température de Stockage
Température de
Fonctionnement
Température de
Surface du Chargeur
Humidité de Stockage
Humidité de
Fonctionnement
Température de
Surface de la Pile
-10°C à 50°C
0°C à 40°C
≦45°C
45% à 85%
35% à 95%
≦60°C
11
AA
AAA
9V
2300-2800
800-1100
280
1-4
1-4
1-2
1000
1000
80
5-7.5
3-4.5
3.5
COMMENT UTILISER
Ce chargeur de piles est utilisé pour les piles AA/ AAA Ni-MH
Ni-CD et les piles rechargeables 9V.
Les piles AA/ AAA doivent être chargées par paire et installées
dans les 1er, 2ème slots, ou les 3ème, 4ème slots.
Lorsque le chargeur est allumé, l’indicateur LED clignotera en
rouge une fois, puis en vert une fois , et puis éteint.
Lorsque la charge des piles AA/ AAA/ 9V, l’indicateur LED sera en
rouge, puis passe au vert une fois pleinement chargé.
La pile absolue 0 Volt ne peut pas être chargée.
Ce chargeur ne peut charger des piles alcalines ou piles au
carbones.
1.
2.
3.
4.
5.
6.
ÉTAPES D'UTILISATION
12
Mode
d’Indication
de Charge
1. Branché à l’alimentation et aucune pile insérée-
D’abord lumière s’allume en rouge, puis en vert,
puis les lumières s’éteignent
2. En Cours de Charge-Lumière Rouge
3. Chargé Pleinement-Lumière Verte
Charge des AA
ou AAA Piles
Charge des
9V Piles
13
POUR PROTÉGER VOTRE CHARGEUR ET PILES
Lors de l’installation de la pile pour la charge, assurez-vous d’insérer
d’abord le pôle négatif (-) de la pile, puis appuyez sur le haut de la pile
pour connecter le contact positif (+) à la plaque. Une direction incorrecte
pour installer la pile endommagera le pôle négatif du chargeur et du
manchon de la pile.
14
Incorrecte direction pour
installer la pile
Correcte direction pour
installer la pile
AAA Piles AAA Piles
AA Piles
AA Piles
9V Piles 9V Piles
9V
9V
ATTENTIONS
POUR ÉVITER LES BLESSURES CORPORELLES ET LES
DOMMAGES MATÉRIELS DUS, MAIS SANS S’Y LIMITER,
AU RISQUE DE CHOC ÉLECTRIQUE OU D’INCENDIE:
Ne démontez pas, ni réassemblez le chargeur, cela pourrait causer
un court-circuit.
NE PAS charger les piles dont le couvercle est endommagé, sinon
cela pourrait provoquer un court-circuit et un risque d’incendie.
NE PAS charger les piles non rechargeables, cela pourrait provoquer
une fuite, une explosion de la pile et des blessures personnelles,
etc.
Ne PAS placer aucun objet sur le chargeur pendant le chargement
des piles, il accumulera la chaleur et causera un risque d’incendie.
Le chargeur peut seulement être utilisé à l’intérieur, veuillez l’éloigner
de l’endroit humide ou de la haute température.
Les enfants ne doivent pas utiliser ce chargeur sans la surveillance
d’un adulte.
Ce chargeur de piles est utilisé pour les piles AA/ AAA Ni-MH Ni-CD
et les piles rechargeables 9V.
Si aucune lumière LED ne s’allume pendant la charge, veuillez
vérifier si la pile est à 0 volt et assurez-vous que les pôles +/- sont
connectés correctement.
Ne peut charger des piles alcalines ou piles au carbones.
La nouvelle pile atteindra la meilleure performance après avoir utilisé
2-3 cycles.
La pile perdra la puissance à cause d’un stockage de longue
durée. Veuillez recharger complètement la pile si elle n’est pas
utilisée pendant longtemps.
Il est normal que la pile devienne chaude lors de charge. La
température va baisser à normal après d’être chargé pleinement,
n’hésitez pas à l’utiliser.
1.
2.
3.
4.
5.
6.
7.
8.
9.
10.
11.
12.
15

GARANTIE
16
NOUS OFFRONS UN REMBOURSEMENT SANS
SOUCI DE 30 JOURS ET UNE GARANTIE LIMITÉE
D’UN AN.
Notre membres d'équipe d'assistance professionnels et amicales
seront toujours là pour vous 24 heures sur 24, 7 jours sur 7.
Nous continuerons à vous fournir un service client et un support
technique sincère. Nous espérons que vous aurez une bonne expérience
chez EBL.
BENUTZERHANDBUCH ● DEUTSCHLAND
WICHTIGE SCHUTZKLAUSELN
Lesen Sie diese Anleitung sorgfältig durch und bewahren Sie sie
für den zukünftigen Gebrauch auf. Wenn dieses Produkt an eine dritte
Person weitergegeben wird, muss diese Anleitung mitgegeben werden.
Bei der Verwendung elektrischer Geräte sollten immer grundlegende
Sicherheitsvorkehrungen getroffen werden, um die Gefahr von Bränden,
Stromschlägen oder Verletzungen von Personen zu verringern,
einschließlich der folgenden:
UM DIE GEFAHR EINES BRANDES ODER ELEKTRISCHEN
SCHLAGES ZU VERRINGERN, BEFOLGEN SIE DIESE
ANWEISUNGEN SORGFÄLTIG.
●
17
VERSUCHSDATEN
SPEZIFIKATIONEN
18
AA/AAA*2 : 600mA ([email protected])
AA/AAA*4: 400mA([email protected])
9V*1/2 : 80mA (60-100mA@ 8.4V)
Modell
Eingang
Durchschnittlicher
Ladestrom
Leerlaufspannung
Akku-Laderate
Größe
Gewicht
EBL-C802
AC 100~240V 50/60HZ 4W Max
AAA/AA: DC 3.5-5.5V; 9V: 9-15V
Bis zu 80%
99.8mm×67mm×69.5mm
81±5g
LADEDAUER
ABETRIEBS- UND LAGERZUSTAND
Die Ladezeiten sind nur ein Richtwert. Die tatsächliche Ladezeit hängt
von der Marke, der Kapazität und dem Zustand der zu ladenden
Akkus ab.
19
Lagertemperatur
Betriebstemperatur
Oberflächentemperatur
des Ladegeräts
Luftfeuchtigkeit bei
Lagerung
Luftfeuchtigkeit bei
der Arbeit
Oberflächentemperatur
der Batterie
-10°C-50°C
0°C-40°C
≦45°C
45%-85%
35%-95%
≦60°C
Batterie-
göße
(Ni-MH)
Zugehörige
Kapazität
(mAh)
Batterie
Anzahl
(Stk.)
Lade-
strom
(mA)
Ungefähre
Ladezeit
(Std.)
AA
AAA
9V
2300-2800
800-1100
280
1-4
1-4
1-2
1000
1000
80
5-7.5
3-4.5
3.5
ANLEITUNG
Dieses Batterieladegerät wird für AA/AAA Ni-MH Ni-CD Batterien
und 9V Batterien verwendet.
AA/AAA-Batterien müssen paarweise aufgeladen und in die
Steckplätze 1,2 oder 3,4 eingesetzt werden.
Wenn Sie das Ladegerät einschalten, blinkt die LED-Anzeige
einmal rot und einmal grün und erlischt dann.
Beim Aufladen von AA/AAA/9V-Batterien leuchtet die LED-Anzeige
rot und wechselt dann auf grün, wenn sie vollständig geladen ist.
Die absolute 0-V-Batterie kann nicht geladen werden.
Kann keine Alkali- oder Kohlenstoffbatterien laden.
1.
2.
3.
4.
5.
6.
BENUTZUNG DER SCHRITTE
20
Aufladen
Anzeige-
modus
1. Einschalten und keine Batterie eingelegt-Erst rotes
Licht, dann grünes Licht, dann Licht aus.
2. Aufladen-Rotes Licht
3. Grün-Voll aufgeladen
Aufladen von
AA/AAA-Akkus
Laden von
9V-Akkus
21

ZUM SCHUTZ IHRES LADEGERÄTS UND IHRER AKKUS
Wenn Sie die Akkus zum Laden einlegen, achten Sie darauf, dass Sie
zuerst den Minuspol (-) der Batterie einlegen und dann die Oberseite
der Akkus drücken, um den Pluspol (+) mit der Platte zu verbinden.
Eine falsche Einbaurichtung der Batterie führt zu Schäden am Minuspol
des Ladegeräts und an der Batteriehülse.
22
Falsche Einbaurichtung
für die Akkus
Richtige Einbaurichtung
für die Akkus
AAA Akkus AAA Akkus
AA Akkus
AA Akkus
9V Akkus 9V Akkus
9V
9V
HINWEISE
ZUR VERMEIDUNG VON PERSONEN- UND SACHSCHÄDEN
DURCH STROMSCHLAG ODER FEUER, ABER NICHT
DARAUF BESCHRÄNKT:
Zerlegen Sie das Akku Ladegerät NICHT und setzen Sie es nicht
wieder zusammen, da dies zu einem Kurzschluss führen kann.
Laden Sie KEINE Batterien, deren Deckel beschädigt ist, da dies
zu Kurzschlüssen und Brandgefahr führen kann.
Laden Sie KEINE nicht wiederaufladbaren Batterien. Dies kann zum
Auslaufen der Batterie, zur Explosion der Batterie, zu
Personenschäden usw. führen.
Legen Sie KEINE Gegenstände auf das Ladegerät, während Sie die
Akkus aufladen, da dies zu einem Hitzestau und damit zu Brandgefahr
führen kann.
Nur im Innenbereich verwenden, vor direkter Sonneneinstrahlung
und Feuchtigkeit/Hochtemperaturen schützen.
Kinder sollten dieses Ladegerät nicht ohne die Aufsicht eines
Erwachsenen benutzen.
Dieses Batterieladegerät wird für AA/AAA Ni-MH Ni-CD Batterien
und 9V Batterien verwendet.
Wenn die LED beim Laden nicht leuchtet, überprüfen Sie bitte, ob
die Batterie absolut 0 V hat, und stellen Sie sicher, dass der +/- Pol
richtig angeschlossen ist.
Es können keine Alkali- oder Kohlenstoffbatterien geladen werden.
Eine neue Akkus erreicht ihre beste Leistung nach 2-3maligem
Gebrauch.
Der Akku verliert bei längerer Lagerung an Leistung. Bitte laden Sie
den Akku vollständig auf, wenn er für längere Zeit nicht benutzt wird.
Es ist normal, dass der Akku beim Laden heiß wird. Die
Temperatur wird sich später auf ein normales Maß abkühlen, bitte
benutzen Sie ihn.
1.
2.
3.
4.
5.
6.
7.
8.
9.
10.
11.
12.
23

GARANTIE
24
WIR BIETEN 30 TAGE SORGENFREIE GELD-ZU-
RÜCK-GARANTIE UND EIN JAHR BESCHRÄNKTE
GARANTIE AN.
Unser professionelles und freundliches Mitarbeiter bietetn Ihnen 24
Stunden am Tag einen problemlosen Service.
Wir werden Ihnen auch weiterhin einen Kundendienst und technische
Unterstützung bieten. Wir wünschen Ihnen eine gute Erfahrung bei
EBL.

GUÍA DE BIENVENIDA ● ESPAÑOL
CONSIDERACIONES IMPORTANTES
Lea estas instrucciones atentamente y guárdelas para futuras
consultas. Si transfiere el producto a una tercera persona, debe incluir
también este manual de instrucciones.
Al usar dispositivos eléctricos,siempre deben tomarse unas precauciones
de seguridad básicas para reducir el riesgo de incendio,de descarga
eléctrica y/o de daños personales incluyendo las siguientes:
GUARDE ESTAS INSTRUCCIONES PARA REDUCIR EL RIESGO
DE INCENDIO O DE DESCARGA ELÉCTRICA, SIGA ESTAS
INSTRUCCIONES ATENTAMENTE.
●
25

DATOS DE PRUEBA
ESPECIFICACIONES
26
AA/AAA*2 : 600mA ([email protected])
AA/AAA*4: 400mA([email protected])
9V*1/2 : 80mA (60-100mA@ 8.4V)
Modelo
Entrada
Corriente de
carga media
Consumo de Energía
sin Carga
Tarifa del Cargador
de Batería
Tamaño
Peso
EBL-C802
AC 100~240V 50/60HZ 4W Max
AAA/AA: DC 3.5-5.5V; 9V: 9-15V
hasta el 80%
99.8mm×67mm×69.5mm
81±5g
TIEMPO DE CARGA
CONDICIONES TRABAJO & ALMACENAMIENTO
Los tiempos de carga son sólo una guía. El tiempo de carga real
variará en función de la marca, la capacidad y el estado de la batería
que se cargue.
27
Temperatura de
Almacenamiento
Temperatura
de Trabajo
Temperatura de
Superficie del
Cargador
Humedad de
Almacenamiento
Humedad de Trabajo
Temperatura de
Superficie de Batería
-10°C-50°C
0°C-40°C
≦45°C
45%-85%
35%-95%
≦60°C
Tamaño
de Pila
(Ni-MH)
Capacidad
Relacionada
(mAh)
Número
de Pila
(pcs)
Corriente
de Carga
(mA)
Tiempo de Carga
Aproximado
(Hrs)
AA
AAA
9V
2300-2800
800-1100
280
1-4
1-4
1-2
1000
1000
80
5-7.5
3-4.5
3.5
CÓMO SE USE
Este cargador de pilas se utiliza para pilas AA/AAA Ni-MH Ni-CD y
pilas de 9V.
Las pilas AA/AAA deben cargarse de dos en dos e instalarse en
1,2 ranuras o 3,4 ranuras.
Al encender el cargador, la luz LED indicadora parpadeará en rojo
y verde una vez y luego se apagará.
Al cargar las pilas AA/AAA/9V, la luz LED indicadora será de color
rojo, y luego cambia a verde cuando está completamente cargada.
La batería de 0V absoluta no se puede cargar.
No puede cargar pilas alcalinas o de carbono.
1.
2.
3.
4.
5.
6.
PASOS DE USO
28
Cargando
modo de
indicación
1. Encendido y sin batería insertada - Primero luz roja,
luego luz verde, finalmente apagar las luces
2. Carga-Luz roja
3. Verde-Completamente cargado
Carga de pilas
AA o AAA
Carga de pilas
de 9V
29
PARA PROTEGER CARGADOR & PILAS
Al colocar la pila para cargarla, asegúrese de que introduce primero el
extremo negativo (-) y, a continuación, presiona la parte superior de la
pila para conectar la placa de contacto positiva (+). Si se introduce en
la dirección incorrecta, se pueden provocar daños al extremo negativo
del cargador y la cubierta de la pila.
30
Dirección incorrecta para
introducir la pila
Dirección correcta para
introducir la pila
AAA pilas AAA pilas
AA pilas
AA pilas
9V pilas 9V pilas
9V
9V
ADVERTENCIAS
PARA EVITAR DAÑOS PERSONALES Y MATERIALES
POR, ENTRE OTROS, EL RIESGO DE DESCARGA
ELÉCTRICA O INCENDIO:
NO desmonte y vuelva a montar el cargador, o podría provocar un
cortocircuito.
NO cargue baterías cuya cubierta esté dañada, o puede causar un
cortocircuito y peligro de incendio.
NO cargue baterías no recargables. Podría causar fugas en las
baterías, explosión de las mismas, lesiones personales, etc.
NO coloque nada en el cargador mientras se cargan las baterías,
ya que se acumulará calor y causará peligro de incendio.
Sólo se puede utilizar en interiores, manténgalo alejado de la luz
solar directa y del entorno húmedo/de alta temperatura.
Los niños no deben utilizar este cargador sin la supervisión de un
adulto.
Este cargador de pilas se utiliza para pilas AA/AAA Ni-MH Ni-CD y
pilas de 9V.
Si no se enciende ninguna luz LED durante la carga, por favor,
compruebe si la batería está a 0V absolutos, y asegúrese de que
el polo +/- está conectado correctamente.
No puede cargar pilas alcalinas o de carbono.
La batería nueva alcanzará el mejor rendimiento después de usarla
2-3 veces.
La energía de la batería se perderá debido a un almacenamiento
prolongado. Por favor, cargue la batería completamente si no se
utiliza durante mucho tiempo.
Es normal que la batería se caliente durante la carga. La
temperatura se enfriará a la normalidad más tarde, por favor,
siéntase libre de usarlo.
1.
2.
3.
4.
5.
6.
7.
8.
9.
10.
11.
12.
31

GARANTÍA
32
OFRECEMOS GARANTÍA DE DEVOLUCIÓN DE
30 DÍAS Y GARANTÍA LIMITAD DE 1 AÑO.
Protegemos su experiencia con una garantía de larga duración y un
servicio posventa completo de 24 horas.
Vamos a seguir para proporcionar un servicio al cliente sincero y
soporte técnico para usted y esperamos que tenga una buena
experiencia con EBL.
GUIDA DI BENVENUTO ● ITALIANO
IMPORTANTI SALVAGUARDIA
Leggere attentamente queste istruzioni e conservarle per un uso
futuro. Se questo prodotto viene ceduto a terzi, è necessario
includere queste istruzioni.
Quando si utilizzano dispositivi elettrici, è necessario seguire sempre
le precauzioni di sicurezza di base per ridurre il rischio di incendi,
scosse elettriche e/o lesioni alle persone, inclusi i seguenti:
CONSERVARE QUESTE ISTRUZIONI PER RIDURRE IL RISCHIO
DI INCENDI O SCOSSE ELETTRICHE, SEGUIRE ATTENTAMENTE
QUESTE ISTRUZIONI.
●
33
DATI DELLE PROVE
SPECIFICHE
34
AA/AAA*2 : 600mA ([email protected])
AA/AAA*4: 400mA([email protected])
9V*1/2 : 80mA (60-100mA@ 8.4V)
Modello
Ingesso
Corrente di
carica media
Tensione a Vuoto
Velocità di Carica
della Batteria
Dimensione
Peso
EBL-C802
AC 100~240V 50/60HZ 4W Max
AAA/AA: DC 3.5-5.5V; 9V: 9-15V
Up to 80%
99.8mm×67mm×69.5mm
81±5g

TEMPI DI CARICA
CONDIZIONI DI LAVORO & CONSERVAZIONE
I tempi di ricarica sono solo indicativi. Il tempo di ricarica reale varia a
seconda della marca, della capacità e delle condizioni della batteria in
carica.
Tipo di
batterie
(Ni-MH)
Capacità
Correlate
(mAh)
Numero di
Batteria
(pcs)
Corrente
di Carica
(mA)
Tempo di Ricarica
Approssimativo
(Hrs)
35
Temperatura di
Conservazione
Temperatura di Lavoro
Temperatura
Superficiale
del Caricatore
Umidità di
Conservazione
Umidità di Lavoro
Temperatura
Superficiale
della Batteria
-10°C-50°C
0°C-40°C
≦45°C
45%-85%
35%-95%
≦60°C
AA
AAA
9V
2300-2800
800-1100
280
1-4
1-4
1-2
1000
1000
80
5-7.5
3-4.5
3.5
COME USARE
Questo caricabatteria viene utilizzato per batterie AA/AAA Ni-MH
Ni-CD e batterie da 9 V.
Le batterie AA/AAA devono essere caricate in coppia e installate in
1,2 slot o 3,4 slot.
Quando si accende il caricabatterie, il LED indica che la luce
lampeggia in rosso e verde una volta e poi si spegne.
Caricando le batterie AA/AAA/9V, il LED indica che la luce sarà
rossa, quindi diventerà verde quando è completamente carica.
Non è possibile caricare la batteria da 0 V assoluto.
Non è possibile caricare batterie alcaline o al carbonio.
1.
2.
3.
4.
5.
6.
PASSI DI UTILIZZO
36
Ricarica
indicando
la modalità
1. Accensione e batteria non inserita: prima lucerossa,
poi luce verde, quindi spegnimento delle luci
2. Ricarica-Luce Rossa
3. Verde-Completamente Carico
Carica AA o
AAA Batterie
Carica 9V Batterie
37

PER PROTEGGERE IL CARICABATTERIE & LE
BATTERIE
Quando si installa la batteria per la ricarica, assicurarsi di inserire prima
il terminale negativo (-) della batteria, quindi premere la parte superiore
della batteria per collegare il contatto positivo (+) alla piastra. Una direzione
errata per installare la batteria causerà danni al terminale negativo del
caricabatterie e al manicotto della batteria.
38
Direzione errata per
installare la batteria
Direzione corretta per
installare la batteria
AAA batterie AAA batterie
AA batterie
AA batterie
9V batterie 9V batterie
9V
9V
AVVERTENZE
PER EVITARE LESIONI PERSONALI E DANNI ALLA
PROPRIETÀ DOVUTI AL RISCHIO DI SCOSSE ELETTRICHE
O INCENDI, DOBBIAMO PRESTARE ATTENZIONE A:
NON smontare e rimontare il caricatore, altrimenti potrebbe causare
un cortocircuito.
NON caricare le batterie il cui coperchio è danneggiato, altrimenti
potrebbe causare cortocircuito e pericolo di incendio.
NON caricare batterie non ricaricabili. Potrebbe causare perdite dalla
batteria, esplosione della batteria, lesioni personali, ecc.
NON mettere nulla sul caricabatterie durante la carica delle batterie,
si accumulerà calore causando pericolo di incendio.
Solo per uso interno, tenerlo lontano dalla luce solare diretta e da
ambienti umidi/ad alta temperatura.
I bambini non dovrebbero utilizzare questo caricabatterie senza la
supervisione di un adulto.
Questo caricabatteria viene utilizzato per batterie AA/AAA Ni-MH
Ni-CD e batterie da 9 V.
Se nessun LED si accende durante la ricarica, controllare se la
batteria è a 0 V assoluti e assicurarsi che il polo +/- sia collegato
correttamente.
Non è possibile caricare batterie alcaline o al carbonio.
La nuova batteria raggiungerà le migliori prestazioni dopo aver
utilizzato 2-3 volte.
La carica della batteria si perde a causa della lunga conservazi-
one. Si prega di caricare completamente la batteria se non viene
utilizzata per molto tempo.
È normale che la batteria si surriscaldi durante la ricarica. La
temperatura tornerà alla normalità in seguito, non esitare a usarla.
1.
2.
3.
4.
5.
6.
7.
8.
9.
10.
11.
12.
39
GARANZIA
40
FORNIAMO 30 GIORNI DI RIMBORSO SENZA
PREOCCUPAZIONI E UN ANNO DI GARANZIA
LIMITATA.
Siamo al tuo servizio 24 ore su 24, 7 giorni su 7.
Continueremo a fornire un servizio clienti sincero e supporto tecnico
per te e farti vivere una buona esperienza da EBL.
取扱説明書 ● 日本語
安全上のご注意
ご使用前に取扱説明書をよくお読みの上、正しく安全にお使い
ください。この取扱説明書を大切に保管してください。電気機器を
使用する場合は、火災、ショット、またはけがを防ぐために基本的な
安全上の注意を守ってください。
火災や感電の危険を防ぐために、本書の内容をご確認後指示に
従ってくだ さい 。
●
41
しけんデータ
商品の使用
42
単3/単4*2: 600mA ([email protected])
単3/単4*4: 400mA([email protected])
9V *1/2: 80mA (60-100mA@ 8.4V)
型番
入力
充電電流平均値
出力電流
充電率
寸法
重量
EBL-C802
AC 100~240V 50/60HZ 4W Max
単3/単4: DC 3.5-5.5V ; 9V: 9-15V
Up to 80%
99.8mm×67mm×69.5mm
81±5g
充電時間
使用と保管環境
図表の充電時間は目安時間です。実際の充電時間は、ブランド、電池
容量、充電中の電池状態によって異なります。
電池種類
(Ni-MH)
電池容量
(mAh)
電池数
(pcs)
電電池
(mA)
充電時間
(Hrs)
43
保管温度
使用温度
充電器使用中温度
保管湿度
使用湿度
電池使用中温度
-10°C-50°C
0°C-40°C
≤45°C
45%-85%
35%-95%
≤60°C
単3
単4
9V
2300-2800
800-1100
280
1-4
1-4
1-2
1000
1000
80
5-7.5
3-4.5
3.5
充電の仕方
この充電器は単3 /単4ニッケル水素、ニカド電池と9V電池を充電
できます。
同じタイプの電池をセットし一番目と二番目のスロットまたは三
番目と四番目のスロットに取り付ける必要があります。
充電器の電源を入れると、LEDライトが赤と緑で点滅し、その後
消灯ます。
単3 /単4 / 9V電池を充電すると、LEDライトが赤になり、フル充
電されるとLEDライトが緑になります。
この充電器は0V電池を充電することができません。
この充電器はアルカリ電池や炭素電池を充電することができま
せん。
1.
2.
3.
4.
5.
6.
44
充電
状態
1、まず電源を入て電池なしの状態で、赤いライトと緑の
ライトは次々に点滅し、後消灯します。
2. 充電中 -赤
3. フル充電 -緑
単3/単4電池の充電 9V電池の充電
45
安全上のご注意
電池のプラスとマイナスの向きを確認して充電器に正しく入れてく
ださい。逆接した場合、マイナス端子の損傷と充電器の故障となり
ます。
46
間違った電池の入れ方
正しい電池の入れ方
単4形 単4形
単3形
9V 9V
単3形
9V
9V
警告
火災事故や感電などにより人身傷害および物的損害を
回避するために本製品の使用と保存をご注意ください:
充電器を分解、改造しないでください。ショートの原因となります。
カバーが損傷した電池を入れないでください。火災や感電を引き
起こす危険性があります。
非充電式電池を充電しないでください。電池の液漏れ、電池の爆
発 、け が な ど の 原 因 と な り ま す 。
充電器に物を載せたり落下しやすいところに置かないでください。
熱が蓄積して火災になる恐れがあります。
屋内の使用のみ、直射日光や湿気/高温環境から遠ざけてください。
子供は大人の監督なしにこの充電器を使用しないでください。
この充電器は単3 /単4ニッケル水素、ニカド電池と9V電池を充電
できます。
充電中にLEDが点灯しない場合は、0V電池であるかどうか充電池
の正極と負極を充電器に正しく入れているかどうかをご確認くだ
さい。
この充電器はアルカリ電池や炭素電池を充電することができませ
ん。
新しい電池は、3~5回充放電サイクルの後最高のパフォーマンス
に達します。
長期間の保管により、電池の電力が失われます。長期間使用しな
い場合は、ご使用前に電池を充電してください。
充電中は電池が熱く感じられる場合がありますが、異常ではあり
ません。充電済温度が下がりますので、お気軽に使ってください。
1.
2.
3.
4.
5.
6.
7.
8.
9.
10.
11.
12.
47
保障
48
30日間の無条件返金と1年間制限ある保証付いて
います。
長期保証と充実した24時間アフターサービスでお客様のEBL体験
をお 守りします。
安心・安全にご使用してもらえるアフターサポートもお任せください。
気になることがありましたら、ご遠慮なくご連絡ください!

THANK Y U
FOR YOUR CHOOSING
Our EBL service team members will
be here for you online 24hours
Email us at: [email protected]