
VOPLLS
X
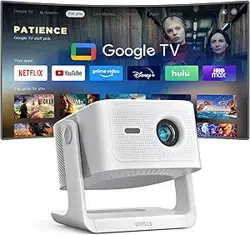
VOPLLS Smart Home
Projector
Version: A0426
User Manual


Projector Connections
贴
Connecting to the Mobile Device
哈
For iOS Device
哈
For Android Device
贴
Connecting to the Computer
哈
Wireless Connection for Mac OS
哈
Wireless Connection for Win10 or Above
哈
Wired Connection
贴
DLNA Streaming for Android & iOS
贴
Connecting to the External Storage Device
哈
Playing Video
哈
Playing Music
哈
Playing Image
哈
Playing WPS Oce
哈
USB Support Fomat
C
A
T
A
L
O
G
Settings
三
Network Setting
三
Bluetooth Setting
三
Projector Setting
三
Dispaly Setting
三
Sound Settings
三
General Settings
Product Features
Trouble Shooting
02
04
05
06
07
07
08
08
01
09
24
24
25
25
27
27
28
贴
Connecting to the DVD Player
23
29
30
28
Important Safety Considerations
Basic Conguration
Projector Overview
Remote Control
Focus and Keystone Correction
贴
How to adjust the projected image shape?
贴
How to get sharp projected image?
贴
How to clean up the dust?
Video Operation Guide
Additional Entertainment Options
10
10
10
11
13
13
14
15
16
17
19
20
21
22
18
三
Other Settings
Cast
Miracast
Video Operation Guide
01
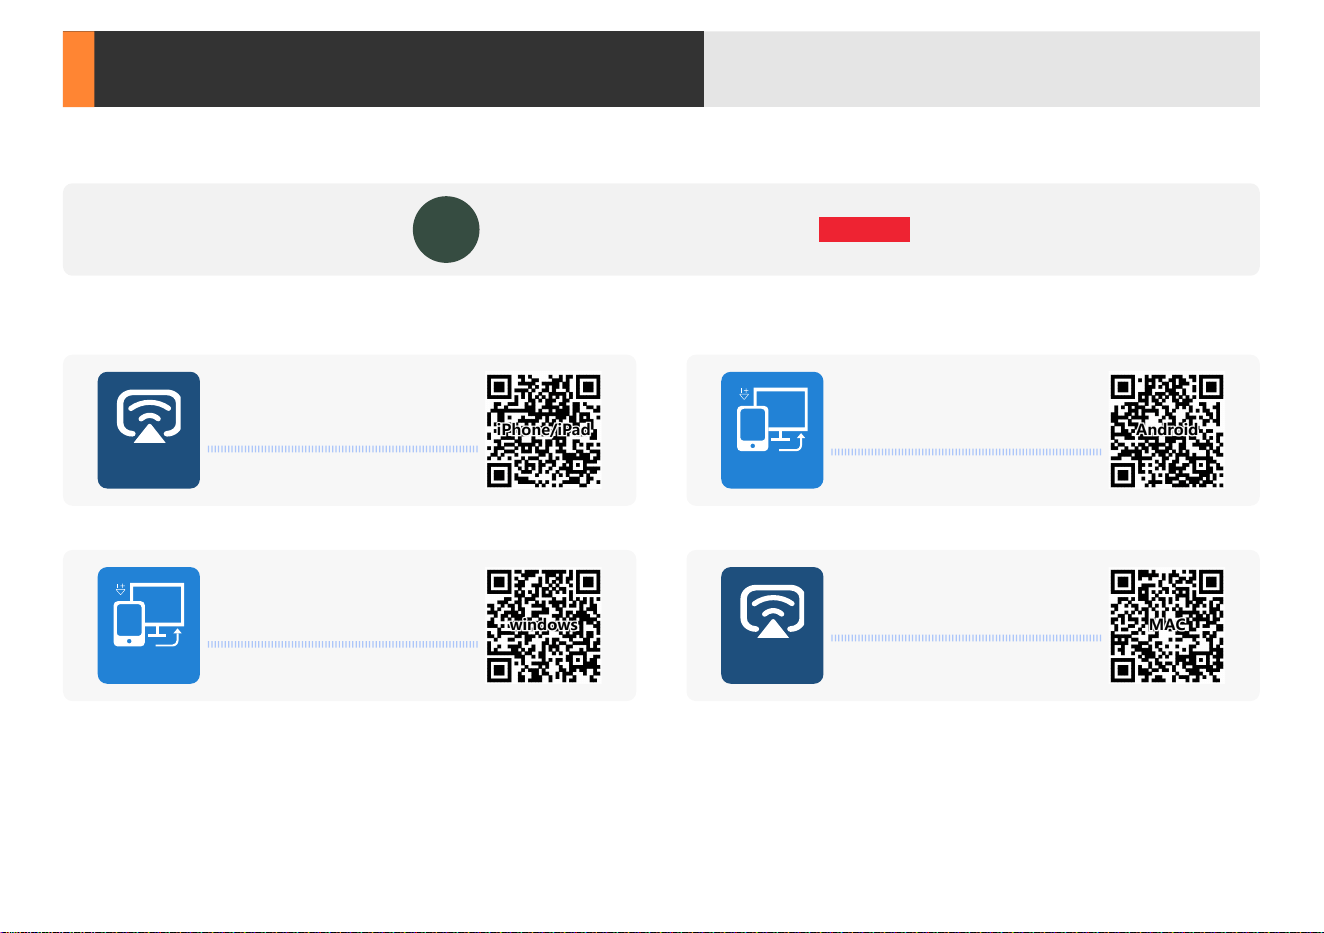
Scan QR codes below or search for "VS-KING PROJECTOR" on YouTube to get videos
VS-KING
VS-KING PROJECTOR
SUBSCRIBE
HOW TO CONNECT TO
IPHONE/IPAD?
HOW TO CONNECT TO MAC?
HOW TO CONNECT TO ANDROID
SMARTPHONE/TABLET?
HOW TO CONNECT TO
WINDOWS LAPTOP?
Miracast
Cast

Important Safety Considerations
02
Do not install the projector in
sites with improper ventilation.
Do not install the projector in
dust and smoke sites.
Please do not look into the lens
when the projector is working.
Otherwise it may hurt your eyes.
Do not install the projector in hot
and humid sites.
Do not install the projector near
the temperature and smoke
transducer. It may cause a
sensor failure.
Please keep the projector away
from water or any other liquid as
it is not waterproof.
Do not block the ventilation holes
(intake or exhaust).
Do not install the projector in sites
with direct blowing of warm and
cool air-condition wind. Otherwise
it may cause the project failure.

03
High Temperature Warning
哈
The temperature near the outlet will rise during and after the projection. Please don't touch it, otherwise it may cause burns.
Installation
哈
Please use the projector in a dark room for best results.
哈
Please use the projector with caution to avoid dropping or shocking, which may damage the projector.
哈
Use the power cord with caution to avoid unduly bending. Damaged power cord may cause electric shock.
Notes on Fire and Electric Shock
哈
Please use the projector with a soft brush. Do not use rigid accessories, such as a crevice cleaning tool, to avoid damage to the projector.
哈
Prevent foreign objects from falling into the projector, such as paper clips and paper scraps, do not attempt to retrieve any such object. Do not
insert any metal object, such as an iron wire or a screwdriver, into the projector. Make sure to immediately turn o the power and ask qualied
professional maintenance personnel to remove any object falling into the projector.
哈
Do not place any liquid on the projector.
Cleaning
哈
Unplug the power cord from the projector.
哈
Use a wet cloth to clean the cabinet regularly. Neutral detergent may be used for serious smudge. Do not use strong detergent or solvent such as
alcohol or diluent.
哈
Use the power cord with caution to avoid unduly bending. Damaged power cord may cause electric shock.
哈
Use an air brush or lens paper to clean the lens and be careful not to scratch or abrade them.
哈
Please clean the ventilation opening and the loudspeaker regularly with a cleaner. The projector will be overheated with blocked dust,
causing the failure.
哈
Please use the projector with a soft brush. Do not use rigid accessories, such as a crevice cleaning tool, to avoid damage to the projector.
Basic Conguration
04
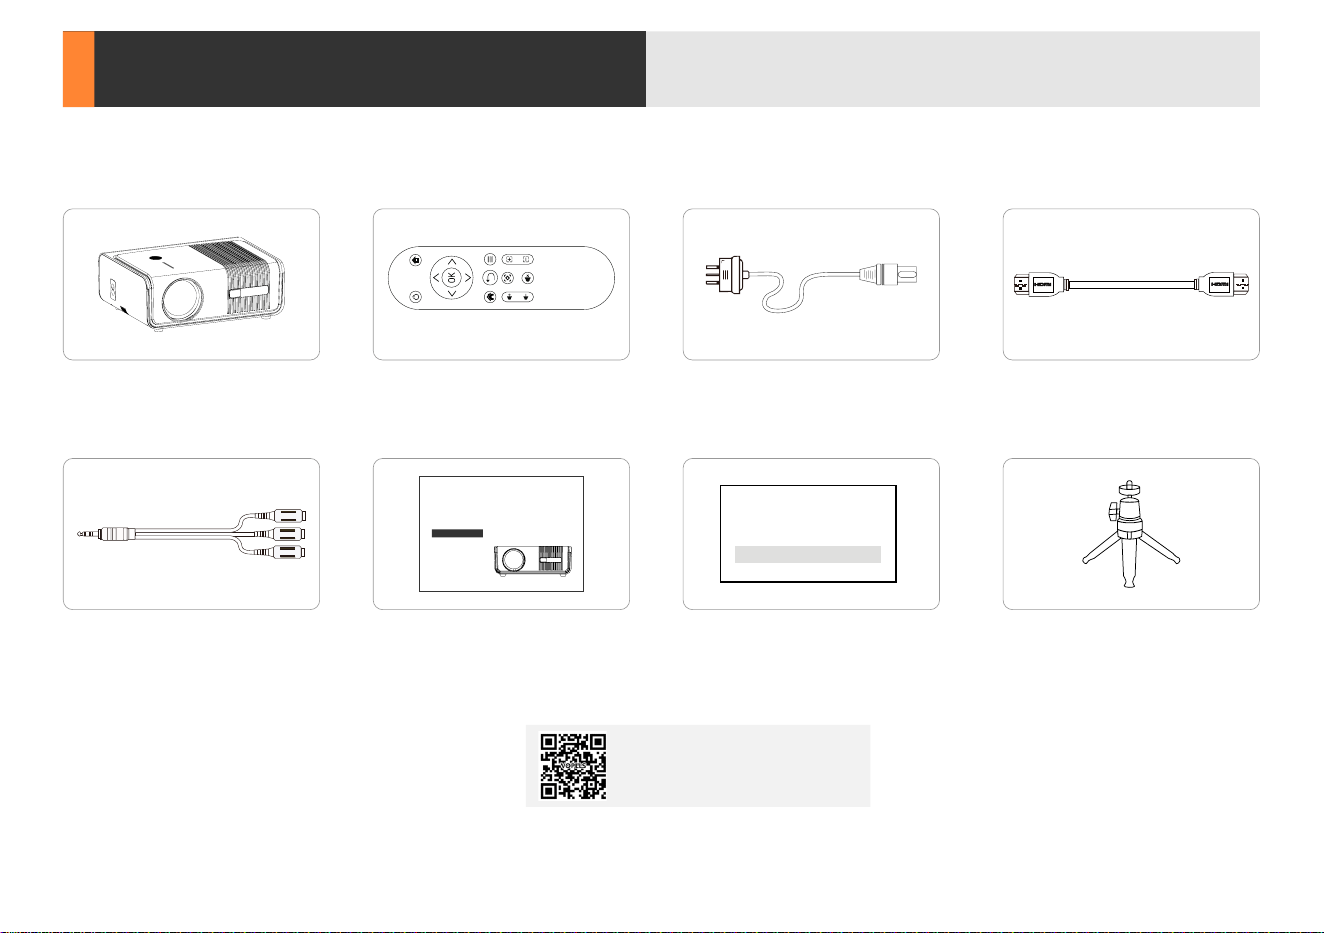
1 x Power Cord 1 x HDMI Cord
1 x AV Signal Cord 1 x Tips 1 x Projector Stand
1 x 1080P Projector
1 x User Manual
VOPLLS Smart Home
Projector
Version: A0426
User Manual
1 x Remote Control
battery not included
剪
Tips:
····························································
If there is any part missing, please contact VOPLLS
support team. Email address of VOPLLS support team:
North America Marketplace:
VIDEO OPERATION
GUIDE
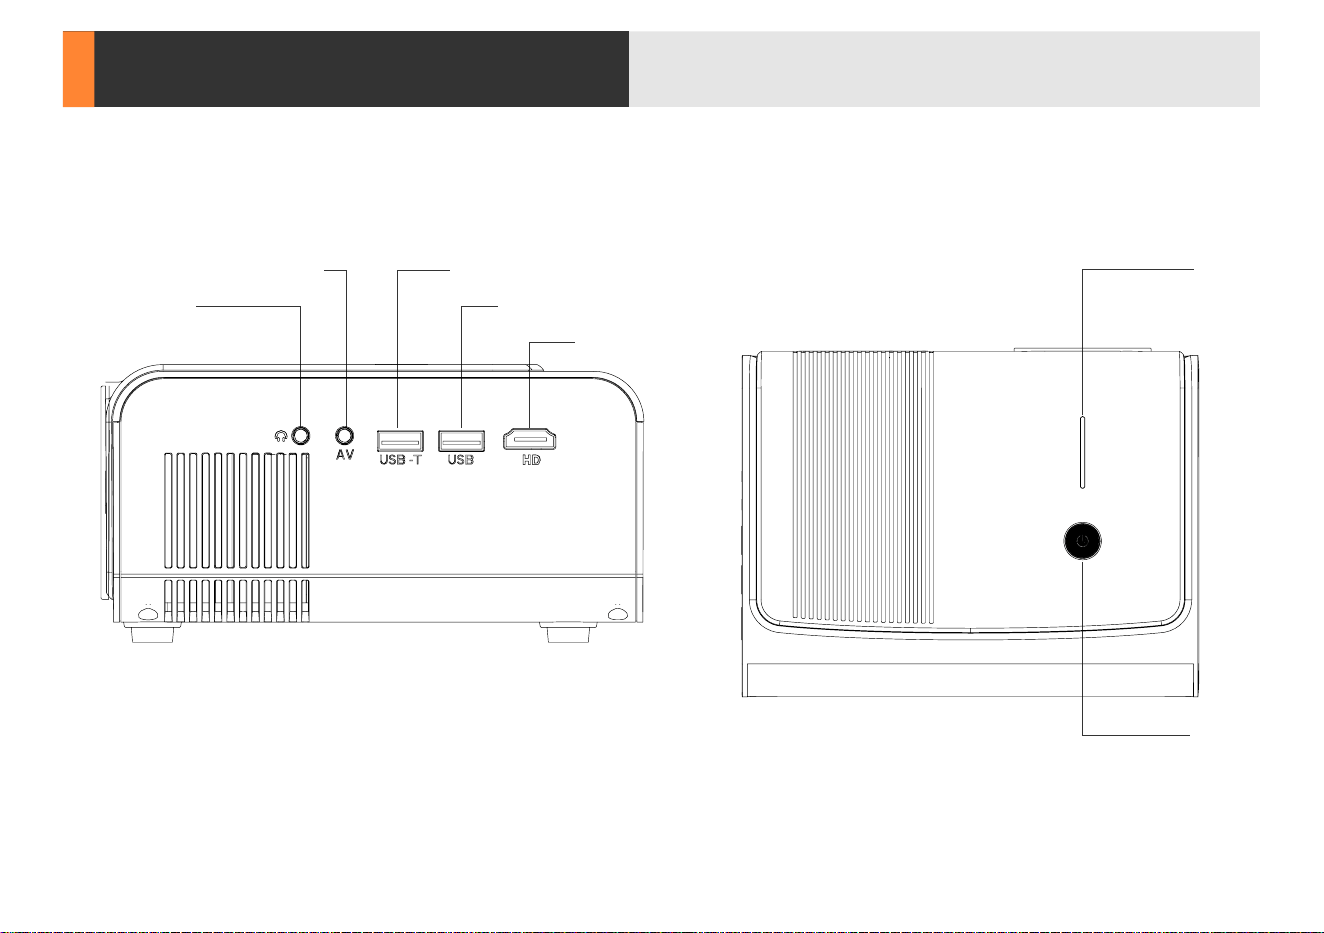
Projector Overview
05
USB
USB-TAV
3.5mm Audio
HDMI
Indicator Light
Power Switch

Remote Control
06
Power Switch Signal Source
Return
Menu
Focus Up
Focus Down
Mute
Move Right
OK
Home Page
Move Left
Move Up
Move Down
Volume Up
Auto Focus
Volume Down
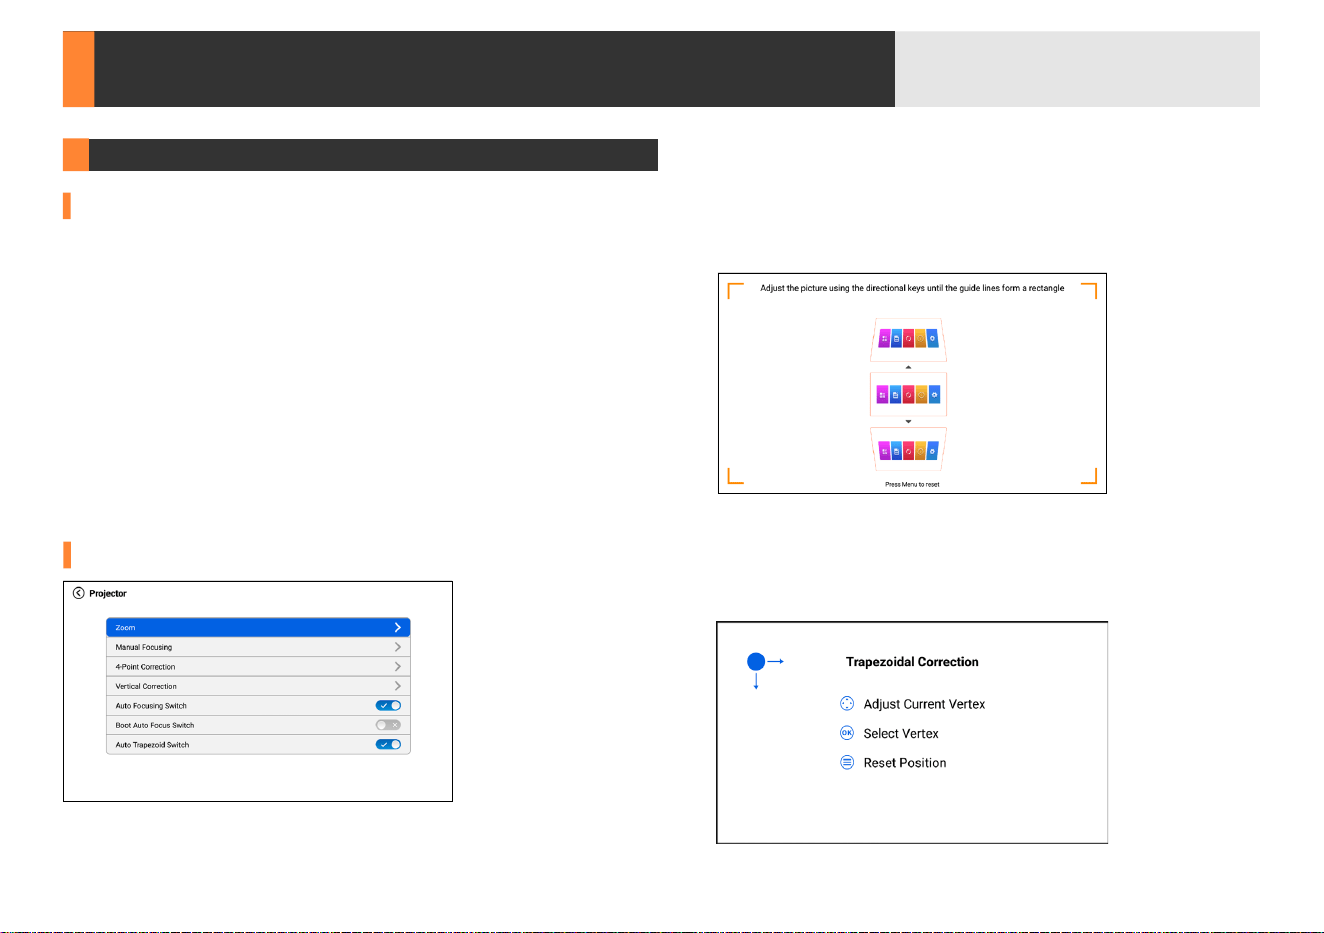
Focus and Keystone Correction
07
Auto Trapezoid Correction
哈
Corner Correction
You can nd "Auto Trapezoid Switch" in the projector settings options.
This option allows for omnidirectional automatic correction. When
this option is turned on, the projector will automatically do trapezoidal
adjustment.
哈
Vertical Correction
Adjust the image ±50° vertically by pressing the "
光
", "
千
".
Press "
n
" to reset.
剪
Tips:
················································································
1. The automatic trapezoidal correction function must be used when the
autofocus function is turned on. If the autofocus function is turned o,
the automatic trapezoidal correction function can not be used.
2. If you need to perform automatic trapezoidal correction, we suggest
that you always maintain the adjustment angle between the projector
and the screen between 0-15°, wait for 3-5 seconds, and the screen will
be trapezoidally corrected to a regular shape.
How to adjust the projected image shape?
Adjust the four points and four sides of the image separately.
Manual Keystone Correction
You can use the "Vertical Correction", "4-Point Correction" in the
projection settings to get a square shape.
08
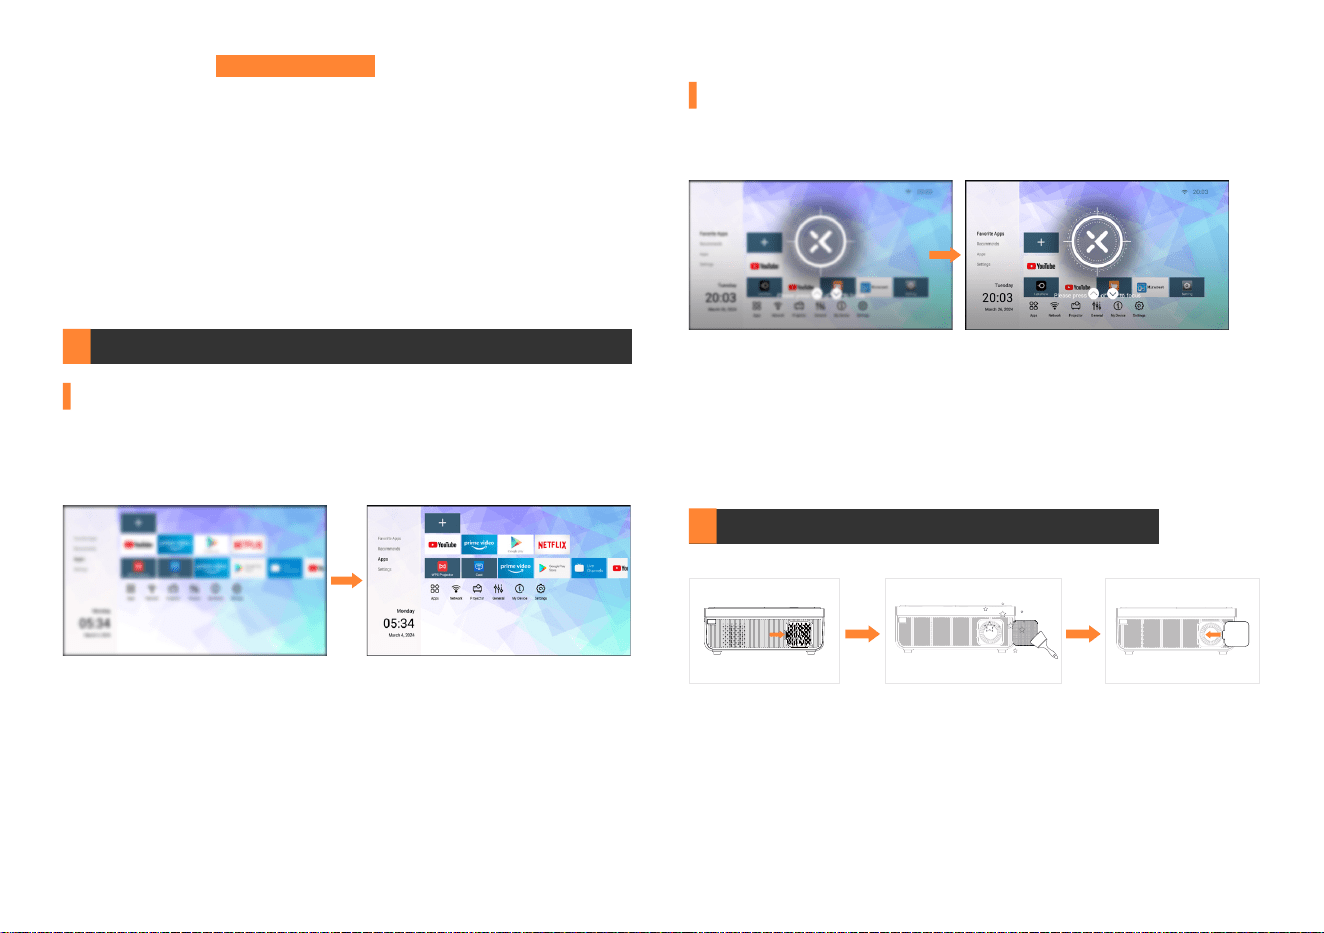
How to clean up the dust?
First press the bottom to open the lid, then pull the dust filter out to
clean, and replace the cover and press to install it. (When opening or
installing the dust cover, it is best to press it rmly with both hands to
ensure success. It is recommended to clean the lid every 3 months.)
Open Clean
Install
Auto Focus
The autofocus function is turned on by default. Once powered on, the
projector automatically focuses.When the projector lens is detected by
the COMS, sensor to shake or move slightly, it will automatically focus
immediately and adjust to the best projected image.
Electric Focus
Click "
g
" and "
a
" shortcut keys on the remote control to quickly auto-
focus to get a clear projection image.
剪
Tips:
················································································
1. It is recommended that the angle range of the projector oset screen
be within 0-15° to avoid partial blurring of the screen. (Front projection
screen is the best and most recommended)
2. The projector will automatically adjust the projected image to a clear
and regular screen eect within 3-5 seconds through the functions of
auto focus and auto keystone correction. It should be noted that the
angle between the projector and the projection screen when it is turned
on, and the angle range of each projector adjustment, must be within
0-30°. Otherwise, the auto focus and auto keystone functions will not
work.
日
Note:
·················································································
1. Please adjust projection distance, the optimum projection distance is
2m-2.5m/6.5ft-8.2ft.
2. It is normal when sharpness in the central, blur in the edge.
How to get sharp projected image?
Step 1:
Select the "Corner Correction" on the operation panel.
Step 2:
Press the "
f
" to choose the corner you need.
Step 3:
Adjust the image of the four corner by pressing "
光
", "
千
",
"
冰
" and "
里
".
剪
Tips:
··················································································
After using electric trapezoidal adjustment, automatic trapezoidal
correction will automatically close. If you want to enable automatic
trapezoidal correction again, you must enter "Projector Settings" and
manually turn on the automatic trapezoidal button before you can use it.
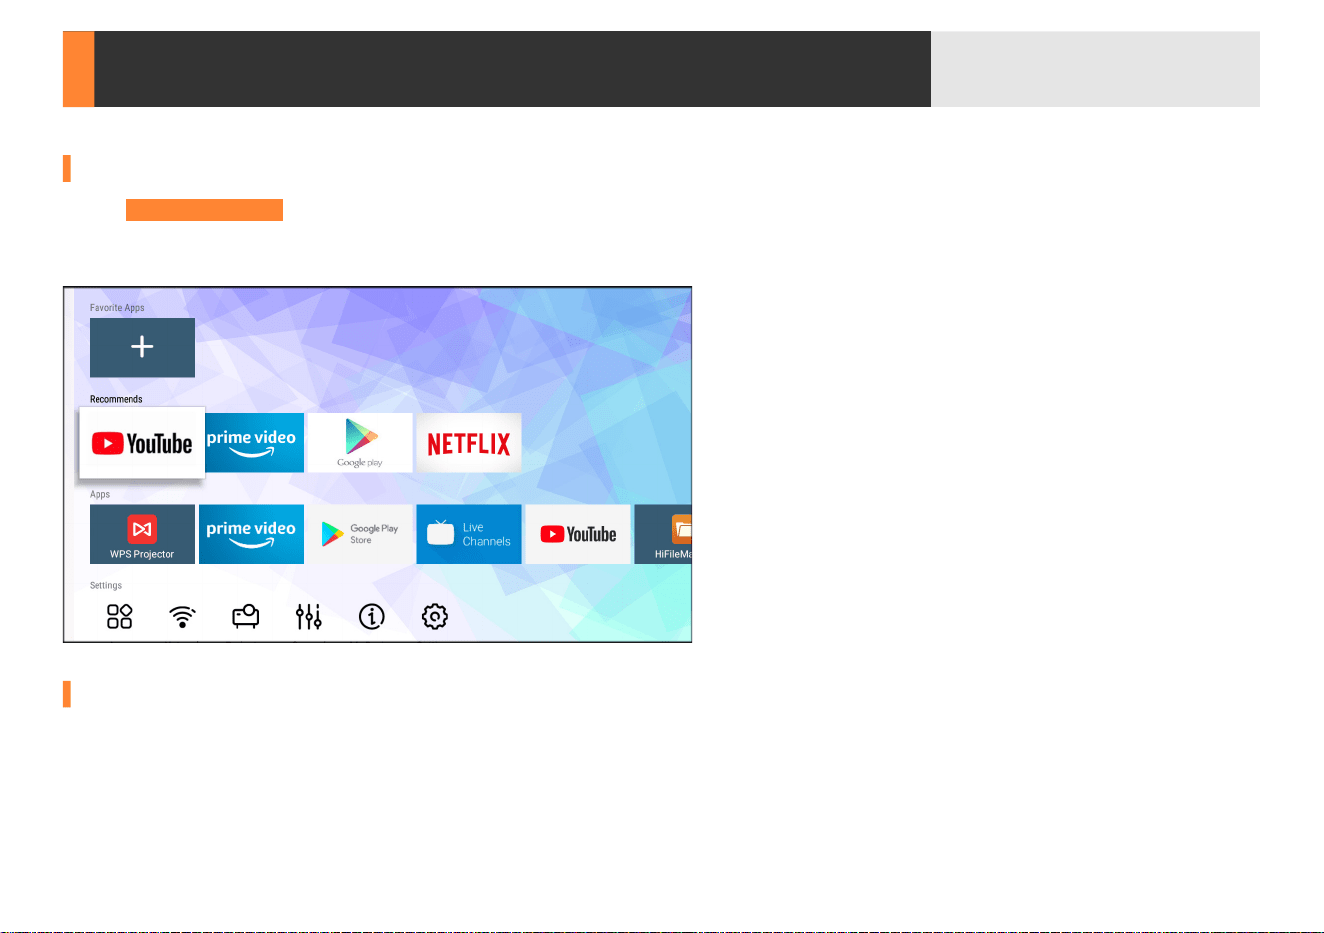
Additional Entertainment Options
09
How to play Netix, Disney+, prime video etc streams
Add & Remove Favorite Apps
1. Click "Google Play Store" on the homepage, then search and download APPs you want to watch.
1. Click "
7
" on the homepage, then select the apps to your Favorite Apps.
2. Click "
7
" on the homepage, then select the apps to your Favorite Apps.
2. Long press "
f
" to pop up Select Action and then choose "Remove" the APPs.
Projector Connections
10
1
8
Connect the power cord. The power button will turn red.
2
8
Short press the power button.
3
8
After turning on, the projector will "autofocus" and "automatic trapezoidal correction" to get the best image performance.
All the devices are needed to connect to the same home WiFi.
剪
Tips:
···························································································································································································
1. Never look into the projector lens when the lamp is on. This can damage your eyes and is especially dangerous for children.
2. Install 2 pieces of AAA batteries into the remote before using it.
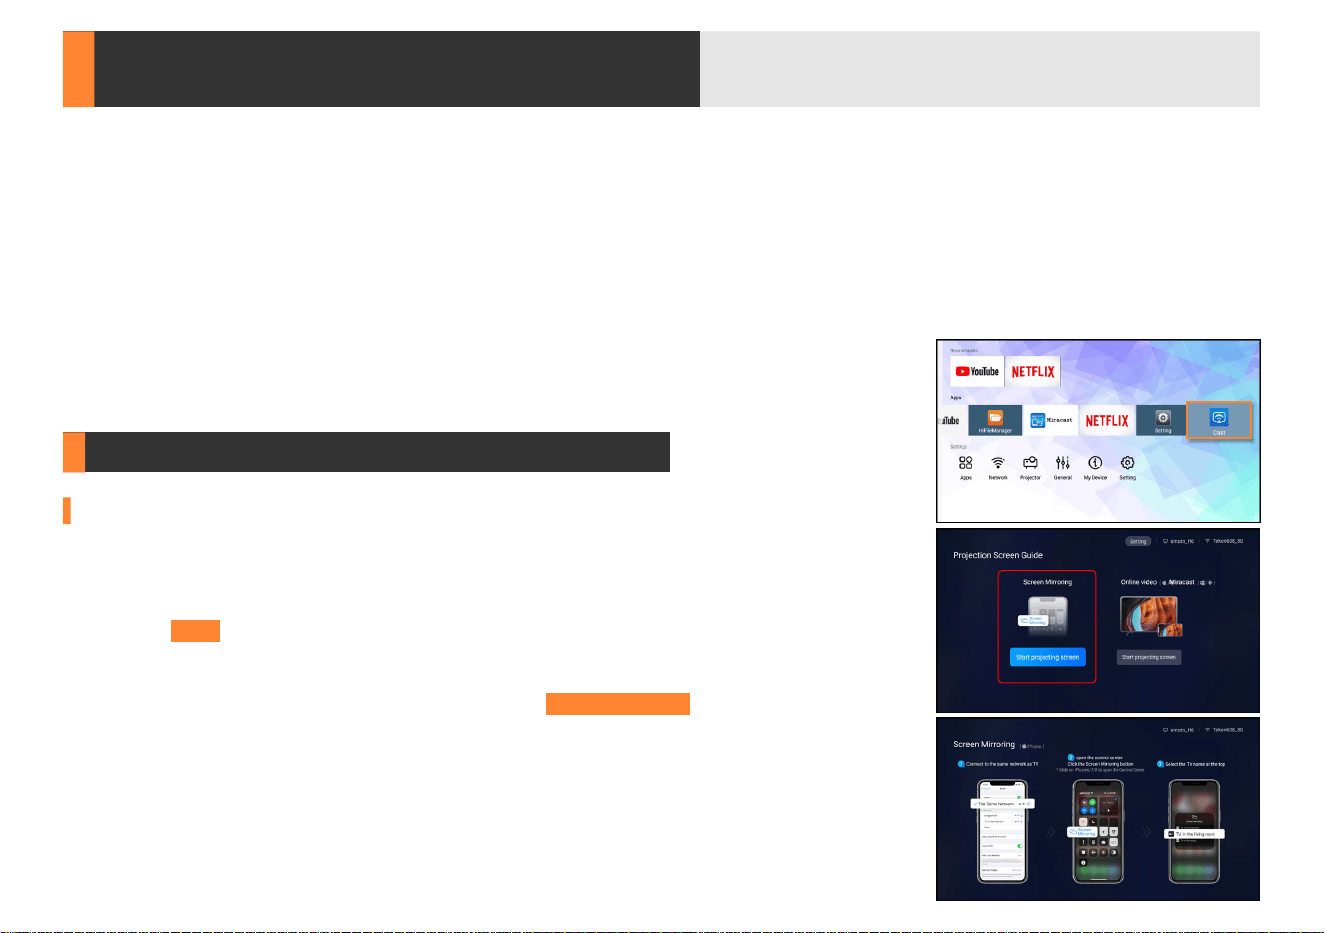
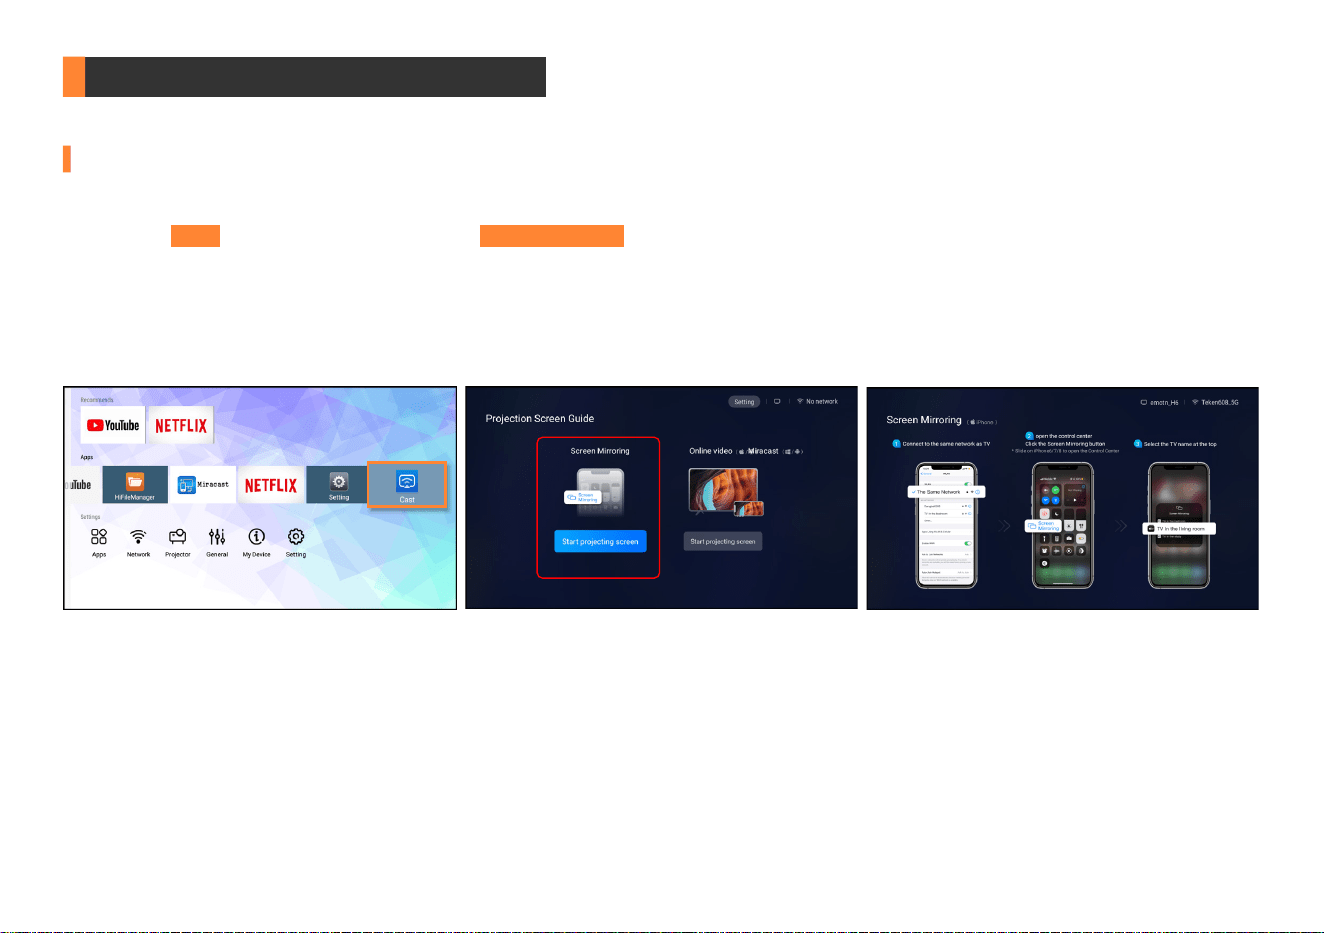
Connecting to the Mobile Device
For iOS Device
Step 1:
Click "
4
" on the home page to connect the projector to your home WiFi.
Step 3:
Connect your iOS device to the same home WiFi as the projector.
Step 4:
Open the control center of your iOS device, click the "Screen Mirroring" and select
"emotn-****" from the list.
Step 2:
Click "Cast" on the home page, then choose "Screen Mirroring"
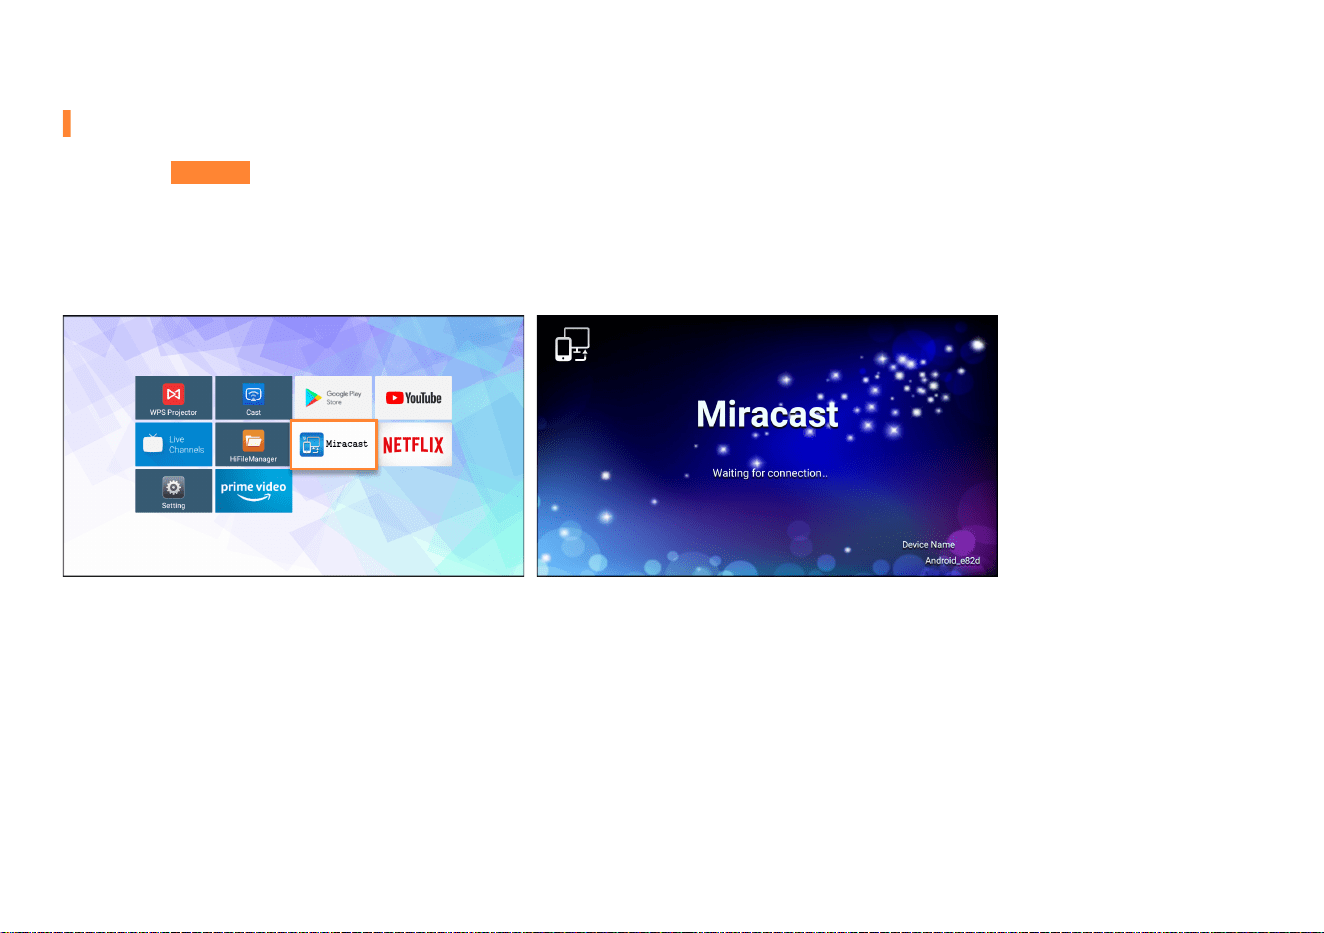
11
For Android Device
Step 1:
Click "Miracast" on the home page.
Step 3:
Open the "Multi-Screen" function and select "Android-***" from the list of your Android device.
Step 2:
Turn on your WiFi and Bluetooth function of your Android device.
日
Note:
··························································································································································································
To activate this function, your Android device must support "Multi-Screen/Wireless" display. Names of "Screen Mirroring" function may differ from
dierent devices. Google phones and partial Motorola phones prohibit screen mirroring directly from the projector due to mirroring protocol issues. You
need to have a Google Chromecast to connect it.
5G
100%
18:4 5
>>
Smart View
PhoneO ther device
Select a device below to mirror your phone’s
screen or play content
Mirror screen
>
Other device Phone
5G
100%
18:4 5
>
Cast
Cast
Cast screen contents to an external
monitor
>>
Cancel Help
Select device(1)
Demos
Casting documents,games,photos,and
videos
>
SPECIAL FEATURES
V30 - ****
5G
100%
21:05
>
>
>
>
>
Huawei Share
Wireless projection
Pirnting
On
VPN
Private DNS
Of
f
V30 - ****
Wireless Projection
Available devices
CANCEL HELP
V30 - ****
12
emotn - ****
emotn - ****
emotn - ****
5G
emotn - ****
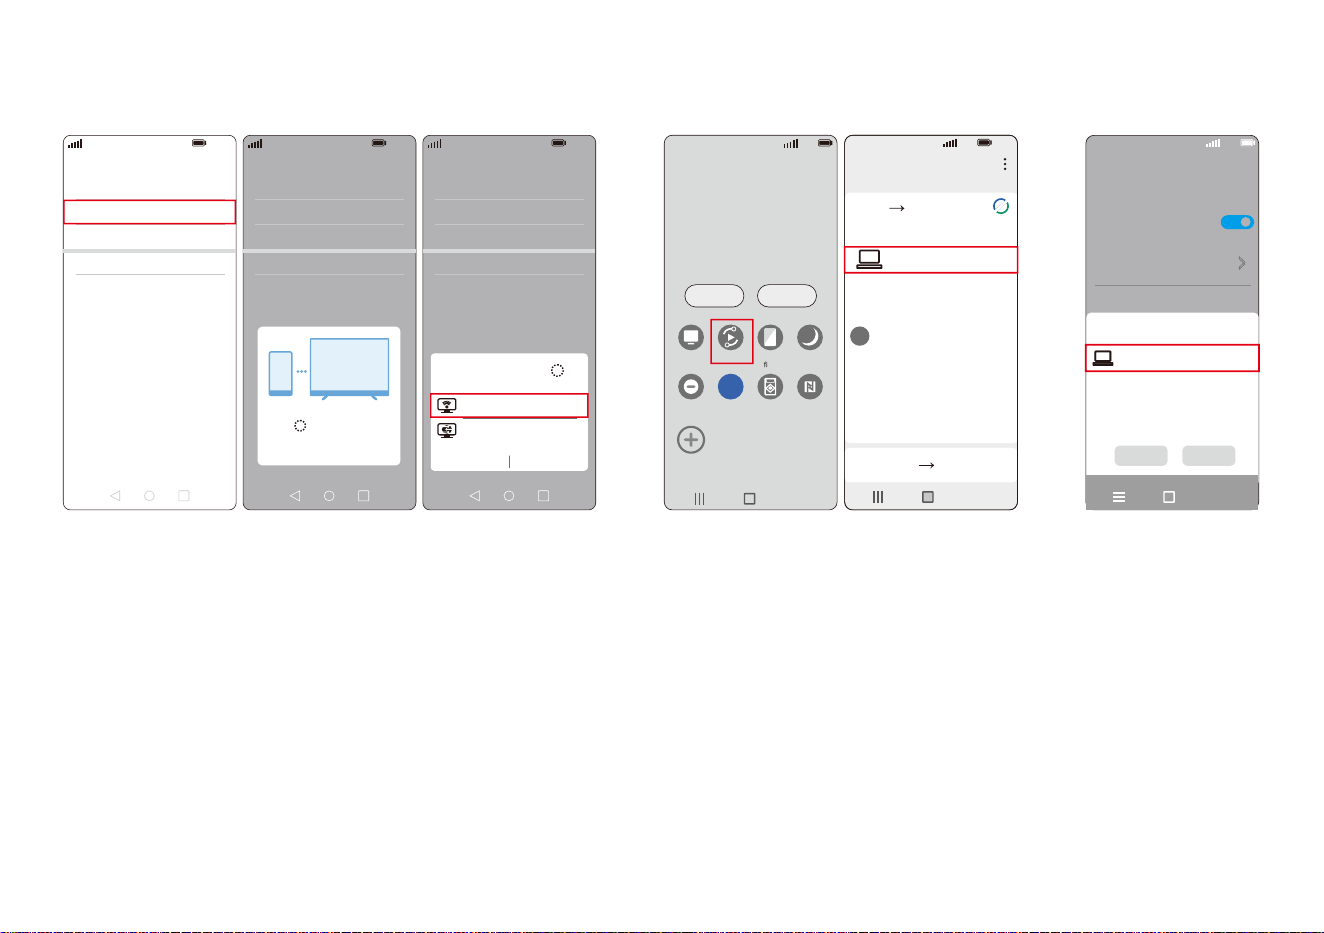
HUAWEI SAMSUNG XIAOMI
HUAWEI:
More connections - Wireless projection.
SAMSUNG:
Swipe up the screen of your Samsung device, then click "Smart View" and search for the device of the projector.
XIAOMI:
Swipe up the screen of your Xiaomi device, then click "Connection & Sharing" and search for the device of the projector.
剪
Tips:
···························································································································································································
1. Make sure your mobile device is closed to the projector when using wireless connection. A distance within 1m/3.3ft is recommended.
2. Due to HDCP copyright of Apps, Netix, Prime Video, Hulu, etc. prohibit screen mirroring directly from the device. You can search and download Apps
from "Google Play Store" on the homepage.
5G
100%
21:05
>
>
>
>
>
Huawei Share
Wireless projection
Pirnting
On
VPN
Private DNS
Of
f
5G
100%
21:0 5
>
>
>
>
>
Huawei Share
Wireless projection
Pirnting
On
VPN
Private DNS
Of
f
Connecting...
CANCEL
5G
100%
>
18:45
Monday , Jul y 5
Devices Media
DeX
DeX
Smart View
Blue light
lter
Dark mode
B
Do not
disturb
5G
Hongbao
accelerator
NFC
5G
13
Connecting to Computer
Wireless Connection for Mac OS
Step 1:
Click "
4
" on the home page to connect the projector to your home WiFi.
Step 3:
Connect your computer to the same home WiFi as the projector.
Step 4:
Projector keeps staying in iOS WiFi Mirroring connection channel page. Open "System Preferences" on your computer - Choose "Displays" -
Click "AirPlay Display" - Connect "emotn-****".
Step 2:
Click "Cast" on the home page, then choose "Screen Mirroring".
剪
Tips:
····························································································································································································
Display Resolution of your computer please choose "Default for display".

14
Wireless Connection for Win10 or Above
Step 3:
Enter "Display" in "Settings" of your computer to nd "Connect to a wireless display".
Step 4:
Projector keeps staying in Android Mirroring connection channel page. Connect to "Android-****" and select "Duplicate these displays" in
"Multiple displays".
Step 2:
Turn on your WiFi function of your computer.
剪
Tips:
····························································································································································································
Step 1:
Click "Miracast" on the home page.
1. Please ensure your laptop has a wireless display function.
2. Please ensure you select "1920*1080 resolution" after you connect the projector.

15
Wired Connection
Step 3:
Press "
s
" on the remote control, and choose "HDMI", then press "
f
" to conrm.
Step 2:
Use included HDMI cable to connect your computer and projector.
剪
Tips:
····························································································································································································
Step 1:
Turn on your computer and the projector.
For Windows7 and higher system, pressing the Windows logo key + P key at the same time and select "DUPLICATE".
Connect the projector to your computer by using the HDMI cord in the package.
SECOND SCOND
SCREEN ONLY
Project
PC SEREEN ONLY
DUPLICATE
EXTEND

16
Step 1:
Click "
4
" on the home page to connect the projector to your home WiFi.
Open the Youtube app on the home page of the projector, access the settings of the Youtube app, then choose "Link with TV code".
Open the Youtube app of your device, tap the Chromecast icon of the app,then tap "Link with TV code" then enter the code of the projector.
Open the Youtube app on the home page of the projector.
Open the Youtube app of your device, tap the Chromecast icon of the app, then tap "YouTube on TV".
Step 2:
Connect your device to the same home WiFi as the projector.
DLNA Streaming for Android & iOS
Way 1:
Way 2:

17
Step 2:
Click the USB les and then press the "
f
" to enter the USB drive les.
剪
Tips:
····························································································································································································
Step 1:
Turn on the projector and insert USB drive, press "
f
" to enter the page.
Please note that your USB drive and les need to meet the following formats. (For example: If the format of your USB drive is NTFS, the memory
capacity of USB drive must be under 128G and the memory of video must be under 2T.)
Connecting to the External Storage Device
USB
18
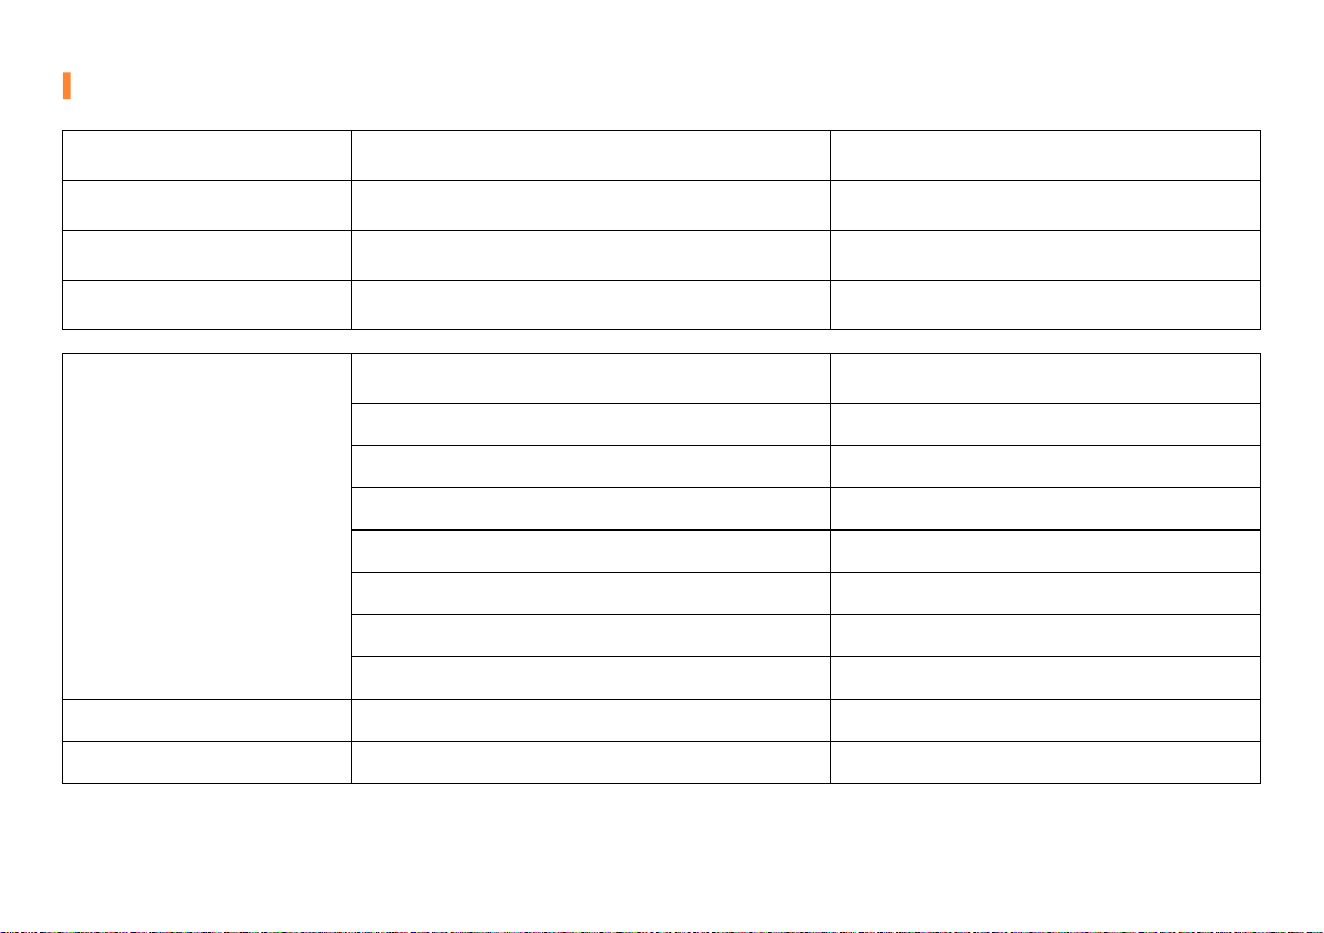
USB Support Fomat
Formats of USB drive
Video:
(Note: corresponding format
and encoder are required when
play via USB)
NTFS
FAT32
FAT
Maximum memory capacity of USB drive
Video formats
128G
AVI
MOV
VOB
128G
FLV
MP4
Mp3, M4A (AAC)Music Format
128G
MKV
MPG
JPEG, BMP, PNGPhoto Format
Maximum memory of each video
Video encoder
2T
H.264
H.264
VOB
4G
FLV
FLV
/
2G
COPX H.264 MPEG-4DIVX MJPEG
COPX H.264 MPEG-4DIVX MJPEG
/
19
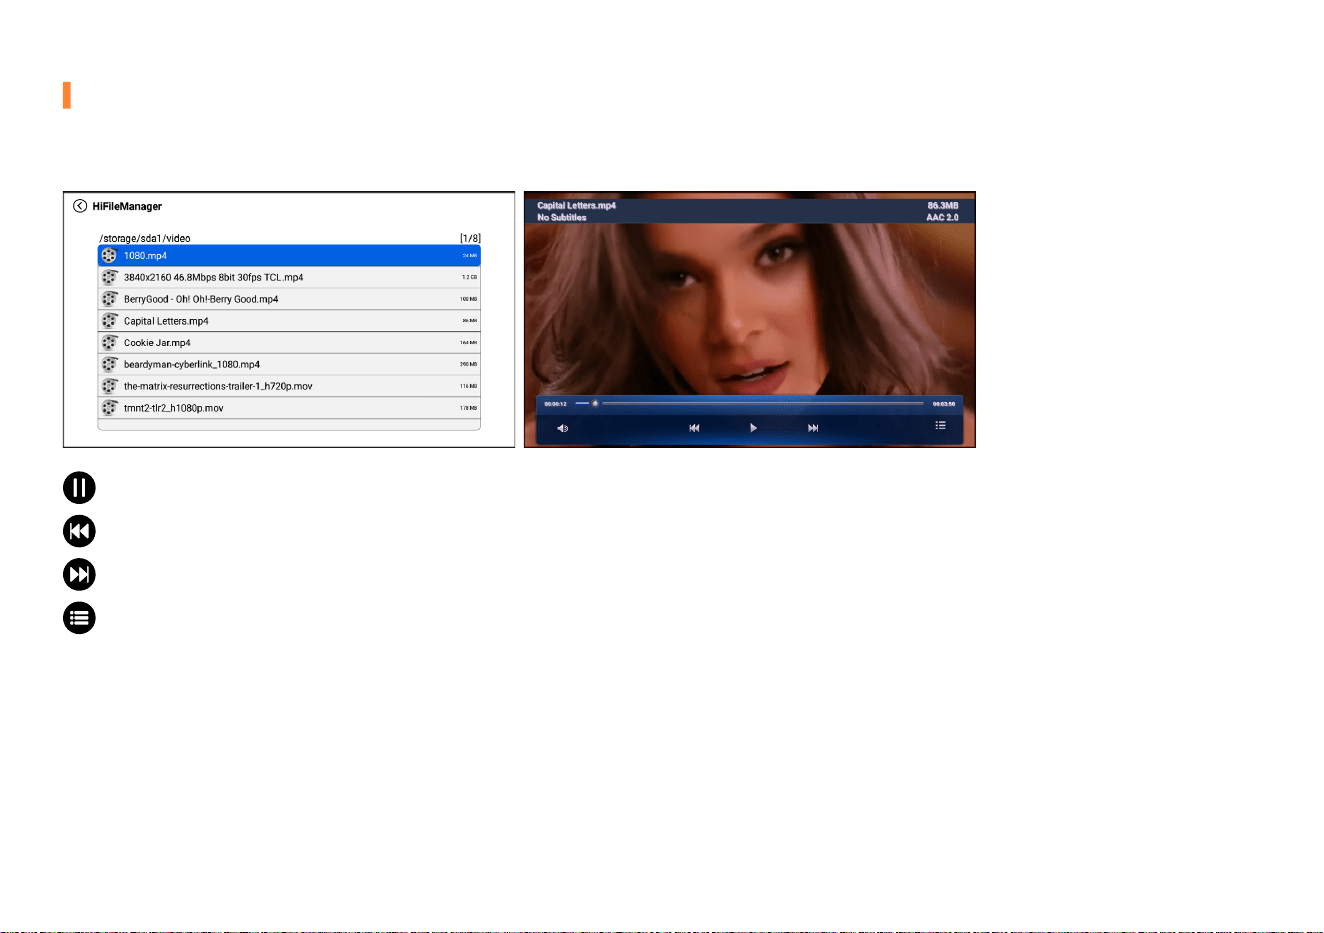
Playing Video
Press the "
光
" or "
千
", select the equipment for video storage. Press "
f
" to play video.
Play or pause:
Play or pause the current video.
Previous:
Go back to the previous video.
Next:
Go to the next video.
Plist:
a list of video les that can be played from the current folder.
剪
Tips:
····························································································································································································
The video content can be viewed by staying the cursor on the selected video for over 3 seconds. Only MP4, RMVB, AVI, RM, MKV and other video
formats are supported in video playing.
20
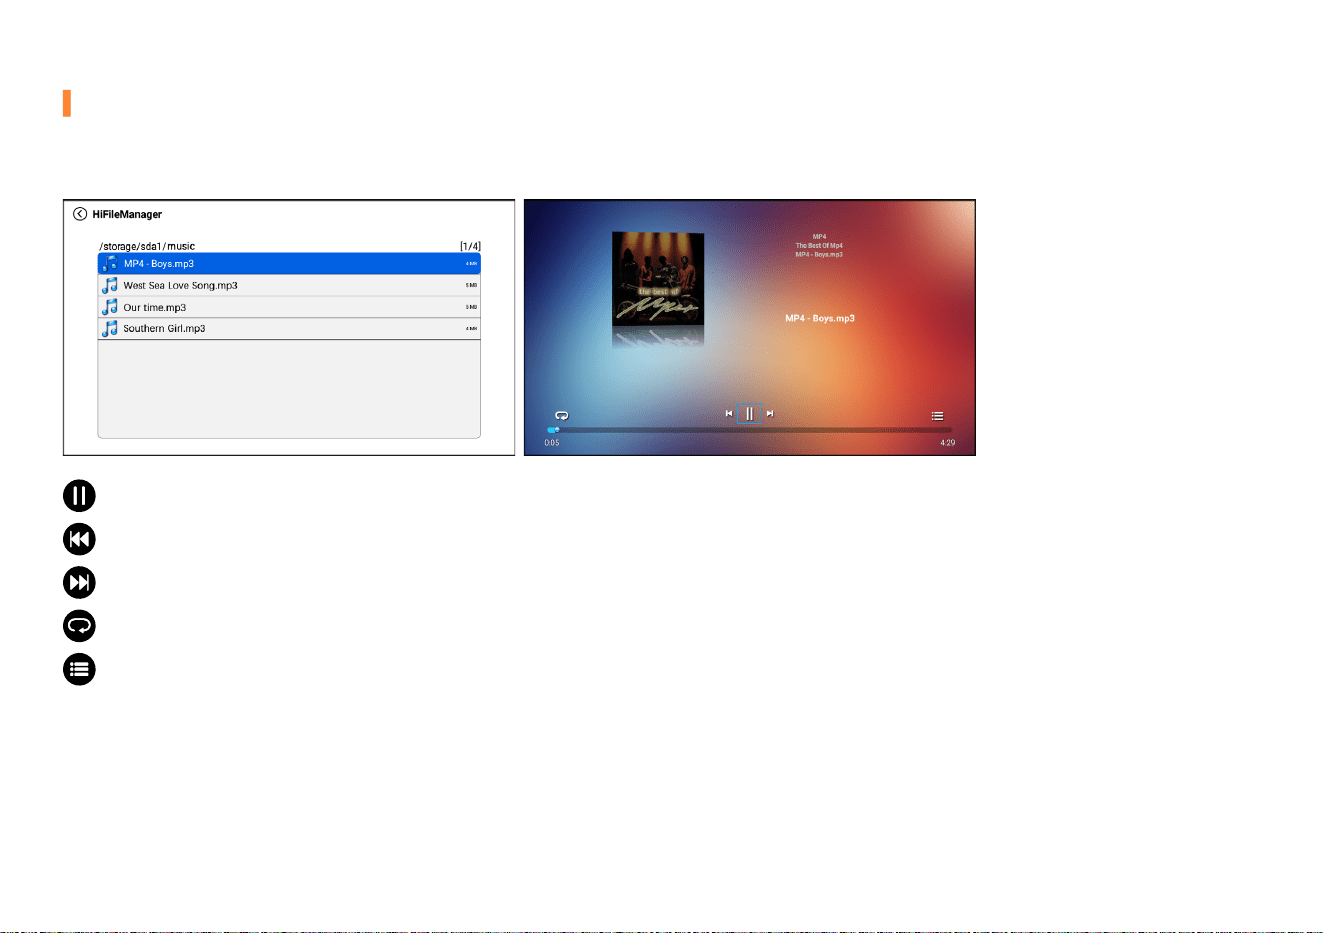
剪
Tips:
····························································································································································································
Only MP3, WMA, OGG, AAC, FLAC, APE, WAV music formats are supported for music playing.
Playing Music
Press the "
光
" or "
千
", select the equipment for video storage. Press "
f
" to play music.
Play or pause:
Play or pause the current music.
Previous:
Go back to the previous music.
Next:
Go to the next music.
Play Sequence:
Sequential Play, Random Play, Single Cycle, List Loop.
Plist:
a list of video les that can be played from the current folder.
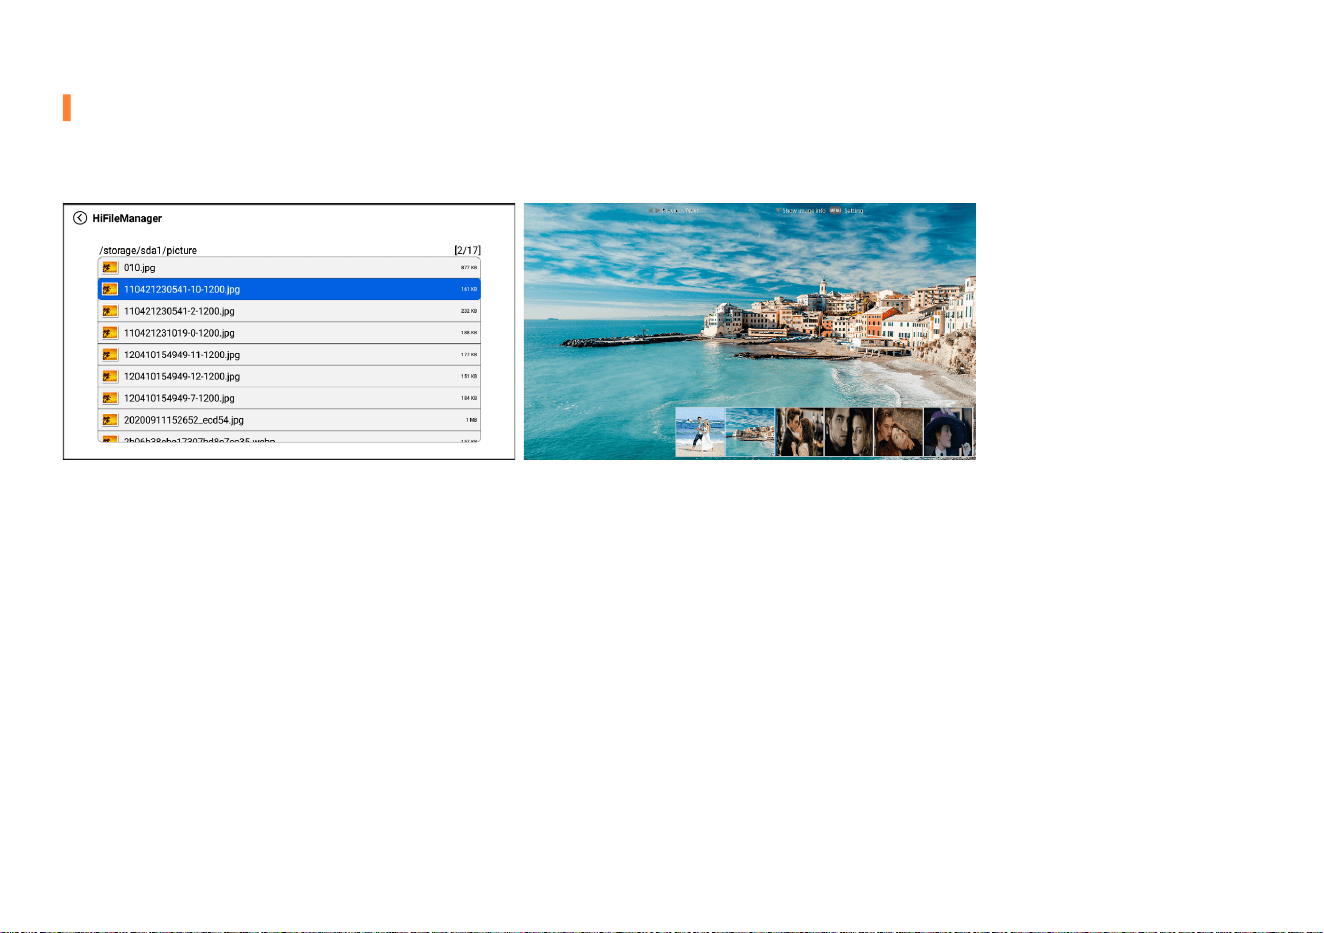
21
Playlist:
Play the current folder's list of image les by pressing "
光
" and "
千
".
Next:
Press "
里
", go back to the next picture.
Previous:
Press "
冰
", go to the previous picture.
剪
Tips:
····························································································································································································
Only JPG/JPEG, BMP, PNG image formats are supported for image playing.
Playing Image
Press the "
光
" or "
千
", select the equipment for image storage. Press "
f
" to play image.
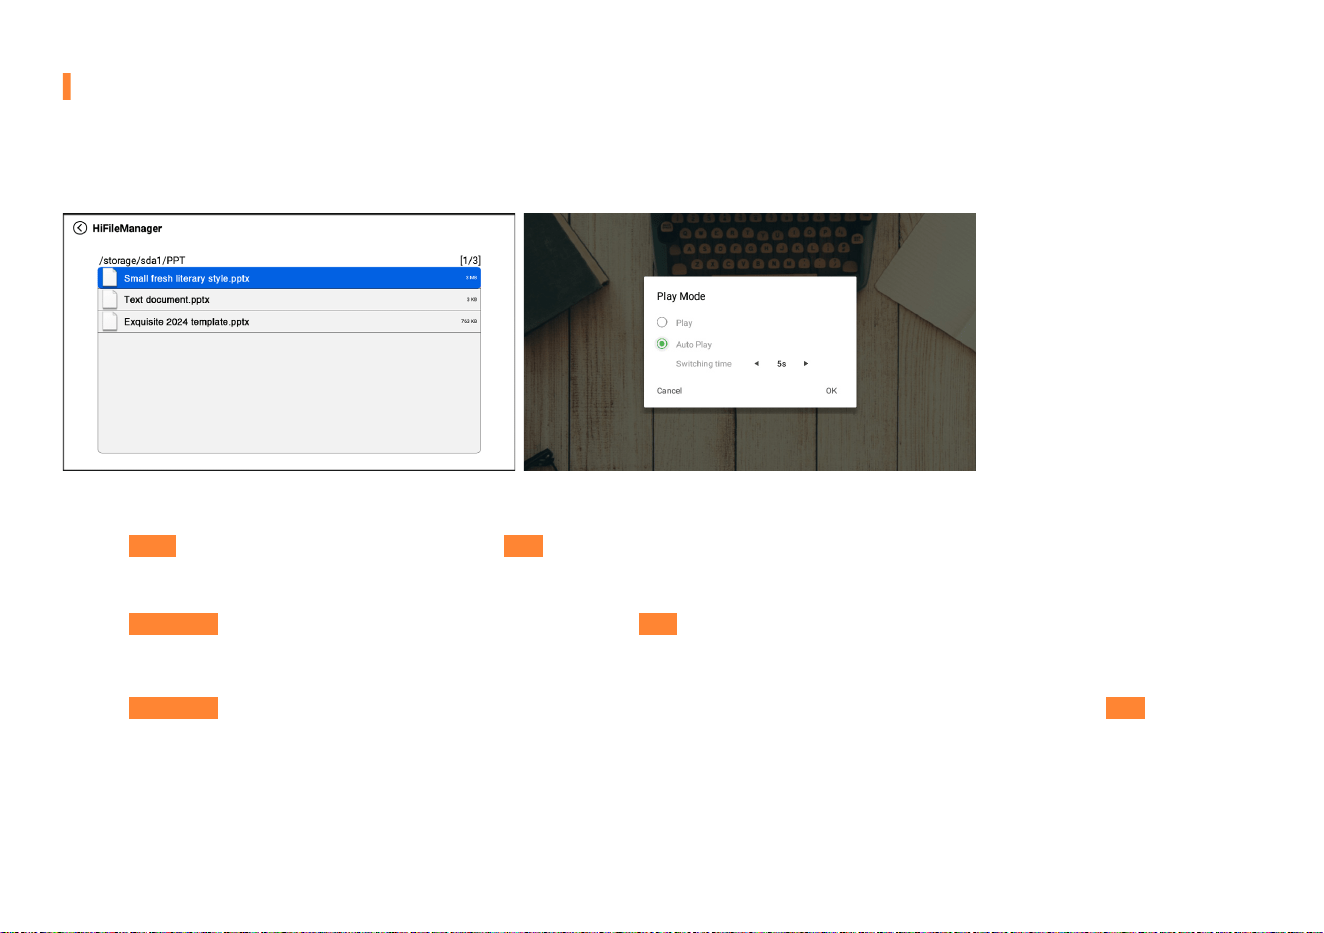
22
Choose "Play", press 3 times "
千
" until cursor stays on "OK" and press "
f
" to play PPT.
Choose "Auto Play", press "
千
" of the remote twice until cursor stays on "OK" and press "
f
" to play PPT.
Choose "Auto Play", press "
千
" of the remote, then press "
冰
" or "
里
" to adjust the switching time, press "
f
" untill cursor stays on "OK" and press
"
f
" to play PPT.
哈
Manual Paly
哈
Auto Play(No need to adjust switching time)
哈
Auto Play(Need to adjust switching time) :
剪
Tips:
····························································································································································································
Only text, excel, word, ppt documents are supported for this function. Can only be viewed, not supported for editing.
Playing WPS Oce
Press the "
光
" or "
千
", select the equipment for oce suite storage. Press "
f
" to play oce suite.
For Playing PPT

23
Connecting to the DVD Player
Step 3:
Connect the other end to any available HDMI port on your projector.
Step 3:
Connect the yellow male connector to the AV In port on the projector.
Step 4:
Press "
s
" on the remote control, and choose "HDMI", then press the "
f
" for conrm.
Step 4:
Press "
s
" on the remote control, and choose "AV", then press the "
f
" for conrm.
Step 2:
Connect the HDMI cable to your computer's HDMI port.
Step 2:
Connect the colorful female connectors to your DVD player’s RCA cable.
Step 1:
Turn on your DVD player and the projector.
Step 1:
Turn on your DVD player and the projector.
Connect the projector to your DVD player by using the HDMI cable in the package.
Connect the projector to your DVD player by using the AV cable in the package.
Option 1
Option 2
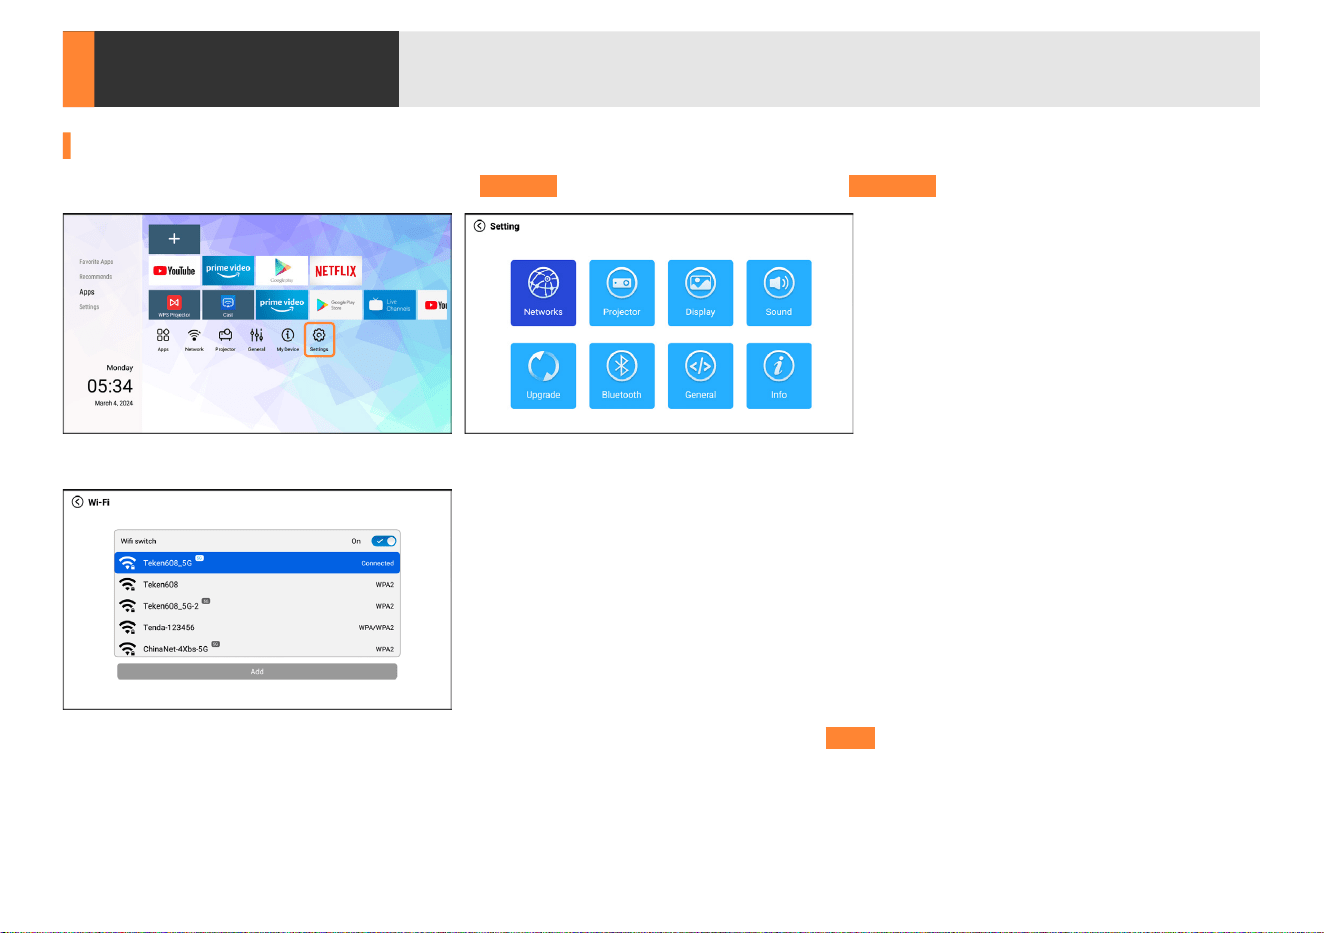
Settings
24
Network Setting
Step 1:
Press the "
光
" , "
千
" , "
冰
" or "
里
", select "Settings" on the home page, and then access "Networks".
Step 2:
Press the "
光
" , "
千
" to select your home network.
Step 3:
Press "
f
" to enter the password page. Enter password of your home network and press "Next" to conrm. Press "
千
" to conrm.
剪
Tips:
····························································································································································································
Please turn on your mobile hotspot as your home network if there is no network.
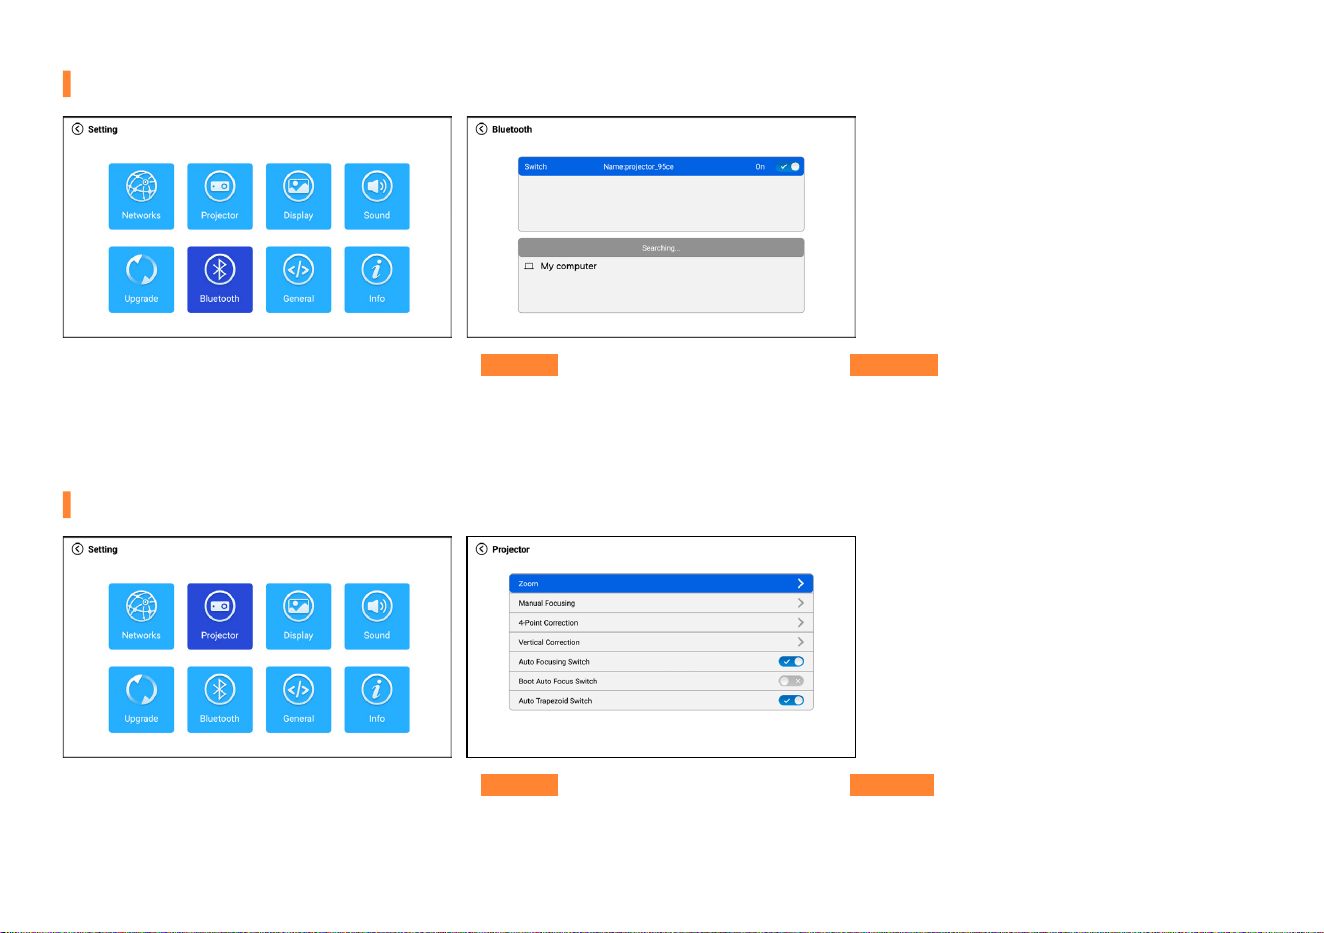
25
Bluetooth Setting
Step 3:
Press the "
光
" or "
千
" to select the correct Bluetooth device from the list, and press the "
f
" to connect.
Step 2:
Switch on your Bluetooth device, and make sure the Bluetooth is in pairing mode.
Step 1:
Press the "
光
" , "
千
" , "
冰
" or "
里
", select "Settings" on the home page, and then access "Bluetooth" on the setting page.
Step 1:
Press the "
光
" , "
千
" , "
冰
" or "
里
", select "Settings" on the home page, and then access "Projector" on the setting page.
Projector Settings
26
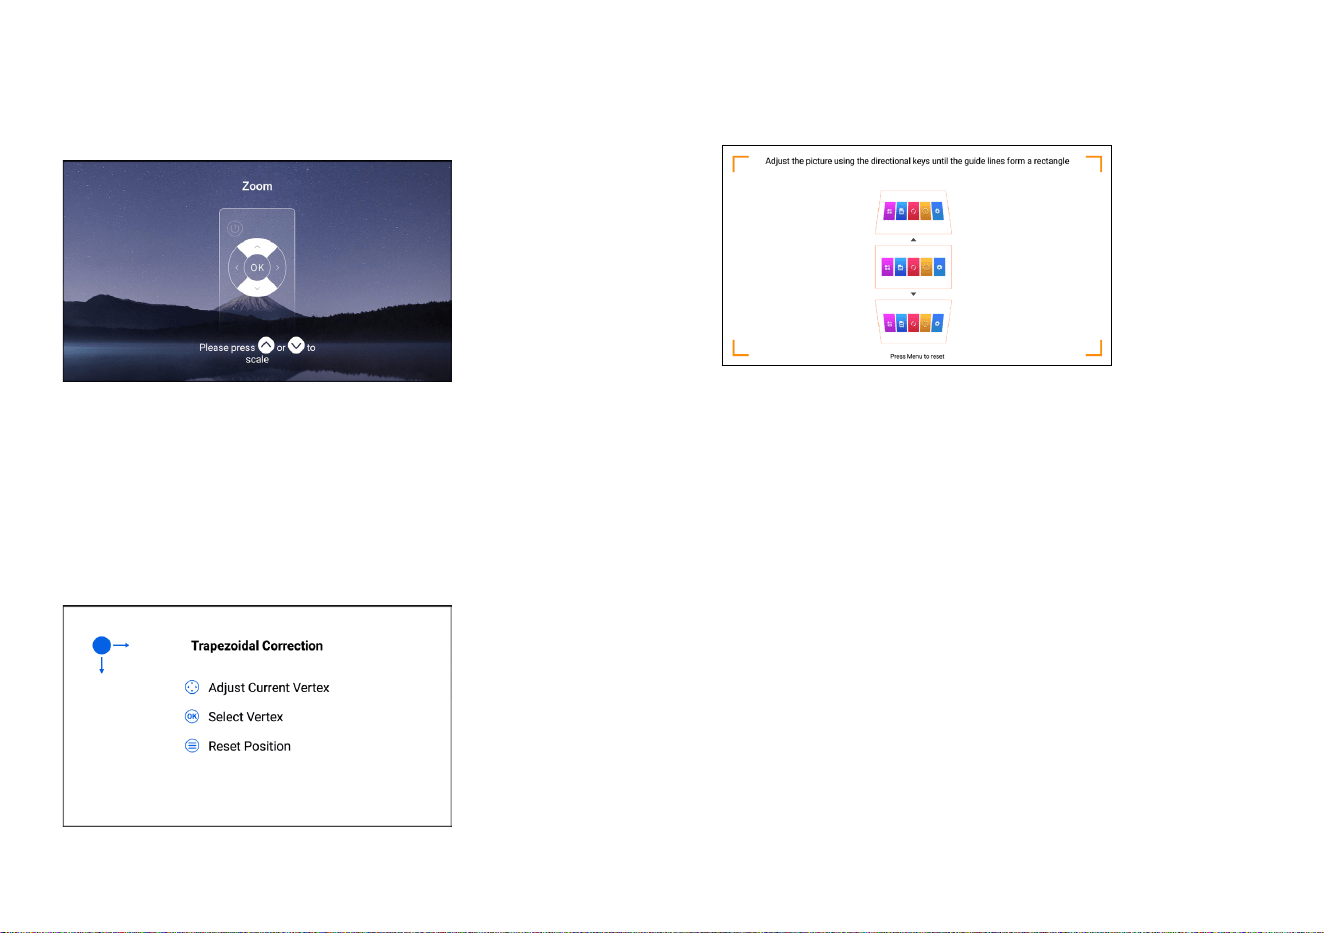
哈
Zoom:
Press "
f
" to enter Zoom page.
哈
Manual Focusing:
Press "
f
" to enter Manual Focusing page.
哈
4-Point Correction:
Adjust the four points and four sides of the
image separately.
哈
Vertical Correction:
哈
Boot Auto Focus Switch:
The autofocus function is turned on by
default. Once powered on, the projector automatically focuses for
the best clear image.
Adjust screen size from 100% to 50% by pressing the "
光
" , "
千
",
Press "
千
" to reduce the screen size, and presss "
光
" to increase the
screen size.
Adjust the distance of the lens by pressing the "
光
" , "
千
" to obtain a
sharper image.
剪
Tips:
············································································
lf you need to make focus adjustments, we recommend that you
make adjustments within the anglerange of 0~30" and wait 3~5
seconds. When a single angle adjustment exceeds 30", the angle
adjustment may be too large and the projector cannot focus.
Adjust the image ±50° vertically by pressing the "
光
", "
千
".
Press "
n
" to reset.
27
Step 1:
Press the "
光
" , "
千
" , "
冰
" or "
里
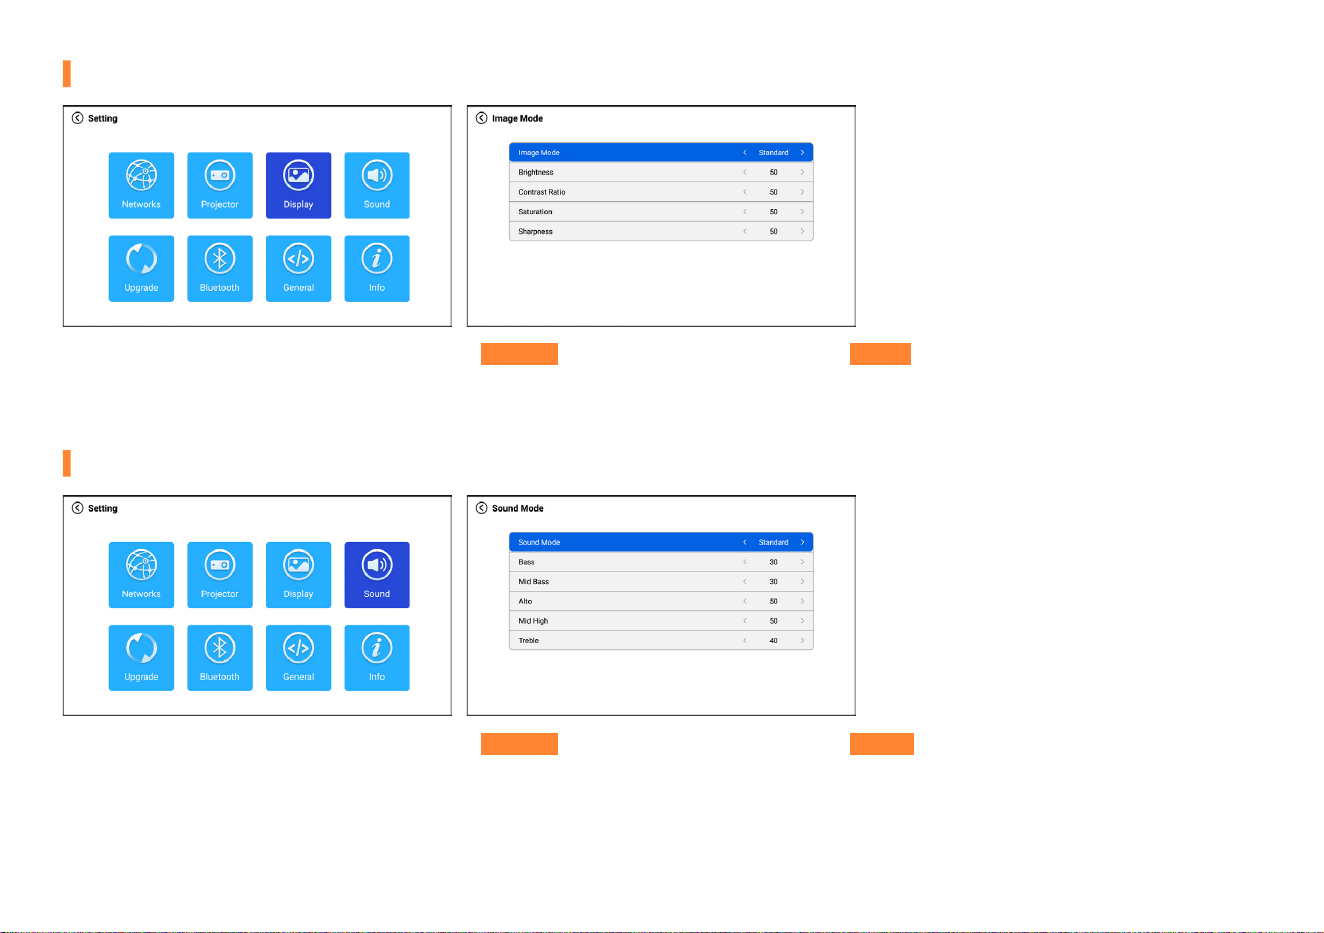
", select "Settings" on the home page, and then access "Dislay" on the setting page.
Step 1:
Press the "
光
" , "
千
" , "
冰
" or "
里
", select "Settings" on the home page, and then access "Sound" on the setting page.
Image Mode: User, Standard, Vivid, Soft Brightness: 0-100 Contrast Ratio: 0-100 Saturation: 0-100 Sharpness: 0-100
Sound Mode: User, Standard, News, Music, Video, Sports Bass: 0-100 Mid Bass: 0-100 Alto: 0-100 Mid High: 0-100
Treble: 0-100
Dislay Setting
Sound Setting
28
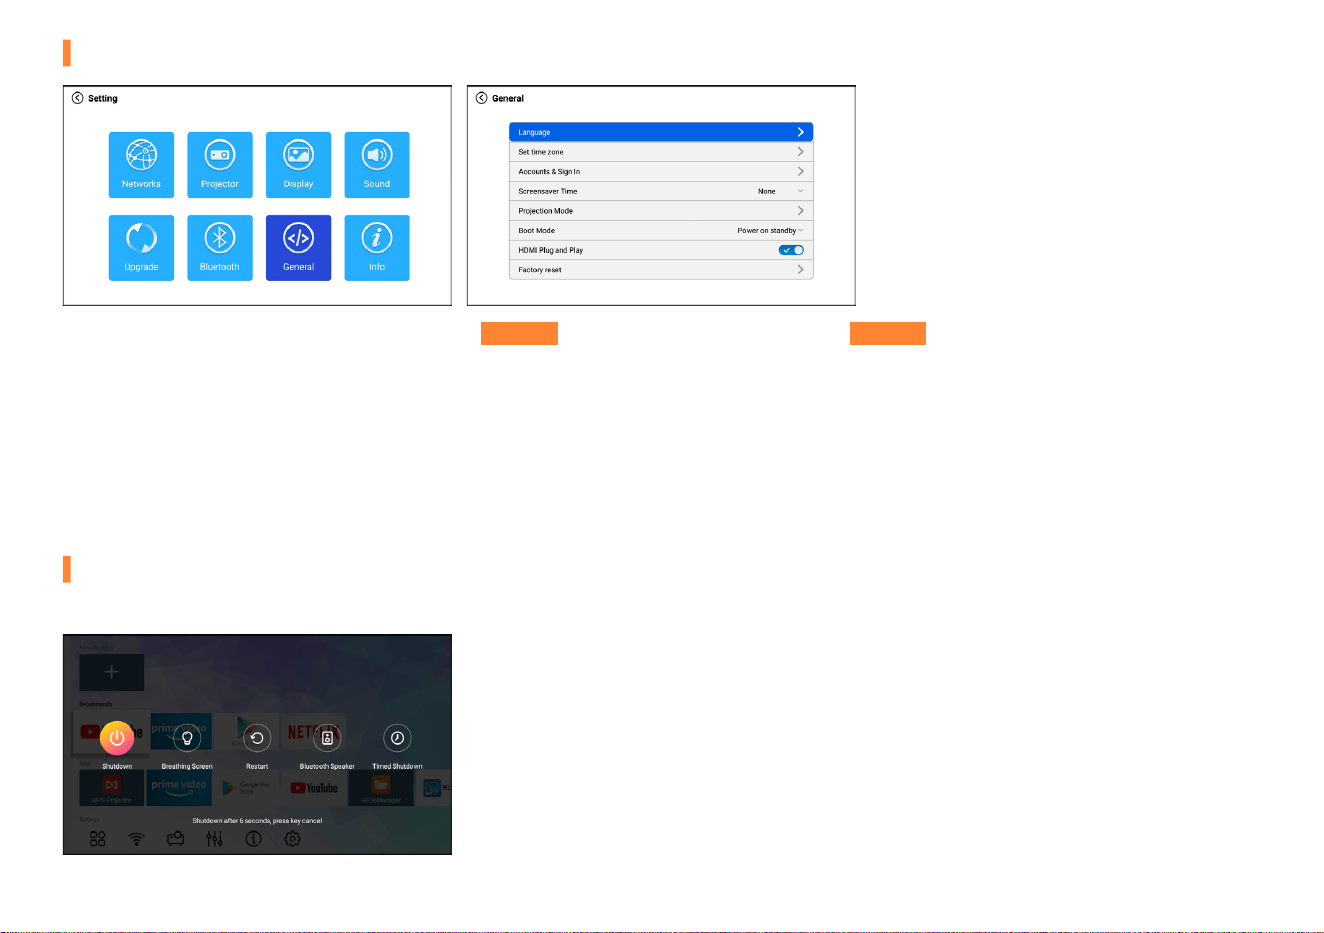
Step 1:
Press the "
光
" , "
千
" , "
冰
" or "
里
", select "Settings" on the home page, and then access "General" on the setting page.
Language: including English, Spanish, Chinese, French, German, etc.
Screensaver Time: None, 15 minutes, 30 minutes
Projection Mode: Front, Rear, Front Ceiling, Rear Ceiling
Boot Mode: Power on start, Power on standby
HDMI Plug and Play: Pluging the HDMI cable, it will automatically adjust to the signal source HDMI
General Settings
Other Settings
Long press "
封
" to enter the settting page. Setting page options: Shutdown, breathing Screen, Restart, Bluetooth Speaker, Timed Shutdown.
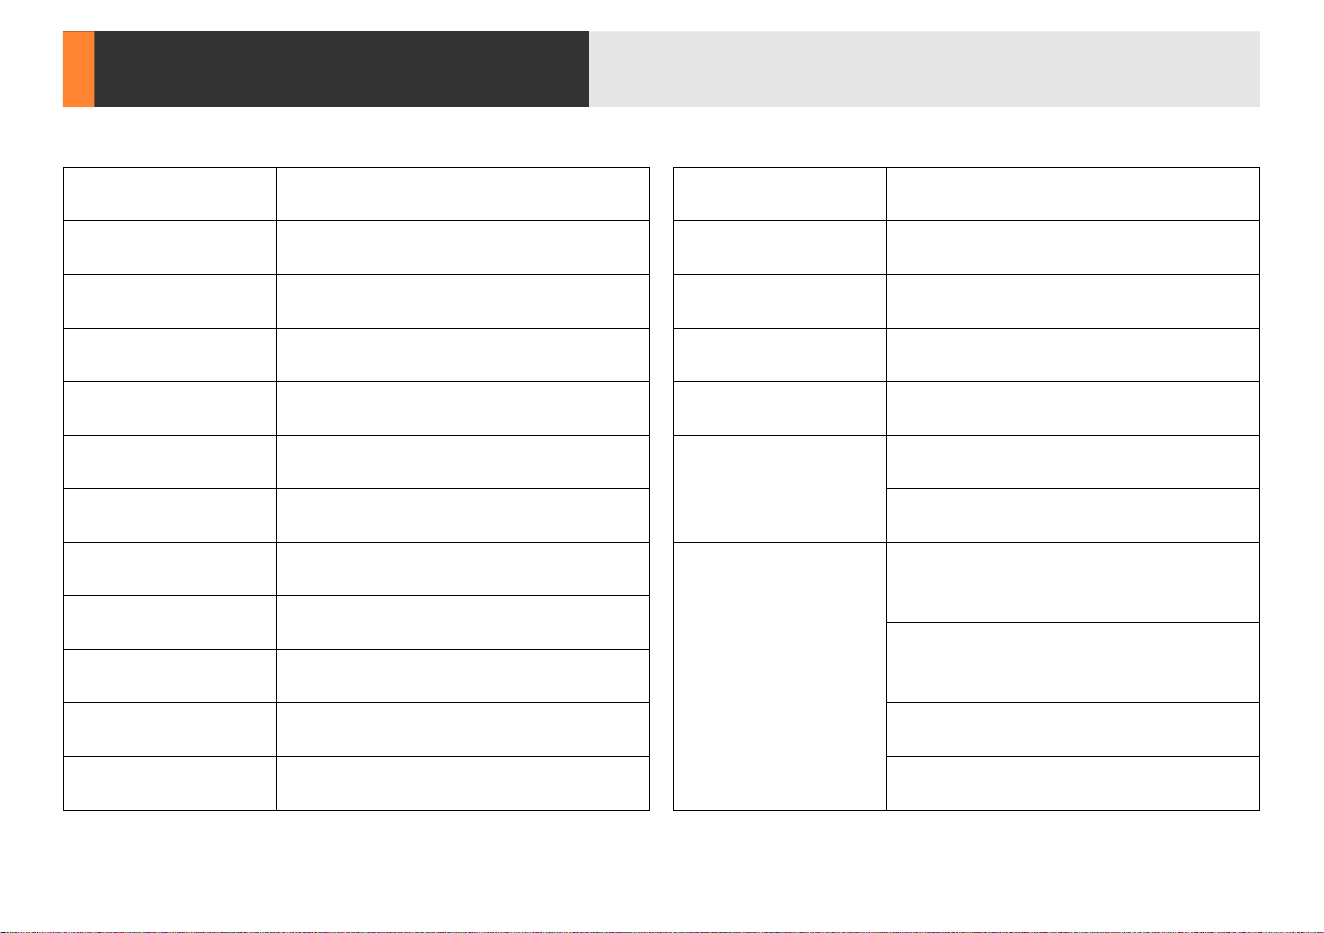
Product Features
29
Projection Tech
Product Model
Projector Weight
Projection Ratio
Output
Dimension
Ceiling Mount Size
Audio Frequency
Signal Ports
USB Ports
Noise and Light
Leaking
Power Supply
LCD TFT Projection system
VP-1
2.53lbs
1.4 : 1
3.5 mm audio port(speakers/headphones)
8.34 * 6.22 * 2.95 inches
M6
3W
Video Input:
1.OVp-p +/-5%
HDMI Input:
480i, 480p, 576i, 720p, 1080i, 1080p, 2k, 4k.
Photo Format:
HPEG, BMP, PNG, JPG/JPEG.
Oce Suite:
Text, excel, word, PPT.
Video Format:
MPEG1, MPEG2, MPEG4, RM, AVI, RMVB,
MOV, MKV, DIVX, VOB, MP4.
Music Format:
MP3, WMA, OGG, AAC, FLAC,
APE, WAV etc.
Low Noise, Low Light leaking
AC 110-240V 50/60HZ
70W
1920P*1080P
AV
<24hour
Auto Correction, Manual Correction
Auto Focus, Manual Focus
The Global Standard
Projector
Consumption
Physical Resolution
AV Input
Signal Format
Keystone Correction
Focus Mode
A Single Continuous
Use Time
Trouble Shooting
30
Problems listed below might occur during the operation of your projector. Please refer to the possible factors which might cause the issue to do
troubleshooting. Any questions during use, please feel free to contact with VOPLLS customer service team. Email address of customer service:
2. Why is the display of the projector available but without audio?
1. Why does focusing fail when the adjustment angle is too large when focusing?
3. Why is the audio of the projector available but without display?
贴
The projector or the connected device (PC, TV, etc.) is muted.
贴
When a single angle adjustment exceeds 30°, it may not be possible to focus due to excessive angle adjustment. Therefore, we recommend adjusting
within the angle range of 0-30° and wait 3-5 seconds.
贴
The video format is not supported by the projector.
贴
Dolby sound is not supported, exit to play again.
贴
Encryption applied to the videos or media player which holds the video.
贴
If the lamp of the projector is o with only audio playing, the lamp is defective. Please contact seller for a replacement.
贴
The audio format is not supported by the projector.
贴
Try another HDMI cable if you select the HD input source.
贴
Encryption applied to the videos or media player which holds the video. Try more videos to dene this possibility.
North America Marketplace:

31
6. How should I do if there are small dots on display?
7. How should I do if there is expanding dark spot or smoke when using the projector?
8. Why does the projector is shut o during playing?
5. How can I do if the remote is unresponsive?
贴
Tap the projector slightly to shake o the dust which may be caused during installing or shipping.
贴
Check if the fan noise increases or the fan stops working. Unplug the projector and contact VOPLLS team for assistance.
贴
Make sure the power plug is working and rmly tted into the outlet.
贴
Make sure the batteries are installed correctly and the power is enough.
贴
Clean the lens with clean non-woven fabrics.
贴
Make sure the outlet and projector power adapter are not wet or humid which will cause sparks or smoke on outlet when power on the projector.
贴
If the LED indicator on the projector is light up, but the fan doesn't work, please contact VOPLLS team for assistance.
贴
Overheat on the projector will activate built-in power-o protection panel. Restart the projector when it gets cooler.
贴
Please check if you set up the shutdown time.
贴
Please make sure the IR receiver is not covered.
10. What kind of Screws do I need for mounting this projector?
贴
M6 Screw
9. Why doesn’t the projector’s lamp light up or power on?
贴
Please contact VOPLLS for assistance when this occurs.
4. How can l do if there is color distortion?
贴
Make sure the video source has a ne resolution.
贴
Reset the projector to manufacturer setting: Enter "Settings" on the home page, then choose "General" and select "Factory reset".

123456789qwe
rtyuiopasdfg
hjklzxcvbnm 北
国风光千里冰封万雪飘望长
城内外去鹅是放骨哈好几看
这谢翠板辨呢没混剪联噢谔
饿阿额呃请其前却七钱亲全
五玩哇王问网人让如日若她
它太图天贴听同团有一要也
与用以呀啊吖嗄爱说上三四
时十啥色的都对等到但点发