
01
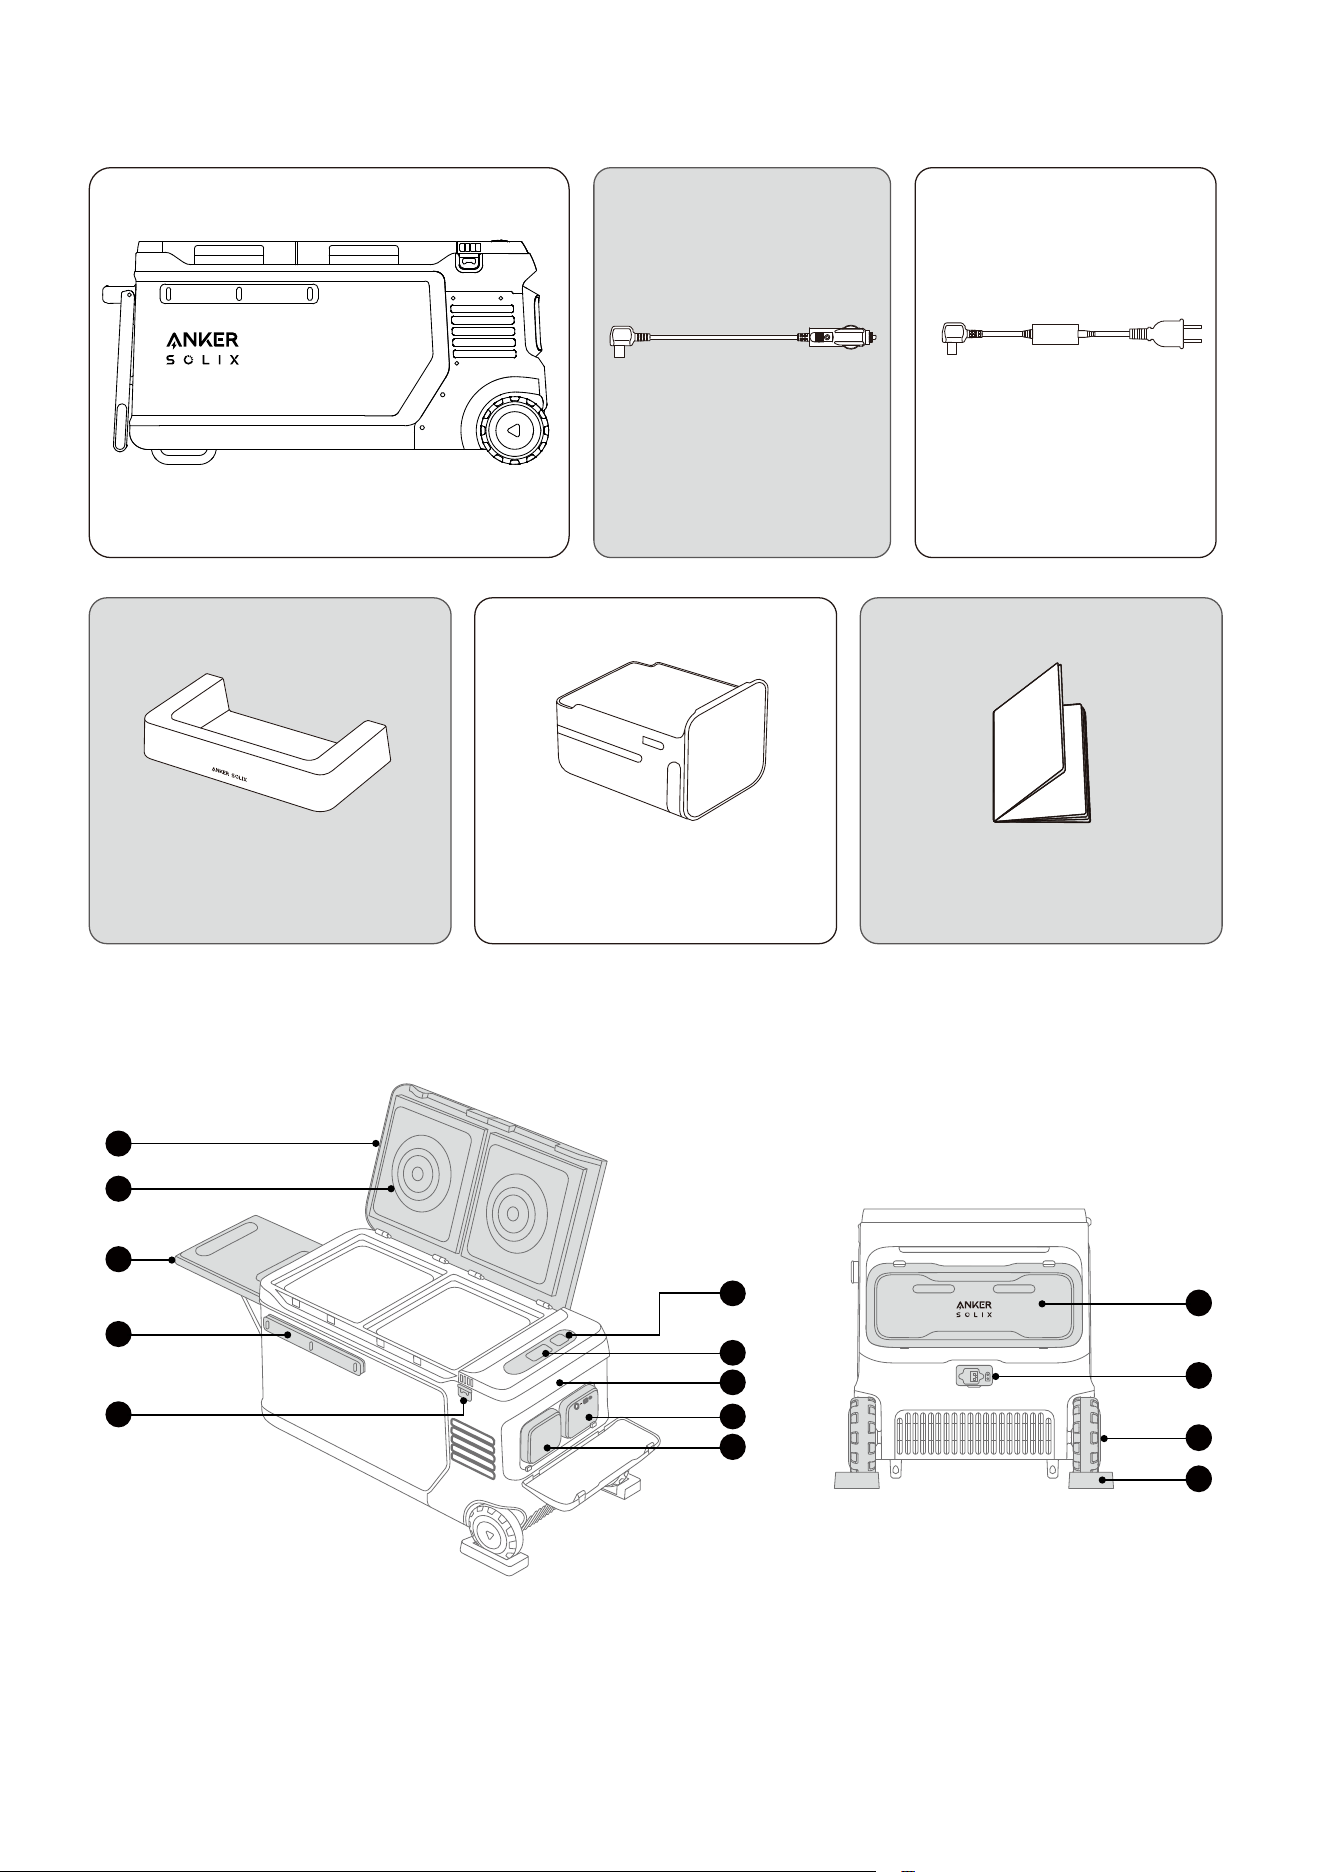
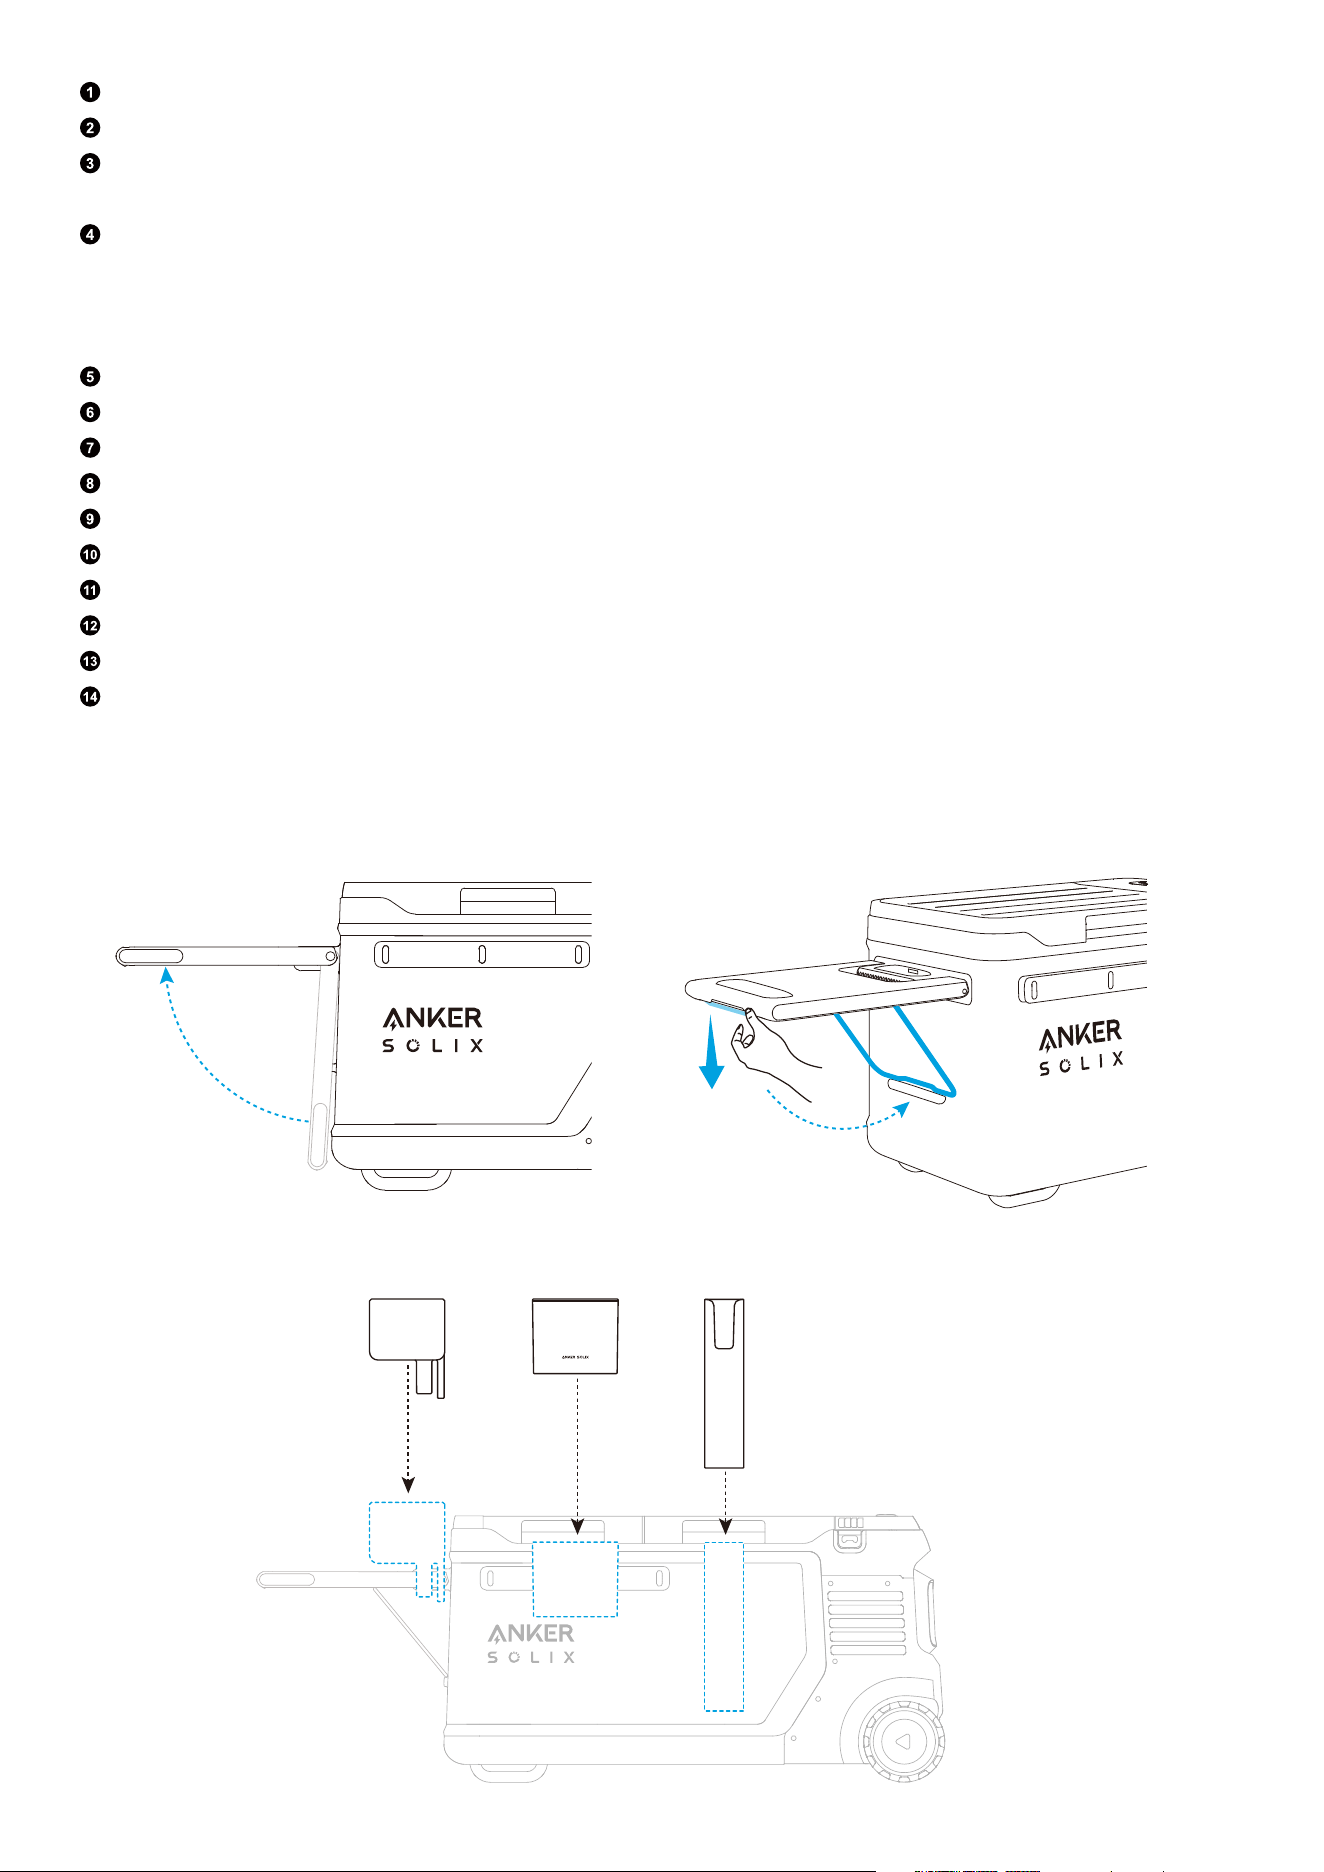
What's in the Box
Anker SOLIX EverFrost 2 58L
Electric Cooler
AC Adapter and Charging
Cable
Wheel Holder
(×2)
Battery Compartment
Drawer
Important Information
Car Charging Cable
Overview
11
12
13
14
6
7
8
9
10
1
2
3
4
5
02
Cooler Cover
Circulating Fan
Tray Table*
Note: Load capacity is 30 kg (66 lb).
Bar**
Note: For accessories such as rod and knife racks, tabletops, and cups, align the protruding strip at the
back of the accessory with the notch on the bar and insert it fully. Refer to the accessory instructions for
details. Accessories can be purchased separately from EverFrost 2.
Bottle Opener
Interactive Icon
Display
Handle
Main Battery
Acessory Container / Secondary Battery
Battery Cover
Input Ports
Wheel
Wheel Holder
*Using the tray table :
1. Li the tray table.
2. Apply moderate force to release the stand, then secure it into place.
**Using the bar :
03
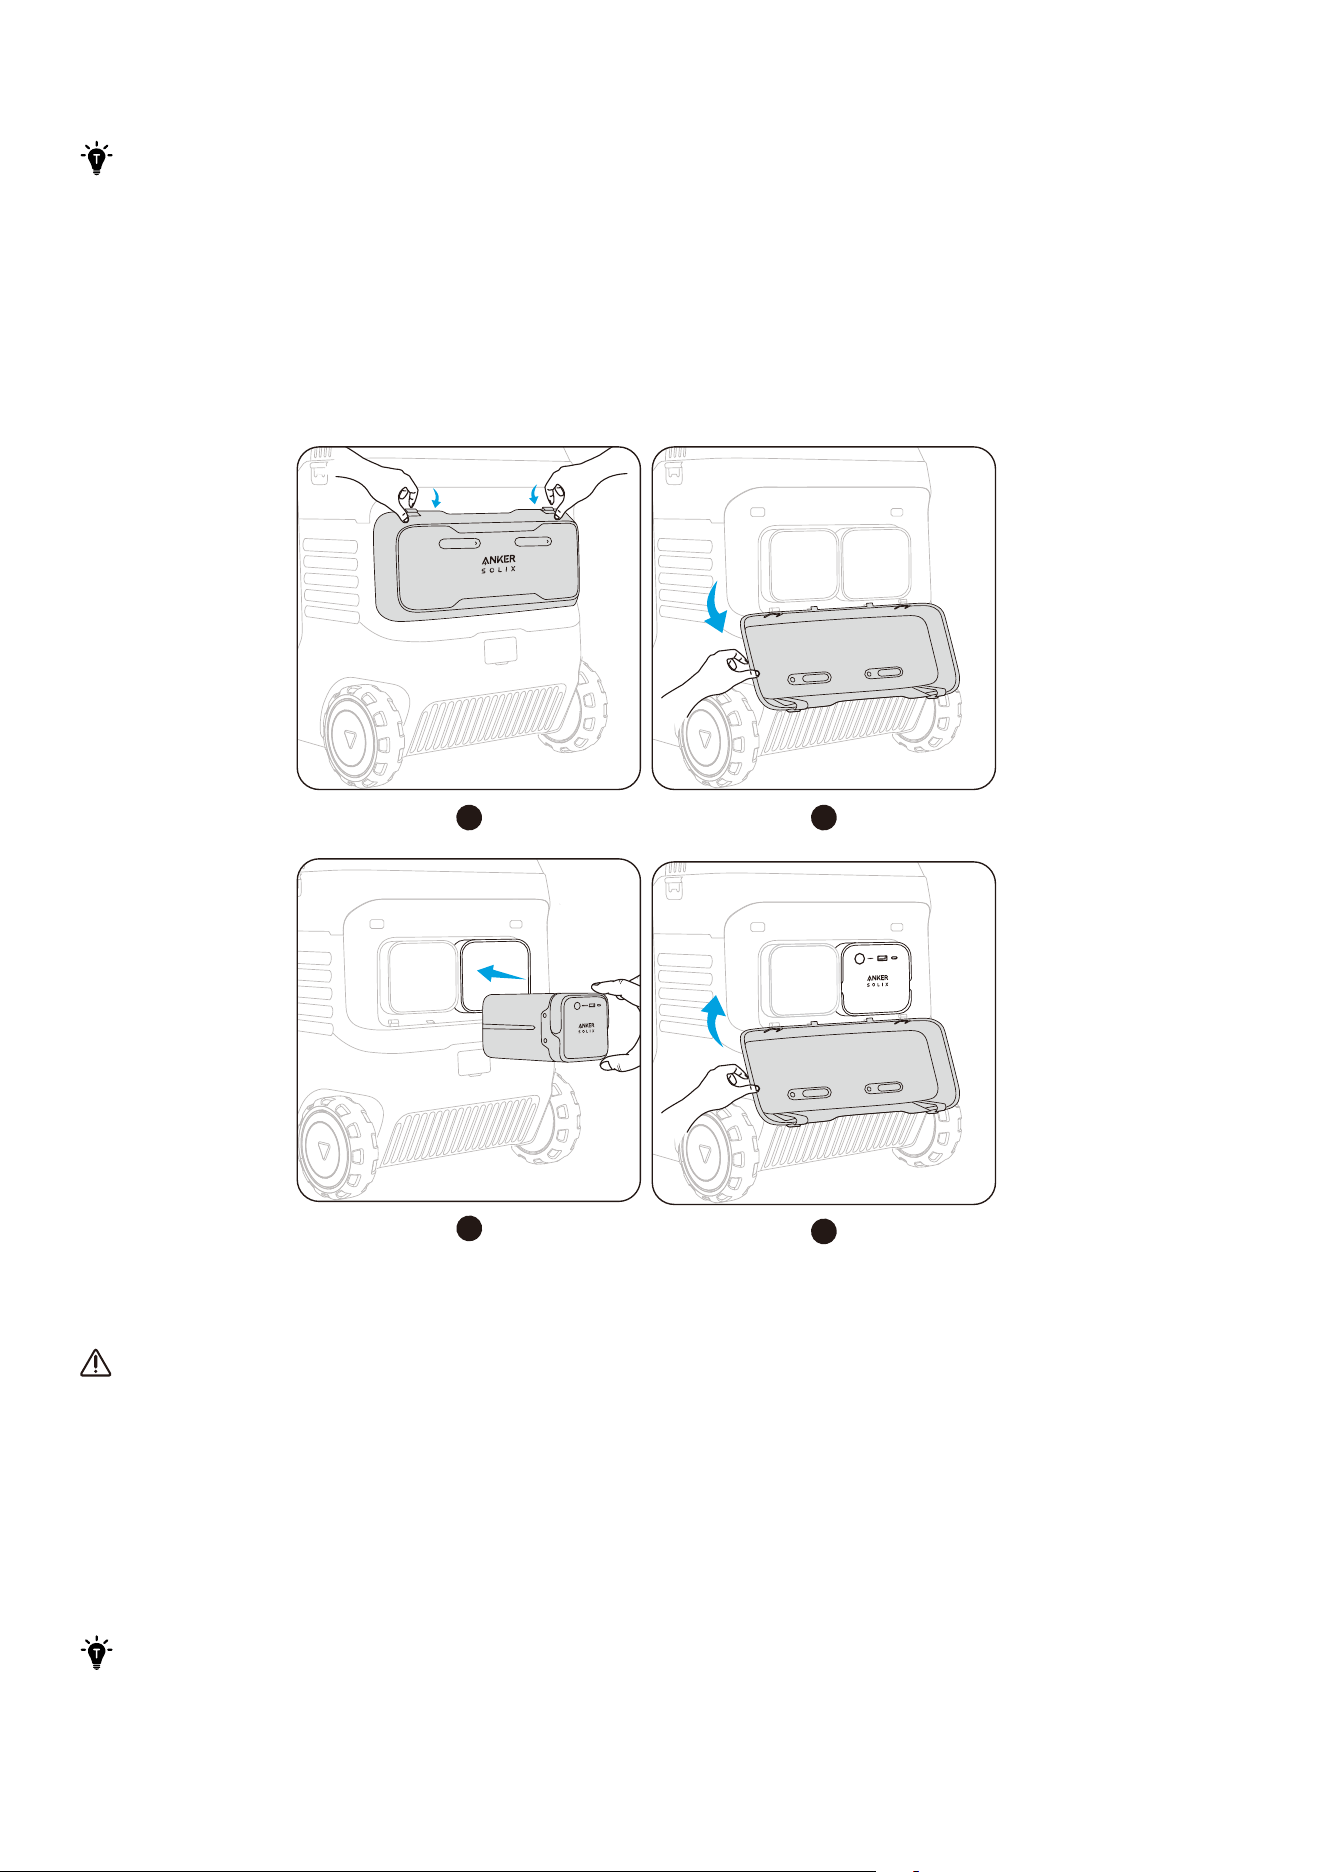
Installing the Battery
·
If there is already a battery in the cooler, please skip this step.
·
The cooler can be installed with one or two batteries. When using one battery, please install it
in the right battery compartment. Do not place any objects in the empty battery compartment
to avoid contamination of the internal battery contact pins, which could lead to poor battery
contact or a short circuit.
Open the battery cover. Place the battery inside, and you will hear a click when the installation is
successful. If the cooler is turned on, the screen will display "Battery Connected." Close the battery cover.
To remove the battery, li its handle.
1 2
3
4
Using Your Cooler
Important Tips for Using the Circulating Fan
1. Do not put your fingers or other objects into the fan cover.
2. Do not allow children to use this product without adult supervision.
3. When using the air-cooling function, do not cover the fan suace. Covering the fan suace leads to
poor motor peormance and reduced cooling.
4. Do not disassemble the fan cover. If you need to disassemble the fan cover under special
circumstances, make sure the cooler is powered o.
Powering On/O
·
To ensure reliable compressor operation aer long transportation, lay the cooler flat for three
hours before turning it on for the first time. Ensure the cooler is connected to the mains power
with a charger or has a battery inside before turning it on.
·
Before using the cooler for the first time, recharge it to activate.
04
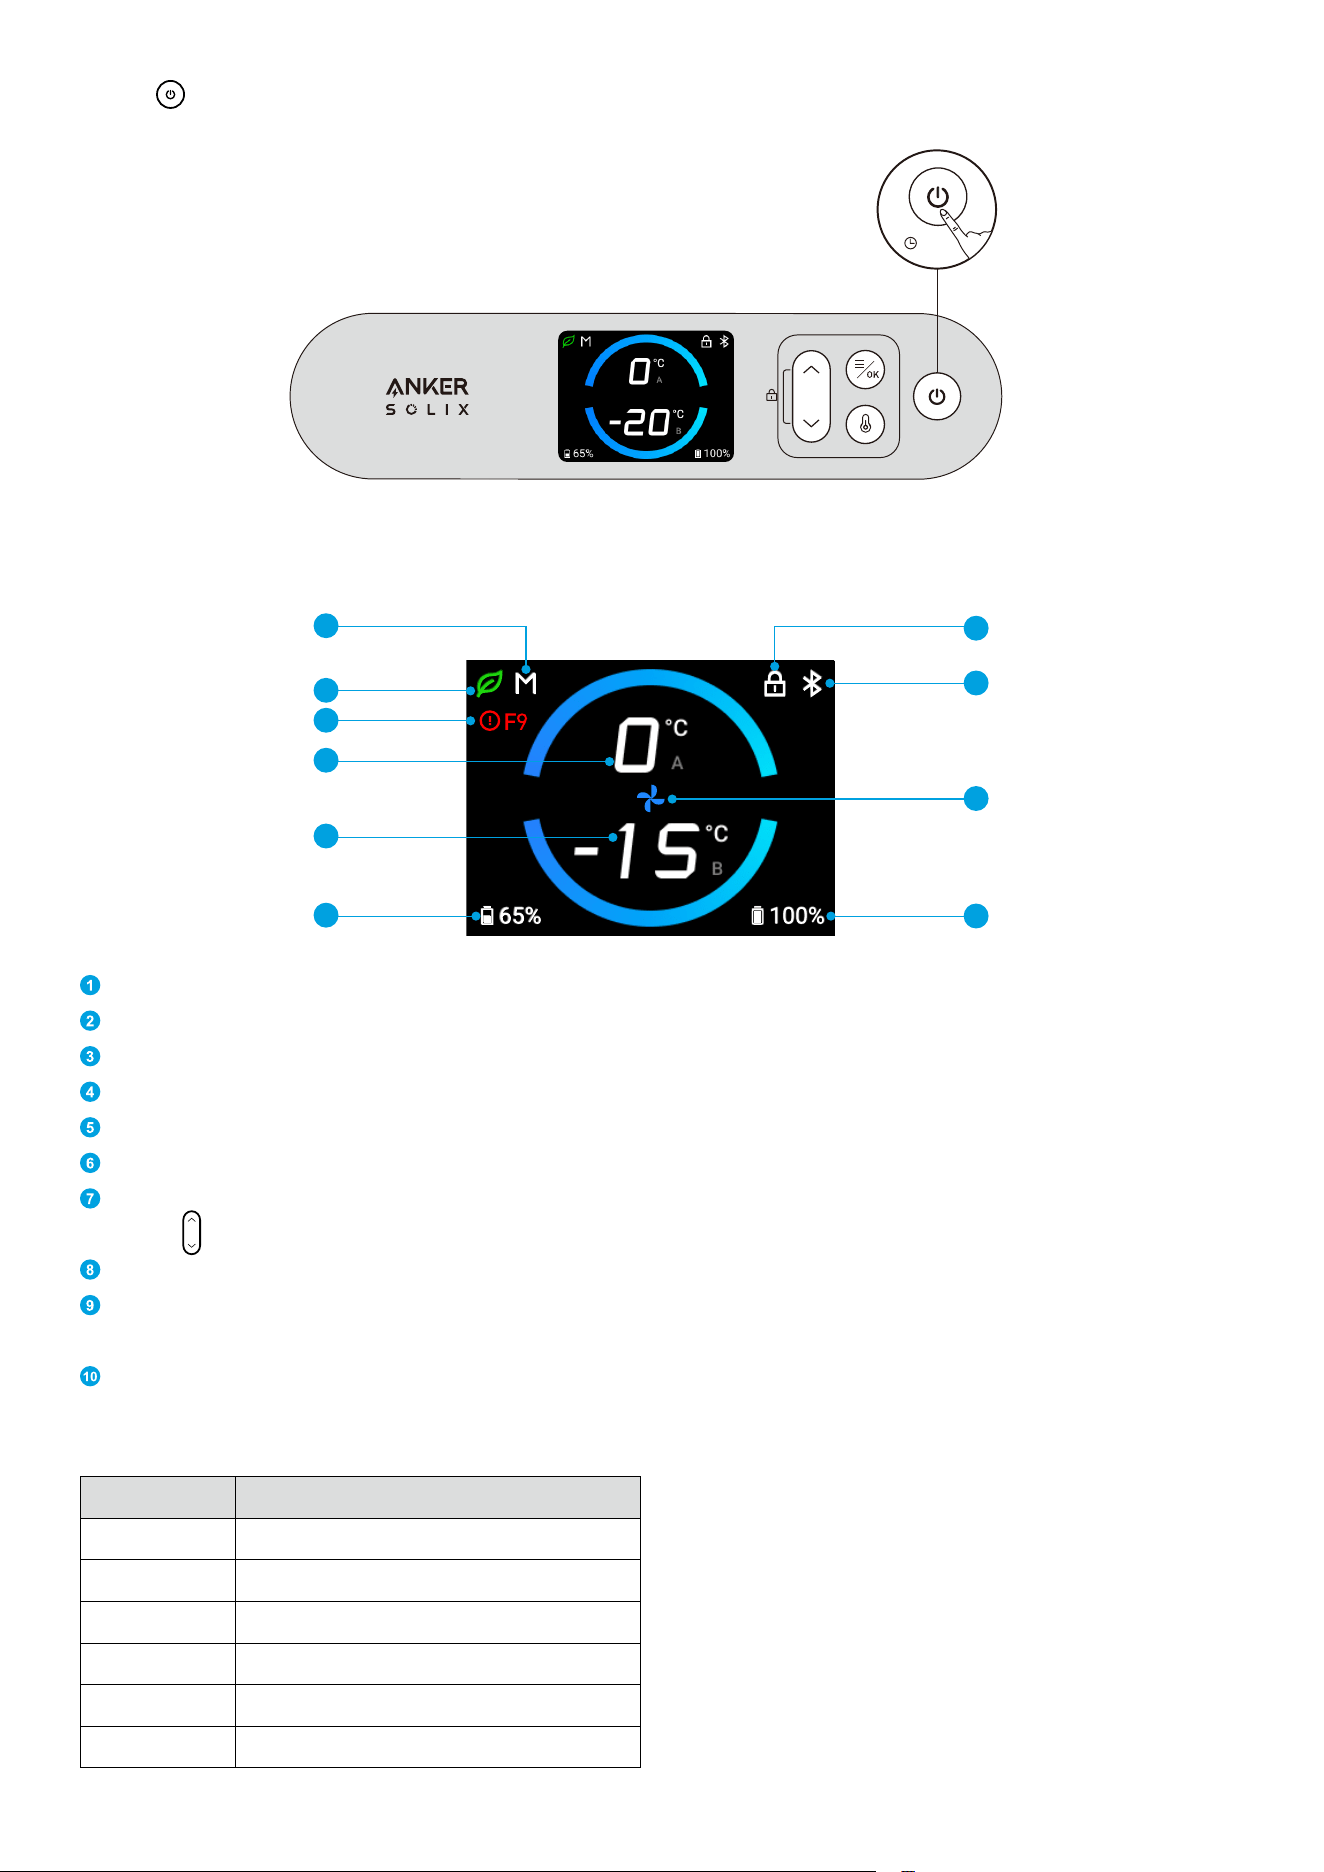
Press
< >
for 3 seconds to turn your cooler on or o.
3s
Screen Guide
9
10
8
7
1
2
3
4
5
6
Protective Voltage (M/H/L)
Eco/Smart/Max Mode
Fault Code*
Zone A Temperqture
Zone B Temperqture
Battery Level of Secondary Battery
Child Safety Lock
Press
< >
once to turn the child safety lock on/o.
Wi-Fi / Bluetooth
Max Mode
This icon only appears when the cooler is in Max mode.
Battery Level of Main Battery
*Fault codes and fault types :
Code Fault Type
F1 Motor MOS Short-Circuit
F2 Motor Input Overvoltage
F3 Motor Input Undervoltage
F4 Motor Overheating
F5 Motor Blocked / Motor Startup Failure
F6 Motor Soware Overcurrent
05
F7 Motor Fan Overcurrent
F8 Motor Overspeed
F9 Motor Blocked at Startup
FA Motor Phase Loss
FB Motor Voltage Drop
FC Communication Error Detected by MCU
FD Cooler Tilt Angle Greater Than 30°
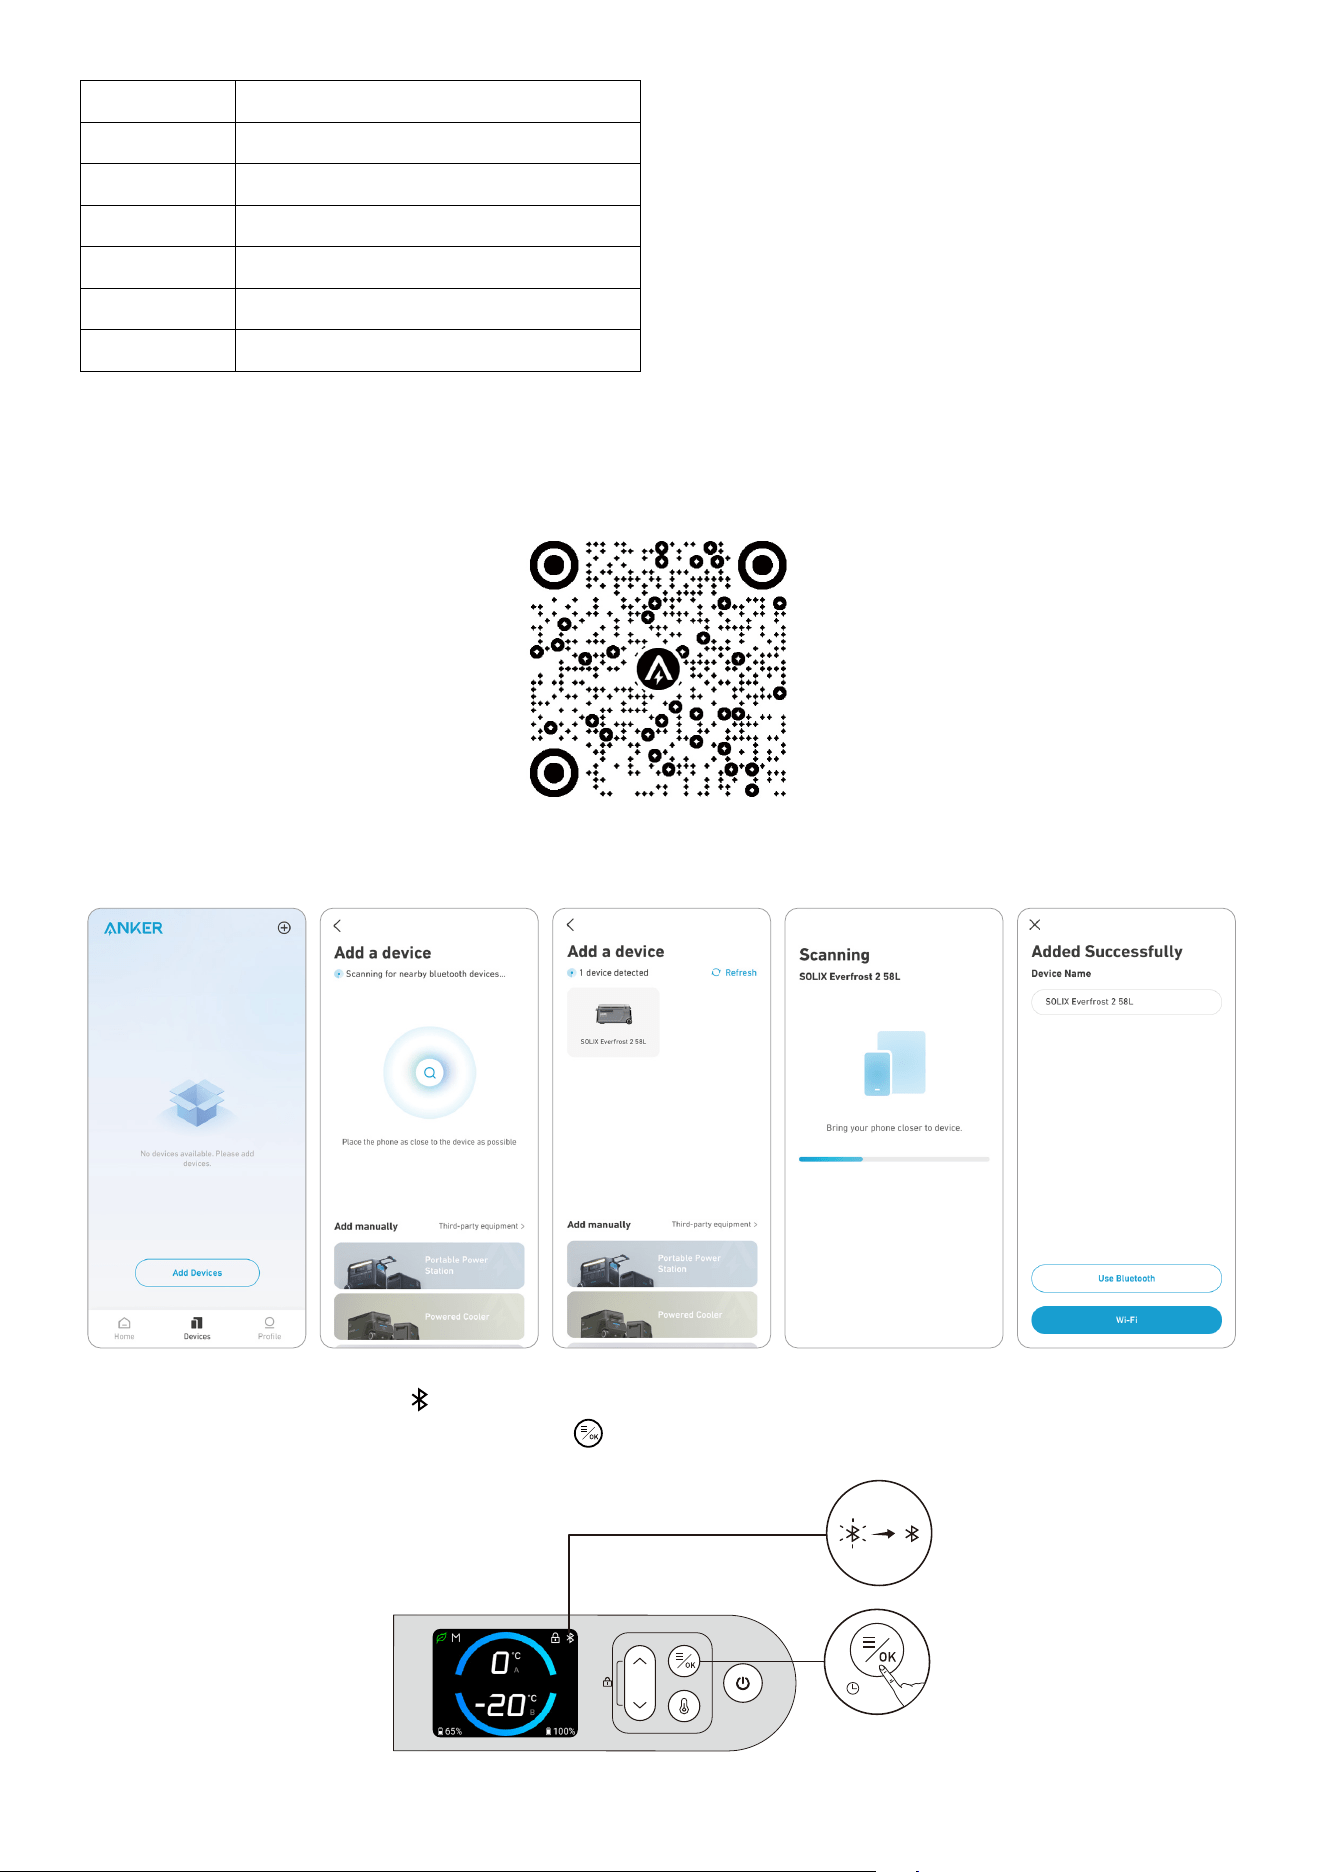
Using the App
Connecting the Cooler
1. Connect with Wi-Fi and download the app to remotely control your cooler.
2. Once the cooler is powered on, its Bluetooth will automatically activate. Next, turn on Bluetooth on your
phone and add the cooler in the app.
3. When added successfully, < > on the screen will turn steady white.
* If you want to turn on /o Bluetooth, press <
> for 2 seconds.
2s
06
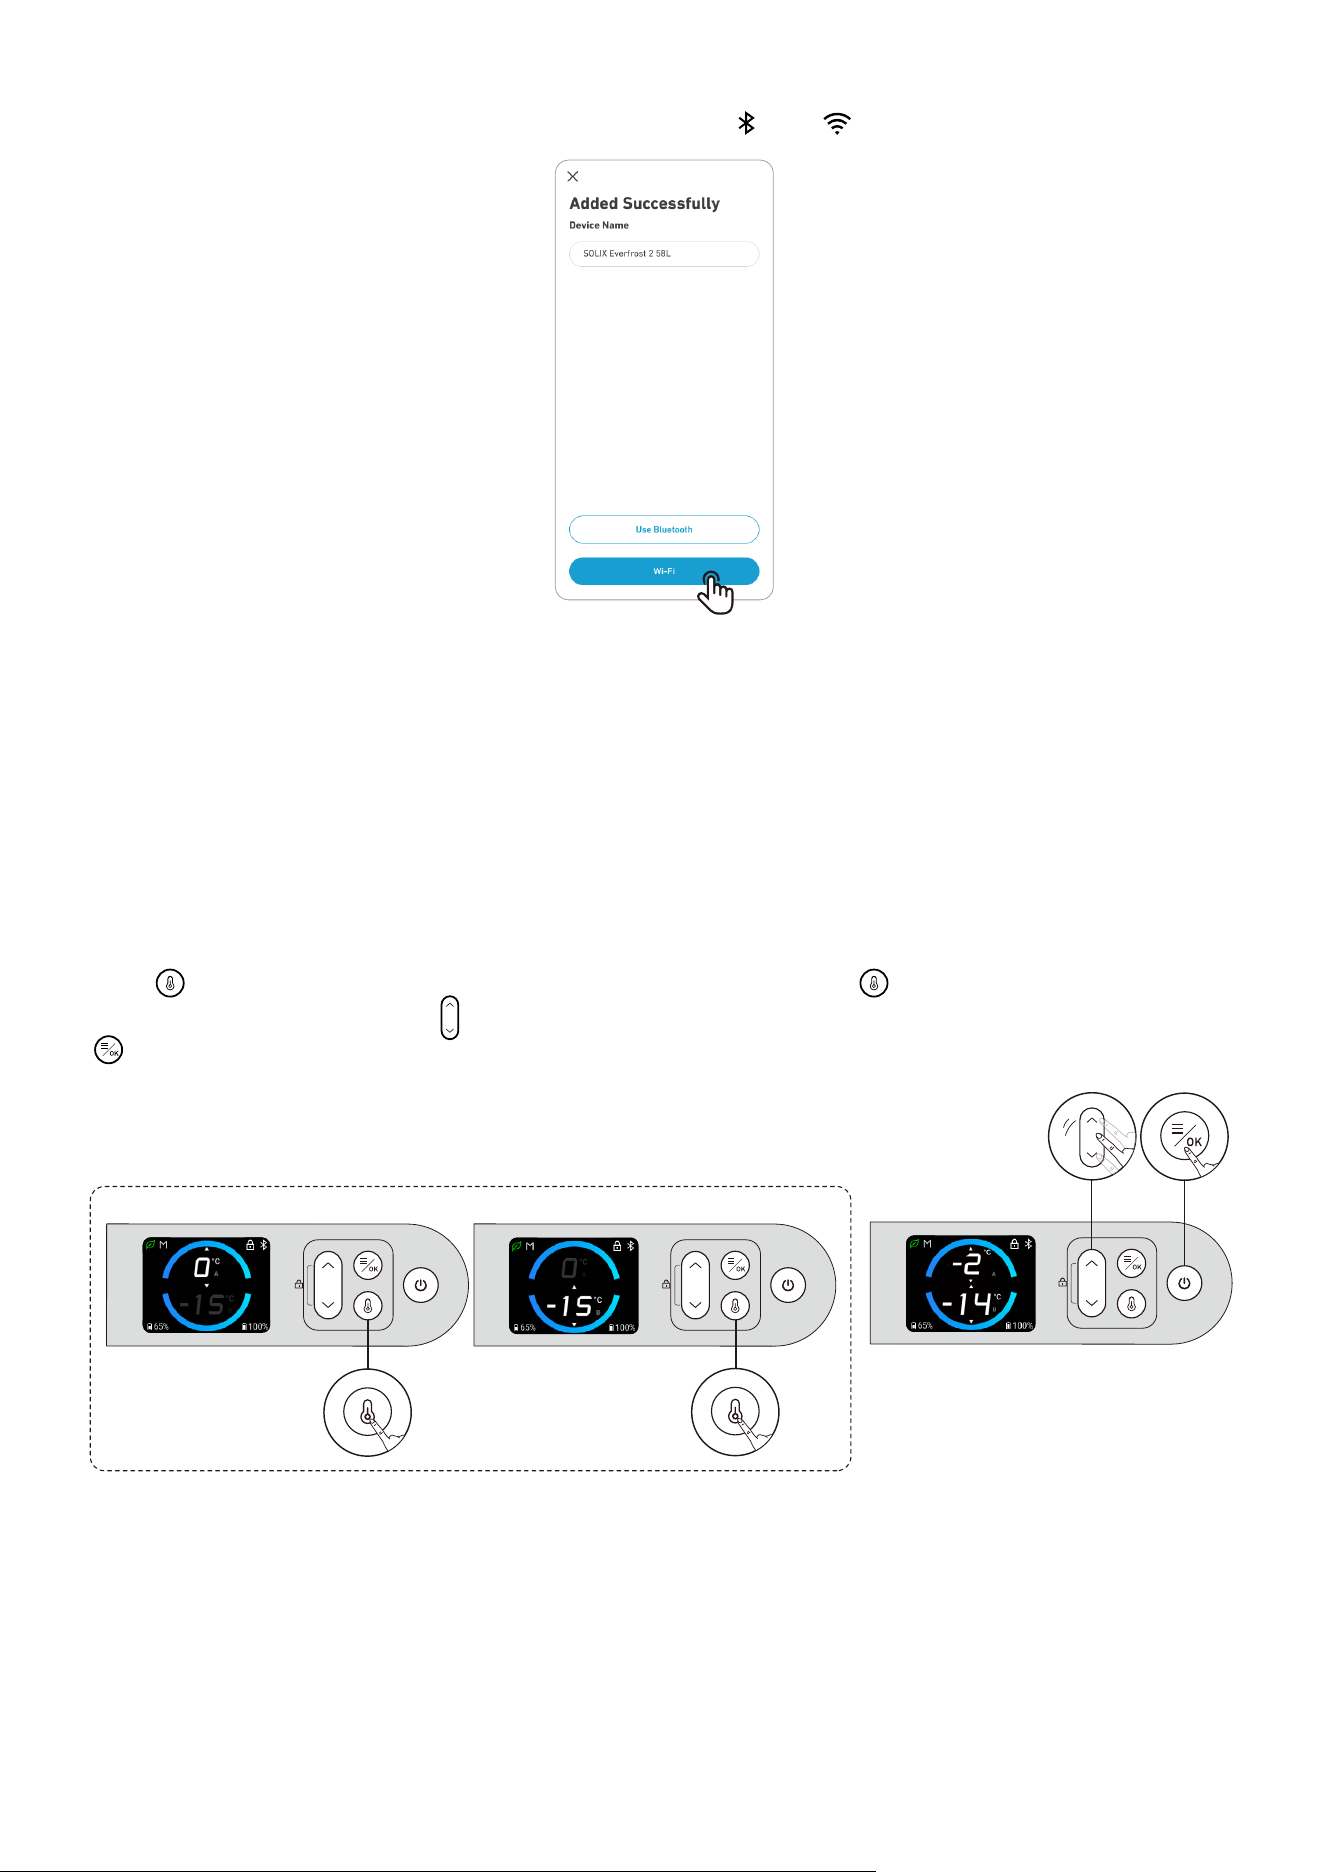
4. We recommend that you connect to Wi-Fi to use the cooler for a better experience. Aer connecting to
Wi-Fi successfully, the icon on the screen will change from <
> to < >.
Installing Firmware Updates
You will receive a notification before updates are installed. Your cooler must be charging and connected
to Wi-Fi or Bluetooth to complete the update. If there is a battery in the cooler, the battery level needs to
be above 1%.
Settings
You can set the temperature/zone/mode in the app or as follows.
Setting the Temperature
Press
< >
once to enter the temperature settings of the A zone. Press
< >
twice to enter the temperature
settings of the B zone. Then use
< >
to adjust the zone temperature. Confirm the temperature by pressing
<
>
.
×1
×2
07
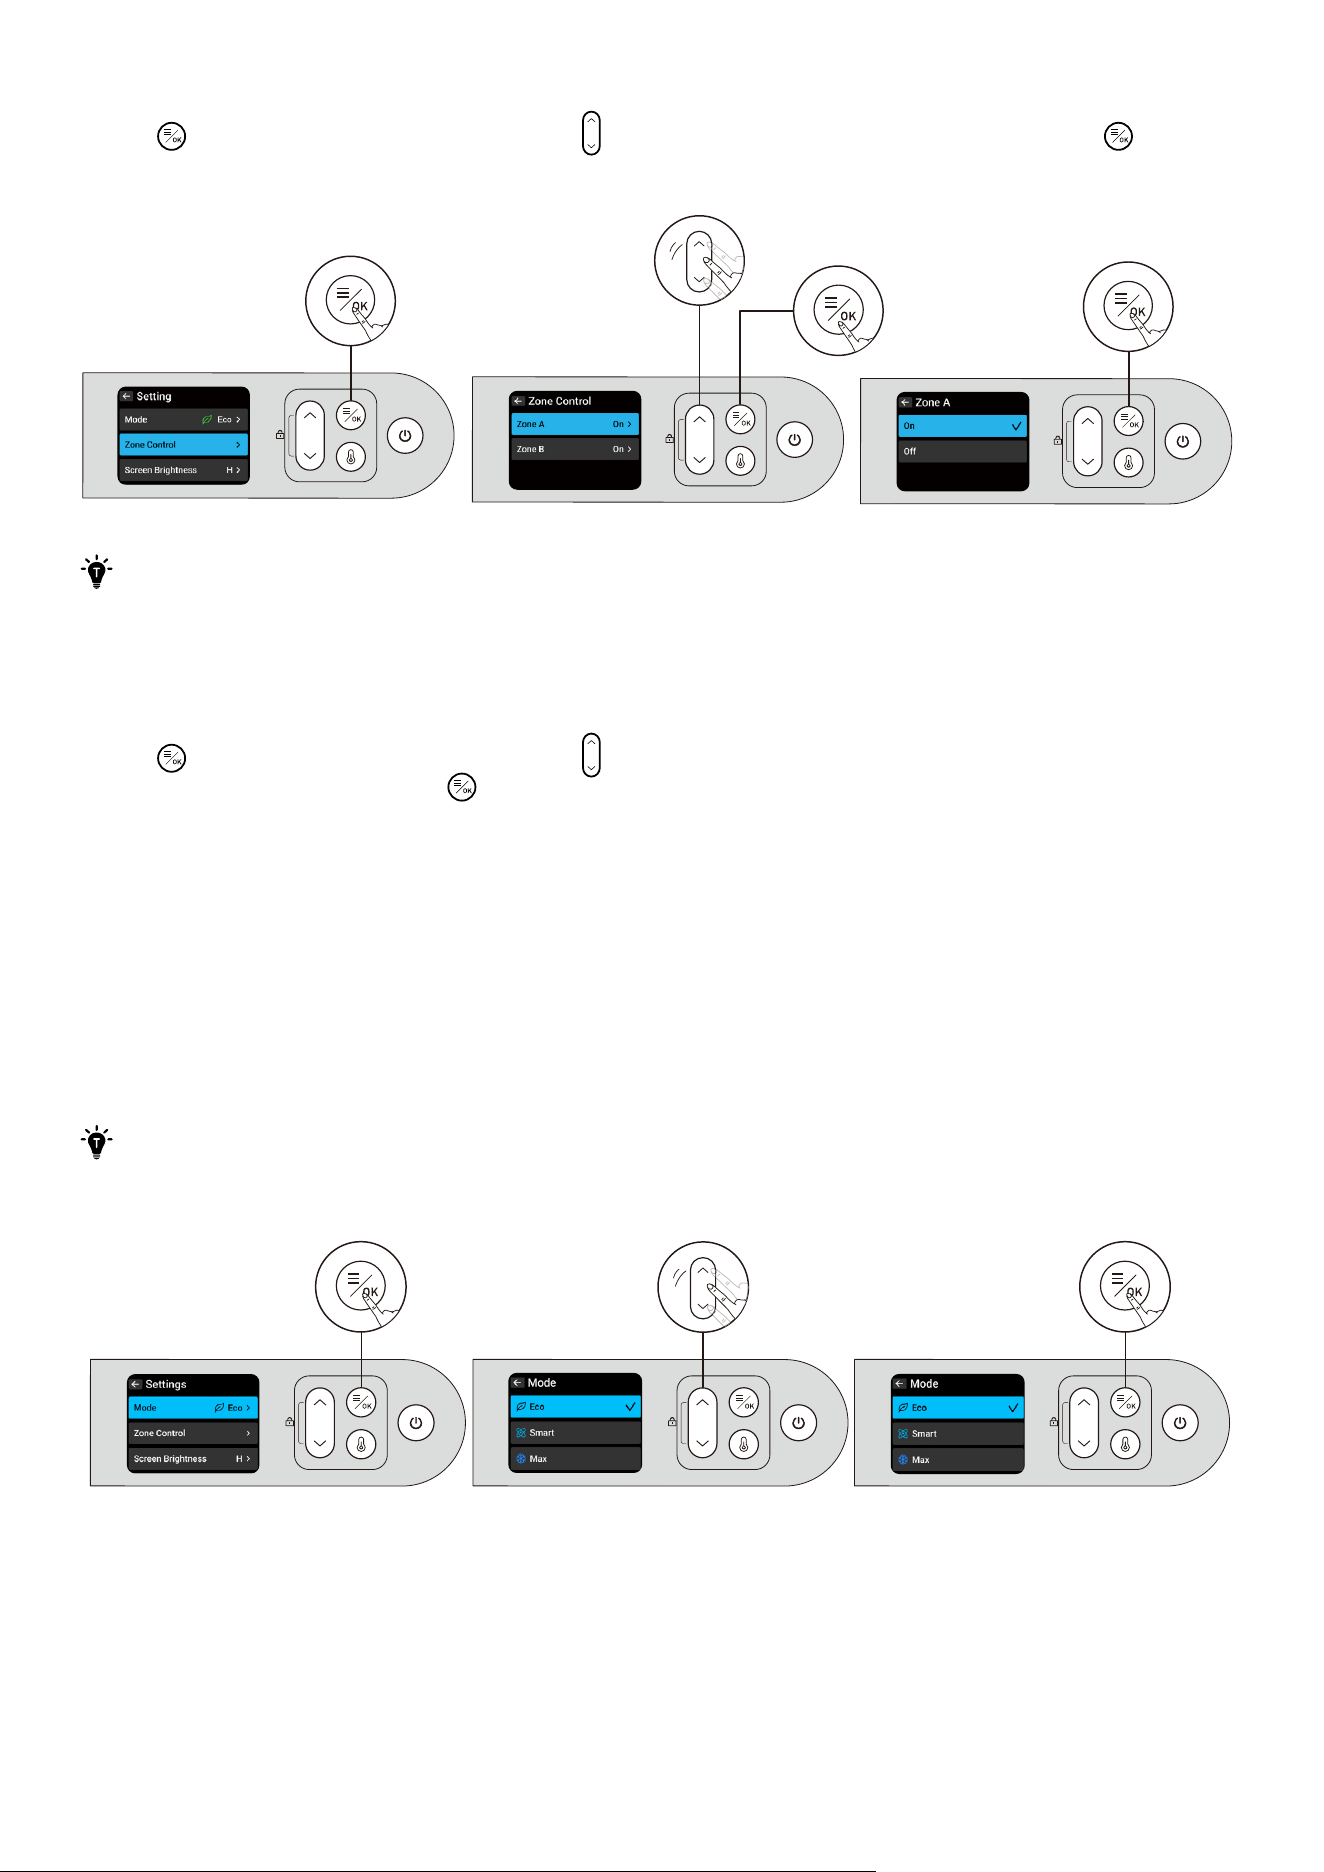
Setting the Zone
Press
< >
to enter the Settings page, press
< >
and <the OK button> to select zones. Press
< >
to turn
on/o the A and B zones.
·
Never set the temperature at 0°C and below when there are glass bottles in the cooler to prevent
the freezing of the contents which may cause the bottles to break and lead to injury.
·
Keep hot food until they have cooled down, otherwise the temperature inside the cooler will rise,
aecting the freshness of other food and increasing power consumption.
Setting the Mode
Press
< >
to enter the Settings page, press
< >
to navigate, and select Mode. Choose between Eco,
Smart, or Max modes and press
< >
to confirm.
·
Eco Mode: Eco mode is the quiestest mode and saves the most energy for the longest battery life. It
stops the air-cooling fan to conserve power, but cooling speed may not be as fast as other modes.
·
Smart Mode: Smart mode, also the default mode of the cooler, utilizes integrated Negative Temperature
Coeicient (NTC) sensors to detect both internal and external temperatures. This enables the system to
decide how the compressor and fan should function, achieving an optimal balance between cooling
peormance and energy eiciency.
·
Max Mode: When Max mode is activated, the cooling fan circulates cool air, and the system uses
maximum power for cooling. Activating Max mode will reduce battery life, so only use this mode as
needed.
To ensure safety during use, the cooling fan will automatically pause when you open the cooler
cover.
08
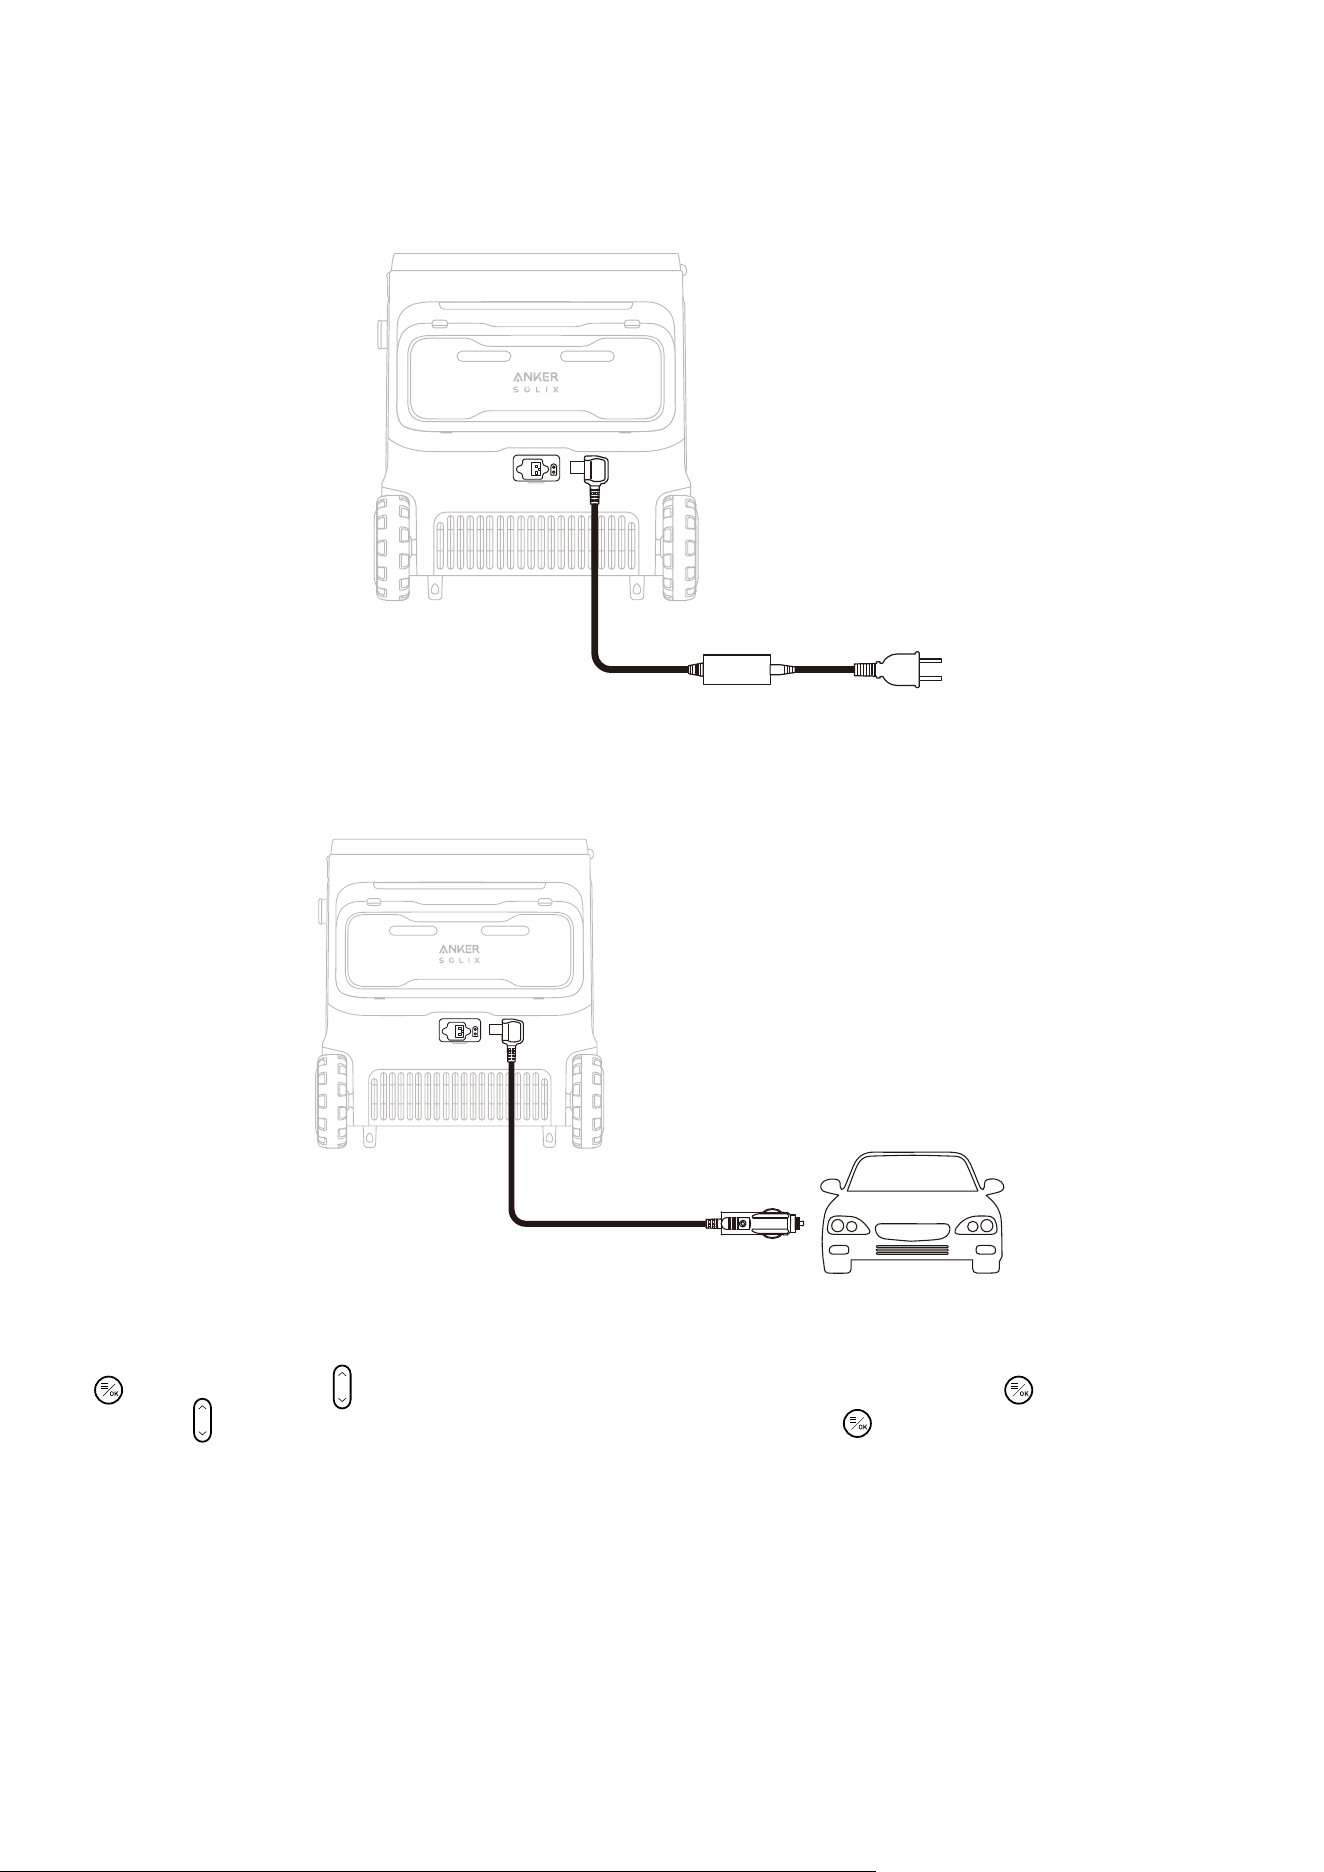
Powering Your Cooler
AC
Power the cooler by connecting to a wall outlet with the AC charging cable.
Car
Connect the cooler to a car's output port with the car charging cable.
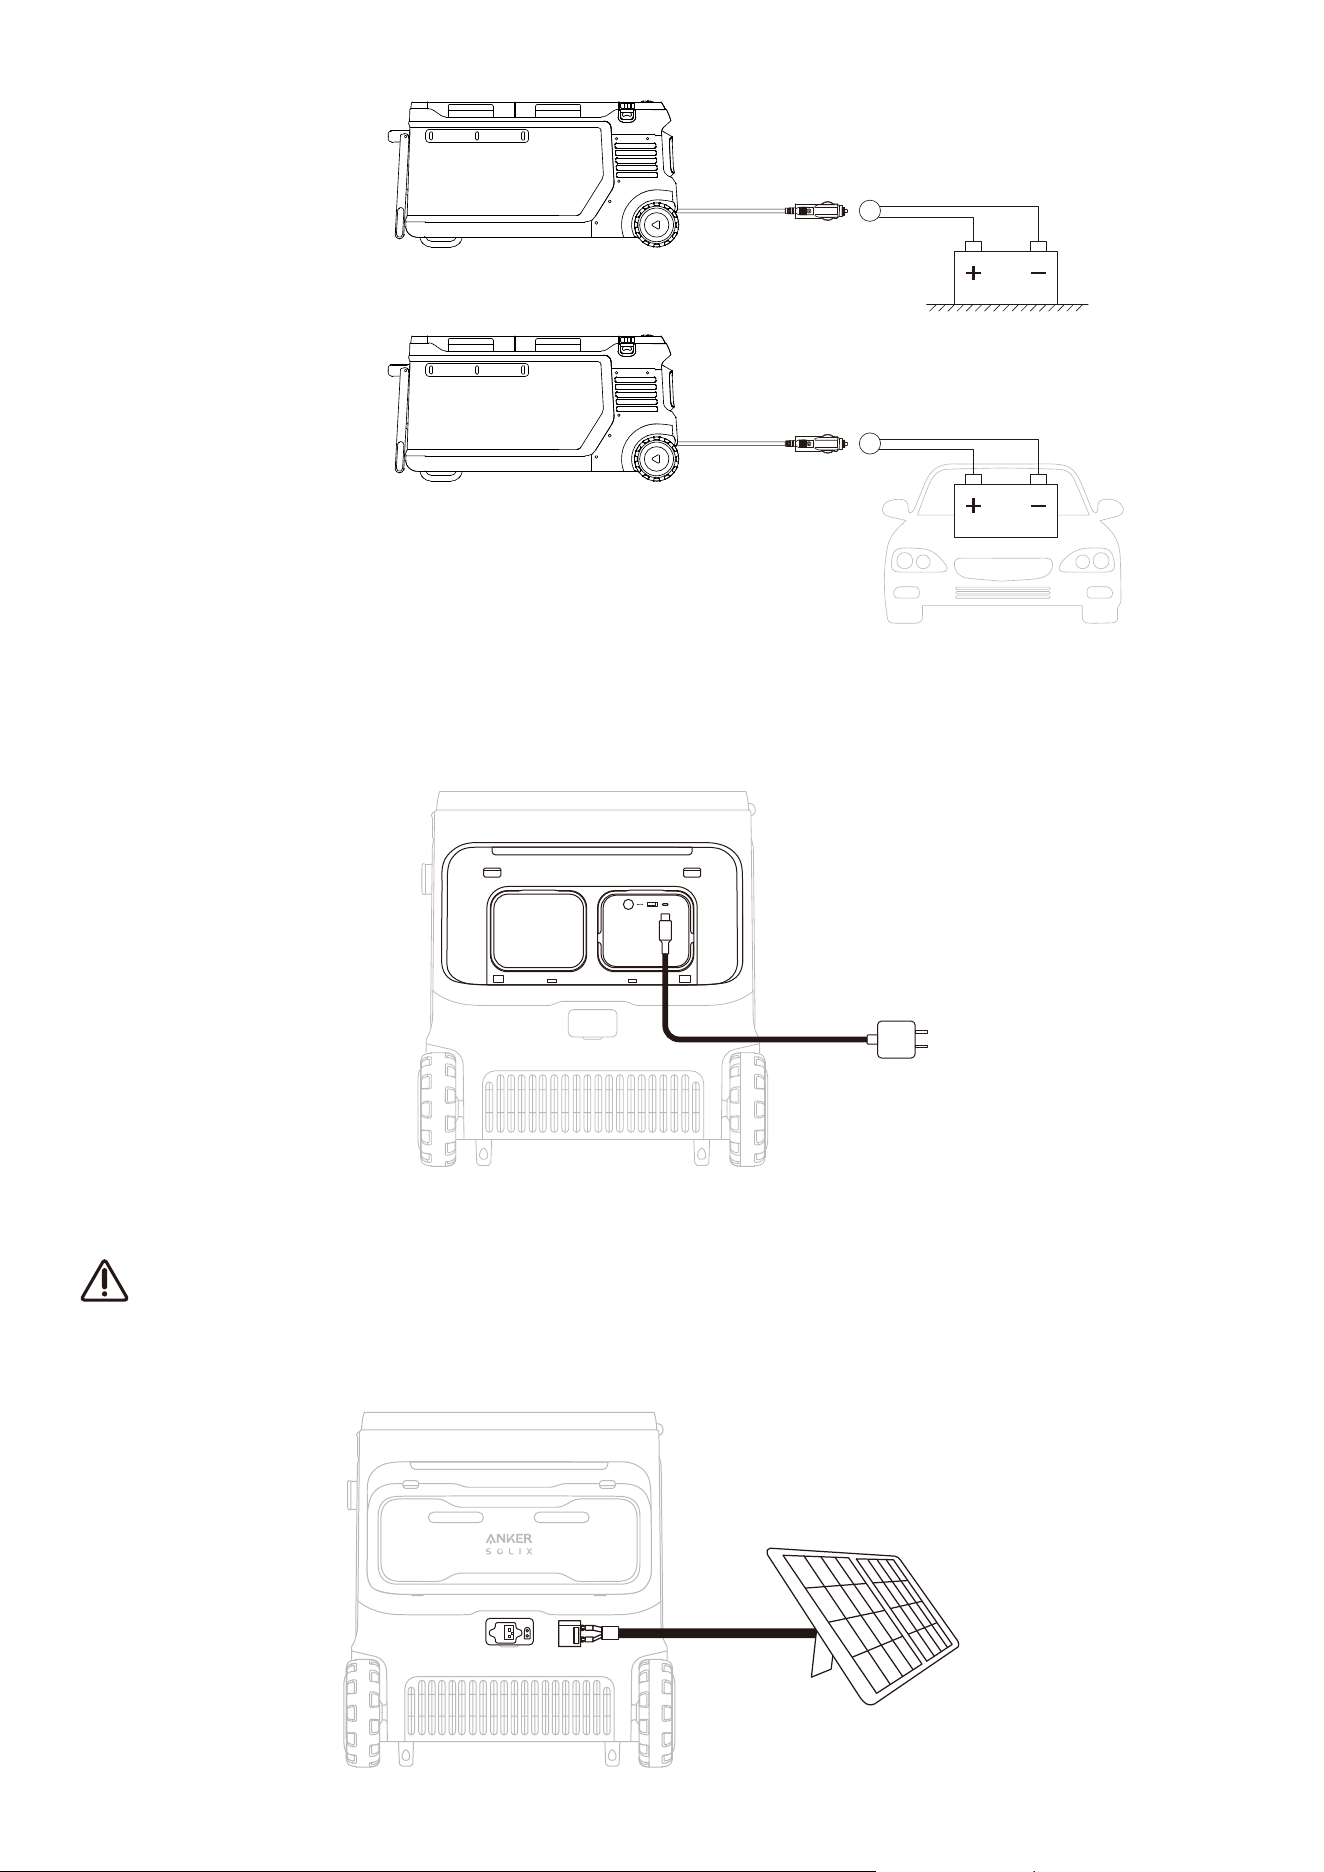
*Car Battery Protection Grades
The cooler supports three levels of battery protection. To modify the level of battery protection, press
< >
, and then press
< >
to choose Protective Voltage, and confirm it by pressing
< >
. Continue
pressing
< >
to choose between "L/M/H", and confirm the level with
< >
. When the cooler is connected
to a car battery (lead-acid battery), the cooler's battery protection prevents the car battery from over-
discharging.
If your cooler does not have a battery and the car's battery voltage is lower than your cooler's set value in
that scenario, your cooler will stop working.
If the car's battery voltage reaches the recovery value needed for battery protection, the cooler will return
to the power-on/o state it was in before the protection was activated.
If the cooler has a battery and the car battery's voltage is lower than the set value for that scenario, the
cooler switches to its own battery power and does not shut down automatically.
Note: When powering the cooler via a car, please disable the battery protection function to avoid
accidental triggering.
09
Low
Medium/High
USB-C
Note: The USB-C cable and charger are not included in the package.
Power the cooler by connecting it to a wall outlet with the USB-C cable.
Solar Panel (100W Max, 12V-30V)
·
This method of powering can only be used when the battery is in the cooler.
·
To protect the compressor's lifespan, the cooler will only be powered when the battery level is at
least 5% during solar charging input.
Power the cooler by connecting it to a solar panel with an XT60 cable.

10
Maintenance Best Practices
·
Turn o all power before cleaning to ensure safety.
·
Clean aer disassembly and then install in reverse order. Do not use excessive force during disassembly
to avoid damaging the components.
·
Use a so cloth with a neutral detergent for wiping. Do not use scouring powder, benzene, hydrochloric
acid, hot water, coarse brushes, abrasives, or hard objects to clean the cooler, as they may damage or
corrode it.
·
Regularly clean the interior and exterior of the cooler with a damp cloth.
·
Never use running water to wash the interior and exterior of the cooler or immerse it in water.
·
To ensure that the cooler is able to ventilate and dissipate heat, the air inlet and outlet must be free of
dust and dirt.
·
Aer cleaning the cooler, check the power cord for any damage or moisture, and ensure that the plug is
not overheated. Make sure everything is in order before connecting the power supply.
·
Before connecting the power, dry the cleaned cooler with a so dry cloth or sponge. This will prevent
water or other liquids from remaining in the electrical components, which may cause electric shock or
short circuit hazards.
·
We recommend placing the cooler on a level suace for use. When the tilt angle exceeds 30°, it will
aect the normal operation of the compressor.
FAQ
1. What type of battery does the cooler use?
LFP (Lithium Iron Phosphate) battery.
2. Can the cooler be connected to the solar panel without the battery?
No. The cooler must have a battery inside when a solar panel is connected. Otherwise, the cooler will
not work.
3. Is there anything to be aware of when using the cooler for the first time?
We recommend laying the cooler flat for three hours before turning it on for the first time.
4. When there is a battery in the cooler, does the external power supply give priority to charging the
battery or supplying power to the cooler?
The external power supply will prioritize charging the cooler.
5. Can the cooler be transported for long periods?
Yes. Make sure to lay the cooler flat for three hours before turning it on aer a long transportation.
6. What's the maximum load capacity of the bar?
It's 30 kg / 66.1 lb.
7. Is it normal to have a smell when I first use the cooler?
Yes. During production, foaming agents are used for better thermal insulation. These agents leave
a slight residual smell, but it's harmless. Before using it for the first time, place the cooler in a well-
ventilated area with the cover open.
11
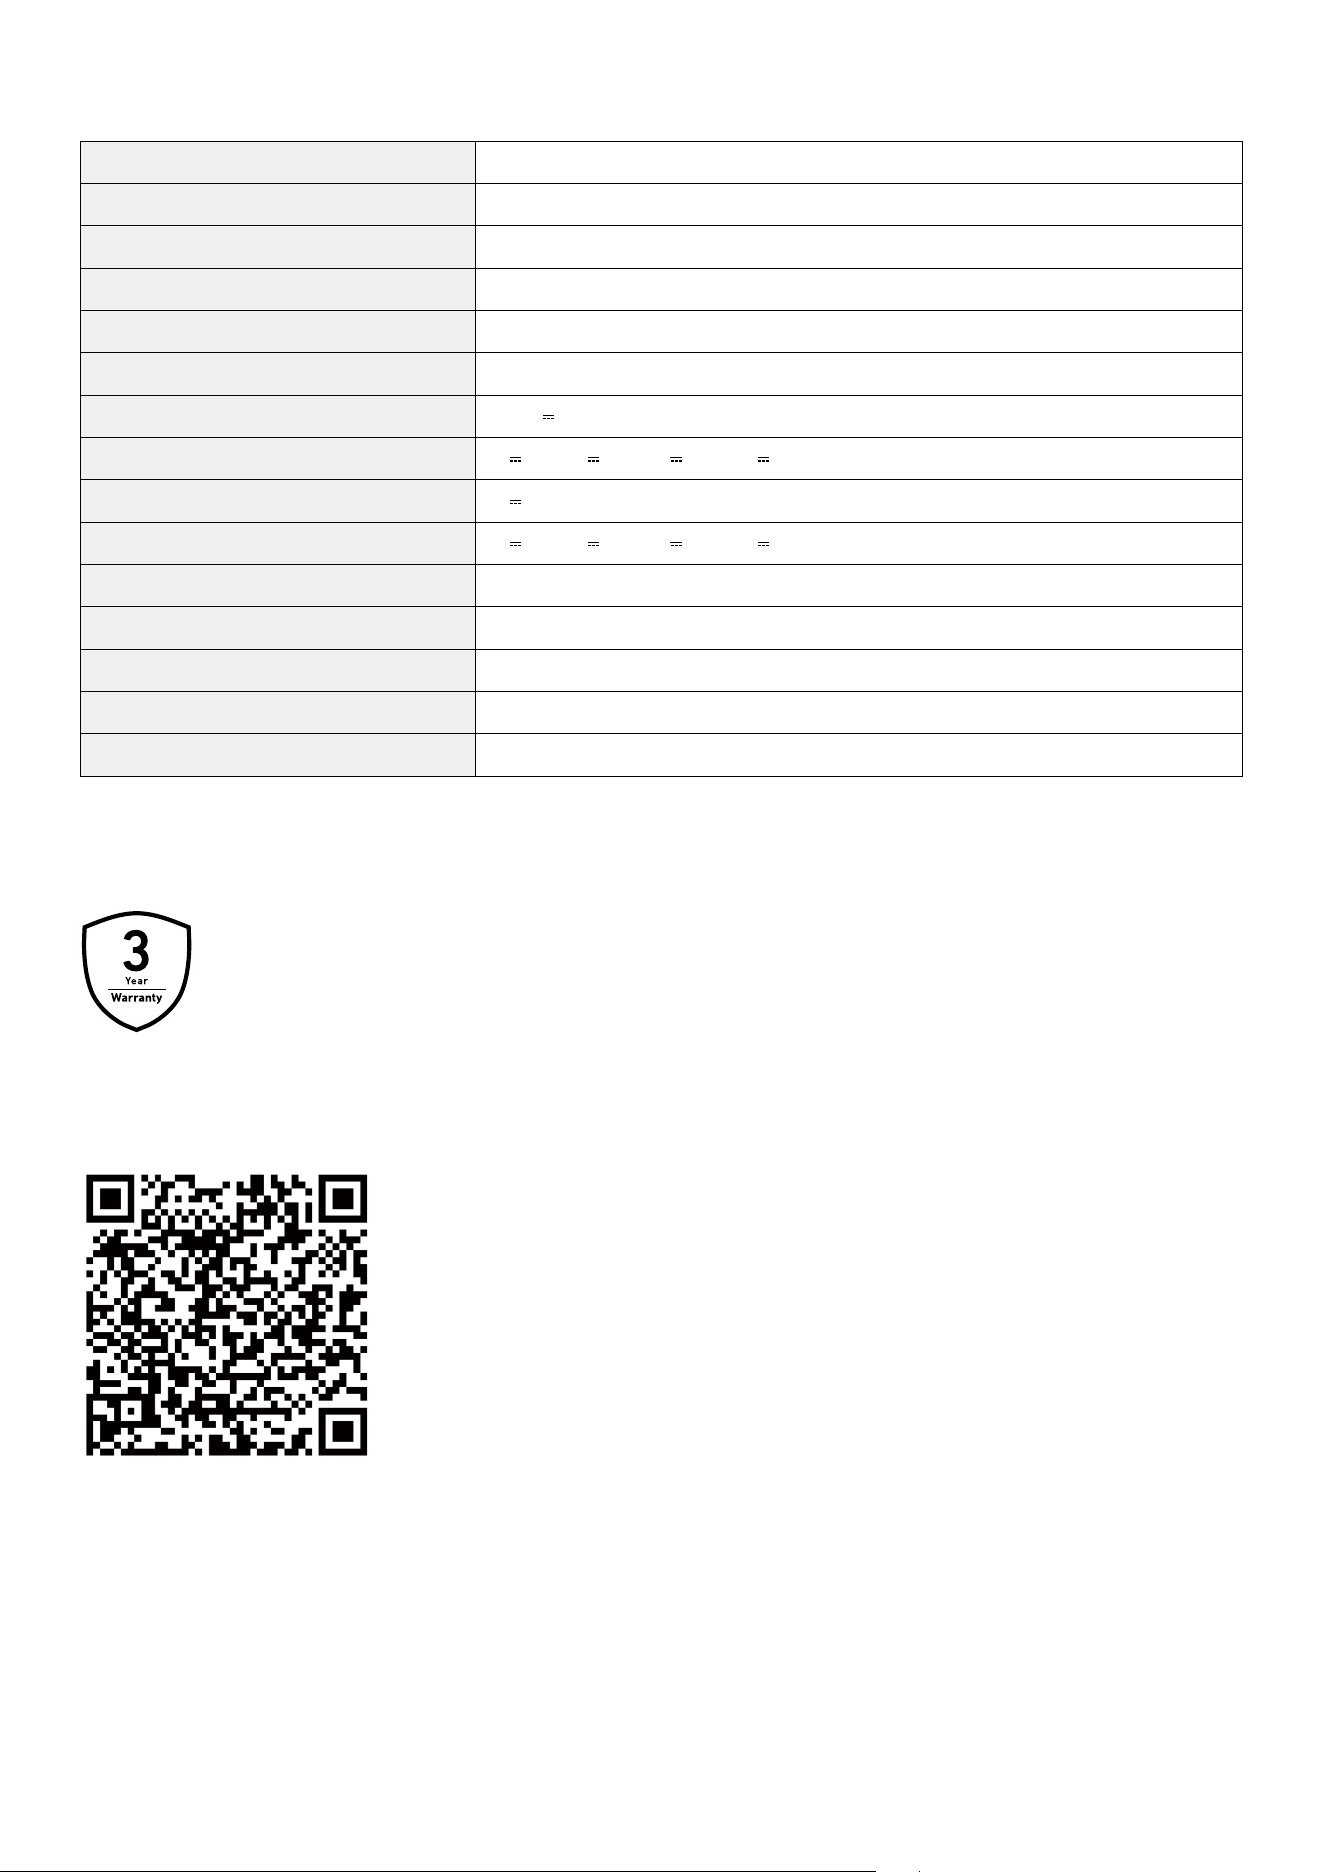
Specifications
Cell Capacity 288Wh
Capacity 58 L / 61 qt
Size 986 × 459 × 493 mm / 38.8 × 18.1 × 19.4"
Battery Compartments 2
Temperature Range -20°C to 20°C / -4°F to 68°F
AC Input Power (Charging) 95W Max
Solar Panel Input 12-30V
8.2A (100W Max)
USB-C1 Input 5V
3A / 9V
3A / 15V
3A / 20V
3A (60W Max)
USB-A Output 5V
2.4A (12W)
USB-C1 Output 5V
3A / 9V
3A / 15V
3A / 20V
3A (60W Max)
USB-A and USB-C1 Total Output 72W
Discharging Temperature -4°F-104°F / -20°C-40°C
Charging Temperature 32°F-104°F / 0°C-40°C
Waterproof IPX3
Net Weight 30 kg / 66 lb
Warranty Policy
3-Year Limited Warranty
Scan the QR code for detailed warranty information.