Quick Start Guide
CENTAUR OVERDRIVE
Legendary Transparent Boost Overdrive with Huge Dynamic Range,
Gain on Tap and Soft Clipping Germanium Diodes
V 0.0
2 3Quick Start GuideCENTAUR OVERDRIVE
(EN) Safety Instruction
1. Read these instructions.
2. Keep these instructions.
3. Heed all warnings.
4. Follow all instructions.
5. Do not use this apparatus near water.
6. Clean only with dry cloth.
7. Do not block any ventilation openings.
Install in accordance with the manufacturer’s
instructions.
8. Do not install near any heat sources
such as radiators, heat registers, stoves,
or other apparatus (including ampliers)
that produce heat.
9. Use only attachments/accessories
specied by the manufacturer.
10. Use only with the
cart, stand, tripod,
bracket, or table
specied by the
manufacturer, or sold
with the apparatus.
When a cart is used, use caution when
moving the cart/apparatus combination to
avoid injury from tip-over.
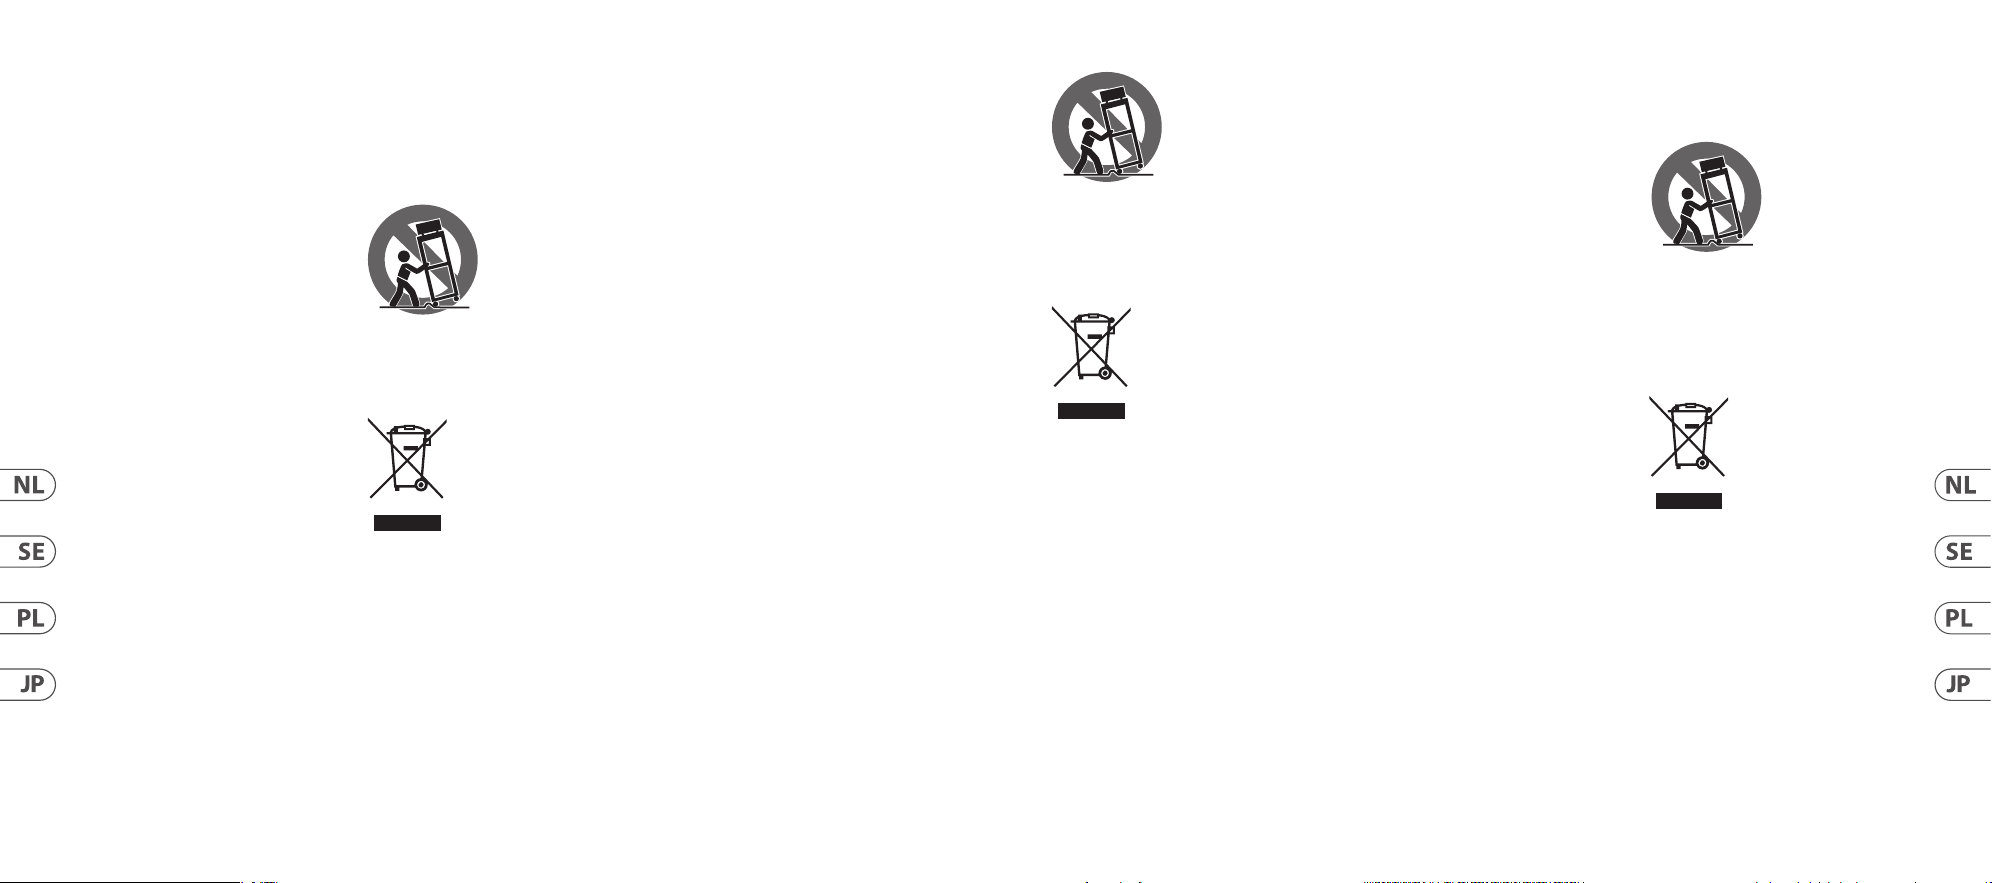
11. Correct disposal of this
product: This symbol
indicates that this product
must not be disposed of with
household waste, according
to the WEEE Directive
(2012/19/EU) and your national law. This
product should be taken to a collection
center licensed for the recycling of waste
electrical and electronic equipment (EEE).
The mishandling of this type of waste could
have a possible negative impact on the
environment and human health due to
potentially hazardous substances that are
generally associated with EEE. At the same
time, your cooperation in the correct
disposal of this product will contribute to the
ecient use of natural resources. For more
information about where you can take your
waste equipment for recycling, please
contact your local city oce, or your
household waste collection service.
12. Do not install in a conned space, such
as a book case or similar unit.
13. Do not place naked ame sources, such
as lighted candles, on the apparatus.
(ES)
Instrucción de seguridad
1. Lea las instrucciones.
2. Conserve estas instrucciones.
3. Preste atención a todas las
advertencias.
4. Siga todas las instrucciones.
5. No use este aparato cerca del agua.
6. Limpie este aparato con un paño seco.
7. No bloquee las aberturas de
ventilación. Instale el equipo de acuerdo con
las instrucciones del fabricante.
8. No instale este equipo cerca de
fuentes de calor tales como radiadores,
acumuladores de calor, estufas u otros
aparatos (incluyendo amplicadores) que
puedan producir calor.
9. Use únicamente los dispositivos o
accesorios especicados por el fabricante.
10. Use únicamente la
carretilla, plataforma,
trípode, soporte o mesa
especicados por el
fabricante o
suministrados junto con
el equipo. Al transportar el equipo, tenga
cuidado para evitar daños y caídas al
tropezar con algún obstáculo.
11. Cómo debe deshacerse
de este aparato: Este símbolo
indica que este aparato no
debe ser tratado como basura
orgánica, según lo indicado
en la Directiva WEEE
(2012/19/EU) y a las normativas aplicables en
su país. En lugar de ello deberá llevarlo al
punto limpio más cercano para el reciclaje de
sus elementos eléctricos / electrónicos (EEE).
Al hacer esto estará ayudando a prevenir las
posibles consecuencias negativas para el
medio ambiente y la salud que podrían ser
provocadas por una gestión inadecuada de
este tipo de aparatos. Además, el reciclaje de
materiales ayudará a conservar los recursos
naturales. Para más información acerca del
reciclaje de este aparato, póngase en
contacto con el Ayuntamiento de su ciudad o
con el punto limpio local.
12. No instale esta unidad en un espacio
muy reducido, tal como encastrada en una
librería o similar.
13. No coloque objetos con llama, como
una vela encendida, sobre este aparato.
(FR) Consignes de sécurité
1. Lisez ces consignes.
2. Conservez ces consignes.
3. Respectez tous les avertissements.
4. Respectez toutes les consignes
d’utilisation.
5. N’utilisez jamais l’appareil à proximité
d’un liquide.
6. Nettoyez l’appareil avec un chion sec.
7. Veillez à ne pas empêcher la bonne
ventilation de l’appareil via ses ouïes de
ventilation. Respectez les consignes du
fabricant concernant l’installation de
l’appareil.
8. Ne placez pas l’appareil à proximité
d’une source de chaleur telle qu’un
chauage, une cuisinière ou tout appareil
dégageant de la chaleur (y compris un ampli
de puissance).
9. Utilisez exclusivement des accessoires
et des appareils supplémentaires
recommandés par le fabricant.
10. Utilisez
exclusivement des
chariots, des diables,
des présentoirs, des
pieds et des surfaces de
travail recommandés
par le fabricant ou livrés avec le produit.
Déplacez précautionneusement tout chariot
ou diable chargé pour éviter d’éventuelles
blessures en cas de chute.
11. Mise au rebut
appropriée de ce produit: Ce
symbole indique qu’en accord
avec la directive DEEE
(2012/19/EU) et les lois en
vigueur dans votre pays, ce
produit ne doit pas être jeté avec les déchets
ménagers. Ce produit doit être déposé dans
un point de collecte agréé pour le recyclage
des déchets d’équipements électriques et
électroniques (EEE). Une mauvaise
manipulation de ce type de déchets pourrait
avoir un impact négatif sur l’environnement
et la santé à cause des substances
potentiellement dangereuses généralement
associées à ces équipements. En même
temps, votre coopération dans la mise au
rebut de ce produit contribuera à l’utilisation
ecace des ressources naturelles. Pour plus
d’informations sur l’endroit où vous pouvez
déposer vos déchets d’équipements pour le
recyclage, veuillez contacter votre mairie ou
votre centre local de collecte des déchets.
12. N’installez pas l’appareil dans un
espace conné tel qu’une bibliothèque ou
meuble similaire.
13. Ne placez jamais d’objets enammés,
tels que des bougies allumées, sur l’appareil.
(DE) Wichtige
Sicherheitshinweise
1. Lesen Sie diese Hinweise.
2. Bewahren Sie diese Hinweise auf.
3. Beachten Sie alle Warnhinweise.
4. Befolgen Sie alle Bedienungshinweise.
5. Betreiben Sie das Gerät nicht in der
Nähe
von Wasser.
6. Reinigen Sie das Gerät mit einem
trockenen Tuch.
7. Blockieren Sie nicht die
Belüftungsschlitze. Beachten Sie beim
Einbau des Gerätes
die Herstellerhinweise.
8. Stellen Sie das Gerät nicht in der
Nähe von Wärmequellen auf. Solche
Wärmequellen sind z.
B. Heizkörper, Herde oder andere Wärme
erzeugende Geräte (auch Verstärker).
9. Verwenden Sie nur Zusatzgeräte/
Zubehörteile, die laut Hersteller geeignet
sind.
4 5Quick Start GuideCENTAUR OVERDRIVE
10. Verwenden Sie
nur Wagen,
Standvorrichtungen
,
Stative, Halter oder
Tische, die vom
Hersteller benannt oder
im Lieferumfang des Geräts enthalten sind.
Falls Sie einen Wagen benutzen, seien Sie
vorsichtig beim Bewegen der
Wagen- Gerätkombination, um Verletzungen
durch Stolpern zu vermeiden.
11. Korrekte Entsorgung
dieses Produkts: Dieses
Symbol weist darauf hin, das
Produkt entsprechend der
WEEE Direktive (2012/19/EU)
und der jeweiligen
nationalen Gesetze nicht zusammen mit
Ihren Haushaltsabfällen zu entsorgen.
DiesesProdukt sollte bei einer autorisierten
Sammelstelle für Recycling elektrischer und
elektronischer Geräte (EEE) abgegeben
werden. Wegen bedenklicher Substanzen,
diegenerell mit elektrischen und
elektronischen Geräten in Verbindung
stehen, könnte eine unsachgemäße
Behandlung dieser Abfallart eine negative
Auswirkung auf Umwelt und Gesundheit
haben. Gleichzeitig gewährleistet Ihr Beitrag
zur richtigen Entsorgung dieses Produkts die
eektive Nutzung natürlicher Ressourcen.
Fürweitere Informationen zur Entsorgung
Ihrer Geräte bei einer Recycling-Stelle
nehmen Sie bitte Kontakt zum zuständigen
städtischen Büro, Entsorgungsamt oder zu
Ihrem Haushaltsabfallentsorgerauf.
12. Installieren Sie das Gerät nicht in
einer beengten Umgebung, zum Beispiel
Bücherregal oder ähnliches.
13. Stellen Sie keine Gegenstände mit
oenen Flammen, etwa brennende Kerzen,
auf das Gerät.
(PT) Instruções de Seguranç
Importantes
1. Leia estas instruções.
2. Guarde estas instruções.
3. Preste atenção a todos os avisos.
4. Siga todas as instruções.
5. Não utilize este dispositivo perto de
água.
6. Limpe apenas com um pano seco.
7. Não obstrua as entradas de ventilação.
Instale de acordo com as instruções do
fabricante.
8. Não instale perto de quaisquer fontes
de calor tais como radiadores, bocas de ar
quente, fogões de sala ou outros aparelhos
(incluindo amplicadores) que produzam
calor.
9. Utilize apenas ligações/acessórios
especicados pelo fabricante.
10. Utilize apenas com
o carrinho, estrutura,
tripé, suporte, ou mesa
especicados pelo
fabricante ou vendidos
com o dispositivo.
Quando utilizar um carrinho, tenha cuidado
ao mover o conjunto carrinho/dispositivo
para evitar danos provocados pela
terpidação.
11. Correcta eliminação
deste produto: este símbolo
indica que o produto não deve
ser eliminado juntamente
com os resíduos domésticos,
segundo a Directiva REEE
(2012/19/EU) e a legislação nacional. Este
produto deverá ser levado para um centro de
recolha licenciado para a reciclagem de
resíduos de equipamentos eléctricos e
electrónicos (EEE). O tratamento incorrecto
deste tipo de resíduos pode ter um eventual
impacto negativo no ambiente e na saúde
humana devido a substâncias
potencialmente perigosas que estão
geralmente associadas aos EEE. Ao mesmo
tempo, a sua colaboração para a eliminação
correcta deste produto irá contribuir para a
utilização eciente dos recursos naturais.
Para mais informação acerca dos locais onde
poderá deixar o seu equipamento usado para
reciclagem, é favor contactar os serviços
municipais locais, a entidade de gestão de
resíduos ou os serviços de recolha de
resíduos domésticos.
12. Não instale em lugares connados, tais
como estantes ou unidades similares.
13. Não coloque fontes de chama, tais
como velas acesas, sobre o aparelho.
(IT) Istruzioni di sicurezza
importanti
1. Leggere queste istruzioni.
2. Conservare queste istruzioni.
3. Prestare attenzione a tutti gli avvisi.
4. Applicare tutte le istruzioni.
5. Non utilizzare questo dispositivo vicino
l'acqua.
6. Pulire esclusivamente con un panno
asciutto.
7. Non bloccare le aperture di
ventilazione. Installare in conformità con le
istruzioni del produttore.
8. Non installare vicino a fonti di calore
come radiatori, termoregolatori, stufe o
altri apparecchi (inclusi amplicatori) che
producono calore.
9. Utilizzare esclusivamente dispositivi/
accessori specicati dal produttore.
10. Utilizzare solo
carrelli, supporti,
treppiedi, stae o tavoli
indicati dal produttore o
venduti con
l'apparecchio.
Utilizzando un carrello, prestare attenzione
quando si sposta la combinazione carrello/
apparecchio per evitare lesioni dovute al
ribaltamento.
11. Smaltimento corretto
di questo prodotto: questo
simbolo indica che questo
dispositivo non deve essere
smaltito insieme ai riuti
domestici, secondo la Direttiva RAEE
(2012/19 / UE) e la vostra legislazione
nazionale. Questo prodotto deve essere
portato in un centro di raccolta autorizzato
per il riciclaggio di riuti di apparecchiature
elettriche ed elettroniche (RAEE). La cattiva
gestione di questo tipo di riuti potrebbe
avere un possibile impatto negativo
sull'ambiente e sulla salute umana a causa di
sostanze potenzialmente pericolose che
sono generalmente associate alle
apparecchiature elettriche ed elettroniche.
Nello stesso tempo la vostra collaborazione
al corretto smaltimento di questo prodotto
contribuirà all'utilizzo eciente delle risorse
naturali. Per ulteriori informazioni su dove è
possibile trasportare le apparecchiature per
il riciclaggio vi invitiamo a contattare l'ucio
comunale locale o il servizio di raccolta dei
riuti domestici.
12. Non installare in uno spazio ristretto,
come in una libreria o in una struttura simile.
13. Non collocare sul dispositivo fonti di
amme libere, come candele accese.
(NL) Belangrijke
veiligheidsvoorschriften
1. Lees deze voorschriften.
2. Bewaar deze voorschriften.
3. Neem alle waarschuwingen in acht.
4. Volg alle voorschriften op.
5. Gebruik dit apparaat niet in de buurt
van water.
6. Reinig het uitsluitend met een droge
doek.
7. Let erop geen van de ventilatie-
openingen te bedekken. Plaats en installeer
het volgens de voor- schriften van de
fabrikant.
8. Het apparaat mag niet worden
geplaatst in de buurt van radiatoren,
warmte-uitlaten, kachels of andere zaken
(ook versterkers) die warmte afgeven.
9. Gebruik uitsluitend door de producent
gespeci- ceerd toebehoren c.q. onderdelen.
10. Gebruik het
apparaat uitsluitend in
combinatie met de
wagen, het statief, de
driepoot, de beugel of
tafel die door de
producent is aangegeven, of die in
combinatie met het apparaat wordt
verkocht. Bij gebruik van een wagen dient
men voorzichtig te zijn bij het verrijden van
de combinatie wagen/apparaat en letsel
door vallen te voorkomen.
11. Correcte afvoer van dit
product: dit symbool geeft
aan dat u dit product op
grond van de AEEA-richtlijn
(2012/19/EU) en de nationale
wetgeving van uw land niet
met het gewone huishoudelijke afval mag
weggooien. Dit product moet na aoop van
de nuttige levensduur naar een ociële
inzamelpost voor afgedankte elektrische en
elektronische apparatuur (AEEA) worden
6 7Quick Start GuideCENTAUR OVERDRIVE
gebracht, zodat het kan worden
gerecycleerd. Vanwege de potentieel
gevaarlijke stoen die in elektrische en
elektronische apparatuur kunnen
voorkomen, kan een onjuiste afvoer van
afval van het onderhavige type een
negatieve invloed op het milieu en de
menselijke gezondheid hebben. Een juiste
afvoer van dit product is echter niet alleen
beter voor het milieu en de gezondheid,
maar draagt tevens bij aan een doelmatiger
gebruik van de natuurlijke hulpbronnen.
Voor meer informatie over de plaatsen waar
u uw afgedankte apparatuur kunt inleveren,
kunt u contact opnemen met uw gemeente
of de plaatselijke reinigingsdienst.
12. Installeer niet in een kleine ruimte,
zoals een boekenkast of iets dergelijks.
13. Plaats geen open vlammen, zoals
brandende kaarsen, op het apparaat.
(SE) Viktiga
säkerhetsanvisningar
1. Läs dessa anvisningar.
2. Spara dessa anvisningar.
3. Beakta alla varningar.
4. Följ alla anvisningar.
5. Använd inte apparaten i närheten
av vatten.
6. Rengör endast med torr trasa.
7. Blockera inte ventilationsöppningarna.
Installera enligt tillverkarens anvisningar.
8. Installera aldrig intill värmekällor som
värme- element, varmluftsintag, spisar
eller annan utrustning som avger värme
(inklusive förstärkare).
9. Använd endast tillkopplingar och
tillbehör som angetts av tillverkaren.
10. Använd endast
med vagn, stativ, trefot,
hållare eller bord som
angetts av tillverkaren,
eller som sålts
till-sammans med
apparaten. Om du använder en vagn, var
försiktig, när du föryttar kombinationen
vagn-apparat, för att förhindra olycksfall
genom snubbling.
11. Kassera produkten på
rätt sätt: den här symbolen
indikerar att produkten inte
ska kastas i hushållssoporna,
enligt WEEE direktivet
(2012/19/EU) och gällande,
nationell lagstiftning. Produkten ska lämnas
till ett auktoriserat återvinningsställe för
elektronisk och elektrisk utrustning (EEE).
Om den här sortens avfall hanteras på fel
sätt kan miljön, och människors hälsa,
påverkas negativt på grund av potentiella
risksubstanser som ofta associeras med EEE.
Avfallshanteras produkten däremot på rätt
sätt bidrar detta till att naturens resurser
används på ett bra sätt. Kontakta kommun,
ansvarig förvaltning eller
avfallshanteringsföretag för mer
information om återvinningscentral där
produkten kan lämnas.
12. Installera inte i ett trångt utrymme,
t.ex. i en bokhylsa eller liknande enhet.
13. Placera inte källor med öppen eld, t.ex.
tända ljus, på apparaten.
(PL) Ważne informacje o
bezpieczeństwie
1. Proszę przeczytać poniższe wskazówki.
2. Proszę przechowywać niniejszą
instrukcję.
3. Należy przestrzegać wszystkich
wskazówek ostrzegawczych.
4. Należy postępować zgodnie z instrukcją
obsługi.
5. Urządzenia nie wolno używać w
pobliżu wody.
6. Urządzenie można czyścić wyłącznie
suchą szmatką.
7. Nie zasłaniać otworów wentylacyjnych.
W czasie podłączania urządzenia należy
przestrzegać zaleceń producenta.
8. Nie stawiać urządzenia w pobliżu
źródeł ciepła takich, jak grzejniki, piece
lub urządzenia produkujące ciepło (np.
wzmacniacze).
9. Używać wyłącznie sprzętu
dodatkowego i akcesoriów zgodnie z
zaleceniami producenta.
10. Używać jedynie
zalecanych przez
producenta lub
znajdujących się w
zestawie wózków,
stojaków, statywów,
uchwytów i stołów. W przypadku
posługiwania się wózkiem należy zachować
szczególną ostrożność w trakcie przewożenia
zestawu, aby uniknąć niebezpieczeństwa
potknięcia się i zranienia.
11. Prawidłowa utylizacja
produktu:
Ten symbol wskazuje, że tego
produktu nie należy
wyrzucać razem ze zwykłymi
odpadami domowymi, tylko
zgodnie z dyrektywą w sprawie zużytego
sprzętu elektrycznego i elektronicznego
(WEEE) (2012/19/EU) oraz przepisami
krajowymi. Niniejszy produkt należy
przekazać do autoryzowanego punktu
zbiórki zużytego sprzętu elektrycznego i
elektronicznego. Niewłaściwe postępowanie
z tego typu odpadami może wywołać
szkodliwe działanie na środowisko
naturalnej i zdrowie człowieka z powodu
potencjalnych substancji niebezpiecznych
zaliczanych jako zużyty sprzęt elektryczny i
elektroniczny. Jednocześnie, Twój wkład w
prawidłową utylizację niniejszego produktu
przyczynia się do oszczędnego
wykorzystywania zasobów naturalnych.
Szczegółowych informacji o miejscach, w
których można oddawać zużyty sprzęt do
recyklingu, udzielają urzędy miejskie,
przedsiębiorstwa utylizacji odpadów lub
najbliższy zakład utylizacji odpadów.
12. Nie instaluj w ograniczonej przestrzeni,
takiej jak półka na książki lub podobny
zestaw.
13. Nie stawiaj na urządzeniu źródeł
otwartego ognia, takich jak zapalone świece.
(JP) 安全指示
1. これらの指示をお読みくだ
さい。
2. これら の 指 示を 守ってくだ
さい。
3. すべ ての 警 告 に注 意してくだ
さい。
4. すべ ての 指 示 に 従ってくだ
さい。
5. この 装 置を 水 の 近くで 使 用し
ないでください。
6. 乾 い た布 で の み 拭 いてくだ
さい。
7. 換気口をふさがないでくださ
い 。製 造 元 の 指 示 に 従 って イ ン ス
トールしてください 。
8. ラ ジ エ ー タ ー 、ヒ ー ト レ ジ ス
タ ー 、ス ト ー ブ 、ま た は 熱 を 発 生 す
るその他の装置 (アンプを含む)
などの 熱 源の 近くに設 置しないで
ください 。
9. 製 造 元が 指 定したアタッチメ
ント/ アクセ サリの み を 使 用してく
ださい。
10. 製造元が指
定 し た 、ま た は 装
置と一緒に販 売さ
れたカート、スタ
ン ド 、三 脚 、ブ ラ
ケ ッ ト 、ま た は テ
ーブルでのみ使 用してください。
カートを使 用する場合は 、カート
と装置の組み合わせを移動すると
き に 、転 倒 に よ る 怪 我 を 防 ぐ よ う
に注 意してください 。
11. この製品の正しい
廃棄: この記号
は、
WEEE
指令
(2012/19 /
EU)
および国内法に従
っ て 、こ の 製 品 を 家 庭
ごみと一 緒 に 廃 棄して
はならないことを示しています。
この製品は、廃電気電子機器
(EEE)
のリサイクル を 許 可さ れ た 収 集 セ
ンターに持ち込む必要がありま
す 。こ の 種 の 廃 棄 物 の 取 り 扱 い を
誤 る と 、一 般 に
EEE
に関連する潜
在的に危険な物質が原因で、環境
と人間の健康に悪影響を与える
可能性があります。同時に、この
製品の正しい廃棄にご協力いただ
くことで、天然資源の効率的な利
用に貢献します。廃棄物をリサイ
クルする 場 所 の詳 細については 、

8 9Quick Start GuideCENTAUR OVERDRIVE
最寄りの市役所または家庭ごみ
収 集サービスにお問い合わせくだ
さい。
12. 本 棚などの狭い場所には設
置しないでください。
13. 火のともったろうそくなどの
裸火源を装置の上に置かないでく
ださい。
(CN) 安全须知
1. 请阅读这些说明。
2. 请妥善保存这些说明。
3. 请注意所有的警示。
4. 请遵守所有的说明。
5. 请勿在靠近水的地方使用本
产品。
6. 请用干布清洁本产品。
7. 请勿堵塞通风孔, 安装本产品
时请遵照厂家的说明, 通风孔不要
覆盖诸如报纸、桌布和窗帘等物品
而妨碍通风。
8. 请勿将本产品安装在热源附近,
如暖气片, 炉子或其它产生热量的
设备 (包括功放器)。 产品上不要放
置裸露的火焰源, 如点燃的蜡烛。
9. 请只使用厂家指定的附属设备
和配 件。
10. 请只使用厂家
指定的或随货销售
的手推车, 架子,
三 角架, 支架和桌
子。 若使用手推车
来搬运设备, 请注
意安全放置设备, 以 避免手推车和
设备倾倒而受伤。
11. 如果液体流入或异物落入设
备内, 设备遭雨淋或受潮, 设备不
能正常运作或被摔坏等, 设备受损
需进行维修时, 所有维修均须由合
格的维修人员进行维修。
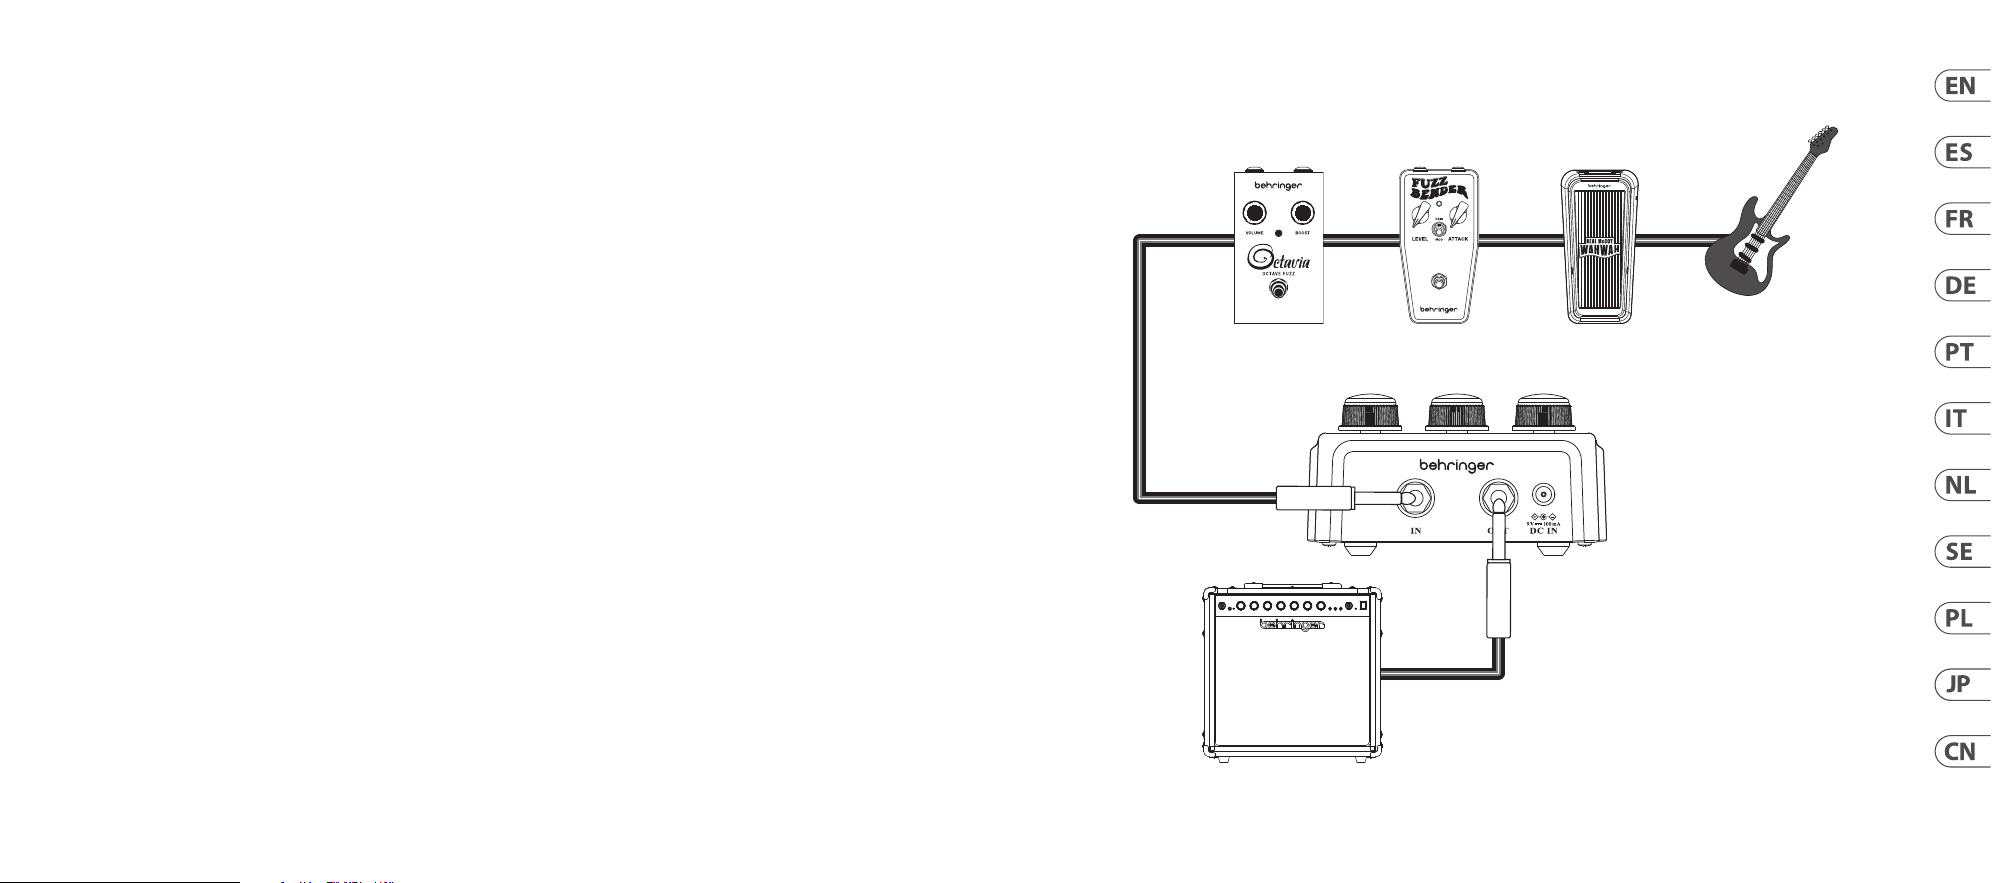
CENTAUR OVERDRIVE Hook-up
(EN) Step 1: Hook-Up
(ES) Paso 1: Conexión
(FR) Etape 1 : Connexions
(DE) Schritt 1: Verkabelung
(PT) Passo 1: Conexões
(IT) Passo 1: Allacciare
(NL) Stap 1: Aansluiten
(SE) Steg 1: Anslutning
(PL) Krok 1: Podłączeni
(JP) ステップ 1: フックアップ
(CN) 第一步: 连接应用
HA-40R Amplier
OCTAVIA
OCTAVE FUZZ
FUZZ BENDER WAHWAH
10 11Quick Start GuideCENTAUR OVERDRIVE
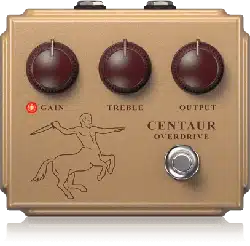
CENTAUR OVERDRIVE Controls
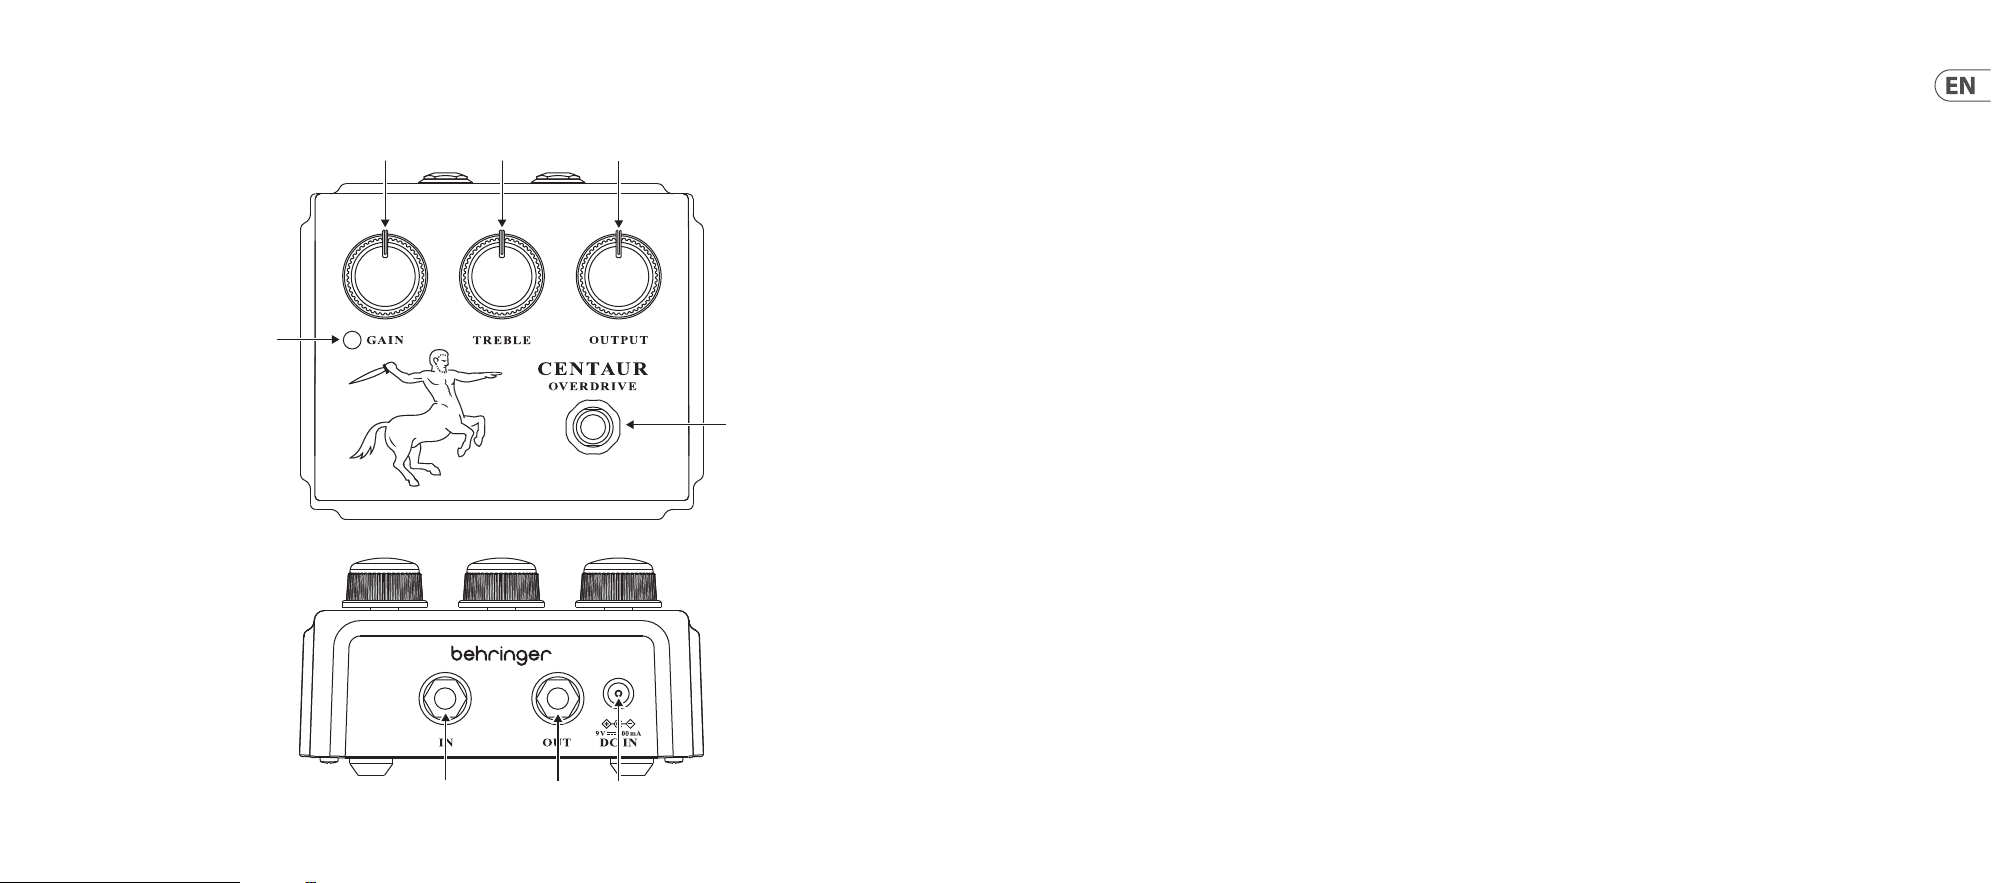
(EN) Step 2: Controls
1. GAIN – Controls the amount of overdrive. This control blends
germanium diode clipping distortion with your guitar’s clean sound,
and at the full counter-clockwise position, the sound is completely
clean, and the pedal can be used as a clean boost. Turn the knob
clockwise to blend in progressively greater amounts of overdrive
distortion and mid frequencies.
2. TREBLE – Adjusts the amount of treble frequencies in the tone. At
the middle 50% setting, the tone is unchanged. As you turn the knob
clockwise beyond the 50% setting, the tone will become brighter. As
you turn the knob counter-clockwise from the 50% setting, the treble
is reduced and your tone will have more bass.
3. OUTPUT – Controls the nal output volume. When the GAIN knob is
set to the fully clean, counter-clockwise position, the OUTPUT control
allows you to use the pedal as a clean boost for more gain into the
input of your amplier.
4. LED – Lights when the eect is active.
5. FOOTSWITCH – Turns the eect on and o.
6. IN – Plug your instrument into this jack using instrument cables with
¼” TS connectors.
7. OUT – Send the signal to your guitar amp or to other pedals via
instrument cables with ¼” TS connectors.
8. DC IN – Connect a standard 9 V / 100 mA power supply to this jack.
Power supply not included.
Battery Operation
CENTAUR OVERDRIVE can also be powered using a single 9 V battery. Loosen
the rear screws until the backplate swings open, and install the battery by
pressing the battery terminals into the battery clip.
The SERIAL NUMBER is located on the bottom.
Buered Bypass
CENTAUR OVERDRIVE uses a Buered Bypass circuit to pass your signal
through the pedal when the eect is switched o.
Buered Bypass compensates for high frequencies lost over long cable
runs, with only a small loss of overall volume. If you are using a long
instrument cable and/or the pedal is placed near the end of a chain of True
Bypass pedals, Buered Bypass can restore highs and clean up your signal.
1
4
5
2 3
6 7 8
12 13Quick Start GuideCENTAUR OVERDRIVE

(FR) Etape 2 : Réglages
1. GAIN – Contrôle la quantité de distorsion. Ce réglage mélange la
distorsion par clipping de diode germanium avec le son propre de votre
guitare, et à la position complètement en sens inverse des aiguilles
d’une montre, le son est complètement propre, et la pédale peut être
utilisée comme un boost propre. Tournez le bouton dans le sens des
aiguilles d’une montre pour mélanger progressivement des quantités
de distorsion de clipping de diode et de fréquences médiums de plus
en plus grandes.
2. TREBLE – Ajuste la quantité de fréquences aiguës dans le ton. À
la position médiane de 50 %, le ton reste inchangé. En tournant le
bouton dans le sens des aiguilles d’une montre au-delà de 50 %, le ton
deviendra plus brillant. En tournant le bouton dans le sens inverse des
aiguilles d’une montre à partir de 50 %, les aigus sont réduits et votre
tonalité aura plus de basses.
3. OUTPUT – Contrôle le volume de sortie nal. Lorsque le bouton GAIN
est réglé complètement propre, en sens inverse des aiguilles d’une
montre, le contrôle OUTPUT vous permet d’utiliser la pédale comme un
boost propre pour plus de gain dans l’entrée de votre amplicateur.
4. LED – S’allume lorsque l’eet est actif.
5. FOOTSWITCH – Active et désactive l’eet.
6. IN – Branchez votre instrument dans cette prise en utilisant des câbles
d’instrument avec des connecteurs TS ¼”.
7. OUT – Envoyez le signal à votre ampli de guitare ou à d’autres pédales
via des câbles d’instrument avec des connecteurs TS ¼”.
8. DC IN – Connectez une alimentation standard 9 V / 100 mA à cette
prise. Alimentation non incluse.
Fonctionnement sur batterie
CENTAUR OVERDRIVE peut également être alimenté par une seule pile 9 V.
Desserrez les vis arrière jusqu’à ce que la plaque arrière s’ouvre, et installez
la pile en enfonçant les bornes de la pile dans le clip de la pile.
Le NUMÉRO DE SÉRIE se trouve en bas.
Bypass tamponné
CENTAUR OVERDRIVE utilise un circuit de bypass tamponné pour faire passer
votre signal à travers la pédale lorsque l’eet est désactivé.
Le bypass tamponné compense la perte de hautes fréquences sur de
longues liaisons de câbles, avec seulement une légère perte de volume
global. Si vous utilisez un long câble d’instrument et/ou que la pédale
est placée près de la n d’une chaîne de pédales à bypass vrai, le bypass
tamponné peut restaurer les hautes fréquences et nettoyer votre signal.
(ES) Paso 2: Controles
1. GAIN - Controla la cantidad de overdrive. Este control mezcla la
distorsión de recorte de diodo de germanio con el sonido limpio de
tu guitarra, y en la posición completamente en sentido contrario a
las agujas del reloj, el sonido es completamente limpio y el pedal se
puede usar como un aumento limpio. Gira la perilla en sentido horario
para mezclar progresivamente mayores cantidades de distorsión de
overdrive y frecuencias medias.
2. TREBLE - Ajusta la cantidad de frecuencias de agudos en el tono. En la
conguración intermedia del 50%, el tono no cambia. A medida que
giras la perilla en sentido horario más allá del 50%, el tono se volverá
más brillante. A medida que giras la perilla en sentido contrario a las
agujas del reloj desde la conguración del 50%, los agudos se reducen
y tu tono tendrá más graves.
3. OUTPUT - Controla el volumen de salida nal. Cuando el control GAIN
está congurado en la posición completamente limpia, en sentido
contrario a las agujas del reloj, el control OUTPUT te permite usar
el pedal como un aumento limpio para obtener más ganancia en la
entrada de tu amplicador.
4. LED - Se enciende cuando el efecto está activo.
5. FOOTSWITCH (Interruptor de pie) - Activa y desactiva el efecto.
6. IN - Conecta tu instrumento a este jack utilizando cables de
instrumento con conectores TS de ¼".
7. OUT - Envía la señal a tu amplicador de guitarra o a otros pedales a
través de cables de instrumento con conectores TS de ¼".
8. DC IN - Conecta un adaptador de corriente estándar de
9 V / 100 mA a este jack. El adaptador de corriente no está incluido.
Operación con batería
CENTAUR OVERDRIVE también puede alimentarse con una sola batería de 9
V. Aoja los tornillos traseros hasta que la placa posterior se abra y coloca la
batería presionando los terminales de la batería en el clip de la batería.
El NÚMERO DE SERIE se encuentra en la parte inferior.
Bypass con buer
CENTAUR OVERDRIVE utiliza un circuito de bypass con buer para que tu
señal pase a través del pedal cuando el efecto está apagado.
El bypass con buer compensa las altas frecuencias perdidas en ejecuciones
de cable largo, con solo una pequeña pérdida de volumen general. Si estás
usando un cable de instrumento largo y/o el pedal está colocado cerca del
nal de una cadena de pedales de bypass verdadero, el bypass con buer
puede restaurar los agudos y limpiar tu señal.
14 15Quick Start GuideCENTAUR OVERDRIVE

(PT) Passo 2: Controles
1. GAIN – Controla a quantidade de overdrive. Este controle mistura a
distorção de clipping de diodo de germânio com o som limpo da sua
guitarra, e na posição totalmente no sentido anti-horário, o som é
completamente limpo, e o pedal pode ser usado como um impulso
limpo. Gire o botão no sentido horário para misturar progressivamente
maiores quantidades de distorção de overdrive e frequências médias.
2. TREBLE – Ajusta a quantidade de frequências agudas no timbre. Na
conguração média de 50%, o timbre não muda. Conforme você gira o
botão no sentido horário além da conguração de 50%, o timbre cará
mais brilhante. À medida que você gira o botão no sentido anti-horário
a partir da conguração de 50%, os agudos são reduzidos e o timbre
terá mais graves.
3. OUTPUT – Controla o volume nal de saída. Quando o botão GAIN
está congurado como totalmente limpo, no sentido anti-horário, o
controle OUTPUT permite que você use o pedal como um impulso limpo
para obter mais ganho na entrada do seu amplicador.
4. LED – Acende quando o efeito está ativo.
5. FOOTSWITCH – Liga e desliga o efeito.
6. IN – Conecte seu instrumento a esta entrada usando cabos de
instrumento com conectores TS de ¼”.
7. OUT – Envie o sinal para o seu amplicador de guitarra ou para outros
pedais usando cabos de instrumento com conectores TS de ¼”.
8. DC IN – Conecte uma fonte de alimentação padrão de 9 V / 100 mA a
esta entrada. Fonte de alimentação não incluída.
Funcionamento com Bateria
CENTAUR OVERDRIVE também pode ser alimentado usando uma única
bateria de 9 V. Afrouxe os parafusos traseiros até que a placa traseira se
abra e instale a bateria pressionando os terminais da bateria no suporte
da bateria.
O NÚMERO DE SÉRIE está localizado na parte inferior.
Bypass com Buer
CENTAUR OVERDRIVE utiliza um circuito de bypass com buer para passar o
seu sinal através do pedal quando o efeito está desligado.
O bypass com buer compensa as altas frequências perdidas em longas
extensões de cabo, com apenas uma pequena perda de volume geral. Se
você estiver usando um cabo de instrumento longo e/ou o pedal estiver
posicionado perto do nal de uma cadeia de pedais com bypass real, o
bypass com buer pode restaurar os agudos e limpar o seu sinal.
(DE) Schritt 2: Bedienelemente
1. GAIN – Steuert die Menge der Verzerrung. Dieses Bedienelement
mischt die Verzerrung durch Germaniumdiodenclipping mit dem
sauberen Klang Ihrer Gitarre. Bei vollständig gegen den Uhrzeigersinn
gedrehtem Regler ist der Klang völlig sauber, und das Pedal kann
als sauberer Booster verwendet werden. Drehen Sie den Regler
im Uhrzeigersinn, um immer größere Mengen an Verzerrung und
Mittenfrequenzen zu mischen.
2. TREBLE – Passt die Menge der Höhenfrequenzen im Klang an. Bei der
mittleren Einstellung von 50 % bleibt der Klang unverändert. Wenn Sie
den Regler im Uhrzeigersinn über die 50 %-Einstellung hinaus drehen,
wird der Klang heller. Wenn Sie den Regler gegen den Uhrzeigersinn
von der 50 %-Einstellung drehen, wird die Höhe reduziert, und Ihr
Klang wird basslastiger.
3. OUTPUT – Steuert die endgültige Ausgangslautstärke. Wenn
der GAIN-Regler auf die vollständig saubere Position gegen den
Uhrzeigersinn eingestellt ist, ermöglicht Ihnen die OUTPUT-Steuerung,
das Pedal als sauberen Booster für mehr Verzerrung am Eingang Ihres
Verstärkers zu verwenden.
4. LED – Leuchtet, wenn der Eekt aktiv ist.
5. FOOTSWITCH – Schaltet den Eekt ein und aus.
6. IN – Schließen Sie Ihr Instrument mit Instrumentenkabeln mit
¼”-TS-Steckern an diesen Anschluss an.
7. OUT – Senden Sie das Signal über Instrumentenkabel mit
¼”-TS-Steckern an Ihren Gitarrenverstärker oder an andere Pedale.
8. DC IN – Schließen Sie ein Standard-Netzteil mit 9 V / 100 mA an diesen
Anschluss an. Netzteil nicht im Lieferumfang enthalten.
Betrieb mit Batterie
CENTAUR OVERDRIVE kann auch mit einer einzelnen 9-Volt-Batterie
betrieben werden. Lockern Sie die hinteren Schrauben, bis die Rückplatte
schwingt, und installieren Sie die Batterie, indem Sie die Batteriekontakte
in den Batterieclip drücken.
Die SERIENNUMMER bendet sich unten.
Gepuerte Bypass-Schaltung
CENTAUR OVERDRIVE verwendet eine gepuerte Bypass-Schaltung, um Ihr
Signal durch das Pedal zu leiten, wenn der Eekt ausgeschaltet ist.
Gepuerter Bypass gleicht die bei langen Kabelverbindungen verlorenen
Höhenfrequenzen aus und verursacht nur einen geringen Verlust der
Gesamtlautstärke. Wenn Sie ein langes Instrumentenkabel verwenden
und/oder das Pedal am Ende einer Kette von True Bypass-Pedalen
platzieren, kann der gepuerte Bypass die Höhen wiederherstellen und Ihr
Signal säubern.
16 17Quick Start GuideCENTAUR OVERDRIVE

(NL) Stap 2: Bediening
1. GAIN – Regelt de hoeveelheid overdrive. Met deze regeling meng je
de germanium diode clipping distortion met het schone geluid van je
gitaar. Bij de volledige tegen de klok in positie is het geluid volledig
schoon en kan de pedaal worden gebruikt als een schone boost.
Draai de knop met de klok mee om progressief grotere hoeveelheden
overdrive vervorming en middenfrequenties te mengen.
2. TREBLE – Past de hoeveelheid hoge tonen in het geluid aan. Bij de
middenstand van 50% blijft het geluid ongewijzigd. Als je de knop met
de klok mee draait voorbij de 50% instelling, zal het geluid helderder
worden. Als je de knop tegen de klok in draait vanaf de 50% instelling,
wordt het hoge tonen verminderd en zal je geluid meer bastonen
hebben.
3. OUTPUT – Regelt het eindvolume. Wanneer de GAIN-knop volledig
schoon is ingesteld, tegen de klok in, stelt de OUTPUT-regeling je
in staat om de pedaal te gebruiken als een schone boost voor meer
versterking naar de ingang van je versterker.
4. LED – Licht op wanneer het eect actief is.
5. FOOTSWITCH – Schakelt het eect in en uit.
6. IN – Sluit je instrument aan op deze aansluiting met instrumentkabels
met ¼” TS-connectoren.
7. OUT – Stuur het signaal naar je gitaarversterker of naar andere
pedalen via instrumentkabels met ¼” TS-connectoren.
8. DC IN – Sluit een standaard 9 V / 100 mA voeding aan op deze
aansluiting. Voeding niet inbegrepen.
Batterijgebruik
CENTAUR OVERDRIVE kan ook worden gevoed met een enkele 9 V-batterij.
Draai de achterste schroeven los totdat het achterpaneel opent en
installeer de batterij door de batterijaansluitingen in de batterijklem te
drukken.
Het SERIENUMMER bevindt zich onderaan.
Buered Bypass
CENTAUR OVERDRIVE maakt gebruik van een Buered Bypass-circuit om je
signaal door de pedaal te leiden wanneer het eect is uitgeschakeld.
Buered Bypass compenseert voor verlies van hoge frequenties over lange
kabeltrajecten, met slechts een kleine vermindering van het totale volume.
Als je een lange instrumentkabel gebruikt en/of de pedaal zich aan het
einde van een keten van True Bypass-pedalen bevindt, kan Buered Bypass
hoge tonen herstellen en je signaal opschonen.
(IT) Passo 2: Controlli
1. GAIN – Controlla la quantità di overdrive. Questo controllo mescola
la distorsione a clipping diodo al germanio con il suono pulito della
tua chitarra e nella posizione completamente in senso antiorario,
il suono è completamente pulito e il pedale può essere usato come
un aumento pulito. Gira la manopola in senso orario per mescolare
progressivamente maggiori quantità di distorsione overdrive e
frequenze medie.
2. TREBLE – Regola la quantità di frequenze alte nel tono. Alla
congurazione centrale del 50%, il tono rimane invariato. Man mano
che giri la manopola in senso orario oltre la congurazione del 50%, il
tono diventerà più brillante. Man mano che giri la manopola in senso
antiorario dalla congurazione del 50%, gli alti si riducono e il tuo tono
avrà più bassi.
3. OUTPUT – Controlla il volume di uscita nale. Quando la manopola
GAIN è impostata completamente pulita, in senso antiorario, il
controllo OUTPUT ti permette di utilizzare il pedale come un aumento
pulito per ottenere più guadagno nell’ingresso del tuo amplicatore.
4. LED – Si accende quando l’eetto è attivo.
5. FOOTSWITCH – Attiva e disattiva l’eetto.
6. IN – Collega il tuo strumento a questa presa utilizzando cavi per
strumenti con connettori TS da ¼”.
7. OUT – Invia il segnale al tuo amplicatore per chitarra o ad altri pedali
tramite cavi per strumenti con connettori TS da ¼”.
8. DC IN – Collega un alimentatore standard da 9 V / 100 mA a questa
presa. Alimentatore non incluso.
Funzionamento a Batteria
CENTAUR OVERDRIVE può anche essere alimentato utilizzando una singola
batteria da 9 V. Allenta le viti posteriori nché il coperchio posteriore si
apre e installa la batteria premendo i terminali della batteria nel supporto
della batteria.
Il NUMERO DI SERIE si trova nella parte inferiore.
Bypass con Buer
CENTAUR OVERDRIVE utilizza un circuito di bypass con buer per far passare
il tuo segnale attraverso il pedale quando l’eetto è spento.
Il bypass con buer compensa le alte frequenze perse su lunghe estensioni
di cavo, con solo una piccola perdita di volume complessiva. Se stai
utilizzando un cavo per strumenti lungo e/o il pedale è posizionato vicino
alla ne di una catena di pedali True Bypass, il bypass con buer può
ripristinare gli alti e pulire il tuo segnale.
18 19Quick Start GuideCENTAUR OVERDRIVE

(PL) Krok 2: Sterowanica
1. GAIN – Kontroluje ilość przesterowania. Ten regulator mieszający
przesterowanie z klippowaniem germanowym diodowym z czystym
dźwiękiem twojej gitary, a w pełnym położeniu przeciwnym do ruchu
wskazówek zegara, dźwięk jest całkowicie czysty, i pedał można
używać jako czystego wzmocnienia. Obróć gałkę zgodnie z ruchem
wskazówek zegara, aby stopniowo mieszać coraz większe ilości
przesterowania i częstotliwości środkowych.
2. TREBLE – Reguluje ilość częstotliwości wysokich w tonie. Przy
ustawieniu środkowym 50%, dźwięk pozostaje niezmieniony. Kiedy
obrócisz gałkę zgodnie z ruchem wskazówek zegara poza ustawieniem
50%, dźwięk stanie się jaśniejszy. Obracając gałkę przeciwnie do ruchu
wskazówek zegara od ustawienia 50%, redukujesz częstotliwości
wysokie, a twój dźwięk będzie miał więcej basu.
3. OUTPUT – Kontroluje końcową głośność wyjściową. Kiedy gałka
GAIN jest ustawiona na całkowicie czystym, przeciwnym do ruchu
wskazówek zegara, ustawieniu, kontrola OUTPUT pozwala używać
pedału jako czystego wzmocnienia, aby uzyskać większą ilość do
wejścia twojego wzmacniacza.
4. LED – Świeci, gdy efekt jest aktywny.
5. FOOTSWITCH – Włącza i wyłącza efekt.
6. IN – Podłącz swój instrument do tego gniazda za pomocą kabli
instrumentowych z wtyczkami ¼” TS.
7. OUT – Wysyła sygnał do twojego wzmacniacza gitarowego lub innych
efektów za pomocą kabli instrumentowych z wtyczkami ¼” TS.
8. DC IN – Podłącz standardowe źródło zasilania 9 V / 100 mA do tego
gniazda. Źródło zasilania nie jest dołączone.
Zasilanie bateryjne
CENTAUR OVERDRIVE może również być zasilany za pomocą pojedynczej
baterii 9 V. Poluzuj tylne śruby, aż tylna pokrywa otworzy się, a baterię
można zainstalować, naciskając zaciski baterii na zacisk baterii.
NUMER SERYJNY znajduje się na spodzie.
Buered Bypass
CENTAUR OVERDRIVE używa układu Buered Bypass do przeprowadzania
sygnału przez pedał, gdy efekt jest wyłączony.
Buered Bypass kompensuje utratę wysokich częstotliwości na długich
kablowych biegach, przy minimalnej utracie całkowitej głośności. Jeśli
używasz długiego kabla instrumentowego i/lub pedał jest umieszczony
blisko końca łańcucha pedałów True Bypass, Buered Bypass może
przywrócić wysokie częstotliwości i oczyścić twój sygnał.
(SE) Steg 2: Kontroller
1. GAIN – Styr mängden överstyrning. Den här kontrollen blandar
germaniumdiodklippningsdistorsion med din elgitarrs rena ljud, och
i fullt motursläge är ljudet helt rent, och pedalen kan användas som
en ren förstärkare. Vrid knoppen medurs för att blanda in progressivt
större mängder överstyrningsdistorsion och mittfrekvenser.
2. TREBLE – Justerar mängden diskantfrekvenser i tonen. Vid
inställningen mitt på 50% förblir tonen oförändrad. När du vrider
knoppen medurs bortom 50% -inställningen blir tonen ljusare. När du
vrider knoppen moturs från 50% -inställningen minskar diskanten och
din ton får mer bas.
3. OUTPUT – Styr den slutliga uteekten. När GAIN-knappen är
inställd på helt rent, medursläge, låter OUTPUT-kontrollen dig
använda pedalen som en ren förstärkare för mer förstärkning till din
förstärkares ingång.
4. LED – Lys upp när eekten är aktiv.
5. FOOTSWITCH – Slår eekten av och på.
6. IN – Anslut ditt instrument till denna jack med instrumentkablar med
¼” TS-anslutningar.
7. OUT – Skicka signalen till din gitarrförstärkare eller till andra pedaler
via instrumentkablar med ¼” TS-anslutningar.
8. DC IN – Anslut en standard 9 V / 100 mA strömförsörjning till denna
jack. Strömförsörjning ingår ej.
Batteridrift
CENTAUR OVERDRIVE kan också drivas med ett enda 9 V batteri. Lossa
de bakre skruvarna tills bakplattan svänger upp, och installera batteriet
genom att trycka batterikontakterna i batteriklippet.
SERIENUMRET nns längst ner.
Buered Bypass
CENTAUR OVERDRIVE använder en Buered Bypass-krets för att låta din
signal passera genom pedalen när eekten är avstängd.
Buered Bypass kompenserar för höga frekvenser som förloras över långa
kabellängder, med endast en liten minskning av den totala volymen. Om du
använder en lång instrumentkabel och/eller pedalen placeras nära slutet
av en kedja med True Bypass-pedaler kan Buered Bypass återställa höga
frekvenser och rena upp din signal.
20 21Quick Start GuideCENTAUR OVERDRIVE

22 23Quick Start GuideCENTAUR OVERDRIVE
(JP) ステップ 2: コントロール
1. ゲ イ ン( GAIN)- オーバードライブの量を調整します。このコ
ントロールは、ギターのクリーンな音にゲルマニウムダイオ
ードのクリッピング歪みをブレンドし、完全に反時計回りの
位 置 で 音 が 完 全 にクリーンになり、ペダル はクリーンブース
トとして使 用できます。ノブを時計回りに回すと、プログレ
ッシブにオーバードライブの歪みとミッド周波数を大量に
ブレンドします。
2. 高 音( TREBLE)- 音色の高音周波数を調整します。中央の
50% の設定では、音色は変わりません。ノブを 50% の設定
を 超 え て 時 計 回 り に 回 す と 、音 色 は 明 る く な り ま す 。ノ ブ を
50% の設定から反時計回りに回すと、高音が減少し、音色
には より 多くの 低 音 が ありま す。
3. 出 力( OUTPUT)- 最 終 出 力 音 量を 制 御します。GAIN ノブが
完全にクリーンな反時計回りの位置に設定されていると
き、OUTPUT コントロールを使用して、ペダルをクリーンブー
ストとして使 用してアンプの入 力にゲインを追 加 で きます。
4. LED- エフェクトが アクティブ なときに点 灯します。
5. フットスイッチ - エフェクトをオン/オフします。
6. イ ン( IN)- インストゥルメントケーブルを使 用して楽 器をこ
の ジ ャ ッ ク に 接 続 し ま す( ¼” TS コ ネ ク タ を 使 用 )。
7. ア ウ ト( OUT)- インストゥルメントケーブルを使 用して、シグ
ナルをギターアンプまたは他のペダルに送信します(¼” TS
コ ネ ク タ を 使 用 )。
8. 電源 (DC IN) - 標準の 9 V / 100 mA 電源アダプターをこのジャ
ックに接続します。電源アダプターは含まれていません。
バッテリー駆 動
CENTAUR OVERDRIVE は 、単 一 の 9 V バッテリーを 使 用しても駆 動
できます。リアスクリューを緩めてバックプレートを開き、バッ
テリーターミナルをバッテリークリップに押し込んでバッテリー
を取り付 けます。
シリアル番号は底部にあります。
バッファードバイパ ス
CENTAUR OVERDRIVE は、効果を切ったときに信号をペダルを通し
て通すためにバッファードバイパス回路 を使用します。
バッファードバイパスは 、長いケーブルランで 失われる高周波
を 補 償 し 、全 体 的 な 音 量 の わ ず か な 損 失 だ け で シ グ ナ ル を 通
過させます。長い楽器ケーブルを使用している場合や、ペダル
が真のバイパスペダルのチェーンの末尾に配置されている場
合、バッファードバイパスは高音を回復し、シグナルをクリーン
アップ しま す。
(CN) 第二步: 控制
1. 增益 (GAIN)- 调节失真量。此控制将锗二极管剪裁失
真与吉他的干净声音混合,完全逆时针位置时,声音完
全干净,踏板可用作干净增益。将旋钮顺时针旋转,逐
渐混入更多失真和中频。
2. 高音 (TREBLE)- 调整音色中的高音频率。 在中间的 50%
设置下, 音色不变。 将旋钮顺时针旋转超过 50% 的设
置时, 音色会变得更亮。 将旋钮逆时针从 50% 的设置
旋转时, 高音减少, 音色会更有低音。
3. 输出 (OUTPUT)- 控制最终输出音量。 当增益旋钮设置
为完全干净的逆时针位置时, 输出控制允许您将踏板
用作干净增益, 以增加放大器输入的增益。
4. LED- 效果激活时亮起。
5. 踏板开关 (FOOTSWITCH)- 打开和关闭效果。
6. 输入 (IN)- 使用带有 ¼” TS 连接器的乐器电缆将您的
乐器插入此插孔。
7. 输出 (OUTPUT)- 使用带有 ¼” TS 连接器的乐器电缆将
信号发送到吉他放大器或通过其他踏板。
8. 电源 (DC IN)- 将标准的 9 V / 100 mA 电源适配器连接到
此插孔。 电源适配器不包括在内。
电池操作
CENTAUR OVERDRIVE 也可以使用单个 9 V 电池供电。松开后
螺钉直至后盖打开, 通过将电池端子按入电池夹来安
装电池。
序列号位于底部。
缓冲旁路
CENTAUR OVERDRIVE 使用缓冲旁路电路,当关闭效果时,将信
号通过踏板传递。
缓冲旁路补偿长电缆传输中丢失的高频,仅有少量整体
音量损失。如果使用长乐器电缆和/或踏板放置在一串真
旁路踏板的末端,缓冲旁路可以恢复高频并清理信号。
Specications
Connections
In
Connector 1 x 1/4" TS, unbalanced
Impedance 1300 kΩ
Out
Connector 1 x 1/4" TS, unbalanced
Output impedance 0.56 kΩ
Controls
Gain 1 x rotary knob,
dual-ganged pot
Treble 1 x rotary knob
±12 dB @ 3 kHz
Output 1 x rotary knob
Maximum output gain 41 dB
Eect on / o 1 x footswitch
System
Bypass mode Buered bypass
Frequency response 20 Hz to 20 kHz (+0 / -0.3 dB)
Dynamic range > 68 dB, 20 Hz to 20 kHz
Signal-to-noise ratio > 60 dB
Power Supply / Voltage
Power input Standard 9 V DC,
centre negative,
> 100 mA (power supply
not included)
Power consumption 0.18 W
Dimensions / Weight
Dimensions (H x W x D) 65.4 x 120.5 x 104.3 mm
(2.57 x 4.74 x 4.11")
Weight 0.49 kg (1.07 lbs)
Due to continuous development, these specications are subject
to change without notice.
Other important information
1. Register online. Pleaseregister your new
Music Tribe equipment right after you purchase it by
visiting musictribe.com. Registeringyour purchase
using our simple online form helps us to process
your repair claims more quickly and eciently.
Also, read the terms and conditions of our warranty,
ifapplicable.
2. Malfunction. Should your Music Tribe
Authorized Reseller not be located in your vicinity, you
may contact the Music Tribe Authorized Fulller for
your country listed under “Support” at musictribe.com.
Shouldyour country not be listed, pleasecheck if your
problem can be dealt with by our “OnlineSupport”
which may also be found under “Support” at
musictribe.com. A lternatively, please submit an
online warranty claim at musictribe.com BEFORE
returning theproduct.
1. Registro online. Lerecomendamos
que registre su nuevo aparato Music Tribe justo
después de su compra accediendo a la página web
musictribe.com. Elregistro de su compra a través
de nuestro sencillo sistema online nos ayudará a
resolver cualquier incidencia que se presente a la
mayor brevedad posible. Además,aproveche para
leer los términos y condiciones de nuestra garantía,
siesaplicable en sucaso.
2. Averías. En el caso de que no exista un
distribuidor Music Tribe en las inmediaciones, puede
ponerse en contacto con el distribuidor Music Tribe de
su país, queencontrará dentro del apartado “Support”
de nuestra página web musictribe.com. En caso de
que su país no aparezca en ese listado, acceda a la
sección “Online Support” (quetambiénencontrará
dentro del apartado “Support” de nuestra
páginaweb) y compruebe si su problema aparece
descrito y solucionado allí. Deforma alternativa,
envíenos a través de la página web una solicitud
online de soporte en periodo de garantía ANTES de
devolvernoselaparato.
1. Enregistrez-vous enligne. Prenezle
temps d’enregistrer votre produit Music Tribe aussi
vite que possible sur le site Internet musictribe.com.
Lefait d’enregistrer le produit en ligne nous permet
de gérer les réparations plus rapidement et plus
ecacement. Prenezégalement le temps de lire les
termes et conditions de notregarantie.
2. Dysfonctionnement. Si vous n’avez pas
de revendeur Music Tribe près de chez vous, contactez
le distributeur Music Tribe de votre pays: consultez
la liste des distributeurs de votre pays dans la page
“Support” de notre site Internet musictribe.com. Si
votre pays n’est pas dans la liste, essayez de résoudre
votre problème avec notre “aideen ligne” que vous
trouverez également dans la section “Support” du site
musictribe.com. Vouspouvez également nous faire
parvenir directement votre demande de réparation
sous garantie par Internet sur le site musictribe.com
AVANT de nous renvoyer leproduit.
Important information Aspectos importantes
Informations importantes
24 25Quick Start GuideCENTAUR OVERDRIVE
Other important information
1. Online registrieren. Bitteregistrieren
Sie Ihr neues Music Tribe-Gerät direkt nach dem
Kauf auf der Website musictribe.com. WennSie
Ihren Kauf mit unserem einfachen online Formular
registrieren, könnenwir Ihre Reparaturansprüche
schneller und ezienter bearbeiten. Lesen Sie bitte
auch unsere Garantiebedingungen, fallszutreend.
2. Funktionsfehler. Sollte sich kein Music
Tribe Händler in Ihrer Nähe benden, können Sie den
Music Tribe Vertrieb Ihres Landes kontaktieren, der
auf musictribe.com unter „Support“ aufgeführt ist.
Sollte Ihr Land nicht aufgelistet sein, prüfen Sie bitte,
ob Ihr Problem von unserem „Online Support“ gelöst
werden kann, den Sie ebenfalls auf musictribe.com
unter „Support“ nden. Alternativ reichen Sie bitte
Ihren Garantieanspruch online auf musictribe.com ein,
BEVOR Sie das Produktzurücksenden.
1. Registre-se online. Porfavor,
registreseu novo equipamento Music Tribe
logo após a compra visitando o site musictribe.
com Registrar sua compra usando nosso simples
formulário online nos ajuda a processar seus pedidos
de reparos com maior rapidez e eciência. Além
disso, leia nossos termos e condições de garantia,
caso sejanecessário.
2. Funcionamento Defeituoso.
Casoseufornecedor Music Tribe não esteja localizado
nas proximidades, vocêpode contatar um distribuidor
Music Tribe para o seu país listado abaixo de “Suporte”
emmusictribe.com. Se seu país não estiver na lista,
favor checar se seu problema pode ser resolvido
com o nosso “SuporteOnline” que também pode
ser achado abaixo de “Suporte”em musictribe.com.
Alternativamente, favorenviar uma solicitação
de garantia online em musictribe.com ANTES da
devolução doproduto.
1. Registratevi online. Vi invitiamo a
registrare il nuovo apparecchio Music Tribe subito
dopo averlo acquistato visitando musictribe.com. La
registrazione dell'acquisto tramite il nostro semplice
modulo online ci consente di elaborare le richieste
di riparazione in modo più rapido ed eciente.
Leggete anche i termini e le condizioni della nostra
garanzia, qualora applicabile.
2. Malfunzionamento. Nel caso in cui il
rivenditore autorizzato Music Tribe non si trovi nelle
vostre vicinanze, potete contattare il Music Tribe
Authorized Fulller per il vostro paese, elencato in
“Support” @ musictribe.com. Se la vostra nazione
non è elencata, controllate se il problema può essere
risolto tramite il nostro “Online Support”che può anche
essere trovato sotto “Support” @ musictribe.com. In
alternativa, inviate una richiesta di garanzia online su
musictribe.com PRIMA di restituire il prodotto.
Weitere wichtige
Informationen
Outras Informações
Importantes
Informazioni importanti
1. Registreer online. Registreer uw
nieuwe Music Tribe-apparatuur direct nadat u
deze hebt gekocht door naar musictribe.com te
gaan. Door uw aankoop te registreren via ons
eenvoudige online formulier, kunnen wij uw
reparatieclaims sneller en eciënter verwerken.
Lees ook de voorwaarden van onze garantie, indien
van toepassing.
2. Storing. Mocht uw door Music Tribe
geautoriseerde wederverkoper niet bij u in de
buurt zijn gevestigd, dan kunt u contact opnemen
met de door Music Tribe Authorized Fulller voor
uw land vermeld onder “Support” op musictribe.
com. Als uw land niet in de lijst staat, controleer
dan of uw probleem kan worden opgelost door
onze "Online Support", die u ook kunt vinden onder
"Support" op musictribe.com. U kunt ook een online
garantieclaim indienen op musictribe.com VOORDAT
u het product retourneert.
1. Registrera online. Registrera din nya
Music Tribe-utrustning direkt efter att du köpt den
genom att besöka musictribe.com. Att registrera
ditt köp med vårt enkla onlineformulär hjälper oss
att behandla dina reparationsanspråk snabbare och
mer eektivt. Läs också villkoren i vår garanti, om
tillämpligt.
2. Fel. Om din Music Tribe-auktoriserade
återförsäljare inte nns i din närhet kan du kontakta
Music Tribe Authorized Fulller för ditt land listat
under “Support” på musictribe.com. Om ditt land
inte är listat, kontrollera om ditt problem kan
hanteras av vår “Onlinesupport” som också nns
under “Support” på musictribe.com. Alternativt kan
du skicka in ett online-garantianspråk på musictribe.
com INNAN du returnerar produkten.
1. Zarejestrować online. Zarejestruj
swój nowy sprzęt Music Tribe zaraz po zakupie na
stronie musictribe.com. Zarejestrowanie zakupu
za pomocą naszego prostego formularza online
pomaga nam szybciej i efektywniej rozpatrywać
roszczenia dotyczące naprawy. Przeczytaj również
warunki naszej gwarancji, jeśli dotyczy.
2. Awaria. Jeśli Twój autoryzowany
sprzedawca Music Tribe nie znajduje się w pobliżu,
możesz skontaktować się z autoryzowanym
dostawcą Music Tribe dla swojego kraju,
wymienionym w sekcji „Wsparcie” na stronie
musictribe.com. Jeśli Twojego kraju nie ma na liście,
sprawdź, czy Twój problem może zostać rozwiązany
przez nasze „Wsparcie online”, które można również
znaleźć w sekcji „Wsparcie” na stronie musictribe.
com. Alternatywnie, prześlij zgłoszenie gwarancyjne
online na musictribe.com PRZED zwrotem produktu.
Belangrijke informatie Viktig information Ważna informacja
26 27Quick Start GuideCENTAUR OVERDRIVE
FEDERAL COMMUNICATIONS
COMMISSION COMPLIANCE
INFORMATION
Behringer
CENTAUR OVERDRIVE
Responsible Party Name: Music Tribe Commercial NV Inc.
Address: 122 E. 42nd St.1,
8th Floor NY, NY 10168,
United States
Email Address: [email protected]
CENTAUR OVERDRIVE
This equipment has been tested and found to comply with the limits
for a Class B digital device, pursuant to part 15 of the FCC Rules.
These limits are designed to provide reasonable protection against
harmful interference in a residential installation. This equipment
generates, uses and can radiate radio frequency energy and, if not
installed and used in accordance with the instructions, may cause
harmful interference to radio communications. However, there is no
guarantee that interference will not occur in a particular installation.
If this equipment does cause harmful interference to radio or television
reception, which can be determined by turning the equipment o and on,
the user is encouraged to try to correct the interference by one or more of
the following measures:
• • Reorient or relocate the receiving antenna.
• • Increase the separation between the equipment and receiver.
• • Connect the equipment into an outlet on a circuit dierent from that to
which the receiver is connected.
• • Consult the dealer or an experienced radio/TV technician for help.
• • Consult the dealer or an experienced radio/TV technician for help.
This equipment complies with Part 15 of the FCC rules. Operation is subject
to the following two conditions:
(1) this device may not cause harmful interference, and
(2) this device must accept any interference received, including interference
that may cause undesired operation.
Important information:
Changes or modications to the equipment not expressly approved by
Music Tribe can void the user’s authority to use the equipment.
Hereby, Music Tribe declares that this product is in compliance with
Directive 2014/35/EU, Directive 2014/30/EU, Directive 2011/65/EU and
Amendment 2015/863/EU, Directive 2012/19/EU, Regulation 519/2012
REACH SVHC and Directive 1907/2006/EC.
Full text of EU DoC is available at https://community.musictribe.com/
EU Representative: Music Tribe Brands DK A/S
Address: Gammel Strand 44, DK-1202 København K, Denmark
UK Representative: Music Tribe Brands UK Ltd.
Address: 8th Floor, 20 Farringdon Street London EC4A 4AB, United Kingdom
1. ヒューズの格納部 / 電圧の選
択: ユニットをパワーソケットに接続す
る前に、各モデルに対応した正しい主電
源を使用していることを確認してくださ
い。ユ ニットによっては、230 V と 120 V
の 2つの違うポジションを切り替えて使
う、ヒューズの格納部を備えているもの
があります。正しくない値のヒューズ
は、絶対に適切な値のヒューズに交換さ
れている必要がありま す。
2. 故障: Music Tribe ディーラーがお
客様のお近くにないときは、musictribe.
com の “Support” 内に列記されている、
お客様の国の Music Tribe ディストリビ
ューターにコンタクトすることができ
ます。お 客様の国がリストにない場合
は、同じ musictribe.com の “Support” 内に
ある “OnlineSupport” でお客様の問題が
処理できないか、チェックしてみてく
ださい。あるいは、商品を返送する前
に、musictribe.com で、オンラインの保
証請求を要請してください。
1. 在线注册。 请购买 Music Tribe 产品
后立即在 musictribe.com 网站注册。 网页上
有简单的在线注册表格。 这有助于我们更
快更有效率地处理您维修等事宜。 请阅读
保修的相关条款及条件。
2. 无法正常工作。 若您的 Music Tribe
产品无法正常工作, 我们会为您尽快修
复。 请联系您购买产品的销售商。 若你
所在地区没有 Music Tribe 销售商, 请联系
musictribe.com 网站的 “WHERETOBUY” 一栏
下的所列出的子公司或经销商。
その他の重要な情報
其他的重要信息
Other important information
28 29Quick Start GuideCENTAUR OVERDRIVE

We Hear You