ALPHA
®
10
Owner’s Manual

© 2021 Garmin Ltd. or its subsidiaries
All rights reserved. Under the copyright laws, this manual may not be copied, in whole or in part, without the written consent of Garmin. Garmin reserves the right to change or
improve its products and to make changes in the content of this manual without obligation to notify any person or organization of such changes or improvements. Go to
www.garmin.com for current updates and supplemental information concerning the use of this product.
Garmin
®
, the Garmin logo, Alpha
®
, and ANT+
®
are trademarks of Garmin Ltd. or its subsidiaries, registered in the USA and other countries. Garmin DriveTrack
™
, Garmin Explore
™
,
Garmin Express
™
, and Thumb Stick
™
are trademarks of Garmin Ltd. or its subsidiaries. These trademarks may not be used without the express permission of Garmin.
Apple
®
and Mac
®
are trademarks of Apple Inc., registered in the U.S. and other countries. The BLUETOOTH
®
word mark and logos are owned by the Bluetooth SIG, Inc. and any use
of such marks by Garmin is under license. Windows
®
is a registered trademark of Microsoft Corporation in the United States and other countries. Other trademarks and trade names
are those of their respective owners.

Table of Contents
Getting Started................................. 1
Setting Up the System.............................1
Alpha 10 Handheld Device......................2
Locking and Unlocking the
Buttons................................................. 2
Charging the Handheld Device............... 3
Charging the Dog Collar Device..............4
Turning On the Device............................. 4
Turning Off the Device........................ 4
Selecting a Language..............................4
Acquiring Satellite Signals...................... 5
Calibrating the Compass........................ 5
Dog Collar Device Setup................... 5
Methods to Add a Dog Collar Device to a
Handheld Device..................................... 5
Adding a Dog or Contact Using
Wireless Pairing................................... 6
Sharing a Dog or Contact
Wirelessly............................................. 6
Adding a Dog Using the Track and
Control Codes...................................... 7
VHF Radio Information....................... 7
Editing Dog Information.......................... 7
Communication with the Collar.............. 8
Connected Features......................... 8
Pairing a Smartphone with Your
Device...................................................... 8
Dog Tracking.................................... 8
Handheld Device Screen......................... 9
Dog Status Icons..................................... 9
Starting and Ending a Hunt...................10
Marking Your Truck Location............... 10
Deleting Your Truck Location........... 10
Contact Tracking............................ 10
Turning On and Off the Transmitter..... 10
Sending and Receiving Messages....... 10
Finding Your Contact ID........................ 10
Changing Your Contact ID.................... 11
Customizing Your Device................11
System Settings.................................... 11
Setting the Device Alerts...................... 11
Remote View......................................... 11
Device Information......................... 11
Viewing E-label Regulatory and
Compliance Information....................... 11
Product Updates................................... 12
Setting Up Garmin Express............... 12
Device Care............................................12
Cleaning the Device...........................12
Attaching the Spine Mount Adapter.....13
Getting More Information..................... 13
Alpha 10 Handheld Device
Specifications........................................14
Maximizing the Battery Life..................14
Data Management................................ 15
Connecting the Handheld Device to a
Computer........................................... 15
Deleting Files..................................... 15
Disconnecting the USB Cable........... 15
Resetting Data and Settings............. 16
Purchasing Accessories....................... 16
Index.............................................. 17
Table of Contents i


Getting Started
WARNING
See the Important Safety and Product Information guide in the product box for product warnings and other
important information.
Setting Up the System
Before you can use the Alpha 10 system, you must set up the devices.
1 Charge the handheld device (Charging the Handheld Device, page 3).
2 Charge the dog collar device (Charging the Dog Collar Device, page 4).
3 Turn on the device (Turning On the Device, page 4).
4 Pair the dog collar device with the handheld device (Methods to Add a Dog Collar Device to a Handheld
Device, page 5).
5 Pair the handheld device with your phone (Pairing a Smartphone with Your Device, page 8).
6 Calibrate the compass (Calibrating the Compass, page 5).
Getting Started 1
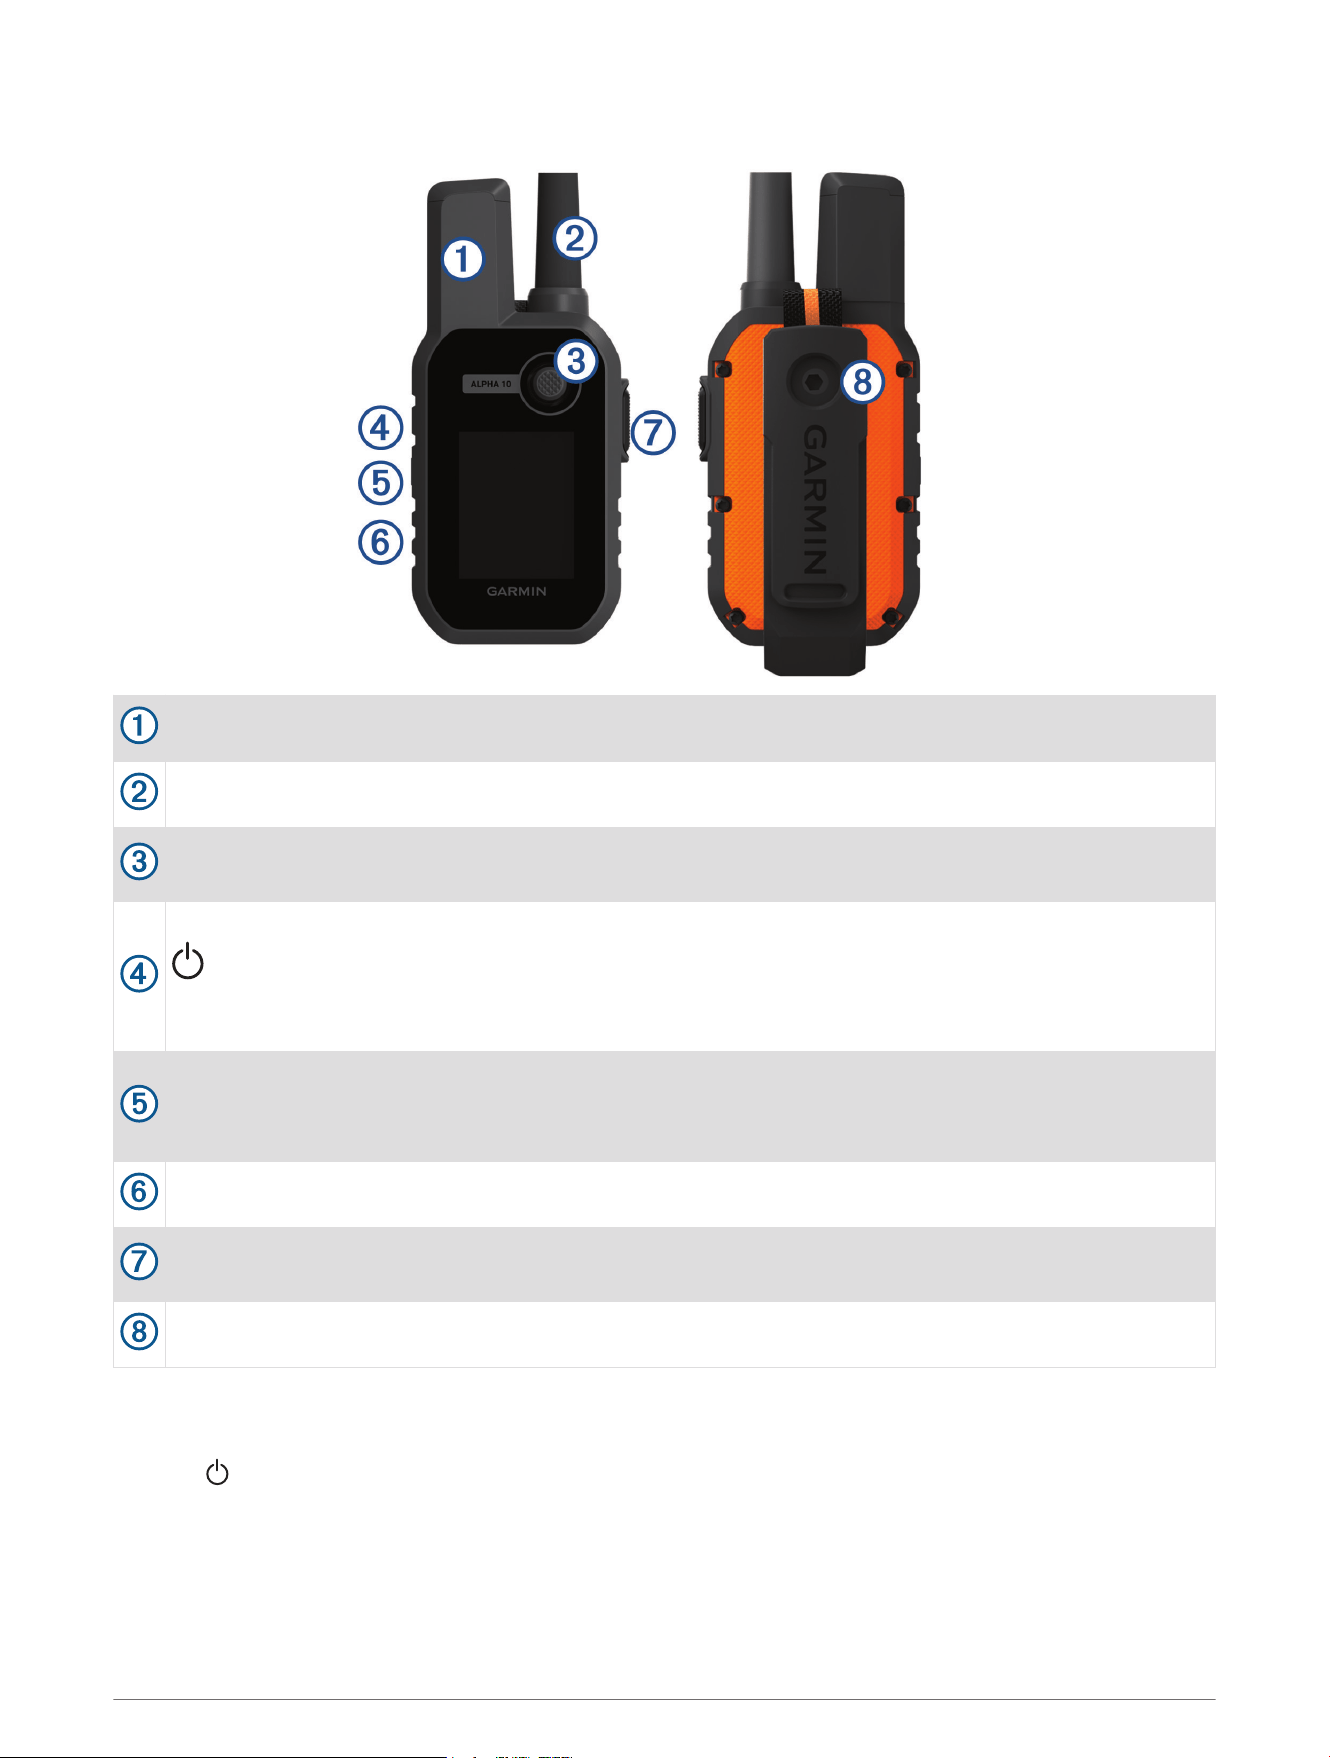
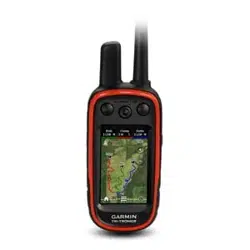
Alpha 10 Handheld Device
GPS antenna
VHF antenna
Thumb Stick
™
controller
Move directionally to scroll or highlight an item. Press to select an item.
Power button
Press to turn the backlight on or off. Hold to turn the device on or off and to lock or unlock the device
buttons.
Training button
Press to activate a training command for the selected dog.
NOTE: This functionality may not be available in your area.
USB port (under weather cap)
Menu button
Press to open and close the device menu. Hold to return to the tracking screen.
Mounting screw with attached carabiner loop and spine mount.
Locking and Unlocking the Buttons
You can lock the device buttons to prevent inadvertent button presses.
1 Press .
2 Select Lock.
3 Hold the menu button to unlock the buttons.
2 Getting Started
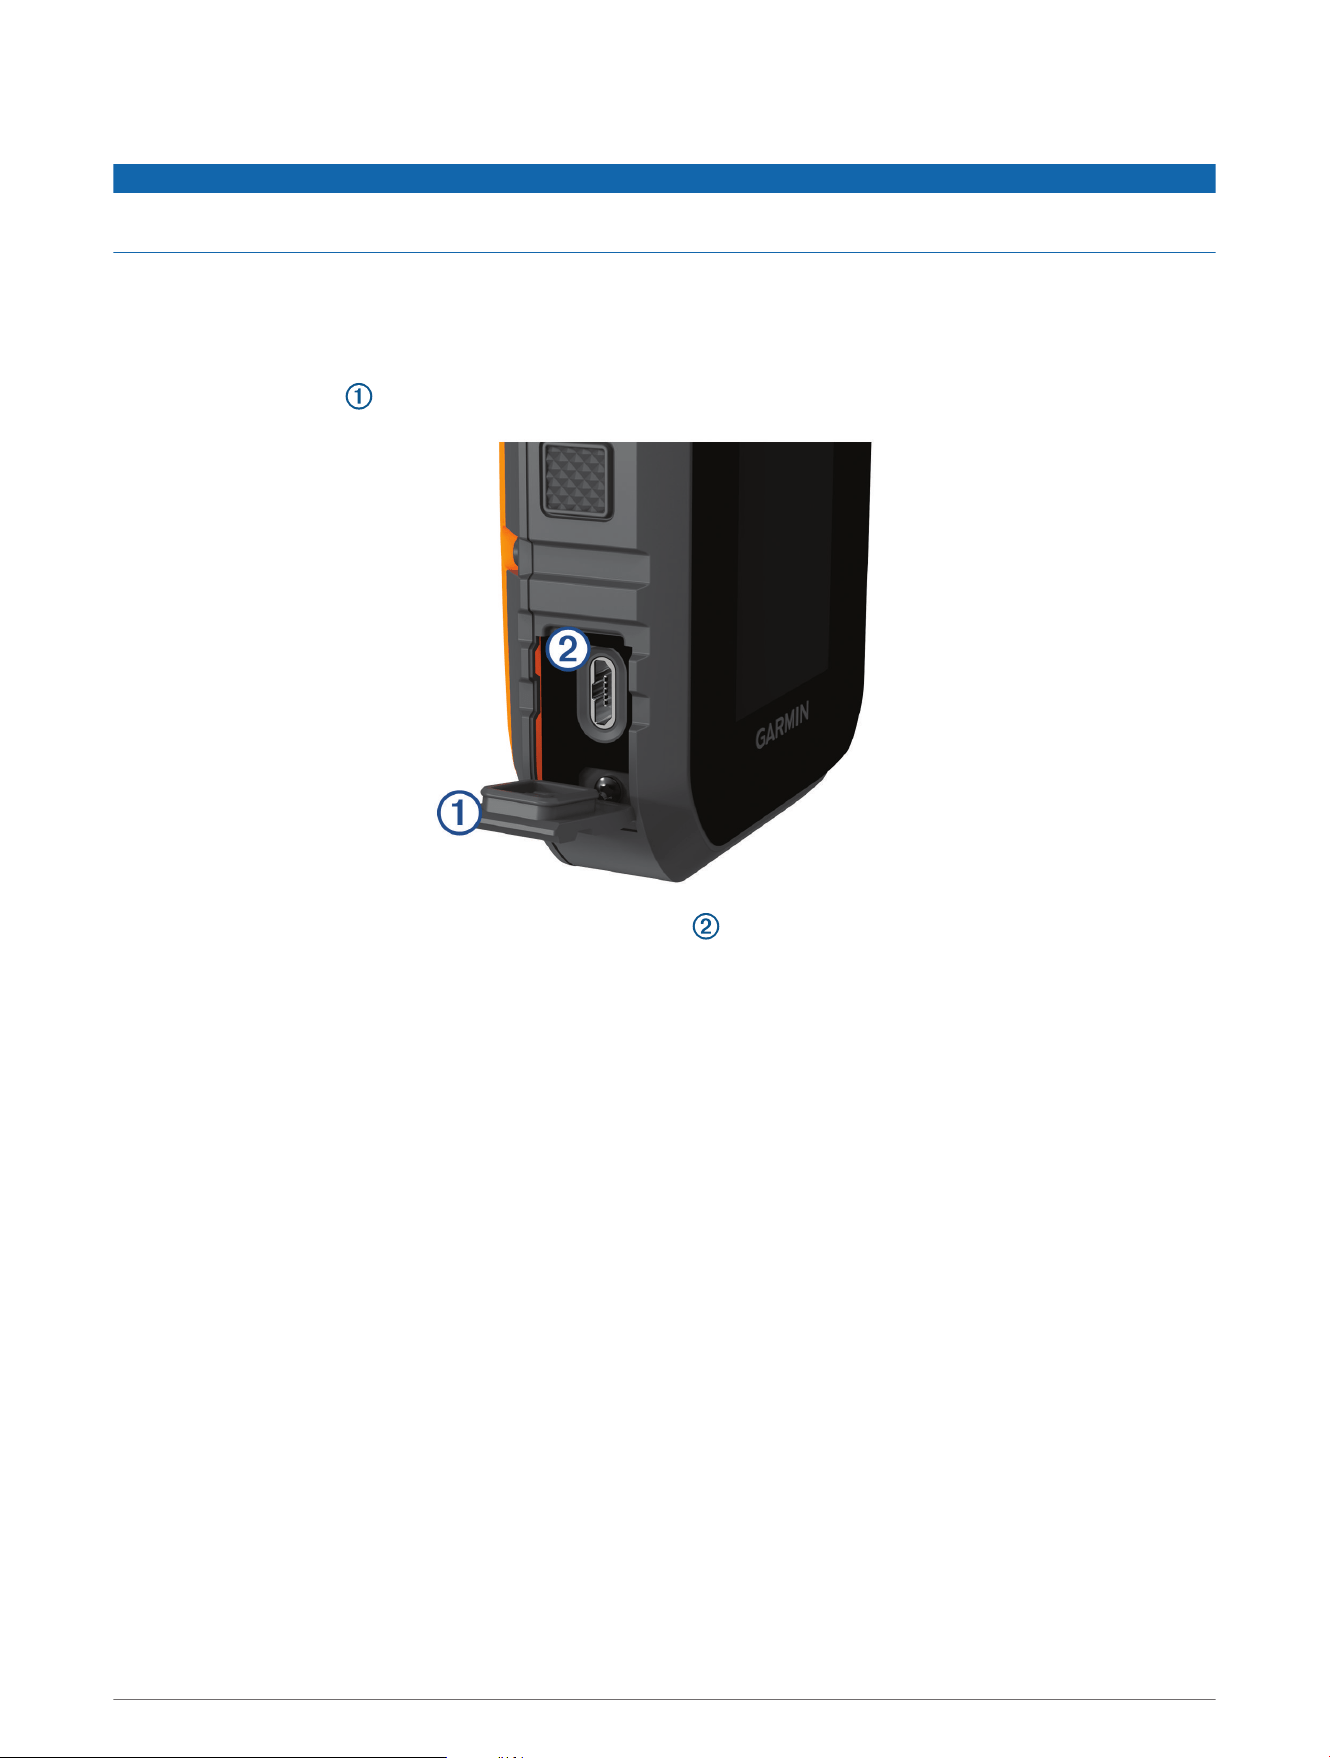
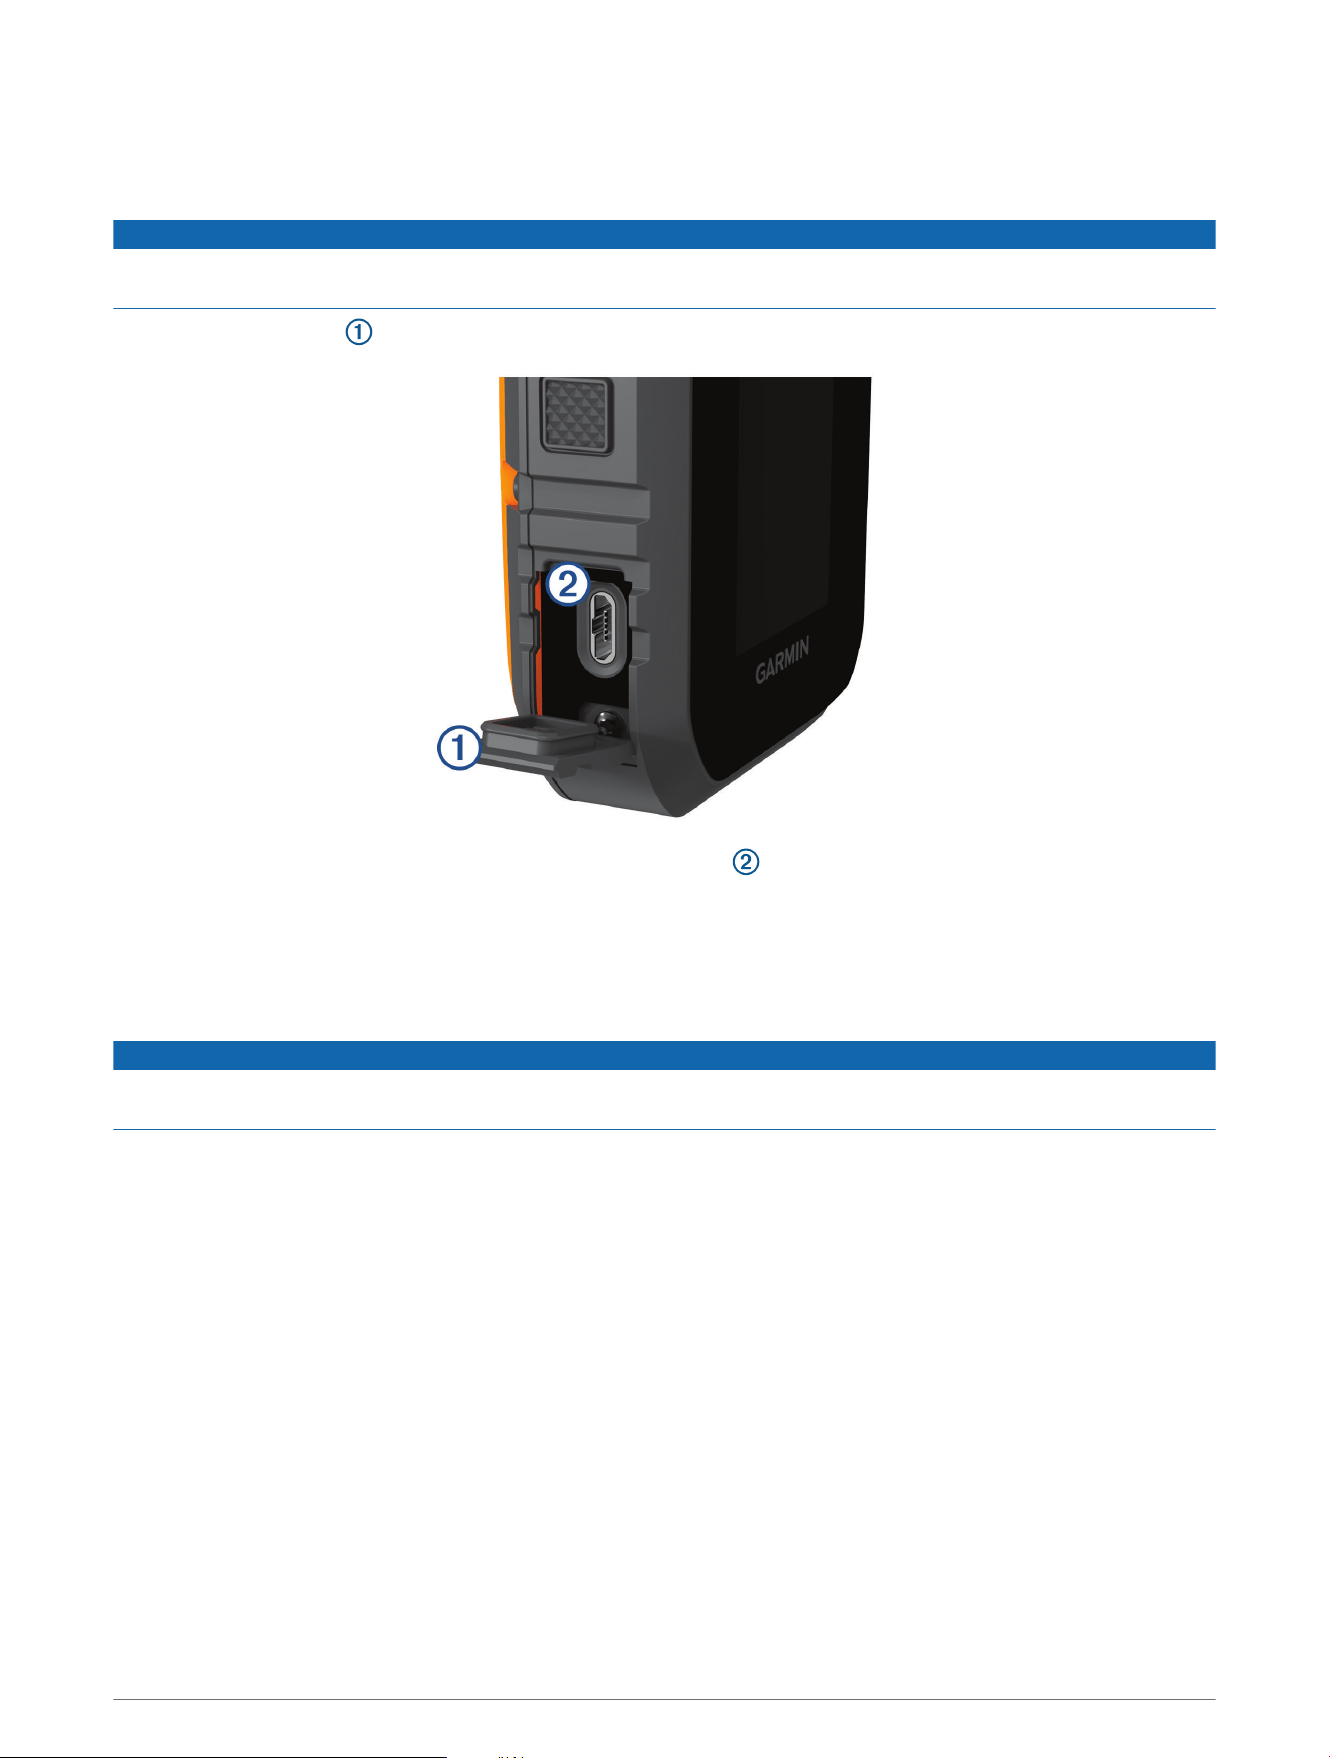
Charging the Handheld Device
NOTICE
To prevent corrosion, thoroughly dry the USB port, the weather cap, and the surrounding area before charging or
connecting to a computer.
You should fully charge the battery before you use the device for the first time. Charging a fully depleted battery
takes about 2 hours.
NOTE: The device will not charge when it is outside the charging temperature range (Alpha 10 Handheld Device
Specifications, page 14).
1 Lift the weather cap .
2 Plug the small end of the power cable into the USB port on the device.
3 Plug the other end of the power cable into a power source.
4 After the device is fully charged, unplug the power cable from the device.
Getting Started 3
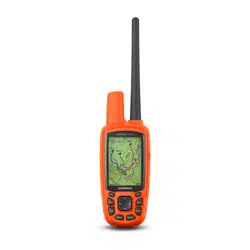
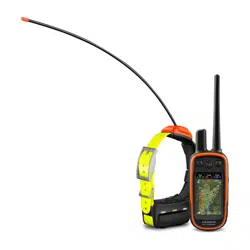
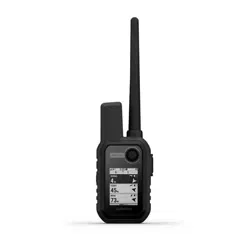
Charging the Dog Collar Device
NOTICE
To prevent corrosion, thoroughly dry the contacts on the collar and the surrounding area before connecting the
charging clip.
NOTE: Your dog collar device may look different than the device pictured.
You should fully charge the battery before you use the device for the first time. Charging a fully depleted battery
takes about five hours.
1 Snap the charging clip onto the device .
2 Plug the small end of the power cable into the mini-USB port on the charging clip cable.
3 Plug the power cable into a power source.
The status LED is solid red when the collar is charging.
4 After the status LED turns solid green, remove the charging clip from the collar.
Turning On the Device
• On the handheld device, press the power button.
• On the dog collar device, hold the power button until the status LED flashes and the collar beeps.
Turning Off the Device
• On the handheld device, hold the power button and select Power Off.
• On the dog collar device, hold the power button until the status LED turns red.
Selecting a Language
When you turn on your device for the first time, you must select the device language from a list of available
languages. You can change the language setting from the System settings.
1 Press the menu button.
2 Select Setup > System > Language.
3 Select a language.
4 Getting Started

Acquiring Satellite Signals
NOTICE
This device is intended for outdoor use only. Satellite reception requires a clear line of sight to the sky. GPS
accuracy may be affected if you use the device indoors.
Both the dog collar device and the handheld device must acquire satellite signals before you put the dog collar
device on your dog. Acquiring satellite signals can take a few minutes.
1 Go outdoors to an open area.
2 Turn on both devices (Turning On the Device, page 4).
3 On the handheld device, select a paired collar with the Thumb Stick controller.
When the dog collar device has acquired satellite signals, the status LED flashes a double-blink or triple-blink in
green. When the handheld device has acquired satellite signals and communicated with a paired dog collar
device, it displays status information for the dog collar device (Handheld Device Screen, page 9).
Calibrating the Compass
NOTICE
Calibrate the electronic compass outdoors. To improve heading accuracy, do not stand near objects that
influence magnetic fields, such as vehicles, buildings, and overhead power lines.
You should calibrate the compass after moving long distances or experiencing temperature changes.
1 Press the menu button.
2 Select Calibrate Compass.
3 Follow the on-screen instructions.
Dog Collar Device Setup
Methods to Add a Dog Collar Device to a Handheld Device
You must add the dog collar device to the handheld device. You can add up to 20 devices to one handheld
device by using MURS/VHF, entering the track and control codes, or by sharing wirelessly using ANT+
®
technology. Up to 20 devices can be active at one time.
Using MURS/VHF: Allows you to add a dog collar device after you have placed the dog collar device into pairing
mode by pressing the power key.
This method is helpful when you are adding a new accessory collar to the system prior to leaving for the hunt
(Adding a Dog or Contact Using Wireless Pairing, page 6).
Entering the track and control codes: Allows you to add a dog collar device that you do not own and that is not
in the area. The dog's owner must determine if you can only track the dog or can track and control the dog.
This method requires the dog's owner to find and communicate the codes to the person adding the dog collar
device.
This method is helpful when you would like to add a dog collar device during a hunt, but you are not near the
dog. For example, you are adding another member of your hunting party's dog collar device to your handheld
device, but you do not own the dog collar device (Adding a Dog Using the Track and Control Codes, page 7).
NOTE: This feature varies based on dog collar device type and feature availability in your area. You may see
track codes only or track and control codes.
Dog Collar Device Setup 5

Adding a Dog or Contact Using Wireless Pairing
1 If the dog collar device is on, turn off the dog collar device (Turning Off the Device, page 4).
2 Hold the power button on the dog collar device until the device emits two series of beeps (about 2 seconds),
and then release the power button.
The status LED flashes rapidly in green. The dog collar device is now ready to be linked, or paired, with a
handheld device.
3 On the handheld device, press the menu button.
4 Select Add Device.
5 Select an option:
• If you are near the dog collar device, select Dog > Pair Collar, and follow the on-screen instructions.
• To add a contact or dog collar device by receiving the information from another handheld device, select
Receive Shared Asset.
NOTE: To successfully add the contact or dog collar device, the other handheld device must be wirelessly
sharing the information (Sharing a Dog or Contact Wirelessly, page 6).
6 After successfully adding the device, enter the name of the dog or contact, and select Done.
Adding a Contact Using the Transmission ID
1 On the handheld device, press the menu button.
2 Select Add Device > Contact.
3 Enter the transmission ID for the contact.
4 Enter the name of the contact, and select Done.
Sharing a Dog or Contact Wirelessly
Before you can share data wirelessly over ANT+, you must bring your Alpha handheld device within 3 m (10 ft.)
of the other handheld device.
1 Select the dog or contact to share or select Device Options.
2 Select Share > Share Wirelessly.
3 Select Yes to allow the other person to track your dog and correct your dog's behavior, if necessary.
To successfully share the contact or dog collar device, the other handheld device must be receiving the
device information (Adding a Dog or Contact Using Wireless Pairing, page 6).
Editing Dog Sharing Information
1 From the tracking screen, select the dog you want to edit or select Device Options.
2 Select Share.
3 Select an option:
• Select Track Code to change the track code for the dog collar device.
• Select Control Code to change the control code for the dog collar device.
• Select Share Wirelessly to share the dog collar device information with another handheld device.
• Select View Legacy Codes to view the previous track and control codes for the dog collar device.
NOTE: This feature may not be available on all devices.
6 Dog Collar Device Setup

Adding a Dog Using the Track and Control Codes
NOTE: This feature varies based on dog collar device type and feature availability in your area.
Before you can add a dog using the track and control codes, the dog owner must find the track and control
codes (Finding the Dog ID and Track and Control Codes, page 7) and tell them to you.
You can use track and control codes to authorize a handheld device to interact with your dog collar device. If
you are not near the dog you want to add or you cannot put the collar into pairing mode, you can add the dog
using the track and control codes.
1 On the handheld device, press the menu button.
2 Select Add Device > Dog > Enter Share Code.
3 Enter the track or control code for the collar, and select Done.
The dog’s track code allows you to track the dog. The dog’s control code allows you to both track and train
the dog.
4 Enter the name of the dog, and select Done.
Finding the Dog ID and Track and Control Codes
You can share a dog’s track code, which enables another person to track your dog. You can also share a dog’s
control code, which enables another person to track and train your dog.
1 Select a dog or select Device Options.
2 Select Share.
The track code and the control code are displayed under the dog's name.
VHF Radio Information
This product may be used only on specific radio frequencies, which vary depending on the country of use. See
the product packaging or go to www.garmin.com/tracking-legal for details about the radio frequency of this
product.
Editing Dog Information
1 From the tracking screen, select the dog you want to edit or select Device Options.
2 Select Edit.
3 Select an option:
• Select Collar Light to change the collar light mode.
• Select ID to change the dog collar device ID.
• Select Update Rate to change how often position data is transmitted from the dog collar device.
• Select Update Share Code to change the dog collar device share code.
• Select Dog Type to set which alerts are sent from the dog collar device.
• Select Battery Saver to turn battery saver mode on or off.
NOTE: This automatically switches to a 2 minute update rate when the collar has 25% battery remaining.
• Select Color to set the color used to identify the dog on external devices.
• Select Collar Sleep Mode to turn collar sleep mode on or off.
NOTE: When connected with the handheld device, the dog collar device can be put into sleep mode to
conserve the battery when you are not actively tracking your dog.
• Select Name to edit the name of the dog.
• Select Remove to remove the dog from your device.
Dog Collar Device Setup 7
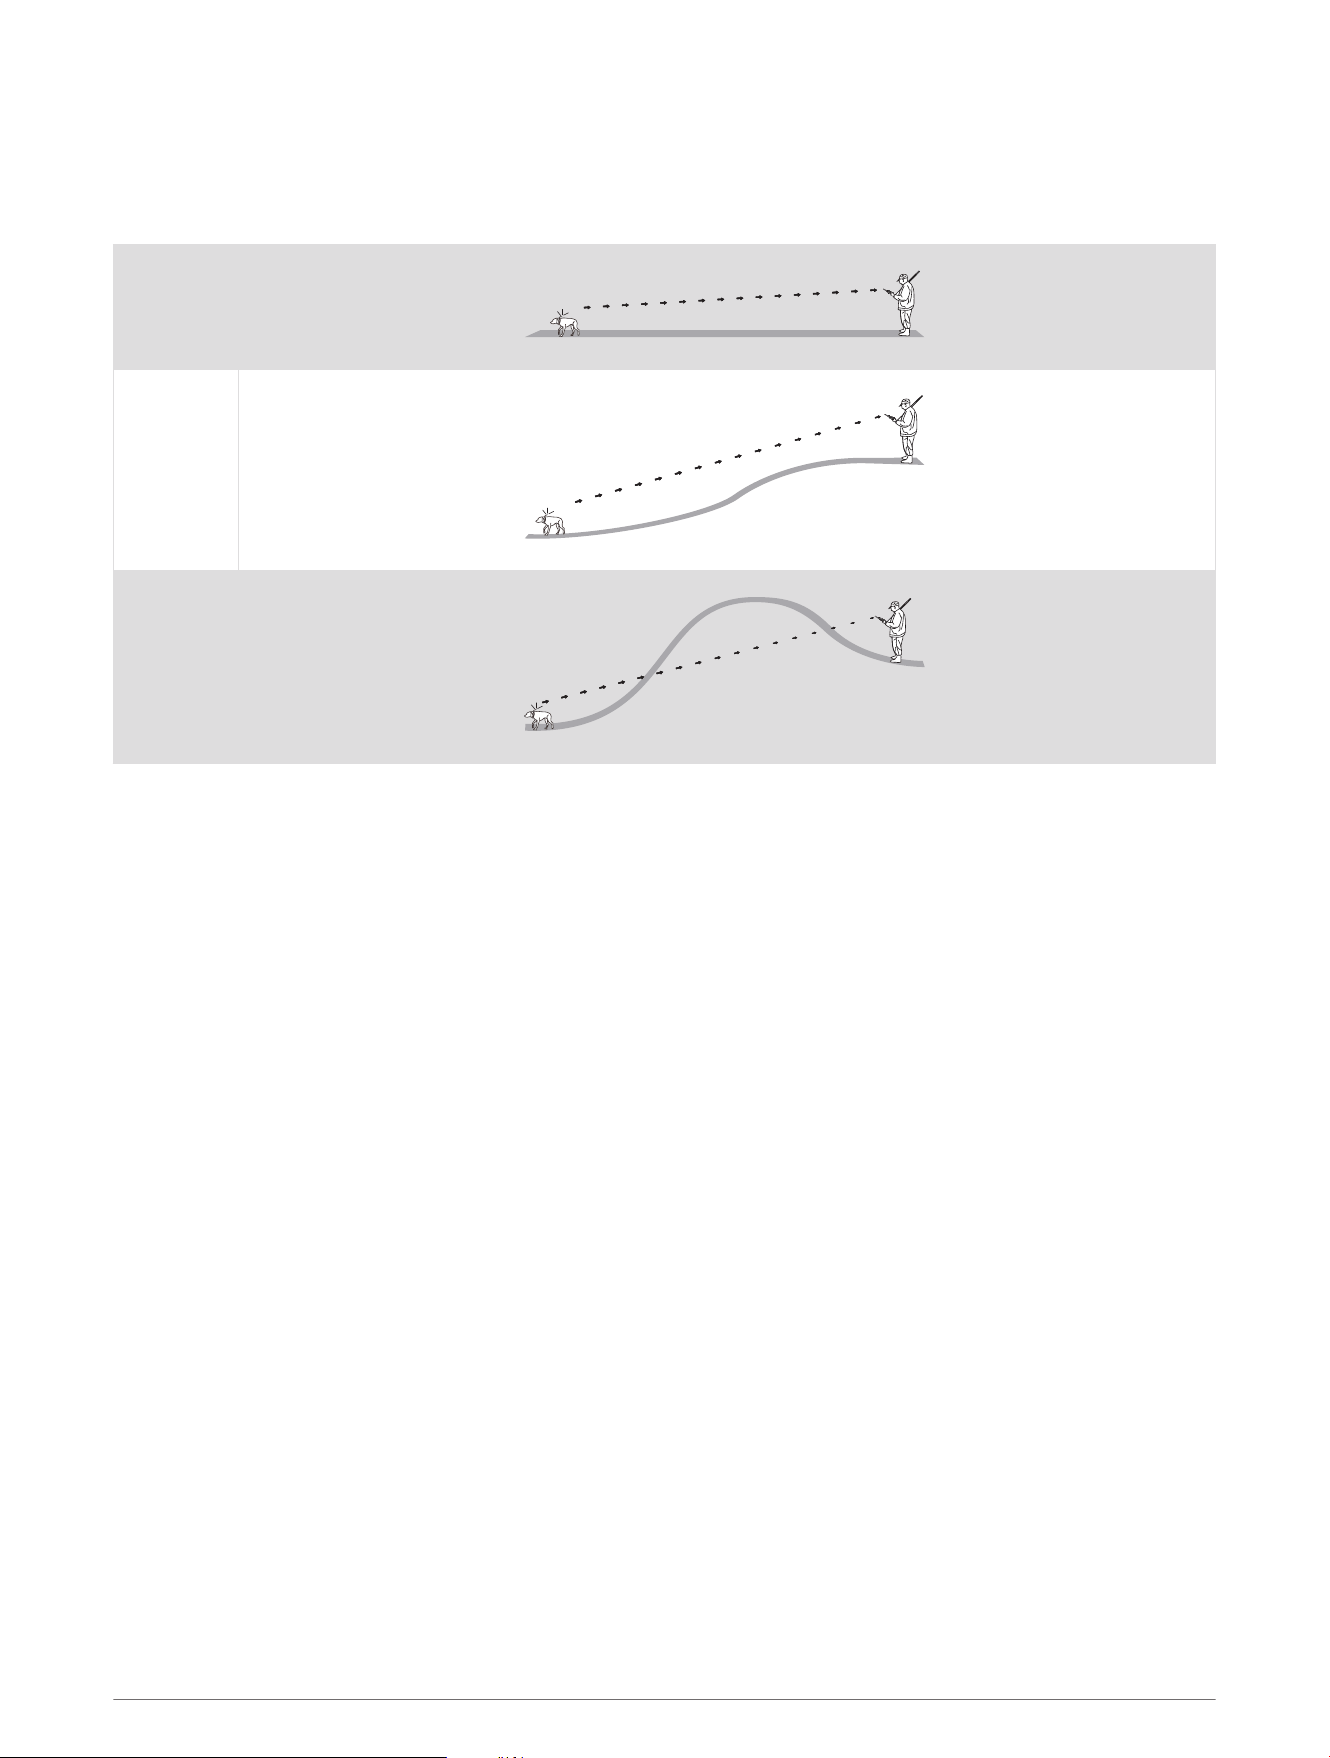
Communication with the Collar
You should keep an unobstructed line of sight between your handheld device and the dog collar device to
produce the best communication signal. To achieve the best line-of-sight conditions, you should move to the
highest elevation point in your area (for example, on the top of a hill).
Best
Good
Poor
Connected Features
Connected features are available for your Alpha 10 device when you install the Garmin Explore
™
app on a
compatible smartphone and connect the handheld device to your smartphone using Bluetooth
®
technology. Go
to garmin.com/apps for more information.
Garmin Explore: The Garmin Explore app shows the dog's location and tracking information during a hunt. After
ending a hunt, you can review tracks and other information to learn more about what happened during the
hunt.
Pairing a Smartphone with Your Device
To use the connected features of the device, it must be paired directly through the Garmin Explore app, instead
of from the Bluetooth settings on your smartphone.
1 Bring your compatible smartphone within 10 m (33 ft.) of your device.
2 Press the menu button on your handheld device.
3 Select Setup > Phone.
4 If necessary, select the toggle switch to enable Bluetooth technology.
5 Select Pair Phone.
6 On your compatible smartphone, enable Bluetooth technology, and open the Garmin Explore app.
7 From the Garmin Explore app, select Devices > Pair Device.
8 Follow the on-screen instructions in the Garmin Explore app to pair your device.
Dog Tracking
The handheld device allows you to track your dog or multiple dogs, using the tracking compass. The compass
pointer indicates the direction of the dog's current location.
8 Connected Features
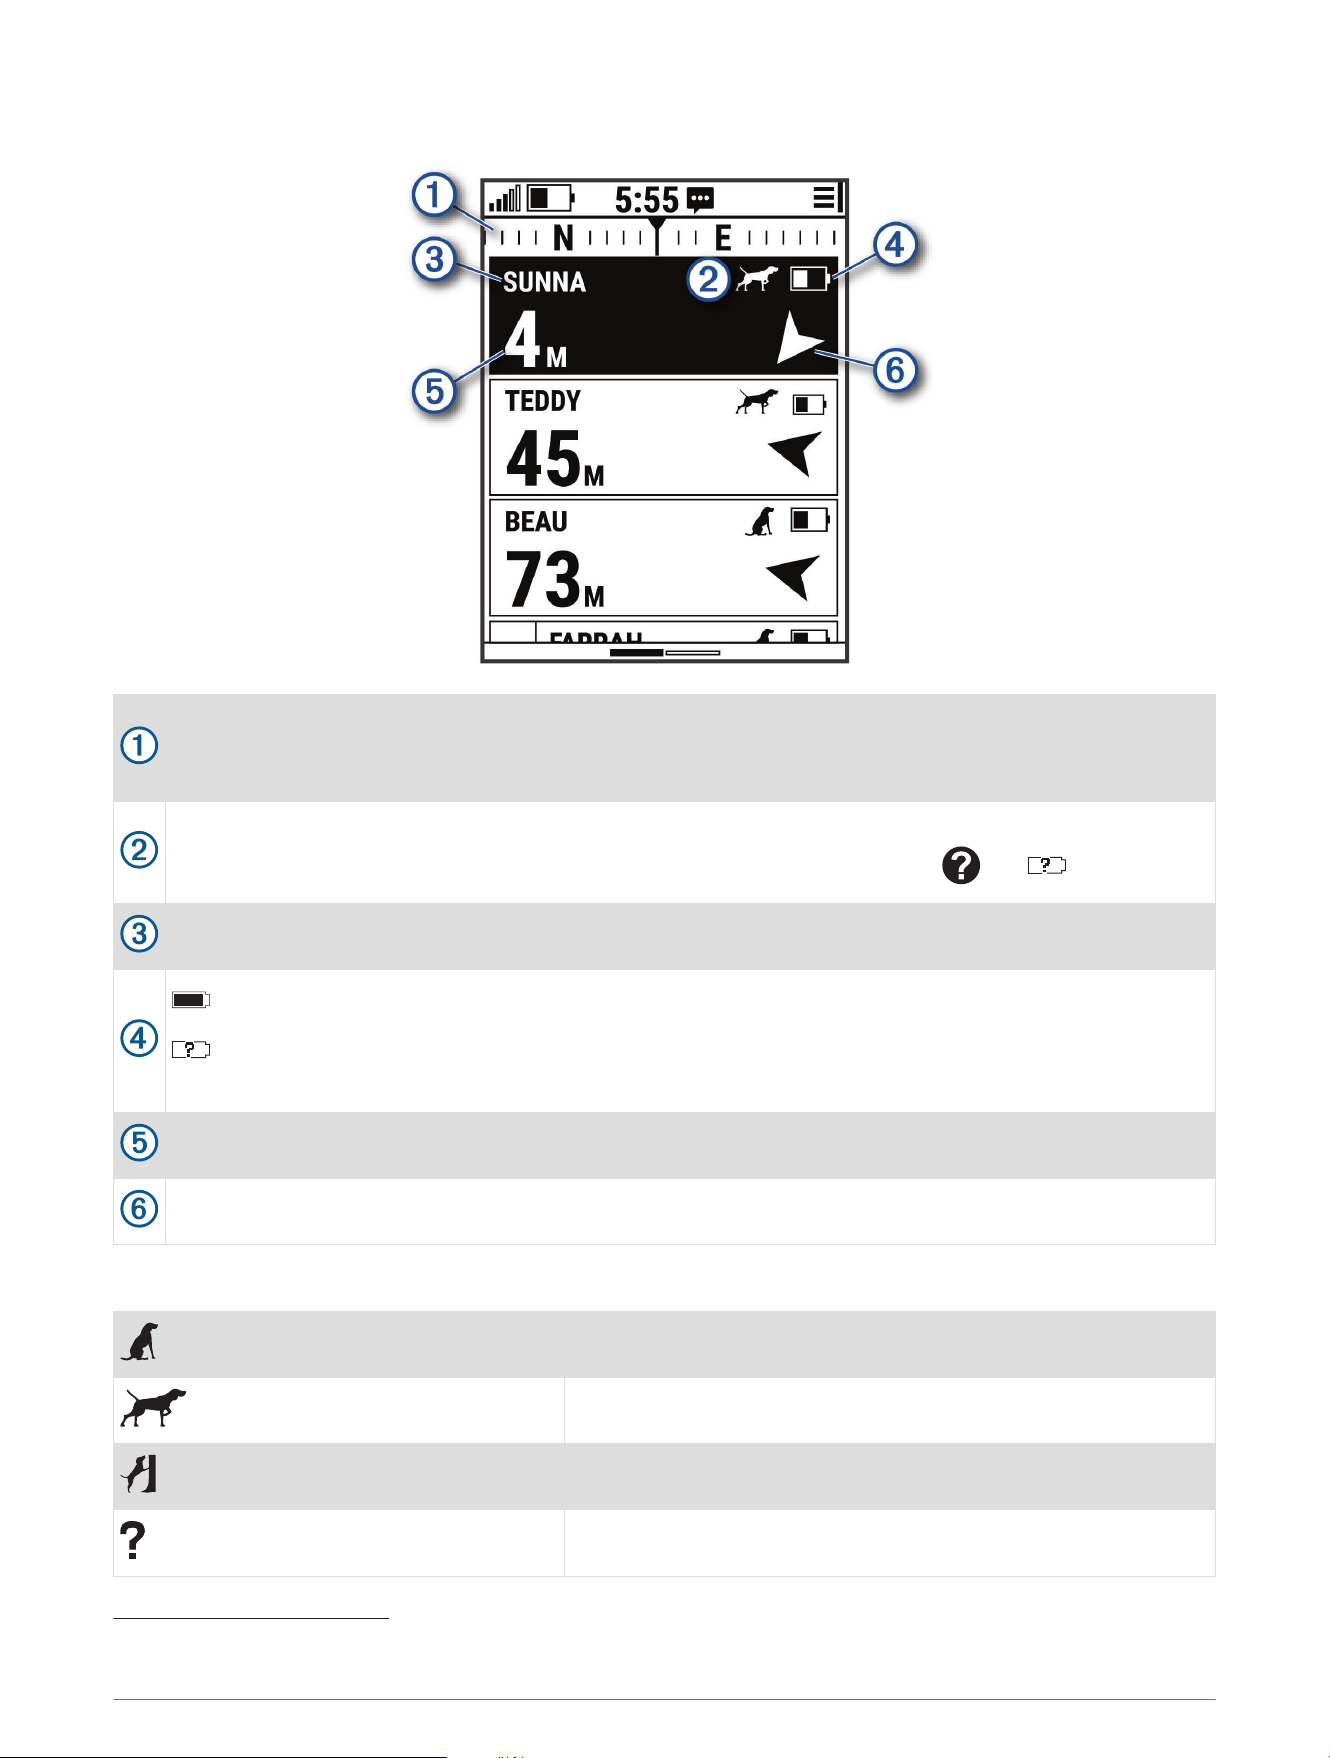
Handheld Device Screen
Shows the direction your device is currently pointing.
NOTE: If the compass does not accurately point to the current direction, you may need to calibrate the
handheld device (Calibrating the Compass, page 5).
Shows the current status of the dog (Dog Status Icons, page 9).
NOTE: If the handheld device loses communication with the dog collar device, and appear.
Indicates the dog collar device currently selected.
Battery level of the dog collar device.
Unknown battery status. Indicates the handheld device cannot determine the battery status of the
dog collar device.
Distance to the dog collar device.
Direction to the dog collar device.
Dog Status Icons
Sitting
On point
Treed
Unknown
1
1
The unknown status icon indicates that the handheld device cannot communicate with the dog collar device.
Dog Tracking 9

Starting and Ending a Hunt
You can start and end a hunt on your handheld device.
NOTE: When your device is connected to the Garmin Explore app, the hunt data is automatically uploaded to
your Garmin Explore account when you end a hunt.
1 Press the menu button.
2 Select Start Hunt.
3 Select the hunt timer to end the hunt.
4 Select Yes.
Marking Your Truck Location
You can mark the location of the truck, so you can navigate back to your truck after the hunt.
1 Press the menu button.
2 Select Mark Truck.
Deleting Your Truck Location
You must delete the previously marked truck location before you can mark a new location.
1 Press the menu button.
2 Select the marked truck.
3 Select Delete.
Contact Tracking
You can track other hunters so you know where they are at all times. You can also send messages to your
contacts. One Alpha 10 handheld device can track up to 20 devices, including compatible dog collar devices and
handheld devices.
Turning On and Off the Transmitter
Before you can add a contact, you must turn on the transmitter.
NOTE: In cold temperatures, if you transmit when the battery is low, the device may shut down.
1 Press the menu button.
2 Select Setup > Transmission ID > Status.
Sending and Receiving Messages
Before you can send a message to or receive a message from your contacts, you must turn on the transmitter
(Turning On and Off the Transmitter, page 10).
You can send and receive automated messages. When you receive a message it appears at the top of your
device screen. Pressing any button will dismiss the message. There are 18 messages you can choose from to
send your contacts, such as Help and I'm coming.
1 From the tracking screen, use the Thumb Stick to scroll right.
2 Select Send Message.
3 Select a message.
The message is sent to your contacts with your name before the message. Anyone tracking your handheld
device receives the message.
Finding Your Contact ID
1 Press the menu button.
2 Select Setup > Transmission ID.
Your contact ID is displayed under the My ID option.
10 Contact Tracking

Changing Your Contact ID
1 Press the menu button.
2 Select Setup > Transmission ID > My ID.
3 Select a new contact ID.
Customizing Your Device
System Settings
From the main menu, select Setup > System.
Language: Sets the text language on the device.
NOTE: Changing the text language does not change the language of user-entered data.
Auto Lock: Allows you to lock the device buttons after a specified amount of time.
Units: Sets the units of measure.
Time Format: Sets the device to display time in a 12-hr or 24-hr format.
Screen Capture: Allows you to save the image on the device screen by pressing the Thumb Stick.
Restore Defaults: Resets all settings to the default values and saves all user-entered information.
Factory Reset: Deletes all user data and resets all settings to the factory default values.
About: Displays e-label regulatory and compliance information.
Setting the Device Alerts
You can customize the type of alert received on your device for messages and warnings.
1 Press the menu button.
2 Select Setup > Alerts.
3 Select an alert type for each category.
Remote View
The handheld device uses ANT+ technology to share dog locations with Garmin DriveTrack
™
devices and
compatible outdoor watches. The handheld device can transmit to multiple devices at the same time. You can
enable or disable sharing this data at any time by pressing the menu button and selecting Setup > Remote View
> Status.
NOTE: For more information about sharing dog locations with another device, refer to the owner's manual for
the device.
Device Information
Viewing E-label Regulatory and Compliance Information
The label for this device is provided electronically. The e-label may provide regulatory information, such as
identification numbers provided by the FCC or regional compliance markings, as well as applicable product and
licensing information.
1 Press the menu button.
2 From the Setup menu, select System.
3 Select About.
Customizing Your Device 11
Product Updates
On your computer, install Garmin Express
™
(www.garmin.com/express).
This provides easy access to these services for Garmin
®
devices:
• Software updates
• Product registration
Setting Up Garmin Express
1 Connect the device to your computer using a USB cable.
2 Go to garmin.com/express.
3 Follow the on-screen instructions.
Device Care
NOTICE
Do not store the device where prolonged exposure to extreme temperatures can occur, because it can cause
permanent damage.
Avoid chemical cleaners, solvents, sunscreen, and insect repellents that can damage plastic components and
finishes.
Secure the weather cap tightly to prevent damage to the USB port.
Avoid extreme shock and harsh treatment, because it can degrade the life of the product.
Cleaning the Device
1 Wipe the device using a cloth dampened with a mild detergent solution.
2 Wipe it dry.
After cleaning, allow the device to dry completely.
12 Device Information

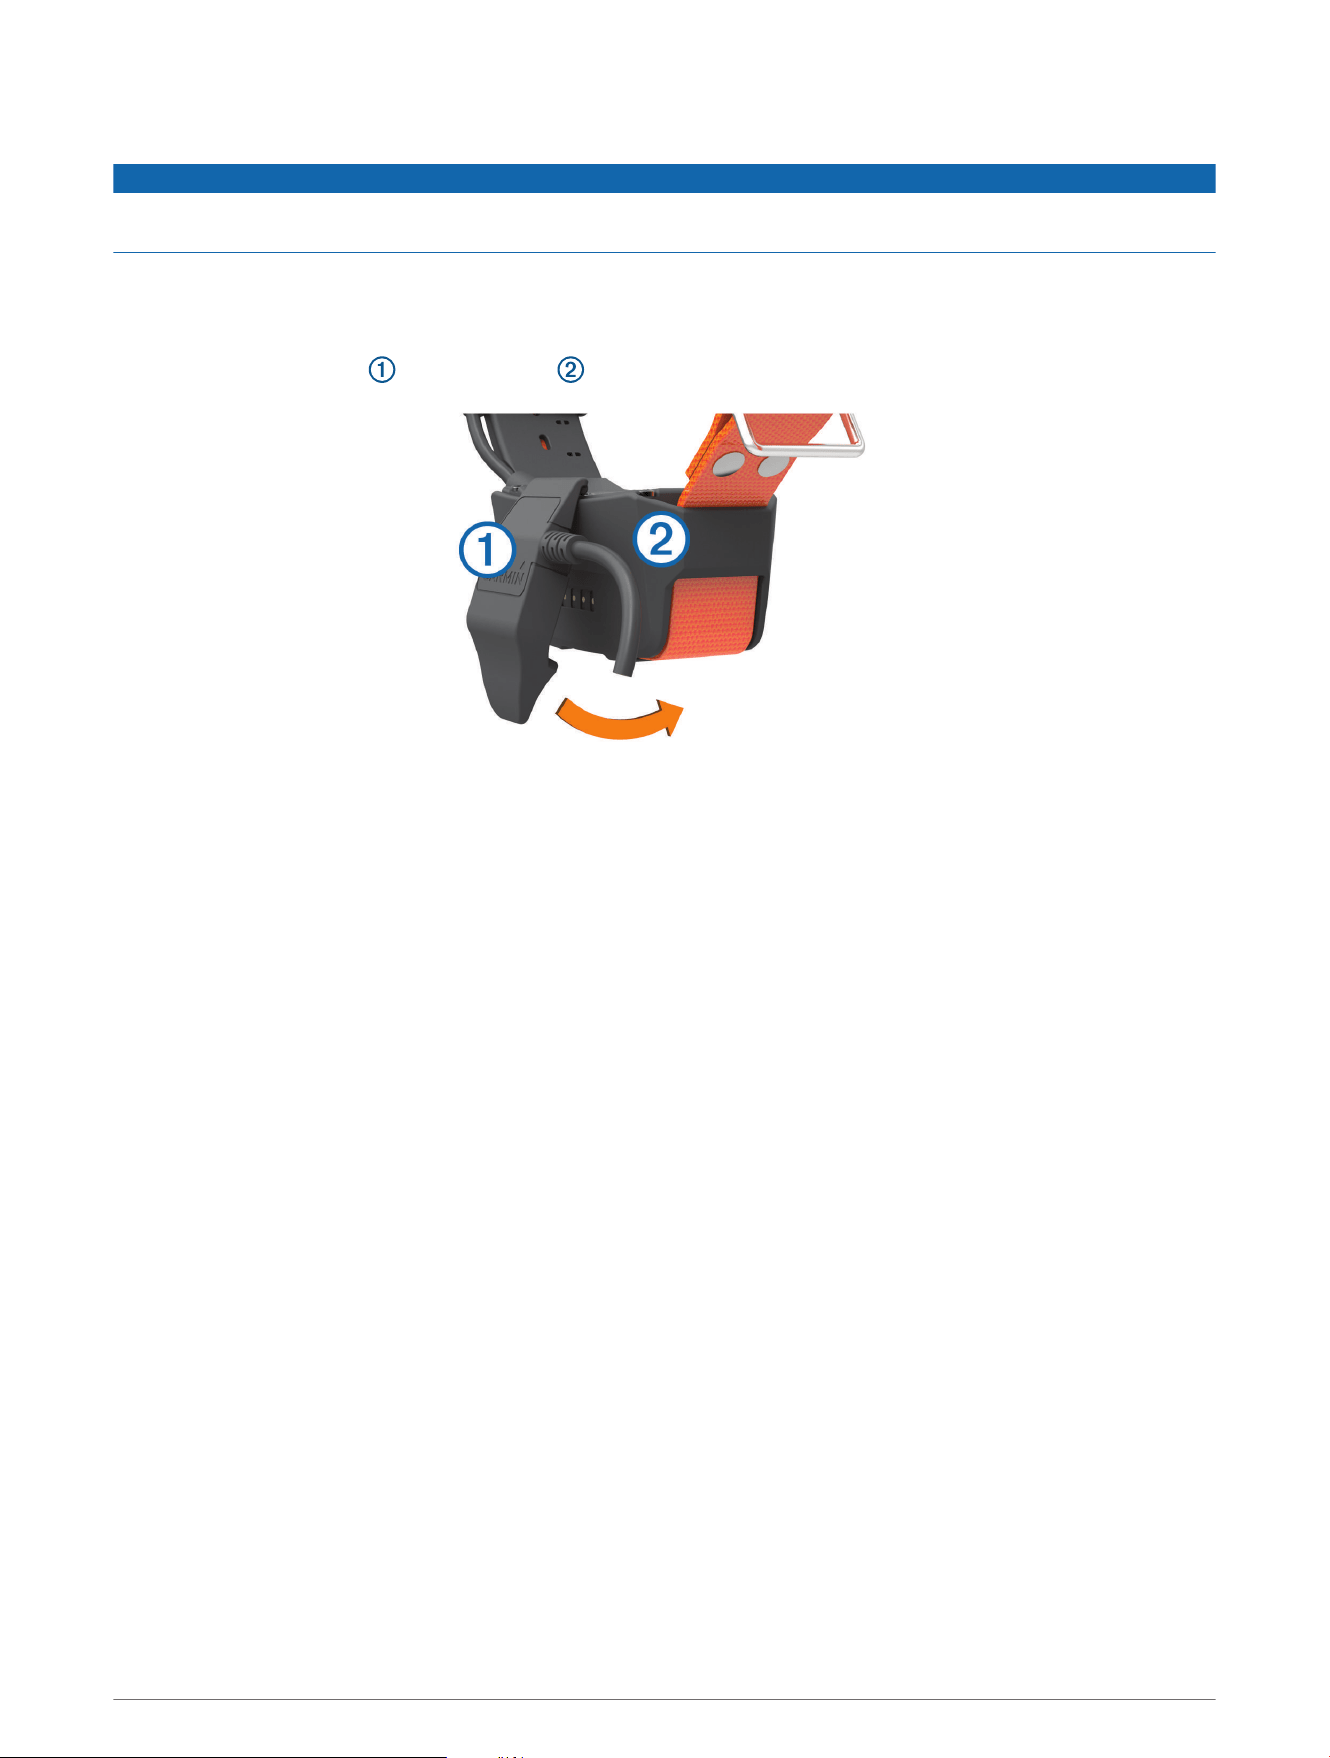
Attaching the Spine Mount Adapter
1 Remove the short screw from the carabiner strap .
2 Secure the spine mount adapter over the back of the device using the long screw included with the
device.
TIP: The spine mount adapter fits over the carabiner strap. You can attach the adapter over the strap or
remove the strap.
Getting More Information
You can find more information about this product on the Garmin website.
• Go to support.garmin.com for additional manuals, articles, and software updates.
• Go to buy.garmin.com, or contact your Garmin dealer for information about optional accessories and
replacement parts.
Device Information 13

Alpha 10 Handheld Device Specifications
Battery type Rechargeable lithium-ion
Battery life Up to 20 hr.
Operating temperature range From -20° to 60°C (from -4° to 140°F)
Charging temperature range From 0° to 40°C (from 32° to 104°F)
Long-term storage temperature range From 0° to 25°C (from 32° to 77°F)
VHF wireless range Up to 14.5 km (9 mi.)
ANT+ low power wireless range About 3 m (10 ft.)
Wireless frequencies/protocols 151-169 MHz @ 32 dBm maximum, 2.4 GHz @ 3.7 dBm maximum
Water rating IEC 60529 IPX7
1
Maximizing the Battery Life
You can do several things to extend the life of the batteries in the handheld device and collar.
• Turn off the transmitter (Turning On and Off the Transmitter, page 10).
• Turn off Remote View (Remote View, page 11).
• Turn on battery saver mode for the dog collar device (Editing Dog Information, page 7).
• Limit the number of tracked assets to 3.
1
The device withstands incidental exposure to water of up to 1 m for up to 30 min. For more information, go to www.garmin.com/waterrating.
14 Device Information
Data Management
Connecting the Handheld Device to a Computer
NOTICE
To prevent corrosion, thoroughly dry the USB port, the weather cap, and the surrounding area before charging or
connecting to a computer.
1 Lift the weather cap .
2 Plug the small end of the USB cable into the USB connector on the device.
3 Plug the other end of the USB cable into an available USB port on the computer.
Your device appears as a removable drive in My Computer on Windows
®
computers and as mounted
volumes on Mac
®
computers.
Deleting Files
NOTICE
If you do not know the purpose of a file, do not delete it. Your device memory contains important system files
that should not be deleted.
1 Open the Garmin drive or volume.
2 If necessary, open a folder or volume.
3 Select a file.
4 Press the Delete key on your keyboard.
Disconnecting the USB Cable
If your device is connected to your computer as a removable drive or volume, you must safely disconnect your
device from your computer to avoid data loss. If your device is connected to your Windows computer as a
portable device, it is not necessary to safely disconnect the device.
1 Complete an action:
• For Windows computers, select the Safely Remove Hardware icon in the system tray, and select your
device.
• For Apple
®
computers, select the device, and select File > Eject.
2 Disconnect the cable from your computer.
Device Information 15

Resetting Data and Settings
The device offers options for deleting your user data and resetting all settings to the factory default values.
1 Press the menu button.
2 Select Setup > System.
3 Select an option:
• To reset all settings to the default values and save all user-entered information, select Restore Defaults.
• To delete all user data and reset all settings to the factory default values, select Factory Reset.
Purchasing Accessories
Go to garmin.com/accessories.
16 Device Information

Index
A
accessories 13, 16
alarms, tones 11
ANT+ 11
applications 8
B
battery
charging 3
maximizing 14
Bluetooth technology 8
C
charging
collar 4
handheld 3
cleaning the device 12
collar 8
charging 4
compass, calibrating 5
computer, connecting 15
contact 10, 11
D
deleting, all user data 15
device, care 12
dog
adding 5–7
ID 7
information 6, 7
track and control codes 7
tracking 8–10
G
Garmin Express 12
updating software 12
GPS, settings 11
H
hunter 10
I
icons 9
initial setup 4
K
keys 2
locking 2
L
line-of-sight radio communication 8
locking, keys 2
M
messages 10
mounts 13
P
pairing, smartphone 8
power key 4
R
radio communication 8
radio frequencies 7
resetting the device 16
S
satellite signals, acquiring 5
screen 9
settings 11
smartphone
applications 8
pairing 8
software, updating 12
specifications 14
T
tones 11
troubleshooting 13, 16
U
USB, disconnecting 15
user data 15
deleting 15
W
waypoints, tracking 10
Wi‑Fi 8
Index 17

support.garmin.com
GUID-1D417107-4752-4DBB-B711-BC3B010D1792 v2December 2021