AIR-210
Instruction &
Recipe Booklet
For your safety and continued enjoyment of this product,
always read the instruction book carefully before using.
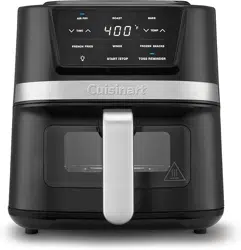
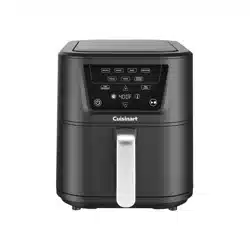
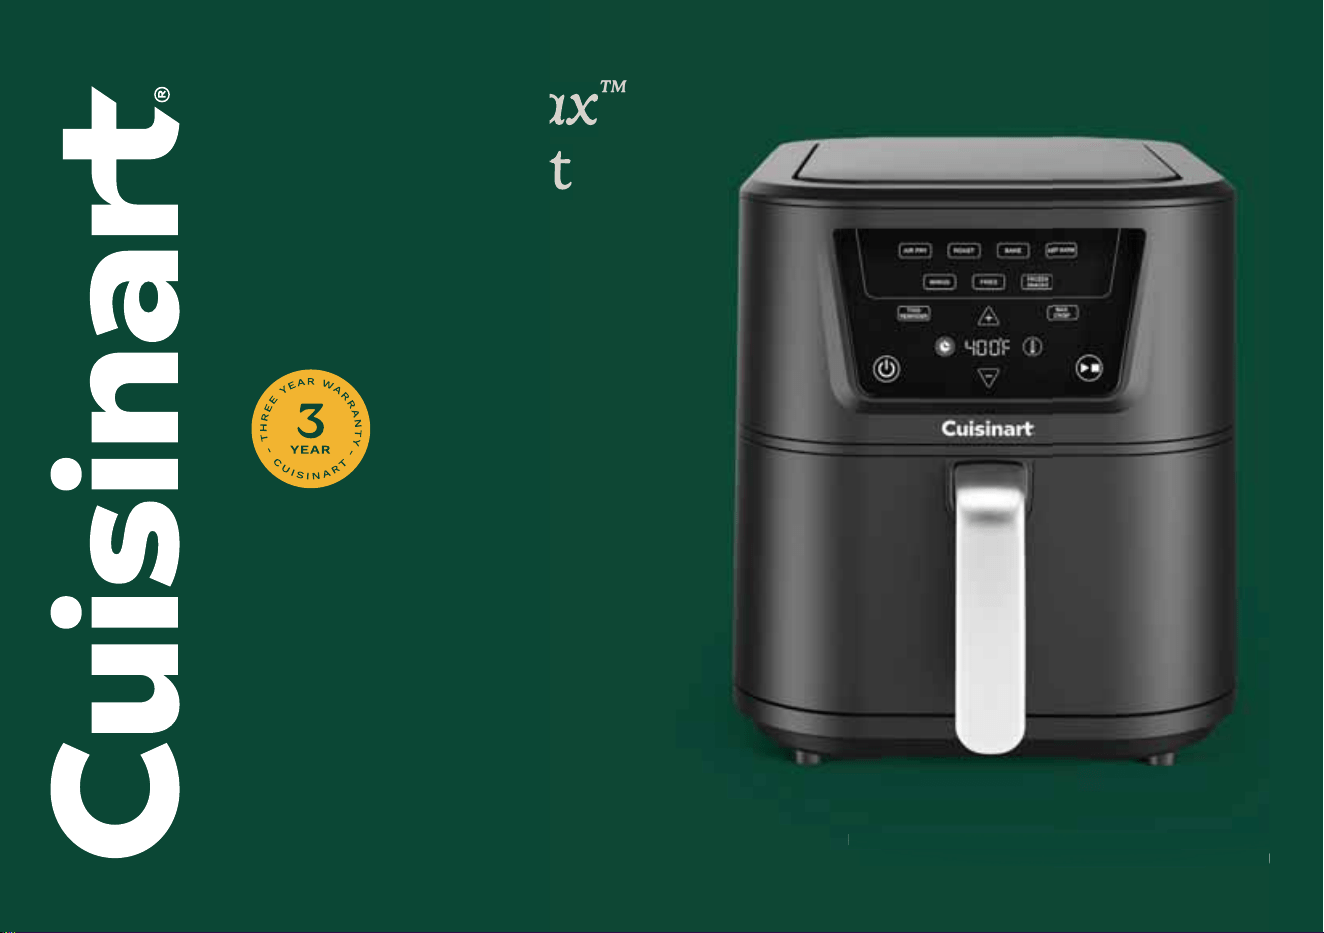
CompactMax
™
8-Qt Basket
Air Fryer
GARANTíA DE
TRES AÑOS
ESPAÑOL INCLUIDO
For
y
our safet
y
and continued en
j
o
y
ment of this product
always read the instruction book care
f
u
lly
be
f
ore usin
g
™

2
CONTENTS
Important Safeguards . . . . . . . . . . . . . . . . . . . . . . . . . . . . . . . . . . . . . . . . 2
Special Cord Set Instructions..................................3
Features and Benefits........................................4
Getting to Know the Control Panel..............................5
Before First Use.............................................6
Operation..................................................6
Air Frying Tips & Hints........................................6
Air Fryer Chart..............................................7
Troubleshooting.............................................8
More Ways to Cook..........................................9
Cleaning and Maintenance ....................................9
Recipes ..................................................10
Warranty..................................................20
IMPORTANT SAFEGUARDS
When using electrical appliances, basic safety precautions should
always be followed including the following:
1. Read all instructions.
2. UNPLUG FROM OUTLET WHEN NOT IN USE AND BEFORE
CLEANING. Allow to cool before cleaning, handling, or putting
on or taking off parts.
3. Do not touch hot surfaces. Use handles or knobs.
4. To protect against electric shock, do not immerse cord or plugs
or the main body of the Cuisinart
®
Basket Air Fryer in water or other
liquids. See Cleaning and Maintenance, page 9.
5. Close supervision is necessary when any appliance is used by or
near children.
6. Do not operate any appliance with a damaged cord or plug, or after
the appliance has malfunctioned or has been dropped or damaged in
any way, or is not operating properly. Return the Cuisinart
®
Basket Air
Fryer to the store or retailer where purchased for examination, repair,
or adjustment.
7. The use of accessory attachments not recommended by Cuisinart
may cause injuries.
8. Do not use outdoors.
9. Do not let cord hang over the edge of the table or counter, where
it could be pulled on inadvertently by children or pets, or touch hot
surfaces, which could damage the cord.
10. Do not place the Cuisinart
®
Basket Air Fryer on or near a hot gas
or electric burner or in a heated oven.
11. Do not use this Cuisinart
®
Basket Air Fryer for anything other than its
intended purpose.
12. Extreme caution should be exercised when using containers
constructed of materials other than metal or glass in the Cuisinart
®
Basket Air Fryer.
13. To avoid burns, use extreme caution when removing Cuisinart
®
Basket Air Fryer accessories or disposing of hot grease.
14. When not in use, always unplug the unit. Do not store any
materials other than manufacturer’s recommended ovenproof
accessories in this Cuisinart
®
Basket Air Fryer.
15. Do not place any of the following materials in the Cuisinart
®
Basket
Air Fryer: paper, cardboard, plastic, and similar products.
16. Do not cover any part of the Cuisinart
®
Basket Air Fryer with metal
foil. This will cause the unit to overheat.
17. Oversize foods, metal foil packages, and utensils must not be
inserted in the Cuisinart
®
Basket Air Fryer, as they may create the risk
of fire or electric shock.
18. A fire may occur if the Cuisinart
®
Basket Air Fryer is covered or
touching flammable materials such as curtains, draperies, or walls
when in operation. Do not store any items on top of the appliance
when in operation. Do not operate under wall cabinets.
19. Do not clean with metal scouring pads. Pieces can break off the pad
and touch electrical parts, creating the risk of electric shock.
20. Do not attempt to dislodge food when the Cuisinart
®
Basket Air Fryer
is plugged into an electrical outlet.
21. WARNING: To avoid possibility of fire, NEVER leave the Cuisinart
®
Basket Air Fryer unattended during use.
22. Use recommended temperature settings for all air frying.
23. Do not rest cooking utensils or baking dishes on the window or on
top of the unit.
24. Press the Power/Standby icon after use to turn off the Cuisinart
®
Basket Air Fryer.

3
25. Do not operate your appliance in an appliance garage or under a wall
cabinet. When storing in an appliance garage, always unplug the unit
from the electrical outlet. Not doing so could create the risk of fire,
especially if the appliance touches the walls of the garage, or the
door touches the unit as it closes.
26. Extreme caution must be used when moving an appliance containing
hot oil or other hot liquids.
27. To disconnect, press the Power/Standby icon to turn off, then
remove plug from wall outlet.
28. This appliance is not intended for use by persons (including children)
with reduced physical, sensory, or mental capabilities, or lack of
experience and knowledge, unless they have been given supervision
or instruction concerning use of the appliance by a person
responsible for their safety. Children should be supervised to ensure
that they do not play with the appliance.
29. If the supply cord is damaged, it must be replaced by the
manufacturer, its service agent, or a similarly qualified person in
order to avoid a hazard.
30. This appliance is intended to be used in households and similar
applications such as:
- Staff kitchen areas in shops, offices, and other working
environments
- Farmhouses
- By clients in hotels, motels, and other residential type environments
- Bed and breakfast type environments
31. This symbol means: The surface of this product
is hot; please be careful when touching it.
32. Always attach plug to appliance first, then plug cord into the wall
outlet. To disconnect, press the Power/Standby icon
nto
nto
nto
, then remove
plug from wall outlet, then remove plug
from wall outlet.
33. This appliance is not intended to be operated by means of an
external timer or separate remote-control system.
SAVE THESE
INSTRUCTIONS
FOR HOUSEHOLD
USE ONLY
NOT INTENDED
FOR COMMERCIAL USE
NOTICE
This appliance has a polarized plug (one blade is wider than the other).
As a safety feature, this plug will fit in a polarized outlet only one way. If
the plug does not fit fully into the outlet, reverse the plug. If it still does
not fit, contact a qualified electrician. Do not attempt to modify the plug
in any way.
Please read and keep these instructions handy. These instructions
will help you to safely operate your Cuisinart
®
Basket Air Fryer and
get the most out of it with consistent, professional results.
SPECIAL CORD SET INSTRUCTIONS
a. A short power-supply cord (or detachable power-supply cord) is
provided to reduce the risk resulting from becoming entangled in
or tripping over a longer cord.
b. Longer detachable power-supply cords or extension cords are
available and may be used if care is exercised in their use.
c. If a longer detachable power-supply cord or extension cord is used:
1. The marked electrical rating of the cord set or extension cord
should be at least as great as the electrical rating of the appliance;
2. The cord should be arranged so that it will not drape over the
countertop or tabletop where it can be pulled on by children
or tripped over unintentionally.

4
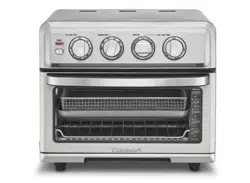
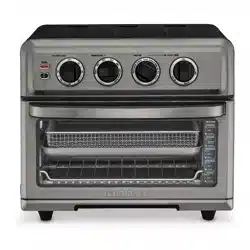
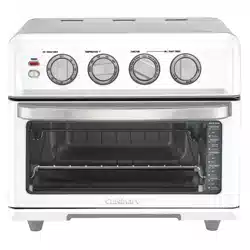
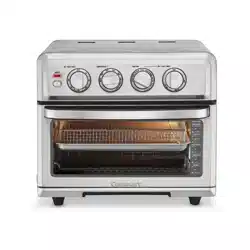
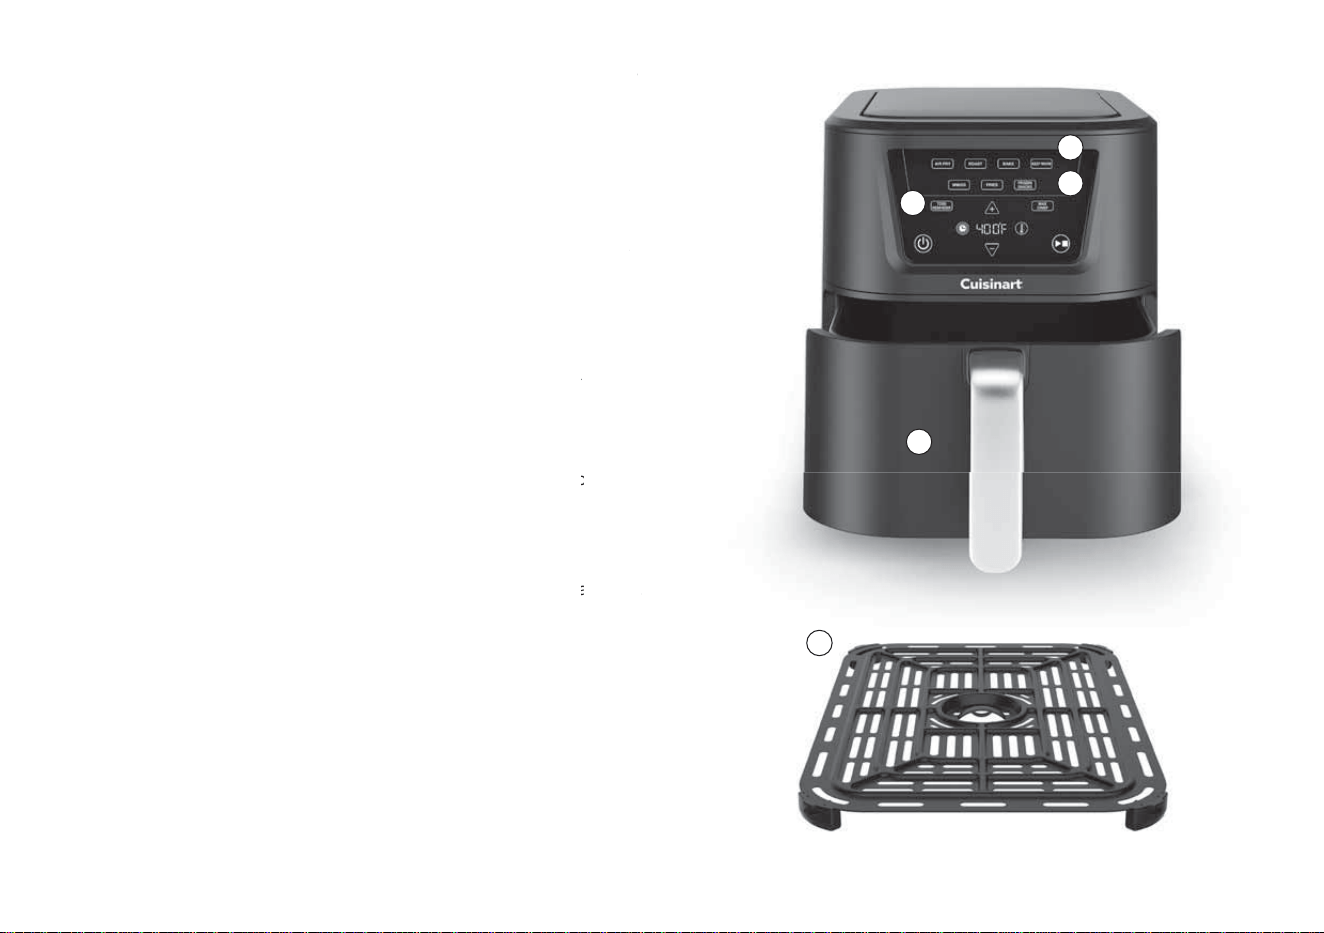
FEATURES AND BENEFITS
1. Digital Control Panel
Features easy-to-use touch controls to select time, temperature,
cooking function, and air fry presets, and a digital display that
shows temperature and countdown timer (details on page 5).
a. Cooking Functions:
Air Fry, Roast, Bake, and Keep Warm.
b. Air Fry Presets:
Wings, Fries, and Frozen Snacks.
c. Toss Reminder:
Optional feature to remind to toss or flip food midway through
cooking. Toss Reminder is automatic for air fry presets, with the
option to deselect.
2. Air Fryer Basket
8.5" x 12"-inch surface area for cooking food.
3. Crisper Plate
Ensures even cooking. Must always be inserted in air fryer basket
for cooking.
4
u
re,
t
u
gh
h
the
s
ket
1a
1b
1c
2
3
5
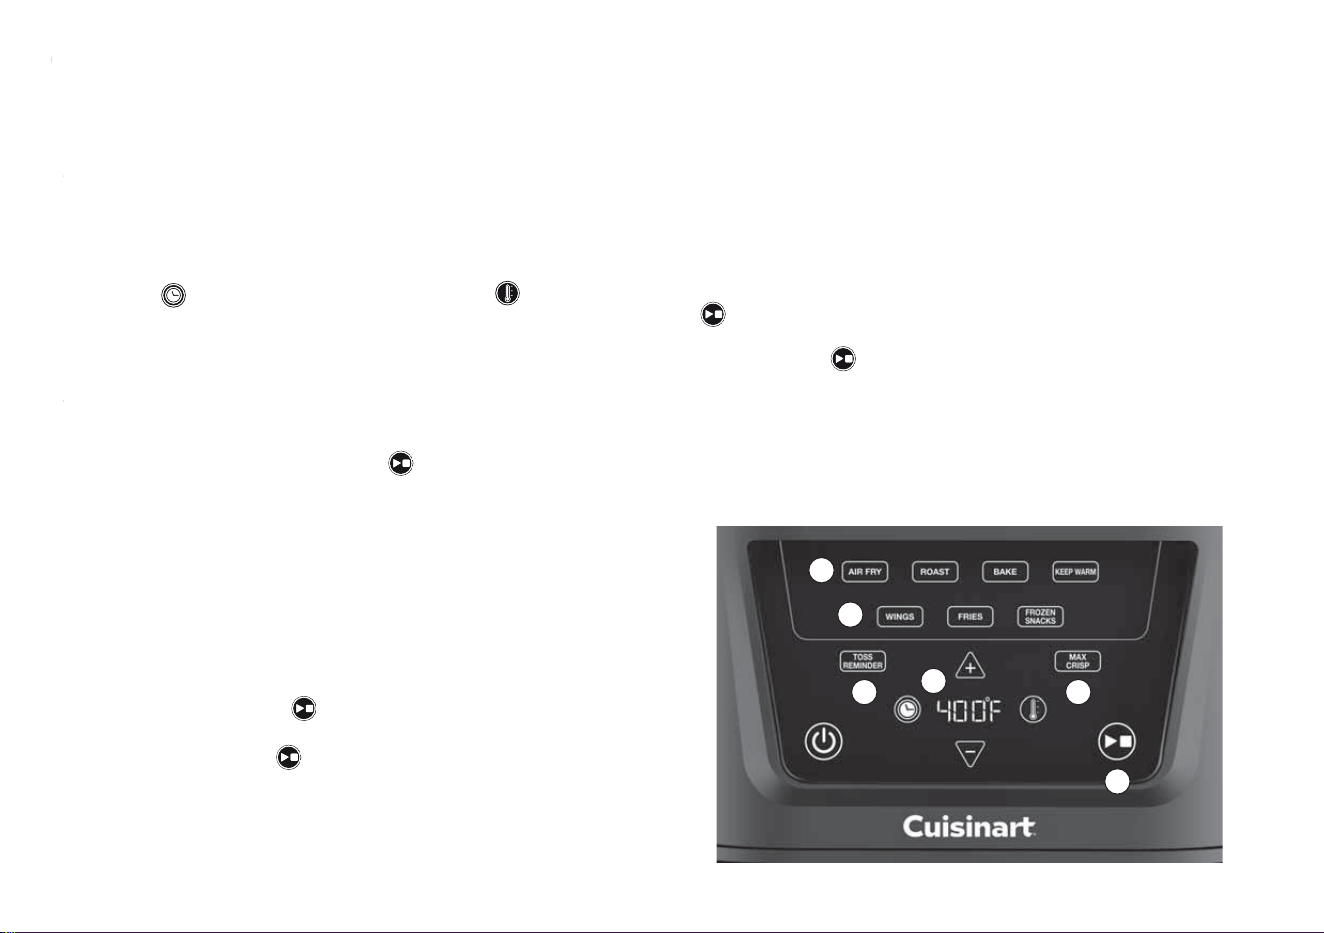
GETTING TO KNOW THE CONTROL PANEL
1. Cooking Functions
Select the desired cooking function based on your cooking method:
Air Fry, Roast, Bake, and Keep Warm.
2. Air Fry Presets
The Cuisinart
®
Basket Air Fryer has convenient, easy-to-use
presets for your air-fried favorites. Choose from Wings, Fries,
and Frozen Snacks.
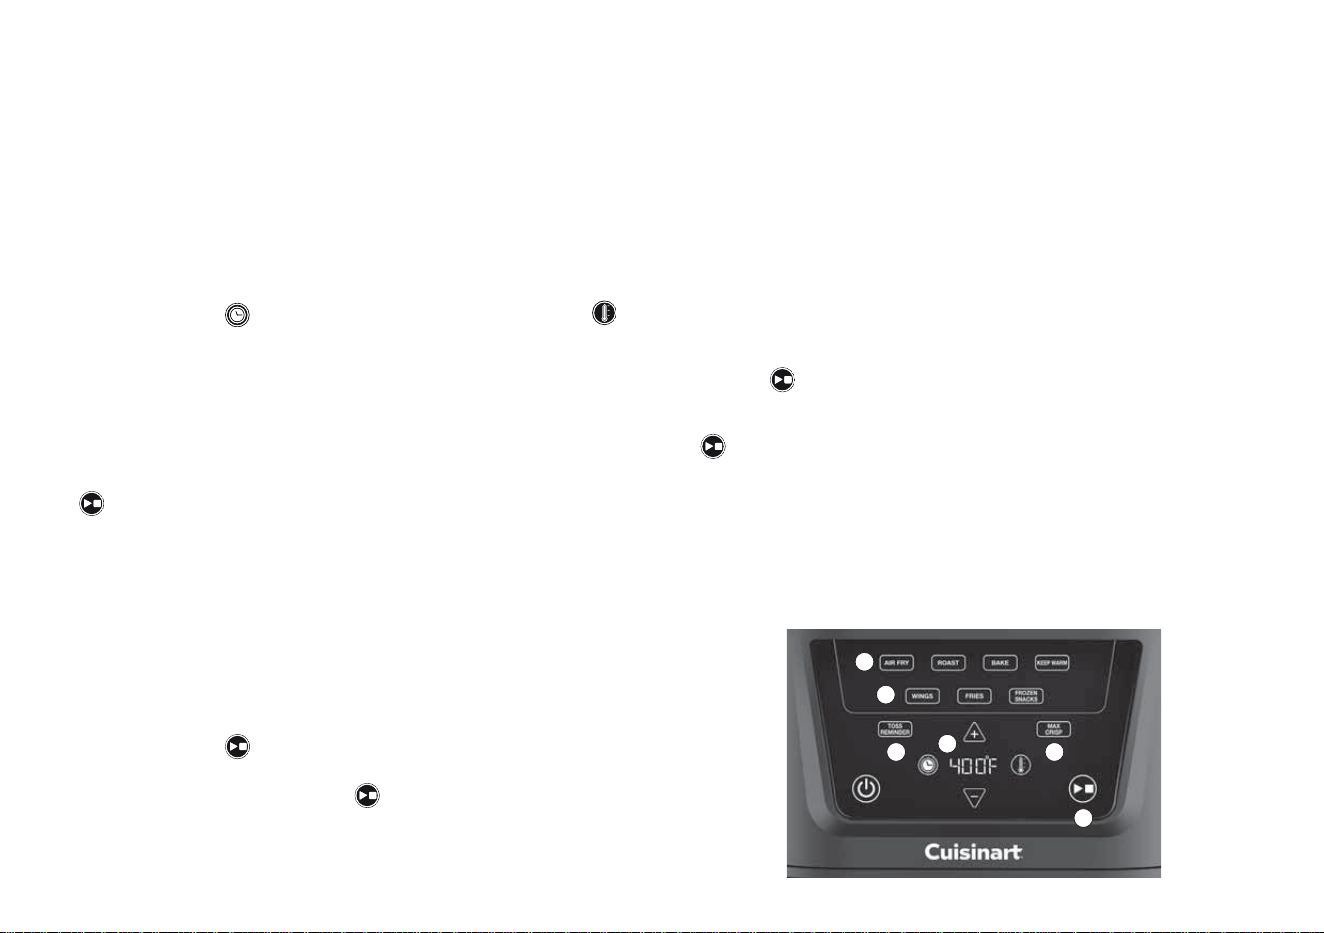
3. Time and Temperature Controls
Press the
icon to set the cooking time, and the icon to set the
temperature. Use the + and - arrows to adjust the cooking time
and temperature of cooking functions and air fry presets (optional).
This will alternate on the digital display.
4. Preheat Feature (not shown)
The Bake function of the Cuisinart
®
Basket Air Fryer has a preheat
feature. With food prepped and ready to cook, press Bake with the
basket in the air fryer, and then press . Preheat will display as a
scrolling rectangle on the control panel. When the unit is preheated,
an audio alert of 5 tones will sound. Remove the basket from the air
fryer, carefully add the prepared food, and then return the basket to
the unit. The countdown timer will start.
5. Automatic Keep Warm (not shown)
Once the timer reaches 00, an audio alert will sound three times and
"00" will hold on the screen for 1 minute. After 1 minute the unit will
automatically enter Keep Warm mode (see #8).
6. Start/Stop
Press the Start/Stop icon
to begin or end the cooking process.
The unit will start cooking once the timer and temperature are set,
and the Start/Stop icon is pressed. Tap the icon again to stop
cooking.
7. Toss Reminder
Press to set an audio alert halfway through cooking (with any cooking
function) as a reminder to toss or flip food. The Toss Reminder button
will flash during programming to indicate it has been selected.
Once cooking begins, it will remain steadily illuminated. At the
halfway point of cooking, 10 quick audio alerts will sound and
the button light will flash.
NOTE: Air fry presets automatically activate the Toss Reminder.
To disable it, simply press Toss Reminder after selecting desired
preset and it will stop flashing.
8. Auto Keep Warm
The Keep Warm function begins automatically at the end of any
cooking cycle and keeps cooked food warm for up to 60 minutes
unless the air fryer basket is removed to pause or the Start/Stop icon
is pressed to turn off. During the automatic Keep Warm mode, the
Keep Warm button will illuminate and the display will scroll. Press the
Start/Stop icon to turn off.
9. Max Crisp
Max Crisp is an independent cooking function with a high-
temperature setting of 405°F-450°F. Use this function to air fry
at a high temperature with shorter cook times.
10. The air fryer will enter sleep mode after 5 minutes of inactivity.
GE
1.
2.
3.
4.
5.
A
O
1
2
3
6
7 9

6
BEFORE FIRST USE
1. Carefully unpack the unit and remove any packaging and promotional
labels.
2. Place your Cuisinart
®
Basket Air Fryer on a flat, level surface.
3. Keep the air fryer 2 to 4 inches away from the wall or from any
objects on the countertop. Do not use on heat-sensitive surfaces.
NOTE: OBJECTS SHOULD NOT BE STORED ON TOP OF THE
AIR FRYER. IF THEY ARE, REMOVE ALL OBJECTS BEFORE YOU
TURN ON YOUR AIR FRYER. THE EXTERIOR WALLS GET HOT
WHEN IN USE. KEEP OUT OF REACH OF CHILDREN.
4. Confirm that there is nothing inside the Cuisinart
®
Basket Air Fryer
except the air fryer basket and crisper plate.
5. Rinse the air fryer basket and crisper plate thoroughly in warm soapy
water and then dry completely
6. Plug power cord into the wall outlet.
OPERATION
Follow these simple steps for cooking operation:
Place the Air Fryer on a Stable Surface
Insert the air fryer basket into the unit base until you hear a click. Ensure
the crisper plate is placed in the bottom of the air fryer basket.
Tap the Power/Standby icon
. The LED display will show “--:--”
indicating that the unit is ready for use.
Set Your Cooking Function, Time, and Temperature
Select the desired cooking function or air fry preset.
To adjust the cooking time, press the
, and use the up and down
to set the desired cooking time. To adjust the cooking temperature,
press the , and use the up and down to set the desired
temperature.
Optional Toss Reminder
The Toss Reminder is automatic for the Air Fry function and presets.
The Toss Reminder button will flash to indicate activation. Simply press
the Toss Reminder button to active or deactivate while setting your
cooking preference.
Start Cooking
Press the
icon to begin cooking. The digital display will show the
selected cooking function, and countdown timer, as well as activated
Toss Reminder.
End of Cooking Cycle
Once the cooking cycle is finished, the unit will sound three beeps and
display "00". After 1 minute the unit will automatically enter Keep Warm
mode until the Start/Stop icon
is pressed or the basket is removed
for more than 5 minutes.
To Turn Off
Press the Start/Stop icon
to turn off the unit. Unplug when not in use.
AIR FRYING TIPS & HINTS
Air frying is a healthy alternative to deep-frying in oil. A high-velocity fan
and an upper heating element circulate air to prepare a variety of foods
that are both delicious and healthier than traditional fried foods.
• Air frying doesn’t require oil, but a light coating of cooking spray or a
drizzle of oil tossed with food can enhance browning.
• Toss Reminder is recommended when cooking large quantities
that overlap and larger foods like chicken cutlets. For faster cooking
and better results, do not overload the air fry basket.
• Foods will cook more evenly when they are cut into equal-size pieces
with minimal overlap.
• An assortment of coatings can be used on air-fried foods.
Some examples of different crumb coatings include breadcrumbs
(plain, seasoned, and panko), crushed cornflakes, potato chips,
and graham crackers. Various flours (including gluten-free) and other
dry foods like cornmeal work as well.
• When cooking proteins, marinades, and juices will drip to the bottom of
the basket. This is a great base for a gravy or pan sauce.
• When air frying greasy foods (e.g., bacon), grease will drain into the
bottom of the air fryer basket. As a precaution, allow hot grease to cool
in the basket before discarding.
• Use tongs or a silicone spatula to remove food from the basket.
• To check on cooking food, remove the basket. This will pause cooking
until the basket is reinserted into the unit.

7
AIR FRYER CHART
The chart below lists recommended cooking times, temperatures, and portions for various types of foods that can be cooked in the Cuisinart
®
Basket
Air Fryer. If portions exceed recommendations, you can toss or flip foods occasionally while cooking to ensure the crispiest, most even results.
Smaller amounts of food may require less time. For best air fry results, periodically check on food during the cooking process.
NOTE: Use a heat-safe baking pan (not included) on the crisper plate for baked goods, quiches, or casseroles.
FUNCTION FOOD ITEM AMOUNT TIME TEMP PREHEAT TOSS/FLIP
Air Fry Breaded cutlets
5 cutlets, 1 to
1½ pounds
20 min 375°F - Flip
Air Fry Salmon
6 llets
(4 ounces each)
10 min 375°F - -
Air Fry Shrimp 2 pounds 8 min 370°F - Toss
Air Fry Bacon 8 slices 6 to 8 min 400°F - Flip
Bake Cake 9 x 5 loaf pan 25 min 325°F
✓
-
Bake Dinner rolls 6 10 to 12 min 350°F
✓
-
Roast Chicken, whole 4 pounds 55 min 350°F
--
Roast Chicken drumsticks 3 pounds 25 min 380°F - Flip
Roast Corn on the cob up to 6 ears 20 min 350°F - Flip

8
PRESET AMOUNT TIME TEMPERATURE PREHEAT TOSS/FLIP
Fries 2 pounds 20 min 400°F
-
Toss
Wings 3 pounds 30 min 400°F
-
Toss
Frozen Snacks - 10 min 400°F
-
Toss
Operation Why won’t my unit turn on?
Make sure your unit is plugged into a functional outlet.
Make sure the air fryer basket is securely in place in the unit. If the basket is not in place, the unit
will display OUT on the LED.
Call Consumer Service at 1-800-726-0190.
Cooking
Why are fried foods not crispy
or fried evenly?
Some foods may require more oil than others. If not crispy enough, lightly spray, brush, or rub more
oil on the food.
Make sure food is spread evenly in a single layer in the air fryer basket with no overlap. If food still
overlaps, toss or ip food halfway through cooking cycle; use the Toss Reminder for an audio alert.
Put the food in for additional cooking time. Make sure to check frequently until food reaches desired
brownness.
Why is my food undercooked?
If you put too much food in the air fryer basket, it may not cook in the suggested time. Try using
smaller batches of food and single layers, rather than stacking food items on top of each other.
If the temperature is too low, the food may not fully cook. For air frying, the ideal temperature
is around 400ºF.
Cleaning
How do I clean tough-to-
remove food residue from the
air fryer basket/crisper plate?
To remove baked-on grease, soak the air fryer basket and crisper plate in hot, sudsy water or use
a nonabrasive cleaner. We recommend hand-washing these parts in hot, sudsy water with a nylon
scouring pad or nylon brush and then thoroughly rinsing them, or washing in a dishwasher.
TROUBLESHOOTING

9
MORE WAYS TO COOK
In addition to air frying, the Cuisinart
®
Basket Air Fryer can be used for
baking, roasting, and more. To cook using these functions, simply select
the function and set cooking time (up to 60 minutes) and temperature.
Some tips and recommendations on temperature and time are listed
below.
• When using the Cuisinart
®
Basket Air Fryer, cooking times may need
to be reduced because of the convection fan’s high speed. Start
checking foods about 5 to 10 minutes before the end of the suggested
cooking time.
• When making baked goods in the unit, we recommend:
– Using a heat-safe baking pan (not included) on the
crisper plate.
– For recipes not specifically developed for this Cuisinart
®
Basket
Air Fryer, we suggest cooking at a lower temperature (25°F to 50°F
lower) than what the recipe indicates.
• To roast vegetables and cuts of meat, set the temperature
to 400°F.
• The Cuisinart
®
Basket Air Fryer can be used to roast beef,
chicken, pork, fish, and more.
CLEANING AND MAINTENANCE
• Always unplug the unit from the electric outlet and allow it to cool
completely before cleaning.
• Do not use abrasive cleaners, as they will damage the finish. Simply
wipe the exterior with a clean, damp cloth and dry thoroughly. Apply the
cleansing agent to a cloth, not directly onto the Cuisinart
®
Basket Air
Fryer, before cleaning.
• To clean interior walls, use a damp cloth and a mild liquid soap solution
or a spray solution on a sponge. Remove any residue from cleaners with
a clean, damp rag. Never use harsh abrasives or corrosive products.
These could damage the Cuisinart
®
Basket Air Fryer surface. Never use
steel wool pads on interior of the Cuisinart
®
Basket Air Fryer.
• Air fryer basket and crisper plate are dishwasher safe. They can also
be hand-washed in hot, sudsy water with a nylon scouring pad or nylon
brush and thoroughly rinsed.
• Remove the crisper plate from the air fryer basket to easily access the
bottom of the air fryer basket.
• Any servicing should be performed by an authorized service
representative.

10
Recipes
Street Corn Deviled Eggs ............................11
Smothered Wae Fries .............................11
Pickleback Wings...................................12
Crispy Gnocchi with Brussels Sprouts .................12
Air-Fried Corn on the Cob with Calabrian Chile Butter....13
Spiced Vegetable Skewers...........................13
Baked Sweet Potatoes ..............................14
Crab Cake Burgers..................................14
Zesty Chicken .....................................15
Loaded Hot Dogs...................................15
Chicken Parmesan Grinders..........................16
Barbecue Chicken ..................................17
Mediterranean Stued Chicken .......................17
Hosin-Glazed Salmon Skewers .......................17
Savory Hand Pies...................................18
Lemon-Glazed Doughnuts...........................19

11
Street Corn Deviled Eggs
A unique twist on the classic deviled egg. This Mexican street
corn-inspired treat utilizes roasted corn in the filling
for a welcome crunch.
Makes 12 servings
1 ear corn, husked
6 large eggs
2 tablespoons crema
3 tablespoons crumbled cotija, divided
1 tablespoon mayonnaise
2 teaspoons Dijon mustard
¼ teaspoon kosher salt
¼ teaspoon chili lime seasoning, plus more for garnish
Zest of ½ lime
1. Put the corn in the air fryer basket. Select Roast at 400°F and
the time to 20 minutes. When the Toss Reminder tone sounds,
turn the corn. Remove the corn and allow to cool.
2. While the corn is cooling, cook the eggs. Place the eggs in the
air fryer basket. Select Air Fry and set the temperature to 250°F
and the time to 18 minutes. When finished cooking, use tongs to
carefully transfer the eggs to a bowl filled with ice water to
stop the cooking process.
3. Once cool enough to handle, peel and halve the eggs. Carefully
scoop out the yolks. Put the yolks into the work bowl of a food
processor fitted with the metal chopping blade. Process until
smooth. Pulse in the crema, 2 tablespoons of the cotija,
mayonnaise, mustard, salt, ¼ teaspoon chili lime seasoning, and
lime zest. (Alternatively, mash the yolks in a medium bowl with
a fork and whisk in the remaining ingredients.)
4. Cut the kernels off the ear of corn. Fold into the yolk mixture.
Taste and adjust seasoning as desired.
5. Spoon or pipe the filling into the center of each egg white.
Sprinkle with the remaining cotija and chili lime seasoning
before serving.
Smothered Waffle Fries
Borrowing the flavors of buffalo wings, we use the air fryer to turn
crispy waffle fries into an addictive game-day snack.
Makes 6 servings
6 slices bacon
1 bag (2 pounds) frozen waffle-cut fries
1 cup (4 ounces) crumbled blue cheese
2 ounces shredded Monterey Jack cheese
1 celery stalk, diced
2 scallions, thinly sliced
2 tablespoons buffalo sauce
1. Put the bacon into the air fryer basket. Select Air Fry
and set the temperature to 400°F and the time to 10 minutes.
Remove and allow to cool. Once cool enough to handle, roughly
chop.
2. While the bacon is cooling, cook the fries. First, carefully pour
out the bacon grease from the air fryer basket into a heatproof
container. Add the waffle fries to the same air fryer basket
(no need to clean after the bacon). Select Air Fry and set the
temperature to 400°F and the time to 10 minutes, tossing when
the Toss Reminder tone sounds. Once cooked, top with the
chopped bacon, the crumbled blue cheese, and shredded
Monterey Jack. Return to the air fryer and set the temperature
to 400°F and the time to 3 minutes to fully melt the cheese.
3. Remove from the air fryer and transfer to a serving plate.
Top with the celery and scallions, then drizzle with the buffalo
sauce. Serve immediately.

12
Pickleback Wings
Inspired by the beloved pickleback shot, these crispy wings
take the flavors of pickle brine and bourbon to create a unique
and scrumptious bite.
Makes 4 to 6 servings
2 pounds chicken wings
1 cup dill pickle brine
½ teaspoon kosher salt
2 tablespoons bourbon
2 teaspoons honey
1 tablespoon light brown sugar
½ teaspoon onion powder
¼ teaspoon garlic powder
½ teaspoon smoked paprika
Pinch cayenne pepper
1 tablespoon chopped dill pickles, for serving
1. In a large bowl, combine the chicken wings and pickle brine.
Cover bowl with plastic wrap and refrigerate for 2 hours. Drain
the wings and pat dry.
2. Put the wings into the air fryer basket in a single layer. Sprinkle
with salt.
3. Select the Wings preset and set the time to 25 minutes. When
the Toss Reminder tone sounds, toss the wings.
4. While the wings are cooking, prepare the sauce. Put the
bourbon, honey, sugar, onion powder, garlic powder, paprika,
and cayenne in a large bowl. Whisk until the sugar is completely
dissolved. Reserve.
5. When time expires, toss the wings in the sauce and return to
the air fryer basket. Select the Wings preset once again and set
the time to 5 minutes (there is no need to toss during this
additional cooking time).
6. Garnish with chopped pickles for serving.
Crispy Gnocchi with Brussels Sprouts
This recipe checks all the boxes – crispy, hearty, zesty,
and quick. Add as much or as little of the hot honey depending
on your spice preference.
Makes 4 servings
1 package (17.56 ounces) shelf-stable gnocchi
Olive oil, for spraying
Kosher salt
Freshly ground black pepper
Nonstick cooking spray
1 pound Brussels sprouts, trimmed and halved
Hot honey, for serving
Lemon zest, for serving
Lemon juice, for serving
1. Put the gnocchi into a large mixing bowl. Spray liberally with
the olive oil and then sprinkle with two pinches each of salt and
a pinch of pepper. Toss to fully coat.
2. Transfer the gnocchi into the air fryer basket. Select Air Fry and
set the temperature to 375°F and the time to 18 minutes.
3. While the gnocchi are cooking, add the sprouts to the mixing
bowl and spray well with olive oil, then toss with salt and
pepper. Add to the gnocchi in the air fryer basket when there
are 12 minutes remaining of cooking time. When the Toss
Reminder tone sounds, toss the mixture.
4. Transfer to a shallow serving bowl and drizzle with hot honey,
then sprinkle with a large pinch of lemon zest and a squeeze of
lemon juice. Serve immediately.

13
Air-Fried Corn on the Cob
with Calabrian Chile Butter
Air frying corn is fast, easy, and delicious. The Calabrian chile
butter is a nice complement that brings the heat.
Makes 6 to 12 servings
6 ears corn, husked
Olive oil, for brushing
½ teaspoon plus pinch kosher salt, divided
4 ounces high-quality butter, room temperature
2 teaspoons jarred Calabrian chiles in oil
¼ teaspoon lemon zest
1. Brush the corn with oil and sprinkle with a pinch of the salt.
Place in the air fryer basket.
2. Select Air Fry and set the temperature to 350°F and the time to
15 minutes.
3. While corn is cooking, prepare the butter*. Place the butter into
a mini chopper and process until smooth. Add the chiles, lemon
zest, and remaining ½ teaspoon salt. Process until incorporated
and smooth.
4. Serve whole ears or cut each in half. Top with butter or serve
on the side.
* Butter can be prepared in advance. Store in the refrigerator in a
small container or wrap in plastic, twisting the ends to create a
small butter log.
Spiced Vegetable Skewers
Enjoy these skewers as a light main dish or alongside
your favorite protein.
Makes 4 skewers (serves 4 to 6)
½ teaspoon ground cumin
¼ teaspoon ground coriander
¼ teaspoon ground cinnamon
Pinch cayenne
¼ teaspoon kosher salt
¼ teaspoon freshly ground black pepper
1 medium bell pepper, cut into 1-inch pieces
1 medium red onion, cut into 1-inch chunks
8 ounces summer squash, cut into 1-inch pieces
8 small mushrooms (1 to 2 inches in diameter)
2 tablespoons olive oil
1½ tablespoons fresh lime juice
1. If using wooden skewers, soak skewers in water for 20 minutes.
2. In a large mixing bowl, combine all the ingredients.
3. String the vegetables on the skewers, alternating vegetables
as you go.
4. Place the skewers in the air fryer basket. Select Air Fry and set
the temperature to 375°F and the time to 15 minutes. When the
Toss Reminder tone sounds, turn the skewers (they only need to
be flipped once during cooking).
5. When skewers are finished, transfer to a serving plate. Serve
immediately.

14
Baked Sweet Potatoes
We like a sweet and spiced coconut oil mixture atop these
perfectly cooked sweet potatoes. If you want a little crunch,
add some chopped pecans before serving.
Makes 4 servings
4 sweet potatoes
Olive oil, for coating potatoes
½ cup coconut oil, room temperature
1 teaspoon maple syrup (optional, if a sweeter topping
is preferred)
1 teaspoon grated orange zest
1 teaspoon ground cinnamon
¼ teaspoon ground nutmeg
Pinch kosher salt
Chopped pecans, for serving (optional)
1. Prick the sweet potatoes all over with the tines of a fork.
Rub with olive oil.
2. Place the sweet potatoes into the air fryer basket. Select Roast
and set the temperature to 375°F and the time to 25 minutes.
Sweet potatoes are cooked when they are easily pierced with a
knife. They may require additional time if the sweet potatoes
are on the larger size.
3. While the sweet potatoes are roasting, prepare the topping. Put
the coconut oil, maple syrup, if using, orange zest, cinnamon,
nutmeg, and salt into a small bowl. Stir together with a fork.
Taste and adjust salt and/or spices as desired.
4. Once the sweet potatoes are cooked, remove and transfer to a
serving plate. Using a couple of forks, split each open and mash
slightly. Spoon the topping over each potato. Serve immediately.
Crab Cake Burgers
Crab cakes are a summer treat, and they're even
better burger-size.
Makes 4 burgers
16 ounces lump crabmeat
1 teaspoon extra-virgin olive oil
1 medium red bell pepper, finely chopped
1 jalapeño, seeded and finely chopped
3 scallions, sliced
1 garlic clove, finely chopped
¼ teaspoon kosher salt
2 large eggs, lightly beaten
1 cup panko breadcrumbs, plus about ½ cup additional for
dredging
½ cup good-quality mayonnaise
1 teaspoon Worcestershire sauce
1 teaspoon Dijon mustard
1½ teaspoons seafood seasoning
Hot sauce (optional)
Olive oil, for spraying
4 sesame seed hamburger buns
Lemon wedges, for serving
Shredded lettuce, for serving
Aïoli, for serving
1. Put the crabmeat in a large bowl. Pick through the crabmeat to
make sure there are no shell fragments; reserve in refrigerator.
2. In a large skillet set over medium heat, add the olive oil. Once
the oil is hot, add the bell pepper, jalapeño, scallions, and
garlic. Sauté until the vegetables soften slightly, about 5
minutes; stir in the salt.
3. Remove the vegetables from the heat and allow them to cool
for a few minutes. Once cool, add the vegetables to the

15
crabmeat. Add the eggs, 1 cup of the panko, mayonnaise,
Worcestershire, Dijon, and seafood seasoning and a dash or two
of hot sauce if desired.
4. Gently mix all ingredients together. The best way to mix the
crab mixture is with clean hands; however, you can also mix
with a spoon. Mix carefully to keep the crabmeat intact.
5. Using a ½-cup measure, form the mixture into cakes and place
them on a clean plate, separating the layers of cakes with wax
paper if necessary. Cover with plastic wrap and refrigerate for
1 hour prior to cooking.
6. Once well chilled, dredge the crab cakes in remaining 1⁄2 cup
panko. Liberally spray both sides of the crab cakes with the
olive oil.
7. Put the crab cakes into the air fryer basket. Select Air Fry and
set the temperature to 400°F and the time to 10 minutes. When
the Toss Reminder tone sounds, carefully flip the crab cakes
over. The crab cakes are done when they are evenly browned
and crispy. Add additional time on Air Fry if necessary.
8. Assemble the burgers. Divide the lettuce evenly among the four
bun bottoms, and then top each with a crab cake. Squeeze
some lemon juice over each crab cake. Coat the underside
of each bun top with some aïoli and then place one on each
crab cake to create a sandwich. Serve immediately.
Zesty Chicken
This chicken dish goes with all types of sides – try it in a grain
bowl or with air fried veggies and flatbread. No matter how you
serve this chicken, the air fryer makes the cooking a breeze.
Makes 4 to 6 servings
2 teaspoons sweet paprika
2 teaspoons dried oregano
1½ teaspoons kosher salt, divided
½ teaspoon ground cumin
½ teaspoon grated lemon zest
1 tablespoon fresh lemon juice
1 tablespoon olive oil
3 pounds mixed bone-in chicken thighs and legs
1. Mix the paprika, oregano, ½ teaspoon salt, cumin, and lemon
zest together in a small bowl or mini chopper. Stir or process to
blend. Mix in the lemon juice. While stirring, or with the chopper
on, add the olive oil in a thin stream until completely
incorporated. Reserve.
2. Sprinkle the chicken pieces all over with remaining teaspoon of
salt and allow to sit at room temperature for about 30 minutes.
3. After the chicken has rested, rub the herb mixture all over the
chicken. Cover and refrigerate for about 1 hour.
4. When ready to cook, place chicken, skin side up, into the air
fryer basket. Select Roast and set the temperature to 375°F
and the time to 30 minutes.
6. Chicken is done when it registers at 170°F when probed with an
instant read thermometer.
7. Ser ve immediately.
Loaded Hot Dogs
An elevated hot dog that takes a page out of the controversial
Hawaiian pizza handbook. We promise that these sweet and spicy
flavors will be sure to please.
Makes 6 servings
6 slices bacon
6 hot dogs
6 hot dog buns

16
6 tablespoons shredded Cheddar
½ cup chopped tomatoes
½ jalapeño, finely chopped
½ cup diced pineapple
1. Place the bacon into the air fryer basket. Select Air Fry and set
the temperature to 400°F and the time to 10 minutes. Remove
and allow to cool slightly. Once cool enough to handle, break or
cut each piece of bacon into 2 pieces.
2. While the bacon is cooling, cook the hot dogs. Place into the air
fryer basket (no need to clean after cooking the bacon), select
Air Fry and set temperature to 400°F and time to 4 minutes.
Remove and reserve.
3. Assemble the hot dogs. Add 1 tablespoon of Cheddar to the
bottom of each hot dog bun. Top each with a hot dog and then
lay the bacon pieces along the sides. Divide the chopped
tomatoes, jalapeño, and pineapple evenly on top of each hot
dog.
4. Place the assembled hot dogs back on the air fryer basket
and set the temperature to 400°F and the time to 2 minutes.
5. Serve immediately.
Chicken Parmesan Grinders
This classic and homey meal is perfect for a fun dinner.
Be sure to have extra sauce on the side.
Makes 4 servings
½ cup unbleached all-purpose flour
¼ teaspoon kosher salt
Pinch freshly ground black pepper
1 large egg, lightly beaten
½ cup Italian seasoned breadcrumbs
4 chicken breasts, pounded evenly
Olive oil, for coating chicken
4 grinder rolls, split
1 cup marinara sauce, divided
1 cup shredded mozzarella
4 teaspoons grated Parmesan
1. Set three shallow dishes on a work surface. Put the flour, salt,
and pepper in one dish. Put the egg in the second. Put the
breadcrumbs in the third.
2. One by one, dredge the chicken breasts first in the flour,
followed by the egg, and then the breadcrumbs. Liberally spray
with olive oil on both sides.
3. Place the chicken in the air fryer basket. Select Air Fry and set
the temperature to 400°F and the time to 15 minutes. When the
Toss Reminder tone sounds, flip over the chicken.
4. Once cooked, remove the chicken from the air fryer. Spread 2
tablespoons of sauce in each roll and then top each with one
chicken breast, followed by ¼ cup shredded mozzarella.
5. Return the assembled grinders to the air fryer basket.
Return the basket to the air fryer with the temperature set
to 450°F and the time to 5 minutes.
6. Remove and sprinkle the top of each grinder with an additional
2 tablespoons of sauce and 1 teaspoon of the grated Parmesan.
Serve immediately.

17
Barbecue Chicken
An easy weeknight dinner to satisfy that barbecue craving.
Serves 6 to 12
3 pounds chicken drumsticks (bone-in chicken thighs can
also be used or a combination of legs and thighs)
¾ teaspoon kosher salt
¼ teaspoon freshly ground black pepper
1 cup prepared barbecue sauce, plus more for serving
1. Toss the drumsticks with the salt and pepper and place into the
air fryer basket. If time allows, let sit for about 30 minutes for
salt to penetrate the meat before roasting.
2. When ready to cook, select Roast and set the temperature to
375°F and the time to 20 minutes. When time expires, brush
the chicken pieces liberally with the barbecue sauce. Select
Roast again and set the temperature to 375°F and the time
to 10 minutes. Chicken is ready when the internal temperature
reaches 170°F.
3. When ready, serve with plenty of barbecue sauce on the side.
Mediterranean Stuffed Chicken
These Mediterranean-inspired chicken breasts are stuffed
with spinach, sundried tomatoes, artichokes, basil, and ricotta.
Makes 4 servings
¾ cup ricotta
¼ cup cooked spinach, strained of excess liquid and roughly
chopped
¼ cup sundried tomatoes, roughly chopped
¼ cup marinated artichokes, roughly chopped
5 basil leaves, roughly chopped
1½ teaspoons kosher salt, divided
4 chicken breasts, sliced vertically to create a pocket
to stuff
1¼ teaspoons freshly ground black pepper
1 tablespoon olive oil
1. In a medium bowl, combine the ricotta, spinach, sundried
tomatoes, artichokes, basil, and ½ teaspoon of salt. Reserve.
2. Season the chicken breasts with the pepper and remaining salt.
Spoon the ricotta mixture into the chicken breasts, dividing the
mixture evenly among the 4 pieces.
3. Place the stuffed chicken into the air fryer basket and drizzle
with the olive oil. Place the basket in the air fryer. Select Roast
and set the temperature to 350°F and the time to 30 minutes.
4. Once the chicken is cooked through, reaching an internal
temperature of 165°F, remove the from the basket. Serve
immediately.
Hoisin-Glazed Salmon Skewers
These skewers are enough for a crowd or meal prep for the week
but can easily be halved for a smaller serving. Pair with rice
and sliced cucumbers to round out the meal.
Makes 4 skewers (4 to 6 servings)
2 tablespoons hoisin sauce
2 tablespoons soy sauce or tamari
2 teaspoons fresh lime juice
1 teaspoon sesame oil
3 pounds salmon, skin on and pin bones removed, cut into
1- to 1½-inch pieces
6 scallions, white parts cut into 1½-inch pieces, green parts
thinly sliced
½ teaspoon toasted sesame seeds
Lime wedges, for serving

18
1. In a medium mixing bowl, add the hoisin sauce, soy sauce, lime
juice, and sesame oil. Whisk until combined. Add the salmon
and toss to coat. Cover and marinate in the fridge for at least
30 minutes and up to 1 hour.
2. If using wooden skewers, soak in water while the salmon is
marinating.
3. Toss the scallion whites with the salmon to coat in the sauce.
Put 1 piece of salmon onto 1 of the skewers. Then add a scallion
piece, followed by another piece of salmon. Continue to
alternate with the remaining ingredients and skewers. Discard
the remaining salmon marinade.
4. Place the skewers in the air fryer basket. Select Air Fry and set
the temperature to 375°F and the time to 10 minutes. When the
Toss Reminder tone sounds, turn the skewers (this only needs
to be done once during cooking).
5. When skewers are finished cooking, transfer to a serving plate.
Sprinkle with the sesame seeds and the reserved scallion
greens.
Savory Hand Pies
Store-bought pie dough brings ease to these tasty hand pies.
We love the combination of kale, squash, and goat cheese, but they
can easily be swapped out for your favorite veggies and cheese!
Makes 6 hand pies
1 tablespoon extra-virgin olive oil, plus more for spraying
¼ medium onion, finely chopped
2 stems curly kale, hard stems removed, and leaves and
tender stems finely chopped
Kosher salt
Freshly ground black pepper
Pinch red pepper flakes
¼ cup crumbled goat cheese
1 cup cubed butternut squash
1 large egg
1 pound prepared pie dough (found in the freezer section,
already rolled into rounds)
Nonstick cooking spray
1. Put the oil into a large skillet set over medium heat. Once the
oil is hot, add the onion, kale, and a pinch each of salt and
pepper. Sauté until the vegetables are softened. Remove from
the heat and add the pepper flakes. Once cool, stir in the goat
cheese. Reserve.
2. Put the squash into the air fryer basket. Spray with olive oil,
and season with a large pinch each of salt and pepper. Toss
well. Select Air Fry and set the temperature to 400°F and the
time to 3 minutes. Transfer to a medium mixing bowl and allow
to cool. Once cool, toss with the kale-goat cheese mixture.
3. In a small bowl, beat the egg with 1 teaspoon of water to make
an egg wash. Reserve.
4. Place dough rounds on a work surface.
5. Scoop 2 tablespoons of filling into the center of each round.
Fold over the dough and crimp to seal. Brush with egg wash.
6. Place the filled hand pies into the air fryer basket. Using a
paring knife, cut a small slit on the top of each hand pie (this
allows steam to vent out of the pie to make sure the crust
comes out nice and crispy and so the pies retain their shape).
7. Select Air Fry and set the temperature to 400°F and the time
to 16 minutes. When the Toss Reminder tone sounds, carefully
flip the hand pies over to ensure even browning. At the end
of cooking, the hand pies should be nicely browned and crispy.
If necessary, add a few extra minutes of cooking time.
8. Cool slightly before serving.

19
Lemon-Glazed Doughnuts
Just a few simple steps to transform refrigerated biscuit dough
into sweet and gooey doughnuts.
Makes 8 doughnuts
1 container/can (1 pound) refrigerated flaky biscuits
Vegetable oil, for spraying
Glaze:
1 cup confectioners’ sugar, sifted
2 tablespoons whole milk
½ teaspoon lemon zest, plus more to sprinkle
1 teaspoon lemon juice
1. Separate the biscuits. Using a 1-inch round cutter, cut a hole in
the center of each biscuit (you can either cook these separately,
to make mini round doughnuts, or you can discard the dough).
2. Spray both sides with vegetable oil and transfer to the air fryer
basket.
3. Select Air Fry and set the temperature to 350°F and the time
to 8 minutes. When the Toss Reminder tone sounds, flip the
doughnuts.
4. While the doughnuts are air frying, prepare the glaze. Put the
ingredients into a small bowl. Whisk well until smooth. If the
glaze seems too thin, add additional confectioners’ sugar
1 teaspoon at a time. If it seems too thick, add milk 1 teaspoon
at a time.
5. Remove the doughnuts from the air fryer. Dip one side of each
doughnut into the glaze. Sprinkle with additional lemon zest.
Serve warm or at room temperature.

20
Limited Warranty
Subject to the exclusions and limitations contained herein, Conair LLC dba
Cuisinart (“Cuisinart”) warrants that the Cuisinart
®
CompactMax
TM
8-Qt Basket
Air Fryer (“Product”) will be free from material defects in materials and
workmanship under normal home use conditions for a period of THREE (3) years
beginning on the date the Product was purchased in its original, sealed
packaging, unless otherwise specified in this Limited Warranty. This Limited
Warranty is only for U.S. consumers (defined herein as purchasers at retail for
personal, family, or household use) who originally purchase the Product from
Cuisinart or an authorized Cuisinart
®
reseller (if you are unsure whether a
retailer or other point of sale is an authorized or unauthorized Cuisinart reseller,
contact Cuisinart).
This Limited Warranty does NOT cover:
• Normal wear and tear;
• Any Product purchased by commercial purchasers or for commercial or
non-household uses;
• Accessories, parts, or software added to the Product after the system is
shipped from Cuisinart;
• Any costs associated with the replacement or repair of the Product, including
labor, installation, or other costs incurred by you without prior Cuisinart
approval;
• Damage to the Product, defective conditions, or nonconformities due to: (1)
external causes, including shipping, accidents, problems with electrical power
(Product designed only for use with 120-volt outlets), abnormal conditions
(such as mechanical or environmental); (2) usage not in accordance with
Product instructions; (3) misuse, neglect, unauthorized alteration,
unauthorized repair; and (4) acts of God or other events beyond Cuisinart’s
control;
• Damage caused by you or any nonauthorized third party, even though
necessary repairs and maintenance might be performed by any company;
• Damage caused by accessories or replacement parts not specifically
authorized by Cuisinart; and
• Any Product where the original Product identification markings (trademark or
serial number) have been removed, altered, or obliterated.
It is recommended that you visit the website https://www.cuisinart.com/
register-your-product.html for a fast, ecient way to complete your product
registration. However, product registration does not eliminate the need for the
consumer to maintain the original proof of purchase in order to obtain the
warranty benefits. In the event that you do not have proof of purchase date,
the purchase date for purposes of this Limited Warranty will be the date of
manufacture.
Hassle-free warranty
If the Product that is the subject of this Limited Warranty fails during the
warranty period for reasons covered by this Limited Warranty, Cuisinart will,
at its option, repair the Product, replace the Product with another identical
or reasonably equivalent product, or if Cuisinart is unable to repair or replace
the Product, refund the purchase price, less the amount directly attributable
to the consumer’s prior usage of the Product. To obtain a return shipping label,
email us at https://www.cuisinart.com/customer-care/product-assistance/
product-inquiry/, or call our Consumer Service Center toll-free at 1-800-726-
0190 to speak with a representative.
Upon receipt of the Product, Cuisinart will inspect the Product and, if required
under this Limited Warranty, attempt to repair, replace, or refund the Product
within thirty (30) days. However, there may be delays beyond Cuisinart’s control,
in which case that time period may be extended as reasonably necessary.
IMPORTANT: If the nonconforming Product is to be serviced by someone other
than Cuisinart’s Authorized Service Center, please remind the servicer to call
our Consumer Service Center at 1-800-726-0190 to ensure that the problem is
properly diagnosed, the Product is serviced with the correct parts, and the
Product is still under warranty.
California residents only
The THREE (3) year Limited Warranty period begins on the date the Product was
delivered, which may be dierent than the date the Product was purchased.
California residents also have the option of obtaining the benefits of this
Limited Warranty by bringing the Product to (A) the store where it was
purchased or (B) another retail store that sells Cuisinart products of the same
type. The retail store shall then, according to its preference, either repair the
Product, refer the consumer to an independent repair facility, replace the
Product with another identical or reasonably equivalent product, or refund the
purchase price less the amount directly attributable to the consumer’s prior
usage of the Product. California residents may also, according to their

21
preference, return nonconforming products directly to Cuisinart for repair or, if
necessary, replacement with another identical or reasonably equivalent product
by calling our Consumer Service Center toll-free at 1-800-726-0190. Cuisinart
will be responsible for the cost of such repair, replacement, and/or shipping and
handling for such nonconforming products under warranty.
THIS LIMITED WARRANTY GIVES YOU SPECIFIC LEGAL RIGHTS, AND YOU MAY
ALSO HAVE OTHER RIGHTS THAT VARY FROM STATE TO STATE OR BY
JURISDICTION. IN THE EVENT THIS LIMITED WARRANTY IS BREACHED, YOU MAY
HAVE CLAIMS FOR REPLACEMENT, DAMAGES, OR OTHER PENALTIES.
LIMITATIONS OF LIABILITY/ADDITIONAL LIMITATIONS AND EXCLUSIONS
ALL EXPRESS AND IMPLIED WARRANTIES ARE LIMITED IN DURATION TO THE
LIMITED WARRANTY PERIOD. NO WARRANTIES APPLY AFTER THAT PERIOD.
SOME STATES (OR JURISDICTIONS) DO NOT ALLOW LIMITATIONS ON HOW
LONG AN IMPLIED WARRANTY LASTS, SO THIS LIMITATION MAY NOT APPLY TO
YOU. CUISINART’S RESPONSIBILITY UNDER THIS OR ANY OTHER WARRANTY,
IMPLIED OR EXPRESS, IS LIMITED TO REPAIR, REPLACEMENT, OR REFUND, AS
SET FORTH ABOVE. THESE REMEDIES ARE THE SOLE AND EXCLUSIVE
REMEDIES FOR ANY BREACH OF WARRANTY. TO THE MAXIMUM EXTENT
PERMITTED BY LAW, CUISINART IS NOT RESPONSIBLE FOR ANY DIRECT,
INDIRECT, SPECIAL, INCIDENTAL, OR CONSEQUENTIAL DAMAGES RESULTING
FROM ANY BREACH OF WARRANTY OR UNDER ANY OTHER LEGAL THEORY
(INCLUDING, BUT NOT LIMITED TO, LOST PROFITS, DOWNTIME, LOSS OF
GOODWILL, DAMAGE TO OR REPLACEMENT OF EQUIPMENT AND PROPERTY,
AND ANY COSTS OF RECOVERING, REPROGRAMMING, OR REPRODUCING ANY
PROGRAM OR DATA STORED IN OR USED WITH A SYSTEM CONTAINING THE
PRODUCT), EVEN IF CUISINART HAS BEEN ADVISED OF THE POSSIBILITY OF
SUCH DAMAGES. SOME STATES (OR JURISDICTIONS) DO NOT ALLOW THE
EXCLUSION OR LIMITATION OF INCIDENTAL OR CONSEQUENTIAL DAMAGES, SO
THE ABOVE LIMITATIONS OR EXCLUSIONS MAY NOT APPLY TO YOU. ALL
EXPRESS AND IMPLIED WARRANTIES ARE LIMITED IN DURATION TO THE
LIMITED WARRANTY PERIOD. NO WARRANTIES APPLY AFTER THAT PERIOD.
SOME STATES (OR JURISDICTIONS) DO NOT ALLOW LIMITATIONS ON HOW
LONG AN IMPLIED WARRANTY LASTS, SO THIS LIMITATION MAY NOT APPLY TO
YOU.
This Limited Warranty is issued by:
Conair LLC
1 Cummings Point Road
Stamford, CT 06902
1-800-726-0190

22
ÍNDICE
Medidas de seguridad importantes ............................22
Uso de alargadores.........................................23
Piezas y características...................................... 24
Familiarícese con el panel de control...........................25
Antes del primer uso........................................26
Instrucciones de uso........................................26
Consejos y sugerencias para freír con aire ......................26
Tabla de referencia .........................................28
Resolución de problemas....................................29
Más formas de cocinar ......................................30
Limpieza y mantenimiento ................................... 30
Recetas ..................................................31
Garantía ..................................................41
MEDIDAS DE SEGURIDAD
IMPORTANTES
Al usar aparatos eléctricos, siempre se deben tomar precauciones
básicas de seguridad, entre ellas las siguientes:
1. Lea todas las instrucciones.
2. DESENCHUFE EL APARATO CUANDO NO ESTÉ EN USO Y
ANTES DE LIMPIARLO. Deje que se enfríe antes de limpiarlo,
manipularlo o instalar/quitar piezas.
3. No toque las superficies calientes; use los mangos/asas/agarraderas
y los botones/perillas/diales.
4. Para reducir el riesgo de descarga eléctrica, no sumerja la carcasa
del aparato, el cable o el enchufe en agua u otros líquidos. Véase la
sección “Limpieza y mantenimiento”.
5. Supervise el uso de este aparato con cuidado cuando sea usado por
o cerca de niños.
6. No use este aparato si el cable o el enchufe están dañados, después
de un mal funcionamiento, después de una caída, o si está dañado;
devuélvelo a un centro de servicio autorizado o al lugar de compra
para su revisión, reparación o ajuste.
7. El uso de accesorios no recomendados por Cuisinart puede causar
lesiones.
8. No lo use en exteriores.
9. No deje que el cable cuelgue de la encimera o de la mesa, donde
niños o animales lo puedan jalar o tropezar, ni que tenga contacto
con superficies calientes.
10. No coloque el aparato sobre o cerca de un quemador a gas o de un
hornillo eléctrico caliente, ni en un horno caliente.
11. Solo use este aparato para el uso previsto.
12. Tenga sumo cuidado al usar fuentes que no sean de metal o vidrio en
el aparato.
13. Para evitar quemaduras, ten sumo cuidado al sacar los accesorios
del aparato o tirar la grasa caliente.
14. Desenchufe el aparato cuando no esté en uso. Almacene
solamente los accesorios recomendados por el fabricante en el
aparato.
15. No ponga papel, cartón, plástico o materiales similares en el aparato.
16. No cubra ninguna parte del aparato con papel de aluminio; esto
causará un sobrecalentamiento.
17. No coloque alimentos ni envases/utensilios metálicos muy grandes
en el horno; esto presenta un riesgo de incendio o descarga
eléctrica.
18. Puede ocurrir un incendio si el aparato está cubierto, toca o se
encuentra cerca de materiales inflamables, tales como cortinas,
colgaduras o paredes. No coloque ningún artículo sobre el aparato
durante el funcionamiento. No coloque ningún artículo sobre el
aparato durante el funcionamiento. No haga funcionar el aparato
debajo de un armario/gabinete.
19. No use estropajos metálicos para limpiar el aparato; partículas
de metal podrían depositarse en sus componentes eléctricos,
presentando un riesgo de descarga eléctrica.
20. Apague el aparato antes de intentar desalojar alimentos atascados.
21. ADVERTENCIA: Para evitar el riesgo de incendio, NUNCA descuide/
deje el aparato sin vigilancia durante el uso.
22. Siempre use las temperaturas recomendadas para freír con aire.
23. No apoye ningún utensilio de cocina o fuentes en la ventanilla o
arriba del aparato.

23
24. Para apagar el aparato después del uso, presione el ícono .
25. No haga funcionar el aparato debajo o dentro de un armario/
gabinete. Siempre desenchufe el aparato antes de almacenarlo en un
armario/gabinete. Dejar el aparato enchufado representa un riesgo
de incendio, especialmente si este toca las paredes o la puerta del
armario/gabinete cuando se cierra.
26. Tenga sumo cuidado al mover un aparato que contenga aceite u otro
líquido caliente.
27. Para desconectar, presione el ícono
y luego desenchufe el
aparato.
28. Los niños o las personas que carezcan de la experiencia o de los
conocimientos necesarios para manipular el aparato, o aquellas
cuyas capacidades físicas, sensoriales o mentales estén limitadas,
no deben usar el aparato sin la supervisión o la dirección de una
persona responsable por su seguridad. No deje que los niños
jueguen con este aparato.
29. Para su seguridad, si el cable está dañado, debe ser sustituido por
el fabricante, un técnico autorizado u otra persona calificada.
30. Este aparato ha sido diseñado para uso doméstico y otras
aplicaciones similares, como, por ejemplo:
- Las cocinas reservadas para los empleados de oficina , y tienda;
- Las alquerías/fincas
- Los cuartos de hotel, motel y otros entornos residenciales
- Los entornos de tipo pensiones/hostales/“bed and breakfast”
31. Este símbolo significa que la superficie del aparato
se pone muy caliente; tenga cuidado al tocarla.
32. Siempre conecte el cable al aparato antes de enchufarlo en la
toma de corriente. Para desconectar, presione el ícono
o eo e
o e
y luego
desenchufe el aparato.
33. Este aparato no ha sido diseñado para ser puesto en marcha
mediante un temporizador o control remoto independiente.
GUARDE ESTAS
INSTRUCCIONES
PARA USO DOMÉSTICO
SOLAMENTE
NO APROBADO
PARA USO COMERCIAL
AVISO
El cable de este aparato cuenta con un enchufe polarizado (una pata
es más ancha que la otra).
Como medida de seguridad, se podrá enchufar de una sola manera en
las tomas de corriente polarizadas. Si el enchufe no entra en la toma de
corriente, inviértalo. Si aún así no entra completamente, comuníquese
con un electricista. No intente modificarlo.
Por favor, lea y conserve estas instrucciones en un lugar seguro.
Estas instrucciones le ayudarán a usar este aparato de forma
segura y siempre obtener resultados consistentes y profesionales.
USO DE ALARGADORES
a. El cable provisto con este aparato es corto o removible, para reducir
el riesgo de que alguien se enganche o tropiece con un cable más
largo.
b. Se puede usar un alargador, siempre que se respeten las
precauciones siguientes.
c. Si usa un cable removible más largo o un alargador:
1. La clasificación nominal del alargador debe ser por lo menos igual
a la del aparato.
24
2. El cable debe ser acomodado de manera que no cuelgue de la
encimera/mesa donde puede ser jalado por niños o puede causar
tropiezos.
PIEZAS Y CARACTERÍSTICAS
1. Panel de control digital
Cuenta con controles táctiles de fácil uso para elegir el tiempo, la
temperatura, el modo de cocción y las funciones preprogramadas
para freír con aire, así como con una pantalla digital que muestra la
temperatura y el tiempo (detalles en la página siguiente).
a. Modos de cocción:
“AIR FRY” (freír con aire), “ROAST” (asar), “BAKE” (hornear) y KEEP
WARM” (mantener caliente).
b. Funciones preprogramadas para freír con aire: “WINGS” (alitas
de pollo), “FRIES” (papas fritas), “FROZEN SNACKS” (bocadillos
congelados).
c. Botón TOSS REMINDER (recordatorio de agitar):
Función opcional para recordarle agitar la cesta o voltear los
alimentos a mitad de cocción. Se activa automáticamente cuando
se usan las funciones preprogramadas para freír con aire, pero se
puede desactivar.
2. Cesta para freír con aire
Superficie de cocción de 8.5 x 12in (21.5 x 30.5cm).
3. Rejilla
Asegura una cocción uniforme. Siempre se debe colocar en la cesta.
24
d
e
l
a
causar
o
, la
a
das
s
tra la
)
y
KEE
P
S
” (
alitas
a
dillos
o
s
c
uando
p
a
p
ero se
a
cesta.
1a
1b
1c
2
3
25
FAMILIARÍCESE CON EL PANEL DE CONTROL
1. Modos de cocción
Presione el botón correspondiente al modo de cocción deseado:
“AIR FRY” (freír con aire), “ROAST” (asar), “BAKE” (hornear) y KEEP
WARM” (mantener caliente).
2. Funciones preprogramadas para freír con aire
Presione el botón correspondiente a la función preprogramada
deseada: “WINGS” (nuggets de pollo), “FRIES” (papas fritas),
“FROZEN SNACKS” (bocadillos congelados).
3. Botones de ajuste del tiempo y de la temperatura
Presione el ícono
para fijar el tiempo de cocción y el ícono
para fijar la temperatura. Use las flechas +/- para ajustar el tiempo
y la temperatura de los modos de cocción o de las funciones
preprogramadas para freír con aire (opcional); el tiempo y la
temperatura aparecerán por turnos en la pantalla.
4. Indicador de precalentamiento
La función “BAKE” (hornear) incluye un período de precalentamiento.
Deje la cesta en el aparato y presione el botón BAKE, y luego
; el indicador de precalentamiento (un rectángulo) aparecerá
en la pantalla. Cuando el aparato alcance la temperatura adecuada,
emitirá 5 pitidos. Retire la cesta, coloque con cuidado los alimentos
en ella y devuélvela al aparato; la cuenta regresiva empezará.
5. Señal de listo
Cuando el temporizador llega a cero, el aparato emite tres pitido y
“00” aparece en la pantalla por 1 minuto. Después de 1 minuto, el
aparato ingresa automáticamente al modo “mantener caliente” (véase
el punto n.°8).
6. Inicio/Paro
Presione el ícono
para iniciar o detener el ciclo de cocción.
El ciclo de cocción empezará después de fijar el tiempo y la
temperatura, y presionar el ícono . Presiónelo otra vez para
detener el ciclo de cocción.
7. Botón TOSS REMINDER (recordatorio de agitar)
Presiónelo para que el aparato emita una señal sonora a mitad
de cocción para recordarle agitar la cesta o voltear los alimentos;
El botón parpadeará durante la programación para indicar que
la función está activada. Cuando el ciclo de cocción empiece,
permanecerá encendido. A mitad de cocción, el aparato emitirá 10
pitidos y el botón parpadeará para indicar que es tiempo de agitar/
voltear los alimentos.
NOTA: El recordatorio se activa automáticamente con las funciones
preprogramadas para freír con aire.
Para desactivarlo, simplemente presione el botón TOSS REMINDER
después de elegir la función deseada; dejará de parpadear.
8. Botón KEEP WARM (modo “mantener caliente” automático)
El modo “mantener caliente” se inicia automáticamente al final de
cualquier ciclo de cocción y mantiene los alimentos calientes por
hasta 60 minutos (a menos que haya retirado la cesta o presionado
el ícono
para apagar el aparato). Durante el ciclo de mantener
caliente, el botón “KEEP WARM” se encenderá y el tiempo y la
temperatura aparecerán por turnos en la pantalla. Presione el ícono
para apagar el aparato.
9. Botón MAX CRISP (modo ultracrujiente)
Función independiente que cocina los alimentos en 405-450°F (205-
230°C) para conseguir resultados ultracrujientes en menos de 30
minutos.
10. El aparato ingresará al modo de espera después de 5 minutos de
inactividad.
F
A
1.
2.
3.
4.
5.
S
C
1
2
3
6
7 9

26
ANTES DEL PRIMER USO
1. Retire con cuidado el aparato del material de embalaje y quite las
etiquetas promocionales pegadas a su carcasa.
2. Coloque el aparato sobre una superficie nivelada y estable.
3. Deje un espacio libre de 2-4in(5-10cm) todo alrededor del aparato.
No lo coloque sobre una superficie sensible al calor.
NOTA: NO GUARDE NINGÚN OBJETO ENCIMA DEL APARATO.
SI LO HACE, QUÍTELOS ANTES DE ENCENDERLO. EL EXTERIOR
DEL APARATO SE PONE CALIENTE DURANTE EL USO;
MANTÉNGALO FUERA DEL ALCANCE DE LOS NIÑOS.
4. Compruebe que no haya nada en el aparato (excepto la cesta y la
rejilla).
5. Lave la cesta para freír con aire y la rejilla en agua jabonosa tibia y
séquelas bien.
6. Enchufe el cable en una toma de corriente.
INSTRUCCIONES DE USO
Siga estos pasos sencillos para cocinar:
Coloque el aparato sobre una superficie estable
Coloque la cesta para freír en la base, empujando hasta que encaje.
Asegúrese de que la rejilla siempre esté en el fondo de la cesta.
Presione el ícono
; la pantalla mostrará “--:--”, indicando que el
aparato está listo para su uso.
Elija el modo de cocción, el tiempo y la temperatura
Presione el botón correspondiente al modo de cocción o a la función
preprogramada para freír con aire que desea usar.
Para fijar el tiempo, presione el ícono
y use las flechas y
para ajustar el tiempo. Para fijar la temperatura presione el ícono
p
p
y use las flechas y para ajustar la temperatura al nivel
deseado.
Recordatorio de agitar opcional
El recordatorio de agitar es automático con el modo “AIR FRY” (freír con
aire) y todas las funciones preprogramadas para freír con aire.
El botón TOSS REMINDER parpadeará para indicar que el
recordatorio está activo. Para activar/desactivar el recordatorio de
agitar, simplemente presione el botón TOSS REMINDER durante la
programación.
Inicie el ciclo de cocción
Presione el ícono
para iniciar el ciclo de cocción. La pantalla digital
mostrará el modo de cocción o la función, el tiempo (temporizador de
cuenta regresiva) y el recordatorio de agitar.
Final del ciclo de cocción
Finalizada la cocción, el aparato emitirá 3 pitidos y la pantalla mostrará
“00”. Después de 1 minuto, el aparato ingresará automáticamente al
modo “mantener caliente” hasta que presione el ícono
átic
átic
átic
o que retire la
cesta por más de 5 minutos.
Apagado
Para apagar el aparato, presione el ícono
. Desenchúfelo cuando no
esté en uso.
CONSEJOS Y SUGERENCIAS PARA FREÍR
CON AIRE
Freír los alimentos con aire es una alternativa saludable a freírlos con
aceite. Un ventilador de alta velocidad hace circular el aire para freír
una variedad de alimentos de forma más saludable que los métodos de
fritura tradicionales, consiguiendo siempre deliciosos resultados.
• Freír con aire no requiere aceite, pero rociar los alimentos con aceite
en aerosol/rocío vegetal o revolverlos con un poco de aceite antes de
la cocción ayuda a que se doren más.
• Se recomienda usar la función “TOSS REMINDER” (recordatorio de
agitar) cuando cocine grandes cantidades de alimentos o alimentos
grandes, tales como chuletas de pollo. No sobrellene la cesta;
disponer los alimentos en una sola capa logrará una cocción más
rápida y mejores resultados.
• Los alimentos se cocinarán más uniformemente si son del mismo
tamaño y si se evita superponerlos.
• Una variedad de coberturas pueden ser usadas para rebozar/empanar
los alimentos antes de freírlos con freír con aire,
p.ej., pan rallado (natural, sazonado o “panko”), hojuelas de maíz
picadas, chips de papa picadas, galletas Graham molidas, etc.
Algunas harinas (incluyendo las mezclas sin gluten y la harina de maíz)
también dan buenos resultados.

27
• Cuando cocine pollo, carne, pescado o mariscos, jugo se acumulará
en el fondo de la cesta. Este jugo es una buena base para preparar
salsa.
• Al freír con aire alimentos grasos (p.ej., tocino), la grasa se acumulará
en la cesta. Deje que la grasa se enfríe antes de tirarla y lavar la cesta.
• Use pinzas de cocina o una espátula de silicona para retirar los
alimentos de la cesta.
• Para comprobar el estado de cocción, retire la cesta; el ciclo de
cocción se detendrá hasta que vuelva a colocar la cesta.

28
TABLA DE REFERENCIA
La tabla a continuación indica el tiempo, la temperatura de cocción y las porciones recomendados para varios tipos de alimentos que pueden
cocinarse en la freidora de aire Cuisinart
®
. Si desea cocinar más alimentos de lo recomendado en la tabla, agite la cesta o voltee los alimentos de
vez en cuando durante la cocción para conseguir resultados uniformes y crujientes. Nota: Pequeñas cantidades de alimentos pueden requerir menos
tiempo de cocción. Para resultados óptimos, compruebe regularmente el estado de cocción.
NOTA: Coloque una fuente resistente al calor (no incluida) directamente en la rejilla para hornear alimentos tales como pasteles/tartas, “quiches”
y cazuelas.
FUNCIÓN ALIMENTOS CANTIDAD TIEMPO TEMPERATURA PRECALENTAR AGITAR/VOLTEAR
“AIR FRY”
(freír con aire)
Chuletas rebozadas
5 chuletas;
1-1.5lb (455-680g)
20min 375°F – Voltear
“AIR FRY”
(freír con aire)
Salmón
6 filetes
de 4oz (115g)
10min 375°F – –
“AIR FRY”
(freír con aire)
Camarones 2 lb (910 g) 8min 370°F – Agitar
“AIR FRY”
(freír con aire)
Tocino 8 lonchas 6-8 min 400°F – Voltear
“BAKE”
(hornear)
Pastel/Bizcocho
Molde de pastel de 9 x
5in(33 x 13cm)
25 min 325°F
✓
–
“BAKE”
(hornear)
Pancitos 6 10-12 minutos 350°F
✓
–
“ROAST”
(asar)
Pollo entero 4lb (1.8kg) 55min 350°F
––
“ROAST”
(asar)
Muslos de pollo 3lb (1.35kg) 25min 380°F – Voltear
“ROAST”
(asar)
Mazorcas de maíz Hasta 6 mazorcas 20min 350°F – Voltear

29
FUNCIÓN
PREPROGRAMADA
CANTIDAD TIEMPO TEMPERATURA PRECALENTAR AGITAR/VOLTEAR
“FRIES” (papas fritas) 2lb (910 g) 20min 400°F
–
Agitar
“WINGS” (alitas de
pollo)
3lb (1.35kg) 30min 400°F
–
Agitar
“FROZEN SNACKS”
(bocadillos
congelados)
–10min400°F
–
Agitar
Funcionamiento El aparato no se enciende.
Compruebe que la toma de corriente esté funcionando.
Compruebe que la cesta esté bien instalada. Si no lo está, el mensaje “OUT” aparecerá en la
pantalla.
Llame a nuestro servicio de atención al cliente al 1-800-726-0190.
Cocción
Los alimentos fritos no son
crujientes o no se cocinan
uniformemente.
Algunos alimentos requieren más aceite que otros. Si los alimentos no están lo suficientemente
crujientes, rocíelos o cepíllelos con aceite antes de cocinarlos.
Cerciórese de distribuir los alimentos uniformemente en la cesta, en una capa y sin superponerlos.
De ser necesario, agite la cesta o voltee los alimentos a mitad de tiempo (use la función “TOSS
REMINDER” para fijar una alerta sonora).
Cocine los alimentos por más tiempo, comprobando el estado de cocción regularmente hasta que
estén dorados.
Los alimentos no están
completamente cocinados.
Si coloca demasiados alimentos en la cesta, puede que no se cocinen bien en el tiempo sugerido.
Procure cocinar cantidades más pequeñas de alimentos a la vez, disponiéndolos en una sola capa.
Si la temperatura es demasiado baja, puede que los alimentos no se cocinen completamente. La
temperatura ideal para freír con aire es alrededor de 400°F.
Limpieza
¿Cómo quitar los residuos
de alimentos de la cesta/
rejilla?
Para eliminar la grasa quemada, remoje los accesorios en agua caliente con jabón o use un
limpiador no abrasivo. Se recomienda lavar los accesorios a mano, en agua caliente con jabón,
usando un estropajo o un cepillo de nylon, y enjuagarlos bien.
RESOLUCIÓN DE PROBLEMAS

30
MÁS FORMAS DE COCINAR
La freidora de aire Cuisinart
®
también puede usarse para hornear (modo
“BAKE”) y asar (modo “ROAST”). Para usar estas funciones, simplemente
elija la función deseada y fije el tiempo de cocción (hasta 60 minutos) y
la temperatura. Siga los consejos y las recomendaciones acerca de la
temperatura y del tiempo a continuación.
• Al usar la freidora de aire Cuisinart
®
, puede que tenga que reducir el
tiempo de cocción ya que el ventilador de convección hace que los
alimentos se cocinan más rápidamente. Empiece a comprobar el punto
de cocción 5-10 minutos antes del final del tiempo recomendado.
• Para hornear, recomendamos:
– Colocar una fuente resistente al calor (no incluida) en la rejilla.
–
Usar una temperatura 25-50°F (15-30°C) inferior a la temperatura
indicada en la receta (para las recetas no desarrolladas
específicamente para este aparato).
• Para asar vegetales y carnes, fije la temperatura en 400°F.
• La freidora de aire Cuisinart
®
puede usarse para asar res, pollo, cerdo,
pescado y más.
LIMPIEZA Y MANTENIMIENTO
• Siempre desenchufe el aparato y deje que se enfríe completamente
antes de limpiarlo.
• No use limpiadores abrasivos; esto dañará el acabado. Limpie el
exterior del aparato con un paño húmedo y séquelo bien. Si desea usar
un limpiador, aplique este en un paño; no en el aparato.
• Para limpiar el interior del aparato, use una esponja humedecida con
agua jabonosa o limpiador. Quite los residuos de limpiador con un paño
húmedo limpio. Nunca use productos abrasivos o corrosivos; esto
puede dañar la superficie del aparato. Nunca use estropajos metálicos
(p.ej., lana de acero) para limpiar el interior del aparato.
• La cesta para freír con aire y la rejilla son aptas para lavavajillas.
También pueden lavarse a mano, en agua caliente con jabón, usando
un estropajo o un cepillo de nylon. Cerciórese de enjuagarlas bien.
• Retire la rejilla de la cesta para la limpieza.
• Cualquier otro servicio debe ser realizado por un técnico autorizado.

31
Recetas
Huevos rellenos de maíz al estilo mexicano ...........32
Papas rejilla con tocino y queso.....................32
Alitas de pollo al estilo “pickleback” .................33
Ñoquis crujientes con coles de Bruselas..............33
Mazorca de maíz “frita” con mantequilla
de chile calabrés ................................34
Brochetas de vegetales especiados ..................34
Camotes al horno................................35
Hamburguesas de cangrejo ........................35
Pollo al limón ...................................36
“Hot dogs” cargados..............................37
Sándwiches de pollo a la Parmesana.................37
Pollo a la barbacoa...............................38
Pollo relleno al estilo mediterráneo..................38
Brochetas de salmón glaseado con hoisin.............39
Empanadas de vegetales y queso ...................39
Rosquillas con glaseado de limón ...................40

32
Huevos rellenos de maíz al estilo mexicano
Un giro único al clásico huevo relleno. Esta delicia inspirada en la
comida callejera mexicana lleva maíz tostado en el relleno para
darle un toque crujiente.
Rinde 12 porciones
1 mazorca de maíz
6 huevos grandes
2 cucharadas de crema mexicana
3 cucharadas de Cotija desmenuzado
1 cucharada de mayonesa
2 cucharaditas de mostaza de Dijon
¼ cucharadita de sal kosher
¼ cucharadita de sazón de chile-lima + más para decorar
Ralladura de ½ lima/limón verde
1. Colocar el maíz en la cesta. Elegir “ROAST” y fijar el tiempo en
20 minutos. Cuando suene el recordatorio de agitar, voltear el
maíz. Al final del tiempo, retirar el maíz de la cesta y dejarlo
enfriar.
2. Mientras el maíz se está enfriando, cocinar los huevos. Colocar
los huevos (en su cáscara) en la cesta. Elegir “AIR FRY” y fijar la
temperatura en 250°F y el tiempo en 18 minutos. Al final de la
cocción, usar pinzas de cocina para sacar los huevos y
colocarlos en un baño de agua fría para detener la cocción.
3. Cuando los huevos estén tibios, pelarlos y cortarlos a la mitad.
Con cuidado, quitar las yemas con una cuchara y colocarlos en
el bol con una procesadora de alimentos equipada con cuchilla
picadora de metal. Procesar hasta que estén suaves. Agregar la
crema, 2 cucharadas del queso Cotija, la mayonesa, la mostaza,
la sazón de chile-lima y la ralladura. Nota: También puede hacer
esto en un tazón, aplastando las yemas.
4. Cortar los granos de maíz de la mazorca y agregarlos a la
mezcla de yemas; revolver para incorporar. Probar y ajustar la
sazón algusto.
5. Rellenar el centro de cada clara con la mezcla de yema, usando
una cuchara o una manga pastelera. Rociar con el queso Cotija
y la sazón de chile-lima restantes.
Papas rejilla con tocino y queso
Adoptando los sabores de las alitas de búfalo, usamos la freidora
de aire para convertir las crujientes papas rejilla en un adictivo
aperitivo para el día del partido.
Rinde 6 porciones
6 lonchas de tocino
2 libras (910 g) de papas rejilla congeladas
1 taza (115 g) de queso azul desmenuzado
2 onzas (55 g) de queso Monterey Jack rallado
1 rama de apio, picada
2 cebolletas (“scallions”), finamente picadas
2 cucharadas de salsa Búfalo
1. Colocar el tocino en la cesta. Elegir “AIR FRY” y fijar la
temperatura en 400°F y el tiempo en 10 minutos. Al final del
tiempo, sacar y dejar enfriar. Una vez frío, picar grueso.
2. Mientras el tocino se está enfriando, cocinar las papas. Verter la
grasa de cocción del tocino en un recipiente resistente al calor.
Colocar las papas en la cesta (no es necesario limpiarla). Elegir
“AIR FRY” y fijar la temperatura en 400°F y el tiempo en 10
minutos. Cuando suene el recordatorio de agitar, agitar la cesta.
Al final de tiempo, cubrir con el tocino picado, el queso azul
desmenuzado y el queso Monterey Jack rallado. Volver la cesta
a la freidora y fijar la temperatura en 400°F y el tiempo en 3
minutos.

33
3. Retirar del aparato y colocar en un plato de servir.
Cubrir con apio, cebolletas y la salsa Búfalo. Servir
inmediatamente.
Alitas de pollo al estilo “pickleback”
Inspiradas por el apreciado chupito de pepinillo (conocido como
“pickleback shot” en inglés), estas crujientes alitas toman los
sabores de la salmuera de pepinillos y del Bourbon al próximo nivel
para crear un bocado único y delicioso.
Rinde 4-6 porciones
ȴʻ ƏŸŁNJĦǒʻʙȻȳȲʼūʚʻʼnőʻĦƏŸǟĦǒʻʼnőʻLJƤƏƏƤʻ
ȳʻ ǟĦȏĦʻʙȴȵȷʼƘƏʚʻʼnőʻǒĦƏƘǧőNJĦʻʼnőʻLJőLJŸƚŸƏƏƤǒ
½ cucharadita de sal kosher
2 cucharadas de Bourbon
2 cucharaditas de miel
1 cucharada (10 g) de azúcar rubia (azúcar de caña integral)
½ cucharadita de cebolla en polvo
¼ cucharadita de ajo en polvo
½ cucharadita de páprika ahumada
1 pizca de pimienta de Cayena
1 cucharada de pepinillos encurtidos picados, para servir
1. Colocar las alitas y la salmuera de pepinillos en un tazón
grande; revolver. Cubrir con papel film/plástico y refrigerar por 2
horas. Después de este tiempo, escurrir y secar las alitas con
papel absorbente.
2. Colocar las alitas en la cesta, en una sola capa. Rociar con sal.
3. Elegir “WINGS” y fijar el tiempo en 25 minutos. Cuando suene el
recordatorio de agitar, agitar la cesta.
4. Mientras las alitas se están cocinando, preparar la salsa.
Colocar el Bourbon, la miel, el azúcar, la cebolla en polvo, el ajo
en polvo, la páprika y la pimienta de Cayena en un tazón
grande. Batir hasta que el azúcar se haya disuelto por completo.
Reservar.
5. Cuando las alitas estén cocinadas, revolverlas en la salsa y
volver a colocarlas en la cesta. Elegir “WINGS” otra vez y fijar el
tiempo en 5 minutos. No es necesario agitar la cesta durante la
cocción.
6. Decorar con pepinillos encurtidos picados antes de servir.
Ñoquis crujientes con coles de Bruselas
Esta receta cumple todos los requisitos: crujiente, sustanciosa,
sabrosa, y rápida. Añada la cantidad que desee de la miel picante
de su preferencia.
Rinde 4 porciones
ȳʻ ʻLJĦljǧőǟőʻʼnőʻȳȹʁȸʼƤȏʻʙȷȲȲʼūʚʻʼnőʻƣƤljǧŸǒʻŪNJőǒłƤǒʻőƚǾĦǒĦʼnƤǒʻĦƏʻ
vacío
Aceite de oliva, para rociar
Sal kosher
Pimienta negra recién molida
Aceite en aerosol/rocío vegetal
1 libra (455 g) de coles de Bruselas, limpias y partidas a la
mitad
Miel picante, para servir
Ralladura de limón, para servir
Jugo de limón, para servir
1. Colocar los ñoquis en un tazón grande. Rociar con una buena
cantidad de aceite de oliva y sazonar con 2 pizcas de sal y
pimienta. Revolver para cubrir.
2. Colocar los ñoquis en la cesta. Elegir “AIR FRY” y fijar la
temperatura en 375°F y el tiempo en 18 minutos.
3. Mientras los ñoquis se están cocinando, colocar las coles en el
tazón y rociar con una buena cantidad de aceite de oliva.

34
Sazonar con una pizca de sal y pimienta y revolver. Cuando
falten 12 minutos de cocción, añadir la mezcla a los ñoquis.
Cuando suene el recordatorio de agitar, agitar la cesta.
4. Pasar a una fuente poco profunda y rociar con miel picante,
ralladura de limón y jugo de limón. Servir inmediatamente.
Mazorca de maíz “frita”
con mantequilla de chile calabrés
Freír maíz con aire es rápido, fácil y delicioso. La mantequilla de
chile calabrés aporta un toque picante agradable.
Rinde 6-12 porciones
6 mazorcas de maíz
Aceite de oliva, para cepillar
½ cucharadita + 1 pizca de sal kosher
ȶʻ ʻƤƚȏĦǒʻʙȳȳȷʼūʚʻʼnőʻƘĦƚǟőljǧŸƏƏĦʻǒŸƚʻǒĦƏʂʻĦʻǟőƘLJőNJĦǟǧNJĦʻ
ambiente
2 cucharaditas de chile calabrés en aceite
¼ cucharadita de ralladura de limón
1. Cepillar las mazorcas de maíz con aceite y rociar con una pizca
de sal. Colocar en la cesta.
2. Elegir “AIR FRY” y fijar la temperatura en 350°F y el tiempo en
15 minutos.
3. Mientras el maíz se está cocinando, preparar la mantequilla*.
Colocar la mantequilla en una minipicadora y procesar hasta
que esté suave. Agregar los chiles, la ralladura y la sal restante.
Procesar hasta conseguir una mezcla suave y homogénea.
4. Servir las mazorcas enteras o cortadas a la mitad, cubiertas
con mantequilla. También puede servir la mantequilla al lado.
* La mantequilla se puede preparar con antelación. Conservar el en
refrigerador, envuelta en papel film/plástico o en un recipiente.
Brochetas de vegetales especiados
Disfrute de estas brochetas como plato principal ligero o como
acompañamiento de su proteína favorita.
Rinde 4-6 porciones (4 brochetas)
½ cucharadita de comino en polvo
¼ cucharadita de semillas de cilantro en polvo
¼ cucharadita de canela en polvo
1 pizca de pimienta de Cayena
¼ cucharadita de sal kosher
¼ cucharadita de pimienta negra recién molida
ȳʻ LJŸƘŸőƚǟƤʻʼnǧƏłőʻƘőʼnŸĦƚƤʂʻőƚʻLJőʼnĦȏƤǒʻʼnőʻȳʼŸƚʻʙȴʁȷʼłƘʚ
ȳʻ łőŁƤƏƏĦʻNJƤƉĦʻƘőʼnŸĦƚĦʂʻőƚʻLJőʼnĦȏƤǒʻʼnőʻȳʼŸƚʻʙȴʁȷʼłƘʚ
8 onzas (225 g) de calabacín amarillo (“summer squash”),
őƚʻLJőʼnĦȏƤǒʻʼnőʻȳʼŸƚʻʙȴʁȷʼłƘʚ
8 champiñones pequeños
2 cucharadas de aceite de oliva
1½ cucharadas de jugo de lima/limón verde fresco
1. Si usa pinchos de madera, remojarlos en agua por 20 minutos.
2. Colocar todos los ingredientes en un tazón grande y revolver
para combinar.
3. Insertar los vegetales en los pinchos, alternándolos.
4. Colocar los pinchos en la cesta. Elegir la función “AIR FRY” y
fijar la temperatura en 375°F y el tiempo en 15 minutos.
Cuando suene el recordatorio de agitar, voltear los pinchos.
5. Una vez finalizada la cocción, colocar los pinchos en un plato
de servir. Servir inmediatamente.

35
Camotes al horno
Nos gusta una mezcla dulce y especiada de aceite de coco sobre
estos camotes perfectamente cocidos. Si los prefiere un poco
crujiente, añadir algunas pacanas picadas antes de servir.
Rinde 4 porciones
4 camotes/batatas/ñames
Aceite de oliva
ɸʻ ǟĦȏĦʻʙȳȴȲʼƘƏʚʻʼnőʻĦłőŸǟőʻʼnőʻłƤłƤʂʻĦʻǟőƘLJőNJĦǟǧNJĦʻĦƘŁŸőƚǟő
1 cucharadita de jarabe de arce/maple (opcional)
1 cucharadita de ralladura de naranja
1 cucharadita de canela en polvo
¼ cucharadita de nuez moscada rallada
1 pizca de sal kosher
Pacanas picadas, para servir (opcional)
1. Pinchar los camotes todo alrededor con un tenedor.
Restregar con aceite de oliva.
2. Colocar los camotes en la cesta. Elegir “ROAST” y fijar la
temperatura en 375°F y el tiempo en 25 minutos. Los camotes
están cocinados cuando se puedan perforar fácilmente con la
punta de un cuchillo. Si son grandes, puede que requieran más
tiempo de cocción.
3. Mientras los camotes se están cocinando, preparar el “jarabe”.
Colocar el aceite de coco, el jarabe de arce/maple (opcional), la
ralladura, la canela, la nuez moscada y la sal en un tazón
pequeño. Revolver con un tenedor. Probar y ajustar la cantidad
de sal y especias al gusto.
4. Finalizada la cocción, pasar los camotes a un plato de servir.
Con la ayuda de un par de tenedores, abrirlos y aplastarlos
ligeramente. Cubrir con cucharadas del “jarabe”. Servir
inmediatamente.
Hamburguesas de cangrejo
Una delicia veraniega, las croquetas de cangrejo son aún mejores
cuando tienen el tamaño de una hamburguesas.
Rinde 4 hamburguesas
16 onzas (455 g) de cangrejo
1 cucharadita de aceite de oliva virgen extra
1 pimiento dulce rojo mediano, finamente picado
1 jalapeño, sin semillas, finamente picado
3 cebolletas (“scallions”), finamente picadas
1 diente de ajo, finamente picado
¼ cucharadita de sal kosher
2 huevos grandes, ligeramente batidos
1 taza (100 g) de pan rallado japonés “panko” + ½ taza (60
g) para rebozar
ɸʻ ǟĦȏĦʻʙȳȴȲʼƘƏʚʻʼnőʻƘĦȅƤƚőǒĦʻŁĦƉĦʻŁǧőƚĦʻłĦƏŸʼnĦʼn
ȳʻ łǧłųĦNJĦʼnŸǟĦʻʙȳȷʼƘƏʚʻʼnőʻǒĦƏǒĦʻÙƤNJłőǒǟőNJǒųŸNJő
1 cucharadita de mostaza de Dijon
1½ cucharaditas de salsa para mariscos
Salsa picante (opcional)
Aceite de oliva, para rociar
4 panes para hamburguesas con semillas de ajonjolí/sésamo
Gajos de limón para servir
Lechuga triturada, para servir
Alioli, para servir
1. Colocar la carne de cangrejo en un tazón grande. Quitar los
posibles cartílagos y refrigerar hasta el momento de usar.
2. Poner el aceite de oliva a calentar a fuego medio, en una sartén
grande. Cuando el aceite esté caliente, agregar los pimientos, el
jalapeño, las cebolletas y el ajo. Saltear por aprox. 5 minutos,
hasta que los vegetales se suavicen ligeramente; añadir la sal.
3. Retirar del fuego y dejar enfriar por unos minutos. Una vez
tibios, agregar los vegetales al cangrejo. Agregar los huevos, 1

36
taza (100g) del pan rallado, la mayonesa, la salsa
Worcestershire, la mostaza de Dijon, la salsa para mariscos y
1-2 pizcas de salsa picante si desea.
4. Mezclar los ingredientes suavemente, a mano (la mejor forma
para hacer esto), o usando una cuchara. Tener cuidado de no
romper la carne de cangrejo.
5. Formar croquetas de ¼ de taza (60ml) y colocarlas en un plato
limpio, usando hojas de papel encerado para separarlas si es
necesario. Cubrir con papel film/plástico y refrigerar por 1 hora
antes de cocinar.
6. Justo antes de cocinarlas, rebozar las croquetas de cangrejo en
pan rallado. Rociar ambos lados con una buena cantidad de
aceite de oliva.
7. Colocar las croquetas de cangrejo en la cesta. Elegir “AIR FRY” y
fijar la temperatura en 400°F y el tiempo en 10 minutos.
Cuando suene el recordatorio de agitar, voltear con cuidado las
croquetas. Las croquetas de cangrejo están cocinadas cuando
están uniformemente doradas y crujientes. Añadir más tiempo
de cocción si es necesario.
8. Armar las hamburguesas: Dividir la lechuga rallada entre las
mitades de pan inferiores y colocar una croqueta de cangrejo en
cada una. Rociar las croquetas con jugo de limón. Untar alioli en
las mitades de pan superiores antes de cubrir las croquetas.
Servir inmediatamente.
Pollo al limón
Este plato de pollo combina con todo tipo de guarniciones:
pruébalo en un bol de granos o con vegetales fritos al aire y pan sin
levadura. No importa cómo sirva este pollo, la freidora de aire hace
que la cocción sea rapidísima.
Rinde 4-6 porciones
2 cucharaditas de páprika dulce
2 cucharaditas de orégano seco
1½ cucharaditas de sal kosher
½ cucharadita de comino en polvo
½ cucharadita de ralladura de limón
1 cucharada de jugo de limón fresco
1 cucharada de aceite de oliva
ȵʻ ƏŸŁNJĦǒʻʙȳʁȵȷʼƌūʚʻʼnőʻƘǧőƏƤǒʻȅʻLJŸőNJƚĦǒʻʼnőʻLJƤƏƏƤ
1. Colocar la páprika, el orégano, ½ cucharadita de la sal, el
comino y la ralladura en un tazón pequeño o el bol de una mini
picadora. Revolver/procesar para combinar. Agregar el jugo de
limón; revolver/procesar. Sin dejar de revolver/procesar, agregar
lentamente el aceite de oliva. Reservar.
2. Rociar la sal restante en el pollo y dejar reposar a temperatura
ambiente por 30 minutos.
3. Restregar la mezcla de hierba en todo el pollo. Cubrir y
refrigerar por aprox. 1 hora.
4. Colocar el pollo, la piel apuntando hacia arriba, en la cesta.
Elegir “ROAST” y fijar la temperatura en 375°F y el tiempo en
30 minutos.
6. El pollo está cocinado cuando la temperatura interna alcance
170°F (77°C).
7. Servir inmediatamente.

37
“Hot dogs” cargados
Unos “hot dog” elevados inspirados en la controvertida pizza
hawaiana. Le prometemos que la mezcla de sabores dulces y
picantes le encantarán.
Rinde 6 porciones
6 lonchas de tocino
6 “hot dogs”
6 pancitos para “hot dogs”
6 cucharadas de queso Cheddar rallado
½ taza (60 g) de tomates picados
½ jalapeño, finamente picado
½ taza (100 g) de piña picada
1. Colocar el tocino en la cesta. Elegir “AIR FRY” y fijar la
temperatura en 400°F y el tiempo en 10 minutos. Retirar de la
cesta y dejar enfriar ligeramente. Una vez frío, romper o cortar
cada loncha a la mitad.
2. Mientras el tocino se está enfriando, cocinar los “hot dogs”.
Colocarlos en la cesta (no es necesario lavarla), elegir “AIR FRY”
y fijar la temperatura en 400°F y el tiempo en 4 minutos.
Finalizada la cocción, retirar y reservar.
3. Armar los “hot dogs”: Esparcir 1 cuchara de queso Cheddar en
la mitad inferior de cada pan. Añadir un “hot dog” y disponer
media loncha de tocino al lado. Dividir uniformemente los
tomates picado, el jalapeño y la piña entre los “hot dogs”.
4. Colocar los “hot dogs” armados en la cesta y fijar la
temperatura en 400°F y el tiempo en 2 minutos.
5. Servir inmediatamente.
Sándwiches de pollo a la Parmesana
Esta comida casera y clásica es perfecta para una cena divertida.
Asegúrese de tener salsa extra para servir.
Rinde 4 porciones
½ taza (60 g) de harina común
¼ cucharadita de sal kosher
1 pizca de pimienta negra recién molida
1 huevo grande, ligeramente batido
½ taza (50 g) de pan rallado sazonado
4 pechugas de pollo, uniformemente ablandadas
Aceite de oliva
4 panecillos estilo “grinder”, partidos en la parte superior
ȳʻ ǟĦȏĦʻʙȴȵȷʼƘƏʚʻʼnőʻǒĦƏǒĦʻrĦNJŸƚĦNJĦ
1 taza (160 g) de queso Mozzarella triturado
4 cucharaditas de queso Parmesano rallado
1. Colocar tres platos en la superficie de trabajo. En uno, colocar
la harina, la sal y la pimienta. Colocar los huevos en el segundo
y el pan rallado en el tercero.
2. Una por una, rebozar las pechugas en la harina, el huevo y el
pan rallado. Rociar una buena cantidad de aceite de oliva en
ambos lados.
3. Colocar el pollo en la cesta. Elegir “AIR FRY” y fijar la
temperatura en 400°F y el tiempo en 15 minutos. Cuando
suene el recordatorio de agitar, voltear el pollo.
4. Una vez finalizada la cocción vez, retirar el pollo de la cesta.
Untar 2 cucharadas de salsa en cada panecillo y colocar una
pechuga y ¼ de taza (40g) de queso Mozzarella rallado.
5. Colocar los sándwiches en la cesta.
Fijar la temperatura en 450°F y el tiempo en 5 minutos.

38
6. Retirar de la cesta y rociar con 2 cucharadas adicionales de la
salsa y 1 cucharadita de queso Parmesano rallado. Servir
inmediatamente.
Pollo a la barbacoa
Una cena fácil entre semana para satisfacer ese antojo de
barbacoa.
Rinde 6-12 porciones
ȵʻ ʻƏŸŁNJĦǒʻʙȳʁȵȷʼƌūʚʻʼnőʻƘǧǒƏƤǒʎƘǧǒƏŸǟƤǒʻʼnőʻLJƤƏƏƤʻłƤƚʻųǧőǒƤʻ
(también se puede usar una combinación de muslos y
piernas)
¾ cucharadita de sal kosher
¼ cucharadita de pimienta negra recién molida
ȳʻ ǟĦȏĦʻʙȴȵȷʼƘƏʚʻʼnőʻǒĦƏǒĦʻŁĦNJŁĦłƤĦʻ˧ʻƘħǒʻLJĦNJĦʻǒőNJǾŸNJ
1. Sazonar el pollo con sal y pimienta y colocarlo en la cesta. Si el
tiempo lo permite, dejar reposar por 30 minutos antes de asar
para que la sal penetre en la carne.
2. Elegir “ROAST” y fijar la temperatura en 375°F y el tiempo en
20 minutos. Al final del tiempo, cepillar el pollo con una buena
cantidad de salsa barbacoa. Elegir “ROAST” otra vez y fijar la
temperatura en 375°F y el tiempo en 10 minutos. El pollo está
listo cuando la temperatura interna alcanza 170°F (77°C).
3. Servir con salsa barbacoa al lado.
Pollo relleno al estilo mediterráneo
Estas pechugas de pollo de estilo mediterráneo están rellenas con
espinacas, tomates secos, alcachofas, albahaca y ricotta.
Rinde 4 porciones
¾ taza (185 g) de queso ricota/requesón
ɻʻ ʻǟĦȏĦʻʙȳȲȲʼūʚʻʼnőʻőǒLJŸƚĦłĦʻłƤłŸʼnĦʂʻőǒłǧNJNJŸʼnĦʻȅʻLJŸłĦʼnĦʻūNJǧőǒƤ
¼ taza (30 g) de tomates secados al sol, picados grueso
¼ taza (50 g) de alcachofas marinadas, picadas grueso
5 hojas de albahaca fresca, rebanadas
1½ cucharaditas de sal kosher
4 pechugas de pollo, partidas verticalmente para crear un
bolsillo para rellenar
1¼ cucharadita de pimienta negra recién molida
1 cucharada de aceite de oliva
1. Colocar el queso ricota, la espinaca, los tomates secados al sol,
las alcachofas, la albahaca y ½ cucharadita de la sal en un
tazón mediano; revolver y reservar.
2. Sazonar las pechugas con pimienta y la sal restante. Rellenar
cada pechuga con la mezcla de queso ricota.
3. Colocar el pollo en la cesta y rociar con aceite de oliva. Colocar
la cesta en el aparato. Elegir “ROAST” y fijar la temperatura en
350°F y el tiempo en 30 minutos.
4. El pollo está cocinado cuando la temperatura interna alcanza
165°F (74°C). Retirar de la cesta. Servir inmediatamente.

39
Brochetas de salmón glaseado con hoisin
Estas brochetas son suficientes para una multitud o para preparar
comida para toda la semana, pero se pueden cortar fácilmente
por la mitad para una ración más pequeña. Sírvalas con arroz y
ensalada de pepino para una comida completa.
Rinde 4-6 porciones (4 pinchos)
2 cucharadas de salsa Hoisin
2 cucharadas de salsa de soya o tamari
2 cucharaditas de jugo de lima/limón verde fresco
1 cucharadita de aceite de sésamo/ajonjolí
ȵʻʻ ʻƏŸŁNJĦǒʻʙȳʁȵȷʼƌūʚʻʼnőʻǒĦƏƘƥƚʻǒŸƚʻLJŸőƏʎųǧőǒƤǒʂʻőƚʻLJőʼnĦȏƤǒʻʼnőʻ
ȳʡȳɸʼŸƚʻʙȴʁȷʡȶʼłƘʚ
6 cebolletas (“scallions”), la parte blanca en pedazos de
ȳɸʼŸƚʻʙȶʼłƘʚʻȅʻƏĦʻLJĦNJǟőʻǾőNJʼnőʻŪŸƚĦƘőƚǟőʻNJőŁĦƚĦʼnĦ
½ cucharadita de semillas de ajonjolí/sésamo tostadas
Gajos de lima/limón verde, para servir
1. Colocar la salsa Hoisin, la salsa de soya, el jugo de lima y el
aceite de sésamo en un tazón mediano. Revolver, batiendo.
Agregar el salmón y revolver para cubrir. Cubrir con papel film/
plástico y refrigerar por un mínimo de media hora, hasta un
máximo de 1 hora.
2. Si va a usar pinchos de madera, remojarlos en agua mientras el
salmón se adoba.
3. Agregar la parte blanca de las cebolletas al salmón; revolver.
Insertar un pedazo de salmón en uno de los pinchos. Insertar
un pedazo de cebolleta, y luego otro pedazo de salmón.
Continuar insertando los ingredientes en los pinchos,
alternándolos. Tirar el adobo restante.
4. Colocar los pinchos en la cesta. Elegir “AIR FRY” y fijar la
temperatura en 375°F y el tiempo en 10 minutos. Cuando suene
el recordatorio de agitar, voltear los pinchos.
5. Una vez finalizada la cocción, colocar los pinchos en un plato
de servir. Rociar con las semillas de sésamo/ajonjolí y la parte
verde de las cebolletas.
Empanadas de vegetales y queso
Comprar masa de empanadas en la tienda facilita la elaboración
de estas sabrosas empanadas. Nos encanta la combinación
de col rizada, calabaza y queso de cabra, pero se pueden
sustituirse fácilmente por sus vegetales y queso favoritos.
Rinde 6 empanadas
1 cucharada de aceite de oliva virgen extra + más para
rociar
¼ cebolla mediana, finamente picada
2 tallos de col rizada (quitar y desechar los tallos duros;
picar finamente los tallos tiernos y las hojas)
Sal kosher
Pimienta negra recién molida
1 pizca de hojuelas de pimiento rojo
¼ taza (30 g) de queso cabra desmenuzado
1 taza (200 g) de cubos de calabaza moscada (“butternut
squash”)
1 huevo grande
ȳʻ ʻƏŸŁNJĦʻʙȴȴȷʼūʚʻʼnőʻƘĦǒĦʻʼnőʻőƘLJĦƚĦʼnĦǒʻłƤƚūőƏĦʼnĦʻʙȅĦʻǾŸőƚőʻ
cortada en discos)
Aceite en aerosol/rocío vegetal
1. Poner a calentar el aceite a fuego medio, en una sartén grande.
Cuando el aceite esté caliente, agregar la cebolla, la col rizada
y una pizca de sal y pimienta. Saltear hasta que los vegetales
estén suaves. Retirar del fuego y agregar la hojuelas de
pimienta. Dejar enfriar y, a continuación, agregar el queso
de cabra. Reservar.

40
2. Colocar la calabaza en la cesta. Rociar con aceite de oliva y
sazonar con una pizca grande de sal y pimienta. Revolver bien.
Elegir “AIR FRY” y fijar la temperatura en 400°F y el tiempo en
3 minutos. Pasar a un tazón mediano y dejar deje que se enfríe.
Una vez fría, agregar la mezcla de col rizada y queso de cabra.
3. Colocar el huevo y 1 cucharadita de agua en un tazón pequeño;
batir para conseguir barniz de huevo. Reservar.
4. Colocar los discos de masa en la superficie de trabajo.
5. Colocar 2 cucharadas del relleno en centro de cada disco.
Doblar la masa sobre sí misma y acanalar las orillas para sellar.
Cepillar con barniz de huevo.
6. Colocar las empanadas en la cesta. Con un cuchillo mondador,
cortar una pequeña hendidura en la parte superior de cada
empanada para permitir que el vapor se escape; esto garantiza
que la corteza salga crujiente y que las empanadas conserven
su forma.
7. Elegir “AIR FRY” y fijar la temperatura en 400°F y el tiempo en
16 minutos. Cuando suene el recordatorio de agitar, voltear con
cuidado las empanadas. Las empanadas están listas cuando
estén bien doradas y crujientes. Si es necesario, añadir unos
minutos de cocción.
8. Dejar enfriar ligeramente antes de servir.
Rosquillas con glaseado de limón
Unos sencillos pasos transforman la masa de galletas refrigerada
en rosquillas dulces y pegajosas.
Rinde aprox. 8 rosquillas (donas)
ȳʻ ʻƏĦǟĦʻʼnőʻȳʼƏŁʻʙȶȷȷʼūʚʻʼnőʻƘĦǒĦʻʼnőʻŁŸȏłƤłųƤǒʻųƤƉĦƏʼnNJĦʼnƤǒʻ
refrigerada
Aceite vegetal para rociar
Glaseado:
1 taza (120 g) de azúcar glasé, tamizado
ȴʻ łǧłųĦNJĦʼnĦǒʻʙȵȲʼƘƏʚʻʼnőʻƏőłųőʻőƚǟőNJĦʻ
½ cucharadita de ralladura de limón + más para rociar
1 cucharadita de jugo de limón
1. Separar los bizcochos. Con un cortador redondo de 1in (2.5cm),
cortar un agujero en el centro de cada bizcocho (los centros se
pueden cocinar por separado, o se puede desechar la masa).
2. Rociar ambos lados con aceite vegetal y disponer en la cesta
para freír.
3. Elegir “AIR FRY” y fijar la temperatura en 350°F y el tiempo en
8 minutos. Cuando suene el recordatorio de agitar, voltear las
rosquillas.
4. Mientras las rosquillas se están cocinando preparar el glaseado.
Colocar los Ingredientes en un tazón pequeño. Batir hasta
conseguir una mezcla suave. Si el glaseado parece demasiado
líquido, agregar más azúcar glasé, 1 cucharadita a la vez. Si el
glaseado parece demasiado espeso, añadir más leche, 1
cucharadita a la vez.
5. Una vez finalizada la cocción, retirar las rosquillas de la cesta.
Bañar la parte superior de cada rosquilla en el glaseado y
colocarlos en un plato de servir. Rociar con más ralladura de
limón. Servir tibios o a temperatura ambiente.

41
Garantía limitada
Sujeto a las exclusiones y limitaciones contenidas en este documento, Conair
LLC/Cuisinart (“Cuisinart”) garantiza que la freidora de aire de 8 cuartos de
galón (7.5L) CompactMax
™
de Cuisinart
®
(“Producto”) estará libre de defectos
de materiales y fabricación en condiciones normales de uso doméstico durante
un período de TRES (3) años a partir de la fecha de compra del Producto en su
embalaje original sellado, a menos que se especifique lo contrario en esta
Garantía Limitada. Esta Garantía Limitada es solo para consumidores de
Estados Unidos (definidos aquí como compradores al por menor para uso
personal, familiar o doméstico) que compren originalmente el Producto a
Cuisinart o a un revendedor autorizado de Cuisinart. Si no está seguro de si un
minorista u otro punto de venta es un revendedor autorizado de Cuisinart,
póngase en contacto con Cuisinart.
Esta Garantía Limitada NO cubre:
• El desgaste normal;
• Cualquier Producto adquirido por compradores comerciales o para usos
comerciales o no domésticos;
• Accesorios, piezas o programas añadidos al Producto después de que
Cuisinart lo haya enviado;
• Cualquier costo asociado con el reemplazo o reparación del Producto,
incluyendo mano de obra, instalación u otros costos incurridos por usted sin
previa aprobación de Cuisinart;
• Daños, defectos y fallas debidos a: (1) causas externas, incluyendo el envío,
accidentes, problemas con el suministro eléctrico (el Producto está diseñado
para su uso exclusivo con enchufes de 120 V), condiciones anormales (como
mecánicas o medioambientales); (2) uso no conforme a las instrucciones del
Producto; (3) uso indebido, negligencia, alteración no autorizada, reparación
no autorizada; y (4) casos fortuitos u otros acontecimientos fuera del control
de Cuisinart;
• Daños causados por usted o terceros no autorizados, aunque cualquier
empresa puede realizar las reparaciones y el mantenimiento necesarios;
• Daños causados por accesorios o repuestos no autorizados específicamente
por Cuisinart; y
• Cualquier Producto cuyas marcas de identificación originales (marca
comercial o número de serie) hayan sido retiradas, alteradas o borradas.
Se recomienda llenar el formulario de registro disponible en https://www.
cuisinart.com/register-your-product.html a fin de facilitar la verificación de la
fecha de compra original de este producto. Sin embargo, no es necesario
registrar el producto para recibir servicio bajo esta garantía. En ausencia de
prueba de la fecha de compra, el período de garantía será calculado a partir de
la fecha de fabricación del producto.
GARANTÍA DE SIN DIFICULTADES
Si el Producto objeto de esta Garantía Limitada falla durante el período de
garantía por razones cubiertas por esta Garantía Limitada, Cuisinart, a su
elección, reparará el Producto, sustituirá el Producto por otro idéntico o
razonablemente equivalente, o si Conair no puede reparar o sustituir el
Producto, reembolsará al consumidor el precio de compra, menos la cantidad
directamente atribuible al uso anterior del Producto por parte del consumidor.
Para obtener una etiqueta de devolución, contáctenos, visitando https://www.
cuisinart.com/customer-care/product-assistance/product-inquiry// o llamando
a nuestro servicio de atención al cliente, al 1-800-726-0190, para hablar con un
representante.
Tras la recepción del Producto, Conair lo inspeccionará y, si lo requiere esta
Garantía Limitada, intentará reparar, reemplazar o reembolsarlo en un plazo de
treinta (30) días. No obstante, pueden producirse retrasos fuera del control de
Cuisinart, en cuyo caso dicho plazo podrá ampliarse en la medida en que sea
razonablemente necesario.
IMPORTANTE: Si debe llevar el producto defectuoso a un centro de servicio no
autorizado, por favor informe al personal del centro de servicio que deben
llamar al servicio de atención al cliente de Cuisinart, al 1-800-726-0190, a fin de
diagnosticar el problema correctamente, usar las piezas correctas para
repararlo y comprobar que el producto aún esté bajo garantía.
Residentes de California solamente
El período de Garantía Limitada de TRES (3) años comienza en la fecha de
entrega del Producto, que puede ser diferente de la fecha de compra del
Producto. Los residentes en California también tienen la opción de obtener los
beneficios de esta Garantía Limitada devolviendo el producto defectuoso (A) a
la tienda donde lo compraron, o (B) a otra tienda que venda productos
Cuisinart
®
del mismo tipo. La tienda podrá, a su elección, reparar el producto,
referir al consumidor a un centro de servicio independiente, sustituir el
producto por uno idéntico o razonablemente equivalente, o reembolsar al
consumidor el precio de compra menos la cantidad directamente atribuible al

42
uso anterior del producto por el consumidor. Los residentes de California
también pueden, si lo desean, enviar el producto defectuoso directamente a
Cuisinart para que sea reparado o sustituido por uno idéntico o razonablemente
equivalente. Para esto, deben llamar a nuestro servicio de atención al cliente al
1-800-726-0190. Cuisinart será responsable por los gastos de reparación,
reemplazo, manejo y envío de los productos defectuosos durante el período de
garantía.
ESTA GARANTÍA LIMITADA LE OTORGA DERECHOS LEGALES ESPECÍFICOS, Y
TAMBIÉN PUEDE TENER OTROS DERECHOS QUE VARÍAN DE UN ESTADO A OTRO
O EN FUNCIÓN DE LA JURISDICCIÓN. EN CASO DE INCUMPLIMIENTO DE ESTA
GARANTÍA LIMITADA, USTED PUEDE RECLAMAR LA SUSTITUCIÓN, UNA
INDEMNIZACIÓN POR DAÑOS Y PERJUICIOS U OTRAS SANCIONES.
LIMITACIONES DE RESPONSABILIDAD/LIMITACIONES Y EXCLUSIONES
ADICIONALES:
TODAS LAS GARANTÍAS EXPRESAS E IMPLÍCITAS TIENEN UNA DURACIÓN
LIMITADA AL PERÍODO DE GARANTÍA LIMITADA. NO SE APLICARÁ NINGUNA
GARANTÍA DESPUÉS DE ESTE PERÍODO. ALGUNOS ESTADOS (O
JURISDICCIONES) NO PERMITEN LIMITACIONES EN LA DURACIÓN DE UNA
GARANTÍA IMPLÍCITA, DE MODO QUE LAS LIMITACIONES MENCIONADAS
PUEDEN NO REGIR PARA USTED. LA RESPONSABILIDAD DE CUISINART BAJO
ESTA O CUALQUIER OTRA GARANTÍA, IMPLÍCITA O EXPRESA, SE LIMITA A LA
REPARACIÓN, SUSTITUCIÓN O REEMBOLSO, SEGÚN LO ESTABLECIDO
ANTERIORMENTE. ESTOS RECURSOS SON LOS ÚNICOS Y EXCLUSIVOS EN CASO
DE INCUMPLIMIENTO DE LA GARANTÍA. EN LA MEDIDA MÁXIMA PERMITIDA POR
LA LEY, CUISINART NO SE HACE RESPONSABLE DE NINGÚN DAÑO DIRECTO,
INDIRECTO, ESPECIAL, INCIDENTAL O CONSECUENTE RESULTANTE DE
CUALQUIER INCUMPLIMIENTO DE LA GARANTÍA O BAJO CUALQUIER OTRA
TEORÍA LEGAL (INCLUYENDO, PERO NO LIMITADO A, LUCRO CESANTE, TIEMPO
DE INACTIVIDAD, PÉRDIDA DEL FONDO DE COMERCIO, DAÑOS O SUSTITUCIÓN
DE EQUIPOS Y BIENES, Y CUALQUIER COSTE DE RECUPERACIÓN,
REPROGRAMACIÓN O REPRODUCCIÓN DE CUALQUIER PROGRAMA O DATOS
ALMACENADOS EN O UTILIZADOS CON UN SISTEMA QUE CONTENGA EL
PRODUCTO), INCLUSO SI CUISINART HA SIDO ADVERTIDO DE LA POSIBILIDAD
DE TALES DAÑOS. ALGUNOS ESTADOS (O JURISDICCIONES) NO PERMITEN LA
EXCLUSIÓN O LIMITACIÓN DE DAÑOS ESPECIALES, INCIDENTALES O
CONSECUENTES, DE MODO QUE LAS LIMITACIONES MENCIONADAS PUEDEN NO
REGIR PARA USTED. TODAS LAS GARANTÍAS EXPRESAS E IMPLÍCITAS TIENEN
UNA DURACIÓN LIMITADA AL PERÍODO DE GARANTÍA LIMITADA. NO SE
APLICARÁ NINGUNA GARANTÍA DESPUÉS DE ESTE PERÍODO.
ALGUNOS ESTADOS (O JURISDICCIONES) NO PERMITEN LIMITACIONES EN LA
DURACIÓN DE UNA GARANTÍA IMPLÍCITA, DE MODO QUE LAS LIMITACIONES
MENCIONADAS PUEDEN NO REGIR PARA USTED.
Esta Garantía Limitada es emitida por:
Conair LLC
1 Cummings Point Road
Stamford, CT 06902
1-800-726-0190

43
Notas/Notas

©2025 Cuisinart
Glendale, AZ 85307
Printed in China
Impreso en China
25CE94065
V IB-18718
Version No: AIR210 IB-18718
Size: 210 MM (W) X 148 MM (H)
Materal: 105gsm gloss artpaper for whole book
Old die-cut:
Coating: GLOSS VARNISHING IN COVER
Color(Front):
COVER: 4C + 1C (BLACK)
PDF version: V AIR210 IB-18718
VOION Code: V AIR210 IB-18718 Operator:ZHAO
VOION Diecut: V AIR210 IB-18718
Coating: GLOSS VARNISHING IN COVER
Remark:
(Back):
INSIDE: 1C + 1C (BLACK)
Date: 13-JUN-2026 Co-ordinator: Trik Wu / Scias Liu
VOION Description