

14 In. Abrasive Chop Saw
Scie à coupe abrasive de 355mm (14 po)
Sierra de corte abrasiva de 355mm (14 pulg)
Operator's Manual
Manuel d’utilisation
Manual del Operario
GMCS140
English
14 In. Abrasive Chop Saw
Operator’s Manual GMCS140
14 In. ABRASIVE CHOP SAW 15 AMP
Operator’s Manual
Specifications:
• Model: GMCS140
• RatedVoltage: 120V~60HZ
• RatedInputPower: 15A
• NoLoadSpeed: 2,800RPM
• BladeSize: 14”(355mm)
• ArborSize: 1”(25mm)
• MaxCuttingCapacity:Round: 4-1/2”(115mm)
• MaxCuttingCapacity:Square: 4”(100mm)
• MaxCuttingCapacity:Rectangular:2-3/4”x6-5/8”(70mmx170mm)
Includes:14”abrasivewheelandWrench
WARnIng:To reduce the risk of injury, user must read and understand
this operator’s manual before operating this tool. Save this Manual for future
reference.
Toll-Free Help Line: 1-888-552-8665
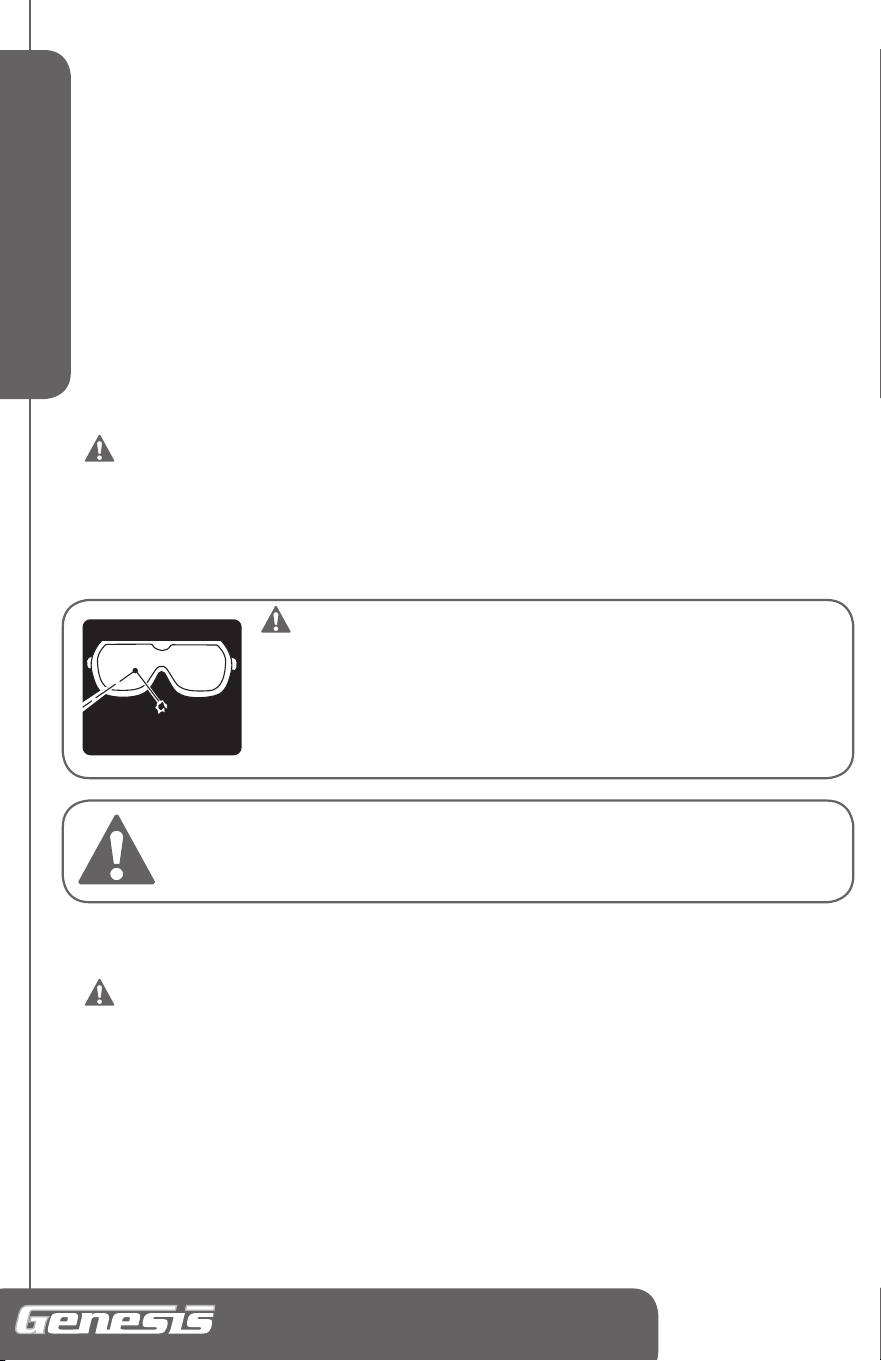
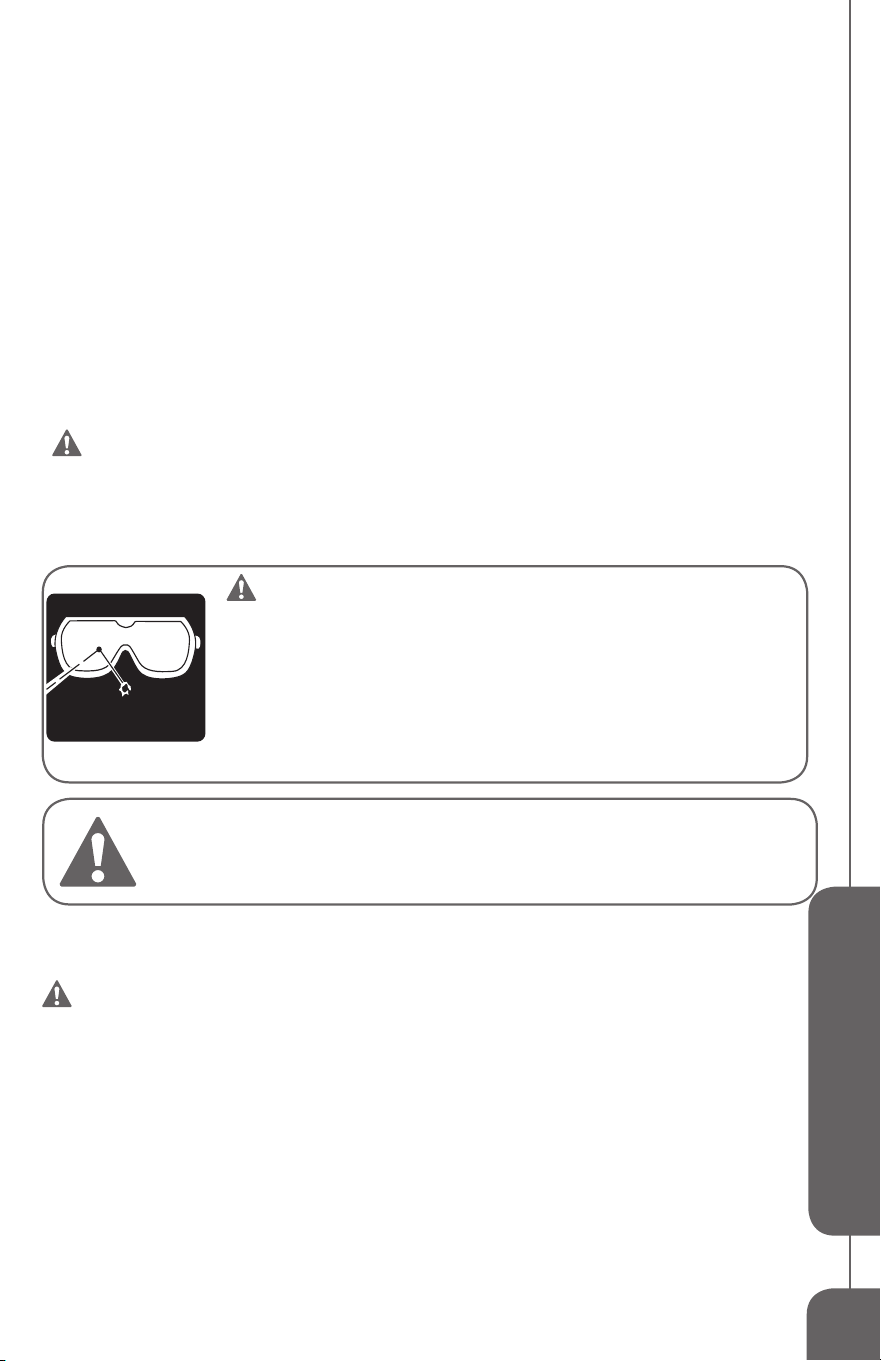
WARnIng:TheOperationofanypowertoolcanresultinforeign
objectsbeingthrownintoyoureyes,whichcanresultinsevereeyedamage.
Beforebeginningtooloperation,alwayswearsafetygogglesorsafetyglasses
withsideshieldsandafullfaceshieldwhenneeded.WerecommendWide
VisionSafetyMaskforuseovereyeglassesorstandardsafetyglasseswith
sideshields.AlwaysweareyeprotectionwhichismarkedtocomplywithANSI
Z87.1.
Look for this symbol to point out important safety
precautions. It means attention!!! Your safety is
involved.
gEnERAL SAFETY RULES
WARnIng:
Some dust created by power sanding, sawing, grinding, drilling, and other
construction activities contains chemicals known to cause cancer, birth defects
or other reproductive harm. Some examples of these chemicals are:
• Leadfromlead-basedpaints,
• Crystallinesilicafrombricksandcementandothermasonryproducts,and
• Arsenicandchromiumfromchemicallytreatedlumber.
Your risk from these exposures varies, depending on how often you do this
type of work. To reduce your exposure to these chemicals: work in a well
ventilated area, and work with approved safety equipment, such as those
dust masks that are specially designed to filter out microscopic particles.
WeARyOuR
fOReSIGHTISBeTTeR
THANNOSIGHT
SAfeTyGLASSeS

3
English
WARnIng:READ AnD UnDERSTAnD ALL WARnIngS, CAUTIOnS
AnD OPERATIng InSTRUCTIOnS BEFORE USIng THIS EQUIPMEnT. Failure
to follow all instructions listed below may result in electric shock, fire and/or
serious personal injury.
SAVE THESE INSTRUCTIONS
WORK AREA SAFETY
•
Keep your work area clean and well lit.Clutteredbenchesanddarkareasinvite
accidents.
•
Do not operate power tools in explosive atmospheres,suchasinthe
presenceofammableliquids,gases,ordust.Powertoolscreatesparkswhichmayignitethedust
orfumes.
•
Keep bystanders, children, and visitors away while operating a power
tool.Distractionscancauseyoutolosecontrol.
ELECTRICAL SAFETY
•
Power tool plugs must match the outlet. Nevermodifythepluginanyway.Donot
useanyadapterplugsinanyearthed(grounded)powertools.Doubleinsulatedtoolsareequipped
withapolarizedplug(onebladeiswiderthantheother).Thisplugwilltinapolarizedoutletonly
oneway.Iftheplugdoesnottfullyintheoutlet,reversetheplug.Ifitstilldoesnott,contact
aqualiedelectriciantoinstallapolarizedoutlet.Donotchangethepluginanyway.Double
insulationeliminatestheneedforthethreewiregroundedpowercordandgroundedpowersupply
system.
•Donotexposepowertoolstorainorwetconditions.Waterenteringapower
toolwillincreasetheriskofelectricshock.
•Avoidbodycontactwithearthedorgroundedsurfacessuchaspipes,
radiators, ranges and refrigerators. Thereisanincreasedriskofelectricshockif
yourbodyisgrounded.
•Donotabusethecord.Neverusethecordforcarrying,pullingorunpluggingthepower
tool.Keepcordawayfromheat,oil,sharpedgesormovingparts.Damagedcordsincreasetherisk
ofelectricshock.
•Whenoperatingapowertooloutside,useanextensioncordsuitable
for outdoor use. Thesecordsareratedforoutdooruseandreducetheriskofelectricshock.
•DonotuseAConlyratedtoolswithaDCpowersupply.Whilethetoolmay
appeartowork.TheelectricalcomponentsoftheACratedtoolarelikelytofailandrateahazardto
theoperator.
PERSONAL SAFETY
•
Stay alert, watchwhatyouaredoingandusecommonsensewhenoperatingapowertool.
Donotusetoolwhiletiredorundertheinuenceofdrugs,alcohol,ormedication.Amomentof
inattentionwhileoperatingpowertoolsmayresultinseriouspersonalinjury.
•Usesafetyequipment.Alwaysweareyeprotection.Safetyequipmentsuchasdust
mask,non-skidsafetyshoes,hardhat,orhearingprotectionforappropriateconditionswillreduce
personalinjuries.
•Dressproperly.Donotwearlooseclothingorjewelry.Keepyourhair,clothingandgloves
awayfrommovingparts.Looseclothes,jewelryorlonghaircanbecaughtinmovingparts.Air
ventsmaycovermovingpartsandshouldbeavoided.

English
14 In. Abrasive Chop Saw
Operator’s Manual GMCS140
•Avoidaccidentalstarting.ensuretheswitchisintheoffpositionbeforepluggingin.
Carryingpowertoolswithyourngerontheswitchorplugginginpowertoolsthathavetheswitch
oninvitesaccidents.
•Removeanyadjustingkeysorwrenchesbeforeturningthepower
tool on. Awrenchorkeythatisleftattachedtoarotatingpartofthetoolmayresultinpersonal
injury.
•Donotoverreach.Maintainproperfootingandbalanceatalltimes.Lossofbalancecan
causeaninjuryinanunexpectedsituation
.
•Ifdevicesareprovidedforconnectionofdustextractionand
collection facilities, ensure these are connected and properly used.
useofthesedevicescanreducedustrelatedhazards.
•Donotusealadderorunstablesupport.Stablefootingonasolidsurfaceenables
bettercontrolofthetoolinunexpectedsituations.
•Keeptoolhandlesdry,cleanandfreefromoilandgrease.Slipperyhandles
cannotsafelycontrolthetool.
TOOL USE AND CARE
•
Secure the work piece. useclamporotherpracticalwaytoholdtheworkpiecetoa
stableplatform.Holdingtheworkpiecebyhandoragainstyourbodyisunstableandmayleadto
lossofcontrol.
•Donotforcethepowertool.Thetoolwillperformthejobbetterandsaferatthefeed
rateforwhichitisdesigned.forcingthetoolcouldpossiblydamagethetoolandmayresultin
personalinjury.
•Usethecorrectpowertoolforthejob.Don’tforcethetoolorattachmenttodoa
jobforwhichitisnotdesigned.
•Donotuseatooliftheswitchdoesnotturnitonoroff.Anytoolthat
cannotbecontrolledwiththeswitchisdangerousandmustberepairedorreplacedbyan
authorizedservicecenter
.
•Turnthepowertooloff,anddisconnecttheplugfromthepowersourceand/
orbatterypackfromthepowertoolbeforemakinganyadjustments,changingtheaccessories,or
storingthetools
. Suchpreventivesafetymeasuresreducetheriskofanaccidentalstartupwhich
maycausepersonalinjury
.
•Storeidletooloutofreachofchildrenandotherinexperienced
persons. Itisdangerousinthehandofuntrainedusers.
•Maintainpowertoolswithcare.Checkforproperalignmentandbindingofmoving
parts,components,andanyotherconditionsthatmayaffectthetool’soperation.Aguardorany
otherpartthatisdamagedmustbeproperlyrepairedorreplacedbyanauthorizedservicecenterto
avoidriskofpersonalinjury.
•Userecommendedaccessories.usingaccessoriesandattachmentsnot
recommendedbythemanufacturerorintendedforuseonthistypetoolmaycausedamageto
thetoolorresultinpersonalinjurytotheuser.Consulttheoperator’smanualforrecommended
accessories.
•Keepcuttingtoolssharpandclean.Properlymaintainedcuttingtoolswithsharp
cuttingedgesarelesslikelytobindandareeasiertocontrol
.
5
English
•Feedtheworkpieceinthecorrectdirectionandspeed.feedthework
pieceintoablade,cutter,orabrasivesurfaceagainstthedirectionofthecuttingtool’sdirection
ofrotationonly.Incorrectlyfeedingtheworkpieceinthesamedirectionmaycausethework
piecetobethrownoutathighspeed.
•Neverleavethetoolrunningunattended,turnthepoweroff.Donot
leavethetooluntilitcomestoacompletestop.
•Neverstartthepowertoolwhenanyrotatingcomponentisin
contact with the work piece.
SERVICE
•
Have Your Power Tool Serviced by a qualified repair person using
only identical replacement parts. Thiswillensurethatthesafetyofthepowertool
ismaintained.
•ServiceYourPowerToolperiodically.Whencleaningatool,becarefulnotto
disassembleanyportionofthetoolsinceinternalwiresmaybemisplacedorpinched.
WARnIng:
READ AnD UnDERSTAnD ALL WARnIngS, CAUTIOnS AnD OPERATIng
InSTRUCTIOnS BEFORE USIng THIS EQUIPMEnT. Failure to follow all
instructions listed below may result in electric shock, fire and/or serious
personal injury.
EXTEnSIOn CORDS
grounded tools require a three wire extension cord.Doubleinsulatedtoolscan
useeitheratwoorthreewireextensioncord.Asthedistancefromthepowersupplyoutletincreases,
youmustuseaheaviergaugeextensioncord.usingextensioncordswithinadequatelysizedwire
causesaseriousdropinvoltage,resultinginlossofpowerandpossibletooldamage.Refertothe
tableshownbelowtodeterminetherequiredminimumwiresize.
Thesmallerthegaugenumberofthewire,thegreaterthecapacityofthecord.forexample:a
14-gaugecordcancarryahighercurrentthana16-gaugecord.Whenusingmorethanoneextension
cordtomakeupthetotallength,besureeachcordcontainsatleasttheminimumwiresizerequired.
Ifyouareusingoneextensioncordformorethanonetool,addthenameplateamperesandusethe
sumtodeterminetherequiredminimumwiresize.
guidelines for Using Extension Cords
• Ifyouareusinganextensioncordoutdoors,besureitismarkedwiththesufx“W-A”(“W”in
Canada)toindicatethatitisacceptableforoutdooruse.
• Besureyourextensioncordisproperlywiredandingoodelectricalcondition.Alwaysreplacea
damagedextensioncordorhaveitrepairedbyaqualiedpersonbeforeusingit.
• Protectyourextensioncordsfromsharpobjects,excessiveheat,anddamporwetareas.
Recommended Minimum Wire Gauge for Extension Cords (120 Volt)
Nameplate
Amperes
(At Full Load)
Extension Cord Length
25 Feet 50 Feet 75 Feet 100 Feet 150 Feet 200 Feet
0–2.0 18 18 18 18 16 16
2.1–3.4 18 18 18 16 14 14
3.5–5.0 18 18 16 14 12 12
5.1–7.0 18 16 14 12 12 10
7.1–12.0 18 14 12 10 8 8
12.1–16.0 14 12 10 10 8 6
16.1–20.0 12 10 8 8 6 6

English
14 In. Abrasive Chop Saw
Operator’s Manual GMCS140
SPECIFIC SAFETY RULES FOR CHOP SAWS
WARnIng: DO nOT LET COMFORT OR FAMILIARITY WITH PRODUCT
(gAInED FROM REPEATED USE) REPLACE STRICT ADHEREnCE TO PRODUCT
SAFETY RULES. If you use this tool unsafely or incorrectly, you can suffer
serious personal injury!
•Makesurethetoolisonarmandlevelsurface.
• Unplug the tool before making adjustments, repairs, maintenance
or storing.
•Weareyeprotection.Donotwearnecktiesorlooseclothing.
•Useonlycut-offwheelratedfor2800RPMorhigherwitha1"arborhole
orappropriatesizedbushing.Neveruseanattachmentratedlowerthan2800RPMorattemptto
machineanundersizedwheeltotthearbor.
•Choosetheright14inchdiametercut-offwheelforthematerialand
the type of cutting you plan to do.forexample,whencuttingaluminum,usean
abrasivecut-offwheelespeciallydesignedtobeusedonaluminum.
•Inspectcut-offwheelbeforestartingthemachineforvisibledefectssuch
asssures,cracksorchips.Replacedamagedcut-offwheelimmediately.
•Donotusethemachineiftheswitchdoesnotturnitonandoff.Defectiveswitches
shouldbeimmediatelyreplacedbyanauthorizedservicecenterandthemachinenotusedunder
repairsarecompleted.
•Alwaysclampandsecuretheworkpiecetothevise;otherwisethework
piecemightbethrownfromthebaseandcausepersonalinjury.
•Useextracautionwithlarge,verysmallorawkwardworkpieces.
•Alwaysprovideadequatesupporttothesidesofthesawtablefor
long work pieces.
•Alwayskeepyourhandsoutofthelineoftherunningwheel.
•Alwaysconrmthatallguardsareinplace,beforeusingthetool.
•Alwayswaituntilthemotorhasreachedfullspeedbeforestartinga
cut.
•Alwayskeepthehandlesdry,cleanandfreeofoilandgrease.Hold
thetoolrmlywheninuse.
•Alwaysoperatethetoolafterensuringtheworkpieceissecured
properly with the vise assembly.
•Alwaysconrmthecut-offwheelisnotcontactingtheworkpiece
beforeswitchisturnedon.
•Beforeusingthetoolonanactualworkpiece,letitrunforawhile.
Watchforvibrationorwobblingthatcouldindicatepoorinstallationorapoorlybalancedwheel.
•Alwaysturnofftoolandwaitforthecut-offwheeltostopbeforemoving
workpieceorchangingsettings.

7
English
•Alwaystightenarborscrewandallclampsbeforeoperating.
•Nevertouchanymovingparts,includingthecut-offwheel,whilethetoolisinuse.
•Neverusethetoolnearammableliquidsorgases.Sparkingcouldcause
anexplosion.
•Neverexposehands,feetandfragilethingstothesparks,asthe
grindingsparksmayharmthem.
•Beforemovingthistool,lockthecuttingheadinthelowerposition.
Unplug the power cord.
•Donotoperateinrainorindamplocations.
•Groundingrequired.
SAVE THESE INSTRUCTIONS
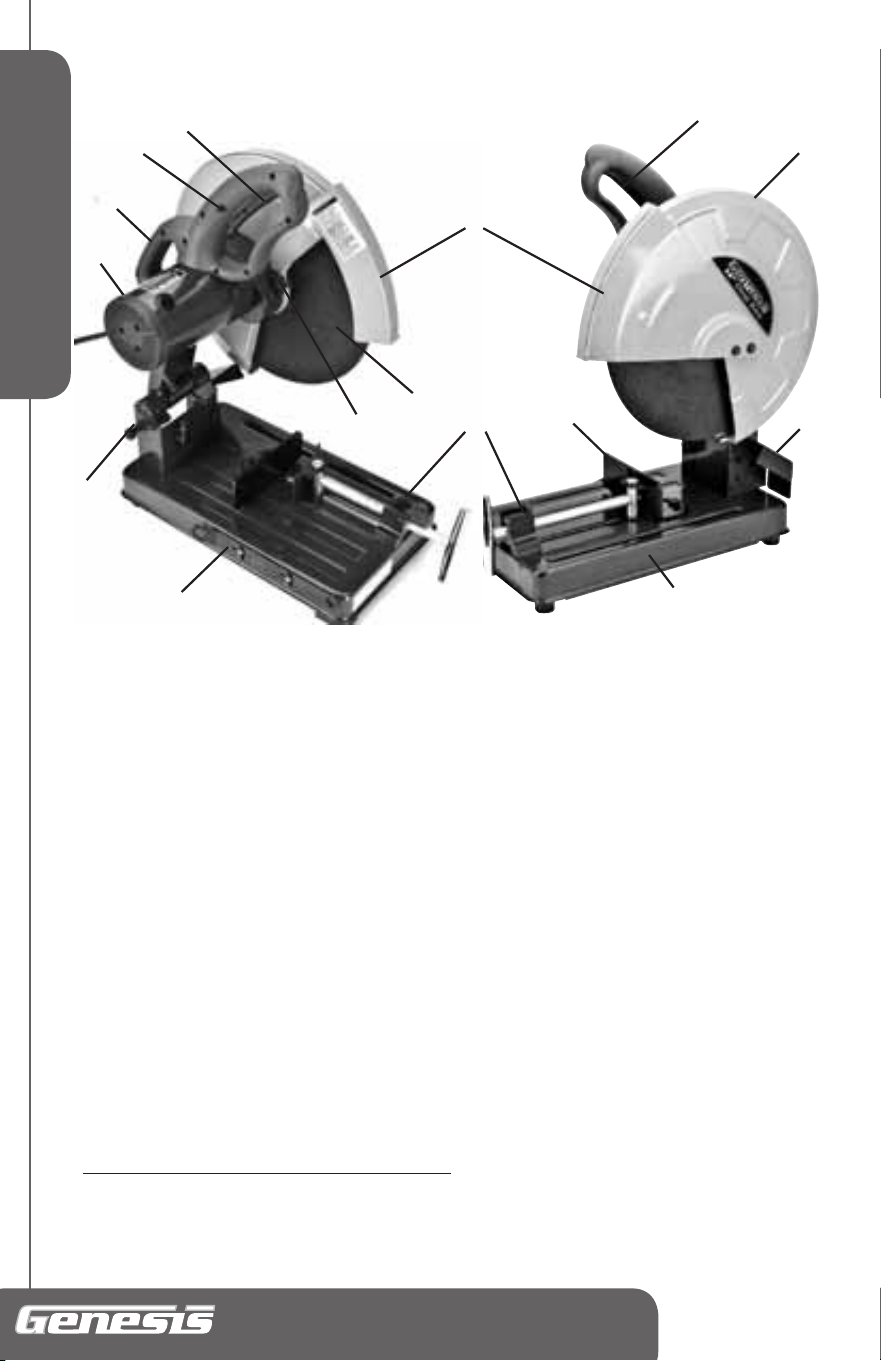
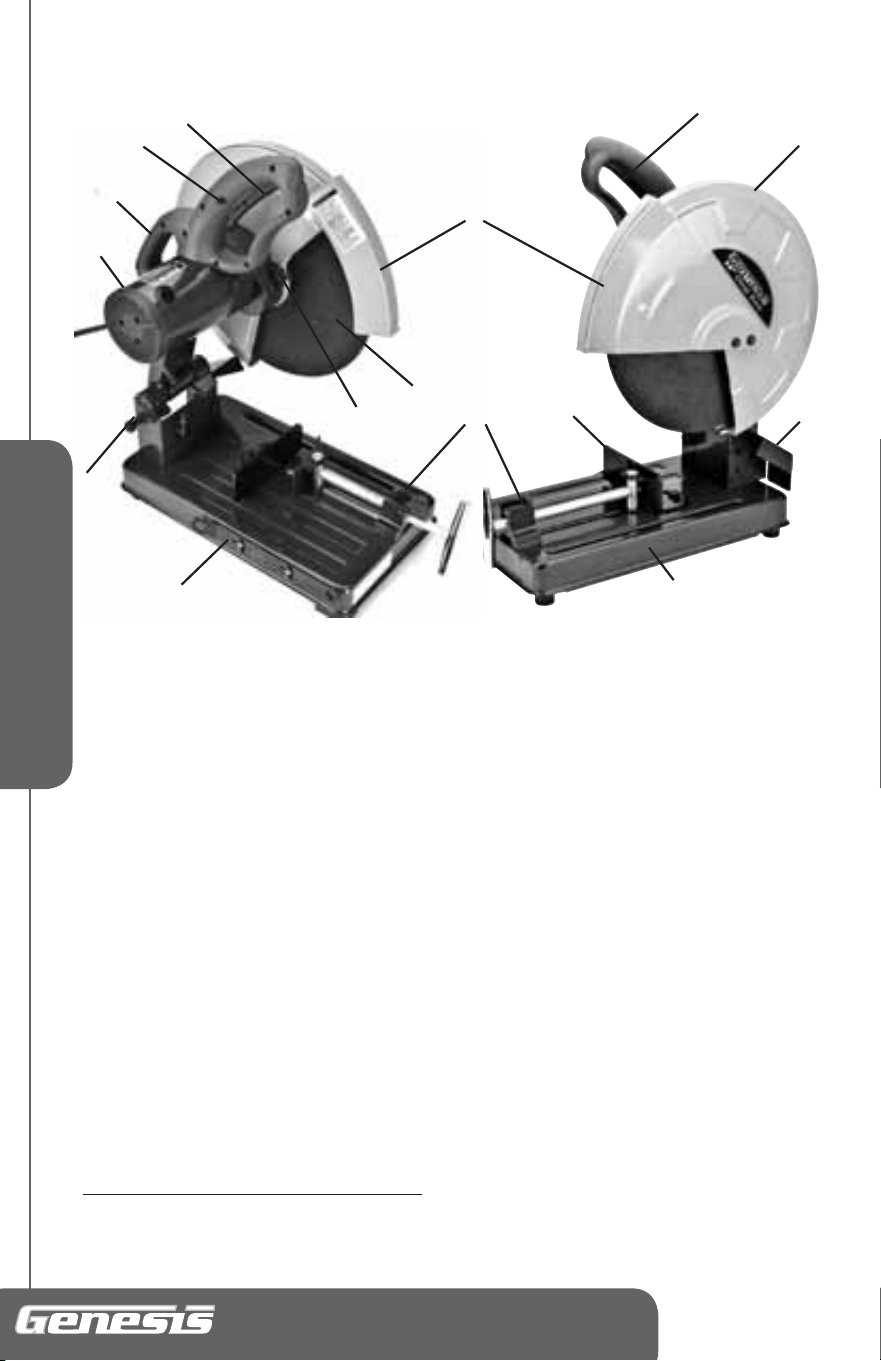
1.TriggerSwitch
2.Lock-OffButton
3.CarryingHandle
4.SpindleLock
5.Motor
6.LockPin
7.ArborWrench
8.LowerGuard
9.upperGuard
10.QuickReleaseLockVise
11.StationaryAdjustablefence
12.SparkDeector
13.Cut-OffWheel
14.Base
English
14 In. Abrasive Chop Saw
Operator’s Manual GMCS140
YOUR 14" ABRASIVE CHOP SAW
UnPACKIng AnD COnTEnT
IMPORTAnT:Due to modern mass production techniques, it is
unlikely the tool is faulty or that a part is missing. If you find anything
wrong, do not operate the tool until the parts have been replaced or the
fault has been rectified. Failure to do so could result in serious personal
injury.
Contents in Package:
Description QTY
ChopSaw 1
Wrench 1
Operator'sManual 1
1
2
FIg 1
14
13
12
11
10
9
8
7
6
5
4
3
1
9
English
ASSEMBLY AnD ADJUSTMEnTS
WARnIng: Always be sure that the tool is switched off and unplugged
from the power source before adjusting, adding accessories, or checking a
function on the tool
.
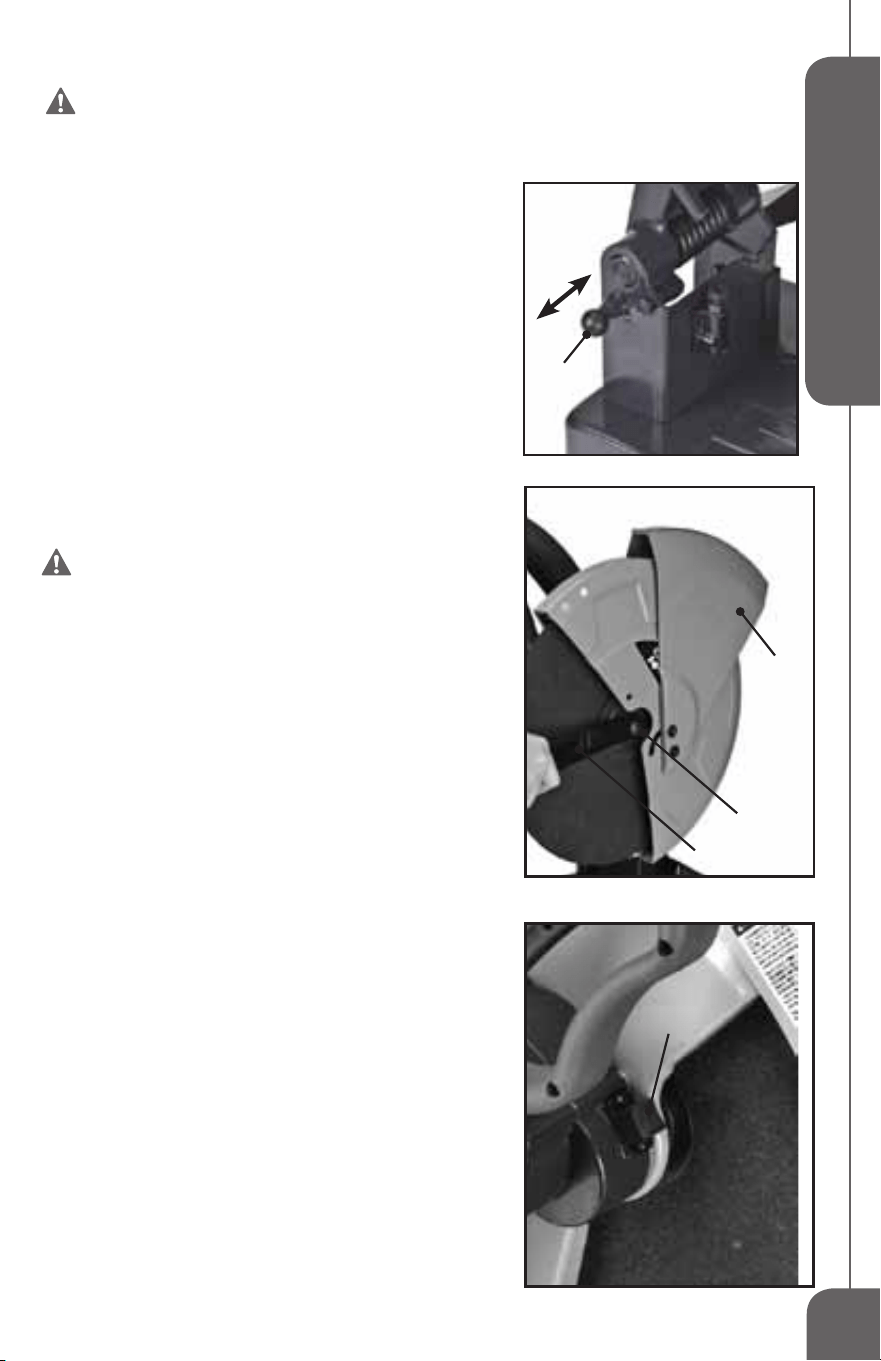
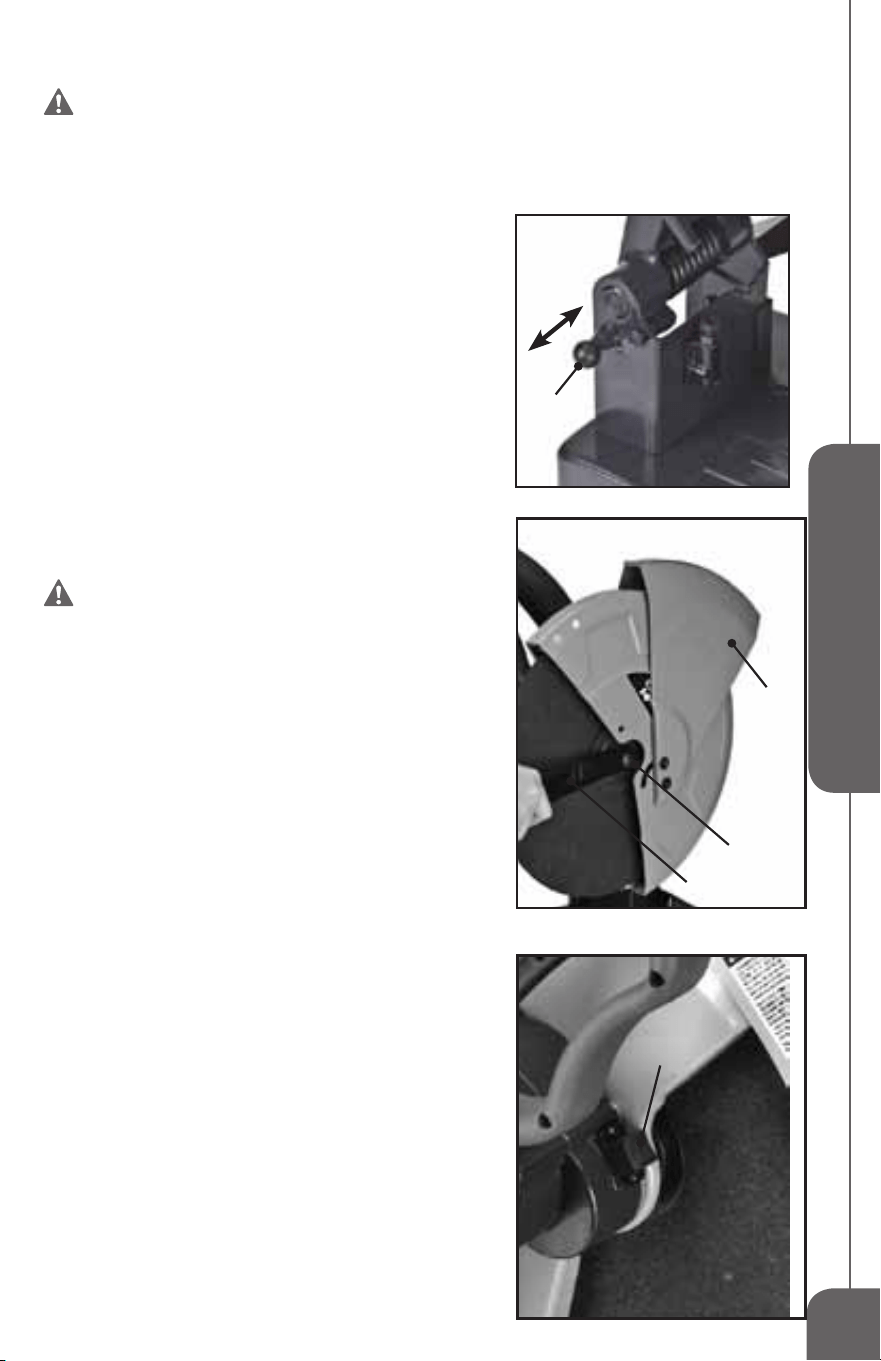
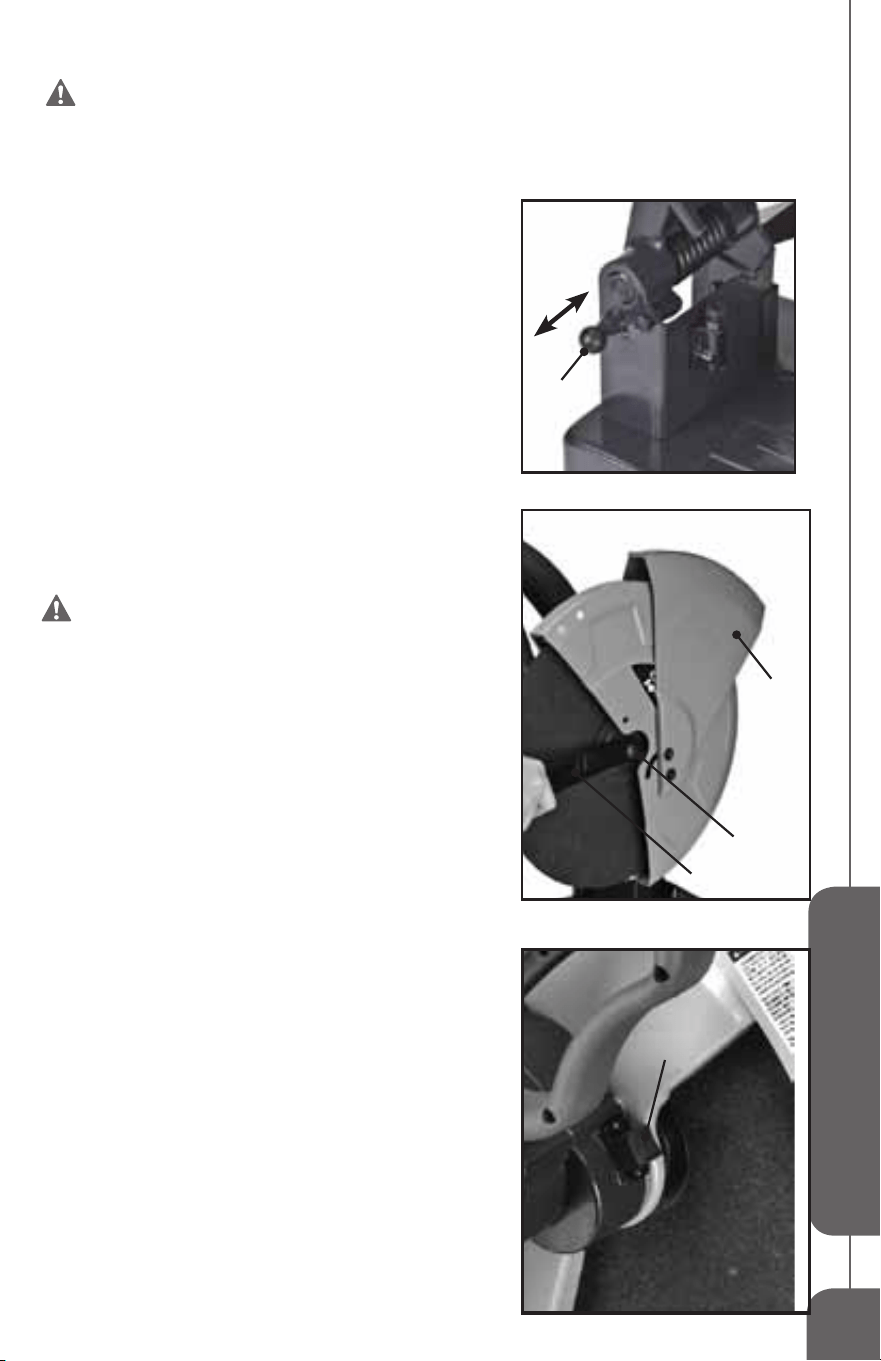
Locking or Unlocking the Cutting Head (FIG2)
Whenstoringortransportingthechopsaw,thecuttinghead
shouldbelockedinthedownposition.
To unlock the cutting head
1.Pressdownlightlyonthecuttinghead.
2.Pullthelockpin(1)outwards.
3.Slowlyraisethecuttingheadintotheworkposition.
To lock down the cutting head
1.Lowerthecuttingheadcompletely.
2.Pushthelockpin(1)inwardstolockthecuttinghead.
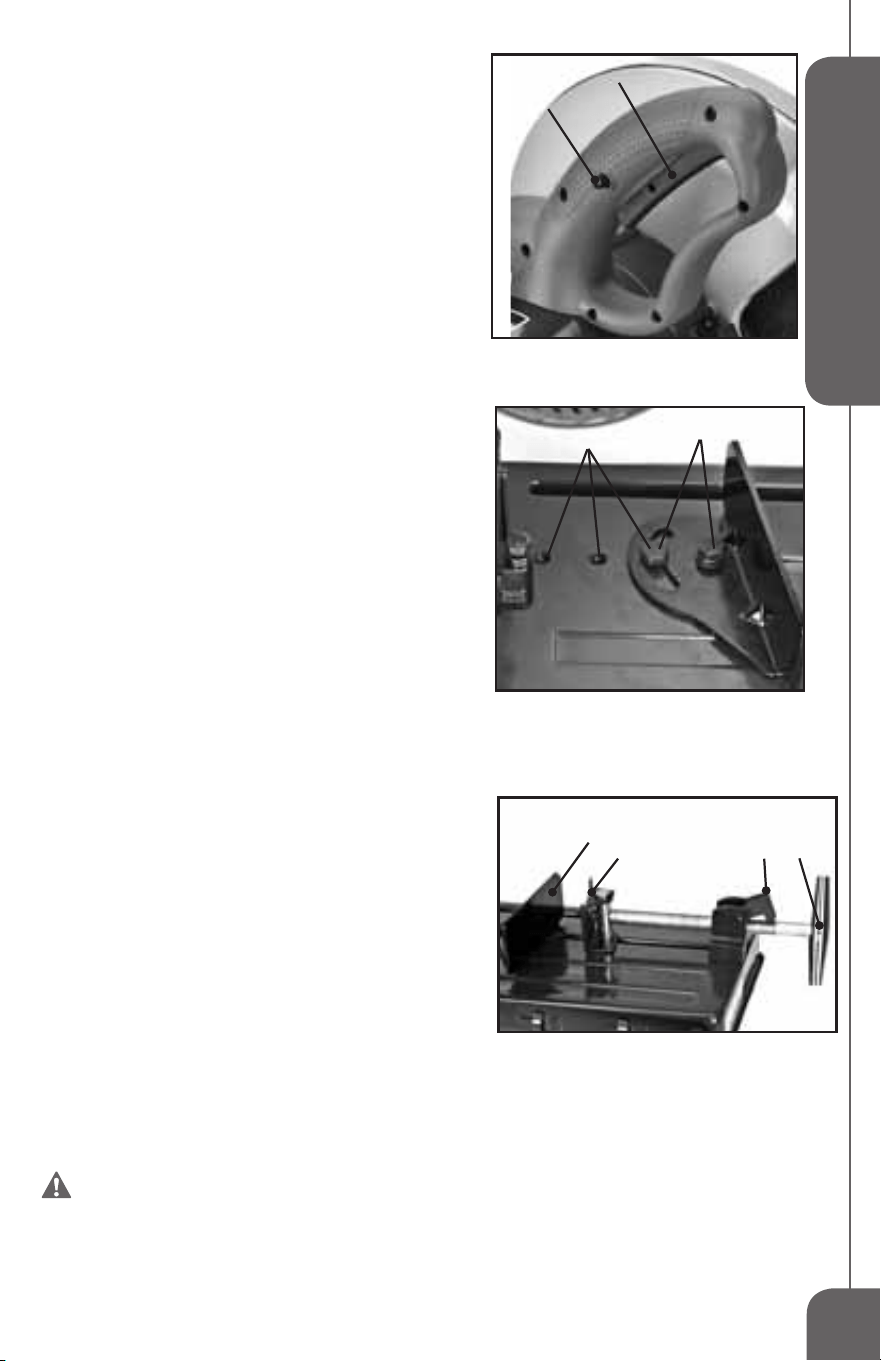
Removing and Installing the Cut-off Wheel
(FIG 3, 4)
WARnIng: To reduce the risk of injury
from a thrown work piece or thrown pieces of
wheel, do not use a new cut-off larger or smaller
than 14" diameter. Make sure the wheel is rated
for2800RPMorhigher.
1.unplugthetoolfromthepowersource.
2.unlockthecuttingheadifitisinthedownposition.
3.Liftthelowerguard(2)uptoexposethearborbolt(3).
4.Pressthespindlelock(5)andholditrmly.Rotatethecut-off
wheeluntiltheshaftislockedbythespindlelock.
5.Maintainpressureonthespindlelock.usethewrench(4)
provided to turn the arbor bolt (3) counter-clockwise and
loosen.
6.Removethearborbolt,washerandouterange.
nOTE: Pay attention to parts removed, noting
their position and direction they face. Wipe the
inner and outer flanges clean of any debris before
installing the new cut off wheel.
7.Removetheoldabrasivewheelandinstallanewone.
8.Puttheouterange,washerandarborboltbackon.
9. Press the spindle lock (5) rmly while turn the wrench
clockwisetotightenthearborbolt(3).
10.Lowerthelowerguardtoitsworkposition.
11. Make sure the spindle lock is released and the cut-off
wheelcanrotatefreely.
12.Lowerthecuttingheaduntilthearmhitsdownstoptomake
surethewheelisnotcontactingthebaseorsurface.Make
downstopadjustmentifitdoes.
1
FIg 2
FIg 3
2
3
4
FIg 4
5

English
14 In. Abrasive Chop Saw
Operator’s Manual GMCS140
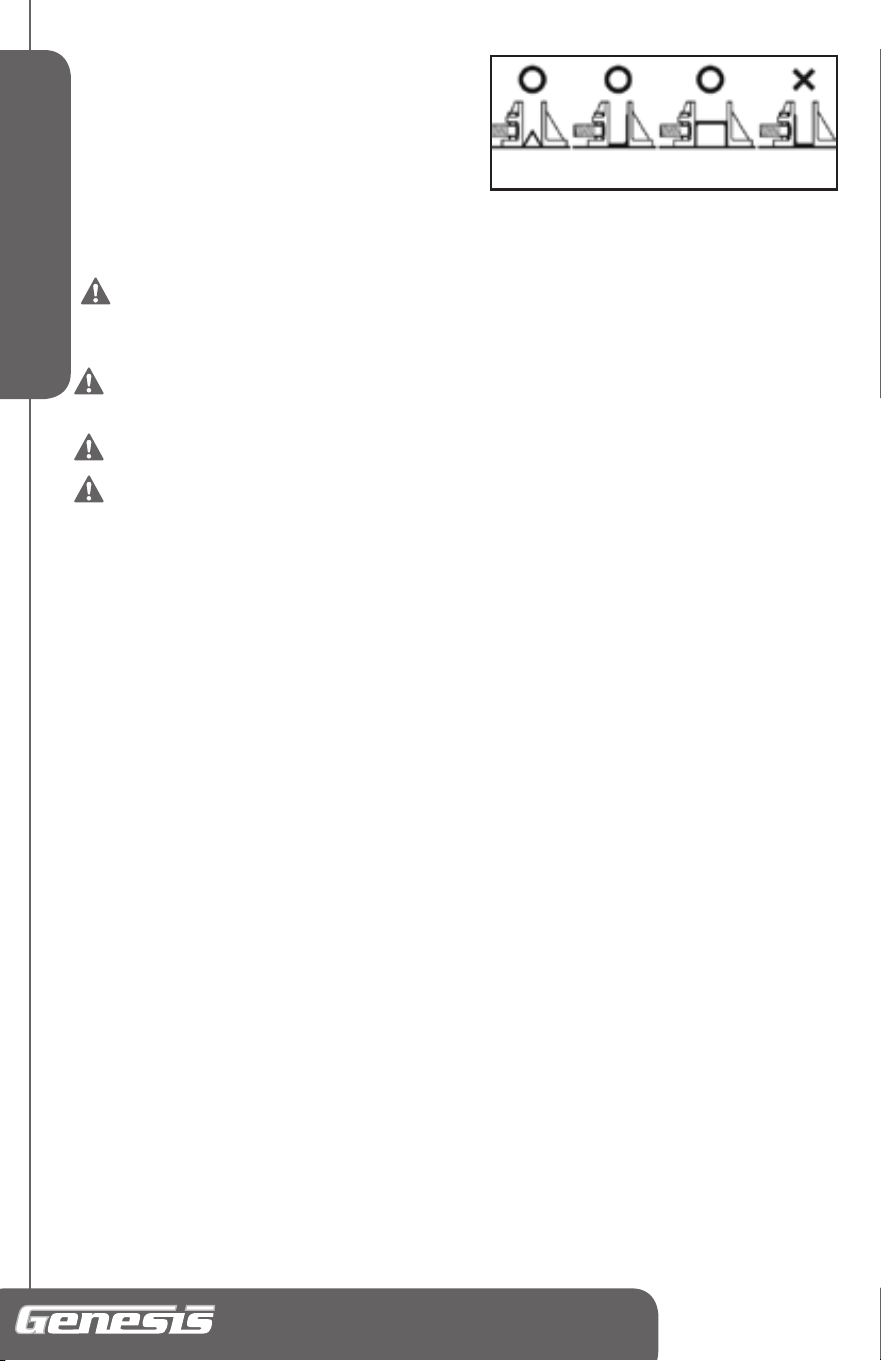
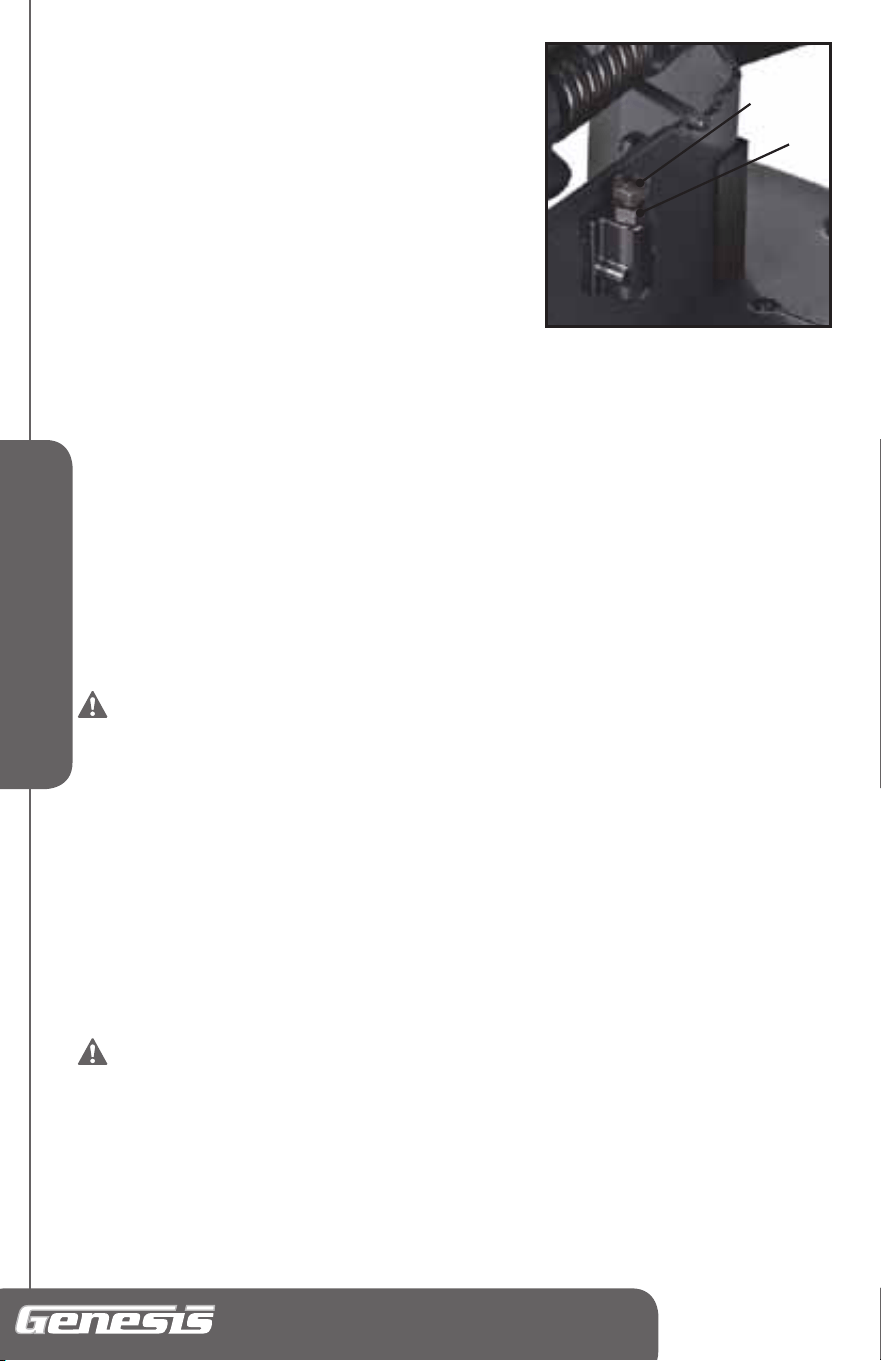
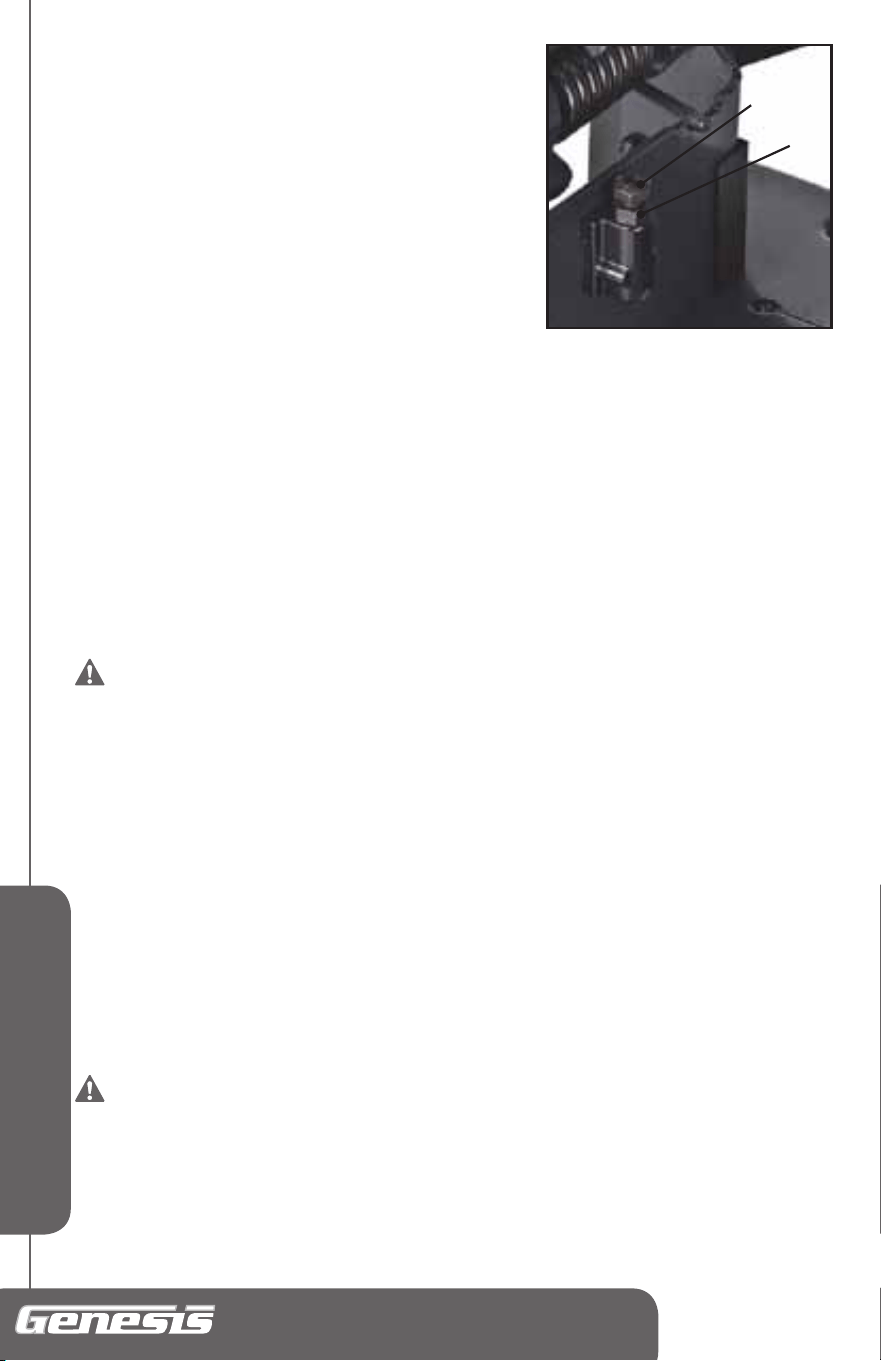
Adjusting Downstop (FIG 5)
Thedownstop shouldbeadjustedsothatmaximumcutting
capacityismaintainedandsothatthecutoffwheeldoesnot
hitthetoolbaseorthesurfacewhichthetoolismountedto.
1.Lowercuttingheaduntilthearmhitsthedownstop.
2.Turnwheelbyhandtoverifymaximumcuttingcapacity.The
cut-offwheelmustnotcontactanypartofthebase.
3.Ifcontactoccurs,loosenthejamnut(2)andadjustdownstop
bolt(1)upanddownuntiltheproblemissolved.Tightenthe
jamnut.
BEFORE USIng THE TOOL
1.Makesurethepowersourceisappropriateforthetool.Topreventoverheating,accidental
stoppingorintermittentoperation,conrmthatthepowercordplugtsproperlyintheelectrical
receptacleanddoesnotfalloutafteritisinserted.Repairorreplacethereceptacleifitisfaulty.
WARnIng: never connect the power tool unless the available AC
power source is of the same voltage as that specified on the nameplate of
the tool. never connect this power tool to a DC power source.
2.Checkthecut-offwheelforvisibledefects.Conrmthatthecut-offwheelisfreeofcracksor
othervisibledamage.Inspecttherotationstabilityofthewheel.
3.Conrmthatthecut-offwheelisxedsecurelytothepowertool.usingthesuppliedwrench,
tightentheclampingboltonthemountingshafttosecurethewheel.
4.Checkthebladeguardforproperoperation.Theguardisdesignedtoprotecttheoperatorfrom
comingintocontactwiththecut-offwheelduringoperationofthetool.Alwayscheckthatthe
bladeguardmovessmoothlyandcoversthecut-offwheelproperly.
5.Conrmthepositionofthespindlelockbeforeusingthetool.Afterinstallingthecut-offwheel,
conrmthatthespindlelockhasbeenreturnedtotheretractpositionbeforeusingthetool.
WARnIng: Do not push the spindle lock during rotation.
6.Securelyclampthecuttingmaterial.ensurethatthematerialissecurelyfastenedwiththevise.If
itisnot,aseriousaccidentcouldbecausedifthematerialcomeslooseorthesawbladebreaks
duringoperation.
7.Makeatrialrun:afterconrmingthatnooneisstandingbehindthetool,startandconrmthatno
operatingabnormalitiesexistbeforeattemptingacuttingoperation.
OPERATIOn
WARnIng: Always be sure that the tool is switched off and unplugged
from the power source before adjusting, adding accessories, or checking a
function on the tool
.
Switch Action (FIG 6)
yoursawisequippedwithatriggerswitchwithLock-offfeature,whichprovidesextrasafetytoavoid
accidentalstart.
To turn on the tool,depressandholdlock-offbutton(2),thensqueezethetriggerswitch(1).
Afterthetoolstarts,youmayreleasethelock-offbutton.Thetoolwillkeepingrunningaslongasyou
continuetoholdthetriggerswitch.
1
2
FIg 5
11
English
nOTE: The tool will not start if you pull the
trigger switch without depressing and holding
the Lock-Off button first.
To turn off the tool, releasethetriggerswitch(1).
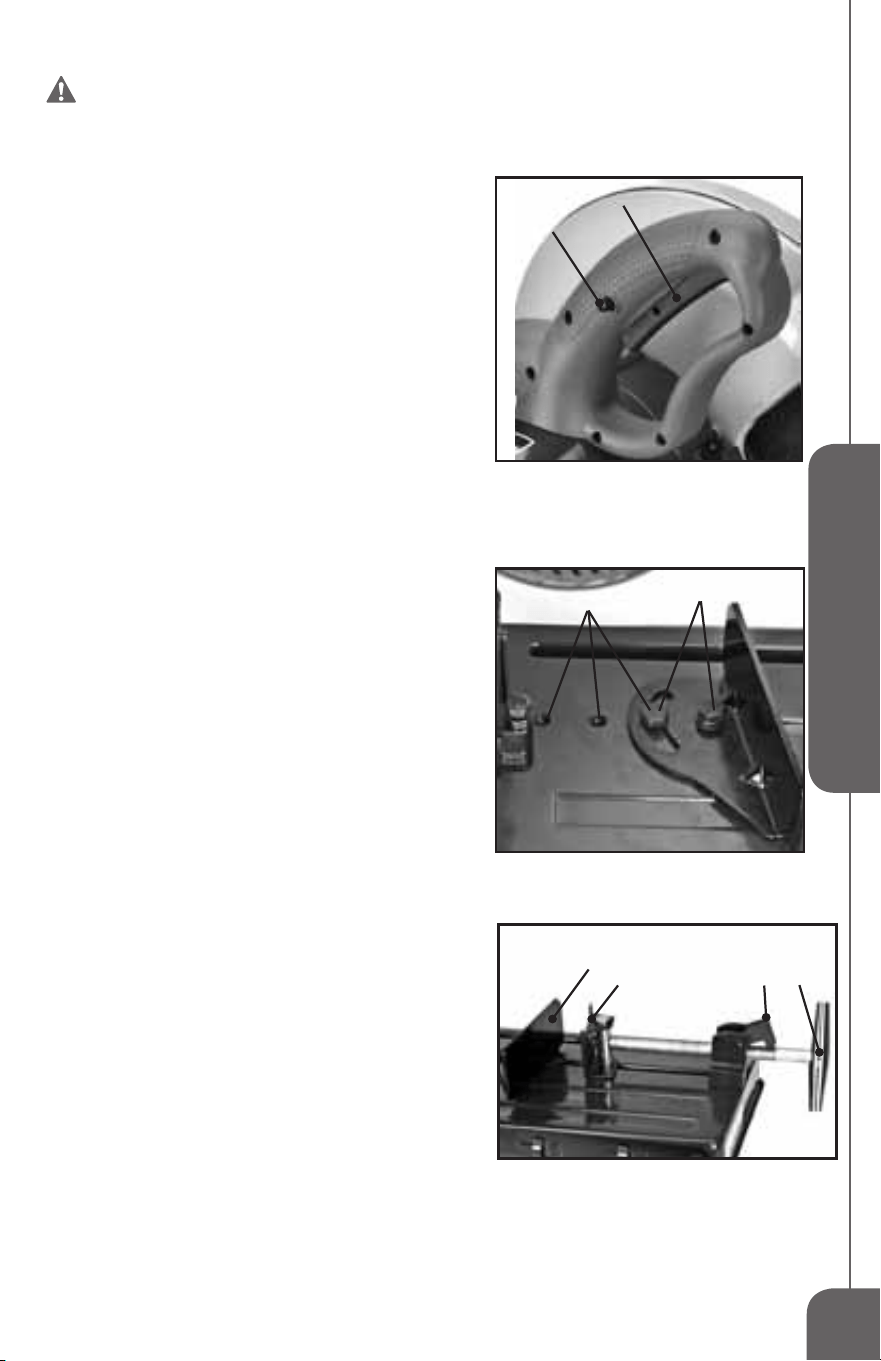
Adjustable Fence (FIG 7)
The stationary fence has three positions (1) for optimal
cuttingofa wide variety and sizes and shapes of metal.
SeefIG7.
Alwaysusethefenceinthemostoptimalpositionthatwill
allowacompletedthroughcutofthematerial.
To move the fence, proceed as follows:
1. Loosen the two hex bolts (2) on the fence using the
wrenchprovided.
2.Removebothhexbolts(2).
3.Movethefencetothedesiredposition.
4.Reinstallthetwohexbolts(2)andtightensecurely.
Cutting at Angles (FIG 7)
Themachineallowstheusertocutangles0-45°leftand
0-30°right.
To Change the Fence Angle
1. Loosen the two hex bolts (2) on the fence using the
wrenchprovided.Donotremovethebolts.
2.Rotatethefencetothedesiredangle.
3.Retightenthetwohexbolts(2).
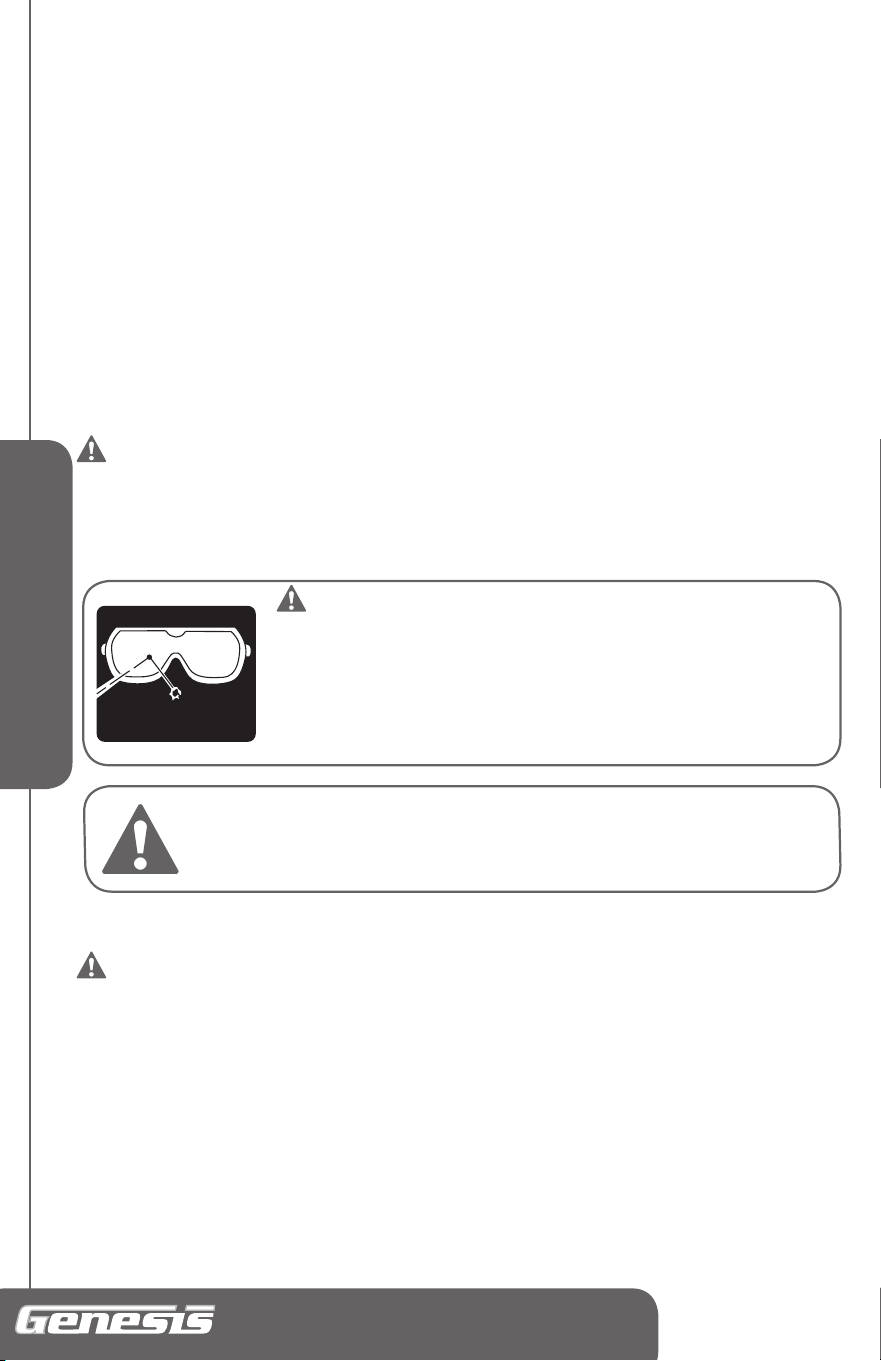
Quick Release Lock Vise (FIG 8)
Thistoolisequippedwithaquickreleaselockviseforeasy
andfastclampingofthematerial.Raiselever(1)forfast
movementofvise.Lowerleverandturncrankhandle(2)for
workpiececlamping.
1.Placetheworkpiecematerialbetweenviseplate(3)and
fence(4).
2.RaisetheQuickReleaseLever(1)andpushtheCrank
Handle(2)tobringVicePlate(3)lightlyintocontactwith
theworkpiecematerial.Then,lowertheQuickRelease
Lever(1)down,andsecurelyxtheworkpiecematerial
inpositionbyturningtheCrankHandleClockwise.
3.Whenthecuttingjobiscompleted,turntheCrankHandle
counterclockwise2or3turnstoloosenthevise,and
removetheworkpiecematerial.
WARnIng: Always set the Quick Release Lever securely into the
threads of the threaded screw to avoid the possibility of the work piece being
ejected from the vise causing damage to the wheel or personal injury.
1
2
FIg 6
FIg 8
1 2
3
4
FIg 7
1
2
English
14 In. Abrasive Chop Saw
Operator’s Manual GMCS140
Clamping the Work Piece (FIG 9)
Positiontheworkpieceinvisesothatifjamoccurs,the
wheelwillnottendtomovetheworkpieceinthevise.
SeefIG9foryourclampingreference.
Generallythechopsawwillcutmostefcientlyifthe
wheeliscuttingthethinnestsection.
Basic Cutting Operation
WARnIng: Always wear safety glasses when operating the chop saw.
To reduce the risk of burns from contact with hot cut off work pieces, wear
protective gloves.
WARnIng: Always use vise to secure the work piece. Always unplug the
saw from the power source before making any adjustment.
WARnIng: Do not use any type of cutting lubricant with this tool.
WARnIng: This chop saw is only designed for dry cutting. Failure to
heed this warning could result in serious personal injury.
1.Depressandholdlock-offbuttonandthensqueezethetriggerswitchtoturnonthesaw.Whencut-off
wheelisrotatingatfullspeed,slowlypushdownthehandleandbringthecut-offwheelinthevicinity
oftheworkpiece.
2.Whenthecut-offwheelcontactstheworkpiece,slowlypushthehandledowntostartthecut.
3.Applysmooth,steadypressure(Donotforce)throughouttheremainderofthecut.
CAUTIOn:Never apply excessive pressure or force the wheel into the material.
Forcing the cut-off wheel may cause overheating or wheel damage.
4.Whenthecutting(ordesiredcuttingdepth)hasbeencompleted,raisethehandleuptotheretract
position.
5.Releasethetriggerswitchandallowthecut-offwheeltocometoacompletestopbeforepreparing
forthenextoperation.
FIg 9

13
English
MAInTEnAnCE
CLEANING
Avoidusingsolventswhencleaningplasticparts.Mostplasticsaresusceptibletodamagefrom
varioustypesofcommercialsolventsandmaybedamagedbytheiruse.usecleanclothstoremove
dirt,dust,oil,grease,etc.
WARnIng: Donotatanytimeletbrakeuids,gasoline,petroleum-
based products, penetrating oils, etc., come in contact with plastic parts.
Chemicals can damage, weaken or destroy plastic which may result in serious
personal injury.
electrictoolsusedonberglassmaterial,wallboard,spacklingcompounds,orplasteraresubjectto
acceleratedwearandpossibleprematurefailurebecausetheberglasschipsandgroundingsare
highlyabrasivetobearings,brushes,commutators,etc.Consequently,wedonotrecommendusing
thistoolforextendedworkonthesetypesofmaterials.However,ifyoudoworkwithanyofthese
materials,itisextremelyimportanttocleanthetoolusingcompressedair.
LUBRICATION
Thistoolispermanentlylubricatedatthefactoryandrequiresnoadditionallubrication.
TWO-YEAR LIMITED WARRAnTY
Thisproductiswarrantedfreefromdefectsinmaterialandworkmanshipfor2yearsafterdate
ofpurchase.Thislimitedwarrantydoesnotcovernormalwearandtearordamagefromneglect
oraccident.Theoriginalpurchaseriscoveredbythiswarrantyanditisnottransferable.Priorto
returningyourtooltostorelocationofpurchase,pleasecallourToll-freeHelpLineforpossible
solutions.THIS PRODUCT IS NOT WARRANTED IF USED FOR INDUSTRIAL OR COMMERCIAL
PURPOSES. ACCESSORIES INCLUDED ARE NOT COVERED BY THE 2 YEAR WARRANTY.
TOLL-FREE HELP LInE
forquestionsaboutthisoranyotherGeNeSISProduct,
PleasecallToll-free:888-552-8665.(Mon-fri,9:00amto4:30pmeST.)
Orvisitourwebsite:
www.richpowerinc.com
Français
Scie à coupe abrasive de 355mm (14 po)
Manuel d’utilisation GMCS140
SCIE À COUPE ABRASIVE DE 355mm (14 po) 15 AMP
Manuel d’utilisation
Spécifications:
• Modèle:GMCS140
• Tensionnominale:120V~60HZ
• Puissanced'entréenominale:15A
• Vitessederotationsanscharge:2,800RPM
• Dimensionsdelalame:355mm(14po)
• Diamètredel'arbre:25mm(1po)
• Capacitédecoupemaximalepourarrondie:115mm(4-1/2po)
• Capacitédecoupemaximalepourcarrée:100mm(4po)
• Capacitédecoupemaximalepourrectangulaire:70mmx170mm(2-3/4pox6-5/8po)
Comprend:unelameàabrasivede355mm,etunecléàlame.
AVERTISSEMEnT: Pour réduire le risque de blessure, l’utilisateur doit
lire et assimiler ce manuel d’utilisation avant de se servir de l’outil. Conservez
ce manuel comme référence ultérieure.
numéro d’aide sans frais: 1-888-552-8665.
AVERTISSEMEnT: L’utilisation de toutoutilélectrique
peutcauserlaprojectiond’objetsétrangersdansvosyeux,pouvantentraîner
desérieuxdommages.Avantdecommenceràvousservirdel’outil,portez
toujoursdeslunettesdesécuritéouavecdesécranslatérauxdeprotection,
etuneprotectionfacialecomplètesinécessaire.Nousrecommandonsle
portd’unmasqueàvisionlargepardessusleslunettes.Porteztoujoursune
protectionoculairequiestmarquéecommeenconformitéavecANSIZ87.1.
Repérez ce symbole qui signale d’importantes
précautions de sécurité. Cela veut dire faites
attention ! Votre sécurité est en jeu.
RÈgLES gÉnÉRALES DE SÉCURITÉ
AVERTISSEMEnT: Certaines poussières produites par des appareils
électriques de ponçage, sciage, meulage, perçage et autres travaux de
construction contiennent des produits chimiques connus pour causer cancer,
anomalies congénitales et autres atteintes à la reproduction. Voici quelques
exemples de ces produits nocifs :
• plombdespeinturesauplomb,
• silicecristallinedesbriquesetdubétonetd’autresmatériauxdeconstruction,
• arsenicetchromedeboisd’œuvretraitéchimiquement.
Votre risque en cas d’exposition varie, selon la fréquence d’exécution de ce type
de tâches. Pour réduire votre exposition à ces produits : travaillez dans une zone
bien ventilée en portant un équipement de sécurité approuvé, tel que masque à
poussières spécialement conçu pour filtrer les particules microscopiques.
PORTeZVOSLuNeTTeSDe
PRÉVOIReSTMIeux
QueNePLuSVOIR
SÉCuRITÉ

15
Français
AVERTISSEMEnT:LISEZ ET ASSIMILEZ TOUS LES AVERTISSEMEnTS,
MISES En gARDE ET InSTRUCTIOnS D’UTILISATIOn AVAnT DE VOUS SERVIR
DE CET ÉQUIPEMEnT. Sinon vous risquez commotion électrique, début
d’incendie et/ou blessures corporelles.
CONSERVEZ CES INSTRUCTIONS
LIEU DE TRAVAIL:
•
gardez propre la zone de travail. Leszonesetétablisendésordreattirentles
accidents.
•Nepasutiliserd’outilsélectriquesdansdesatmosphères
explosives, parexempleenprésencedeliquidés,gazoupoussièresinammables.Les
outilsélectriquesproduisentdesétincellesrisquantd’enammerlespoussièresouvapeurs.
•Garderlesbadauds,enfantsetvisiteursàl’écartpendant
l’utilisation d’un outil électrique. Lesdistractionspeuventcauseruneperdrele
contrôle.
SÉCURITÉ ÉLECTRIQUE
•
La puissance des bouchons outil doit correspondre à la prise
électrique. Nejamaismodierlapriseenaucunefaçon.Nepasutiliserd'adaptateurde
bouchonsdanstoutelaterre(laterre)lesoutilsélectriques.Lesoutilsàdoubleisolationsont
équipésd’unechepolarisée(unebrocheestpluslargequel’autre)..Cettechenepeutêtre
branchéesuruneprisepolariséequedansunseulsens.Silachenepeutpasêtreinséréedans
laprise,l’inverser.Sivousnepouveztoujourspasêtrel’insérer,faireinstalleruneprisepolarisée
parunélectricienqualié.Nepasmodierlache,dequelquefaçonquecesoit.Ladouble
isolationéliminelebesoindecordond’alimentationàtroislsetd’uncircuitsecteurmisàla
terre.
•NEPASexposerlesoutilsélectriquesàlapluieoul’humidité.La
pénétrationd’eaudanscesoutilsaccroîtlerisquedechocélectrique.
•Évitertoutcontactducorpsavecdessurfacesmisesàlaterre,
tellesquetuyaux,radiateurs,cuisinièresetréfrigérateurs.Lerisquédechocélectriqueestaccru
lorsquelecorpsestmisàlaterre.
•NEPASmaltraiterlecordond’alimentation.Nejamaisutiliserlecordon
d’alimentationpourtransporterl’outiletnejamaisdébranchercedernierentirantsurlecordon.
Garderlecordonàl’écartdelachaleur,del’huile,desobjetstranchantsetdespiècesen
mouvement.Remplacerimmédiatementtoutcordonendommagé.uncordonendommagéaccroît
lerisqued’électrocution.
•Lorsquel'exploitationd'unpouvoirendehorsdesoutils,l'utilisationd'une
rallongeélectriquepouruneutilisationextérieure.Cescordonssontprévuspouruneutilisationà
l'extérieuretderéduirelerisquedechocélectrique.
•NEPASutiliserl'ACnotéeslesoutilsd'unealimentationencourant
continu. Mêmesil'outilsemblefonctionner,lescomposantsélectriquesdel'ACnotéesoutil
sontsusceptiblesd'échoueretd'accroîtrelerisquepourl'opérateur.
SÉCURITÉ PERSONNELLE
•
Rester attentif, prêter attention au travail et faire prévue de bon sens
lors de l’utilisation de tout outil électrique. Nepasutilisercetoutilenétatde
fatigueousousl’inuencedel’alcool,dedroguesoudemédicaments.unmomentd’inattention
pendantl’utilisationd’unoutilélectriquepeutentraînerdesblessuresgraves.

Français
Scie à coupe abrasive de 355mm (14 po)
Manuel d’utilisation GMCS140
•Utiliserl’équipementdesécurité.Toujoursporteruneprotection
oculaire. Suivantlesconditions,leportd’unmasqueltrant,dechaussuresdesécurité,d’un
casqueoud’uneprotectionauditiveestrecommandé.
•Portezunetenueappropriée.Neportezpasdevêtementsottants,gants,cravate,
bracelets,montredepoignetouautresbijouxquipeuventêtrehappéspardespiècesen
mouvement.Leportdechaussuresantidérapantesestrecommandé,ainsiqueleportd’une
couverturedescheveuxs’ilssontlongs.
•Évitezd'undémarrageaccidentel.S'assurerquelecommutateurestenposition
arrêtavantdebrancherpo.Detransportoutilavecledoigtsurl'interrupteuroudebrancherdes
outilsélectriquesquisontlecommutateurinviteaccidents.
•Enlevezlesclésetoutilsderéglageavantdemettreenmarche.Les
clés,clavettes,déchetsetautresdébrispeuventêtreprojetésàgrandevitesse,etainsicauserdes
gravesblessures..
•NEtravaillezpasàboutdebras.Gardezunebonnepostureetunbonéquilibreen
permanence,undéséquilibrepeutamenervotrechutesurlamachineenaction,avecpossibilitéde
blessure.
•SIdispositifssontprévuspourlaconnexiond'extractiondes
poussières et des installations de collecte, d'assurerceux-cisontconnectés
etutiliséscorrectement.L'utilisationdecesappareilspeutréduirelesrisquesliésàlapoussière.
Nepasutiliserl’outilsuruneéchelleouunsupportinstable.unebonnetenueetunbonéquilibre
permettentdemieuxcontrôlerl’outilencasdesituationimprévue
.
•Maintenezl’outilsec,propreetsanshuileougraisse.utiliseztoujoursun
chiffonproprepourlenettoyage.N’utilisezjamaisdeuidepourfreins,d’essence,deproduitsà
basedepétrole,nin’importequeltypedesolvantpournettoyerl’outil.
UTILISATION ET ENTRETIEN DE L’OUTIL
•
Sécurisation de la pièce à travailler. utilisezdesserre-jointsouunétaupour
maintenirlapiècetravailléequandc’estpossible.C’estplussûrquedeseservirdesaouses
mainsetpermetdegardersesdeuxmainslibrespouractionnerl’outil.Lapertedecontrôledela
piècetravailléepeutentraînerdesblessurescorporelles.
•
nE forcez pas sur l’outil. L’outileffectueralatâchedefaçonmeilleureetplussûre
àlavitessedepénétrationpourlaquelleilaétéconçu.forcersurl’outilpeutéventuellement
endommagerlamachineetentraînerdesblessures.
•Utilisezlebonoutilpourlatâche.Neforcezpassurl’outilouaccessoirepour
exécuterunetâchepourlaquelleiln’apasétéconçu.N’utilisezpasl’outilpourunenaliténon
prévuecarvousrisquezdesdégâtsmatérielset/oudesblessurescorporelles.
•N’utilisezpasl’outilsisoninterrupteurdemarche/arrêtfonctionne
mal. faitesimmédiatementremplacerlesinterrupteursdéfectueuxparuncentrederéparations
agréé.
•Débrancherl’outilavantd’effectuerdesréglages,dechangerd’accessoireou
derangerl’outil.Cesmesuresdesécuritéréduisentlesrisquesdedémarrageaccidenteldel’outil.
•Rangerlesoutilsnonutiliséshorsdeportéedesenfantsetdes
personnes n’ayant pas reçu de formation adéquate. entrelesmainsde
personnesn’ayantpasreçudeformationadéquate,lesoutilssontdangereux.

17
Français
•Entretenirsoigneusementlesoutils.Vérierqu’aucunepiècemobilen’estmal
alignée,grippéeoubriséeets’assurerqu’aucunautreproblèmenerisquéd’affecterlebon
fonctionnementdel’outil.encasdedommages,faireréparerl’outilavantdel’utiliserdenouveau.
Denombreuxd’accidentssontcauséspardesoutilsmalentretenir.
•N’utilisezquedesaccessoiresrecommandés.L’utilisationd’accessoireset
équipementsannexesnonrecommandésparleconstructeurounonprévuspourêtreutiliséssur
cetyped’outilpeutcauserdesdégâtsmatérielset/oudesblessurescorporellespourl’utilisateur.
Consultezlemanueld’utilisationpourconnaîtrelesaccessoriesrecommandés.
•Maintenirdesoutilsdecoupenetteetpropre.Bienentretenuavecdesoutilsde
coupedepointesontmoinssusceptiblesdelieretsontplusfacilesàcontrôler.
•Poussezlapièceàtravaillerdanslabonnedirectionàlabonne
vitesse. N’envoyezlapièceverslalamelecouteauoulasurfaceabrasive,selonlamachine,
queensensopposéàlarotationdel’outildecoupe.unemauvaiseprésentationdelapiècedansle
mêmesensquelarotationdel’outildecoupefaitquelapièceestprojetéeàgrandevitesse.
•NEjamaislaisserl'outilenmarchesanssurveillance.Éteignezl'appareil.Ne
laissezpasl'outiljusqu'àcequ'ilarriveàunarrêtcomplet.
•NEdémarrezjamaisunoutilquanduncomposantrotatifestdéjàen
contact avec la pièce travail lée.
SERVICE
•Demandezàvotreoutilélectriqueàêtredesservieparunepersonne
qualifiée en utilisant uniquementdespiècesidentiques.Celapermettrades'assurerquela
sécuritédel'outilélectriqueestmaintenue
.
•L'entretiendevotreoutilélectriquepériodiquement.Lorsdunettoyaged'un
outil,faireattentionànepasdémonterunepartiedel'outilenraisondecâblesélectriquespeuvent
êtreégarésoupincé.
CONSERVEZ CES INSTRUCTIONS
AVERTISSEMEnT: LISEZ ET ASSIMILEZ TOUS LES AVERTISSEMEnTS,
MISES En gARDE ET InSTRUCTIOnS D’UTILISATIOn AVAnT DE VOUS SERVIR
DE CET ÉQUIPEMEnT. Sinon vous risquez commotion électrique, début
d’incendie et/ou blessures corporelles.
CORDONS RALLONGES
Les outils mis à la terre nécessitent un cordon rallonge à trois fils.Lesoutilsà
doubleisolationpeuventutiliserdescordonsrallongeindifféremmentàdeuxoutroisconducteurs.Plus
augmenteladistancedepuislaprised’alimentation,pluslecalibredelarallongedevraêtreimportant.
L’utilisationdecordonsrallongesavecdeslsmalcalibréspeutprovoqueruneimportantechutede
tensiond’entrée,d’oùunepertedepuissanceetdepossiblesdommagespourl’outil.Reportez-vousau
tableaupourdéterminerlatailleminimumrequisepourlesls.
Pluslenumérodecalibredelestfaible,plusimportanteestlacapacitéencourantducordon.Par
exempleuncalibre14peuttransporteruncourantplusfortqu’unldecalibre16.Quandvousutilisez
plusd’uncordond’extensionpourobtenirlalongueurtotale,assurez-vousquechacuncontientau
moinslecalibreminimumdelsrequis.Sivousutilisezuncâbled’extensionpouralimenterplusd’un
outil,ajoutezlesampéragesdeleursplaquessignalétiquesetutilisezcettesommepourdéterminerle
calibreminimumdesls.
Français
Scie à coupe abrasive de 355mm (14 po)
Manuel d’utilisation GMCS140
Conseils d’utilisation de cordons rallonges
•
Sivousutilisezuncordonrallongeàl’extérieur,assurez-vousqu’ilestmarquédusufxe«W-A»(W
seulementauCanada),quiindiquequ’ilconvientbienàuneutilisationàl’extérieur.
• Assurez-vousquevotrecordonrallongeestcorrectementcâbléetenbonneconditionélectrique.
Remplaceztoujoursuncordonrallongeendommagéoufaites-leréparerparunepersonnequaliée
avantdel’utiliser.
• Protégezvoscordonsrallongesdesanglesetobjetstranchants,delachaleurexcessive,etdes
zoneshumidesoumouillées.
RÈgLES DE SÉCURITÉ SPÉCIFIQUES POUR SCIES À
COUPE ABRASIVE
AVERTISSEMEnT: nE laissez PAS une fausse sécurité s’installer
provoquée per confort et familiarité avec le produit (suite à des utilisations
répétées) remplacer la stricte application des règles de sécurité pour la scie
à onglets. Si vous utilisez cet outil dangereusement et incorrectement, vous
pouvez subir de sérieuses blessures.
•Assurez-vousquelaoutilestsurunesurfacefermeetdeniveau.
• Débranchez la outil avant de procéder à des changements,
réglages, les réparations, l'entretien ou l'entreposage.
•Portezuneprotectionoculaire.Nepasporterdescravateoudes
vêtements amples.
•Utiliseruniquementdeslameàabrasiveclasséspourunrégimede
2,800tr/minouplusélevé,avecuntroud'arbrede25mm(1po)ouunedouillede
tailleappropriée.Nejamaisutiliserunaccessoireclassépourunrégimeinférieurà2,800tr/min
niessayerd'usinerunemeuleavecuntroutroppetitpourlamontersurl'arbre.
•Utiliserlebonde14poucesdediamètrederouedecoupurepourle
matériel et le type de coupe que vous comptez faire.Parexemple,lorsque
couped'aluminium,utilisezunemeuledecoupurespécialementconçupourêtreutilisésur
l'aluminium.
•Inspecterlalameàabrasiveavantdemettrelescieenmarchepourdéterminers'il
yadesssures,criques,écaillagesouautredéfauts.Remplacerimmédiatementtoutemeule
endommagée.
Calibre de fil minimum recommandé pour cordons de rallonge (en 120 Volts)
Ampérage
nominal
(à pleine
charge)
Longueur du cordon de rallonge
7.6 m
25 Feet
15.2 m
50 Feet
22.9 m
75 Feet
30.5 m
100 Feet
45.7 m
150 Feet
61.0 m
200 Feet
0–2.0 18 18 18 18 16 16
2.1–3.4 18 18 18 16 14 14
3.5–5.0 18 18 16 14 12 12
5.1–7.0 18 16 14 12 12 10
7.1–12.0 18 14 12 10 8 8
12.1–16.0 14 12 10 10 8 6
16.1–20.0 12 10 8 8 6 6

19
Français
•Nepasutiliserlamachinesil'interrupteurdemarcheetarrêtne
fonctionne pas. uninterrupteurdéfectueuxdoitêtreremplacéimmédiatementparuncentre
deréparationagrééetilnefautpasutiliserlamachineavantd'avoirfaitlesréparations.
•Toujoursserrerlapièceàtravaillerdansl'étau,sinonellerisqued'êtreprojetée
etdeprovoquerdesblessures.
•Faitesextrêmementattentionaveclesouvragestrèsgrands,très
petits ou ayant des formes compliquées.
•Toujoursprévoirunsupportadéquatauxcôtésdelatabledesciage
pour les longues pièces à travailler.
•Toujourstenirlesmainsàl'écartdelalignedecoupedelalameà
abrasive.
•Toujoursvérierquetouslesprotectionssontenplaceavant
d'utiliser l'outil.
•Toujoursattendrequelemoteuraitatteintsavitessemaximaleavant
de commencer une coupe.
•Toujourss'assurerquelespoignéessontsèches,propreset
exemptes d'huile ou de graisse. Mainteniruneprisefermesurl'outilpendantson
utilisation.
•Toujoursvérierquelapièceàtravaillerestfermementserréedans
l'étau avant d'utiliser l'outil.
•Toujoursvérierquelalamenetouchepaslapièceàtravailleravant
d'actionner l'interrupteur.
•Laissertournerl'outilpendantuncertaintempsavantdel'utilisersur
une pièce à travailler. Prêterattentionauxvibrationsetauxoscillationsquipourraientêtre
lesigned'unmontageincorrectoud'unelamemaléquilibrée.
•Toujoursmettrel'outilhorstensionetattendrel'arrêtdelalameavant
dedéplacerlapièceàtravailleroudemodierlesréglages.
•Toujoursserrerlavisd'arbreettouteslesxationsavantusage.
•Nejamaistoucherdespiècesenmouvement,ycomprislalame,pendantque
l'outilfonctionne.
•Nejamaisutiliserl'outilàproximitédeliquidesoudegaz
inammables.uneétincellepourraitdéclencheruneexplosion.
•Nejamaisexposerlesmains,lespiedsoudesobjetsfragilesaux
étincelles de meulage pouréviterlesrisquesdeblessure.
•Avantdepassercetoutil,verrouillerl'alimentationlatêteenposition
basse. Débranchez le cordon d'alimentation.
•Nepasexposerlamachineàlapluienil'utiliserdansdesendroits
humides.
•Miseàlaterrerequise.
CONSERVEZ CES INSTRUCTIONS
1.Gâchetted’interrupteur
2.Boutondeverrouillage
3.Poignéedetransport
4.Leverrouillaged’arbre
5.Moteur
6.Axedeverrouillage
7.Cléàarbre
8.Protecteurinférieure
9.Protecteursupérieure
10.Étaurapidedesortiedeverrouillage
11.etauxe
12.Étincelledéecteur
13.Lameàabrasive
14.Base
Français
Scie à coupe abrasive de 355mm (14 po)
Manuel d’utilisation GMCS140
VOTRE SCIE À COUPE ABRASIVE
OUVERTURE DE L`EMBALLAgE ET COnTEnU
IMPORTATnT:grâce à des techniques modernes de production de
masse, il est peu probable que l'outil est défectueux ou qu'une pièce
est manquante. Si vous trouvez quelque chose de mal, ne pas faire
fonctionner l'outil jusqu'à ce que les parties ont été remplacés ou la
faute a été corrigée. Le fait de ne pas le faire pourrait entraîner des
blessures graves.
Contenu de carton de pièces en vrac:
Description QUAn
Scie 1
Clé 1
Manueldel’opérateur 1
1
2
FIg 1
14
13
12
11
10
9
8
7
6
5
4
3
1
21
Français
ASSEMBLAgE ET RÉgLAgES
AVERTISSEMEnT: Toujours du lieu de la interrupteur éteint dans la
position verrouillée et débranché de la source d'alimentation avant d'effectuer
tout le montage, de réglages ou de changer d'accessoires.
Verrouillage et déverrouillage de la tête
de coupe (Fig 2)
Quandvous entreposezou transportezlascie,sa têtede
coupedoitêtreverrouilléeenpositionbasse.
Pour déverrouiller la tête de coupe
1.Appuyezlégèrementsurlatêtedecoupe.
2.Tirezsurleaxedeverrouillage(1)versl'extérieur.
3.Lentementrelevezlatêtedecoupeenpositiondetravail.
Pour verrouiller la tête de coupe
1.Abaissezcomplètementlatêtedecoupe.
2. Poussezla axede verrouillage (1) vers l'intérieur pour
bloquerlatêtedecoupe.
Démontage et montage de la lame à
abrasive (FIG 3, 4)
AVERTISSEMEnT: Pour réduire le
risque de blessures causées par une pièce de
projection ou de morceaux jetés de la lame,
ne pas utiliser un nouveau seuil supérieur
ou inférieur à 355 mm (14 po) de diamètre.
Assurez-vousquelalameestévaluépour2800
tr / min ou plus.
1.Débranchezl'outildelasourced'alimentation.
2.Déverrouillerlatêtedecoupesielleestsurlaposition
verslebas.
3.Souleverleprotecteurinférieur(2)àexposerleboulon
del'arbre(3).
4. Appuyez sur le verrouillage d’arbre (5) et le tenir
fermement.Tournezla lame jusqu'à ce que l'arbre est
bloquéparleverrouillaged’arbre.
5.Maintenirlapressionsurleverrouillaged’arbre.utilisezla
clé(4)àconditiondetournerleboulondel'arbre(3)dans
lesensantihoraireetdesserrer.
6. Retirez le boulon de l'arbre, la rondelle et la bride
extérieure.
REMARQUE: Faites attention aux pièces
déposées, en notant leur position et leur
orientation. Essuyer la bride intérieur et extérieur
propre de tous les débris avant d'installer
nouvelle la lame à abrasive.
7.Retirezlavieillelameàabrasiveetinstallezunnouveau.
8.Placezlabrideextérieure,larondelleetboulondel'arbre
denouveau.
1
FIg 2
FIg 3
2
3
4
FIg 4
5
Français
Scie à coupe abrasive de 355mm (14 po)
Manuel d’utilisation GMCS140
9. Appuyez sur le verrouillage d’arbre (5) fermement tout
tournerlaclédanslesenshorairepourserrerleboulonde
l'arbre(3).
10.Abaisserleprotecteurinférieuràsonpostedetravail.
11.Assurez-vous que le verrouillage d’arbre estlibéréet la
lameabrasivepeuttournerlibrement.
12.Abaisserlatêtedecoupejusqu’àcequesonbrastouche
labutéepours'assurerquelalamen'estpascontactavec
labaseoudesurface.faireunréglagelabutéesiellene.
Réglage de la butée (FIG 5)
Labutéedoitêtrerégléedemanièreàmaintenirunmaximum
delargeurdecoupeetquelelameàabrasivenetouchepas
labasedel'outiloudelasurfacedelaquellel'outilestmonté.
1.Abaisserlatêtedecoupejusqu’àcequesonbrastouchelabutée.
2.Tournezlelamemanuellementpourvousassurerquelalargeurdecoupeestaumaximum.Lelame
nedoitcontacteraucunepartiedel’embase.
3.encasdecontact,desserrerl'écroudeblocage(2)etd'ajusterleboulonbutée(1)jusqu'àceque
leproblèmeestrésolu.Serrerl'écroudeblocage.
AVAnT D'UTILISER CET OUTIL
1.Vérierquelasourced'alimentationconvientàl'outil.Pouréviterlesrisquesdesurchauffe,
d'arrêtsoudainoudefonctionnementintermittent,vérierquelecordond'alimentations'adapte
correctementàlaprisesecteuretnesedétachepasaprèsl'avoirintroduite.Réparerouremplacer
laprisesecteurencasdedéfaillance.
AVERTISSEMEnT: ne jamais brancher cet outil motorisé sur le
secteur à moins que la source d'alimentation CA ne corresponde à la
tension spécifiée sur la plaque signalétique de l'outil. ne jamais brancher
cet outil sur une source d'alimentation CC.
2.Inspecterlalamepourtoutdéfautvisuel.Vérierquelalameestexemptedessuresoud'autres
dommagesvisibles.Vérierlastabilitédelalameenrotation.
3.Vérierquelalameestsolidementxéesurl'outilmotorisé.Pourxersolidementlalame,serrer
lavisdeserragesurl'axedemontagedelalameàl'aidedelacléfournie.
4.Vérierlebonfonctionnementdelaprotecteurdelalame.Laprotecteurdelalameestconçue
pourprotégerl'opérateurcontretoutcontactaveclalamependantl'utilisationdel'outil.Toujours
vérierquelaprotecteursedéplacelibrementetrecouvrelalamecorrectement.
5.Vérierlapositionduverrouillaged’arbreavantd'utiliserl'outil.Aprèsavoirmontélelameà
abrasive,vérierqueleverrouillaged’arbreestenpositionrétractéeavantd'utiliserl'outil.
AVERTISSEMEnT: ne pas appuyer sur le verrou de la broche au
cours de la rotation de la lame.
6.Immobilisersolidementlapièceàtravailler.Vérierquelematériauestbienxéenplacedans
l'étau.Sinon,unaccidentgravepourraitseproduiresilematériaus'échappaitousilalameà
abrasiveserompaitencoursd'opération.
7.faireunessai:aprèss'êtreassuréquepersonnenesetientderrièrel'outil,mettrelascieen
marcheetvérierqu'aucuneanomaliedefonctionnementn'existeavantdeprocéderàuntravail
decoupe.
1
2
FIg 5
23
Français
FOnCTIOnnEMEnT
AVERTISSEMEnT: Toujours du lieu de la interrupteur éteint dans la
position verrouillée et débranché de la source d'alimentation avant d'effectuer
tout le montage, de réglages ou de changer d'accessoires.
Utilisation du interrupteur (FIG 6)
Votre scie est équipée d'un interrupteur à gâchette
avec fonction de verrouillage, ce qui offre une sécurité
supplémentairepouréviterundémarrageaccidentel.
Pour mettre la scie en MARCHE, appuyer sur
le bouton de verrouillage (2) sans relâcher et presser la
gâchettedeinterrupteur(1).Aprèsledémarragedel'outil,
vouspouvezrelâcherleboutondeverrouillage.L'outilde
maintienencoursd'exécutionjusqu'àcequevousrelâchez
lagâchette.
REMARQUE: L'outil ne démarre pas si vous
tirez sur la gâchette sans appuyer sur le Bouton
De Verrouillage en premier.
Pour l’ARRÊTER la scie, relâcherlagâchettede
interrupteur(1).
Réglage de l'étau (FIG 7)
L'étau xe comporte trois positions de serrage (1) pour
optimiserlacoupedemétauxdedifférentesvariétés,tailles
ouformesl.Voirlagure7.
Toujours utiliser l'étau dans la position optimale qui
permetteunecoupetotaledumatériau.
Pour déplacer le etau, procédez comme suit:
1.Desserrerlesdeuxboulonshexagonaux(2)surlaplaque
d'étauutilisantlacléfournie.
2.Retirezlesdeuxboulonshexagonaux(2).
3.Déplacerlaplaqued'étaudanslapositionsouhaitée.
4. Réinstaller les deux boulons hexagonaux (2) et serrez
fermementenplace.
Coupes en angle (FIG 7)
Cettemachinepermetàl'utilisateurd'effectuerdescoupes
enangles0-45°àgaucheetàdroite0-30°.
Pour modifier l'angle de la plaque d'étau
1.Desserrerlesdeuxboulonshexagonaux(2)surlaplaque
d'étauutilisantlacléfournie.Neretirezpaslesboulons.
2.Pivoterlaplaqued'étauàl'anglesouhaité.
3.Resserrezlesdeuxboulonshexagonaux(2).
Étau rapide de sortie de verrouillage (FIG 8)
Cetoutilestéquipéd'unétaurapidededéverrouillagepourleserragefacileetrapidedelamatière.
Souleverlelevier(1)pourlemouvementrapided'étau.Abaisserlelevierettournezlamanivelle(2)pour
piècedeserrage.
1
2
FIg 6
FIg 8
1 2
3
4
FIg 7
1
2

Français
Scie à coupe abrasive de 355mm (14 po)
Manuel d’utilisation GMCS140
1.Placerlapièceàtravaillerentrelaplaqued'étau(3)etleguide(4).
2.Releverlelevierdeverrouillagerapide(1)etappuyersurlapoignéeàvis(2)pourmettrelégèrement
encontactlaplaqued'étau(3)aveclapièceàtravailler.ensuite,abaisserlelevierdeverrouillage
rapide(1)etxerfermementlapièceàtravaillerenpositionentournantlapoignéeàvisdansle
senshoraire.
3.Lorsquelacoupeestterminée,tournerlapoignéeàvis2ou3toursdanslesensanti-horairepour
desserrerl'étauetretirerlapiècetravaillée.
AVERTISSEMEnT: Toujours visser le levier de verrouillage rapide sur
les filets de la vis filetée afin d'éviter l'éjection éventuelle de la pièce à travailler
de l'étau, des dommages à l'étau ou des blessures.
Serrage de la pièce (FIG 9)
Positionpiècedansunétaudesortequesibourrage,
lalameneserapastendanceàdéplacerlapiècedans
l'étau.Voirlagure9pourvotreserragederéférence.
engénéral,lalamesecoupelaplusefcacesilalame
estlacoupedelasectionlaplusmince.
Fonctionnement de coupe
AVERTISSEMEnT: Toujours porter des lunettes de sécurité lorsque
le fonctionnement du scie. Pour réduire le risque de brûlures par contact avec
découpe à chaud arrêt de travail morceaux, portez des gants de protection.
AVERTISSEMEnT: Toujours utiliser étau pour fixer la pièce à usiner.
Toujours débrancher la scie de la source d'alimentation avant de procéder à
tout ajustement.
AVERTISSEMEnT: ne pas utiliser n'importe quel type de lubrifiant de
coupe avec cet outil.
AVERTISSEMEnT: Cette scie à coupe abrasive est uniquement destiné
à la coupe à sec. Le non respect de cet avertissement pourrait entraîner des
blessures graves.
1.Appuyezsurleboutondeverrouillagehorstension,puisappuyezsurlagâchette.Lorsquelalameà
abrasiveentreencontactaveclapièceàtravailler,abaisserlentementlapoignéepourcommencer
lacoupe.
2.Lorsquelalameàabrasiveentreencontactaveclapièceàtravailler,abaisserlentementlapoignée
pourcommencerlacoupe.
3.exercerunepressionconstanteetrégulière(Neforcezpas)pendantlerestedelacoupe.
ATTEnTIOn:Ne jamais exercer une pression excessive ni forcer la lame dans
le matériau à couper. Cela pourrait entraîner une surchauffe du moteur et des
dommages à la lame à abrasive.
4.orsquelacoupe(oulaprofondeurdecoupesouhaitée)estachevée,releverlapoignéeenposition
rétractée.
5.Relâcherlagâchetteaprèschaquecoupeetattendrequelalamedescies'immobilisecomplètement
avantdesepréparerpourleprochaintravail.
FIg 9

25
Français
EnTRETIEn
NETTOYAGE
Éviterd’utiliserdessolvantspourlenettoyagedespiècesenplastique.Laplupartdesmatières
plastiquespeuventêtreendommagéespardiverstypesdesolvantsducommerce.utiliserunchiffon
proprepouréliminerlasaleté,lapoussière,l’huile,lagraisse,etc.
AVERTISSEMEnT: Nejamaislaissedeliquidestelsqueleuidede
freins, l’essence, les produits à base de pétrole, les huiles pénétrantes, etc.,
entrer en contact avec les pièces en plastique. Les produits chimiques peuvent
endommager, affaiblir ou détruire le plastique, ce qui peut entraîner des
blessures graves.
Lesoutilsélectriquesutiliséssurlabredeverre,lepla¬coplâtre,lesmasticsdebouchageou
leplâtres’usentplusviteetsontsusceptiblesdedéfaillanceprématurée,carlesparticulesetles
éclatsdebredeverresontfortementabrasifspourlesroulements,balais,commutateurs,etc.en
conséquence,nousnerecommandonspasd’utilisercetoutilpouruntravailprolongéaveccestypes
dematériaux.Toutefois,sil’outilaétéutilisésurl’undecesmatériaux,ilestextrêmementimportant
delenettoyeràl’aircomprimé.
LUBRIFICATION
Ceoutilsestlubriésenpermanenceàl'usineetnenécessitentaucunelubricationsupplémentaire.

Français
Scie à coupe abrasive de 355mm (14 po)
Manuel d’utilisation GMCS140
gARAnTIE DE DEUX AnS
Ceproduitestgarantiexemptdedéfautsdusaumatériauxetàlamaind’œuvrependant2ansà
compterdesadated’achat.Cettegarantielimitéenecouvrepasl’usurenormalenilesdétériorationsou
dommagesdusànégligence,utilisationanormaleouaccident.L’acheteurd’origineestcouvertparcette
garantiemaisellen’estpastransférable.Avantderenvoyervotrel'outilaumagasind'achat,s'ilvousplaît
appelezsansfraislaligned'aidepourlessolutionspossibles.CE PRODUIT N’EST PAS GARANTI S’IL
EST UTILISÉ POUR DES FINS INDUSTRIELLES OU COMMERCIALES.
LES ACCESSOIRES COMPRIS DANS CE KIT NE SONT PAS COUVERTS PAR LA GARANTIE DE 2 ANS.
LIgnE D’ASSISTAnCE SAnS FRAIS:
PourvosquestionssurceproduitouunautredeGeNeSIS,veuillezutiliserenAmériqueduNordce
numérod’appelsansfrais:888-552-8665.(Mon.-fri9:00am-4:30pmeST.)
Ouvisiteznotresiteweb:www.richpowerinc.com
27
Español
SIERRA DE CORTE ABRASIVA DE 355 mm (14 pulg) 15 AMP
Manual del Operario
Especificaciones:
• Modelo: GMCS140
• Voltajenominal: 120V~60HZ
• Consumonominal: 15A
• Velocidadenvacío: 2,800RPM
• Tamañodelahoja: 355mm(14”)
• Diámetrodeleje: 25mm(1”)
• Capacidadmáximadecorte:Redondo: 115mm(4-1/2”)
• Capacidadmáximadecorte:Cuadrado 100mm(4”)
• Capacidadmáximadecorte:Rectangular:70mmx170mm(2-3/4”x6-5/8”)
Incluye:unhojaabrasivade355mm(14")yunllavedelahoja
ADVERTEnCIA: Para reducir el riesgo de lesiones, el usuario debe
leer y entender este manual del operario antes de operar esta herramienta.
guarde este manual para consultas futuras.
Línea de ayuda gratuita: 1-888-552-8665.
ADVERTEnCIA: Laoperacióndecualquierherramienta
motorizadapuedeprovocarellanzamientodeobjetosextrañoshaciasusojos,
locualpuederesultarendañogravedelosojos.Antesdeiniciarlaoperación
conlaherramienta,siemprecolóquesegafasdeseguridadconprotectores
lateralesycuandoseanecesario,unacaretadeproteccióndetodalacara.
Recomendamoslascaretasdevisiónampliaparautilizarsobrelasgafasde
seguridadconprotectoreslaterales.Siempreutiliceproteccióndeojosque
estémarcadaindicandoelcumplimientodelanormaANSIZ87.1
Busque este símbolo que indica precauciones de
seguridad importantes. Éste significa ¡¡¡atención!!!
Su seguridad está involucrada.
REgLAS gEnERALES DE SEgURIDAD
ADVERTEnCIA: Algunos polvos producidos por actividades como
lijar, aserrar, pulir, taladrar y otras actividades relacionadas con la construcción
contienen productos químicos que se sabe causan cáncer, defectos de
nacimiento u otros daños en el sistema reproductivo. Algunos ejemplos de
estos productos químicos son:
•plomoprocedentedepinturasdebasedeplomo,
•sílicecristalinaprocedentedeladrillos,cementoyotrosproductosdemampostería,y
•arsénicoycromoprocedentesdelamaderatratadaquímicamente.
elriesgodeestasexposicionesvaría,dependiendodelafrecuenciaconqueserealizaestetipo
detrabajo.Parareducirlaexposiciónaestosproductosquímicos:trabajeenunaáreaconbuena
ventilaciónyconlosequiposdeseguridadaprobados,talescomomascarillasantipolvoespecialmente
diseñadasparaeliminarporltraciónpartículasmicroscópicas.
uTILICeSuSGAfAS
LAPReVISIÒNeSMejOR
QueNOTeNeRVISIÒN
DeSeGuRIDAD

Español
Sierra de corte abrasiva de 355mm (14 pulg)
Manual del Operario GMCS140
ADVERTEnCIA: AnTES DE UTILIZAR ESTE EQUIPO, LEA Y EnTIEnDA
TODAS LAS ADVERTEnCIAS, PRECAUCIOnES E InSTRUCCIOnES DE
OPERACIÓn. no seguir todas las instrucciones enumeradas a continuación,
podría resultar en una descarga eléctrica, un incendio y/o lesiones personales
graves.
GUARDE ESTAS INSTRUCCIONES
ÁREA DE TRABAJO:
•
Mantenga limpia y bien iluminada el área de trabajo.unamesadetrabajo
maldespejadayunamalailuminaciónsoncausascomunesdeaccidentes.
•
no utilice herramientas motorizadas en atmósferas explosivas,comolas
existentesalrededordelíquidos,gasesypolvosinamables.Lasherramientaseléctricasgeneran
chispasquepuedenencenderelpolvoylosvaporesinammables.
•
Mantenga alejados a los circunstantes,niñosydemáspresentesalutilizaruna
herramientaeléctrica.Todadistracciónpuedecausarlapérdidadelcontroldelaherramienta.
SEGURIDAD EN EL MANEJO DE EQUIPOELÉCTRICO
•
La herramienta eléctrica enchufes debe coincidir con la toma de
corriente.Nuncamodiqueelenchufedeningunamanera.Noutiliceningúnadaptadorde
enchufesencualquiertierra(tierra)lasherramientaseléctricas.Lasherramientasconaislamiento
dobleestánequipadasdeunaclavijapolarizada(unapatillaesmásanchaquelaotra).esta
clavijaencajadeunasolaformaenunatomadecorrientepolarizada.Silaclavijanoencaja
completamenteenlatomadecorriente,inviertalaclavija.Siaúnasínoencaja,comuníquese
conunelectricistacalicadoparaqueinstaleunatomadecorrientepolarizada.Nomodiquela
clavijadeningunamanera.Conelaislamientodobleseeliminalanecesidaddeusarcablesdetres
conductoresyconexiónatierra,asícomodesistemasdealimentacióneléctricaconconexióna
tierra
•
no exponga las herramientas eléctricas a la lluvia ni a condiciones
de humedad.Laintroduccióndeaguaenunaherramientaeléctricaaumentaelriesgode
descargaseléctricas.
•
Evite el contacto del cuerpo con las superficies de objetos
conectados a tierra,comolastuberías,radiadores,estufasyrefrigeradores.existeun
mayorriesgodedescargaseléctricassielcuerpoestáencontactocontierra.
•
no maltrate el cordón eléctrico.Nuncauseelcordóneléctricoparaportarlas
herramientasniparasacarlaclavijadeunatomadecorriente.Mantengaelcordónlejosdelcalor,
aceite,bordesaladosypiezasmóviles.Cambiedeinmediatotodocableeléctricodañado.Los
cordoneseléctricosdañadosaumentanelriesgodedescargaseléctricas.
•
Al utilizar una herramienta eléctrica en el exterior,utiliceuncordóneléctrico
deextensiónquellevelasmarcas“W-Ao“W”..estoscordoneseléctricosestánaprobadosparael
usoenexterioresyreducenelriesgodedescargaseléctricas.
•
no utilice el adaptador de CA evaluado las herramientas con un
suministro de corriente.Sibienlaherramientapuedeparecerqueeltrabajo,los
componenteseléctricosdelaherramientadeCAnominalesprobablequenoyplantearunpeligro
paraeloperador.

29
Español
SEGURIDAD PERSONAL
•
Permanezca alerta,presteatenciónaloqueestéhaciendoyapliqueelsentidocomún
alutilizarherramientaseléctricas.Noutilicelaherramientasiestácansadooseencuentra
bajolosefectosdealgunadroga,alcoholomedicamento.unmomentodeinatenciónalutilizar
unaherramientaeléctricapuedecausarlesionescorporalesserias.
•
Use equipo de seguridad.Siemprepóngaseprotecciónparalosojos.Cuando
loexijanlascircunstanciasdebeponersecaretacontraelpolvo,zapatosdeseguridad
antiderrapantes,cascooprotecciónauditiva
•
Vístase adecuadamente.Novistaropasholgadasnijoyas.Recójaseelcabellosi
estálargo.Mantengaelcabello,laropaylosguantesalejadosdelaspiezasmóviles.Las
ropasholgadas,lasjoyasyelcabellolargopuedenengancharseenlaspiezasmóviles.
•
Evite un arranque accidental de la unidad.Asegúresequeelinterruptorestá
apagadoantesdeconectarlaunidad.Llevarlasherramientasconeldedoenelinterruptoro
conectarlasconelinterruptorpuestoescausacomúndeaccidentes.
•
Retire toda llave o herramienta de ajuste antes de encender la
herramienta eléctrica.Todallaveoherramientadeajustedejadaenunapieza
giratoriadelaherramientaeléctricapuedecausarlesiones.
•
no estire el cuerpo para alcanzar un distancia mayor a la natural.
Mantengaunaposturarmeybuenequilibrioentodomomento.Laposturarmeyelbuen
equilibriopermitenunmajorcontroldelaherramientaensituacionesinesperadas.
•
Si los aparatos que se ofrecen para la conexión de extracción de
polvo y de instalaciones de recogida,asegurarqueestosestánconectadosy
seutilizanadecuadamente.elusodeestosdispositivospuedereducirlosriesgosrelacionados
conelpolvo.
•
no utilice la unidad al estar en una escalera o en un soporte
inestable.unaposturaestablesobreunasuperciesólidapermiteunmejorcontroldela
herramientaensituacionesinesperadas.
•
Mantenga la herramienta seca,limpiaylibredeaceiteygrasa.Siempreutilice
untrapolimpiopararealizaractividadesdelimpieza.Nuncautiliceuidosdefreno,gasolina,
productosdebasedepetróleo,niningúnsolvente,paralimpiarlaherramienta.
EMPLEO Y CUIDADO DE LA HERRAMIENTA
•
Asegure la pieza de trabajo.utiliceprensasdesujeciónounaprensadebanco
parasostenerlapiezadetrabajocuandoseaposible.utilizarprensasdesujeciónodispositivos
mecánicossimilaresesmásseguroqueutilizarsumano(s)ylepermiteutilizarambasmanospara
operarlaherramienta.Perderelcontroldelapiezadetrabajopuedecausarlesionespersonales.
•
no fuerce la herramienta.utilicelaherramientaadecuadaparacadatarea.La
herramientaadecuadaefectúamejorydemaneramásseguraeltrabajo,siademássemanejaala
velocidadparalaqueestádiseñada.
•
Utilice la herramienta correcta para el trabajo.Nofuercelaherramientao
accesorioutilizándoloenuntrabajoparaelcualnofuediseñado.Noutilicelaherramientapara
unpropósitoparacualnoestádiseñadayaquepodríaproducirsedañoalamáquinay/olesiones
personales.
•
no utilice la herramienta si el interruptor no realiza la operación de
encendido y apagado.Soliciteauncentrodeservicioautorizadoquereemplacelos
interruptoresdefectuosos.

Español
Sierra de corte abrasiva de 355mm (14 pulg)
Manual del Operario GMCS140
• Apague la máquina,ydesconectelamáquinadelafuentedeenergíaantesdeajustaro
cambiarlosvaloresdeajuste,oalrealizarreparaciones.Podríaocurrirunarranqueaccidentalque
causelesionespersonales.
•
guarde las herramientas que no estén en uso fuera del alcance de
los niñosydetodapersonanocapacitadaenelusodelasmismas.Lasherramientasson
peligrosasenmanosdepersonasnocapacitadasenelusodelasmismas.
•
Proporcione mantenimiento con cuidado a las herramientas.Revisepara
versihaydesalineaciónoatoramientodepiezasmóviles,rupturadepiezasotodaotracondición
quepuedaafectarelfuncionamientodelaherramienta.Sisedañalaherramienta,llévelaa
servicioantesdevolverautilizarla.Numerososaccidentessoncausadosporherramientasmal
cuidadas.
•
Utilice los accesorios recomendados.utilizaraccesoriosnorecomendadospor
elfabricanteonodiseñadosparausoenunaherramientadeestetipo,podríacausardañoa
lamáquinaolesionespersonalesalusuario.Consulteelmanualdeloperarioparaconocerlos
accesoriosrecomendados.
•
Mantenga las herramientas de corte afiladas y limpias.Lasherramientas
decortebiencuidadas,conbordesbienalados,tienenmenosprobabilidaddeatascarseenla
piezadetrabajoysonmásfácilesdecontrolar.
•
Empuje la pieza de trabajo en la dirección y velocidad correctas.
empujelapiezadetrabajodentrodelahoja,cuchillaosupercieabrasivaúnicamenteen
direccióncontrariaaladirecciónderotacióndelaherramientadecorte.elempujeincorrectode
lapiezadetrabajoenlamismadirecciónderotacióndelaherramientadecorteprovocaquela
piezadetrabajosealanzadaaaltavelocidad.
•
nunca deje la herramienta funcionando sin supervision.Desactivela
energía.Noabandonelamáquinahastaquesehayadetenidoporcomplete
•
nunca arranque una herramienta cuando cualquier componente
giratorio está en contacto con la pieza de trabajo.
SERVICIO
•
HAn toolto su poder ser reparado por una persona cualificada de
reparación utilizando sólo repuestos idénticos.estogarantizaráquela
seguridaddelaherramientadepodersemantiene.
•
Servicio de su herramienta eléctrica periódicamente.Cuandouna
herramientadelimpieza,cuidadodenodesmontarcualquierpartedelaherramientainterna,
porqueloscablespuedenserapretadofueradelugar.
ADVERTEnCIA: AnTES DE UTILIZAR ESTE EQUIPO, LEA Y EnTIEnDA
TODAS LAS ADVERTEnCIAS, PRECAUCIOnES E InSTRUCCIOnES DE
OPERACIÓn. no seguir todas las instrucciones enumeradas a continuación,
podría resultar en una descarga eléctrica, un incendio y/o lesiones personales
graves.
GUARDE ESTAS INSTRUCCIONES
31
Español
CABLES DE EXTEnSIÓn
Las herramientas de conexión a tierra requieren un cable de extensión
de tres alambres.Lasherramientasdeaislamientodoblepuedenutilizaruncablede
extensióndedosotresalambres.Amedidaqueaumentaladistanciadesdeeltomacorrientede
suministrodeenergía,usteddebeutilizaruncabledeextensióndemayorcalibre.utilizarcables
deextensiónconalambrededimensionesinadecuadascausaunacaídagrandedelvoltaje,loque
resultaenpérdidadeenergíayposibledañoalaherramienta.Consultelatablamostradaenseguida
paradeterminareltamañodealambremínimorequerido.
entremáspequeñoseaelnúmerodecalibredelalambre,mayoreslacapacidaddelcable.Por
ejemplo:uncabledecalibre14puedetransportarmáscorrientequeuncabledecalibre16.Cuandose
utilizamásdeuncabledeextensiónparaconformarlalongitudtotal,veriquequecadacablecontiene
comomínimoeltamañodealambremínimorequerido.Siustedestáutilizandouncabledeextensión
paramásdeunaherramienta,sumelosamperiosindicadosenlaplacadedatosdecadaherramientay
utilicelasumaparadeterminareltamañodealambremínimorequerido.
Pautas para utilizar cables de extensión
•
Siustedestáutilizandouncabledeextensiónenexteriores,veriquequeestémarcadoconel
sujo“W-A”(“W”enCanadá)queindicaqueesaceptableparausoenexteriores.
•Veriquequesucabledeextensióntienelosalambresapropiadosyqueestáenbuenas
condicioneseléctricas.Siemprereemplaceuncabledeextensióndañadoohágalorepararpor
unapersonacalicadaantesdeutilizarlo.
•Protejasuscablesdeextensióncontraobjetoscortantes,calorexcesivoyáreasmojadaso
húmedas.
Calibre de alambre mínimo recomendado para cables de extensión (120 Voltios)
Amperios según
la placa de datos
(a plena carga)
Longitud del cable de extensión
25 pies 50 pies 75 pies 100 pies 150 pies 200 pies
0–2.0 18 18 18 18 16 16
2.1–3.4 18 18 18 16 14 14
3.5–5.0 18 18 16 14 12 12
5.1–7.0 18 16 14 12 12 10
7.1–12.0 18 14 12 10 8 8
12.1–16.0 14 12 10 10 8 6
16.1–20.0 12 10 8 8 6 6

Español
Sierra de corte abrasiva de 355mm (14 pulg)
Manual del Operario GMCS140
REgLAS DE SEgURIDAD ESPECÍFICAS PARA SIERRAS DE
CORTE ABRASIVA
ADVERTEnCIA: nO permita que la confianza o familiaridad con el
producto (lograda después del uso repetido) reemplace el estrito cumplimiento
de estas reglas de seguridad para sierras ingleteadoras. Si usted utiliza esta
herramienta de manera insegura o incorrecta, usted puede sufrir graves
lesiones personales.
•Asegúresedequelaherramientaestésobreunasuperciermey
nivelada.
• Desenchufe la herramienta antes de hacer cambios, ajustes o
reparaciones.
•Usarprotecciónocularparatrabajar.Nousarcorbataniropa
suelta.
•Usarsólolahojaabrasivaproporcionpara2800rpmosuperiorconun
1"agujerodelárboloelbushingclasicadosegúntamañoapropiado.Nuncauseunahoja
abrasivaproporcionbajode2800rpmointentamecanizarunaruedadeltamanobajopara
encajarelárbol
•Usarel14-pulgadasdediámetrodelahojadecorteparael
material y el tipo de corte que se planea hacer.Porejemplo,cuandocorte
dealuminio,utiliceundiscoabrasivadecorteespecialmentediseñadoparaserutilizadoenel
aluminio.
•Inspeccionelahojaabrasivaantesdeempezarlamáquinapara
los defectos visibles como las hendiduras, crujidos o astillas.
Reemplacedañadomoliendolahojaabrasiveinmediatamente.
•Nouselamáquinasielinterruptornoloenciendeniapaga.Los
interruptoresdefectivosdebenserreemplazadosinmediatamenteporuncentrodeservicio
autorizadoylamáquinanousóbajoreparacionescompletadas.
•Sujeteyaseguresiemprelapiezadetrabajoaltornillodebanco;
de lo contrario,lapiezadetrabajopodríasalirdespedidadelabaseycausarlesionesen
elcuerpo.
•Tengaprecauciónadicionalconlaspiezasdetrabajomuygrandes,
muy pequeñas o con forma complicada.
•Cuandovayaatrabajarconunapiezalarga,asegúresesiemprede
que la pieza tenga un apoyo adecuado a ambos lados de la mesa
de la sierra.
•Mantengasiemprelasmanoslejosdelalíneadelahojaabrasiva.
•Siemprecompruebequetodoslosdispositivosdeprotección
estén en su lugar, antes de usar la herramienta.
•Antesdeiniciaruncorte,siempreesperehastaqueelmotorhaya
alcanzado la velocidad máxima.
•Mantengasiemprelosmangossecos,limpiosylibresdeaceitey
grasa. Sostengalaherramientarmementecuandolaestéusando.

33
Español
• Siempre maneje la herramienta después de asegurarse que la
pieza de trabajo está asegurada adecuadamente con el tornillo de
banco.
•Siemprecompruebequelahojaabrasivanoestéencontactocon
la pieza de trabajo antesdeaccionarelinterruptor.
•Antesdeutilizarlaherramientasobreunapiezadetrabajoreal,
hágala funcionar por un tiempo. Observesihayalgunavibraciónomovimiento
quepudieraindicarlequelainstalaciónesdecienteoquelahojaestádesequilibrada.
•Apaguesiemprelaherramientayesperehastaquelacuchilladela
sierra se detenga antesdemoverlapiezadetrabajoocambiarlasconguraciones.
•Siempreajusteeltornillodelejeytodaslasabrazaderasantesde
operar la máquina.
•Nuncatoquelaspartesmovibles,inclusolahojaabrasivadelasierra,mientrasla
herramientaseencuentreenfuncionamiento.
•Nuncautilicelaherramientacercadelíquidosogasesinamables.
Laschispaspodríancausarunaexplosión.
•Nuncaexpongalasmanos,lospiesyobjetosfrágilesalaschispas
producidas,yaqueéstaspodríandañarlos.
•Antesdetransportarlaherramienta,bloqueeelcabezaldecorteen
la posición inferior. Desconecte el cable de alimentación.
•Noexpongaestamáquinaparalloveróuseenlassituaciones
húmedas.
•Serequiereconexiónatierra.
GUARDE ESTAS INSTRUCCIONES

1.Gatillodelinterruptor
2.Botóndelsegurodeapagado
3.Mangodetransporte
4.Pasadordejación
5.Motor
6.Pasadordebloqueo
7.Llavedelárbol
8.Proteccióninferior
9.Protecciónsuperior
10.Prensadetornillodeliberación
rápidadesujeción
11.Tornillosujetadorjoadjustable
12.Deectordechispa
13.Hojadesierraabrasiva
14.Base
Español
Sierra de corte abrasiva de 355mm (14 pulg)
Manual del Operario GMCS140
SU SIERRA DE CORTE ABRASIVA DE 355 mm
DESEMPAQUETADO Y COnTEnIDO
IMPORTAnTE:Debido a las modernas técnicas de producción en
masa, es poco probable que la herramienta está defectuoso o que una
parte se pierde. Si encuentra algo incorrecto, no opere la herramienta
hasta que las partes han sido sustituidos o la falla ha sido corregida. El
no hacerlo podría resultar en lesiones graves.
Piezas Sueltas en la Cartón:
Descripción CAnT.
Sierra 1
Llave 1
Manualdelusuario 1
1
2
FIg 1
14
13
12
11
10
9
8
7
6
5
4
3
1
35
Español
EnSAMBLAJE Y AJUSTES
ADVERTEnCIA: Asegúresesiempredequelaherramientaestá
apagada y desenchufada de la fuente de alimentación antes de ajustar, agregar
accesorios, o control de una función en la herramienta.
Bloquear o desbloquear el cabezal de
corte (FIG 2)
Cuandoseguardaotransportalasierradecorteabrasiva,la
cabezadecortedebeasegurarseenlaposiciónabajo.
Para desbloquear el cabezal de corte.
1.Presionelevementehaciaabajosobrelacabezadecorte.
2.Tiredelpasadordebloqueo(1)haciaelexterior.
4.Levantelentamentelacabezadecortehacialaposición
detrabajo.
Para bloquear el cabezal de corte
1.Bajecompletamentelacabezadecorte.
2. empuje el pasador de bloqueo (1) hacia adentro para
bloquearelcabezaldecorte.
Desmontaje y instalación de la hoja de sierra
abrasiva (FIG 3, 4)
ADVERTEnCIA: Para reducir el riesgo
de lesiones causadas por una pieza de trabajo
lanzado o arrojado pedazos de la hoja abrasiva,
no use un nuevo hoja abrasiva de mayor o menor
que355mm(14plug)dediámetro.Asegúresede
que la hoja abrasiva está clasicado para 2800
RPM o superior.
1.Desconectelaherramientadelafuentedealimentación.
2.Desbloquealacabezadecortesiestáenposicióndebloqueo.
3.Levanteelprotector inferior (2) para exponer el perno del
eje(3).
4. Presione el pasador de jación (5) y sujétela rmemente.
Girelahojadecortehastaqueelejeestábloqueadoporel
pasadordejación.
5.Mantenerlapresiónsobreelpasadordejación.utilicela
llave(4)proporcionadaparagirareltornillodeeje(3)hacia
laizquierdayaoje.
6.Retireelpernodeleje,laarandelaylabridaexterior.
nOTA: Preste atención a las piezas retiradas,
teniendo en cuenta su posición y dirección
que se enfrentan. Limpie las bridas de interior
y exterior limpia de cualquier residuo antes de
instalar el nuevo hoja de sierra abrasiva.
7.Retireelhojaabrasivaviejoeinstaleunonuevo.
8.Coloquelabrida,laarandelayelpernodelejedenuevo.
9.Presioneelpasadordejación(5)rmemente,altiempogirar
lallavehacialaderechaparaapretarelpernodeleje(3).
1
FIg 2
FIg 3
2
3
4
FIg 4
5
Español
Sierra de corte abrasiva de 355mm (14 pulg)
Manual del Operario GMCS140
10.Bajeelprotectorinferiorasulaposicióndetrabajo.
11.Asegúresedequeelpasadordejaciónseliberaylahoja
decorteabrasivapuedegirarlibremente.
12.Bajelacabezadecortehastaelbrazogolpeeconeltopede
bajadaparaasegurarsedequelahojadeabrasivonoesté
encontactoconlabaseosupercie.Hacerelajustetope
debajadasilohace.
Ajuste del tope de bajada (FIG 5)
el tope de bajada debe ser ajustado para que se mantenga
almáximolacapacidaddecorte,yparaquelahojadecorte
abrasivanogolpeelabasedelaherramientaolasupercieque
vamontadalaherramienta.
1.Bajelacabezadecortehastaelbrazogolpeeconeltopedebajada.
2. Gire el hoja con la mano para vericar la máximacapacidad de corte. el hoja no debe hacer
contactoconningunapartedelabase.
3.Sielhojatopaconalgo,aojelacontratuerca(2)yajustarelpernotopedebajada(1)arribayabajo
hastaqueelproblemaestáresuelto.Apretarlatuerca.
AnTES DE USAR LA HERRAMIEnTA
1.Asegúresedequelafuentedecorrienteeslaadecuadaparalaherramienta.Paraevitarquela
herramientasesobrecaliente,sedetengaaccidentalmenteofuncionedemaneraintermitente,
veriquequeelenchufedelcableentraadecuadamenteenlatomadecorrienteeléctricaynose
saledespuésdeinsertado.Siestádefectuosa,repareoreemplacelatomadecorrienteeléctrica.
ADVERTEnCIA: nunca conecte la herramienta eléctrica a menos
que el voltaje de la fuente de corriente CA sea el especificado en la placa
indicadora de la herramienta. nunca conecte esta herramienta eléctrica a
una fuente de corriente continua (CC).
2.Reviselahojaabrasivaparadetectardefectosvisibles.Compruebequelahojaabrasivanotenga
grietasniotrosdañosvisibles.Inspeccionelaestabilidaddelarotacióndelahojadelasierra..
3.Conrmequelahojadelasierraestésujetadeformaseguraalaherramientaeléctrica.Conel
propósitodeasegurarlahojadelasierra,utilicelallavesuministradaparaajustarelpernodela
abrazaderaenelejedemontaje.
4.Veriquequeelprotectordelasierrafuncionacorrectamente.elprotectordelasierraestá
diseñadoparaevitarqueeloperadorentreencontactoconlahojadelasierraduranteel
funcionamientodelaherramienta.Siempreveriquequeelprotectordelahojasemuevacon
suavidadycubralahojadelasierrademaneraadecuada.
5.Antesdeutilizarlaherramienta,compruebelaposicióndelpasadordejación.Despuésdeinstalar
lahojadelasierra,veriquequeelpasadordejaciónestéenlaposicióninicialantesdeutilizarla
herramienta.
ADVERTEnCIA: no presione el pasador de fijación mientras la hoja
esté en rotación.
6.Sujetedeformaseguraelmaterialdecorte.Asegúresedequeelmaterialseencuentrasujetocon
rmezaconeltornillodebanco.Delocontrario,podríaocurrirunaccidentegravesielmaterialse
aojaolacuchilladelasierraserompedurantelaoperación.
7.Realiceunapruebadefuncionamiento:despuésdeconrmarquenohaynadieparadodetrásde
laherramienta,enciéndalaycompruebequenohayningunaanomalíaantesdeintentarhaceruna
operacióndecorte.
1
2
FIg 5
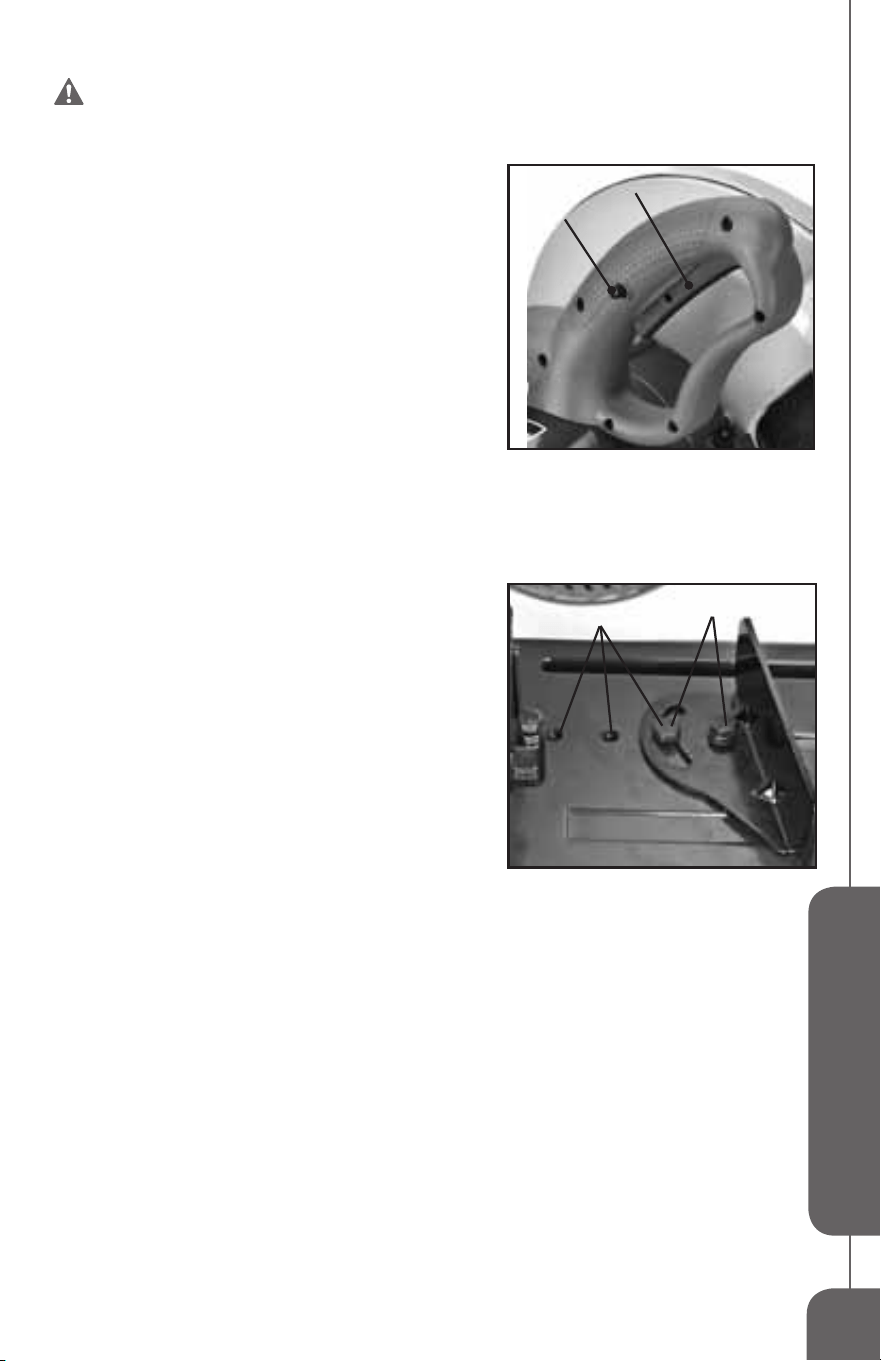
37
Español
UTILIZACIÓn
ADVERTEnCIA:Asegúrese siempre de que la herramienta está
apagada y desenchufada de la fuente de alimentación antes de ajustar, agregar
accesorios, o control de una función en la herramienta
.
Acción del interruptor (FIG 6)
Lasierra está equipadacongatillodel interruptoro conla
botón del seguro de apagado,que proporciona seguridad
adicionalparaevitarunarranqueaccidental.
Para encender la sierra,Presionehaciaabajoenle
botóndelsegurodeapagado(2),yluegoaprieteelgatillo
del interruptoro (1). Después de encender la herramienta,
usted puede soltar el botón del seguro de apagado . La
herramientademantenimientodecorrerhastaquesesuelte
elgatillodelinterruptoro.
nOTA: La herramienta no se enciende si se
tira el gatillo del interruptoro sin pulsar el botón
del seguro de apagado primero.
Para apagarlo, suelteelgatillodelinterruptoro(1).
Ajuste del tornillo sujetador fijo adjustable
(FIG 7)
eltornillosujetadorjotienetresposiciones(1)paraelcorte
óptimodeunaampliavariedad,tamañosyformasdemetal..
Véaselagura7.
Siempre use el tornillo sujetador jo en la posición más
adecuada que le permita realizar un corte completo del
material.
Para mover el tornillo sujetador fijo, proceda de
la siguiente manera
1.Aojelosdostornilloshexagonales(2)sobrelaplacapara
eltornilloconlallavesuministrada.
2.Retirelosdostornillosdecabezahexagonal(2).
3.Coloquelaplacaparaeltornillosujetadoralaposicióndeseada.
4.Reinstalarlosdostornilloshexagonales(2)yaprietebien.
Cortes en ángulos (FIG 7)
Lamáquinapermitealusuariocortarángulos0-45°izquierday0-30°derecha.
Para cambiar el ángulo de la placa del tornillo sujetador
1.Aojelosdostornilloshexagonales(2)sobrelaplacaparaeltornilloconlallavesuministrada.No
quitelostornillos
2.Girelaplacadeltornillosujetadorhastaelángulodeseado.
3.Vuelvaaapretarlosdostornilloshexagonales(2).
Prensa de tornillo de liberación rápida de sujeción (FIG 8)
estaherramientaestáequipadaconunprensadetornillodeliberaciónrápidadesujecióndefácily
rápidodesujecióndelmaterial.Levantelapalanca(1)paraelmovimientorápidodeprensa.Bajela
palancaygiraralamanivela(2)paralapiezadetrabajodesujeción.
1
2
FIg 6
FIg 7
1
2
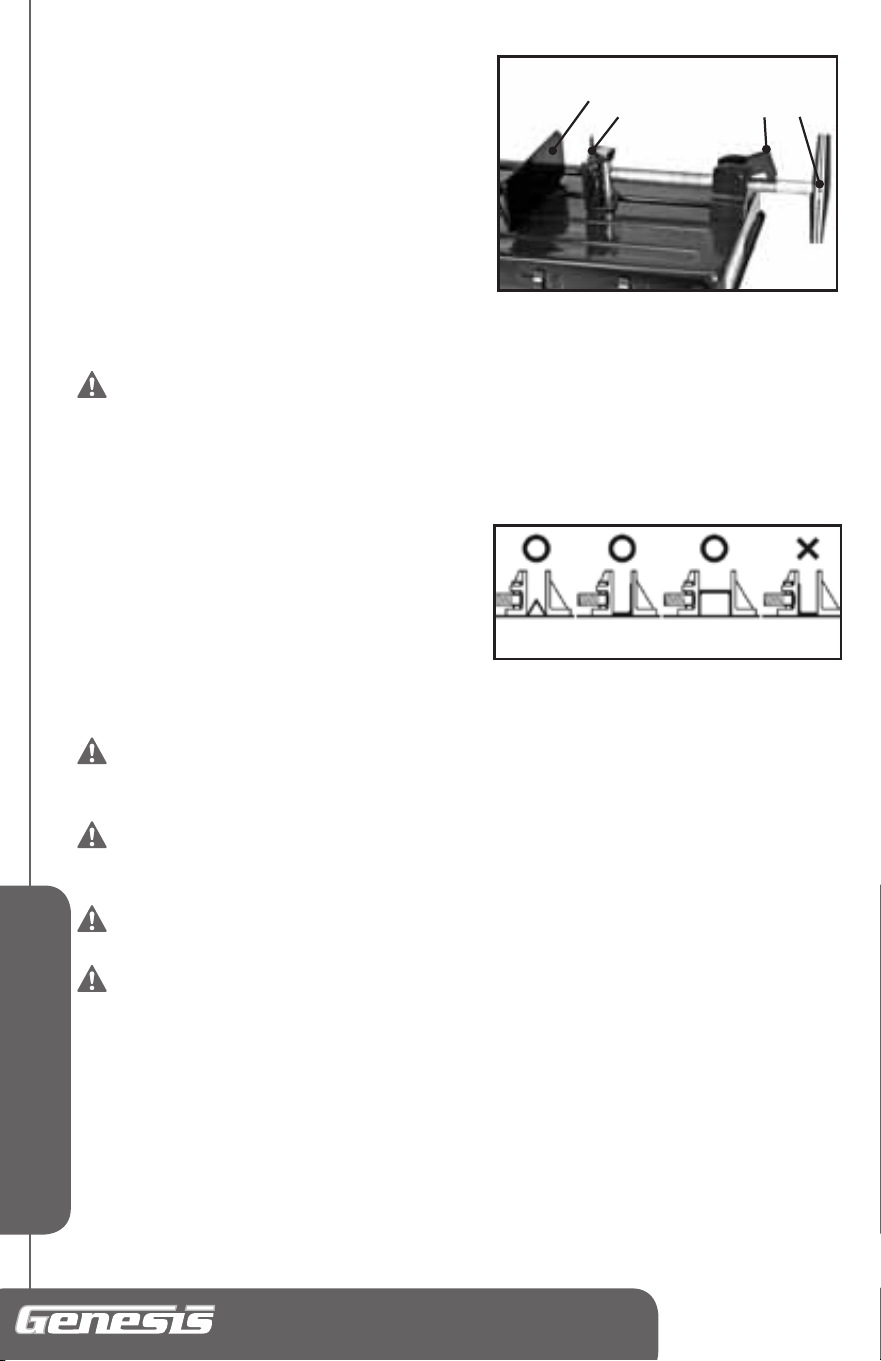
Español
Sierra de corte abrasiva de 355mm (14 pulg)
Manual del Operario GMCS140
1.Coloqueelmaterialdelapiezaentre la placa de
tornillosujetador(3)yeltope(4).
2.Levantelapalancadeliberaciónrápida(1)yempuje
lamaniveladelamanija(2)paraqueelvicioplaca
(3)ligeramente en contacto con el material dela
piezadetrabajo.Acontinuación,bajelapalancade
liberaciónrápida(1)haciaabajo,yjermementela
piezadetrabajodematerialenlaposición,girando
lamanivelaensentidohorario.
3.Cuando haya terminadode hacerelcorte,gireel
mangodeltornillo2ó3vecesensentidocontrarioa
lasagujasdelrelojparaaojareltornillodebanco,y
retireelmaterialdelapiezadetrabajo.
ADVERTEnCIA: Siempre fije bien la palanca de liberación rápida en
las roscas deltornillo para evitar la posibilidad de que la pieza de trabajo salga
despedida del tornillo sujetador y cause daños en la hoja abrasiva o lesiones
personales.
Sujeción de la pieza (FIG 9)
Coloquelapiezaentrelasplacasdetornillosujetador
quesiatasco,lahojaabrasivanotiendeamoverla
piezaenlaprensa.Véaselafig.9parasusujeciónde
referencia.
engeneral,lahojadesierracortemásecientesilahoja
desierradecorteabrasivoeslasecciónmásdelgada.
Operación de corte básico
ADVERTEnCIA: Siempre use anteojos de seguridad al manejar la
sierra. Para reducir el riesgo de quemaduras por el contacto con el corte
caliente de piezas de trabajo, utilizar guantes protectores.
ADVERTEnCIA: Siempre utilice la tornillo sujetador para asegurar
la pieza. Siempre desenchufe la sierra de la fuente de alimentación antes de
realizar cualquier ajuste.
ADVERTEnCIA: Nouseningúntipodelubricantedecorteconesta
herramienta.
ADVERTEnCIA: Esta sierra sólo está diseñado para corte en seco.
El incumplimiento de esta advertencia puede resultar en lesiones personales
graves.
1.enciendaelinterruptoryveriquequelahojadelasierraabrasivaestégirandoamáximavelocidad,
bajeelmangolentamenteyacerquelacuchillaalapiezadetrabajo.
2.Cuandolahojade lasierraabrasivaestéencontactocon lapiezadetrabajo,empuje elmango
lentamentehaciaabajoparainiciarelcorte.
3.Apliquepresiónsuaveyconstante(Nofuerce)durantetodoeltiemporestantedelcorte.
PRECAUCIÓn: Nunca aplique presión en exceso o fuerce la hoja sobre el
material. Forzar la hoja podría hacer que la hoja se sobrecaliente o se dañe.
FIg 9
FIg 8
1 2
3
4

39
Español
4. Cuando haya nalizado el corte (ola profundidadde corte deseado),levante el mangohasta la
posicióninicial.
5.Apagueelinterruptordespuésdeterminarcadaoperacióndecorteyespereaquelahojadelasierra
sedetengacompletamenteantesdeprepararlaparalasiguienteoperación.
MAnTEnIMIEnTO
LIMPIEZA
eviteelempleodesolventesallimpiarpiezasdeplástico.Lamayoríadelosplásticossonsusceptibles
adiferentestiposdesolventescomercialesypuedenresultardañados.utilicepañoslimpiospara
eliminarlasuciedad,elpolvo,elaceite,lagrasa,etc.
ADVERTEnCIA: Nopermitaenningúnmomentoqueuidospara
frenos, gasolina, productos a base de petróleo, aceites pen¬etrantes, etc.,
lleguen a tocar las piezas de plástico. Las sustancias químicas pueden
dañar, debilitar o destruir el plástico, lo cual a su vez puede producir lesiones
corporales serias.
Lasherramientaseléctricasqueseutilizanenmaterialesdebradevidrio,panelesdeyesopara
paredes,compuestosderesanaroyeso,estánsujetasadesgasteaceleradoyposiblefalloprematuro
porquelaspartículasylimadurasdebradevidriosonaltamenteabrasivasparaloscojinetes,
escobillas,conmutadores,etc.Porconsiguiente,norecomendamoselusodeestaherramientadurante
períodosprolongadosdetrabajoenestostiposdemateriales.Sinembargo,siustedtrabajacon
cualquieradeestosmateriales,essumamenteimportantelimpiarlaherramientaconairecomprimido.
LUBRICACIÓN
Suherramientaspermanentementelubricadoenlafábricaynorequierenlubricaciónadicional.
gARAnTÍA DE DOS AÑOS:
esteproductoestágarantizadocontradefectosdematerialydefabricacióndurante2añosapartir
delafechadecompra.estagarantíalimitadanocubreeldesgastenormalodañospornegligencia
oaccidente.elcompradororiginalestácubiertoporestagarantíaynoestransferible.Antesde
devolverlosuherramientaparaalmacenarlaubicacióndelacompra,porfavorllamegratisala
líneadeayudaparalasposiblessoluciones.ESTE PRODUCTO NO ESTÁ GARANTIZADO SI SE
UTILIZA PARA PROPÓSITOS INDUSTRIALES O COMERCIALES.
LOS ACCESORIOS INCLUIDOS CON ESTE JUEGO NO TIENEN 2 AÑOS DE GARANTÍA.
LÍnEA DE AYUDA gRATUITA:
ParapreguntasacercadeesteocualquierotroproductoGeNeSISLlamegratuitamentealteléfono:
888-552-8665.(Mon.-fri9:00am-4:30pmeST.)
Ovisitenuestrositioweb:www.richpowerinc.com

Richpower Industries, Inc.
736 Hampton Road
Williamston, SC USA
www.richpowerinc.com