
USER MANUAL
PORTABLE OR MOUNTABLE
PANEL HEATER
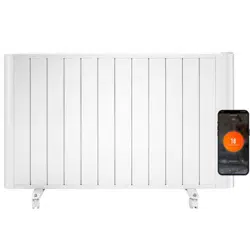
EAH20LEDWB EAH20LEDWW
Thank you for choosing electriQ
Please read the manual before using this heater
and keep it safe for future reference.
Visit our page, www.electriQ.co.uk, for our entire product range.
2

3
CONTENTS
SAFETY WARNINGS
4
PARTS
6
ATTACHING THE FEET
6
WALL INSTALLATION
6
OPERATION
8
SETTING UP THE APP
9
CLEANING AND STORAGE
15
TECHNICAL SPECIFICATION
15
TROUBLESHOOTING
15
SUPPORT
17
PRODUCT FICHE
19

4
SAFETY INSTRUCTIONS
IMPORTANT
• Carefully read the instructions before operating the unit
• This appliance is for indoor use only.
• Rating: This unit must be only connected to a 220-240 V / 50 Hz earthed outlet.
• Installation must be in accordance with the regulations of the country where the unit is used.
• All national regulations concerning the discharge of air must be fulfilled.
• If you have any doubt about the suitability of your electrical supply, have it checked and, if
necessary, modified by a qualified electrician.
• This heater has been tested and is safe to use. However, as with any electrical appliance - use it
with care.
• Joists, beams and rafters shall not be cut or notched to install the appliance.
• Disconnect the power from the unit before dismantling, assembling or cleaning.
• Avoid touching any moving parts within the appliance.
• Never insert fingers, pencils or any other objects through the guard.
• This appliance is not intended for use by persons (including children) with reduced physical,
sensory or mental capabilities or lack of experience and knowledge unless they have been given
supervision or instruction concerning the use of the appliance by a person responsible for their
safety.
• Children aged from 3 years and less than 8 years shall only switch on/off the appliance provided
that it has been placed or installed in its intended normal operating position. They have been given
supervision or instruction concerning the use of the appliance in a safe way and understand the
hazards involved. Children aged from 3 years and less than 8 years shall not plug in, regulate and
clean the appliance or perform user maintenance.
• Children under 3 years should be kept away unless continuously supervised.
• Children should be supervised to ensure that they do not play with the appliance.
• CAUTION: Some parts of this product can become very hot and cause burns. Particular attention
has to be given where children and vulnerable people are present.
• Do not clean the unit by spraying it or immersing it in water.
• Never connect the unit to an electrical outlet using an extension cord. If an outlet is not available,
a qualified electrician should install one.
• If the supply cord is damaged, it must be replaced by the manufacturer, its service agent, or
similarly qualified persons to avoid a hazard.
• Ensure the power cord is not stretched, exposed to sharp objects or edges, or routed under the
unit.
• Do not use this heater in the immediate vicinity of a bath, shower, or swimming pool.
• do not use this heater if it has been dropped.
• do not use it if there are visible signs of damage to the heater.
• Always ensure the heater is used on a flat-level surface.
• An authorised service representative should perform any service other than regular cleaning.
Failure to comply could result in a voided warranty.
• Never use the plug as a switch to start and turn off the heater. Use the provided power switch on
the rear of the unit.
• CAUTION: In order to avoid a hazard due to inadvertent resetting of the thermal cut-out, this
appliance must not be supplied through an external switching device, such as a timer, or connected
to a circuit that is regularly switched on and off by the utility.
• WARNING: In order to avoid overheating, do not cover the heater. Do not cover the air inlet or
outlet or place items close to the unit, which may restrict airflow, as this may present a heater risk.
• The heater must not be located immediately below a socket outlet.
• Always ensure the unit is secure before operation. Do not use it on unstable or uneven surfaces,
and if it is wall-mounted, it must be securely attached to a suitable wall.

5
• Do not move or tilt the unit.
• Avoid keeping the unit in direct sunlight for a long period of time.
• The heater is designed to be used at temperatures above -20°C. If it is exposed to temperatures
below this, it must be allowed to warm above this level before operation.
• Do not attempt to repair, disassemble or modify the appliance. This unit contains no user-
serviceable parts.
• Always unplug or disconnect the appliance from the mains power supply when not in use or when
moving or cleaning it. Do not pull the cord to unplug the heater.
• Keep the heater clean. Do not allow any object to enter the ventilation or exhaust opening, as this
may cause electric shock, heater, or damage to the heater.
• Do not use the appliance for anything other than its intended use. It is designed for domestic indoor
use only.
• WARNING: Do not use this heater in small rooms when they are occupied by persons not capable
of leaving the room on their own unless constant supervision is provided.
• WARNING: To reduce the risk of the heater, keep textiles, curtains, or any other flammable material
at least 1 m from the air outlet.
• There may be a trace of odour during the first few minutes of initial use or after a period of storage.
This is normal and will quickly disappear.
• This appliance has hot and arcing or sparking parts inside. Please do not use it in areas where
gasoline, paint, or any flammable liquids are used or stored.
• This appliance is not intended for use in bathrooms, laundry areas, or similar humid locations.
Never place it where it may fall into a bathtub or otherwise become exposed to water.
• If the unit is wall-mounted, it must be installed in accordance with current regulations for the area
where it is installed. If unsure, professional advice should be sought.
• WARNING: To reduce the risk of heater or electrical shock, DO NOT use this appliance with any
solid-state Speed Control Device or any variable speed controllers.
• Always ensure the heater is turned off before leaving it unattended.
ENERGY SAVING AND UNIT SAFETY PROTECTION TIP
• Do not cover or restrict the airflow. Please do not use it in a dusty environment.
• For safety and maximum performance, when used as a portable unit, the minimum distance from
a wall or objects should be 50cm.
6
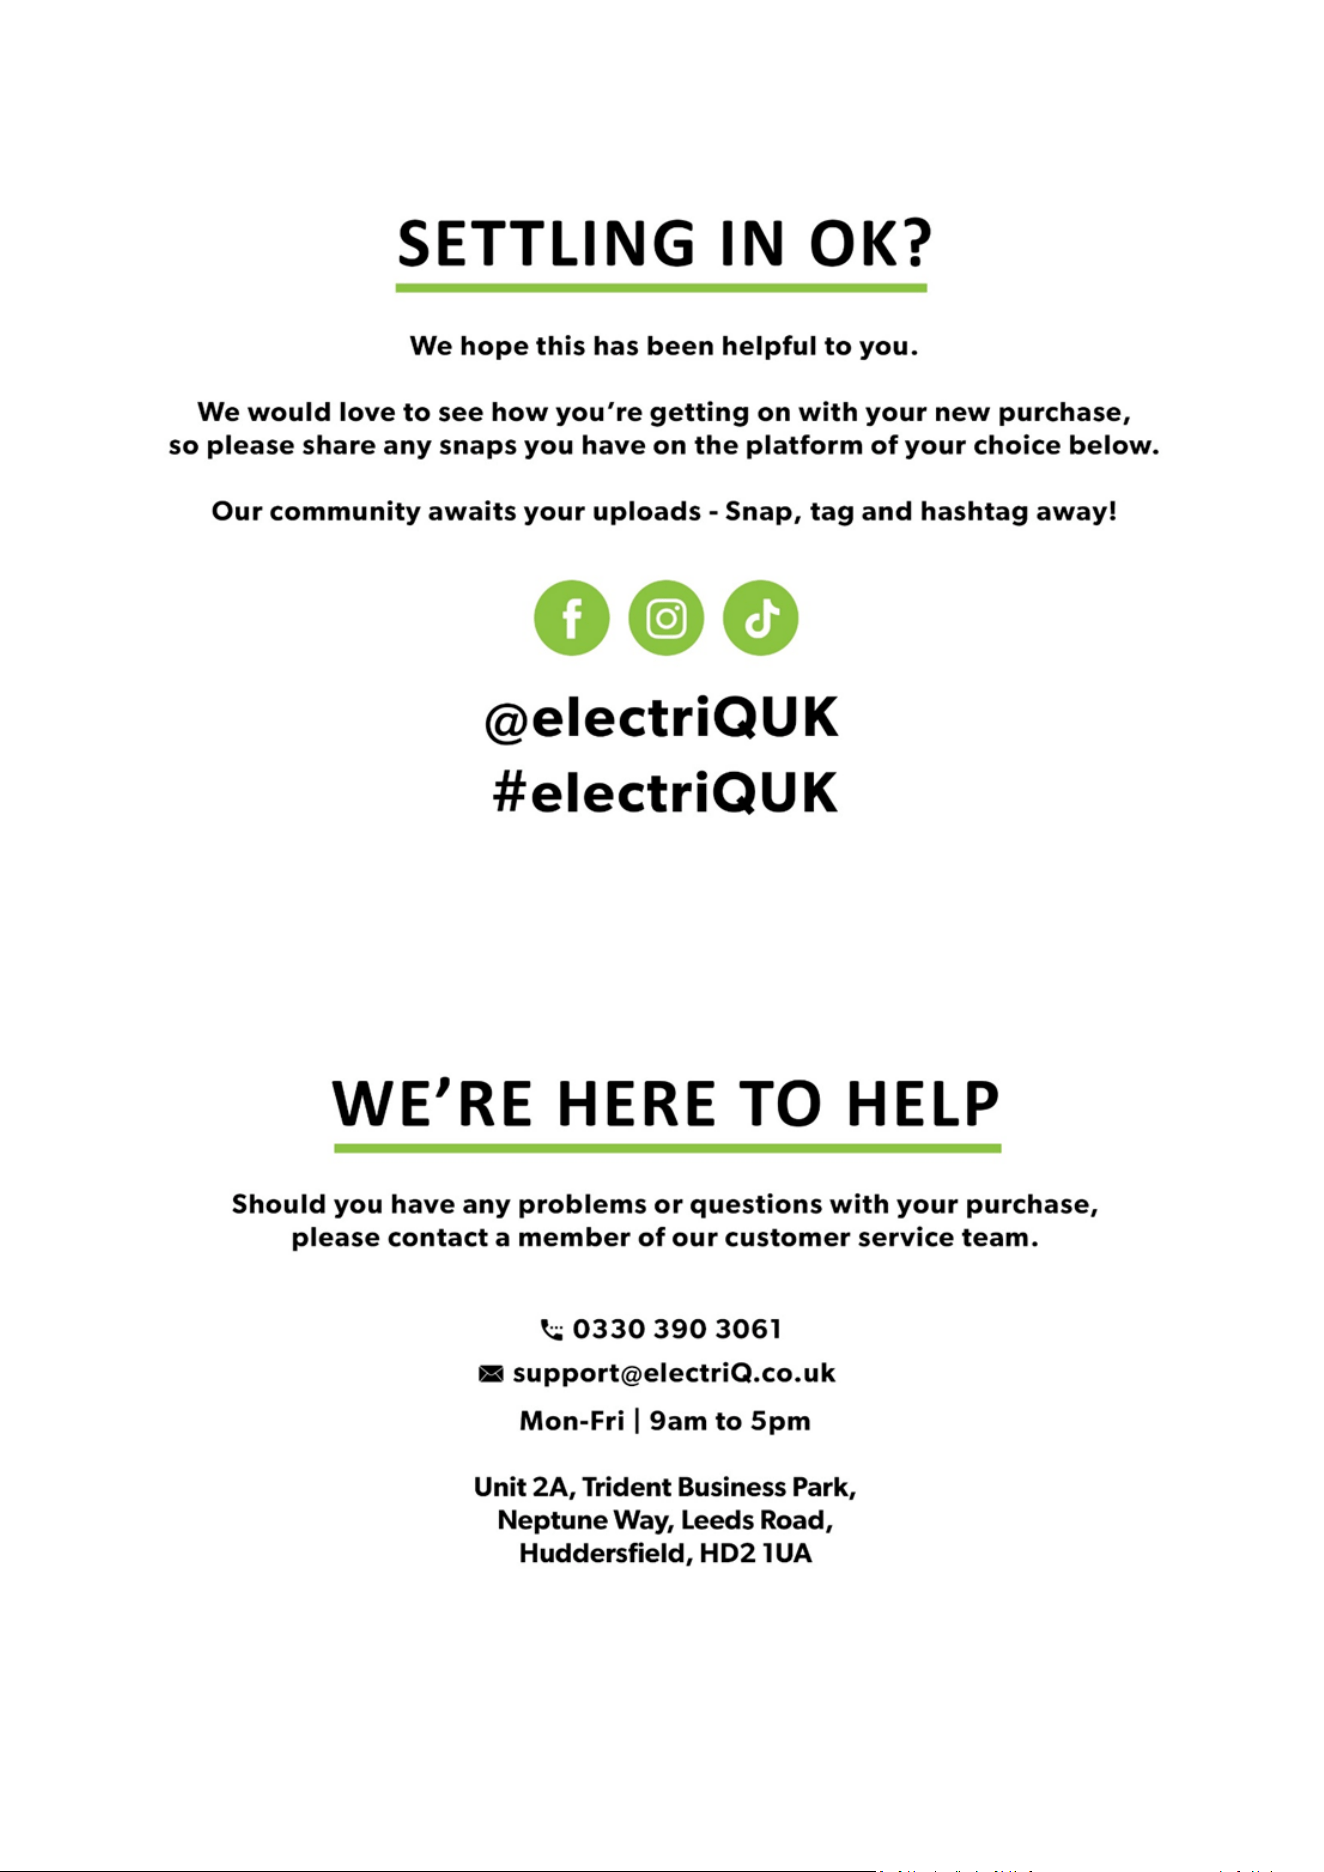
PARTS
NO.
PART
IMAGE
QTY
A Hangers
2
B Plug and Screws
2
C Hook
2
D Plug and Screws
1
E Screws
2
F Screws
4
/
Feet
/
2
ATTACHING THE FEET
1. Rest the heater upside down on a soft cotton cloth or carpet.
2. Fix the feet to the base of the heater using the four screws provided.
3. Line up the holes in the base with the holes in the feet, put the screws
through the holes and tighten with a screwdriver.
NOTE
: This product must be used on the floor with the feet being firmly
attached.
WALL INSTALLATION
Do not install the heater in a bathroom, steam room or
any place where it is consistently exposed to water.
1. Ensure the wall you are mounting on the heater
can support its weight.
2. Mark the drill points on your wall.

7
3. Drill two holes with a diameter of 10mm
and a depth of 60mm. These are for the
support brackets at the bottom of the
heater.
4. Insert the two wall plugs (B) and secure the two
hooks (C) with the two screws (B).
5. Fix the two hangers (A) to the back of the heater with four
screws (E).
6. Hang the heater onto the hooks (C), then mark
where the brackets (A) will be fixed.
7. For the brackets (A), drill two 4mm diameter
holes with a depth of 25mm.
8. Insert the two wall plugs (D) and secure the heater
brackets (A) to the wall with two screws (D).
8
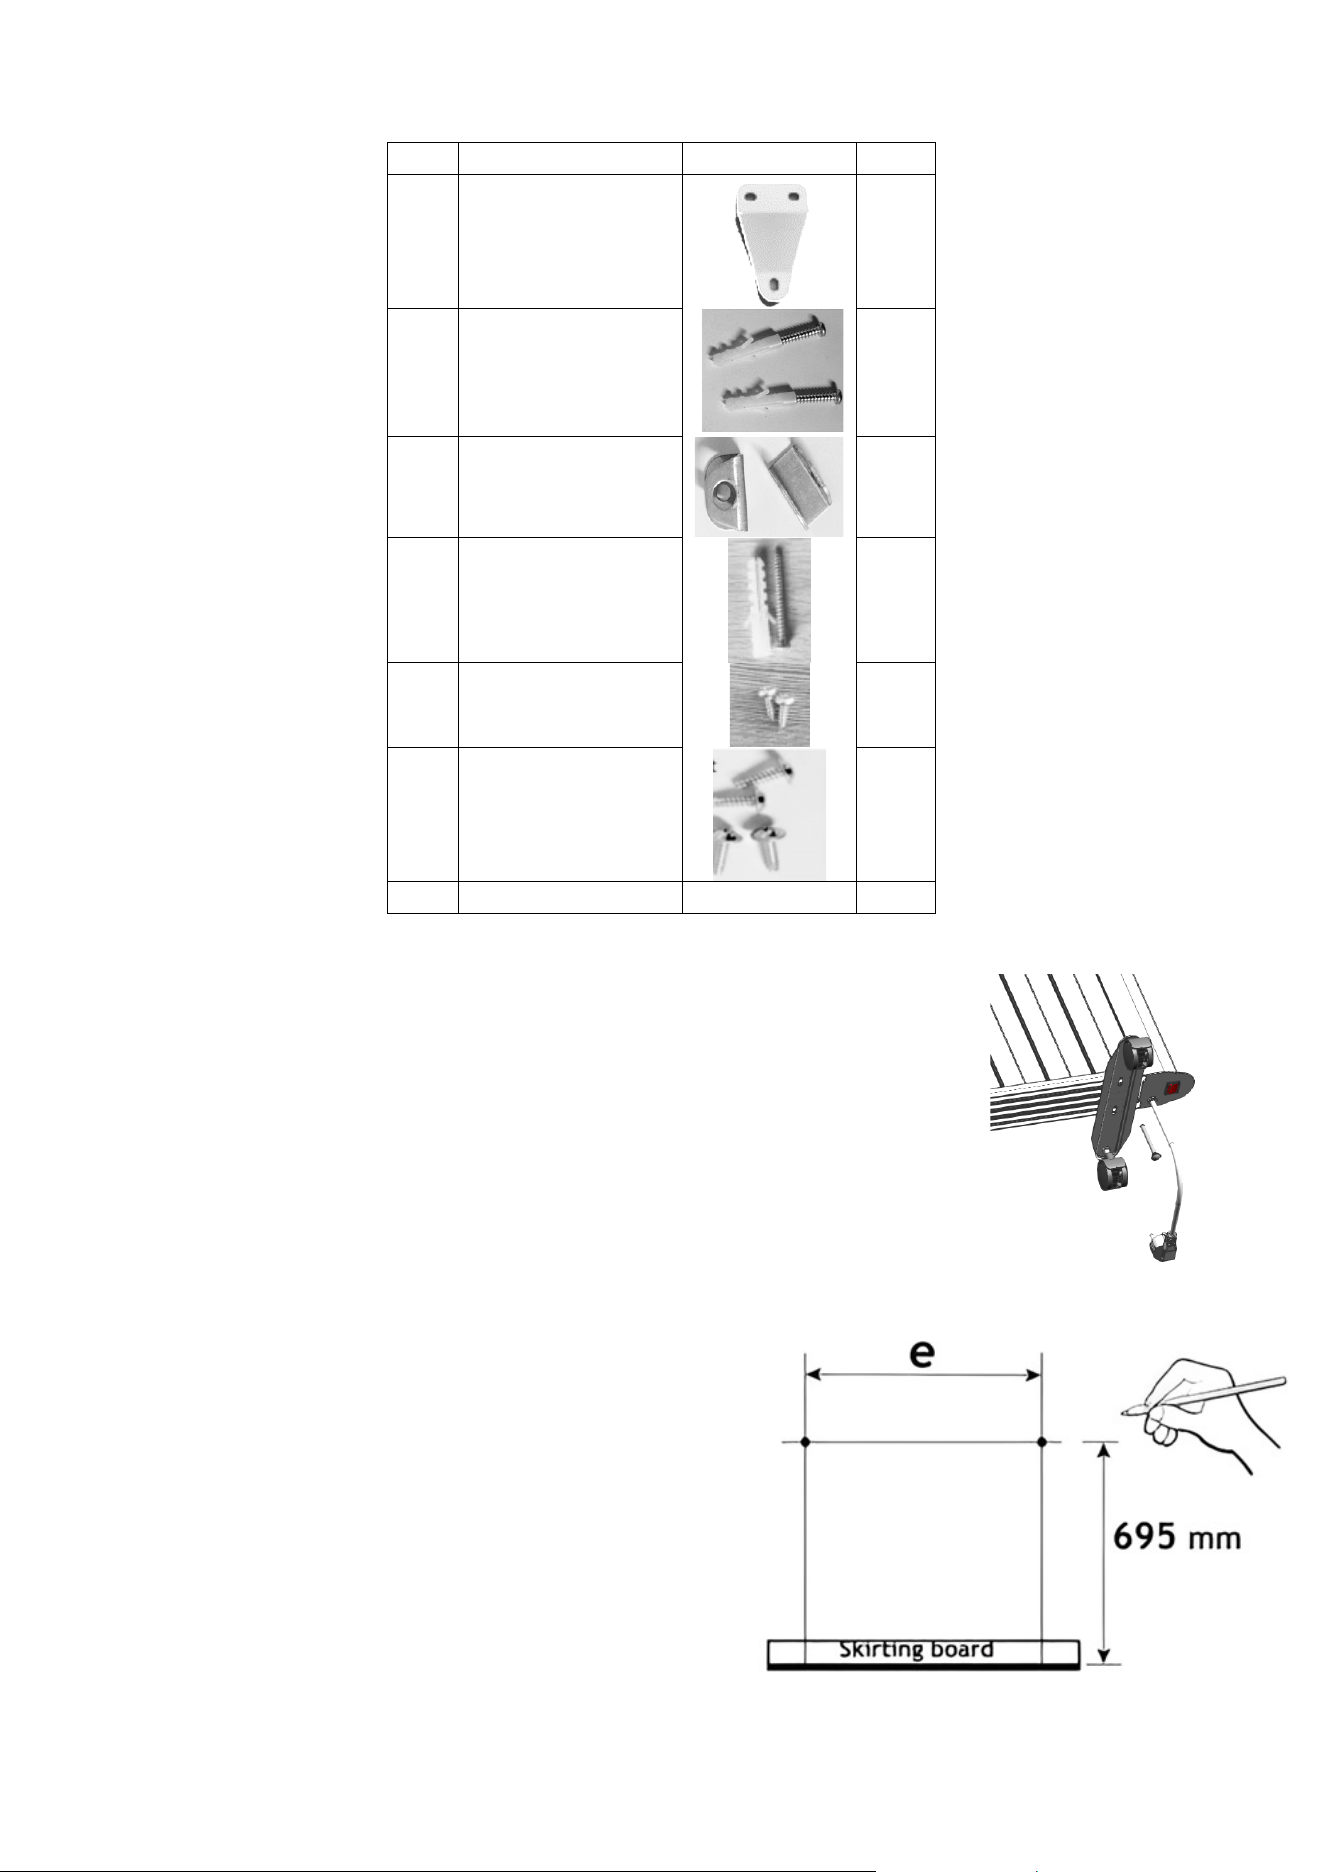
OPERATION
FUNCTION
DESCRIPTION
Power
Press the ON/OFF button once to turn it on and once to turn it off.
When turned on, the display will light up with the current
temperature of the room.
Temperature Selection
Use the increase and decrease buttons to change the desired
temperature in 1-degree increments. The range can be set from 5-
40˚C. The display will show your selection and return to the current
temperature after a few seconds of inactivity. When the target
temperature has been exceeded by 2 degrees, the heater will turn
off.
Timer
Repeatedly press the mode button until the clock lights up on the
display. Use the increase and decrease buttons to set the timer to
turn the unit off for 1-24 hours. The selection will flash for a few
seconds and then switch back to display the current temperature.
The clock icon will remain lit while the timer is in use.
Child Lock
Press the clock button for 3 seconds, and the control panel will lock;
repeat to unlock. The lock will light up when it is locked.
NOTE: The heater will beep with each selection.
ON / OFF button
9
SETTING UP THE WIFI APP
This is designed as a general guide to the setup. There may be differences in the interface and
features available due to product development and features of the model.
BEFORE YOU START
• Ensure your router provides a standard 2.4 GHz connection.
• If your router is dual-band, ensure that both networks have different network names (SSID). Your
router's provider or Internet service provider can provide advice specific to your router.
• Place the device as close as possible to the router during setup.
• Once the app has been installed on your phone, turn off the data connection and ensure your
phone is connected to your router via Wi-Fi.
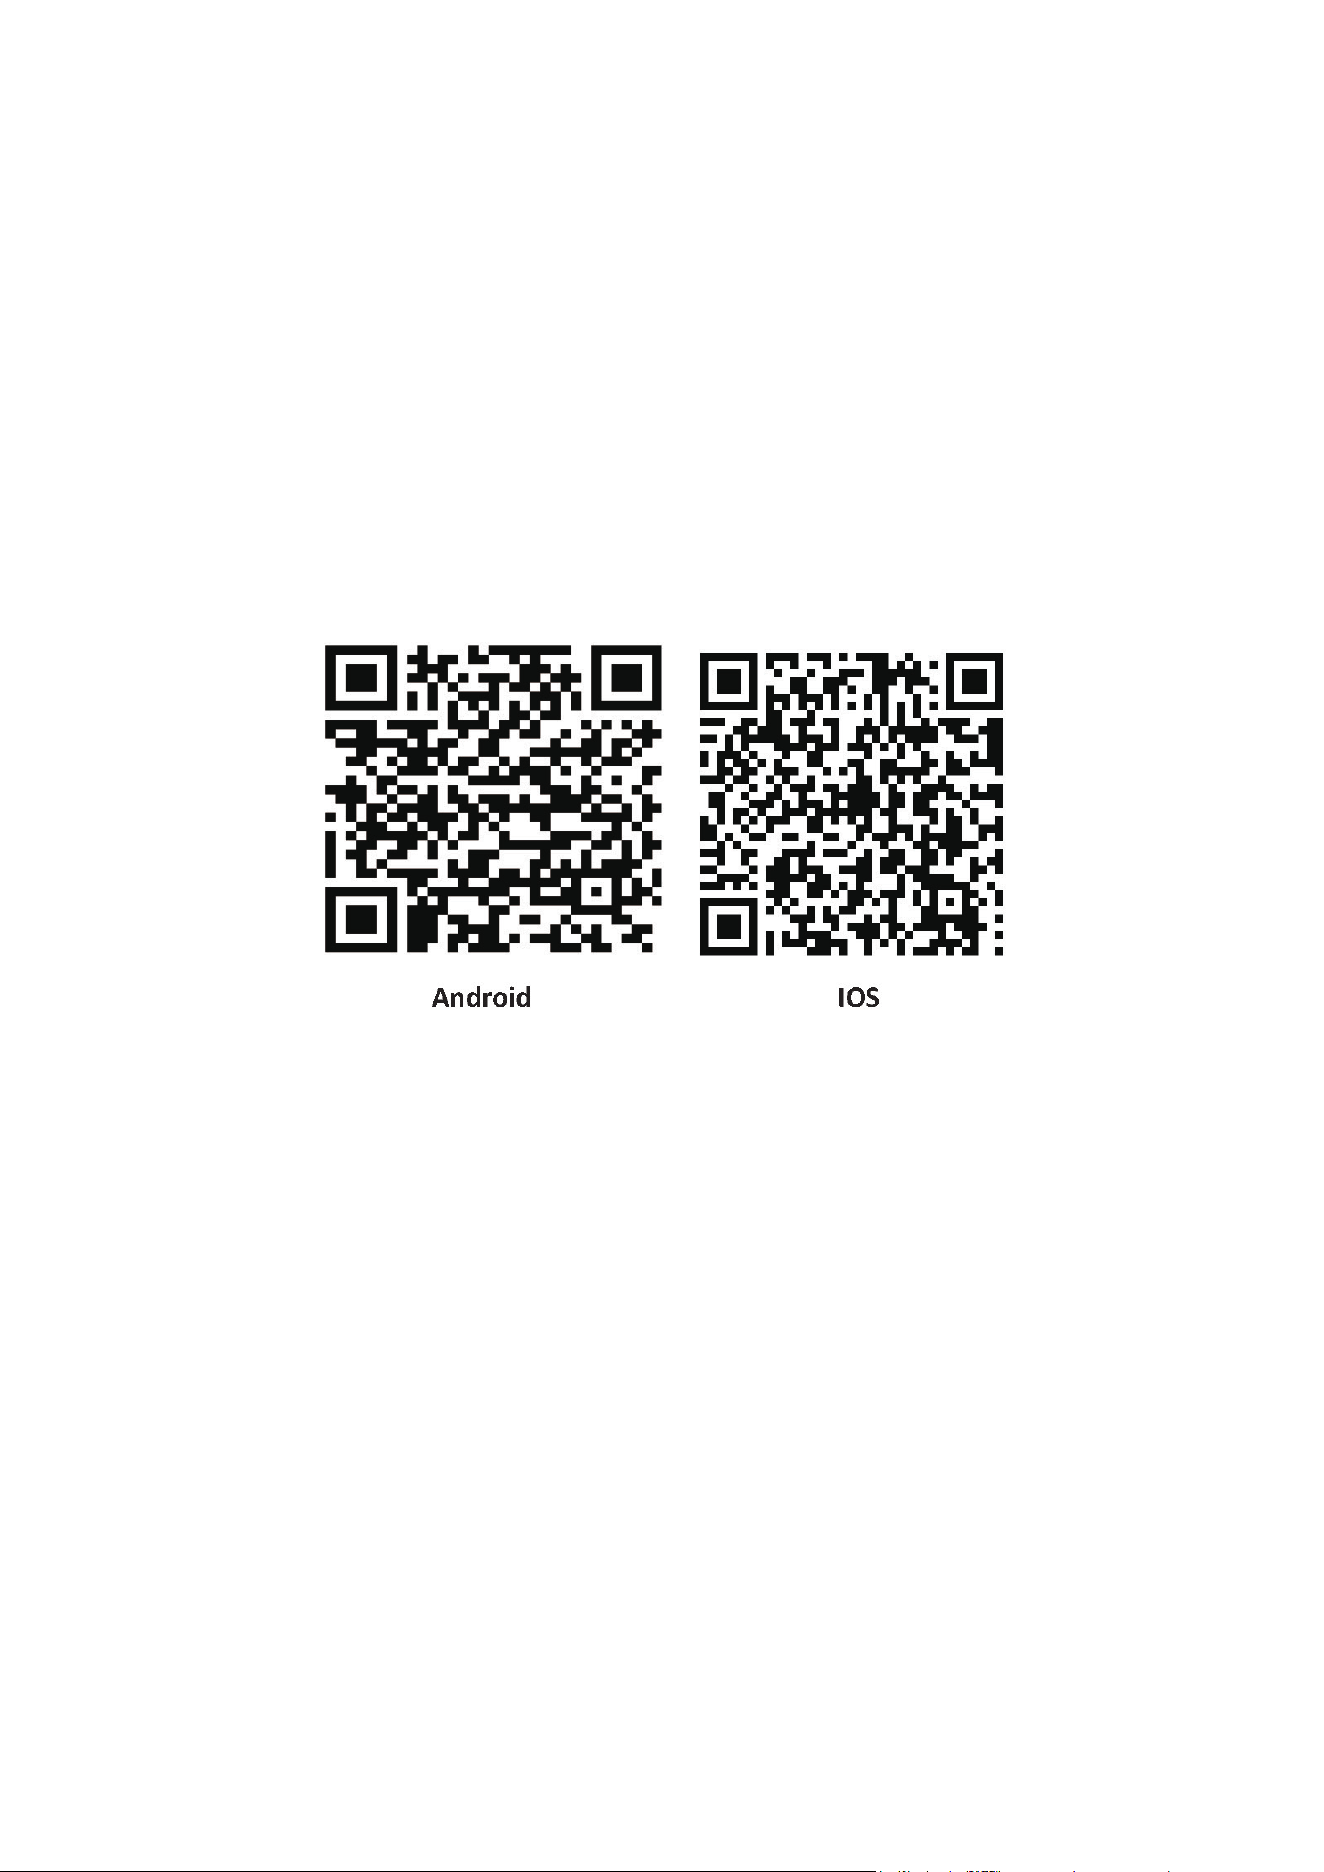
DOWNLOAD THE APP TO YOUR PHONE
You can download the” TUYA SMART” app from your chosen app store by using the QR codes
below or searching for the app in your chosen store.
10
APP CONNECTION
NOTE: Due to continuous product improvement, some images may differ from the current app. You can
download it from the Apple or Google Play Store.
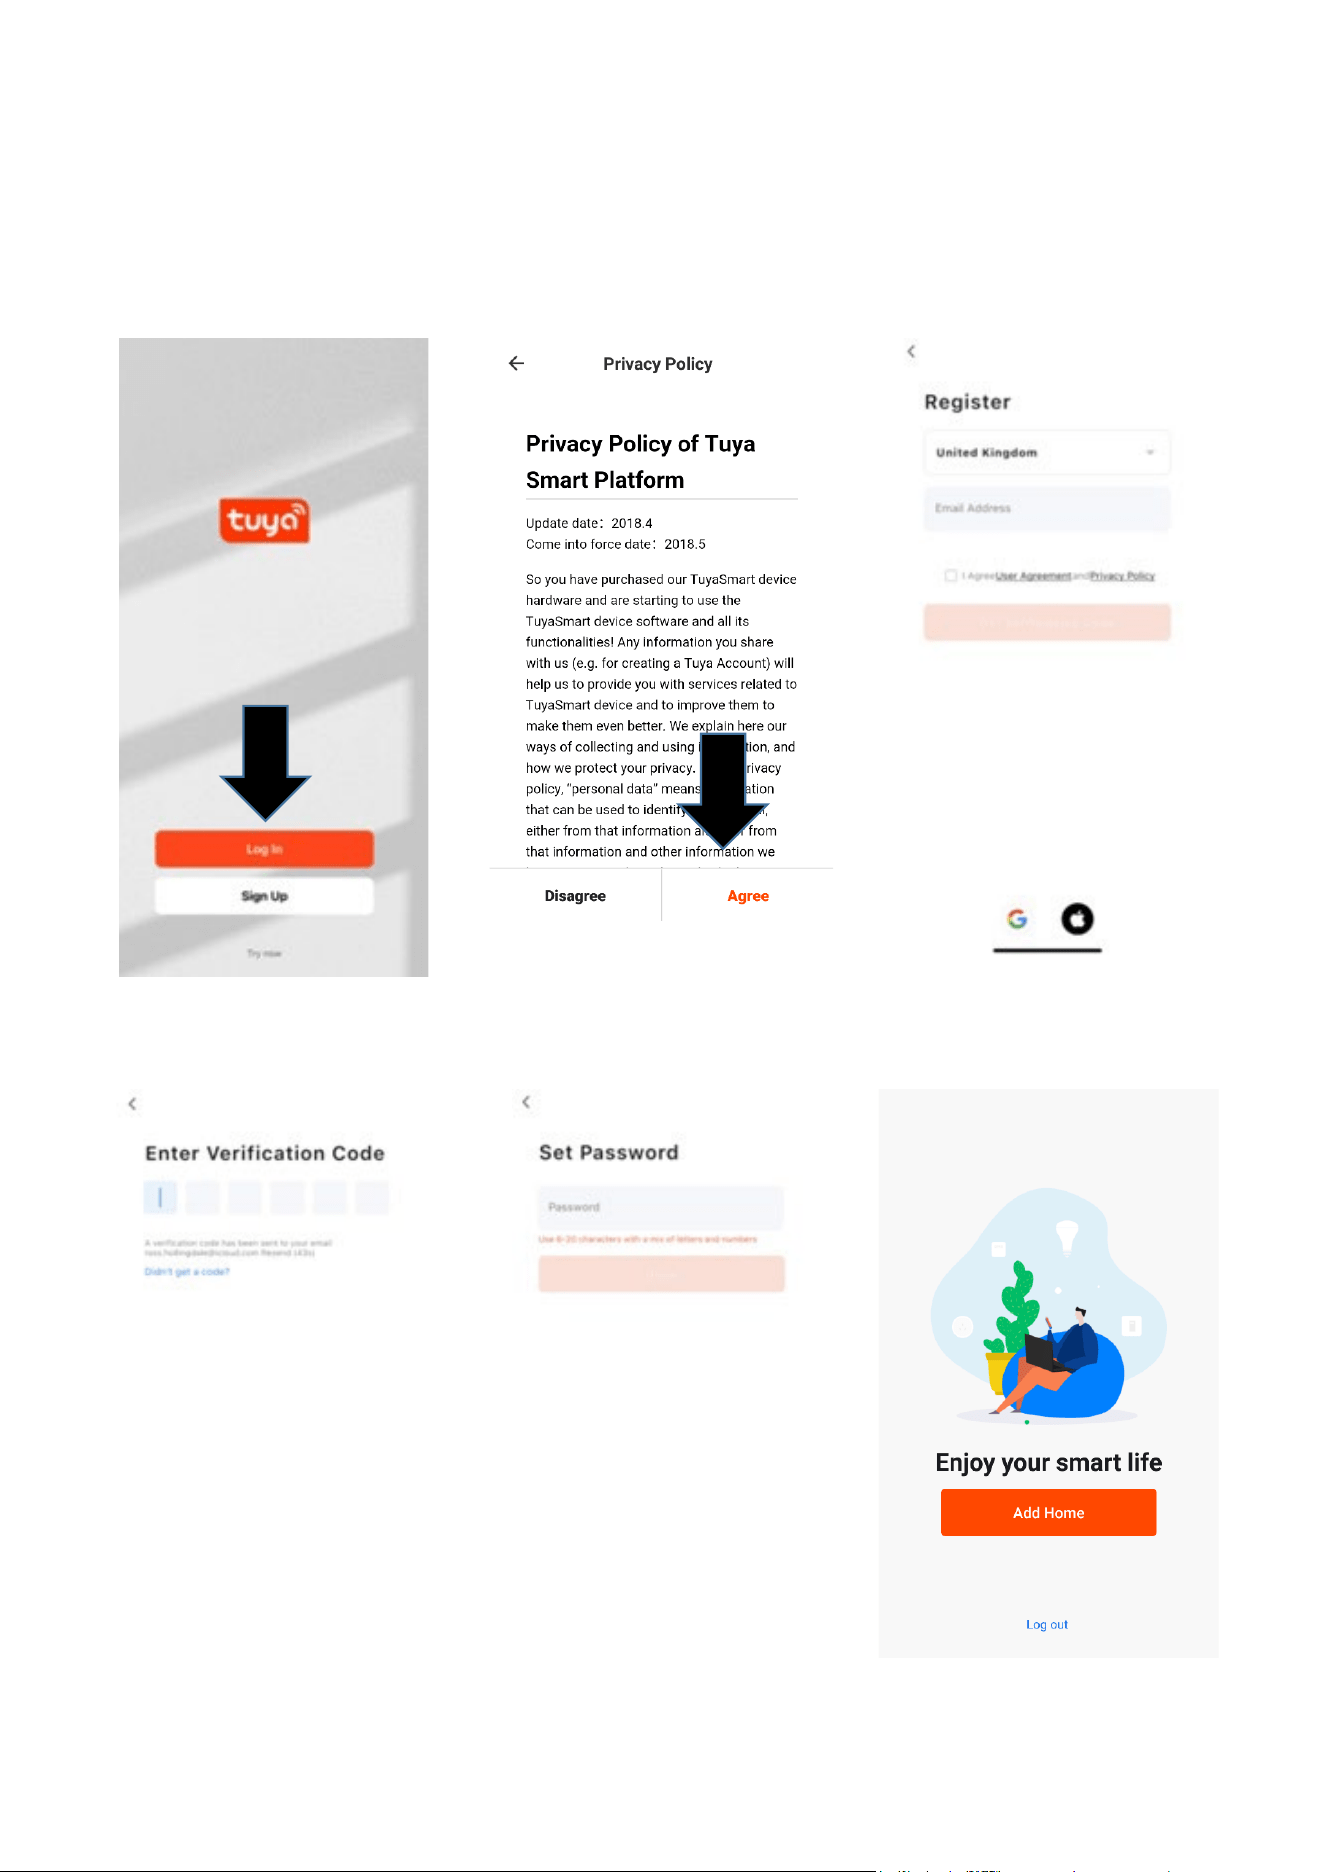
1. Press the register button at
the bottom of the screen.
2. Read the Privacy policy and
press the Agree Button.
3. Enter your email address
or phone number and
press continue to register.
4. A verification code will be sent
using the method selected in
step 3. Enter the code into
the app.
5. Type in the password you
would like to create. This
needs to be 6-20 characters,
with letters and numbers.
6. The app is now registered. It
will automatically log you in
following registration.
11
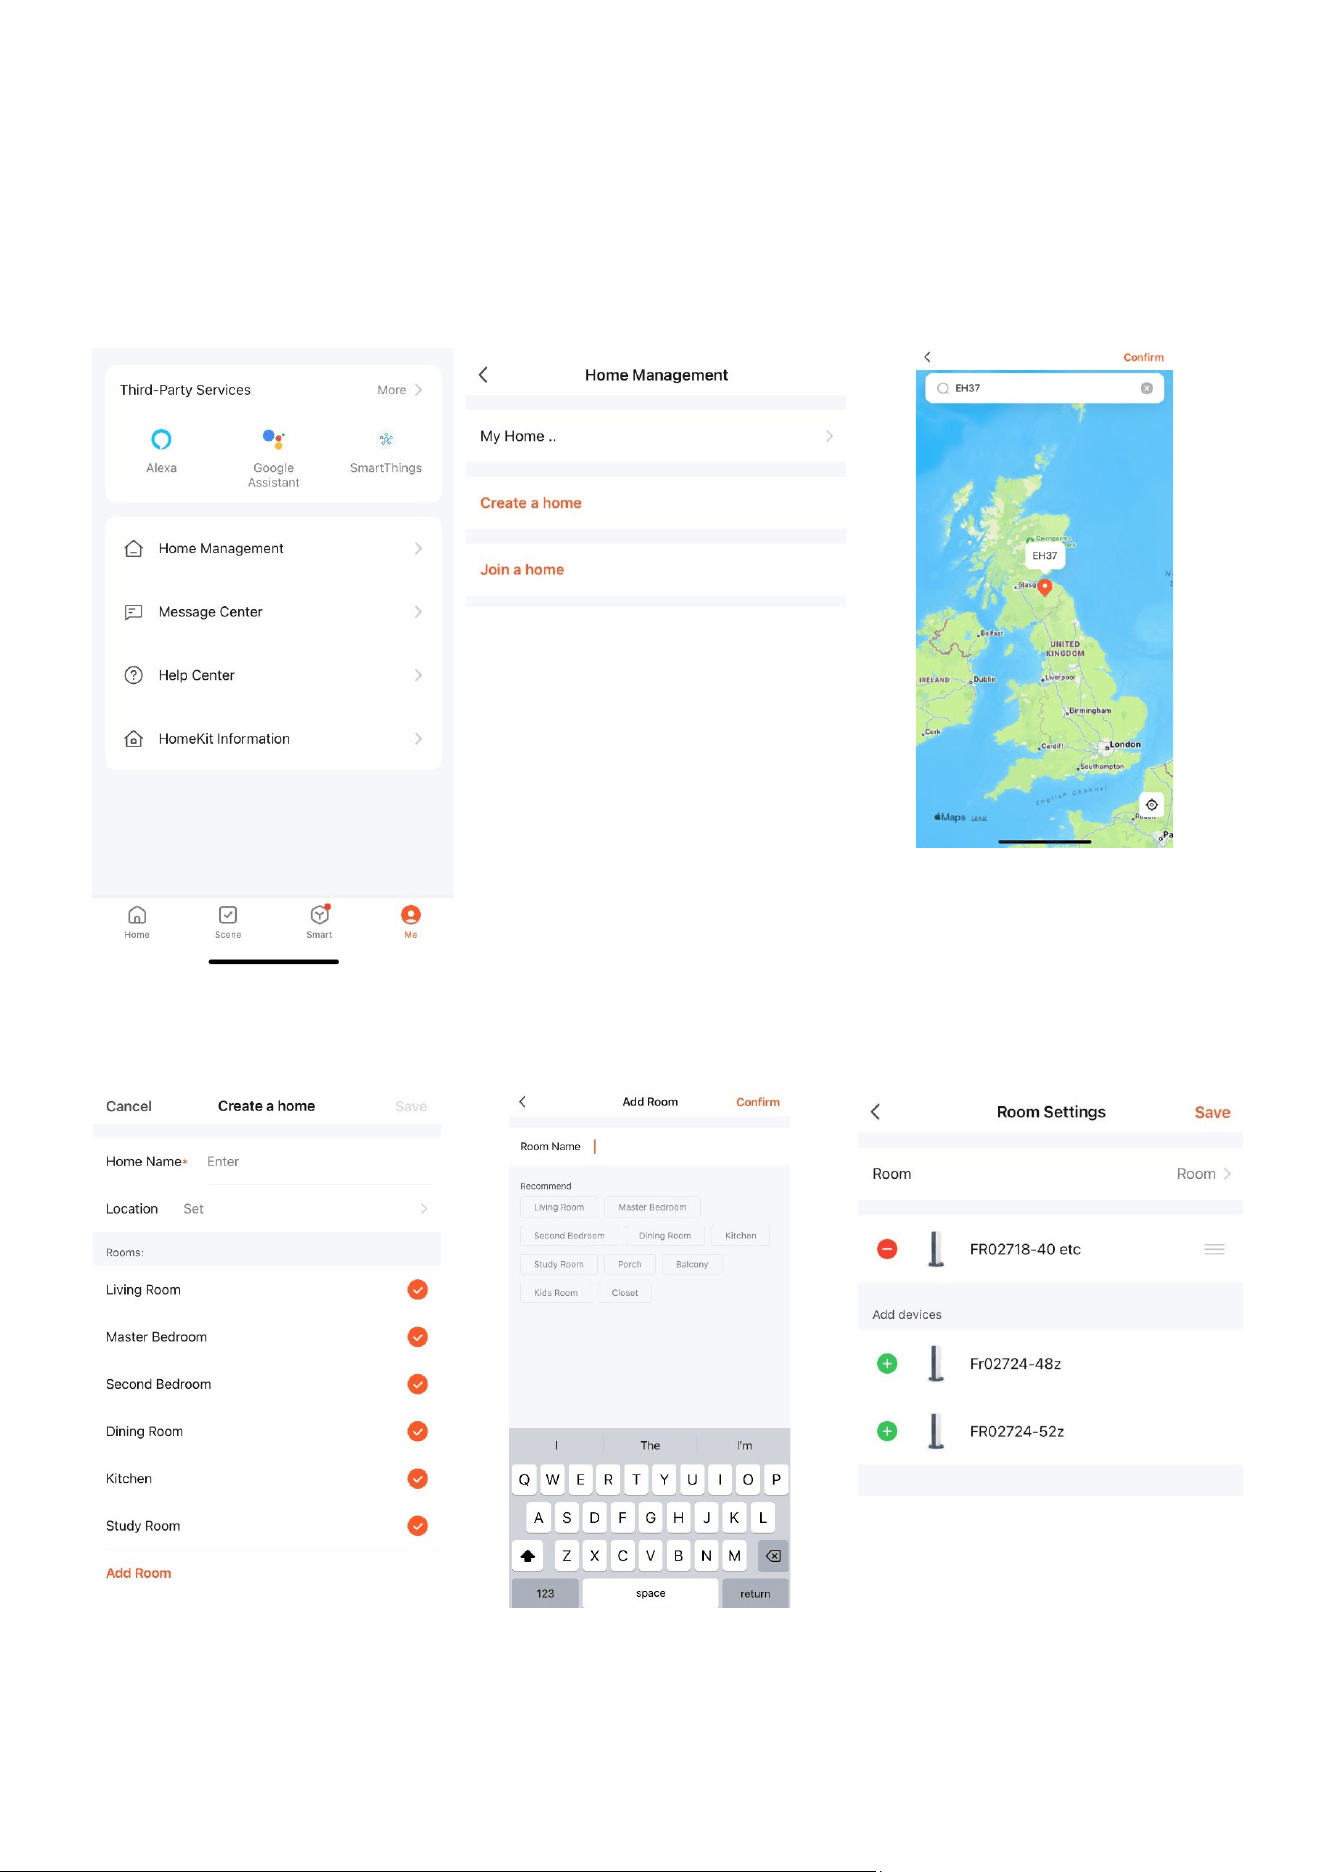
SETTING UP YOUR HOME WITHIN THE APP
The app allows you to have multiple homes, rooms, and devices, so you will need to set up at least one to
get started.
1. Select ‘Me’ at the bottom of
the screen, then ‘Home
Management’.
2. Create and name your home,
join a home or use the home you
have set up already.
3. Select a location to either allow
the app to pinpoint your location
via GPS in your phone settings or
type/ drop the pin on the map.
4. Select your rooms. Untick
any rooms that you do not
need. Click and add a room if
you require more.
5. Add another room and type in
the name or select an option.
Then select confirm.
6. Select the room your unit is in.
Then click on the green cross to
add the device to that room, then
save.
12
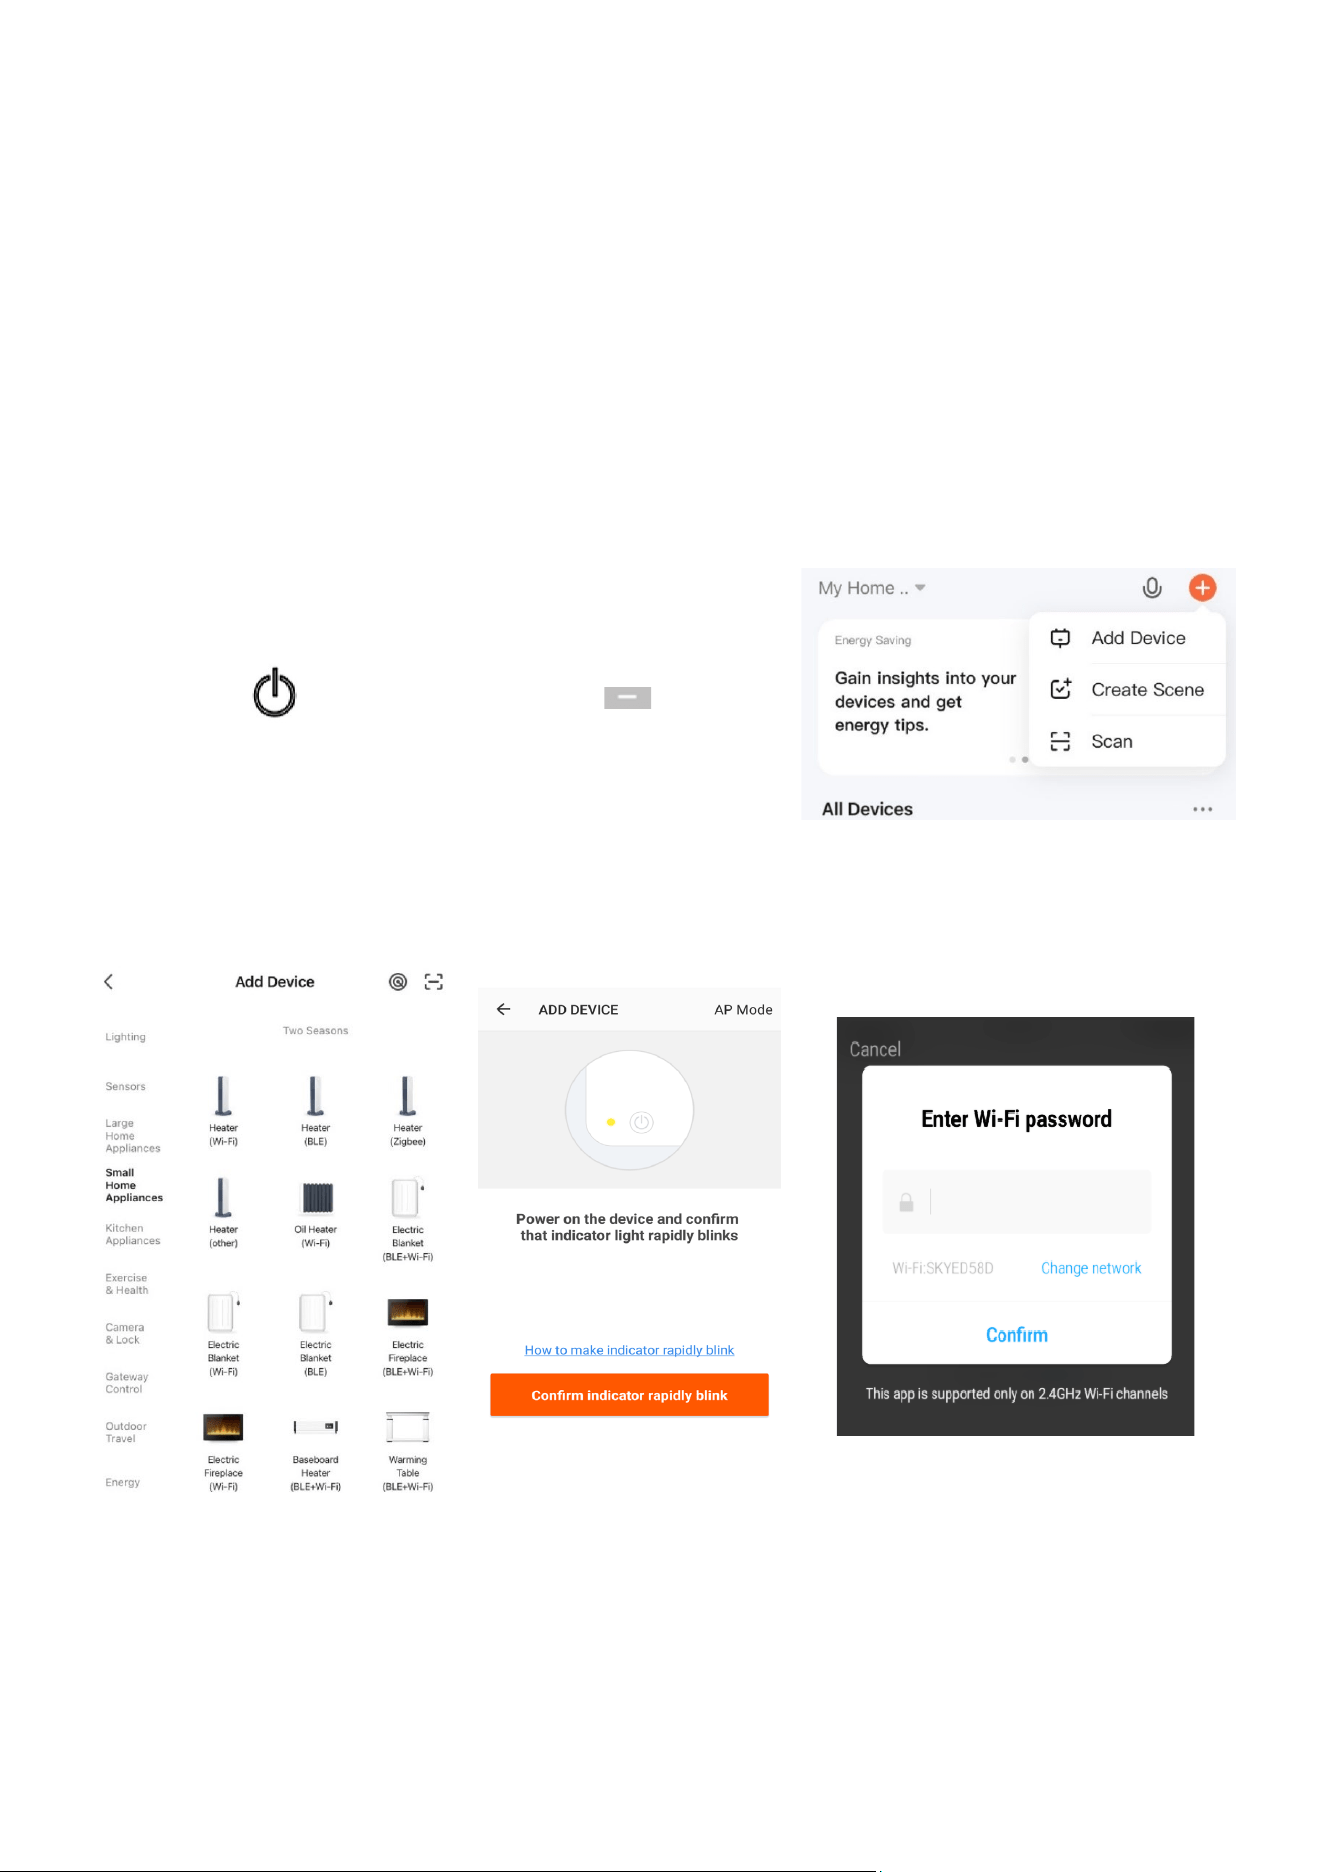
CONNECTING TO THE UNIT
1. Turn the heater on using
the power button.
2
Quick Connection: Hold
down the decrease button
for 3 seconds to turn the
intelligent control on.
Follow the steps in order.
Hotspot Connection:
Alternatively, hold the
button longer for this to
flash slowly. Then, for this
connection mode, follow
step 6, then from step 3.
3. On the app, select the 'Add' button in
the top corner. Then, select 'Add
Device'.
4. Ensure your phone is
connected to the same Wi-Fi as
the unit. Then select 'Small
Home Heaters' and then electric
heaters.
5. Confirm the indicator is
blinking on the app (if it is,
return to step 1 if not).
6. Enter the Wi-Fi password and then
wait for the transfer of the settings to be
completed.
13
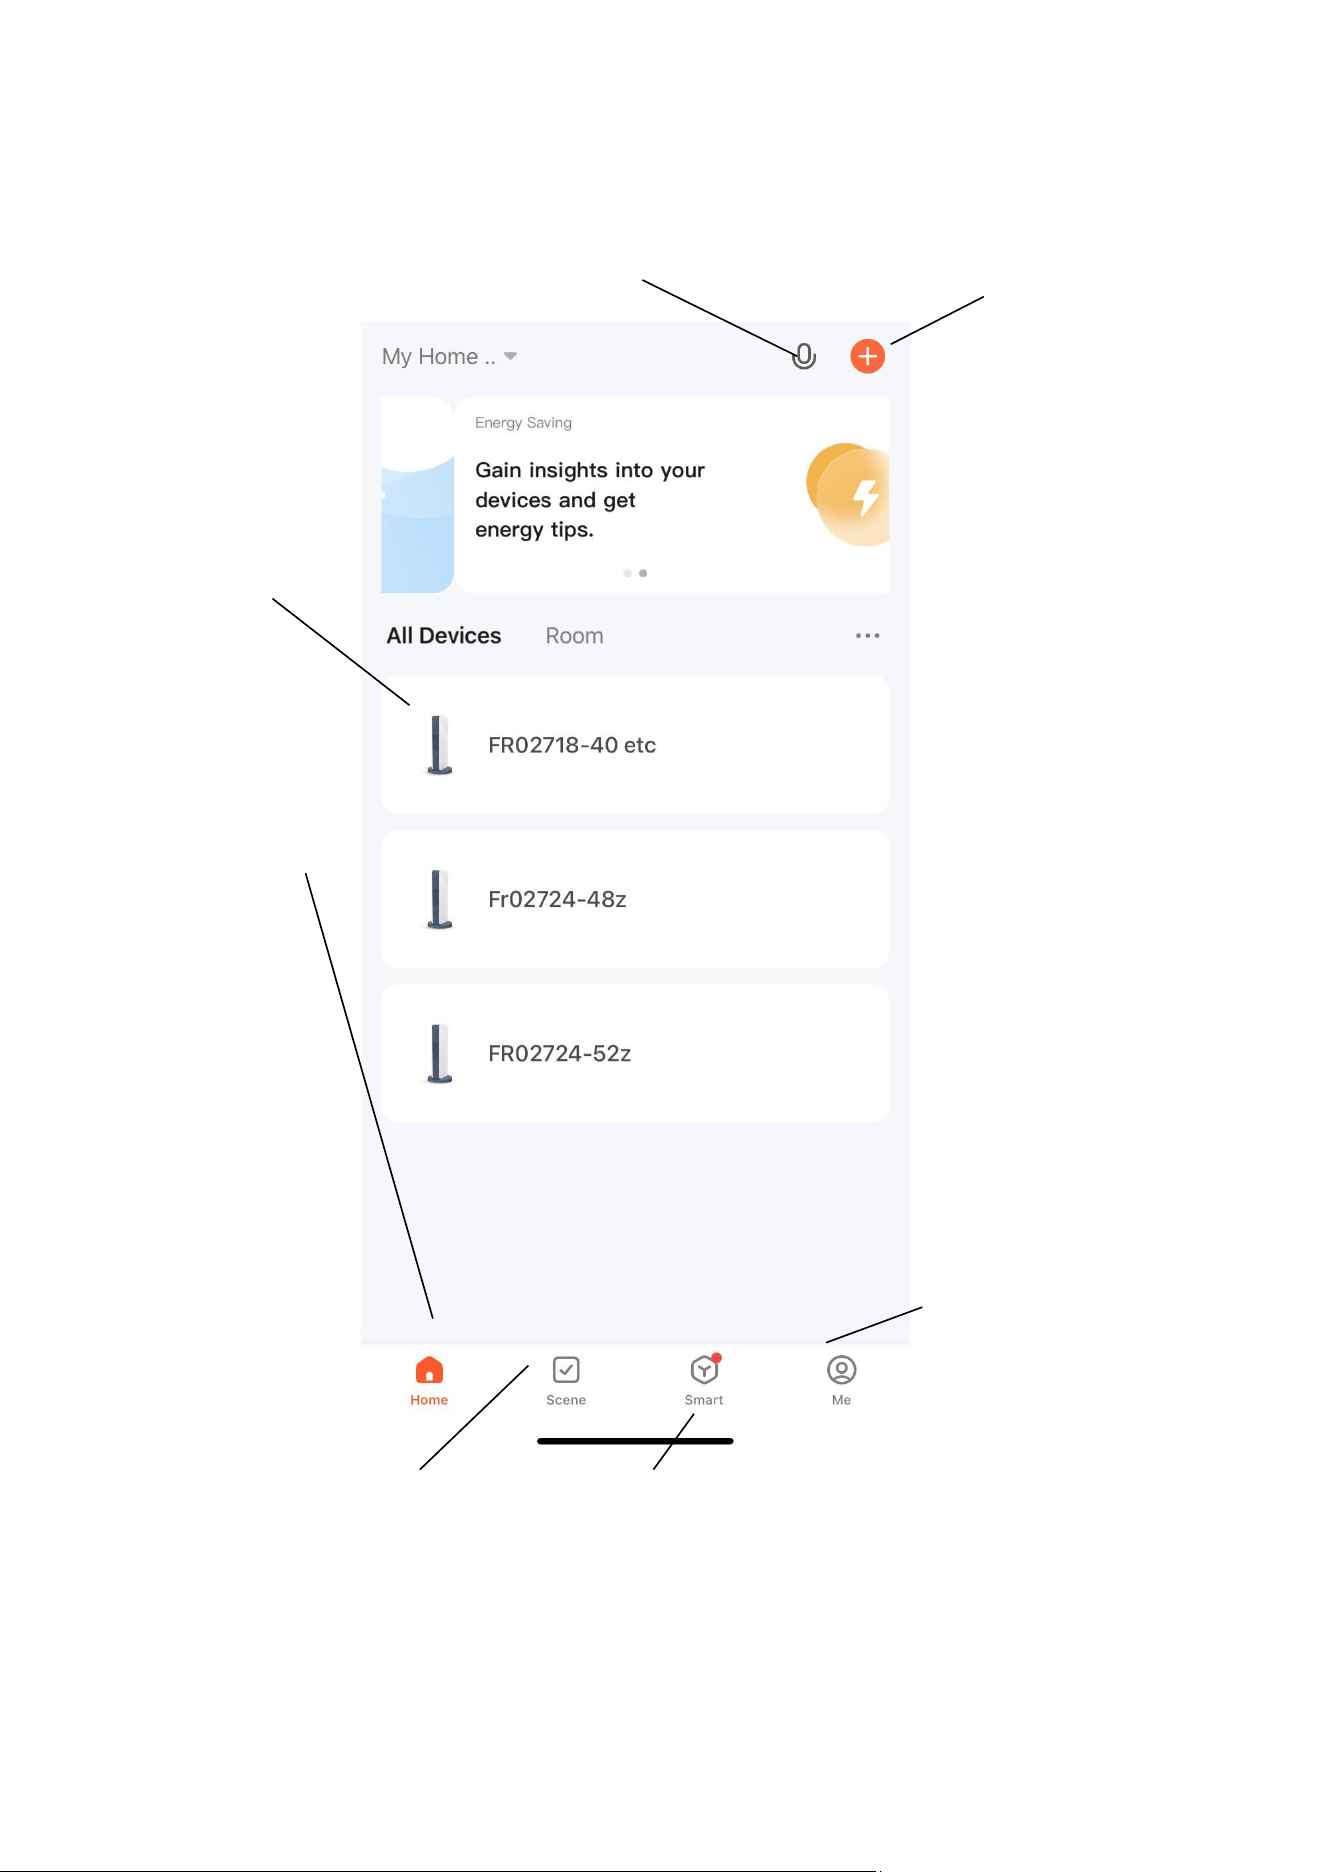
CONTROLLING THE DEVICE VIA THE APP
HOME SCREEN
Add Device: Add a device
to the app and go through
the setup process.
Voice Control: Press to give verbal
instructions for operation.
Name of Heater:
Press to enter the
Device Screen
Home: Return to home
screen from the Smart
Scene and Profile screens
Scene: Allows you to
program intelligent
behaviour based on the
internal and external
environment.
Smart: Shows you smart
insights and allows you to
set up alerts, cameras and
alarms.
Profile: Provides the
option for changing
settings.
14
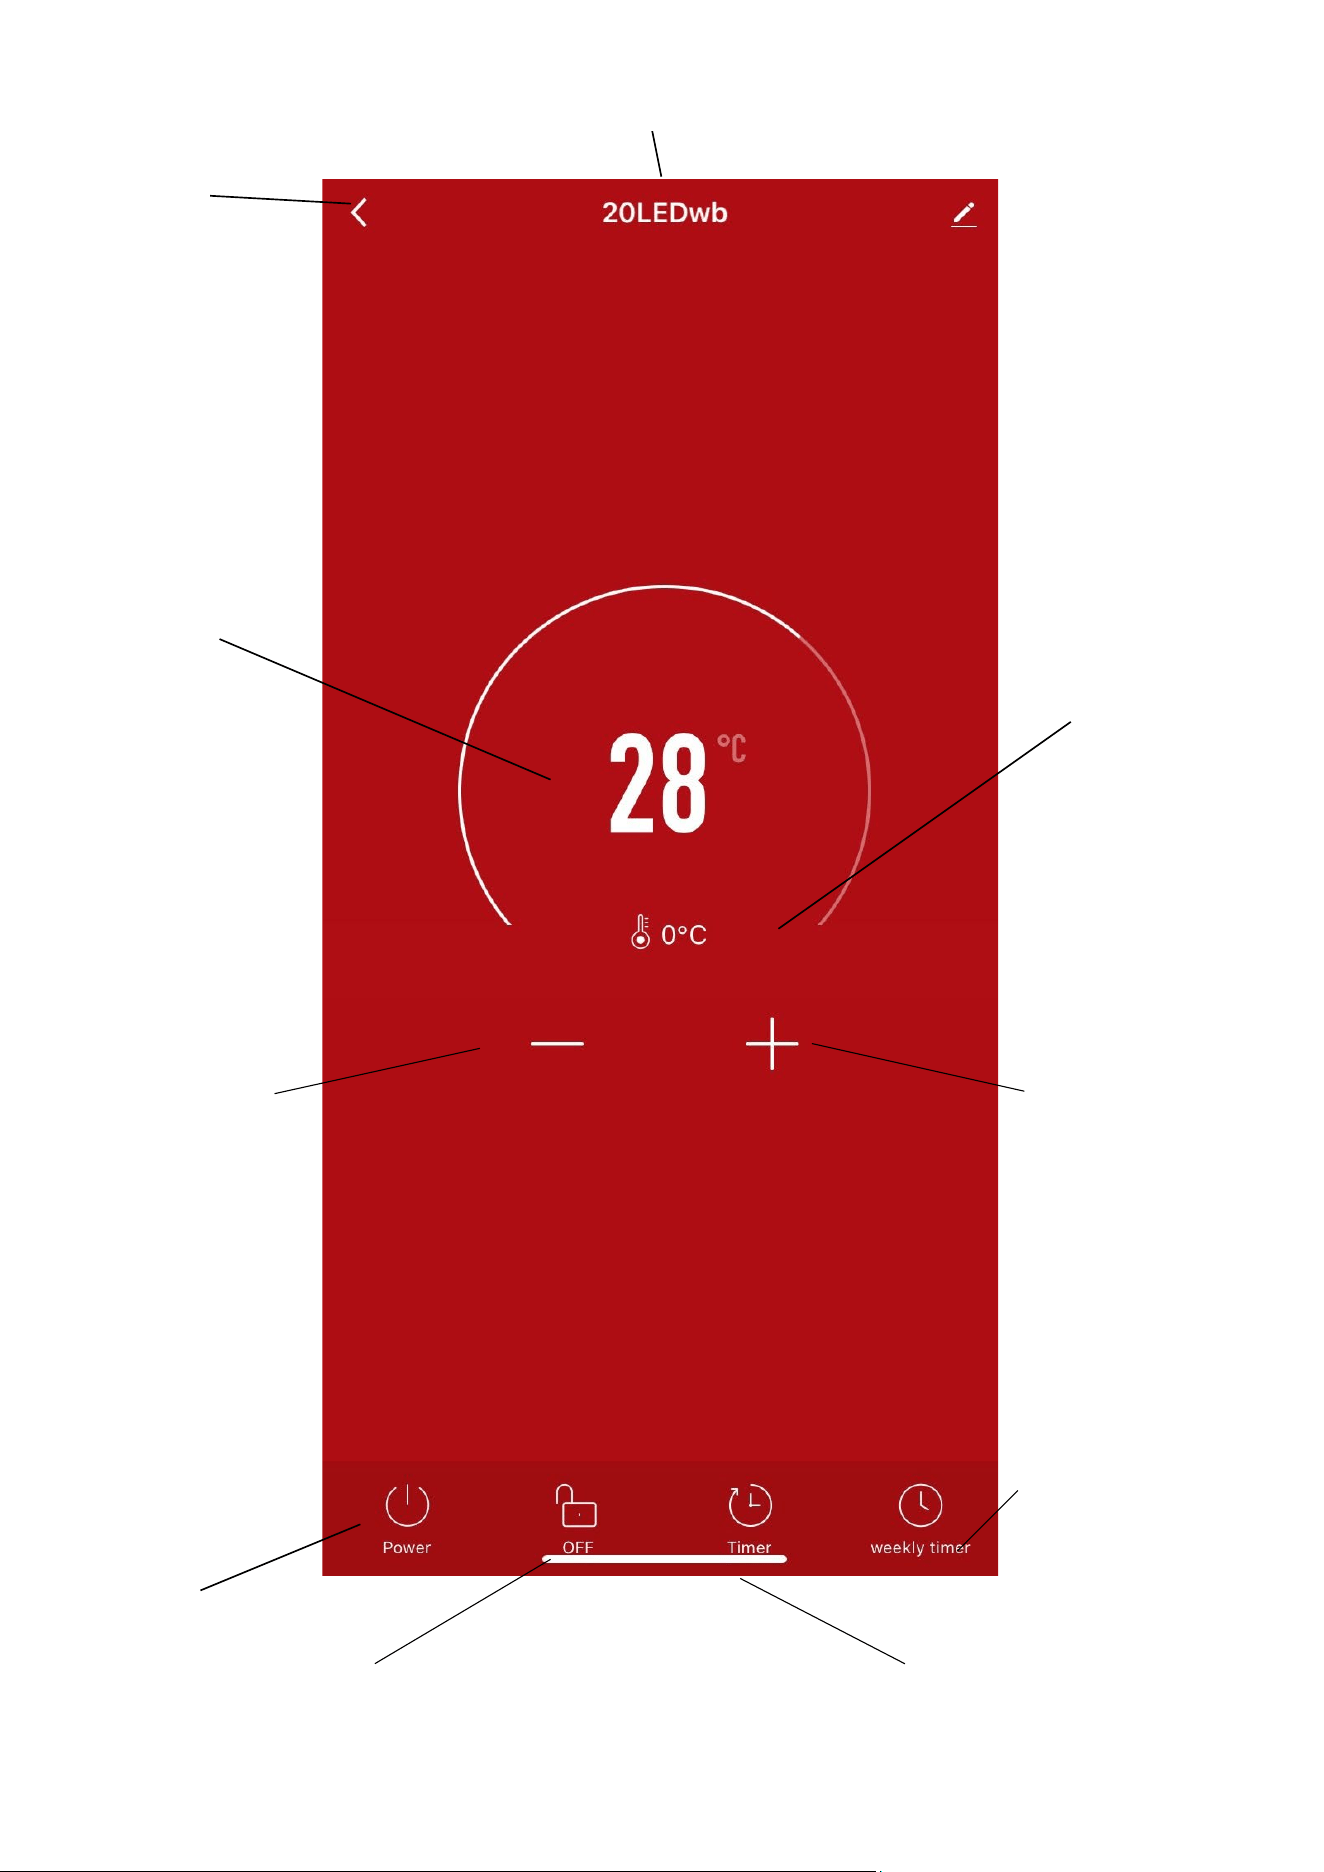
Current
Temperature:
Displays what the
current temperature
is.
DEVICE HOME SCREEN
Device Name
Back: Returns to the
Home Screen
Desired
Temperature:
Displays what has
been set as the
target room
temperature.
Decrease Desired
Temperature
Temperature range
5-40⁰C
Power: Use to turn
the unit on or off.
Schedule: Set up a
weekly schedule for
when you would like
the unit to turn on and
off.
There must be 5
minutes between
turning the unit on
or off.
Increase Desired
Temperature
Temperature range 5-
40⁰C
Lock: You can use this to
lock and unlock the control
panel.
Countdown: This is the
timer function.
15
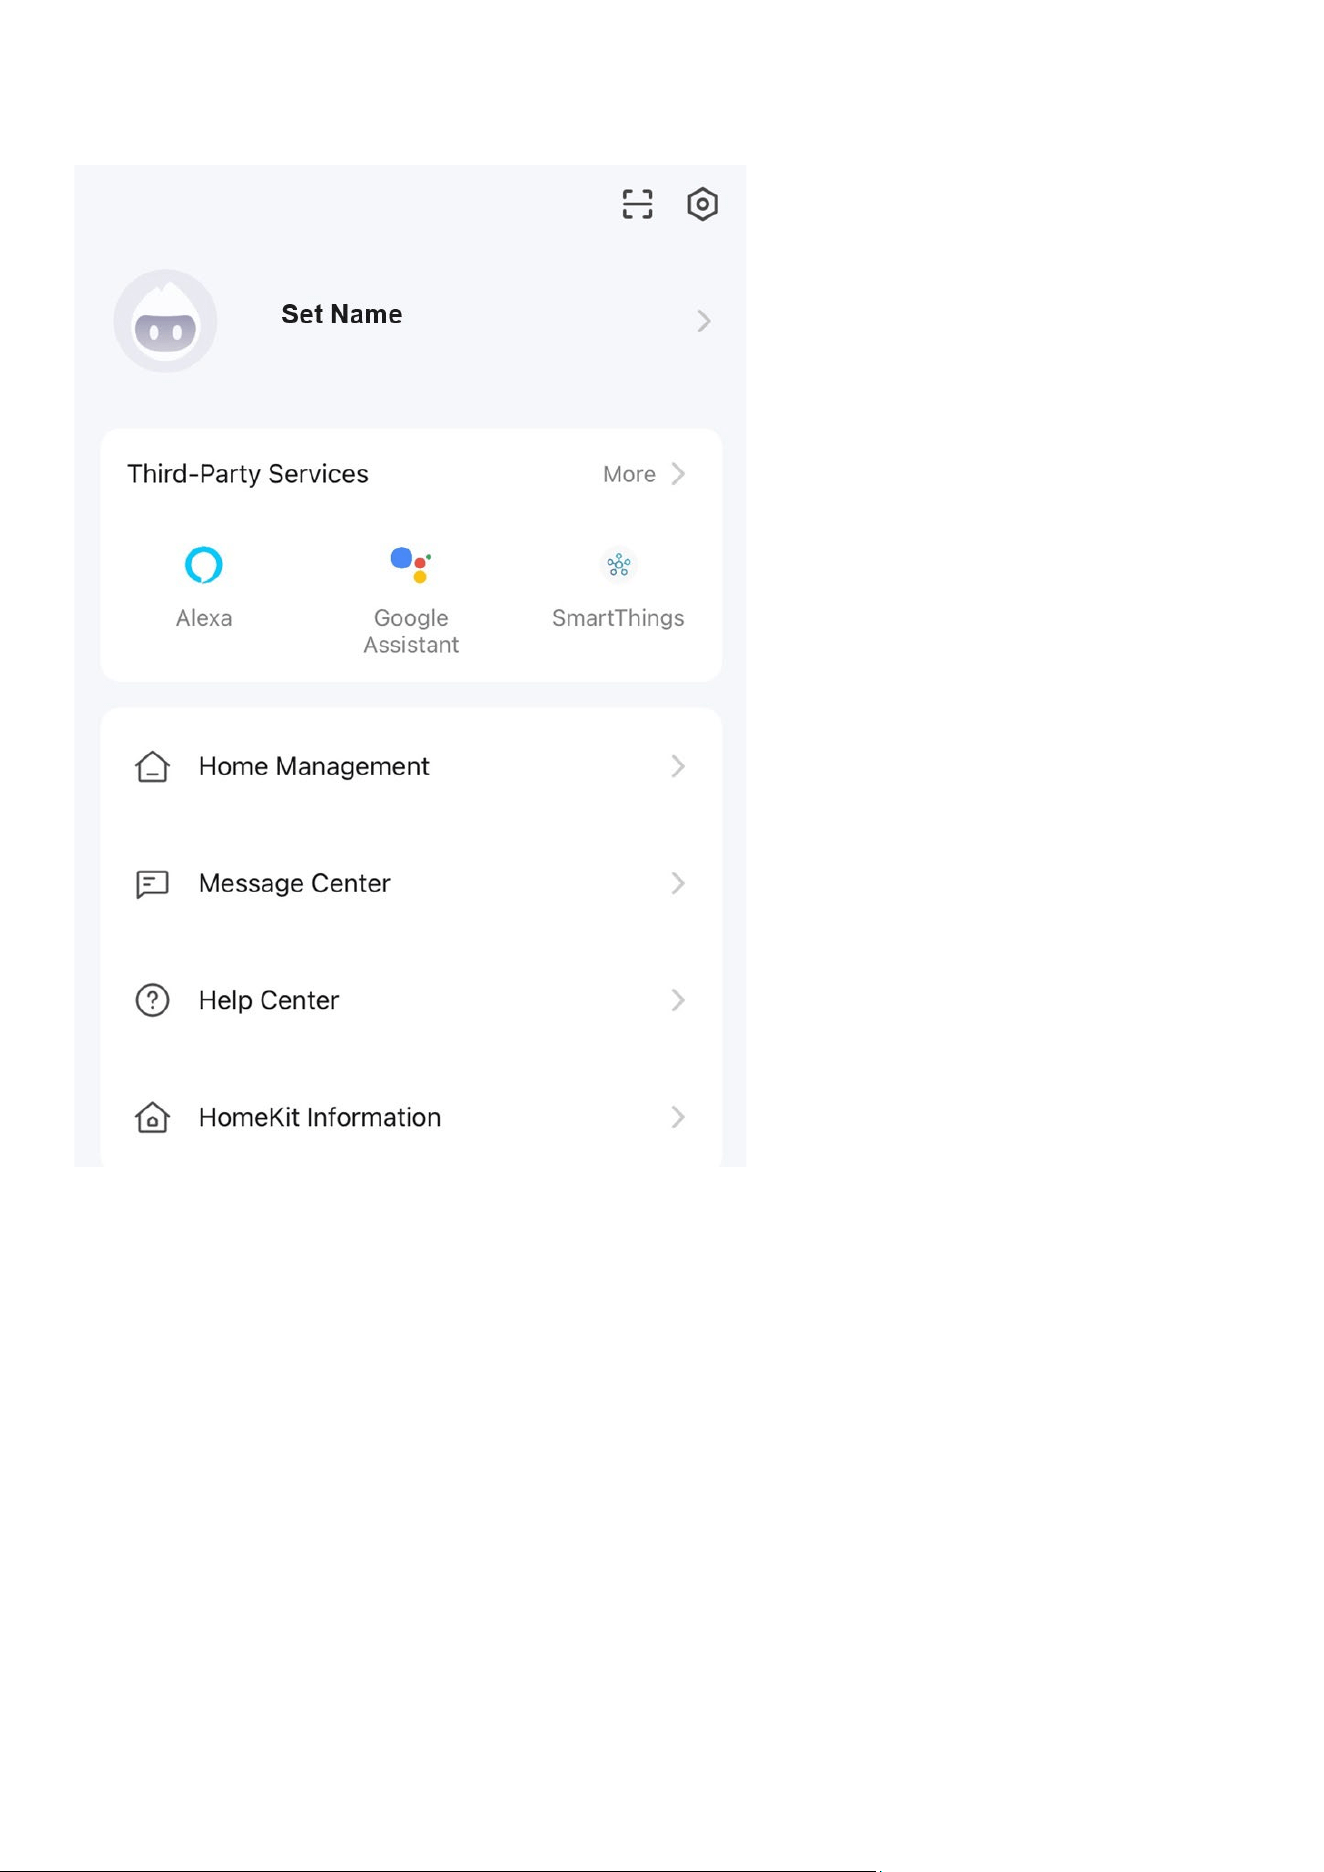
PROFILE TAB
The profile tab allows you to edit both your
details and use the added features of the
unit.
HOME MANAGEMENT
Home Management provides options for
managing your TUYA account, such as
adding a home, adding and removing rooms,
and sharing devices with family.
MESSAGE CENTRE
View notifications from devices if alarms are
set up (dependent on the device).
HELP CENTRE
Aids using the features provided within the
app.
HOME KIT INFORMATION
Allows you to add home switches that are
compatible with the TUYA app.
CONNECTION TROUBLESHOOTING
1. Check whether the device is powered on and in WiFi connection mode.
2. Ensure the WiFi password has been entered into the app correctly (Case sensitive)
3. Check that the phone is connected to the WiFi you are connecting the device to.
4. Ensure the network you are connecting to is 2.4 GHz (5 GHz WiFi networks are not supported)
and that the item has a strong WiFi signal.
5. If your router is dual band, ensure that the 2.4 GHz network has a different network name
(SSID). Your Internet service provider or router manufacturer can provide further advice on
changing router settings.
6. Check the settings on the router. Encryption should be WPA2-PSK, and the authorisation type
should be set to AES.
16
CLEANING AND STORAGE
ATTENTION: Please shut off the unit and unplug from the mains before cleaning or
performing any maintenance.
CLEANING THE SURFACE
• Clean the heater with a duster or a soft wet cloth.
Please do not use chemical solvents (such as benzene, alcohol or gasoline) as they may
cause irreversible damage. Make sure no water enters the control panel or gaps in the
casing.
• Do not run the unit until completely dry.
• Place the heater in its original box or cover to protect it from dust when not in use.
• Store it in a cool, dry place.
TECHNICAL SPECIFICATIONS
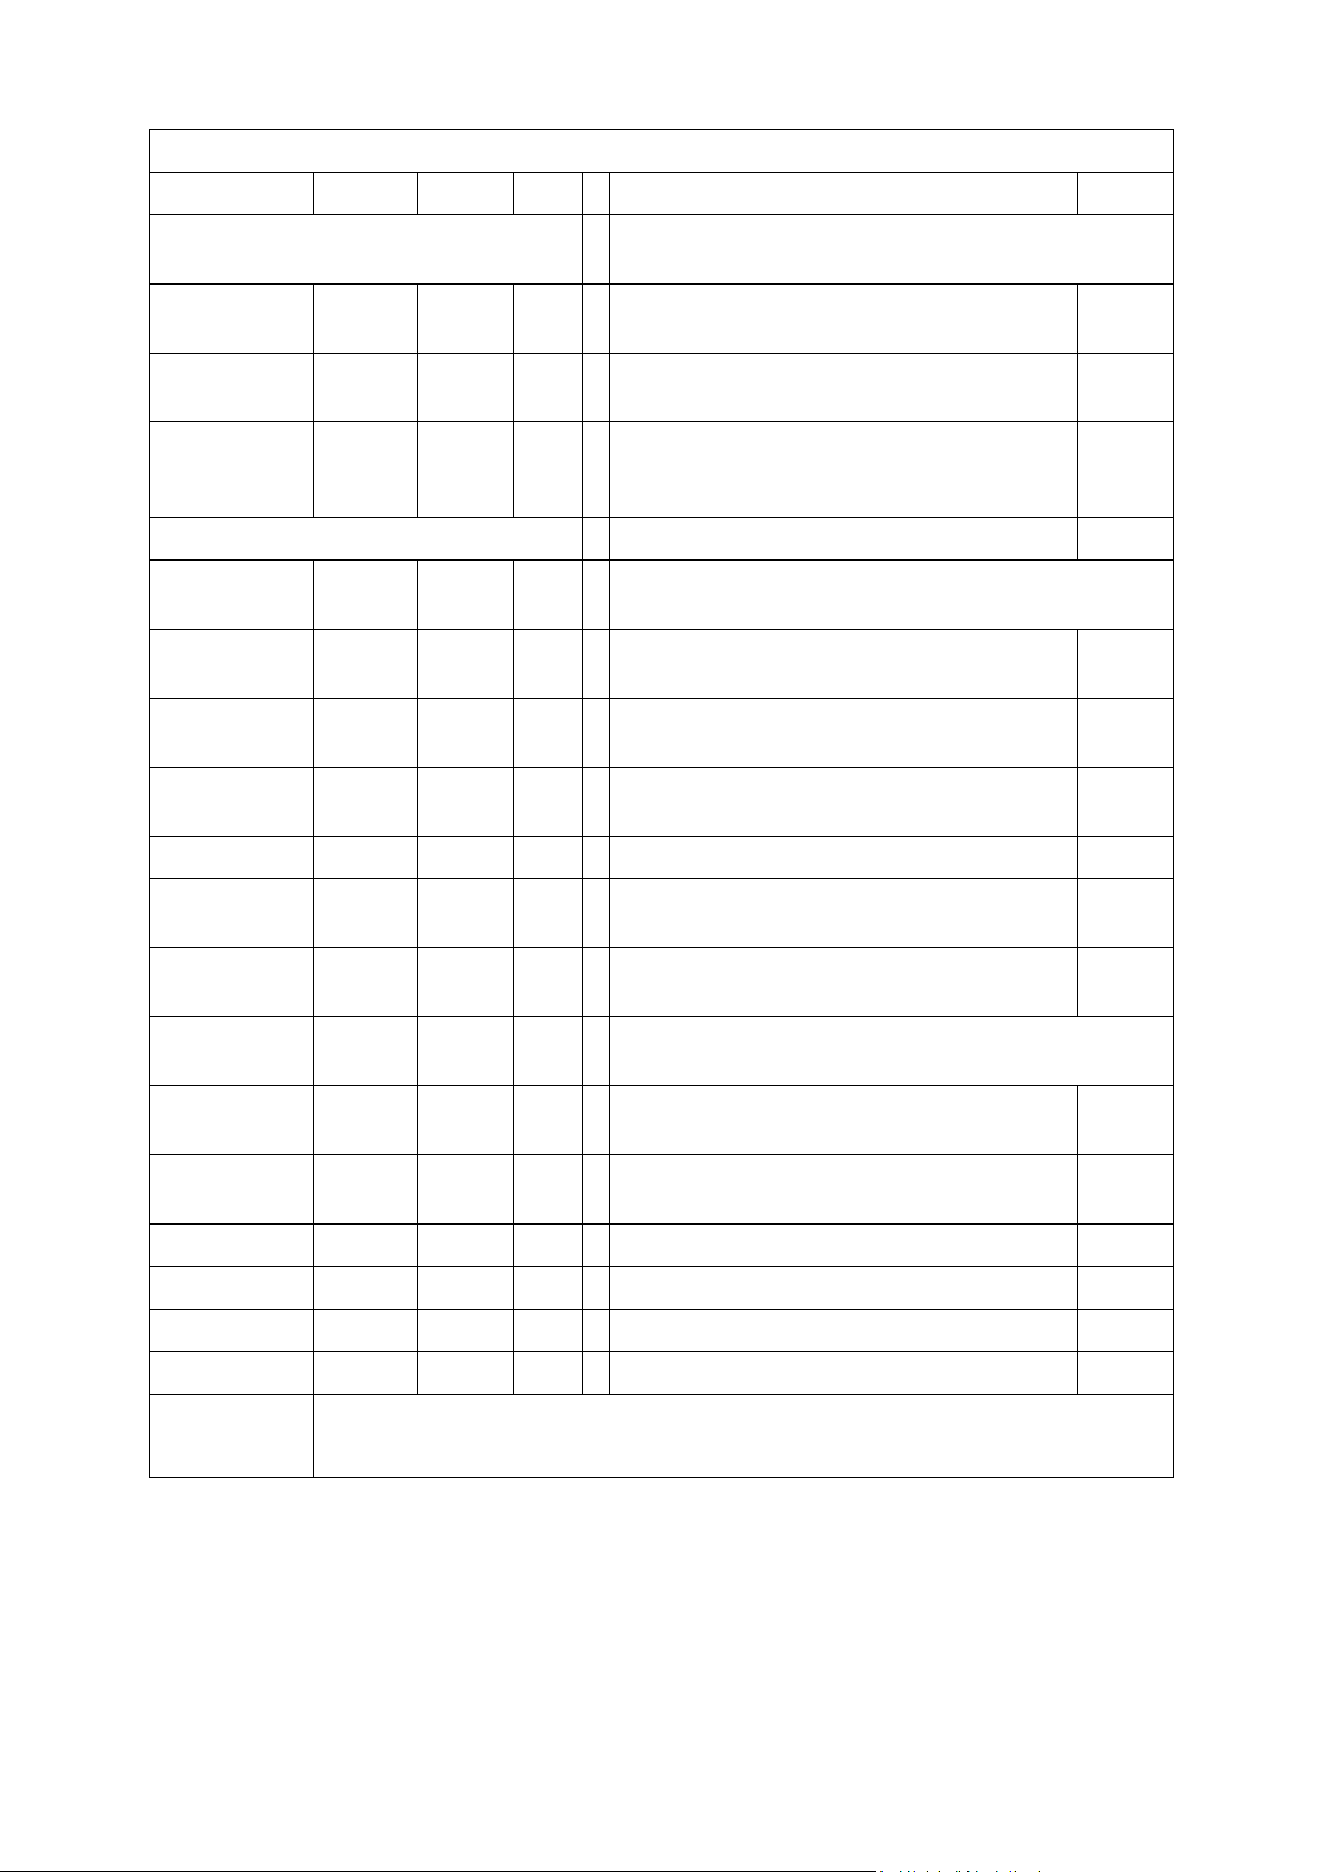
TROUBLESHOOTING
Do not attempt to repair or disassemble the unit yourself. Unauthorised repair attempts will invalidate
the warranty and may cause bodily harm.
Issue
Possible Reason
Solution
No power
1. The power cord is unconnected
2. There is no power from the socket
3. The power switch on the rear of the unit
is turned off.
1. Connect the power cord
2. Check socket is turned on
3. Ensure the power switch on
the rear of the unit is in the on
position
Odour
emission
from the
unit
1. New unit. When the unit is used for the
first time, the fan motor may produce an
odour which will dissipate within a week of
use
1. No action required
Strong
vibrations
and noise
1. The unit is not placed on a flat surface
2. The unit may be damaged
1. Place on a flat surface. May
put an anti-
vibration mat
underneath
2. If the heater is damaged,
discontinue use and contact the
service centre.
Model
EAH20LEDWB
EAH20LEDWW
Voltage
220-240V~
Frequency
50-60Hz
Power
2000W
IP Waterproof
IPX0
Recommend heating area
≤ 15m2
17
electriQ UK SUPPORT
www.electriQ.co.uk/support
For your convenience, please make these simple checks before calling the service line.
If the unit still fails to operate, call 0330 390 3061 or complete the online form.
1. Is the unit plugged into the mains?
2. Is the fuse OK?
3. Switch the unit off and wait three minutes to see if the issue is resolved. Restart the
unit.
Office hours: 9 AM - 5 PM, Monday to Friday
www.electriQ.co.uk
Unit 2A, Trident Business Park,
Neptune Way, Huddersfield,
HD2 1UA
Disposal: Do not dispose of this product as unsorted municipal waste. Collection of such waste must
be handled separately as special treatment is necessary.
Recycling facilities are now available for all customers at which you can deposit your
old electrical products. Customers will be able to take any old electrical equipment to
participating civic amenity sites run by their local councils. Please remember that this
equipment will be further handled during the recycling process, so please be
considerate when depositing your equipment. Please get in touch with the local council
for details of your local household waste recycling centres.

18
PSTI STATEMENT OF COMPLIANCE
Description: Panel Heater
Model Number: EAH20LEDWB and EAH20LEDWW
Manufacturer: electriQ, 2A Trident Business Park, Leeds Road, Huddersfield, HD2 1UA
PSTI Contact: TiSecurity@buyitdirect.co.uk
We have prepared this statement of compliance and can confirm that this product is compliant with the deemed
compliance conditions in Schedule 2 of The Product Security and Telecommunications Infrastructure (Security
Requirements for Relevant Connectable Products) Regulations 2023.
Duration of security updates: 21/08/2029. This date is correct at the time of printing, but we may extend it. Please visit
www.electriQ.co.uk
for the latest information and details of our PSTI compliance.
Richard Leach
Compliance and Quality Manager, Buy It Direct, Huddersfield
21
st
August 2024
EU DECLARATION OF CONFORMITY
Hereby, electriQ declares that these air conditioners are in compliance with Directive 2014/53/EU. The full text of
the EU declaration of conformity is available at the following internet addresses:
https://www.electriq.co.uk/content/DOC/EU/EAH20LEDWB.pdf
https://www.electriq.co.uk/content/DOC/EU/EAH20LEDWW.pdf
UK DECLARATION OF CONFORMITY
Hereby, electriQ declares that these air conditioners are in compliance with Radio Equipment Regulations 2017. The
full text of the UK declaration of conformity is available at the following internet addresses:
https://www.electriq.co.uk/content/DOC/UK/EAH20LEDWB.pdf
https://www.electriq.co.uk/content/DOC/UK/EAH20LEDWW.pdf
19
PRODUCT FICHE
Model Identifier: EAH20LEDWB EAH20LEDWW
Item
Symbol
Value
Unit
Item
Unit
Heat Output
Type of heat input, for electric storage local space
heaters only (select one)
Nominal heat
output
P
nom
2
kW
manual heat charge control, with integrated
thermostat
No
Minimal heat
output
P
min
2
kW
manual heat charge control with room
and/or outdoor temperature feedback
No
Maximum
continuous
heat output
P
max
2
kW
electronic heat charge control with room
and/or outdoor temperature feedback
No
Auxiliary electricity consumption
fan assisted heat output
No
At nominal
heat output
el
max
N/A
kW
Type of heat output/room temperature control
(select one)
At minimum
heat output
el
min
N/A
kW
single stage heat output and no room
temperature control
No
In standby
mode
el
SB
0.69
W
two or more manual stages, no room
temperature control
No
with mechanical thermostat room
temperature control
No
with electronic room temperature control
No
with electronic room temperature control
plus day timer
No
with electronic room temperature control
plus week timer
Yes
Other control options (multiple selections
possible)
room temperature control with presence
detection
No
room temperature control, with open window
detection
Yesa
with distance control option
Yes
with adaptive start control
No
with working time limitation
Yes
with black bulb sensor
No
Contact
Details
electriQ, Unit 2A, Trident Business Park, Neptune Way, Huddersfield,
HD2 1UA
The Black Church St Marys Place, Dublin 7.
V20240829SS