
USER MANUAL ESPRESSO MAKER GCM4240
1
GCM4240
USER MANUAL
8-IN-1 ONE-TOUCH
AUTOMATIC ESPRESSO MAKER

CONTENTS
Important Safeguards . . . . . . . . . . . . . . . . . . . . . . . . . . . . . . 4
Know Your Espresso Maker . . . . . . . . . . . . . . . . . . . . . . . . . . 6
Control Panel . . . . . . . . . . . . . . . . . . . . . . . . . . . . . . . . 7
Using Your Espresso Maker
Before First Use . . . . . . . . . . . . . . . . . . . . . . . . . . . . . . . 8
Setting Up and Priming the Espresso Maker . . . . . . . . . . . . . . . 8
Filling the Portafilter. . . . . . . . . . . . . . . . . . . . . . . . . . . . . 9
Placing the Portafilter . . . . . . . . . . . . . . . . . . . . . . . . . . . 9
Mug Size Guide . . . . . . . . . . . . . . . . . . . . . . . . . . . . . . . 10
Drink Types . . . . . . . . . . . . . . . . . . . . . . . . . . . . . . . . . 10
Making an Espresso . . . . . . . . . . . . . . . . . . . . . . . . . . . . 11
Making a Cappuccino . . . . . . . . . . . . . . . . . . . . . . . . . . . 12
Making a Latte. . . . . . . . . . . . . . . . . . . . . . . . . . . . . . . . 13
Making an Americano . . . . . . . . . . . . . . . . . . . . . . . . . . . 14
Brewing in Manual Mode. . . . . . . . . . . . . . . . . . . . . . . . . . 15
Frothing Milk. . . . . . . . . . . . . . . . . . . . . . . . . . . . . . . . . 16
Cleaning and Maintenance
Cleaning the Portafilter and Brew Head . . . . . . . . . . . . . . . . . 17
Cleaning the Water Reservoir . . . . . . . . . . . . . . . . . . . . . . . 17
Cleaning the Milk Reservoir and Frothing Tube . . . . . . . . . . . . . 17
Descaling . . . . . . . . . . . . . . . . . . . . . . . . . . . . . . . . . . 18
Troubleshooting . . . . . . . . . . . . . . . . . . . . . . . . . . . . . . 18
Warranty and Service . . . . . . . . . . . . . . . . . . . . . . . . . . . . . . 19
All rights reserved. No portion of this manual may be reproduced by any means whatsoever without written
permission from The Steelstone Group, except for the inclusion of quotations in a media review. Although
every precaution has been taken in the preparation of this manual, The Steelstone Group assumes no
responsibility for errors or omissions. Nor is any liability assumed for damages resulting from the use of
the information contained herein. Although every eort has been made to ensure that the information
contained in this manual is complete and accurate, The Steelstone Group is not engaged in rendering
professional advice or services to the individual consumer; further, The Steelstone Group shall not be held
responsible for any loss or damage allegedly arising from any information or suggestions in this manual.
Model: GCM4240 | © 2024 Gourmia | 2.0
The Steelstone Group Brooklyn, NY | Gourmia.com

3
Here at Gourmia, our one and only goal is to make sure
nutritious and delicious meals are always a practical
possibility no matter how fast-paced your life is. Whether
you’re in need of a hearty breakfast, a mid-day snack, or a
satisfying supper, our dependable, easy-to-use appliances
are designed to work for you while you work your way
through your busy day.
This manual provides an overview and instructions on
all the espresso maker’s functions and features, along
with directions for assembling, operating, cleaning,
and maintaining your appliance. Please read all safety
instructions before getting started. Keep this manual handy
for future use and review.
Our team is available to help with any and every question
you might have about your new espresso maker. We’re
excited for you and want you to get the most out of your
purchase—so whether you need assistance with setup or
guidance on which features to enable for which drinks,
we’re happy to walk you through it, step by step.
Happy and easy cooking!
We’d love to hear about the delicious drinks you’re creating!
Share your thoughts, recipes, and photos with us.
Congratulations on the
purchase of your Espresso
Maker from Gourmia!
@gourmia

IMportant SafEGuardS
FOR CUSTOMER SERVICE VISIT WWW.GOURMIA.COM OR CALL 888.552.0033
4
IMPORTANT SAFEGUARDS
Before operating this espresso maker, read and follow all these
basic safety precautions:
1. The appliance can be used
by children aged 8 years and
above and persons with reduced
physical, sensory or mental
capabilities or lack of experience
and knowledge if they have been
given supervision or instruction
concerning use of the appliance
in a safe way and understand the
hazards involved. Children should
not play with the appliance.
Cleaning and user maintenance
shall not be done by children
unless they are 8 or older and
supervised.
2. Keep the appliance and its cord
out of reach of children less than 8
years old.
3. Make sure your outlet voltage
corresponds to the voltage stated
on the rating label of the espresso
maker.
4. To protect against fire, electric
shock, or injury to persons do not
immerse cord, plug, or appliance
in water or other liquid.
5. Close supervision is necessary
when this appliance is used by or
near children.
6. Unplug from outlet when not in
use and before cleaning. Allow the
appliance to cool before putting
on or taking o parts, and before
cleaning the appliance.
7. do not operate the appliance
with a damaged cord or plug or if
the appliance malfunctions or has
been damaged in any manner.
Return appliance to an authorized
service facility for examination,
repair, or adjustment.
8. The use of accessories not
recommended by the appliance
manufacturer may result in fire,
electric shock, or injury to persons.
9. do not touch hot surfaces; use
handles or knobs.
10. do not operate this appliance
outdoors. do not use for
commercial purposes.
11. do not let the cord hang over
the edge of a table or counter or
touch any hot surfaces.
12. Use on a hard, flat, level, heat-
resistant surface only.
13. Always be sure to secure the
water reservoir tightly back inside
the unit with the lid closed and
filled with water between the
minimum and maximum mark
before turning the appliance on.
14. do not remove the portafilter while
brewing coee. Exercise caution
when removing the portafilter after
brewing since the metal parts
will be hot. Make sure to hold the
portafilter by the handle and use
the filter retention clip to dispose
the grounds.
SAVE THESE INSTRUCTIONS

IMportant SafEGuardS
USER MANUAL ESPRESSO MAKER GCM4240
5
15. Extreme caution must be
exercised when moving
appliances with hot liquids.
16. Only remove the water reservoir
when the appliance is turned o.
17. This appliance is not intended
to be operated by means of an
external timer or separate remote-
control system.
18. do not remove the portafilter
at any time during the brewing
process.
19. If coee does not drip, it means
the filter is blocked. Turn o the
appliance and allow it to cool
down. The blockage may be
caused by the coee being too
finely ground.
20. do not place the appliance on or
near a hot gas or electric burner,
or in a heated oven.
21. do not use the appliance for other
than its intended use.
22. do not leave the appliance
unattended when turned on.
23. This appliance should only be
used in households or similar
environments.
Cord and plug Safety
1. A short power-supply cord is provided to reduce risk of becoming entangled
in or tripping over a longer cord.
2. Extension cords may be used if care is exercised in their use.
3. If an extension cord is used:
• The marked electrical rating of the extension cord should be at least equal
to the electrical rating of the appliance.
• The longer cord should be arranged so that it will not drape over the
countertop or tabletop where it can be pulled on by children or tripped
over.
Electrical polarized plug
This unit has a polarized plug (one blade is wider than the other).
To reduce the risk of electric shock, the plug is intended to be
used by inserting it into the electrical outlet only one way. If the
plug does not fit securely into the outlet, reverse the plug and
re-insert. If it still does not fit, contact a qualified electrician for
assistance. Do not modify the plug in any way.
poWEr
AC120V~ 60Hz 1,300W
KnoW Your ESprESSo MaKEr
FOR CUSTOMER SERVICE VISIT WWW.GOURMIA.COM OR CALL 888.552.0033
6
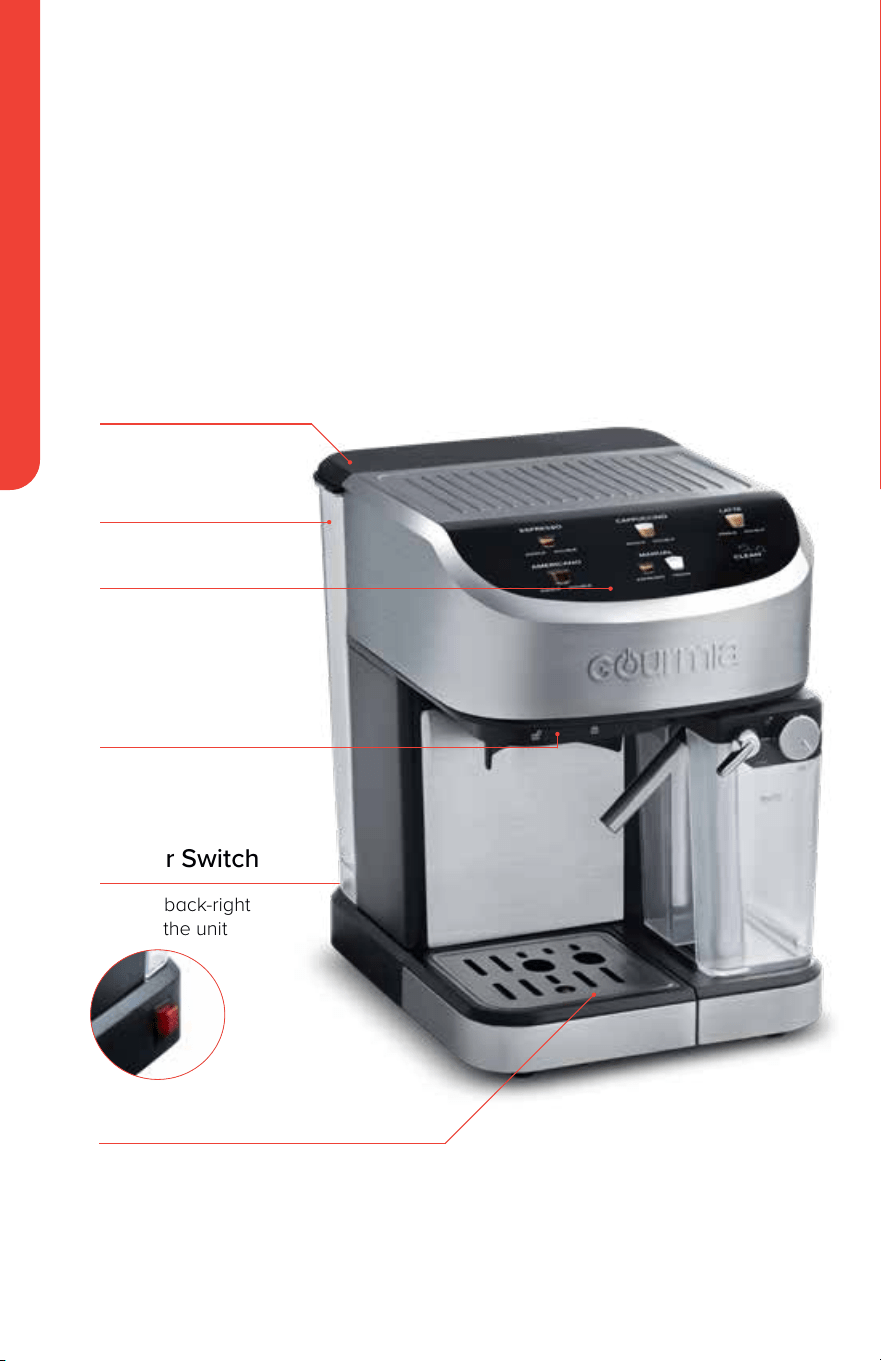
KNOW YOUR
ESPRESSO MAKER
Power Switch
On the back-right
side of the unit
Water Reservoir
Cover
Removable
Water Reservoir
Control Panel
Removable Drip Tray
Brew Head
KnoW Your ESprESSo MaKEr
USER MANUAL ESPRESSO MAKER GCM4240
7
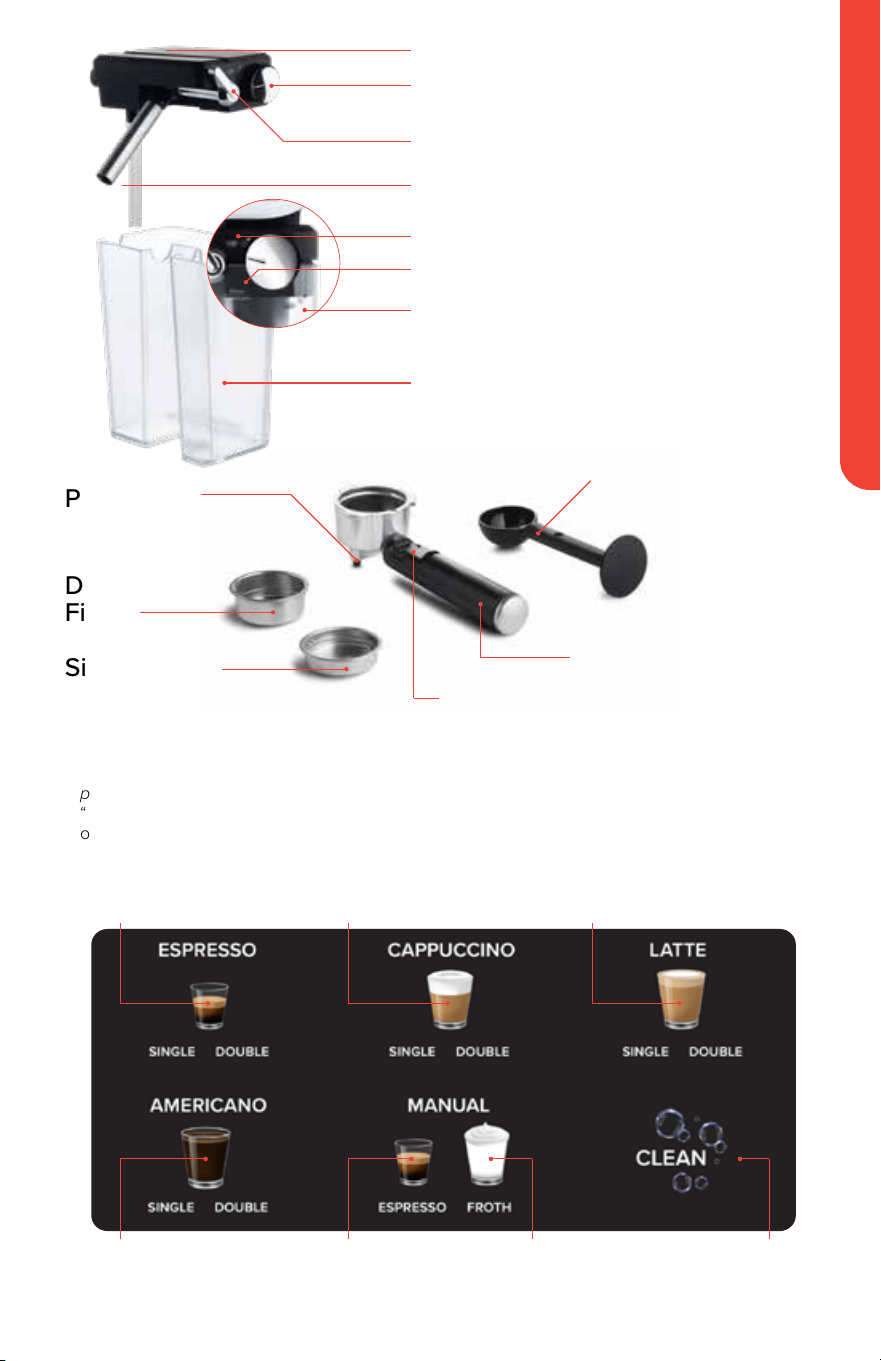
Double-Shot
Filter
Single-Shot
Portafilter
Measuring Scoop
and Tamper
Portafilter Handle
Portafilter Retention Clip
Control panel
Removable Milk Reservoir
Milk Reservoir Lid
Froth Strength Control
Froth Dispensing Tube Lever
Froth Dispensing Tube
Minimum Strength
Clean / Americano Position
Maximum Strength
When the espresso maker is turned on for the first time, only the CLEan icon on the control
panel will be blinking. You must prime the espresso maker to be able to brew coee. See
“Setting Up and Priming the Espresso Maker” on page 8. After priming, all icons will light up
on the control panel as long as the milk reservoir is correctly inserted into the unit.
ESPRESSO
Icon
CAPPUCCINO
Icon
LATTE
Icon
AMERICANO
Icon
MANUAL
ESPRESSO Icon
CLEAN
Icon
FROTH
Icon

uSInG Your ESprESSo MaKEr
FOR CUSTOMER SERVICE VISIT WWW.GOURMIA.COM OR CALL 888.552.0033
8
Before first use
1. remove and discard all packaging material and stickers that are not
permanent.
2. remove the water reservoir, milk reservoir, portafilter, filters, measuring
scoop, and removable drip tray. Wash them with non-abrasive soap.
Thoroughly dry the parts. Wipe the exterior with a damp cloth.
USING YOUR
ESPRESSO MAKER
Setting up and priming the
Espresso Maker
When the espresso maker is first turned on, only the CLEan icon will
appear on the control panel. This will continue until the appliance is
primed.
1. Place the espresso maker on
a hard, flat, and heat-resistant
surface.
2. Detach the water reservoir and
open the water reservoir cover.
3. Fill the water reservoir with water
between the “Min” and “Max”
mark and reattach it to the back
of the appliance. .
4. Plug the power cord into an
outlet.
5. Turn the espresso maker on by
flicking the power switch on the
right side of the appliance. The
CLEan icon will blink on the
control panel.
6. Insert the empty milk reservoir
into the appliance until it clicks
into place. The CLEan icon will
stop blinking and become steady.
7. Set the froth strength control to
the clean position.
8. Turn the froth dispensing
tube lever to rotate the froth
dispensing tube upward.
9. Place a heatproof cup or mug
under the froth dispensing tube.
10. Tap the CLEAN icon. The clean
icon will blink until the espresso
maker is done preheating. After
preheating, water will dispense
into the cup. When cleaning is
complete, all other icons will
appear on the control panel.
11. Discard the water dispensed into
the cup.
Before using the espresso maker for the first time, it is required
to prime the appliance. See Setting up and priming the
Espresso Maker below.

uSInG Your ESprESSo MaKEr
USER MANUAL ESPRESSO MAKER GCM4240
9
placing the portafilter
1. Place the portafilter underneath
the brew head, with the handle
facing toward the left.
2. Keep one hand atop the
appliance to keep it steady while
fastening the portafilter into the
brew head. The handle must
align with the open lock icon on
the brew head.
3. Turn the handle to the right to
lock the portafilter into the brew
head. The handle must align with
the closed lock icon on the brew
head.
filling the portafilter
1. Select your filter size. Use the
single-shot filter for one shot of
espresso. Use the double-shot
filter for larger sized drinks, or
for a double shot of espresso.
Align the gap in the filter with the
groove in the portafilter. Drop the
filter into the portafilter and rotate
the filter to ensure it’s locked in
place.
2. Use the measuring spoon to fill
the filter with espresso grounds.
Do not exceed the MAX line in
the filter.
3. Use the tamper end of the
measuring spoon to press on
the grounds. The surface of the
espresso grounds should be
smooth after pressing.
4. Clean any excess grounds from
the rim of the portafilter.
uSInG Your ESprESSo MaKEr
FOR CUSTOMER SERVICE VISIT WWW.GOURMIA.COM OR CALL 888.552.0033
10
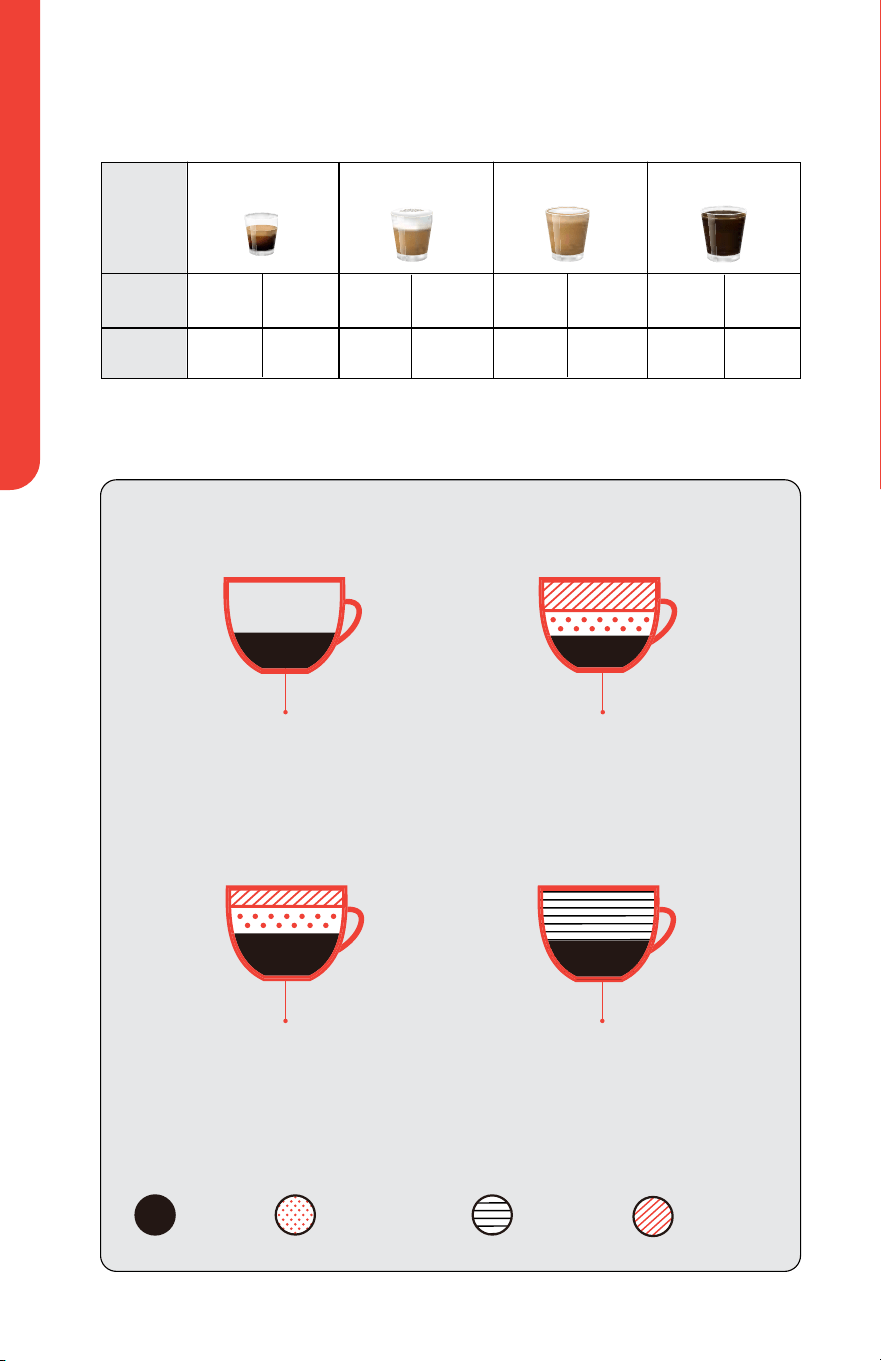
drink types
Espresso Steamed Milk
Milk Foam
Hot Water
AmericanoLatte
Made up of
1/3 espresso and
2/3 hot water.
Made up of
1/3 espresso and
2/3 steamed milk
topped with milk foam.
Espresso Cappuccino
One shot of
espresso.
Made up of
1/3 espresso,
1/3 steamed milk,
and 1/3 milk foam.
Mug Size Guide
Drink
Shot
Size
ESPRESSO CAPPUCCINO LATTE AMERICANO
SINGLE
2 OZ
DOUBLE
3 OZ
SINGLE
5 OZ
DOUBLE
10 OZ
SINGLE
12 OZ
DOUBLE
16 OZ
SINGLE
5 OZ
DOUBLE
10 OZ
note: To accommodate larger mugs, remove the drip tray.

uSInG Your ESprESSo MaKEr
USER MANUAL ESPRESSO MAKER GCM4240
11
Making an Espresso
Ensure the water reservoir is filled with water and placed to the back of
appliance and the espresso maker is plugged in and turned on.
1. To fill the portafilter with espresso,
follow the instructions under
“Filling the Portafilter” on page 9.
2. To attach the portafilter to the
brew head, follow the instructions
under “Placing the Portafilter” on
page 9.
3. Place a cup on the drip tray.
4. For a single shot, tap the
ESPRESSO icon once. For a double
shot, tap the ESPRESSO icon twice.
Your selected drink type will blink
until the espresso maker is done
preheating. After preheating, the
brewing process will begin.
5. When brewing is complete, the
appliance will beep three times
and your espresso will be ready
for sipping.
6. Discard the spent grounds by
removing the portafilter from the
brew head. Lift the filter retainer
clip so that it’s placed over the
filter edge, and hold it in place as
you dump the grounds into the
trash.

uSInG Your ESprESSo MaKEr
FOR CUSTOMER SERVICE VISIT WWW.GOURMIA.COM OR CALL 888.552.0033
12
Making a Cappuccino
Ensure the water reservoir is filled with water and attached to the back of
appliance and the espresso maker is plugged in and turned on.
1. Fill the milk reservoir with milk
below the “Max” mark.
2. Insert the milk reservoir into the
appliance until it clicks into place.
note: If the milk reservoir is not
securely inside the appliance, the
cappuccino function will not be
available as an option.
3. Set the froth strength control to
the maximum strength.
note: The above setting is a
recommendation only.
4. To fill the portafilter with espresso,
follow the instructions under
“Filling the Portafilter” on page 9.
5. To attach the portafilter to the
brew head, follow the instructions
under “Placing the Portafilter” on
page 9.
6. Position the froth dispensing tube
over a large heatproof cup.
7. For a single shot, tap the
CAPUCCINO icon once. For a
double shot, tap the CAPPUCCINO
icon twice. Your selected drink
type will blink until the espresso
machine is done preheating. After
preheating, the brewing process
will begin.
8. When brewing is complete, the
appliance will beep three times
and your cappuccino will be
ready for sipping.
9. Discard the spent grounds by
removing the portafilter from the
brew head. Lift the filter retainer
clip so that it’s placed over the
filter edge, and hold it in place as
you dump the grounds into the
trash.

uSInG Your ESprESSo MaKEr
USER MANUAL ESPRESSO MAKER GCM4240
13
Making a Latte
Ensure the water reservoir is filled with water and attached to the back of
appliance and the espresso maker is plugged in and turned on.
1. Fill the milk reservoir with milk
below the “Max” mark.
2. Insert the milk reservoir into the
appliance until it clicks into place.
note: If the milk reservoir is not
securely inside the appliance, the
latte function will not be available
as an option.
3. Set the froth strength control to
the minimum strength.
note: The above setting is a
recommendation only.
4. To fill the portafilter with espresso,
follow the instructions under
“Filling the Portafilter” on page 9.
5. To attach the portafilter to the
brew head, follow the instructions
under “Placing the Portafilter” on
page 9.
6. Position the froth dispensing tube
over a large heatproof cup.
7. For a single shot, tap the LATTE
icon once. For a double shot,
tap the LATTE icon twice. Your
selected drink type will blink until
the espresso machine is done
preheating. After preheating, the
brewing process will begin.
8. When brewing is complete, the
appliance will beep three times
and your latte will be ready for
sipping.
9. Discard the spent grounds by
removing the portafilter from the
brew head. Lift the filter retainer
clip so that it’s placed over the
filter edge, and hold it in place as
you dump the grounds into the
trash.

uSInG Your ESprESSo MaKEr
FOR CUSTOMER SERVICE VISIT WWW.GOURMIA.COM OR CALL 888.552.0033
14
Making an americano
Ensure the water reservoir is filled with water and attached to the back of
appliance and the espresso maker is plugged in and turned on.
1. Insert a filled or empty milk
reservoir into the appliance until it
clicks into place.
note: If the milk reservoir is not
securely inside the appliance, the
americano function will not be
available as an option.
2. Set the froth strength control to
the Clean / Americano position.
3. To fill the portafilter with espresso,
follow the instructions under
“Filling the Portafilter” on page 9.
4. To attach the portafilter to the
brew head, follow the instructions
under “Placing the Portafilter” on
page 9.
5. Position the froth dispensing tube
over a large heatproof cup.
6. For a single shot, tap the
AMERICANO icon once. For a
double shot, tap the AMERICANO
icon twice. Your selected drink
type will blink until the espresso
machine is done preheating. After
preheating, the brewing process
will begin.
7. When brewing is complete, the
appliance will beep three times
and your americano will be ready
for sipping.
8. Discard the spent grounds by
removing the portafilter from the
brew head. Lift the filter retainer
clip so that it’s placed over the
filter edge, and hold it in place as
you dump the grounds into the
trash.

uSInG Your ESprESSo MaKEr
USER MANUAL ESPRESSO MAKER GCM4240
15
Brewing in Manual Mode
Ensure the water reservoir is filled with water and attached to the back of
appliance and the espresso maker is plugged in and turned on.
1. To fill the portafilter with espresso,
follow the instructions under
“Filling the Portafilter” on page 9.
2. To attach the portafilter to the
brew head, follow the instructions
under “Placing the Portafilter” on
page 9.
3. Place a heatproof cup over the
drip tray.
4. Tap the MANUAL ESPRESSO icon.
The text below the icon will blink
for three seconds then the brew
cycle will begin.
5. When your desired amount of
coee has dispensed, tap the
MANUAL ESPRESSO icon again and
coee will cease brewing.
note: The maximum amount of
coee that will dispense is 14 oz.
6. Discard the spent grounds by
removing the portafilter from the
brew head. Lift the filter retainer
clip so that it’s placed over the
filter edge and hold it in place as
you dump the grounds into the
trash.

uSInG Your ESprESSo MaKEr
FOR CUSTOMER SERVICE VISIT WWW.GOURMIA.COM OR CALL 888.552.0033
16
frothing Milk
Ensure the water reservoir is filled with water and attached to the back of
appliance and the espresso maker is plugged in and turned on.
1. Fill the milk reservoir with milk
below the “Max” mark.
2. Secure the milk reservoir in the
appliance until it clicks into place.
3. Set the froth strength control.
4. Position the froth dispensing tube
over a heatproof cup.
5. Tap the FROTH icon.
6. Milk will froth for a maximum of
three minutes. To stop frothing
earlier, tap the FROTH icon again
and milk will cease frothing.

CLEanInG and MaIntEnanCE
USER MANUAL ESPRESSO MAKER GCM4240
17
CLEANING AND MAINTENANCE
Cleaning the portafilter and Brew Head
1. Turn the appliance o and unplug
the power cord from the outlet.
Wait for the metal parts to cool
down before touching them.
2. Remove the portafilter from the
brew head and dump the used
espresso grounds. Lift the filter
retainer clip so that it’s placed
over the filter edge, and hold it in
place as you dump the espresso
grounds into the trash.
3. Rinse the single-shot filter,
double-shot filter, and portafilter
with warm, soapy water.
4. Wipe the underside of the brew
head with a damp cloth to clean
o any excess coee grounds.
Cleaning the Water reservoir
1. Discard leftover water.
2. Wash the water reservoir with soapy water. Rinse and dry well.
Cleaning the Milk reservoir and frothing tube
1. Remove the milk reservoir from
the unit. If there is any remaining
milk, pour the milk into a separate
container and store it in the
refrigerator.
2. Wash the milk reservoir and milk
reservoir lid thoroughly with warm,
soapy water. Do not use abrasive
cleansers and scouring pads.
note: Hand wash only! The milk
reservoir is not dishwasher safe.
3. Ensure there is water in the water
reservoir.
4. Position the froth dispensing tube
over a large heatproof cup.
5. Set the froth strength to the Clean
/ Americano position. Tap the
CLEAN icon.
6. Wait until all the water has
finished dispensing before
removing the cup from
underneath the brew head
(the unit will beep three times
and other function buttons will
reappear).
7. Dispose of the water in the mug
and any remaining water in the
milk reservoir and water reservoir.
the following cleaning instructions should be followed after every
use of the espresso maker.

CLEanInG and MaIntEnanCE
FOR CUSTOMER SERVICE VISIT WWW.GOURMIA.COM OR CALL 888.552.0033
18
descaling
After using the espresso maker for a while, limescale will begin to build up inside
the appliance. After 300 uses, only the CLEan icon will appear on the control
panel, indicating the espresso maker needs to be descaled.
1. Fill the removable water reservoir
with equal parts water and
vinegar between the “Min” and
“Max” mark.
2. Use the froth dispensing
tube lever to rotate the froth
dispensing tube upward and
position a mug underneath it.
3. Tap the CLEAN icon.
4. Allow remaining water and
vinegar to sit overnight in the
water reservoir.
5. On the following day, discard the
water and vinegar.
6. Rinse the water reservoir
thoroughly with tap water and
then pour the water back into the
sink.
7. Fill up the water reservoir with
water and begin brewing again.
This washes out any remaining
vinegar.
notE: If an odor of vinegar
persists, run another cycle with
water.
troubleshooting
ISSUE SOLUTIONS
Only the CLEAN icon appears on the
control panel.
The other icons will appear when the
espresso maker is primed. See “Setting Up
and Priming the Espresso Maker” on page 8.
Only the ESPRESSO and MANUAL
ESPRESSO icons appear on the control
panel.
The other icons will appear when the milk
reservoir is correctly inserted into the unit.
Insert the milk reservoir into the unit by aligning
the groove on top of the reservoir with the
notch on the unit and pushing. It will click into
place when done correctly.
A drink has been chosen and the unit is
running, but no coee is dispensing from
the portafilter.
Detach then reattach the water reservoir to the
unit (this may need to be done a few times).
Run a clean cycle. See CLEANING THE MILK
RESERVOIR AND FROTHING TUBE on page 17.
Water is spreading from the drip tray
when brewing or cleaning.
A. Water dispenses from the froth dispensing
tube when brewing Americano or running a
clean cycle. Ensure the froth dispensing tube is
above the cup.
B. Empty the drip tray.
WarrantY and SErvICE
USER MANUAL ESPRESSO MAKER GCM4240
19
WARRANTY
AND SERVICE
for customer service, questions or comments
Visit gourmia.com
Email [email protected]
Call 888.552.0033
Mon-Thu 9:00 a.m. to 6:00 p.m. ET
Fri 9:00 a.m. to 3:00 p.m. ET
Languages: English, Spanish, French
register your product at
www.gourmia.com/warranty
This Limited Warranty is for one full year from the date of
purchase and requires proof of purchase from an authorized
seller. It is applicable to the original purchaser only and is not
transferable to a third party user. Repair or replacement of
defective parts is solely at Gourmia’s discretion. In the event
that repair isn’t possible, Gourmia will replace the product/part.
If product repair/replacement won’t suce, Gourmia has the
option of refunding the cash value of the product or component
returned.
Product defects not covered under the Warranty provisions
include normal wear and damage incurred from use or
accidental negligence, misuse of instruction specifications
or repair by unauthorized parties. Gourmia is not liable for
any incidental or consequential damages incurred by such
circumstances.
Only valid within the United States.
@gourmia
FOR CUSTOMER SERVICE VISIT WWW.GOURMIA.COM OR CALL 888.552.0033
20
We’d love to hear from you!
888.552.0033
Get cooking with