FCC WARNING
This device complies with pa 15 of the FCC Rules. Operation is subject to the following two
conditions : (1) this device may not cause harmful inteerence, (2) and this device must accept
any inteerence received,inc luding inteerence that may cause undesired operation.
Any changes or modications not expressly approved by the pay responsible for compliance
could void the user's authority to operate the equipment.
NOTE:This equipment has been tested and found to comply with the limits for a Class B digital
device, pursuant to Pa l5 of the FCC Rules. These limits are designed to provide reasonable
protection against harmful inteerence in a residential installation. This equipment generates,
uses and can radiate radio frequency energy and, if not installed and used in accordance with
the instructions, may cause harmful inteerence to radio communications.
However, there is no guarantee that inteerence will not occur in a paicular installation. If this
equipment does cause harmful inteerence to radio or televis ion reception, which can be
determined by turning the equipment o and on, the user is encouraged to t to correct the
inteerence by one or more of the following measures:
-- Reorient or relocate the receiving antenna.
-- Increase the separation between the equipment and receiver.
-- Connect the equipment into an outlet on a circuit dierent
from that to which the receiver is connected.
-- Consult the dealer or an experienced radio/TV technic ian for help.
To maintain compliance with FCC's RF Exposure guidelines,This equipment should be installed
and operated with minimum distance between 20cm the radiator your body: Use only the
supplied antenna.
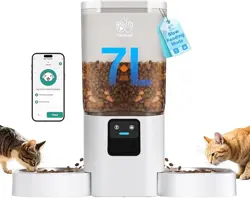
USER MANUAL
Automatic Pet Feeder With Camera
Please read the manual before using the product
suppo: [email protected]
SAFETY PRECAUTUONS
Warning
·Dispose of all packaging materials properly. Some items may be packed in poly-bags; these
bag could cause suocation; keep away from children and pets.
·
Do not allow small children to play with, in or around the pet feeder.
·
To reduce the risk of inju, please keep close supeision when an appliance is used near children.
·
Do not use the feeder with pets not able to reach the food tray or with any physical disability
·
Do not immerse the base pa in water at any time as it may damage electronic components
like the control panel.
·
Do not place any foreign object in the pet feeder.
·
Do Not use outdoors. Check operation frequently to be sure the unit is dispensing properly.
·
Do not use wet, canned or moist food.
·
Do not disassemble the unit other than as instructed in the user guide.
·
Do not use the feeder for anything other than its intended use.
·
Only use attachments recommended or sold by the manufacturer. The use of attachments
not recommended or sold by the manufacturer may cause an unsafe condition. Do not modify
the pet feeder.
·
Do not operate any appliance if the unit is malfunctioning or has been damaged. Do not
attempt repairs on the pet feeder yourself. Contact our customer seice immediately for
fuher instructions.
·
Always unplug when not in use and before cleaning.
·
Never pull on the electrical power cord to remove the plug from the wall outlet.
·
If the plug of this device gets wet, turn on electricity to that wall outlet. Do not attempt to
unplug.
·
Examine the feeder after installation. Do not plug in if there is water on the power cord or plug.
·
To avoid tripping, always position power cord out of the way of foot trac.
CAUTION
·Do not allow pets to chew on or swallow any pas.
·
If an extension cord is necessa, one unit with a proper rating should be used.
·
Do not install or store the feeder where it will be exposed to weather or temperatures below -10
℃.
·
Use alkaline D batteries to power. Do not use rechargeable batteries.
·
Check the batteries regularly. Before leaving for extended time, always replace batteries
with new ones.
·
Do not life the pet feeder by lid, food tank, or food tray. Lt and car it using both hands
and the base, while keeping the unit in an upright position.
·
Suitable for d food only, with kibble size ranging from 2-10m. Larger kibble may get stuck
as the food outlet.
·
Read and obsee all impoant notices listed on the pet feeder and in the packaging.
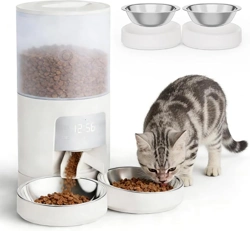
PetUltra
Automatic Cat Feeder
BUTTONS AND DISPLAY OVERREVIEW
Recording Button: press and hold for 1s until a beep is heard then the device stas to
record. Keep holding the button throughout your recording. Release the button when you hear
the beep twice, this indicates that the recording has ended. The device suppos a maximum
of 10s recording.
Note:
·
The default of the meal call playback is 2 time, and the meal call plays when feeding time is
up.
·
Delete your recording, press and hold the recording button for 1s. Release immediately
after a beep is heard. When 2 beeps are heard, no recording is taken.
Note:
·When press the feed button, feed a poion manually, it is unlocked
·When the device is locked status, long press set button for 6s to restore facto setting
Feed Button: Press once to feed a poion manually
Set Button: Press for 7s, when you hear "dingdong" sounds, which means the device
restores the facto setting and automatically resta (the red light ashes quickly for 7s to 10s
and goes out, the blue light is always on for 10s to 15s and then ashes)
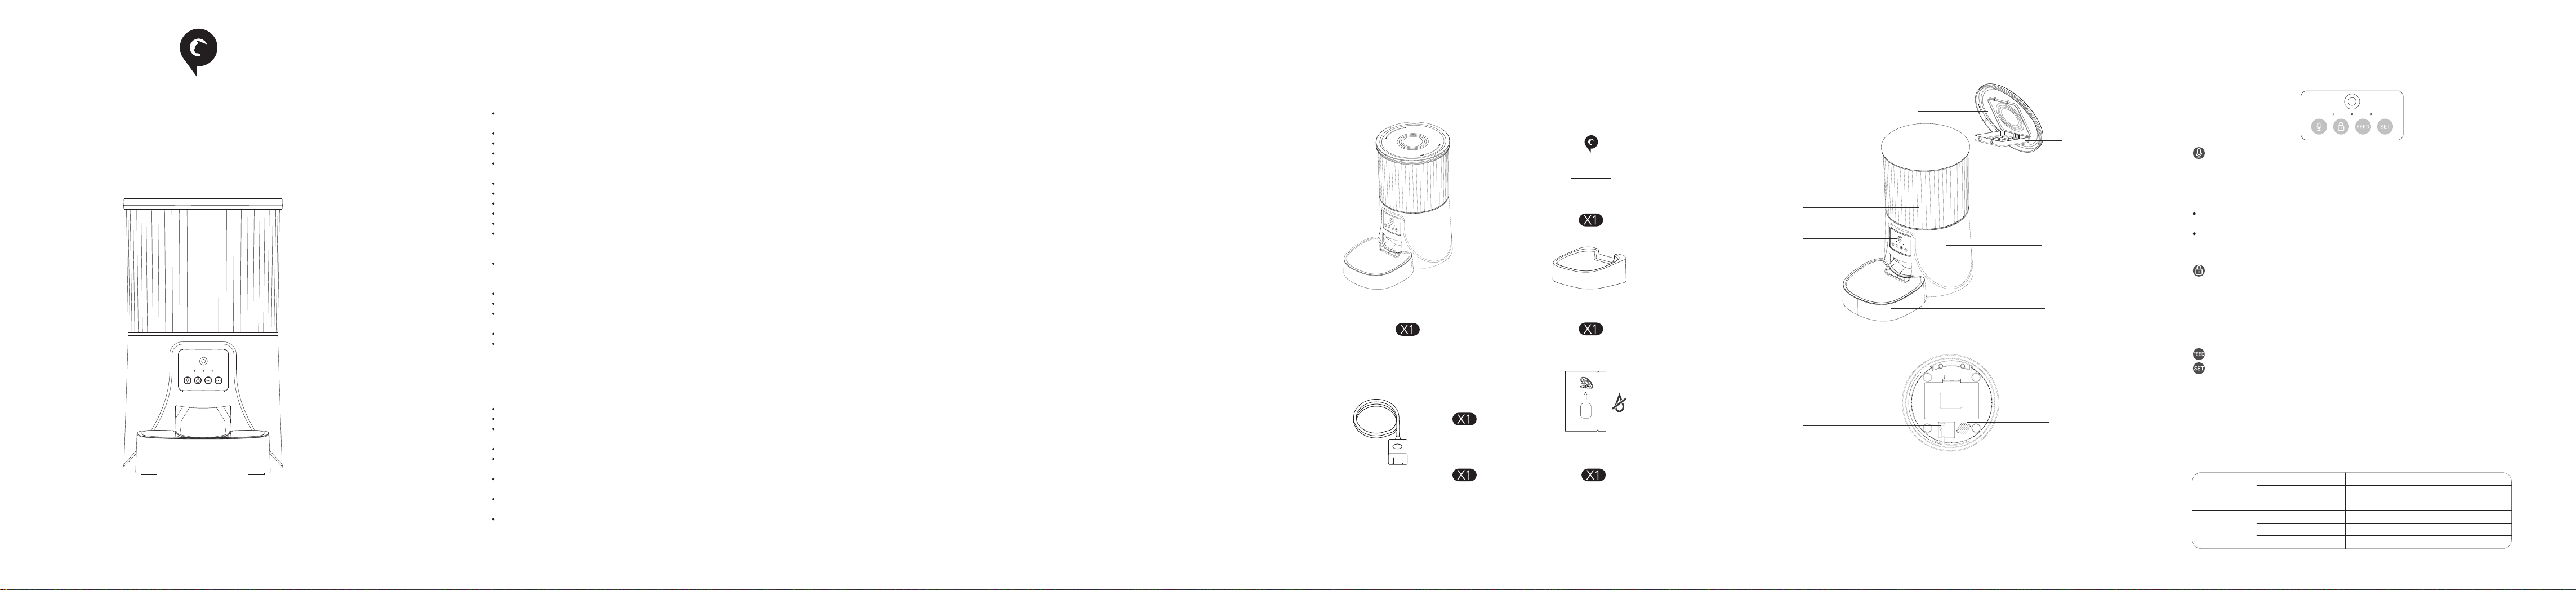
PRODUCT IMAGE
Front View
Bottom View
2
1
3
6
7
4
5
8
9
10
6.Base
7. Bowl Tray
8.Batte Compament
9. Power Socket
10.Speaker
1.Lid
2.Desiccant Carrier
3.Food Tank
4. Camera & Control Pannel
5. Food Outlet
IN THE BOX
Desiccant Bag
Do Not Eat
Power Cable
Power Adapter
Bowl Tray
User Manual
PetUltra
LED INDICATORS
Red
Flash
Flash Twice
Locked/Unlocked
Abnormal or low voltage
Stay for about 6s
Power on, WiFi quick connection/AP mode switch
Blue
Flash
Stay Solid
Stay for about 6s
Power on, WiFi quick connection/AP mode switch
Connected to WiFi and fully operational
Ready to connect with App.
Locked / Unlocked Button: Under unlock state, long press for 6s and the red led light
ashes twice, lock the device. Under locked state, long Press for 6s and the red led light ashes
twice, unlock the device.
GETTING STARTED
1. Assembling Food Tray
1) Tank out the food bowl inside the food tank.
2) Check the food tank is in place
3) Install the food bowl
Attach the bowl to the designated notches
underneath the feeder base.
2.Connection Power
1) Inse the 5V power adapter into a wall socket.
Plug in the power socket of the feeder.
2) Open the batte compament at the button
of the unit, and install 3 alkaline D batteries (not
included) in case of outage.
7. Wait for the device toconnect to the
network
8. Adding successfully, you can name
the feeder
9. Tap "Schedule" to set the feeding
schedule
10. Tap"Add timing", set feeding time
and number of meals
11. Choose the time and number of
meal
12. Click " " to enter the device
settings
1. Scan the QR code or search for
“PETTECH” on APP Store to download
the app.Sign up or log in to your
account
2. Open the APP, select Home page, tap
“Add Device” or “+” in the upper right
corner
3. Choose Pet Feeder with Camera
(Wi-Fi)
4. Conrm the device indicator is
ashing, then next step
5. Enter the WIFI password,note that
the name andpassword do not contain
Chinese characters and special symbols,
and 5G WiFi is not suppoed.
6. Keep the QR code facing the feeder's
camera at a distance of 10-15cm
PETTECH APP SPECIFIC OPERATIONS
Warning: Please use the original 5V power supply.
Note:
Before moving the feeder, press the
bowl down to remove it from the
feeder base. If there is grain in the food
bowl, handle it gently to avoid spilling.
Hold the base instead of any other
pas when lifting the feeder.
Note:
◎ Batte NOT included.
◎ Before connecting to power, make sure all
pas are clean and complete d.
3.Put the desiccant bag into the carrier under the lid
The PETULTRA desiccant bag can remove the moisture
and odor inside the tank, protect the pet food from
oxidation damage, and always be fresh.
D Size
Batte
Note:
◎ It's recommended to use a
desiccant bag and change them eve
15 days in case of mold.
◎ Please remove the desiccant bag
before cleaning the lid
◎ For a better antioxidant eect, tear
o the sealing lm outside the small
package only when you use it.
4.Filling Food Tank
Add d pet food to the food tank.
CLEANING & CARE
It’s recommended to clean the feeder regularly for the health of your pet.
The washable pas of the PETULTRA auto feeder are as follows: food tank, food tray, and lid
(without desiccant bag); they can be submerged in water. Clean by hand-washing using cool
or warm soapy water.
Dissembling the food tank
If you have food inside the tank or chute, press the feed button for a few times to empty rst.
Press the food tank buckles with your thumbs, push the tank upward to disassemble.
Dissembling the food tray
Empty the tray, press it down to remove from the base.
Rinse and let all pas air d completely before assembling.
Note: Be careful not to hu your ngers when disassembling the food tank by great strength.
SPECIFICATIONS
Food Tank Capacity: 4 liters
Power Supply: DC 5V/1A power adapter; 3 x alkaline D batteries
Power Adapter: AC 110-240V Input, DC 5V output
G.W: 1.75KG
Size: 18.4x18.4x31.9 cm
Note:
◎ Do NOT use canned, wet or moist
pet food.
◎ Recommend kibble size ranging
from 2-10mm/0.07-0.4 in in diameter.
TROUBLESHOOTING
Q: The food won’t come out
A: 1) Please be sure to ll in with d food; kibble size should range from 2-10mm / 0.07-0.4
inch in diameter.
2)Check whether any foreign objects are placed - disassemble the food tank and check the
chute. Also check the food outlet.
3)Check whether it’s low batte level-whether the power adapter is connected or there is
any outage when no batte is installed.
Q: I can’t disassemble the food tank
A: Please follow steps in Clean & Care
Q: I can’t here any voice recordings when feeding
A: Make sure you’ve recorded successfully, unlock the control panel, press the Feed button to
check. If no sound is heard, you may need to record again and be sure to save the recording.
Q: Food volume for each poion is not the same
A: The rst few poions may va, and it doesn’t mean a faulty equipment. After about 6
feedings it should be almost even.
Q: I can’t congure the feeder on my mobile
A: Incorrect account and password format
Use only number and letter for username and password, 12 digits at most.
5G not suppoed- Please use 2.4G wireless network.
Application problem - Some program conicts may happen. Please resta your mobile
Q: Feeders appears disconnected from WiFi
A: Weak disconnection -Please check that the distance between your feeder and router is no
more than 10m/33ft, and no concrete walls or too many obstacles between them. Otherwise
the WiFi network can be weak and cause unstable connection.
Do Not Eat
10mm
HD:
Talk
High Denition/Standard Denition, the defaul video
quality is HD( high denition), tap HD or SD to select
your preferred video quality
Two-Way Talk(the default mode): Tap to speak, the
pet or people on the other side can hear you and talk
with you. Tap again to end the talk. It ensures seamless
comunication between the two sides.
One-way communication: Tap to speak, release the
button to end the talk. You can't hear the other side
when you are talking.
Note: To enable the one way communication function,
tap" " icon in the upper right corner- Basic function
settings- Talk Mode- One way communication.