
Espresso
Coffee
Machine

CONTENTS
SAFETY PRECAUTIONS
COMPONENTS
OPERATING INSTRUCTIONS
CLEANING & MAINTENANCE
TROUBLESHOOTING
TECHNICAL SPECIFICATION
.
1
3
4
8
12
13

SAFETY PRECAUTIONS
Please read this manual carefully. Please keep this user manual as well as the appliance
certificate in a safe place for later use or for subsequent owners.
In case the product needs to be repaired while in operation, kindly get in touch with our after-sales
service team. Avoid disassembling the product yourself to prevent any potential dangers.
This appliance may be used by children over the age of 8 years old and by persons with reduced
physical, sensory or mental capabilities or by persons with a lack of experience or knowledge if they
are supervised or instructed by a person responsible for their safety how to use the appliance safely
and have understood the associated hazards.
This appliance is intended for private domestic use and household environment only. Only used
the appliance in enclosed spaces.
This appliance is intended for use up to a maximum height of 2000 meters above sea level.
Warnings and important instructions appearing in this guide are not meant to cover all possible
conditions and situations that may occur. Common sense, caution, and care must be exercised when
installing, maintaining, or operating your appliance.
Risk of suffocation!
Children may put packaging material over their heads or wrap themselves up in it and suffocate.
- Keep packaging material and small parts away from children.
- Children may breathe in or swallow small parts, causing them to suffocate.
Risk of electric shock!
If the appliance or the power cord is damaged, this is dangerous:
- Never operate a damaged appliance.
- Never pull on the power cord to unplug the appliance. Always unplug the appliance at the mains.
- If the appliance or the power cord is damaged, immediately unplug the power cord or switch off
the fuse in the fuse box.
Improper repairs are dangerous:
- Repairs to the appliance should only be carried out by trained specialist staff.
- Only use genuine spare parts when repairing the appliance.
- If the power cord of this appliance is damaged, it must be replaced by the qualified technician.
1

Penetrating moisture may cause an electric shock.
- Before cleaning, pull out the mains plug or switch off the fuse in the fuse box.
- Do not use wet sponge cloths, steam- or high-pressure cleaners to clean the appliance.
- The appliance must not be immersed in water.
Risk of scald!
The appliance becomes very hot during use! Allow the appliance to cool down before removing
or attaching parts, moving, relocating or cleaning it.
- Never touch the hot appliance parts like the steam/hot water outlet, the metal part of the
portafilter or the filter during or shortly after use.
- After prolonged use, the cup warmer gets so hot that you might scald yourself on it!
Never point the milk tube towards persons, animals or steam and moisture sensitive furniture!
- The escaping steam or the liquid is very hot and could cause scalding!
Use caution
Never take the portafilter off while the appliance performs a brewing process or steams milk -
the appliance is pressurized!
Do not leave the espresso machine unattended when in use. This applies especially when
children are nearby.
Only cups and tamper may be placed on the cup warmer. Do not place any other items on the
appliance.
Keep the appliance and accessories clean.
If the appliance is to be left unattended, cleaned, moved, assembled, or stored, always switch OFF
the espresso machine with the ON/OFF button. Switch off at the power outlet and unplug.
Ensure the product is properly assembled before first use.
Do not use any other liquid apart form cold mains/tap water. We do not recommend the use of highly
filtered, demineralised or distilled water as this may affect the taste of the coffee and how the
espresso machine is designed to function.
SAVE THIS USER MANUAL
FOR FUTURE USE
2
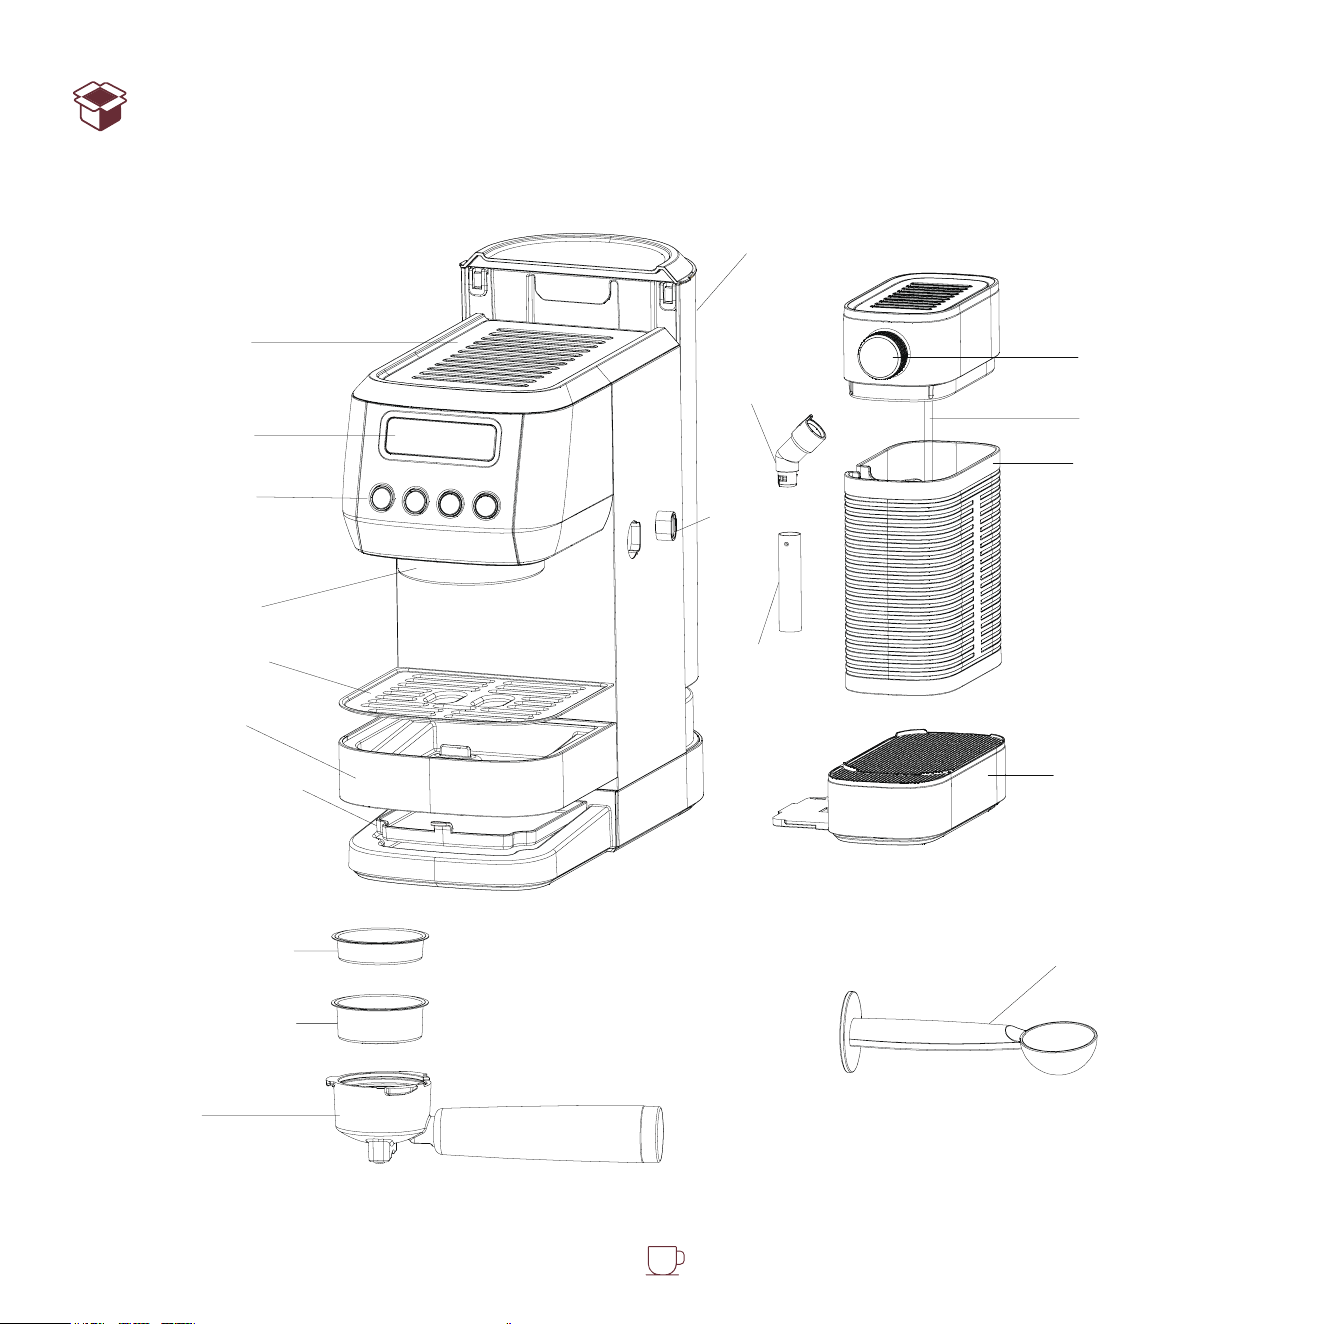
COMPONENTS
LCD Display
Cup Warmer
Water Reservoir
Milk Reservoir
Milk Reservoir
Base
Measure Spoon
with Tamper
Silicone Tube
Milk Knob
Connector
Lock
Milk Tube
Control Panel
Brew Head
Drip Plate
Drip Tray
Inner Drip Tray
Single Shot Filter
Double Shot Filter
Portafilter
3
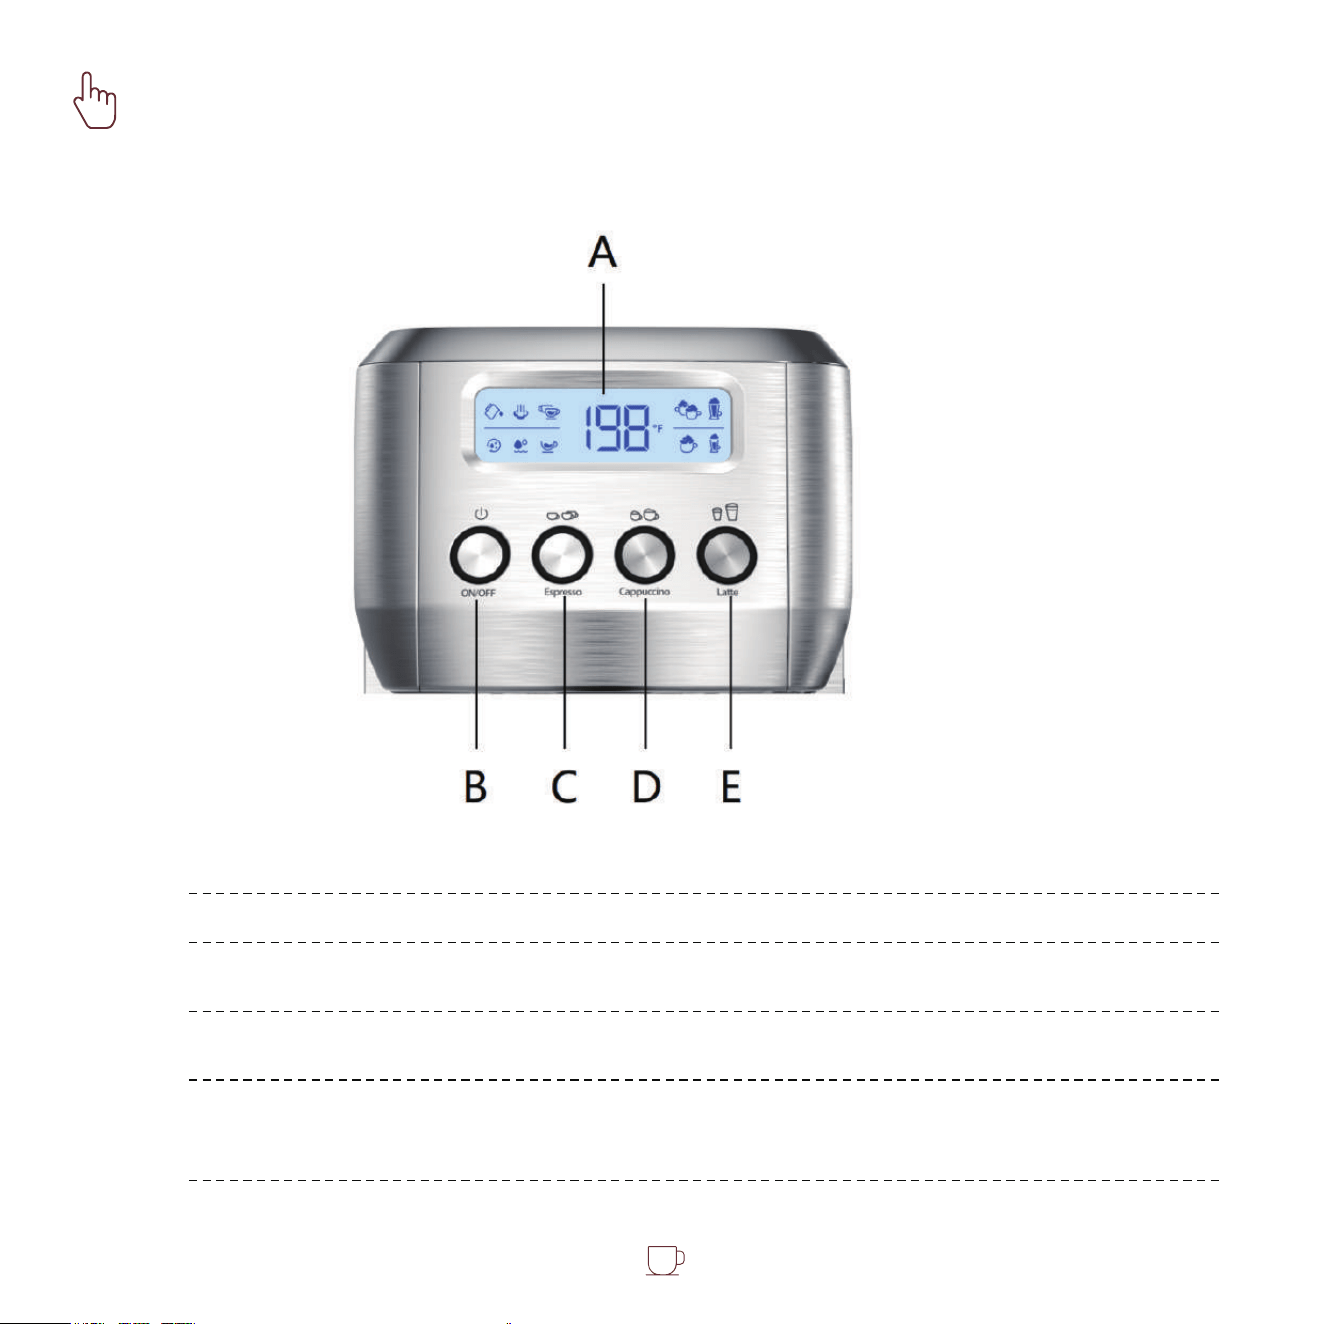
OPERATING INSTRUCTIONS
Control Panel
LCD Display
Display the working status
Press to turn ON/OFF the machine
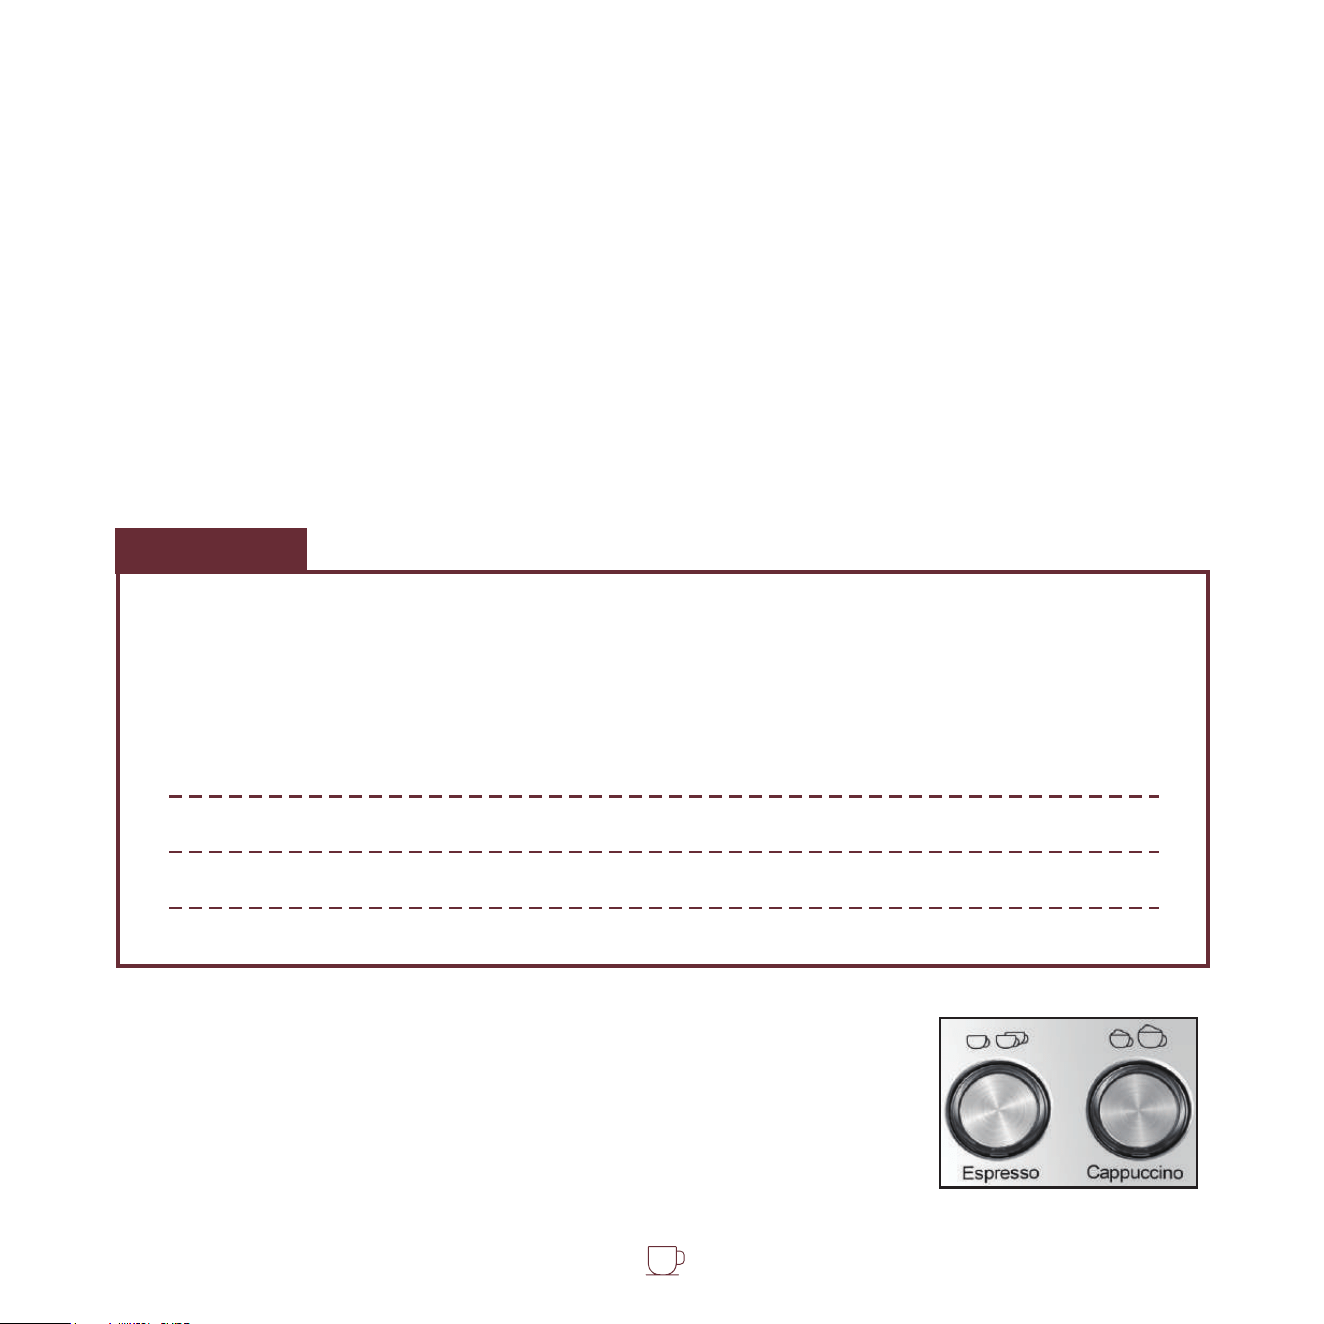
Press to toggle between single and double shot.
Hold down for 3 seconds to customize the value.
Press to toggle between small and large cup.
Hold down for 3 seconds to manual milk frothing.
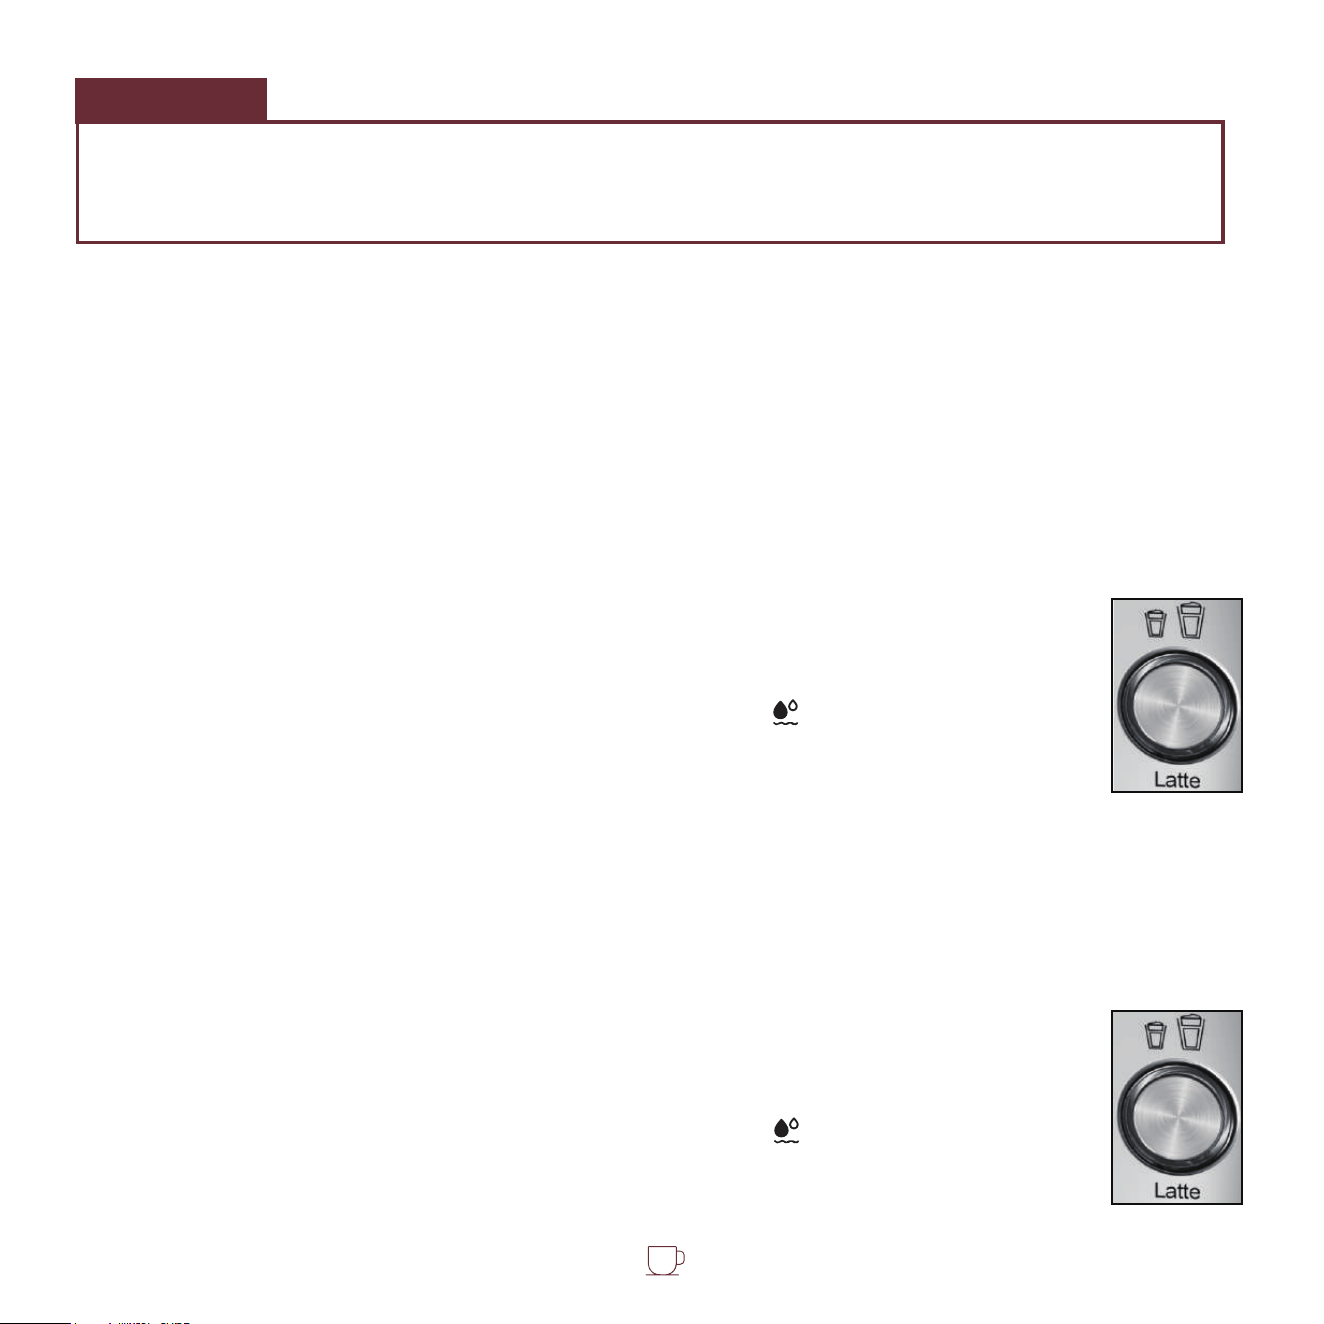
Press to toggle between small and large cup.
Hold down for 3 seconds to run the cleaning cycle
of milk-frothing system.
ON/OFF Button
Espresso Button
Cappuccino Button
Latte Button
A
B
C
D
E
4
Before First Use
To ensure the first cup of coffee tastes excellent, please prepare the coffee maker as follows:
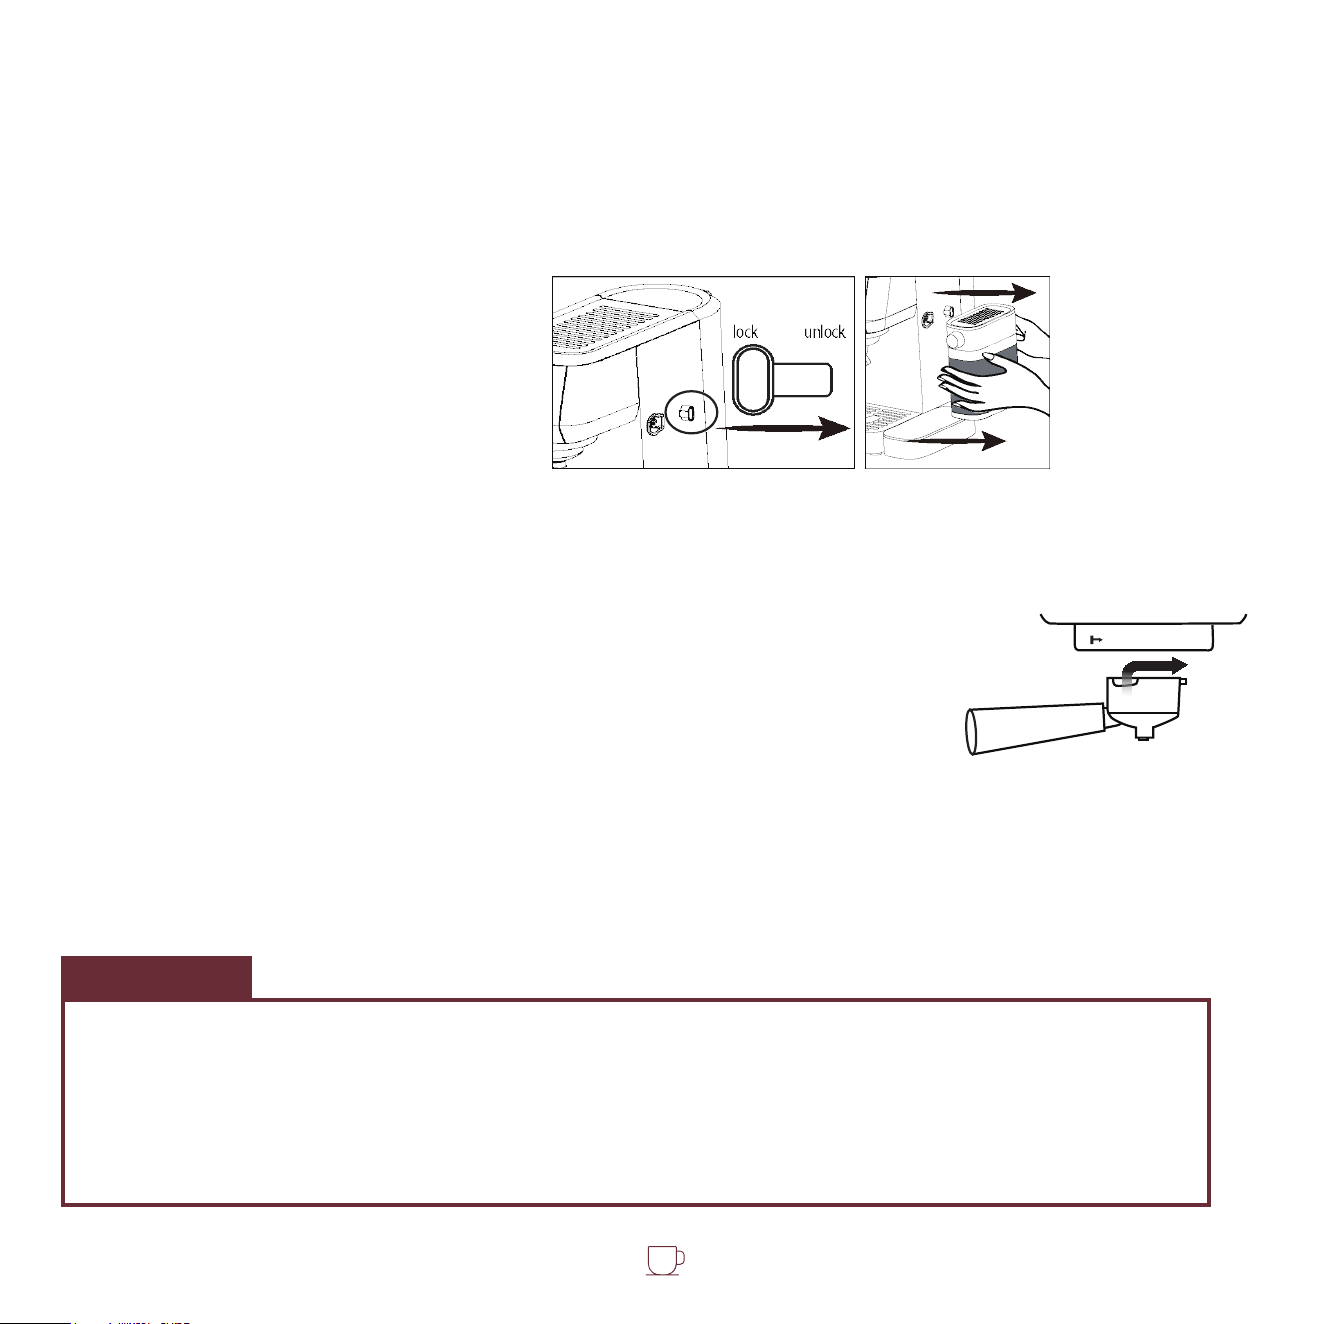
1. Remove the plug at the bottom of the water reservoir. Install the water reservoir.
2. Fill the water reservoir and milk reservoir with ambient temperature water up to the “MAX” mark.
3. Install the milk reservoir and its base:
a. Unlock the milk reservoir lock.
b. Connect the milk reservoir.
c. Lock the milk reservoir.
4. Connect the machine to a power source, press the ON/OFF button. The power indicator turns on and
the machine starts to preheat. The preheating takes about 2 minutes.
5. Once the preheating is finished, all buttons will keep lighting.
6. Place the brewing filter without any ground coffee into the portafilter.
Place the portafilter at a 45° angle to the left and slot it into the brew
head, then rotate it to the right to lock it in place. The portafilter should
be installed at a right angle to the machine or with a slight tilt to the right.
7. Place an empty cup under the portafilter.
8. Rotate the milk knob to adjust the milk tube towards the cup.
9. Press the Cappuccino button once start the brewing cycle.
10. After the brewing cycle, DISCARD the used water.
Now your coffee maker is ready to use.
t Lock
1. There may be a loud noise and a little shake when the machine pumps the water out the
first time. This is normal. The machine is releasing some air from the system. The noise will be
weak in the future using.
2. The filter could be a bit snug and difficult to remove from the portafilter when you need to
replace it. You can use a different filter to help pry it out.
NOTE
5

Making Espresso
Making Cappuccino or Latte
Using cold portafilter, filters, and cups can lower the extraction temperature, impacting the espresso
quality. It is advisable to run a brewing cycle without ground coffee to preheat them before extraction.
1. Remove the portafilter by turning it clockwise. Place the brew filter into the portafilter, making sure it
fits properly.
2. Use the measure spoon, add ground coffee to the brewing filter then tamp the ground coffee down
tightly with the spoon.
3. Install the portafilter. And then press the Espresso button to select one shot or two shot.
Check out the Quick Start Guide (brochure) for more brewing advices.
2. Follow the above steps in Making Espresso but do not press any button. Use the single shot filter for
a small cup and the double shot filter for a large cup.
3. If the temperature is too low to produce steam, the Cappuccino or Latte buttons icon will be flashing,
indicating the machine is preheating.
4. All buttons will keep lighting once the preheating is done.
5. Press the Cappuccino or Latte button to your liking. Pressing once will choose a small cup, while
pressing twice will choose a large cup.
6. You may add additional frothed milk by pressing and holding the Cappuccino button for 3 seconds.
The button will flash in blue and green alternately. Press the Cappuccino button again when finished.
1. Before starting, it is important to gently rotate the knob to adjust the milk tube
towards the cup.
Make sure to clean the milk tube after use. See section Cleaning & Maintenance.
NOTE
6
NOTE:
1. If no operation is selected within 15 seconds, the machine will return to standby mode.
2. The coffee maker has a memory function that will automatically remember your last
setting for brewing.
3. The adjustable volume range are as follows:
Customize The Volume of Espresso, Cappuccino and Latte
Reset the Default Volumes
(5 SECONDS)
This machine allows you to customize the volume of Espresso, Cappuccino and Latte as you desired.
1. When the machine has finished preheating (all buttons lights up), press and hold the Espresso
button for 3 seconds.
2. The Espresso, Cappuccino, and Latte buttons will flash alternately in green indicating the machine
is ready to customize the volume.
3. Choose a brewing mode among Espresso, Cappuccino, and Latte by pressing the related button.
4. Press once or twice to decide between single shot or double shot (small cup or large cup).
5. When the desired amount of frothed milk or coffee is reached, press the button again. If you opt
for Cappuccino or Latte, you must confirm the amount twice (first for milk, then for coffee).
6. When setting finished, the machine will beep for 3 times indicating that the volume is recorded. It
will return to standby mode.
Espresso
9-50s (25-200ml)
9-50s (25-200ml)
15-130s
15-130s
9-50s (25-200ml)
/
Coffee
Unit: s = seconds
Milk
Cappuccino
Latte
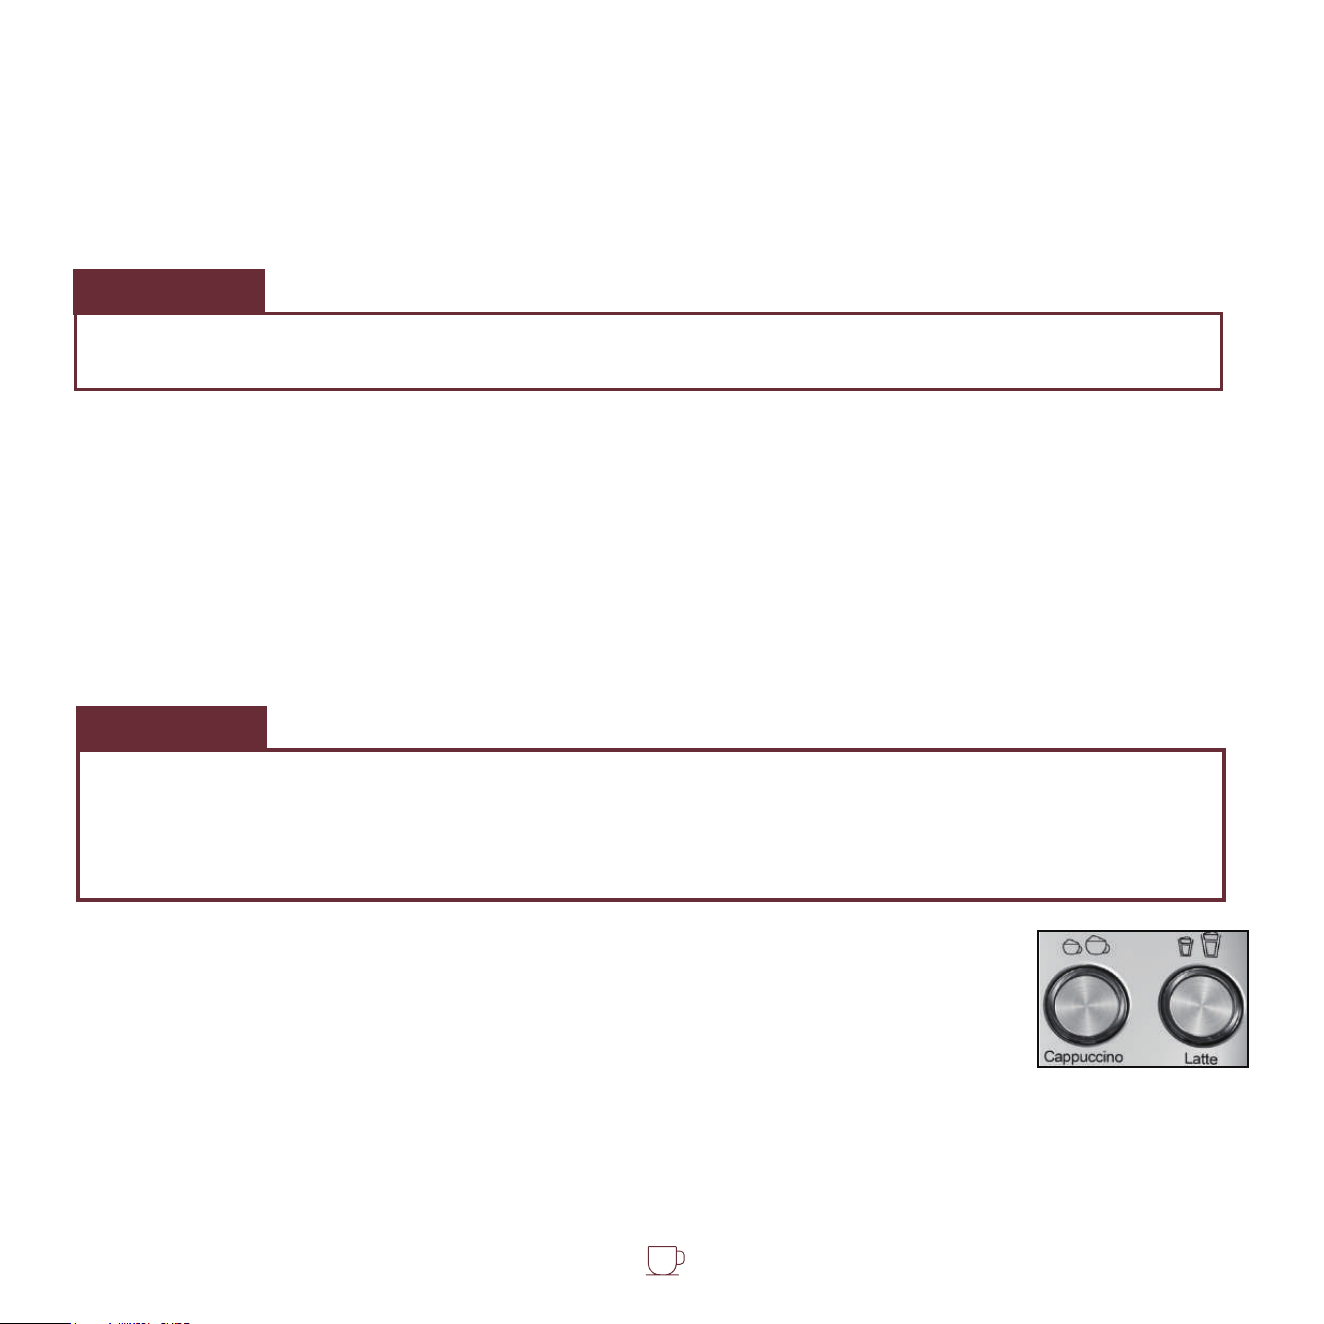
To reset the machine to the default volumes of Espresso, Cappuccino
and Latte, press and hold the Espresso and Cappuccino buttons at
the same time for 5 seconds. The machine will return to its default
settings.
7

When the water shortage warning is triggered, the Espresso, Cappuccino and Latte buttons
simultaneously will flash in green, and will flash on screen.
Once the water shortage warning is triggered, please proceed as follows:
1. Press the ON/OFF button and turn off the machine.
2. Refill the water reservoir with ambient temperature water up to the “MAX” mark.
3. Place a cup under the portafilter, and gently rotate the milk knob to adjust the milk tube towards the
cup.
4. Turn on the machine.
5. Press either one of the Espresso, Cappuccino, or Latte button. The machine will start to pump water
and make hot water.
6. Once the pump ceases to work and hot water stops flowing, the water shortage is solved. All the
buttons will keep lighting. Now the machine is ready to use.
Water Shortage Warning
If no operation is chosen within 15 minutes in standby mode, the machine will automatically power
down, turning off all buttons. To restart, simply press the ON/OFF button once more.
DO NOT clean with alcohol or solvent cleanser.
NEVER immerse the housing in water to clean.
Allow the coffee machine to cool down sufficiently before cleaning.
Regularly clean the housing of the coffee machine with a damp sponge, then clean the water and milk
reservoir, drip tray and drip plate and dry them.
Clean portafilter with cleanser or warm water.
Clean all attachments and dry thoroughly.
Auto Shut-Off
Cleaning the Appliance
If you find that the filter is blocked with a very fine powder while brewing coffee, immerse the filter in
boiling water for 10 minutes to unclog it, then rinse it with running water.
Cleaning the Portafilter and Filters
CLEANING & MAINTENANCE
8
WARNING:
DO NOT wash any of the parts in the dishwasher.
To avoid burns, the filter must only be removed when the portafilter has cooled down sufficiently.
Once you are done making your beverage with milk, you can either store the milk reservoir with milk in
the refrigerator or completely clean the milk reservoir and milk tube.
It is important to clean the milk-frothing system immediately after making cappuccino, latte or manual
frothing.
Residual milk may clog the milk frother, leading to frothing problems, which can negatively impact the
taste of coffee or produce an unpleasant odor.
If the milk reservoir is stored in the refrigerator:
1. Place a large empty cup under the portafilter. Ensure there is sufficient water in the water reservoir above the
"MIN" mark.
2. Gently rotate the knob to adjust the milk tube towards the cup.
3. Press and hold the Latte button for 3 seconds.
To thoroughly clean the milk reservoir:
1. Drain the milk reservoir and rinsh it with running water.
2. Fill the milk reservoir with clean water.
3. Place a large empty cup under the portafilter. Ensure there is sufficient water in the water reservoir above the
"MIN" mark.
4. Gently rotate the knob to adjust the milk tube towards the cup.
5. Press and hold the Latte button for 3 seconds.
6. The machine will start to make hot water from the milk tube, and will flash on the screen.
7. The cleaning cycle will last for around 80 seconds.
8. Repeat steps 3-6 to make sure the milk residue is entirely removed.
4. The machine will start to make hot water from the milk tube, and will flash on the screen.
5. The cleaning cycle will last for around 80 seconds.
6. Repeat steps 1-4 to make sure the milk residue is entirely removed.
7. The milk tube is clean and the milk reservoir can be restored in the refrigerator.
Cleaning the Milk Reservoir and Milk Tube
(3 SECONDS)
(3 SECONDS)
9

9. Rinse and wash all parts of the milk reservoir including lid thoroughly with warm soapy water. Rinse and dry
well. Do not use abrasive cleaners and scouring pads, as they will scratch the finish.
Deep Cleaning the Milk Reservoir Lid
If you find that the machine can not product the
milk foam, it may be due to a blockage in the air
inlet. You can use a 0.25mm needle to clear the
air inlet and it should work normally.
NOTE
Follow the below procedures to deeply clean the milk reservoir lid.
1. Remove the rubber plug on the lid.
2. Remove the silicone tube and the milk tube.
3. Rinse each pipe opening with clean water. (Do not immerse in water!)
4. Dry well and assemble all parts back to correct position. In particular, the rubber plug must be
installed back in place, or the milk reservoir will not work.
10
NOTE
WARNING:
Do not try to disassemble the brew head. It will damage the brew head and lead to leakage.
Please also refer to the instructions on the descaling agent. Please use a household descaling
agent, or you can use citric acid instead of a commercial descaling agent - in this case use
100 parts of water to 3 parts of citric acid.
Descaling
To make sure your coffee machine operates efficiently, to clean the internal pipes, and to preserve the
flavor of your coffee, the coffee machine needs to be descaled, cleaned and maintained periodically.
Also, after 500 times of brew cycle, it is necessary to run a descaling cycle. Otherwise, the Descale
warning will appear at every time start-up.
Please proceed below steps to descaling the machine:
1. Fill the water with descaling agent (4 parts water to 1 part descaling agent) into the water reservoir
up to the “MAX” marking.
2. Place a cup/mug or other suitable receptacle on the drip tray and keep pressing
the Cappuccino and Latte buttons together for 5 seconds. The machine will start
the descaling cycle and run for 6 minutes then stop automatically.
3. Repeat the previous steps until the water with descaling agent is running out.
4. Next, repeat the process two more times using only CLEAN TAP WATER without any descaling
agent.
(5 SECONDS)
Regularly remove any coffee grounds from the brew head using a brush, and wash with hot water:
Insert the portafilter into it without using coffee grounds. Place a cup under the brew head and press
the Espresso button twice to fill the cup. Then remove the portafilter from the brew head and clean it
with a dry cloth.
Cleaning the Brew Head
11
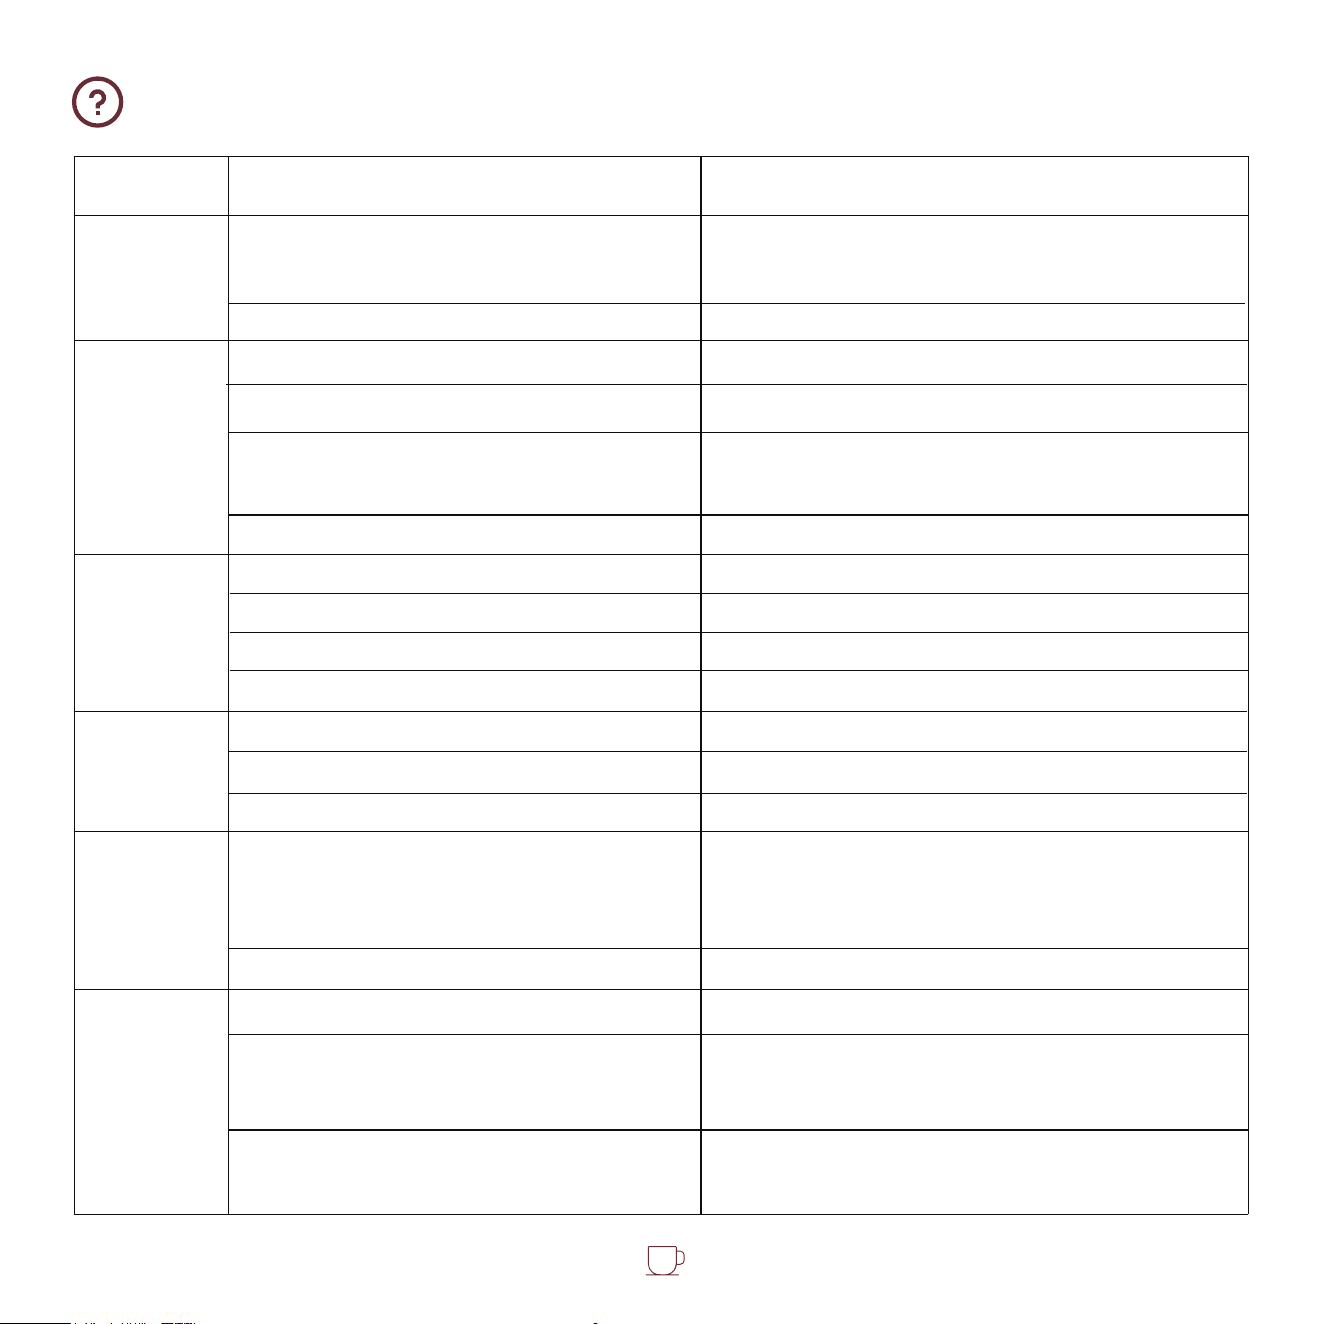
TROUBLESHOOTING
Filter is clogged up.
Clean the filters hole with a pin.
Clean the filters hole with a pin.
Problem Possible Cause Solution
Fill water tank.
Water tank is not installed correctly.
Water tank is empty.
Short circuit/ power outlet has no power.
Check the power supply.
Remove the water tank and correctly install it.
The machine cannot pump water.
Press and hold the Latte button for 3 seconds to
run the cleaning cycle. This process will help the
machine to pump water.
Machine
doesn’t work
Coffee does
not run out
of the
portafilter
The machine is not switched on or the
power plug is not plugged in.
Plug in the power plug, press the ON/OFF button.
And the power indicator will light up.
Coffee is
cold.
Cups are not preheated.
Too much coffee in the filter.
Filter is clogged up.
Coffee is ground too finely.
Too much coffee in filter.
Ground coffee is tamped too strongly.
Coffee is ground too coarsely.
Too little coffee in filter.
Ground coffee is not tamped strong enough.
Machine is not preheated.
Coffee ground is sticking to the sealing
ring of the brew head.
Turn off the machine, wait until it cooled down;
and then clean the filter, portafilter and the sealing
ring.
Portafilter is not securely attached.
Insert the filter holder and turn it to the right until
you feel some resistance.
preheat cups with warm water.
Make sure to use the correct amount of coffee.
Decrease the tamping pressure.
Increase the tamping pressure.
Ensure appropriate degree of grinding.
Ensure appropriate degree of grinding.
Ensure appropriate amount.
Ensure appropriate amount.
Coffee runs
through too
quickly
Coffee
spills out of
the filter.
Let hot water run through the machine with the
inserted portafilter (with filter but without coffee
grounds) to warm up the brew system before
brewing the first coffee.
Coffee only
slowly runs
out of the
portafilter
12
Please do not attempt to disassemble the unit yourself to prevent any potential dangers or damage to
the appliance.
TECHNICAL SPECIFICATION
Model
Voltage
Power
Espresso pressure
Capacity of water reservoir
Capacity of milk reservoir
Product size
CM1636
120V~ 60Hz
1350W
20 Bar
1.3 L / 44 OZ
0.7 L / 24 OZ
315x217x305 mm
12.4x8.5x12.0 inch
Manufacturer: Foshan Shunde QINGZHOU Electric Appliances Co., Ltd.
Add.: Room 2901, Building 18, Vanke Jinyu Riverside Plaza, No. 13 Desheng Middle Road, Daliang Street,
Shunde District, Foshan City, Guangdong Province, China
Contact: Emily Tel: +1 (838) 910 8317 E-Mail: [email protected]
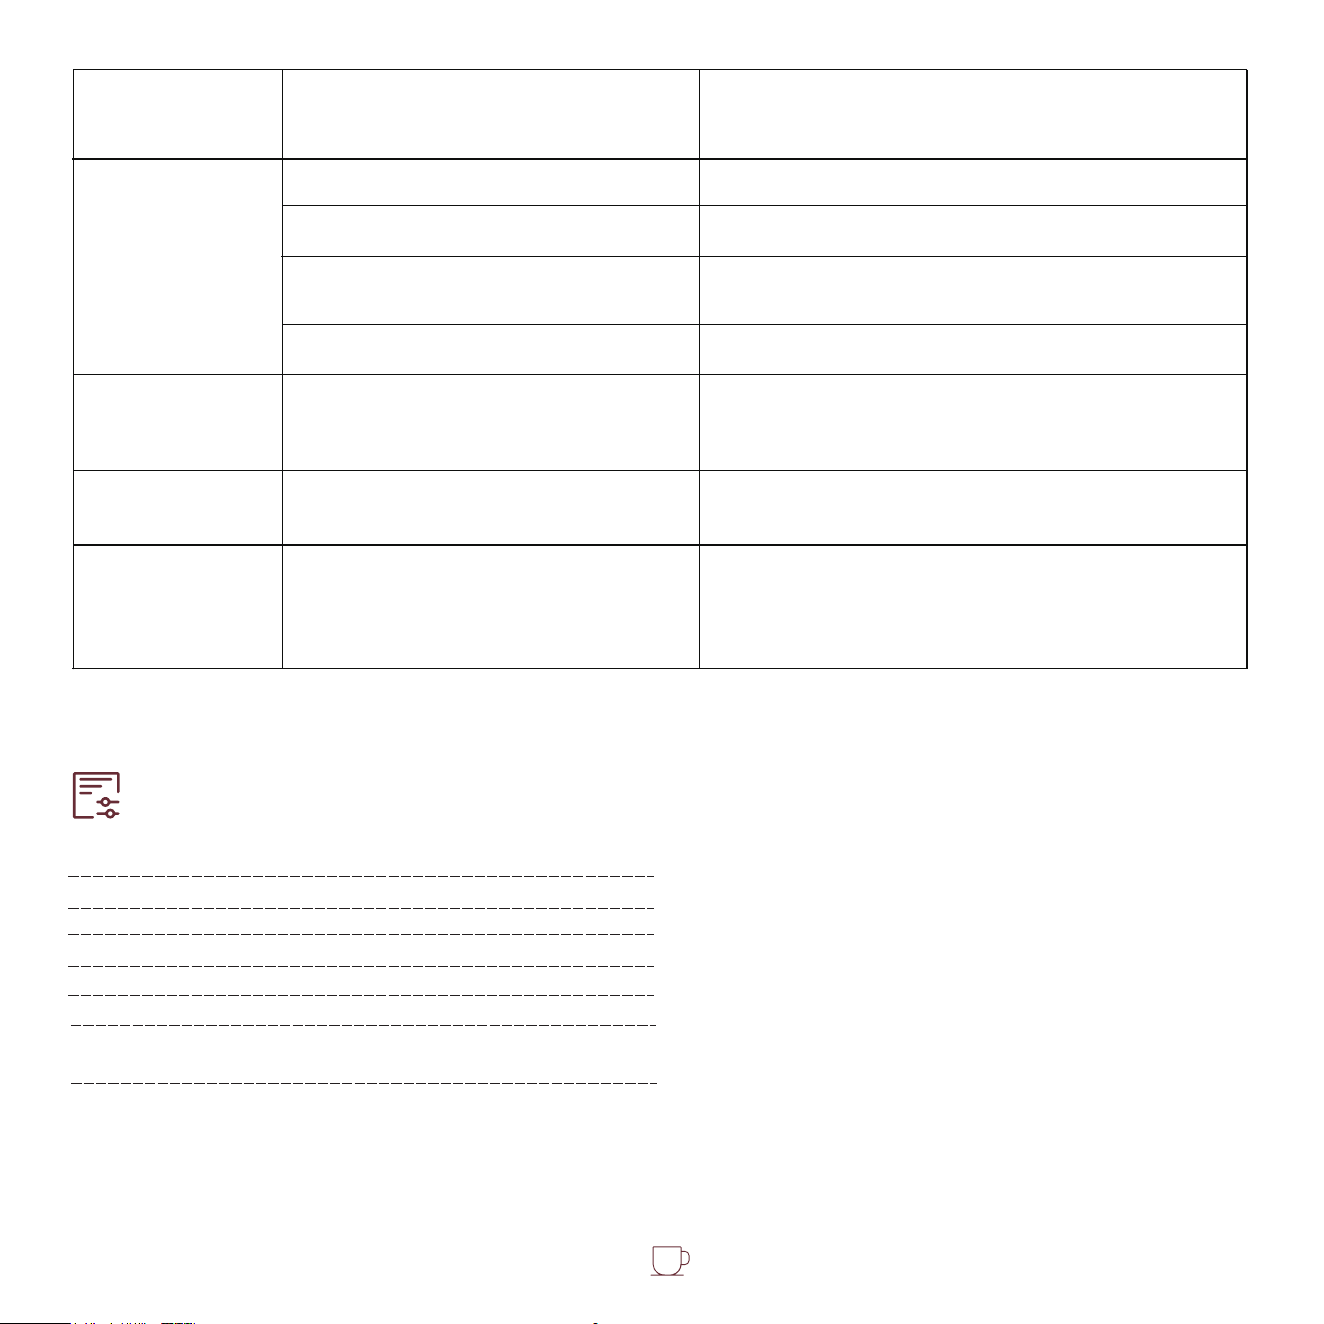
The milk reservoir is not inserted.
Run out of steam.
Milk is not cold enough.
Milk tube is blocked.
Air inlet is blocked.
Use a 0.25mm pin to clean the air inlet.
Frothing tube is blocked.
There are some residue milk in
the milk-frothing system.
Water reservoir is out of water.
Follow the instructions to clean the milk reservoir
& frothing tube.
Follow the instructions to clean the milk
reservoir & frothing tube in time.
Refill the water reservoir with ambient tempera-
ture water. Then press either one of the Espres-
so, Cappuccino, or Latte button.
Insert the milk reservoir into the machine, and
push the locker to the “Lock" position.
Check the volume in water reservoir.
Chill milk before making cappuccino or latte.
Follow the instructions to clean the milk reservoir
and milk tube.
Milk is not foamy
after frothing or it
is not coming out
of the milk tube
Bad smell from
the milk tube
Espresso, Cap-
puccino, and Latte
buttons are
flashing in green
Cappuccino and
Latte buttons do
not light up
The quantity of
milk varies with
each brewing
13

12
You will automatically get 1 year of warranty, and upgrade to full replacement
guarantee.
If anything goes wrong with your product, we will provide you with a brand
new unit as a replacement, or provide you with a full refund.
If there is a problem with your parts and accessories, you can replace them
for free.