Technical Support and E-Warranty Certificate www.vevor.com/support
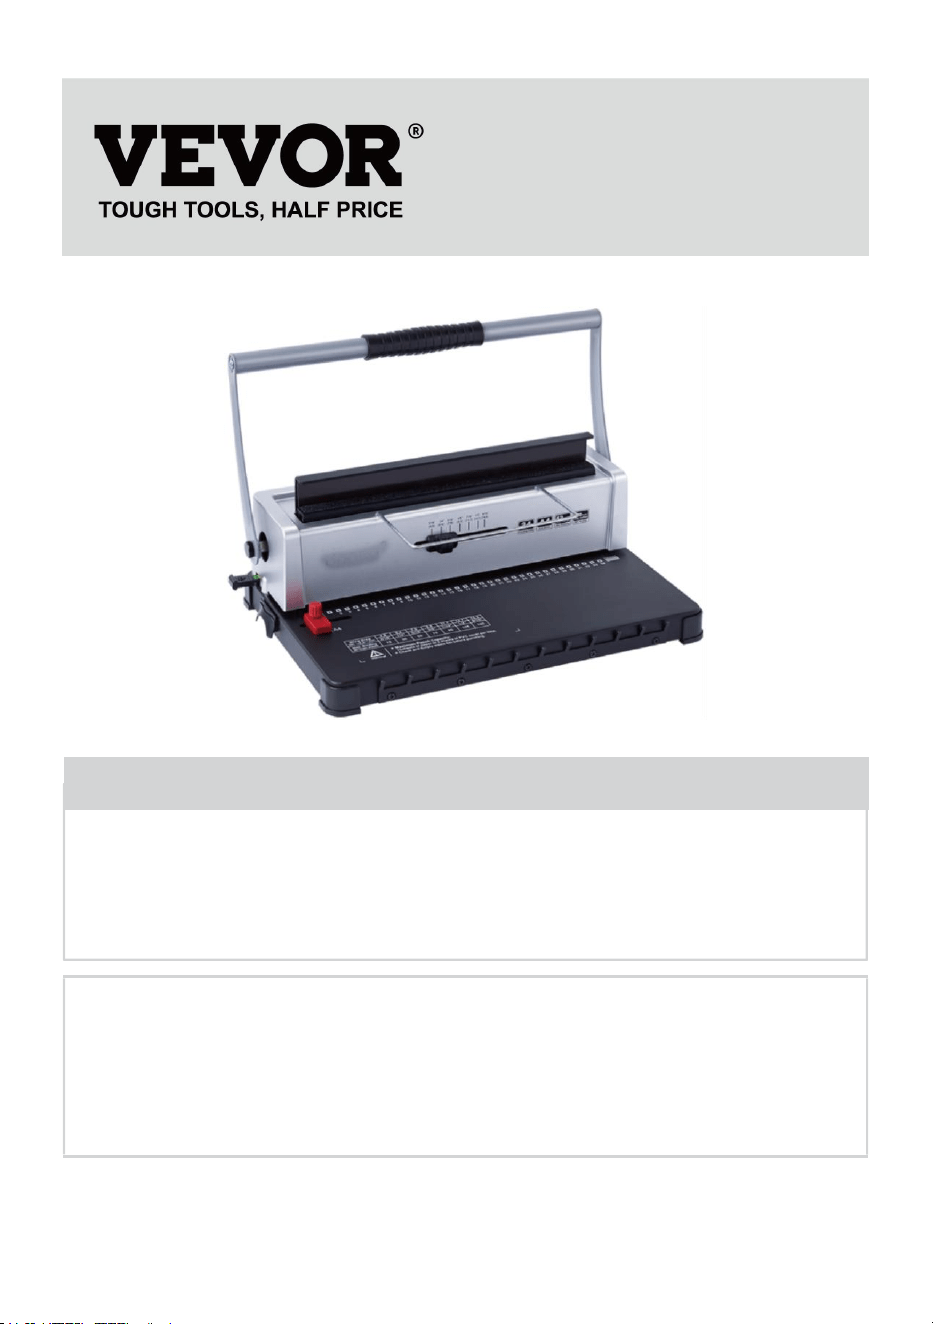
BINDING MACHINE
MODEL: STD12B
We continue to be committed to provide you tools with competitive price.
"Save Half", "Half Price" or any other similar expressions used by us only represents an
estimate of savings you might benefit from buying certain tools with us compared to the major
top brands and does not necessarily mean to cover all categories of tools offered by us. You
are kindly reminded to verify carefully when you are placing an order with us if you are
actually saving half in comparison with the top major brands.


- 1 -
MODEL: STD12B
Have product questions? Need technical support? Please feel free to
contact us:
Technical Support and E-Warranty Certificate
www.vevor.com/support
NEED HELP? CONTACT US!
This is the original instruction, please read all manual instructions
carefully before operating. VEVOR reserves a clear interpretation of our
user manual. The appearance of the product shall be subject to the
product you received. Please forgive us that we won't inform you again if
there are any technology or software updates on our product.
BINDING MACHINE

- 2 -
WARMING & ATTENTIONS
Read this operation manual carefully before using.
Keep the machine separately from children.
Keep the machine away from fire and liquid.
Put the machine on a stable and safe place in order to prevent if from
falling or causing any injury to people or the machine itself.
Test the machine with some scrap paper before formally punching and
binding, to make sure whether the position is correct to punch.
Take out the surplus parts from the packing box. Put the machine on
balanced and safe place to avoid falling off or causing any injury to
people or the machine.
Operate the machine strictly as per the manuals especially pay
attention to the max Punching and binding capacity.
Please test the machine before you punch the official documents.
When punching the plastic covers, we suggest that the cover should
be clipped between two pieces of paper.
Please don't use the machine to punch hard materials such as metals
to avoid damage to the machine.
When clamping the plastic ring, please don't put your fingers inside
this area, otherwise, you will get hurt.
Max punch capacity: 10-12 sheets (Paper Thickness: 80g(<20lb)
paper) Note: If you use paper of other thickness, please reduce the
paper according to the actual situation!
For the first use, make a punch with blotting paper to suck up excess
lube from the blade
Warning-To reduce the risk of injury, user must read
instructions manual carefully.
- 3 -
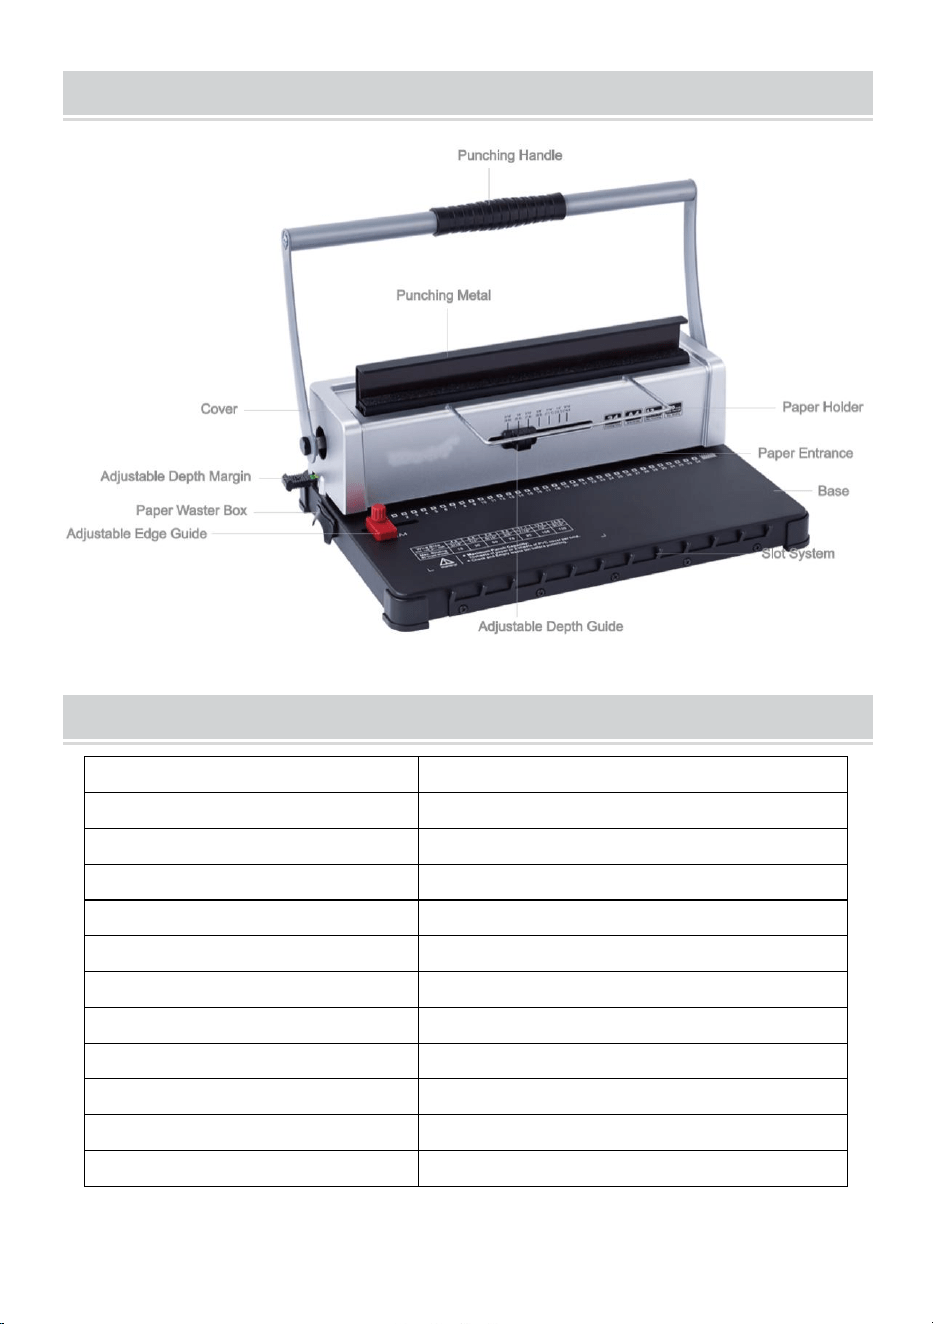
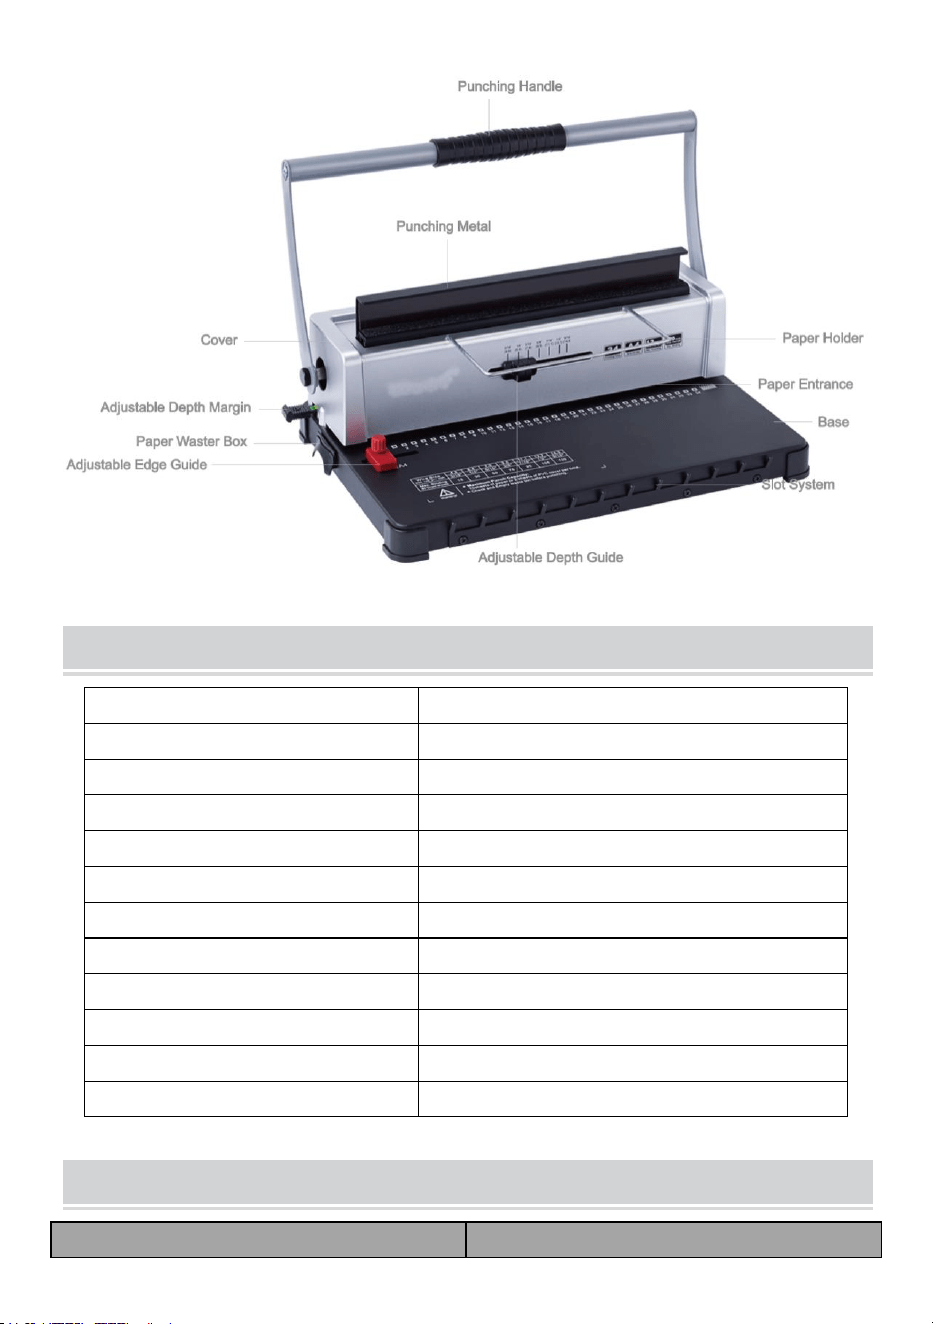
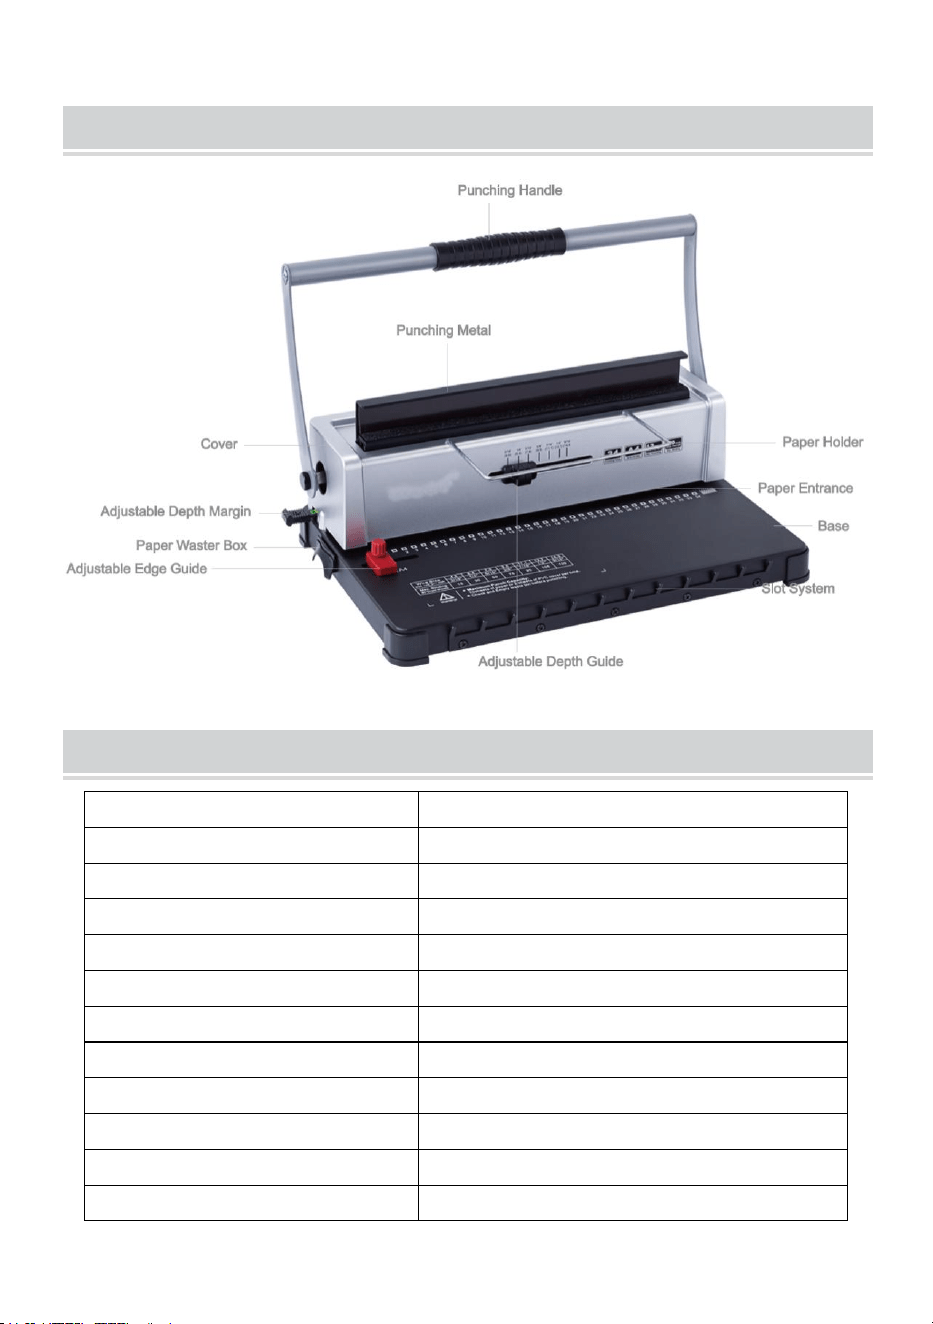
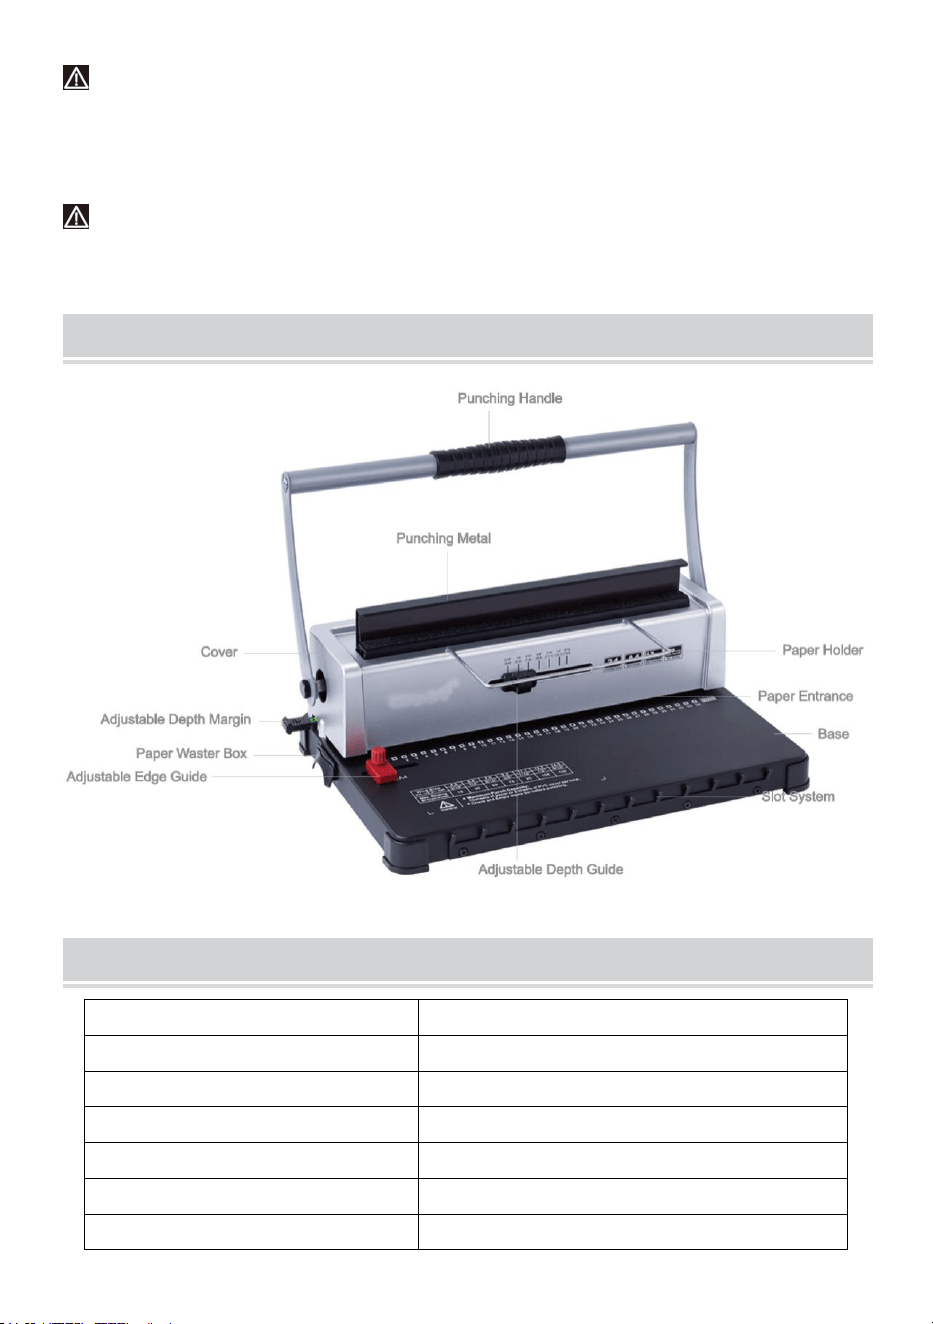
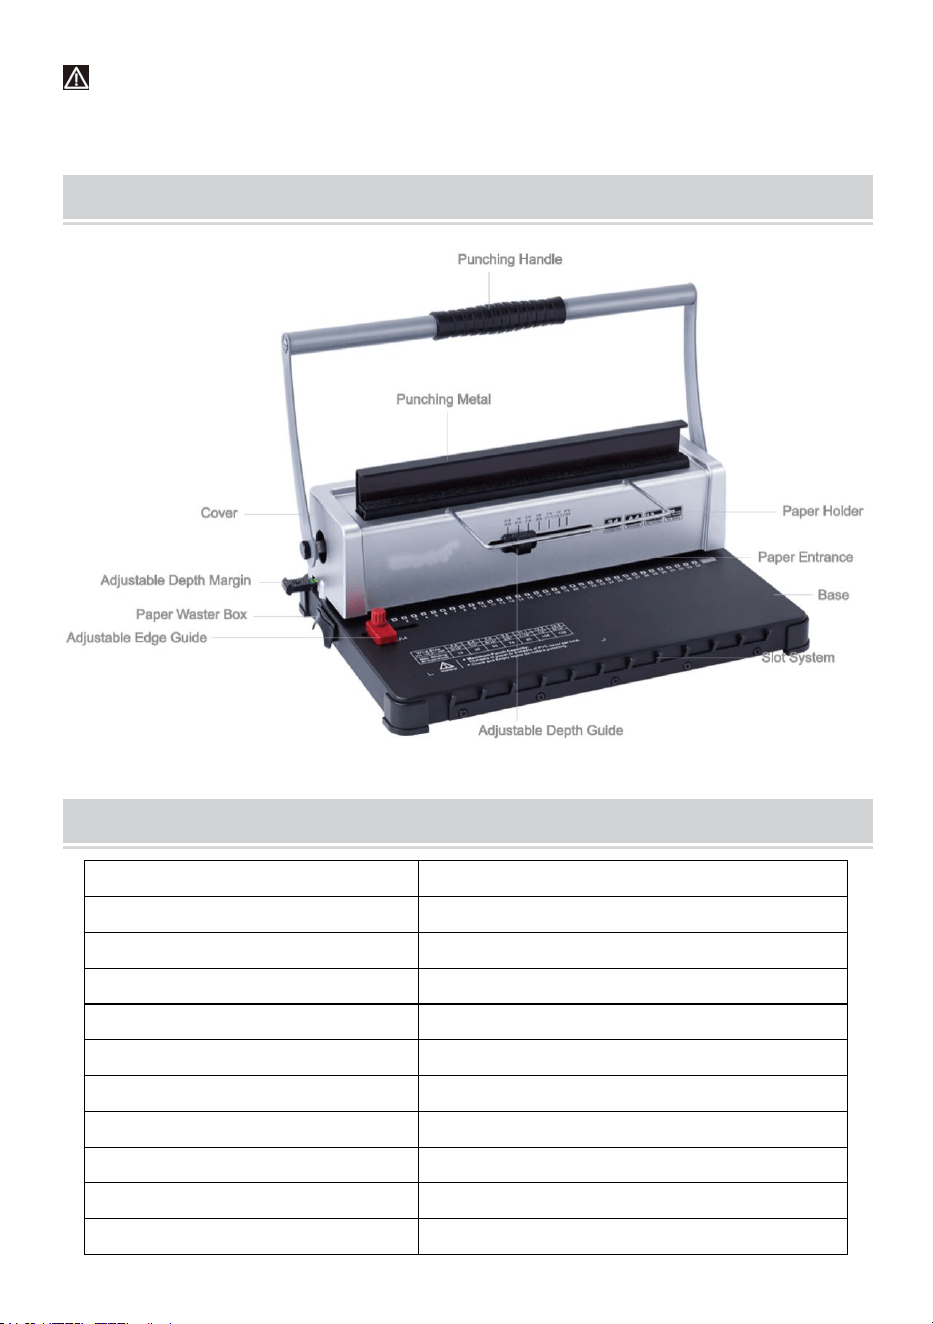
STRUCTURAL REPRESENTATION
TECHNICAL SPECIFICATIONS
Punching Capacity:
12 Sheets (A4 80g)
Binding Capacity:
120 Sheets (A4)
Paper Margin:
3/5/7 mm
Square Holes:
34 holes
Square Hole Distance:
8.46mm
Square Hole Size:
4x4mm
Type of knife:
double knife
Paper Format:
A4 paper or smaller sizes
Machine Dimension:
370*245*260mm
N.W.:
4.9kg
Packing Dimension:
440*190*310mm
G.W.:
5.3kg

- 4 -
PARTS LIST
Parts Name
Quantity
Paper shelf
1 pc
Blotting paper
1 pc
Instructions
1 pc
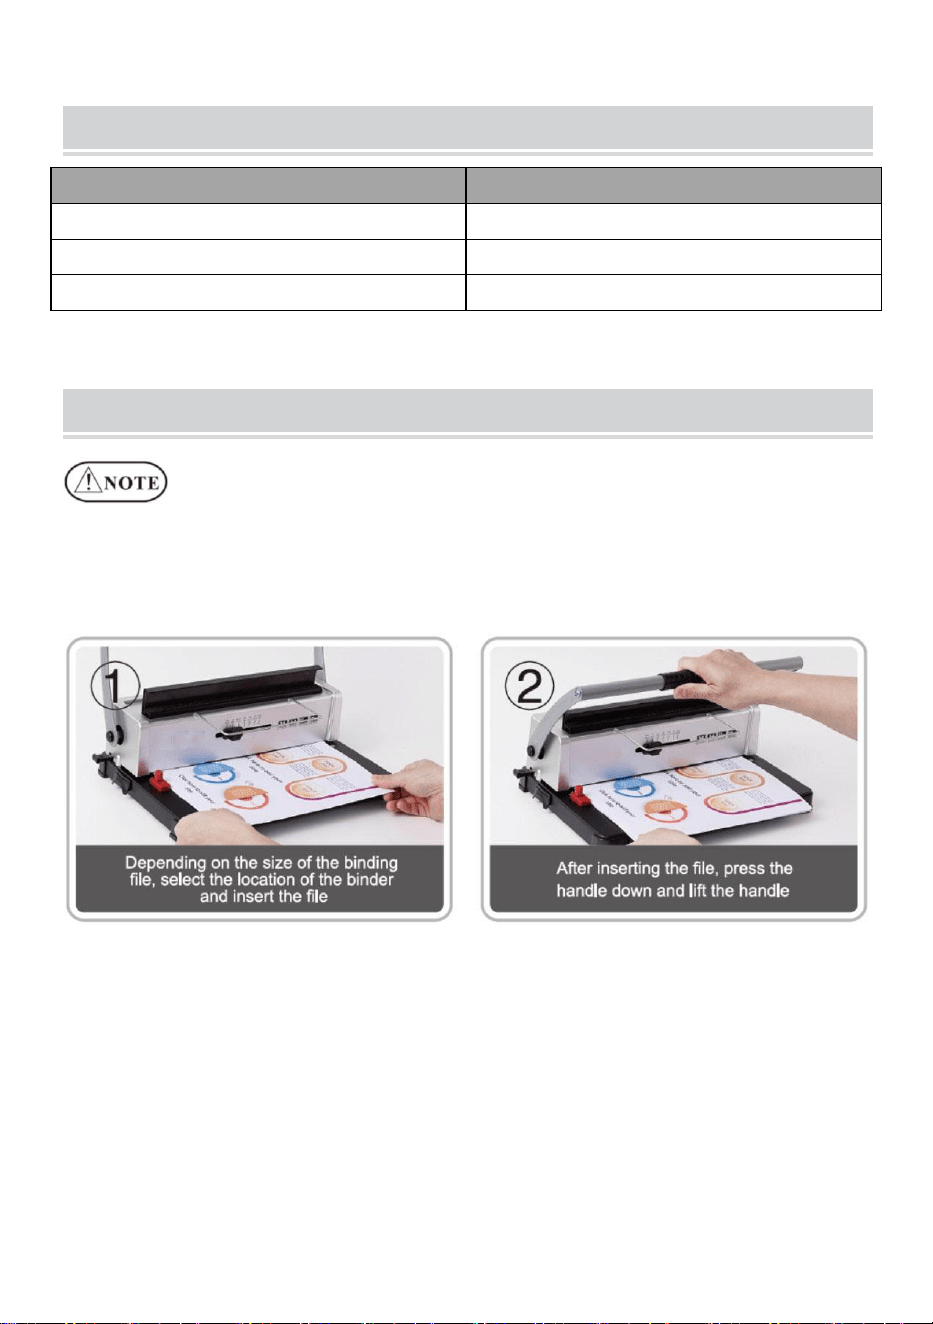
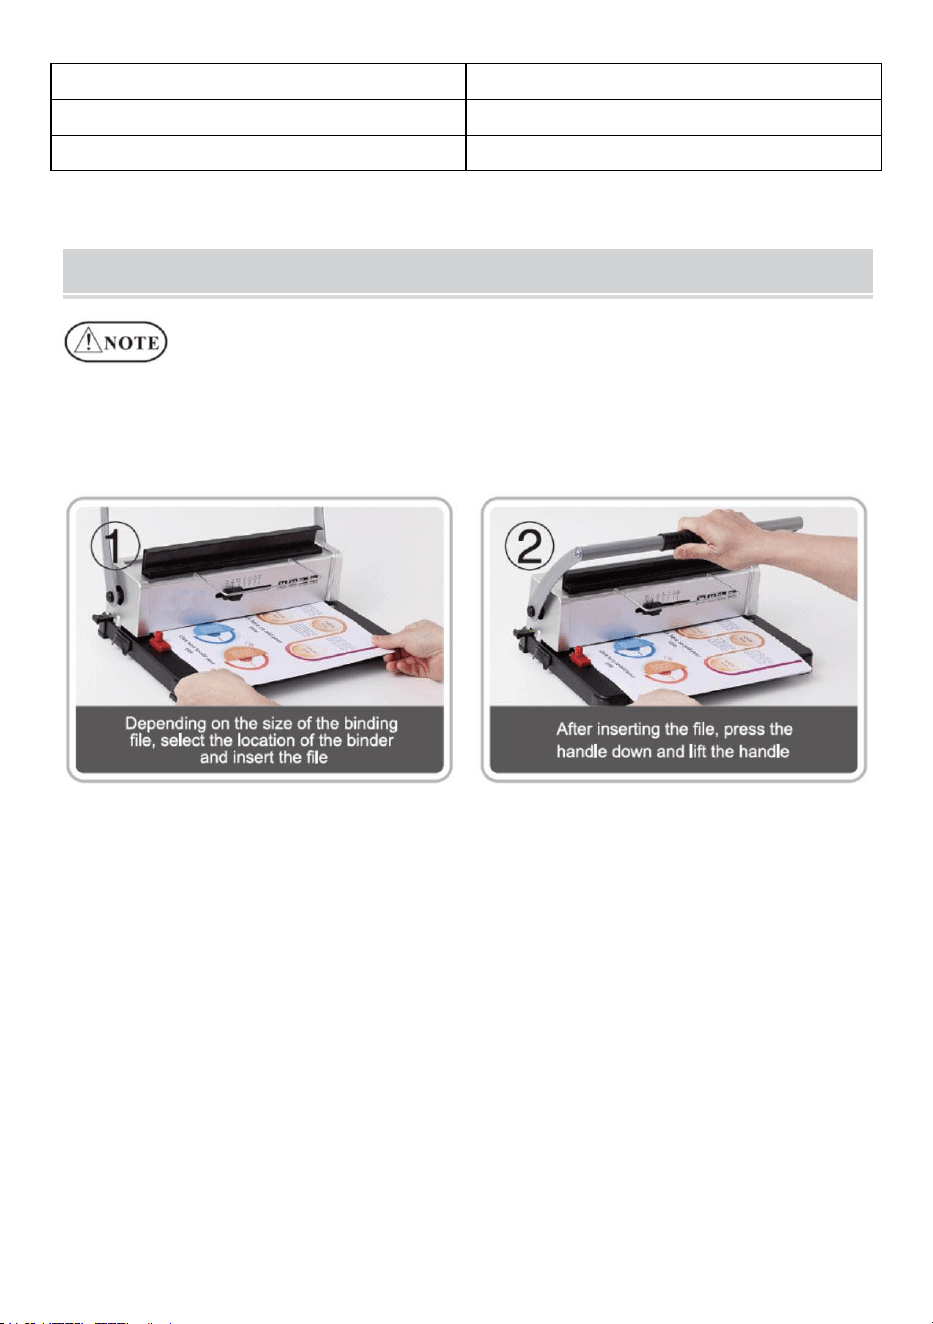
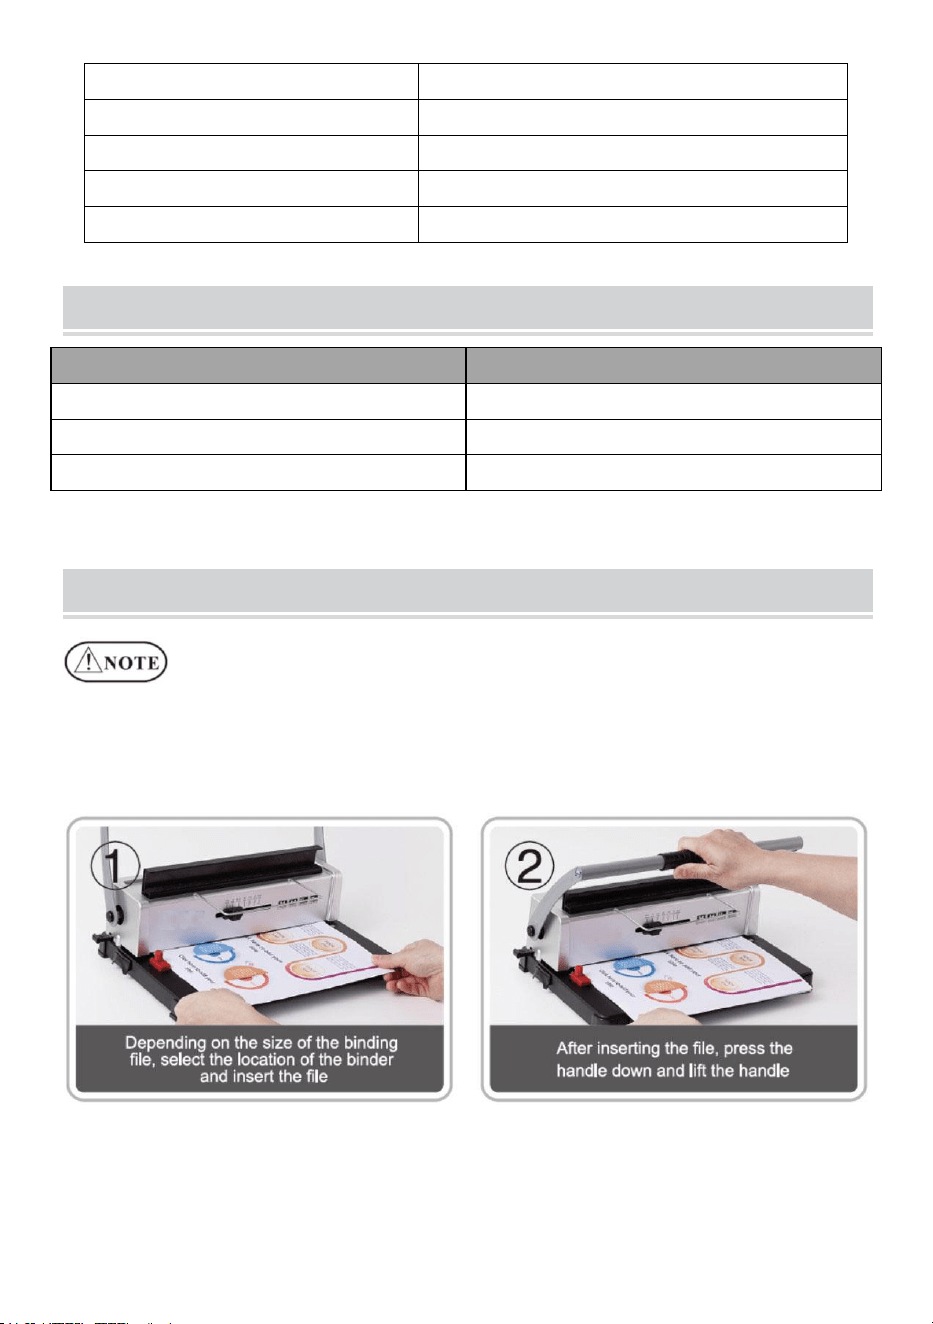
OPERATING GUIDE
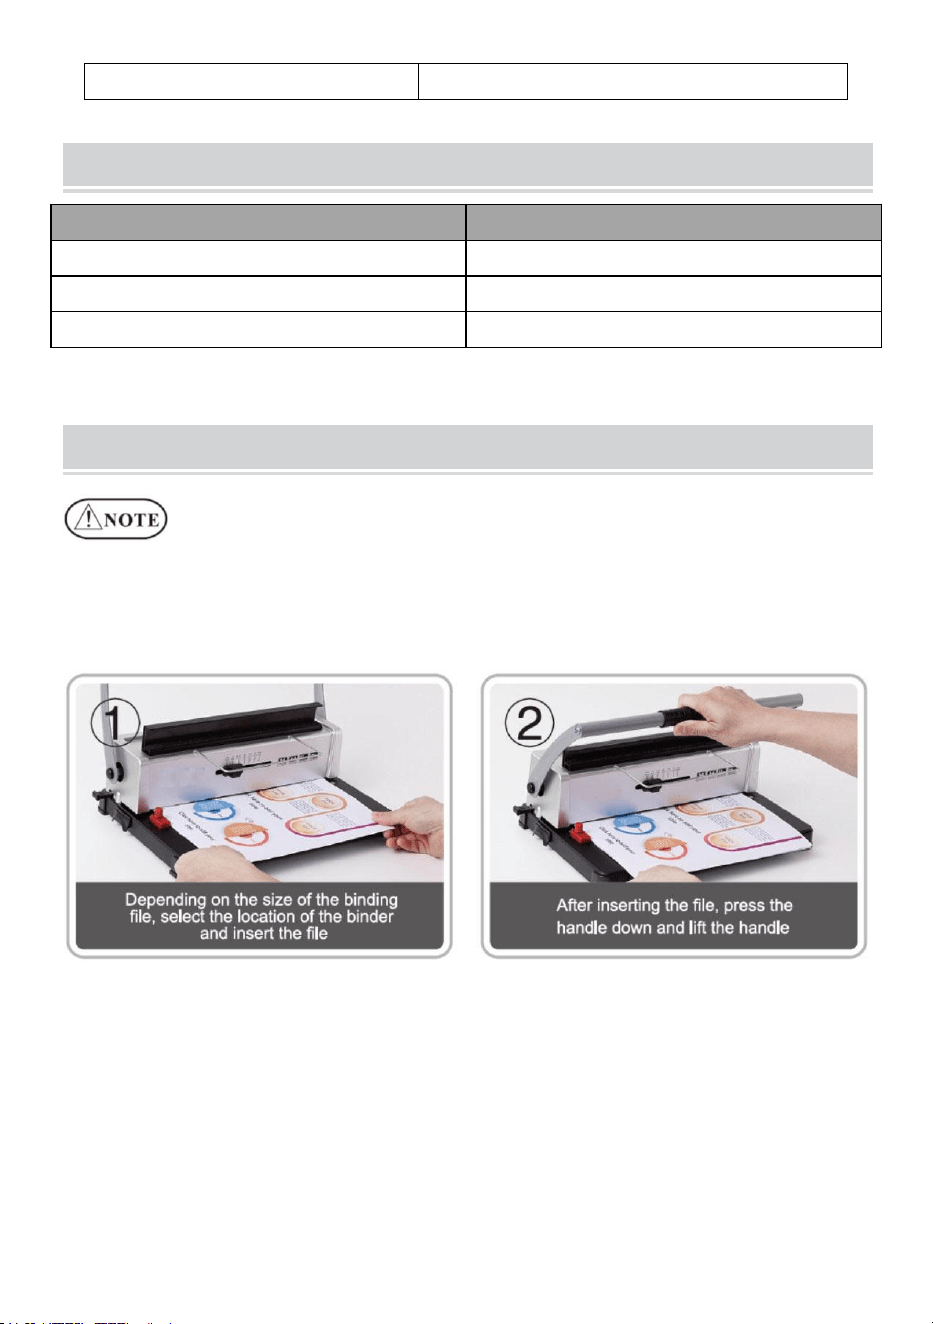
Place the machine on a steady
and even place before using!
For the first use, make a punch with blotting paper to suck up excess
lube from the blade.
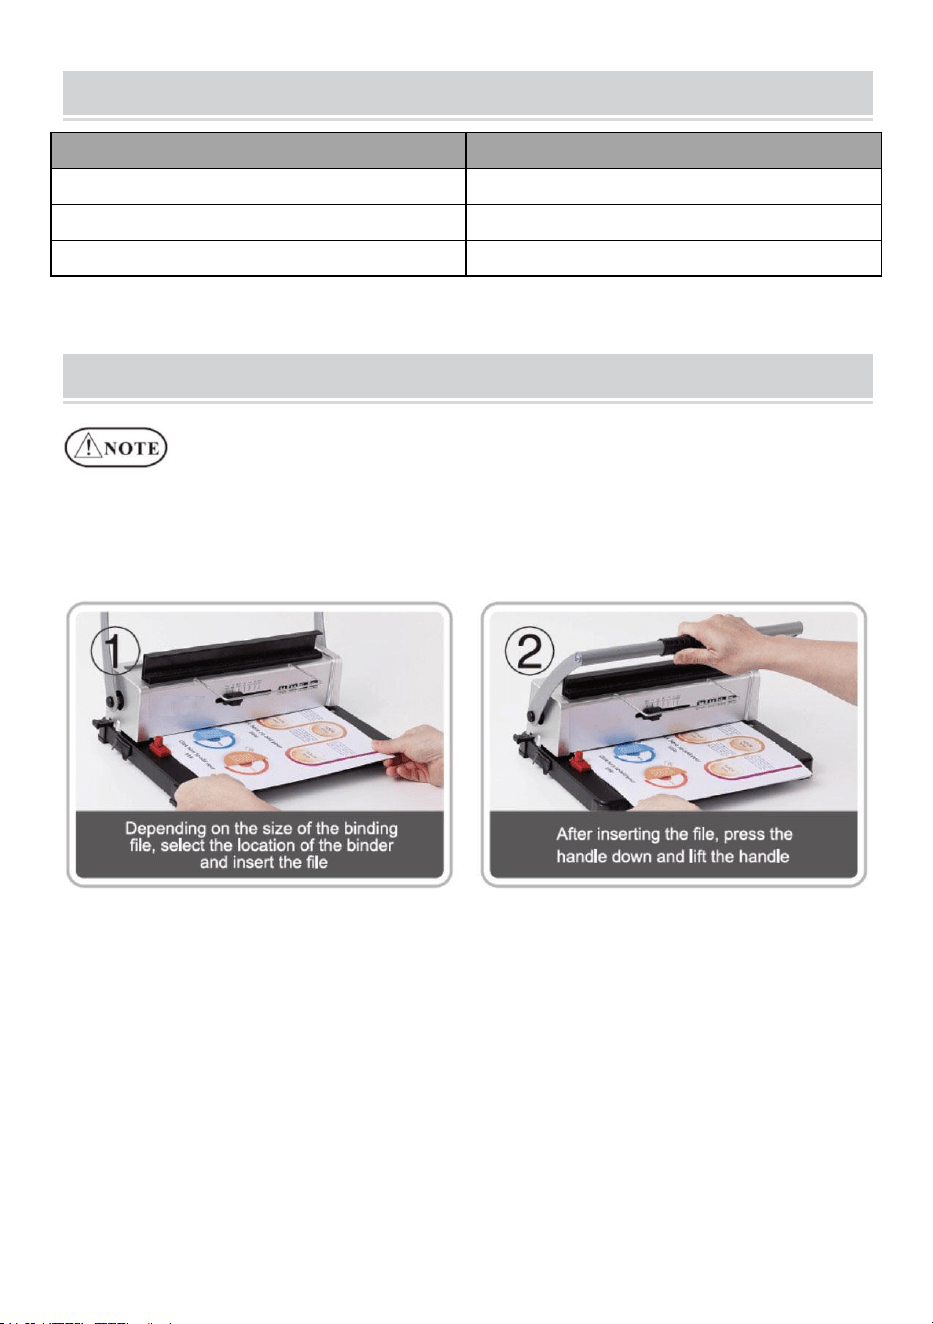
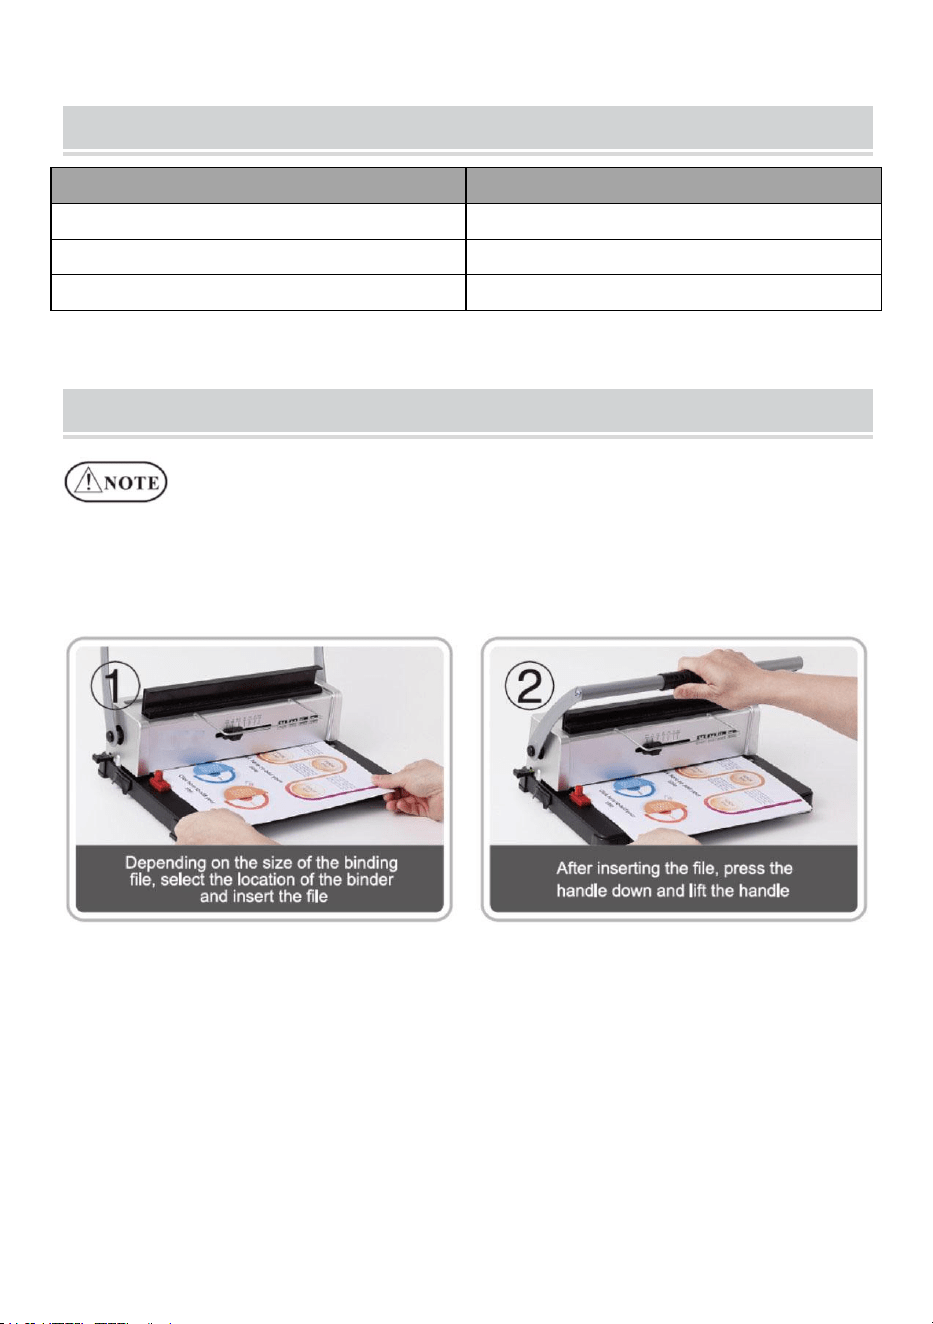
1. Punching Operation
- 5 -
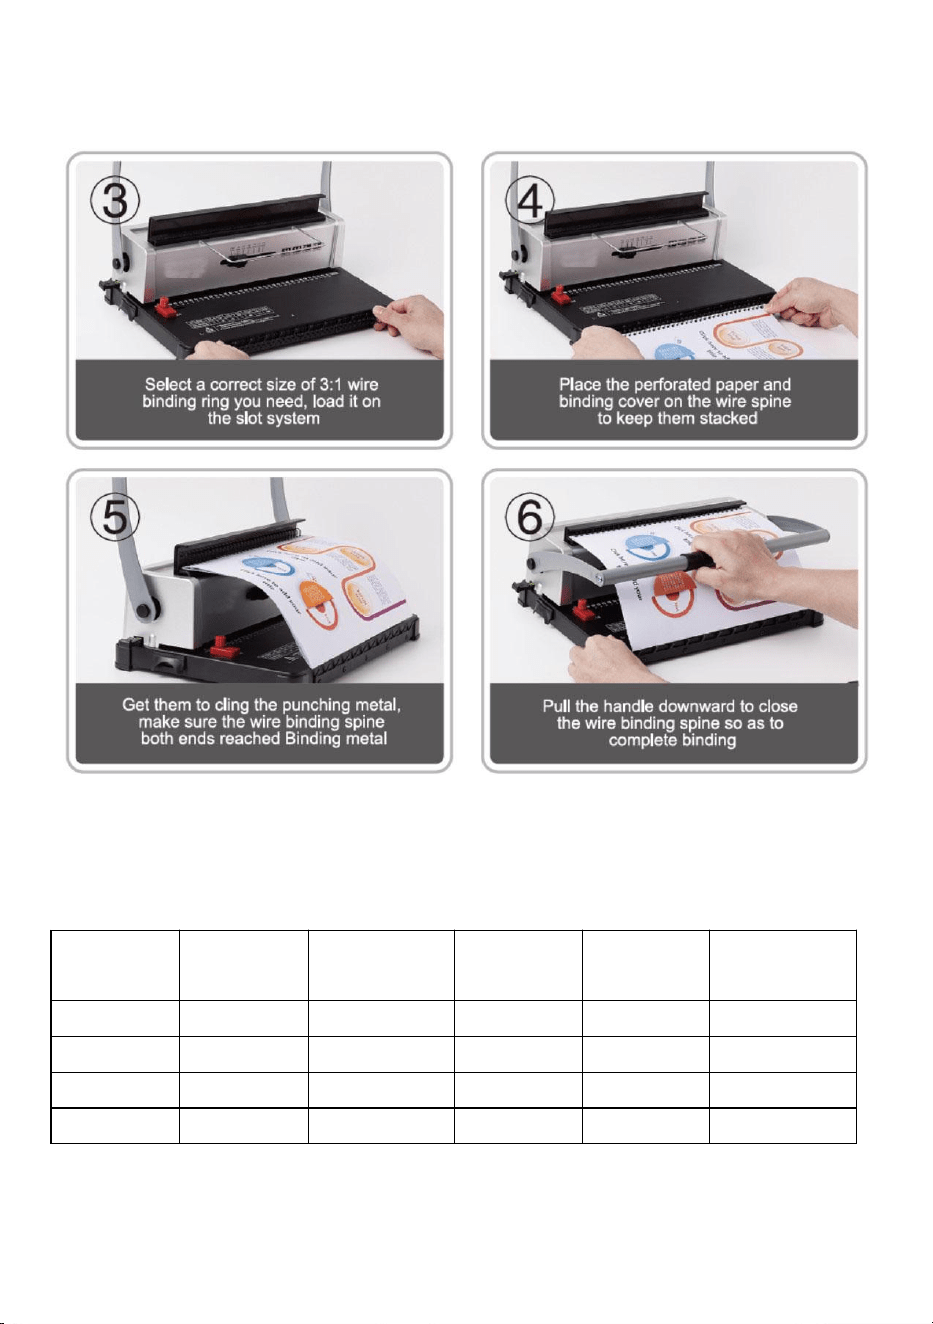
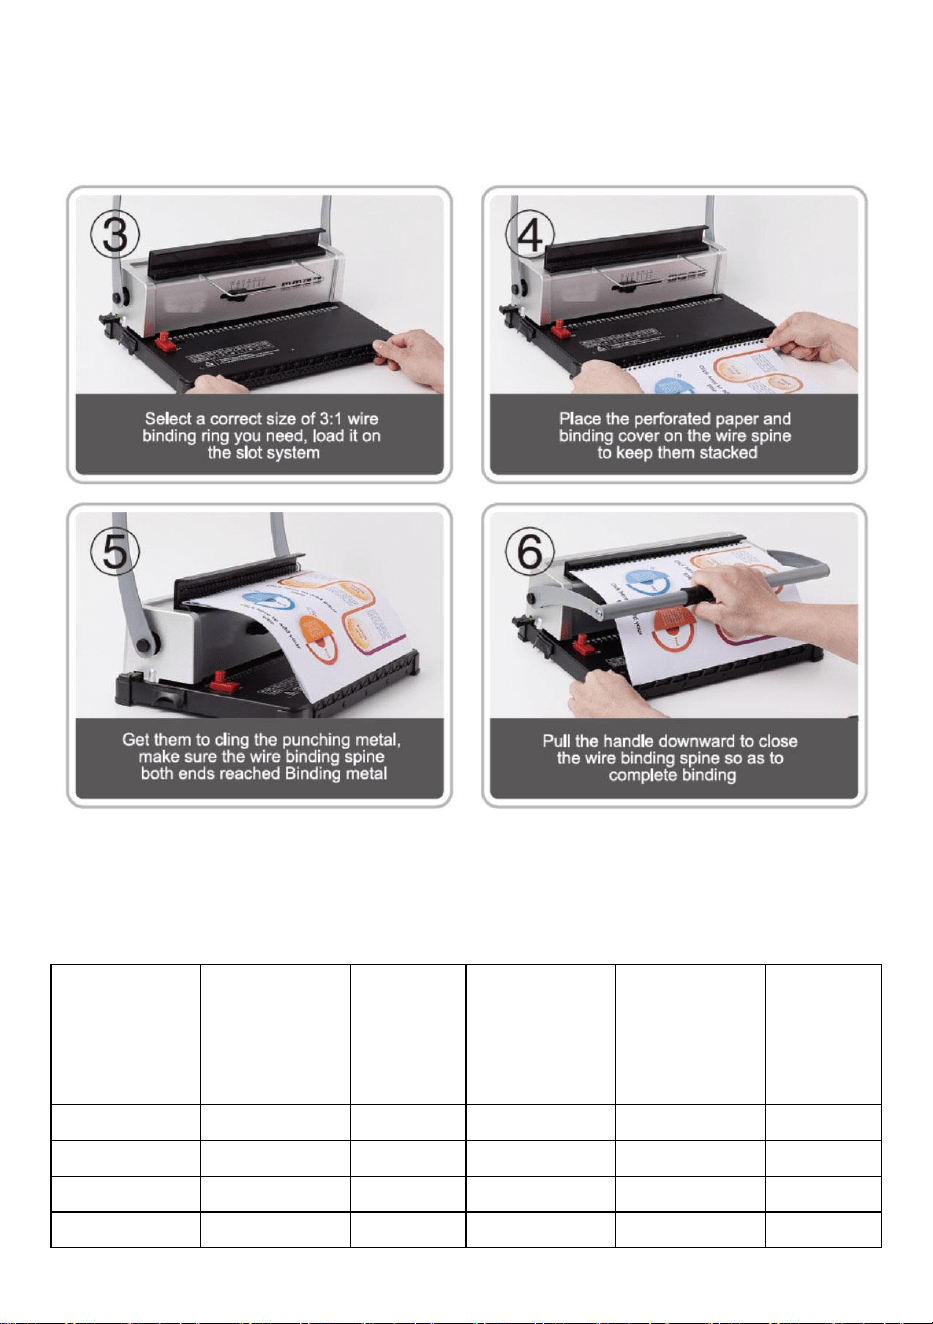
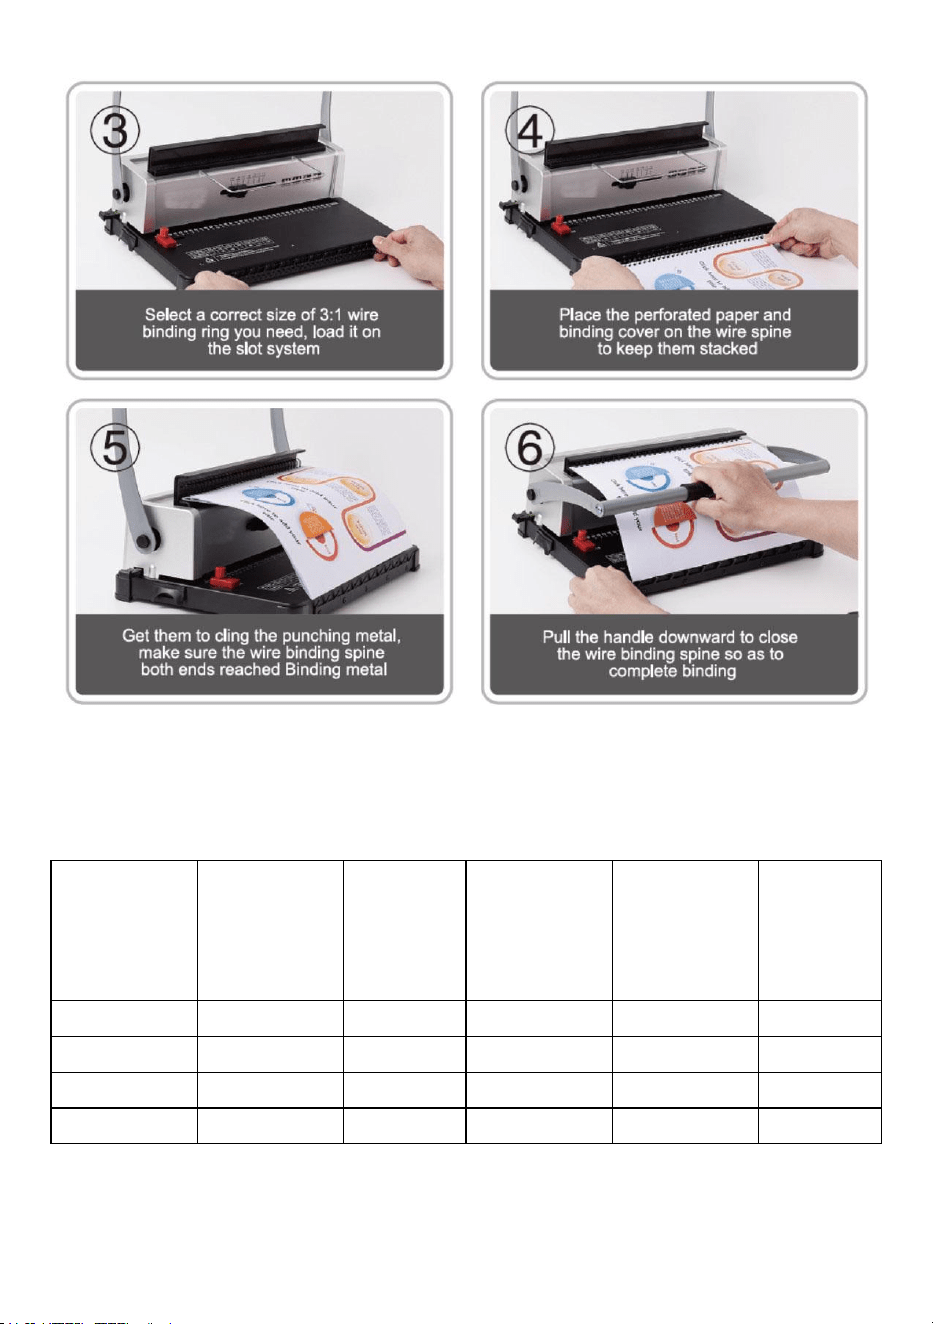
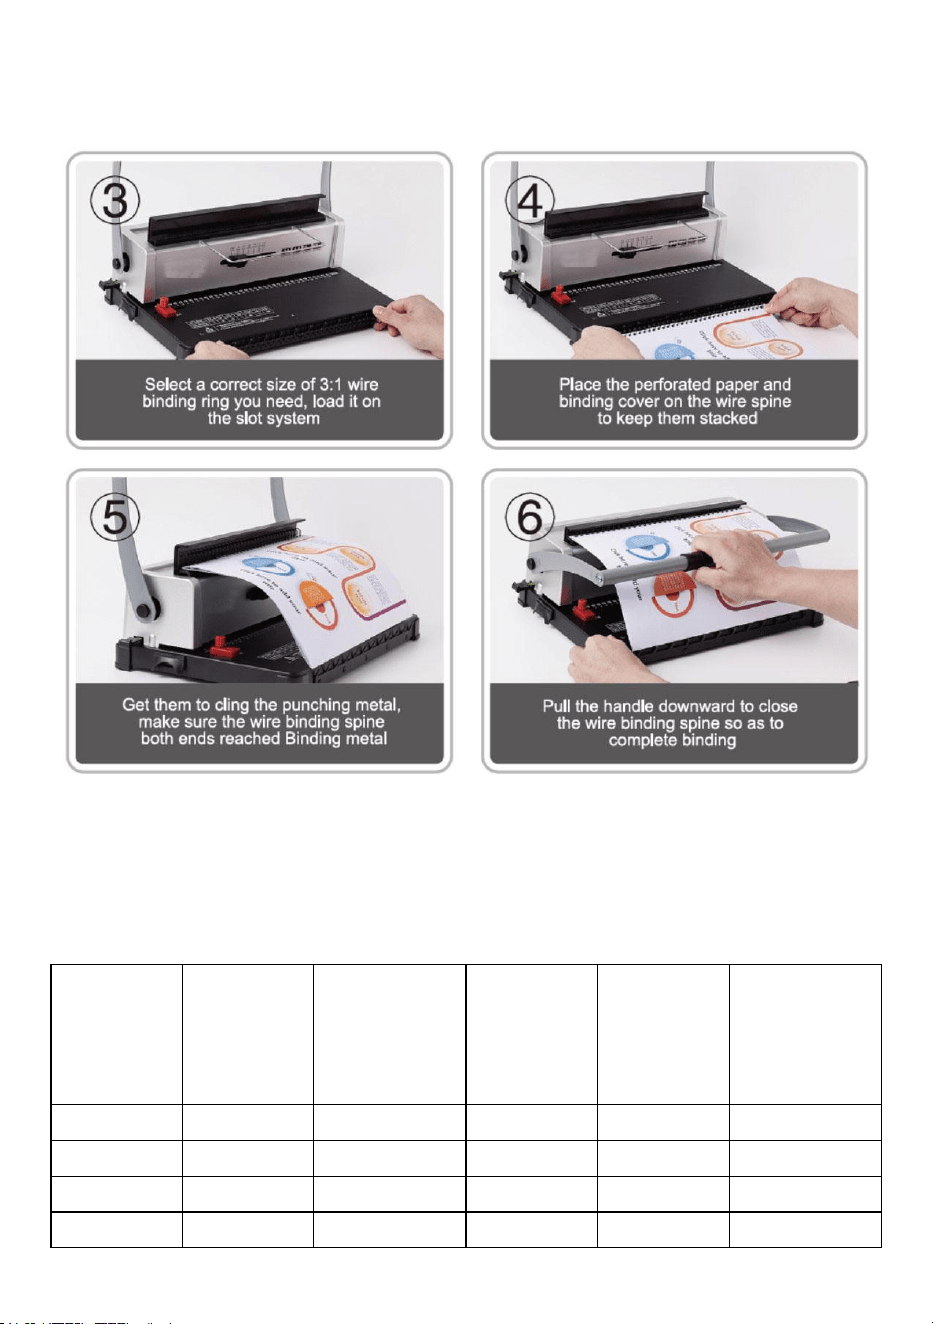
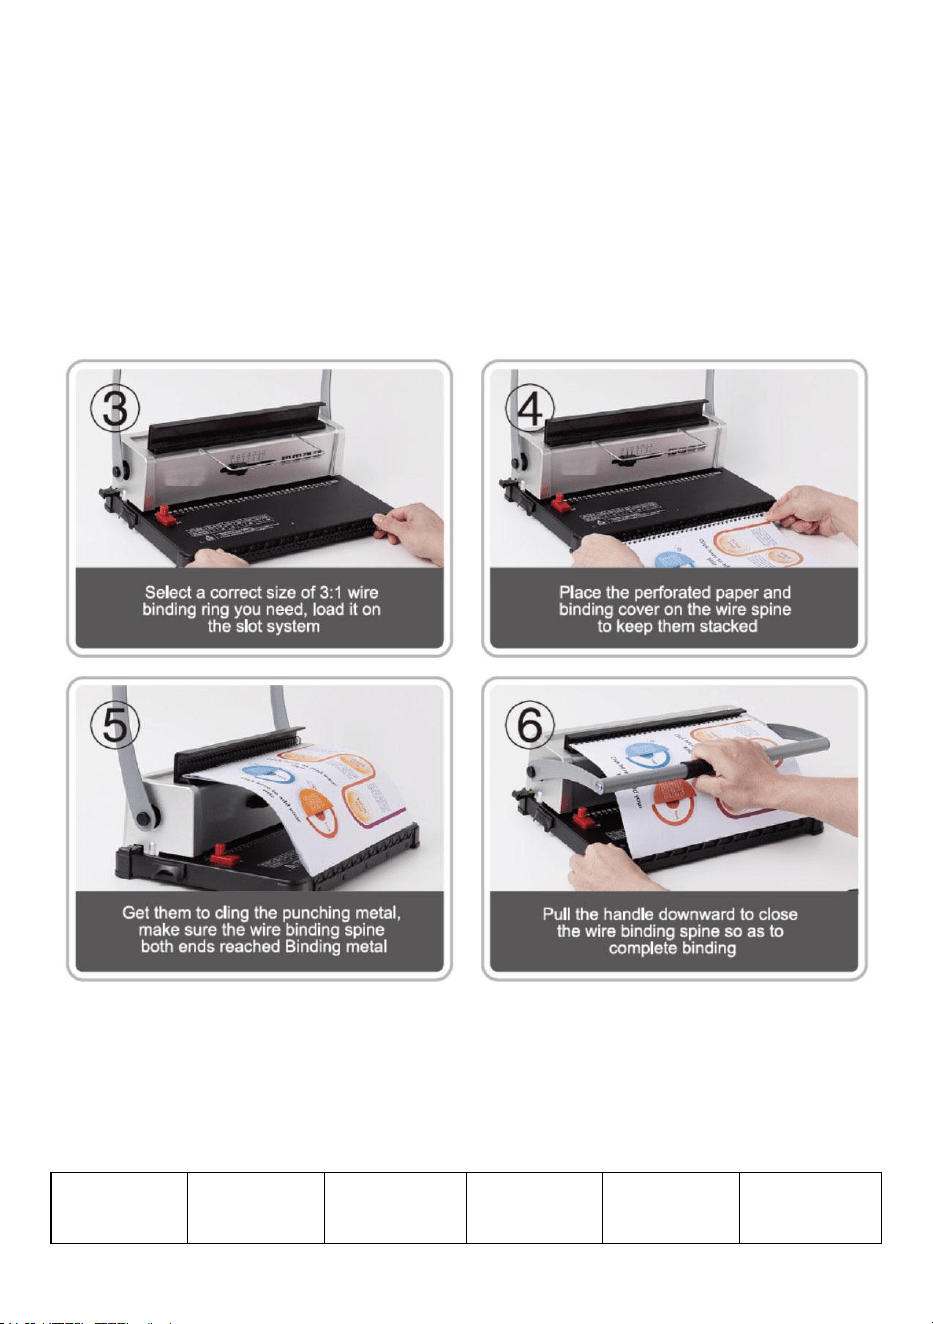
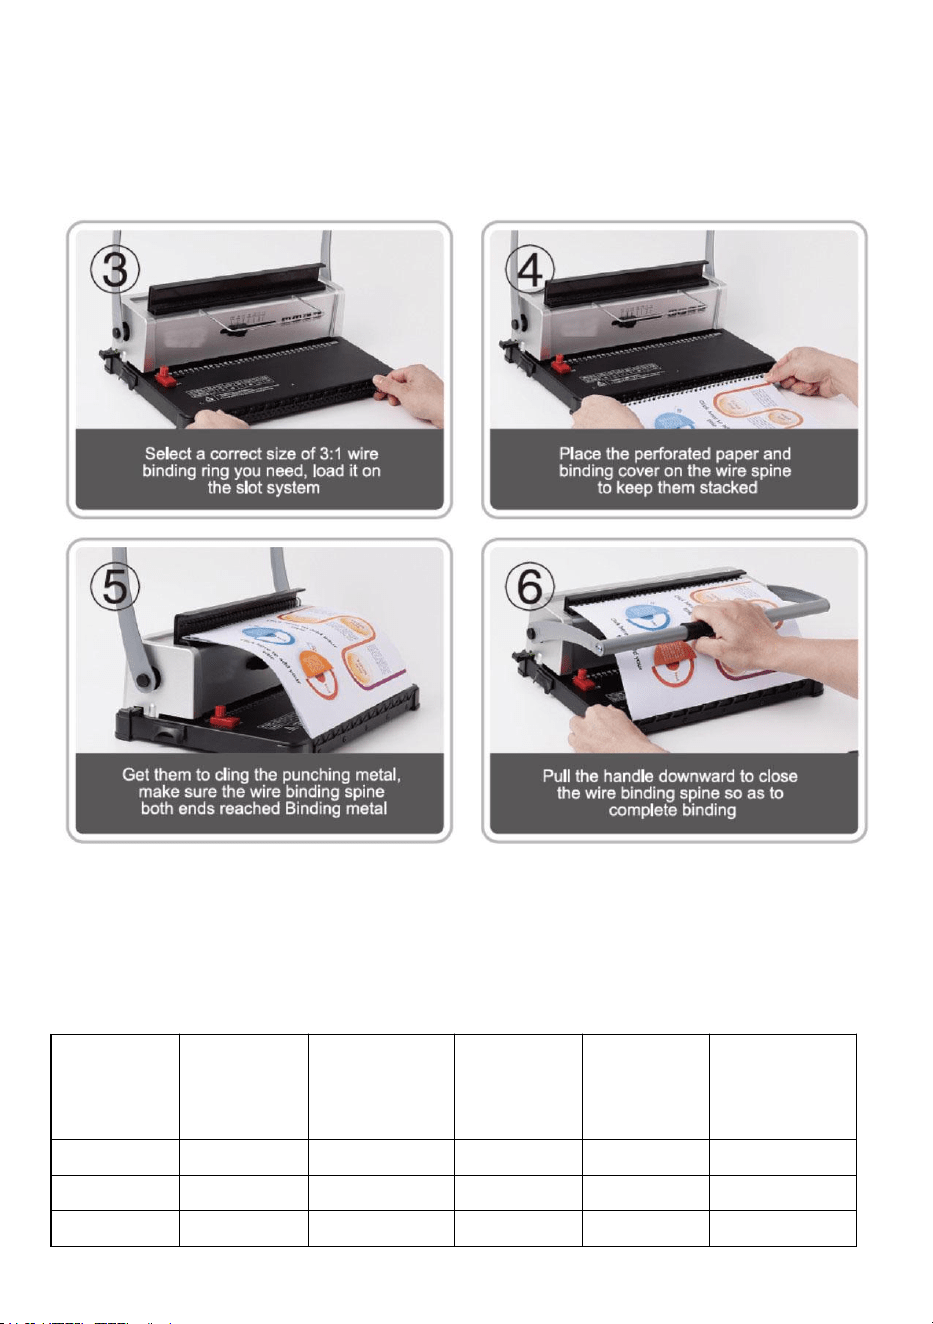
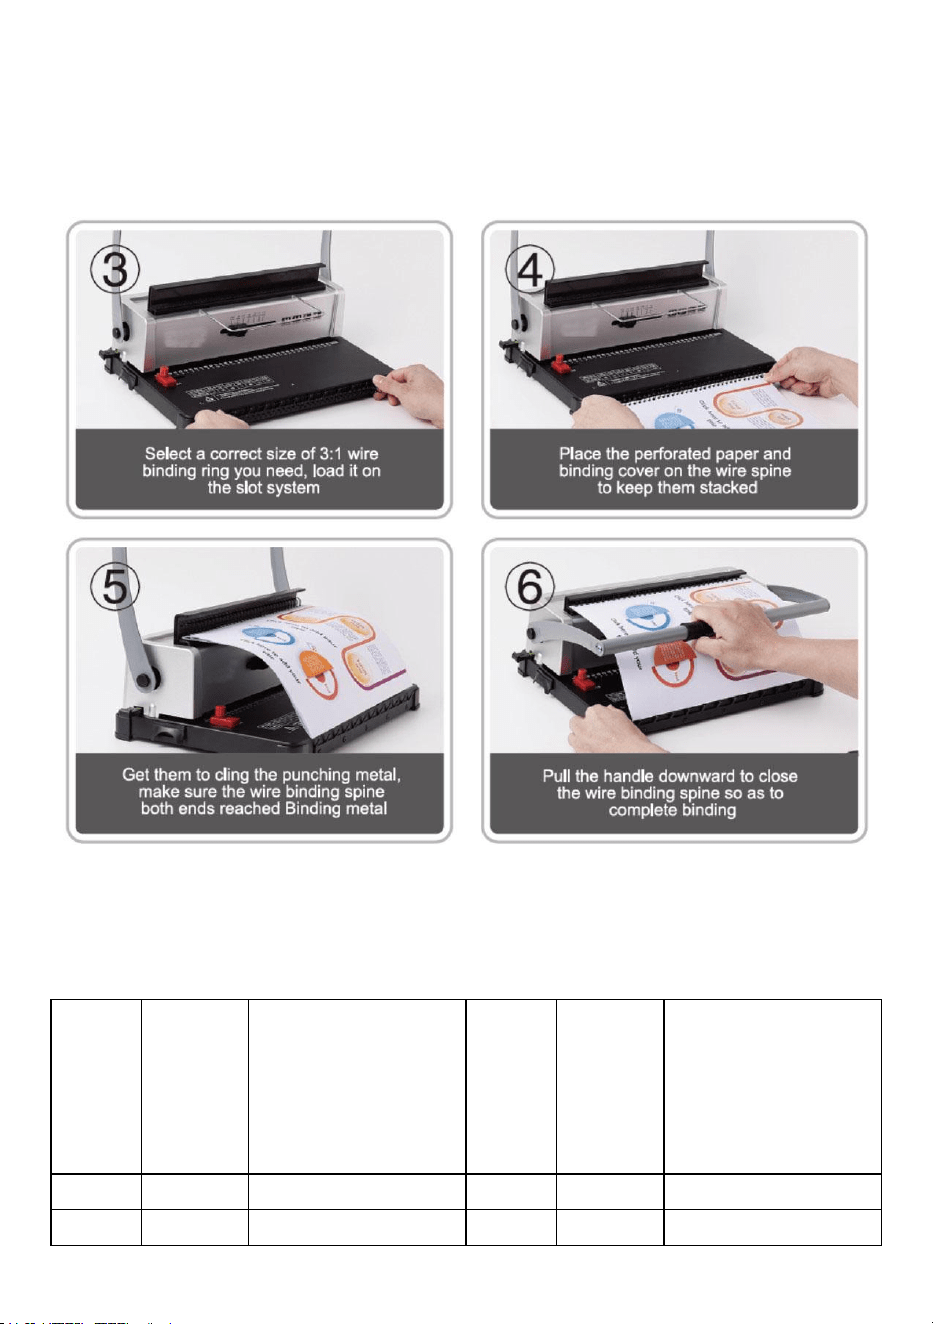
2. Binding Operation
Choose the Iron hoop according to the thickness of the document. The
following form is for your reference to choose the proper Iron hoop.
Wire size
(mm)
Wire size
(inch)
Max.Binding
sheets
Wire size
(mm)
Wire size
(inch)
Max.Binding
sheets
4.8
3/16
15
11.1
7/16
95
6.4
1/4
30
12.7
1/2
105
7.9
3/8
75
14.3
9/16
120
9.5
3/8
75
- 6 -
3. Clean up the waste bin
The waste bin, which is located at the back of the machine, is
dedicated for the waste of punching. The frequency of cleaning up the
waste bin depends on the frequency you use the machine.
1.Pull out the waste bin from the back of the machine
2.Pour the waste into the rubbish bin.
3.And insert the waste bin again.
Please clean up the waste bin frequently!
PROBLEMS & SOLUTIONS
Problems
Reasons
Solutions
1. The handle couldn't
be pressed down when
punching
Paper scraps or other hard
materials remain inside the
punch slot
Clean up the foreign matter
Execeeding the max.
punching capacity or use the
other thickness paper
Reduce the paper according
to the actual situation
2. The paper margin is
slanting
The paper is lopsided when
inserting
Take out the paper and put it
in again
Paper scraps or other hard
materials remain inside the
punch slot
Clean up the foreign matter
3. Paper punching is
impenetrable or hard to
pull out the paper
Execeeding the max.
punching capacity or use the
other thickness paper
Lessen the punching
thickness or reduce the
paper according to the
actual situation (follow the
manual)
4. Paper couldn't touch
the rack when inserting
The paper is dilapidated with
rolled-up paper edges
Smooth the paper and put it
in again

- 7 -
Manufacturer: Shanghaimuxinmuyeyouxiangongsi
Address: Shuangchenglu 803nong11hao1602A-1609shi, baoshanqu,
shanghai 200000 CN.
Imported to AUS: SIHAO PTY LTD. 1 ROKEVA STREETEASTWOOD
NSW 2122 Australia
Imported to USA: Sanven Technology Ltd. Suite 250, 9166 Anaheim
Place, Rancho Cucamonga, CA 91730
REP
EC
E-CrossStu GmbH
Mainzer Landstr.69, 60329 Frankfurt am Main.
REP
UK
YH CONSULTING LIMITED.
C/O YH Consulting Limited Office 147, Centurion
House, London Road, Staines-upon-Thames, Surrey,
TW18 4AX


Technisch Ondersteuning en E-garantiecertificaat www.vevor.com/support
BINDMACHINE
MODEL: STD12B
We continue to be committed to provide you tools with competitive price.
"Save Half", "Half Price" or any other similar expressions used by us only represents an
estimate of savings you might benefit from buying certain tools with us compared to the major
top brands and does not necessarily mean to cover all categories of tools offered by us. You
are kindly reminded to verify carefully when you are placing an order with us if you are
actually saving half in comparison with the top major brands.


MODEL: STD12B
Have product questions? Need technical support? Please feel free to
contact us:
Technical Support and E-Warranty Certificate
www.vevor.com/support
NEED HELP? CONTACT US!
This is the original instruction, please read all manual instructions
carefully before operating. VEVOR reserves a clear interpretation of our
user manual. The appearance of the product shall be subject to the
product you received. Please forgive us that we won't inform you again if
there are any technology or software updates on our product.
BINDING MACHINE

WARMING & ATTENTIONS
Lees deze gebruiksaanwijzing zorgvuldig door voordat u het apparaat
gaat gebruiken.
Houd het apparaat buiten bereik van kinderen.
Houd het apparaat uit de buurt van vuur en vloeistoffen.
Plaats de machine op een stabiele en veilige plaats om te voorkomen
dat deze omvalt of dat er letsel ontstaat aan personen of de machine
zelf.
Test de machine met wat kladpapier voordat u gaat ponsen en
inbinden, om er zeker van te zijn dat de positie voor het ponsen correct
is.
Haal de overtollige onderdelen uit de verpakking. Zet de machine op
een gebalanceerde en veilige plek om te voorkomen dat deze valt of
letsel veroorzaakt aan mensen of de machine.
Bedien de machine strikt volgens de handleiding en let vooral op de
maximale pons- en bindcapaciteit.
Test de machine voordat u de officiële documenten stempelt.
Bij het ponsen van de plastic hoezen adviseren wij om de hoes tussen
twee stukken papier te klemmen.
niet om harde materialen zoals metalen te ponsen, om schade aan de
machine te voorkomen.
Wanneer u de plastic ring vastklemt, zorg er dan voor dat u uw vingers
niet in dit gebied steekt, anders kunt u zich bezeren.
Maximale perforatiecapaciteit: 10-12 vellen (papierdikte: 80 g (<20 lb)
papier) Let op: Als u papier van een andere dikte gebruikt, verklein dan
de papierdikte afhankelijk van de werkelijke situatie!
Maak voor het eerste gebruik een gaatje met vloeipapier om
Waarschuwing: om het risico op letsel te verkleinen, moet de
gebruiker de gebruiksaanwijzing zorgvuldig lezen.

overtollige smeer van het mes op te zuigen
STRUCTURAL REPRESENTATION
TECHNICAL SPECIFICATIONS
Perforatiecapaciteit:
12 vellen (A4 80g)
Bindend vermogen:
120 vellen (A4)
Papiermarge:
3/5/7mm
Vierkante gaten:
34 gaten
Afstand vierkante gaten:
8,46 mm
Vierkante gatgrootte:
4x4mm
Type mes:
dubbel mes
Papierformaat:
A4-papier of kleinere formaten
Machine-afmetingen:
370*245*260mm
NW:
4,9 kg
Verpakkingsafmetingen :
440*190*310mm
GW :
5,3 kg
PARTS LIST
Onderdeel Naam
Hoeveelheid
Papieren plank
1 stuk
Vloeipapier
1 stuk
Instructies
1 stuk
OPERATING GUIDE
Plaats de machine op een stabiele ondergrond
en zelfs plaatsen voor gebruik!
Maak bij het eerste gebruik een gaatje met vloeipapier om overtollig
smeermiddel van het lemmet op te zuigen .
1. Ponsbewerking
2. Bindende bewerking
Kies de Iron Hoop volgens de dikte van het document. Het volgende
formulier is voor uw referentie om de juiste Iron Hoop te kiezen.
Draadmaat
(mm )
Draadmaat
( duim)
M
ax.Bindi
ng
s heet
Draadmaat
(mm )
Draadmaat
( duim)
M
ax.Bindi
ng
s heet
4.8
3/16
15
11.1
7/16
95
6 .4
1 /4
3 0
12.7
1/2
1 05
7 .9
3 /8
7 5
1 4.3
9 /16
1 20
9 .5
3 /8
7 5

3. Maak de prullenbak schoon
De afvalbak, die zich aan de achterkant van de machine bevindt, is
bestemd voor het afval van het ponsen. De frequentie van het
schoonmaken van de afvalbak is afhankelijk van hoe vaak u de
machine gebruikt.
1. Trek de afvalbak uit de achterkant van de machine
2. Gooi het afval in de afvalbak.
3. En plaats de afvalbak weer terug.
Maak de afvalbak regelmatig schoon!
PROBLEMS & SOLUTIONS
Problemen
Redenen
Oplossingen
1. De hendel kon niet
worden ingedrukt tijdens
het slaan
Papiersnippers of andere harde
materialen blijven in de
perforatiegleuf achter
Maak de vreemde materie
schoon
Overschrijding van de max.
perforatiecapaciteit of gebruik
het papier van een andere dikte
Verminder het papier
volgens de werkelijke
situatie
2. De papierrand is
schuin
Het papier is scheef bij het
invoegen
Haal het papier eruit en doe
het er weer in
Papiersnippers of andere harde
materialen blijven in de
perforatiegleuf achter
Maak de vreemde materie
schoon
3. Het papier is
ondoordringbaar of
moeilijk uit te trekken
Overschrijding van de max.
perforatiecapaciteit of gebruik
het papier van een andere dikte
Verminder de perforatiedikte
of verminder het papier
volgens de werkelijke
situatie ( volg de
handleiding)

4. Het papier kon het rek
niet raken bij het
invoegen
Het papier is vervallen met
opgerolde papierranden
Strijk het papier glad en leg
het er weer in


Teknisk Support och e-garanticertifikat www.vevor.com/support
BINDNINGSMASKIN
MODELL: STD12B
We continue to be committed to provide you tools with competitive price.
"Save Half", "Half Price" or any other similar expressions used by us only represents an
estimate of savings you might benefit from buying certain tools with us compared to the major
top brands and does not necessarily mean to cover all categories of tools offered by us. You
are kindly reminded to verify carefully when you are placing an order with us if you are
actually saving half in comparison with the top major brands.

MODELL: STD12B
Have product questions? Need technical support? Please feel free to
contact us:
Technical Support and E-Warranty Certificate
www.vevor.com/support
NEED HELP? CONTACT US!
This is the original instruction, please read all manual instructions
carefully before operating. VEVOR reserves a clear interpretation of our
user manual. The appearance of the product shall be subject to the
product you received. Please forgive us that we won't inform you again if
there are any technology or software updates on our product.
BINDING MACHINE

WARMING & ATTENTIONS
Läs denna bruksanvisning noggrant före användning.
Förvara maskinen separat från barn.
Håll maskinen borta från eld och vätska.
Ställ maskinen på en stabil och säker plats för att förhindra att den
faller eller orsakar skador på människor eller själva maskinen.
Testa maskinen med lite skrotpapper innan du formellt stansar och
binder, för att säkerställa att positionen är korrekt att stansa.
Ta ut överskottsdelarna från förpackningen. Placera maskinen på en
balanserad och säker plats för att undvika att falla av eller orsaka
skador på personer eller maskinen.
Använd maskinen strikt enligt manualerna, var särskilt uppmärksam
på den maximala stans- och bindningskapaciteten.
Testa maskinen innan du stansar de officiella dokumenten.
Vid stansning av plasthöljen föreslår vi att locket ska klippas mellan två
papperslappar.
Använd inte maskinen för att stansa hårda material som metaller för
att undvika skador på maskinen.
du klämmer fast plastringen, lägg inte fingrarna i detta område, annars
kommer du att skada dig.
Max hålkapacitet: 10-12 ark (Papperstjocklek: 80g(<20lb) papper) Obs:
Om du använder papper av annan tjocklek, vänligen reducera
papperet enligt den faktiska situationen!
För första gången gör du en stans med läskpapper för att suga upp
överflödigt smörjmedel från bladet
STRUCTURAL REPRESENTATION
Varning - För att minska risken för skada måste användaren
läsa instruktionerna noggrant.
TECHNICAL SPECIFICATIONS
Stanskapacitet:
12 ark (A4 80g)
Bindande kapacitet:
120 ark (A4)
Pappersmarginal:
3/5/7 mm
Fyrkantiga hål:
34 hål
Fyrkantigt håls avstånd:
8,46 mm
Storlek fyrkantigt hål:
4x4 mm
Typ av kniv:
dubbel kniv
Pappersformat:
A4-papper eller mindre storlekar
Maskinens mått:
370*245*260 mm
NW:
4,9 kg
Förpackningsmått :
440*190*310mm
GW :
5,3 kg
PARTS LIST
Delarnas namn
Kvantitet
Pappershylla
1 st
Torka papper
1 st
Instruktioner
1 st
OPERATING GUIDE
Placera maskinen på ett stöd
och även placera före användning!
För första gången, gör en stans med läskpapper för att suga upp
överflödigt smörjmedel från bladet .
1. Stansningsoperation
2. Bindande operation
Välj järnbågen efter dokumentets tjocklek. Följande formulär är för din
referens för att välja rätt järnbåge.
Trådstorlek
(mm )
Trådstorlek
( tum)
M
ax.Bindni
ng
lakan
Trådstorlek
(mm )
Trådstorlek
( tum)
M
ax.Bindni
ng
lakan
4.8
3/16
15
11.1
16/7
95
6 .4
1/4
3 0
12.7
1/2
1 05
7 .9
3/8
7 5
1 4.3
9/16
1 20
9 .5
3/8
7 5
3. Städa upp soptunnan
Papperskorgen, som finns på baksidan av maskinen, är avsedd för
slöseri med stansning. Hur ofta soptunnan städas beror på hur ofta du
använder maskinen.
1. Dra ut soptunnan från baksidan av maskinen
2.Häll avfallet i soptunnan.
3. Och sätt i soptunnan igen.
Städa soptunnan ofta!
PROBLEMS & SOLUTIONS
Problem
Skäl
Lösningar
1. Handtaget kunde inte
tryckas ner vid stansning
Pappersrester eller andra hårda
material finns kvar inuti
hålskåran
Rensa upp främmande
föremål
Överskrider max.
stanskapacitet eller använd
papper med annan tjocklek
Minska papperet enligt den
faktiska situationen
2 . Pappersmarginalen
är snett
Papperet är skevt när det sätts
in
Ta ut papperet och lägg i det
igen
Pappersrester eller andra hårda
material finns kvar inuti
hålskåran
Rensa upp främmande
föremål
3. Pappersstansning är
ogenomtränglig eller
svår att dra ut papperet
Överskrider max.
stanskapacitet eller använd
papper med annan tjocklek
Minska
stansningstjockleken eller
minska papperet enligt den
faktiska situationen ( följ
bruksanvisningen)
4 . Papper kunde inte
röra stället när det sattes
in
Pappret är förfallet med
upprullade papperskanter
Jämna till papperet och sätt i
det igen


Tecnico Supporto e certificato di garanzia elettronica www.vevor.com/support
MACCHINA RILEGATRICE
MODELLO: STD12B
We continue to be committed to provide you tools with competitive price.
"Save Half", "Half Price" or any other similar expressions used by us only represents an
estimate of savings you might benefit from buying certain tools with us compared to the major
top brands and does not necessarily mean to cover all categories of tools offered by us. You
are kindly reminded to verify carefully when you are placing an order with us if you are
actually saving half in comparison with the top major brands.


MODELLO: CODICE ARTICOLO: STD12B
Have product questions? Need technical support? Please feel free to
contact us:
Technical Support and E-Warranty Certificate
www.vevor.com/support
NEED HELP? CONTACT US!
This is the original instruction, please read all manual instructions
carefully before operating. VEVOR reserves a clear interpretation of our
user manual. The appearance of the product shall be subject to the
product you received. Please forgive us that we won't inform you again if
there are any technology or software updates on our product.
BINDING MACHINE

WARMING & ATTENTIONS
Leggere attentamente il presente manuale d'uso prima dell'uso.
Tenere la macchina lontano dalla portata dei bambini.
Tenere la macchina lontana dal fuoco e dai liquidi.
Posizionare la macchina in un luogo stabile e sicuro per evitare che
cada o causi lesioni alle persone o alla macchina stessa.
Prima di perforare e rilegare formalmente, testare la macchina con un
po' di carta straccia, per accertarsi che la posizione di perforazione sia
corretta.
Estrarre le parti in eccesso dalla scatola di imballaggio. Posizionare la
macchina in un luogo sicuro ed equilibrato per evitare cadute o lesioni
a persone o alla macchina.
Utilizzare la macchina attenendosi scrupolosamente alle istruzioni
fornite nel manuale, prestando particolare attenzione alla capacità
massima di perforazione e rilegatura.
Si prega di testare la macchina prima di perforare i documenti ufficiali.
Quando si perforano le copertine di plastica, suggeriamo di fissare la
copertina tra due fogli di carta.
Si prega di non utilizzare la macchina per perforare materiali duri come
i metalli per evitare di danneggiarla.
Quando si stringe l'anello di plastica, si prega di non mettere le dita in
questa zona, altrimenti ci si potrebbe ferire.
Capacità massima di perforazione: 10-12 fogli (spessore della carta:
carta da 80 g (<20 libbre)) Nota: se si utilizza carta di spessore diverso,
ridurre la carta in base alla situazione effettiva!
Per il primo utilizzo, fai un punzone con carta assorbente per aspirare
il lubrificante in eccesso dalla lama
Attenzione: per ridurre il rischio di lesioni, l'utente deve leggere
attentamente il manuale di istruzioni.
STRUCTURAL REPRESENTATION
TECHNICAL SPECIFICATIONS
Capacità di perforazione:
12 fogli (A4 80g)
Capacità di rilegatura:
120 fogli (A4)
Margine della carta:
3/5/7 millimetri
Fori quadrati:
34 buche
Distanza del foro quadrato:
8,46 mm
Dimensioni del foro quadrato:
4x4mm
Tipo di coltello:
coltello doppio
Formato cartaceo:
Carta A4 o formati più piccoli
Dimensioni della macchina:
370*245*260mm
NO:
4,9 kg
dell'imballaggio :
440*190*310mm
GW :
5,3 kg
PARTS LIST
Nome delle parti
Quantità
Ripiano di carta
1 pz.
Carta assorbente
1 pz.
Istruzioni
1 pz.
OPERATING GUIDE
Posizionare la macchina su una superficie stabile
e anche posizionarlo prima dell'uso!
Per il primo utilizzo, praticare un foro con carta assorbente per aspirare il
lubrificante in eccesso dalla lama .
1. Operazione di punzonatura
2. Operazione di associazione
Scegli il cerchio di ferro in base allo spessore del documento. Il
seguente modulo è per il tuo riferimento per scegliere il cerchio di ferro
appropriato.
Dimension
i del filo
(mm )
Dimension
i del filo
( pollice)
M
ax.Rilegatur
a
fogli
Dimension
i del filo
(mm )
Dimension
i del filo
( pollice)
M
ax.Rilegatur
a
fogli
4.8
3/16
15
11.1
7/16
95
6 .4
1 /4
3 0
12.7
1/2
1 05
7 .9
3/8
7 5
1 4.3
9/16
1 20
9 .5
3/8
7 5

3. Pulisci il bidone della spazzatura
Il contenitore dei rifiuti, che si trova sul retro della macchina, è
dedicato ai rifiuti di perforazione. La frequenza di pulizia del
contenitore dei rifiuti dipende dalla frequenza di utilizzo della
macchina.
1. Estrarre il contenitore dei rifiuti dal retro della macchina
2. Versare i rifiuti nel cestino.
3. E reinserire il cestino.
Si prega di pulire frequentemente il cestino dei rifiuti!
PROBLEMS & SOLUTIONS
Problemi
Motivi
Soluzioni
1. La maniglia non
poteva essere premuta
verso il basso durante la
perforazione
Residui di carta o altri materiali
duri rimangono all'interno della
fessura di perforazione
Pulisci il corpo estraneo
Superamento del massimo.
capacità di perforazione o
utilizzare un altro spessore di
carta
Ridurre la carta in base alla
situazione reale
2. Il margine della carta
è inclinato
La carta è storta quando viene
inserita
Togli la carta e rimettila
dentro
Residui di carta o altri materiali
duri rimangono all'interno della
fessura di perforazione
Pulisci il corpo estraneo
3. La perforazione della
carta è impenetrabile o è
difficile estrarre la carta
Superamento del massimo.
capacità di perforazione o
utilizzare un altro spessore di
carta
Ridurre lo spessore della
perforazione o ridurre la
carta in base alla situazione
effettiva ( seguire il

manuale)
4. La carta non poteva
toccare il rack durante
l'inserimento
La carta è rovinata con i bordi
arrotolati
Lisciare la carta e rimetterla
dentro


Techniczny Wsparcie i certyfikat gwarancji elektronicznej www.vevor.com/support
MASZYNA DO OPRAWY
MODELE: STD12B
We continue to be committed to provide you tools with competitive price.
"Save Half", "Half Price" or any other similar expressions used by us only represents an
estimate of savings you might benefit from buying certain tools with us compared to the major
top brands and does not necessarily mean to cover all categories of tools offered by us. You
are kindly reminded to verify carefully when you are placing an order with us if you are
actually saving half in comparison with the top major brands.


MODEL: STD12B
Have product questions? Need technical support? Please feel free to
contact us:
Technical Support and E-Warranty Certificate
www.vevor.com/support
NEED HELP? CONTACT US!
This is the original instruction, please read all manual instructions
carefully before operating. VEVOR reserves a clear interpretation of our
user manual. The appearance of the product shall be subject to the
product you received. Please forgive us that we won't inform you again if
there are any technology or software updates on our product.
BINDING MACHINE

WARMING & ATTENTIONS
Przed użyciem należy uważnie przeczytać instrukcję obsługi.
Trzymać urządzenie z dala od dzieci.
Trzymaj maszynę z dala od ognia i płynów.
Ustaw maszynę w stabilnym i bezpiecznym miejscu, aby zapobiec jej
upadkowi i obrażeniom ludzi lub samej maszyny.
Przed formalnym dziurkowaniem i oprawieniem przetestuj maszynę na
kawałku papieru, aby upewnić się, czy pozycja dziurkowania jest
prawidłowa.
Wyjmij nadmiarowe części z opakowania. Umieść maszynę w
zrównoważonym i bezpiecznym miejscu, aby uniknąć upadku lub
spowodowania obrażeń u ludzi lub maszyny.
Używaj maszyny ściśle według instrukcji, zwracając szczególną
uwagę na maksymalną wydajność dziurkowania i oprawy.
prosimy o przetestowanie maszyny.
Przy dziurkowaniu plastikowych okładek zalecamy, aby okładkę
zacisnąć pomiędzy dwoma arkuszami papieru.
Aby uniknąć uszkodzenia urządzenia, nie należy używać urządzenia
do dziurkowania twardych materiałów, np. metali .
Podczas zaciskania plastikowego pierścienia nie wkładaj palców do
tego obszaru, gdyż może to spowodować obrażenia.
Maksymalna pojemność dziurkowania: 10–12 arkuszy (grubość
papieru: 80 g (<20 funtów)) Uwaga: Jeśli używasz papieru o innej
grubości, zmniejsz papier odpowiednio do aktualnej sytuacji!
Przy pierwszym użyciu zrób dziurkacz z bibuły, aby odessać nadmiar
smaru z ostrza
Ostrzeżenie: Aby zminimalizować ryzyko obrażeń, użytkownik
powinien uważnie przeczytać instrukcję obsługi.

STRUCTURAL REPRESENTATION
TECHNICAL SPECIFICATIONS
Pojemność dziurkowania:
12 arkuszy (A4 80g)
Pojemność wiązania:
120 arkuszy (A4)
Margines papieru:
3/5/7 mm
Otwory kwadratowe:
34 dołki
Odległość między otworami
kwadratowymi:
8,46 mm
Rozmiar otworu
kwadratowego:
4x4mm
Rodzaj noża:
podwójny nóż
Format papieru:
Papier A4 lub mniejszy
Wymiary maszyny:
Wymiary: 370*245*260 mm
Północny zachód:
4,9 kg
opakowania :
Wymiary: 440*190*310mm
GW :
5,3 kg
PARTS LIST
Nazwa części
Ilość
Półka na papier
1 szt.
Bibułka do bibuły
1 szt.
Instrukcje
1 szt.
OPERATING GUIDE
Ustaw maszynę na stabilnej powierzchni
i umieścić przed użyciem!
Przy pierwszym użyciu należy wykonać dziurkacz z bibuły, aby odessać
nadmiar smaru z ostrza .
1. Operacja dziurkowania

2. Operacja wiązania
Wybierz obręcz Iron hoop zgodnie z grubością dokumentu. Poniższy
formularz jest dla Ciebie odniesieniem, aby wybrać odpowiednią
obręcz Iron hoop.
Rozmiar
drutu
(mm )
Rozmiar
drutu
( cal)
Maksymalna
wiązka
arkusze
Rozmiar
drutu
(mm )
Rozmiar
drutu
( cal)
Maksymalna
wiązka
arkusze
4.8
3/16
15
11.1
7/16
95
6.4
1 /4
3 0
12.7
1/2
1 05
7.9
3 /8
7 5
1 4.3
9 /16
1 20
9.5
3 /8
7 5

3. Posprzątaj kosz na śmieci
Kosz na odpady, który znajduje się z tyłu maszyny, jest przeznaczony
na odpady powstałe podczas dziurkowania. Częstotliwość
czyszczenia kosza na odpady zależy od częstotliwości korzystania z
maszyny.
1. Wyciągnij pojemnik na odpady z tyłu urządzenia
2. Wylej odpady do kosza na śmieci.
3. Następnie ponownie włóż kosz na śmieci.
Prosimy o częste sprzątanie kosza na śmieci!
PROBLEMS & SOLUTIONS
Problemy
Powody
Rozwiązania
1. Podczas uderzania
nie można było nacisnąć
uchwytu
Resztki papieru lub inne twarde
materiały pozostają wewnątrz
otworu dziurkacza
Wyczyść ciała obce
Przekroczenie maks.
pojemność dziurkowania lub
użyj papieru o innej grubości
Zmniejsz ilość papieru
zgodnie z rzeczywistą
sytuacją
2. Margines papieru jest
pochyły
Papier jest krzywy podczas
wkładania
Wyjmij papier i włóż go
ponownie
Resztki papieru lub inne twarde
materiały pozostają wewnątrz
otworu dziurkacza
Wyczyść ciała obce
3. Dziurkowanie papieru
jest niemożliwe lub
trudne do wyciągnięcia
Przekroczenie maks.
pojemność dziurkowania lub
użyj papieru o innej grubości
Zmniejsz grubość
dziurkowania lub ilość
papieru zgodnie z aktualną
sytuacją ( postępuj zgodnie
z instrukcją)

4. Papier nie mógł
dotykać półki podczas
wkładania
Papier jest zniszczony, a jego
krawędzie są zwinięte
Wygładź papier i włóż go
ponownie


Technisch Support und E-Garantie-Zertifikat www.vevor.com/support
BINDEMASCHINE
MODELL: STD12B
We continue to be committed to provide you tools with competitive price.
"Save Half", "Half Price" or any other similar expressions used by us only represents an
estimate of savings you might benefit from buying certain tools with us compared to the major
top brands and does not necessarily mean to cover all categories of tools offered by us. You
are kindly reminded to verify carefully when you are placing an order with us if you are
actually saving half in comparison with the top major brands.


MODELL: STD12B
Have product questions? Need technical support? Please feel free to
contact us:
Technical Support and E-Warranty Certificate
www.vevor.com/support
NEED HELP? CONTACT US!
This is the original instruction, please read all manual instructions
carefully before operating. VEVOR reserves a clear interpretation of our
user manual. The appearance of the product shall be subject to the
product you received. Please forgive us that we won't inform you again if
there are any technology or software updates on our product.
BINDING MACHINE

WARMING & ATTENTIONS
Lesen Sie diese Bedienungsanleitung vor der Verwendung sorgfältig
durch.
Bewahren Sie die Maschine außerhalb der Reichweite von Kindern
auf.
Halten Sie die Maschine von Feuer und Flüssigkeiten fern.
Stellen Sie die Maschine auf einen stabilen und sicheren Platz, um zu
verhindern, dass sie herunterfällt oder Personen oder die Maschine
selbst verletzt werden.
Testen Sie die Maschine vor dem eigentlichen Stanzen und Binden mit
etwas Altpapier, um sicherzustellen, dass die Position zum Stanzen
richtig ist.
Nehmen Sie die überzähligen Teile aus der Verpackung. Stellen Sie
die Maschine auf einen stabilen und sicheren Platz, um ein
Herunterfallen oder Verletzungen von Personen oder der Maschine zu
vermeiden.
Betreiben Sie die Maschine strikt gemäß den Handbüchern und
achten Sie insbesondere auf die maximale Stanz- und Bindekapazität.
Bitte testen Sie die Maschine, bevor Sie die offiziellen Dokumente
lochen.
Beim Stanzen der Kunststoffhüllen empfehlen wir, die Hülle zwischen
zwei Papierstücke zu klemmen.
Bitte verwenden Sie die Maschine nicht zum Stanzen von harten
Materialien wie Metallen, um Schäden an der Maschine zu vermeiden.
Achten Sie beim Festklemmen des Kunststoffrings darauf, dass Ihre
Finger nicht in diesen Bereich geraten, da Sie sich sonst verletzen
könnten.
Warnung: Um das Verletzungsrisiko zu verringern, muss der
Benutzer die Bedienungsanleitung sorgfältig lesen.
Maximale Stanzkapazität: 10–12 Blatt (Papierstärke: 80 g (< 20 lb)
Papier) Hinweis: Wenn Sie Papier anderer Stärke verwenden,
reduzieren Sie die Papiermenge bitte entsprechend der tatsächlichen
Situation!
Machen Sie beim ersten Gebrauch einen Schlag mit Löschpapier, um
überschüssiges Schmiermittel von der Klinge abzusaugen
STRUCTURAL REPRESENTATION
TECHNICAL SPECIFICATIONS
Stanzleistung:
12 Blatt (A4 80g)
Bindungskapazität:
120 Blatt (A4)
Papierrand:
3/5/7 mm
Quadratische Löcher:
34 Löcher
Quadratischer Lochabstand:
8,46 mm
Quadratische Lochgröße:
4x4mm
Messertyp:
Doppelmesser
Papierformat:
A4-Papier oder kleinere Formate
Maschinenabmessungen:
370*245*260 mm
NW:
4,9 kg
Verpackungsmaße :
440 x 190 x 310 mm
GW :
5,3 kg
PARTS LIST
Teile Name
Menge
Papierregal
1 Stck.
Löschpapier
1 Stck.
Anweisungen
1 Stck.
OPERATING GUIDE
Stellen Sie die Maschine auf eine stabile
und vor Gebrauch gleichmäßig platzieren!
Machen Sie beim ersten Gebrauch einen Schlag mit Löschpapier, um
überschüssiges Schmiermittel von der Klinge aufzusaugen .
1. Stanzvorgang
2. Bindungsvorgang
Wählen Sie den Eisenrahmen entsprechend der Dicke des
Dokuments. Das folgende Formular dient Ihnen als Referenz bei der
Auswahl des richtigen Eisenrahmens.
Drahtgröß
e
Drahtgröß
e
Max.Bindun
g
Drahtgröß
e
Drahtgröß
e
Max.Bindun
g
(mm )
( Zoll)
s Blätter
(mm )
( Zoll)
s Blätter
4.8
3/16
15
11.1
7/16
95
6 .4
1 /4
3 0
12.7
1/2
1 05
7.9
3 /8
7 5
1 4.3
9 /16
1 20
9 .5
3 /8
7 5
3. Den Mülleimer aufräumen
Der Abfallbehälter an der Rückseite der Maschine ist für den
Lochabfall vorgesehen. Wie oft der Abfallbehälter geleert werden
muss, hängt davon ab, wie häufig Sie die Maschine verwenden.
1. Ziehen Sie den Abfallbehälter aus der Rückseite der Maschine heraus
2. Werfen Sie den Abfall in den Mülleimer.
3.Und setzen Sie den Abfallbehälter wieder ein.
Bitte leeren Sie den Mülleimer regelmäßig!
PROBLEMS & SOLUTIONS
Probleme
Gründe
Lösungen
1. Der Griff ließ sich
beim Schlagen nicht
herunterdrücken
Papierreste oder andere harte
Materialien bleiben im
Lochschlitz zurück
Reinigen Sie die
Fremdkörper
Das Maximum wird erreicht.
Stanzkapazität oder verwenden
Sie die andere Dicke Papier
Reduzieren Sie das Papier
entsprechend der
tatsächlichen Situation
2. Der Papierrand ist
schräg
Das Papier wird schief eingelegt
Papier herausnehmen und
erneut einlegen
Papierreste oder andere harte
Materialien bleiben im
Lochschlitz zurück
Reinigen Sie die
Fremdkörper

3. Papierstanzen ist
undurchdringlich oder
schwer, das Papier
herauszuziehen
Das Maximum wird erreicht.
Stanzkapazität oder verwenden
Sie die andere Dicke Papier
Verringern Sie die
Stanzstärke oder reduzieren
Sie das Papier
entsprechend der
tatsächlichen Situation
( folgen Sie der Anleitung).
4. Das Papier konnte
beim Einlegen das Rack
nicht berühren
Das Papier ist verfallen mit
aufgerollten Papierrändern
Glätten Sie das Papier und
legen Sie es erneut ein


Technique Certificat d'assistance et de garantie électronique
www.vevor.com/support
MACHINE À RELIER
MODÈLE : STD12B
We continue to be committed to provide you tools with competitive price.
"Save Half", "Half Price" or any other similar expressions used by us only represents an
estimate of savings you might benefit from buying certain tools with us compared to the major
top brands and does not necessarily mean to cover all categories of tools offered by us. You
are kindly reminded to verify carefully when you are placing an order with us if you are
actually saving half in comparison with the top major brands.


MODÈLE: NORME 12B
Have product questions? Need technical support? Please feel free to
contact us:
Technical Support and E-Warranty Certificate
www.vevor.com/support
NEED HELP? CONTACT US!
This is the original instruction, please read all manual instructions
carefully before operating. VEVOR reserves a clear interpretation of our
user manual. The appearance of the product shall be subject to the
product you received. Please forgive us that we won't inform you again if
there are any technology or software updates on our product.
BINDING MACHINE

WARMING & ATTENTIONS
Lisez attentivement ce manuel d’utilisation avant utilisation.
Gardez la machine à l’écart des enfants.
Gardez la machine à l’écart du feu et des liquides.
Placez la machine dans un endroit stable et sûr afin d'éviter qu'elle ne
tombe ou ne cause des blessures aux personnes ou à la machine
elle-même.
Testez la machine avec du papier brouillon avant de perforer et de
relier officiellement, pour vous assurer que la position est correcte
pour perforer.
Retirez les pièces excédentaires du carton d'emballage. Placez la
machine dans un endroit sûr et équilibré pour éviter toute chute ou
blessure aux personnes ou à la machine.
Utilisez la machine strictement conformément aux manuels, en faisant
particulièrement attention à la capacité maximale de perforation et de
reliure.
Veuillez tester la machine avant de perforer les documents officiels.
Lors de la perforation des couvertures en plastique, nous suggérons
que la couverture soit clipsée entre deux morceaux de papier.
Veuillez ne pas utiliser la machine pour percer des matériaux durs tels
que des métaux afin d'éviter d'endommager la machine.
Lors du serrage de la bague en plastique, ne mettez pas vos doigts à
l'intérieur de cette zone, sinon vous risquez de vous blesser.
Capacité de perforation maximale : 10 à 12 feuilles (épaisseur du
papier : 80 g (< 20 lb)) Remarque : si vous utilisez du papier d'une
autre épaisseur, veuillez réduire le papier en fonction de la situation
réelle !
Avertissement - Pour réduire le risque de blessure, l'utilisateur
doit lire attentivement le manuel d'instructions.
Pour la première utilisation, faites un poinçon avec du papier buvard
pour aspirer l'excédent de lubrifiant de la lame
STRUCTURAL REPRESENTATION
TECHNICAL SPECIFICATIONS
Capacité de perforation :
12 feuilles (A4 80g)
Capacité de liaison :
120 feuilles (A4)
Marge du papier :
3/5/7 mm
Trous carrés :
34 trous
Distance du trou carré :
8,46 mm
Taille du trou carré :
4x4mm
Type de couteau :
couteau double
Format du document :
Papier A4 ou formats plus petits
Dimensions de la machine :
370*245*260mm
NO:
4,9 kg
de l'emballage :
440*190*310mm

GW :
5,3 kg
PARTS LIST
Nom des pièces
Quantité
Étagère à papier
1 pièce
Papier buvard
1 pièce
Instructions
1 pièce
OPERATING GUIDE
Placez la machine sur une surface stable
et même placer avant utilisation !
Pour la première utilisation, faites un poinçon avec du papier buvard
pour aspirer l'excédent de lubrifiant de la lame .
1. Opération de poinçonnage
2. Opération de liaison
Choisissez le cerceau en fer en fonction de l'épaisseur du document.
Le formulaire suivant est à titre de référence pour vous aider à choisir
le cerceau en fer approprié.
Taille du
fil
(mm )
Taille du
fil
( pouce)
Liaison
max.
feuilles
Taille du
fil
(mm )
Taille du
fil
( pouce)
Liaison
max.
feuilles
4.8
3/16
15
11.1
7/16
95
6 .4
1 /4
3 0
12.7
1/2
1 05
7 .9
3 /8
7 5
1 4.3
9 /16
1 20
9 .5
3 /8
7 5
3. Nettoyer la poubelle
Le bac à déchets, situé à l'arrière de la machine, est destiné aux
déchets de perforation. La fréquence de nettoyage du bac à déchets
dépend de la fréquence d'utilisation de la machine.
1. Retirez le bac à déchets de l'arrière de la machine
2. Versez les déchets dans la poubelle.
3. Et réinsérez la poubelle.
Veuillez nettoyer fréquemment la poubelle !
PROBLEMS & SOLUTIONS
Problèmes
Raisons
Solutions
1. La poignée ne pouvait
pas être enfoncée lors
du poinçonnage
Des morceaux de papier ou
d'autres matériaux durs restent
à l'intérieur de la fente de
perforation
Nettoyer les corps étrangers
Dépasser le max.
capacité de perforation ou
utiliser un papier d'une autre
épaisseur
Réduisez le papier en
fonction de la situation réelle
2. La marge du papier
est inclinée
Le papier est déséquilibré lors
de l'insertion
Retirez le papier et
remettez-le
Des morceaux de papier ou
d'autres matériaux durs restent
à l'intérieur de la fente de
perforation
Nettoyer les corps étrangers

3. La perforation du
papier est impénétrable
ou il est difficile de retirer
le papier
Dépasser le max.
capacité de perforation ou
utiliser un papier d'une autre
épaisseur
Réduisez l'épaisseur de
perforation ou réduisez le
papier en fonction de la
situation réelle ( suivez le
manuel)
4. Le papier ne pouvait
pas toucher le support
lors de l'insertion
Le papier est délabré avec des
bords de papier enroulés
Lissez le papier et
remettez-le en place


Técnico Soporte y certificado de garantía electrónica www.vevor.com/support
MAQUINA ENCUADERNADORA
MODELO: STD12B
We continue to be committed to provide you tools with competitive price.
"Save Half", "Half Price" or any other similar expressions used by us only represents an
estimate of savings you might benefit from buying certain tools with us compared to the major
top brands and does not necessarily mean to cover all categories of tools offered by us. You
are kindly reminded to verify carefully when you are placing an order with us if you are
actually saving half in comparison with the top major brands.


- 1 -
MODELO: ESTÁNDAR ESTÁNDAR 12B
Have product questions? Need technical support? Please feel free to
contact us:
Technical Support and E-Warranty Certificate
www.vevor.com/support
NEED HELP? CONTACT US!
This is the original instruction, please read all manual instructions
carefully before operating. VEVOR reserves a clear interpretation of our
user manual. The appearance of the product shall be subject to the
product you received. Please forgive us that we won't inform you again if
there are any technology or software updates on our product.
BINDING MACHINE

- 2 -
WARMING & ATTENTIONS
Lea atentamente este manual de funcionamiento antes de usarlo.
Mantenga la máquina alejada de los niños.
Mantenga la máquina alejada del fuego y de líquidos.
Coloque la máquina en un lugar estable y seguro para evitar que se
caiga o provoque lesiones a las personas o a la propia máquina.
Pruebe la máquina con un poco de papel borrador antes de perforar y
encuadernar formalmente, para asegurarse de que la posición sea
correcta para perforar.
Saque las piezas sobrantes de la caja de embalaje. Coloque la
máquina en un lugar seguro y equilibrado para evitar que se caiga o
provoque lesiones a las personas o a la máquina.
Opere la máquina estrictamente de acuerdo con los manuales,
prestando especial atención a la capacidad máxima de perforación y
encuadernación.
Pruebe la máquina antes de perforar los documentos oficiales.
Al perforar las cubiertas de plástico, sugerimos sujetarlas entre dos
hojas de papel.
utilice la máquina para perforar materiales duros como metales para
evitar dañar la máquina.
Al sujetar el anillo de plástico, no coloque los dedos dentro de esta
área, de lo contrario, se lastimará.
Capacidad máxima de perforación: 10-12 hojas (grosor del papel: 80 g
(<20 lb)) Nota: Si usa papel de otro grosor, reduzca el papel según la
situación real.
Para el primer uso, haga un punzón con papel secante para absorber
el exceso de lubricante de la cuchilla.
Advertencia: Para reducir el riesgo de lesiones, el usuario
debe leer atentamente el manual de instrucciones.

- 3 -
STRUCTURAL REPRESENTATION
TECHNICAL SPECIFICATIONS
Capacidad de perforación:
12 hojas (A4 80g)
Capacidad de encuadernación:
120 hojas (A4)
Margen del papel:
3/5/7 milímetros
Agujeros cuadrados:
34 hoyos
Distancia del agujero
cuadrado:
8,46 mm
Tamaño del agujero cuadrado:
4x4 mm
Tipo de cuchillo:
cuchillo doble
Formato del artículo:
Papel A4 o tamaños más pequeños
Dimensiones de la máquina:
370*245*260 mm
NOROESTE:
4,9 kilos
Dimensiones del embalaje :
440*190*310 mm
- 4 -
GW :
5,3 kilos
PARTS LIST
Nombre de las piezas
Cantidad
Estantería de papel
1 pieza
Papel secante
1 pieza
Instrucciones
1 pieza
OPERATING GUIDE
Coloque la máquina sobre una superficie firme.
¡Y colóquelo uniformemente antes de usar!
Para el primer uso, haga un punzón con papel secante para absorber el
exceso de lubricante de la cuchilla .
1. Operación de punzonado
- 5 -
2. Operación de encuadernación
Elija el aro de hierro según el grosor del documento. El siguiente
formulario es para su referencia para elegir el aro de hierro adecuado.
Tama
ño del
cable
(mm )
Tamaño
del
cable
( pulgad
a)
Máx.Encuadernaci
ón
hojas
Tama
ño del
cable
(mm )
Tamaño
del
cable
( pulgad
a)
Máx.Encuadernaci
ón
hojas
4.8
3/16
15
11.1
16/7
95
6 .4
1 /4
3 0
12.7
1/2
1 05
- 6 -
7 .9
3 /8
7 5
1 4.3
9 /16
1 20
9 .5
3 /8
7 5
3. Limpiar el cubo de basura
El contenedor de residuos, que se encuentra en la parte posterior de
la máquina, está destinado a los residuos de la perforación. La
frecuencia de limpieza del contenedor de residuos depende de la
frecuencia con la que se utilice la máquina.
1. Saque el contenedor de residuos de la parte posterior de la máquina.
2.Vierte los residuos en el contenedor de basura.
3.Y vuelva a insertar el contenedor de basura.
¡Por favor, limpie el contenedor de basura con frecuencia!
PROBLEMS & SOLUTIONS
Problemas
Razones
Soluciones
1. No se pudo presionar
el mango hacia abajo al
perforar
Restos de papel u otros
materiales duros permanecen
dentro de la ranura de
perforación.
Limpiar la materia extraña
Superando el máximo.
Capacidad de perforación o
utilizar papel de otro grosor.
Reducir el papel según la
situación real
2. El margen del papel
está inclinado.
El papel está torcido al
insertarlo
Saca el papel y vuelve a
colocarlo.
Restos de papel u otros
materiales duros permanecen
dentro de la ranura de
perforación.
Limpiar la materia extraña

- 7 -
3. La perforación del
papel es impenetrable o
es difícil extraer el papel.
Superando el máximo.
Capacidad de perforación o
utilizar papel de otro grosor.
Reduzca el grosor de
perforación o reduzca el
papel según la situación real
( siga el manual)
4. El papel no pudo
tocar la rejilla al
insertarlo.
El papel está deteriorado con
los bordes enrollados.
Alise el papel y vuelva a
colocarlo.