AirVision M1 Glasses
User Manual

2
COPYRIGHT AND WARRANTY INFORMATION
No part of this manual, including the products and software described in it, may be reproduced, transmitted,
transcribed, stored in a retrieval system, or translated into any language in any form or by any means, except
documentation kept by the purchaser for backup purposes, without the express written permission of
ASUSTeK COMPUTER INC. (“ASUS”).
Product warranty or service will not be extended if: (1) the product is repaired, modied or altered, unless
such repair, modication of alteration is authorized in writing by ASUS; or (2) the serial number of the is
defaced or missing.
ASUS PROVIDES THIS MANUAL “AS IS” WITHOUT WARRANTY OF ANY KIND, EITHER EXPRESS OR IMPLIED,
INCLUDING BUT NOT LIMITED TO THE IMPLIED WARRANTIES OR CONDITIONS OF MERCHANTABILITY
OR FITNESS FOR A PARTICULAR PURPOSE. IN NO EVENT SHALL ASUS, ITS DIRECTORS, OFFICERS,
EMPLOYEES OR AGENTS BE LIABLE FOR ANY INDIRECT, SPECIAL, INCIDENTAL, OR CONSEQUENTIAL
DAMAGES (INCLUDING DAMAGES FOR LOSS OF PROFITS, LOSS OF BUSINESS, LOSS OF USE OR DATA,
INTERRUPTION OF BUSINESS AND THE LIKE), EVEN IF ASUS HAS BEEN ADVISED OF THE POSSIBILITY OF
SUCH DAMAGES ARISING FROM ANY DEFECT OR ERROR IN THIS MANUAL OR PRODUCT.
Products and corporate names appearing in this manual may or may not be registered trademarks or
copyrights of their respective companies, and are used only for identication or explanation and to the
owners’ benet, without intent to infringe.
SPECIFICATIONS AND INFORMATION CONTAINED IN THIS MANUAL ARE FURNISHED FOR
INFORMATIONAL USE ONLY, AND ARE SUBJECT TO CHANGE AT ANY TIME WITHOUT NOTICE, AND
SHOULD NOT BE CONSTRUED AS A COMMITMENT BY ASUS. ASUS ASSUMES NO RESPONSIBILITY OR
LIABILITY FOR ANY ERRORS OR INACCURACIES THAT MAY APPEAR IN THIS MANUAL, INCLUDING THE
PRODUCTS AND SOFTWARE DESCRIBED IN IT.
Copyright © 2024 ASUSTeK COMPUTER INC. All Rights Reserved.
LIMITATION OF LIABILITY
Circumstances may arise where because of a default on ASUS’ part or other liability, you are entitled to
recover damages from ASUS. In each such instance, regardless of the basis on which you are entitled to
claim damages from ASUS, ASUS is liable for no more than damages for bodily injury (including death) and
damage to real property and tangible personal property; or any other actual and direct damages resulted
from omission or failure of performing legal duties under this Warranty Statement, up to the listed contract
price of each product.
ASUS will only be responsible for or indemnify you for loss, damages or claims based in contract, tort or
infringement under this Warranty Statement.
This limit also applies to ASUS’ suppliers and its reseller. It is the maximum for which ASUS, its suppliers,
and your reseller are collectively responsible.
UNDER NO CIRCUMSTANCES IS ASUS LIABLE FOR ANY OF THE FOLLOWING: (1) THIRD-PARTY CLAIMS
AGAINST YOU FOR DAMAGES; (2) LOSS OF, OR DAMAGE TO, YOUR RECORDS OR DATA; OR (3) SPECIAL,
INCIDENTAL, OR INDIRECT DAMAGES OR FOR ANY ECONOMIC CONSEQUENTIAL DAMAGES (INCLUDING
LOST PROFITS OR SAVINGS), EVEN IF ASUS, ITS SUPPLIERS OR YOUR RESELLER IS INFORMED OF THEIR
POSSIBILITY.
SERVICE AND SUPPORT
Visit our multi-language website at https://www.asus.com/support.
E22770
First Edition
November 2024

3
Table of Contents
Safety precautions .................................................................................. 7
Operating environment .............................................................................. 8
Health.......................................................................................................... 8
Product safety and storage ....................................................................... 8
Proper disposal .......................................................................................... 9
Chapter 1: Getting to know your glasses
Chapter 2: Setting up
Customizing your t ..............................................................................16
Changing the nosepiece (optional) .........................................................16
Adjusting the nosepiece (optional) .........................................................17
Adding the prescription insert (optional) ...............................................18
Removing the prescription insert ............................................................20
Connecting a host device .....................................................................21
Host device requirements .......................................................................21
Connecting to a smartphone ...................................................................22
Connecting to a laptop or gaming handheld .......................................... 24
Putting on your glasses ...........................................................................27
Attaching the light shield ......................................................................... 28
Removing the light shield ........................................................................29
Chapter 3: Using your glasses
Understanding viewing modes ............................................................32
Positioning (multi-screen) mode .............................................................32
Floating (single-screen) mode ................................................................33
Switching viewing modes ....................................................................34
Using the touchpad with gestures ....................................................... 35
Basic controls and settings .....................................................................35
Advanced controls and settings .............................................................36

4
Using the ASUS AirVision app ..............................................................38
Accessing ASUS AirVision.......................................................................38
ASUS AirVision widget panel ...................................................................39
Device Info ....................................................................................................40
Virtual Screen Setting...................................................................................41
Display Settings ............................................................................................43
Distance Settings .........................................................................................44
More ..............................................................................................................45
Gesture & Hotkey Settings ..................................................................46
App Preferences ..................................................................................47
Quick brightness adjustment ..................................................................48
Quick volume adjustment ........................................................................50
Quick distance adjustment ......................................................................52
Working with multi-screens ..................................................................... 54
Moving windows to virtual screens .............................................................54
Personalizing your multi-screen layout ..................................................55
Adding virtual screens .................................................................................55
Deleting virtual screens ...............................................................................59
Rearranging your multi-screen layout .........................................................60
Appendix
Regulatory Notices ...............................................................................62
M1 Glasses Specications ...................................................................64
Trademarks ...........................................................................................65
Service and Support ............................................................................. 65

5
About this manual
This manual provides information about the hardware and software
features of your glasses through the following chapters:
Chapter 1: Getting to know your glasses
This chapter details the parts of your Glasses and its accessories.
Chapter 2: Setting up your glasses
This chapter shows you how to set up your glasses, including
connecting it to a host device and downloading the app.
Chapter 3: Using your glasses
This chapter guides you through how the touch controls on your
glasses work and how to navigate the user interface.
Appendix
This section includes safety notices for your glasses.

6
Conventions used in this manual
To highlight key information in this manual, some text are presented as
follows:
WARNING! This message contains important information that must
be followed to keep you safe while performing tasks and prevent
damage to your product’s data and components.
IMPORTANT! This message contains vital information that must be
followed to complete a task.
NOTE: This message contains additional information and tips that can
help complete tasks.
Typography
Bold This indicates a menu or an item that must be selected.
Italic This indicates a section that you can refer to in this manual.
Multi-language versions
Download other language versions of this User Manual via this website:
https://www.asus.com/support

7
Safety precautions
• Refer to the user manual and take note of the safety instructions
before using this product.
• This product does not contain a battery and must be connected to a
device capable of DisplayPort (DP) output via a USB Type-C
®
cable.
• This product is not intended for use by children under the age of 18.
For those between 18 and the legal age of majority, this product should
only be used under the supervision of a legal guardian.
• Do not use this product if you are pregnant; have a history of epilepsy,
high blood pressure, acrophobia, or severe myopia; or suffer from pre-
existing heart or other serious medical conditions.
• Before putting on this product, check the volume of the media being
played, and avoid using this product for prolong periods at high volume
to prevent damage to your hearing.
• Do not use this product while driving or playing sports, as this product
will affect your eld of vision.
• Keep this product away from water; do not immerse this product in
liquid.
• Keep this product dry and avoid using it in dusty, humid, and elevated
salt environments.
• Do not use this product during thunderstorms to avoid potential
malfunctions and the risk of electric shock.
• Use this product only within the temperature range of 0˚C (32˚F) to
35˚C (95˚F), and store it within the range of 0˚C (32˚F) to 45˚C (113˚F).
• Do not expose this product to high temperature or heat sources.
• Do not disassembly or alter this product in any way.
• Do not throw this product into re.
• Keep children and pets away from this product, and do not allow them
to place it into their mouth.
• Always handle this product with care. Do not drop, put pressure on, or
toss it.
• Store this product and its accessories out of the reach of children, as
they may contain small parts that pose a choking hazard.

8
Operating environment
• Assess the safety of the environment before use. Stay away from
stairs, balconies, open doors and windows, and open ames.
• We advise against using this product while in a moving vehicle, as
speed variations may exacerbate adverse reactions.
• Do not use this product in noisy settings to reduce distraction risks.
Health
• This product is factory-set to low blue light mode to meet hardware-
based low blue light eye protection standards. Low blue light eye
protection can reduce harmful blue light emitted from the screen,
thereby reducing visual fatigue caused by prolonged screen viewing.
• This product is not a toy and is not suitable for children or people with
sensory impairment.
• Adjust the brightness as needed during the use of this product to
protect your eyesight.
• Immediately discontinue use of this product upon experiencing any
signs of dizziness or eye discomfort, and consult a doctor.
• To avoid discomfort, limit device use to under two hours, and take a 10
to 15-minute break every 45 minutes.
Product safety and storage
• Do not wear this product over another pair of glasses.
• Do not expose this product to liquid or strong physical impact to avoid
damaging it.
• Use only authorized accessories with this product.
• Do not disassemble or attempt to repair this product yourself or
through an unauthorized repair center.
• If this product overheats, stop using it immediately, and allow it to cool
down.

9
Proper disposal
Do not throw this product in municipal waste. This product has
been designed to enable proper reuse of parts and recycling. The
symbol of the crossed out wheeled bin indicates that the product
(electrical, electronic equipment and mercury-containing button
cell battery) should not be placed in municipal waste. Check local
regulations for disposal of electronic products.
• Store this product in its dedicated case, keeping it away from liquids,
moisture, and direct sunlight.
• Store this product in a temperature range of 0˚C (32˚F) to 45˚C (113˚F)
with low humidity. It is only designed to withstand sweat and small
water droplets.

10

11
Chapter 1: Getting to know your
glasses
Chapter 1:
Getting to know your
glasses
12
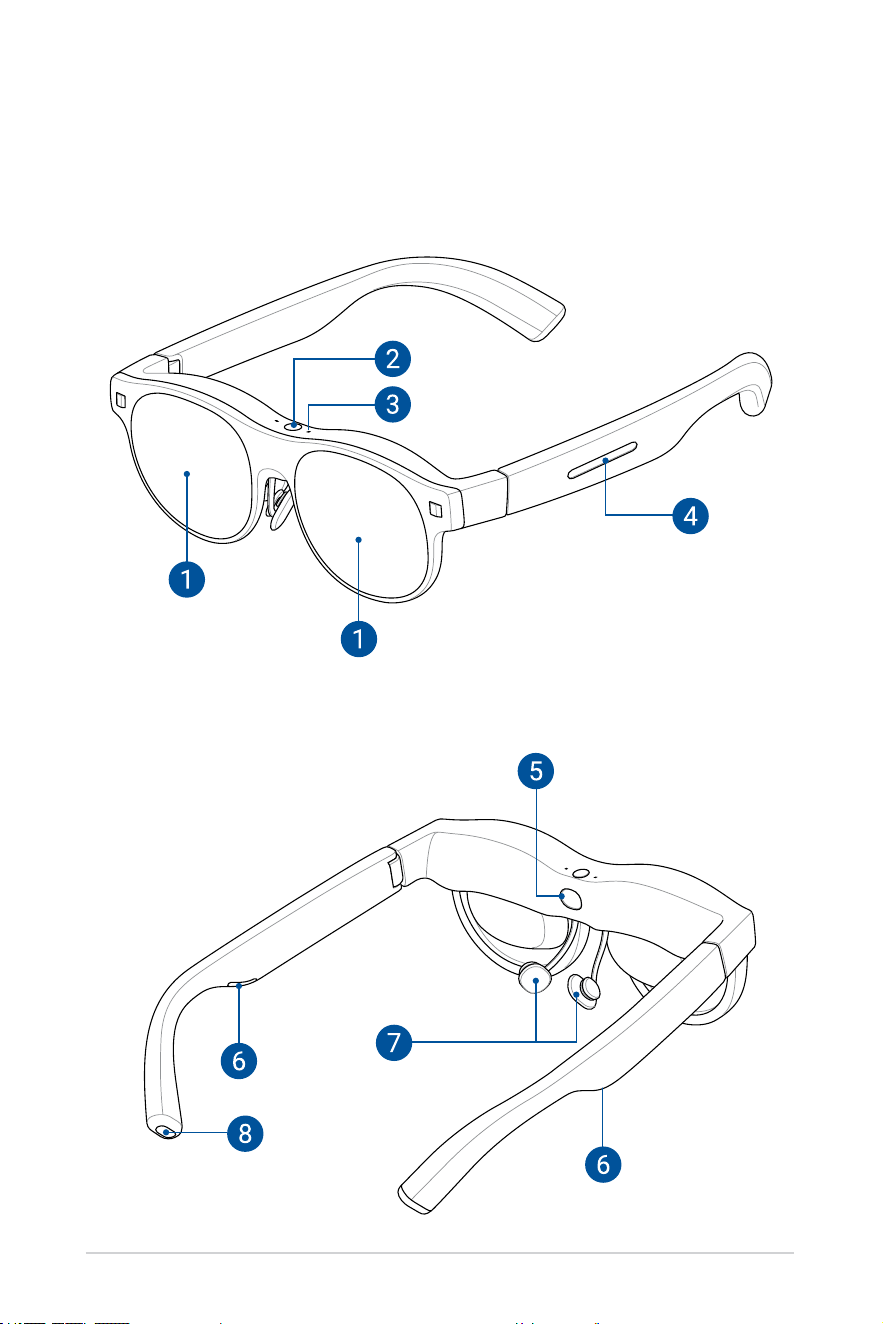
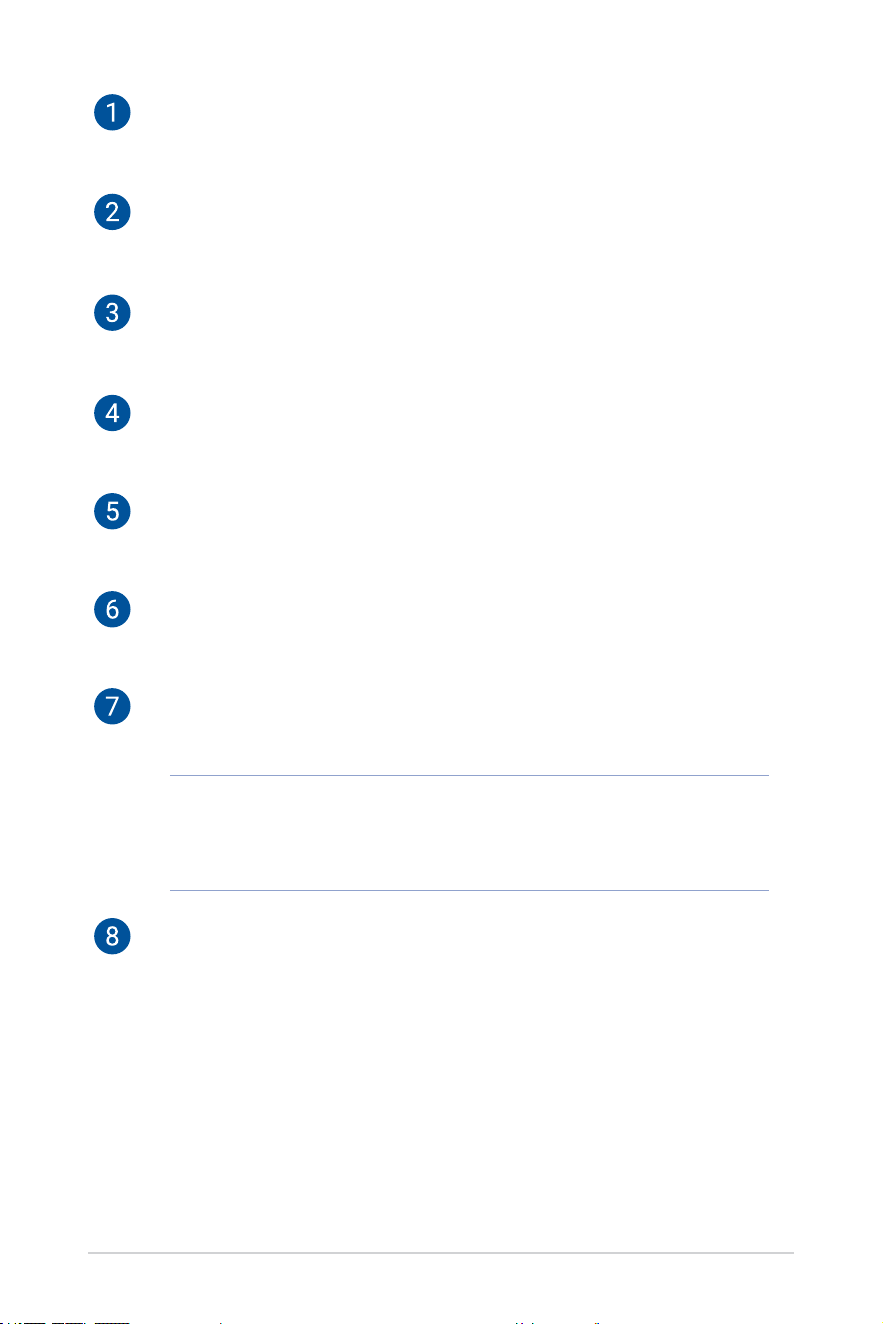
Features
13
Displays
The built-in micro-OLED displays provide full HD resolution for viewing virtual
screens.
Ambient light sensor
This sensor detects your nearby light conditions to automatically adjust the
brightness for an optimal viewing experience.
Built-in microphones
The built-in microphones capture clear audio for calls and voice commands,
enabling convenient hands-free communication.
Touchpad
The touchpad on the left temple provides a convenient way to adjust brightness
and interact with the user interface.
Wear detection sensor
This sensor automatically turns off the screen when you are not wearing your
glasses to save power and protect the lenses.
Built-in speakers
The built-in speakers deliver an immersive audio experience without the need for
external headphones or earbuds.
Nosepiece
The adjustable nosepiece allows your glasses to t comfortably at the right height
for the correct viewing angle.
NOTE: If the pre-installed nosepiece does not t comfortably or at the
right height to facilitate the optimal viewing angle, you can switch to the
alternate size nosepiece bundled in the box. See Changing the nosepiece
for detailed instructions.
USB Type-C
®
port
This port allows you to connect compatible devices, such as smartphones,
personal computers, and gaming handhelds with a USB Type-C port. See the Host
device requirements section for supported devices.

14

15
Chapter 2:
Setting up your glasses
Chapter 2: Setting up
16
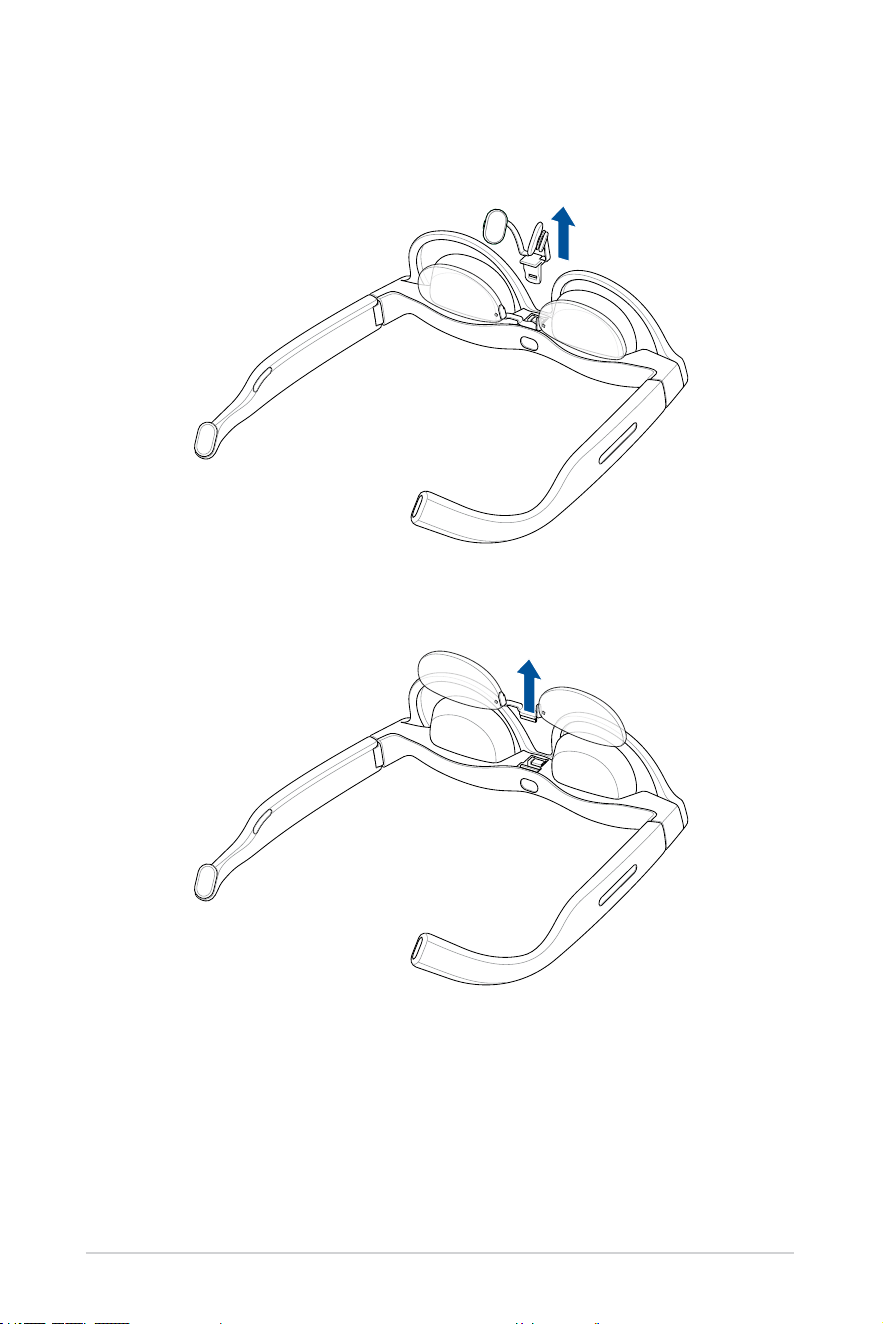
Changing the nosepiece (optional)
If the pre-installed nosepiece does not t comfortably or positioned at the
right height for the optimal viewing angle, you can switch to the alternate
size nosepiece bundled in the box.
1. Place your glasses on a sturdy at surface with the nosepiece facing
up.
2. Hold the glasses securely with one hand and use the other hand to
gently loosen and slide off the existing nosepiece from the frame.
NOTE: Ensure not to damage the frame or any other components.
Customizing your t
Before getting started with your glasses, it is important to understand
how to adjust and customize them to achieve the best t and optimal
viewing experience. This section will guide you through the process of
making adjustments and customizations for improved comfort and overall
experience.
17
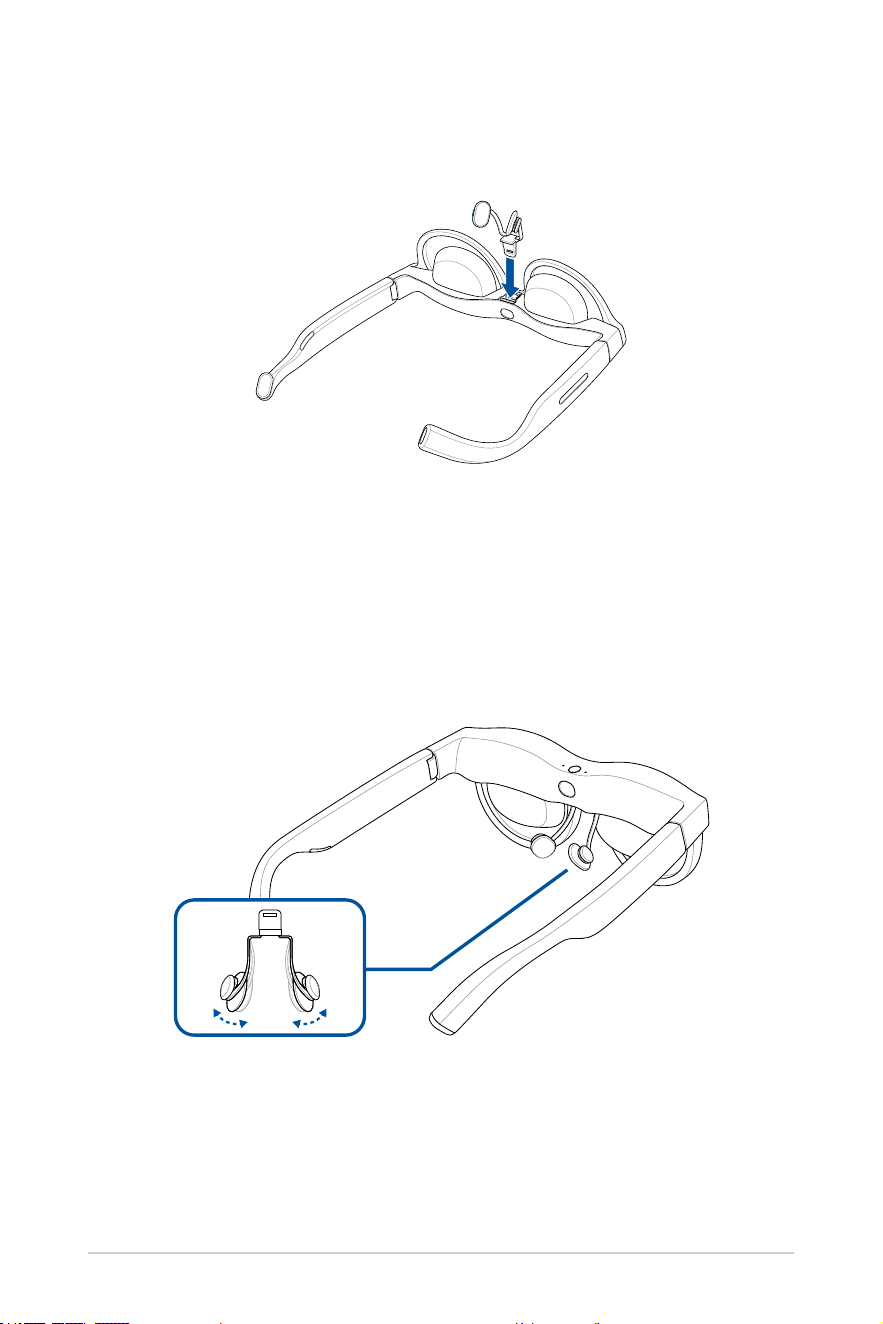
Adjusting the nosepiece (optional)
Adjust the nose pads on the nosepiece so that your glasses sit comfortably
on your face at a comfortable height. The nose pads can be adjusted by
gently pushing them together or pulling them apart.
3. Install the alternate nosepiece by aligning and inserting it in the
orientation shown.

18
Adding the prescription insert (optional)
1. Visit a local optical store to t corrective lenses to the bundled
prescription insert.
NOTE: In certain countries, you may need to rst visit an eye doctor to
obtain a prescription before you can get corrective lenses tted at an
optical store.
2. Follow steps 1 to 2 in the Changing the nosepiece section.
3. Align and insert the prescription insert into the slot closer to the wear
detection sensor.
19
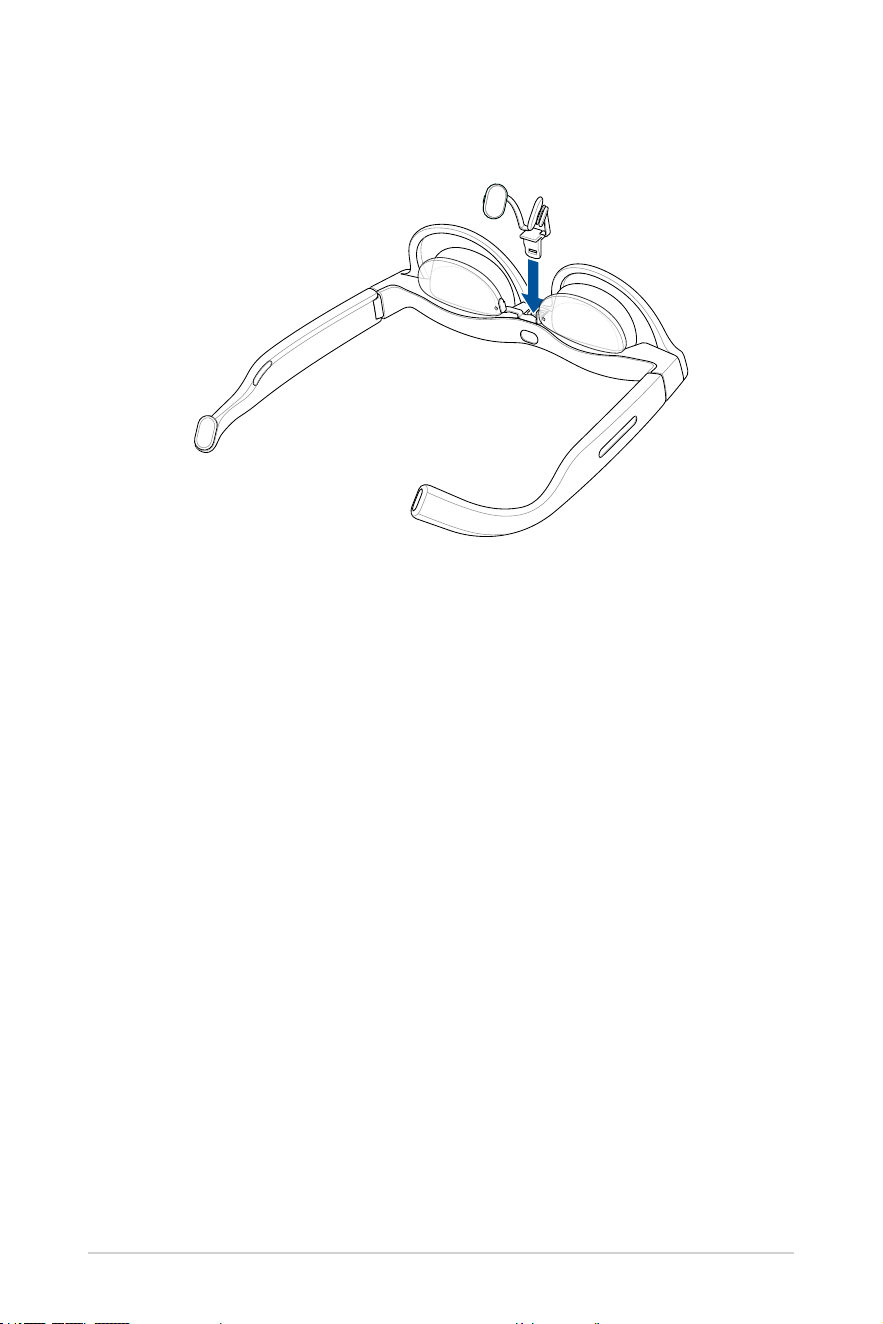
4. Replace the nosepiece and press down rmly to secure the prescription
insert in place.
20
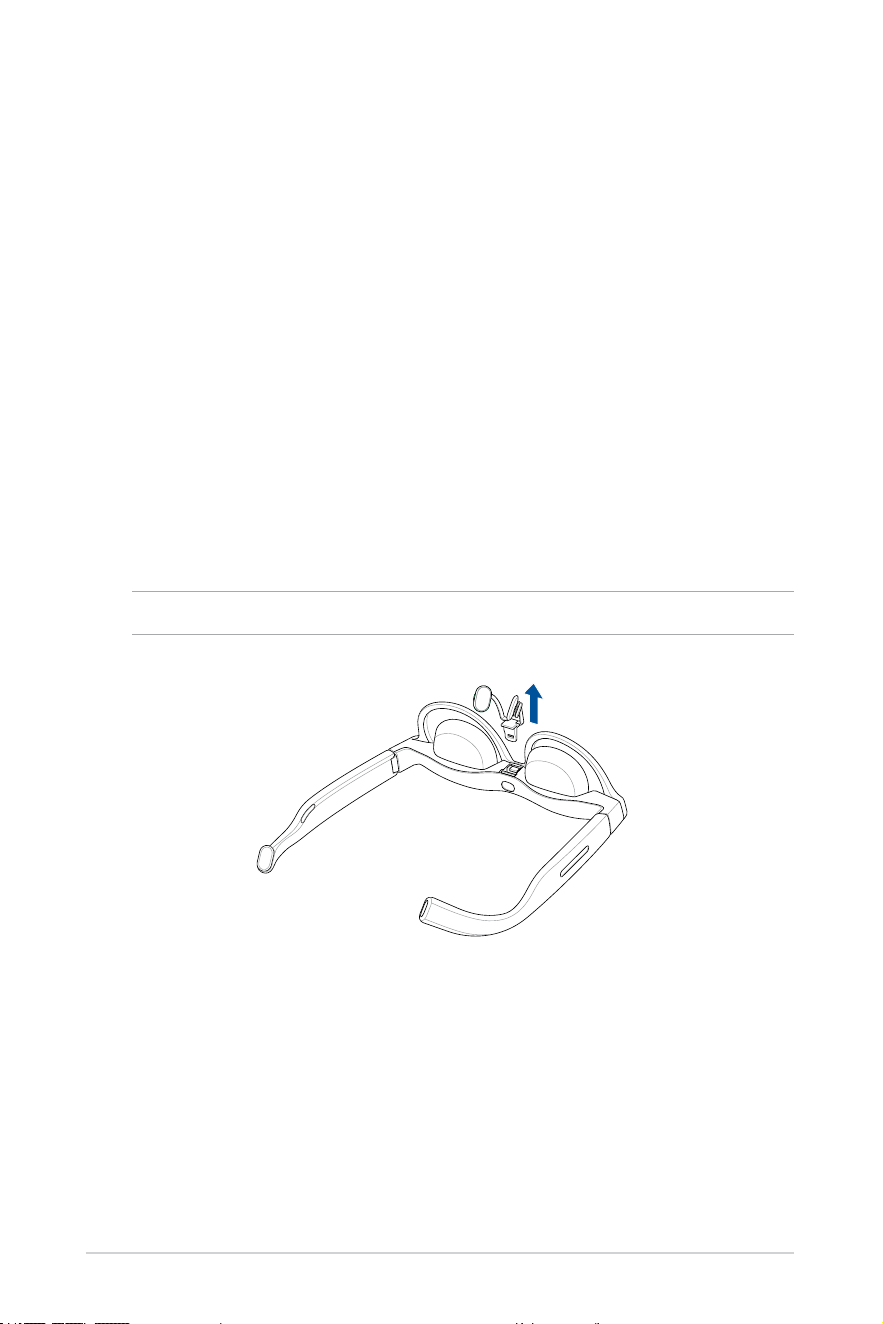
Removing the prescription insert
1. Follow steps 1 to 2 in the Changing the nosepiece section.
2. Carefully remove the prescription insert.
21
Connecting a host device
You can connect your glasses to various host devices, such as laptop
computers, smartphones, and gaming handhelds. For laptop computers,
you will need a Thunderbolt™ 4 port or a USB Type-C port that supports the
output of a display signal through DP alt mode. Similarly, for smartphones
and gaming handhelds, you will need a USB Type-C port that supports
display signal output through DP alt mode.
Host device requirements
Device type Connection type OS required for
AirVision app
Smartphones USB Type-C port with DP alt mode --
Laptops
USB Type-C port with DP alt mode
or
Thunderbolt™ 4 port
Windows
Gaming
handhelds
USB Type-C port with DP alt mode Windows
22
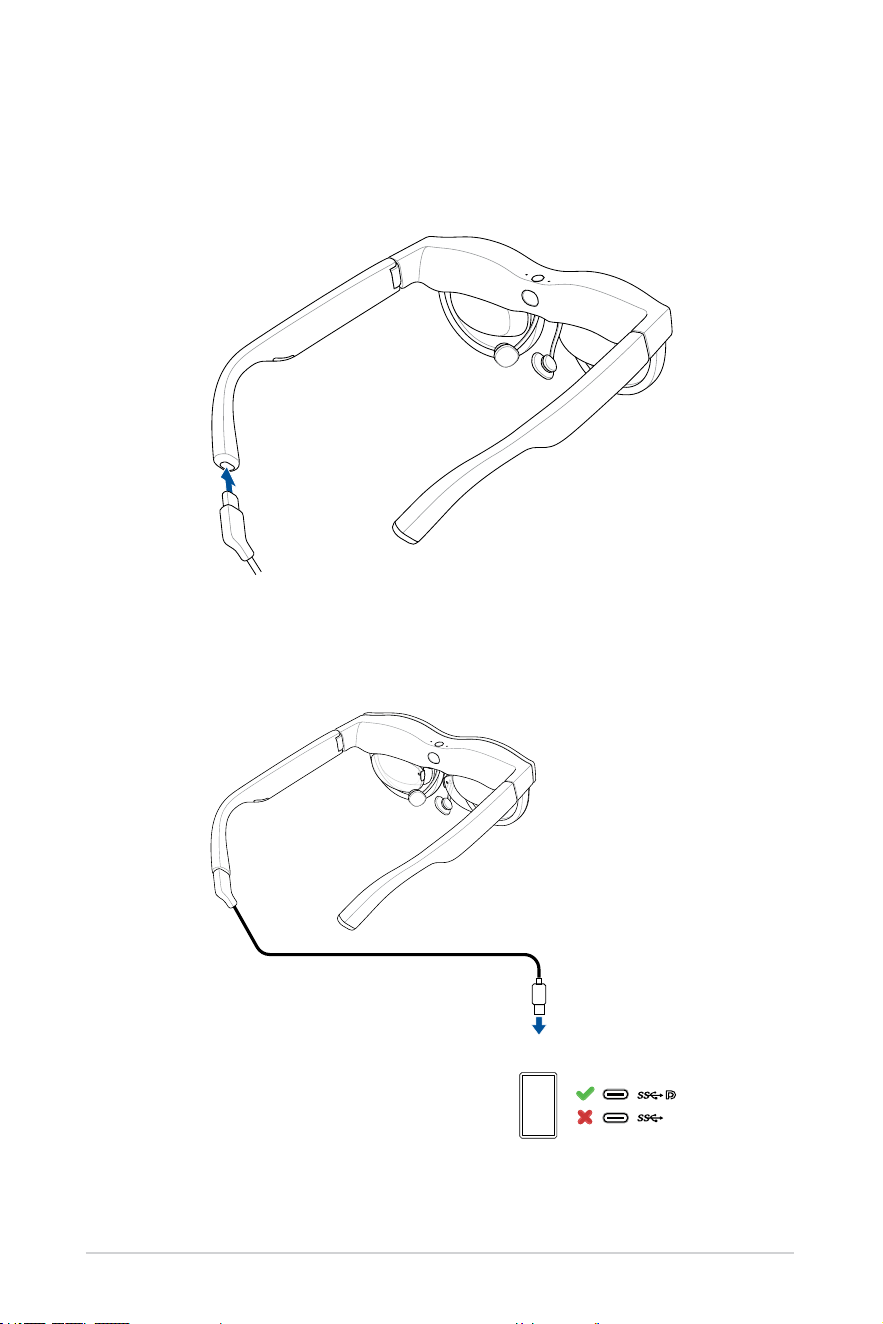
Smartphone
2. Connect the other end of the USB cable to the USB Type-C port on your
smartphone.
Connecting to a smartphone
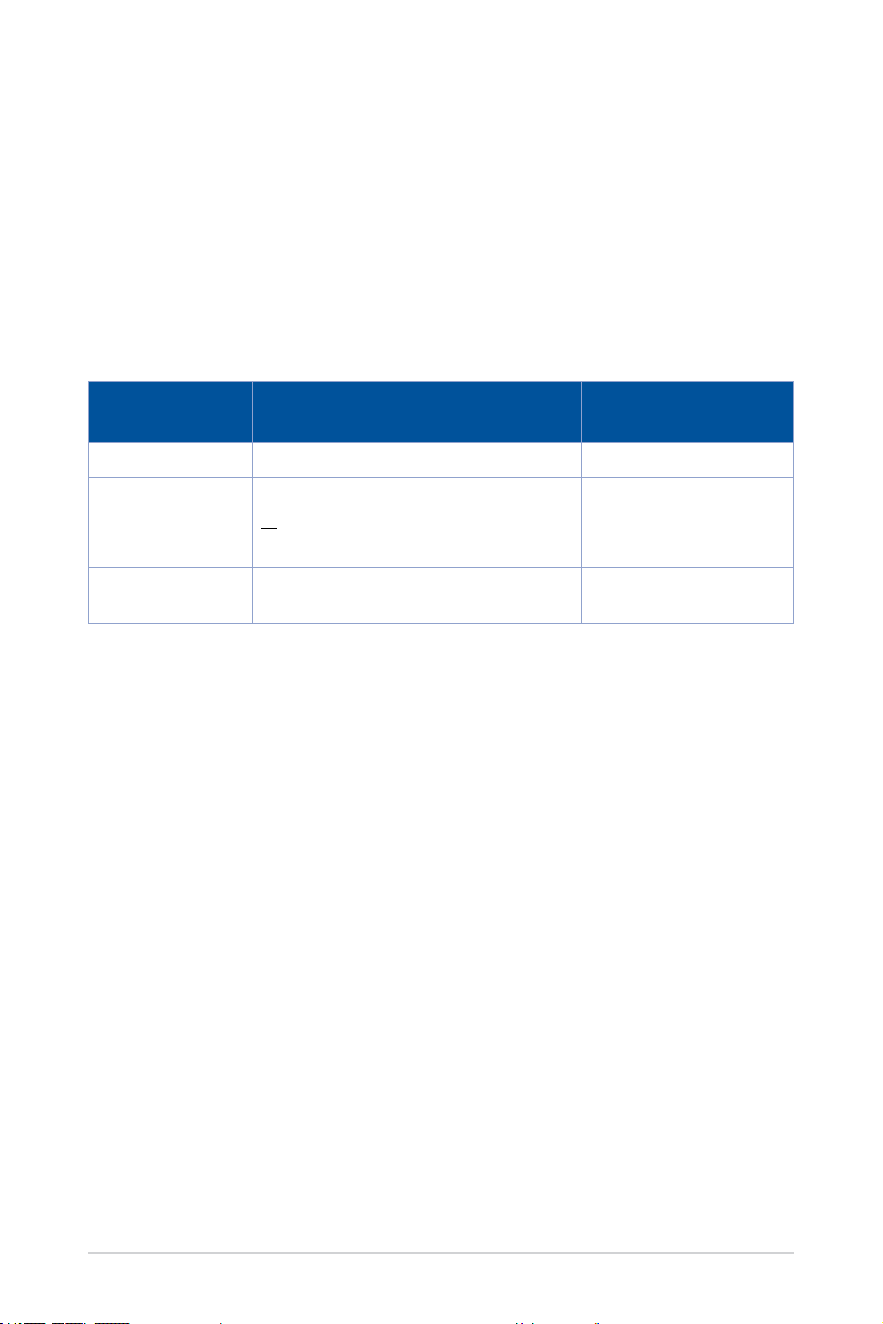
1. Connect the angled end of the bundled USB cable to the USB Type-C
port on your glasses.

23
NOTE:
• To use your glasses with a smartphone, the smartphone must be
able to support DP output through its USB Type-C port.
• Due to the design of iPhone 15 and newer models, you may not
be able to adjust the volume when using it with your glasses.
To ensure a better experience, we recommend using Bluetooth
earphones and setting the audio output to earphones.
24
Connecting to a laptop or gaming handheld
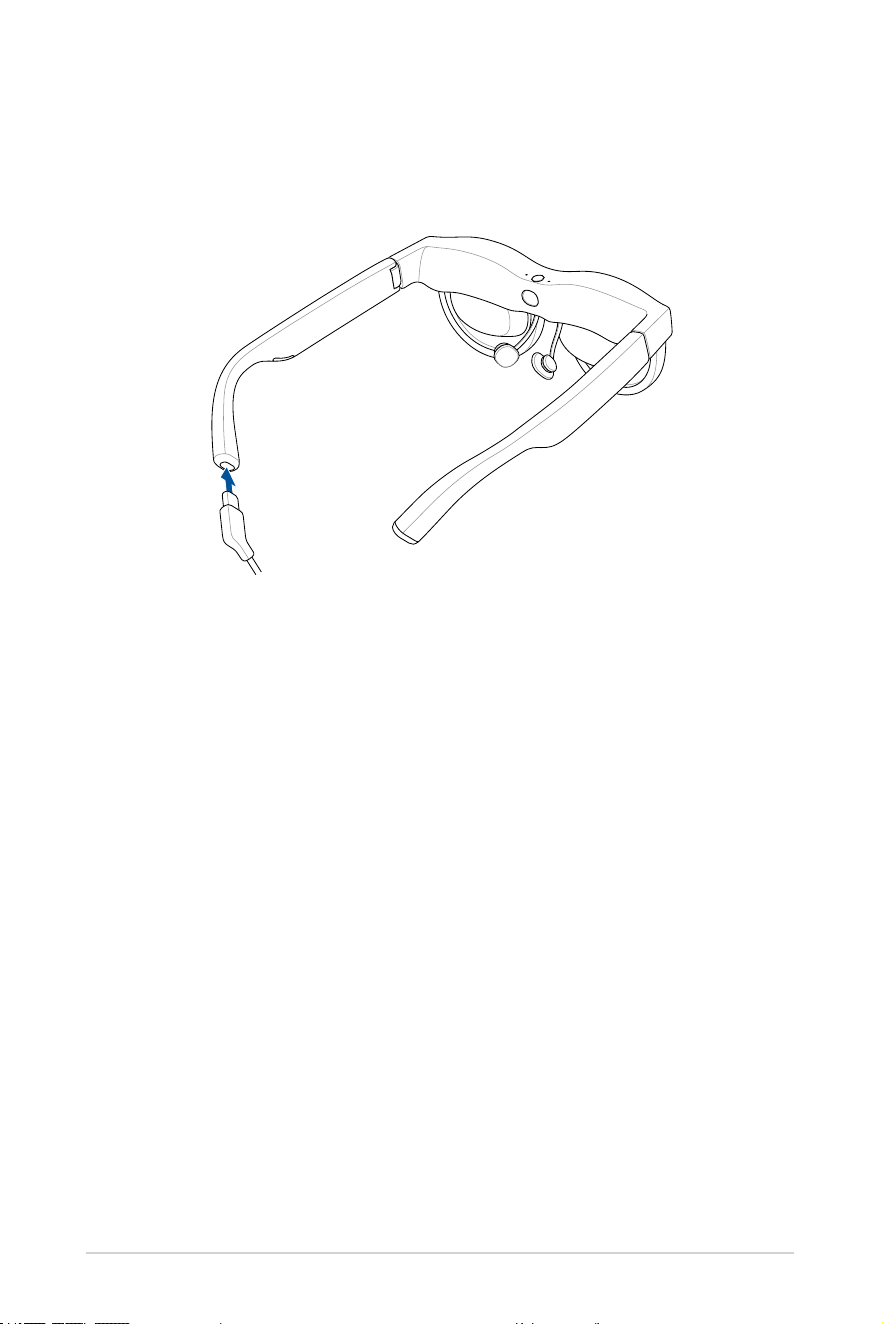
1. Connect the angled end of the bundled USB cable to the USB Type-C
port on your glasses.

25
Laptop
Gaming handheld
2. Connect the other end of the USB cable to the USB Type-C port on your
laptop or gaming handheld.

26
3. When you connect your laptop or gaming handheld to the glasses for
the rst time, the ASUS AirVision app should automatically download
and install.
4. (Optional) If the ASUS AirVision app does not automatically download,
visit https://www.asus.com/support and search for ASUS AirVision
app to manually download and install it.
27
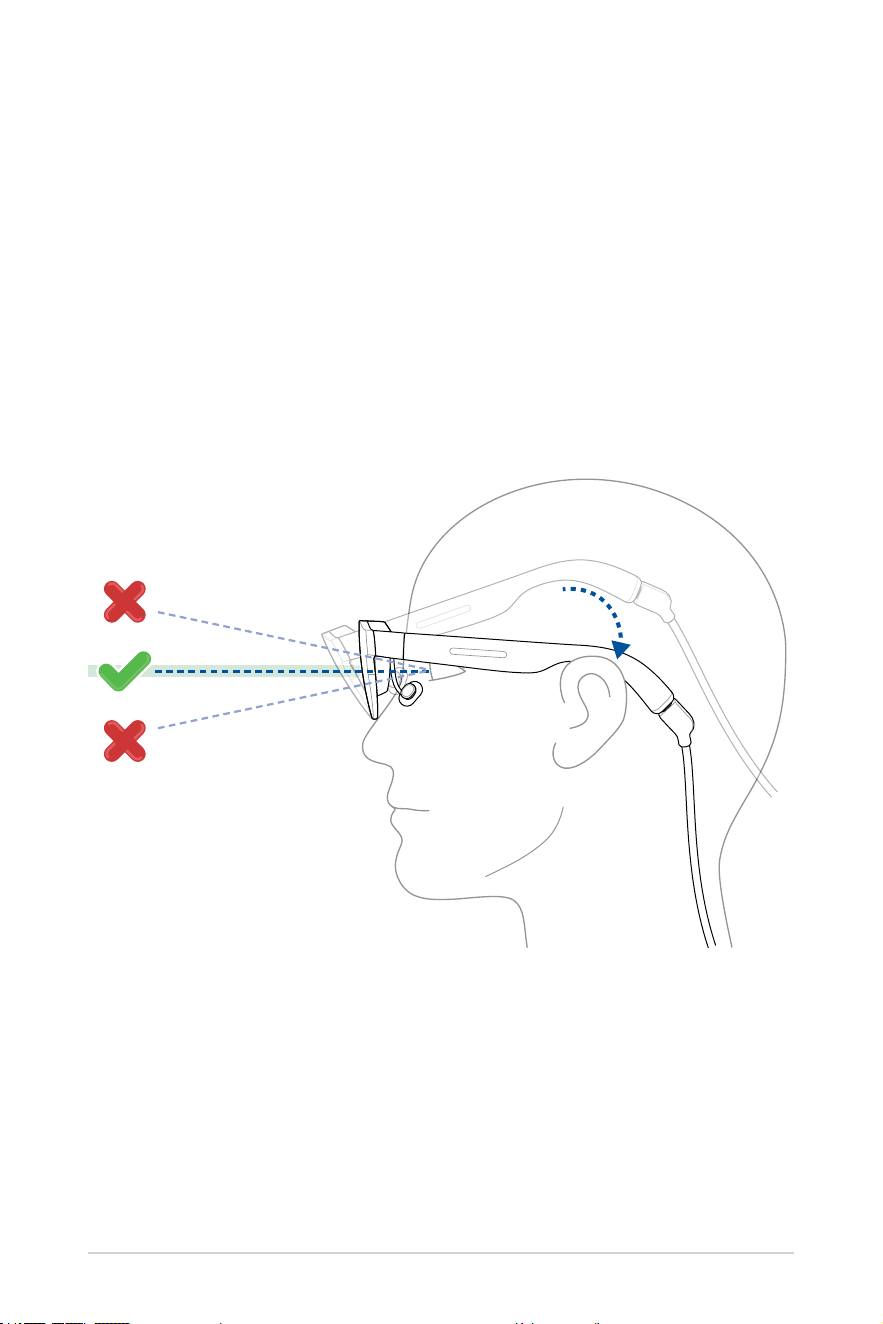
Putting on your glasses
1. Hold the glasses by the temples with both hands.
2. Put on the glasses as shown, ensuring the temples rest comfortably
on your ears.
3. Tilt or adjust the glasses on your face until the display is directly in line
with your eyes.
4. Continue to adjust the glasses until they are at an optimal viewing
angle. Refer to the Adjusting the nosepiece section to further adjust the
nosepiece, if necessary.
28
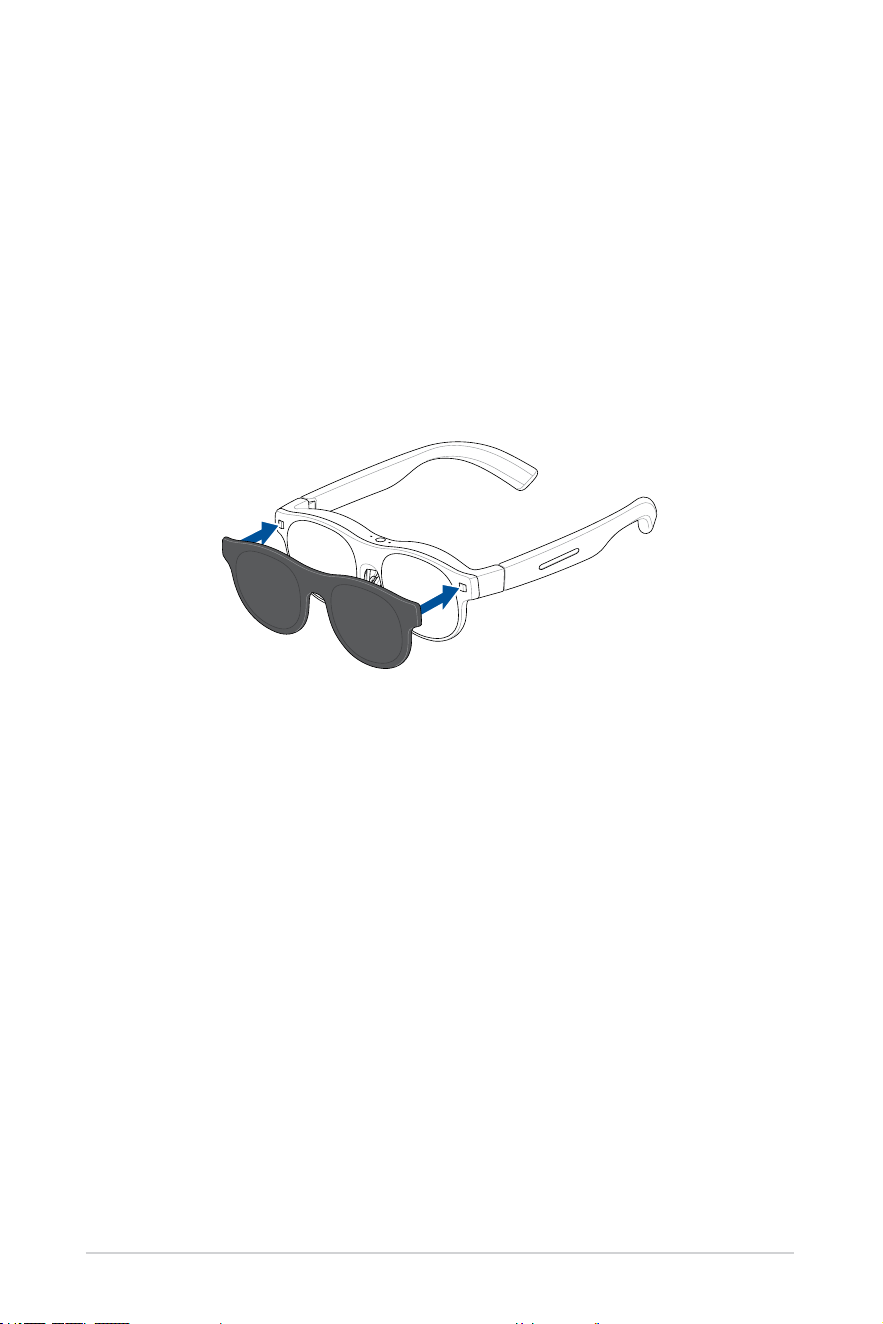
Attaching the light shield
To block out excess ambient light for a glare-free visual experience, attach
the bundled light shield to your glasses.
To attach the light shield:
1. Position the light shield as shown with the magnetic attachment
points on the light shield aligned with the corresponding points on your
glasses.
2. Move the light shield close to your glasses until the magnets attract to
securely attach the light shield in place.
29
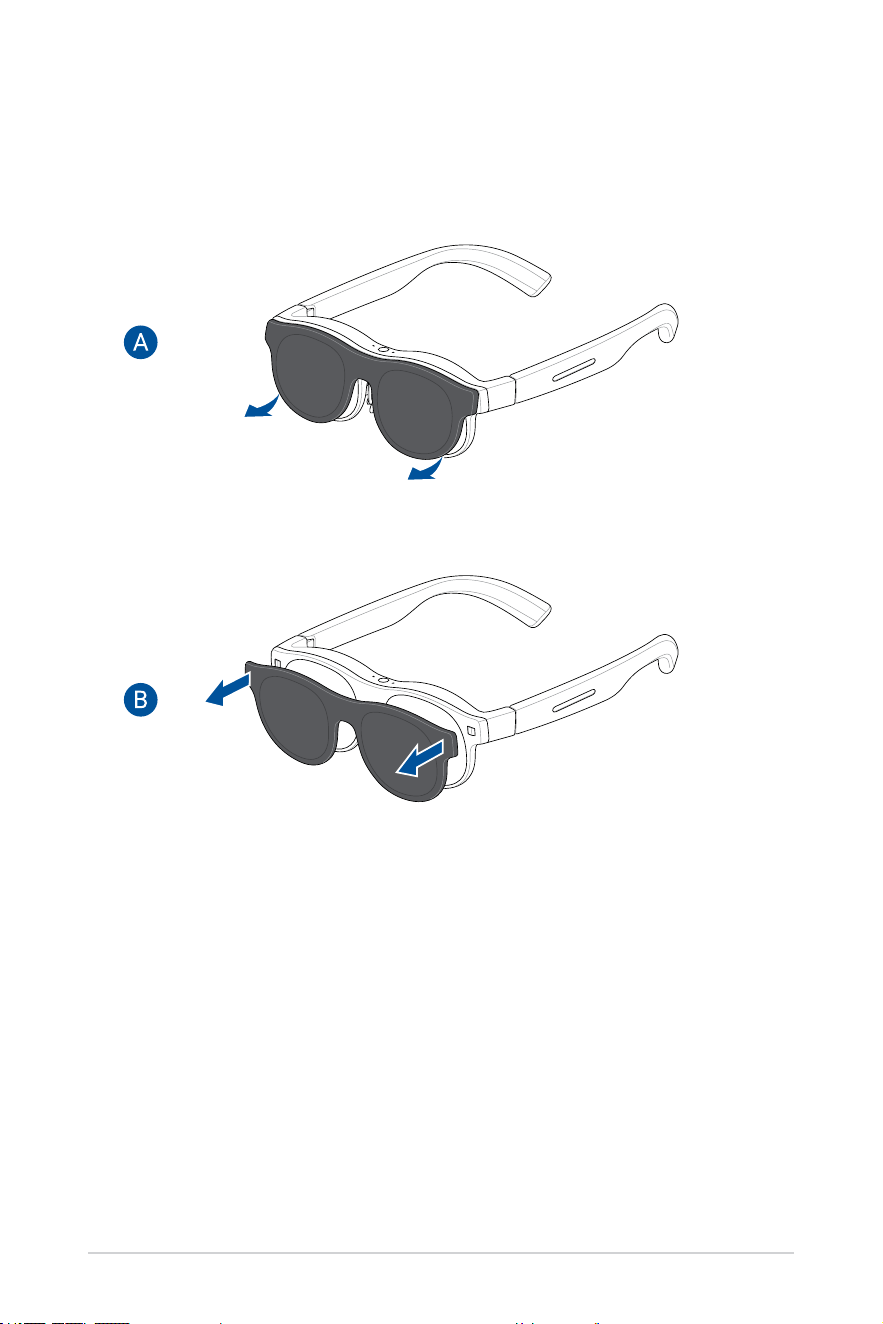
Removing the light shield
1. Gently detach the light shield by gently lifting it from the bottom edge (A)
and then pulling it away from your glasses as shown (B).
2. Keep the magnetic light shield in a safe place when not in use.

30

31
Chapter 3:
Using your glasses
32
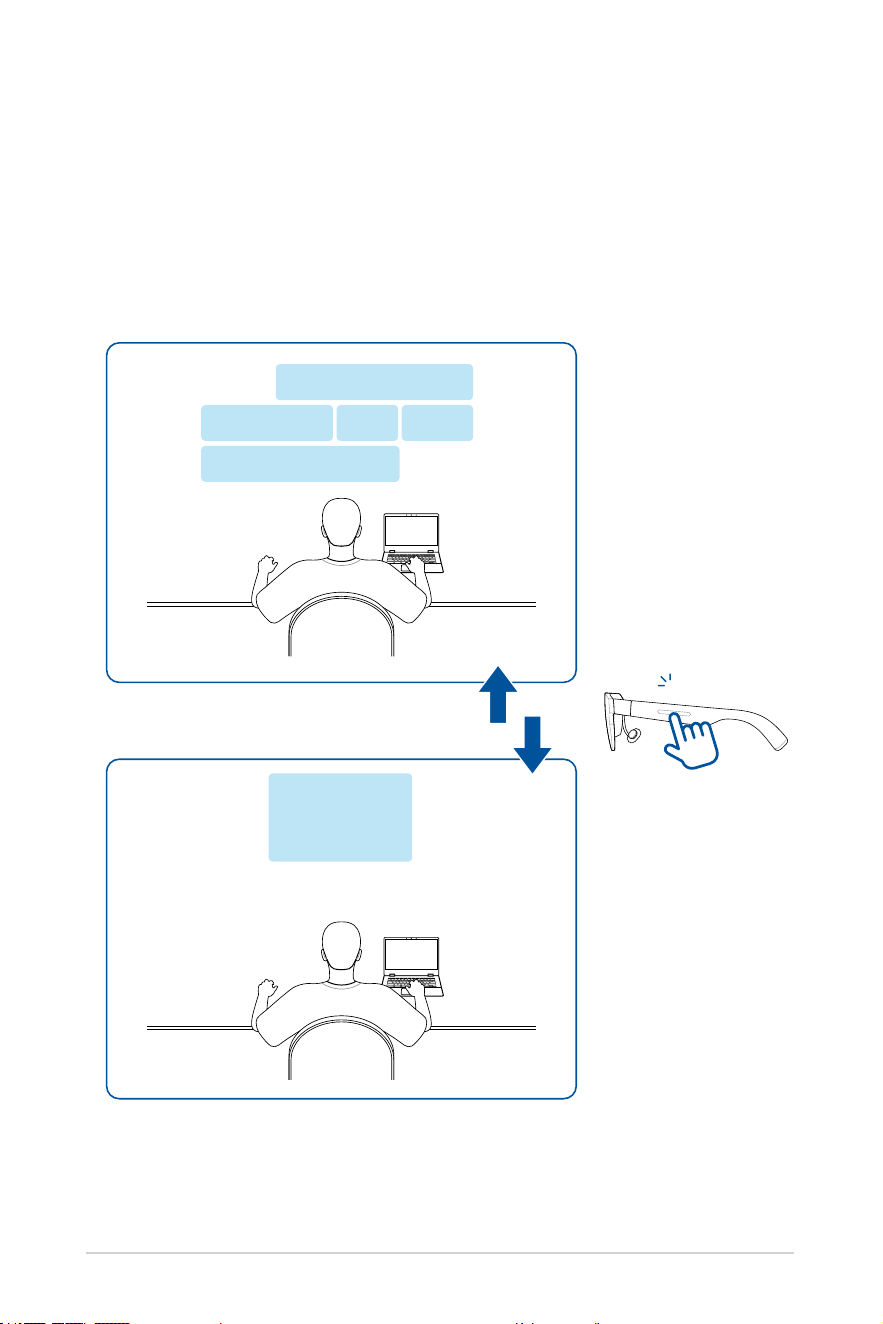
Understanding viewing modes
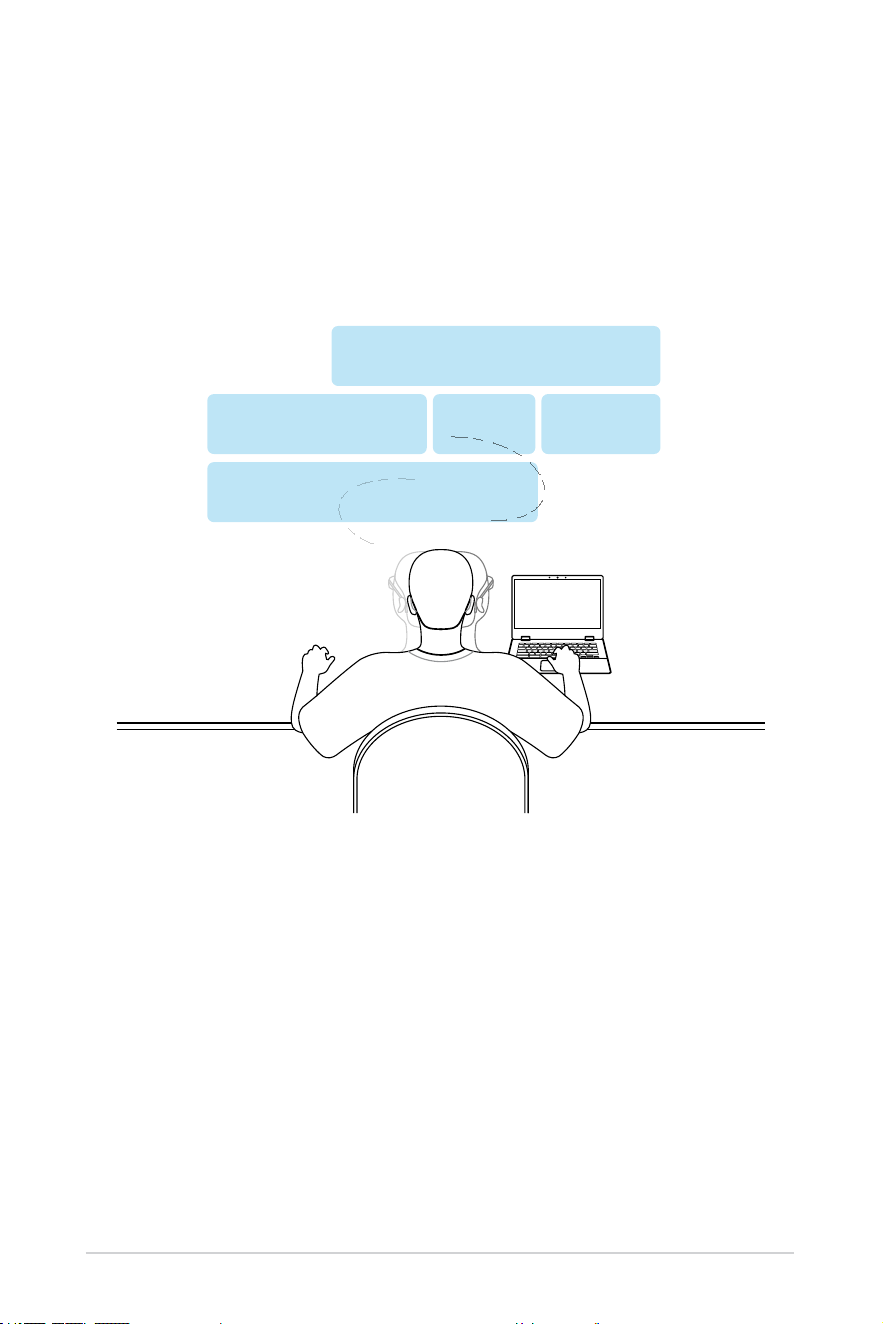
Positioning (multi-screen) mode
In positioning mode, the virtual screens are xed or pinned to a specic
point within your workspace and will not move when you move or look in a
different direction, similar to physical screens.
33
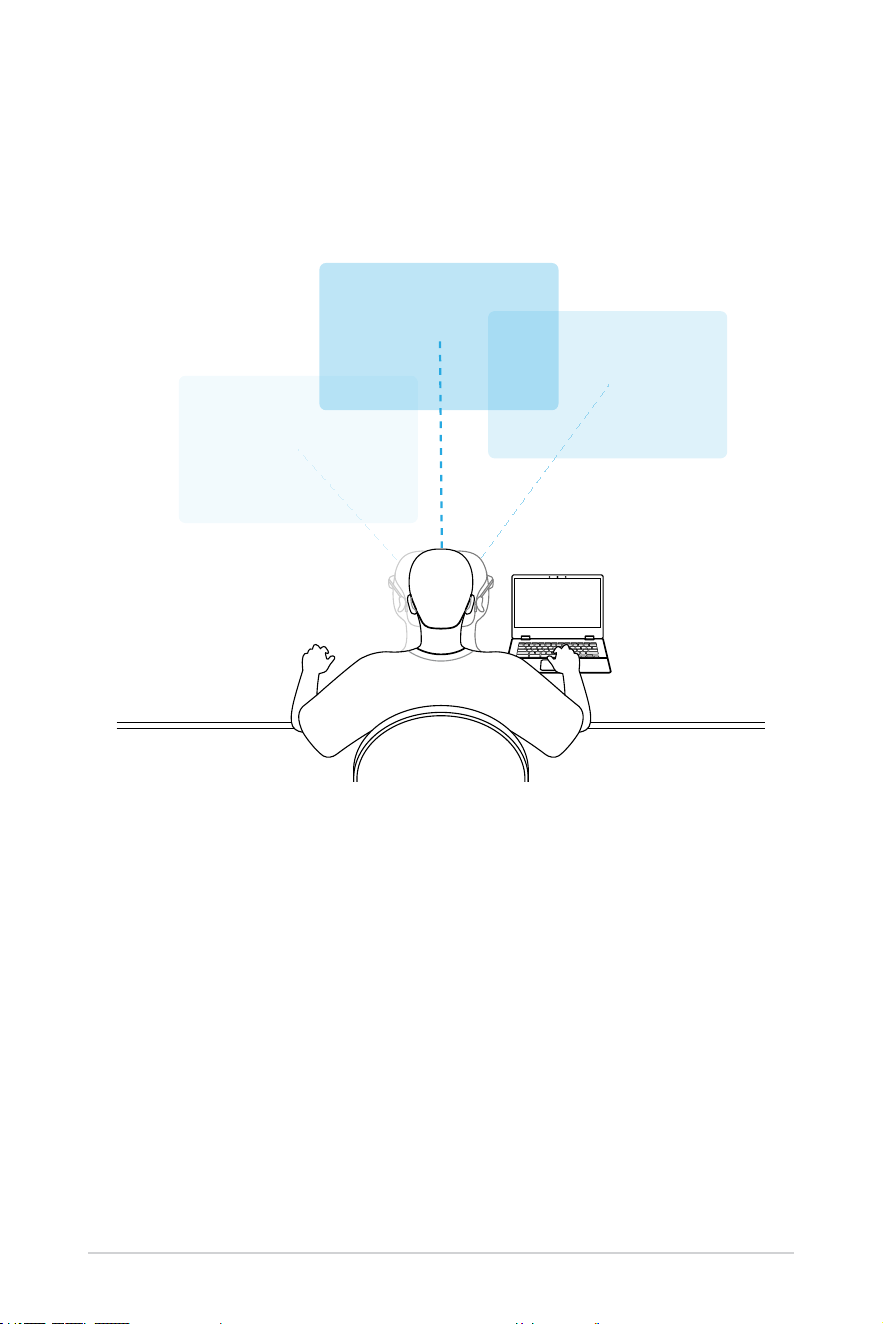
Floating (single-screen) mode
In oating mode, the virtual screen moves with your line of sight. This
means that as you move your head or change your viewing direction, the
screen will move along with it.
34
Switching viewing modes
While in a multi-screen layout, you can quickly and easily switch to a single
screen layout with a one-nger double tap of the touchpad on the left
temple of your glasses. This will bring the screen that is in your line of sight
to the forefront in oating mode. Another one-nger double tap will switch
you back to positioning mode with the multi-screen layout centered in front
of you.
2
35
Using the touchpad with gestures
Using the touchpad, which is located on the left temple of your glasses, you
can modify settings and seamlessly interact with the AirVision app, if it is
installed.
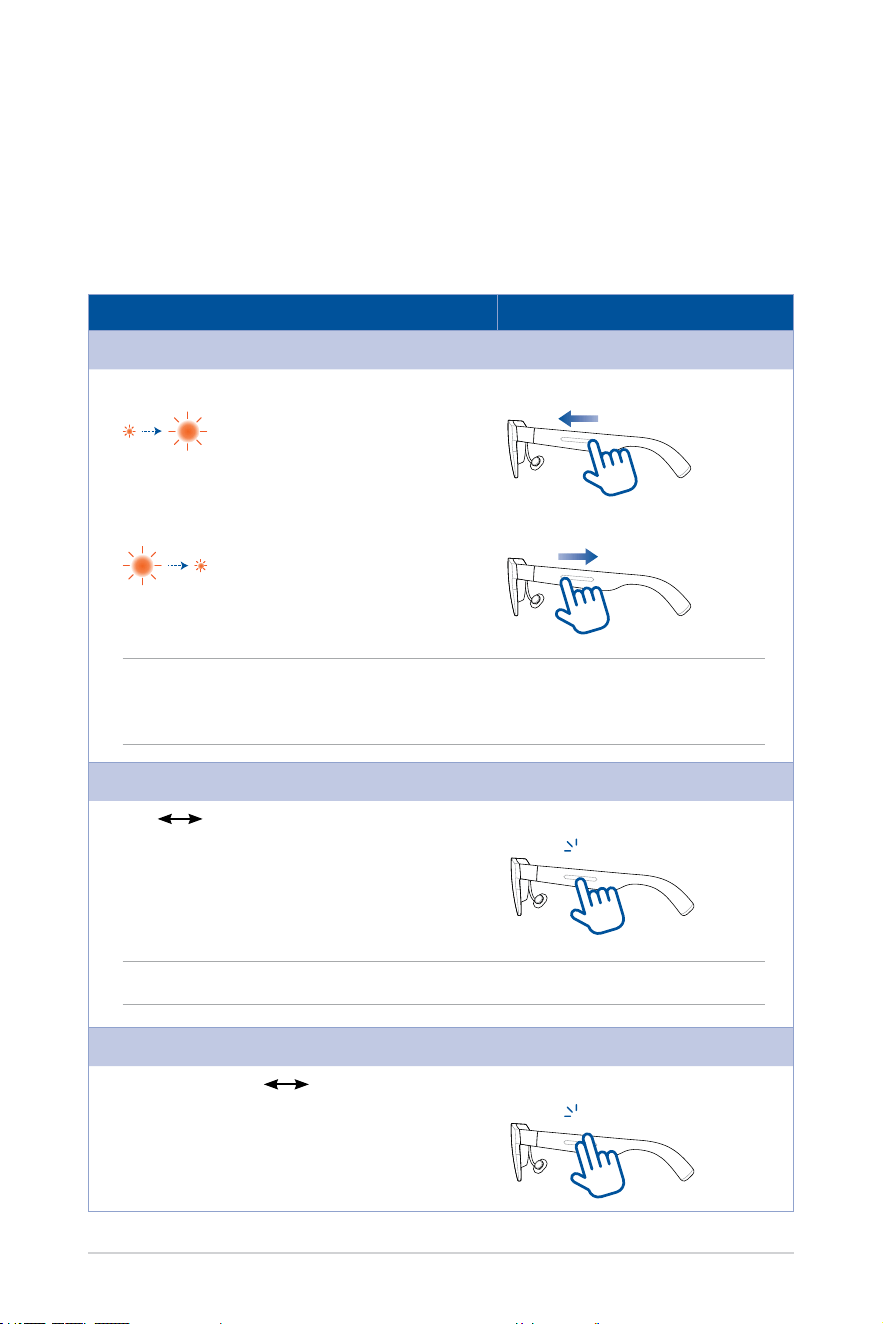
Basic controls and settings
Controls and settings Gesture
Brightness
Increase
One-nger swipe forward
Decrease One-nger swipe backward
NOTE: This gesture only works when the AirVision app is not installed. For host
devices with the AirVision app installed, refer to the Quick brightness adjustment
section for instructions on adjusting brightness.
Audio/Video playback
Play
Pause One-nger tap
1
NOTE: This gesture is only available in oating mode.
Instant transparent
Lowest brightness
Previous setting Two-nger tap
1
36
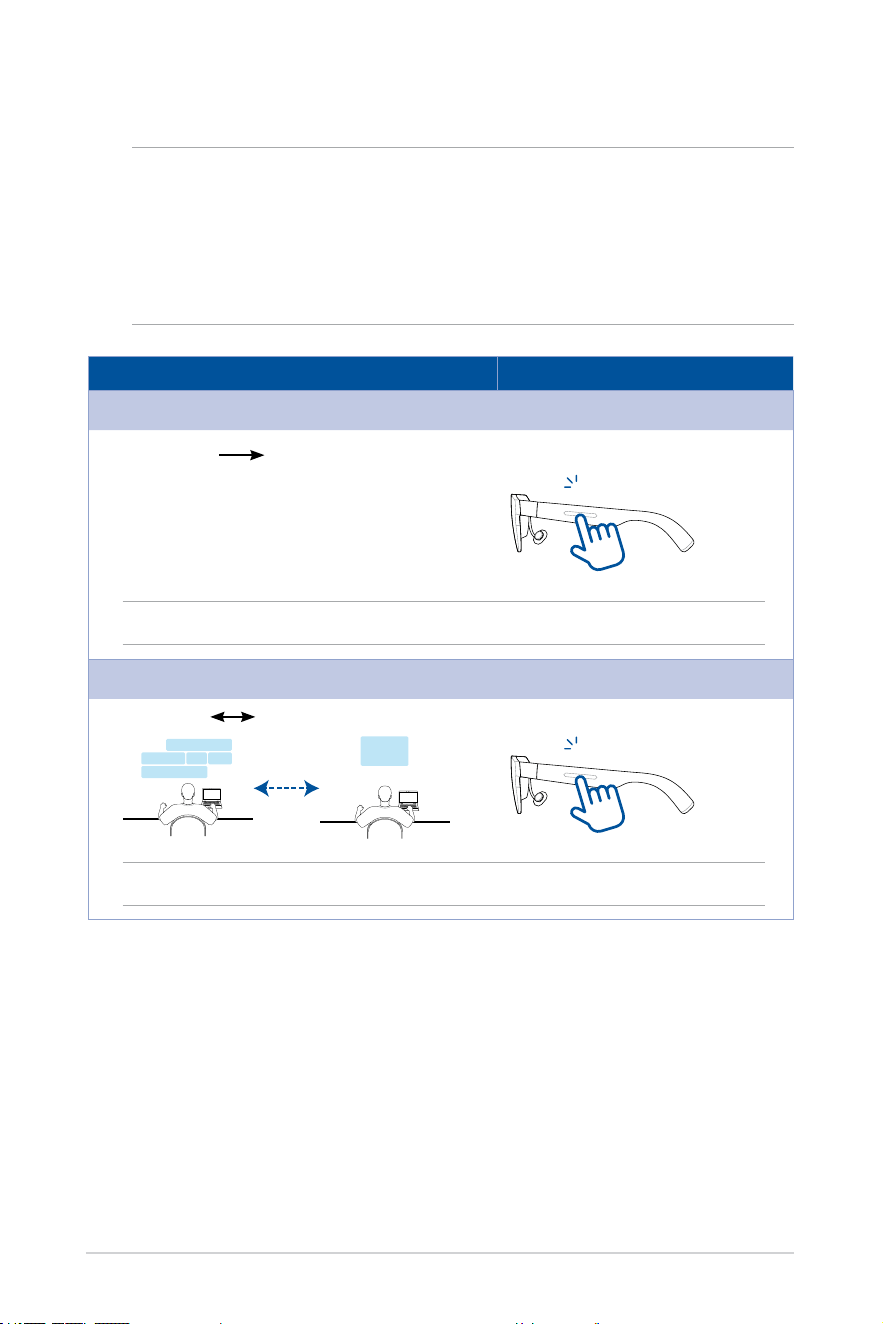
Controls and settings Gesture
Center virtual screens
Off-centered
Centered One-nger tap
1
NOTE: This gesture control applies only to positioning mode.
Switch viewing mode
Positioning
Floating One-nger double tap
2
NOTE: Refer to the Understanding viewing modes section for more information.
Advanced controls and settings
NOTE:
• Advanced controls and settings require the ASUS AirVision app to
be installed on the host device.
• For more information about 3D, oating, and positioning modes,
refer to the Understanding viewing modes section.
37
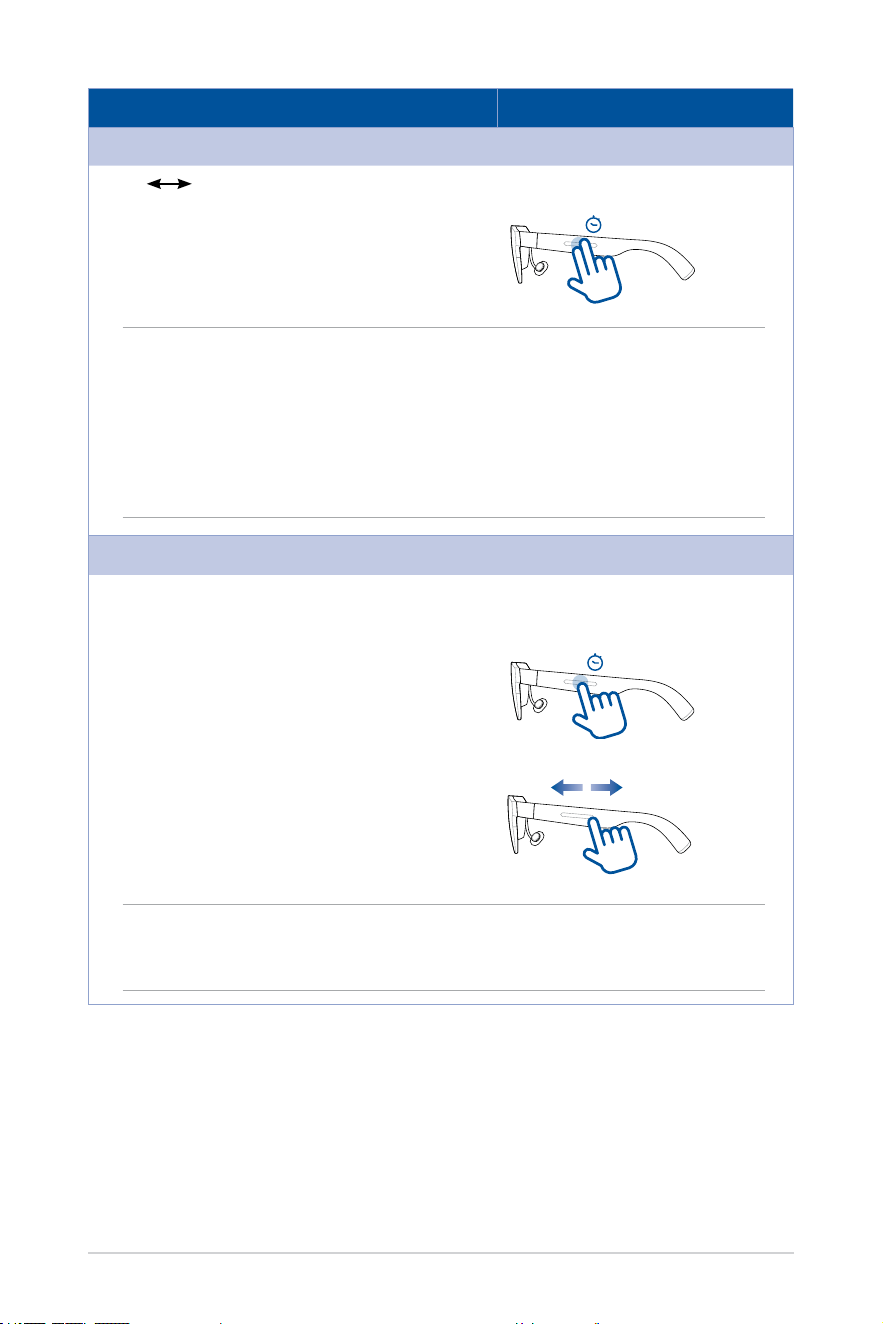
Controls and settings Gesture
3D mode
On
Off Two-nger press and hold for 1.5 s
1.5s
NOTE:
• Before you switch to 3D mode, make sure that the AirVision app is active and you
are not in Light Load mode.
• 3D mode is only available for videos in side-by-side 3D (SBS 3D) format with the
video played in full-screen mode.
• Ensure that the aspect ratio of your virtual screen matches that of the 3D video so
that the 3D video displays as intended.
Shortcut menu to access brightness, volume, and distance settings
Open shortcut menu One-nger press and hold for 1.5 s,
then slide forward or backward
1.5s
NOTE: Refer to the Quick brightness adjustment, Quick volume adjustment, and Quick
distance adjustment sections for step-by-step instructions to adjust these frequently-
used settings.

38
Using the ASUS AirVision app
With the ASUS AirVision app installed on your computer, you can set up
multiple virtual screens and place content on them just like you would with
multiple physical displays on the desk in your home oce. You will have
wide-ranging options for how to set up each of these virtual screens.
NOTE: The number of virtual screens that can be supported will
depend on your computer’s CPU and GPU resources.
Accessing ASUS AirVision
1. From the Start menu on your computer’s desktop, click All apps >
ASUS_AirVision.
2. Click Yes on the conrmation pop-up window to load the app.
3. Once ASUS AirVision is loaded, you should see the ASUS AirVision
oating widget icon
on your desktop.
4. Click
to open the ASUS AirVision widget panel that allows you to
access information and settings related to your glasses.
39
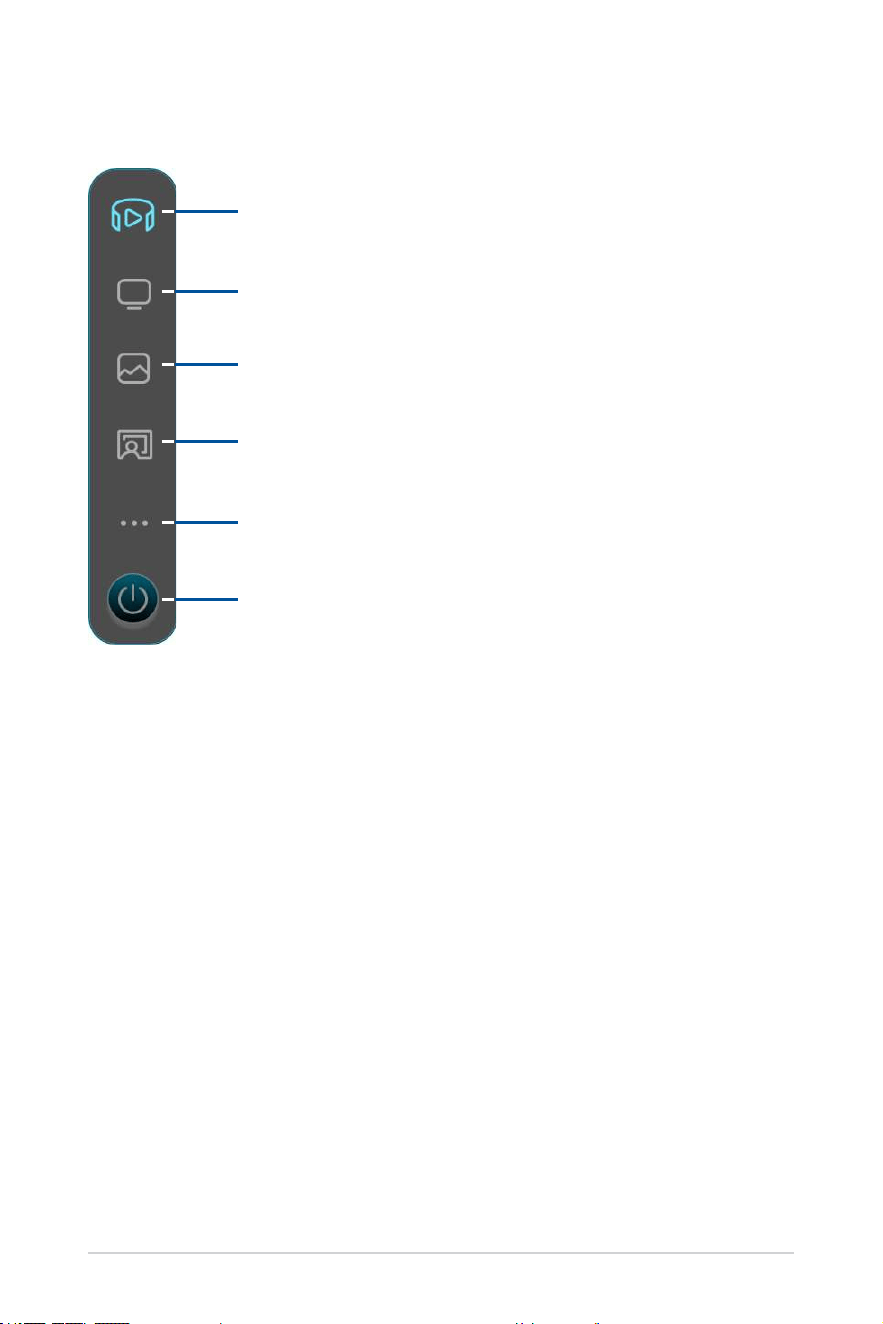
Device Info
Virtual Screen Setting
Display Settings
Distance Settings
More
Close Application
ASUS AirVision widget panel
40
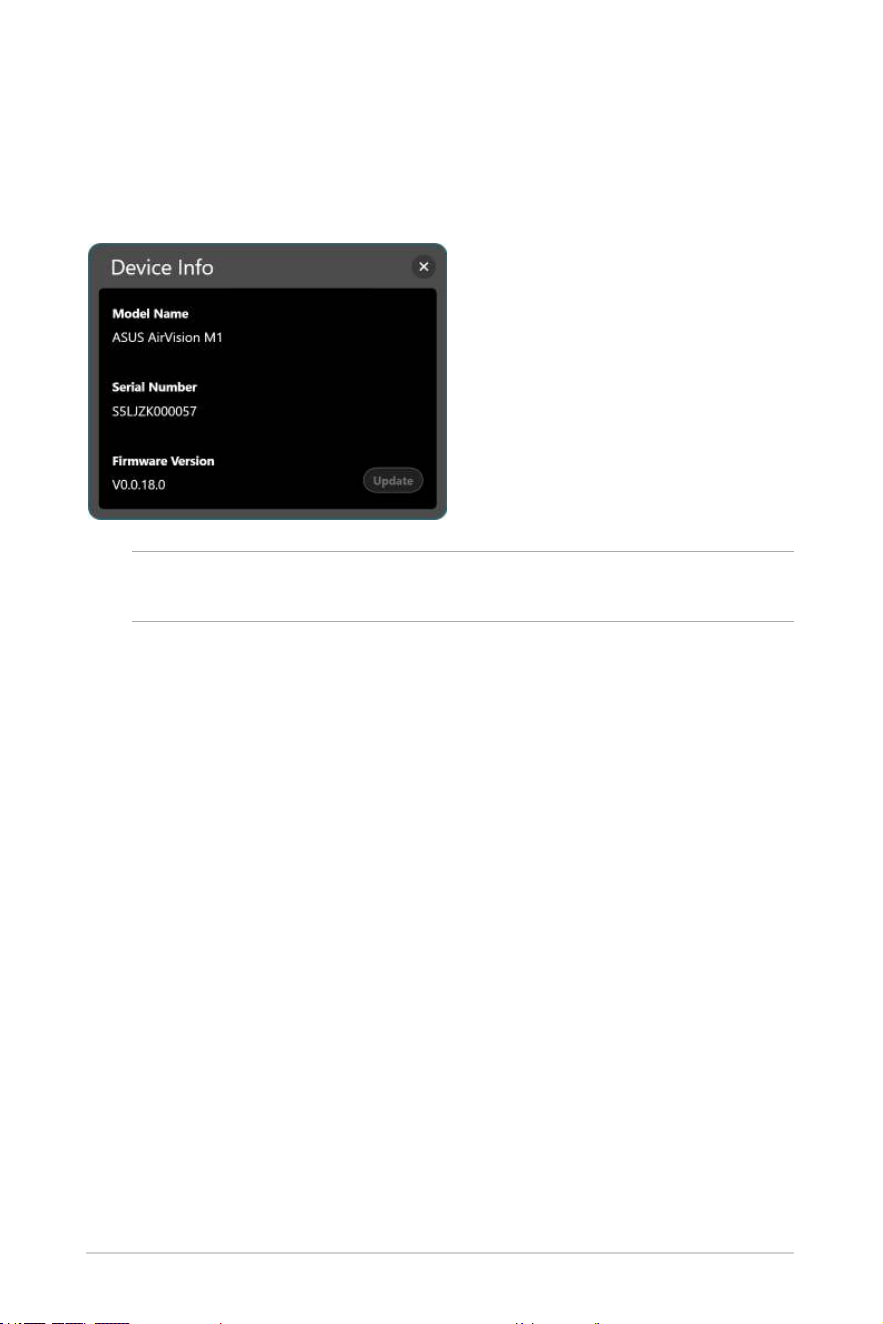
Device Info
Use this menu to access information on your glasses, including the serial
number and the current rmware version installed, and to update the
rmware for your glasses.
NOTE: If the latest rmware is already installed, the Update button will
not be available.
41
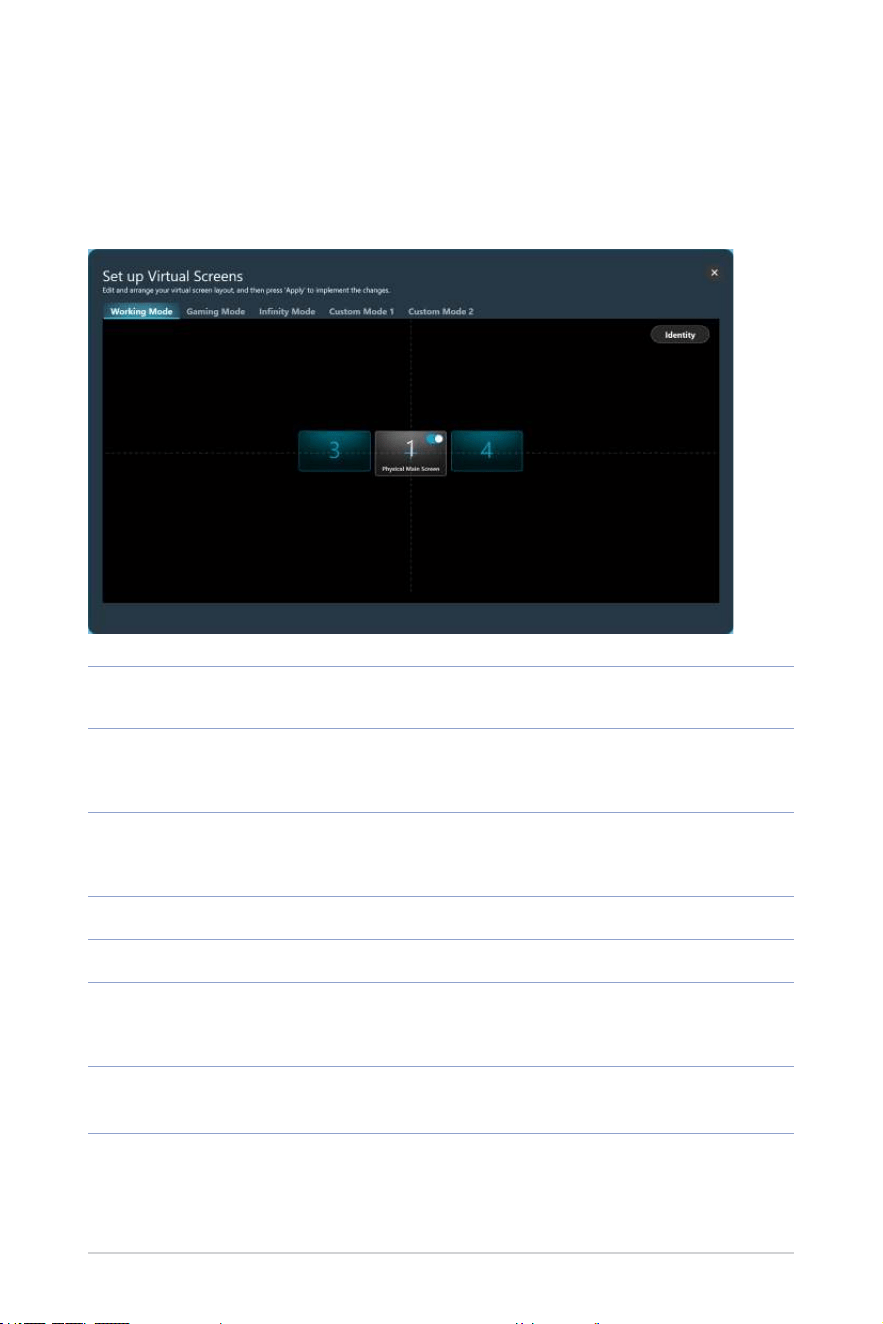
Virtual Screen Setting
Use this menu to select one of the preset layouts to quickly start using your
glasses with a multi-screen layout or create and save your own multi-screen
layout to maximize your productivity.
Working Mode
Select this mode to add two standard virtual screens, one on
each side of the main display, while you work.
Gaming Mode
Select this mode for gaming as it provides three aspect ratio
options – 21:9, 32:9, and 48:9 – to accommodate a wide range
of game genres.
Innity Mode
Select this mode when you have need a large digital whiteboard
for online collaboration or a spacious canvas for your creative
outlet.
Custom Mode 1
Select to create and save a custom layout tailored to your needs.
Custom Mode 2
Select to create and save a second custom layout.
Identify
Click this button to display the assigned number for each virtual
screen. The assigned number is shown in the lower left corner
and corresponds to the number displayed on the layout.
Physical Main
Screen
Use this switch to show or hide the virtual screen that
corresponds to the physical main screen.

42
NOTE: For instructions on personalizing your multi-screen layout,
refer to the Personalizing your multi-screen layout section or go to
the AirVision widget panel > More > Tutorials to view the on-screen
tutorials.
43
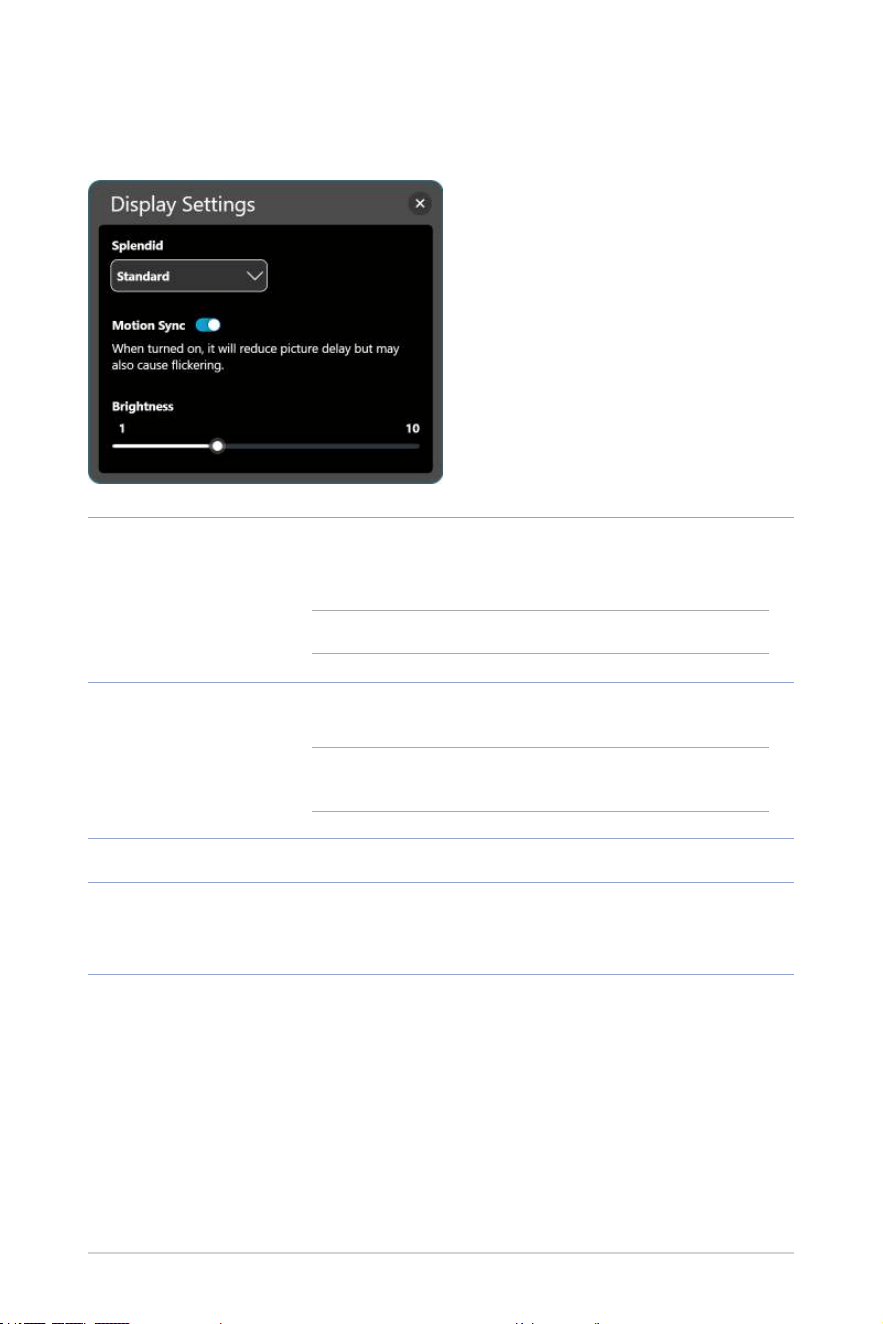
Display Settings
Use this menu to set your preferences for the virtual screens.
Splendid
Choose a preset picture mode that optimizes your viewing
experience for the current environment and activity.
Available options: Standard, Theater, Oce, Game, and Eye Care.
NOTE: Choose Eye Care mode to reduce blue light emission.
Motion Sync
Turn on this option for smooth transitions as you navigate your
virtual workspace.
NOTE: Expect the screen to dim slightly when you turn on
Motion Sync.
Brightness
Drag the slider to adjust the brightness of the virtual screen(s).
Blue Light Filter
(only available in Eye
Care mode)
Drag the slider to adjust the blue light lter level. The higher the
level, the more blue light emission is reduced.
44
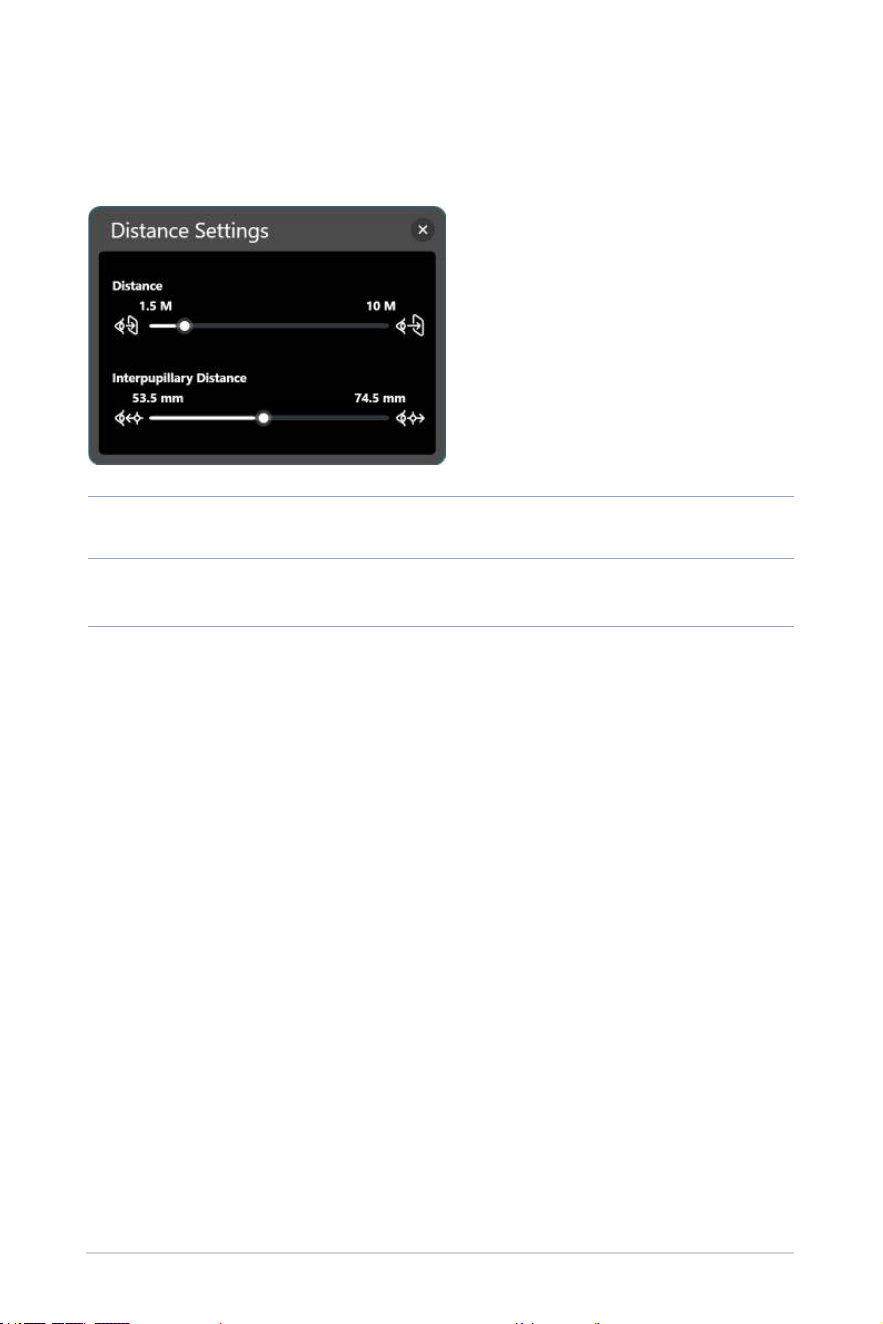
Distance Settings
Use this menu to digitally adjust your glasses’ interpupillary distance and
the virtual screen’s projection distance.
Distance
Drag the slider to set the distance at which you want the virtual
screen(s) to appear in front of you.
Interpupillary
Distance
Drag the slider to adjust the image alignment for each eye to
match your interpupillary distance for best image clarity.
45
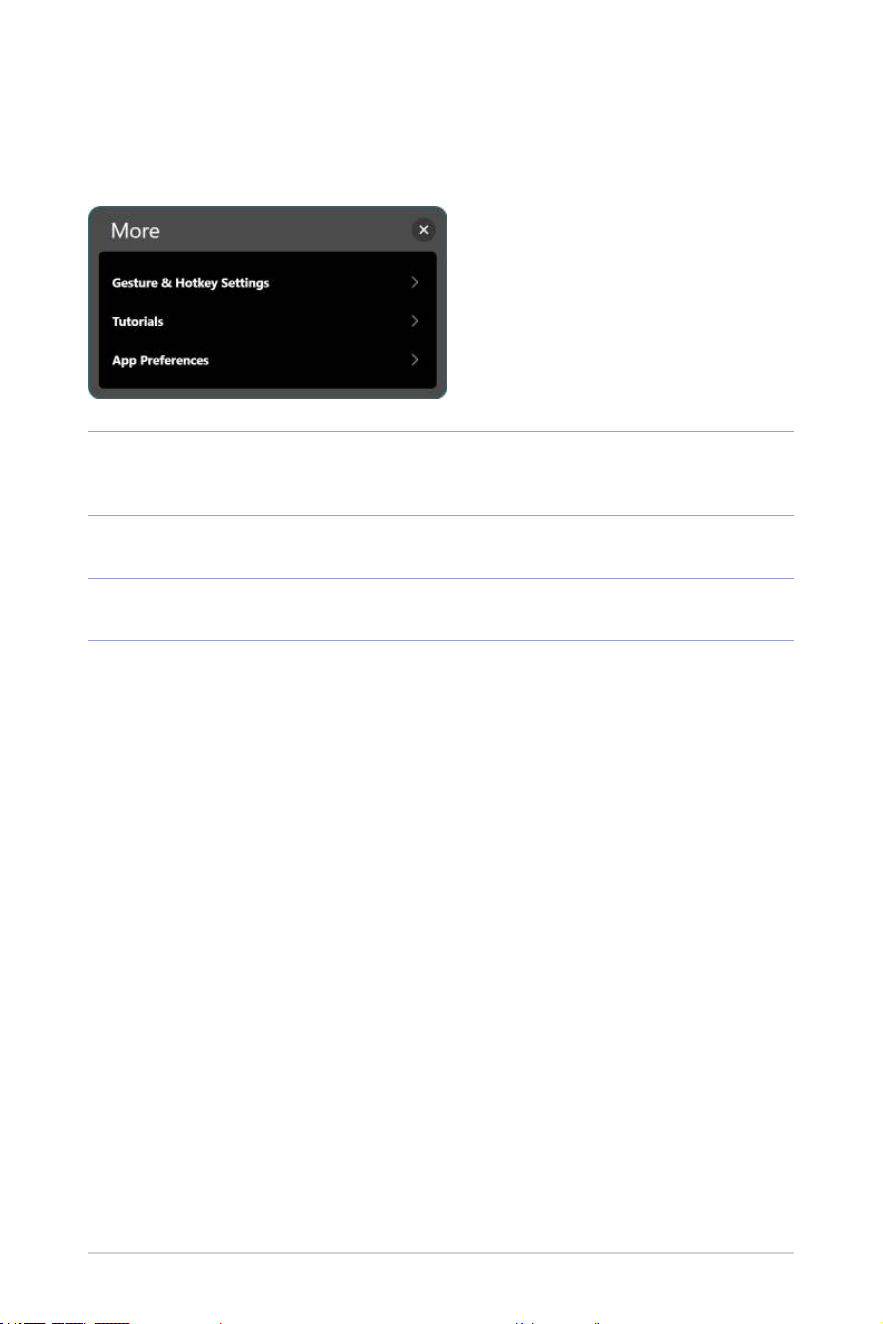
More
The More menu allows you to view gesture control settings, customize
hotkey settings, as well as set your app preferences.
Gesture & Hotkey
Settings
Select this option for a summary of gestures that you can use on
the touchpad to control and navigate the virtual screens and also
to assign your own hotkeys for certain settings.
Tutorials
Click this option to view short tutorials that show you how to use
gestures to control the various features of your glasses.
App Preferences
Click this option to access a menu that allows you to personalize
your app experience.
46
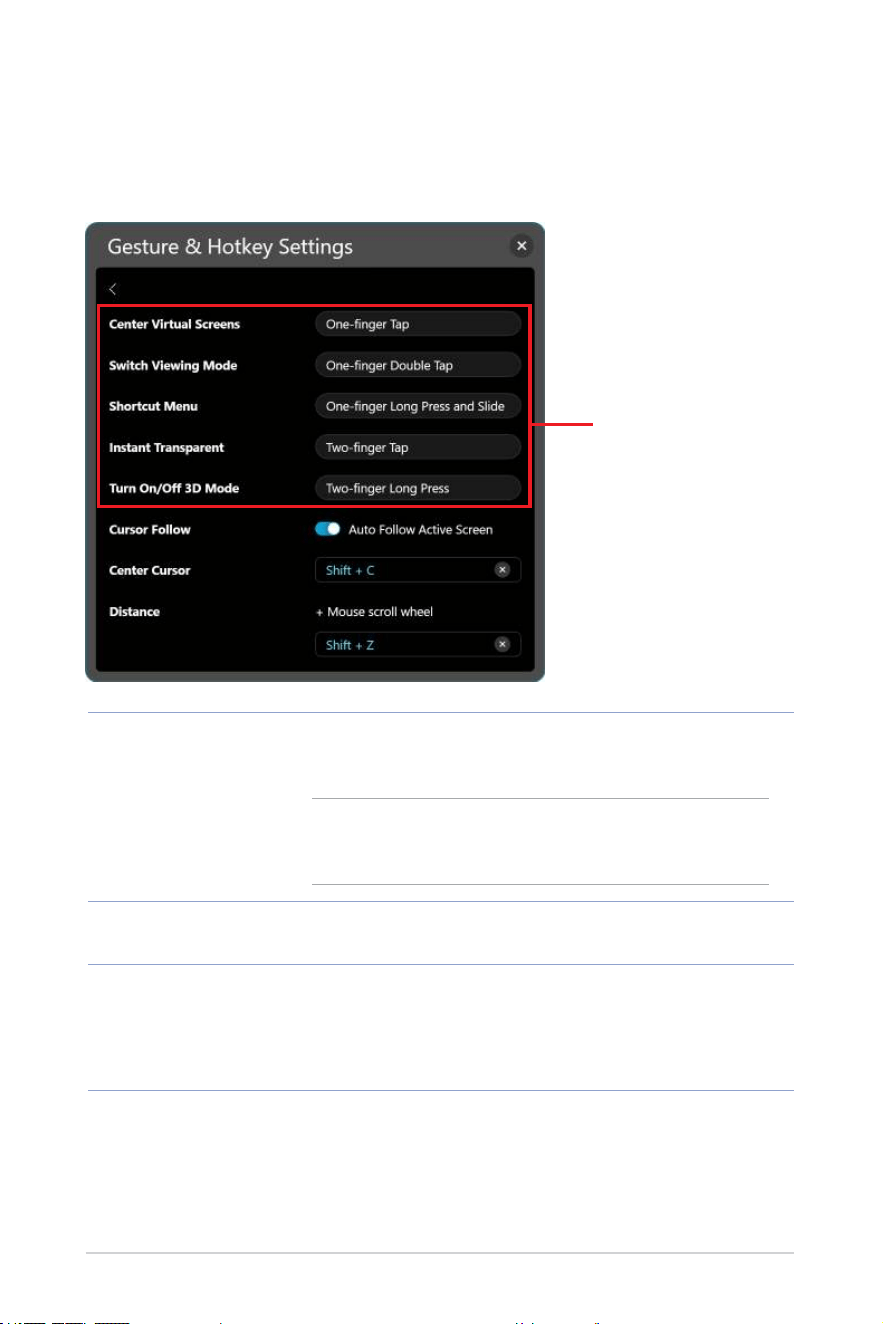
Gesture & Hotkey Settings
This menu summarizes the gestures that you can use on the touchpad to
control and navigate the virtual screens and also allows you to assign your
own hotkeys for certain settings.
Cursor Follow
Turn on Auto Follow Active Screen to allow the cursor to
automatically follow and appear on the screen that is in your line
of sight.
NOTE: You can assign your own keyboard shortcut for this
feature. The keyboard shortcut must include either the Shift
or Alt key combined with a letter key.
Center Cursor
Brings the mouse cursor to the center of the virtual screen that is
in your line of sight.
Distance
Allows you to assign your own keyboard shortcut to use in
conjunction with a mouse scroll wheel for adjusting the distance
at which you prefer the virtual screen(s) to appear in front of you.
The keyboard shortcut must include either the Shift or Alt key
combined with a letter key.
Summary of gestures
47
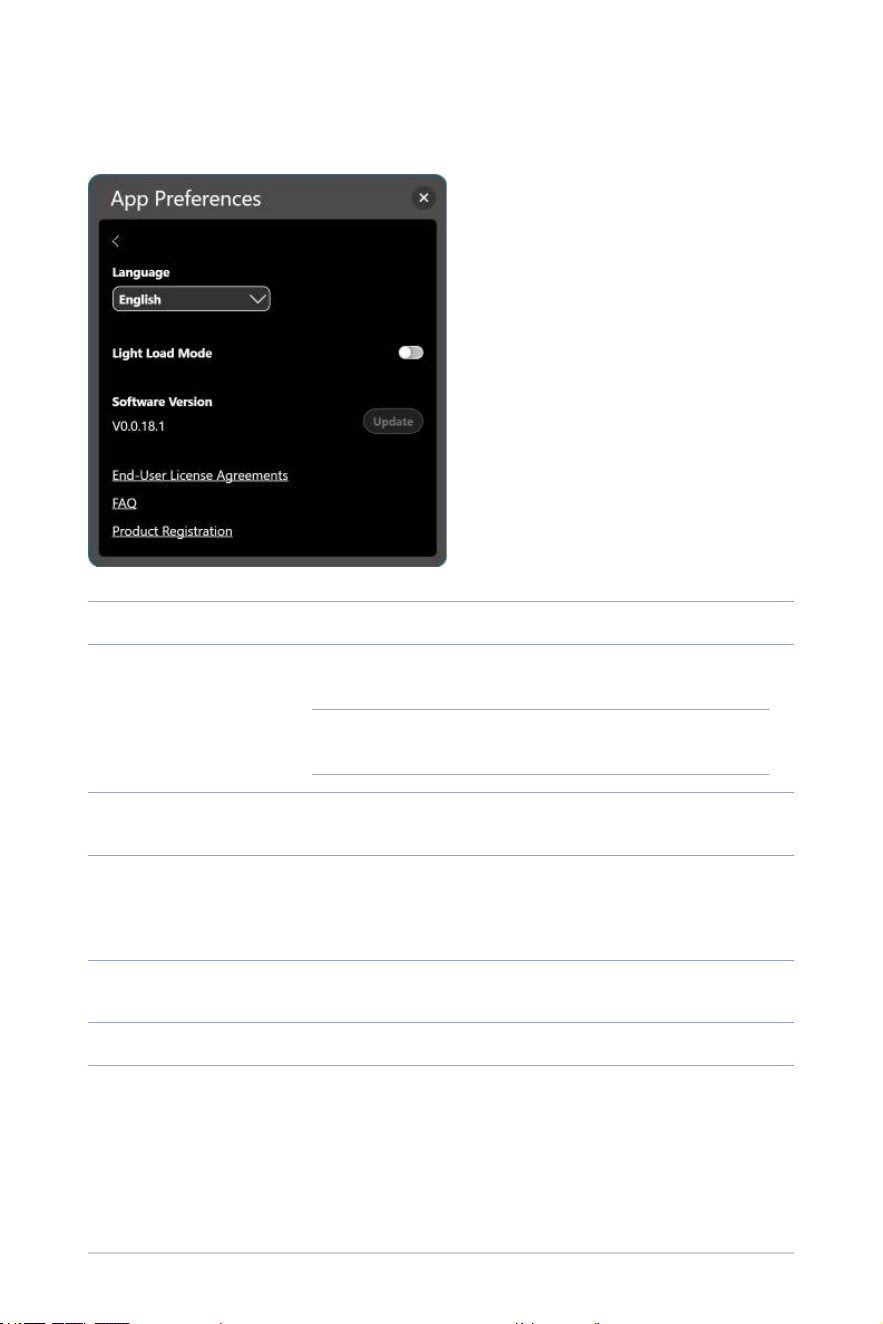
App Preferences
Use this menu to customize your app experience.
Language
Select the language to use for the ASUS AirVision app.
Light Load Mode
Turn on this option to conserve your host device’s energy
consumption.
NOTE: In this mode, interpupillary distance adjustment will
be disabled.
Software Version
Shows the current software version and allows you to update if a
newer version is available.
End-User License
Agreements
Click to bring up the end-user license agreements. Click
Understood if you have fully read, understood, and accept the
terms and conditions of the End-User License Agreements
(EULA).
FAQ
Click to open the FAQ page to nd answers to frequently asked
questions and troubleshoot issues.
Product Registration
Click to open the product registration page.
48
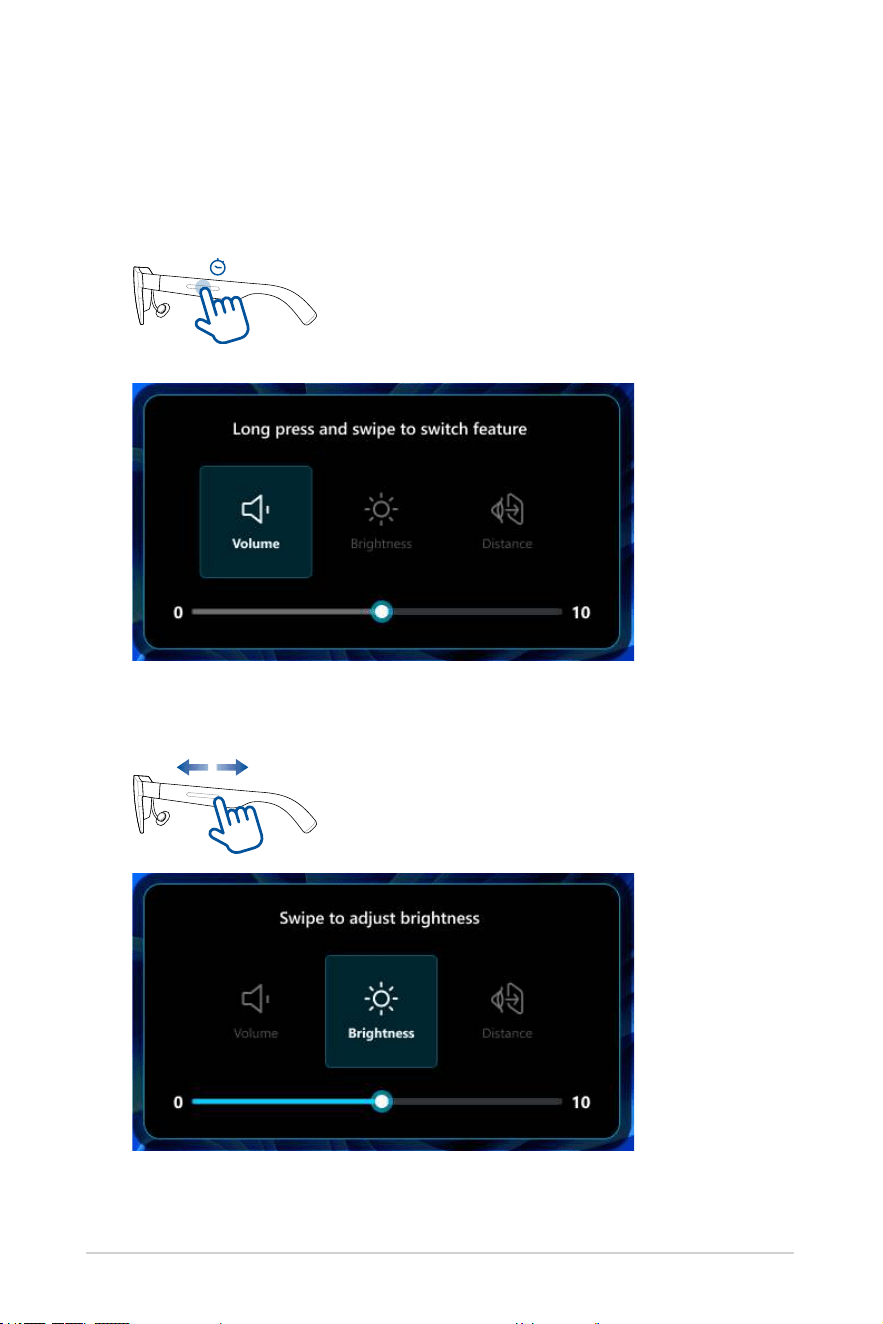
Quick brightness adjustment
You can quickly adjust the brightness using the shortcut menu.
1. One-nger press and hold the touchpad located on the left temple of
your glasses for at least 1.5 s until the shortcut menu opens.
1.5s
2. Keep your nger on the touchpad and slide it forward or backward until
the Brightness option is selected.
49
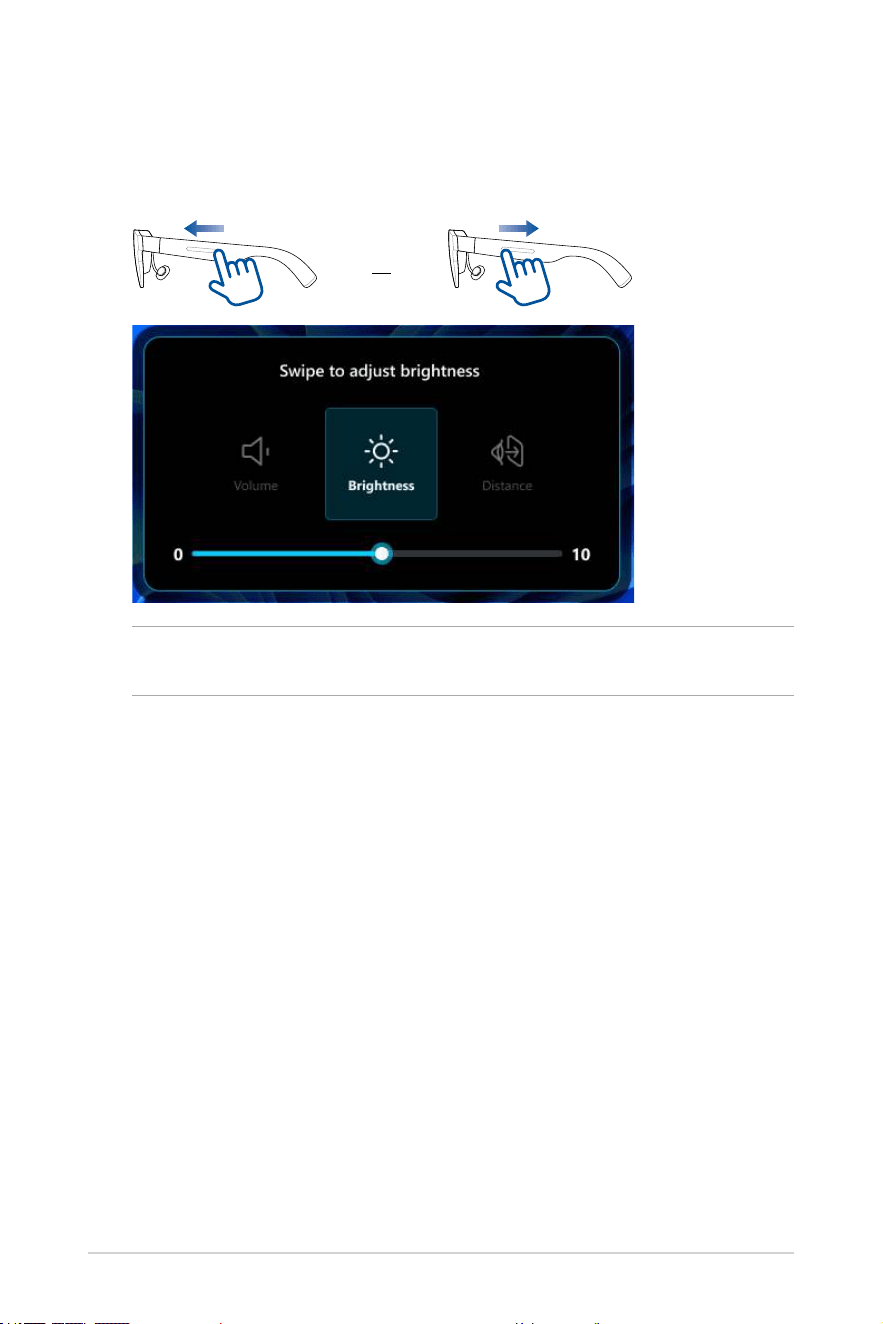
3. Once the Brightness option is selected, release your nger from the
touchpad.
4. Swipe forward with one nger to increase the brightness or swipe
backward to decrease the brightness.
or
NOTE: You can also adjust the brightness from the app’s Display
Settings menu (see the Display Settings section).
50
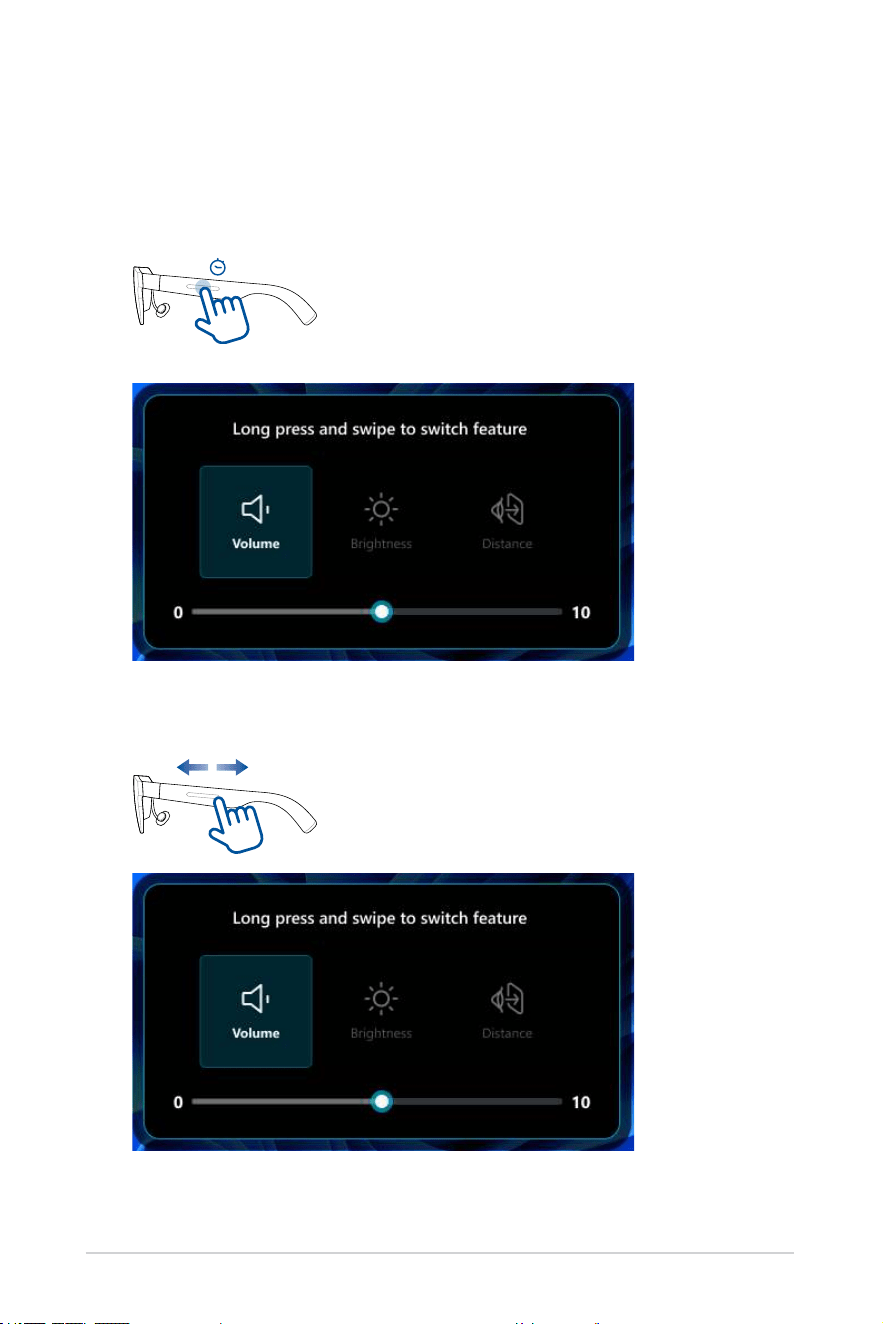
Quick volume adjustment
You can quickly adjust the volume using the shortcut menu.
1. One-nger press and hold the touchpad located on the left temple of
your glasses for at least 1.5 s until the shortcut menu opens.
1.5s
2. Keep your nger on the touchpad and slide it forward or backward until
the Volume option is selected.
51
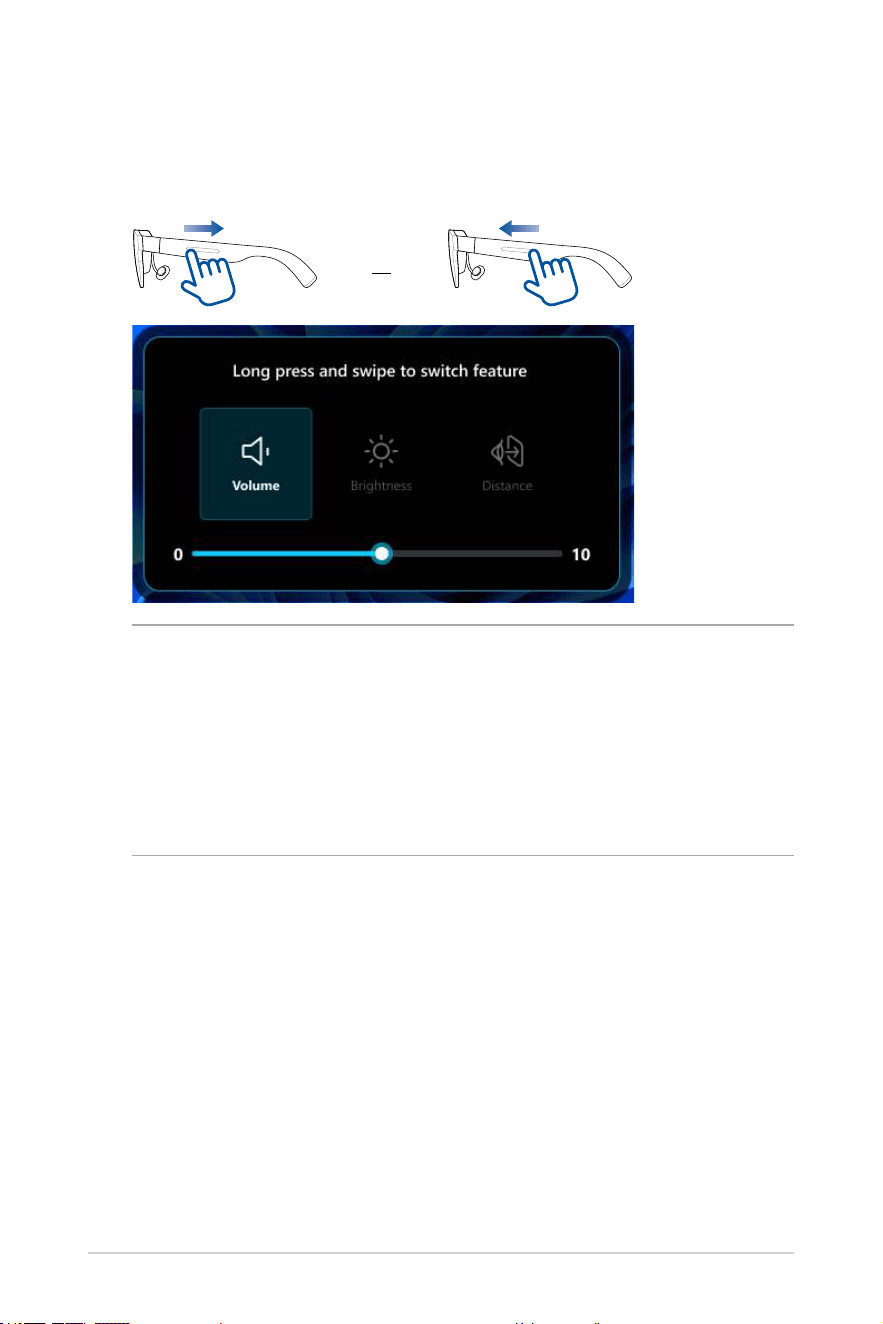
3. Once the Volume option is selected, release your nger from the
touchpad.
4. Swipe backward with one nger to increase the volume or swipe
forward to decrease the volume.
or
NOTE:
• You can also adjust the volume through your host device’s volume
control.
• Due to the design of iPhone 15 and newer models, you may not
be able to adjust the volume when using it with your glasses.
To ensure a better experience, we recommend using Bluetooth
earphones and setting the audio output to earphones.

52
Quick distance adjustment
You can quickly adjust the distance using the shortcut menu.
1. One-nger press and hold the touchpad located on the left temple of
your glasses for at least 1.5 s until the shortcut menu opens.
1.5s
2. Keep your nger on the touchpad and slide it forward or backward until
the Distance option is selected.
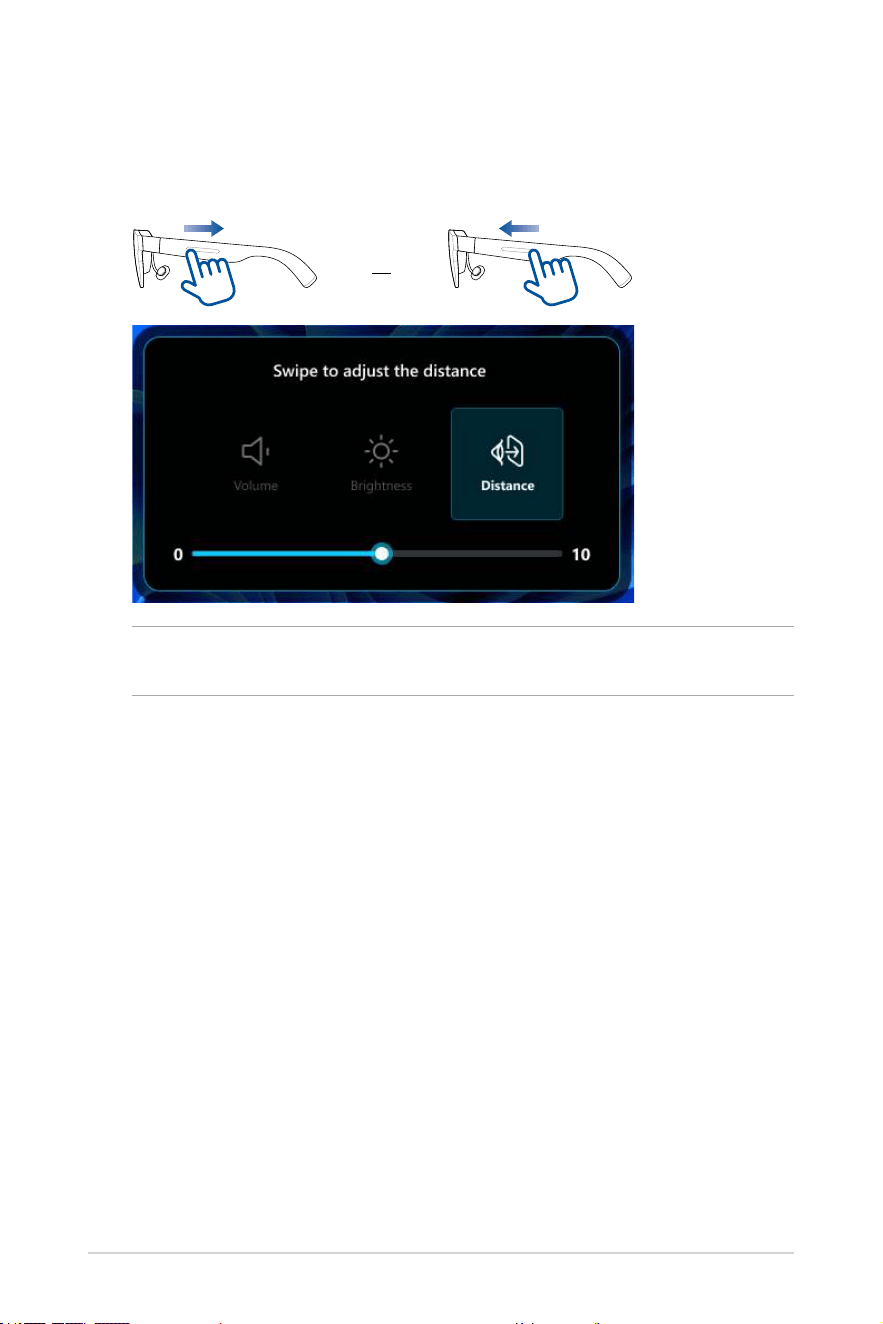
53
3. Once the Distance option is selected, release your nger from the
touchpad.
4. Swipe backward with one nger to increase the distance or swipe
forward to decrease the distance.
or
NOTE: You can also adjust the distance from the app’s Distance
Settings menu (see the Distance Settings section).

54
Working with multi-screens
Once you have selected a multi-screen layout, you can start moving active
windows from your main physical screen to each virtual screen, similar
to how you would move windows across multiple physical displays when
using the Extend mode in Microsoft Windows.
Moving windows to virtual screens
1. Click and hold the title bar of the window that you want to move from
your physical main screen.
2. Drag it to the edge of the physical main screen toward your target
virtual screen.
3. Flick the window over the edge, and it will appear on the target virtual
screen.
4. Release your mouse button to complete the move.
5. Repeat steps 1 to 4 for any other windows that you want to move.
NOTE: To move a window back to the physical main screen, drag it
back in the opposite direction.
55
Personalizing your multi-screen layout
If the three preset virtual screen layouts (Working Mode, Gaming Mode, and
Innity Mode) do not meet your layout requirements, you can personalize
your multi-screen layout by adding and rearranging the virtual screens.
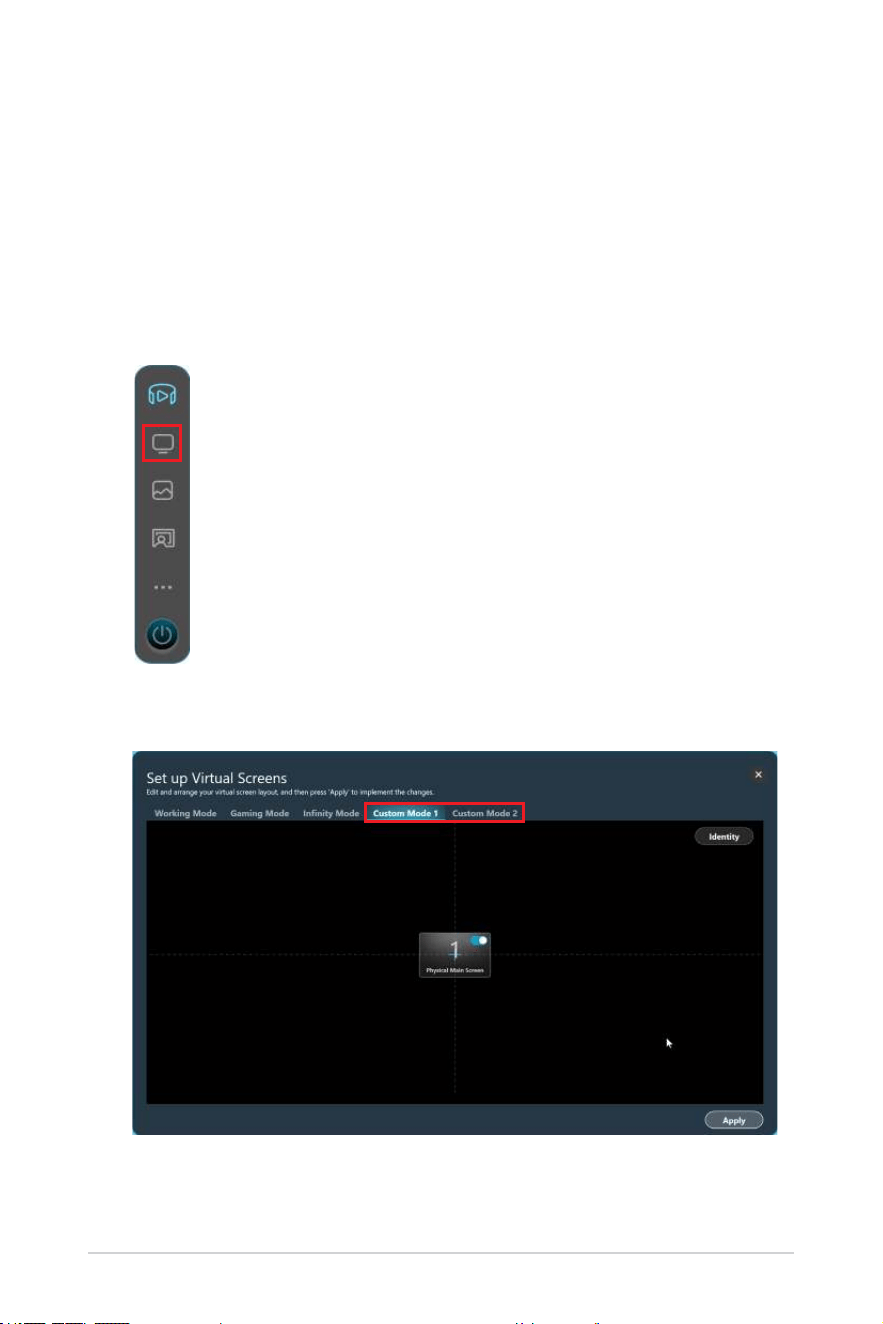
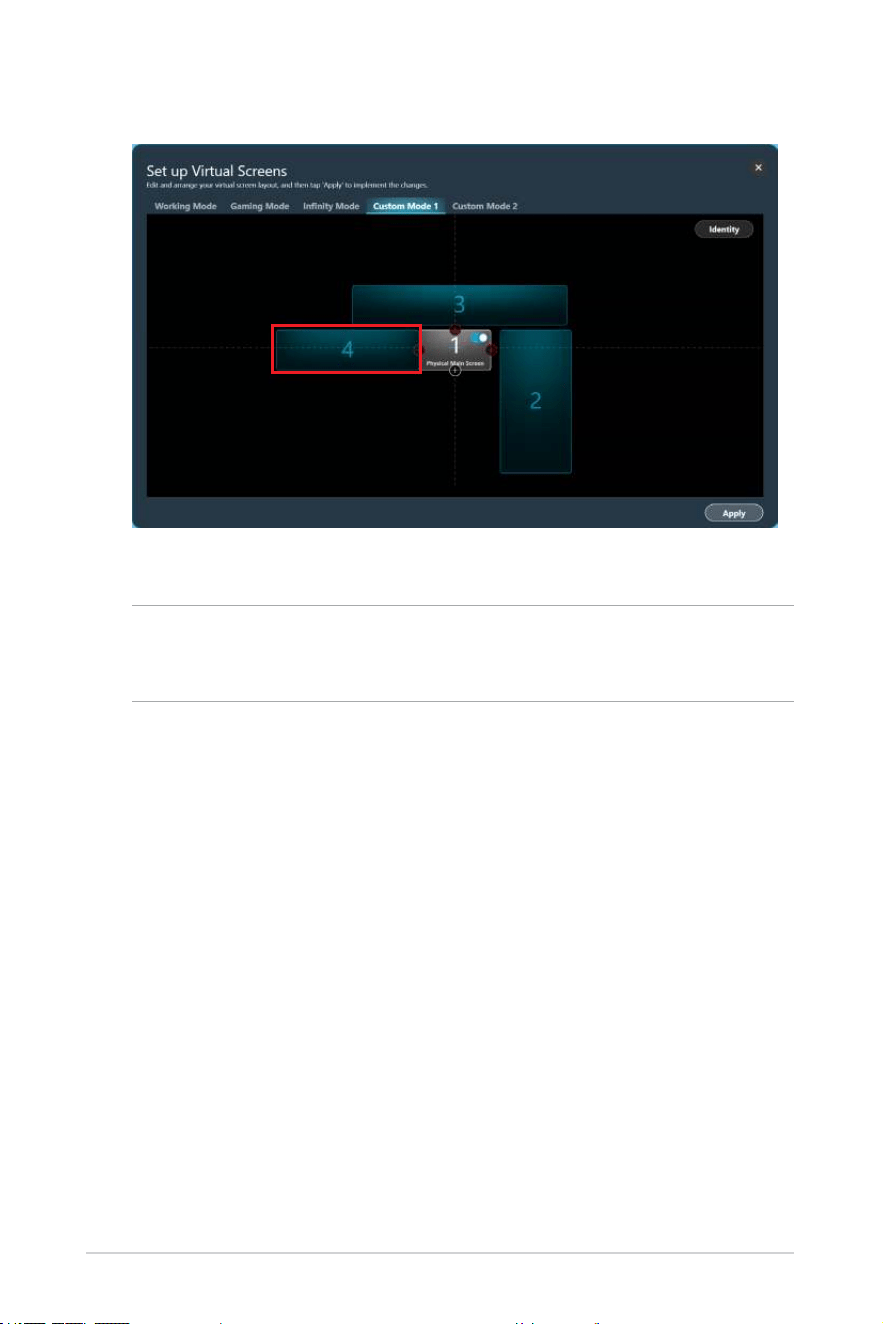
Adding virtual screens
1. Click Virtual Screen Setting on the AirVision widget panel.
2. Click the Custom Mode 1 or Custom Mode 2 tab.
56
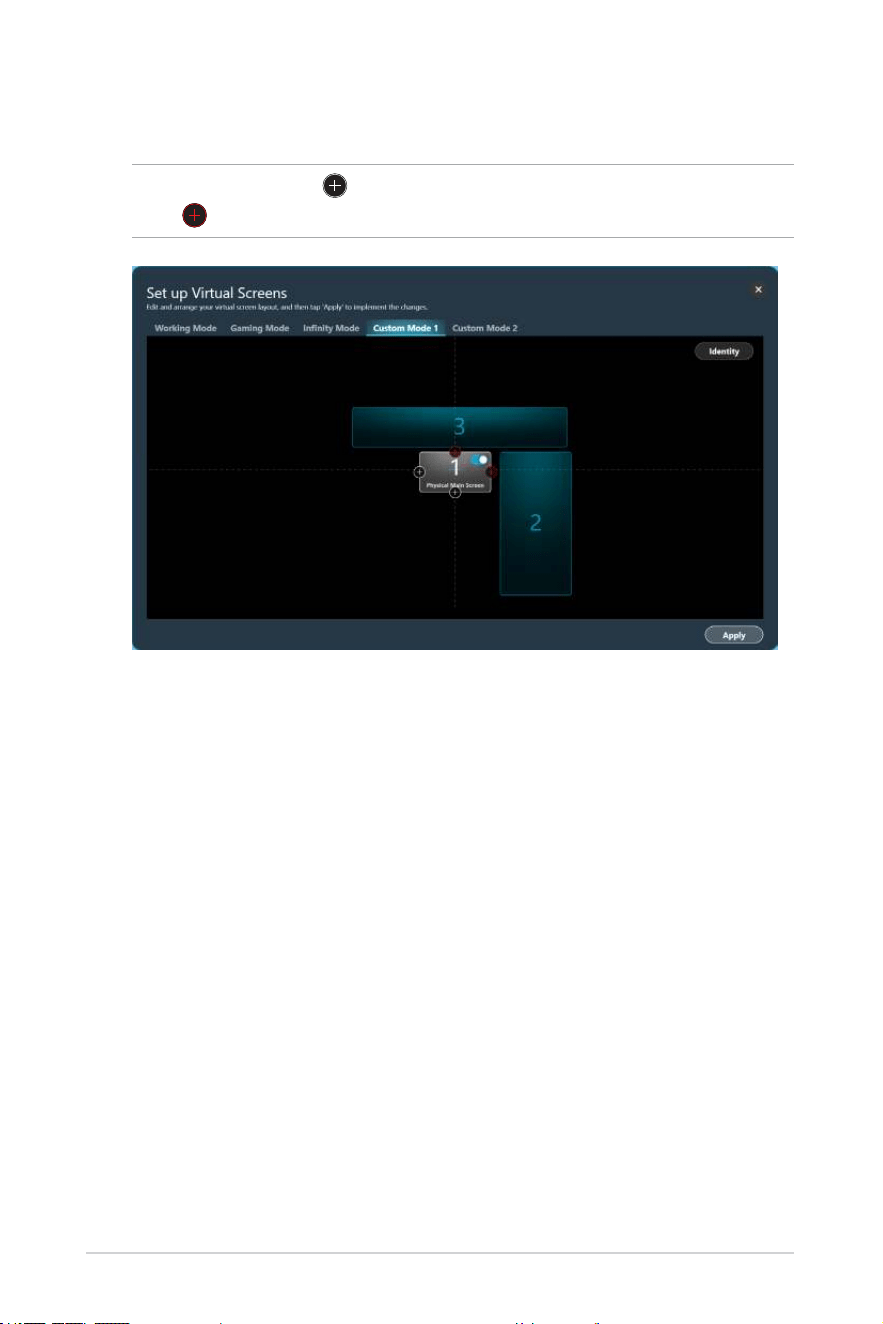
3. Hover over the screen to which you want to add an adjacent virtual
screen.
NOTE: You will see
indicating where you can add a virtual screen
and
indicating where a virtual screen already exists.
57
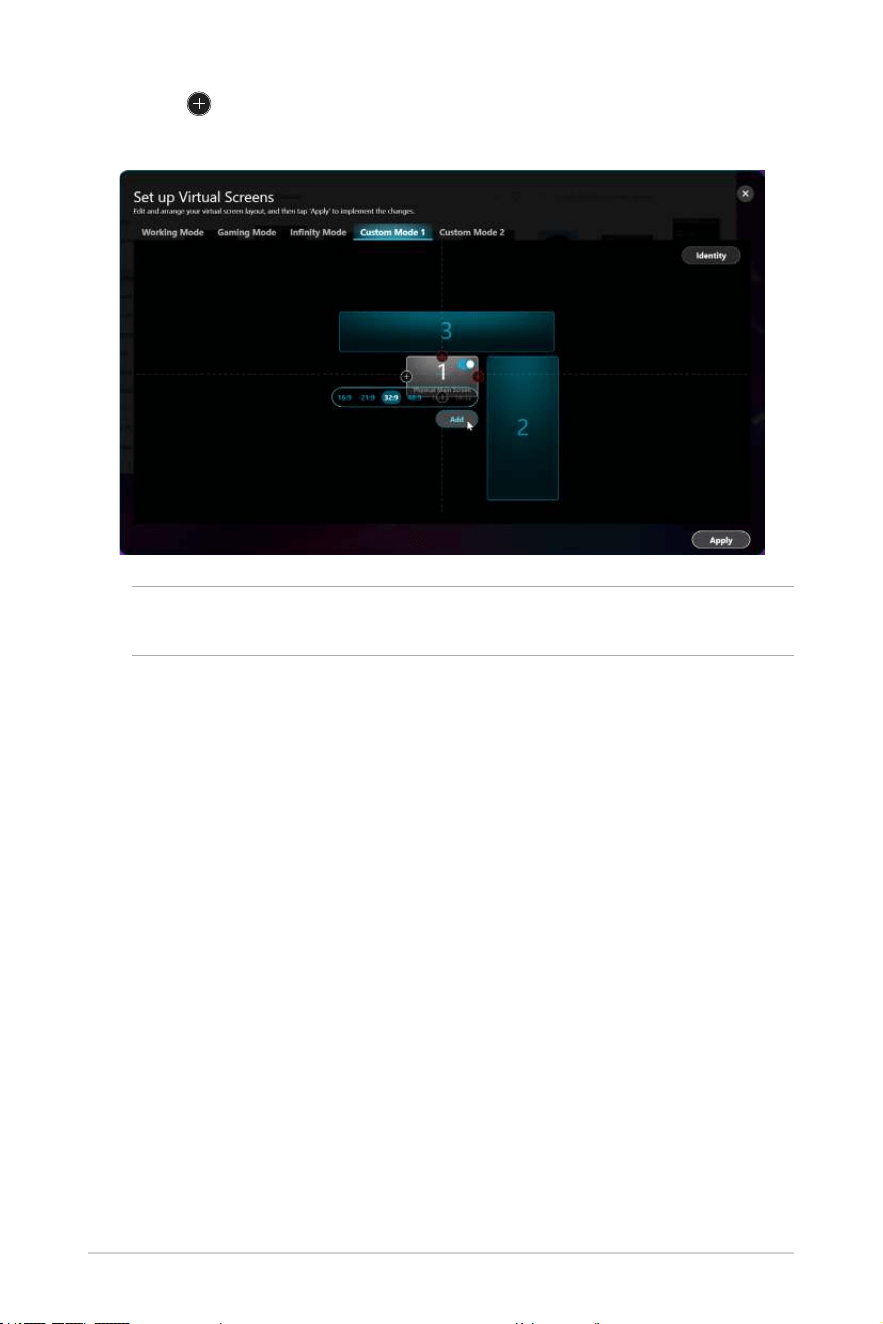
4. Click on the edge you want the virtual screen to be added, select
your desired aspect ratio for that new screen, and click Add.
NOTE: Aspect ratios that are grayed out are not supported by your
host device.
58
5. The new virtual screen will appear in the layout.
6. To add another screen, repeat steps 3 to 5.
NOTE: The maximum number of virtual screens that can be supported
will depend on your system’s hardware specications and operating
system version.
7. When you are satised with the layout, click Apply to conrm the
changes.
59
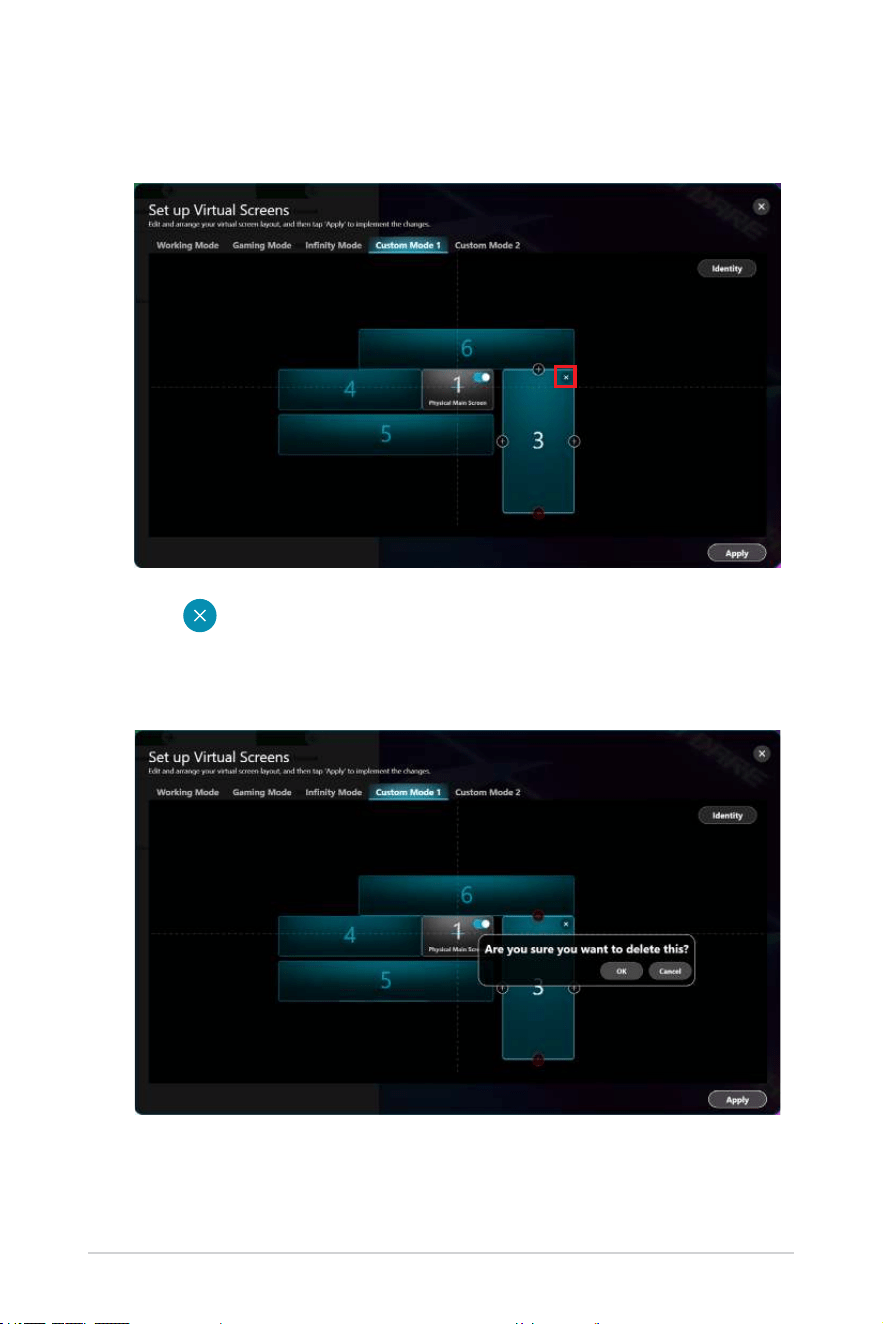
Deleting virtual screens
1. Click the virtual screen you want to remove from your layout.
2. Click in the upper-right corner to remove the virtual screen.
3. Click OK to conrm that you want to delete the virtual screen or Cancel
to keep it.

60
Rearranging your multi-screen layout
1. Follow steps 1 to 6 in the Adding virtual screens section.
2. Click and drag the virtual screen to where you want on the layout.
3. Do this with all the virtual screens that you want to move.
4. When you are satised with the layout, click Apply.

61
Appendix
Appendix

62
Regulatory Notices
Federal Communications Commission Statement
This device complies with part 15 of the FCC Rules. Operation is subject
to the following two conditions: (1) This device may not cause harmful
interference, and (2) this device must accept any interference received,
including interference that may cause undesired operation.
NOTE: This equipment has been tested and found to comply with the limits
for a Class B digital device, pursuant to part 15 of the FCC Rules. These
limits are designed to provide reasonable protection against harmful
interference in a residential installation. This equipment generates, uses
and can radiate radio frequency energy and, if not installed and used in
accordance with the instructions, may cause harmful interference to radio
communications.
Simplied EU Declaration of Conformity
ASUSTek Computer Inc. hereby declares that this device is in compliance
with the essential requirements and other relevant provisions of Directive
2014/53/EU. Full text of EU declaration of conformity is available at
https://www.asus.com/support.
Simplied UKCA Declaration of Conformity
ASUSTek Computer Inc. hereby declares that this device is in compliance
with the essential requirements and other relevant provisions of The Radio
Equipment Regulations 2017 (S.I. 2017/1206). Full text of UKCA declaration
of conformity is available at https://www.asus.com/support/.

63
ASUS Recycling/Takeback Services
ASUS recycling and takeback programs come from our commitment to the
highest standards for protecting our environment. We believe in providing
solutions for you to be able to responsibly recycle our products, batteries,
other components as well as the packaging materials. Please go to
https://esg.asus.com/en/Takeback.htm for detailed recycling information
in different regions.
Global Environmental Regulation Compliance and
Declaration
ASUS follows the green design concept to design and manufacture our
products, and makes sure that each stage of the product life cycle of ASUS
product is in line with global environmental regulations. In addition, ASUS
disclose the relevant information based on regulation requirements.
Please refer to https://esg.asus.com/Compliance.htm for information
disclosure based on regulation requirements ASUS is complied with.
Japan JIS-C-0950 Material Declarations
EU REACH SVHC
Korea RoHS
64
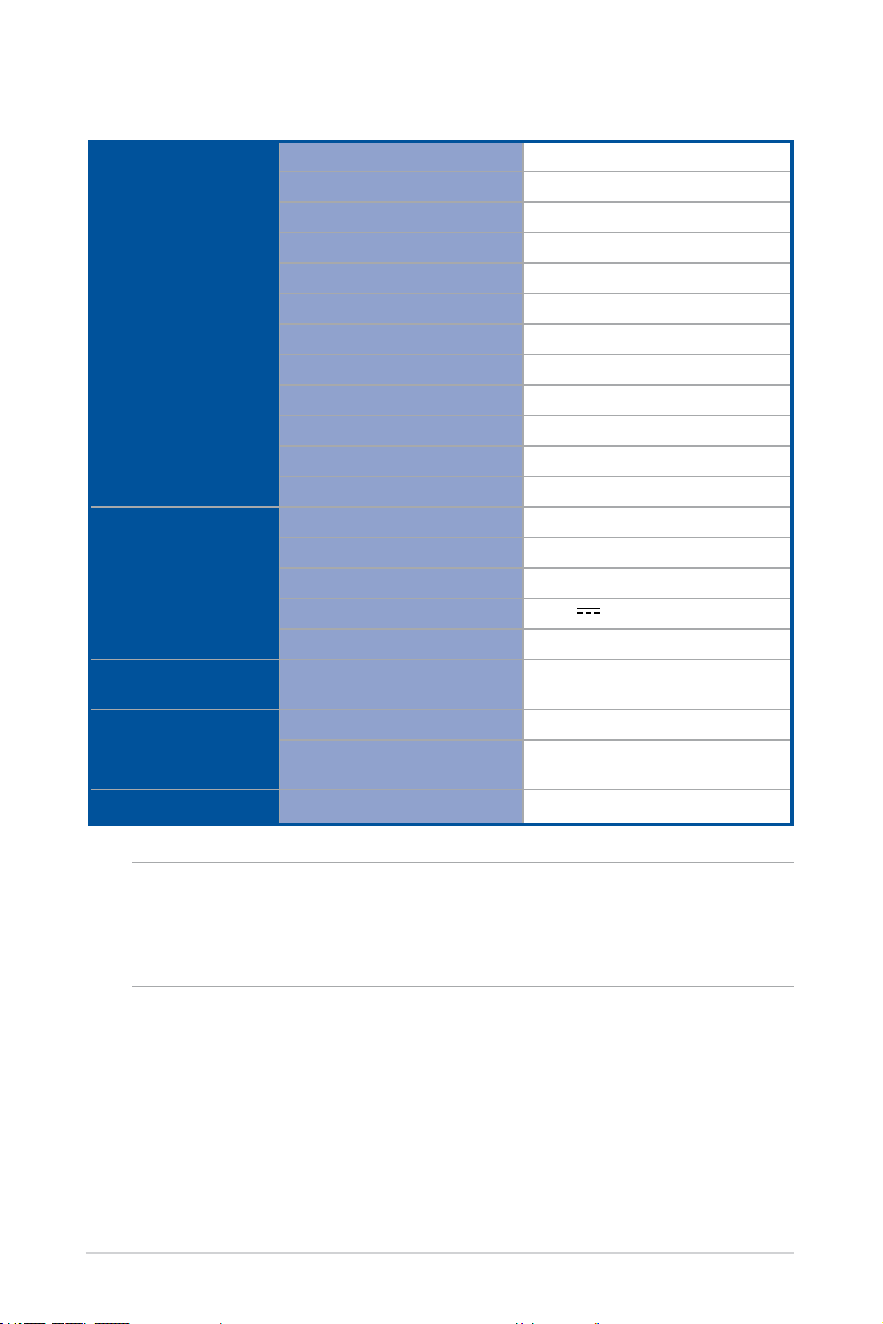
M1 Glasses Specications
Display
Display Technology
Micro OLED
Lens Type
Freeform
Resolution
1080p per eye
Refresh Rate
72 Hz
Aspect Ratio
16:9
Brightness
1,100 nits (typical)
Panel Size
0.49”
Color Gamut
95% DCI-P3
Field of View
38
o
Diopter Adjustment
No
Virtual Image Distance
2 meters
3D Mode Support
Yes
Device
Dimensions (W x H x D)
171 x 53 x 170 mm
Net Weight
87 g
Chassis Color
Black
Power Input
5.0 V 1.0 A
Replaceable Nosepiece
Yes
Tracking
Positioning Feature
3 degree-of-freedom (DoF) head
tracking
Audio
Features
Built-in speakers
2 x 1 W speakers
Built-in microphones
2 x microphones (noise-
canceling)
Connectivity
Ports
USB Type-C
®
NOTE:
• Specications are subject to change without prior notice.
• Product availability may vary by region.
65
Service and Support
Visit our multi-language website at https://www.asus.com/support/.
Trademarks
USB Type-C
®
and USB-C
®
are registered trademarks of USB Implementers
Forum.
66