
User guide
© Samsung
Samsung owns the copyright for this manual. Use or reproduction of this manual in parts or entirety without the authorization of Samsung is prohibited. Trademarks other than Samsung are property of their respective owners.
OMDX (OM32DX)
OHDX (OH46DX OH55DX OH55DX-S)
The color and the appearance may differ depending on the product, and the content in the
manual is subject to change without prior notice to improve the performance.

Table of contents
Before Using the Product
Safety Precautions 4
Safety symbols 4
Electricity and Safety 5
Installation 6
Operation 7
Cleaning 10
Storage and Maintenance 11
OM32DX 11
OH46DX / OH55DX / OH55DX-S
11
Preparations
Checking the Components 12
Parts 13
OM32DX 13
Anti-theft Lock (OM**
models only) 14
OH46DX / OH55DX / OH55DX-S 15
Remote Control 17
2
Before Installing the Product 19
Tilting Angle and Rotation 19
Ventilation (OM** models only) 19
Ventilation (OH** models only) 20
Installing the product 21
Connecting and Using
a Source Device
Before Connecting 22
Pre-connection Checkpoints 22
Before connecting cables
(OH**
models only) 23
Connecting to a PC 24
Connection Using an HDMI Cable 24
Connecting an External Monitor 25
Connecting to a Video Device 26
Connection Using an HDMI Cable 26
Connecting HDMI to Sound system and
Video device 26
Connecting to an Audio System 27
Connecting the LAN Cable 27
Connecting using the Wi-Fi&BT module
(OH**
models only) 27
Changing the Input source 28
Source 28
Multiple Display Control
Cable Connection 29
RS232C Cable 29
LAN Cable 30
Connection 32
Control Codes 33
Using MDC 41
MDC Program Installation/Uninstallation 41

Table of contents
3
Home Screen
Favorites 42
Features 42
MagicInfo 43
Schedule
49
Web browser
50
Custom Home
53
Screen Mirroring
53
Workspace
53
SMARTVIEW
+ 54
APPS
54
Settings
55
All Settings 55
Network 55
Clone Product 55
ID Settings 56
Video Wall 56
Network Status 57
On/Off Timer 58
Ticker 59
Menu
Picture 60
OnScreen Display 65
Network 67
Network Settings (Wired) 68
Network Settings (Wireless) 70
Use WPS 72
System 76
Support 89
Troubleshooting Guide
Requirements Before Contacting Samsung
Customer Service Center 91
Testing the Product 91
Checking the Resolution and Frequency 91
Check the followings. 92
Q & A 97
Specifications
General 98
Preset Timing Modes 100
Appendix
Responsibility for the Pay Service (Cost to
Customers) 101
Not a product defect 101
A Product damage caused by customer's
fault 101
Others 101
Prevention of Afterimage Burn-in 102
What is afterimage burn-in? 102
Recommended prevention practices 102
License 103
Terminology 104

4
Before Using the Product
Chapter 01
The following safety instructions are to ensure your personal safety and prevent property
damage. Please read the following to ensure the proper use of the product.
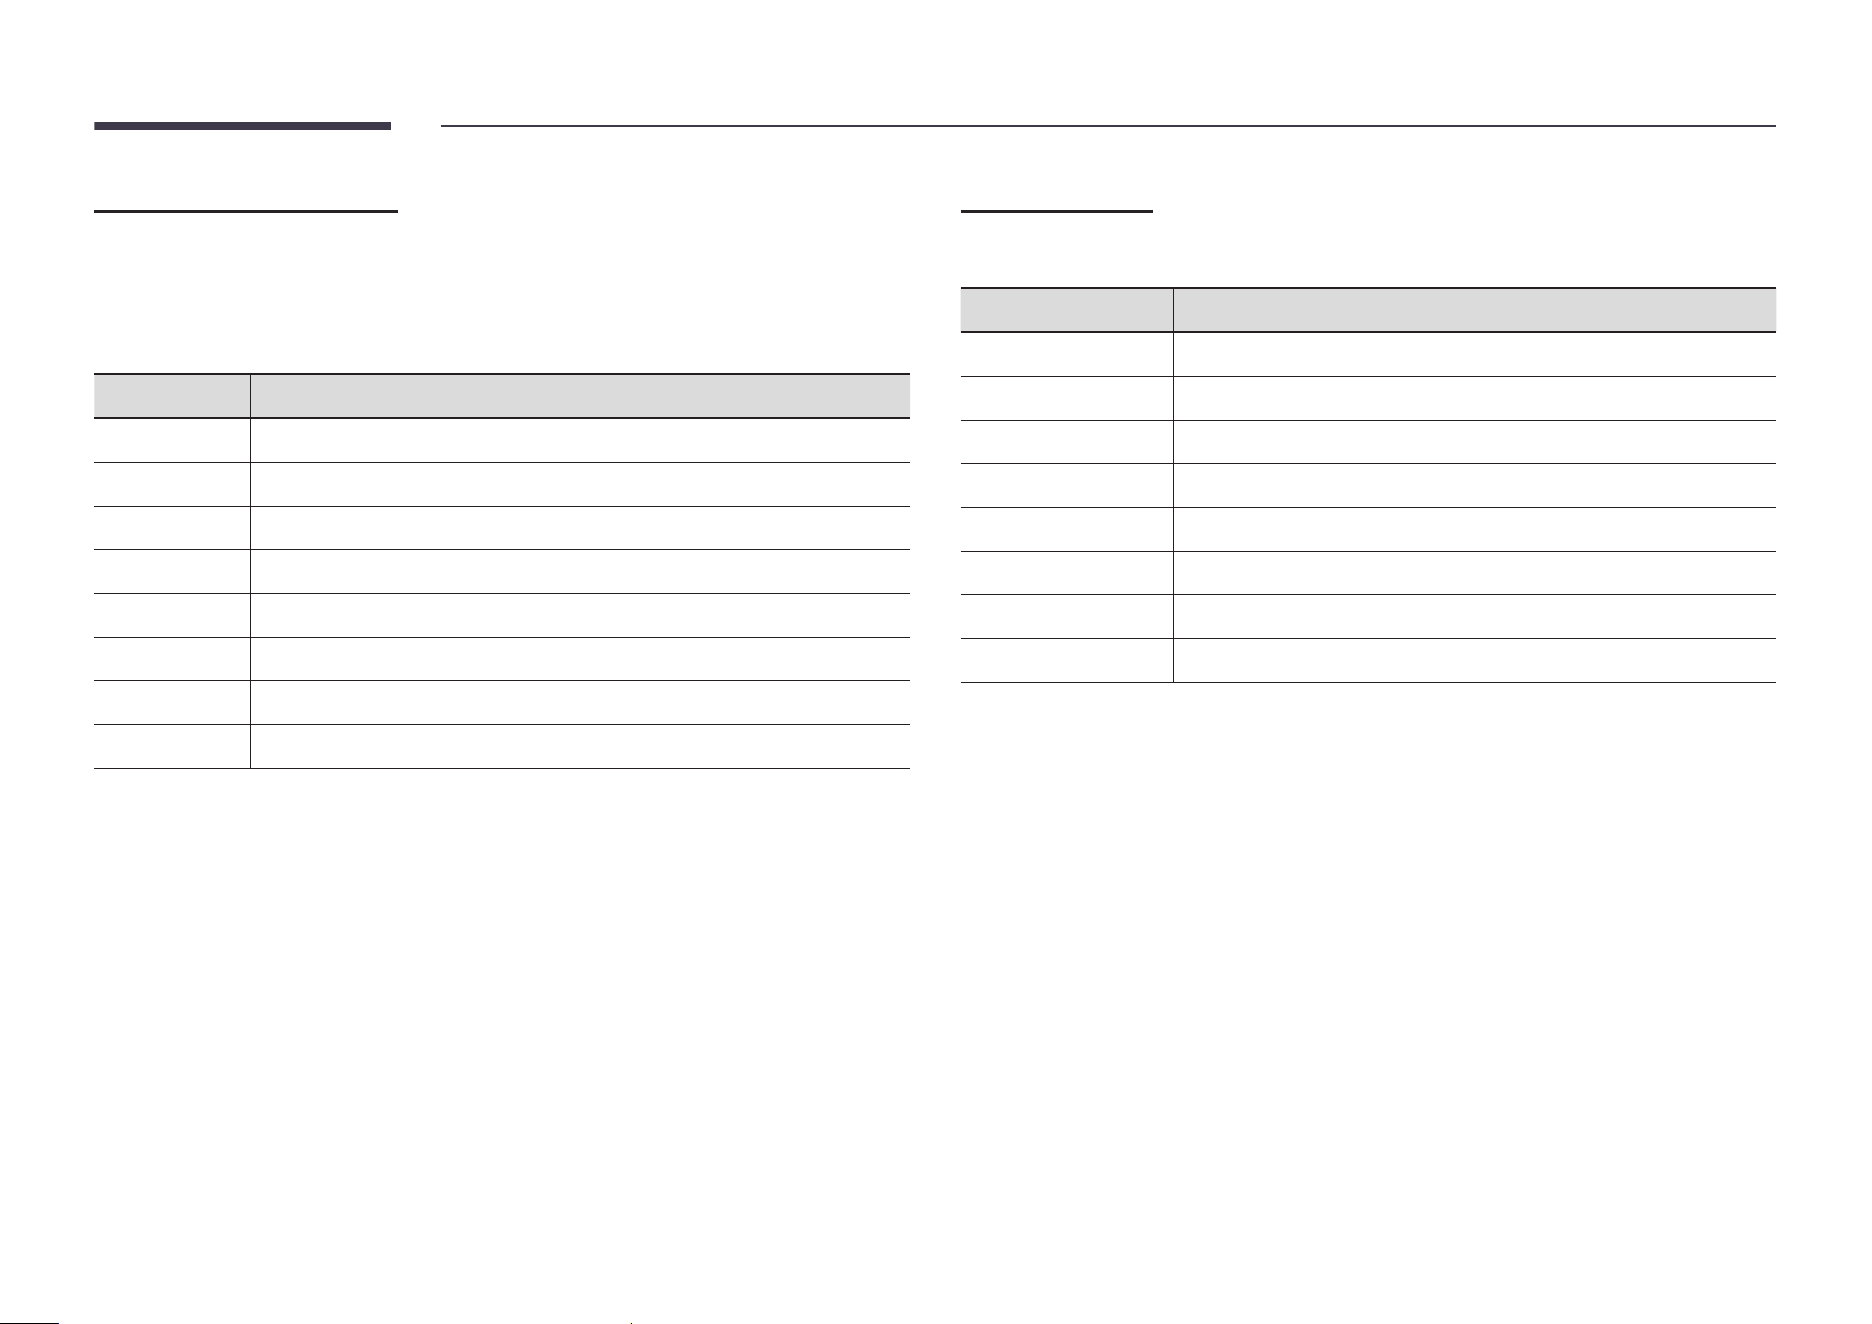
Safety symbols
Symbol Name Meaning
Warning
A serious or fatal injury may result if instructions are not followed.
Caution
Personal injury or damage to properties may result if instructions
are not followed.
Prohibition
Do NOT attempt.
Instruction
Follow directions.
CAUTION
RISK OF ELECTRIC SHOCK. DO NOT OPEN.
CAUTION: TO REDUCE THE RISK OF ELECTRIC SHOCK, DO NOT REMOVE COVER (OR BACK). THERE
ARE NO USER SERVICEABLE PARTS INSIDE. REFER ALL SERVICING TO QUALIFIED PERSONNEL.
This symbol indicates that high
voltage is present inside. It is
dangerous to make any kind of
contact with any internal part of this
product.
AC voltage: Rated voltage marked
with this symbol is AC voltage.
This symbol indicates that this
product has included important
literature concerning operation and
maintenance.
DC voltage: Rated voltage marked
with this symbol is DC voltage.
Class II product: This symbol indicates
that a safety connection to electrical
earth (ground) is not required. If this
symbol is not present on a product
with a mains lead, the product
MUST have a reliable connection to
protective earth (ground).
Caution. Consult instructions for use:
This symbol instructs the user to
consult the user manual for further
safety related information.
Safety Precautions

5
Electricity and Safety
Warning
Do not use a damaged power cord or plug, or a loose power socket.
• An electric shock or fire may result.
Do not use multiple products with a single power socket.
• Overheated power sockets may cause a fire.
Do not handle the power cord with a wet body part. Otherwise, an electric shock may result.
Insert the power plug all the way in so it is not loose.
• An unsecure connection may cause a fire.
Connect the power plug to a grounded power socket (type 1 insulated devices only).
• An electric shock or injury may result.
Do not bend or pull the power cord with force. Be careful not to leave the power cord under a
heavy object.
• Damage to the cord may result in a fire or electric shock.
Do not place the power cord or product near heat sources.
• A fire or electric shock may result.
Clean any dust around the pins of the power plug or the power socket with a dry cloth.
• A fire may result.
Caution
Do not disconnect the power cord while the product is being used.
• The product may become damaged by an electric shock.
Only use the power cord provided with your product by Samsung. Do not use the power cord
with other products.
• A fire or electric shock may result.
Keep the power socket where the power cord is connected unobstructed.
• The power cord must be disconnected to cut off power to the product when an issue occurs.
• Note that the product is not completely powered down by using only the power button on
the remote.
Hold the plug when disconnecting the power cord from the power socket.
• An electric shock or fire may result.

6
Installation
Warning
DO NOT PLACE CANDLES, INSECT REPELLANTS OR CIGARETTES ON TOP OF THE PRODUCT. DO
NOT INSTALL THE PRODUCT NEAR HEAT SOURCES.
• A fire may result.
Have a technician install the wall-mount hanger.
• Installation by an unqualified person can result in an injury.
• Only use approved cabinets.
Do not install the product in poorly ventilated spaces such as a bookcase or closet.
• An increased internal temperature may cause a fire.
When installing the product, keep it at a distance from the wall so that it is well ventilated.
"
Refer to the Outdoor Installation Guide. (http://www.samsung.com/business)
• An increased internal temperature may cause a fire.
Discard the plastic packaging that the product is packaged in, immediately after unpacking.
• Plastic packaging material can cause suffocation if it is handled improperly.
Do not install the product on an unstable or vibrating surface (insecure shelf, sloped surface,
etc.)
• The product may fall and become damaged or cause an injury.
• Using the product in an area with excess vibration may damage the product or cause a fire.
Edible oil, such as soybean oil, can damage or deform the product. Do not install the product in
a kitchen or near a kitchen counter.
Precautions during installation and storage
• After opening the cover, install the product within 1 hour under humidity of 60% or below. (P.
23)
• Keep the predefined humidity while opening the cover or assembling the housing (e.g.
connection of external device).
• During operation and storage of the product, be sure to attach the cover.

7
Caution
Do not drop the product while moving.
• Product failure or personal injury may result.
Do not set down the product on its front.
• The screen may become damaged.
When installing the product on a cabinet or shelf, make sure that the bottom edge of the front
of the product is not protruding.
• The product may fall and become damaged or cause an injury.
• Install the product only on cabinets or shelves of the right size.
Set down the product gently.
• Product failure or personal injury may result.
If the product is installed in an unusual location, the surrounding environment may cause
a serious quality problem. Therefore, be sure to contact Samsung Customer Service Center
before installation.
• Places where many fine dusts are generated, places where chemicals are used, places
with too high or low temperatures, places with a lot of moisture or water, transportation
equipment such as vehicles, airports and stations used continuously for a long time, and
more.
Operation
Warning
There is a high voltage inside the product. Never disassemble, repair or modify the product
yourself.
• A fire or electric shock may result.
• Contact Samsung Customer Service Center for repairs.
If the product generates abnormal sounds, a burning smell or smoke, disconnect the power
cord immediately and contact Samsung Customer Service Center.
• An electric shock or fire may result.
Do not hang on to or climb on the product.
• The product may tip over or fall, causing injury or death.
Do not put heavy objects, toys or snacks on top of the product.
• Hanging on to the product to get a toy or snack may cause heavy objects to fall or the
product to tip over, resulting in injury or death.

8
Do not drop objects on the product or apply impact.
• A fire or electric shock may result.
Do not move the product by pulling the power cord or any cable.
• Product failure, an electric shock or fire may result from a damaged cable.
If a gas leakage is found, do not touch the product or power plug. Also, ventilate the area
immediately.
• Sparks can cause an explosion or fire.
Do not lift or move the product by pulling the power cord or any cable.
• Product failure, an electric shock or fire may result from a damaged cable.
Do not use or keep combustible spray or an inflammable substance near the product.
• An explosion or fire may result.
Ensure the vents are not blocked by tablecloths or curtains.
• An increased internal temperature may cause a fire.
Do not insert metallic objects (chopsticks, coins, hairpins, etc) or objects that burn easily (paper,
matches, etc) into the product (through the vent or input/output ports, etc).
• Be sure to power off the product and disconnect the power cord when water or other foreign
substances have entered the product. Then contact Samsung Customer Service Center.
• Product failure, an electric shock or fire may result.
Do not block the vent on the product. The product may not function properly due to potential
overheating.
Do not attempt to insert your fingers or objects into the vents.
• Product failure or personal injury may result.
While the power plug is plugged into a power socket, do not insert a chopstick or other
conductor into a remaining power socket. Also, after disconnecting the power plug from the
power socket, do not touch the pins of the plug immediately.
• Otherwise, an electric shock may result.
Do not use liquid fumigators containing chemicals, such as mosquito repellent or air freshener,
around the product.
• If steam comes in contact with the product surface or enters the product, it may cause
stains or malfunction.

9
Caution
Leaving the screen fixed on a stationary image for an extended period of time may cause
afterimage burn-in or defective pixels.
• Activate power-saving mode or a moving-picture screen saver if you will not be using the
product for an extended period of time.
Disconnect the power cord from the power socket if you do not plan on using the product for an
extended period of time (vacation, etc).
• Dust accumulation combined with heat can cause a fire, electric shock or electric leakage.
Use the product at the recommended resolution and frequency.
• Your eyesight may deteriorate.
Do not hold the product upside-down or move it by holding the stand.
• The product may fall and become damaged or cause an injury.
Looking at the screen too close for an extended period of time can deteriorate your eyesight.
Take a break for at least 5 minutes after using the product for 1 hour.
Do not touch the screen when the product has been turned on for an extended period of time
as it will become hot.
Exercise caution when adjusting the product angle or stand height.
• Parts of the human body may become caught and could be injured.
• Tilting the product at an excessive angle may cause the product to fall and an injury may
result.
Do not place heavy objects on the product.
• Product failure or personal injury may result.
When using headphones or earphones, do not turn the volume too high.
• Having the sound too loud may damage your hearing.
Exercise caution when storing the remote control batteries and small accessories, so they are
not swallowed.
• If swallowed, consult a physician immediately.
When replacing the battery, insert it with the right polarity (+, -).
• Otherwise, the battery may become damaged or it may cause fire, personal injury or
damage due to leakage of the internal liquid.
Use only the specified standardized batteries, and do not use a new battery and a used battery
at the same time.
• Otherwise, the batteries may be damaged or cause fire, personal injury or damage due to a
leakage of the internal liquid.
The batteries (and rechargeable batteries) are not ordinary refuse and must be returned
for recycling purposes. The customer is responsible for returning the used or rechargeable
batteries for recycling.
• The customer can return used or rechargeable batteries to a nearby public recycling center
or to a store selling the same type of the battery or rechargeable battery.

10
Cleaning
OM32DX
Warning
Do not spray water or cleaner directly on the product.
• The product’s surface may be damaged, or the markings may be erased.
• An electric shock or fire may result.
Caution
When cleaning, be sure to disconnect the power plug and wipe gently with a soft and dry cloth
such as superfine fibers or cotton flannels to prevent scratches.
• The product's surface may be damaged, or the markings may be erased.
Be sure to use a soft and dry cloth such as superfine fibers or cotton flannels because the
surface of the product and the screen display are vulnerable to scratches.
• The product's surface or the screen display can be easily scratched with foreign substances.
Do not apply chemicals containing alcohol, solvent, or surfactant such as wax, benzene, thinner,
pesticide, air freshener, lubricant, or cleaner to the product.
• The product's exterior may be discolored or cracked, the surface of the panel may be peeled
off, or the markings may be erased.
OH46DX / OH55DX / OH55DX-S
"
Exercise care when cleaning as the panel and exterior of advanced LCDs are easily
scratched.
"
Take the following steps when cleaning.
1
Power off the product and computer.
2
Disconnect the power cord from the product.
"
When removing the power cord, hold the plug. Never hold the plug with a wet body
part. Otherwise, an electric shock may result.
3
Use water and a dry cloth to clean the protection glass.
• Wipe with a clean wet cloth.
"
To remove tough stains, wipe using a cloth with a small amount of ethanol based
cleaner.
Use a brush to remove any debris from the inlet and outlet opening.
"
To remove tough stains, wipe using a cloth with a small amount of ethanol based
cleaner.
"
If washing with water, keep the pressure below 0.5 bar.
4
Connect the power cord to the product when cleaning is finished.
5
Power on the product and computer.
11
Storage and Maintenance
OM32DX
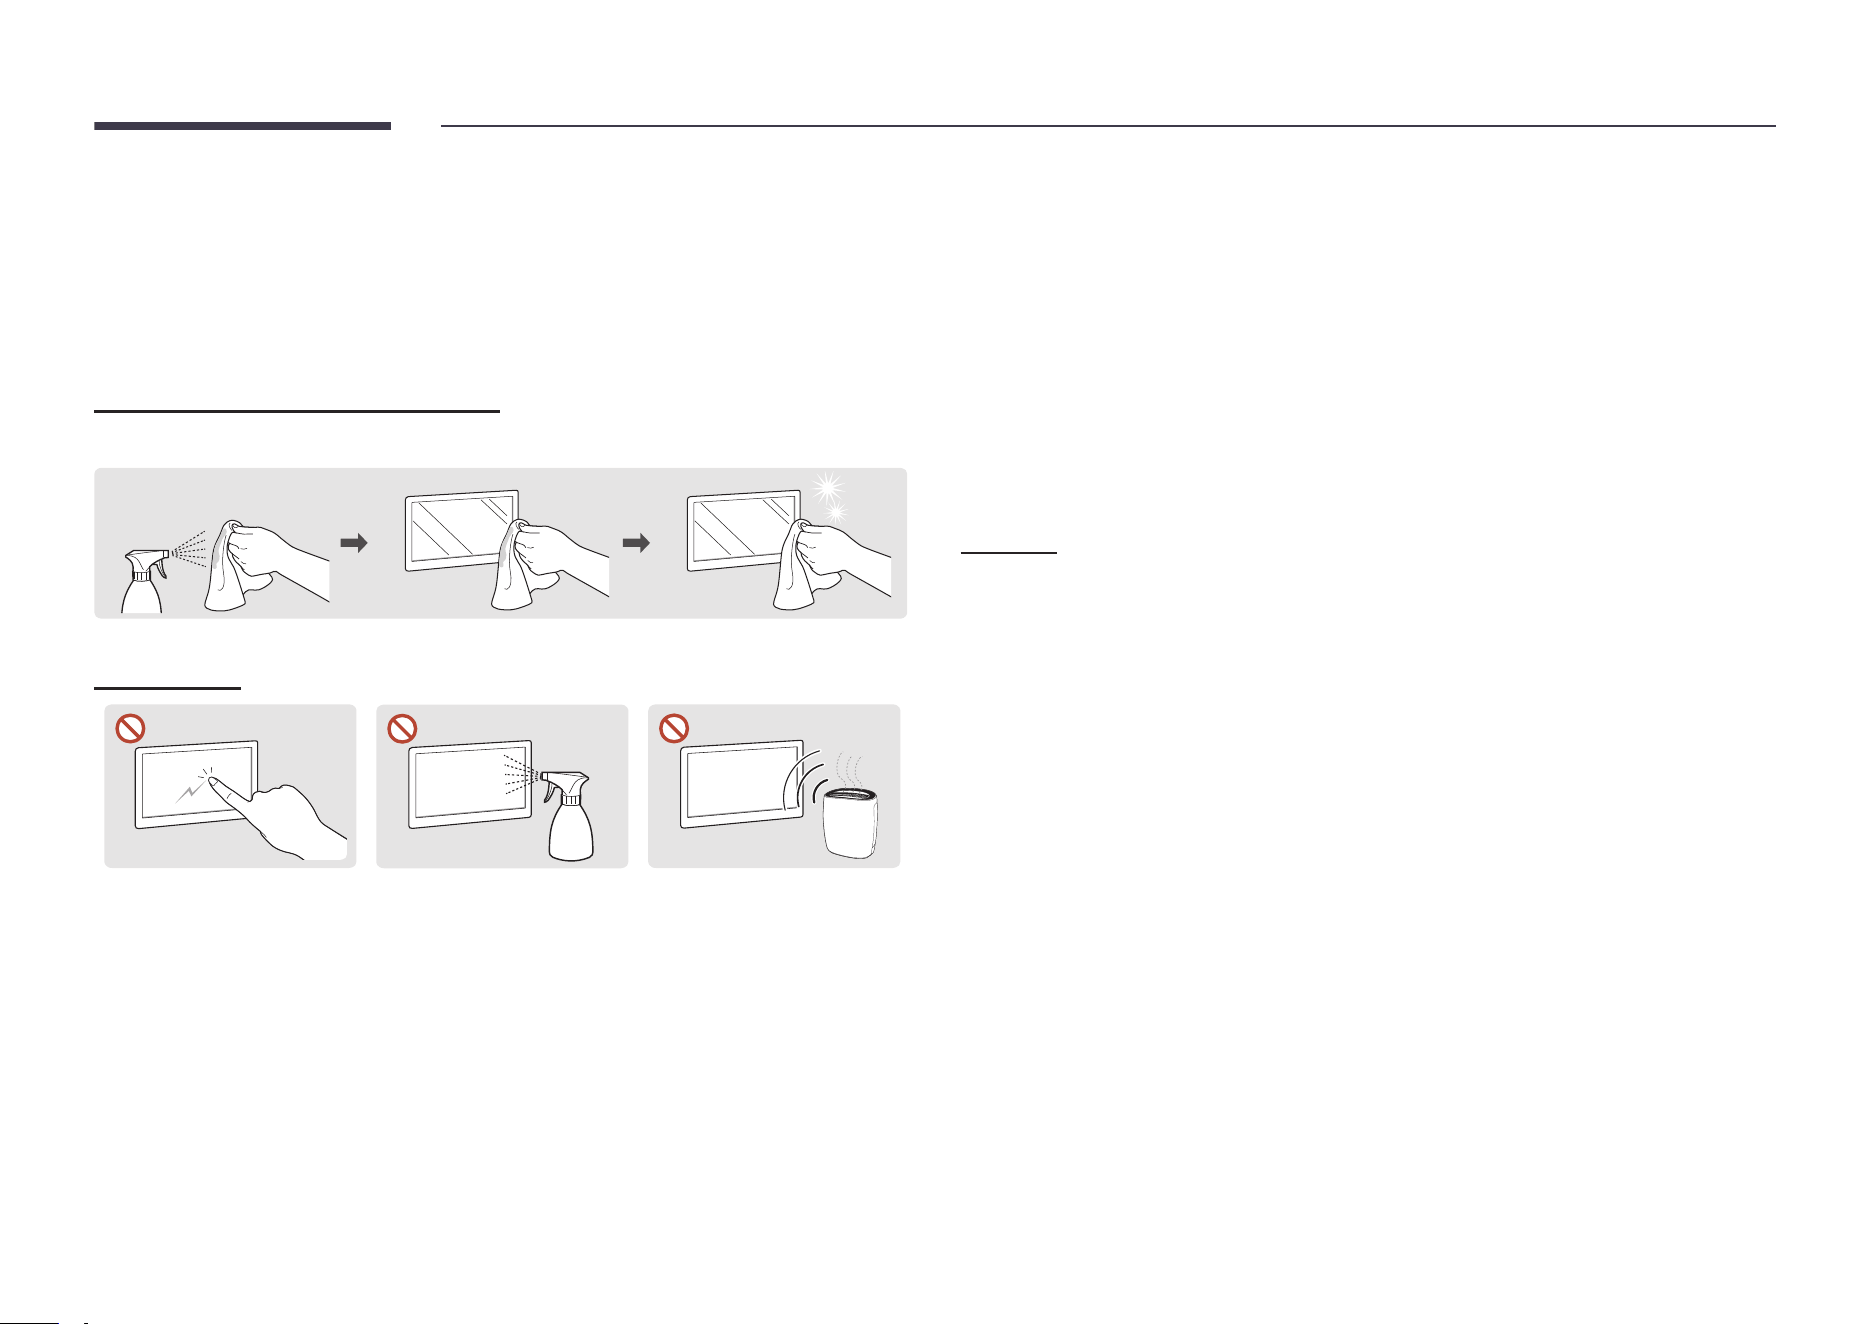
Cleaning the exterior and display
Wipe the surface with a slightly wet, soft cloth, and then wipe with a dry cloth.
1 2 3
Precautions
Do not scratch the screen
with sharp objects. Scratches
may leave marks or damage
the product.
Do not spray water directly
on any part of the product.
Product failure, an electric
shock or fire may result from
water that enters the product.
Due to the characteristics of
high-glossy products, using
a UV humidifier nearby may
create white-colored stains
on the product.
• Removing a sticker attached on the screen may leave residues. Clean the residues before
watching the screen.
• Do not strongly press and rub the product. Damage to the product may result.
• Do not wipe the screen with chemicals. Product failure may result.
• Contact Samsung Customer Service Center if the inside of the product needs cleaning
(service fee will be charged).
• We recommend using a clean cloth when touching the front panel, instead of a bare body
part.
OH46DX / OH55DX / OH55DX-S
Storage
Due to the characteristics of high-glossy products, using a UV humidifier nearby may create
whitecolored stains on the product.
"
Contact Customer Service Center if the inside of the product needs cleaning (service fee
will be charged).

12
Preparations
Chapter 02
"
Contact the vendor where you
purchased the product if any
components are missing.
"
The appearance of the components
may differ from the images shown.
Checking the Components
Simple User Guide
Warranty card
(Not available in some locations)
Regulatory guide Power cord
Batteries (AAA x 2)
(Not available in some locations)
Remote Control
EXTERNAL Wi-Fi&BT module
accessory
(OH55DX-S model only)
External ambient light sensor
(OM** models only)
External IR cable
(OM** models only)
13
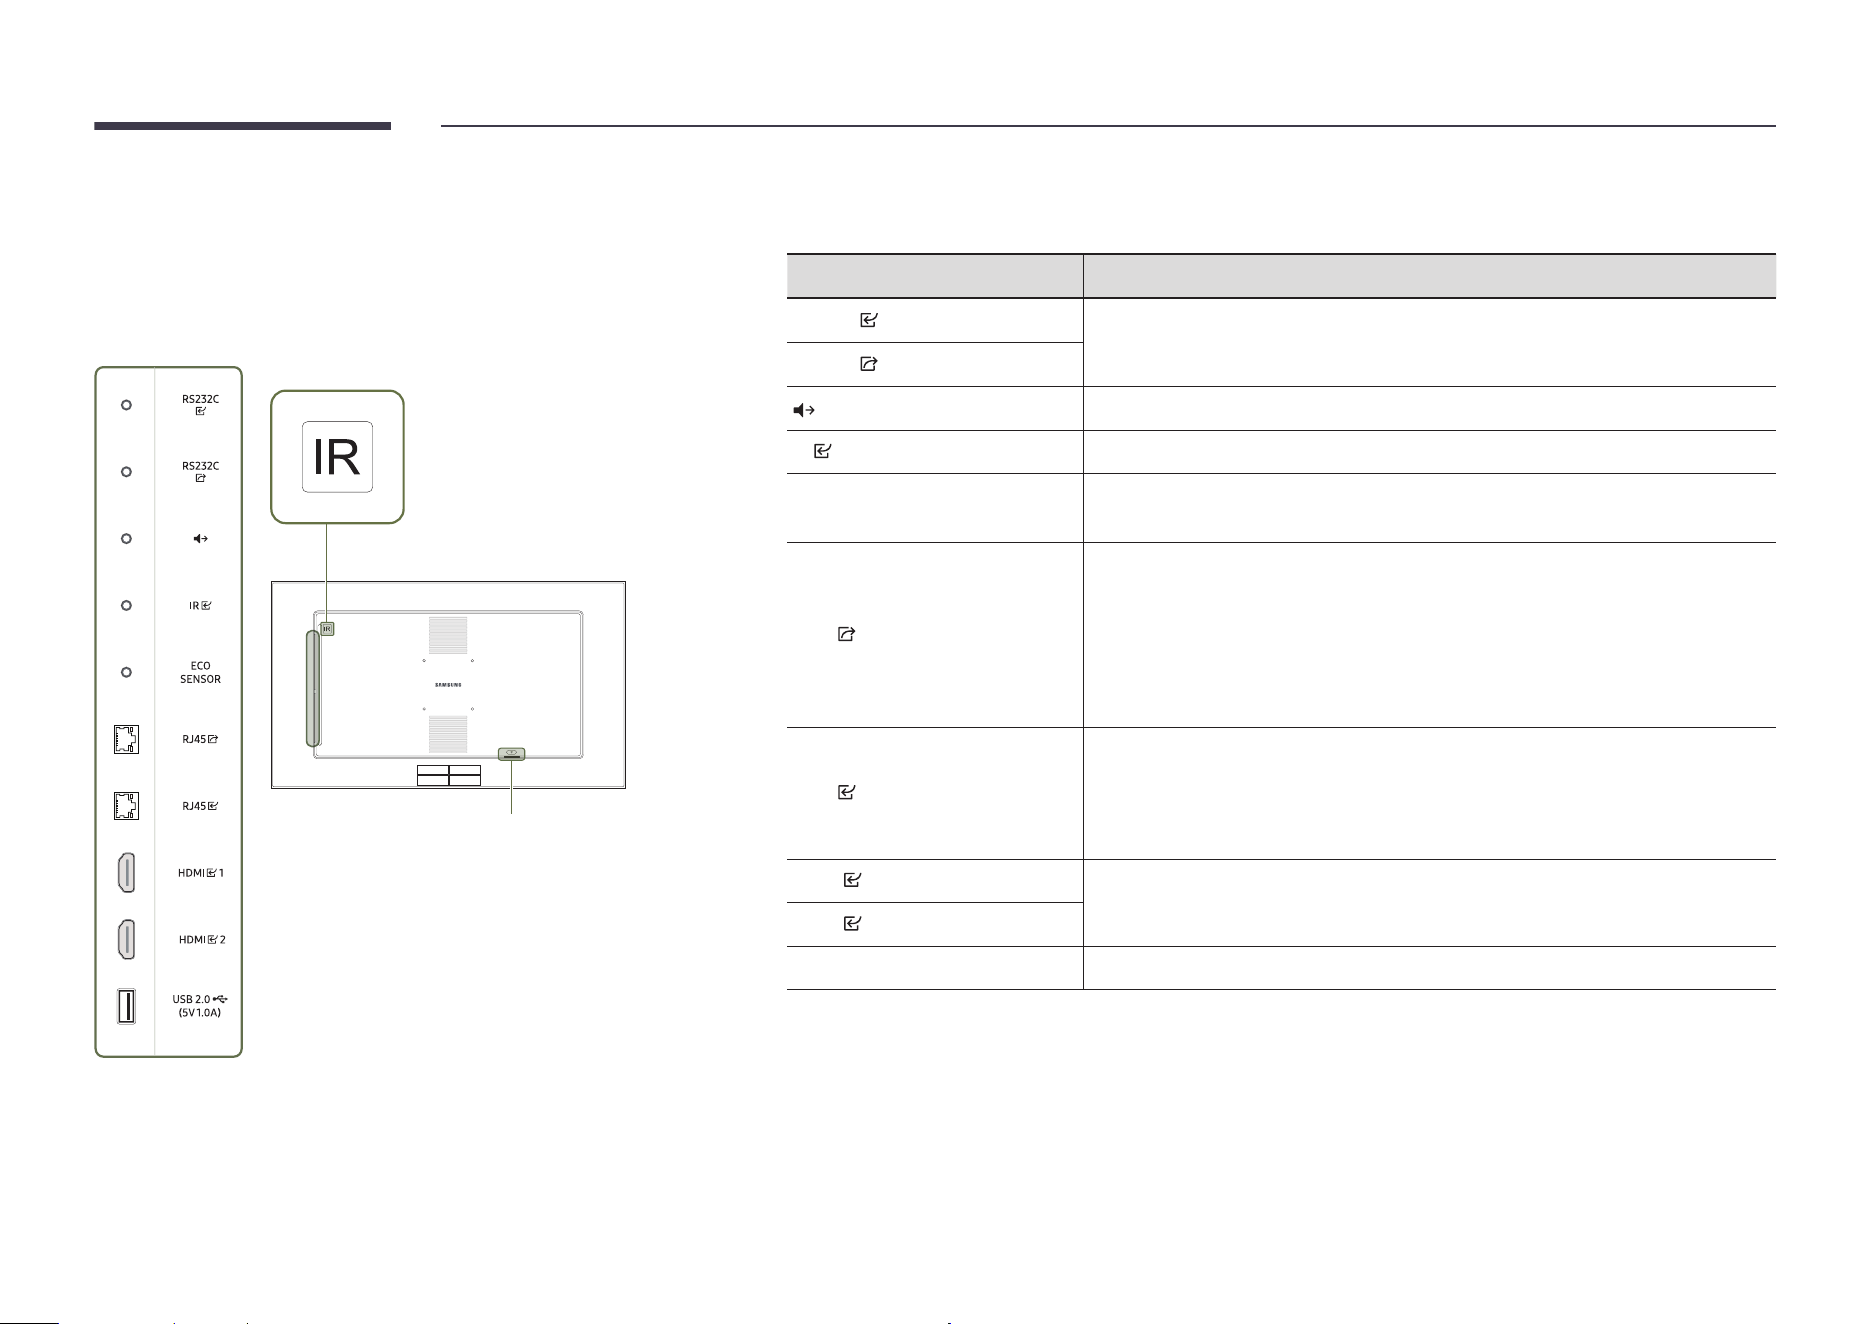
Parts
OM32DX
Stick the receiver of an external IR
cable to this location when the cable
is not used or the product is moved.
Power
"
The color and shape of parts may differ from what is shown. Specifications are subject to change without notice
to improve quality.
Port Description
RS232C
Connects to MDC using an RS232C adapter.
RS232C
Outputs sound to an audio device through an audio cable.
IR
Connects to an external IR cable that receives signals from the remote control.
ECO SENSOR
Used to supply power to the external sensor board and to receive signals from
the ambient light sensor.
RJ45
• Wired LAN connection port used to connect an external device such as a
laptop to connect to the Internet.
• Connects to MDC using a LAN cable. (10/100 Mbps)
"
To connect a LAN cable, use a CAT 7 (*STP type) cable for the connection.
(10/100 Mbps)
*Shielded Twisted Pair
RJ45
Connects to MDC and the Internet using a LAN cable. (10/100 Mbps)
"
To connect a LAN cable, use a CAT 7 (*STP type) cable for the connection.
(10/100 Mbps)
*Shielded Twisted Pair
HDMI 1
Connects to a source device using a HDMI cable.
HDMI 2
USB 2.0
¨
(5V 1.0A)
Connect to a USB memory device.

14
Anti-theft Lock (OM** models only)
"
An anti-theft lock allows you to use the product securely even in public places.
"
The locking device shape and locking method depend on the manufacturer. Refer to the user guide provided with your anti-theft locking device for details.
"
The following images are for reference only. Real-life situations may differ from what is shown in the images.
To lock an anti-theft locking device:
1
Fix the cable of your anti-theft locking device to a heavy object such as a desk.
2
Put one end of the cable through the loop on the other end.
3
Insert the locking device into the anti-theft lock slot at the back of the product.
4
Lock the locking device.
– An anti-theft locking device can be purchased separately.
– Refer to the user guide provided with your anti-theft locking device for details.
– Anti-theft locking devices can be purchased at electronics retailers or online.
15
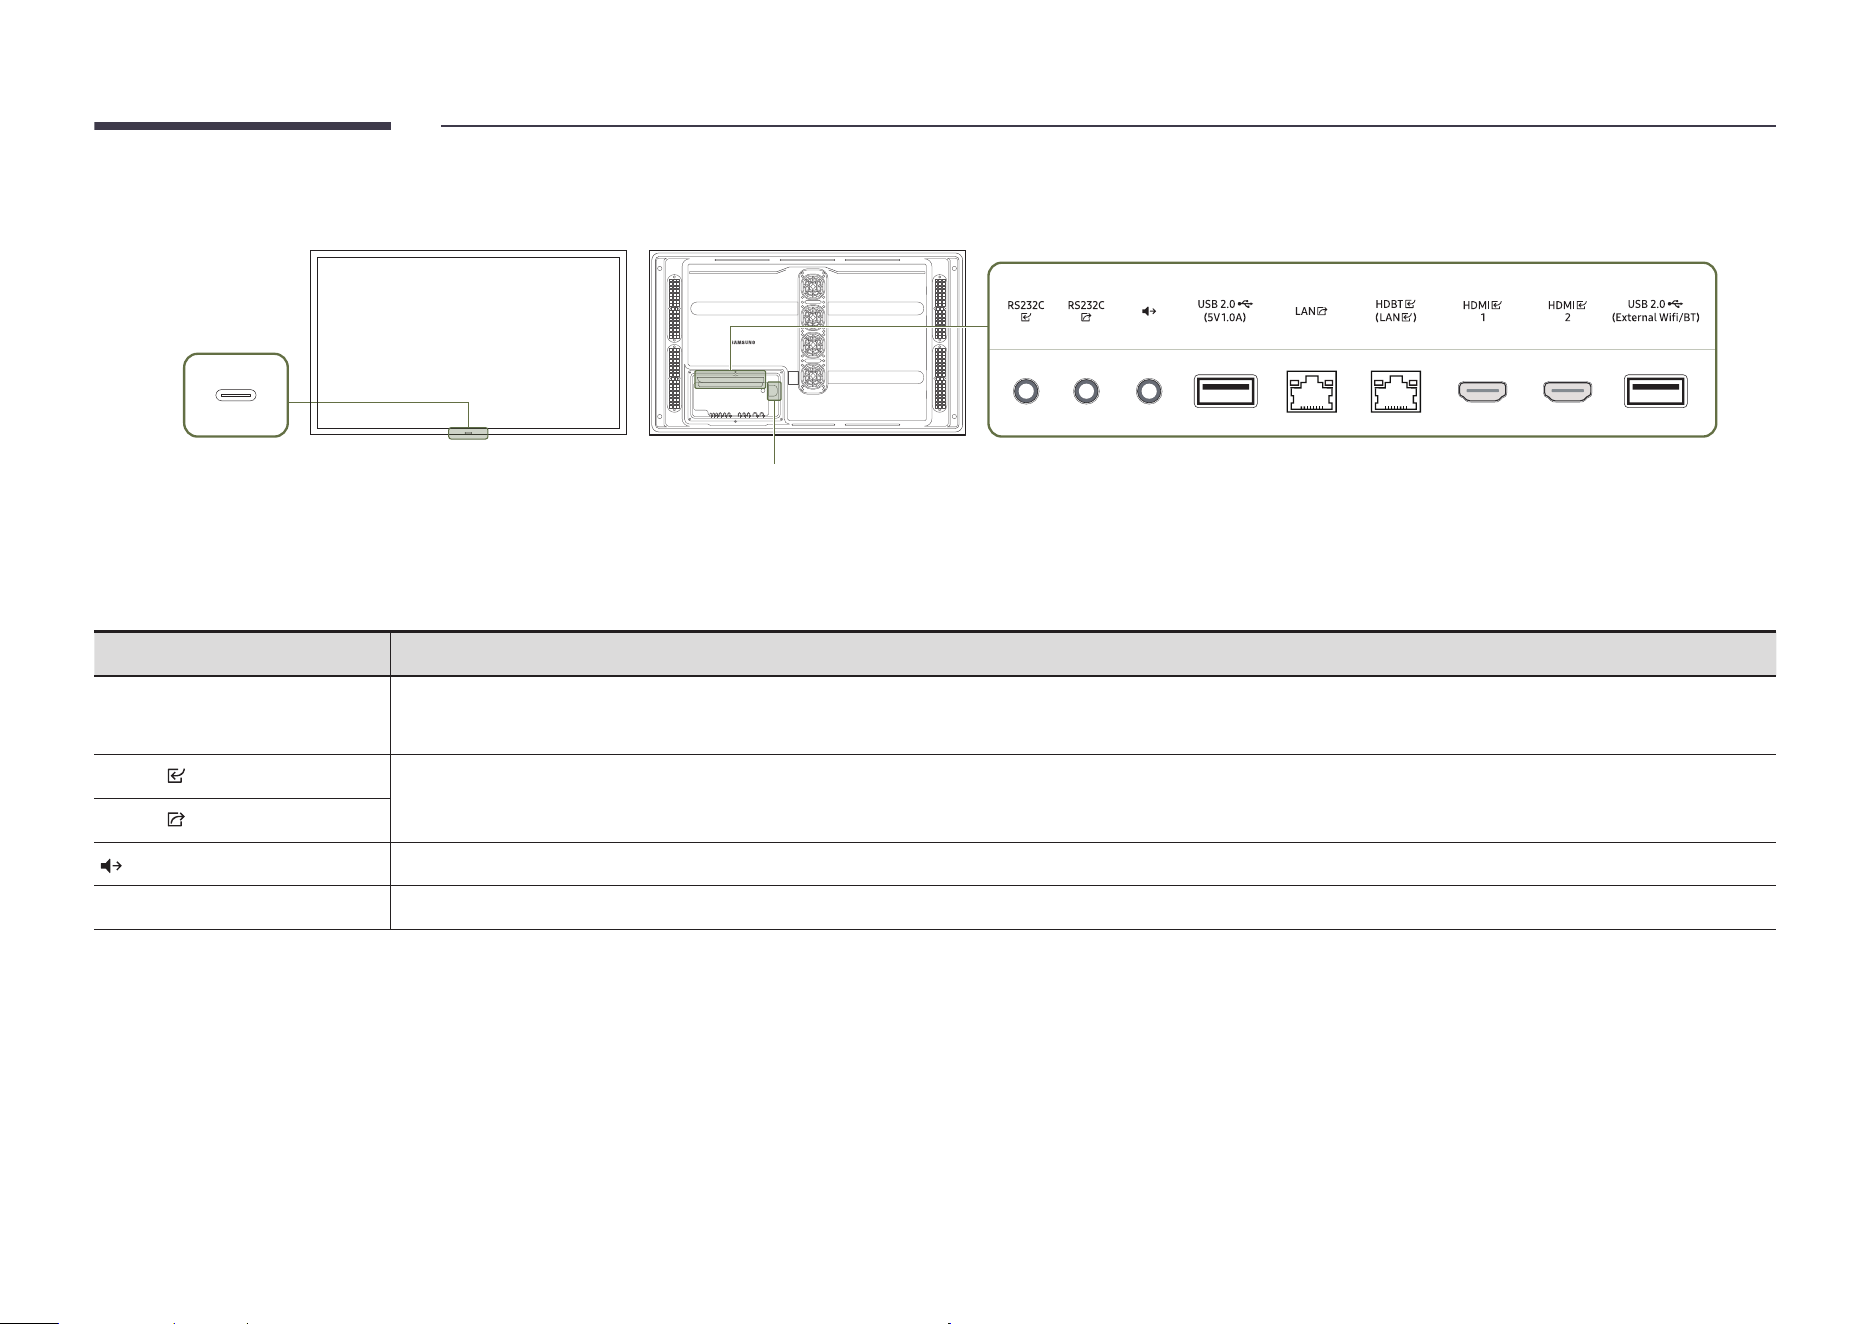
OH46DX / OH55DX / OH55DX-S
Power
Power LED /
Remote sensor /
Eco Sensor
"
The color and shape of parts may differ from what is shown. Specifications are subject to change without notice to improve quality.
Port Description
Remote sensor
Press a button on the remote control pointing at the sensor on the front of the product to perform the corresponding function.
"
Using other display devices in the same space as the remote control of this product can cause the other display devices to be inadvertently controlled.
RS232C
Connects to MDC using an RS232C adapter.
RS232C
Outputs sound to an audio device through an audio cable.
USB 2.0
¨
(5V 1.0A)
Connect to a USB memory device.
16
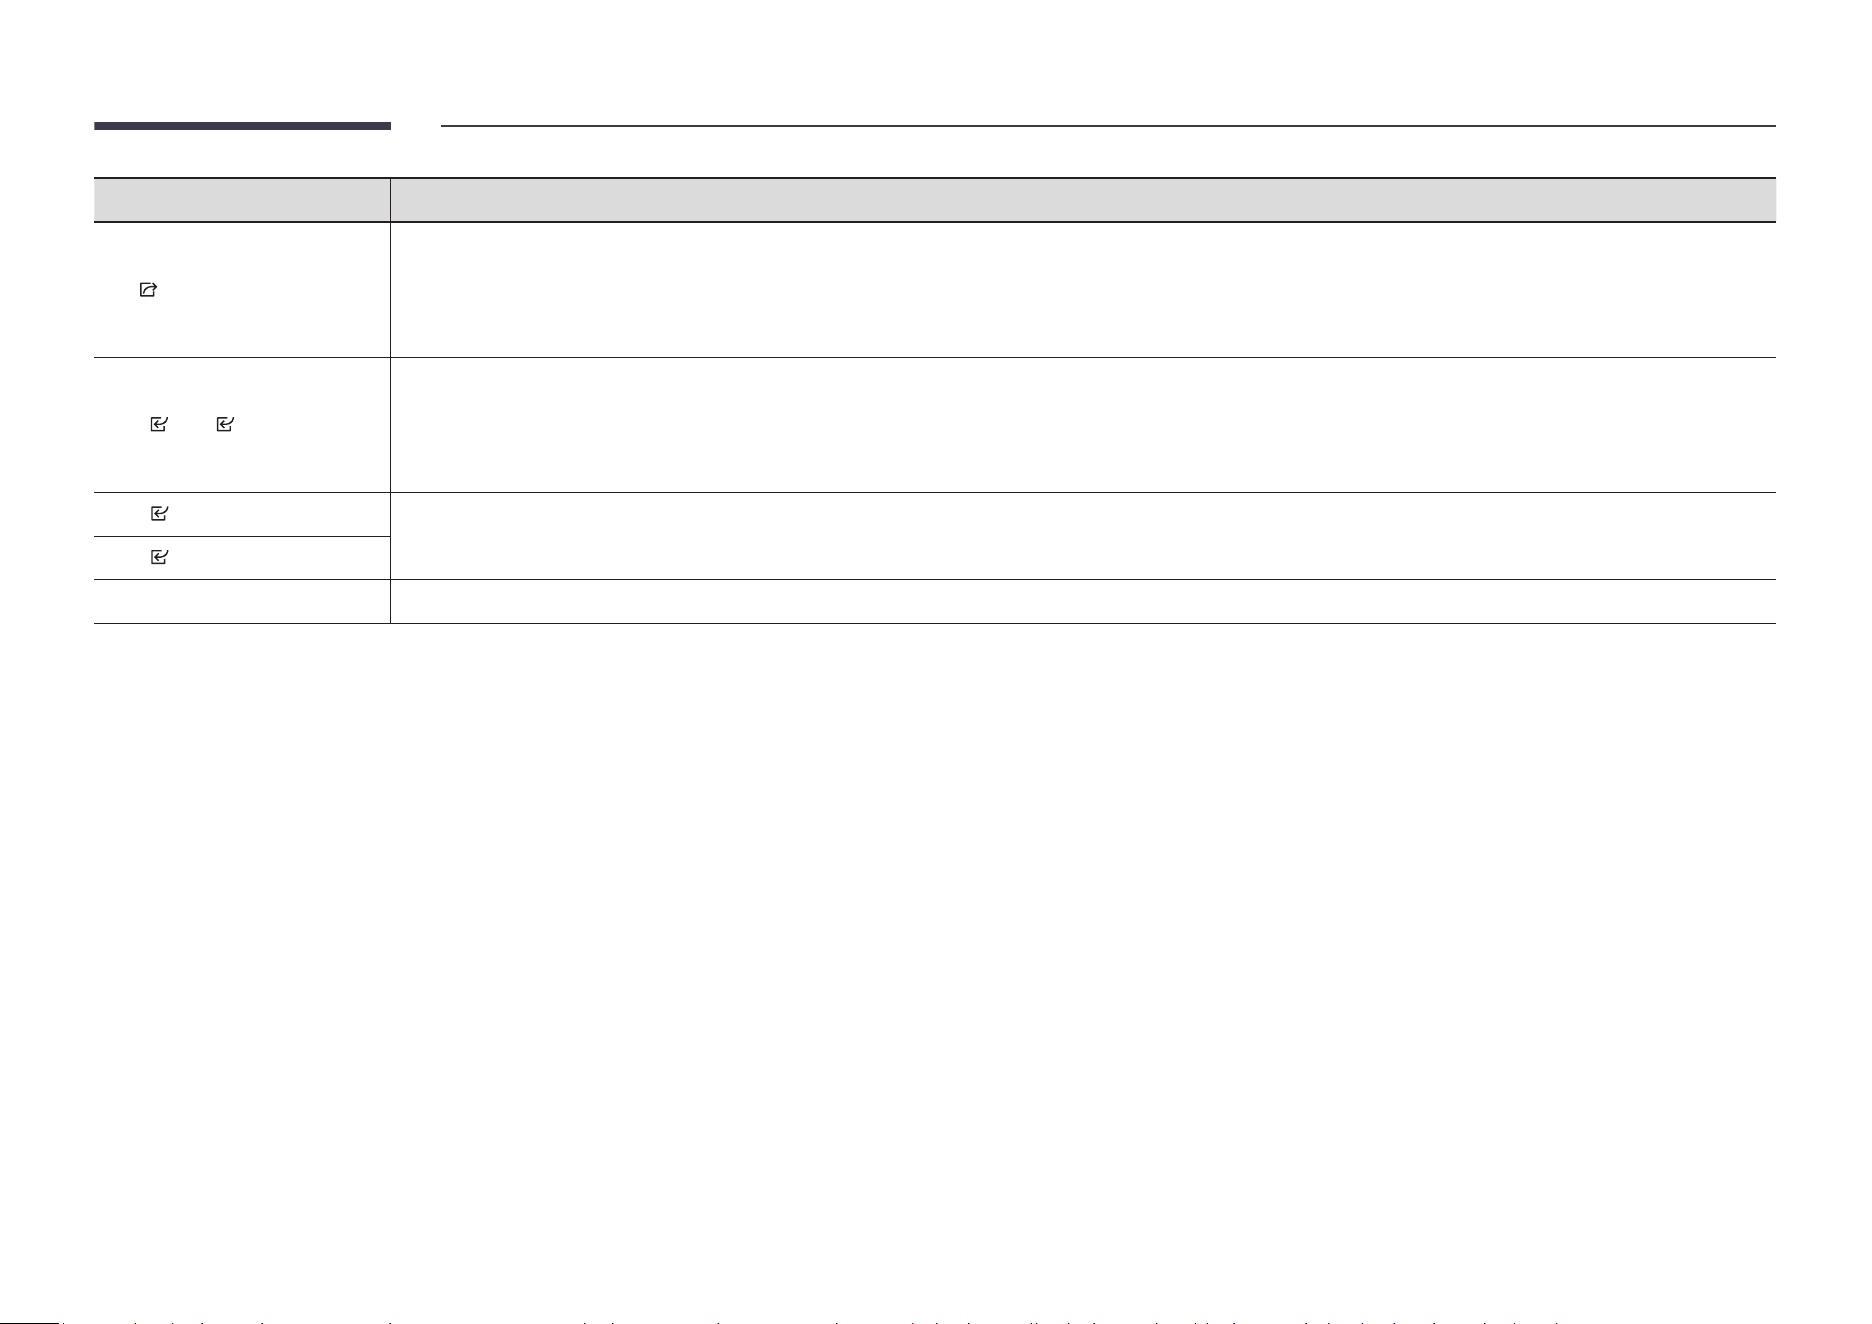
Port Description
LAN
• Wired LAN connection port used to connect an external device such as a laptop to connect to the Internet.
• Connects to MDC and the Internet using a LAN cable. (10/100 Mbps)
"
To connect a LAN cable, use a CAT 7 (*STP type) cable for the connection. (10/100 Mbps)
*Shielded Twisted Pair
HDBT (LAN )
• Sends the HDMI signal to a connected LAN cable using an HDBaseT transmitter.
• Connects to MDC and the Internet using a LAN cable. (10/100 Mbps)
"
To connect a LAN cable, use a CAT 7 (*STP type) cable for the connection. (10/100 Mbps)
*Shielded Twisted Pair
HDMI 1
Connects to a source device using a HDMI cable.
HDMI 2
USB 2.0
¨
(External Wi/BT)
Connect to a USB memory device.
Use the remote control within 7 m to 10 m from the sensor on the product at an angle of 30° from the left and right.
"
Do not use a new and used battery together. Replace both batteries at the same time.
"
Remove batteries when the remote control is not to be used for an extended period of time.
17
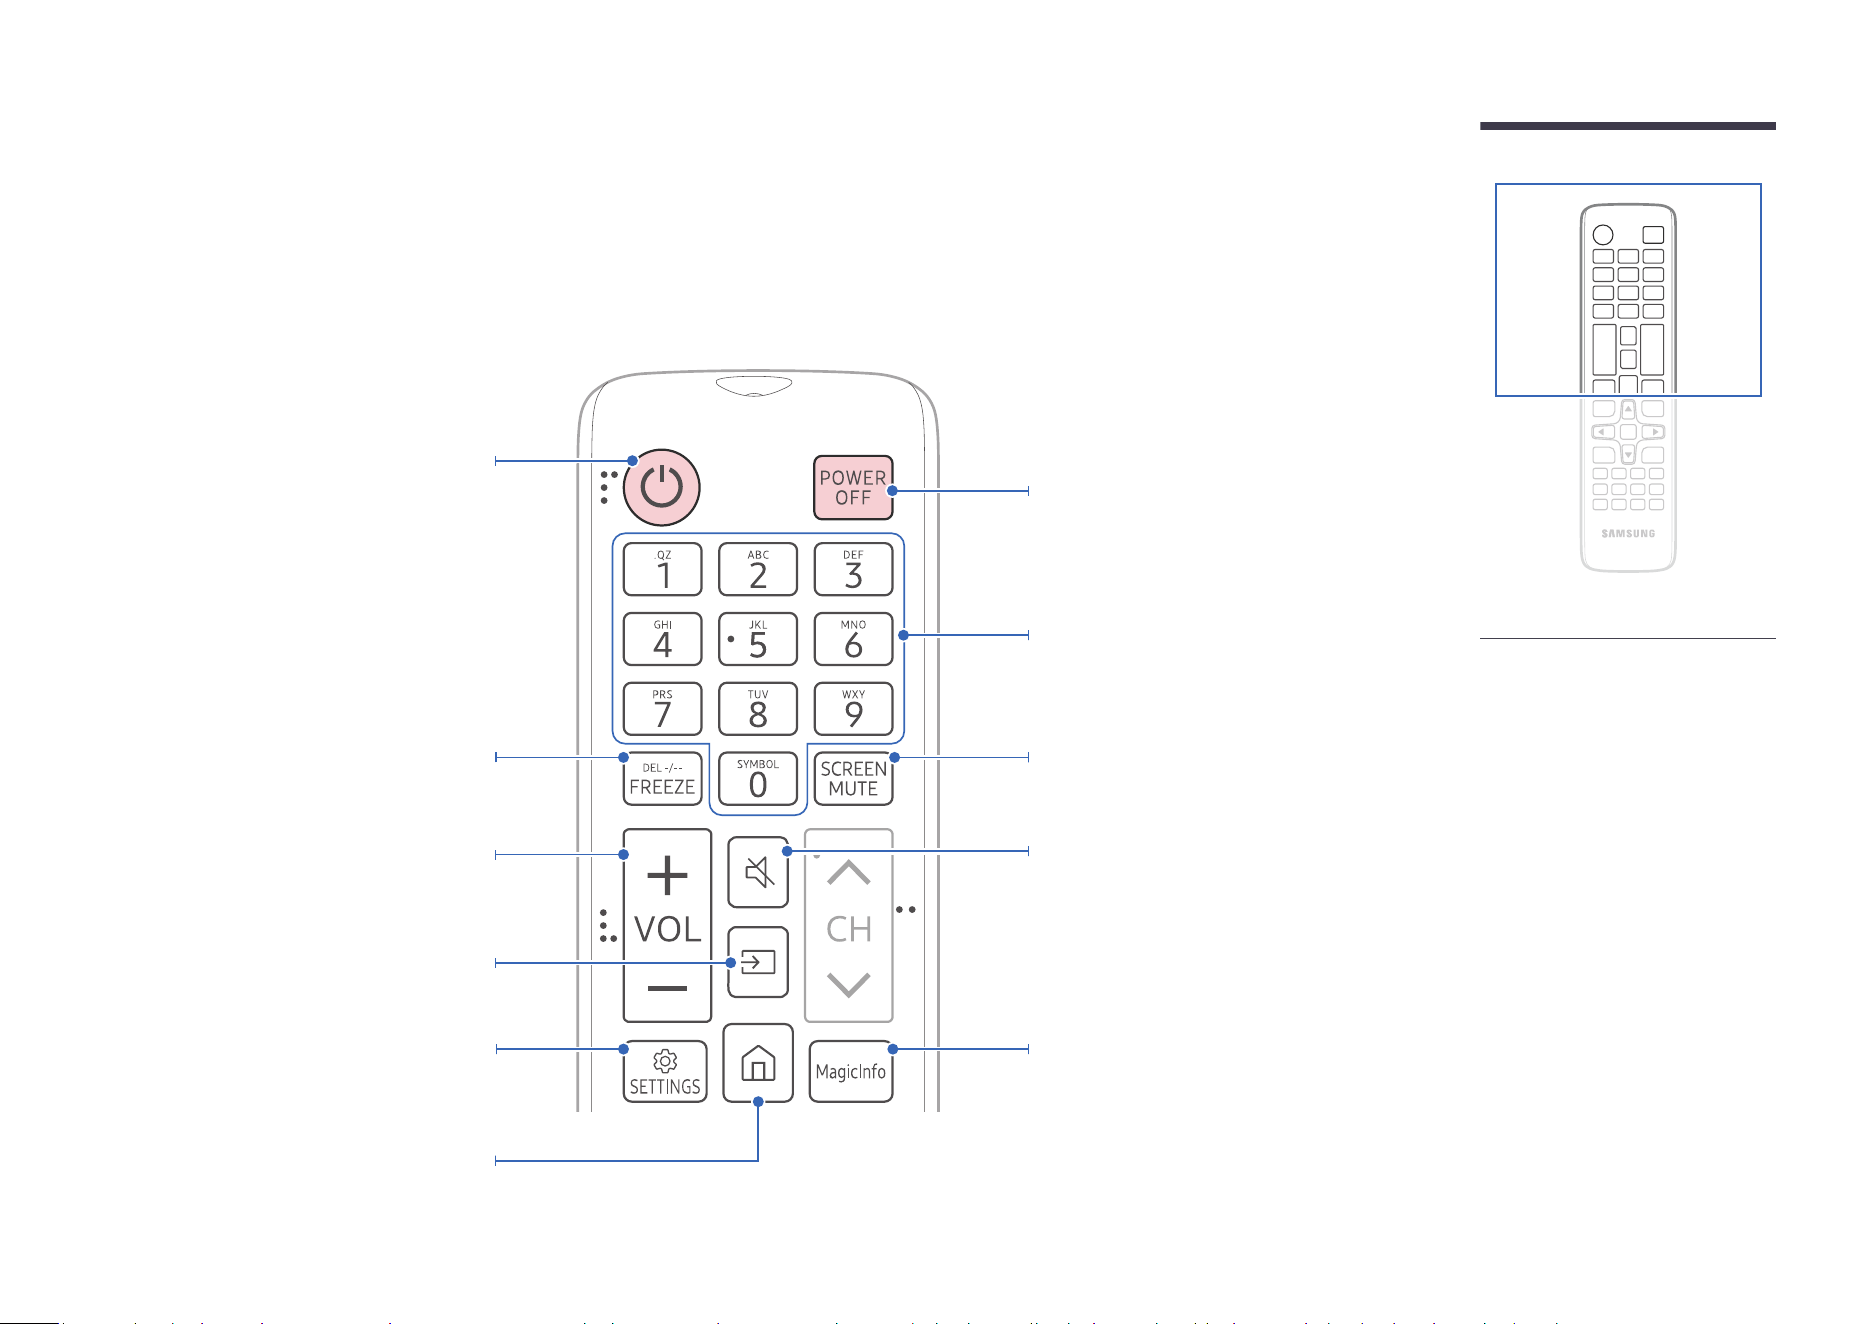
Remote Control
"
Using other display devices in the same space as the remote control of this product can cause the other display devices to be inadvertently controlled.
"
A button without a description in the image below is not supported on the product.
"
The FREEZE function is only available for Source.
Adjust the volume.
Power off the product.
Number buttons
Use to enter a PIN, enter a Date, etc.
Power on the product.
Change the input source.
Display or hide the onscreen display menu, or
return to the previous menu.
A shortcut button to Home screen (MagicInfo).
Mute the sound.
• Unmuting the sound: Press MUTE again
or press the volume control(+ VOL -)
button.
Use this hotkey to directly access MagicInfo.
"
This hotkey is available when a network
box is connected. You can purchase a
network box separately.
"
This function may not be supported
depending on the model.
Stop the screen.
Turns off the screen only. To turn the screen
back on, press it again.
"
Remote control button functions
may differ for different products.
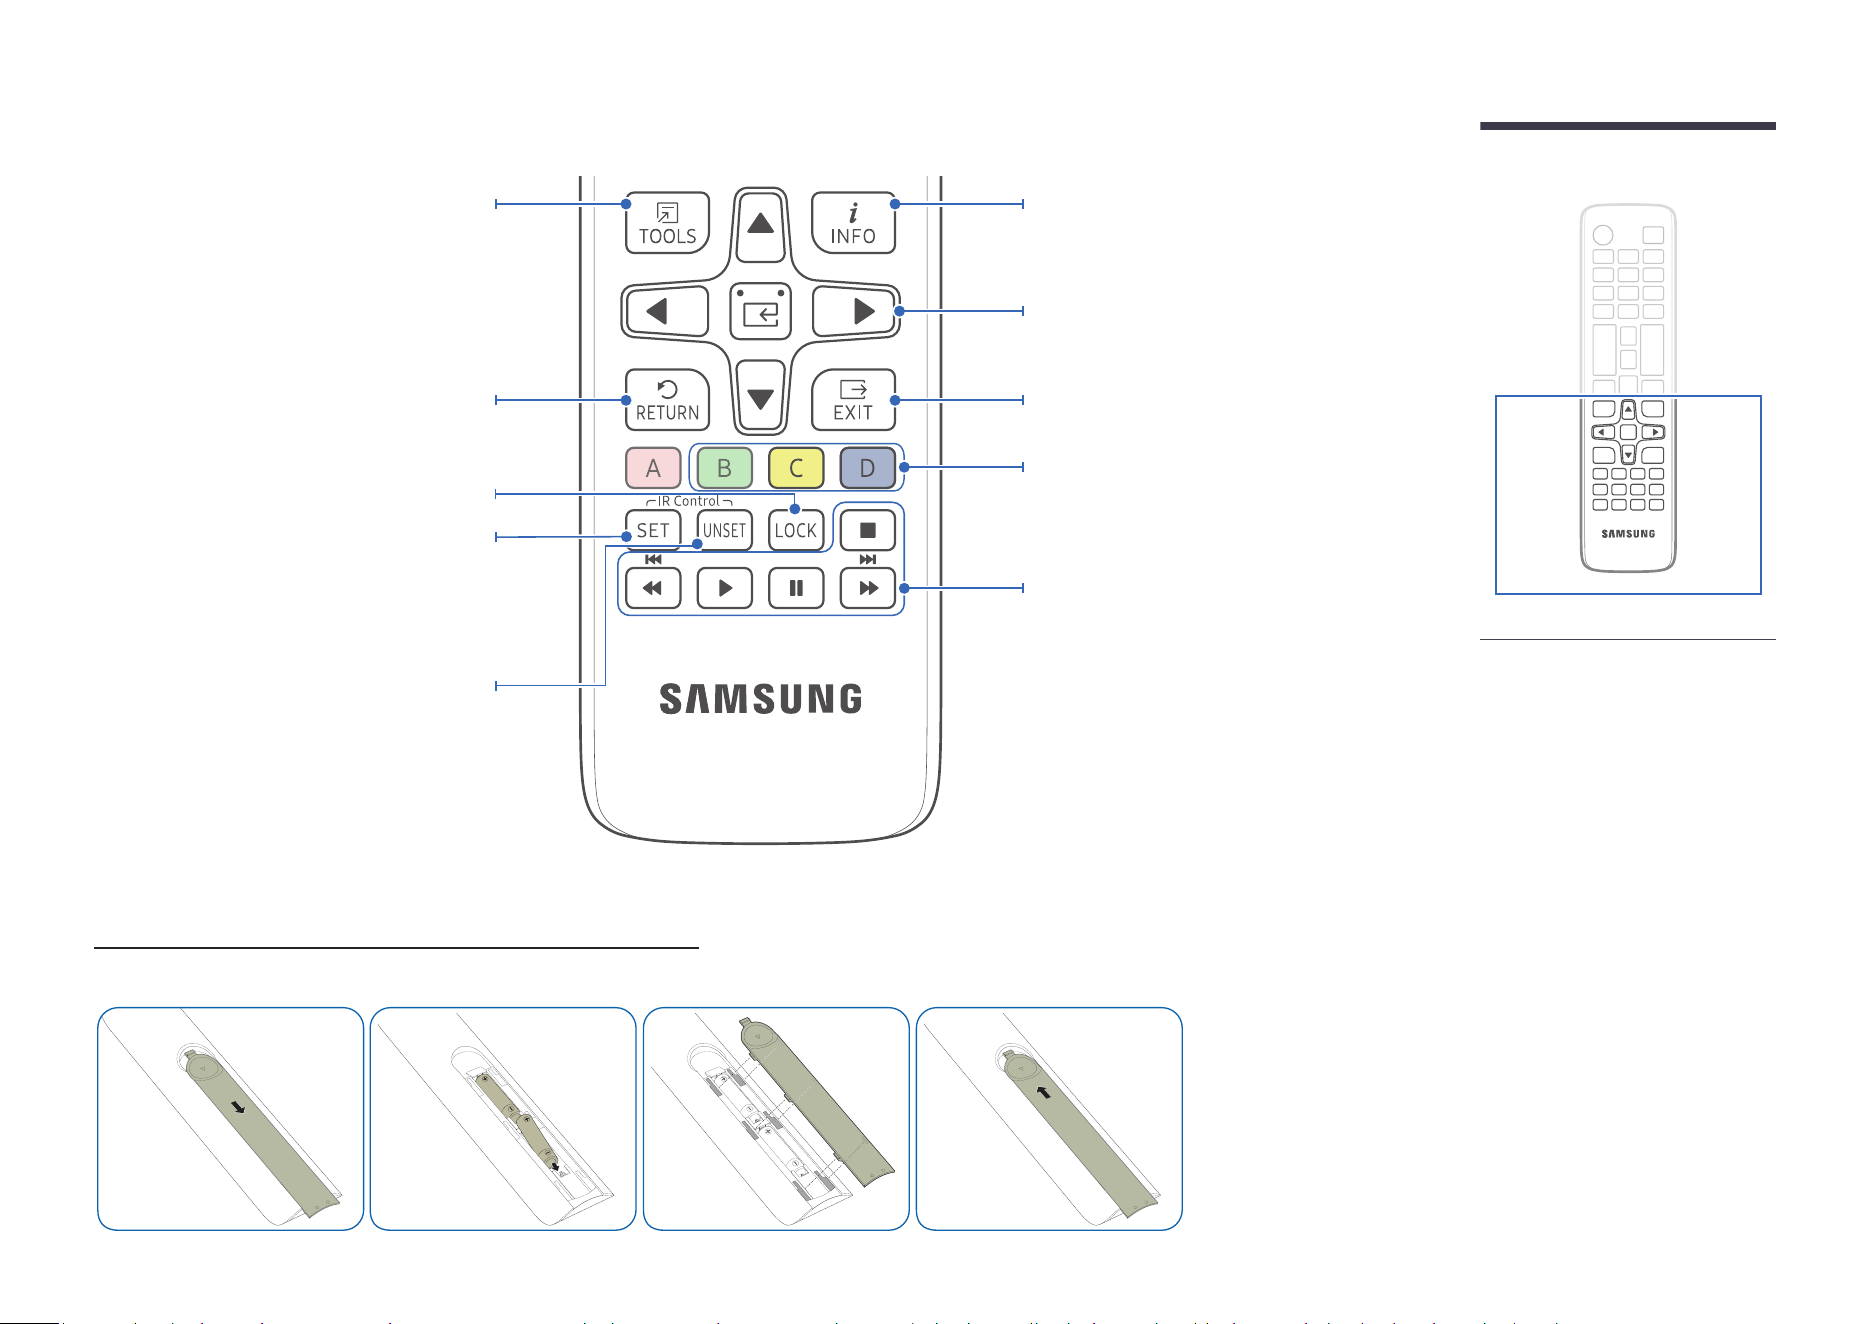
18
Move to the upper, lower, left or right menu,
or adjust an option's setting.
Confirm a menu selection.
Exit the current menu.
Select from the connected external devices.
"
Some models may not support all port
types.
Use these buttons with specific features. Use
these buttons according to the directions on
the product screen.
Display information about the current input
source.
Return to the previous menu.
Quickly select frequently used functions by
pressing it while a content is playing.
It sets safe lock function.
Press the SET button and enter a device ID
using numeric buttons. Control the product
using the remote control.
Cancel a value that has been set using the SET
button and control all connected products
using the remote control.
"
Remote control button functions
may differ for different products.
To place batteries in the remote control (AAA x 2)
"
Remove batteries when the remote control is not to be used for an extended period of time.
19
Before Installing the Product
"
Contact Samsung Customer Service Center for further details.
To prevent injury, this apparatus must be securely attached to the floor/wall in accordance with
the installation instructions.
• Ensure that an authorized installation company installs the wall mount.
• Otherwise, it may fall and cause personal injury.
• Make sure to install the specified wall mount.
If the product temperature increases due to high outside temperature or the environment in
which the product is installed, the luminance decreases for product overheating mitigation and
accident prevention.
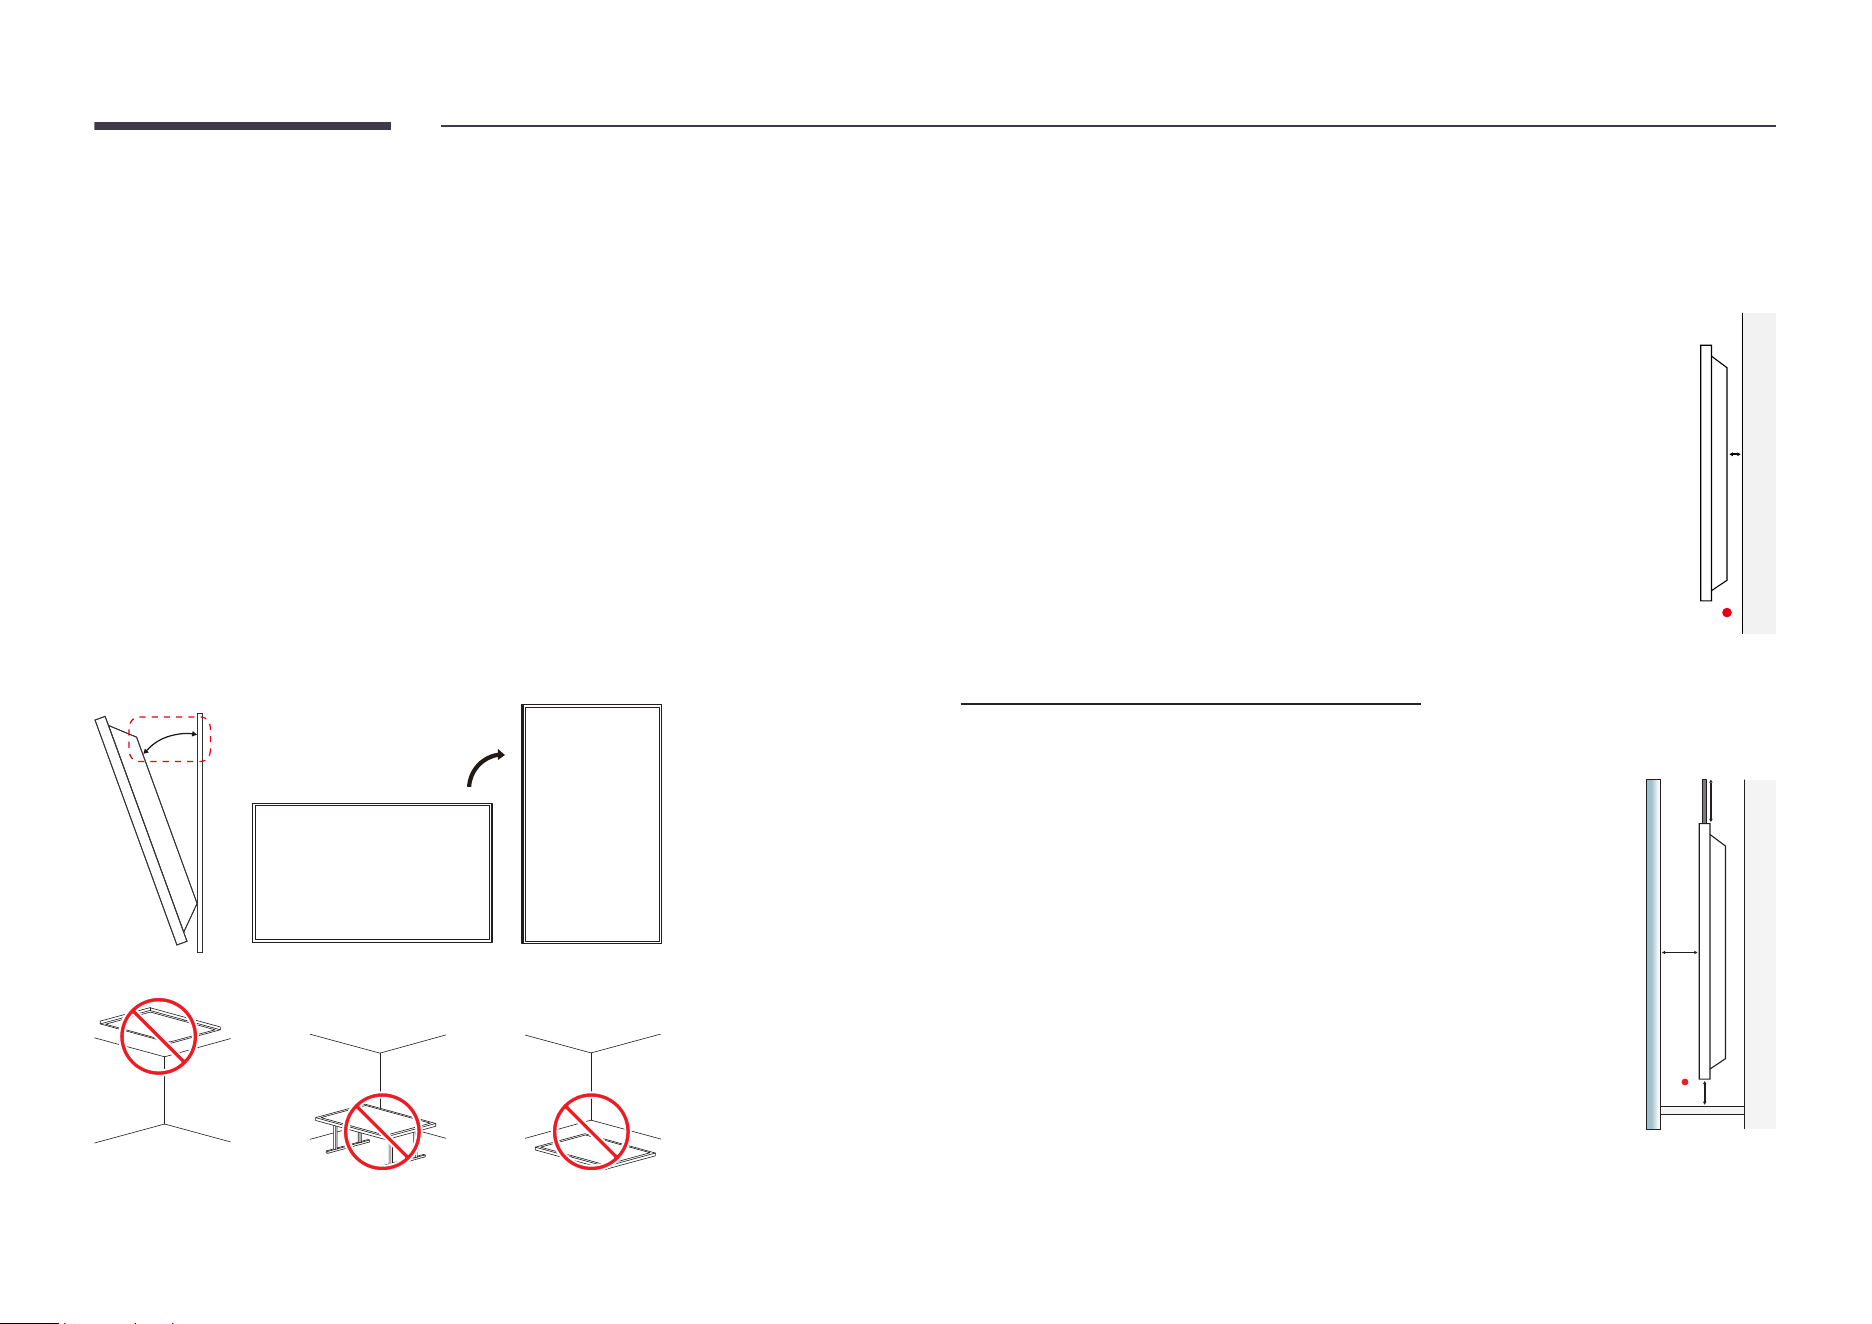
Tilting Angle and Rotation
• The product can be tilted at a maximum angle of 15° from a perpendicular wall surface.
• To use the product vertically (portrait), turn it clockwise.
15°
"
Do not use this model installed on a ceiling, floor, or table.
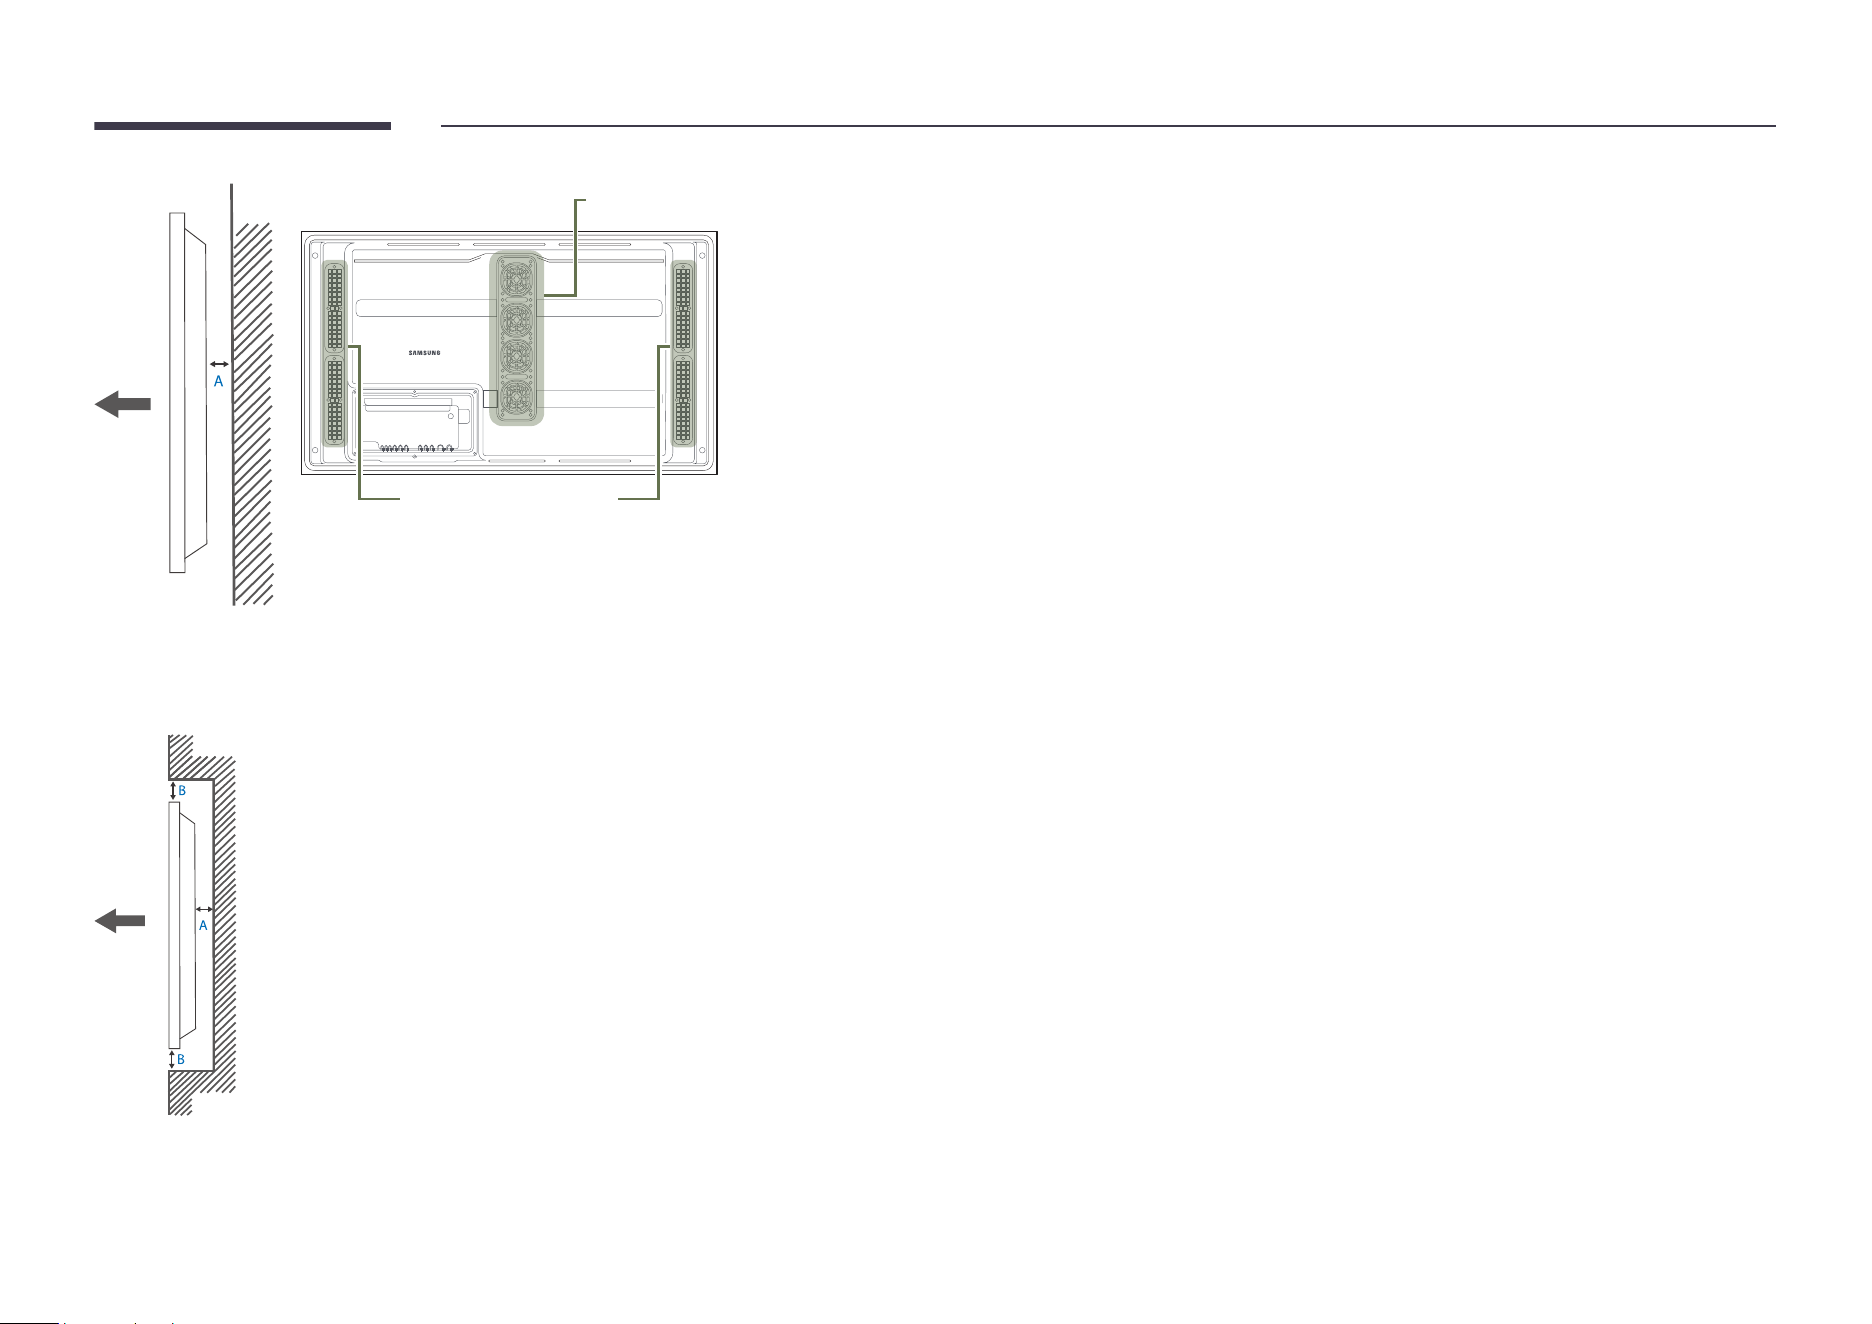
Ventilation (OM** models only)
Installation on a Perpendicular Wall
A
Minimum 60 mm
B
Ambient temperature: Under 30 °C (If affected by sun light)
Ambient temperature: Under 40 °C (If not affected by sun light)
"
When mounting to a wall surface, the clearance between the product
and the wall should be at least 60 mm at all times. The ambient
temperature should not be exceed 30 °C if it is affected by sun light.
The ambient temperature should not be exceed 40 °C if it is not
affected by sun light.
A
B
Clearance for installation by windows
"
Do not block the ventilation openings on the top and bottom sides.
A
Distance from the show-window > 100 mm
B
Distance from the ceiling > 300 mm
C
Distance from the floor > 100 mm
D
Operation temperature range: 0 to 30 ℃ (under direct sunlight)
C
A
B
D
20
Air vent
Air intake
Ventilation (OH** models only)
Installation on a Perpendicular Wall
A Minimum 50 mm
"
Do not block the vent on the product.
Installation on an Indented Wall
A Minimum 50 mm
B Minimum 50 mm
"
When installing the product on an indented wall, allow at least the space specified above between the product
and wall for ventilation and ensure that the ambient temperature is kept below 50°C.
21
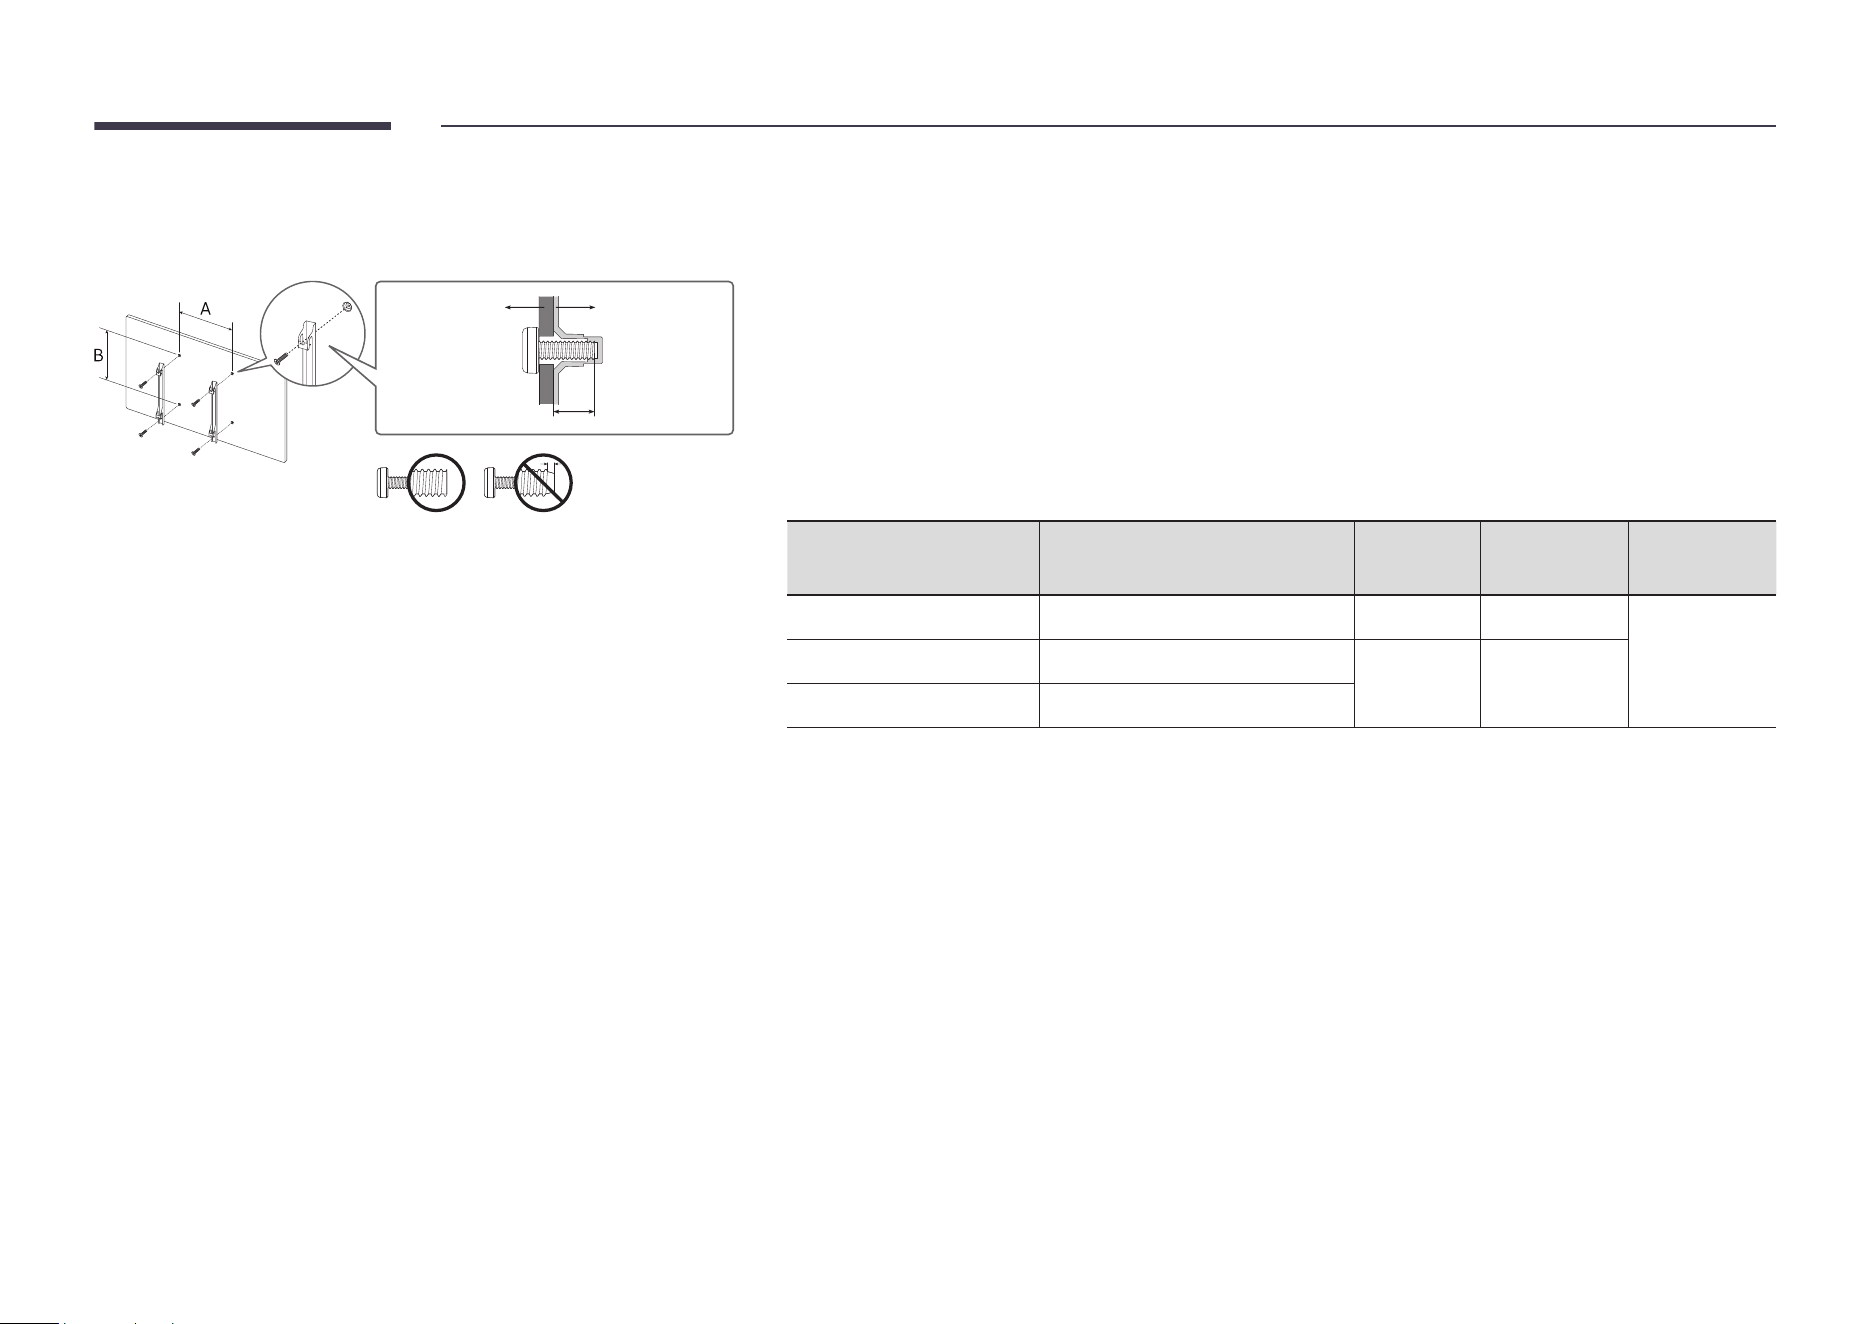
Installing the product
LFD
Wall mount
bracket
C
• Use Metric Screws with length no longer than listed depth below and depth of mounting bracket combined.
Screws that are too long may cause damage to the inside of the product.
• The screw length may vary depending of the thickness of the brackets.
Use the screws meeting the minimum depth of mounting holes specified in the installation guide.
• Do not fasten the screws too firmly. This may damage the product or cause the product to fall, leading to
personal injury.
• Samsung is not liable for product damage or personal injury resulting from using screws that do not comply
with the standard specifications.
• Do not mount the product at more than a 15 degree tilt.
• Always have two people mount the product on a wall.
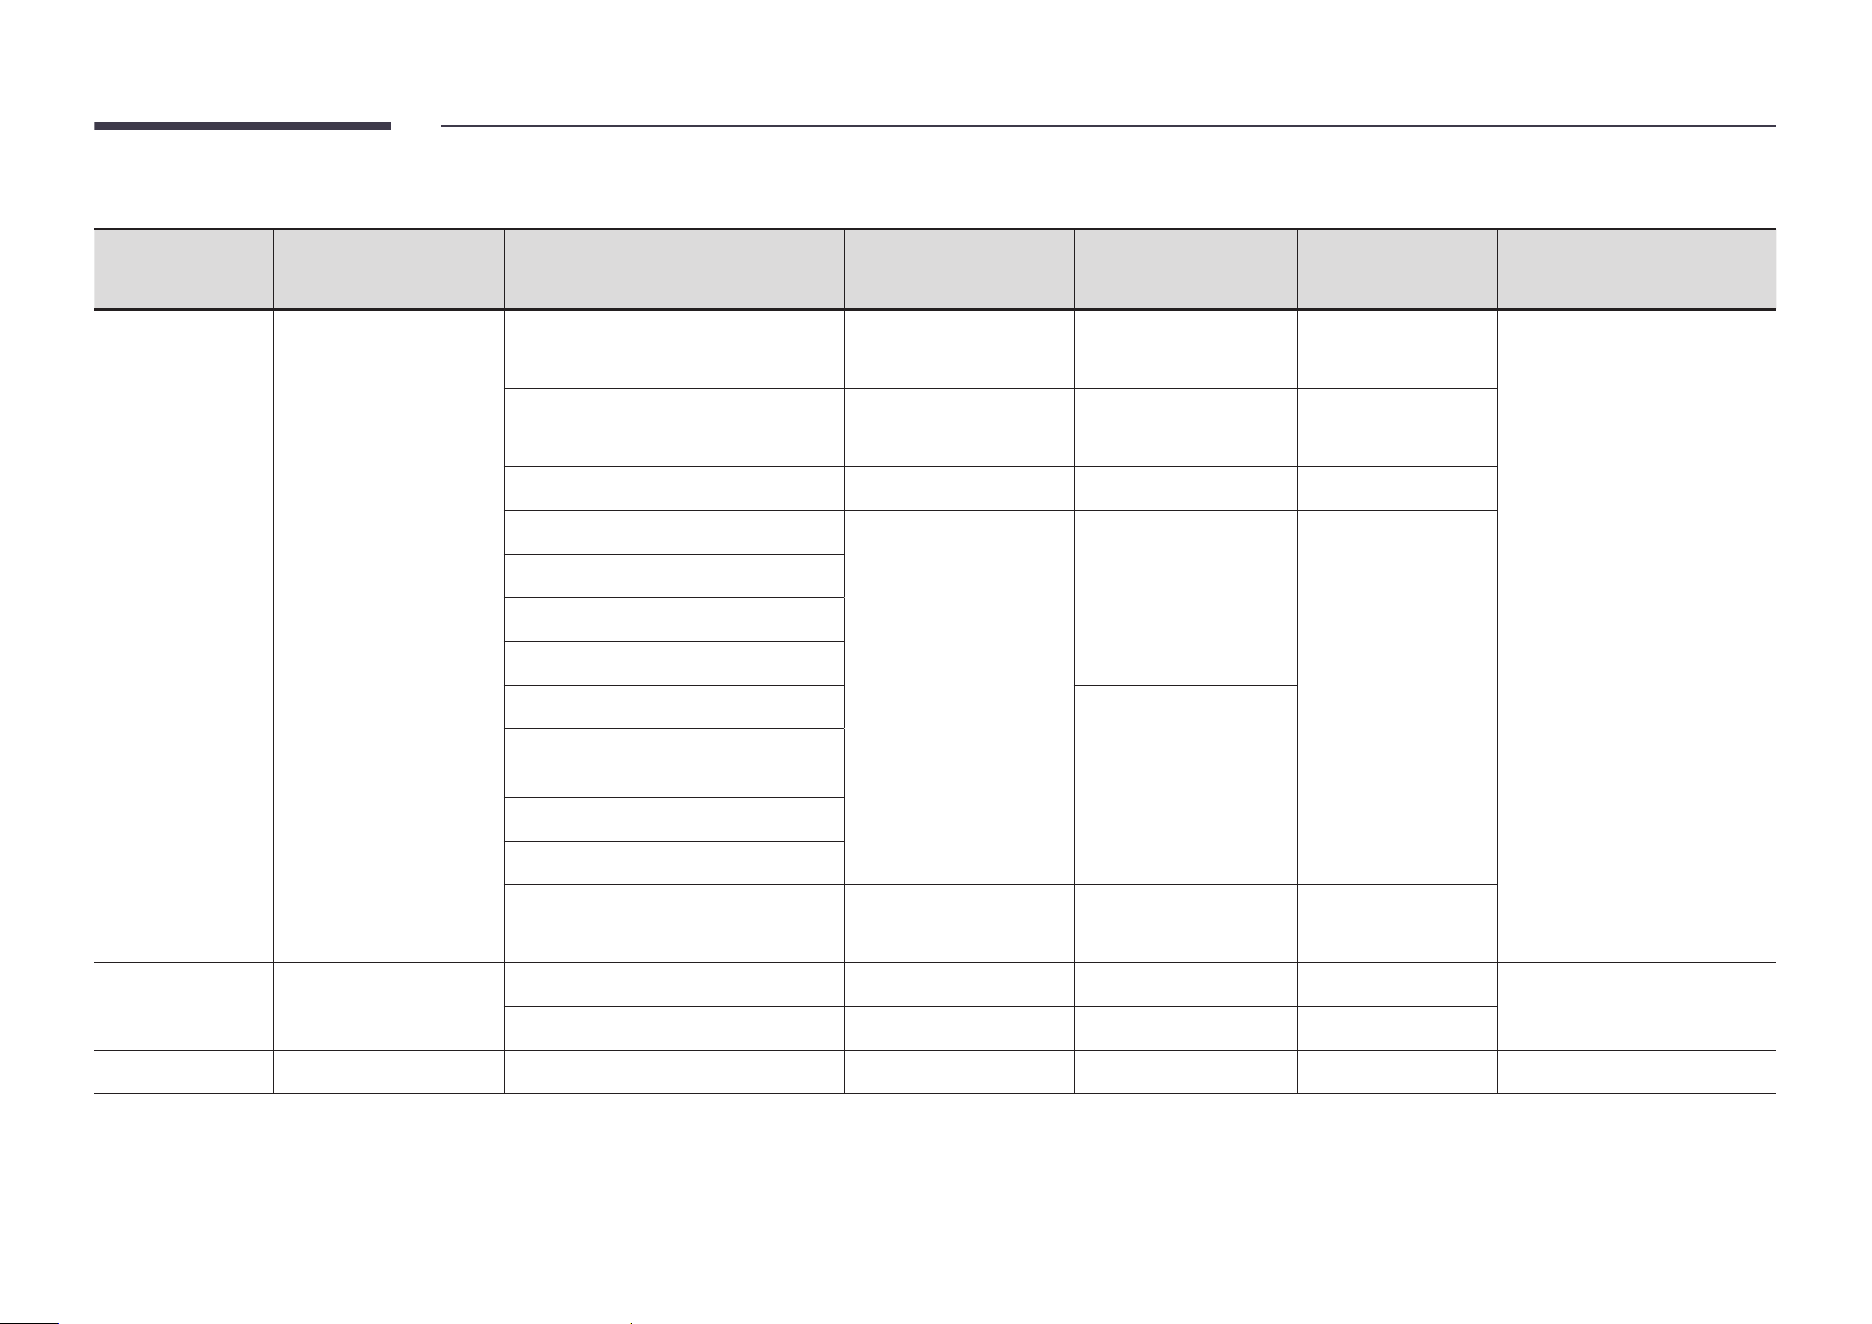
• The product’s mounting patterns and specification are shown in the table below.
Model Name
VESA screw hole specs (A * B)
in millimeters
C (mm)
Standard
Screw
Quantity
OM32DX 100 x 100 18 - 20 M4
4OH46DX 995 x 500
9 - 11 M8
OH55DX / OH55DX-S 1186 x 560
"
Ensure product is powered off when installing a mounting bracket. It may result in personal injury due to
electric shock.

22
Before Connecting
Pre-connection Checkpoints
"
Refer to the user guide for the source device you want to connect with.
The number and location of ports available on the source device may vary depending on the model.
"
Do not connect the power cord until all connections are completed.
Connecting the power cord during connection may damage the product.
"
Check the types of ports at the back of the product you want to connect.
"
We recommend using authorized cables for HDMI cable connections.
Connecting and Using a Source Device
Chapter 03
23
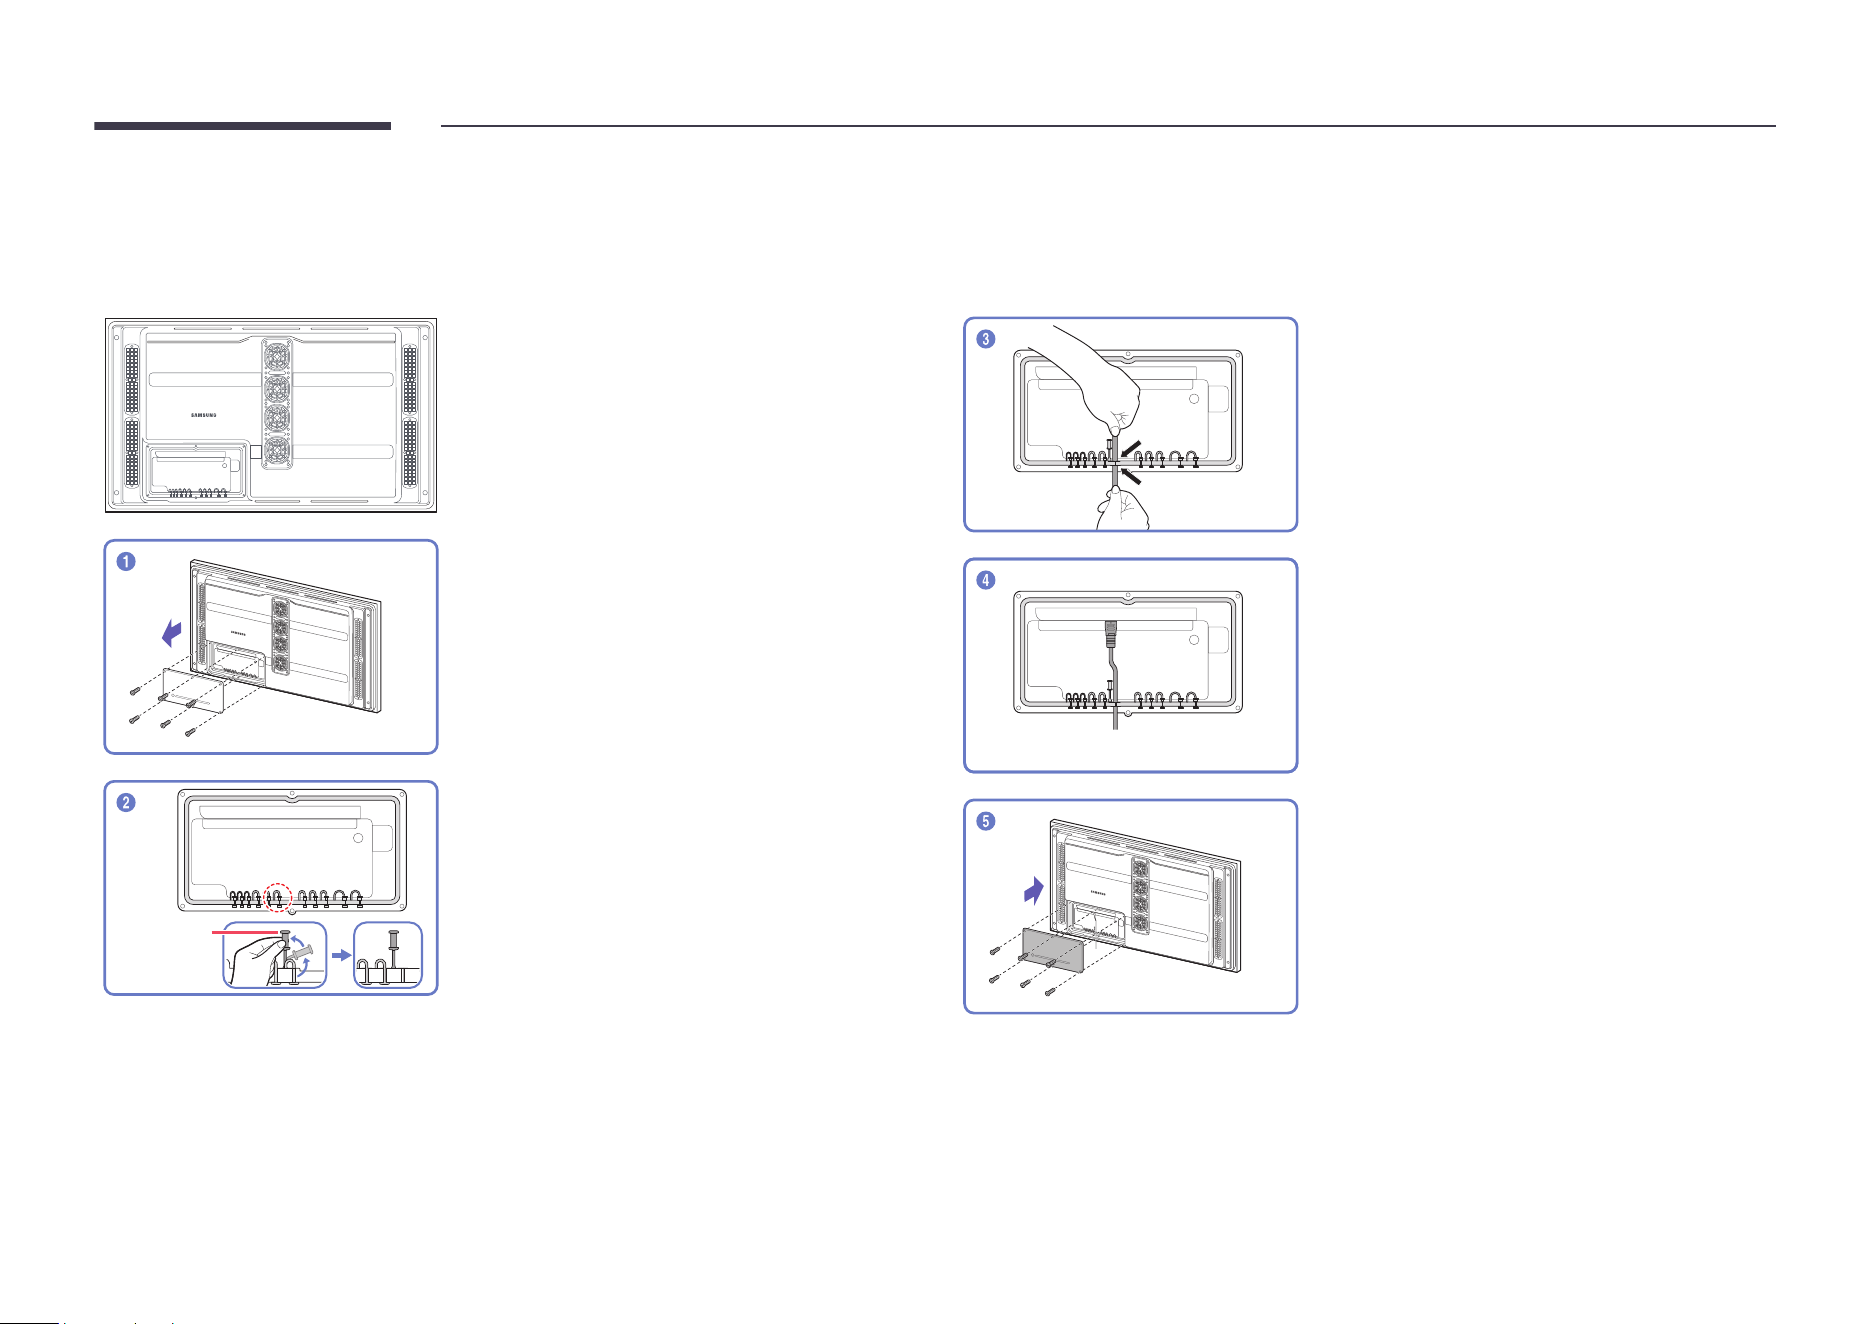
Before connecting cables (OH** models only)
"
The color and shape of parts may differ from what is shown. Specifications are subject to change without notice to improve quality.
Unfasten the screws, then remove the cover.
Silicone bar
Remove the appropriate silicone bar for the
thickness of the cable to connect.
Different hole sizes and corresponding cable
thickness for each:
"
8 Ø hole x 1 : Insert the 8 Ø cable
"
7 Ø hole x 1 : Insert the 7 Ø cable
"
5.5 Ø hole x 4 : Insert the 5.5 Ø cable
"
5 Ø hole x 2 : Insert the 5 Ø cable
"
3 Ø hole x 3 : Insert the 3 Ø cable
Insert the appropriate cable into the hole from
which the silicone bar was removed.
The cable should be connected as shown.
Close the cover, then fasten the screws.
"
After all the cables are connected, make sure
to close the cover and fasten the screws to
ensure it is water tight.
"
Recommended torque : 10 - 12 kgf.cm
24
Connecting to a PC
• Do not connect the power cord before connecting all other cables.
Ensure you connect a source device first before connecting the power cord.
• A PC can be connected to the product in a variety of ways.
Select a connection method suitable for your PC.
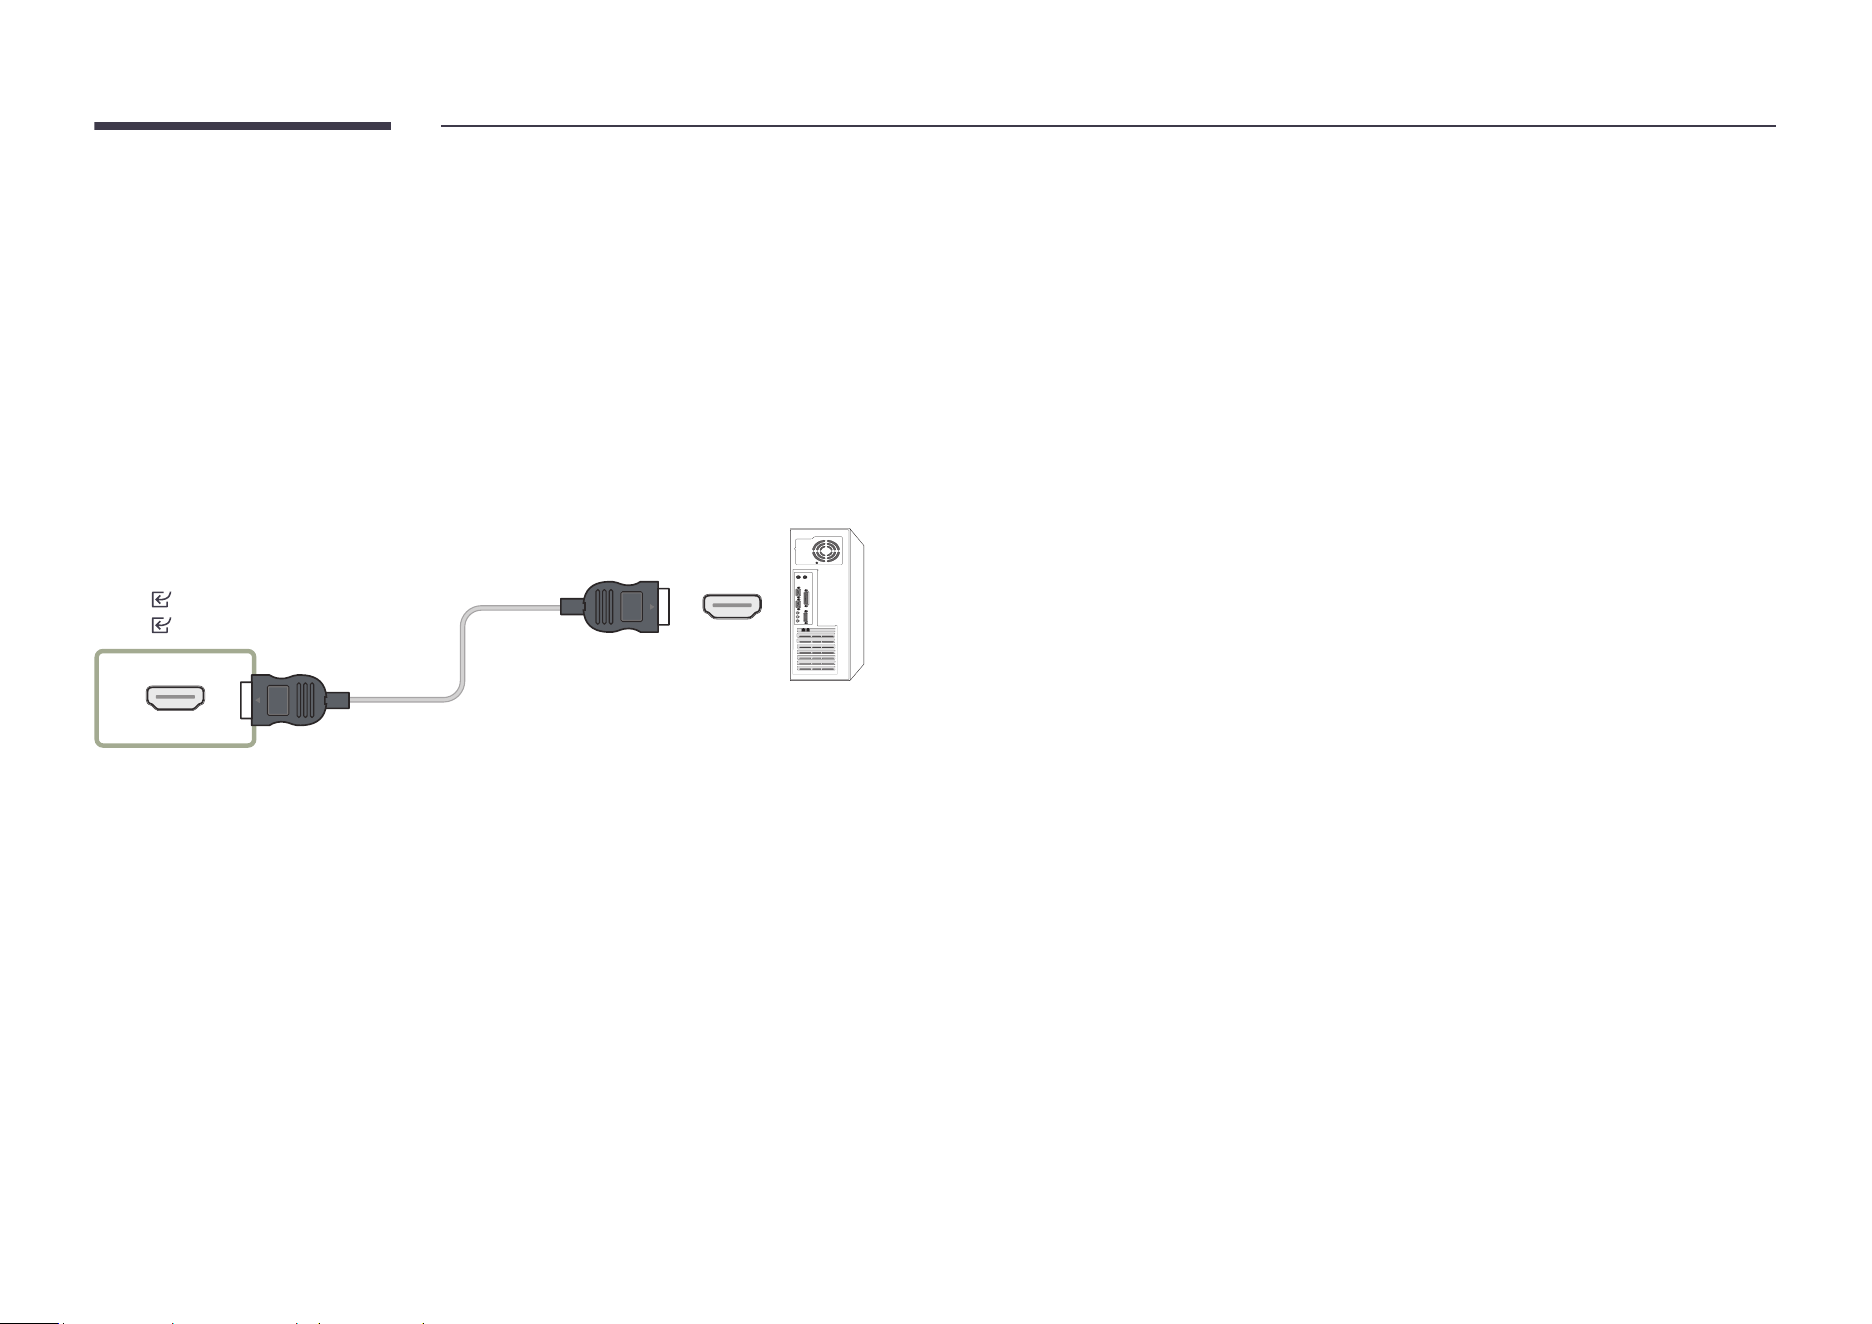
Connection Using an HDMI Cable
"
Connecting parts may differ in different products.
HDMI 2
HDMI 1
25
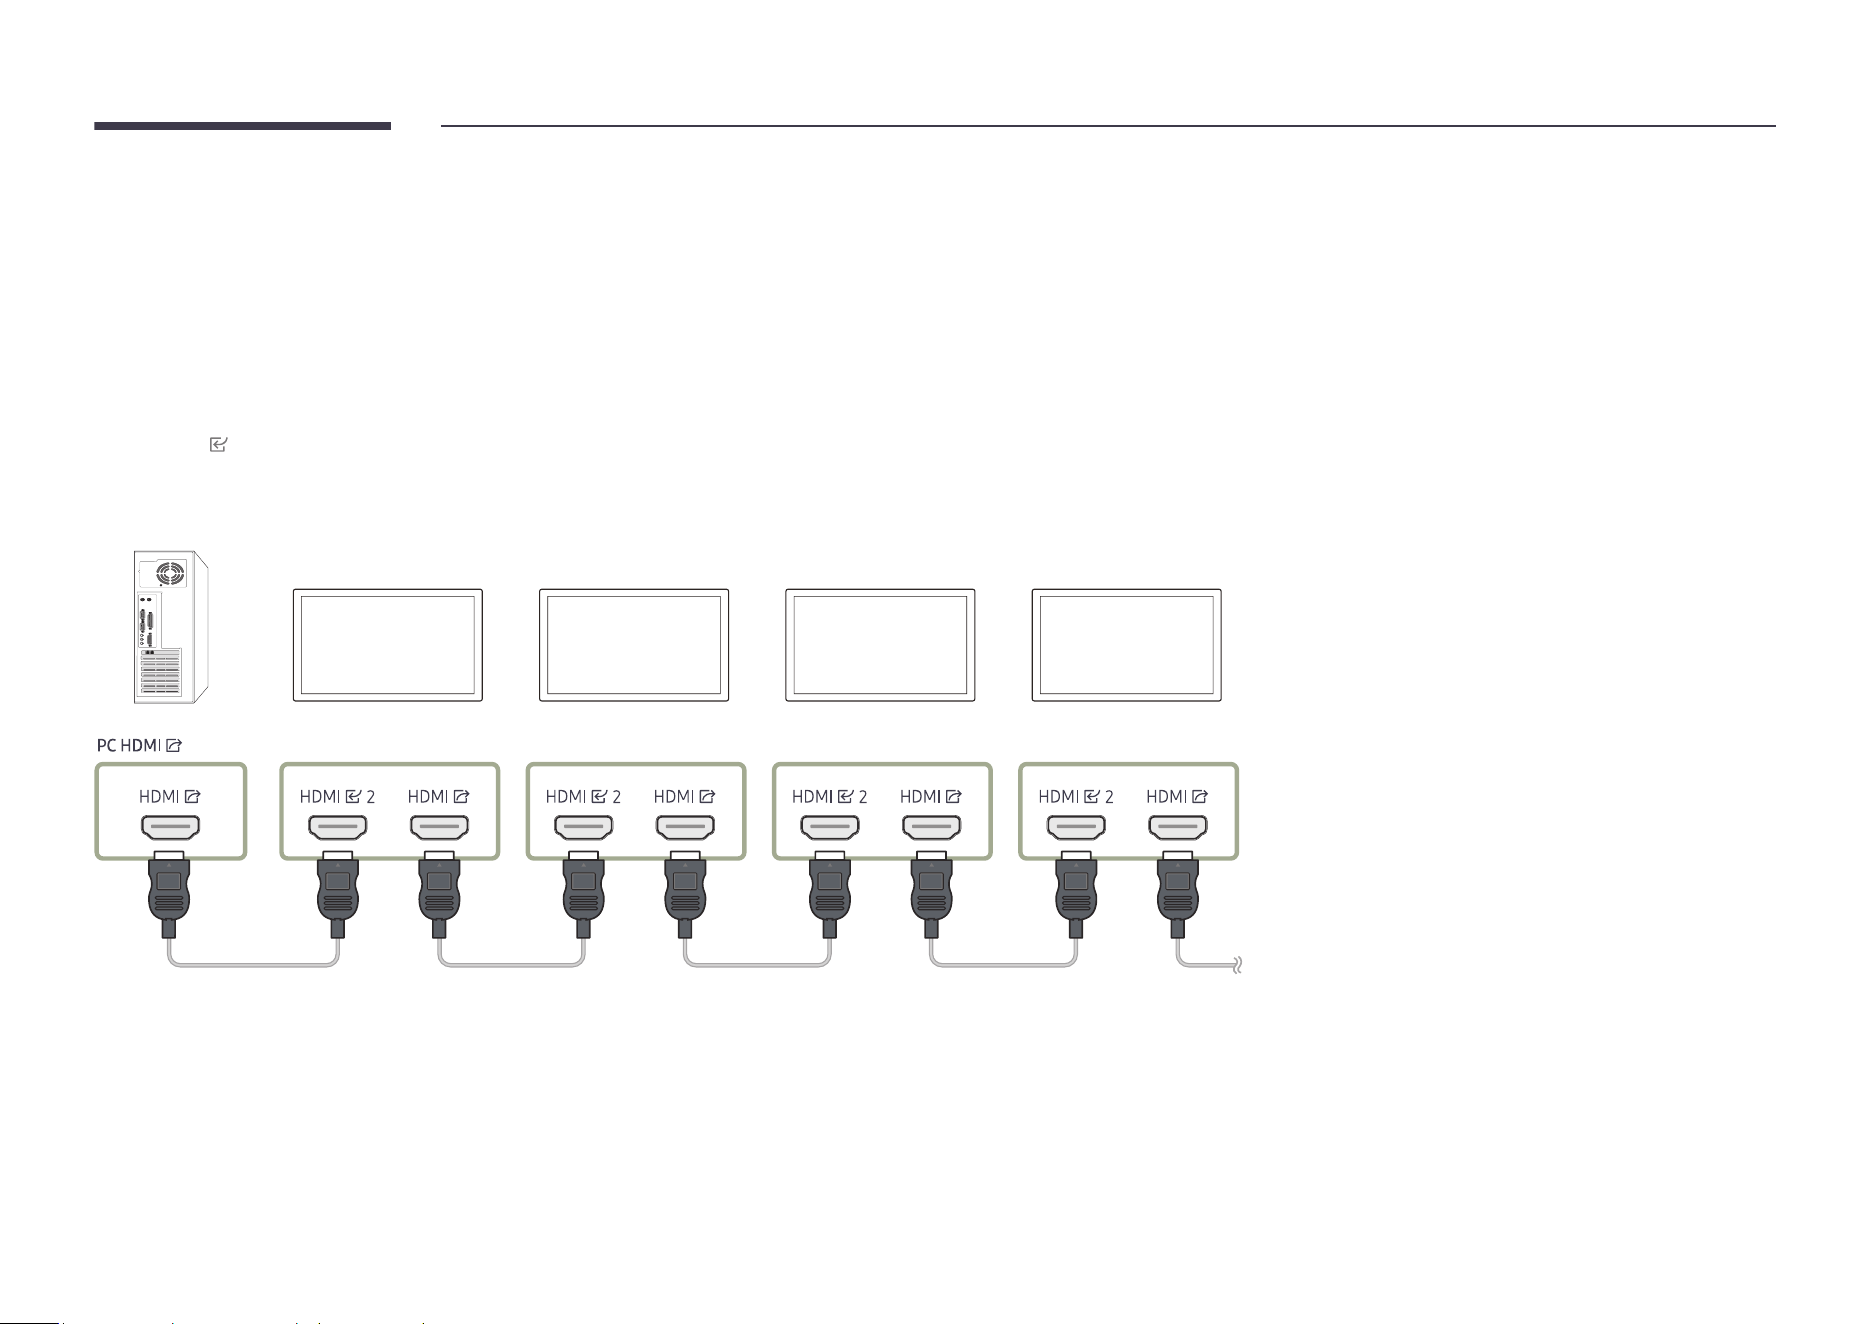
Connecting an External Monitor
• Do not connect the power cable before connecting all other cables.
Ensure you connect a source device first before connecting the power cable.
"
Only the ports that are marked as DAISY CHAIN are supported. Connecting parts may differ in different products.
"
Use a cable shorter than 10 feet (3m) to get the best UHD content viewing quality.
"
Maximum loopouts: Up to 4 are supported if HDCP 2.2 is supported, up to 7 if HDCP 1.4 is supported, and up to 9 if HDCP is not supported.
"
HDMI
1 is not supported.
"
Setting Anynet+ (HDMI-CEC) to On while using a daisy chain connection may cause malfunction.
PC
Monitor 1 Monitor 2 Monitor 3
Monitor 4
26
Connecting to a Video Device
• Do not connect the power cable before connecting all other cables.
Ensure you connect a source device first before connecting the power cable.
• You can connect a video device to the product using a cable.
"
Press the SOURCE button on the remote control to change the source.
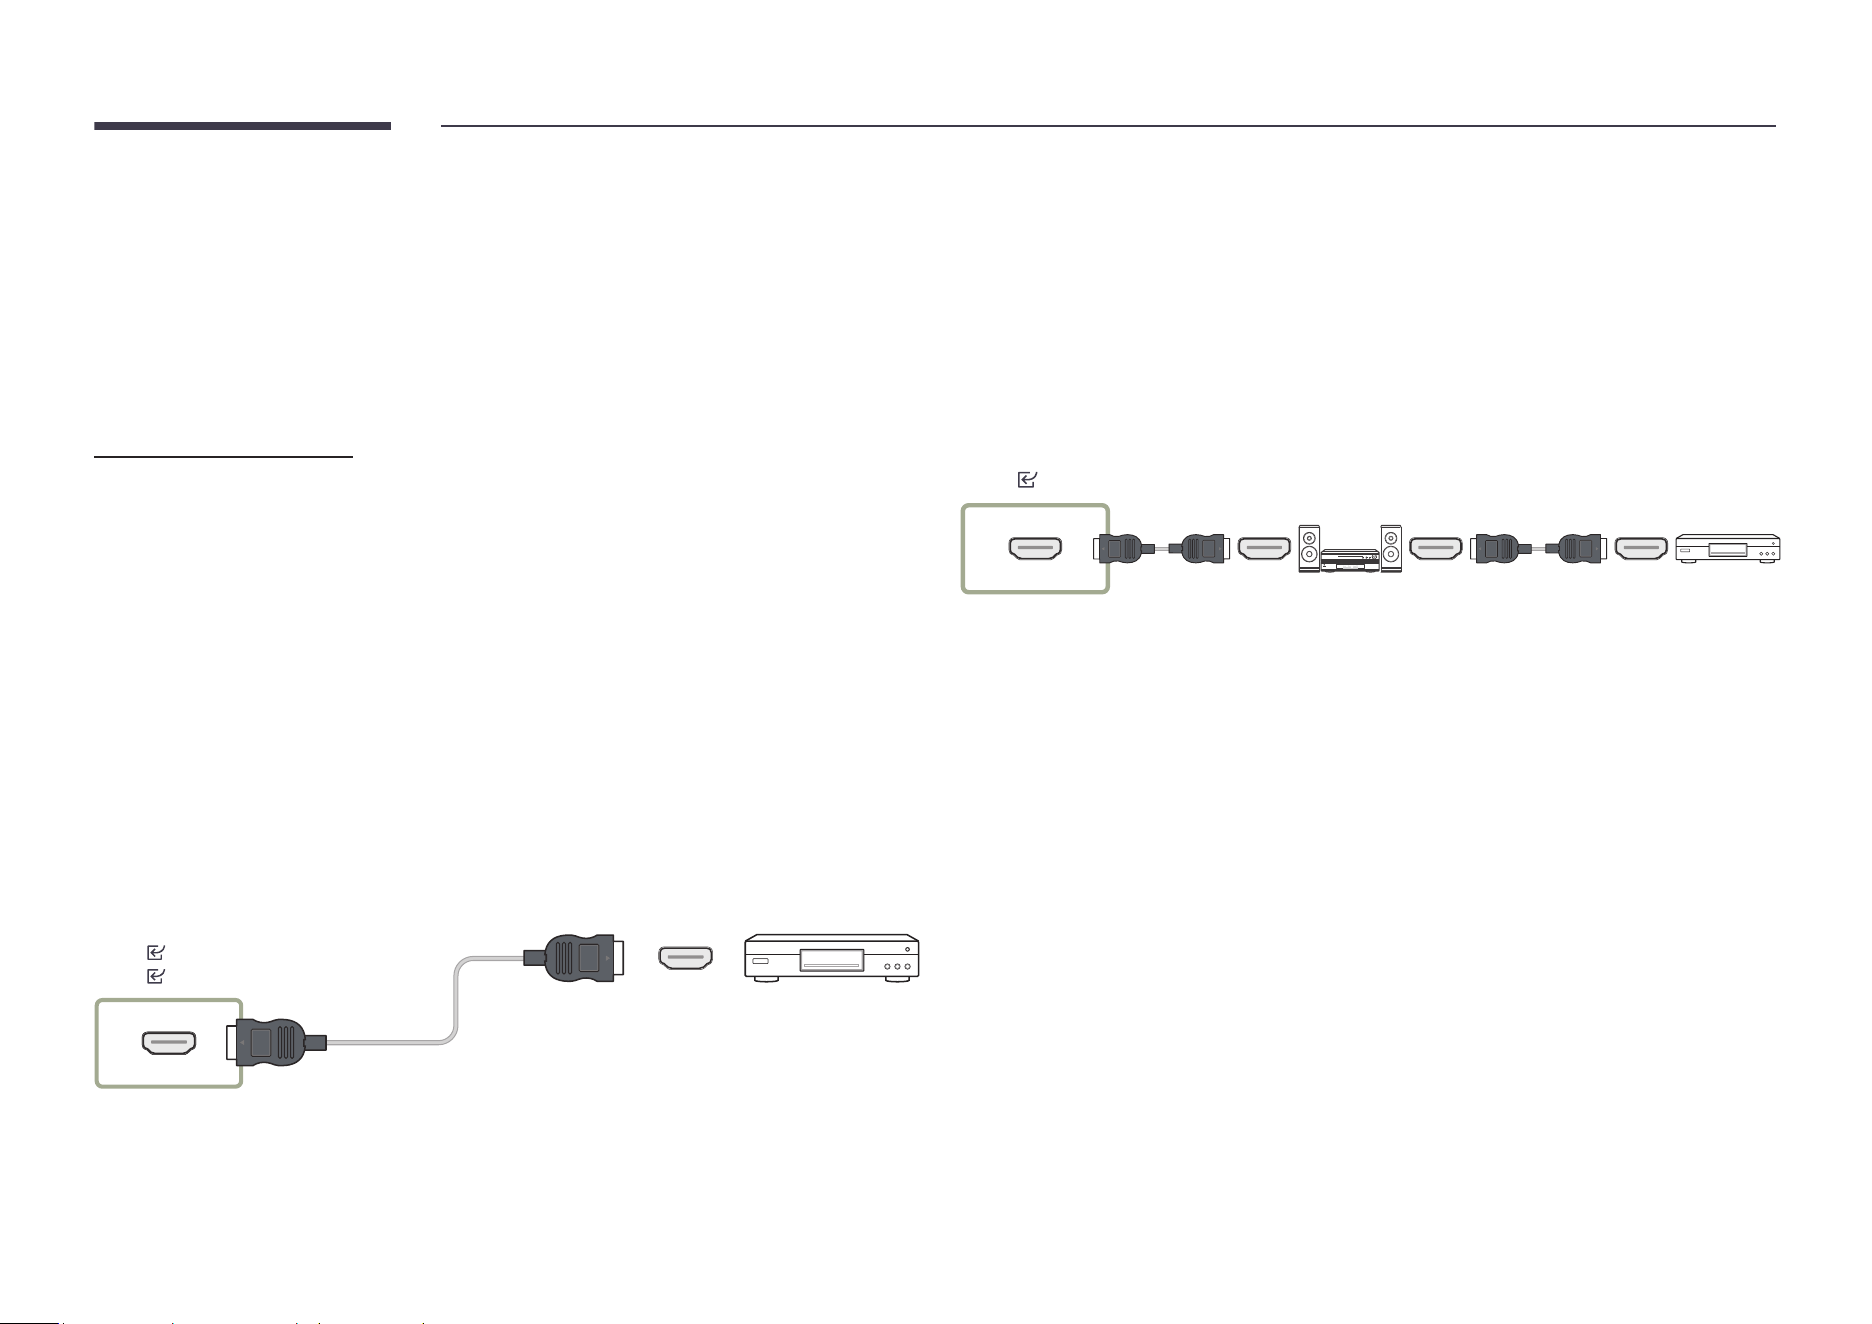
Using an HDMI Cable
• An HDMI cable supports digital video and audio signals, and does not require an audio
cable.
• The picture may not display normally (if at all) or the audio may not work if an external
device that uses an older version of HDMI mode is connected to the product. If such a
problem occurs, ask the manufacturer of the external device about the HDMI version and, if
out of date, request an upgrade.
• Be sure to use an HDMI cable with a thickness of 14 mm or less.
• Be sure to purchase a certified HDMI cable. Otherwise, the picture may not display or a
connection error may occur.
• A basic high-speed HDMI cable or one with ethernet is recommended.
This product does not support the ethernet function through HDMI.
Connection Using an HDMI Cable
"
Connecting parts may differ in different products.
HDMI 2
HDMI 1
Connecting HDMI to Sound system and
Video device
"
Connecting parts may differ in different products.
After connecting a video device to the product using SOUND BAR HDMI Port an HDMI cable,
make sure to configure the settings as shown below.
Settings → System → General → set HDMI Hot Plug to Off
HDMI 1
27
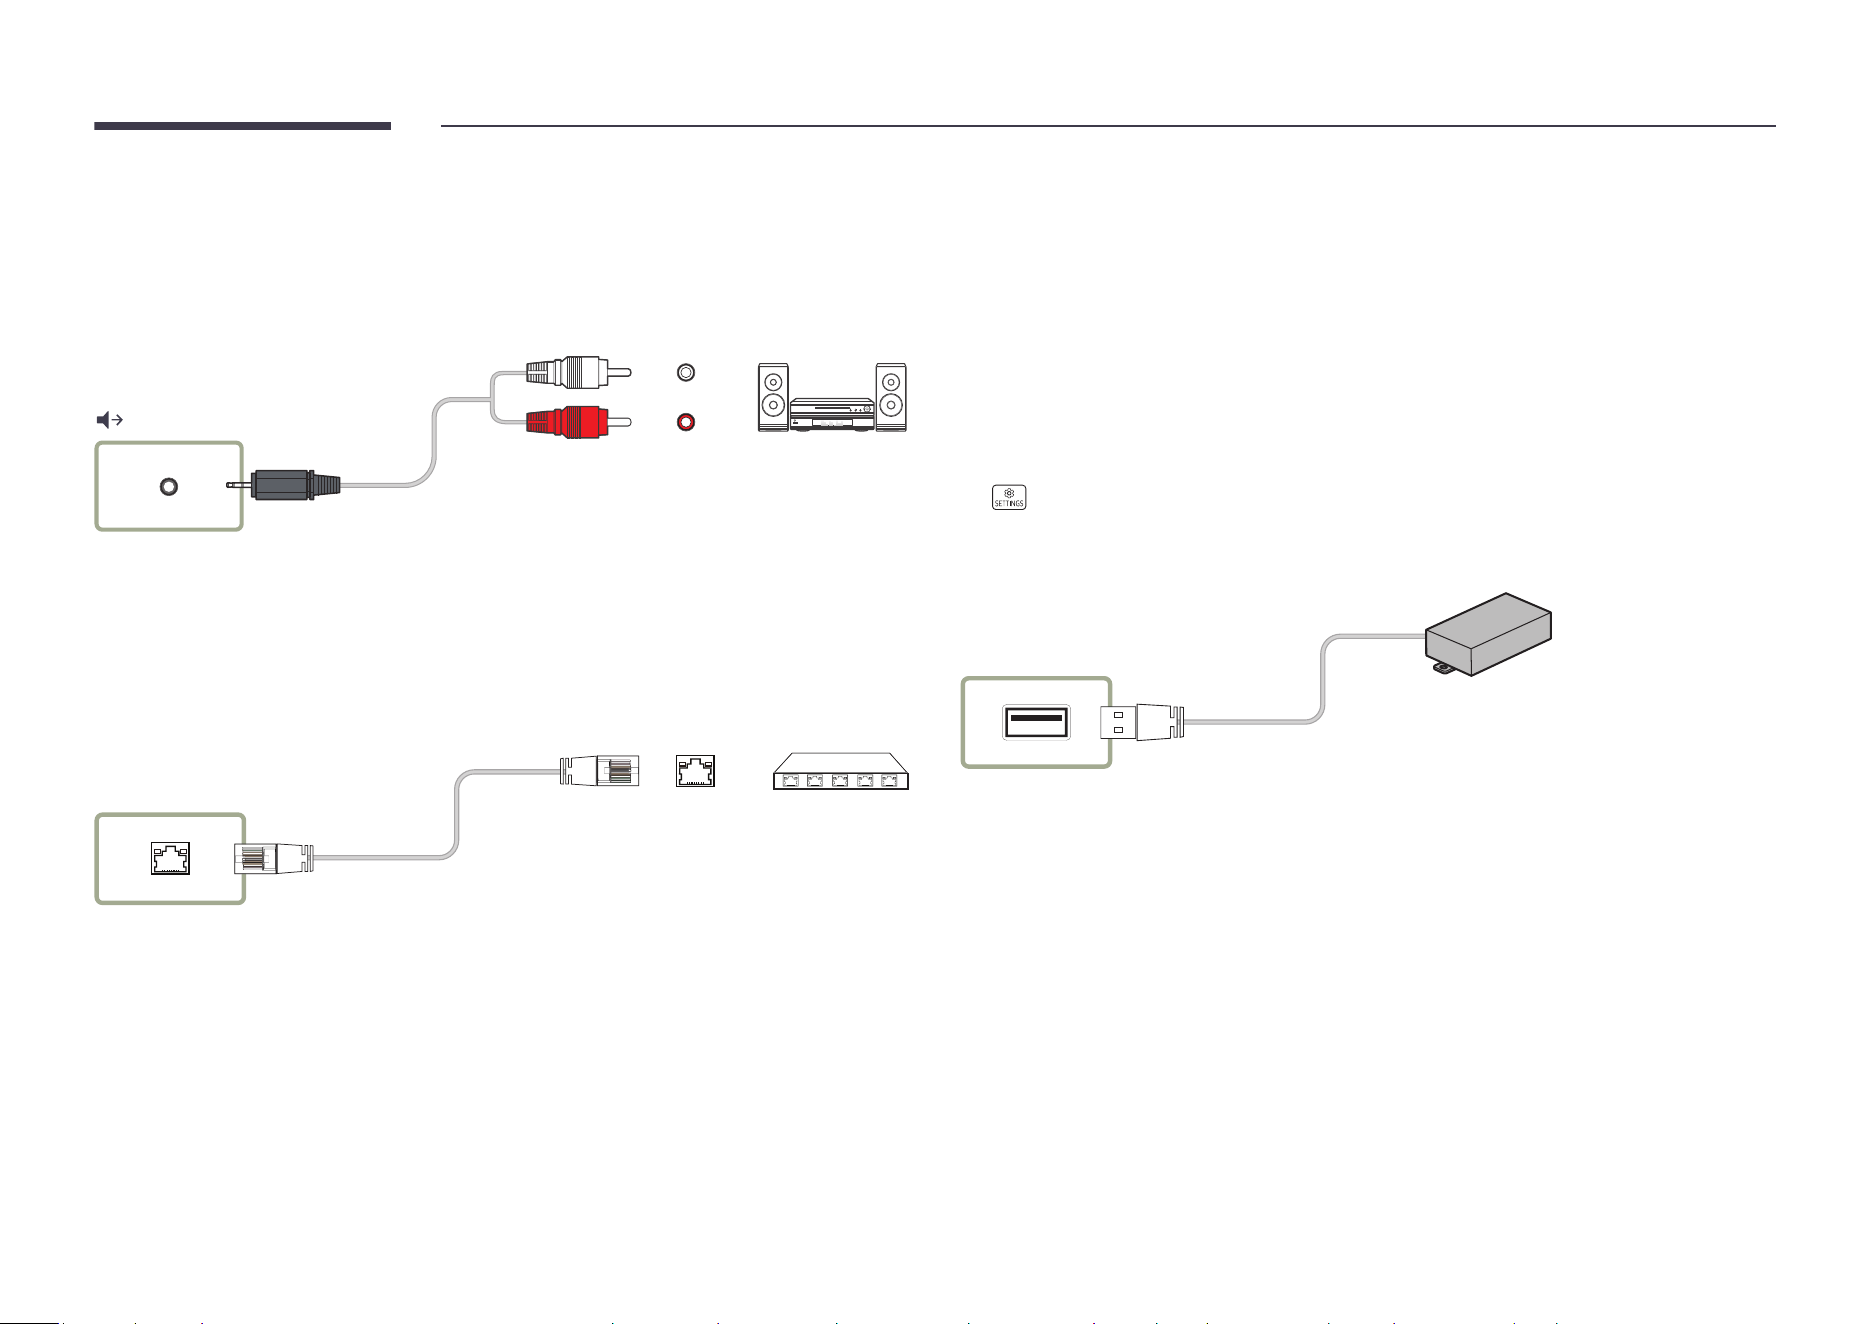
Connecting to an Audio System
"
Connecting parts may differ in different products.
"
Make sure to connect the same color connectors together. (white to white, red to red, etc.)
Connecting the LAN Cable
"
Connecting parts may differ in different products.
RJ45 (HDBT/LAN)
• To connect a LAN cable, use a CAT 7 (*STP type) cable for the connection. (10/100 Mbps)
*Shielded Twisted Pair
Connecting using the Wi-Fi&BT module
(OH** models only)
Use the supplied double-sided tape to affix the external Wi-Fi&BT module.
It is recommended that the module be positioned within 10 m from the wireless router,
ensuring that it faces the router.
Connect the external Wi-Fi&BT module to the USB port, and turn the product off and on again.
"
Make sure to connect it to the USB 2.0 ¨ (External Wifi/BT) port.
"
→ Support → Contact Samsung
If the Wi-Fi&BT module is properly connected, you can check the MAC address and
Bluetooth address.
USB 2.0
¨
(External Wifi/BT)
"
This component may not be provided, depending on the model.

28
Changing the Input source
Source
s → sSource
Source allows you to select a variety of sources and change source device names.
You can display the screen of a source device connected to the product. Select a source from
source list to display the screen of the selected source.
"
The input source can also be changed by using the SOURCE button on the remote control.
"
The screen may not display correctly if an incorrect source is selected for the source device
you want to convert to.
Edit
s → sSource → d → Edit → E
(s → ▲ → Edit → E)
Edit the name and device type of a connected external device.
• The list can include the following source devices. Source devices on the list differ
depending on the selected source.
HDMI 1 / HDMI 2 / Cable Box / Game Console / PC / Blu-ray player / Home Theater System
"
Available source devices may vary depending on the product.
• You cannot edit the following sources.
MagicInfo S / Web Browser / Screen Mirroring / Workspace / SMARTVIEW+
"
Menu items may vary depending on the model.
29
Cable Connection
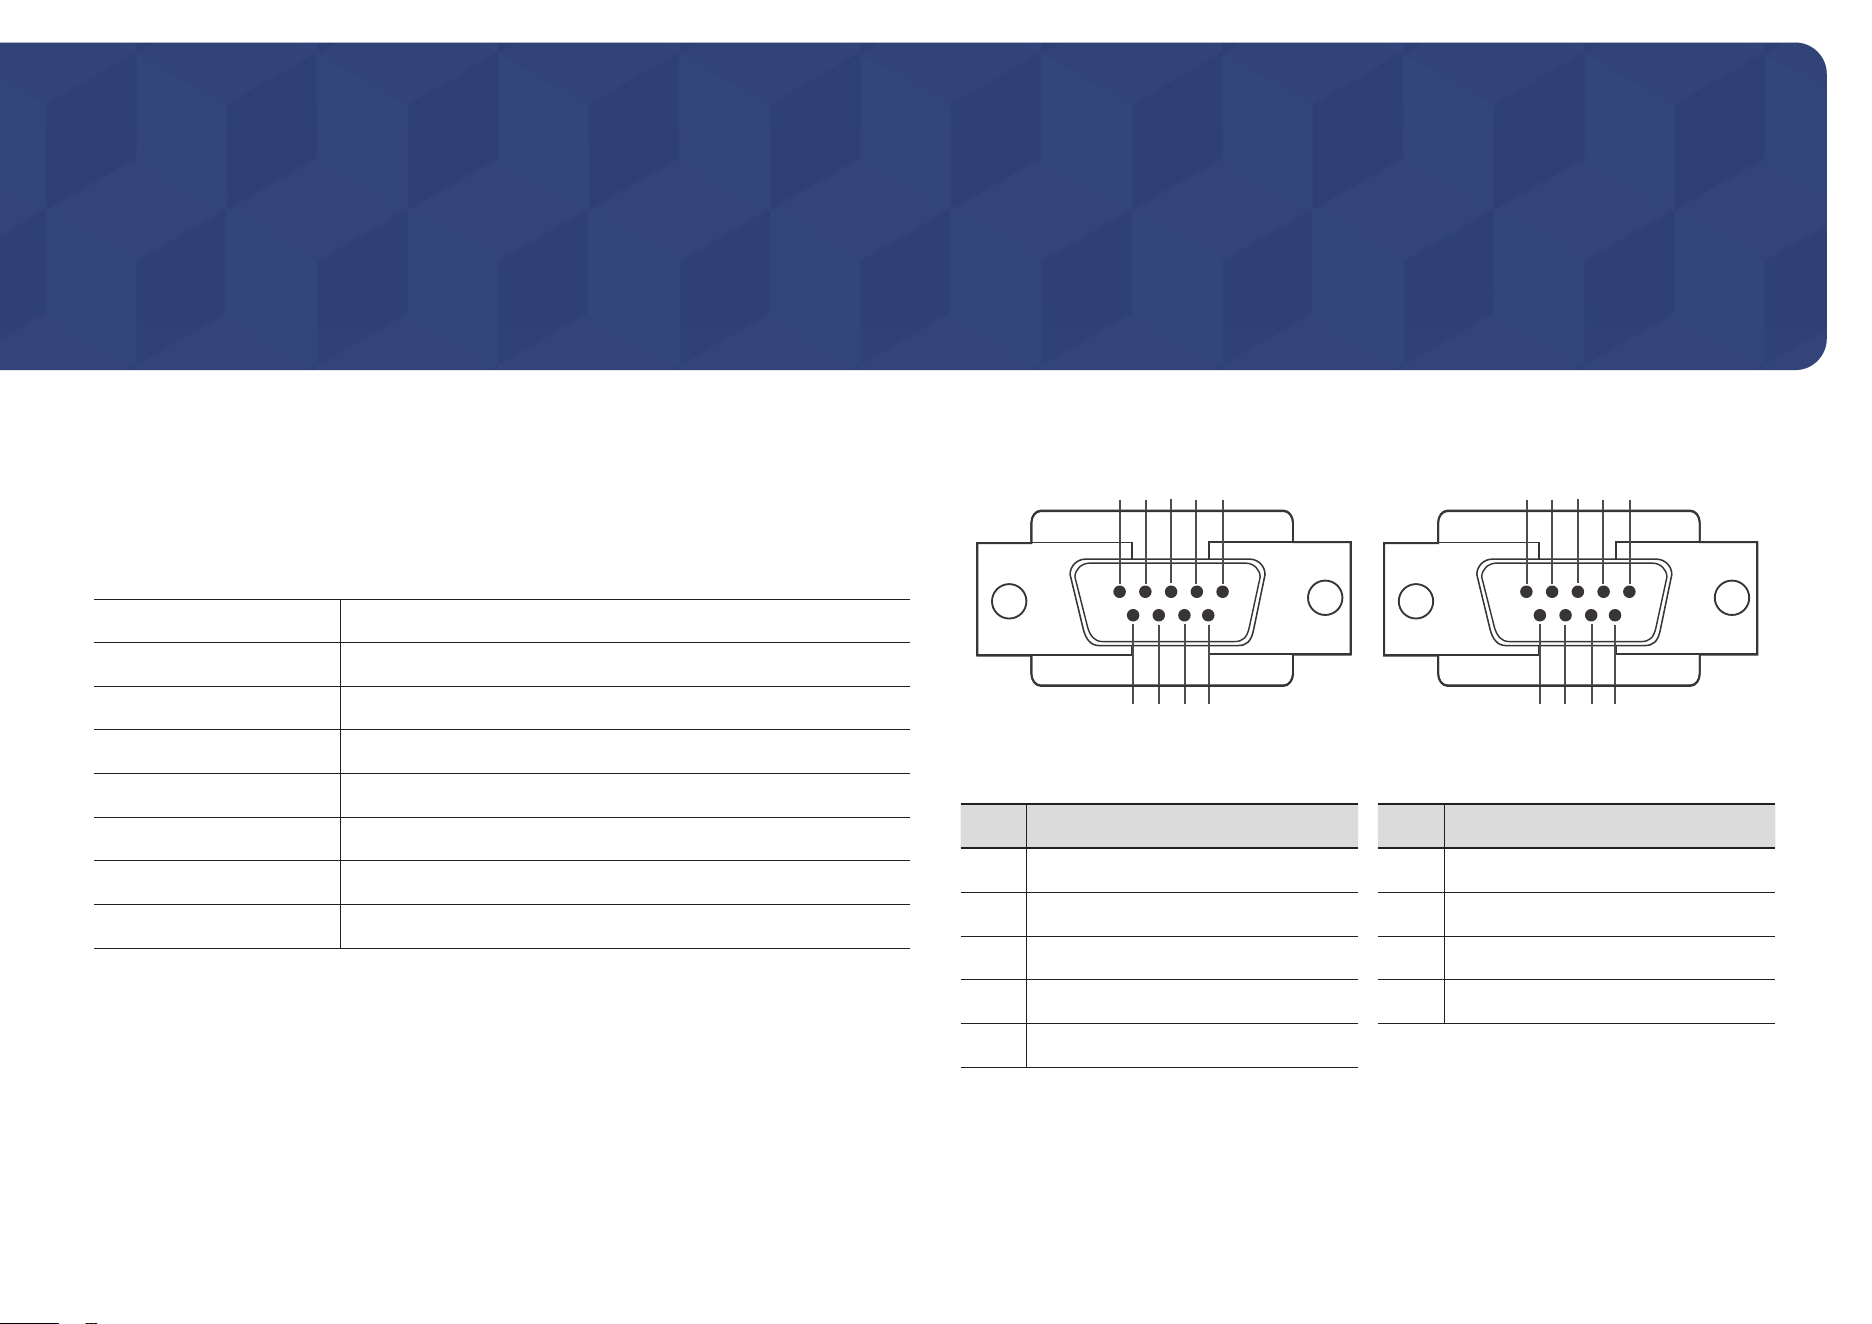
RS232C Cable
Interface
RS232C (9 pins)
Pin
TxD (No.2), RxD (No.3), GND (No.5)
Bit rate
9600 bps
Data bits
8 bit
Parity
None
Stop bit
1 bit
Flow control
None
Maximum length
15 m (only shielded type)
• Pin assignment
1 2 3 4 5
6 7 8 9
5 4 3 2 1
9 8 7 6
<Male type> <Female type>
Pin Signal
1
Detect data carrier
2
Received data
3
Transmitted data
4
Prepare data terminal
5
Signal ground
Pin Signal
6
Prepare data set
7
Send request
8
Clear to send
9
Ring indicator
Control multiple display devices connected to a PC simultaneously.
Multiple Display Control
Chapter 04
30
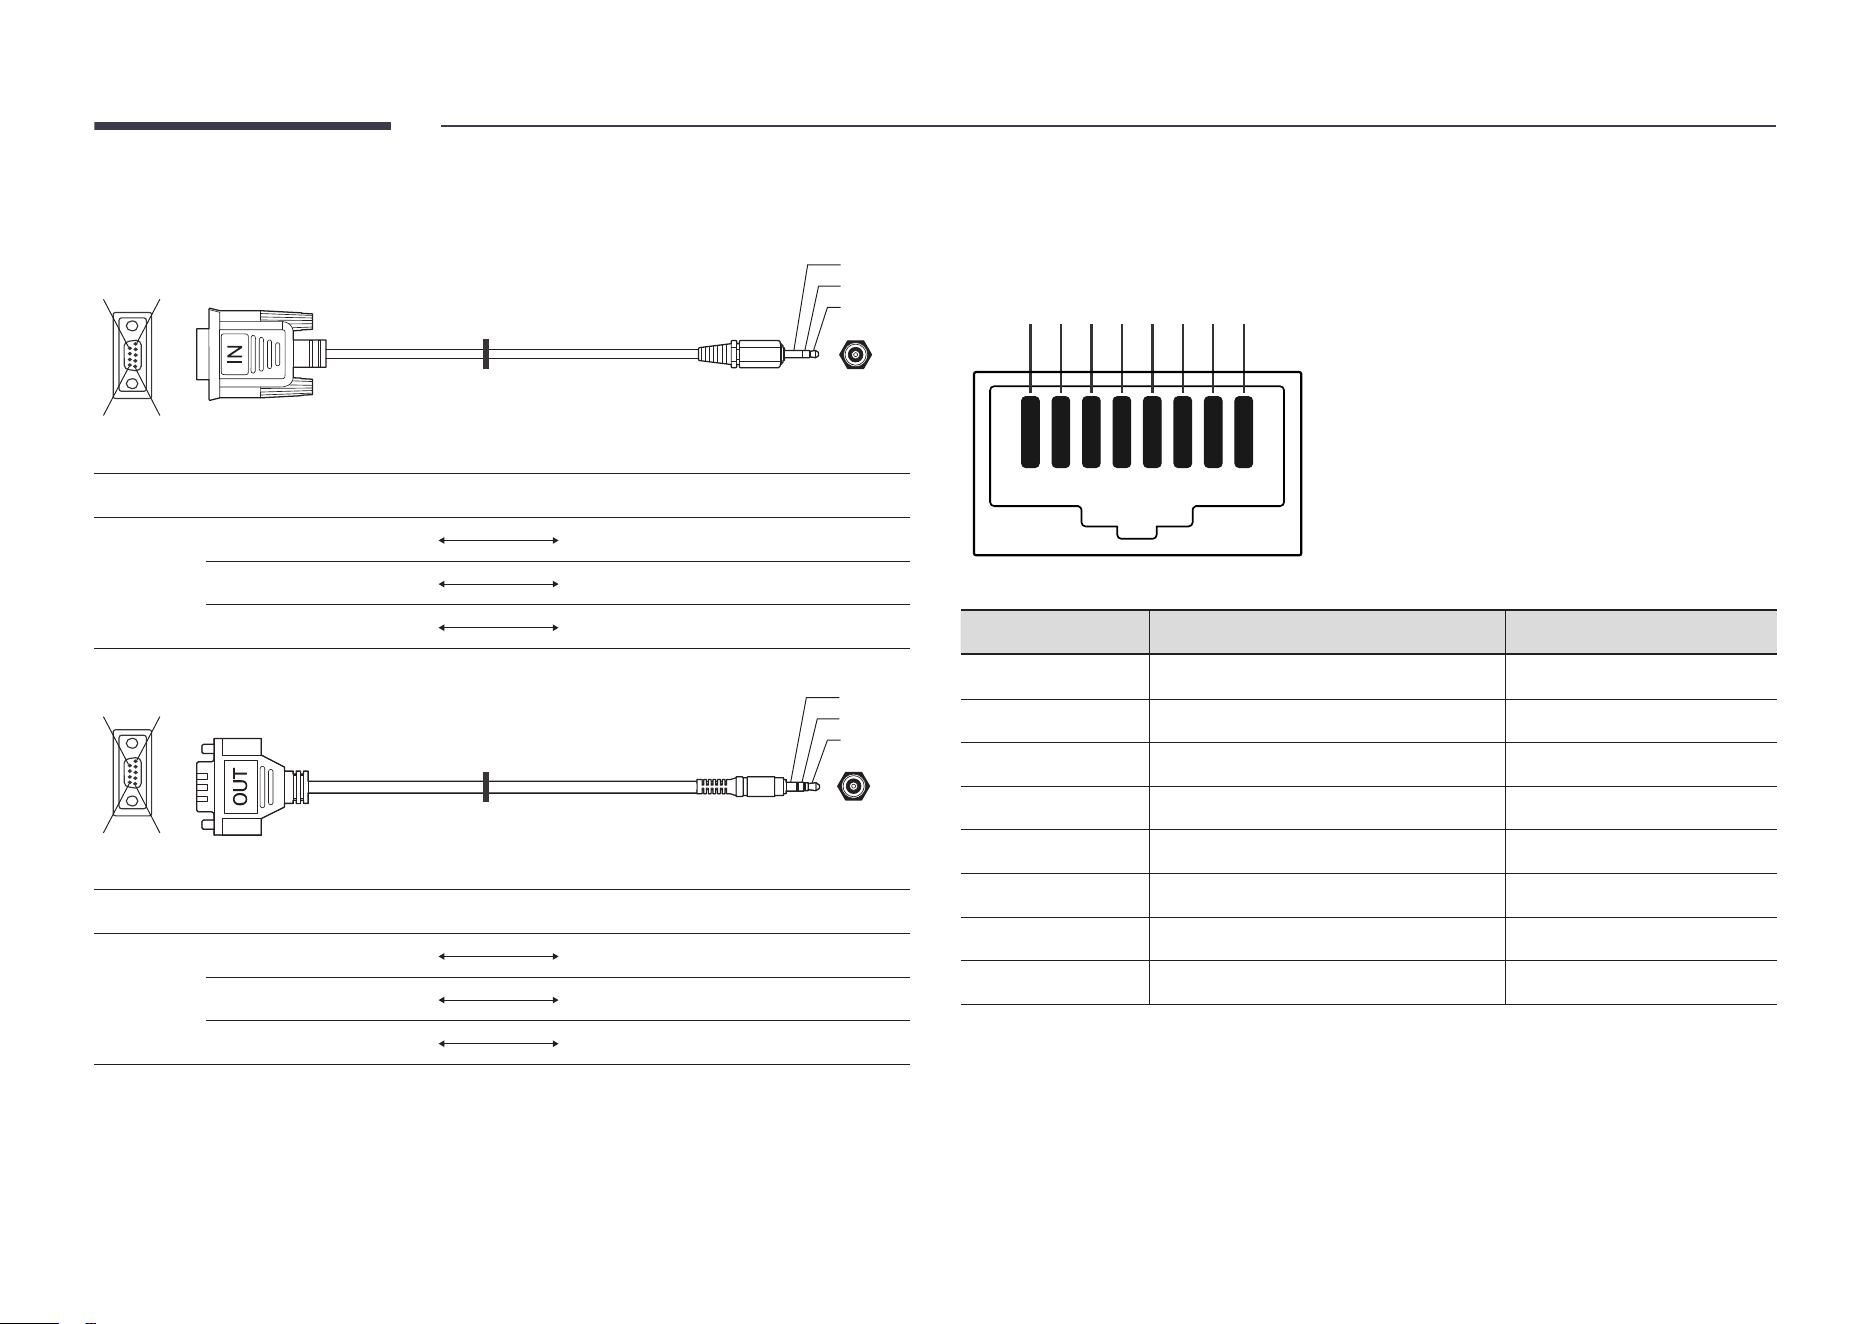
• RS232C cable
Connector: 9-Pin D-Sub to Stereo Cable
5
1
6
9
-P2-
1
2
3
-P1-
-P1- -P1- -P2- -P2-
Male type
Rx 2
1 Tx STEREO
Tx 3
2 Rx PLUG
Gnd 5
3 Gnd (3.5ø)
-P2-
-P1-
1
2
3
5
1
6
9
-P1- -P1- -P2- -P2-
Female
type
Rx 3
1 Tx STEREO
Tx 2
2 Rx PLUG
Gnd 5
3 Gnd (3.5ø)
"
This function may differ depending on the model.
LAN Cable
• Pin assignment
1 2 3 4 5 6 7 8
Pin No Standard Color Signal
1
White and orange TX+
2
Orange TX-
3
White and green RX+
4
Blue NC
5
White and blue NC
6
Green RX-
7
White and brown NC
8
Brown NC
31
• Connector : RJ45
Direct LAN cable (PC to HUB)
RJ45
HUB
P1
P1P2
P2
Signal P1 P2 Signal
TX+ 1
1 TX+
TX- 2
2 TX-
RX+ 3
3 RX+
RX- 6
6 RX-
Cross LAN cable (PC to PC)
RJ45
P1 P2
RJ45
Signal P1 P2 Signal
TX+ 1
3 RX+
TX- 2
6 RX-
RX+ 3
1 TX+
RX- 6
2 TX-

32
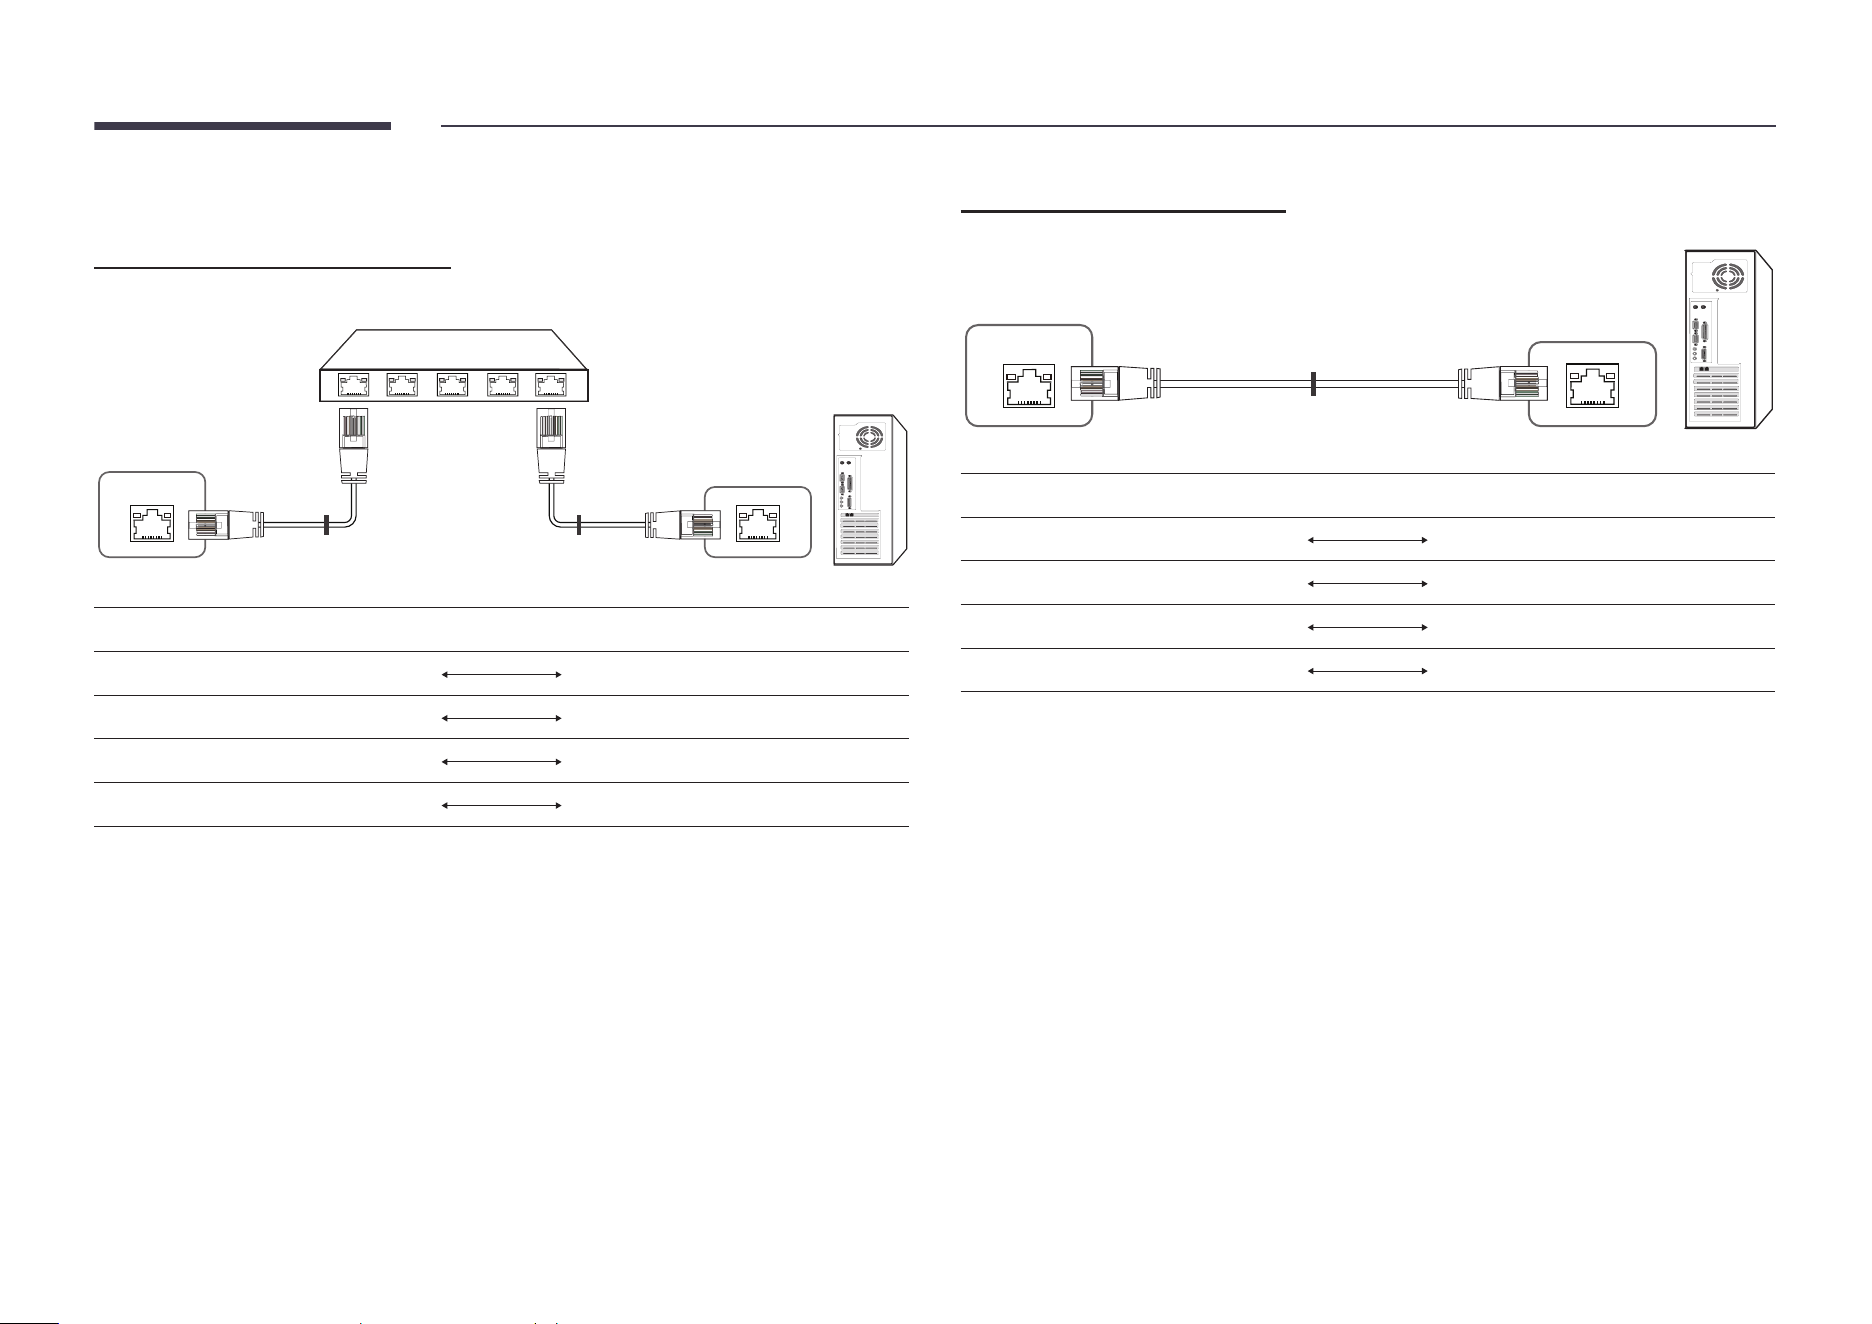
Connection
"
Ensure you connect each of the adapters to the correct RS232C
or port on the product.
"
Connecting parts may differ depending on the model.
• Connection 1
Monitor 1 Monitor 2 Monitor 3 Monitor 4
PC
• Connection 2
RJ45
5 4 3 2 1
Monitor 2Monitor 1
PC
Monitor 3
• Connection 3
RJ45
Monitor 1 Monitor 2 Monitor 3 Monitor 4
PC
• Connection 4
"
This option is only available for models that have LAN
and LAN ports.
RJ45
Monitor 1 Monitor 2 Monitor 3 Monitor 4
PC
33
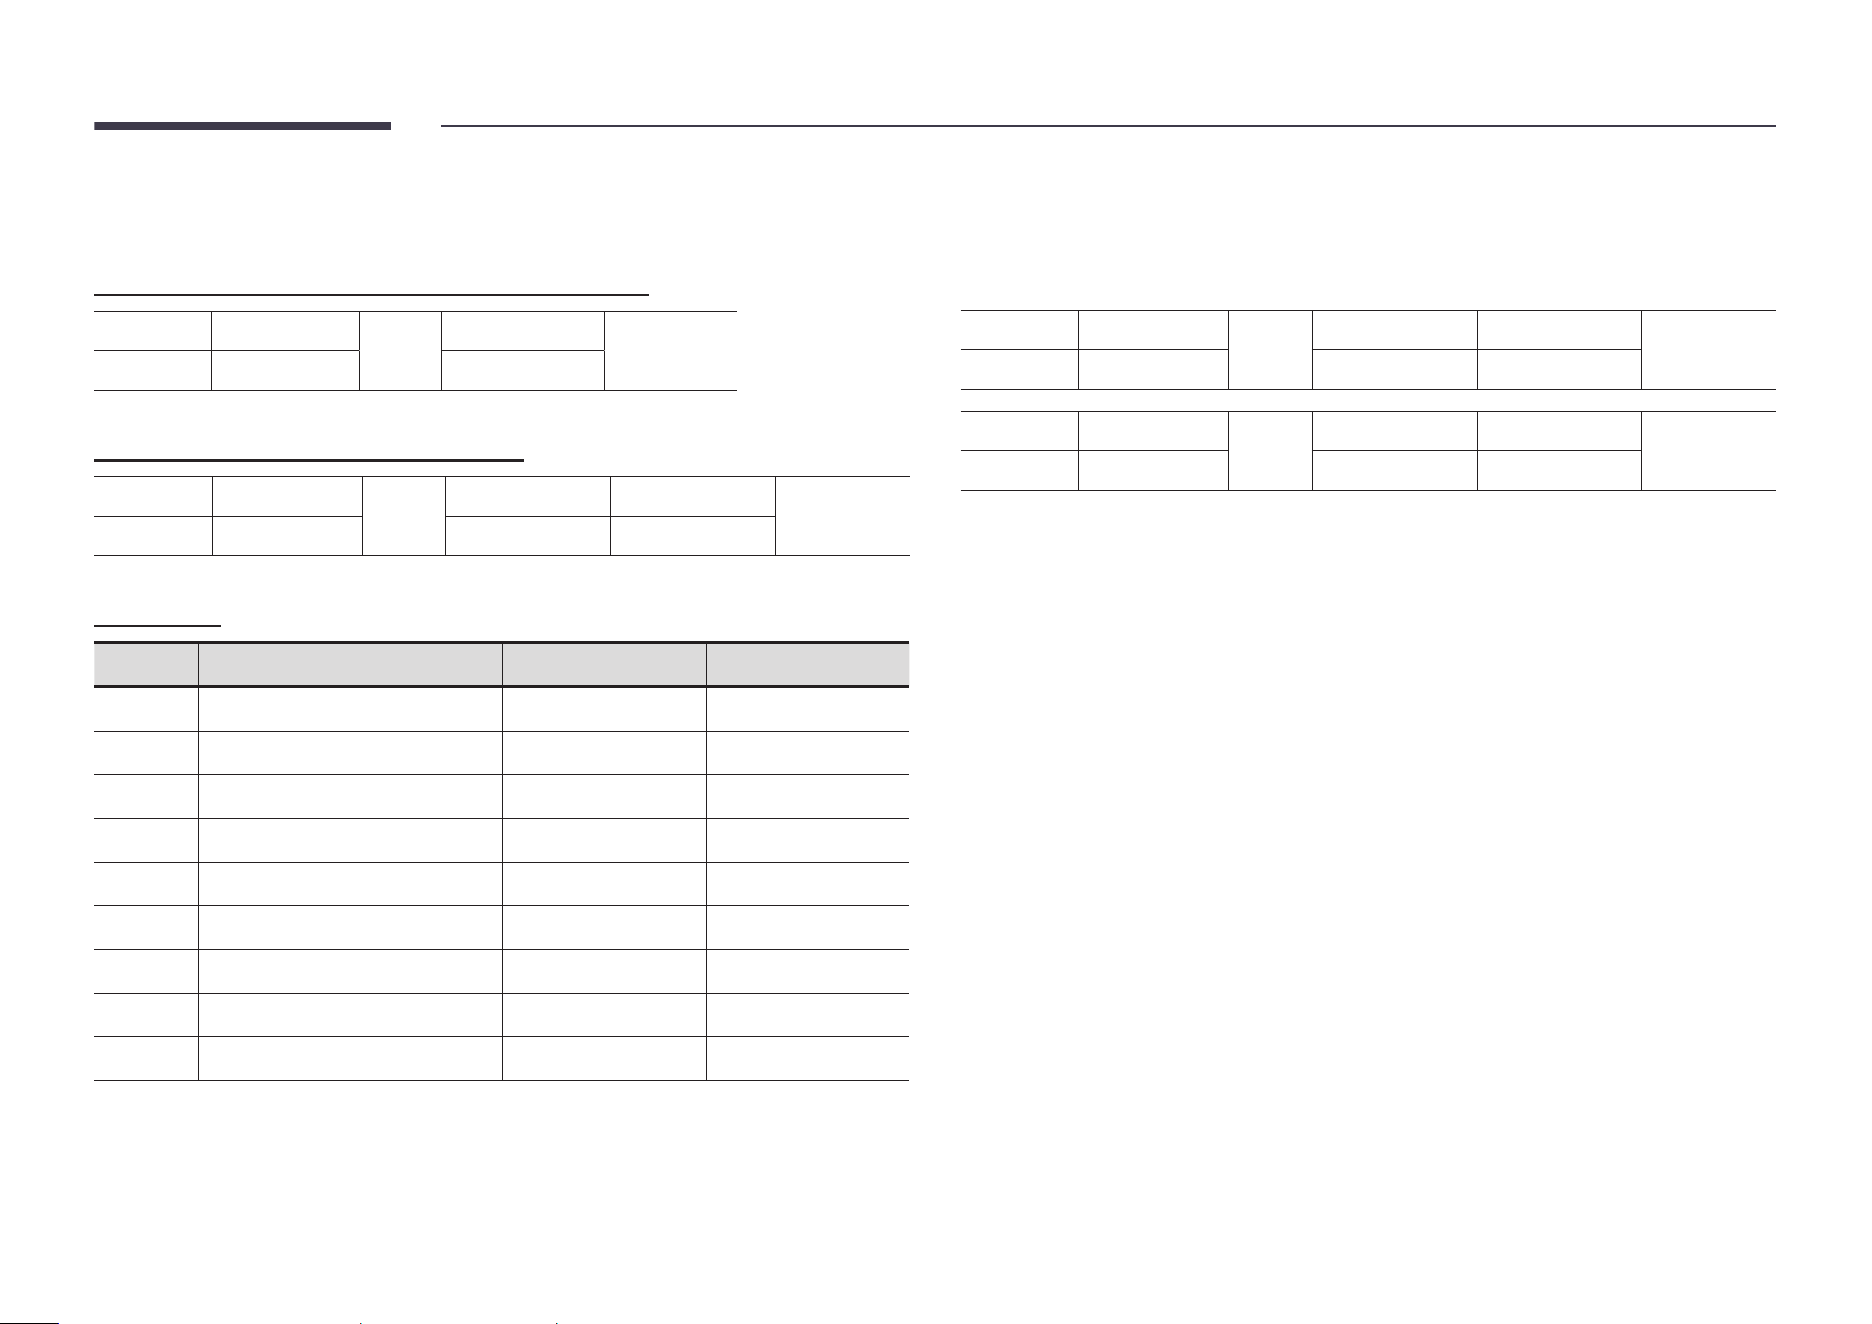
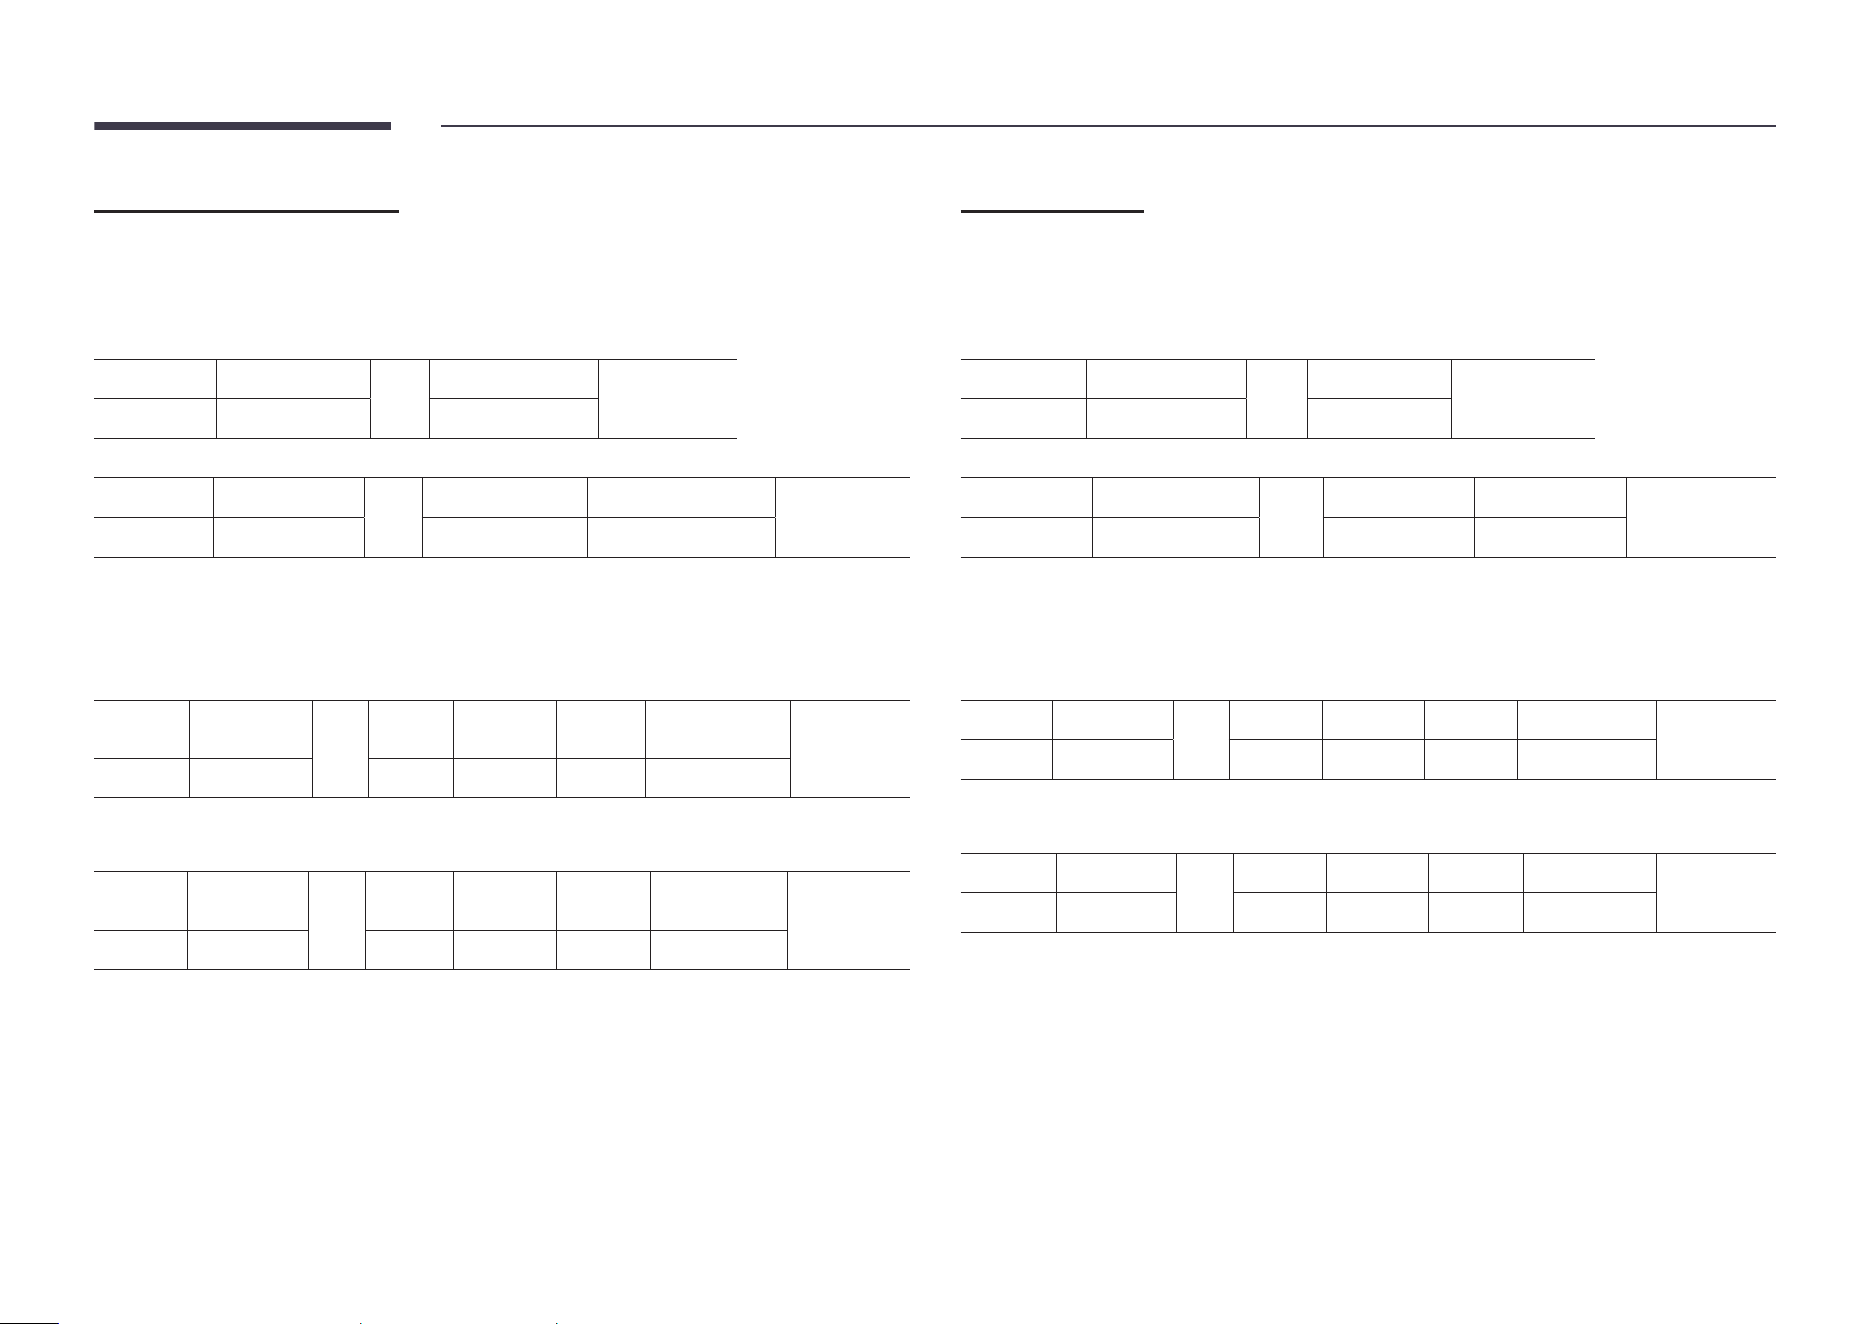
Control Codes
Viewing control state (Get control command)
Header Command
ID
Data length
Checksum
0xAA Command type 0
Controlling (Set control command)
Header Command
ID
Data length Data
Checksum
0xAA Command type 1 Value
Command
No. Command type Command Value range
1
Power control 0x11 0~1
2
Volume control 0x12 0~100
3
Input source control 0x14 -
4
Screen mode control 0x18 -
5
Screen size control 0x19 0~255
6
Video wall mode control 0x5C 0~1
7
Safety Lock 0x5D 0~1
8
Video Wall On 0x84 0~1
9
Video Wall User Control 0x89 -
• All communications take place in hexadecimals. The checksum is calculated by adding
up all values except the header. If a checksum adds up to be more than 2 digits as shown
below (11+FF+01+01=112), the first digit is removed.
E.g. Power On & ID=0
Header Command
ID
Data length Data 1
Checksum
0xAA 0x11 1 "Power"
Header Command
ID
Data length Data 1
12
0xAA 0x11 1 1
• To control all devices connected by a serial cable simultaneously irrespective of IDs, set the
ID as "0xFE" and transmit commands. Commands will be executed by each device but ACK
will not respond.
34
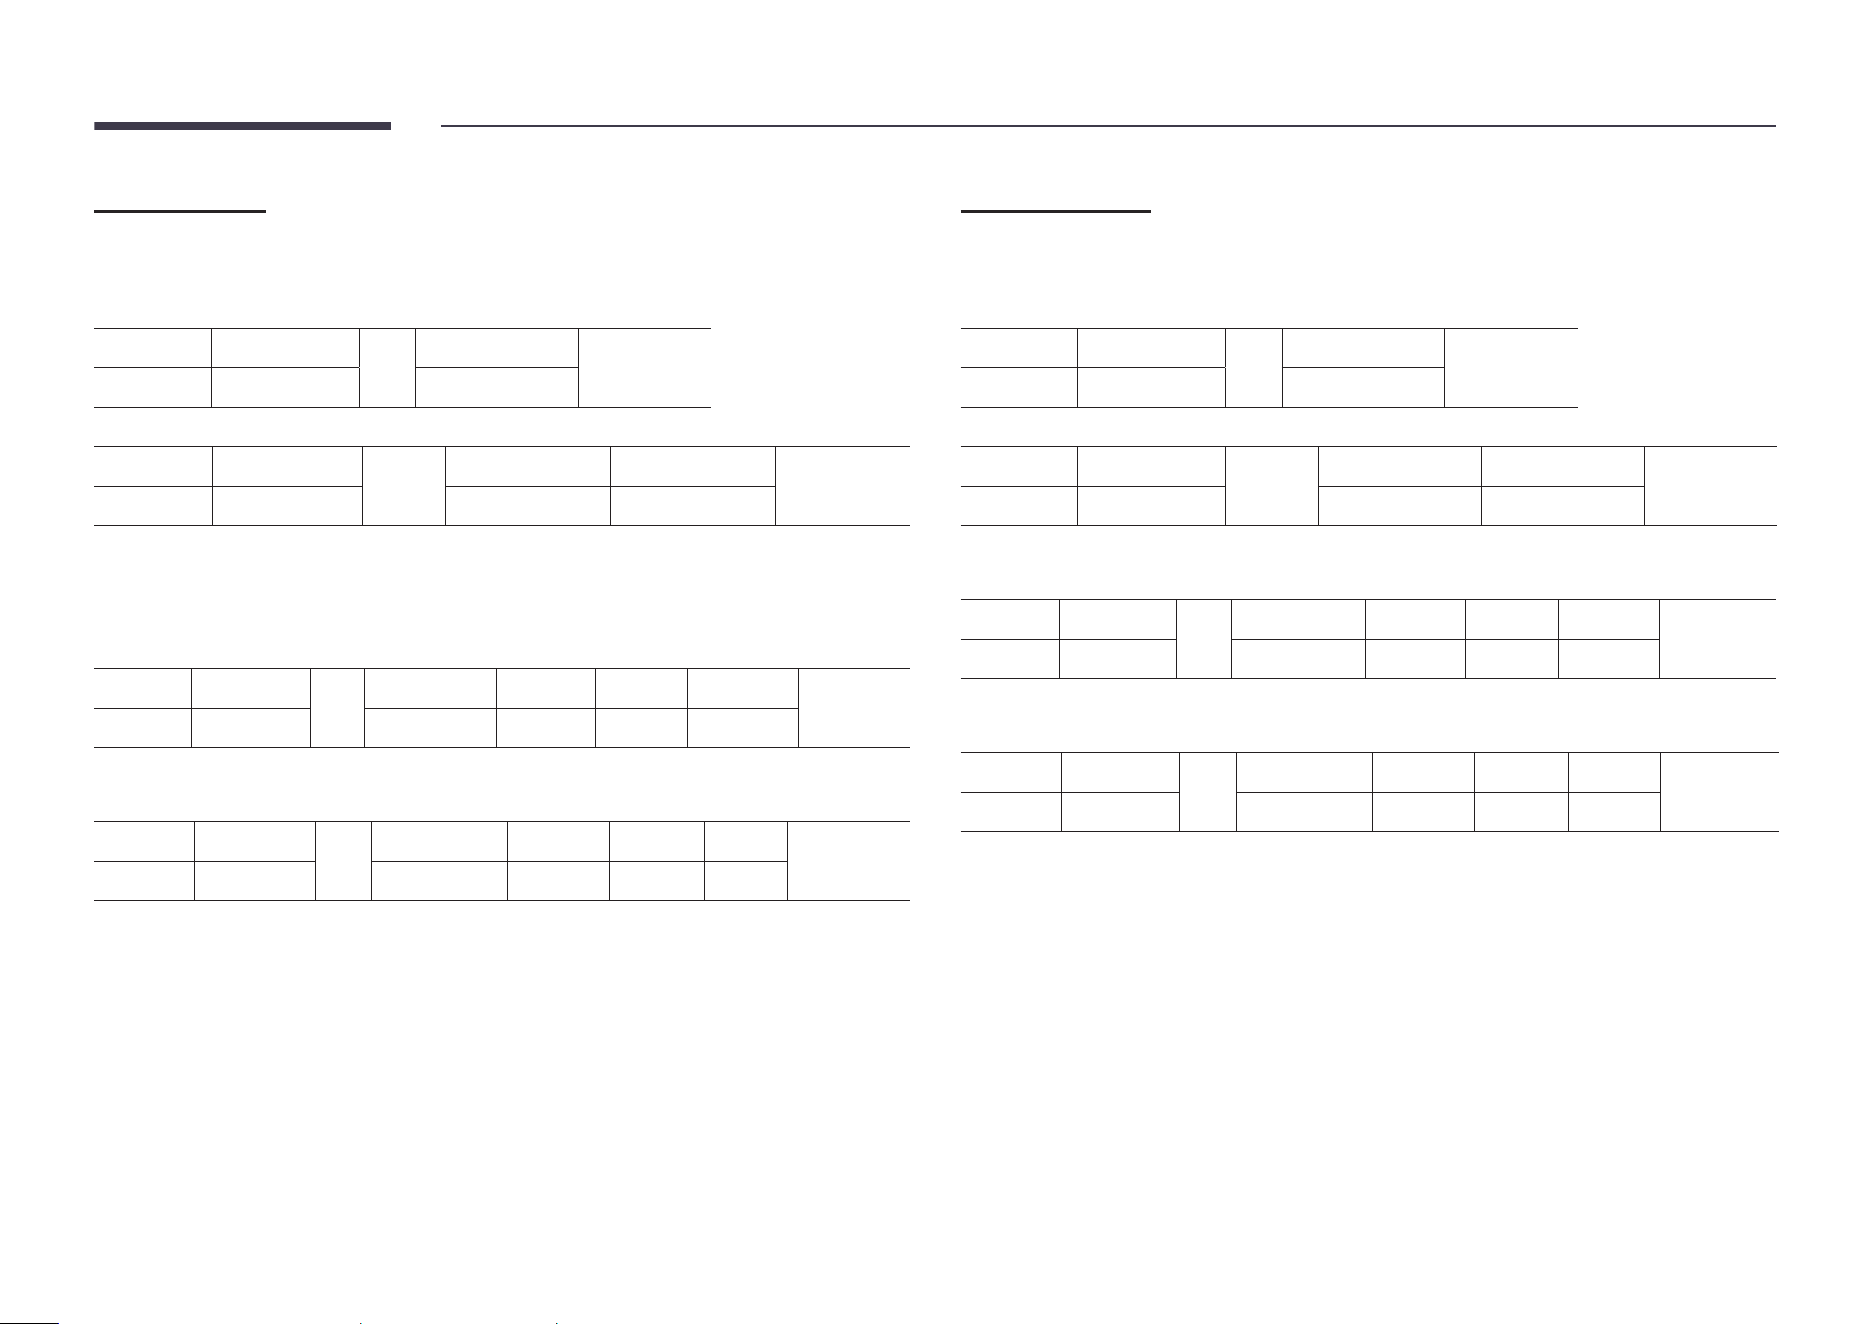
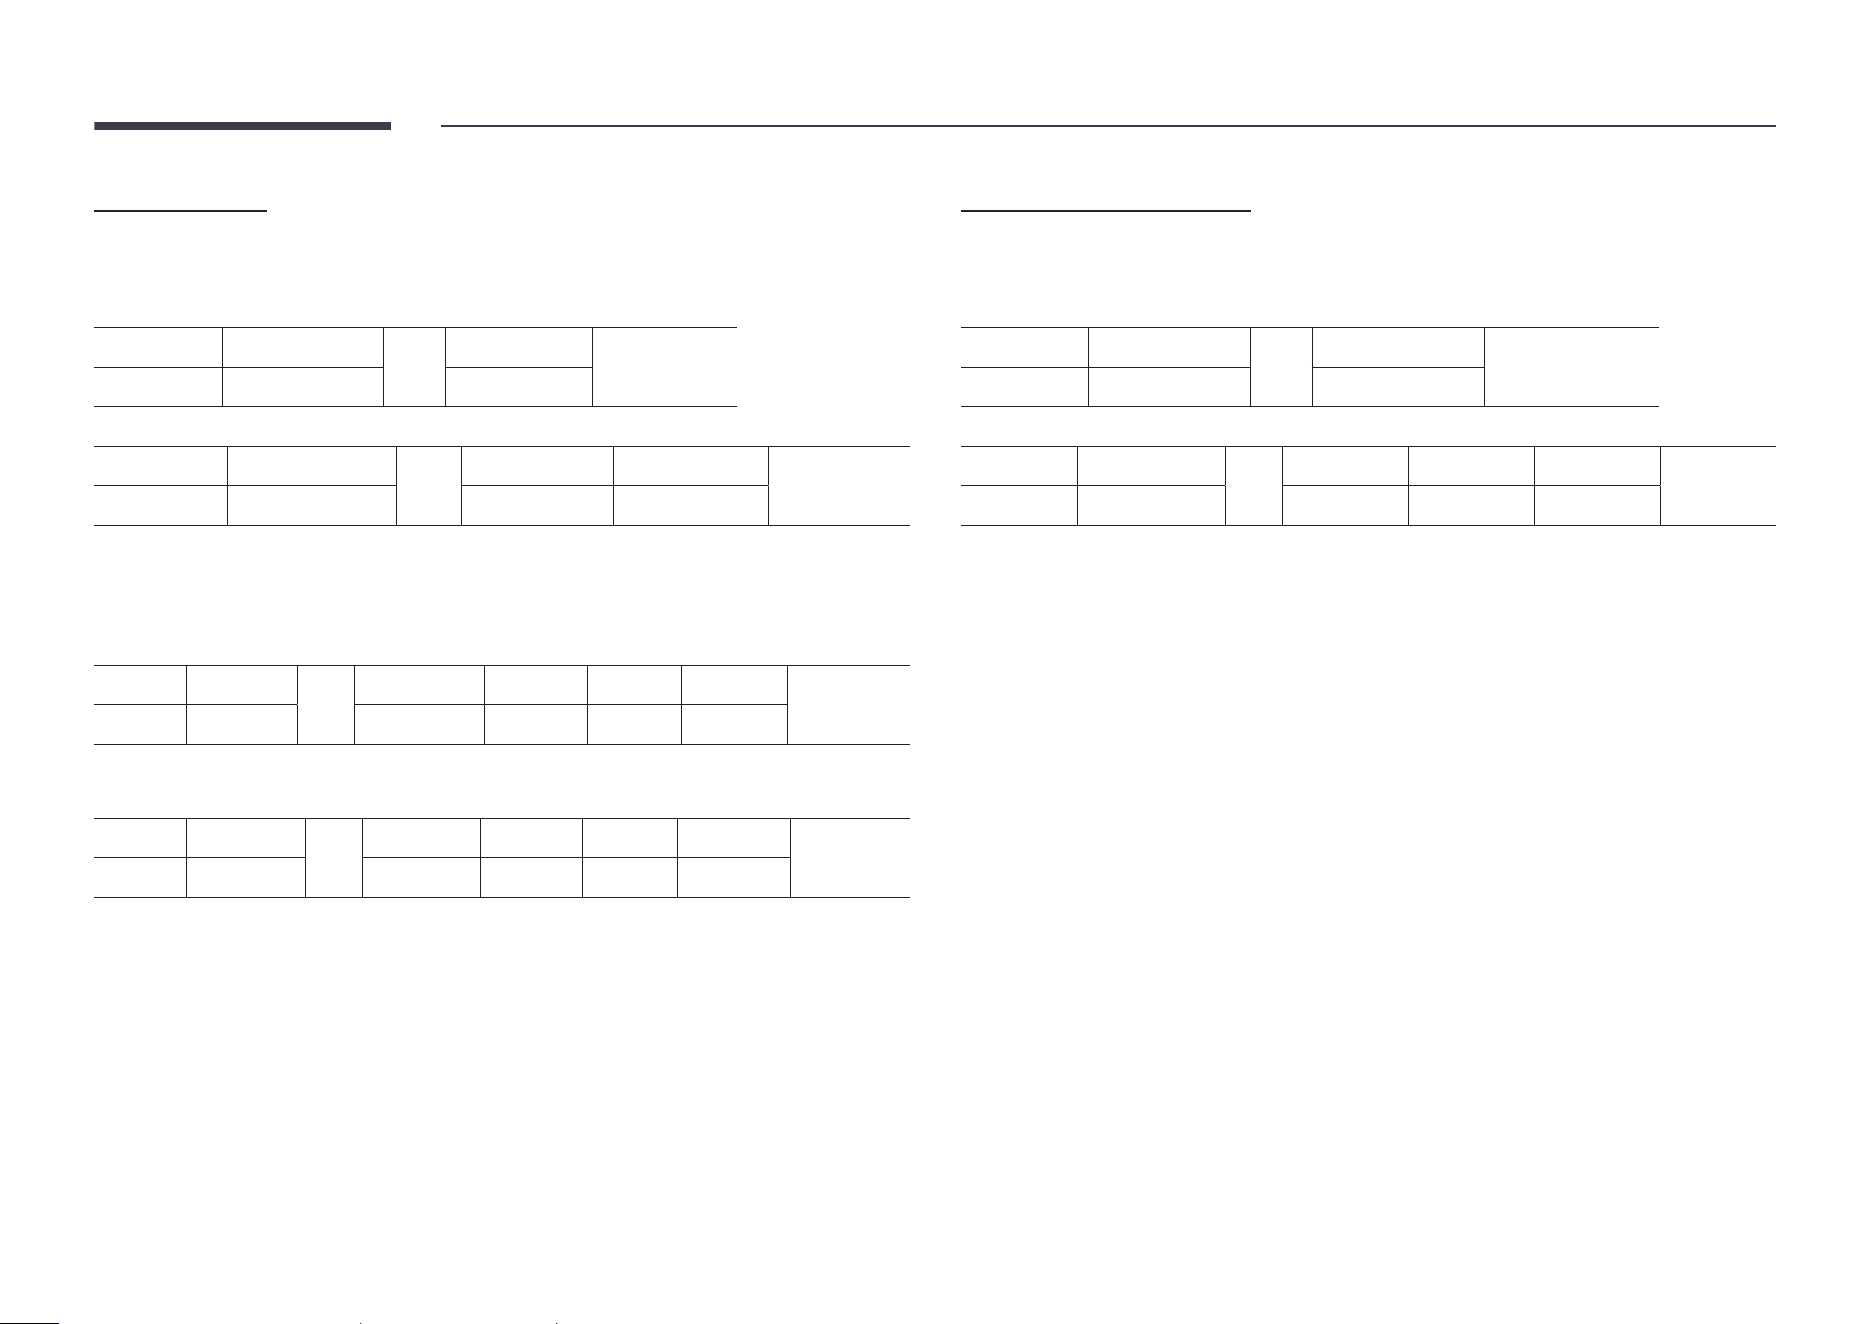
Power control
• Function
A product can be powered on and off using a PC.
• Viewing power state (Get Power ON / OFF Status)
Header Command
ID
Data length
Checksum
0xAA 0x11 0
• Setting power ON/Off (Set Power ON / OFF)
Header Command
ID
Data length Data
Checksum
0xAA 0x11 1 "Power"
"Power": Power code to be set on a product.
1: Power ON
0: Power OFF
• Ack
Header Command
ID
Data length Ack/Nak r-CMD Val1
Checksum
0xAA 0xFF 3 'A' 0x11 "Power"
"Power": Power code to be set on a product.
• Nak
Header Command
ID
Data length Ack/Nak r-CMD Val1
Checksum
0xAA 0xFF 3 'N' 0x11 "ERR"
"ERR" : A code showing what error has occurred.
Volume control
• Function
The volume of a product can be adjusted using a PC.
• Viewing volume state (Get Volume Status)
Header Command
ID
Data length
Checksum
0xAA 0x12 0
• Setting the volume (Set Volume)
Header Command
ID
Data length Data
Checksum
0xAA 0x12 1 "Volume"
"Volume": Volume value code to be set on a product. (0-100)
• Ack
Header Command
ID
Data length Ack/Nak r-CMD Val1
Checksum
0xAA 0xFF 3 'A' 0x12 "Volume"
"Volume": Volume value code to be set on a product. (0-100)
• Nak
Header Command
ID
Data length Ack/Nak r-CMD Val1
Checksum
0xAA 0xFF 3 'N' 0x12 "ERR"
"ERR" : A code showing what error has occurred.

35
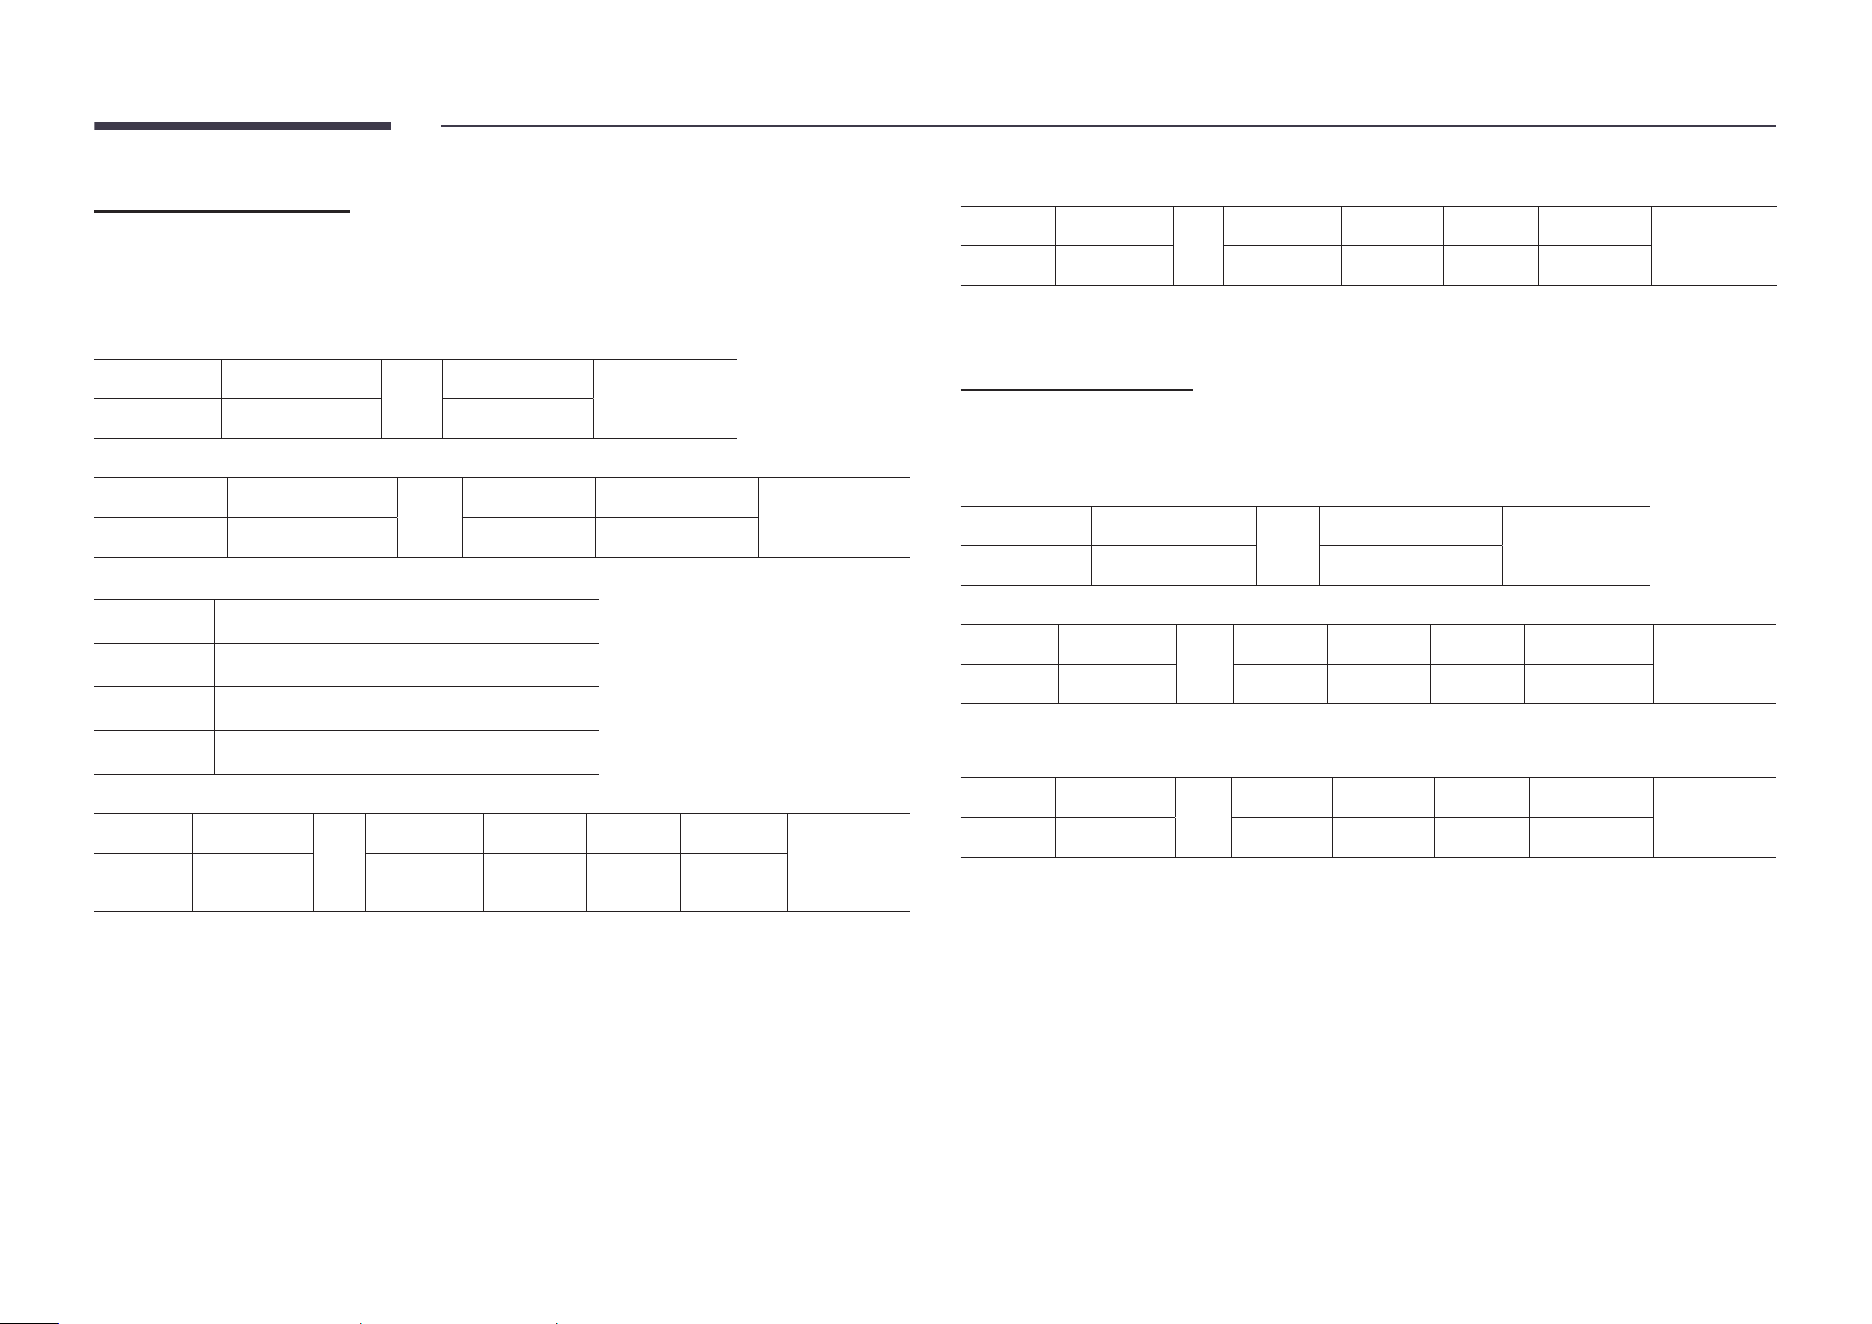
Input source control
• Function
The input source of a product can be changed using a PC.
• Viewing input source state (Get Input Source Status)
Header Command
ID
Data length
Checksum
0xAA 0x14 0
• Setting the input source (Set Input Source)
Header Command
ID
Data length Data
Checksum
0xAA 0x14 1 "Input Source"
"Input Source": An input source code to be set on a product.
0x0C Input source
0x20 MagicInfo
0x21 HDMI1
0x22 HDMI1_PC
0x23 HDMI2
0x24 HDMI2_PC
0x55 HDBT (OH** models only)
"
HDMI1_PC and HDMI2_PC cannot be used with the Set command. They only respond to
"Get" commands.
"
Available input sources may vary depending on the model.
"
MagicInfo is only available with models that contain the MagicInfo function.
• Ack
Header Command
ID
Data length Ack/Nak r-CMD Val1
Checksum
0xAA 0xFF 3 'A' 0x14
"Input
Source"
"Input Source": An input source code to be set on a product.
• Nak
Header Command
ID
Data length Ack/Nak r-CMD Val1
Checksum
0xAA 0xFF 3 'N' 0x14 "ERR"
"ERR" : A code showing what error has occurred.
36
Screen mode control
• Function
The screen mode of a product can be changed using a PC.
Screen mode cannot be controlled when the Video Wall function is enabled.
• Viewing screen status (Get Screen Mode Status)
Header Command
ID
Data length
Checksum
0xAA 0x18 0
• Setting the picture size (Set Picture Size)
Header Command
ID
Data length Data
Checksum
0xAA 0x18 1 "Screen Mode"
"Screen Mode": A code that sets the product status
0x01 16 : 9
0x04 Zoom
0x31 Wide Zoom
0x0B 4 : 3
• Ack
Header Command
ID
Data length Ack/Nak r-CMD Val1
Checksum
0xAA 0xFF 3 'A' 0x18
"Screen
Mode"
"Screen Mode": A code that sets the product status
• Nak
Header Command
ID
Data length Ack/Nak r-CMD Val1
Checksum
0xAA 0xFF 3 'N' 0x18 "ERR"
"ERR": A code showing what error has occurred
Screen size control
• Function
The screen size of a product can be changed using a PC.
• Viewing the screen size (Get Screen Size Status)
Header Command
ID
Data length
Checksum
0xAA 0x19 0
• Ack
Header Command
ID
Data length Ack/Nak r-CMD Val1
Checksum
0xAA 0xFF 3 'A' 0x19 "Screen Size"
"Screen Size": product screen size (range: 0 – 255, unit: inch)
• Nak
Header Command
ID
Data length Ack/Nak r-CMD Val1
Checksum
0xAA 0xFF 3 'N' 0x19 "ERR"
"ERR": A code showing what error has occurred
37
Video Wall Mode Control
• Function
Video Wall mode can be activated on a product using a PC.
This control is only available on a product whose Video Wall is enabled.
• Viewing video wall mode (Get Video Wall Mode)
Header Command
ID
Data length
Checksum
0xAA 0x5C 0
• Setting the video wall (Set Video Wall Mode)
Header Command
ID
Data length Data
Checksum
0xAA 0x5C 1 "Video Wall Mode"
"Video Wall Mode": A code used to activate Video Wall mode on a product
1: Full
0: Natural
• Ack
Header Command
ID
Data
length
Ack/Nak r-CMD Val1
Checksum
0xAA 0xFF 3 'A' 0x5C "Video Wall Mode"
"Video Wall Mode": A code used to activate Video Wall mode on a product
• Nak
Header Command
ID
Data
length
Ack/Nak r-CMD Val1
Checksum
0xAA 0xFF 3 'A' 0x5C "ERR"
"ERR": A code showing what error has occurred
Safety Lock On
• Function
PC can be used to turn the Safety Lock On function on or off on a product.
This control is available regardless of whether or not the power is turned on.
• Viewing the safety lock state (Get Safety Lock Status)
Header Command
ID
Data length
Checksum
0xAA 0x5D 0
• Enabling or disabling safety lock (Set Safety Lock Enable / Disable)
Header Command
ID
Data length Data
Checksum
0xAA 0x5D 1 "Safety Lock"
"Safety Lock": Safety lock code to be set on a product
1: ON
0: OFF
• Ack
Header Command
ID
Data length Ack/Nak r-CMD Val1
Checksum
0xAA 0xFF 3 'A' 0x5D "Safety Lock"
"Safety Lock": Safety lock code to be set on a product
• Nak
Header Command
ID
Data length Ack/Nak r-CMD Val1
Checksum
0xAA 0xFF 3 'N' 0x5D "ERR"
"ERR": A code showing what error has occurred
38
Video Wall On
• Function
Turn Video Wall on or off on the product from your computer.
• Get Video Wall On/Off Status
Header Command
ID
Data length
Checksum
0xAA 0x84 0
• Set Video Wall On/Off
Header Command
ID
Data length Data
Checksum
0xAA 0x84 1 V.Wall_On
• V.Wall_On: Video Wall code to be assigned to the product
1: Video Wall ON
0: Video Wall OFF
• Ack
Header Command
ID
Data length Ack/Nak r-CMD Val1
Checksum
0xAA 0xFF 3 'A' 0x84 V.Wall_On
V.Wall_On : Same as above
• Nak
Header Command
ID
Data length Ack/Nak r-CMD Val1
Checksum
0xAA 0xFF 3 'N' 0x84 ERR
"ERR": A code showing what error has occurred
Video Wall User Control
• Function
Turn the Video Wall function on or off on the product from your computer.
• Get Video Wall Status
Header Command
ID
Data length
Checksum
0xAA 0x89 0
• Set Video Wall
Header Command
ID
Data length Val1 Val2
Checksum
0xAA 0x89 2 Wall_Div Wall_SNo
Wall_Div: Video Wall Divider code assigned to the product
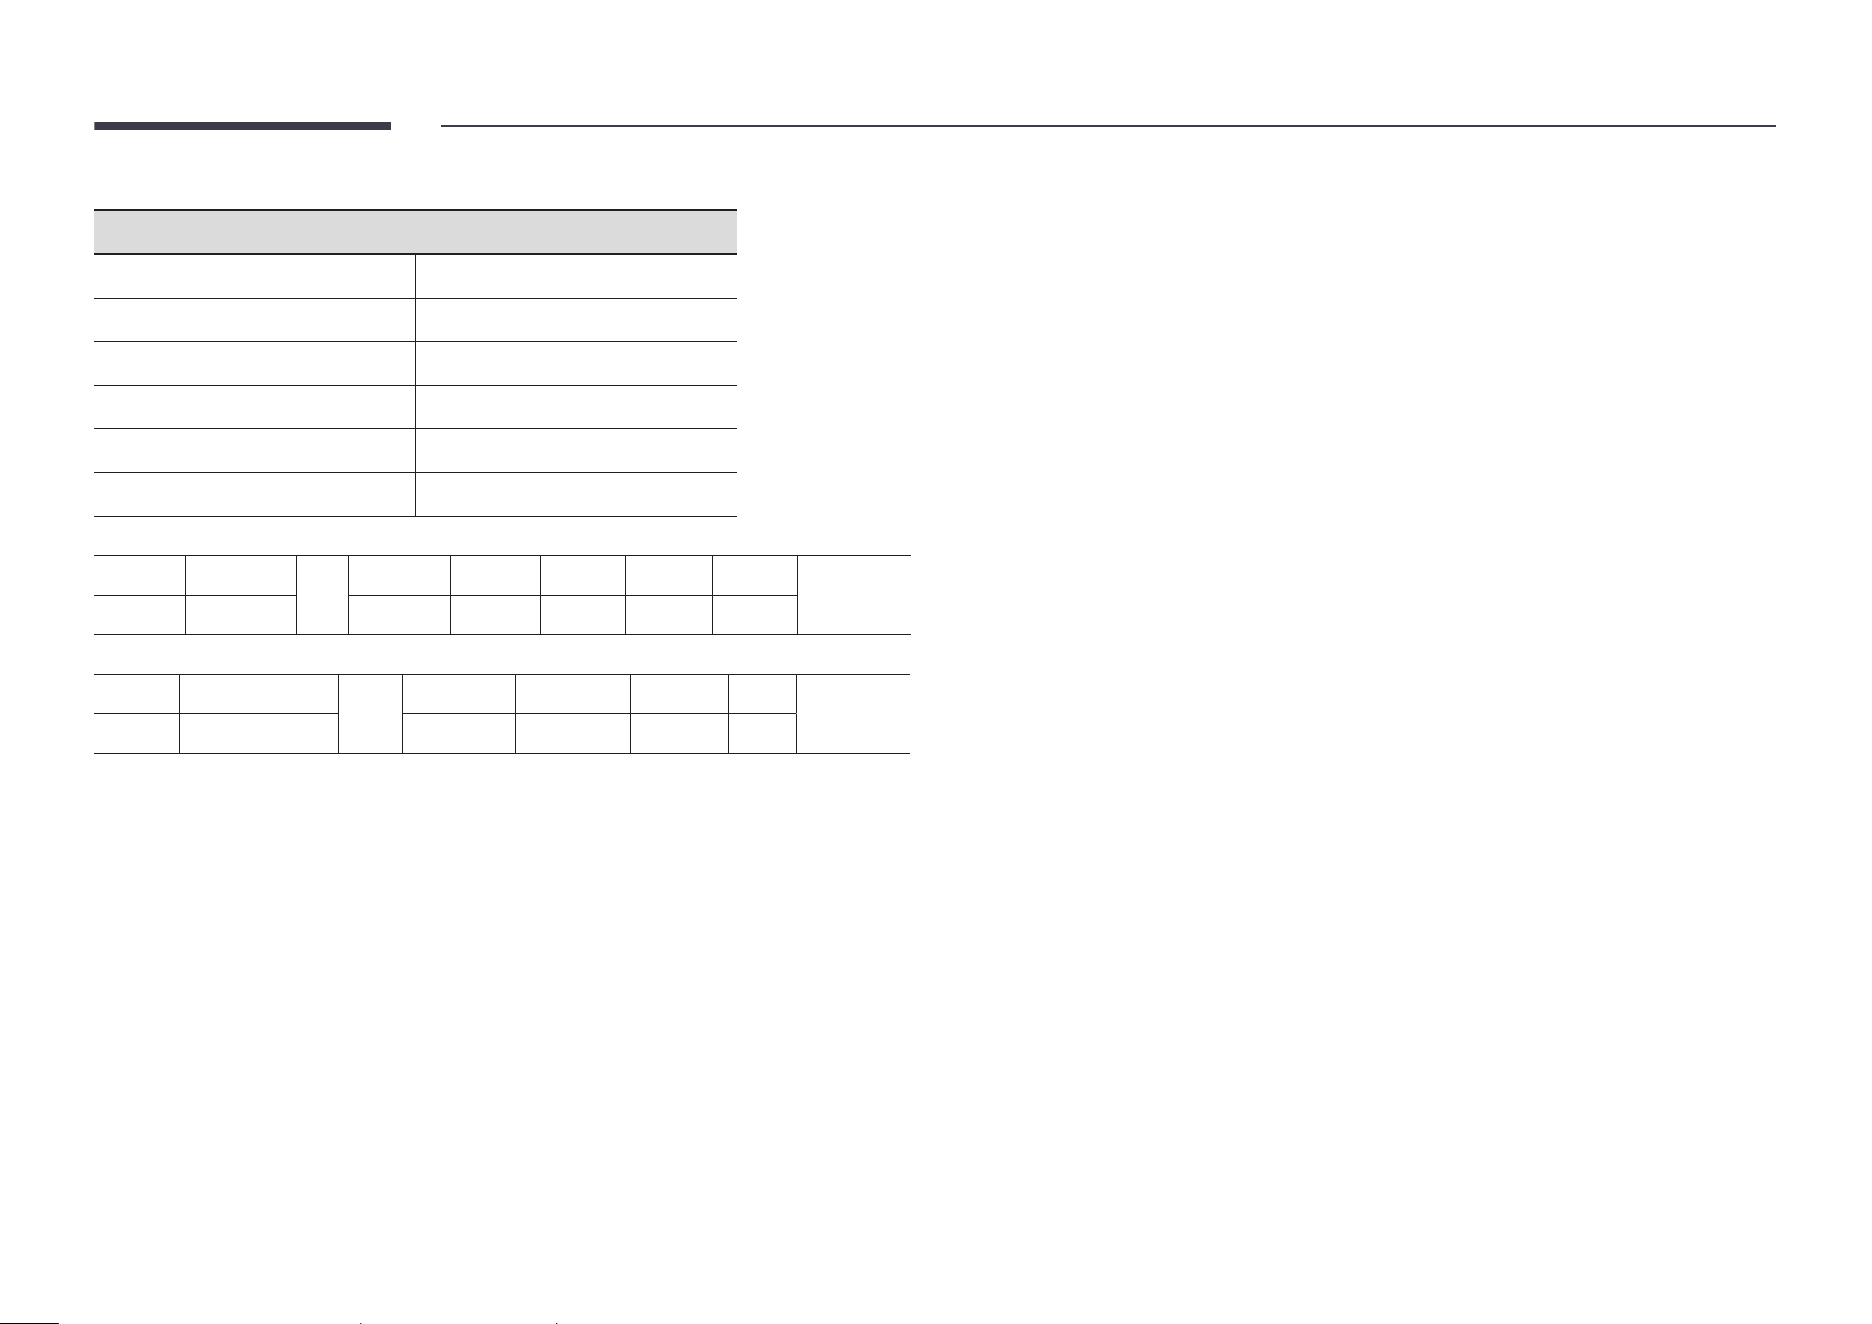
39
Wall_SNo: Product Number code assigned to the product
10x10 Video Wall Model : ( 1 ~ 100)
Set Number Data
1 0x01
2 0x02
... ...
99 0x63
100 0x64
• Ack
Header Command
ID
Data length Ack/Nak r-CMD Val1 Val2
Checksum
0xAA 0xFF 4 'A' 0x89 Wall_Div Wall_SNo
• Nak
Header Command
ID
Data length Ack/Nak r-CMD Val1
Checksum
0xAA 0xFF 3 'N' 0x89 ERR
"ERR": A code showing what error has occurred

40
Wall_Div: Video Wall Divider code assigned to the product
10x10 Video Wall Model
1 2 3 4 5 6 7 8 9 10 11 12 13 14 15
Off
0x00 0x00 0x00 0x00 0x00 0x00 0x00 0x00 0x00 0x00 0x00 0x00 0x00 0x00 0x00
1
0x11 0x12 0x13 0x14 0x15 0x16 0x17 0x18 0x19 0x1A 0x1B 0x1C 0x1D 0x1E 0x1F
2
0x21 0x22 0x23 0x24 0x25 0x26 0x27 0x28 0x29 0x2A 0x2B 0x2C 0x2D 0x2E 0x2F
3
0x31 0x32 0x33 0x34 0x35 0x36 0x37 0x38 0x39 0x3A 0x3B 0x3C 0x3D 0x3E 0x3F
4
0x41 0x42 0x43 0x44 0x45 0x46 0x47 0x48 0x49 0x4A 0x4B 0x4C 0x4D 0x4E 0x4F
5
0x51 0x52 0x53 0x54 0x55 0x56 0x57 0x58 0x59 0x5A 0x5B 0x5C 0x5D 0x5E 0x5F
6
0x61 0x62 0x63 0x64 0x65 0x66 0x67 0x68 0x69 0x6A 0x6B 0x6C 0x6D 0x6E 0x6F
7
0x71 0x72 0x73 0x74 0x75 0x76 0x77 0x78 0x79 0x7A 0x7B 0x7C 0x7D 0x7E N/A
8
0x81 0x82 0x83 0x84 0x85 0x86 0x87 0x88 0x89 0x8A 0x8B 0x8C N/A N/A N/A
9
0x91 0x92 0x93 0x94 0x95 0x96 0x97 0x98 0x99 0x9A 0x9B N/A N/A N/A N/A
10
0xA1 0xA2 0xA3 0xA4 0xA5 0xA6 0xA7 0xA8 0xA9 0xAA N/A N/A N/A N/A N/A
11
0xB1 0xB2 0xB3 0xB4 0xB5 0xB6 0xB7 0xB8 0xB9 N/A N/A N/A N/A N/A N/A
12
0xC1 0xC2 0xC3 0xC4 0xC5 0xC6 0xC7 0xC8 N/A N/A N/A N/A N/A N/A N/A
13
0xD1 0xD2 0xD3 0xD4 0xD5 0xD6 0xD7 N/A N/A N/A N/A N/A N/A N/A N/A
14
0xE1 0xE2 0xE3 0xE4 0xE5 0xE6 0xE7 N/A N/A N/A N/A N/A N/A N/A N/A
15
0xF1 0xF2 0xF3 0xF4 0xF5 0xF6 N/A N/A N/A N/A N/A N/A N/A N/A N/A

41
Using MDC
Multiple display control "MDC" is an application that allows you to easily control multiple
display devices simultaneously using a PC.
For details on how to use the MDC program, refer to Help after installing the program. The MDC
program is available on the website. (http://www.samsung.com/business)
"
If you press the On or Off button located at the top left of the screen, the product checks its
status for about one minute. To run other commands, try after the one minute.
"
For details on how to connect devices for multiple display control, refer to page 32.
MDC Program Installation/Uninstallation
"
Installing and uninstalling steps can vary depending on the OS.
Installation
"
MDC installation can be affected by the graphics card, mother board and network
conditions.
1
Click the MDC Unified installation program.
2
Click "Next".
3
When the "Welcome to the InstallShield Wizard for MDC_Unified" screen appears, click
"Next".
4
In the "License Agreement" window displayed, select "I accept the terms in the license
agreement" and click "Next".
5
In the displayed "Customer Information" window, fill out all the information fields and click
"Next".
6
In the displayed "Destination Folder" window, select the directory path you want to install
the program in and click "Next".
"
If the directory path is not specified, the program will be installed in the default
directory path.
7
In the displayed "Ready to Install the Program" window, check the directory path to install
the program in and click "Install".
8
Installation progress will be displayed.
9
Click "Finish" in the displayed "InstallShield Wizard Complete" window.
"
Select "Launch the program" and click "Finish" to run the MDC program immediately.
10
The MDC Unified shortcut icon will be created on the desktop after installation.
"
The MDC execution icon may not be displayed depending on the PC system or product
specifications.
"
Press F5 if the execution icon is not displayed.
Uninstallation
1
Select Settings → Control Panel on the Start menu and double-click Add/Delete Program.
2
Select MDC Unified from the list and click Change/Remove.

42
Favorites
→ Favorites
"
This function may not be supported depending on the model.
Add features available under Source or Features that are frequently used, to Favorites.
"
Press d to select Add to Favorites, and press E.
Delete or rearrange items in Favorites.
"
Press d to select Move or Remove, and press E. If Move is selected, you can move an item
to the left or right.
Features
→ Features
"
This function may not be supported depending on the model.
Various features are available.
Add frequently used features to Favorites.
"
Press d to select Add to Favorites, and press E.
You can also set options for each app.
Accessible using the button on the remote control.
Home Screen
Chapter 05
43
MagicInfo
→ Features → MagicInfo → E
Play a range of content such as channels with schedules assigned, templates or files.
"
This function may not be supported depending on the model.
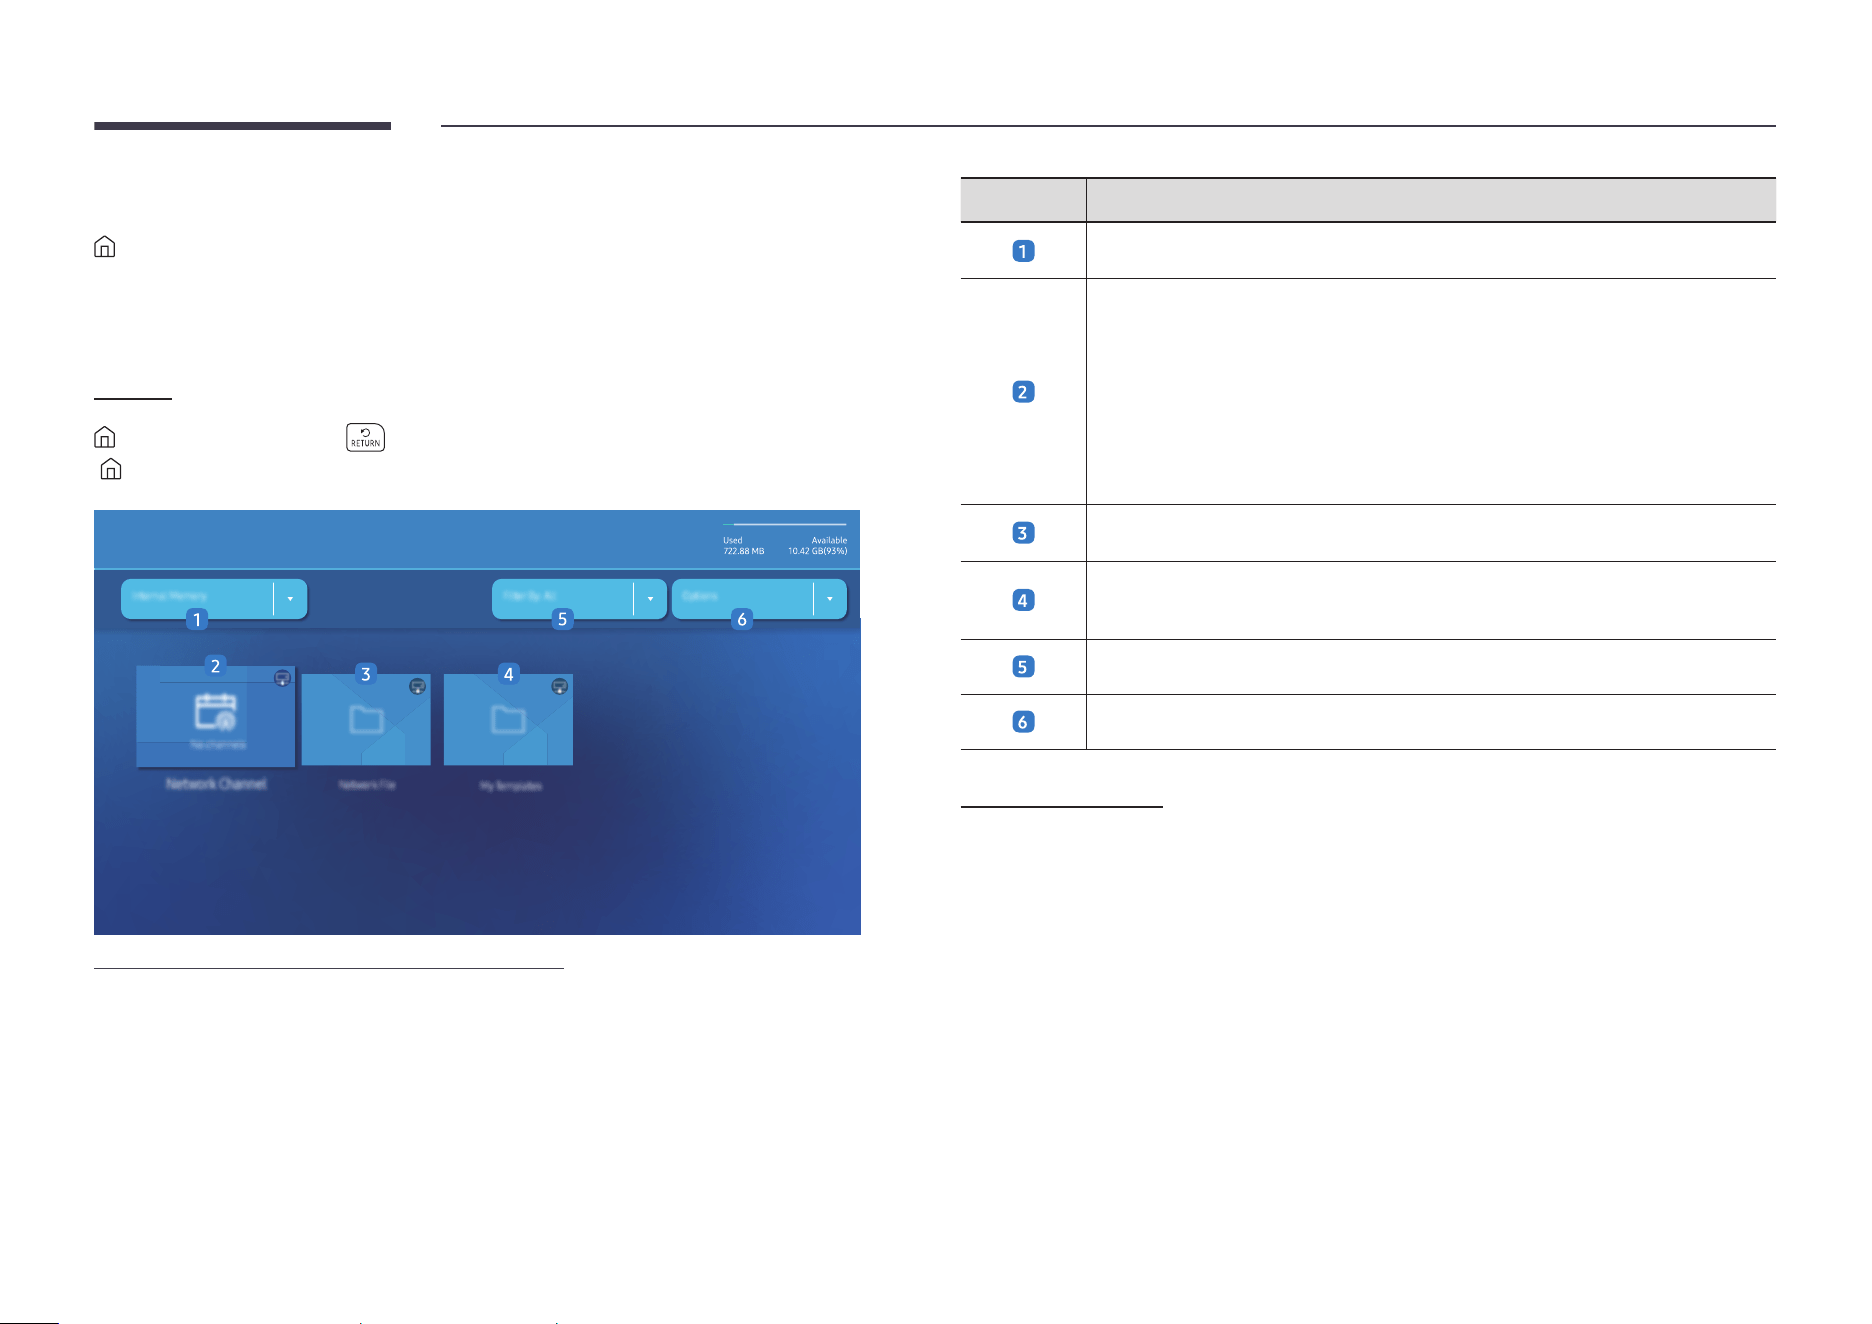
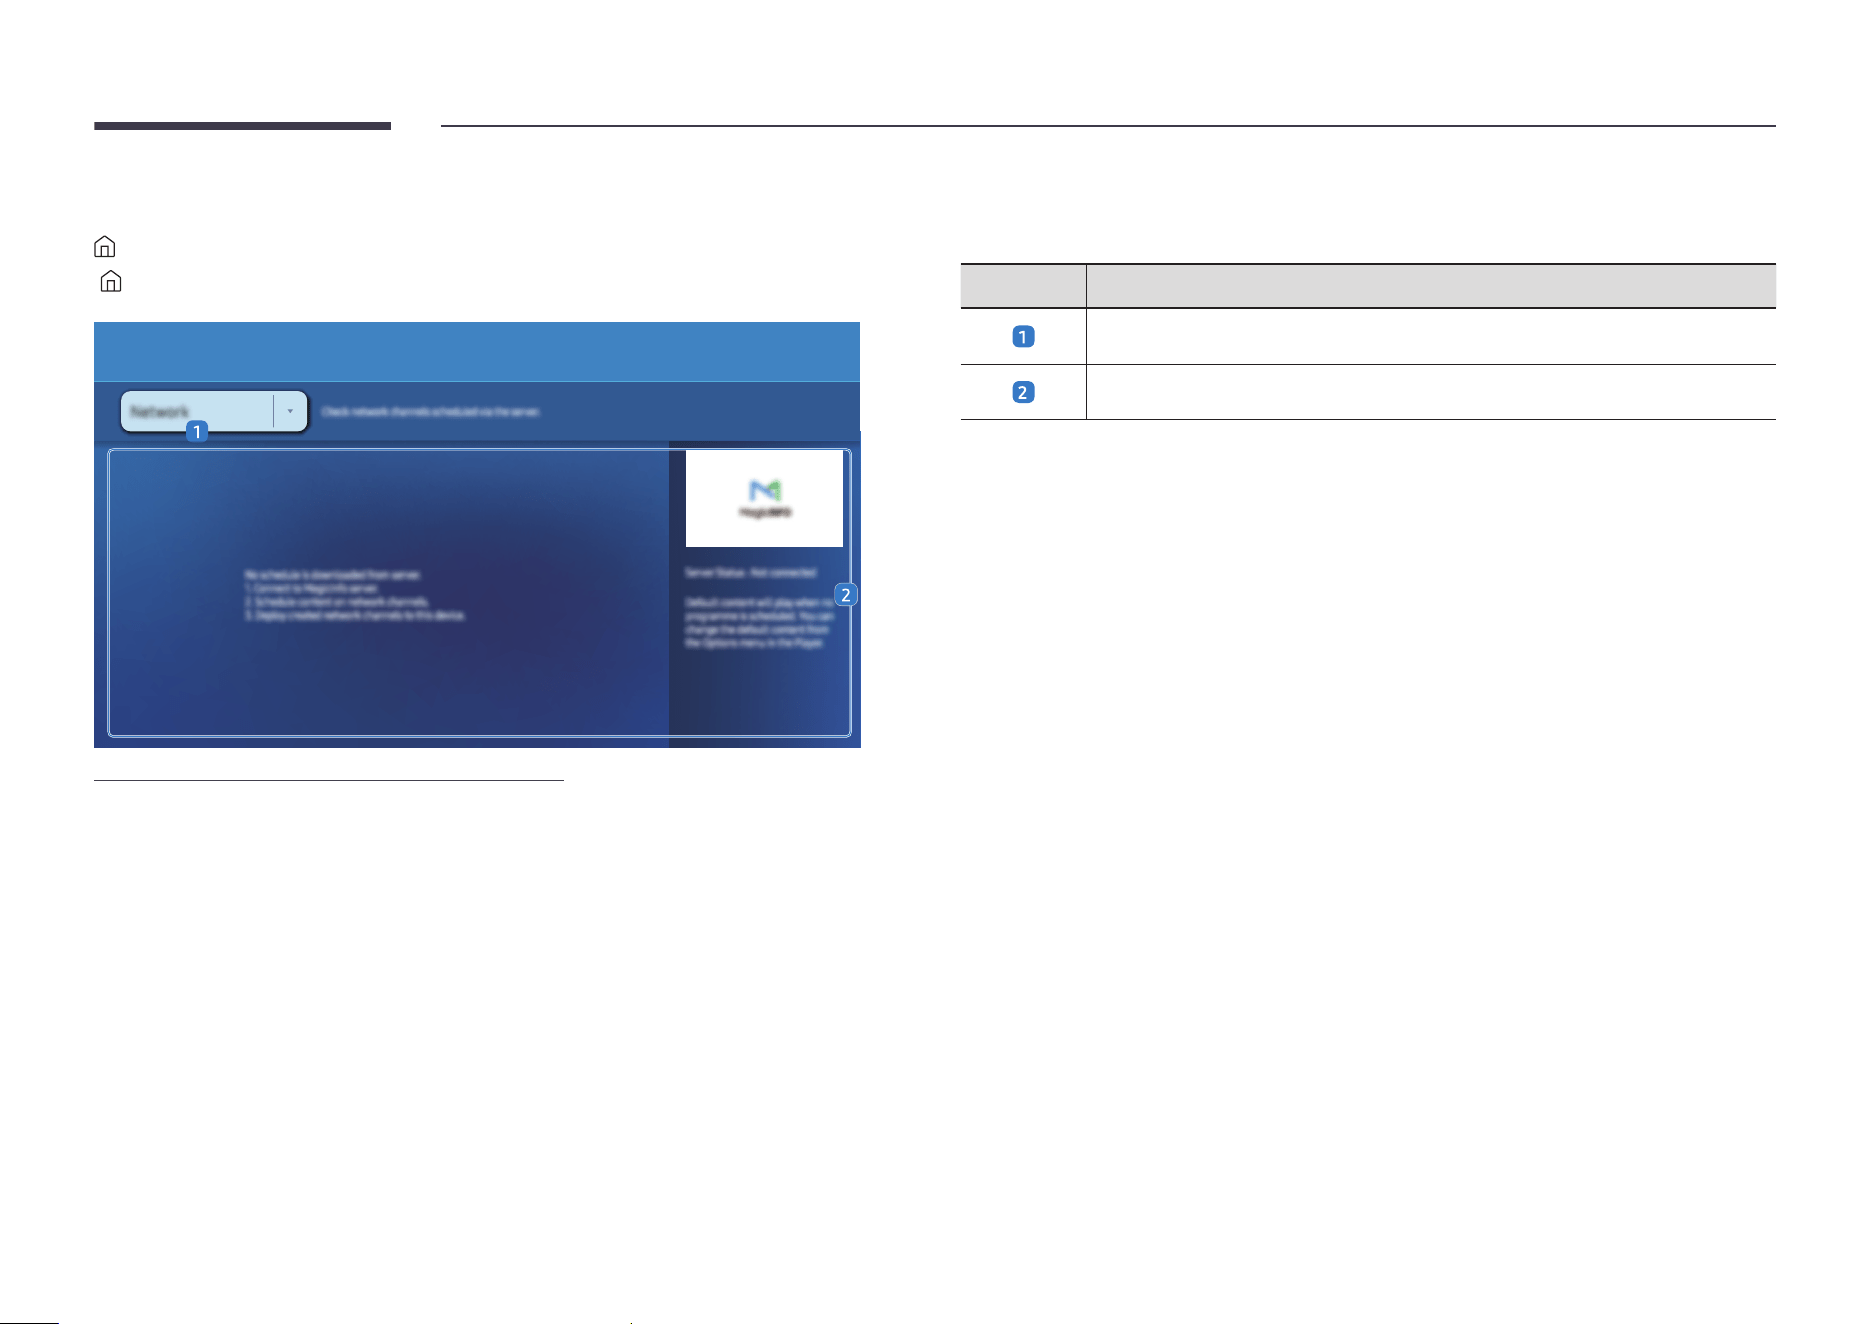
Player
→ Features → MagicInfo →
( → Player → E)
Player
"
The displayed image may differ depending on the model.
"
To use the Player feature, set Play via to MagicInfo in System.
(MENU → System → Play via → MagicInfo)
"
You must set Clock Set before you can use this feature.
No. Description
Select between internal or external memory.
Play content, templates and schedules configured on the server.
• You can view whether the server is connected (approval) in the Player
screen. To view whether the server is connected when a Network Channel is
running, press INFO on the remote control.
1
Select Network Channel from the Player screen. The No channel. message
appears if no channel has been registered in Network Channel.
2
Network Channel will run.
Play content stored on the server.
Play templates stored in My Templates folder in the Internal Memory.
"
This function may not be supported depending on the model.
Select a content type as criterion to search for a desired content list.
Set different options for Player.
Viewing content
1
Select either internal or external memory. The files saved in the selected memory appear.
2
Select the desired file. The content appears on the screen. (For more information on
compatible file formats, see the “File formats compatible with Player” section.)
44
When content is running
Control buttons on the remote control
You can play, pause, or skip the content on the playlist by pressing buttons on the remote
control.
Button Function
TOOLS
Brings up the menu bar.
INFO
Displays the general information of the content.
►
Goes to next file or page.
◄
Goes to previous file or page.
E
/
∆
/
³
Plays or pauses slide show or video content.
´
Stops displaying content and goes to the Player screen.
π
Rewinds the video content.
µ
Fast forwards the video content.
"
If there is only one image file in the Internal Memory or USB, the Slide Show will not play.
"
If the name of a folder is too long on the USB, you cannot select the folder.
"
Portrait option for Content Orientation is not available for contents with a resolution higher
than 3840 x 2160.
"
Content Size for videos with a resolution higher than 3840 x 2160 supports Full Screen only.
Available menu
Press the TOOLS button on the remote control during content playback to configure settings.
Menu Description
Playlist
View a list of content items currently playing.
Web Element Zoom
50 / 100 / 200 / 300
Repeat All / Repeat One
Set the repeat mode.
Background Music
Set the background music to be played when content is running.
Reset
Reset the background music.
Pause
Pause the background music.
Prev
Play the previous background music on the list.
Next
Play the next background music on the list.
"
Reset, Pause, Prev, Next only appear when the background music is set.
"
This function may not be supported depending on the model.

45
File Formats Compatible with Player
• Supported file systems include FAT32 and NTFS.
• A file with a vertical and horizontal resolution larger than the maximum resolution cannot
be played. Check the vertical and horizontal resolution of the file.
• Check the supported video and audio Codec types and Versions.
• Check the supported file versions.
"
PowerPoint version up to 97 – 2013 is supported
"
For USB-Internal Memory file transfer, click Options → Send. Wait for about a 50 seconds
before OK message appears.
• Location of template files
– Internal Memory → USB transfer: USB → under MagicinfoSlide folder
– USB → Internal Memory transfer: Internal Memory → under My Templates folder
• Location of other files (non-template)
– Internal Memory → USB transfer: USB → under MagicinfoSlide folder
– USB → Internal Memory transfer: Under the root folder
"
This function may not be supported depending on the model.
Network Schedule Multiframe
Playback restrictions
• 1 to 3 FHD video files can be played simultaneously or only one UHD video file and one
FHD video file at a time. In portrait playback mode, 3 FHD video files can be played
simultaneously or only one UHD video file at a time.
• For Office files (PPT and Word files) and PDF files, only one file type is supported at a time.
• LFD(*.LFD) files are not supported.
• Contents with a resolution higher than 3840 x 2160 are not supported.
Sound output restrictions
• More than one sound output cannot be used.
• Playback priority: network BGM → local BGM → video file in the main frame selected by the
user
"
Network BGM: Settings can be configured when creating a server schedule.
"
Local BGM: BGM settings can be configured using the tools displayed after the TOOLS
button is pressed during Player playback.
"
User-selected main frame: Main frame settings can be configured when creating a
server schedule.
Template les(*.LFD)
Restrictions
• Check that you have Contents and Schedules folders published to the USB storage device.
"
A properly published content appears as Published Content
in the USB device.
"
When copying a content you published to a USB device (Published Content
) to the
Internal Memory, the content appears in Internal Memory as Published Content
only. Contents and Schedules folders are not visible under Internal Memory.
Playback restrictions
• A maximum of two video (Video) files can be played.
• For Office files (PPT and Word files) and PDF files, only one file type is supported at a time.
• When playing more than one video files simultaneously, make sure that the display areas
are not overlapping one another.
Sound output restrictions
• More than one sound output cannot be used.
• Playback priority: network BGM → local BGM → video file in the main frame selected by the
user
46
Supported video codecs
File format Container Video codecs Resolution
Frame rate
(fps)
Bit rate
(Mbps)
Audio codecs
*.avi
*.mkv
*.asf
*.wmv
*.mp4
*.mov
*.3gp
*.vro
*.mpg
*.mpeg
*.ts
*.tp
*.trp
*.flv
*.vob
*.svi
*.m2ts
*.mts
AVI
MKV
ASF
MP4
3GP
MOV
FLV
VRO
VOB
PS
TS
H.264 BP/MP/HP 4096 x 2160
4096 x 2160: 60
1920 x 1080: 120
60
AC3
LPCM
ADPCM(IMA, MS)
AAC
HE-AAC
WMA
Dolby Digital+
MPEG(MP3)
MPEG-H
AC-4
OPUS
G.711(A-Law, μ-Law)
HEVC (H.265 - Main, Main10) 7680 x 4320
7680 x 4320: 60
3840 x 2160: 120
100
Motion JPEG 3840 x 2160 30 80
MPEG-4 SP/ASP
1920 x 1080
60
20
Windows Media Video 9 (VC-1)
MPEG-2
MPEG-1
Microsoft MPEG-4 version 1/2/3
30
Windows Media Video 7 (WMV1) /
Video 8 (WMV2)
H.263 Sorenson
VP6
AV1 7680 x 4320
7680 x 4320: 60
3840 x 2160: 120
80
*.webm
WebM
VP8 1920 x 1080 60 20
Vorbis
VP9 3840 x 2160 3840 x 2160: 60 80
*.rmvb
RMVB RV8/9/10 (RV30/40) 1920 x 1080 60 20 RealAudio 6

47
Other restrictions
• Codecs may not function properly if there is a problem with the content.
• Video content does not play or does not play correctly if there is an error in the content or
container.
• Sound or video may not work if they have standard bit rates/frame rates above the TV’s
compatibility ratings.
• If the Index Table is has an error, the Seek (Jump) function will not work.
• When playing video over a network connection, the video may not play smoothly because of
data transmission speeds.
• Some USB/digital camera devices may not be compatible with the TV.
• HEVC codec is only available in MKV / MP4 / TS containers.
• The MVC codec is supported partly.
Video decoders
• H.264 UHD is supported up to Level 5.1, and H.264 FHD is supported up to Level 4.2 (TV does
not support FMO / ASO / RS).
• HEVC UHD is supported up to Level 5.2, and HEVC FHD is supported up to Level 4.1.
• HEVC 8K is supported up to Level 6.1.
• VC1 AP L4 is not supported.
• GMC 2 or above is not supported.
• When a single video file is playing, Seamless mode is not supported under the following
conditions:
– Incompatible codec (MVC, VP3, MJPEG)
↔
Incompatible codec
– Incompatible codec
↔
Compatible codec
– The resolution is different from that of the monitor
– The frequency is different from that of the monitor
Audio decoders
• WMA is supported up to 10 Pro 5.1 channels, M2 profile.
• WMA1, WMA lossless / Voice are not supported.
• QCELP and AMR NB/WB are not supported.
• Vorbis is supported for up to 5.1 channels.
• Dolby Digital+ is supported for up to 5.1 channels.
• The supported sample rates are 8, 11.025, 12, 16, 22.05, 24, 32, 44.1, and 48 kHz, and differ
with the codec.
Image
• Compatible image file format: JPEG, PNG, BMP
"
32-bit, 24-bit and 8-bit BMP files are supported.
• Supported maximum resolution: 7680 x 4320 (JPEG), 4096 x 4096 (PNG, BMP)
"
When playing 10 files in one LFD file - 5120 x 5120
• Supported maximum file size: 20MB
• Supported Slideshow Effect: 9 effects
(Fade1, Fade2, Blind, Spiral, Checker, Linear, Stairs, Wipe, Random)

48
Power Point PDF WORD
• Compatible document file formats
– Extension : ppt, pptx, pps, ppsx
– Version : Office 97 ~ Office 2019
• Functions not supported
– Animation effect
– 3D shapes (which will be displayed in 2D)
– Header and footer (some subitems are not supported)
– Word Art
– Align
A group alignment error may occur
– Office 2007
SmartArt is not fully supported. 97 out of 115 subitems
are supported.
– Object insertion
– Half-width characters
– Letter spacing
– Charts
– Vertical text
Some subitems are not supported
• Compatible document file formats
– Extension : pdf
• Functions not supported
– Content less than 1 pixel not supported because of
performance degradation issue.
– Mask image and tile image content is limitedly
supported, depending on the performance of the
shading pattern device.
– 3D Shadow Effects not supported.
– Some characters not supported
(Special characters may be corrupted)
• Compatible document file formats
– Extension : .doc, .docx
– Version : Office 97 ~ Office 2019
• Functions not supported
– Page background effect
– Some paragraph styles
– Word Art
– Align
A group alignment error may occur
– 3D shapes (which will be displayed in 2D)
– Office 2007
SmartArt is not fully supported. 97 out of 115 subitems
are supported.
– Charts
– Half-width characters
– Letter spacing
– Vertical text
Some subitems are not supported
49
Schedule
→ Features → Schedule → E
( → Schedule → E)
Schedule
Wednesday, January 13, 12:00 AM
"
The displayed image may differ depending on the model.
You can check the schedule imported from a selected storage device.
"
This function may not be supported depending on the model.
No. Description
Select the saved location of the schedule.
Create/Edit/Delete/View schedule of content playback.

50
Web browser
→ Features → Web browser → E
(s → Web Browser → E)
Connect the network to access the Internet from the product like accessing the Internet from a
computer.
"
This function may not be supported depending on the model.
Settings
→ Features → Web browser → d → Settings → E
(s → Web Browser → ▲ → Settings → E)
Refresh Interval
Set the time for the web browser to wait before returning to the homepage.
• Off / 5 min / 10 min / 15 min / 30 min
Zoom
Set the zoom scale to apply when the web browser is refreshed.
• 50% / 75% / 100% / 125% / 150% / 200% / 300%
Home Page
Set the website to display when the web browser is refreshed.
• Samsung Display / Custom
Custom
Enter the URL to set as the homepage.
• Enter URL
"
Available only when Home Page is set to Custom.

51
Advanced Settings
General
Hide Tabs and Toolbar
automatically
If the browser tabs, menu or toolbar are not used for a while,
they will automatically disappear. To make them appear again,
move the pointer or focus to the top of the screen.
• Use / Do not use
Hide Cursor in Touch Mode
Hide the cursor to prevent interference with touch operation.
• Use / Do not use
Pop-up Blocker
Make your browsing experience more pleasant by blocking pop-
up windows.
• Use / Do not use
Proxy Server
Configure a proxy server for the web browser.
• Use / Do not use
Reset Settings
All your customized Web Browser settings will be reset to their
default values. Your browsing history won't be affected.
Search Engine
If you enter a keyword in the URL/keyword input field, Web Browser will open the Search
Results page. Choose the search engine you want to use.
• Google / Bing
Privacy & Security
Do Not Track
Ask websites not to track you.
• Use / Do not use
Delete History
Delete your entire browsing history.
JavaScript
Allow all sites to run JavaScript for a better browsing experience.
• Use / Do not use
Delete browsing data
Delete all browsing data such as cookies, cached images and
data. Your browsing history won't be affected.
Block Third-Party Cookies
Block third-party websites from saving and reading cookie data.
Features on some sites may not work.
• Use / Do not use
Encoding
Encoding
Choose an encoding method for webpages. The current setting
is Auto.
• Auto / Manual (Current : Unicode)
About
Display the current version of Web Browser.

52
Read Before Using the Web Browser Function
Read this information before using the Web Browser function.
• File download is not supported.
• The Web Browser function may not be able to access certain websites, including websites
operated by certain companies.
• The product does not support playback of flash videos.
• E-commerce for online purchases is not supported.
• ActiveX is not supported.
• Only a limited number of fonts are supported. Certain symbols and characters may not be
displayed properly.
• The response to remote commands and the resulting on-screen display may be delayed
while a webpage is loading.
• Loading a webpage may be delayed or suspended completely depending on the status of
the participating systems.
• Copy and paste operations are not supported.
• When composing an email or a simple message, certain functions such as the font size and
color selection may not be available.
• The number of access logs that can be saved is limited.
• The number of windows that can be opened concurrently is limited.
• Web browsing speed will differ with the network environment.
• Browsing history is saved from latest to oldest, with the oldest entries being overwritten
first.
• Depending on the types of video/audio codecs supported, you may not be able to play
certain HTML5 video and audio files.
• Video sources from PC-optimized streaming service providers may not play properly on our
proprietary Web Browser browser.

53
Custom Home
→ Features → Custom Home → E
( → Custom Home → E)
Enter your 6 digit PIN number. If you want to change the PIN number, use the Change PIN
function.
Select an item to run in Custom Home mode. Press the Home key to return to this screen.
"
This function may not be supported depending on the model.
Screen Mirroring
→ Features → Screen Mirroring → E
(s → Screen Mirroring → E)
Follow the instructions on the screen to adjust the PC settings and wirelessly connect the
Product to the PC.
"
This function may not be supported depending on the model.
Workspace
→ Features → Workspace → E
(s → Workspace → E)
"
This function may not be supported depending on the model.
"
Make sure that the product is connected to the network.
"
Be sure to connect your keyboard and mouse before starting this function.
Access to remote PC and your work resources with this function.
• Window PC
Remote PC: This function allows you to connect your product to a remote PC or a cloud
server.
Screen Sharing: Share your Windows PC screen to your device.
"
Only PCs or Cloud Servers running on macOS/Windows 7 Pro or newer are supported.
• Mac
Remote Login: Connect to Your Mac through Remote Login.
• Samsung DeX: Connect to your Samsung mobile device from your device.
• Microsoft 365: Collaborate with online versions of Microsoft 365.

54
SMARTVIEW+
→ Features → SMARTVIEW+ → E
(s → SMARTVIEW+ → E)
• You can view multiple content items through SMARTVIEW+.
• To start the function, select SMARTVIEW+, and then select the content to add in Select
content. or select a desired combination in Preset at the top of SMARTVIEW+. Or run screen
sharing for your mobile device.
• To share the screen of a PC, enter the address provided on the screen into your web browser
(e.g., Chrome, Edge, Firefox or Safari).
• To share the screen of a mobile or tablet device, download and install the Samsung Signage
Mobile App from the Samsung Apps, Google Play Store or Apple App Store, and then enter
the numbers displayed on the screen.
• A maximum of 10 clients can be connected, and a maximum of 10 device screens can be
shared at the same time.
• For a PC, you can directly control screen sharing by connecting as an administrator.
"
For details on using this feature, refer to the on-screen instructions.
"
This function may not be supported depending on the model.
APPS
→ Features → APPS → E
(
→ Support → Apps → E)
Manage and update your apps. To use the APPS Menu, please agree to the Terms and
Conditions.
Check details information of app and reinstall when the app does not work properly.

55
Settings
Check the current network and Internet connection.
"
This function may not be supported depending on the model.
All Settings
→ Settings → All Settings → E
(
)
Displays the Settings menu for configuring specific settings.
Network
→ Settings → Network → E
(
→ Network → E)
Check the current network and Internet connection.
Clone Product
→ Settings → Clone Product → E
( → Clone Product → E)
Export settings on the product to an external storage device. You can also import settings from
an external storage device.
This option is useful when assigning the same settings to several products.
When a duplicate le is not found on the external storage device
1
Connect the external storage device, then run the Clone Product function.
2
The No cloning file found on the external storage device. Export this device's settings to
the external storage device? message appears.
3
Select Export to export the settings.
When a duplicate le is found on the external storage device
1
Connect the external storage device, then run the Clone Product function.
2
The Cloning file found. Please select an option. message appears.
Run the Import from External Storage or Export to External Storage function.
– Import from External Storage: Copy settings saved on an external storage device to the
product.
"
After configuration is complete, the product is rebooted automatically.
– Export to External Storage: Copy settings on the product to an external storage device.

56
ID Settings
→ Settings → ID Settings → E
( → ID Settings → E)
Assign an ID to a set.
Device ID
Set a unique ID number for each product.
"
Press u/d to select a number, and press E.
"
Enter the number you want using the number buttons on the remote control.
Device ID Auto Set
This feature automatically allots an ID number to a device connected through an RS232C cable.
"
This function is only available on the first device within an RS-232C daisy chain.
"
This function may not be supported depending on the model.
PC Connection Cable
Select which type of cable you are using to connect the display to the PC.
• RS232C cable
Communicate with MDC through the RS232C cable.
• RJ-45 (LAN)/Wi-Fi Network or RJ45(LAN) cable
Communicate with MDC through the RJ45 cable.
"
Available functions may differ depending on the model.
Video Wall
→ Settings → Video Wall → E
( → Video Wall → E)
Customize the layout of multiple displays that are connected to form a video wall.
In addition, display part of a whole picture or repeat the same picture on each of the connected
multiple displays.
To display multiple images, refer to MDC Help or the MagicInfo user guide. Some models may
not support the MagicInfo function.
"
This function may not be supported depending on the model.
Video Wall
You can activate or deactivate Video Wall.
To organize a video wall, select On.
• Off / On
Horizontal x Vertical
This feature automatically splits a videowall display based on a videowall matrix configuration.
Enter the videowall matrix.
The videowall display is split based on the configured matrix. The number of vertical or
horizontal display devices can be set within the range 1 and 15.
"
A videowall display can be split into a maximum of 225 screens.
"
The Horizontal x Vertical option is only enabled when Video Wall is set to On.

57
Screen Position
To rearrange split screens, adjust the number for each product in the matrix using the Screen
Position feature.
Selecting Screen Position will display the videowall matrix with the numbers assigned to the
products that form the videowall.
To rearrange products, use the direction buttons on the remote control to move a product to
another desired number. Press the E button.
"
Screen Position allows you to split the screen into a maximum of 225 views (15 x 15).
"
The Screen Position option is only enabled when Video Wall is set to On.
"
To use the function, make sure Horizontal x Vertical is configured.
Format
Select how to display images on the videowall display.
• Full: Display images in full screen with no margin.
• Natural: Display images in the original aspect ratio without enlarging or reducing the size.
"
The Format option is only enabled when Video Wall is set to On.
Apply Source Settings
Use this menu to select whether to apply the video wall settings to all sources or only to the
current source.
"
This function may not be supported depending on the model.
Network Status
→ Network → Network Status → E
(
→ Network Status → E)
You can check the current network and Internet status.
"
This function may not be supported depending on the model.

58
On/Off Timer
→ Settings → On/Off Timer → E
(
→ On/Off Timer → E)
"
You must set Clock Set before you can use this feature.
On Timer
Set On Timer so that your product turns on automatically at a time and on a day of your choice.
The power is turned on with the specified volume or input source.
On Timer: Set the on timer by making a selection from one of the seven options. Ensure you set
the current time first.
(On Timer 1 ~ On Timer 7)
"
While the internal/USB memory option can be used with On Timer for MagicInfo mode, it is
recommended to use an internal memory.
"
Proper operation of On Timer feature cannot be guaranteed if used with a battery powered
USB device, which can take longer to be recognized.
• Setup: Select Don't Use, Once, Everyday, Mon~Fri, Mon~Sat, Sat~Sun or Manual. If you
select Manual, you can choose the days you want On Timer to turn on your product.
– The check mark indicates days you’ve selected.
• Time: Set the hour and minute. Use the number buttons or the up and down arrow keys to
enter numbers. Use the left and right arrow buttons to change entry fields.
• Volume (For models with built-in speakers): Set the desired volume level. Use the up and
down arrow buttons to change the volume level.
• Source: Select the input source of your choice.
• Content (when the Source is set to Internal/USB for MagicInfo mode): From the USB device
or internal memory, select a file (e.g. music, photo, or video) to play just after the product is
turned on.
Off Timer
Set the off timer (Off Timer) by making a selection from one of the seven options. (Off Timer 1 ~
Off Timer 7)
• Setup: Select Don't Use, Once, Everyday, Mon~Fri, Mon~Sat, Sat~Sun or Manual. If you
select Manual, you can choose the days you want Off Timer to turn off your product.
– The check mark indicates days you’ve selected.
• Time: Set the hour and minute. Use the number buttons or the up and down arrow keys to
enter numbers. Use the left and right arrow buttons to change entry fields.
Holiday Management
Timer will be disabled during a period specified as a holiday.
• Add Holiday: Specify the period you want to add as a holiday.
Select the start and end dates of the holiday you want to add using the
u
/
d
buttons, and
click the Done button.
The period will be added to the list of holidays.
– Start Date: Set the start date of the holiday.
– End Date: Set the end date of the holiday.
• Delete: Delete selected items from the list of holidays.
• Edit: Select a holiday item and then change the date.
• Apply to Timers: Set the On Timer and Off Timer to not activate on public holidays.
– Press
E
to select the On Timer and Off Timer settings you do not want to activate.
– The selected On Timer and Off Timer will not activate.

59
Ticker
→ Settings → Ticker → E
( → Ticker → E)
Input text while a video or image is displayed and display the text on the screen.
"
You must set Clock Set before you can use this feature.
• Off / On: Set whether or not to use Ticker.
• Message: Enter a message to display on the screen.
• Time: Set the Start Time and End Time to display a Message.
• Font Options: Specify the text font and color for the message.
• Position: Select a position to display a Message.
• Scroll: Turn scroll effects of Ticker on or not. Specify the scroll Direction and Speed for the
message.
• Preview: Preview your Ticker settings.

60
Picture
2nd 3rd Description
Backlight / Brightness /
Contrast / Sharpness
Your product has several options for adjusting picture quality.
"
You can adjust and store settings for each external device you have connected to an input on the product.
"
Lowering picture brightness reduces power consumption.
"
You may adjust the brightness of your displayto achieve maximum level by going to Backlight and Contrast to 100(max).
"
Due to the characteristics of the display panels, brightness level of individual products may vary.
Color Temperature It sets color temperature. The value and temperature increase simultaneously, so the ratio of blue color rises. (Range:
2800K–16000K)
"
Enabled when Color Tone is set to Off.
Accessible using the button on the remote control.
Menu
Chapter 06
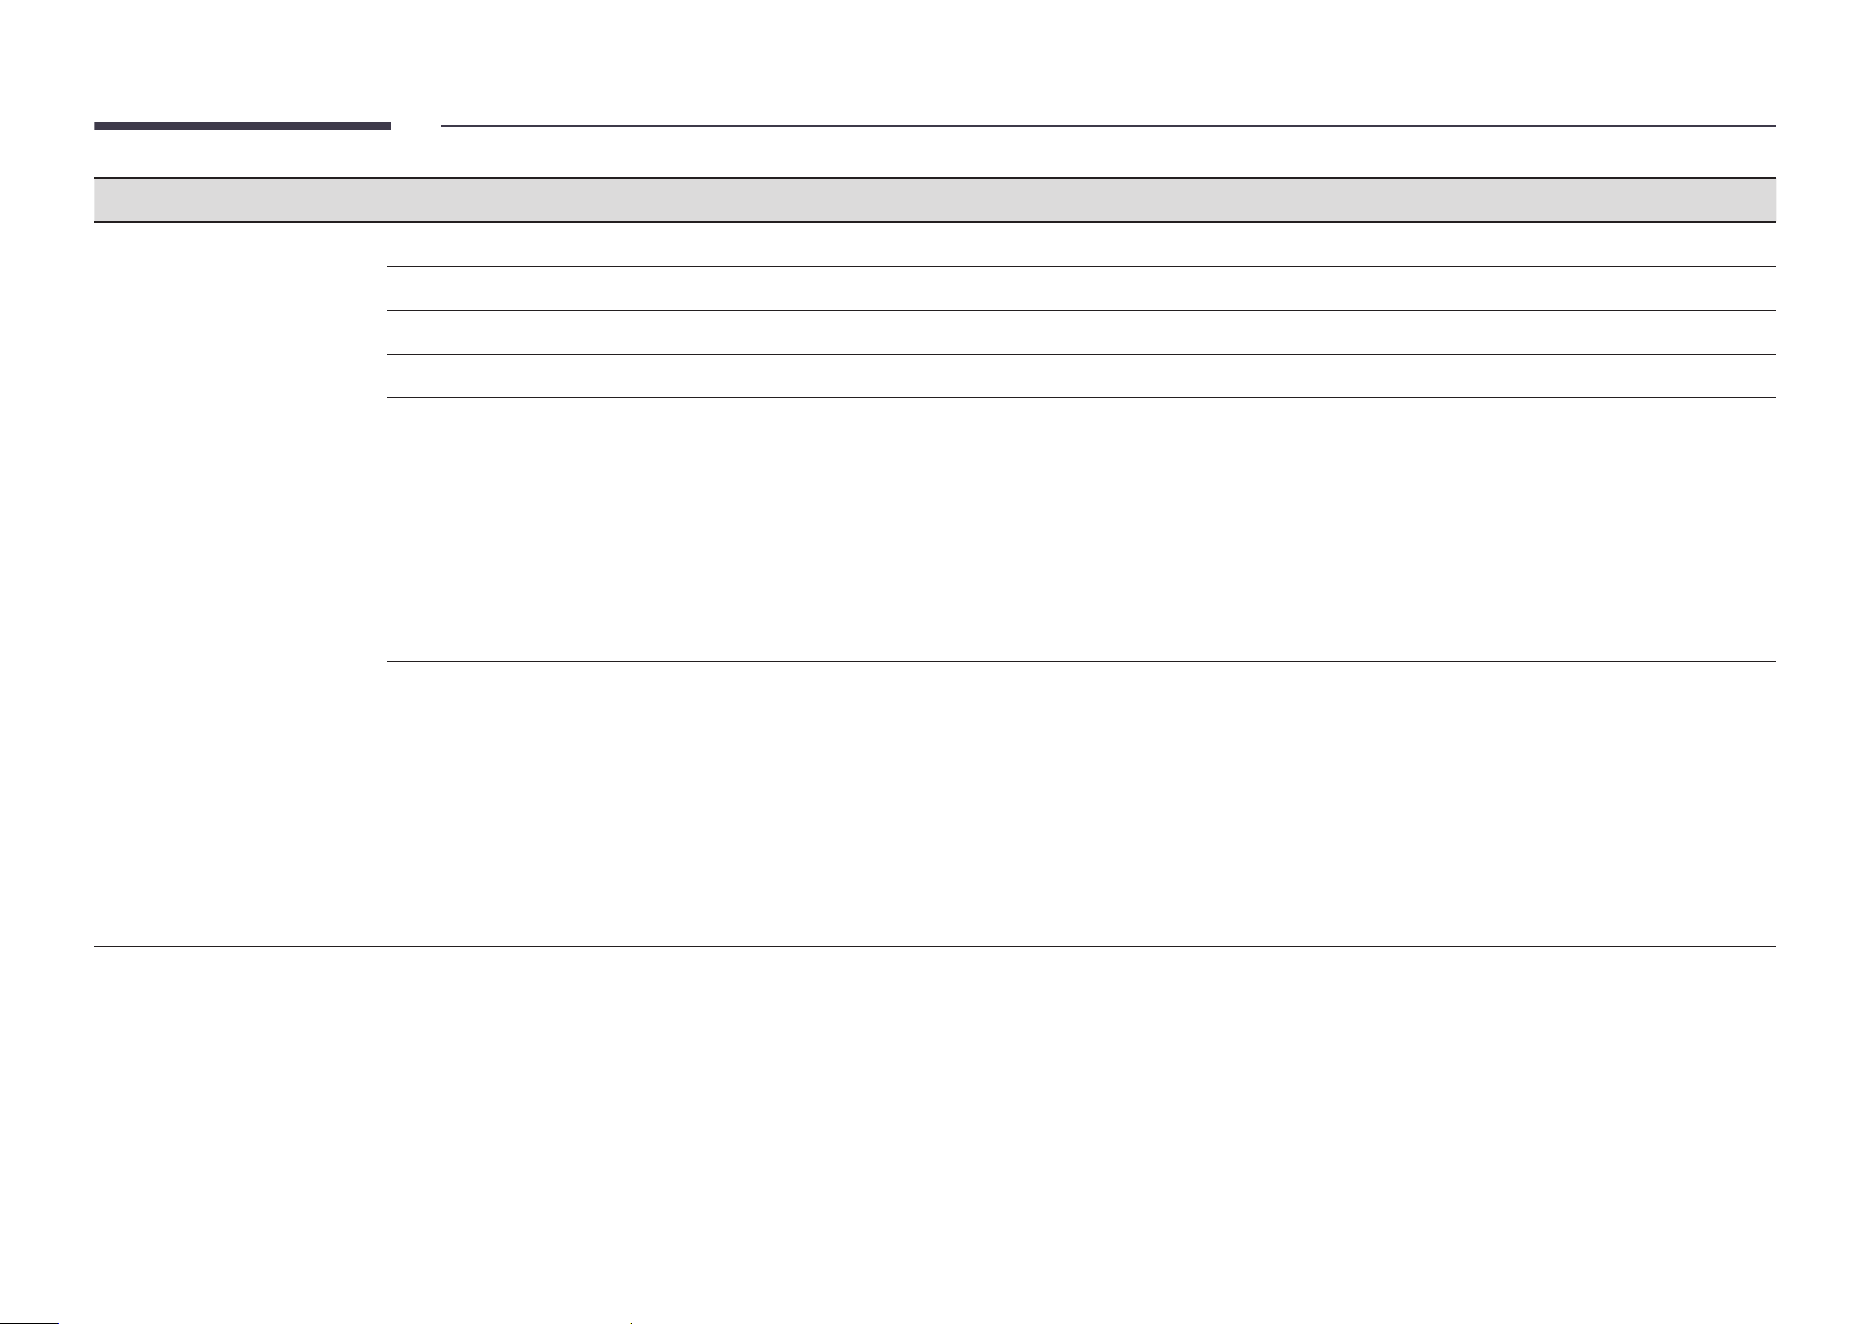
61
2nd 3rd Description
Advanced Settings Configure advanced picture settings to create your preferred picture.
Picture Enhancer Displays enhanced color and sharpness.
Color Adjust the color saturation levels. Color saturation intensifies as the value nears 100. (Range: 0~100)
Tint (G/R) Adjust the ratio of green to red tint levels. Increasing values intensifies the saturation of red and green colors. (Range: 0~50)
White Balance Adjust the color temperature of the picture so that white objects appear brighter.
• 2 Point
Adjust red, green, and blue luminosity levels in two sections for precise white balance optimization.
• 20 Point Settings
Controls the white balance in 20 point interval by adjusting the red, green, and blue brightness.
– 20 Point
Adjust red, green, and blue luminosity levels in twenty sections for precise white balance optimization.
"
Some external devices may not support this function.
Gamma Adjust the mid-range brightness of the picture.
"
Gamma settings HLG, ST.2084, and BT.1886 may change depending on the input video settings. For models with the HDR+
Mode support, the Gamma settings HLG, ST.2084, and BT.1886 may change depending on the input video and HDR+ Mode
settings. If HDR+ Mode is set to Off, HLG, ST.2084, and BT.1886 settings may be available depending on the input video. To
adjust S Curve, set HDR+ Mode to Off.
• HLG / ST.2084 / BT.1886 / 2.2 / S Curve
Adjust the HLG, ST.2084, BT.1886, S Curve levels of the picture.
"
If 2.2 is selected, level adjustment is not possible.
"
Available functions may differ depending on the port type.
62
2nd 3rd Description
Advanced Settings Contrast Enhancer Automatically balance the contrast to prevent excessive differences between bright and dark areas.
Black Tone Select the black level to adjust the screen depth.
Flesh Tone Adjust the flesh tone color by increasing or decreasing red levels.
Color Space Settings Configure color space settings to refine the spectrum of colors on your screen.
• Color Space
Choose a color space.
"
To adjust Color, Red, Green, Blue and Reset, set Color Space to Custom.
• Color Gamut
Choose a color gamut.
"
This function may not be supported depending on the model.
Input Signal Plus Expands the input signal range for HDMI connections.
"
When Input Signal Plus is set to On, up to the 4096 x 2160 @ 60 Hz resolution is supported.
When Input Signal Plus is set to Off, up to the 1920 x 1080 @ 60 Hz resolution is supported.
"
Connecting parts may differ depending on the model.
"
This function may not be supported depending on the model.
Motion Lighting Reduces power consumption by reducing screen brightness when the picture on the screen is in motion.
63
2nd 3rd Description
Picture Options Color Tone Select the color tone that best suits your viewing preferences.
"
Settings can be adjusted and stored for each external device connected to an input on the product.
"
Available options may vary depending on the product.
Digital Clean View Reduce picture noise to avoid distractions such as flickering.
• Auto / Off
HDMI Black Level Adjust the black level to optimize the HDMI picture brightness and contrast.
"
Only available if the input signal from the external device connected to the HDMI port is RGB444.
Film Mode Make frame transitions from older video sources smoother. This function is only available when the input signal is TV, AV,
Component (480i, 1080i), or HDMI (1080i).
Dynamic Backlight Automatically adjust the backlight to provide the best possible screen contrast under the current conditions.
Dynamic Peaking Automatically adjust the backlight to provide the best possible screen contrast under the current conditions.
"
This function may not be supported depending on the model.
Apply Picture Settings Apply the picture settings to all external devices connected to the device or to the current source only.
64
2nd 3rd Description
Picture Size Settings Choose size and aspect ratio picture displayed on screen.
"
Some external devices and applications may not support this function.
Picture Size Different screen adjustment options are displayed depending on the current input source.
"
Available functions may differ depending on the model or input signals.
"
Do not set your product to 4:3 format for a long time.
The borders displayed on the left and right, or top and bottom of the screen may cause image retention (screen burn)
which is not covered by the warranty.
Fit to Screen Adjusts the picture position. When selected, the full program image will be displayed. No part of the image will be cut off.
Zoom and Position Adjusts the picture zoom and position. This function is available only if Picture Size is set to Custom.
"
If you want to reset the picture to its original position, select Reset in the Zoom and Position screen. The picture will be set
to its default position.
Reset Picture Restore all picture settings to the factory default.
65
OnScreen Display
2nd 3rd Description
Display Orientation Onscreen Menu Orientation Select whether the onscreen menu should be displayed in landscape or portrait orientation.
• Landscape / Portrait
"
This function may not be supported depending on the model.
Source Content Orientation Rotate the product screen orientation.
• Landscape / Portrait
"
This function may not be supported depending on the model.
Aspect Ratio Set the rotated screen to be either full screen or original.
"
Available only when Source Content Orientation is set to Portrait.
Screen Protection Screen Saver Activate a screensaver when your device displays a still image for two hours or more.
Screen Burn Protection To reduce the possibility of screen burn, this unit is equipped with Screen Burn Protection screen burn prevention technology.
Screen Burn Protection moves the picture slightly on the screen.
• Pixel Shift
Minimize image retention by finely moving pixels horizontally or vertically.
"
Horizontal, Vertical and Time are enabled only when Pixel Shift is set to On.
"
The Pixel Shift value may differ depending on the model.
"
Displaying a still image or a 4:3 output for an extended period of time may cause image retention. This is not a defect
in the product.
• Timer
You can set the timer for Screen Burn Protection.
The Screen Burn Protection feature stops automatically after a specified period of time.
• Immediate Display
Select the screen saver you want to display immediately.
66
2nd 3rd Description
Message Display Source Info Select whether to display the source OSD when the input source changes.
No Signal Message Select whether to display the no-signal OSD when no signal is detected.
The message No Cable Connected will appear if no source device is connected.
MDC Message Select whether to display the MDC OSD when the product is controlled by the MDC.
Language Set the menu language.
"
A change to the language setting will only be applied to the onscreen menu display. It will not be applied to other
functions on your PC.
Reset OnScreen Display This option returns the current settings under OnScreen Display to the default factory settings.
67
Network
2nd 3rd Description
Network Status You can check the current network and Internet status.
Open Network Settings Configure network settings to connect to an available network.
Network Type
"
Network Type menu may not be available in Wired models.
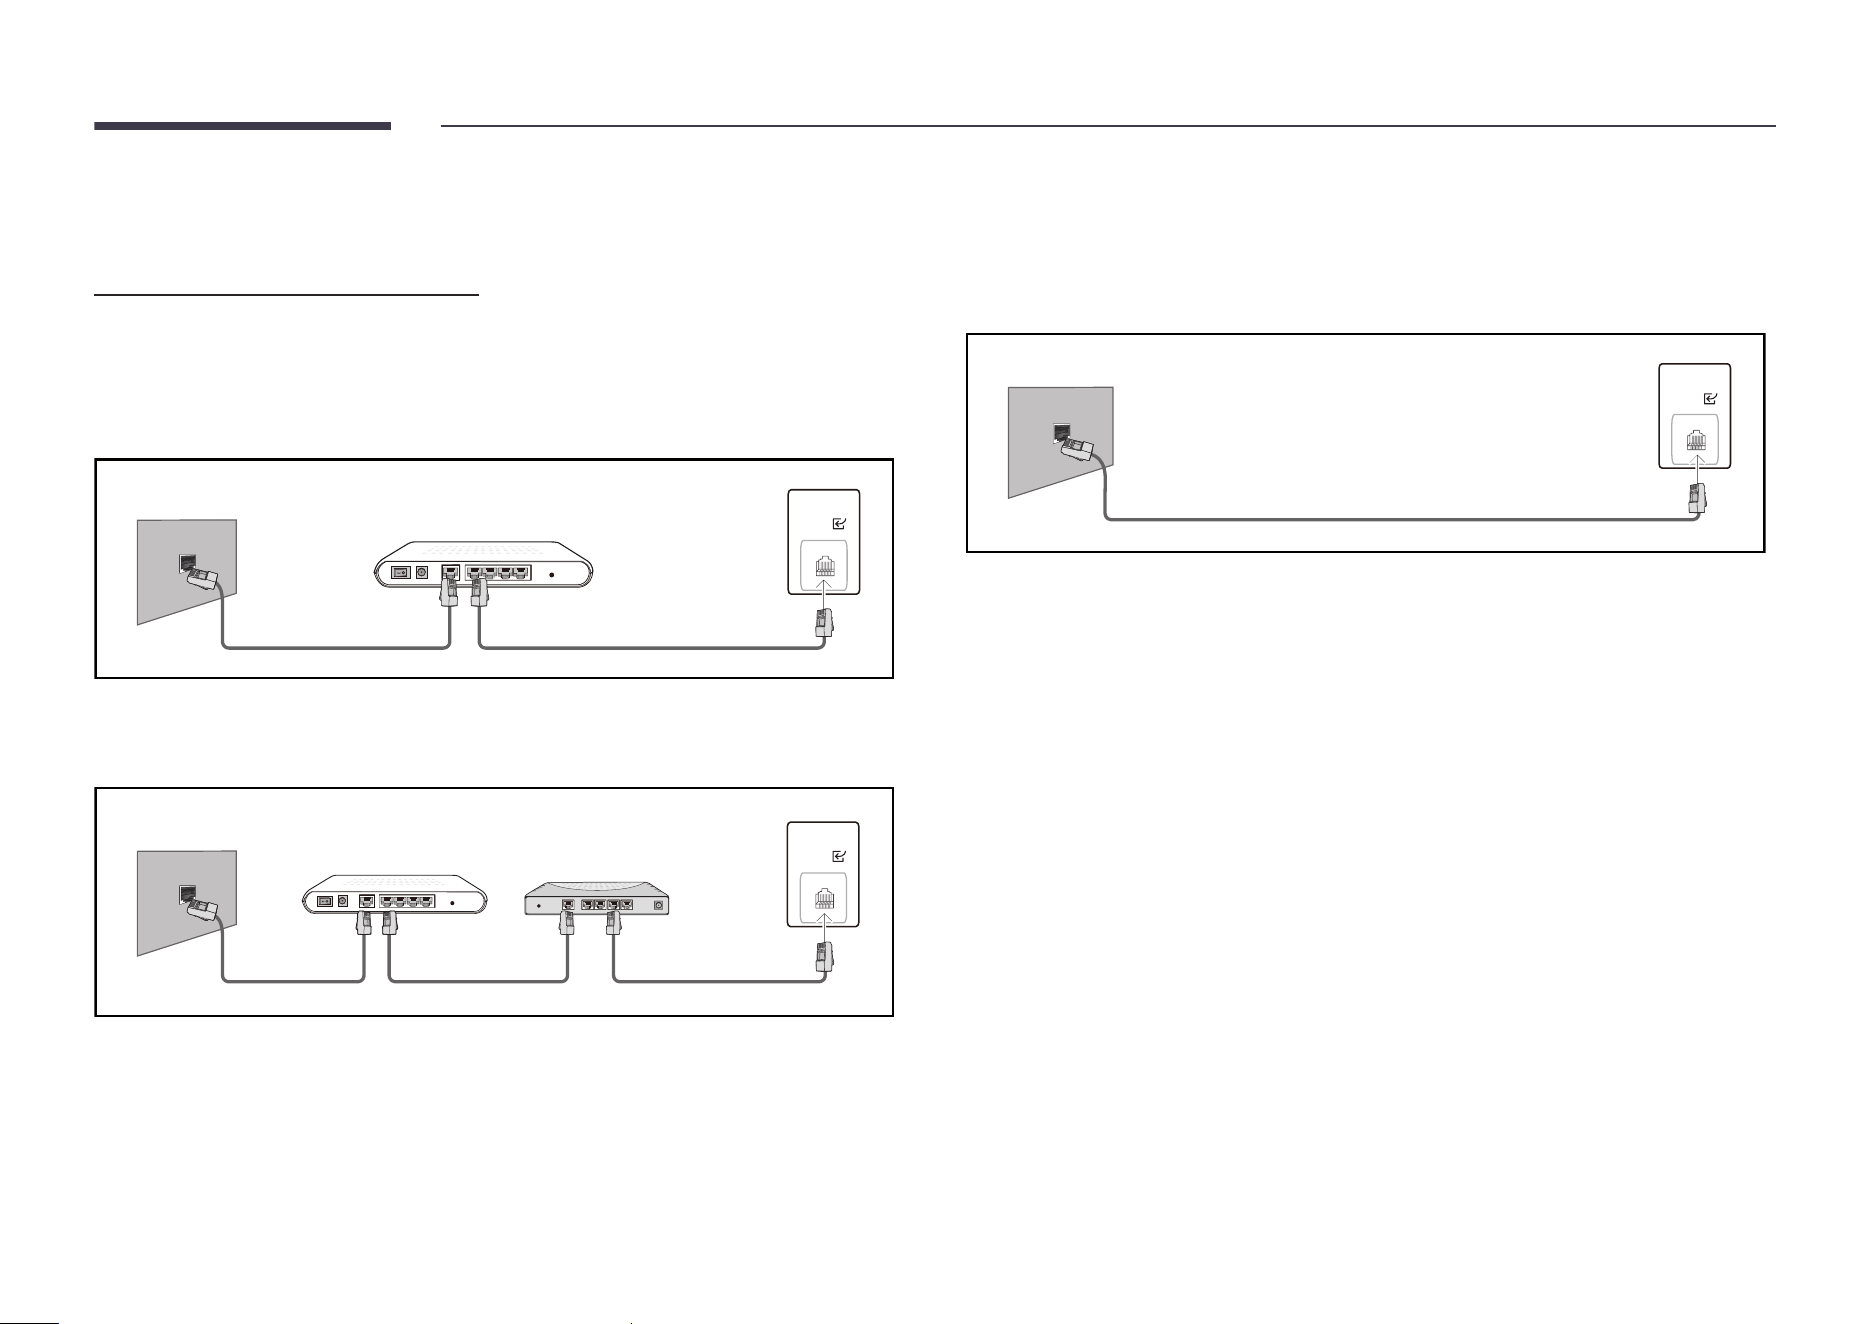
68
Network Settings (Wired)
Connecting to a Wired Network
There are three ways to attach your product to your LAN using cable.
• You can attach your product to your LAN by connecting the LAN port on the back of your
product to an external modem using a LAN cable.
See the diagram below.
The Modem Port on the Wall
Modem Cable LAN Cable
External Modem
(ADSL / VDSL)
LAN
RJ45
(LAN
)
• You can attach your product to your LAN by connecting the LAN port on the back of your
product to an IP Sharer which is connected to an external modem. Use LAN cable for the
connection. See the diagram below.
The Modem Port on the Wall
Modem Cable LAN Cable LAN Cable
External Modem
(ADSL / VDSL)
IP Sharer
(having DHCP server)
LAN
RJ45
(LAN
)
• Depending on how your network is configured, you may be able to attach your product to
your LAN by connecting the LAN port on the back of your product directly to a network wall
outlet using a LAN cable.
See the diagram below. Note that the wall outlet is attached to a modem or router
elsewhere in your house.
The LAN Port on the Wall
LAN Cable
LAN
RJ45
(LAN
)
If you have a Dynamic Network, you should use an ADSL modem or router that supports
the Dynamic Host Configuration Protocol (DHCP). Modems and routers that support DHCP
automatically provide the IP Address, Subnet Mask, Gateway, and DNS values your product
needs to access the Internet so you do not have to enter them manually. Most home networks
are Dynamic Networks.
Some networks require a Static IP address. If your network requires a Static IP address, you
must enter the IP Address, Subnet Mask, Gateway, and DNS values manually on your product
IP Settings when you set up the network connection. To get the IP Address, Subnet Mask,
Gateway, and DNS values, contact your Internet Service Provider (ISP).
If you have a Windows computer, you can also get these values through your computer.
"
You can use ADSL modems that support DHCP if your network requires a Static IP address.
"
ADSL modems that support DHCP also let you use Static IP addresses.

69
Set the network connection to use Internet services such as perform software upgrades.
Automatic Open Network Settings (Wired)
Connect to the network using a LAN cable.
Make sure a LAN cable is connected first.
How to set up automatically
1
Set Network Type to Wired from the Open Network Settings page.
"
For wired models, select Network Status menu.
2
The network test screen appears and verifies the network connection.
When the connection has been verified, the “Success! Your device is connected to the
Internet. If you have any problems using online services, please contact your Internet
service provider.” message appears.
"
If the connection process fails, check the LAN port connection.
"
If the automatic process cannot find the network connection values or if you want to set the
connection manually, go to the next section(Manual Open Network Settings (Wired)).
Manual Open Network Settings (Wired)
Offices may use static IP addresses.
If this is the case, ask the network administrator for the IP Address, Subnet Mask, Gateway and
DNS server address. Enter these values manually.
Getting the Network Connection Values
To view the Network connection values on most Windows computers, follow these steps.
1
Right click the Network icon on the bottom right of the screen.
2
In the pop-up menu that appears, click Status.
3
On the dialog that appears, click the Support tab.
4
On the Support Tab, click the Details button. The Network connection values are displayed.
"
The path to the settings depends on the installed OS.
How to set up manually
1
Set Network Type to Wired from the Open Network Settings page.
The network test screen appears and the verification process starts. Press Cancel. The
verification process stops.
"
For wired models, select Network Status menu.
2
Select IP Settings on network connection screen. The IP Settings screen appears.
3
Select the field at the top, press E, and then set IP Setting to Enter manually. Repeat the
entry process for each field in the IP Address.
"
Setting IP Setting to Enter manually automatically changes DNS Setting to Enter
manually.
4
When done, select OK at the bottom of the page, and then press E. The network test
screen appears and the verification process starts.
5
When the connection has been verified, the “Success! Your device is connected to the
Internet. If you have any problems using online services, please contact your Internet
service provider.” message appears.
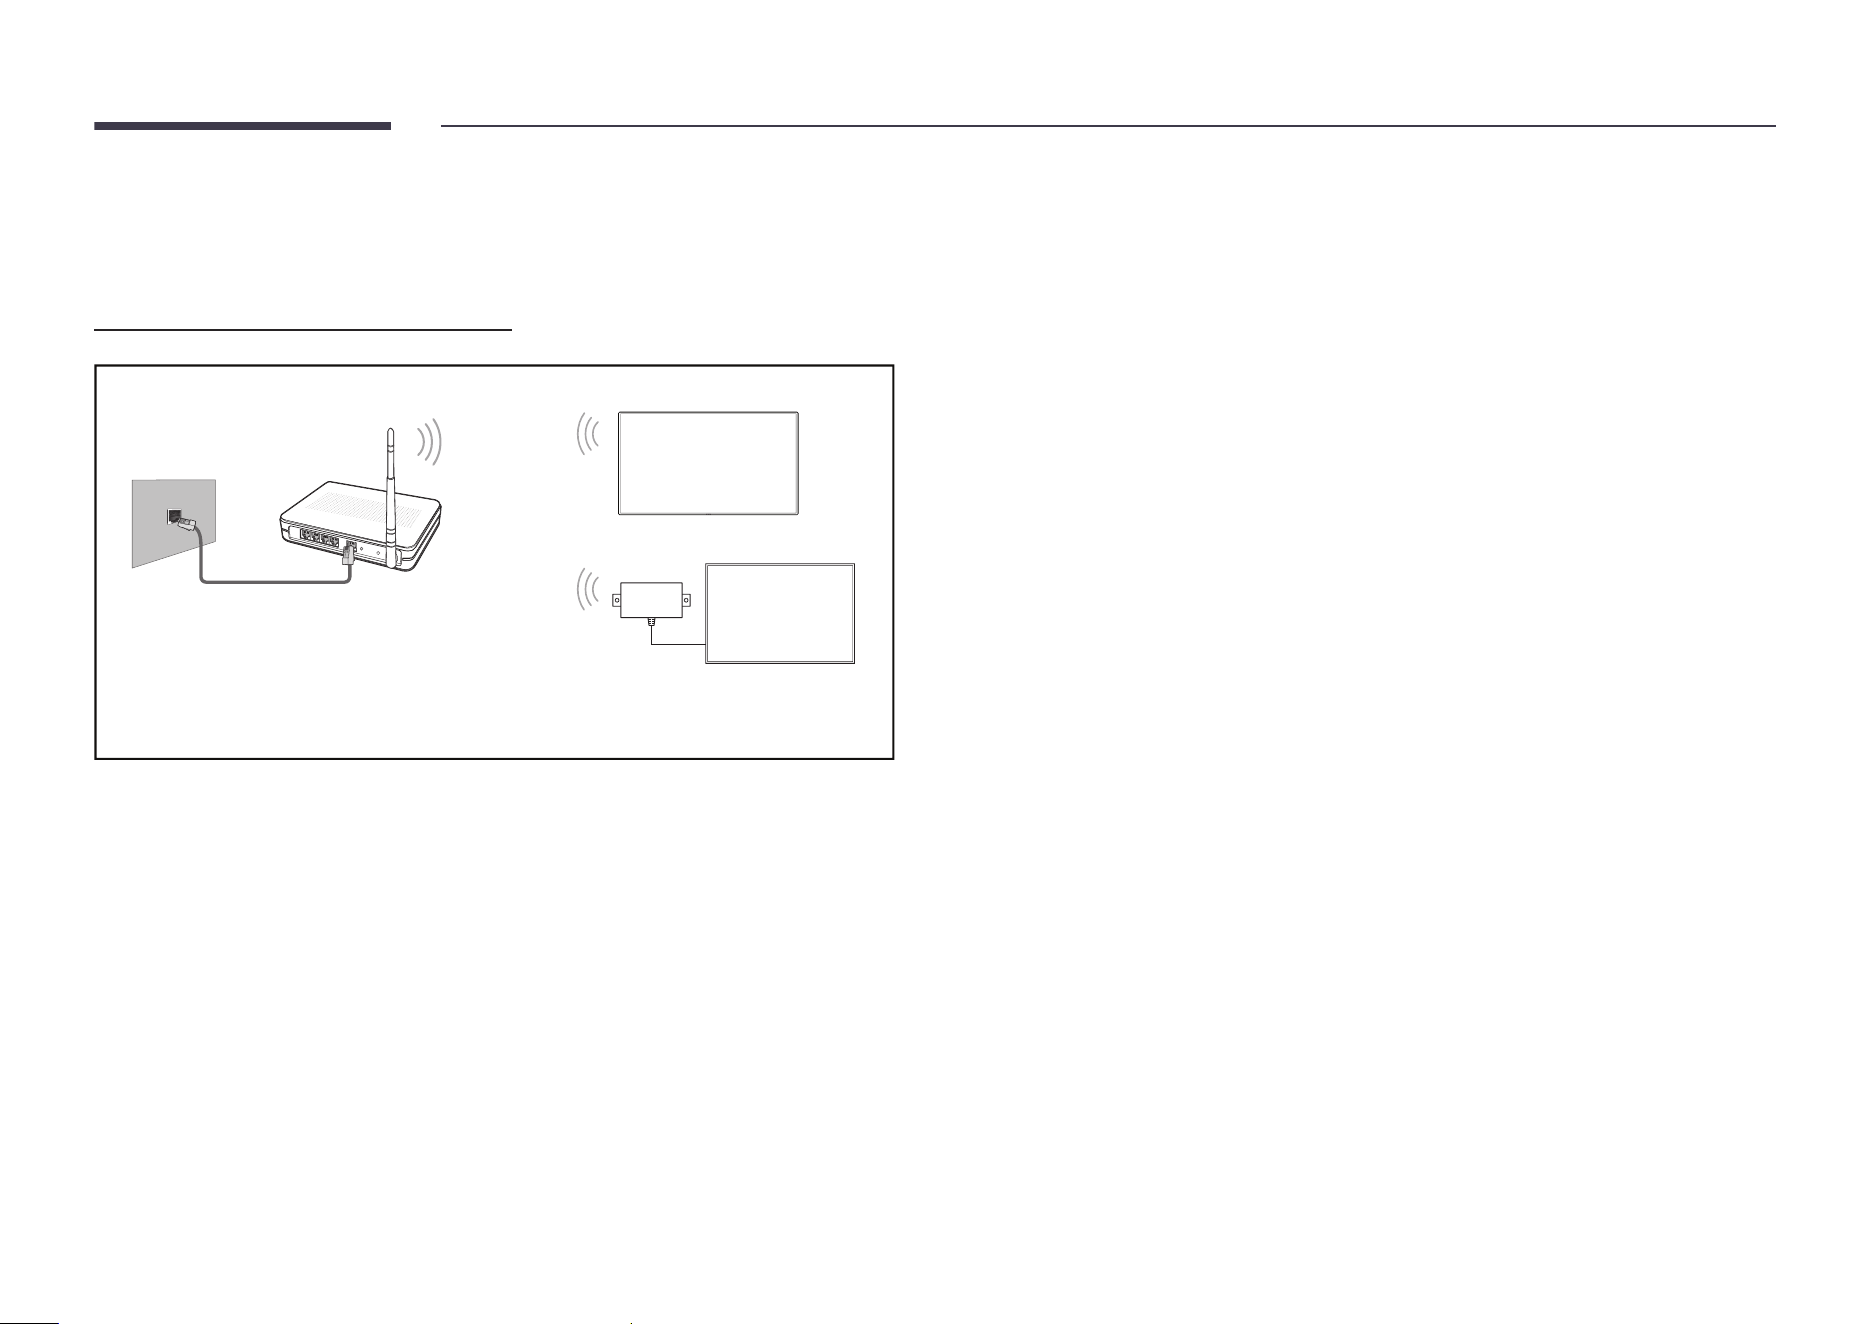
70
Network Settings (Wireless)
"
This function may not be supported depending on the model.
Connecting to a Wireless Network
The LAN Port on the Wall
LAN Cable
Wireless IP sharer
(router having DHCP server)
OM** models only
OH** models only
"
This component may not be
provided, depending on the model.
Samsung recommends using IEEE 802.11n. When you play video over a network connection, the
video may not play smoothly.
"
Select a channel for the wireless IP sharer that is not currently being used. If the channel
set for the wireless IP sharer is currently being used by another device nearby, this will
result in interference and communication failure.
"
Your product supports only the following wireless network security protocols.
– Authentication Modes: WEP, WPAPSK, WPA2PSK
– Encryption Types: WEP, TKIP, AES
In compliance with the Wi-Fi certification specifications, Samsung products do not support
WEP or TKIP security encryption in networks running in the High-throughput(Greenfield)
802.11n mode.
"
If your wireless router supports WPS (Wi-Fi Protected Setup), you can connect to the
network through PBC (Push Button Configuration) or PIN (Personal Identification Number).
WPS will automatically configure the SSID and WPA key in either mode.
"
Connection Methods: You can setup the wireless network connection in three ways.
Automatic Network Setup, Manual Network Setup, Use WPS

71
Automatic Network Setup (Wireless)
Most wireless networks have an optional security system that requires devices that access the
network to transmit an encrypted security code called an Access or Security key. The Security
key is based on a Pass Phrase, typically a word or a series of letters and numbers of a specified
length you were asked to enter when you set up security for your wireless network. If you use
this method of setting up the network connection, and have a Security key for your wireless
network, you will have to enter the Pass Phrase during the automatic or manual setup process.
How to set up automatically
1
Set Network Type to Wireless from the Open Network Settings page.
2
The Network function searches for available wireless networks. When done, it displays a list
of the available networks.
In the list of networks, press the
▲
or
▼
button to select a network, and then press the
E
button.
"
If the desired wireless router does not appear, select Refresh to search again.
"
If the router cannot be found after retrying, select the Add Network.
3
If the Enter the password for (AP Name). screen appears, go to step 4. If you select a
wireless router that does not have security, go to step 6.
4
If the router has security, enter the Enter the password for (AP Name). (Security key or PIN).
5
When done, use the right arrow button to move the cursor to Done, and then press E. The
network connection screen appears and the verification process starts.
"
A connection with the router is established, but the Internet cannot be accessed. In this
case, contact your Internet service provider.
6
When the connection has been verified, the “Success! Your device is connected to the
Internet. If you have any problems using online services, please contact your Internet
service provider.” message appears.
Manual Network Setup (Wireless)
Offices may use static IP addresses.
If this is the case, ask the network administrator for the IP Address, Subnet Mask, Gateway and
DNS server address. Enter these values manually.
Getting the Network Connection Values
To view the Network connection values on most Windows computers, follow these steps.
1
Right click the Network icon on the bottom right of the screen.
2
In the pop-up menu that appears, click Status.
3
On the dialog that appears, click the Support tab.
4
On the Support Tab, click the Details button. The Network connection values are displayed.

72
How to set up manually
1
Set Network Type to Wireless from the Open Network Settings page.
2
The Network function searches for available wireless networks. When done, it displays a list
of the available networks.
3
In the list of networks, press the u or d button to select a network, and then press the E
button twice.
"
If the desired wireless router does not appear, select Refresh to search again.
"
If the router cannot be found after retrying, select the Stop button.
The Add Network button appears.
4
If the Enter the password for (AP Name). screen appears, go to step 5. If you select a
wireless router that does not have security, go to step 7.
5
If the router has security, enter the Enter the password for (AP Name). (Security key or PIN).
6
When done, use the right arrow button to move the cursor to Done, and then press E. The
network connection screen appears and the verification process starts.
7
Select Cancel while network connections are being attempted. This will stop the
connection.
8
Select IP Settings on network connection screen. The IP Settings screen appears.
9
Select the field at the top, press E, and then set IP Setting to Enter manually. Repeat the
entry process for each field in the IP Address.
"
Setting IP Setting to Enter manually automatically changes DNS Setting to Enter
manually.
10
When done, select OK at the bottom of the page, and then press E. The network test
screen appears and the verification process starts.
11
When the connection has been verified, the “Success! Your device is connected to the
Internet. If you have any problems using online services, please contact your Internet
service provider.” message appears.
Use WPS
"
This function may not be supported depending on the model.
How to set up using Use WPS
If your router has a Use WPS button, follow these steps.
1
Set Network Type to Wireless from the Open Network Settings page.
2
Select Use WPS, press E.
3
Press the WPS or PBC button on your wireless router within the next two minutes. Your
product automatically acquires all the network setting values it needs and connects to your
network.
– If you want to use the WPS PIN, select WPS PIN.
Go to your wireless router's Settings, enter your PIN, and then select OK.
4
The network connection screen appears, and network setup is done.

73
2nd 3rd Description
Server Network Settings Connect to Server Connect to MagicInfo server.
"
If you do use the TLS option, the server is configured to use https and data transfer is encrypted. (Port number: 7002)
"
If you don't use the TLS option, enter the server IP address and port number. Use 7001 as the port number. (If you are
unable to connect to the server using port number 7001, check with your server administrator to find the correct port
number and then change the port number.)
"
Enter the server IP address and port number. Use 7001 as the port number. (If unable to connect to the server using port
number 7001, check with your server administrator to find the correct port number and then change the port number.)
"
For the MagicInfo Server user guide, visit the following website: http://www.samsung.com/business → Support →
Resources → MagicInfo Web Manual.
Verify MagicINFO Server Enable this option to block HTTPS communication if the domain name of the MagicINFO Server URL is different from the
domain name of the MagicINFO Server certificate.
MagicInfo Mode Select the appropriate MagicInfo Mode depending on the environment where you are using the product.
"
Supported content types may be limited while MagicInfo Mode is set to Lite.
Server Access Allow or deny access to MagicInfo server.
FTP Mode Specify the FTP operating mode.
Proxy Server Set up your proxy server connection and related functions.
"
Address / Port / ID and Password are enabled only when Proxy Server is set to On.

74
2nd 3rd Description
Server Network Settings UEM Setting Configure settings for connection to the UEM (Unified Endpoint Management) server including Crestron.
Enter the required information according to the guide for the server you want to connect to.
"
The device information is sent to the UEM server while its connection is maintained. By resetting the settings, the
configuration can be deleted, disabling the connection.
• Crestron
Configure Crestron server connection setting and connect to the server by pressing Save button.
– XiO
Connect to XiO server, and its default operating server URL is entered in advance.
If you want to connect both XiO and other Crestron server type at the same time, connect to XiO server first and then
connect to other Crestron server type.
– Control System
Connect Control System server of which its connection configuration is set by Server Address, Port, IP ID.
Crestron's auto discovery feature is supported byAuto Discoveryoption.
Secure Connection is supported by setting Secure Connection, Authentication ID, Authentication Password.
If you set Verify Certificate as off, then certificate verification is skipped during Secure Connection.
A certificate can be installed into the device by System → Security → Certificate Manager → App Certificate.
– VC-4
Connect VC-4 server of whichits connection configuration is set by Server Address, Port, IP ID, Room ID.
Crestron's auto discovery feature is supported by Auto Discovery option.
Secure Connection is supported by setting Secure Connection, Authentication ID, Authentication Password.
If you set Verify Certificate as off, then certificate verification is skipped during Secure Connection.
A certificate can be installed into the device bySystem → Security → Certificate Manager → App Certificate.
– Fusion
If you set Outbound Connection as on, then your device will be wating for connection from Fusion server.
If you set Outbound Connection as off, then connect Fusion server of which its connection configuration is set by Server
Address, Port.
Secure Connection is supported by setting Secure Connection only for Outbound Connection off option.
• UEM Status
You can view current UEM app operating status or reset the settings by pressing Reset button.

75
2nd 3rd Description
Embedded Server Settings Embedded Server Turn on to enable the embedded server. Turn off to delete registered server information.
Turn on the embedded web server for managing devices using the web browser on your PC / mobile device.
When the web server is set to Client mode, the registered server address is displayed, along with whether or not the server is
registered, at the bottom of the Help page.
Server Mode To use this device as a local web server, set it to 'Server'. If you already have a server device nearby, set it as 'Client' to connect
this device to the server.
The embedded web server can be set to either of the following two modes.
• Server
– When it is set to Server mode, you can control devices by accessing the following URL from your PC / mobile device:
https://device-ip:4000
– When accessing for the first time, you should set the initial password before using the server.
– Use the "Register Device" menu to register and control other devices that are set to Client mode.
• Client
– When it is set to Client mode, you can register devices to a supported server.
– If you turn the Embedded Server feature off and on again while in Client mode, all information is reset and you should
register devices again from the server.
"
CAUTION: Ensure that all devices and your PC / mobile device are connected to the same local network.
Wi-Fi Enable or disable the Wi-Fi. Turn on this option to use features that require a Wi-Fi connection.
"
This function may differ depending on the model.
Device Name Select or enter a device name.
This name can be shown on network device over the network.
76
System
2nd 3rd Description
Accessibility Voice Guide Settings
"
This function may not be supported depending on the model.
• Voice Guide
Switch Voice Guide on or off. The language used for Voice Guide will be the same as the current menu language.
"
Volume, Speed and Pitch are enabled only when Voice Guide is set to On.
"
The availability may vary depending on the region.
• Volume
Set the volume level for the Voice Guide.
• Speed
Set the speed of the Voice Guide.
• Pitch
Tune the pitch of the Voice Guide.
• Background Sound Volume
Adjust background sound volume during voice guidance.
High Contrast Set the background and font to high-contrast colors in Menu. Menu transparencies become opaque when the option is
selected.
Enlarge Enlarge the size of the Menu area.
"
This function may not be supported depending on the model.
Zoom Menu and Text Make the menu and text larger.
SeeColors Mode Allows users with color blindness to experience rich colors. Enable this feature to customize colors to suit your viewing
conditions, to experience richer colors on the screen.
"
Some menus are not available when SeeColors Mode is in use.
"
This function may not be supported depending on the model.
77
2nd 3rd Description
Start Setup Go through the initial setup steps like you did the first time you used this product.
"
Enter your 6 digit PIN number.
If you want to change the PIN number, use the Change PIN function.
"
Change the PIN to keep your device secure.
Zero Touch Configuration Set up the device through Tizen Business Manager.
Before using Zero Touch Configuration, register the device at Tizen Business Manager.
Touch Control Set the functions related to touch control.
Touch Control Prevent touch gestures from controlling your device.
• Samsung SMART Signage / Connected Source Device / Auto
"
This function may not be supported depending on the model.
Admin Menu Lock Set the Admin Menu Lock to display the administrator settings menu when you touch and hold the finger on the screen.
"
Available only when Touch Control is set to On.
Time You can configure Clock Set or DST. Configure various time-related settings.
Clock Set Select Clock Set. Select Date or Time, and then press E.
Use the number buttons to enter numbers or press the up and down arrow buttons. Use the left and right arrow buttons to
move from one entry field to the next. Press E when done.
"
You can set the Date and Time directly by pressing the number buttons on the remote control.
NTP Settings Set up the server URL and time zone to use the network time.
DST Switches the DST (Daylight Saving Time) function on or off.
"
Start Date, End Date and Time Offset are enabled only when DST is set to On.
Power On Delay When connecting multiple products, adjust the power-on time for each product to prevent power overload (within the range
0–50 seconds).
78
2nd 3rd Description
Auto Source Switching Auto Source Switching Switch to preset source or another source when the main source device gets disconnected.
Primary Source Recovery Select whether to restore the selected primary input source when a primary input source is activated.
"
The Primary Source Recovery function is disabled if Primary Source is set to All.
Primary Source Select a primary source to switch to when no signals are received from the current input.
Secondary Source Select a secondary source to switch to when no signals are received from the current input.
"
The Secondary Source function is disabled if Primary Source is set to All.
Default Input Select the default input to switch to when the new input is disconnected. The Last Input option only includes external inputs
connected through cables.
"
Auto Source Switching must be set to New Input to enable the Default Input option.
Power Control Auto Power On This feature automatically turns on the product as soon as it is plugged in. Pressing the power button is not needed.
Max. Power Saving Conserve power by turning off PC monitor when PC is not used for certain time.
Standby Control When no signal is detected, it determines whether or not to enter sleep mode.
Remote Configuration Keep the network connection active when the product is turned off.
Power Button
The power button on the remote control
can be set to turn on the power or turn on or off the power.

79
2nd 3rd Description
Power and Energy Saving
"
This function may not be supported depending on the model.
Brightness Limit Turn the Brightness Limit on or off. If you select On, the display won't have the maximum brightness, but you will save energy.
• Off / On
"
This function may not be supported depending on the model or geographical area.
Energy Saving Solution /
Brightness Reduction
Reduce power consumption by adjusting brightness settings.
"
The name of this function may appear differently depending on the model.
Backlight Optimization /
Brightness Optimization
Automatically adjust the screen brightness based on the ambient light level.
• Min. Brightness: Set the minimum brightness for the signage screen. This function only works if its value is lower than the
value set in the Picture menu's Backlight setting.
"
This function may not be supported depending on the model.
"
The name of this function may appear differently depending on the model.
Backlight Schedule / Screen
Lamp Schedule
Adjust panel brightness by schedule. The closer to 100, the brighter the panel.
"
The name of this function may appear differently depending on the model.
No Signal Power Off Save power by turning the product off when no signal is received from any source.
"
This function does not operate if the display is in the standby mode.
"
The product will automatically power off at a specified time. The time can be changed as required.
Auto Power Off Choose how long the display will wait before turning off after no user interaction is detected.
SmartThings Settings Register the screen to SmartThings.
The connected screen can be easily controlled or set by SmartThings.
"
To use Wired SmartThings, please turn the Remote Configuration to On. (OH55DX-S model is not supported.)
"
This function may not be supported depending on the model.
80
2nd 3rd Description
Fan Settings It sets items related to the speed and temperature of the fan in each set.
Fan Control Selects auto or manual for the fan speed settings.
• Auto / Manual
"
(OM** models only) "Auto" mode disabled.
Fan Speed Setting Sets the fan speed within a range of 1 and 100.
"
Enabled when Fan Control is set to Manual.
Outdoor Mode To use the product at a low temperature below 0 °C, make sure to set Outdoor Mode to "On".
This feature keeps the internal temperature of the product steady so that the product can start properly when it is powered
on.
• Off / On
"
Do not disconnect the power cable when this feature is set to "On".
"
The product consumes more power when it is turned off if this feature is set to "On" rather than to "Off".
"
This function may not be supported depending on the model.
81
2nd 3rd Description
External Device Manager Manage external devices connected to your signage.
Input Device Manager Set up keyboards to use with your product. You can add keyboards and configure their setting.
"
Available for Bluetooth enabled models only.
• Bluetooth devices
Connect a Bluetooth keyboard or mouse to your device.
• Keyboard Settings
Configure the connected keyboard settings.
– Keyboard Language
Set the language of your keyboard.
– Keyboard Type
Set the type of your keyboard.
• Mouse Settings
Configure the connected mouse settings.
– Primary Button
Select the button you want to use as the primary button to click and select.
– Pointer Speed
Set the speed of the mouse pointer.
Device Connect Manager Allow devices, like phones and tablets, on your network to share content with your product.
• Access Notification
Display a notification when a device such as a smartphone or tablet, is connected. If you use a Wi-Fi network that requires
a password, turn off this option to automatically connect with devices without viewing notifications.
• Device List
View and manage connected devices.

82
2nd 3rd Description
Play via Select the appropriate Play via mode depending on the environment where you are using the product.
The home screen may be different depending on the setting.
Change PIN Change your 6-digit Personal Identification Number (PIN).
Choose any 6 digits for your PIN and enter it in Enter a new PIN.. Reenter the same 6 digits in Enter the PIN again..
The product has memorized your new PIN.
"
Change the PIN to keep your device secure.
83
2nd 3rd Description
Security
"
Enter your 6 digit PIN number.
If you want to change the PIN number, use the Change PIN function.
"
Change the PIN to keep your device secure.
Safety Lock On Turn Safety Lock On on or off. Safety Lock On restricts the actions that can be carried out by the remote control. The correct
PIN must be entered to turn Safety Lock On off.
• Power On Button
Turn on this feature to enable the remote control's Power button to turn on the product while Safety Lock On is enabled.
Screen Monitoring Lock Blocks screen images from being monitored by MagicINFO Server.
USB Auto Play Lock Select whether to automatically play MagicInfo or MagicInfo Lite content saved on a connected USB device.
"
Your content should be a Published Content
that is authored by using MagicInfo Premium application and published to
the USB device you are using. The MagicInfo Premium application program is available on the website.
(http://www.samsung.com/business)
"
When published to a USB device, your Published Content
is saved to Contents and Schedules folders in the root folder
of the connected USB device.
"
Connecting a USB device containing MagicInfo or MagicInfo Lite content displays "USB Auto Play Lock : On" for five
seconds.
Mobile Connection Lock Restrict other devices on your network, such as smart phones and tablets, to prevent them from sharing content on the
product.
• Screen Mirroring Standby
Turn on this option to receive connection requests from any source type.
84
2nd 3rd Description
Security Remote Management You can Allow or Deny external commands to access your product through a network.
Secured Protocol Secure the protocol between this device and other devices.
It is recommended that this item be set to On, to ensure security.
• SNMP Settings
Set up your ID and password for the SNMP connection.
Server Security Status You can view the MagicINFO server information.
"
This function is enabled when connected to MagicINFO or RM server.
Network Lock Block external network access. You can register networks on the server to allow access.
USB Lock Block connection to external USB ports.
Certificate Manager Manage the certificates installed on this device.
"
Limited supports for Enterprise WPA2 (TLS/TTLS/PEAP) certified models only.
• App Certificate
View and manage the app certificates installed on this device.
Connect a USB flash drive that contains certificates to install them on this device.
• Network Certificate
View and manage the network certificates installed on this device.
Wired 802.1x Connection
To turn on the Wired 802.1x Connection feature, set it to On.

85
2nd 3rd Description
General Anynet+ (HDMI-CEC) Anynet+ is a function that enables you to control all connected Samsung devices that support Anynet+ with your Samsung
product remote control. The Anynet+ system can be used only with Samsung devices that have the Anynet+ feature. To be sure
your Samsung device has this feature, check if there is an Anynet+ logo on it.
"
You can only control Anynet+ devices using the product remote control, not the buttons on the product.
"
The product remote control may not work under certain conditions. If this occurs, reselect the Anynet+ device.
"
Anynet+ works when the AV device supporting Anynet+ is in the standby or on status.
"
Anynet+ supports up to 12 AV devices in total. Note that you can connect up to 3 devices of the same type.

86
Troubleshooting for Anynet+
Problem Possible Solution
Anynet+ does not work.
• Check if the device is an Anynet+ device. The Anynet+ system supports Anynet+ devices only.
• Check if the Anynet+ device power cord is properly connected.
• Check the Anynet+ device’s Video/Audio/HDMI cable connections.
• Check whether Anynet+ (HDMI-CEC) is set to On in the System menu.
• Check whether the remote control is Anynet+ compatible.
• Anynet+ doesn’t work in certain situations. (initial setup)
• If you have removed and then reconnected the HDMI cable, please make sure to search devices again or turn your
product off and on again.
• Check if the Anynet+ function of the Anynet device is set on.
I want to start Anynet+.
• Check if the Anynet+ device is properly connected to the product and check if the Anynet+ (HDMI-CEC) is set to On
in the System menu.
I want to exit Anynet+.
• Press the
s
button on the product remote control and select a non- Anynet+ device.
The message “Disconnecting
Anynet+ device ...” appears on
the screen.
• You cannot use the remote control when you are configuring Anynet+ or switching to a view mode.
• Use the remote control after the product has completed Anynet+ configuration or has finished switching to Anynet+.
The Anynet+ device does not
play.
• You cannot use the play function when initial setup is in progress.
The connected device is not
displayed.
• Check whether or not the device supports Anynet+ functions.
• Check whether or not the HDMI cable is properly connected.
• Check whether Anynet+ (HDMI-CEC) is set to On in the System menu.
• Search Anynet+ devices again.
• Anynet+ requires an HDMI connection. Make sure the device is connected to your product with an HDMI cable.
• Some HDMI cables may not support Anynet+ functions.
• If the connection is terminated because there has been a power failure or the HDMI cable has been disconnected,
please repeat the device scan.
87
2nd 3rd Description
General HDMI Hot Plug This feature is used to activate the time delay to turn on a HDMI source device.
Custom Logo You can download, select, and set the display time of a custom logo that appears when the product turns on.
• Custom Logo
"
You can select a custom logo (image/video) or turn off the custom logo display.
"
You must download the custom logo from an external USB device to set the custom logo.
• Logo Display Time
"
If the type of custom logo is Image, you can set the Logo Display Time.
• Download Logo File
"
You can download a custom logo into the product from an external USB device.
"
The file name of the custom logo you want to download must be saved as “samsung” in all small letters.
"
When there are multiple numbers of external USB connections, the product will attempt to download the custom logo
from the last device that has been connected to the product.
Custom logo file restrictions
• Images up to 50 MB in size can be used.
– Supported image file: samsung_image.*
– Supported file extensions: jpg, jpeg, bmp, png
• Videos up to 150 MB in size can be used. The recommendation is under 20 seconds in length.
– Supported video file: samsung_video.*
– Supported file extensions: avi, mpg, mpeg, mp4, ts, wmv, asf
88
2nd 3rd Description
General Game Mode When connecting to a game console such as PlayStation™ or Xbox™, you can enjoy a more realistic gaming experience by
selecting game mode.
"
If you connect other external devices while Game Mode is on, the screen may not be in good condition.
DICOM Simulation Mode Adjust the display mode to output a picture close to the GSDF standard of DICOM Part 14.
"
This device cannot be used as a medical diagnostic device, even if the DICOM Simulation Mode is enabled.
"
This function may not be supported depending on the model.
Adaptive Picture Optimizes brightness and provides the best picture quality in real time, based on the light level of the surrounding
environment.
When this function is on, some picture settings are not supported.
"
This function may not be supported depending on the model.
Empty Storage Delete files to make space for new content. Recently played files will not be deleted.
Reset System Reset all system settings to default.
89
Support
2nd 3rd Description
Software Update The Software Update menu lets you upgrade your product software to the latest version.
"
Be careful not to turn off the power until the upgrade is complete. The product will turn off and on automatically after
completing the software upgrade.
"
When you upgrade software, all video and audio settings you have made will return to their default settings. We advise you
to write down your settings so that you can easily reset them after the upgrade.
Update Now Update the software to the latest version.
"
Current version: This is the software version already installed in the product.
• Updating through USB Device
Download the update package from Samsung's website to a USB storage device and then connect the device to the product to
update the product's software.
"
Remember to save the update package to the top-most directory of the USB device. Otherwise, the product will not be
able to find the update package.
• Updating through the network
"
This function can be run when the network is connected properly.
Apps Manage and update your apps. To use the Apps Menu, please agree to the Terms and Conditions.
Check details information of app and reinstall when the app does not work properly.
"
This function may not be supported depending on the model.
90
2nd 3rd Description
Contact Samsung You can view the address of the Samsung website, the call center phone number, your product's model number, software
version, Open Source License and other information.
"
Go to Contact Samsung and find the product Model Code and Software Version.
Terms & Privacy View and set the privacy policy for MagicInfo and other services.
"
Make sure that the product is connected to the network.
"
Menu items may vary depending on the model.
"
The availability may vary depending on the region.
"
This feature is enabled only when “Smart Signage Privacy Notice” is selected during setup.
Device Care Optimize and diagnose the condition of your Signage. You can check and clean your storage space, diagnose problems or
request technical support.
Reset All This option returns all the current settings for a display to the default factory settings.

91
"
Before calling Samsung Customer
Service Center, test your product
as follows. If the problem persists,
contact Samsung Customer Service
Center.
Requirements Before Contacting Samsung Customer Service Center
Testing the Product
Check if your product is operating normally by using the product test function.
If the screen remains blank while the Power LED / Remote sensor blinks even when the product is correctly connected to a PC, perform product testing.
1
Power off both the PC and product.
2
Disconnect all the cables from the product.
3
Power on the product.
4
If No Cable Connected is displayed, the product is operating normally.
If the screen remains blank, check the PC system, video controller and cable.
Checking the Resolution and Frequency
Not Optimum Mode will briefly be displayed if a mode that exceeds a supported resolution is selected (refer to Supported Preset Timing Modes).
Troubleshooting Guide
Chapter 07
92
Check the followings.
Installation issue (PC mode)
The screen keeps switching on and off.
Check the cable connection between the product and PC, and ensure the connection is secure.
Blank spaces are found on all four sides of the screen when
an HDMI cable is connected to the product and PC.
The blank spaces found on the screen have nothing to do with the product.
Blank spaces on the screen are caused by the PC or graphics card. To resolve the problem,
adjust the screen size in the HDMI settings for the graphics card.
If the graphics card settings menu does not have an option to adjust the screen size, update the
graphics card driver to the latest version.
(Please contact the graphics card or computer manufacturer for further details about how to
adjust the screen settings.)
Screen issue
No Signal is displayed on the screen.
Check that the product is connected correctly with a cable.
Check that the source device connected to the product is powered on.
Not Optimum Mode is displayed.
This message is displayed when a signal from the graphics card exceeds the product's
maximum resolution and frequency.
Supported Preset Timing Modes Table and set the maximum resolution and frequency
according to the product specifications.
The images on the screen look distorted.
Check the cable connection to the product.
The screen is not clear. The screen is blurry.
Set the resolution and frequency to the recommended level.
The screen appears unstable and shaky.
Check that the resolution and frequency of the PC and graphics card are set within a range
compatible with the product. Then, change the screen settings if required by referring to the
Additional Information on the product menu and the Standard Signal Mode Table.
There are shadows or ghost images left on the screen.
93
Screen issue
The screen is too bright. The screen is too dark.
Adjust Brightness and Contrast.
Screen color is inconsistent.
Go to Picture and adjust the Color Space Settings.
White does not really look white.
Go to Picture and adjust the White Balance settings.
There is no image on the screen and the Power LED /
Remote sensor blinks every 0.5 to 1 second.
The product is in power-saving mode.
Press any key on the keyboard or move the mouse to return to the previous screen.
The product will turn off automatically.
Go to System and make sure Auto Power Off is set to Off.
If a PC is connected to the product, check the power status of the PC.
Make sure the power cable is connected properly to the product and power outlet.
If the signal from a connected device is not detected, the product automatically turns off after
10 to 15 minutes.
Picture quality of the product is different from the dealer
shop where it was purchased.
Use an HDMI cable to obtain high-definition (HD) picture quality.
The screen display does not look normal.
Encoded video content may cause the display to appear corrupted in scenes featuring fast
moving objects such as in a sports event or action video.
Low signal level or low picture quality may cause the display to appear corrupted. This does not
mean the product is defective.
A phone within a distance of one-meter radius may cause static on analog and digital products.
The brightness and color do not look normal.
Go to Picture and adjust the screen settings such as Color Temperature, Brightness and
Sharpness.
Go to Settings → System and adjust the Power and Energy Saving settings.
Reset the screen settings to the default settings.
94
Screen issue
Lines (red, green or blue) are displayed on the screen.
These lines are displayed when there is a defect in DATA SOURCE DRIVER IC on the monitor.
Contact a Samsung Service Center to resolve the issue.
The display looks unstable and then freezes.
The screen may freeze when a resolution other than the recommended resolution is used or
if the signal is not stable. To resolve the issue, change the PC resolution to the recommended
resolution.
The screen cannot be displayed in full screen.
A scaled SD (4:3) content file can cause black bars on both sides of an HD channel screen.
A video with an aspect ratio different from the product can cause a black bars at the top and
bottom of the screen.
Change the screen size setting to full screen on the product or source device.
Remote control issue
The remote control does not work.
Make sure that the batteries are correctly in place (+/-).
Check if the batteries are flat.
Check for power failure.
Make sure that the power cord is connected.
Check for any special lighting or neon signs switched on in the vicinity.
95
Source device issue
A beeping sound is heard when my PC is booting.
If a beeping sound is heard when your PC is booting, have your PC serviced.
Other issue
The product smells like plastic.
The plastic smell is normal and disappears over time.
Audio or video cuts out intermittently.
Check the cable connection and connect it again if required.
Using a very hard or thick cable may corrupt audio and video files.
Make sure cables are flexible enough to ensure durability. When mounting the product onto a
wall, it is recommended to use right-angle cables.
Small particles are found on the edges of the product.
The particles are part of the product design. The product is not defective.
When I try to change the PC resolution, a message "The
dened resolution is not currently supported." appears.
The message "The defined resolution is not currently supported." appears if the input source
resolution exceeds the maximum resolution of the display.
To resolve the issue, change the PC resolution to a resolution supported on the display.
HDMI Black Level is not functioning properly on an HDMI
device with YCbCr output.
This function is available only when a source device, such as a DVD player and STB, is connected
to the product via an HDMI (RGB signal) cable.

96
Other issue
There is no sound in HDMI mode.
Displayed picture colors may not look normal. Video or sound may not be available. This can
occur if a source device that only supports an older version of the HDMI standard is connected
to the product.
The IR sensor is not functioning.
Make sure the sensor light turns on when a button is pressed on the remote control.
If the sensor light does not turn on, on the back of the product turn off the power and then turn
it on again.
(The Power LED / Remote sensor lights up red when the screen is switched off.)
If the sensor light still does not turn on after the power switch is turned off and then on again,
an internal jack may be disconnected.
Contact your nearest service center to have the product serviced.
If the sensor light that is on does not flash red when a button is pressed on the remote control,
the IR sensor may be defective.
Contact your nearest service center to have the product serviced.
• This function is available only when a source device, such as a DVD player and STB, is
connected to the product via an HDMI (RGB signal) cable.

97
Q & A
Question Answer
How can I change the frequency?
Set the frequency on your graphics card.
• Windows 7: Go to Control Panel → Appearance and Personalization → Display → Adjust
resolution → Advanced Settings → Monitor and adjust the frequency in Monitor Settings.
• Windows 8: Go to Settings → Control Panel → Appearance and Personalization → Display
→ Adjust resolution → Advanced Settings → Monitor and adjust the frequency in Monitor
Settings.
• Windows 10: Go to Settings → System → Display → Advanced display settings → Display
adapter properties → Monitor, and adjust Screen refresh rate under Monitor settings.
How can I change the resolution?
• Windows 7: Go to Control Panel → Appearance and Personalization → Display → Adjust
Resolution and adjust the resolution.
• Windows 8: Go to Settings → Control Panel → Appearance and Personalization → Display →
Adjust Resolution and adjust the resolution.
• Windows 10: Go to Settings → System → Display → Advanced display settings, and adjust
the resolution.
How do I set powersaving mode?
• Windows 7: Set power-saving mode in Control Panel → Appearance and Personalization →
personalise → Screen Saver Settings or BIOS SETUP on the PC.
• Windows 8: Set power-saving mode in Settings → Control Panel → Appearance and
Personalization → personalise → Screen Saver Settings or BIOS SETUP on the PC.
• Windows 10: Set power-saving mode in Settings → Personalization → Lock screen → Screen
timeout settings → Power & sleep or BIOS SETUP on the PC.
"
Refer to the user manual for your
PC or graphics card for further
instructions on adjustment.

98
Model Name OM32DX OH46DX OH55DX / OH55DX-S
Panel
Size
32 CLASS (31.5 inches / 80.1 cm) 46 CLASS (45.9 inches / 116.8 cm) 55 CLASS (54.6 inches / 138.7 cm)
Display area
698.4 mm (H) x 392.85 mm (V) 1018.08 mm (H) x 572.67 mm (V) 1209.6 mm (H) x 680.4 mm (V)
Resolution
Optimum resolution
1920 x 1080 @ 60 Hz
Maximum resolution
4096 x 2160 @ 60 Hz
Power Supply
AC100-240V~ 50/60Hz
*
Refer to the label at the back of the product as the standard voltage can vary in different countries.
Environmental
considerations
Operating
Temperature: 32 °F to 104 °F (0 °C to 40 °C)
*
For installing the enclosure, keep the internal
temperature at 104 °F (40 °C) or below.
Humidity: 10% to 80%, non-condensing
Temperature: -22 °F to 122 °F (-30 °C to 50 °C)
*
For installing the enclosure, keep the internal temperature at 104 °F (40 °C) or below.
Humidity: 10% to 80%, non-condensing
Storage
Temperature: -4 °F to 122 °F (-20 °C to 50 °C)
Humidity: 5% to 95%, non-condensing
*
Applicable before the product package is unpacked.
Specications
Chapter 08
General

99
• Plug-and-Play
This monitor can be installed and used with any Plug-and-Play compatible systems. Two-way data exchange between the monitor and PC system optimizes the monitor settings. Monitor
installation takes place automatically. However, you can customize the installation settings if desired.
• Due to the nature of the manufacturing of this product, approximately 1 pixel per million (1ppm) may appear brighter or darker on the panel. This does not affect product performance.
• This product can be set to only one resolution for each screen size to obtain the optimum picture quality due to the nature of the panel. Using a resolution other than the specified resolution
may degrade the picture quality. To avoid this, it is recommended that you select the optimum resolution specified for your product.
• For detailed device specifications, visit the Samsung website.
(USA only)
Dispose unwanted electronics through an approved recycler. To find the nearest recycling location, go to our website: www.samsung.com/recycling or call, 1-800-Samsung
For battery recycling go to call2recycle.org or call 1-800-822-8837
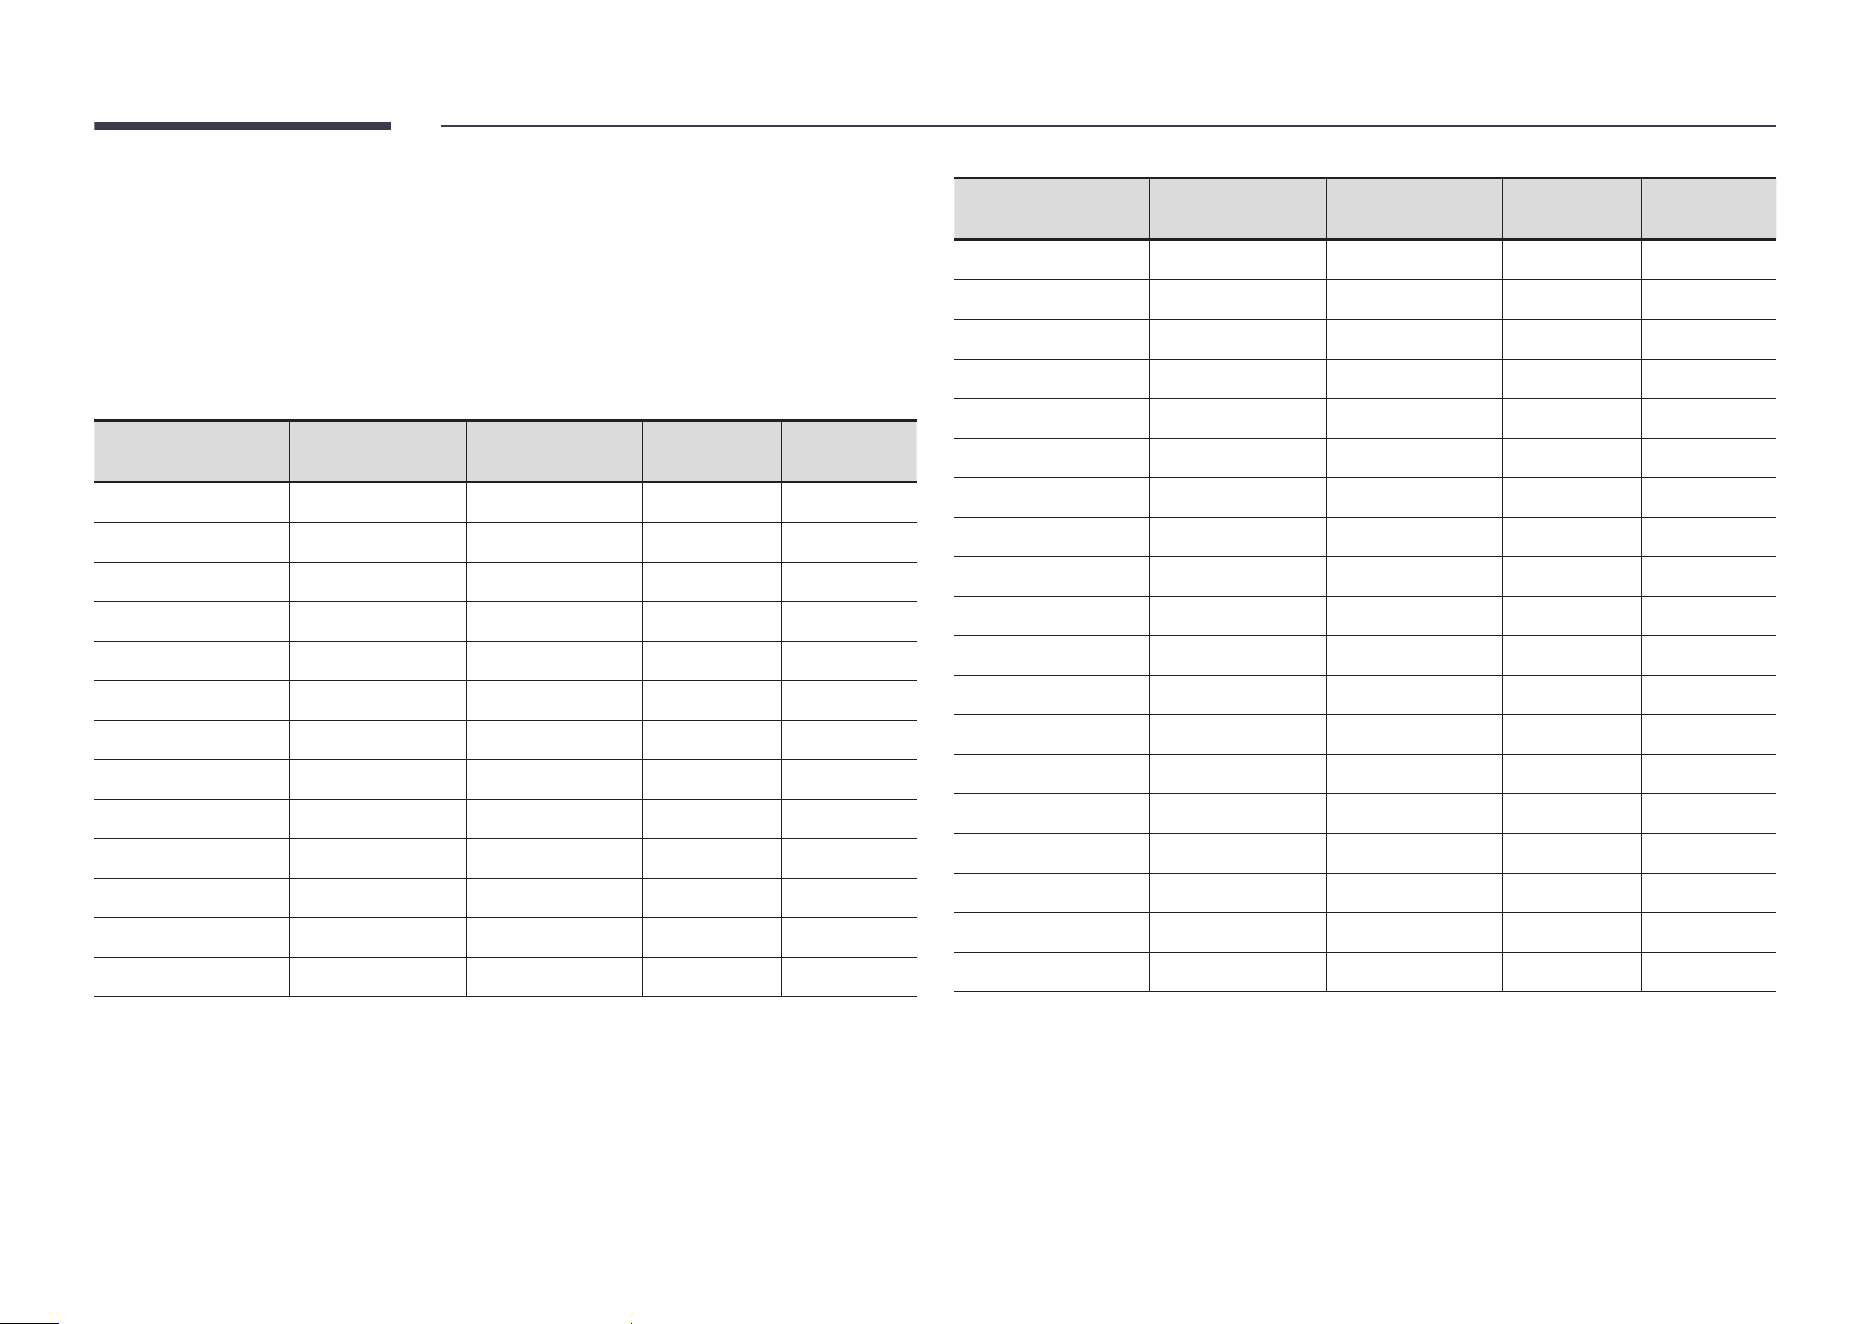
100
Preset Timing Modes
The screen will automatically be adjusted if a signal that belongs to the following standard
signal modes is transmitted from your PC. If the signal transmitted from the PC does not belong
to the standard signal modes, the screen may be blank with the Power LED / Remote sensor on.
In such a case, change the settings according to the following table by referring to the graphics
card user manual.
Resolution
Horizontal Frequency
(kHz)
Vertical Frequency
(Hz)
Pixel Clock
(MHz)
Sync Polarity
(H/V)
IBM, 720 x 400 31.469 70.087 28.322 -/+
MAC, 640 x 480 35.000 66.667 30.240 -/-
MAC, 832 x 624 49.726 74.551 57.284 -/-
VESA DMT, 640 x 480 31.469 59.940 25.175 -/-
VESA DMT, 640 x 480 37.861 72.809 31.500 -/-
VESA DMT, 640 x 480 37.500 75.000 31.500 -/-
VESA DMT, 800 x 600 37.879 60.317 40.000 +/+
VESA DMT, 800 x 600 48.077 72.188 50.000 +/+
VESA DMT, 800 x 600 46.875 75.000 49.500 +/+
VESA DMT, 1024 x 768 48.363 60.004 65.000 -/-
VESA DMT, 1024 x 768 56.476 70.069 75.000 -/-
VESA DMT, 1024 x 768 60.023 75.029 78.750 +/+
VESA DMT, 1152 x 864 67.500 75.000 108.000 +/+
Resolution
Horizontal Frequency
(kHz)
Vertical Frequency
(Hz)
Pixel Clock
(MHz)
Sync Polarity
(H/V)
VESA DMT, 1280 x 720 45.000 60.000 74.250 +/+
VESA DMT, 1280 x 800 49.702 59.810 83.500 -/+
VESA DMT, 1280 x 1024 63.981 60.020 108.000 +/+
VESA DMT, 1280 x 1024 79.976 75.025 135.000 +/+
VESA DMT, 1440 x 900 55.935 59.887 106.500 -/+
VESA DMT, 1600 x 900 60.000 60.000 108.000 +/+
VESA DMT, 1680 x 1050 65.290 59.954 146.250 -/+
VESA DMT, 1920 x 1080 67.500 60.000 148.500 +/+
VESA CVT, 1366 x 768 47.712 59.790 85.500 -/-
CTA-861, 3840 x 2160 54.000 24.000 297.000 +/+
CTA-861, 3840 x 2160 56.250 25.000 297.000 +/+
CTA-861, 3840 x 2160 67.500 30.000 297.000 +/+
CTA-861, 3840 x 2160 112.500 50.000 594.000 +/+
CTA-861, 3840 x 2160 135.000 60.000 594.000 +/+
CTA-861, 4096 x 2160 54.000 24.000 297.000 +/+
CTA-861, 4096 x 2160 56.250 25.000 297.000 +/+
CTA-861, 4096 x 2160 67.500 30.000 297.000 +/+
CTA-861, 4096 x 2160 112.500 50.000 594.000 +/+
CTA-861, 4096 x 2160 135.000 60.000 594.000 +/+

101
Responsibility for the Pay Service (Cost to
Customers)
"
When the service is requested, in spite of in warranty, we may charge you for a visit from a
service technician in the following cases.
Not a product defect
Cleaning of the product, Adjustment, Explanation, Re-installation and etc.
• If a service technician gives instructions on how to use product or simply adjusts options
without disassembling product.
• If a defect is caused by external environmental factors (Internet, Antenna, Wired Signal,
etc.)
• If a product is reinstalled or devices are connected additionally after installing the
purchased product for the first time.
• If a product is reinstalled to move to a different spot or to move to a different house.
• If the customer requests instructions on how to use because of another company's product.
• If customer requests instructions on how to use the network or another company's
program.
• If customer requests software installation and setup for the product.
• If a service technician removes/cleans dusts or foreign materials inside of the product.
• If customer requests an installation additionally after purchasing a product through home-
shopping or online.
A Product damage caused by customer's fault
Product damage caused by customer's mishandling or wrong repair
If a product damage is caused by;
• External impact or drop.
• Use of supplies or separately sold product unspecified by Samsung.
• Repair from a person besides an engineer of outsourcing service company or partner of
Samsung Electronics Co., Ltd.
• Remodeling or repairing the product by customer.
• Using it with incorrect voltage or non-authorized electrical connections.
• Not following the "cautions" in User guide.
Others
• If product fails by natural disaster. (lightning, fire, earthquake, flood damage, etc)
• If consumable components are all used up. (Battery, Toner, Fluorescent lights, Head,
Vibrator, Lamp, Filter, Ribbon, etc.)
• Brightness has decreased due to aging of the product.
• The product is faulty due to sulphur (S), phosphorus (P) or other chemical substances.
"
If customer requests a service in case the product has no defect, service fee may be
charged. So please read User guide first.
Appendix
Chapter 09
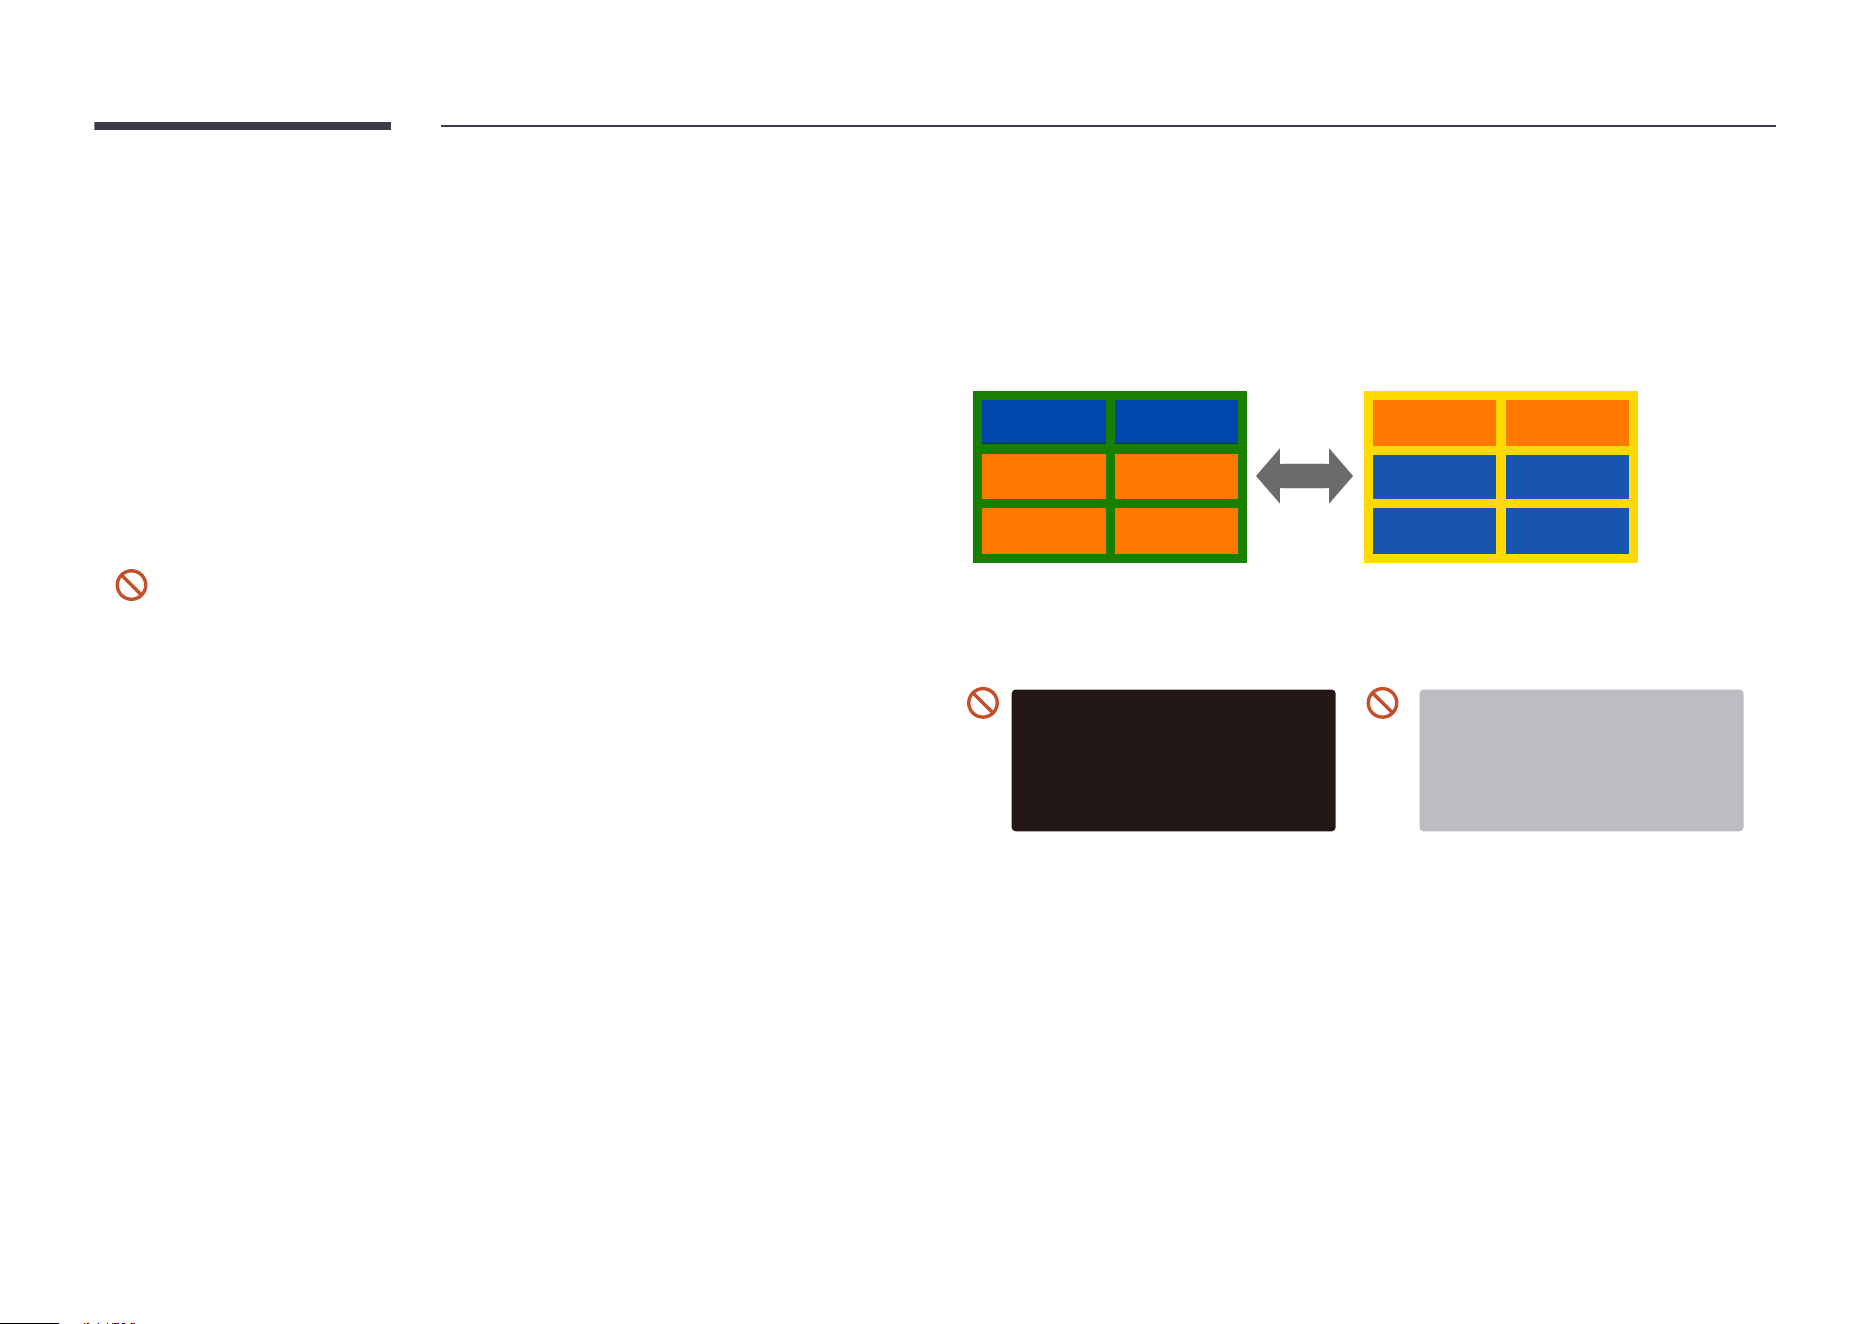
102
Prevention of Afterimage Burn-in
What is afterimage burn-in?
Afterimage burn-in should not occur when the panel is operating normally. Normal operation
refers to a continuously changing video pattern. If the panel displays a fixed pattern for an
extended period of time a slight voltage difference may occur between the electrodes in pixels
that control the liquid crystals.
Such a voltage difference between electrodes increases with time and makes the liquid
crystals thinner. When this occurs, a previous image can remain on the screen when the pattern
changes.
This information is a guide to prevent afterimage burn-in. Viewing a fixed screen
for an extended period of time may cause afterimage burn-in. This problem is not
included in warranty.
Recommended prevention practices
Viewing a fixed screen for an extended period of time may cause afterimage burn-ins or
smudges. If the product is not to be used for a long time, turn it off, or activate the Power
Saving mode or Screen Saver with a moving image.
• Change the colors regularly.
FLIGHT
FLIGHT
TIME
TIME
21:10
20:30
SAMSUNG
SAMSUNG
SAMSUNG
SAMSUNG
21:10
20:30
Type 1 Type 2
• Avoid combinations of a text color and background color of contrasting brightness.
"
Avoid using colors of contrasting brightness (black and white; gray and black).
SAMSUNG
FLIGHT TIME
20:30
:
:
SAMSUNG
FLIGHT TIME
20:30
:
:
103
License
Dolby, Dolby Atmos, Dolby Audio and the double-D symbol
are registered trademarks of Dolby Laboratories Licensing
Corporation. Manufactured under license from Dolby
Laboratories. Confidential unpublished works. Copyright ©
2012-2021 Dolby Laboratories. All rights reserved.
The terms HDMI, HDMI High-Definition Multimedia Interface, HDMI
trade dress and the HDMI Logos are trademarks or registered
trademarks of HDMI Licensing Administrator, Inc.
Open Source License Notice
Open Source used in this product can be found on the following webpage
(https://opensource.samsung.com).
THIS PRODUCT IS SOLD WITH A LIMITED LICENCE AND IS AUTHORISED TO BE USED
ONLY IN CONNECTION WITH HEVC CONTENT THAT MEETS EACH OF THE THREE
FOLLOWING QUALIFICATIONS: (1) HEVC CONTENT ONLY FOR PERSONAL USE; (2) HEVC
CONTENT THAT IS NOT OFFERED FOR SALE; AND (3) HEVC CONTENT THAT IS CREATED
BY THE OWNER OF THE PRODUCT.
THIS PRODUCT MAY NOT BE USED IN CONNECTION WITH HEVC ENCODED CONTENT
CREATED BY A THIRD PARTY, WHICH THE USER HAS ORDERED OR PURCHASED FROM
A THIRD PARTY, UNLESS THE USER IS SEPARATELY GRANTED RIGHTS TO USE THE
PRODUCT WITH SUCH CONTENT BY A LICENSED SELLER OF THE CONTENT.
YOUR USE OF THIS PRODUCT IN CONNECTION WITH HEVC ENCODED CONTENT IS
DEEMED ACCEPTANCE OF THE LIMITED AUTHORITY TO USE AS NOTED ABOVE.

104
Terminology
480i / 480p / 720p / 1080i /
1080p____ Each of the scanning
rates above refers to the number of
effective scanning lines that decides
the screen resolution. The scanning
rate may be indicated in i (interlaced)
or p (progressive), depending on the
scanning method.
- Scanning
Scanning refers to a process of
sending pixels that form an image
progressively. A larger number of
pixels will deliver a clearer and more
vivid picture.
- Progressive
In progressive scan mode, all lines
of pixels are scanned one by one
(progressively) on the screen.
- Interlaced
In interlaced scan mode, every
other line of pixels is scanned from
top to bottom first and then the
remaining lines of pixels (that were
not scanned) are scanned.
Non-interlace Mode and Interlace
Mode____ Non-interlace mode
(progressive scan) displays a
horizontal line from the top to the
bottom of a screen progressively.
Interlace mode displays the odd
number lines first and the even
number lines next. Non-interlace
mode is mainly used in monitors
as it produces screen clarity and
interlace mode is mainly used in
TVs.
Dot Pitch____ The screen consist
of red, green and blue dots. A
shorter distance between the dots
produces a higher resolution. Dot
pitch refers to the distance between
the shortest distance between
dots of the same color. Dot pitch is
measured in millimeters.
Vertical Frequency____ The product
displays a single image many times
per second (like a fluorescent light
that flickers) to display an image for
a viewer to see. The rate of a single
image being displayed repeatedly
per second is called vertical
frequency or refresh rate. Vertical
frequency is measured in Hz.
E.g. 60Hz refers to a single image
being displayed 60 times in one
second.
Horizontal Frequency____ The
time required to scan a single line
from the left to the right side of
the screen is called a horizontal
cycle. The reciprocal number of a
horizontal cycle is called horizontal
frequency. Horizontal frequency is
measured in kHz.
Source____ Input source refers to
a video source device connected to
the product such as a camcorder or
video or DVD player.
Plug & Play____ Plug & Play is a
function that allows the automatic
exchange of information between
a monitor and PC to produce an
optimum display environment.
The product uses VESA DDC
(international standard) to execute
Plug & Play.
Resolution____ Resolution is the
number of horizontal dots (pixels)
and vertical dots (pixels) that
form a screen. It represents the
level of display detail. A higher
resolution enables more data to
be displayed on the screen and is
useful to perform multiple tasks
simultaneously.
E.g. A resolution of 1920 X 1080
consists of 1,920 horizontal pixels
(horizontal resolution) and 1,080
vertical pixels (vertical resolution).
DVD (Digital Versatile Disc)____
DVD refers to a CD-sized mass
storage disk where you can save
multimedia (audio, video or game)
applications using MPEG-2 video
compression technology.
HDMI (High Definition Multimedia
Interface)____ It is an interface that
can be connected to a digital audio
source as well as a high-definition
video source by using a single cable
without compression.
Multiple Display Control (MDC)____
MDC (Multiple Display Control) is
an application that allows multiple
display devices to be controlled
simultaneously using a PC.
Communication between a PC and
monitor takes place using RS232C
(serial data transmission) and RJ45
(LAN) cables.