
AP218E2
Original instructions

Important!
This appliance is not intended for use by persons (including children) with
reduced physical, sensory or mental capabilities, or lack of experience
and knowledge, unless they have been given supervision or instruction
concerning use of the appliance by a person responsible for their safety.
Children should be supervised to ensure that they do not play with the
appliance.
It is essential that you read the instructions in this manual before
operating this machine.
Subject to technical modifications.
3
3
x 4x 4
2
1
4
6
3
14
16
15
10
11
12
13
19
17
20
7
5
8
9
18
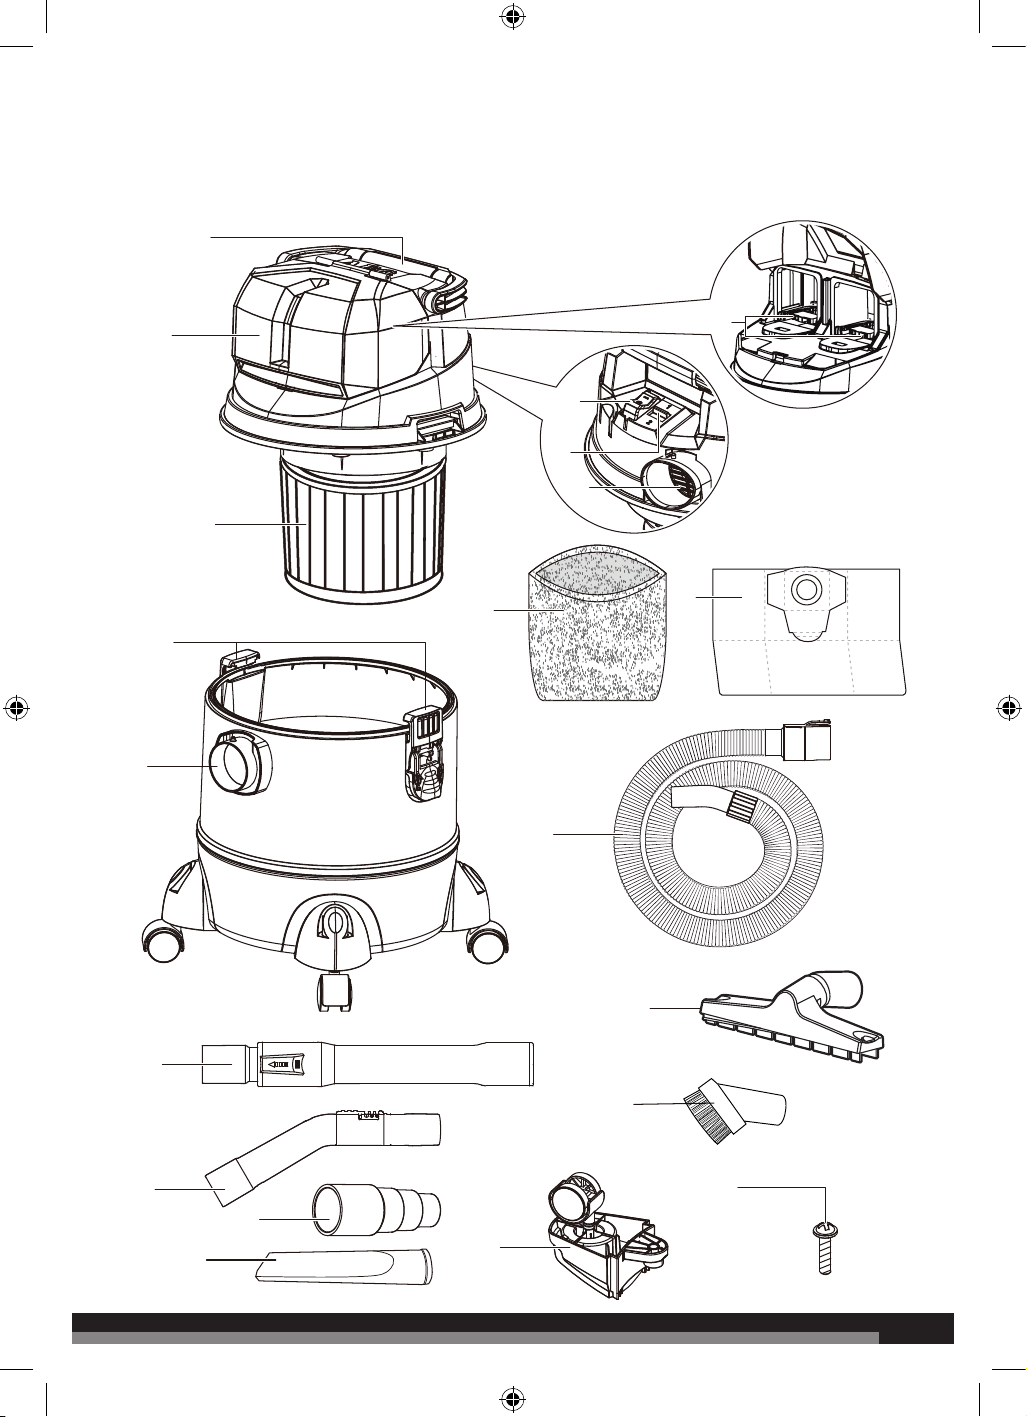
1. Handle
2. Battery cover
3. HEPA filter
4. Switch button
5. Speed selector
6. Blower port
7. Battery ports
8. Latches
9. Vacuum port
10. Extension tube
11. Air regulator
12. Power tool adaptor
13. Crevice tool
14. Foam sleeve filter
15. Dust bag
16. Hose set
17. Floor tool
18. Round brush
19. Caster feet
20. Caster feet screw
4
4
Fig. 1
Fig. 2
Fig. 4
Fig. 5
Fig. 6
Fig. 7
Fig. 8
Fig. 3
3
1
2
1
2
2
1
1
1
2
1
2
3
5
5
Fig. 9
Fig. 10
Fig. 11
Fig. 12
Fig. 13
1
2
Fig. 16
3
Fig. 14
Fig. 15
Fig. 17
1
2
2
1
6
6
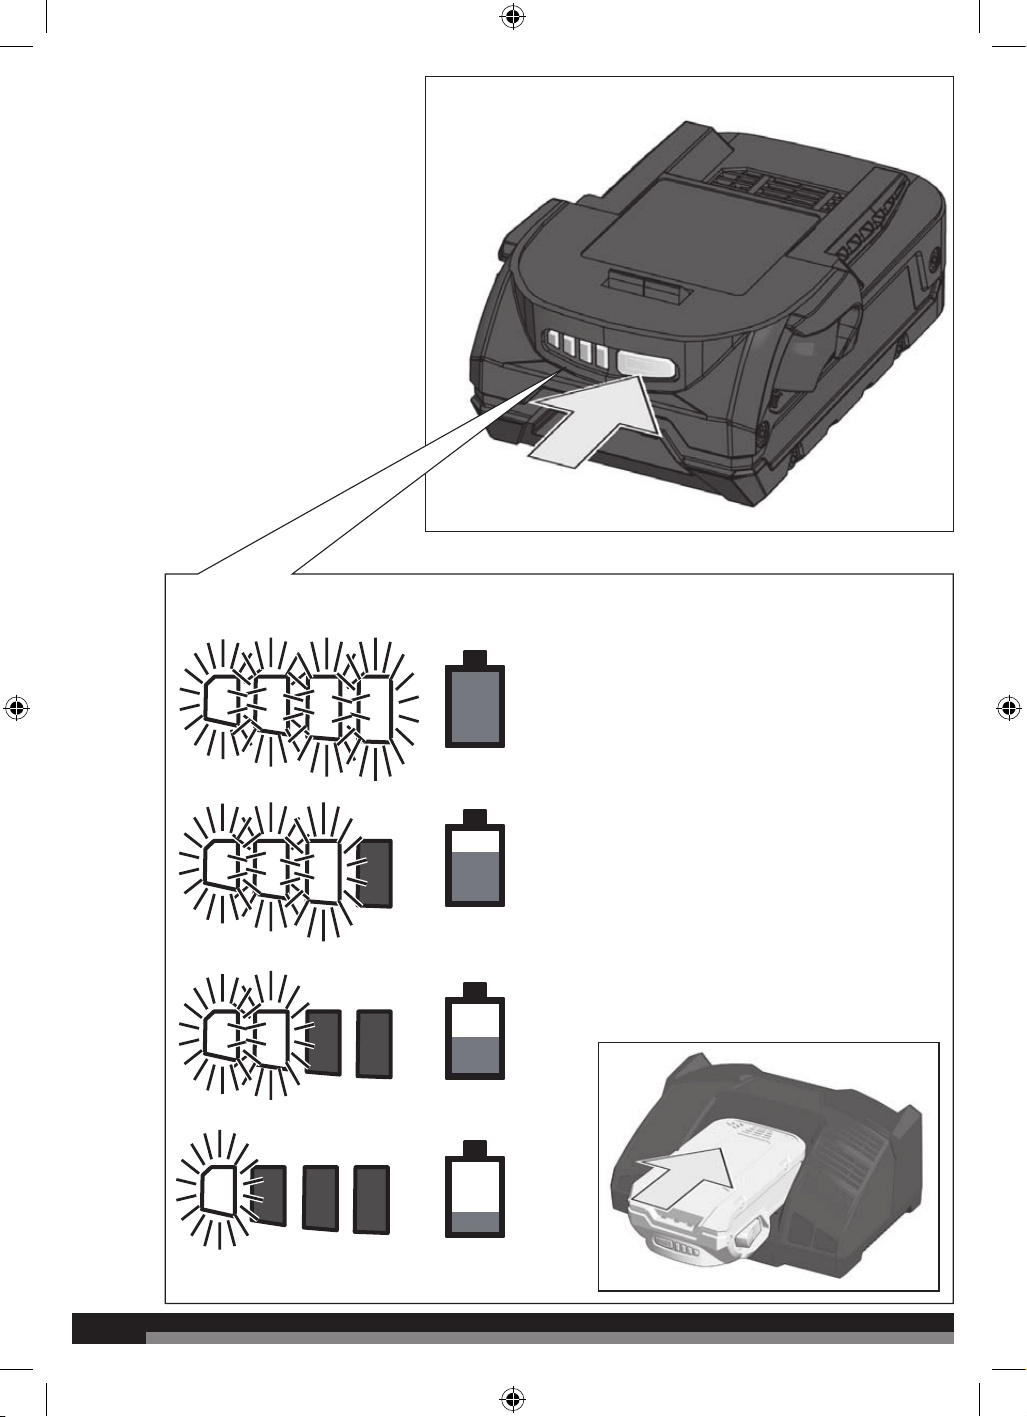
75-100 %
50-75 %
25-50 %
0-25 %

7
7
BATTERY AND CHARGER
Compatible battery pack
(not included)
Compatible charger
(not included)
L1820R
L1820S
A18FB2
L1825R
L1830R-X5
L1840R
A18B4
A18FB4
L1850R
A18FB5
L1860R
L1860R-X5
L1890R
AL18G
BL1218
BLK1218
BL18DPS
BL18S
Use AEG 18V battery and charger only
NOTE: The product is not compatible with A18OB8.
WARNING! Read all safety warnings and all instructions.
Failure to follow the warnings and instructions may result in electric
shock, fire and/or serious injury.
Save all warnings and instructions for future reference.
DUST EXTRACTOR SAFETY WARNINGS
■ The product is designed solely for use in the private sector
and for the designated purpose. The product is not suitable for
commercial use. Do not use the product outdoors (unless it has
been specifically designed for use outdoors). Do not subject the
product to heat, direct sunshine or very high moisture (e.g., rain).
■ Never immerse the product in liquids and be aware of sharp
edges that may damage it. Never use the product with wet or
damp hands. Remove all battery packs immediately if the product
becomes wet or damp when it is running. Do not immerse the
appliance in water.
■ The product may only be used and kept in a private home.
■ The product is designed to vacuum up materials that are not
hazardous to your health and that are not flammable.
■ Never hold the connectors in front of your face (especially your
eyes, ears, etc.). Never direct the nozzle towards persons or
animals.
■ Only use the product for its designated purpose. Any other types
of use are at your own risk and are possibly dangerous.
■ Other uses and unattended operation are not allowed.
■ The manufacturer cannot be made responsible for damages that
are caused by improper use or incorrect operation.
■ Wear protective clothing and gloves.
■ Make sure that the correct dust bag has been inserted securely
in its holder before using the product. The wrong dust bag or
incorrectly installed dust bags can cause damage to the product
and cause the guarantee to become void.
■ Do not vacuum up ashes, hot coals and the like, large fragments
of glass and sharp objects.
■ Do not vacuum up any printer toner dust as it is electrically
conductive. In addition, it is possible that it will not be completely
filtered out by the filter system of the wet/dry vacuum cleaner and
can be released into the air via the exhaust fan.
■ Never vacuum flammable or poisonous liquids like petrol, oil,
acids, or other volatile substances.
■ Do not vacuum up liquids that are hotter than 60°C or any
poisonous or flammable dusts.
■ Never lay the product on its side. Pay particular attention to a
horizontal position and adequate stability on stairs.
■ Always remove all battery packs after use and before cleaning or
changing the filters or accessories.
■ Only trained specialists may make repairs on electric equipment.
Improper repairs could result in considerable danger to the user.
■ Do not store the product directly beside a hot oven or radiator.
■ Children, disabled persons, and the aged are often not aware of
the dangers that can result from handling electric appliances. The
above mentioned persons and untrained persons must never
work with this electrical appliance.
■ When cleaning or removing the product, always switch it
off. Remove all battery packs, if you are not going to use the
product for an extended period of time. Also, remove any special
accessories from the product.
■ Always keep the product clean. Do not use any solvents or
cleaners that may damage or be harmful to the product or user.
■ Never leave the product switched on unattended. If you leave the
work area, switch the product off and remove all battery packs.
■ In order to protect children from electric household appliances, do
not give children access to the product.
■ Never use the product when you are under the influence of
medication, alcohol or drugs, if you are currently under medical
care, or if you are tired.
■ Check the product regularly for any possible damage. Do not use
damaged appliances.
■ Do not try to repair the product yourself. Always use an authorised
technician for repairs.
■ Only use original spare parts and accessories. Non approved parts
or third-party accessories may be a possible source of danger and
cause the guarantee to become void.
■ If you notice liquid leaking from the product, switch it off
TECHNICAL DATA 20L DUST EXTRACTOR
AP218E2
Rated voltage 18 V
Max. suction 12 Kpa
Noise 87 db(A)
Motor power 360 W
Tank volume 20 L
Weight - not including battery pack 5.6 kg
Ingress protection IPX4

8
8
immediately and remove all battery packs.
■ Do not submerge the product in water. Make sure that water is
not spilled on the product.
■ When disposing of the wastewater, make sure that you observe
any legal regulations.
■ Only store the product in a safe and dry location outside the reach
of children.
■ This appliance is not intended for use by persons (including
children) with reduced physical, sensory or mental capabilities, or
lack of experience and knowledge, unless they have been given
supervision or instruction concerning use of the appliance by a
person responsible for their safety.
■ Children should be supervised to ensure that they do not play
with the appliance.
■ Never vacuum up hot ashes, pointed or sharp objects.
■ Never use the product in damp rooms.
■ Do not use the product without a dust bag (an exception is wet
vacuuming or with the cartridge filter). Make sure that the dust
bag is inserted into the appliance correctly.
■ When using the product, make sure that no hair, clothing, or
members are drawn in.
■ Keep the vacuum cleaner away from heat sources such as radiant
heaters, ovens, and so on.
■ If the hose or tools are blocked, switch off the product and remove
the blockage(s) before re-starting the product.
■ Cleaning filters and replacing them regularly maintains vacuum
performance. We recommend that your filters should be checked,
cleaned and replaced periodically.
■ Damage to the vacuum cleaner caused as a direct result of not
adhering to the general safety information and the instructions in
this user guide invalidates the warranty.
■ Cleaning and user maintenance shall not be made by children
without supervision.
■ Rechargeable batteries are to be removed from the appliance
before being charged.
■ Exhausted batteries are to be removed from the appliance and
safely disposed of.
■ If the appliance is to be stored unused for a long period, the
batteries should be removed.
■ The supply terminals are not to be short-circuited.
ADDITIONAL BATTERY SAFETY WARNINGS
WARNING! To reduce the risk of fire, personal injury, and product
damage due to a short circuit, never immerse your tool, battery pack
or charger in fluid or allow a fluid to flow inside them. Corrosive or
conductive fluids, such as seawater, certain industrial chemicals, and
bleach or bleach containing products, etc., can cause a short circuit.
SPECIFIED CONDITIONS OF USE
This cordless wet/dry vacuum is intended for household use. It may
be used for light vacuuming of wet or dry media.
CAUTION
Danger of explosion if battery is incorrectly replaced. Replace only
with the same or equivalent type.
ASSEMBLY
CAUTION
Use only manufacturer’s approved vacuum filters and filter bags.
Before attempting to use or before cleaning this vacuum, be
sure that you fully understand the instructions for setting up or
cleaning/changing filters.
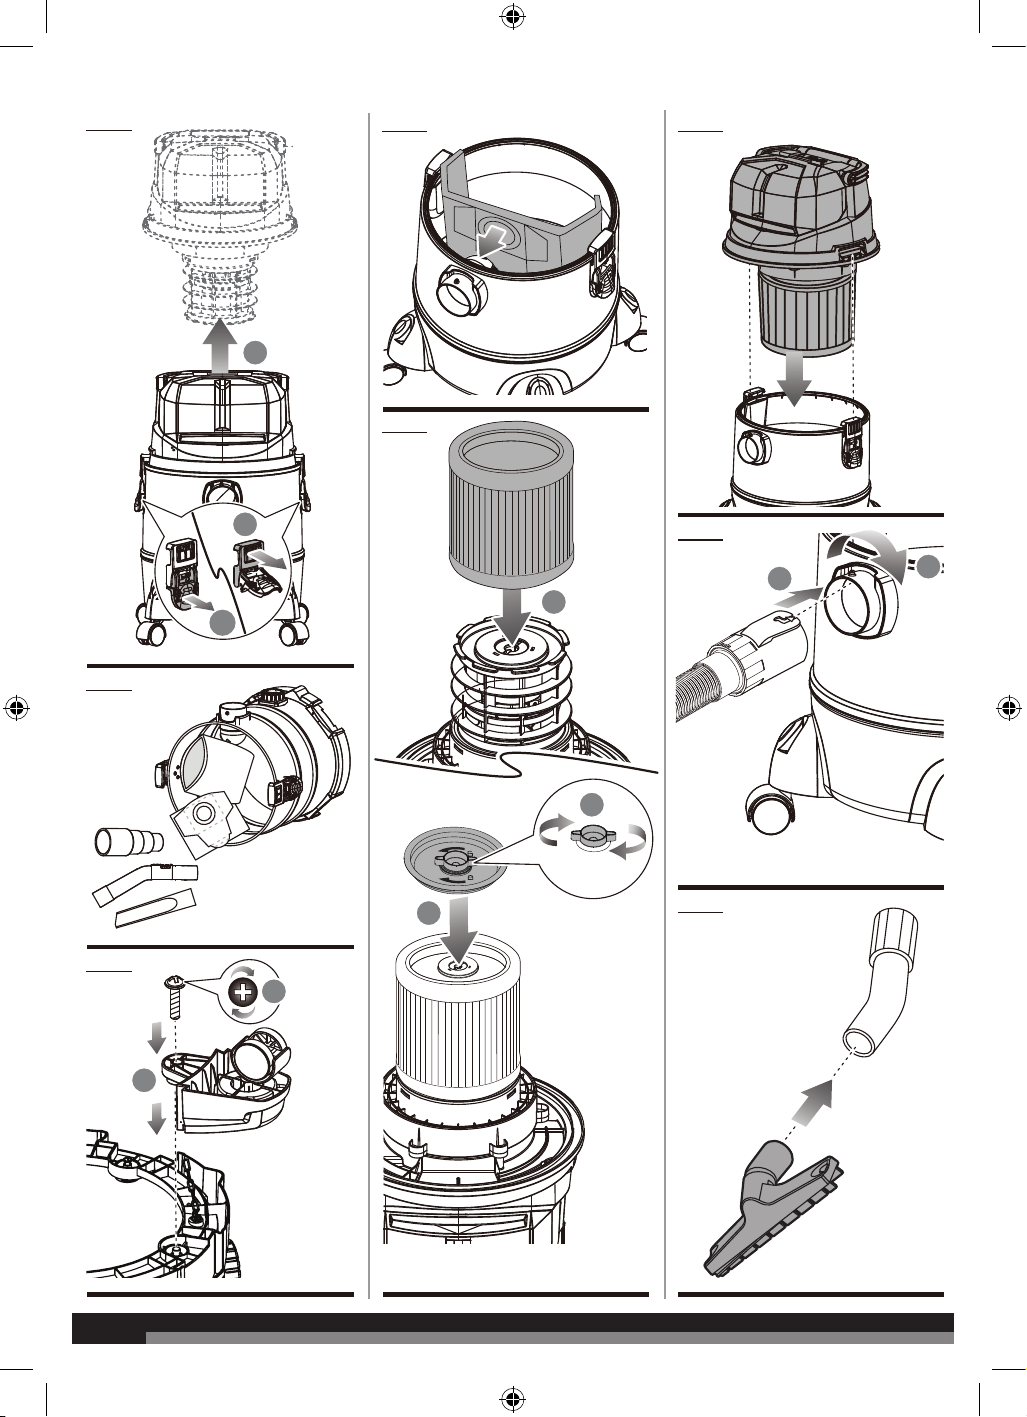
UNPACKING THE PRODUCT AND GENERAL ASSEMBLY
See figure 1-8.
1. Verify that no battery pack is inserted in the battery port(s).
2. Undo the latches.
3. Lift the power head off the tank. (Fig 1)
4. Remove the contents from inside the tank and carton. Make sure
you have all contents as listed in component list. (Fig 2)
5. Turn the tank upside down and insert the four caster feet into the
slots on the base. Apply downward pressure to each caster. Verify
that the casters are mounted correctly. Lock the casters in place
with the provided screws. (Fig 3
6. The product comes ready for dry vacuum cleaning. If HEPA
filter is not installed, refer to the Installing HEPA filter section for
instructions of installation. (Fig 5)
7. Fit collection bag flange onto the inlet stub, taking care not to
damage the bag. (Fig 4)
8. For wet vacuum cleaning, remove the HEPA filter and collection
bag. Install the supplied foam filter. Refer to the Installing foam
sleeve filter section for instructions of installation. (Fig 11)
9. Place the power head back on the tank, aligning the top section
with the latches, and hook the latches. (Fig 6)
10. Insert the locking end of the hose into the vacuum port and turn
to lock into place. (Fig 7)
11. Choose the desired accessories and push onto the suction tube.
(Fig 8)
WARNING
If filters are contaminated or damaged, they must be replaced prior
to performing wet vacuuming operations.
BATTERY PORTS
The product is equipped with dual battery ports for an extended
operation time per use. When two battery packs are inserted, the
product draws power from the battery pack at the left port first. When
the battery pack at the left port is fully discharged, the product will
begin drawing power from the battery pack at the right port.
INSTALLING/REMOVING BATTERY PACK
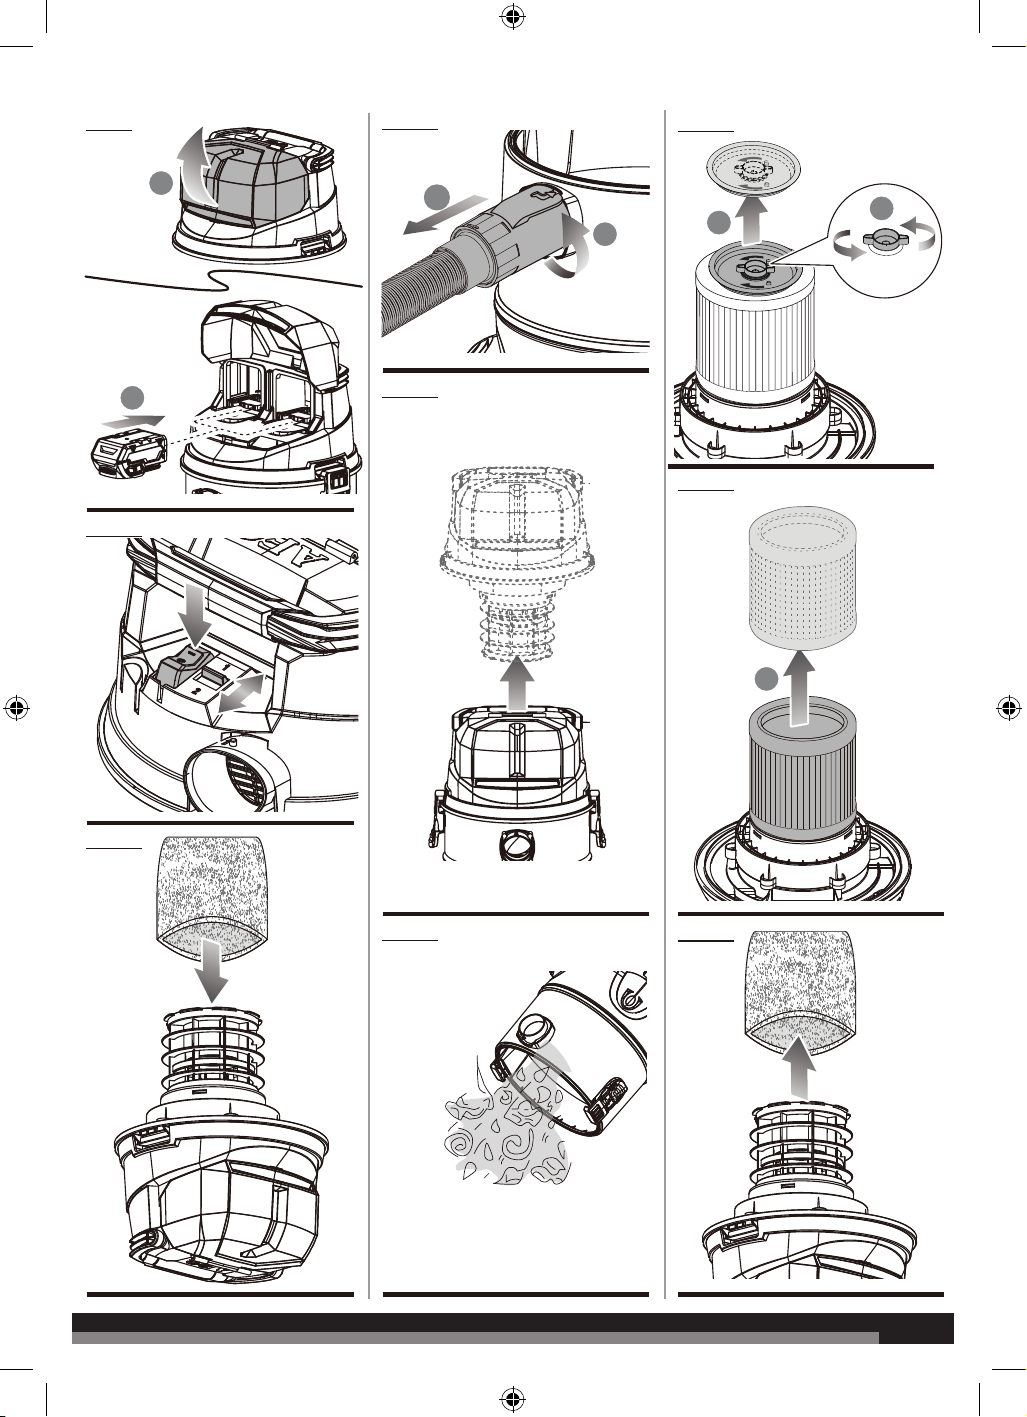
See figure 9.
The product is operated by an AEG 18V battery pack.
1. Open the battery port cover. (Fig 9)
2. Place the battery pack in the product, aligning the ribs on the
battery pack with the grooves in the battery port. (Fig 9)
3. Make sure the latches on the battery pack snap into place and
the battery pack is secured to the product before beginning
operation.

9
9
OPERATION
DRY VACUUMING
See figure 4-11.
WARNING
Be sure to read, understand all warnings and instructions in the
manual before use. Do not vacuum in areas with flammable gases,
vapours, or explosive dusts in the air.
WARNING
Flammable gases or vapors include but are not limited to; lighter
fluid, solvent type cleaners, oil-base paints, gasoline, alcohol or
aerosol sprays. Explosive dusts include but are not limited to; coal,
magnesium, grain or gun powder. To reduce the risk of health
hazards from vapors or dust, do not vacuum toxic materials.
CAUTION
Never operate the vacuum cleaner without all of the filters
installed. This includes the HEPA filter and collection bag. Motor
damage, loss of operating eiciency and recirculation of hazardous
material into the work area will take place if not installed. Make sure
no battery pack is inserted in the battery ports before assembly.
NOTE: Make sure the power tool adaptor is fully fitted into the dust
port of the power tool.
1. Verify that no battery pack is inserted in the battery ports.
2. In order to prepare your vacuum for dry vacuuming, verify that
the HEPA filter is securely mounted. With power head removed
and in upside down position, make sure the filter is pushed in until
it stops against the power head and the filter cap is installed. Turn
the locking knob clockwise to lock the filter cap in place. (Fig 5)
3. For improved dust collecting, fit collection bag flange onto the
inlet stub, taking care not to damage the bag. (Fig 4)
4. Place the power head back on the tank, and secure it in place
using the latches. (Fig 6)
5. Insert the locking end of the hose into the vacuum port and lock
in place. Push the required attachment onto the free end of the
hose or extension. (Fig 7)
6. Open the battery port cover and insert a battery pack in the
battery port. (Fig 9)
7. Turn the motor on by turning the switch to the ‘I’ ON position.
(Fig 10)
8. Slide the speed selector for the desired vacuuming speed.
9. Once you have completed vacuuming, flip the switch to the ‘O’
OFF position and remove all battery packs from the battery ports.
(Fig 10)
WARNING
If filters are contaminated or damaged, they must be replaced prior
to performing wet vacuuming operations.
NOTE: Do not use the HEPA filter for wet vacuuming.
WET VACUUMING
See figure 11.
WARNING
Be sure to read, understand all warnings and instructions in the
manual before use. Do not vacuum in areas with flammable gases,
vapours, or explosive dusts in the air.
WARNING
Flammable gases or vapors include but are not limited to; lighter
fluid, solvent type cleaners, oil-base paints, gasoline, alcohol or
aerosol sprays. Explosive dusts include but are not limited to; coal,
magnesium, grain or gun powder. To reduce the risk of health
hazards from vapors or dust, do not vacuum toxic materials.
1. Verify that no battery pack is inserted in the battery ports. Verify
that the tank is clean and free of dust and dirt.
2. Remove the HEPA filter and dust bag. (Fig 16 and reverse of
Fig 4)
3. Rinse out the inside of tank to remove any loose debris.
4. Carefully install the foam sleeve filter over the filter cage and place
the power head back on the tank. (Fig 11)
NOTE: Do not use the HEPA filter for wet vacuuming.
WARNING
If filters are contaminated or damaged, they must be replaced prior
to performing wet vacuuming operations.
Wet vacuuming operation instructions
1. Fit the desired nozzle to the vacuum hose.
2. Verify that the switch is in the ‘O’ OFF position before inserting
the battery pack.
3. Open the battery port cover and insert a battery pack in the
battery port. (Fig 9)
4. Turn the motor on by flipping the switch to the ‘I’ ON position.
(Fig 10)
5. After use, empty the tank. (Fig 15)
NOTE: Do not use the HEPA filter for wet vacuuming.
NOTE: When vacuuming large quantities of liquids, do not immerse
the nozzle completely in the liquid. Leave a gap at the tip of the
nozzle opening to allow air inflow.
The machine is fitted with a float valve that stops the suction action
when the tank reaches its maximum capacity. You will notice an
increase in motor speed.
When this happens, turn o the machine, remove all battery packs,
and drain the liquid into a suitable receptacle or drain. To continue
vacuuming, refit the tank with the drain cap. After wet vacuuming,
turn the machine o and remove all battery packs. Empty the tank,
clean and dry the inside and outside before storage.
The foam filter must be removed after wet vacuuming, and the HEPA
filter must be reinstalled before dry vacuuming again.
BATTERIES
Battery packs which have not been used for some time should be
recharged before use.
Temperatures in excess of 50°C reduce the performance of the
battery pack. Avoid extended exposure to heat or sunshine (risk of
overheating).
The contacts of chargers and battery packs must be kept clean.
For an optimum life-time, the battery packs have to be fully charged,

10
10
after used.
To obtain the longest possible battery life remove the battery pack
from the charger once it is fully charged.
For battery pack storage longer than 30 days:
• Store the battery pack where the temperature is below 27°C and
away from moisture.
• Store the battery packs in a 30% - 50% charged condition.
• Every six months of storage, charge the pack as normal.
TRANSPORTING LITHIUM BATTERIES
Lithium-ion batteries are subject to the Dangerous Goods Legislation
requirements.
Transportation of those batteries has to be done in accordance with
local, national and international provisions and regulations.
■ The user can transport the batteries by road without further
requirements.
■ Commercial transport of Lithium-Ion batteries by third parties is
subject to Dangerous Goods regulations. Transport preparation
and transport are exclusively to be carried out by appropriately
trained persons and the process has to be accompanied by
corresponding experts.
When transporting batteries:
■ Ensure that battery contact terminals are protected and insulated
to prevent short circuit.
■ Ensure that battery pack is secured against movement within
packaging.
■ Do not transport batteries that are cracked or leak.
Check with forwarding company for further advice
BATTERY PACK PROTECTION
The battery pack has overload protection that protects it from being
overloaded and helps to ensure long life. Under extreme stress the
battery electronics switch o the machine automatically. To restart,
switch the machine o and then on again. If the machine does not
start up again, the battery pack may have discharged completely. In
this case it must be recharged in the battery charger.
MAINTENANCE
See figure 12-14.
WARNING
Always remove all battery packs before removing the power head
from the tank.
1. Verify that no battery pack is inserted in the battery ports.
2. Disconnect the hose from the vacuum. (Fig 13)
3. Undo the latches and remove the power head from the tank. (Fig
14)
4. Clear all dirt or debris from the tank and hose. (Fig 15)
5. Clean the foam filter by washing it with water and mild soap.
6. Check the hose and attachments to verify that they have not been
damaged.
INSTALLING AND REMOVING HEPA FILTER
Installing HEPA filter
See figure 5.
1. Verify that no battery pack is inserted in the battery ports.
2. Remove power head and place in upside down position.
3. Install the HEPA filter over the filter cage with the flat end of the
filter towards the vacuum power head. Carefully push filter in until
it stops against the power head.
4. Install the filter cap. Turn the locking knob clockwise to lock the
filter cap in place.
Removing HEPA filter
See figure 15-16.
1. Unlock and remove the filter cap by tuning cap counter clockwise.
2. Carefully hold and pull the HEPA filter up for removal.
3. To clean, either dust off the filter by gently tapping or brushing
directly off. Alternatively wash it with clean water. If washed,
please allow to air dry for 24 hours before installing back onto
the unit.
NOTE: Change the cartridge filter regularly for best performance.
Always use the HEPA filter for dry vacuuming. If the product is used
for dry vacuuming without the HEPA filter and cap attached, the
motor will burn out and the warranty will be voided.
NOTE: The HEPA cartridge filter included is made of high quality
materials designed to stop small dust particles. The HEPA cartridge
filter should be used for dry pick-up only.
A dry HEPA cartridge filter is necessary to pick up dust. If the HEPA
cartridge filter is wet, it will clog quickly and be very diicult to clean.
Handle the HEPA cartridge filter carefully when removing it for
replacing it. Check the HEPA cartridge filter for tears or small holes. A
small hole can let dust pass through and out of the cleaner.
Do not use a HEPA cartridge filter with holes or tears. Replace it
immediately.
Clean the cartridge filter by gently tapping or brushing dirt o. For
optimal performance it is recommended to regularly change this filter
depending on level of use.
CLEANING AND CHANGING HEPA FILTER
WARNING
To ensure maximum performance, clean the HEPA filter after each
discharge cycle or if performance drops. Replace the HEPA filter
every 25 discharge cycles.
Cleaning HEPA filter
The HEPA filter supplied is washable. Having a washable filter helps
increase its lifespan. Clean the HEPA filter on a regular basis.
NOTE: Filter maintenance is important. Make sure the HEPA filter is
cleaned and replaced on a regular basis.
Helpful hint: When washing the HEPA filter it will need to completely
dry before reusing in the vacuum. We recommend to always have a
spare filter (not supplied) on hand to replace in case of urgent use
needed.
Changing the HEPA filter
Replace the HEPA filter when loss of vacuum continues to occur after
you have checked for any obstructions in the hose or wand. Also,
install a new collection bag.
INSTALLING AND CLEANING FOAM SLEEVE FILTER
Installing foam sleeve filter
See figure 11.
1. Verify that no battery pack is inserted in the battery ports.
2. Remove power head and place in upside down position.
11
11
3. Carefully slide foam sleeve filter down over the filter cage making
sure the hole is covered.
4. Replace the power head on to the tank.
Cleaning foam sleeve filter
See figure 17.
1. With the removed power head in the upside down position,
carefully remove foam sleeve filter.
2. Use a mild soap and water solution to wash foam sleeve filter and
rinse with clean water.
3. Allow filter to air dry before installing and using again.
CHANGING THE DUST BAG
When the collection bag is 3/4 full, it must be replaced. Excessive over
filling of this bag makes it diicult to remove from the vacuum tank
and can result in breakage and spills. When collection bag becomes
3/4 full, turn o vacuum and slowly remove the collection bag from
the tank until the opening in the collection bag is clear of the tank.
Use only AEG accessories and AEG spare parts. Should components
need to be replaced which have not been described, please contact
one of our AEG service agents (see our list of guarantee/service
addresses).
If needed, an exploded view of the tool can be ordered. Please state
the Article No. as well as the machine type printed on the label and
order the drawing at your local service agents or directly at:
Techtronic Industries Australia Pty Ltd
PO Box 1065
Mount Waverley VIC 3149
Tel. no. 1300 234 797
Australia
Techtronic Industries N.Z. Limited
PO Box 12-806
Penrose AUCKLAND 1642
Tel. no. 0800 234 797
New Zealand
SYMBOLS
Safety alert
V
Volts
Direct current
Regulatory Compliance Mark (RCM). Product meets
applicable regulatory requirements.
Please read the instructions carefully before starting
the machine.
Do not dispose of electric tools together with
household waste material. Electric tools and
electronic equipment that have reached the end of
their life must be collected separately and returned
to an environmentally compatible recycling facility.
TROUBLESHOOTING
Problem
Possible Causes Solution
Vacuum will not operate. 1. No power supply.
2. Tank full.
1. Check if battery pack is properly inserted.
2. Check if battery pack if charged.
3. Empty tank.
Dust comes out from motor cover. 1. The cartridge filter is missing or damaged.
2. HEPA cartridge filter is not installed correctly.
1. Attach or replace cartridge filter.
2. Check the HEPA catridge filter and install it
correctly.
Reduced efficiency and motor/
speed vibration.
1. There is a blockage in the nozzle, hose, or the
tank inlet. The cartridge filter is clogged by fine
dust.
2. Dust bag is full.
1. Check nozzle, hose and tank inlets for blockage.
Take off the filter and clean it. Or install a new
cartridge filter.
2. Replace the dust bag.

AEG is a registered trade mark used under
license from AB Electrolux (publ).
© 2021 Techtronic Cordless GP.
Techtronic Industries Australia Pty Ltd
31 Gilby Road, Mount Waverley,
VIC, 3149, Australia
Techtronic Industries N.Z. Limited
Unit C, 70 Business Parade South,
Highbrook, Auckland 2013, New Zealand
www.aegpowertools.com.au
www.aegpowertools.co.nz
20241101v2B
AEG is a registered trade mark used under
license from AB Electrolux (publ).
