Email:support@euhomy.com
Facebook:@Euhomy.Official
PORTABLE NUGGET ICE MAKER
USER Manual
SKU
:IM-15S-AZ-HM


Congratulations
Dear Customer:
Welcome to the Euhomy family. Thank you for purchasing one of our products.
Our goal is to provide you with superior service. If there is anything missing from or wrong with
your order, or if you have any questions about using our ice maker, PLEASE contact us.
Email: [email protected]
Facebook: @Euhomy.Official
The Euhomy team is available 24/7 to address your questions, comments, and concerns. Your
satisfaction is our ultimate goal. We want to make everything right so you'll share your positive
experience with other shoppers on Amazon.
If you experience any problems, please send an email to [email protected].
Our mission:
* To be the most trusted appliance brand.
* To create practical, compact appliances that better your life.
Be sure to register at
www.euhomy.com/register
for updates, warranty, and other relevant information.


Q&A
1.How often do I need to clean my ice maker?
2.How should I clean the machine?
3.Why is my ice cube cloudy?
4.
Can I put milk and juice into the water tank to make ice cubes?
5.Why does my ice cube melt easily?
6.Why is my ice so thick and difficult to fall from the ice tray?
What should I do?
7.Why does the ice cubes have a plastic smell?
8.Why is there noise in the operation of my machine?
9.Why is water leaking from my machine?
10.Why is there water flowing but not making ice?
Depending on how frequently you use it, it is recommended that you clean it at least once a week. Failure to clean the
machine will cause scale accumulation, which will eventually block the pump and cause the product to stop working
properly.
It is recommended to use lemon water or weak acid vinegar for cleaning. Drain immediately after cleaning, and then clean
it with pure water.
It is recommended to drain the water at least once every three days (pulling out the small hose on the right side of the
water tank). Draining will not only ensure that the hardness of the water is not too high, but also ensure that impurities
can be discharged well,
We do not recommend washing vour ice baskets and scoops in the dishwasher as that may damage them.
and it is not easy to produce scale in the water tank.
It means that the water quality is turbid. It is recommended to use drinking water and distilled water. If your water quality
problem is serious, it is recommended that you install a water filter kit.
We recommend that you do not do that. Our research has found that the high concentration of milk and beverages can
easily block the pump and reduce the life span of the pump. At the same time, the protein in milk is prone to calcification,
which chemically reacts with the PU water pipe inside the machine, which easily breaks it, making the product unable to
continue working.
Since the ice maker is not a refrigerator, it does not have a heat preservation function. The high ambient temperature in
summer will accelerate the melting of ice cubes. You can close the lid of the machine to keep the internal temperature.
Some customers also put electric fans on the side of the machine to blow away the hot air surrounding the device, thus
solving the problem. Feel free to try it yourself. However, if you are not using ice cubes for a long time, we recommend
removing them from the ice basket and storing them in the refrigerator.
It may be that your ice making time is set for too long, or it may be that the temperature of your environment is very low.
You can reduce the time to 0 or -6 by pressing the minus key on the touch panel.
The ice cube itself has no taste. If you feel there is a plastic smell, try to clean the inside of the machine with lemon
water, then run a few cycles, and finally rinse with distilled water.
There is a faint sound when the machine is running. Closing the lid can reduce the noise. If the water pump makes a noise
during use, it is recommended to turn off the machine first, and then turn on the machine after cleaning the filter in the
water tank to observe whether or not the noise disappears.
It may be that the PUA tube inside the machine fell off during transportation. You can remove the back cover of the
machine and connect it by yourself. If you don't know how to operate, please contact the Euhomy team. We will give you
a professional video to help you solve the problem.
Please provide a video or picture and send it to us. The Euhomy team will assist you.


01
Contents
02
03-04
05
06
07-12
13
15
SAFETY INSTRUCTIONS
PREPARING YOUR ICE MAKER FOR USE
GETTING TO KNOW YOUR UNIT
OPERATING PROCEDURES & MAINTENANCE
USING YOUR ICE MAKER
TROUBLESHOOTING
TECHNICAL PARAMETERS & CIRCUIT DIAGRAM
SAFETY INSTRUCTIONS
02
Your safety, as well as the safety of others,
is of utmost importance to us.
We have incorporated many important safety messages in the manual of your appliance.
Always read and follow all the safety instructions.
Below is the safety alert symbol.
AII Safety messages will follow the safety alert symbol and the word " DANGER" or "WARNING " .
These words mean:
Death or severe injury will occur if you don’t follow the instruc-
tions properly.
All safety messages provide information on potential hazards, way to reduce the risk of injury, and
consequences of not following the instructions.

PREPARING YOUR ICE MAKER FOR USE
SAFETY TIPS
03
When using electric appliances, it's vital to follow basic safety
steps to lower the risk of fires, electric shocks, or harm to
people and property. Make sure to read all the instructions
before you start using any appliance.
Do not use this product or any other appliance if the cord is damaged.
If the power cord's is damaged, replace it with a new one from the manufacturer, their service
agent, or an expert to avoid potential risk.
Make sure you place this ice-maker in a location where the plug is easily accessible. It is
important to only connect it to properly grounded outlets, and avoid plugging anything else into
the same outlet.
Double-check that the plug fully inserted into the socket. Ensure that the power cord is not
running over carpeting or other heat insulators.
Do not cover the cord. Keep the cord out of traffic areas, and away from water.
It is not recommended to use an extension cord as it can cause overheating and potentially lead
to a fire. However, if it is absolutely necessary to use one, make sure it's rated at least 14AWG
and can handle a minimum of 1875 watts.
Remember to unplug the ice maker before performing any cleaning, repairs or service.
Be cautious and vigilant when children are present near this appliance.
Don't use your ice maker outside. Set it up in a location that is away from direct sunlight and
make sure there is a gap of at least a 6-inch between the back of your unit and the wall. Also,
keep a minimum distance of 6 inches free on each side of your unit to ensure proper ventilation.
Do not use any other liquid. Only use water to make the ice-cube.
Do not use flammable fluids to clean your ice maker as the fumes may cause a fire or explosion.
Please make sure to keep the ice maker steady and avoid causing it to fall over.
If the ice maker is brought in from outside in wintertime, give it a few hours to warm up to room
temperature before plugging it in.

04
WARNING: This appliance must be grounded.
DANGER:
CAUTION:
The ice maker must be installed in accordance with the safety standard of Refrigeration Systems,
ASHRAE15. Do not install the ice maker in public building corridors or hallways .
If the unit is malfunctioning and requires maintenance, it should be serviced by factory authorized
personnel. Replacement of any components should be done with similar parts to minimize the risk
of ignition caused by incorrect parts or improper service.
Attention:
The wires in this power cord are colored based on the following code:
Green or Green with a strip yellow: Grounding
White: Neutral
Black: Live
To avoid a hazard due to instability of the appliance, it must be placed at a even or flat surface.
Risk Of Fire or Explosion.
Flammable Refrigerant Used.
Do Not Use Mechanical Devices To Defrost Ice Maker.
Do Not Puncture Refrigerant Tubing.
To Be Repaired Only By Trained Service Personnel.
Consult Repair Manual/Owner’s Guide Before Attempting To Install or Service
This Product
All Safety Precautions Must be Followed.
Dispose Of Property In Accordance With Federal Or Local Regulations.
Flammable Refrigerant Used .
Follow Handling Instructions Carefully. Flammable Refrigerant Used.
PREPARING YOUR ICE MAKER FOR USE
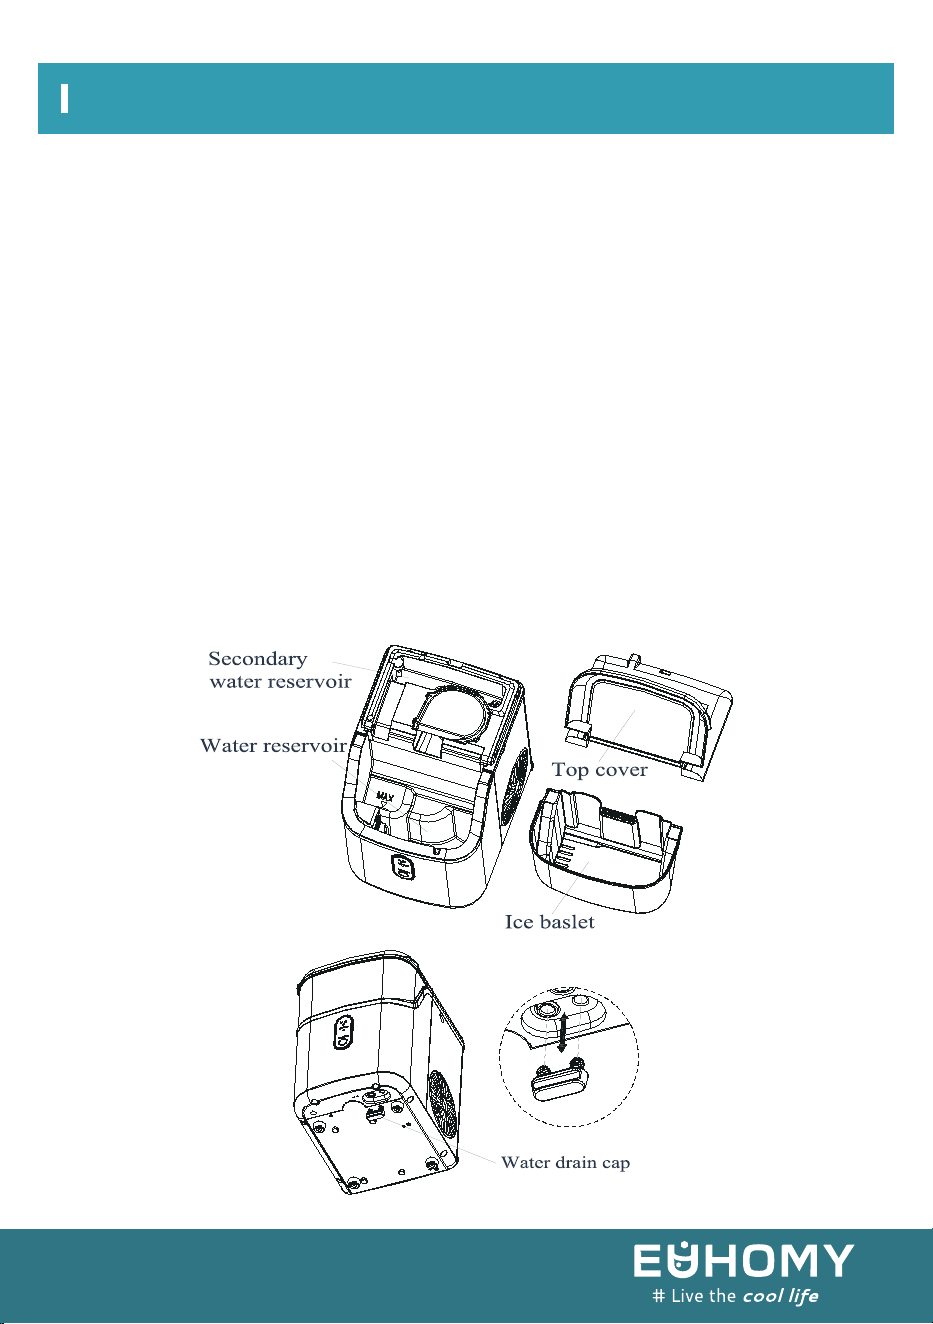
GETTING TO KNOW YOUR UNIT
05
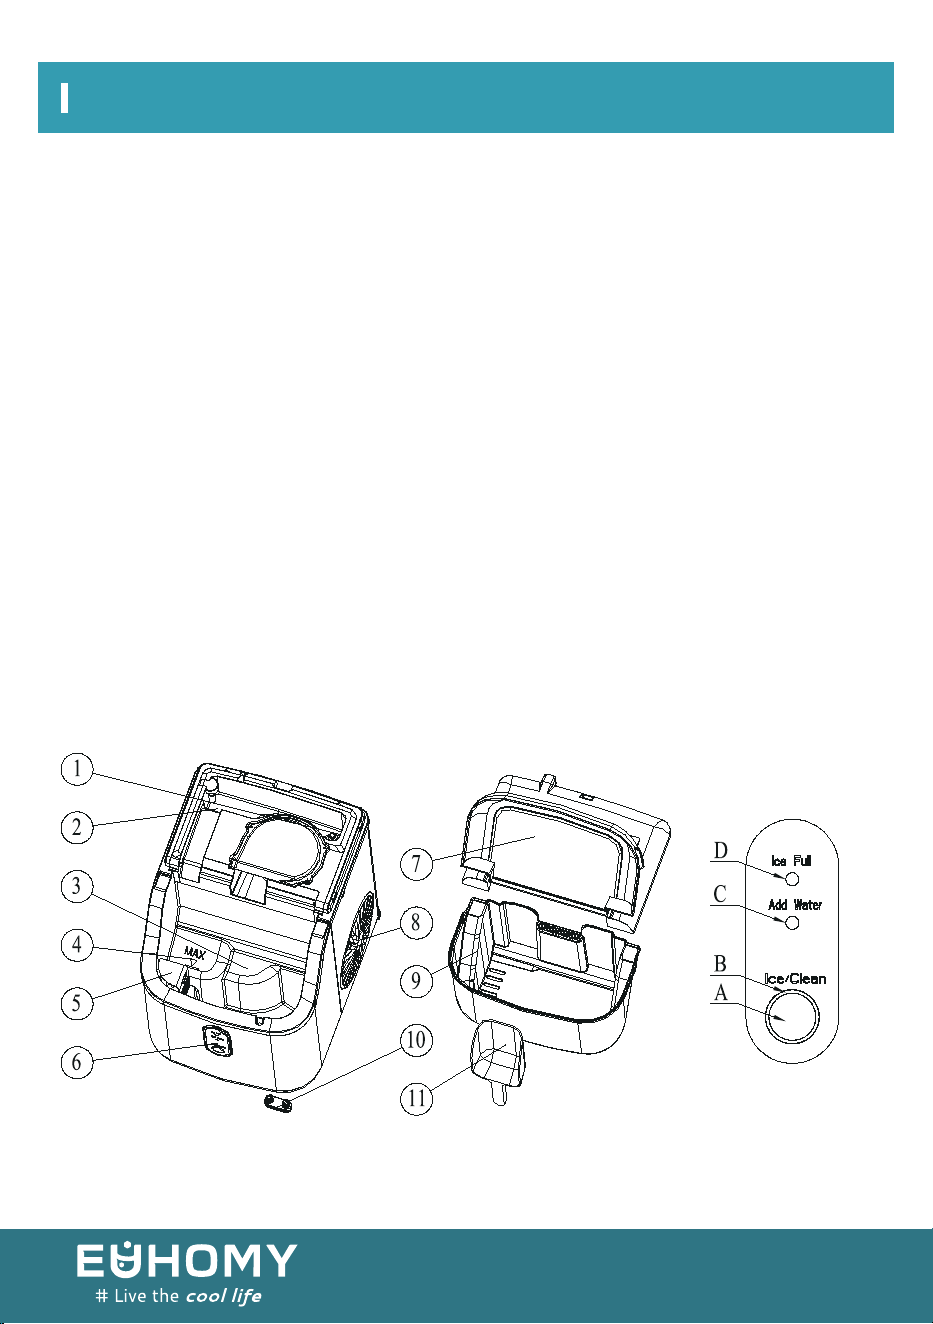
1. Float Switch;
2. Secondary Water Reservoir (It connects directly with the evaporator);
3. Water Reservoir;
4. Maximum Water Level;
5. Filter;
6. Control Panel:
A.Ice making and cleaning buttons;
B.Ring indicator light;
C.Water lack indicator light;
D.Ice full indicator light;
7. Top Cover,(removable from the top)
8. Hot Air Outlet;
9. Ice Basket;
10. Water Drain Cap (at the front bottom side of the unit);
11. Ice Scoop;

OPERATING PROCEDURES & MAINTENANCE
DANGER
06
1. Remove both the exterior and interior packaging, and then check to ensure that all the accesso-
ries are included. If any of the parts are missing, please contact our customer service for assis-
tance.
2. Remove all the tapes from the unit and take out the accessory parts inside.
3. Clean the interior with lukewarm water and a soft cloth.
4. Place your ice maker on a level counter or table, away from direct sunlight and other sources of
heat (i.e., stove, furnace, and radiator). Make sure that at least 6 inches are between the back and
sides of your ice maker and the wall.
5. Allow one hour for the refrigerant fluid to settle before plugging your ice maker in.
6. Ensure that the power plug is easily accessible.
WARNING: Fill with potable water only. Only use drinking water.
*Improper use of the grounded plug can result in electrical shock. If the power cord
is damaged, please contact our customer service.
1. To ensure your safety, it's important to ground this unit properly. The power cord comes with
a grounding plug that fits standard grounding wall outlets, which helps reduce the risk of
electric shock.
2. Always plug your appliance into dedicated, well-installed grounding wall outlet. Do not
damage the plug's grounding means under any circumstances. If you have any questions
concerning power and grounding, seeking advice from a certified electrician.
3.This appliance requires a standard 110-120Volt, 60Hz electrical outlet with proper grounding
means.
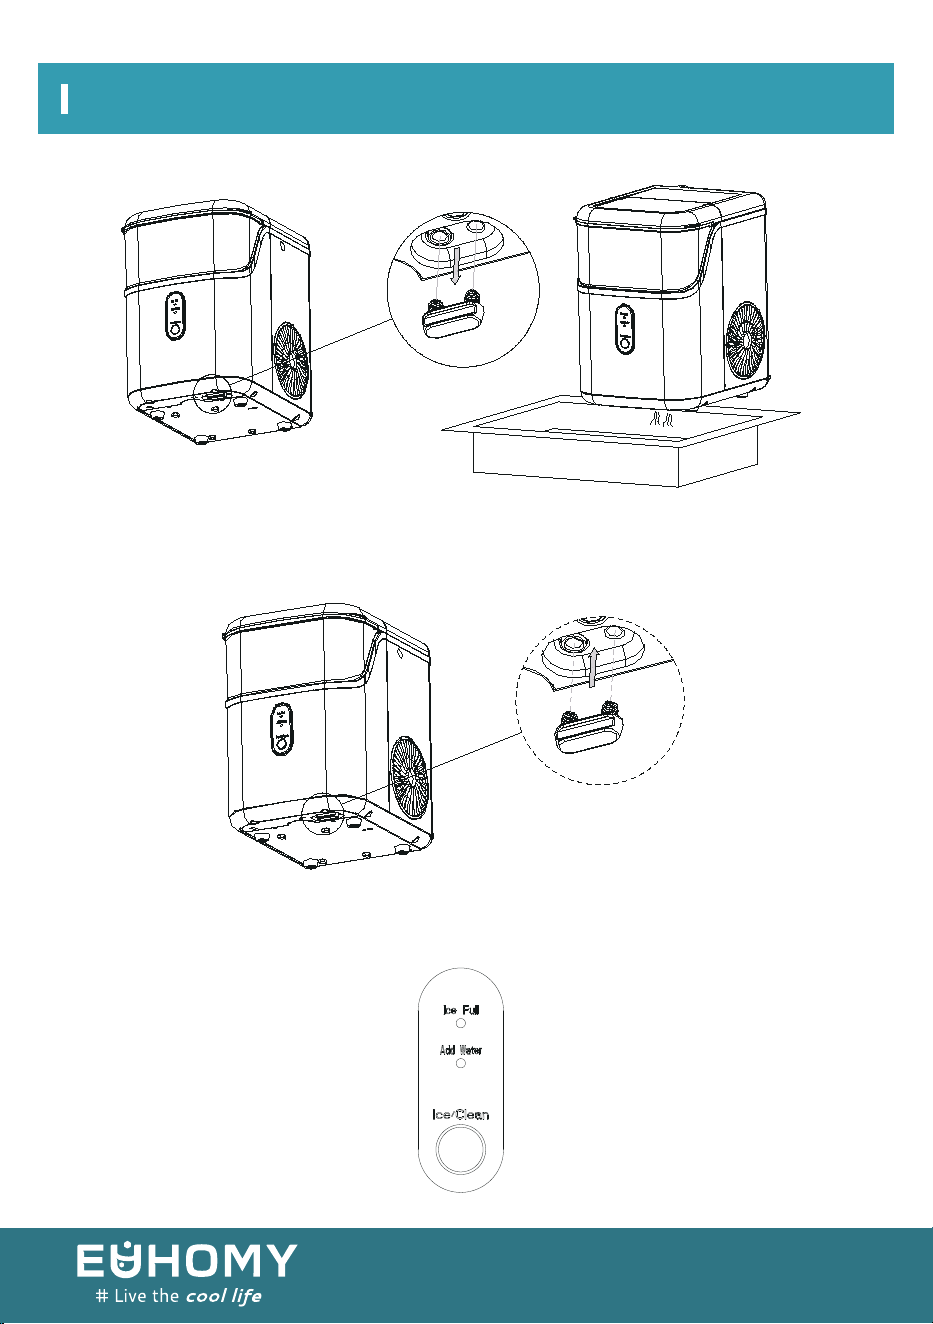
USING YOUR ICE MAKER
07
Before using your ice maker, it is strongly recommended to clean it thoroughly.
Unplug the unit before cleaning or making any maintenance.
1.Take out the ice basket.
2.Clean the interior with diluted detergent, warm water, and a soft cloth.
3.Rinse the inside parts with water and drain out the water by unplugging the drain cap located on
the bottom front side.
4.Use a mild detergent solution and warm water to clean the exterior of the ice maker regularly.
5.Dry the interior and exterior with a clean, soft cloth.
6.If the machine is not going to be used for a long time, drain the water entirely & dry the interior.
How to start the unit
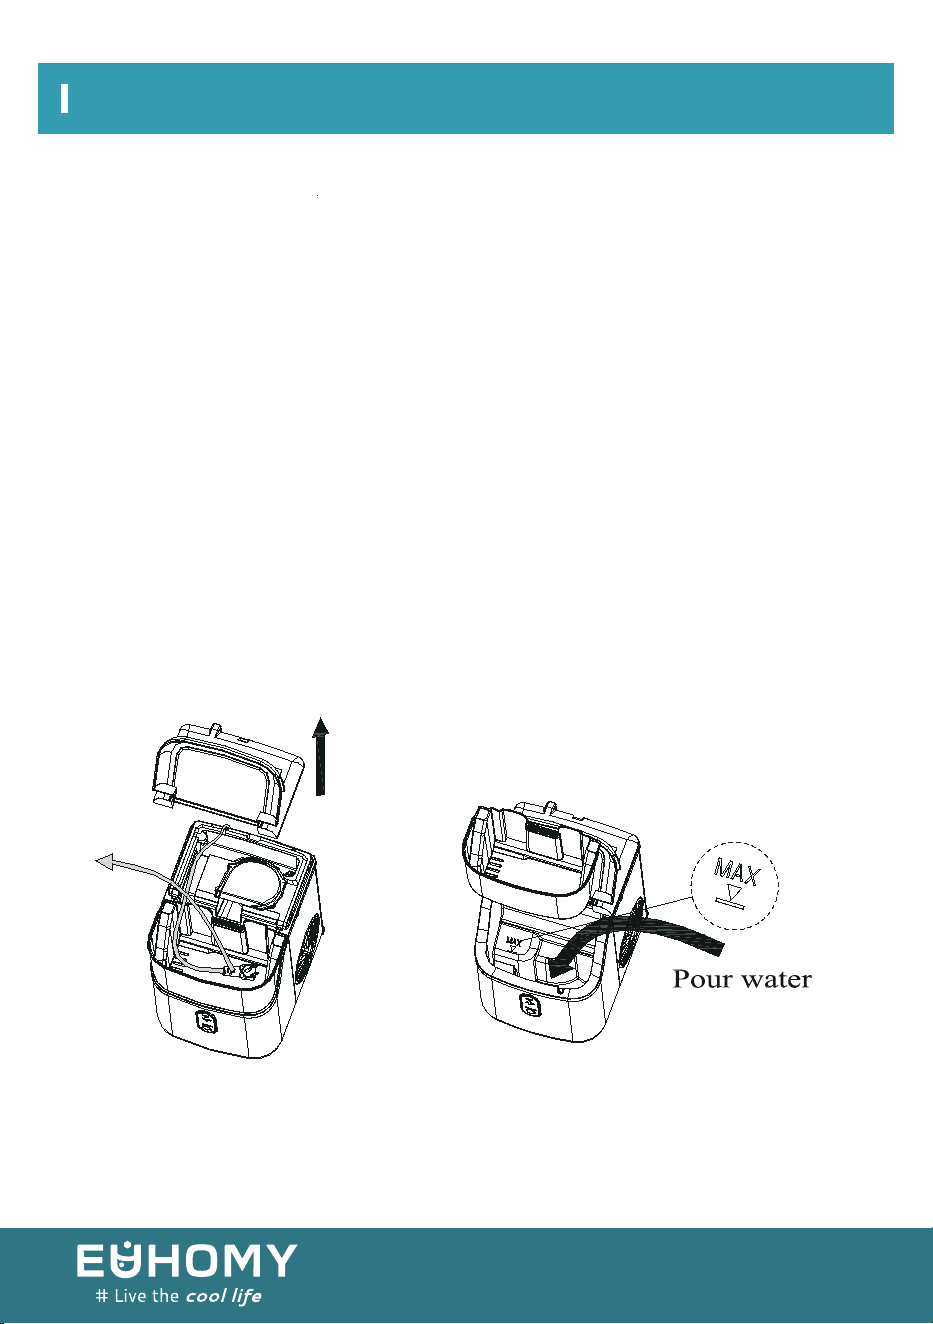
1.Remove the top back cover and the power cord. Then, back the top cover.
2.Take out the ice basket and pour potable water in to the water reservoir. Ensure that you don’t
exceed 0.3-gallon water.
3.Put the ice basket back in place.
4.Plug in the unit. The ring indicator will turn red. To start making ice, press the "ice /clean" button.
If you want to do automatic cleaning, press the "Ice/Clean" button.
USING YOUR ICE MAKER
08
CLEAN
We recommend running the initial cleaning,procedure before using the appliance for
the first time or if the device has not been cleaned in a long time. Here are the steps to
follow:
1.Before cleaning, make sure to insert the water drain cap into the appliance to ensure it works
properly
2.Press and hold the “ICE/CLEAN” button for 5 seconds. The cleaning procedure will be activated
when the Ring indicator light flashes white. After running for 15 minutes, the process will
automatically exit To interrupt the process, simply press the “ICE/CLEAN” button again ,and it will
exit immediately.
3.After the cleaning procedure, remove the top cover and ice basket Rinse the main water
reservoir and the secondary water reservoir. Then, move the appliance to the edge of the desktop
and ensure it is placed steadily.
4.Place a water container under the appliance and remove the drain cap from the bottom to
collect dirty water. When the process is done, reinsert the drain cap..
09
USING YOUR ICE MAKER
System Cleaning/Sanitizing Procedure
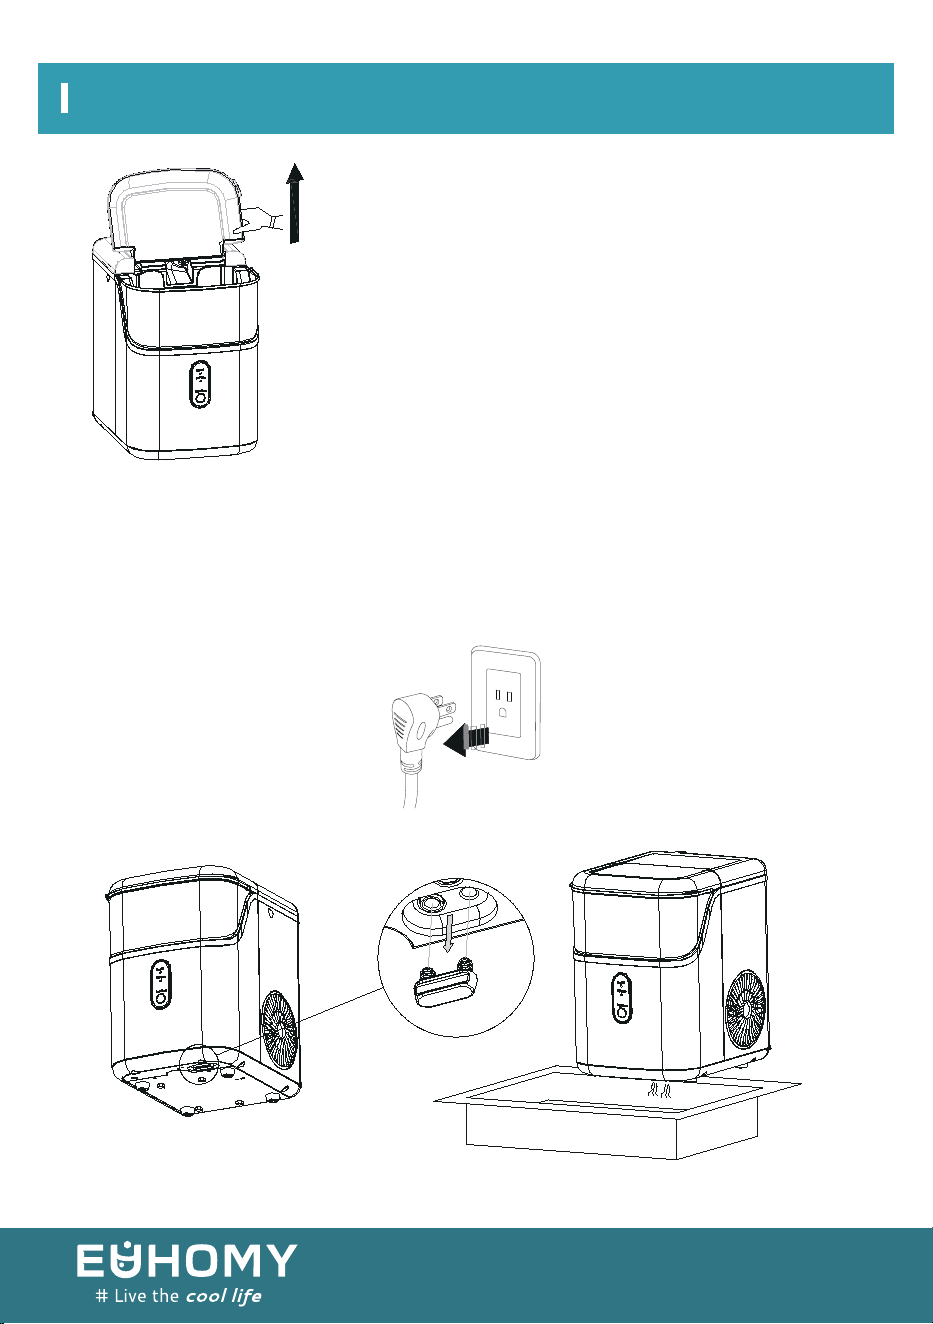
1. Unplug the ice maker.
2. Take off the bottom drain cap and drain out the water to a sink.
Tips: remove the top back cover by pulling up the front clear cover gently.
Change the water in the reservoir every 24 hours to ensure a reasonable hygiene level. If the unit is
not in use, drain and dry the water reservoir.
USING YOUR ICE MAKER
10
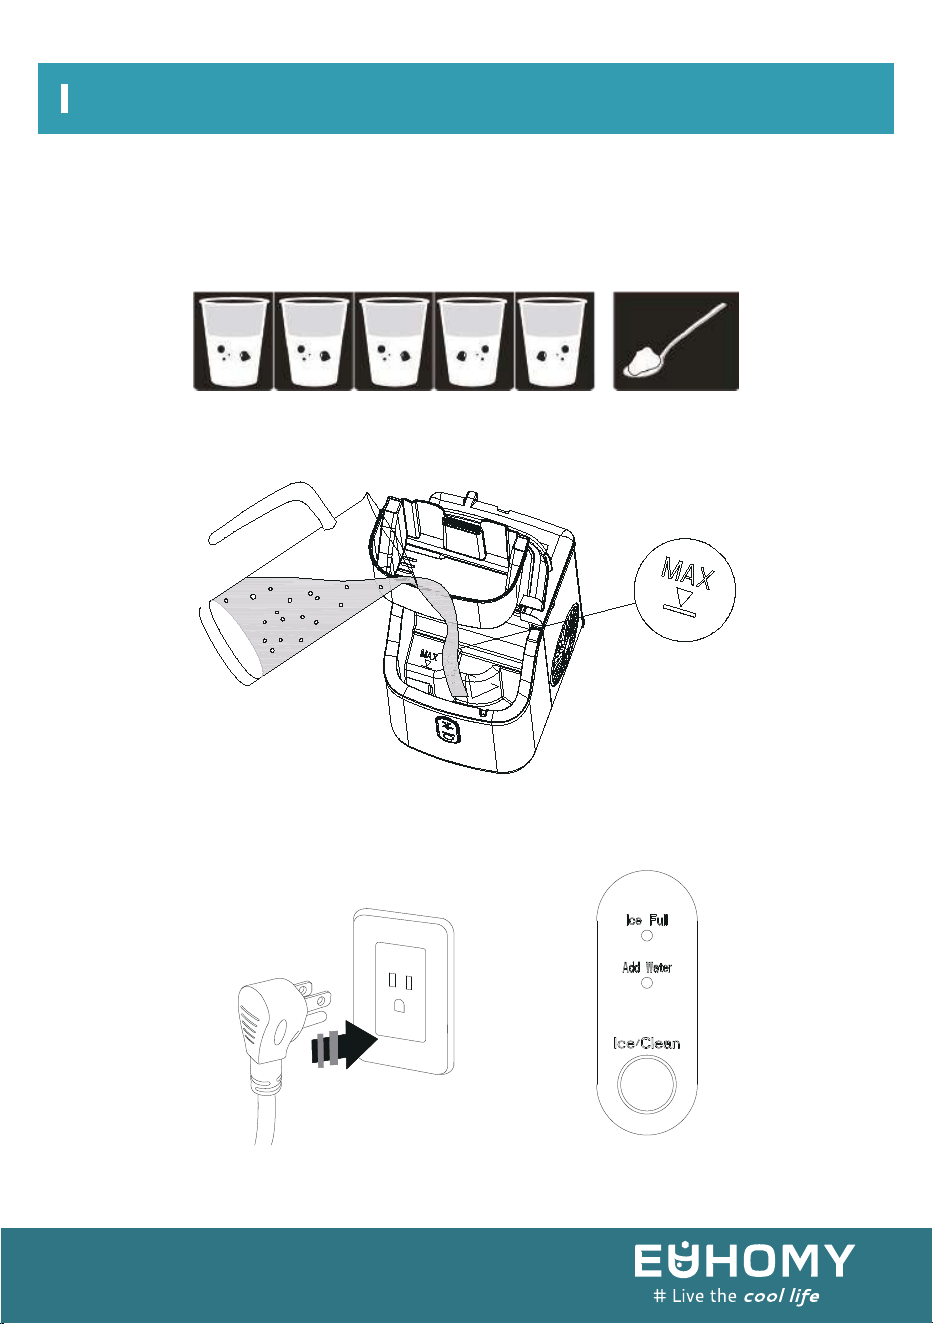
5. Pour the solution into the water reservoir up to the “MAX” water level.
6. Plug in the ice maker, press and hold the "Ice/Clean" button for 5 seconds to initiate the
cleaning process(15mins)
7.When the "Ice/Clean" indicator turns off, remove the drain cap and drain the water into a sink.
3. For daily cleaning, dilute one teaspoon of household bleach in five cups of water.
4.For monthly cleaning of removing mineral deposits, use the white vinegar instead of the water
solution mentioned above(and then plug in to turn on the “cleaning function” for about 5 minutes.
After that, unplug it again to leave the white vinegar in the unit for at least 12hours).
11
USING YOUR ICE MAKER
8. Repeat steps 4 to 6 with fresh water for two more cycles to rinse the inside.
9. Replace the drain cap on the bottom.
9. After completing the cleaning process, fill the reservoir with fresh water and press the
"Ice/Clean" button to start making ice cubes.
12
1. Before making ice, make sure to insert the water drain cap into the appliance to ensure it works
properly
2. Press and hold the “ICE/CLEAN” button for 5 seconds. The ice making procedure will be
activated when the Ring indicator light flashes white. To interrupt the process, simply press the
“ICE/CLEAN” button again ,and it will stop immediately.
3. We recommend running the initial cleaning procedure before using the appliance for the first
time or if the device has not been cleaned in a long time.
4. If the "Add water" light is on and the ice machine stops working, add water and restart it.
Otherwise, it will take a long time to start automatically. After restarting, the compressor will have
a 3-minute waiting time before making ice again.
5. When the ice bin is full, the machine stops and the "ice full" light turns on. It resumes automati-
cally once the ice is removed.
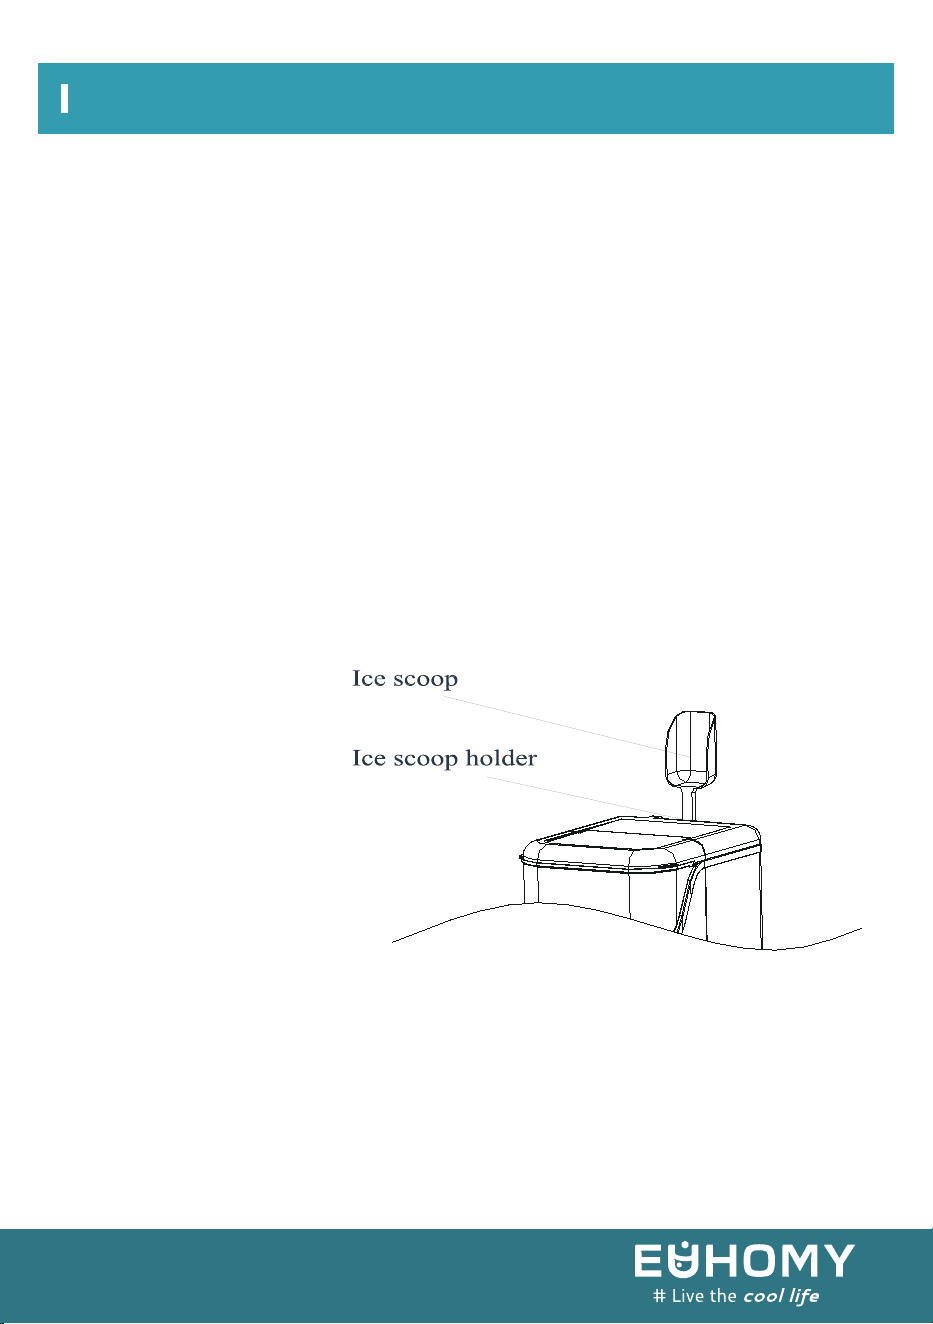
Put the scoop on the top back cover
How to obtain the ice cube
ice scoop position
USING YOUR ICE MAKER
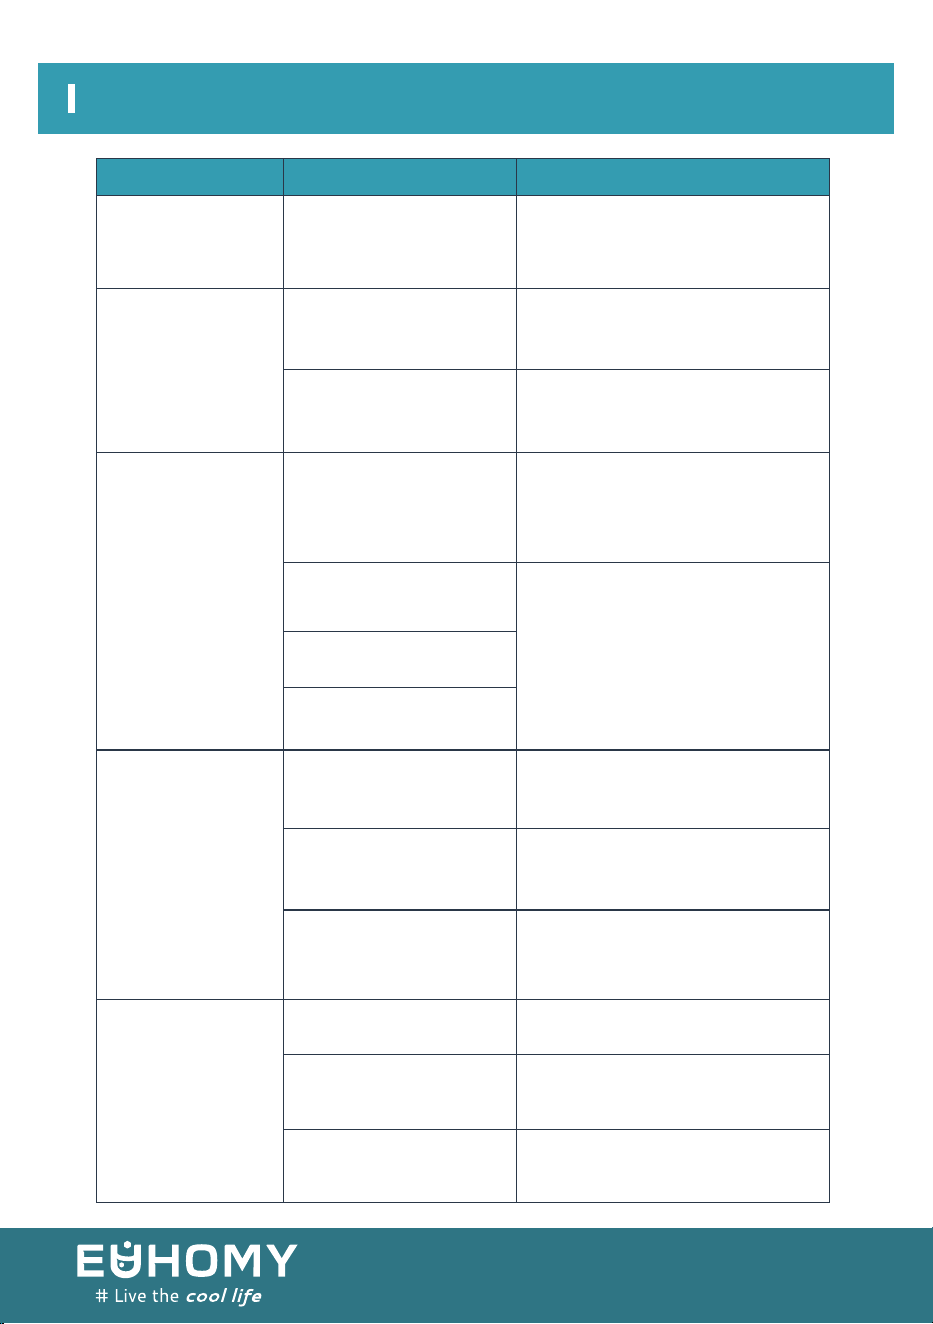
TROUBLESHOOTING
13
“ICE FULL”
indicator turns on
“Add Water ”
indicator turns on
Ring indicator light
flashes red
Lack of Water.
The amount of ice is
excessive
No ice cube inside.
Ambient temperature or
water temperature in
inner tank is too high.
Time to grab some ice cubes out.
Stop the ice maker, fill water, and
press “ICE/CLEAN” button again to
restart the unit.
Remove any obstacles inside or
clean the inside wall of the ice
storage bin.
Run the ice maker below 90
Fahrenheit and use colder water.
Cover motor is broken
Press the ICE button twice, restart
the ice-making program. If the
problem persists, get a qualified
technician or contact us.
Making Ice too
slowly
Water leakage
Pipe in the cooling system
is blocked.
Hot Air outlet has been
blocked by something.
Refrigerant liquid leakage.
Water temperature in
inner tank is too high.
Refrigeration system
malfunctions.
Drain plug not in place.
Pipe Joint in the
appliance may Loose
The seal has reached
service life
Put the drain plug in place.
Verify by a qualified technician or
contact with us.
Verify by a qualified technician or
contact with us.
Make sure the ventilation distance
for the hot air outlet.
The water needs to be within the
temperature range of 7℃ to 32℃.
Verify by a qualified technician or
contact us.
Problem
Possible Cause
Solution

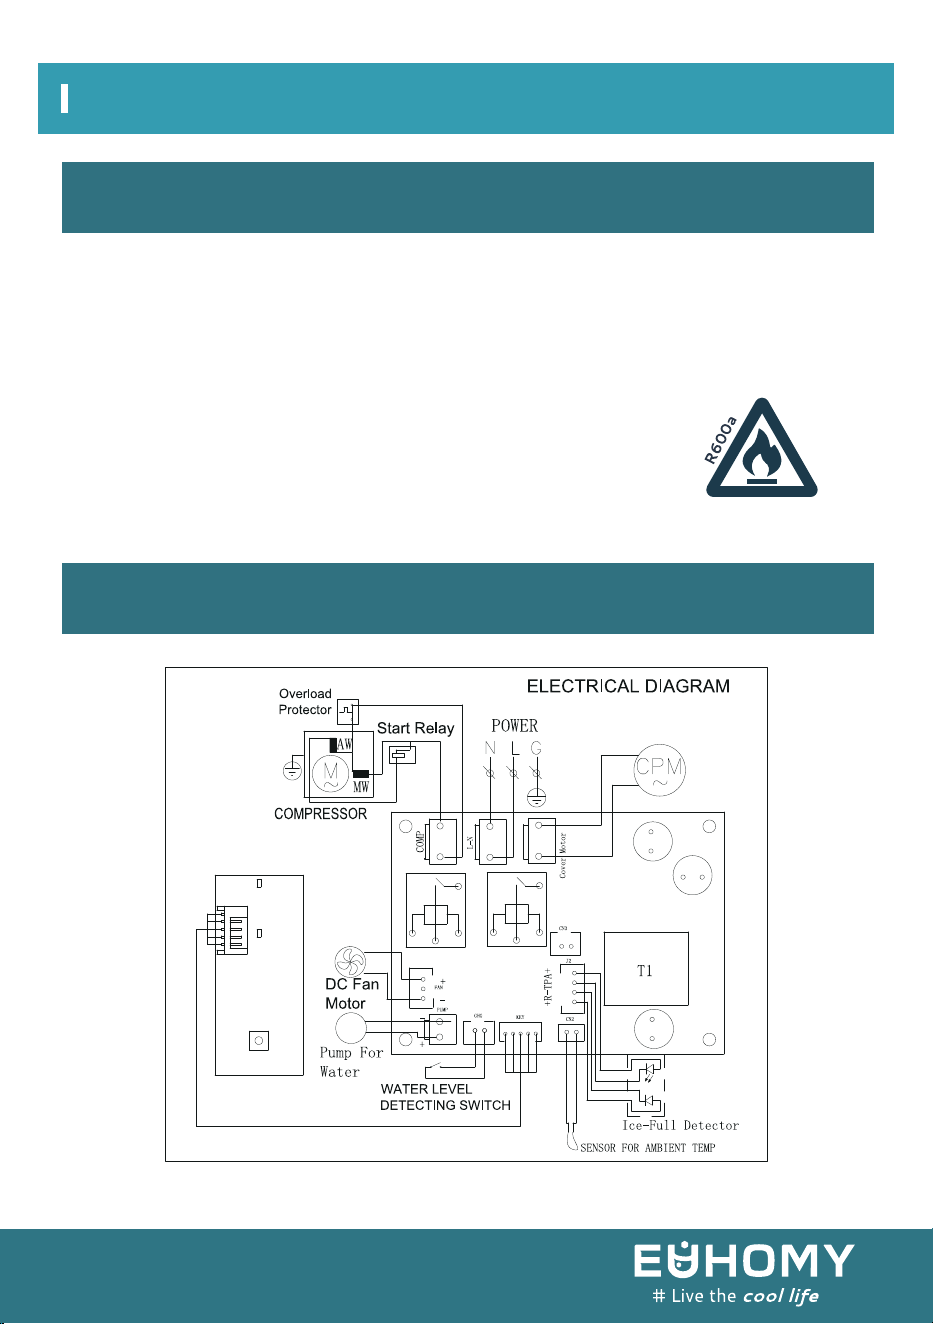
TECHNICAL PARAMETERS & CIRCUIT DIAGRAM
15
SKU IM-15S-AZ-HM
Model IM-15S
Protection Type I
Power 115V/60Hz
Ice Making Current 2.7A
Refrigerant R600a.0.57Oz / 16g
Vesicant C
5H10
Dimension 287x220x322mm
CIRCUIT DIAGRAM
TECHNICAL PARAMETERS


Email:support@euhomy.com
Facebook:@Euhomy.Official