
Technical Support and E-Warranty Certificate
www.vevor.com/support
ELECTRIC HIGH PRESSURE
FUEL PUMPS INSTRUCTIONS
MODEL: ZRM0943012A, ZR1003004A, ZR1053019A
We continue to be committed to provide you tools with competitive price.
"Save Half", "Half Price" or any other similar expressions used by us only
represents an estimate of savings you might benefit from buying certain tools
with us compared to the major top brands and does not necessarily mean to cover
all categories of tools offered by us. You are kindly reminded to verify carefully
when you are placing an order with us if you are actually Saving
Half in comparison with the top major brands.
-
1
-
Have product questions? Need technical support? Please feel free to
contact us:
Technical Support and E-Warranty Certificate
www.vevor.com/support
NEED HELP? CONTACT US!
This is the original instruction, please read all manual instructions
carefully before operating. VEVOR reserves a clear interpretation of our
user manual. The appearance of the product shall be subject to the
product you received. Please forgive us that we won't inform you again if
there are any technology or software updates on our product.
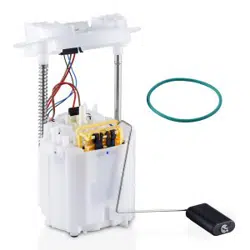
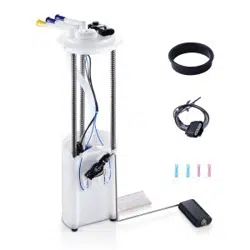
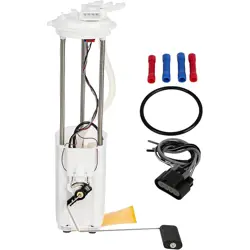
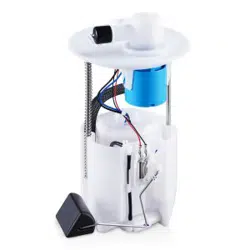
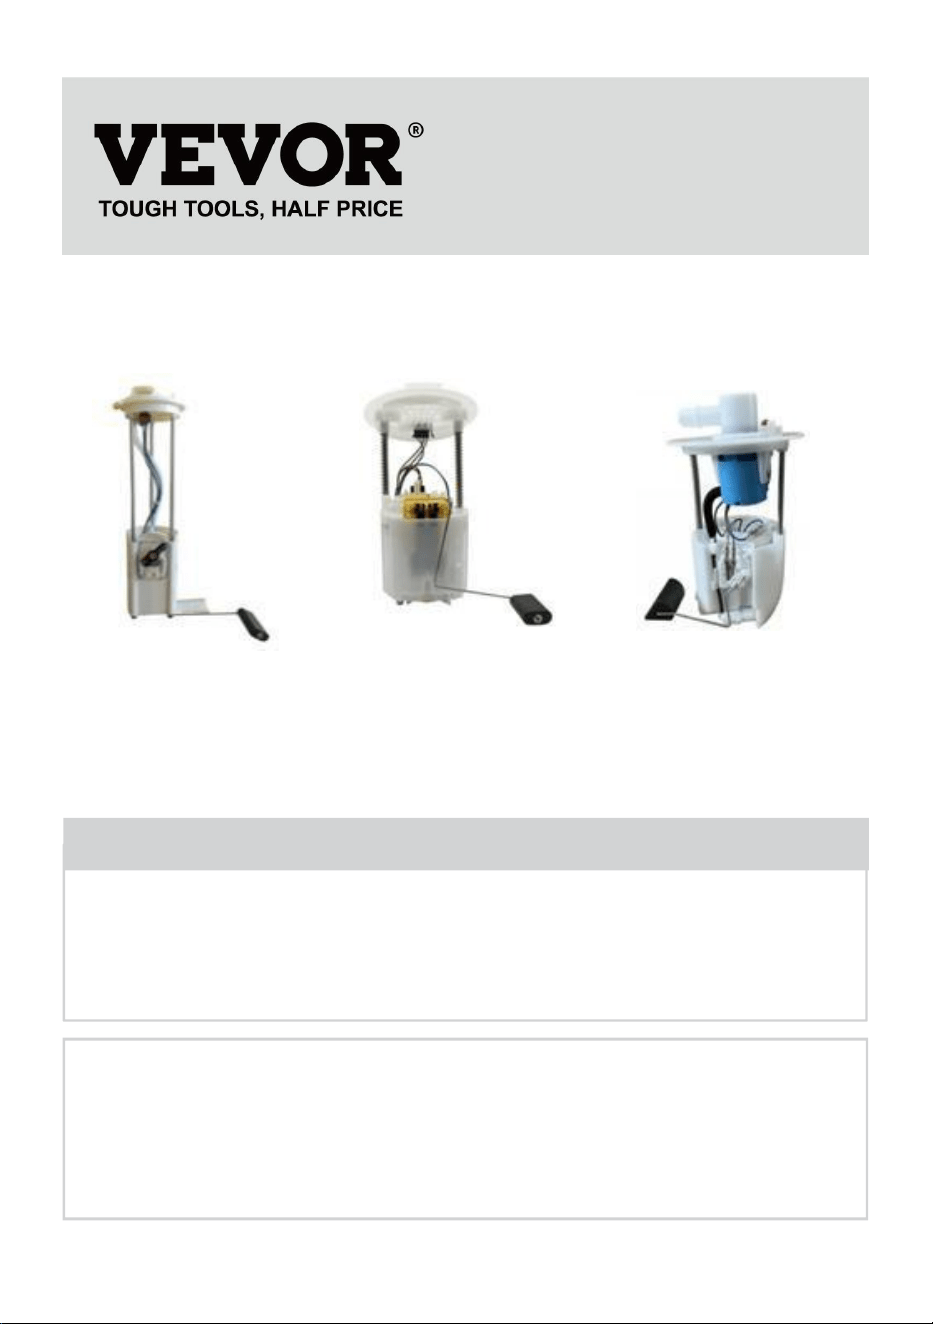
ELECTRIC HIGH
PRESSURE FUEL PUMPS
ZRM0943012A ZR1003004A ZR1053019A
(The picture is for reference only, please refer to the actual object)
-
2
-
Symbol
Symbol Description
Warning-To reduce the risk of injury, user must read
instructions manual carefully.
This product is of protection class III.
This product is subject to the provision of European
Directive 2012/19/EC. The symbol showing a wheelie bin
crossed through indicates that the product requires
separate refuse collection in the European Union. This
applies to the product and all accessories marked with this
symbol. Products marked as such may not be discarded
with normal domestic waste, but must be taken to a
collection point for recycling electrical and electronic
devices
SAFETY INFORMATION
1. Repair procedures, tools, and parts to service motor vehicles, and
the experience of the person performing the work make it impossible to
describe all ways or conditions under which motor vehicles are or may
be serviced, or to provide cautionary statements regarding hazards that
may result.
2. Standard and accepted safety precautions and equipment should be
used.when handling toxic or flammable materials. Safety goggles, other
protection,and appropriate clothing (long-sleeve shirt, trousers and safety
shoes) are required.
3. Make sure your work area is well ventilated and not exposed to
heat,electricity, or open flames. No smoking! Clean up spills immediately
and have a Class B or C fire extinguisher readily accessible. Consult
appropriate repair manuals for any required special tools.
4. Not for use in marine or aircraft applications.
-
3
-
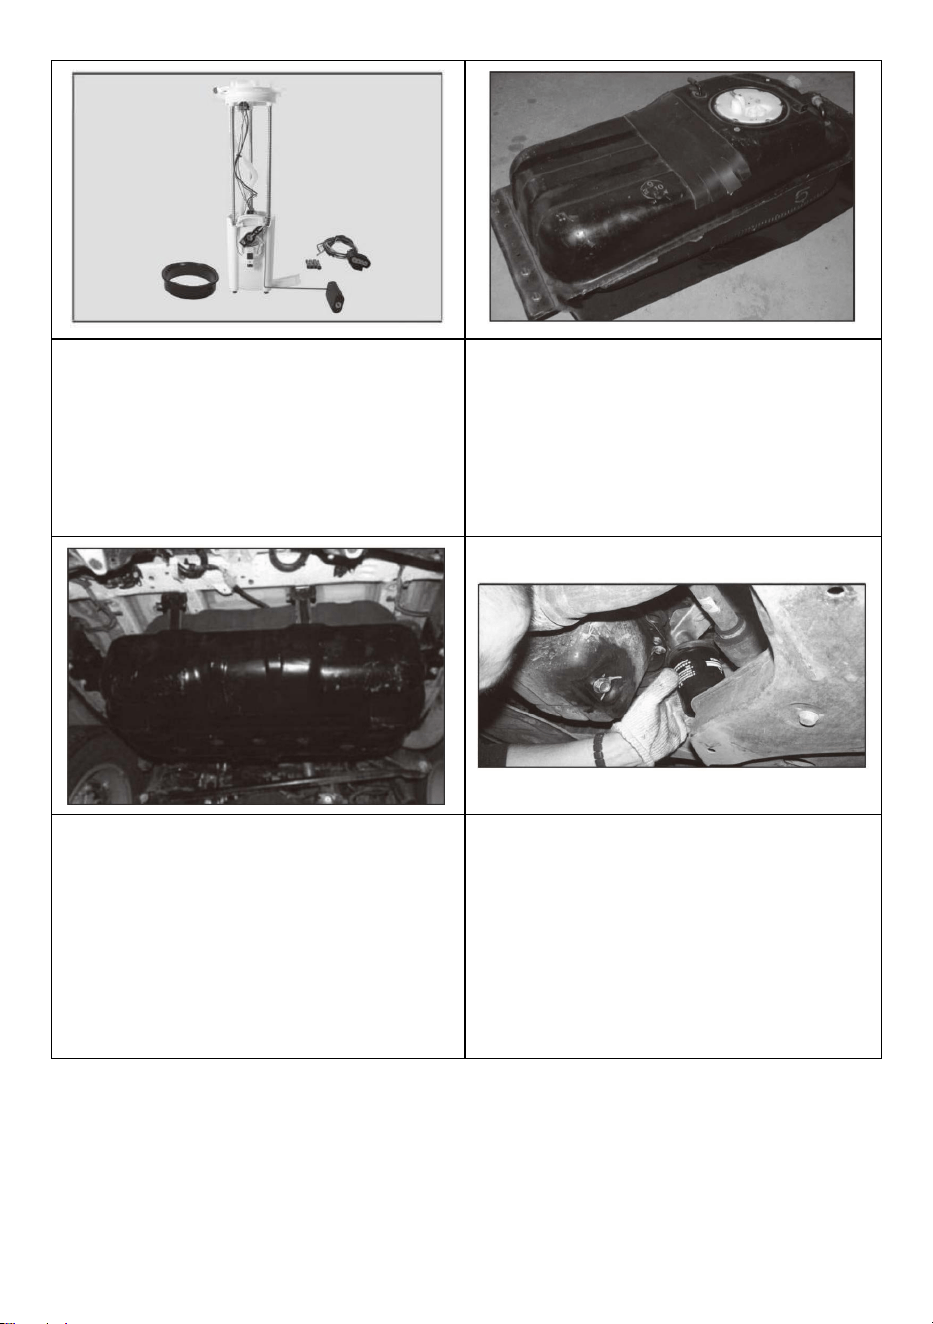
INSTRUCTIONS
STEP 1
STEP 2
MAKE SURE IT'S YOUR FUEL PUMP!
•
Check related fuel system
RELIEVE SYSUEM FUEL PRESSURE
•
Consult repair manual for proper
components such as fuel filter, relays,
procedures
vehicle wiring and connectors,chassis
grounds, fuel pressure regulator and
fuel itself- contaminated fuel is a
leading cause of fuel pump failure
STEP 3
STEP 4
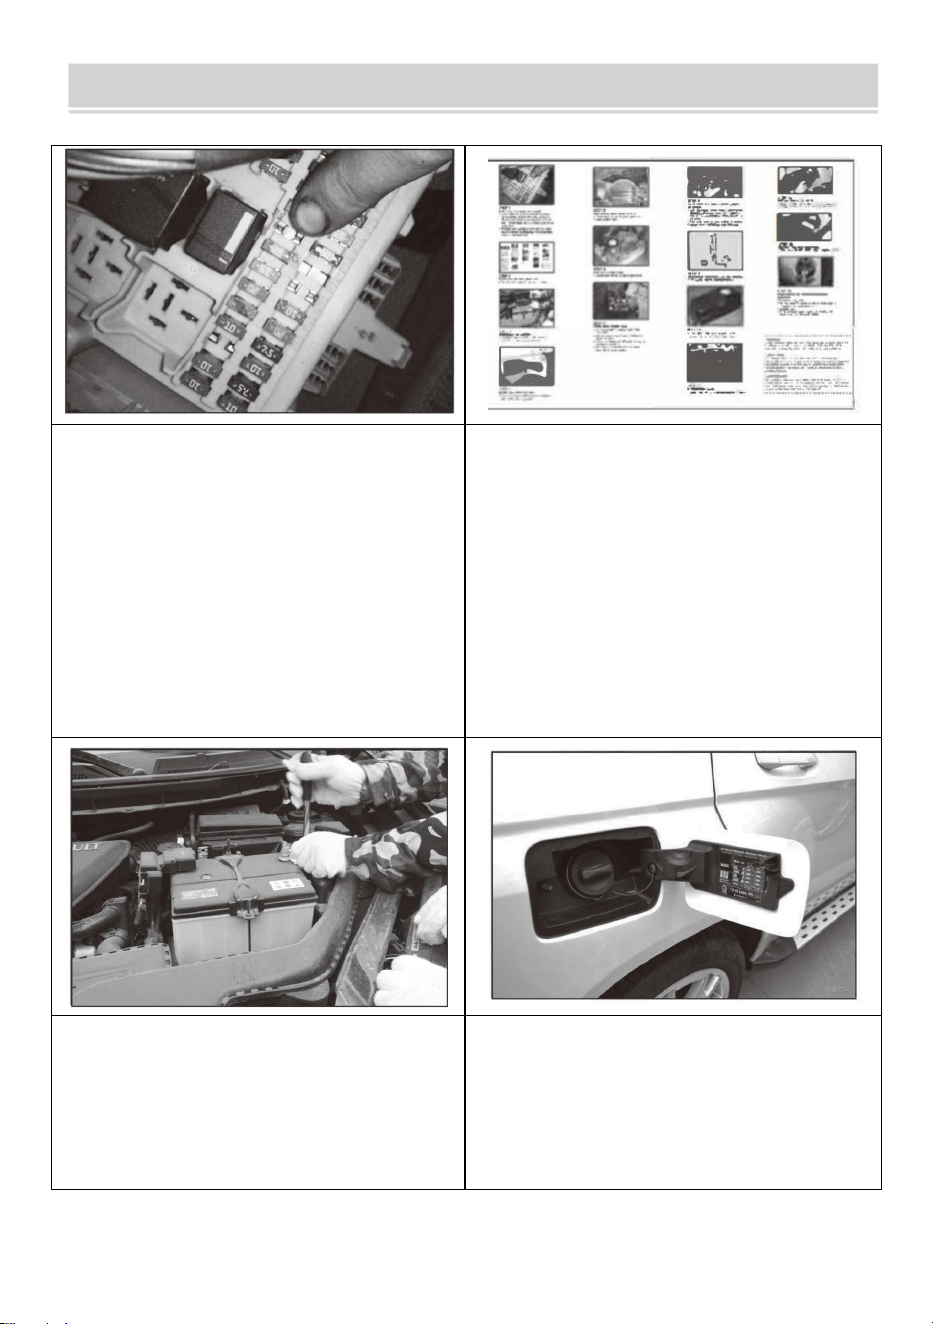
DISCONNECT THE BATTERY
EMPTY FUEL FROM GAS TANK
•
Disconnect negative battery cable to
•
Drain fuel into approved containers
reduce possibility of sparks or engine
and dispose of per local codes or
starting
regulations
-
4
-
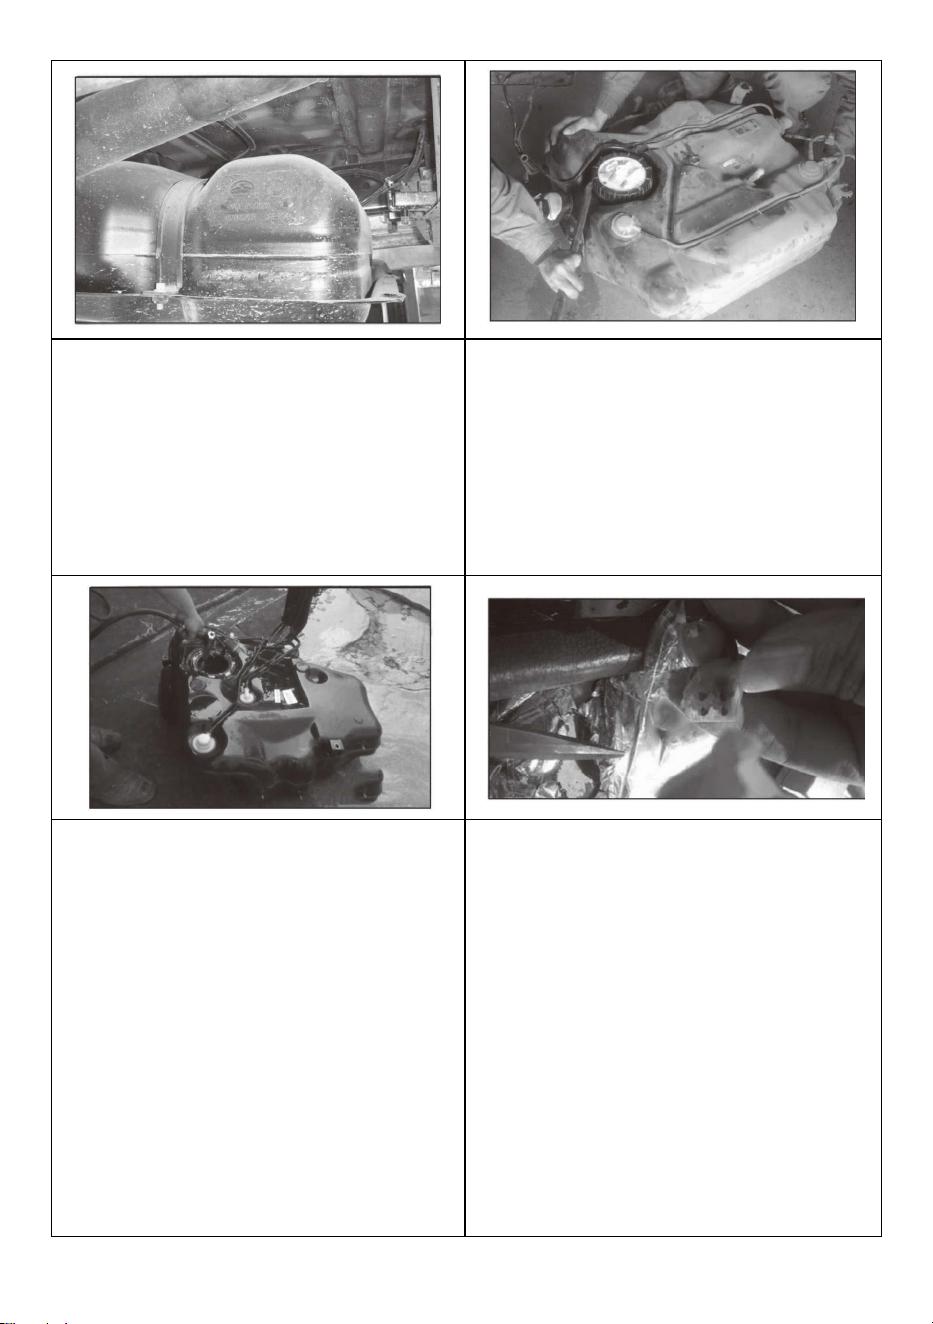
STEP 5
REMOVE FUEL TANK FROM
VEHICLE
•
Consult repair manual for proper
procedures
•
Clean outside of tank
STEP 6
REMOVI OW FUEL PUMP
•
Consult repair manual for proper
procedures
STEP 7
CLEAN INSIDE OF FUEL TANK
•
Fuel contamination is leading cause of
fuel pump failure
•
New fuel pump strainer is not a
substitute for cleaning the tank
•
Contact local Radiator/Fuel Tank
Repair shop for tank cleaning
assistance
STEP 8
INSPECT/REPLACE VEHICLE
WIRING/HOSES AS NEEDED
•
Damaged or faulty vehicle wiring is a
leading cause of misdiagnosis and
premature fuel pump failure
•
Wire harness must be replaced if
included with new fuel pump
•
Other replacement harnesses
available for purchase
•
Replace wom or deteriorated hoses
and fittings
-
5
-
STEP 9
INSTALL NEW FUEL PUMP AND
NEW STRAINER
•
New strainer required
STEP 10
INSTALL NEW TANK SEAL (IF
APPLICABLE)
•
Consult repair manual for proper
procedures
STEP 11
RE-INSTALL FUEL TANK
•
Consult repair manual for proper
installation procedures
STEP 12
REPLACE VEHICLE FUEL FILTER
•
Clogged fuel filter will significantly
shorten fuel pump life
•
Clogged fuel filter may cause low fuel
pump pressure
-
6
-
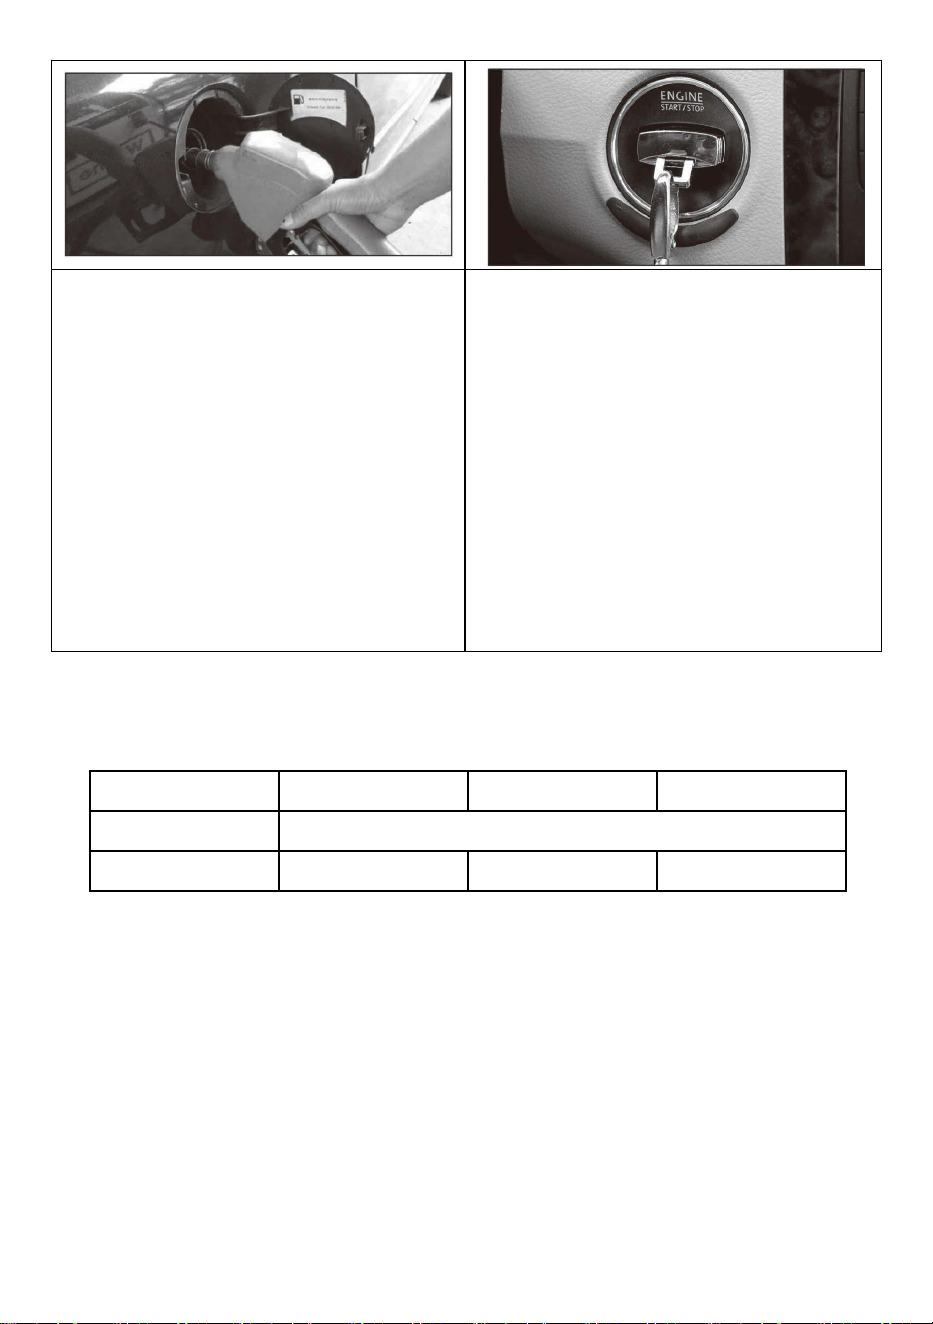
STEP 13
STEP 14
FILL GAS TANK WTTH CLEAN FUEL
START ENGINE AND CHECK FOR
•
Clean fuel is critical to ensure proper
LEAKS ORPROBLEMS
fuel pump operation
Reconnect battery cable
•
Key may need to be cycled on and off
several times to build proper fuel
system pressure
•
Check for leaks
•
All fuel pumps are tested at point of
manufacture to ensure proper operation
when installed
Model ZRM0943012A ZR1003004A ZR1053019A
Input DC 12V
Current(Max) 7A 8.5A 7A
WARNING:
If fuel pump has supply and return lines, make sure the plastic bracket on
the hoses is securely fastened to the vehicle. Static electricity will be
grounded by using this bracket, eliminating arcing and possible fire.
-
7
-
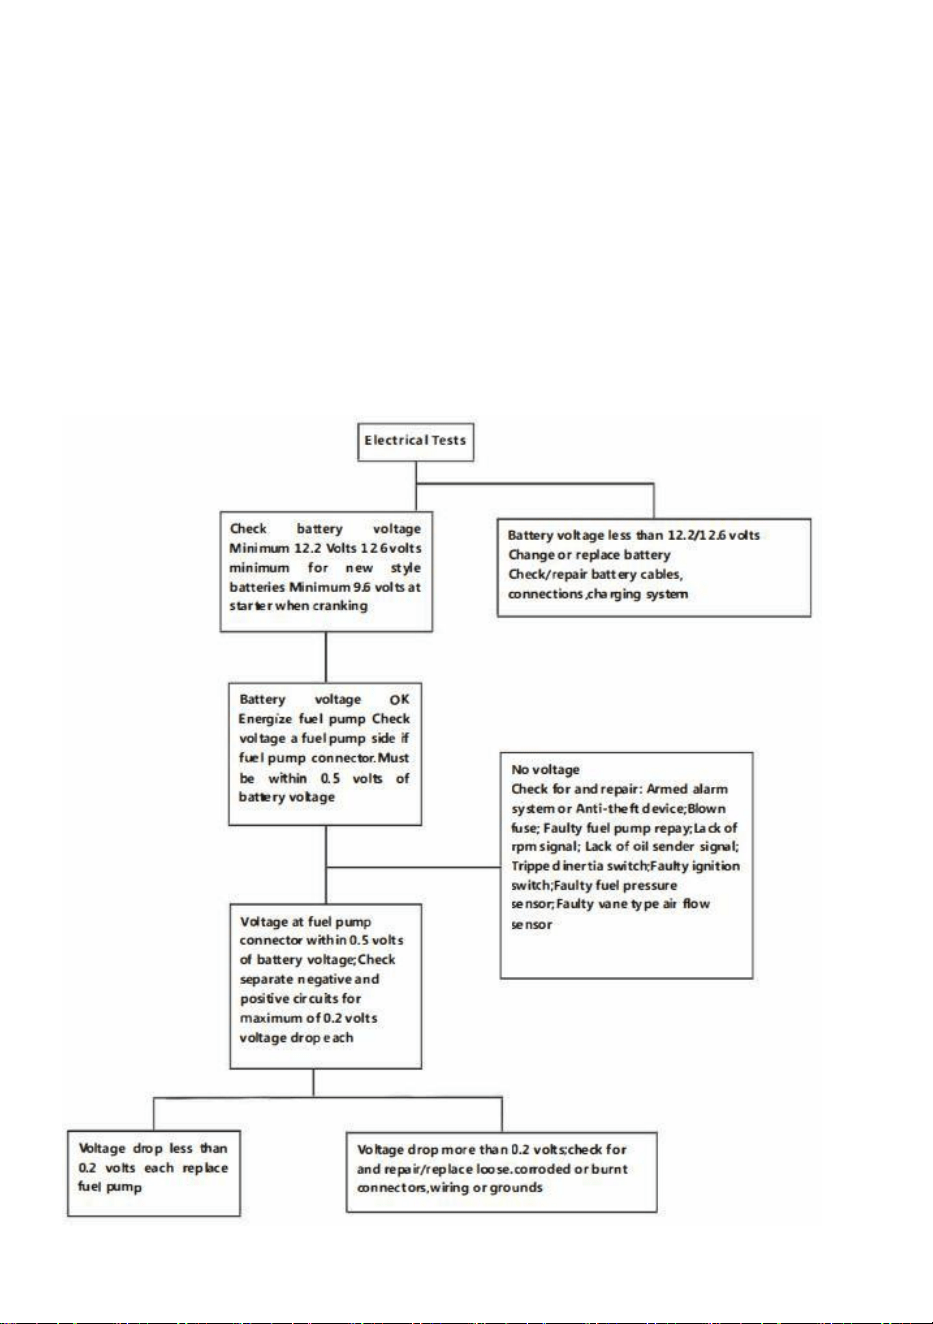
ELECTRICAL TESTS
Repair procedures,tools and parts to service motor vehicles, and the experience of the person
performing the work make it impossible to describe all ways or conditions under which motor vehicles
are or may be serviced,or to provide cautionary statements regarding hazards that may result.
Standard and accepted safety precautions and equipment should be used when handing toxic or
flammable materials. Safety goggles, other protection,and appropriate clothing (long-sleeve shirt,
trousers and safety shoes) are required. Make sure your work area is well-ventilated and not exposed
to heat, electricity, or open flames. No smoking! Clean up spills immediately and have a dass B or C
fire extinguisher readily accessible. Consult appropriate repair manuals for required special tools.
-
8
-
FUEL DELIVERY SYSTEMS DIAGNOSTICS
An engine may not start or run properly for any reasons.Be sure to CHECK:
Adequate fuel in vehicle tank
Fuel filter has been replaced
Fuel system has no leaks
Fuel is fresh and of good quality
Fuel delivery electrical system checks OK
Engine mechanical systems check OK
Electrical systems check OK
Ignition system checks OK
Charging system checks OK
Battery voltage is at least 12.2 volts(12.6 volts for new type batteries)
Cranking voltage is at least 9.6 Volt
Inertia switch is reset(typical of FORD applications
Oil pressure and RPM signal are present
See vehicle specific service information for fuel delivery system specs, detailed safety. diagnostic,
and repair information.
-
9
-
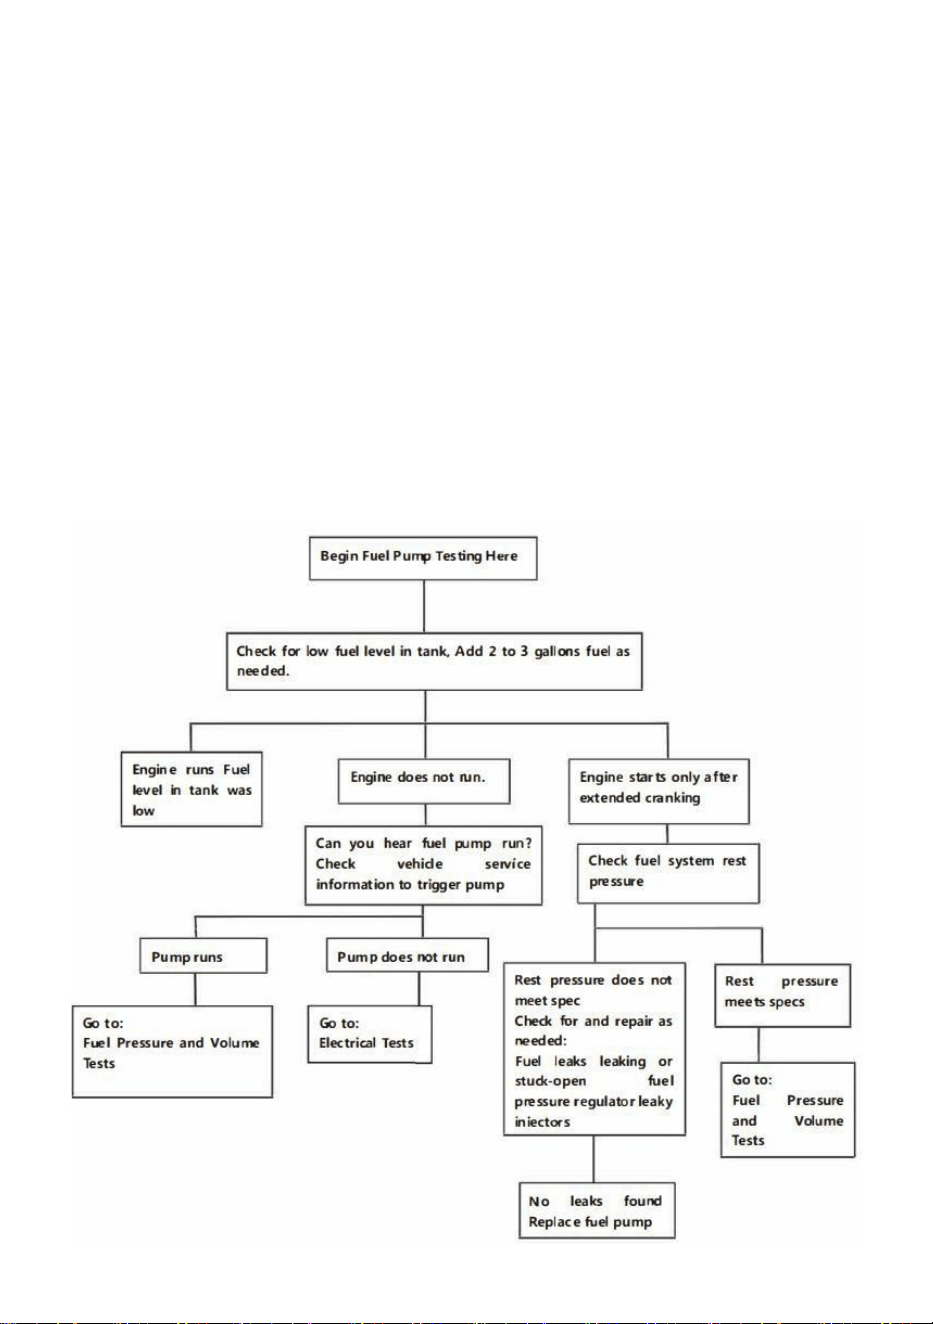
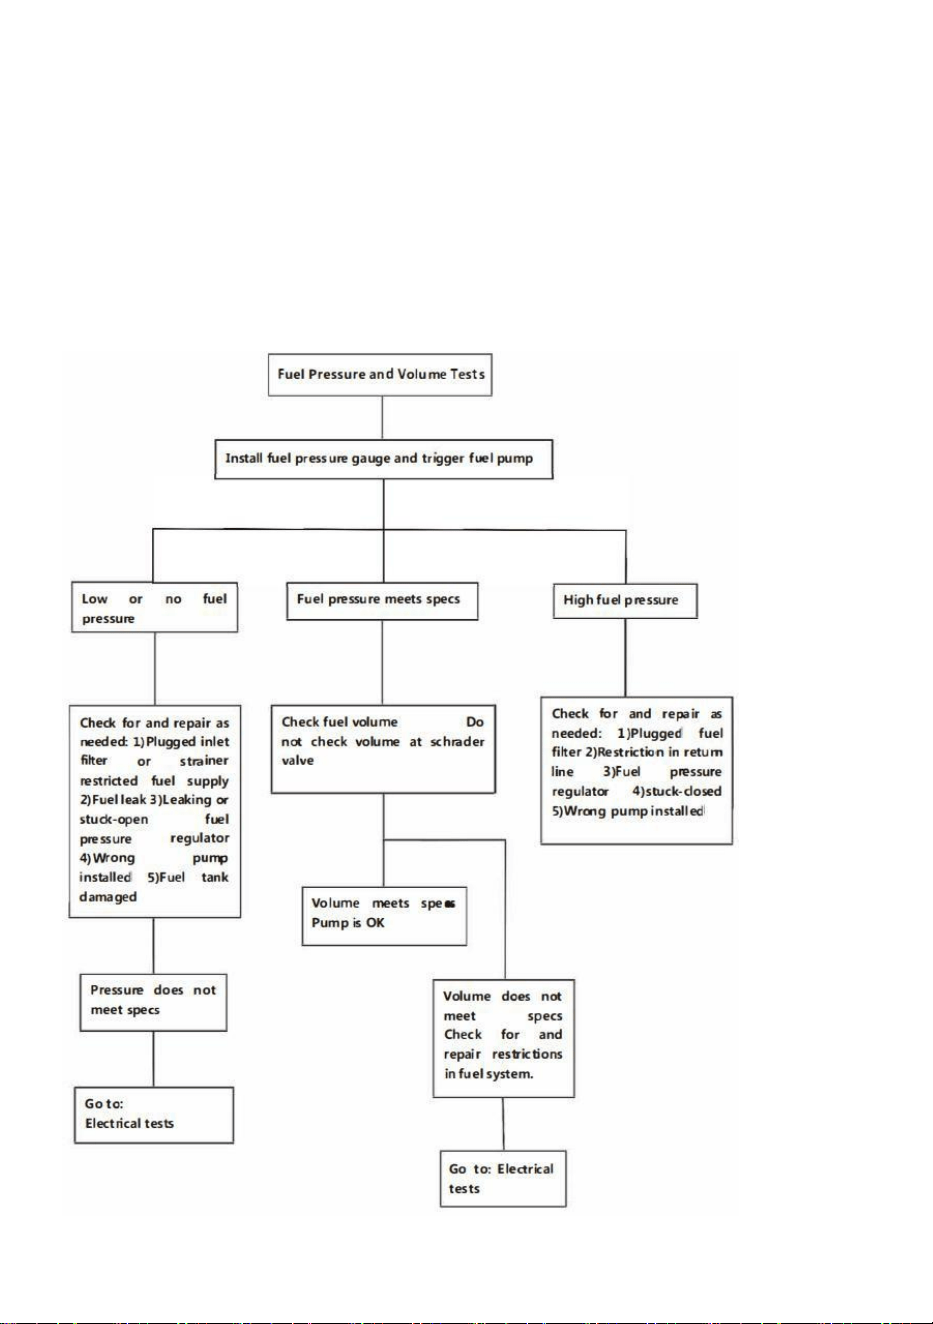
FUEL PRESSURE AND VOLUME TESTS
The most common reasons for repeat fuel pump failures are:
Mis-diagnosis
Not measuring fuel volume
Not replacing fuel filter and strainer with new
Fuel contamination
Not properly cleaning and flushing inside of fuel tank
Not correcting on-vehicle electrical connector, wiring and ground issues
Not resetting a tripped inertia switch
Not checking for oil pressure and RPM signals

- 10 -
Manufacturer: Shanghaimuxinmuyeyouxiangongsi
Address: Shuangchenglu 803nong11hao1602A-1609shi, baoshanqu,
shanghai 200000 CN.
Imported to AUS: SIHAO PTY LTD, 1 ROKEVA STREETEASTWOOD NSW
2122 Australia
Imported to USA: Sanven Technology Ltd., Suite 250, 9166 Anaheim Place,
Rancho Cucamonga, CA 91730
E-CrossStu GmbH
Mainzer Landstr.69, 60329 Frankfurt am Main.
YH CONSULTING LIMITED.
C/O YH Consulting Limited Office 147, Centurion House,
London Road, Staines-upon-Thames, Surrey, TW18 4AX
EC REP
UK REP