A5P | 01
3005050.1
Please read all instructions carefully before use and
retain for future reference.
Veuillez lire attentivement ces instructions avant
utilisation et conservez-les pour pouvoir les consulter
à l’avenir.
Bitte lesen Sie die Anleitung sorgfältig und bewahren Sie
sie als Referenz auf.
Leed todas las instrucciones detenidamente antes de
usar y retened para futuras consultas.
Si prega di leggere attentamente tutte le istruzioni prima
dell’uso e conservarle per una futura consultazione.
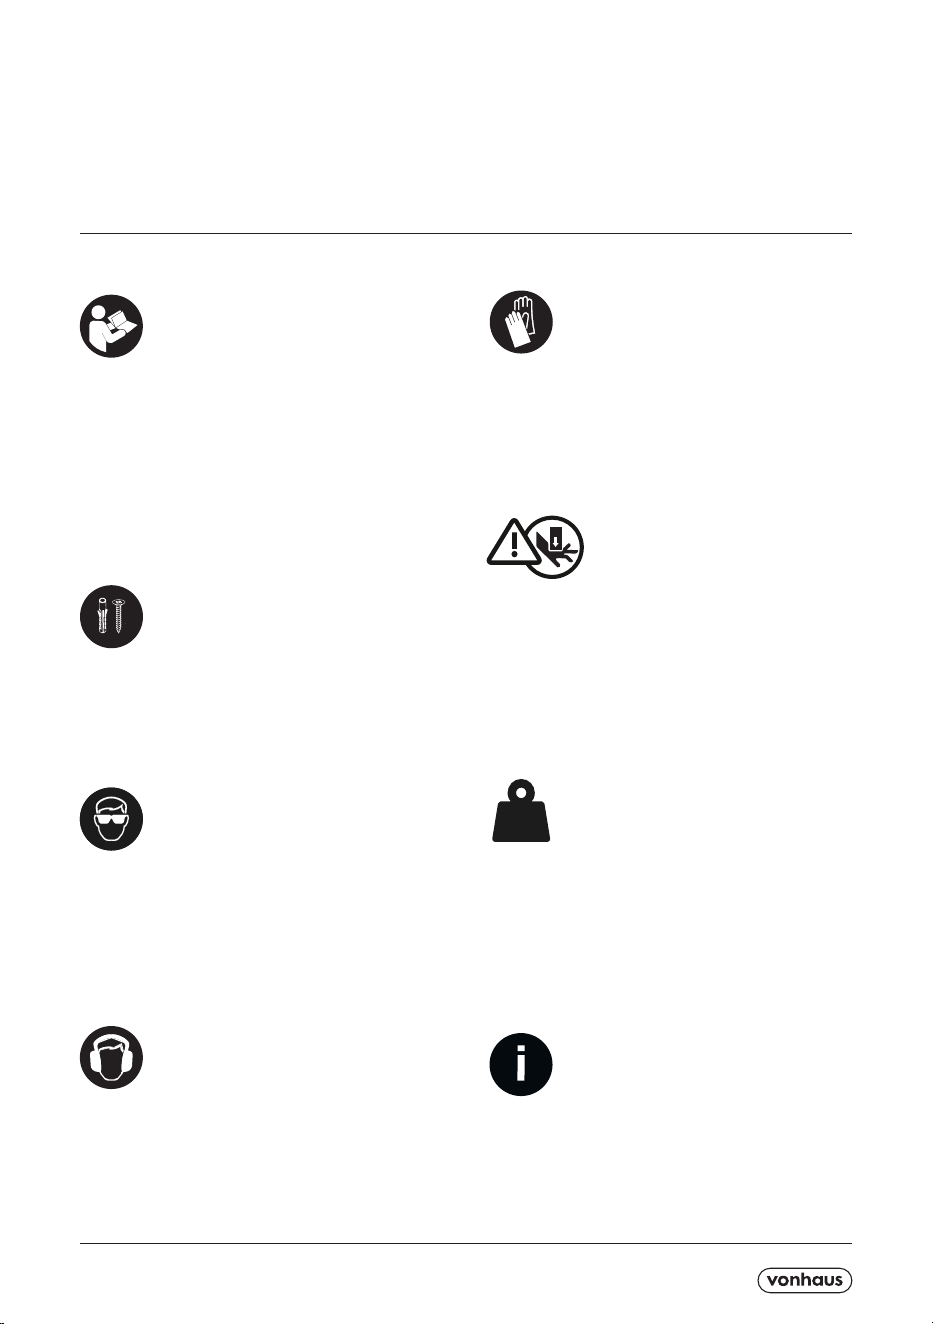
Wall xings not included.
Fixations murales non incluses.
Wandhalterungen nicht enthalten.
Fijaciones de pared no incluidas.
Fissaggi a parete non inclusi.
Protect your eyes.
Protégez vos yeux.
Schützen Sie Ihre Augen.
Protejed sus ojos.
Proteggere gli occhi.
Protect your ears.
Protégez vos oreilles.
Schützen Sie Ihre Ohren.
Protejed vuestros oídos.
Proteggere le orecchie.
Protect your hands.
Protégez vos mains.
Schützen Sie Ihre Hände.
Protejed vuestras manos.
Proteggere le mani.
CAUTION Potential nger trap/pinchment points
ATTENTION Vous pourriez vous pincer/coincer les
doigts
VORSICHT Finger einklemmen/quetschen möglich
PRECAUCIÓN Posibles puntos de captura de dedos
AVVERTENZA Potenziale pericolo di intrappolamento
delle dita
Re-tighten xings every 6 months
Resserrez les xations tous les six mois
Befestigungen alle 6 Monate nachziehen
Apretad de nuevo las jaciones cada 6 meses
Riavvitare le viti ogni 6 mesi
25kg/55lb
Maximum.
Maximum.
Maximal.
Máximo.
Massimo.

A5P | 01
EN
Basic safety precautions should always be followed.
INTENDED USE This product is not intended for outdoor
use.This product is not intended as a climbing structure
and it is not a toy. Children should be supervised to
ensure that they do not play with the product.
BEFORE FIRST USE Locate the product in a suitable
area where it will not create an obstruction. Locate away
from sources of combustion.
GENERAL SAFETY The assembly pack may contain
small parts which can pose a choking hazard to children
and pets. Do not overload the product as this may result
in damage to the product or personal injury.
For strength, it is recommended that the Projector
Screen be mounted to wooden stud or masonry walls.
Use of additional tools/hardware may be required.
NOTE: It is recommended that you air out your Projector
Screen in a well-ventilated area for 24-48 hours before
mounting.
Mount this product away from sources of heat or
ignition. The product should not obstruct entrances or
exits to a room, especially if these are re exits.
Use of a spirit level (not supplied) is recommended to
ensure the product is installed straight and even against
the mounting surface.
Do not fasten or attach anything to the Screen.
Do not stretch the Screen. The Roller should always
maintain a minimum of 1½ wraps of fabric to prevent
damage.
Do not pull, hang from or swing on the Screen or Screen
Housing. Gently pull the Screen in an even motion to
successfully lower for viewing.
CAUTION! Do not immediately release the Screen when
setting it up for viewing. Hold the Screen at the desired
length and allow the locking mechanism to engage
before releasing slowly.
Ensure all xings are tight and secure. Secure all
xings periodically to maintain maximum strength for
supporting the unit.
Failure to follow correct guidance, installation and
operating procedures will invalidate the warranty and
may result in damage or injury.
CLEANING & MAINTENANCE Do not clean the product
with any abrasive cloths or chemicals. Solvents or
detergents can cause damage to the surface.
Periodically check and re-tighten ttings where
applicable. Re-tighten all ttings after rst week following
assembly. To clean, sponge down with warm water, a soft
cloth and mild detergent. Ensure you have all the pieces
listed. If you are missing any components, contact our
customer services department at
FR
Les précautions de sécurité de base doivent toujours
être suivies.
UTILISATION PRÉVUE Ce produit n’est pas conçu pour
une utilisation en extérieur.Ce produit ne doit pas être
utilisé comme une échelle et ce n’est pas un jouet. Les
enfants devraient toujours être supervisés pour s’assurer
qu’ils ne jouent pas avec le produit.
AVANT LA PREMIÈRE UTILISATION Placez le
produit dans un endroit approprié où il ne créera pas
d’obstruction. Éloigner des sources de combustion.
SÉCURITÉ GÉNÉRALE Le kit de montage peut
contenir de petites pièces pouvant présenter un
risque d’étouement pour les enfants et les animaux
domestiques. Ne surchargez pas le produit car cela
pourrait l’endommager ou causer des blessures.
Pour plus de solidité, il est recommandé de monter
l’écran du projecteur sur des poteaux en bois ou des
murs en maçonnerie. L’utilisation d’outils / matériels
supplémentaires peut être nécessaire.
REMARQUE: Il est recommandé d’aérer votre écran de
projecteur dans un endroit bien ventilé pendant 24 à 48
heures avant le montage.
Montez ce produit loin des sources de chaleur ou
d’inammation. Le produit ne doit pas obstruer les
entrées ou les sorties d’une pièce, surtout s’il s’agit de
sorties de secours.
L’utilisation d’un niveau à bulle (non fourni) est
recommandée pour garantir que le produit est installé
droit et même contre la surface de montage.
Ne xez ni ne xez rien à l’écran.
N’étirez pas l’écran. Le rouleau doit toujours maintenir
un minimum de 1½ enveloppes de tissu pour éviter tout
dommage.
Ne tirez pas, ne vous suspendez pas ou ne vous
balancez pas sur l’écran ou le boîtier de l’écran. Tirez
doucement l’écran dans un mouvement régulier pour
l’abaisser avec succès pour la visualisation.
MISE EN GARDE! Ne relâchez pas immédiatement
l’écran lors de sa conguration pour la visualisation.
Tenez l’écran à la longueur souhaitée et laissez le
mécanisme de verrouillage s’enclencher avant de le
relâcher lentement.
Assurez-vous que toutes les xations sont serrées et
sécurisées. Fixez toutes les xations périodiquement
pour maintenir une résistance maximale pour soutenir
l’unité.
Le non-respect des instructions, des procédures
d’installation et de fonctionnement correctes annulera
la garantie et peut entraîner des dommages ou des
blessures.
NETTOYAGE ET ENTRETIEN Ne nettoyez pas le
produit avec des chions abrasifs ou des produits
chimiques. Solvants ou
les détergents peuvent endommager la surface. Vériez
et resserrez périodiquement les raccords, le cas
échéant.
Resserrer tous les raccords après la première semaine
suivant le montage. Pour nettoyer, éponger avec de
l’eau tiède, un chion doux et un détergent doux.
Assurez-vous d’avoir tous les morceaux énumérés. S’il
vous manque des composants, contactez notre service
clientèle à l’adresse

A5P | 01
DE
Grundlegende Sicherheitsvorkehrungen sollten immer
beachtet werden.
NUTZUNGSZWECK Dieses Produkt ist nicht für den
Gebrauch im Freien vorgesehen.Dieses Produkt ist nicht
als Klettergerüst gedacht und es ist kein Spielzeug.
Kinder sollten beaufsichtigt werden. Stellen Sie sicher,
dass Kinder nicht mit dem Produkt spielen.
VOR DEM ERSTEN GEBRAUCH Stellen Sie das
Produkt an einem geeigneten Ort auf, an dem es
keine Verstopfungen gibt. Nicht in der Nähe von
Verbrennungsquellen aufstellen.
ALLGEMEINE SICHERHEIT Das Montagepaket kann
kleine Teile enthalten, die eine Erstickungsgefahr für
Kinder und Haustiere darstellen können. Überladen Sie
das Produkt nicht, da dies zu Schäden am Produkt oder
zu Verletzungen führen kann.
Aus Gründen der Festigkeit wird empfohlen,
die Projektionswand an Holzpfosten oder
Mauerwerkswänden zu montieren. Möglicherweise sind
zusätzliche Tools / Hardware erforderlich.
HINWEIS: Es wird empfohlen, die Projektionswand
vor der Montage 24 bis 48 Stunden lang an einem gut
belüfteten Ort zu lüften.
Montieren Sie dieses Produkt nicht in der Nähe von
Wärme- oder Zündquellen. Das Produkt darf die
Ein- und Ausgänge eines Raums nicht behindern,
insbesondere wenn es sich um Notausgänge handelt.
Die Verwendung einer Wasserwaage (nicht im
Lieferumfang enthalten) wird empfohlen, um
sicherzustellen, dass das Produkt gerade und
gleichmäßig auf der Montageäche installiert wird.
Befestigen oder befestigen Sie nichts am Bildschirm.
Dehnen Sie den Bildschirm nicht. Die Walze sollte
immer mindestens 1½ Stowickel enthalten, um
Beschädigungen zu vermeiden.
Ziehen, hängen oder schwingen Sie nicht am Bildschirm
oder am Bildschirmgehäuse. Ziehen Sie den Bildschirm
vorsichtig in einer gleichmäßigen Bewegung, um ihn für
die Anzeige erfolgreich abzusenken.
VORSICHT! Lassen Sie den Bildschirm nicht sofort los,
wenn Sie ihn für die Anzeige einrichten. Halten Sie den
Bildschirm auf der gewünschten Länge und lassen Sie
den Verriegelungsmechanismus einrasten, bevor Sie ihn
langsam loslassen.
Stellen Sie sicher, dass alle Befestigungen fest und
sicher sind. Sichern Sie alle Befestigungen regelmäßig,
um die maximale Festigkeit für die Unterstützung des
Geräts aufrechtzuerhalten.
Die Nichtbeachtung der korrekten Anweisungen,
Installations- und Betriebsverfahren führt zum Erlöschen
der Garantie und kann zu Schäden oder Verletzungen
führen.
REINIGUNG UND WARTUNG Reinigen Sie das
Produkt nicht mit Scheuerlappen oder Chemikalien.
Lösungsmittel oder
Reinigungsmittel können die Oberäche beschädigen.
Überprüfen Sie gegebenenfalls regelmäßig die
Anschlüsse und ziehen Sie sie wieder fest.
Ziehen Sie alle Anschlüsse nach der ersten Woche
nach der Montage wieder fest. Zum Reinigen mit
warmem Wasser, einem weichen Tuch und einem milden
Reinigungsmittel abwischen. Stellen Sie sicher, dass
Sie alle Teile aufgelistet haben. Wenn Sie Komponenten
vermissen, wenden Sie sich an unseren Kundendienst
unter
ES
Siempre se deben seguir las precauciones básicas de
seguridad.
USO PREVISTO Este producto no es para uso en
exteriores. Este producto no pretende ser una estructura
de escalada y no es un juguete. Los niños deben ser
supervisados para asegurarse de que no jueguen con el
producto.
ANTES DE LA PRIMERA UTILIZACIÓN Ubique el
producto en un área adecuada donde no cree una
obstrucción. Localizar lejos de fuentes de combustión.
SEGURIDAD GENERAL El paquete de ensamblaje
puede contener piezas pequeñas que pueden
representar un peligro de asxia para niños y mascotas.
No sobrecargue el producto, ya que podría dañar el
producto o provocar lesiones personales.
Para mayor resistencia, se recomienda que la pantalla
del proyector se monte en montantes de madera o
paredes de mampostería. Se puede requerir el uso de
herramientas / hardware adicionales.
NOTA: Se recomienda ventilar la pantalla del proyector
en un área bien ventilada durante 24-48 horas antes del
montaje.
Monte este producto lejos de fuentes de calor o
ignición. El producto no debe obstruir las entradas o
salidas a una habitación, especialmente si se trata de
salidas de incendio.
Se recomienda el uso de un nivel de burbuja (no
suministrado) para garantizar que el producto se instale
recto e incluso contra la supercie de montaje.
No sujete ni adjunte nada a la pantalla.
No estire la pantalla. El rodillo siempre debe mantener
un mínimo de 1½ envolturas de tela para evitar daños.
No tire, cuelgue ni balancee la pantalla o la carcasa
de la pantalla. Tire suavemente de la pantalla en un
movimiento uniforme para bajar con éxito para ver.
¡PRECAUCIÓN! No suelte inmediatamente la pantalla
cuando la congure para verla. Sostenga la pantalla
a la longitud deseada y permita que el mecanismo de
bloqueo se enganche antes de soltarla lentamente.
Asegúrese de que todas las jaciones estén apretadas
y seguras. Asegure todas las jaciones periódicamente
para mantener la máxima resistencia para soportar la
unidad.
El incumplimiento de la guía correcta, la instalación y
los procedimientos operativos invalidarán la garantía y
pueden causar daños o lesiones.
LIMPIEZA Y MANTENIMIENTO No limpie el producto
con paños o productos químicos abrasivos. Disolventes
o Los detergentes pueden dañar la supercie. Revise
periódicamente y vuelva a apretar los accesorios donde
corresponda.
Vuelva a apretar todos los accesorios después de la
primera semana después del montaje. Para limpiar,
esponja con agua tibia, un paño suave y un detergente
suave. Asegúrate de tener todas las piezas listadas. Si
le falta algún componente, póngase en contacto con
nuestro departamento de atención al cliente en

A5P | 01
IT
Le precauzioni di sicurezza di base dovrebbero sempre
essere seguite.
USO PREVISTO Questo prodotto non è destinato per
uso esterno. Questo prodotto non può essere utilizzato
come struttura per arrampicarsi e non è un giocattolo.
I bambini devono essere supervisionati anché non
giochino con il prodotto.
PRIMA DEL PRIMO UTILIZZO Localizzare il prodotto
in un’area adatta dove non crei ostruzioni. Individuare
lontano da fonti di combustione.
SICUREZZA GENERALE La confezione di
assemblaggio può contenere piccole parti che possono
rappresentare un rischio di soocamento per i bambini
e gli animali domestici. Non sovraccaricare il prodotto in
quanto ciò potrebbe causare danni al prodotto o lesioni
personali
Per maggiore resistenza, si consiglia di montare lo
schermo del proiettore su montanti in legno o pareti in
muratura. Potrebbe essere necessario l’uso di strumenti
/ hardware aggiuntivi.
NOTA: si consiglia di aerare lo schermo del proiettore
in un’area ben ventilata per 24-48 ore prima del
montaggio.
Montare questo prodotto lontano da fonti di calore o
ignizione. Il prodotto non deve ostruire gli ingressi o le
uscite di una stanza, soprattutto se si tratta di uscite di
sicurezza.
Si consiglia l’uso di una livella a bolla d’aria (non in
dotazione) per garantire che il prodotto sia installato
diritto e persino contro la supercie di montaggio.
Non ssare o attaccare nulla allo schermo.
Non allungare lo schermo. Il rullo deve sempre
mantenere un minimo di 1½ avvolgimenti di tessuto per
evitare danni.
Non tirare, appendere o oscillare sullo schermo o
sull’alloggiamento dello schermo. Tirare delicatamente
lo schermo in un movimento uniforme per abbassarlo
correttamente per la visualizzazione.
ATTENZIONE! Non rilasciare immediatamente lo
schermo durante l’impostazione per la visualizzazione.
Tenere lo schermo alla lunghezza desiderata e
consentire al meccanismo di blocco di impegnarsi prima
di rilasciarlo lentamente.
Assicurarsi che tutti i ssaggi siano serrati e sicuri.
Fissare periodicamente tutti i ssaggi per mantenere la
massima resistenza per il supporto dell’unità.
La mancata osservanza delle istruzioni, dell’installazione
e delle procedure operative corrette invaliderà la
garanzia e potrebbe causare danni o lesioni.
PULIZIA E MANUTENZIONE Non pulire il prodotto con
panni abrasivi o prodotti chimici. Solventi o
i detersivi possono causare danni alla supercie.
Controllare periodicamente e serrare nuovamente i
raccordi laddove applicabile.
Stringere di nuovo tutti i raccordi dopo la prima
settimana dopo il montaggio. Per pulire, spugnare
con acqua tiepida, un panno morbido e un detergente
delicato. Assicurati di aver elencato tutti i pezzi. Se
mancano componenti, contattare il nostro servizio clienti
all’indirizzo
SL
Vedno je treba upoštevati osnovne varnostne ukrepe.
NAMEN UPORABE Ta izdelek ni namenjen zunanji
uporabi. Ta izdelek ni namenjen kot plezalna
konstrukcija in ni igrača. Otroke je treba nadzorovati
zagotovite, da se z izdelkom ne igrajo.
PRED PRVO UPORABO Izdelek poiščite na primernem
območju, kjer ne bo oviral. Ločite stran od virov
zgorevanja.
SPLOŠNA VARNOST Montažni paket lahko vsebuje
majhne dele, ki lahko ogrozijo otroke in hišne ljubljenčke.
Izdelka ne preobremenjujte, saj lahko to povzroči škodo
na izdelku ali telesne poškodbe.
Zaradi trdnosti je priporočljivo, da je zaslon projektorja
nameščen na lesene stenske ali zidane stene. Morda bo
potrebna uporaba dodatnih orodij / strojne opreme.
OPOMBA: Priporočljivo je, da zaslon projektorja pred
namestitvijo 24-48 ur prezračite v dobro prezračevanem
prostoru.
Ta izdelek namestite proč od virov toplote ali vžiga.
Izdelek ne sme ovirati vhodov ali izhodov v sobo, zlasti
če gre za požarne izhode.
Priporoča se uporaba vodne tehtnice (ni priložena),
da zagotovite, da je izdelek nameščen naravnost in
enakomerno ob pritrdilno površino.
Na zaslon ne pritrdite ali pritrdite ničesar.
Ne raztezajte zaslona. Valj mora vedno imeti najmanj 1½
ovoja blaga, da prepreči poškodbe.
Na zaslonu ali ohišju zaslona ne vlecite, ne visite na
njem in se ne premikajte. Nežno potegnite zaslon z
enakomernim gibanjem, da se uspešno spustite za
ogled.
POZOR! Ko ga nastavljate za ogled, zaslona ne spustite
takoj. Pred počasnim spuščanjem zaslona držite želeno
dolžino in pustite, da se zaskočni mehanizem zaskoči.
Prepričajte se, da so vse pritrditve tesne in varne.
Občasno pritrdite vse pritrdilne elemente, da ohranite
največjo trdnost za podporo enote.
Neupoštevanje pravilnih navodil, namestitve in
obratovanja bo razveljavilo garancijo in lahko povzročilo
škodo ali poškodbe.
ČIŠČENJE IN VZDRŽEVANJE Izdelka ne čistite z
abrazivnimi krpami ali kemikalijami. Topila oz
detergenti lahko poškodujejo površino.
Občasno preverite in ponovno privijte okovje
primerno. Po prvem tednu po montaži ponovno privijte
vse armature. Za čiščenje gobo spustite s toplo vodo,
mehko krpo in blagim detergentom. Poskrbite, da so
navedeni vsi kosi. Če vam manjkajo kateri koli sestavni
deli, se obrnite na naš oddelek za pomoč strankam na
naslovu

A5P | 01
WALL MOUNTING GUIDE | GUIDE DE MONTAGE MURAL | WANDHALTERUNG | GUIA
DE MONTAJE EN PARED | GUIDA PER IL MONTAGGIO A PARETE | MONTAJE EN PARED
GUIDE
EN
IMPORTANT When drilling into walls always check that
the there are no hidden wires or pipes.
Ensure that the screws and wall plugs being used are
suitable for supporting the unit to be installed.
If you are unsure it is recommended you contact a
suitable qualied tradesperson.
TIPS Ensure you use a recommended drill bit to match
the wall plug and hole size.
Take extra care when drilling high walls, ceilings and
ceramic tiles, ensure the wall plug is tted below the
ceramic tile to avoid splitting or cracking.
Ensure the wall plugs are well tted and are a secure t
to the drilled hole.
The guide below will help to determine the most suitable
wall plug type for your application.
FR
IMPORTANT Lorsque vous percez dans un mur, vériez
toujours qu’il n’y a pas de tuyaux ou de ls cachés
derrière.
Vériez que les vis et les chevilles utilisées conviennent
au support de l’unité installée.
Si vous n’êtes pas sûr, il est conseillé de contacter un
artisan qualié.
ASTUCES Assurez-vous de toujours utiliser une mèche
recommandée, correspondant à la taille des trous et des
chevilles. Faites très attention lorsque vous percez haut
dans un mur, dans un plafond et des tuiles en cérami-
que. Assurez-vous que la cheville est bien placée sous
la tuile en céramique pour éviter que quelque chose ne
craque ou ne se fende.
Vériez que les chevilles sont bien en place et s’adapt-
ent parfaitement au trou percé.
Le guide ci-dessous vous aidera à déterminer le type de
cheville le plus approprié à la tâche en cours.
DE
WICHTIG Achten Sie beim Bohren in Wände immer
darauf, dass keine verdeckten Kabel oder Rohre oder
ähnliches vorhanden sind.
Stellen Sie sicher, dass die verwendeten Schrauben
und Dübel geeignet sind, das zu installierende Gerät zu
tragen.
Wenn Sie unsicher sind empfehlen wir, einen geeigneten
qualizierten Fachmann zu kontaktieren.
TIPPS Stellen Sie sicher, dass Sie einen Bohrer
verwenden, der zur Größe der Wandschraube und zur
Größe des Lochs passt.
Seien Sie besonders vorsichtig, wenn Sie in hohe
Wände, Decken und Keramikiesen bohren. Achten Sie
darauf, dass der Dübel unter der Keramikiese ange-
bracht ist, um ein Spalten oder Reißen zu vermeiden.
Stellen Sie sicher, dass die Dübel gut angebracht sind
und sicher in das Bohrloch passen.
Die nachstehende Anleitung hilft Ihnen, den für Ihre An-
wendung am besten geeigneten Steckertyp zu ermitteln.
ES
IMPORTANTE Cuando taladréis paredes, comprobad
que no haya cables o tuberías ocultos.
Asegúrese de que los tornillos y los enchufes de pared
que se utilizan sean adecuados para soportar la unidad
que se va a instalar.
Si no estáis seguro, os recomendamos que contactéis a
un profesional cualicado adecuado..
CONSEJOS Asegúrese de usar una broca recomen-
dada para que coincida con el enchufe de pared
y el tamaño del oricio. Tened especial cuidado al
taladrar paredes altas, techos y baldosas de cerámica,
asegúrese de que el tapón de pared esté colocado
debajo de la baldosa de cerámica para evitar rajaduras
o grietas. Asegúrese de que los enchufes de pared
estén bien ajustados y que se ajusten de manera segura
al oricio perforado.
La siguiente guía le ayudará a determinar el tipo de
enchufe de pared más adecuado para su aplicación.
IT
IMPORTANTE Quando si fora nelle pareti controllare
sempre che non ci siano cavi o tubi nascosti.
Accertarsi che le viti e le prese a muro in uso siano
idonee per supportare la struttura da installare.
In caso di dubbi, si prega di consultare un negoziante
qualicato.
SUGGERIMENTI Accertarsi di usare una punta da
trapano consigliata per abbinare la presa a muro alle
dimensioni dei fori. Prestare particolare attenzione
quando si forano pareti alte, sotti e piastrelle in ceram-
ica, accertarsi che la presa a muro sia ssata al di sotto
della piastrella in ceramica per evitare separazioni o
rotture. Accertarsi che le prese a muro siano ssate
bene e in una posizione sicura per forare.
La guida al di sotto ti aiuterà a stabilire il tipo di presa a
parete più idoneo per la tua applicazione.
SL
POMEMBNO Pri vrtanju v stene vedno preverite, da ni
skritih žic ali cevi.
Prepričajte se, da so uporabljeni vijaki in stenski čepi
primerni za podporo enote, ki jo želite namestiti.
Če niste prepričani, je priporočljivo, da se obrnete na
ustreznega usposobljenega trgovca.
Namigi Prepričajte se, da uporabljate priporočen sveder,
ki ustreza velikosti stenskega čepa in luknje.
Bodite še posebej previdni pri vrtanju visokih sten,
stropov in keramičnih ploščic, poskrbite, da je stenski
čep nameščen pod keramično ploščico, da se izognete
razcepu ali razpokam.
Prepričajte se, da so stenski čepi dobro nameščeni in
varno pritrjeni na izvrtano luknjo.
Spodnji vodnik vam bo pomagal določiti najprimernejši
tip stenskih vtičev za vašo uporabo.
A5P | 01
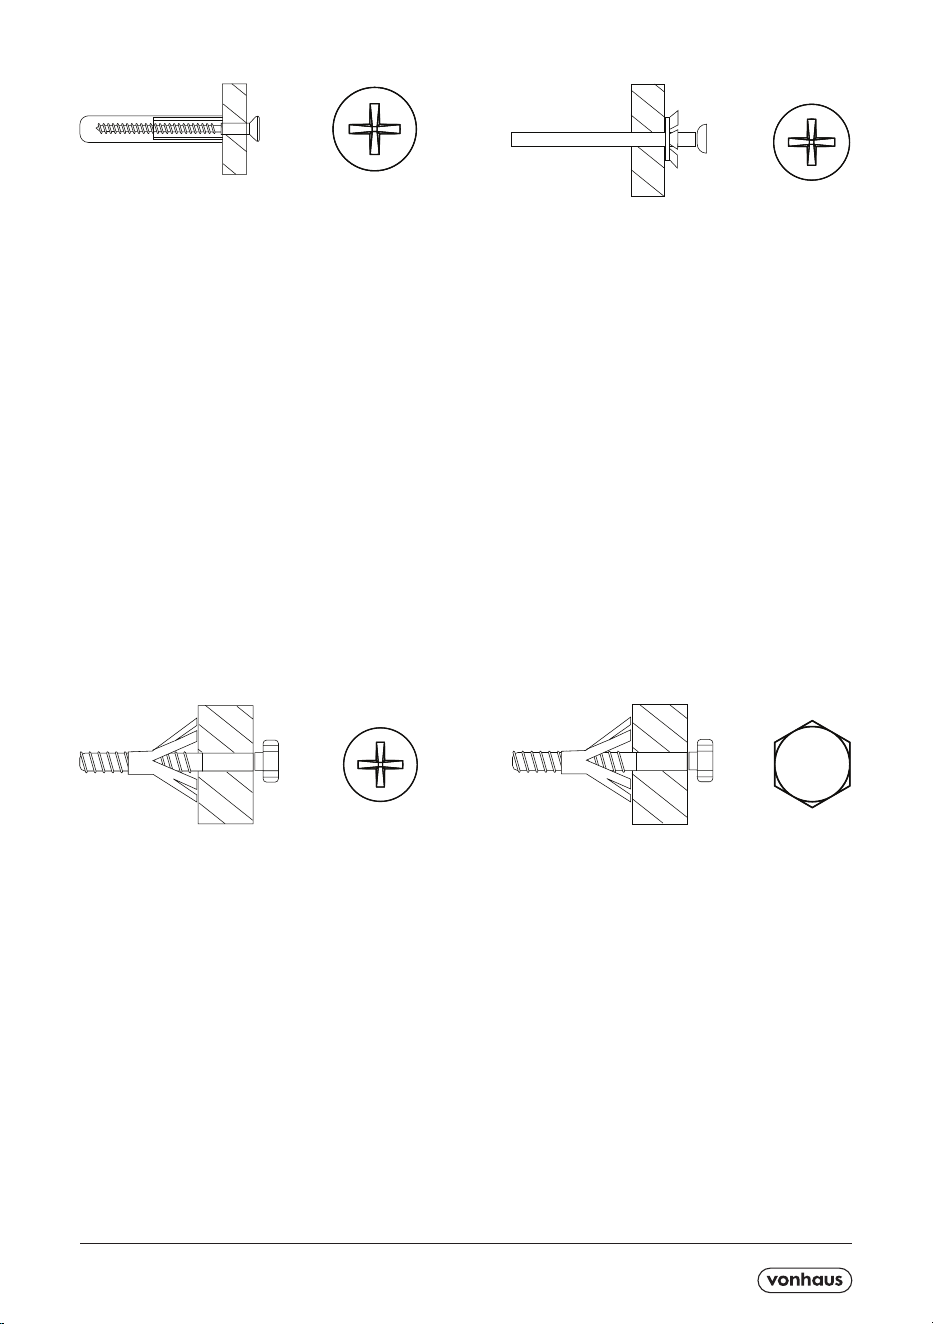
Hammer Fixing
Use with wall stuck with plaster board. The Hammer
xing allows it to be xed to a wall rather than the
plaster board.
Scellement au marteau
À utiliser dans les murs en placoplâtre. Le
scellement au marteau permet de le xer au mur plutôt
qu’au plâtre.
Hammerbefestigung
Für die Verwendung mit einer Wand, die mit Gipskarton
verklebt ist. Die Hammerbefestigung ermöglicht die
Befestigung an einer Wand und nicht an der Gipsplatte.
Fijación de martillo
Para usar con pared pegada con placa de yeso. La
jación del martillo permite que se je a una pared en
lugar de a la placa de yeso.
Fissaggio a martello
Da usare con tutti i muri bloccati con pannelli di car-
tongesso. Il ssaggio a martello consente il ssaggio a
muro piuttosto che al cartongesso.
Shield Anchor
For use with heavier items such as TVs.
Cheville blindée
À utiliser avec des objets plus lourds, par exemple des
TV.
Schildanker
Zur Verwendung mit schwereren Gegenständen wie
Fernsehgeräten.
Ancla de escudo
Para usar con artículos más pesados como televisores.
Ancoraggio
Da usare con articoli più pesanti delle TV.
Cavity Fixing Heavy Duty
For use when supporting heavy loads for example
cabinets and shelving.
Fixation robuste sur cavité
À utiliser pour supporter les charges lourdes, par exem-
ple des vitrines ou des étagères.
Hohlraumbefestigung Schwerlast
Zur Verwendung beim Tragen schwerer Lasten, z. B.
Schränke und Regale.
Reparación de cavidades para trabajo pesado
Para usar al soportar cargas pesadas, por ejemplo,
gabinetes y estanterías.
Fissaggio cavità resistente
Da usare per supportare carichi pesanti per esempio per
armadi e mensole.
Cavity Fixing
For use with plaster board partitions or hollow
wooden doors.
Fixation sur cavité
À utiliser pour les cloisons en placoplâtre ou les
portes en bois creuses.
Hohlraumbefestigung
Zur Verwendung mit Trennwänden aus Gipskarton-
platten oder hölzernen Hohlraumtüren.
Fijación de la cavidad
Para usar con tabiques de yeso o puertas de
madera huecas.
Fissaggio cavità
Da usare per divisioni in cartongesso o porte in
truciolato.

A5P | 01
Standard Wall Plug
Suitable for use on most types of wall such as brick,
breeze block, concrete, stone, wood or plaster.
Cheville standard
Convient à la plupart des types de mur, par exemple
en briques, en parpaings, en ciment, en pierre, en
bois ou en plâtre.
Standard Wanddübel
Geeignet für die meisten Wandtypen wie
Ziegelstein, Windschutz, Beton, Stein, Holz oder
Putz.
Tarugo de pared estándar
Adecuado para usar en la mayoría de los tipos de
paredes, como ladrillos, bloques de brisa, concreto,
piedra, madera o yeso.
Presa a muro standard
Adatta per la maggior parte delle pareti come
mattoni, pezzi di cemento, calcestruzzo, pietra,
legno o gesso.
A5P | 01
CONTENTS / CONTENU / INHALT / CONTENIDOS / CONTENUTO / CONTENIDO
Tools required - Not included
NOTE: Upon opening this product, there may be a slight odour. This is
due to the chemical treatment required to achieve a true white material.
Every care is taken during manufacturing to air out the product, however,
should the smell remain, please leave in the open position for 24-48 hours
in a well-ventilated area.
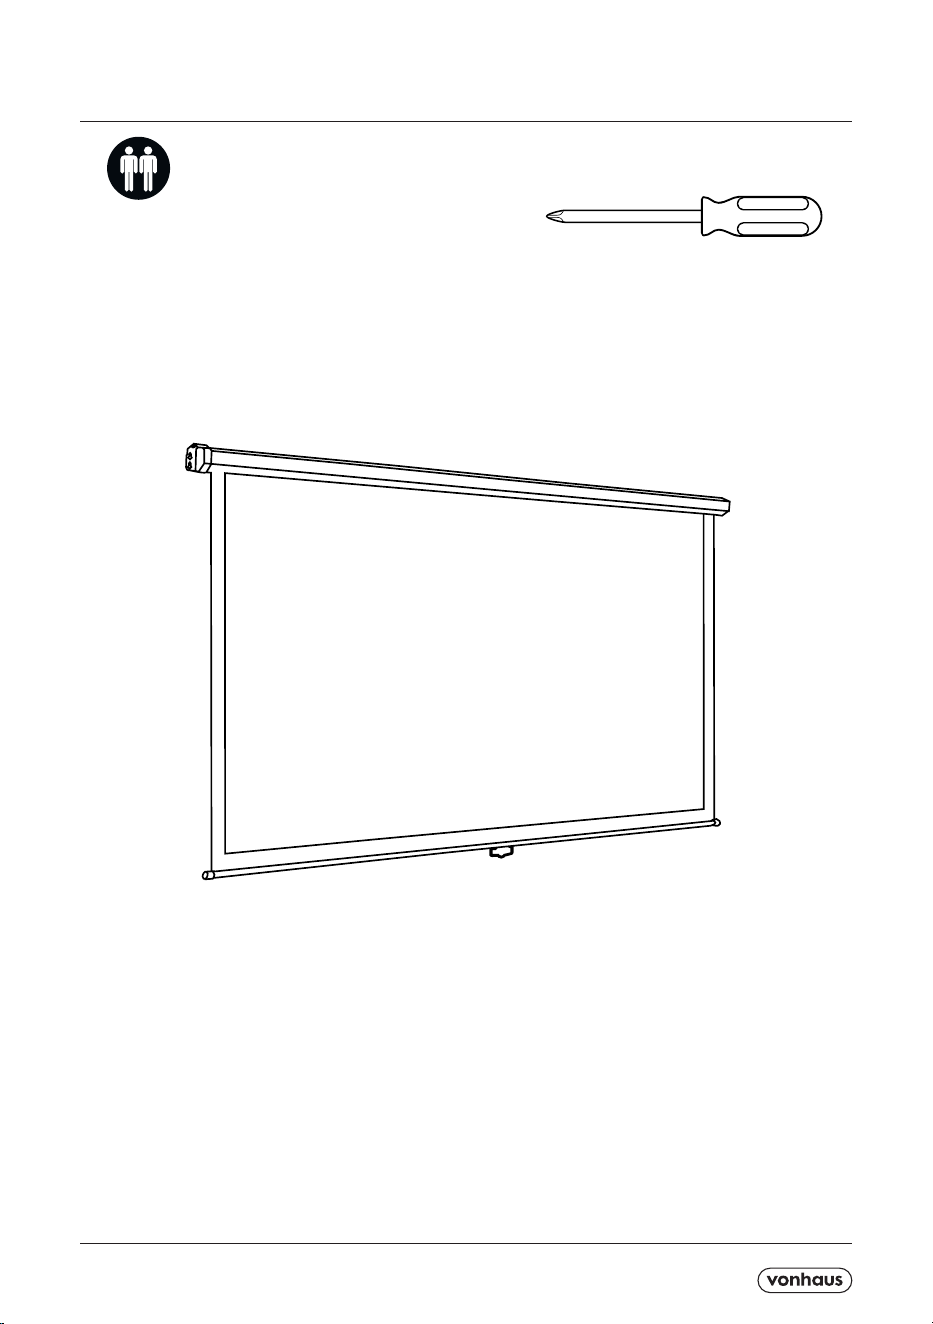
2 person assembly required.
2 personnes sont nécessaires pour l’assemblage.
Für die Montage sind 2 Personen nötig.
Se requieren 2 personas para el montaje.
Per il montaggio sono richieste 2 persone.
A5P | 01
ASSEMBLY / ASSEMBLÉE / VERSAMMLUNG / MONTAJE / MONTAGGIO / EL MONTAJE
1
2
FLUSH WALL ASSEMBLY /
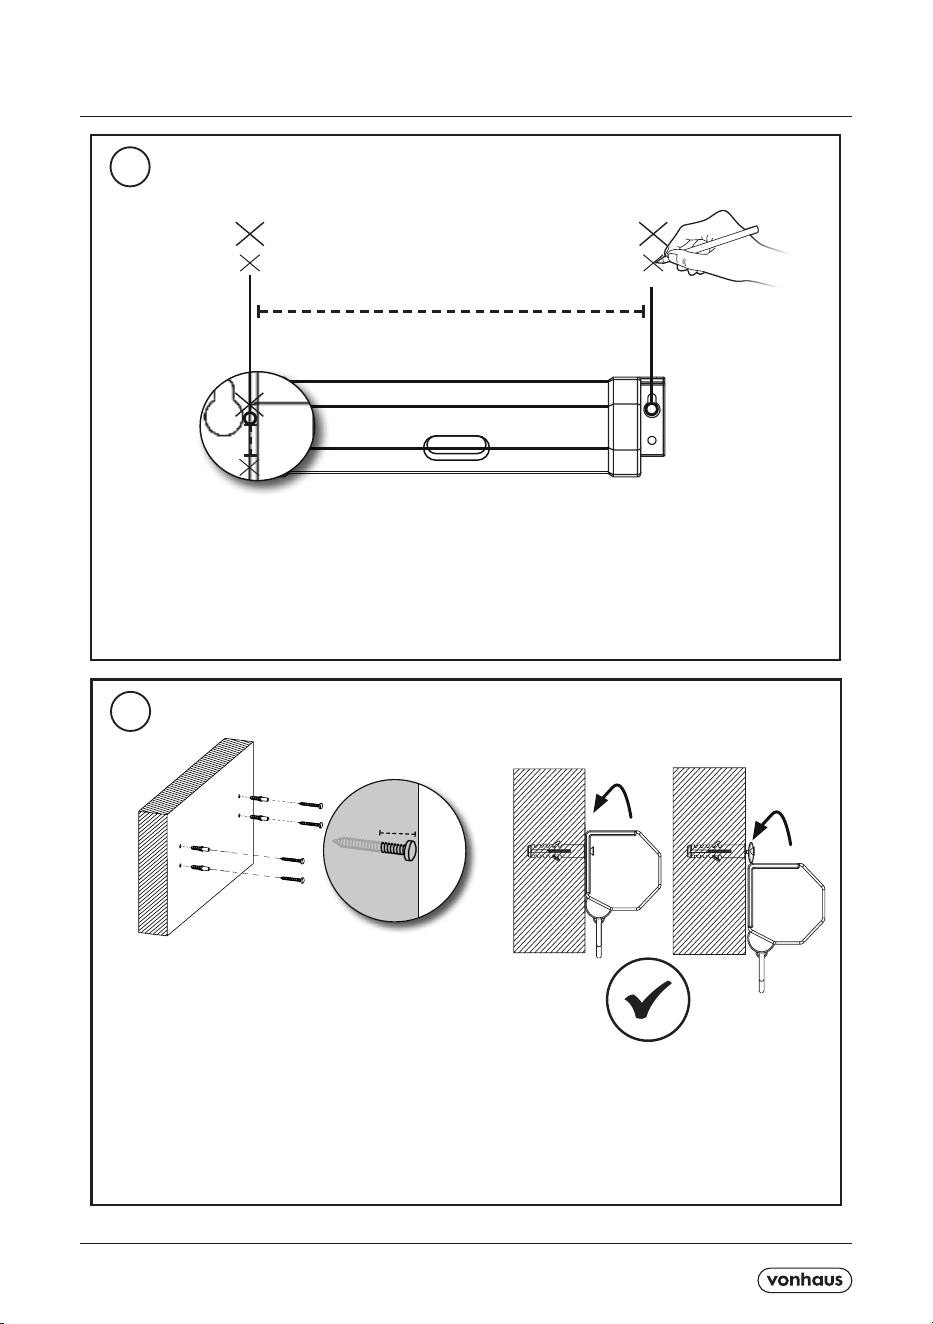
Measure the distance between the keyholes on the end caps
and mark these locations on the wall. Measure the diameter
of the keyhole (the head of the xing screws should be
smaller than this - sizes vary between models).
Drill holes in the locations previously
marked and insert plastic anchors
(if required), followed by the
appropriate screw.
NOTE! Leave 3-4mm of the
screw exposed in order to mount
the Screen Housing.
Hook the Screen Housing
onto the exposed screws.
A5P | 01
ASSEMBLY / ASSEMBLÉE / VERSAMMLUNG / MONTAJE / MONTAGGIO / EL MONTAJE
1
2
CEILING ASSEMBLY /
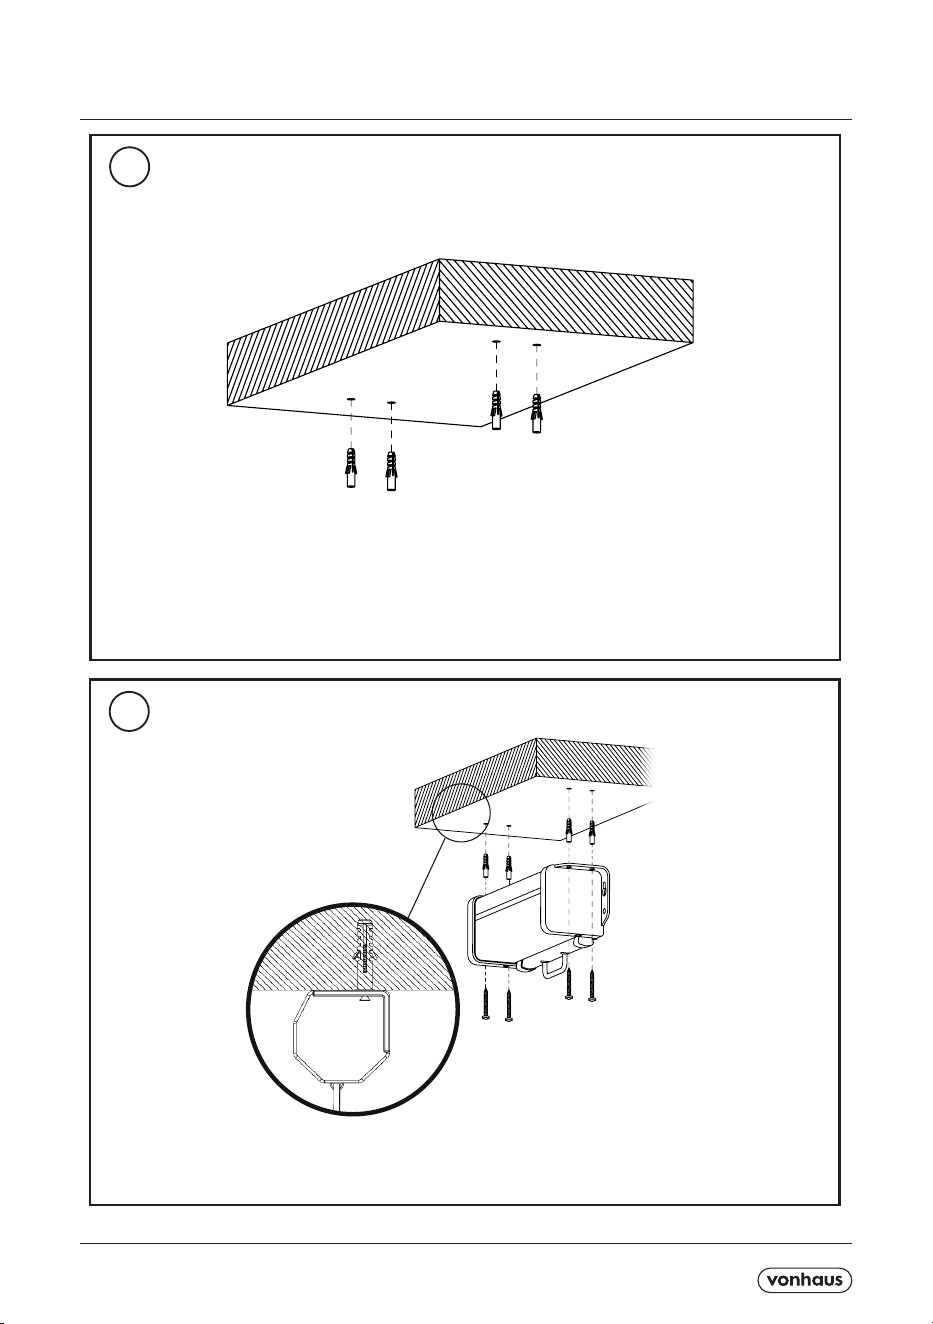
Fix the Screen Housing in place with 4 screws
as shown (not included).
Drill holes and insert plastic anchors (if required).
Fix the Screen Housing in place
with 4 screws as shown.
A5P | 01
CEILING ASSEMBLY /
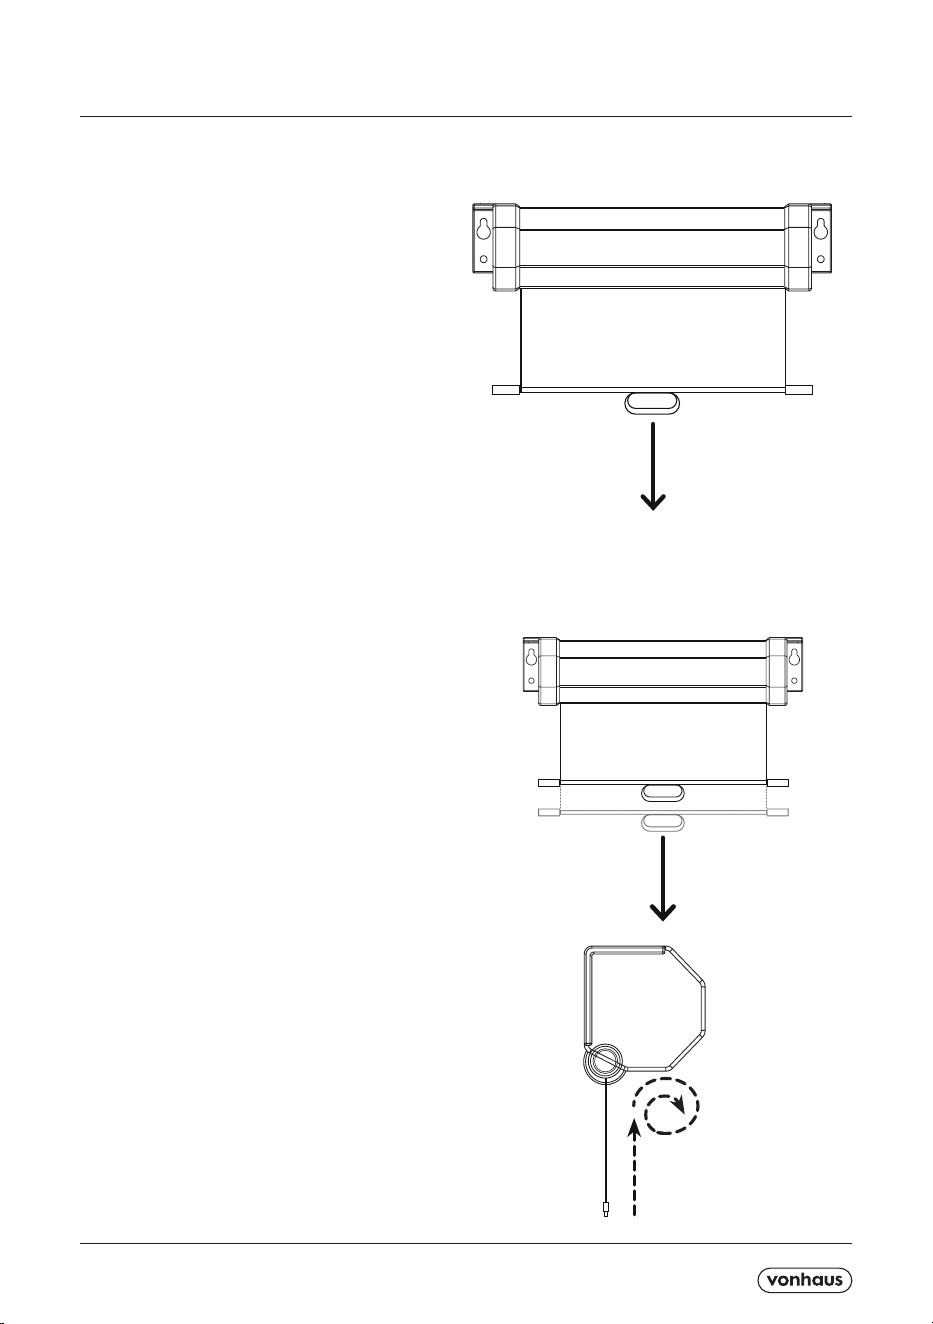
Use the handle to gently but swiftly pull
straight down to the desired length.
CAUTION: DO NOT release the handle
immediately; pause for a moment, and
allow the Screen to retract a little for the
locking mechanism to engage.
Pull downwards and outwards towards your
body slightly to release the locking mechanism.
Guide the Screen back up into the Screen
Housing carefully but swiftly to avoid engaging
the locking mechanism.
CAUTIONCAUTION: Do not release the handle whilst
guiding the Screen back in to the casing. Doing
so will cause the Screen to recoil rapidly and
cause damage to the mechanism.
Front view
Side view
WITHDRAW
RETRACT
OPERATION | OPÉRATION | DIE ANWENDUNG | OPERACIÓN | FUNZIONAMENTO

A5P | 01
EN
DISPOSAL INFORMATION Please recycle where facil-
ities exist. Check with your local authority for recycling
advice.
CUSTOMER SERVICE If you are having diculty using
this product and require support, please contact
WARRANTY To register your product and nd out if
you qualify for a free extended warranty please go to
www.vonhaus.com/warranty. Please retain a proof of
purchase receipt or statement as proof of the purchase
date. The warranty only applies if the product is used
solely in the manner indicated in the warnings page
of this manual, and all other instructions have been
followed accurately. Any abuse of the product or the
manner in which it is used will invalidate the warranty.
Returned goods will not be accepted unless re-pack-
aged in its original packaging and accompanied by a
relevant and completed returns form. This does not
aect your statutory rights. No rights are given under
this warranty to a person acquiring the appliance sec-
ond-hand or for commercial or communal use.
COPYRIGHT All material in this instruction manual are
copyrighted by DOMU Brands.Any unauthorised use
may violate worldwide copyright, trademark, and other
laws.
FR
INFORMATIONS RELATIVES AU RECYCLAGE Veu-
illez recycler là où il existe des installations adéquates.
Vériez auprès de vos autorités locales pour obtenir des
conseils sur le recyclage.
SERVICE CLIENT Si vous rencontrez des dicultés
pour utiliser ce produit et avez besoin d’assistance,
veuillez contacter
GARANTIE Pour enregistrer votre produit et découvrir
si vous vous qualiez pour une extension gratuite de
garantie, rendez-vous sur
www.vonhaus.com/warranty. Conservez une preuve
d’achat, reçu ou attestation, pour prouver la date de
l’achat. La garantie ne s’applique que si le produit a
été utilisé de la manière indiquée dans la section de la
page des avertissements de ce manuel et que toutes
les instructions ont été suivies de manière précise.
Tous les abus réalisés sur le produit, dans la manière
dont il a été utilisé, rendront la garantie caduque. Les
marchandises renvoyées ne seront acceptées que si
elles sont remballées dans leur emballage d’origine et
accompagnées d’un formulaire de retour adéquat et
rempli. Ceci n’aecte pas vos droits statutaires. Cette
garantie n’accorde aucun droit à une personne obtenant
le produit de seconde main ou à des ns d’utilisation
commerciale ou communale.
DROITS D’AUTEUR Toutes les informations de ce
manuel d’utilisation sont protégées par droit d’auteur
par DOMU Brands. Toute utilisation non autorisée
pourrait enfreindre les lois mondiales de droit d’auteur,
de marque déposée ainsi que d’autres lois.
DE
ENTSORGUNG Bitte entsorgen Sie das Produkt an
geeigneten Entsorgungsstellen. Fragen Sie bei Ihrer
Gemeinde nach.
KUNDENSERVICE Wenn Sie Schwierigkeiten mit
diesem Produkt haben und Unterstützung benötigen,
wenden Sie sich bitte an
GARANTIE Um Ihr Produkt zu registrieren und zu er-
fahren, ob eine kostenlose verlängerte Garantie möglich
ist, gehen Sie bitte auf www.vonhaus.com/warranty.
Bitte behalten Sie eine Rechnung oder den Kassenzet-
tel als Nachweis des Einkaufdatums auf. Die Garantie
gilt nur, wenn das Produkt nur wie in dieser Anleitung
beschrieben verwendet wurde und wenn alle Anweisun-
gen befolgt wurden. Jeglicher Missbrauch des Produkts
oder der Art und Weise, in der es verwendet wird, macht
die Garantie ungültig. Zurückgegebene Artikel werden
nur akzeptiert, wenn sie sich in der Originalverpackung
benden und wenn ein relevantes und vollständig aus-
gefülltes Rücksendeformular enthalten ist. Dies betrit
nicht Ihre gesetzlichen Ansprüche. Für Artikel, die ge-
braucht erworben wurden, oder die kommerzielle oder
gemeinschaftlich genutzt werden, entstehen keinerlei
Ansprüche auf Garantie.
COPYRIGHT Alle Materialien in dieser Anleitung stehen
unter Copyright von DOMU Brands Ltd.Jede unautor-
isierte Verwendung kann das weltweite Copyright, die
Handelsmarke und andere Gesetze verletzen.
ES
INFORMACION DE DESECHO Por favor, reciclad
en las instalaciones correspondientes. Consultad
con vuestra autoridad local para obtener consejos de
reciclaje.
SERVICIO AL CLIENTE Si tiene dicultades para uti-
lizar este producto y necesita asistencia, contacte con
GARANTÍA Para registrar vuestro producto y averiguar
si calica para una garantía extendida gratuita, vaya a
www.vonhaus.com/warranty. Conservad un compro-
bante de recibo de compra o extracto como prueba
de la fecha de compra. La garantía solo se aplica si el
producto se utiliza únicamente de la manera indicada
en la página de advertencias de este manual, y todas
las demás instrucciones se han seguido con precisión.
Cualquier abuso del producto o la manera en que se
use invalidará la garantía. Los productos devueltos no
se aceptarán a menos que se vuelvan a empaquetar en
su embalaje original y acompañados por un formulario
de devolución completo y pertinente. Esto no afecta
sus derechos legales. No se otorgan derechos bajo
esta garantía a una persona que adquiere el aparato de
segunda mano o para uso comercial o comunitario
DERECHOS DE AUTOR Todo el material en este
manual de instrucciones está protegido por DOMU
Brands. Cualquier uso no autorizado puede violar los
derechos de autor, marcas comerciales y otras leyes en
todo el mundo.
C

A5P | 01
IT
INFORMAZIONI SULLO SMALTIMENTO Si prega di
riciclare nelle apposite strutture. Chiedere una consu-
lenza alle autorità competenti per il riciclo.
SERVIZIO CLIENTI Se si riscontrano dicoltà nell’uti-
lizzo di questo prodotto e si richiede supporto,
contattare
GARANZIA Per registrare il prodotto e capire se hai
diritto all’estensione di garanzia, vai su
www.vonhaus.com/warranty. Si prega di conservare
la ricevuta del pagamento quale prova della data d’ac-
quisto. La garanzia si applica solo se il prodotto viene
utilizzato esclusivamente come indicato nella pagina
delle Avvertenze del presente manuale e se tutte le altre
informazioni vengano accuratamente seguite. Qualsia-
si abuso nell’utilizzo di questo prodotto invaliderà la
garanzia. I resi non saranno accettati se non riposti nella
confezione originale ed accompagnati da un modulo di
reso completo. Ciò non pregiudica i propri diritti obblig-
atori. La presente garanzia non attribuisce alcun diritto
a coloro che acquistano prodotti di seconda mano o per
ni commerciali o condivisi.
COPYRIGHT Tutto il materiale contenuto nel presente
manuale delle istruzioni è protetto da copyright di
DOMU Brands. Qualsiasi uso non autorizzato potrebbe
violare il copyright a livello mondiale, marchio ed altre
leggi.
SL
PODATKI O ODSTRANJEVANJU Prosimo, reciklirajte
tam, kjer obstajajo objekti. Za nasvet glede recikliranja
se obrnite na lokalni organ.
STORITEV ZA KUPCE Če imate težave z uporabo tega
izdelka in potrebujete podporo, se obrnite na
GARANCIJA Če želite registrirati svoj izdelek in ugot-
oviti, ali izpolnjujete pogoje za brezplačno podaljšano
garancijo, obiščite www.vonhaus.com/warranty. Kot
dokazilo o datumu nakupa hranite dokazilo o potrdilu
o nakupu ali izjavo. Garancija velja samo, če se izdelek
uporablja izključno na način, ki je naveden na strani z
opozorili v tem priročniku, in vsa druga navodila so bila
natančno upoštevana. Vsaka zloraba izdelka ali način
uporabe bo razveljavila garancijo. Vrnjeno blago ne bo
sprejeto, razen če je ponovno zapakirano v originalno
embalažo in mu je priložen ustrezen in izpolnjen obrazec
za vračilo. To ne vpliva na vaše zakonske pravice. V
skladu s to garancijo osebe ne pridobijo naprave, ki
jo kupi iz druge roke ali za komercialno ali komunalno
uporabo.
AVTORSKE PRAVICE Ves material v teh navodilih za
uporabo je zaščiten z blagovno znamko DOMU. Vsaka
nepooblaščena uporaba lahko krši mednarodne zakone
o avtorskih pravicah, blagovnih znamkah in drugih.
THANK YOU
Thank you for purchasing your product/appliance.
Should you require further assistance with your
purchase, you can contact us at
VonHaus is a registered trademark of DOMU Brands
Ltd. Made in China for DOMU Brands. M24 2RW.
MERCI
Merci d’avoir acheté notre produit/appareil.
Si vous aviez besoin d’aide suite à votre achat, vous
pouvez nous contacter a
VonHaus est une marque déposée de DOMU Brands
Ltd. Fabriqué en Chine pour DOMU Brands. M24 2RW.
VIELEN DANK
Vielen Dank, dass Sie das Produkt/Gerät gekauft haben.
Sollten Sie weitere Unterstützung benötigen,
können Sie uns gerne unter (email) kontaktieren.
VonHaus ist eine registrierte Handelsmarke von DOMU
Brands Ltd. Hergestellt in China für DOMU Brands.
M24 2RW.
GRACIAS
Gracias por comprar vuestro producto/aparato
Si requiere asistencia con vuestra compra, podeis
contactarnos a
VonHaus es una marca registrada de DOMU Brands
Ltd. Hecha en China para DOMU Brands. M24 2RW.
GRAZIE
Grazie per aver acquistato il prodotto.
Per ulteriore assistenza sul tuo acquisto, puoi
contattarci all’indirizzo email
VonHaus è un marchio registrato di DOMU Brands Ltd.
Made in Cina per DOMU Brands. M24 2RW.
HVALA VAM
Zahvaljujemo se vam za nakup izdelka / naprave.
Če potrebujete dodatno pomoč pri vašem
nakup, nas lahko kontaktirate na
VonHaus je registrirana blagovna znamka podjetja
DOMU Brands Ltd. Izdelano na Kitajskem za znamke
DOMU. M24 2RW.