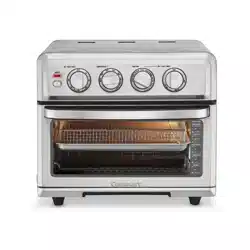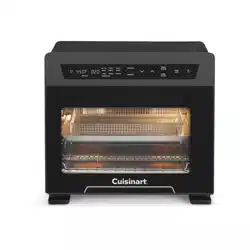
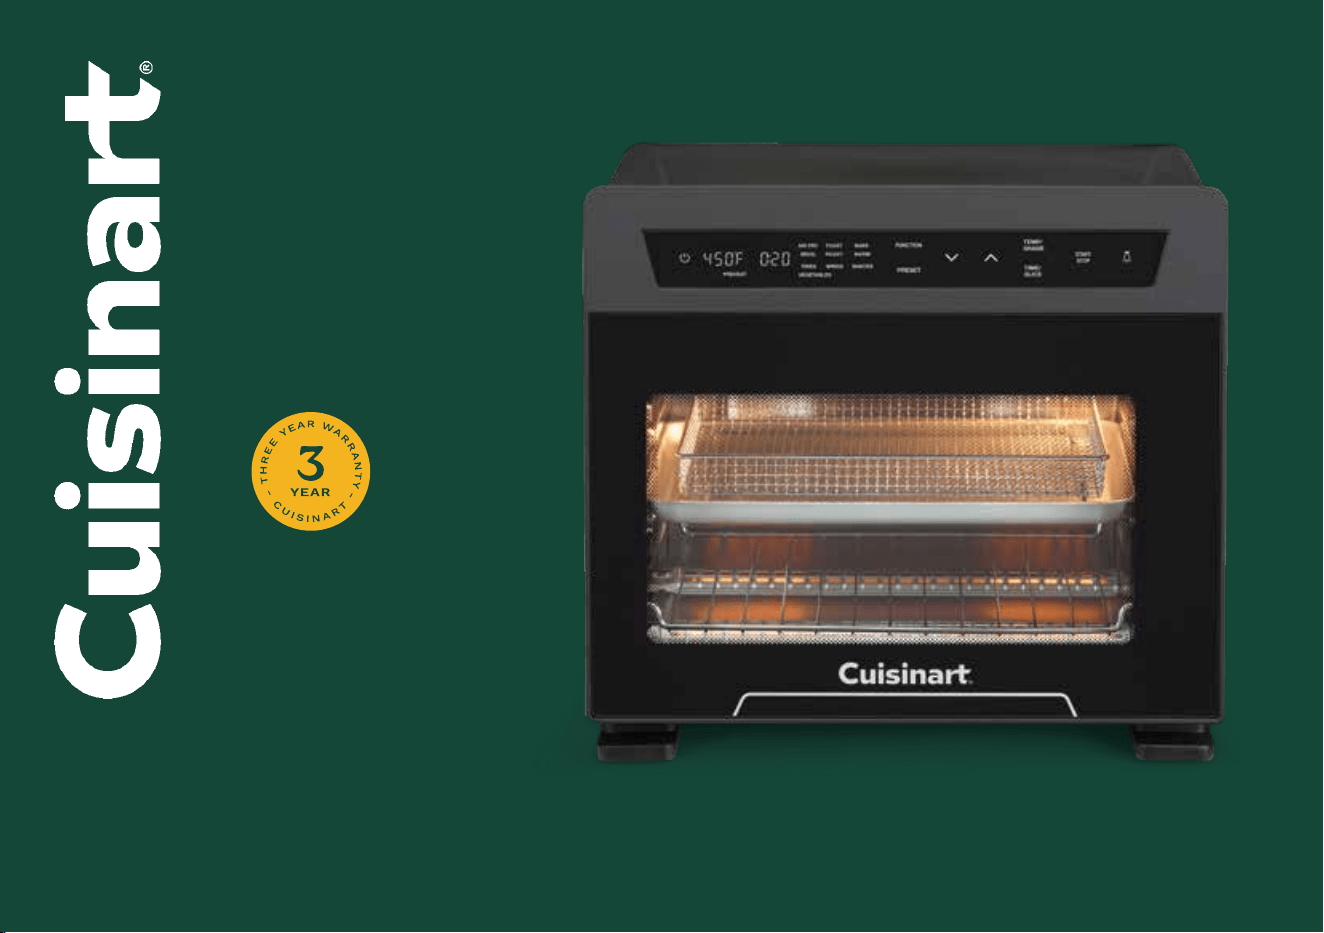
10-in-1
Extra-Large
Digital
Air Fryer
Oven
TOA-110
For your safety and continued enjoyment of this product,
always read the instruction book carefully before using.
Instruction
& Recipe Booklet
GARANTíA DE
TRES AÑOS
TRADUCCIÓN AL ESPAÑOL INCLUIDA

2
CONTENTS
Important Safeguards........................................2
Special Cord Set Instructions .................................3
Features and Benefits .......................................4
Getting to Know Your Control Panel ............................5
Before First Use ............................................6
Operation .................................................6
Oven Rack and Pan Position Diagrams..........................6
Tips and Hints .............................................7
Air Frying Chart ............................................8
Cleaning and Maintenance ..................................10
Troubleshooting ...........................................11
Warranty .................................................12
Recipes..................................................14
IMPORTANT SAFEGUARDS
When using an electrical appliance, especially when children are present,
basic safety precautions should always be taken, including the following:
1. Read all instructions.
2. UNPLUG FROM OUTLET WHEN NOT IN USE AND BEFORE
CLEANING. Allow to cool before cleaning or handling, or putting
on or taking off parts.
3. Do not touch hot surfaces. Use handles.
4. To protect against electric shock, do not place any part of the air
fryer oven in water or other liquids. See instructions for cleaning.
5. This appliance should not be used by or near children or individuals
with certain disabilities.
6. Do not operate any appliance with a damaged cord or plug, or after
the appliance has malfunctioned or has been dropped or damaged
in any way or has been dropped in water. Return the air fryer oven
to the store or retailer where purchased for examination, repair, or
adjustment.
7. The use of accessory attachments not recommended by Cuisinart
may cause injury.
8. Do not use outdoors.
9. Do not let cord hang over the edge of the table or countertop where
it could be pulled on inadvertently by children or pets, or touch hot
surfaces, which could damage the cord.
10. Do not place the air fryer oven on or near a hot gas or electric burner
or in a heated oven.
11. Do not use this air fryer oven for anything other than its intended
purpose.
12. Extreme caution should be exercised when using containers con-
structed of materials other than metal or glass in the oven.
13. To avoid burns, use extreme caution when removing air fryer oven
accessories or disposing of hot grease.
14. When not in use, always unplug the unit. Do not store any
materials other than manufacturer’s recommended ovenproof
accessories in this air fryer oven.
15. Do not place any of the following materials in the air fryer oven:
paper, cardboard, plastic, and similar products.
16. Do not cover the crumb tray or any part of the oven with metal foil.
This will cause overheating of the oven.
17. Oversize foods, metal foil packages, and utensils must not be insert-
ed in the air fryer oven, as they may involve a risk of fire or electric
shock.
18. A fire may occur if the air fryer oven is covered or touching flammable
materials such as curtains, draperies, or walls when in operation. Do
not store any items on top of the appliance when in operation. Do not
operate under wall cabinets.
19. Do not clean with metal scouring pads. Pieces can break off the pad
and touch electrical parts, involving a risk of electric shock.

3
20. Do not attempt to dislodge food when the air fryer oven is plugged
into electrical outlet.
21. Warning: To avoid possibility of fire, NEVER leave the air fryer oven
unattended during use.
22. Use recommended temperature settings for all cooking/baking,
roasting, and air frying.
23. Do not rest cooking utensils or baking dishes on glass door.
24. Do not operate your appliance in an appliance garage or under a wall
cabinet. When storing in an appliance garage, always unplug the unit
from the electrical outlet. Not doing so could create a risk of fire, espe-
cially if the appliance touches the walls of the garage or the door touch-
es the unit as it closes.
25. Extreme caution must be used when moving an appliance containing
hot oil or other hot liquids.
26. To disconnect, press Start/Stop to ensure cooking is stopped, then
remove plug from wall outlet.
27. This appliance is not intended for use by persons(including children) with
reduced physical, sensory, or mental capabilities, or lack of experience
and knowledge, unless they are closely supervised and instructed con-
cerning use of the appliance by a person responsible for their safety.
Close supervision is necessary when any appliance is used by or near
children. Children should be supervised to ensure that they do not play
with the appliance.
SAVE THESE
INSTRUCTIONS
Please read and keep these instructions handy. These instructions will
help you use your Cuisinart
®
10-in-1 Extra-Large Digital Air Fryer Oven to
its fullest, so that you will achieve consistent, professional results
SPECIAL CORD SET INSTRUCTIONS
A short power-supply cord is provided to reduce the risks resulting from
becoming entangled in or tripping over a longer cord. Extension cords are
available and may be used if care is exercised in their use.
If an extension cord is used, the marked electrical rating of the extension
cord must be at least as great as the electrical rating of the appliance, and
the longer cord should be arranged so that it will not drape over the coun-
tertop or tabletop, where it can be tripped over unintentionally or pulled on
by children.
NOTICE
This appliance has a polarized plug (one blade is wider than the other). To
reduce the risk of electric shock, this plug is intended to fit into a polarized
outlet only one way. If the plug does not fit fully into the outlet, reverse the
plug. If it still does not fit, contact a qualified electrician. Do not attempt to
modify the plug in any way.
FOR HOUSEHOLD
USE ONLY
NOT INTENDED
FOR COMMERCIAL USE

4
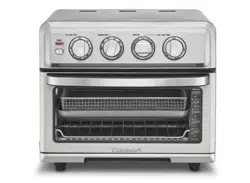
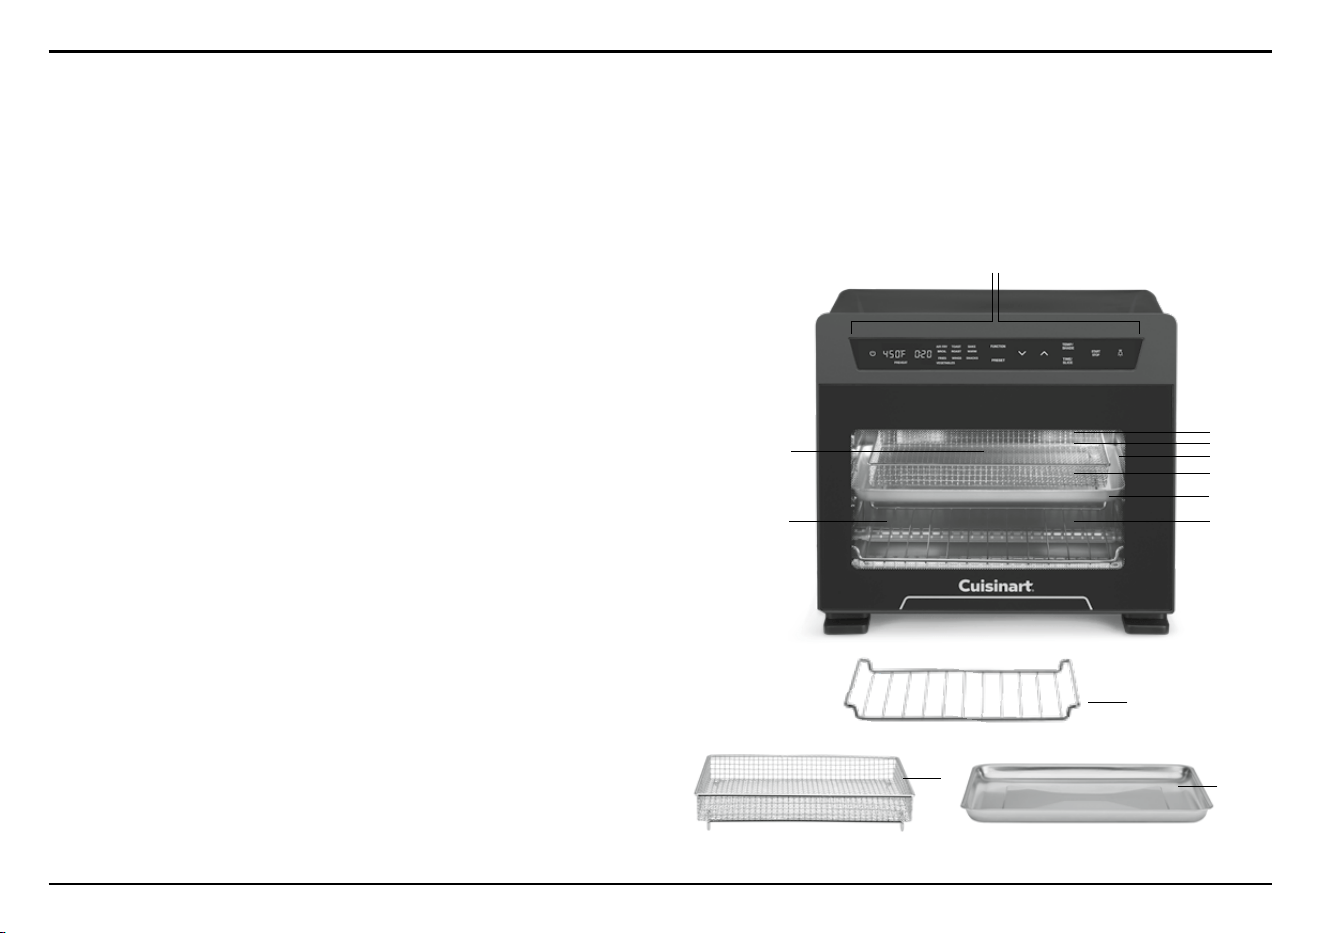
FEATURES AND BENEFITS
1. Control Panel
Touch screen control with LED display for easy operation.
(see details on page 5).
2. Interior Light
Interior light to easily view food while cooking.
3. Viewing Window
Large viewing window to check progress.
4. Oven Rack
Can be used in three positions. Use the wire rack for toasting bread
or bagels, baking frozen pizza or re-heating pizza.
5. Rack Positions
A. Lower Position – recommended when cooking larger foods (e.g., a whole
chicken), baked goods, and pizza.
B. Middle Position – recommended for toasting and air frying. Has a 50%
stop feature, so the rack stops halfway out of the oven. The oven rack
can be removed from this position by lifting the front of the rack
and sliding it out. This position is recommended for toasting and air frying.
C. Upper Position – recommended for broiling.
NOTE: Refer to page 6 for suggested rack positions with different functions.
6. Interior Crumb Tray (not shown)
The Crumb Tray is placed on the bottom of the oven cavity and slides in
and out for easy cleaning.
7. Air Fryer Basket
Use the basket when using the Air Fry or Broil functions to optimize
your cooking results. The air fryer basket must always be set in
the baking/drip pan.
8. Baking/Drip Pan
A baking/drip pan is included for your convenience. Use alone when
baking or roasting. Use baking/drip pan with air fryer basket when Air Frying
or Broiling.
4
7
1
3
5B
5A
8
8
7
5C
4
2
5
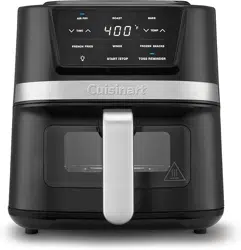
GETTING TO KNOW YOUR CONTROL PANEL
1. Digital Display
Displays cooking functions, time and temperature, toast shade and slices,
preheat, and ready indicators.
2.
On/Off/Wake
Press to turn the unit on/off and to wake the unit from standby mode.
3. Function
Press to enter the function-setting mode and choose one of the 6 functions:
Air Fry, Toast, Bake, Broil, Roast, and Warm.
4. Preset
Press to enter the preset-setting mode and choose one of the 4 air fry
presets: Fries, Wings, Snacks, and Vegetables.
5.
Down/Up
Press to scroll through functions or air fry presets, adjust cooking time, adjust
cooking temperature, change toast shade, and change toast slices.
6. Temp/Shade
Press to enter the temperature- and shade-setting mode.
7. Time/Slice
Press to enter the time- and slice-setting mode.
8. Light
Press to turn on the oven's internal light. Note: The light will turn off
automatically after 20 seconds. To turn it off before, press the button again.
9. Start/Stop
Starts and stops cooking process.
ADJUSTING OVEN TONE VOLUME
1. Press and hold both FUNCTION and PRESET buttons for 3 seconds.
2. Default (1–low) or previously selected volume will display.
3. Press
or to select desired volume: 0 (off/deactivated),
1 (low), or 2 (high).
The above changes will only work when the oven is not in an operational mode.
The setting will return to default if the oven is unplugged for more than
30 minutes.
4
51 2 3 6
7
8
9
6
BEFORE FIRST USE
1. Place your air fryer oven on a flat, level surface.
2. Move oven 2 to 4 inches away from the wall or from any objects on
the countertop. Do not use on heat-sensitive surfaces.
NOTE: OBJECTS SHOULD NOT BE STORED ON THE TOP OF
THE OVEN. IF THEY ARE, REMOVE ALL OBJECTS BEFORE YOU
TURN ON YOUR OVEN. THE EXTERIOR WALLS GET VERY HOT
WHEN IN USE. KEEP OUT OF REACH OF CHILDREN.
3. Slide in the crumb tray under the bottom heaters and make sure that
there is nothing in the oven.
4. Plug power cord into the wall outlet.
OPERATION
1. Place the appropriate rack, pan, and/or basket in the position recom-
mended in the chart at right.
2. Press the standby icon
to wake the unit. FUNCTION and PRESET
will flash.
3. Press FUNCTION or PRESET and scroll through the cooking options
using the up/down arrows. TEMP/SHADE will flash to indicate the next
step.
4. Press TEMP/SHADE to adjust the temperature or toast shade if
needed. Use the up/down arrows to adjust.
5. Press TIME/SLICE to adjust the cooking time or number of bread
slices for toasting, if needed. Press the up/down arrows to adjust.
6. Press START/STOP to begin the cooking cycle.
NOTE: You can press START/STOP after selecting your FUNCTION or
PRESET if no adjustments to TEMP/SHADE or TIME/SLICE are needed.
7. To adjust the time, temperature, toast shade or number of slices once
cooking has begun, simply press TEMP/SHADE or TIME/SLICE and
use the up/down arrows to adjust. The new adjustment will flash for 3
seconds and activate automatically.
8. To change the function or preset after cooking gas begun, hold
START/STOP to cancel cycle, then choose another function or preset.
PREHEAT (BAKE FUNCTION ONLY):
The oven will automatically preheat when the Bake function is selected.
While the oven is preheating, the PREHEAT indicator will appear on the
screen. Once preheat is complete, a beep will sound and the indicators
READY will appear on the screen. If cooking time is set, the timer will
begin counting down.
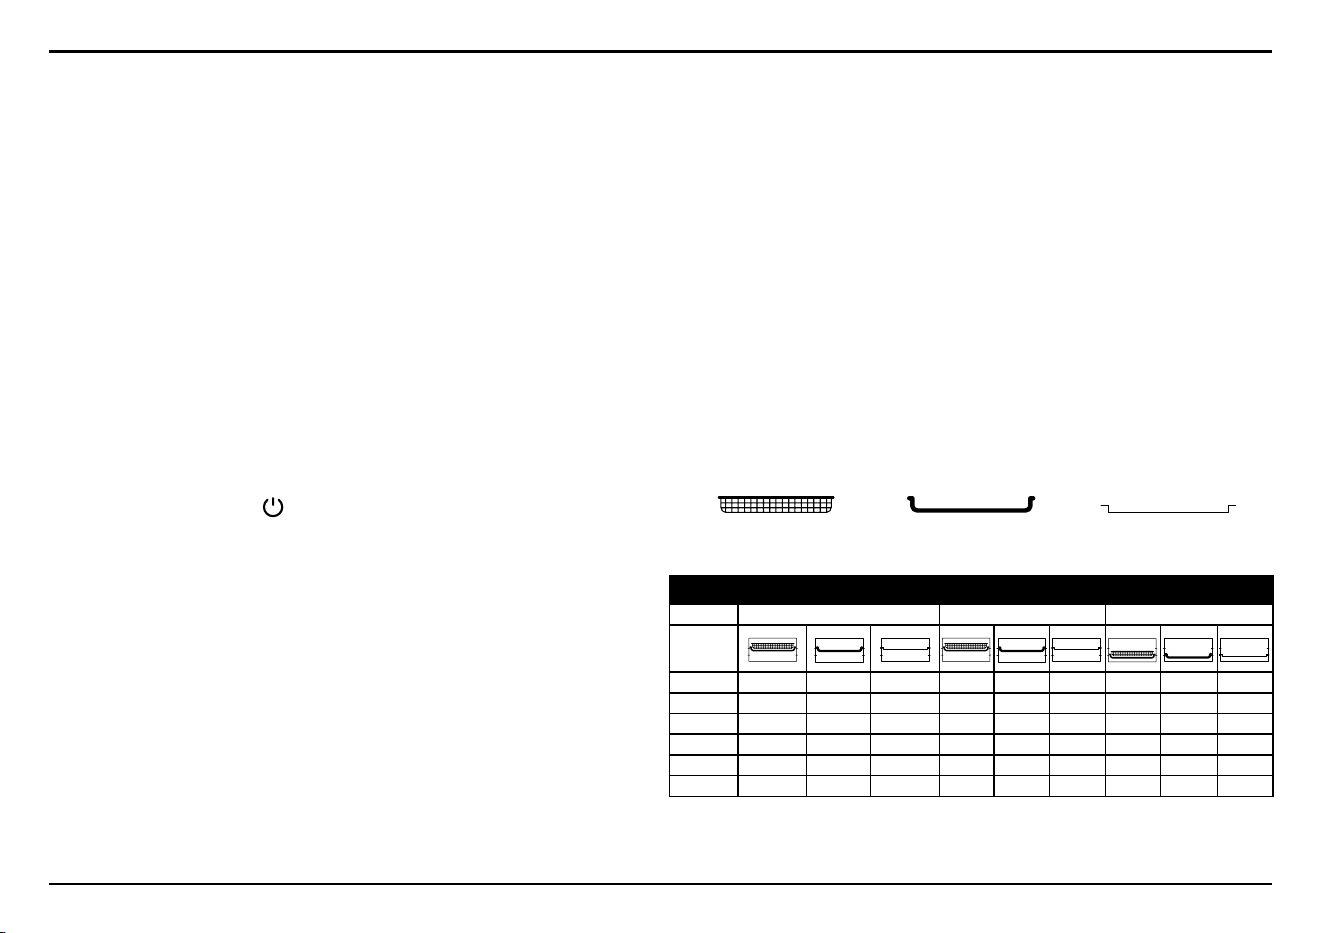
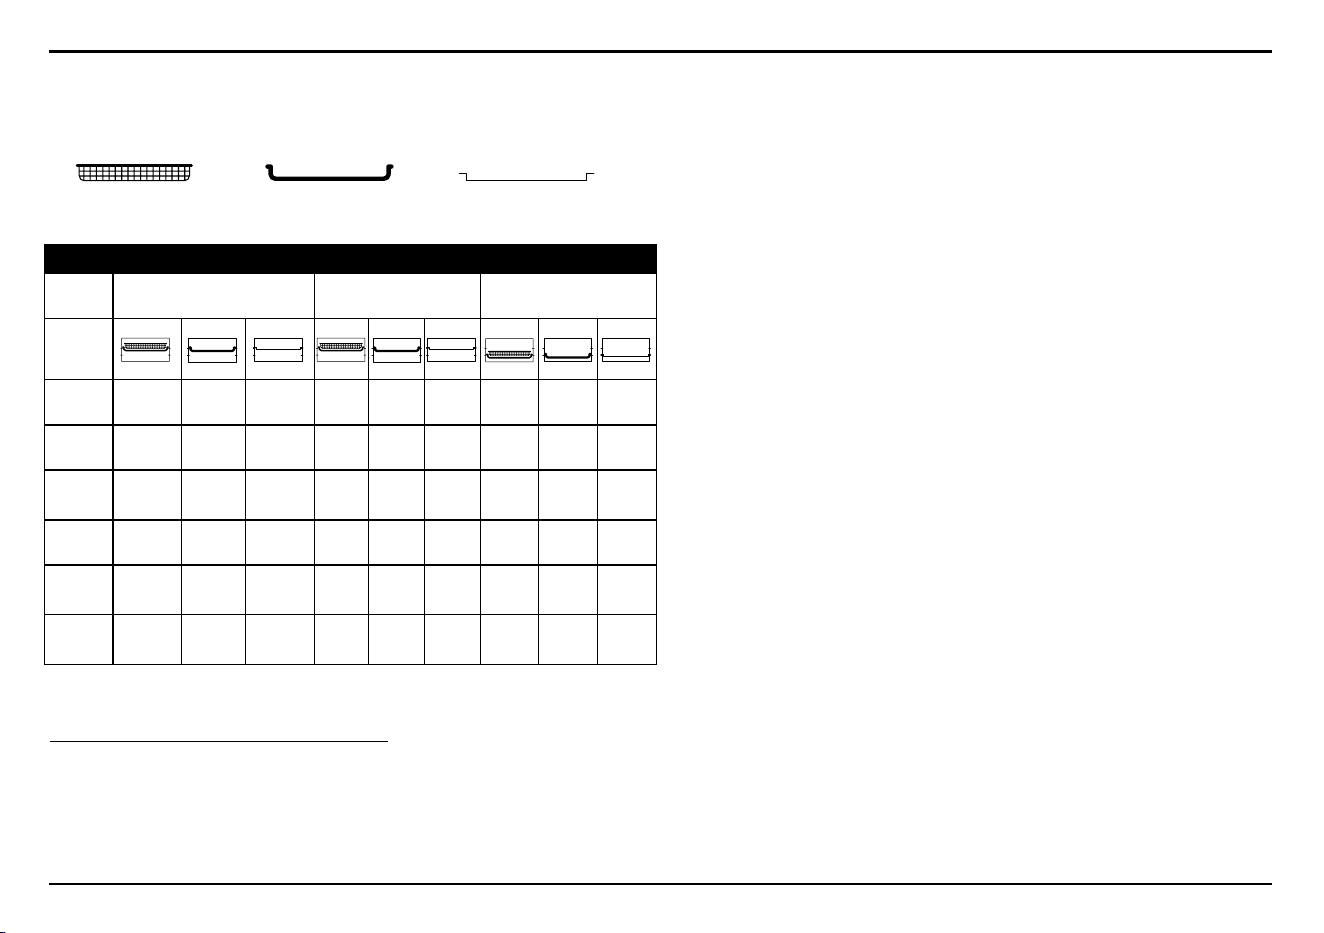
OVEN RACK AND PAN POSITION DIAGRAMS
Please refer to the chart below for suggested oven rack, baking/drip pan,
and air fryer basket positions.
Wire Rack
Baking/Drip Pan
Air Fryer Basket
SUGGESTED BASKET/PAN/RACK POSITIONS
Upper position Middle position Lower position
Function
Toast X
Bake X X X X
Broil X X X X X X X X X
Roast X X X X X X
Air Fry X X X
Warm X X X X X X X X X

7
TIPS AND HINTS
AIR FRY
TIP: For best results, use the provided air fryer basket fitted into the
baking/drip pan.
Air Fry can be used at 200°F to 450°F for up to 1 hour. This function is
used to air fry meals as a healthy alternative to deep frying in oil. A high
fan speed and multiple heating elements circulate hot air to prepare a
variety of meals that can be both delicious and healthier than traditional
frying.
• Default: 400°F; 10 minutes.
• Many foods that can be fried can be air fried without using excess
amounts of oil. Air fried foods will taste lighter and be less greasy than
deep-fried foods.
• Air frying doesn’t require oil, but a light spray can enhance browning
and crispiness. Use an oil sprayer or a nonstick olive oil cooking spray
to keep it extra light, a pastry brush to evenly coat, or pour a little oil
into a bowl, add food, and toss.
• Most oils can be used for air frying. Olive oil is preferred for a richer
flavor. Vegetable, canola, or grapeseed oils are recommended for
milder flavors.
• An assortment of coatings can be used on air fried foods.
Some examples of different crumb mixtures include breadcrumbs,
seasoned breadcrumbs, panko breadcrumbs, crushed cornflakes,
potato chips, and graham crackers. Various flours, including
gluten-free, and other dry foods like cornmeal work as well.
• Most foods do not need to be flipped during cooking, but larger items,
like chicken cutlets, should be turned halfway through the cooking
cycle to ensure evenly cooked and browned results.
• When air frying large quantities of food that fill the pan, toss food
halfway through the cooking cycle to ensure evenly cooked results
and color.
• Use higher temperatures for foods that cook quickly, like bacon and
chips, and lower temperatures for foods that take longer to cook, like
breaded chicken.
• Foods will cook more evenly if they are cut into the same-size pieces.
• Please note that many foods release water when they cook. When
cooking large quantities for an extended period of time, condensation
may build up, which could leave moisture on your countertop.

8
Food Recommended Amount Temperature Time
Bacon 12 ounces, 10 to 12 slices 400ºF 8 to 10 minutes
Chicken Wings 2 pounds, about 20 wings (max 3 pounds) 400ºF 20 to 25 minutes
Frozen Appetizers (e.g.,
mozzarella sticks, popcorn
shrimp, etc.)
1½ pounds, about 20 frozen mozzarella sticks 400ºF 5 to 7 minutes
Frozen Chicken Nuggets 1 pound, about 34 frozen chicken nuggets 400ºF 10 minutes
Frozen Fish Sticks 12 ounces, about 20 frozen sh sticks 400ºF 8 minutes
Frozen Fries 1 to 2 pounds 450ºF 15 to 25 minutes
Frozen Steak Fries 1 to 2 pounds 450ºF 15 to 25 minutes
Hand-Cut Fries
1 to 2 pounds (2 to 4 medium potatoes), cut into
¼-inch thick pieces, about 4 inches
400ºF
15 to 20 minutes
Hand-Cut Steak Fries
1 to 2 pounds (2 to 4 medium-large potatoes), cut
into eighths lengthwise
400ºF 15 to 20 minutes
Shrimp
1 pound, about 16 extra-large shrimp 375ºF 8 to 10 minutes
Tortilla Chips
Six 5-inch tortillas cut into fourths 400ºF 5 to 6 minutes, toss halfway through
Vegetables
1 pound, about 4 cups 400ºF
Thin slices: 10 minutes;
larger cut: 15 to 20 minutes
AIR FRYING CHART
The chart below lists recommended amounts, cooking times, and temperatures for various types of food that can be air fried in the Cuisinart
®
10-in-1
Extra-Large Digital Air Fryer Oven. If portions exceed recommendations, you can toss occasionally while cooking to ensure the crispiest, most even
results. Smaller amounts of food may require less time. For best air frying results, use the oven light to periodically check on food.
NOTE: When air frying, always use the air fryer basket with the baking/drip pan. For all foods below, we suggest using the upper position for best results.
NOTE: Air frying doesn’t require oil, but a light coating can enhance browning and crispiness. Use an oil sprayer or a nonstick olive oil cooking spray
to keep it extra light, a pastry brush to evenly coat, or pour a little oil into a bowl, add food, and toss.

9
AIR FRY PRESETS
I
n addition to having programmable time and temperature for air frying,
the Cuisinart
®
10-in-1 Extra-Large Digital Air Fryer Oven has convenient,
easy-to-use presets for your fried favorites—french fries, chicken wings,
snacks, and vegetables.
• Default: 400°F; 10 minutes
To use air fryer presets, press the PRESET button and use the up/down
arrows
to scroll through and select desired air fry preset.
NOTE: Most presets can be used with frozen or fresh foods.
TOAST
Toast shade can be set from 1 to 7 and number of slices can be set to
1 to 9 slices. This function is used to toast bread and other items; both
fresh and frozen items can be used.
• Default: Shade 4; 3 to 4 slices
• For best results and more evenly toasted items:
– If toasting two pieces, center them in the middle of the oven rack
– Four pieces should be evenly spaced—two in front, two in back
– Nine pieces should be evenly spaced—three in front, three in the
middle, three in the back
• To add time before the end of the toasting cycle, press TIME/SLICE
and use the up arrow to add more time
• Shade Guide: Light (1, 2), medium (3, 4, 5), dark (6,7)
WARNING: Always use the middle position for toasting. Do not invert
rack in Position 2 as this may result in burning.
BAKE
Bake can be used at 200°F to 450°F for up to 2 hours. Baking is recom-
mended for a variety of foods you would normally prepare in a conven-
tional oven. Since this is a small convection oven, cooking times may
vary from those in recipes designed for a standard home oven. Because
the air fryer oven circulates hot air efficiently, it often cooks food faster
than traditional ovens. We recommend checking your food frequently
when getting used to the appliance to prevent overcooking.
• Default: 350°F; 30 minutes
• Important: All of our included recipes were specially developed for the
Cuisinart
®
10-in-1 Extra-Large Digital Air Fryer Oven and have been
tested in our Cuisinart Test Kitchen.
BROIL
Broil is fixed at 450°F and can be used for up to 2 hours. Broiling func-
tion can be used for beef, chicken, pork, fish, and more. It also can be
used to top-brown casseroles and gratins.
• Default: 450°F; 5 minutes
• For best results, use the provided air fryer basket fitted into the baking/
drip pan to broil
• Never use glass oven dishes to broil
• Be sure to keep an eye on food — items can brown quickly when
broiling
ROAST
Roast can be used at 200ºF to 450ºF for up to 2 hours.
• Default: 375°F; 45 minutes
• Roasting time is significantly reduced, compared to a large home oven,
and meats and poultry are perfectly cooked — browned on the out-
side, moist and juicy on the inside
• Dress up vegetables by roasting them; as they caramelize, they
become sweet and delicious
• Because some foods roast faster, begin checking progress at least 5 to
10 minutes before the end of suggested cooking time

10
WARM
Warm can be used at 150°F to 300°F for up to 2 hours. Use this function
to keep food warm once cooked.
• Default: 150°F; 30 minutes
CLEANING AND MAINTENANCE
• Always unplug the oven from the electrical outlet and allow it to cool
completely before cleaning.
• Do not use abrasive cleaners, as they will damage the finish. Simply
wipe the exterior with a clean, damp cloth and dry thoroughly. Apply
the cleansing agent to a cloth, not directly onto the toaster oven, before
cleaning.
• To clean interior walls, use a damp cloth and a mild liquid soap solution
or a spray solution on a sponge. Remove any residue from cleaners
with a clean, damp rag. Never use harsh abrasives or corrosive prod-
ucts. These could
damage the oven surface. Never use steel wool pads on interior of
oven.
• Cleaning the accessories:
All accessories should be hand-washed in hot, sudsy water, using a
nylon scouring pad or nylon brush, and thoroughly rinsed. These items
are NOT dishwasher safe.
• After cooking greasy foods and once your oven has cooled, always
clean the top of the oven interior. If this is done on a regular basis, your
oven will perform like new. Removing the grease will help to keep toast-
ing consistent, cycle after cycle.
• To remove crumbs, slide out the crumb tray and discard crumbs. Wipe
clean and replace. To remove baked-on grease, soak the tray in hot,
sudsy water or use nonabrasive cleaners. Never operate the oven with-
out the crumb tray in place.
• Any other servicing should be performed by an authorized service
representative.

11
TROUBLESHOOTING
Operation Why won’t my unit turn on? Make sure your unit is plugged into a functional outlet.
Make sure the oven door is closed.
Call Consumer Service at 1-800-726-0190.
Why does the fan remain on
after cooking?
The fan remains on for cooling purposes.
Why does the light turn off? The light only stays on for 20 seconds each time the light button is pressed to conserve energy. This is normal.
Programming Can I change my cooking
function when the unit is
already cooking?
You need to rst interrupt the current cooking function by pressing START/STOP. Then press
to return to the main menu.
Can I change the time or
temperature when the unit is
already cooking?
Yes. Simply press TEMP/SHADE or TIME/SLICE and use the up/down arrows to make adjustments during the cooking
cycle.
Cooking Why is my food not crispy or
fried evenly?
Some foods may require more oil than others. If not crispy enough, spray, brush, or add some oil on the food.
Make sure food is spread evenly in one single layer in the air fryer basket with no overlap. If food still overlaps, toss or
ip food halfway through cooking cycle.
Put the food in for additional cooking time. Make sure to check periodically until food reaches desired brownness.
Do not leave oven unattended.
Why is my food undercooked? If you put too much food in the basket, try with smaller batches of food and single layers, rather than stacking food on
top of each other.
The temperature might be too low. Press TEMP/SHADE and use the up arrow to increase temperature.
When preparing foods with a high water content water may drip into the pan and produce steam. This will not affect the
unit or the end results. It may fog up the viewing window on the sides or corners.
Why do condensation and
steam come out of my unit?
The pan, basket, or crumb tray may contain grease residue from previous use. Make sure to clean all accessories
properly after each use.
Cleaning How do I clean tough-to-
remove food residue from my
accessories?
To remove baked-on grease, soak the accessories in hot, sudsy water or use a nonabrasive cleanser.

12
Limited Warranty
Subject to the exclusions and limitations contained herein, Conair LLC dba
Cuisinart (“Cuisinart”) warrants that the Cuisinart
®
10-in-1 Extra-Large Digital Air
Fryer Oven ("Product") will be free from material defects in materials and
workmanship under normal home use conditions for a period of three (3) years
beginning on the date the Product was purchased in its original, sealed
packaging, unless otherwise specied in this Limited Warranty. This Limited
Warranty is only for U.S. consumers (dened herein as purchasers at retail for
personal, family, or household use) who originally purchase the Product from
Cuisinart or an authorized Cuisinart
®
reseller (if you are unsure whether a
retailer or other point of sale is an authorized or unauthorized Cuisinart reseller,
contact Cuisinart).
This Limited Warranty does NOT cover:
• Normal wear and tear;
• Any Product purchased by commercial purchasers or for commercial or
nonhousehold uses;
• Accessories, parts, or software added to the Product after the system is
shipped from Cuisinart;
• Any costs associated with the replacement or repair of the Product,
including labor, installation, or other costs incurred by you without prior
Cuisinart approval;
• Damage to the Product, defective conditions, or nonconformities due to: (1)
external causes, including shipping, accidents, problems with electrical
power (Product designed only for use with 120-volt outlets), abnormal
conditions (such as mechanical or environmental); (2) usage not in
accordance with Product instructions; (3) misuse, neglect, unauthorized
alteration, unauthorized repair; and (4) acts of god or other events beyond
Cuisinart’s control;
• Though necessary repairs and maintenance might be performed by any
company, damage caused by you or any nonauthorized third party may void
this Limited Warranty;
• Damage caused by accessories or replacement parts not specically
authorized by Cuisinart may void this Limited Warranty; and
• Any Product where the original Product identication markings
(trademark or serial number) have been removed, altered, or obliterated
from the Product.
It is recommended that you visit our website, https://www.cuisinart.com/
register-your-product.html, for a fast, ecient way to complete your product
registration. However, product registration does not eliminate the need for the
consumer to maintain the original proof of purchase in order to obtain the
warranty benets. In the event that you do not have proof of purchase date, the
purchase date for purposes of this Limited Warranty will be the date of
manufacture.
Hassle-free warranty
If the Product that is the subject of this Limited Warranty fails during the
warranty period for reasons covered by this Limited Warranty, Cuisinart will, at
its option, repair the Product, replace the Product with another identical or
reasonably equivalent product, or if Cuisinart is unable to repair or replace the
Product, refund the purchase price, less the amount directly attributable to the
consumer’s prior usage of the Product. To obtain a return shipping label, email
us at https://www.cuisinart.com/customer-care/product-assistance/product-
inquiry/, or call our Consumer Service Center toll-free at 1-800-726-0190 to
speak with a representative.
Upon receipt of the Product, Cuisinart will inspect the Product and, if required
under this Limited Warranty, attempt to repair, replace, or refund the Product
within thirty (30) days. However, there may be delays beyond Cuisinart’s control,
in which case that time period may be extended as reasonably necessary.
IMPORTANT: If the nonconforming Product is to be serviced by someone other
than Cuisinart’s Authorized Service Center, please remind the servicer to call
our Consumer Service Center at 1-800-726-0190 to ensure that the problem is
properly diagnosed, the Product is serviced with the correct parts, and the
product is still under warranty.
California residents only
The three (3) year Limited Warranty period begins on the date the Product was
delivered, which may be dierent than the date the Product was purchased.
California residents also have the option of obtaining the benets of this
Limited Warranty by bringing the Product to (A) the store where it was
purchased or (B) another retail store that sells Cuisinart products of the same
type. The retail store shall then, according to its preference, either repair the
Product, refer the consumer to an independent repair facility, replace the
Product with another identical or reasonably equivalent product, or refund the
purchase price less the amount directly attributable to the consumer’s prior
usage of the Product. California residents may also, according to their

13
preference, return nonconforming products directly to Cuisinart for repair or, if
necessary, replacement with another identical or reasonably equivalent product
by calling our Consumer Service Center toll-free at 1-800-726-0190. Cuisinart
will be responsible for the cost of such repair, replacement, and/or shipping and
handling for such nonconforming products under warranty.
THIS LIMITED WARRANTY GIVES YOU SPECIFIC LEGAL RIGHTS, AND YOU MAY
ALSO HAVE OTHER RIGHTS THAT VARY FROM STATE TO STATE OR BY
JURISDICTION. IN THE EVENT THIS LIMITED WARRANTY IS BREACHED, YOU MAY
HAVE CLAIMS FOR REPLACEMENT, DAMAGES, OR OTHER PENALTIES.
LIMITATIONS OF LIABILITY/ADDITIONAL LIMITATIONS AND EXCLUSIONS
ALL EXPRESS AND IMPLIED WARRANTIES ARE LIMITED IN DURATION TO THE
LIMITED WARRANTY PERIOD. NO WARRANTIES APPLY AFTER THAT PERIOD.
SOME STATES DO NOT ALLOW LIMITATIONS ON HOW LONG AN IMPLIED
WARRANTY LASTS, SO THIS LIMITATION MAY NOT APPLY TO YOU. CUISINART’S
RESPONSIBILITY UNDER THIS OR ANY OTHER WARRANTY, IMPLIED OR
EXPRESS, IS LIMITED TO REPAIR, REPLACEMENT, OR REFUND, AS SET FORTH
ABOVE. THESE REMEDIES ARE THE SOLE AND EXCLUSIVE REMEDIES FOR ANY
BREACH OF WARRANTY. TO THE MAXIMUM EXTENT PERMITTED BY LAW,
CUISINART IS NOT RESPONSIBLE FOR ANY DIRECT, INDIRECT, SPECIAL,
INCIDENTAL, OR CONSEQUENTIAL DAMAGES RESULTING FROM ANY BREACH OF
WARRANTY OR UNDER ANY OTHER LEGAL THEORY (INCLUDING, BUT NOT
LIMITED TO, LOST PROFITS, DOWNTIME, GOODWILL, DAMAGE TO OR
REPLACEMENT OF EQUIPMENT AND PROPERTY, AND ANY COSTS OF
RECOVERING, REPROGRAMMING, OR REPRODUCING ANY PROGRAM OR DATA
STORED IN OR USED WITH A SYSTEM CONTAINING THE PRODUCT), EVEN IF
CUISINART HAS BEEN ADVISED OF THE POSSIBILITY OF SUCH DAMAGES. SOME
STATES DO NOT ALLOW THE EXCLUSION OR LIMITATION OF INCIDENTAL OR
CONSEQUENTIAL DAMAGES, SO THE ABOVE LIMITATIONS OR EXCLUSIONS MAY
NOT APPLY TO YOU. ALL EXPRESS AND IMPLIED WARRANTIES ARE LIMITED IN
DURATION TO THE LIMITED WARRANTY PERIOD. NO WARRANTIES APPLY AFTER
THAT PERIOD. SOME STATES (OR JURISDICTIONS) DO NOT ALLOW LIMITATIONS
ON HOW LONG AN IMPLIED WARRANTY LASTS, SO THIS LIMITATION MAY NOT
APPLY TO YOU.
This Limited Warranty is issued by:
Conair LLC
1 Cummings Point Road
Stamford, CT 06902
1-800-726-0190

14
RECIPES
Taco Dip ....................................................14
Pickleback Wings.............................................15
Smothered Tots ..............................................15
Crab Cake Burgers............................................16
Mozzarella Stuffed Meatballs....................................16
Loaded Hot Dogs.............................................17
Chicken Katsu ...............................................17
Roast Chicken with Lemon and Herbs ............................18
Spicy Salmon Sushi Bake ......................................18
Korean Pulled Pork ...........................................19
Crispy Gnocchi with Brussels Sprouts ............................19
Butternut Squash Macaroni and Cheese...........................20
Savory Hand Pies.............................................20
French Onion Soup Grilled Cheese ...............................21
Blueberry Cornbread Cake .....................................22
Stone Fruit Crisp .............................................22
Taco Dip
The air fryer oven makes easy work of bringing together all of the favorite
flavors of tacos in one delicious dip.
Makes 6 to 8 servings
8 ounces (1 standard package) cream cheese, room temperature
and cut into 8 pieces
1 can (16 ounces) refried beans
1 cup shredded Cheddar or Monterey Jack cheese
½ cup salsa
1 cup grape tomatoes, sliced
½ cup sliced black olives
2 jalapeños, stem trimmed, thinly sliced (for a milder dip, halve
and then seed the jalapeños)
4 scallions, trimmed and thinly sliced
½ avocado, ripe but firm, pitted, peeled, and sliced
½ lime, for serving
2 tablespoons cilantro leaves, for serving
Tortilla chips, for serving
1. Distribute the cream cheese pieces evenly in a 9-inch round cake
dish, then top with the refried beans. Cover with the shredded
cheeses, and then transfer to the oven in the middle position.
2. Select Broil and set the temperature at 450°F and time to 5 minutes.
Press Start/Stop. Cook until the cheese is fully melted.
3. When the dip base is ready, remove from the oven. Spoon the salsa
over the cheese, and then top with the sliced items. Squeeze the lime
over top, and then garnish with the cilantro. Serve hot with the tortilla
chips.

15
Pickleback Wings
Inspired by the beloved pickleback shot, these crispy wings take
the flavors of pickle brine and bourbon to create a unique
and scrumptious bite.
Makes 4 to 6 servings
2 pounds chicken wings
1 cup dill pickle brine
Nonstick cooking spray
½ teaspoon kosher salt
2 tablespoons bourbon
1 tablespoon light brown sugar
2 teaspoons honey
½ teaspoon smoked paprika
½ teaspoon onion powder
¼ teaspoon garlic powder
Pinch cayenne pepper
1 tablespoon chopped dill pickles, for serving
1. In a large bowl, combine the chicken wings and pickle brine. Cover
the bowl with plastic wrap and refrigerate for 2 hours. Drain the wings
and pat dry.
2. Place the air fryer basket onto the baking pan and generously coat
with nonstick cooking spray.
3. Put the marinated chicken wings into the basket in a single layer.
Sprinkle with the salt.
4. Place the prepared basket into the oven in the upper position. Select
the Wings preset and press Start.
5. While the wings are cooking, prepare the sauce. Put the bourbon,
light brown sugar, honey, paprika, onion powder, garlic powder,
and cayenne in a large bowl. Whisk until the sugar is completely
dissolved. Reserve.
6. When time expires, toss the wings in the sauce and return to the
air fry basket. Select the Wings preset and cook for an additional 5
minutes.
7. Garnish with chopped pickles, and serve immediately.
Smothered Tots
This quick snack to share is the perfect companion for any game day.
The toppings can be increased if a stronger flavor is preferred.
Makes 6 servings
6 slices bacon
1 bag (2 pounds) frozen potato puffs (tater tots)
1 cup (4 ounces) crumbled blue cheese
½ cup (2 ounces) ounces shredded Monterey Jack cheese
1 celery stalk, diced
2 scallions, thinly sliced
2 tablespoons buffalo sauce
1. Place the air fryer basket onto the baking pan. Put the bacon slices
into the basket. Select Air Fry, and set the temperature at 400°F and
time for 10 minutes. Press Start/Stop.
2. Remove the bacon and allow to cool. Once cool enough to handle,
roughly chop.
3. While the bacon is cooling, cook the tots. Spread on the same
air fryer basket set in the baking pan (no need to clean after the
bacon) and put in the upper position of the oven. Select Air Fry and
set the temperature at 425°F and time for 10 minutes. Press Start/
Stop. Once cooked, remove from the oven. Top with the bacon, blue
cheese, and Monterey Jack. Put back into the oven. Select Broil at
450°F for 5 minutes to fully melt
the cheese.
4. Remove from the oven. Top with the celery and scallions, then drizzle
with the buffalo sauce. Serve immediately.

16
Crab Cake Burgers
Crab cakes are a beloved appetizer or topping for a salad, but why not
make them into a burger? The air fryer gives these tasty crab cakes
the perfect crispy exterior.
Makes 4 burgers
16 ounces lump crabmeat
1 teaspoon extra-virgin olive oil
1 medium red bell pepper, finely chopped
1 jalapeño, seeded and finely chopped
3 scallions, sliced
1 garlic clove, finely chopped
¼ teaspoon kosher salt
2 large eggs, lightly beaten
1 cup panko breadcrumbs, plus about ½ cup more for dredging
½ cup mayonnaise
1 teaspoon Worcestershire sauce
1 teaspoon Dijon mustard
1½ teaspoons seafood seasoning
Hot sauce (optional)
Olive oil, for spraying
4 sesame seed hamburger buns
Shredded lettuce
Lemon wedges
Aïoli
1. Put the crabmeat in a large bowl. Pick through the crabmeat to make
sure there are no shells; reserve in refrigerator.
2. To a large skillet over medium heat, add the olive oil. Once the oil is
hot, add the peppers, scallions, and garlic. Sauté until the vegetables
soften slightly, about 5 minutes; stir in the salt.
3. Remove the vegetables from the heat and allow them to cool for a
few minutes. Once cool, add the vegetables to the crabmeat. Add
the eggs, 1 cup of the panko, the mayonnaise, Worcestershire, Dijon,
seafood seasoning, and a dash or two of hot sauce, if desired.
4. Gently mix all ingredients together. The best way to mix the crab
mixture is with clean hands; however, you can also combine with a
spoon. Mix carefully to keep the crabmeat intact.
5. Using a ½-cup measure, form the mixture into cakes, and then place
them on a clean plate, separating the layers of cakes with waxed
paper, if necessary. Cover with plastic wrap, and refrigerate for 1
hour prior to cooking.
6. Once well chilled, dredge the crab cakes in the remaining panko.
7. Place the air fryer basket into the baking pan, and coat the basket
with olive oil spray. Put the crab cakes into the basket. Spray both
sides with olive oil.
8. Put the assembled pan into the middle rack position. Select Air Fry
and set the temperature at 400°F and time for 10 minutes. Press
Start/Stop. Cook until evenly browned.
9. Assemble the burgers. Divide the shredded lettuce among the bun
bottoms, and then top each with a crab cake. Squeeze some lemon
juice on top of each crab cake. Lightly coat the inside of each bun
top with some of the aïoli, and then place on top of the crab cakes.
Serve immediately.
Mozzarella Stuffed Meatballs
An extra indulgence is added to these Italian-style meatballs with the
addition
of melty mozzarella.
Makes 12 meatballs
1 pound ground beef
¼ cup marinara sauce, plus more for serving
2 tablespoons Italian seasoned breadcrumbs
¼ teaspoon kosher salt
Pinch freshly ground black pepper
1½ ounces mozzarella, cut into twelve ¼-inch cubes
Nonstick cooking spray, for the basket

17
1. Put the beef, sauce, breadcrumbs, salt, and pepper into a large
mixing bowl. Mix gently and evenly with clean hands.
2. Divide the mixture into 12 even portions. Put one cube of the
mozzarella into the center of one of the portions of meat, and then
shape the meat mixture into a ball around the cheese. Reserve.
Repeat with the remaining meat and mozzarella.
3. Place the air fryer basket into the baking pan and coat the basket
with nonstick cooking spray. Evenly space the meatballs on the
basket. Put into the upper rack position. Select Air Fry and set the
temperature at 350°F and time for 10 minutes. Press Start/Stop.
4. When the meatballs are done, serve immediately.
Loaded Hot Dogs
Inspired by the debatably delicious Hawaiian pizza, these hot dogs come
together in a flash and are loaded with sweet and savory flavor.
Makes 6 servings
6 slices bacon
6 hot dogs
6 tablespoons shredded Cheddar
6 hot dog buns
½ cup chopped tomatoes
½ jalapeño, finely chopped
½ cup diced pineapple
1. Place the air fryer basket into the baking pan. Lay the bacon slices in
the basket. Put in the upper position of the oven. Select Air Fry and
set the temperature at 400°F and time for 10 minutes. Press Start/
Stop. Remove and allow to cool slightly. Once cool enough to handle,
break or cut each slice of bacon into 2 pieces.
2. While the bacon is cooling, cook the hot dogs. Place on the same
air fryer basket set in the baking pan (no need to clean after cooking
the bacon). Put in the upper position. Select Air Fry and set the
temperature at 400°F and time for 4 minutes. Press Start/Stop.
Remove and reserve.
3. Assemble the hot dogs. Add 1 tablespoon of Cheddar to the bottom
of each hot dog bun. Top each with a hot dog and then lay the bacon
pieces along the sides. Divide the tomatoes, jalapeño, and pineapple
evenly among the hot dogs.
4. Place the assembled hot dogs back on the air fryer basket. Put the
assembled basket with the hot dogs in the middle position. Select
Air Fry and set temperature at 400°F and time for 2 minutes . Press
Start/Stop.
5. Serve immediately.
Chicken Katsu
Japanese-style chicken cutlets are super crispy thanks to the panko
breadcrumbs. Serve over rice with shredded cabbage and some Korean
BBQ sauce for a quick and tasty meal.
Makes 4 servings
½ cup unbleached all-purpose flour
¼ teaspoon kosher salt
Pinch freshly ground black pepper
2 large eggs
1 cup panko breadcrumbs
1 pound chicken tenders (pounded thin, if necessary, to make
even pieces)
Nonstick cooking spray
Olive or vegetable oil, for coating chicken
Cooked white rice, for serving
Shredded green cabbage, for serving
Korean barbecue sauce, for serving
1. Set out 3 shallow bowls or pie plates to hold the breading
ingredients. In the first bowl, add the flour, salt, and pepper; whisk to
combine. Add the eggs to the second, whisking to lightly beat. To the
third bowl, add the panko.

18
2. Dip one chicken tender first in the flour, shaking off any excess,
then in the eggs, and finally in the panko. Reserve on a clean plate.
Repeat with the remaining tenders.
3. Place the air fryer basket into the baking pan and coat the basket
with nonstick cooking spray. Liberally spray the chicken with olive
or vegetable oil and then place on the air fryer basket.
4. Put the pan into the top position of the oven. Select Air Fry and set
the temperature at 400°F and time for 16 minutes. Press Start. Cook,
flipping the tenders halfway through the cooking time.
5. Serve the chicken with white rice, shredded cabbage, and Korean
barbecue sauce.
Roast Chicken with Lemon and Herbs
The Cuisinart
®
10-in-1 Extra-Large Air Fryer Oven does the heavy lifting
in this classic roast chicken preparation, ensuring crispy skin and juicy
meat every time.
Makes 4 to 6 servings
1 whole chicken, about 4 pounds
1½ teaspoons kosher salt
½ teaspoon freshly ground black pepper
1 lemon, halved, seeds removed
6 garlic cloves, crushed
1 large handful fresh herbs (any mix of rosemary, thyme, parsley,
or oregano)
1 tablespoon olive oil
1. Pat the chicken dry with paper towels and then generously season
with the salt and pepper, including the cavity. Squeeze the lemon into
the cavity and place the squeezed halves in the cavity with the garlic
and herbs. Place on the baking pan, and allow to sit for 30 minutes
before roasting.
2. Before roasting, rub the olive oil all over the surface of the chicken.
3. Place the pan in the lower position of the oven. Select Roast, and set
the temperature at 375°F and time for 60 minutes. Press Start/Stop.
4. The chicken is ready when juices run clear and the thickest part of
the thigh registers 165°F with an instant-read thermometer.
5. Allow the chicken to rest for about 5 minutes before serving
Spicy Salmon Sushi Bake
Sushi lovers, look no further for your next easy weeknight dinner!
All the delicious flavors of spicy salmon sushi come together in this
simple casserole. This sushi bake can be enjoyed on its own, but we
recommend serving with nori sheets and sliced avocado to take it to a
whole other level!
Makes 6 to 10 servings
3 pounds salmon fillet, skin off and pin bones removed
1 teaspoon kosher salt
Nonstick cooking spray
4 cups cooked sushi rice, warm
1 teaspoon furikake
4 ounces cream cheese, room temperature
¼ cup Japanese mayonnaise, plus more for garnish
2 tablespoons Sriracha
2 teaspoons lightly seasoned rice wine vinegar
¼ cup sweet chili sauce, plus more for garnish
3 scallions, sliced, green and white parts divided
1. Season the salmon with the salt. Place the air fryer basket onto the
baking pan and generously coat with nonstick cooking spray.
2. Place the salmon in the basket. Place into the oven in the upper rack
position. Select Air Fry, and set the temperature at 375°F and the
time to 15 minutes. Press Start/Stop. Cook until the salmon is cooked
through – it may take less than the set time.
3. In a 9x13-inch baking pan, press the cooked sushi rice into an even
layer. Sprinkle with the furikake and reserve.

19
4. In a large bowl, whisk together the cream cheese, mayonnaise,
Sriracha, and rice wine vinegar until smooth. Crumble the cooked
salmon and add to the sauce along with the scallion whites. Toss to
combine. Spread the salmon mixture over the rice in an even layer.
5. Place the pan in the lower position of the oven. Select Bake, and set
the temperature at 450°F and time for 8 minutes. Press Start/Stop.
Cook until the salmon starts to brown.
6. Remove the pan from oven. Drizzle with additional mayonnaise
and sweet chili sauce. Garnish with the scallion greens. Serve
immediately.
Korean Pulled Pork
This spicy and sweet pulled pork is perfect served on its own,
as a sandwich, or over loaded fries.
Makes 4½ cups
¼ cup gochujang
¼ cup honey
2 tablespoons soy sauce
2 tablespoons lightly seasoned rice wine vinegar
2 teaspoons kosher salt
5 pounds boneless pork butt
1. Place the gochujang, honey, soy sauce, vinegar, and salt in a large
bowl and whisk until combined. Add the pork and coat evenly with
the sauce. Cover the bowl with plastic wrap and refrigerate overnight.
2. When ready to cook, transfer the marinated pork to a 9x13-inch
baking pan and cover with foil. Place the pan into the oven in the
lower position. Select Roast, and set the temperature at 300°F and
time for 3 hours. Press Start/Stop. After 3 hours, remove the foil
and return the pan to the oven. Select Roast and set temperature at
300°F and time for 30 minutes.
3. When time expires, shred the pork and mix with any drippings if
desired, then serve.
Crispy Gnocchi with Brussels Sprouts
A quick and simple meal that will be on the table in under 30 minutes.
Makes 4 servings
1 package (17.6 ounces) shelf-stable gnocchi
Olive oil, for spraying
Kosher salt
Freshly ground black pepper
Nonstick cooking spray
1 pound Brussels sprouts, trimmed and halved
Hot honey, for serving
Lemon zest, for serving
Lemon juice, for serving
1. Put the gnocchi into a large mixing bowl. Spray liberally with the olive
oil and then sprinkle with two pinches of salt and a pinch of pepper.
Toss to fully coat.
2. Place the air fryer basket into the baking pan. Lightly coat with
nonstick cooking spray. Transfer the gnocchi into the basket,
reserving the bowl. Place into the oven in the middle rack position.
Select Air Fry, and set the temperature at 375°F and time for 18
minutes. Press Start/Stop.
3. While the gnocchi are cooking, add the sprouts to the reserved
mixing bowl and spray well with olive oil, then toss with a pinch
of salt and pepper. Add to the gnocchi when there is 12 minutes
remaining of cooking time.
4. Transfer to a shallow serving bowl. Drizzle with hot honey, and
sprinkle with a large pinch of lemon zest and a squeeze of lemon
juice. Serve immediately.

20
Butternut Squash Macaroni and Cheese
Add some fall flavors to this favorite dish. Not only does the squash
make for a creamier consistency, but it also adds some extra nutrition
(and the kids will never know!).
Makes 8 servings
1 pound cubed butternut squash (about 4 cups cubed)
2 teaspoons extra-virgin olive oil
1 teaspoon kosher salt, divided
Pinch freshly ground black pepper
½ teaspoon fresh thyme leaves
2 sage leaves, finely chopped
Nonstick cooking spray
2 cups buttery crackers
8 ounces cream cheese, room temperature and cut into 6 pieces
1 teaspoon ground mustard
¼ teaspoon ground nutmeg
1 pound macaroni
2 cups whole milk, room temperature
8 ounces Monterey Jack
8 ounces Cheddar
Softened butter or nonstick cooking spray, for the pan
1. Put the squash, olive oil, a pinch of the salt, the pepper, thyme, and
sage into a mixing bowl. Toss to combine.
2. Place the air fryer basket into the baking pan. Lightly coat with
nonstick cooking spray. Add the squash and place into the upper
position of the oven. Select Air Fry and set the temperature at 400°F
and time for 20 minutes. Press Start/Stop. Cook, tossing halfway
through. Remove and allow to cool slightly.
3. While the squash is cooking, put the crackers into the work bowl of
a food processor fitted with the chopping blade. Process until finely
chopped. Remove and reserve.
4. With the chopping blade still in the food processor, add the cooked
squash to the work bowl. Pulse a few times, and then process until
smooth. Scrape down the bowl and then add the cream cheese,
remaining salt, and spices. Pulse a few times, and then process until
smooth. Reserve.
5. Cook the pasta until al dente. Drain and then return to the cooking
pot. Add the milk and the reserved cream cheese-squash mixture,
stirring until well combined.
6. Remove the chopping blade from the work bowl and then fit with
the medium shredding disc (no need to clean the bowl). Shred the
cheeses, and then stir into the pasta mixture.
7. Coat a 13x9-inch pan with the butter, and then transfer the pasta
mixture to the pan. Top with the reserved cracker crumbs.
8. Place the pan into the oven in the lower position. Select Bake and set
the temperature at 350°F and time for 10 minutes. Press Start/Stop.
Cook until the top is golden brown.
9. Cool slightly before serving.
Savory Hand Pies
Store-bought pie dough brings ease to these tasty hand pies. We love
the combination of kale, squash, and goat cheese, but they can easily
be swapped out for your favorite veggies and cheese.
Makes 6 hand pies
1 tablespoon extra-virgin olive oil, plus more for spraying
¼ medium onion, finely chopped
2 stems curly kale, hard stems removed, and leaves and tender
stems finely chopped
Kosher salt
Freshly ground black pepper
Pinch red pepper flakes
¼ cup crumbled goat cheese
1 cup cubed butternut squash
1 large egg
1 pound prepared pie dough (found in the freezer section,
already rolled into rounds)

21
Nonstick cooking spray
1. Put the oil into a large skillet set over medium heat. Once the oil is
hot, add the onion, kale, and a pinch each of salt and pepper. Sauté
until the vegetables are softened. Remove from the heat and add the
pepper flakes. Once cool, stir in the goat cheese. Reserve.
2. Put the squash into the air fryer basket fitted in the baking pan. Spray
with olive oil, and season with a large pinch of salt and pepper. Toss
well. Put into the upper position of the oven. Select Air Fry at 400°F
and set the time to 3 minutes. Press Start/Stop. Remove from the
oven and allow to cool. Once cool, toss with the kale-goat cheese
mixture.
3. In a small bowl, beat the egg with 1 teaspoon of water to make an
egg wash. Reserve.
4. Cut six 6-inch rounds out of the prepared dough. Scoop 2
tablespoons of filling into the center of each round. Fold over the
dough and crimp to seal. Brush with the egg wash.
5. Lightly coat the air fryer basket with the nonstick cooking spray.
Place the filled hand pies in the assembled basket. Using a paring
knife, cut a small slit on the top of each hand pie to allow steam to
vent out of the pies to make sure the crust comes out nice and crispy
and so the pies retain their shape.
6. Put into the upper position of the oven. Select Air Fry and set the
temperature at 400°F and the time to 18 minutes. Press Start/Stop.
Cook until browned and crispy.
7. Cool slightly before serving.
French Onion Soup Grilled Cheese
The flavors of beloved French onion soup get sandwiched between two
slices of bread and broiled to perfection in this indulgent spin
on a classic.
Makes 4 sandwiches
4 cups sliced onions, from about 2 medium onions
2 tablespoons extra-virgin olive oil, divided
½ teaspoon kosher salt
4 tablespoons dry sherry
8 slices Gruyère
8 slices thick-cut French or Italian bread
1. In a medium bowl, toss the onions with 1 tablespoon of the olive
oil and the salt. Spread evenly on the baking pan. Place the baking
pan into the oven in the lower position. Select Roast and set the
temperature at 350°F and time for 30 minutes. Press Start/Stop.
Cooking, tossing the onions every 10 minutes. When time expires,
drizzle the sherry over the onions. Select Roast. Press Start/Stop,
and cook for an additional 5 minutes. Remove from the oven and
transfer to a small bowl. Reserve.
2. Assemble the sandwiches: Lay out four slices of bread and top each
with one slice of cheese. Evenly divide the caramelized onions among
the four slices of bread, followed by the remaining slices of cheese.
Top with the four remaining bread slices. Brush the top and bottom of
each with olive oil.
3. Place the air fryer basket onto the baking pan. Arrange the
sandwiches in the basket. Put into the middle position of the oven.
Select Broil and set the temperature at 450°F and time for 2 minutes.
Press Start/Stop. Cook, watching the sandwiches and stopping once
the cheese is melted and the bread is toasted and brown.
NOTE: You may need to work in batches, depending on the size of
the sliced bread.
4. Remove the sandwiches from oven and serve immediately.

22
Blueberry Cornbread Cake
A summertime treat for breakfast with coffee or topped with ice cream
for a decadent dessert.
Makes 12 servings
Softened butter or nonstick cooking spray, for coating pan
2 cups cake flour (not self-rising)
1 cup yellow cornmeal, preferably medium coarseness
1 tablespoon baking powder
1 teaspoon kosher salt
3 large eggs
3 large egg yolks
1
/
3
cup vegetable oil
1½ teaspoons pure vanilla extract
16 tablespoons (2 sticks) unsalted butter, room temperature,
cut into small cubes
1 cup granulated sugar
1 cup buttermilk
2 cup blueberries, fresh or frozen
1. Coat a 13x9-inch baking pan with the softened butter or nonstick
cooking spray, and line with parchment paper; reserve.
2. Put the flour, cornmeal, baking powder, and salt in a small bowl.
Whisk to fully combine; reserve.
3. Put the eggs, yolks, oil, and vanilla into a large measuring cup and
whisk well to combine; reserve.
4. Put the butter into a large mixing bowl and, using a hand mixer, beat
until creamy. Add the sugar, and beat until the butter and sugar are
lightened, about 2 minutes. With the hand mixer on low, add the
liquid mixture, and then the buttermilk gradually, until incorporated.
Mix in the dry ingredients in two additions until just combined. Fold in
the blueberries.
5. Transfer the batter to the prepared pan, and spread evenly. Place into
the lower position of the oven. Select Bake and set the temperature
at 350°F and time for 20 minutes. Press Start/Stop. Cook, baking
until the cake is lightly golden.
6. Let cool in pan, and then serve.
Stone Fruit Crisp
There is little that is more satisfying than a warm fruit crisp. Stone fruit
works well here with the spices in the oat topping.
Makes 15 servings
Filling:
3½ pounds fruit (mixture of stone fruits such as peaches, plums,
apricots, and nectarines), pitted and cut into 1-inch pieces
1 cup granulated sugar
¼ teaspoon kosher salt
½ teaspoon pure vanilla extract
½ teaspoon fresh lemon juice
3 tablespoons arrowroot powder
Topping:
2 cups rolled oats
1 cup unbleached all-purpose flour
1 cup packed light brown sugar
½ teaspoon ground cinnamon
½ teaspoon ground ginger
½ teaspoon kosher salt
12 tablespoons (1½ sticks) unsalted butter, cubed
and room temperature
1. Put the fruit, sugar, salt, vanilla, and lemon juice into a large mixing
bowl; toss to fully combine. Add the arrowroot powder and stir to
coat well. Transfer to a 13x9-inch baking pan; reserve.
2. Prepare the topping: Put oats, flour, sugar, cinnamon, ginger, and
salt into a mixing bowl and combine. Add the butter, and with a large
fork, a pastry blender, or your fingers, work the butter into the dry

23
ingredients. Once the butter is evenly distributed, sprinkle over the
top of the filling.
3. Put the pan into the lower position of the oven. Select Bake and set
the temperature at 350°F and time for 30 minutes. Press Start/Stop.
Cook for 30 minutes, or until the filling is bubbling and the top is
browned.
4. Remove and allow to cool slightly before serving.

24
Notes

25
ÍNDICE
Medidas de seguridad importantes ............................25
Uso de alargadores ........................................26
Piezas y características .................................... 27
Panel de control ...........................................28
Antes del primer uso .......................................29
Instrucciones de uso .......................................29
Posiciones de la bandeja/rejilla .............................. 30
Consejos y sugerencias .....................................30
Tabla de referencia para freír con aire..........................31
Limpieza y mantenimiento .................................. 33
Resolución de problemas ...................................34
Garantía .................................................35
Recetas .................................................37
MEDIDAS DE SEGURIDAD IMPORTANTES
Al usar aparatos eléctricos, especialmente en presencia de niños,
siempre se deben tomar precauciones básicas de seguridad, entre ellas
las siguientes:
1. Lea todas las instrucciones.
2. DESENCHUFE EL APARATO CUANDO NO ESTÉ EN USO Y
ANTES DE LIMPIARLO. Deje que se enfríe antes de limpiarlo,
manipularlo o instalar/quitar piezas.
3. No toque las superficies calientes; use los mangos/asas/agarraderas.
4. Para reducir el riesgo de descarga eléctrica, no sumerja ninguna
parte del aparato en agua u otros líquidos. Véase las instrucciones
de limpieza.
5. Este aparato no debe ser usado por o cerca de niños o personas con
ciertas discapacidades.
6. No use este aparato si el cable o el enchufe están dañados, después
de un mal funcionamiento, después de una caída/caída en agua, o si
está dañado; devuélvalo a un centro de servicio autorizado o al lugar
de compra para su revisión, reparación o ajuste.
7. El uso de accesorios no recomendados por Cuisinart puede causar
lesiones.
8. No lo use en exteriores.
9. No deje que el cable cuelgue de la encimera o de la mesa, donde
niños o animales lo puedan jalar o tropezar, ni que tenga contacto
con superficies calientes.
10. No coloque el aparato sobre o cerca de un quemador a gas o de un
hornillo eléctrico caliente, ni en un horno caliente.
11. Solo use este aparato para el uso previsto.
12. Tenga sumo cuidado al usar fuentes que no sean de metal o vidrio
resistente al calor en el horno.
13. Para evitar las quemaduras, tenga sumo cuidado al sacar los
accesorios del horno o tirar la grasa caliente.
14. Desenchufe el aparato cuando no esté en uso. Almacene
solamente los accesorios resistentes al calor recomendados por el
fabricante en el horno.
15. No coloque papel, cartón, plástico o materiales similares en el horno.
16. No cubra la bandeja recogemigas ni la rejilla del horno con papel de
aluminio; esto puede provocar un sobrecalentamiento.
17. No coloque alimentos ni envases/utensilios metálicos muy grandes
en el horno; esto presenta un riesgo de incendio o descarga
eléctrica.
18. Puede ocurrir un incendio si el aparato está cubierto, toca o se
encuentra cerca de materiales inflamables tales como cortinas,
colgaduras o paredes. No coloque ningún artículo sobre el aparato
durante el funcionamiento. No haga funcionar el aparato debajo de
un armario/gabinete.

26
19. No use estropajos metálicos para limpiar el aparato; partículas
de metal podrían depositarse en sus componentes eléctricos,
presentando un riesgo de descarga eléctrica.
20. Apague el aparato antes de intentar desalojar alimentos atascados.
21. Advertencia: Para evitar el riesgo de incendio, NUNCA descuide/
deje el aparato sin vigilancia durante el uso.
22. Siempre use las temperaturas recomendadas para hornear, asar y
freír con aire.
23. No apoye ningún utensilio de cocina o fuentes en la puerta de vidrio.
24. No haga funcionar el aparato debajo o dentro de un armario/
gabinete. Siempre desenchufe el aparato antes de almacenarlo en un
armario/gabinete. Dejar el aparato enchufado representa un riesgo
de incendio, especialmente si este toca las paredes o la puerta del
armario/gabinete cuando se cierra.
25. Tenga sumo cuidado al mover un aparato que contenga aceite u otro
líquido caliente.
26. Para desconectar, presione el botón START/STOP, y luego
desenchufe el aparato.
27. Los niños o las personas que carezcan de la experiencia o de los con-
ocimientos necesarios para manipular el aparato, o aquellas cuyas
capacidades físicas, sensoriales o mentales estén limitadas, no deben
usar el aparato sin la supervisión o la dirección de una persona respons-
able por su seguridad. Supervise el uso de este aparato con cuidado
cuando sea usado por o cerca de niños. No deje que los niños jueguen
con este aparato.
GUARDE ESTAS
INSTRUCCIONES
Por favor, lea y conserve estas instrucciones en un lugar seguro.
Estas instrucciones le ayudarán a sacar el máximo provecho de su horno
tostador digital Cuisinart
®
y siempre obtener resultados consistentes
y profesionales.
USO DE ALARGADORES
El cable provisto con este aparato es corto, para reducir el peligro de que
alguien se enganche o tropiece con un cable más largo. Se puede usar un
alargador, siempre que se respeten las precauciones siguientes.
La clasificación nominal del alargador debe ser por lo menos igual a la del
aparato. El cable más largo debe ser acomodado de tal manera que no
cuelgue de la encimera/mesa, donde puede ser jalado por niños o causar
tropiezos.
AVISO
El cable de este aparato cuenta con un enchufe polarizado (una pata es
más ancha que la otra). Como medida de seguridad, aquel enchufe se
podrá enchufar de una sola manera en la toma de corriente de tierra. Si
el enchufe no entra en la toma de corriente, inviértalo. Si aun así no entra
completamente, comuníquese con un electricista. No intente modificarlo.
PARA USO DOMÉSTICO
SOLAMENTE
NO APROBADO PARA
USO COMERCIAL
27
PIEZAS Y CARACTERÍSTICAS
1. Panel de control
Controles táctiles y pantalla LED para un fácil uso
(véase la página siguiente para más detalles).
2. Luz
Permite ver fácilmente los alimentos mientras se cocinan.
3. Ventanilla grande
Permite observar el progreso de la cocción.
4. Rejilla del horno
Puede usarse en tres posiciones. Use la rejilla para tostar pan
o bagels, hornear pizza congelada o recalentar pizza.
5. Posiciones de la rejilla
A. Posición inferior – recomendada para hornear alimentos grandes
(p.ej., pollo entero), productos de panadería y pizza.
B. Posición intermedia – recomendada para tostar y freír con aire.
La rejilla se detendrá a la mitad al jalarse fuera del horno. Para
deslizarla fuera del horno, levante la parte delantera. Esta posición
es recomendada para tostar y freír con aire.
C. Posición superior – recomendada para dorar/gratinar.
NOTA: Véase la guía en la página 29 para las posiciones
recomendadas con diferentes funciones.
6. Bandeja recogemigas (no ilustrada)
Se desliza hacia dentro y hacia fuera para una fácil limpieza.
7. Cesta para freír con aire
Use la cesta con las funciones “AIR FRY” (freír con aire) y “BROIL”
(dorar/gratinar) para optimizar los resultados de cocción. La cesta
para freír con aire siempre debe colocarse en la bandeja para
hornear/de goteo.
8. Bandeja para hornear/de goteo
Incluida para su conveniencia. Úsela por sí sola para hornear
o asar. Úsela con la cesta para freír con aire para freír con aire
y dorar/gratinar.
4
7
1
3
5B
5A
8
8
7
5C
4
2

28
FAMILIARÍCESE CON EL PANEL DE CONTROL
1. Pantalla digital
Muestra las funciones de cocción, el tiempo de cocción, la
temperatura, el nivel de tostado, la cantidad de rebanadas, el
indicador de precalentamiento y el indicador de listo.
2. Botón de encendido/apagado
Presiónelo para despertar el aparato del modo de reposo, iniciar el
ciclo de cocción y apagar el aparato después de la cocción.
3. Botón FUNCTION (función)
Presiónelo para ingresar al modo de fijación de la función. El horno
cuenta con 6 funciones: “AIR FRY” (freír con aire), “TOAST” (tostar),
“BAKE” (hornear), “BROIL” (dorar/gratinar), “ROAST” (asar) o “WARM
(mantener caliente).
4. Botón PRESET (preajuste para freír con aire)
Presiónelo para ingresar al modo de fijación del preajuste para freír
con aire. El horno cuenta con 4 preajustes para freír con aire: “FRIES”
(papas fritas), “WINGS” (alitas de pollo), “SNACKS” (bocadillos) o
“VEGETABLES” (vegetales).
5. Flechas
Presiónelas para elegir la función, el preajuste para freír con aire,
el tiempo de cocción, la temperatura, el nivel de tostado o el número
de rebanadas.
6. Botón TEMP/SHADE (temperatura/nivel de tostado)
Presiónelo para ingresar al modo de fijación de la temperatura
y del nivel de tostado.
7. Botón TIME/SLICE (tiempo de cocción/número de rebanadas)
Presiónelo para ingresar al modo de fijación del tiempo de cocción
y del número de rebanadas.
8. Botón de luz
Presiónelo para encender la luz interna. Nota: La luz se apagará
automáticamente después de 20 segundos. Para apagarla antes
de este tiempo, presione el botón otra vez.
9. Botón START/STOP
Presiónelo para iniciar/detener el proceso de cocción.
4
51 2 3 6
7
8
9

29
CÓMO AJUSTAR EL VOLUMEN DEL TONO
1. Mantenga presionados el botón los botones FUNCTION y PRESET por
3 segundos;
2. El volumen por defecto (1–bajo) o el volumen previamente fijado
aparecerá en la pantalla.
3. Use las flechas
y para para fijar el volumen al nivel deseado: 0
(desactivado), 1 (bajo) o 2 (alto).
Nota: Solo se puede ajustar el volumen cuando el horno no está en uso.
El volumen volverá al ajuste por defecto si se corta la corriente por más
de 30 minutos.
ANTES DEL PRIMER USO
1. Coloque el horno sobre una superficie plana y nivelada.
2. Deje un espacio libre de 2-4in(5-10cm) alrededor del aparato. No lo
coloque sobre una superficie sensible al calor.
NOTA: NO GUARDE NINGÚN OBJETO ENCIMA DEL HORNO. SI
LO HACE, QUÍTELOS ANTES DE ENCENDERLO. EL EXTERIOR
DEL APARATO SE PONE MUY CALIENTE DURANTE EL USO;
MANTÉNGALO FUERA DEL ALCANCE DE LOS NIÑOS.
3. Coloque la bandeja recogemigas en su sitio, deslizándola debajo
de las resistencias inferiores, y compruebe que no haya nada en el
horno.
4. Enchufe el cable en una toma de corriente.
INSTRUCCIONES DE USO
1. Coloque la rejilla, la bandeja y/o la cesta para freír en la posición
recomendada (véase la tabla a la derecha).
2. Presione el botón
para despertar el aparato; los botones
FUNCTION (función) y PRESET (preajuste para freír con aire)
parpadearán.
3. Presione el botón deseado, FUNCTION (función) y PRESET (preajuste
para freír con aire), dependiendo de su necesidad, elegir una función o
elegir un preajuste para freír con aire. A continuación, use las flechas
para elegir la opción deseada. El botón TEMP/SHADE (temperatura/
nivel de tostado) parpadeará.
4. Presione el botón TEMP/SHADE para ajustar la temperatura o el nivel
de tostado si es necesario.
Use las flechas para elegir el ajuste deseado.
5. Presione el botón TIME/SLICE para ajustar el tiempo de cocción y el
número de rebanadas si es necesario. Use las flechas para elegir el
ajuste deseado.
6. Presione el botón START// STOP para iniciar el ciclo de cocción.
NOTA: Si no necesita ajustar la temperatura, el tiempo, el grado de
tostado o el número de rebanadas, puede presionar el botón START/
STOP directamente después de elegir la función o el preajuste para freír
con aire.
7. Para ajustar el tiempo, la temperatura, el nivel de tostado o el número
de rebanadas después de que el ciclo de cocción haya empezado,
simplemente presione el botón TEMP/SHADE (temperatura/nivel de
tostado) o TIME/SLICE (tiempo de cocción/número de rebanadas),
y use las flechas para elegir los ajustes deseados. El nuevo ajuste
parpadeará por 3 segundos y se activará.
8. Para cambiar la función o el preajuste para freír con aire después
de que el ciclo de cocción haya empezado, mantenga presionado el
botón START/STOP para reiniciar el ciclo y empiece la programación
otra vez.
PRECALENTAMIENTO (FUNCIÓN “BAKE” SOLAMENTE)
Cuando usa la función “BAKE” (hornear), el horno se precalienta
automáticamente.
El indicador “PREHEAT” (precalentando) aparece en la pantalla durante
el precalentamiento. Cuando el horno esté caliente, emitirá un pitido y
el indicador “READY” aparecerá en la pantalla. Si ha fijado el tiempo de
cocción, el temporizador empezará la cuenta regresiva.
30
POSICIONES DE LA BANDEJA/REJILLA
Véase las posiciones de la rejilla/bandeja/cesta sugeridas en la tabla
a continuación.
CONSEJOS Y SUGERENCIAS
“AIR FRY” (FREÍR CON AIRE)
CONSEJO: Para mejores resultados, coloque la cesta para freír con aire en la
bandeja para hornear/bandeja de goteo.
La función “AIR FRY” (freír con aire) puede usarse con temperaturas de 200°F
a 450°F, por hasta 1 hora. Freír con aire es una alternativa saludable a freír con
aceite. Un ventilador de alta velocidad hace circular el calor producido por varias
resistencias para preparar una variedad de recetas más saludables que con la
fritura tradicional.
• Opciones por defecto: 400 °F; 10 minutos.
• Muchos alimentos pueden ser fritos de esta manera, usando muy poco aceite.
Los alimentos fritos con aire son más ligeros y menos aceitosos que los
alimentos fritos en aceite.
• Freír con aire no requiere aceite, pero rociar ligeramente los alimentos con
aceite ayuda a que sean más dorados y crujientes. Use un rociador o spray de
aceite de oliva para mantenerlo extraligero, pincele aceite uniformemente en
los alimentos (usando una brocha de cocina), o vierta un poquito de aceite en
un tazón, agregue los alimentos y revuelva.
• La mayoría de los aceites pueden usarse para freír con aire. Sin embargo,
el aceite de oliva da un sabor más rico a los alimentos. Para un sabor más
suave, se recomienda usar aceite vegetal, aceite de colza/canola o aceite
de semilla de uva.
• Una variedad de coberturas pueden ser usadas para rebozar/empanar los
alimentos antes de freírlos con freír con aire, p.ej., pan rallado, pan rallado
sazonado, pan rallado japonés “panko”, hojuelas de maíz picadas, chips de
papa picadas, galletas Graham molidas, etc. Algunas harinas (incluyendo las
mezclas sin gluten y la harina de maíz) también dan buenos resultados.
• La mayoría de los alimentos no requieren voltearse durante la cocción, pero los
artículos más grandes, tales como las chuletas de pollo, deben voltearse a la
mitad del ciclo de cocción para que se cocinen y se doren uniformemente.
• También se recomienda revolver los alimentos a mitad de tiempo cuando
fría con aire muchos alimentos a la vez, para que se cocinen y se doren
uniformemente.
• Use temperaturas más altas para los alimentos que suelen cocinarse más
rápido, tales como el tocino y los chips de vegetales; use temperaturas
más bajas para los alimentos que requieren más tiempo tales como el pollo
empanizado.
• Los alimentos se cocinarán más uniformemente si son del mismo tamaño;
por lo tanto, córtelos en pedazos uniformes.
• Tenga presente que muchos alimentos pierden agua durante la cocción.
Cuando cocine altas cantidades de alimentos por un largo período, puede
que se produzca condensación, la cual puede dejar la encimera húmeda.
Rejilla del
horno
Bandeja para
hornear/de goteo
Cesta para freír
con aire
POSICIONES DE LA REJILLA/BANDEJA/CESTA SUGERIDAS
Posición superior Posición intermedia Posición inferior
Función
“TOAST”
(tostar)
X
“BAKE”
(hornear)
X X X X
“BROIL”
(dorar/
gratinar)
X X X X X X X X X
“ROAST”
(asar)
X X X X X X
“AIR FRY”
(freír con
aire)
X X X
“WARM”
(mantener
caliente)
X X X X X X X X X

3131
Alimento Cantidad recomendada Temperatura Tiempo
Tocino 12 oz (340 g), 10-12 lonchas 400°F 8-10 minutos
Alitas de pollo 2lb (910 g), aprox. 20 alitas (máximo 3lb/1.35kg) 400°F 20-25 minutos
Bocaditos/Aperitivos congelados
(p.ej., palitos de Mozzarella,
camarones rebozados, etc.)
1½lb (680 g), aprox. 20 piezas 400°F 5-7 minutos
Nuggets de pollo congelados 1lb (455 g); aprox. 34 pzas. 400°F 10 minutos
Palitos de pescado congelados 12 oz (340 g); aprox. 20 pzas. 400°F 8 minutos
Papas fritas congeladas 1-2lb (455-910 g) 450°F 15-25 minutos
Papas fritas gruesas congeladas 1-2lb (455-910 g) 450°F 15-25 minutos
Papas fritas frescas
1-2lb (455-910 g); 2-4 papas medianas cortadas en
palitos de 4 x ¼in(10cm x 0.5cm)
400°F
15-20 minutos
Papas fritas gruesas frescas
1-2lb (455-910 g); 2-4 papas medianas a grandes
cortadas a lo largo en ocho pedazos
400°F 15-20 minutos
Camarones 1 libra (455 g); aprox. 16 camarones extragrandes 375°F 8-10 minutos
Chips de maíz/Totopos
6 tortillas de 5in(12.5cm), cortadas en cuartos 400°F
5-6 minutos (revolver a la mitad del
tiempo)
Vegetales
1lb (455 g) 400°F
Rodajas delgadas: 10 minutos;
pedazos grandes: 15-20 minutos
TABLA DE REFERENCIA PARA FREÍR CON AIRE
La tabla a continuación indica las cantidades, el tiempo de cocción y la temperatura de cocción recomendados para varios tipos de alimentos que pueden
freírse con aire. Si desea freír con aire más alimentos de lo recomendado en la tabla, agite la cesta o voltee los alimentos de vez en cuando durante la cocción
para conseguir resultados uniformes y crujientes. Nota: Pequeñas cantidades de alimentos pueden requerir menos tiempo de cocción. Use la luz del horno
para comprobar los resultados regularmente, hasta conseguir los resultados deseados.
NOTA: Siempre coloque la cesta para freír con aire en la bandeja para hornear/de goteo. Para mejores resultados, se recomienda usar la posición superior
para freír con aire los alimentos a continuación.
NOTA: Freír con aire no requiere aceite, pero rociar ligeramente los alimentos con aceite ayuda a que sean más dorados y crujientes. Use un rociador
o spray de aceite de oliva para mantenerlo extraligero, pincele aceite uniformemente en los alimentos (usando una brocha de cocina), o vierta un
poquito de aceite en un tazón, agregue los alimentos y revuelva.

3232
PREAJUSTES PARA FREÍR CON AIRE
Además de dejarle ajustar la temperatura y el tiempo de cocción
cuando use la función “AIR FRY” (freír con aire), el horno freidor digital
extragrande 10 en 1 Cuisinart
®
también cuenta con prácticos preajustes
para preparar sus alimentos fritos favoritos: papas fritas, alitas de pollo,
nuggets de pollo, bocaditos/aperitivos y vegetales.
• Opciones por defecto: 400°F; 45 min
Presione el botón PRESET y use las flechas (
) para elegir el
preajuste
para freír con aire deseado:
NOTA: La mayoría de los preajustes pueden usarse con alimentos
frescos o congelados.
“TOAST” (TOSTAR)
La función “TOAST” (tostar) le deja elegir el nivel de tostado, desde 1
hasta 7, y el número de rebanadas, desde 1 hasta 9. Esta función se usa
para tostar pan y otros artículos (frescos o congelados).
• Opciones por defecto: nivel de tostado: 4; número de rebanadas:
3-4.
• Para conseguir resultados uniformes:
– Si tuesta dos artículos, céntrelos en el medio del horno
– Si tuesta cuatro artículos a la vez, espácielos uniformemente, dos en
frente dos atrás
– Si tuesta seis artículos, espácielos uniformemente, tres en frente
y tres atrás
• Para añadir tiempo durante el ciclo de tostado, presione el botón
TIME/SLICE y use la flecha hacia arriba para añadir tiempo.
• Niveles de tostado disponibles: Claro (1, 2), medio (3, 4, 5) y oscuro
(6, 7).
ADVERTENCIA: Siempre ponga la rejilla en la posición intermedia para
tostar. No invierta la rejilla; esto puede causar un incendio o hacer que
los alimentos se quemen.
“BAKE” (HORNEAR)
La función “BAKE” (hornear) puede usarse con temperaturas de 200°F
a 450°F, por hasta 2 horas. Esta función es perfecta para hornear
cualquier artículo que prepararía normalmente en su horno convencional.
Nota: El tiempo de cocción puede variar en comparación con un horno
normal. El horno freidor hace circular el aire caliente durante la cocción;
por lo tanto, el tiempo de cocción puede resultar más corto que en un
horno tradicional. Hasta acostumbrarse a los tiempos de cocción en el
horno freidor, se recomienda vigilar la cocción con frecuencia para evitar
que los alimentos se cocinen en exceso.
• Opciones por defecto: 350°F; 45 min
• Importante: Todas nuestras recetas han sido especialmente
desarrolladas para ser horneadas en el horno freidor digital
extragrande 10 en 1 Cuisinart
®
y han sido probadas en nuestra
cocina profesional.
“BROIL” (DORAR/GRATINAR)
La función “BROIL” (dorar/gratinar) siempre usa 450°F, y puede usarse
por hasta 2 horas. Esta función puede usarse para asar carne de res,
pollo, cerdo, pescado, y más. También es perfecta para dorar/gratinar
cazuelas y platos gratinados.
• Opciones por defecto: 450 °F; 5 minutos
• Para mejores resultados, coloque la cesta para freír con aire en la
bandeja para hornear/bandeja de goteo.
• Nunca dore/gratine alimentos colocados en fuentes de vidrio.
• Vigile la cocción para evitar que los alimentos se quemen
“ROAST” (ASAR)
La función “ROAST” (asar) puede usarse con temperaturas de 200°F
a 450°F, por hasta 2 horas.
• Opciones por defecto: 375 °F; 45 minutos
• Esta función reduce considerablemente el tiempo de cocción y permite
conseguir resultados perfectos: carnes y pollo/aves dorados por fuera
y húmedos y jugosos por dentro.

33
• Ase los vegetales hace que se caramelicen, volviéndose dulces y
deliciosos
• Asar es mucho más rápido que hornear. Por lo tanto, empiece a
comprobar el punto de cocción 5-10 minutos antes del final del tiempo
recomendado.
“WARM” (MANTENER CALIENTE)
La función “WARM” (mantener caliente) puede usarse con temperaturas
de 150°F a 300°F, por hasta 2 horas. Esta función se usa para mantener
los alimentos cocinados calientes.
• Opciones por defecto: 150 °F; 30 minutos
LIMPIEZA Y MANTENIMIENTO
• Siempre desenchufe el horno y deje que se enfríe completamente
antes de limpiarlo.
• No use limpiadores abrasivos; esto dañará el acabado. Limpie el
exterior del aparato con un paño húmedo y séquelo bien. Si desea usar
un limpiador, aplique este en un paño; no en el aparato.
• Para limpiar el interior del aparato, use una esponja humedecida con
agua jabonosa o limpiador. Quite los residuos de limpiador con un
paño húmedo limpio. Nunca use productos abrasivos o corrosivos;
esto puede dañar la superficie del horno. Nunca use estropajos
metálicos (p.ej., lana de acero) para limpiar el interior del horno.
• Limpieza de los accesorios: Todos los accesorios deben ser lavados a
mano en agua caliente con jabón, usando un estropajo o un cepillo de
nylon, y bien enjuagados. NO son aptos para lavavajillas.
• Después de cocinar alimentos grasos, siempre limpie el techo del
horno, luego de que se haya enfriado. Si lo hace regularmente, el horno
seguirá funcionando como nuevo. Limpiar la grasa también asegurará
un tostado consistente y uniforme, ciclo tras ciclo.
Para eliminar las migas, deslice la bandeja recogemigas hacia fuera.
Límpiela con un paño y vuelva a colocarla en su sitio. Para eliminar la
grasa quemada, remoje la bandeja en agua caliente con jabón o use un
limpiador no abrasivo. Nunca haga funcionar el aparato sin la bandeja
recogemigas.
• Cualquier otro servicio debe ser realizado por un técnico autorizado.

34
RESOLUCIÓN DE PROBLEMAS
Funcionamiento El aparato no se enciende. Compruebe que la toma de corriente esté funcionando.
Compruebe que la puerta del horno esté cerrada.
Llame a nuestro servicio de atención al cliente al 1-800-726-0190.
¿Por qué el ventilador
permanece encendido
después de la cocción?
El ventilador permanece encendido al final de la cocción para enfriar el horno.
¿Por qué se apaga la luz? La luz solo permanece encendida por 20 segundos para ahorrar energía; esto es normal.
Programación ¿Se puede cambiar la
función después de que haya
empezado la cocción?
Sí, pero primero deberá cancelar la función actual, presionando el botón START/STOP. A continuación, presione el
botón
para activar el menú de programación.
¿Se puede cambiar el tiempo
o la temperatura cocción
después de que haya
empezado la cocción?
Sí. Simplemente presione el botón TEMP/SHADE o TIME/SLICE y use las flechas para ajustar el tiempo y la
temperatura.
Cocción ¿Por qué los alimentos fritos
no son crujientes o no se fríen
uniformemente?
Algunos alimentos requieren más aceite que otros. Si los alimentos no están lo suficientemente crujientes, use más
aceite para freírlos. Nota: puede cepillar, verter o rociar el aceite.
Cerciórese de distribuir los alimentos uniformemente en la cesta, en una capa y sin superponerlos. De ser
necesario, revuelva o voltee los alimentos a mitad de tiempo.
Cocine los alimentos por más tiempo, comprobándolos regularmente hasta que estén dorados.
Nunca descuide/deje el horno sin vigilancia durante el uso.
Los alimentos no están
completamente cocinados.
Procure cocinar tandas más pequeñas, disponiendo los alimentos en una sola capa.
Puede que la temperatura esté demasiado baja. Presione el botón TEMP/SHADE y use la flecha hacia arriba para
incrementar la temperatura.
Cuando hornee alimentos con un alto contenido de humedad, el agua/juego puede gotear en la bandeja,
produciendo vapor; esto es normal y no afectará el resultado final pero puede empañar algunas partes de la
ventanilla.
¿Por qué condensación/vapor
sale del aparato?
Puede haber residuos de aceite en la bandeja para hornear, la cesta para freír o la bandeja recogemigas. Limpie
con cuidado todos los accesorios después de cada uso.
Limpieza ¿Cómo quitar los residuos de
alimentos de los accesorios?
Para eliminar la grasa quemada, remoje los accesorios en agua caliente con jabón o use un limpiador no abrasivo.

35
RESOLUCIÓN DE PROBLEMAS
Funcionamiento El aparato no se enciende. Compruebe que la toma de corriente esté funcionando.
Compruebe que la puerta del horno esté cerrada.
Llame a nuestro servicio de atención al cliente al 1-800-726-0190.
¿Por qué el ventilador
permanece encendido
después de la cocción?
El ventilador permanece encendido al final de la cocción para enfriar el horno.
¿Por qué se apaga la luz? La luz solo permanece encendida por 20 segundos para ahorrar energía; esto es normal.
Programación ¿Se puede cambiar la
función después de que haya
empezado la cocción?
Sí, pero primero deberá cancelar la función actual, presionando el botón START/STOP. A continuación, presione el
botón
para activar el menú de programación.
¿Se puede cambiar el tiempo
o la temperatura cocción
después de que haya
empezado la cocción?
Sí. Simplemente presione el botón TEMP/SHADE o TIME/SLICE y use las flechas para ajustar el tiempo y la
temperatura.
Cocción ¿Por qué los alimentos fritos
no son crujientes o no se fríen
uniformemente?
Algunos alimentos requieren más aceite que otros. Si los alimentos no están lo suficientemente crujientes, use más
aceite para freírlos. Nota: puede cepillar, verter o rociar el aceite.
Cerciórese de distribuir los alimentos uniformemente en la cesta, en una capa y sin superponerlos. De ser
necesario, revuelva o voltee los alimentos a mitad de tiempo.
Cocine los alimentos por más tiempo, comprobándolos regularmente hasta que estén dorados.
Nunca descuide/deje el horno sin vigilancia durante el uso.
Los alimentos no están
completamente cocinados.
Procure cocinar tandas más pequeñas, disponiendo los alimentos en una sola capa.
Puede que la temperatura esté demasiado baja. Presione el botón TEMP/SHADE y use la flecha hacia arriba para
incrementar la temperatura.
Cuando hornee alimentos con un alto contenido de humedad, el agua/juego puede gotear en la bandeja,
produciendo vapor; esto es normal y no afectará el resultado final pero puede empañar algunas partes de la
ventanilla.
¿Por qué condensación/vapor
sale del aparato?
Puede haber residuos de aceite en la bandeja para hornear, la cesta para freír o la bandeja recogemigas. Limpie
con cuidado todos los accesorios después de cada uso.
Limpieza ¿Cómo quitar los residuos de
alimentos de los accesorios?
Para eliminar la grasa quemada, remoje los accesorios en agua caliente con jabón o use un limpiador no abrasivo.
Garantía limitada
Sujeto a las exclusiones y limitaciones contenidas en este documento,
Conair LLC/Cuisinart (“Cuisinart”) garantiza que el horno freidor digital
extragrande 10 en 1 Cuisinart
®
(“Producto”) estará libre de defectos de
materiales y fabricación en condiciones normales de uso doméstico durante un
período de TRES (3) años a partir de la fecha de compra del Producto
en su embalaje original sellado, a menos que se especique lo contrario
en esta Garantía Limitada. Esta Garantía Limitada es solo para consumidores de
Estados Unidos (denidos aquí como compradores al por menor para
uso personal, familiar o doméstico) que compren originalmente el Producto
a Cuisinart o a un revendedor autorizado de Cuisinart. Si no está seguro
de si un minorista u otro punto de venta es un revendedor autorizado
de Cuisinart, póngase en contacto con Cuisinart.
Esta Garantía Limitada NO cubre:
• El desgaste normal;
• Cualquier Producto adquirido por compradores comerciales o para usos
comerciales o no domésticos;
• Accesorios, piezas o programas añadidos al Producto después de que
Cuisinart lo haya enviado;
• Cualquier costo asociado con el reemplazo o reparación del Producto,
incluyendo mano de obra, instalación u otros costos incurridos por usted
sin previa aprobación de Cuisinart;
• Daños, defectos y fallas debidos a: (1) causas externas, incluyendo el envío,
accidentes, problemas con el suministro eléctrico (el Producto
está diseñado para su uso exclusivo con enchufes de 120 V), condiciones
anormales (como mecánicas o medioambientales); (2) uso no conforme
a las instrucciones del Producto; (3) uso indebido, negligencia, alteración no
autorizada, reparación no autorizada; y (4) casos fortuitos u otros
acontecimientos fuera del control de Cuisinart;
• Aunque cualquier empresa puede realizar las reparaciones y el
mantenimiento necesarios, los daños causados por usted o por terceros no
autorizados pueden anular esta Garantía Limitada;
• Los daños causados por accesorios o repuestos no autorizados
especícamente por Cuisinart pueden anular esta Garantía Limitada; y
• Cualquier Producto cuyas marcas de identicación originales (marca
comercial o número de serie) hayan sido retiradas, alteradas o borradas del
Producto.
Se recomienda llenar el formulario de registro disponible en https://cuisinart.
registria.com a n de facilitar la vericación de la fecha de compra original de
este producto. Sin embargo, no es necesario registrar el producto para recibir
servicio bajo esta garantía. En ausencia de prueba de la fecha de compra, el
período de garantía será calculado a partir de la fecha de fabricación del
producto.
GARANTÍA DE SIN DIFICULTADES
Si el Producto objeto de esta Garantía Limitada falla durante el período de
garantía por razones cubiertas por esta Garantía Limitada, Cuisinart, a su
elección, reparará el Producto, sustituirá el Producto por otro idéntico o
razonablemente equivalente, o si Conair no puede reparar o sustituir el
Producto, reembolsará al consumidor el precio de compra, menos la cantidad
directamente atribuible al uso anterior del Producto por parte del consumidor.
Para obtener una etiqueta de devolución, contáctenos, visitando https://www.
cuisinart.com/customer-care/product-assistance/product-inquiry/ o llamando
a nuestro servicio de atención al cliente, al 1-800-726-0190, para hablar con
un representante.
Tras la recepción del Producto, Conair lo inspeccionará y, si lo requiere esta
Garantía Limitada, intentará reparar, reemplazar o reembolsarlo en un plazo de
treinta (30) días. No obstante, pueden producirse retrasos fuera del control de
Cuisinart, en cuyo caso dicho plazo podrá ampliarse en la medida en que sea
razonablemente necesario.
IMPORTANTE: Si debe llevar el aparato defectuoso a un centro de servicio no
autorizado, por favor informe al personal del centro de servicio que deben
llamar al servicio de atención al cliente de Cuisinart, al 1-800-726-0190 a n de
diagnosticar el problema correctamente, usar las piezas correctas para
repararlo, y comprobar que el producto aún esté bajo garantía.
Residentes de California solamente
El período de Garantía Limitada de TRES (3) años comienza en la fecha de
entrega del Producto, que puede ser diferente de la fecha de compra del
Producto. Los residentes en California también tienen la opción de obtener los
benecios de esta Garantía Limitada devolviendo el producto defectuoso (A) a
la tienda donde lo compraron, o (B) a otra tienda que venda productos
Cuisinart
®
del mismo tipo. La tienda podrá, a su elección, reparar el producto,
referir al consumidor a un centro de servicio independiente, sustituir el
producto por uno idéntico o razonablemente equivalente, o reembolsar al
consumidor el precio de compra menos la cantidad directamente atribuible al

36
uso anterior del producto por el consumidor. Los residentes de California
también pueden, si lo desean, enviar el producto defectuoso directamente a
Cuisinart para que sea reparado o sustituido por uno idéntico o razonablemente
equivalente. Para esto, deben llamar a nuestro servicio de atención al cliente al
1-800-726-0190. Cuisinart será responsable por los gastos de reparación,
reemplazo, manejo y envío de los productos defectuosos durante el período de
garantía.
ESTA GARANTÍA LIMITADA LE OTORGA DERECHOS LEGALES ESPECÍFICOS, Y
TAMBIÉN PUEDE TENER OTROS DERECHOS QUE VARÍAN DE UN ESTADO A OTRO
O EN FUNCIÓN DE LA JURISDICCIÓN. EN CASO DE INCUMPLIMIENTO DE ESTA
GARANTÍA LIMITADA, USTED PUEDE RECLAMAR LA SUSTITUCIÓN, UNA
INDEMNIZACIÓN POR DAÑOS Y PERJUICIOS U OTRAS SANCIONES.
LIMITACIONES DE RESPONSABILIDAD/LIMITACIONES Y EXCLUSIONES
ADICIONALES
TODAS LAS GARANTÍAS EXPRESAS E IMPLÍCITAS TIENEN UNA DURACIÓN
LIMITADA AL PERÍODO DE GARANTÍA LIMITADA. NO SE APLICARÁ NINGUNA
GARANTÍA DESPUÉS DE ESTE PERÍODO. ALGUNOS ESTADOS (O
JURISDICCIONES) NO PERMITEN LIMITACIONES EN LA DURACIÓN DE UNA
GARANTÍA IMPLÍCITA, DE MODO QUE LAS LIMITACIONES MENCIONADAS
PUEDEN NO REGIR PARA USTED. LA RESPONSABILIDAD DE CUISINART BAJO
ESTA O CUALQUIER OTRA GARANTÍA, IMPLÍCITA O EXPRESA, SE LIMITA A LA
REPARACIÓN, SUSTITUCIÓN O REEMBOLSO, SEGÚN LO ESTABLECIDO
ANTERIORMENTE. ESTOS RECURSOS SON LOS ÚNICOS Y EXCLUSIVOS EN CASO
DE INCUMPLIMIENTO DE LA GARANTÍA. EN LA MEDIDA MÁXIMA PERMITIDA POR
LA LEY, CUISINART NO SE HACE RESPONSABLE DE NINGÚN DAÑO DIRECTO,
INDIRECTO, ESPECIAL, INCIDENTAL O CONSECUENTE RESULTANTE DE
CUALQUIER INCUMPLIMIENTO DE LA GARANTÍA O BAJO CUALQUIER OTRA
TEORÍA LEGAL (INCLUYENDO, PERO NO LIMITADO A, LUCRO CESANTE, TIEMPO
DE INACTIVIDAD, PÉRDIDA DEL FONDO DE COMERCIO, DAÑOS O SUSTITUCIÓN
DE EQUIPOS Y BIENES, Y CUALQUIER COSTE DE RECUPERACIÓN,
REPROGRAMACIÓN O REPRODUCCIÓN DE CUALQUIER PROGRAMA O DATOS
ALMACENADOS EN O UTILIZADOS CON UN SISTEMA QUE CONTENGA EL
PRODUCTO), INCLUSO SI CUISINART HA SIDO ADVERTIDO DE LA POSIBILIDAD
DE TALES DAÑOS. ALGUNOS ESTADOS (O JURISDICCIONES) NO PERMITEN LA
EXCLUSIÓN O LIMITACIÓN DE DAÑOS ESPECIALES, INCIDENTALES O
CONSECUENTES, DE MODO QUE LAS LIMITACIONES MENCIONADAS PUEDEN NO
REGIR PARA USTED. TODAS LAS GARANTÍAS EXPRESAS E IMPLÍCITAS TIENEN
UNA DURACIÓN LIMITADA AL PERÍODO DE GARANTÍA LIMITADA. NO SE
APLICARÁ NINGUNA GARANTÍA DESPUÉS DE ESTE PERÍODO. ALGUNOS
ESTADOS (O JURISDICCIONES) NO PERMITEN LIMITACIONES EN LA DURACIÓN
DE UNA GARANTÍA IMPLÍCITA, DE MODO QUE LAS LIMITACIONES MENCIONADAS
PUEDEN NO REGIR PARA USTED.
Esta Garantía Limitada es emitida por:
Conair LLC
1 Cummings Point Road
Stamford, CT 06902
1-800-726-0190

37
RECETAS
“Taco dip” ..................................................37
Alitas de pollo al estilo “pickleback” ..............................38
“Tots” con queso .............................................38
Hamburguesas de cangrejo.....................................39
Albóndigas con relleno de Mozzarella .............................39
“Hot dogs” cargados ..........................................40
Pollo empanado al estilo japonés ................................40
Pollo asado con limón y hierbas .................................41
Cazuela de sushi de salmón picante ..............................41
Carnitas de cerdo al estilo coreano...............................42
Ñoquis crujientes con coles de Bruselas...........................42
Macarrones con queso de calabaza moscada ......................43
Empanadas de vegetales y queso................................44
Sándwiches de queso asados con sabor a sopa de cebolla francesa....44
Pastel de maíz con arándanos azules .............................45
Crujiente de frutas ............................................46
“Taco dip”
El horno freidor de aire hace que sea fácil reunir todos los sabores
favoritos de los tacos en una deliciosa salsa
Rinde 6-8 porciones
8 onzas (225 g) de queso crema, a temperatura ambiente, en 8
pedazos
1 lata de 16 oz (455 g) de frijoles refritos
1 taza (115g) de queso Monterey Jack o Cheddar rallado
½ taza (120ml) de salsa mexicana
1 taza (150 g) de tomates de pera, partidas a la mitad
½ taza (100 g) de aceitunas negras deshuesadas
2 jalapeños, finamente rebanados (quitar las semillas si no le
gusta muy picante)
4 cebolletas (“scallions”), en rodajas finas
½ aguacate maduro pero firme, rebanado
½ lima/limón verde, para servir
2 cucharadas de hojas de cilantro, para servir
Chips de maíz/totopos, para servir
1.
Disponer los pedazos de queso crema en el fondo de un molde
redondo de 9in (23cm) y cubrir con los frijoles refritos. Rociar con
el queso y meter al horno, en la posición intermedia.
2. Elegir la función “ROAST” (asar) y fijar el tiempo en 5 minutos y la
temperatura en 450°F. Presionar el botón START/STOP. Cocinar
hasta que el queso esté completamente derretido.
3. Cuando el queso esté derretido, retirar la base del “dip” del
horno. Cubrir con la salsa mexicana y, a continuación, añadir los
ingredientes rebanados. Rociar con jugo de lima y decorar con
cilantro. Servir con chips de maíz/totopos calientes.

38
Alitas de pollo al estilo “pickleback”
Inspiradas por el apreciado chupito de pepinillo (conocido como
“pickleback shot” en inglés), estas crujientes alitas toman los sabores de
la salmuera de pepinillos y del Bourbon al próximo nivel para crear un
bocado único y delicioso.
Rinde 4-6 porciones
2 libras (910g) de alas de pollo
1 taza (235ml) de salmuera de pepinillos
Aceite en aerosol/rocío vegetal
½ cucharadita de sal kosher
2 cucharadas de Bourbon
1 cucharada (10 g) de azúcar rubia (azúcar de caña integral)
2 cucharaditas de miel
½ cucharadita de páprika ahumada
½ cucharadita de cebolla en polvo
¼ cucharadita de ajo en polvo
1 pizca de pimienta de Cayena
1 cucharada de pepinillos encurtidos picados, para servir
1. Colocar las alitas y la salmuera de pepinillos en un tazón grande;
revolver. Cubrir con papel film/plástico y refrigerar por 2 horas.
Después de este tiempo, escurrir y secar las alitas con papel
absorbente.
2. Colocar la cesta para freír con aire en la bandeja para hornear
y engrasarla con una buena cantidad de aceite en aerosol/rocío
vegetal.
3. Disponer las alitas en la cesta, en una sola capa. Sazonar con sal.
4. Meter al horno, en la posición superior. Elegir el preajuste “WINGS”
y presionar el botón START/STOP.
5. Mientras las alitas se están cocinando, preparar la salsa. Colocar
el Bourbon, el azúcar, la miel, la páprika, la cebolla en polvo y la
pimienta de Cayena en un tazón grande. Batir hasta que el azúcar se
haya disuelto por completo. Reservar.
6. Cuando las alitas estén cocinadas, revolverlas en la salsa y volver a
colocarlas en la cesta para freír con aire. Elegir el preajuste “WINGS”
y cocinar por 5 minutos adicionales.
7. Decorar con pepinillos encurtidos picados y servir inmediatamente.
“Tots” con queso
Este rápido tentempié para compartir es el acompañante perfecto para
cualquier día de partido. Los condimentos pueden incrementarse si se
prefiere un sabor más fuerte.
Rinde 6 porciones
6 lonchas de tocino
2 libras (910g) de “tater tots” (croquetas de papa)
1 taza (115 g) de queso azul desmenuzado
½ taza (55 g) de queso Monterey Jack rallado
1 rama de apio, picada
2 cebolletas (“scallions”), finamente picadas
2 cucharadas de salsa Búfalo
1. Colocar la cesta para freír con aire en la bandeja para hornear.
Disponer las lonchas de tocino en la cesta. Elegir la función “AIR
FRY” y fijar la temperatura en 400°F y el tiempo en 10 minutos.
Presionar el botón START/STOP.
2. Al final de la cocción, retirar del horno y dejar enfriar. Una vez frío,
picar grueso.
3. Mientras el tocino se está enfriando, cocinar los “tater tots”.
Disponerlos en el fondo de la bandeja para hornear (no es necesario
lavarla) y meter esta al horno en la posición superior. Elegir la función
“AIR FRY” y fijar la temperatura en 425°F y el tiempo en 10 minutos.
Presionar el botón START/STOP. Al final de la cocción, retirar del
horno. Cubrir con tocino, queso azul y queso Monterey Jack. Meter
de vuelta al horno. Elegir la función “BROIL”, fijar la temperatura
en 450°F, y gratinar por 5 minutos, hasta que el queso esté
completamente derretido.

39
4. Retirar del horno. Rociar con apio, cebolletas y la salsa Búfalo. Servir
inmediatamente.
Hamburguesas de cangrejo
Las croquetas de cangrejo son un aperitivo muy apreciado o una
guarnición de ensalada deliciosa, pero ¿por qué no convertirlas en una
hamburguesa? El horno freidor de aire da a estas sabrosas croquetas de
cangrejo el exterior crujiente perfecto.
Rinde 4 hamburguesas
16 onzas (455 g) de carne de cangrejo
1 cucharadita de aceite de oliva virgen extra
1 pimiento dulce rojo mediano, finamente picado
1 jalapeño, sin semillas, finamente picado
3 cebolletas (“scallions”), rebanadas
1 diente de ajo, finamente picado
¼ cucharadita de sal kosher
2 huevos grandes, ligeramente batidos
1 taza (100 g) de pan rallado japonés “panko” + ½ taza (60 g)
para rebozar
½ taza (120ml) de mayonesa
1 cucharadita de salsa Worcestershire
1 cucharadita de mostaza de Dijon
1½ cucharaditas de salsa para mariscos
Salsa picante (opcional)
Aceite de oliva, para rociar
4 panes para hamburguesas con semillas de ajonjolí/sésamo
Lechuga rallada
Gajos de limón
Alioli
1. Colocar la carne de cangrejo en un tazón grande. Quitar los posibles
cartílagos y refrigerar hasta el momento de usar.
2. Poner el aceite de oliva a calentar a fuego medio, en una sartén
grande. Cuando el aceite esté caliente, agregar los pimientos, las
cebolletas y el ajo. Saltear por aprox. 5 minutos, hasta que los
vegetales se suavicen ligeramente; añadir la sal.
3. Retirar del fuego y dejar enfriar por unos minutos. Una vez tibios,
agregar los vegetales al cangrejo. Agregar los huevos, 1 taza (100g)
del pan rallado, la mayonesa, la salsa Worcestershire, la mostaza de
Dijon, la salsa para mariscos y 1-2 pizcas de salsa picante si desea.
4. Mezclar los ingredientes suavemente, a mano (la mejor forma para
hacer esto), o usando una cuchara. Tener cuidado de no romper la
carne de cangrejo.
5. Formar croquetas de ¼ de taza (60ml) y colocarlas en un plato
limpio, usando hojas de papel encerado para separarlas si es
necesario. Cubrir con papel film/plástico y refrigerar por 1 hora antes
de cocinar.
6. Justo antes de cocinarlos, rebozar las croquetas de cangrejo en pan
rallado.
7. Colocar la cesta para freír con aire en la bandeja para hornear y
engrasarla con aceite de oliva en aerosol/rocío vegetal. Disponer las
croquetas de cangrejo en la cesta para freír con aire. Rociar ambos
lados de las croquetas con aceite de oliva.
8. Meter al horno, en la posición intermedia. Elegir la función “AIR FRY”
y fijar la temperatura en 400°F y el tiempo en 10 minutos. Presionar el
botón START/STOP. hasta que estén doradas uniformemente.
9. Armar las hamburguesas: Dividir la lechuga rallada entre las mitades
de pan inferiores y colocar una croqueta de cangrejo en cada una.
Rociar las croquetas con jugo de limón. Untar ligeramente el interior
de cada mitad de pan superior con alioli y cubrir las croquetas de
cangrejo. Servir inmediatamente.
Albóndigas con relleno de Mozzarella
La mozzarella derretida convierte estas albóndigas al estilo italiano
en un plato indulgente.
Rinde 12 albóndigas

40
1 libra (455 g) de carne de res molida
¼ taza (60ml) de salsa marinara + más para servir
2 cucharadas de pan rallado sazonado (estilo italiano)
¼ cucharadita de sal kosher
1 pizca de pimienta negra recién molida
1½ onzas (40g) de Mozzarella, en 12 cubos de ¼ x ¼in
(0.5 x 0.5cm)
Aceite en aerosol/rocío vegetal para engrasar la cesta
1. Colocar la carne, la salsa, el pan rallado, la sal y la pimienta en un
tazón grande. Revolver suavemente con las manos limpias.
2. Dividir la mezcla en 12 porciones iguales. Colocar un cubo de
Mozzarella en el centro de una porción y formar una albóndiga
alrededor del queso. Reservar. Repetir con la carne y la Mozzarella
restantes.
3. Colocar la cesta para freír con aire en la bandeja para hornear
y engrasarla con aceite en aerosol/rocío vegetal. Disponer las
albóndigas en la cesta. Meter al horno, en la posición. Elegir la
función “AIR FRY” y fijar la temperatura en 350°F y el tiempo en 10
minutos. Presionar el botón START/STOP.
4. Servir inmediatamente después de la cocción.
“Hot dogs” cargados
Inspirados en la discutiblemente deliciosa pizza hawaiana,
estos “hot dogs” se preparan en un abrir y cerrar de ojos y están
cargados de sabor dulce y salado.
Rinde 6 porciones
6 lonchas de tocino
6 “hot dogs”
6 cucharadas de queso Cheddar rallado
6 pancitos para “hot dogs”
½ taza (60 g) de tomates picados
½ jalapeño, finamente picado
½ taza (100 g) de piña picada
1. Colocar la cesta para freír con aire en la bandeja para hornear.
Disponer las lonchas de tocino en la cesta. Meter al horno, en la
posición superior. Elegir la función “AIR FRY” y fijar la temperatura
en 400°F y el tiempo en 10 minutos. Presionar el botón START/STOP.
Retirar del horno y dejar enfriar ligeramente. Una vez frío, romper o
cortar cada loncha a la mitad.
2. Mientras el tocino se está enfriando, cocinar los “hot dogs”.
Colocarlos en la cesta (no es necesario lavarla) y meter al horno,
en la posición superior. Elegir la función “AIR FRY” y fijar la
temperatura en 400°F y el tiempo en 4 minutos. Presionar el botón
START/STOP. Al final de la cocción, retirar del horno y reservar.
3. Armar los “hot dogs”: Esparcir 1 cuchara de queso Cheddar en la
mitad inferior de cada pan. Añadir un “hot dog” y disponer media
loncha de tocino al lado. Dividir uniformemente los tomates, el
jalapeño y la piña entre los “hot dogs”.
4. Colocar los “hot dogs” armados en la cesta para freír con aire. Meter
al horno, en la posición intermedia. Elegir la función “AIR FRY” y fijar
la temperatura en 400°F y el tiempo en 2 minutos. Presionar el botón
START/STOP.
5. Servir inmediatamente.
Pollo empanado al estilo japonés
El pollo empanado al estilo japonés queda súper crujiente gracias al pan
rallado panko. Sírvalo sobre arroz con col rallada y un poco de salsa
barbacoa coreana para una comida rápida y sabrosa.
Rinde 4 porciones
½ taza (60 g) de harina común
¼ cucharadita de sal kosher
1 pizca de pimienta negra recién molida
2 huevos grandes
1 taza (100 g) de pan rallado japonés “panko”
1 libra (225g) de trocitos de pollo, ablandadas hasta que
queden delgados

41
Aceite en aerosol/rocío vegetal
Aceite de oliva o vegetal, para cubrir el pollo
Arroz blanco cocido, para servir
Col verde rallada, para servir
Salsa barbacoa coreana, para servir
1. Preparar 3 platos poco profundo. Colocar la harina, la sal y la
pimienta en el primer plato; revolver para combinar. Colocar los
huevos en
el segundo plato; batirlos ligeramente. Colocar el pan rallado en el
tercer plato.
2. Rebozar los trocitos de pollo uno por uno, pasándolos primero por
la harina (sacudiendo el exceso), después por el huevo batido y
finalmente por el pan rallado. Reservar, sobre un plato limpio.
Repetir con el resto de los trocitos.
3. Colocar la cesta para freír con aire en la bandeja para hornear y
engrasarla con aceite en aerosol/rocío vegetal. Rociar el pollo con
una generosa cantidad de aceite de oliva o vegetal y colocarlo en la
cesta para freír con aire.
4. Meter al horno, en la posición superior. Elegir la función “AIR FRY”
y fijar la temperatura en 400°F y el tiempo en 16 minutos. Presionar
START/STOP. Cocinar, volteando los trocitos de pollo a la mitad del
tiempo.
5. Servir con arroz blanco, col rallada y salsa barbacoa coreana.
Pollo asado con limón y hierbas
El horno freidor digital extragrande 10 en 1 Cuisinart
®
se encarga del
trabajo pesado en esta preparación clásica de pollo asado, garantizando
una piel crujiente y una carne jugosa cada vez.
Rinde 4-6 porciones
1 pollo entero de aprox. 4lb (1.8kg)
1½ cucharaditas de sal kosher
½ cucharadita de pimienta negra recién molida
1 limón, cortado a la mitad
6 dientes de ajo, machacados
1 manojo grande de hierbas frescas (cualquier mezcla de
romero, tomillo, perejil u orégano)
1 cucharada de aceite de oliva
1. Secar el pollo con papel absorbente y sazonar con una buena
cantidad de sal y pimienta, incluyendo la cavidad. Rociar el jugo de
limón en la cavidad e introducir en ella las mitades de limón, el ajo
y las hierbas. Colocar en la bandeja para hornear y dejar descansar
por 30 minutos antes de asar.
2. Antes de asar, restregar el pollo con aceite de oliva.
3. Meter al horno, en la posición inferior. Elegir el modo “ROAST” y
fijar la temperatura en 375°F y el tiempo en 60 minutos. Presionar el
botón START/STOP.
4. El pollo está listo cuando el jugo salga claro y la temperatura interna
(medida con un termómetro instantáneo en la parte más gruesa)
alcance 165°F.
5. Dejar reposar por 5 minutos antes de servir.
Cazuela de sushi de salmón picante
Amantes del sushi, ¡no busquen más para su próxima cena fácil entre
semana! Todos los deliciosos sabores del sushi de salmón picante
se unen en esta sencilla cazuela. Puede disfrutarse tal como es, pero
recomendamos servirlo con láminas de nori y aguacate en rodajas para
llevarlo a otro nivel.
Rinde 6-10 porciones
3 libras (1.35kg) de filete de salmón
1 cucharadita de sal kosher
Aceite en aerosol/rocío vegetal
4 tazas (630 g) de arroz sushi cocido, tibio
1 cucharadita de Furikake (condimento japonés)
4 onzas (115 g) de queso crema, a temperatura ambiente

42
¼ taza (60ml) de mayonesa japonesa + más para decorar
2 cucharadas de salsa sriracha
2 cucharaditas de vinagre de vino de arroz condimentado
¼ taza (60ml) de salsa de chile dulce + más para decorar
3 cebolletas (“scallions”), picadas, las partes blanca y verde
separadas
1. Sazonar el salmón con sal. Colocar la cesta para freír con aire en la
bandeja para hornear y engrasarla con una buena cantidad de aceite
en aerosol/rocío vegetal.
2. Disponer el salmón en el cesta. Meter al horno, en la posición
superior. Elegir la función “AIR FRY” y fijar la temperatura en 375°F y
el tiempo en 15 minutos. Presionar el botón START/STOP. Cocinar el
salmón. Nota: Puede que tome menos del tiempo indicado.
3. Coloque el arroz sushi en el fondo de una bandeja para hornear de
9 x 13in (23 x 33cm); presionar hasta formar una capa uniforme.
Rociar con Furikake y reservar.
4. Colocar el queso crema, la mayonesa, la salsa sriracha y el vinagre
de vino de arroz en un tazón grande; batir hasta conseguir una
mezcla suave. Desmenuzar el salmón y agregarlo a la salsa, junto
con la parte blanca de las cebolletas. revolver para combinar.
Esparcir la mezcla de salmón sobre el arroz en una capa uniforme.
5. Meter al horno, en la posición inferior. Elegir el modo “BAKE” y fijar la
temperatura en 450°F y el tiempo en 8 minutos. Presionar el botón
START/STOP. Hornear hasta que el salmón empiece a dorarse.
6. Retirar del horno. Rociar con mayonesa y salsa de chile dulce.
Decorar con la parte verde de las cebolletas. Servir inmediatamente.
Carnitas de cerdo al estilo coreano
Este cerdo desmenuzado picante y dulce es perfecto servido solo,
como sándwich, o sobre papas fritas cargadas.
Rinde 4½ tazas
¼ taza (60ml) de gochujang (salsa picante coreana)
¼ taza (85 g) de miel
2 cucharadas de salsa de soya
2 cucharadas de vinagre de vino de arroz condimentado
2 cucharaditas de sal kosher
5 libras (2.25kg) de pierna de cerdo deshuesada
1. Colocar el gochujang, la miel, la salsa de soya, el vinagre y la sal
en un tazón grande; revolver para combinar. Agregar el cerdo y
revolver uniformemente con la salsa. Cubrir con papel film/plástico y
refrigerar por una noche.
2. Cuando esté lista/o para cocinar, colocar el cerdo marinado en una
bandeja para hornear de 9 x 13in (23 x 33cm) y cubrir con papel
de aluminio. Meter al horno, en la posición inferior. Elegir el modo
“ROAST” y fijar la temperatura en 300°F y el tiempo en 3 horas.
Presionar el botón START/STOP. Después de 3 horas, quitar el papel
de aluminio y volver al horno. Elegir la función “ROAST” y fijar la
temperatura en 300°F y el tiempo en 30 minutos.
3. Al final del tiempo, desmenuzar el cerdo, mezclar con los
condimentos (si desea) y servir.
Ñoquis crujientes con coles de Bruselas
Una comida rápida y sencilla lista para servir en menos de 30 minutos.
Rinde 4 porciones
1 paquete de 17.6oz (500g) de ñoquis frescos envasados
al vacío
Aceite de oliva, para rociar
Sal kosher
Pimienta negra recién molida
Aceite en aerosol/rocío vegetal
1 libra (455 g) de coles de Bruselas, limpias y partidas a la mitad
Miel caliente, para sevir
Ralladura de limón, para servir
Jugo de limón, para servir

43
1. Colocar los ñoquis en un tazón grande. Rociar con una buena
cantidad de aceite de oliva y sazonar con 2 pizcas de sal y pimienta.
Revolver para cubrir.
2. Colocar la cesta para freír con aire en la bandeja para hornear.
Engrasar ligeramente la cesta con aceite en aerosol/rocío vegetal.
Disponer los ñoquis en la cesta (reservar el tazón). Meter al horno,
en la posición intermedia. Elegir la función “AIR FRY” y fijar la
temperatura en 375°F y el tiempo en 18 minutos. Presionar el botón
START/STOP.
3. Mientras los ñoquis se están cocinando, colocar las coles en el
tazón reservado y rociar con una buena cantidad de aceite de oliva.
Sazonar con una pizca de sal y pimienta y revolver. Cuando falten
solo 12 minutos de cocción, añadir la mezcla a los ñoquis.
4. Al final de la cocción, colocar en cuenco para servir poco profundo.
Rociar con miel caliente, ralladura de limón y jugo de limón. Servir
inmediatamente.
Macarrones con queso de calabaza moscada
Añada sabor a este plato favorito. La calabaza no solo le da una
consistencia más cremosa, sino que también le añade algo más de
nutrición (¡y los niños nunca lo sabrán!)
Rinde 8 porciones
1 libra (255g) de calabaza moscada, en cubos
2 cucharaditas de aceite de oliva virgen extra
1 cucharadita de sal kosher
1 pizca de pimienta negra recién molida
½ cucharadita de hojas de tomillo fresco
2 hojas de salvia fresca, finamente picadas
Aceite en aerosol/rocío vegetal
2 tazas (200g) galletas de mantequilla saladas
8 onzas (225 g) de queso crema, a temperatura ambiente,
en 6 pedazos
1 cucharadita de mostaza en polvo
¼ cucharadita de nuez moscada rallada
1 libra (445 g) de macarrones
2 tazas (475ml) de leche entera, a temperatura ambiente
8 onzas (225 g) de queso Monterey Jack
8 onzas (225 g) de queso Cheddar
Mantequilla a temperatura ambiente y aceite en aerosol/rocío
vegetal, para engrasar el molde
1. Colocar la calabaza, el aceite de oliva, una pizca de sal, la pimienta,
el tomillo y la salvia en un tazón mediano; revolver para combinar.
2. Colocar la cesta para freír con aire en la bandeja para hornear.
Engrasar ligeramente la cesta con aceite en aerosol/rocío vegetal.
Agregarla calabaza y meter al horno, en la posición superior. Elegir
la función “AIR FRY” y fijar la temperatura en 400°F y el tiempo en 20
minutos. Presionar el botón START/STOP. Cocinar, revolviendo a la
mitad del tiempo. Retirar del horno y dejar enfriar ligeramente.
3. Mientras la calabaza se está cocinando, colocar las galletas en el bol
de una procesadora de alimentos equipada con cuchilla de metal.
Procesar hasta que estén finamente picadas. Al final de la cocción,
retirar del horno y reservar.
4. Colocar la calabaza cocinada en el bol de la procesadora de
alimentos. Pulsar varias veces, y luego procesar a alta velocidad
hasta conseguir un puré suave. Raspar el bol y agregar el queso
crema, la sal restante y las especias. Pulsar varias veces, y luego
procesar a alta velocidad hasta conseguir un puré suave. Reservar.
5. Cocinar la pasta “al dente”. Escurrir y volver a colocar en la cacerola.
Agregar la leche y la mezcla de calabaza; revolver para combinar.
6. Quitar la cuchilla e instalar un disco triturador mediano (no es
necesario limpiar el bol). Triturar los quesos y agregarlos a la pasta.
7. Engrasar un molde de 13 x 9in(33 x 23cm) con mantequilla y
colocar la mezcla de pasta en el molde. Cubrir con las galletas
molidas.
8. Meter al horno, en la posición inferior. Elegir la función “BAKE” y
fijar la temperatura en 350°F y el tiempo en 10 minutos. Presionar
el botón START/STOP. Hornear hasta que la parte superior esté bien
dorada.

44
9. Dejar enfriar ligeramente antes de servir.
Empanadas de vegetales y queso
Comprar masa de empanadas en la tienda facilita la elaboración de
estas sabrosas empanadas. Nos encanta la combinación de col rizada,
calabaza y queso de cabra, pero se pueden sustituirse fácilmente por
sus vegetales y queso favoritos.
Rinde 6 empanadas
1 cucharada de aceite de oliva virgen extra + más para rociar
¼ cebolla mediana, finamente picada
2 tallos de col rizada (quitar y desechar los tallos duros; picar
finamente los tallos tiernos y las hojas)
Sal kosher
Pimienta negra recién molida
1 pizca de hojuelas de pimiento rojo
¼ taza (30 g) de queso cabra desmenuzado
1 taza (200 g) de cubos de calabaza moscada (“butternut
squash”)
1 huevo grande
1 libra (225g) de masa de empanadas congelada (ya viene
cortada en discos)
Aceite en aerosol/rocío vegetal
1. Poner a calentar el aceite a fuego medio, en una sartén grande.
Cuando el aceite esté caliente, agregar la cebolla, la col rizada y una
pizca de sal y pimienta. Saltear hasta que los vegetales estén suaves.
Retirar del fuego y agregar la hojuelas de pimienta. Dejar enfriar y,
a continuación, agregar el queso de cabra. Reservar.
2. Colocar la calabaza en la cesta, puesta en la bandeja para hornear.
Rociar con aceite de oliva y sazonar con una pizca grande de sal
y pimienta. Revolver bien. Meter al horno, en la posición superior.
Elegir la función “AIR FRY” y fijar la temperatura en 400°F y el tiempo
en 3 minutos. Presionar el botón START/STOP. Al final del tiempo,
retirar del horno y dejar enfriar. Una vez frío, agregar la mezcla de col
rizada y queso de cabra.
3. Colocar el huevo y 1 cucharadita de agua en un tazón pequeño; batir
para conseguir barniz de huevo. Reservar.
4. Cortar la masa en 6 círculos de 6in (15cm). Colocar 2 cucharadas
del relleno en centro de cada disco. Doblar la masa sobre sí misma y
acanalar las orillas para sellar. Cepillar con barniz de huevo.
5. Engrasar ligeramente la cesta para freír con aire con aceite en
aerosol/rocío vegetal. Colocar las empanadas en ella. Con un
cuchillo mondador, cortar una pequeña hendidura en la parte
superior de cada empanada para permitir que el vapor se escape;
esto garantiza que la corteza salga crujiente y que las empanadas
conserven su forma.
6. Meter al horno, en la posición superior. Elegir la función “AIR FRY” y
fijar la temperatura en 400°F y el tiempo en 18 minutos. Presionar el
botón START/STOP. Hornear hasta que estén doradas y crujientes.
7. Dejar enfriar ligeramente antes de servir.
Sándwiches de queso asados con sabor
a sopa de cebolla francesa
Los sabores de la amada sopa de cebolla francesa se intercalan
entre dos rebanadas de pan asadas a la perfección en este delicioso
giro de un clásico.
Rinde 4 sándwiches
2 cebollas medianas, rebanadas
2 cucharadas de aceite de oliva virgen extra
½ cucharadita de sal kosher
4 cucharadas de jerez seco
8 tajadas de queso suizo
8 rebanadas gruesas de pan francés o italiano
1. Colocar la cebolla, 1 cucharada del aceite de oliva y la sal en un
tazón mediano; revolver. Esparcir uniformemente la mezcla en la
bandeja para hornear. Meter al horno, en la posición inferior. Elegir
la función “ROAST” y fijar la temperatura en 350°F y el tiempo en
30 minutos. Presionar el botón START/STOP. Asar, revolviendo cada

45
10 minutos. Al final del tiempo, rociar con el jerez. Elegir la función
“ROAST”. Presionar el botón START/STOP y asar por 5 minutos
adicionales. Retirar del horno y colocar en un tazón pequeño.
Reservar.
2. Armar los sándwiches: Colocar cuatro rebanadas de pan en un plato
y cubrir con una tajada de queso. Dividir uniformemente la cebolla
caramelizada entre las cuatro rebanadas y cubrir con el queso
restante. Cerrar con otra rebanada de pan. Pincelar la parte superior
con aceite de oliva.
3. Colocar la cesta para freír con aire en la bandeja para hornear.
Disponer los sándwiches en la cesta para freír con aire. Meter al
horno, en la posición intermedia. Elegir la función “BROIL” y fijar la
temperatura en 450°F y el tiempo en 2 minutos. Presionar el botón
START/STOP. Asar hasta que el queso esté derretido y la parte
superior del pan esté dorada y bien tostada. NOTA: Puede que tenga
que trabajar en tandas, dependiendo del tamaño de las rebanadas
de pan.
4. Retirar del horno y servir aún caliente.
Pastel de maíz con arándanos azules
Una delicia veraniega perfecta para desayunar con café o tomar
con helado como postre.
Rinde 12 porciones
Mantequilla a temperatura ambiente y aceite en aerosol/rocío
vegetal, para engrasar el molde
2 tazas (270 g) de harina de repostería sin levadura
1 taza (125 g) de harina de maíz amarillo (preferiblemente de
grosor medio)
1 cucharada de polvo de hornear
1 cucharadita de sal kosher
3 huevos grandes
3 yemas de huevogrande
1
⁄
3
taza (80ml) de aceite vegetal
1½ cucharaditas de extracto natural de vainilla
16 cucharadas (325 g) de mantequilla sin sal, a temperatura
ambiente, en cubos pequeños
1 taza (200 g) de azúcar granulada
1 taza (245 g) de suero de leche (“buttermilk”)
2 taza (140 g) de arándanos azules frescos o congelados
1. Engrasar ligeramente un molde de 9 x 13in(23 x 33cm) con
mantequilla o aceite en aerosol/rocío vegetal; forrar con papel
sulfurizado y reservar.
2. Colocar la harina, la harina de maíz, el polvo de hornear y la sal en un
tazón pequeño. Batir para mezclar; reservar.
3. Colocar los huevos, las yemas, el aceite y la vainilla en una taza
medidora grande; batir para combinar y reservar.
4. Colocar la mantequilla en un tazón grande y acremar, usando una
batidora de mano, hasta que esté suave. Agregar el azúcar y seguir
batiendo por aprox. 2 minutos, hasta conseguir una mezcla muy
ligera. Ajustar la velocidad de la batidora al nivel bajo e incorporar
gradualmente el suero de leche. Agregar la mezcla de ingredientes
secos, en dos adiciones, y mezclar ligeramente. Incorporar los
arándanos azules.
5. Verter la mezcla en el molde preparado, repartiéndola uniformemente
en este. Meter al horno, en la posición inferior. Elegir la función
“BAKE” y fijar la temperatura en 350°F y el tiempo en 20 minutos.
Presionar el botón START/STOP. Hornear hasta que el pastel esté
dorado.
6. Retirar del horno, dejar enfriar en el molde, y servir.

46
Crujiente de frutas
Hay pocas cosas que satisfagan más que un crujiente de fruta tibio.
Las frutas se combinan deliciosamente con las especias de la cobertura
en esta sabrosa receta.
Rinde 15 porciones
Relleno:
3½ libras (1.5kg) de una mezcla de duraznos, nectarinas,
ciruelas y albaricoques/chabacanos/damascos, en trozos de
1in(2.5cm)
1 taza (200 g) de azúcar granulada
¼ cucharadita de sal kosher
½ cucharadita de extracto natural de vainilla
½ cucharadita de jugo de limón fresco
3 cucharadas de arrurruz en polvo
Cobertura:
2 tazas (160 g) de copos de avena
1 taza (125 g) de harina común
1 taza llena (200 g) de azúcar rubia (azúcar de caña integral)
½ cucharadita de canela en polvo
½ cucharadita de jengibre en polvo
½ cucharadita de sal kosher
12 cucharadas (180g) de mantequilla sin a temperatura
ambiente, en pedazos
1. Colocar las frutas, el azúcar, la sal, la vainilla y el jugo de limón en un
tazón grande; revolver para combinar. Agregar el arrurruz en polvo y
revolver para cubrir. Colocar la mezcla en un molde de 13x 9in(33 x
23cm); reservar.
2. Preparar la cobertura: Colocar la avena, la harina, el azúcar, la
canela, el jengibre y la sal en un tazón mediano; revolver para
combinar. Agregar la mantequilla y revolver con la mezcla, usando
un mezclador de masas o sus dedos. Cuando la mantequilla esté
incorporada uniformemente, esparcir la cobertura sobre el relleno.
3. Meter al horno, en la posición inferior. Elegir la función “BAKE” y
fijar la temperatura en 350°F y el tiempo en 30 minutos. Presionar el
botón START/STOP. Hornear hasta que el relleno burbujee y que la
parte superior esté muy dorada.
4. Retirar del horno y dejar enfriar ligeramente antes servir.

47
Notas

©2025 Cuisinart
Glendale, AZ 85307
Printed in China
Impreso en China
25CE94060
IB-18717-ESP