
HP Poly Studio A2 Admin Guide
SUMMARY
This guide provides end-users with task-based user information for the named product.

Legal information
Copyright and license
© , HP Development Company, L.P. The
information contained herein is subject to
change without notice. The only warranties
for HP products and services are set
forth in the express warranty statements
accompanying such products and services.
Nothing herein should be construed as
constituting an additional warranty. HP shall
not be liable for technical or editorial errors
or omissions contained herein.
Trademark credits
All third-party trademarks are the property of
their respective owners.
Privacy policy
HP complies with applicable data privacy
and protection laws and regulations. HP
products and services process customer
data in a manner consistent with the HP
Privacy Policy. Please refer to HP Privacy
Statement.
Open source software used in this product
This product contains open source software.
You may receive the open source software
from HP up to three (3) years after the
distribution date of the applicable product
or software at a charge not greater than
the cost to HP of shipping or distributing
the software to you. To receive software
information, as well as the open source
software code used in this product, contact
HP by email at ipgoopensourceinfo@hp.com.

Table of contents
1 About this guide..................................................................................................................................................................................................................................... 1
Audience, purpose, and required skills .......................................................................................................................................................................... 1
Supporting Documentation ................................................................................................................................................................................................... 1
Icons used in Poly documentation .................................................................................................................................................................................... 1
2 Setting up the HP Poly Studio A2 hardware..................................................................................................................................................................... 2
Install and connect HP Poly Studio A2 devices....................................................................................................................................................... 2
Install and connect HP Poly Studio A2 Audio Bridge .......................................................................................................................................... 8
3 Introducing HP Poly Studio A2.................................................................................................................................................................................................. 11
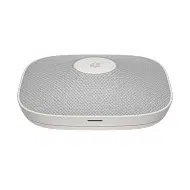
HP Poly Studio A2 features and capabilities............................................................................................................................................................11
HP Poly Studio A2 overview................................................................................................................................................................................................. 12
HP Poly Studio A2 Audio Bridge hardware overview............................................................................................................................. 12
HP Poly Studio A2 Audio Bridge LED status indicators........................................................................................................................13
HP Poly Studio A2 Audio Bridge ports.............................................................................................................................................................. 13
HP Poly Studio A2 Table Mic hardware overview...................................................................................................................................... 13
HP Poly Studio A2 Table Mic LED status indicators................................................................................................................................14
Poly NoiseBlockAI with HP Poly Studio A2................................................................................................................................................................15
HP Poly Studio A2 room configuration options.....................................................................................................................................................16
Cabling HP Poly Studio A2 devices...............................................................................................................................................................................20
Cabling HP Poly Studio A2 devices with Poly Studio X Series video bars............................................................................. 20
Cabling HP Poly Studio A2 devices with Poly Studio V Series video bars............................................................................. 22
Cabling HP Poly Studio A2 devices with Poly Studio G62 ................................................................................................................. 23
Selectable PoE switch power classes.........................................................................................................................................................................24
Custom cabling with HP Poly Studio A2 .................................................................................................................................................................... 25
Custom cabling support and limitations ....................................................................................................................................................... 25
4 Configuring HP Poly Studio A2................................................................................................................................................................................................27
Pair an HP Poly Studio A2 Audio Bridge device to a Poly video conferencing system.............................................................27
View connected HP Poly Studio A2 devices............................................................................................................................................................27
Identify a HP Poly Studio A2 Table Mic device .......................................................................................................................................................27
Enable NoiseBlockAI v2 ........................................................................................................................................................................................................ 28
5 Troubleshooting HP Poly Studio A2 devices.................................................................................................................................................................29
iii

Locate the serial number on HP Poly Studio A2 devices.............................................................................................................................. 29
HP Poly Studio A2 Audio Bridge not pairing ........................................................................................................................................................... 29
HP Poly Studio A2 Table Mic not pairing....................................................................................................................................................................30
HP Poly Studio A2 Audio Bridge LED is blinking red..........................................................................................................................................30
Factory Restore the HP Poly Studio A2 Audio Bridge .....................................................................................................................................30
6 Getting help........................................................................................................................................................................................................................................... 31
HP Inc. addresses....................................................................................................................................................................................................................... 31
Document information........................................................................................................................................................................................................... 32
iv

About this guide1
This guide provides information that you need to use the beta features for HP Poly Studio A2.
Audience, purpose, and required skills
This guide is intended for beginning users, as well as intermediate and advanced users, who want to
learn more about the features available with HP Poly Studio A2.
Supporting Documentation
In addition to this admin guide, review the following documentation to set up, configure, and use your
system.
● Poly Partner Mode Administrator Guide
● Poly Partner Mode User Guide
● Poly Video Mode Administrator Guide
● Poly Video Mode User Guide
Icons used in Poly documentation
This section describes the icons used in Poly documentation and what they mean.
WARNING! Indicates a hazardous situation that, if not avoided, could result in serious injury or death.
CAUTION: Indicates a hazardous situation that, if not avoided, could result in minor or moderate
injury.
IMPORTANT: Indicates information considered important but not hazard-related (for example,
messages related to property damage). Warns the user that failure to follow a procedure exactly as
described could result in loss of data or in damage to hardware or software. Also contains essential
information to explain a concept or to complete a task.
NOTE: Contains additional information to emphasize or supplement important points of the main text.
TIP: Provides helpful hints for completing a task.
About this guide
1
Setting up the HP Poly Studio A2 hardware2
Set up the HP Poly Studio A2 hardware as described in the following steps.
Install and connect HP Poly Studio A2 devices
HP Poly Studio A2 comes with flexible installation options.
You can run cables of daisy-chained HP Poly Studio A2 Table Mic devices either across the table or
discreetly hide them under the table via bored holes. The adhesive mounting magnets placed on the
table act as mounting docks as well as markers for optimal placement positions for the HP Poly Studio
A2 Table Mic devices.
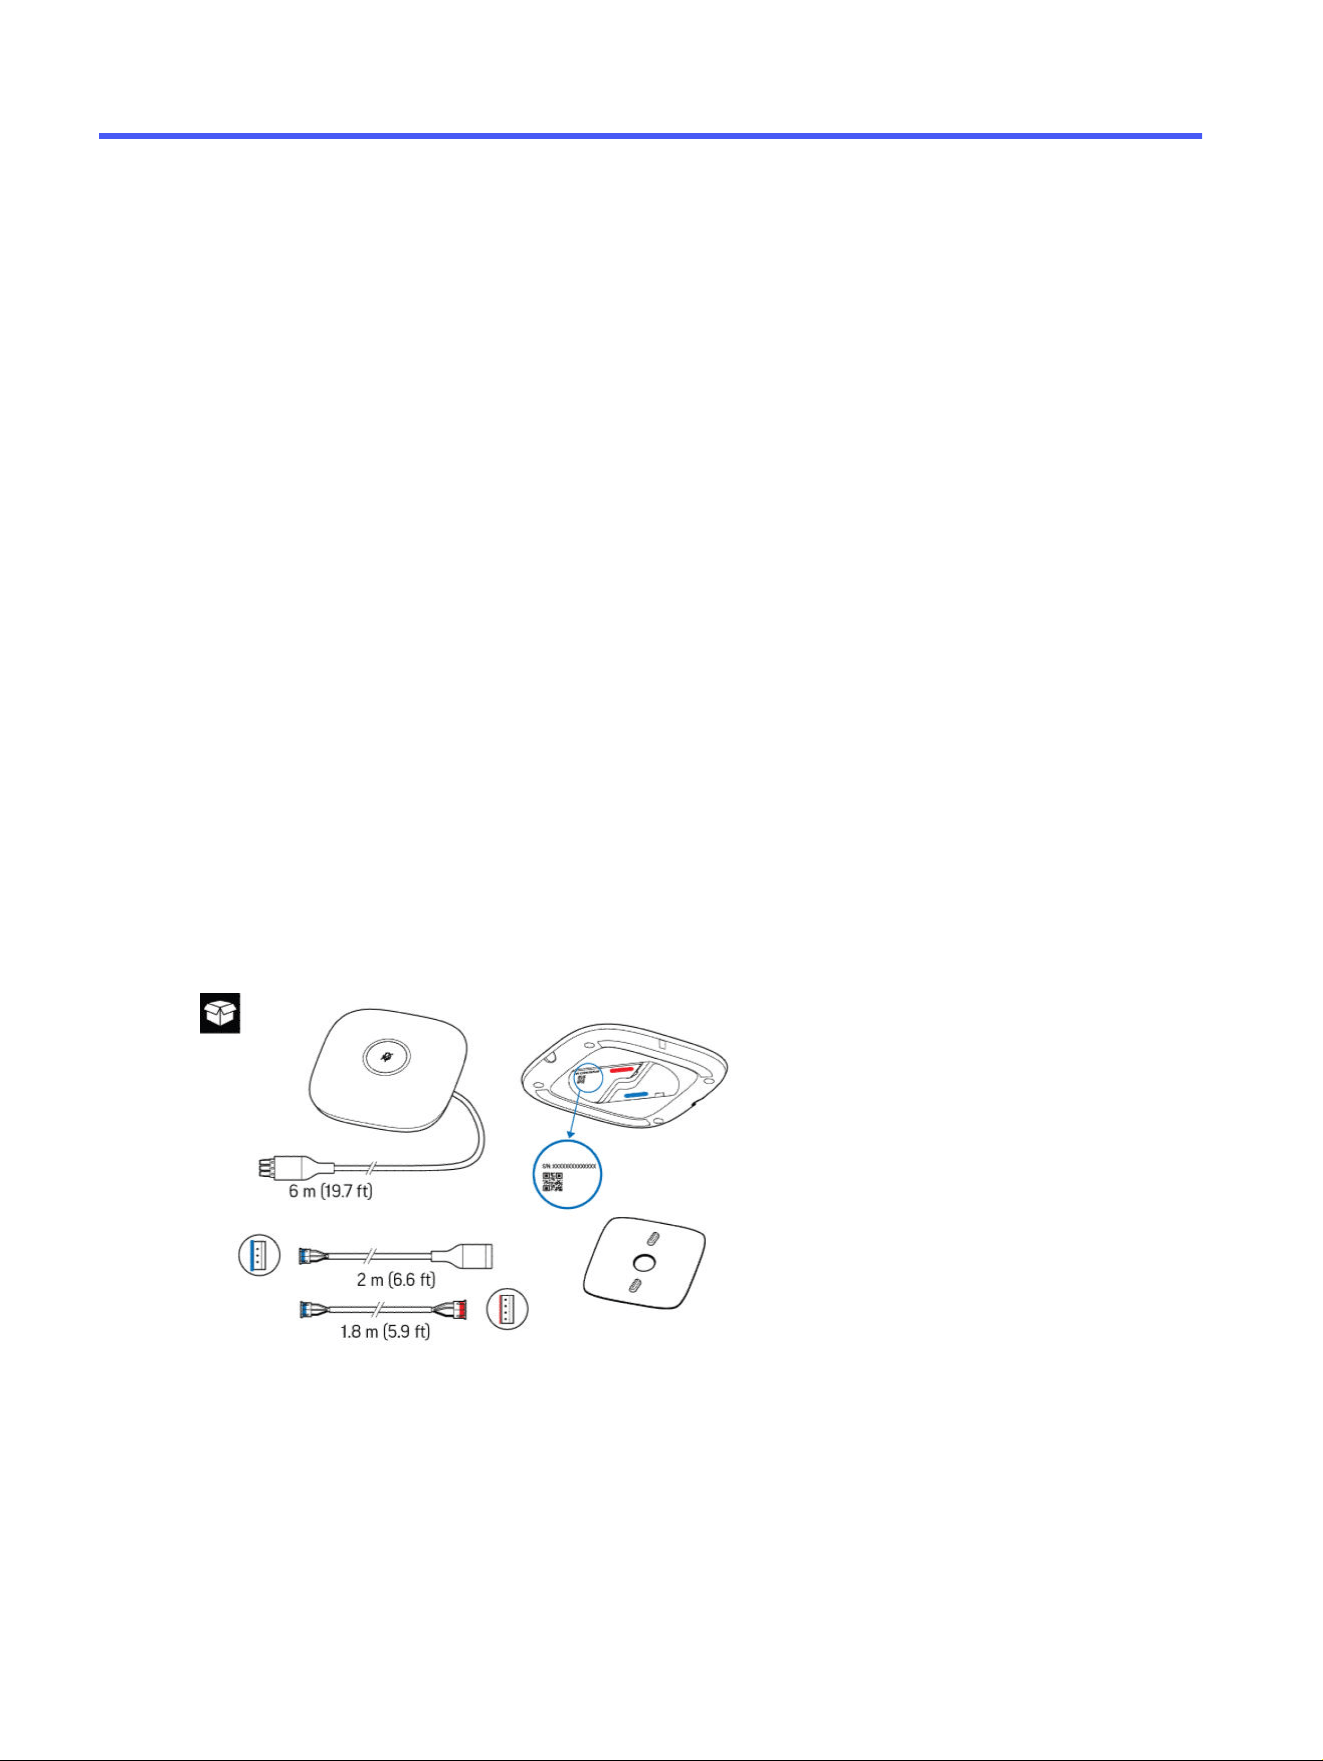
The HP Poly Studio A2 Table Mic device comes with a magnetic plate, and the following cables:
● Pre-connected 6-meter (19.7-foot) JST (female) to phoenix (male) cable
● 2-meter (6.6-foot) JST (male) to phoenix (female) cable
● 1.8-meter (5.9-foot) JST (male) to JST (female) cable
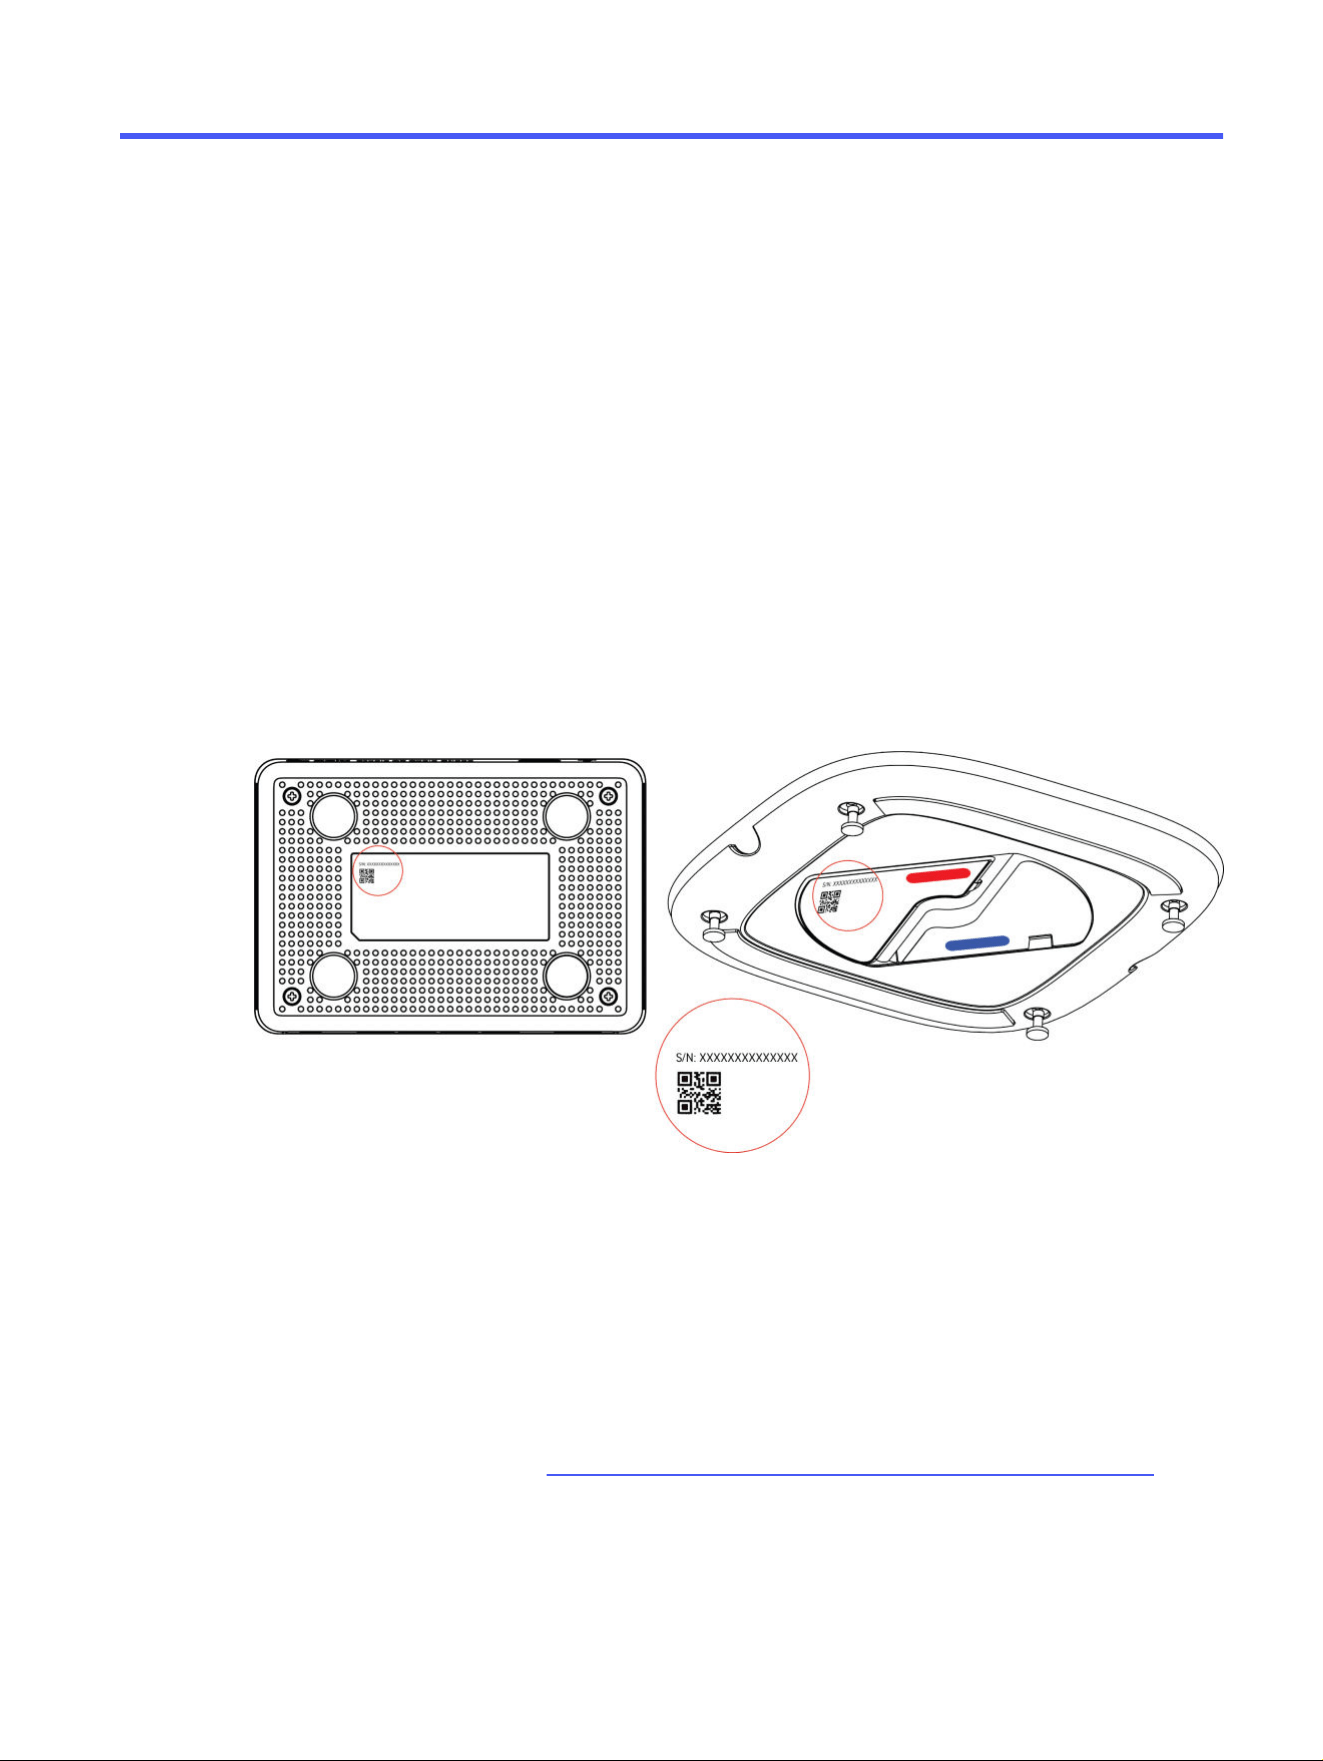
The serial number, shown numerically and represented by a QR code, displays on the underside of the
HP Poly Studio A2 Table Mic device.
To set up HP Poly Studio A2 devices, you need a measuring tape and a small Philips screwdriver. To bore
holes in the tables for discreet cabling, you also need a drill with a 10 mm (0.39 in.) drill bit.
2
Chapter 2 Setting up the HP Poly Studio A2 hardware
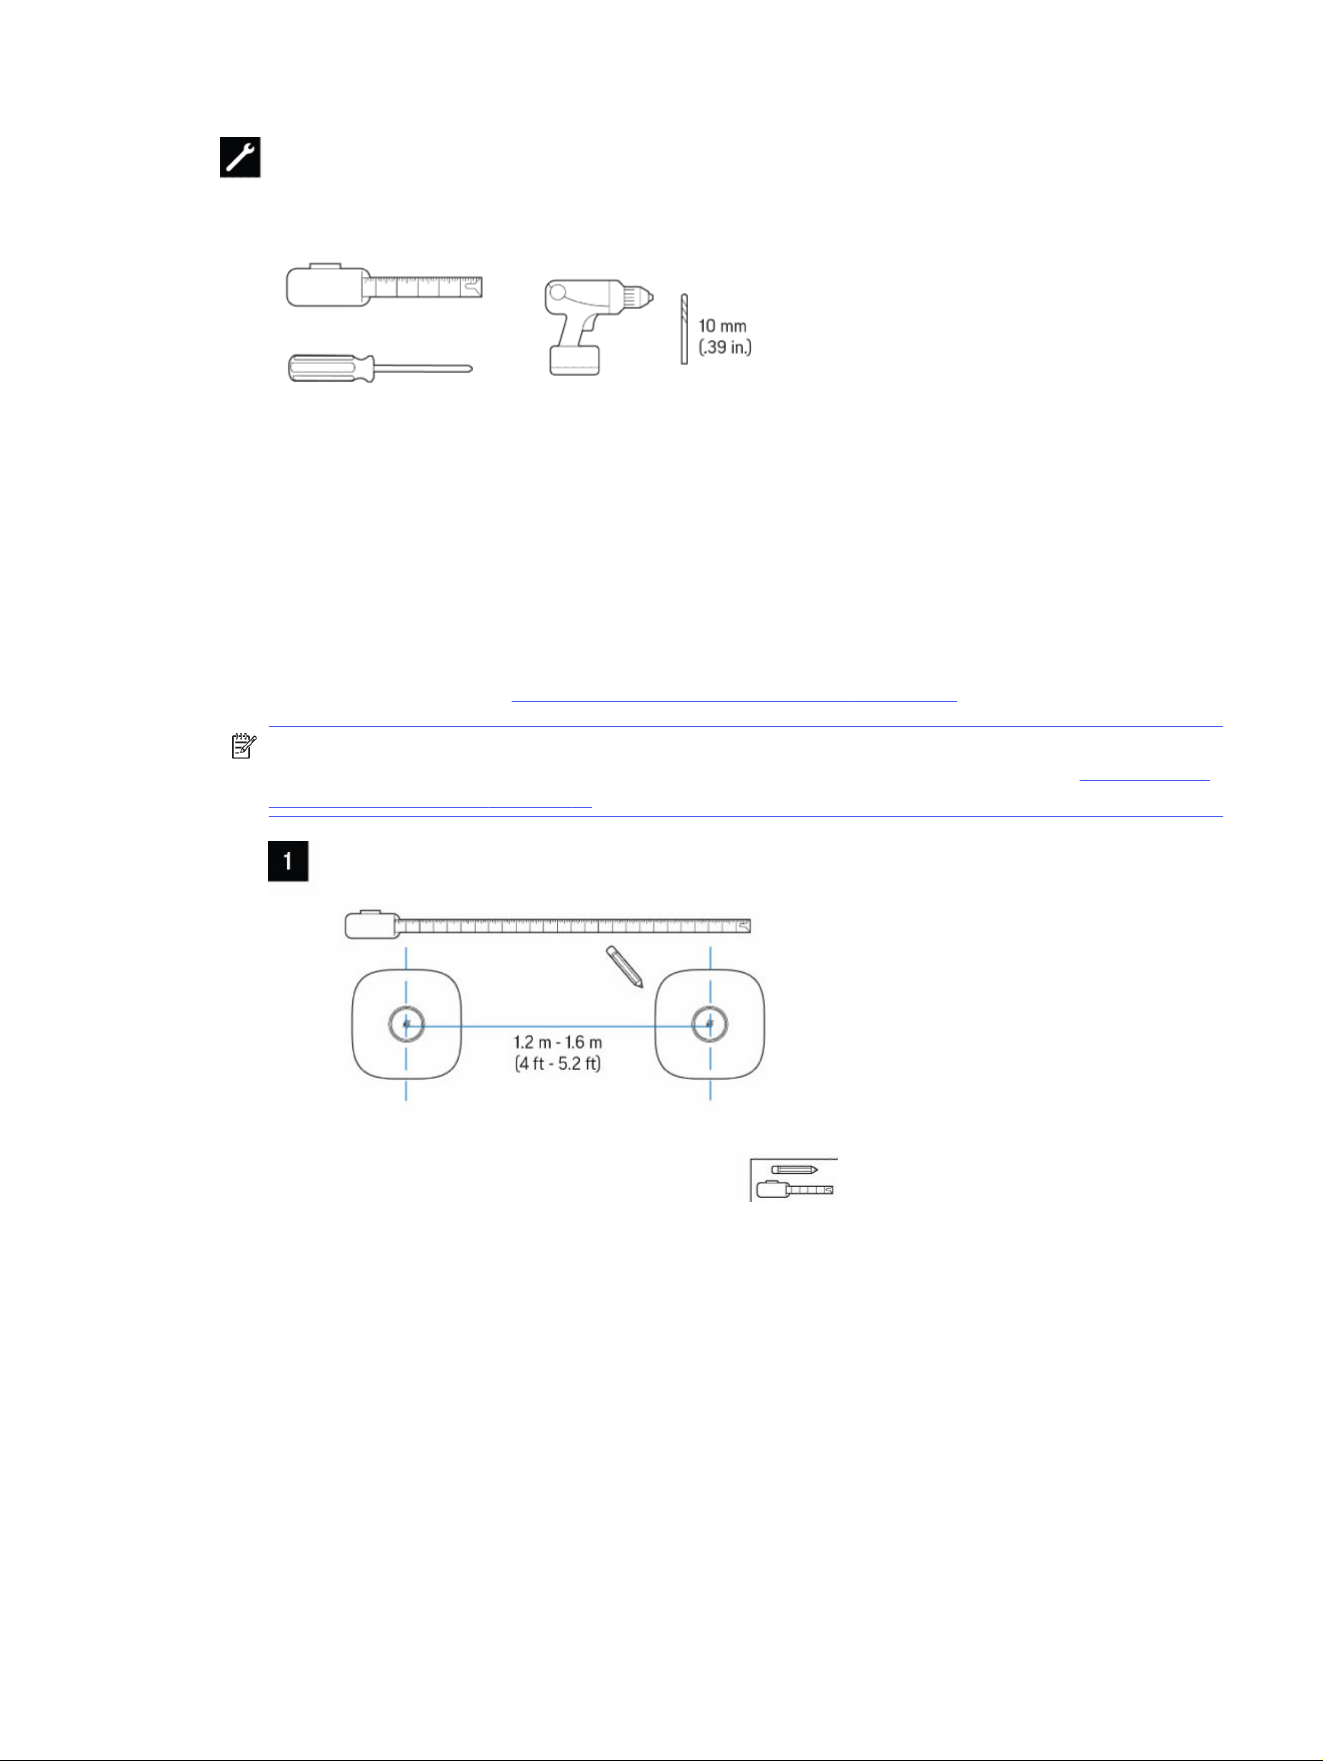
1. Using the measuring tape, mark out the optimal placement of the table mics.
If connecting the HP Poly Studio A2 Table Mic with the 1.8-meter (5.9-foot) JST (male) to JST (female)
cable above the table, place them between 1.2 m (4 ft) and 1.6 m (5.2 ft) apart. To place them further
apart or to hide the cables under the table, use both the pre-connected 6-meter (19.7-foot) JST
(female) to phoenix (male) cable and 2-meter (6.6-foot) JST (male) to phoenix (female) cable. For
more information, review Poly Studio A2 Room Configuration on page 16.
NOTE: With Poly NoiseBlockAI switched off, the pickup range is 1.8 meters. With Poly NoiseBlockAI
switched on, the pickup range is up to 4.3 meters apart. For more information, review NoiseBlockAI
with HP Poly Studio A2 on page 15.
Install and connect HP Poly Studio A2 devices
3
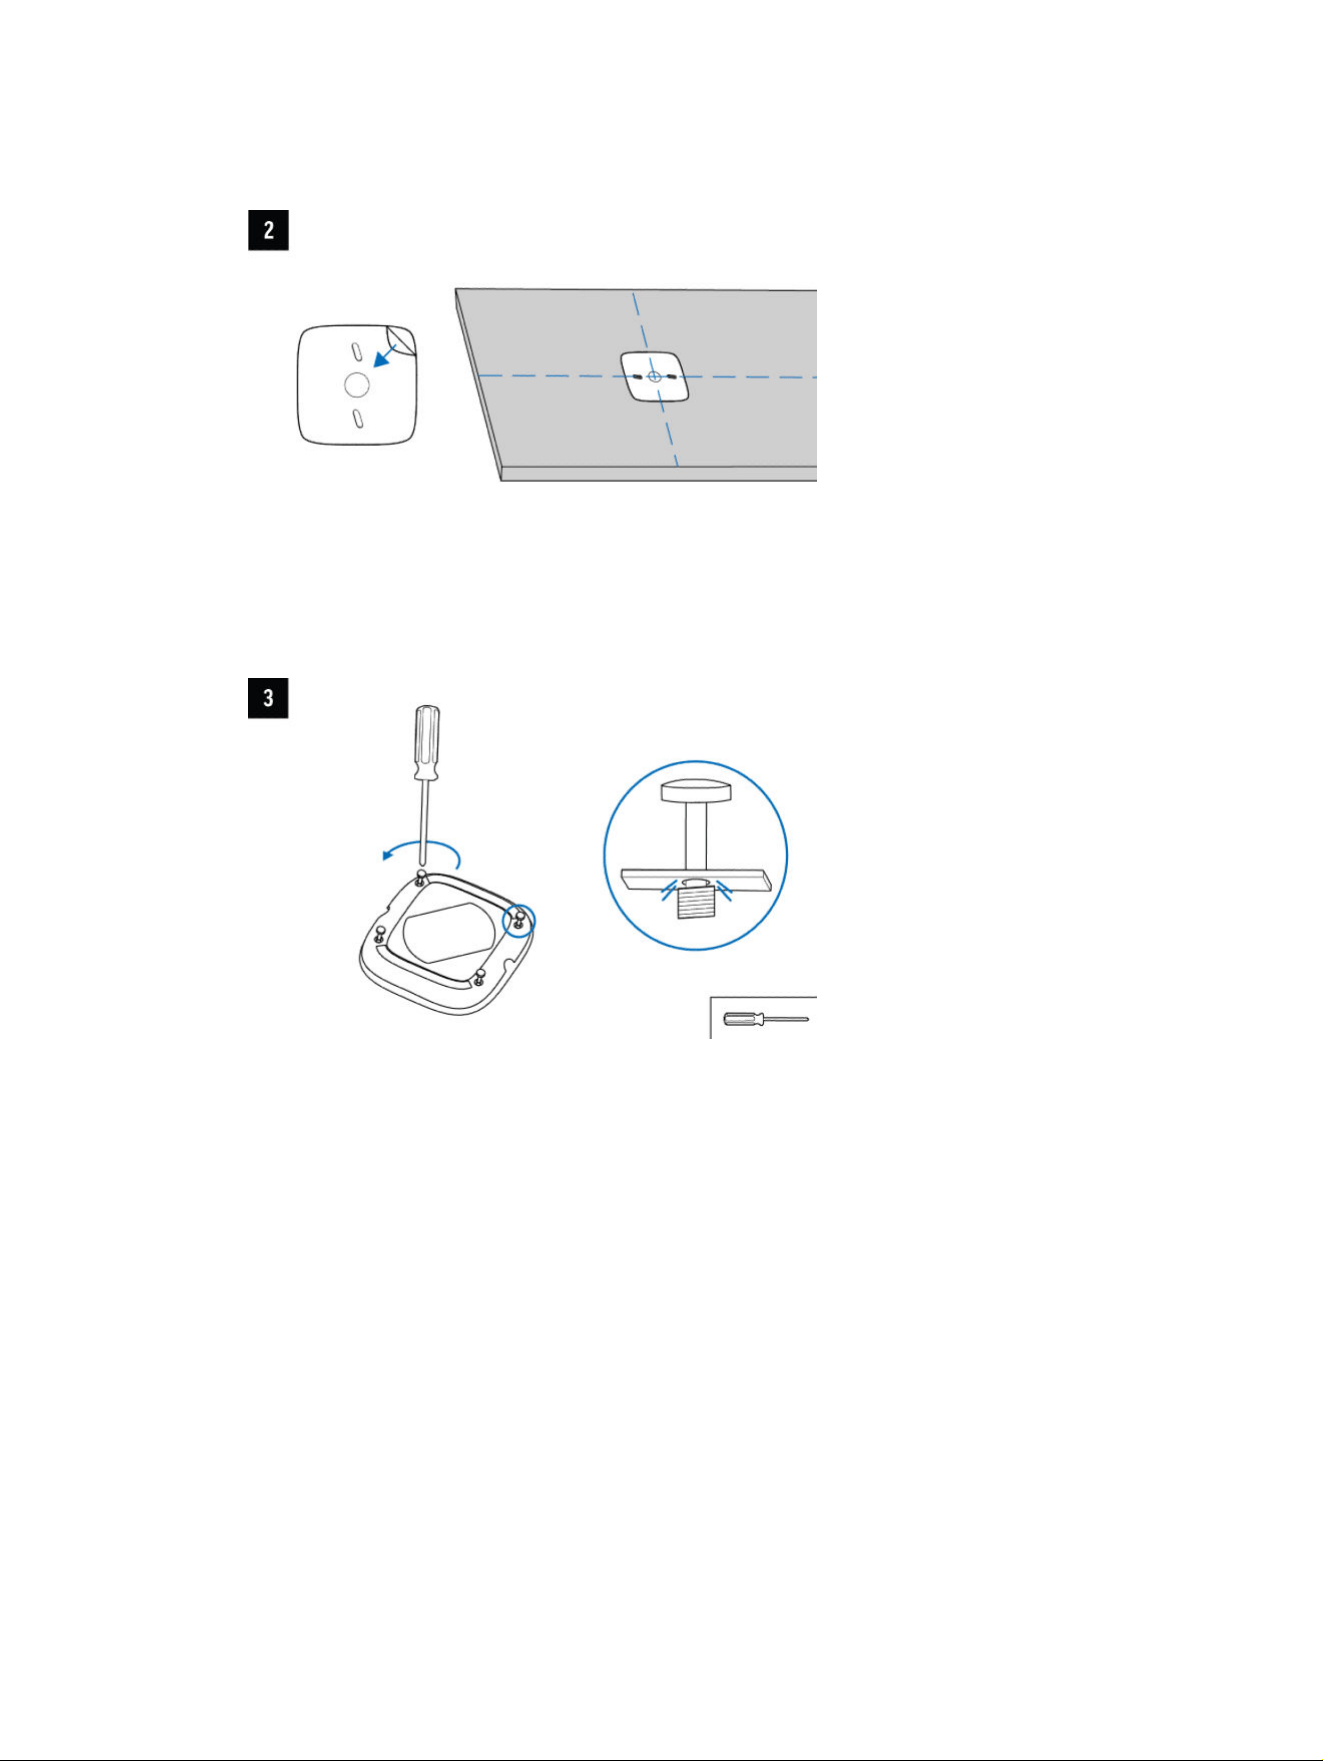
2. Peel back the sticker on the magnetic mounting plate and stick it to the conference table, aligning
the edges in parallel with the table edges.
3. Use the Philips screwdriver to loosen the screws on the underside of the HP Poly Studio A2 Table
Mics. These are captive screws that are designed to remain attached even when fully loosened.
4. For a below-table discreet cabling configuration, go to step 7.
For above-table cabling, plan your cabling configuration. The phoenix end of the preconnected
cable for the HP Poly Studio A2 Table Mic device connects to the HP Poly Studio A2 Audio Bridge
device. Additional HP Poly Studio A2 Table Mic devices connect either directly into the HP Poly
Studio A2 Audio Bridge device or in a daisy-chain configuration using the JST to JST cable.
4
Chapter 2 Setting up the HP Poly Studio A2 hardware
5. The JST cables and ports are color-coded and have different sizes and shapes. Connect the
(narrower) blue male cable connectors to the blue ports and (wider) red female cable connectors
to red ports. Make sure to fully push the connectors into the ports. To reduce unnecessary length
in cables, feed extra cable slack through the channels in the HP Poly Studio A2 Table Mic devices
in a clockwise direction. Replace the backing cover of the HP Poly Studio A2 Table Mic device and
secure using the four captive screws.
Install and connect HP Poly Studio A2 devices
5
6. Place the HP Poly Studio A2 Table Mic devices on the magnetic mounting plates.
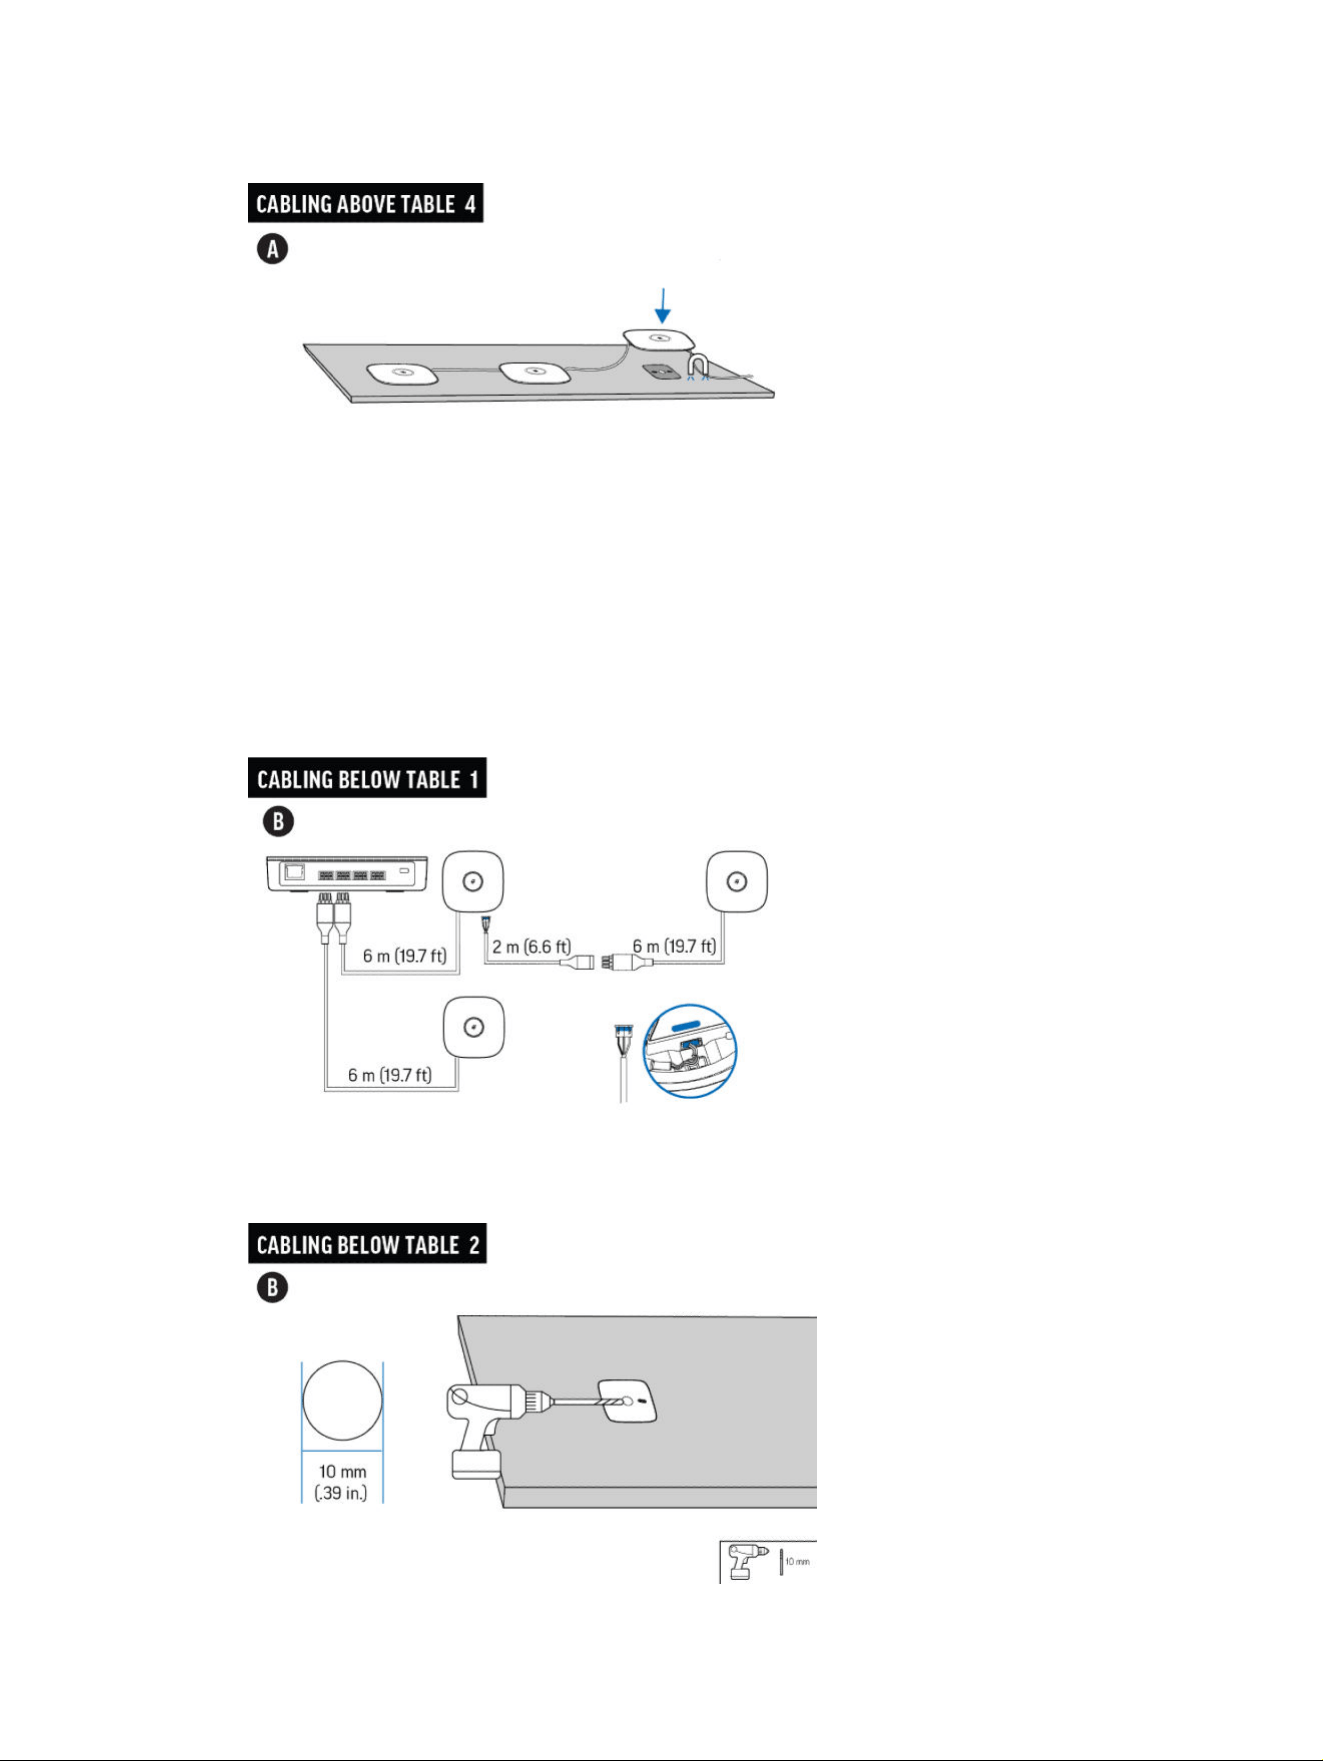
7. For a below-table discreet cabling setup, plan your cabling configuration. Connect the phoenix end
of the preconnected cable for the HP Poly Studio A2 Table Mic device to the HP Poly Studio A2
Audio Bridge device. Connect additional HP Poly Studio A2 Table Mic devices either directly into
the HP Poly Studio A2 Audio Bridge device or in a daisy-chain configuration. To span extended
distances when daisy-chaining HP Poly Studio A2 Table Mic devices, connect the 2-meter (6.5-foot)
JST (male) to phoenix (female) cable to the preconnected phoenix (male) to JST cable.
8. Using the hole of the affixed magnetic plate as a guide, drill a 10 mm (0.39 in.) hole through the
conference table. Repeat for all HP Poly Studio A2 Table Mic devices.
6
Chapter 2 Setting up the HP Poly Studio A2 hardware
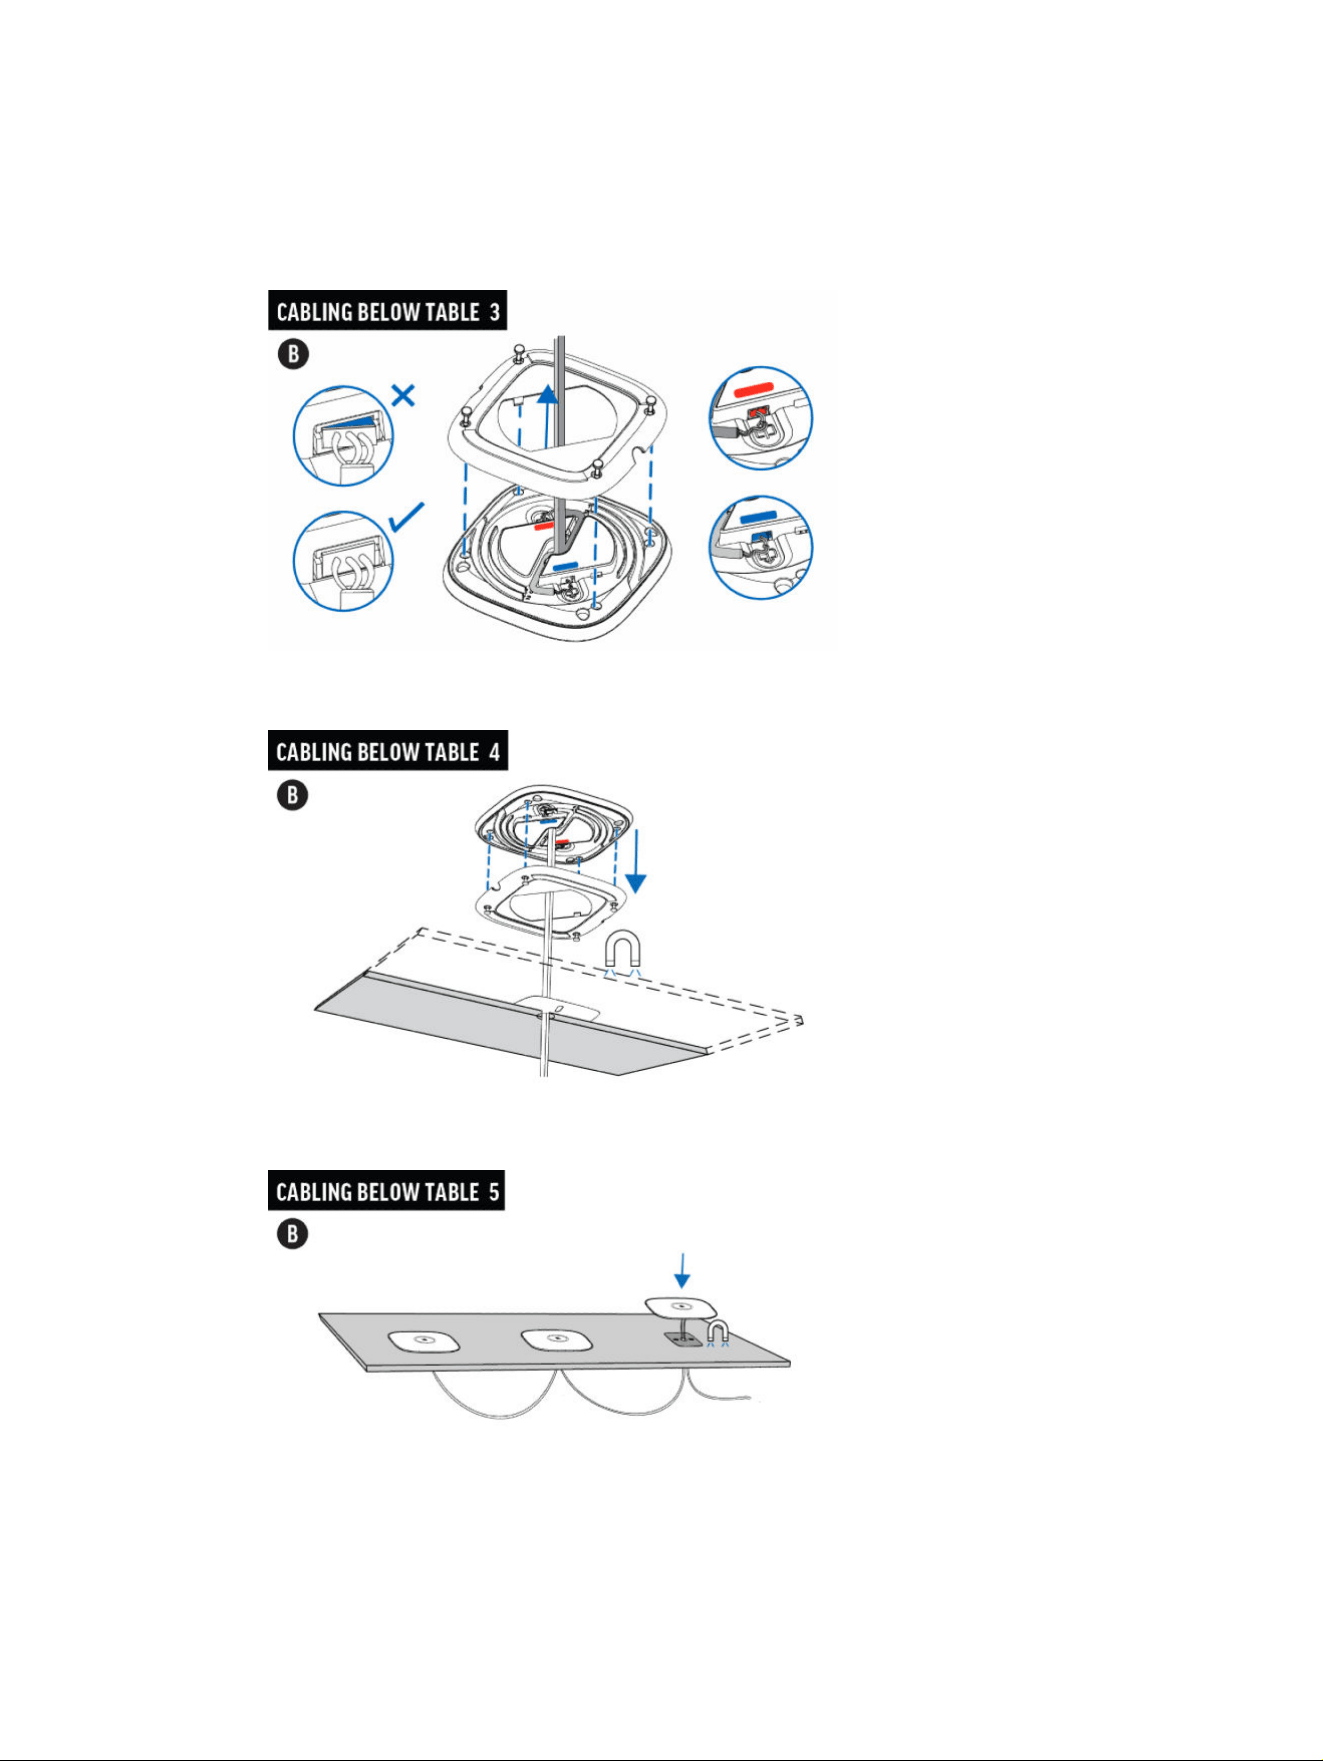
9. The JST cables and ports are color-coded and have different sizes and shapes. Connect the
(narrower) blue male cable connectors to the blue ports and (wider) red female cable connectors
to red ports Make sure to fully push the connectors into the ports. Before replacing the backing
cover, feed the cables through the space in the back panel. Secure the backing cover using the four
captive screws. .
10. Feed the cables through the magnetic plates and bored holes in the conference table.
11. Place the HP Poly Studio A2 Table Mic devices on the magnetic mounting plates.
Install and connect HP Poly Studio A2 devices
7

Install and connect HP Poly Studio A2 Audio Bridge
Once you mount the HP Poly Studio A2 Table Mic devices in their optimal position and cable them to
each other, connect them to the HP Poly Studio A2 Audio Bridge device and the HP Poly video room
configuration.
The following steps outline the basic configuration of HP Poly Studio A2 devices with a Poly Studio
G62 video conferencing system. Review Cabling HP Poly Studio A2 devices on page 22 for details on
additional configuration options, for example, using an Poly Studio X Series video bar or using an HP Mini
G9+ for Windows configuration.
1. To set up the HP Poly Studio A2 Audio Bridge, you need a spirit level and a drill with a 6 mm (1/4 inch)
drill bit.
2. The HP Poly Studio A2 Audio Bridge device comes with a mounting plate, an 8-meter (26-foot)
phoenix cable, a 3.6-meter (11.8-foot) CAT6A cable, four wall plugs, and four 1-inch #8 screws.
8
Chapter 2 Setting up the HP Poly Studio A2 hardware
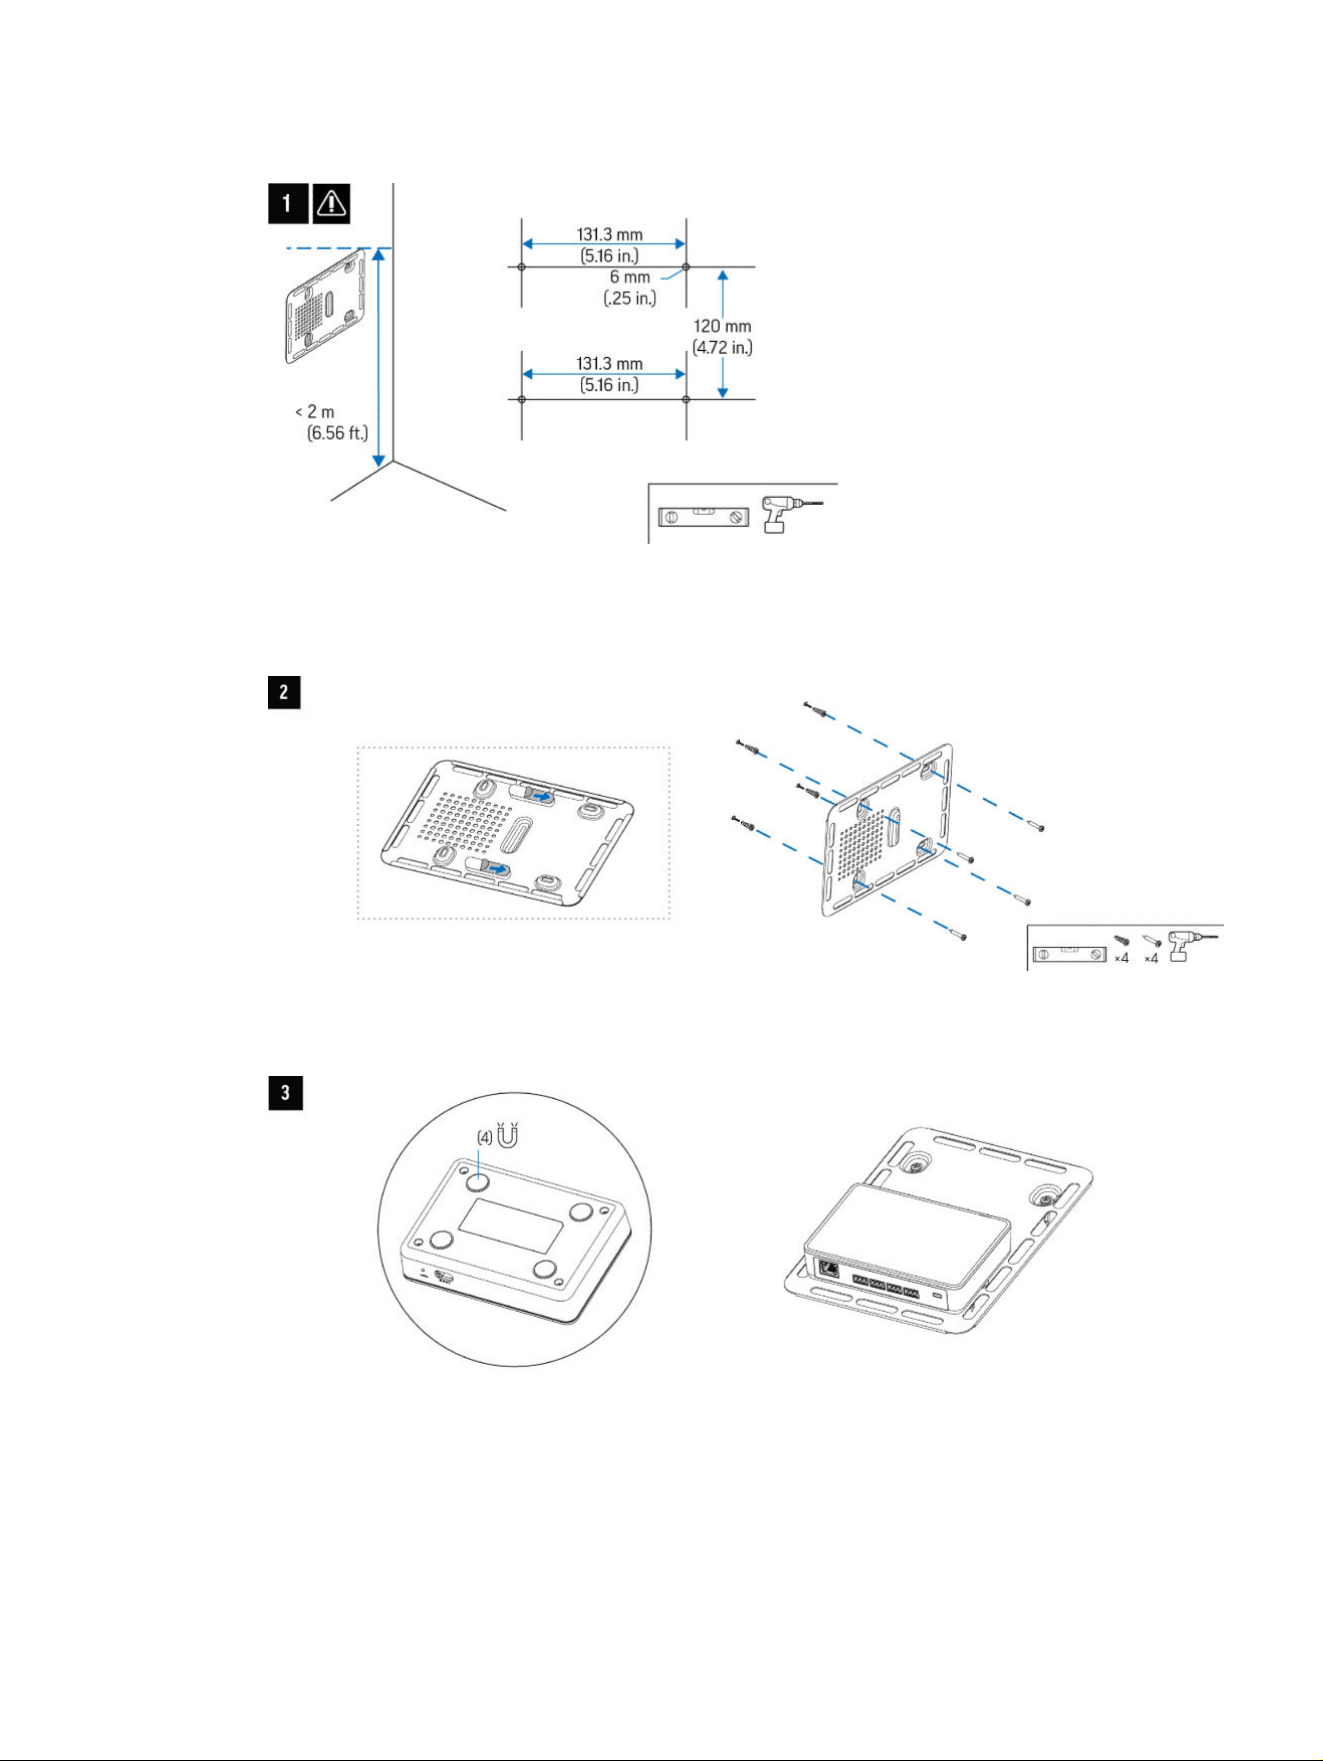
3. Use the spirit level to mark the screw points of the metal plate. Drill four 6-mm (1/4 inch) holes.
4. Place the wall plugs in the drill holes. Remove the stickers on the back of the metal plate and stick
the plate to the wall, ensuring the drill holes line up with the gaps in the metal plate. Screw in the
four screws, securing the metal plate to the wall.
5. Place the HP Poly Studio A2 Audio Bridge device on the metal plate. Magnetic disks on the bottom
of the audio bridge attach directly to the metal plate.
6. Using a CAT6A cable, connect the PoE port of the HP Poly Studio A2 Audio Bridge device to the
OUT port of a PoE injector. Connect the IN port of the PoE injector to the LLN port of the video
Install and connect HP Poly Studio A2 Audio Bridge
9
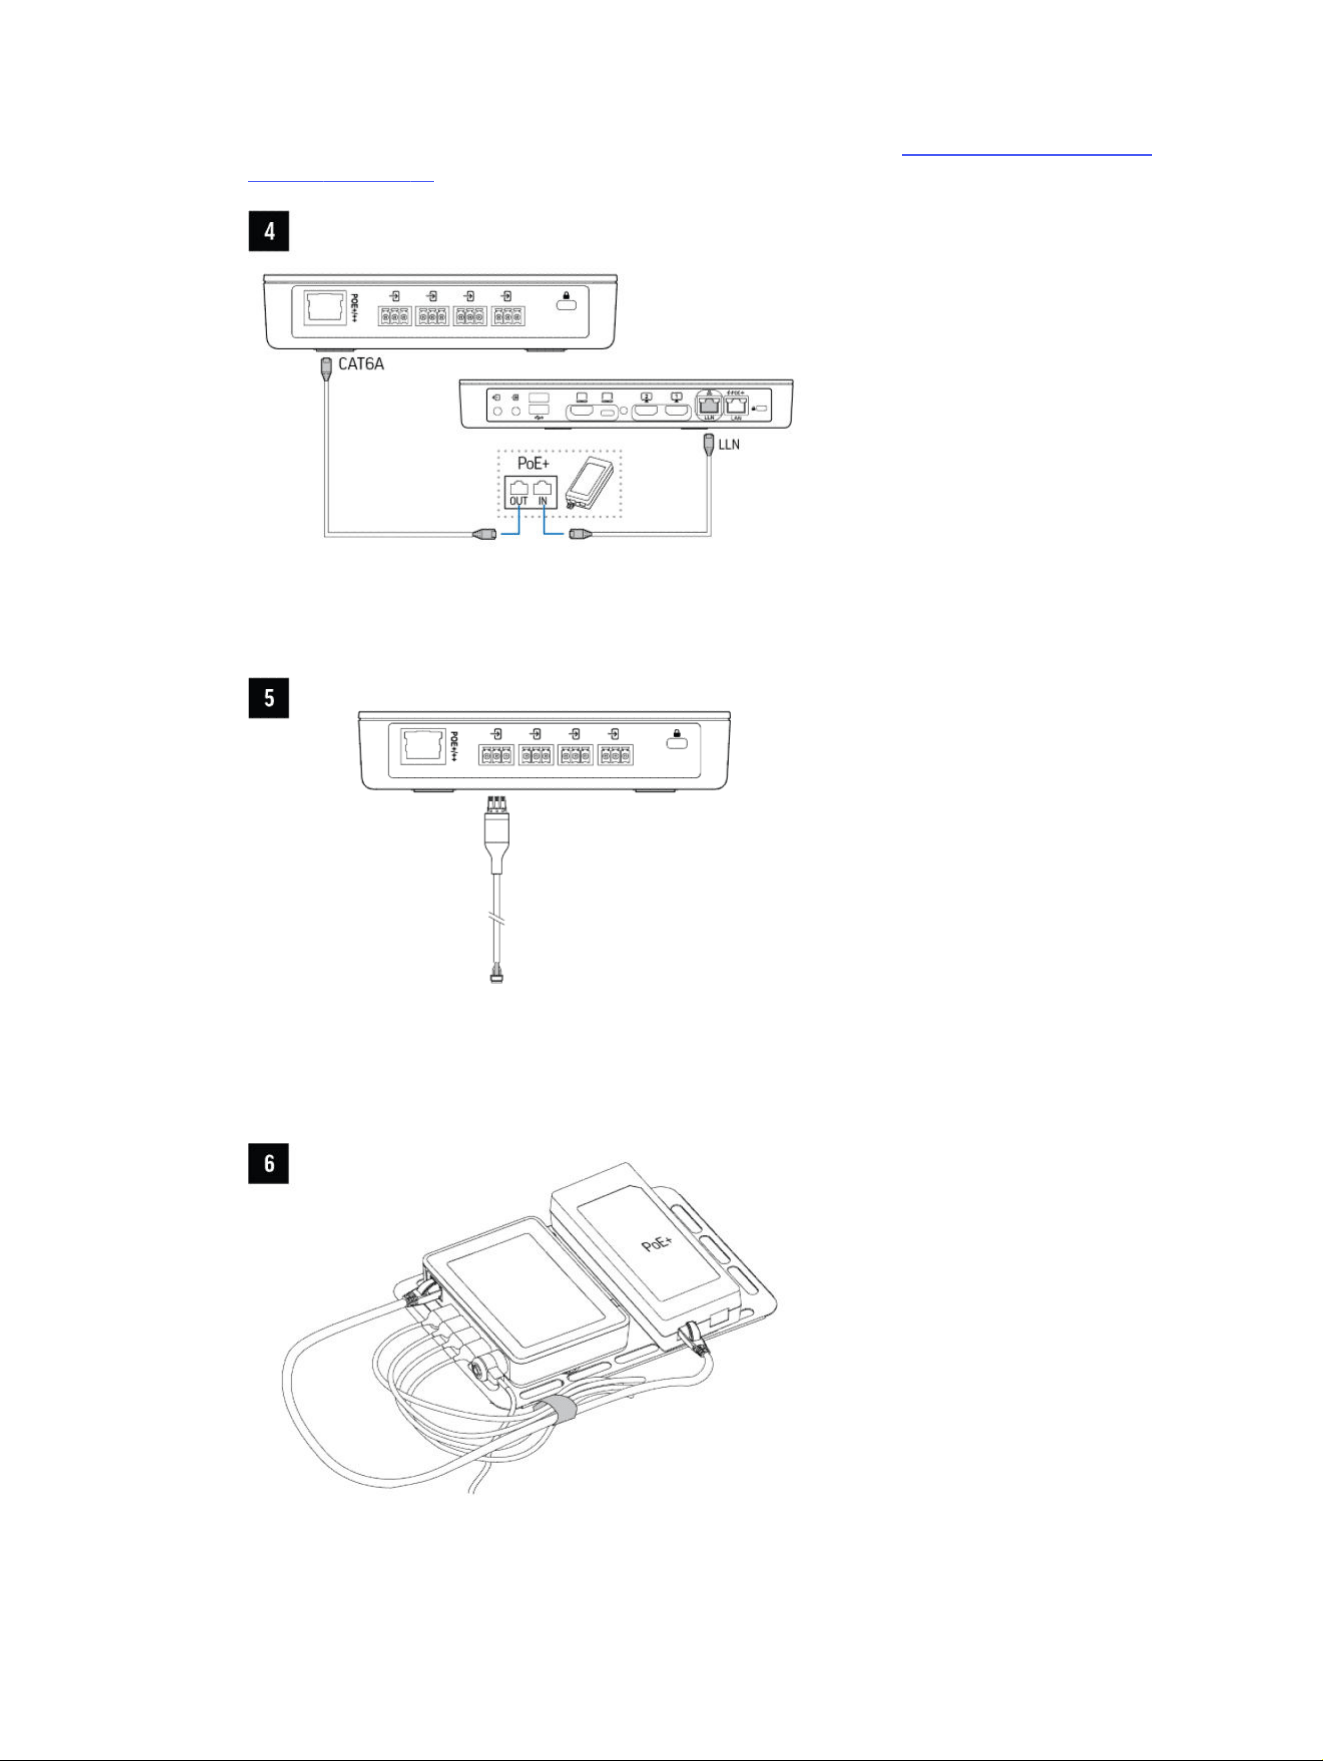
conferencing system or Poly video bar. For more information, review Cabling HP Poly Studio A2
devices on page 22.
7. Connect the phoenix end of the preconnected cable of the HP Poly Studio A2 Table Mic device to
the HP Poly Studio A2 Audio Bridge device.
8. For optimal cable management, mount the PoE injector on the magnetic metal plate beside the HP
Poly Studio A2 Audio Bridge device.
10
Chapter 2 Setting up the HP Poly Studio A2 hardware

Introducing HP Poly Studio A23
The HP Poly Studio A2 audio room solution delivers an inclusive hybrid meeting experience that ensures
participant voices are clearly heard wherever they are in the room.
This audio solution, powered by Poly StudioNet, provides flexible configuration options for scalability
with the ability to daisy-chain multiple microphones.
The HP Poly Studio A2 Audio Bridge interoperates with Poly StudioNet on HP Poly video systems.
HP Poly Studio A2 features and capabilities
HP Poly Studio A2 devices provide a modular audio solution for conference rooms.
HP Poly Studio A2 supports the following features:
● Flexible setup, scalable to any room size
● High-quality audio and unmatched clarity
● Streamlined setup with discreet cabling
● Increased speech intelligibility with microphone auto-switching when connected to a Poly Studio X
video bar with Poly NoiseBlockAI
● Unified control with Poly Lens
NOTE: HP Poly Studio A2 Table Mics are not intercompatible with IP Poly microphones.
Introducing HP Poly Studio A2
11
HP Poly Studio A2 overview
HP Poly Studio A2 audio bridge and microphones provide simplified configuration with Pro A/V
performance. The new design includes LED indicators and intuitive cable wrapping for discrete
mounting and flexible installation.
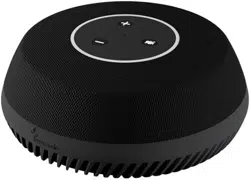
HP Poly Studio A2 Audio Bridge hardware overview
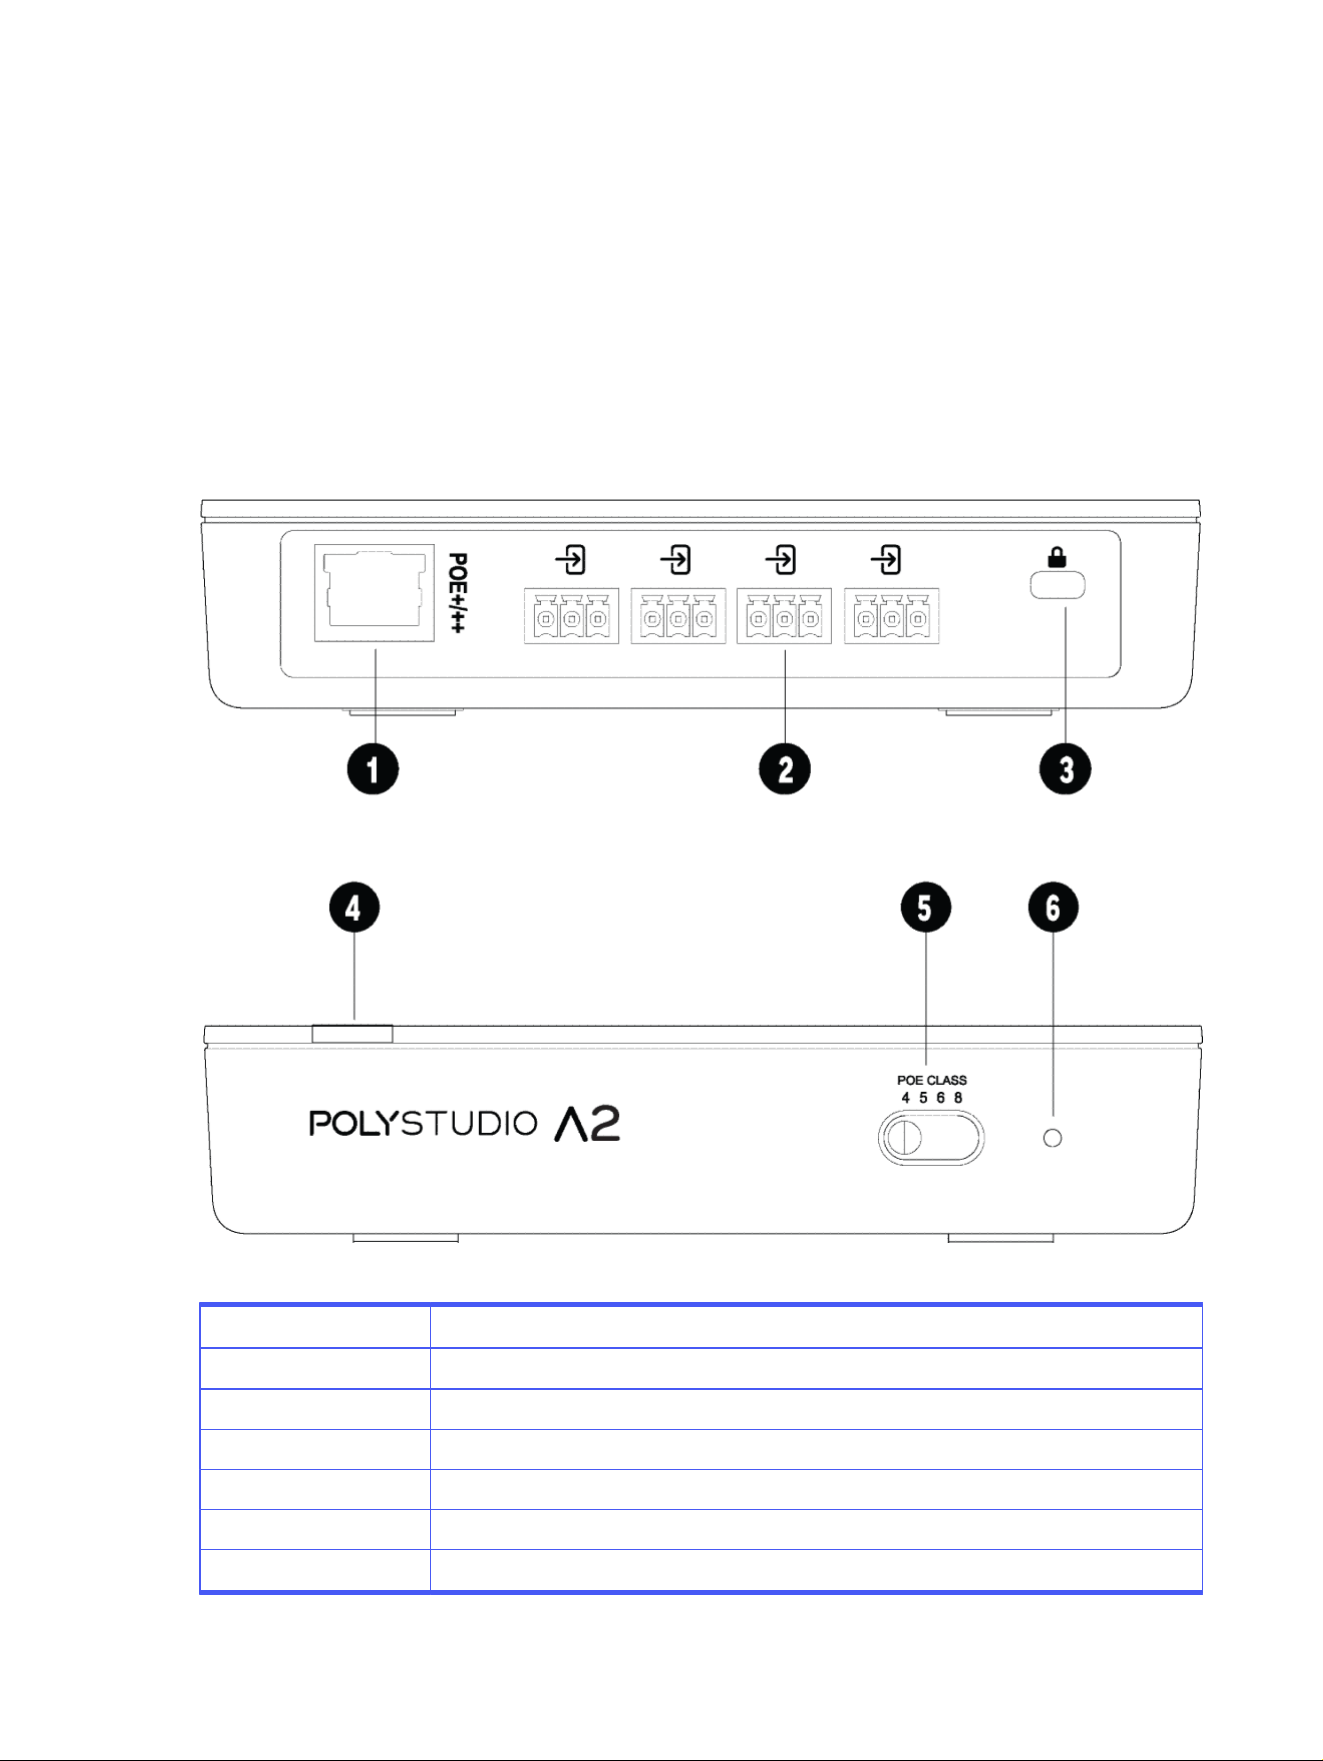
HP Poly Studio A2 Audio Bridge receives audio and audio control for HP Poly video systems.
HP Poly Studio A2 Audio Bridge is powered by PoE, which provides power and connection to all audio
devices connected to it directly or via a daisy-chain configuration. HP Poly Studio A2 Audio Bridge
converts A2B to StudioNet Audio and StudioNet Audio to A2B.
Table 3-1
HP Poly Studio A2 Audio Bridge
Reference number LED behavior
1 PoE port
2 A2B bus ports
3 Security lock
4 LED indicator
5 PoE switch
6 Factory restore pinhole
12 Chapter 3 Introducing HP Poly Studio A2
HP Poly Studio A2 Audio Bridge LED status indicators
The following table lists the LED behavior for HP Poly Studio A2 Audio Bridge. The table lists each LED
indicator and its associated status.
Table 3-2 LED status indicators
System status LED Behavior
Bootup initialization Breathing white
Powered on Solid white
Firmware update/factory reset Breathing amber
Low power alert Blinking red
One or more connected mics not working Blinking red
Recovering from an error Blinking red for 2 minutes (see HP Poly Studio A2 Audio Bridge
LED is blinking red on page 30)
HP Poly Studio A2 Audio Bridge ports
The following table outlines the port usage on the HP Poly Studio A2 Audio Bridge devices.
Table 3-3
HP Poly Studio A2 Audio Bridge system ports
Port TCP/UDP State Usage
18888 TCP Listening StudioNet protocol
4443 TCP Listening (when active) StudioNet update and log
upload
2000 UDP Open StudioNet discovery protocol
8000-8100 UDP Open StudioNet media to/from
paired StudioNet Primary
319,320 UDP Open StudioNet audio clock
synchronization with paired
StudioNet primary
123 UDP Open StudioNet time
synchronization with paired
StudioNet primary
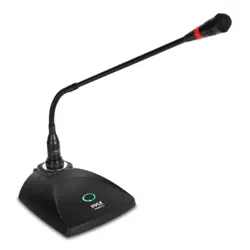
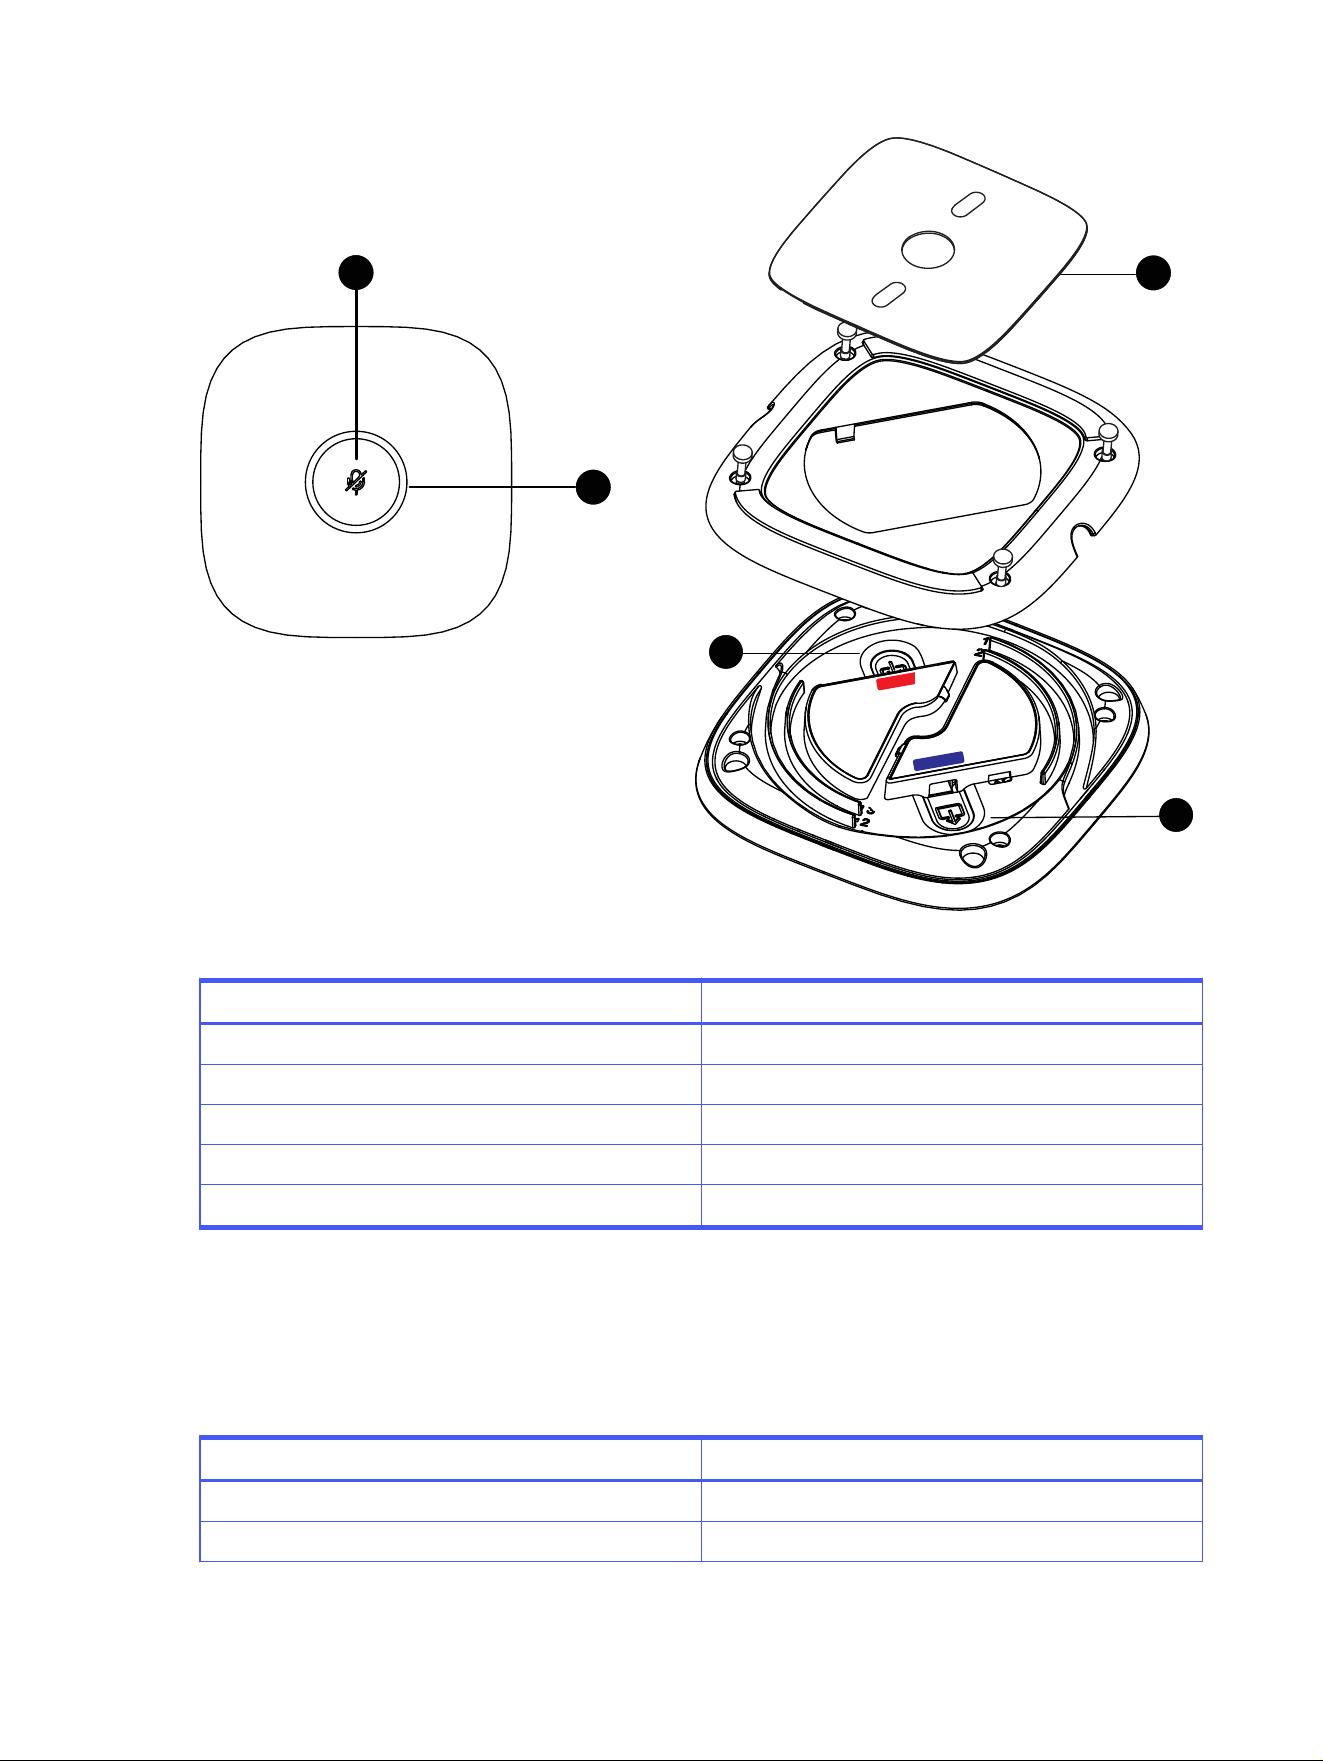
HP Poly Studio A2 Table Mic hardware overview
HP Poly Studio A2 Table Mic devices are table-mounted microphones that contain four cardioid
microphone elements, a capacitive touch mute button, and integrated status LEDs.
Distribute up to eight microphones across four independent daisy-chains from the HP Poly Studio A2
Audio Bridge device to handle any size room, even extra-large conferencing areas.
HP Poly Studio A2 Audio Bridge LED status indicators
13
4
5
1
22
3
Table 3-4 HP Poly Studio A2 Table Mic hardware feature descriptions
Reference number Feature description
1 Mute
2 LED status indicator
3 Magnetic table plate
4 Cable input
5 Cable output
HP Poly Studio A2 Table Mic LED status indicators
The following table lists the LED behavior for your HP Poly Studio A2 Table Mic devices. The table lists
each LED indicator and its associated status.
Table 3-5
LED status indicators
System status LED behavior
Boot-up initialization Breathing white
Active call unmuted Solid green
14 Chapter 3 Introducing HP Poly Studio A2
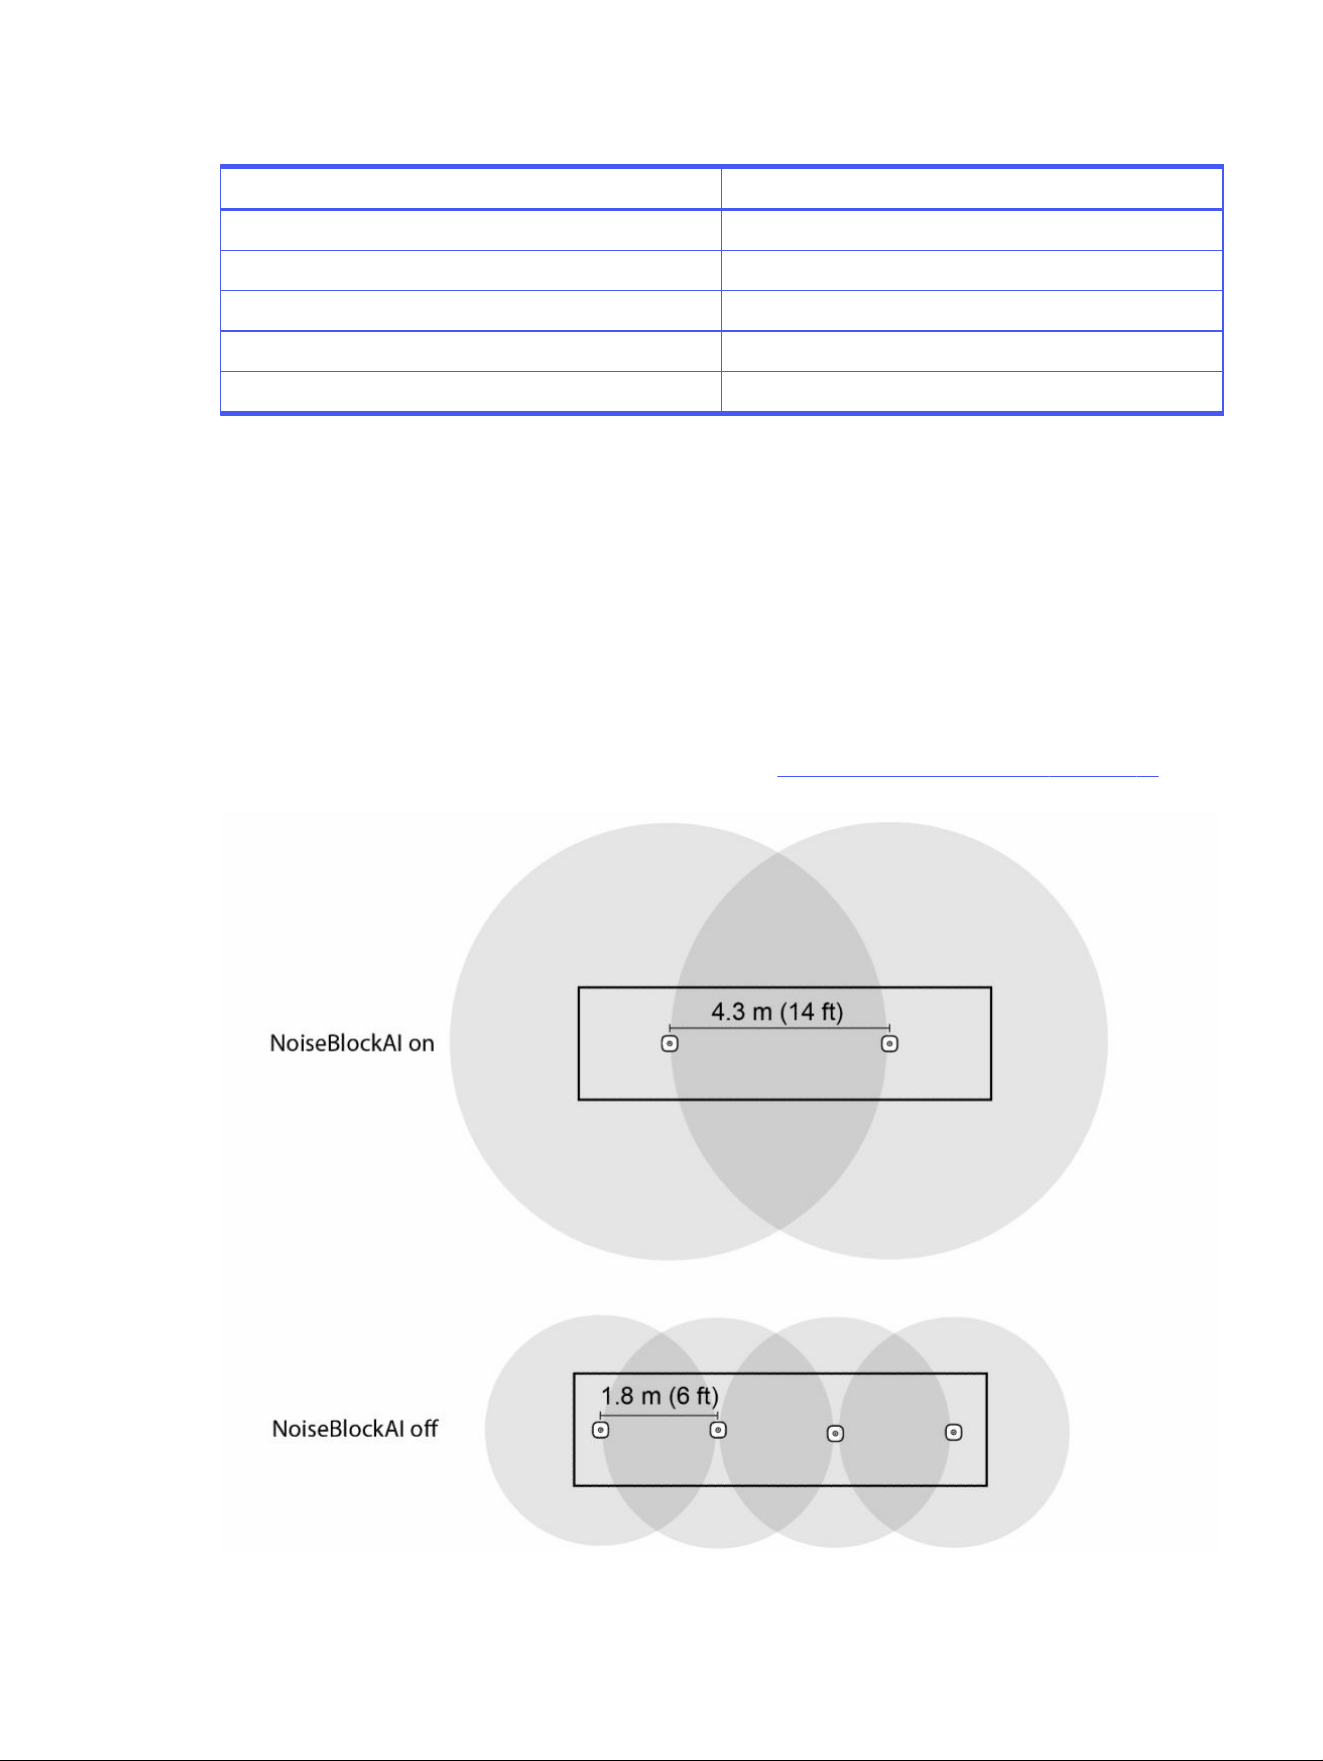
Table 3-5 LED status indicators (continued)
System status LED behavior
Active call muted Solid red
Ready to pair/pairing in progress Blinking blue and white
Pairing successful Solid blue
Firmware update/factory reset Breathing amber
Device identification/channel identification Blinking amber
Poly NoiseBlockAI with HP Poly Studio A2
Poly NoiseBlockAI uses AI and machine learning to identify and block distracting noises such as
keyboard typing, paper shuffling, and HVAC humming and reverberation during calls, ensuring a
seamless call experience. Poly NoiseBlockAI keeps conversations on track and enables meeting
participants to be heard more clearly.
With Poly NoiseBlockAI enabled on HP Poly Studio A2, the pickup distance increases from the standard
1.8 m (6 ft) to 4.3 m (14 ft). This means that you can place your HP Poly Studio A2 Table Mic devices up to
4.3 m (14 ft) apart.
For information on enabling Poly NoiseBlockAI, review the Configure HP Poly Studio A2 on page 27
section.
Poly NoiseBlockAI with HP Poly Studio A2
15

HP Poly Studio A2 room configuration options
HP Poly recommends using the appropriate number of devices based on your conferencing room size.
Table 3-6 Recommended number of HP Poly Studio A2 devices by room size
Room size Dimensions Recommended Poly video
conferencing device options
Recommended number of
table mics (in addition to
video bar mics)
Small 10 ft x 15 ft
3 m x 4.5 m
Poly Studio V12 1
Small 10 ft x 15 ft
3 m x 4.5 m
Poly Studio X32 1 to 2
Medium 15 ft x 20 ft
4.5 m x 6 m
Poly Studio V12 1
Medium 15 ft x 20 ft
4.5 m x 6 m
Poly Studio V52
Poly Studio X52
1 to 4
Large 18 ft x 28 ft
5.5 m x 8.5 m
Poly Studio V72
Poly Studio X72
4
Extra-large 25 ft x 32 ft
7.6 m x 9.8 m
Poly Studio G62 8
When positioning microphones in a conference space, consider the following recommendations:
● Placing microphones with a similar distance between participants helps the far end hear
conversations more smoothly and evens the sound.
● Direct sound is preferable to reflected sound. Avoid positioning participants with their backs to a
microphone, which can cause their voices to sound dull and contain significant amounts of room
reverberation.
● Multiple microphones are ideal for meetings with rectangular conference tables where people sit
along a long edge. Using multiple microphones ensures there’s even coverage of audio input for
each participant.
● Avoid placing microphones where direct airflow from fans or HVAC might impact the audio input to
the microphone.
● The minimum distance to place a microphone from a video bar with integrated speaker is 2.5 m (8.2
ft).
Table 3-7
Quantity of supported paired devices by video conferencing system
Paired device Poly Studio G62 Poly Studio X52 Poly Studio X72
Poly TC10 (Corp net) 1 1 1
Poly Studio E70 2 2 2
HP Poly Studio A2 Audio
Bridge (LLN net)
1 1 1
16 Chapter 3 Introducing HP Poly Studio A2

Table 3-7 Quantity of supported paired devices by video conferencing system (continued)
Paired device Poly Studio G62 Poly Studio X52 Poly Studio X72
HP Poly Studio A2 Table Mic 8 4 4
Netgear 1 1 1
4K TV 1 1 1
Supported ecosystems by video conferencing system
The following ecosystems are supported on Poly Studio G62, Poly Studio X52, and Poly Studio X72:
● Zoom
● Microsoft
● Poly VideoOS
Figure 3-1 Typical configuration of a small room with Poly Studio V12 (Poly NoiseBlockAI not enabled)
HP Poly Studio A2 room configuration options
17
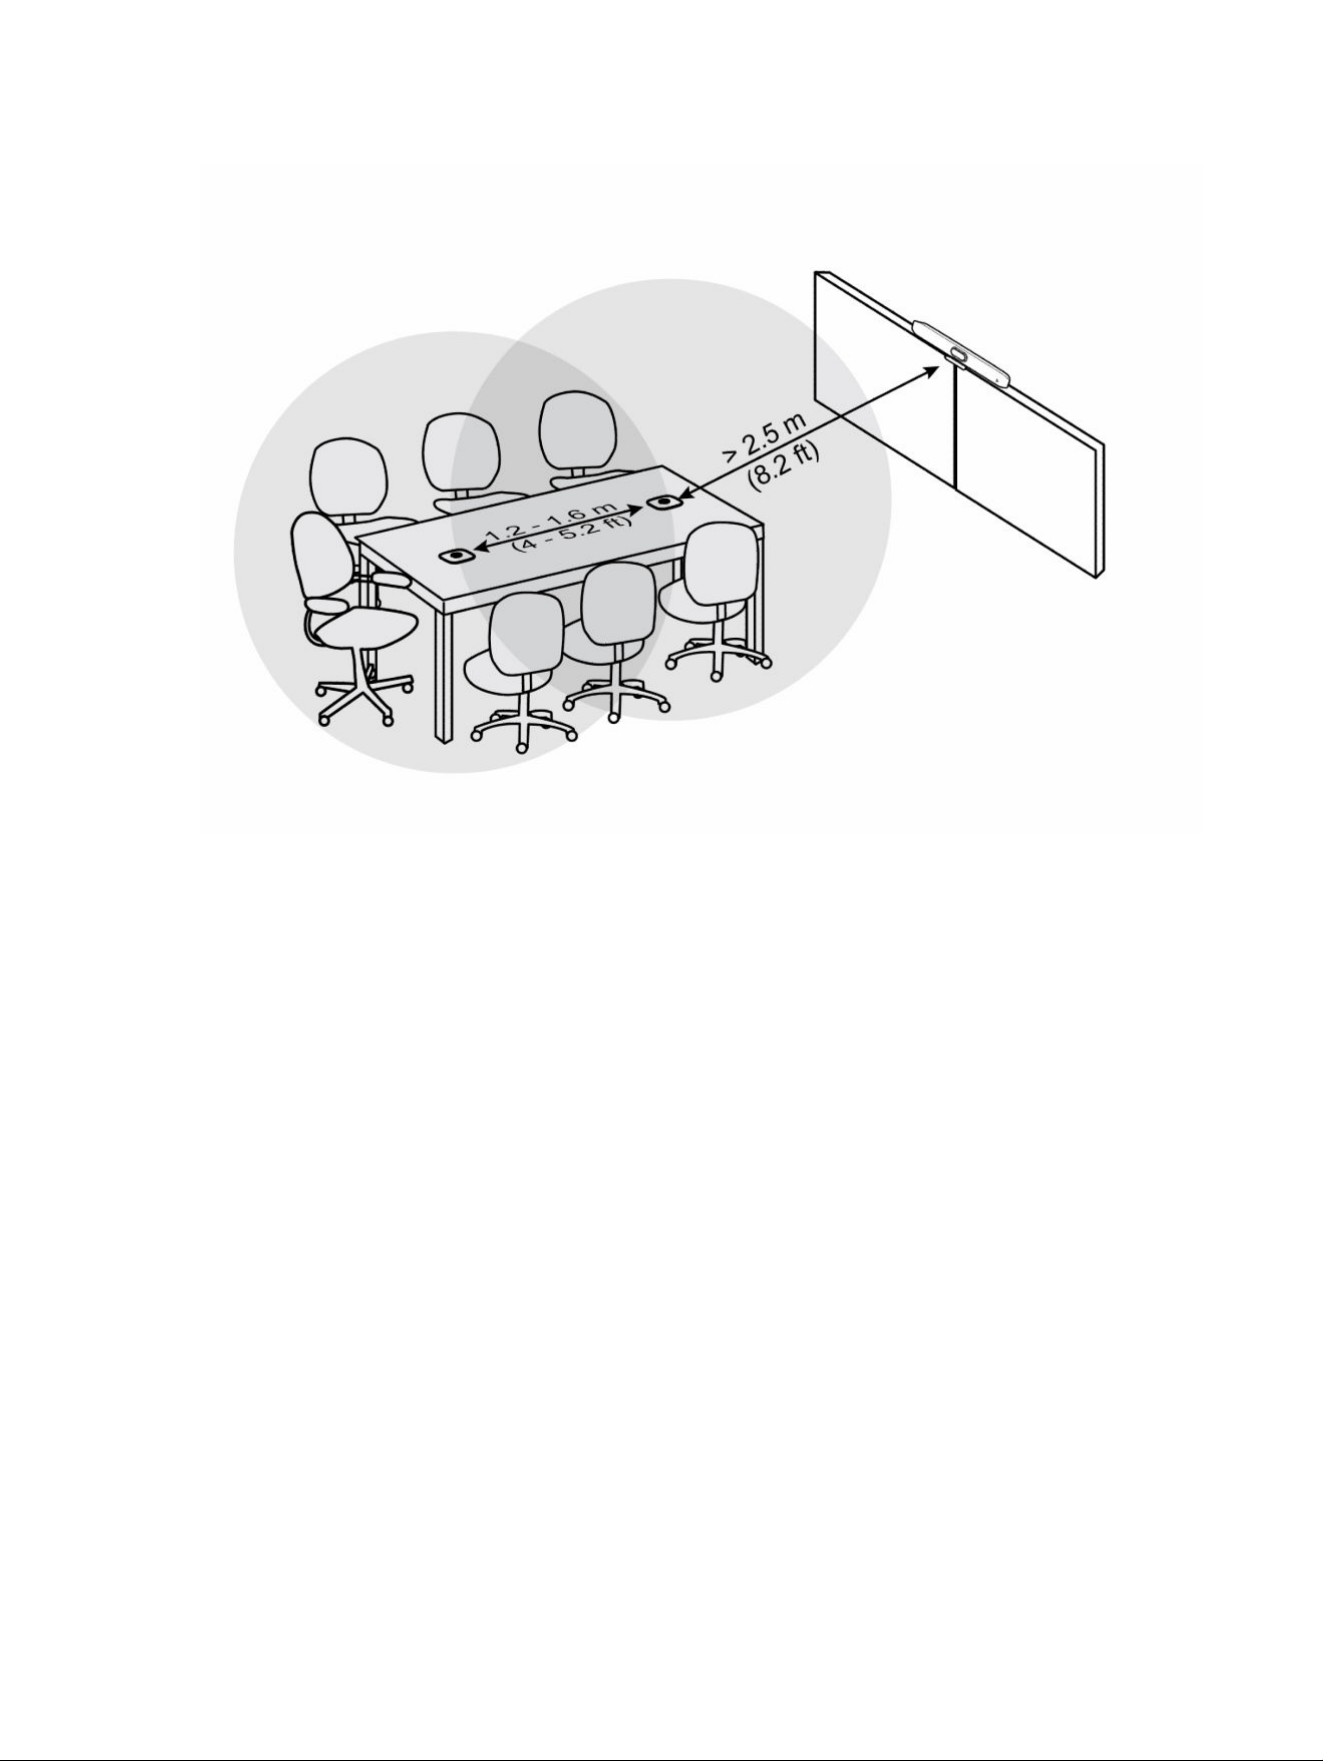
Figure 3-2 Typical configuration of a small room with Poly Studio X32 (Poly NoiseBlockAI not enabled)
18 Chapter 3 Introducing HP Poly Studio A2
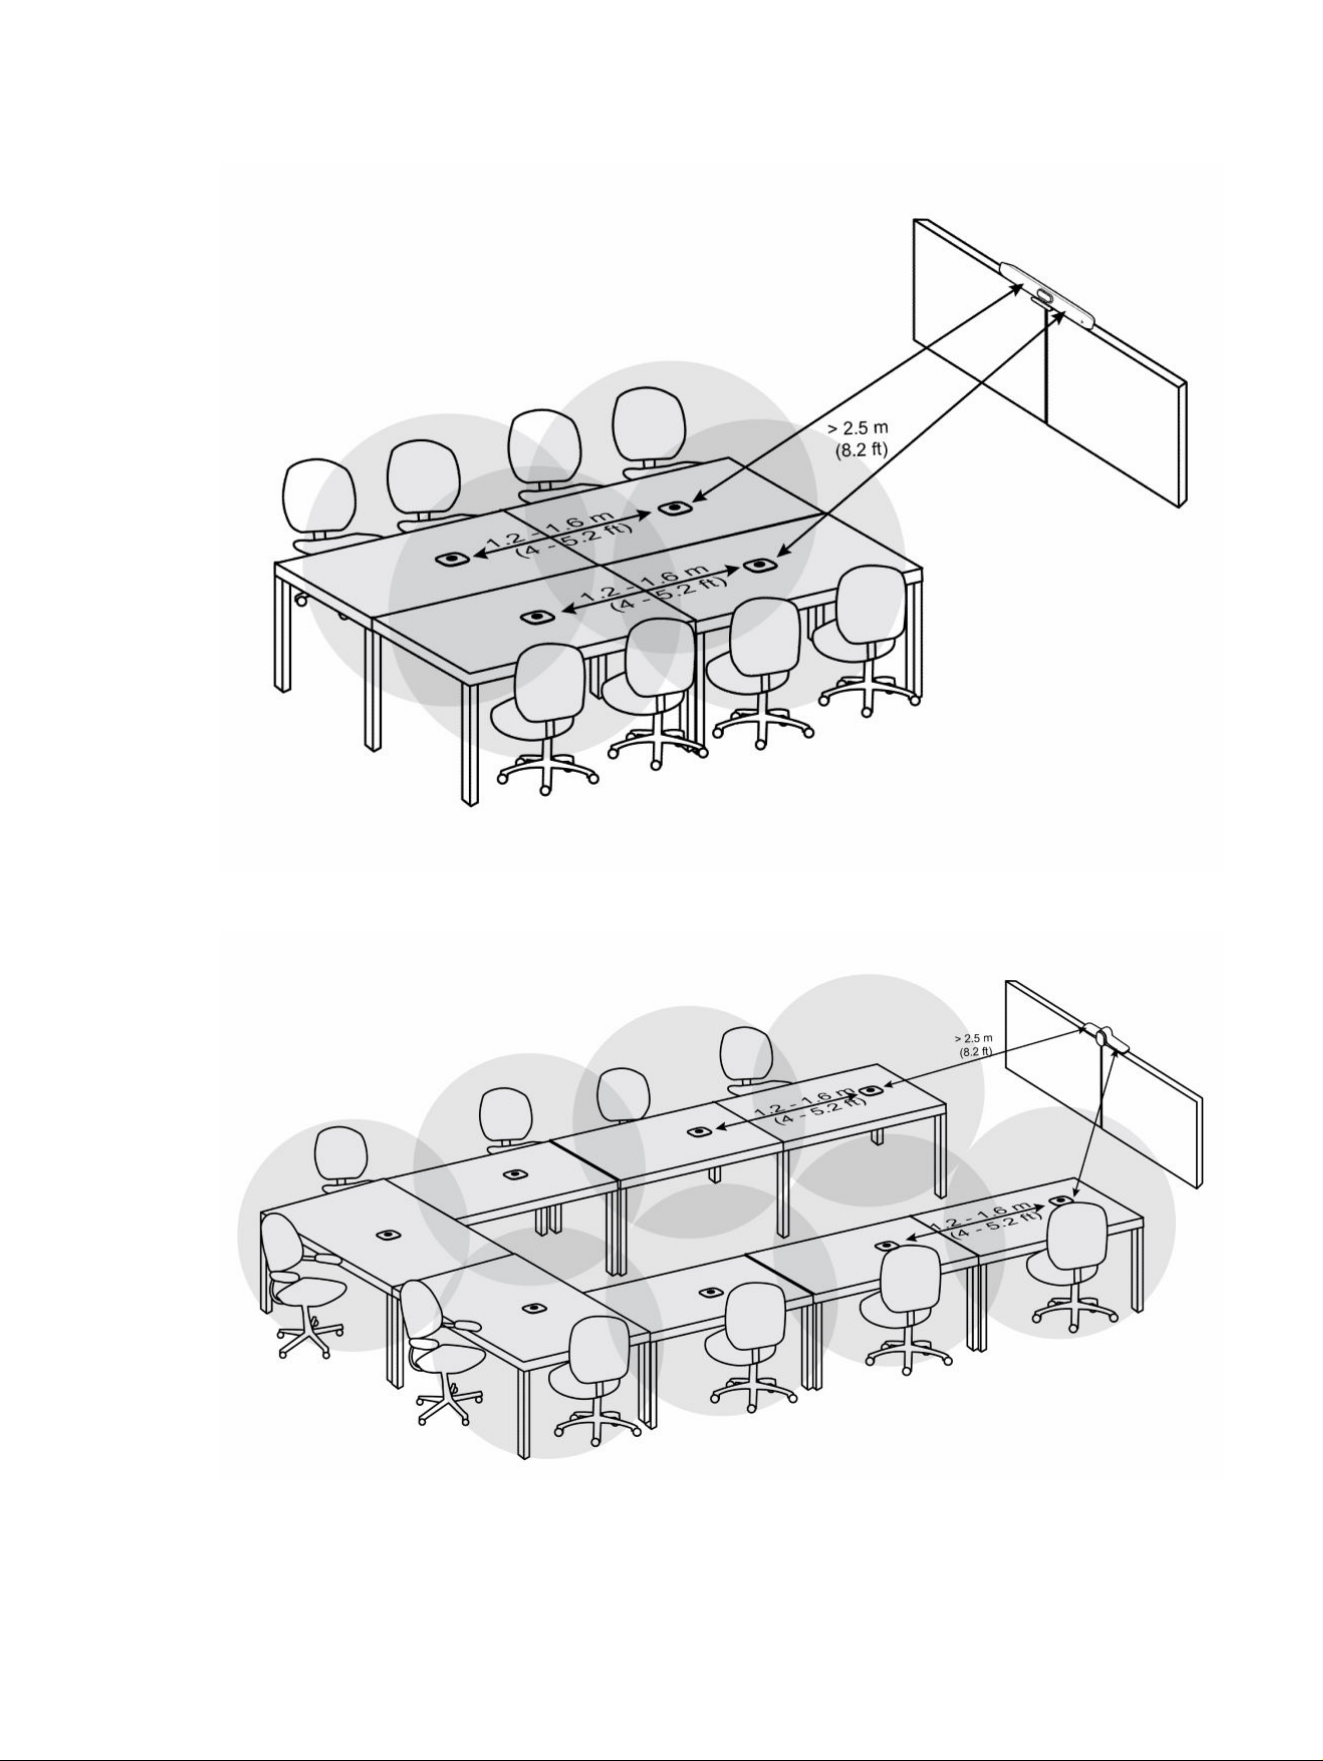
Figure 3-3 Typical configuration of a medium room (Poly NoiseBlockAI not enabled)
Figure 3-4 Typical configuration of a large/extra large room (Poly NoiseBlockAI not enabled)
HP Poly Studio A2 room configuration options
19

Cabling HP Poly Studio A2 devices
HP Poly Studio A2 provides flexible configuration options that can easily adapt and expand as room
requirements grow and change.
The following video bars don’t have a dedicated LLN port and require a USB Type-A to Ethernet adapter
that converts the existing LAN port to an LLN:
● Poly Studio X32
● Poly Studio X52
● Poly Studio V52
When you connect the adapter from the USB Type-A port of the video bar to the corporate network and
restart the video bar, the built-in LAN port on the video bar becomes an LLN. The USB Type-A to Ethernet
port becomes the primary network. To ensure compatibility, use the approved HP adapter, HP USB 3.0 to
Gig RJ-45 Adapter G2 (part number: M91114-001).
IMPORTANT: Use shielded twisted pair (STP) Ethernet cables between the PoE injector and the HP
Poly Studio A2 Audio Bridge device, and between the PoE injector and the Poly video bar.
NOTE: You must connect the HP Poly Studio A2 Table Mic devices to the HP Poly Studio A2 Audio
Bridge device before connecting the PoE power. If you connect the mics after you power up the audio
bridge, the audio bridge doesn’t detect the mics.
Cabling HP Poly Studio A2 devices with Poly Studio X Series video bars
HP Poly Studio A2 provides configuration options for various room sizes with Poly Studio X Series video
bars.
NOTE: If using a Poly Studio X32 system, power it up before powering up the HP Poly Studio A2 Audio
Bridge device. Once the Poly Studio X32 system starts searching or gets an IP address, power up the
HP Poly Studio A2 Audio Bridge device.
20
Chapter 3 Introducing HP Poly Studio A2
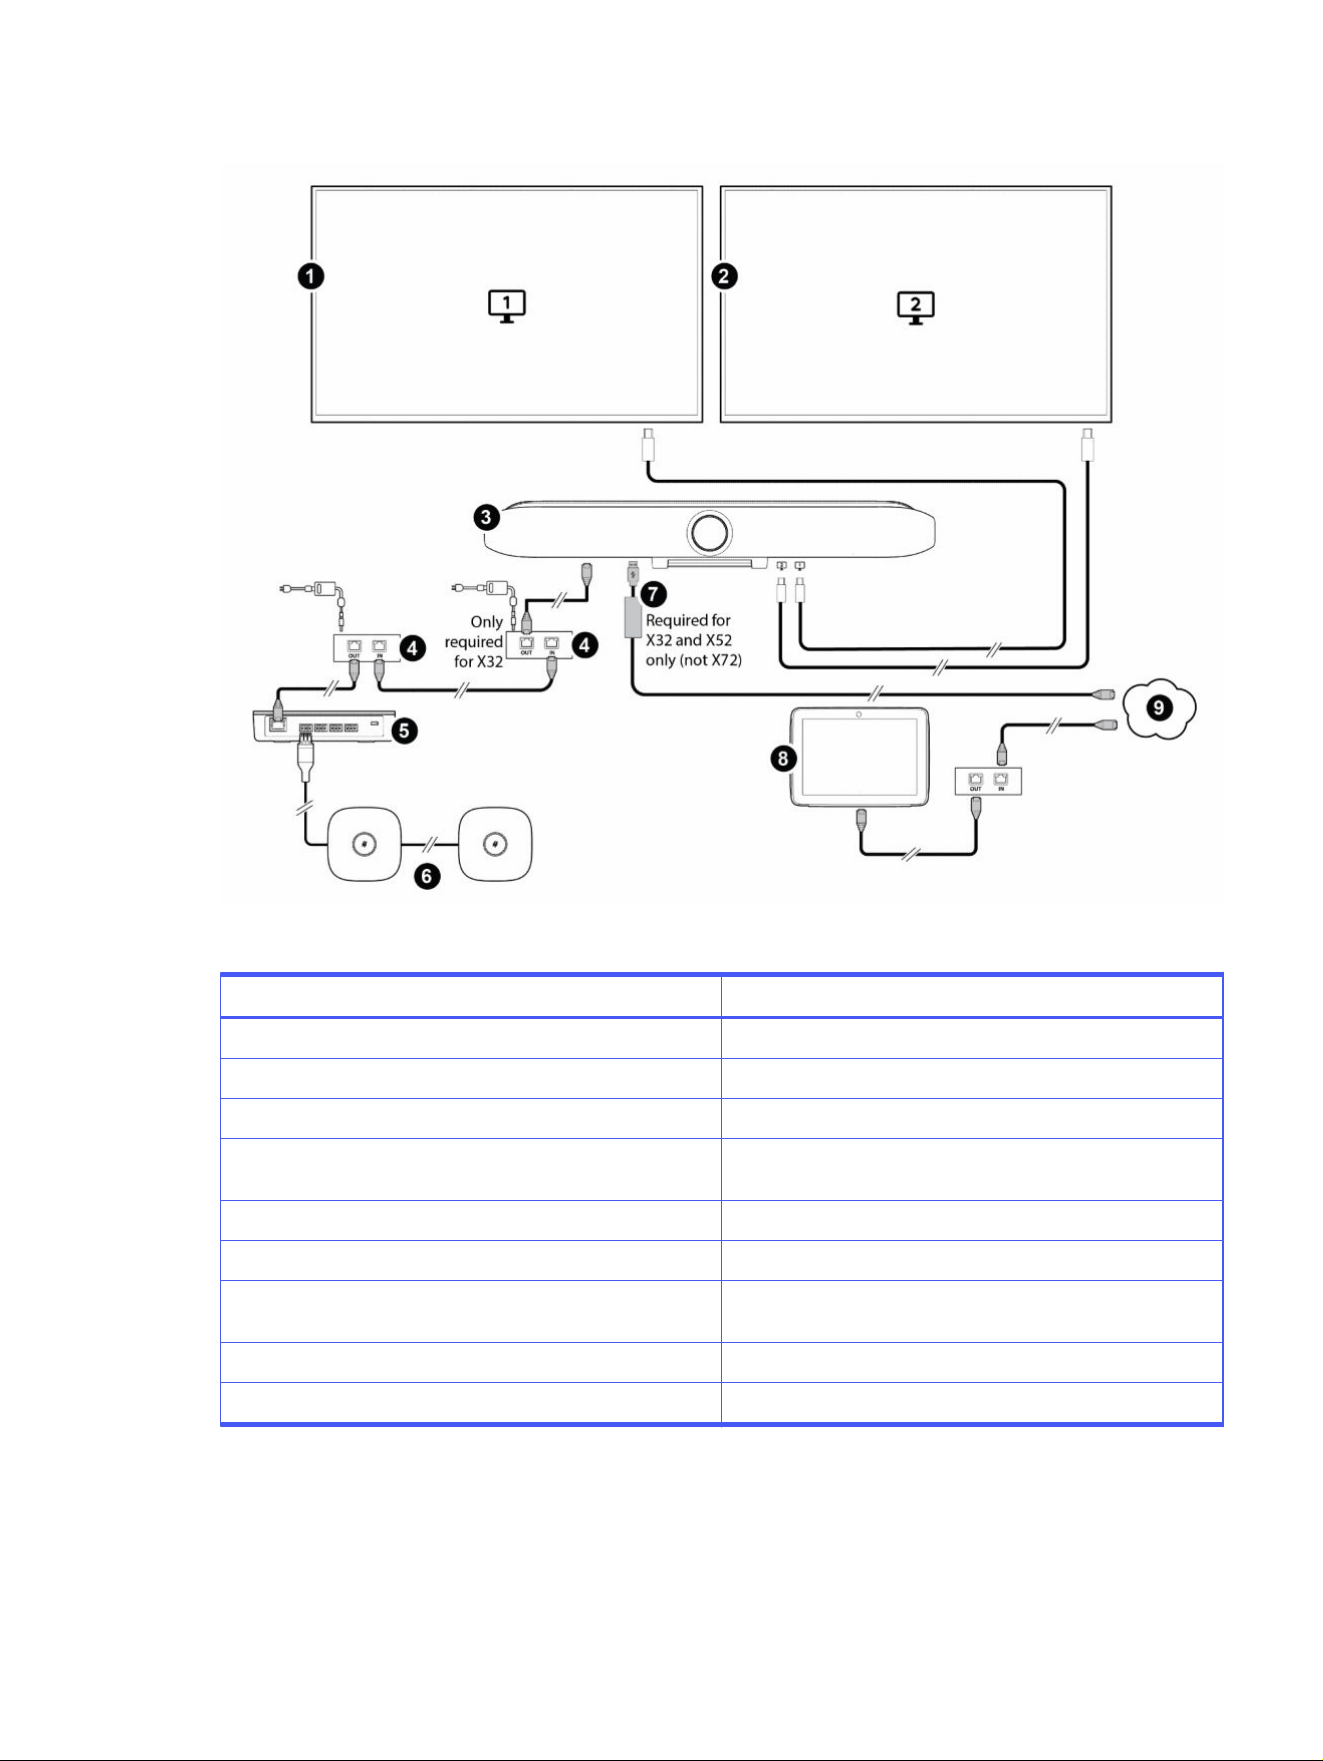
Figure 3-5 HP Poly Studio A2 with Poly Studio X Series video bars configuration
Table 3-8 Poly Studio X32 configuration hardware key
Item Description
1 Display 1
2 Display 2
3 Poly Studio X Series video bar
4 PoE adapters - one required for Poly Studio X52 and Poly
Studio X72; two required for Poly Studio X32
5 HP Poly Studio A2 Audio Bridge device
6 HP Poly Studio A2 Table Mic devices
7 USB Type-A to Ethernet adapter (not required for Poly Studio
X72)
8 Poly touch controller
9 LAN
Cabling HP Poly Studio A2 devices with Poly Studio X Series video bars 21
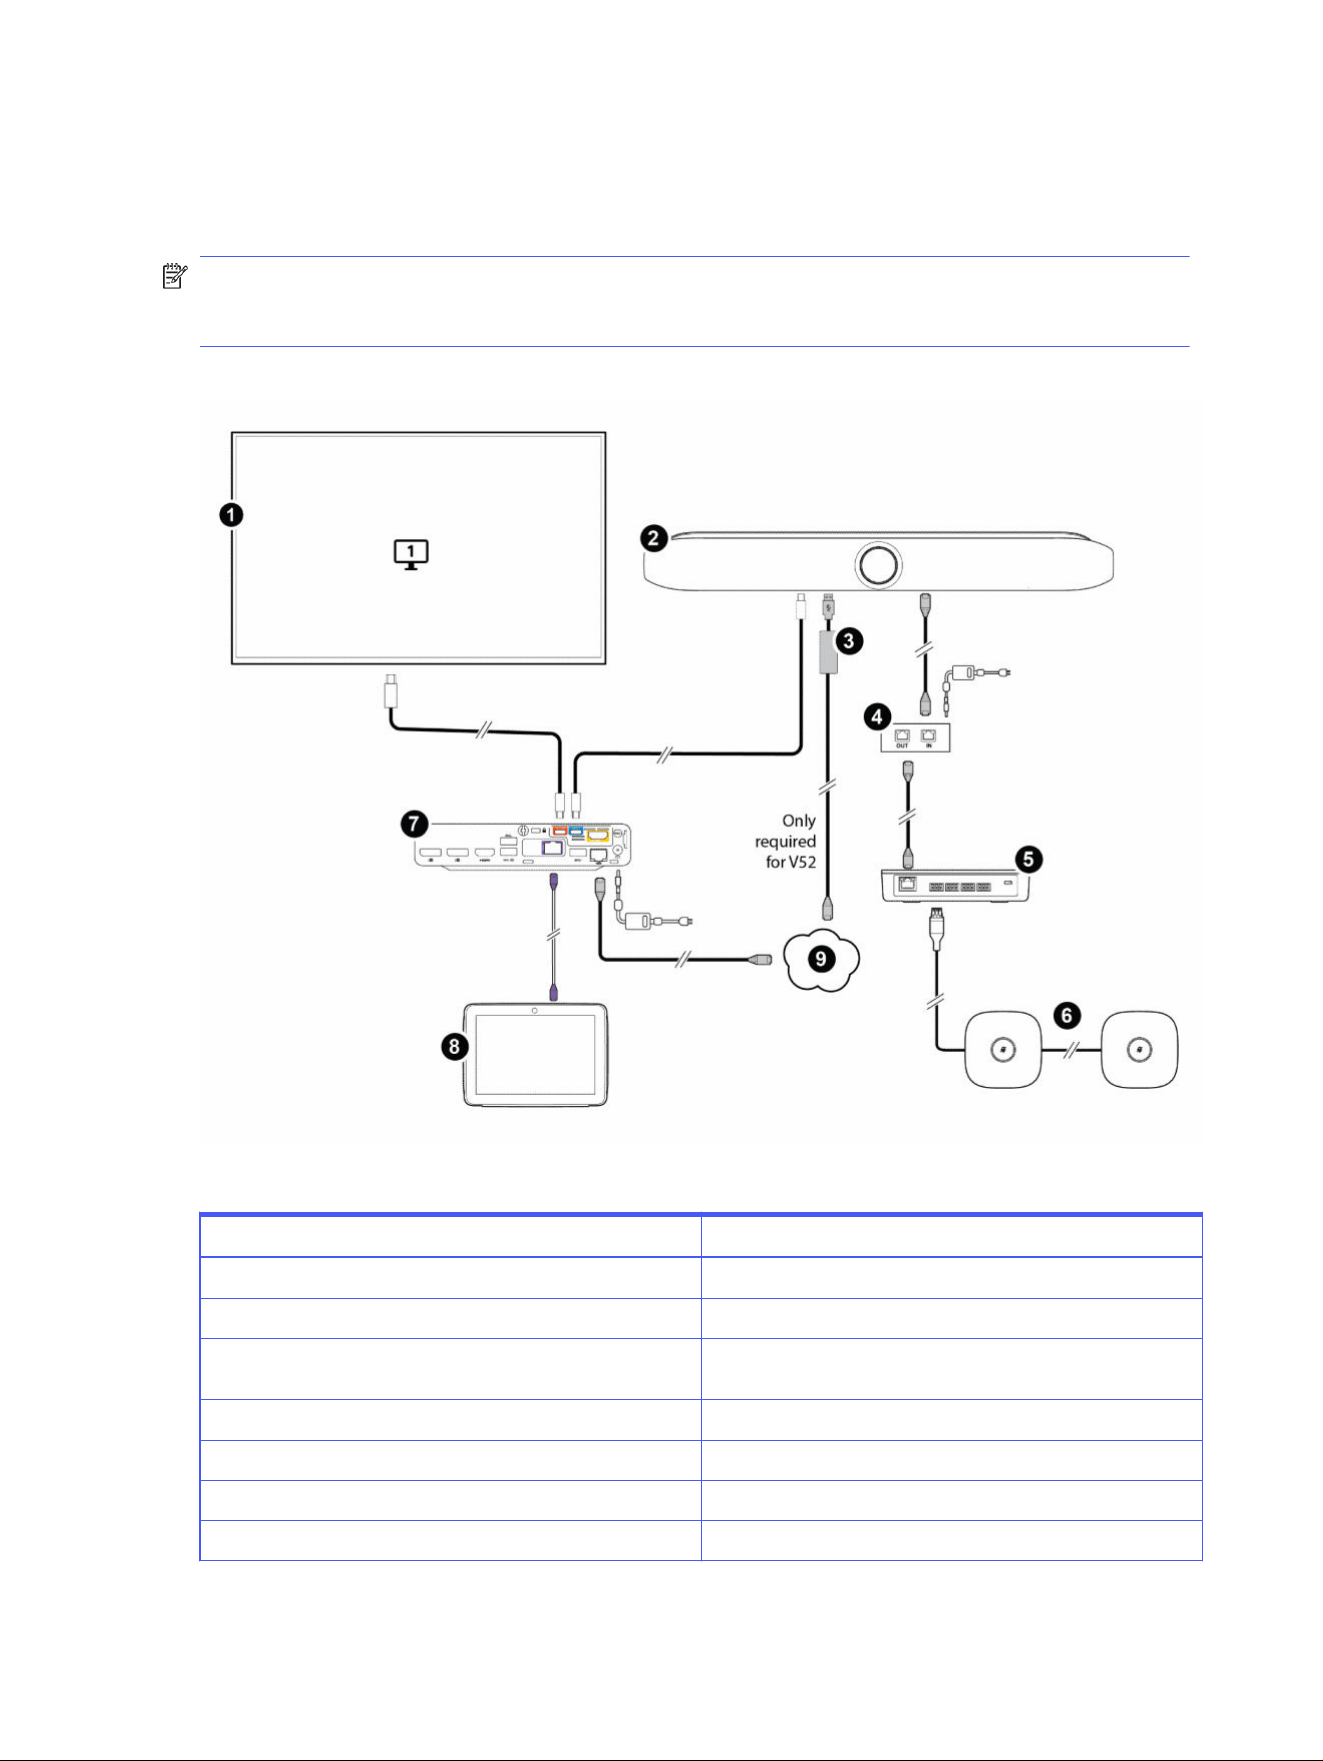
Cabling HP Poly Studio A2 devices with Poly Studio V Series video bars
HP Poly Studio A2 is supported on a Poly Studio V52 and Poly Studio V72 connected to a Poly Studio
Base Kit G9 Plus system on Windows. Review the following diagram for cabling information.
NOTE: To use HP Poly Studio A2 with a Poly Studio V12 system, connect a single HP Poly Studio A2
Table Mic device directly into the Poly Studio V12 system. You don't need a HP Poly Studio A2 Audio
Bridge device. Only one HP Poly Studio A2 Table Mic device is supported for Poly Studio V12.
Figure 3-6 HP Poly Studio A2 with Poly Studio V Series video bar configuration
Table 3-9 Poly Studio V Series configuration hardware key
Item Description
1 Display
2 Poly Video V Series video bar
3 USB Type-A to Ethernet adapter (for Poly Studio V52 only;
connection to network optional for device management)
4 PoE Switch
5 HP Poly Studio A2 Audio Bridge device
6 HP Poly Studio A2 Table Mic devices
7 HP Mini IP Conference PC
22 Chapter 3 Introducing HP Poly Studio A2
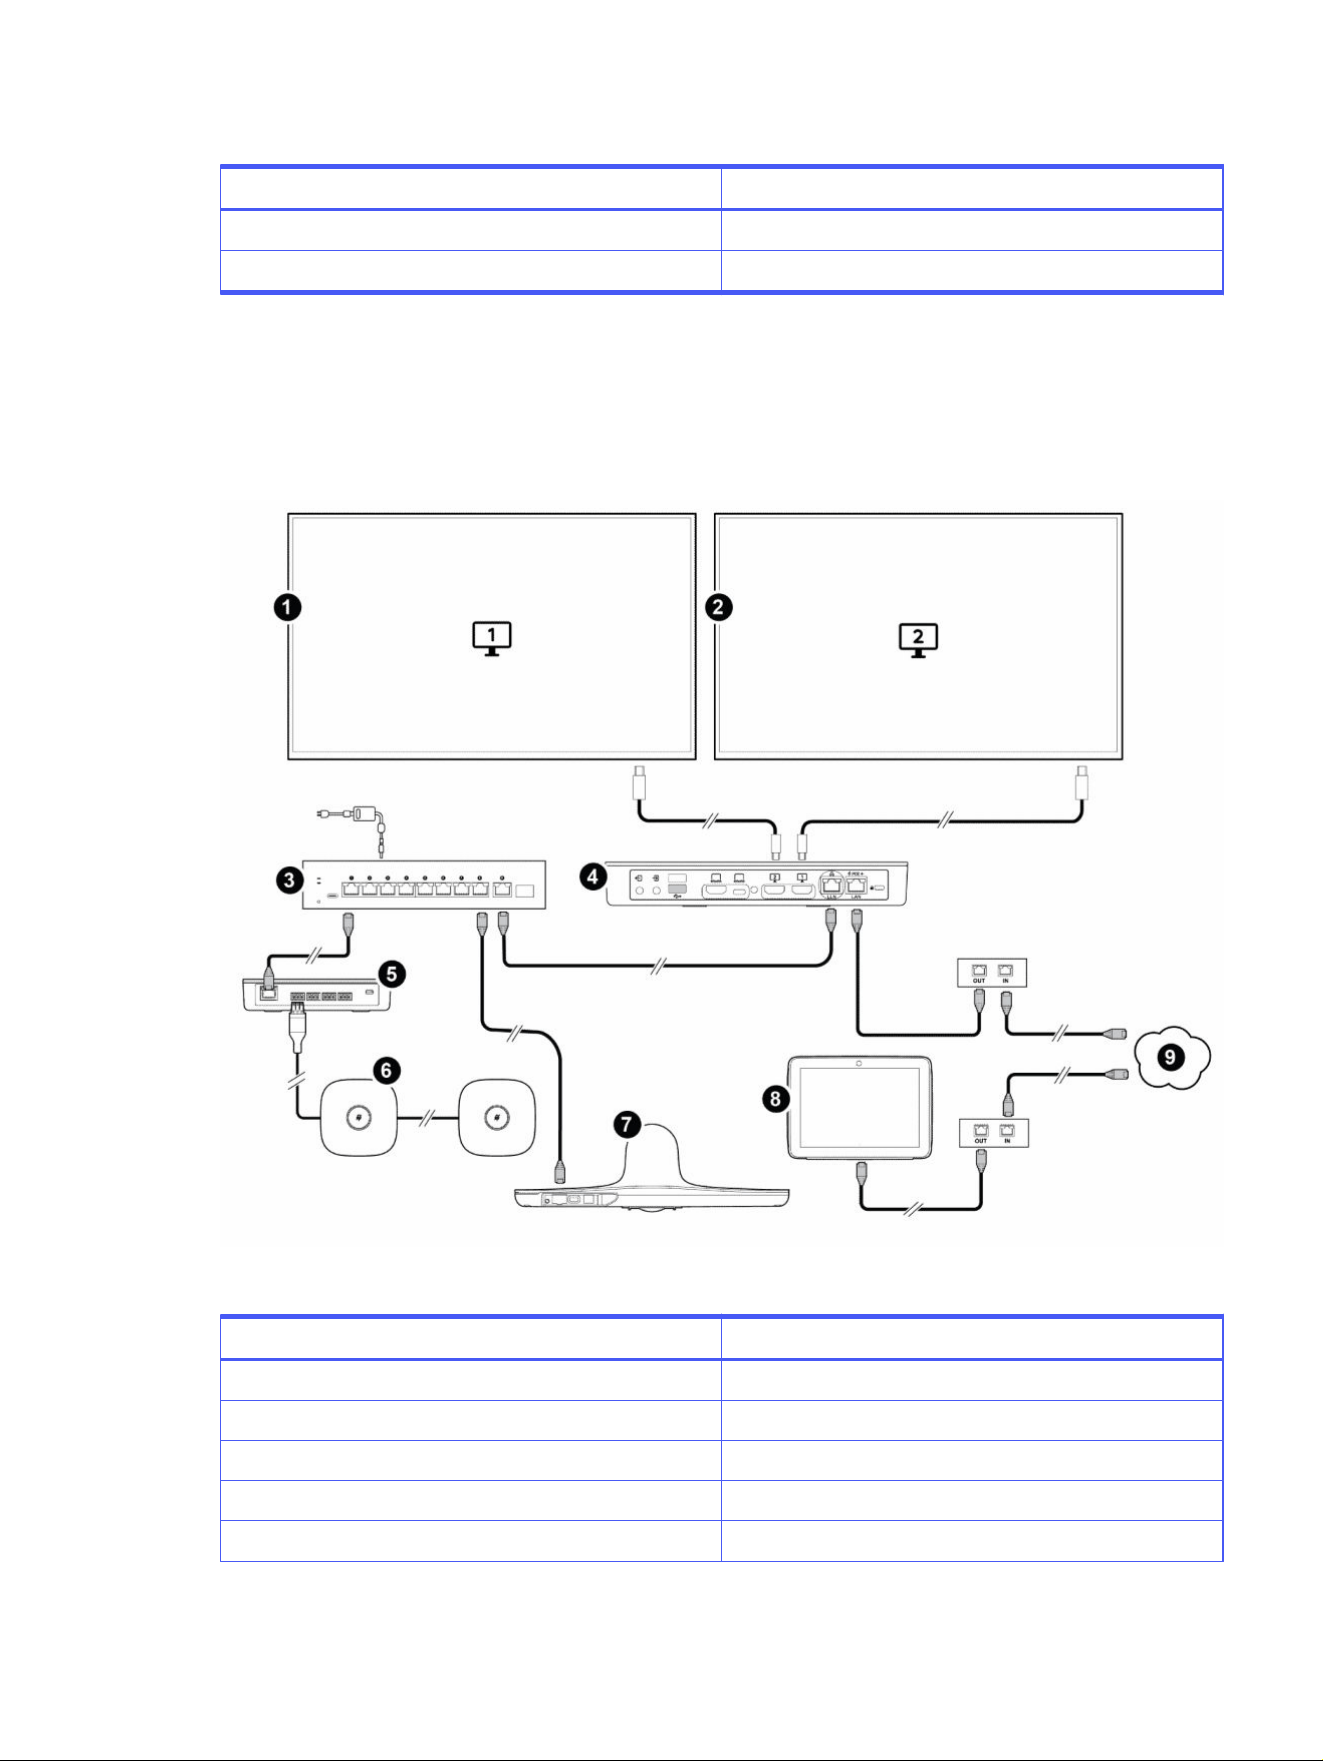
Table 3-9 Poly Studio V Series configuration hardware key (continued)
Item Description
8 Poly touch controller
9 LAN
Cabling HP Poly Studio A2 devices with Poly Studio G62
Connect HP Poly Studio A2 to a Poly Studio G62 system with a Poly Studio E70 camera for extra-large
room coverage. Review the following diagram for cabling information.
Figure 3-7 HP Poly Studio A2 with Poly Studio G62 configuration
Table 3-10
Poly Studio G62 configuration hardware key
Item Description
1 Display 1
2 Display 2
3 Netgear switch
4 Poly Studio G62
5 HP Poly Studio A2 Audio Bridge
Cabling HP Poly Studio A2 devices with Poly Studio G62 23
Table 3-10 Poly Studio G62 configuration hardware key (continued)
Item Description
6 HP Poly Studio A2 Table Mic devices
7 Poly Studio E70
8 Poly touch controller
9 LAN
NOTE: For information on supported Netgear switches, review the Poly VideoOS release notes.
Selectable PoE switch power classes
The following table outlines which PoE class to choose, depending on your conferencing space
requirements.
Table 3-11
Selectable switch power classes (PoE, PoE+, PoE++)
PoE class Source power Device power Audio bridge support (8
W)
Maximum table mics (2
W)
PoE + Type 2 Class 4 30 W 25.5 W 1 8
PoE++ Type 3 Class 5 45 W 40 W 1 8
PoE++ Type 3 Class 6 60 W 51 W 1 8
PoE++ Type 4 Class 8 90 W 71.3 W 1 8
24 Chapter 3 Introducing HP Poly Studio A2
Custom cabling with HP Poly Studio A2
HP recommends that you use the cables that come in the box with your HP Poly Studio A2 devices.
You can use your own cables to span longer distances, for example, across multiple tables or to aid
in hiding cables under the ground or in plenum spaces, as long as you adhere to the following HP
guidelines.
Custom cabling support and limitations
Adhere to the following guidelines when creating a custom cabling configuration.
Table 3-12 Supported custom cabling
Span number Connection type Cable length
Typical
Cable length
Maximum
Maximum
number of
connectors*
Cable type
1 Audio bridge to
table microphone
6 meters (20 feet) 18 m (59 ft) 4 Shielded 22 AWG 1-pair
stranded audio wire
2 to 8 Table microphone
to table
microphone
1.8, 8 meters (6, 26
feet)
18 m (59 ft) 6 Shielded 22 AWG 1-pair
stranded audio wire
*The input and output of a connection counts as two connectors.
IMPORTANT:
● The maximum supported total length between audio bridge and last table mic in series is 144 m
(472 ft); the total maximum number of connectors is 46.
● Construct all custom cables using shielded 22 AWG 1-pair stranded audio wire.
● The cables must meet a characteristic impedance of 100 ohm.
● HP Poly recommends using a male phoenix connector type 1803581 and a female phoenix
connector type 1857896.
The following figures indicate the wire colors of in-the-box cables and the industry standard colors that
apply to custom cables.
Custom cabling with HP Poly Studio A2
25

The following graphic shows an example of how you can hide cables in conduit in the legs of meeting
room tables and under the floor for a discrete solution.
26
Chapter 3 Introducing HP Poly Studio A2

Configuring HP Poly Studio A24
When you connect an HP Poly Studio A2 Audio Bridge to a Poly video system, the Poly video system
auto-detects the HP Poly Studio A2 Table Mic devices connected to the HP Poly Studio A2 Audio Bridge
device.
Pair an HP Poly Studio A2 Audio Bridge device to a Poly video
conferencing system
Pair an HP Poly Studio A2 Audio Bridge device to a Poly video conferencing system in the system web
interface of the Poly video conferencing system.
1. In the system web interface of the Poly video conferencing system, go to General Settings > Device
Management.
2. Under Connected Devices, find the HP Poly Studio A2 Audio Bridge device and select Pair.
The HP Poly Studio A2 Audio Bridge device connects and an Unpair option displays.
View connected HP Poly Studio A2 devices
View the HP Poly Studio A2 devices that are connected to a Poly video system in the system web
interface.
1. In the system web interface, go to Audio/Video > Audio.
2. Select the Audio Bridge tab.
A connected HP Poly Studio A2 Audio Bridge device displays, along with HP Poly Studio A2 Table
Mic devices that are connected to it.
Identify a HP Poly Studio A2 Table Mic device
Identify the specific HP Poly Studio A2 Table Mic device that corresponds to each one listed in the Audio
Bridge tab on the system web interface by using the amber LED indicator feature.
1. In the system web interface, go to Audio/Video > Audio.
2. Select the Audio Bridge tab.
Configuring HP Poly Studio A2
27

3. For a listed HP Poly Studio A2 Table Mic device, select the light bulb icon.
The LED indicator of the HP Poly Studio A2 Table Mic device that corresponds to the listed mic
displays a solid amber light.
Enable NoiseBlockAI v2
Eliminate echoes heard on the far end due to room conditions and materials by enabling NoiseBlockAI
v2.
1. In the system web interface, go to Audio / Video > Audio > NoiseBlockAI v2.
2. In the drop-down menu, select NoiseBlockAI v2.
28
Chapter 4 Configuring HP Poly Studio A2
Troubleshooting HP Poly Studio A2 devices5
If you’re having issues with your HP Poly Studio A2 devices, try the troubleshooting options and solutions
in the following topics.
Locate the serial number on HP Poly Studio A2 devices
Find your device's serial number on the product label on the underside of your HP Poly Studio A2 device.
■
On the underside of your HP Poly Studio A2 devices, in the middle panel, note the serial number
HP Poly Studio A2 Audio Bridge not pairing
If the Poly video system isn’t detecting the HP Poly Studio A2 Audio Bridge device, reset the audio bridge.
1. To view the connection status of the HP Poly Studio A2 Audio Bridge, go to the system web
interface of the connected Poly Video system.
2. Go to Audio/Video > Audio and select the Audio Bridge tab.
3. If the HP Poly Studio A2 Audio Bridge device isn’t listed in the Audio Bridge tab, factory restore the
audio bridge as described in Factory Restore the HP Poly Studio A2 Audio Bridge on page 30.
Troubleshooting HP Poly Studio A2 devices
29

HP Poly Studio A2 Table Mic not pairing
If the HP Poly Studio A2 Table Mic device isn’t working, reset the connected HP Poly Studio A2 Audio
Bridge device.
Perform one of the following steps:
● In the system web interface, go to Diagnostics > Reboot.
● Unplug and reconnect the Ethernet cable.
HP Poly Studio A2 Audio Bridge LED is blinking red
If the HP Poly Studio A2 Audio Bridge LED blinks red, it is usually an indication that one or more of the
mics aren’t working or that the device isn’t getting enough power. Occasionally, however, the LED blinks
red if the device detects an error and recovers from it.
1. If the HP Poly Studio A2 Audio Bridge LED blinks red, wait for 2 minutes to see if it turns solid white
before performing further troubleshooting steps.
2. If the LED continues to blink red, restore it as described in Factory Restore the HP Poly Studio A2
Audio Bridge on page 30
Factory Restore the HP Poly Studio A2 Audio Bridge
You may need to factory restore a HP Poly Studio A2 Audio Bridge to resolve issues, for example, pairing
or connection issues.
1. Remove the CAT 6A cable.
2. Insert a pin or straightened paper clip through the factory restore button pinhole.
3. Press and continue to hold the restore button for more than 10 seconds after reconnecting the
LAN cable to power up the device. The LED will begin breathing amber to indicate factory reset has
begun.
The factory reset takes approximately 2 minutes. When complete, HP Poly Studio A2 Audio Bridge
reboots. The LED breathes white before becoming solid white indicating that the HP Poly Studio A2
Audio Bridge reboot is complete.
NOTE: After the LED becomes solid-white, always wait at least 40 seconds before removing
power.
30
Chapter 5 Troubleshooting HP Poly Studio A2 devices

Getting help6
Poly is now a part of HP. The joining of Poly and HP paves the way for us to create the hybrid work
experiences of the future. Information about Poly products has transitioned from the Poly Support site
to the HP Support site.
The Poly Documentation Library is continuing to host the installation, configuration/administration, and
user guides for Poly products in HTML and PDF format. In addition, the Poly Documentation Library
provides Poly customers with information about the transition of Poly content from Poly Support to HP
Support.
The HP Community provides additional tips and solutions from other HP product users.
HP Inc. addresses
Contact HP at the following office locations.
HP US
HP Inc.
1501 Page Mill Road
Palo Alto, CA 94304
United States
Phone:+ 1 650-857-1501
HP Germany
HP Deutschland GmbH
HP HQ-TRE
71025 Boeblingen, Germany
HP Spain
HP Printing and Computing Solutions, S.L.U.
Cami de Can Graells 1-21 (Bldg BCN01)
Sant Cugat del Valles
Spain, 08174
902 02 70 20
HP UK
HP Inc UK Ltd
Regulatory Enquiries, Earley West
300 Thames Valley Park Drive
Reading, RG6 1PT
United Kingdom
Getting help
31

Document information
Review the following document information.
Model ID: MN
Document part number: P84761-001A
Last update: October 2025
Email us at documentation.f[email protected] with queries or suggestions related to this document.
32 Chapter 6 Getting help