English ��������������������������������������������� 3
Español������������������������������������������ 25
Operating Instructions
(Household use) Rechargeable Shaver
Model No.
ES‑PV6A
ES‑PV3A

2
3
English
Operating Instructions
(Household use) Rechargeable Shaver
Model No.
ES‑PV6A
ES‑PV3A
Thank you for purchasing this Panasonic product.
Before operating this unit, please read these instructions completely and save them for future use�
Contents
Safety precautions.............. 5
Important information ���������������10
Parts identication ��������������������11
Charging the shaver ������������������ 12
How to use ���������������������������������13
Cleaning the shaver ������������������16
Replacing the system outer
foil and the inner blades �����������18
Troubleshooting ������������������������19
Battery life ����������������������������������21
Removing the built-in
rechargeable battery �����������������22
Specications ����������������������������22

4
English
IMPORTANT
SAFETY
INSTRUCTIONS
When using an electrical appliance,
basic precautions are required to always
be followed, including the following:
Read all instructions before using this
appliance.
DANGER
To reduce the risk of electric shock:
1.
Except when charging, always unplug
this appliance from the electrical
outlet immediately after using.
2.
Unplug this appliance before cleaning.
WARNING
To reduce the risk of burns, re,
electric shock, or injury to persons:
1. This appliance is not intended for use
by persons (including children) with
reduced physical, sensory or mental
capabilities, or lack of experience
and knowledge, unless they have
been given supervision or instruction
concerning use of the appliance by a
person responsible for their safety.
Children should be supervised to
ensure that they do not play with the
appliance.
2. Use this appliance only for its
intended use as described in this
manual. Do not use attachments not
recommended by the manufacturer.
3.
Never operate this appliance when it
has a damaged cord or plug, when it
is not working properly, after it has
been dropped or damaged, or after it
has been dropped into water. Return
the appliance to an authorized service
center for examination and repair.
5
English
4. Keep the cord away from heated
surfaces.
5. Never drop or insert any object into
any opening.
6. Do not use outdoors or operate
where aerosol (spray) products are
being used.
7. Do not use this appliance with
damaged shaving blades and/or foil,
as it has the potential to result in
facial injury.
8. Always insert the USB cable into
appliance and the USB power
adaptor rst, then to outlet. To
disconnect, turn all controls to “o”
then remove plug from outlet.
SAVE THESE
INSTRUCTIONS
The USB power adaptor is sold separately.
Safety precautions
Make sure to follow these instructions.
To prevent accidents, injuries or damage to property,
please follow the instructions below.
■ The following chart indicates the degree of
damage caused by improper operation�
DANGER
Indicates a potential hazard
that will result in serious
injury or death.
WARNING
Indicates a potential hazard
that could result in serious
injury or death.
CAUTION
Indicates a potential hazard
that could result in minor
injury or property damage.
■ The symbols are classied and explained as
follows�
This symbol indicates prohibition.
This symbol indicates requirement that must
be followed.
6
English
WARNING
► This product
This product has a built-in rechargeable
battery. Do not throw into re, apply heat, or
charge, use, leave, or store in a high
temperature environment�
‑ Doing so may cause overheating, ignition, or
explosion.
Do not modify or repair�
‑ Doing so may cause re, electric shock, or
injury.
Contact an authorized service center for
repair (replacement of battery etc).
Never disassemble except when disposing
of the product�
‑ Doing so may cause re, electric shock, or
injury.
► Power supply
Do not use in a way that would exceed the
rating of the household outlet or the wiring�
‑ Exceeding the rating by connecting too many
plugs to one household outlet may cause re
due to overheating.
Fully insert the power plug of USB power
adaptor�
‑
Failure to do so may cause re or electric shock.
Disconnect the USB plug when cleaning the
main body with water�
‑ Failure to do so may cause electric shock or
injury.
► USB power adaptor/USB cable
Do not immerse them in water or wash with
water�
Do not place them over or near water lled
sink or bathtub�
Never use them if they are damaged or if the
power plug ts loosely in a household outlet.
Do not damage them�
• Do not deface, modify, forcefully bend or
pull them� Also, do not place anything
heavy on, twist or pinch them�
‑ Doing so may cause electric shock or re due
to a short circuit.
Do not use them to charge other devices�
[Note that USB power adaptor (ES-RU1-02)
can be used with compatible Panasonic
products�]
‑ Doing so may cause burn or re due to a
short circuit.
Do not connect or disconnect them to a
household outlet with a wet hand�
‑ Doing so may cause electric shock or injury.
7
English
WARNING
Use only with USB Power Source on a
certied product, such as class 2 power
supply�
‑
It is necessary to separately purchase a power
adaptor if required to power this product. The
Panasonic power adaptor ES‑RU1‑02 (Class
2 Power Unit) is recommended.
Use the specied USB power adaptor and
USB cable�
‑ Failure to do so may cause burns, electric
shock or re due to a short circuit.
Regularly clean them to prevent dust from
accumulating�
‑ Failure to do so may cause re due to
insulation failure caused by humidity.
Remove the USB power adaptor and wipe it
with a dry cloth.
► In case of an abnormality or malfunction
Immediately stop using and remove the
USB power adaptor�
‑ Failure to do so may cause re, electric
shock, or injury.
<Abnormality or malfunction cases>
• The main unit, USB power adaptor or USB
cable is deformed or abnormally hot�
• The main unit, USB power adaptor or USB
cable smells of burning�
• There is an abnormal sound during use or
charging of the main unit�
‑ Immediately request inspection or repair at an
authorized service center.
► Preventing accidents
Persons using an implanted medical
electronic device, such as a pacemaker,
should not allow this product to be in the
vicinity of where the medical electronic
device is implanted�
‑ Doing so may cause an accident or illness.
Do not place within reach of children or
infants� Do not let them use it�
‑ Putting parts or accessories in the mouth may
cause an accident or injury.
8
English
WARNING
If oil is consumed accidentally, do not
induce vomiting, drink a large amount of
water and contact a physician�
If oil comes into contact with eyes, wash
immediately and thoroughly with running
water and contact a physician�
‑ Failure to follow these instructions may result
in physical problems.
CAUTION
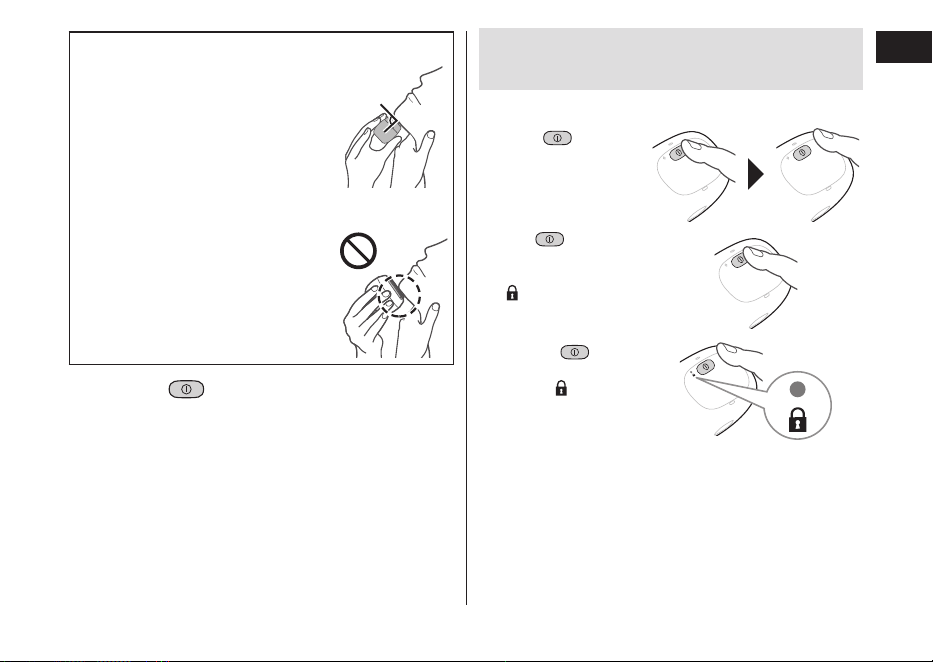
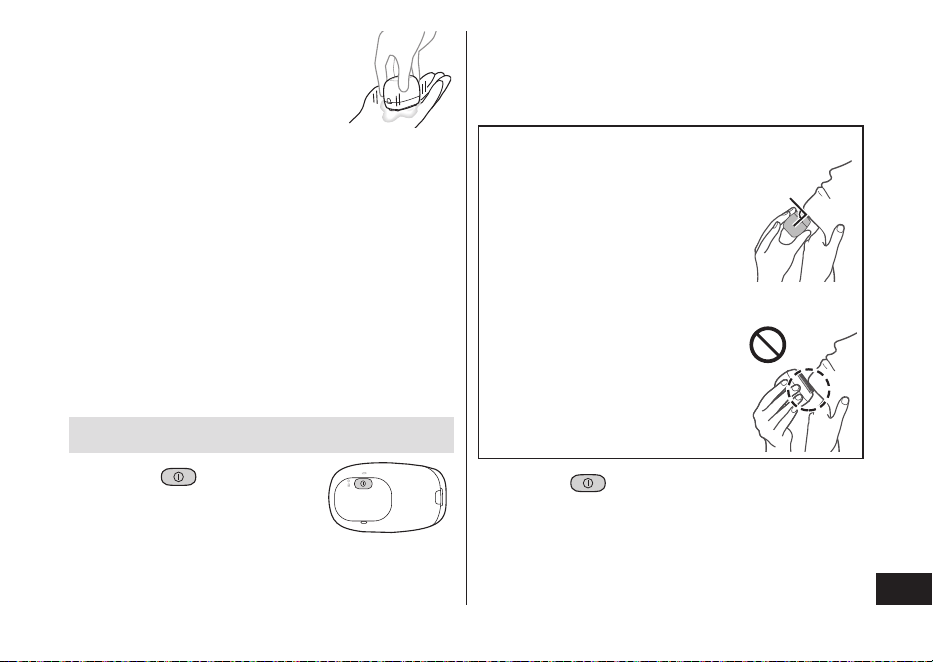
► Protecting the skin
Do not forcefully press the system outer
foil� Also, do not touch the system outer foil
with ngers or nails when in use.
Do not use this product for hair on head or
any other part of the body�
‑ Doing so may cause injury to skin or reduce
the life of the system outer foil.
Do not use excessive pressure to apply the
system outer foil to your lip or other part of
your face�
Do not apply the system outer foil directly
to blemishes or injured skin�
Do not touch the blade section (metallic
section) of the inner blade�
‑ Doing so may cause injury to skin or hand.
Check the system outer foil for cracks or
deformations before use�
‑ Failure to do so may cause injury to the skin.
► Note the following precautions
Do not allow metal objects or trash to
adhere to power plug of USB power adaptor
or USB plug�
‑ Doing so may cause electric shock or re due
to a short circuit.
Do not charge when the appliance socket is
wet�
‑ Doing so may cause electric shock or re.
Do not share your shaver with your family
or other people�
‑
Doing so may result in infection or inammation.
Disconnect the USB power adaptor from the
household outlet when not charging�
‑ Failure to do so may cause electric shock or
re due to electrical leakage resulting from
insulation deterioration.
9
English
Handling of the removed battery
when disposing
DANGER
• The rechargeable battery is exclusively for
use with this appliance� Do not use the
battery with other products�
• Do not charge the battery after it has been
removed from the product�
• Do not throw into re or apply heat.
• Do not hit, disassemble, modify, or
puncture with a nail�
• Do not let the positive and negative
terminals of the battery get in contact with
each other through metallic objects�
• Do not carry or store the battery together
with metallic jewellery such as necklaces
and hairpins�
• Do not use or leave the battery where it
will be exposed to high temperatures,
such as under direct sunlight or near other
sources of heat�
• Never peel o the tube.
‑ Doing so may cause overheating, ignition, or
explosion.
WARNING
After removing the rechargeable battery, do
not keep it within reach of children and
infants�
‑ The battery will harm the body if accidentally
swallowed.
If this happens, consult a physician immediately.
If the battery uid leaks out and comes in
contact with the eyes, do not rub the eyes,
and thoroughly rinse with clean water, such
as tap water�
‑ Failure to do so may cause eye injury.
Consult a physician immediately.
CAUTION
If the battery uid leaks out and comes in
contact with the skin or clothes, rinse o
with clean water, such as tap water�
‑ Failure to do so may cause inammation.
10
English
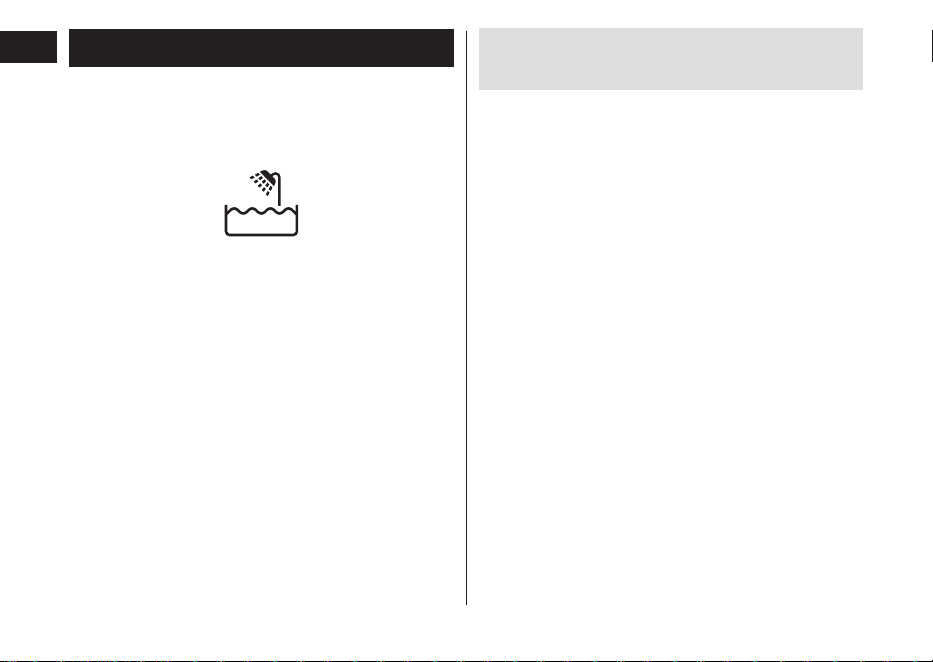
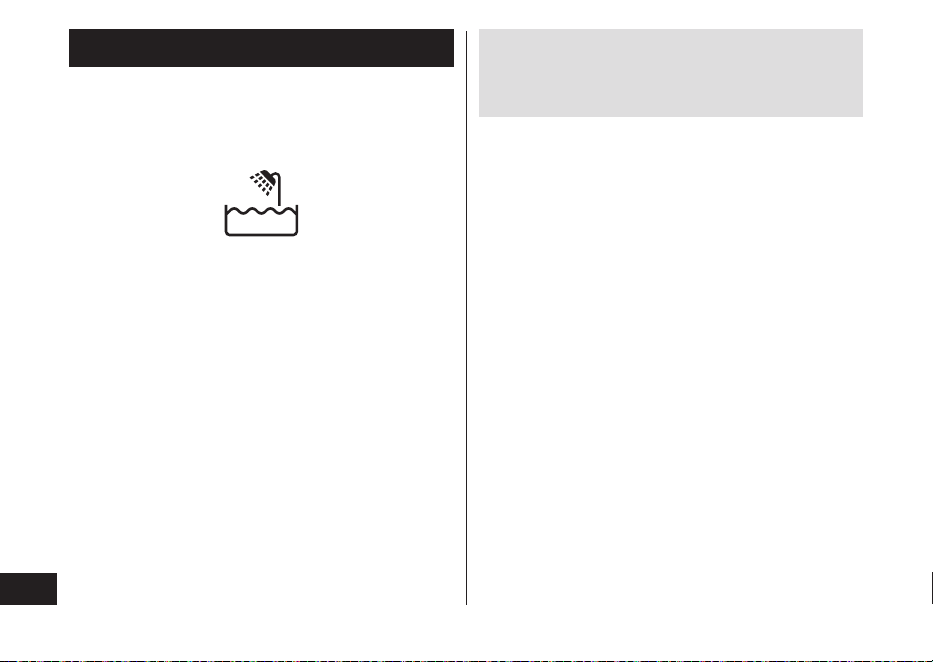
Important information
• This WET/DRY shaver can be used for wet shaving
using shaving lather or for dry shaving. You can use
this watertight shaver in the shower and clean with
water. The following symbol means suitable for use in
a bath or shower.
• Treat yourself to wet lather shaves for at least three
weeks and notice the dierence. Your Panasonic
WET/DRY shaver requires a little time to get used to
because your skin and beard need about a month to
adjust to any new shaving method.
• Keep both the inner blades inserted. If only one of the
inner blades is inserted, the shaver may become
damaged.
• If you clean the shaver with water, do not use salt
water or hot water. Do not soak the shaver in water
for a long period of time.
• Charge the appliance correctly according to these
Operating Instructions. (See page 12 "Charging the
shaver".)
• This appliance contains battery that is only
replaceable by skilled persons. Please contact an
authorized service center for the details of repair.
Note the following precautions in order to prevent
malfunction, deformation and deterioration
• Do not drop or hit against other objects.
• Do not let the system outer foil come in contact with
hard objects.
• Do not leave the shaver exposed to direct sunlight
with the foil frame detached.
• Do not dry using heat from a dryer or other appliance.
• Be sure to place the protective cap on the shaver
when carrying around or storing.
•
Store the shaver in a place with low humidity after use.
11
English
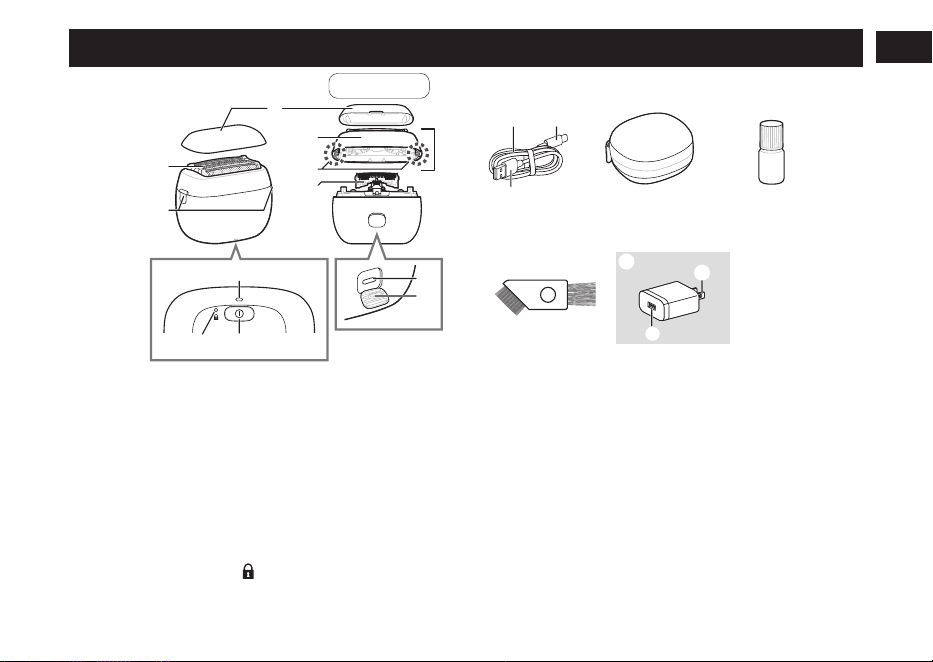
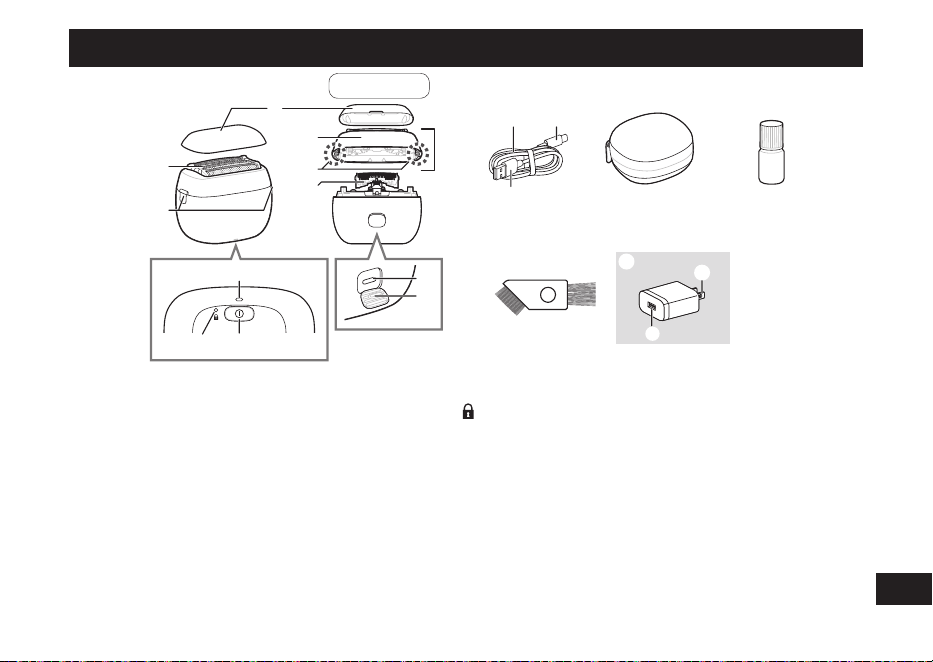
Parts identication
8
9 :
;
<
7
1
2
3
4
6
5
A
Back
>=
?
B
C
D
E
F
@
A
A Main body
1 Protective cap
2 System outer foil
3 Foil frame release buttons
4 Foil frame
5 Outer foil section
6 System outer foil release
buttons
7 Inner blades
8 Charge status lamp
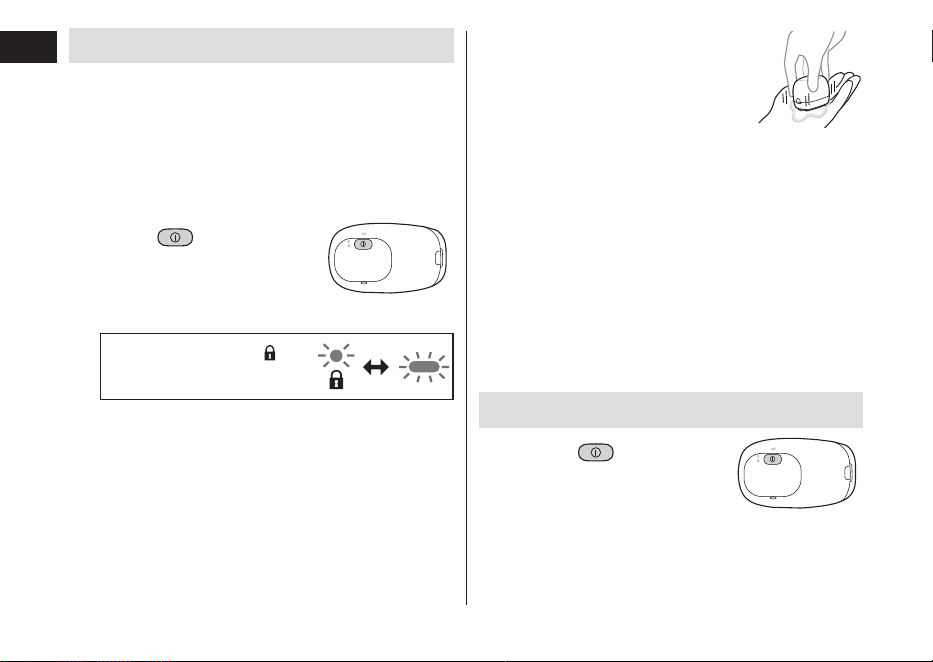
9 Switch lock lamp (
)
: Power switch
; Appliance socket (Type‑C)
< Socket cover
B USB cable
= Cord
> USB plug (Type‑C)
? USB plug (Type‑A)
Accessories
C Travel case
D Oil
E Cleaning brush
F Class 2 power supply
[Referred to as the “USB
power adaptor” in this
operating instructions�]
(ES-RU1-02) (Sold separately)
@ Power plug
A USB port (Type‑A)
12
English
Charging the shaver
• Turn the shaver o.
• Wipe o any water droplets on the appliance socket.
• Use the specied USB power adaptor and USB cable.
• The USB power adaptor is sold separately.
1
Open the socket
cover and insert
the USB plug
rmly into the
main body and
USB power
adaptor�
2
Insert the USB
power adaptor
rmly into a
household outlet�
1
2
1
• Check that the charge status lamp is glowing.
• Charging is completed after approx. 2 hours.
3
Remove the USB power adaptor
from the household outlet, and
remove the USB plug from the
main body after the charge
status lamp turns o.
• Close the socket cover.
Note
You cannot operate the shaver while charging.
► When the battery capacity is low
• The appliance beeps twice after switched o.
• The charge status lamp blinks once
every second when operating the
shaver.
You can shave 2 to 3 times after the
charge status lamp blinks. (This will dier
depending on usage.)
► Notes
• The shaver may be charged with adaptors and cables
other than the specied ones, but Panasonic's
specied adaptor with splash-resistant design and a
USB cable with an overheating protection feature
should be used to ensure safety.
The adaptor is not completely waterproof, so prevent
it from getting wet.
•
After charging is completed, turning the power switch
ON with the shaver plugged in will cause the charge
status lamp to light up and then turn o after 5 seconds.
13
English
• If there is noise from the radio or other sources while
using or charging the appliance, move to a dierent
location to use the appliance.
• The battery will become deteriorated even when it has
not been in use for a long period of time (6 months or
more), so charge it fully once every 6 months.
• When charging the shaver for the rst time or when it
has not been in use for more than 6 months, the
charging time may change or the charge status lamp
may not glow for a few minutes. It will eventually glow
if kept connected.
• Recommended ambient temperature for charging is
10 °C – 35 °C (50 °F – 95 °F). It may take longer to
charge or the battery may fail to charge properly in
extremely high or low temperatures.
The charge status lamp will blink twice every second
when there is a problem with charging.
Charge the shaver within the recommended ambient
temperature range.
• The shaver can be used for approximately 2 weeks
with a full charge. (Based on one 3‑minute dry‑shave
usages per day in an ambient temperature range of
20 °C – 30 °C [68 °F – 86 °F].)
The number of usable days varies depending on the
following conditions.
‑ Beard thickness
‑ Pressure applied to the skin
‑ Usage in shaving foam mode
‑ Usage of wet shaving
• Charging each time does not aect battery life,
because it uses a lithium‑ion battery.
• To keep charging the battery will not aect battery
performance.
How to use
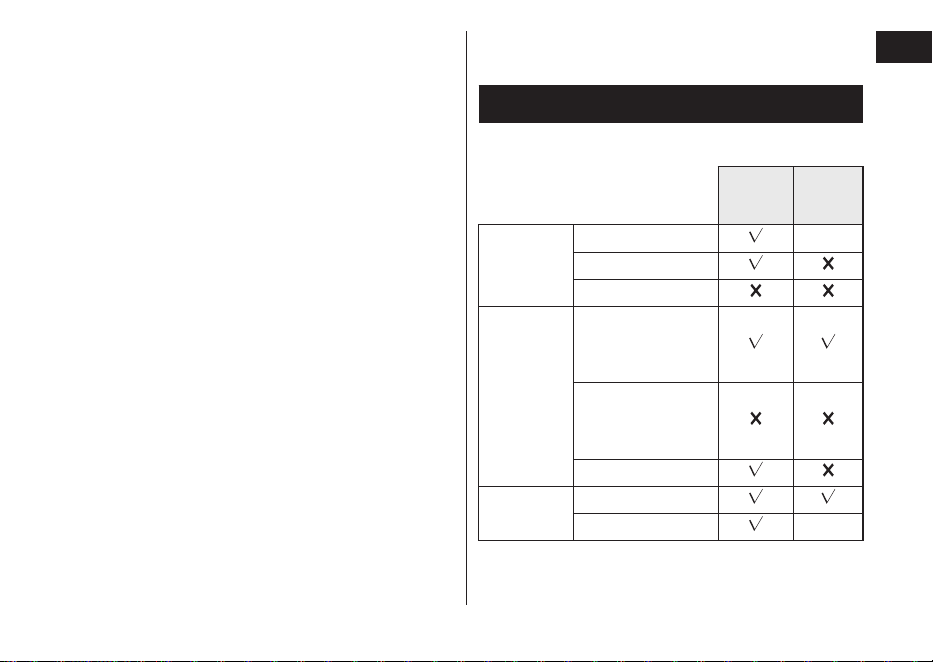
► Usable facial cleansers, etc�
Shaving
Shaving
foam
mode
Shaving
agent
Shaving foam
—
Shaving gel
Shaving cream
Facial
cleanser
Facial cleansing
foam
(without scrubbing
compounds)
Facial cleansing
foam
(with scrubbing
compounds)
Facial soap
Body soap
etc.
Liquid
Foam —
• Do not use anything other than above listed shaving
agent/facial cleanser/body soap etc. as these may
cause the blades to clog, or be unable to make foam.
14
English
Making foam in shaving foam mode
It is easier to make foam this way than by hand.
• Check the system outer foil for cracks or deformations
before use.
• Check that the socket cover is closed.
1
Preparing foam
Scoop a suitable amount of facial cleanser or
similar in your hand, and add a suitable amount of
cold or warm water.
2
Hold for
2 seconds or more
to switch to shaving
foam mode�
The switch lock lamp ( )
and charge status lamp blink
alternately.
• The shaving foam mode ends after 15 seconds.
The shaver can then be used to shave.
• To stop using the shaving foam mode and start
shaving, press the power switch once.
3
Press the blades
gently in the palm of
your hand, mix the
facial cleanser etc�
around and move the
blades up and down
to make foam�
• If there is insucient foam, add
slightly more water, hot water or
facial cleanser etc. to make it
easier to create foam.
► Notes
• Do not use shaving agent (excluding foam), facial
cleansing foam (with scrubbing compounds) or soap
as these may cause the blades to clog, or be unable
to make foam.
Shaving beard
1
Press and
shave�
The “shaving sensor”, which automatically adjusts the
power depending on the beard thickness, will operate.
It will shave with high power on areas where the beard
is heavy, and reduce the power on areas where the
beard is thin, to reduce burden on the skin.
15
English
Tips for better shaving
Apply the whole system outer foil
perpendicularly against the skin and
shave by slowly gliding the shaver
over the face against the grain of
the beard.
• The beard under the chin and
around the throat can be shaved
better by stretching the skin so the
beard will stand.
90°
• To prevent damaging the system
outer foil, do not shave with only a
part of the system outer foil.
2
Press when nished.
► Notes
• The appliance may not operate in an ambient
temperature lower than approximately 5 °C (41 °F).
• The shaving sensor may not respond depending on
the type and quantity of the shaving gel or the quantity
of the foam. This is not abnormal.
• After wet shaving, wash the main body with water and
apply oil to the system outer foil.
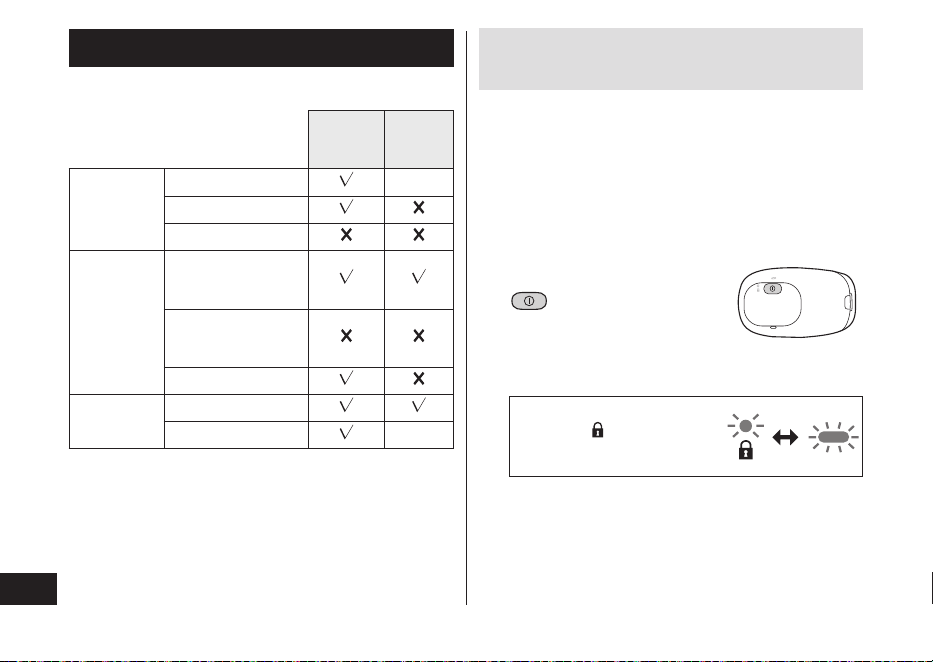
Operation and display of the
switch lock
► Locking the power switch
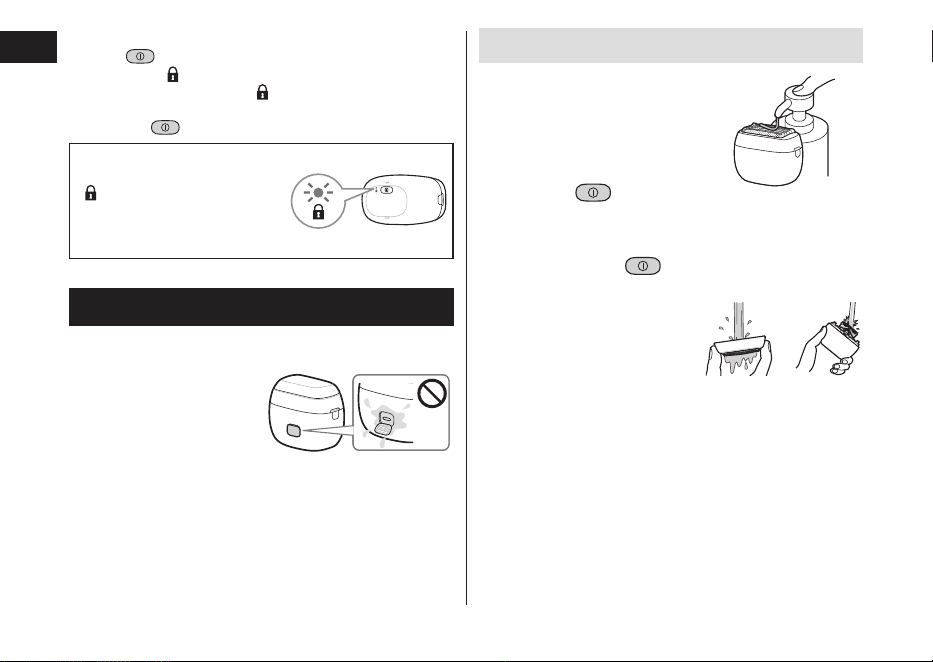
1. Press
once and
then release.
• The shaver starts
operating.
2. Hold for more
than 2 seconds until
the switch lock lamp
(
) turns on.
• The shaver will
stop operating.
3. Release .
• The switch lock
lamp (
) will turn
o after 5 seconds.
16
English
► Unlocking the power switch
1. Hold
for more than 2 seconds until the switch
lock lamp (
) turns o.
• The switch lock lamp (
) will turn o.
• The shaver starts operating.
2. Release
.
The power switch is locked
when the switch lock lamp
(
) blinks for 5 seconds and
the shaver does not operate
even though the power
switch is pressed.
Cleaning the shaver
• We recommend cleaning the shaver after each use.
• Turn the shaver o and disconnect the USB plug.
• Check that the socket
cover is closed.
Cleaning with water
1
Apply some hand
soap and some
water to the
system outer foil�
2
Press and
make foam for
several seconds,
then press to
stop making foam�
3
Remove the outer
foil section and
clean with
running water�
• See page 18 for
removing the outer foil
section.
4
After rinsing with water, shake
the shaver up and down for a few
times to remove excess moisture
and then wipe o any drops of
water with a dry cloth�
17
English
5
Dry the outer foil section and the
shaver completely�
• Allow the shaver to dry in the shade, avoid direct
sunlight.
6
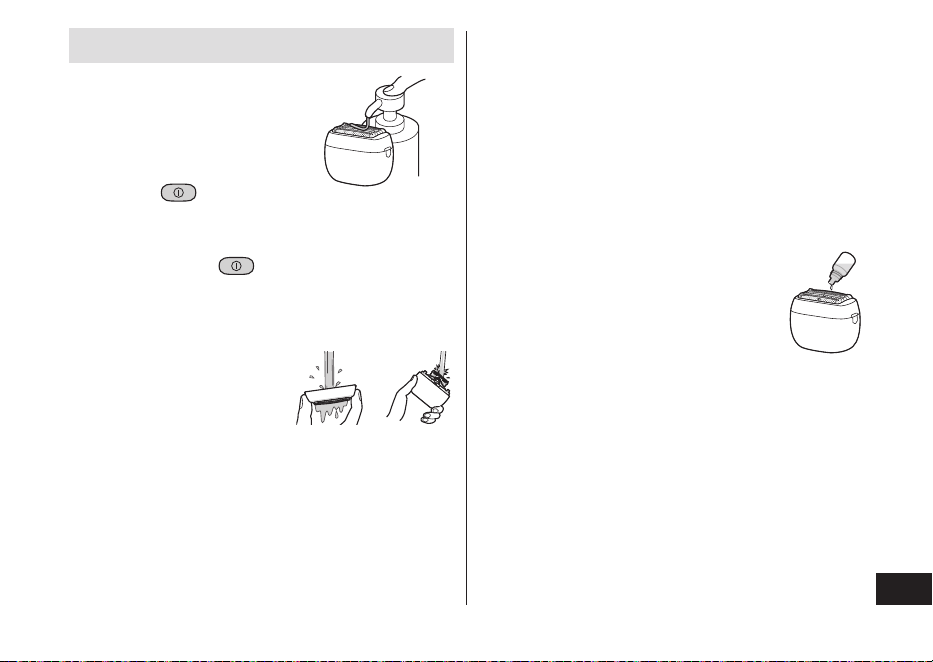
Lubricate the shaver�
1. Apply one drop of oil to each of the
system outer foils.
2. Switch the shaver on, and run it for
approximately ve seconds.
3. Switch o the shaver, and wipe o
any excess oil from the system
outer foil with a soft cloth.
Notes
• Be careful not to hit the main body on the sink or any
other object while draining the water. Failure to do so
may cause malfunction.
• Do not wipe with thinners, benzine, alcohol etc.
Doing so may cause malfunction, cracking or
discoloration of the parts.
Wipe with diluted soapy water.
• Do not use any kitchen or bathroom detergents other
than hand soap.
Doing so may cause malfunction.
Cleaning with the brush
Remove the outer foil section and the inner blades.
(See page 18.)
Do not use any brush other than the supplied one.
► Cleaning with the short brush
• Clean the inner blades using the short
brush by moving it in direction as
illustrated.
• Do not move the short brush
perpendicularly against the blades as it
will damage the inner blades and aect
their sharpness.
► Cleaning with the long brush
Clean the foil frame,
system outer foil and
the main body using
the long brush.
► System outer foil
Clean the system outer foil in the
areas indicated by the circles every
time you use the shaver. Otherwise,
abnormal sound may be generated.
18
English
Replacing the system outer
foil and the inner blades
system outer foil Approximately once every
year*
inner blades Approximately once every
two years*
* The replacement timing is a recommendation and is
subject to individual usage and preference.
Do not throw away the foil frame.
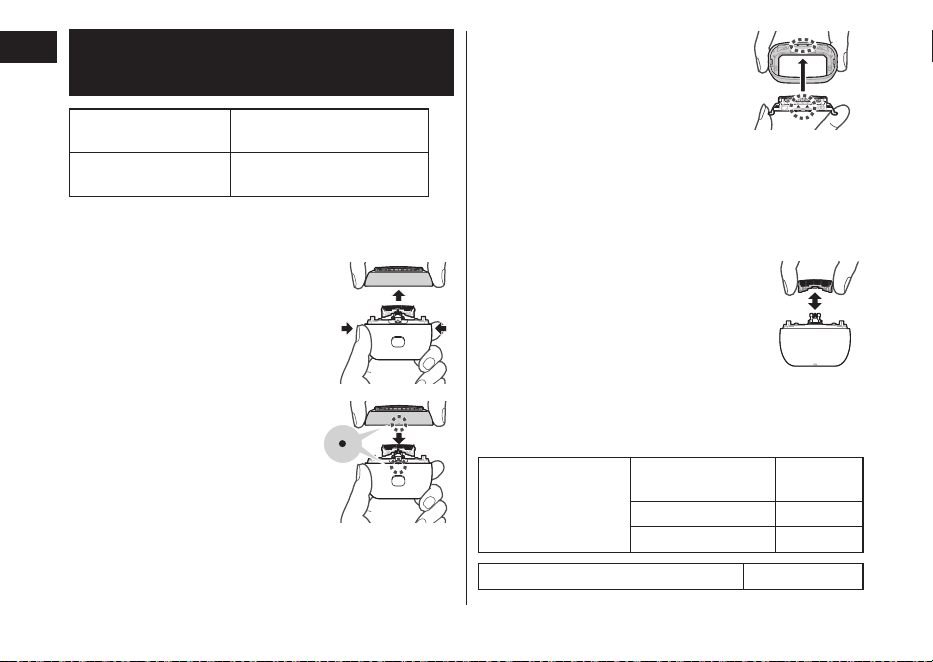
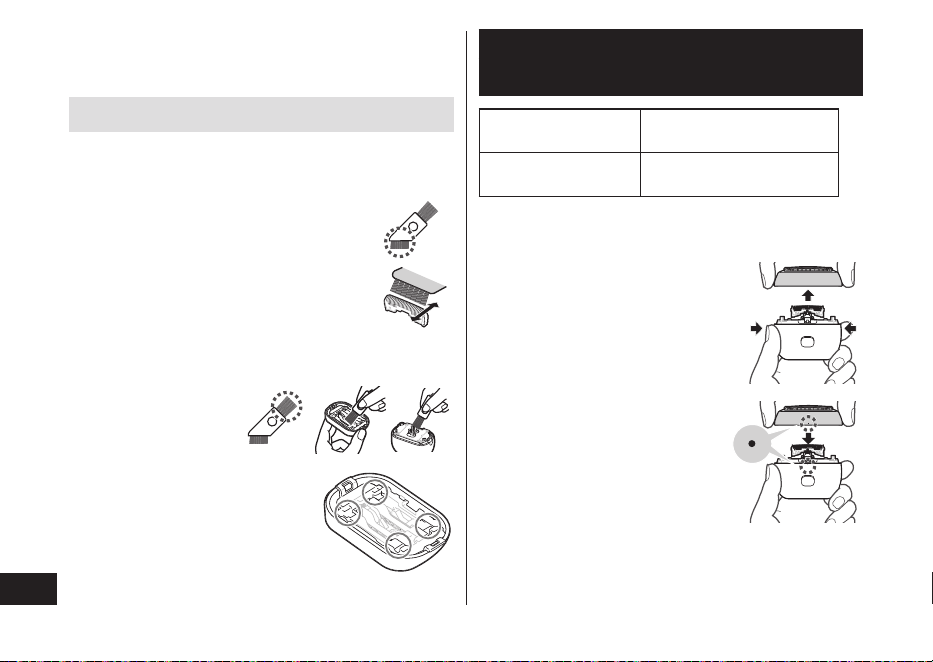
► Removing the outer foil section
Press the foil frame release buttons
and lift the outer foil section upwards.
► Attaching the outer foil section
Align the foil frame (•) and the main
body (•) marks, and securely attach
it evenly until it clicks.
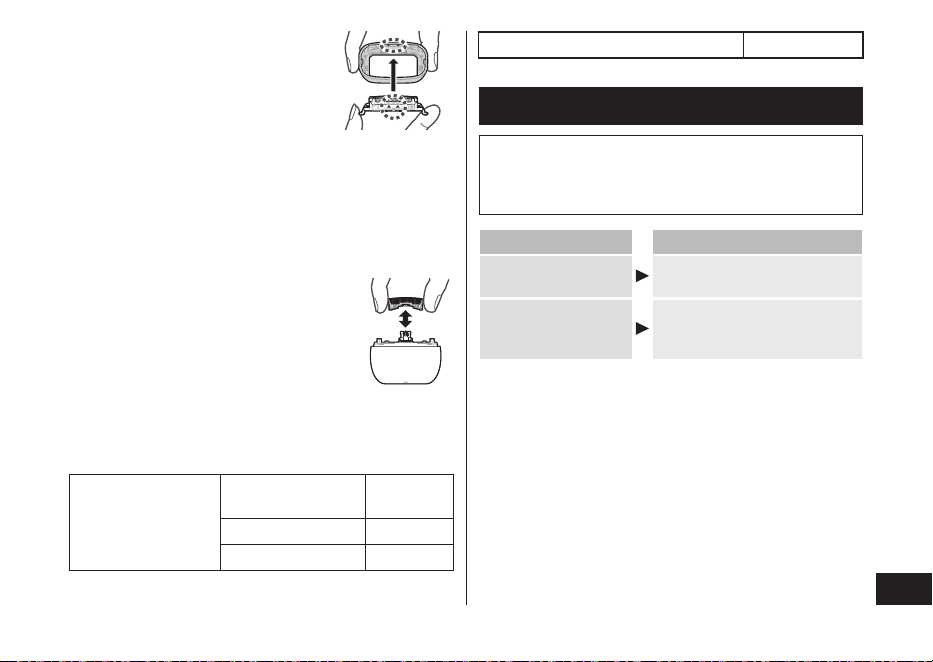
► Replacing the system outer foil
1. Press the system outer foil release
buttons and pull down the system
outer foil.
• Do not press the system outer
foil release buttons with
excessive force.
Doing so may bend the system
outer foil, preventing complete
attachment to the foil frame.
2. Align the foil frame (▲) and the system outer foil
(▲) marks, and attach it until it clicks.
► Replacing the inner blades
1.
Remove the inner blades one at a time.
2. Insert the inner blades one at a time.
► Replacement parts and optional parts
Replacement parts and optional parts are available at
your dealer or Service Center.
Replacement parts
for ES‑PV6A/
ES‑PV3A
System outer foil
and inner blades
WES9040
System outer foil WES9181
Inner blades WES9170
USB power adaptor ES‑RU1‑02

19
English
Troubleshooting
Perform the following actions.
If the problems still cannot be solved, contact the
store where you purchased the unit or a service
center authorized by Panasonic for repair.
Problem Action
The power switch
does not turn ON.
Unlock the switch lock. (See
page 16.)
The power will not
switch to OFF.
Press the power switch
twice while using in shaving
foam mode.
Problem Action
The shaving sensor
does not respond.
The shaving sensor may not
respond when the remaining
battery capacity is low. If this
happens, recharge the shaver.
Apply oil. (See page 17.)
The shaving sensor may not
respond when there is not
enough oil on the blades.
Depending on the beard
thickness or the amount of
beard trimmings in the shaver
head, the shaving sensor
may not react and the driving
sound may not change. This
is not abnormal.
The shaving sensor may not
respond depending on the type
and quantity of the shaving gel.
This is not abnormal.

20
English
Problem Action
The shaving sensor
responds even
though the shaver is
not in contact with
the skin.
Clean the beard trimmings
from the shaver.
Clean the system outer foil
with the brush. (See
page 17.)
When the shaver is extremely
dirty, remove the foil frame
and wash with water.
(See page 16.)
Replace the system outer
foil and/or inner blades.
Foam cannot be
made in shaving
foam mode.
Making foam may be dicult
depending on the type of
facial cleansers etc., so
adjust the amount of water
or facial cleanser.
Foam made in
shaving foam mode
contains shavings.
Before making foam, cleanly
rinse o any shavings. (See
page 16.)
Problem Action
Operating time is
short even after a
full charge.
When the number of
operations per charge starts
to decrease, the battery is
nearing the end of its life.
Apply oil.
Clean the shaver.
The usable number of days
might be lower depending
on how the shaver is used
(for example, when used for
wet shaving).
Shaver does not
operate even after
charging.
The shaver will not operate
while it is connected to the
household outlet.
Use the specied USB power
adaptor and USB cable.
Use the appliance in an
ambient temperature
approximately 5 °C (41 °F)
or higher.
The battery has reached the
end of its life.
The driving sound
changes while
shaving.
The shaving sensor is
operating. The sound
changes depending on the
beard thickness.

21
English
Problem Action
Makes a loud sound.
Apply oil.
The blades will not move
smoothly when there is no
oil on the blades, requiring
more power.
The shaver makes a
high‑pitched sound due to
the linear motor drive. This
does not indicate a problem.
Conrm that the blades are
properly attached.
Clean the system outer foil with
the brush. (See page 17.)
The odor is getting
stronger.
Clean the shaver.
Shavings y out in
all directions.
Clean the inner blades with
the brush when shavings are
adhering to the inner blades.
System outer foil
gets hot.
Apply oil.
Replace the system outer
foil if it is damaged or
deformed. (See page 18.)
Problem Action
You do not get as
close a shave as
before.
Clean the shaver.
Apply oil.
This can be improved by
replacing the outer foil and/
or inner blades.
Battery life
The life of the battery is 3 years. The battery in this
shaver is not intended to be replaced by consumers.
22
English
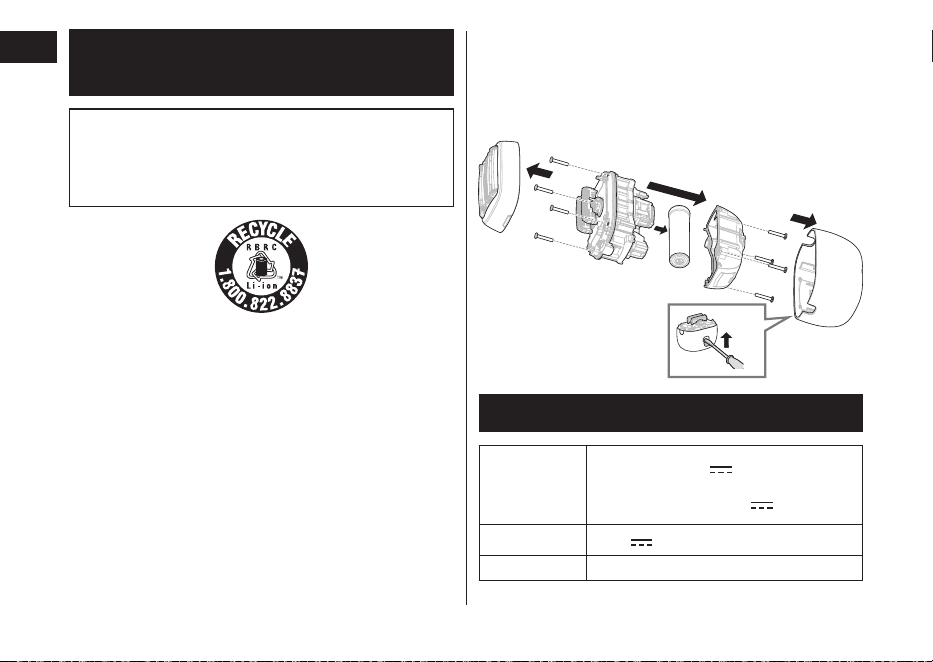
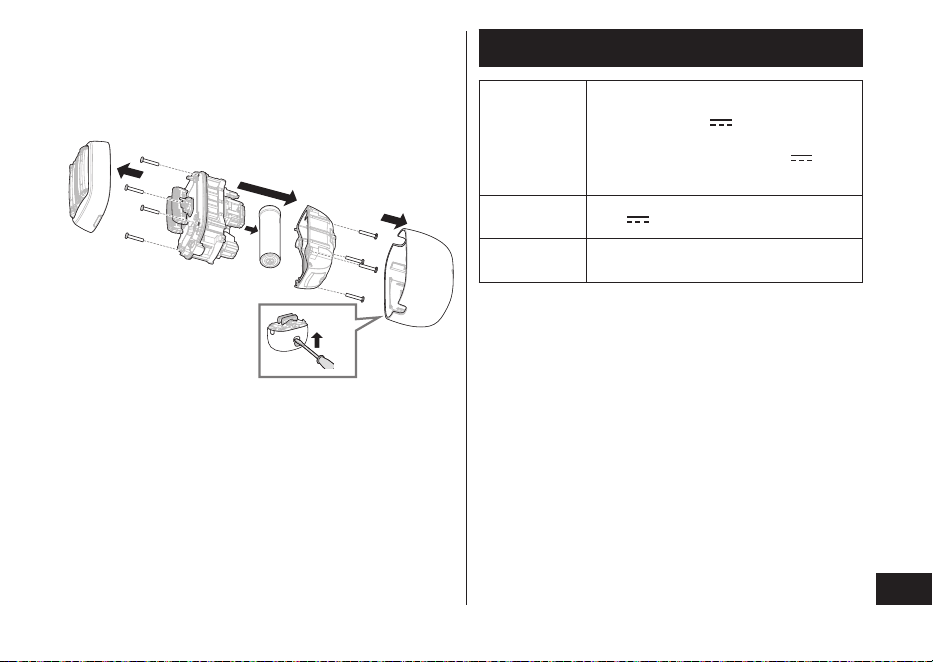
Removing the built-in
rechargeable battery
ATTENTION:
A lithium ion battery that is recyclable powers the
product you have purchased. Please call
1‑800‑8‑BATTERY for information on how to recycle
this battery.
Remove the built-in rechargeable battery before
disposing of the shaver�
The battery is to be disposed of safely.
This gure must only be used when disposing of the
shaver, and must not be used to repair it. If you
dismantle the shaver yourself, it will no longer be
waterproof, which may cause it to malfunction.
• Remove the shaver from the USB plug.
• Press the power switch to turn on the power and then
keep the power on until the battery is completely
discharged.
• Perform steps 1 to 5 and lift the battery, and then
remove it.
• Use a at head screwdriver as shown.
• Take care not to short circuit the positive and negative
terminals of the removed battery, and insulate the
terminals by applying tape to them.
1
2
5
3
4
3
Specications
Output rating
of applicable
adaptor (sold
separately)
5.0 V
1.0 A
In compliance with Class 2 power
supply with 5.0 V
1.0 A
Motor voltage
3.6 V
Charging time
Approx. 2 hours
This product is intended for household use only.

23
English
Federal Communication Commission Interference
Statement
This equipment has been tested and found to comply
with the limits for a Class B digital device, pursuant to
Part 15 of the FCC Rules. These limits are designed
to provide reasonable protection against harmful
interference in a residential installation. This
equipment generates, uses and can radiate radio
frequency energy and, if not installed and used in
accordance with the instructions, may cause harmful
interference to radio communications. However, there
is no guarantee that interference will not occur in a
particular installation. If this equipment does cause
harmful interference to radio or television reception,
which can be determined by turning the equipment o
and on, the user is encouraged to try to correct the
interference by one of the following measures:
• Reorient or relocate the receiving antenna.
• Increase the separation between the equipment and
receiver.
•
Connect the equipment into an outlet on a circuit
dierent from that to which the receiver is connected.
• Consult the dealer or an experienced radio/TV
technician for help.
FCC Caution: To assure continued compliance, install
and use in accordance with provided instructions. Any
changes or modications not expressly approved by
the party responsible for compliance could void the
user’s authority to operate this equipment.
This device complies with part 15 of the FCC Rules.
Operation is subject to the following two conditions:
(1) This device may not cause harmful interference,
and (2) this device must accept any interference
received, including interference that may cause
undesired operation.
Personal Care & Beauty Care Products
FOR USA ONLY
30-Day Quality
Satisfaction Guarantee
If you are dissatised with any Panasonic Personal
Care & Beauty Care Products for any reason, simply
return it to the place of purchase with a dated proof of
purchase, in the original packaging, with all
accessories, parts and instructions, within 30 days of
the date of purchase for a full refund.
Abuse or misapplication of this product voids the
guarantee.

24
English
FOR YOUR CONVENIENCE, WE HAVE ESTABLISHED
A TOLL-FREE (IN USA ONLY) NATIONAL ACCESSORY
PURCHASE HOTLINE AT 1-800-332-5368�
PRODUCT REGISTRATION
(U.S. customers only)
Go to www.shop.panasonic.com/register and register
your product now to receive these benets:
Safety Notication
We contact our customers in case of recall
Owner Verication
Proof of purchase in case of product theft or loss
Ecient Warranty Service
In case there is a problem with your product
Special Oers and Promotions from Panasonic
25
Español
Instrucciones de funcionamiento
(Uso doméstico) Afeitadora recargable
Modelo
ES‑PV6A
ES‑PV3A
Gracias por comprar este producto Panasonic.
Antes de utilizar este aparato, lea todas las instrucciones y guárdelas para su uso en el futuro�
Contenido
Precauciones de seguridad
... 27
Información importante ������������������32
Identicación de las partes ������������33
Carga de la afeitadora ��������������������� 34
Forma de uso ����������������������������������� 36
Limpieza de la afeitadora ����������������38
Reemplazo de la lámina
exterior y las hojas interiores���������40
Solución de problemas ������������������� 41
Vida útil de la batería �����������������������44
Desmontaje de la batería
recargable interior ��������������������������� 44
Especicaciones �����������������������������45

26
Español
INSTRUCCIONES
DE SEGURIDAD
IMPORTANTES
Cuando se usa un dispositivo eléctrico,
siempre se deben seguir precauciones
básicas, incluidas las siguientes.
Lea todas las instrucciones antes de
utilizar este dispositivo.
PELIGRO
Para reducir el riesgo de descargas
eléctricas:
1. Excepto cuando lo esté cargando,
desenchufe siempre este aparato de la
toma eléctrica inmediatamente después
de utilizarlo.
2. Desenchufe este dispositivo antes de
limpiarlo.
ADVERTENCIA
Para reducir el riesgo de quemaduras,
incendio, descargas eléctricas o lesiones:
1. Este aparato no debe ser utilizado por
personas (incluyendo niños) con
capacidades físicas, sensoriales o
mentales limitadas, o con falta de
conocimiento y experiencia, a menos
que se encuentren bajo supervisión o se
les haya instruido sobre el uso del
aparato por parte de una persona
responsable de la seguridad. Supervise
a los niños pequeños para asegurarse
de que no jueguen con la afeitadora.
2. Utilice este dispositivo solo para el n
para el que se diseñó, como se describe
en este manual. No utilice ningún
accesorio que no haya sido
recomendado por el fabricante.
3.
Nunca utilice este aparato si el cable o el
enchufe están dañados, si no funciona
correctamente, o si se ha caído, se ha
27
Español
dañado o se ha mojado. Devuelva el
aparato a un centro de servicio
autorizado para examinarlo y repararlo.
4. Mantenga el cable alejado de supercies
calientes.
5. Nunca introduzca ni deje caer objetos
por ninguna abertura.
6. No lo use al aire libre ni donde se estén
usando productos en aerosol (spray).
7. No utilice este aparato si las hojas de
corte o las láminas están dañadas, ya
que podría causarle heridas en la cara.
8.
Siempre introduzca primero el cable USB
en el aparato y el adaptador USB de
alimentación, luego al tomacorriente. Para
desconectarlo, coloque todos los controles
en la posición “apagado” y, a continuación,
retire el enchufe del tomacorriente.
CONSERVE ESTAS
INSTRUCCIONES
El adaptador USB de alimentación se vende por separado.
Precauciones de seguridad
Asegúrese de cumplir estas instrucciones.
Para evitar accidentes, lesiones o daños materiales, cumpla
las siguientes instrucciones.
■
El siguiente cuadro indica el grado de daño provocado
en caso de operación incorrecta�
PELIGRO
Indica un peligro potencial que
provocará una lesión grave o la
muerte.
ADVERTENCIA
Indica un peligro potencial que
podría causar una lesión grave
o la muerte.
PRECAUCIÓN
Indica un peligro potencial que
podría causar una lesión leve o
daños materiales.
■
A continuación, se clasican y explican los símbolos.
Este símbolo indica prohibición.
Este símbolo indica un requisito que debe seguirse.
28
Español
ADVERTENCIA
► Este producto
Este producto incluye una batería recargable� No la
arroje al fuego ni la exponga a altas temperaturas.
Tampoco la recargue, la use, la deje ni la guarde en
un lugar con temperaturas elevadas�
‑
Si lo hace, podría provocar un sobrecalentamiento,
un incendio o una explosión.
No lo modique ni lo repare.
‑
Si lo hace, podría provocar un incendio, una
descarga eléctrica o sufrir lesiones.
Póngase en contacto con un centro de servicio
autorizado para su reparación (cambio de batería,
etc.).
Nunca lo desarme, excepto cuando vaya a
desechar el producto�
‑
Si lo hace, podría provocar un incendio, una
descarga eléctrica o sufrir lesiones.
► Alimentación eléctrica
No lo utilice de manera que supere la capacidad
nominal del tomacorriente o del cableado�
‑
Superar el valor nominal al conectar demasiados
enchufes a un tomacorriente puede causar un
incendio debido al sobrecalentamiento.
Introduzca completamente la clavija del enchufe
del adaptador USB de alimentación�
‑
De lo contrario, podría producirse un incendio o
una descarga eléctrica.
Desconecte el enchufe USB cuando limpie el
cuerpo principal con agua�
‑
De lo contrario, podría sufrir una descarga eléctrica
o lesiones.
► Adaptador USB de alimentación/cable USB
No los sumerja en agua ni los lave con agua�
No los coloque sobre o cerca de un lavamanos o
una bañera llenos de agua�
No los utilice si están dañados o si la clavija del
enchufe queda oja al conectarla en un
tomacorriente�
No los dañe�
• No deforme, modique, doble o tire de estos
con fuerza� Tampoco coloque nada pesado
encima de ellos, ni los retuerza ni los pellizque�
‑
Si lo hace, podría provocar una descarga eléctrica
o un incendio debido a un cortocircuito.
No los utilice para cargar otros dispositivos�
[Tenga en cuenta que el adaptador USB de
alimentación (ES
-RU1-02) puede utilizarse con
productos Panasonic compatibles]�
‑
De lo contrario, podría sufrir quemaduras o
provocar un incendio debido a un cortocircuito.
29
Español
ADVERTENCIA
No los conecte ni desconecte de un
tomacorriente si tiene las manos mojadas�
‑
Si lo hace, podría sufrir descargas eléctricas o
lesiones.
Debe usarlo solamente con una fuente de
alimentación USB en un producto certicado,
como la fuente de alimentación de clase 2�
‑
Hay que comprar un adaptador de corriente si es
necesario por separado para alimentar este
aparato. Recomendamos el adaptador de corriente
Panasonic ES‑RU1‑02 (Fuente de alimentación
clase 2).
Utilice el adaptador USB de alimentación y cable
USB especicados.
‑
De lo contrario, podría sufrir quemaduras,
descargas eléctricas o provocar un incendio
debido a un cortocircuito.
Límpielos regularmente para evitar la
acumulación de polvo�
‑
De lo contrario, podría originarse un incendio
debido a una falla del aislamiento provocada por la
humedad.
Retire el adaptador USB de alimentación y límpielo
con un paño seco.
► En caso de anomalía o falla en el funcionamiento:
Suspenda inmediatamente el uso y retire el
adaptador USB de alimentación�
‑
De lo contrario, podrían producirse un incendio,
una descarga eléctrica o una lesión.
<Casos de anomalía o funcionamiento incorrecto>
• La unidad principal, el adaptador USB de
alimentación o el cable USB están deformados
o anormalmente calientes�
• La unidad principal, el adaptador USB de
alimentación o el cable USB huelen a quemado�
• Se escucha un ruido extraño durante el uso o
al cargar la unidad principal�
‑
Solicite inmediatamente una revisión o reparación
en un centro de servicio autorizado.
► Evite accidentes
Las personas que tienen un dispositivo
electrónico médico implantado en su cuerpo,
como por ejemplo un marcapasos, no deben
permitir que la unidad toque la piel donde se
encuentra implantado�
‑
Hacerlo puede causar un accidente o una molestia.
No deje el aparato al alcance de los niños o
bebés� No les permita usarlo�
‑
Introducirse piezas o accesorios en la boca puede
provocar accidentes y lesiones.
30
Español
ADVERTENCIA
Si el aceite se ingiere de forma accidental, no
induzca el vómito; beba abundante agua y
póngase en contacto con un médico�
Si el aceite entra en contacto con los ojos,
enjuáguelos de inmediato con abundante agua
del grifo y póngase en contacto con un médico�
‑
El incumplimiento de estas instrucciones puede
tener como consecuencia problemas físicos.
PRECAUCIÓN
► Protección de la piel
No ejerza mucha presión sobre la lámina exterior.
Evite, además, tocar la lámina exterior con los
dedos o las uñas cuando utilice el aparato�
No utilice este producto para el cabello o el vello
de cualquier otra parte del cuerpo�
‑
Si lo hace, podría sufrir lesiones de la piel o reducir
el tiempo de vida útil de la lámina exterior.
No ejerza mucha presión al aplicar la lámina
exterior sobre los labios o cualquier otra parte
de la cara�
No aplique la lámina exterior directamente sobre
imperfecciones o heridas de la piel�
No toque la sección de la hoja (sección metálica)
de la hoja interior�
‑
Si lo hace, podría sufrir lesiones en la piel o en las
manos.
Antes de usar, verique que la lámina exterior no
tenga grietas ni esté deformada�
‑
De lo contrario, podría sufrir heridas en la piel.
► Tenga en cuenta las siguientes precauciones
No permita que objetos metálicos o suciedad se
introduzcan en la clavija del enchufe del
adaptador USB de alimentación o el enchufe USB�
‑
Si lo hace, podría provocar una descarga eléctrica
o un incendio debido a un cortocircuito.
No cargue cuando la conexión del aparato esté
mojada�
‑
Si lo hace, podría sufrir descargas eléctricas o
provocar un incendio.
No comparta su afeitadora con sus familiares ni
con otras personas�
‑
Esto podría provocar infecciones o inamación.
Desconecte el adaptador USB de alimentación del
tomacorriente cuando no esté cargando el aparato�
‑
Si lo hace, podría provocar una descarga eléctrica
o un incendio debido a una fuga eléctrica
resultante del deterioro del aislamiento.
31
Español
Manipulación de la batería extraída
para desecharse
PELIGRO
• La batería recargable debe utilizarse
exclusivamente con este aparato. No utilice la
batería con otros productos�
• No cargue la batería una vez retirada del producto�
• No la arroje al fuego ni le aplique calor�
• No la golpee ni la desarme, modique o perfore.
• No permita que los terminales positivo y
negativo de la batería entren en contacto entre
ellos a través de objetos metálicos�
• No transporte ni almacene la batería junto con
joyas metálicas, como por ejemplo collares u
horquillas para el pelo�
• No utilice ni deje la batería donde quede
expuesta a temperaturas elevadas, como por
ejemplo la luz solar directa o cerca de otras
fuentes de calor�
• No pele el tubo�
‑
Si lo hace, podría provocar un sobrecalentamiento,
un incendio o una explosión.
ADVERTENCIA
Después de retirar la batería recargable,
manténgala fuera del alcance de los niños�
‑
Si se ingiere accidentalmente, la batería causará
lesiones físicas.
Si esto llegara a suceder, consulte con un médico
inmediatamente.
Si llegara a escaparse el líquido de la batería y
entra en contacto con los ojos, no se los frote,
sino que enjuáguelos con abundante agua
limpia, como la del grifo�
‑
De lo contrario, podría provocar lesiones oculares.
Consulte con un médico inmediatamente.
PRECAUCIÓN
Si el líquido de la batería llega a escaparse y
entra en contacto con la piel o la ropa, enjuague
con agua del grifo�
‑
De lo contrario, podría provocar inamaciones.
32
Español
Información importante
•
Esta afeitadora en HÚMEDO/SECO puede utilizarse para
afeitar en húmedo empleando espuma, o en seco. Puede
utilizar esta afeitadora impermeable bajo la ducha y
limpiarla con agua. El símbolo siguiente indica que puede
utilizarse en una bañera o ducha.
•
Afeítese con espuma durante tres semanas y observe la
diferencia. Su afeitadora Panasonic en HÚMEDO/SECO
requiere algo de tiempo para ajustarse debido a que su piel
y su barba necesitan alrededor de un mes para
acostumbrarse a un nuevo método de afeitado.
•
Mantenga insertadas ambas hojas interiores. Si inserta solo
una de ellas, la afeitadora podría dañarse.
•
Si limpia la afeitadora con agua, no utilice agua salada ni
agua caliente. No moje la afeitadora durante un largo tiempo.
•
Cargue el aparato correctamente según estas instrucciones
de funcionamiento. (Consulte la página 34 “Carga de la
afeitadora”.)
•
Este aparato contiene una batería, únicamente personas
capacitadas deben reemplazarla. Póngase en contacto con
un centro de servicio autorizado para obtener detalles sobre
su reparación.
Tenga en cuenta las siguientes
precauciones para evitar un mal
funcionamiento, deformación y deterioro
•
No permita que el aparato sufra caídas o impactos contra
otros objetos.
•
No deje que la lámina exterior entre en contacto con objetos
duros.
•
No deje la afeitadora expuesta a la luz solar directa, fuera
del armazón de la lámina.
•
No seque utilizando altas temperaturas con un secador ni
con otro aparato.
•
Asegúrese de colocar la afeitadora en su tapa protectora
cuando deba transportarla o almacenarla.
•
Después del uso, guarde la afeitadora en un lugar poco
húmedo.
33
Español
Identicación de las partes
8
9 :
;
<
7
1
2
3
4
6
5
A
Trasera
>=
?
B
C
D
E
F
@
A
A
Cuerpo principal
1
Tapa protectora
2
Lámina exterior
3
Botones de liberación del
armazón de la lámina
4
Armazón de la lámina
5
Sección de la lámina exterior
6
Botones de liberación de la
lámina exterior
7
Hojas interiores
8
Luz indicadora de estado de carga
9
Luz indicadora de bloqueo del
interruptor (
)
:
Interruptor de encendido
;
Conexión del aparato (Tipo C)
<
Tapa de conexión
B
Cable USB
=
Cable
>
Enchufe USB (Tipo C)
?
Enchufe USB (Tipo A)
Accesorios
C
Estuche de viaje
D
Aceite
E
Escobilla de limpieza
F
Fuente de alimentación Clase 2
[Denominado “Adaptador USB de
alimentación” en estas
instrucciones de funcionamiento�]
(ES-RU1-02) (vendido por separado)
@
Clavija del enchufe
A
Puerto USB (Tipo A)
34
Español
Carga de la afeitadora
•
Apague la afeitadora.
•
Limpie con un paño las gotas de agua de la conexión del
aparato.
•
Utilice el adaptador USB de alimentación y cable USB
especicados.
•
El adaptador USB de alimentación se vende por separado.
1
Abra la tapa de
conexión e
introduzca el
enchufe USB
rmemente en el
cuerpo principal y
el adaptador USB
de alimentación�
2
Introduzca el
adaptador USB de
alimentación
rmemente en el
tomacorriente�
1
2
1
•
Compruebe que la luz indicadora de estado de carga
se ilumina.
•
La carga total se realiza en aproximadamente 2 horas.
3
Retire el adaptador USB de
alimentación del tomacorriente, y
retire el enchufe USB del cuerpo
principal después de que se apague
la luz indicadora de estado de carga�
•
Cierre la tapa de conexión.
Nota
No puede poner en funcionamiento la afeitadora mientras
se está cargando.
► Cuando el nivel de carga de la batería es bajo
•
El aparato emite dos pitidos después de apagarlo.
•
La lámpara de estado de carga parpadea
una vez cada segundo durante el
funcionamiento de la afeitadora.
Puede afeitarse 2 ó 3 veces después de
que la lámpara de estado de carga parpadee. (Esto
puede variar dependiendo de la utilización.)
► Notas
•
La afeitadora puede cargarse con adaptadores y cables
diferentes de los especicados, pero para garantizar la
seguridad deben utilizarse el adaptador especicado de
Panasonic con diseño resistente a salpicaduras y un cable
USB con característica de protección contra
sobrecalentamiento.
El adaptador no es completamente impermeable, así que
evite que se moje.

35
Español
•
Una vez que nalice la carga, al presionar el botón de
encendido con la afeitadora enchufada, la lámpara de
estado de carga se iluminará y, a continuación, se apagará
transcurridos 5 segundos.
•
Si se producen ruidos desde un aparato de radio u otras
fuentes mientras se esté utilizando o cargando el aparato,
colóquese en otro lugar para utilizarlo.
•
La batería se deteriorará cuando no se haya utilizado
durante un largo tiempo (6 meses o más), por lo tanto
cárguela completamente una vez cada 6 meses.
•
Cuando cargue la afeitadora por primera vez o cuando no
la haya utilizado durante más de 6 meses, el tiempo de
carga puede variar o la luz indicadora de estado de carga
podría no iluminarse durante unos minutos. Si mantiene la
afeitadora conectada, nalmente se iluminará.
•
La temperatura ambiente recomendada para la carga es de
entre 10 y 35 °C (entre 50 y 95 °F). El rendimiento de las
baterías podría verse afectado o las baterías podrían
requerir más tiempo para cargarse correctamente en
condiciones de temperatura extremadamente baja o alta.
La luz indicadora de estado de carga parpadeará dos veces
cada segundo si existe un problema con la carga.
Cargue la afeitadora dentro del rango de temperatura
ambiente recomendado.
•
La afeitadora puede utilizarse durante dos semanas
aproximadamente con una carga completa. (Asumiendo un
afeitado diario en seco de tres minutos, en un rango de
temperatura ambiente de 20 a 30 °C [de 68 a 86 °F]).
El número de días durante los que puede utilizarse varía en
función de las condiciones que se indican a continuación:
‑
Grosor de la barba
‑
Presión aplicada a la piel
‑
Uso en modo espuma de afeitado
‑
Uso del afeitado húmedo
•
La carga cada vez no tendrá efecto en la duración de la
batería, debido a que utiliza una batería de iones de litio.
•
Seguir cargando la batería no afectará su rendimiento.
36
Español
Forma de uso
► Limpiadores faciales que pueden utilizarse, etc�
Afeitado
Modo
espuma
de afeitar
Agente de
afeitar
Espuma de afeitar
—
Gel de afeitar
Crema de afeitar
Limpiador
facial
Espuma de limpieza
facial
(sin exfoliantes)
Espuma de limpieza
facial
(con exfoliantes)
Jabón facial
Jabón para el
cuerpo, etc.
Líquido
Espuma —
•
No utilice nada diferente al agente de afeitar/limpiador
facial/jabón para el cuerpo, etc. mencionados
anteriormente, ya que estos pueden provocar que las hojas
se obstruyan o que no se forme espuma.
Formación de espuma en el modo
espuma de afeitar
Es más fácil formar espuma de esta manera que si se hace a
mano.
•
Antes de usar, verique que la lámina exterior no tenga
grietas ni esté deformada.
•
Compruebe que la tapa de conexión está cerrada.
1
Preparación de la espuma
Tome una cantidad adecuada de limpiador facial o
producto similar en su mano, y añada una cantidad
adecuada de agua fría o caliente.
2
Mantenga pulsado
durante
2 segundos o más
para cambiar al modo
espuma de afeitar�
La luz indicadora de bloqueo del
interruptor (
) y la luz
indicadora de estado de carga
parpadean alternativamente.
•
El modo espuma de afeitar termina después de
15 segundos. Luego, la afeitadora puede utilizarse
para afeitar.
•
Para detener el uso del modo espuma de afeitar y
comenzar el afeitado, pulse el interruptor de encendido
una vez.
37
Español
3
Presione las hojas
suavemente en la palma
de la mano, mezcle el
limpiador facial, etc�
alrededor y mueva las
hojas hacia arriba y
hacia abajo para formar
espuma�
•
Si no hay suciente espuma, agregue
un poco más de agua, agua caliente
o limpiador facial, etc. para que se
haga más fácil formar espuma.
► Notas
•
No utilice un agente de afeitar (excluyendo la espuma),
espuma de limpieza facial (con exfoliantes) o jabón, ya que
estos pueden provocar que las hojas se obstruyan o que no
se forme espuma.
Afeitado de la barba
1
Pulse y proceda a
afeitarse�
Se activará el “sensor de afeitado”, que ajusta
automáticamente la potencia según el espesor de la barba.
Afeitará con alta potencia cuando la barba sea espesa y
reducirá la potencia en zonas en las que la barba es menos
copiosa, para reducir la presión que se ejerce sobre la piel.
Consejos para un mejor afeitado
Aplique la lámina exterior
perpendicularmente contra la piel y
afeite deslizando lentamente la
afeitadora sobre el rostro, en el sentido
contrario al crecimiento de la barba.
•
La barba de debajo de la barbilla y
alrededor de la garganta se puede
afeitar mejor si se estira la piel para
que la barba sobresalga.
90°
•
Para evitar daños a la lámina exterior,
no afeite solo con una parte de ella.
2
Pulse cuando termine�
► Notas
•
Es posible que el aparato no funcione cuando la
temperatura ambiente sea de aproximadamente 5 °C
(41 °F) o menos.

38
Español
•
Es posible que el sensor de afeitado no responda
dependiendo del tipo y la cantidad del gel de afeitar o la
cantidad de espuma. Esto es normal.
•
Después del afeitado húmedo, lave el cuerpo principal con
agua y aplique aceite en la lámina exterior.
Operación e indicador de bloqueo del
interruptor
► Bloqueo del interruptor de encendido
1.
Pulse una vez
luego suéltelo.
•
La afeitadora
empezará a funcionar.
2.
Mantenga pulsado
por más de
2 segundos hasta que
se encienda la luz
indicadora de bloqueo
del interruptor (
).
•
La afeitadora dejará
de funcionar.
3.
Suelte .
•
La luz indicadora de
bloqueo del
interruptor (
) se
apagará después de
5 segundos.
► Desbloqueo del interruptor de encendido
1.
Mantenga pulsado por más de 2 segundos hasta que
se apague la luz indicadora de bloqueo del interruptor (
).
•
La luz indicadora de bloqueo del interruptor ( ) se
apagará.
•
La afeitadora empezará a funcionar.
2.
Suelte .
El interruptor de alimentación se
bloquea cuando la luz
indicadora de bloqueo del
interruptor (
) parpadea
durante 5 segundos y la
afeitadora no funciona incluso
con el interruptor de
alimentación pulsado.
Limpieza de la afeitadora
•
Recomendamos limpiar la afeitadora después de cada uso.
•
Apague la afeitadora y desconecte el enchufe USB.
•
Compruebe que la tapa de
conexión está cerrada.
39
Español
Limpieza con agua
1
Aplique jabón de
manos y un poco
de agua en la
lámina exterior.
2
Pulse y forme
espuma durante
unos segundos,
luego pulse
para detener la
formación de
espuma�
3
Retire la sección de
la lámina exterior y
límpiela con agua
corriente�
•
Consulte la página 40
para retirar la sección de la
lámina exterior.
4
Después de enjuagarla, agite la
afeitadora hacia arriba y abajo varias
veces para eliminar el exceso de
humedad y luego seque con un paño
seco las gotas de agua que queden�
5
Seque completamente la sección de
la lámina exterior y la afeitadora.
•
Permita que la afeitadora se seque a la sombra y evite
la luz solar directa.
6
Lubrique la afeitadora�
1.
Aplique una gota de aceite en cada
lámina exterior.
2.
Encienda la afeitadora y déjela
funcionando durante aproximadamente
5 segundos.
3.
Apague la afeitadora y limpie el exceso
de aceite de la lámina exterior con un
paño suave.
Notas
•
Tenga cuidado de no golpear el cuerpo principal contra el
lavamanos o con cualquier otro objeto mientras está
vaciando el agua. Si lo hace, podrían producirse problemas
de funcionamiento.
•
No utilice disolventes, bencina, alcohol, etc.
Si lo hace, puede producirse una falla o las piezas pueden
agrietarse o decolorarse.
Limpie con agua jabonosa diluida.
40
Español
•
No utilice detergentes de cocina o de baño, solo el jabón de
manos.
Si lo hace, podría provocar un mal funcionamiento.
Limpieza con la escobilla
Quite la sección de la lámina exterior y las hojas interiores.
(Consulte la página siguiente.)
No utilice ninguna escobilla
diferente de la suministrada.
► Limpieza con la escobilla corta
•
Limpie las hojas interiores con la escobilla
corta moviéndola en la dirección que se
indica en la gura.
•
No mueva la escobilla corta
perpendicularmente contra las hojas ya que
podría dañar las hojas interiores y afectar su
alado.
► Limpieza con la escobilla larga
Limpie el armazón de la
lámina, la lámina exterior y
el cuerpo principal
utilizando la escobilla larga.
► Lámina exterior
Limpie la lámina exterior en las áreas
indicadas con círculos cada vez que
utilice la afeitadora. De otra manera,
puede generarse un ruido extraño.
Reemplazo de la lámina exterior
y las hojas interiores
lámina exterior Aproximadamente una vez
cada año*
hojas interiores Aproximadamente una vez
cada dos años*
* El tiempo de reemplazo es una recomendación y depende
del uso y preferencia individuales.
No se debe desechar el armazón de la lámina.
► Cómo retirar la sección de la lámina
exterior
Pulse los botones de liberación del
armazón de la lámina y levante la sección
de la lámina exterior hacia arriba.
► Cómo colocar la sección de la
lámina exterior
Alinee las marcas del armazón de la
lámina (•) y el cuerpo principal (•), y
acóplelas con rmeza y uniformemente
hasta que se escuche un chasquido.
41
Español
► Reemplazo de la lámina exterior
1.
Pulse los botones de liberación de la
lámina exterior y empuje la lámina
exterior hacia abajo.
•
No ejerza una presión excesiva
sobre los botones de liberación de la
lámina exterior.
Si lo hace, podría doblar la lámina
exterior e impediría que el armazón de
la lámina se acople completamente.
2.
Alinee las marcas del armazón de la lámina (▲) y la
lámina exterior (▲), y acóplelas hasta que se escuche un
chasquido.
► Reemplazo de las hojas interiores
1.
Retire las hojas interiores una a la vez.
2.
Introduzca las hojas interiores una a una.
► Piezas de repuesto y piezas opcionales
Las piezas de repuesto y piezas opcionales están disponibles
donde su distribuidor o en el Centro de Servicio.
Piezas de repuesto
para el modelo
ES‑PV6A/ES‑PV3A
Lámina exterior y
hojas interiores
WES9040
Lámina exterior WES9181
Hojas interiores WES9170
Adaptador USB de alimentación ES‑RU1‑02
Solución de problemas
Lleve a cabo las acciones que se indican a continuación.
Si no se pueden resolver los problemas, póngase en contacto
con la tienda en la que compró la unidad o con un centro de
servicio autorizado por Panasonic para realizar la reparación.
Problema Acción
El interruptor de
encendido no enciende.
Quite el bloqueo del interruptor.
(Consulte la página 38.)
El encendido no se
apaga (OFF).
Pulse el interruptor de
encendido dos veces al usar en
modo espuma de afeitar.

42
Español
Problema Acción
El sensor de afeitado
no responde.
El sensor de afeitado puede no
responder cuando el nivel de
carga de la batería es bajo. Si
esto sucediera, recargue la
afeitadora.
Aplique aceite. (Consulte la
página 39.)
El sensor de afeitado puede no
responder si las hojas no
disponen de suciente aceite.
Dependiendo del grosor de la
barba o de la cantidad de
restos de barba acumulados en
el cabezal de la afeitadora, es
posible que el sensor de
afeitado no reaccione y no
cambie el sonido de
funcionamiento. No se trata de
una falla.
Es posible que el sensor de
afeitado no responda
dependiendo del tipo y la
cantidad del gel de afeitar. Esto
es normal.
Problema Acción
El sensor de afeitado
responde incluso
cuando la afeitadora
no está en contacto
con la piel.
Elimine los restos de barba de
la afeitadora.
Limpie la lámina exterior con la
escobilla. (Consulte la
página 40.)
Cuando la afeitadora esté
extremadamente sucia, retire el
armazón de la lámina y lávelo
con agua.
(Consulte la página 39.)
Sustituya la lámina exterior y/o
las hojas interiores.
No puede formarse
espuma en el modo
espuma de afeitar.
Formar espuma puede ser
difícil dependiendo del tipo de
limpiadores faciales, etc., de
modo que ajuste la cantidad de
agua o de limpiador facial.
La espuma formada
en el modo espuma
de afeitar contiene
restos de barba.
Antes de formar la espuma,
enjuague hasta que quede limpia
de cualquier resto de barba.
(Consulte la página 38.)

43
Español
Problema Acción
El tiempo de
funcionamiento es
breve, incluso después
de la carga completa.
Cuando el número de usos por
carga empiece a disminuir, la
batería estará acercándose al
nal de su vida útil.
Aplique aceite.
Limpie la afeitadora.
El número de días de uso
puede reducirse dependiendo
de cómo se use la afeitadora
(por ejemplo, en caso de
afeitado húmedo).
La afeitadora no
funciona después de
cargarla.
La afeitadora no funcionará
mientras esté conectada al
tomacorriente.
Utilice el adaptador USB de
alimentación y cable USB
especicados.
Utilice el aparato con una
temperatura ambiente de
aproximadamente 5 °C (41 °F)
o superior.
La batería ha llegado al nal de
su vida útil.
El sonido de
funcionamiento varía
durante el afeitado.
El sensor de afeitado funciona.
El sonido varía en función del
grosor de la barba.
Problema Acción
Emite un sonido fuerte.
Aplique aceite.
Las hojas no se moverán
suavemente si les falta aceite, y
necesitarán más energía.
Es posible que la afeitadora
emita un ruido fuerte debido al
motor lineal. Esto no representa
un problema.
Conrme que las hojas están
correctamente colocadas.
Limpie la lámina exterior con la
escobilla. (Consulte la
página 40.)
El olor es cada vez
más fuerte.
Limpie la afeitadora.
Los pelos recortados
vuelan en todas las
direcciones.
Limpie las hojas interiores con
la escobilla cuando los restos de
barba queden adheridos a ellas.
La lámina exterior se
calienta.
Aplique aceite.
Sustituya la lámina exterior si
está dañada o deformada.
(Consulte la página 40.)
44
Español
Problema Acción
No obtiene un afeitado
tan perfecto como
antes.
Limpie la afeitadora.
Aplique aceite.
Esto puede mejorarse
reemplazando la lámina
exterior y/o las hojas interiores.
Vida útil de la batería
La vida útil de la batería es de 3 años. La batería de esta
afeitadora no está diseñada para que los consumidores la
reemplacen.
Desmontaje de la batería
recargable interior
ATENCIÓN:
El producto que ha comprado se alimenta con una batería
de iones de litio reciclable. Llame al teléfono
1‑800‑8‑BATTERY para obtener información acerca de
cómo reciclar la batería.
Retire la batería recargable interna antes de deshacerse
de la afeitadora�
La batería debe eliminarse de forma segura.
Esta gura solo debe utilizarse al desechar la afeitadora, no
para repararla. Si desarma la afeitadora, dejará de ser resistente
al agua, lo que puede ocasionar un mal funcionamiento.
•
Desconecte la afeitadora del enchufe USB.
•
Pulse el interruptor de encendido para encender el aparato y
déjelo encendido hasta que la batería se descargue totalmente.
45
Español
•
Lleve a cabo los pasos
1
a
5
y levante la batería,
después retírela.
•
Utilice un destornillador de cabeza plana como se muestra.
•
Evite que se produzca un cortocircuito en los terminales
positivo y negativo de la batería extraída y aísle los
terminales colocando cinta adhesiva sobre ellos.
1
2
5
3
4
3
Especicaciones
Potencia
nominal del
adaptador
correspondien‑
te (vendido por
separado)
5.0
V
1.0 A
En cumplimiento con la fuente de
alimentación Clase 2 con 5.0 V
1.0 A
Voltaje del
motor
3.6 V
Tiempo de
carga
Aproximadamente 2 horas
Este producto está destinado para uso doméstico únicamente.
46
Español
PARA SU CONVENIENCIA, AHORA DISPONEMOS DE
UNA LÍNEA NACIONAL DE LLAMADA GRATIS PARA LA
COMPRA DE ACCESORIOS (SOLO EN LOS EE� UU�);
LLAME AL 1-800-332-5368�
Declaración de Interferencia de la Comisión Federal de
Comunicaciones
Este equipo ha sido probado y se encuentra en
conformidad con los límites establecidos para dispositivos
digitales de la Clase B, conforme a lo dispuesto en la
Sección 15 de los lineamientos de la CFC. Estos límites
han sido diseñados para proporcionar protección razonable
contra la interferencia perjudicial en una instalación
residencial. Este equipo genera, usa y puede irradiar
energía de radiofrecuencia y, si no se instala y se usa en
conformidad con las instrucciones proporcionadas, podría
ocasionar interferencia perjudicial a las radio
comunicaciones. Sin embargo, no se garantiza que no se
presentará ninguna interferencia en una instalación en
particular. Si este equipo ocasiona interferencias
perjudiciales en la recepción de radio o de televisión, lo
cual se puede determinar apagando y encendiendo el
equipo, se le pide al usuario tratar de corregir la
interferencia mediante una de las siguientes medidas:
•
Cambie de orientación o de lugar la antena de recepción.
•
Aumente la separación entre el equipo y el receptor.
•
Conecte el equipo en una toma de corriente que sea de
un circuito diferente a aquel en el que está conectado el
receptor.
•
Póngase en contacto con el distribuidor o con un técnico
experimentado en radio/TV para solicitar ayuda.
Precauciones de la CFC: Para garantizar la conformidad de
forma continua, instale y use el aparato de acuerdo a las
instrucciones proporcionadas. Cualquier cambio o
modicación que se realice que no esté aprobado por la
parte responsable de la conformidad podría invalidar la
autoridad del usuario para usar este equipo.
Este dispositivo está en conformidad con la parte 15 de la
normativa de la FCC. El funcionamiento está sujeto a las
siguientes dos condiciones: (1) Este dispositivo no puede
causar interferencias perjudiciales, y (2) este dispositivo
debe aceptar cualquier interferencia recibida, incluyendo
interferencias que podrían producir un funcionamiento no
deseado.
REGISTRO DEL PRODUCTO
(Solo para clientes de EE. UU.)
Vaya a www.shop.panasonic.com/register y registre su
producto ahora para recibir estos benecios:
Noticación de seguridad
Nos comunicaremos con nuestros clientes en caso de
reprocesamiento
Vericación del propietario
Prueba de compra en caso de robo o pérdida del producto
Servicio eciente de garantía
En caso de problemas con su producto
Ofertas especiales y promociones de Panasonic

47
MEMO

© Panasonic Corporation 2024
F EN, ES
Printed in Japan
Impreso en Japón
ES9700PV6A1A Y0724‑0
IN USA CONTACT:
Panasonic Corporation of North America
Two Riverfront Plaza, Newark, NJ 07102‑5490
Service • Assistance • Accessories
https://shop�panasonic�com/personal-care
https://help�na�panasonic�com
https://www�panasonic�com

